

Page 1
ASTERIA
ASTERIA
User's Manual
Thank you for choosing
GRD products
Page 2
ASTERIA
User's manual
21
Package
Monitor – 1pc.
Wall mounting bracket with screws– 1pc.
Door panel cords – 2pcs.
Audio phone cord - 1pc.
Sub monitor cord – 1pc.
User's manual – 1pc.
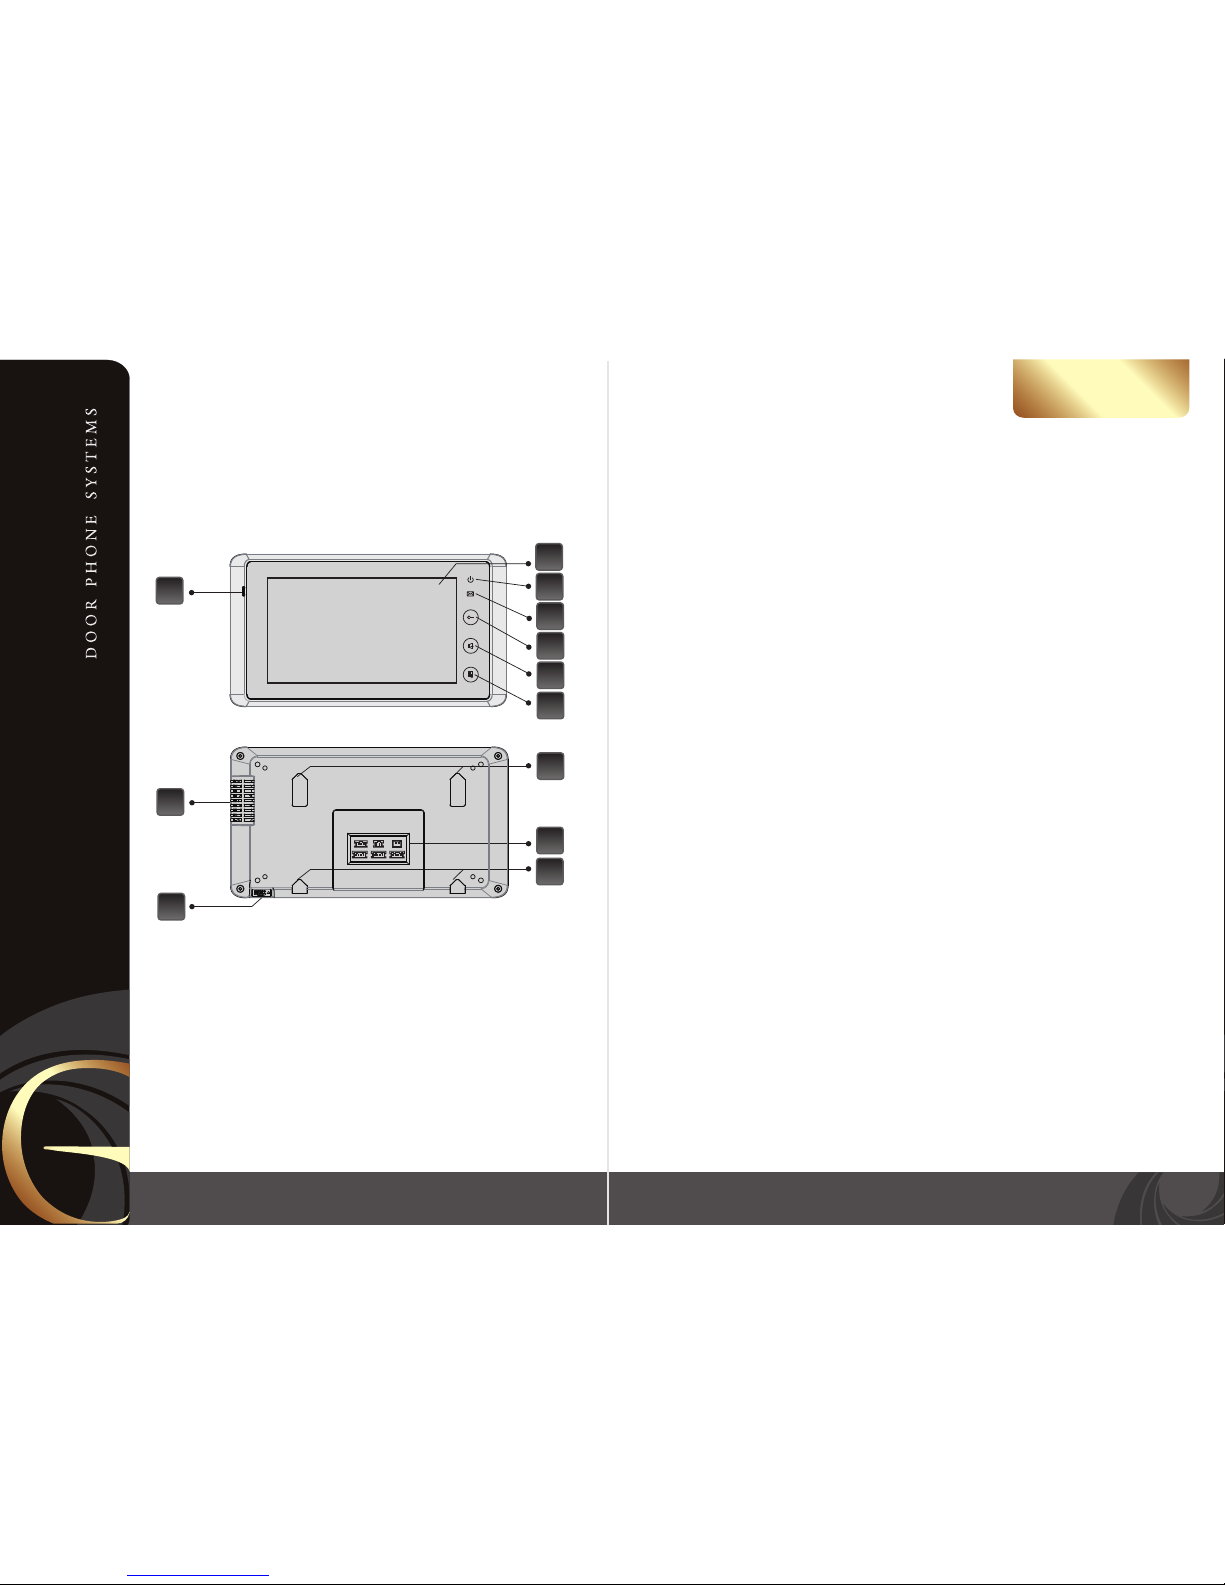
1. LCD screen
2. Power indicator
3. New photos indicator
4. „Open lock” button
5. „Monitor/Talk” button
6. „Menu” button
7. Microphone
8. Wall mounting bracket holes
9. Connection panel
10. Speaker
11. MicroSD card slot
Keys
Characteristics:
• touch screen
• address intercom between 5 monitors
• 2 door panels and audio phone connection
• 4 door panels connection using MDS adapter
• multimedia menu, volume, brightness and color
digtal tuning
• incoming call night mode
• sensor keyboard
• 12 polyphonic melodies
• built-in photo memory
• microSD card photo view
Specication:
Display 7" touch screen LCD display
Resolution 800х480 pixels
Power ~100-240V AC (50-60 Hz)
Power supply external, 16-24V DC
Power consumption 8 W in working mode,
1.5 W in standby mode
Door panels system 4-wires
Video signal type Analog, PAL or NTSC system
Built-in memory 120Mb (800 pictures)
Dimensions 225mm(W)> х 125mm(H) х ( T)23mm
Temperature range 0˚С - 40˚С
1
4
3
6
5
7
8
8
9
10
11
2
1
2
3
4
Page 3
User’s manual
43
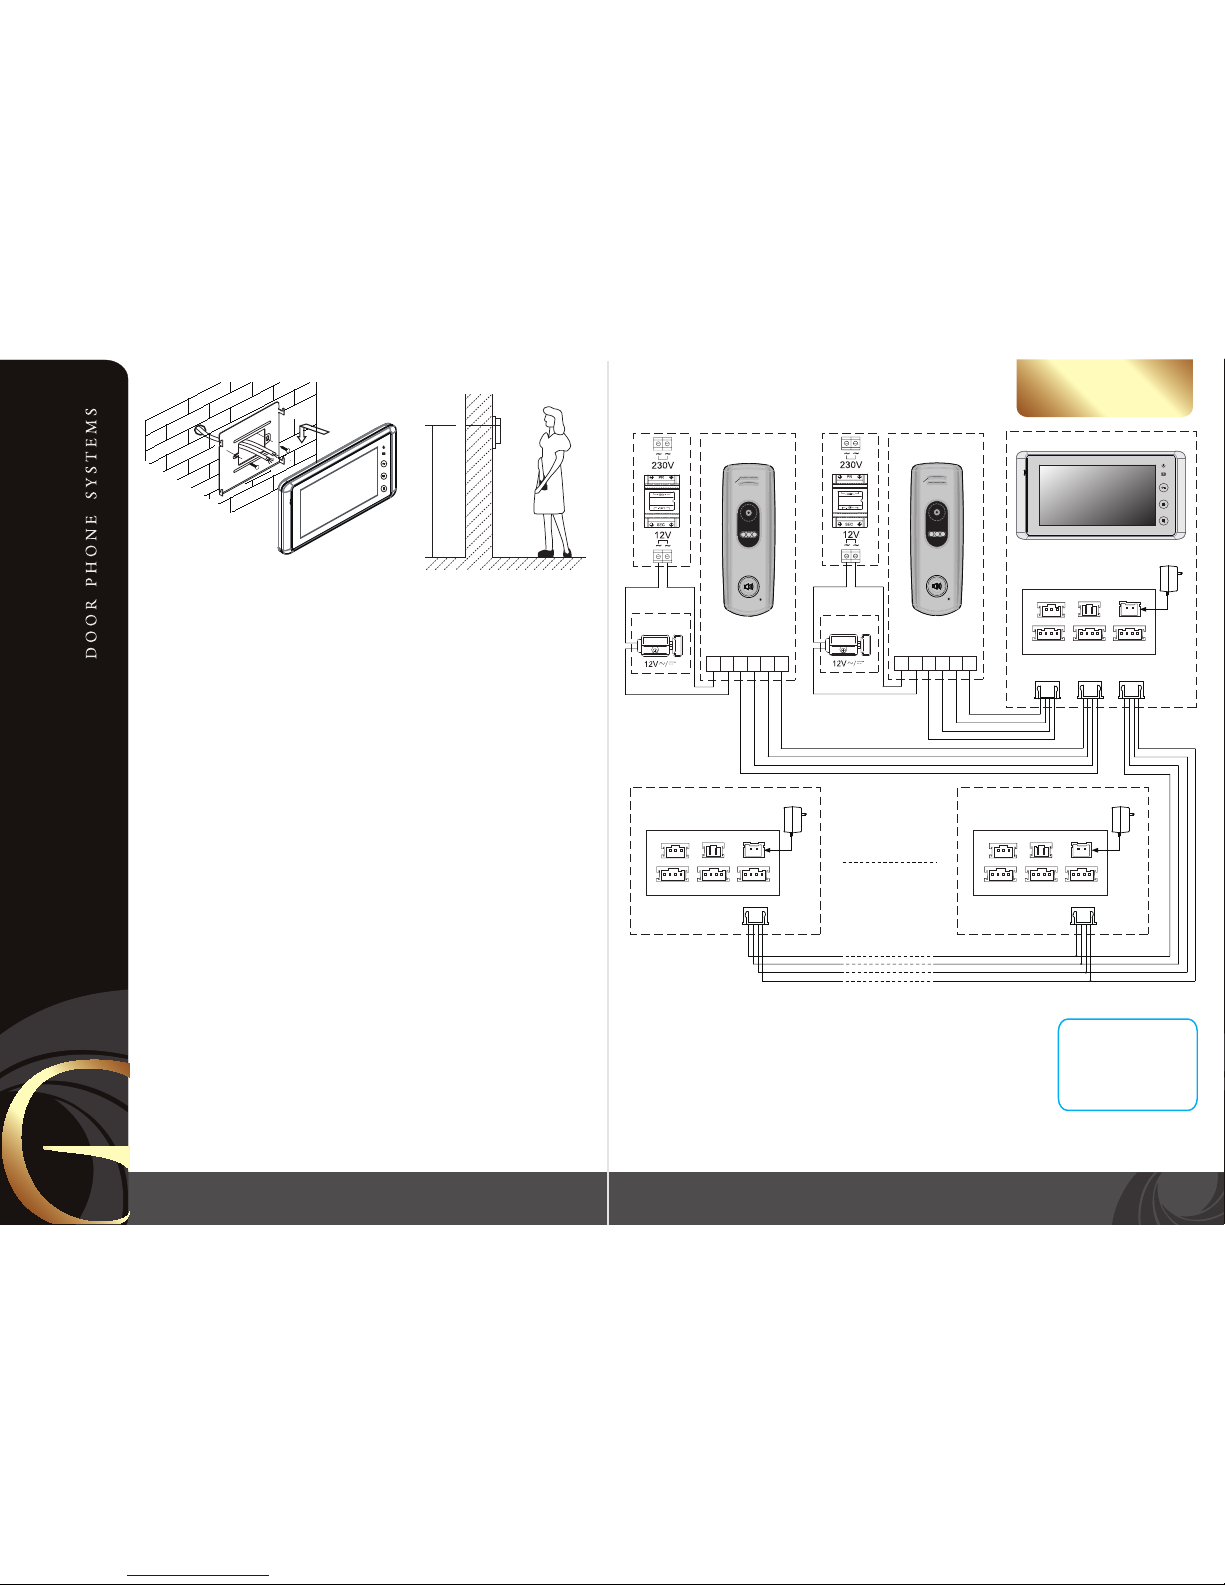
Two door panels and two locks connection to the GRD Asteria monitors system
Keys:
- Ground (black wire)
- Audio (blue wire)
- Video (yellow wire)
- Power (red wire)
Installation instructions
A) Cable connection
1. Connect the monitor to the camera according to the wiring diagram.
2. Carefully insert the wires to the terminal, taking care that the 2 bare wires do not touch.
B) Installation height
Recommended installation height is approximately 145cm - 160cm for monitor unit and
160-170cm for outdoor camera.
C) Installation of the monitor
1. Fix the wall mounting bracket in the best place by using screws and plugs.
2. Carefully place the indoor monitor against the bracket and gently push down the
monitor so that the pins on the bracket engage in the slots on the rear of the monitor,
then pull the monitor down to x the monitor on the wall bracket.
Cable recommendations:
If cable length between monitor and door panel not more than 30m then you can use
4-wire or 6-wire cable with 0,5 sq.mm. area of one wire. If this length exceeds 30m then
you should use coaxial cable for video (for example RG69), all other connections 4-wire
cable can be used.
ATTENTION!
Depending on monitor position in the system (If more that one monitor is used), right
”user code” should be set for every monitor. Main monitor (all cameras and/or door panels
are conected to the main monitor) user code should be set to 1.
Additional monitors should use 2, 3, 4 or 5 user code.
If there is only one monitor in the system, then user code should be set to 1.
Users can change ”User code” in such way: in the main menu touch ”User setup” icon, then
touch ”Installer setup” icon and enter 2412 password on the dialer, then touch ”ok”
button. After that you can touch ”User code” icon and enter proper user code for the
monitor and touch ”ok” button.
Also pay attention to the correct position of the JP/VD jumper on the rear connection
panel of the monitor according schematic diagram.
Attention!
Don't connect powerful devices (such as CCD cameras with infrared backlight) directly
to the power supply of the door panel. It can cause damage to the monitor with
no warranty providing. You should use external power supply for such powerful devices.
Maximum current for the door panel power is 300mA.
ASTERIA
145~160 cm
Schematic diagram 1
Note:
1. First and last monitor in the system JP/VD jumper should be installed. All other
monitors JP/VD jumper should be removed.
2. If two door panels connected to the monitor then you should activate second
door panel in such way: in the main menu touch ”User setup” icon, then touch
”Installer setup” icon and enter 2412 password on the dialer, then touch ”ok”
button. After that you can touch ”2 Way Input” icon and dial 1, then touch ”ok”
button to conrm your choise.
G
A
V
B
1
2
3
4
Jumper
installed
Audio
phone
Door 1
JS-OS1
JS-AP JP/VD DC-IN
DC- DC+
JS-OS2 JS-VD
B G V A
B G A
B G V A
B G V A
Door 2 Add.monitor
Jumper
removed
Audio
phone
Door 1
Door 2 Add.monitor
Jumper
installed
Audio
phone
Door 1
Door 2 Add.monitor
User code: 1
Door panel 1
Lock 1
~ AC
110-230V
JS-OS1
JS-AP JP/VD DC-IN
DC- DC+
JS-OS2 JS-VD
B G V A
B G A
B G V A
B G V A
~ AC
110-230V
User code: N (N≤5)
JS-OS1
JS-AP JP/VD DC-IN
DC- DC+
JS-OS2 JS-VD
B G V A
B G A
B G V A
B G V A
~ AC
110-230V
RY RY A V G B
RY RY A V G B
Green
White
Blue
Yellow
Black
Red
Green
White
Blue
Yellow
Black
Red
Door panel 2
Lock 2
User code: 2
Page 4
ASTERIA
User's manual
65
Schematic diagram 2
1
2
3
4
JS-OS1
JS-AP JP/VD DC-IN
DC- DC+
JS-OS2 JS-VD
B G V A
A V G B
A V G B
A V G B
A V G B
A V G B
A G B
B G A
B G V A
B G V A
User code: 1
~ AC
110-230V
Door panel 4
Door panel 3
Door panel 2
Door panel 1
VT-MDS
SET
SET
SET
SET
DS4
DS3
DS2
DS1
JW_VP
JS-AP
JS-LK
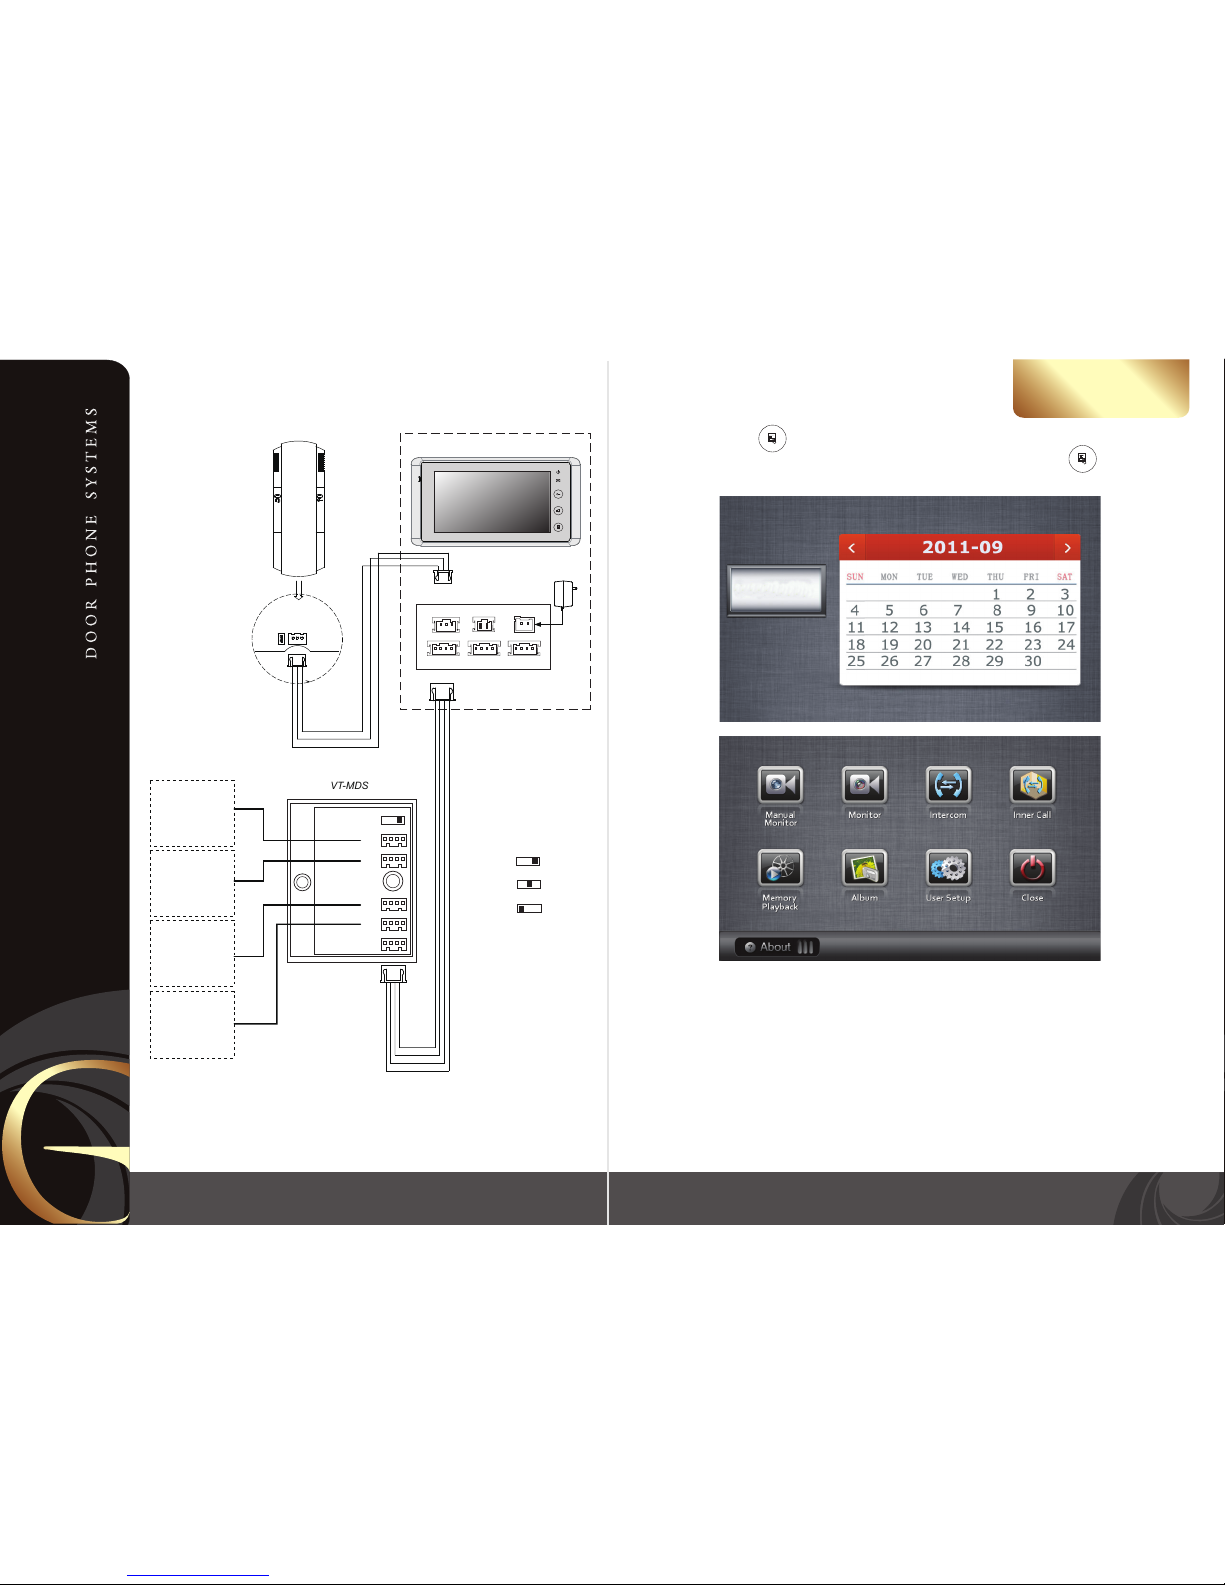
Audio phone and 4 door panels connection using VT-MDS module.
(VT-MDS moule and audio phone does not included into monitor’s kit).
4 door panels connected
3 door panels connected
2 door panels connected
Settings of SET switch on
VT-MDS module:
Main menu
In standby mode press button twice or touch anywhere on the screen two times to enter main menu. Also
you can see the calendar and current time after rst touch of the screen or rst press of button.
Main menu consists of such icons:
1) Manual monitor - choose the door panel and view the picture
2) Monitor - view the picture starting from the rst door panel
3) Intercom - address intercom any monitor in the system
4) Inner call- all monitors call
5) Memory Playback - view the pictures from the door panels
6) Album - view the pictures from microSD card memory
7) User Setup - user settings of the monitor (melody, volume, date and time settings, etc.)
8) Close - turns o the screen, enter standby mode
17:09
Jumper
installed
Audio
phone
Door 1
Door 2 Add.monitor
Page 5
ASTERIA
User's manual
87
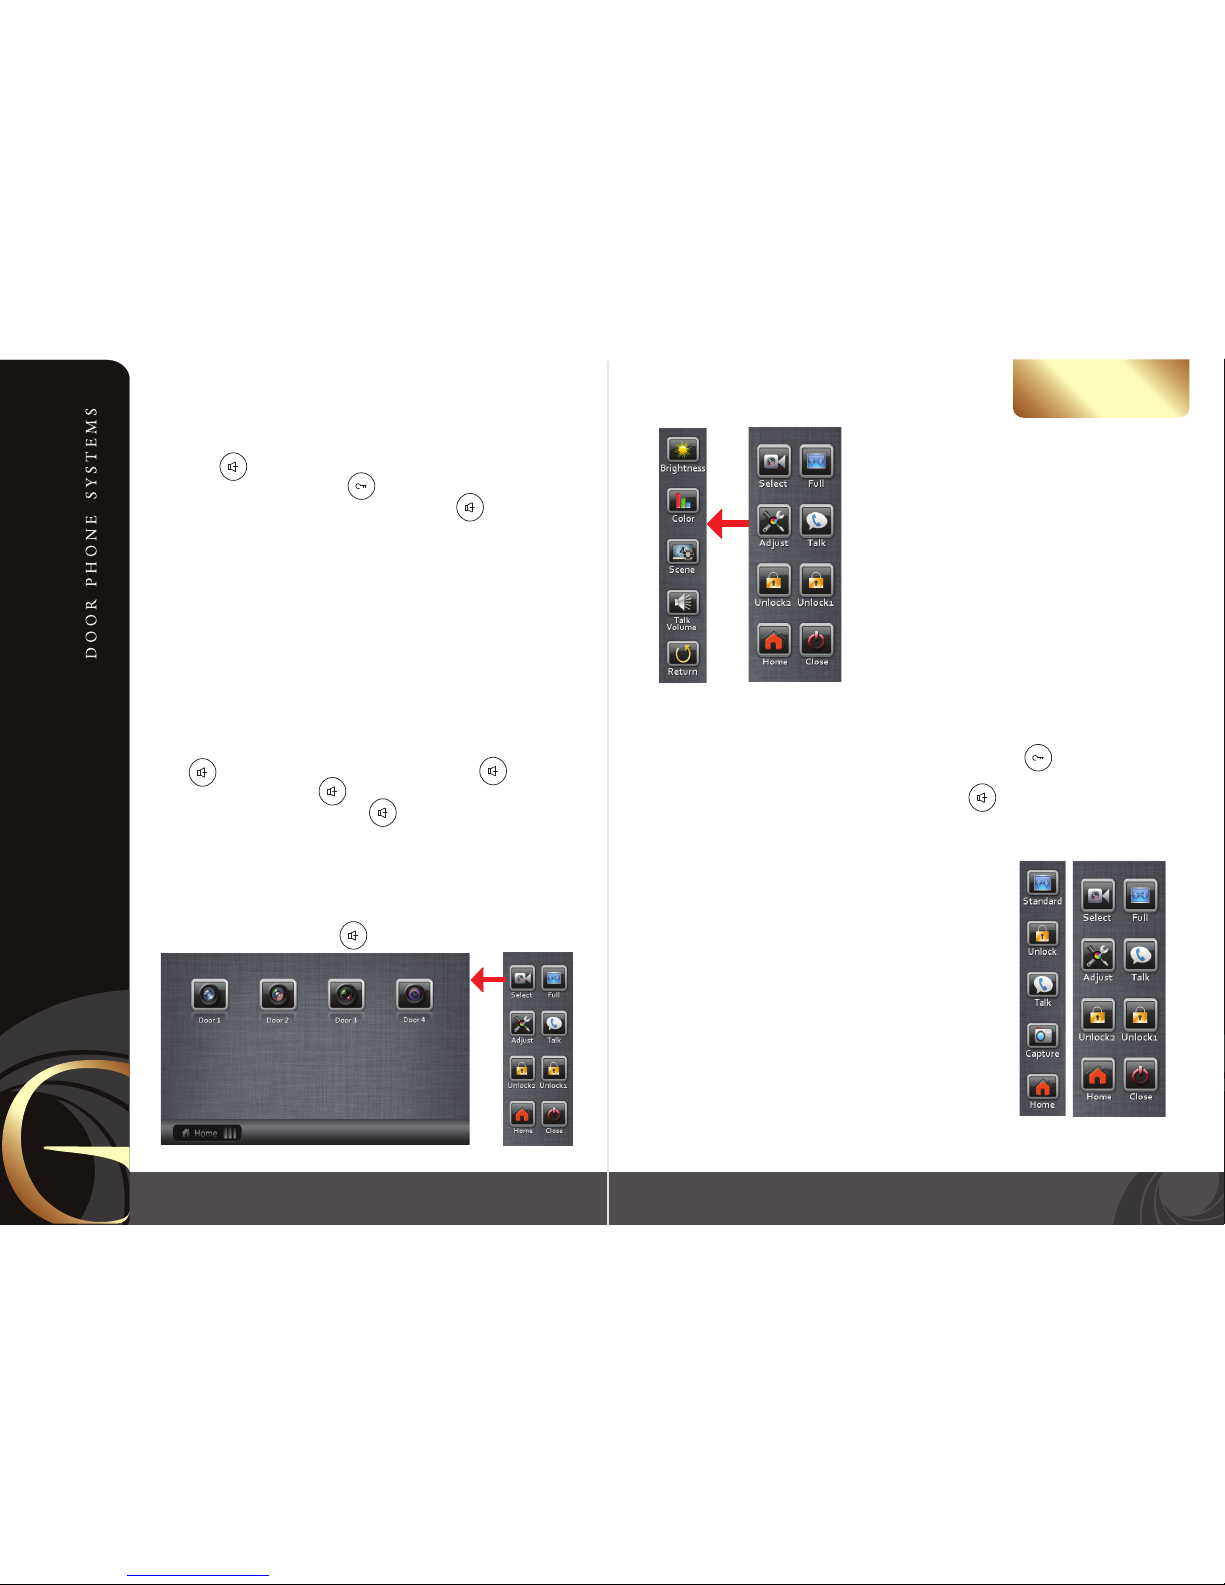
You can convert image format from 16:9 to 4:3 in such way: during
viewing or talking with the visitor touch “Full” or “Standard” icon in
the right upper side of the monitor screen. In full screen mode (16:9)
only one vertical line of icons is available (”Adjust”, “Select”, and
“Home” icons aren’t available in this mode). In standrd screen mode
(4:3) two vertical lines of icons are available.
This settings can be made only during viewing or talking with the
visitor. The operations are as below: If you don’t see two vertical
lines of icons on the right side of the screen, touch “Standard” icon
in the right upper side of the screen to enter 4:3 mode. After that
touch “Adjust” icon on the right panel and then touch “Color” or
“Brightness” icon. Now you can see current value of color or
brightness as a number in the middle of the screen and “left” and
“right” arrows near current value indicator. Touch “left” or “right”
arrows to decrease or increase ccurrent color or brightness. Touch
“Scene” icon to apply presets of color and brightness. There are 4
presets available in the “Scene” menu: user, soft, brightly and
normal. Touch “left” and “right” arrows to change current scene
preset. After all settings have been made, touch “Return” icon to
exit settings menu.
Brightness and color adjust
Door unlock and talk activation while viewing
If you want to unlock the door during door panel view or talking, press button. You will see
“Unlock” icon in the left upper corner of the screen.
If you want to talk with the visitor during door panel view, press button. You will see “speaker” logo
in the left upper corner of the screen. It means that voice connection has been activated.
Image format convertation 16 : 9 or 4 : 3
Incoming calls answer
When a visitor prsses call buttton on the door panel, all the indoor monitors will
chime simultaneously. The screen will show the image from the door panel, left upper
corner of the screen will show the sign which door panel have been pressed (DS1 or
DS2). Press button to talk with the visitor. If you want to unlock the door for
the visitor during conversation, press button. “ Unlock” icon will be shown in
the left upper corner of the screen. To end current call, press button.
Talking volume adjust
When you talk with the visitor you can adjust talking volume by going to the 4:3 screen
mode. If you don’t see two vertical lines of icons on the right side of the screen, touch
“Standard” icon in the right upper side to enter 4:3 mode. After that touch “Adjust”
icon on the right panel and then touch “Talk Volume” icon. Now you can see current
volume as a number in the middle of the screen and “left” and “right” arrows near
current volume indicator. Touch “left” and “right” arrows to decrease or increase
current volume, then touch “Return” icon.
Door panels viewing
Press button in standby mode to view DOOR1 image. Press button again
to talk with DOOR1 visitor. Press button one more time to view DOOR2 image,
then you can talk with DOOR2 by pressing button again. If you want to choose
door panel to view, you can also touch “Select” icon on the right menu panel of the
screen in 4:3 mode. You will see menu where you can choose any door panel you want
to view by simple touch of the target icon. To end the view, touch “Close” or “Home”
icon on the right bottom side of the csreen.
Note: when you are viewing images, if a call is coming from the door panel, the visitor call
will be prior to viewing function. Press button to answer the call.
Page 6
ASTERIA
User's manual
109
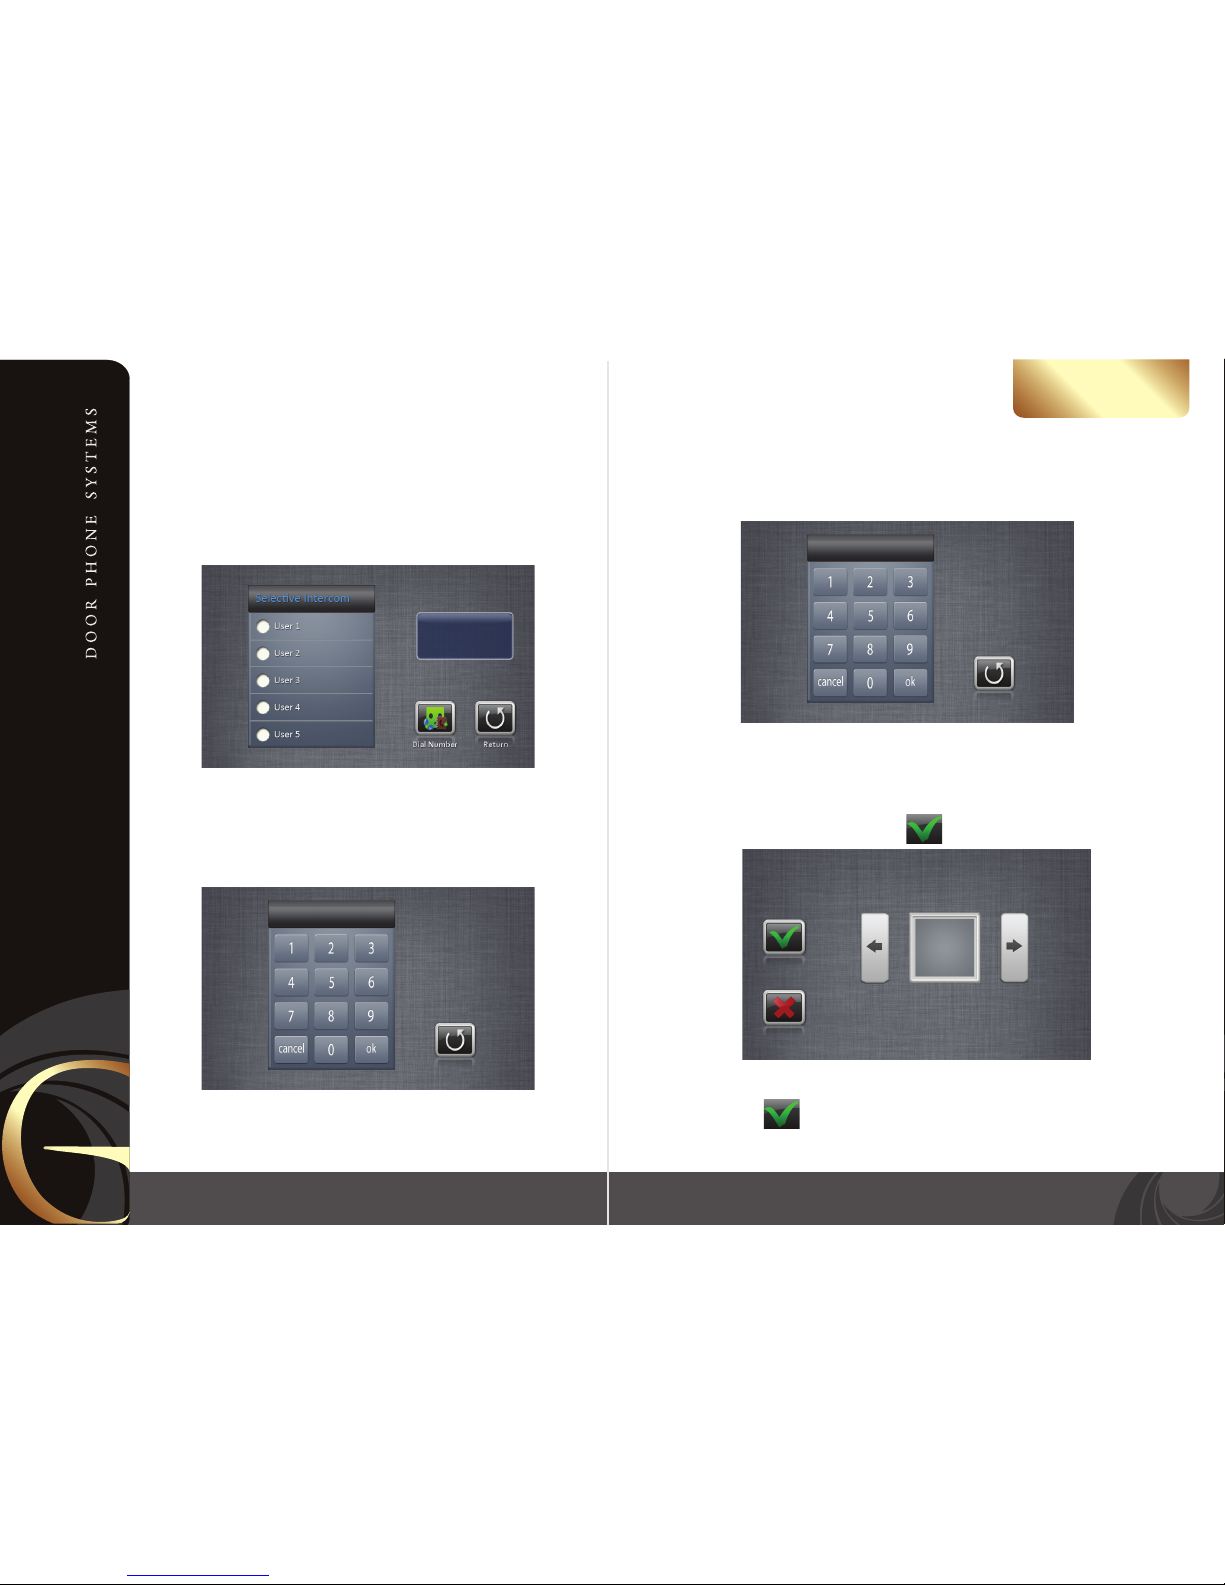
Intercom between monitors
Touch ”Intercom” icon in the main menu to star t selective intercom to the one of the
monitors in the system. Choose one of the monitors from the list by touching it's
number and then touch ”Dial Number” icon to start calling target monitor. To end the
call touch ”Return” icon.
If you want to call all the monitors in the system touch „Inner call” icon in the main
menu. All the monitors will start ringing at the same time. To end the call, touch
”Return” icon.
Date and time settings
Touch ”User Setup” in the main menu of the monitor, then touch ”Calendar” to enter
calendar settings menu. You will see the dialer, where you can enter current date and
time:
Enter current date and time using keys with numbers on the dialer. You can move
marker using ”cancel” button.
2012-12-26 16:30
Redial
Day time setting
The day time setting is used to change the day ring volume and night ring volume. 07:00 AM - 18:00 PM is
the default day time. Touch ”User Setup” icon in the main menu and then touch ”Day Time” icon to enter
day time settings menu. Use dialer to set the time and use ”cancel” icon to move the marker. After entering
day time, touch ”ok” icon to save day time settings.
Day ring volume and night ring volume settings
You can set a ring volume for day time and night time individually. Touch ”User Setup” icon in the main
menu and then touch ”Ring Volume” icon to enter day volume setting menu. Use „Left” and ”Right” arrows
to decrease or increase current day volume. Touch icon to save day volume setting.
To set night ring volume touch ”User Setup” icon in the main menu and then touch ”Night Ring Volume”
icon to enter night volume setting menu. Use „Left” and ”Right” arrows to decrease or increase current
night volume. Touch icon to save day volume setting.
[07:00] -- [18:00]
6
Page 7
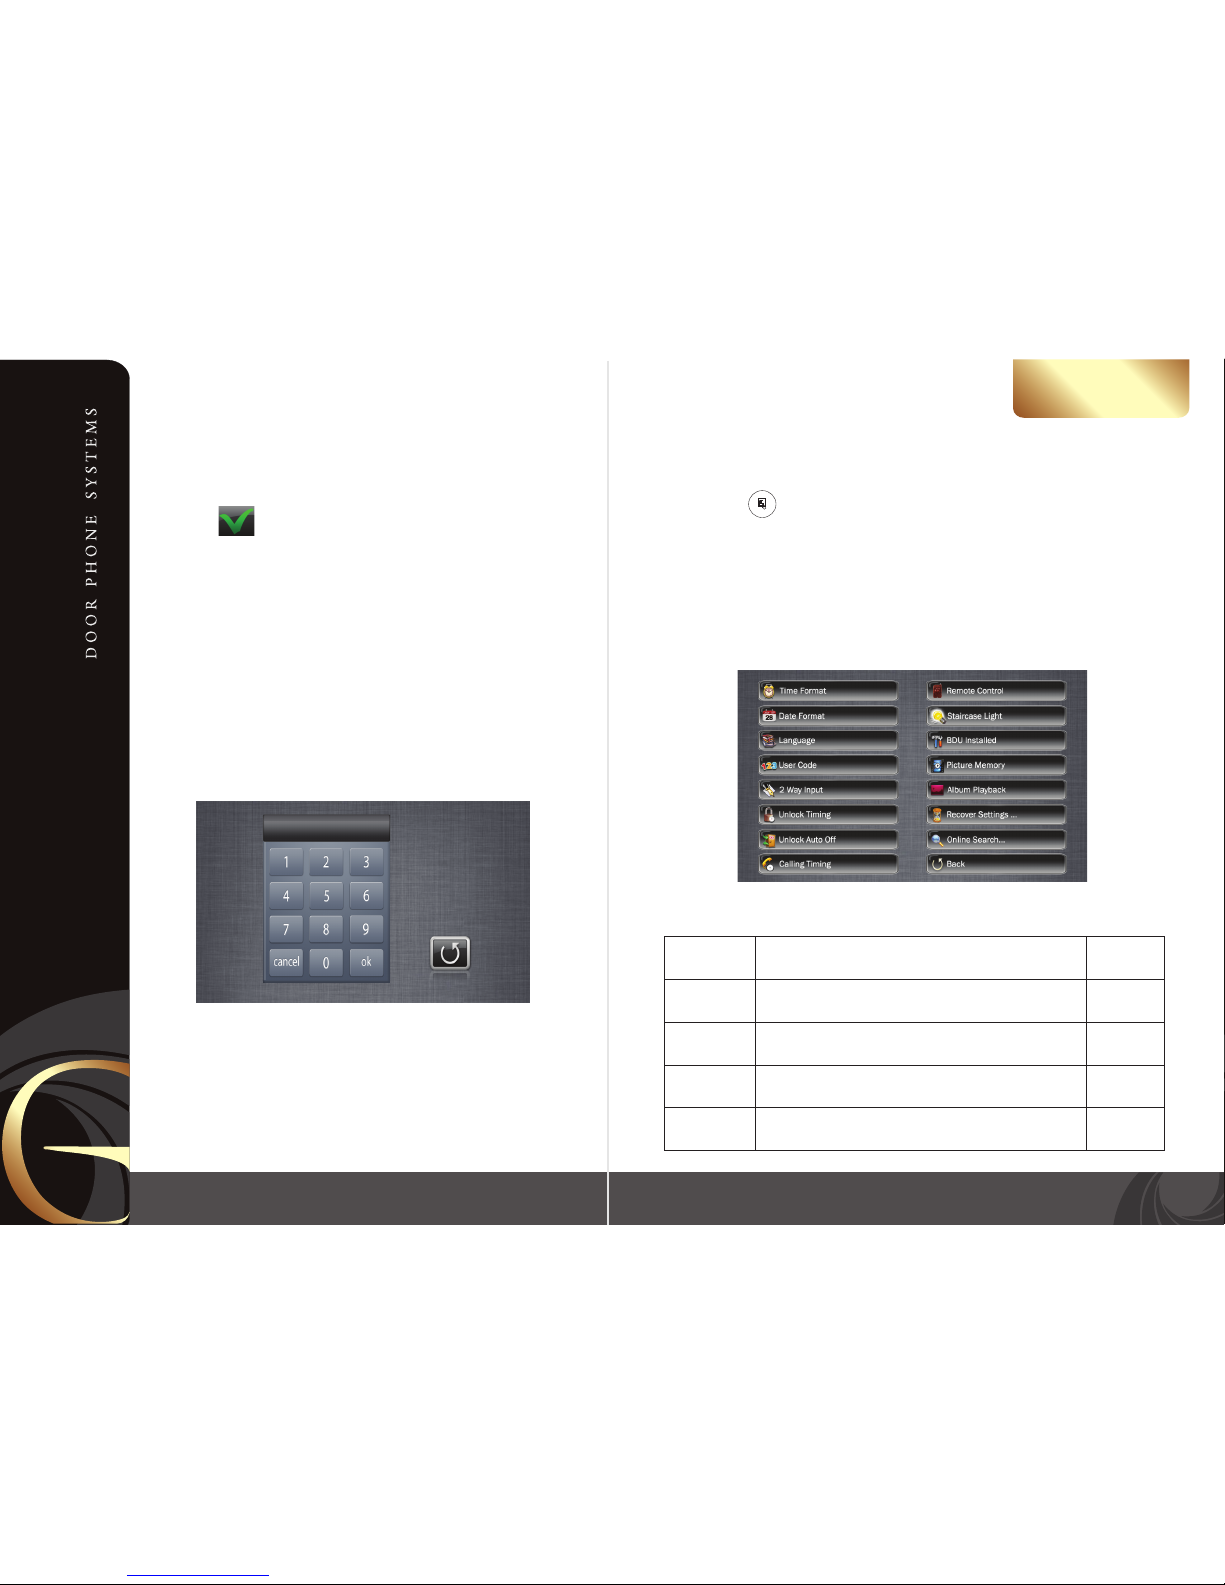
Ringtone settings
There are three types of ring tones in the monitor: rst door panel call tone, second
door panel call tone and intercom call tone.
Touch ”User Setup” icon in the main menu and then touch ”Master Call tone” icon to
enter rst door panel tone settings menu. Choose the melody from the list and touch
it, then press icon to conrm your choise.
To set second door panel call tone, touch ”User Setup” icon in the main menu and then
touch ”Slaver Call tone” icon to enter settings menu. The operations are the same as for
the rst door panel.
To set intercom tone, touch ”User Setup” icon in the main menu and then touch
”Intercom Call tone” icon to enter settings menu. The operations are the same as for the
rst door panel.
Viewing time setting
Touch ”User Setup” icon in the main menu and then touch ”Monitor time” icon to enter
viewing time setting menu. You will see the dialer, where you can enter viewing time
from 30 seconds to 59 minutes and 59 seconds, using keys with numbers. Also you can
move marker using ”cancel” button. After entering viewing time touch ”ok” icon to
conrm your choise.
Restore to default
Touch ”User Setup” icon in the main menu and then touch ”Restore to default” icon two
times to reset all monitor settings to the factory settings. All settings will be restored to
default except Calendar setting.
ASTERIA
User's manual
1211
Album photo playback
If you want to view the pictures from microSD card, touch ”Album” icon in the main menu. Monitor will
begin picture playing. Also you can manually change the picture by sliding it right or left on the screen to
play next or previous pic ture. To nish the album playing, touch the screen and hold the nger for 2
seconds or press button.
Note: all pictures on the microSD card should be converted into *.TVS format by using ”T-Views Photo” software
and placed into ”Album” folder.
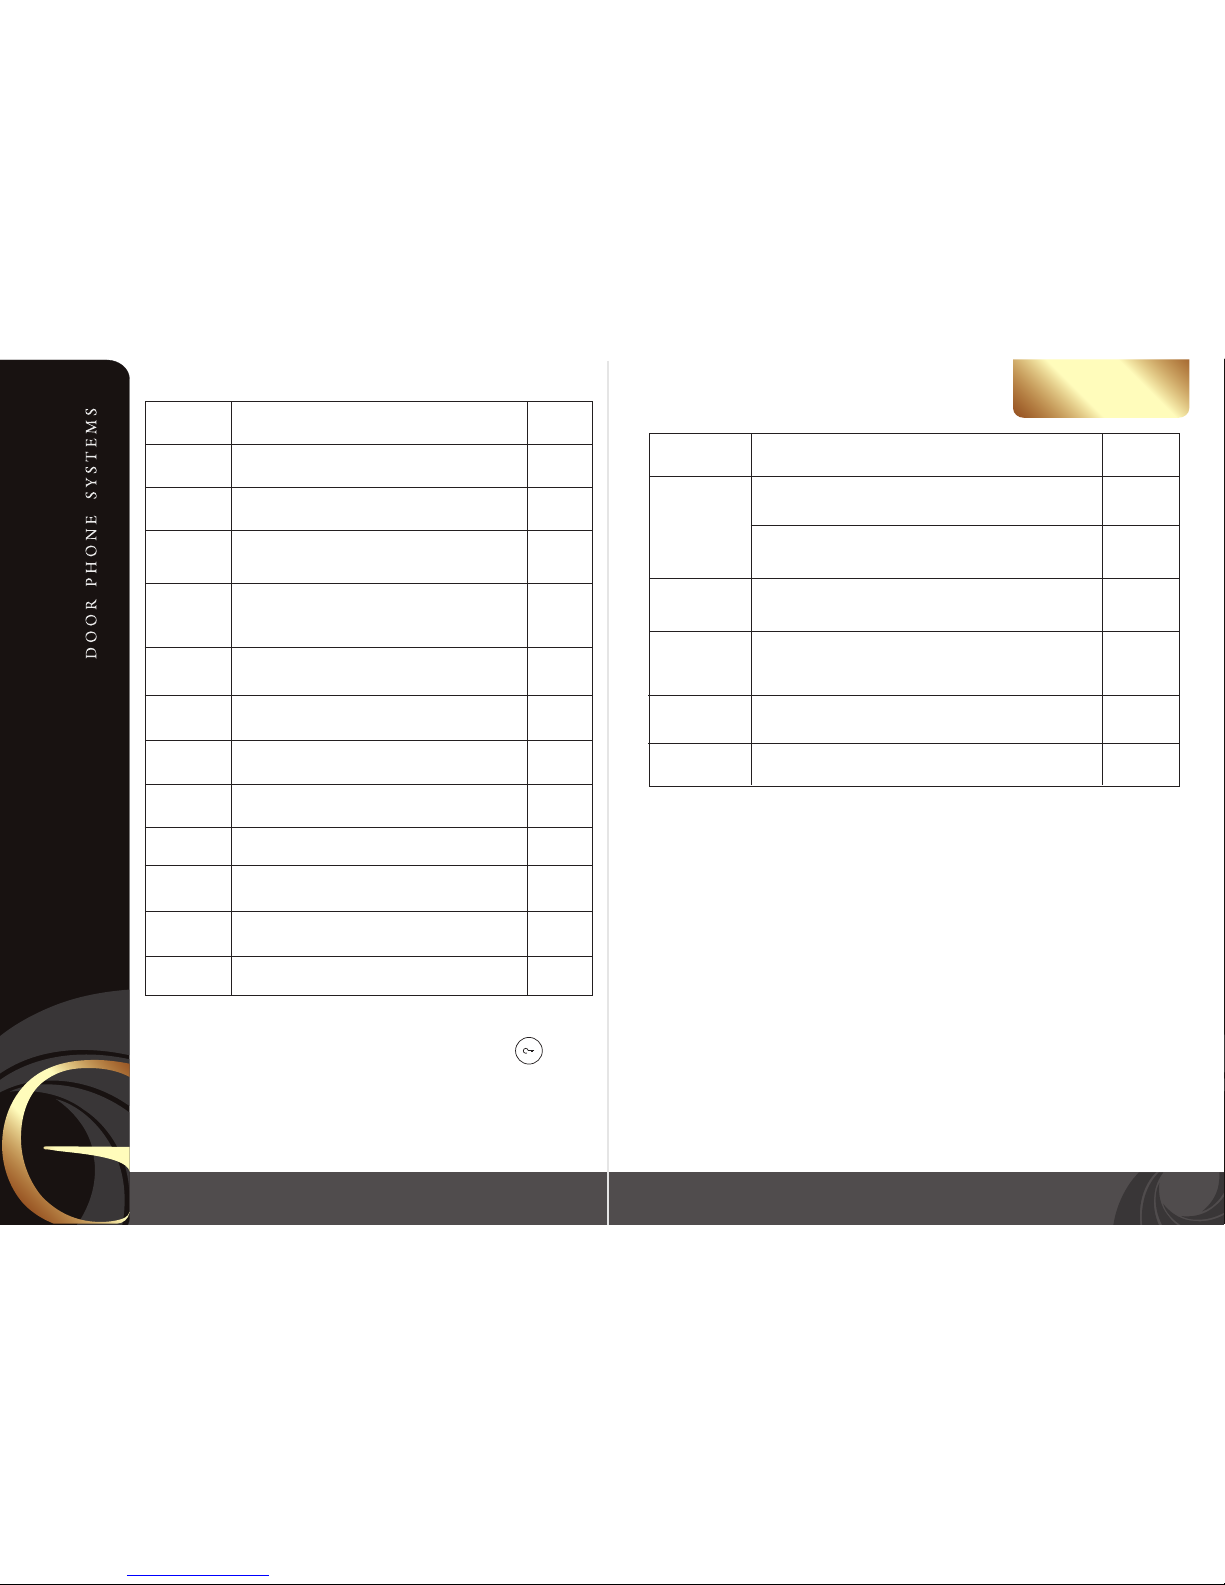
Installer setup
Touch ”User Setup” icon in the main menu and then touch ”Installer Setup” icon. Then enter 2412 pasword
using screen dialer and touch ”ok” to enter installer setup.
[01:30]
Item
Time Format
Date Format
Language
User code
Description
Default
value
0: 24-hours format
1: 12-hours format
0: day/month/year format
1: month/day/year format
0: English language
1: Russian language
1: Master monitor
2,3,4,5: Slave monitors
0
0
1
1
Page 8
ASTERIA
User's manual
14
13
Item
Item
2 Way Input
Unlock
Timing
Unlock
Auto O
Calling
Timing
Remote
Control
Staircase
Light
BDU installed
Picture
Memory
Album Playback
Recover
settings
Online
Search
Back
Description
Description
Default
value
Default
value
0: one door panel connected to the monitor
1: two door panels connected to the monitor
(JS/OS2 terminal is used)
0-9: lock release time in seconds
Not used
Not used
Not used
1, 4, 8: quantity of captured images after incoming call
from the door panel
1-999: max. playing time for Album in minutes
Touch this icon two times to recover factory settings
Search the devices connected to the system
Exit to the User Setup menu
1-9: monitor will be o after 1-9 seconds from unlocking
0: monitor will not be o after unlocking
[xx][yy], both values can be changed from 03 to 60
in seconds x10. It means for example [03] x 10 = 30 seconds
[xx] call waiting time
[yy] talking time
0
3
0
0
0
0
1
10
-
-
-
03 and 09
Monitor advanced settings
Touch ”About” icon in the main menu of the monitor, then press and hold button
for 3 seconds. Now you can see dialpad where you can enter values, according to the
table on the nex t page. Use ”cancel” icon to move the marker and ”ok” icon to conrm
new value.
Volume
Setting
Logo status
setting
Factory setting
Initialization
setting
NTSC/PAL
setting
8800 - 8899: intercom talking volume, including microphone and
speaker. The larger you set, the weaker it will be
8900 - 8999: door panels talking volume, including microphone and
speaker. The larger you set, the weaker it will be
8630: logo disabled before standby mode
8631: logo enabled before standby mode
2499: restore to initialization settings, including user setup, installer
setup, format pictures, logo status and volume setting
8500: automatic identication mode
8501: PAL standard mode
8502: NTSC standard mode
8800
8900
8630
-
-
8500
2412: recover factory settings, including user setup, installer setup
and format pictures
Warranty
Warranty period is 18 months from purchaseing.
Warranty void if unit was damaged by the fault of the custumer.
Warranty void if the sticker on the backside of the unit was broken.
Life time of the unit depends on it's maintainance and carefull using.
Safety Instructions
1. Do not install near other electronic equipment such as computers, TV, video recorder as this may cause
radiated interference to the unit.
2. Do not disassemble the unit.
3. Do not spray water on the indoor unit. Do not keep the outdoor unit where it will be exposed to extreme
moisture.
4. Do not drop or shock the unit, dropping can result in failure to operate. Circuit boards can crack and may not
survive the impact.
5. Remove the power cord from the wall socket when unit is not used for long periods
6. Do not cover the ventilation holes with clothing, paper, curtains etc.
7. Keep minimum distance 5cm around the apparatus for sucient ventilation.
8. This apparatus is designed for middle climates. Do not use in high humidity, dusty or dirty areas. The
electronics may be contaminated.
9. To disconnect or isolate the unit, switch o at the socket or remove plug from wall socket. Please ensure the
plug and socket is easily accessible.
10. Do not use harsh chemicals, cleaning solvents or strong detergents. To clean, wipe with a damp cloth from
time to time.
Page 9
ASTERIA
User's manual
16
15
Index
Package.....................................................................................................................................................................1
Keys.............................................................................................................................................................................1
Characteristics...................................................................................................................................................2
Specication.......................................................................................................................................................2
Installation instructions..................................................................................................................................3
Schematic diagram 1.......................................................................................................................................4
Schematic diagram 2.......................................................................................................................................5
Main menu..........................................................................................................................................................6
Incoming calls answer.....................................................................................................................................7
Talking volume adjust.....................................................................................................................................7
Door panels viewing........................................................................................................................................7
Brightnes and cololr adjust...........................................................................................................................8
Door unlock and talk activation while viewing.....................................................................................8
Image format convertation 16:9 or 4:3.....................................................................................................8
Intercom between monitors............................................................................................................................9
Date and time settings....................................................................................................................................9
Day time setting..................................................................................................................................................10
Day ring volume and night ring volume settings...............................................................................10
Ringtone settings...........................................................................................................................................11
Viewing time setting.....................................................................................................................................11
Restore to default...........................................................................................................................................11
Album photo playback.................................................................................................................................12
Installer setup..................................................................................................................................................12
Monitor advanced settings.........................................................................................................................13
Safety instructions.........................................................................................................................................14
Warranty............................................................................................................................................................14
Notes
 Loading...