

Page 1
USER MANUAL
V 1.2
WWW.GRDIAN.COM
english
Page 2

CONTENTS
Safety Information...................................................................................................................0
In the Box................................................................................................................................1
Overview..................................................................................................................................2
Mounting the Camera..............................................................................................................3
Mounting the Front Camera.............................................................................................3
Mounting the Rear Camera..............................................................................................4
Connecting the Camera and Memory.......................................................................................5
GPS Antenna............................................................................................................................6
GRDIAN Viewer Pro: Gallery Menu..................................................................................17
Viewing Downloaded Content and Snapshots.......................................................17
Playback..............................................................................................................18
Viewing Files on the Computer...............................................................................................19
File Naming Structure............................................................................................................20
Understanding the File Sequence.........................................................................20
Parking Mode........................................................................................................................21
Troubleshoot...........................................................................................................................23
Gesture Photography..............................................................................................................22
Customer Support..................................................................................................................24
GRDIAN Viewer Pro..................................................................................................................7
GRDIAN Viewer Pro: Main Menu...............................................................................................8
GRDIAN Viewer Pro: Cam Menu.................................................................................9-13
Camera Settings............................................................................................10-11
Video Library........................................................................................................12
Video Playback....................................................................................................13
GRDIAN Viewer Pro: Track Menu.............................................................................14-16
Page 3

SAFETY INFORMATION
WARNING: Failure to follow these safety instructions could result in damage to your device
and other surrounding property. Read all the safety information below before using.
Handling
Handle your device with care. Your device can be damaged if dropped, burned, punctured,
crushed, or if it comes in contact with liquid. If your device is damaged, do not continue using
it, as it may cause injury. Use the correct input voltage. Do not spray cleaning products on
the device. Detach the power cord from the device if the device emits an unusual smell or if
there is smoke. Do not remove the microSD card while it is saving or reading data. Remove
the power cord from the device if you are not planning to use the device for a long time. If the
product is damaged or the power supply is cut due to an accident, video may not be recorded.
Repairing
Do not attempt to repair the device yourself. Doing so will void the Warranty, damage your
device or may cause injury. If your device is damaged or is defective, contact GRDIAN.
Distraction
Do not operate the device while driving. Operate only when your vehicle is parked. Do not
install the device where it interferes with the driver’s vision.
Exposure to Extreme Heat
KRIOS and its accessories comply with applicable surface temperature standards and limits.
However, even within these limits, sustained exposure to heat for long periods of time may
cause damage to the device. Use common sense to avoid situations where your skin is in
contact with a device or its power adapter when it’s operating or plugged into a power source
for long periods of time. It is important to keep KRIOS and its power adapter in a well ventilated area when in use.
Choking hazard
Some accessories may present a choking hazard to small children. Keep these accessories
away from small children.
Page 4
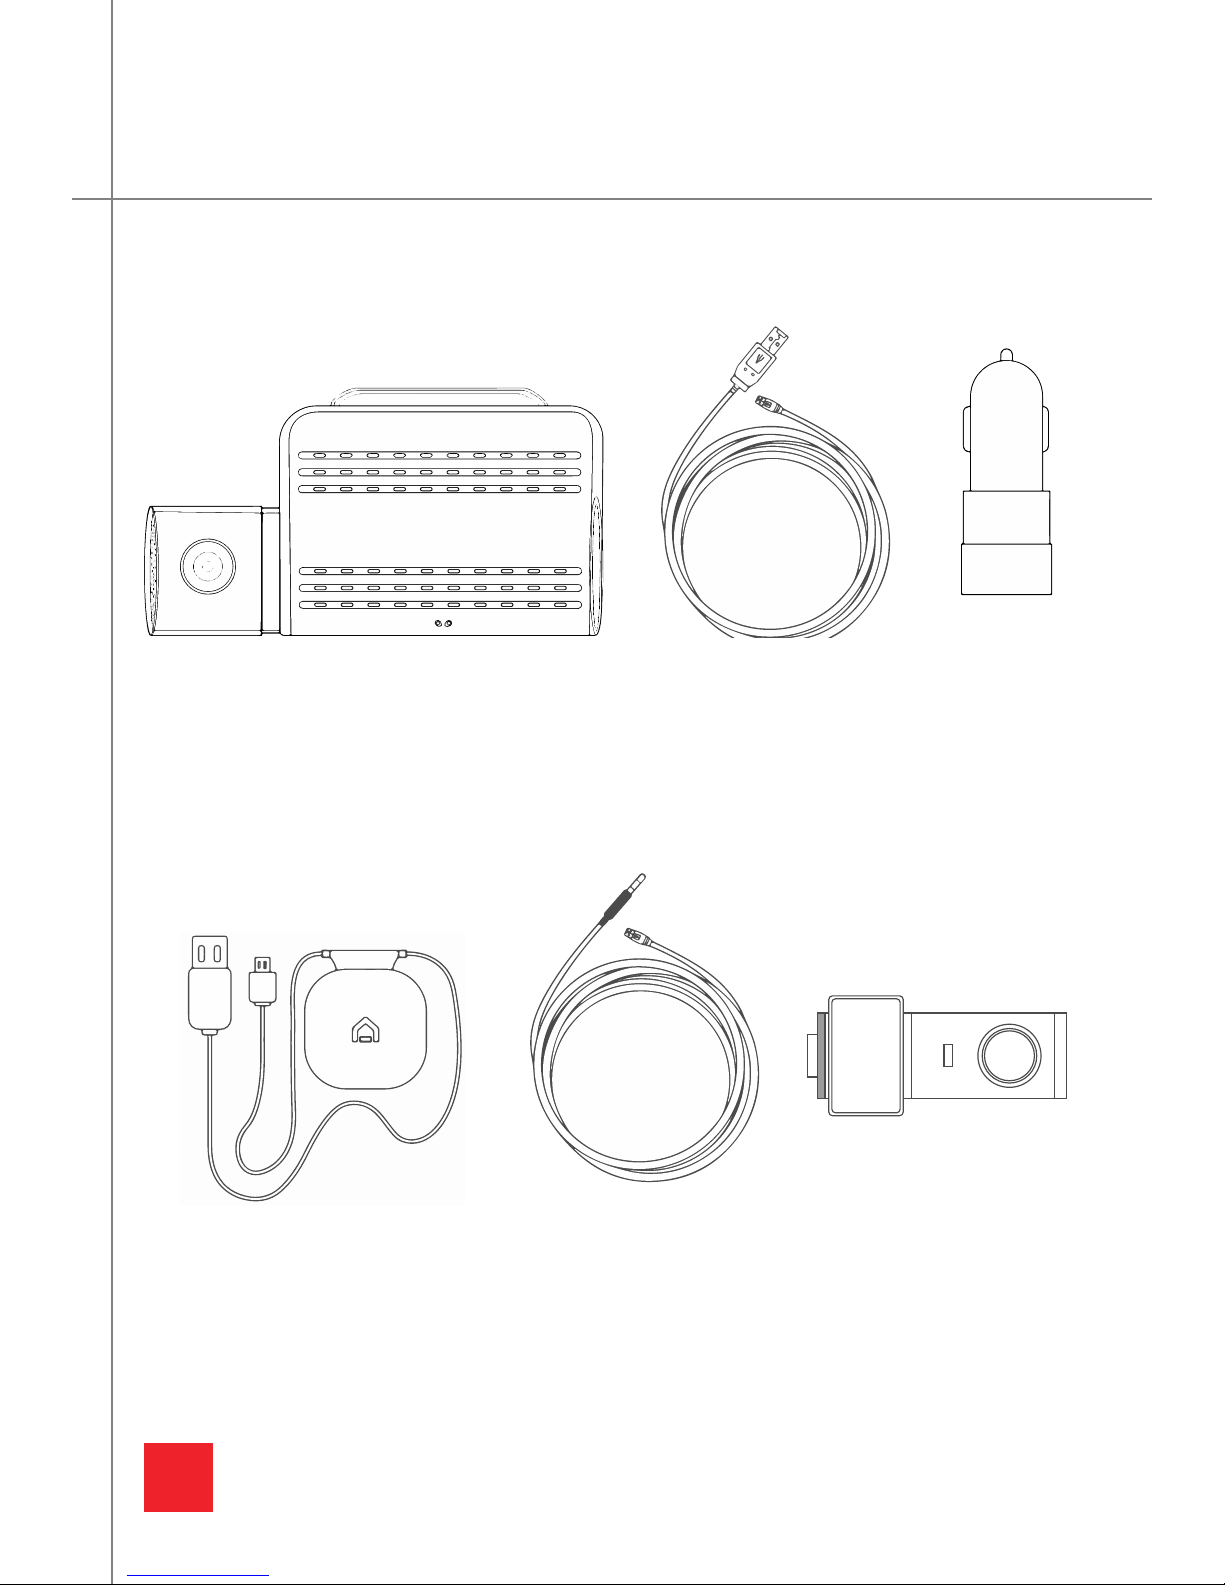
1
MAIN UNIT
GPS ANTENNA (OPTIONAL)
USB CABLE USB CAR
CHARGER
REAR CAMERA CABLE REAR CAMERA
IN THE BOX
Page 5

2
Camera Lens
Start/Pause
Gesture
Sensor
Removable Adhesive
Mount
micro USB
Power Socket
Rear Camera Video
Speaker
LED
microSD slot
Camera LensRear Camera Bracket
Unscrew side ring to remove
rear camera from bracket
MIC
OVERVIEW
Page 6
3
MOUNTING THE CAMERA
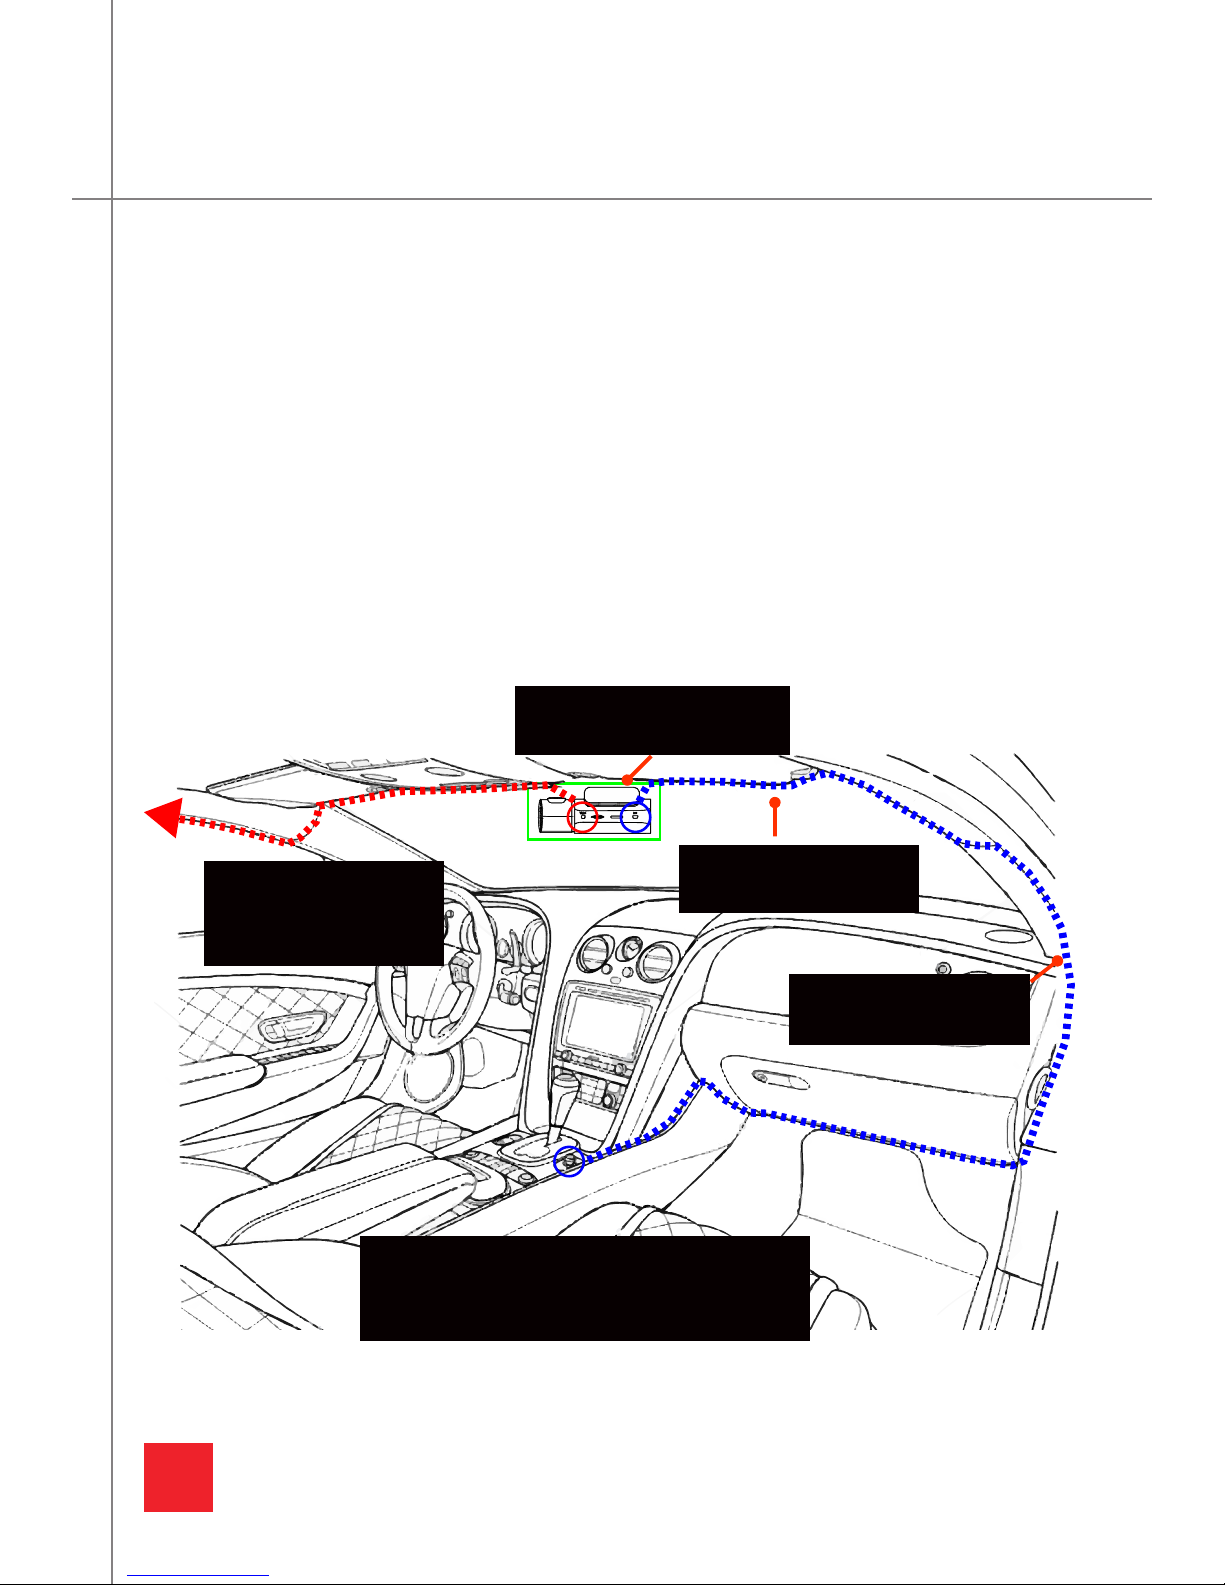
MOUNTING THE FRONT CAMERA
1. Peel away the 3M tape and place the main unit at the center of your windshield.
2. Locate a power source. This can either be a USB terminal or a cigarette outlet.
3. Use the micro USB power cable to route the wire inside your headliner. Route the cable
left or right depending on the location of your power source.
4. Continue through the headliner of your vehicle and down the A Pillar. Tuck your wire intthe
rubber weather guide to conceal wiring.
5. Continue down in the direction of your power source. Tuck in additional wiring into the
nooks and crannies of your vehicle.
6. Plug the micro USB power cable into your power source with the provide car charger or
directly into your USB terminal.
Affix your camera to the
center of the windshield.
NOTE: The power cable and rear cable can
be routed in either direction, depending on
the location of your cigarette outlet/USB.
Route the power cable
into your headliner.
Route the rear camera
cable into your headliner.
Rear Camera Cable
micro USB Power Cable
Continue to route into
the rubber rain-guard.
Page 7
4
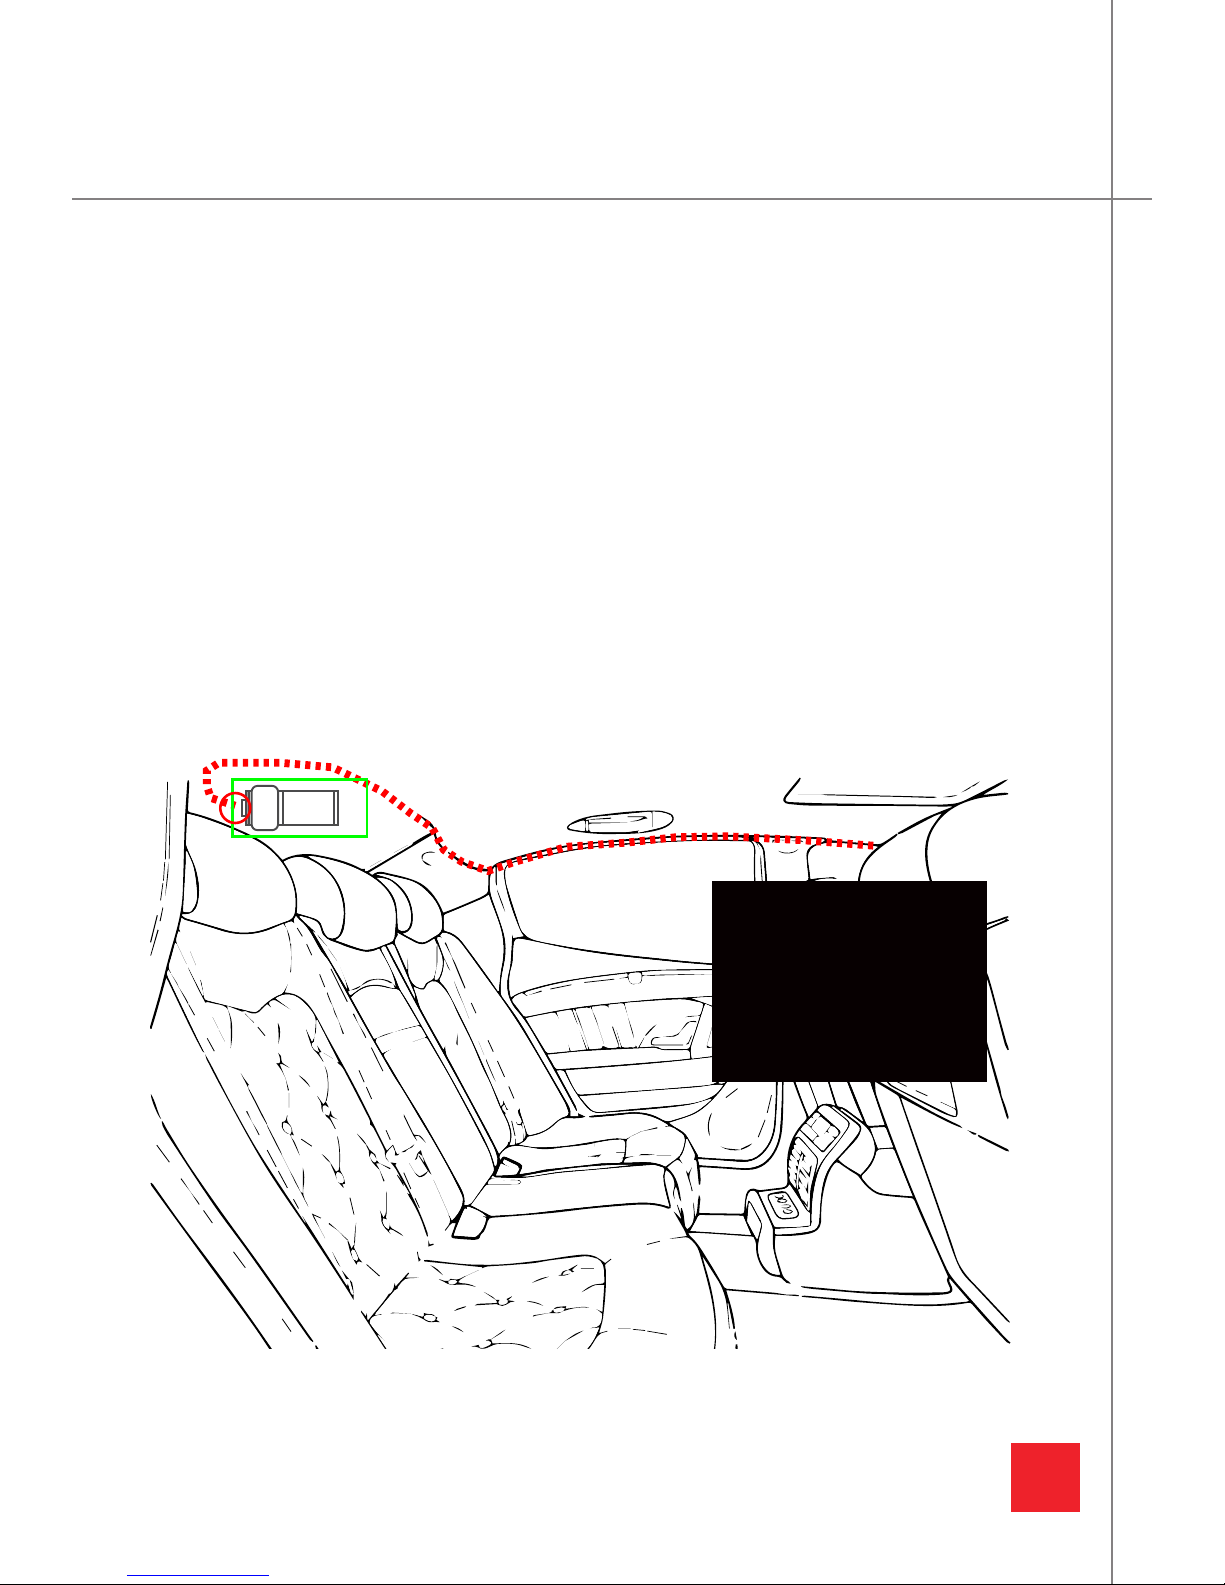
MOUNTING THE REAR CAMERA
MOUNTING THE CAMERA
1. Peel away the 3M tape and place the rear camera at the center of your rear windshield.
Make sure the rear camera is mounted in the correct orientation. The USB side should be
pointed to the left when facing the rear window from inside your vehicle.
2. Plug the rear camera cable into the main unit. Route the cable into the front headliner
through the A Pillar, B Pillar, C Pillar and then to the rear headliner.
3. Plug the rear camera cable into the rear camera. Excess wires can usually be tucked into
the rear headliner.
Affix your rear camera to
the center of the windshield with the USB side
to the left when facing
the rear windshield from
inside the cabin.
Rear Camera Cable
Page 8
5
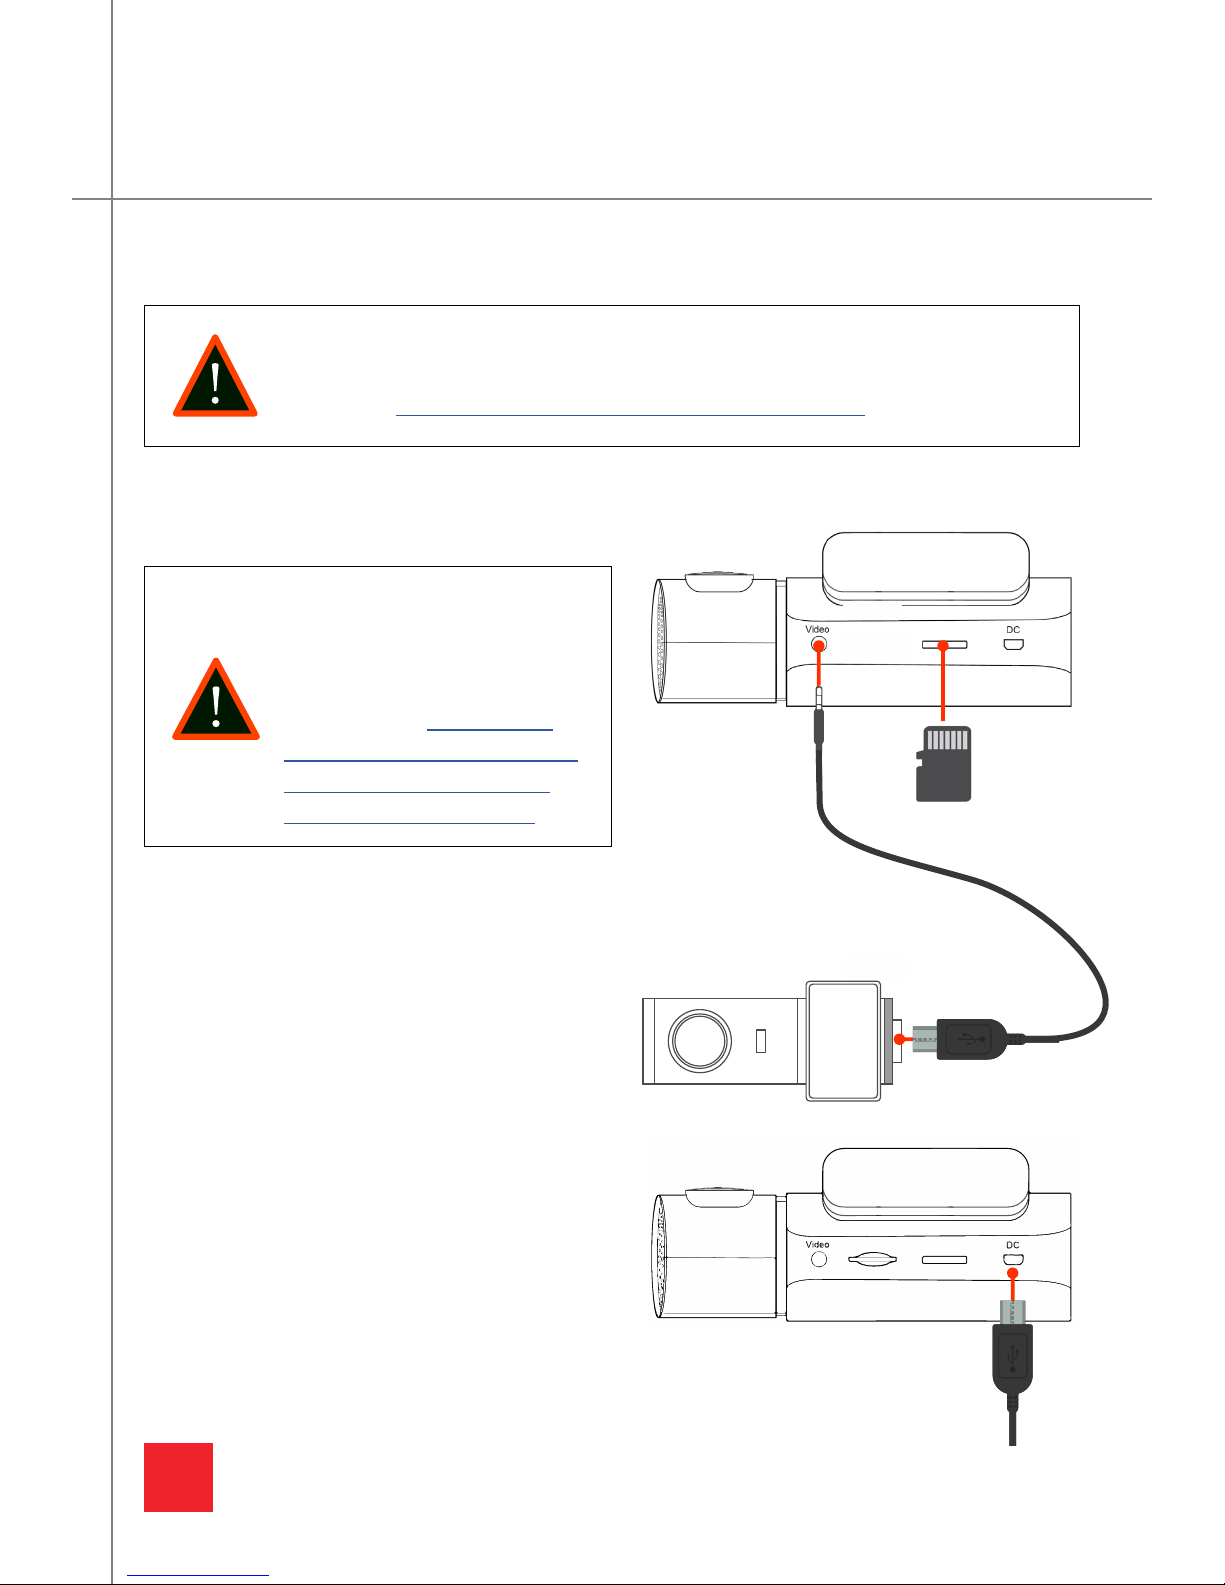
INSERTING YOUR MEMORY CARD
Insert your memory card into the main device.
CONNECTING THE CAMERA AND MEMORY
MEMORY CARD
USE A COMPATIBLE MEMORY CARD
For optimal performance, please use one of the recommended memory cards
listed here: grdian.com/blog/dash-cam-memory-cards
NOTE
For memory cards 64gb and
higher, format your memory
card to FAT32. For a howto-guide visit: grdian.com/
blog/how-to-format-yourmemory-card-to-fat32for-windows-and-mac
CONNECTING THE REAR CAMERA
TURNING ON YOUR CAMERA
1. Plug the rear camera cable into the
main unit.
2. Plug the micro USB end into the rear
camera.
1. Plug the micro USB power cable into the
main unit.
2. The camera will automatically turn ON and
begin recording.
Page 9
6
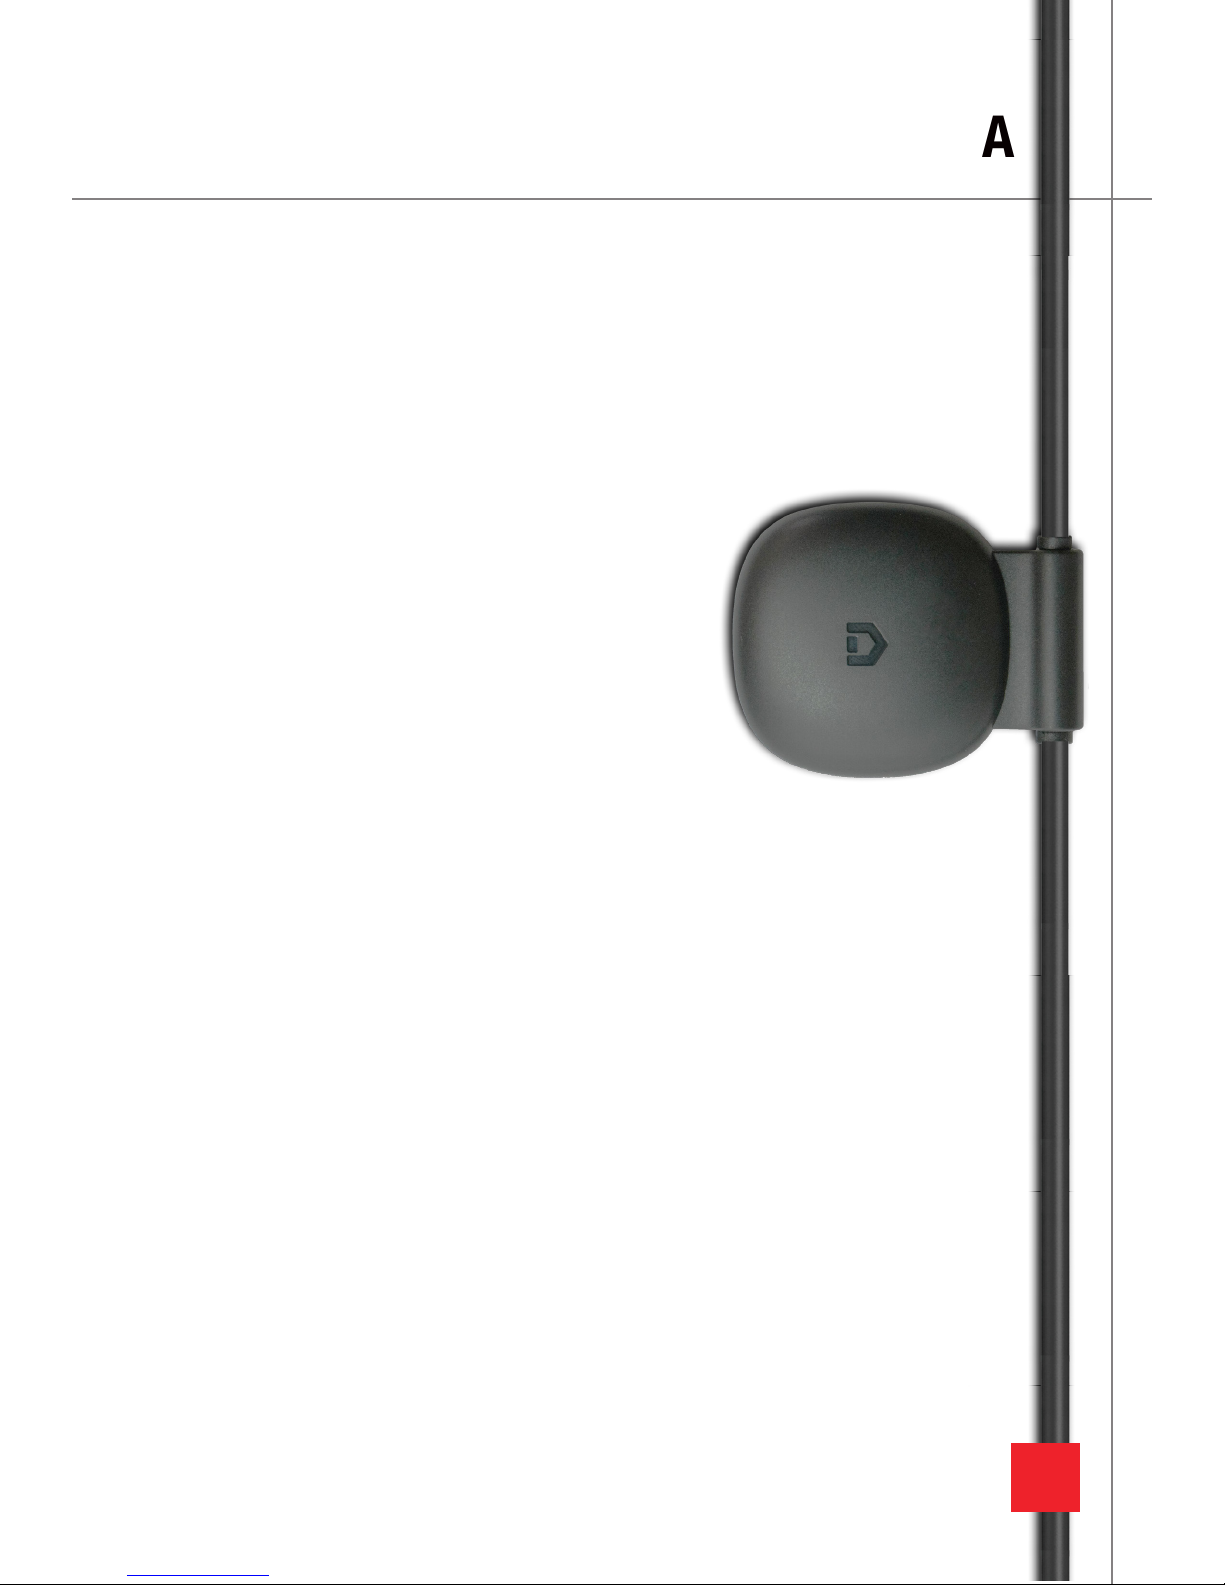
GPS ANTENNA
GPS ANTENNA (SOLD SEPARATELY)
The GPS Antenna is optional and replaces your existing
micro USB power cable. It is setup the same way as the
micro USB power cable. Peel away the VHB adhesive to
attach to the windshield.
FEATURES
The GPS antenna gives your camera the ability to track
your route history, average speed, distance traveled, and
more.
View your GPS data with the GRDIAN Viewer Pro app. To
purchase, please visit www.grdian.com
Page 10
7
GRDIAN VIEWER PRO
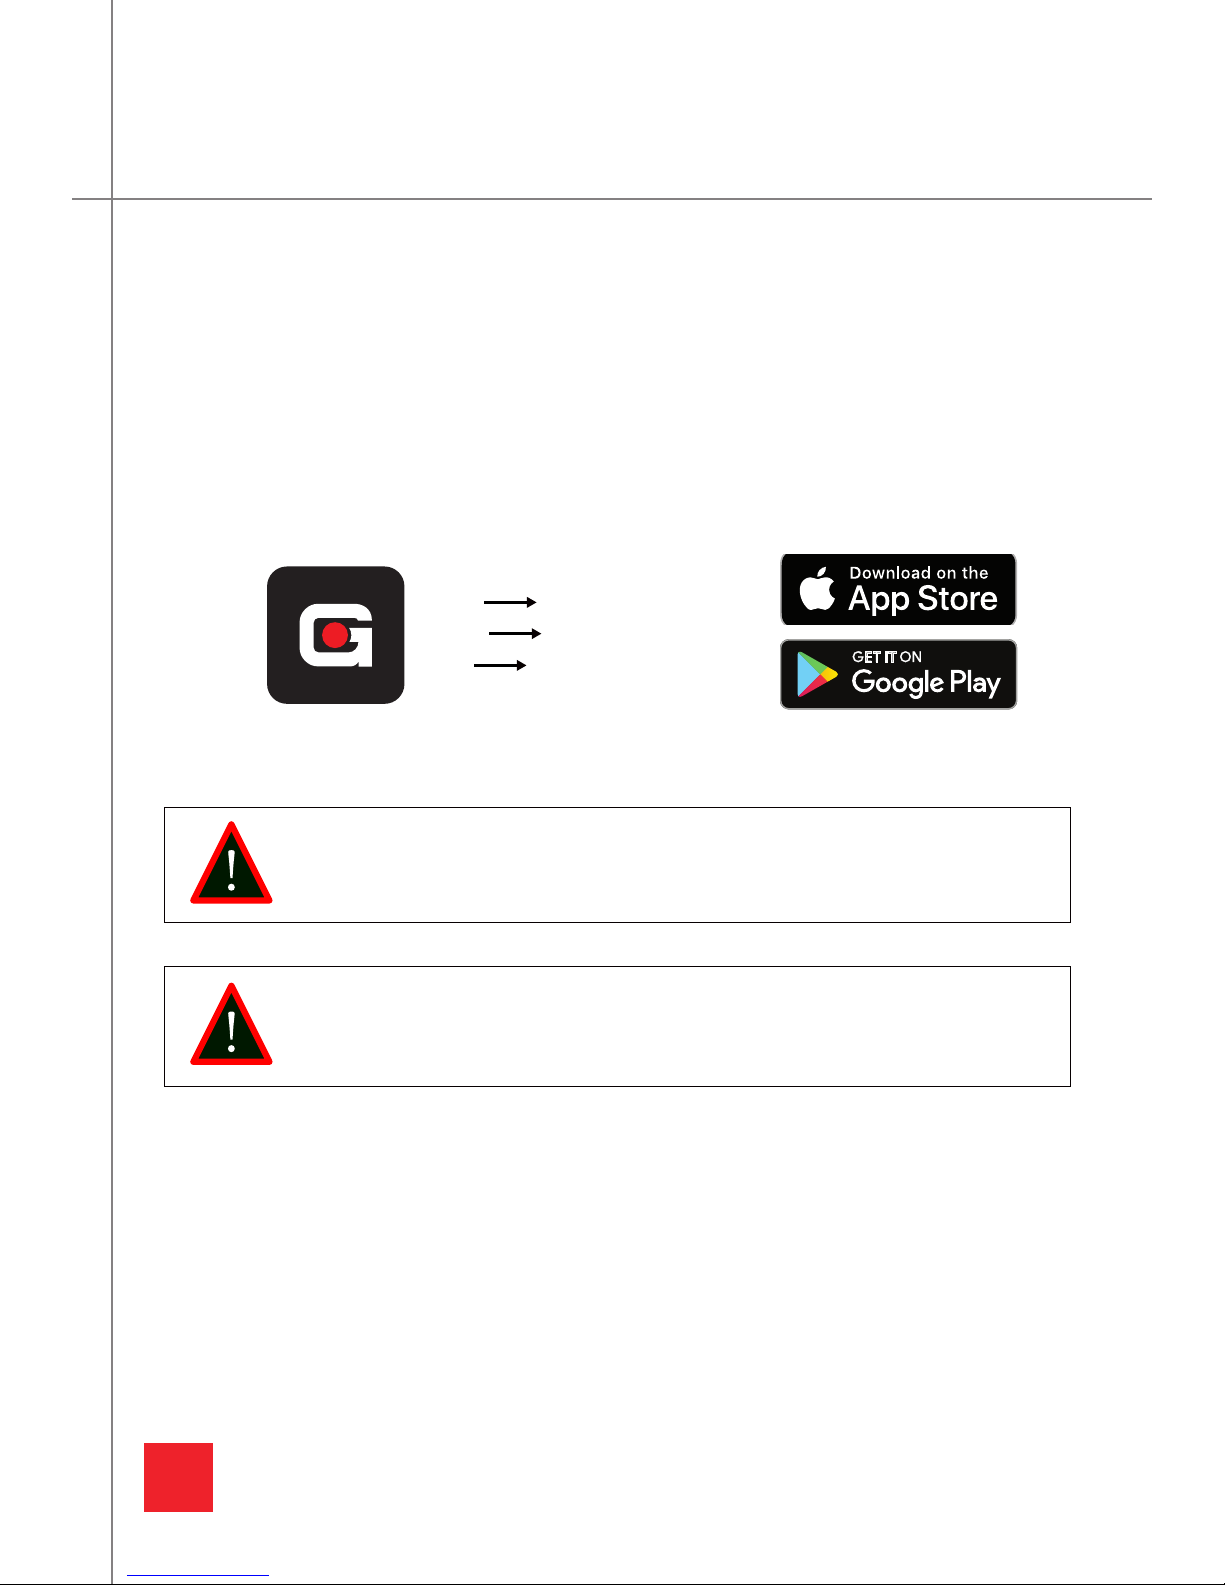
1. Plug the camera into a power source to turn ON.
2. Download the GRDIAN Viewer Pro app.
3. Locate SSID: KP323_XXXXXX in your Wifi settings.
4. Enter the password: 12345678
6. Open the GRDIAN Viewer Pro app and press Connect.
APP GRDIAN Viewer Pro
SSID KP323_XXXXXX
PW 12345678
INSTALLING AND CONNECTING TO THE APP
NOTE
Compatible with Android 6.0 and up and iOS 9.0 and up
WARNING
Do not attempt to operate when vehicle is in motion. Only operate when your
vehicle is parked
Page 11
8
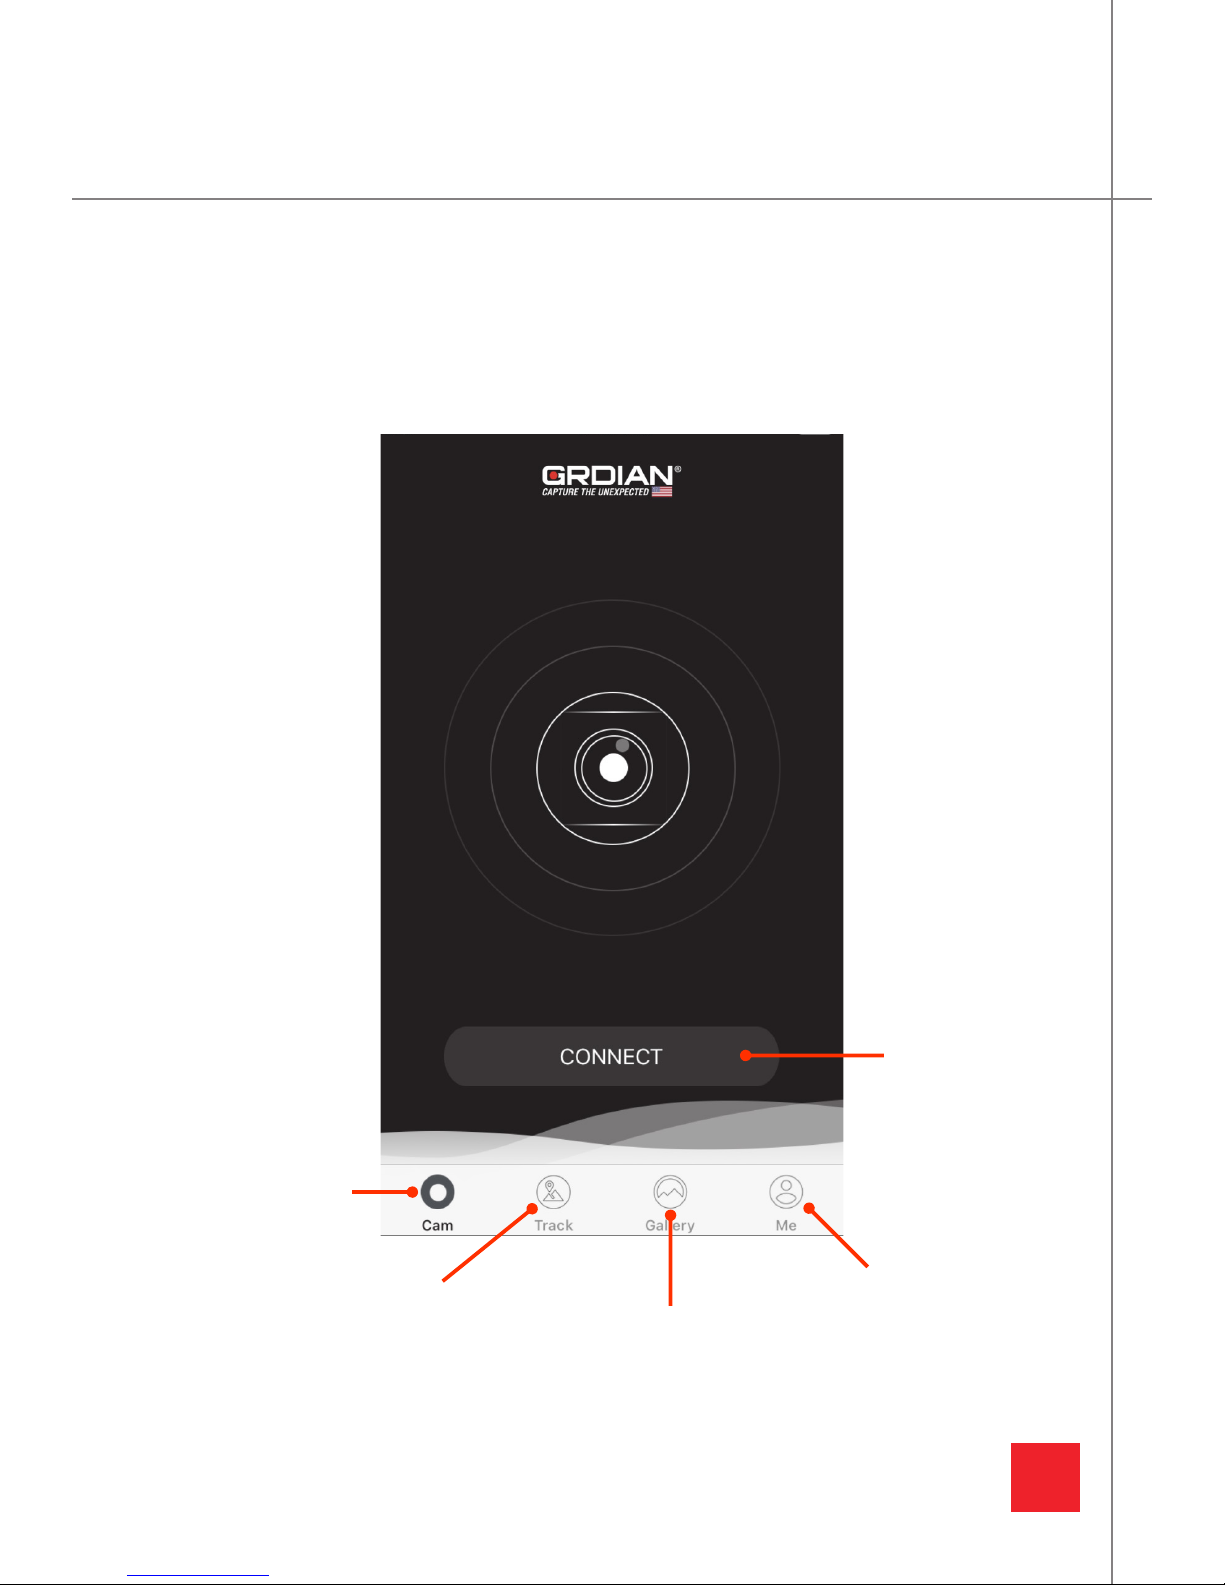
When connected, the Main Menu lets you view your entire video library, edit camera settings,
downloaded content, images, and GPS data. Submenus: Cam, Track, Gallery and Me.
Cam Menu
Access your library
and camera settings
here. See Page 9
Connect
Connect to your
camera.
Me Menu
Information about
your camera and
app.
Gallery Menu
View your downloaded
videos and snapshots here.
See Page 17
Track Menu
View your route history, average
speed, time traveled and more.
Feature available only with the
optional GPS Antenna. See Page
14
MAIN MENU
GRDIAN VIEWER PRO: MAIN MENU
Page 12
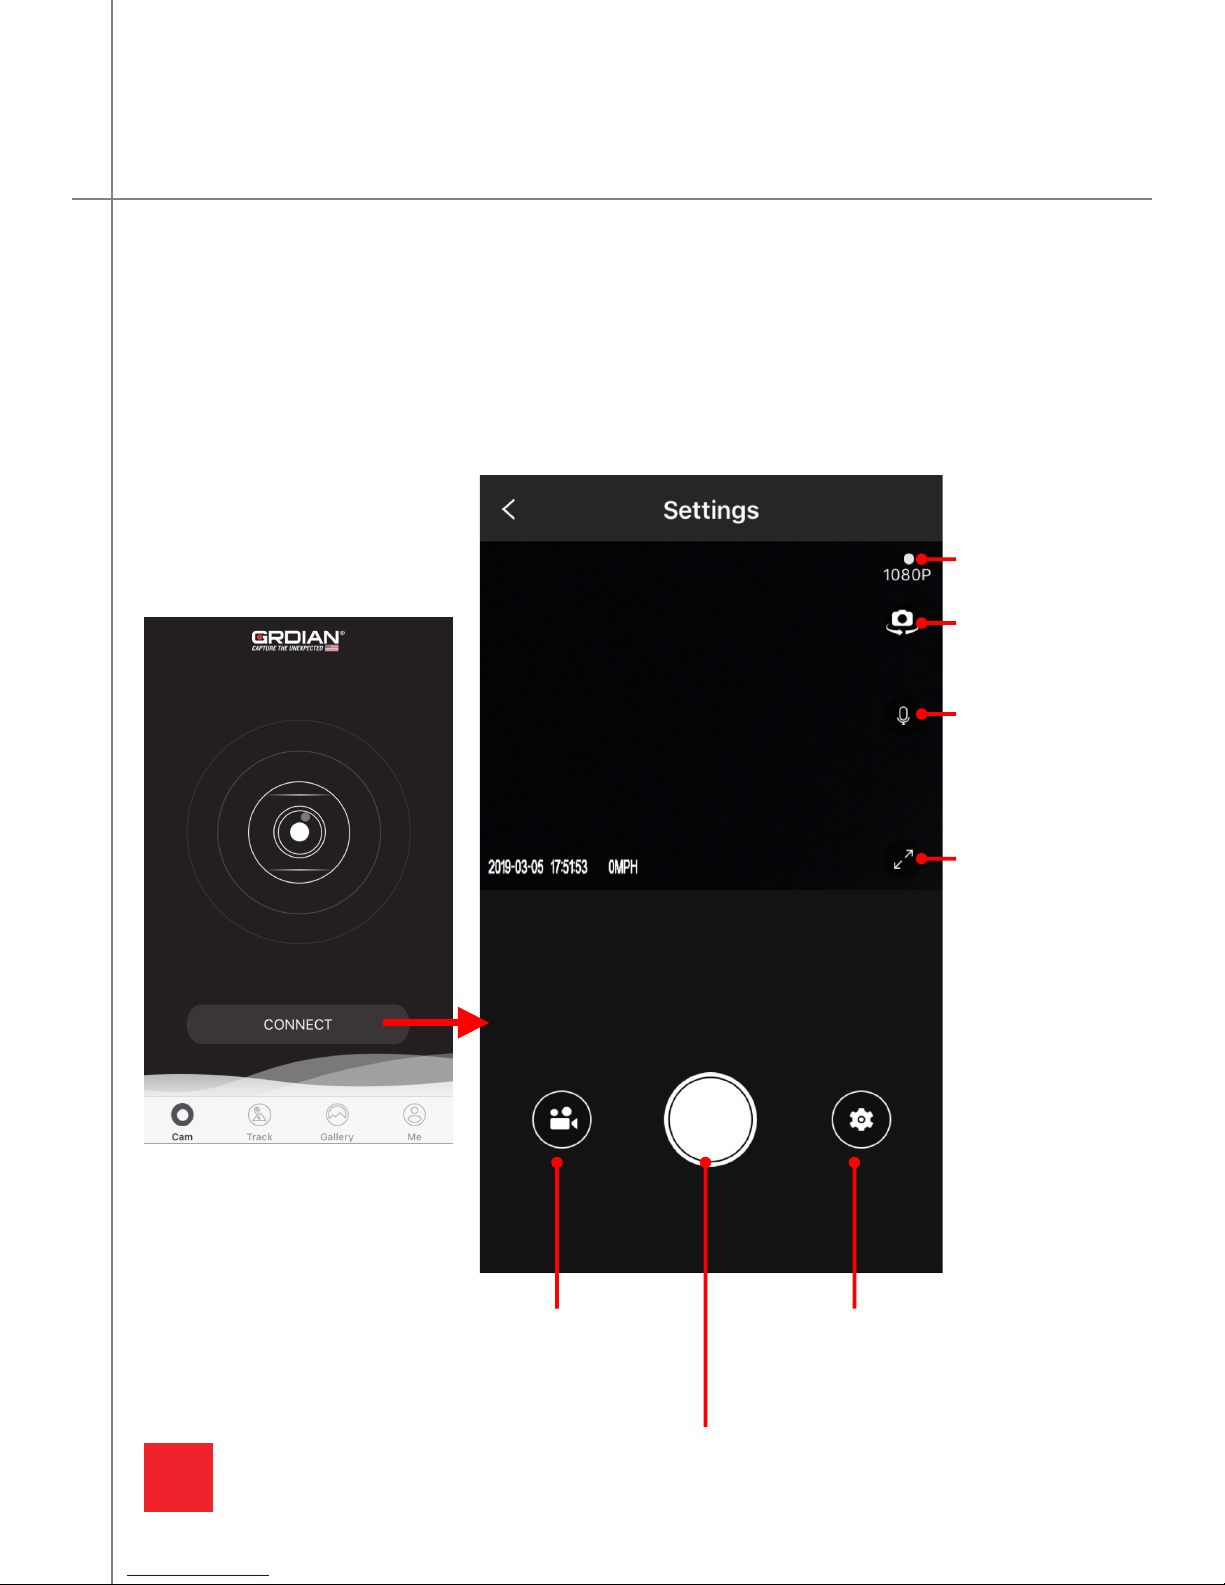
9
Use the Connect button to connect to the front and rear camera. Access the live preview, view
your recordings, edit settings, and download videos.
CAM MENU
Video Library
Take a Photo
Video
Resolution
Switch
views
Mic
Fullscreen
Camera Settings
GRDIAN VIEWER PRO: CAM MENU
Page 13
10
GRDIAN VIEWER PRO: CAM MENU
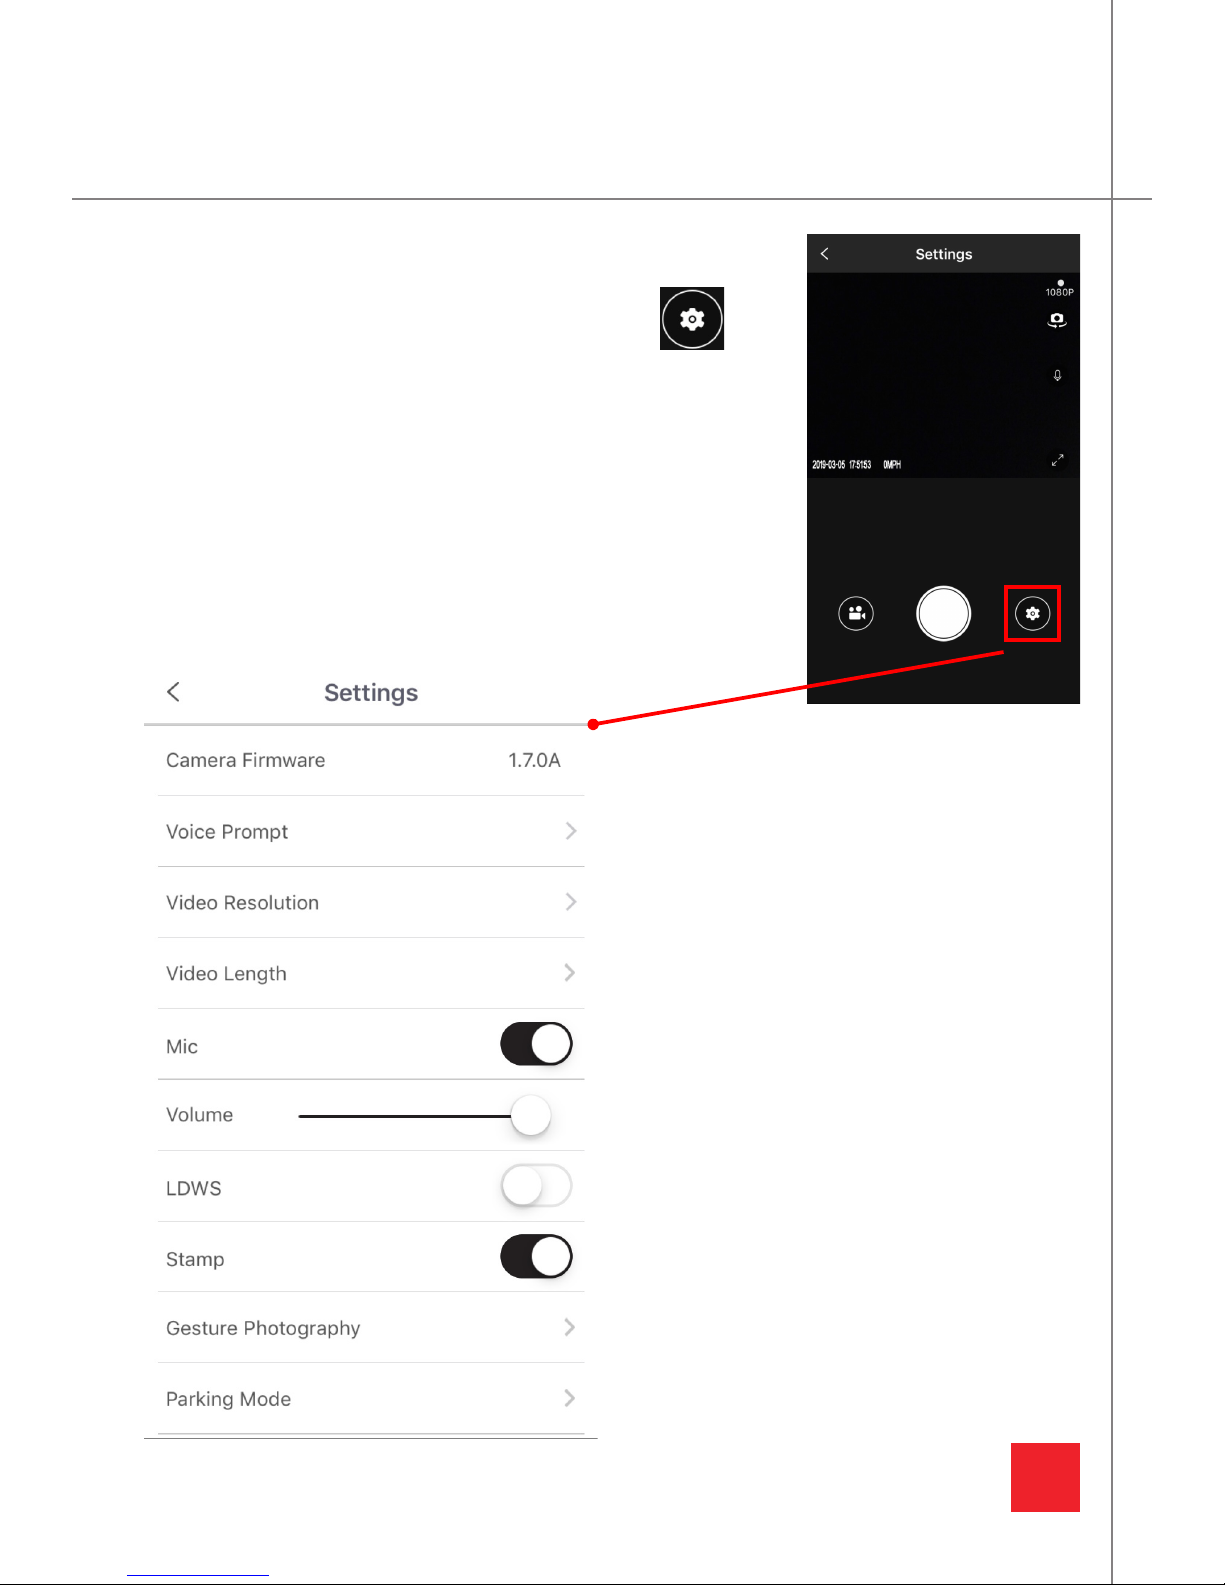
To access the camera’s settings, press the gear icon.
Camera Firmware: Firmware version.
Voice Prompt: Enable/disable voice alerts.
Video Resolution: Choose from 1080p or 720p.
Video Length: Choose from 1,3 or 5 min.
Mic: Enable/disable mic.
Volume: Adjust volume of the camera’s alerts.
LDWS: Lane departure warning system.
Stamp: Removes the time and speed stamp.
Gesture Photography: Enable/disable, adjust
sensitivity.
Parking Mode: Enable/disable, adjust sensitivity.
CAMERA SETTINGS
Page 14
11
GRDIAN VIEWER PRO: CAM MENU
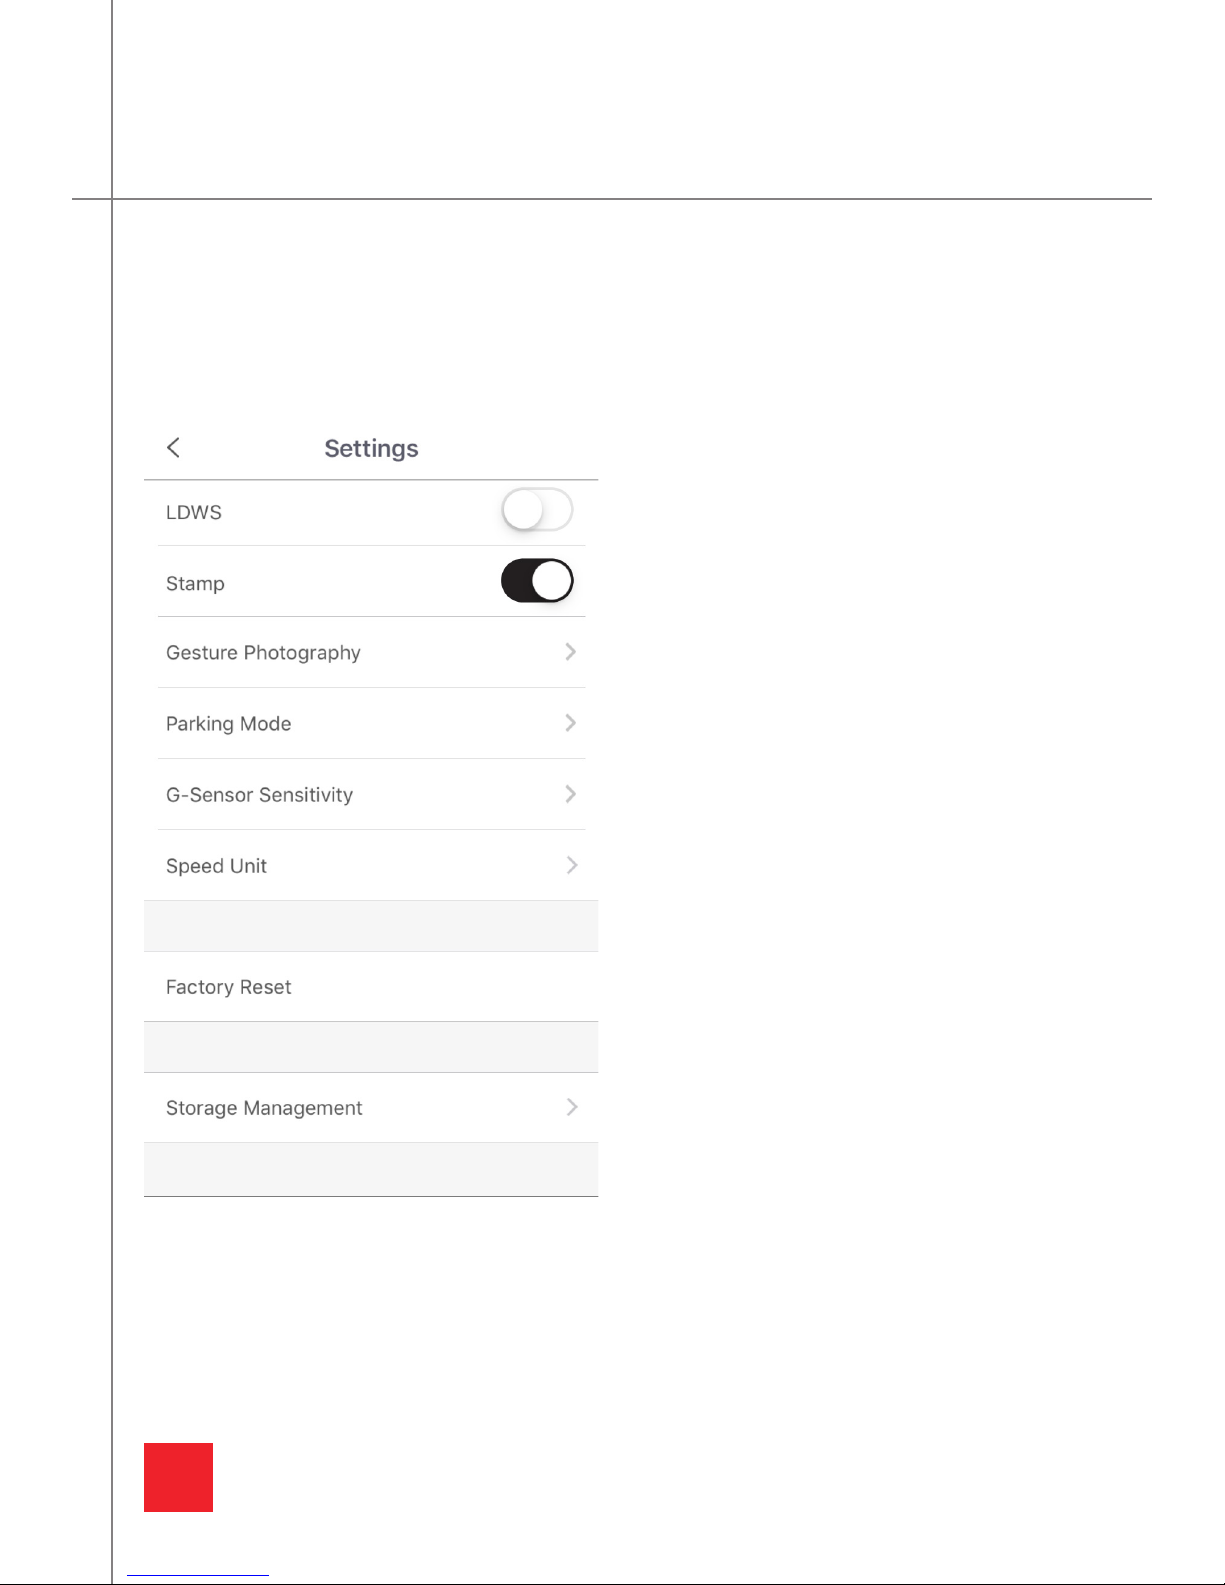
G-Sensor Sensitivity: Enable/disable, adjust
sensitivity
Speed: Change from KPH or MPH
Factory Rest: Rest camera to default settings
Storage Management: Manage your memory
card
CAMERA SETTINGS (CONTINUED)
Page 15
12
GRDIAN VIEWER PRO: CAM MENU
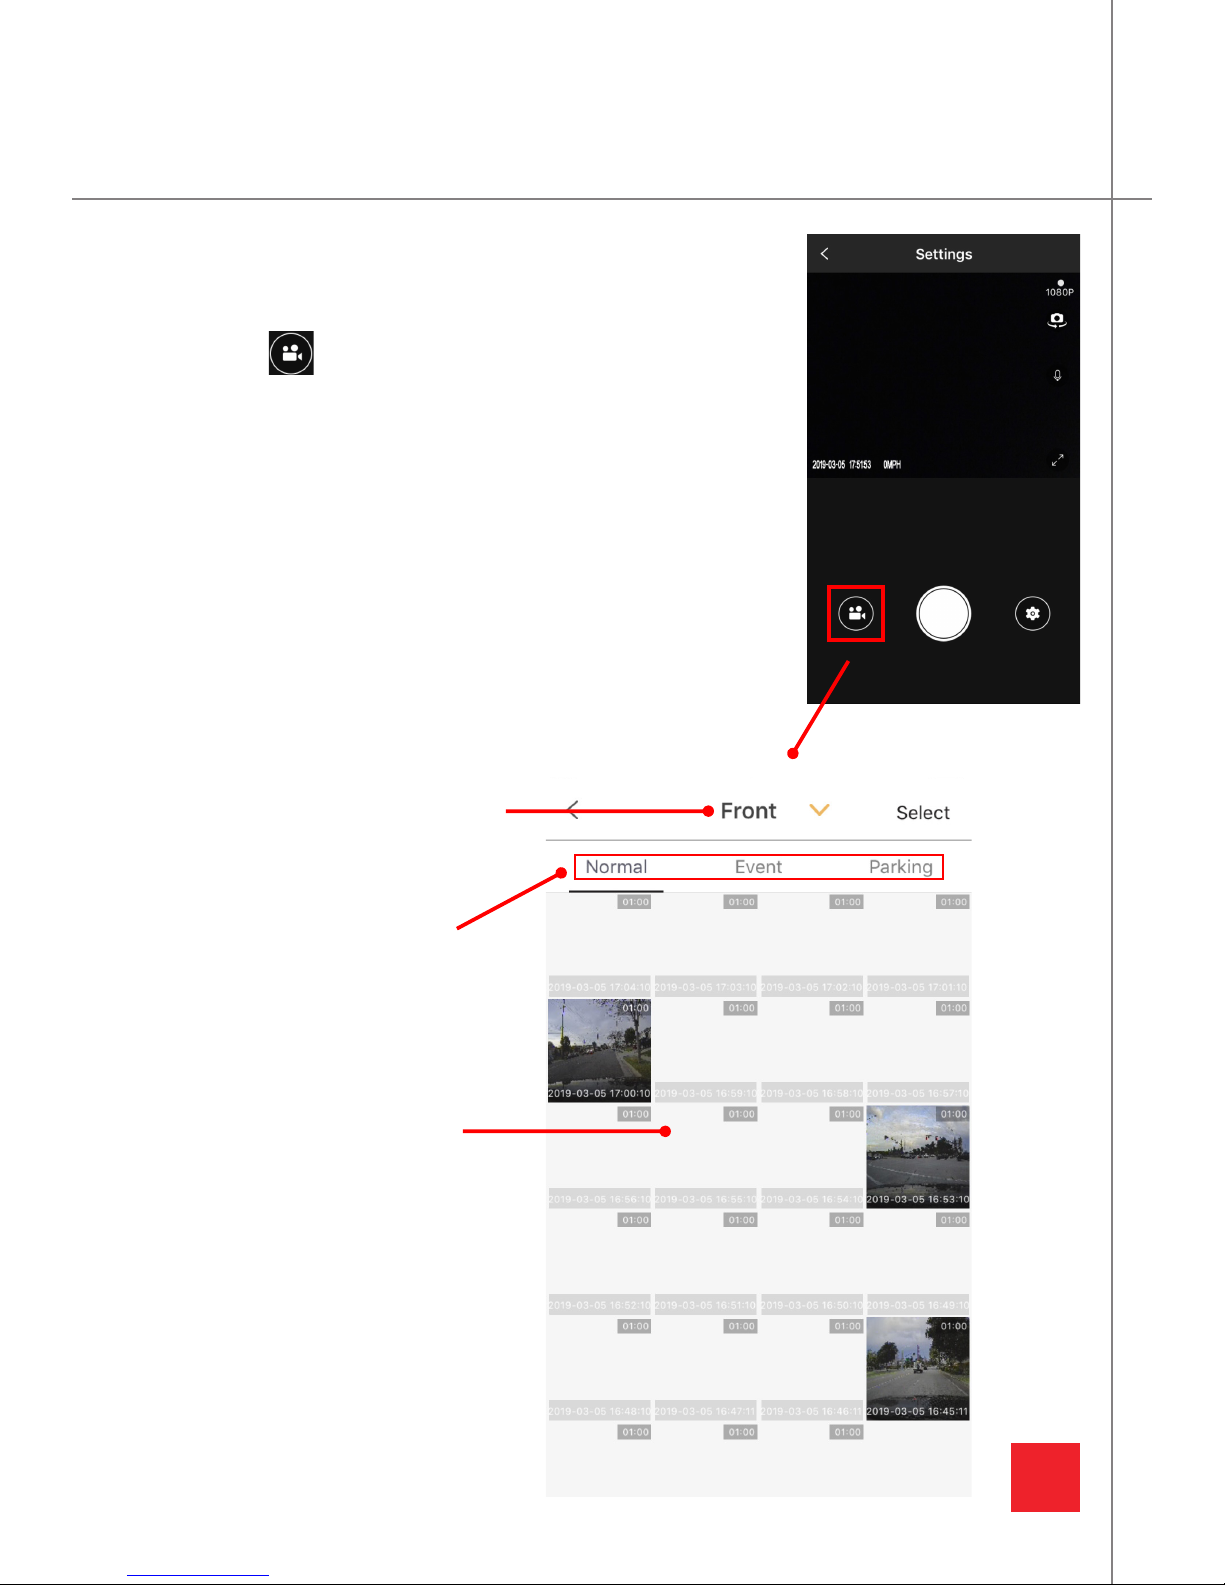
To access your recordings, access the Video Library by
pressing the icon.
NORMAL
Contains normal recordings.
EVENT
Recordings are saved here when the g-sensor is triggered.
PARKING
When the camera enters parking mode, recordings will be
saved here.
Switch from Front to Rear
recordings
Switch to view Normal, Event
or Parking recordings
Thumbnail preview of your
recordings.
VIDEO LIBRARY
Page 16
13
GRDIAN VIEWER PRO: CAM MENU
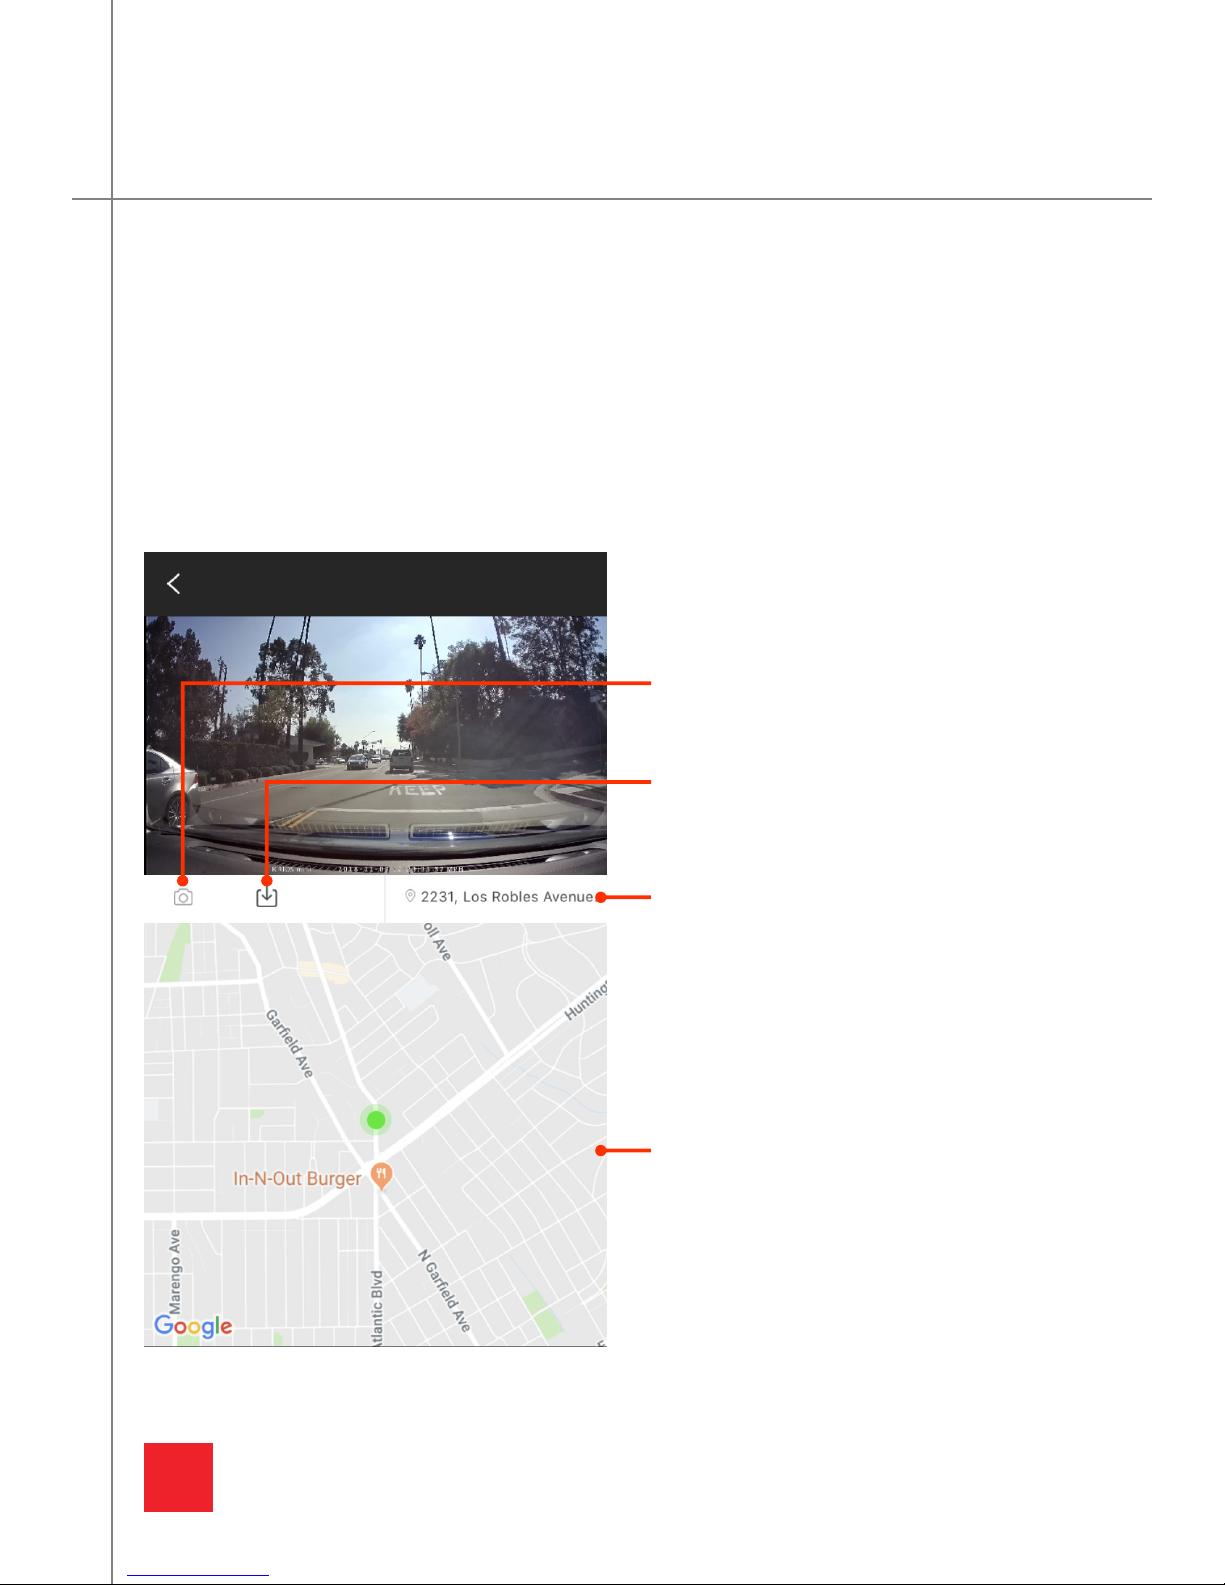
VIDEO PLAYBACK
Location
View your exact location here. (Only availble with the GPS Antenna)
Snapshot
Take a snapshot of the current frame.
Download
Download the video to your device.
Google Maps
View your current position (Only available
with the GPS Antenna)
To playback a video, choose one from the video library. In the playback menu, download, take
a snapshot, and view your route history in relation to the video playing (feature available only
with the GPS antenna).
Page 17
14
GRDIAN VIEWER PRO: TRACK MENU
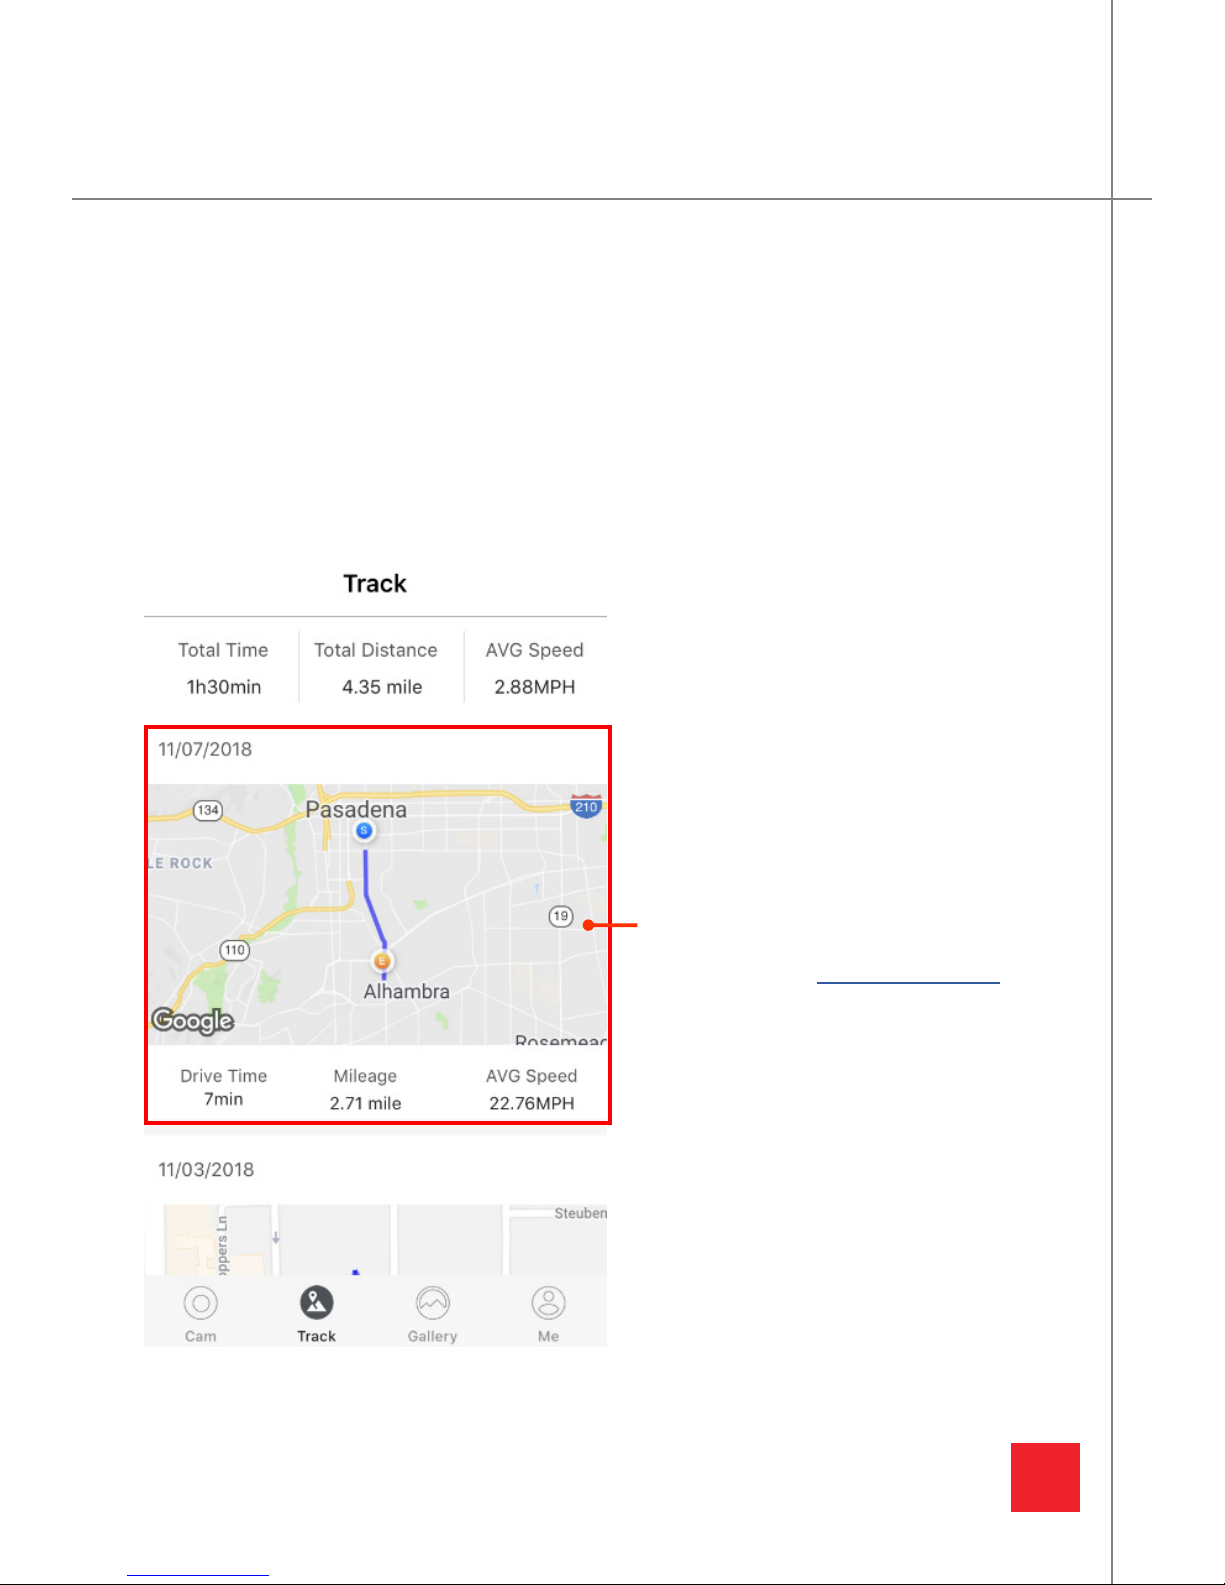
To access the Track Menu, head back to the Main Menu. Press the icon. In the Track
menu, you will find your route history and various information recorded with your GPS antenna.
This feature is only available with your GPS antenna. Choose from one of the routes to view its
details.
TRACK MENU
Track History
Track your entire route history with the optional GPS Antenna. View from start to end,
average speed, distance traveled, and more.
To purchase, visit www.grdian.com
Page 18
15
GRDIAN VIEWER PRO: TRACK MENU
TRACK MENU (CONTINUED)
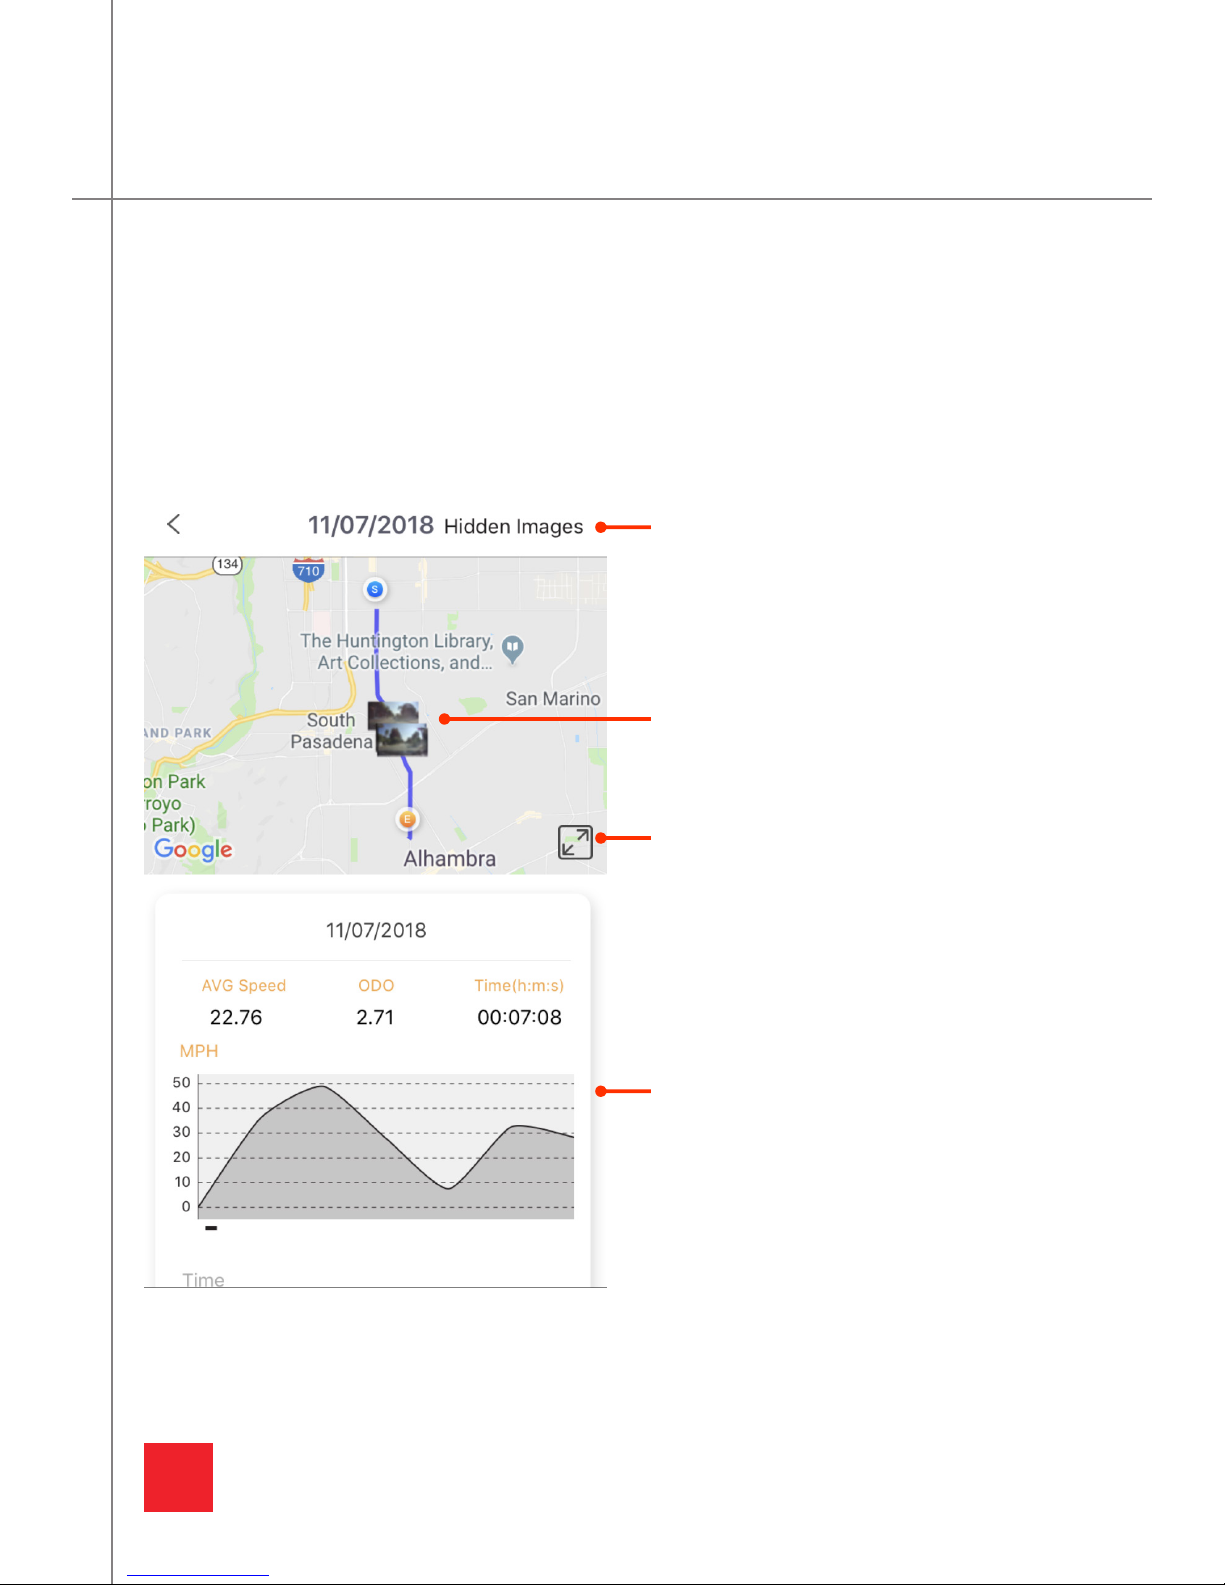
Expand
Expand Google Maps
Images
Toggle ON/OFF to display where your
snapshots were taken along your route.
Images
Images taken along the trip are displayed
on the map.
Route Information
View your trip information and GPS data
collected from either your phone or GPS
antenna.
VIEWING A ROUTE
To view a route, select a route you would like to view. You will be presented with various information regarding your trip.
Page 19
16
GRDIAN VIEWER PRO: TRACK MENU
TRACK MENU (CONTINUED)
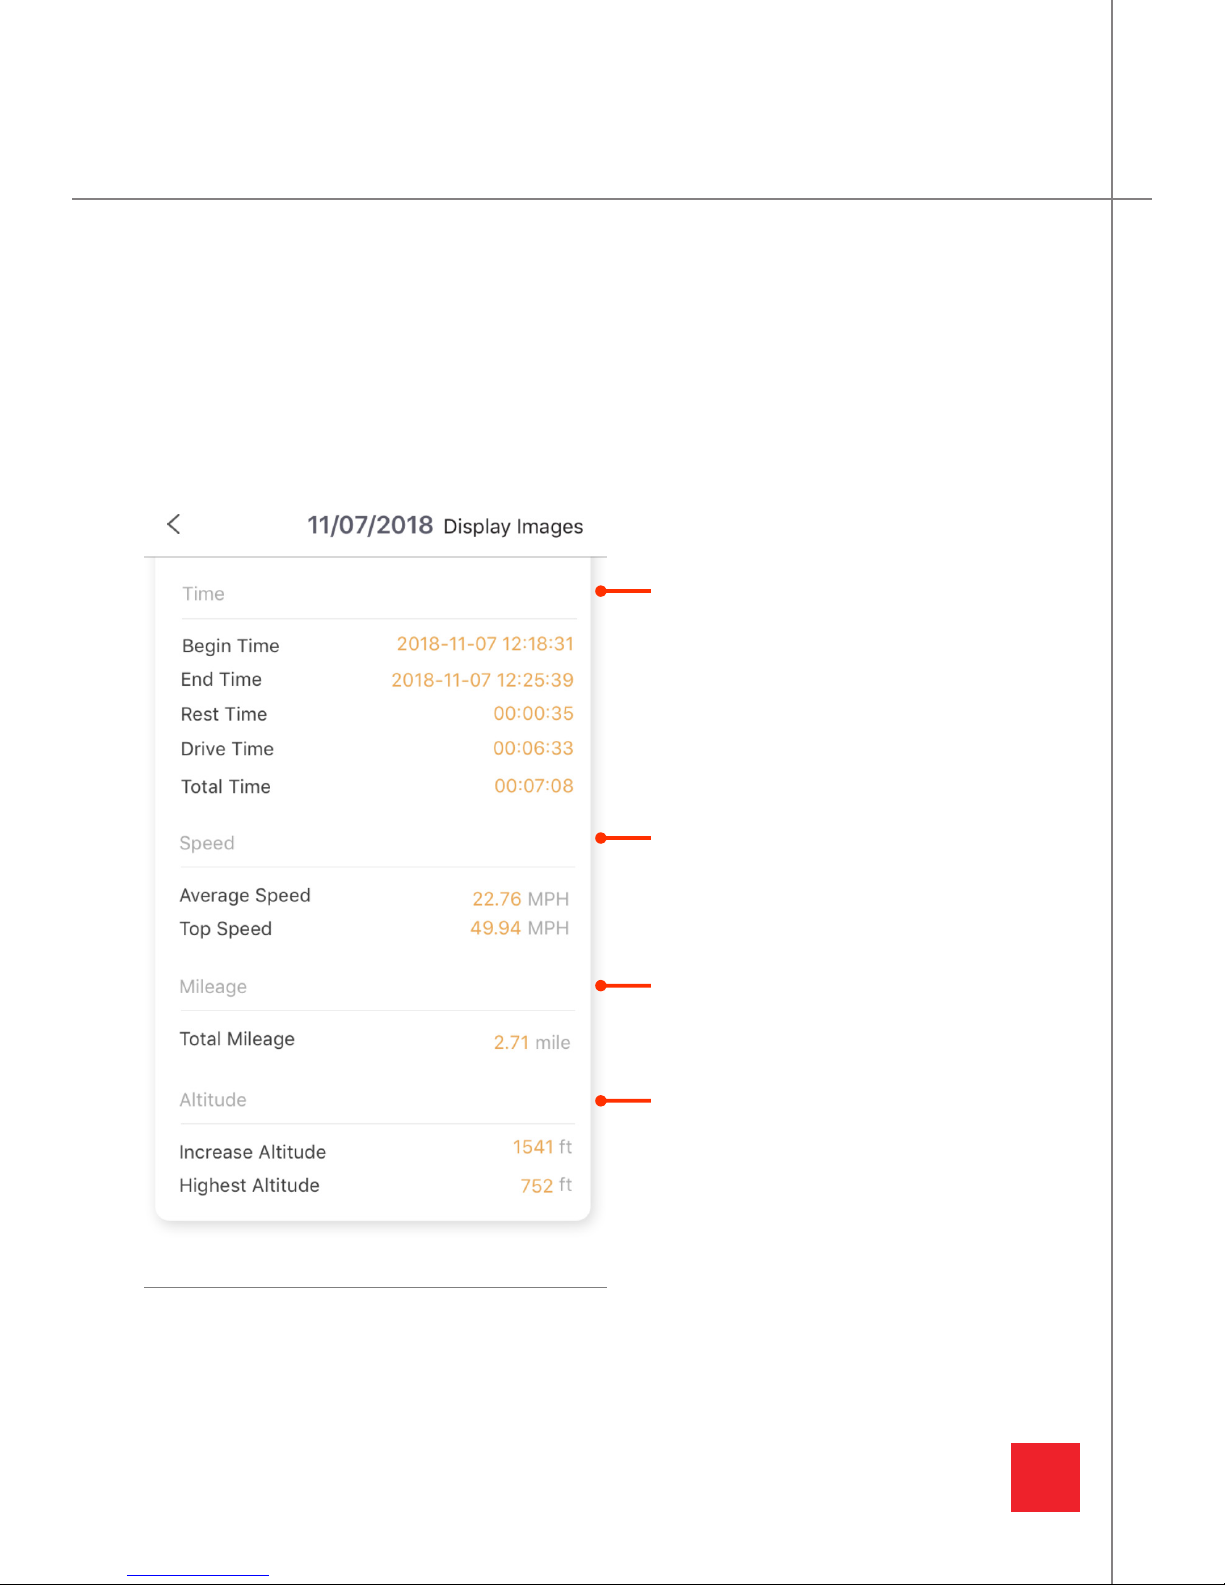
Speed
Information related to speed.
Time
Information related to time.
Mileage
Distance traveled.
Altitude
Information related to altitude.
Page 20
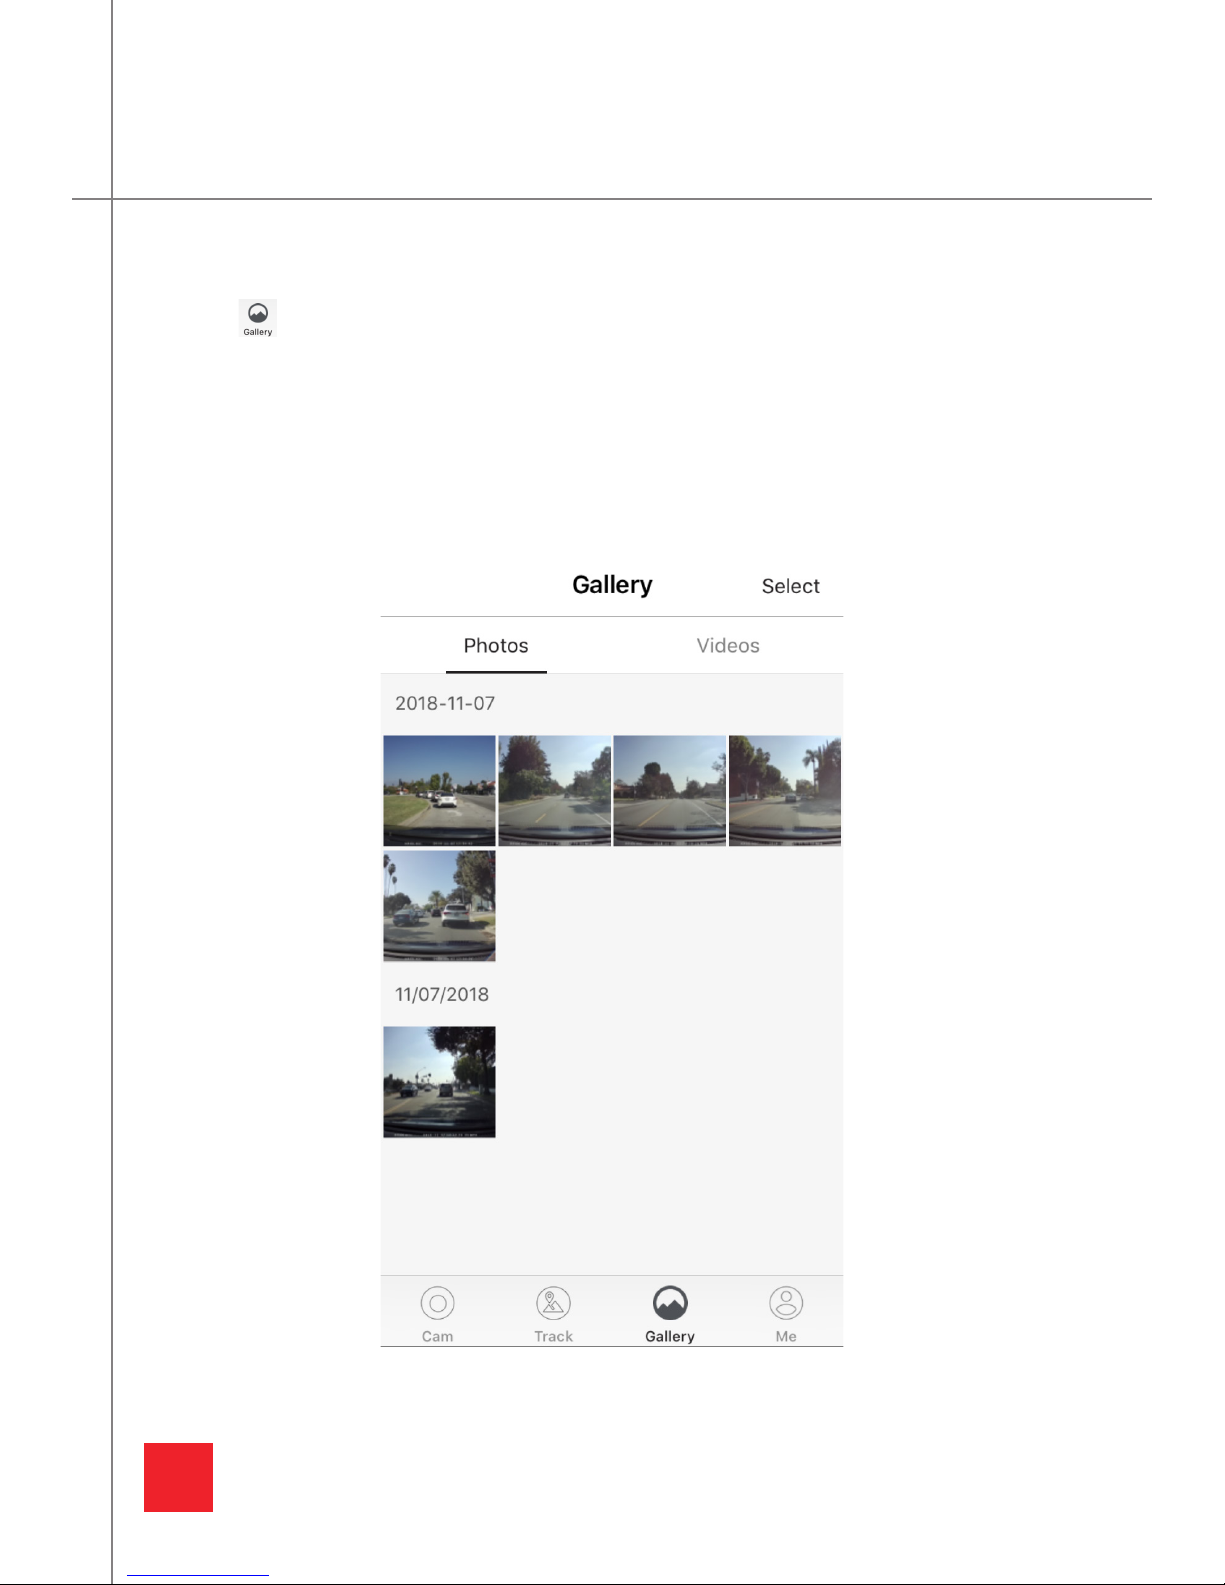
17
GRDIAN VIEWER PRO: GALLERY MENU
VIEWING DOWNLOADED CONTENT AND SNAPSHOTS
Press the icon to access the Gallery Menu. The Gallery Menu contains downloaded snapshots and videos.
For Gesture Photography snapshots, images will automatically sync when connected to the
camera.
Page 21
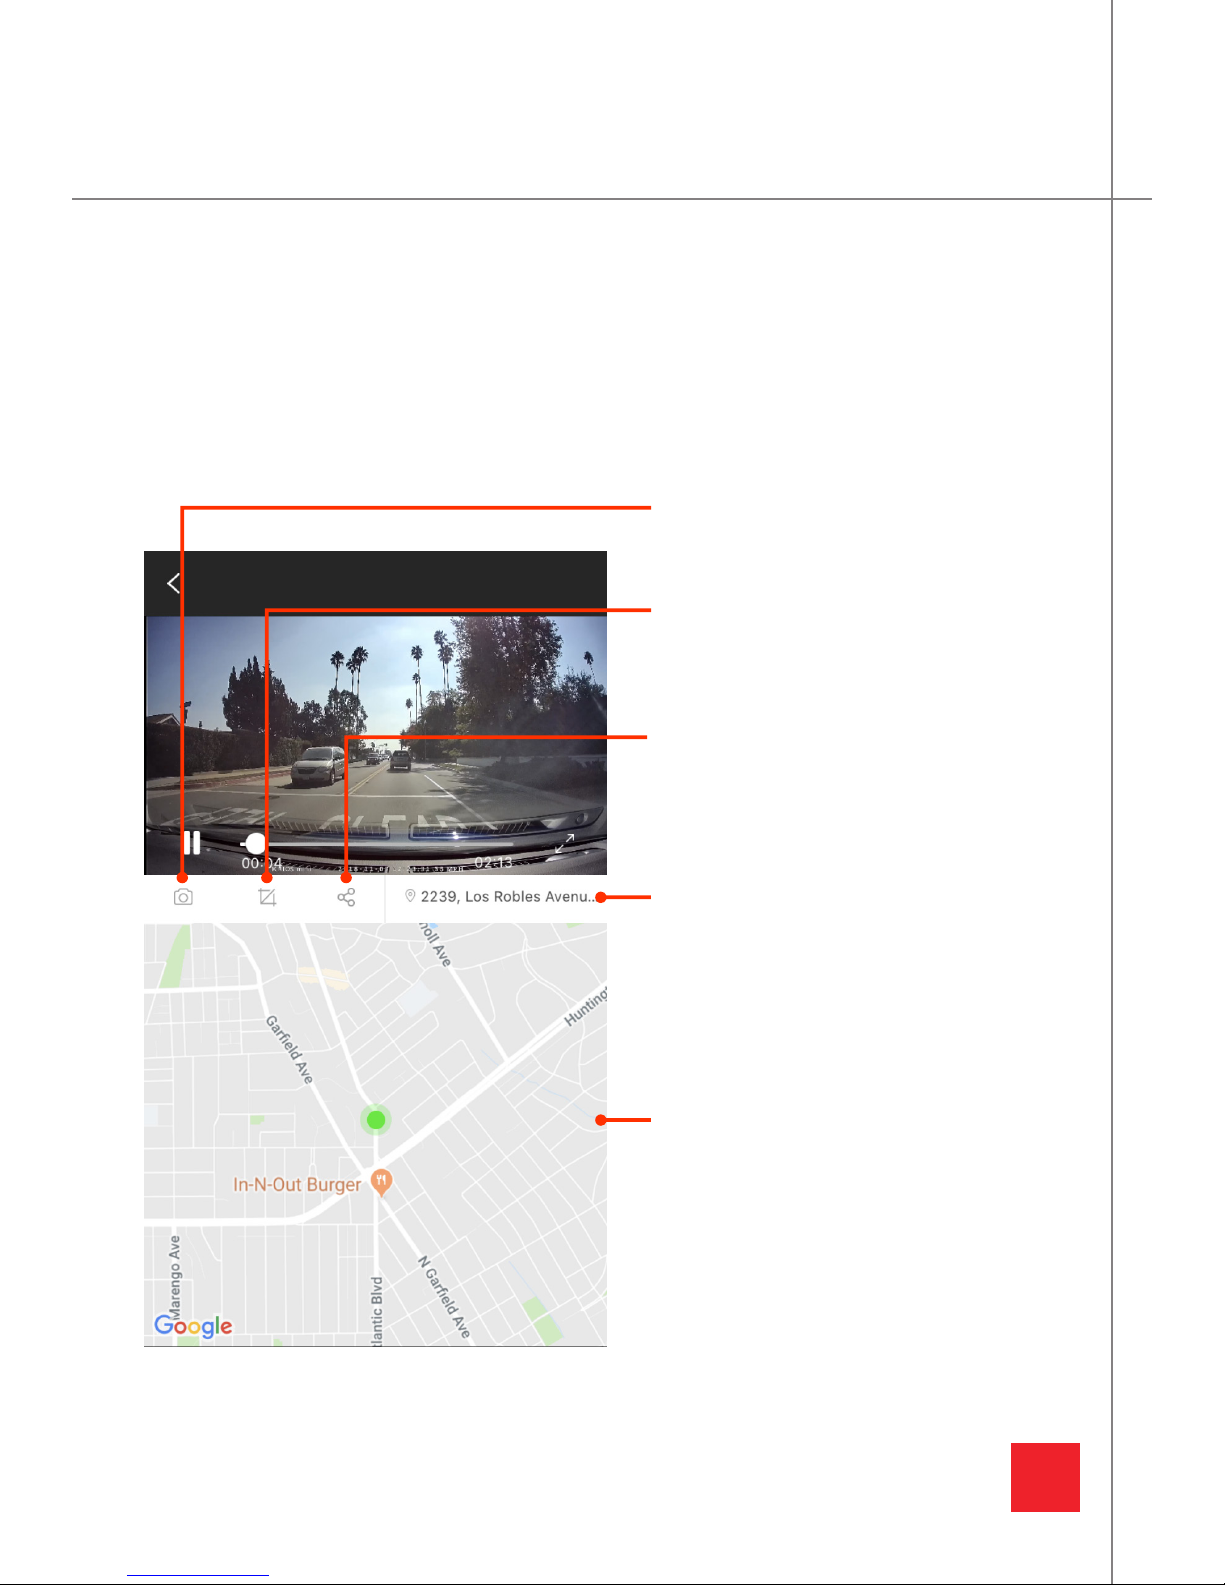
18
GRDIAN VIEWER PRO: GALLERY MENU
View and playback downloaded content from your camera here. Easily edit and share your clips
to Facebook, Instagram, message, email and more.
PLAYBACK
Location
Information related to your location in
relation to the current video frame.
Share
Share your video wherever you please or
upload it.
Trim
Trim your video to make it shorter.
Screenshot
Take a screenshot of your video.
Google Maps
Shows your current position.
Page 22
19
VIEWING FILES ON THE COMPUTER
READING, DOWNLOADING AND TRANSFERRING
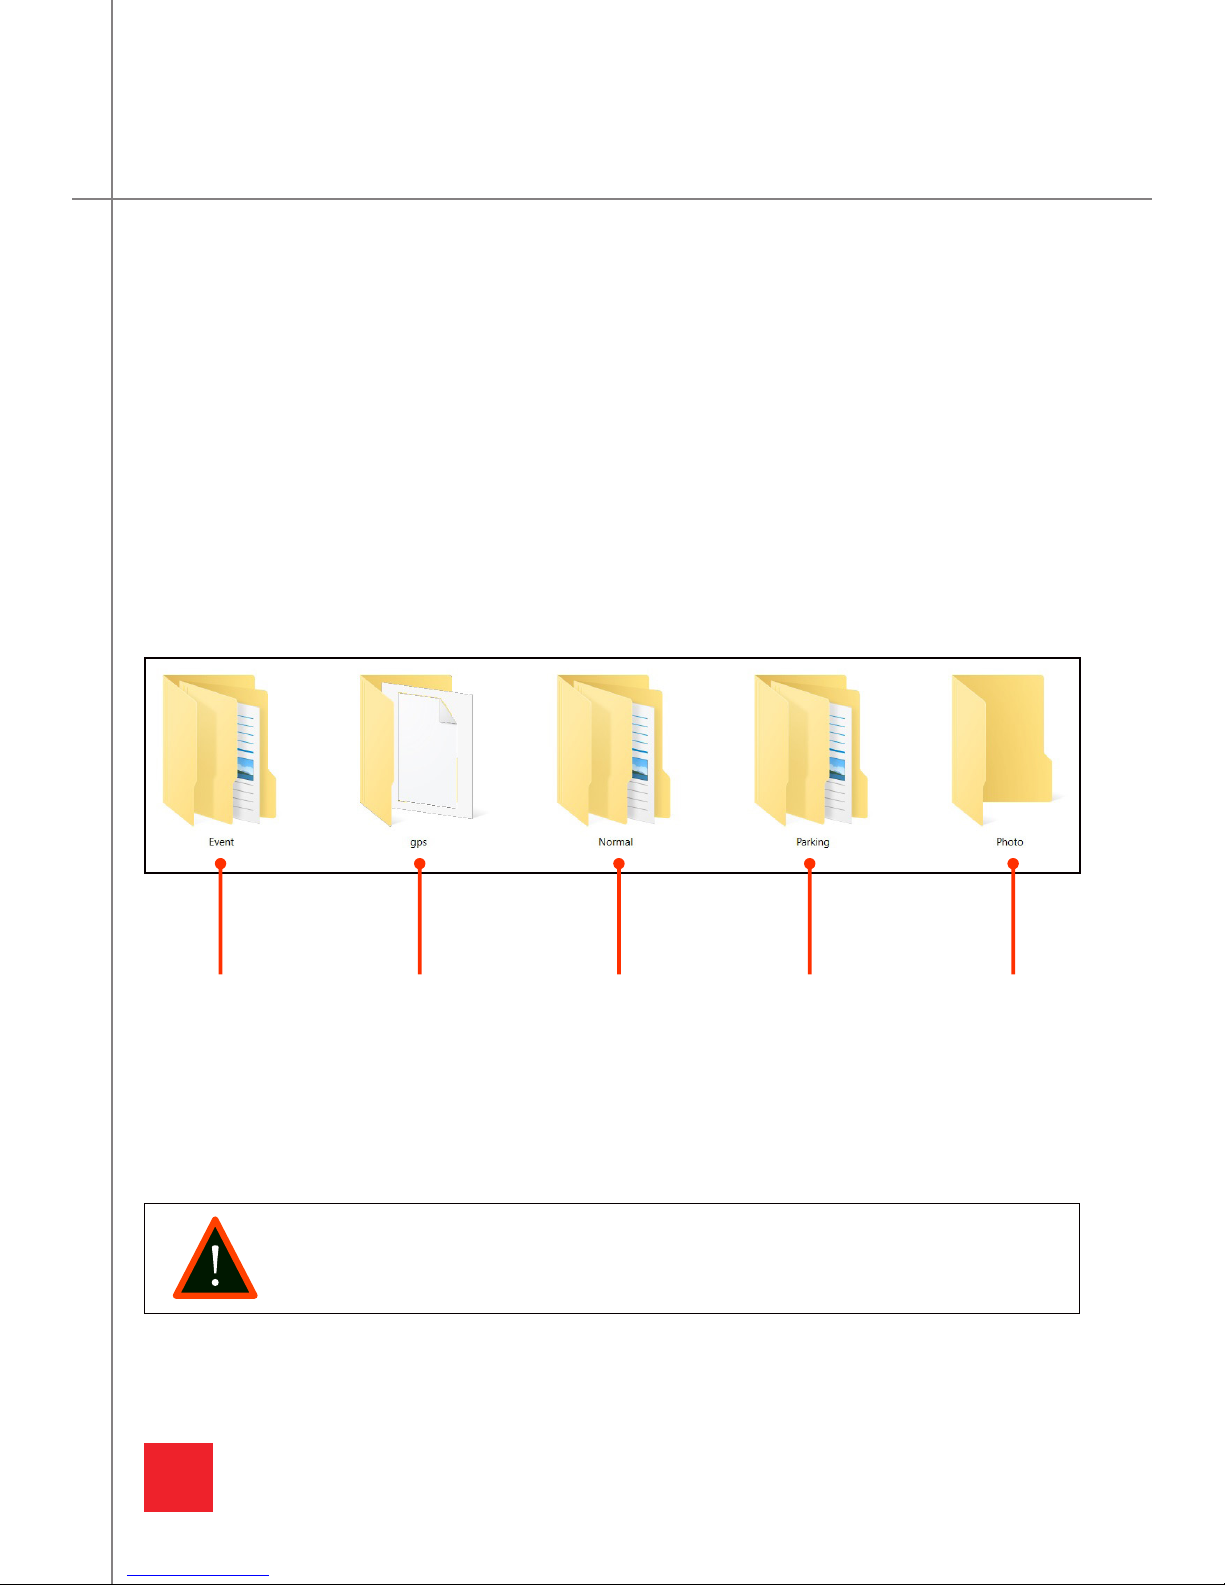
The fastest way to read, download, and transfer files en masse is to insert your memory card into
the computer.
When you view your files on your computer you will see the following: Event, gps, Normal,
Parking, and Photo.
FILE STRUCTURE
Access DCIM folder to
view your photos/
videos.
Saved recordings
when g-sensor
was triggered.
Normal Recordings.
Saved recordings
when in Parking
Mode.
Photos saved
when using
the Gesture
Photography
feature.
GPS data collected
by the optional
GPS Antenna.
NOTE: Do not edit or delete files within the memory card. Doing so may mess up
the sequence of files.
Page 23
20
FILE NAMING STRUCTURE
FILE NAME
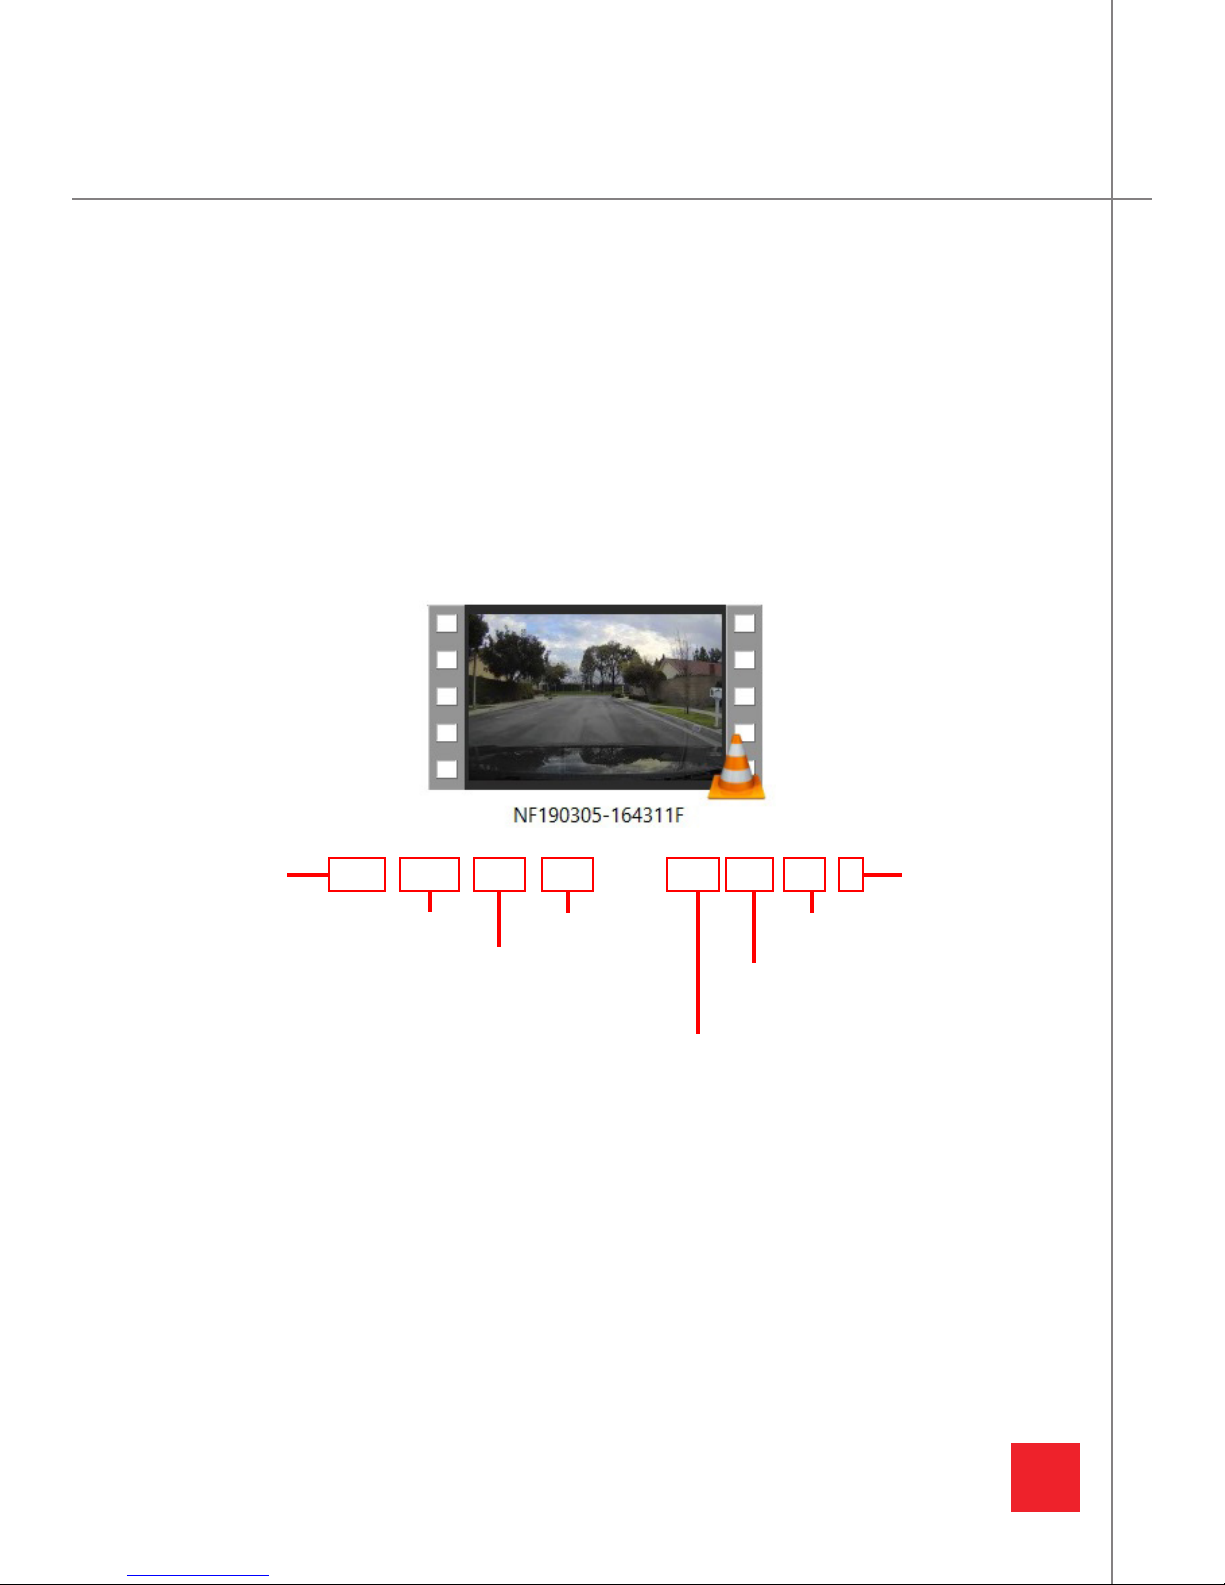
Your files are named sequentially according to its recording time, day and type. Below is an
explanation of the file name structure.
Type of recording Type of recording
Year
Day
Month
Minute
Second
UNDERSTANDING THE FILE SEQUENCE
NF 19 03 05 - 16 43 11 F
Hour
Page 24
21
PARKING MODE
The camera is equipped with motion sensor techonology. The motion sensor sensitvitiy can be
adjusted in the Camera Settings. See Page 10.
When no motion is detected, the camera will stop recording. When motion is detected, the camera will automatically begin to record and place the videos into the Parking Folder. When motion
is detected for more than 2 minutes, the camera will exit Parking Mode.
The camera also utilizes the g-sensor to trigger Parking Mode capabilities. When the camera
senses no vibration for more than 2 minutes, the camera will enter Parking Mode. Once vibration
is detected, it will begin recording.
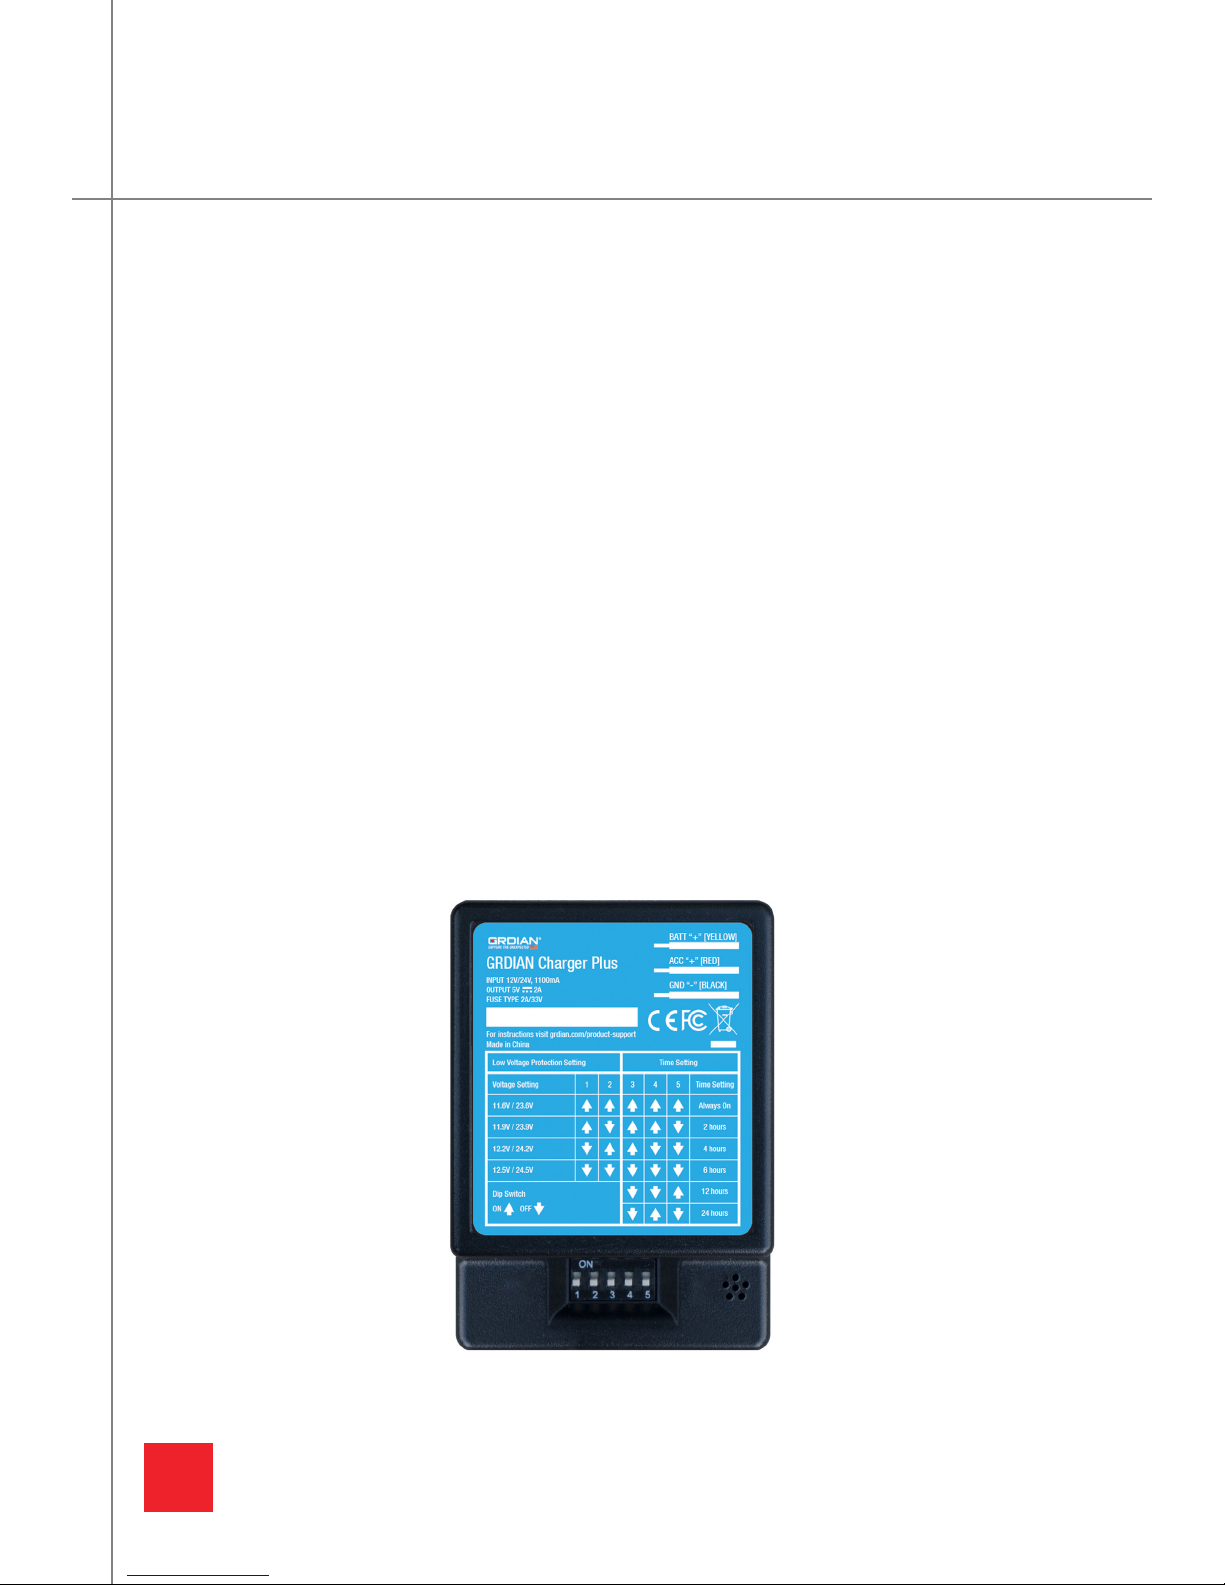
The best method to setup Parking Mode for your camera is to use a Hardwire Kit. GRDIAN’s
Charger Plus is a hardwire kit with voltage protection and built-in timer. The Charger Plus is
available for purchase at grdian.com
Sold Separately
PARKING MODE FEATURE
HARDWIRING YOUR CAMERA FOR PARKING MODE
Page 25
22
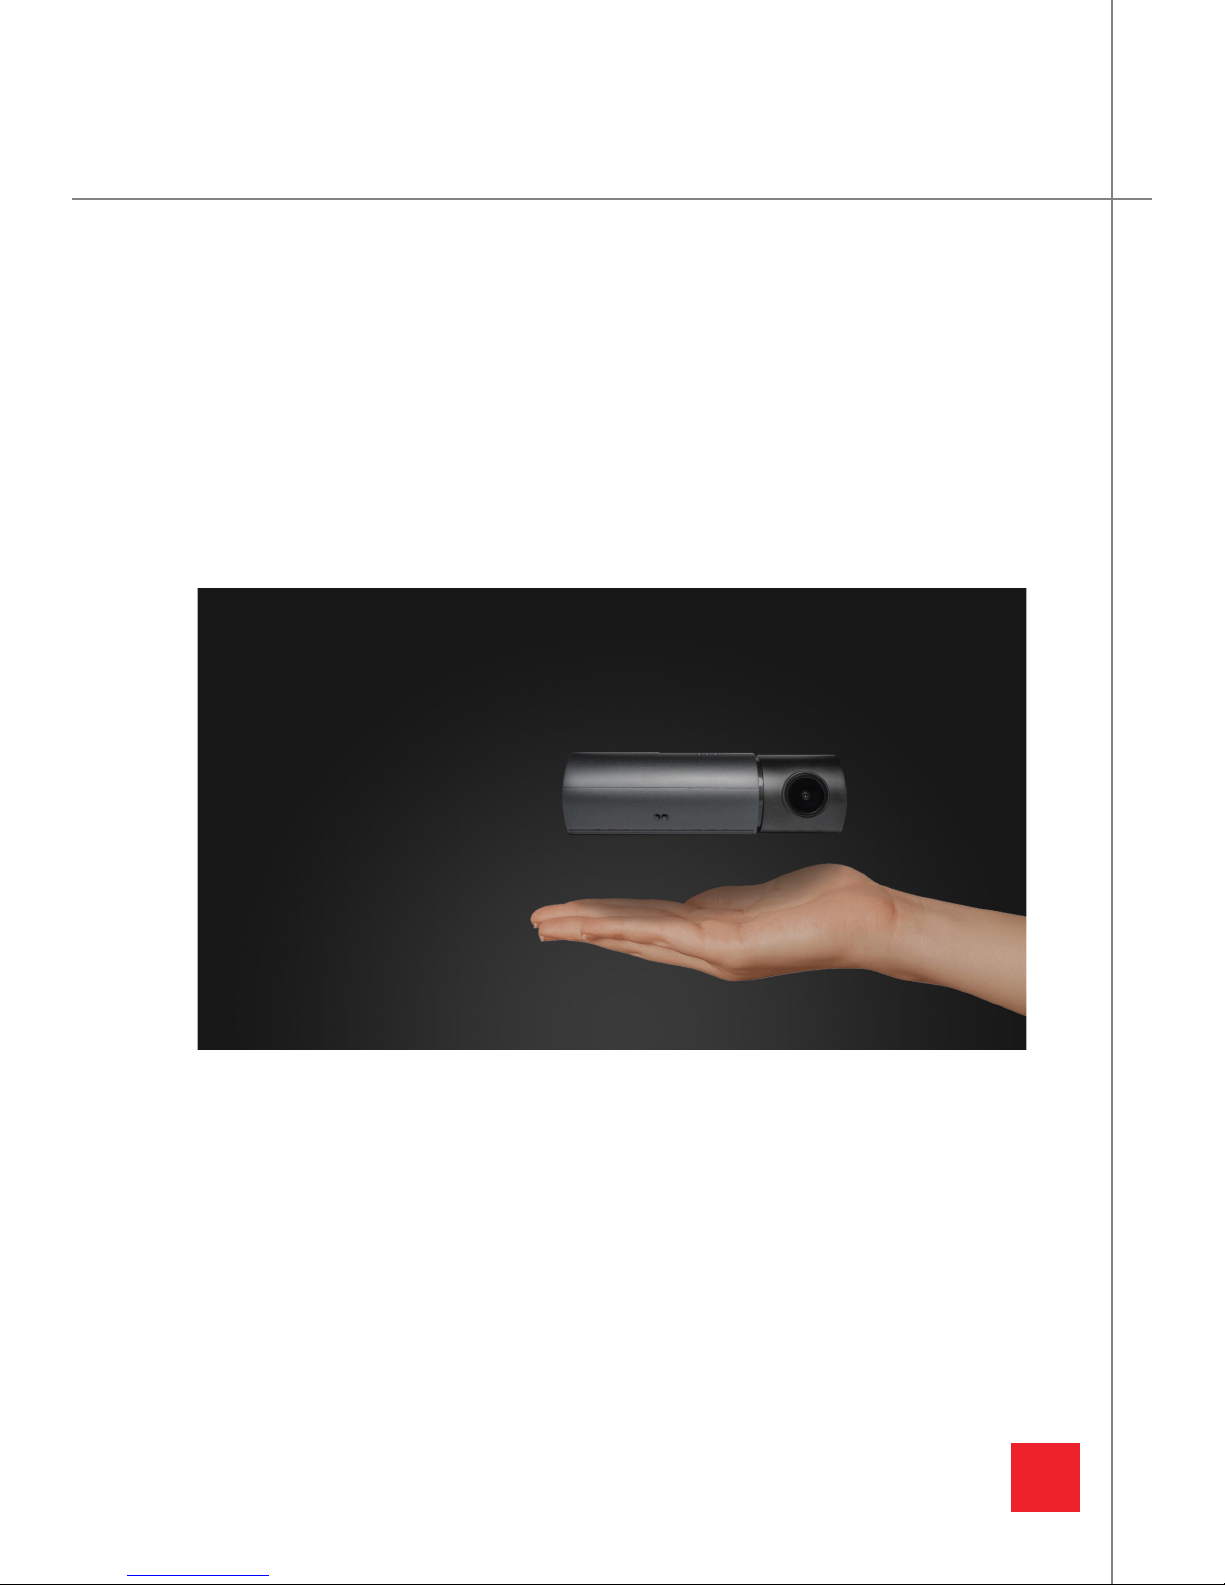
GESTURE PHOTOGRAPHY
With the gesture photography feature, easily take quick snapshots while on the road. With a
simple wave of your hand, the KRIOS pro will geotag the exact location your photo was taken.
(Geotagging available only with the GPS Antenna).
Adjust the sensitivity in the Camera Settings. See Page 10.
HOW TO USE GESTURE PHOTOGRAPHY
Page 26

23
UNABLE TO CONNECT TO APP
If you are experiencing issues with connecting to the app check to make sure you are using a
compatible memory card. For a list of compatible memory cards visit: grdian.com/blog/dash-
cam-memory-cards
If you are using a compatible memory card and are still experiencing issues connecting to the
app, turn on Airplane Mode. Turn on ONLY the Wifi and connect to your device. You may turn
back on your celluar once connected properly.
CAMERA IS NOT RESPONDING OR RECORDING
If your camera is not responding, make sure for memory cards 64gb and higher you format the
memory card to FAT32. For instructions on how to format to FAT32 visit: grdian.com/blog/how-
to-format-your-memory-card-to-fat32-for-windows-and-mac
TROUBLESHOOT
Page 27

24
TRADEMARKS
SUPPORT
GRDIAN is dedicated to providing the best possible services and products. To reach out to our
support team, please visit: grdian.com/contact-us
MESSAGING US
We make ourselves available to you on different social media platforms. You can reach out to us
on Twitter, Facebook, and Instagram.
GRDIAN, the GRDIAN logo, the KRIOS, the KRIOS logo, Capture the Unexpected are trademarks or
registered trademarks of GRDIAN, LLC in the U.S. and internationally. Other names and marks are
the property of their respective owners
CUSTOMER SUPPORT
Page 28
WWW.GRDIAN.COM
 Loading...