

Page 1
INTERACTIVE MOBILE
USER MANUAL
Last Updated: 4/12/17
Page 2

Join TEAMGRDIAN
Tag us on YouTube with TEAMGRDIAN
facebook.com/teamgrdian
@teamgrdian
twitter.com/teamgrdian
youtube.com/c/grdian-electronics
Page 3

About this Manual
Important Safety Information
Accessories
A Quick Look
Using the App (Android)
Installing Your Dash Cam
Playing Back on Your Computer
Dashcam Viewer & Optional GPS
Product Specifications
Troubleshoot
3
2
4
5
14
Table of Contents
*Click to jump to page
Click the icon to return to Table of Contents
6-7
8
9
10
11
12
13
Getting Started (Quick Guide)
Using the App (iOS)
Page 4

IMPORTANT SAFETY INFORMATION
WARNING: Failure to follow these safety instructions could result in fire, electric
shock, injury, or damage to your GRDIAN device or other property. Read all the safety
information below before using the DEFENDR+.
Handling Handle the DEFENDR+ with care. The DEFENDR+ can be damaged if dropped,
burned, punctured, crushed, or if it comes in contact with liquid. If your DEFENDR+ is
damaged, do not continue using it, as it may cause injury. Use the correct input voltage. Do
not spray cleaning products on the device. Detach the power cord from the device if the
device emits an unusual smell or if there is smoke. Do not remove the microSD card while it
is saving or reading data. Remove the power cord from the device if you are planning not to
use the device for a long time. If the product is damaged or the power supply is cut due to an
accident, video may not be recorded.
Repairing Do not attempt to repair the DEFENDR+ yourself. Doing so will void the Warranty,
damage your device or may cause injury. If your DEFENDR+ is damaged or is defective,
contact GRDIAN.
Distraction Do not operate the product while driving. Operate only when your vehicle is
parked. Do not install the device where it interferes with the driver’s vision.
Exposure to Extreme Heat The DEFENDR+ and its accessories comply with applicable surface temperature standards and limits. However, even within these limits, sustained exposure
to heat for long periods of time may cause damage to the device. Use common sense to avoid
situations where your skin is in contact with a device or its power adapter when it’s operating
or plugged into a power source for long periods of time. It is important to keep the DEFENDR+
and its power adapter in a well ventilated area when in use.
Choking hazard Some accessories may present a choking hazard to small children. Keep
these accessories away from small children.
2
Page 5

ABOUT THIS MANUAL
Thank you for your purchase of the DEFENDR+. The contents of this manual may be subject
to change without prior notice.
Warranty This product does not guarantee that it will record all accidents. In accordance
with Personal Information Security Law & related legislation, GRDIAN is not responsible for
any problems due to illegal use of this product. Recorded video produced by this product
constitutes the secondary data that may help to determine the circumstances of an accident.
GRDIAN is not responsible for any loss or damage caused by an accident.
For more information about Warranty visit: http://www.grdian.com/support/warranty
Copyright & Trademark The instruction manual is protected by Copyright Law, and all
rights to it are protected by law. It it prohibited to reproduce, copy, modify, or translate this
instruction manual without permission.
GRDIAN Capture the Unexpected is the registered trademark of GRDIAN. GRDIAN reserves the
rights regarding all works related to the GRDIAN brand such as product design, trademarks,
and product promotional videos. It is prohibited to reproduce, copy, modify, or use related
works without permission. Any violation may be penalized in accordance with the relevant
regulations.
3
Page 6

4
ACCESSORIES
Suction Cup Mount
Car Charger
GPS Adapter
(Optional)
Adhesive Mount
USB
Page 7
5
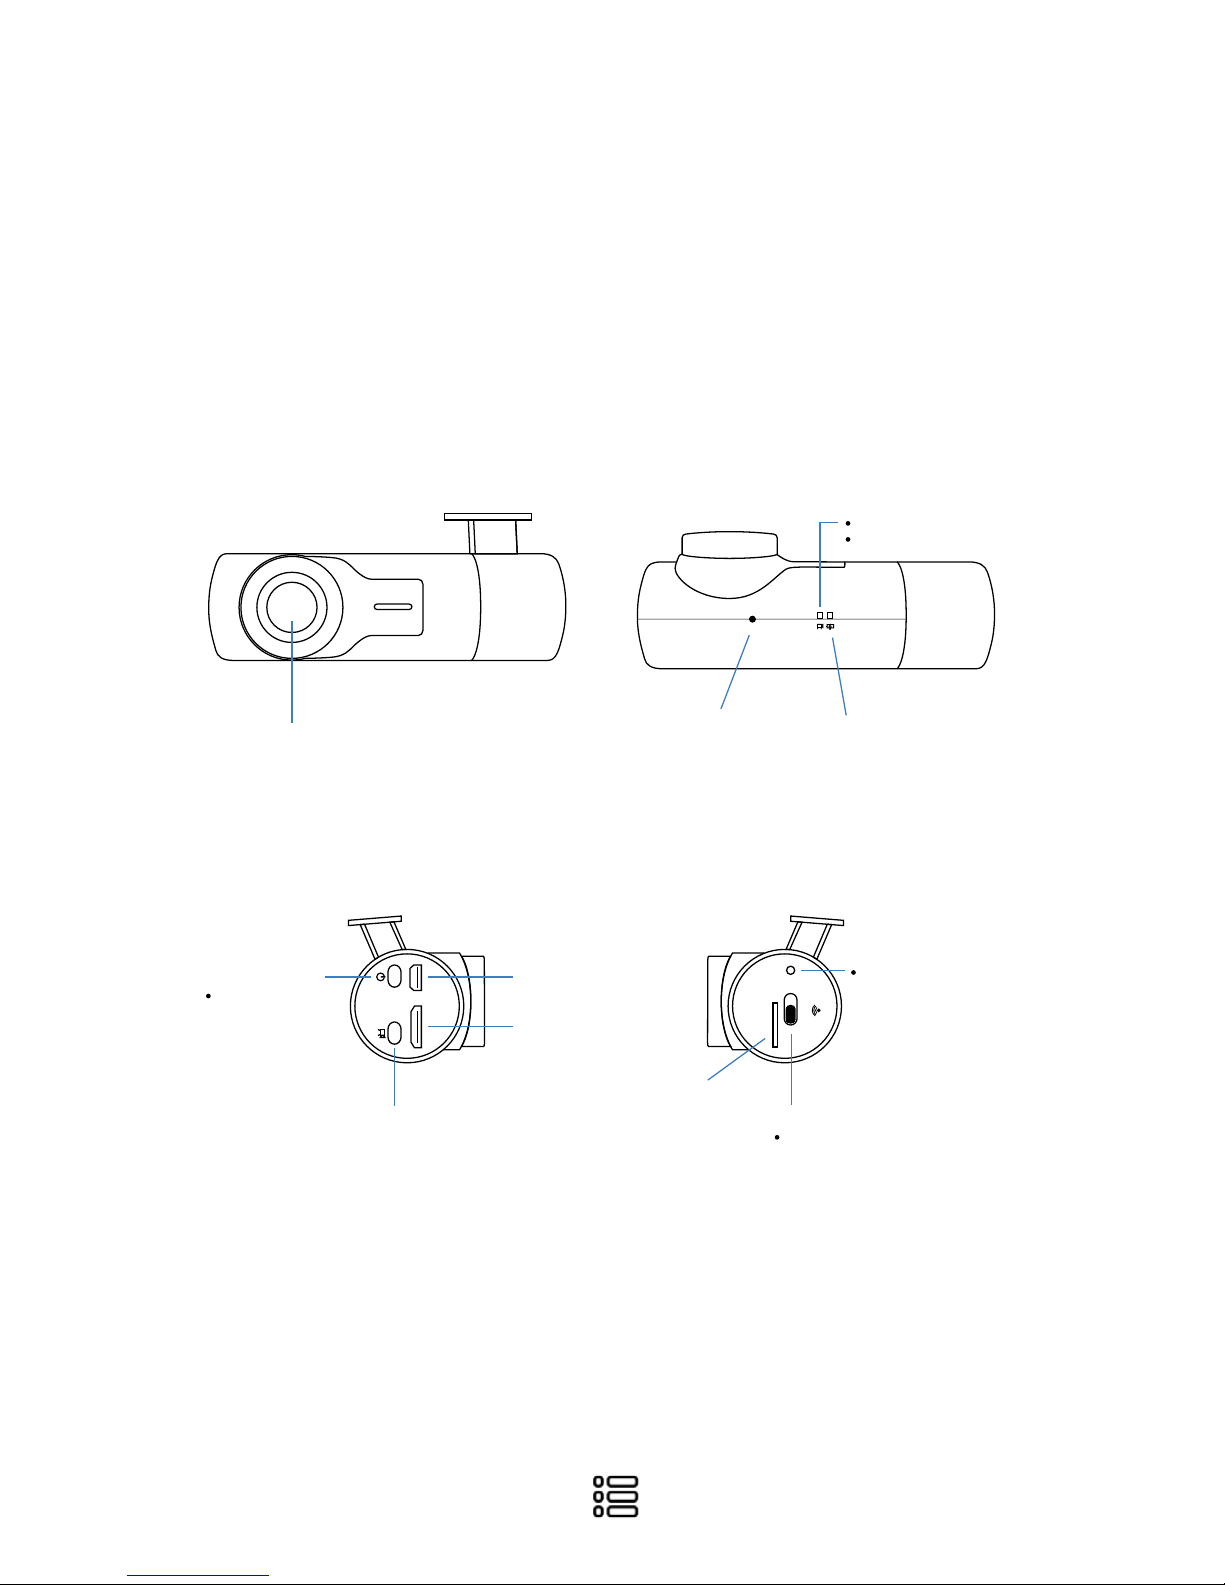
A QUICK LOOK
DEFENDR+
Front
Side Side 2
Bottom
Camera Lens
Reset Button
Recording Indicator:
Blinks when recording
Solid when not recording
Power Indicator
Wi-Fi
Wi-Fi Indicator
microSD
Slot
Manual Stop/Start
Recording
Power Button
Manually turn off
when recording
Solid when Wi-Fi is established
On/Off
mini USB
mini HDMI
ON
OFF
ON
RESET
OFF
ON
OFF
ON
OFF
Page 8
GETTING STARTED (QUICK GUIDE)
MEMORY CARD
For optimal performance, we highly recommend using one of the memory cards found
on our recommended memory cards list.
grdian.com/blogs/grdian/recommended-dash-cam-memory-cards
microSD, microSDHC, or microSDXC
Capacity up to 128gb; Use a 64gb microSD for optimal performance over Wi-Fi.
1. Make sure the microSD does not contain any files. Format the card if needed before
inserting in.
2. The device should be completely turned off before inserting your microSD into the
memory card slot found on your device.
DOWNLOAD THE APP
The DEFENDR+ is compatible only with iOS and Android devices.
Android users download:
LINKINEYES
iOS users download:
FNMultiCam
CONNECTING THE DEFENDR VIA WI-FI
1. Plug the DEFENDR+ into the cigarette outlet with the provided car charger. Once
your device is powered on, wait for the Wi-Fi indicator to turn solid green. It may
take a few seconds for Wi-Fi to establish.
2. Once the Wi-Fi indicator turns solid, you can now connect the DEFENDR+ to your
mobile phone.
3. Connect the DEFENDR+ to your mobile device in your Wi-Fi settings. Locate
AMBA_XXXXXX and connect.
4. Enter the password: 1234567890
USING THE APP
1. Once connected, open the APP. You will be automatically connected.
2. For more detailed information about the APP visit page 8.
6
Page 9

GETTING STARTED (QUICK GUIDE)
SETTINGS AND PERFORMANCE
By default, the DEFENDR+ has been preconfigured for optimal performance.
Tips
Higher the resolution, the larger the file. This will impact download time over Wi-Fi.
Using a higher loop recording time, the larger the file will be. This will impact
download time over Wi-Fi.
Using a larger memory card will impact loading time when viewing the media
manager. We recommend using a maximum of 64gb if you find yourself download-
ing videos via Wi-Fi often.
If you are using your G-Sensor, overtime your memory will fill up with locked files.
This will prevent overwriting.
UPDATING THE FIRMWARE
To get the latest firmware for your DEFENDR+ visit the support page of the DEFENDR+.
Stay updated by signing up for our newsletter.
For the latest firmware visit grdian.com/support/defendr-plus-product-support
FOLLOW THE STEPS EXACTLY TO PREVENT DAMAGE TO YOUR DEVICE.
1. Using a formatted memory card, download the firmware and extract it to your
memory card. You should only have the .bin file in your memory card.
2. With the DEFENDR+ unplugged, insert your memory card.
3. Plug the DEFENDR+ into a power source. DO NOT PLUG THE DEFENDR+ INTO THE
COMPUTER.
4. Once powered on, the device will blink rapidly. Please wait until the device com pletely shutsdown. DO NOT INTERRUPT THE UPDATING PROCESS.
5. Once the device is completely shutdown, unplug the DEFENDR+. Remove the
memory card and format it on your computer.
6. DO NOT INSERT YOUR MEMORY CARD YET. Plug the DEFENDR+ back into a power
source. Wait for the DEFENDR+ to shutdown and reboot.
7. Once it has rebooted, you can resume using the DEFENDR+ as usual.
7
Page 10
USING THE APP (iOS)
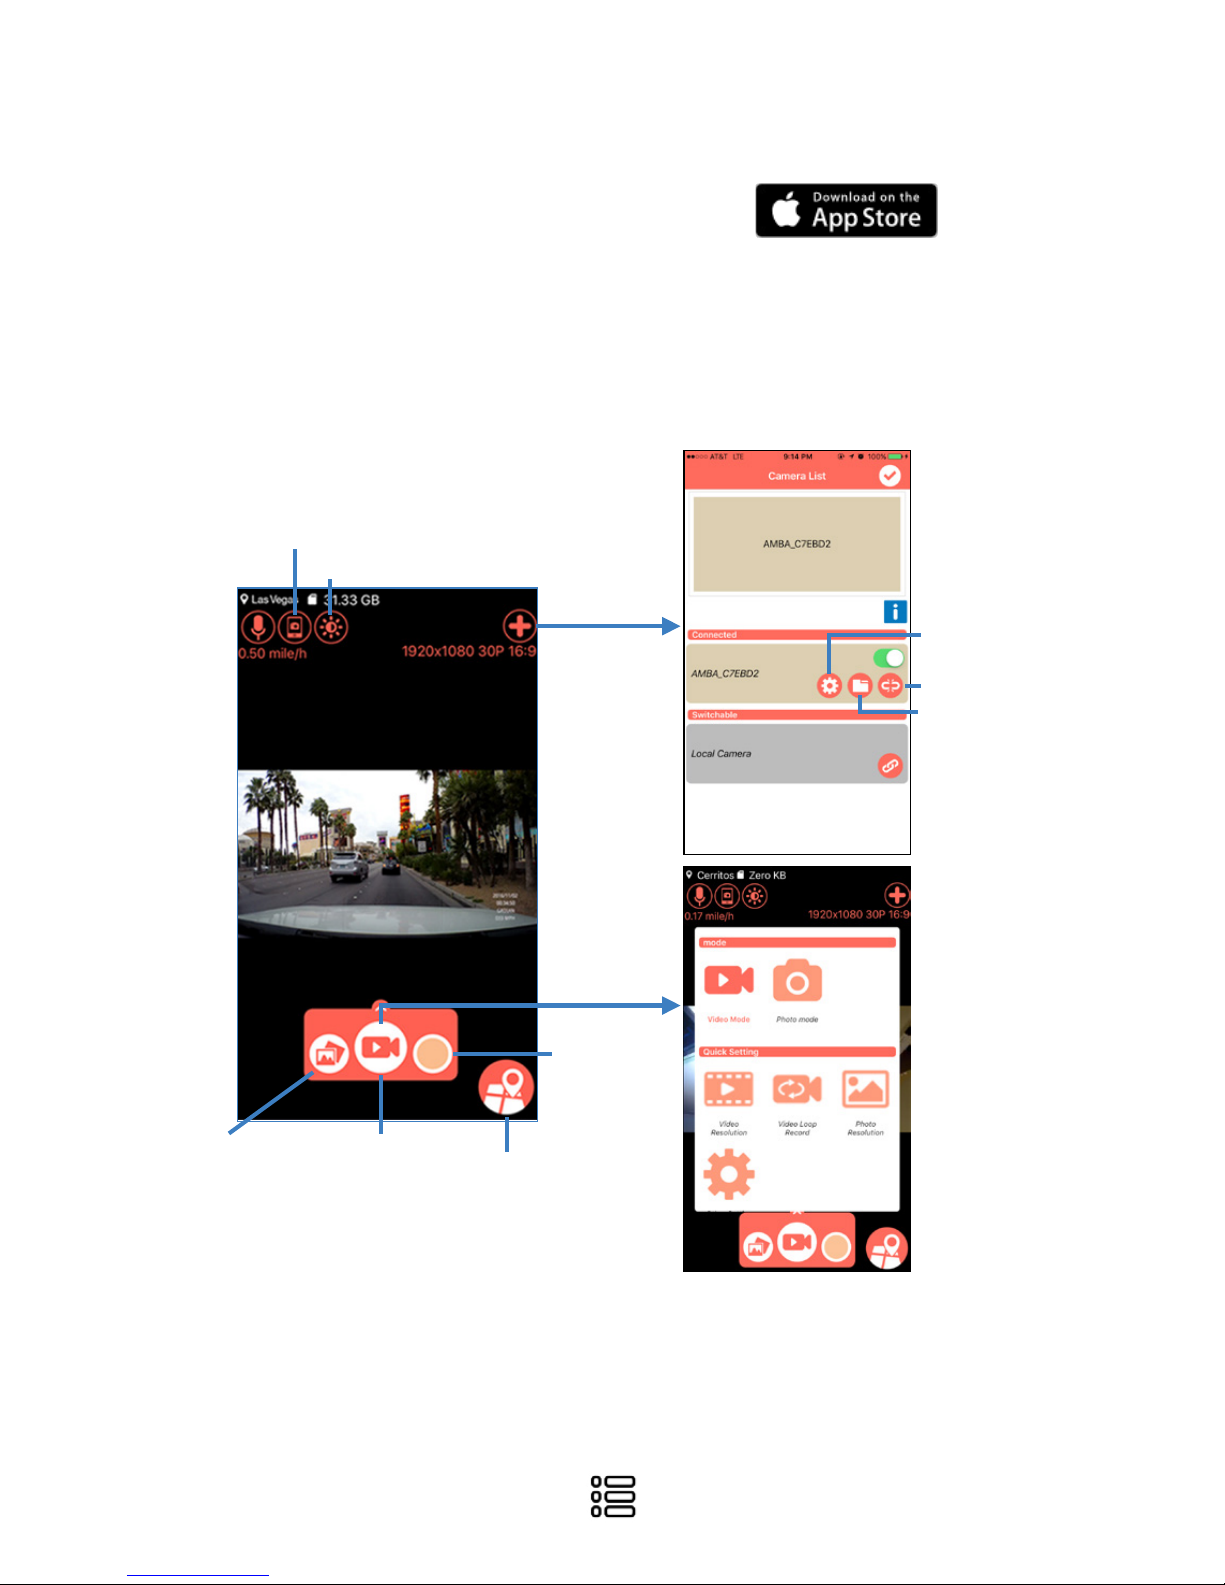
Maps
Camera list
Screenshot
Dim Screen
Unlink
Settings
Media Manager
Change mode
Video Mode:
Record/Pause
Photo Mode:
Take Photo
File List
8
TIP: To edit settings, view or download footage you have to PAUSE recording first.
USING THE FNMULTICAM APP
1. Download and install the FnMultiCam APP from
the Apple Store
2. Open the Wi-Fi settings of your device to connect
to the DEFENDR+.
3. Locate AMBA_XXXXXX and enter the password
1234567890.
Page 11
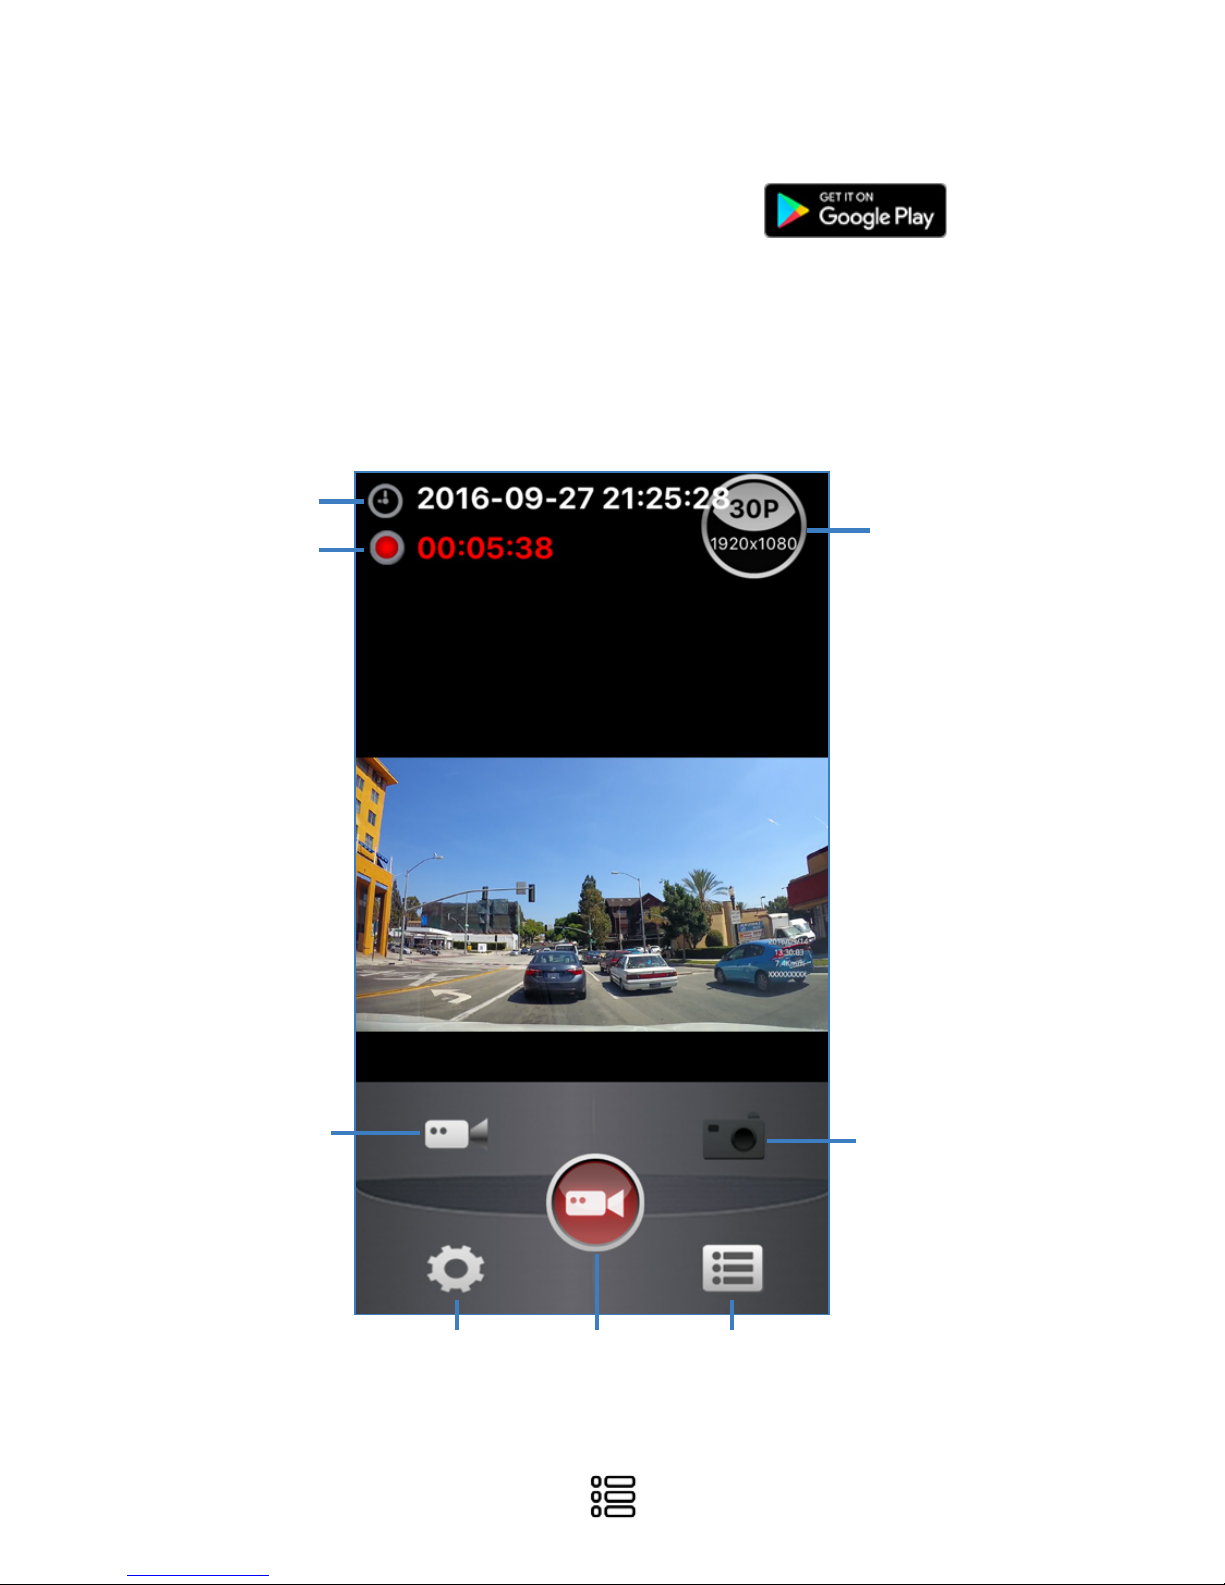
USING THE APP (ANDROID)
Media
Manager
Settings
Camera Mode
Recording Mode
Date & Time
Active Camera
Resolution
Recording Time
Record/
Capture
9
USING THE LINKINEYES APP
1. Download and install the FnMultiCam APP from
the Google Play Store
2. Open the Wi-Fi settings of your device to connect
to the DEFENDR+.
3. Locate AMBA_XXXXXX and enter the password
1234567890.
TIP: To edit settings, view or download footage you have to PAUSE recording first.
Page 12
10
INSTALLING YOUR DASH CAM
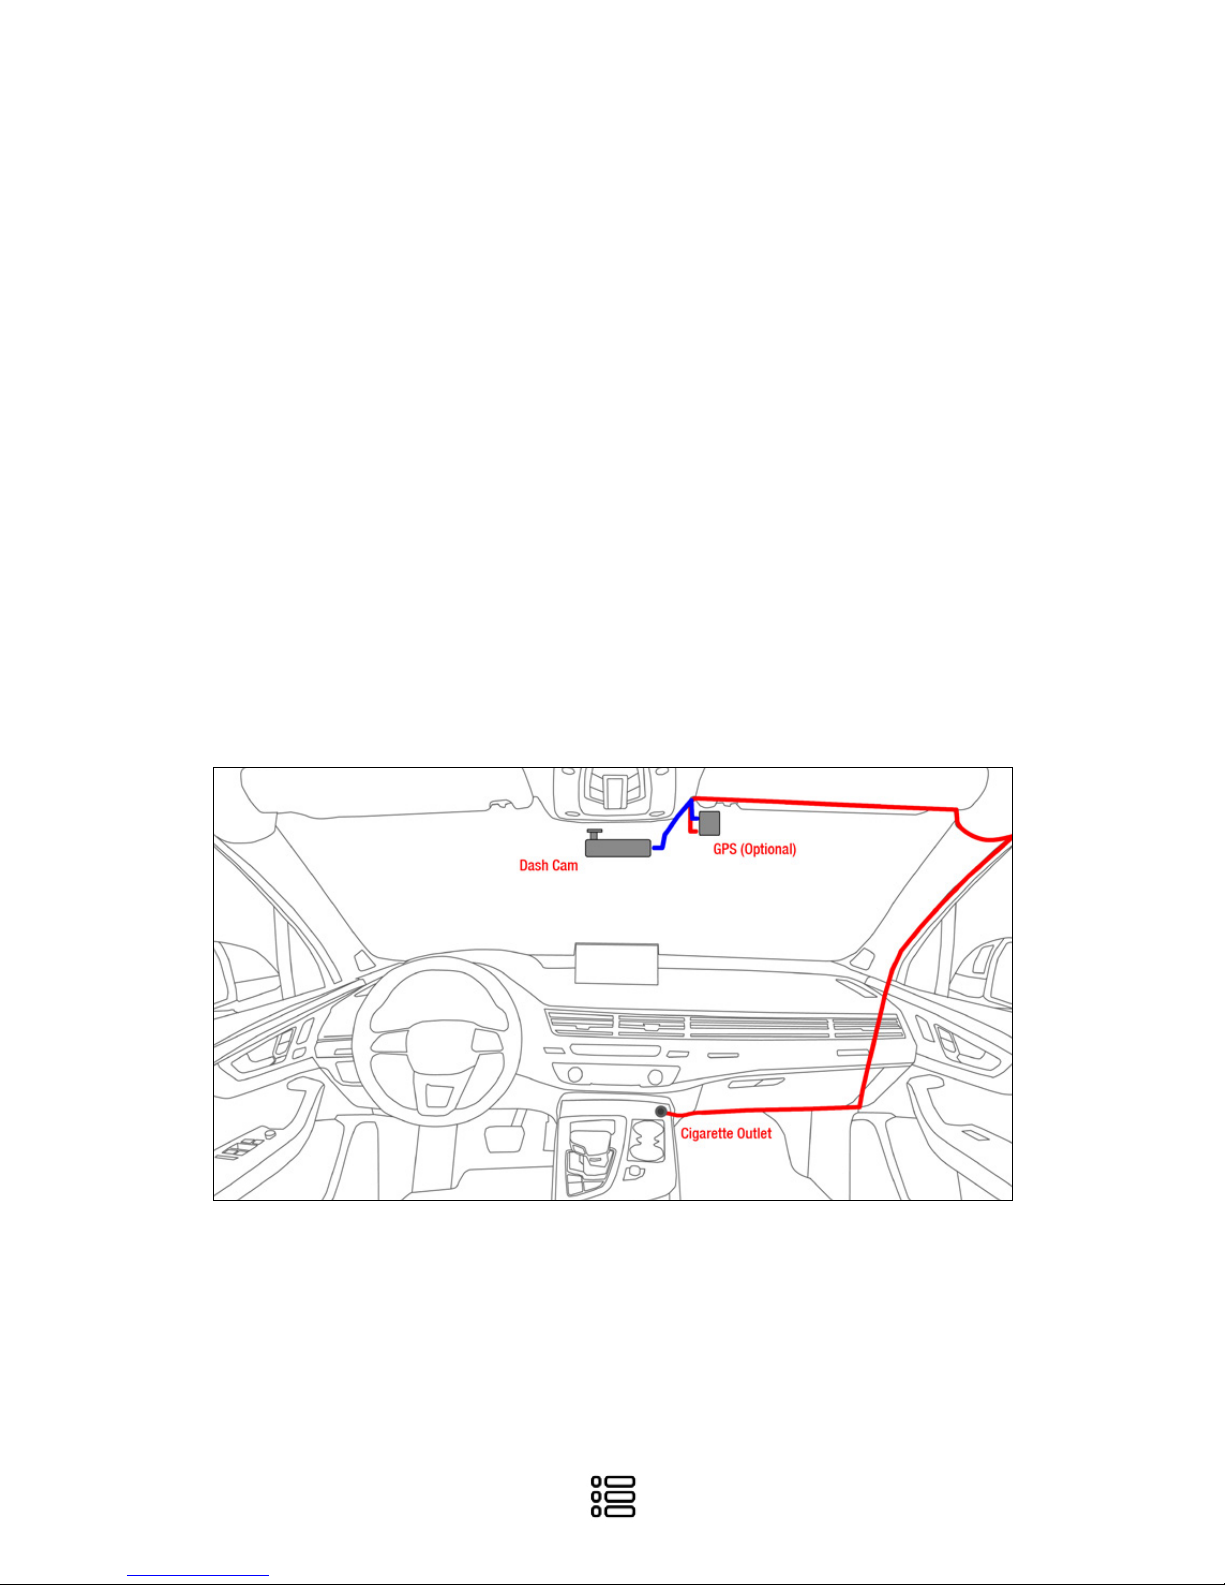
This installation guide does not require hardwiring. This guide will utilize the car
charger.
1. Position and mount your dash cam where it will not obstruct the driver’s view. We
recommend installing behind the rear view mirror.
2. Locate your cigarette oulet. Note: Make sure that your cigarette outlet isn’t constant ly running power even if you turn off your vehicle. You want to plug the car charger
into a cigarette outlet that turns off when you leave your car.
3. Route your wire like illustrated below. First run the cable along the headliner and
then inside the A-pillar. You may need to remove the A-pillar trim with a trim removal
tool.
4. Run the cable down the weather strip.
5. Once you have run the cable all the way down, you can either hide your wires under
the floor mat or find crevices along the side or under and tuck the cables in.
For more detailed instructions and installation video visit
grdian.com/blogs/grdian/installing-your-dash-cam-without-hardwiring
Page 13
PLAYING-BACK ON THE COMPUTER
11
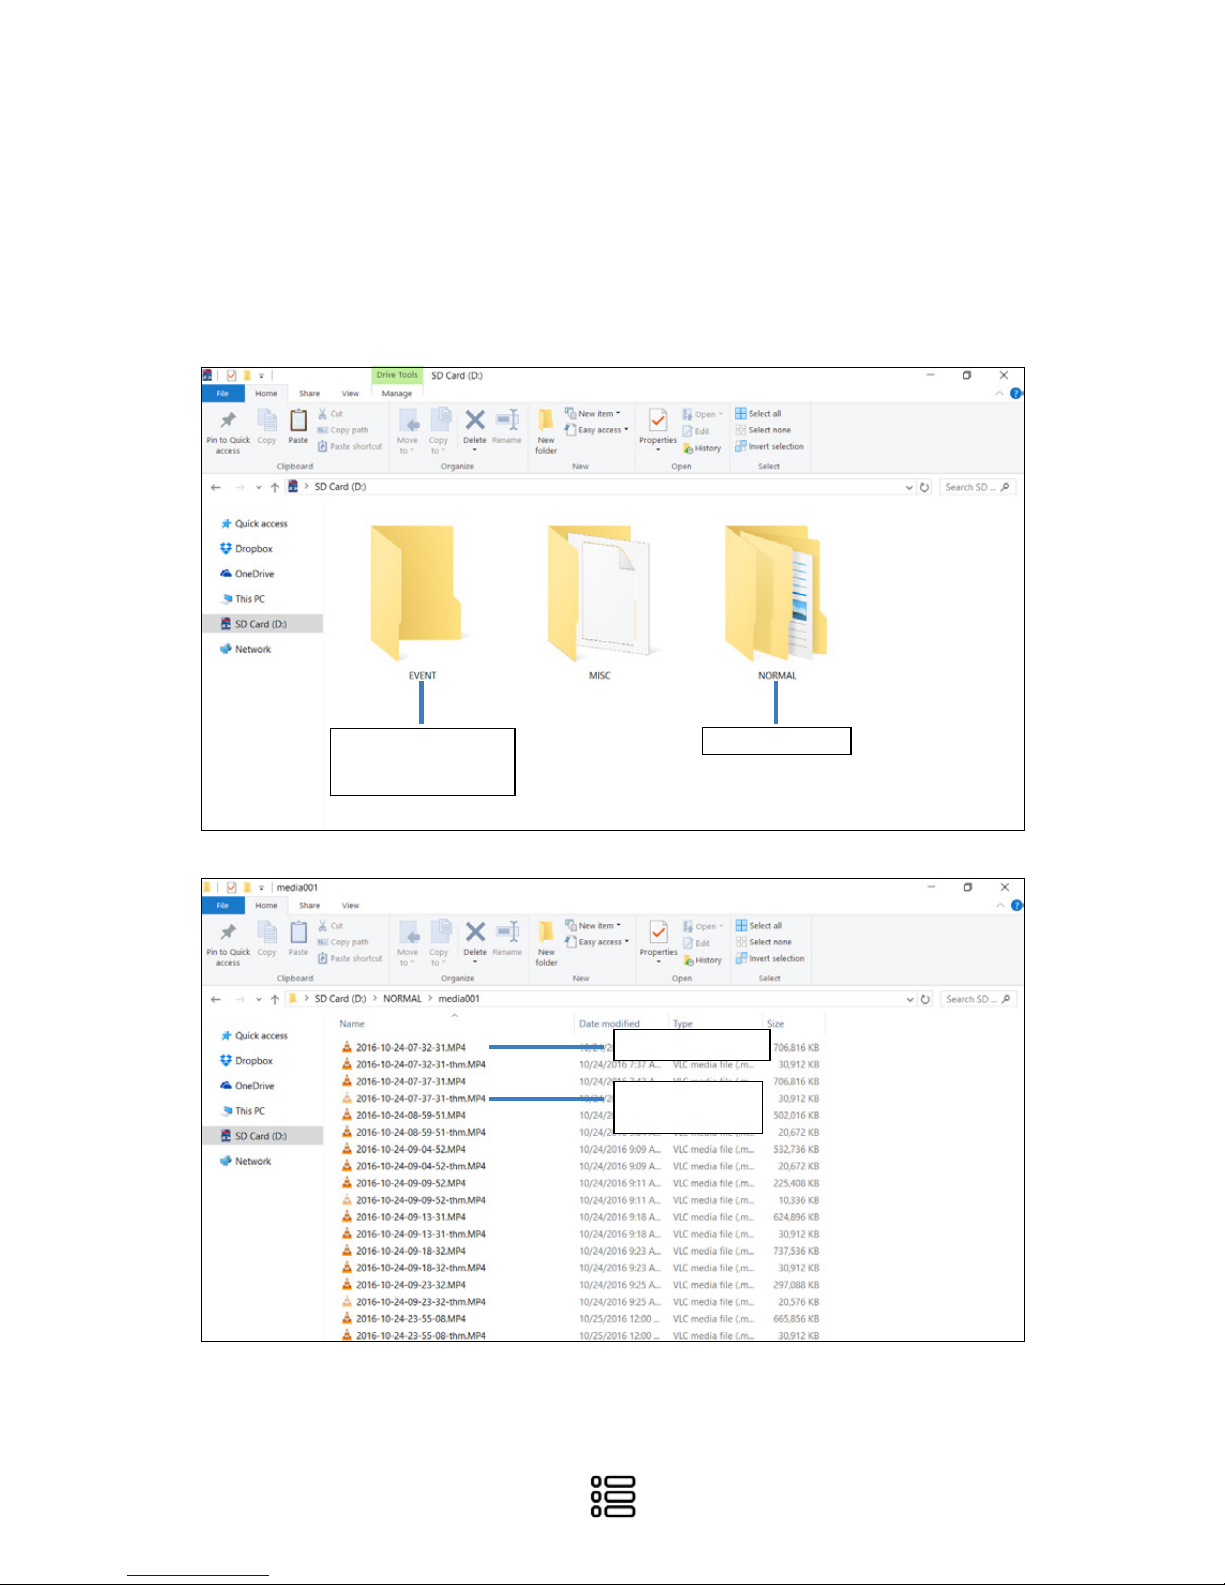
To access the footage captured with your DEFENDR+ remove the microSD from the
DEFENDR+ or use the supplied USB cable to connect to your computer. Below is the
file structure you will see.
For more detailed instructions visit
grdian.com/blogs/grdian/playing-back-your-dash-cam-footage
Contains locked file
segments when G-Sensor
feature is on
Full resolution video
Thumbnail preview
over Wi-Fi
Contains all footage
Page 14
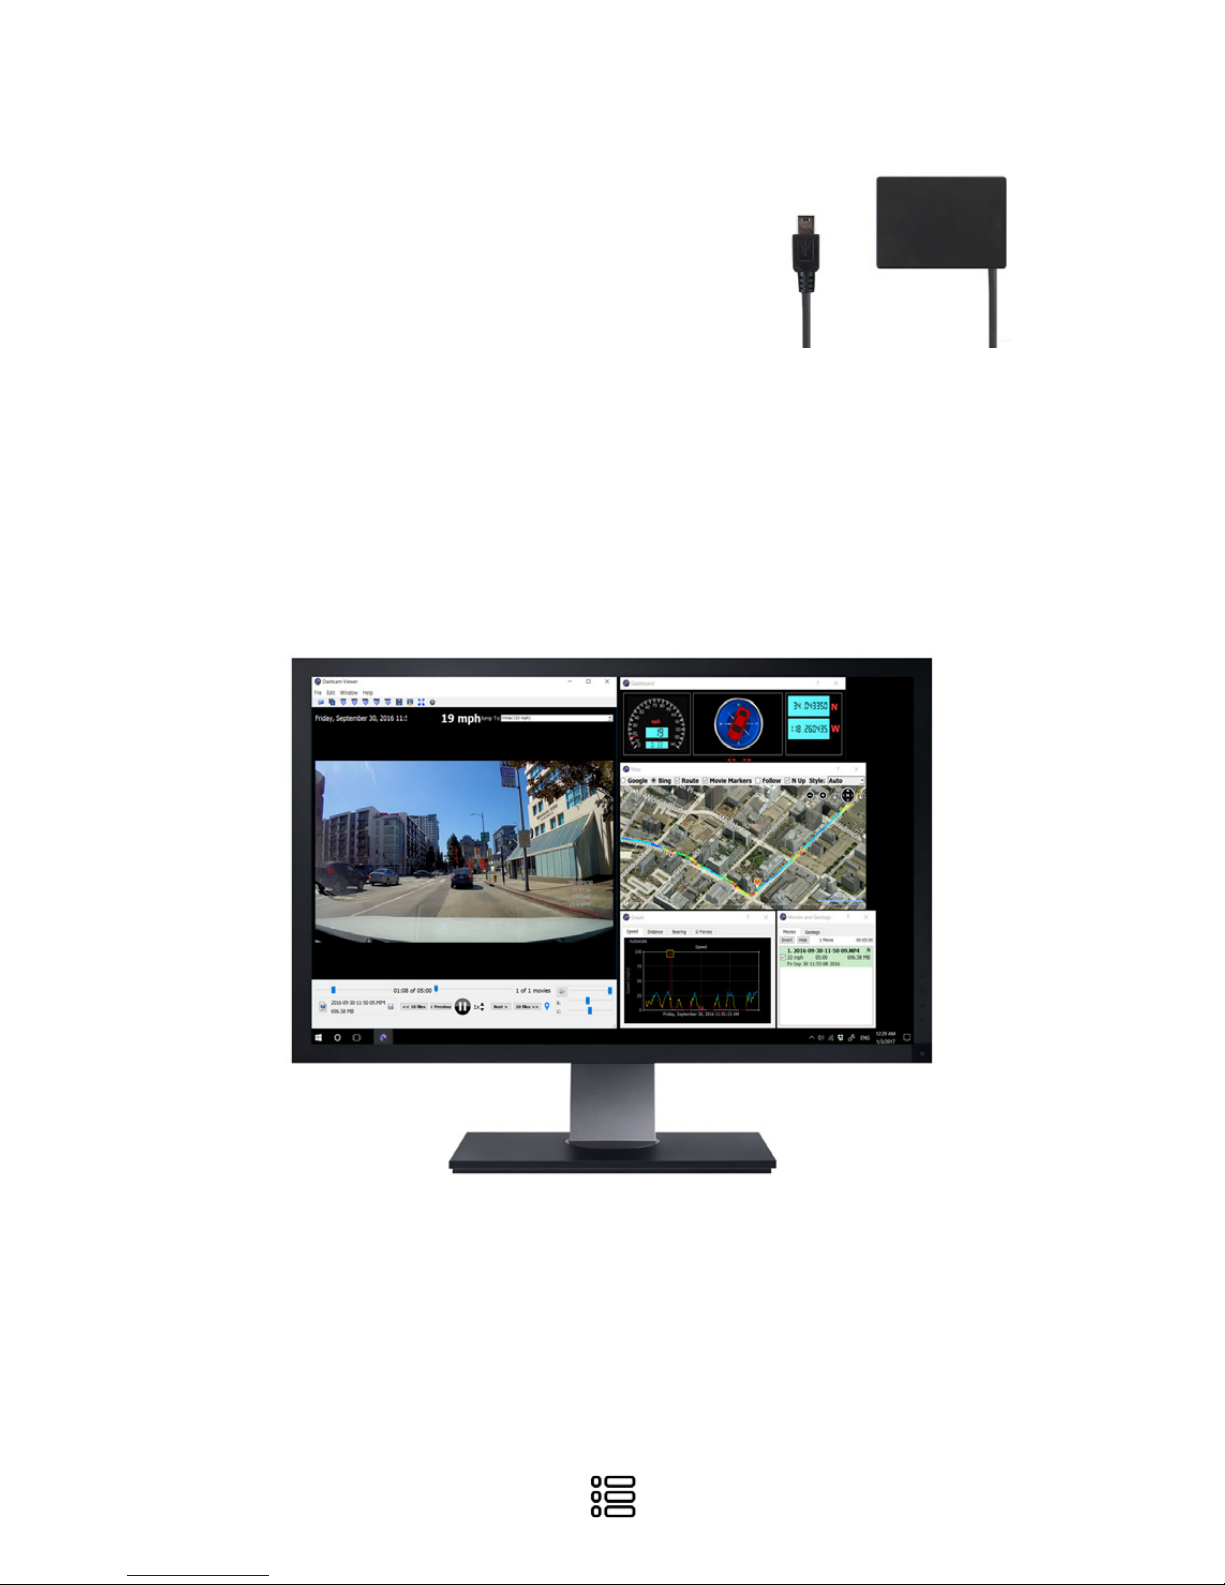
The optional GPS adapter can be purchased separately.
The GPS Adapter will record various information such as
speed, location, coordinates, and more.
To playback the information recorded with your GPS
adapter, download the Dashcam Viewer. Available for
both MACs and PC.
For more information visit grdian.com/blogs/grdian/how-to-playback-dashcam-
footage-with-gps-using-the-dashcam-viewer
12
DASHCAM VIEWER & OPTIONAL GPS
Page 15

Model
DEFENDR+
89 x 38 x 44mm (3.5 x 1.5 x 1.7in)
Ambarella A7LA55
Omnivision 4689
160° wide angle view
Built-in mic
Built-in
Built-in 3-axis acceleration sensor
Optional GPS Adapater available for purchase
microSD up to 128GB, refer to recommended memory cards list
H.264/MP4
-10°C to 60°C (14°F-140°F)
iOS & Android
Supercapacitor
Super HD (2560 x 1080) @30 fps
Super HD (2304 x 1296) @30fps
Full HD (1920 x 1080) @45fps
Full HD (1920 x 1080) @30fps
Full HD (1920 x 1080) @30fps HDR
HD (1280 x 720) @60fps
HD (1280 x 720) @30fps
Dashcam Viewer
Processor
Lens
Wi-Fi
GPS
Battery
Video Resolutions
Compatible Software
Dimensions
Image Sensor
Audio
G-Sensor
Memory
Video Format
Opertain Temp.
Compatible Apps
PRODUCT SPECIFICATIONS
13
Page 16

TROUBLESHOOT
The App won’t connect to my device
Unable to loop record/issues with the memory card
Unable to record
The adhesive or suction cup mount is not staying on
I am unable to change my settings.
I am unable to playback the footage.
I am unable to load my footage with the app.
If you are having trouble accessing the app, force quit the app and open it again.
Please check for compatibility (Android 4.0.3 or later & iOS 8.0 or later)
Because of the constant writing of data onto a card, dash cams use specific memory
cards. Click here for a list of recommended memory cards.
If your G-Sensor is on, files that are triggered by the G-Sensor will be locked. Overtime,
these files will accumulate and fill the memory card. Format the card when needed.
Clean your window, a clean surface allows for maximum adhesion.
To change the camera settings, pause recording first.
To playback your footage, pause recording first.
For optimal performance, we recommend using memory cards up to 64gb. A 128gb
will work with your device but may not load videos correctly with the app, due to the
size of data.
Cant find the answer to your question? Contact us at [email protected]
14
Page 17

Page 18
www.GRDIAN.com
 Loading...