

Page 1
GrayWolf
Sensing Solutions
WolfSense™ IAQ LAP
User Manual
Page 2

DISCLAIMER:
Determining the suitability for use of any equipment described in this manual remains
SOLELY THE RESPONSIBILITY OF THE END USER.
PRODUCT WARNING:
GrayWolf Sensing Solutions' DirectSenseTMprobes and DirectSenseTMkits are NOT
suitable for use in flammable or potentially explosive environments. They are NOT
certified intrinsically safe. They are also NOT intended for use in confined spaces
where operator safety might be at risk due to exposure levels, such as reduced
oxygen, during the course of the instrument survey.
This manual is published solely for instructional purposes related to the operation of
GrayWolf's DirectSense™ and VentCal™ products. Some of the details contained in
this manual are derived from information proprietary to GrayWolf Sensing Solutions,
LTD, and its publication does not convey anyright to reproduce or use the contained
information for any other reason than for the operation and use of the described
products. Reproduction or any other use of this material requires the express written
consent of GrayWolf Sensing Solutions, LTD.
WolfSense™, DirectSense™ and VentCal™ are registered trademarks of GrayWolf
Sensing Solutions, LLC.
© Copyright 1999, 2008. All rights reserved.
Page 3

GrayWolf
Sensing Solutions
WolfSense™ IAQ LAP
DirectSense™
User Manual
GrayWolf Sensing Solutions
12 Cambridge Drive
Trumbull, CT 06611
www.wolfsense.com
Page 4

This page intentionally left blank.
Page 5

i
Table of Contents
INTRODUCTION ..........................................................................................................1
UNPACKING YOUR GRAYWOLF MONITOR..............................................................1
POWERING..................................................................................................................2
SETTING UP THE HARDWARE AND SOFTWARE....................................................3
NAVIGATING IN WOLFSENSE IAQ LAP.....................................................................4
LIVE MODE...................................................................................................................5
Readings...................................................................................................................5
Details.......................................................................................................................6
Statistics ...................................................................................................................6
Graph........................................................................................................................7
DATA ORGANIZATION: SITES AND LOCATIONS....................................................7
Creating, Selecting and Deleting Site Folders and Location Files............................8
TYPES OF LOGS .........................................................................................................9
Append or Overwrite.................................................................................................9
Snapshot Log..........................................................................................................10
Standard Timed Log...............................................................................................10
Auto Start/Stop Log ................................................................................................11
THE LOGGING PROCESS.........................................................................................12
LOG INFORMATION AND STORED READINGS......................................................12
Log Information.......................................................................................................12
Stored Readings.....................................................................................................13
NOTEBOOK................................................................................................................13
Text Notes ..............................................................................................................14
Drawing Notes........................................................................................................14
Reports...................................................................................................................15
Sound .....................................................................................................................16
Custom File Types..................................................................................................16
PROBE INFORMATION .............................................................................................19
PROBE CALIBRATION DATA....................................................................................19
PROBE CALIBRATION...............................................................................................20
PROBE SETUP...........................................................................................................22
USING ADDITIONAL EXTERNAL PROBES..............................................................23
NAVIGATING IN WOLFSENSE PC............................................................................24
WOLFSENSE PC SOFTWARE..................................................................................24
Graphing Data Files in WolfSense PC ...................................................................25
Printing Location Files, Notes, Reports & Calibration Data from WolfSense PC...26
MAINTENANCE, CLEANING, SERVICE....................................................................27
SUMMARY OF CAUTIONS........................................................................................28
TROUBLESHOOTING................................................................................................29
SPECIFICATIONS......................................................................................................30
PROBES & ACCESSORIES.......................................................................................31
Page 6

This page intentionally left blank.
Page 7
1
Introduction
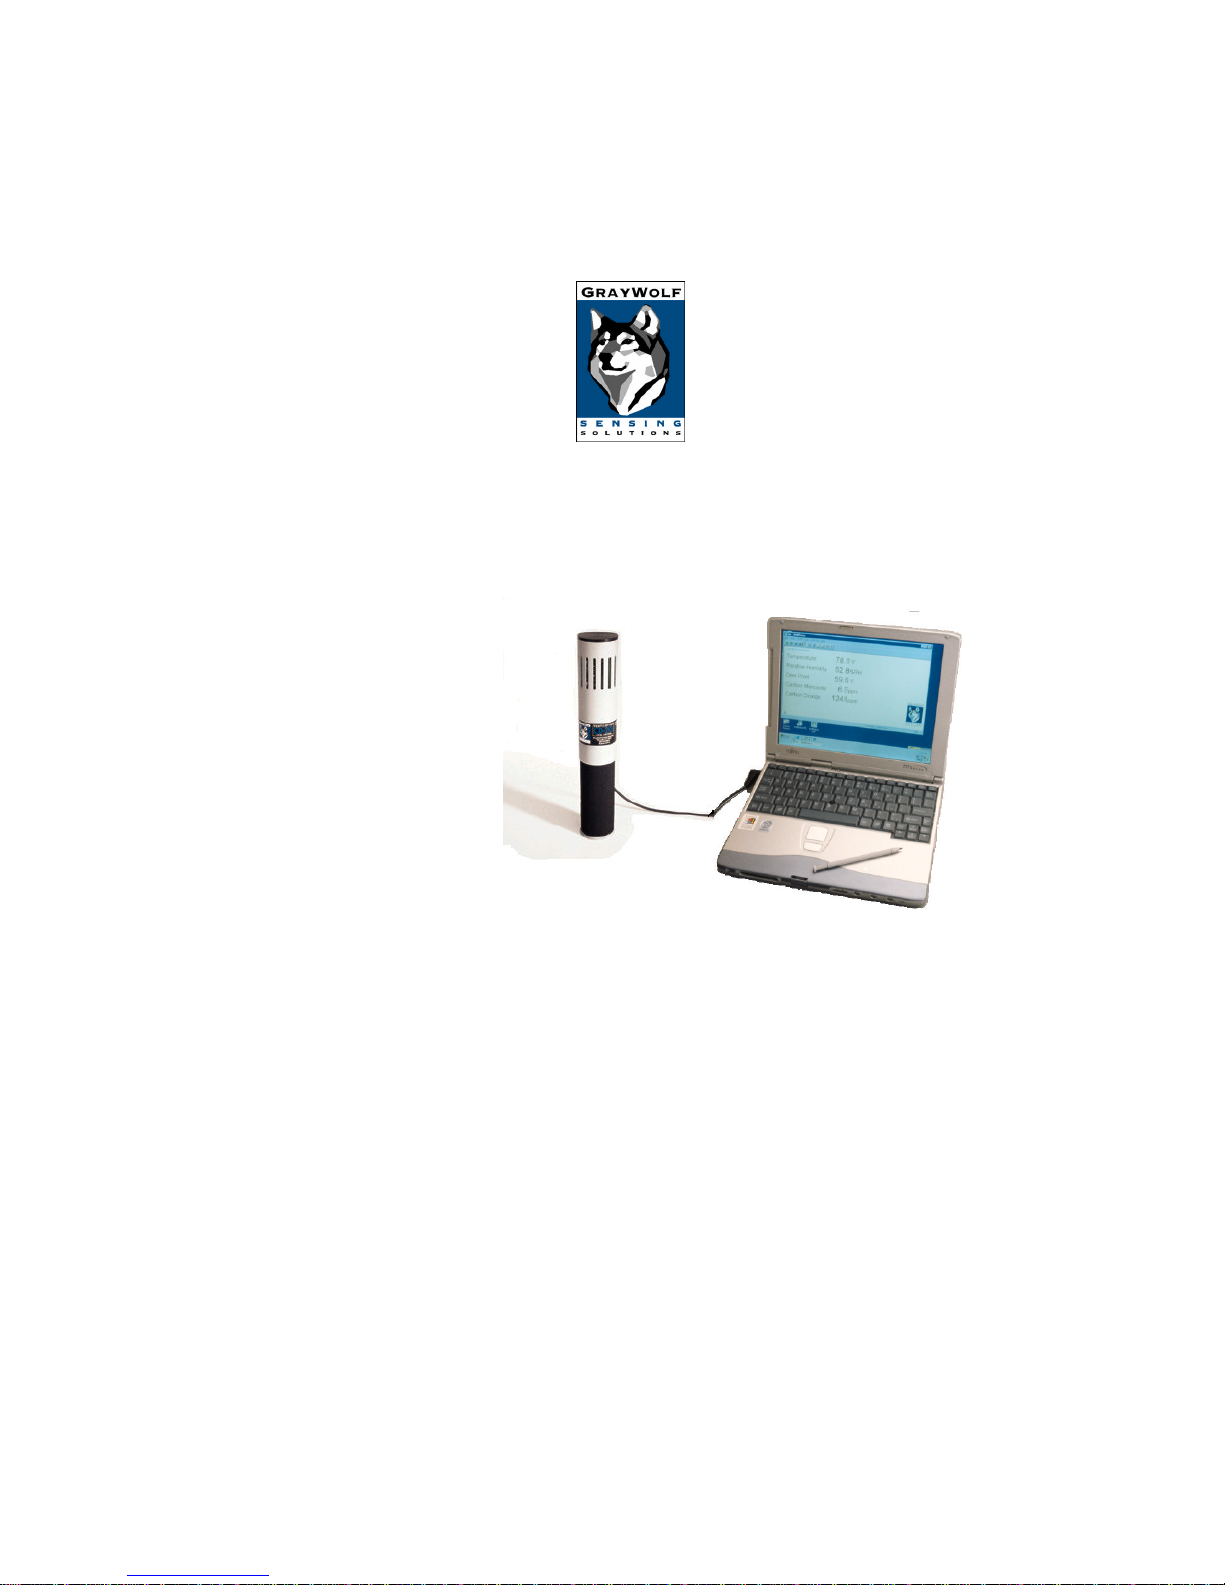
GrayWolf Sensing Solutions provides a fully integrated system for measuring indoor
air quality and ventilation. A laptop computer (Lap PC) running WolfSense™ IAQ
LAP software takes readings of air quality from a probe connected through the serial
port. You may choose to view live readings as they happen, plot readings for a
selected measurement parameter in real time and/or log the readings for future use.
Later, you may use WolfSense™ PC software on the Lap PC to open files of logged
readings for printing, graphing or exporting to a word processor or spreadsheet.
In the DirectSense™ 100 kit, the probe (model IQ-410) has four sensors which
provide five measurements: Temperature (°F/°C), Relative Humidity (%RH), Dew
Point, Carbon Monoxide (CO), and Carbon Dioxide (CO2). The Dew Point is derived
from Temperature and Relative Humidity readings.
In the VentCal™ 100 kit, the probe (model CD-201) has two sensors which provide
measurements of Carbon Dioxide, Temperature, and Outdoor Air (OA) ventilation.
VentCal™ software (SOFT-VENT) upgrades the DirectSense™ 100 kit to include all
VentCal™ capabilities.
This manual will get you started. Help files are available in all WolfSense™ software.
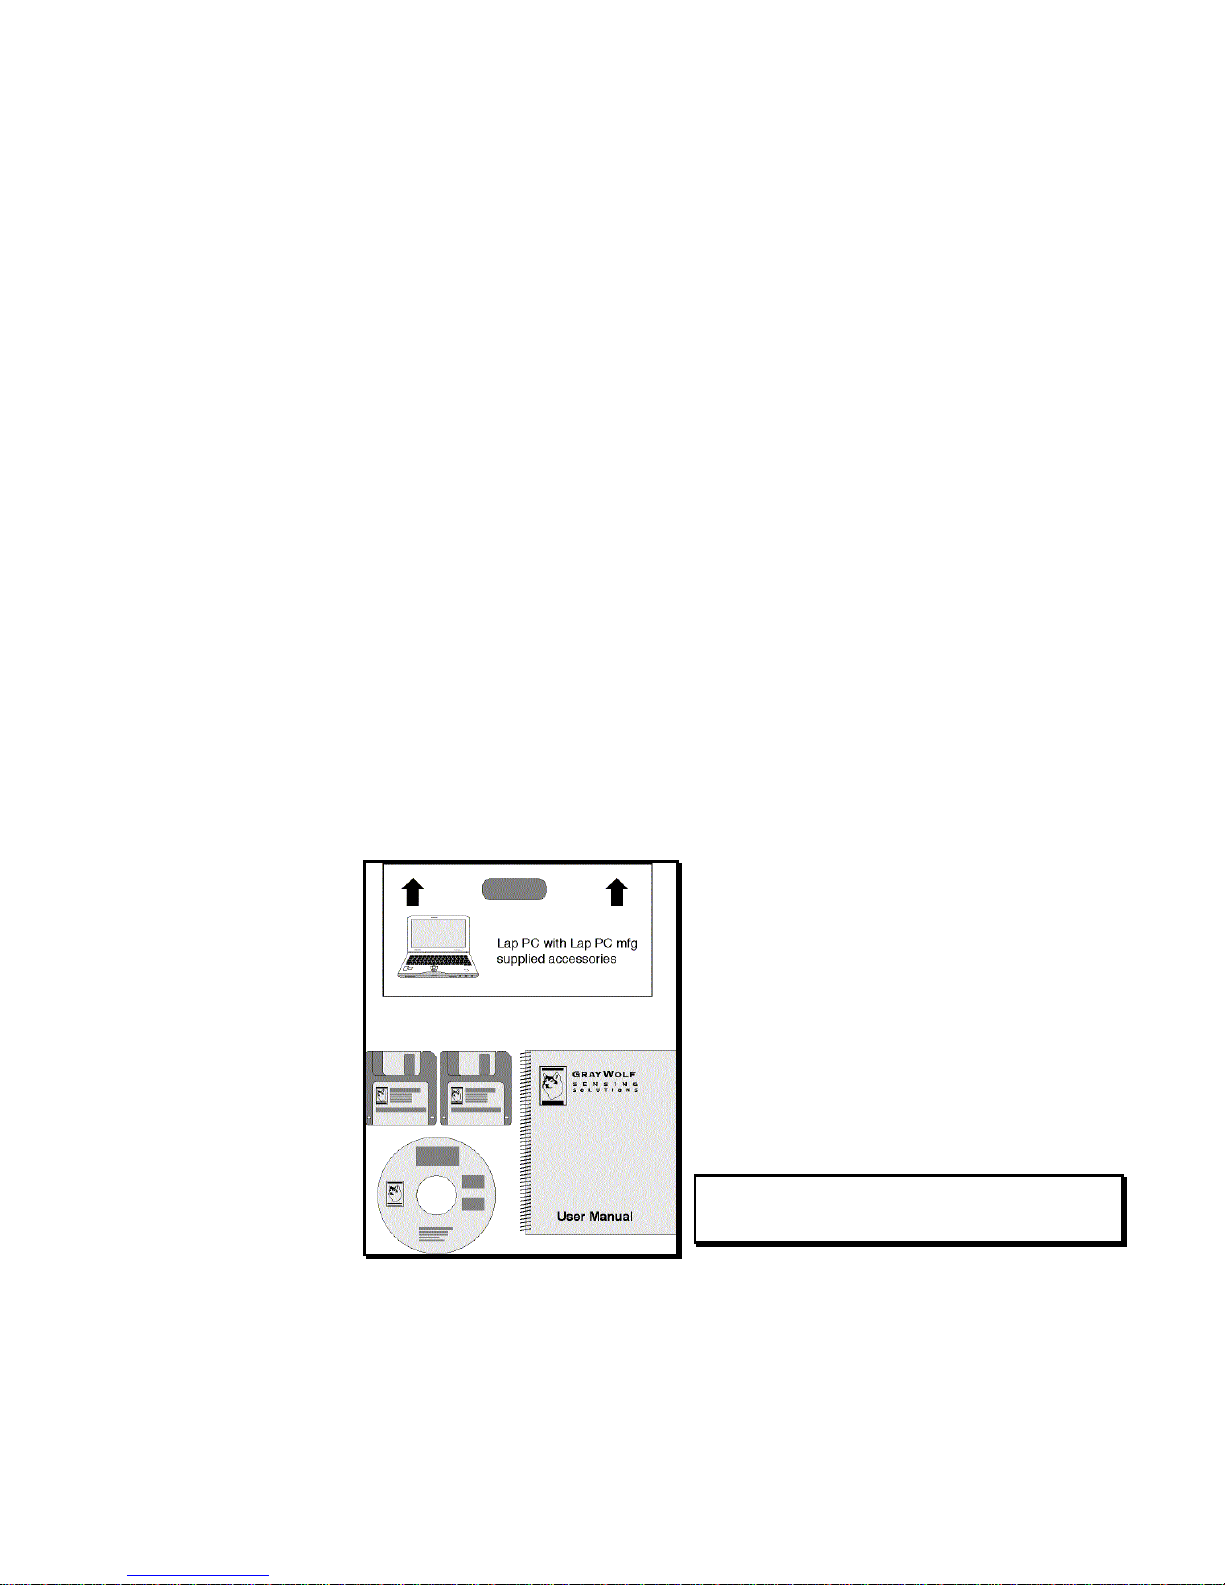
Unpacking your GrayWolf Monitor
Figure 1 - Your GrayWolf monitor kit provides everything you need
to get started:
User Manual;
Probe: IQ-410 for DirectSense™ 100 or
CD-201 for VentCal™ 100 (see Figure 2);
ACC-A110 GrayWolf AC adapter (see Figure 2);
ACC-ADY-L9 serial/AC power adapter (see Figure 2);
PCC-05 probe pouch with shoulder strap (see Figure 56);
WolfSense™ software on CD-ROM (contact GrayWolf for
software on 3½” disks);
Fujitsu Lifebook computer (if ordered from GrayWolf) with
Lap-PC-manufacturer-suppliedaccessories.
NOTE: The VentCal™ software module is unlocked by a modified
serial number found on the CD case and may be installed only if
you have purchased this option from GrayWolf.
Page 8
2
Powering
The Lap PC will run using its own battery pack or with the help of the AC adapter
supplied with the Lap PC. Before first use, charge the battery according to the
instructions in your Lap PC manual.
NOTE: Charge your Lap PC batteries frequently to avoid data loss.
Like the Lap PC, the probe runs on batteries or with an AC adapter. The probe uses
only alkaline batteries. The GrayWolf kit provides two D cells and a 110VAC adapter
(240VAC in Europe) for the probe. WolfSense IAQ LAP software will warn you if the
probe’s battery voltage is low. If, when you plug in the probe, its batteries are flat, you
will see “No Probe Attached” in the upper left-hand corner of the Lap PC screen.
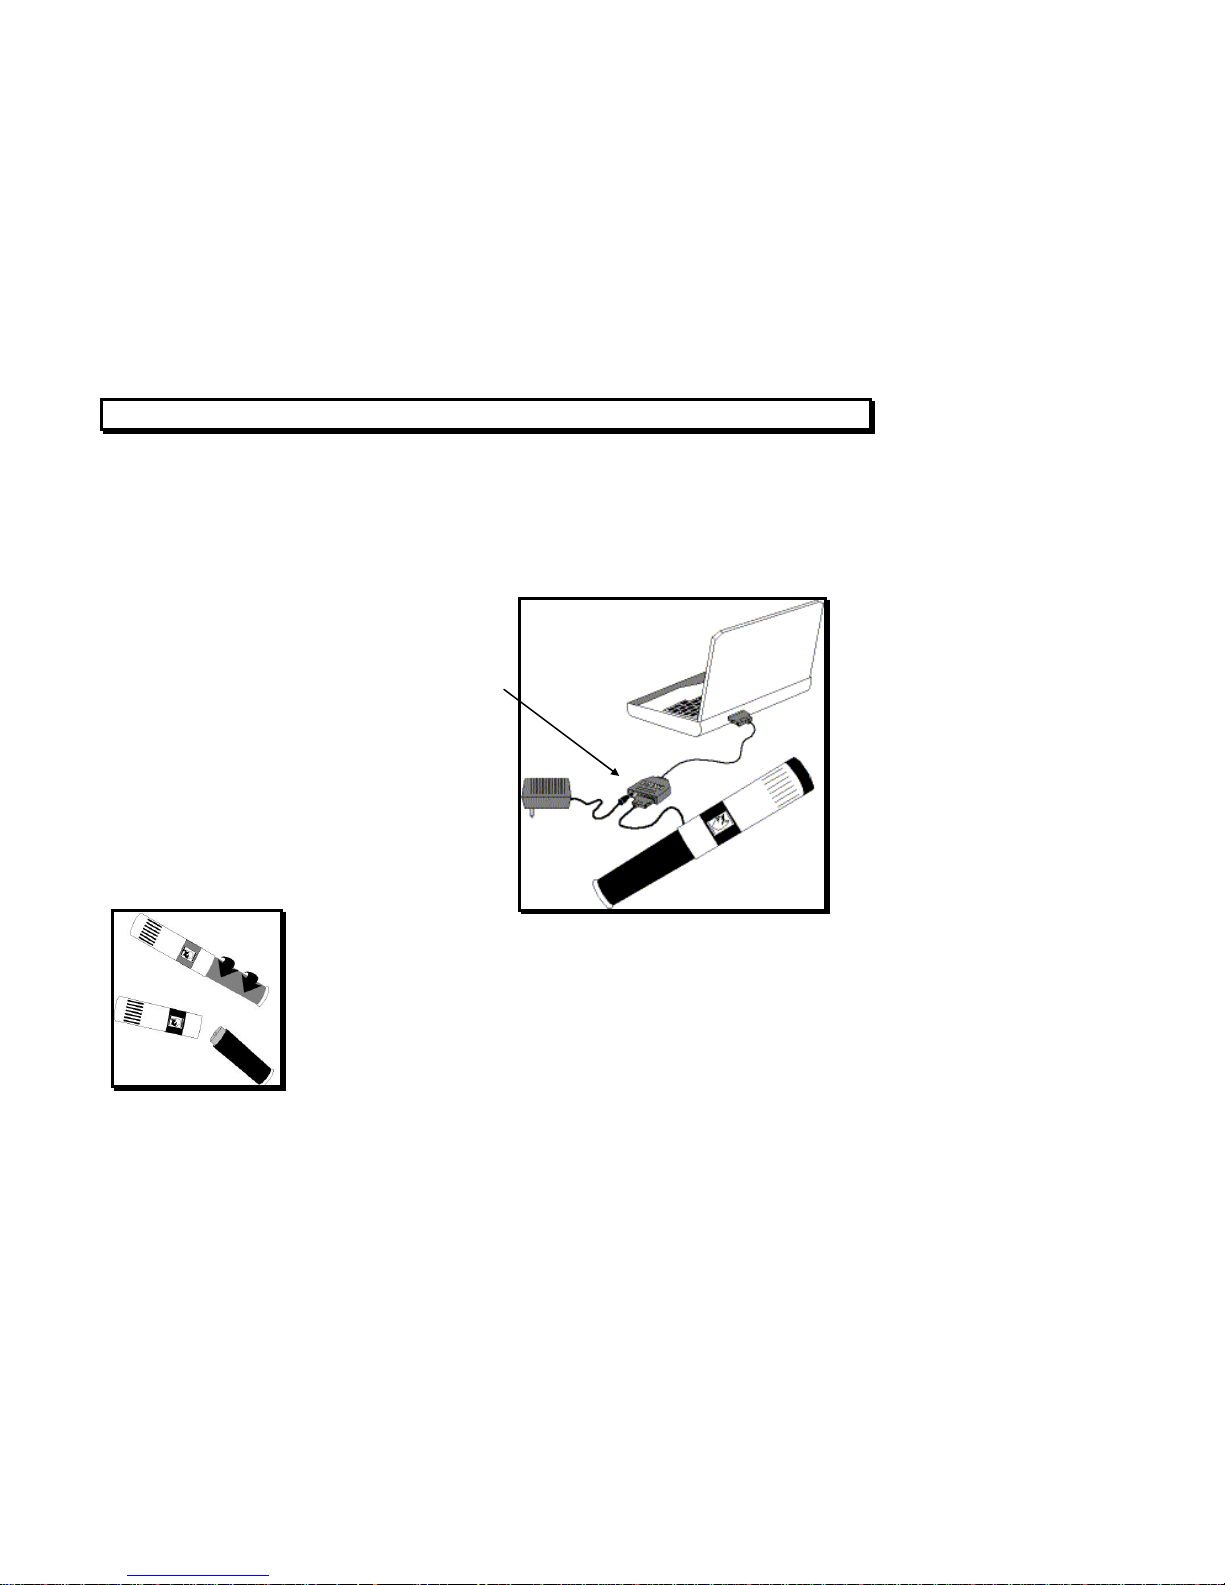
Changing Batteries on the Probes
Hold the top of the probe with one hand and the handle with the other.
Twist the probe handle in a counterclockwise direction.
Remove the old batteries.
Insert 2 new D-cell alkaline batteries, ensuring that the battery positive is to
the top.
Carefully screw the handle back onto the probe, ensuring not to cross-thread
the handle or overtighten it.
When setting up the Lap PC to work only from a battery pack for an extended period
of time, refer to your Lap PC user manual for tips on conserving battery power. If the
Lap PC’s batteries become depleted, a warning message is issued and then
WolfSense IAQ LAP will automatically stop logging and suspend the Lap PC.
Figure 2 - Using an AC Adapter to Power the Probe
The ACC-ADY-L9 serial/AC power adapter allows you
to power the probe with an AC adapter if you will be
taking readings longer than the expected life of the
batteries. It has a serial adapter and an AC power
socket.
Figure 3 - Battery Location
on the Probe
Page 9

3
Setting up the Hardware and Software
The serial port on the Lap PC (as in Figure 2) is used to connect to the probe while
taking readings. Before attaching the probe, be sure the COM port is clear and that
the COM indicator appears in the lower right-hand side of the screen.
For most laptop PCs, you will use the mouse, touchpad or trackball to navigate in
WolfSense IAQ LAP. For the Fujitsu Lifebook, you may also use the stylus pen to tap
options on the screen. In this manual, you will see instructions to click on or tap an
option.
Complete the next 4 steps to install WolfSense IAQ LAP software.
1. Familiarize yourself with the Lap PC user manual and the Microsoft
Windows™ 98 manual.
2. Follow the instructions for setting up the Lap PC, including the manufacturer’s
recommendation for the number of hours to charge the battery pack before the
first use—even if powering it with the AC adapter provided.
3. Install the WolfSense software from the CD-ROM supplied in the kit:
If the CD doesn’t run automatically, from the PC Start menu,
run [drive]:\Setup.exe.
The Setup program loads WolfSense IAQ LAP and WolfSense PC onto your
Lap PC, and places two icons on the desktop.
4. Double-click or double-tap on the icon to start WolfSense IAQ LAP or WolfSense
PC. Use WolfSense IAQ LAP to collect readings from the probe and WolfSense
PC to analyzeand manipulate stored readings.
Page 10
4
Navigating in WolfSense IAQ LAP
From the main screen, you will perform all the functions available with WolfSense
LAP. The pull-down menus and toolbar buttons are described briefly below.
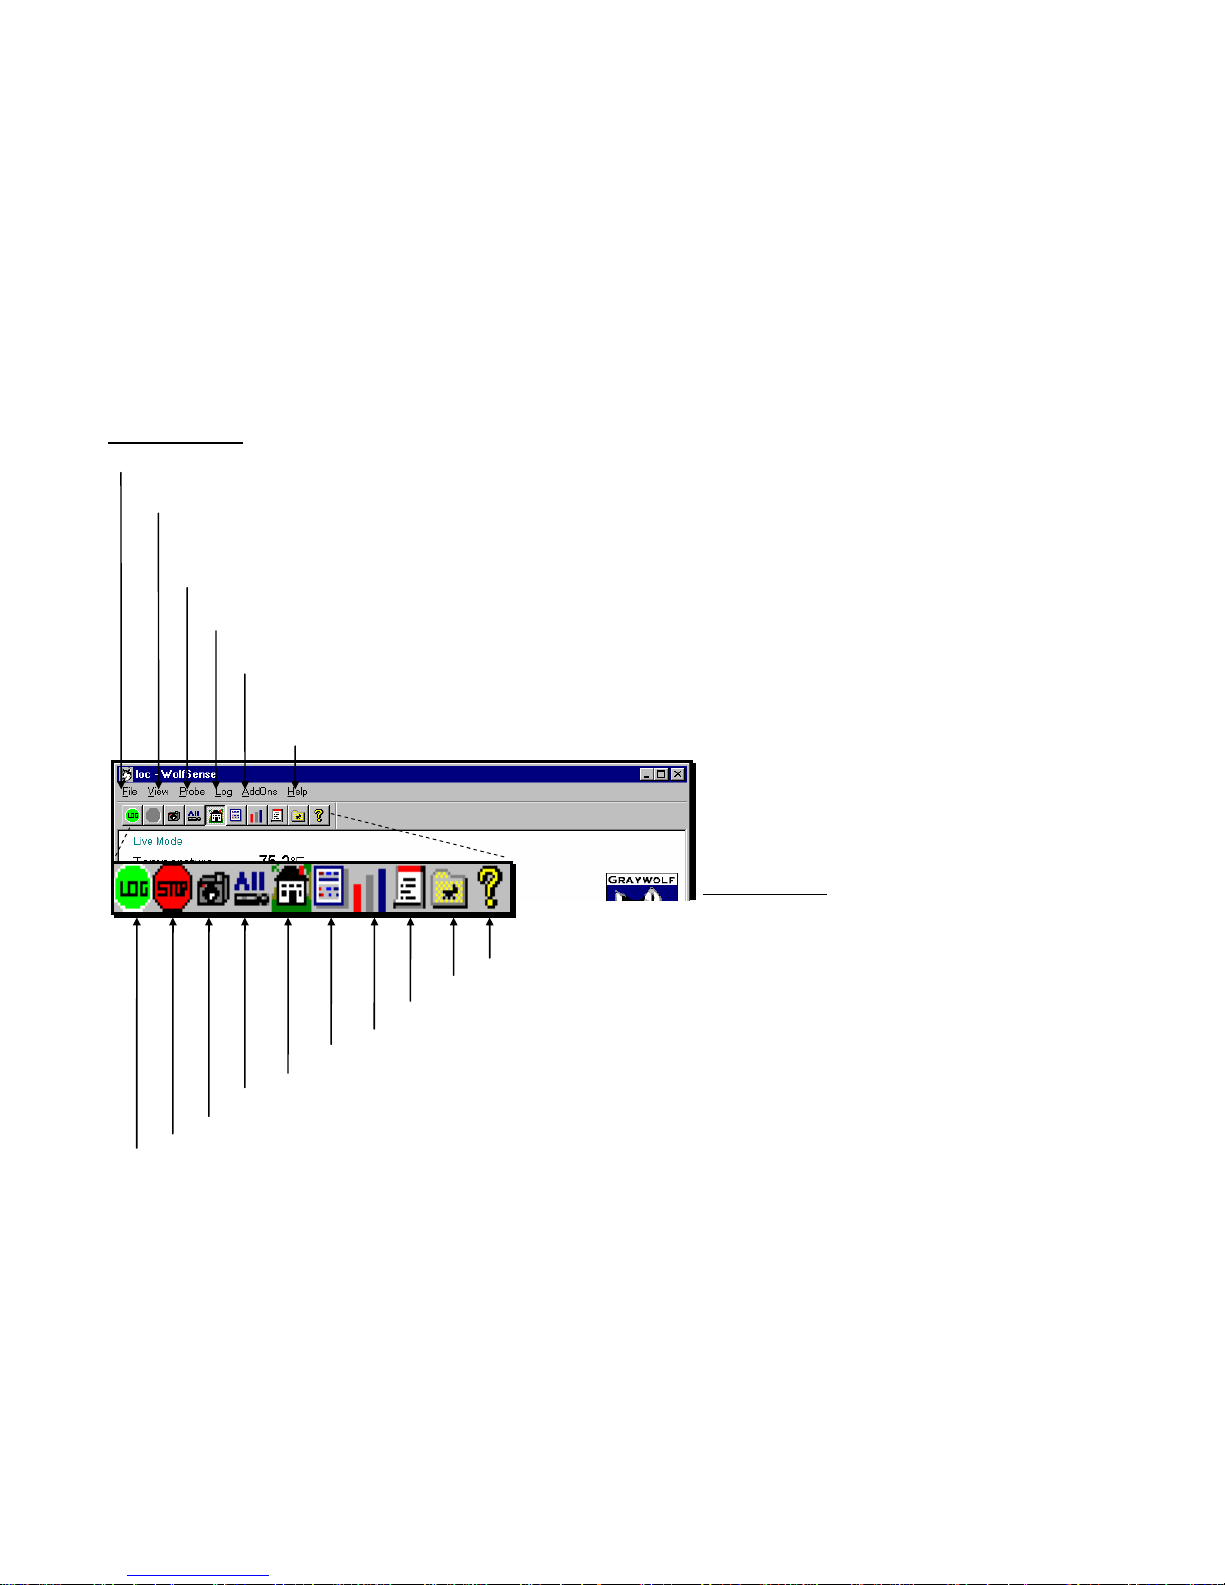
Pull-Down Menus
File - to manage files: OPEN LOCATION in WolfSense PC, NOTEBOOK to access Text Notes, Drawing Notes
and Report Templates, EXIT.
View - to view READINGS,DETAILS orSTATISTICS for live readings. GRAPH to plot readings for a
selected measurement parameter in real time. VIEW LOCATION where readings have been or
will be logged. Check individual measurement parameters to include or exclude them. VIEW
ALL to display all measurement parameters. CHANGE UNITS of measure.
Probe - to see INFORMATION about the probe or to CALIBRATE the probe. VIEW ACTIVE CAL for
probe calibration data. SETUP to change serial ports. DETECT PCMIAPORT PROBES.
Log - to set up how the readings will be logged: as SNAPSHOT,STANDARD TIMED or AUTO
START/STOP. To view LOG INFORMATION. To set or create LOCATION files or SITE
folders. To START or STOP a log.
Add-ons - VentCal Ventilation Calculations, Basic Volume Flow, DuctCal Equal Area
Traverse, DuctCal Log-T Traverse, FumeCal Fumehood Face Velocity,
ThermCal Thermal Comfort. Add-ons listed on this menu are documented in
separate manuals.
Help - to see HELP TOPICS on WolfSense IAQ LAP, ABOUT WOLFSENSE.
Figure 4 WolfSense IAQ LAP
Pull-down Menus and
Toolbar Buttons
Toolbar Buttons
HELP - ? opens WolfSense IAQ LAP help topics.
LOCATIONS - opens LOCATIONS dialog box.
NOTEBOOK - accesses Text Notes, Drawing Notes and Report
Templates.
STATISTICS - displays statistics about a chosen parameter.
DETAILS - displays multiple readings in columnar format.
HOME - returns to the main WolfSense screen.
ALL - displays all measurement parameters, updating readings continuously.
SNAPSHOT - manually captures live values instantaneously in a location file.
STOP- stops a timed log in progress.
LOG - starts a timed log previously set up.
Page 11
5
Live Mode
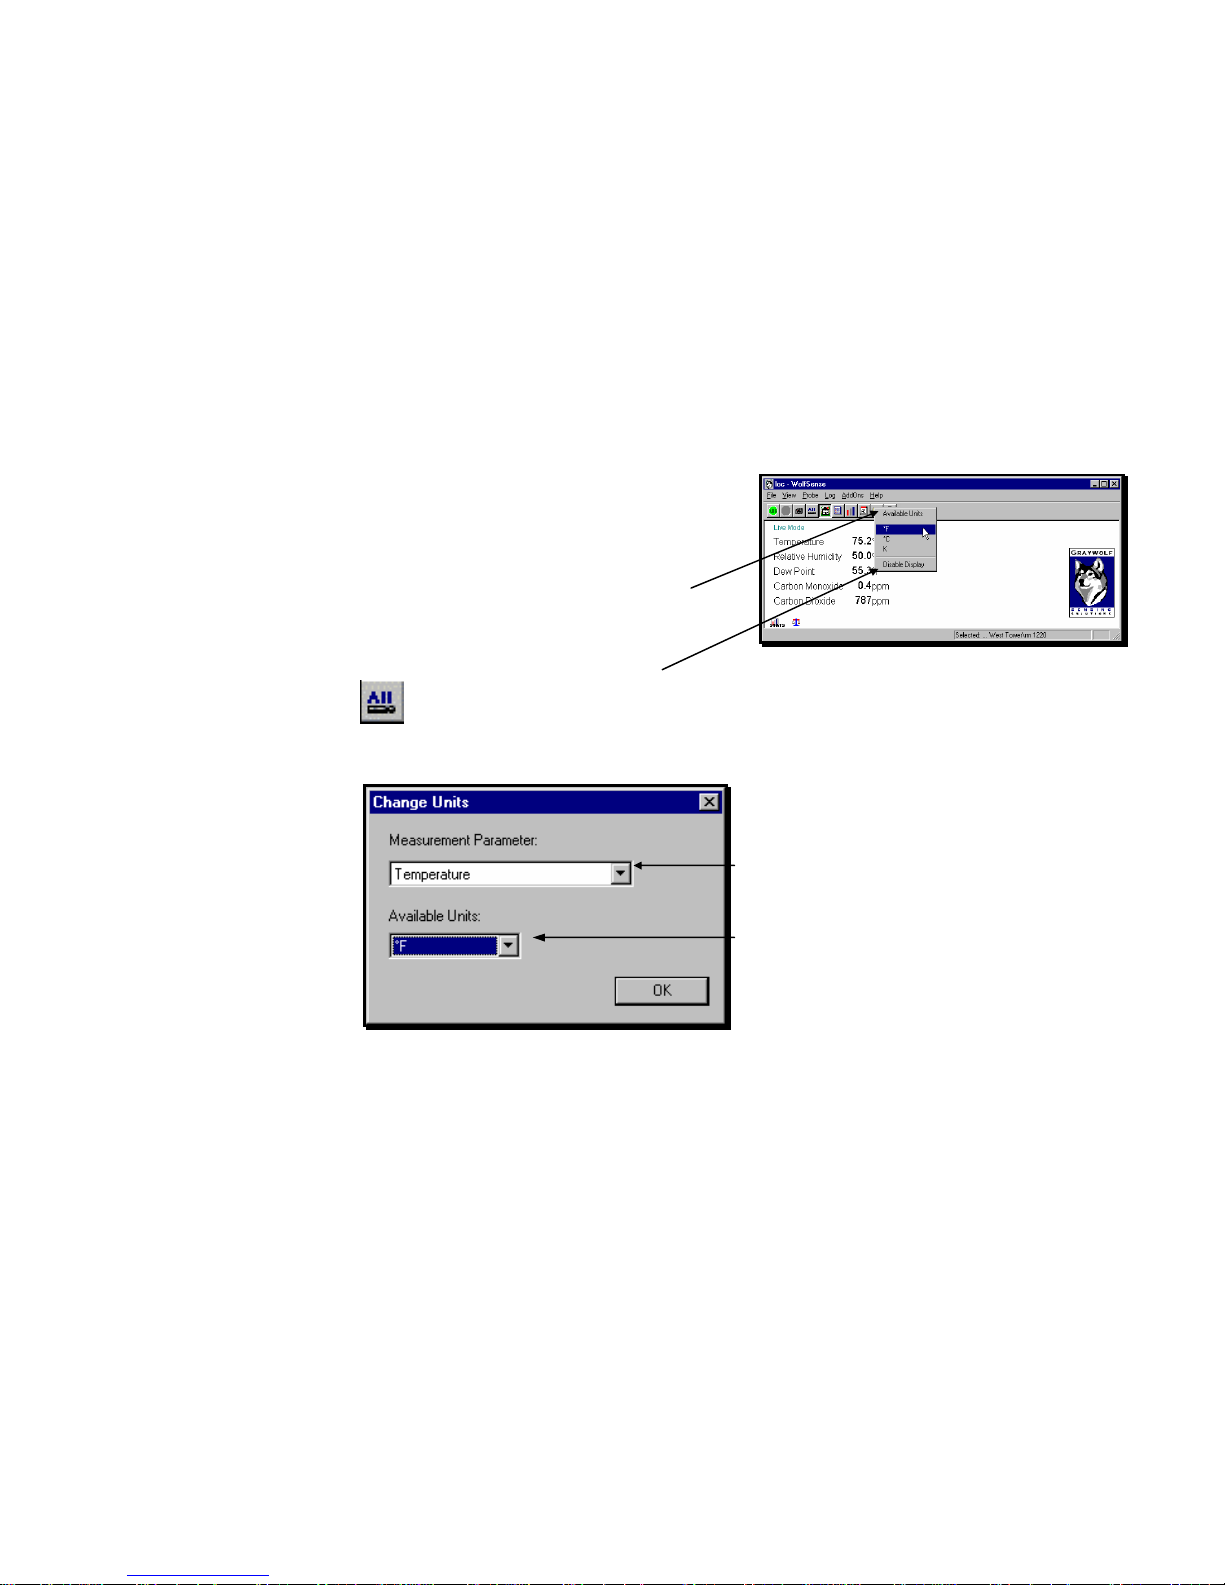
Readings
Once the probe is attached, WolfSense IAQ LAP will display live readings from the
probe in real time.
To see current values from the probe,
click on or tap View, Readings.
To change the units of measure, double-click or
double-tap on the current value. (Also see CHANGE
UNITS below.)
When the AVAILABLE UNITS dialog box appears,
click on or tap the desired unit of measure: for
example, Fahrenheit, Celsius or Kelvin (absolute).
To remove a parameter from the display,
click on or tap Disable Display.
To restore all parameters, click on or tap the
ALL toolbar button or View, View All, or type Ctrl-A.
Another way to change the units of measure is to
click on or tap View, Change Units.
In the CHANGE UNITS dialog box, click on or tap the
pull-down menu arrow for Measurement Parameter.
Click on or tap the desired measurement parameter.
Click on or tap the pull-down menu arrow for
Available Units.
Click on or tap the unit of measure you want to
display.
Click on or tap OK.
Figure 5 - Live Mode - Readings (DirectSense 100)
Figure 6 - CHANGE UNITS dialog box
Page 12
6
Details
Details allows you to display multiple measurement parameters in columnar format.
This section describes how to view in real time live readings which are updated at
two-second intervals (not user-adjustable). See “Stored Readings” on page 13 for
information on viewing data that has been logged into location files at user-selected
intervals.
To see continuously updated live values
from the probe, click on or tap the Details toolbar
button or View, Details.
The table displays columns based on parameters
chosen for display in View, Readings.
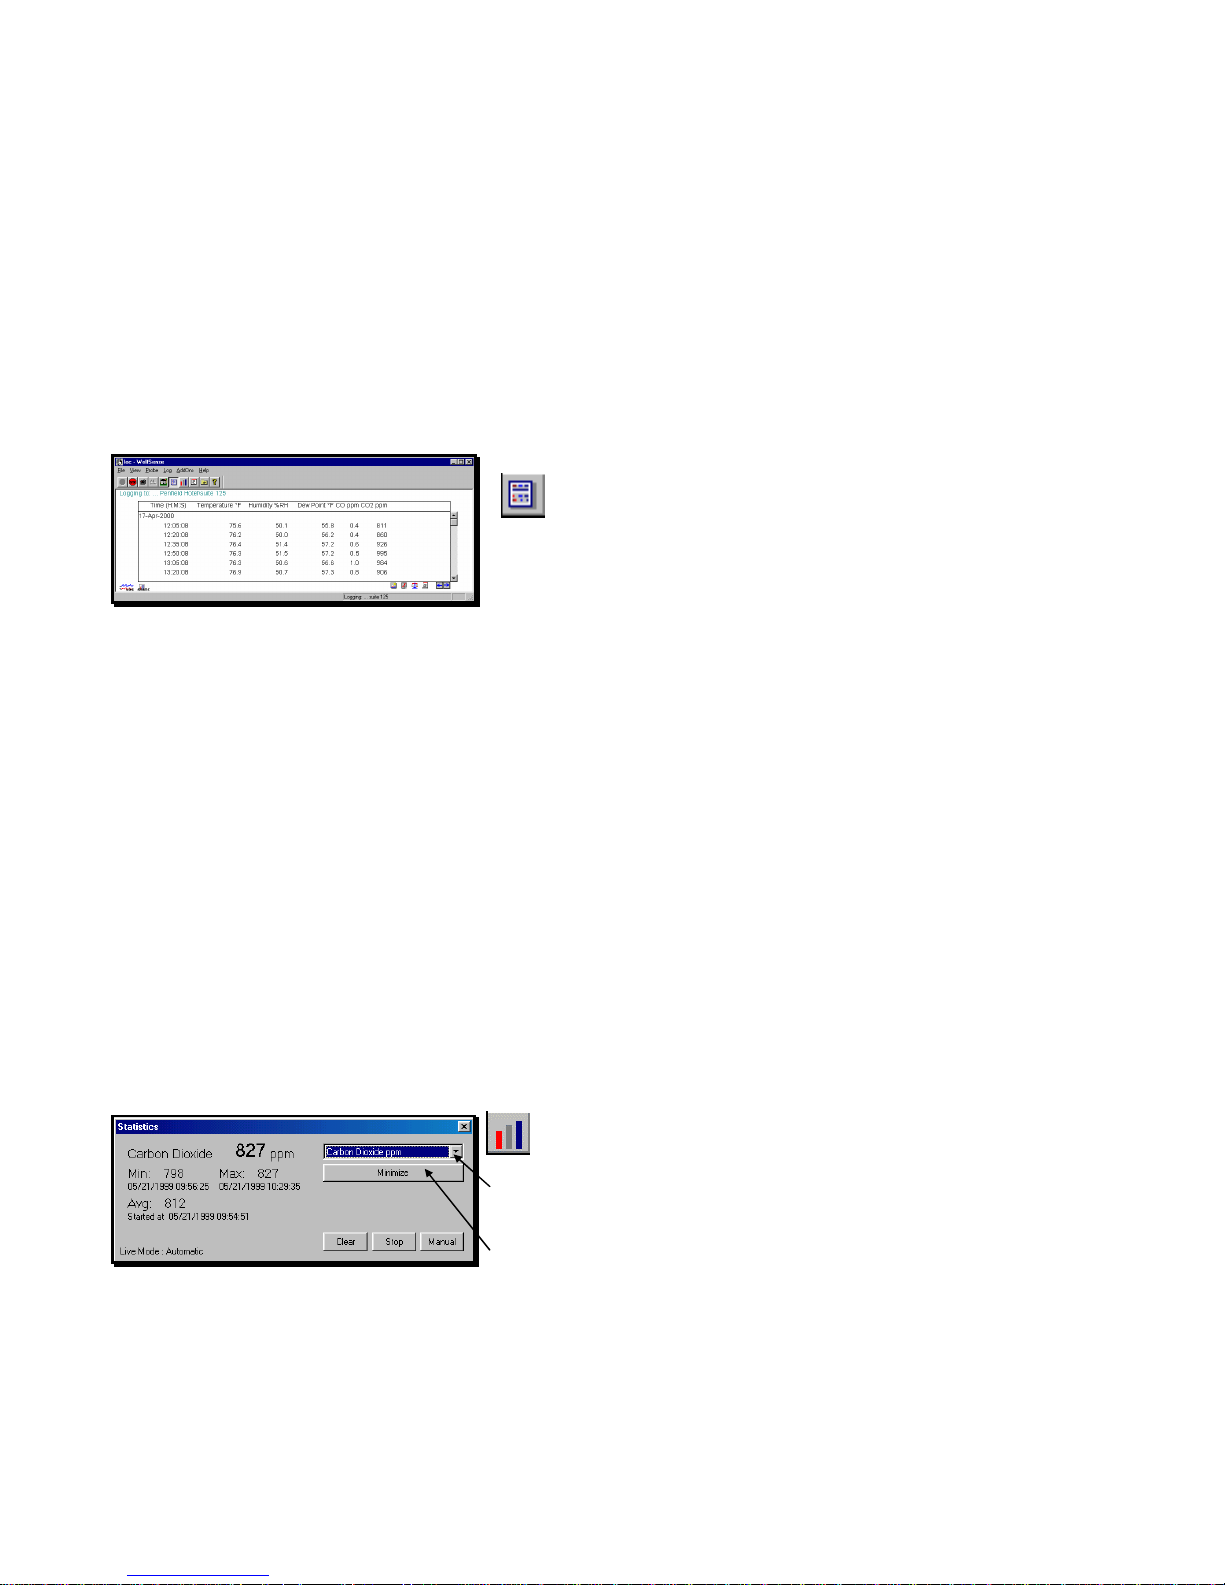
Statistics
The Statistics window displays the minimum, maximum and average readings for a
single parameter in a separate window that may be minimized and kept on the
screen.
The Manual/Auto button toggles between Automatic and Manual modes.
In Auto mode, readings taken from the probe at two-second intervals update the
minimum and maximum values, and are automatically added to the readings used to
calculate the average. The Stop/Resume button lets you stop and resume readings
in Auto mode.
In Manual mode, click on or tap Add to add readings manually to the tally of readings
included in the statistics calculations for the chosen parameter.
Clear resets the minimum, maximum and average to zero.
Click on or tap the Statistics toolbar button
or View, Statistics.
To choose a different parameter for display,
click on or tap the pull-down menu arrow.
Click on or tap the new parameter.
Click on or tap Minimize to shrink the window and
keep it on display.
Figure 7 - Live Mode - Details (DirectSense 100)
Figure 8 - STATISTICS dialog box in Auto mode
Page 13
7
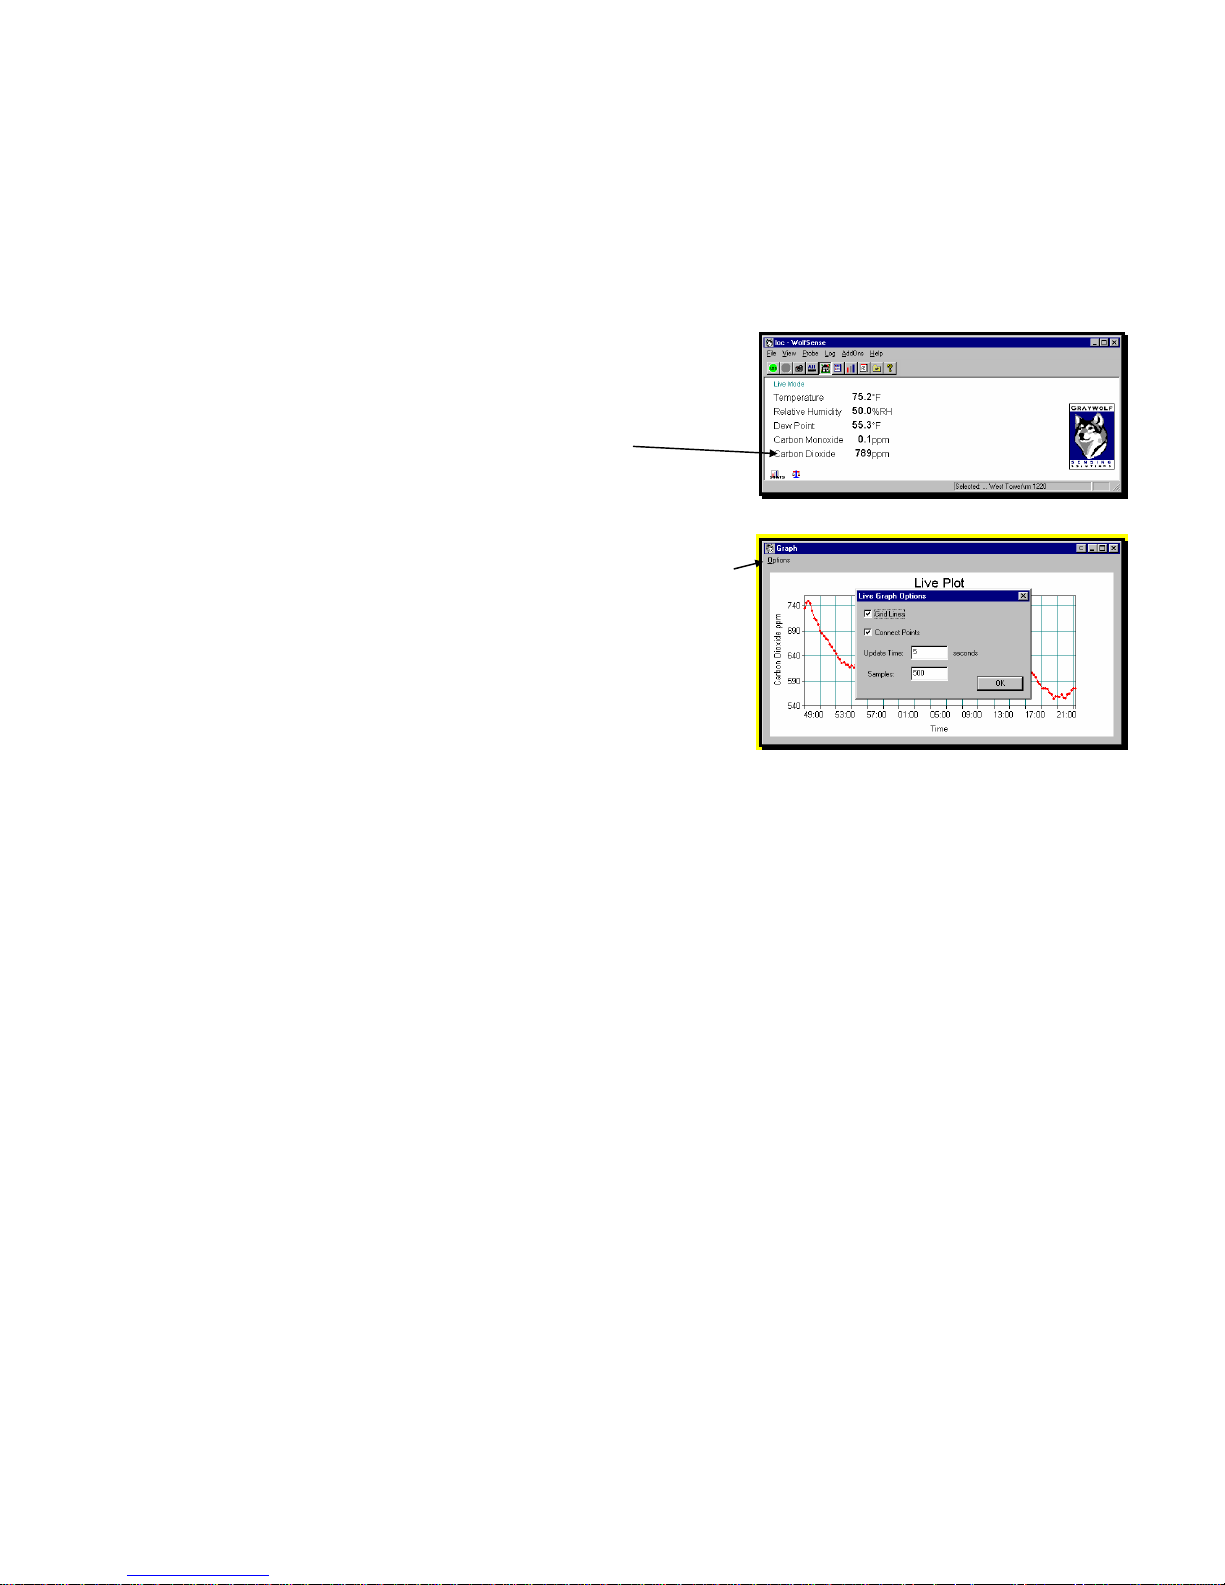
Graph
Graph allows you to plot readings for a selected measurement parameter in real time
from Live Mode, Readings.
To see current values from the probe,
click on or tap View, Readings.
To choose the parameter you want to graph,
click on or tap the desired parameter.
Click on or tap View, Graph.
Click on or tap Options to change the appearance of
the graph:
Check Grid Lines to display gridlines;
Check Connect Points to draw lines between
points;
Set Update Time in seconds;
Set the number of Samples to be taken.
Data Organization: Sites and Locations
Logged readings are stored in individual data files called location (.loc) files.
Calibration data, text notes, drawing notes, and template reports are also stored and
organized as attachments to these location files (see “Notebook” on page 13).
Location files are stored in the Windows folder which WolfSense calls site folders or
Sites. WolfSense IAQ LAP and WolfSense PC software use the same Windows file
structure of site folders and location files on the Lap PC. If you create a location file
in WolfSense IAQ LAP, you will be able to open it from WolfSense PC.
Each site folder may contain multiple sub-sites and multiple location files to further
organize the data. For example, a site folder called "School" may have one sub-site
for the "Ground Floor" containing locations for the "Principals Office" and "Library"
and another sub-site called "3rd Floor" containing a location for the "Teachers
Lounge." The root site in the WolfSense file system is \My Documents\WolfSense\,
so the three location files would have these file names:
\My Documents\WolfSense\School\Ground Floor\Principals Office.loc
\My Documents\WolfSense\School\Ground Floor\Library.loc
\My Documents\WolfSense\School\3rd Floor\Teachers Lounge.loc
Figure 9 – LIVE MODE READINGS
Figure 10 – GRAPH Readings in Real Time
Page 14

8
Creating, Selecting and Deleting Site Folders and Location Files
First, create or select the site folder you need.
Then, create or select a location file in that site folder.
The next time a log begins, readings will collect in the location file you just selected.
This location file collects readings until you select a different
location file for logging.
To create a new site folder from the main WolfSense IAQ LAP screen,
click on or tap the Set Site/Location toolbar button or Log, Locations/Sites.
In the LOCATIONS dialog box (see Figure 13), click on or tap Sites.
In the SITES dialog box, you will see highlighted the name of the last site folder
in which a location file was created or selected.
To choose a different site, scroll, click or tap through
the site folder tree until you see the desired site
folder.
Click on or tap the site folder.
Click on or tap the field under NEW SITE NAME.
Type the name for the new sub-site folder.
Click on or tap Create Site.
Click on or tap Locations. Or, if starting from the main WolfSense
IAQ LAP screen, click on or tap Log, Locations/Sites.
Click on or tap in the field under NEW LOCATION.
Type the name of the new location file. You may also use the right
and left arrows to insert pre-set names such as Location1,
Location2, etc.
Click on or tap Create Location.
The new location file name will appear in the list of locations and is
selected for logging. The wolf’s head indicating a location file will
be light gray. When a file has data in it, the wolf’s head is black and
white.
See “Notebook” on page 13 to create a text note, drawing note or
template report for new or existing location files.
To select an alternate location for logging, click on or tap Sites and scroll, click or tap
through the site folder directory to the desired site. Click on or tap Locations. Click
Figure 11 - Log menu
Figure 12 - SITES dialog box
Figure 13 - LOCATIONS dialog box. The
wolf’s head indicates a location file
where data is or will be stored. Light
gray wolf’s head means emptyfile; black
and white head means file has data.
Page 15

9
on or tap an existing location to highlight it. Click on or tap Select. The dialog box
will close and the location file will be ready for logging.
To delete a location file or entire site folder, click on or tap File, Open or View, View
Location. Scroll, click or tap through the site folder directory to the desired site or
folder. Press the DEL key. Click on or tap Yes to confirm that you want to send it to
the Recycle Bin.
To print a location file, see “Printing Location Files, Notes, Reports & Calibration Data
from WolfSense PC” on page 26.
Types of Logs
WolfSense IAQ LAP offers three ways to log data into a
location file:
Snapshot Log - manually.
Standard Timed Log - at pre-set intervals initiated at
the measurement site and until stopped by user.
Auto Start/Stop Log - at pre-set intervals between
pre-programmed start and stop times.
Append or Overwrite
The LOCATION EXISTS dialog box appears when you try to add readings to a file that
already exists and contains logged data.
Click on or tap Append to ADD readings to the
existing file; or
Click on or tap Overwrite to DELETE all readings
previously stored in that location file and replace
them with the new set of readings.
Click on or tap Don’t give this message again to
suppress this dialog box until the next time you
change locations or log modes.
Figure 14 - Log menu
Figure 15 – LOCATION EXISTS dialog box
Page 16

10
Snapshot Log
The Snapshot Log lets you log values from the probe manually—even supplemental
values if you are running a Standard Timed or Auto Start/Stop log.
Click on or tap the Snapshot toolbar button
or Log, Snapshot Log.
The dialog box confirms the name of the location file
to which values are being logged.
You will see the LOCATION EXISTS dialog box above if
the location file already has stored readings in it and
you have not checked Don’t give this message
again (Figure 15).
Standard Timed Log
The Standard Timed Log program logs readings in a location file at pre-set
intervals—until you stop the data logging or exit from WolfSense IAQ LAP. From the
STANDARD TIMED LOG SETUP dialog box, set the location file to be used and the
interval between readings.
Click on or tap Log, Standard Timed Log.
Click on or tap Set Location to select or create the
location file for logging. (See page 8 for details.)
To change the interval, click on or tap the hour,
minute or second digits. Then type your choice, or
use the up and down arrows on your keyboard.
Click on or tap Start Log to begin data logging, or
click on or tap OK to save the time interval and exit.
When finished logging data, click on or tap
the Stop toolbar button or Log, Stop Log to end the
logging session.
If you try to exit WolfSense IAQ LAP while a log is
running, you will see a warning.
Click on or tap Cancel to continue logging, or
click on or tap OK to exit.
Figure 16 - Confirmation Message from Snapshot Log
Figure 17- STANDARD TIMEDLOG SETUP dialog box
Figure 18 – Warning if you try to exit while a log is running
Page 17

11
Auto Start/Stop Log
The Auto Start/Stop Log allows you to specify a starting date and time, an ending date
and time, and an interval. Because it will start and stop automatically, this log mode
is particularly useful for unattended logging and/or for pre-programming the system
for delivery to a measurement location in the PCC-15 deluxe hardshell security case.
From the main WolfSense IAQ LAP screen, click on
or tap Log, Auto Start/Stop Log.
Click on or tap the START or END field to display a
calendar.
To scroll through the months, click on or tap the right
and left arrows at the top of the calendar.
Click on or tap the date to select it.
Click on or tap OK to close the calendar.
Edit the interval times as for the Standard Timed
Log above.
Click on or tap Set Location to create or select a
location file.
Click on or tap OK to save changes without
starting the logger. The dialog box will close.
Click on or tap Start Log so logging will begin at
the specified start time. The dialog box will close.
NOTE: Install fresh probe batteries before using the Auto Start/Stop Log for
extended periods without AC power. Charge the Lap PC batteries frequently.
If the Lap PC’s batteries become depleted, a warning message is issued and
WolfSense IAQ LAP will automatically stop logging and suspend the Lap PC.
Figure 19 - AUTO START/STOP LOG SETUP dialog box
Figure 20 - Calendar to Set Start/Stop Dates and Times
Page 18

12
The Logging Process
To start any of the three types of data logging, follow these steps:
1. Make sure the probe is securely attached to the serial port.
2. Set the parameters you wish to log. See “Readings” on page 5.
3. Select a location file for storing the readings for these parameters.
See “Data Organization: Sites and Locations” on page 7.
4. Select the log program. See “Types of Logs” on page 9.
5. Initiate timed logging in one of three ways:
Click on or tap the Start Log button in the AUTO START/STOP LOG or
STANDARD TIMED LOG dialog boxes.
Click on or tap Log, Start Log from the main WolfSense IAQ LAP screen.
Click on or tap the LOG toolbar button.
Log Information and Stored Readings
Log Information
During logging, readings appear on the screen in Detail format by default. You may
also choose to display current live readings in Readings format. (See page 5.)
The location file name will appear at the top of the
screen and the Log icon, at the lower left side.
To find out what log program is active, click on or
tap Log, Log Info or the Log icon.
The LOG PROGRAM dialog box shows the kind of log, the specified
interval, and the location file to which readings are being logged.
Figure 21 - View, Details while Logging (DirectSense 100)
Figure 22 - LOG PROGRAM dialog box
Page 19

13
Stored Readings
You may also view stored readings after logging them in a location file. From the
main WolfSense IAQ LAP screen, click on or tap File, Open Location or View, View
Location. Click, tap or scroll through the site folder directory to the desired site
folder. Double-click or double-tap the site folder for a list of its location files. Doubleclick or double-tap the desired location file. The location file will automatically open in
WolfSense PC. For information on data and file manipulation, see “Navigating in
WolfSense PC” on page 24. See also “Printing Location Files, Notes, Reports &
Calibration Data from WolfSense PC” on page 26.
Notebook
Notebook contains one Text Note, one Drawing Note, multiple Report Templates, one
Sound Note and one Custom Note for each location file. All of the notes and reports
may be updated as often as needed. You may create one report from each of the
report templates. You may also add or delete your own customized report templates
for the “Report” selection in the \ProgramFiles\GrayWolf\WolfSense\Templates
directory. The Sound Note uses your system’s sound recording software and a
microphone to record an audio note. Custom Note lets you set a default file type
such as Excel or Visio for a custom note you might want to create. Creating and
printing each type of note or report is described in the following sections.
Just as you do when you set up a log, you must first select the location file for which
you wish to create a text note, drawing note or report.
From the main WolfSense IAQ LAP screen,
click on or tap the Set Site/Location toolbar button
or Log, Locations/Sites.
Click on or tap Sites to find the desired site folder.
Click on or tap Locations for a list of location files.
Click on or tap the desired location file name.
Click on or tap Notebook or Select. Notebook puts
you into the NOTEBOOK dialog box immediately.
Select selects the file and closes the dialog box.
Click on or tap the Notebook toolbar button
or File, Notebook to go to the NOTEBOOK dialog box
for the selected location file.
Shortcut: If you click on or tap the Notebook toolbar button or File, Notebook without first selecting a
location file, you will go to the last location file selected.
Figure 23 - LOCATIONS dialog box: Using Notebook
Page 20
14
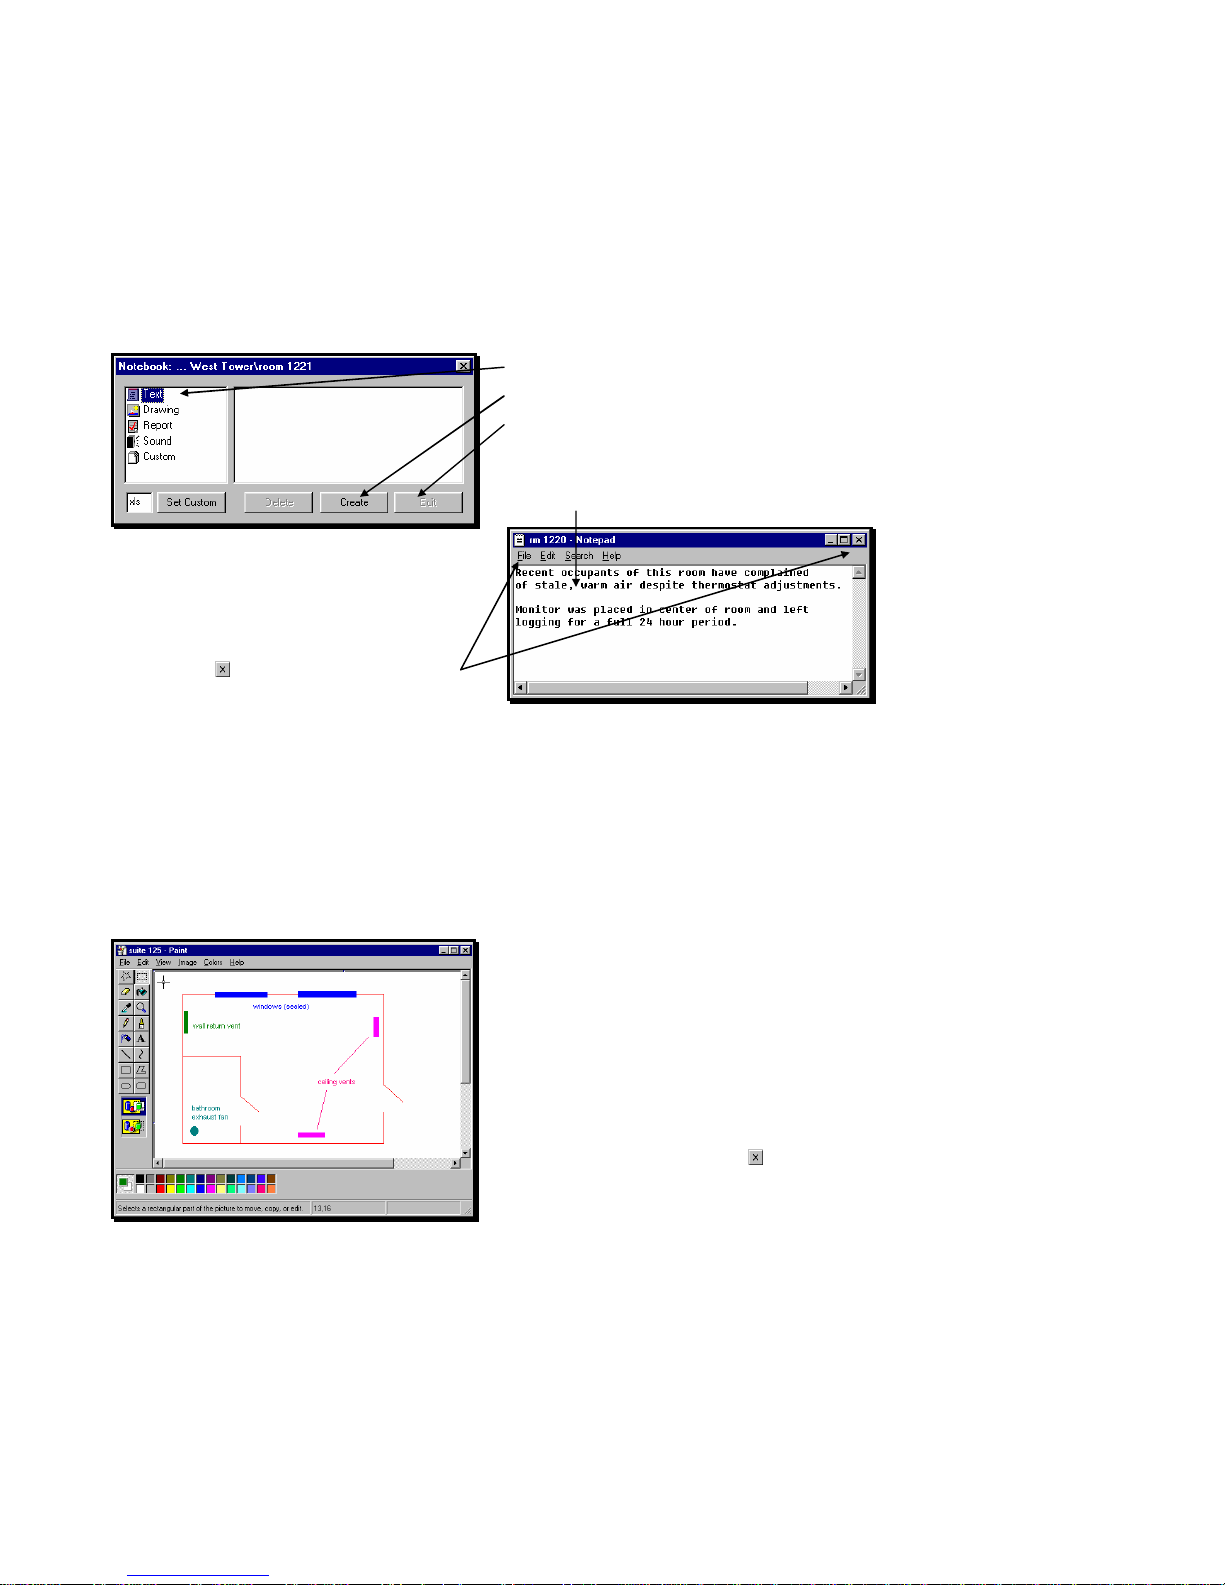
Text Notes
Once you have selected a file as described in the previous section, you may create a
text note using Windows Notepad or your system’s default text editor.
For a text note, click on or tap Text.
Click on or tap Create.
The Edit button will be available only if a note
already exists for the location.
Click on or tap inside the edit window to activate
the cursor.
Type or revise a text note using the text editor
provided. On your keyboard, use the Enter key to
start new lines of text; use the arrow keys to move
the cursor through the text.
To print the text note, click on or tap File, Print.
Click on or tap or File, Exit to exit the editor.
You will be asked if you want to save your changes.
Click on or tap Yes or No.
The text note will close and you will return to
WolfSense IAQ LAP.
Drawing Notes
Once you have selected a file as described on the previous page, you may create a
drawing note in Microsoft Paint or your system’s default Bitmap editor.
Click on or tap Drawing in the NOTEBOOK dialog box (Figure 24). Click on or tap Create.
The Edit button will be available only if a drawing
already exists for the location file selected.
Create a drawing with the editor provided.
To draw points, click on or tap on the screen.
To draw freehand, hold the left mouse button down
while moving it or drag the stylus on the screen.
To remove points or lines just drawn, click on or tap
Edit, Undo.
To remove all points, click on or tap Image, Clear
Image.
To print the drawing, click on or tap File, Print, OK.
To close the drawing, click on or tap or File, Exit.
You will be asked if you want to save the changes.
Click on or tap Yes to save changes, No to save
without changes, or Cancel to continued editing the
drawing.
Figure 24 - NOTEBOOK dialog box
Figure 25 - Text Note window
Figure 26 - Drawing Note window using MS Paint
Page 21

15
Reports
Use the multiple report templates provided in WolfSense IAQ LAP to create one of
each report for any location file in Microsoft Word or your system’s default RTF editor.
Update each report as often as needed. Reports are stored with their associated
location file in the same site folder: \My Documents\WolfSense. Add your own report
templates to the \Program Files\GrayWolf\WolfSense\Templates directory: create
templates in using a word processor and save them as Rich Text Format (.rtf) files.
To access Reports from the main WolfSense IAQ LAP screen, click on or tap Log,
Locations/Sites, Notebook, or, if you have already selected the location file, click on
or tap File, Notebook or the Notebook toolbar button.
Click on or tap Report.
Click on or tap a report template on the right.
Click on or tap Create. Edit will be available only if a
report already exists for the location
If you click on or tap Create and a report already
exists for this location, you will see this warning.
Click on or tap Yes or No.
The report will open in MS Word. See Help for MS
Word about its editor features.
To print the report, click on or tap File, Print, OK.
To edit an existing report, click on Report.
The ATTACHED REPORTS dialog box shows a list of
existing reports.
Click on or tap the report you want to edit.
Click on or tap View.
Edit in MS Word.
Save before exiting.
Figure 27 - Report Templates in NOTEBOOK dialog box
Figure 28 – Warning that Report Already Exists
Figure 29 – ATTACHED REPORTS dialog box
Page 22

16
Sound
If your Lap PC is equipped with sound recording software and a microphone, you may
record notes as sound.
Click on or tap Sound in the NOTEBOOK dialog box (Figure 27). Click on or tap Create. Speak into the
microphone to record your note. Click on or tap to stop recording and close the sound note.
Custom File Types
You may want to create a custom note using other applications on your Lap PC. Set
Custom lets you set a file extension, so that clicking on Create automatically opens a
new file of that specified file type.
Click on or tap the field next to Set Custom.
Type in the three-character file extension for the type
of custom note you wish to create.
Click on or tap Set Custom.
Click on or tap Custom.
Click on or tap Create.
The editor or software program associated with the
custom file extension will open.
Edit and Print according to the application’s help
instructions. Save before exiting.
To change the custom note to a different file type, you must confirm that you want to
replace the note type and delete the previous custom note.
Click on or tap the field next to Set Custom.
Type in the three-character file extension for the type
of custom note you wish to create.
Click on or tap Set Custom.
Click on or tap Yes to replace the custom note type.
Click on or tap Yes to delete previous format custom
note.
Click on Custom in the NOTEBOOK dialog box.
Click on Create. Create your new custom note and
save before exiting.
If you reset the custom note file type to one you
used before, the old custom note will reappear.
Figure 30 – Custom Note creation
Figure 31 – Change Custom Note Type dialog box
Figure 32 – Delete Custom Note dialog box
Page 23

17
This page intentionally left blank.
Page 24

18
This page intentionally left blank.
Page 25

19
Probe Information
To display the status of the probe from the WolfSense IAQ LAP main screen, click on
or tap Probe, Information.
Probe Battery - how much battery time is left.
Battery life calculations are based on standard
alkaline batteries used at 70ºF (21ºC). Battery life
will vary depending on the battery manufacturer and
the ambient temperature at which the probe is used.
Probe Type - model number of probe.
Serial Number - unique identifier of probe.
Probe Calibration Data
Calibration data includes date, time, last factory calibration, last user calibration and
settings for each parameter. It is stored in the probe and a copy is made (along with
the measurement data) for every location file. Any time calibration data changes, the
new data is appended to the calibration data already associated with the location file
so you have a complete record of calibrations for all measurement data in each
location file. You may view calibration data for location files from WolfSense PC.
Open a location file from the WolfSense IAQ LAP or
WolfSense PC main screen.
Click on or tap the Calibration Data icon in
the lower right-hand corner of the screen.
You may also view calibration data for a probe attached to the Lap PC in live mode.
In that case, click on or tap the Calibration Data icon in the lower left-hand corner of
the screen.
Figure 33 - PROBE INFORMATION display
Figure 34 – Probe Calibration Data
Page 26

20
Probe Calibration
The probe may be calibrated in one of three ways:
at the factory, according to GrayWolf standards;
at the factory (or an outside calibration laboratory) using NIST-certified
traceable standards;
by the user (described in this section).
You cannot change factory and NIST calibrations.
Temperature is factory-calibrated. Dew Point*, which is
derived from Temperature and Relative Humidity, has no
calibration.
The three parameters you may change are Relative Humidity
(%RH)*, Carbon Monoxide(CO)* and Carbon Dioxide (CO2).
The range for each parameter has two pre-set calibration
points. Normally, you only change these points to match
reference gas or salt values for calibration.
Calibration should be performed at least every 12 months on
the %RH sensor and at least every 6 months on the CO and
CO2sensors. More frequent calibration is recommended if
the sensors are exposed to contaminants such as heavy
cigarette smoke. Note that most IAQ monitoring protocols
advise calibrating CO and CO2sensors more frequently.
The probe should be returned to the factory for temperature
calibration every 24 months. WolfSense provides kits for %RH,
CO and CO2calibration. See “Probes & Accessories” on page
31 for the contents of each kit.
To set up the correct calibration environment for Carbon
Monoxide(CO)* and Carbon Dioxide (CO2), place the flowhood
over the probe (Figure 35). For Relative Humidity (%RH)*,
place the probe upside down in the adapter on the jar of salt
solution (Figure 36).
*
DirectSense only.
Figure 35 - Calibration
Environment for CO or CO2:
Flowhood over probe
Figure 36 - Calibration
Environment for %RH:
Probe adapter on jar of salt
solution
Page 27

21
Note: If WolfSense detects that a sensor may have drifted out of specification,
the icon will appear, along with a * next to the parameter that may need to
be checked. However, do NOT rely on this indicator to ensure proper
calibration because WolfSense can only detect sensor drift in some instances.
To calibrate the probe, click on or tap Probe,
Calibration.
Click on or tap the arrow to see the drop-down list of
user-calibrated parameters.
Click on or tap the parameter you want to calibrate.
Click on or tap the high or low point value.
Edit the CAL POINT to match your reference value, if
necessary. CAL POINT must match the gas or %RH
reference you use. Recommended STABILITY TIME is 60
seconds, but you may edit it if you wish.
Click on or tap Calibrate to begin the calibration
process.
Optional: Click on or tap Default to force all calibrations
to revert to the factory defaults for calibration points and
stabilization times initially supplied by GrayWolf.
Optional: Click on or tap Clear to remove the current
calibration. If a user calibration is cleared, the probe will
use a NIST calibration (if available) or the factory
calibration.
Clear affects only the selected calibration point.
If you changed the calibration point value, you will be
prompted to confirm this action.
WARNING! Confirming this action will
overwrite the existing calibration settings.
Click on or tap Yes.
Place the probe in the appropriate calibration
environment.
Start the flow of gas for CO or CO2, or place the
probe in the %RH jar.
Wait for the readings to settle within a range of
roughly 2-3%. This typically takes under 2 minutes
for CO and CO2, but 45-60 minutes for %RH.
Click on or tap OK.
Figure 37 - PROBE CALIBRATION dialog box
Figure 38 - CALIBRATION Warning dialog box
Figure 39 - Set up Calibration Environment for CO
2
Page 28

22
A countdown screen shows the additional
stabilization time allowed and remaining for this
measurement.
Once the stabilization time has elapsed, the software
will automatically record the current value of the
measurement. You may then continue with the
other calibration point or other measurement
parameters.
All calibration information is stored in the
probe so that each probe “remembers” its correct calibration values. You will be
prompted to send the updated calibration information to the probe.
NOTE: No changes to the calibration information are confirmed to the probe until you
click on or tap OK to exit the calibration dialog box.
Click on or tap OK in the lower right-hand corner of
the CALIBRATION INFO dialog box (Figure 37).
Click on or tap Yes to send the new calibration
information to the probe,
No to abandon your changes, or
Cancel to return to the calibration dialog box.
Probe Setup
The probe is attached to the Lap PC through the serial port. You may attach only one
probe at a time (as in Figure 2). Use Probe Setup if you need to change the serial
port where you will connect the probe.
Before attaching the probe to the Lap PC, be sure
the COM port is clear and that the COM indicator
flickers in the lower right-hand side of the WolfSense
LAP window. If it does not appear, the serial port
you have selected is not available.
Attach the probe to the serial port.
Figure 40 - Calibration Countdown screen
Figure 41- Last Chance to Stop Changes to Calibration
Settings of Probe
Figure 42 – COM Indicates Port Available for Probe
Page 29

23
Changing Serial Ports
Click on or tap in the field next to Serial Port.
Type the number of the COM port available for use.
(The system defaults to 1 the first time.)
Click on or tap OK.
Click on or tap Yes to restart WolfSense IAQ LAP
before you start taking readings.
Using Additional External Probes
If you want to use an additional probe, such as an
MIE particulate sensor (see separate manual),
plug it into the PCMIA slot and select
Detect PCMIA Port Probes on the Probe menu.
Because selecting this option slows down
response time, uncheck it when you are not
plugging a probe into the PCMIA slot.
Figure 43 – PROBE SETUP dialog box
Figure 44 – Application Restart Message
Figure 45 – Probe menu
Page 30

24
Navigating in WolfSense PC
From the main screen, you will perform all the functions available with WolfSense PC.
The pull-down menus and toolbar buttons are described briefly below.
Pull-Down Menus
File - to manage files: OPEN, OPEN VENTCAL REPORT NOTEBOOK, PRINT, EXPORT, list of recently used files,
TRANSFER, EXIT.
Edit - to COPY selected columns onto the Windows clipboard so they may be pasted into Word,
Excel or other programs. All columns are selected by default. Select a particular column or
columns by clicking on the column headings.
View - to show or hide the TOOLBAR, STATUS BAR and location file STATISTICS.
Window - to CASCADE orTILE windows, ARRANGE ICONS, switch to or show location file in use.
Graph - to CREATE graphs.
Help - to show HELP TOPICS,GETTING STARTED,WOLFSENSE IAQ HELP,
ABOUT WOLFSENSE PC.
Figure 46 WolfSense PC
Pull-down Menus and
Toolbar Buttons
for Open Files
Toolbar Buttons
Help - shows HELP TOPICS on WolfSense PC.
Export - EXPORTS data in comma-separated file to a word processor,
spreadsheet or other program.
Print - PRINTS tables or charts as they appear on the screen.
Graph - displays data graphically,withmany options for constructing the GRAPH.
Copy - to COPY columns onto the Windows clipboard for pasting into other applications. See
Pull-down Menus, EDIT, above.
Transfer - TRANSFERS files manually between a Handheld PC and a desktop PC.
Open - OPENS location files from the Windows directory you chose during installation for WolfSense files.
WolfSense PC Software
After gathering air quality data on the Lap PC using WolfSense IAQ LAP, you will use
WolfSense PC to manipulate the location file data. You may print, graph and/or
export the location file data to spreadsheets.
Once in WolfSense PC, you will see the structure of the \My Documents\WolfSense
site folder. This one site folder structure is shared by WolfSense IAQ LAP and
WolfSense PC.
NOTE: Although only .loc location files are displayed, all associated Note and
Report files and calibration data files are stored with them in the same site folder.
To see all files, in the File, Open dialog box, change Files of Type to ALL.
Page 31

25
After logging is complete, open a location file from
WolfSense IAQ LAP, or click on or tap
Start, Programs, GrayWolf, WolfSense PC.
Click on or tap Open to see location files stored on
your Lap PC.
Click, scroll or tap through the directory to find the
location file you want to open.
Click on or tap Open.
The file will open in a columnar format similar to
View, Details in WolfSense IAQ LAP.
The icons in the lower right-hand corner indicate if a
text note, drawing note, template report, sound note
or custom note exists for this location file.
Click on or tap the associated icon to see a note or
report.
Click on or tap the Calibration Data icon to see
Calibration Data.
Graphing and printing data are shown below. See
“Navigating in WolfSense PC” on page 24 for other
ways to manipulate your data.
Graphing Data Files in WolfSense PC
WolfSense PC offers options for creating graphs: an x-axis and one or multiple yaxes; grids and labels; and titles that may or may not be displayed.
Figure 47 – Location File Open in WolfSense PC
Figure 48 –Notes and Reports icons
Text Note • Drawing Note • Report Template
Sound Note • Custom Note • Calibration Data
Figure 49 - Graph Axes
Figure 50 - Graph Options Figure 51 - Graph Title
Figure 52 - Graph Generated from WolfSense PC
+ +
Page 32

26
Printing Location Files, Notes, Reports & Calibration Data from WolfSense PC
A location file may only be printed from WolfSense PC. If you open a location file
from WolfSense IAQ LAP, the file actually opens in WolfSense PC.
Once a text note, drawing note, template report or custom note has been created for
a location file, you may print it from WolfSense PC.
If starting from WolfSense IAQ LAP, click on or tap
File, Open Location or View, View Location.
If starting from WolfSense PC, click on or tap File,
Open or the Open toolbar button.
Click, tap or scroll through the site folder directory to
the desired location file.
Click on or tap the location file name.
Click on or tap Open.
To print the location file,
click on or tap File, Print, OK or the Print toolbar
button.
To print a note, template report or calibration data,
click on or tap the icon in the lower right-hand corner
of the screen to open the associated text note,
drawing note, template report, custom note or
calibration data.
Click on or tap File, Print.
For details on printing, see the Notes and Reports
sections in “Notebook” beginning on page 13.
Figure 53 –Notes and Reports Icons in WolfSense PC
Text Note • Drawing Note • Report Template
Sound Note • Custom Note • Calibration Data
Figure 54 – Notebook icons: Text note, drawing note,
template report, sound note, custom note and
calibration data may be printed.
Page 33

27
Maintenance, Cleaning, Service
Lap PC
Please refer to your user manual for specific instructions on the care of your Lap PC.
Probe
The probe requires very little maintenance: battery changes, periodic calibration, CO
sensor replacement (typically every 24-36 months), dusting.
See “Powering” on page 2 for details on battery changes.
The %RH, CO and CO2sensors may be calibrated in the field following the
instructions in “Probe Calibration” on page 20. The temperature sensor is calibrated
at the factory. It is recommended that you return your probe to GrayWolf for an
annual factory recalibration and check-up.
The CO sensor has an expected operating life of approximately two years.
WolfSense IAQ LAP checks the output of the sensor during calibration and, as the
CO sensor nears the end of its operating life, warns you that the sensor needs to be
replaced. You may order a SEN-CO1 replacement sensor from GrayWolf or return
the probe to GrayWolf to have the sensor changed.
To change the CO sensor yourself:
1. Unscrew the probe handle from the probe body. (See Figure 3 on page 2.)
2. Carefully remove the black cap from the top of the probe. This is a press fit and the cap can
normally be removed by hand.
3. Cut the tie that is holding the CO2and CO sensors.
4. Unplug the CO2cell.
5. Unplug the CO cell.
6. Plug in the new CO cell.
7. Plug in the CO2cell.
8. Fix cells in place with a new tie.
9. To reassemble the probe, use the reverse procedure.
Before using the probe with the new sensor, calibrate the CO sensor using the
procedure described in “Probe Calibration” on page 20.
When not using the probe for a period of time, store it in a cool, dry, dust-free
environment. The recommended storage temperature is 32ºF to 70ºF (0ºC to 21ºC).
If the storage period will be more than four weeks, remove the batteries from the
probe before storing.
Page 34

28
If the outside of the probe becomes dirty, you may clean it using a slightly damp cloth.
It is not recommended that you clean inside the probe. If the inside does get dirty or
dusty, the probe should be returned to GrayWolf for servicing.
Summary of Cautions
Avoid operation in direct sunlight as %RH measurements may become erratic.
Do not immerse the probe in water.
This is a precision instrument. Do not drop the probe or subject it to undue vibration
or shock.
When not using the probe for a period of time, store it in a cool, dry, dust-free
environment. The recommended storage temperature is 32ºF to 70ºF (0ºC to 21ºC).
If the storage period will be more than four weeks, remove the batteries from the
probe before storing.
Do not place the probe in an environment where condensation will form on it. The
CO2sensor is an optical sensor which uses an active detector and a reference
detector for stable long-term readings. If condensation has formed on one of the
detectors or if there are temperature differences between the two detectors, CO
2
readings may be erratic until the sensor has stabilized to its new environment.
Page 35

29
Troubleshooting
Symptom – The WolfSense software has locked up
Press CTRL-ALT-DEL.
In the dialog box, click on or tap WolfSense IAQ LAP (or WolfSense PC).
Click on or tap END TASK.
Restart the WolfSense software from the LAP PC desktop.
If the system does not respond, from the Windows Start Menu, click on or tap Shut
Down. Restart Windows.
If the system still does not respond, you will need to perform a hard reset.
Push the Reset button to reboot.
Symptom – No communication with the probe
Check to ensure that:
The probe is plugged in properly.
The probe has good batteries.
The battery contacts are clean and not corroded.
The CO2sensor is flashing (visible through the slots) to indicate power is on.
Another application on the Lap PC has not locked the use of the serial port. The
COM indicator appears in the lower right-hand corner of the WolfSense LAP
window when the COM port selected in Probe, Setup is available. If the COM
port is unavailable, you may have to shut down any applications that use the
serial port or restart your computer.
Symptom – Bad or erratic CO2or %RH readings
Check to ensure that:
The probe is shielded from direct sunlight. Readings from these sensors can be
affected by strong direct light.
Symptom – Bad or erratic CO2readings
Check to ensure that:
The sensor is plugged into the circuit board.
You have not moved the probe from a cold environment to a relatively warm,
humid environment.
The probe is not in a variable temperature air stream.
The CO2sensor is an optical sensor which uses an active detector and a reference
detector for stable long-term readings. If condensation has formed on one of the
detectors or if there are temperature differences between the two detectors, CO
2
readings may be erratic until the sensor has stabilized to its new environment.
Symptom – CO2sensor continues to flash after Lap PC is turned off
It is normal for the sensor to flash for a minute or two after power-down.
Page 36

30
Specifications
LAP PC
32MB RAM minimum
20MB minimum available hard disk space
Microsoft Windows 98, NT
Recommended model Fujitsu Lifebook Computer B-2130 is equipped with:
400MHz Intel® Celeron processor
64MB RAM
6GB hard drive
56.6K modem
external 3.5" floppy drive
Microsoft Windows 98
PROBES
Parameter Range Accuracy
Carbon Dioxide 0 to 10,000ppm ±3%rdg ±50ppm
Carbon Monoxide 0 to 500ppm ±2ppm <50ppm, ±3%rdg >50ppm
Relative Humidity 0 to 100% ±2%rh <80%rh, ±3%rh >80%rh
Temperature 15° to 160°F (-10° to 70°C) 1%rdg ±0.6°F (±0.3°C)
Dew Point -27° to 158°F (-33° to 70°C) ±4°F for %RH >10% (±2°C)
Probe Response Time: All sensors exhibit 90% response < 1 minute
Probe Dimensions: 2 in. (5cm) diameter X 12.5in. (30cm) length
Probe Weight with Batteries: 1 lb. 10 oz. (0.7kg)
Probe Power: Typical battery life with 2 alkaline D cells of 150+ hours @ 70°F
(21°C); or 5VDC with AC adapter
Page 37

31
Probes & Accessories
PROBES
IQ-410 CO, CO2, %RH and Temperature Probe
CD-201 CO2, Temperature and Ventilation Probe
AS-201 Telescoping Hotwire Air Velocity Probe
PM-201 MIE Particulate Monitor
ACC-SCPM Serial Card Adapter with software for PM-201
TG-201 Toxic Gas Probe (up to 5 sensors)
ACCESSORIES
HH-02 NEC Mobilepro 780 Handheld Computer
PH-01 Compaq Aero 2180 Palmheld Computer
MN-01 Fujitsu B-2130 Mini-Notebook Computer
ACC-PR1 Printer for HH-02
Cases
PCC-05 Probe pouch
PCC-15 Deluxe (large) hardshell security case
Figure 55 - Open PCC-15 deluxe
hardshell security carrying case.
Figure 56 - PCC-05 probe pouch with
shoulder strap.
Tip: To avoid influencing the CO
2
or %RH readings, wear the PCC-05
soft carrying case across your back.
Page 38

32
ACCESSORIES (continued)
Calibration
CA-GS12 CO and CO2calibration kit for DirectSense 100 includes:
300 & 1000ppm CO2reference gasses, 0.5 & 90 ppm CO reference
gasses, case, flowhood and regulator
CA-GS2H CO2calibration kit for VentCal 100 includes:
1000 and 5000ppm CO2reference gasses, case, flowhood and regulator
CA-HD1 Gas calibration hood and duct-bleed accessory
CA-RH1 %RH calibration kit
NIST-XX NIST Traceable Calibration Certificate
Power
ACC-A110 110VAC adapter for probes
ACC-A220 220VAC adapter for probes
SOFTWARE
SUB-WS1 1-year subscription to WolfSense (IAQ LAP & PC) upgrades
SOFT-VENT Add-on module for Outdoor Air Ventilation Calculations
SOFT-DUCT Duct Traverse Calibration software
SOFT-DUCT Duct Traverse Calibration software
SOFT-HOOD Fumehood Face Velocity Calibration software
SOFT-THERM Thermal Comfort Calibration software
WolfSense Air Air Velocity Probe software
WolfSense IAQ Palm Palmheld PC software for DirectSense 100 applications
WolfSense IAQ Lap Laptop PC software for DirectSense 100 applications
SOFT-HW1 Handwriting Recognition Software
SPARES
SEN-CO1 Replacement CO sensor
ACC-ST3 Replacement styluses (set of 3) for Lifebook
ACC-ADY-L9 Replacement serial/AC power Y adapter
CO-0 0.5 ppm CO calibration gas cylinder
CO-95 95 ppm CO calibration gas cylinder
CO2-300 300 ppm CO2calibration gas cylinder
CO2-1000 1000 ppm CO2calibration gas cylinder
CO2-5000 5000 ppm CO2calibration gas cylinder
Page 39

PRODUCT WARNING:
GrayWolf Sensing Solutions' DirectSenseTMprobes and DirectSenseTMkits are NOT
suitable for use in flammable or potentially explosive environments. They are NOT
certified intrinsically safe. They are also NOT intended for use in confined spaces
where operator safety might be at risk due to exposure levels, such as reduced
oxygen, during the course of the instrument survey.
Page 40

Warranty
GrayWolf Sensing Solutions LTD (hereafter referred to as "GrayWolf") will warranty parts and labor for any
manufactured defects in its products for 12 months. The warranty does not cover abuse (e.g., products
crushed, dropped, electrically shocked, heat-stressed or water-saturated), hazard, accident, transportation
or causes beyond ordinary use. All service, including repair, maintenance and sensor replacements, must
be performed by GrayWolf or one of its authorized service centers. Defects on finished goods
manufactured by others, such as computer systems, are excluded and are covered by the original
manufacturer's warranty (usually one year).
Limitation of Warranty and Liability for GrayWolf Products
(a) Except as otherwise agreed in writing, GrayWolf warrants, under normal conditions of operation, each product sold
(except for finished products not of its manufacture) against defects of material and workmanship, provided that such
product has been properlyutilized. This warrantyapplies to the original purchaser only and shall commence to run
from the date of shipment and shall continue for a period of twelve (12) months. In any event, GrayWolf's liability for
any such defects of material and workmanship shall not exceed the cost of replacement of defective parts upon timely
notification of such defect in writing delivered to GrayWolf's North American home office. GrayWolf shall not be liable
for damage or destruction caused during deliveryorcausedotherthan by employees of GrayWolf.
(b) GrayWolf shall, at its option, repair such defects or replace the parts or products found defective. All defective parts
are to be returned immediately, freight prepaid, to GrayWolf. GrayWolf will make no allowance for repairs or
alterations made by the purchaser unless made with the advance writtenconsent of GrayWolf. GrayWolf assumes no
liability for costs of disassembly of defective parts and equipment. Shipment by purchaser of all repairs and
replacements under this warrantyare F.O.B. GrayWolf's factory,North American service facility or authorized service
representative, and method of shipment will be determined by GrayWolf. The purchaser will pay shipping costs and
insurance in both directions of products, parts, or components shipped for warrantyservice hereunder. The purchaser
will be responsible for risk of loss in both directions. Replaced parts or components will become the property of
GrayWolf. Replacement parts or components may contain recycled, refurbished, or remanufacturedparts equivalent
to new parts and shall be warranted for the remainder of the original warrantyperiod for the products.
(c) Productsthat are not covered bywarranty, such as products that have been subjected to physical misuse or are
beyond the warrantyperiod, will have an estimate submitted before the repair work commences. All out-of-warranty
repairs carry a 90-daywarranty from the date of return shipment.
(d) GrayWolf shall not be liable for delays, deprivation of use, or any other damages, direct or indirect, which may result to
the purchaser because of defects in the product or because of the purchaser's inabilityto operate it or use it to his
satisfaction. GrayWolf will not be liable to anyone for special or consequential damages of any kind. GrayWolf neither
assumes nor authorizes any personto assume for it any other obligationor liabilitywith respect to GrayWolf products.
GrayWolf does not warranty that the equipment is fit for any particularpurposeunless notice of the purposeis
specifically submitted to GrayWolf in writing and is specifically confirmed by an officer of GrayWolf to you.
(e) Finished goods manufactured by others, including computers, batteries, carryingcases and bar coding wands are not
warranted byGrayWolf, but are covered by the original manufacturer'swarranty.
EXCEPT FOR THE FOREGOING EXPRESS WARRANTY, THERE ARE NO WARRANTIES, REPRESENTATIONS, OR
GUARANTEES, EXPRESS OR IMPLIED, EXCEPT AS ARE EXPRESSLY SET FORTH HEREIN. THE FOREGOING
WARRANTY IS THE ONLY WARRANTY MADE BY GRAYWOLF. ANY IMPLIED WARRANTY OF MERCHANTABILITY
OR FITNESS FOR A PARTICULAR PURPOSE ON THIS PRODUCT IS LIMITED IN DURATION TO THE ONE-YEAR
DURATION OF THIS WRITTEN WARRANTY AND IS STRICTLY LIMITED TO THE RETURN AND REPAIR OR
REPLACEMENT OF THE EQUIPMENT. IN NO EVENT SHALL ANY CLAIM EXCEED THE PURCHASE PRICE OF THE
EQUIPMENT PAID BY THE PURCHASER. SOME STATES DO NOT ALLOW LIMITATIONSON HOW LONG AN
IMPLIED WARRANTY LASTS OR FOR THE EXCLUSION OF INCIDENTAL OR CONSEQUENTIAL DAMAGES, SO THE
ABOVE LIMITATIONS OR EXCLUSIONS MAY NOT APPLY TO YOU. THIS WARRANTY GIVES YOU SPECIFIC LEGAL
RIGHTS AND YOU MAY ALSO HAVE OTHER RIGHTS WHICH VARY FROM STATE TO STATE.
Page 41

WolfSense Technical Support
http://www.wolfsense.com/tech.html
Software e-mail: softsupport@wolfsense.com
Hardware e-mail: techsupport@wolfsense.com
Phone: 203-849-8509
WolfSense on the Web: http://www.wolfsense.com
Feedback
We appreciate your input. Please e-mail any
comments or suggestions you may have
about this manual to manuals@wolfsense.com.
 Loading...