


PAGE 1GRAYNS™ - INSTRUCTION MANUAL
ABOUT GRAYNS™
The GRAYNS™ Rice Cooker is an amazing invention that redefi nes healthy living by
cooking rice in the traditional way along with the convenience of smart modern living.
Rice cooked in GRAYNS™, undergoes an intelligent 4-stage cooking process that
determines the optimal cooking temperatures, moisture content and cooking times to
ensure that much of the unhealthy starch or RDS (Rapidly digested starch) is discarded
and the result is healthy, perfectly cooked rice.
The patented technology used to make this possible is ingenious, yet practical and
hygienic.
PAGE 2 GRAYNS™ - INSTRUCTION MANUAL
INDEX
IMPORTANT USER
INFORMATION &
INSTRUCTION
The following symbols are
used in this user manual:
General information & tips
The appliance is not to be used by children or persons with reduced physical, sensory or mental capabilities,
or lack of experience and knowledge, unless they have been given supervision or instruction.
Children being supervised not to play with the appliance.
Caution
ABOUT GRAYNS 1
FAMILIARIZING YOURSELF WITH THE GRAYNS RICE COOKER 3
WHAT’S INSIDE YOUR GRAYNS BOX 3
GRAYNS OVERVIEW 5
CONTROL PANEL - Navigation Trackball 6
DIGITAL CONTROL INTERFACE - Screen Display 7
PREPARING YOUR GRAYNS RICE COOKER 9
PREPARATION TO COOK 10
MAKING GRAYNS RICE 12
HOW TO COOK GRAYNS RICE 15
Select Type of Rice (DEFAULT) 15
Cooking (DEFAULT) 16
Customize Your Rice 17
Cooking (CUSTOMIZE) 19
Cooking Process 20
HOW TO SOAK 21
HOW TO SOAK & COOK 24
HOW TO CANCEL PROGRESS 26
SERVING 27
MAINTAINING 29
Washable 29
Wet Wipe Only 30
Cleaning The Steam Vent 31
Cleaning The Starch Collector 32

PAGE 3GRAYNS™ - INSTRUCTION MANUAL
WHAT’S INSIDE YOUR GRAYNS BOX
FAMILIARIZING YOURSELF WITH THE GRAYNS RICE COOKER
1
2
3
4
5
6
Strainer Basket
Made from stainless steel to hold your
rice and let the water drain perfectly
Steel ball
marble sized stainless steel ball allows
the water to drain
Inner container
Durable non-stick construction makes
cleanup easy
Cooker
Consists of a set of several parts including
the lid, handle, front and back cover, scroll
button and screen.Made from high quality,
durable materials.
Collector cap
The Cap avoids spilling & splashing from
the hot contents of the Cooker. The cap
can be opened for cleaning purposes
Starch collection Tray
This container collects the starch that has
been drained during cooking.
1
2
3
4
5
6

PAGE 4 GRAYNS™ - INSTRUCTION MANUAL
8
9
Accessories:
Power cable
connect the cooker to a power source
Measuring cup
Allows you to measure the amount of
cook
Scoop
Use to fl uff and scoop the rice from the
strainer basket
Spare Steel ball
7
8
9
10
10
PAGE 5GRAYNS™ - INSTRUCTION MANUAL
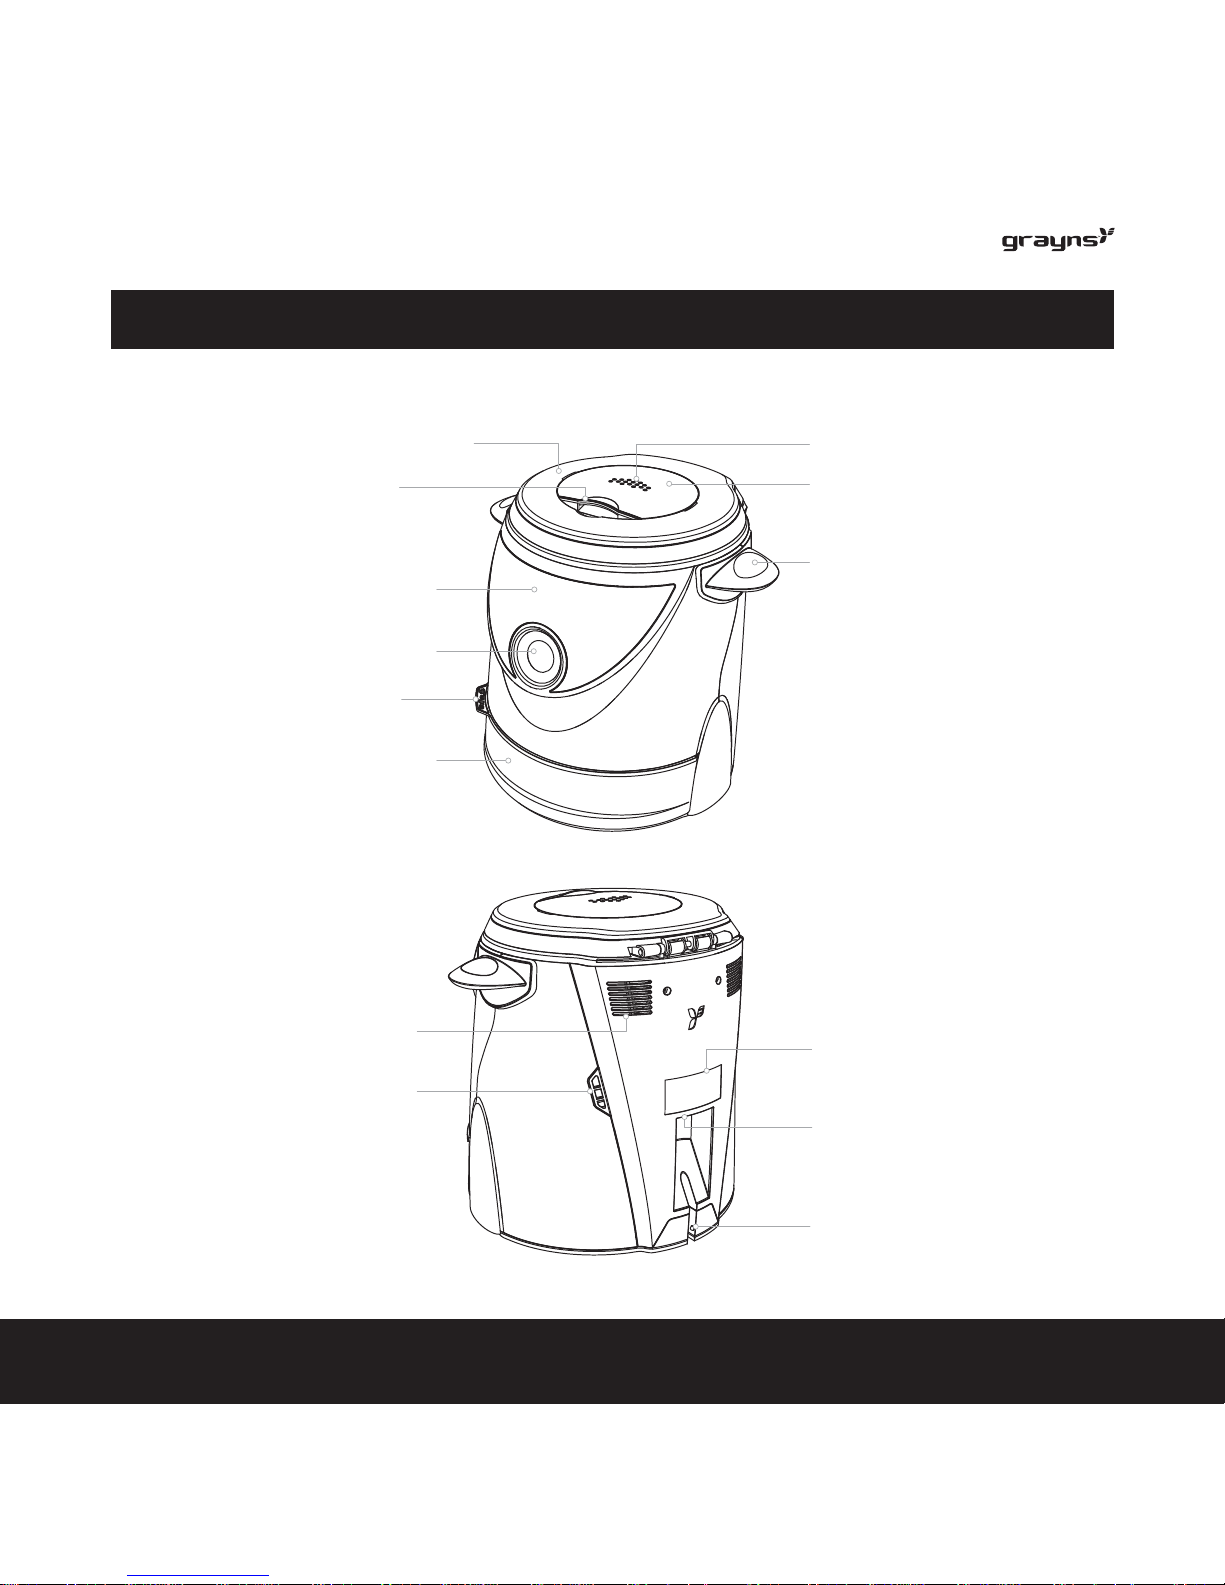
GRAYNS OVERVIEW
FAMILIARIZING YOURSELF WITH THE GRAYNS RICE COOKER
Lid
Lid slot
Screen display
Navigation trackball
Collector cap
Starch collector
Holder
Steam cover
Steam vent
Infomation label
Exhaust
air outlet
Ventilation
Power in
Wire slot
PAGE 6 GRAYNS™ - INSTRUCTION MANUAL
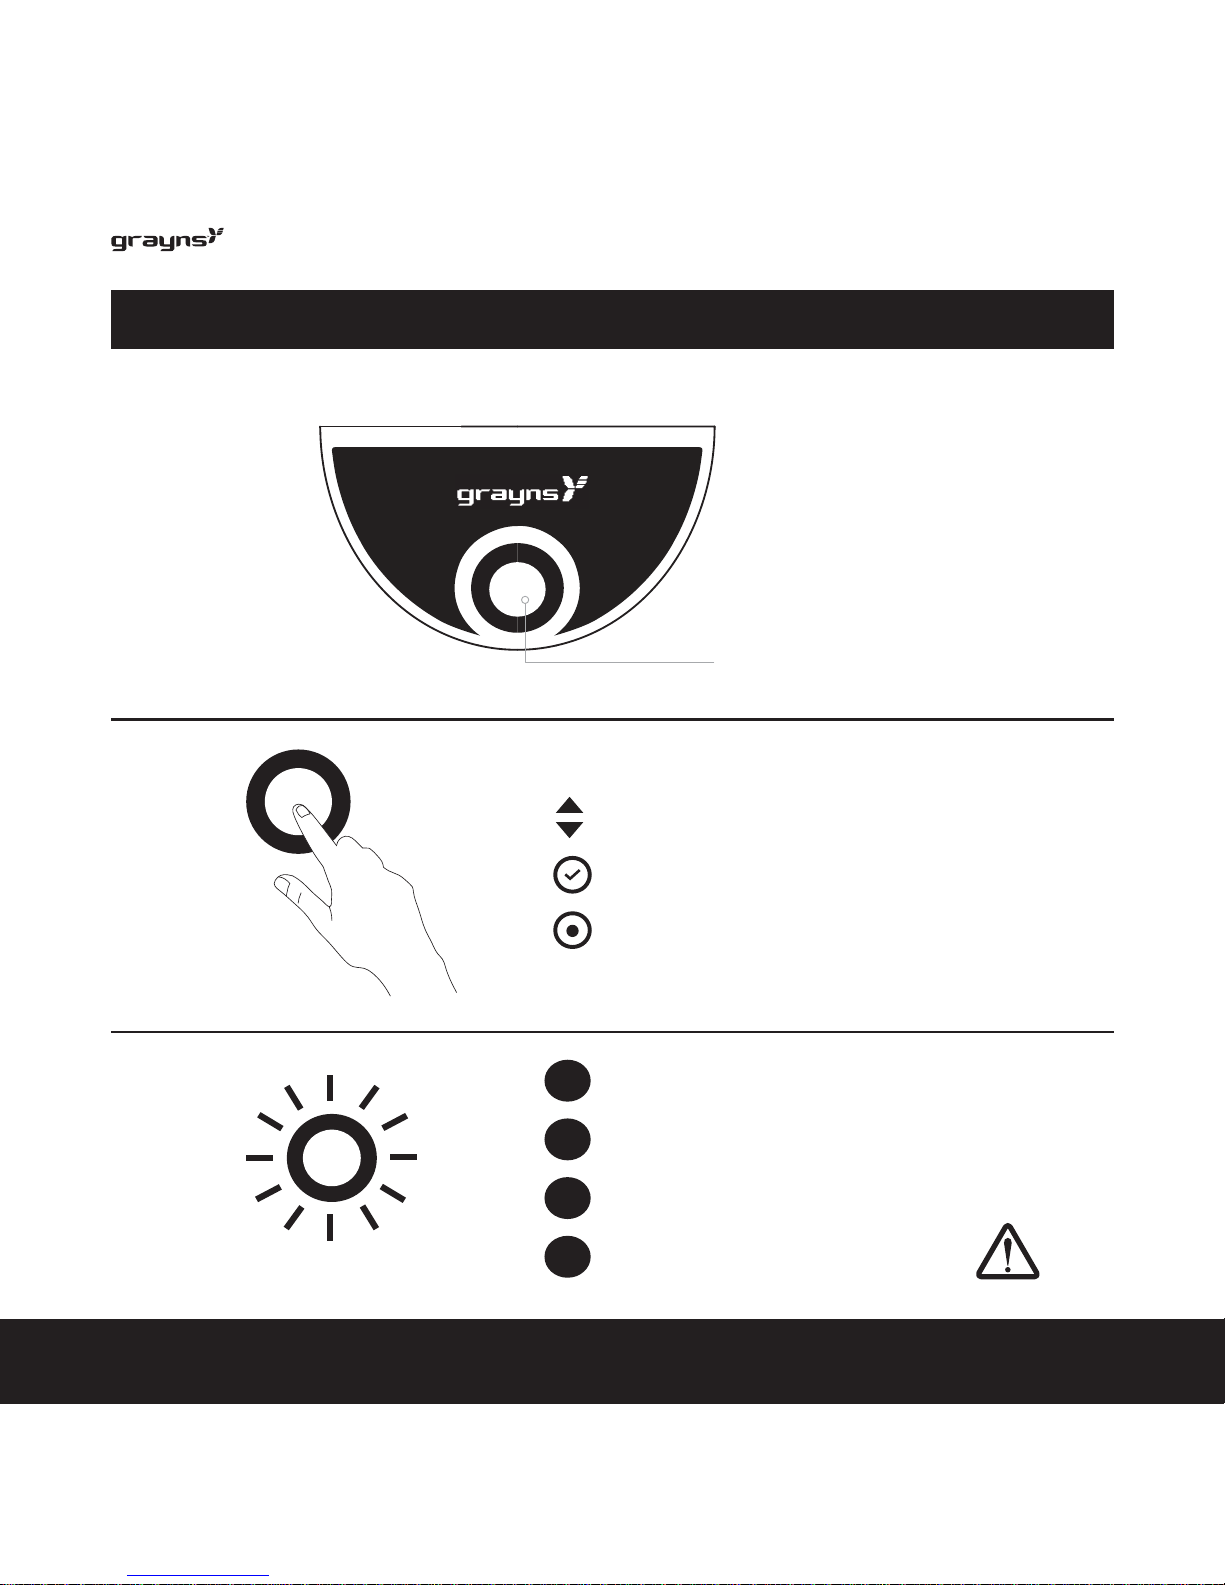
CONTROL PANEL - Navigation Trackball
FAMILIARIZING YOURSELF WITH THE GRAYNS RICE COOKER
Navigation Trackball
BLUE - Progress mode
B
WHITE - Standby mode / Menu
W
GREEN - Completed / Ready
G
RED - Error! / Progress failed
R
How to Operate
Light Indicator
Scroll up / down - Move option / next / previous
Single click - To confi rm / select / ok / yes / no
Press & hold - Back to main menu / return / on & off
PAGE 7GRAYNS™ - INSTRUCTION MANUAL
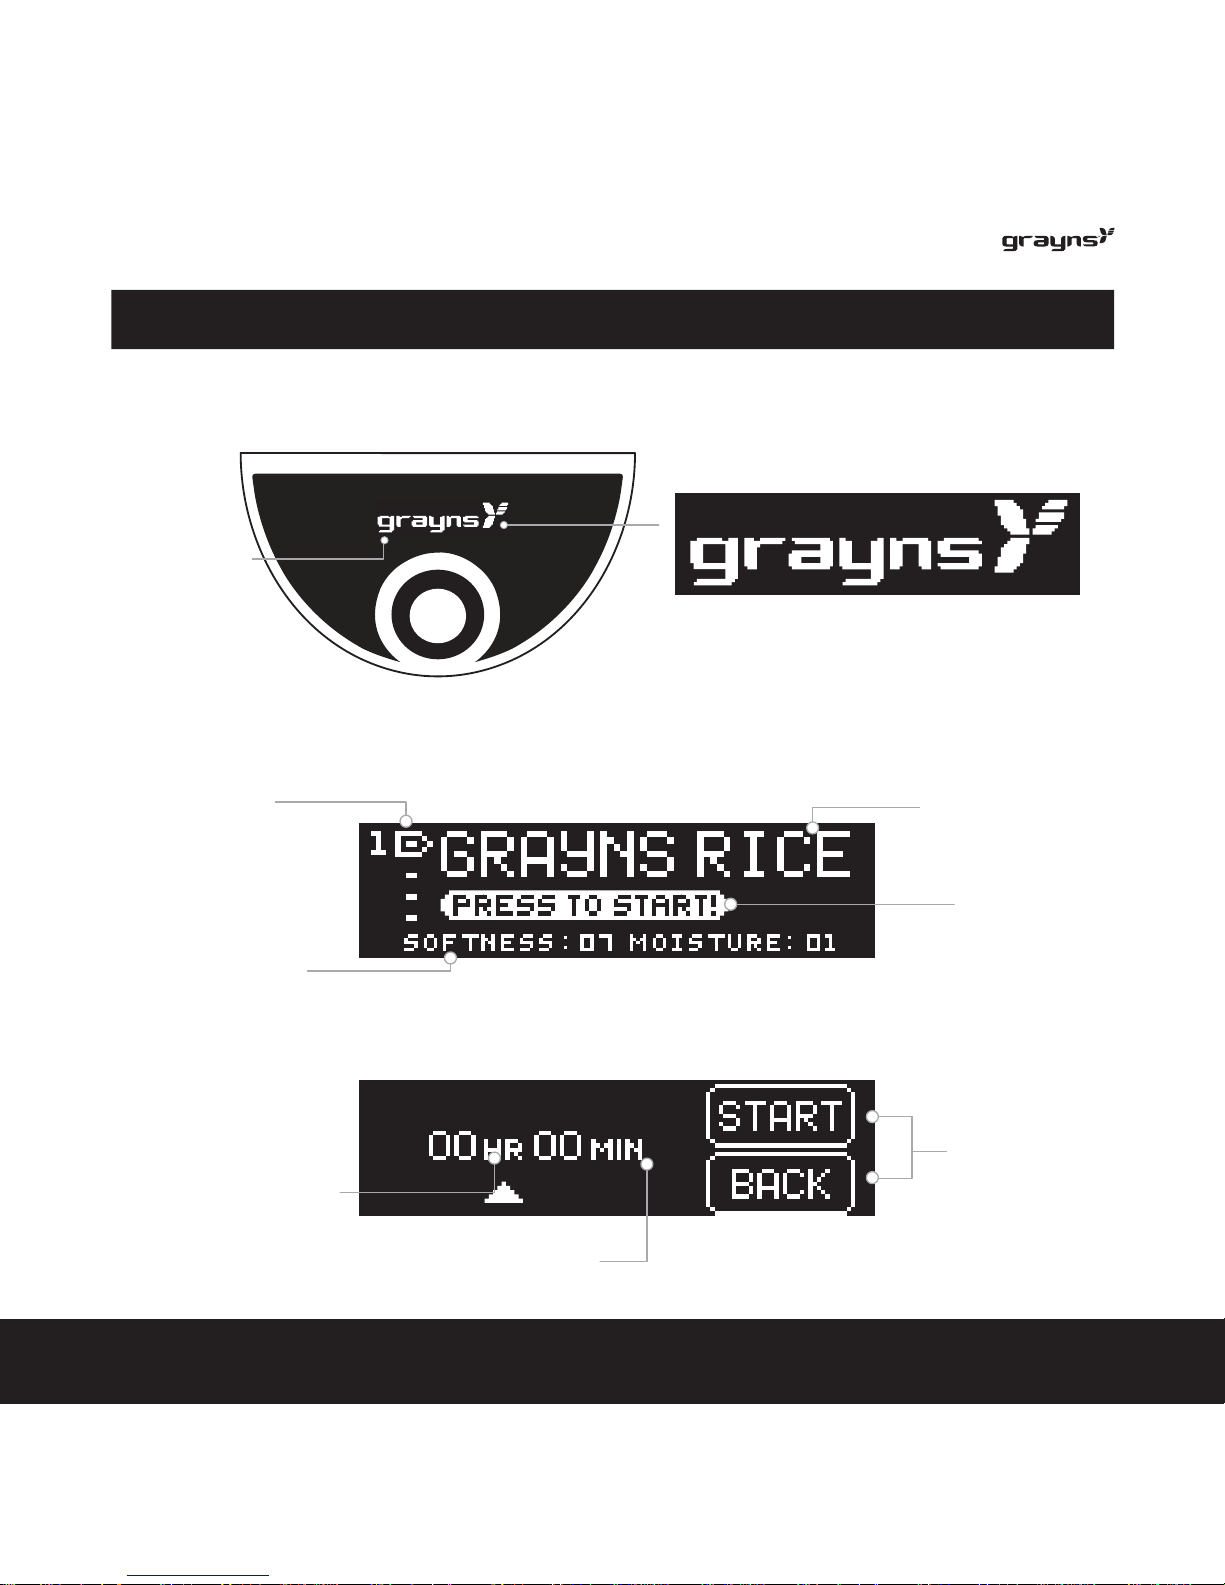
DIGITAL CONTROL INTERFACE- Screen Display
FAMILIARIZING YOURSELF WITH THE GRAYNS RICE COOKER
Selection bar
& number
Current cooking
setting / next setting
Features option
Command
MAIN MENU
WELCOME SCREEN
Screen
Display
Command
option
TIMING SELECTION
Time Option
‘HOUR’
Time Option
‘MINUTE’

PAGE 8 GRAYNS™ - INSTRUCTION MANUAL
ERROR SCREEN
Setting Option
Description
COOKING PROGRESS
COOKING SETTING
Selection Bar
Progress
Percentage
Current setting bar
Setting option
Current setting by
number
Current Features
Current Process
Progress Timing
Progress Bar
Command
PAGE 9GRAYNS™ - INSTRUCTION MANUAL
PREPARING YOUR GRAYNS RICE COOKER
1
2
3
4
5
6
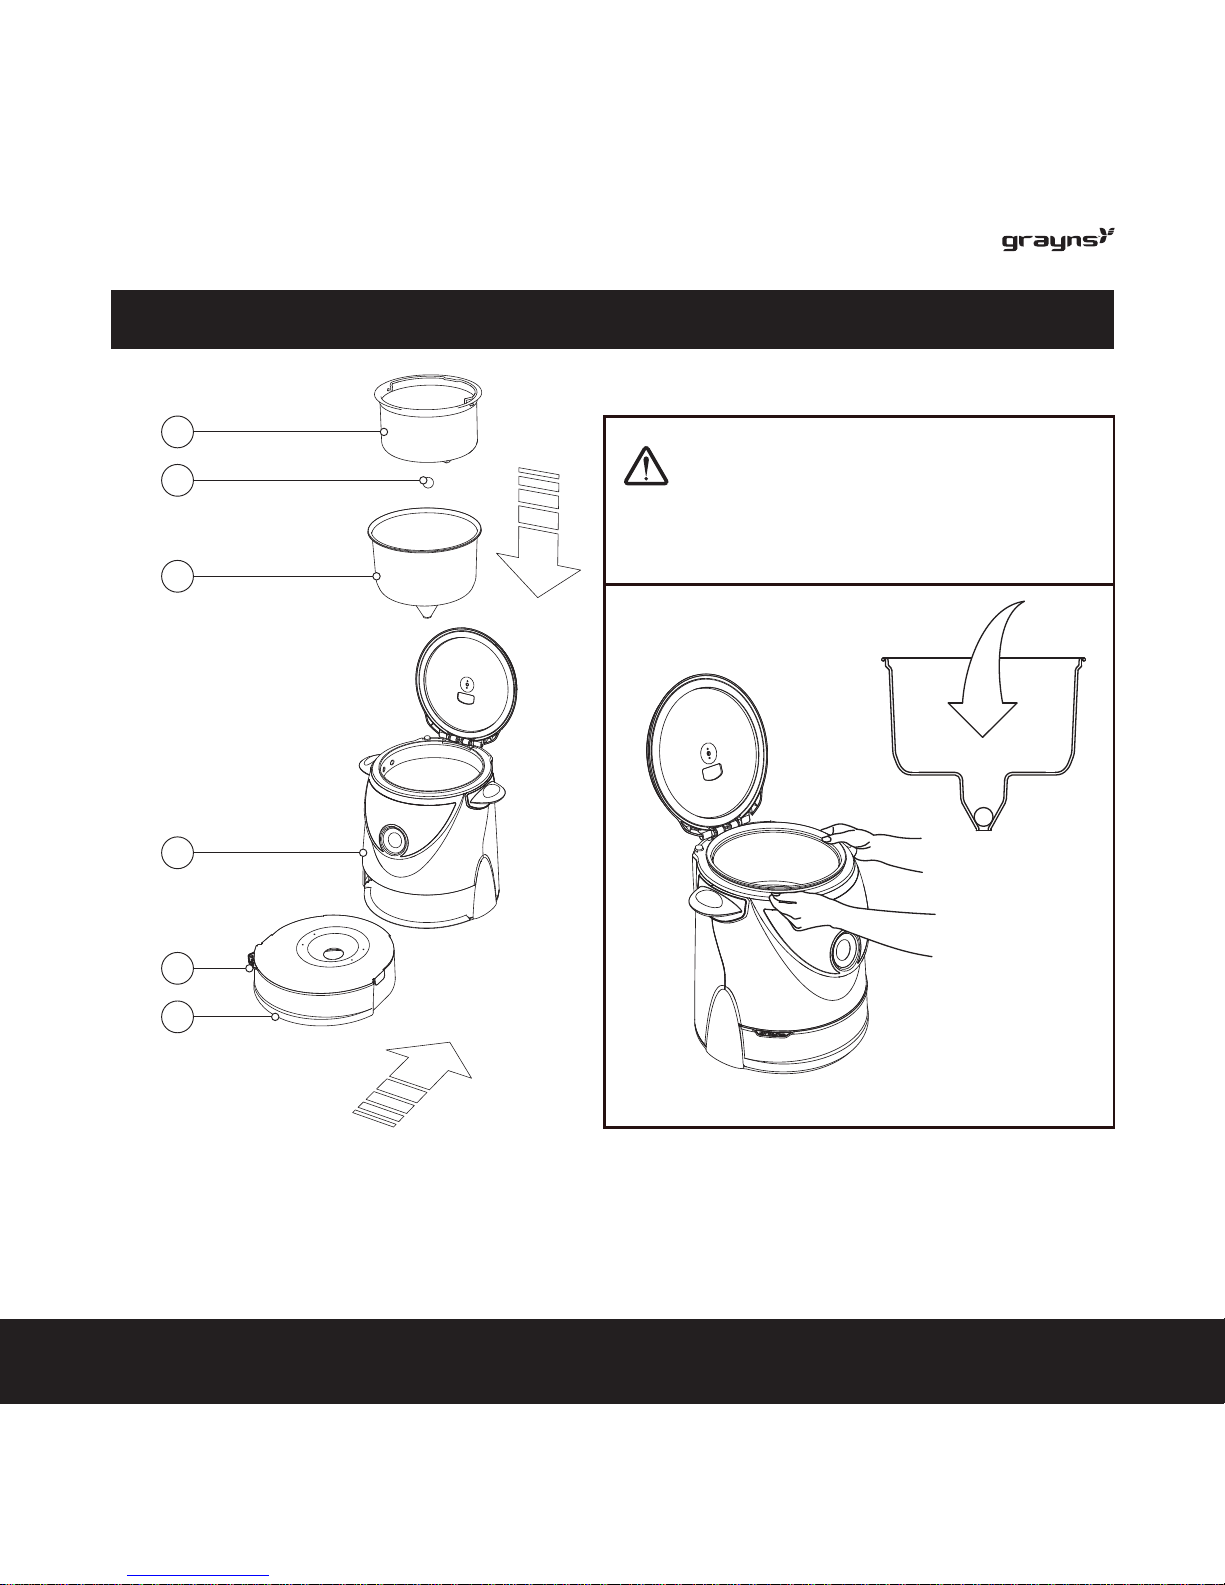
Place Cap (5) and Collector (6), Strainer Basket (1), Inner Container (3) and Steel Ball
(2) into the cooker in the right position.
Please ensure the Steel Ball and
the Inner Container is in the right
position and fi rmly placed to avoid
any leakage or failure to perform.

PAGE 10 GRAYNS™ - INSTRUCTION MANUAL
PREPARING YOUR GRAYNS RICE COOKER
Take the strainer basket & collector out of the rice cooker. Take out the
collector tray, and put the strainer basket into the collector.
A.
Refer to the cooking instruction for the ideal ratio to get a satisfactory
cooking results
PREPARATION TO COOK

PAGE 11GRAYNS™ - INSTRUCTION MANUAL
Measure rice with the measuring
cup and transfer into the strainer
basket. Maximum rise quantity is 3
cups. Rinse the rice until the water
become relatively clear.
Put the water until maximum level
to get an ideal result and make
sure the water does not exceed
the maximum level. Please refer to
the marking on the strainer basket.
.C.B
Refer to the cooking instruction on the next page (14) for the ideal ratio
to get a satisfactory cooking results.

PAGE 12 GRAYNS™ - INSTRUCTION MANUAL
To facilitate the release of starch from the rice, fi ll the container with water up
to the mark indicated regardless of the amount of rice you used.
PREPARING YOUR GRAYNS RICE COOKER
MAKING GRAYNS RICE
MAXIMUM
*use 180ml (6 oz) measuring cup
Water = Maximum
Approx 1.9L @9
1/2 cups
Maximum water level
Rice
1 cup
2 cups
3 cups

PAGE 13GRAYNS™ - INSTRUCTION MANUAL
D.
Close the Lid properly Make sure the steam cover
is in place especially after
washing. Press the top to
ensure that it is properly
closed to avoid any spillover
steam.

PAGE 14 GRAYNS™ - INSTRUCTION MANUAL
E.
Plug in the cord to the rice
cooker in vertical position
F.
Plug in to the wall socket
and turn it on. Wait until the
welcome menu appears.
Please proceed to menu
selection.
Check the screen for any ERROR! if there is a message follow the instruction
indicated.
R

PAGE 15GRAYNS™ - INSTRUCTION MANUAL
HOW TO COOK GRAYNS RICE - Select Type of Rice (DEFAULT)
The default settings is set for most
kind of rice; Long grain, medium
grain and short grain
Scroll down - fi nd menu
Click! - select default
Click! - select customize
Scroll down - make a selection
Click! - confi rm timing - save and exit
W
W
W
W

PAGE 16 GRAYNS™ - INSTRUCTION MANUAL
HOW TO COOK GRAYNS RICE - Cooking (DEFAULT)
Click! - confi rm menu - continue cooking
W
current setting
Make sure the setting is correct & continue cooking. The setting is save as your
default setting

PAGE 17GRAYNS™ - INSTRUCTION MANUAL
HOW TO COOK GRAYNS RICE - Customize Your Rice
Customize the settings according
to your preference and taste. At
default the setting is 0.5 for both
softness and moisture. For softness
the higher the number the softer is
the rice. Conversely the lower the
number the harder the rice. This
is true for ‘moisture’ as well. The
lower the number the drier the rice.
Customization maybe necessary
for different type of rice e.g brown
rice etc.
Click! - select customize
Click! - Select softness
Scroll down - make a selection
Click! - select manual
Scroll up/down - increase/reduce
softness level
Click! - confi rm setting - save and
exit
W
W
W
W

PAGE 18 GRAYNS™ - INSTRUCTION MANUAL
HOW TO COOK GRAYNS RICE - Customize Your Rice
Click! - select Grayns Rice - continue
cooking
W
W
W
Once the setting is done, it will be
saved as your default. The following
cooking process will remain your
own setting with just a click of the
button.
W
Scroll down - make a selection
Click! - select moisture
Scroll down - make a selection
Click! - select back
Scroll up/down - increase/reduce
softness level
Click! - confi rm setting - save and
exit

PAGE 19GRAYNS™ - INSTRUCTION MANUAL
HOW TO COOK GRAYNS RICE - Cooking (CUSTOMIZE)
Click! - confi rm menu - continue cooking
W
current setting
Make sure the setting is correct. The setting is saved as your default setting

PAGE 20 GRAYNS™ - INSTRUCTION MANUAL
HOW TO COOK GRAYNS RICE - Cooking Process
Please wait until the cooking
process is ‘completed’ or the lights
indicator on the trackball turns to
green. Press the trackball to return
to main menu. Then switch off the
power.
Wait....
Wait....
Wait....
Wait....
Done!
B
B
B
B
G
W
Press - to return
Return to the main menu

PAGE 21GRAYNS™ - INSTRUCTION MANUAL
Rince the rice, repeat the same method of PREPARING YOUR GRAYNS
RICE COOKER in page 10. Make sure the rice does not exceed the maximum
level. Put the rice and strainer basket into the rice cooker, then add the exact
amount of water.
HOW TO SOAK

PAGE 22 GRAYNS™ - INSTRUCTION MANUAL
HOW TO SOAK
W
W
W
W
You can use the SOAK function with
GRAYNS rice cooker. Set the time
in hours or minutes as you require.
Click! - confi rm setting - select start
* select back to return for time setting
Scroll down - make a selection
Click! - select soak
Scroll up/down - increase/reduce the
time setting (hour)
Click! - confi rm setting - proceed to
minute
Scroll up/down - increase/reduce the
time setting (minute)
Click! - confi rm setting

PAGE 23GRAYNS™ - INSTRUCTION MANUAL
HOW TO SOAK
B
Wait....
Wait....
B
Done!
G
W
Press - to return
Return to the main menu
Please wait until the ‘completed’
sign appear and the water will
then transude into the collection
tray. The light indicator on the
trackball will turn to green. Press
the trackball to return to main
menu.
Soak & Cook
If you wish to soak & cook please
continue the process as shown in
page 24.

PAGE 24 GRAYNS™ - INSTRUCTION MANUAL
HOW TO SOAK & COOK
W
W
W
W
Soak and cook is ideal for various
types of brown rice. It will soak to
the time you set, and straight away
continue cooking. It is also suitable
for certain types of rice. You can set
the time of soaking as long as you
want and cooking will start upon
completion of soaking time.
Click! - confi rm setting - select start
* select back to return for time setting
Scroll down - make a selection
Click! - select soak
Scroll up/down - increase/reduce the
time setting (hour)
Click! - confi rm setting - proceed to
minute
Scroll up/down - increase/reduce the
time setting (minute)
Click! - confi rm setting

PAGE 25GRAYNS™ - INSTRUCTION MANUAL
HOW TO SOAK & COOK
B
B
B
After soaking it will straight away
cook. Please wait until the sign
‘completed’ appears. When the
light indicator on the trackball turns
to green. Press the trackball to
return to main menu.
The heat on the trackball is
normal due to the heat transfer
from the cooking process.
Wait....
Wait....
Wait....
Wait....
B
Done!
G
W
Press - to return
Return to the main menu

PAGE 26 GRAYNS™ - INSTRUCTION MANUAL
HOW TO CANCEL PROGRESS - Return to Main Menu
Press & hold
Return to the main menu
Wait....
Press & Hold the Trackball for a
moment to cancel the cooking/
soaking progress. Wait until the
screen return to the welcome
screen and the main menu.
B
W
W

PAGE 27GRAYNS™ - INSTRUCTION MANUAL
SERVING
HOT CONTENT! Please use cooking
gloves to avoid any injury due to the
heat from the cooking process. Do not
open the lid while cooking. Be careful
with the hot steam coming out of the
steam vent.
If you open the lid during the cooking
process, the screen will shows error!
Please close the lid to resume the
process.
Make sure the display shows
“Completed” and the button indicator is
green. Use the notch on top of the lid
to hold. Preferably access from side to
avoid any heat from the steam. Lift up
the cover.
G
A.

PAGE 28 GRAYNS™ - INSTRUCTION MANUAL
Scoop your rice for serving. You may
also remove the basket if you wish to
scoop all the rice into a container/plate.
B.

PAGE 29GRAYNS™ - INSTRUCTION MANUAL
CLEANING! Before cleaning your rice cooker, always unplug and allow
it to cool fi rst.
MAINTENANCE - Washable
Remove the inner pot, steel ball, strainer & starch collector from the
rice cooker and wash them in warm, soapy water with a soft sponge.
Rinse completely, then dry with a soft clean cloth. Any residue of
vinegar or salt may cause your metal parts to corrode. Always clean
thoroughly after each use.
Strainer
Basket
Steel
Ball
Inner
Container
Steam
Cover
Drain Cap
&
Starch Collector
QUICK CLEANING! for Basket, Inner Container and Steel Ball. Add 1/2 cup
of water and a small amount of dish liquid soap or dishwasher detergent to
inner pot. RINSE WELL AND DRY COMPLETELY BEFORE RE-USING.
DO NOT USE ANY ABRASIVE CLEANER OR SCOURING PAD TO CLEAN THE NONSTICK INNER POT. Do not use the inner container if the coating is scratched or peel off
Make sure the steel ball and the inner container cone is cleaned properly to
prevent any possible leakage or blockage. Any impurities and defects may
cause malfunction.

PAGE 30 GRAYNS™ - INSTRUCTION MANUAL
DO NOT IMMERSE THE PRODUCT INTO WATER.
MAINTENANCE - Wet Wipe Only
Clean the outside of your cooker when
necessary. Do not use abrasive cleaners. DO
NOT SUBMERGE ANY PART OF THE RICE
COOKER BODY IN WATER.
To clean the heating plate and thermo-control
plate, use sponge and dish washing soap to
polish or remove any residue. Then wipe with
a damp cloth. Allow to dry completely before
re-using. You must keep the heating plate
and thermocontrol plate free from any foreign
objects.
Wipe clean - to clear from any strach collected
Lid
Thermocontrol
plate
Body
Starch collecting
area

PAGE 31GRAYNS™ - INSTRUCTION MANUAL
Top Lid
Steam Vent
MAINTENANCE - Cleaning The Steam Vent
Take out the Steam Cover. Wipe with a
dimp cloth the cover and the top of the
steam ventilation lid to remove dirt and
stratch.

PAGE 32 GRAYNS™ - INSTRUCTION MANUAL
MAINTENANCE - Cleaning the Starch Collector
Starch collected in this container is not
for consumption. It is to be disposed
Pull out the Starch Collector from the
rice cooker. Take out the Drain Cap and
dispose the starch collected. Handle with
care, heat content may cause injury.
 Loading...