

Page 1
Tablet PC
User Manual
Hello Customers
Thanks for using our tablet PC!
In order to help you to use our product freely, we provide this manual for your
references, you will find detailed introduction and guide line of how to use our product
in the manual, please read this manual carefully before using our product s.
Please back up your personal data to your PC. We are not responsible for the data
loss due to hardware and software misoperation, product Maintenance, battery
replace or other accidents lead to personal data loss and damage.
Meanwhile, we can not control our user’s misunderstanding of this manual , so we
are also not responsible for the accidental loss caused by misunderstanding this
manual, so does not responsible for the thi rd party loss caused by using this product
as well.
The information of this manual is under copyright protection. Any parts of this
manual are not allowed to photocopy without any written permission from us. We
reserve the final explanation to this manual and related information for warranty.
This product comply with Handheld personal information processing equipment
general specification
GB/T 18220-2000
Precautions
Do not use adapter under high wet environment and touch the adapter with wet
hand.
Do not use metal object to contact with pro duct and this will lead to short circuit
Do not try to disintegrate or rebuild and this will lead to electric shock and hampe r
the warranty.
Please use soft cloth to clean, do not let the liquid inside of the product.
Do not allow child to play this product alone. Do not let it fall down or hit by hard
When use this product as mobile hard disk, please transfer and save the file
Do not use overloaded power adapter, bend the adapter cable with force as
We will not notice due to the function change, please kindly understand.
There may have some inconformity with actual settings and op e ratio ns w i thin t hi s
object which may lead to damage to hard disk and surface, data loss or other
hardware damage.
according to file management method, any operation may cause the file loss, we
are not responsible for this. Kindly suggest to back up you personal data.
which may lead to fire.
manual which may due to hardware upgrade, please access our official website
and call us for the latest informat ion, thanks for your cooperation.
Page 2
Specifications
z Display:7inch screen 5 points Capacitive Touch panel, 1024*600,16:10 IPS
z OS:Android 4.2 .2 operations syst em
z CPU:ARM Cortex A9 dual core,1.6GHz
z GPU:Mali400 MP4 Quad-core GPU
z RAM: 1GB DDR3
z Speaker:1 speaker
z Camera: Front 0.3M
z Internet:support WIFI
z Entertainment:support 3D, G senor games,online chatting
z HD cinema:support Flash 11.1 online video,1080P video, HDMI output.
z OTG: USB 2.0, connect with PC, flash driver.
z Storage:build in memory, support TF card up to 32GB
z Play time:internal smart power management system, long last video play.
Device description
① Touch screen:You can click and drag in the touch screen.
② Camera:You can take photos and videos etc..
③ Volume-:Turn down the volume.
④ Volume+:Turn up the volume.
⑤ POWER:
Turn on/off the device by long pressing this button.
-- When the power indicator is on, press the power key, the device will turn on. (It will
take some time)
-- Press for 3 seconds when it is off.
The system would indicate MID Option. Click “Power off” to shut it down. Press the
return key to stay.
Press the Power key for a short time, you can shut /start the screen
1
.
⑥ :DC jack: Connect the power cable to charge to the device.
⑦ :Mini USB, Mini-5pin connector.
⑧ MIC:Voice receiving .
⑨ :Earphone jack: 3.5mm standard earphone jack.
⑩ Micro SD car d:SD card slot.
【TIPS 】:1. When the battery is low, it will power off automatically.
2. Shutdown illegally, when you restart, device would scan and repair the
disk. The screen will stay at the progress bar for a long time .
3. Definition of “Press”:
Short Press: Press the button less than 2 seconds.
Long Press: Press the button more than 3 seconds.
If there is no special explanation, “Press” means Short Press.
2
Setting up for the first time
Charging your device:
For first-time use, you need to charge the device for ten hours.
After that you can recharge the device as needed.
Connect the DC-in jack to your device and plug the AC adapter into any AC outlet.
【TIPS】:
1. This device adopts built-in polymer battery. Only the specified charger should be
used.
2. It is normal for the device’s surface to become warm during ch a rging or long
periods of use. All devices are factory tested before release.
3. If you do not use this set for a long time, please charge/release it once
one month to avoid deep discharge. The damage caused by battery
3
Page 3

over-consuming is not included in t he warranty.
Connecting to a PC:
• You can connect with PC by USB cable attached with the device.
Y ou can transf e r y our per sonal dat a t o the PC.
• Connect the PC and the device, it will change to the USB mode, in this state, realize
the files transfer function between the PC and the device.
Connecting a USB device:
• USB devices are supported, such as a keyboard, through the USB port.
• View media files on USB storage with installed photo, music or v ideo applications.
【Caution】: Before removing this USB storage, make sure your device is not
accessing data from the USB storage.
Inserting the MicroSD card :
You may install a Micro SD card to expand your device’s storage space.
4
1. Turn off the device by pressing and holding the power button.
2. Insert the Micro SD card as shown.
【Note】: Ensure that the Micro SD card is inserted all the way into the card slot.
【Caution】: Before removing this card, make sure your device is not accessing data
on the card.
Resetting the device:
You may have to perform a reset if your device fails to respond when buttons are
pressed or the screen is tapped.
If your device does not respond to screen input .
To reset your device use a small thin object (such as a paperclip) to press the
recessed reset button.
Connecting to the Network:
1. Wi-Fi wireless setup:
Enter the setting interface, and turn on the Wi-Fi item.
The device will automatically search any acce ssible nearby wireless networks.
5
Commonly used settings
Press the setup icon to enter the setting.
Wi-Fi: Click ON or OFF to open or cl ose Wi-Fi.
When open Wi-Fi,the system will scan the wifi signal around automatically.
Meanwhile, users could add network manually as well.
6
More…:
1. Portable hotspot:
You must connect the cable to net work (by RJ45 connector) then you can enter the
option to open or close the “Portable Wi-Fi hotspot”, you can also take t his device as a
Wi-Fi Router.
【Remark1】:After turning on “Portable Wi-Fi hotspot”,Wi-Fi will close automatically.
7
Page 4
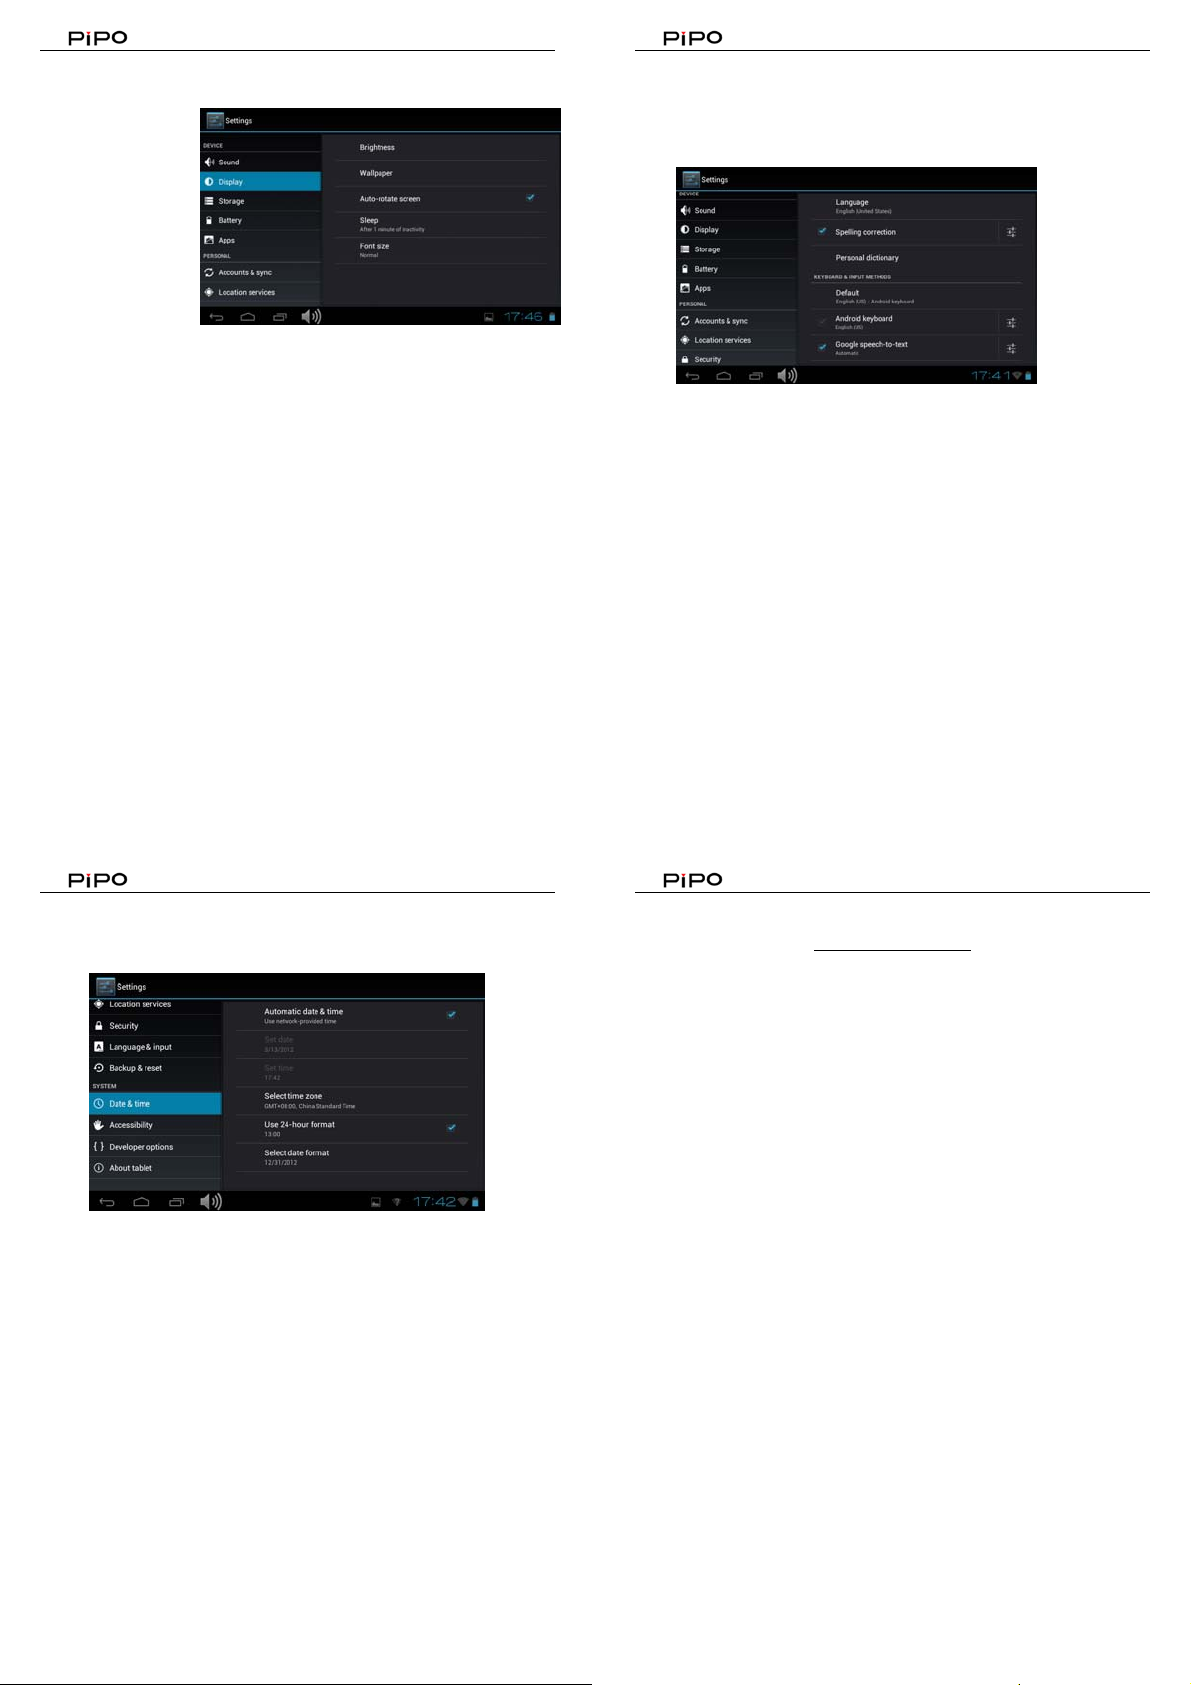
Display:
Rotate screen setting:
Enter setting menu:
Display Æ Auto-rotate
screen, you can open
/close the screen
autorotation function.
Language & input:
1. Language: Users can choose OSD Languages.
2. KEYBOARD & INPUT METHODS: select language method.
【Remark】:In
this state ,users
can switch the
input method .
Date & time: when the internet is connected , turn on “Automatic date & time ”,
the device can obtain the real date and time from the internet.
8
9
Trouble shooting
• Can not power on:
--Connect the power cable to charge to the device, aft er a while and then check
again.
--If it still can not power on, pleas e contact with our distributor or service centre.
• Serious noise:
--Check if the music file is damaged.
--If the music files are damaged, it may cause serious noise and jumping sound.
• Can not download or copy:
--Check if it is connecting correctly between the device and PC.
--Check the spare space of the memory.
10
11
Page 5
--Check the USB cable.
• USB connect is fail:
--Make sure that the USB device is securely connected to the USB jack.
--Check if the USB device or a cable is d amaged.
--If the USB device is connected vi a a USB hub, connect the USB device directly to
the device.
• Cannot connect the device to the wireless LAN router:
--Check if the wireless LAN router is on.
--Depending on the surrounding environment, such as the wall material, radio wave
receiving condition, or obstacles between the device and the wireless LAN router, the
communication distance may be sho rtened. Move the device and the wireless LAN
router closer to each other. Devices that use a 2.4GHz frequency band, such as a
microwave, Bluetooth, or digital cordless device, may interrupt the communication.
Move the device away from such devices, or turn off such devi ces.
• FCC STATEMENT
1. This device complies with Part 15 of t he FCC Rules. Operation is subject t o the
following two conditions:
(1) This device may not cause harmful interference, and
(2) This device must accept any interference received, including interference
may cause
2. Changes or modifications not expressly approved by the party responsible for
compliance could void the user’s authority to operate the equipment.
This equipment has been tested and found to comply with the limits for a Class B
digital device, pursuant to part 15 of the FCC Rules. These limits are designed to
provide reasonable protection again st ha rmful interference in a residential installation.
that
undesired operation.
This equipment generates, uses an d can radiate radio frequency energy and, if not
installed and used in accordance with the instructions, may cause harmful
interference to radio communications. However, there is no guarantee that
interference will not occur in a particular installation. If this equipm ent does cause
harmful interference to radio or television reception, which can be determined by
turning the equipment off and on, the user is encouraged to try to correct the
interference by one or more of the following measures:
—Reorient or relocate the receiving antenna.
—Increase the separation betw een the equipment and receiver.
—Connect the equipment into an outlet on a circuit different from that to which the
receiver is connected.
—Consult the dealer or an experienced radio/ TV technician for help.
12
• FCC Radiation Exposure Statement:
The device has been evaluated to meet general RF exposure requirement. The
device can be used in portable exposure condition without RF strict ion.
13
14
15
 Loading...