


XSXS
XSXS
XS
-6 FM-6 FM
-6 FM-6 FM
-6 FM
RACE RACE
RACE RACE
RACE
synthesizer synthesizer
synthesizer synthesizer
synthesizer
XS-6.2
DEUTSCH
Seite 2Seite 2
Seite 2Seite 2
Seite 2
D
FRANÇAIS
PP
PP
P
aa
aa
a
gg
gg
g
e 54e 54
e 54e 54
e 54
F
ENGLISH
PP
PP
P
aa
aa
a
gg
gg
g
e 28e 28
e 28e 28
e 28
GB
BETRIEBSHANDBUCH
OPERATING MANU AL
INSTRUCTIONS D’ UTILISATION

2
Graupner XS-6 FM Synthesizer-Fernlenksystem
Inhaltsverzeichnis: Seite
Sicherheitshinweise 3 - 5
Laden des Senderakkus 5, 8
Funktionsbeschreibung/Techn. Daten 6
Sender Bedienelemente 7
Kanalwahl Empfänger-Synthesizer-System 7
Kanalwahl Sender-Synthesizer-System 8
Display-Anzeigen 9
Zugang zum System-Modus 10
System-Modus Ablaufdiagramm 1 1
Übertragungs-Rate N=normal/F=schnell 12
Daten löschen 12
Modell kopieren 13
Elektronische Trimmung Lenkung/Gas 14
Schnellverstellung im Direkt-Modus 15
Bremsservo-Einstellung EP A 15
Festlegung Servo 3 16
Stufenlose Dual-Rate Steuerrad 17
Moment-Taster-Festlegung/Programm GBC 18 - 19
Ablaufdiagramm Einstell-Menü 20
Endpunkt-Einstellung der Servos EP A 21
MIX-Einstellung Servo 3 22
SUB-Trim-Modus 23
TDB Totband-Einstellung Gas/Bremse 23
Servo-Reverse 23
Exponential-Funktion 24
Anschlußbeispiele Empfänger/BEC 25 - 26
Motorentstörung 27
Für Ihre Notizen 80
Frequenztabelle 81
Konformitätszertifikat 82
Garantiebedingungen 83
Allgemeines:
Technisch hochwertiges Fernlenksystem mit moderner
Synthesizer-T echnologie. Quarze nicht mehr erforderlich.
Durch konsequente technische Optimierung bieten diese
Geräte in ihrer Klasse einen erweiterten Bedienungs- und
Funktionskomfort.
Höchste Betriebssicherheit durch moderne Impulsaufbereitung mit Micro-Computer.
Großer LCD-Monitor zur übersichtlichen Information von
Funktions- und Einstellparametern sowie digitaler Anzeige des Senderkanals, Modellspeicher und der Senderbatteriespannung .
Im SB6 SYN-Empfänger bereits integriertes BEC-System
zur Stromversorgung der Empfangsanlage aus der An-
triebsbatterie.
Achtung: Das Fernsteuersystem ist nicht geeignet zum
Steuern von großen RC-Car-Modellen wie 1:5 oder 1:4
oder Verbrennungsmotoren mit Zündsystemen.
XS-6 FM Synthesizer 40, für das 40-MHz-Band
Best.-Nr. 3117
XS-6 FM Synthesizer 41, für das 41-MHz-Band
Best.-Nr. 3117.41*
* Nur für Export
Im Set enthalten
Sender XS-6 FM Synthesizer
FM-PLL-Synthesizer-Empfänger SB6 SYN
Servo,Schalterkabel.
Lieferbares Zubehör
Batterien: für Empfänger (4 Stück erforderlich)
bitte nur Batterien vom Typ: Mignon / R6 verwenden.
ECO-POWER 1,2V/800 mAh Best.-Nr. 3621
NC-Batterie für Sender
Graupner 8N-800mAh 9,6V/800mAh Best.-Nr. 3423
Sanyo 8KR-1 100AAU 9,6V/1100mAh Best.-Nr . 3413
Empfohlene Ladegeräte
MINILADER 2 Best.-Nr . 6422
MUL TILADER 3 Best.-Nr. 6427
MUL TILADER 6E
1)
Best.-Nr. 6426
TURBOMAT 6 Plus
1)
Best.-Nr. 6428
TURBOMAT 7 Plus
1)
Best.-Nr. 6429
TURBOMAT 16 Plus
1)
Best.-Nr. 6430
ULTRAMAT 25
1)
Best.-Nr. 6417
ULTRA DUO PLUS 30
1)
Best.-Nr. 6416
1)
Für die Aufladung ist zusätzlich für den Sender das
Ladekabel Best.-Nr. 3022, für Empfängerakku Best.Nr. 3021 erforderlich.
Weitere Ladegeräte und Batterien finden Sie im
GRAUPNER-Hauptkatalog FS.
Ersatzteil
Teleskopantenne für Sender, Best.-Nr . 3115.6
Ausführungen und Zubehör:

3
Um noch lange Freude an Ihrem Modellbauhobby zu
haben, lesen Sie diese Anleitung unbedingt genau durch
und beachten Sie vor allem die Sicherheitshinweise.
Diese Anleitung ist einem evtl. nachfolgenden Benutzer
unbedingt mit auszuhändigen.
Anwendungsbereich
Diese Fernsteueranlage darf nur ausschließlich für den
vom Hersteller vorgesehenen Zweck, für den Betrieb in
nicht manntragenden Modellfahrzeugen eingesetzt werden. Eine anderweitige Verwendung ist verboten.
Sicherheitshinweise
Ferngesteuerte Modelle sind kein Spielzeug!
Auch kleine Modelle können durch unsachgemäße Handhabung aber auch durch fremdes Verschulden erhebliche Sach- oder Personenschäden verursachen.
Behandeln Sie ihre Fernlenkanlage sorgfältig. Das sichert stets gleichbleibende Zuverlässigkeit und Betriebsbereitschaft.
Technische Defekte elektrischer oder mechanischer Art
können zum unverhofften Anlaufen des Motors und/oder
zu herumfliegenden T eilen führen, die Sie erheblich verletzen können!
Der Fernsteuerbetrieb darf nur bei „normalen“ Außentemperaturen durchgeführt werden, d. h. in einem Bereich von - 15 °C bis + 55 °C.
T eile, die durch einen Motor angetrieben werden, stellen
eine ständige Verletzungsgefahr dar. Sie dürfen mit keinem Körperteil oder Gegenstand berührt werden! Eine
schnell drehende Luftschraube kann z. B. einen Finger
abschlagen!
Halten Sie sich niemals in der oder vor der Drehebene
von Luftschrauben oder sonstigen sich drehenden T eilen
auf!
Schützen Sie alle Geräte vor Staub, Schmutz, Feuchtigkeit, Vibrationen und anderen Fremdteilen. Setzen Sie
diese niemals übermäßiger Hitze oder Kälte aus. Vermeiden Sie Stoß- und Druckbelastung.
Überprüfen Sie die Geräte stets auf Beschä-digungen an
Gehäusen und Kabeln. Beschädigte oder naß gewordene Geräte, selbst wenn sie wieder trocken sind, nicht
mehr verwenden!
Einführung in das XS-6 FM RACE Fernlenk-System
Es dürfen nur die von uns empfohlenen Komponenten
und Zubehörteile verwendet werden. Verwenden Sie
immer nur zueinander passende, original
GRAUPNER
Steckverbindungen gleicher Konstruktion und gleichen
Materials.
Es dürfen keinerlei Veränderungen an den Geräten durchgeführt werden, sonst erlischt die Betriebserlaubnis und
Sie verlieren jeglichen Versicherungsschutz
Wenn die Batterieanzeige am Sender in den leeren Bereich wandert, Betrieb einstellen und neue Batterien einsetzen bzw. laden. Kontrollieren Sie regelmäßig den
Zustand insbesondere der Empfängerbatterie. Warten Sie
nicht solange, bis die Bewegungen der Rudermaschinen merklich langsamer geworden sind!
Trennen Sie immer alle Batterien von ihrem Modell ab,
wenn Sie es gerade nicht mehr benützen. Verbrauchte
Batterien rechtzeitig ersetzen.
Einbau der Empfangsanlage im Modell
Der Empfänger wird stoßgesichert, in Schaumgummi
gelagert und gegen Staub und Schmutz und Feuchtigkeit
geschützt im Modell untergebracht. Der Empfänger darf
an keiner Stelle unmittelbar am Modell anliegen, da sonst
Vibrationen oder Erschütterungen direkt auf ihn übertragen werden.
Die Empfängerantenne nicht kürzen oder verlängern und
möglichst weit weg von Elektromotoren, Servos, metallischen Gestängen oder stromführenden Leitungen usw.
verlegen.
Achten Sie beim Verlegen der Kabel darauf, daß diese
nicht auf Zug belastet, übermäßig geknickt oder gebrochen sind. Auch sind scharfe Kanten immer eine Gefahr
für die Isolation. Achten Sie darauf, daß alle Steckverbindungen fest sitzen. Beim Lösen der Steckverbindung
nicht an den Kabeln ziehen.
Vermeiden Sie Verpolungen und Kurzschlüsse jeglicher
Art mit den Anschlußkabeln, die Geräte sind dagegen
nicht geschützt.
Beim Einbau der Empfangsanlage in ein Modell mit Verbrennungsmotor, alle Teile immer geschützt einbauen,
damit keine Abgase oder Ölreste eindringen können.
Dies gilt vor allem für
Sicherheitshinweise unbedingt beachten!

4
Einführung in das XS-6 FM RACE Fernlenk-System
den meist in der Außenhaut des Modells eingebauten
EIN-/AUS-Schalter.
Servos stets mit den beigefügten Vibrations-dämpfergummis befestigen, nur so sind sie vor allzu harten
Vibrationsschlägen einigermaßen geschützt.
Zum Steuern die Senderantenne immer ganz aus-
ziehen.
In geradliniger Verlängerung der Senderantenne bildet
sich nur eine geringe Feldstärke aus. Es ist demnach
falsch, mit der Antenne des Senders auf das Modell zu
„zielen“, um die Empfangs-verhältnisse günstig zu beeinflussen.
Bei gleichzeitigem Betrieb von Fernlenkanlagen auf benachbarten Kanälen sollen die Piloten in einer losen Gruppe beieinanderstehen. Abseits stehende Piloten gefährden sowohl die eigenen als auch die Modelle der anderen.
Verhaltensregeln
Betreiben Sie Ihr Modell niemals auf öffentlichen Straßen, Wegen und Plätzen.
Gefährden Sie niemals Tiere, Zuschauer oder andere
Piloten.
Betreiben Sie Ihr Modell niemals in der Nähe von Hochspannungsleitungen oder in der Nähe von Schleusen
und öffentlicher Schifffahrt.
Überprüfung vor dem Start
Sind mehrere Modellsportler am Platz, vergewissern
Sie sich vorher davon, daß Sie als einziger auf Ihrem
Kanal senden, ehe Sie Ihren eigenen Sender einschalten. Die Doppelbelegung eines Frequenzkanals verursacht Störungen oder kann andere Modelle zum Absturz
bringen.
Bevor Sie den Empfänger einschalten vergewissern Sie
sich, daß der Gasknüppel des Senders auf Stopp/Leerlauf steht.
Immer zuerst Sender einschalten,
dann erst Empfänger einschalten.
Immer zuerst Empfänger ausschalten,
dann erst Sender ausschalten
Wenn diese Reihenfolge nicht eingehalten wird, also der
Empfänger eingeschaltet ist, der dazu-gehörige Sender
jedoch auf „AUS“, so kann der Empfänger durch andere
Sender, Störungen usw. zum Ansprechen gebracht
werden.
Das Modell führt unkontrollierte Steuerbewegungenaus
und kann Sach- oder Personenschäden verursachen.
Die Rudermaschinen können in Endanschlag laufen und
Elektronik, Getriebe, Gestänge, Ruder usw. beschädigen und die Empfängerbatterie durch die hohe Belastung
vorzeitig entleeren.
Vor jedem Einsatz korrekte Funktion und Reichweite
überprüfen. Dazu aus entsprechendem Abstand vom
Modell kontrollieren, ob alle Ruder einwandfrei funktionieren und in der richtigen Richtung ausschlagen.
Diese Überprüfung bei laufendem Motor wieder-holen,
während ein Helfer das Modell festhält.
Einbau der Gestänge und Ruder
Grundsätzlich muß der Einbau so erfolgen, daß die Gestänge frei und leichtgängig laufen.
Besonders wichtig ist, daß alle Ruderhebel ihre vollen
Ausschläge ausführen können, also nicht mechanisch
begrenzt werden.
Darauf achten, daß keine Metallteile z. B. durch Ruderbetätigung, Vibration, drehende Teile usw. aneinanderreiben. Hierbei entstehen sogenannte Knackstörungen, die den Empfänger stören.
Modelle mit Verbrennungsmotor
Um einen laufenden Motor jederzeit anhalten zu können,
muß man die Motor-Drossel so eingestellt haben, daß
das Vergaserküken ganz geschlossen wird, wenn Steuerknüppel und Trimmhebel in die Leerlaufendstellung
gebracht werden.
Empfänger mit BEC-System
Achtung: Die Belastbarkeit des BEC-System ist begrenzt!
Bei Verwendung von stärkeren Servos mit höherer
Stromaufnahme darf das BEC-System nicht mehr verwendet werden, da eine Überlastung zur sofortigen Zerstörung des BEC-Systems führt. In diesem Fall
muß
eine separate Empfängerbatterie verwendet werden.
Stromquellen
Verwenden Sie niemals defekte, beschädigte Zellen
oder Batterien mit unterschiedlichen Zellentypen, Mischungen aus alten und neuen Zellen oder Zellen unterschiedlicher Fertigung.
Sicherheitshinweise unbedingt beachten!

5
Einführung in das XS-6 FM RACE Fernklenk-System
Laden der Batterien
Alle Akkus müssen vor jedem Betrieb geladen werden.
Es sind stets die Ladehinweise des Akkuherstellers zu
beachten und die Ladezeiten unbedingt genau einzuhalten.
Batterien niemals unbeaufsichtigt aufladen.
Versuchen Sie niemals, Trockenbatterien aufzuladen
(Explosionsgefahr)
Laden der Senderbatterien
Das Batteriefach des Senders kann mit wiederaufladbaren Batterien bestückt werden.
Verwenden Sie nur ausschließlich Zellen vom Typ:
Mignon AA0 / R6.
Ist der Sender mit wiederaufladbaren Zellen ausgestattet,
können diese über die seitlich am Sender angebrachte
Ladebuchse aufgeladen werden. Der Sender muß während des gesamten Ladevorgangs auf „AUS“ geschaltet
sein.
Der Ladeanschluß des Senders ist mit einer RückstromSicherheitsschaltung ausgestattet. Dadurch werden Schäden bei Verpolen oder
Kurzschluß mit den Anschlußsteckern des Senderladekabels verhindert.
Ein Aufladen der Senderbatterie mit einem AutomatikLadegerät ist aufgrund der Rückstrom-Sicherheitsschaltung nicht möglich.
Maximaler-Sender-Ladestrom
Um Schäden am Sender zu verhindern darf der maximale Ladestrom
niemals 500 mA (0,5 A) übersteigen.
Es sind immer die Lade- und Behandlungshinweise der
Batterie- und Ladegerätehersteller zu beachten.
Kapazität und Betriebszeit
Für alle Stromquellen gilt: Bei niedrigen Temperaturen
nimmt die Kapazität stark ab, daher sind die Beriebszeiten bei Kälte kürzer.
Entstörung der Elektromotoren
In Modellen mit Elektroantrieb muß
jeder Motor sorgfältig
entstört werden. Eine vielleicht schon vorhandene Grundentstörung des Elektromotors reicht in den meisten Fällen nicht aus, sondern erfüllt nur die gesetzlichen Auflagen. Beachten Sie deshalb unbedigt die entsprechenden
Hinweise in der Montage und Bedienungsanleitung des
Modells.
Weitere Entstörfilter und Entstörbauteile finden Sie im
GRAUPNER Hauptkatalog FS.
Einsatz von elektronischen Fahrtreglern
Die richtige Auswahl eines elektronischen Fahrtreglers richtet sich vor allem nach Bauart und Größe des
verwendeten Elektromotors und des Fernsteuermodells.
Um ein Überlasten / Beschädigen des Fahrtreglers zu
verhindern, sollte die Dauer-Strombelastbarkeit des Fahrtreglers
mindestens die Hälfte des maximalen MotorenBlockierstromes betragen. Das bedeutet wenn der Motor
einen Blockierstrom von 100 A aufweist, so ist mindestens ein Fahrtregler mit einer
Dauer-Belastbarkeit von
50 A erforderlich.
Besondere Vorsicht ist bei sogenannten Tuning-Motoren
angebracht, die auf Grund ihrer niedrigen Windungszahlen im Blockierfall ein vielfaches ihres Nennstromes aufnehmen und somit den Fahrtregler zerstören können.
Bei Schiffsmodellen sollten eine noch größere Sicherheitsreserve einkalkuliert werden, da sobald die Schiffsschraube durch Tang oder andere Fremdteile blockiert
wird, sofort der gesamte Blockierstrom auf dem Fahrtregler lastet.
Fahrtrichtung kontrollieren
Viele Fahrtenregler mit Rückwärtsfahrstufe haben meist
im Rückfahrbetrieb eine geringere Belastbarkeit als bei
Vorwärtsfahrt.
Kontrollieren Sie deshalb unbedingt ob sich Ihr Fahrtregler in „Vorwärts“-Betrieb befindet wenn Sie Ihr Fahrzeug
vorwärts steuern.
Haftungsausschluß / Schadenersatz
Sowohl die Einhaltung der Montage- und Betriebsanleitung
als auch die Bedingungen und Methoden bei Installation,
Betrieb, Verwendung und Wartung der Fernsteuerkomponenten können von der Fa.
GRAUPNER
nicht über-
wacht werden. Daher übernimmt die Fa.
GRAUPNER
keinerlei Haftung für Verluste, Schäden oder Kosten, die
sich aus fehlerhafter Verwendung und Betrieb ergeben
oder in irgendeiner Weise damit zusammenhängen.
Soweit gesetzlich zulässig, ist die Verpflichtung der Fa.
GRAUPNER
zur Leistung von Schadenersatz, gleich
aus welchem Rechtsgrund, begrenzt auf den Rechnungswert der an dem schadensstiftenden Ereignis unmittelbar
beteiligten Warenmenge der Fa.
GRAUPNER
.
Sicherheitshinweise unbedingt beachten!

6
Technische Daten Sender
Gleichstromleistung
des Senders ca. 1,5 W
Kanalraster 10 kHz
Programmierbare Kanäle K 50 - K 92
Betriebsspannung 9,6 ... 12V
Stromaufnahme ca. 160 mA
Kanalfunktion 2, alle trimmbar
Temperaturbereich ca. -15°C ... + 55°C
Antennenlänge ca. 830 mm
Abmessungen ca. 175x147x75 mm
Gewicht (o. Batt.) ca. 390 g
Technische Daten Empfänger
Kanalraster 10 kHz
Programmierbare Kanäle K 50 - K 92
Zwischenfrequenz 455 kHz
Betriebsspannung 4,8 ... 7,2V (BEC)
Stromaufnahme ca. 38 mA
Empfindlichkeit ca. 10 µV
Temperaturbereich -15°C ... + 55 °C
Antennenlänge ca. 600 mm
Abmessung ca. 49x34x21 mm
Gewicht ca. 32 g
Funktionsbeschreibung und Technische Daten
Merkmale des XS-6 FM RACE Senders
Ergonomisch und technisch modernes Fernlenk-System mit Synthesizer-Technologie für den anspruchsvollen ProfiRCCar- und Rennboot-Fahrer.
FCH (Frequency Channel Selection). Automatische
Sendefrequenz-Synthese. Frequenzwahl nach Kanal-
nummer . Keine Quarze erforderlich.
10 Modellspeicher
Modernes Computer-Fernlenk-System mit 8 bit CPU
mit FULL DIGITAL ACCURATE TUNING (hochgenaues, digitales Justier- und Einstellsystem) für 3
Servos
Gehäuse im modernen Techno-Design mit optimiert
positionierten Steuerungs-Bedienelementen und ergonomischer Grifform für ermüdungsfreien Lenkeinsatz.
Großer LCD-Monitor zur übersichtlichen Information
von Funktions- und Einstellparametern sowie digitaler
Anzeige des Senderkanals, Modellspeichers und der
Senderbatteriespannung.
4-Tastenterminal zur Programmierung und präzisen
Einstellung gewünschter Funktionen und Parametern.
4 Zwei-Wege-Wipp-Tasten für volldigitale Lenk-Trim/
Lenk-Trim-Rate, Drossel-T rim-,Drossel/Brake-Funktion
sowie programmierbare Stellmöglichkeit der 3.
Servofunktion.
ESB (Emergency Security Button) Sicherheits-MomentNottaster zur schnellen Umschaltung wichtiger Funktionen in Notfallsituationen.
PPN = PPM 18 (Normal Modulation)
PPF = PPN Fast, doppelte (schnelle) Übertragungsrate = Halbierung der Reaktionszeit von Servos und
Regler .
BAT optische und akustische Batterie-Unterspannungswarnung.
MD1 10 Modellspeicher für Funktions- und Einstelldaten. Jeder Modellspeicher kann mit Modellkurznamen
versehen werden.
STC (Steering Center Trim) Sub--T rim Lenkung
THC (Throttle Center Trim) Sb-T rim-Leerlauf
EXP ST (Steering Exponential adjustment) ExponentialFunktion für Lenkservo 0 - 100 %.
EXP THF (Throttle Exponential adjustment) THF = V orwärts Gas, THB = Bremse - 100 %.
EPA ST (End Point adjustment Steering) Endpunkteinstellung der Servowege Steuerung links/rechts max.
125 - 0 %.
EPA (End Point adjustment) Endpunkteinstellung der
Bremse durch Zwei-Wege-Wipp-Taste max. 125 - 0 %.
EPA TH (End Point adjustment Throttle) Endpunkteinstellung von Drossel THC und Bremse R/B.
EPA F3 (End Point adjustment Funktion 3) Endpunkteinstellung für 3. Servofunktion.
ST (Steering Reversing switch) Servoreverse für
Lenkservo
TH (Throttle Reversing switch) Servoreverse für
Drosselservo
F3 (Function 3 Reversing switch) Servoreverse für Funktion 3.
TDA (Throttle Deadband adjustment) für Gas- und
Bremsfunktion getrennt einstellbarer Anfang des Wirkbereiches.
Moderner LAP record timer bis 50 Runden mit einer
Rundenmesszeit bis 99,9 Sek. Ermöglicht die nachträgliche Analyse wichtiger Parameter je Runde, z. B.
Motor,-, Regler-, Antriebsbatterie-, Reifen- und Modellspezifikation.

7
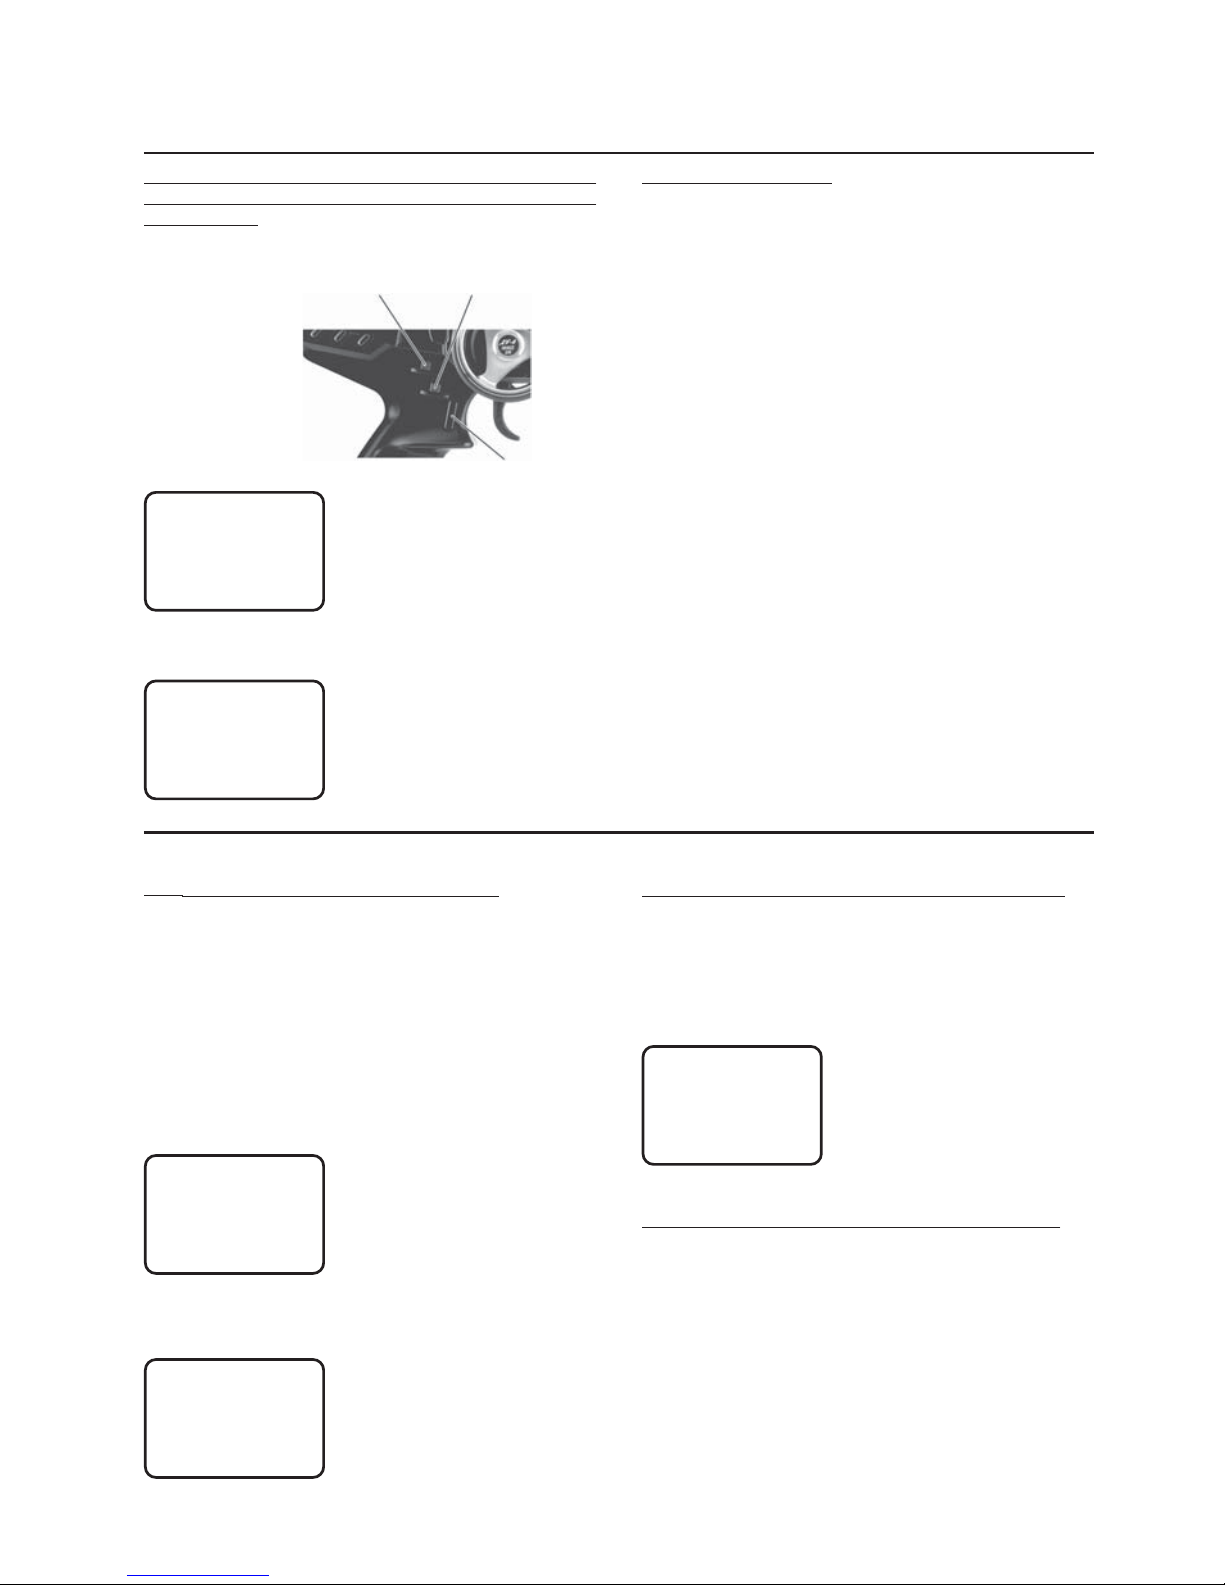
Elektronische
Trimmung
Gas
Elektronische
Trimmung
Lenkung
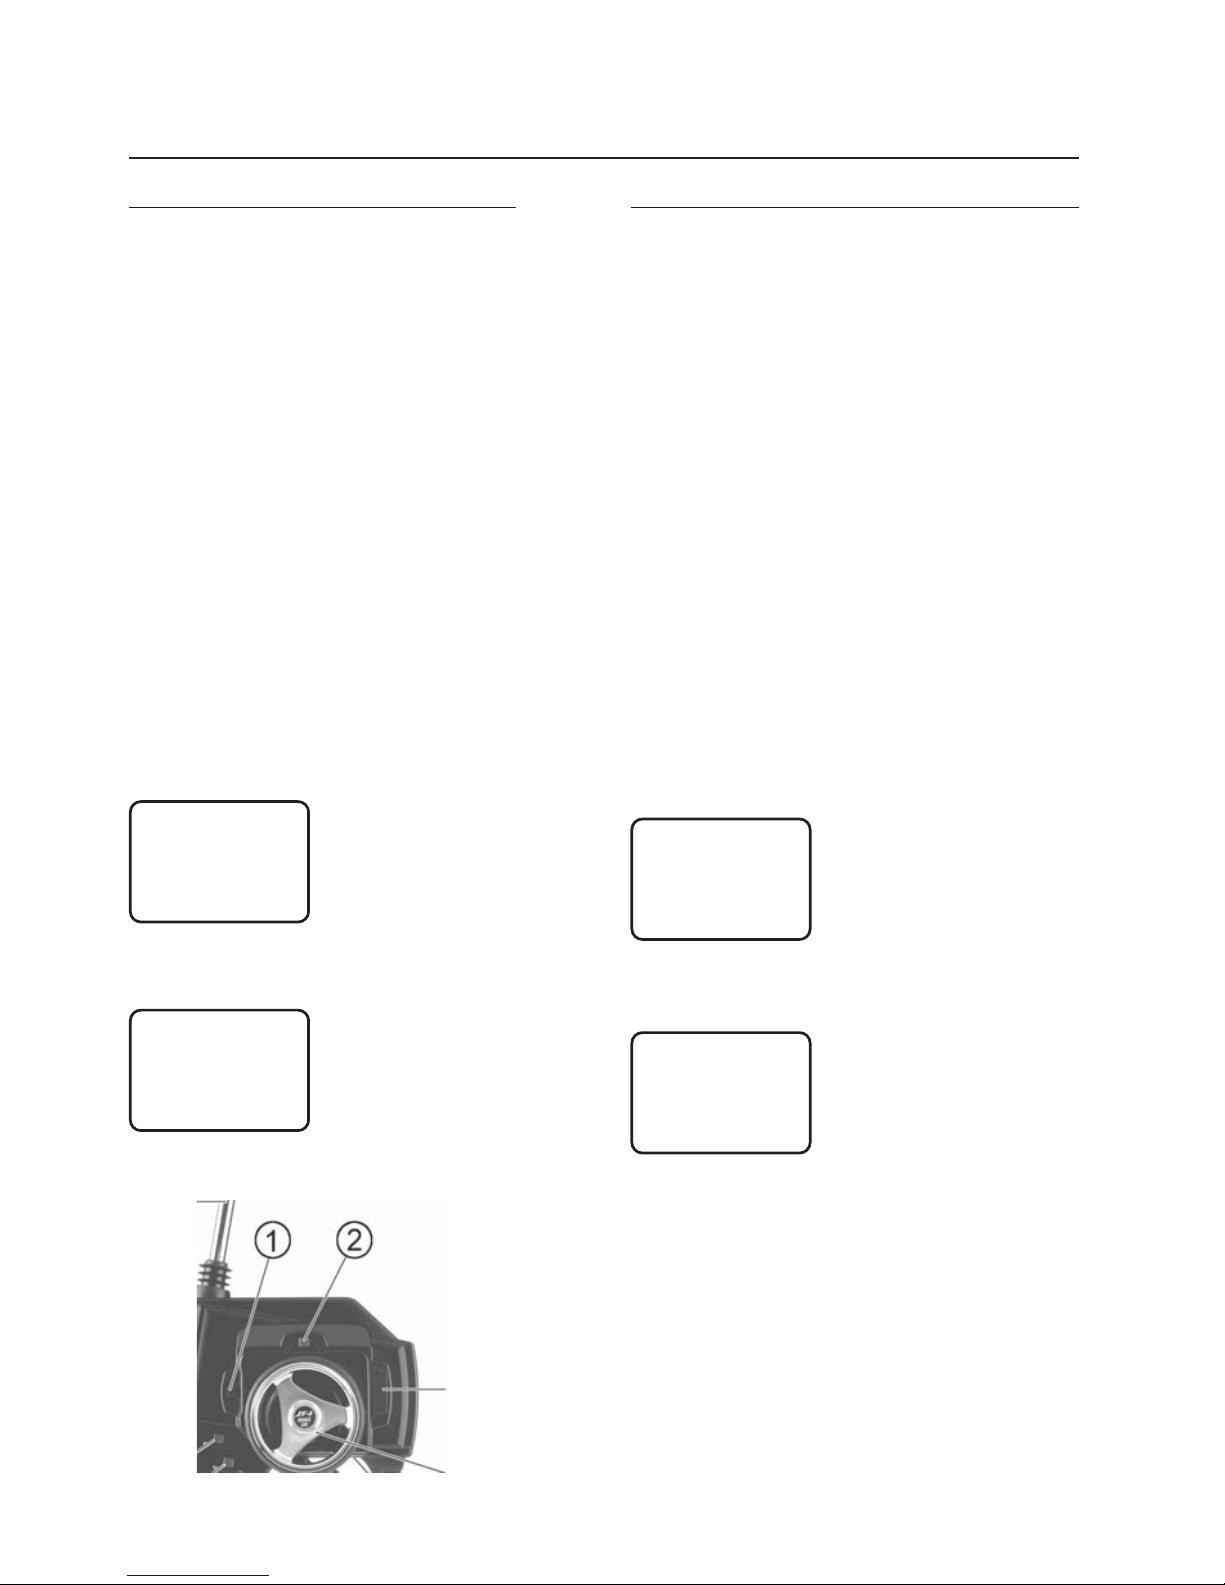
EIN/AUSSchalter
RückstellkraftEinstellschraube
Steuerrad
Gas/Brems-Hebel
Momenttaste C
Antenne
LC-Display
Bildschirm-Anzeige
Eingabe-Tasten
Elektronischer Digital-
Einsteller B (Wipp-Taste-B)
Steuerrad für
Lenkfunktion
Ladebuchse
(nur für wieder-
aufladbare Akkus)
Elektronischer Digital-
Einsteller A (Wipp-Taste-A)
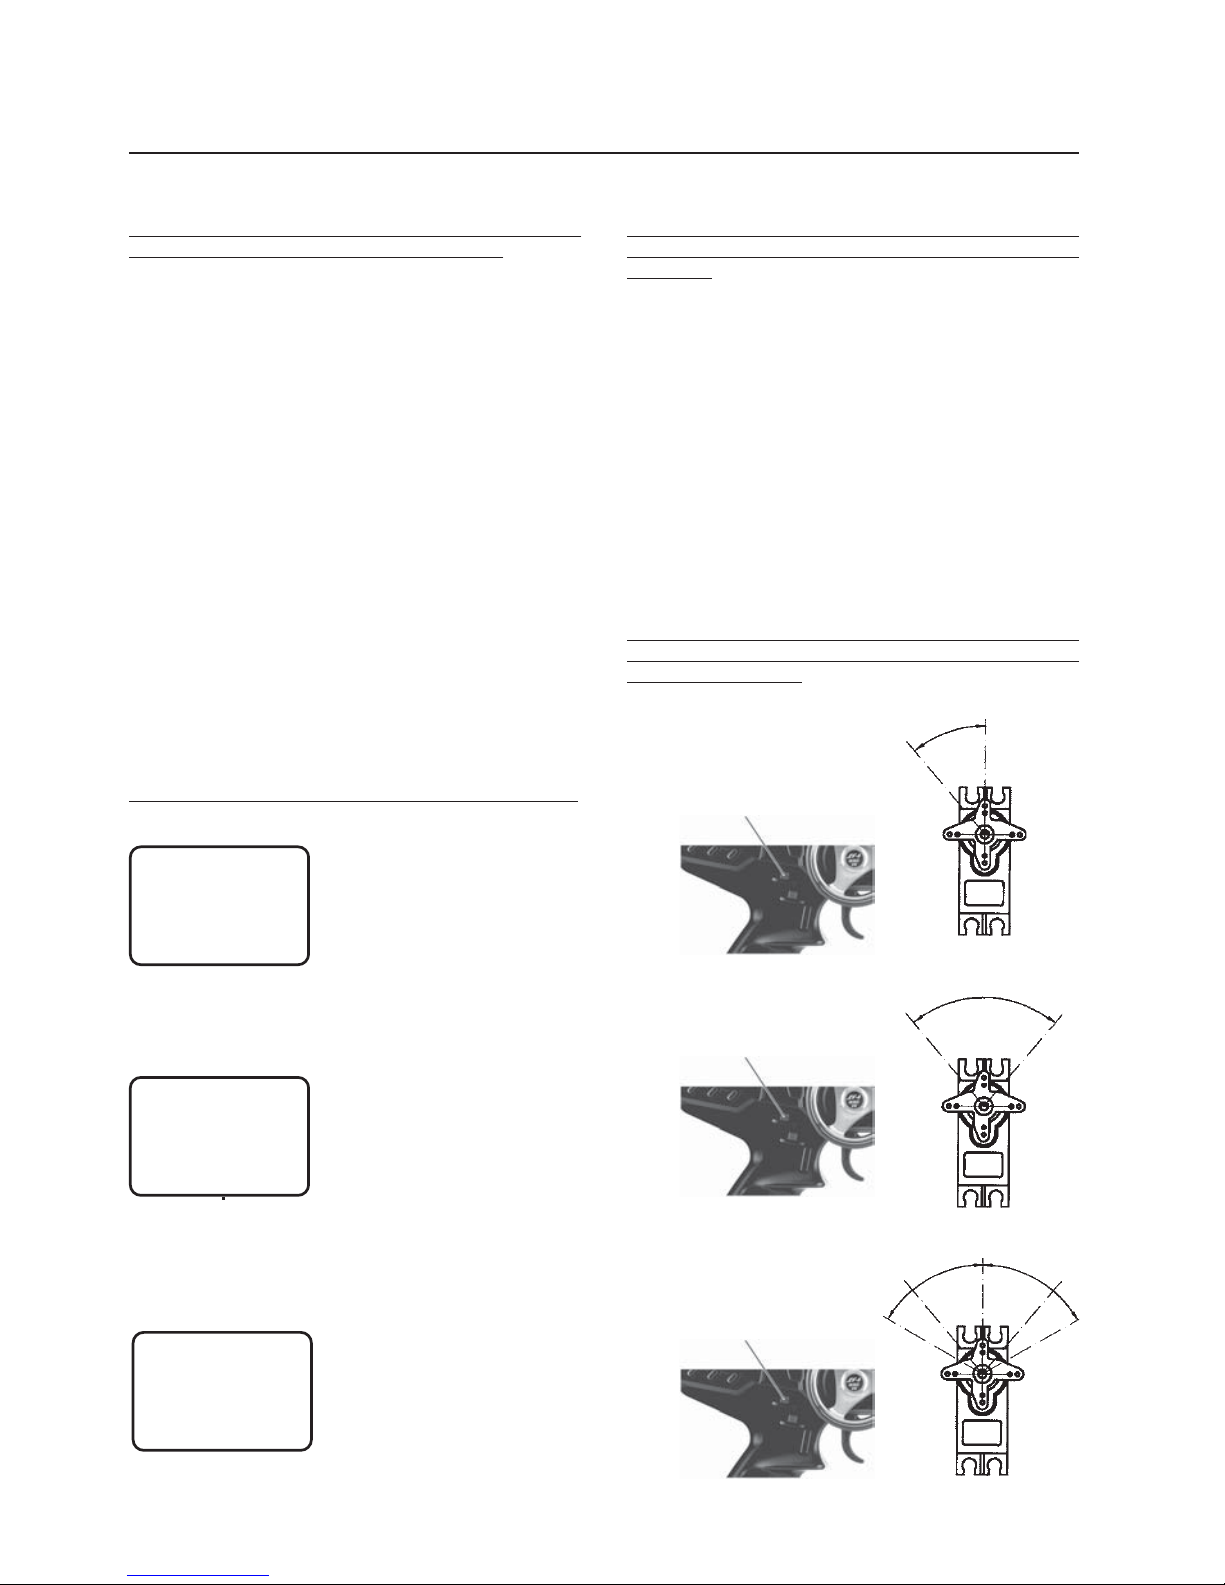
Sender Bedienelemente
Bemerkung: BEC-System max. mit 1 A belastbar!
Bei Verwendung von stärkeren Servos mit höherer
Stromaufnahme darf das BEC-System nicht mehr verwendet werden, da eine Überlastung zur sofortigen Zerstörung des Empfängers und der daran angeschlossenen Servos führt.Kommen stärkere Servos zum Einsatz, z. B. Hochleistungs-Digital-Servos, muß das BECSystem durch einstecken der Empfängerbatterie in eine
Servobuchse (1-3) abgeschaltet werden!
Batteriefach
Beschreibung der Empfangsanlage
Empfangsanlage ist mit ei-
nem Synthesizer-System
ausgestattet das erlaubt, mit
einem kleinen Schraubendreher den gewünschten Kanal
zwischen K 50 und K 92 einzustellen (vorderer Kanalsteller x 10, hinterer Kanalsteller x 1).
Bei Verwendung von anderen FM-Empfängern, z. B. C
6 FM, muß der Sender auf den im Empfänger eingesteckten RX-Quarzkanal programmiert werden.
Empfänger SB6SYN
8
Kanalwahl TX : (K 50-92 durch Synthesizer)
Kanalwahl durch Synthesizer-System (System-Modus)
Durch ein modernes Synthesizer-System
sind keine Quarze mehr erforderlich.
1. Durch Drücken der Taste MODE und Sender EIN gelangen
Sie in den System-Modus.
In diesem Modus ist das Sender-HF-Teil abgeschaltet!
2. Nach Anwahl des Kanal-Selektors CH mit der T aste MODE,
kann der gewünschte Kanal zwischen K 50 bis 92 mit den Tasten INC + oder DEC- ausgewählt.
3. Mit ENTER (Taste MODE und CHANNEL, gleichzeitig
Drücken) kann der ausgewählte neue Frequenzkanal gespeichert werden. Durch kurzes AUS/EINschalten wird der
Sender mit dem neuen Frequenzkanal aktiviert.
4. Vereinfachte Einspeicherung: Nach Auswahl des gewünschten neuen Frequenzkanals, den Sender kurz AUS/
EINschalten. Dadurch wird der neue Frequenzkanal ge-
speichert und der Sender auf der neu gewählten Sendefrequenz aktiviert.
Steuerrad-Rückstellkraft-Einstellung
Die Rückstellkraft des Steuerrades ist über eine vertieft
angebrachte Kreuzschlitzschraube einstellbar (siehe
Punkt 5, Seite Sender-Bedienelemente). Drehen der Einstellschraube im Uhrzeigersinn erhöht die Rückstellkraft.
Laden des Senderakkus
Auf der linken Seite des Senders unten befindet sich
die Ladebuchse, die nur für Graupner-Ladekabel geeignet ist. Bitte versuchen Sie nicht Ladekabel anderer
Hersteller zu benutzen, da diese möglicherweise anders
gepolt sind und den Sender beschädigen könnten! Der
Pluspol (rotes Kabel) ist mit der 5,5 mm Metall-Außenhülse verschaltet. Der Minuspol ist schwarz und mit
der Metall-Innenhülse mit 2,2 mm Bohrung, verbunden.
Senderladung
Der Sender ist mit wiederaufladbarem NC-Akku bestückt, dieser kann über die seitlich am Sender ange-
brachte Ladebuchse geladen werden.
Der maximal zuläßige Ladestrom ist vom Akkutyp ab-
hängig. Bitte beachten Sie unbedingt die Angaben des
Akkuherstellers!
Achtung: Um eine Beschädigung des Senders zu vermeiden darf der Ladestrom niemals größer als 500
mA sein.
Der Ein/Aus-Schalter des Senders muß während des
ganzen Ladevorganges auf „OFF“ (AUS) geschaltet
sein.
Die Senderladebuchse ist mit einer RückstromSicherheitsschaltung ausgestattet, welche Schäden durch
Verpolen oder Kurzschluß mit den Ladekabelsteckern verhindert.
Das Aufladen des Senderakkus mit einem Automatik-Ladegerät ist wegen der fehlenden Spannungs-
rückmeldung aufgrund der Rückstrom-Sicherheitsschaltung nicht möglich!
Der Sender kann in den GRAUPNER-Servicestellen
für eine Aufladung durch ein Automatik-Ladegerät
umgerüstet werden.
Achtung: Auch bei einem Automatik-Ladegerät muß
der Ladestrom manuell eingestellt werden um
sicherzustellen,daß der maximal zulässige Ladestrom von 500 mA nicht überschritten wird.
Empfohlene Ladegeräte
Best.-Nr.
6422 MINILADER 2
6427 MUTILADER 3
6426 MUL TILADER 6E*
6428 TURBOMA T 6 Plus*
6429 TURBOMA T 7 Plus*
6430 TURBOMA T 16 Plus
6417 UL TRAMA T 25*
6416 UL TRA DUO PLUS 30*
*Ladekabel erforderlich
3022 Ladekabel für Sender
3021 Ladekabel für Empfänger
8 I
CHX
M
RATE
EXP
TRIM
L/F
R/B
%
V
REV .
EP
5 0
CHX
MIX
RATE
EXP
TRIM
L/F
R/B
%
V
REV . NORM
EPA
INC +
DEC -

9
Display-Anzeigen
Normale Betriebs-Anzeige
Nach dem Einschalten des Senders, wird auf der LCAnzeige ein Diagramm wie folgt angezeigt. Bei dieser
Einstellung spricht man von Normalbetrieb-Anzeige.
Bemerkungen: Wenn irgendein elektronischer TrimTaster während dieser Anzeige am Sender benutzt wird,
erscheint automatisch die Anzeige für den Direkt-Trim-
Modus. Weitere Informationen hierzu erhalten Sie im
Abschnitt Trim-Modus.
Lithium-Batterie Backup-System
Ihr XS-6 FM RACE Fernlenksystem ist mit einem 5Jahre Lithium-Batterie-Backup-System ausgestattet.
Dieses System schützt und hält die Pro-grammierdaten
aufrecht, wenn die Senderspannung unter 8,5 V kommt,
oder falls die Sender-NC-Batterie entfernt bzw. durch
lange Lagerung total leer wird. Nach 5-Jahren ist es
erforderlich die Lithium-Batterie im GRAUPNER-Service zu ersetzen.
Backup-Fehler Anzeige im LC-Display
Wenn die Backup-Fehler-Anzeige erscheint, ist folgendes zu tun: Gleichzeitiges Drücken der Tasten MODE
und CHANNEL (ENTER) damit alle Programmdaten ge-
sichert werden. Falls Sie dies nicht tun, sind alle
Programmeinstellungen verloren! Wenn diese Anzei-
ge ein zweites Mal erscheint, ist eine Überholung im
GRAUPNER-Service angezeigt.
Es empfiehlt sich alle Programmierdaten in einer kleinen Tabelle selbst aufzuschreiben und als Datensicherung aufzubewahren.
er
BAk
Display-Anzeige/Lithium-Batterie-Backup
BAK ER Lithium-Batterie leer
.
Sender zum Wechsel
der Lithiumzelle an Service einsenden!
Niedrige Batteriespannung
Wenn die Spannung der 8 Mignon-Zellen unter einen
Wert von 8,5 Volt sinkt erscheint folgende Anzeige: (BAT)
und ein kontinuierlicher Warnton. Die Batterien müs-
sen für einen weiteren Betrieb ersetzt bzw. geladen
werden. Die niedrige Batterie-Spannungs-Anzeige ist in
allen Betriebs-Modus aktiv.
8,5
BAT
V
8,5 v
Unterspannung der
Senderbatterie. Betrieb einstellen!
BAT
Warnung: Senderbatterie
leer, muß geladen werden.
I 0,6
c54
V
10,6 v
Betriebsspannung der
Senderbatterie
C54
im Sender eingestellter
Frequenzkanal

10
%
V
REV . NORM
%
V
Zugang zum System-Modus (System Set-up Mode)
1.Um zum System-Modus zu gelangen drücken Sie die
Taste MODE und schalten Sie zusätzlich den Sender
EIN. Das Sender-HF-Teil wird abgeschaltet!
2. Durch mehrfaches Drücken der Taste MODE können Sie die benötigten Funktionen, z. B. Modellname
oder Frequenz-Kanal usw. auswählen und mit INC +
oder DEC - die gewünschten Parameter einstellen.
(Siehe auch System-Modus-Flussdiagramm.)
3. Um den System-Modus zu verlassen schalten Sie
den Sender kurzzeitig AUS/EIN. Dadurch gelangen Sie
automatisch in die Display-Grundanzeige, in der die
Spannung der Senderbatterie und die Modellnummer oder der Sendekanal angezeigt wird. Das
Sender-HF-Teil wird durch den AUS/EIN-Schaltvorgang automatisch wieder aktiviert.
System-Modus-Flussdiagramm
FrequenzkanalAuswahl
(K 50 - 92)
Modellname
(max. 3 Buchstaben)
Modellname
max. 3 Buchstaben
Modellnummer
(1 - 10)
Zugang zu Modellnamen Eingabe
im System-Modus
Um in die Modellnamen Eingabe-Funktion zu gelangen, beachten Sie die folgenden Schritte:
1. Durch Drücken der Taste MODE und Sender EIN
gelangen Sie in den System-Modus.
2. Durch mehrmaliges Drücken der Taste MODE erreichen Sie das Modellauswahl-Menü MDL (siehe erste Displayanzeige oben links).
3. Mit INC+ oder DEC- gewünschten Modellspeicher
(Modell 1 - 10) auswählen.
4. Modellname: Durch zweimaliges Drücken der MODE
Taste gelangen Sie in das Modellauswahl-Menü
(MDA), der erste Buchstabe blinkt jetzt.
5. Mit INC+ oder DEC- gewünschten ersten Buchsta-
ben auswählen, z. B. “C“ (dieser Buchstabe blinkt).
6. Mit der Taste CHANNEL den zweiten Buchstaben
anwählen und mit INC oder DEC auswählen, z. B.
“L“ (dieser Buchstabe blinkt).
7. Mit d er Taste CHANNEL den dritten Buchstaben an-
wählen und mit INC+ oder DEC- auswählen, z. B.
“K“ (auch dieser Buchstabe blinkt).
8. Durch Drücken der Tasten MODE und CHANNEL
(ENTER) oder Sender kurzes AUS/EINschalten
wird der eingestellte Name in den ausgewählten
Modellspeicher übernommen.
EXP
L/F
R/B
%
V
c54
I I.0 V
Display-Anzeige
Grund-Menü
I I3
CLK
Modellname eingeben (im System-Modus)
Das XS-6 System erlaubt eine dreistellige Namens-
eingabe für jeden der 10 verfügbaren Modellspeicher.
Das gewählte Modell, mit Modellname, wird im NormalDisplay angezeigt. Diese Besonderheit ist hilfreich bei
der Identifikation unterschiedlicher Modelle, Einstellungen usw.
I I.4
RATE
EXP
TRIM
L/F
R/B
%
V
REV . NORM
8 I
CHX
M
RATE
EXP
TRIM
L/F
R/B
%
V
EP
L/F
I IN
FRM
RATE
EXP
TRIM
L/F
R/B
%
V
REV . NORM
I II0
MDA
RATE
EXP
TRIM
L/F
R/B
%
V
M
MODE
MODE
MODE
⇓
⇓
⇓
Modellauswahl
(Modell 1 -10)
Übertragungszeit
N=PPM normal
F=PPM schnell (fast)
MDL
11
INC +
DEC -
INC +
DEC -
INC +
DEC -
INC +
DEC -
INC +
DEC -
INC +
DEC -
INC +
DEC -
INC +
DEC -
INC +
DEC -
I I.4
MDL
MIX
RATE
EXP
TRIM
L/F
R/B
%
V
REV . NORM
EPA
8 I
CHX
MIX
RATE
EXP
TRIM
L/F
R/B
%
V
REV . NORM
EPA
I II0
MDL
MIX
RATE
EXP
TRIM
L/F
R/B
%
V
REV . NORM
EPA
5 0
CHX
MIX
RATE
EXP
TRIM
L/F
R/B
%
V
REV . NORM
EPA
I II0
CUP
MIX
RATE
EXP
TRIM
L/F
R/B
%
V
REV . NORM
EPA
I IN
FRM
MIX
RATE
EXP
TRIM
L/F
R/B
%
V
REV . NORM
EPA
I IF
FRM
MIX
RATE
EXP
TRIM
L/F
R/B
%
V
REV . NORM
EPA
I I0
AUX
MIX
RATE
EXP
TRIM
L/F
R/B
%
V
REV . NORM
EPA
I 2P
AUX
MIX
RATE
EXP
TRIM
L/F
R/B
%
V
REV . NORM
EPA
LN
AUX
MIX
RATE
EXP
TRIM
L/F
R/B
%
V
REV . NORM
EPA
I I2
CLR
RATE
EXP
TRIM
L/F
R/B
%
V
REV . NORM
I.6
CPY
MIX
RATE
EXP
TRIM
L/F
R/B
%
V
REV . NORM
EPA
-
I.3
CPY
MIX
RATE
EXP
TRIM
L/F
R/B
%
V
REV . NORM
EPA
-
3
I I2
CLR
MIX
RATE
EXP
TRIM
L/F
R/B
%
V
REV . NORM
EPA
2
I II0
MDA
MIX
RATE
EXP
TRIM
L/F
R/B
%
V
REV . NORM
EPA
M
System-Modus Ablaufdiagramm (System Set-up Mode)
MODE
MODE
MODE
MODE
MODE
MODE
CLEAR
INC + DEC -
ENTER
MODE
CHANNEL
Modell-Auswahl (MDL 1-10)
Kanalwahl Sender (K 50-92)
Modell-Name (Mod. 1-10)
Übertragungs-Modus (N/F)
Servofunktion 3 (2P/LN)
Speicher löschen (auf Werkseinstellung zurücksetzen)
Speicher kopieren
Um in den System-Modus zugelangen, beachten
Sie die folgenden Schritte:
1. Durch Drücken der Taste MODE und Sender EIN
gelangen Sie in den System-Modus.
2. Durch mehrmaliges Drücken der Taste MODE
erreichen Sie das gewünschte Sy-stem-Menü
(Übersicht siehe Ablaufdia-gramm).
3. Mit der Taste INC+ oder DEC- die gewünsch-ten
Einstellparameter auswählen.
4. Durch kurzes AUS/EINschalten des Senders wer-
den die geänderten Werte im System-Modus (System Set-up Modus) übernommen und gespeichert.
5. Die anwenderspezifischen System-daten bleiben gespeichert und werden immer beim Einschaltvorgang initialisiert. Die Parameter bleiben
im System-Modus so lange bestehen, bis sie vom
Anwender erneut verändert werden.
Zugang zum System-Modus
I I0
GBC
MIX
RATE
EXP
TRIM
L/F
R/B
%
V
REV . NORM
EPA
LA
GBC
MIX
RATE
EXP
TRIM
L/F
R/B
%
V
REV . NORM
EPA
Eb
GBC
MIX
RATE
EXP
TRIM
L/F
R/B
%
V
REV . NORM
EPA
MODE
Moment-Taster C (Auswahl Eb/LA)

12
Übertragungs-Rate (Frame selection) N = Normal und F = Fast im System-Modus
Das Fernlenk-System XS-6 FM RACE bietet für den
Profi-Einsatz die Möglichkeit die Frame-Rate
(Übertragungszeit) von ca. 19 ms normal auf 12,7ms
schnell umzuschalten.
Diese schnelle Frame-Time wird im Renneinsatz bei
Profi-Piloten bevorzugt und ermöglicht einen direktere Ansteuerung von Hochleistungs-Servos im
Wettbewerbseinsatz, wenn extremeste Unterschiede
von Rundenzeiten für die ersten Plätze im Rennen entscheidend sind.
I IF
FRM
Übertragungszeit fast (schnell)
vom Profi-Piloten bevorzugte Übertragungszeit.Muß mit FM-Empfängern
auf sichere Funktion geprüft werden.
I IN
FRM
Übertragungszeit normal
werkseitig eingestellte Übertragungszeit ca. 19 ms, paßt zu allen StandardFM-Empfängern
Werkseitig justierte Frame-Rate N= normal
Profi-Piloten bevorzugte Frame-Rate F= fast
Übertragungszeit „fast“ 12,7 ms
Übertragungszeit „normal“ 19 ms
Bei Kombination mit FM-Empfängern anderer Fabrikate ist eine sorgfältige Überprüfung und Funktionskontrolle von Servos und Fahrtregler unbedingt erforderlich!
CLR-Daten löschen im System-Modus
Die Funktion CLR erlaubt es alle Daten im Speicher des
ausgewählten Modells in dem System-Modus zu löschen
und auf die Voreinstellungen des Herstellers zurückzusetzen. Dazu das zu löschende Modell mit INC+ oder DECauswählen
1. Die Taste MODE gedrückt halten und Sender
EINschalten um zum System-Modus zu gelangen.
2. Mit der T aste MODE durch mehrfaches Drücken Modell-
speicher-Menü MDL anwählen und mit INC+ oder DEC-
gewünschtes Modell auswählen.
3. Durch sechsfaches Drücken der Taste MODE gelangen
Sie in das Löschmenü CLR.
Die vorher angewählte Modellnummer blinkt jetzt.
Durch gleichzeitiges Drücken der Tasten INC+ und
DEC- werden alle im Modellspeicher eingestellten Daten gelöscht und auf werkseitig vorgegebene Stan-
dardwerte zurückgesetzt.
4. Nun kann die Neuprogrammierung mit den gewünschten neuen Einstellwerten im System-Modus erfolgen
(näheres siehe System-Modus Ablaufdiagramm).
Durch gleichzeitiges Drücken der Tasten INC+ und DEC-
wird der eingestellte Modellspeicher (blinkend) gelöscht
und auf werkseitig vorgegebene Standardwerte zurück-
gesetzt.
Die Nummer des eingestellten Modells blinkt nicht mehr.
Nun kann der Modellspeicher mit allen Parametern neu programmiert werden.
Zugang zu Speicher-Lösch-Funktion CLR im
System-Modus
Löschen von Einstelldaten in Modellspeichern erfolgt im System-Modus
Nach Auswahl des zu löschenden Modells gelangen Sie
durch sechsfaches Drücken der Taste MODE in das Menü
CLR, in dem das vorher eingestellte Modell (z. B. 2) blinkt.
MDL
I I3
Modell-Menü MD
L
gewünschtes Modell
Nr. 1 bis 10 zum
Löschen auswählen
I I3
CLR
Lösch-Menü CLR
ausgewähltes Modell durch gleichzeitiges Drücken der Tasten INC+
und DEC- löschen

13
CPY Modell kopieren im System-Modus
Modell kopieren
In der Modell-Auswahl-Funktion im System-Modus
ist eine Option verfügbar die es erlaubt, ein Modell als
Kopie auf einen anderen Modellspeicher zu kopieren.
Diese Kopie kann für dasselbe RC-Car Modell in unterschiedliche Rennen Verwendung finden.
Zugang zur Kopier-Funktion im System-Modus
1. Die Taste MODE gedrückt halten und Sender
EINschalten um zum System-Modus zu gelangen.
2. Mit der Taste MODE durch mehrfaches Drücken
Modellspeicher-Menü MDL anwählen und mit INC+
oder DEC- gewünschtes zu kopierendes Modell
auswählen.
3. Durch siebenfaches Drücken der Taste MODE gelangen Sie in das Kopier-Menü CPY. Das Menü-
system wählt automatisch einen Modellspeicher
höher als das zu kopierende Modell eingestellt
war.Dieser Zielmodellspeicher binkt in der Display-
Anzeige. Falls jedoch ein anderer freier Modellspeicher gewünscht wird, kann mit den T asten INC+
oder DEC- ein neuer Zielspeicher ausgewählt werden.
4. Durch gleichzeitiges Drücken der Tasten INC+ und
DEC- (CLEAR) werden alle Daten des zu kopieren-
den Modells MDL in den ausgewählten Zielmodell-
speicher übertragen. (Vorhergehende vorhandene
Werte werden bei diesem Vorgang gelöscht!)
Ist der werkseitige Modellname, z. B. MD5 im Modellspeicher so wird ein neuer Modellname z. B. MD6
zugeteilt. Ansonsten wird der Name des Modells mit
kopiert.
Nach Auswahl des zu kopierenden Modells gelangen
Sie durch siebenfaches Drücken der Taste MODE in
das Menü CPY, in dem der um einen höher gerückten
Modellspeicher blinkt (6).
MDL
I I5
Modell-Menü MD
L
gewünschtes Modell
Nr. 1 bis 10 zum
Kopieren auswählen (z.B. 5)
Zu kopierender Modellspeicher MDL
Ausgewählter Zielmodellspeicher CPY
Kopier-Menü CPY
automatisch angewähltes Zielmodell blinkt. Mit den Tasten INC+
oder DEC- kann jedoch ein anderer Zielmodellspeicher ausgewählt
werden. Durch gleichzeitiges Drükken der T asten INC+ und DEC- wird
das Modell in den ausgewählten
Zielmodellspeicher kopiert
I I6
CPY
14
Elektronische Trimmung Lenkung und Gas (Direkt-TRIM über Trim-Tasten)
Elektronische Trimmung Lenk-Servo (ST)
Steuerrad-Servo-Trim-Einstellung:
1. Bei eingeschaltetem Sender und eingeschaltetem
Modell die Steuerrad-Trim-Taste (2) ST TRIM in
die gewünschte Verstell-Richtung drücken. Automatisch erscheint im Display das Steuer-CenterTrim-Menü TRIM STC.
2. TRIM Taste (2) TRIM ST (Lenk-Servo) so lange in
der gewünschten Richtung festhalten, bis am Modell die Center-Mitte erreicht ist bzw . das Modell 100
% geradeaus fährt. (Die Verstellmöglichkeit beträgt
+/-30 Steps). Falls der V erstellwert der elektronischen
Trimmung nicht ausreicht, kann im SUB-TRIM-Modus TRIM STS eine größere Korrektur vorgenommen
werden. Bei sehr großen Abweichungen der Mittelstellung des Lenk-Servos ist es empfehlenswert, das
Gestänge mechanisch am Lenk-Servo nachzustellen.
3. Nach loslassen der Trim-Taste (2) TRIM STC ist
der TRIM-Korrekturwert gespeichert und das Sender-Display kehrt nach kurzer Zeit automatisch in
die Grundanzeige zurück.
Elektronische Trimmung Gas/Bremse-Servo (TH)
Gas/Brems-Servo Trim-Einstellung:
1. Bei eingeschaltetem Sender und eingeschaltetem
Modell die Gas/Brems-Trimmung (1) TRIM TH in
die gewünschte TRIM-Richtung drücken. Automa-
tisch erscheint im Display das Gas/Brems-CenterTRIM-Menü TRIM THC.
2. TRIM Taste (1) TRIM TH (Gas/Brems-Servo) so-
lange in der gewünschten Richtung festhalten, bis
am Gas/Brems-Servo des Modells die erforderliche
Center-Mitte erreicht ist. (Die Verstellmöglichkeit
beträgt +/- 60 Steps.) Falls der V erstellwert der elek-
tronischen Trimmung nicht ausreicht, kann im SUBTRIM-Modus TRIM THS eine größere Korrektur vor-
genommen werden. Bei sehr großen Abweichungen
der Mittelstellung des Gas/Brems-Servos ist es empfehlenswert, das Gestänge mechanisch am Gas/
Brems-Servo nachzustellen.
3. Nach loslassen der Gas/Brems-TRIM-Taste (1)
TRIM THC ist der TRIM-Korrekturwert gespeichert
und das Sender-Display kehrt nach kurzer Zeit au-
tomatisch in die Grundanzeige zurück.
elektronische
Trimmung
Gas
EIN/AUS
Schalter
Steuerrad
elektronische
Trimmung
Lenkung
Anmerkung:Die maximalen Mittenverstellungen von
Lenk- Servo STC (Direkt-TRIM) max. +/- 30 Steps und
STS (SUB-TRIM) max. +/-125 Steps sowie für das Gas/
Brems-Servo THC (Direkt-TRIM) max. +/- 60 Steps und
THS (SUB-TRIM) max. +/- 125 Steps dürfen nicht überschritten werden, sonst könnte das Servo seinen mechanischen Anschlag erreichen.
SUB-TRIM-Änderungen wirken sich in der Mitte, jedoch
auch in den Endstellungen (links und rechts) aus. Bit-
te prüfen Sie sorgfältig die Endpunkt-Positionen, damit
das Servo nicht mechanisch anläuft und evtl. beschädigt wird!
TRIM STC Lenk-Direkt-TRIM
R/B30-0-L/F30Steps„CLEAR“=0
TRIM STC Lenk-Direkt-TRIM
Durch Betätigung der Taste ST.
TRIM (2) gewünschte MittenVerstellung des Lenkservos
einstellen, max. +/-30 Steps.
STC
TRIM
L/F
%
5
TRIM
L/F
TRIM
L/F
%
I 0,6
c54
V
10,6 v
Betriebsspannung der
Senderbatterie
C54
im Sender eingestellter
Frequenzkanal
Display-Grundanzeige
Anzeige Direkt-Trim STC (Lenk-Servo)
TRIM THC Gas/Brems-Direkt-TRIM
R/B60-0-L/F60Steps„CLEAR“=0
TRIM
THC Gas/Brems-Direkt-
TRIM. Durch Betätigung der Ta-
ste TH. TRIM (1) gewünschte
Mitten-Verstellung des Gas/
Brems-Servos einstellen, max.
+/-60 Steps.
THCX
EXP
TRIM
L/F
%
TRIM
56
R/B
TRIM
L/F
%
I 0,6
c54
V
10,6 v
Betriebsspannung der
Senderbatterie
C54
im Sender eingestellter
Frequenzkanal
Display-Grundanzeige
Anzeige Direkt-Trim THC (Gas/Brems-Servo)
15
Schnellverstellung im Direkt-Modus (stufenlose Dual-Rate)
Der Direkt-Rate-Modus ist erreichbar über die Benutzung
der elektronischen Direkt-Rate-Wipp-Tasten-A und -B am
oberen Teil des Sendergriffes für Bremse und Lenkung.
Diese Funktion erlaubt eine „Schnellverstellung“ des Lenk-
ausschlages (Rate) mit Wipp-Taste-B bzw. Bremsaus-
schlag mit Wipp-Taste-A ohne drücken einer der 4-Funkt-
ions-Tasten.
Der max. Wert dieses Lenkweges STM kann von 0 - 125%
mit der Taste INC+ oder DEC- als Lenk-Grundweg im Ein-
stell-Menü voreingestellt werden.
Dieser im Menü STM mit INC+ und DEC- voreingestellte
Wert (Masterweg) kann mit der Direkt-Wipp-Taste B nicht
überschritten, jedoch bis 40 % reduziert werden.
Der max. Wert dieses Bremsweges EPA TH R/B kann von
0 - 125 mit der Taste INC+ oder DEC- als Grundweg im
Einstell-Menü voreingestellt werden.
Dieser im Menü EPA TH R/B voreingestellte Wert (Grund-
weg) kann mit der Direkt-Wipp-Taste-A nicht überschrit-
ten, jedoch bis „0“ reduziert werden. (Nur möglich, wenn
Taste-A nicht als AUX benutzt wird.)
Achtung: Wenn EPA TH auf „0“ reduziert ist, funktioniert
der Direkt-Modus EPA BRK nicht!
ist eine Schnellverstellung und Anpassung der Brems-
wirkung während des Fahrbetriebes auf die im Renneinsatz erforderlichen Gegebenheiten schnell möglich.
Schnellverstellung der Bremswirkung
EPA BRK während des
Fahrbetriebes (stufenlose Dual-Rate) durch Betätigung der
Wipp-Taste-A. Achtung: Wenn EPA TH auf „0“ gestellt ist, funktioniert
EPA BRK nicht!
Erläuterung: Getrennte Brems-Servos werden vorzugs-
weise in Großmodellen eingesetzt, wenn getrennt einstellbare Bremskräfte für Vorder- und Hinterräder gewünscht
werden.
RATE
XP
TRIM
Wipp-Taste-A Wipp-Taste-B
Schnellverstellung des Lenkweges während des Fahrbetriebes (stufenlose Dual-Rate) durch Betätigung der
Wipp-Taste-B
M
RATE
EXP
TRIM
L/F
EP
EPA TH
Brems-Servo-
Endpunkt Brems-Hebel drücken
(Bremse) und gewünschten max.
Bremsweg mit INC+ oder DEC-
im Einstell-Menü einstellen.
I25
RATETRIM
TH
EPA
EPA TH maximaler Brems-W eg
EPA TH 0-125 „ENTER“=100
R/B
EXP
Die Betriebsart AUX (Servo 3 linear) ist nur möglich, wenn
vorher im System-Modus die Funktion AUX mit der Taste INC+
oder DEC- linear „LN“ ausgewählt ist.
EPA BRK Brems-Servo-Einstellung
AUX 2P Servo 3 als 2-Punkte- Stellservo
1. Auswahl: Im System-Modus AUX mit den T asten INC+
oder DEC- AUX 2P (2-Punkte-Servo-3-Funktion) ak-
tivieren.
2. Auswahl der Taste „A“ oder „C“: Im System-Mo-
dus GBC kann mit derTaste INC+ oder DEC- GBC
2P die Taste „C“ für die 2-Punkte-Servo-Funktion
ausgewählt werden.
3. Ist der GBC System-Modus nicht auf 2P eingestellt,
so wird automatisch die Taste „A“ für die 2-Punkte-
Servo-3-Funktion aktiviert.
AUX Prop.Steuerweg-Servo 3
-125 - +125 von EPA AUX 0-190
AUX
Steuerweg-Servo 3
Durch Betätigung der Wipp-T asteA stufenlose proportionale Verstellung Servo 3. Achtung: Nur mög-
lich, wenn EPA AUX nicht auf „0“
steht!
AUXX
EXP
TRIM
L/F
I25
AUX LN Servo 3 als lineares Stellservo 3
RATE STM Master-Lenkweg
0%-125%„CLEAR“=100%
RATE STM Master-LenkungGrundweg.
Durch Betätigung der
Taste INC+ oder DEC- Grundweg im
Einstell-Menü voreinstellen.
STM
TRIM
L/F
%
95
%
RATE
RATE STG Rate-Lenkweg
40%-100% vom Master-Weg
RATE STG
Rate-Lenkweg
Durch Betätigung der Wipp-T asteB stufenlose „Schnellverstellung“
des Rate-Lenkweges von 40 - 100
% des Master-Lenkweges.
STGX
EXP
TRIM
L/F
%
RATE
45
%
EPA BRK benötigte Bremswirk.
EPA BRK 0-125„ENTER“=1/2TH
L/F
R/B
MI
RATE
EXP
TRIM
EP
EPA BRK
mit Wipp-Taste-A
gewünschte Bremswirkung
(Brems-Servo) im Fahrbetrieb
einstellen.
RATETRIM
L/F
R/B
BRK
EPA
95
R/B
Moment-T aste „C“
16
AUX- Funktion Festlegung Servo 3 Wipp-Taste-A (System-Modus)
L/F
RATE
EXP
TRIM
L/F
R/B
%
V
REV . NORM
L/F
R/B
RATE
EXP
TRIM
L/F
%
V
AUX Funktion Servo 3 erlaubt Ihnen auszuwählen, welche Funktion die 2-Wege-Wipp-Taste „A“
ausführt:
Bei Auswahl der Stellfunktion „0“ wird der 3.
Kanal nur über das Mischsystem „MIX“ angesteuert. Wenn MIX-Funktionen auf „0“ gestellt sind,
hat der 3. Kanal keine Funktion !
Bei Auswahl der Stellfunktion „2P“ wird der 3.
Kanal über die Taste „A“ als 2-Punkte-Stell-
funktion betätigt, das Servo stellt nur die 2 Endpunkte ein!
Bei Auswahl der Stellfunktion „LN“ wird der 3.
Kanal über die Taste „A“ linear betätigt!
Achtung: Die programmierten Werte werden nur
durch kurzes AUS/EINschalten im System-Mo-
dus übernommen.
RATE
EXP
TRIM
L/F
R/B
REV .
L/F
LN
AUX
RATE
EXP
TRIM
L/F
Display-Anzeige AUX im System-Modus
0
AUXX
M
RATE
EXP
TRIM
L/F
R/B
%
EP
R/B
AUX
2P
RATE
EXP
TRIM
L/F
R/B
2-Wege-Wipp-Taste „A“
abgeschaltet, Ansteuerung
des Servo 3 nur über MIX Gas/
Bremsfunktion und/oder Lenkfunktion
2-Wege-Wipp-Taste „A“
steuert die Endpunkte des
Servo 3 als Sonderfunktion
2-Wege-Wipp-Taste „A“
steuert Servo 3 linear als
Stellservo innerhalb des
Stellweges in die gewünschte Position
Gas/BremsHebel
Um zur AUX Funktion im System-Modus zu gelangen beachten Sie folgende Schritte:
1.Durch Drücken der T aste MODE und Sender
EIN, gelangen Sie in den System-Modus in
den vorher ausgewählten Modellspeicher.
2.Durch mehrmaliges Drücken der MODE Ta-
ste AUX-Menü (Servo 3) auswählen.
3. Mit den Tasten INC + oder DEC - die gewünschte 3. Servofunktion LN (linear), 2P (2-
Punkte-Stellfunktion) oder 0 (Mischerfunktion
für Bremse) auswählen.
4. Durch kurzes AUS/EINschalten des Senders
werden eingestellte Parameter in den ausgewählten Modellspeicher übernommen.
L/F
R/B
%
V
REV . NORM
RATE
EXP
TRIM
L/F
R/B
%
V
REV . NORM
RATE
EXP
TRIM
R/B
%
V
REV . NORM
M
RATE
EXP
TRIM
L/F
R/B
%
V
EP
MI
RATE
EXP
TRIM
L/F
%
V
REV . NORM
EP
RATE
EXP
TRIM
L/F
R/B
%
V
REV . NORM
AUX 0 Taster „A“ ohne
Funktion, Ansteuerung
des 3. Servos durch Mix
im Einstell-Modus mit Gas/
Brems-Hebel und/oder
Lenkfunktion
AUX 2P Servo 3 wird
über die 2-Wege-Wipp-Taste „A“/„C“ als 2-Punkte
Stellfunktion betätigt. Durch
MIX kann im Einstell-Modus
mit Gas/Brems-Hebel und/
oder Lenkfunktion das
Servo 3 beeinflusst werden.
AUX LN Servo 3 wird
über die 2-Wege-Wipp-Taste „A“ linear als Stellservo
betätigt.Durch MIX kann im
Einstell-Modus mit Gas/
Brems-Hebel und/oder
Lenkfunktion das Servo 3
beeinflusst werden.
17
Wipp-Taste-B
Eine stufenlose Schnellverstellung des Lenkweges
während des Fahrbetriebes (stufenlose Dual-Rate),
durch Betätigung der Wipp-Taste-B, erlaubt die Ver-
kleinerung der Ausschlagsgröße (RATE STG).Dieser
Einstellwert (Multi-Rate) kann im Bereich von 125 %
bis 50 % auf die Erfordernisse im Renneinsatz reduziert werden.
Der Grundwert des Lenk-Servoweges muß im EinstellMenü EPA ST voreingestellt werden! Bei Auslieferung
des Senders ist der Wert im Einstell-Menü EPA ST auf
100 % gesetzt, kann jedoch zwischen 125 % bis 0 %
erhöht/reduziert werden.
Die Direkt-RATE-Schnell-Funktion RATE STG wird bei
Betätigung der Wipp-Taste-B automatisch aufgerufen
und erlaubt über diese Wipp-Taste-B ein direktes
schnelles Anpassen des Lenkweges (stufenlose Dual-
Rate) während des Rennens und ermöglicht eine optimale Anpassung auf die Rennstrecken-Erfordernisse.
Dual-Rate Steuerrad-Funktion Wipp-Taste-B
2. Die benötigte Größe des Servo-Lenkweges RATE
STG (Multi-Rate) ist mit der Wipp-Taste-B während
des Renneinsatzes stufenlos schnell justierbar.
Diese Größe ist bezogen auf den eingestellten End-
punkt-Servoweg im Einstell-Menü EPA ST, in dem
der vorgegebene Grundweg mit der Taste INC+ oder
DEC- vorgewählt wird.
3.Nach loslassen der Wipp-Taste-B kehrt der Sender
ca. 2 Sekunden später automatisch wieder in die
Grundanzeige zurück.
EPA ST Lenk-Servo-Endweg
L/F R/B 0-125 „CLEAR“=100
EPA ST
Lenk-Servo-Endweg
L/F
und R/B. Mit
den Tasten INC+ oder
DEC- Links- und Rechtsausschlag getrennt im Einstell-Menü voreinstellen.
%
RATE STG Rate-Lenkweg
50-125% Lenk-Servo-Endweg
RATE STG
Rate-Lenkweg
Durch Betätigung der Wipp-Taste-B stufenlose „Schnellverstellung“ (Multi-Rate) von
50 - 125 % des Lenk-ServoEndweges
EPA ST
STGX
EXP
TRIM
L/F
%
RATE
85
%
Display-Anzeige nach Betätigung der Wipp-Taste-B
Voreinstellung des Lenk-Servo-Weges EPA ST
1. Der maximale Servo-Lenkweg EPA ST muß als er-
stes auf das Modell angepaßt werden. Die Anpas-
sung erfolgt im Einstell-Menü EPA ST.
2. Sender EIN, durch mehrmaliges drücken der Taste
MODE Menüpunkt EPA ST, EPA TH oder EPA AUX
anwählen.
3. Mit der Taste CHANNEL Einstell-Menü EPA ST für
das Lenkservo auswählen.
4. Mit den Tasten INC+ oder DEC- den Weg des
Lenkservos auf das Modell anpassen.
1. Sender EINschalten, durch Betätigung der Wipp-Ta-
ste-B wird automatisch das Menü RATE STG (stufenlose Dual-Rate) aktiviert und im Display sichtbar.
ST
TRIM
L/F
EPA
I25
L/F
R/B
RATE STG Rate-Lenkweg
50-125% Lenk-Servo-Endweg
RATE STG
Rate-Lenkweg
Durch Betätigung der Wipp-T asteB stufenlose „Schnellverstellung“
(Multi-Rate) von 50 - 125 % des
Lenk-Servo-Endweges
EPA ST
STGX
EXP
TRIM
L/F
%
85
%
%
Stufenlose Schnellverstellung
Display-Anzeige EPA ST im Einstell-Menü
Stufenlose Schnellverstellung RATE STG
TRIM
L/F
%
RATE
18
GBC Moment-Taster-Festlegung System -Modus (Set-up Mode)
Im System-Modus (Set-up Mode) besteht die Möglichkeit die
Funktion der Momenttaste „C“, die bequem mit dem Dau-
men betätigt werden kann, auf eine der 3 möglichen Grundfunktionen, die der Pilot für den erforderlichen Einsatz benö-
tigt, festzulegen.
GBC „LA“ = Rundenstoppuhr / Rundenzähler
Die Moment-Taste „C“ funktioniert jetzt automatisch.
Der LAP-Timer läuft wenn LAP blinkt. Die Rundenzeiten (3 - 99,9 s) werden automatisch abgespeichert.
Durch mehrmaliges drücken der T aste MODE wird das
LAP-Menü (Rundenzähler-Menü) im Display sichtbar
(LAP blinkt). In der oberen Reihe wird die Rundenzeit
in zehntel Sekunden, in der unteren Reihe die Rundenzahl angezeigt.
Anhalten des LAP-Timers, durch gleichzeitiges Drükken der Tasten INC+ und DEC- (CLEAR) oder automa-
tisch nach 50 Runden. Die einzelnen Rundenzeiten
(max. 50) können mit der Taste INC+ oder DEC- auf-
gerufen und ausgelesen werden.
Löschen der Rundenzeiten, durch gleichzeitiges Drükken der Tasten INC+ und DEC- (CLEAR) im LAP-Menü bei
angehaltener Rundenstoppuhr werden alle Rundenzeiten
gelöscht.
Bei Neustart des Rundenzählers erhalten alte (nicht
gelöschte Runden) das V orzeichen (-) minus.
Anmerkung:
Wenn die Rundenmeßzeit von 3 - 99,9 s überschritten wurde zeigt das Display OVR (Over run) an.
Die Sperrzeit zwischen den Runden beträgt 3 s.
Kleinere Rundenzeiten werden nicht angenommen.
Moment-Taster C (Auswahl LA/Eb)
LA
GBC
RATE
EXP
TRIM
L/F
R/B
%
V
„LA“: Rundenstoppuhr (LAP
timer) Ermöglicht das Stoppen
der Rundenzeiten von 3 - 99,9
s (in zehntel Sekunden) und
zählen der Runden 1 - 50
Anmerkung: Die Rundenzeiten sind nur auslesbar,
wenn der LAP-Timer steht. Drücken Sie deshalb die
Tasten INC+ und DEC- (CLEAR) gleichzeitig, danach
darf das Timer-Symbol LAP nicht mehr blinken!
Bei laufendem LAP-Timer wird nur die aktuelle Rundenzeit angezeigt!
Mit der Taste INC+ oder DEC- kann die gewünschte
Runde ausgewählt und die Rundenzeit abgelesen wer-
den. Die Anzeige ist in zehntel Sekunden, z. B. 226 =
22,6 sec.
Eb
GBC
RATE
EXP
TRIM
L/F
R/B
%
V
„Eb“: maximaler Lenkweg
(Emergency Steering Button)
Wegreduzierung RATE STG
wird bei gedrückter Taste „C“
automatisch auf RATE STM um-
geschaltet
„0“/(„2P“): C-Taste ohne Funk-
tion, (werkseitig eingestellt).
Wenn AUX auf „2P“ eingestellt
ist, erscheint statt der „0“ „2P“ im
Display und die Taste „C“ wird
für die
2-Punkt-Stellfunktion (Servo3)
verwendet.
I I0
GBC
RATE
EXP
TRIM
L/F
R/B
%
V
Moment-Taste „C“
Eingabeschritte Lap timer/Rundenzähler „LA“
1. Mit der Moment-Taste „C“ wird durch Drücken die
Rundenstoppuhr (LAP-Timer) aktiviert und durch
blinken des „LAP“ im Display angezeigt.
2. Ab dem zweiten Drücken der Moment-Taste „C“
wird die Rundenzeit (in zehntel Sekunden) und die
Rundenzahl abgespeichert.
3. Mit der MODE T aste kann man das Rundenstoppuhr-
Display anwählen und die aktuelle Rundenzahl und
Rundenzeit ablesen.
4. Die älteren Rundenzeiten können mit INC+ und DECnur dann angeschaut werden, wenn die Rundenstoppuhr steht. (LAP im Display blinkt nicht!)
5. Mit „CLEAR“ kann die laufende Rundenstoppuhr
angehalten oder bei angehaltener Rundenstoppuhr
alle Rundenzeiten gelöscht werden. Mit der Taste
„C“ kann sie wieder gestartet werden.
6. Wenn die Rundenstoppuhr angehalten und erneut
gestartet wird, werden die im vorherigen Rundenspeicher gespeicherten Runden mit minus (-) ge-
kennzeichnet.
3
226
RATE
EXP
TRIM
L/F
R/B
%
V
LAP
22,6 s Rundenzeit
Runde 3
19
GBC „Eb“ Emergency Steering Button
(Sicherheits-Moment-Nottaster)
GBC „2P“ = Servo 3 2-Punkt-Stellfunktion
Moment-Taste „C“
GBC Moment-Taster-Festlegung System -Modus (Set-up Mode)
Durch Auswahl der Sicherheits-Momentfunktion im Menü
GBC „Eb“ besteht die Möglichkeit, mit dem Moment-Taster „C“ die Sicherheitsfunktion auszulösen.
Eb
GBC
RATE
EXP
TRIM
L/F
R/B
%
V
„Eb“: maximaler Lenkweg
(Emergency Steering Button)
Wegreduzierung RATE STG
wird bei gedrückter Taste „C“
automatisch auf RATE STM um-
geschaltet
Die Funktion GBC „Eb“ hebt eingestellte Wegreduzierungen im Menü RATE STG auf und schaltet
automatisch auf das Menü RATE STM Master-Len-
kung-Grundweg um.
Dadurch wird automatisch auf den größten programmierten Master-Lenkung-Grundweg umgeschal-
tet, so lange der Moment-Taster „C“ mit dem Daumen gedrückt bleibt.
Diese Umschaltung verhindert unter Umständen einen
Crash in oder vor Kurven und ermöglicht nach einem
Fahrfehler schnelle Streckenkorrekturen mit extre-
men Lenkausschlägen.
Die 2-Punkt-Stellfunktion ist nur aktiv, wenn vorher
im Menü Servo 3 AUX (System-Modus) mit der Taste
INC+ oder DEC- die Funktion AUX „2P“ eingestellt wurde.
Durch einmaliges Drücken der Taste MODE gelangen
Sie in das Menü GBC. Durch mehrmaliges Drücken
der T aste INC+ Menü GBC „2P“ auswählen. Nach AUS/
EINschalten ist das Menü GBC „2P“ aktiv und das
Servo 3 kann mit der Taste „C“ in die beiden pro-
grammierten Endstellungen geschaltet werden.
AUX „2P“: Wenn AUX auf
„2P“ eingestellt ist, erscheint
statt der „0“ „2P“ im Display und
die Taste „C“ wird für die 2-
Punkt-Stellfunktion (Servo 3)
verwendet.
2P
AUX
RATE
EXP
TRIM
R/B
Eingabeschritte GBC „Eb“ Emergency
Steering Button (Sicherheits-Moment-Nottaster)
1. Durch Drücken von MODE und Sender EINschalten
gelangen Sie in den System-Modus.
2. Durch mehrmaliges Drücken der Taste MODE gelangen Sie in das Menü GBC.
3. Mit der Taste INC+ oder DEC- aktivieren Sie im Menü
GBC den Sicherheits-Modus GBC „Eb“.
4. Durch kurzes AUS/EINschalten ist der Sicherheits-
Moment-Nottaster gespeichert.
5. Durch gedrückthalten der Moment-Taste „C“ mit
dem Daumen wird automatisch ein im Menü RATE
STG eingestellter kleinerer Lenkservo-Weg ignoriert und auf den im Master RATE STM größten
Lenkservo-Weg umgeschaltet.
Eingabeschritte GBC „2P“ = Servo 3
2-Punkt-Stellfunktion
1. Durch Drücken von MODE und Sender EINschalten
gelangen Sie in den System-Modus.
2. Mit der Taste MODE gelangen Sie in das Servo 3
Menü AUX.
3. Durch Drücken der Taste INC+ 2-Punkt-Stellfunktion
AUX 2P auswählen.
4. Di e Taste MODE einmal drücken um in das Moment-
Tasterauswahl-Menü GBC zu gelangen.
5. Sender AUS/EINschalten um Tasterkonfiguration
GBC 2P zu speichern.
GBC „0“= Taste „C“ aus (werkseitige Einstellung)
GBC „0“: Taste „C“ ohne
Funktion, (werkseitig einge-
stellt).
I I0
GBC
RATE
EXP
TRIM
L/F
R/B
%
V
GBC „2P“: Moment-Taste „C“
als 2-Punkt-Stellfunktion Servo
3 aktiv
I I2P
GBC
RATE
EXP
TRIM
L/F
R/B
V
20
REV
MD3
RATE
EXP
TRIM
R/B
%
V
STX
RATE
EXP
TRIM
L/F
RR/B/
%
I II0,6
RATE
EXP
TRIM
L/F
R/B
%
V
REV . NORM
RATETRIM
L/F
R/B
%
V
REV . NORM
RATE
EXP
TRIM
L/F
R/B
I I0
STS
RATE
EXP
TRIM
R/B V
RATE
EXP
L/F
R/B
%
V
ST
RATE
EXP
TRIM
L/F
R/B
%
V
RATE
EXP
TRIM
L/F
R/B
%
V
REV . NORM
RATE
EXP
TRIM
L/F
R/B
%
V
REV
I00
.
NORM
I I
STM
RATE
EXP
TRIM
L/F
R/B
%
V
RATETRIM
L/F
R/B
%
V
REV . NORM
I I8
RATE
EXP
TRIM
L/F
R/B
%
V
MODE
MODE
MODE
MODE
MODE
RATE
EXP
TRIM
L/F
R/B
%
V
Ablaufdiagramm Einstell-Menü
CHANNEL
EPA
L/F
V
TH
R/B
EPA
I
C54
MIX
V
6
STL
MIX
%
5
THS
TRIM
TH
-
EXP
THF
%
AUX
EPA
AUS
TRIM
%
AUX
RATE
%
2
THB
EXP
%
-
TRIM
REV.NORM
L/F
L/F
R/B
I00 I00
-
I II0,6
I00
REV.NORM
REV.NORM
-
CHANNEL
CHANNEL
CHANNEL
CHANNEL
CHANNEL
CHANNEL
THB
MIX
GAS
BREMSE
CHANNEL
CHANNEL
CHANNEL
GAS / F
BREMSE / R
L/F
L/F
25
75
STEUER-R
STR
THF
MIX
35
%
%
Um zum Einstell-Menü zu gelangen Sender EINschalten. Danach Drücken Sie die Taste MODE. Das Display
wechselt ins Einstell-Menü, wie im Ablaufdiagramm ersichtlich. Durch Drücken der Taste MODE kann die gewünschte Funktion angewählt und eingestellt werden.
Normale Betriebsanzeige nach Einschalten
Endweg vorwärts(F) Bremse(B)
0 bis 125 „CLEAR“=100
Einseiten-Endweg links/rechts
0 bis 125 „CLEAR“=100
Einseiten-Endweg Kanal 3
0 bis 190 „CLEAR“=100
Gas Sub-trim adjustment
R/B
125-0-
L/F
125“CL“=0
Gas Reverse-Schalter
REVERSE-NORMAL
Kanal 3 Reverse-Schalter
REVERSE-NORMAL
Lenkung Subtrim adjustment
Lenk.Rev.Schalt.
REV-NORMAL
STM Lenkservo
Grundweg
EXP ST-Lenkung-
Expo.
Bremse Exponential Einstellung
-100%(mild)-LN-100%(quick)
Gas Expo.vorwärts Einstelllung
-100%(mild)-LN-100%(quick)
Lenkung links
Kanal 3Mix adj.
Lenkung rechts Kanal 3 Mix adj.
-125%-0%-125%„CLEAR“=0%
Gas vorwärts Kanal 3 Mix adj.
-125%-0%-125%“CLEAR“=0
Bremse/Gas Kanal 3 Mix adjustm.
-125%-0%-125%“CLEAR“=0%
Kanal 3 Sub-trim adjustment
R/B
125-0-
L/F
125(=25°)“CL“=0
AUX = Kanal 3
RATE STM Steuer-Weg-
Grundeinstellung. (Masterweg) des
Lenk-Servos für normalen Fahrbetrieb
MODE
ST
RATE
EXP
TRIM
L/F
R/B
%
V
REV . NORM
LN
EXP
EXP
TRIM
L/F
R/B
TDB
RATE
EXP
TRIM
L/F
R/B
%
V
REV . NORM
0
MODE
%
L/F
TDB Gas/Bremse
Todband-Reduz.
TDB Gas/Bremse
Todband-Reduzierung
0 - 100 %„CLEAR“=0%
(„LF“) vorwärts oder
(„RB“) Bremse, abhängig
von der momentanen Trigger
Position des Gas-Bremshebels.

21
Durch Drücken der Taste MODE gelangen Sie in den
Einstell-Modus. Durch mehrmaliges Drücken der Taste MODE, EPA-Menü zur Endpunkt-Einstellung aus-
wählen
EPA Endpunkt-Einstellung der Servos (Einstell-Menü)
Der Menüpunkt EPA Endpunkt-Einstellung der Servos
(End-point adjustment) , erlaubt es für jedes Servo getrennt den Maximalausschlag für Lenkung, Gas/Bremse und Funktion-3 zu erhöhen bzw . verringern. In jeder
Stellrichtung ist eine getrennte Einstellung möglich.
Durch diese Endpunkt-Einstellung wird der benötigte
Servoausschlag auf die Erfordernis des Modells angepaßt.
Der Einstellbereich reicht von 0 % bis 125%. Die werk-
seitige Voreinstellung beträgt 100 % für beide Richtungen.
Die auf dem Display angezeigte Einstell-Richtung ist von
der jeweiligen Position des „Gebers“ (Steuerrad, Gas/
Bremse, Funktion-3) abhängig.
EPA AUX
Servo 3 mit Hilfe
der Taste „A“/„C“ und/oder der
Mischfunktionen „MIX“ auf rechten Endausschlag bringen und
gewünschten Servo-Endpunkt
mit INC+ oder DEC- einstellen.
Zugang Endpunkt-Servoweg Einstell-Menü
1. Sender einschalten um zum Funktions-Menü zu ge-
langen.
2. Die Taste MODE so oft drücken bis im Display das
Servoweg-Endpunkt-Einstell-Menü EPA erscheint.
3. Mit der Taste CHANNEL eine für die Einstellung benötigte Funktion ST (Steering) Steuerrad/Lenkung,
TH (Throttle) Gas/Brems-Hebel oder AUX (Auxchannel) 3. Servofunktion auswählen.
4. Ausgewählten Geber in die einzustellende Funkti-
on bringen (links/rechts, vorwärts/rückwärts oder
Bremse). Nun mit INC+ oder DEC- Taste den gewünschten Servoendausschlag einstellen. Den Geber in die jeweils entgegengesetzte Richtung brin-
gen um auch die entgegengesetzte Seite des
Servoweges zu justieren.
5. Sender kurz AUS/EINschalten um die eingestellten
Werte zu speichern und das EPA (Servoweg-End-
punkt-Einstell-Menü) zu verlassen und in die Display-Grundanzeige zurückzugelangen.
Bemerkung: Bei der Einstellung der Ausschläge für
die Lenkfunktion wird zur Erzielung ordentlicher
Fahreigenschaften folgendes vorgeschlagen: Die Ein-
seitenwege in beide Richtungen (links wie rechts) vom
„Lenkausschlag des Servo“ her, wenn möglich, gleich
einstellen.
EPA AUX
Servo 3 mit Hilfe
der Taste „A“/„C“ und/oder der
Mischfunktionen „MIX“ auf linken
Endausschlag bringen und gewünschten Servo-Endpunkt mit
INC+ oder DEC- einstellen.
AUX
EPA
R/B
I00
AUX
EPA
I00
L/F
Display-Anzeige nach Einschalten des Senders
EPA Endpunkt Servo 3 links
0 bis 190 „CLEAR“=100
EPA Endpunkt Servo 3 rechts
0 bis 190 „CLEAR“=100
C54
RATE
EXP
TRIM
I II0,6
V
%
V
REV . NORM
%
V
REV . NORM
%
V
Display-Anzeigen der Endpunkt-Einstellungen
EPA Endpunkt-Lenkservo links
0 bis 125 „CLEAR“=100
EPA Endpunkt Gasservo vorwärts
0 bis 125 „CLEAR“=100
L/F
R/B
RATE
EXP
TRIM
M
RATE
EXP
TRIM
L/F
EP
MI
RATE
EXP
TRIM
EP
EPA ST
Steuerrad nach links
L/F (Lenkung links) drehen und
gewünschten Servo-Endpunkt mit
INC + oder DEC- einstellen.
EPA ST
Steuerrad nach
rechts R/B (Lenkung rechts) dre-
hen und gewünschten ServoEndpunkt mit INC + oder DEC-
einstellen.
EPA TH
Gas/Brems-Hebel
ziehen L/F (vorwärts) und ge-
wünschten Servo-Endpunkt für
Vollgas mit INC + oder DEC - ein-
stellen.
EPA TH
Gas/Brems-Hebel
drücken R/B (Bremse) und ge-
wünschten Servo-Endpunkt für
rückwärts bzw. Bremse mit INC+
oder DEC- einstellen.
RATETRIM
L/F
R/B
TH
R/B
EPA
I00
RATETRIM
L/F
R/B
TH
EPA
L/F
I00
STX
RATE
EXP
TRIM
L/F
RR/B/
%
EPA
I00
STX
RATE
EXP
TRIM
L/F
%
EPA
L/F
I00
EPA Endpunkt-Lenkservo rechts
0 bis 125 „CLEAR“=100
EPA Endpunkt Bremsservo
0 bis 125 „CLEAR“=100
10,6 v
Betriebsspannung der
Senderbatterie
C54
im Sender eingestellter
Frequenzkanal

22
%
V
REV . NORM
R
1. Um zum Einstell-Menü zu gelangen Sender
EINschalten.
2. Die Taste MODE so oft drücken bis im Display der
Menüpunkt MIX STL/ MIX STR erscheint.
3. Durch mehrmaliges Drücken der Taste CHANNEL
und gleichzeitiger Betätigung des Steuerrades
links/rechts einzustellende Funktion MIX STL oder
MIX STR bzw. durch Betätigung des Gas/BremsHebels MIX THF oder MIX THB auswählen.
4. Ausgewählten Geber in die einzustellende Rich-
tung bringen (links/rechts, vorwärts/rückwärts oder
Bremse). Nun mit INC+ oder DEC- Taste den ge-
wünschten Mischwert des Servo 3 einstellen. Geber in die jeweils entgegengesetzte Richtung brin-
gen um auch die andere Seite des Servoweges zu
justieren.
5. Sender kurz AUS/EINschalten um die eingestellten
Werte zu speichern und das Einstell-Menü zu verlassen um in die Display-Grundanzeige zurückzugelangen.
MIX-Einstellung Servo 3 (Einstell-Menü)
Gas/Brems-MIX:
MIX THF / MIX THB
Diese Funktion erlaubt eine Beeinflußung durch die
Gas/Brems-Funktion auf die Servofunktion 3.
Beispiel für getrennte Vorder/Hinterrad-Bremse:
Erläuterung: Getrennte Brems-Servos werden vorzugsweise in Großmodellen eingesetzt, wenn getrennt einstellbare Bremskräfte für Vorder- und Hinterräder gewünscht werden.
MIX Steuerrad links/Servo 3
-125%-0%-+125%„CLEAR“=0%
MIX Steuerrad rechts/Servo 3
-125%-0%-+125%„CLEAR“=0%
RATE
EXP
TRIM
MIX STL
Steuerrad nach
links (Lenkung links) drehen
und gewünschten Mischwert mit
INC+ oder DEC- einstellen.
MIX STR
Steuerrad nach
rechts (Lenkung rechts) drehen
und gewünschten Mischwert mit
INC+ oder DEC- einstellen.
STRX
RATE
EXP
TRIM
L/F
%
MIX
35
STLX
RATE
EXP
TRIM
L/F
%
MIX
33
Im Mix-Menü läßt sich einstellen, wie die Geber für
„Steuerrad“ und „Gas“ als Mischfunktion auf die
Servofunktion 3 wirken sollen. Es läßt sich für jeden
Geber getrennt der Mixanteil sowie der Mix-Offset unabhängig einstellen bzw. programmieren.
Lenk-MIX:MIX STL / MIX STR
Diese Funktion erlaubt eine Beeinflußung durch die Lenkung auf die Servofunktion3.
%
%
Kanal 3 Mixer-Funktion
%
V
REV . NORM
%
V
L/F
R/B
M
RATE
EXP
TRIM
L/F
EP
MI
RATE
EXP
TRIM
EP
MIX THF
Gas/Brems-He-
bel ziehen (vorwärts) und gewünschten Mischwert für Vollgas
mit INC+ oder DEC- einstellen.
MIX THB
Gas/Brems-He-
bel drücken (Bremse) und gewünschten Mischwert für rückwärts bzw. Bremse mit INC+
oder DEC- einstellen.
RATETRIM
L/F
R/B
THB
MIX
I05
RATETRIM
L/F
R/B
THF
MIX
0
MIX Gas vorwärts/Servo 3
-125%-0%-+125%„CLEAR“=0%
%
%
MIX Bremse rückwärts/Servo 3
-125%-0%-+125%„CLEAR“=0%
MIX Gas/Brems-Servo 3 (Einstell-Menü)
Anmerkung:Bei Verwendung der MIX-Funktion Servo
3 ist eine 2P-Steuerung nicht sinnvoll.
Im System-Modus sollte die Funktion AUX 3 auf „0“
oder „LN“ eingestellt sein.
Zugang zum MIX-Einstell-Menü Servo 3
TDB Gas/Brems-Hebel Totband-Einstellung
Die Totband-Reduzierung wird benutzt um den „Totbereich“ (Spiel des Gas/Bremsgestänges) zwischen
dem Neutralpunkt und dem Startpunkt von Gas und
von Neutral zum Startpunkt Bremse zu reduzieren /
aufzuheben.
Dieser Bereich ist manchmal als „Totbereich“ benannt. Wenn mehr Gastrimmung verwendet wird (auch
bekannt als statische Bremse), existiert mehr toter
Triggerbereich rechts von neutral.
Stellen Sie den Vorwärts-Wert so ein, daß die Reifen
Ihres RC-Car sich gerade bewegen, wenn Sie den Gashebel etwas betätigen.
Stellen Sie den Bremswert so ein, daß die Bremsbacken gerade die Bremsscheibe berühren, wenn Sie
den Bremshebel etwas betätigen.
TDB
RATE
EXP
TRIM
L/F
R/B
%
V
REV . NORM
0
%
L/F
TDB Gas/Bremse Totband-Redu-
zierung 0 - 100 %„CLEAR“=0%
(„LF“) vorwärts oder („RB“) Bremse,
abhängig von der momentanen
Trigger Position des Gas/Bremshebels.

23
REV-NORM TH
Servo-Dreh-
richtung Gas/Brems-Servo.
Mit der Taste INC+ oder DEC- gewünschte Drehrichtung auswählen.
SUB-TRIM-Modus (Einstell-Menü)
Anmerkung:
Der Menüpunkt SUB-TRIM im Einstell-Menü erlaubt
eine komfortable elektronische Mittenverstellung der
Servos für Lenkung, Gas und AUX (Servo 3), ohne
daß der Trim-Bereich der Trim-Tasten für die Lenk-
und Gas-Funktion berührt oder eingeschränkt wird.
Verstellwege des reservierten Trim-Bereiches der Di-
rekt-Trim-Tasten werden durch die SUB-TRIM-Funktion nicht beeinflußt.
Diese SUB-TRIM-Funktion ist sehr hilfreich. Sie ermöglicht die Feinjustage der Servomitte der einzelnen Servos, ohne daß am Modell mechanische Eingriffe vorgenommen werden müssen.
Obwohl die SUB-TRIM-Funktion eine hilfreiche Stellung einnimmt, ist es angezeigt, nur „kleine“ (bis 30
Step) Trim-Korrekturen vorzunehmen, da ansonsten
unerwünschte, nicht gleiche Servowege auftreten können.
Werden mehr als +/-30 Step-Verstellung erforderlich,
ist eine „mechanische“ Einstellung vorzunehmen.
REV-NORM AUX
Servo-Rev.Funkt.3
REV-NORM
L/F
R/B
MI
RATE
EXP
TRIM
EP
REV-NORM AUX
Servo-Dreh-
richtung Servo 3. Mit der Taste
INC+ oder DEC- gewünschte
Drehrichtung auswählen.
RATETRIM
L/F
R/B
AUX
Drehrichtung des Servos (Servo-Reverse)
Um in das Servo-Reverse-Menü zu gelangen Sender EIN,
MODE T aste mehrfach betätigen, bis das Menü
REV-NORM ST im
Display erscheint. Mit T aste CHANNEL gewünschte Servo-Funk-
tion ST, TH oder AUX auswählen.
REV-NORM ST Servo-Rev.Lenkung
REV-NORM
REV-NORM ST Servo-Drehrichtung Lenkservos.
Mit der T aste INC+ oder DEC- gewünschte
Drehrichtung auswählen.
ST
TRIM
L/F
%
REV-NORM TH Servo-Rev.Gas/Br.
REV-NORM
-
REV -NORM
-
REV -NORM
THX
EXP
TRIM
L/F
%
REV -NORM
-
Der Menüpunkt Drehrichtung Servo ist eine sehr hilf-
reiche Einrichtung, wenn Sie ein neues Modell aufbau-
en. Die Wirkung der Drehrichtung des jeweiligen
Servos in Relation zur „Geberbewegung“ . Die Servo-
Reverse-Funktion steht für die Kanäle Lenkung, Gas/
Bremse und AUX (3. Servo-Funktion) zur Verfügung.
Zugang zum Servo-Reverse-Menü
Um zum Servo-Reverse-Menü zu gelangen beachten Sie folgende Schritte:
1. Sender EIN-schalten
2. MODE Taste mehrfach drücken bis im Display das
Einstell-Menü REV-NORM TH erscheint.
3. Mit der Taste CHANNEL gewünschte Servo-Funkti-
on ST (Lenkung), TH (Gas/Bremse) oder AUX
(Servo-Funktion 3) auswählen.
4. Mit der T aste INC+ oder DEC- die gewünschte Servo-
Drehrichtung (REV-NORM) einstellen.
5. Sender kurz AUS/EIN-schalten um eingestellte Wer-
te zu speichern und in die Display-Grundanzeige zurückzukehren.
Erläuterung:
Um in das SUB-TRIM-Menü zu gelangen Sender EIN,
MODE Taste mehrfach betätigen, bis das Menü TRIM STS
im Dis pla y ers chei nt. M it de r Taste CHANNEL gewünschte
Servo-Funktion STS, THS oder AUS auswählen.
TRIM AUS Servo 3 SUB-TRIM
-125-0-125 „CLEAR“=0
L/F
R/B
MI
RATE
EXP
TRIM
EP
TRIM AUX Servo 3 SUB-TRIM
Durch Betätigung der Taste INC+
oder DEC- SUB-TRIM-Verstellung
des AUX-Servos trimmen. Bei AUX
2P (2 Punkt) sollte die Trimmung auf
0 gestellt sein.
RATETRIM
L/F
R/B
AUX
TRIM
95
R/B
SUB-TRIM STS, THS und AUS
TRIM STS Lenkung SUB-TRIM
125-0-125 „CLEAR“=0
TRIM STS Lenkung SUB-TRIM
Durch Betätigung der Taste INC+ oder
DEC- SUB-TRIM-Mittenverstellung der
Lenkung -125 - +125 Step trimmen.
STS
TRIM
L/F
%
5
TRIM
L/F
TRIM THS Gas/Bremse SUB-TRIM
125-0-125 „CLEAR“=0
TRIM
THS
Gas/Brems SUB-
TRIM Durch Betätigung der Taste
INC+ oder DEC- SUB-TRIM-Mittenverstellung des Gas/Brems-Hebels
trimmen.
THSX
EXP
TRIM
L/F
%
TRIM
45
R/B

24
Der Menüpunkt EXP ST Exponential-Steuerrad-Funk-
tion, erlaubt das Lenkverhalten um die Neutralposition maßgeschneidert auf das Modellfahrzeug abzustimmen, ohne daß sich dies auf den max. Lenkaus-
schlag auswirkt.
Normalerweise wird EXP (Exponential-Funktion) benutzt
um die Neutralstellung zu entschärfen. Das System
XS-6 FM RACE ermöglicht beide Richtungen: positiv
(+normal) und negativ (- erhöhte Empfindlichkeit um
die Neutralstellung) Expo-Werte einzustellen.
ST
RATE
EXP
TRIM
L/F
R/B
%
V
REV . NORM
85
EXP
EXP ST
Exponential-Steuerrad-
Funktion.
Mit
den T asten INC+ oder
DEC- gewünschte ExponentialFunktion (-1% bis -100%) auswählen.
EPX ST Expo-Steuerrad-Funktion
-100%-LN-100% „CLEAR“=LN
%
ST
RATE
EXP
TRIM
L/F
R/B
%
V
REV . NORM
LN
EXP ST
LN Steuerrad-Funktion
linear aufgehoben.
Mit den Tasten
INC+ oder DEC- Steuercharakteristik von fein-fühlig 100% bis aggressiv +100% einstellbar.
EPX ST LN Linearer Steuerweg
-100%-LN-100% „CLEAR“=LN
1. Sender EINschalten.
2. MODE Taste mehrfach Drücken bis EXP ST im Dis-
play erscheint.
3. Mit der Taste CHANNEL EXP ST auswählen.
4. Mit der Taste DEC- gewünschten Exponential-%-
Satz 1 - 100 % einstellen um eine feinfühlige Steue-
rung um die Nullage des Lenkservos zu erreichen.
5. Mit der Taste INC+ kann eine aggressive Steuerkurve programmiert werden, wenn große Stellwege
um die Mitte des Lenkservos erforderlich sind.
6. Durch gleichzeitiges Drücken der T asten INC+ und
DEC- kann die Exponential-Funktion schnell abgeschaltet werden (LN) linear. Das Lenkservo ar-
beitet in der LN-Funktion wieder linear.
7. Durch gleichzeitiges Drücken der Tasten MODE
und CHANNEL oder kurzes AUS/EIN-schalten des
Senders werden die eingestellten Werte in den
Speicher des Einstellmenüs übernommen und das
Display kehrt in die Grundanzeige zurück.
EXP ST Exponential-Funktion Lenkservo (Einstell-Menü)
EXP ST Exponential-Steuerrad-Funktion
RATE
EXP
TRIM
L/F
R/B
%
V
EXP
Voreinstellung der Exponential-Funktion
25
Empfänger mit BEC-System
Der SB6 SYN-Empfänger ist mit einem hochwertigen Spannungsstabilisierungsystem (BEC = Battery Eliminator
Circuitry) ausgerüstet. Die Stromversorgung des Empfängers und der daran angeschlossenen Servos kann aus der
Fahrbatterie erfolgen.
Wichtiger Hinweis:
Das BEC-System kann nur begrenzt belastet werden:
Bei Antriebsbatterien mit 4,8 ... 6V (4 ... 5 NiCd- oder NiMH-Zellen) maximal 1Ampere
Bei Antriebsbatterien mit 7,2V (6 NiCd- oder NiMH-Zellen) maximal 0,7Ampere.
Dies entspricht in etwa der Belastung die durch zwei Standard-Servos z. B. C507, C508, C512 oder C 577 hervorgerufen wird.
Bei Verwendung von stärkeren Servos mit höherer Stromaufnahme darf das BEC-System nicht mehr verwendet werden, da eine Überlastung zur sofortigen Zerstörung des Empfängers und der daran angeschlossenen
Servos führt.
Kommen stärkere Servos zum Einsatz, z. B. 2 Hochleistungs-Digital-Servos, muß das BEC-System durch einstecken
der Empfängerbatterie in eine Servobuchse (1 - 3) umgangen werden. Die Akkuanschlußbuchse bleibt dann frei!
Anschlußbeispiel 1: Mechanischer Fahrtregler mit BEC-Anschluß
Die meisten Elektro-Fahrzeuge mit mechanischem Fahrtregler sind bereits mit einem BEC-Anschlußkabel ausgerüstet.
Man erkennt dies an einem separaten, 2-poligen BEC-Anschlußkabel mit rotem Anschlußstecker das fest am mechanischen Fahrtregler angeschlossen ist. Dieser Stecker kann direkt mit der Batterieanschlußbuchse des Empfängers verbunden werden (siehe Skizze unten).
Achtung: Der SB6 SYN-Empfänger ist nur für den Betrieb bis 7,2 V (maximal 6 NiCd- oder NiMH-Zellen) geeignet. Ist
das Fahrzeug mit einer Fahrbatterie mit höherer Spannung ausgestattet, so darf dieser 2-polige BECAnschluß nicht mit dem Empfänger verbunden werden. In einem solchen Fall muß eine separate Empfängerbatterie (siehe Anschlußbeispiel 3) verwendet werden.
Empfangsanlage
BEC-System, Anschlußbeispiele
Mit kleinem Schraubendreher
gewünschten Frequenzkanal
K 50 - K 92 auswählen.
26
Anschlußbeispiel 2: Elektronischer Fahrtregler mit BEC-System
Viele der im RC-Car-Bereich üblichen, elektronischen Fahrtregler besitzen meist bereits ein eingebautes BEC-System.
Achtung: Auch diese BEC-Systeme sind nicht uneingeschränkt belastbar. Hier gilt wie auch schon im
Anschlußbeipiel 1 beschrieben bei höheren Belastungen eine separate Empfängerbatterie (siehe Anschlußbeispiel 3) zu verwenden. Beachten Sie hierzu die entsprechenden Hinweise in der Anleitung
des Fahrtenreglers!
Anschlußbeispiel 3: Separate Empfängerbatterie
Der Anschluß einer separaten Empfängerbatterie erfolgt an einem nicht benötigten Servoanschluß. Sind alle
Servoanschlüsse bereits belegt, so erfolgt der Anschluß über ein V-Kabel, Best.-Nr. 3936.1 1 (siehe Skizze unten). An
den Batterieanschluß des Empfängers darf nichts angeschlossen werden.
Empfangsanlage
Anschlußbeispiele
Mit kleinem Schraubendreher
gewünschten Frequenzkanal
K 50 - K 92 auswählen.
Mit kleinem Schraubendreher
gewünschten Frequenzkanal
K 50 - K 92 auswählen.

27
Empfängerantenne
Die Empfängerantenne ist direkt am Empfänger angeschlossen. Die Länge der Antenne sollte nicht verändert werden.
Die Antenne soll geradlinig und möglichst weit weg von
Elektromotoren, Rudermaschinen, metallischen Gestängen oder stromführenden Leitungen verlegt werden.
Bei Schiffsmodellen ist der Einbau der Empfangsanlage
so vorzunehmen, daß der Empfänger und die Antenne
so weit wie möglich weg von Antriebs-Elektromotoren,
stromführenden Leitungen und Metallteilen liegt.
Eine Stabantenne ist bei Schiffsmodellen jeder anderen Antenne vorzuziehen.
Bei Automodellen haben sich Stabantennen bewährt.
Hier dürfen ausnahmsweise entsprechend gekürzte Antennen verwendet werden, da keine großen Reichweiten
überbrückt werden müssen.
Einbau der Gestänge und Anlenkungen
Grundsätzlich muß der Einbau so erfolgen, daß
die Gestänge frei und leichtgängig laufen.
Schwergängige Gestänge und Ruder kosten Strom, verringern die Betriebsdauer und wirken sich nachteilig auf
die Stellgenauigkeit aus. Besonders wichtig ist, daß alle
Ruderhebel ihre vollen Ausschläge ausführen können,
also nicht mechanisch begrenzt werden.
Nach diesen Gesichtspunkten sind die Durchführungsöffnungen für die Gestänge im Modell auszulegen, Ruderscharniere zu prüfen usw.
Besonders wichtig ist diese Forderung für die Betätigung
der Motordrossel.
Die Stellung »V ollgas« muß durch die Knüppelstellung
bestimmt werden, keineswegs durch mechanischen
Anschlag der Drosselvorrichtung.
Andernfalls steht die Rudermaschine während des Betriebs fast ständig unter Vollast, hat dadurch eine hohe
Stromaufnahme und kann durchbrennen.
Auch die Leerlaufstellung muß elektrisch, also durch
Knüppelstellung, bestimmt werden und darf nicht mechanisch durch Anschlag der Drossel-Vorrichtung erfolgen.
Anhang
Ergänzende Hinweise
Entstören von Elektromotoren
Zu einer technisch einwandfreien Anlage gehören entstörte Elektromotoren, da alle Elektromotoren zwischen
Kollektor und Bürsten Funken erzeugen, die je nach Art
des Motors die Funktion der Fernlenkanlage mehr oder
weniger stören.
In Schiffsmodellen mit Elektroantrieb muß der Motor
daher sorgfältig entstört werden.
Entstörfilter unterdrücken solche Störimpulse weitgehend
und sollen bei Elektroantrieb und Steuerung mit einer
Fernsteuer-Anlage grundsätzlich eingebaut werden.
Entstörfilter sollen möglichst dicht am Antriebsmotor montiert werden und die Anschlußleitungen von den Stromanschlüssen und der Masseverbindung des Motors zum
Entstörfilter sollen so kurz wie irgend möglich sein (max.
20 mm). Für jeden Elektro-Antriebsmotor ist eine eigene
Entstörung bzw . ein eigenes Entstörfilter zu verwenden.
Entstörkomponenten sowie Entstörfilter finden Sie im
GRAUPNER Hauptkatalog FS.

28
Graupner XS-6 FM Synthesizer radio control system
Contents: Page
Safety notes 29 - 31
Charging the transmitter battery 31, 34
Description of functions, Specification 32
Transmitter controls 33
Selecting channels, Receiver Synthesizer system
33
Selecting channels, Transmitter Synthesizer system
34
Screen displays 35
Accessing System Mode 36
System Mode flowchart 37
Transmission rate N = Normal / F = Fast 38
Erasing data 38
Copying model data 39
Electronic trims, steering / throttle 40
Quick adjustment in Direct Mode 41
Brake servo adjustment EPA 41
Defining servo 3 42
Proportional Dual Rate, steering wheel 43
Defining momentary button / GBC program 44 - 45
Set-up Menu flowchart 46
Servo end-point adjustment, EP A 47
MIX adjustment, servo 3 48
SUB-TRIM mode 49
TDB deadband adjustment, throttle / brake 49
Servo reverse 49
Exponential function 50
Typical wiring arrangements, receiver / BEC 51 - 52
Motor suppression 53
For your notes 80
Frequency table 81
Conformity certificate 82
Guarantee conditions 83
General information:
Technically advanced radio control system exploiting
modern Synthesizer technology. No crystals required.
The technical features of this system have been carefully
optimised to offer expanded operating features and
excellent functional convenience in its class.
Modern signal processing using micro-computer for
maximum operational security .
Large LCD monitor provides clearly legible information
on function and set-up parameters, plus digital display
of transmitter channel, model memory and transmitter
battery voltage.
SB6 SYN receiver includes integral BEC system: powers
the receiving system from the drive battery.
Caution: this radio control system is not suitable for
controlling large RC model cars such as 1:5 and 1:4
models, or models powered by internal combustion
engines with ignition systems.
Available versions and accessories:
XS-6 FM Synthesizer 40, for the 40 MHz band
Order No. 3117
XS-6 FM Synthesizer 41, for the 41 MHz band
Order No. 3117.41*
* For export only
Set contents
XS-6 FM Synthesizer transmitter
SB6 SYN FM PLL Synthesizer receiver
Servo, switch harness
Optional accessories
Batteries: for receiver (4 cells required)
Please use only Mignon / R6 (AA-size) cells.
ECO-POWER 1.2 V/800 mAh Order No. 3621
NC battery packs for transmitter
Graupner 8N-800 mAh 9.6 V/800 mAh Order No. 3423
Sanyo 8KR-1 100 AAU 9.6 V/1100 mAh Order No. 3413
Recommended battery chargers
MINILADER 2 Order No. 6422
MULTILADER 3 Order No. 6427
MULTILADER 6E
1)
Order No. 6426
TURBOMAT 6 Plus
1)
Order No. 6428
TURBOMAT 7 Plus
1)
Order No. 6429
TURBOMAT 16 Plus
1)
Order No. 6430
ULTRAMAT 25
1)
Order No. 6417
ULTRA DUO PLUS 30
1)
Order No. 6416
1) For charging the set’s batteries you will also need
the following charge leads: for the transmitter Order
No. 3022, for the receiver battery Order No. 3021.
Please refer to the main GRAUPNER FS catalogue for
details of other battery chargers and batteries.
Replacement part
Telescopic transmitter aerial, Order No. 3115.6

29
Introduction: the XS-6 FM RACE radio control system
Safety notes - essential reading!
We all want you to have many hours of pleasure in our
mutual hobby of modelling, and safety is an important
aspect of this. It is absolutely essential that you read
right through these instructions and take careful note of
all our safety recommendations.
These instructions must be passed on to the new owner
if you ever sell the equipment.
Application
This radio control system may only be used for the
purpose for which the manufacturer designed it, i.e. for
operating radio-controlled models which do not carry
humans. No other type of use is approved or permissible.
Safety notes
Radio-controlled models are not playthings!
Even small models can cause serious personal injury
and damage to property if they are handled
incompetently , or if their operation is affected by the action
of others.
Handle your radio control system with care at all times.
This will ensure that the equipment remains reliable and
ready for use over a long period.
T echnical problems in electrical and mechanical systems
can cause motors to rev up or burst into life unexpectedly ,
with the result that parts may fly off at great speed,
causing considerable injury.
Radio control equipment should only be used in “normal” ambient temperatures, i.e. within the range -15°C
to +55°C.
All parts which are driven by a motor or engine represent
a permanent injury hazard. Do not touch these items
with any object or part of your body. Remember that a
propeller spinning at high speed can easily slice off a
finger.
Never stand in the primary danger zone, i.e. in the
rotational plane of the propeller or other rotating parts.
Protect all electronic equipment from dust, dirt, damp,
vibration and foreign bodies. Avoid subjecting the
equipment to excessive heat or cold. Do not subject the
equipment to shock or pressure.
Check the units at regular intervals for damage to cases
and leads. Do not re-use any item which is damaged or
has become wet, even after you have dried it out
thoroughly.
Use only those components and accessories which we
expressly recommend. Be sure to use only genuine
matching
GRAUPNER
connectors of the same design
with contacts of the same material.
Do not make any modifications of any kind to the
equipment. Doing so invalidates the guarantee, and you
forfeit all insurance cover.
Monitor the transmitter battery voltage display , and cease
operations as soon as it reaches the “discharged” area.
Fit new batteries or recharge the pack. Check the state
of your batteries regularly , especially the receiver battery .
Do
not wait until you notice the servos are running more
slowly than normal!
Always disconnect all the batteries in your model when
you know you will not use it for a while. Replace
exhausted batteries in good time.
Installing the receiving system in the model
The receiver must be packed in soft foam and stowed in
the model car or boat in such a way that it is protected
effectively from dirt, dust and spray. The receiver must
not make contact with the chassis at any point, otherwise
motor vibration and shocks will be transmitted directly to
it.
The receiver aerial must not be shortened or extended,
and should be routed as far away as possible from electric
motors, servos, metal pushrods and high-current cables.
When installing the equipment make sure that no cables
are under strain, bent very tightly or broken. Keep wires
away from sharp edges which could damage the
insulation. Ensure that all connectors are firmly inserted.
Always withdraw connectors using the housing itself don’t pull on the wires.
Avoid reverse polarity and short-circuits of all kinds
involving the connecting leads, as the equipment is not
protected against such errors.
When installing the receiving system in a model with a
glowplug or petrol engine, be sure to install all the
components in well protected positions so that no exhaust
gas or oil residues can reach the units and get nside
them. This applies above all to the ON / OFF switch,
which is usually installed in the outer skin of the model.

30
Introduction: the XS-6 FM RACE radio control system
Always install servos using the vibration-damping
grommets supplied. The rubber grommets provide some
degree of protection from mechanical shock and severe
vibration.
Always extend the transmitter aerial fully before
operating your model.
Transmitter field strength is at a minimum in an imaginary
line extending straight out from the transmitter aerial. It
is therefore fundamentally misguided to “point” the
transmitter aerial at the model in the hope of obtaining
good reception.
When several radio control systems are in use on
adjacent channels, the drivers should always stand
together in a loose group. Operators who insist on
standing away from the group endanger their own models
as well as those of the other drivers.
Correct behaviour
Model cars should never be run on roads, footpaths,
public squares etc.
Take care at all times not to endanger people, animals
or other modellers.
Keep well clear of high-tension overhead cables. Never
run your model boat close to docks or full-size boats.
Pre-run checking
If there are several modellers at the site, check carefully
with all of them that you are the only one on “your”
channel before you switch on your own transmitter. If
two modellers switch on transmitters on the same
channel, the result is interference to one or both models,
and the usual result is at least one wrecked model.
Before you switch on the receiver, ensure that the throttle
stick is at the stop / idle end-point.
Always switch on the transmitter first,
and only then the receiver.
Always switch off the receiver first,
and only then the transmitter.
If you do not keep to this sequence, i.e. if the receiver is
at any time switched on when “its” transmitter is switched
off, then the receiver is wide open to signals from other
transmitters and any interference, and may respond
unpredictably.
The model could then carry out uncontrolled movements,
which could easily result in personal injury or damage to
property. The servos may run to their end-stops and
damage the gearbox, linkage, control surface etc.; the
high current drain will also exhaust the receiver battery
very quickly.
Before every session check that the system works
properly in every respect, and has adequate range. This
means checking that all the control surfaces respond
correctly and in the appropriate direction to the transmitter
commands at a suitable ground range.
Repeat this check with the motor running, with an
assistant holding the model securely for you.
Installing control systems and linkages
The basic rule is that all linkages should be installed in
such a way that the pushrods move accurately , smoothly
and freely.
It is particularly important that all servo output arms can
move to their full extent without fouling or rubbing on
anything, or being obstructed mechanically at any point
in their travel.
Ensure that no metal parts are able to rub against each
other , e.g. when controls are operated, when parts rotate,
or when motor vibration affects the model. Metal-to-metal
contact causes electrical “noise” which can interfere with
the correct working of the receiver.
Models with internal combustion engines
It is important that you can stop your motor at any time.
With a glow motor this is achieved by adjusting the
throttle so that the barrel closes completely when you
move the throttle stick and trim to their end-points.
Receiver with integral BEC system
Caution: the power supply capacity of the
BEC system is limited!
If you wish to use powerful servos drawing a high current,
the BEC system must not be used as it would be
overloaded and immediately wrecked. In this case a separate receiver battery
must be used.
Batteries
Never use faulty or damaged cells, or batteries consisting
of cells of different types, mixtures of old and new cells,
or cells of different makes.
Be sure to keep to our safety recommendations!

31
Introduction: the XS-6 FM RACE radio control system
Charging batteries
All rechargeable packs must be charged before each
session. Keep to the battery manufacturer’s
recommendations for charging, and do not exceed the
stated charge times.
Never leave batteries on charge unsupervised.
Never attempt to recharge dry cells, as they may explode.
Charging the transmitter batteries
The transmitter battery compartment can be fitted with
individual rechargeable cells.
Be sure to use cells of the Mignon / AA / R6 size.
If the transmitter is fitted with rechargeable cells, they
can be recharged via the charge socket mounted on the
side of the transmitter. Note that the transmitter must be
set to “OFF” for the full period of the charge process.
The transmitter charge socket is fitted with a reverseflow guard circuit which prevents damage to the
transmitter electronics if the banana plugs on the charge
lead are short-circuited or connected with reverse polarity .
The transmitter battery cannot be charged using an
automatic charger due to the presence of the protective
circuit.
Maximum transmitter charge current
To avoid damage to the transmitter the charge current
should
never exceed 500 mA (0.5 A). Always keep to
the recommendations for charging and general handling
stated by the manufacturer of the battery and charger.
Capacity and operating times
This rule applies to all forms of electrical power source:
at low temperatures capacity is greatly reduced, i.e.
operating times are shorter in cold conditions.
Suppressing electric motors
In electric-powered models
every motor must be
thoroughly suppressed. Some electric motors are fitted
with basic suppression measures as standard, but these
are generally not adequate for our purposes - they are
only designed to satisfy legal requirements. Please read
the notes and recommendations supplied by the model’s
manufacturer.
Refer to the main GRAUPNER FS catalogue for details
of suppressor filters.
Using electronic speed controllers
When selecting an electronic speed controller you should
take into account the type and size of the electric motor
and the nature of the radio-controlled model. To avoid
overloading and damaging the speed controller, its
continuous load capacity should be
at least half of the
maximum motor stall current. This means: if the motor
draws 100 A when stalled, the speed controller should
be rated at 50 A
continuous current.
Take particular care if you wish to use a “tuning” or “hot”
motor. These have a small number of turns on the
winding, which means that the stall current may be
several times higher than its nominal current. Stalling a
motor of this type would destroy the speed controller
immediately.
In model boats an even higher safety margin should be
invoked. If the propeller is stalled by floating weed or
other debris, the speed controller is subjected to the
motor’s full stall current.
Check the direction of running
Many speed controllers with a reverse stage have a lower
current capacity in reverse than in forward running.
For this reason it is essential to check that your speed
controller is in “forwards” mode when the car is actually
moving forward.
Liability exclusion / Compensation
As manufacturers, we at
GRAUPNER
are not in a
position to influence the way you install, operate and
maintain the radio control system components. For this
reason we are obliged to refute all liability for loss,
damage or costs which are incurred due to the
incompetent or incorrect use and operation of our
products, or which are connected with such operation in
any way.
Unless otherwise prescribed by law , the obligation of the
GRAUPNER
company to pay compensation is limited to
the invoice value of that quantity of
GRAUPNER
products
which was immediately and directly involved in the event
in which the damage was caused.
Be sure to keep to our safety recommendations!

32
Transmitter specification
Transmitter output power approx. 1.5 W
Channel spacing 10 kHz
Programmable frequency channels Ch 50 - Ch 92
Operating voltage 9.6 ... 12 V
Current drain approx. 160 mA
Channel functions 2, with trims
Temperature range approx. -15°C ... + 55°C
Aerial length approx. 830 mm
Dimensions approx. 175 x 147 x 75 mm
Weight (excl. batt.) approx. 390 g
Receiver specification
Channel spacing 10 kHz
Programmable frequency channels Ch 50 - Ch 92
Intermediate frequency 455 kHz
Operating voltage 4.8 ... 7.2 V (BEC)
Current drain approx. 38 mA
Sensitivity approx. 10 uV
Temperature range approx. -15°C ... + 55°C
Aerial length approx. 600 mm
Dimensions approx. 49 x 34 x 21 mm
Weight approx. 32 g
Description of functions, Specification
The XS-6 FM RACE is an ergonomically refined, technically advanced radio control system incorporating Synthesizer technology, designed for the demanding pro-standard RC car and racing boat operator.
Features of the XS-6 FM RACE transmitter
STC (Steering Centre Trim) steering sub-trim
THC (Throttle Centre Trim) idle sub-trim
EXP ST (Steering Exponential Adjustment) exponential
function for steering servo, 0 - 100%
EXP THF (Throttle Exponential Adjustment) THF =
forward throttle, THB = Brake 0 - 100%
EPA ST (End Point Adjustment, Steering) End-point
adjustment of servo travels, steering left/right, max. 125 0%.
EPA (End Point Adjustment, Brake) Brake end-point
adjustment using two-way rocker button, max. 125 - 0%.
EPA TH (End Point Adjustment, Throttle) Throttle endpoint adjustment THC and brake R/B
EPA F3 (End Point Adjustment, Function 3) End-point
adjustment for 3rd servo function
ST (Steering reversing switch) Servo reverse for steering
servo
TH (Throttle reversing switch) Servo reverse for throttle
servo
F3 (Function 3 reversing switch) Servo reverse for function
3
TDA (Throttle Deadband Adjustment) for throttle and
brake function, programmable initial effect point,
separately variable.
Modern LAP record timer: Up to 50 laps with a lap range
of 0 - 99.9 sec. Enables driver to analyse important
parameters for each lap after the race, e.g. motor,
controller, drive battery, tyre and model specification.
FCH (Frequency Channel Selection). Automatic
transmitter frequency synthesis. Frequency selected
by channel number - no crystals required.
10 model memories
Modern computer radio control system with 8-bit CPU
featuring FULL DIGIT AL ACCURA TE TUNING (precision
digital adjustment and set-up system) for three servos.
Modern techno-design case with optimally positioned
controls and ergonomically efficient pistol-grip handle for
tireless steering.
Large LCD screen provides clearly legible information
on function and set-up parameters plus digital display of
transmitter channel, model memory and transmitter
battery voltage.
4-button terminal for programming and adjusting
functions and parameters accurately .
4 two-way rocker buttons for fully digital steering trim /
steering trim rate, throttle trim, throttle/brake function plus
programmable proportional / non-proportional third servo
function.
ESB (Emergency Security Button) - momentary
emergency button switches important functions instantly
in an emergency situation.
PPN = PPM 18 (normal modulation)
PPF = PPN Fast, double transmission rate = halving of
response time of servos and speed controller.
BAT visual and audible low battery voltage warning.
MD1 10 model memories for storing function and set-up
data. A short model name can be assigned to each model
memory.

33
Electronic trim, throttle
Electronic trim, steering
ON/OFF switch
Steering wheel return
spring adjustment
screw
Throttle/brake lever
Momentary button C
Aerial
LCD screen
Input buttons
Electronic digital adjustor B
(rocker button B)
Steering wheel
Charge socket
(for rechargeable
batteries only)
Electronic digital adjustor A
(rocker button A)
Transmitter controlsender Bedienelemente
Note: the maximum current capacity of the BEC system
is 1 A!
If you wish to use powerful servos drawing a high current
the BEC system must not be used, since overloading
the circuit will immediately wreck the receiver and the
servos connected to it. If powerful servos are to be used,
e.g. high-performance digital servos, the BEC system
must be disabled by plugging a receiver battery into any
servo socket (1 - 3).
Battery compartment
Description of receiving system
The receiver features a Synthesizer system which allows
you to set the channel of your
choice within the range Ch 50
to Ch 92. The channel is set
using a small screwdriver
(front channel disc x 10, rear
channel disc x 1).
If you wish to use a different FM receiver, e.g. C6 FM,
the transmitter must be set to the channel corresponding
to the crystal installed in the receiver.
Empfänger SB6SYN

34
Selecting the TX channel: (Ch 50 - 92 by Synthesizer)
Selecting the channel using the Synthesizer system (System Mode)
The modern Synthesizer system eliminates
the need for crystals.
1. Press the MODE button and switch the transmitter
ON to reach System Mode.
Note that the transmitter RF section is switched off in
this mode.
2. Select the channel selector CH using the MODE
button, then set the desired channel within the range
Ch 50 to Ch 92 using the INC+ or DEC- buttons.
3. Pressing ENTER (MODE and CHANNEL
simultaneously) stores the new frequency channel
you have selected. Switch the transmitter OFF/ON
briefly to activate the new frequency channel.
4. Simplified frequency storing: select the new frequency
channel of your choice, then just switch the transmitter
OFF/ON briefly. This stores the new frequency
channel, and simultaneously activates the transmitter
on the new transmission frequency.
Adjusting the steering wheel return spring
The force of the steering wheel return spring can be
varied by means of a recessed cross-point screw (see
Point 5, illustration of transmitter controls). Turning the
adjustment screw clockwise increases the spring force.
Charging the transmitter battery
he charge socket is located at the bottom of the lefthand side of the transmitter. Note that it is suitable only
for Graupner charge leads. Please do not attempt to
use other makes of charge lead, as their polarity may
be different, in which case the transmitter could be
damaged. The positive terminal (red wire) is connected
to the 5.5 mm Ø outer metal sleeve. The negative
terminal is black and is wired to the 2.2 mm I.D. inner
metal sleeve.
Transmitter charging
If the transmitter is fitted with a rechargeable NC battery ,
the pack can be charged via the charge socket located
on the side of the transmitter case.
The maximum permissible charge current varies
according to the battery type. Please be sure to keep
within the battery manufacturer’s stated limits.
Caution: to avoid damage to the transmitter the charge
current must never be higher than 500 mA.
The transmitter’s On/Off switch must be set to “OFF” for
the full duration of the battery charge process.
The transmitter charge socket features a reverse current
guard circuit which prevents damage to the transmitter
electronics if the charge lead plugs or shorted, or
connected with reversed polarity.
In its standard form the transmitter battery cannot be
charged using an automatic charger due to the presence
of the protective circuit, which prevents the charger
monitoring the battery voltage.
The transmitter can be converted for use with automatic
battery chargers by any GRAUPNER Service Centre.
Caution: even if you use an automatic charger the charge
current must be set manually, to ensure that the
maximum permissible charge current of 500 mA is not
exceeded.
Recommended battery chargers
6422 MINILADER 2
6427 MULTILADER 3
6426 MULTILADER 6E*
6428 TURBOMAT 6 Plus*
6429 TURBOMAT 7 Plus*
6430 TURBOMAT 16 Plus*
6417 ULTRAMAT 25*
6416 ULTRA DUO PLUS 30*
* Charge leads required:
8 I
CHX
M
RATE
EXP
TRIM
L/F
R/B
%
V
REV .
EP
5 0
CHX
MIX
RATE
EXP
TRIM
L/F
R/B
%
V
REV . NORM
EPA
INC +
DEC -

35
Screen displays
Normal operating display
When you switch on the transmitter, the LCD screen
shows the following display . W e refer to this as the normal operating display.
Notes: if any electronic trim button is pressed while this
display is on the screen, the Direct Trim Mode display
then appears automatically . See the section “Trim Mode”
for more information on this.
Lithium battery back-up display
Y our XS-6 FM RACE radio control system is fitted with a
lithium battery back-up system which has a life of five
years. This system protects and maintains the
programmed data if the transmitter battery voltage falls
below 8.5 V, or if the transmitter NC battery is removed
or becomes totally discharged due to prolonged storage.
After five years it will be necessary to send the transmitter
to a GRAUPNER Service Centre to have the lithium
battery replaced.
Back-up error screen display
If the Backup Error display appears, carry out this
procedure: press the MODE and CHANNEL buttons
simultaneously (= ENTER) to back-up all program data.
If you do not do this, all your programmed settings will
be lost. If the same display appears a second time, the
transmitter requires an overhaul by a GRAUPNER Service Centre.
To be on the safe side it makes good sense to write
down all the programming data in a small table, and
store this as a permanent data back-up.
er
BAk
Lithium battery back-up system
BAK ER
: Lithium battery flat.
Send transmitter to Graupner
Service Centre for replacement
of the Lithium cell.
Low battery voltage
If the total voltage of the 8 AA cells falls below a value of
8.5 Volts the BAT display appears on the screen,
accompanied by a continuous warning sound. If this
occurs, you must replace or recharge the batteries before
you continue operating your model. The low battery
voltage display is active in all operating modes.
BAT
8.5v: Low transmitter battery voltage. Cease operations!
8,5
BAT
V
8,5 v
Low transmitter battery
voltage. Cease operations!
BAT
warning: Transmitter
battery flat; pack must be
recharged.
I 0,6
c54
V
10,6 v
Transmitter battery
operating voltage
C54
Frequency channel set
on transmitter

36
%
V
REV . NORM
%
V
Accessing System Mode (System Set-up Mode)
1. Press the MODE button and switch the transmitter
ON to reach System Mode.
Note that the transmitter RF section is switched off in
this mode.
2. Press the MODE button repeatedly to select the
required function, e.g. Model Name, Frequency
Channel etc., and adjust the parameter concerned
using INC+ or DEC-. (See also System Mode
flowchart.)
3. To quit System Mode switch the transmitter OFF/ON
briefly. This automatically takes you to the Base
Screen Display, which shows the voltage of the
transmitter battery and the model number or
transmission channel. Switching the transmitter OFF/
ON automatically reactivates the transmitter RF
section.
System Mode flowchart
Frequency Channel Select
(Ch 50 - 92)
Model Name
(max. three letters)
Model name
max. 3 letters
Model number
(1 - 10)
Accessing Model Name Input in System
Mode
Use the following procedure to move to the Model Name
Input function:
1. Press the MODE button and switch the transmitter
ON to reach System Mode.
2. Press the MODE button repeatedly to reach the Model Select Menu MDL (see first display column, top
left).
3. Select the desired model memory (model 1 - 10) using
INC+ or DEC-.
4. Model name: press the MODE button twice to reach
the Model Select Menu (MDA); the first letter flashes.
5. Select the first letter of your choice using INC+ or DEC, e.g. “C” (this letter flashes).
6. Press the CHANNEL button to move on to the second letter, and select it using INC+ or DEC- as
previously, e.g. “L” (this letter flashes).
7. Press the CHANNEL button to move to the third letter,
and select it using INC+ or DEC-, e.g. “K” (this letter
flashes).
8. Press the MODE and CHANNEL buttons
simultaneously (= ENTER), or switch the transmitter
OFF/ON briefly to assign the set name to the selected
model memory .
EXP
L/F
R/B
%
V
c54
I I.0 V
Base Menu
Display
I I3
CLK
Entering the model name (in System Mode)
The XS-6 system allows you to enter a three-character
name for each of the 10 available model memories. The
model you select is then shown by name in the normal
screen display . This special feature is a useful means of
identifying different models, settings etc.
I I.4
RATE
EXP
TRIM
L/F
R/B
%
V
REV . NORM
8 I
CHX
M
RATE
EXP
TRIM
L/F
R/B
%
V
EP
L/F
I IN
FRM
RATE
EXP
TRIM
L/F
R/B
%
V
REV . NORM
I II0
MDA
RATE
EXP
TRIM
L/F
R/B
%
V
M
MODE
MODE
MODE
⇓
⇓
⇓
Model Select
(model 1 - 10)
Transmission speed
N = PPM normal
F = PPM fast
MDL

37
INC +
DEC -
INC +
DEC -
INC +
DEC -
INC +
DEC -
INC +
DEC -
INC +
DEC -
INC +
DEC -
INC +
DEC -
INC +
DEC -
I I.4
MDL
MIX
RATE
EXP
TRIM
L/F
R/B
%
V
REV . NORM
EPA
8 I
CHX
MIX
RATE
EXP
TRIM
L/F
R/B
%
V
REV . NORM
EPA
I II0
MDL
MIX
RATE
EXP
TRIM
L/F
R/B
%
V
REV . NORM
EPA
5 0
CHX
MIX
RATE
EXP
TRIM
L/F
R/B
%
V
REV . NORM
EPA
I II0
CUP
MIX
RATE
EXP
TRIM
L/F
R/B
%
V
REV . NORM
EPA
I IN
FRM
MIX
RATE
EXP
TRIM
L/F
R/B
%
V
REV . NORM
EPA
I IF
FRM
MIX
RATE
EXP
TRIM
L/F
R/B
%
V
REV . NORM
EPA
I I0
AUX
MIX
RATE
EXP
TRIM
L/F
R/B
%
V
REV . NORM
EPA
I 2P
AUX
MIX
RATE
EXP
TRIM
L/F
R/B
%
V
REV . NORM
EPA
LN
AUX
MIX
RATE
EXP
TRIM
L/F
R/B
%
V
REV . NORM
EPA
I I2
CLR
RATE
EXP
TRIM
L/F
R/B
%
V
REV . NORM
I.6
CPY
MIX
RATE
EXP
TRIM
L/F
R/B
%
V
REV . NORM
EPA
-
I.3
CPY
MIX
RATE
EXP
TRIM
L/F
R/B
%
V
REV . NORM
EPA
-
3
I I2
CLR
MIX
RATE
EXP
TRIM
L/F
R/B
%
V
REV . NORM
EPA
2
I II0
MDA
MIX
RATE
EXP
TRIM
L/F
R/B
%
V
REV . NORM
EPA
M
System Mode Flowchart (System Set-up Mode)
MODE
MODE
MODE
MODE
MODE
MODE
CLEAR
INC + DEC -
ENTER
MODE
CHANNEL
Model Select (MDL 1 - 10)
Transmitter Channel Select (Ch 50 - 92)
Model Name (Mod. 1 - 10)
Transmission mode (N/F)
Servo function 3 (2P/LN)
Erase memory (reset to factory default)
Copy memory
Accessing System Mode
Use the following procedure to reach System Mode:
1. Press the MODE button and switch the transmitter
ON to reach System Mode.
2. Press the MODE button repeatedly to select the
System Menu you wish to access (summary: see
flowchart).
3. Select the desired set-up parameter using the INC+
or DEC- buttons.
4. Switch the transmitter OFF/ON briefly to accept the
altered values and store them in System Mode (System Set-up Mode).
5. The user-specific system data is now stored. This
data is always initialised when you switch the
transmitter on. The parameter settings continue to
be stored in System Mode until such time as you
change them again.
I I0
GBC
MIX
RATE
EXP
TRIM
L/F
R/B
%
V
REV . NORM
EPA
LA
GBC
MIX
RATE
EXP
TRIM
L/F
R/B
%
V
REV . NORM
EPA
Eb
GBC
MIX
RATE
EXP
TRIM
L/F
R/B
%
V
REV . NORM
EPA
MODE
Momentary button C (select Eb/LA)

38
Transmission rate (Frame Selection) N = Normal and F = Fast in System Mode
For professional drivers the XS-6 FM RACE radio control
system offers the facility to switch the Frame Rate
(transmission time) from around 19 ms (normal) to 12.7
ms (fast).
This fast Frame Time is preferred for racing work by
professional drivers, as it provides more direct control
of high-performance servos as used in competition work,
when very small differences in lap times can decide the
top places in any race.
If you wish to use this facility with FM receivers of other
makes it is essential to carry out a careful check to ensure
that the servos and speed controller work correctly with
it.
I IF
FRM
Transmission time fast
The transmission rate preferred
by the pro driver. It is essential
to check that this works reliably
with your FM receivers.
I IN
FRM
Transmission time normal
Factory set transmission time
approx. 19 ms, matching all
standard FM receivers.
Factory default: Frame Rate N = normal
Profi-Piloten bevorzugte Frame-Rate F= fast
Transmission time “fast” 12.7 ms
ransmission time “normal” 19 ms
CLR: Erasing data in System mode
The CLR function enables the user to erase all data in
the memory of the selected model in System Mode, and
to reset the memory to the manufacturer’s default
settings. The first step is to select the model to be erased
using the INC+ or DEC- buttons.
1. Hold the MODE button pressed in and switch the
transmitter ON to reach System Mode.
2. Press the MODE button repeatedly to select the Model Memory Menu MDL, and select the desired model
using INC+ or DEC-.
3. Press the MODE button six times to reach the Erase
Menu CLR.
The previously selected model number now flashes.
Pressing the INC+ and DEC- buttons simultaneously
erases the set (flashing) model memory, and the
memory is reset to the factory default values.
4. Model data can now be entered into the vacant
memory in System Mode (for more information see
System Mode flowchart).
If you press the INC+ and DEC- buttons simultaneously
the selected (flashing) model memory is erased, and
the memory is reset to the factory default values.
The number of the selected model ceases to flash. The
model memory can now be re-programmed with the data
for another model.
Accessing Memory Erase function CLR in
System Mode
Set-up data in model memories can only be
erased in System Mode
When you have selected the model to be erased, move
to the CLR menu by pressing the MODE button six times.
The selected model (e.g. 2) now flashes.
MDL
I I3
Model Menu MDL
Select model No. 1 to
10 to erase
I I3
CLR
Erase Menu CLR
Press the INC+ and DECbuttons simultaneously to
erase the selected model.

39
CPY: Model Copy in System Mode
Copying a model
IThe Model Select function in System Mode includes an
option which enables you to copy a model to another
model memory .
The copy function can be useful when you are using the
same RC model car under different circumstances (different races).
Accessing the Copy function in System Mode
1. Hold the MODE button pressed in and switch the
transmitter ON to reach System Mode.
2. Press the MODE button repeatedly to select the Model Memory Menu MDL, and select the model to be
copied using INC+ or DEC-.
3. Press the MODE button seven times to reach the
Copy Menu CPY. The menu system automatically
selects the model memory one higher than the model
to be copied. This target model memory flashes on
the screen. However , if you wish to use another vacant
model memory, select the new target memory using
the INC+ or DEC- buttons.
4. Press the INC+ and DEC- buttons (CLEAR)
simultaneously to copy all the data of the model MDL
previously selected into the set vacant model memory .
Note: if the target memory contains data, the old
values are overwritten by the copy process.
When you have selected the model to be copied, move
to the CPY menu by pressing the MODE button seven
times. The model memory one number higher than that
previously selected (6) now flashes.
MDL
I I5
Model Menu MDL
Select desired model No. 1 to
10 for copying (e.g. 5)
Model memory MDL to be copied
Selected target model memory CPY
Copy Menu CPY
The automatically selected
target model flashes. However ,
you can select any other target
model memory using the INC+
or DEC- buttons. Press the
INC+ and DEC- buttons
simultaneously to copy the
model into the selected target
model memory .
I I6
CPY

40
Electronic Trim for Steering and Throttle (Direct TRIM using Trim buttons)
Electronic trim, steering servo (ST)
Steering wheel trim adjustment:
1. Switch on the transmitter and the receiving system in
the model, then move the steering wheel trim button
(2) ST TRIM in the desired direction. The screen
responds by automatically displaying the Steering
Centre Trim Menu TRIM STC.
2. Hold TRIM button (2) TRIM ST (steering servo) in the
appropriate direction until the steering system on the
model reaches the centre position, or until the model
runs in a perfectly straight line. (The adjustment range
is +/- 30 steps.) If the range of the electronic trim
system is not sufficient, it is possible to make a larger
correction using the SUB-TRIM mode TRIM STS. If
you find that a major deviation of the centre position
of the steering servo is required, we recommend that
you carry out a mechanical adjustment to the linkage
at the steering servo.
3. Release trim button (2) TRIM STC, and the TRIM
correction value is stored. The transmitter screen now
reverts automatically to the base display after a few
moments.
Electronic trim, throttle/brake servo (TH)
Throttle/brake servo trim adjustment:
1. Switch on the transmitter and the receiving system in
the model, then move the throttle/brake trim button
(1) TH TRIM in the desired direction. The screen
responds by automatically displaying the Throttle/
Brake Centre Trim Menu TRIM THC.
2. Hold TRIM button (1) TRIM TH (throttle/brake servo)
in the appropriate direction until the throttle/brake
servo reaches the centre position. (The adjustment
range is +/- 60 steps.) If the range of the electronic
trim system is not sufficient, it is possible to make a
larger correction in the SUB-TRIM mode TRIM THS.
If a major deviation of the centre position of the throttle/
brake servo is required, we recommend that you carry
out a mechanical adjustment to the linkage at the
throttle/brake servo.
3. Release trim button (1) TRIM THC, and the TRIM
correction value is stored. The transmitter screen now
reverts automatically to the base display after a few
moments.
Electronic
trim, throttle
ON/OFF
switch
Steering
wheel
Electronic trim,
steering
Note: The stated maximum centre offsets must not be
exceeded, otherwise the servos concerned could strike
their mechanical end-stops. The maximum values are:
steering servo STC (Direct TRIM) +/- 30 steps, STS
(SUB-TRIM) max. +/- 125 steps, throttle/brake servo
THC (Direct TRIM) max. +/- 60 steps and THS (SUBTRIM) max. +/- 125 steps.
Changes to SUB-TRIM affect the end-points (left and
right) as well as the centre position. If you use SUBTRIM please check the end-point positions carefully to
ensure that the servo is not damaged due to striking its
mechanical end-stops.
TRIM STC Steering Direct Trim
R/B 30-0-L/F30 steps, “CLEAR”=0
TRIM STC Steering Direct
TRIM Operate ST. TRIM
button (2) to set the required
centre offset of the steering
servo, max. +/- 30 steps.
STC
TRIM
L/F
%
5
TRIM
L/F
TRIM
L/F
%
I 0,6
c54
V
10,6 v
Transmitter battery
operating voltage
C54
Frequency channel set
on the transmitter
Base screen display
Direct Trim display STC (steering servo)
TRIM THC Throttle/Brake Direct Trim
R/B 60-0-L/F60 steps, “CLEAR”=0
TRIM
THC GThrottle/Brake
Direct TRIM
Operate TH. TRIM button (1) to
set the desired centre offset of
the throttle/brake servo, max. +/
- 60 steps.
THCX
EXP
TRIM
L/F
%
TRIM
56
R/B
TRIM
L/F
%
I 0,6
c54
V
10,6 v
Transmitter battery
operating voltage
C54
Frequency channel set on
the transmitter
Base screen display
Direct Trim display THC (throttle/brake servo)

41
Quick-adjust in Direct Mode (Proportional Dual Rates)
Direct Rate mode is accessed using the electronic Direct
Rate rocker buttons A and B for brake and steering. They
are located in the top part of the transmitter handle.
This function enables you to effect a “quick adjustment” of
steering travel (Rate) using rocker button B, or brake travel
using rocker button A, without having to press one of the
four function buttons.
The maximum value of steering travel STM can be pre-set
in the Set-up Menu within the range 0 - 125% using the
INC+ or DEC- buttons. This represents the basic steering
travel.
This pre-set value (Master travel), selected in the STM menu
using INC+ and DEC-, is the maximum travel. Using Direct
Rocker Button B the value can be reduced to 40%, but it
cannot be exceeded.
The maximum value of brake travel EPA TH R/B can be
pre-set in the Set-up Menu within the range 0 - 125% using
the INC+ or DEC- buttons. This represents the basic brake
travel.
This pre-set value (basic travel), selected in the EP A TH R/
B menu, is the maximum travel. Using Direct Rocker Button
A the value can be reduced to “0”, but it cannot be exceeded.
This is only possible if button A is not set to act as AUX.
Caution: if EPA TH is reduced to “0”, the Direct Mode EPA
BRAKE does not work!
Operating rocker button A in the EPA BRK menu enables
the driver to carry out a “quick adjustment” to the model’s
braking effect during a race, to allow for the track conditions
and other circumstances.
Explanation: Large-scale models often employ separate brake servos, as it is desirable to adjust the braking
force individually for the front and rear wheels
Quick adjustment of braking effect EPA BRK during a
race (Proportional Dual Rate) using rocker button A.
Caution: If EPA TH is set to “0”, EPA BRK does not
work!.
RATE
XP
TRIM
Rocker button A Rocker button B
Fast adjustment of steering travel when the car is
running (Proportional Dual Rates) by operating
rocker button B.
M
RATE
EXP
TRIM
L/F
EP
EPA TH
Brems-Servo-
Endpunkt
brake servo endpoint: Press brake lever (brake)
and set desired maximum brake
travel in the Setup Menu using
INC+ or DEC-.
I25
RATETRIM
TH
EPA
EPA TH maximum brake travel
EPA TH 0-125 “ENTER” = 100
R/B
EXP
The operating mode AUX (servo 3 linear) is only
available if you have already set the AUX function as
linear “LN”. This is done in System Mode using the
INC+ or DEC- buttons.
EPA BRK brake servo adjustment
AUX 2P servo as 2-point non-proportional
servo
1. Select: In System Mode set AUX as AUX 2P (2-point
servo 3 function) using the INC+ or DEC- buttons.
2. Select button “A” or “C”: in System Mode GBC use
the INC+ or DEC- buttons to select button “C” for the
2-point servo function GBC 2P.
3. If you do not set the GBC System Mode to 2P, button
“A” is automatically assigned to control the 2-point
servo 3 function.
AUX Prop Travel Servo 3
-125 - +125 of EPA AUX 0-190
AUX
travel - servo 3 Press
rocker button A for proportional
control of servo 3. Caution: Only
possible if EPA AUX is not set
to “0”.
AUXX
EXP
TRIM
L/F
I25
AUX LN servo 3 as linear proportional servo 3
RATE STM Master Steering T ravel
0%-125% “CLEAR”=100%
RATE STM Basic Master
steering travel. Use the INC+
and DEC- buttons to set the
basic travel in the Setup Menu.
STM
TRIM
L/F
%
95
%
RATE
RATE STG Rate Steering Travel
40%-125% of Master travel
RATE STG
Rate Steering
Travel. Operating rocker
button B provides “quick
adjustment” of the steering
travel rate within the range 40
- 100% of the Master steering
travel.
STGX
EXP
TRIM
L/F
%
RATE
45
%
EPA BRK required brake ef fect
EPA BRK 0-125 “ENTER”=1/2 TH
L/F
R/B
MI
RATE
EXP
TRIM
EP
EPA BRK
with rocker button
A
Set desired braking effect (brake
servo) when the car is running.
RATETRIM
L/F
R/B
BRK
EPA
95
R/B
Momentary button “C”

42
AUX function: Defining servo 3 Rocker Button A (System Mode)
RATE
EXP
TRIM
L/F
R/B
%
V
REV . NORM
RATE
EXP
TRIM
L/F
%
V
AUX function Servo 3 enables you to select
the function assigned to the 2-way rocker
button “A”:
If you select function “0”, the 3rd channel is controlled
solely via the mixer system “MIX”. If you set the MIX
functions to “0”, the 3rd channel has no function.
If you select the non-proportional function “2P”, the 3rd
channel is controlled as a 2-point non-proportional
function using button “A”; the servo only moves between
the two end-points.
If you select the proportional function “LN” the 3rd
channel is controlled proportionally by button “A”.
Caution: The programmed values are not accepted in
System Mode until you switch the transmitter OFF/ON
briefly.
RATE
REV .
LN
AUX
AUX display in System Mode
0
AUXX
M
RATE
%
AUX
2P
2-way rocker button “A”
switched off. Servo 3 is actuated
only via MIX throttle/brake function
and/or steering function
2-way rocker button “A” controls the
end-points of servo 3 as an auxiliary
function
2-way rocker button “A” provides
linear control of servo 3 as a proportional servo, moving it to the
desired position within its travel.
Throttle/brake lever
This is the procedure for accessing the AUX
function in System Mode:
1. Pressing the MODE button and switching the
transmitter on takes you to System Mode, and into
the previously selected model memory.
2. Press the MODE button repeatedly to select the AUX
menu (servo 3).
3. Use the INC+ or DEC- buttons to select the desired
3rd servo function LN (linear), 2P (2-point non-proportional function) or 0 (mixer function for brake).
4. Switching the transmitter OFF/ON briefly accepts the
set parameter into the selected model memory.
L/F
R/B
%
V
REV . NORM
RATE
EXP
TRIM
L/F
R/B
%
V
REV . NORM
RATE
EXP
TRIM
R/B
%
V
REV . NORM
M
RATE
EXP
TRIM
L/F
R/B
%
V
EP
MI
RATE
EXP
TRIM
L/F
%
V
REV . NORM
EP
RATE
EXP
TRIM
L/F
R/B
%
V
REV . NORM
AUX 0
Button “A” without
function. Servo 3 is controlled
by the throttle/brake lever and/
or the steering function, using
a mixer selected in Set-up
Mode.
AUX 2P
Servo 3 is operated
as a 2-point non-proportional
function using the 2-way rocker
button “A” / “C”. Servo 3 can be
influenced by the throttle/brake
lever and/or the steering
function, using a mixer selected
in Setup Mode.
AUX LN
Servo 3 is
controlled proportionally using
the 2-way rocker button “A”.
Servo 3 can be influenced by
the throttle/brake lever and/or
the steering function, using a
mixer selected in Setup Mode.

43
Rocker Button B
Steering travel can be adjusted quickly and proportionally
(Proportional Dual Rate) while the car is running, using
rocker button B to reduce the travel (RATE STG). The
set value (Multi-Rate) can be adjusted within the range
125% to 50% to meet the requirements of the moment.
The first essential step is to set the basic value for steering
servo travel in the Setup Menu EPA ST. The factory
default value in the Setup Menu EPA ST is 100%, but it
can be set to any value within the range 125% to 0%.
The Direct RATE quick function RATE STG is
automatically called up when you operate rocker button
B. Rocker button B is used to adjust the steering travel
quickly (Proportional Dual Rate) during a race, and
enables the driver to adjust the car to suit the
requirements and conditions of the track.
Dual Rate steering wheel function Rocker Button B
2. The appropriate servo steering travel RA TE STG (Multi-Rate) can be adjusted quickly and proportionally
during a race using rocker button B.
This value refers to the servo end-point travel you
have already selected in the Set-up Menu EPA ST,
where you select the basic travel using the INC+ or
DEC- buttons.
3. When you release rocker button B, the transmitter
reverts automatically to the base display after about
two seconds.
EEP A ST steering servo end-point
L/F R/B 0-125 “CLEAR”=0
EPA ST steering servo end-
points L/F and R/B. Use the
INC+ or DEC- buttons in the
Setup Menu to set the left and
right travel.
%
RATE STG Rate steering travel
50-125% steering servo end-point
RATE STG
Rate steering
travel. Operating rocker button
B provides proportional “quick
adjustment” (Multi-Rate) of the
set steering servo travel EPA
ST within the range 50 to
125%.
STGX
EXP
TRIM
L/F
%
RATE
85
%
Screen display when you operate rocker
button B
Selecting steering servo travel EPA ST
1. The first essential action is to select maximum servo
steering travel EPA ST to suit the model. This
adjustment is made in the Setup Menu EPA ST.
2. Switch the transmitter ON, then press the MODE button
repeatedly to reach the menu point EPA ST, EPA TH
or EPA AUX.
3. Press the CHANNEL button in the Setup Menu to
select EPA ST for the steering servo.
4. Adjust the travel of the steering servo to suit the model
using the INC+ or DEC- buttons.
1. Switch the transmitter ON, then operate rocker button
B. This automatically activates the RATE STG menu
(Proportional Dual Rate) and displays it on the screen.
ST
TRIM
L/F
EPA
I25
L/F
R/B
RATE STG Rate Steering
50-125% steering servo end-point
RATE STG
Rate-Lenkweg
Durch Betätigung der Wipp-T asteB stufenlose „Schnellverstellung“
(Multi-Rate) von 50 - 125 % des
Lenk-Servo-Endweges
EPA ST
STGX
EXP
TRIM
L/F
%
85
%
%
Quick Proportional Adjustment
Screen display EPA ST in Setup Menu
Proportional Quick Change RATE STG
TRIM
L/F
%
RATE

44
Defining GBC Momentary Button System Mode (Set-up Mode)
In System Mode (Set-up Mode) it is possible to define
the function of momentary button “C”, which can be
operated conveniently by the thumb. There are three
alternative basic functions which the operator can select
according to preference.
GBC “LA” = Lap timer / Lap counter
The momentary button “C” now works automatically.
“LAP” flashes on the screen when the LAP timer is
running. The transmitter automatically stores the lap
times (3 - 99.9 s). Pressing the MODE button repeatedly
brings up the LAP menu (lap counter menu) on the
screen (LAP flashes). The top row displays the lap time
in tenths of a second; the bottom row displays the lap
number.
The LAP timer is stopped by pressing the INC+ and
DEC- buttons simultaneously (CLEAR); it stops
automatically after 50 laps. The individual lap times (max.
50) can then be called up and read out using the INC+
or DEC- buttons.
Erasing lap times: With the lap timer stopped, press the
buttons INC+ and DEC- (CLEAR) simultaneously in the
LAP menu to erase all the recorded lap times.
If you re-start the lap counter without erasing previously
recorded times, a minus (-) prefix is added to the earlier
(non-erased) laps.
Note:
If the lap time range of 3 - 99.9 seconds is exceeded,
the screen displays OVR (over-run). The barrier time
between laps is 3 seconds. Lap times shorter than this
are not accepted.
Momentary button C (select LA/Eb)
LA
GBC
RATE
EXP
TRIM
L/F
R/B
%
V
„LA“: Lap stopwatch (LAP
timer). Enables the driver to
record lap times from 3 - 99.9
s (in tenths of a second) and
count laps 1 - 50.
Note: The lap times can only be read out if the LAP timer
is stopped. This is done by pressing the INC+ and DECbuttons (CLEAR) simultaneously; the timer symbol LAP
then ceases flashing.
When the LAP timer is running the screen only shows
the current lap time.
Use the INC+ or DEC- buttons to select the desired lap
and read out the lap time. Lap times are displayed in
tenths of a second, e.g. 226 = 22.6 seconds.
Eb
GBC
RATE
EXP
TRIM
L/F
R/B
%
V
„Eb“: Maximum steering travel
(Emergency Steering Button)
Pressing button “C”
automatically switches travel
reduction RA TE STG to RA TE
STM.
„0“/(„2P“): C button has no
function (factory default). If you
set AUX to “2P”, the screen
shows “2P” instead of “0”, and
button “C” controls the 2-point
non-proportional function
(servo 3).
I I0
GBC
RATE
EXP
TRIM
L/F
R/B
%
V
Momentary button “C”
Input procedure for lap timer “LA”
1. Press the momentary button “C” to activate the LAP
timer; “LAP” flashes on the screen.
2. Press the momentary button “C” a second time to store
the lap time (in tenths of a second) and the lap number .
3. Y ou can press the MODE button to select the lap timer
display , and then read off the current lap number and
lap time.
4. Earlier lap times can be viewed using INC+ and DEC, but only when the lap timer is stopped (LAP not
flashing on the screen).
5. Press “CLEAR” to stop the current lap timer, or to
erase all lap times if the lap timer is stopped. Press
the “C” button to re-start the timer.
6. If the lap timer is stopped and then started again, a
minus sign (-) is added as a prefix to the laps stored
in the previous lap memory.
3
226
RATE
EXP
TRIM
L/F
R/B
%
V
LAP
22.6 s lap time
Lap 3

45
GBC “Eb” Emergency Steering Button
GBC “2P” = Servo 3 2-point non-proportional function
Momentary button “C”
Defining the GBC Momentary Button System Mode (Set-up Mode)
If the momentary security function is selected in the GBC
“Eb” menu, the security function can be triggered using
the momentary button “C”.
Eb
GBC
RATE
EXP
TRIM
L/F
R/B
%
V
„Eb“: maximum steering
travel (Emergency Steering
Button) Pressing button “C”
automatically switches travel
reduction RATE STG to
RA TE STM.
The GBC “Eb” function overrides any travel reductions
you have set in the RATE STG menu, and switches
automatically to the Master steering travel you have
selected in the RATE STM menu.
The effect is that maximum programmed Master steering
travel is automatically available for as long as you hold
the momentary button “C” pressed in with your thumb.
Under certain circumstances this switching facility can
prevent a crash in or before a turn, and also allows you
to exploit extreme steering travels to make a rapid course
correction to recover from a driving error.
The 2-point non-proportional servo function is only active
if you have already selected the function AUX “2P” using
the INC+ or DEC- buttons in the Servo 3 AUX menu
(System Mode).
Press the MODE button once to reach the GBC menu.
Press the INC+ button repeatedly to select the GBC “2P”
menu. Switch the transmitter OFF/ON briefly to activate
the menu GBC “2P”. Servo 3 can now be switched
between the two programmed end-points using button
“C”.
AUX „2P“: If AUX is set to
“2P”, the screen shows “2P”
instead of “0”, and button “C”
is used to control the 2-point
non-proportional function
(Servo 3).
2P
AUX
RATE
EXP
TRIM
R/B
EProcedure for setting GBC “Eb” Emergency
Steering Button
Procedure for setting GBC “2P” = Servo 3 2point non-proportional function
1. Press MODE and switch transmitter ON to reach System Mode.
2. Press the MODE button to reach the Servo 3 menu
AUX.
3. Press the INC+ button to select the 2-point non-proportional function AUX 2P.
4. Press the MODE button once to reach the Momentary
Button Select menu GBC.
5. Switch the transmitter OFF/ON briefly to store the
button configuration GBC 2P.
GBC “0” = Button “C” off (factory default
setting)
GBC „0“: TButton “C” has no
function (factory default
setting).
I I0
GBC
RATE
EXP
TRIM
L/F
R/B
%
V
GBC „2P“: Momentary button
“C” as 2-point non-proportional function Servo 3 active
I I2P
GBC
RATE
EXP
TRIM
L/F
R/B
V
1. Press MODE and switch transmitter ON to reach System Mode.
2. Press the MODE button repeatedly to reach the GBC
menu.
3. In the GBC menu activate the security mode GBC
“Eb” using the INC+ or DEC- buttons.
4. Switching the transmitter OFF/ON briefly stores the
momentary security emergency button.
5. If you now hold the momentary button “C” pressed in
with your thumb, any reduced steering travel selected
in the RATE STG menu is automatically ignored.
Steering travel is switched to the maximum servo
travel set in Master RATE STM.

46
REV
MD3
RATE
EXP
TRIM
R/B
%
V
STX
RATE
EXP
TRIM
L/F
RR/B/
%
I II0,6
RATE
EXP
TRIM
L/F
R/B
%
V
REV . NORM
RATETRIM
L/F
R/B
%
V
REV . NORM
RATE
EXP
TRIM
L/F
R/B
I I0
STS
RATE
EXP
TRIM
R/B V
RATE
EXP
L/F
R/B
%
V
ST
RATE
EXP
TRIM
L/F
R/B
%
V
RATE
EXP
TRIM
L/F
R/B
%
V
REV . NORM
RATE
EXP
TRIM
L/F
R/B
%
V
REV
I00
.
NORM
I I
STM
RATE
EXP
TRIM
L/F
R/B
%
V
RATETRIM
R/B
%
V
REV . NORM
RATETRIM
L/F
R/B
%
V
REV . NORM
I I8
RATE
EXP
TRIM
L/F
R/B
%
V
MODE
MODE
MODE
MODE
MODE
RATE
EXP
TRIM
L/F
R/B
%
V
Flowchart Set-up Menu
CHANNEL
EPA
L/F
V
TH
R/B
EPA
I
C54
MIX
V
6
STL
MIX
%
5
THS
TRIM
TH
-
EXP
THF
%
AUX
EPA
AUS
TRIM
%
AUX
RATE
%
2
THB
EXP
%
-
TRIM
REV.NORM
L/F
L/F
R/B
I00 I00
-
I II0,6
I00
REV.NORM
REV.NORM
-
CHANNEL
CHANNEL
CHANNEL
CHANNEL
CHANNEL
CHANNEL
THB
MIX
GAS
BREMSE
CHANNEL
CHANNEL
CHANNEL
GAS / F
BREMSE / R
L/F
L/F
25
75
STEUER-R
STR
THF
MIX
35
%
%
To reach the Set-up Menu first switch the transmitter ON,
then press the MODE button. The screen switches to the
Set-up Menu as shown in the flowchart. Press the MODE
button to select the desired function and adjust it.
Normal operating display after switching on
End-point forward (F) brake (B)
0 to 125 “CLEAR”=100
Single-sided end-point left/right
0 to 125 “CLEAR” = 100
Single-side end-point channel 3
0 to 190 “CLEAR”=100
Throttle sub-trim adjustment
RB125-0-LF125 “CL”=0
Throttle reverse switch
REVERSE-NORMAL
Channel 3 reverse switch
REVERSE-NORMAL
Steering sub-trim
adjustment
Steering reverse switch
REV-NORMAL
STM steering servo
basic travel
EXP ST steering
expo
Brake exponential adjustment
-100%(mild)-LN-100%(quick)
Throttle EXP forward setting
-100%(mild)-LN-100%(quick)
Steering left
Channel 3 mix adj.
Steering right Channel 3 mix adjust
-125%-0%-125% “CLEAR”=0%
Throttle forward channel 3 mix adjust 125%-0%-125% “CLEAR”=0
Brake/throttle channel 3 mix
adjustment -125%-0%-125%
“CLEAR”=0%
Channel 3 sub-trim adjustment
RB125-0-LF125(=25°) “CL”=0
AUX =
Channel 3
RATE STM steering
basic travel setting.
(Master travel) of
steering function for
normal running
MODE
ST
RATE
EXP
TRIM
L/F
R/B
%
V
REV . NORM
LN
EXP
EXP
TRIM
L/F
R/B
TDB
RATE
EXP
TRIM
L/F
R/B
%
V
REV . NORM
0
MODE
%
L/F
TDB throttle/brake
deadband reduction
TDB throttle/brake deadband
reduction 0 - 100%, CLEAR=“0”
(“LF”) forward or (“RB”) brake,
according to momentary position
of throttle-brake lever

47
Press the MODE button to reach Set-up Mode. Press the
MODE button repeatedly to select the EPA menu for servo
end-point adjustment.
EPA Servo End-point Adjustment (Set-up Menu)
EPA AUX
Move servo 3 to
right end-point using the “A”/“C”
button and/or the mixer function
“MIX” and adjust servo end-point
using INC+ or DEC-.
EPA AUX
Move servo 3 to
left end-point using the “A”/“C”
button and/or the mixer function
“MIX” and adjust servo end-point
using INC+ or DEC-.
AUX
EPA
R/B
I00
AUX
EPA
I00
L/F
Display after switching transmitter on
EPA end-point servo 3 left
0 to 125 “CLEAR”=100
EPA end-point servo 3 right
0 to 125 “CLEAR”=100
C54
RATE
EXP
TRIM
I II0,6
V
%
V
REV . NORM
%
V
REV . NORM
%
V
End-point adjustment displays
EPA end-point steering servo left
0 to 125 “CLEAR”=100
EPA end-point throttle servo forward
0 to 125 “CLEAR”=100
L/F
R/B
RATE
EXP
TRIM
M
RATE
EXP
TRIM
L/F
EP
MI
RATE
EXP
TRIM
EP
EPA ST
Rotate steering wheel
to left L/F (steering left) and
adjust servo end-point using
INC+ or DEC-.
EPA ST
Rotate steering wheel
to right R/B (steering right) and
adjust servo end-point using
INC+ or DEC-.
EPA TH
Pull throttle/brake
lever back (forward) and adjust
servo end-point using INC+ or
DEC-.
EPA TH
Pull throttle/brake
lever back (forward) and adjust
servo end-point using INC+ or
DEC-.
RATETRIM
L/F
R/B
TH
R/B
EPA
I00
RATETRIM
L/F
R/B
TH
EPA
L/F
I00
STX
RATE
EXP
TRIM
L/F
RR/B/
%
EPA
I00
STX
RATE
EXP
TRIM
L/F
%
EPA
L/F
I00
EPA end-point steering servo right
0 to 125 “CLEAR”=100
EPA end-point of break servo
0 to 125 “CLEAR”=100
10,6 v
Transmitter battery
operating voltage
C54
Frequency channel set
on transmitter
The menu point EP A servo End-point Adjustment enables
you to increase or reduce maximum servo travel
separately for each servo, and for each direction from
centre. Available for steering, throttle/brake and function
3.
End-point adjustment enables you to adjust servo travel
to meet the requirements of the model.
The adjustment range is from 0% to 125%. The factory
default setting is 100% for both directions.
The direction of adjustment displayed on the screen is
reversed by moving the associated transmitter control
(steering wheel, throttle/brake lever, function 3) in the
opposite direction.
Accessing the Servo End-point Adjustment
menu
1. Switch the transmitter on to reach the Function Menu.
2. Press the MODE button repeatedly until the screen
shows the servo travel End-point Adjustment menu
EPA.
3. Use the CHANNEL button to select the function you
wish to adjust: ST (Steering), steering wheel/steering;
TH (Throttle) throttle/brake lever, or AUX (Aux.
channel) 3rd servo function.
4. Move the associated transmitter control in the direction
you wish to adjust (left/right, forward/back or brake),
then set the appropriate servo end-point using the
INC+ or DEC- buttons. Move the transmitter control
in the opposite direction, then adjust the opposite end
of the servo’s travel.
5. Switch the transmitter OFF/ON briefly to store the set
values and quit the EPA (servo travel End-point
Adjustment menu). The transmitter reverts to the base
screen display.
Note: Although it is possible to set different travels for
the steering servo to either side of centre, we recommend
that you set identical travels (same left as right) if possible,
otherwise the car will exhibit different turning
characteristics to either side.

48
MIX adjustment, Servo 3 (Set-up Menu)
Throttle/brake MIX mix THF / MIX THB
This function sets up a mixer from the throttle/brake
function to servo function 3.
Example for separate front/rear wheel brake:
Explanation: Large-scale models often employ separate brake servos, as it is desirable to adjust the braking
force individually for the front and rear wheels.
MIX steering wheel left/servo 3
-125%-0%-+125%
“CLEAR”=0%
MIX steering wheel right/servo 3
-125%-0%-+125% “CLEAR”=0%
MIX STL
Rotate steering
wheel left (steering left) and
adjust the mixer value using
INC+ or DEC-
MIX STR
Rotate steering
wheel right (steering right) and
adjust the mixer value using
INC+ or DEC-.
STRX
RATE
EXP
TRIM
L/F
%
MIX
35
STLX
RATE
EXP
TRIM
L/F
%
MIX
33
In the Mix Menu you can define how the “steering wheel”
and “throttle” transmitter controls are to affect servo
function 3 as a mixer function. The mixer ratio and mixer
offset can be programmed and set separately for each
transmitter control.
Steering MIX MIX STL / MIX STR
This function sets up a mixer from the steering function
to servo function 3.
%
%
Channel 3 Mixer Function
MIX THF
Pull back throttle/
brake lever (forwards) and
adjust the mixer value using
INC+ or DEC-.
MIX THB
Move throttle/brake
lever forward (brake) and adjust
the mixer value using INC+ or
DEC-.
RATETRIM
L/F
R/B
THB
MIX
I05
RATETRIM
L/F
R/B
THF
MIX
0
MIX throttle forward/servo 3
-125%-0%-+125% “CLEAR”=0%
%
%
MIX brake reverse/servo 3
-125%-0%-+125% “CLEAR”=0%
MIX throttle/brake servo 3 (Set-up Menu)
Note: If you are using the MIX function there is no sense
in setting servo 3 to non-proportional (2P) mode.
The AUX 3 function should therefore be set to “0” or
“LN” in System Mode.
1. Switch the transmitter ON to reach the Set-up Menu.
2. Press the MODE button repeatedly until the menu
point MIX STL/MIX STR appears on the screen.
3. Press the CHANNEL button repeatedly, and operate
the steering wheel left/right at the same time to select
the function MIX STL or MIX STR; operate the throttle/
brake lever to select MIX THF or MIX THB.
4. Move the selected transmitter control in the direction
to be adjusted (left/right, forward/reverse or brake),
then adjust the mixer value for servo 3 using INC+ or
DEC-. Move the transmitter control in the opposite
direction to adjust the other end of the servo’s travel.
5. Switch the transmitter OFF/ON briefly to store the set
values and leave the Set-up Menu. The transmitter
now reverts to the base screen display.
Accessing the MIX Adjustment Menu Servo 3
TDB Throttle/brake lever Deadband
Adjustment
TDB
RATE
EXP
TRIM
L/F
R/B
%
V
REV . NORM
0
%
L/F
TDB Throttle/brake deadband
reduction 0 - 100% CLEAR”=0%
(“LF”) forward or (“RB”) brake,
according to the current position
of the throttle/brake lever.
The purpose of deadband reduction is to reduce or
eliminate the “deadband” (lost motion in the throttle/brake
linkage) between the neutral point and the point where
the throttle takes effect, and from neutral to the point
where the brake takes effect.
This area is termed the “deadband”. If more throttle trim
is used (known as static brake), greater trigger deadband
exists to the right of neutral.
Adjust the forward value until the wheels of your RC car
just move when you operate the throttle lever slightly.
Adjust the brake value until the brake shoes just make
contact with the brake disc when you operate the brake
lever slightly.

49
REV-NORM TH
direction of
throttle/brake servo. Set the
appropriate direction of rotation
using the INC+ or DEC- buttons.
SUB-TRIM Mode (Set-up Menu)
Note:
The menu point SUB-TRIM in the Set-up Menu provides
a convenient electronic means of adjusting the servo
centre position for steering, throttle and AUX (servo 3),
without affecting or restricting the range of the trim buttons
for the steering and throttle functions.
The travel of the reserved trim range of the Direct Trim
buttons is not affected by the SUB-TRIM function.
The SUB-TRIM function can be extremely useful, as it
allows you to make fine adjustments to the centre position
of the individual servos without having to carry out any
mechanical adjustments on the model.
Although the SUB-TRIM function is very convenient, we
strongly recommend that you only use it to carry out minor
trim corrections (up to 30 steps), otherwise undesirable
differential servo travels may occur.
If you need to make an adjustment of more than +/- 30
steps, we advise that you adjust the mechanical linkage
on the model.
REV-NORM AUX Servo Reverse,
Function 3 REV-NORM
L/F
R/B
MI
RATE
EXP
TRIM
EP
REV-NORM AUX
direction of
servo 3. Set the appropriate
direction of rotation using the
INC+ or DEC- buttons.
RATETRIM
L/F
R/B
AUX
Direction of servo rotation (Servo Reverse)
To reach the Servo Reverse Menu switch the transmitter
ON and press the MODE button repeatedly until the REVNORM ST Menu appears on the screen. Use the CHANNEL
button to select the servo function ST, TH or AUX.
REV-NORM ST Servo Reverse,
Steering REV-NORM
REV-NORM ST direction of
steering servo. Set the
appropriate direction of rotation
using the INC+ or DEC- buttons.
ST
TRIM
L/F
%
REV-NORM TH Servo Reverse,
Throttle/brake REV-NORM
-
REV -NORM
-
REV -NORM
THX
EXP
TRIM
L/F
%
REV -NORM
-
Accessing the Servo Reverse Menu
This is the procedure for reaching the Servo Reverse
Menu:
1. Switch the transmitter ON.
2. Press the MODE button repeatedly until the Set-up
Menu REV-NORM TH appears on the screen.
3. Use the CHANNEL button to select the servo function
you wish to reverse: ST (steering), TH (throttle/brake)
or AUX (servo function 3).
4. Use the INC+ or DEC- buttons to set the appropriate
direction of servo rotation (REV-NORM).
5. Switch the transmitter OFF/ON briefly to store the set
values, and to revert to the base screen display.
Explanation:
The Servo Direction menu point is a very useful facility,
particularly when you are setting up a new model. Servo
reverse changes the direction of rotation of the servo
concerned relative to the movement of the transmitter
control. The servo reverse function is available for the
channels Steering, Throttle/brake and AUX (3rd servo
function).
To reach the SUB-TRIM menu switch the transmitter ON
and press the MODE button repeatedly until the TRIM STS
Menu appears on the screen. Select the desired servo
function STS, THS or AUX using the CHANNEL button.
TRIM AUX Servo 3 SUB-TRIM
125-0-125 “CLEAR”=0
L/F
R/B
MI
RATE
EXP
TRIM
EP
TRIM AUX Servo 3 SUB-TRIM
Press the INC+ or DEC- buttons
to adjust the centre position of
the AUX servo. If you have set
AUX 2P (2-point) the trim should
be set to 0. The available range
is -125 to +125 steps.
RATETRIM
L/F
R/B
AUX
TRIM
95
R/B
SUB-TRIM STS, THS and AUX
TRIM STS Steering SUB-TRIM
125-0-125 “CLEAR”=0
TRIM STS Steering SUB-TRIM
Press the INC+ or DEC- buttons
to adjust the centre position of
the steering servo over -125 to
+125 steps.
STS
TRIM
L/F
%
5
TRIM
L/F
TRIM THS Throttle/brake SUB-TRIM
125-0-125 “CLEAR”=0
TRIM
THS
Throttle/brake SUB-
TRIM
Press the INC+ or DECbuttons to adjust the centre
position of the throttle/brake
servo over -125 to +125 steps.
THSX
EXP
TRIM
L/F
%
TRIM
45
R/B

50
The menu point EXP ST exponential steering wheel
function allows the user to fine-tune the model car’s
steering characteristics around the neutral position
without affecting maximum steering travel.
In most cases EXP (exponential function) is used to
provide softer control around the neutral position.
However, the XS-6 FM RACE system provides both
directions of exponential: positive (+ normal) and negative (- increased sensitivity around the neutral position).
ST
RATE
EXP
TRIM
L/F
R/B
%
V
REV . NORM
85
EXP
EPX ST
E
Exponential steering
wheel function. Use the INC+
or DEC- button to adjust the
exponential function (-100% to
100%).
EXP ST Expo Steering wheel function 100%-LN-100% “CLEAR”=LN
%
ST
RATE
EXP
TRIM
L/F
R/B
%
V
REV . NORM
LN
EPX ST
LN
linear steering
wheel function disabled. Use
the INC+ or DEC- button to
adjust the exponential function
for steering within the range
fine (-100%) to aggressive
(+100%).
EXP ST LN Linear
-100%-LN-100% “CLEAR”=LN
1. Switch the transmitter ON.
2. Press the MODE button repeatedly until EXP ST
appears on the screen.
3. Use the CHANNEL button to select EXP ST.
4. Use the DEC- button to set the desired exponential
percentage 1 - 100%, to achieve fine control around
the zero point of the steering servo.
5. Use the INC+ button to set an aggressive control curve
if you require large travel around the centre point of
the steering servo.
6. Press the INC+ and DEC- buttons simultaneously to
switch off the Exponential function and revert to linear (LN). The steering servo works in normal linear
fashion if you select the LN option.
7. Press the MODE and CHANNEL buttons
simultaneously, or switch the transmitter OFF/ON
briefly, to store the set values in the Set-up Menu
memory, and to revert to the base screen display.
EXP ST Exponential Function, steering servo (Set-up Menu)
EXP ST Exponential, Steering Wheel Function
RATE
EXP
TRIM
L/F
R/B
%
V
EXP
Selecting the Exponential function

51
Receiver with BEC system
The SB6 SYN receiver features a high-quality voltage stabilisation system (BEC = Battery Eliminator Circuit). This
draws the required power for the receiver and the servos connected to it from the model’s main drive battery.
Important note:
The BEC system has limited current capacity:
With a 4.8 ... 6 V drive battery (4 ...5 NiCd or NiMH cells): maximum 1 Amp
With a 7.2 V drive battery (6 NiCd or NiMH cells): maximum 0.7 Amp
This corresponds approximately to the load represented by two standard servos, e.g. C507, C508, C512 or C577.
If you wish to use more powerful servos drawing higher currents, the BEC system must not be used, as
overloading will immediately wreck the receiver and the servos connected to it.
If powerful servos are installed in your model, e.g. two high-performance digital servos, the BEC system must
be by-passed by plugging a receiver battery into any servo socket (1 - 3). In this case the battery socket is
simply left unused.
Wiring diagram 1: Mechanical speed controller with BEC connector
Most electric cars with a mechanical speed controller are fitted with a BEC cable as standard. This takes the form of
a separate 2-core BEC cable with a red connector, attached permanently to the mechanical speed controller. This
connector can be plugged directly into the battery socket on the receiver (see sketch below).
Caution: The SB6 SYN receiver is designed to be used only with batteries up to 7.2 V (6 NiCd or NiMH cells). If the
car is fitted with a higher voltage drive battery, the 2-pin BEC connector must not be connected to the
receiver. In such cases a separate receiver battery (see wiring diagram 3) must be used.
Receiving system
BEC system, typical wiring arrangements
Receiver
Select desired frequency channel (Ch
50 - 92) using a small screwdriver
If the receiving system is not to be
powered from the drive battery, the
battery holder supplied with the RC set
can be used.
Mechanical
speed controller
Drive battery
4.8 ... 7.2 V
to motor
ON/OFF switch

52
Wiring diagram 2: Electronic speed controller with BEC system
Many electronic speed controllers designed for model car use feature an integral BEC system as standard.
Caution: These BEC systems also have restricted current capacity. As already described in wiring diagram 1, a
separate receiver battery (see wiring diagram 3) must be fitted if powerful servos are to be used. Please
read the notes on this subject in the operating instructions supplied with your speed controller.
Wiring diagram 3: Separate receiver battery
A separate receiver battery can be connected to any vacant servo socket. If all the servo sockets are already in use,
a Y-lead (Order No. 3936.11) can be employed (see diagram below). Do not connect anything to the receiver ’s
battery socket.
Receiving system
T ypical wiring arrangements
Select desired frequency channel
(Ch 50 - 92) using a small screwdriver
Electronic speed controller
with BEC system
to motor
Drive battery
Receiver
Select desired frequency channel
(Ch 50 - 92) using a small screwdriver
Switch harness
Order No. 3934.1
receiver
battery
4.8 V
Receiver
Y-lead,
Order No. 3936.11

53
Receiver aerial
The receiver aerial is attached permanently to the
receiver, and is about 100 cm long.
The aerial should be deployed in as straight a line as
possible, and as far away as possible from electric
motors, servos, metal pushrods and high-current leads.
In model boats the receiving system should be installed
in such a way that the receiver and the aerial are as far
away as possible from electric drive motors, high-current
cables and metal parts.
For model boats a vertical whip with a free length of 80 100 cm is preferable to any other type of aerial.
Whip aerials have also proved excellent in model cars.
As an exception to the rule, a shorter aerial may be used
in a model car since the range required is relatively short.
Installing pushrods and linkages
The basic rule is that all linkages must be unobstructed
and free-moving.
Stiff pushrods and control systems cause higher currents
to flow, thereby reducing running times and adversely
affecting accuracy of control. It is especially important
that all servo output arms are free to move to the full
extent of their travel in both directions without being
mechanically obstructed at any point.
Any areas of the model through which pushrods pass
must be checked carefully, to ensure that they do not
foul the linkage. The same applies to hinged components.
It is particularly important to check that the throttle system
fulfils this requirement.
The “full throttle” setting must be determined by the stick
position, not by the mechanical end-stop of the throttle
system.
If this is not the case, the servo will be under full load
almost constantly when the model is running; it will then
draw a heavy current and may burn out.
For the same reason the idle setting must also be defined
electrically, i.e. through the stick position, and not
mechanically through the throttle system end-stop.
Appendix
Supplementary notes
Suppressing electric motors
All conventional electric motors generate sparks between
commutator and brushes, and the sparking causes
interference to a greater or lesser extent to the radio
control system. For this reason all electric motors in the
model must be effectively suppressed if the radio system
is to work properly.
In electric-powered model boats the motors must
therefore be suppressed carefully.
Suppressor filters are reasonably effective at suppressing
this type of interference, and should always be used in
any model powered by an electric motor and controlled
by radio.
Wherever possible suppressor filters should to fitted as
close as possible to the drive motor, and the connecting
leads from the terminals to the motor’s earth connection
should be as short as you can possibly make them (max.
20 mm). Each electric drive motor must be suppressed
separately, with its own suppressor filter.
Please refer to the main GRAUPNER FS catalogue for
details of suppressor components and suppressor filters.
Order No. 3361 (max. 18A)
Order No. 3362 (max. 36A)
Suppression using suppressor filter
Order No. 3588
Order No. 3584
Minimum suppression

54
Système à micro-processeur XS-6 FM RACE Synthétiseur GRAUPNER
Sommaire : Page
Conseils de sécurité 55 – 57
Charge de la batterie d’émission 57, 60
Description des fonctions, caractér. techniques 58
Organes de commande de l’émetteur 59
Sélection du canal de réception 59
Sélection du canal d’émission 60
Indications de l’affichage 61
Accès au Mode Système 62
Diagramme de déroulement du Mode Système 63
Taux de transmission N=normal/F=rapide 64
Effacement des données 64
Copie de modèle 65
Trims électroniques de direction/gaz 66
Réglage rapide en Mode Direct 67
Réglage du servo de frein EPA 67
Définition du servo 3 68
Dual Rate du volant de direction 69
Définition touche momentanée / GBC 70 – 71
Menu des réglages 72
Réglage des fins de course du servo EPA 73
Réglage MIX du servo 3 74
Mode SUB-Trim 75
Réglage Gaz/Frein TBD 75
Servo-Reverse 75
Fonction exponentielle 76
Exemple récepteur / BEC 77 – 78
Antiparasitage des moteurs électriques 79
Pour vos notes 80
Tableau des fréquences 81
Certificat de conformité 82
Conditions de garantie 83
Généralités :
Ensemble de radiocommande de haute qualité technique
en technologie synthétiseur moderne. Un quartz n’est
plus nécessaire. Grâce à une optimisation technique
conséquente, cet appareil offre pour sa classe un grand
confort d’utilisation et des fonctions étendues.
Haute sécurité de fonctionnement grâce au traitement
moderne des impulsions par un micro-processeur.
Ecran LCD de grande surface offrant une information
claire sur les fonctions et les paramètres de réglage ,
ainsi que l’affichage du canal d’émission, des mémoires
de modèle et de la tension de la batterie d’émission.
Système BEC déjà intégré dans le récepteur S6B SYN
pour l’alimentation de la réception par la batterie de
propulsion.
Attention : Cet ensemble R/C n’est pas adapté pour
le pilotage des gros modèles de voiture à l’échelle
1:5 ou 1:4, ou des modèles à moteur thermique avec
système d’allumage.
Composition des ensembles et accessoires :
XS-6 FM Synthétiseur 40, pour la bande des 40 MHz,
Réf. N°3117.
XS-6 FM Synthétiseur 41, pour la bande des 41 MHz,
Réf. N° 3 117.41*.
* Seulement pour la France.
Composition des ensembles :
Emetteur XS-6 FM Synthétiseur
Récepteur S6B SN FM-PLL Synthétiseur
Servo, Cordon interrupteur
.
Accessoires disponibles :
Piles sèches : pour réception (4 pièces nécessaires)
Utiliser uniquement des piles type Mignon/R6.
Accus ECO-POWER 1,2 V/800 mA Réf. N°3621
Batteries NC pour émetteur:
Graupner 8N-800mA 9,6 /800mA Réf. N°3423
Sanyo 8KR-1100AAU 9,6 V/1100mA Réf. N°3413
Chargeurs conseillés :
MINILADER 2 Réf. N°6422
MUL TILADER 3 Réf. N°6427
MULTILADER 6E
1)
Réf. N°6426
TURBOMAT 6 Plus
1)
Réf. N°6428
TURBOMAT 7 Plus
1)
Réf. N°6429
TURBOMAT 16 Plus
1)
Réf. N°6430
ULTRAMAT 25
1)
Réf. N°6417
ULTRA DUO PLUS 30
1)
Réf. N°6416
1) Un cordon Réf. N°3022 pour le recharge de la
batterie d’émission et un cordon Réf. N°3021 pour
la recharge de l’accu de réception seront
nécessaires en supplément.
D’autres modèles de chargeurs ainsi que d’autres
batteries se trouvent dans le catalogue général
GRAUPNER FS.
Pièce détachée :
Antenne télescopique pour émetteur, Réf. N°3115.6.

55
Introduction dans le système de radiocommande XS-6 FM RACE
Conseils de sécurité à observer impérativement !
Afin de pouvoir pratiquer votre hobby dans les
meilleures conditions possibles, veuillez lire
attentivement ces instructions et observer surtout les
conseils de sécurité donnés. Ces instructions devront
être remisés à un éventuel utilisateur suivant de cet
ensemble R/C.
Domaine d’utilisation :
Cet ensemble R/C doit être exclusivement utilisé dans
le but prévu par son fabricant, c’est-à-dire pour la
radiocommande des modèles réduits. Toute autre
utilisation est interdite.
Conseils de sécurité
Les modèles radiocommandés ne sont pas des
jouets !
Même un petit modèle peut provoquer des dégâts
matériels ou corporels à la suite d’une manipulation
incorrecte ou pour une cause étrangère.
Entretenez soigneusement votre ensemble R/C pour
le maintenir toujours en parfait état de fonctionnement.
Une défectuosité technique d’ordre électrique ou
mécanique peut provoquer le démarrage incontrôlé du
moteur et/ou l’éjection de pièces qui peuvent vous
blesser sérieusement.
Un ensemble de radiocommande doit être utilisé dans
des conditions de températures extérieures normales,
c’est-à-dire comprises entre – 15° C et + 55° C.
Les hélices et en général toutes les pièces en rotation
entraînées par un moteur présentent un danger de
blessure permanent. Elles ne doivent être touchées par
aucune partie du corps ni entrer en contact avec aucun
objet. Une hélice tournant à haut régime peut par ex.
couper un doigt !
Ne vous tenez jamais devant ou sur le côté du champ
de rotation d’une hélice.
Protégez tous les appareils de la poussière, des
salissures, de l’humidité et des vibrations. Ne les
soumettez jamais à une chaleur ou à un froid excessif.
Evitez-leur les chocs et les contraintes de tous genres.
Vérifiez régulièrement l’état du boîtier et du câblage.
Les appareils qui ont été endommagés ou qui ont pris
l’humidité ne devront plus être utilisés, même après
avoir été séchés !
Il conviendra d’utiliser uniquement les composants et
les accessoires que nous conseillons Utiliser
uniquement des connecteurs d’origine Graupner
adaptés entre-eux, de même fabrication et en même
matière.
Aucune modification ne devra être effectuée sur les
appareils, autrement aucune sécurité de
fonctionnement ne pourra être assurée et le bénéfice
de la garantie sera perdu !
Lorsque l’indication de la tension de la batterie
d’émission approche de la zone ‘’vide’’, interrompre
l’utilisation de l’émetteur pour remplacer les piles ou
recharger la batterie. Contrôlez régulièrement surtout
l’état de l’alimentation de la réception. N’attendez pas
que le déplacement des servos devienne nettement
plus lent pour intervenir !
Retirez toutes les batteries du modèle lorsqu’il n’est
pas utilisé. Remplacez à temps les piles usagées.
Montage de la réception dans le modèle :
Le récepteur sera enrobé dans du caoutchouc mousse
et placé dans le modèle à l’abri de la poussière, des
salissures et de l’humidité ; il ne devra toucher à aucun
endroit directement la structure du modèle, car
autrement les vibrations et les secousses lui seraient
directement retransmises.
Ne pas raccourcir ni rallonger le fil d’antenne de
réception et l’éloigner le plus possible des moteurs
électriques, des servos, des tringleries métalliques ou
des conducteurs de courant de forte intensité.
Lors de la disposition du câblage, veillez à ce que les
cordons ne soient pas trop tendus, exagérément pliés
ou coupés. Les pièces à bords vifs présentent toujours
un danger pour l’isolation des fils électriques. Assurezvous que tous les connecteurs sont correctement
enfichés. Ne tirez pas sur les fils pour déconnecter les
prises.
Evitez les inversions de polarité et les court-circuits
de tous genres avec les cordons de raccordement ; les
appareils ne sont pas protégés contre cela.
Pour le montage de la réception dans un modèle
propulsé par un moteur thermique, tous les composants
devront être à l’abri des gaz d’échappement et des
projections d’huile. Ceci vaut particulièrement pour
l’interrupteur de la réception généralement monté
extérieurement sur un flanc du fuselage.

56
Introduction dans le système de radiocommande XS-6 FM RACE
Conseils de sécurité à observer impérativement !
Les servos seront fixés avec les silent-blocs fournis
parmi leurs accessoires pour les isoler des vibrations.
Déployez toujours entièrement l’antenne
télescopique de l’émetteur pour piloter.
Il ne se produit qu’un faible effet de champ dans le
prolongement en ligne droite de l’antenne d’émission,
c’est pourquoi il est erroné de viser le modèle en vol
avec l’antenne dans le but d’améliorer la portée.
Lors de l’utilisation simultanée de plusieurs ensembles
R/C émettant sur des canaux voisins, les pilotes doivent
se tenir en groupe rapproché. Un pilote isolé met non
seulement sont propre modèle en danger, mais aussi
celui des autres.
Règles de comportement :
Ne faites jamais évoluer votre modèle de voiture sur
les voies publiques, les routes à grande circulation et
les places.
Ne mettez jamais en danger les animaux, les
spectateurs ou les autres pilotes.
Ne faites jamais évoluer votre modèle volant à proximité
de lignes à haute tensions, ou votre bateau près des
écluses et des embarcadères.
Vérifications avant le départ :
Si plusieurs modélistes se trouvent sur place, assurezvous que vous êtes le seul à utiliser votre canal avant
de mettre votre propre émetteur en contact. La doubleoccupation d’un canal de fréquence provoque des
perturbations et peut entraîner le crash d’un autre
modèle.
Avant de mettre la réception en contact, assurez-vous
que le manche des gaz sur l’émetteur soit sur la position
Stop/Ralenti.
Mettez toujours d’abord l’émetteur en contact,
ensuite la réception
Coupez toujours d’abord la réception
ensuite l’émetteur
Si cet ordre n’est pas respecté et que la réception est
en contact alors que l’ interrupteur de l’émetteur est
coupé, le récepteur peut être perturbé ou répondre aux
ordres d’un autre émetteur.
Le modèle devient alors incontrôlé et peut provoquer
des dégâts matériels ou personnels. Les servos
peuvent partir en butée de fin de course en détériorant
la pignonerie, la tringlerie et en vidant prématurément
l’accu de réception par la forte surcharge temporaire
occasionnée.
Avant chaque utilisation, vérifiez le fonctionnement
correct et la portée de l’installation R/C. Pour cela,
vérifiez à une certaine distance du modèle si toutes
les gouvernes fonctionnent impeccablement et
débattent dans le bon sens.
Répétez cette opération avec le moteur en marche, en
faisant tenir le modèle par un aide.
Montage des tringleries et des gouvernes :
Par principe, le montage doit se faire de façon à ce
que les tringleries puissent se mouvoir librement.
Il est particulièrement important que le palonnier du
servo puisse se déplacer sur la totalité de sa course,
sans être bloqué mécaniquement.
Veiller à ce qu’aucune pièce métallique, par ex. par le
mouvement d’une gouverne, par des vibrations,
ne frottent entre-elles en venant perturber la réception.
Modèle avec moteur thermique :
Pour pouvoir arrêter à tout moment un moteur
thermique en marche, la commande des gaz doit être
réglée de façon à ce que l’admission d’air du
carburateur soit complètement fermée lorsque le
manche des gaz et le levier de trim sont ramenés sur
la position du ralenti.
Récepteur avec système BEC :
Attention : La charge admissible du
système BEC est limitée !
Avec l’utilisation de servos puissants et de forte
consommation, le système BEC ne devra plus être
utilisé, car une surcharge conduira à sa destruction
immédiate. Dans ce cas, un accu de réception séparé
devra être utilisé.
Sources d’alimentation :
N’utilisez
jamais d’éléments défectueux, détériorés, ou
de batteries composées d’éléments de types différents,
de mélange d’éléments vieux et neufs ou d’éléments
de fabrications différentes.
Charge des batteries :
Tous les accus devront être chargés avant chaque
utilisation.
Il conviendra de respecter les conseils et les temps de
charge indiqués par le fabricant des batteries .
Ne jamais recharger des batteries sans surveillance.
Ne jamais tenter de recharger des piles sèches
(Danger d’explosion !)

57
Introduction dans le système de radiocommande XS-6 FM RACE
Conseils de sécurité à observer impérativement !
que lorsque le moteur présente un courant au blocage
de 100 A, un régulateur de vitesse avec une charge
admissible permanente d’au moins 50 A est nécessaire.
Contrôle du sens de marche :
De nombreux régulateurs de vitesse pourvus d’un étage
en marche arrière ont une plus faible charge admissible
dans ce sens qu’en marche avant.
Pour cette raison, il conviendra de vérifier si votre
véhicule se trouve en fonctionnement ‘’Marche avant’’
lorsque vous le pilotez dans ce sens de marche.
Exclusion de responsabilité/Dédommagements :
Le respect des instructions de montage et d’utilisation,
ainsi que les conditions d’installation, de
fonctionnement et d’entretien de cet ensemble de
radiocommande ne peuvent pas être surveillés par la
Firme Graupner . En conséquence, nous déclinons toute
responsabilité concernant la perte, les dommages et
les frais résultant d’une utilisation incorrecte ainsi que
notre participation aux dédommagements d’une façon
quelconque.
Tant qu’elle n’est pas impérativement contrainte par le
législateur, la responsabilité de la Firme Graupner pour
le dédommagement, quelque soit la raison de droit, se
limite à la valeur marchande d’origine Graupner
impliquée dans l’accident. Ceci n’est pas valable dans
la mesure où la Firme Graupner serait contrainte par la
législation en vigueur pour une raison de grande
négligence.
Charge de la batterie d’émission :
Le porte-batterie de l’émetteur pourra être garni avec
des éléments rechargeables.
Utiliser exclusivement des piles sèches du type Mignon
AA0 / R6.
Si l’émetteur est alimenté par des éléments
rechargeables, ceux-ci pourront être rechargés par la
prise de charge disposée sur le côté du boîtier de
l’émetteur . L ’interrupteur de l’émetteur devra être coupé
durant toute la durée du processus de charge.
La prise de charge de l’émetteur est équipée d’une
sécurité anti-retour du courant qui empêche toute
détérioration en cas d’inversion de polarité ou de courtcircuit avec les fiches du cordon de charge de
l’émetteur.
Une recharge de la batterie d’émission avec un
chargeur automatique n’est pas possible en raison de
la présence ce cette sécurité anti-retour du courant.
Courant de charge maximal d’émission :
Pour empêcher une détérioration de l’émetteur, le
courant de charge maximal ne devra jamais dépasser
500 mA (0,5 A). Il conviendra de toujours respecter les
prescriptions de charge et de traitement indiqués par
les fabricants de la batterie et du chargeur.
Capacité et autonomie d’utilisation :
Ceci est valable pour toutes les sources de courant :
La capacité de toutes les batterie chute fortement par
faibles températures, d’où une autonomie d’utilisation
plus courte par temps froid.
Antiparasitage des moteurs électriques :
Sur un modèle à propulsion électrique,
chaque moteur
devra être soigneusement antiparasité. L’antiparasitage
de base des moteurs électriques ne suffit pas dans la
plupart des cas ; il permet juste de satisfaire aux normes
imposées. Il conviendra de se référer aux indications
correspondantes données dans les instructions de
montage et d’utilisation du modèle concerné.
Des condensateurs et des filtres antiparasites se
trouvent dans le catalogue général GRAUPNER FS.
Utilisation des variateurs de vitesse électroniques :
Le bon choix d’un régulateur de vitesse électronique
dépend avant tout de la taille du moteur électrique utilisé
et du modèle R/C. Afin d’éviter de surcharger et
d’endommager le régulateur de vitesse, la charge en
courant admissible de celui-ci doit être au moins la
moitié du courant au blocage du moteur. Cela signifie

58
Caractéristiques techniques de l’émetteur :
Puissance d’émission, env . 1,5 W
Bande passante 10 kHz
Canaux programmables K 50 – K 92
Tension de service 9,6 … 12 V
Consommation, env . 160 mA
Nombre de fonctions 2, trimmables
Plage de températures - 15°C … + 55°C
Longueur de l’antenne, env . 830mm
Dimensions, env . 175x147x75mm
Poids (sans batterie), env . 390 g.
Caractéristiques techniques du récepteur :
Bande passante 10 kHz
Canaux programmables K 50 – K 92
Fréquence intermédiaire 455 kHz
Tension de service 4,8 … 7,2 V (BEC)
Consommation, env . 38 mA
Sensibilité, env. 10 µV
Plage de températures - 15°C … + 55°C
Longueur de l’antenne, en. 600 mm
Dimensions, env . 49x34x21mm
Poids, env. 32 g.
Particularités de l’émetteur XS-6 FM RACE :
Ensemble de radiocommande ergonomique moderne en technologie synthétiseur pour les pilotes de
voitures et de bateaux de course R/C exigeants.
Description des fonctions et caractéristiques techniques
10 Mémoires de modèle.
Ensemble R/C moderne à micro-processeur 8 bit
CPU avec FULL DIGITAL ACCURATE TUNING
(Système de réglage digital de haute précision) pour 3
servos.
Boîtier en design moderne avec organes de
commande en positions optimisées et poignée de forme
ergonomique pour un pilotage confortable.
Ecran LCD de grande surface offrant une information
claire des fonctions et des paramètres de réglage ainsi
que l’affichage du canal d’émission, des mémoires de
modèle ainsi que de la tension de la batterie d’émission.
Terminal à 4 touches pour la programmation et le
réglage précis des fonctions et des paramètres désirés.
4 Touches à bascule à deux sens pour le trim
totalement digital des fonctions de direction, de ralenti,
de frein ainsi que pour la possibilité de positionnement
réglable de la 3
ème
fonction de servo.
ESB (Emergency Security Button), touche de sécurité
pour une rapide commutation momentanée de fonctions
importantes en cas de besoin.
PPN = PPM 18 (Modulation normale).
PPF = PPM rapide , taux de transmission doublé =
Réduction de moitié du temps de réaction des servos
et du régulateur .
BAT Avertissement optique et acoustique de la soustension de la batterie d’émission.
MD1 10 Mémoires de modèle pour les fonctions et les
données de réglage. Chaque mémoire pourra être
dotée d’un nom abrégé de modèle.
STC (Steering Center Trim) = Sub-trim de direction.
THC (Throttle Center Trim) = Sub-trim de ralenti.
EXP ST (Steering Exponential adjustment) = Fonction
exponentielle pour le servo de direction .
EXP THF (Throttle Exponential adjustment) THF = Gaz
en avant, THB = Frein – 100%.
EPA ST (End Point adjustment Steering). Réglage du
point extrême de la course du servo de direction gauche/
droite, max. 125 – 0%.
EPA (End Point adjustment) . Réglage du point extrême
de freinage par une touche à bascule à deux sens,
max. 125 - 0%.
EPA TH (End Point adjustment Throttle). Réglage du
point extrême du ralenti THC et du frein R/B.
EPA F3 (End Point adjustment Function 3). Réglage
du point extrême pour le servo de la fonction 3.
ST (Steering Reversing Switch). Inversion du sens de
la course du servo de direction.
TH (Throttle Reversing Switch) . Inversion du sens de
la course du servo de gaz. F3 (Function 3 Reversing
Switch) . Inversion du sens de la course du servo de la
fonction 3.
TDA (Throttle Deadband adjustment) . Réglable
séparément au début de la plage d’action pour les
fonctions des gaz et de frein.
LAP record Timer moderne jusqu’à 50 tours avec un
temps de mesure au tour de 9 – 99,9 sec. Permet une
analyse ultérieure des paramètres importants par tour ,
par ex. moteur , régulateur, batterie de propulsion, pneus
et spécifications du modèle.

59
Trim
de gaz
électronique
Trim de
direction
électronique
Interrupteur
Vis de réglage de la
force de rappel au
neutre du volant
Levier de Gaz/Frein
Touche momentanée C
Antenne
télescopique
Ecran d’affichage
LCD
Touches
de données
Réglage électronique
digital B (Touche à bascule B)
Volant de
direction
Prise de charge
(* seulement pour les
accus rechargeables)
Réglage électronique
digital A (Touche à bascule A)
Organes de commande de l’émetteur
Remarque : Le système BEC supporte une charge
maximale de 1 A. !
Avec l’utilisation de servos puissants à forte consommation,
le système BEC ne devra plus être utilisé, car une
surcharge détruira immédiatement le récepteur et les
servos qui y sont connectés. En cas d’utilisation de servos
puissants, comme par ex. les servos digitaux à grande
puissance, le système BEC devra être dé-commuté en
enfichant la prise de l’accu de réception dans l’une des
sorties de voie (1-3) du récepteur.
Logement de
la batterie
Description de la réception
La réception est équipée
d’un système Synthétiseur
qui permet de sélectionner
le canal désiré entre K 50
et K 92 avec un petit
tournevis.
Avec l’utilisation d’autres récepteurs FM, par ex. C6 FM,
l’émetteur devra être programmé avec le quartz RX enfiché
dans le récepteur.
Récepteur SB6 SYN

60
Sélection du canal TX : (K 50-92 par le Synthétiseur)
Sélection du canal par le système Synthétiseur (Mode Système)
Grâce à un système Synthétiseur moderne, les
quartz ne sont plus nécessaires.
1. On accède au Mode Système en mettant l’émetteur
en contact et en pressant la touche MODE. Dans
ce Mode, la partie HF de l’émetteur est dé-commutée.
2. Après l’appel du sélecteur de canal CH avec la touche
MODE, le canal désiré pourra être sélectionné entre
K 50 à 92 avec les touches INC+ ou DEC-.
3. Avec ENTER (Touches MODE et CHANNEL pressées
simultanément) le nouveau canal de fréquence
sélectionné pourra être mémorisé. Par une courte
commutation COUPE/CONTACT, l’émetteur sera
activé avec le nouveau canal de fréquence.
4. Mémorisation simplifiée : Après la sélection du
nouveau canal de fréquence, commuter brièvement
l’émetteur COUPE/CONTACT. Le nouveau canal de
fréquence sera ainsi mémorisé et l’émetteur sera
activé sur ce dernier.
Réglage de la force de rappel au neutre du volant de direction
La force de rappel au neutre du volant de direction est
réglable par une vis à tête cruciforme (V oir le point 5, en
page 7 ‘’Organes de commande de l’émetteur’’). En
tournant la vis dans le sens horaire, la force de rappel est
augmentée.
Charge de la batterie d’émission
La prise de charge se trouve en bas sur le côté gauche
de l’émetteur et elle est adaptée uniquement pour le
cordon de charge Graupner. Ne pas tenter d’utiliser un
cordon de charge d’une autre fabrication, car celui-ci
pourrait être connecté avec une inversion de polarité et
détériorer l’émetteur.
Charge de l’émetteur
Le courant de charge maximal admissible dépend du
type de la batterie et il conviendra de se référer aux
indications du fabricant !
Attention : Pour éviter une détérioration de l’émetteur,
le courant de charge ne devra jamais dépasser 500
mA.
L’interrupteur de l’émetteur devra être placé sur la
position ‘’COUPE’’ durant le processus de charge.
La prise de charge est équipée d’une sécurité anti-
retour du courant qui empêche toute détérioration en
cas d’inversion de polarité ou de court-circuit avec
les fiches du cordon de charge.
Pour cette raison, la recharge de la batterie d’émission
avec un chargeur automatique n’est pas possible !
L’émetteur pourra cependant être retourné au S.A.V.
GRAUPNER pour être transformé afin de permettre
une recharge de la batterie par un chargeur
automatique.
Attention : Même avec un chargeur automatique, le
courant de charge devra être réglé manuellement pour
s’assurer qu’il ne dépassera pas 500 mA.
Chargeurs conseillés :
MINILADER 2 Réf. N°6422
MUL TILADER 3 Réf. N°6427
MULTILADER 6E
1)
Réf. N°6426
TURBOMAT 6 Plus
1)
Réf. N°6428
TURBOMAT 7 Plus
1)
Réf. N°6429
TURBOMAT 16 Plus
1)
Réf. N°6430
ULTRAMAT 25
1)
Réf. N°6417
ULTRA DUO PLUS 30
1)
Réf. N°6416
1) Un cordon Réf. N°3022 pour le recharge de la
batterie d’émission et un cordon Réf. N°3021 pour
la recharge de l’accu de réception seront
nécessaires en supplément.
8 I
CHX
M
RATE
EXP
TRIM
L/F
R/B
%
V
REV .
EP
5 0
CHX
MIX
RATE
EXP
TRIM
L/F
R/B
%
V
REV . NORM
EPA
INC +
DEC -

61
Indications de l’affichage
Affichage en fonctionnement normal
Après la mise en contact de l’émetteur, l’affichage cidessous apparaît sur l’écran. Cet affichage correspond
au fonctionnement normal.
Remarques : Lorsqu’une touche de trim électronique
quelconque sera utilisé durant cet affichage, l’indication
pour le Mode-Trim-Direct apparaîtra automatiquement.
Pour plus d’informations à ce sujet, voir le paragraphe
Mode-Trim.
Système de mémoire par batterie au lithium
L’ensemble R/C XS-6 FM RACE est équipé d’un
système de mémoire par batterie au lithium d’une
durée de 5 ans. Ce système protège et conserve les
données de programmation lorsque la tension de la
batterie d’émission descend en dessous de 8,5 V , lorsque
celle-ci est retirée de l’émetteur ou lorsqu’elle est
totalement vide après un long stockage. Après 5 ans,
le remplacement de la batterie au lithium doit être effectué
par le S.A.V. GRAUPNER.
Indication de panne sur l’affichage
Lorsque cette indication de panne est affichée, faire ce
qui suit : Presser simultanément les touches MODE et
CHANNEL (ENTER) afin de sécuriser toutes les
données de programmation. Si cela n’est pas fait, tous
les réglages programmés seront perdus ! Lorsque cette
indication apparaît une deuxième fois, un remplacement
de la batterie par le S.A.V . GRAUPNER est nécessaire.
er
BAk
Panne de la batterie au lithium
BAK ER
Batterie au lithium
vide Retourner l’émetteur au
S.A.V. pour remplacer la
batterie.
Trop faible tension de la batterie d’émission
Lorsque la tension des 8 éléments Mignon descend en
dessous d’une valeur de 8,5 Volts, l’avertissement (BAT)
apparaît sur l’affichage avec un signal acoustique
continu. La batterie devra alors être remplacée , ou
rechargée avant toute autre utilisation. L’indication de la
trop faible tension de la batterie est active dans tous les
Modes de fonctionnement.
8,5
BAT
V
8,5 v
Sous-tension de la
batterie d’émission. Interrompre
le fonctionnement.
BAT
Avertissement : Batterie
d’émission vide, doit être
rechargée.
I 0,6
c54
V
10,6 v
Tension de service de
la batterie d’émission
C54
Canal de fréquence réglé
dans l’émetteur l’émetteur

62
%
V
REV . NORM
%
V
Accès au Mode Système (Système Mode Set-up)
1. Pour accéder au Mode Système, presser la touche
MODE et mettez en plus l’émetteur en contact. La
partie HF de l’émetteur sera dé-commutée !
2. Par plusieurs pressions sur la touche MODE, les
fonctions nécessaires telles que par ex. le nom du
modèle ou le canal de fréquence etc… pourront être
sélectionnés et les paramètres désirés pourront être
réglés avec les touches INC+ ou DEC- (Voir aussi le
diagramme de déroulement fluide du Mode Système).
3. Pour quitter le Mode Système, mettre l’émetteur en
contact un court instant COUPE/CONTACT. On accède
ainsi automatiquement à l’affichage de base
indiquant la tension de la batterie d’émission et le
numéro du modèle, ou le canal de fréquence. La
partie HF de l’émetteur sera automatiquement à
nouveau activée par le processus de commutation
COUPE/CONTACT.
Diagramme fluide du Mode Système :
Sélection du canal de
fréquence
(K 50 – 92)
Nom de modèle
(max. 3 caractères)
Nom de modèle
Max 3 caractères
Numéro de modèle
(1 – 10)
Accès aux données des noms de modèle dans
le Mode Système
Pour accéder à la fonction des données de noms de
modèle, procéder comme suit :
1. Accéder au Mode Système en pressant la touche
MODE et en mettant l’émetteur en contact.
2. Atteindre le menu Sélection de modèle MDL (Voir la
première ligne de l’affichage, en haut à gauche) en
pressant plusieurs fois la touche MODE.
3. Sélectionner la mémoire de modèle désirée (1 – 10)
avec les touches INC+ ou DEC- .
4. Nom de modèle : Accéder au menu Sélection de
modèle (MDA) en pressant deux fois la touche
MODE ; le premier caractère clignote maintenant.
5. Sélectionner le premier caractère désiré avec INC+
ou DEC- , par ex. ‘’C’’ (Ce caractère clignote).
6. Sélectionner le deuxième caractère avec la touche
CHANNEL et les touches INC ou DEC, par ex. ‘’L’’
(Ce caractère clignote).
7. Sélectionner le troisième caractère avec la touche
CHANNEL et INC+ ou DEC-, par ex. ‘’K’’ (Ce caractère
clignote).
8. En pressant les touches MODE et CHANNEL (ENTER)
ou en mettant l’émetteur un court instant en contact
COUPE/CONTACT le nom de modèle enregistré sera
transmis dans la mémoire de modèle sélectionnée.
EXP
L/F
R/B
%
V
c54
I I.0 V
Indication de
l’affichageMenu de
base
I I3
CLK
Entrée du nom de modèle
(Dans le Mode Système)
Le système XS-6 permet l’entrée d’un nom composé
de 3 caractères dans chacune des 10 mémoires de
modèle disponibles. Le modèle sélectionné apparaîtra
avec son nom sur l’affichage normal. Cette particularité
est très utile pour l’identification des différents modèles,
des réglages, etc…
I I.4
RATE
EXP
TRIM
L/F
R/B
%
V
REV . NORM
8 I
CHX
M
RATE
EXP
TRIM
L/F
R/B
%
V
EP
L/F
I IN
FRM
RATE
EXP
TRIM
L/F
R/B
%
V
REV . NORM
I II0
MDA
RATE
EXP
TRIM
L/F
R/B
%
V
M
MODE
MODE
MODE
⇓
⇓
⇓
Sélection du modèle
(Modèle 1 – 10)
Temps de transmission
N = PPM normal
F = PPM rapide
MDL

63
INC +
DEC -
INC +
DEC -
INC +
DEC -
INC +
DEC -
INC +
DEC -
INC +
DEC -
INC +
DEC -
INC +
DEC -
INC +
DEC -
I I.4
MDL
MIX
RATE
EXP
TRIM
L/F
R/B
%
V
REV . NORM
EPA
8 I
CHX
MIX
RATE
EXP
TRIM
L/F
R/B
%
V
REV . NORM
EPA
I II0
MDL
MIX
RATE
EXP
TRIM
L/F
R/B
%
V
REV . NORM
EPA
5 0
CHX
MIX
RATE
EXP
TRIM
L/F
R/B
%
V
REV . NORM
EPA
I II0
CUP
MIX
RATE
EXP
TRIM
L/F
R/B
%
V
REV . NORM
EPA
I IN
FRM
MIX
RATE
EXP
TRIM
L/F
R/B
%
V
REV . NORM
EPA
I IF
FRM
MIX
RATE
EXP
TRIM
L/F
R/B
%
V
REV . NORM
EPA
I I0
AUX
MIX
RATE
EXP
TRIM
L/F
R/B
%
V
REV . NORM
EPA
I 2P
AUX
MIX
RATE
EXP
TRIM
L/F
R/B
%
V
REV . NORM
EPA
LN
AUX
MIX
RATE
EXP
TRIM
L/F
R/B
%
V
REV . NORM
EPA
I I2
CLR
RATE
EXP
TRIM
L/F
R/B
%
V
REV . NORM
I.6
CPY
MIX
RATE
EXP
TRIM
L/F
R/B
%
V
REV . NORM
EPA
-
I.3
CPY
MIX
RATE
EXP
TRIM
L/F
R/B
%
V
REV . NORM
EPA
-
3
I I2
CLR
MIX
RATE
EXP
TRIM
L/F
R/B
%
V
REV . NORM
EPA
2
I II0
MDA
MIX
RATE
EXP
TRIM
L/F
R/B
%
V
REV . NORM
EPA
M
Diagramme de déroulement du Mode Système (Système Mode Set-up)
MODE
MODE
MODE
MODE
MODE
MODE
CLEAR
INC + DEC -
ENTER
MODE
CHANNEL
Sélection du modèle (MDL 1-10)
Sélection du canal d’émission (K 50 – 92)
Nom de modèle (Mod. 1 – 10)
Mode de transmission (N/F)
Fonctions de servo 3 (2P/LN)
Effacement mémoire (Retourner pour réglage en usine)
Copie de mémoire
Pour accéder au Mode Système, procéder comme
suit :
1. Presser la touche MODE et mettre l’émetteur en
contact.
2. Atteindre le Système Menu désiré en pressant
plusieurs fois la touche MODE (Voir le diagramme
de déroulement).
3. Sélectionner le paramètre de réglage désiré avec
les touches INC+ ou DEC-.
4. Enregistrer et mémoriser les valeurs modifiées dans
le Mode Système (Système Mode Set-up) par de
courtes commutations COUPE/CONTACT de
l’émetteur .
5. Le système de données spécifiques de
l’utilisateur reste mémorisé et sera toujours initialisé
avec un processus de commutation. Le paramètre
reste dans le Mode Système tant qu’il n’a pas été
renouvelé par l’utilisateur .
Accès au Mode Système
I I0
GBC
MIX
RATE
EXP
TRIM
L/F
R/B
%
V
REV . NORM
EPA
LA
GBC
MIX
RATE
EXP
TRIM
L/F
R/B
%
V
REV . NORM
EPA
Eb
GBC
MIX
RATE
EXP
TRIM
L/F
R/B
%
V
REV . NORM
EPA
MODE
Touche momentanée C (Sélection Eb/LA)

64
Sélection du taux de transmission N = Normal et F = Rapide dans le Mode Système
Le système R/C XS-6 FM RACE offre la possibilité de
commuter entre le taux de transmission (Temps de
transmission) normal de 19 ms et le taux de transmission
rapide de 12,7 ms.
Ce taux de transmission rapide sera préféré des pilotes
professionnels et permettra la commande directe de
servos à grande puissance en compétition lorsque
d’infimes différences de temps au tour sont décisives
pour la première place dans une course.
En combinaison avec des récepteurs FM d’une autre
fabrication, une vérification soigneuse et un contrôle
de la fonction des servos et du régulateur de vitesse
sont absolument nécessaires.
I IF
FRM
Temps de transmission
rapide
préféré des pilotes professionnels. Devra être vérifié
avec les récepteurs FM pour
une parfaite sécurité de
fonctionnement
I IN
FRM
Temps de transmission
normal
Temps de transmission
d’environ 19 ms réglé en usine,
adapté à tous les récepteurs
FM.
Taux N = Normal réglé en usine :
Taux F = Rapide pour pilotes professionnels :
T emps de transmission
„normal“ 19 ms
CLR - Effacement des données dans le Mode Système
La fonction CLR permet d’effacer toutes les données
dans une mémoire de modèle sélectionnée dans le
Mode Système pour les remettre sur les réglages
d’origine du fabricant. Pour cela, sélectionner le
modèle à effacer avec INC+ ou DEC-.
1. Maintenir la touche MODE pressée et mettre l’émetteur
en contact pour accéder au Mode Système.
2. En pressant plusieurs fois la touche MODE, accéder
au menu Mémoire de modèle MDL et sélectionner le
modèle désiré avec INC+ ou DEC-.
3. En pressant six fois la touche MODE, accéder au
menu Effacement CLR.
Le numéro de modèle préalablement sélectionné
clignote maintenant. En pressant simultanément les
touches INC+ et DEC- , toutes les données
enregistrées dans la mémoire de modèle seront
effacées et remises sur la valeur standard donnée
en usine.
4. La nouvelle programmation pourra alors être faite
avec de nouvelles valeurs de réglage dans le Mode
Système (voir le diagramme de déroulement du Mode
Système).
En pressant simultanément les touches INC+ et DEC-
, la mémoire de modèle (clignotante) sera effacée et
les réglages seront remis sur la valeur standard
donnée en usine.
Le numéro du modèle effacé ne clignote plus. La
mémoire de modèle pourra alors être à nouveau
programmée avec tous les paramètres.
Accès à la mémoire de la fonction d’effacement CLR
dans le Mode Système
L’effacement de données de réglage dans une
mémoire de modèle se fait dans le Mode Système :
Après la sélection du modèle à effacer, accéder dans
le menu CLR en pressant six fois la touche MODE,
dans lequel le modèle préalablement réglé (par ex. 2)
clignote.
MDL
I I3
Menu Modèle MDL
Sélectionner le modèle
à effacer N°1 à 10
I I3
CLR
Menu d’effacement CLR
Effacer le modèle en pressant
simultanément INC+ et
DEC-
T emps de transmission
„fast“ 12,7 ms

65
CPY – Copie de modèle dans le Mode Système
Copier un modèle
Dans la fonction Sélection de modèle du Mode
Système, une option permettant de copier un modèle
dans une autre mémoire est à disposition.
Cette copie peut servir pour un modèle de voiture R/C
utilisée dans différentes courses.
Accès à la fonction de copie dans le Mode
Système
1. Maintenir la touche MODE pressée et mettre l’émetteur
en contact pour accéder au Mode Système.
2. En pressant plusieurs fois la touche MODE, accéder
au menu Mémoire de modèle MDL et sélectionner le
modèle désiré pour le copier avec INC+ ou DEC-.
3. En pressant six fois la touche MODE, accéder au
menu Copier CPY. Le système de menu sélectionne
automatiquement une mémoire au dessus de celle
du modèle à copier. Cette mémoire cible de modèle
clignote sur l’affichage. Si toutefois une autre
mémoire de modèle libre est désirée, elle pourra
être sélectionnée avec les touches INC+ ou DEC-.
4. En pressant simultanément les touches INC+ et DEC-
(CLEAR), toutes les données du modèle à copier
seront transmises dans la mémoire cible de modèle
sélectionnée. (Une valeur antécédente existante sera
effacée avec ce processus !).
Le nom de modèle d’origine, par ex. MD5 dans la
mémoire de modèle sera remplacé par un nouveau
nom, par ex. MD6. Autrement, le nom du modèle sera
copié avec la mémoire.
Après la sélection du modèle à copier, accéder dans le
menu CPY en pressant six fois la touche MODE, dans
lequel clignote la mémoire de modèle suivante (6).
MDL
I I5
Menu Modèle MDL
Sélectionner le modèle à
copier N°1 à 10 (par ex.5)
Pour copier une mémoire de modèle MDL
Sélection de la mémoire cible de modèle CPY
Copier – Menu CPY
Le modèle cible sélectionné
clignote automatiquement.
Une autre mémoire cible de
modèle pourra cependant être
sélectionnée avec les touches
INC+ ou DEC-. En pressant
simultanément ces deux
touches, le modèle sélectionné
sera copié dans la mémoire
cible.
I I6
CPY

66
Trims électroniques de direction et de gaz (TRIM direct par Touches de Trim)
Trim électronique du servo de direction (ST)
Réglage du trim du servo du volant de direction
1. Avec l’émetteur et la réception en contact, presser
la touche de trim du volant de direction (2) ST TRIM
dans le sens de décalage désiré. Le menu Steuer-
Center-Trim STC apparaît alors automatiquement sur
l’affichage.
2. Maintenir la touche de trim (2) TRIM ST (Servo de
direction) pressée dans le sens désiré jusqu’à ce que
la direction soit au neutre sur le modèle et qu’il roule à
100% en ligne droite (La possibilité de réglage est
de +/-30 Pas). Au cas où la valeur de décalage du trim
électronique ne serait pas suffisante, une plus grande
correction pourra être effectuée dans le Mode SUB
TRIM STS. Avec une trop grande différence de la
position neutre du servo de direction, il est conseillé de
régler mécaniquement la tringlerie de commande.
3. Après avoir relâché la touche de trim (2) TRIM STC,
la valeur de correction de trim est mémorisée et
l’écran de l’émetteur revient après un court temps
automatiquement sur l’affichage de base.
Trim électronique du servo Gaz/Frein (TH)
Réglage du trim du servo Gaz/Frein
1. Avec l’émetteur et la réception en contact, presser
le trim de Gaz/Frein (1) TRIM TH dans le sens désiré.
Le menu Gas/Brems-Center-TRIM THC apparaît alors
automatiquement sur l’affichage.
2. Maintenir la touche de trim (1) TRIM TH (Servo Gaz/
Frein) pressée dans le sens désiré jusqu’à ce que le
servo atteigne le décalage du milieu de sa course
nécessaire (La possibilité de réglage est de +/- 60
Pas). Au cas où la valeur de décalage du trim
électronique ne serait pas suffisante, une plus grande
correction pourra être effectuée dans le Mode SUB
TRIM THS. Avec une trop grande différence de la
position milieu du servo Gaz/Frein, il est conseillé de
régler mécaniquement la tringlerie de commande.
3. Après avoir relâché la touche de trim (1) TRIM THC,
la valeur de correction de trim est mémorisée et
l’écran de l’émetteur revient après un court temps
automatiquement sur l’affichage de base.
Trim électronique
de gaz
Interrupteur
Volant de
direction
Trim électronique de
direction
Remarque : Le décalage maximum du milieu de la
course du servo de direction STC (Trim direct) de +/- 30
Pas et du STS (SUB-TRIM) de +/- 125 Pas, ainsi que du
servo Gaz/Frein THC (Trim direct)de +/- 60 Pas et du
THS (SUB-TRIM) de +/- 125 Pas ne devra pas être
dépassé, car autrement le servo atteindra sa butée
mécanique.
Les modifications du SUB-TRIM n’agissent pas dans
le milieu, mais aussi sur les extrémités de course
(gauche et droite) ; vérifier soigneusement les
positions de point final afin que le servo ne soit pas
bloqué mécaniquement et éventuellement détérioré.
Réglage rapide en Mode direct (Dual-Rate progressif)
TRIM STC Direction-Direct-TRIM
R/B30-0-L/F30Steps„CLEAR“=0
TRIM STC Trim de direction
STC direct. Régler le
décalage désiré du servo de
direction
en pressant la
touche ST.TRIM (2), max. +/
- 30 Pas.
STC
TRIM
L/F
%
5
TRIM
L/F
TRIM
L/F
%
I 0,6
c54
V
10,6 v
Tension de serice de
la batterie d’émission
C54
Canal de fréquence réglé
dans l’émetteur
Affichage de base sur l’écran
Affichage direct Trim STC (Servo de direction)
TRIM THC Gas/Brems-Direkt-TRIM
R/B60-0-L/F60Steps„CLEAR“=0
TRIM
THC Trim Gaz/Frein
direct. Régler le décalage
désiré du servo Gaz/Frein
en
pressant la touche TH.TRIM
(1), max. +/- 60 Pas.
THCX
EXP
TRIM
L/F
%
TRIM
56
R/B
TRIM
L/F
%
I 0,6
c54
V
10,6 v
T ension de serice dela
batterie d’émission
C54
Canal de fréquence réglé
dans l’émetteur
Affichage de base sur l’écran
Affichage direct Trim THC (Servo Gaz/Frein)

67
Réglage rapide en Mode direct (Dual-Rate progressif)
Le Mode Direct-Rate est accessible par l’utilisation des
touches à bascule électroniques A et B sur la partie
supérieure de la poignée de l’émetteur pour le frein et la
direction.
Cette fonction permet un ‘’Réglage rapide’’ du
débattement de la direction (Taux) avec la touche à
bascule B et de la course du frein avec la touche à
bascule A, sans presser l’une des 4 touches de fonction.
La valeur maximum de cette course de direction STM
pourra être pré-réglée de 0 – 125% dans le menu
Réglage en tant que course de base de la direction
avec les touches INC+ ou DEC- .
Cette valeur pré-réglée dans le menu STM avec INC+
et DEC- (Course Master) ne pourra pas être dépassée
avec la touche à bascule B, mais réduite jusqu’à 40%.
La valeur maximum de la course du frein EPA TH R/B
pourra être pré-réglée de 0 – 125% comme course de
base dans le menu Réglage avec les touches INC+ ou
DEC- .
Cette valeur pré-réglée dans le menu EPA TH R/B
(Course de base) ne pourra pas être dépassée avec la
touche à bascule A, mais réduite jusqu’à ‘’0’’
(Seulement possible lorsque la touche A ne sera pas
utilisée comme AUX).
Attention : Lorsque EP A TH est réduit sur ‘’0’’ , le Mode
direct EPA BRK ne fonctionne pas !
En actionnant la touche à bascule A dans le menu EPA
BRK , un réglage rapide et une adaptation de l’efficacité
du frein en fonction des nécessités de la course sont
possibles durant le parcours.
Explication : Un servo de frein séparé est utilisé de
préférence dans les gros modèles, lorsqu’une puissance
de freinage indépendante sur les roues avant et arrière
est désirée.
Un réglage rapide de l’efficacité du frein EPA BRK
durant le fonctionnement (Dual-Rate progressif) est
possible en actionnant la touche à bascule A .
Attention : Lorsque EPA TH est réduit sur ‘’0’’ , EPA
BRK ne fonctionne pas !
RATE
XP
TRIM
Touche à bascule A Touche à bascule B
Réglage rapide de la course de direction durant
le fonctionnement (Dual-Rate progressif) par
l’actionnement de la touche à bascule B.
M
RATE
EXP
TRIM
L/F
EP
EPA TH
Point final du
servo de frein EPA TH.
Presser la gâchette du frein et
régler la course max désirée
dans le menu
Réglage avec INC+ ou DEC-
I25
RATETRIM
TH
EPA
EPA TH Course de frein max.
EPA TH 0-125 „ENTER“=100
R/B
EXP
La fonction AUX linéaire ‘’LN’’ (Servo linéaire 3) n’est
possible que lorsqu’elle a été préalablement
sélectionnée dans le Mode Système avec les touches
INC+ ou DEC-
Réglage du servo de frein EPA BRK
Servo 3 AUX 2P en tant que servo à deux positions
1. Sélection : Activer AUX 2P dans le Mode Système
AUX (Fonction du servo 3 sur deux positions)
avec les touches INC+ ou DEC-.
2. Sélection de la touche ‘’A’’ ou ‘’C’ ’ : La touche ‘’C’’
pourra être sélectionnée dans le Mode Système
GBC 2P avec les touches INC+ ou DEC- pour la
fonction du servo sur 2 positions.
3. Si le Mode Système GBC n’est pas réglé sur 2P, la
touche ‘’A’’ sera automatiquement activée pour la
fonction du servo sur 2 positions.
Servo 3 AUX course Propportionnelle
-125/ +125 de EPA AUX 0-190
AUX
Commande proporti-
onnelle du Servo 3 AUX en
actionnant la touche à bascule A. Attention : Seulement
possible lorsque EPA AUX
n’est pas sur ’’0’’.
AUXX
EXP
TRIM
L/F
I25
Servo 3 AUX LN en tant que servo linéaire
RATE STM Master-Lenkweg
0%-125%„CLEAR“=100%
RATE STM Course de base
de la direction. En actionnant
les touches INC+ ou DEC-, la
course de base est pré-réglée
dans le menu Réglage
STM
TRIM
L/F
%
95
%
RATE
RATE STG Rate-Lenkweg
40%-100% vom Master-Weg
RATE STG
Réduction de
course de la direction. En
actionnant la touche à bascule
B, la course est réduite
progressivement de 40 –
100% de la course Master.
STGX
EXP
TRIM
L/F
%
RATE
45
%
EPA BRK
Efficacité de frein nécessaire
EPA BRK 0-125„ENTER“=1/2TH
L/F
R/B
MI
RATE
EXP
TRIM
EP
EPA BRK
régler l’efficacité
de freinage désirée (Servo de
frein) en marche avec R/B la
touche à bascule A.
RATETRIM
L/F
R/B
BRK
EPA
95
R/B
Touche à bascule C

68
Fonction AUX du servo 3 par la touche à bascule A (Mode Système)
L/F
RATE
EXP
TRIM
L/F
R/B
%
V
REV . NORM
L/F
R/B
RATE
EXP
TRIM
L/F
%
V
La fonction AUX Servo 3 permet de
sélectionner quelle action aura la touche à
bascule à 2 sens A
Avec la sélection de la fonction ‘’0’’, la voie 3 sera
seulement commandée par le système de mixage ‘’MIX’’.
Lorsque les fonctions MIX sont réglées sur ‘’0’’ , la voie
3 n’a aucune fonction !
Avec la sélection de la fonction ‘’2P’’ , la voie 3 est
actionnée par la touche ‘’A’’ comme fonction à 2
positions ; le servo s’arrête seulement sur les 2 fins de
course !
Avec la sélection de la fonction ‘’LN’’, la voie 3 est
commandée linéairement par la touche ‘’A’’.
Attention : Les valeurs programmées seront
transmises dans le Mode Système seulement par une
courte commutation COUPE/CONTACT de l’émetteur.
RATE
EXP
TRIM
L/F
R/B
REV .
L/F
LN
AUX
RATE
EXP
TRIM
L/F
Indications de l’affichage AUX dans le Mode
Système
0
AUXX
M
RATE
EXP
TRIM
L/F
R/B
%
EP
R/B
AUX
2P
RATE
EXP
TRIM
L/F
R/B
Touche à bascule à 2 sens ‘’A’’ décommutée. Commande du servo 3
uniquement par la fonction MIX Gaz/
Frein et/ou la fonction de direction.
La touche à bascule à 2 sens ‘’A’’
commande le Servo 3 sur ses fins de
course en tant que fonction spéciale.
La touche à bascule à 2 sens ‘’A’’
commande le Servo 3 linéairement
sur une position désirée de sa
course.
Gâchette Gaz/Frein
Pour accéder à la fonction AUX dans le Mode
Système, procéder comme suit :
1. Accéder à la mémoire de modèle préalablement
sélectionnée dans le
Mode Système en pressant la
touche MODE et en mettant l’émetteur en contact.
2. Sélectionner le menu AUX (Servo 3) par plusieurs
pressions sur la touche MODE.
3. Sélectionner la fonction de servo désirée avec les
touches INC+ ou DEC-: LN (linéaire), 2P (2 positions)
ou 0 (Fonction de mixage pour frein).
4. Les paramètres réglés seront transmis dans la
mémoire de modèle sélectionnée par une courte
commutation COUPE/CONT ACT de l’émetteur .
L/F
R/B
%
V
REV . NORM
RATE
EXP
TRIM
L/F
R/B
%
V
REV . NORM
RATE
EXP
TRIM
R/B
%
V
REV . NORM
M
RATE
EXP
TRIM
L/F
R/B
%
V
EP
MI
RATE
EXP
TRIM
L/F
%
V
REV . NORM
EP
RATE
EXP
TRIM
L/F
R/B
%
V
REV . NORM
AUX 0
Touche ‘’A’’ sans
fonction. Servo 3 commandé par
Mix dans le mode Réglage avec
la gâchette Gaz/Frein et/ou la
fonction de direction.
AUX 2P
Servo 3 commandé
par la touche à 2 sens ‘’A’’/’’C’’
sur 2 positions.
Le servo 3 pourra être influencé
par MIX dans le mode Réglage
avec la gâchette Gaz/Frein et/
ou la fonction de direction.
AUX LN
Servo 3 commandé
par la touche à 2 sens ‘’A’’
comme servo linéaire. Le servo
3 pourra être influencé par MIX
dans le mode Réglage avec la
gâchette Gaz/Frein et/ou la
fonction de direction.

69
Touche à bascule B
Un réglage rapide de la course de la direction durant le
fonctionnement (Dual-Rate progressif) en actionnant
la touche à bascule B permet de réduire l’amplitude du
débattement (RA TE STG). Cette valeur de réglage (Mul-
ti-Rate) pourra être réduite de 125% jusqu’à 50% selon
les nécessités en course.
La valeur de base de la course du servo de direction
devra être pré-réglée dans le menu Réglage EPA ST !
La valeur est fixée sur 100% dans ce menu à la livraison
de l’émetteur, elle pourra cependant être augmentée ou
réduite entre 125% jusqu’à 0%.
La fonction rapide Direct-RATE STG sera automa-
tiquement appelée en actionnant la touche à bascule
B et permettra par cette dernière une adaptation rapide
directe de la course de la direction (Dual-Rate
progressif) aux nécessités du parcours durant la course.
Fonction Dual-Rate du volant de direction, touche à bascule B
2. L’amplitude nécessaire de la course du servo de
direction RATE STG (Multi-Rate) est rapidement et
progressivement réglable durant la course avec la
touche à bascule B.
Cette amplitude est calculée sur les fins de course du
servo réglées dans le menu Réglage EPA ST dans
lequel la course de base sera pré-sélectionnée avec
les touches INC+ ou DEC-.
3. Après avoir relâché la touche à bascule B, l’émetteur
revient automatiquement environ 2 secondes plus tard
sur l’affichage de base.
EEPA ST Fins de course servo de direction
L/F R/B 0-125, ‘’CLEAR’’ = 100
EPA ST Fins de course du
sero de direction L/F et R/B.
Régler séparément R/B les
fins de course gauche et
droite dans le menu Réglage
avec les touches INC+ ou
DEC-.
%
RATE STG Taux de course de direction
50 – 125% Fins de course servo de direction
RATE STG
Taux de course
de direction. Réglage rapide
(Multirate) de 50 – 125% des
fins de course du servo de
direction EPA ST par la touche
à bascule B.
STGX
EXP
TRIM
L/F
%
RATE
85
%
Indication de l’affichage après avoir actionné
la touche à bascule B
Pré-réglage de la course du servo de direction
EPA ST
1. La course maximale du servo de direction EPA ST devra
avant tout être adaptée au modèle. L ’adaptation se fait
dans le menu Réglage EPA ST.
2. Mettre l’émetteur en contact, sélectionner le point de
menu EPA ST, EPA TH ou EPA AUX par plusieurs
pressions sur la touche MODE.
3. Sélectionner le menu EPA ST pour le servo de direction
avec la touche CHANNEL.
4. Adapter la course du servo de direction au modèle avec
les touches INC+ ou DEC-.
1. Mettre l’émetteur en contact, en actionnant la touche
à bascule B le menu RATE STG (Dual-Rate progressif)
sera automatiquement activé et visible sur l’affichage.
ST
TRIM
L/F
EPA
I25
L/F
R/B
RATE STG Taux de course de direction
50 – 125% Fins de course servo de direction
RATE STG
Taux de
course de direction Réglage
rapide progressif (Multirate) de
50 - 125% des fins de course
du servo de direction en actionnant la touche à bascule B.
STGX
EXP
TRIM
L/F
%
85
%
%
Réglage rapide progressif
Indication de l’affichage EPA ST dans le menu
Réglage
Réglage rapide progressif RATE STG
TRIM
L/F
%
RATE

70
GBC - Définition de la touche momentanée, Mode Système (Mode Set-up)
Dans le Mode Système (Mode Set-up), il existe la
possibilité de définir la fonction de la touche
momentanée ‘’C’’ qui permettra au pilote d’actionner
confortablement avec le pouce l’une des 3 fonctions
de base possibles.
GBC ‘’LA’’ = Chronomètre/Compte-tours
La touche momentanée ‘’C’’ fonctionne maintenant
automatiquement. Le chronomètre fonctionne lorsque LAP
clignote. Les temps au tour (3 – 99,9 s) seront
automatiquement mémorisés. En pressant plusieurs fois
la touche MODE, le menu LAP (Menu du compte-tours)
sera visible sur l’affichage (LAP clignote) . Les temps au
tour seront indiqués en dixièmes de seconde sur la ligne
supérieure et le nombre de tours sur la ligne inférieure.
Arrêt du chronomètre en pressant simultanément les
touches INC+ et DEC- (CLEAR) ou automatiquement
après 50 tours. Les différents temps au tour (max. 50)
pourront être appelés avec les touches INC+ ou DEC- et
lus sur l’affichage.
Effacement des temps au tour : En pressant simultanément
les touches INC+ et DEC- (CLEAR) dans le menu LAP
avec le chronomètre arrêté, tous les temps au tour seront
effacés.
Avec un nouveau départ du compte-tours, les anciens tours
(les tours non effacés) sont précédés du signe moins (-).
Remarque :Lorsque la mesure du temps au tour de 3 –
9,99 s a été dépassée, l’affichage indique OVR (Over run).
Le temps de fermeture est de 3 s. , les trop petits temps
au tour ne sont pas pris en compte.
Touche momentanée C (Sélection LA/Eb)
LA
GBC
RATE
EXP
TRIM
L/F
R/B
%
V
„LA“: Chronomètre compte-
tours (LAP Timer) . Permet de
compter les temps au tour de
3 – 99,9 s (en dixièmes
de secondes) et les tours 1 –
50.
Remarque :Les temps au tour sont seulement lisibles
lorsque le chronomètre est arrêté. Pour cela, presser
simultanément les touches INC+ et DEC- (CLEAR) afin
que le symbole du Timer LAP ne clignote plus !
Avec le chronomètre en marche, seuls les temps au tour
actuels sont indiqués !
Le tour désiré pourra être sélectionné avec les touches
INC+ ou DEC- et le temps au tour pourra être lu sur
l’affichage. L’indication est en dixième de seconde, par
ex. 226 = 22,6 sec.
Eb
GBC
RATE
EXP
TRIM
L/F
R/B
%
V
„Eb“: Course de direction
maximale, (Emergency
Steering Button). La
réduction de course RATE
STG sera automatiquement
commutée sur RATE STM en
pressant la touche ‘’C’’.
„0“/(„2P“): Touche C sans
fonction (Réglage d’usine) .
Lorsque AUX est réglée sur
‘’2P’’, cet af fichage apparaît à
la place de ‘’0’’ sur l’écran et
la touche ‘’C’’ sera utilisée
pour commander le servo 3
sur 2 positions.
I I0
GBC
RATE
EXP
TRIM
L/F
R/B
%
V
Fonctionnement du Chronomètre/Compte
tours ‘’LA’’
1. Le Chronomètre (LAP Timer) sera activé en pressant
la touche momentanée ‘’C’’ et son fonctionnement
sera indiqué par le clignotement de ‘’LAP’’ sur
l’affichage.
2. A partir de la deuxième pression sur la touche
momentanée ‘’C’’ les temps au tour (en dixièmes de
seconde) et le nombre de tours seront mémorisés.
3. Avec la touche MODE, on pourra afficher le
chronomètre et lire le nombre actuel de tours et le
temps au tour.
4. Les anciens temps au tour pourront être lus avec INC+
et DEC-, seulement lorsque le chronomètre est arrêté
(LAP ne clignote plus sur l’affichage).
5. Le Chronomètre en marche pourra être arrêté avec
‘’CLEAR’’ ou tous les temps au tour pourront être
effacés avec le compte-tours arrêté . Ils seront re-
démarrés avec la touche ‘’C’’.
6. Lorsque le compte-tours sera arrêté et re-démarré,
les tours préalablement mémorisés seront désignés
par le signe moins (-).
3
226
RATE
EXP
TRIM
L/F
R/B
%
V
LAP
Temps au tour 22,6 s
Tour 3
Touche momentanée ‘’C’’

71
GBC ‘’Eb’’ Emergency Steering Button
(Touche momentanée de sécurité)
‘’2P’’ = Fonction sur 2 positions du servo 3
GBC - Définition de la touche momentanée, Mode Système (Mode Set-up)
Par la sélection de la fonction momentanée de
sécurité dans le menu GBC ‘’Eb’’, il existe la
possibilité de déclencher une fonction de
sécurité avec la touche momentanée ‘’C’’.
Eb
GBC
RATE
EXP
TRIM
L/F
R/B
%
V
„Eb“: Course de direction
maximale(Emergency Stee-
ring Button). Le taux de reduction STG sera automa-
tiquement commuté sur RATE
STM en pressant la touche
‘’C’’.
La fonction GBC ‘’Eb’’ prélève des réductions de
course réglées dans le menu RATE STG et les
commute automatiquement dans le menu RATE STM
Master (Course de base de direction), tant que la
touche momentanée ‘’C’’ est maintenue pressée
avec le pouce.
Cette commutation empêche dans certaines
circonstances un crash ou une sortie de virage et permet
après un erreur de conduite de rapides corrections
de trajectoire avec un débattement extrême de la
direction.
La fonction sur 2 positions du servo 3 est seulement
active lorsque la fonction AUX ‘’2P’’ a été
préalablement réglée dans le menu Servo 3 AUX (Mode
Système) avec les touches INC+ ou DEC-.
Accéder au menu GBC en pressant une seule fois la
touche MODE. Sélectionner ensuite le menu GBC ‘’2P’’
en pressant plusieurs fois la touche INC+. Après une
commutation COUPE/CONTACT, le menu GBC ‘’2P’’
est activé et le servo 3 pourra être commandé sur les
deux fins de course programmées avec la touche ‘’C’’.
AUX „2P“: Lorsque AUX est
réglée sur ‘’2P’’, cet afficage
apparaît sur l’écran à la place
de ‘’0’’ et la touche ‘’C’’ est
utilisée pour commander le
servo 3 sur ses 2 positions.
2P
AUX
RATE
EXP
TRIM
R/B
Fonction GBC ‘’Eb’’ Emergency, Steering Button (Touche momentanée de sécurité)
1. Accéder au Mode Système en pressant la touche
MODE et en mettant l’émetteur en contact.
2. Accéder au menu GBC en pressant plusieurs fois la
touche MODE.
3. Activer le Mode-Sécurité GBC ‘’Eb’’ dans le menu
GBC avec les touches INC+ ou DEC- .
4. Par une courte commutation COUPE/CONTACT de
l’émetteur, la touche momentanée de sécurité est
mémorisée.
5. En maintenant la touche momentanée ‘’C’’ pressée
avec le pouce, la plus faible course du servo de
direction réglée dans le menu RATE STG sera ignorée
et la commutation se fera automatiquement sur la plus
grande course réglée dans Master RATE STM.
Fonctionnement GBC ‘’2P’’ = Servo 3 sur 2
positions
1. Accéder au Mode Système en pressant la touche
MODE et en mettant l’émetteur en contact.
2. Accéder au menu AUX Servo 3 avec la touche MODE.
3. Sélectionner la fonction AUX 2P en pressant la touche
INC+.
4. Presser une seule fois la touche MODE pour accéder
au menu Sélection touche momentanée GBC.
5. Commuter l’émetteur COUPE/CONTACT pour
mémoriser la configuration de la touche GBC 2P.
GBC ‘’0’’ = Touche ‘’C’’ coupée (Réglage
d’usine)
GBC „0“: TTouche ‘’C’’sans
fonction (Réglage d’usine)
I I0
GBC
RATE
EXP
TRIM
L/F
R/B
%
V
GBC „2P“: Touche
momentanée ‘’C’’ pour
activer le Servo 3 sur 2
points.
I I2P
GBC
RATE
EXP
TRIM
L/F
R/B
V
Touche momentanée ‘’C’’

72
REV
MD3
RATE
EXP
TRIM
R/B
%
V
STX
RATE
EXP
TRIM
L/F
RR/B/
%
I II0,6
RATE
EXP
TRIM
L/F
R/B
%
V
REV . NORM
RATETRIM
L/F
R/B
%
V
REV . NORM
RATE
EXP
TRIM
L/F
R/B
I I0
STS
RATE
EXP
TRIM
R/B V
RATE
EXP
L/F
R/B
%
V
ST
RATE
EXP
TRIM
L/F
R/B
%
V
RATE
EXP
TRIM
L/F
R/B
%
V
REV . NORM
RATE
EXP
TRIM
L/F
R/B
%
V
REV
I00
.
NORM
I I
STM
RATE
EXP
TRIM
L/F
R/B
%
V
RATETRIM
R/B
%
V
REV . NORM
RATETRIM
L/F
R/B
%
V
REV . NORM
I I8
RATE
EXP
TRIM
L/F
R/B
%
V
MODE
MODE
MODE
MODE
MODE
RATE
EXP
TRIM
L/F
R/B
%
V
Diagramme de déroulement du Menu Réglage
CHANNEL
EPA
L/F
V
TH
R/B
EPA
I
C54
MIX
V
6
STL
MIX
%
5
THS
TRIM
TH
-
EXP
THF
%
AUX
EPA
AUS
TRIM
%
AUX
RATE
%
2
THB
EXP
%
-
TRIM
REV.NORM
L/F
L/F
R/B
I00 I00
-
I II0,6
I00
REV.NORM
REV.NORM
-
CHANNEL
CHANNEL
CHANNEL
CHANNEL
CHANNEL
CHANNEL
THB
MIX
GAS
BREMSE
CHANNEL
CHANNEL
CHANNEL
GAS / F
BREMSE / R
L/F
L/F
25
75
STEUER-R
STR
THF
MIX
35
%
%
Pour accéder au menu Réglage, mettre l’émetteur en
contact. Presser ensuite la touche MODE. L’affichage
s’échange dans le menu Réglage, comme il est visible sur
le diagramme de déroulement. La fonction désirée pourra
être sélectionnée et réglée en pressant la touche MODE.
Affichage normal après la mise en contact
Fin de course avant (F) Frein (B)
0 à 125 ‘’CLEAR’’ = 100
Réglage fin de course g/d
0 à 125 ‘’CLEAR’’ = 100
Fin de course d’un côté voie 3
0 à 190 ‘’CLEAR’’ = 100
Réglage Sub-trim Gaz
125-0-L/F 125 ‘’CL’ ’ = 0
Com. Re. Gaz
REVERSE-NORMAL
Com. Re. voie 3
REVERSE-NORMAL
Réglage Sub-trim
Direction
Com. Rev. Direction
REVERSE-NORMAL
STM Servo direction
Course de base
EXPST
Direction Expo.
Réglage Exponentiel Frein
-100% (mild)-LN-100%(quick)
Réglage Expo. Gaz avant
-100% (mild)-LN-100%(quick)
Direction gauche
voie 3 Mix adj.
Direction droite voie 3 Mix adj.
-125%-0%-125%, CLEAR = 0%
Gaz avant voie 3 Mix adj.
-125%-0%-125%, CLEAR = 0%
B Frein/Gaz voie 3 Mix adj.
-125%-0%-125%, CLEAR= 0%
Réglage Sub-trim voie 3
125-0-L/F 125 ‘’CL’ ’ = 0
AUX = voie 3
RATE STM Réglage course de base du servo de
direction pour utilisation normale.
MODE
ST
RATE
EXP
TRIM
L/F
R/B
%
V
REV . NORM
LN
EXP
EXP
TRIM
L/F
R/B
TDB
RATE
EXP
TRIM
L/F
R/B
%
V
REV . NORM
0
MODE
%
L/F
TDB Gaz/Frein
Red. T odband
TDB Frein réduction Bande morte 0 – 100%, CLEAR
= 0% (LF) avant ou (RB) Frein dépendant de la position
momentanée de la gâchette de commande Gaz/Frein.

73
Accéder dans le Mode Réglage en pressant la touche
MODE. En pressant plusieurs fois cette même touche,
sélectionner le menu EPA pour le réglage des fins de
course.
Réglage des fins de course des servos (Menu Réglage)
Le point de menu EPA Réglage des fins de course
des servos permet d’augmenter ou de diminuer le
débattement maximal de chaque servo pour la direction,
les gaz et le frein ainsi que pour la fonction 3 ; un réglage
séparé dans chaque sens est possible.
Grâce à ce réglage des fins de course, le débattement
nécessaire de chaque servo sera adapté aux nécessités
du modèle.
La plage de réglage est de 0% à 125% . Le réglage
effectué en usine est de 100% pour les deux sens de
course.
Le sens de réglage indiqué sur l’affichage dépend de la
position de chaque organe de commande (Volant de
direction, gâchette Gaz/Frein, Fonction 3).
EPA AUX
Mettre le servo 3
sur la fin de coursedroite
désirée à l’aide des touches
‘’A’’/’’C’’ et/ou par les fonctions
de mixage ‘’MIX’’ et la régler
avec INC+ ou DEC- .
Accès au menu de réglage des fins de course
de servo
1. Mettre l’émetteur en contact pour accéder au menu
Fonctions.
2. Presser la touche MODE jusqu’à ce que le menu de
réglage des fins de course de servo EPA apparaisse
sur l’affichage.
3. Avec la touche CHANNEL , sélectionner une Fonction
ST (Steering) nécessaire pour le réglage du volant de
direction, ou TH (Throttle) pour la gâchette Gaz/Frein,
ou encore AUX (Voie auxilliaire) pour la fonction du
servo 3.
4. Placer l’organe de commande sélectionné dans la
position à régler (Gauche/droite, avant/arrière ou frein)
. Régler alors l’une des fins de course désirées avec
les touches INC+ ou DEC- .Déplacer ensuite l’organe
de commande dans le sens opposé et régler de même
l’autre fin de course du servo.
5. Commuter brièvement l’émetteur COUPE/CONTACT
pour mémoriser les valeurs réglées et pour quitter le
menu de réglage des fins de course EPA avec le
retour à l’affichage de base.
Remarque : Lors du réglage du débattement pour la
fonction de direction, veiller si possible à régler
l’amplitude de la course du servo égale dans les deux
sens (à gauche comme à droite) pour l’obtention de
caractéristiques de tenue de route conformes.
EPA AUX
Mettre le servo 3
sur la fin de courseauche
désirée à l’aide des touches
‘’A’’/’’C’’ et/ou par les fonctions
de mixage ‘’MIX’’ et la régler
avec INC+ ou DEC- .
AUX
EPA
R/B
I00
AUX
EPA
I00
L/F
Indication de l’affichage après la mise en contact de
l’émetteur
Fin de course gauche du Servo 3 EPA
0 à 190 ‘’CLEAR’’ = 100
Fin de course droite du Servo 3 EP A
0 à 190 ‘’CLEAR’’ = 100
C54
RATE
EXP
TRIM
I II0,6
V
%
V
REV . NORM
%
V
REV . NORM
%
V
Affichage des réglages sur les fins de course
Fin de course gauche du servo de direction EPA
0 à 125, ‘’CLEAR’’ = 100
Fin de course du servo de gaz marche avant EPA
0 à 125, ‘’CLEAR’’ = 100
L/F
R/B
RATE
EXP
TRIM
M
RATE
EXP
TRIM
L/F
EP
MI
RATE
EXP
TRIM
EP
EPA ST
ourner le volant vers
la gauche L/F (Direction à
gauche) et régler la fin de
course désirée du servo avec
INC ou DEC-.
EPA ST
Tourner le volant vers
la droite R/B (Direction à droite)
et régler la fin de course désirée
du servo avec INC ou DEC-.
EPA TH
Tirer la gâchette
Gaz/Frein L/F (Marche avant) et
régler la fin de course désirée
du servo pour plein gaz avec
INC+ ou DEC-
EPA TH
Presser la gâchette
Gaz/Frein R/B (Frein) et régler
la fin de course désirée du
servo pour la marche arrière et
le frein avec INC+ ou DEC-.
RATETRIM
L/F
R/B
TH
R/B
EPA
I00
RATETRIM
L/F
R/B
TH
EPA
L/F
I00
STX
RATE
EXP
TRIM
L/F
RR/B/
%
EPA
I00
STX
RATE
EXP
TRIM
L/F
%
EPA
L/F
I00
Fin de course droitedu servo de direction EP A
0 à 125, ‘’CLEAR’’ = 100
Fin de course du servo de frein EPA
0 à 125, ‘’CLEAR’’ = 100
10,6 v
ension de service de
la batterie d’émission
C54
Canal de fréquence réglé
dans l’émetteur

74
%
V
REV . NORM
1. Mettre l’émetteur en contact pour accéder au menu
Réglage .
2. Presser la touche MODE jusqu’à ce que le menu MIX
STL/MIX STR apparaisse sur l’affichage.
3. En pressant plusieurs fois la touche CHANNEL et en
tournant simultanément le volant de direction à
gauche et à droite, régler la fonction MIX STL ou MIX
STR ou en actionnant la gâchette Gaz/Frein,
sélectionner MIX TFH ou MIX THB.
4. Placer l’organe de commande dans le sens à régler
(gauche/droite, avant/arrière ou frein). Régler alors la
valeur de mixage désirée du servo 3 avec INC+ ou
DEC-. Déplacer l’organe dans chaque sens opposé
et régler également l’autre côté de la course du servo.
5. Commuter brièvement l’émetteur COUPE/CONTACT
pour mémoriser les valeurs réglées et pour quitter le
menu Réglage avec le retour à l’affichage de base.
Réglage MIX pour le Servo 3 (Menu Réglage)
MIX-Gaz/Frein: MIX THF / MIX THB
Cette fonction permet une influence de la commande
Gaz/Frein sur le servo 3 . Exemple : pour un freinage
séparé sur les roues avant et arrière.
Explication : Un servo de frein séparé est utilisé de
préférence sur les gros modèles, lorsqu’une puissance
de freinage différente sur les roues
avant et arrière est désirée.
MIX Direction à gauche/Servo 3
-125%-0%-+125%,’’CLEAR’’ = 0%
MIX Direction à droite/Servo 3
-125%-0%-+125%,’’CLEAR’’ = 0%
RATE
EXP
TRIM
MIX STL
Tourner le volant
de direction vers la gauche
(Direction à gauche) et régler
la valeur de mixage désirée
avec INC+ ou DEC-
MIX STR
Tourner le volant
de direction vers la droite
(Direction à droite) et régler la
valeur de mixage désirée avec
INC+ ou DEC-.
STRX
RATE
EXP
TRIM
L/F
%
MIX
35
STLX
RATE
EXP
TRIM
L/F
%
MIX
33
Le volant de direction et l’organe de commande des
gaz peuvent être réglés comme fonction de mixage
agissant sur le Servo 3 dans le Menu Mix. La proportion
de mixage ainsi que l’Offset peuvent être réglés et
programmés séparément pour chaque organe.
MIX-Direction : MIX STL / MIX STR
Cette fonction permet une influence sur le servo 3 par
la direction.
%
%
Fonction de mixage de la Voie 3
%
V
REV . NORM
%
V
L/F
R/B
M
RATE
EXP
TRIM
L/F
EP
MI
RATE
EXP
TRIM
EP
MIX THF
Tirer la gâchette
des gaz (en avant) et régler la
valeur de mixage désirée pour
plein gaz avec INC+ ou DEC-
MIX THB
Presser la
gâchette du frein et régler la
valeur de mixage désirée pour
la marche arrière et le frein
avec INC+ ou DEC-.
RATETRIM
L/F
R/B
THB
MIX
I05
RATETRIM
L/F
R/B
THF
MIX
0
MIX Gaz en avant-Servo 3
-125%-0%-+125%,’’CLEAR’’ = 0%
%
%
MIX Gaz en arrière-Servo 3
-125%-0%-+125%,’’CLEAR’’ = 0%
MIX Gaz/Frein-Servo 3 (Menu Réglage)
Remarque: Avec l’utilisation de la fonction MIXServo 3, une commande 2P n’est pas significative.
La fonction AUX 3 sera réglée sur ‘’0’’ ou sur ‘’LN’’
dans le Mode Système.
Accès au menu de réglage Mix-Servo 3
TBD - Réglage de la bande morte de la gâchette
Gaz/Frein
La réduction de la bande morte sera utilisée pour
réduire/augmenter la ‘’Plage morte’’ (Jeu dans la
tringlerie Gaz/Frein) entre le point neutre et le point de
départ des gaz et du frein.
Cette plage est connue comme ‘’Plage morte’’. Lorsque
davantage de trim de gaz sera utilisé (connu aussi
comme frein statique), il existera aussi davantage de
plage morte sur la gâchette, à droite du neutre.
Fixer la valeur en marche avant de façon à ce que les
pneus de la voiture R/C se mettent en ligne droite
lorsqu’on actionne un peu la gâchette de gaz.
Fixer la valeur du freinage de façon à ce les plaquettes
touchent juste le disque de frein en actionnant un peu
la gâchette Gaz/Frein.
TDB
RATE
EXP
TRIM
L/F
R/B
%
V
REV . NORM
0
%
L/F
TDB Réduction de la bande morte
Gaz/Frein 0 – 100% ‘’CLEAR’’ = 0%
(‘’L/F’’) marche avant ou (‘’RB’’)
Frein, selon la position
momentanée de la gâchette Gaz/
Frein

75
REV-NORM TH
Inversion du
sens de course du servo
Gaz/Frein. Sélectionner le
sens désiré avec les touches
INC+ ou DEC-.
Mode SUB-TRIM (Menu Réglage)
Remarques :
Le point de menu SUB-TRIM dans le menu Réglage
permet un confortable décalage électronique du
neutre des servos de direction, de gaz et AUX (Servo
3), sans que la plage des touches de trim pour la
direction et la fonction des gaz ne soit touchée ni
limitée.
La plage de réglage réservée des touches de trim direct
ne sera pas influencée par la fonction SUB-TRIM.
Cette fonction SUB-TRIM est très utile. Elle permet un
réglage précis du neutre des différents servos, sans
qu’une intervention mécanique dans le modèle soit
nécessaire.
Il conviendra cependant de n’effectuer que de ‘’petites’’
corrections de trim (Jusqu’à 30 Pas), car autrement il
se produira des courses de servo inégales indésirables.
Lorsqu’un décalage de plus de +/- 30 Pas sera
nécessaire, un réglage ‘’mécanique’’ devra être
effectué.
Servo-Reverse AUX Servo 3
REV-NORM
L/F
R/B
MI
RATE
EXP
TRIM
EP
REV-NORM AUX
Inversion
su sens de course du servo
3. Sélectionner le sen désiré
avec les touches INC+ ou
DEC-.
RATETRIM
L/F
R/B
AUX
Sens de course des servos (Sero-Reverse)
Mettre l’émetteur en contact pour accéder au menu ServoReverse, presser plusieurs fois la touche MODE jusqu’à ce
que le menu REV-NORM ST apparaisse sur l’affichage.
Sélectionner le fonction de servo désirée ST, TH, ou AUX
avec la touche CHANNEL.
Servo-Reverse ST Direction
REV-NORM
REV-NORM ST Inversion du
sens de course du servo de
direction. Sélectionner le
sens désiré avec les touches
INC+ ou DEC-.
ST
TRIM
L/F
%
Servo-Reverse TH Gaz/Frein
REV-NORM
-
REV -NORM
-
REV -NORM
THX
EXP
TRIM
L/F
%
REV -NORM
-
Accès au menu Servo-Reverse
Pour accéder au menu Servo-Reverse, procéder
comme suit:
1. Mettre l’émetteur en contact
.
2. Presser plusieurs fois la touche MODE jusqu’à ce
que le menu de réglage REV-NORM TH apparaisse
sur l’affichage.
3. Sélectionner le fonction de servo désirée ST
(Direction), TH (Gaz/Frein) ou AUX (Servo 3) avec la
touche CHANNEL.
4. Régler le sens de course désiré (REV-NORM) avec
les touches INC+ ou DEC-.
Explication :
Le point de menu Sens de course des servos est une
disposition très utile lorsqu’on réalise un nouveau
modèle. Le sens de la course de chaque servo peut
être accordé avec le sens de déplacement de l’organe
correspondant sur l’émetteur. La fonction Servo-
Reverse est à disposition sur les voies de direction, de
Gaz/Frein et AUX (Servo 3).
Mettre l’émetteur en contact pour accéder au menu SUB-TRIM,
presser plusieurs fois la touche MODE jusqu’à ce que le menu
TRIM STS apparaisse sur l’affichage. Sélectionner la fonction
désirée STS, THS ou AUS avec la touche CHANNEL.
TRIM AUS SUB-TRIM Servo 3
125-0-125,’’CLEAR’’ = 0
L/F
R/B
MI
RATE
EXP
TRIM
EP
TRIM AUX SUB-TRIM Servo
3. En actionnant les touches
INC+ ou DEC- régler le décalage du neutre du servo AUX.
Avec AUX 2P (2 positions), le
trim doit être placé sur 0.
RATETRIM
L/F
R/B
AUX
TRIM
95
R/B
SUB-TRIM STS, THS et AUS
TRIM STS, SUB-TRIM Direction
125-0-125,’’CLEAR’’ = 0
TRIM STS SUB-TRIM de di-
rection. En actionnant les
touches INC+ ou DEC- régler
le décalage du neutre de la
direction (-125 - +125 Pas).
STS
TRIM
L/F
%
5
TRIM
L/F
TRIM THS, SUB-TRIM Gaz/Frein
125-0-125,’’CLEAR’’ = 0
TRIM
THS
SUB-TRIM Gaz/
Frein. En actionnant les
touches INC+ ou DEC- régler
le décalage du neutre de la
gâchette Gaz/Frein.
THSX
EXP
TRIM
L/F
%
TRIM
45
R/B

76
Le point de menu Fonction exponentielle EXP ST du
volant de direction permet un pilotage précis du
modèle dans la plage autour de la position neutre, sans
affecter l’amplitude de débattement totale de la direction.
La fonction exponentielle EXP est normalement utilisée
pour affiner la position neutre. Le système XS-6 FM
RACE permet le réglage de la valeur d’Expo dans les
deux sens : positif (+ normal) et négatif (- sensibilité
augmentée de la position neutre).
ST
RATE
EXP
TRIM
L/F
R/B
%
V
REV . NORM
85
EXP
EPX ST Fonction exponenti-
elle du Volant de direction .
Sélectionner la fonction exponentielle désirée (-1% à –
100%) avec les touches INC+
ou DEC-.
EXP ST Fonction exponentielle de direction
-100% LN-100% ,’’CLEAR’’ = LN
%
ST
RATE
EXP
TRIM
L/F
R/B
%
V
REV . NORM
LN
EPX ST
LN
Fonction linéaire
du volant de direction. La caractéristique de la commande
est réglable de sensible –
100% à agressive +100% avec
les touches INC+ ou DEC-.
EXP ST LN Course de commande linéaire
-100% LN-100% ,’’CLEAR’’ = LN
1. Mettre l’émetteur en contact.
2. Presser plusieurs fois la touche MODE jusqu’à ce que
EXP ST apparaisse sur l’affichage.
3. Sélectionner EXP ST avec la touche CHANNEL.
4. Régler la valeur d’exponentiel désirée (-1% à -100%)
avec la touche DEC- pour obtenir une commande
sensible et la position neutre du servo de direction.
5. Une commande agressive pour les virages pourra être
programmée avec la touche INC+, lorsqu’une grande
course pour le milieu du servo de direction est
nécessaire.
6. En pressant simultanément les touches INC+ et DEC, la fonction exponentielle pourra être rapidement
commutée sur linéaire (LN). Le servo de direction
travaillera à nouveau en fonction linéaire.
7. En pressant simultanément les touches MODE et
CHANNEL, ou par une courte commutation COUPE/
CONTACT de l’émetteur, les valeurs réglées seront
transmises dans la mémoire du menu Réglage et
l’écran reviendra sur l’affichage de base.
Fonction exponentielle EXP ST pour le servo de direction (Menu Réglage)
Fonction exponentielle EXP ST du volant de
direction
RATE
EXP
TRIM
L/F
R/B
%
V
EXP
Pré-réglage de la fonction exponentielle

77
Récepteur avec système BEC
Le récepteur SB6 SYN est équipé d’un système de stabilisation en tension de haute qualité (BEC = Battery Elmiminator
Circuitry). L’alimentation du récepteur et des servos qui sont y sont connectés peut se faire par la batterie de propulsion.
Avertissements importants :
Le charge du système BEC devra être limitée: La capacité des batteries de propulsion de 4,8…6 V (4…5 éléments
NiCd ou NiMH) devra être au maximum de 1 Ampère.
Celle des batteries de propulsion de 7,2 V (6 éléments NiCd ou NiMH) au maximum de 0,7 ampère.
Ceci correspond à peu près à la charge pour l’alimentation de deux servos standard, tels que par ex. C507, C508,
C512 ou C577.
Avec l’utilisation de servos puissants de forte consommation, le système BEC ne devra plus être utilisé, car
une surcharge conduira à la destruction immédiate du récepteur et des servos qui sont connectés.
En cas d’utilisation de servos très puissants, par ex. 2 servos digitaux, le système BEC sera dé-commuté en
connectant l’accu de réception sur l’une des sorties de voie (1 –3) du récepteur ; la prise pour l’accu restera
alors libre sur celui-ci.
Exemple de branchement 1 : Variateur de vitesse mécanique avec raccordement BEC
La plupart des voitures électriques avec un variateur de vitesse mécanique sont déjà équipées d’un cordon de
raccordement BEC. Celui-ci est constitué d’un cordon à deux fils avec une prise mâle rouge
à connecter sur le variateur de vitesse. Cette prise pourra être directement reliée à celle pour l’accu sur le récepteur
(Voir le dessin ci-dessous).
Attention : Le récepteur S6B SN est adapté pour une alimentation jusqu’à seulement 7,2 V (6 éléments NiCd ou
NiMH) . Si la voiture est équipée d’une batterie de propulsion d’une plus forte tension, cette prise BEC
à 2 pôles ne devra pas être reliée au récepteur . Dans un tel cas, un accu de réception séparé devra être
utilisé (Voir l’exemple de branchement 3).
Ensemble de réception
(Système BEC, exemple de branchement)
Sélectionner le canal de
fréquence désiré K 50 – K 92
avec un petit tournevis.
Si l’alimentation ne se fait pas par la
batterie de propulsion, le portebatterie fourni avec l’ensemble R/C
pourra être utilisé.
Récepteur
Batterie de propulsion
4,8 … 7,2 V
Variateur de vitesse
mécanique
Interrupteur
Vers le moteur

78
Exemple de branchement 2 : Régulateur de vitesse électronique avec système BEC
La plupart des régulateurs de vitesse électroniques comprennent un système BEC intégré.
Attention: La charge de ce système BEC est également limitée. Comme il a déjà été décrit dans l’exemple de
branchement 1, un accu de réception séparé devra également être utilisé en cas de charge élevée (V oir
l’exemple de branchement 3). Se référer pour cela aux indications données dans les instructions d’utilisation
du régulateur de vitesse.
Exemple de branchement 3 : Accu de réception séparé
Le branchement d’un accu de réception séparé se fait une sortie de voie libre du récepteur. Si toutes les sorties de
voie sont occupées, le branchement se fera par un cordon en V, Réf. N°3936.11 (V oir le dessin ci-dessous). Rien ne
doit être connecté sur la sur la prise pour l’accu sur le récepteur.
Ensemble de réception
Exemples de branchement)
Sélectionner le canal de
fréquence désiré K 50 – K 92
avec un petit tournevis.
Batterie de
propulsion
Régulateur de vitesse
électronique
avec Système BEC
Récepteur
Vers le moteur
Sélectionner le canal de fréquence désiré
K 50 – K 92 avec un petit tournevis.
Accu de
réception
4,8 V
Récepteur
Cordon interrupteur
Réf. N°3934.1
Cordon en V
Réf. N°3936.11

79
Antenne de réception
Le fil d’antenne de réception est directement relié au
récepteur, sa longueur est d’environ 100 cm.
L’antenne doit être disposée en ligne droite et la plus
éloignée possible des moteurs électriques, des
servos, des tringleries métalliques ou des conducteurs
de courant de forte intensité.
Dans les modèles de bateau, l’installation de la
réception doit être effectuée de façon à ce que le
récepteur et l’antenne soient les plus éloignés possible
des moteurs de propulsion, des conducteurs de
courant et des pièces métalliques.
Une antenne fouet d’une longueur libre de 80 à 100
cm est préférable à tout autre genre d’antenne sur
les modèles de bateau.
Les modèles de voiture sont obligatoirement équipés
d’une antenne fouet. Ici, une antenne raccourcie
pourra être utilisée, car une très grande portée n’est
pas indispensable.
Montage des tringleries et des connexions
Par principe, le montage des tringleries de commande
doit être effectué de façon à ce qu’elles puissent se
mouvoir librement et souplement.
Des tringleries et des gouvernes qui forcent entraînent
une consommation de courant plus élevée en
diminuant l’autonomie de vol et au détriment de la
précision de la commande.
Il est particulièrement important que tous les
palonniers puissent se déplacer sur la totalité de la
course du servo, sans être limités mécaniquement.
Ceci est aussi très important pour la commande des
gaz. La position ‘’plein gaz’’ devra être accordée avec
le déplacement du manche de commande, elle ne
devra en aucun cas être limitée par la butée de
l’admission d’air du carburateur , autrement durant les
vols en permanence à plein régime le servo
consommera beaucoup de courant et videra
rapidement l’accu de réception.
Le déplacement du manche sur la position du ralenti
devra de même ne pas être limité par la butée de
l’admission d’air du carburateur.
Annexe
conseils supplémentaires
Antiparasitage des moteurs électriques
Le bon fonctionnement d’une installation R/C dépend
du parfait antiparasitage des moteurs électriques, car
ils génèrent tous des étincelles entre le collecteur et
les balais qui, selon le genre du moteur, perturbent
plus ou moins la réception.
Dans les modèles à propulsion électrique, le moteur
devra être soigneusement antiparasité. Les filtres
antiparasites suppriment efficacement de telles
perturbations et devront absolument être installés. Le
filtre devra être monté le plus près possible du moteur .
Avec l’utilisation de condensateurs antiparasites, se
référer aux instructions d’utilisation du moteur pour le
montage et les types à employer . Dans les installations
comprenant plusieurs moteurs électriques, chaque
moteur devra être antiparasité.
Les condensateurs et les filtres antiparasites se trouvent
dans le catalogue général GRAUPNER FS.
Antiparasitage minimum
Réf. N°3584
Réf. N°3588
Antiparasitage avec filtre
Réf. N°3361 (Jusqu’à 18 A)
Réf. N°3362 (Jusqu’à 36 A)

80
Für Ihre Notizen / For your notes / Pour vos notes

81
Zulässige Betriebsfrequenzen / Approved operating frequencies / Fréquences autorisées
Directive R&TTE 1995/5/EC
Legende, Key to symbols, Légende:
FCB = Alle Modelle, All models, Tous les modèles.
F =
Nur Flugmodelle, Model aircraft only, Seulement pour modéles voulant.
CB =
Nur Auto- und Schiffsmodelle, Model cars and boats only, Seulement pour autos et bateaux.
Der Betrieb der Fernsteueranlage ist nur auf den für das je weilige EU-Land national zugelassenen Frequenz en/Kanälen zulässig. Bitte beachten Sie die jeweilige Gesetzeslage. Das Benutzen der F ernsteueranlage auf davon abw eichenden F requenz en/Kanälen ist verboten.
This radio control system may only be operated legally on the frequency bands and spot frequencies approved f or use in each EU country . Please chec k and observe your national regulations. The use of the radio control system on non-approv ed frequencies is illegal and prohibited.
L’utilisation d’un ensemble de radiocommande doit se faire uniquement dans les fréquences
d’émission autorisées dans chaque Pa ys Européen. La bande des 41 MHz, par ex. est réservée
à la Fr ance (Voir dans le tableau des fréquences en page 27). L’utilisation d’autres fréquences
est interdite. A titre indicatif , le bande des 40 MHz ne sont pas autorisées en F r ance .
!
!
!
!
!
!

82
Zulassung, Konformität / Admission, conformity / Autorisation, conformité.
Sender für das 27- und 40-MHz-Band dürfen anmelde- und gebührenfrei betrieben werden.
Transmitters on the 27 and 40 MHz bands require no registration or licence fee to operate.
Zulassungszertifikat
Approval certificate, Certificat d’autorisation
Konformitätszertifikat
Conformity certificate, Certificate de conformité
Konformitätserklärung
Conformity declaration, Déclaration de conformité

83
2 4
Wir gewähren auf dieses Erzeugnis eine / This product is / Sur ce produit nous accordons une
Garantie von
warrantied for
garantie de
Monaten
month
mois
Die Fa. G raupner GmbH & Co. KG, Henriettenstraße
94-96, 73230 Kirchheim/Teck gewährt ab dem Kaufdatum auf dieses Produkt eine Garantie von 24 Monaten.
Die Garantie gilt nur für die bereits beim Kauf des Produktes vorhandenen Material- oder Funktionsmängel.
Schäden die auf Abnützung, Überlastung, falsches Zubehör oder unsachgemäße Behandlung zurückzuführen sind, sind von der Garantie ausgeschlossen.
Die gesetzlichen Rechte und Gewährleistungsansprüche des Verbrauchers werden durch diese Garantie
nicht berührt.
Bitte überprüfen Sie vor einer Reklamation oder Rücksendung das Produkt genau auf Mängel, da wir Ihnen
bei Mängelfreiheit die entstandenen Unkosten in Rechnung stellen müssen.
Graupner GmbH & Co. KG, Henriettenstraße 94-96.
73230 Kirchheim/Teck, Germany guarantees this
product for a period of 24 months from date of
purchase.
The guarantee applies only to such material or
operational defects witch are present at the time of
purchase of the product.
Damage due to wear, overloading, incompetent
handling or the use of incorrect accessories is not
covered by the guarantee.
The user´s legal rights and claims under garantee are
not affected by this guarantee.
Please check the product carefully for defects before
you are make a claim or send the item to us, since we
are obliged to make a charge f or our cost if the product
is found to be free of faults.
La société Graupner GmbH & Co . KG,
Henriettenstraße 94-96, 73230 Kirchheim/Teck,
Allemagne, accorde sur ce produit une garantie de 24
mois à partir de la date d´achat.
La garantie prend effet uniquement sur les vices de
fonctionnement et de matériel du produit acheté. Les
dommages dûs à de l´usure, à de la surcharge, à de
mauvais accessoires ou à d´une application inadaptée,
sont exclus de la garantie.
Cette garantie ne remet pas en cause les droits et
prétentions légaux du consommateur.
Avant toute réclamation et tout retour du prouit, v euillez
s.v .p . cotrôler et noter exactement les déf auts ou vices
Servicestellen / Service / Service après-vente
Graupner-Zentralservice Servicehotline
Graupner GmbH & Co. KG Graupner GmbH & Co. KG
Postf ach 1242 (00 49)(01805) 472876
D-73220 Kirchheim Montag - Freitag
(00 49)(07021) 722 130 9
30
-1130 und 1300 -1500 Uhr
Andorra
Sorteny 2 MODELISME
Lluis Villasevil
Av .Santa Anna.13
Les Escaldes
(00 37) 86 08 27
Belgie/Belgique/Nederland
Jan van Mouwerik
Slot de Houvelaan 30
3155 Maasland VT
(00 31)(0 10) 59 13 59 4
Italia
GiMax
Via Manzoni, no. 8
25064 Gussago
(00 39)(03 0) 25 22 73 2
Schweiz
Graupner Service
Postf ach 92
8423 Embrach - Embraport
(0041)(04 3) 26 66 58 3
United Kingdom
GLIDERS
Brunel Drive
Newark, Nottinghamshire
NG24 2EG
(00 44)(01 63 6) 61 05 39
France
Graupner Fr ance
Gérard Altmayer
86, rue St. Antoine
57601 Forbach-Oeting
(00 33)(03 87) 85 62 12
Sverige
Baltechno Electronics
Box 5307
40227 Göteborg
(00 46)(03 1) 70 73 00 0
Luxembourg
Kit Flammang
129, route d’Arlon
8009 Strassen
(00 35) 23 12 23 2
Ceská Republika/
Slovenská Republika
RC Servis Z. Hnizdil
Leteckà 666/22
16100 Praha 6 - Ruzynè
(00 42)(02) 36 62 74
Espana
F A - Sol S.A.
C. Avin yo 4
08240 Manresa
(00 34)(09 3) 87 34 23 4

84
Graupner GmbH & Co. KG
Henriettenstraße 94 - 96
D-73230 Kirchheim/Teck
Änderungen sowie Liefermöglichkeiten vorbehalten. Lieferung durch den Fachhandel. Bezugsquellen werden nachgewiesen. Für Druckfehler kann keine Haftung übernommen werden.
Specifications and availability subject to change. Supplied through specialist model
shops only. We will gladly inform you of your nearest supplier. We accept no
liability for printing errors.
Sous réserve de modifications et de possibilité de livraison. Livraison uniquement
spécialisés en modélisme. Nous pourrons vous communiquer l’adresse de votre
revendeur le plus proche. Nous ne sommes pas responsables d’éventuelles
erreurs d’impression.
11/02XS-6 FM RACE
Postfach 12 42
D-73220 Kirchheim/Teck
Internet: http://www.graupner.de
 Loading...