

Page 1

Operating Instructions for the VELOX model boat
Order No. 2161
The full-size vessel
The VELOX escort tug was built at Astilleros Gondan in Spain in the year 2005, and
was delivered to Ostensjo Rederi AS, Haugesund, Norway, in 2006. The ship is fitted
with two Type 32R6/210-2 Voith-Schneider propellers, powered by a pair of Bergen
C25: 33L8P diesel engines, each generating 2400 kW. This power train gives the tug
a maximum pulling power of 140 t at fifteen knots, and 150 t at ten knots.
Overall length
.
37.00 m
Length between perps. 33.85 m
Overall beam
14.00 m
Draft at CWL 5.40 m
Max. draft
6.90 m
Speed 15 kn
Bollard pull 65 t
Equipment:
Double hydraulic winch with 200 t pull
1 x 250 m 80 mm Ø steel cable
1 x 800 m 57 mm Ø plastic cable
Fire-fighting equipment:
1 Water monitor: 20.000 l / min
1 Foam monitor: 20.000 l / min
Accommodation:
Six single cabins, living room, galley, wash-rooms, laundry
Model description
Specification
Length approx. 885 mm
Beam approx. 350 mm
Draft approx. 130 mm
Overall height approx. 550 mm
All-up weight incl. RC approx. 6.5 kg
Dry weight excl. battery approx. 4.5 kg
Scale approx. 1 : 46
Our model of the VELOX was developed with the support of Voith Turbo Schneider
Propulsion, Heidenheim. Like the full-size vessel, the model is equipped with two
Voith Schneider propellers.
The Voith Schneider power units make the tug extremely manoeuvrable, as it can
move in any direction.
GRAUPNER GmbH & Co. KG D-73230 KIRCHHEIM/TECK GERMANY
No liability for printing errors. Technical modifications reserved.
10/2010 #0062222
1
Page 2
This Premium Line model is designed for modellers with little experience. Installing
the receiving system components requires no modelling experience or manual skill.
Adjusting the working systems does call for accurate working and some patience;
please carry out this stage conscientiously. Your care will be rewarded with a model
boat which attracts attention wherever you go, and which will give you many
interesting hours at the lakeside.
This model is capable of manoeuvres which are not feasible with any other model
boat fitted with a conventional propulsion system.
Thanks to the close collaboration with Voith Turbo Schneider Propulsion of
Heidenheim, the model is capable of carrying out the same manoeuvres as the fullsize vessel.
Assembly instructions
• In the following section the Voith Schneider Propeller is abbreviated to VSP.
• Stick : dual-axis transmitter stick
• Control lever : lever on the VSP
• Remove the security packaging, lift the model out of the transport box and place it
in the boatstand.
• Ensure that all the components are present, and check the transport box for parts
which might have come loose in transit. Any such parts can be re-attached to the
appropriate location on the model with a drop of cyano glue.
• Lift off the superstructure, followed by the winch.
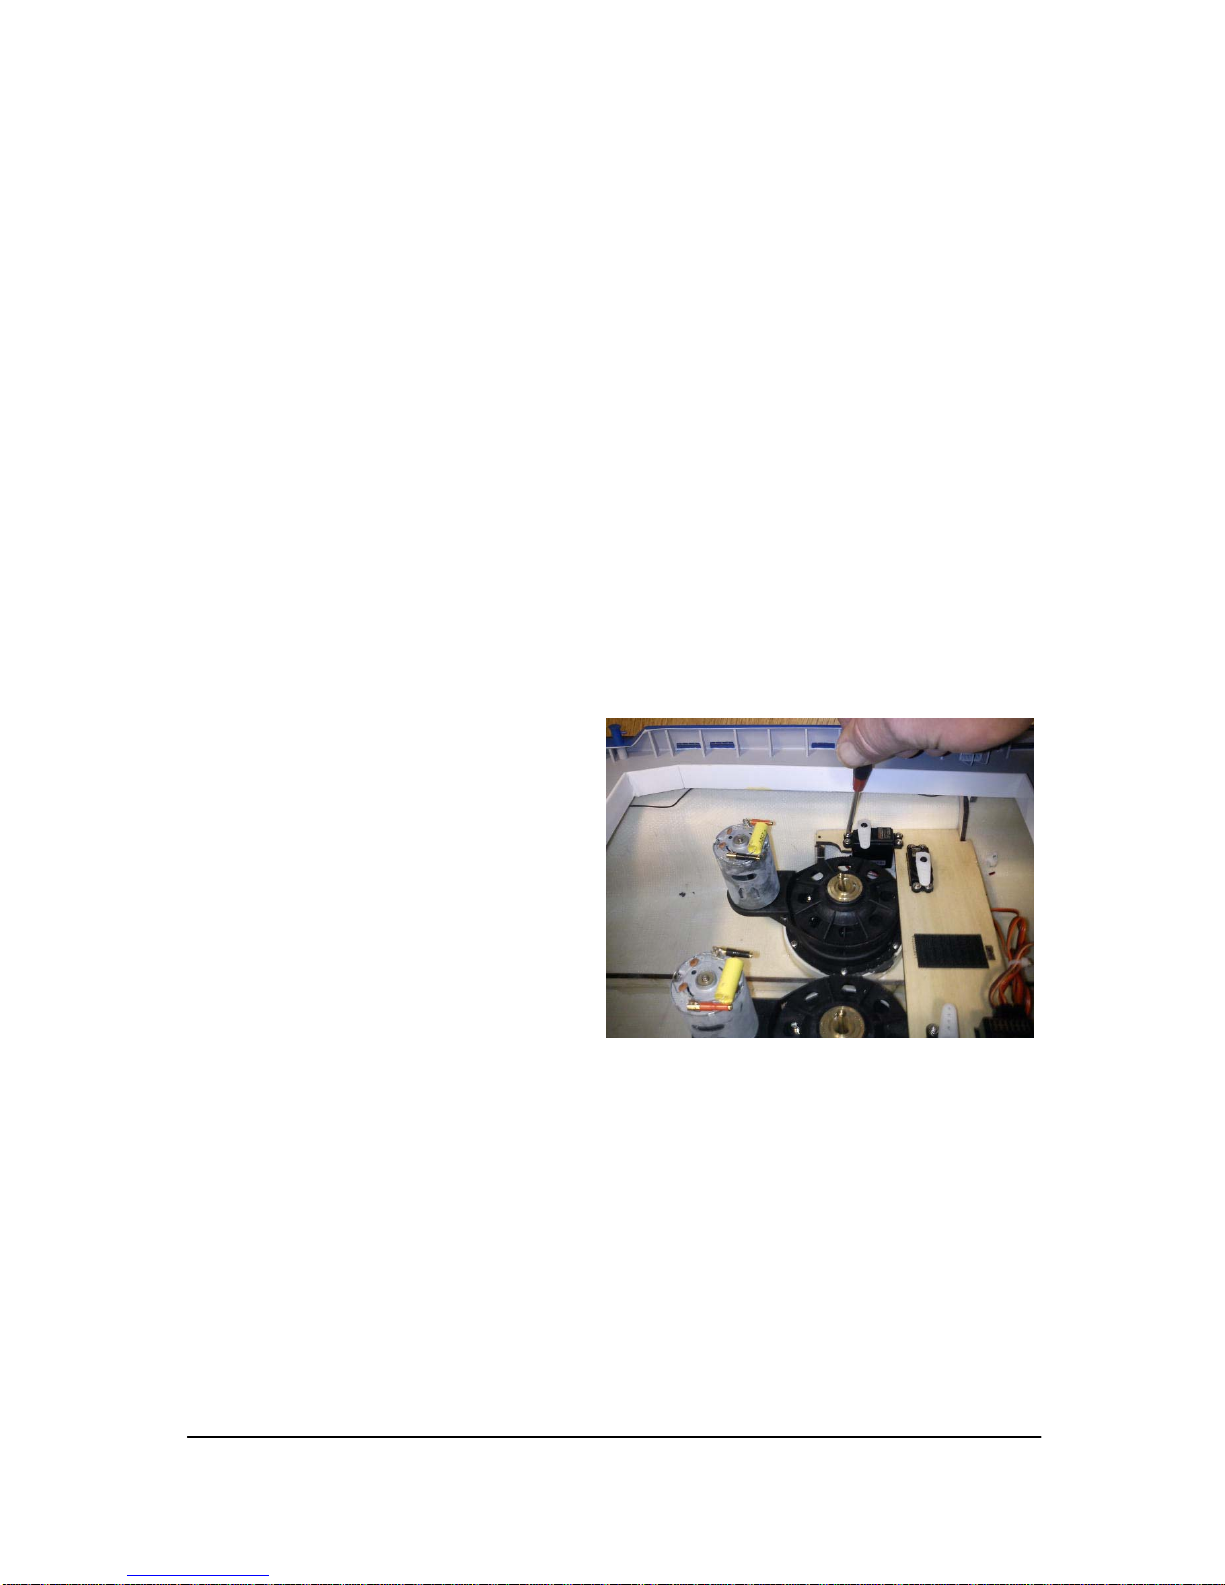
• Locate the second hole from the
outside of the double-ended servo
output levers, and open them up
using a 2 mm drill, so that the
clevises can be connected to them.
Press the rubber grommets supplied
with the servos into the mounting
lugs, then push the brass spacer
sleeves into the holes in the grommets from the underside. Place the
servos in the openings in the wooden
plate and fit the four retaining screws
for each one. IMPORTANT: ensure that the servo leads are not trapped or
damaged.
• Screw the threaded rods into the aluminium ball-links and the steel clevises.
Engage the clevises in the drilled-out 2 mm holes in the servo output levers.
• Remove the black bellcranks from the VSP control levers, as they are not needed.
• Set the control levers of the VSPs approximately to centre by clamping them with
a suitable tool.
• Screw the aluminium ball-links to the control levers using the M2 x 12 screws
supplied; you will need to screw the clevises in or out on the threaded rods to
achieve this. Apply a drop of thread-lock fluid, e.g. UHU Schraubensicher (Order
No. 952), to the threads of the ball-links to prevent them working loose. When
tightening the M2 x 12 screws, hold the control levers with pointed-nose pliers to
prevent them moving.
GRAUPNER GmbH & Co. KG D-73230 KIRCHHEIM/TECK GERMANY
No liability for printing errors. Technical modifications reserved.
10/2010 #0062222
2
• Thread-lock fluid is not necessary at this point, as the linkage balls revolve in the
links themselves. The balls should therefore be oiled lightly.
Page 3
• Note that the linkages should be connected to the VSPs symmetrically, i.e. the
lateral servo pushrods on the underside, the rear servo pushrods on top, or vice
versa. If you neglect to do this, you may encounter problems with some
manoeuvres (e.g. accurate straight running or traversing may be impossible).
• It must be possible to disconnect the
motors from each other for the
purpose of setting up the VSPs
correctly.
• This is accomplished by unsoldering
the wires from the motors.
• Solder the G2 couplers to the
terminal tags on the motors, and
solder the G2 plugs to the wires.
• Shorten the wires to a length of
about 12 cm, and solder the positive
and negative wires from the motors
to a G2 plug.
• Solder the G2 couplers to the speed controller, and insulate these joints by fitting
the plastic housings over them. Insulate the speed controller / motor connections
with heat-shrink sleeves. Once you have set up the VSPs accurately, a heat-shrink
sleeve can be shrunk over the connection. You will only need access to this
connection if the speed controller ever needs to be replaced or repaired.
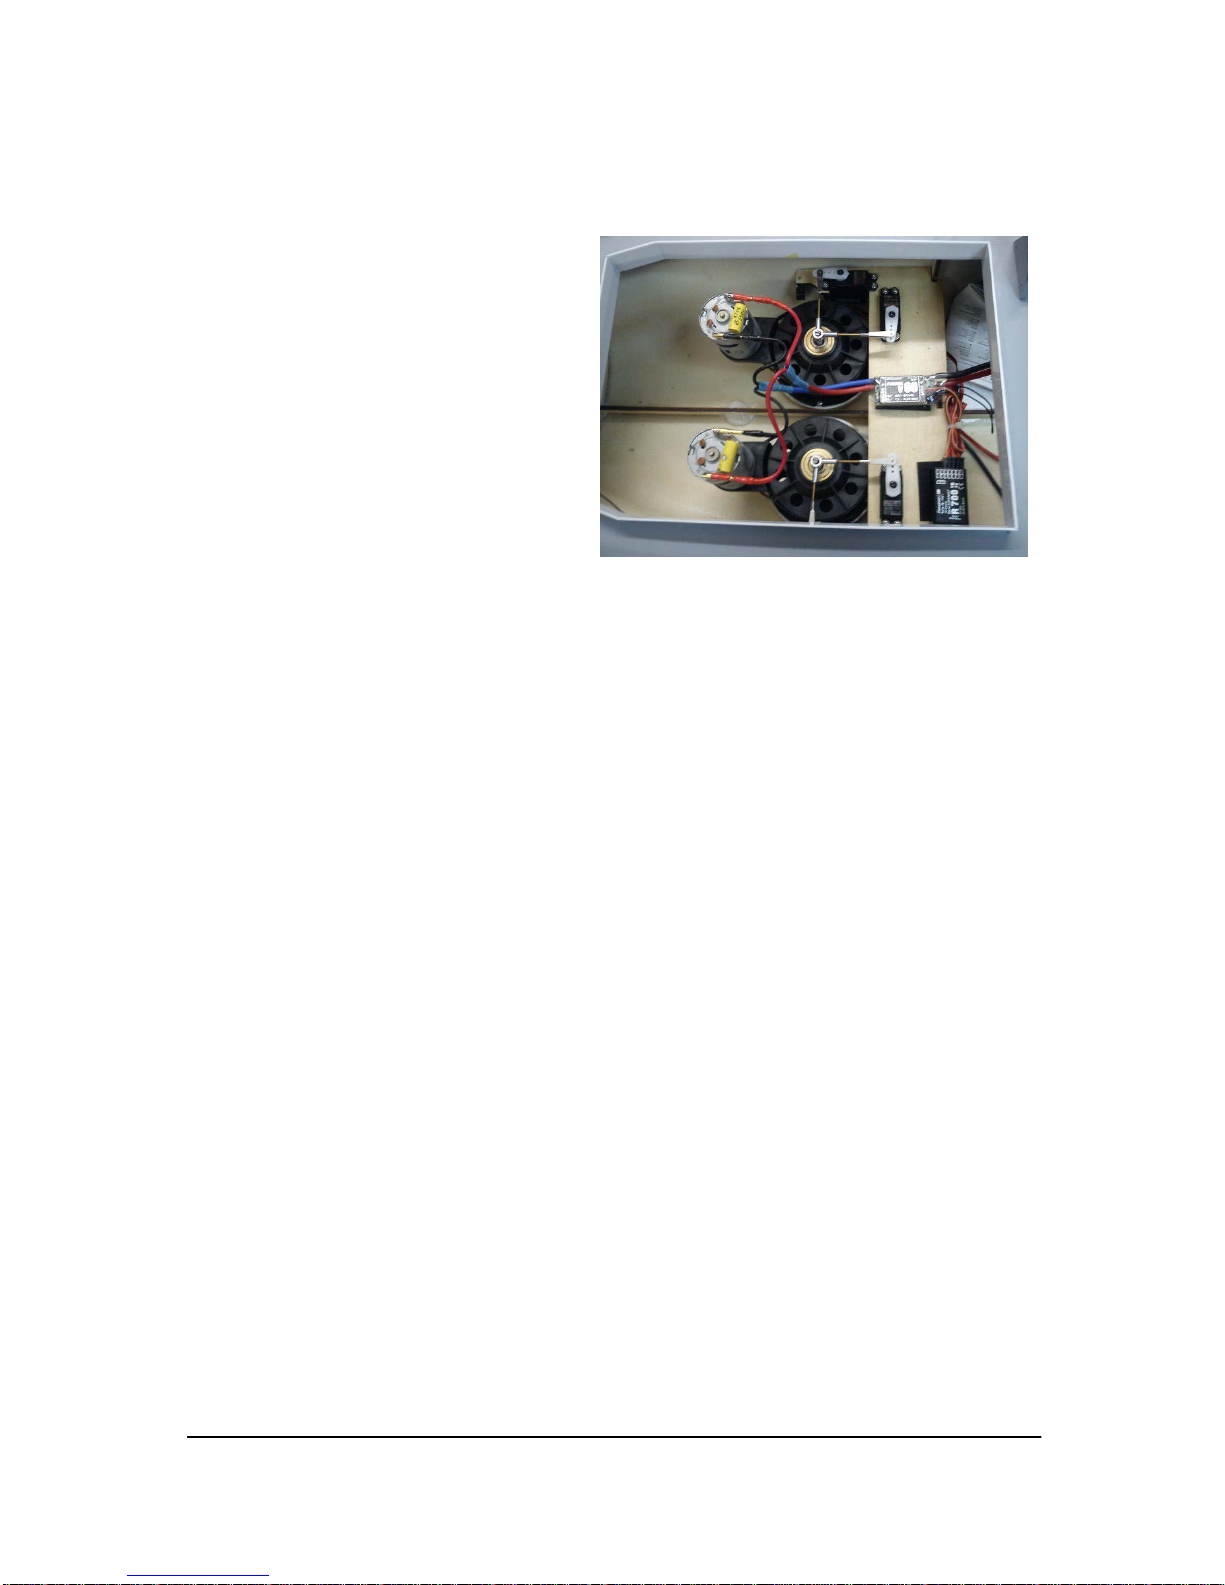
• Attach the speed controller to the servo plate using Velcro (hook-and-loop) tape.
• Fix the receiver to the servo plate using Velcro (hook-and-loop) tape.
• Deploy the servo cables neatly, keeping them well clear of the drive system gears
and the VSP belts.
• Channel assignment at the receiver:
• Channel 1: left VSA forward, stop, reverse
• Channel 2: left VSA left, stop, right
• Channel 3: right VSA forward, stop, reverse
• Channel 4: right VSA left, stop, right
• Channel 5: speed controller for setting the speed of the VSP
• Channel 5: for fixed rotational speed a switch is preferable; for variable speed use
a slider. The rotational speed of both VSPs is increased and reduced in parallel.
• Solder a connecting lead, Order No. 94308, to the terminal tags of the batteries.
• Insulate the soldered joints with insulating tape or heat-shrink sleeves.
• Charge up the two drive batteries.
• Mark the location of the drive batteries in the model.
• To prevent the batteries shifting, stick pieces of Velcro tape (hook side) to the hull
floor at the battery position. Apply the mating Velcro tape (loop side) to the
underside of the batteries themselves.
• Fit the two batteries between the servo plate and the deck, pushing them aft on
each side of the keel rail.
GRAUPNER GmbH & Co. KG D-73230 KIRCHHEIM/TECK GERMANY
No liability for printing errors. Technical modifications reserved.
10/2010 #0062222
3
Page 4

GRAUPNER GmbH & Co. KG D-73230 KIRCHHEIM/TECK GERMANY
No liability for printing errors. Technical modifications reserved.
10/2010 #0062222
4
Setting up the VSPs
• Place the travel limiters in the transmitter stick wells. Please note: the limiters only
fit Graupner transmitters. The openings in the limiters do not correspond to the
stick units of other makes of transmitter.
• We recommend that you install the limiters permanently using thin double-sided
adhesive tape; they will not obstruct when you are operating other model boats.
• Charge up your transmitter and switch it on.
• Select an unoccupied memory on your transmitter.
• Select the Servo Settings menu at the transmitter, and reduce the end-points of all
the servos to about 30% to avoid damaging the servos during the next stage.
• We also recommend that you reduce the maximum speed of the speed controller
to about 50% or less, again by adjusting the servo travels at the transmitter; the
motors should only turn slowly while you are adjusting the system.
• Disconnect the motors from the power supply.
• Important: take care to avoid short-circuits; insulate any bare connectors.
• Connect the batteries to the battery link lead, Order No. 3031.
• Connect the speed controller’s battery connectors to the battery link lead.
• When adjusting the motors, leave the servos at the centre position to avoid
possible damage to them.
• Connect the motors to the speed controller and check that they rotate in the
correct direction.
• Directions as seen from the stern, looking forward:
• Right VSP: to the right (clockwise)
• Left VSP: to the left (anti-clockwise)
• Important: any attempt at setting up the VSPs in the bathtub or any similar con-
fined container will fail. Open water is required, otherwise water will flow between
the propeller blades, the hull and the “bank”, and cause confusing movements.
• To prevent the model drifting away during the adjustment procedure, secure it to
the bank or quay with a 1 - 2 m length of buoyant cord attached to the towing bar.
Ensure that the cord cannot become entangled in the propeller blades.
• Important: each VSP must be adjusted individually, i.e. without the other one
running.
• Set all the transmitter trim levers to centre.
• Connect one VSP to the speed controller.
• Select the Servo Settings menu at the transmitter, and adjust the centre position of
both servos until the boat floats motionless in the water.
• Caution: the two servos have a mutually inter-active effect on the steering and
running characteristics of the VELOX. For example, if you alter the centrepoint of
the forward / reverse servo, this will also have an effect on the rudder setting.
Keep the control lever close to its centre position, and the transmitter stick at the
Centre - 0 - position at all times during the adjustment procedure.
• It will take a little while to complete these adjustments, i.e. until the model is
motionless in the water. If you find you have to adjust the settings too far from the
centre point, it is best to adjust the threaded rods and start again.
• Watch the floating cord to check whether the boat is stationary or not.
• At this point you can adjust the travel end-points for both servos.
• This is accomplished by moving the associated stick to the upper / lower or right /
left end-point, and set values for servo travel at which the control lever does not
contact or foul the VSP’s guide sleeve.
Page 5

GRAUPNER GmbH & Co. KG D-73230 KIRCHHEIM/TECK GERMANY
No liability for printing errors. Technical modifications reserved.
10/2010 #0062222
5
• Move the transmitter stick in a circular path, and check that the control lever does
not foul the guide sleeve at any point. If there is any contact, you will hear a rattling
sound from the VSP. If this should occur, reduce the end-points for the corresponding servo slightly. Movement of the VSP’s control lever must not generate
noises of any sort.
• Important: never operate the boat without the travel limiters in place, as they
protect the VSP and the servos from overloading.
• If the control lever strikes or rubs on the guide sleeve, the mechanism and servos
will be under excessive strain, and this in turn will cause the bearings to leak. The
ball-links on the control lever will also wear much more quickly under these
circumstances.
• For your information: the maximum travel is about 4 mm to each side.
• Untie the cord from the model. When you give a ‘forward’ command, the boat
should now travel in a straight line forward. With only one VSP operating, the
model will always tend to turn when reversing. However, for the setting-up stage
only forward running is relevant.
• Once you have completed the set-up procedure for one VSP, disconnect its motor
from the speed controller and connect the other VSP to the controller.
• At this point the same adjustments have to be carried out on the other VSP.
• Once you have completed the settings on the second VSP, disconnect it from the
speed controller.
• Now connect both VSPs to the controller, and carry out a test-run with the boat.
• The model should run straight in the forward and reverse directions.
• Now set the maximum motor speed: the rotational speed of the propeller wheel
should be about 457 rpm, which corresponds to a motor speed of N
nom
: 6000 rpm.
This is the same speed as the full-size power plants.
• On a 12 V supply this rotational speed corresponds to a speed controller setting of
about 52% (Graupner RC system)
• Maximum speed is available at 8800 rpm. Note that motor speeds higher than this
may damage the VSPs.
• Special manoeuvres such as tight turns, rotating on the spot and traversing are
certainly possible with this model, but they do require practice. You must use both
dual-axis sticks to control the boat.
• The stick positions are shown in the diagram. Note that any movement of the
transmitter stick causes the VSP’s control lever to move in the opposite direction.
• TIP: the best method of steering large, broad turns is to allow one VSP to run
forwards, and steer with the other. Tight turns are best initiated using both VSPs.
• When traversing, keep one stick motionless and control the model with the other.
Oil the linkage balls in the ball-links at regular intervals, but take care that no oil runs
through the guide sleeve into the propeller wheel. The plain bearing can be lubricated
lightly with gearbox grease or high-viscosity oil: apply a little grease between the
guide sleeve and the control lever of the VSP.
Important: do not use mineral oil.
It will take you a lot of practice and many runs before you completely master the
model’s manoeuvring capabilities.
All of us in the Graupner team hope you have loads of fun running your Voith
Schneider VELOX escort tug.
Page 6

GRAUPNER GmbH & Co. KG D-73230 KIRCHHEIM/TECK GERMANY
No liability for printing errors. Technical modifications reserved.
10/2010 #0062222
6
Essential accessories (not included in the kit):
Order No. Description
4725 mc-12 RC set, 40 MHz
or
4755 mx-16 HoTT RC set, 2.4 GHz
7935 DES 657 BB (four required)
7176 POWER MOS 60 speed controller
775 Lead-acid drive battery, 6 V / 7 Ah (two required)
7592 4NH-3000 RX receiver battery, 4.8 V RTU
3031 G2 battery link lead
2989 G2 connector system for connecting the motors to the speed controller
2994 G2 plug and socket for connecting the motors (two required)
3368 Velcro (hook-and-loop) tape, 500 mm
3934.3 Switch harness
Replacement parts:
Order No. 2358 Voith Schneider propeller
Order No. 2358.1 Propeller blade and circlips
Order No. 2358.3 Toothed belt
Best. Nr. 3499.20 Ball Link M2
Page 7

Electrical system and RC diagram
Reverse forward
Reverse forward
Direction of rotation
Order No
2994
Order Nr.
2989
Direction of rotation
Switch harness, OrderNo. 3934.3
Left-right
Order Nr.
3031
solder
Right-left
GRAUPNER GmbH & Co. KG D-73230 KIRCHHEIM/TECK GERMANY
No liability for printing errors. Technical modifications reserved.
10/2010 #0062222
7
Page 8

GRAUPNER GmbH & Co. KG D-73230 KIRCHHEIM/TECK GERMANY
No liability for printing errors. Technical modifications reserved.
10/2010 #0062222
8
GRAUPNER GmbH & Co. KG D-73230 KIRCHHEIM/TECK GERMANY
No liability for printing errors. Technical modifications reserved.
10/2010 #0062222
8
Page 9

VSP® Voith Schneider Propeller
Instructions for VSP
Order No. 2358
The Voith Schneider drive unit is a scale model of a full-size propulsion system using
a blade propeller; the unit provides both power and control of direction in the model
boat. In a sense it represents a perfect variable-pitch propeller, because its thrust can
be varied both in magnitude and direction. The amount and direction of thrust are
controlled solely by varying the cyclic pitch of the blades, and this makes it possible
to adjust the boat’s position quickly and accurately to suit changing conditions and
tasks. The integral electric motor is only required to run at constant speed and
direction, regardless of the manoeuvre; no speed controller or method of reversing
motor direction are required. The operating voltage must not exceed 12 V.
The Voith Schneider propeller is designed as a robust slow-running unit using a high
reduction ratio on the electric motor; this ensures reliability and long life even when
the system is subjected to considerable external forces in strenuous tug manoeuvres.
The rotational speed of the propeller wheel should be around 765 rpm, which
equates to a motor speed of N
nom
: 8040 rpm.
VSP Order No. 2358
At 12 V this rotational speed corresponds to a speed controller setting of around 60%
(Graupner RC system).
The Voith Schneider drive unit (single-propeller and twin-propeller systems) is
installed in the underside of the boat, with a free flow of water to and from it in all
directions.
The model Voith Schneider drive system is primarily made of glass fibre reinforced
plastic, and features special bearings made of water-lubricated plastic. Highly
stressed parts such as the control lever, the guide sleeve and the motor pinion are
made of metal. The propeller blades can easily be removed and replaced if
damaged.
The drive unit is controlled by two servos acting upon the central control lever, which
in turn swivels the five vertical propeller blades in order to change their pitch. It is
essential to install servos with accurate centring characteristics, i.e. digital servos, as
any slop or lack of precision in the servos makes precise control of the model
impossible.
The travel of the two servos must be restricted to 4 mm from the centre to both sides.
These exact travels can only be set using a programmable MC system.
It is essential to avoid the control lever fouling the inside of the guide sleeve. Any
contact will generate a rattling sound from the mechanism, and this indicates an
overload condition. If left uncorrected, this will result in damage to the mechanism
and leaks in the system.
Important: check every time you switch the RC system on that the trim levers are at
the neutral position.
Repairing the VSP
Disconnect the motor from the power supply leads. Disconnect the servo linkages
from the control lever.
Unscrew the M3 x 3 grubscrew between the guide sleeve and the toothed belt pulley.
GRAUPNER GmbH & Co. KG D-73230 KIRCHHEIM/TECK GERMANY
No liability for printing errors. Technical modifications reserved.
10/2010 #0062222
9
Page 10

Remove the belt and unscrew the belt pulley; you will need to hold the propeller
blades in your hand under the model to secure the propeller wheel. Unscrew the
motor and remove the six screws which retain the propeller wheel cover. Fit the
motor screws again, tighten them lightly, and gently tilt the motor in order to remove
the whole power unit; you can now withdraw the motor and cover from the guide
sleeve. At this stage it is possible to replace the bearings in the cover. Once the
bearings are removed, the main control lever and the plain bush can also be
dismantled. Measure the depth at which the plain bush is fitted before removing the
main control lever. The control lever must not
contact the bottom of the propeller wheel.
GRAUPNER GmbH & Co. KG D-73230 KIRCHHEIM/TECK GERMANY
No liability for printing errors. Technical modifications reserved.
10/2010 #0062222
10
The propeller wheel is sealed with a cover and five
screws. The propeller blades can be replaced by
removing the cover and the guide sleeve. The
blades are secured in the propeller wheel using
circlips. When removing them note the orientation of
the white sliding blocks between the lever and the
control plate (see illustration).
Re-assemble the unit by reversing the procedure
described above. Don’t forget to fit the M3 x 3 grubscrew.
Circlip
Sliding block
The malleable gasket material can be re-used an indefinite number of times. First
remove the residue from the installation ring and the cover, then knead the material
together and form it into a cord again. Lay this in the ring and re-install the VSP.
It will not be possible to achieve exactly the same installed position a second time, so
you must always repeat the set-up procedure with the VSP after re-connecting all the
linkages.
Important: the propeller wheel mechanism is lubricated by water only: do not apply
oil or grease to the propeller wheel, as this will just ruin the plastic.
Oil the linkage balls in the ball-links at regular intervals, but take care that no oil runs
through the guide sleeve into the propeller wheel. The plain bearing can be lubricated
lightly with gearbox grease or high-viscosity oil: apply a little grease between the
guide sleeve and the control lever of the VSP.
Important: do not use mineral oil.
Installing the Voith Schneider Propeller in the model
A circular 84 mm Ø opening must be cut in the bottom of the hull for each drive unit.
The ABS support ring, which is supplied with each power unit, is glued in this circular
opening. The outrigger which bears the motor must be positioned facing either the
bow or the stern.
Locate the gasket material supplied in the set, mould it into a cord about 1.5 mm in
diameter using your hands, then place it directly in the internal shoulder of the 1.5
mm recess on the sealing surface of the mounting ring; it should be located outside
the six holes. Press the gasket material into the corner of the 1.5 mm recess, and
check that it is not interrupted at any point all round. Place the VSP in the support
ring and secure it using the six screws supplied. Caution: only tighten the screws
moderately. Tighten the screws steadily, working sequentially round the circle; do not
tighten them alternately, from side to side.
Page 11

GRAUPNER GmbH & Co. KG D-73230 KIRCHHEIM/TECK GERMANY
No liability for printing errors. Technical modifications reserved.
10/2010 #0062222
11
Page 12

GRAUPNER GmbH & Co. KG D-73230 KIRCHHEIM/TECK GERMANY
No liability for printing errors. Technical modifications reserved.
10/2010 #0062222
12
Manufacturer’s declaration
from Graupner GmbH & Co. KG
If material defects or manufacturing faults should arise in a product distributed by us
in the Federal Republic of Germany and purchased by a consumer (§ 13 BGB), we,
Graupner GmbH & Co. KG, D-73230 Kirchheim/Teck, Germany, acknowledge the
obligation to correct those defects within the limitations described below.
The consumer is not entitled to exploit this manufacturer’s declaration if the failure in
the usability of the product is due to natural wear, use under competition conditions,
incompetent or improper use (including incorrect installation) or external influences.
This manufacturer’s declaration does not affect the consumer’s legal or contractual
rights regarding defects arising from the purchase contract between the consumer
and the vendor (dealer).
Extent of the guarantee
If a claim is made under guarantee, we undertake at our discretion to repair or
replace the defective goods. We will not consider supplementary claims, especially
for reimbursement of costs relating to the defect (e.g. installation / removal costs) and
compensation for consequent damages unless they are allowed by statute. This does
not affect claims based on legal regulations, especially according to product liability
law.
Guarantee requirements
The purchaser is required to make the guarantee claim in writing, and must enclose
original proof of purchase (e.g. invoice, receipt, delivery note) and this guarantee
card. He must send the defective goods to us at his own cost, using the following
address:
Brunel Drive
GB, NEWARK, Nottinghamshire
NG242EG
Tel. (+44) 16 36 61 05 39
Fax: (+44) 16 36 60 52 55
Email: service.uk@graupner.com
The purchaser should state the material defect or manufacturing fault, or the
symptoms of the fault, in as accurate a manner as possible, so that we can check if
our guarantee obligation is applicable.
The goods are transported from the consumer to us and from us to the consumer at
the risk of the consumer.
Duration of validity
This declaration only applies to claims made to us during the claim period as stated
in this declaration. The claim period is 24 months from the date of purchase of the
product by the consumer from a dealer in the Federal Republic of Germany (date of
purchase). If a defect arises after the end of the claim period, or if the evidence or
documents required according to this declaration in order to make the claim valid are
not presented until after this period, then the consumer forfeits any rights or claims
from this declaration.
Limitation by lapse of time
If we do not acknowledge the validity of a claim based on this declaration within the
claim period, all claims based on this declaration are barred by the statute of
limitations after six months from the time of implementation; however, this cannot
occur before the end of the claim period.
Page 13

GRAUPNER GmbH & Co. KG D-73230 KIRCHHEIM/TECK GERMANY
No liability for printing errors. Technical modifications reserved.
10/2010 #0062222
13
Applicable law
This declaration, and the claims, rights and obligations arising from it, are based
exclusively on the pertinent German Law, without the norms of international private
law, and excluding UN retail law.
Important safety notes
You have purchased a kit which can be assembled to produce a fully working RC
model when fitted out with the appropriate accessories. As manufacturers, we at
GRAUPNER are not in a position to influence the way you install, operate and
maintain the boat, nor the other components used in connection with the model. For
this reason we are obliged to deny all liability for loss, damage or costs which are
incurred due to the incompetent or incorrect use and operation of our products, or
which are connected with such operation in any way. Unless otherwise prescribed by
binding law, the obligation of the GRAUPNER company to pay compensation,
regardless of the legal argument employed, is excluded. This includes personal
injury, death, damage to buildings, loss of trade or turnover, interruption of business
or other indirect or direct damages which are caused by the operation of the model.
Under all circumstances and in all cases the company’s overall liability is limited to
the amount which you actually paid for this model.
The VELOX is operated at the sole risk of the operator. To avoid injury to persons
and damage to property please handle your model boat carefully and operate it
conscientiously at all times.
Before you run the boat for the first time it is important to check that your private third
party insurance policy provides cover when you are operating model boats of this
kind. If you are not sure, take out a special insurance policy designed to cover the
risks of RC modelling.
These safety notes are important, and must be kept in a safe place. If you ever
dispose of the model, be sure to pass them on to the new owner.
The following points are important and must be observed at all times:
This model is not suitable for children or young persons under fourteen years of age.
Before you run the model check that the radio control system is working properly,
and that all electrical connections are firmly seated.
Ensure that the channel on which you intend to run the model is not already in use by
another modeller. Never run the boat if you are not certain that your channel is free.
Remember that other radio sets and transmitting equipment can cause serious
interference to the model’s operation. As far as possible, ensure that no equipment of
this kind is switched on in the vicinity while you are operating the model.
Do not exceed the recommended operating voltage. Higher voltages can cause
terminal damage to the electronics and the model.
Do not subject the model to high levels of humidity, heat, cold or dirt.
Take particular care to keep the model properly sealed. Open the boat after each
run, and allow it to dry out thoroughly.
Care and maintenance
After every run remove the superstructure and remove any water which has
penetrated the hull. If water gets inside any of the electronic units, dry them out
thoroughly and send them to your nearest GRAUPNER Service Centre for checking.
Spraying the electronics with WET.PROTECT (Order No. 968.50) is an effective
method of preventing the effects of damp.
Page 14

We hope you have loads of fun building and running your VELOX model boat.
GRAUPNER GmbH & Co. KG D-73230 KIRCHHEIM/TECK GERMANY
No liability for printing errors. Technical modifications reserved.
10/2010 #0062222
14
 Loading...