

Page 1
Bedienungsanleitung
Instruction Manual
Manuel d’utilisation
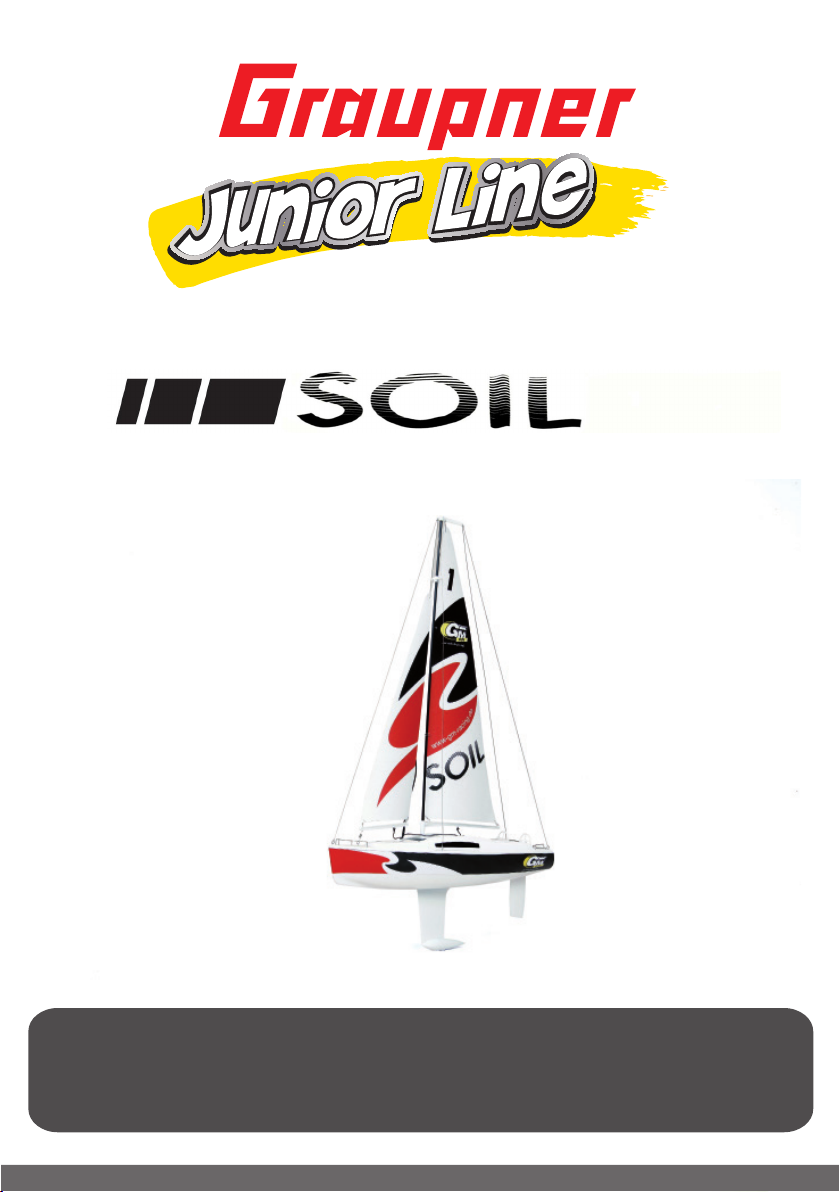
Junior Line WP Soil micro Segelboot RTR
Deutsch 02-11
English 12-21
Francais 22-31
Page 2

Betriebsanleitung für das Modell Soil, Best.-Nr. 92301
Beschreibung des Modells
• Fertigmodell (RTR)
• 2,4 GHz Frequenzhopping RC-System, daher können mehrere Modelle parallel betrieben werden
• Stabiler Kunststoff Rumpf und Deck, fertig miteinander verklebt
• Das Modell ist schon komplett mit Segeln aufgebaut
• Ruderservo ist eingebaut und angeschlossen
• Lieferumfang: Rumpf mit Deck fertig verklebt, Deckel, Segel, Ruderanlage, Schiffsständer,
aufgebrachter Dekorbogen, Kleinteile
Technische Daten
Länge ü.a. ca. 260 mm
Breite ca. 90 mm
Gesamthöhe ca. 435 mm
Gesamtgewicht ca. 175 g
Herstellererklärung der Fa. Graupner/SJ GmbH
Inhalt der Herstellererklärung
Sollten sich Mängel an Material oder Verarbeitung an einem von uns in der Bundesrepublik Deutschland
vertriebenen, durch einen Verbraucher (§ 13 BGB) erworbenen Gegenstand zeigen, übernehmen wir,
die Fa. Graupner/SJ GmbH , Kirchheim/Teck im nachstehenden Umfang die Mängelbeseitigung für den
Gegenstand.
Rechte aus dieser Herstellererklärung kann der Verbraucher nicht geltend machen, wenn die
Beeinträchtigung der Brauchbarkeit des Gegenstandes auf natürlicher Abnutzung, Einsatz unter
Wettbewerbsbedingungen, unsachgemäßer Verwendung (einschließlich Einbau) oder Einwirkung von
außen beruht.
Diese Herstellererklärung lässt die gesetzlichen oder vertraglich eingeräumten Mängelansprüche und
-rechte des Verbrauchers aus dem Kaufvertrag gegenüber seinem Verkäufer (Händler) unberührt.
Umfang der Garantieleistung
Im Garantiefall leisten wir nach unserer Wahl Reparatur oder Ersatz der mangelbehafteten Ware.
Weitergehende Ansprüche, insbesondere Ansprüche auf Erstattung von Kosten im Zusammenhang
mit dem Mangel (z.B. Ein-/Ausbaukosten) und der Ersatz von Folgeschäden sind – soweit gesetzlich
zugelassen – ausgeschlossen. Ansprüche aus gesetzlichen Regelungen, insbesondere nach dem
Produkthaftungsgesetz, werden hierdurch nicht berührt.
Voraussetzung der Garantieleistung
Der Käufer hat den Garantieanspruch schriftlich unter Beifügung des Originals des Kaufbelegs (z.B.
Rechnung, Quittung, Lieferschein) und dieser Garantiekarte geltend zu machen. Er hat zudem die defekte
Ware auf seine Kosten an die folgende Adresse einzusenden.
Fa. Graupner/SJ GmbH, Serviceabteilung,
Henriettenstr.96, D 73230 Kirchheim/Teck
Der Käufer soll dabei den Material- oder Verarbeitungsfehler oder die Symptome des Fehlers so konkret
benennen, dass eine Überprüfung unserer Garantiepicht möglich wird.
Der Transport des Gegenstandes vom Verbraucher zu uns als auch der Rücktransport erfolgen auf Gefahr
des Verbrauchers.
2
Junior Line WP Soil micro Segelboot RTR
Page 3
Junior Line WP Soil micro Segelboot RTR
3
Page 4
4
Junior Line WP Soil micro Segelboot RTR
Page 5
Junior Line WP Soil micro Segelboot RTR
55
Page 6

6
Junior Line WP Soil micro Segelboot RTR
Page 7
Wichtige Sicherheits- und Betriebshinweise zur RC-Anlage
• Zum Binden von Sender und Empfänger drücken Sie bei eingeschaltetem Sender kurz auf den
Bind-Taster auf der Empfängereinheit. Die vorher rot blinkende LED wird nach dem erfolgreichen
Bindvorgang grün.
• Schützen Sie alle Geräte vor Staub, Schmutz, Feuchtigkeit, Vibrationen und anderen Fremdteilen.
Setzen Sie diese auch niemals übermäßiger Hitze oder Kälte aus.
• Vermeiden Sie Stoß- und Druckbelastung. Überprüfen Sie die Geräte stets auf Beschädigung an
Gehäusen und Kabeln.
• Zum Lösen der Kabelverbindungen dürfen Sie niemals an den Kabeln ziehen.
• Vermeiden Sie Verpolungen und Kurzschlüsse jeder Art sowie eine überhöhte Spannung der
Stromversorgung. Die Geräte sind dagegen nicht geschützt.
• Verwenden Sie nur die von GRAUPNER/SJ spezizierten und freigegebenen Komponenten.
• GRAUPNER/SJ empehlt nur die Verwendung von Trockenbatterien zur Senderstromversorgung. Der
Einsatz von Akkus in diesem Bereich erfolgt nach eigenem Ermessen.
• Die Trockenbatterien zur Stromversorgung dürfen niemals nachgeladen werden. Nur Akkus dürfen
nachgeladen werden.
• Die Batterie und Akku müssen ausreichend voll sein und die Reichweite der Fernsteuerung muss
überprüft worden sein. Im Zweifelsfall sollte die Senderbatterie zur Sicherheit ausgetauscht werden,
wenn der Zustand der Batterie nicht bekannt ist.
• Sollte Wasser in die RC-Komponenten gedrungen sein, legen Sie diese trocken und schicken Sie diese
zur Kontrolle an die zuständige GRAUPNER/SJ-Servicestelle ein (siehe Auistung der zuständigen
Servicestellen am Ende der Anleitung).
Pege und Wartung
• Säubern Sie das Modell nach jedem Gebrauch. Entfernen Sie sofort evtl. eingedrungenes Wasser mit
einem Küchentuch oder Ähnlichem. Lassen Sie die Abdeckungen immer für längere Zeit offen, damit
die Restfeuchtigkeit austrocknen kann.
• Säubern Sie das Modell und die RC-Komponenten nur mit geeigneten Reinigungsmitteln. Informieren
Sie sich hierzu bitte bei Ihrem Fachhändler.
• Wenn das Modell längere Zeit nicht betrieben werden soll, sollten alle bewegten Teile (Welle usw.)
demontiert, gesäubert und neu geschmiert werden. Auch müssen alle Akkus und Batterien aus dem
Modell und Sender entfernt werden und gesondert gelagert werden.
Betriebsanleitung
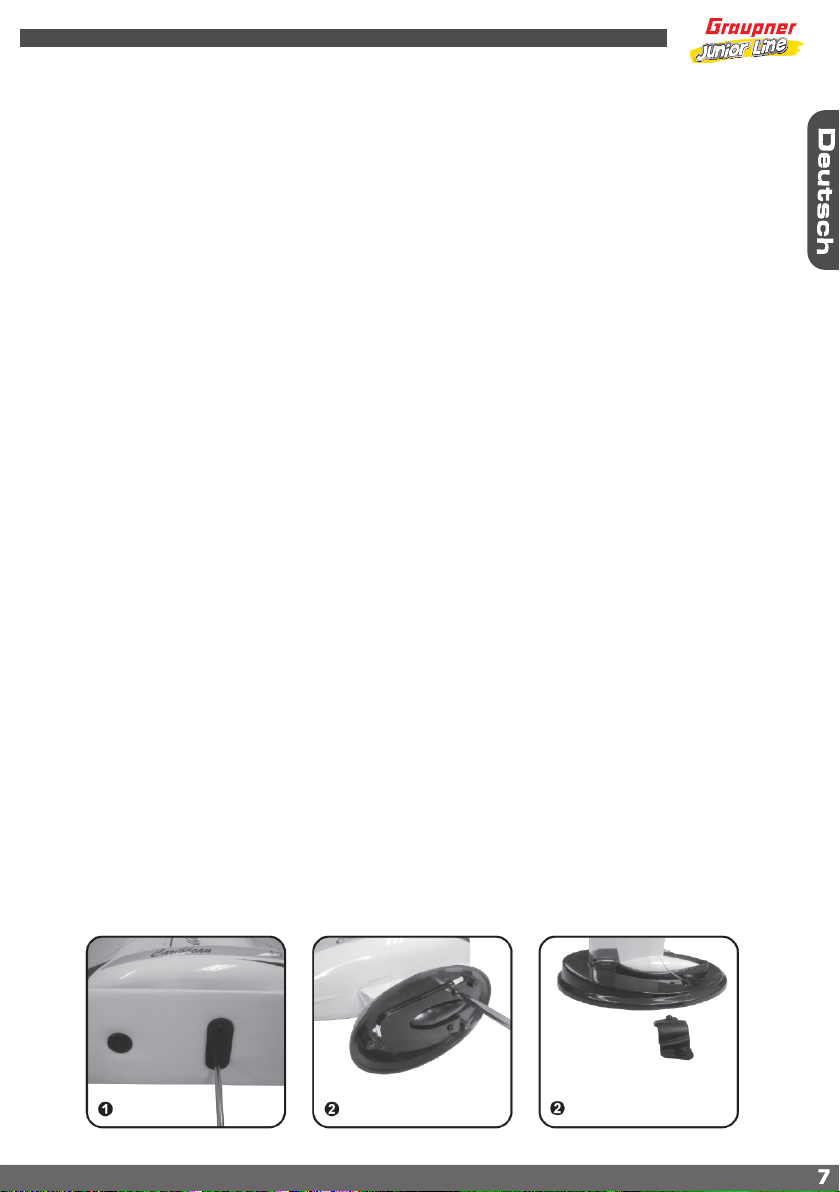
Soil auspacken
1. Das Modell Soil ist mit Schrauben am Karton und am Schiffständer gesichert.
2. Entfernen Sie die 3 Schrauben mit einem Kreuzschlitzschraubenzieher wie in den Bildern unten
gezeigt, danach können Sie das Modell aus dem Karton nehmen.
3. Entfernen Sie 2 Schrauben an der Unterseite des Schiffständers, halten Sie dabei das Modell
unbedingt fest, da es sonst herunterfallen kann.
Junior Line WP Soil micro Segelboot RTR
77
Page 8
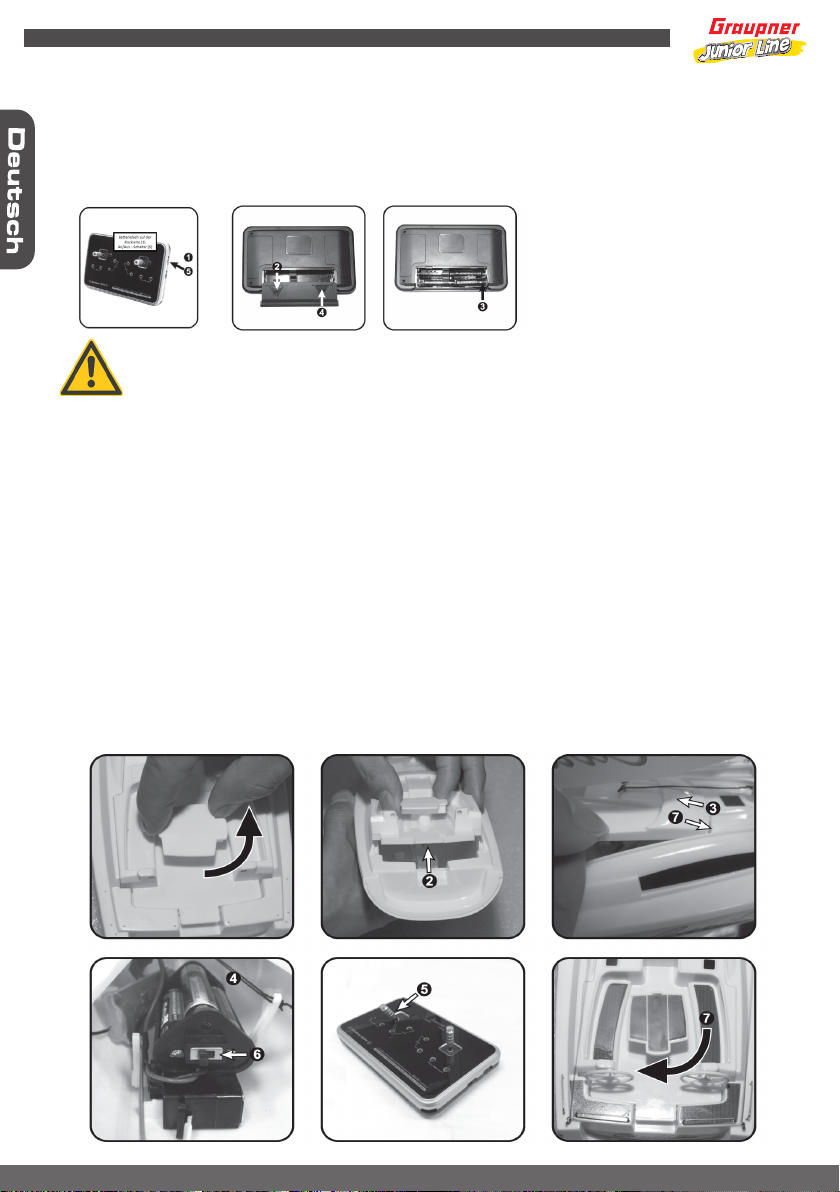
Senderbatterie einlegen
1. Kontrollieren Sie den Sender, ob er ausgeschaltet ist (Stellung OFF) (5).
2. Entfernen Sie die Abdeckung (2)
3. Schieben Sie den Batteriedeckel in Pfeilrichtung herunter.
4. Die Batterie (4x AA) polungsrichtig einlegen (im Boden ist die richtige Polung eingeprägt). (3)
5. Schließen Sie den Deckel. (4)
ACHTUNG!
Es ist sehr wichtig, dass Sie beim Einschalten des Senders, den linken Steuerknüppel
immer auf der untersten Position halten.
Akku im Modell platzieren
Stellen Sie das Modell auf den mitgelieferten Schiffsständer.
1. Nehmen Sie die Abdeckung ab, indem Sie vorsichtig den Tisch drehen.
2. Heben Sie die Abdeckung mit dem hinteren Teil zuerst mit dem Tisch nach oben an. (Ziehen Sie
nicht an den Steuerrädern, diese könnten beschädigt werden).
3. Halten Sie jetzt die Abdeckung weiter vorn, an beiden Seiten. Heben Sie die Abdeckung etwas an
und ziehen Sie die Abdeckung dann nach hinten ab.
4. Legen Sie jetzt 3x „AAA“ Batterien in das Batteriefach ein. Achten Sie dabei auf die korrekte Polarität
5. Bringen Sie jetzt den linken Knüppel des Senders in die unterste Position, danach schalten Sie den
Sender ein.
6. Schalten Sie den Schalter am Batteriefach ein. Schauen Sie ob die LED am Empfänger grün
leuchtet. Wenn die LED rot leuchtet, dann müssen Sie den Empfänger binden. Diesen Vorgang
sehen Sie im Schritt „Fernsteuerung und Empfänger binden“.
7. Wenn Sie sich vergewissert haben, dass die grüne LED leutet, ist Ihr Modell jetzt einsatzbereit.
Befestigen Sie jetzt die Abdeckung wieder und xieren Sie diese wieder mit dem Tisch.
HINWEIS: Achten Sie darauf, dass Sie beim öffnen die 2 Steuerräder nicht abbrechen, lösen Sie den
Deckel immer vorsichtig!
8
Junior Line WP Soil micro Segelboot RTR
Page 9
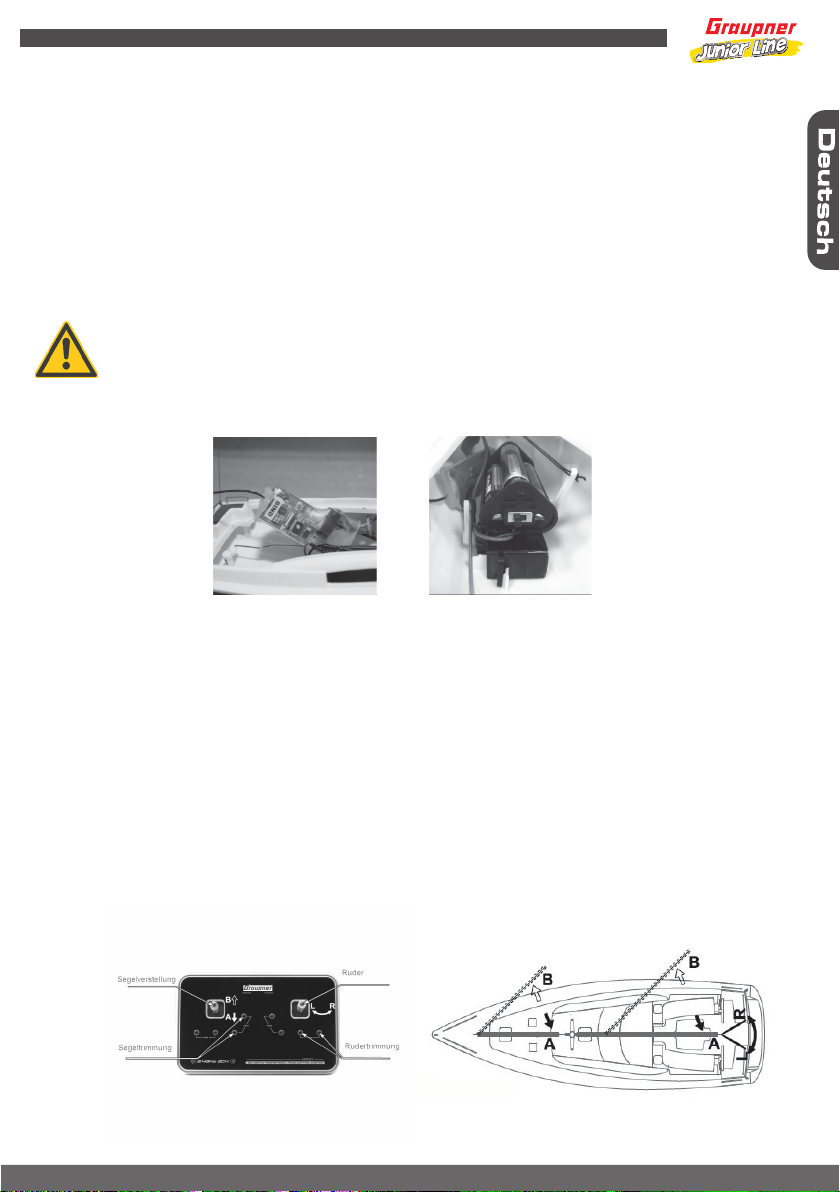
Fernsteuerung und Empfänger binden
Unter normalen Umständen sind die Fernsteuerung und der Empfänger werksseitig gebunden. Sollte
dies aus welchen Gründen auch immer nicht so sein (die LED am Empfänger leutet rot) führen Sie folgende
Schritte aus:
1. Vergewissern Sie sich, dass der linke Knüppel in der unteren Position ist.
2. Schalten Sie den Schalter am Batteriefach an, nachdem Sie die 3 „AAA“ Batterien korrekt eingelegt
haben.
3. Nehmen Sie vorsichtig die Empfängereinheit aus dem Rumpf, diese bendet sich im vorderen Teil.
4. Drücken Sie jetzt den „BIND“ Knopf am Empfänger. Nach kurzer Zeit wird die LED von rot auf grün um-
schalten und damit signalisieren, dass der Empfänger mit der Fernsteuerung verbunden ist.
5. Schieben Sie den Empfänger jetzt wieder zurück in den Rumpf. Achten Sie dabei darauf, dass die Anten-
ne im vorderen Teil bleibt und nicht zu nahe an den Batterien ist.
ACHTUNG!
Während des Bindungsvorgangs darf der Sender nicht mehr als 1 Meter vom Empfänger entfernt
sein. Es darf sich auch kein ähnliches Produkt im Umkreis von 10 Metern benden, welches
den Bindungsvorgang beeinussen kann. Wenn die grüne LED am Empfänger blinkt, wurde
der Bindungsvorgang nicht korrekt ausgeführt. Bitte wiederholen Sie die Schritte erneut.
Senderfunktionen
Bevor Sie das Modell das erste Mal benutzen, machen Sie sich mit den Senderfunktionen vertraut. Dazu
schalten Sie den Sender ein (Stellung ON) bei funktionierender Stromversorgung leuchtet die LED.
Danach schalten Sie am Batteriefach die Stromversorgung des Modells an und kontrollieren ob der
Bindungsvorgang erfolgreich war.
1. Segelverstellung: durch Bewegen des Knüppels zur Segelverstellung in Richtung (A) wird das Segel in
eine „neutrale“ Position geholt. Wenn man den Knüppel in Richtung (B) bewegt werden die Segel geöff-
net.
2. Rudersteuerung (rechts/links): durch Bewegen des Knüppels fährt das Modell Kurven. Bei einer
Rechtsbewegung nach rechts, links entsprechend. Umso stärker Sie die Drehbewegung ausführen,
umso kleiner der Kurvenradius.
HINWEIS: das Modell ist ein Segelschiff, wenn der Wind zu schwach oder zu stark ist, kann sich das
Fahrverhalten drastisch ändern! Sie sollten das Modell bei starkem Wind nicht benutzen, da es sonst
kentern kann.
Junior Line WP Soil micro Segelboot RTR
9
Page 10
Das Segeln
Segeln mit Modellyachten ist nicht schwer,
wenn man die Zusammenhänge zwischen
Windrichtung, Bootsrichtung und entsprechender Segeleinstellung kennt. Machen Sie sich
mit der Segeltheorie vertraut (z.B. durch Fachliteratur), bevor Sie das Modell das erste Mal
einsetzen. Wir können Ihnen mit den folgenden
Hinweisen nur eine kleine, grundsätzliche Hilfestellung geben.
Die verschiedenen Segelkurse (siehe Skizze/
Fachausdrücke kursiv geschrieben)
Ein Segelboot kann niemals gegen den Wind
segeln (schwarzer Pfeil (W)). In dem Bereich
von 90° (dunkelgraue Fläche) werden die Segel immer attern (killen) und so keinen Vortrieb leisten können. Erst wenn das Boot ca.
45° von der Windrichtung abgefallen ist, wird
es bei dichtgeholten Segeln zu fahren beginnen (Übergang dunkelgrau zu hellgrauer
Fläche (2a) bzw. (2b)). Diesen Kurs nennt man
am Wind segeln. Nur auf diesem Kurs und mit
dichtgeholten Segeln kann ein Segelboot durch
das sogenannte Kreuzen gegen den Wind
segeln. Es segelt dazu einen Zickzackkurs:
einige Zeit auf Backbordbug (Großsegel auf
der linken Bootseite (2a)) und dann nach einer
Wende (Boot wird mit dem Bug durch den Wind
gedreht, von Stellung (2a) über (1) auf (2b)),
einige Zeit auf Steuerbordbug (Großsegel auf
der rechten Bootsseite (2b)) usw.. Das effektive
schnelle Kreuzen mit einem Segelboot verlangt
viel Fingerspitzengefühl und Beobachtung und
gilt als eigentliche Kunst des Segelns.
Die anderen Kurse sind weniger anspruchsvoll.
Wenn der Wind von der Seite kommt, werden
die Segel gerade so weit geöffnet (geert),
dass sie nicht attern, etwa 30 bis 45° zur
Bootslängsachse. Diesen Kurs nennt man mit
halbem Wind segeln ((3a) halber Wind auf Backbordbug/(3b) halber Wind auf Steuerbordbug).
Wenn das Boot noch weiter abfällt (Abfallen: Boot mit dem Heck immer mehr in Windrichtung drehen(II)/Anluven: Boot mit dem
Bug immer mehr in Windrichtung drehen(I)) gelangt es auf den raumen Kurs, bei dem die Segel auf ca. 60° zur Bootsmitte
geert werden (4a/4b). Nur auf diesen beiden Kursen kann die max. Bootsgeschwindigkeit erreicht werden.
Segelt das Boot direkt vom Wind weg, spricht man vom vor dem Wind segeln. Hierbei sollen die Segel max. geert werden (ca.
90° zur Bootslängsachse). Durch verschiedene Druckverhältnisse der Segel wird hier das Vorsegel von alleine auf die dem
Großsegel gegenüberliegende Seite drehen. Dieser Vorgang kann durch kleine Ruder-/Kurskorrekturen bewusst hervorgerufen
werden. Wenn der Wind zu stark wird bzw. ist, kann ein Segelboot dabei sehr leicht mit dem Bug unter Wasser gedrückt werden.
Wenn das Boot von einem raumen Kurs segelnd durch Ruderlegen in die vor dem Wind Stellung gebracht wird (abfallen)
und dann durch weiteres Ruderlegen wieder auf einen raumen Kurs (ca. rechtwinklig zum alten raumen Kurs) gesteuert wird,
fährt das Boot eine Halse. Die Halse gilt als vollzogen, wenn der weit geerte Großbaum von einer Bootsseite auf die andere
Bootsseite schwingt.
Steuerverhalten/Segelverhalten
Durch wechselnde Winddrücke wird ein leistungsorientiertes Segelboot nicht von alleine seinen Kurs beibehalten, sondern z.B.
bei einer Windböe von alleine mehr oder weniger stark anluven, d.h. in den Wind drehen. Dies kann man nur verhindern, indem
rechtzeitig die Segel leicht geert werden und dazu ggf. auch leicht Gegenruder gegeben wird, bis die Böe vorbei ist. Wenn das
Boot abfallen soll, so sind neben der dazu nötigen Ruderbewegung auch gezielt simultan die Segel zu eren. Bei stärkerem
Wind fährt sonst das Boot trotz entsprechender Ruderbewegung relativ stur einfach weiter geradeaus. Bei zu kräftigem Wind
wird jedes Segelboot unkontrollierbar in den Wind drehen. Die Segeläche ist dann zu groß; wenn kein alternativ kleineres
Segel zur Verfügung steht, ist ein Segeln nicht mehr möglich.
10
Junior Line WP Soil micro Segelboot RTR
Page 11
Hinweise zum Umweltschutz
Entsorgung
Elektronische und elektrische Produkte dürfen nicht in den Hausmüll.
Entsorgen Sie das Produkt am Ende seiner Lebensdauer gemäß den geltenden gesetzlichen Vorschriften.
Wichtiger Entsorgungshinweis zu Batterien und Akkus:
Jeder Verbraucher ist nach der deutschen Batterieverordnung gesetzlich zur Rückgabe aller gebrauchten und verbrauchten Batterien bzw. Akkus
verpichtet.
Eine Entsorgung über den Hausmüll ist verboten. Alte Batterien und Akkus können unentgeltlich bei den öffentlichen Sammelstellen der Gemeinde, in unseren Verkaufsstellen und überall dort abgegeben werden, wo Batterien und Akkus der betreffenden Art verkauft werden.
Sie können die von uns gelieferten Batterien ausreichend frankiert auch nach Gebrauch an folgende Adresse zurücksenden:
Graupner/SJ GmbH
Service: Gebrauchte Batterien
Henriettenstr. 96
73230 Kirchheim unter Teck
Sie leisten damit einen wesentlichen Beitrag zum Umweltschutz!
Schadstoffhaltige Batterien bzw. Akkus sind mit den folgenden Symbolen gekennzeichnet, um auf das Hausmüll-Entsorgungsverbot hinzuweisen.
Unter dem Zeichen ist das chemische Symbol für das Schwermetall angegeben:
Batterie enthält:
1) Cd: Cadmium
2) Hg: Quecksilber
3) Pb: Blei
Jungfernfahrt
Laden Sie den Akku und testen Sie die Funktionen des Modells. Drücken Sie die Abdeckung fest, so dass
sie nicht herunterfallen kann. Nun können Sie die Jungfernfahrt starten.
Machen Sie sich bei der Jungfernfahrt erst mit dem Fahrverhalten vertraut. Testen Sie das Lenkverhalten,
den Bremsweg und die Reichweite.
Viel Spaß beim Fahren mit Ihrem Modell Soil
Notizen
11
Page 12

Operating instructions for the model Soil, Order No. 92301
Model description
• Finished model (RTR)
• 2.4 GHz frequency hopping RC system to permit the operation of multiple models in parallel
• Stable plastic hull and deck already glued together
• This model is already completely assembled including sails.
• The rudder servo is built in and connected.
• Delivered items: Hull and deck already glued together, cabin cover, sails, rudder system, ship stand, at
tached decals, small parts
Technical data
Length, about 260 mm
Breath, about 90 mm
Total height, about 435 mm
Total weight, about 175 g
Graupner/SJ GmbH manufacturer‘s declaration
Content of the manufacturer declaration
If there should be an evident material or processing defect in one of the objects marketed in the Federal
Republic of Germany and purchased by a consumer (§ 13 BGB) we, the company Graupner/SJ GmbH,
Kirchheim/Teck, accept responsibility for eliminating the object‘s defect within the scope as specied below.
The rights acquired through this manufacturer declaration cannot be asserted by the consumer when the
object‘s usage impairment is due to natural wear, use under competitive conditions, improper usage (including improper installation), or external causes.
This manufacturer declaration leaves the legal or contractual provisions for defect claims and the consumer‘s
rights in the purchase contract with respect to the seller (dealer) unaffected.
Scope of guarantee performance
In the event of a guarantee claim, we reserve the right to choose between a repair or the replacement of
defective goods. Further reaching claims, in particular claims for compensation of costs in conjunction with
the defect (e.g. assembly/disassembly costs) and remuneration for consequential damages – when legally
permitted – are excluded. Claims based on legal regulations, in particular those associated with product
liability law, are unaffected by this.
Prerequisite to guarantee performance
The purchaser must assert claim for guarantee performance in writing, which is to be accompanied by the
original purchase receipt (e.g. invoice, receipt, delivery note) and this guarantee card. The purchaser must
also return the defective goods to the following address at his/her own cost.
Fa. Graupner/SJ GmbH , Service Department,
Henriettenstr. 96, 73230 Kirchheim/Teck, Germany
The purchaser is to state in the claim the nature of the material or processing defect or the defect‘s symp-
toms specically enough that a review of our guarantee obligation is possible.
The transportation of the object from purchaser to us as well as return transportation is at the risk of the
purchaser.
1212
Junior Line WP Soil micro Segelboot RTR
Page 13

Junior Line WP Soil micro Segelboot RTR
1313
Page 14

14
Junior Line WP Soil micro Segelboot RTR
Page 15

Junior Line WP Soil micro Segelboot RTR
15
Page 16

16
Junior Line WP Soil micro Segelboot RTR
Page 17

Important safety and operating notices for the RC system
• With the transmitter switched on, briey press the Bind button on the receiver unit to bind the transmitter
and receiver. The LED that was blinking red will turn green after a successful binding process.
• Protect all units from dust, dirt, moisture, vibrations and other foreign parts. Also, never expose these units
to excessively hot or cold temperatures.
• Avoid mechanical jarring and pressure stresses. Always check units for damage to housings and cables.
• Never pull on cables to disconnect cable connectors.
• Avoid reversed polarity and short-circuit conditions of any kind as well as excessive power supply volt-age.
The devices are not protected against these conditions.
• Use only components which have been specied and released by GRAUPNER/SJ.
• GRAUPNER/SJ recommends that only dry-cell (i.e. primary cell) batteries be used as the transmitter‘s pow-
er supply. The use of rechargeable (i.e. secondary cell) batteries for this purpose is at one‘s own risk.
• Never attempt to recharge the power supply‘s dry-cell (i.e. primary cell) battery. Only rechargeable (i.e.
secondary cell) batteries may be charged.
• The battery must have an adequate charge and the remote control unit‘s range must be tested. If in doubt,
the transmitter‘s battery should be replaced when its charge state is unknown.
• If water has intruded into RC components, dry them out then send them to the responsible GRAUPNER
service center for inspection (see listing of responsible service centers at the end of these instructions).
Care and maintenance
• Clean the model after every use. Immediately remove any water which has intruded by appropriate means,
e.g. with a kitchen towel or similar. Always leave covers open/off for an extended period so re-sidual mois
ture can dry out.
• Clean the model and RC components only with suitable cleaning materials. Please contact your dealer for
information about this.
• If the model is not to be operated for a long time, all moving parts (shafts, etc.) should be taken out, cleaned
and re-lubricated. All batteries must also be removed from the model and the transmitter for separate sto
rage.
Operating instructions
Unpacking Soil
1. The model Soil is secured to the carton and its ship stand with screws.
2. Remove these 3 screws with a Phillips screwdriver as shown in the pictures below. Afterwards the model
can be taken out of its carton.
3. Remove the 2 screws on the bottom of the ship stand. Be sure to hold the model securely while do-ing this
as otherwise it can fall.
Junior Line WP Soil micro Segelboot RTR
17
Page 18

Inserting the transmitter‘s battery
1. Check to make sure the transmitter is switched off (switch position OFF) (5).
2. Remove the cover (2).
3. Push the battery compartment cover away in the direction of the arrow.
4. Insert the batteries (4x AA) with correct polarity orientation (as marked in the bottom of the battery com-
partment). (3)
5. Close the cover. (4)
Attention!
It is very important that the stick on the left is at it´s lowest position before switch on the transmitter.
Placing the battery in the model
Place the model on the delivered ship stand.
1. Turn the table carefully to open the hatch.
2. Lift up the rear part of the hatch by holding the table. Do not hold the two steering wheel, they may be
damaged.
3. Hold the front part of the hatch on both sides, carefully pull the hatch up a little bit, then you could remove
the hatch by pulling.
4. Now inatll 3 pcs of „AAA“ alkaline batteries to the reciever battery box, notice the correct polarity.
5. Push down the left stick of the transmitter till the end, then switch on the transmitter power.
6. Switch on the plug on the battery box. Observe the reciever green light soil green, if it soil red, you need to
bind the transmitter with the reciever, detaild information is given in next step.
7. After making sure the green light is on, your model is ready to use. Place the hatch again and x with the
table.
Note: Pay attention when opening the cabin that neither of the ship‘s 2 wheels are broken off. Always
remove the cover carefully!
18
Junior Line WP Soil micro Segelboot RTR
Page 19

Transmitter and reciver binding
Under normal circumstances, the remote control and the receiver are binded from the factory. Should
this out for whatever reason may not be like this (the LED on the receiver glows red), perform the following
steps:
1. Make sure that the left stick is in the lower position.
2. Turn the switch on the battery compartment on after you have inserted the 3 „AAA“ batteries correctly.
3. Carefully remove the receiver unit from the hull, this is located in the front.
4. Now press the „BIND“ button on the receiver. After a short time, the LED will turn from red to green and
thus indicate that the receiver is connected to the remote control.
5. Slide the receiver now back in the fuselage. Make sure that the antenna in the front part remains and is not
too close to the battery.
ATTENTION!
During the binding process, the transmitter must not be more than 1 meter away from the
receiver. It also should be no similar product located in the range of 10 meters, which
may affect the binding process. If the green LED ashes on the receiver
the binding process is not performed correctly. Please repeat the steps again.
Transmitter functions
When the transmitter is switched on (switch position ON) and the power supply is operating, the LED will be
lit.
1. Sail adjustment: sails can be hauled into a „neutral“ position by moving the sail adjustment joystick in
direction (A). The sails will open when the joystick is moved in direction (B).
2. Rudder control (left/right): the model will make curves by moving the joystick. Moving the joystick to the
right will cause the model to turn right, moving the joystick left will cause the model to turn left. The more
turn movement executed, the smaller the model‘s curve radius becomes.
NOTE: this is a model sailing vessel; if the wind is too weak or too strong, navigation behavior can change
drastically! You should not use the model in strong wind because it can capsize.
Junior Line WP Soil micro Segelboot RTR
19
Page 20

Sailing
Sailing model yachts is not difcult if one understands the relationships between wind direction,
boat direction and respective sail settings.
Familiarize yourself with sailing theory (e.g.
via trade literature) before operating the model
for the rst time. The following notices will only
provide you with a small basic introduction.
The various sailing courses are shown in the
sketch along with their italicized sailing terms.
A sailboat can never sail against the wind (black
arrow (W)). Within a range of 90° to the wind
(darkly shaded area) the sails will always luff
(shake) and thus no forward motion can be
generated. Only when the boat is about 45° off
of the wind direction with tightly hauled sails
will it begin to sail forward (transition between
darkly and lightly shaded areas (2a) and (2b)).
This course is known as sailing close to the
wind. Only on this course, and with tightly
hauled sails, can a sailboat „beat“ or „work“
against the wind with a sailing technique known
as „tacking“. „Tacking“ is a method of sailing a
zigzag course; part of the time to port (mainsail
on the left side of the vessel (2a)) then after a
tack (turning the boats bow through the eye of
the wind, from position (2a) through (1) to (2b))
to starboard for a while (mainsail on the right
side of the vessel (2b)) and so on. Effective,
rapid tacking with a sailboat requires a lot of
sensitivity and observation. It is deemed to be
the essence of sailing.
The other courses are less demanding. When
the wind comes from the side, the sails are
opened (slack-ened) just wide enough so they
do not luff, about 30 to 45° with respect to the
vessel‘s keel. This course is known as beam
reach ((3a) beam reach to port/(3b) beam reach
to starboard).
When the boat bears away more (bear away:
turning the boat‘s stern increasingly toward the direction of the wind (II) / to head up: turning the boat‘s bow is increasingly in
the direction of the wind (I)) it will attain a broad reach course at which the sails will be eased to about 60° to the boat‘s midship
(4a/4b). Only on these two courses is it possible for a sailboat to attain its maximum speed.
If the boat is sailing directly with the wind, this is referred to as „running“. In this case the sail should be opened completely
(about 90° to the vessel‘s keel). As a consequence of different pressures on the sails, the foresail will turn by itself to the side
opposite of the mainsail. This process can be deliberately induced with small rudder/course corrections. If the wind is too
strong it can easily press the sailboat‘s bow under water.
If the boat is sailing a reach and is brought into a windward position (bear away) by rudder movement and then, with additional
rudder movement, again brought into a reach course (at about a right angle to the old reach course), the boat has made a jibe.
The jibe is considered complete when the wide open main boom swings from one side of the boat to the other.
Control behavior / sailing behavior
A performance-oriented sailing vessel will not be able to maintain its course by itself through changing wind pressures but
rather, e.g. for a gust of wind, will head up more or less severely, i.e. turn into the wind. This can only be prevented by timely
easing of the sails slightly and, if necessary, also giving some counteraction with the rudder until the gust has passed. If the
boat is bearing away, then in addition to necessary rudder movement the sails must also be eased at the same time. Otherwise the boat will quite stubbornly continue to sail directly ahead despite appropriate rudder movement. Every sailboat will
uncontrollably turn into the wind if the wind is too strong. The sail is then too large; if no smaller sail is available then sailing is
no longer possible.
20
Junior Line WP Soil micro Segelboot RTR
Page 21

Environmental protection notices
Disposal
Electronic and electric products may not be thrown away with household waste.
Dispose of the product at the end of its service life according to applicable legal regulations.
Important disposal notice for batteries:
Some countries have laws requiring that all used batteries be turned over to an authorized collection center.
Disposing of batteries along with common household garbage is forbidden. Old batteries can be turned into communal collection centers for
disposal at no charge or they can be returned to one of our dealerships or anywhere else where batteries of that given type are sold.
Used batteries we have delivered can also be sent back to us, at your cost, through the mail. Use the return address below:
Graupner/SJ GmbH
Service: Used batteries
Henriettenstr. 96
73230 Kirchheim unter Teck, Germany
This represents an essential contribution to environmental protection.
Batteries containing hazardous materials are marked with one of the symbols shown below in order to call attention to the ban on their disposal
with household waste.
Beneath each symbol is the chemical abbreviation for the heavy metal substance contained.
Battery contains:
1) Cd: cadmium
2) Hg: quicksilver (mercury)
3) Pb: lead
Maiden voyage
Charge the battery and test the model‘s functions. Press the cabin securely into place so that it will not fall
off. Now the maiden voyage can begin.
Take the time during the maiden voyage to become familiar with the model‘s maneuvering behavior. Test the
steering behavior, braking overtravel and RC range.
Now have a lot of fun with your model Soil.
Notes
Junior Line WP Soil micro Segelboot RTR
21
Page 22

Notice d‘utilisation du modèle Soil, Best.-Nr. 92301
Description du modèle
Français
• Modèle terminé (RTR)
• Système de fréquence Hopping en 2,4 GHz, on peut donc évoluer avec plusieurs modèles en même temps
• Coque et pont rigides, collés
• Le modèle est déjà monté, avec les voiles
• Le servo du gouvernail est monté est branché
• Contenu de la livraison: Coque avec pont collé, Cockpit, voiles, gouvernail, support, décoration posée,
petites pièces diverses
Caractéristiquestechniques
Longueur hors tout 260 mm
Largeur 90 mm
Hauteur totale 435 mm
Poids total 175 g
Déclaration fabricant de la société Graupner/SJ GmbH
Contenu de la déclaration fabricant
Si une pièce, que nous avons mise sur le marché allemand, devait présenter un défaut ou un vice caché
(conformément au § 13 BGB ), nous, Sté Graupner/SJ GmbH, Kirchheim/Teck,Henriettenstraße 96 D-73230
Kirchheim/Teck, nous nous engageons à la remplacer dans le cadre ci-dessous.
Le consommateur (client) ne peut faire valoir les droits de cette déclaration, si la pièce en question a fait
l’objet d’une usure normale, si elle a été utilisée dans des conditions anormales, si son utilisation n’est pas
conforme (y compris le montage) ou si elle a été sujette à des inuences extérieures
Cette déclaration ne change en rien les droits du consommateur (client) vis à vis de son détaillant
(revendeur).
Etendue de la garantie
Dans le cas d’une prise en charge au titre de la garantie, nous nous réservons le droit, soit de remplacer
la pièce en question, soit de la réparer. D’autres revendications, liées à la pièce défectueuse et un dédommagement des dégâts engendrés par cette pièce (par ex. les coûts de montage /démontage) et autres
conséquences, sont - dans la mesure ou cela est autorisé par le législateur - exclues. Les droits issus des
différentes législations, en particulier, les régles de responsabilités au niveau du produit, ne sont pas remises
en cause
Conditions de garantie
L’acheteur peut faire valoir la garantie, par écrit, sur présentation de la preuve d’achat (par ex. facture, quittance, bon de livraison). Les frais d’envoi, à l’adresse ci-dessous, restant à sa charge.
Fa. Graupner/SJ GmbH, Serviceabteilung,
Henriettenstr.96, D 73230 Kirchheim/Teck
Par ailleurs, l’acheteur est prié de décrire le défaut ou dysfonctionnement constaté de la manière la plus explicite et la plus concrètre posssible, de sorte que nous puissions vérier la possibilité de la prise en charge
de la garantie.
Les marchandises voyagent toujours aux risques et périls du client, qu’il s’agisse de l’expédition du client
vers nos services ou l’inverse.
22
Junior Line WP Soil micro Segelboot RTR
Page 23

Français
Junior Line WP Soil micro Segelboot RTR
23
Page 24

Français
24
Junior Line WP Soil micro Segelboot RTR
Page 25

Junior Line WP Soil micro Segelboot RTR
25
Page 26

Français
26
Junior Line WP Soil micro Segelboot RTR
Page 27

Consignes importantes pour l’utilisation en toute sécurité de votre ensemble RC
• Pour assigner (procédure Binding) l‘émétteur et le récepteur entre eux, appuyez brièvement sur la touche
Bind du récepteur, lorsque l‘émetteur est allumé . La LED, qui auparavant clignotait au rouge, passera au
vert dès que la procédure Binding est réussie.
• Protégez tous les éléments contre la poussière, les saletés, l’humidité, les vibrations, et autres corps étran
gers . Ne les exposez jamais aux fortes chaleurs ni aux froids intenses.
• Evitez les coups et les écrasements. Vériez régulièrement si les éléments ne sont pas endommagées au
niveau des prises et des cordons.
• Pour déconnecter les prises, ne jamais tirer sur les ls.
• Evitez les inversions de polarité et les court-circuits de toute sorte, ainsi que des tensions d’alimentation trop
élevées. Les appareils ne sont pas protégés contre cela.
• N’utilisez que des composants spéciques et autorisés par GRAUPNER.
• Pour l’alimentation de l’émetteur, GRAUPNER recommande de n’utiliser que des piles sèches. L’utilisation
d’accus rechargeables est possible, mais reste à la seule initiative de l’utilisateur.
• Ne jamais recharger les piles sèches de l‘alimentation. Seuls les accus sont rechargeables.
• Les piles doivent être sufsamment chargées et un essai de portée radio doit être effectué. En cas de doute,
et par mesure de sécurité, remplacez les piles de l’émetteur et de la réception, notamment, lorsque que l’on
ne connait pas l’état de charge des piles.
• Si des composants RC ont pris l’eau, séchez-les et envoyez-les, pour contrôle, dans un des centres SAV
agrées par GRAUPNER, (voir liste en n de cette notice).
Maintenance et entretien
• Après chaque utilisation, nettoyez le modèle. Retirez immédiatement l’eau qui à pu s’inltrer avec de
l’essuie-tout ou chiffon similaire. Laissez le tout ouvert sufsamment longtemps pour que l’humidité restante
puisse sécher.
• Ne nettoyer le modèle et l‘émetteur qu’avec des produits appropriés Renseignez-vous auprès de votre
détaillant / revendeur.
• Si le modèle doit être remisé, stocké pour une longue période, il faut démonter toutes les pièces en mouve
ment (arbre, etc), les nettoyer et les graisser. Accus et piles doivent également être retirés de l’émetteur et
du modèle, pour être stockés à part.
Français
Notice d‘utilisation
Déballez le modèle Soil
1. Le modèle est xé avec des vis sur le carton et sur le support.
2. Avec un tournevis à empreinte cruciforme enlevez les trois vis comme indiqué sur les photos ci-dessous,
puis retirez le modèle du carton.
3. Enlevez les deux vis du dessous du support en maintenant impérativement fermement le modèle, sinon, il
risque de tomber.
Junior Line WP Soil micro Segelboot RTR
27
Page 28

Mise en place des piles de l‘émetteur
1. Vériez si l’émetteur est bien coupé (position OFF) (5).
Français
2. Retirez le cache (2)
3. Faites glisser le couvercle vers le bas, dans le sens de la èche.
4. Montez les piles (4 x AA) en respectant la polarité (la polarité correcte est marquée dans le fond du loge
ment). (3)
5. Remontez le couvercle. (4)
Attention!
Il est très important que le bâton sur la gauche est à son niveau le plus bas avant de mettre l ‚émetteur.
Mise en place de la pile dans le modèle
Placez le modèle sur le stand de navire livré.
1. Tournez la table soigneusement pour ouvrir la trappe.
2. Soulevez la partie arrière de la trappe par la tenue de la table. Ne pas tenir les deux au volant, ils peuvent
être endommagés.
3. Maintenez la partie avant de la trappe des deux côtés, retirez soigneusement la trappe un peu, alors vous
pourriez enlever la trappe en tirant.
4. Maintenant inatll 3 pièces de piles alcalines „AAA“ à la boîte de batterie de récepteur, notez la polarité.
5. Abaissez le stick gauche de l‘émetteur jusqu‘à la n, puis basculer sur la puissance de l‘émetteur.
6. Mettez le bouchon sur le boîtier de la batterie. Observez le récepteur vert feu vert du sol, s‘il rouge du sol,
vous devez lier l‘émetteur avec le récepteur, l‘information est donnée detaild à l‘étape suivante.
7. Après s‘être assuré que le voyant vert est allumé, votre modèle est prêt à être utilisé. Replacez la trappe et
le xer avec la table.
Note: Faites attention lors de l‘ouverture de la cabine qu‘aucun des 2 roues du navire sont rompues. Tou
jours retirer le couvercle avec précaution!
28
Junior Line WP Soil micro Segelboot RTR
Page 29

Émetteur et de liaison reciver
Dans des circonstances normales, la télécommande et le récepteur sont binded de l‘usine. Si
ceci pour une raison quelconque ne peut pas être comme ça (la LED du récepteur s‘allume en rouge), effectuez les étapes suivantes:
1. Assurez-vous que le stick gauche est en position basse.
2. Mettez l‘interrupteur sur le compartiment des piles après avoir inséré les batteries 3 „AAA“ correctement.
3. Retirez délicatement le récepteur de la coque, il est situé à l‘avant.
4. Maintenant, appuyez sur le bouton „BIND“ sur le récepteur. Après un court instant, la LED passe du rouge
au vert et indique que le récepteur est branché à la télécommande ainsi.
5. Glissez le récepteur maintenant de retour dans le fuselage. Assurez-vous que l‘antenne dans la partie avant
reste et n‘est pas trop près de la batterie.
ATTENTION!
Pendant le processus de liaison, l‘émetteur ne doit pas être supérieure à 1 mètre de distance du ré
cepteur. Il devrait également être aucun produit similaire situé dans la plage de 10 mètres, qui peuvent
affecter le processus de liaison. Si la LED verte clignote sur le récepteur
le processus de reliure n‘est pas effectuée correctement. S‘il vous plaît répéter les étapes à nouveau.
Fonctions émetteur
Allumé (position ON), et si l’alimentation est correcte, la LED reste allumée.
1. Réglage des voiles: En déplaçant le mache de commande de la voile en direction de A, la voile est ramenée
en position „neutre“ . Lorsque vous déplacez le manche vers B, vous ouvrez la voile.
2. Commande du gouvernail (droite/gauche): En bougeant le manche, le modèle virera de bord . Si vous
le mettez à droite, il ira à droite, sur la gauche, il ira à gauche. Plus l’amplitude de la rotation du volant sera
importante, plus le rayon du virage sera petit,
REMARQUE Ce modèle est un voilier et si le vent est trop faible ou trop fort, le comportement peut se
modif ier du tout au tout! Evitez de sortir avec votre modèle si le vent est trop fort, il pourrait chavirer.
Français
Junior Line WP Soil micro Segelboot RTR
29
Page 30

La pratique de la voile
La pratique de la voile n’est pas bien compli-
quée à partir du moment ou l’on sait comment
Français
positionner les voiles en fonction de la
direction et vent et de la direction du bateau.
Familiarisez-vous avec la théorie de la voile
(par ex. avec des revues spécialisées) avant
de mettre le voilier à l’eau pour la première
fois. Avec les quelques conseils qui suivent,
nous ne pouvons vous apporter qu’une petite
aide pour les premiers pas.
Les différents manoeuvres en voile (voir croquis/les termes spéciques sont en italique)
Un voilier ne peut jamais naviguer directe-
ment face au vent (èche noire (W)). Dans
la plage des 90° (zone hachurée grise) les
voiles otteront toujours au vent (faseyer) et
elles ne pourront pas faire avancer le voilier.
Ce n’est que lorque le bateau se trouve à 45°
par rapport à la direction du vent et lorsqu’on
ramène les voiles qu’il commencera à avancer
(passage de la zone en gris foncé à la zone
en gris clair (2a) ou (2b). On appelle cela
remonter le vent. Ce n’est que comme cela,
et avec les voiles bordées,qu’un voilier peut
louvoyer et remonter face au vent. Il navigue
alors en zig-zag: un certain temps à bâbord,
(la grand’voile est à gauche du bateau (2a)),
puis, après un changement de cap, (l’avant
du bateau passe dans le vent et passe de la
position (2a) à la position (2b), en passant par
(1) il navigue un certain temps à tribord (la
grand’voile est alors à droite du bateau (2B)),
et ainsi de suite. Le louvoyement rapide avec
un voilier demande beaucoup de doigté, et un
sens de l’observation aigü, en fait, tout l’art de
la voile, c’est cela.
Les autres manoeuvres sont moins exigean-
tes. Lorsque le vent est de travers, il suft
d’ouvrir les voiles (choquer) juste ce qu’il faut pour qu’elle ne faseyent pas, env. 30 à 45° par rapport à l’axe longitudinal du
bateau. On appelle cela naviguer par vent de travers ((3a) vent de travers bâbord (3b) vent de travers tribord).
Lorsque le voilier passe encore davantage en vent arrière (virer en vent arrière: lorsque l’arrière du bateau se met de plus en
plus dans le vent (II)/virer par vent de face: lorque l’avant du bateau se met de plus en plus dans le vent (I)), il suft d’ouvrir les
voiles de 60° env. par rapport à l’axe longitudinal du bateau(4a/4b). Seules ces deux manoeuvres permettent d’atteindre la
vitesse maximale du bateau.
Si le vent pousse le bateau, on appelle cela avoir le vent en poupe, ou être au portant. Dans ce cas, il faut ouvrir les voiles au
maximum (env.90° par rapport à l’axe du bateau). Compte tenu des différentes forces exercées par le vent dans les voiles,
la voile avant, le foc, et la grand’voile s’ouvrent automatiquement en sens contraire. On peut provoquer cela par de petites
corrections ou changement de cap au gouvernail. Si le vent est vraiment trop fort, ou s’il se renforce,l’avant du bateau peut
rapidement s’enfoncer sous l’eau.
Lorsque le bateau est dévié de sa trajectoire et amené, par une action sur le gouvernail, face au vent (virer par vent arrière) et
lorsqu’on le remet sur une trajectoire avec le gouvernail (perpendiculaire par rapport à l’ancienne trajectoire), on appelle cela
virer par vent arrière. Ce virage peut être considéré comme effectué quand la bôme de la grand’voile passe de l’autre coté du
bateau.
Manoeuvres/Comportement
Les pressions exercées par le vent dans les voiles n’étant pas constantes, le bateau ne pourra pas maintenir son cap tout
seul, mais virer, par ex. en cas de bourrasques, plus ou moins violemment face au vent. On ne peut éviter cela qu’en ouvrant
légèrement les voiles et en contrant légèrement au gouvernail, et ce, jusqu’à ce que la rafale de vent soit passée. Si le bateau
doit virer par vent arrière, il faut, en plus du gouvernail, ouvrir simultanément les voiles. Si le vent est vraiment trop fort, malgré
les actions sur le gouvernail, le ba-teau poursuivra malgré tout sa trajectoire. Par vent fort, tout voilier se mettra de manière
incontrôlée dans le vent. La surface de voile est alors trop importante; et si vous n’avez pas un autre jeu de voiles plus petit,
toute navigation est à proscrire.
30
Junior Line WP Soil micro Segelboot RTR
Page 31

Protection de l‘environnement
Recyclage
En n de vie, les composants électriques et électroniques ne peuvent pas être jetés aux déchets ménagers.
Débarassez-vous du produit en n de vie, conformément à la législation en vigueur.
Remarque importante concernant le recyclage des piles et accus:
Selon la législation allemande, chaque utilisateur est tenu de déposer les piles ou accus usagés dans un centre de tri en vue de leur recyclage.
Il est interdit de s‘en débarasser en les jetant aux ordures ménagères. Les piles et accus usagés sont à déposer dans une collecte de votre com-
mune, dans un de nos points de vente ou dans tout magasin qui commercialise ce type de piles ou accus ..
Vous pouvez également nous retourner les piles que nous vous avons fournies, après usage, à l’adresse ci-dessous, sufsamment affranchies:
Graupner/S GmbH
Service: Gebrauchte Batterien
Henriettenstr. 96
73230 Kirchheim unter Teck
Vous participez ainsi, de manière signicative, à la protection de l’environnement!
Les piles ou accus contenant des produits dangereux sont marqués des symboles ci-dessous pour attirer l’attention sur l’interdiction formelle de
les jeter aux ordures.
Sous le sigle, gure le symbole chimique des métaux lourds:
La batterie contient:
1) Cd: Cadmium
2) Hg: Mercure
3) Pb: Plomb
Première mise à l’eau
Chargez l‘accu et vériez le bon fonctionnement de toutes les fonctions du modèle. Vériez également la
bonne assise et la xation du Cockpit. Vous voilà prêts pour les premiers essais
Familiarisez-vous d’abord, au cours de cette „première“, avec le comportement et les réactions du modèle.
Testez ses capacités à virer de bord, les distances nécessaires à l’immobilisation et la portée.
Français
Nous vous souhaitons Bon Vent avec votre modèle Soil
Remarques
Junior Line WP Soil micro Segelboot RTR
31
Page 32

32
Junior Line WP Soil micro Segelboot RTR
Page 33

Konformitätserklärung gemäß dem Gesetz über Funkanlagen und
Telekomunikationsendeinrichtungen (FTEG) und der Richtlinie 1999/5/EG (R&TTE)
Declaration of Conformity in accordiance with the Radio and Telecomunikations Terminal Equipment
Graupner/SJ GmbH
Henriettenstraße 96
D-73230 Kirchheim/Teck
Act (FTEG) and Directive 1999/5/EG (R&TTE)
erklärt, dass das Produkt:
declares that the product
Fernsteuerung für Modell #92301 Segelboot RTR
Verwendungszweck: Funkanlage zur Fernsteuerung von Modellen
Intended purpose Radio equipment for remote controlling of models
Geräteklasse: 1
Equipment class
bei bestimmungsgemäßer Verwendung den grundlegenden Anforderungen des § 3 und den
übrigen einschlägigen Bestimmungen des FTEG (Artikel 3 der R&TTE) entspricht.
complies with the essential requirements of § 3 and the other relevant provisions of the FTEG (Article 3 of the
R&TTE Directive), when used for its intended purpose
Angewendete harmonisierte Normen:
Harmonised standards applied
EN 60950-1: 2006 +
A11:2009
EN 301 489-1 V1.8.1
EN 301 489-3 V1.4.1
EN
300 440-1 V1.6.1
EN
300 440-2 V1.4.1
Gesundheit und Sicherheit gemäß § 3 (1) 1. (Artikel 3 (1) a))
Health and safety requirements pursuant to § 3 (1) 1. (Article 3 (1) a))
Schutzanforderungen in Bezug auf die elektromagnetische
Verträglichkeit § 3 (1) 2, Artikel 3 (1) b))
Protection requirement concernig electromagnetic compatibility
§ 3 (1) 2, Artikel 3 (1) b))
Maßnahmen zur effizienten Nutzung des Frequenzspektrums
§ 3 (2) (Artikel 3 (2))
Measures for the efficient use of the radio frequency spectrum
§ 3 (2) (Article 3 (2))
Kirchheim, 24. April 2013
Ralf Helbing, Geschäftsführer
Ralf Helbing, Managing Director
Graupner/SJ GmbH Henriettenstraße 96 D-73230 Kirchheim/Teck Germany
Tel: 07021/722-0 EMail: info@graupner.deFax: 07021/722-188
Junior Line WP Soil micro Segelboot RTR
33
Page 34

Notizen
34
Junior Line WP Soil micro Segelboot RTR
Page 35

Notizen
Junior Line WP Soil micro Segelboot RTR
35
Page 36

Graupner/SJ GmbH
Henriettenstrasse 96
73230 Kirchheim/Teck
Germany
V1.1 SV-7/2014
 Loading...