

Page 1
Anleitung
INNOVATION & TECHNOLOGY
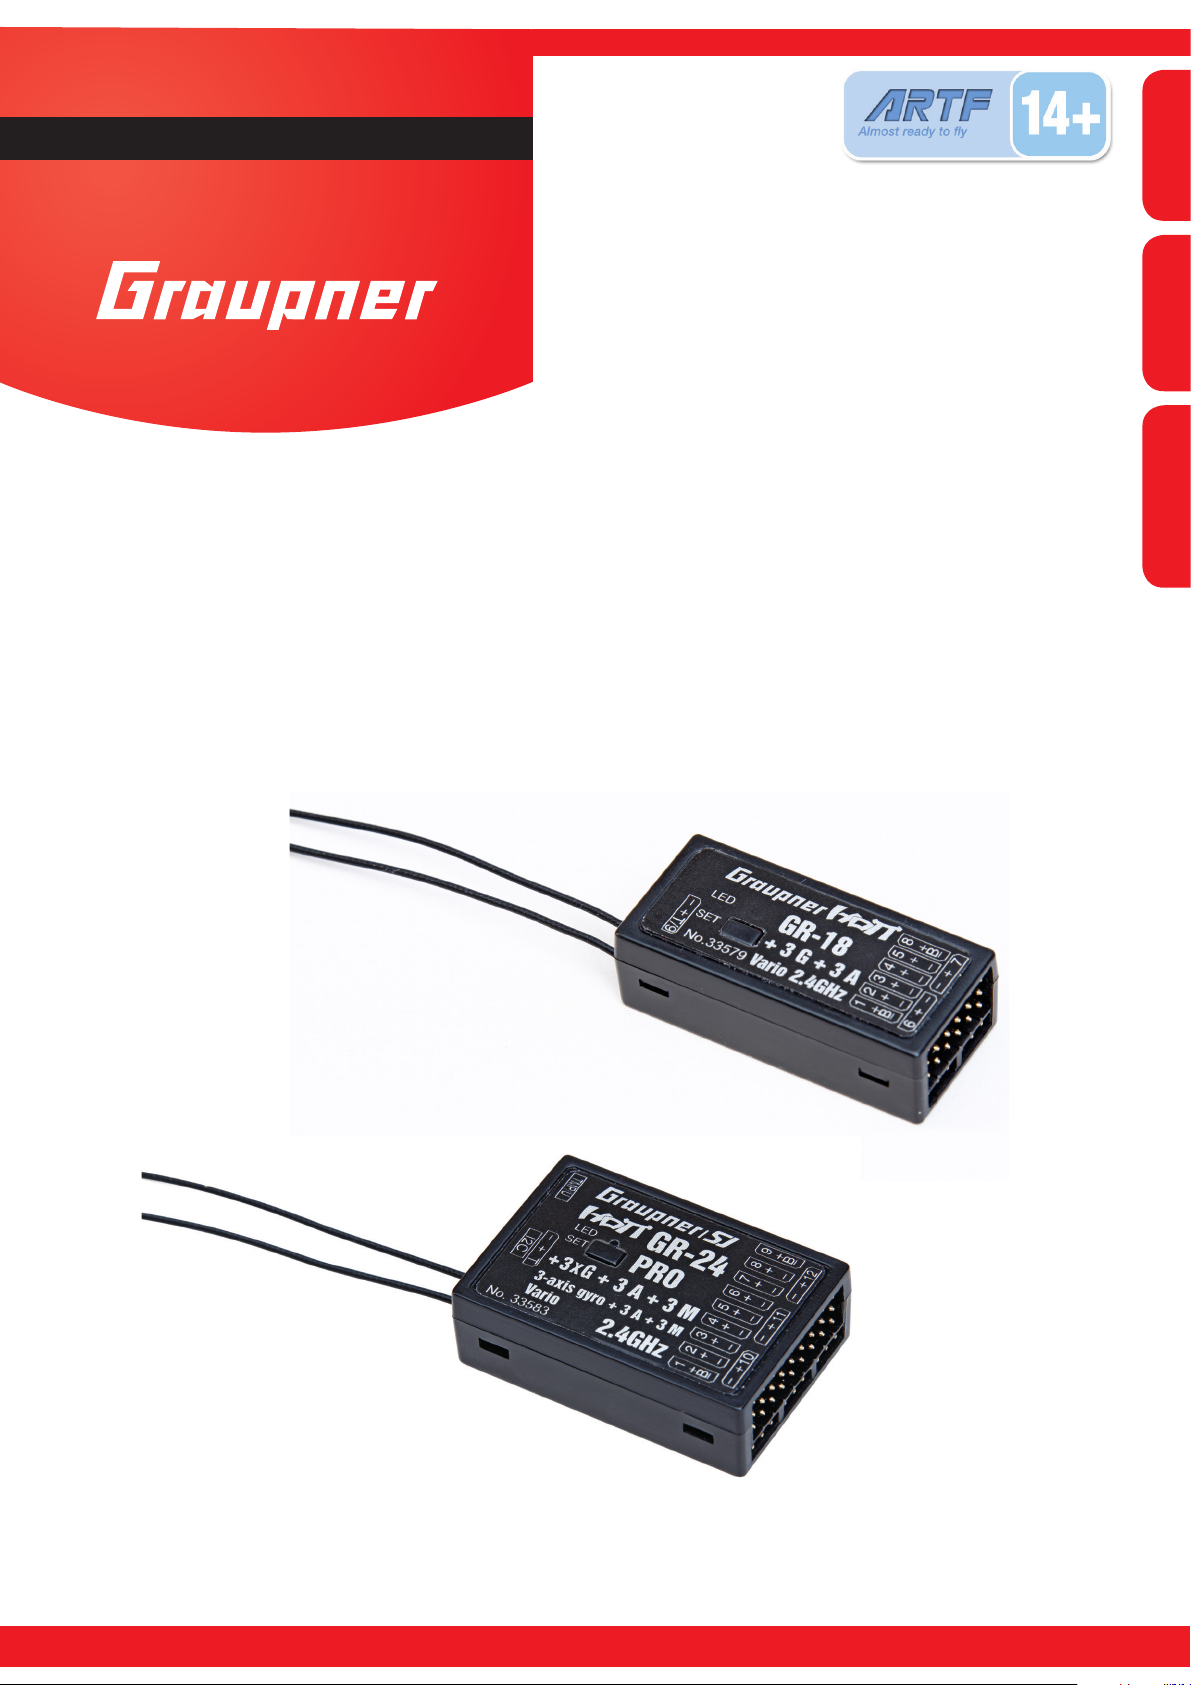
33579 Empfänger GR-18 3xG+3A+Vario
33583 Empfänger GR-24 PRO 3xG+3A+3M+Vario
Deutsch
English
ais
ç
Fran
GRAUPNER/SJ GmbH. Henriettenstr.96, KG D-73230 KIRCHHEIM/TECK GERMANY
2014/03/04
Page 2

Deutsch
Inhaltsverzeichnis
Vorwort ................................................................................ 3
Bestimungsgemäße Verwendung ..................................... 3
Bedeutung der Symbole .................................................... 3
Warn- und Sicherheitshinweise ........................................ 4
Generelle Hinweise............................................................. 4
Binding ................................................................................ 5
Einbau im Modell (Fläche) ................................................. 6
Einbau im Modell (Heli) ...................................................... 6
Anschluss ........................................................................... 7
Stromversorgung ............................................................... 7
Telemetrie (T/9 bei GR-18) ................................................. 7
EMPFÄNGER EINSTELLMENÜ FLÄCHE .......................... 7
Initialisierung des Kreisels (Fläche) ................................. 9
Freie Mischer ...................................................................... 9
Zuordnen der Kreiselachsen ........................................... 10
Einstellung des Servolimit der Kanäle ........................... 12
Programmierung der Gyro-Einstellungen (Fläche) ....... 12
Display Kreiseleinstellungen........................................... 12
Programmieren mit Proportionalgebern ........................ 13
Programmieren ohne Proportionalgeber ....................... 13
EMPFÄNGER EINSTELLMENÜ HELI .............................. 14
Montage des Empfängers ................................................ 15
Vorbereitung des Helikopters .......................................... 15
Voreinstellungen am Sender ........................................... 15
Initialisierung des Kreisels (Heli) .................................... 16
Grundeinstellungen (Vorgehensweise) .......................... 16
Grundeinstellung Regel ................................................... 16
Achsenzuordnung ............................................................ 18
Taumelscheiben Einstellung ohne Expert.mode ........... 20
Taumelscheiben Einstellung mit Expert.mode .............. 20
Heckrotor Einstellung ohne Expertenmode ................... 21
Heckrotor Einstellung mit Expertenmode ..................... 21
Firmware Update .............................................................. 22
Herstellererklärung der Firma Graupner/SJGmbH ........ 24
Konformitätserklärung ..................................................... 25
Garantie ............................................................................. 26
Entsorgungshinweis ........................................................ 27
Page 3
innovation & technologie
!
Vorwort
VIELEN DANK,
dass Sie sich für das Graupner/SJ HoTT 2.4 System entschieden haben. Bitte lesen Sie vorab die gesamte
Bedienungsanleitung, bevor Sie versuchen, das Graupner HoTT 2.4 System zu installieren bzw. einzusetzen.
• Der Empfänger sorgt für die Stabilisierung des Flugmodells bei schwierigen Windverhältnissen für bis zu 3 Achsen
• Natürliches Flugverhalten durch proportionale Kreiselausblendung
• Sehr gute Stabilisierung für sauber geogene Flugguren
• Durch den 3-Achs Kreisel lassen sich auch schwierig zu beherschende Kunstugmodelle sehr gutmütig iegen
und Kunstug wird extrem vereinfacht
• Flugguren lassen sich deutlich sauberer iegen
• Einfache Einstellung der Kreiselzuweisung
• Einstellung der Parameter über die HoTT-Telemetrie
• Höhensensor für Variofunktion und Höhe
Achtung!
Vor der Montage und Inbetriebnahme des Empfängers sollten Sie unbedingt die Anleitung
vollständig lesen.
Deutsch
Bestimungsgemäße Verwendung
Der Empfänger ist ausschließlich für den Einsatz in funkferngesteuerten Modellen vorgesehen, ein anderweitiger Betrieb
ist nicht zulässig und kann zu Schäden am Empfänger oder Modell oder schweren Verletzungen führen.
Achtung: Die Empfänger dürfen nur in Elektrohelimodellen verwendet werden!
Für jegliche unsachgemäße Handhabung außerhalb dieser Bestimmungen wird keine Garantie oder Haftung
übernommen.
Nicht geeignet für Kinder unter 14 Jahren. Dies ist kein Spielzeug!
Zusätzlich ist er mit einer Telemetriefunktion ausgestattet, diese ist nur in Kombination mit einem Graupner/SJ HoTT
2.4 System verfügbar. Falls Sie kein Graupner/SJ HoTT 2.4 System besitzen, wird der Empfänger nicht funktionieren.
Bitte lesen Sie vorab die gesamte Anleitung bevor Sie versuchen, den Empfänger zu installieren bzw. einzusetzen.
Diese Bedienungsanleitung ist Bestandteil dieses Produkts. Sie enthält wichtige Hinweise zum Betrieb und Handling
der Empfänger. Bewahren Sie die Bedienungsanleitung deshalb auf und geben sie bei Weitergabe des Produkts an
Dritte mit. Nichtbeachtung der Bedienungsanleitung und der Sicherheitshinweise führen zum Erlöschen der Garantie.
Graupner arbeitet ständig an der Weiterentwicklung sämtlicher Produkte; Änderungen des Lieferumfangs in Form,
Technik und Ausstattung müssen wir uns deshalb vorbehalten.
Bitte haben Sie Verständnis dafür, dass aus Angaben und Abbildungen dieser Bedienungsanleitung keine Ansprüche
abgeleitet werden können.
Bewahren Sie deshalb diese Bedienungsanleitung zum Nachlesen auf!
Bedeutung der Symbole
Achtung!
Dieses Symbol hebt Verbote hervor welche unbedingt durch den Anwender eingehalten werden
müssen! Jegliche Missachtung der nebenstehenden Verbote kann die Funktionsfähigkeit sowie
die Sicherheit des Betreibers beeinträchtigen.
Achtung!
Dieses Symbol hebt folgende Hinweise hervor welche durch den Anwender unbedingt beachtet
werden müssen! Jegliche Missachtung der nebenstehenden Hinweise, kann die sichere Funktion
wie die Sicherheit des Betreibers selbst beeinträchtigen.
Dieses Symbol hebt Hinweise hervor welche durch den Betreiber unbedingt beachtet werden
sollten um einen sicheren Betrieb des Gerätes zu gewährleisten.
3
Page 4
Deutsch
Warn- und Sicherheitshinweise
Warnung!
Das Betreiben des Empfängers unter Einuss von Medikamenten, Alkohol, Drogen, usw. ist verboten.
Achtung!
Jegliche Abweichung von der Anleitung wirkt sich eventuell auf die Funktion und Betriebssicherheit des Empfängers aus und muss unter allen Umständen vermieden werden.
Achtung!
Die Inbetriebnahme und der Betrieb des Empfängers erfolgt einzig und allein auf Gefahr des
Betreibers. Nur ein vorsichtiger und überlegter Umgang beim Betrieb schützt vor Personen- und
Sachschäden.
Achtung!
Nicht geeignet für Kinder unter 14 Jahren!
Achtung!
Schützen Sie den Empfänger vor Staub, Schmutz, Feuchtigkeit und anderen Fremdteilen.
Setzen Sie den Empfänger niemals übermäßiger Vibration, Hitze oder Kälte aus.
Achtung!
Achten Sie auch während der Programmierung unbedingt darauf, dass ein angeschlossener Verbrennungs- oder Elektromotor nicht unbeabsichtigt anläuft.
Achtung! Vermeiden Sie Stoß- und Druckbelastung. Überprüfen Sie den Empfänger stets auf
Beschädigungen an Gehäusen und Kabeln. Beschädigte oder nass gewordene Empfänger, selbst
wenn sie wieder trocken sind, nicht mehr verwenden!
Achtung!
Achten Sie beim Verlegen der Kabel darauf, dass diese nicht auf Zug belastet, übermäßig geknickt oder gebrochen sind. Auch sind scharfe Kanten eine Gefahr für die Isolation.
Achtung!
Achten Sie darauf, dass alle Steckverbindungen festsitzen. Beim Lösen der Steckverbindung
nicht an den Kabeln ziehen.
Achtung!
Der Empfänger darf an keiner Stelle unmittelbar am Rumpf oder Chassis anliegen, da sonst Motorerschütterungen oder Landestöße direkt auf ihn übertragen werden.
Achtung!
Es dürfen keinerlei Veränderungen an dem Empfänger durchgeführt werden. Andernfalls erlischt
die Zulassung und Sie verlieren jeglichen Versicherungsschutz.
Achtung!
Vor jedem Einsatz korrekte Funktion und Reichweite überprüfen. Kontrollieren Sie regelmäßig
den Zustand der Akkus.
Hinweis!
Nutzen Sie alle Ihre Hott Komponenten immer nur mit der jeweils aktuellen Softwareversion.
Hinweis!
Sicherheit ist kein Zufall und ferngesteuerte Modelle sind kein Spielzeug!
Generelle Hinweise
Generelle Hinweise
• Die integrierten Kreisel des Empfängers arbeiten hochauösend und sehr schnell. Verwenden Sie daher möglichst
schnelle Digitalservos, um die Korrekturen direkt und präzise umzusetzen und ein Aufschwingen des Modells zu
verhindern.
• Verwenden Sie vorzugsweise Brushless-Servos da bei normalen Servos die ständigen Korrekturen die Lebensdauer
deutlich reduzieren, halten Sie Servoverlängerungskabel so kurz wie möglich.
• Achten Sie beim Einschalten oder Einstellen der Fernsteuerung unbedingt darauf, dass die Senderantenne immer
mindestens 15 cm von den Empfängerantennen entfernt ist! Benden Sie sich nämlich mit der Senderantenne zu
nahe an den Empfängerantennen, übersteuert der Empfänger und die rote LED am Empfänger beginnt zu leuchten.
Darauf reagiert der Sender mit einem etwa einmal pro Sekunde ertönenden Piep sowie dem Blinken der roten LED.
Page 5

innovation & technologie
Die Fernsteuerung bendet sich infolgedessen im Fail-Safe-Modus. Vergrößern Sie in diesem Fall den Abstand
solange, bis das akustische Warnsignal verstummt und die blaue Sender-LED wieder dauerhaft leuchtet, sowie die
rote LED am Empfänger aus ist.
Binding
Binding
Um eine Verbindung zu einem Graupner HoTT Sender aufbauen zu können, muss zunächst der Graupner-HoTT
2.4-Empfänger mit „seinem“ Graupner-HoTT 2.4-HF-Modul (Sender) „verbunden“ werden. Diesen Vorgang bezeichnet
man als „Binding“. Dieses „Binding“ ist allerdings nur einmal je Empfänger-/HF-Modul-Kombination erforderlich, sodass
Sie das nachfolgend beschriebene „Binding“ nur bei weiteren Empfängern durchführen müssen (und kann – z. B. nach
einem Senderwechsel – jederzeit wiederholt werden). Führen Sie bei Bedarf folgende Schritte aus:
• das Binden ist nur möglich, wenn der Empfänger seit dem Einschalten noch keine Verbindung mit einem gebundenen
Sender hatte (rote LED leuchtet), durch Drücken der SET-Taster wird der Empfänger in den BIND-Modus gebracht.
• wollen Sie einen bereits auf den Sender gebundenen Empfänger auf einen neuen Modellspeicher binden, gehen Sie
wie folgt vor:
• HF-Teil des Senders im Menü „Grundeinstellungen Modell“ ausschalten
• Empfänger einschalten und durch Drücken und Halten der SET-Taste in den Bindingmodus bringen
• Binding im Sendermenü „Grundeinstellungen Modell“ starten
• Wenn die rote LED des Empfängers innerhalb von etwa 10 Sekunden erlischt und die grüne LED leuchtet, wurde der
Binding-Vorgang erfolgreich abgeschlossen.
• Ihre Sender-/Empfängerkombination ist nun betriebsbereit.
• Leuchtet die rote LED jedoch weiter, so ist das „Binding“ fehlgeschlagen. Wiederholen Sie in diesem Fall die gesamte
Prozedur.
Deutsch
Binding mehrerer Empfänger pro Modell
Bei Bedarf können auch mehrere Empfänger pro Modell gebunden werden. Binden Sie dazu die jeweiligen Empfänger
zuerst einzeln wie vorstehend beschrieben.
Beim späteren Betrieb ist der Empfänger, der zuletzt gebunden wurde, der Master-Empfänger. An diesem sind auch
ggf. im Modell eingebaute Telemetriesensoren anzuschließen, da nur der Master-Empfänger deren Daten über den
Rückkanal sendet. Der zweite und alle weiteren Empfänger laufen parallel zum Master-Empfänger im Slave-Mode mit
abgeschaltetem Rückkanal!
Mit der Channel-Mapping Funktion der HoTT Telemetrie können die Steuerfunktionen auch beliebig auf mehrere
Empfänger aufgeteilt werden oder aber auch mehrere Empfängerausgänge mit derselben Steuerfunktion belegt werden.
Beispielsweise um je Querruderblatt zwei Servos anstatt nur einem einzelnen ansteuern zu können usw.
Fail-Safe-Funktion
Standardmäßig behalten im Lieferzustand des Empfängers alle angeschlossenen Servos im Falle einer Fail-SafeSituation ihre zuletzt als gültig erkannte Position bei („Hold“-Modus). Im Fail-Safe-Fall leuchtet die rote LED am
Empfänger. Darüber hinaus piept der Sender etwa einmal pro Sekunde zur akustischen Warnung.
Nutzen Sie das Sicherheitspotenzial dieser Option, indem Sie für einen Fail-Safe-Fall wenigstens die Motordrosselposition
bei Verbrennermodellen auf Leerlauf bzw. die Motorfunktion bei Elektromodellen auf „Stopp“ bzw. bei Heli-Modellen auf
„Hold“ programmieren. Das Modell kann sich dann im Störungsfall nicht so leicht selbstständig machen und so Sachoder gar Personenschäden hervorrufen.
Lesen Sie dazu auch die Bedienungsanleitung Ihres Fernsteuersystems!
Das Kreiselsystem bleibt im Fail-Safe-Fall aktiv!
Reichweitentest
Führen Sie einen Reichweitetest des Graupner-HoTT 2.4-Systems entsprechend den nachfolgenden Anweisungen
durch. Lassen Sie sich ggf. von einem Helfer beim Reichweitetest unterstützen.
Bauen Sie den vorzugsweise bereits an den Sender gebundenen Empfänger, wie vorgesehen im Modell ein.
• Schalten Sie die Fernsteuerung ein und warten Sie, bis am Empfänger die rote LED nicht mehr leuchtet. Nun
können die Servobewegungen beobachtet werden.
• Stellen Sie das Modell so auf ebenen Untergrund (Paster, kurzer Rasen oder Erde), dass dieEmpfängerantennen
mindestens 15 cm über dem Erdboden liegen. Es ist deshalb ggf. nötig, dasModell während des Tests entsprechend
zu unterlegen.
• Halten Sie den Sender in Hüfthöhe und mit Abstand zum Körper. Zielen Sie aber mit der Antenne nicht direkt auf
das Modell, sondern drehen und/oder knicken Sie die Antennenspitze so, dass sie während des Betriebs senkrecht
ausgerichtet ist.
• Starten Sie den Reichweitetest-Modus (wie in der Anleitung des Senders beschrieben).
• Bewegen Sie sich vom Modell weg und bewegen Sie währenddessen die Knüppel. Wenn Sie innerhalb einer
Entfernung von ca. 50 m zu irgendeinem Zeitpunkt eine Unterbrechung der Verbindung feststellen, versuchen Sie
diese zu reproduzieren.
5
Page 6
Deutsch
• Gegebenenfalls einen vorhandenen Motor einschalten, um zusätzlich die Störsicherheit zu überprüfen.
• Bewegen Sie sich weiter vom Modell weg, solange bis keine perfekte Kontrolle mehr möglich ist.
• Beenden Sie nun den Reichweite-Testmodus manuell.
Das Modell sollte jetzt wieder reagieren. Falls dies nicht 100%-ig der Fall ist, benutzen Sie das System nicht und
kontaktieren Sie den zuständigen Service der Graupner/SJ GmbH.
Führen Sie den Reichweitentest vor jedem Flug durch und simulieren Sie dabei alle Servobewegungen, die auch im
Flug vorkommen. Die Reichweite muss dabei immer mindestens 50 m am Boden
betragen, um einen sicheren Modellbetrieb zu gewährleisten.
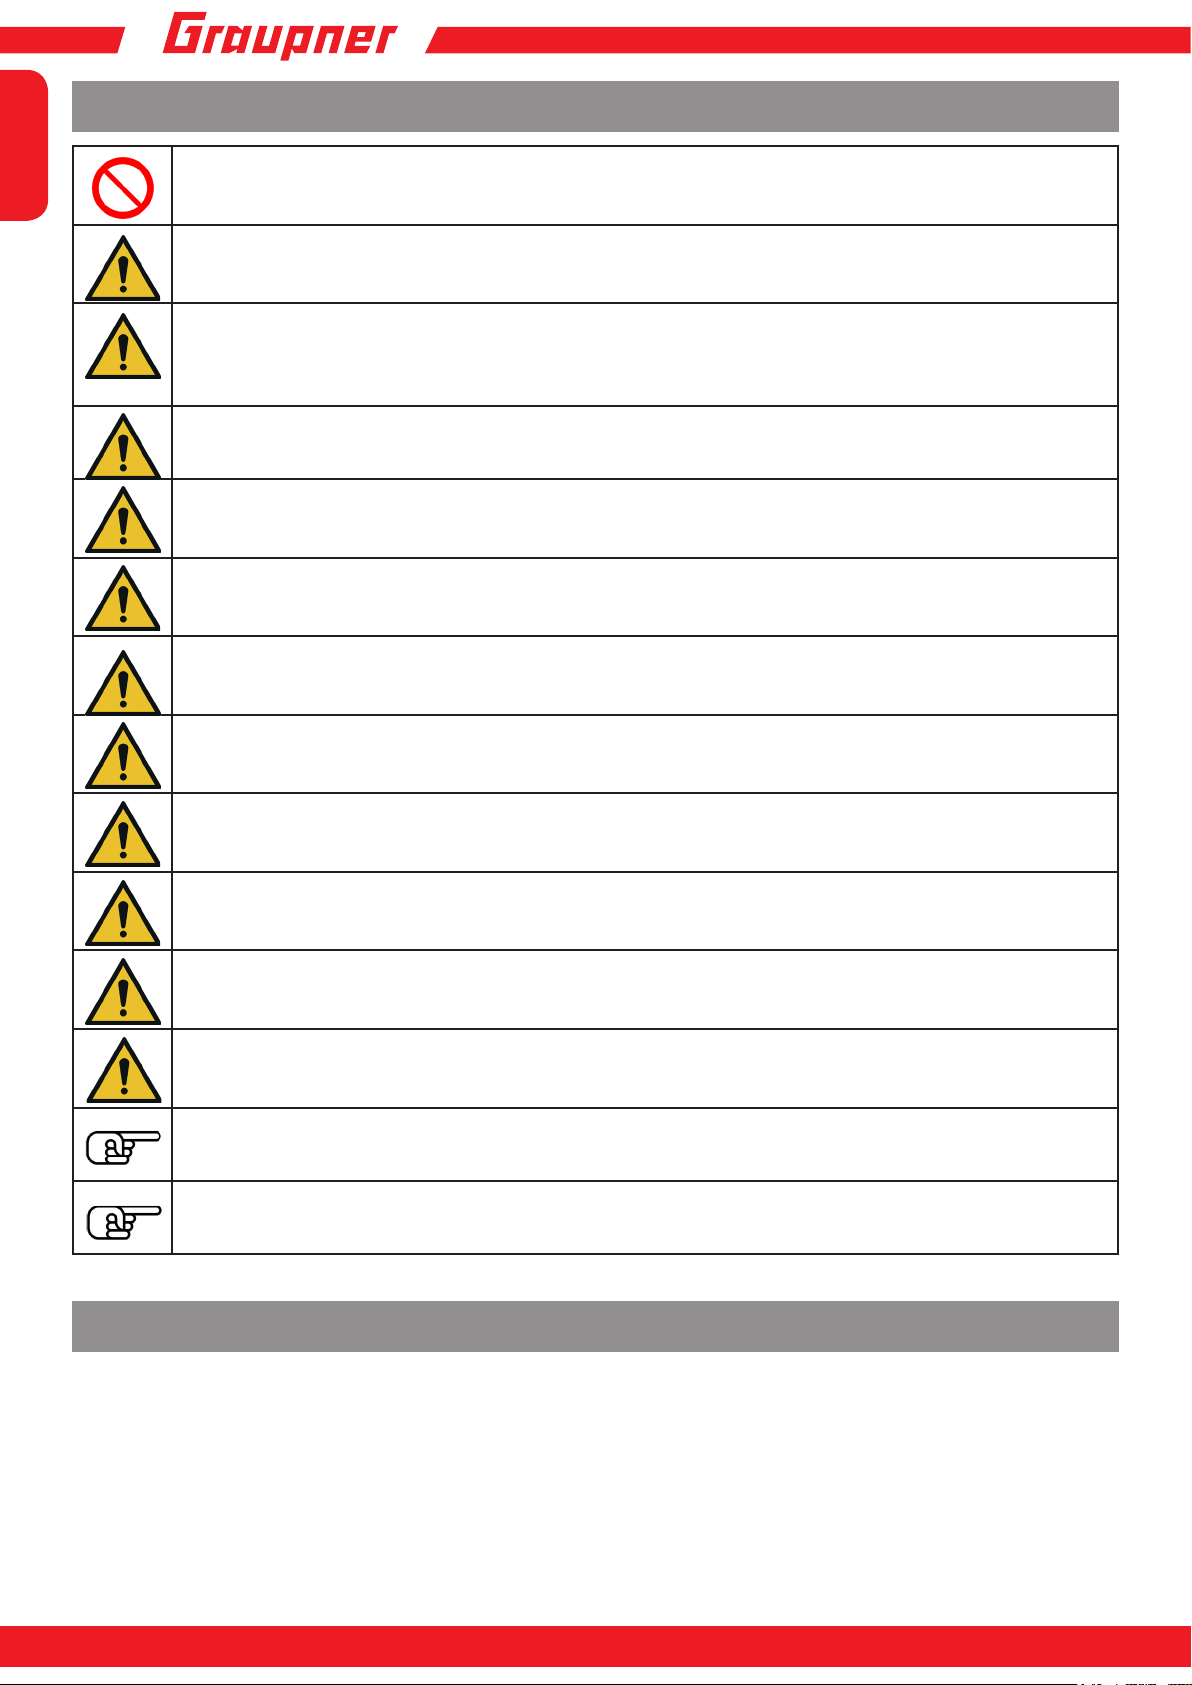
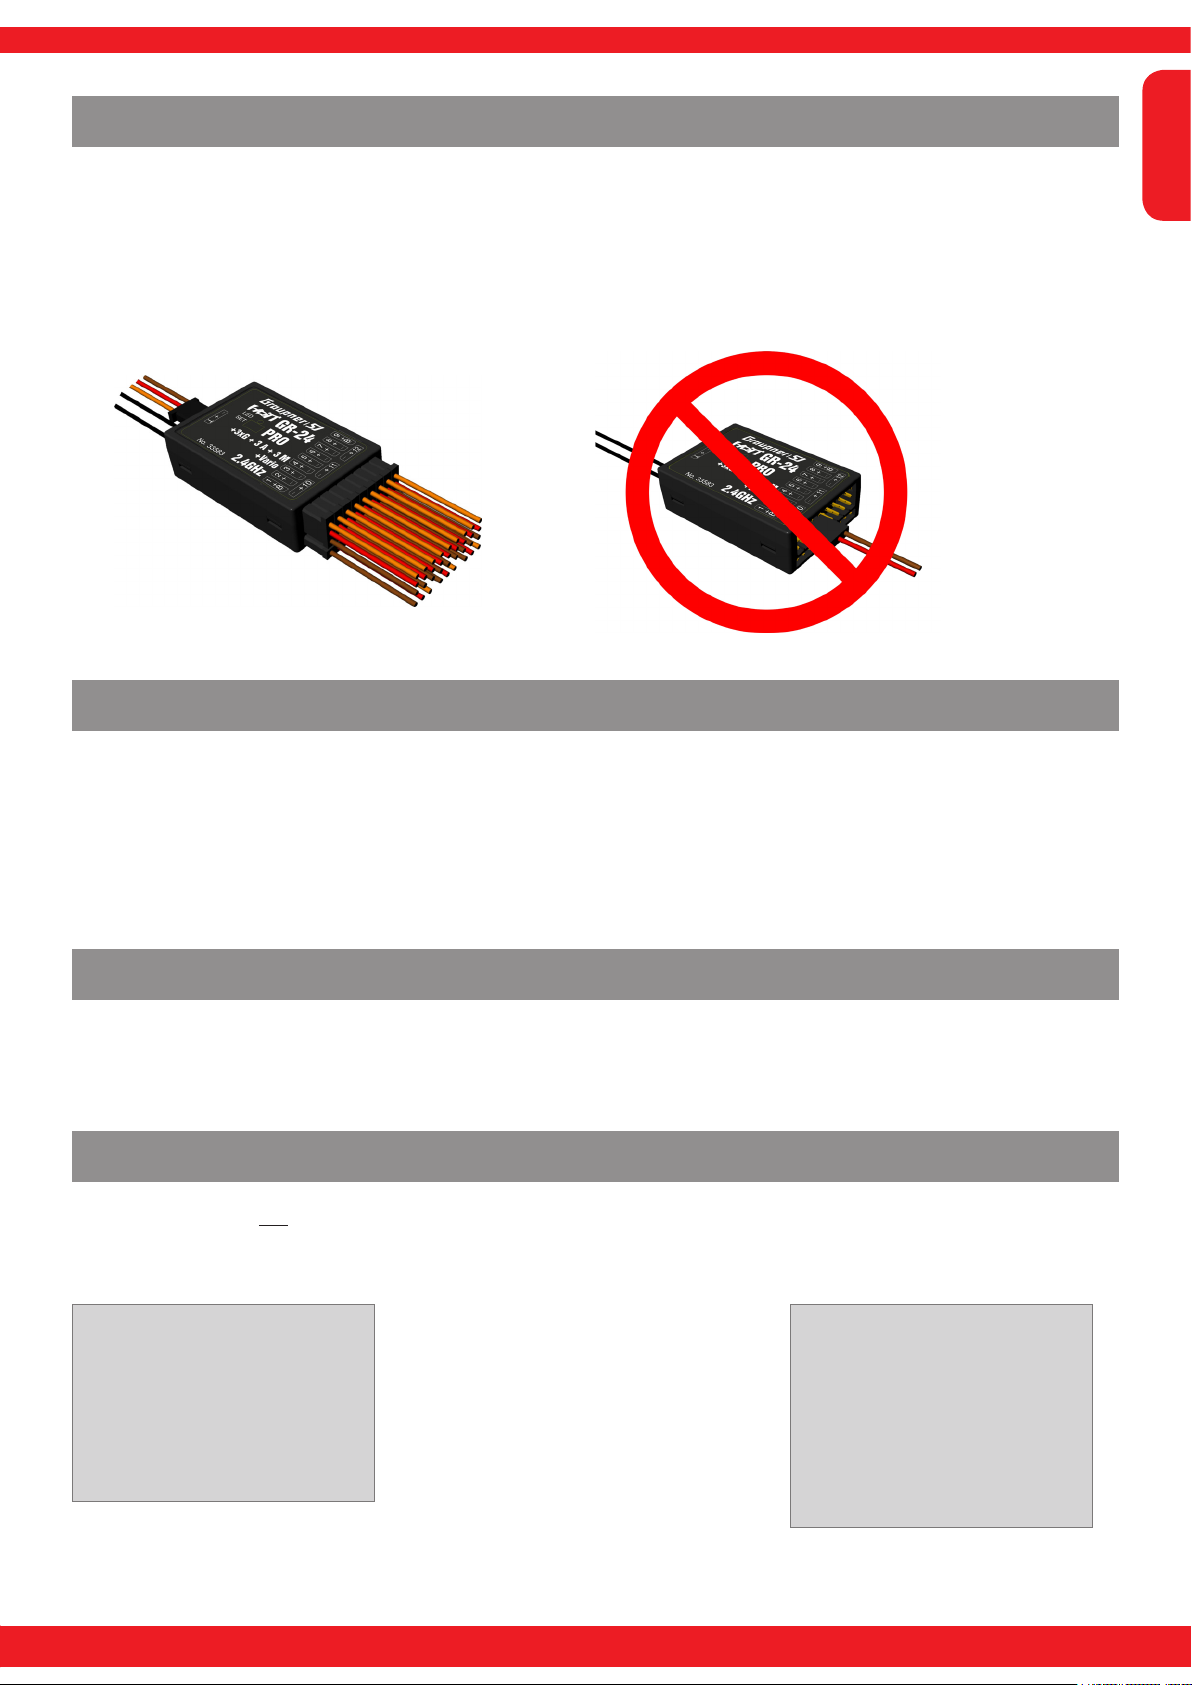
Einbau im Modell (Fläche)
Der Gyro-Empfänger muss gerade und im rechten Winkel zur Flugzeuglängsachse eingebaut werden, damit die Kreisel
wie vorgesehen funktionieren können, wegen der Beschleunigungssensoren zusätzlich auch waagrecht zur Längsachse.
OK
OK
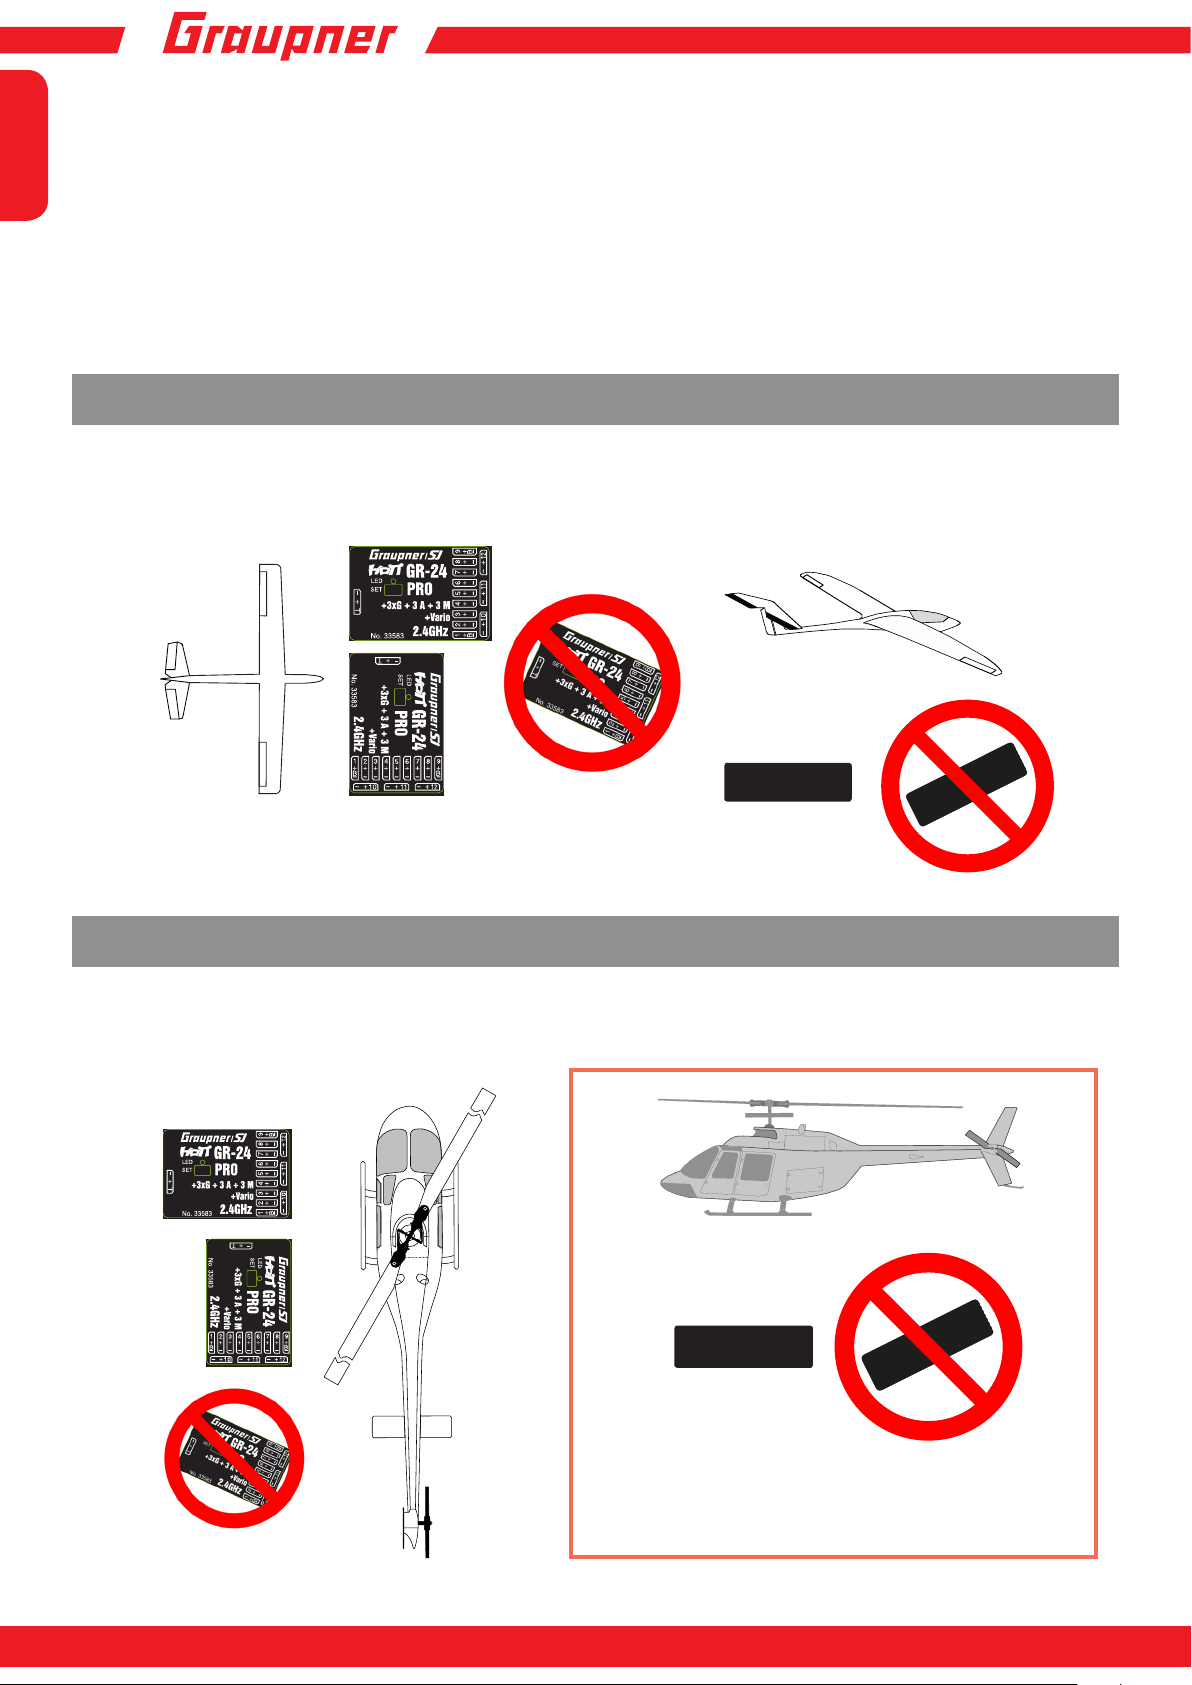
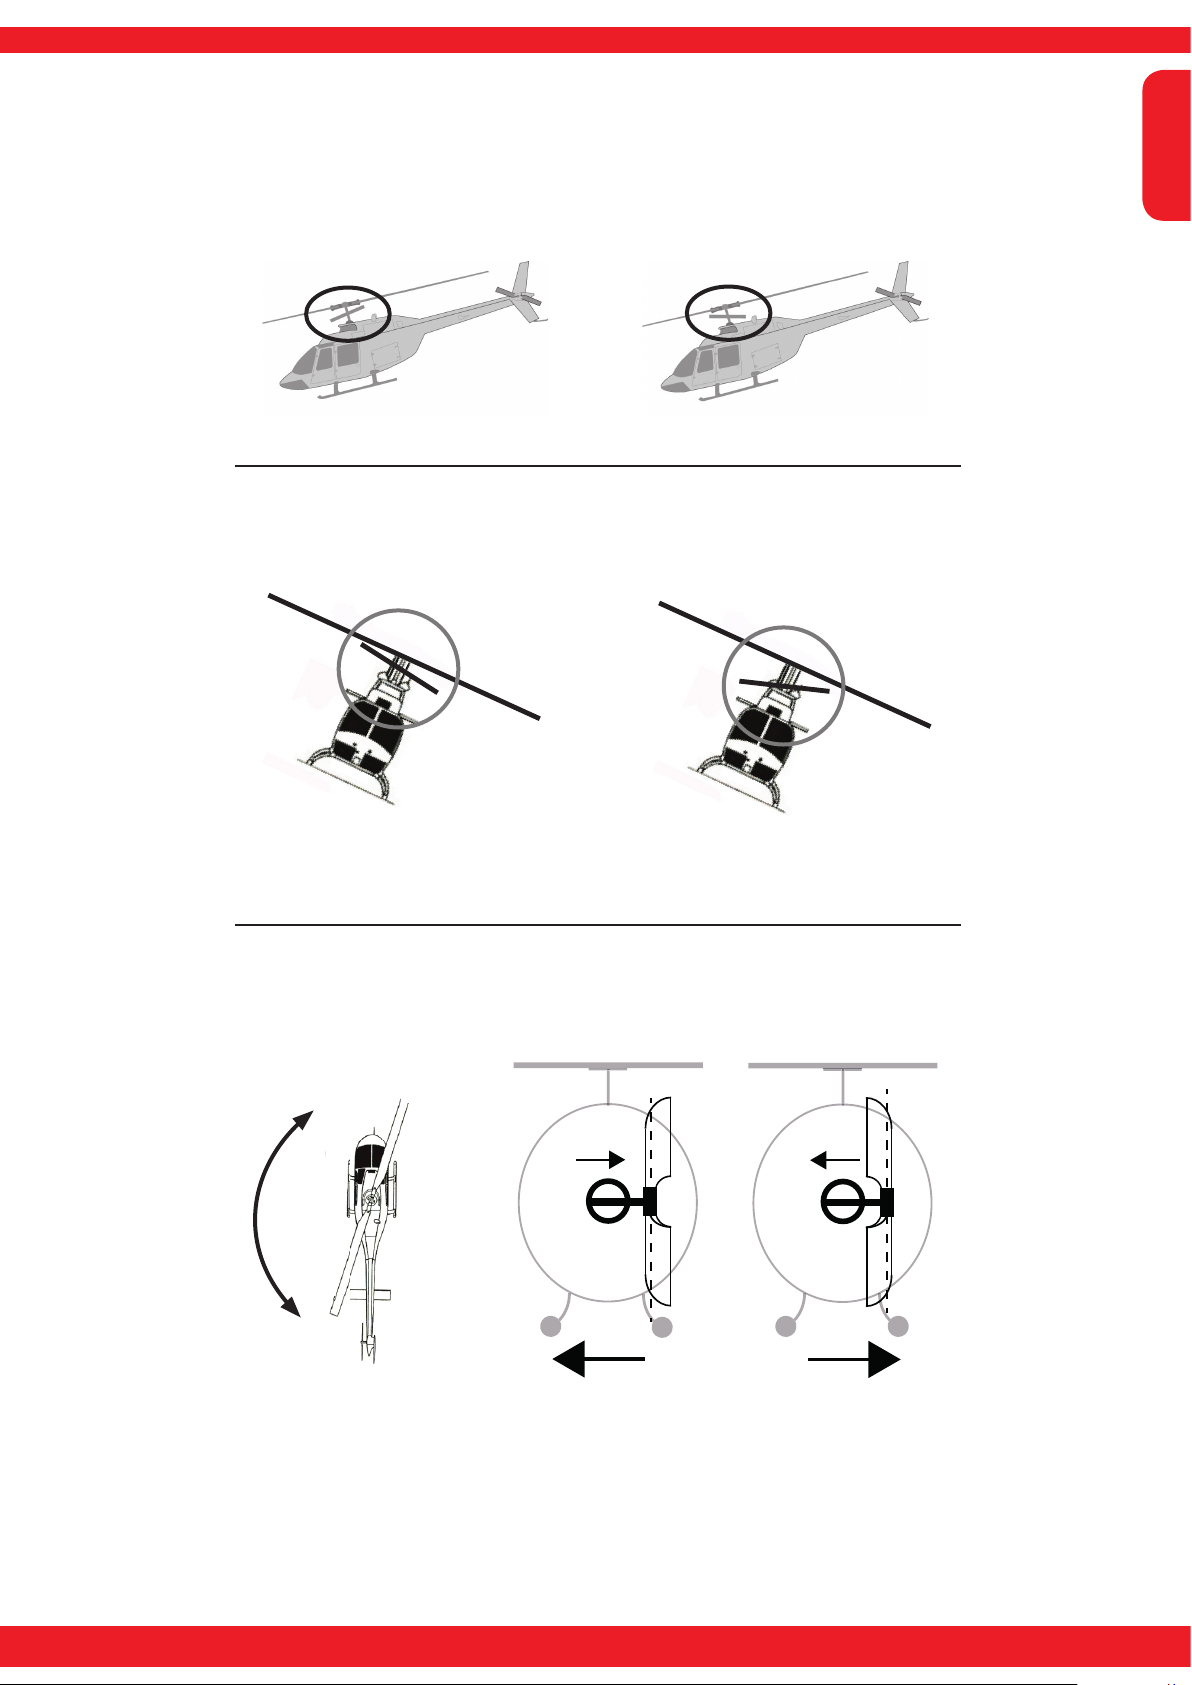
Einbau im Modell (Heli)
Der Empfänger muss unbedingt rechtwinklig auf der Empfängerplattform am Helikopter ausgerichtet werden. Sie
können den Empfänger auch hochkant rechtwinklig einbauen. Es muß immer eine Kante des Empfängers paralell zu
einer Heliachse liegen.
OK
OK
Diese Einbaulage ist im Moment noch nicht relevant,
wird aber bei späterer Nutzung
der Beschleunigungssensoren (durch Softwareupdate) wichtig sein!
Page 7
innovation & technologie
Anschluss
Stecken Sie die Servos in die Steckerleiste des Empfängers. Das Stecksystem ist verpolungssicher, achten Sie auf die
kleinen seitlichen Fasen. Wenden Sie auf keinen Fall Gewalt an, der Stecker sollte leicht einrasten. Die Buchsen sind
auch entsprechend beschriftet, die braune Litze (-), rot (+) und orange (Signal). Die Servoanschlüsse der GraupnerHoTT 2.4-Empfänger sind nummeriert.
Der Anschluss Kanal 8 (K6 bei GR 18) kann auch für das (digitale) Summensignal programmiert werden (siehe Abschnitt
5 Empfänger Einstellmenü).
OK
Deutsch
Stromversorgung
Für den Akkuanschluss sind keine bestimmten Buchsen vorgesehen. Verbinden Sie die Stromversorgung bevorzugt mit
der/den Buchse(n), die nahe an den angeschlossenen Servos liegen. Falls Sie mehrere getrennte Akkus anschließen
wollen, achten Sie unbedingt darauf, dass die Akkus die gleiche Nennspannung und Nennkapazität besitzen. Schließen
Sie keinesfalls unterschiedliche Akkutypen oder Akkus mit zu stark voneinander abweichenden Ladezuständen an,
da es dabei zu kurzschlussähnlichen Effekten kommen kann. Schalten Sie in solchen Fällen aus Sicherheitsgründen
Spannungsstabilisierungen wie z.B. PRX-5A-Empfängerstromversorgungen (Best.-Nr. 4136) zwischen Akkus und
Empfänger.
Telemetrie (T/9 bei GR-18)
An die Buchse mit der Bezeichnung „T“ (T/9)- Telemetrie - werden die optionalen Telemetriesensoren oder Module
angeschlossen. Ausserdem wird über diese Buchse das Update durchgeführt (Siehe Punkt 23). Beim GR-18 kann die
Buchse noch optional für K9 genutzt werden.
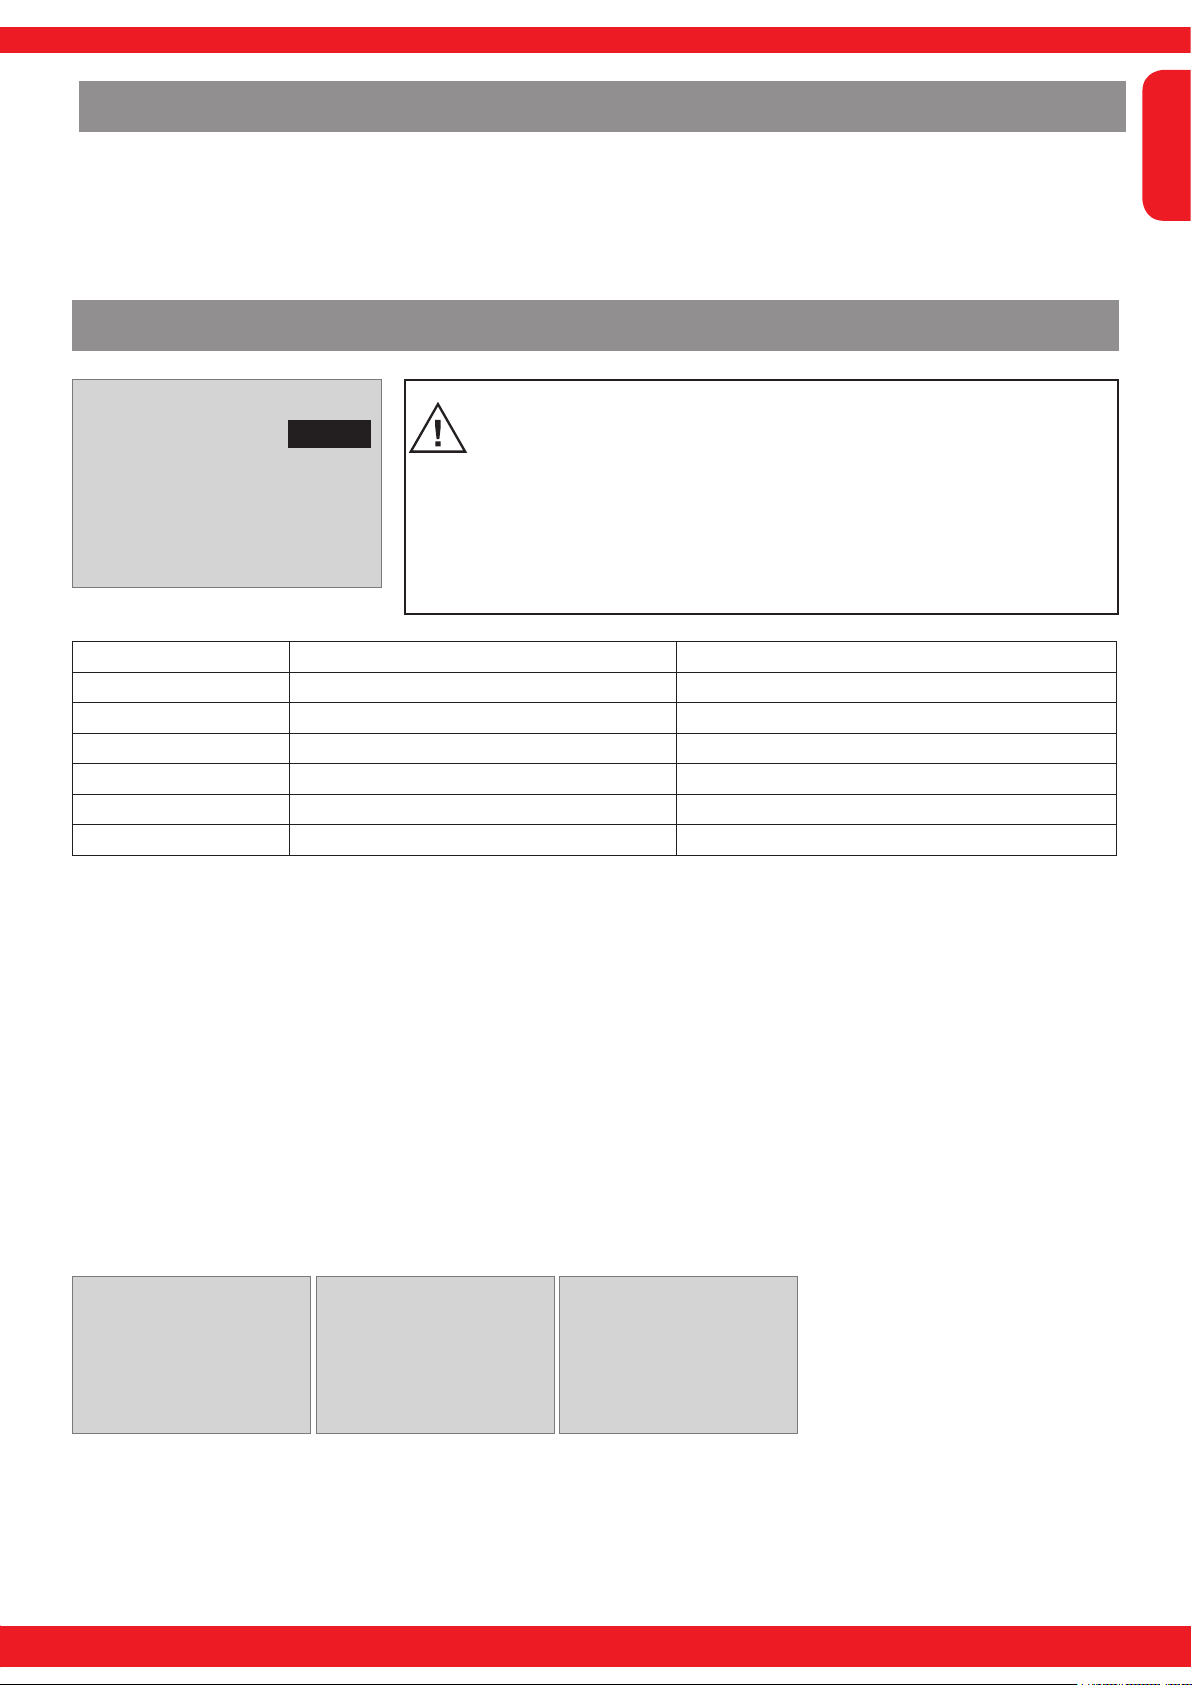
EMPFÄNGER EINSTELLMENÜ FLÄCHE
Der Empfänger kann nur mit einem geeigneten HoTT-Sender oder in Verbindung mit der SMART-BOX (Best.-Nr. 33700)
programmiert werden.
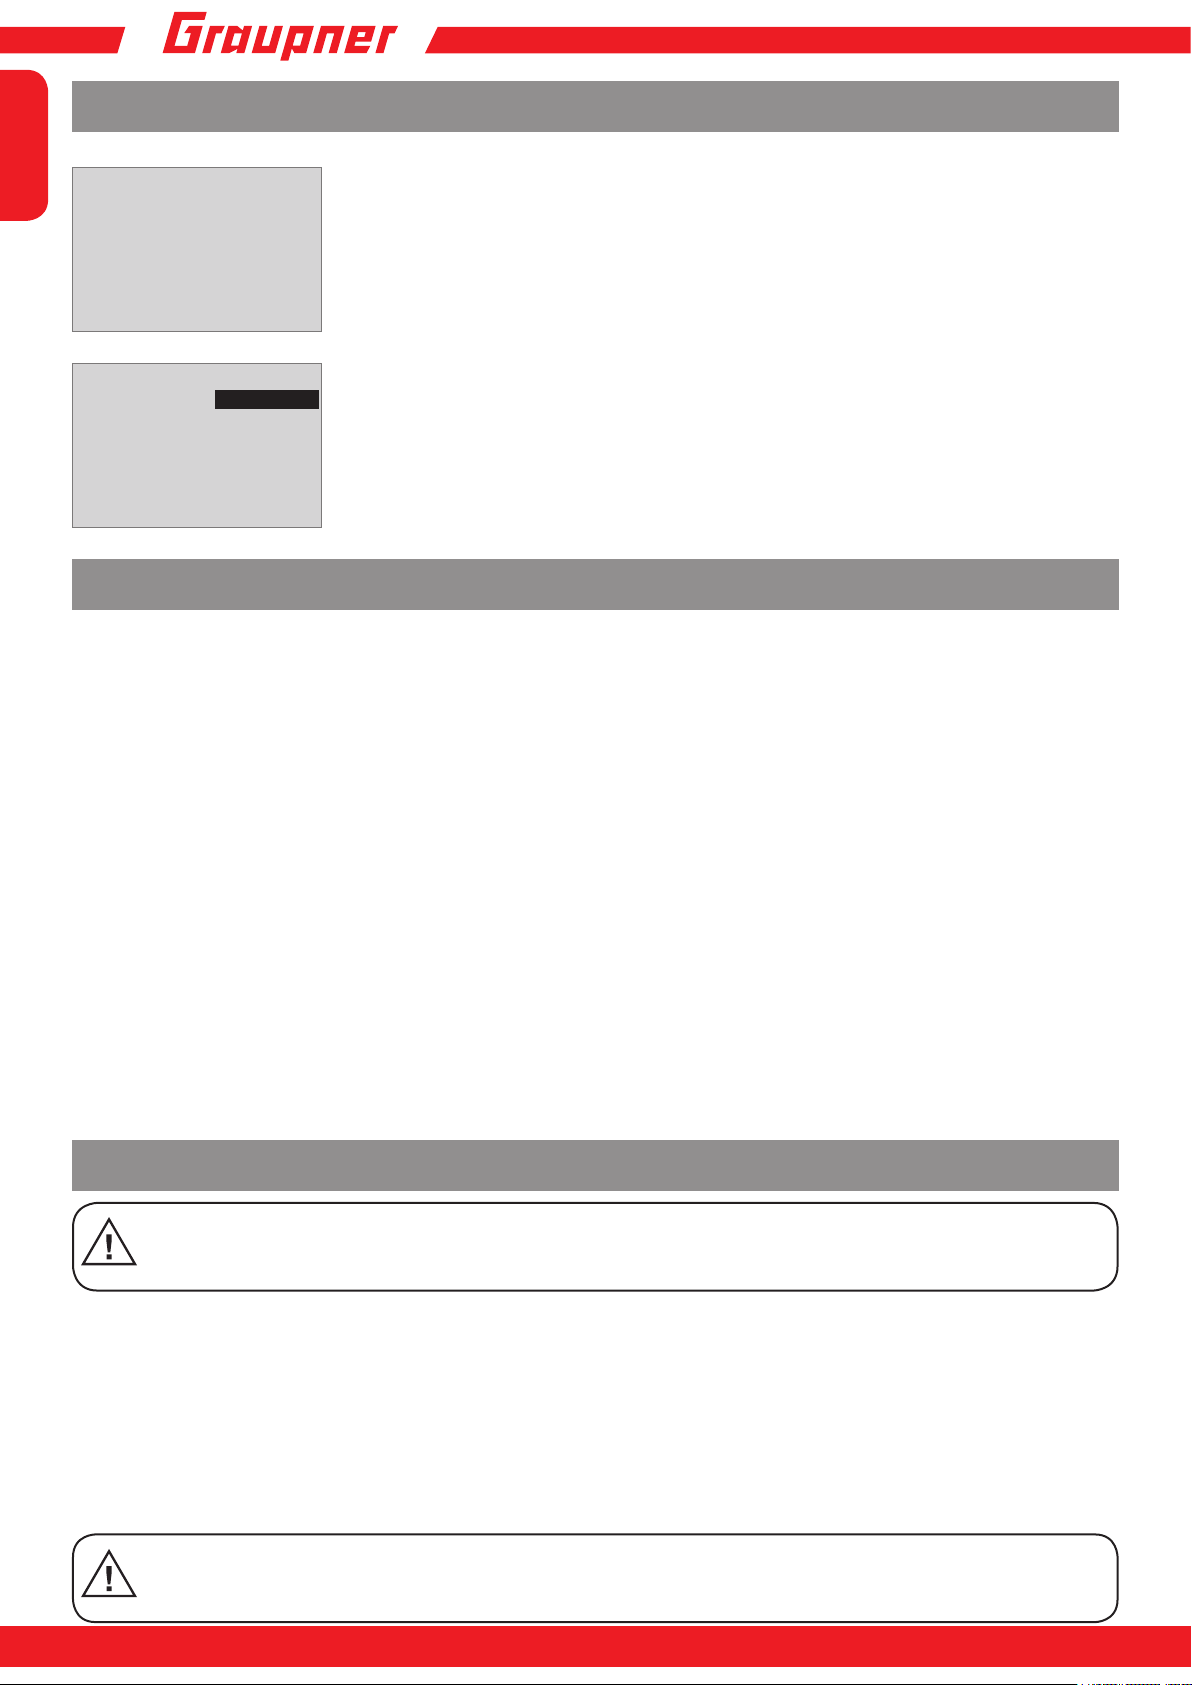
Menü bei GR-24 Menü bei GR-18
EMPFÄNGER 1.0 < >
>Modelltyp:
ALARM VOLT:
ALARM TEMP:
Hoehe max:
>ZYKLUS:
>SUMD an K8:
SPRACHE:
Flaeche
3.2V
70°C
125m
10ms
Nein
deutsch
Das Einstellmenü des Empfängers erscheint im Menü „Telemetrie“ unter
EINSTELLEN / ANZEIGEN oder im
Falle der SMART-BOX unter SETTING
& DATAVIEW. Wie Sie in dieses Menü
gelangen, lesen Sie bitte in der Bedienungsanleitung Ihres Senders bzw.
Smart-Box.
EMPFÄNGER 1.0 < >
>Modelltyp:
ALARM VOLT:
ALARM TEMP:
Hoehe max:
>ZYKLUS:
>SUMD an K6:
Sensor an K9
SPRACHE:
Flaeche
3.2V
70°C
125m
10ms
Nein
Nein
deutsch
7
Page 8
Deutsch
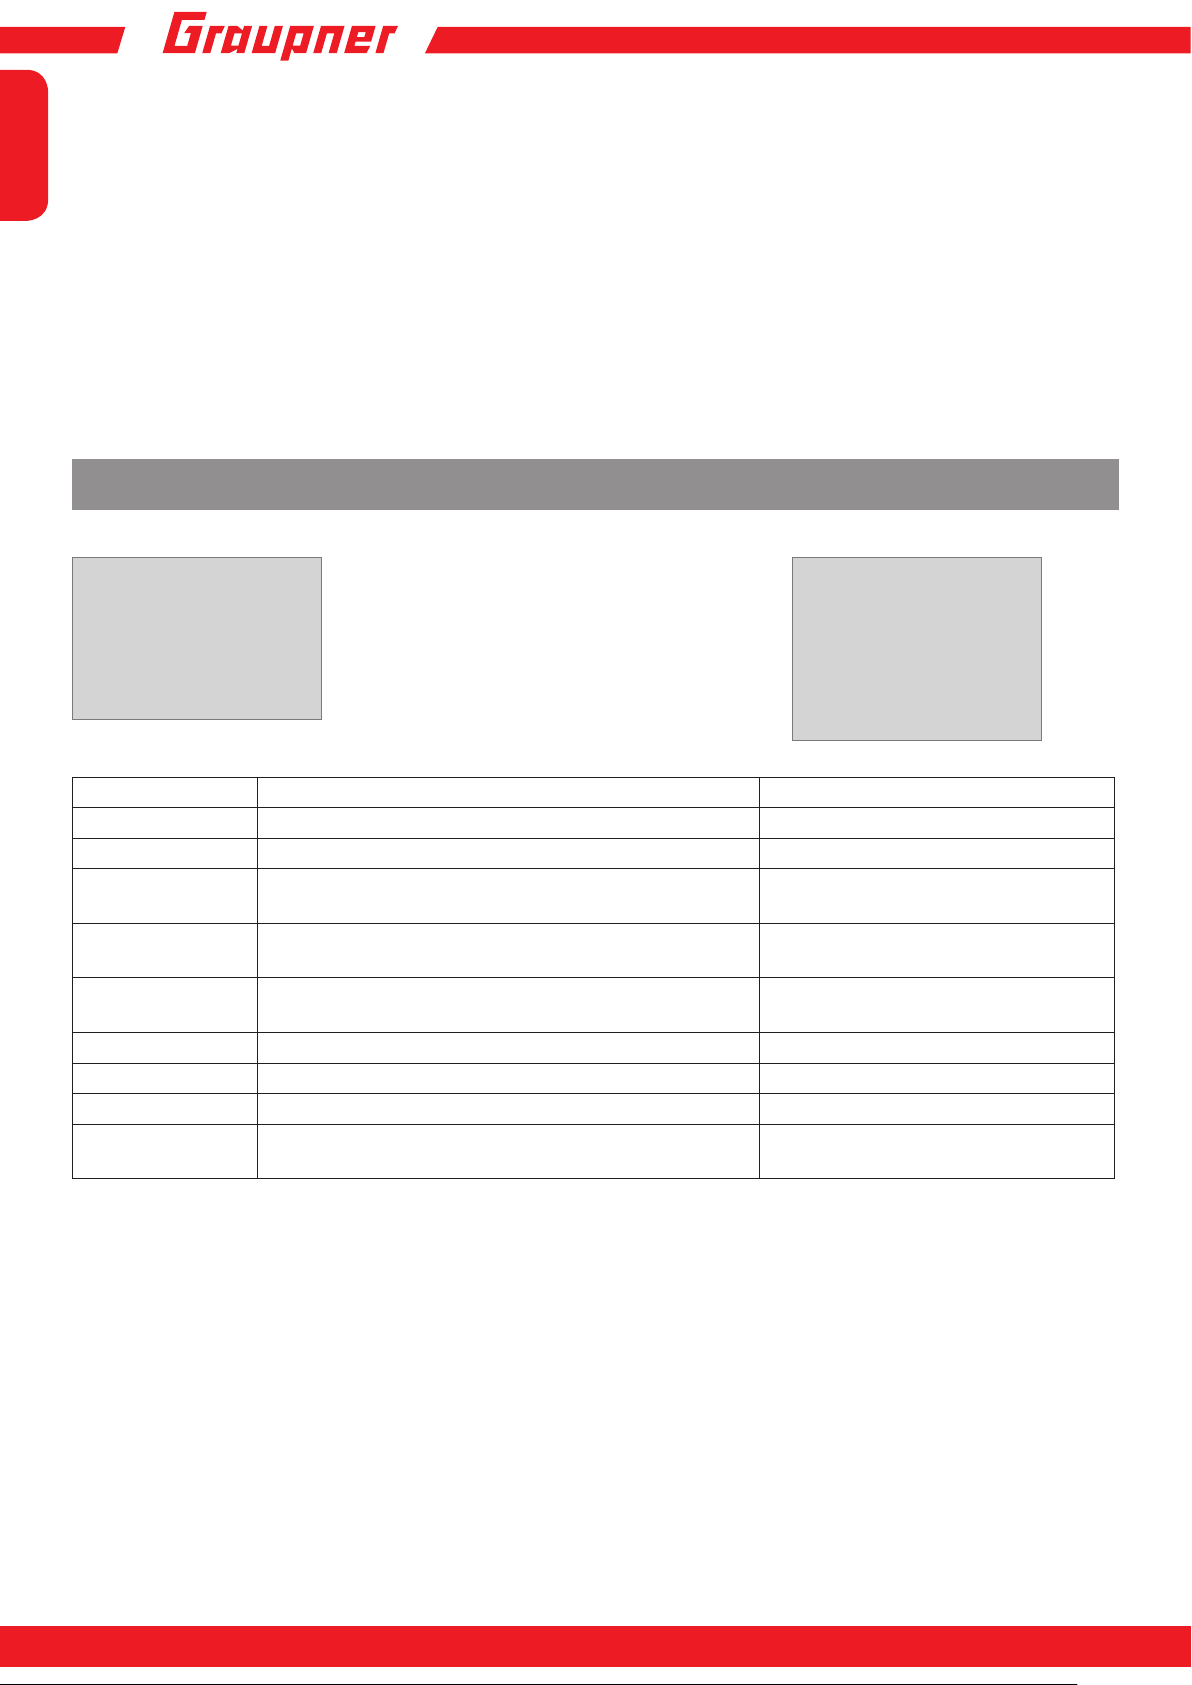
Display-Anzeige Erläuterung Einstellungen
EMPFÄNGER 1.0 1.0 zeigt die Firmwareversion des Emp-
fängers an
MODELLTYP Auswahl des Modelltyps Fläche, Heli
ALARM VOLT. Alarmgrenze der Unterspannungswar-
nung des Empfängers
ALARM TEMP. Empfänger-Übertemperaturwarnung 50 - 80° C
Hoehe max. Maximalhöhe 0 - 2500 m
ZYKLUS Zykluszeit in ms 10 / 20 ms
SUMD an K8 (6) Digitales Summensignal an Kanal 8 (6) Ja / Nein
Sensor an K9 Telemetrie-Sensor an Kanal 9 (nur bei
GR 18)
SPRACHE Menüsprache wählen deutsch, englisch, französisch, italienisch und spa-
Modelltypauswahl (Modelltyp): hier können Sie den Modelltyp wählen.
Bei der Auswahl „Flaeche“ können Sie dann in den nachfolgenden Menü Seiten die Gyroeinstellungen für Flächenmodelle
einstellen.
Bei der Auswahl „Heli“ können Sie dann wie in den ab Punkt 11 beschriebenen Menü Seiten die Gyroeinstellungen des
integrierten Flybarless System für Helikopter einstellen.
-
2.5 - 24.0 V
Werkseinstellung: 3.8 V
Werkseinstellung: +70° C
in 25 m Schritten
Ja / Nein
nisch
Unterspannungswarnung (ALARM VOLT): sinkt die Empfängerspannung unter den eingestellten Wert, erfolgt eine
Unterspannungswarnung durch das HF-Modul des Senders in Form des „allgemeinen Alarmtons“, eines gleichmäßigen
Piepsen im Rhythmus von ca. einer Sekunde oder der Sprachausgabe „Empfängerspannung“.
Temperaturwarnung (ALARM TEMP): übersteigt die Empfängertemperatur die eingestellte Temperatur, erfolgt eine
Warnung durch das HF-Modul des Senders in Form des „allgemeinen Alarmtons“, eines gleichmäßigen Piepsen im
Rhythmus von ca. einer Sekunde oder der Sprachausgabe „Empfängertemperatur“.
Maximalhöhe (Hoehe max.): hier kann eine Maximalhöhe vorgegeben werden, bei deren Erreichen ein Alarm ausgelöst
wird, entweder durch das HF-Modul des Senders in Form des „allgemeinen Alarmtons“, eines gleichmäßigen Piepsen
im Rhythmus von ca. einer Sekunde oder der Sprachausgabe „Höhe“. Beachte: beim Einschalten des Empfängers wird
die aktuelle Höhe als 0 gesetzt, die angezeigte Höhe ist also die relative Höhe ausgehend vom Startpunkt.
Zykluszeit (ZYKLUS): bei ausschließlicher Verwendung von Digitalservos kann eine Zykluszeit von 10 ms eingestellt
werden. Im Mischbetrieb oder ausschließlicher Verwendung von Analogservos sollte 20 ms gewählt werden, da
Analogservos überfordert sein können und mit „Zittern“ oder „Knurren“ reagieren.
HoTT Summensignal (SUMD): wird das digitale Summensignal an Kanal 8 (6 bei GR 18) aktiviert, wird (anstatt
eines Servos) das Summensignal mit 8 Kanälen über diese Buchse ausgegeben. Der als SUMD kongurierte HoTT-
Empfänger generiert permanent aus 8 Steuersignalen vom Sender ein digitales Summensignal und stellt dieses am
empfängerspezisch festgelegten Servoanschluss bereit. Ein solches Signal wird zum Zeitpunkt der Überarbeitung
dieser Anleitung von einigen der neuesten elektronischen Entwicklungen im Bereich von Power-Stromversorgungen usw. genutzt.
WARNUNG: Beachten Sie in diesem Zusammenhang aber unbedingt die dem jeweils angeschlossenen Gerät
beiliegenden Einstellhinweise, da Sie ansonsten riskieren, dass Ihr Modell ggf. uniegbar wird.
Menüpunkt nur bei 33579 GR-18 3xG+3A+Vario
Telemetrie Sensor (Sensor an K9): Diese Buchse können Sie entweder für die Telemetrie oder für einen zusätzlichen
Kanal (9) verwenden. (Achtung! Beides zusammen ist nicht möglich!) Die Umschaltung erfolgt in diesem Menüpunkt.
Wenn Sie „Ja“ wählen ist die Buchse für den Anschluss eines Sensors geschaltet. Wenn Sie „Nein“ wählen ist die
Buchse mit dem Steuerkanal 9 belegt.
Page 9
innovation & technologie
Initialisierung des Kreisels (Fläche)
Nach dem Einschalten des Modells ist der Kreisel sofort aktiv aber noch nicht initialisiert. Um ihn zu initialisieren, halten
Sie Ihr Modell beim Einschalten ruhig. Die Kalibrierung wird nur durchgeführt wenn der Empfänger absolut ruhig liegt.
Nach ca. 3 Sekunden in Ruheposition bewegen sich die Querruder kurz einmal auf und ab. Dieser „Wackler“ signalisiert
die erfolgreiche Initialisierung, das Ende der Kalibrierung. Warten Sie nach jedem Einschalten diese Kalibrierung ab
bevor Sie das Modell starten!
Freie Mischer
Deutsch
FREIE MISCHER < >
>MISCHER:
VON KANAL:
NACH KANAL:
>TRIMM:
>WEG-:
WEG+:
1
1
6
+0%
+100%
+100%
Wichtiger Hinweis: bei Verwendung der Kreisel muss im Sender
immer Modelltyp: Leitwerk: normal eingestellt werden. V-Leitwerke,
Deltamodelle oder z.B. zwei Höhenruderservos müssen somit über
die Empfängermischer angesteuert werden, nicht über die Sendermischer,
da die Kreiselstabilisierung ansonsten nicht auf diese Servos wirkt! Die
vier Empfängermischer wirken ‚hinter‘ den Kreiseln. Falls Sie im Menü
»Flächenmischer« oder »freie Mischer« Ihres HoTT-Senders bereits
Mischerfunktionen programmiert haben, achten Sie unbedingt darauf,
dass sich jene Mischer mit denen dieses Menüs nicht überschneiden!
Display-Anzeige Erläuterung Einstellungen
MISCHER Mischerauswahl 1, 2....4
VON KANAL Signalquelle bzw. Quellkanal 0,1,2,...6
NACH KANAL Zielkanal 0,1,2,...6
TRIMM Trimmposition in % -15 - + 15%
WEG- Wegbegrenzung bei % Servoweg -150 bis +150%
WEG+ Wegbegrenzung bei % Servoweg -150 bis +150%
MISCHER: bis zu vier Mischer können gleichzeitig programmiert werden. Wechseln Sie in der Zeile „Mischer“ zwischen
Mischer 1, Mischer 2,.... und Mischer 4.
Die folgenden Einstellungen betreffen immer nur den in dieser Zeile ausgewählten Mischer.
VON KANAL: das an der Signalquelle (bzw. Quellkanal) anliegende Signal wird in einstellbarem Maße dem Zielkanal
(NACH KANAL) zugemischt. Die Funktionsweise ist analog zum Menü „Freie Mischer“ in den HoTT Sendern.
NACH KANAL: dem Zielkanal (NACH KANAL) wird anteilig das Signal des Quellkanals (VON KANAL) zugemischt. Der
Mischanteil wird von den in den Zeilen „WEG–“ und „WEG+“ eingetragenen Prozentsätzen bestimmt. Wählen Sie „0“,
wenn kein Mischer gesetzt werden soll.
Anteil der Zumischung (WEG-/+): Mit den Einstellwerten dieser beiden Zeilen wird der Prozentsatz der Zumischung
in Relation zum Quellkanal (VON KANAL) getrennt für beiden Richtungen vorgegeben.
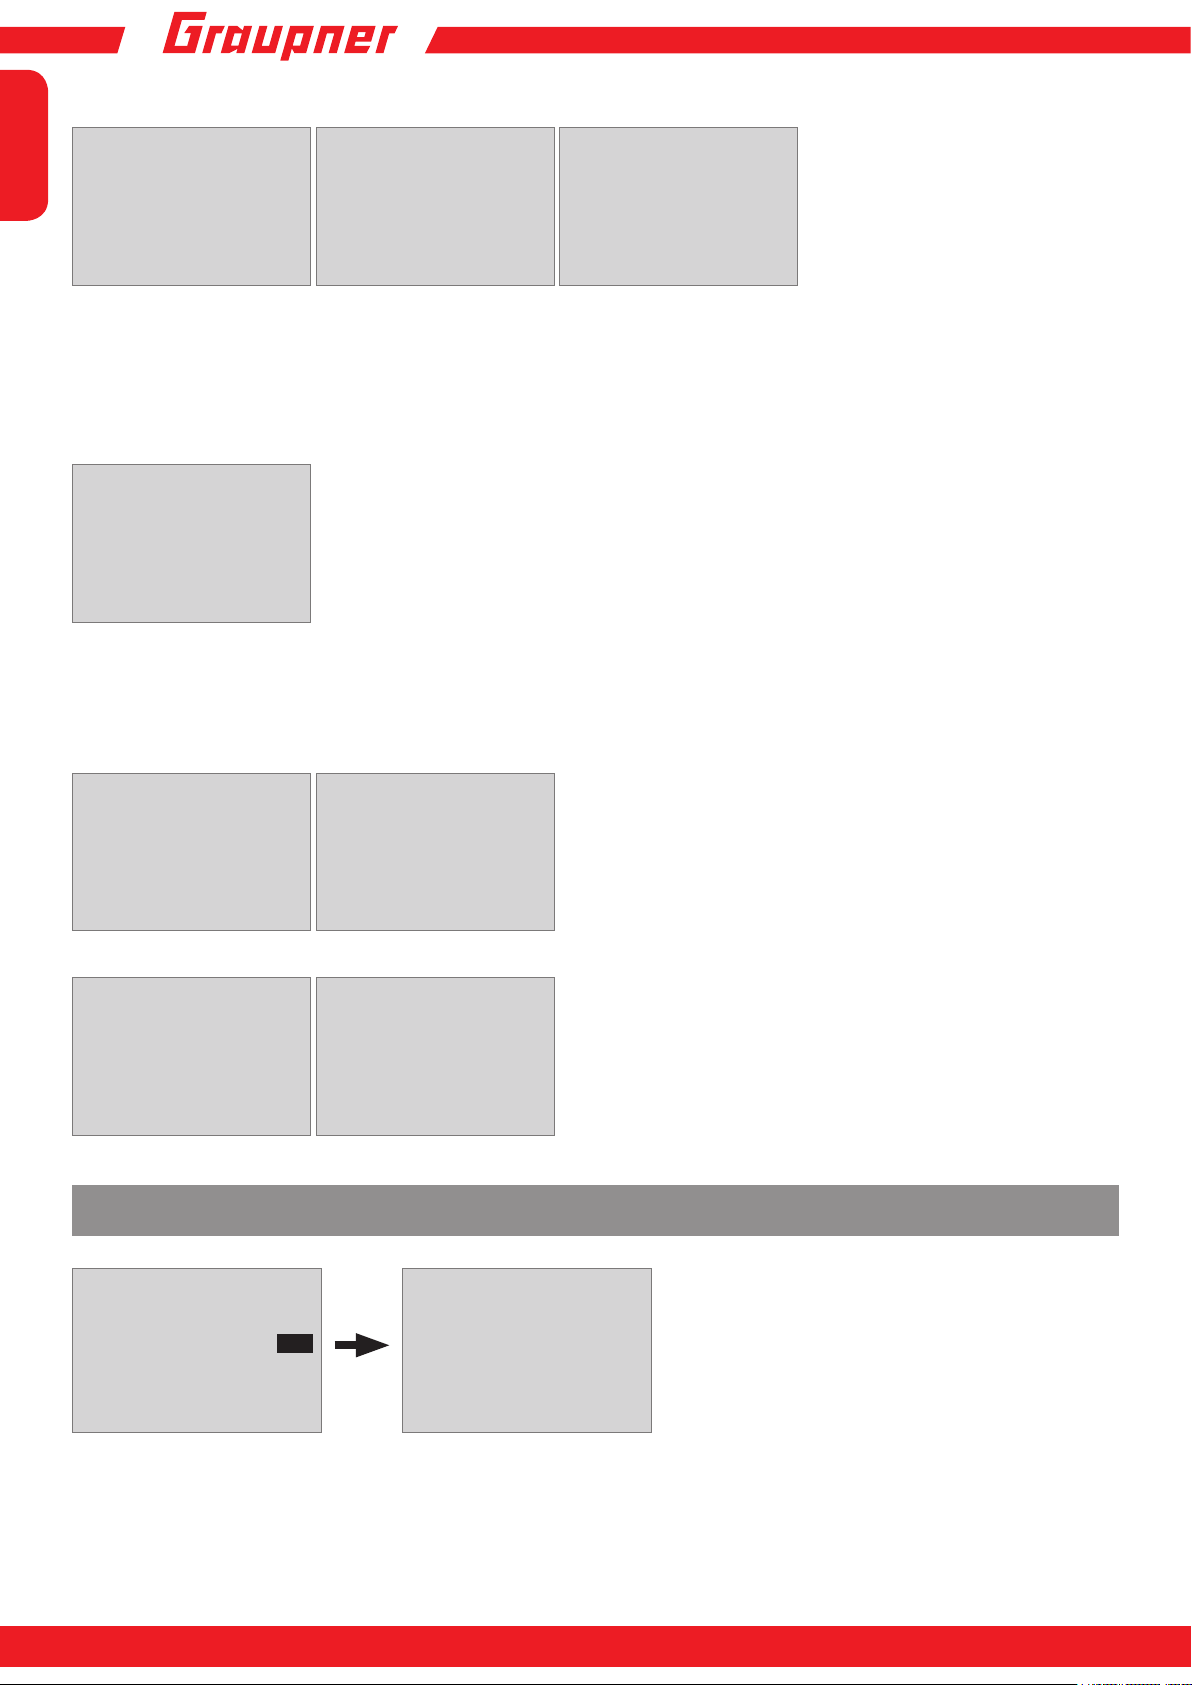
Programmierbeispiele:
V-Leitwerk mit Differenzierung für das Seitenruder
FREIE MISCHER < >
>MISCHER:
VON KANAL:
NACH KANAL:
>TRIMM:
>WEG-:
WEG+:
+100%
+100%
FREIE MISCHER < >
>MISCHER:
1
VON KANAL:
3
NACH KANAL:
4
>TRIMM:
+0%
>WEG-:
WEG+:
+0%
-60%
+100%
FREIE MISCHER < >
>MISCHER:
2
VON KANAL:
4
NACH KANAL:
3
>TRIMM:
>WEG-:
WEG+:
3
4
4
+0%
+100%
+60%
Eine Differenzierung ist bei diesem Leitwerkstyp normalerweise nicht nötig. Ohne Differenzierung entfällt Mischer 3,
außerdem muss WEG- von Mischer 2 dann -100% betragen.
Alternativ kann die Programmierung auch im Sendermenü vorgenommen werden. Anstelle des ‚Freien Mischers 3‘
im Empfänger kann auch ein Sendermischer ‚Seitenruder‘ → ‚Höhenruder‘ verwendet werden, der asymmetrisch
eingestellt wird, z.B. +30%, -30%. Dadurch wird im Empfänger wieder ein Mischer frei.
9
Page 10
Deutsch
Deltamodell mit Differenzierung (1 Querruder)
FREIE MISCHER < >
>MISCHER:
VON KANAL:
NACH KANAL:
>TRIMM:
>WEG-:
WEG+:
+100%
+60%
Querruder-Differenzierung im Beispiel 40%. Alternativ kann die Programmierung auch im Sendermenü vorgenommen
werden. Anstelle des ‚Freien Mischers 3‘ im Empfänger kann auch ein Sendermischer Querruder → Höhenruder verwendet
werden, der asymmetrisch eingestellt wird, z.B. +30%, -30%. Dadurch wird im Empfänger wieder ein Mischer frei.
Zwei Höhenruderservos
(Kanal 6 für das zweite Höhenruderservo)
FREIE MISCHER < >
>MISCHER:
VON KANAL:
NACH KANAL:
>TRIMM:
>WEG-:
WEG+:
+100%
+100%
FREIE MISCHER < >
>MISCHER:
1
VON KANAL:
2
NACH KANAL:
3
>TRIMM:
+0%
>WEG-:
WEG+:
1
3
6
+0%
+0%
-100%
-100%
FREIE MISCHER < >
>MISCHER:
2
VON KANAL:
3
NACH KANAL:
2
>TRIMM:
>WEG-:
WEG+:
3
2
2
+0%
+60%
+100%
Nur für Sender ohne Butterymischer (z.B. mx-10 HoTT):
Wird ein Butterymischer benötigt, geht entweder keine Differenzierung oder die Landeklappenstellung nicht mehr, da
hier 2 Mischer benötigt werden.
Programmierbeispiel:
FREIE MISCHER < >
>MISCHER:
VON KANAL:
NACH KANAL:
>TRIMM:
>WEG-:
WEG+:
+100%
+100%
FREIE MISCHER < >
>MISCHER:
1
VON KANAL:
1
NACH KANAL:
2
>TRIMM:
+0%
>WEG-:
WEG+:
2
1
5
+0%
-100%
-100%
Programmierbeispiel:
FREIE MISCHER < >
>MISCHER:
VON KANAL:
NACH KANAL:
>TRIMM:
>WEG-:
WEG+:
+100%
+100%
FREIE MISCHER < >
>MISCHER:
1
VON KANAL:
1
NACH KANAL:
2
>TRIMM:
+0%
>WEG-:
WEG+:
2
1
3
+0%
-100%
-100%
Zuordnen der Kreiselachsen
Kreisel Zuordnung<
>Quer Servos:
Neueinstellung:
Quer:
>Hoehe:
>Seite:
2
Ja
+2
+0
+0
Kreisel Zuordnung<
>Quer Servos:
>Neueinstellung:
Quer:
Hoehe:
>Seite:
2
Nein
+2
+1
-3
Quer Servos: geben Sie hier an, wenn Ihr Modell mit zwei Querruderservos ausgestattet ist (Wert 2 programmieren).
Der Kreisel für Kanal (Servo) 2 wirkt dann auch auf Kanal (Servo) 5. Außerdem wird die Summe beider Kanäle für die
Kreiselausblendung verwendet, wenn die Querruder auch zusätzlich als z.B. Flaperon oder Speedbrake verwendet
werden.
Page 11
innovation & technologie
ACHTUNG: die Servoreverse-Einstellung muss für beide Querruderservos gleich sein, also entweder beide normal
oder beide reverse! Ist das nicht möglich, darf auf keinen Fall ein Servo im Sendermenü umgestellt werden, sondern
muss gegebenenfalls gedreht im Modell eingebaut werden!
Werden hingegen Servos verwendet, die programmiert werden können (z.B. Graupner DES, HVS oder HBS-Servos
- lesen Sie dazu die Anleitung des Update-Programms Firmware_Upgrade_grStudio - kann die ServoreverseEinstellung direkt im Servo vorgenommen werden.
Beachten Sie die Einbauhinweise auf Seite 5 dieser Anleitung! In einem ersten Schritt müssen die drei Kreiselachsen
und -Richtungen des Empfängers eingelernt werden. Schalten Sie dazu Sender und Modell ein und gehen im
Empfängermenü Kreisel-Einstellungen auf ‚Neueinstellung: Ja‘.
• geben Sie anschließend den vollen Knüppelausschlag in eine Richtung für ein beliebiges Ruder, im folgenden
beispielhaft für das Querruder beschrieben
• die erkannte Achse (Quer) wird invers dargestellt (im Auslieferungszustand wird für alle Achsen der Wert ‚+0‘
angezeigt, die Achsen können auch manuell auf ‚+0‘ gesetzt werden, 0 = Kreisel inaktiv)
• danach das Modell gemäß dem Knüppelausschlag mindestens 45° drehen, wenn Sie den Querruderknüppel nach
links bewegt haben, muss mit dem Modell eine Linkskurve simuliert werden → die linke Tragäche mindestens 45°
nach unten bewegen
• damit ist diese Achse und Richtung eingelernt, nun müssen noch die beiden fehlenden Achsen auf die gleiche Weise
eingelernt werden
• in der Anzeige ‚Quer/Höhe/Seite erscheint die jeweilige Kreiselachse 1, 2 oder 3, das Vorzeichen ergibt sich aus der
Einbaulage und Servorichtung
• sind alle drei Achsen eingelernt, springt die Anzeige auf ‚Neueinstellung: Nein‘.
Deutsch
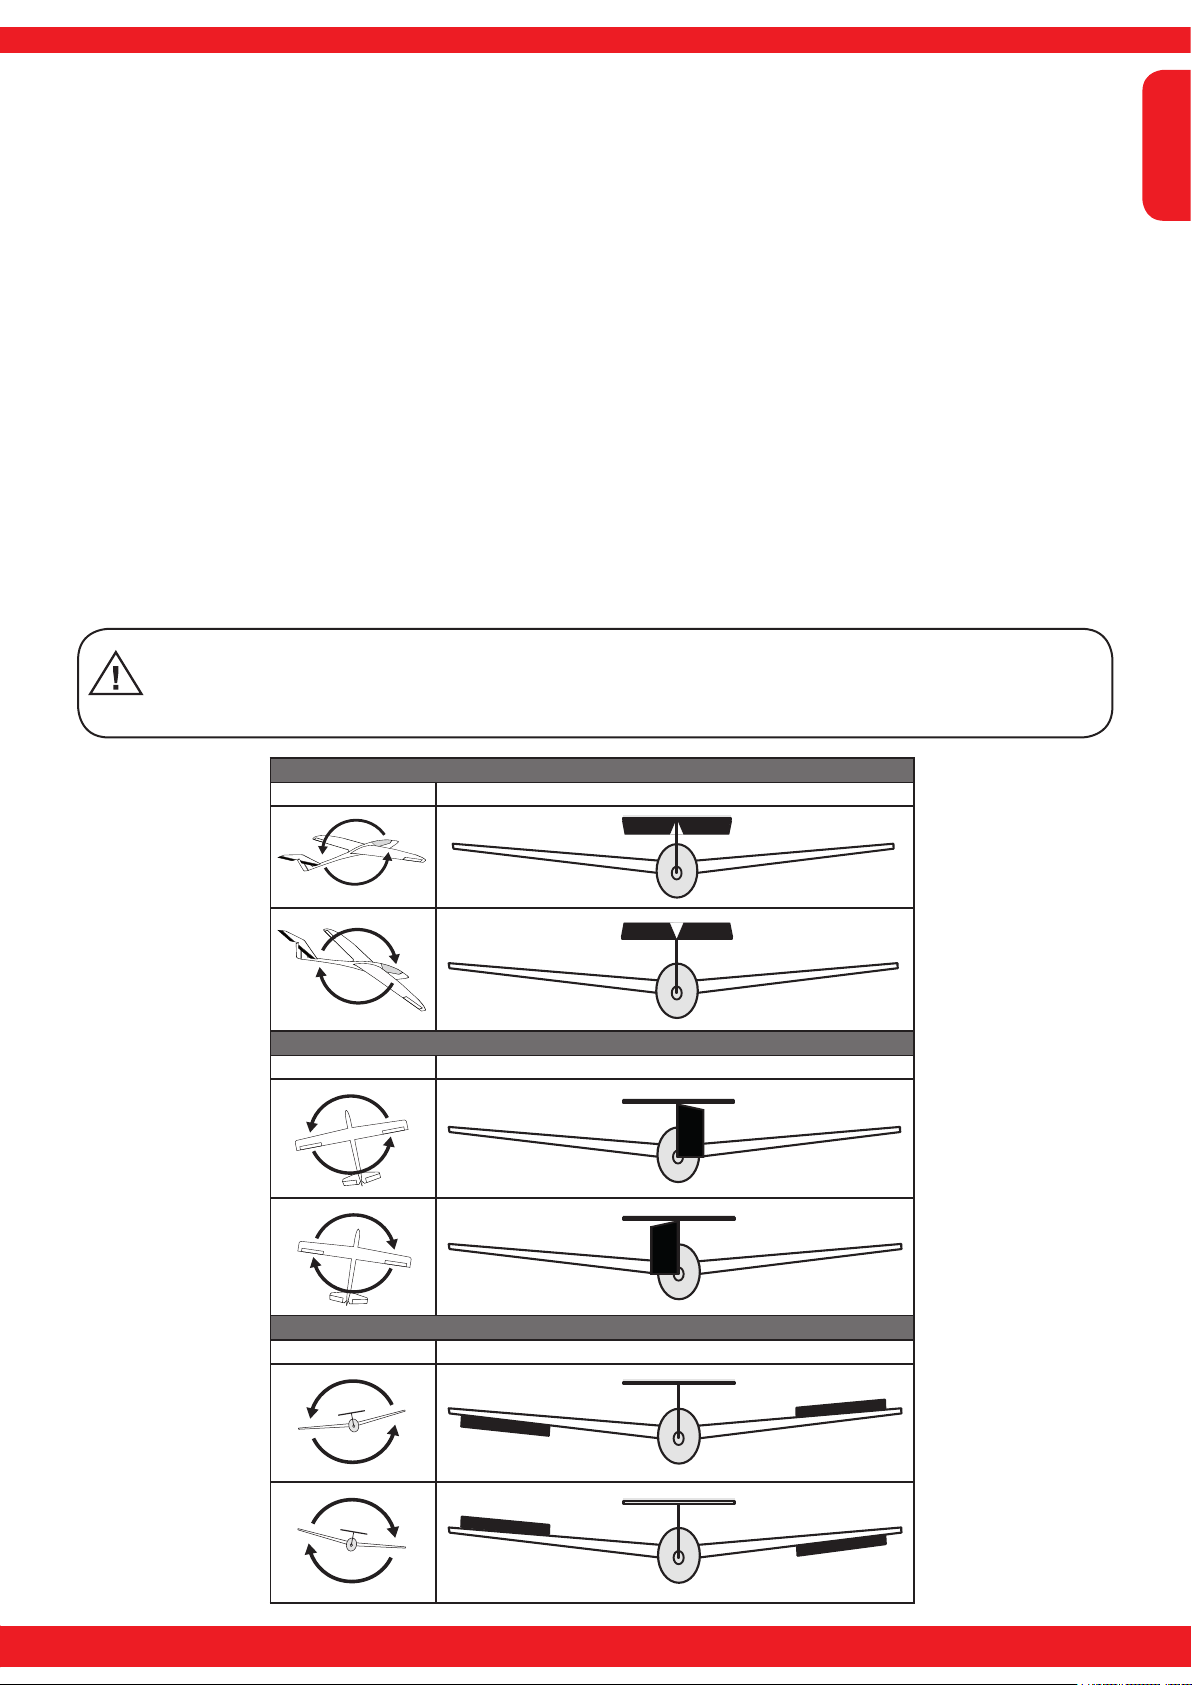
WARNUNG: überprüfen Sie nach dem Einlernen die korrekte Funktion aller Kreisel! Bewegen Sie dazu das
Modell in allen Achsen und überprüfen Sie die Ruderausschläge - siehe Abbildung unten. Bewegt sich ein
Ruder in die falsche Richtung, wiederholen Sie die Neueinstellung. Auf keinen Fall darf das Modell trotzdem
geogen werden, Absturzgefahr!
HÖHENRUDER
Bewegung des Modells Ruderreaktion (Heckansicht)
SEITENRUDER
Bewegung des Modells Ruderreaktion (Heckansicht)
QUERRUDER
Bewegung des Modells Ruderreaktion (Heckansicht)
11
Page 12
Deutsch
Einstellung des Servolimit der Kanäle
SERVOLIMIT <
> 1:
2:
3:
4:
5:
6:
7:
SERVOLIMIT <
> 1:
2:
3:
4:
5:
6:
7:
-150% +150% SEL
-150% +150% SEL
-150% +150% SEL
-150% +150% SEL
-150% +150% SEL
-150% +150% SEL
-150% +150% SEL
-150% +150% STO
-150% +150% SEL
-150% +150% SEL
-150% +150% SEL
-150% +150% SEL
-150% +150% SEL
-150% +150% SEL
+83% STO
In diesem Menü können Sie die Servowege für alle Kanäle limitieren. Begrenzen Sie die
Servowege auf den maximal möglichen Ausschlag, damit die Servos im Gyro-Betrieb
nicht in den Anschlag laufen können. Bewegen Sie den Cursor in die gewünschte Zeile
(durch weiteres abwärtsbewegen des Cursors werden weitere Kanäle angezeigt), hier
„1:“ für Kanal 1. Durch Drücken der SET-Taste wechselt das Feld „SEL“ in „STO“.
Bewegen Sie nun den Steuerknüppel von Kanal 1 in die gewünschte Richtung und
Position, dabei wird die entsprechende Prozentanzeige invertiert dargestellt. Drücken
Sie nun wieder die SET-Taste und der eingestellte Wert wird angezeigt und gespeichert.
Verfahren Sie für die anderen Kanäle entsprechend.
Programmierung der Gyro-Einstellungen (Fläche)
PID (proportional-integral-diferenzial) Regelung
Grundsätzlich basiert die Regelung der Kreiselsensoren auf drei Parametern:
P-Faktor: stellt die proportionale Regelung ein
P-proportional: weicht der Sollwert vom Istwert ab, geht dies proportional in die Stellgröße ein, vereinfacht gesagt der
Eingangswert (e) wird einfach mit einem festen Wert multipliziert: u(t)=Kp*e(t). Diesen Wert Kp nennt man Verstärkung.
Der Ausgangswert ist also proportional zur Eingangswert des Reglers.
Es muss immer erst eine Abweichung vom Sollwert vorhanden sein, damit die proportionale Regelung startet - ist die
Abweichung 0, ist das Produkt ja auch null. Ist die Verstärkung zu groß gewählt, beginnt der P-Regler aufzuschwingen
und wird instabil.
I-Faktor: integrale Regelung (im Moment im Empfänger nicht implementiert)
D-Faktor: stellt die differenziale Regelung ein
D-differenzial: Hier wirkt die Geschwindigkeit der Änderung des Eingangswerts auf den Ausgangswert des Reglers. Je
schneller also das Modell um die Achse kippt, um so größer ist das Gegensteuern des Reglers. Kippt das Modell ganz
gemächlich, wird der D-Regler kaum gegensteuern. Auch ist es völlig egal, wie weit das Modell schon gekippt ist, nur
die Geschwindigkeit der Bewegung ist entscheidend. Die Geschwindigkeit der Änderung wird noch mit einem Faktor
multipliziert (wie bei der P-Regelung) und ergibt dann den Ausgangswert. Einen reinen D-Regler gibt es daher nicht, er
muss immer in Kombination mit einem P-Regler eingesetzt werden.
Display Kreiseleinstellungen
ACHTUNG: bevor Sie bei einem neuen Modell mit den Einstellungen beginnen, müssen Sie die Anzahl
der Querruderservos im Menüpunkt Quer Servos eingeben sowie die Kreiselachsen und -richtungen im
Menüpunkt Neueinstellung anlernen.
Quer/Höhe/Seite: zeigt die programmierten P-Faktoren für das entsprechende Ruder an.
Beachte: Die Kreiselachsen müssen zuerst über Neueinstellung (siehe Absatz „Zuordnen der Kreiselachsen“) eingelernt
werden! Der Kreisel kann durch Setzen des Wertes AUS in der jeweiligen Steuerfunktion auch deaktiviert werden.
P-Faktor (Faktor):
Generell wird der P-Anteil zuerst eingestellt, anschließend der D-Anteil (Einstellbereich jeweils 0 bis 10). Allgemein
gilt, je größer die Ruder, umso kleiner ist der benötigte P-Anteil. Beginnen Sie mit Faktor 2 (Werkseinstellung), als
Maximalwert sollten Sie 4-5 für die Normalugphase, 2-3 für Speedug, 3-6 für die Landung nicht übersteigen; nur beim
Torquen können Sie bis zum Maximalwert 10 gehen.
WARNUNG: werden die Flugphasen getrennt programmiert, muss die Flugphasenwahl während des Flugs
unbedingt beachtet werden, ansonsten können sich die Ruder aufschwingen und im schlimmsten Fall das
Modell zerstören!
Page 13

innovation & technologie
Hinweis: je höher die Geschwindigkeit des Modells, desto eher kann es sich aufschwingen.
D-Faktor: bei gleichbleibendem P-Anteil kann ein kleinerer D-Faktor die Schwingneigung verringern. Sollten Sie jedoch
den P-Faktor eine Stufe niedriger wählen, so kann vermutlich der D-Anteil erhöht werden, bevor die Ruder schwingen.
Durch eine Feinabstimmung des D-Faktors kann die Kreiselwirkung optimiert werden.
Hinweis: mit dem voreingestellten P- und D-Wert sollte das Modell schnell und ohne Überschwingen auf Störeinüsse
reagieren. Die genauen Werte für das jeweilige Modell sind aber nur im Flug zu ermitteln. Reagiert das Modell mit den
Werkseinstellungen träge oder gar nicht, ist der Wert zu erhöhen, schwingt sich das Modell hingegen auf (erkennbar an
Wellenbewegungen im Flug), ist er zu reduzieren.
Ist Ihr Sender mit Proportionalgebern ausgestattet, kann der Wert auch während des Fluges verstellt werden.
Je nach verwendetem Sender kann der Faktor fest vorgegeben oder mit Hilfe der Proportionalgeber auch während des
Fluges verändert werden.
Programmieren mit Proportionalgebern
ist Ihr HoTT-Sender mit proportionalen Gebern ausgestattet, kann der P- und D-Faktor auch während des Betriebs für
jede Achse verändert, sozusagen ‚erogen‘ werden. Programmieren Sie proportionale Geber (z.B. die Schieberegler bei
der mc-20) auf einen beliebigen Kanal von 5 bis 16 (hier im Beispiel Kanal 9). Nun kann über die Proportionalgeber der
P-Faktor (und auch der D-Faktor) verändert werden. Die aktuellen Werte werden dabei in Klammern angezeigt.
Deutsch
Vorgehensweise am Beispiel Querruder (Quer):
Kreisel Einstell.< >
>Quer:
>Hoehe:
>Seite:
Faktor:
Faktor D:
• Somit kann der einmal „erogene“ (über den Proportionalgeber eingestellte) Wert gespeichert werden.
• gehen Sie weiter zu Höhe bzw. Seite und wählen auch hier Kanal und Faktor aus (Sie können entweder den
gleichen Kanal wählen, um alle Achsen gleichzeitig zu verändern oder auch verschiedene Kanäle, um die Achsen
einzeln zu programmieren)
• bewegen Sie den Cursor in die Zeile Faktor. Hier kann der P-Faktor für Quer-, Höhen- und Seitenruder zusätzlich
übergeordnet durch einen Proportionalgeber verändert werden (Einstellbereich bis 200%)
• bewegen Sie den Cursor in die Zeile Faktor D. Hier kann der D-Faktor für Quer-, Höhen- und Seitenruder
übergeordnet durch einen Proportionalgeber verändert werden (Einstellbereich bis 200%, wobei Kanalwert -100%
den Faktor 0% ergibt, 0% Kanalwert gleich 100% und +100% ergibt Faktor 200%). Dadurch kann sehr einfach eine
Anpassung an die Fluggeschwindigkeit vorgenommen werden, insbesondere kann für die Landung eine höhere
Kreiselempndlichkeit aktiviert werden (auch ohne Flugphasenumschaltung).
• Fliegen Sie ihr Modell und verändern die Werte sukzessive, bis die gewünschte Kreiselkorrektur ohne Aufschwingen
erreicht ist
• möglicherweise ist es sinnvoll bzw. einfacher, den Kreisel zunächst nur für eine Achse zu aktivieren und die
Einstellung zu eriegen als für mehrere Achsen gleichzeitig
(2)K9
(3)K8
(44%)K10
(140%)K11
• bewegen Sie den Cursor in die gewünschte Zeile, hier „Quer“ für das Querruder
• durch Drücken der SET-Taste wird das Feld Kanal aktiv,
• wählen Sie den gewünschten Kanal aus (unterhalb des Werts 0) und speichern ihn
6
durch erneutes Drücken der SET-Taste
• bewegen Sie den entsprechenden Proportionalgeber, um den Faktor zu verändern
(Einstellbereich 0 -10, wobei 0 keine Kreiselkorrektur für die jeweilige Achse bedeutet)
• dieser Faktor kann auch durch Drücken der Taste links oder rechts direkt über nommen werden. Damit wird der vom Proportionalgeber belegte Kanal wieder frei
und kann anderweitig verwendet werden.
Programmieren ohne Proportionalgeber
Kreisel Einstell.< >
>Quer:
>Hoehe:
>Seite:
Faktor:
Faktor D:
• bewegen Sie den Cursor in die gewünschte Zeile, hier „Quer“ für das Querruder
• durch Drücken der SET-Taste wird das Feld Kanal aktiv, wählen Sie den gewünschten
2
4
Wert (1 - 10 oder AUS) aus und speichern ihn durch erneutes Drücken der SET-Taste
6
• Wählen Sie zuerst einen niedrigen Wert (Anhaltspunkte siehe Abschnitt P-Faktor) und
Aus
Aus
machen einen Testug. Ist die Kreiselkorrektur zu niedrig, Wert schrittweise bis
zur gewünschten Kreiselkorrektur erhöhen, schwingt das Modell bereits auf,
Wert schrittweise senken
• wählen Sie keinen Kanal (K5 - K16) aus, diese Funktion ist nur für Sender mit Pro portionalgebern
• gehen Sie weiter zu Höhe bzw. Seite und wählen den gewünschten Wert (oder AUS)
13
Page 14
Deutsch
• „Faktor“ und „Faktor D“ belassen Sie die Einstellung hier auf AUS.
• möglicherweise ist es sinnvoll bzw. einfacher, den Kreisel zunächst nur für eine Achse zu aktivieren und die Einstellung
zu eriegen als für mehrere Achsen gleichzeitig
Haben Sie die optimalen Einstellungen gefunden, können Sie einen entsprechenden Schalter zur
Sicherheit oder auch zur Umschaltung der Faktorempndlichkeitseinstellung aktivieren. z.B. können
Sie einen 3 Funktionsschalter dem „Faktor“ und „Faktor D“ zuordnen und so zwischen den Werten von
0% (AUS) und 100% sowie 200% umschalten.
Flugphasenabhängige Einstellung
Die Ansteuerung der Faktoreinstellung über einen Kanal durch ugphasenabhängige Gebereinstellung ist nur bei MX
20 / MC20 / MC32 möglich, siehe hierzu in der Anleitung des jeweiligen Senders die Menüpunkte „Gebereinstellungen“
und „Flugphaseneinstellungen“
EMPFÄNGER EINSTELLMENÜ HELI
Menü bei GR-18Menü bei GR-24
EMPFÄNGER 1.0 < >
>Modelltyp:
ALARM VOLT:
ALARM TEMP:
Hoehe max:
>ZYKLUS:
>SUMD an K8:
SPRACHE:
HELI
3.2V
70°C
125m
10ms
Nein
deutsch
Das Einstellmenü des Empfängers erscheint
im Menü „Telemetrie“ unter EINSTELLEN / ANZEIGEN oder im Falle der SMART-BOX unter
SETTING & DATAVIEW. Wie Sie in dieses Menü
gelangen, lesen Sie bitte in der Bedienungsanleitung Ihres Senders bzw. Smart-Box.
EMPFÄNGER 1.0 < >
>Modelltyp:
ALARM VOLT:
ALARM TEMP:
Hoehe max:
>ZYKLUS:
>SUMD an K6:
Sensor an K9
SPRACHE:
HELI
3.2V
70°C
125m
10ms
Nein
Nein
deutsch
Display-Anzeige Erläuterung Einstellungen
EMPFÄNGER 1.0 1.0 zeigt die Firmwareversion des Empfängers an MODELLTYP Auswahl des Modelltyps Fläche, Heli
ALARM VOLT. Alarmgrenze der Unterspannungswarnung des
Empfängers
2.5 - 24.0 V
Werkseinstellung: 3.8 V
ALARM TEMP. Empfänger-Übertemperaturwarnung 50 - 80° C
Werkseinstellung: +70° C
Hoehe max. Maximalhöhe 0 - 2500 m
in 25 m Schritten
ZYKLUS Zykluszeit in ms 10 / 20 ms
SUMD an K8 (6) Digitales Summensignal an Kanal 8 (6) Ja / Nein
Sensor an K9 Telemetrie-Sensor an Kanal 9 (nur bei GR 18) Ja / Nein
SPRACHE Menüsprache wählen deutsch, englisch, französisch,
italienisch und spanisch
Modelltypauswahl (Modelltyp): hier können Sie den Modelltyp wählen.
Bei der Auswahl „Flaeche“ können Sie dann in den Menü Seiten wie ab Punkt 5 beschrieben die Gyroeinstellungen für
Flächenmodelle einstellen.
Bei der Auswahl „Heli“ können Sie dann in den nachfolgenden Menü Seiten die Gyroeinstellungen des integrierten
Flybarless System für Helikopter einstellen.
Unterspannungswarnung (ALARM VOLT): sinkt die Empfängerspannung unter den eingestellten Wert, erfolgt eine
Unterspannungswarnung durch das HF-Modul des Senders in Form des „allgemeinen Alarmtons“, eines gleichmäßigen
Piepsen im Rhythmus von ca. einer Sekunde oder der Sprachausgabe „Empfängerspannung“.
Temperaturwarnung (ALARM TEMP): übersteigt die Empfängertemperatur die eingestellte Temperatur, erfolgt eine
Warnung durch das HF-Modul des Senders in Form des „allgemeinen Alarmtons“, eines gleichmäßigen Piepsen im
Rhythmus von ca. einer Sekunde oder der Sprachausgabe „Empfängertemperatur“.
Maximalhöhe (Hoehe max.): hier kann eine Maximalhöhe vorgegeben werden, bei deren Erreichen ein Alarm ausgelöst
wird, entweder durch das HF-Modul des Senders in Form des „allgemeinen Alarmtons“, eines gleichmäßigen Piepsen
Page 15
innovation & technologie
im Rhythmus von ca. einer Sekunde oder der Sprachausgabe „Höhe“. Beachte: beim Einschalten des Empfängers wird
die aktuelle Höhe als 0 gesetzt, die angezeigte Höhe ist also die relative Höhe ausgehend vom Startpunkt.
Zykluszeit (ZYKLUS): bei ausschließlicher Verwendung von Digitalservos kann eine Zykluszeit von 10 ms eingestellt
werden. Im Mischbetrieb oder ausschließlicher Verwendung von Analogservos sollte 20 ms gewählt werden, da
Analogservos überfordert sein können und mit „Zittern“ oder „Knurren“ reagieren.
HoTT Summensignal (SUMD): wird das digitale Summensignal an Kanal 8 (6 bei GR 18) aktiviert, wird (anstatt
eines Servos) das Summensignal mit 8 Kanälen über diese Buchse ausgegeben. Der als SUMD kongurierte HoTT-
Empfänger generiert permanent aus 8 Steuersignalen vom Sender ein digitales Summensignal und stellt dieses am
empfängerspezisch festgelegten Servoanschluss bereit. Ein solches Signal wird zum Zeitpunkt der Überarbeitung
dieser Anleitung von einigen der neuesten elektronischen Entwicklungen im Bereich von Power-Stromversorgungen usw. genutzt.
WARNUNG: Beachten Sie in diesem Zusammenhang aber unbedingt die dem jeweils angeschlossenen
Gerät beiliegenden Einstellhinweise, da Sie ansonsten riskieren, dass Ihr Modell ggf. uniegbar wird.
Deutsch
Montage des Empfängers
Der Empfänger muss unbedingt rechtwinklig auf der Empfängerplattform am Helikopter ausgerichtet werden. Bitte auf
jeden Fall die Einbauanleitung in Abschnitt 3.1 beachten. Entfernen Sie vor der Montage den Aufkleber auf der Empfängerrückseite und verwenden Sie idealerweise das Doppelklebeband Best.Nr.: 96382.1.
Der Empfänger muss zur stabilen Stromversorgung mit mind. zwei Stromzuleitungen angeschlossen werden. Die ma-
ximal mögliche Stromaufnahme der Servos beachten!
Achtung: Die Empfänger dürfen nur in Elektrohelimodellen verwendet werden!
Vorbereitung des Helikopters
Alle Servos auf Neutral stellen, die Hebel müssen unbedingt rechtwinklig stehen, die Taumelscheibe muss neutral stehen (rechtwinkelig zur Hauptrotorachse). Die TS Gestänge müssen die gleiche Länge aufweisen.
Voreinstellungen am Sender
Freien/gelöschten Modellspeicher auswählen, Heli Modell aktivieren.
Alle Trimmungen müssen auf 0 stehen und dürfen auch im Flug auf keinen Fall verändert werden.Wenn möglich sollte
man daher die Trimmungen im Sender deaktivieren. Bei den Sendern MX-20, MC-16/20/32 und mz-18/24 Trimmung im
Menü deaktivieren.(Trimmschritte auf 0 stellen)
• Taumelscheibentyp 1 Servo aktivieren bzw. beibehalten (die Taumelscheibenmischung erfolgt im FBL System)
• Der Weg des Gaskanals (K6) muss unbedingt so eingestellt sein, dass bei Motor aus ein Wert nahe -100% (Servoanzeige) erreicht wird, da sonst die Kreiselkalibrierung nicht erfolgt.
• Sender Wegeinstellungen bleiben während der Basiseinstellungen auf jeden Fall auf 100%
• Falls das Heckservo nicht vom Typ 1,5ms Mitte (Standard) ist, dieses noch nicht einstecken!
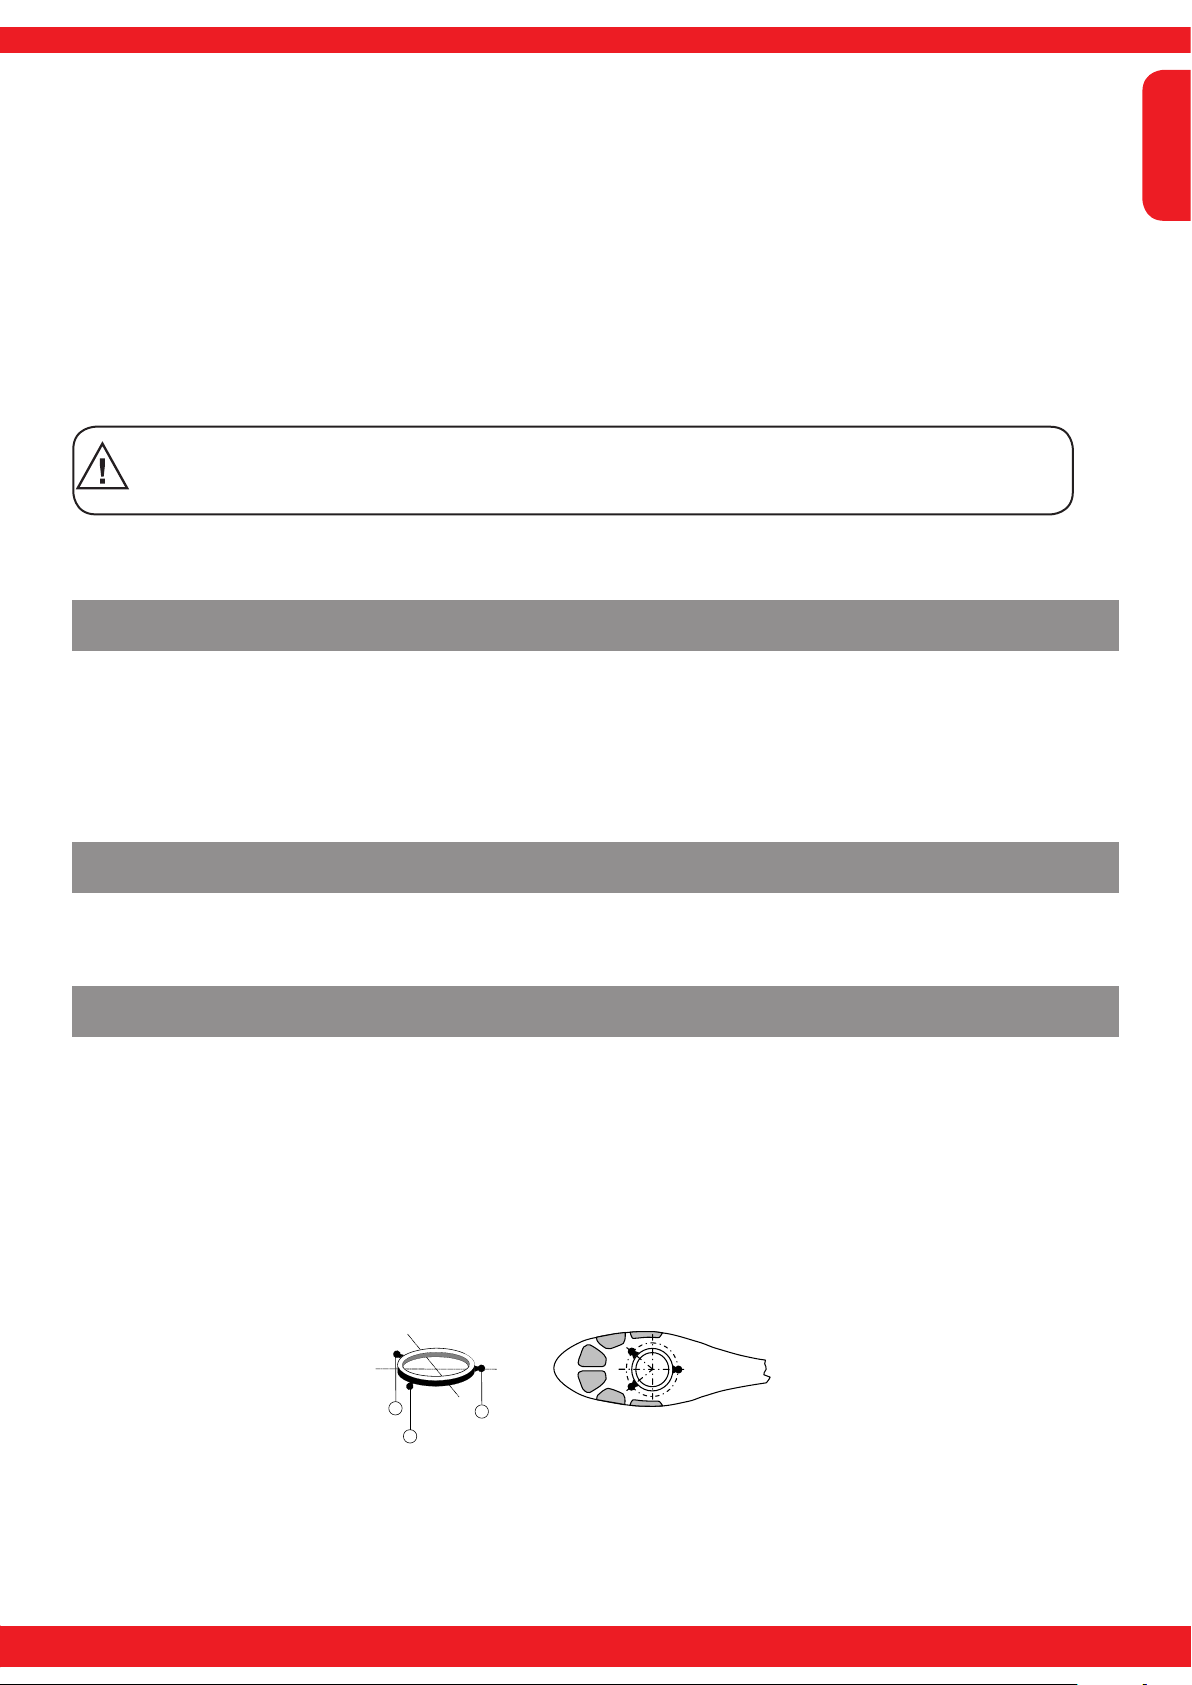
• Servoanordnung TS bei 120/135/140 Grad:
Vorn links = 1, Vorn rechts = 2, Hinten =3
2
1
• Empfänger an Sender binden
• Telemetrie Menü des Empfängers aufrufen, auf der ersten Seite in der ersten Zeile Modelltyp auf Heli stellen
• Alle Servoeinstellungen am Sender in Neutralstellung bringen (Servoanzeige 0%),
3
15
Page 16

Deutsch
Initialisierung des Kreisels (Heli)
Nach dem Einschalten des Modells ist der Kreisel sofort aktiv aber noch nicht initialisiert. Um ihn zu initialisieren, halten
Sie Ihr Modell beim Einschalten ruhig. Die Kalibrierung wird nur durchgeführt wenn der Empfänger absolut ruhig liegt.
Nach ca. 3 Sekunden in Ruheposition bewegt sich die Taumelscheibe kurz dreimal. Diese „Wackler“ signalisieren die
erfolgreiche Initialisierung, das Ende der Kalibrierung. Warten Sie nach jedem Einschalten diese Kalibrierung ab bevor
sie das Modell starten!
Grundeinstellungen (Vorgehensweise)
1. Nach erfolgreicher Vorbereitung des Senders und des Helis rufen Sie das Telemetriemenü im Sender auf (siehe
Anleitung des Senders) und wechseln in das Menü „Grundeinst. Regel“.
2. Die TS-/Heck Einstellmenüs überblättern Sie dabei, diese werden später bearbeitet!
3. Hier muss jetzt Punkt für Punkt von oben nach unten durchgearbeitet werden:
Grundeinstellung Regel
Grundeinst. Regel<v>
>Drehrichtung rechts
TS Typ
TS Frequenz
TS Richtung
TS S1 Mitte
TS S2 Mitte
TS S3 Mitte
140 Grad
50Hz
+0
+0
+0
+0
↕ ↕ Durch drücken der Pfeiltasten auf dem rechten Touchpad kommen
Sie zu weiteren Menüpunkten die weiter unten liegen!
TS Zykl.Weg 7 +100
Pitch Weg_B +100
TS Limit +50
TS Drehung +0
Heck Servo 1,5ms
Heck Frequenz 50Hz
Heck Mitte +0
Hecklimit B +50
Expo Ja
Logging +3
Expertenmode Nein
Drehrichtung
Rotordrehrichtung auswählen: rechts oder links
TS Typ
Taumelscheiben-Typ: Wählen Sie den korrekten Taumelscheibentyp aus. 90°, 120°, 135°, 140°.
Werkseinstellung 140°
Die Rollservos werden an Kanal 1 und 2 angesteckt, das Nickservo an Kanal 3, das Heckservo an Kanal 4 darf erst
eingesteckt werden, wenn der Parameter „Heck Servo“ korrekt eingestellt ist.
Die Motorsteuerung wird an Kanal 6 eingesteckt.
TS Frequenz
TS Frequenz: Frequenz für die Taumelscheibenservos
Werkseinstellung: 50 Hz
Warnung: Analoge Servos dürfen nur mit 50 Hz betrieben werden. Ansonsten werden die Servos zerstört. Viele
digitale Servos können mit einer höheren Frequenz betrieben werden. (Verwendung auf eigene Gefahr). Dadurch
wird die Regelung schneller. Bei HBS-Servos empfehlen wir eine Einstellung von 200 Hz.
TS Richtung
Werkseinstellung: 0
Hier wird die Laufrichtung der TS Servos so eingestellt, dass die TS beim „Pitchen“ nicht kippt. Einfach unter den
Optionen die passende auswählen (Pitch Richtung wird, wenn nötig, im Servomenü des Senders unter K1 eingestellt).
Page 17

innovation & technologie
Nun wird die Laufrichtung der Taumelscheibe kontrolliert. Bei Pitch nach oben, muss sich die Taumelscheibe parallel
nach oben bewegen. Läuft die Taumelscheibe entgegengesetzt, so muss im Sender bei den Servoeinstellungen Servo
1 die Servoumpolung eingestellt werden und die Roll- und Nickrichtung wird über die Servoumpolung Servo 2 und Servo
3 eingestellt.
TS S1 Mitte, S2 Mitte und S3 Mitte
Werkseinstellung: 0
Die Taumelscheibe sollte so gut wie möglich rechtwinkelig zur Hauptrotorachse ausgerichtet werden. Erst mechanisch
optimal einstellen und dann die 3 Servos im Menü einstellen. Eine perfekte Einstellung ist dann erreicht wenn der Heli
auf der Stelle schwebt.
TS Zykl. Weg 7
Werkseinstellung: +100
Den TS zyklischen Weg 7 grad stellen Sie bei aktiviertem Menü so ein, dass bei dem vollen Rollauschlag = 100 % Weg
im Servodisplay des Senders die Rotorblätter auf beiden Seiten möglichst genau +-7° zyklischer Ausschlag bewirkt.
Dazu muss unbedingt das Feld ausgewählt sein (invers angezeigt), damit die Taumelscheibe ohne Gyrowirkung auf
einem Direktmodus gesteuert und eingestellt werden kann. Nur in diesem Modus kann der Weg korrekt eingestellt
werden. Die korrekte Einstellung des Weges ist sehr wichtig. Davon hängt zum großen Teil die korrekte Kreiselwirkung
ab. Die Einstellung sollte deshalb mit einer digitalen Pitchlehre möglichst genau vorgenommen werden.
Pitch Weg_A/B
Werkseinstellung: 100
Wird automatisch entsprechend Pitchknüppelausschlag am Sender ausgewählt. Mit der Pitchlehre bei Vollausschlag
+-100% die gewünschten Pitchwege messen und in diesem Menü einstellen. Alle weiteren Einstellungen können später
an den Pitchkurven in der jeweiligen Flugphase am Sender eingestellt werden.
Deutsch
TS Limit
Werkseinstellung: +50
Taumelscheibenbegrenzung. Die Taumelscheibenbegrenzung muss so eingestellt werden, dass in keinem Fall ein
Servo auf Anschlag laufen kann, aber dennoch möglichst viel Weg ermöglicht wird. Bei allen Vollauschlägen darf also
kein Servo brummen.
TS Drehung
„TS Drehung“ = Hier kann (für bestimmte Mehrblattsysteme) eine virtuelle TS-Drehung (in Grad) eingestellt werden.
Damit ist die TS (Taumelscheibe) fertig eingestellt, weiter geht es mit dem Heck:
Heck Servo
Heck Servo: Wählen Sie hier die korrekte Mittelstellung für Ihr Heck Servo.
Mittelimpuls: 1,5ms, 760μs oder 960µs.
Werkseinstellung 1,5ms. Normalerweise sind 1,5ms Standard für Heckservos. Narrowband-Servos (in der Regel
spezielle Heckrotorservos) können jedoch auch einen anderen Mittelimpuls verlangen. Diesen Wert unbedingt
vom Servo-Handbuch ermitteln und richtig einstellen. Ist kein Wert vermerkt, handelt es sich in der Regel um ein
Standardservo mit 1,5ms. Bei DES, HVS oder HBS-Servos ist dieser Wert teilweise programmierbar. Wir empfehlen
jedoch die Standardeinstellung zu belassen.
Heck Frequenz
Heck Frequenz: Die Heckfrequenz kann von 50 – 333 Hz eingestellt werden.
Werkseinstellung: 50 Hz
Warnung: Analoge Servos dürfen nur mit 50 Hz betrieben werden. Ansonsten werden die Servos
zerstört.
Viele digitale Servos können mit einer höheren Frequenz betrieben werden. (Verwendung auf eigene Gefahr).
Dadurch wird die Regelung schneller. Bei HBS-Servos empfehlen wir eine Einstellung von 333 Hz.
Heck Mitte
Werkseinstellung: 0
Der Heckservohebel sollte 90 Grad zum Heckanlenkgestänge stehen.
Die Feintrimmung erfolgt dann über Heck Mitte. Der Heckrotor sollte bei Neutralstellung des Servos ca. 2-3°
Anstellwinkel gegen das Drehmoment am Heckrotor eingestellt sein.
17
Page 18

Deutsch
Hecklimit A/B
Werkseinstellung: 50
Begrenzung der Heckservowege. So einstellen, dass es nie mechanisch anschlägt, aber der mögliche Weg voll
ausgenutzt wird. Hier sollten aerodynamisch sinnvolle Werte gewählt werden. Bei zu großen Ausschlägen kann es zu
Strömungsabriss kommen.
Expo
„Expo“ = Per Default „Ja“ wird innerhalb der Regelung ein Expo von ca. 25% auf der TS und ca. 30% auf dem Heck
verwendet. Die Einstellung ist auch am Sender machbar (Dual Rate/Expo). Dazu setzen Sie den Wert auf Nein,
stellen aber für den Erstug unbedingt ähnliche Werte am Sender ein.
Logging
loggt die entsprechende Servofunktion auf SD-Karte für spätere Auswertung und Fehleranalyse.
0 = kein logging
1 = Roll und Nick logging
2 = Roll logging
3 = Nick logging
4 = Heck logging
Wir empfehlen immer mindestens eine Funktion zu loggen.
Expertenmode
„Expertenmode“ = Steht per Default auf Nein, auch Experten sollten für die ersten Schritte mit dem neuen
System bei dieser Einstellung bleiben (es erscheinen deutlich weniger Optionen im TS und Heck-Menü) und
erst nach Eingewöhnung bei Bedarf auf den Expertenmode und die zusätzlichen Möglichkeiten wechseln.
Damit sind die Grundeinstellungen fertig, weiter geht es mit den folgenden Einstellungen:
Achsenzuordnung
Achsenzuordnung <
>Neueinstellung
Roll (Rechts):
>Nick (Druecken):
>Heck: (Rechts)
Ja
+2
+0
+0
Neueinstellung
Neueinstellung: Ja/Nein
Zuweisung der Kreisel und Kreiselwirkrichtung.
Falls noch nicht geschehen, unbedingt jetzt am Sender die Servorichtungen K1-4 so einstellen, dass alles richtig
herum funktioniert.
Gehen Sie im Empfängermenü „Achsenzuordnung“ auf Neueinstellung und stellen hier auf ‚Neueinstellung: Ja‘. Weisen
Sie nun die Achsen wie folgt zu:
• Am Sender Roll voll rechts kurz einsteuern, die Rollachse wird invers dargestellt. Danach hat man wieder beide
Hände frei für den Heli !
• Heli um mehr als 45 Grad nach rechts rollen → die erkannte Achse mit dem benötigten Vorzeichen wird angezeigt,
das Feld ist nicht mehr invers, diese Achsenerkennung ist abgeschlossen
• Nun das gleiche für Nick: Am Sender voll Nick vorn kurz einsteuern
• Heli um mehr als 45 Grad nach vorn drehen, die Achse wird angezeigt, das Feld ist nicht mehr invers, diese
Achsenerkennung ist abgeschlossen
• Als letztes für Heck: Am Sender voll Heck rechts kurz einsteuern
• Heli so drehen, dass die Nase mehr als 45 Grad nach rechts dreht, die Achse wird angezeigt, das Feld ist nicht mehr
invers, diese Achsenerkennung ist abgeschlossen
Die Kreisel und Wirkrichtungen sind nun zugewiesen. Überprüfen Sie nun zur Sicherheit die Richtigkeit der Wirkrichtungen. Siehe folgende Abbildungen!
Achsenzuordnung <
>Neueinstellung
Roll (Rechts):
Nick: (Druecken):
>Heck (Rechts):
Nein
+2
+1
-3
Page 19
INNOVATION & TECHNOLOGIE
Prüfen von Nick = Elv = Elevator
Den Heli mit der Nase nach unten neigen, die Taumelscheibe muss so gesteuert werden, dass sie in der
Waagerechten bleibt.
Falsch! Richtig!
Prüfen von Roll = Ail = Aileron
Heli nach rechts neigen, Taumelscheibe muss automatisch in der Waagerechten bleiben.
Deutsch
Falsch! Richtig!
Prüfen der Heckwirkrichtung (Blickrichtung von hinten)
Heck nach links drehen, das Heckrotorblatt muss sich nach rechts drehen. Heck nach rechts drehen, das Heckrotorblatt
muss sich nach links drehen. Der Heli muss mit dem Heckrotor der Drehrichtung entgegenwirken!
Drehrichtung
Heckrotorblatt
Drehrichtung
Heli
Stimmt eine der Wirkrichtungen nicht, ist die Neueinstellung zu wiederholen!
Drehrichtung
Heckrotorblatt
Drehrichtung
Heli
Optimierung der Taumelscheiben- und Heckparameter können im Expertenmode für den jeweiligen Heli
und Flugstil durchgeführt werden. Es wird aber dringend empfohlen zuerst mit den Einstellungen ohne
Expertenmode zu iegen!
Wenn durch irgendwelche Veränderungen am Heli (z.B. neue Servos) am Sender Laufrichtungen geändert
werden oder der Empfänger in einer anderen Lage eingebaut wird, muss unbedingt dieser Einlernvorgang
wieder komplett durchgeführt werden !
19
Page 20

Deutsch
Taumelscheiben Einstellung ohne Expert.mode
Taumelsch. Einst.<v>
>TS-Empndlichk.
>Direktanteil
TS- Empndlichkeit
Taumelscheiben-Empndlichkeit, 1-10, Min oder K5…K16
Werkseinstellung: 5
Die Zeile ‚TS-Empndlichkeit‘ erlaubt eine Empndlichkeitseinstellung entweder über die Werte 1..10 oder über die
Zuordnung eines Kanals (K5-K16) mit einem Proportionalgeber über den der Wert geregelt wird. Ist darüber eine zufriedenstellende Einstellung gefunden, kann dieser Wert über die Taste ‚rechts‘ oder ‚links‘ als Festwert übernommen
werden.
Eine Flugphasenabhängige Empndlichkeit ist dann über verschiedene Einstellungen möglich.
Bei zu hohen Werten:
Überstabilisierung Heli reagiert nur leicht verzögert auf Steuereingaben, schwingt bei Speedügen
Bei zu geringen Werten:
Heli Schwebt nicht mehr sauber, Windanfällig.
Direktanteil
Werkseinstellung +85
Mit dem Direktanteil kann das direkte Reaktionsverhalten auf die Steuereingabe des Piloten eingestellt werden. 3D-
Piloten sollten mit Werten 80…95 testen.
Der Heli wird beim schnellen Nick-stoppen schwingen, wenn der Wert zu hoch eingestellt ist.
(5)K9
+85
Taumelscheiben Einstellung mit Expert.mode
Taumelsch. Einst.<v>
>TS-Empndlichk.
>Direktanteil
P TS
I TS
D TS
Schnellugopt.
↕ ↕
Schwebestab. normal
(Menüpunkt Taumelscheiben-Empndlichkeit siehe oben)
(Menüpunkt Direktanteil siehe oben)
P TS (Proportional) Taumelscheibe
P-Faktor Taumelscheibe
Werkseinstellung: +100 (typ. 50 – 70)
P Taumelscheibe ist für das härtere Einrasten der Taumelscheibe verantwortlich. Höhere Werte ergeben ein schnelleres Einrasten. Bei zu hohen P-Werten beginnt der Heli bzw. die Taumelscheibe zu „schwingen“. In diesem Fall muss
der Wert wieder reduziert werden.
(5)K9
+85
+100
+70
+0
+20
Durch drücken der unteren ▼ Pfeiltasten auf dem rechten Touchpad kommen Sie zu
weiteren Menüpunkten die weiter unten liegen!
I TS (Integral)Taumelscheibe
I-Faktor Taumelscheibe
Werkseinstellung: +70 (typ. 70 – 90)
Der I-Faktor sorgt für ein konstantes Rollen/Nicken. Mit niedrigen Werten beginnen und nur so lange erhöhen, bis die
Roll und Nickraten konstant sind.
Page 21

innovation & technologie
D TS (Differential)
D-Faktor für Taumelscheibe
Werkseinstellung: +0
Der D-Faktor D TS beeinusst das Stoppverhalten der Taumelscheibe.
Wenn beim Stoppen von Nick der Heli etwas nachwippt, dann sollte zuerst dieser Parameter in 5er Schritten erhöht
werden, um das Nickeinrasten zu testen.
Schnellugoptimierung
Werkseinstellung: +20
Beim schnellen Geradeausiegen sollte der Heli exakt in einer Linie/Höhe iegen und nicht in einer Wellenform. Fliegt
der Helikopter eine Wellenform, so kann der Wert erhöht werden, bis der Heli gerade iegt. In der Regel muss dieser
Parameter nicht verändert werden.
Schwebeugstabilisierung
hoch = stabiler Schwebeug auch bei Wind
normal = normale Schwebeugstabilität
niedrig = agil für extremen 3D Flugstil
Heckrotor Einstellung ohne Expertenmode
Deutsch
Heckrotor Einst.<v>
>Heck-Empndl.
>
Heck-Empndlichkeit
Heck-Empndlichkeit:, 1-10, MIN oder K5…K16
Werkseinstellung: 5
Die Zeile ‚Heck-Empndl.‘ erlaubt eine Empndlichkeitseinstellung entweder über die Werte 1..10 oder über die
Zuordnung eines Kanals (K5-K16) mit einem Proportionalgeber über den der Wert geregelt wird. Ist darüber eine zufriedenstellende Einstellung gefunden, kann dieser Wert über die Taste ‚rechts‘ oder ‚links‘ als Festwert übernommen
werden.
Eine ugphasenabhängige Empndlichkeit ist dann über verschiedene Einstellungen möglich.
Sollte sich das Heck aufschwingen, so muss der entsprechende Wert reduziert werden.
(5)K9
Heckrotor Einstellung mit Expertenmode
Heckrotor Einst.<v>
>Heck-Empndl.
P Heck
I Heck
D Heck
Pitch->Heck
TS-> Heck
(5)K9
+80
+70
+15
+25
+8
(Menüpunkt Heck-Empndlichkeit siehe oben)
P Heck
P Faktor Heck
Werkseinstellung: +80
P Heck ist für das härtere Einrasten des Hecks verantwortlich. Höhere Werte ergeben ein schnelleres Einrasten.
Bei zu hohen P-Werten beginnt das Heck zu „schwingen“. In diesem Fall muss der Wert wieder reduziert werden.
21
Page 22
Deutsch
I Heck
I-Faktor Heck
Werkseinstellung: +70
Der I-Faktor sorgt für konstante Pirouetten. Mit niedrigen Werten beginnen und nur so lange erhöhen, bis die
Pirouetten konstant sind. Zu hohe Werte sorgen für langsames Heckpendeln.
D Heck
D Faktor Heck
Werkseinstellung: +15
Der D-Faktor Heck beeinusst das Stoppverhalten des Hecks. Wenn beim Stoppen des Hecks das Heck etwas
nachwippt, dann sollte zuerst dieser Parameter in 5er Schritten erhöht werden, um das Heckeinrasten zu testen.
Pitch->Heck TS->Heck
Pitch->Heck TS->Heck
Werkseinstellung: +25 Werkseinstellung: +8
Diese beiden Funktionen wirken optimal, wenn sie zusammen eingestellt werden. Beim schnellen Pitch-pumping
(Pitchstössen) und Taumelscheibenbewegungen soll das Heck auch während der Belastung stabil bleiben. Bricht das
Heck kurz aus, so kann Pitch->Heck erhöht werden, bis das Heck stehen bleibt.
Am Boden kann gut kontrolliert werden, ob das Heck gegen das Drehmoment steuert.
TS->Heck ist in der Regel 1/3 niedriger einzustellen als Pitch->Heck.
Firmware Update
Firmware Updates des Empfängers werden über die Telemetriebuchse mit Hilfe eines PCs mit Windows XP, Vista oder
7 durchgeführt. Dazu benötigen Sie die separat erhältliche USB-Schnittstelle Best.-Nr. 7168.6 und das Adapterkabel
Best.-Nr. 7168.6A oder 7168.S.
Die dazu benötigten Programme und Dateien nden Sie bei den entsprechenden Produkten jeweils unter Download auf
www.graupner.de.
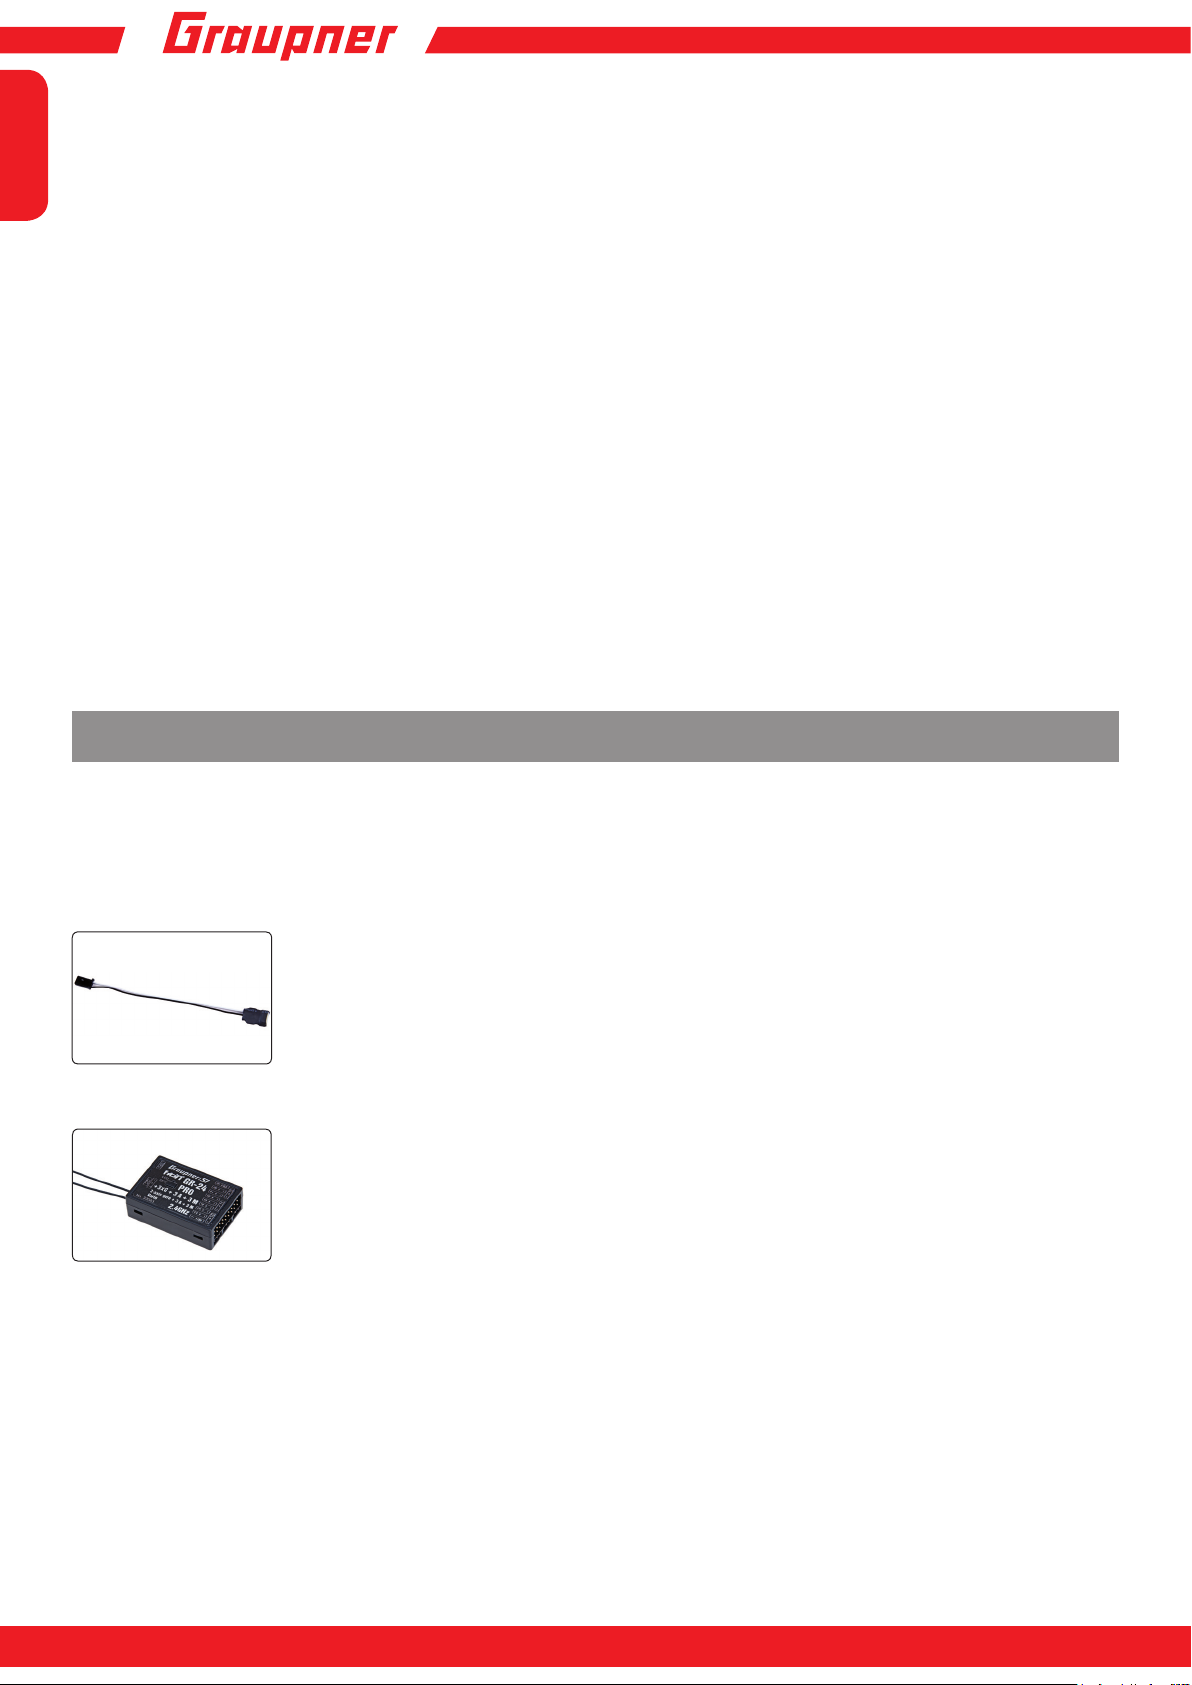
Verbinden Sie das Adapterkabel mit der USB Schnittstelle Best.-Nr. 7168.6. Das Stecksystem
ist verpolungssicher, achten Sie auf die kleinen seitlichen Nasen. Wenden Sie auf keinen Fall
Gewalt an, der Stecker sollte leicht einrasten.
Stecken Sie das Adapter-Kabel in die Telemetriebuchse des Empfängers. Das Stecksystem
ist verpolungssicher, achten Sie auf die kleinen seitlichen Fasen. Wenden Sie auf keinen Fall
Gewalt an, der Stecker sollte leicht einrasten.
Starten „Slowyer/Gyro Empfänger Update“
Das „Slowyer/Gyro Empfänger Update“ -Programm rufen Sie vorzugsweise aus dem „Firmware_Up-grade_grStudio“-
Programm auf. Klicken Sie im linken Funktions-Menü unter „Link“ den Punkt „Receiver Downloader“ an. (Alternativ
wählen Sie unter „Menu“ den entsprechenden Eintrag „Micro Receiver Upgrade“.)
Das zugehörige Anwendungsprogramm können Sie auch direkt starten. Doppelklicken Sie dazu auf die Datei „micro_
gyro_swloader.exe“. Sie nden diese exe-Datei im Verzeichnis „Graupner_ PC Software“ des „HoTT_Software VX“-
Paketes.
Page 23
innovation & technologie
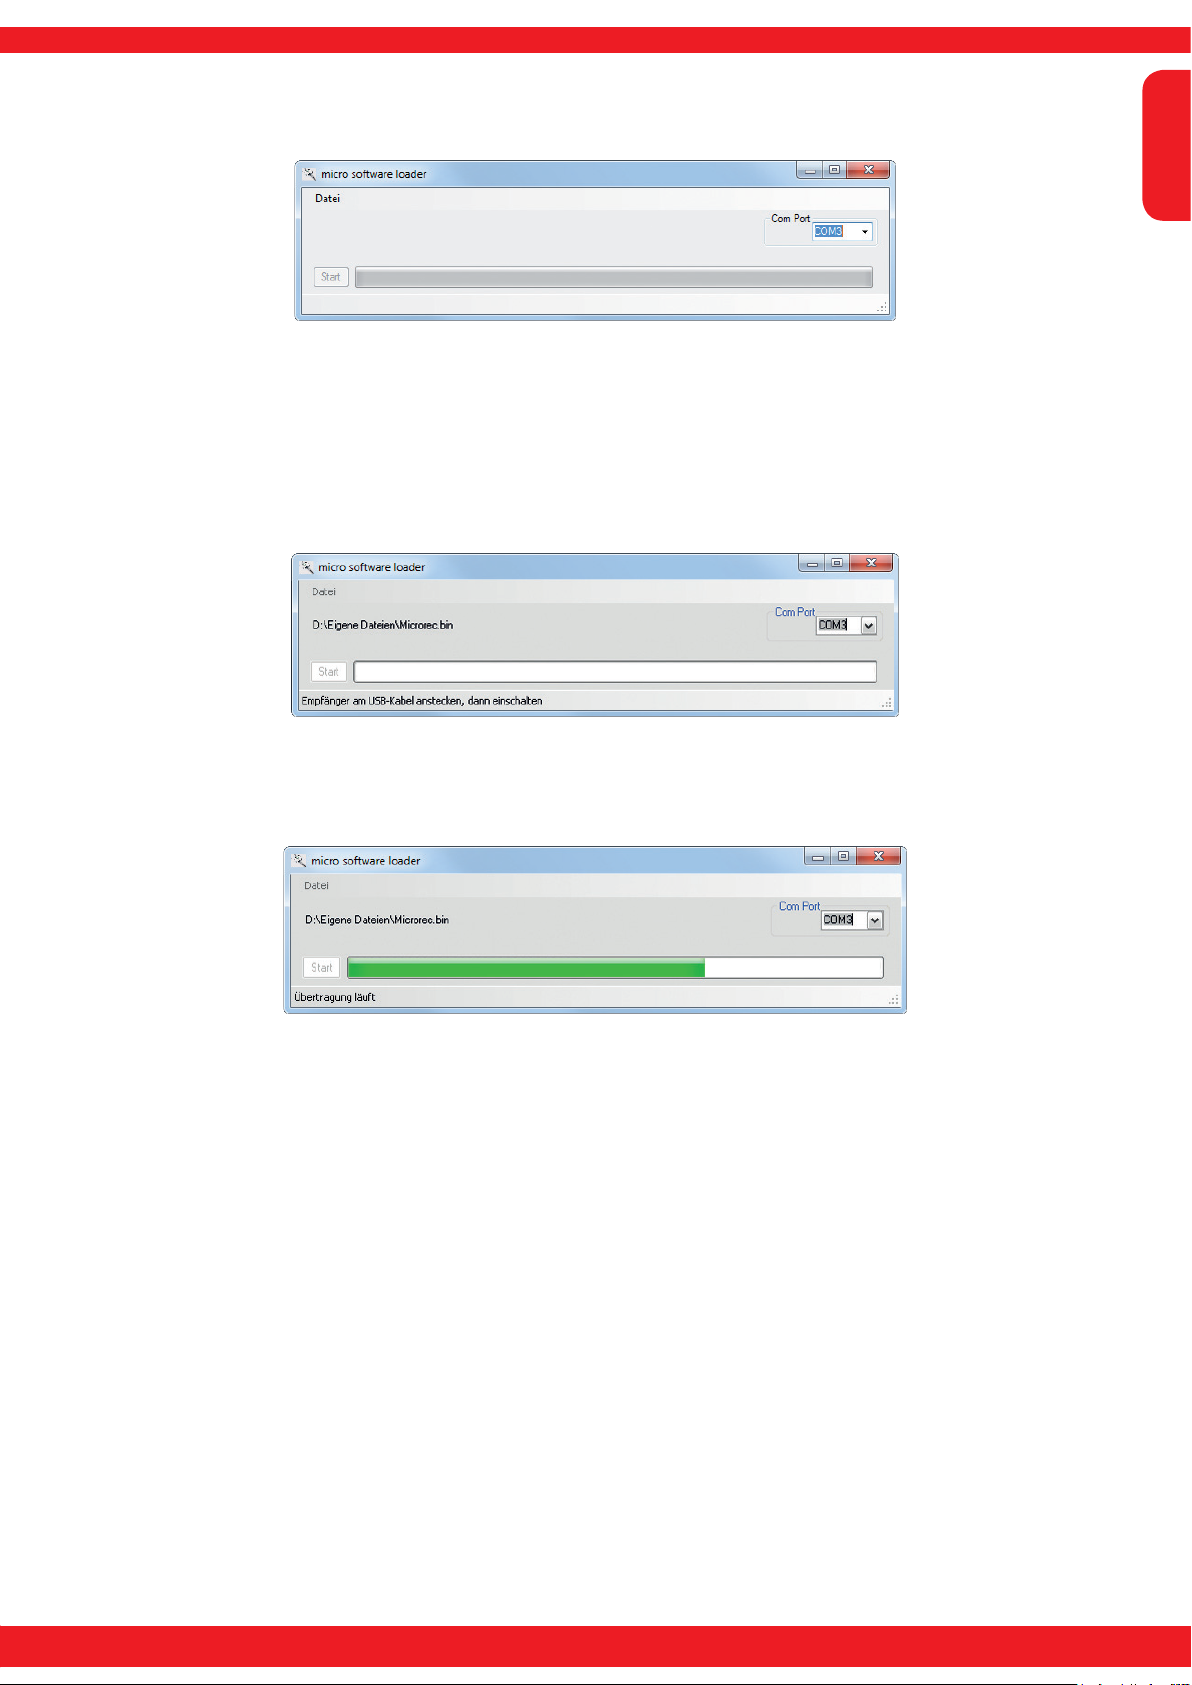
Im nun erscheinenden Programmfenster stellen Sie zunächst auch hier den „richtigen“ COM-Port der USBSchnittstelle Best.-Nr. 7168.6 im Auswahlfenster ein.
Falls Sie sich nicht sicher sind, überprüfen Sie den COM-Port im Fenster „Port wählen“ im „Menu“ des „Firmware_
Up-grade_grStudio“, und merken Sie sich die COM-Port-Nummer zum Eintrag „Silicon Labs CP210x USB to
UART Bridge“ – hier „COM03“. (Auf eine falsche Port-Auswahl werden Sie beim Auslesen der Empfängerdaten
hingewiesen.) Klicken Sie auf den Button „Datei”, um die entsprechende Firmware-Datei namens „MicroStabi7X_V_
XX.bin“ von der Festplatte zu laden („XX“ kennzeichnet die Versionsnummer).
Nach dem Laden der Datei klicken Sie auf Start...
Deutsch
... schließen Sie den Empfänger an und schalten ihn ein.
Der Fortschrittsbalken zeigt die ordnungsgemäße Übertragung an. Die Empfänger-LED leuchtet währenddessen rot und grün, sie blinkt abwechselnd rot und grün sobald die Übertragung beendet ist.
Bitte beachten Sie hierzu die ausführliche Updateanleitung unter http://www.graupner.de im Downloadbereich des
jeweiligen Artikels.
23
Page 24

Deutsch
Herstellererklärung der Firma Graupner/SJGmbH
Inhalt der Herstellererklärung
Sollten sich Mängel an Material oder Verarbeitung an einem von uns in der Bundesrepublik Deutschland
vertriebenen, durch einen Verbraucher (§ 13 BGB) erworbenen Gegenstand zeigen, übernehmen wir, die Fa.
Graupner/SJ GmbH, Kirchheim/Teck im nachstehenden Umfang die Mängelbeseitigung für den Gegenstand.
Rechte aus dieser Herstellererklärung kann der Verbraucher nicht geltend machen, wenn die Beeinträchtigung
der Brauchbarkeit des Gegenstandes auf natürlicher Abnutzung, Einsatz unter Wettbewerbsbedingungen,
unsachgemäßer Verwendung (einschließlich Einbau) oder Einwirkung von außen beruht.
Diese Herstellererklärung lässt die gesetzlichen oder vertraglich eingeräumten Mängelansprüche und -rechte
des Verbrauchers aus dem Kaufvertrag gegenüber seinem Verkäufer (Händler) unberührt.
Umfang der Garantieleistung
Im Garantiefall leisten wir nach unserer Wahl Reparatur oder Ersatz der mangelbehafteten Ware.
Weitergehende Ansprüche, insbesondere Ansprüche auf Erstattung von Kosten im Zusammenhang mit dem
Mangel (z.B. Ein-/Ausbaukosten) und der Ersatz von Folgeschäden sind – soweit gesetzlich zugelassen –
ausgeschlossen. Ansprüche aus gesetzlichen Regelungen, insbesondere nach dem Produkthaftungsgesetz,
werden hierdurch nicht berührt.
Voraussetzung der Garantieleistung
Der Käufer hat den Garantieanspruch schriftlich unter Beifügung des Originals des Kaufbelegs (z.B.
Rechnung, Quittung, Lieferschein) und dieser Garantiekarte geltend zu machen. Er hat zudem die defekte
Ware auf seine Kosten an die folgende Adresse einzusenden.
Fa. Graupner/SJ GmbH, Serviceabteilung,
Henriettenstr.96, D 73230 Kirchheim/Teck
Der Käufer soll dabei den Material- oder Verarbeitungsfehler oder die Symptome des Fehlers so konkret
benennen, dass eine Überprüfung unserer Garantiepicht möglich wird.
Der Transport des Gegenstandes vom Verbraucher zu uns als auch der Rücktransport erfolgen auf Gefahr
des Verbrauchers.
Gültigkeitsdauer
Diese Erklärung ist nur für während der Anspruchsfrist bei uns geltend gemachten Ansprüche aus dieser
Erklärung gültig. Die Anspruchsfrist beträgt 24 Monate ab Kauf des Gerätes durch den Verbraucher bei einem
Händler in der Bundesrepublik Deutschland (Kaufdatum). Werden Mängel nach Ablauf der An-spruchsfrist
angezeigt oder die zur Geltendmachung von Mängeln nach dieser Erklärung geforderten Nachweise oder
Dokumente erst nach Ablauf der Anspruchsfrist vorgelegt, so stehen dem Käufer keine Rechte oder Ansprüche
aus dieser Erklärung zu.
Verjährung
Soweit wir einen innerhalb der Anspruchsfrist ordnungsgemäß geltend gemachten Anspruch aus dieser
Erklärung nicht anerkennen, verjähren sämtliche Ansprüche aus dieser Erklärung in 6 Monaten vom Zeitpunkt der Geltendmachung an, jedoch nicht vor Ende der Anspruchsfrist.
Anwendbares Recht
Auf diese Erklärung und die sich daraus ergebenden Ansprüche, Rechte und Pichten ndet ausschließlich
das materielle deutsche Recht ohne die Normen des Internationalen Privatrechts sowie unter Ausschluss
des UN-Kaufrechts Anwendung.
Page 25

Konformitätserklärung
INNOVATION & TECHNOLOGIE
Konformitätserklärung gemäß dem Gesetz über Funkanlagen und
Telekomunikationsendeinrichtungen (FTEG) und der Richtlinie 1999/5/EG (R&TTE)
Declaration of Conformity in accordiance with the Radio and Telecomunikations Terminal Equipment
Act (FTEG) and Directive 1999/5/EG (R&TTE)
Graupner/SJ GmbH
Henriettenstraße 96
D-73230 Kirchheim/Teck
erklärt, dass das Produkt:
declares that the product
Geräteklasse: 1
Equipment class
den grundlegenden Anforderungen des § 3 und den übrigen einschlägigen Bestimmungen des
FTEG (Artikel 3 der R&TTE) entspricht.
complies with the essential requirements of § 3 and the other relevant provisions of the FTEG (Article 3 of the
R&TTE Directive).
GR-24 PRO +3xG + 3A + 3M+Vario HoTT - No. 33583
GR-18 +3xG + 3A+Vario HoTT - No. 33579
Deutsch
Angewendete harmonisierte Normen:
Harmonised standards applied
EN 60950-1:2006+A11:
2009+A1:2010+A12:
Health and safety requirements pursuant to § 3 (1) 1. (Article 3 (1) a))
Gesundheit und Sicherheit gemäß § 3 (1) 1. (Artikel 3 (1)a))
2011
EN 301 489-1 V1.9.2
EN 301 489-17 V2.1.1
Protection requirement concernig electromagnetic compatibility
§ 3 (1) 2, Artikel 3 (1) b))
EN 300 328 V1.7.1
Measures for the efficient use of the radio frequency spectrum
§ 3 (2) (Article 3 (2))
Schutzanforderungen in Bezug auf elektromagnetische
Verträglichkeit § 3 (1) 2, Artikel 3 (1) b))
Maßnahmen zur effizienten Nutzung des Frequenzspektrums
§ 3 (2) (Artikel 3 (2))
Kirchheim, 17. April 2013
Ralf Helbing, Geschäftsführer
Ralf Helbing, Managing Director
Graupner/ SJ GmbH Henriettenstraße 96 D-73230 Kirchheim/Teck Germany
Tel: 07021/722-0 EMail: info@graupner.deFax: 07021/722-188
#33579: GR-18+3xG+3A+Vario
FCC ID: SNL-16006100
#33583 : GR-24 PRO +3XG+3A+3M+VARIO
FCC ID: SNL-16005800
25
Page 26

Deutsch
Garantie
Wir gewähren auf dieses Erzeugnis eine /
This product is /
Garantie von
warrantied for
garantie de
Die Fa.Graupner/SJ GmbH, Henriettenstrasse 96,
73230 Kirchheim/Teck gewährt ab dem Kaufdatum auf
dieses Produkt eine Garantie von 24 Monaten. Die Garantie
gilt nur für die bereits beim Kauf des Produktes vorhandenen
Material- oder Funktionsmängel. Schäden, die auf Abnützung, Überlastung, falsches Zubehör oder unsachgemäße
Behandlung zurückzuführen sind, sind von der Garantie
ausgeschlossen. Die gesetzlichen Rechte und Gewährleistunsansprüche des Verbrauchers werden durch diese Garantie nicht berührt. Bitte überprüfen Sie vor einer Reklamation
oder Rücksendung das Produkt genau auf Mängel, da wir
Ihnen bei Mängelfreiheit die entstandenen Unkosten in
Rechnung stellen müssen.
Graupner/SJ GmbH, Henriettenstrasse 96,
Kirchheim/Teck, Germany guarantees this product for a
period of 24 months from date of purchase. The guarantee
applies only to such material or operational defects witch
are present at the time of purchase of the product. Damage
due to wear, overloading, incompetent handling or the use
of incorrect accessories is not covered by the guarantee. The
user´s legal rights and claims under guarantee are not
affected by this guarantee. Please check the product
carefully for defects before you are make a claim or send the
item to us, since we are obliged to make a charge for our
cost if the product is found to be free of faults.
24
73230
Sur ce produit nous accordons une
Monaten
months
mois
Servicestellen / Service / Service après-vente
Graupner-Zentralservice
Graupner/SJ GmbH
Henriettenstrasse 96
D-73230 Kirchheim / Teck
Die Adressen der Servicestellen außerhalb Deutschlands
entnehmen Sie bitte unserer Webseite www.graupner.de.
For adresses of service points outside of germany please
refer to www.graupner.de/en/.
Pour adresses des points de service situés en dehors de
l'Allemagne s'il vous plaît se référer à www.graupner.de/fr/.
Servicehotline
(+49) (0)7021/722-130
Montag - Donnerstag
7:30 -9:00 Uhr
9:15 -16:00 Uhr
Freitag
9:00 - 13:00 Uhr
La société Graupner/SJ
73230 Kirchheim/Teck, Allemagne, accorde sur ce produit
une garantie de 24 mois à partir de la date d´achat. La garantie prend effet uniquement sur les vices de fonction-nement
et de matériel du produit acheté. Les dommages dûs à de
l´usure, à de la surcharge, à de mauvais accessoires ou à
d´une application inadaptée, sont exclus de la garantie.
Cette garantie ne remet pas en cause les droits et prétentions légaux du consommateur. Avant toute réclamation et
tout retour du produit, veuillez s.v.p. contrôler et noter
exactement les défauts ou vices.
GmbH, Henriettenstrasse 96,
Garantie-Urkunde
Warranty certifi cate / Certifi cat de garantie
Übergabedatum
Date of purchase/delivery
Date de remise
Name des Käufers
Owner´s name
Nom de I`acheteur
Straße, Wohnort
Complete adress
Adresse complète
Firmenstempel und Unterschrift des Einzelhändlers
Stamp and signature of dealer
Cachet et signature du vendeur
Page 27

Entsorgungshinweis
HINWEISE ZUM UMWELTSCHUTZ
innovation & technologie
Das Symbol auf dem Produkt, der Gebrauchsanleitung oder der Verpackung weist darauf hin, dass dieses
Produkt bzw. elektronische Teile davon am Ende seiner Lebensdauer nicht über den normalen Hausmüll
entsorgt werden dürfen.
Es muss an einem Sammelpunkt für das Recycling von elektrischen und elektronischen Geräten abgegeben
werden.
Die Werkstoffe sind gemäß ihrer Kennzeichnung wiederverwertbar. Mit der Wiederverwendung, der stofichen Verwertung oder anderen Formen der Verwertung von Altgeräten leisten Sie einen wichtigen Beitrag zum Umweltschutz.
Batterien und Akkus müssen aus dem Gerät entfernt werden und bei einer entsprechenden
Sammelstelle getrennt entsorgt werden.
Bei RC - Modellen müssen Elektronikteile, wie z.B. Servos, Empfänger oder Fahrtenregler aus dem Produkt ausgebaut
und getrennt bei einer entsprechenden Sammelstelle als Elektro-Schrott entsorgt werden.
Bitte erkundigen Sie sich bei der Gemeindeverwaltung nach der zuständigen Entsorgungsstelle.
Deutsch
27
Page 28

Manual
INNOVATION & TECHNOLOGY
33579 Receiver GR-18 3xG+3A+Vario
33583 Receiver GR-24 PRO 3xG+3A+3M+Vario
English
GRAUPNER/SJ GmbH. Henriettenstr.96, KG D-73230 KIRCHHEIM/TECK GERMANY
2013/09/01
Page 29

Contents
Preamble .....................................................................................................30
Approved Usage .........................................................................................30
Key to the Symbols ....................................................................................30
Safety notes ................................................................................................31
General notes..............................................................................................31
innovation & technologie
Binding ........................................................................................................32
Installation in the model (airplane) ...........................................................33
Installation in the model (heli) ...................................................................33
Connections ................................................................................................34
Power supply ..............................................................................................34
Telemetry (T/9 at GR-18) ............................................................................34
Receiver setup menu .................................................................................34
initialising the gyro (plane) ........................................................................36
Free mixer ...................................................................................................36
Assigning the gyro axes ............................................................................38
Adjust servolimit for channels ..................................................................39
Programming the gyro settings ................................................................39
Gyro settings display .................................................................................40
Programming, transmitter with proportional controls ............................40
Programming, transmitter without proportional controls ......................41
English
RECEIVER SETUP MENU FOR HELICOPTERS .......................................41
Installing the receiver.................................................................................42
Preparing the helicopter ............................................................................42
Transmitter presettings..............................................................................42
Initialising the gyro (helicopter) ................................................................43
Basic model settings (procedure).............................................................43
Base setup controller .................................................................................43
Axis assignment .........................................................................................45
Swashplate setting without Expertmode .................................................47
Swashplate setting with Expertmode .......................................................47
Tail rotor setting without Expertmode ......................................................48
Tail rotor setting with Expertmode ..........................................................48
Firmware update .........................................................................................49
Manufacturer‘s declaration on behalf of GRAUPNER/SJ GmbH ...........51
Declaration of conformity ..........................................................................52
Warranty ......................................................................................................53
Environmental protection notes ...............................................................54
29
Page 30

Preamble
!
MANY THANKS
for deciding to purchase the Graupner/SJ HoTT 2.4 system. Please read right through these operating instructions
before you attempt to install and operate the Graupner HoTT 2.4 system.
• The receiver stabilises the model aircraft in difcult, windy conditions, acting on a maximum of three axes
English
• Proportional gyro suppression for natural ying characteristics
• Excellent stabilisation for smooth, accurate manoeuvres
• The triple-axis gyro endows even very demanding aerobatic models with docile ying characteristics, and greatly
simplies aerobatics
• Aerobatic manoeuvres can be own much more accurately
• Simple gyro assignment procedure
• Facility to adjust parameters using HoTT telemetry
• Altitude sensor for vario and altimeter function
Attention!
Prior to the installation and commissioning of the receiver be sure to read the instructions
completely.
Approved Usage
Note: The receivers may only be used in electric heli models!
The receiver is intended exclusively for use in radio-controlled models. Any other usage is prohibited, and may result in
damage to the receiver or model, and serious personal injury. We grant no guarantee and accept no liability for any type
of use outside the stipulated range.
Not suitable for children under fourteen years. This receiver is not a toy!
The receiver is also equipped with a telemetry function which is only available in combination with a Graupner/SJ HoTT
2.4 system. If you do not own a Graupner/SJ HoTT 2.4 system, the receiver will not work.
Please start by reading through the whole instructions before you attempt to install and operate the receiver.
These operating instructions are an integral part of the product. They contain important notes on operating and handling
the receiver. For this reason please store the operating instructions in a safe place, and pass them on to the new owner if
you ever dispose of the product. Failure to observe the operating instructions and safety notes invalidates the guarantee.
Here at Graupner we are constantly working on the further development of all our products; for this reason we are
obliged to reserve the right to introduce changes to the set contents in form, technology and features.
Please understand that we will not countenance claims resulting from information and illustrations in these operating
instructions.
Please store the operating instructions in a safe place for future reference!
Key to the Symbols
Caution!
This symbol alerts you to prohibited actions which must be observed at all times. Any failure
to observe the prohibited action indicated in this way may prevent the equipment working, and
endanger the safety of the operator.
Caution!
This symbol alerts you to information which must be observed at all times. Any failure to observe
the information indicated in this way may prevent the equipment working properly, and endanger
the safety of the operator.
This symbol indicates information which should always be observed in order to ensure that the
equipment operates reliably.
Page 31

Safety notes
Warnung!
Das Betreiben des Empfängers unter Einuss von Medikamenten, Alkohol, Drogen, usw. ist
verboten.
Caution!
Any deviation from the instructions may have an adverse effect on the function and operational
security of the receiver, and must be avoided under all circumstances.
Caution!
The operator bears full responsibility for using the receiver. The only way to guard against
personal injury and property damage is to handle the equipment carefully and use it exactly as
recommended.
Caution!
Not suitable for children under fourteen years.
Caution!
Protect the receiver from dust, soiling, damp and foreign bodies. Never subject the receiver to
excessive vibration, heat or cold.
Caution!
During the programming process you must bear in mind that an internal combustion engine or
electric motor could unexpectedly burst into life at any time.
Caution!
Avoid subjecting the receiver to shocks and pressure. Check the receiver regularly for damage to
the case and cables. Do not re-use a receiver which is damaged or has become wet, even after it
has dried out again.
Caution!
When deploying the cables ensure that they are not under tension, not tightly bent (kinked) or
fractured. Avoid sharp edges which could damage cable insulation.
Caution!
Ensure that all plug-in connections are rmly seated. Do not pull on the wires when
disconnecting plugs and sockets.
Caution!
The receiver must not make physical contact with the model’s fuselage, hull or chassis, as this
would allow motor vibration and landing shocks to be transferred directly to it.
Caution!
It is not permissible to carry out modications of any kind to the receiver. Any changes invalidate
product approval, and you forfeit any insurance protection.
Caution!
Ensure that the equipment is working correctly and at full range before every ight. Check the
state of the batteries at regular intervals.
Note!
Ensure that all your HoTT components are loaded with the current version of the software at all
times.
Note!
Safety is no accident, and radio-controlled models are not playthings!
innovation & technologie
English
General notes
• The receiver’s integral gyros are very fast, high-resolution components. This means that you should always use highspeed digital servos wherever possible, so that the gyro’s corrective signals are converted directly and accurately into
servo movement; this helps to prevent the model oscillating.
• Keep all servo extension leads as short as possible.
• When switching on or adjusting the radio control system, it is essential to keep the transmitter aerial at least 15 cm
from the receiver aerial(s). If the transmitter aerial is too close to the receiver aerials, the receiver will be swamped
and the red LED on the receiver will light up. The transmitter responds with a ashing red LED and repeated beeps
at approximately one-second intervals, i.e. the radio control system reverts to fail-safe mode. If this should happen,
increase the distance until the audible warning ceases, and the blue transmitter LED lights up constantly once more.
The red LED on the receiver should now be off.
31
Page 32

Binding
The Graupner/SJ HoTT 2.4 receiver must be “bound” to “its” Graupner/SJ HoTT 2.4 RF module (transmitter) before a
radio link can be created between them; this process is known as “binding”. Binding is only necessary once for each
combination of receiver / RF module, so the binding procedure described below only needs to be repeated if you add
more receivers. However, binding can be repeated at any time if you wish; for example, if you switch transmitters. This
is the procedure in detail:
English
• Binding is only possible if the receiver has not been linked with a bound transmitter since being switched on (red
LED lights); press the SET button to set the receiver to BIND mode.
• If you have already bound a receiver to the transmitter, and wish to bind the receiver to a new model memory, this
is the procedure:
• Switch the transmitter’s RF section off in the “Basic model settings” menu.
• Switch the receiver on, and press the SET button to set it to Bind mode.
• Initiate binding in the transmitter’s “Basic model settings” menu.
• If the receiver’s red LED moved within about 10 seconds to green, the Binding Operation was completed successfully.
• Your transmitter / receiver combination is now ready for use.
• However, if the red LED continues to glow, then the binding process has failed. If this should happen, repeat the
whole procedure.
Binding multiple receivers per model
If necessary it is also possible to bind more than one receiver to a particular model. First bind each receiver individually
as described earlier.
When the system is actually in use, the receiver which was last bound acts as the Master unit, and any telemetry
sensors installed in the model must be connected to this receiver, as only the Master receiver transmits the data to
the ground using the downlink channel. The second - and any other - receivers operate in Slave mode, in parallel with
the Master receiver, with the downlink channel switched off. The channel mapping function of HoTT telemetry also
allows the control functions to be divided up amongst multiple receivers, or alternatively the same control function to
be assigned to multiple receiver outputs. For example, this is useful if you wish to actuate each aileron with two servos
instead of just one.
Fail-Safe function
In the receiver’s default state, all connected servos remain in their last valid position (“Hold” mode) if a fail-safe situation
should arise. In fail-safe mode the red LED on the receiver lights up, and the transmitter generates an audible alert by
beeping at a rate of around one per second.
You can exploit the safety potential of this option by at least setting the throttle position (for internal-combustion powered
models) to Idle, or the motor function (electric-powered models) to “Stop”, or “Hold” for a model helicopter, if a fail-safe
event should occur. These settings ensure that the model is less likely to y out of control if interference should occur,
thereby helping to avoid property damage or even personal injury.
Read the operating instructions supplied with your radio control system for more details.
The gyro system remains active in a fail-safe situation.
Range-checking
• The range of your Graupner/SJ HoTT 2.4 system can be checked as described in the following instructions. We
recommend that you ask a friend to help you with the procedure.
• Ideally the receiver should already be bound to the transmitter. Install it in the model in its nal position.
• Switch the radio control system on, and wait until the red LED on the receiver goes out. The servo movements can
now be observed.
• Place the model on a at surface (pavement, close-mown grass, earth), and ensure that the receiver aerials are at
least 15 cm above the ground. It may be necessary to pack up the model to achieve this for the period of the rangecheck.
• Hold the transmitter away from your body at hip-level. Don’t point the transmitter aerial straight at the model; instead
rotate or angle the aerial tip in such a way that it is vertical when you operate the transmitter controls.
• Select range-check mode, as described in the transmitter instructions.
• Walk away from the model, moving the transmitter sticks. If you detect an interruption in the radio link at any time
within a distance of about 50 m, see if you can reproduce the problem.
• If your model is tted with a motor or engine, switch it on or start it, so that you can check effective range when
potential interference is present.
• Walk further away from the model to the point where full control is no longer possible.
• At this point you should manually switch off range-check mode.
• The model should now respond to the controls again. If this is not 100% the case, do not use the system. Contact
the Graupner/SJ Service Centre in your locality and ask their advice.
• We recommend that you carry out a range-check before every ight, simulating all the servo movements which
occur in ight. To guarantee reliable model operation, radio range must always be at least 50 m on the ground.
Page 33

innovation & technologie
Installation in the model (airplane)
The gyro receiver must be installed straight and at right angles to aircraft longitudinal axis, so that the rotors can work
as intended, because of the accelerometer in addition also horizontal to the longitudinal axis.
OK
OK
English
Installation in the model (heli)
The receiver has to be aligned strictly at right angles and parallel to the oor on the receiver platform on the helicopter.
You can also install on edge at right angles to the receiver. There must always be an edge of the receiver are paralell
to a Heli axis.
OK
OK
This mounting position is at the moment not
important, but for later use the accelerometers be
important (through Software Update)!
33
Page 34

Connections
Connect the servos to the row of sockets on one end of the receiver. The connectors are polarised: note the small
chamfers on one side. Never use force - the connectors should engage easily. The polarity is also printed on the
receiver; the negative wire (-) is brown, the positive (+) red and the signal orange. The servo sockets of Graupner/SJ
HoTT 2.4 receivers are numbered sequentially.
English
The socket for channel 8 can also be programmed to deliver a (digital) sum signal (see section 3.2: Receiver set-up).
OK
Power supply
The receiver does not feature specic sockets for connecting the battery. We recommend that you connect the power
supply to the socket(s) close to the servos already connected to the receiver. If you wish to connect multiple separate
batteries, the batteries must be of the same nominal voltage and capacity. Never connect batteries of different type,
or packs of greatly differing states of charge, as this can cause effects similar to a short-circuit. If you encounter this
problem, we recommend the use of a voltage stabiliser unit (e.g. PRX-5A receiver power supply, Order No. 4136)
between the batteries and the receiver.
Telemetry (T/9 at GR-18)
The optional telemetry sensors are connected to the socket marked “T” (T/9)- Telemetry. In addition, the update is
performed on this socket (see point 5). At the GR-18, the socket can be used optionally for K9.
Receiver setup menu
Der Empfänger kann nur mit einem geeigneten HoTT-Sender oder in Verbindung mit der SMART-BOX (Best.-Nr. 33700)
programmiert werden.
menu GR-24 menu GR-18
RECEIVER 1.0 < >
>Type of Model:
ALARM VOLT:
ALARM TEMP:
max altitude:
>Period:
>SUMD at K8:
LANGUAGE:
Plane
3.8V
70°C
125m
10ms
No
english
The receiver set-up menu appears in
the “Telemetry” menu under SETTINGS
/ DISPLAYS; alternatively - if you are
using a SMART-BOX - under SETTING
& DATAVIEW. The method of accessing
this menu is described in the operating
instructions supplied with your transmitter
or the Smart-Box.
RECEIVER 1.0 < >
>Type of Model:
ALARM VOLT:
ALARM TEMP:
max altitude:
>Period:
>SUMD at K6:
Sensor at K9:
LANGUAGE:
Plane
3.8V
70°C
125m
10ms
No
No
english
Page 35

innovation & technologie
Display Explanation Settings
RECEIVER
1.0
Type of Model Selection of modeltype Plane, Heli
ALARM VOLT. Alarm threshold for the receiver’s low
ALARM TEMP. Receiver overheating warning 50 - 80° C
Max. altitude maximum altitude 0 - 2500 m
PERIOD Cycle time (frame rate) in ms 10 / 20 ms
SUMD at CH8 Digital sum signal at channel 8 Yes / No
Sensor at CH 9Telemetry-Sensor at channel 9 (only at GR-
LANGUAGE Select menu language German, English, French, Italian or Spanish
Model type selection (Type of model): here you can choose the model type.
By selecting “Plane” you will be able to access the gyrosettings for surface models, as described in chapter 4.
The selection “Heli” will be made available through a future software update. It will enable a receiver-integrated
ybarless system, which can be adjusted inside the transmitters telemetry settings.
1.0 indicates the version of the receiver’s
rmware
voltage warning
18)
-
2.5 - 24.0 V
Default setting: 3.8 V
Default setting: +70° C
in 25 m increments
Yes / No
English
Low-voltage warning (ALARM VOLT): if the receiver voltage falls below the set value, a low-voltage warning is
generated by the transmitter’s RF module in the form of the “general alarm tone”: a regular beeping at a rate of about
one per second; alternatively the speech output message “Receiver voltage”.
Temperature warning (ALARM TEMP): if the receiver temperature exceeds the set temperature threshold, a warning
is generated by the transmitter’s RF module in the form of the “general alarm tone”: a regular beeping at a rate of
about one per second; alternatively the speech output message “Receiver temperature”.
Maximum altitude (Max. altitude): at this point you can enter a maximum altitude, at which an alarm is triggered,
either via the transmitter’s RF module in the form of the “general alarm tone”: a regular beeping at a rate of about one
per second; alternatively the speech output message “Height”. Note: the model’s actual height is adopted as zero
when the receiver is switched on; the indicated height is therefore the altitude relative to the launch point.
Cycle time (PERIOD): if your system is used exclusively with digital servos, you can set a cycle time (frame rate) of
10 ms at this point. If your system includes some or all analogue servos, you should always select 20 ms, as many
analogue servos cannot process the higher frame rate, and may respond by “jittering” or “growling”.
HoTT sum signal (SUMD): if you activate the digital sum signal at channel 8, a sum signal containing eight channels
is present at this socket, instead of a servo signal. The HoTT receiver congured as SUMD constantly generates a
digital sum signal from 8 control signals from the transmitter and makes this signal available at the appropriate servo
socket, which is receiver-specic. At the time these instructions were revised, this type of signal is used by several of
the latest electronic developments in the area of ybarless systems, heavy-duty airborne power supplies, etc.
WARNING: if you wish to use this facility, it is essential to observe the set-up information supplied with the
devices connected to the receiver, otherwise there is a risk that your model may be uncontrollable!
Menu item only at 33579 GR-18 PRO 3XG +3 A + Vario
Telemetry sensor (sensor at K9): This jack allows you to use either for telemetry or for an extra channel (9). (Note:
Both together is not possible!) Switching is done in this menu item. If you select “Yes”, the socket is connected to the
connection of a sensor. If you select “No” a jack is connected to the control channel 9.
35
Page 36

initialising the gyro (plane)
After switching on the model of the gyroscope is immediately active but not yet initialized. To initialize it, you keep your
model when switching quiet and straight in level ight - the best place it on the at ground or a at table. After about 2
seconds, the ailerons move up and down just once. This “wiggle” signaled the successful initialization, the end of the
calibration, only then the model may be moved again.
English
All sticks are to be kept strictly in neutral!
WARNING: during the initialisation phase the gyro detects the model’s neutral attitude, and for this reason it
is absolutely essential to leave the model in its ‘normal ight attitude’ during the activation phase, and avoid
moving it! If you neglect this, the gyro may detect an incorrect ight attitude, with the result that the model will not y
as you expect it to. It may be difcult to control, and could even crash!
During the initialisation phase the receiver also detects the centre points of the individual control channels; this
information is used for gyro suppression. Gyro suppression reduces the stabilising action progressively as the
transmitter controls are deected away from centre; at +/- 100% the gyro is completely disabled.
Free mixer
RX FREE MIXER < >
>MIXER:
MASTER CH:
SLAVE CH:
>TRIM:
>TRAVEL-:
TRAVEL+:
Screen Display Key Settings
MIXER Mixer select 1, 2....4
FROM CHANNEL Signal source / source channel 0,1,2,...6
TO CHANNEL Target channel 0,1,2,...6
TRIM Trim position in % -15 - + 15%
TRAVEL- Travel limit at % Servo travel -150 bis +150%
TRAVEL+ Travel limit at % Servo travel -150 bis +150%
MIXER: up to four mixers can be programmed simultaneously. You can switch between Mixer 1, Mixer 2, … and mixer
4 in the “Mixer” line.
The following settings only affect the mixer selected in this line.
+0%
+100%
+100%
1
1
6
these control surfaces, since the gyro stabilisation system will have no effect
on these servos otherwise. The four receiver mixers work ‘downstream’ of
the gyros. If you have already programmed mixer functions in the “Wing
mixers” or “Free mixers” menu of your HoTT transmitter, you must ensure
that those mixers do not overlap with those available in this menu!
Important note: If you wish to use the gyros, you must always set
the tail type to ‘normal’ in the transmitter’s model type menu. If your
model is a delta, features a V-tail, or has two elevator servos, you
must use the receiver mixer - not the transmitter mixer - to control
FROM CHANNEL: the signal present at the signal source (or source channel) is mixed in to the target channel (TO
CHANNEL) to an extent which can be set by the user. The method of setting up the values is analogous to the “Free
mixers” menu in HoTT transmitters.
TO CHANNEL: part of the source channel signal (FROM CHANNEL) is mixed into the target channel (TO CHANNEL).
The mixer ratio is determined by the percentage values entered in the “TRAVEL-” and “TRAVEL+” lines. Select “0” if
you do not require the mixer.
Mixer ratio (TRAVEL-/+): in these two lines you can dene the mixer ratio in relation to the source channel (FROM
CHANNEL); the value is set separately for both directions.
Page 37

Programming examples:
V-tail with rudder differential
RX FREE MIXER < >
>MIXER:
MASTER CH:
SLAVE CH:
>TRIM:
>TRAVEL-:
TRAVEL+:
+100%
+100%
RX FREE MIXER < >
>MISCHER:
1
MASTER CH:
3
SLAVE CH:
4
>TRIM:
+0%
>TRAVEL-:
TRAVEL+:
+0%
-60%
+100%
RX FREE MIXER < >
>MIXER:
2
MASTER CH:
4
SLAVE CH:
3
>TRIM:
>TRAVEL-:
TRAVEL+:
innovation & technologie
3
4
4
+0%
+100%
+60%
Differential is not normally necessary with this tail type. Mixer 3 is not required if you do not need rudder differential, and
TRAVEL- for mixer 2 must then be set to -100%.
Alternatively you may prefer to carry out the programming using the transmitter menu. A ‘Rudder elevator’ mixer can
be set up at the transmitter instead of ‘Free mixer 3’ at the receiver; the mixer should be set up asymmetrically, e.g.
+30%, -30%. This option frees up one mixer at the receiver.
Delta with aileron differential (1 aileron)
RX FREE MIXER < >
>MIXER:
MASTER CH:
SLAVE CH:
>TRIM:
>TRAVEL-:
TRAVEL+:
+100%
+60%
RX FREE MIXER < >
>MIXER:
1
MASTER CH:
2
SLAVE CH:
3
>TRIM:
+0%
>TRAVEL-:
TRAVEL+:
+0%
-100%
-100%
RX FREE MIXER < >
>MIXER:
2
MASTER CH:
3
SLAVE CH:
2
>TRIM:
>TRAVEL-:
TRAVEL+:
3
2
2
+0%
+60%
+100%
In this example aileron differential is set to 40%. Alternatively you may prefer to carry out the programming using the
transmitter menu. An ‘Aileron elevator’ mixer can be set up at the transmitter instead of ‘Free mixer 3’ at the receiver;
the mixer should be set up asymmetrically, e.g. +30%, -30%. This option frees up one mixer at the receiver.
Two elevator servos
(channel 6 for the second elevator servo)
RX FREE MIXER < >
>MIXER:
MASTER CH:
SLAVE CH:
>TRIM:
>TRAVEL-:
TRAVEL+:
1
3
8
+0%
+100%
+100%
English
Only for transmitters without a buttery (crow) mixer (e.g. mx-10 HoTT):
If a buttery (crow) mixer is required, you will not be able to use one of the two functions ‘differential’ or ‘landing ap’
adjustment, as two mixers are needed for this.
Programming example:
RX FREE MIXER < >
>MIXER:
MASTER CH:
SLAVE CH:
>TRIM:
>TRAVEL-:
TRAVEL+:
+100%
+100%
RX FREE MIXER < >
>MIXER:
1
MASTER CH:
1
SLAVE CH:
2
>TRIM:
+0%
>TRAVEL-:
TRAVEL+:
2
1
5
+0%
-100%
-100%
Programming example:
RX FREE MIXER < >
>MIXER:
MASTER CH:
SLAVE CH:
>TRIM:
>TRAVEL-:
TRAVEL+:
+100%
+100%
RX FREE MIXER < >
>MIXER:
1
MASTER CH:
1
SLAVE CH:
2
>TRIM:
+0%
>TRAVEL-:
TRAVEL+:
2
1
3
+0%
-100%
-100%
37
Page 38

Assigning the gyro axes
English
GYRO ASSIGNMENT <
>AILERON SERVOS:
DO SETUP:
AILERON:
ELEVATOR:
RUDDER:
2
YES
+2
+0
-0
GYRO ASSIGNMENT <
>AILERON SERVOS:
DO SETUP:
AILERON :
>ELEVATOR:
>RUDDER:
2
NO
+2
+1
-3
Aileron servos: you should enter the value 2 in this line if your model has two aileron servos; in this case the gyro for
channel (servo) 2 also acts on servo 5. If the ailerons are also used as aperons or speedbrakes, gyro suppression is
based on the sum of both channels.
CAUTION: the servo reverse setting must be the same for both aileron servos, i.e. either both ‘normal’ or
both ‘reverse’. If this is not possible, on no account should you reverse one servo in the transmitter menu.
The only option is to re-install it in the model by turning it round physically.
However, if your model is tted with programmable servos (e.g. Graupner DES, HVS or HBS types - see
the instructions for the update program ‘Firmware_Upgrade_grStudio - then it is possible to reverse the direction of
rotation at the servo itself.
Please read the installation notes on page 22-23 of these instructions. The rst step is to dene the three gyro axes
and the orientation of the receiver. This is accomplished by switching on the transmitter and model, and selecting ‘New
setting: yes’ in the receiver’s ‘Gyro settings’ menu.
• Now move the stick for any control surface to full travel in one direction; in the following example we use the aileron
channel.
• The detected axis (aileron) is highlighted (black background). (In the receiver’s default state the value for all axes
is shown as ‘+0’; the axes can also be set manually to ‘+0’. 0 = inaktiv)
• Now turn the model through at least 45° in the direction corresponding to the stick movement. For example, if you
moved the aileron stick to the left, you must simulate a left turn with the model move the left wing down through
at least 45°.
• This process denes the one axis and direction; now you must repeat the procedure for the other two axes.
• The gyro axis 1, 2 or 3 is now displayed in the ‘Aileron / Elevator / Rudder’ display; a negative prex will appear if
servo reverse is activated.
Once all three axes are dened, the display automatically reverts to ‘New setting: no’.
WARNING: once you have completed this procedure, it is absolutely essential to check that all the gyros are
working in the correct direction. This is accomplished by moving the model around all three axes in turn, and
checking the control surface deections - see diagrams below. You must not y the model before doing this:
crash hazard!
ELEVATOR
Model movement Control surface response (seen from the tail)
RUDDER
Model movement Control surface response (seen from the tail)
aileron see next page
Page 39

AILERON
Model movement Control surface response (seen from the tail)
Adjust servolimit for channels
innovation & technologie
English
SERVOLIMIT <
> 1:
2:
3:
4:
5:
6:
7:
SERVOLIMIT <
> 1:
2:
3:
4:
5:
6:
7:
-150% +150% SEL
-150% +150% SEL
-150% +150% SEL
-150% +150% SEL
-150% +150% SEL
-150% +150% SEL
-150% +150% SEL
-150% +150% STO
-150% +150% SEL
-150% +150% SEL
-150% +150% SEL
-150% +150% SEL
-150% +150% SEL
-150% +150% SEL
In this menu, you can limit the servo travel for all channels. Limit the servo travel to
the maximum possible deection, so that the servos can not run in the stop in the gyro
operation. Move the cursor to the desired line (by further downward move of the cursor
will be displayed further channels), here “1” for channel 1 Pressing the SET button is
pressed the “SEL” eld in “STO”.
Now move the stick of channel 1 in the desired direction and position, while the corresponding percentage display is shown inverted. Now press the SET button again and
the set value is displayed and stored. Go through the procedure for the other channels.
Programming the gyro settings
PID (Proportional Integral Differential) correction
The stabilising effect of the gyro sensors is based fundamentally on three parameters:
P factor: denes proportional correction
P = proportional: if the intended value is not the same as the actual value, then the difference is fed proportionally into
the corrective signal; in simple terms, the input value (e) is multiplied by a xed value: u(t) = Kp*e(t). Kp is termed the
amplication value. The output value is therefore proportional to the gyro’s input value. Proportional correction cannot
occur until a deviation from the intended value is present; if the deviation is 0, then the product is also zero. If the
amplication value is set too high, the P factor causes the model to oscillate and become unstable.
I factor: integral correction (not currently implemented)
D factor: denes differential correction
D = differential: in this case the corrective output value is affected by the rate of change of the input value, i.e. the faster
the model tilts around the axis, the more pronounced the corrective response of the gyro. If the model changes attitude
very gently, then the D factor causes hardly any corrective action. It also makes absolutely no difference how far the
model has already changed attitude; the crucial value is only the speed or rate of the movement. The rate of change is
again multiplied by a factor (as with P correction) to produce the output value. For this reason pure D correction is not
used; it must always be employed in combination with P correction.
39
Page 40

Gyro settings display
CAUTION: before you start entering settings for a new model, it is essential to select the number of aileron servos
in the Aileron servos menu point, and to dene the gyro axes and orientation in the New settings menu point.
English
Aileron / Elevator / Rudder: shows the programmable P factors for the corresponding control surface.
Note: the gyro axes must rst be dened under New settings (see section 3.4).
If you wish to disable the gyro, enter the value OFF in the appropriate control function.
P factor:
The P factor should always be set rst, followed by the D factor (adjustment range in each case 0 to 10). A general rule
is that the larger the control surface, the smaller the P factor required. Start with a factor of 2 (default setting), and do
not exceed 4 - 5 as maximum value for the normal ight phase, 2 - 3 for speed, 3 - 6 for landing; the maximum value of
10 should be reserved for torque-rolls only.
WARNING: if you program separate ight phases, it is essential to select the appropriate ight phase when the
model is in the air, as inappropriate gyro settings may cause the control surfaces to oscillate, possibly resulting
in the loss of the model!
Note: the higher the model’s speed, the more quickly oscillation may set in.
D factor: for a given P factor setting, the model’s tendency to oscillate can be reduced by setting a lower D factor.
However, if you select a lower setting for the P factor, then you may be able to set a higher D factor value before the
onset of control surface oscillation. The gyro effect can be optimised by ne-tuning the D factor.
Note: the standard P and D values should cause the gyros to correct the model’s attitude quickly when it is upset by an
outside inuence, without causing oscillation, but in practice the optimum values for a particular model can only be found
by ight-testing. If the model displays little or no automatic stabilisation with the default settings, the value should be raised;
on the other hand, if the model oscillates (wave-like movements in ight), the value should be reduced.
If your transmitter has spare proportional controls, you can use them to adjust the values while the model is ying.
Some transmitters allow the corrective factors to be altered during a ight using the proportional controls, whereas
others allow xed values only.
Programming, transmitter with proportional controls
If your HoTT transmitter is equipped with proportional controls, it is also possible to adjust the P and D factors for each
axis during a ight: what you might call ‘ying the settings’. You need to assign proportional controls (e.g. the sliders on
the mc-20) to any channel in the range 5 to 16 (in this example channel 9); now you can alter the P factor (and the D
factor) using these controls. In each case the current values are shown in brackets.
Procedure, using the ailerons as an example:
GYRO SETTINGS < >
>AILERON:
>ELEVATOR:
>RUDDER:
COEFF.:
COEFF. D:
be used for some other purpose, e.g. for elevator or rudder.
• Move on to elevator and / or rudder, and select the channel and factor (you can either select the same channel,
in order to alter all the axes simultaneously, or different channels, allowing you to program the axes individually).
• Move the cursor to the Factor line, where you can also change the P factor for aileron, elevator and rudder with
priority (adjustment range up to 200%).
• Move the cursor to the D factor line, where you can alter the D factor for aileron, elevator and rudder with priority
using a proportional control (adjustment range up to 200%; channel value -100% equates to a factor of 0%, channel
value 0% equates to 100%, and +100% equates to 200%). This makes it a very easy matter to match the gyro’s
corrective effect to the model’s airspeed. In particular, higher gyro gain can be used for the landing approach -
without the need to switch ight phases.
• Now test-y your model and ne-tune the values one by one until your preferred stabilising effect is achieved
without the model oscillating.
• It may be sensible or easier to activate the gyro for one axis only at rst, and then to establish the optimum setting
for that axis, rather than for several axes simultaneously.
(2)K9
(3)K8
(44%)K10
(140%)K11
• Move the cursor to the appropriate line, in this case “Ail” for aileron.
• Press the SET button to activate the Channel eld.
• Select the appropriate channel, and save the setting with pressing the SET button again
6
• move the corresponding proportional control to alter the factor (adjustment range 0 -
10; 0 means no gyro correction for that axis).
• You can also adopt this factor directly by pressing the left button < or the right button >.
This frees up the channel previously occupied by the proportional control, so that it can
Page 41

innovation & technologie
Programming, transmitter without proportional controls
GYRO SETTINGS < >
>AILERON:
>ELEVATOR:
>RUDDER:
COEFF.:
COEFF. D:
• Move the cursor to the appropriate line, in this case “Ail” for aileron.
• Press the SET button to activate the Channel eld, select the appropriate value (1 - 10 of
2
4
OFF), then press the SET button to save it.
6
• First select a low value (see P factor section for starting points) and carry out a test-ight.
Aus
Aus
If gyro stabilisation is not sufciently pro nounced, increase the value step by step until the
level of correction is as required; if the model already oscillates, reduce the value step by step.
• Do not select a channel (Ch5 - Ch16); this function is only relevant to transmitters with
proportional controls.
• Move on to elevator or rudder and select the desired value (or OFF).
• Leave the settings for “Factor” and “Factor D” at OFF.
• It may be sensible or easier to activate the gyro for one axis only at rst, and then to establish the optimum setting
for that axis, rather than for several axes simultaneously.
Once you have found the optimum settings, you can set up a transmitter switch to control the gyro, i.e. for switching
between gain settings. For example, you could assign a three-position switch to “Factor” and “Factor D”, and then use
it to switch the values between 0% (OFF), 100% and 200%.
Flight phase specic settings
It is possible to use a channel to control the factor value by setting up ight phase specic transmitter control settings,
but only if the transmitter is an MX20 / MC20 or MC32; please see the instructions supplied with your transmitter and
refer to the “Transmitter control settings” and “Flight phase settings” menu points for more information.
RECEIVER SETUP MENU FOR HELICOPTERS
Menu for GR-18Menu for GR-24
RECEIVER 1.0 < >
>Type of Model:
ALARM VOLT:
ALARM TEMP:
max. altitude:
>PERIOD:
>SUMD at K8:
LANGUAGE:
HELI
3.2V
70°C
125m
10ms
english
The receiver setup menu appears in the
"Telemetry" menu under SETTINGS / DISPLAYS
or if you are using a SMART-BOX under
SETTING & DATAVIEW. How to access this
menu is described in the operating instructions
supplied with your transmitter or Smart-Box.
No
RECEIVER 1.0 < >
>Type of Model:
ALARM VOLT:
ALARM TEMP:
max. altitude:
>PERIOD:
>SUMD at K6:
Sensor at K9
LANGUAGE:
HELI
3.2V
70°C
125m
10ms
No
No
english
English
Display Explanation Settings
RECEIVER 1.0 1.0 indicates the version of the receiver's rmware -
Type of Model Selection of model type Plane, Heli
ALARM VOLT Alarm threshold for the receiver’s low voltage warning 2.5 – 24.0 V
Default setting: 3.8 V
ALARM TEMP Receiver overheating warning 50 – 80°C
Default setting: +70°C
max. altitude Maximum altitude 0 – 2500 m
In 25 m increments
PERIOD Cycle time in ms 10/20 ms
SUMD at K8 (6) Digital sum signal at channel 8 (6) Yes/No
Sensor at K9 Telemetry sensor at channel 9 (for GR 18 only) Yes/No
LANGUAGE Select menu language English, French, German, Italian and Spanish
Model type selection (Type of Model): This is where you can choose the model type.
If you select "Plane", you can then set the gyro settings for xed-wing models on the menu screens, as described from point 5.
If you select "Heli", you can then set the gyro settings of the integrated ybarless system for helicopters on the subsequent
menu screens.
Low-voltage warning (ALARM VOLT): If the receiver voltage falls below the set value, a low-voltage warning is
generated by the transmitter's RF module in the form of a "general alarm tone" (regular beeping at a rate of approx. one
beep per second) or the "receiver voltage" speech output message.
Temperature warning (ALARM TEMP): If the receiver temperature exceeds the set temperature, a warning is generated
by the transmitter’s RF module in the form of a "general alarm tone" (regular beeping at a rate of approx. one beep per
second) or the "receiver temperature" speech output message.
41
Page 42

Maximum altitude (max. altitude): This is where you can specify a maximum altitude. When the model reaches this
altitude, an alarm is triggered either by the transmitter's RF module in the form of a "general alarm tone" (regular beeping
at a rate of approx. one beep per second) or the "altitude" speech output message. Note: When the receiver is switched
on, the model's current altitude is set to 0; the displayed altitude is therefore the altitude relative to the launch point.
Cycle time (PERIOD): If your system is used exclusively with digital servos, you can set a cycle time (frame rate) of
10 ms. If your system includes some or uses exclusively analogue servos, you should always select 20 ms, as many
English
analogue servos cannot process the higher frame rate and may respond by "jittering" or "growling".
HoTT sum signal (SUMD): If the digital sum signal is activated at channel 8 (6 for GR 18), a sum signal with 8
channels is issued from this socket (instead of a servo signal). The HoTT receiver congured as SUMD
constantly generates a digital sum signal from 8 control signals from the transmitter and makes this signal
available at the specied servo socket, which is receiver-specic. At the time this manual was revised, this
type of signal is used by several of the latest electronic developments relating to heavy-duty power supplies, etc.
WARNING: If you wish to use this option, you must observe the
setup information supplied with the device connected to the receiver, otherwise there is a risk that your model
may be uncontrollable.
Installing the receiver
The receiver must be aligned at right angles to the helicopter on the receiver platform. Please ensure you always
observe the installation instructions in section 3.1. Prior to installation, remove the sticker on the back of the receiver.
We recommend using double-sided tape (order no.: 96382.1) to x the receiver in place.
The receiver must be connected to a stable power supply with at least two power cables. Comply with the maximum
power consumption permitted by the servos.
Caution: The receivers may only be used in electric helicopter models.
Preparing the helicopter
Set all servos to neutral; the arms must be at right angles and the swashplate must be in the neutral position (perpendicular
to the main rotor axis). The swashplate pushrods must be the same length.
Transmitter presettings
Select the free/deleted model memory and activate the helicopter model.
All trims must be set to 0 and must not be altered in ight under any circumstances. If possible, trims should therefore
be deactivated in the transmitter. With transmitters MX-20, MC-16/20/32 and mz-18/24, disable the trim in the menu.
(Set trim increments to 0).
• Activate or retain the servo for swashplate type 1 (the swashplate mixer is implemented in the FBL system)
• The travel of the gas channel (K6) must be set so that a value close to -100% (servo display) is reached when the
motor is off, as otherwise gyro calibration will not take place.
• Transmitter travel settings always remain at 100% for the basic settings
• Do not connect the tail servo if it does not have a mid-point of 1.5 ms (standard).
• Swashplate servo arrangement at 120/135/140 degrees:
front left = 1, front right = 2, back =3
2
1
• Bind the receiver to the transmitter
• Access the receiver's "Telemetry" menu and set the model type to "Heli" in the rst row of the rst screen
• Set all the servo settings on the transmitter to neutral (servo display 0%)
3
Page 43

innovation & technologie
Initialising the gyro (helicopter)
Once the model has been switched on, the gyro immediately becomes active but still needs to be initialised. To initialise
the gyro, keep your model still when you switch it on. The calibration process can only be performed when the receiver
is absolutely still. After approx. 3 seconds in the idle position, the swashplate moves briey three times. These "wiggles"
signal that initialisation has been successful and that calibration is complete. Always wait until the calibration process
has nished before starting to y the model.
Basic model settings (procedure)
1. Once the transmitter and helicopter have successfully been prepared, access the "Telemetry" menu in the transmitter
(see transmitter manual) and switch to the "Base setup contr." menu.
2. Scroll past the swashplate/tail setup menus; these will be used later on.
3. You must work through each item of this menu in order from top to bottom:
Base setup controller
BASE SETUP CONTR.<v>
>Rotating dir right
Swp type
Swp frequency
Swp dir
S1 mid
S2 mid
S3 mid
↕ ↕ Pressing the arrow keys on the right touchpad allows you to
Swp travel 7d +100
Collective_B +100
Cyclic max +50
Swp rotate +0
Tail servo 1.5ms
Tail frequency 50Hz
Tail mid +0
Tail limit B +50
Expo Yes
Logging +3
Expertmode No
140 Deg
50Hz
+0
+0
+0
+0
access additional menu items that are listed further down.
English
Rotating dir
Select the rotating direction for the rotor: right or left
Swp type
Swashplate type: select the correct swashplate type. 90°, 120°, 135°, 140°.
Default setting 140°
The roll servos are connected to channels 1 and 2, the nick servo to channel 3, and the tail servo may only be connected
to channel 4 once the "Tail servo" parameter has been set correctly.
The motor control system is connected to channel 6.
Swp frequency
Swp frequency: frequency for the swashplate servos
Default setting: 50 Hz
Warning: Analogue servos may only be operated at 50 Hz. If they are not, the servos will be destroyed. Many
digital servos can be operated at a higher frequency. (Use at your own risk). This allows the model to be controlled
more quickly. With HBS servos, we recommend setting the frequency to 200 Hz.
43
Page 44

Swp direction
Default setting: 0
Here, the direction of rotation of the Swp servos is set so that the Swp does not tilt during pitching. Select the right set
ting from the options (pitch direction is set under K1 in the transmitter's servo menu, if required).
The direction of rotation of the swashplate is now monitored. If the model pitches upwards, the swashplate must move
upwards in parallel. If the swashplate is travelling in the opposite direction, the servo reverse setting must be applied in
the transmitter for the servo 1 settings and the roll and nick direction is set via the servo 2 and servo 3 servo reverse.
English
S1 mid, S2 mid and S3 mid
Default setting: 0
The swashplate should be aligned as far as possible at right angles to the main rotor axis. First, set the optimum
mechanical settings and then set up the 3 servos in the menu. The swashplate is set up perfectly when the helicopter
is able to hover on the spot.
Swp travel 7d
Default setting: +100
When the menu is activated, set the Swp cyclic travel to 7 degrees so that when the full roll command is applied (= 100%
travel in the transmitter servo display), the rotor blades generate a cyclic travel that is as close to +-7° as possible on
both sides. To do this, the eld must be selected (highlighted) so that the swashplate can be controlled and adjusted
in direct mode when gyro gain is switched off. This is the only mode in which the travel can be set correctly. It is very
important that the travel is set correctly. It plays a major role in terms of acquiring the correct gyro gain. The setting
should therefore be made as accurately as possible using a digital pitch gauge.
Collective_A/B
Default setting: 100
It is selected automatically based on the pitch stick travel on the transmitter. Use the pitch gauge to measure the
required pitch travel when the full commands are applied (+-100%) and set it in this menu. All of the other settings can
be made later on the transmitter for the pitch curves in the respective ying phase.
Cyclic max
Default setting: +50
Swashplate limit. The swashplate limit must be set so that it is not possible for a servo to reach its mechanical limits,
while ensuring that the servo's travel is as large as possible. No humming should come from any of the servos when
full travel commands are applied.
Swp rotate
"Swp rotate" = a virtual Swp rotation (in degrees) can be set here (for certain systems with several blades).
The Swp (swashplate) is now fully set up and you can move on to the tail:
Tail servo
Tail servo: select the correct mid-point for your tail servo here.
Mid pulse width: 1.5 ms, 760 μs or 960 µs.
Default setting: 1.5 ms. 1.5 ms is generally the default setting for tail servos. Narrowband servos (generally special tail
rotor servos) may however require a different mid pulse width. You must locate this value in the servo manual and set
it correctly. If a value has not been specied, it is probably a standard servo set at 1.5 ms. If you have a DES, HVS or
HBS servo, this value can sometimes be programmed. However, we recommend sticking with the default setting.
Tail frequency
Tail frequency: the tail frequency can be set to between 50 and 333 Hz.
Default setting: 50 Hz
Warning: Analogue servos may only be operated at 50 Hz. If they are not, the servos will be destroyed.
Many digital servos can be operated at a higher frequency. (Use at your own risk). This allows the model to be
controlled more quickly. With HBS servos, we recommend setting the frequency to 333 Hz.
Tail mid
Default setting: 0
The tail servo arm should be at a 90-degree angle to the tail linkage pushrod.
The ne trim is then adjusted based on the mid-point of the tail. When the servo is set to neutral, the tail rotor should be
set to a pitch angle of approx. 2 to 3° against the torque at the tail rotor.
Page 45

innovation & technologie
Tail limit A/B
Default setting: 50
Limits the tail servo travel. It must be set so that it never reaches its mechanical limits but so that the full travel can be
used. Values that are suitable in terms of aerodynamics should be selected here. If the travel is too large, this may cause
the servo to stall.
Expo
"Expo" is set to "Yes" by default; this means that within the controller an exponential value of approx. 25% is used on the
Swp and approx. 30% on the tail. The setting can also be made on the transmitter (dual rate/expo). To do this, set the
value to "No"; however, you must set similar values on the transmitter for the rst ight.
Logging
Logs the respective servo function on the SD card to carry out an evaluation and error analysis later on.
0 = no logging
1 = roll and nick logging
2 = roll logging
3 = nick logging
4 = tail logging
We recommend always logging at least one function.
Expertmode
English
"Expertmode" is set to "No" by default. Even experts should stick with this setting when carrying out the rst
steps with the new system (there are much fewer options in the Swp and tail menu) and they should only switch
to Expertmode and its additional options if they need to and when they have got used to the system.
You have completed the basic model settings and can now move on to the following settings:
Axis assignment
Axis assign <
>Setup
Roll (right):
>Nick (push):
>Tail: (right)
Yes
+2
+0
+0
Setup
Setup: Yes/No
Assignment of the gyros and their operating direction.
If you have not already done so, you must now set the K1-4 servo directions so that everything works correctly.
In the receiver's "Axis assign" menu, go to the "Setup" option and set it to "Setup: Yes". Now assign the axes as follows:
• On the transmitter, briey set the roll command fully to the right; the roll axis is highlighted. You will then have both
hands free again to operate the helicopter.
• Roll the helicopter more than 45 degrees to the right → the identied axis with the required prex is displayed, the
eld is no longer highlighted and identication of this axis is complete
• Now do the same for nick: on the transmitter, briey set the nick command so that it is fully forward
• Roll the helicopter more than 45 degrees forwards; the axis is displayed, the eld is no longer highlighted and
identication of this axis is complete
• Finally complete the procedure for the tail: on the transmitter, briey set the tail command fully to the right
• Turn the helicopter so that the nose turns more than 45 degrees to the right; the axis is displayed, the eld is no
longer highlighted and identication of this axis is complete
The gyros and operating directions have now been assigned. Now check to make sure that the operating directions are
correct.
Axis assign <
>Setup
Roll (right):
Nick: (push):
>Tail (right):
No
+2
+1
-3
45
Page 46

See the illustrations below.
Checking nick = Elv = elevator
Tilt the helicopter so that its nose is facing downwards; the swashplate must be controlled so that it stays horizontal.
Incorrect! Correct!
English
Checking roll = Ail = aileron
Tilt the helicopter to the right; the swashplate must automatically stay horizontal.
Incorrect! Correct!
Checking the tail direction of operation (viewed from the back)
Turn the tail to the left; the tail rotor blade must turn to the right. Turn the tail to the right; the tail rotor blade must turn to
the left. The helicopter and the tail rotor must move in opposite directions.
Drehrichtung
Heckrotorblatt
Drehrichtung
Heli
If one of the directions of operation is wrong, you must repeat the axis assignment process.
Drehrichtung
Heckrotorblatt
Drehrichtung
Heli
The swashplate and tail parameters can be optimised in Expertmode to suit your helicopter model and ying
style. However, we strongly recommend ying your model rst using the settings without Expertmode.
If the directions are changed on the transmitter due to any modi cations being made to the helicopter (e.g. new
servos) or if the receiver is installed in a different position, the teach-in procedure must be repeated in full.
46
Page 47

innovation & technologie
Swashplate setting without Expertmode
SWASHPLATE ADJUST<v>
>SWP sensitivity
>Direct stick
SWP sensitivity
Swashplate sensitivity, 1 – 10, Min or K5 – K16
Default setting: 5
The "SWP sensitivity" row allows you to specify a sensitivity setting either using the values 1 to 10 or by assigning a
channel (K5 to K16) with a proportional control, which is used to control the value. Once you have found a satisfactory
setting, this value can be applied as a xed value by pressing the "right" or "left" button.
Different settings can then be used to adjust the sensitivity based on specic ight phases.
If the values are too high:
Overstabilisation; the helicopter responds to commands with just a slight delay and oscillates during high-speed ights.
If the values are too low:
Helicopter no longer hovers in a stable manner, susceptible to wind.
Direct stick
Default setting +85
The direct stick setting allows you to set the direct response of the helicopter to the pilot's commands. 3D pilots should
test the response with values ranging between 80 and 95.
If the nick command stops abruptly, the helicopter will oscillate if the value is set too high.
(5)K9
+85
English
Swashplate setting with Expertmode
SWASHPLATE ADJUST<v>
>SWP sensitivity
>Direct stick
P swp
I swp
D swp
Speedight
↕ ↕
Hovering stab. normal
(See above for swashplate sensitivity menu item)
(See above for direct stick menu item)
P swp (proportional) swashplate
Swashplate P-factor
Default setting: +100 (typ. 50 – 70)
The P swashplate option is responsible for effecting a harder stop with the swashplate. Higher values result in a faster
stop. If the P values are too high, the helicopter and/or the swashplate will start to "oscillate". In such cases, the value
must be reduced again.
(5)K9
+85
+100
+70
+0
+20
Pressing the down ▼ arrow keys on the right touchpad allows you to access additional
menu items that are listed further down.
I swp (integral) swashplate
Swashplate I-factor
Default setting: +70 (typ. 70 – 90)
The I-factor ensures constant rolling/nicking. Start with low values and only increase them until the roll and nick rates
are constant.
47
Page 48

D swp (differential)
D-factor for swashplate
Default setting: +0
The D swp D-factor inuences the how the swashplate is stopped.
If the helicopter bounces somewhat when nick is stopped, this parameter should rst be increased in 5-degree increments
to test the nick stop.
Speedight optimisation
English
Default setting: +20
When the helicopter is ying quickly in a straight line, it should y precisely in one line/at one altitude and not in a wave
form. If the helicopter ies in a wave form, the value can be increased until the helicopter ies straight. This parameter
should generally not be changed.
Hovering stabilisation
High = stable hovering even when windy
Normal = normal stability when hovering
Low = agile for extreme 3D ying style
Tail rotor setting without Expertmode
TAIL ADJUST<v>
>Tail sensitiv.
Tail sensitivity
Tail sensitivity: 1 – 10, MIN or K5 – K16
Default setting: 5
The "Tail sensitiv." row allows you to specify a sensitivity setting either using the values 1 to 10 or by assigning a channel
(K5 to K16) with a proportional control, which is used to control the value. Once you have found a satisfactory setting,
this value can be applied as a xed value by pressing the "right" or "left" button.
Different settings can then be used to adjust the sensitivity based on specic ight phases.
If the tail swings up, the corresponding value must be reduced.
(5)K9
Tail rotor setting with Expertmode
TAIL ADJUST<v>
>Tail sensitiv.
P tail
I tail
D tail
Collect. torque
Cycl torque
(5)K9
+80
+70
+15
+25
+8
(See above for tail sensitivity menu item)
P tail
Tail P-factor
Default setting: +80
The P tail option is responsible for effecting a harder stop with the tail. Higher values result in a faster stop. If the P values
are too high, the tail will start to "oscillate". In such cases, the value must be reduced again.
Page 49

innovation & technologie
I tail
Tail I-factor
Default setting: +70
The I-factor ensures constant pirouetting. Start with low values and only increase them until the pirouettes are constant.
If the values are too high, this will cause the tail to oscillate slowly.
D tail
Tail D-factor
Default setting: +15
The tail D-factor inuences how the tail is stopped. If the tail bounces somewhat when the tail is stopped, this parameter
should rst be increased in 5-degree increments to test the tail stop.
Collect. torque Cycl torque
Collect. torque Cycl torque
Default setting: +25 Default setting: +8
These two functions work best when they are set together. In the event of fast pitch pumping and swashplate movements,
the tail should remain stable even when load is applied. If the tail swings out briey, the "Collect. torque" setting can be
increased until the tail stops.
On the ground, you can easily check whether the tail is working against the torque.
As a rule, "Cycl torque" should be set 1/3 lower than "Collect. torque".
English
Firmware update
Updates to the receiver's rmware are made via the telemetry socket using a PC running Windows XP, Vista or 7. You
will also need a USB interface (order no. 7168.6) and adapter lead (order no. 7168.6A or 7168.S), which are available
separately.
The programs and les required can be found in the Download area for the corresponding products at www.graupner.de.
Connect the adapter lead to the USB interface (order no. 7168.6). The connectors are reverse
polarity protected: note the small chamfers on the sides. Never use force – the connectors
should engage easily.
Connect the adapter lead to the receiver's telemetry socket. The connectors are reverse polarity
protected: note the small chamfers on the sides. Never use force – the connectors should
engage easily.
Starting the "Slowyer/Gyro receiver update"
We recommend accessing the "Slowyer/Gyro receiver update" program from the "Firmware_Up-grade_grStudio"
program. Click on the "Receiver Downloader" item under "Link" in the left function menu. (Alternatively, select the "Micro
Receiver Upgrade" under "Menu").
It is also possible to start the associated application program directly by double-clicking on the "micro_gyro_swloader.
exe" le. You will nd this .exe le in the "Graupner_ PC Software" folder of the "HoTT_Software VX" package.
49
Page 50

A program window will now appear in which you should rst set the “correct” COM port for the USB interface
(order no. 7168.6) in the selection window.
English
If you are not sure which port to use, check the COM port in the "Select Port" window in the "Menu" of the "Firmware_Upgrade_grStudio" and note down the COM port number for the "Silicon Labs CP210x USB to UART Bridge" entry – in
this case "COM03". (If you select the wrong port, you will be alerted to this when you read out the receiver data). Click
on "File" to load the corresponding rmware le named "MicroStabi7X_V_XX.bin" from the hard disc ("XX" stands for
the version number).
When the le has loaded, click on start...
... connect the receiver and switch it on.
The progress bar shows that the transfer is running normally. The receiver LED lights up red and green during this
process and ashes red and green alternately once the transfer is complete.
Please refer to the detailed update instructions for the item in question in the Download area at http://www.graupner.de.
Page 51

innovation & technologie
Manufacturer‘s declaration on behalf of GRAUPNER/SJ GmbH
Contents of the manufacturer’s declaration:
If material defects or manufacturing faults should arise in a product distributed by us in the Federal
Republic of Germany and purchased by a consumer (§ 13 BGB), we, Graupner/SJ GmbH D-73230
Kirchheim/Teck, Germany, acknowledge the obligation to correct those defects within the limitations
described below.
The consumer is not entitled to exploit this manufacturer’s declaration if the failure in the usability of
the product is due to natural wear, use under competition conditions, incompetent or improper use
(including incorrect installation) or external inuences.
This manufacturer’s declaration does not affect the consumer’s legal or contractual rights regarding
defects arising from the purchase contract between the consumer and the vendor (dealer).
Extent of the guarantee
If a claim is made under guarantee, we undertake at our discretion to repair or replace the defective
goods. We will not consider supplementary claims, especially for reimbursement of costs relating to
the defect (e.g. installation / removal costs) and compensation for consequent damages unless they
are allowed by statute. This does not affect claims based on legal regulations, especially according
to product liability law.
English
Guarantee requirements
The purchaser is required to make the guarantee claim in writing, and must enclose original proof of
purchase (e.g. invoice, receipt, delivery note) and this guarantee card. He must send the defective
goods to us at his own cost, using the following address:
Graupner/SJ GmbH, Service Department,
Henriettenstr.96, D 73230 Kirchheim/Teck, Germany
Service Department: tel. [0049] 7021-722130
The purchaser should state the material defect or manufacturing fault, or the symptoms of the fault,
in as accurate a manner as possible, so that we can check if our guarantee obligation is applicable.
The goods are transported from the consumer to us and from us to the consumer at the risk of the
consumer.
Duration of validity
This declaration only applies to claims made to us during the claim period as stated in this declaration.
The claim period is 24 months from the date of purchase of the product by the consumer from a
dealer in the Federal Republic of Germany (date of purchase). If a defect arises after the end of
the claim period, or if the evidence or documents required according to this declaration in order to
make the claim valid are not presented until after this period, then the consumer forfeits any rights
or claims from this declaration.
Limitation by lapse of time
If we do not acknowledge the validity of a claim based on this declaration within the claim period,
all claims based on this declaration are barred by the statute of limitations after six months from the
time of implementation; however, this cannot occur before the end of the claim period.
Applicable law
This declaration, and the claims, rights and obligations arising from it, are based exclusively on the
pertinent German Law, without the norms of international private law, and excluding UN retail law.
51
Page 52

English
Declaration of conformity
Konformitätserklärung gemäß dem Gesetz über Funkanlagen und
Telekomunikationsendeinrichtungen (FTEG) und der Richtlinie 1999/5/EG (R&TTE)
Declaration of Conformity in accordiance with the Radio and Telecomunikations Terminal Equipment
Act (FTEG) and Directive 1999/5/EG (R&TTE)
Graupner/SJ GmbH
Henriettenstraße 96
D-73230 Kirchheim/Teck
erklärt, dass das Produkt:
declares that the product
GR-24 PRO +3xG + 3A + 3M+Vario HoTT - No. 33583
GR-18 +3xG + 3A+Vario HoTT - No. 33579
Geräteklasse: 1
Equipment class
den grundlegenden Anforderungen des § 3 und den übrigen einschlägigen Bestimmungen des
FTEG (Artikel 3 der R&TTE) entspricht.
complies with the essential requirements of § 3 and the other relevant provisions of the FTEG (Article 3 of the
R&TTE Directive).
Angewendete harmonisierte Normen:
Harmonised standards applied
EN 60950-1:2006+A11:
2009+A1:2010+A12:
Health and safety requirements pursuant to § 3 (1) 1. (Article 3 (1) a))
Gesundheit und Sicherheit gemäß § 3 (1) 1. (Artikel 3 (1)a))
2011
EN 301 489-1 V1.9.2
EN 301 489-17 V2.1.1
Protection requirement concernig electromagnetic compatibility
§ 3 (1) 2, Artikel 3 (1) b))
Schutzanforderungen in Bezug auf elektromagnetische
Verträglichkeit § 3 (1) 2, Artikel 3 (1) b))
52
EN 300 328 V1.7.1
Measures for the efficient use of the radio frequency spectrum
§ 3 (2) (Article 3 (2))
Kirchheim, 17. April 2013
Maßnahmen zur effizienten Nutzung des Frequenzspektrums
§ 3 (2) (Artikel 3 (2))
Ralf Helbing, Geschäftsführer
Ralf Helbing, Managing Director
Graupner/ SJ GmbH Henriettenstraße 96 D-73230 Kirchheim/Teck Germany
Tel: 07021/722-0 EMail: info@graupner.deFax: 07021/722-188
#33579: GR-18+3xG+3A+Vario
FCC ID: SNL-16006100
#33583 : GR-24 PRO +3XG+3A+3M+VARIO
FCC ID: SNL-16005800
Page 53

Warranty
innovation & technologie
Wir gewähren auf dieses Erzeugnis eine /
This product is /
Garantie von
warrantied for
garantie de
Die Fa.Graupner/SJ GmbH, Henriettenstrasse 96,
73230 Kirchheim/Teck gewährt ab dem Kaufdatum auf
dieses Produkt eine Garantie von 24 Monaten. Die Garantie
gilt nur für die bereits beim Kauf des Produktes vorhandenen
Material- oder Funktionsmängel. Schäden, die auf Abnützung, Überlastung, falsches Zubehör oder unsachgemäße
Behandlung zurückzuführen sind, sind von der Garantie
ausgeschlossen. Die gesetzlichen Rechte und Gewährleistunsansprüche des Verbrauchers werden durch diese Garantie nicht berührt. Bitte überprüfen Sie vor einer Reklamation
oder Rücksendung das Produkt genau auf Mängel, da wir
Ihnen bei Mängelfreiheit die entstandenen Unkosten in
Rechnung stellen müssen.
Graupner/SJ GmbH, Henriettenstrasse 96,
Kirchheim/Teck, Germany guarantees this product for a
period of 24 months from date of purchase. The guarantee
applies only to such material or operational defects witch
are present at the time of purchase of the product. Damage
due to wear, overloading, incompetent handling or the use
of incorrect accessories is not covered by the guarantee. The
user´s legal rights and claims under guarantee are not
affected by this guarantee. Please check the product
carefully for defects before you are make a claim or send the
item to us, since we are obliged to make a charge for our
cost if the product is found to be free of faults.
24
73230
Sur ce produit nous accordons une
Monaten
months
mois
Servicestellen / Service / Service après-vente
Graupner-Zentralservice
Graupner/SJ GmbH
Henriettenstrasse 96
D-73230 Kirchheim / Teck
Die Adressen der Servicestellen außerhalb Deutschlands
entnehmen Sie bitte unserer Webseite www.graupner.de.
For adresses of service points outside of germany please
refer to www.graupner.de/en/.
Pour adresses des points de service situés en dehors de
l'Allemagne s'il vous plaît se référer à www.graupner.de/fr/.
Servicehotline
(+49) (0)7021/722-130
Montag - Donnerstag
7:30 -9:00 Uhr
9:15 -16:00 Uhr
Freitag
9:00 - 13:00 Uhr
English
La société Graupner/SJ
73230 Kirchheim/Teck, Allemagne, accorde sur ce produit
une garantie de 24 mois à partir de la date d´achat. La garantie prend effet uniquement sur les vices de fonction-nement
et de matériel du produit acheté. Les dommages dûs à de
l´usure, à de la surcharge, à de mauvais accessoires ou à
d´une application inadaptée, sont exclus de la garantie.
Cette garantie ne remet pas en cause les droits et prétentions légaux du consommateur. Avant toute réclamation et
tout retour du produit, veuillez s.v.p. contrôler et noter
exactement les défauts ou vices.
GmbH, Henriettenstrasse 96,
Garantie-Urkunde
Warranty certifi cate / Certifi cat de garantie
Übergabedatum
Date of purchase/delivery
Date de remise
Name des Käufers
Owner´s name
Nom de I`acheteur
Straße, Wohnort
Complete adress
Adresse complète
Firmenstempel und Unterschrift des Einzelhändlers
Stamp and signature of dealer
Cachet et signature du vendeur
53
Page 54

English
Environmental protection notes
The symbol on this product, its operating instructions or packaging gives notice that
this product may not be discarded as common household waste at the end of its service
life. It must be turned over to a recycling collection point for electric and electronic
apparatus.
The materials can be recycled according to their markings. You make an important
contribution to protection of the environment by utilizing facilities for reuse, material
recycling or other means of exploiting obsolete equipment.
Batteries must be removed from the unit and disposed of separately at an appropriate
collection point. Please inquire with local authorities about the responsible waste
collection locations.
Page 55

Notice
INNOVATION & TECHNOLOGY
d’utilisation
33579 Récepteur GR-18 3xG+3A+Vario
33583 Récepteur GR-24 PRO 3xG+3A+3M+Vario
ais
ç
Fran
GRAUPNER/SJ GmbH. Henriettenstr.96, KG D-73230 KIRCHHEIM/TECK GERMANY
2013/09/01
5554
Page 56

Sommaire
Sommaire ..................................................................................................................56
Préface.......................................................................................................................57
Utilisation en toute Conformite ...............................................................................57
Signication des differents Symboles ...................................................................57
Consignes de Prudence et de Securite ..................................................................58
Generalites ................................................................................................................59
Binding ......................................................................................................................59
Fran
Montage dans le Modele (Avion) .............................................................................60
Montage dans le Modele (Heli) ................................................................................61
ç
ais
Branchement.............................................................................................................61
Alimentation ..............................................................................................................62
Télémétrie..................................................................................................................62
Menu Reglage Recepteur.........................................................................................62
Initialisation du gyroscope (Avion) .........................................................................63
Mixages libres ...........................................................................................................63
Attribution des Axes du Gyroscope .......................................................................65
Réglez servolimit pour les canaux..........................................................................66
Programmarion des Reglages Gyro .......................................................................66
Réglages gyro à l’écran ...........................................................................................67
Programmation sur émetteur avec éléments de commande proportionnels .....67
Programmation sans éléments de commande proportionnels............................68
MENU DE RÉGLAGE HELI DU RÉCEPTEUR ..........................................................69
Montage du récepteur ..............................................................................................70
Préparation de l'hélicoptère ....................................................................................70
Pré-réglages de l'émetteur ......................................................................................70
Initialisation du gyroscope (Heli) ............................................................................70
Réglages de base (procédure) ................................................................................71
Règle de paramétrage de base................................................................................71
Affectation des axes.................................................................................................73
Mise a jour .................................................................................................................75
Certicat de conformité ...........................................................................................77
Déclaration de la Société Graupner/SJ GmbH.......................................................78
Protection de l‘environnement ................................................................................79
Garantie .....................................................................................................................80
Page 57

innovation & technologie
Préface
Votre choix s’est porté sur la technologie Graupner/SJ HoTT en 2.4, nous vous en remercions. Avant d’essayer de
monter et de vous servir de votre ensemble Graupner HoTT en 2.4, lisez attentivement la notice, dans son intégralité.
• Le récepteur est capable d’assurer la stabilité du modèle sur ses 3 axes, même dans des conditions météorologiques
difciles
• Comportement normal en vol grâce à un masquage gyroscopique proportionnel
• Excellente stabilisation pour effectuer des gures propres
• Grâce au gyroscope 3 axes, les modèles de voltige qui demandaient auparavant une bonne maîtrise du pilotage
peuvent désormais se piloter beaucoup plus facilement, ce qui simplie énormément la voltige
• Les gures en vol sont nettement plus « propres »
• Réglage simple de l’attribution du gyroscope
• Réglage des paramètres par la Télémétrie HoTT
• Altimètre et Vario
ais
ç
Utilisation en toute Conformite
L’utilisation de ce récepteur est exclusivement réservée aux modèles réduits radiocommandés, toute autre utilisation est
interdite et peut conduire à d’importants dégâts au niveau du récepteur, du modèle ou provoquer de graves blessures
corporelles. Nous déclinons toute responsabilité et droit à la garantie en cas d’utilisation non conforme aux présentes
recommandations. Ne convient pas aux enfants de moins de 14 ans. Ce n’est pas un jouet!
De plus, il est équipé d‘une fonction de télémétrie, mais celle-ci n’est exploitable qu’avec un émetteur Graupner/SJ
HoTT en 2.4. Si vous ne possédez pas d’émetteur Graupner/SJ HoTT en 2.4, le récepteur ne fonctionnera pas.
Avant de monter et de vous servir de votre récepteur, lisez attentivement la notice dans son intégralité.
Cette notice d’utilisation fait partie intégrante du produit. Elle contient d’importantes informations, quant à son utilisation
et à la manipulation du variateur. Gardez-la précieusement et transmettez-la au nouvel acquéreur en cas de revente ou
de cession du produit. Le non-respect des consignes d’utilisation et de sécurité qui y gurent entraîne la perte du droit
à la garantie.
Graupner travaille constamment à l’amélioration de ses produits; de ce fait, nous sommes contraints de nous réserver
le droit pour toute modication sans avis préalable, qu’il s’agisse du contenu, de l’équipement ou de la technologie mise
en œuvre.
Nous tenons également à préciser que d’éventuelles divergences par rapport aux photos, croquis et indications de cette
notice, ne peuvent faire l’objet de réclamations, nous vous remercions pour votre compréhension.
C’est une des raisons pour lesquelles nous vous conseillons de garder précieusement cette notice sous la main!
Signication des differents Symboles
Fran
Attention!
Ce symbole attire l’attention sur les interdictions qui doivent impérativement être
respectées par l’utilisateur! Tout non-respect des interdictions ci-contre peut conduire à des
dysfonctionnements et mettre la sécurité de l’utilisateur en cause.
Attention!
Ce symbole souligne les conseils et recommandations qui devront être suivies
impérativement par l’utilisateur! Tout non-respect des recommandations ci-contre peut
inuencer négativement le bon fonctionnement et compromettre la sécurité de l’utilisateur.
Ce symbole attire l’attention sur les conseils et remarques qui devront impérativement être
respectés par l’utilisateur pour assurer un fonctionnement able en toute sécurité du produit.
57
Page 58

Fran
ç
ais
Consignes de Prudence et de Securite
Mise en garde!
L’utilisation du récepteur sous l’emprise de médicaments, d’alcool, drogue, etc. est
formellement interdite.
Attention!
Tout écart par rapport à la notice peut éventuellement conduire à un dysfonctionnement du
récepteur, entraver la sécurité et doit être absolument être évité.
Attention!
La mise en route et l’utilisation de l’émetteur se font sous la seule et unique responsabilité
de l’utilisateur. Seule une utilisation avec toutes les précautions nécessaires et en toute
conscience sera en mesure d’éviter des dégâts matériels et blessures physiques.
Attention!
N’est pas destiné aux enfants de moins de 14 ans!
Attention!
Protégez le récepteur contre la poussière, les saletés, l’humidité et contre tout corps
étranger. Faites en sorte qu’il ne soit pas soumis à de trop fortes vibrations, à de trop fortes
chaleurs ou à un froid trop intense.
Attention!
En cours de programmation, veillez impérativement à ce que le moteur thermique ou
électrique qui y est branché ne puisse pas démarrer inopinément
Attention!
Evitez les coups et les écrasements. Vériez également si le boîtier du récepteur et les cordons
ne sont pas endommagés. Des récepteurs endommagés ou détrempés, même après
séchage, ne devront plus être réutilisés!
Attention!
Lorsque vous mettez les cordons en place, veillez à ne pas trop tirer sur les ls et à
ce qu’ils ne forment pas un angle trop fermé pour ne pas casser le l
présentent également un danger pour l’isolation.
Attention!
Veillez également à ce que toutes les ches/prises soient branchées correctement.
Pour débrancher une che ou une prise, ne jamais tirer sur les ls
Attention!
Ne jamais placer le récepteur à un endroit dans le fuselage ou sur le châssis, là où les
vibrations du moteur ou des acoups lors de l’atterrissage pourraient lui être transmise
directement.
Attention!
Toute modication au niveau du récepteur est interdite. Elle entraînerait une extinction de
l’autorisation d’exploitation et de l’assurance.
Attention!
Avant chaque utilisation, vériez le bon fonctionnement et faites un essai de portée.
Vériez à intervalles réguliers, l’état de vos accus.
Conseil!
N’utilisez vos composants Hott que lorsqu’ils sont à jour, c’est-à-dire à la version actuelle
du Software.
Conseil!
La sécurité n’est jamais un hasard et les modèles radiocommandés ne sont pas des jouets!
.
.
. Des arêtes vives
Page 59

innovation & technologie
Generalites
• Les gyroscopes intégrés au récepteur fonctionnent avec une haute résolution et sont très rapides. De ce fait,
utilisez des servos digitaux rapides qui puissent transmettre les corrections de manière directe et précise pour
éviter une déstabilisation du modèle.
• Les rallonges servos doivent être aussi courtes que possibles.
• Lorsque vous allumez l’émetteur ou lors du réglage sur l’émetteur, veillez impérativement à ce que l’antenne
d’émission soit à au moins 15 cm des antennes de réception! Si l’antenne d’émission est trop près des antennes
de réception, le récepteur est perturbé et la LED rouge du récepteur s’allume. A quoi l’émetteur réagit en émettant
un Bip sonore à chaque seconde et la LED rouge sur le récepteur se met à clignoter. De ce fait, la radiocommande
se met en mode Fail-Safe. Dans ce cas, augmentez la distance entre l’antenne d’émission et les antennes de
réception jusqu’à ce que le signal d’alarme se coupe et jusqu’à ce que la LED bleue de l’émetteur se remette au
bleu constant et que la LED rouge du récepteur s’éteigne.
Binding
Binding (Assignation)
Pour pouvoir établir une liaison avec un émetteur bien précis, le récepteur Graupner HoTT 2.4 doit d’abord être assigné
à «son» module HF (émetteur) Graupner HoTT 2.4. Cette procédure est appelée «Binding». Mais cette procédure
n’est nécessaire qu’une seule fois par ensemble module HF / récepteur, de manière à ce que vous n’ayez à lancer la
procédure «Binding» décrite ci-dessous que pour des d’autres récepteurs supplémentaires (celle-ci peut, par ex. en cas
de changement d’émetteur, être reprise à tout moment). En cas de besoin, procédez de la manière suivante:
• L’assignation (Binding) n’est possible que si le récepteur, depuis sa mise en route, n’a pas encore de liaison avec un
émetteur déjà assigné (la LED rouge est allumée), en appuyant sur la touche SET, le récepteur est mis en mode BIND.
• Si vous souhaitez attribuer un nouvelle mémoire au récepteur déjà assigné à un émetteur, procédez de la manière
suivante:
• Coupez le module HF de l’émetteur dans le menu « Réglages de base du modèle »
• Allumez l’émetteur et mettez-le en mode Binding en appuyant sur la touche SET
• Lancez la procédure Binding dans le menu « Réglages de base du modèle » de l’émetteur
• Si la LED rouge du récepteur s’éteint dans les 10 secondes, la procédure Binding s’est effectuée avec succès.
• Votre ensemble émetteur/récepteur est maintenant opérationnel.
• Si par contre la LED rouge reste allumée, la procédure Binding a échouée. Dans ce cas, reprenez toute la procédure.
Assignation de plusieurs récepteurs à un seul et même modèle
Si nécessaire, vous pouvez également assigner plusieurs récepteurs à un seul et même modèle. Assignez d’abord
respectivement chacun des récepteurs, individuellement, comme décrit ci-dessus.
Par la suite, c’est le dernier récepteur assigné qui sera le récepteur maître. C’est sur celui-là que devront être branché
les capteurs/sondes de télémétrie, étant donné que seul le récepteur maître est en mesure de transmettre les données
télémétriques à l’émetteur, par la voie de retour. Le deuxième récepteur et tous les autres qui suivent, fonctionneront
alors en mode Slave, avec voie de retour coupée, parallèlement au récepteur maître!
Grâce à la fonction Channel-Mapping de la télémétrie HoTT, les voies de commande peuvent être réparties librement
sur plusieurs récepteurs, mais on peut également attribuer une seule et même fonction à plusieurs sorties récepteur.
Par exemple pour avoir la possibilité de commander un aileron avec deux servos au lieu d’un seul, etc..
ais
ç
Fran
Fonction Fail-Safe
D’origine, la conguration du récepteur est telle que les servos, en cas de conguration Fail-Safe, se mettent dans leur
dernière position reconnue correcte (Mode «Hold»). En mode Fail-Safe, la LED rouge du récepteur s’allume et, pour
l’alarme, l’émetteur émet un Bip sonore à chaque seconde.
Protez de tout le potentiel de sécurité de cette option, en programmant, pour une conguration Fail-Safe, par exemple,
une position Ralenti de la commande des gaz lorsqu’il s’agit d’un moteur thermique, « Arrêt moteur » s’il s’agit d’un
moteur électrique et, pour des hélicoptères, programmez le mode « Hold ». En cas de perturbations, le modèle ne
pourra plus faire n’importe quoi et provoquer d’éventuels dégâts matériels, voire des blessures physiques.
A ce sujet, consultez également la notice de votre radiocommande. En conguration Fail-Safe, le système gyroscopique
reste activé!
59
Page 60

Essai de portée
Faites un essai de portée de votre ensemble Graupner-HoTT 2.4 selon les indications qui suivent. Il est préférable de
faire cet essai à deux. Montez le récepteur, assigné à l’émetteur, dans le modèle comme prévu.
• Allumez l’émetteur et attendez jusqu’à ce que la LED rouge de l’émetteur se coupe. Vous pouvez maintenant
observer les déplacements des servos.
• Posez le modèle par terre, sur une surface plane (bitume, herbe rase ou terre) de manière à ce que les antennes
de réception soient au moins à 15 cm au-dessus du sol. Pour l’essai, il sera peut être nécessaire de caler ou de
surélever le modèle.
• Tenez l’émetteur à hauteur des hanches, sans toutefois le coller au corps. Ne visez pas directement le modèle avec
l’antenne, mais tournez/repliez l’antenne de manière à ce qu’elle soit verticale durant le vol.
• Lancez le mode essai de portée (comme décrit dans la notice de l’émetteur).
• Eloignez-vous du modèle tout en déplaçant les manches de commande. Si vous constatez une interruption dans la
Fran
ç
liaison émetteur/récepteur, dans la limite des 50 mètres, essayez de la reproduire.
• Si le modèle est équipé d’un moteur, lancez le moteur, pour vous assurer que ce dernier ne crée pas d’interférences.
• Continuez à vous éloigner du modèle jusqu’à ce qu’un contrôle correct ne soit plus possible.
• Mettez maintenant un terme au mode test de l’essai de portée manuellement.
ais
Le modèle doit à nouveau réagir aux ordres de commande. Si ce n’est pas le cas à 100%, ne persistez pas et contactez
un Service Après Vente Graupner/SJ GmbH.
Avant chaque vol, faites cet essai de portée et simulez tous les déplacements servos susceptibles d’intervenir en vol.
Pour une évolution en toute sécurité, la portée au sol doit toujours être d’au moins 50 mètres.
Montage dans le Modele (Avion)
Pour que les gyroscopes du récepteur fonctionnent correctement il faut que le récepteur soit placé à angle droit par
rapport à l’axe longitudinal du modèle et également à l’horizontale par rapport à l’axe longitudinal du modèle à cause
de l’accéléromètre.
OK
OK
Page 61

innovation & technologie
Montage dans le Modele (Heli)
Le destinataire doit nécessairement être aligné à angles droits vers le récepteur sur la plate-forme de l‘hélicoptère. Vous
pouvez également installer sur le bord à angle droit vers le récepteur. Il doit toujours y avoir un bord du récepteur sont
paralell à un axe Heli.
OK
OK
ais
ç
Fran
Cette position de montage est à l‘heure actuelle pas
d‘importance, mais pour une utilisation ultérieure
les accéléromètres être importante (par mise à jour
logicielle)!
Branchement
Branchez les servos sur les sorties récepteurs. La connectique est équipée de détrompeurs, ce sont les petites arêtes
latérales. Ne forcez pas, la prise doit pouvoir se brancher sans effort. Les ches sont également repérées en conséquence,
l brun (-), l rouge (+), l orange (signal). Les sorties des récepteurs Graupner-HoTT 2.4 sont numérotées.
La sortie 8 peut également être programmée pour un signal cumulé (digital) (voir paragraphe 3.2 récepteur.
OK
61
Page 62

Alimentation
Il n’y a pas de sorties réservées au branchement de l’accu. Branchez l’alimentation sur la (ou les) sortie la plus proche
des servos qui y sont branché. Si vous voulez brancher plusieurs accus séparés, veillez à ce que ceux-ci aient la même
tension nominale et la même capacité. Ne jamais y brancher des accus de types différents ou des accus dont l’état de
charge diverge de trop, cela pourrait provoquer des effets similaires à un court-circuit. Dans des cas pareils, et pour des
raisons de sécurité, montez un régulateur de tension de l’alimentation du récepteur, par ex. PRX-5A (Réf. 4136) entre
l’accu et le récepteur.
Télémétrie
Fran
Les capteurs/sondes de télémétrie, en option, se branchent sur la sortie repérée par un « T » Télémétrie. Par ailleurs les
mises à jour du Firmware du récepteur et à l’aide de l’interface USB se font également sur cette sortie.
ç
ais
Menu Reglage Recepteur
menu GR-24 menu GR-18
RECEPTEUR 1.0 < >
>Type de Modèle: Aile
ALARME VOLT:
ALARME TEMP:
Alt. max:
Cycle:
SUMD sur Voie 8:
SPRACHE:
3.8V
70°C
125m
10ms
Non
francaise
Le menu de réglage du récepteur apparaît dans le menu
«Télémétrie» sous REGLAGES/AFFICHAGES ou, dans
le cas d’une SMART-BOX, sous SETTING & DATAVIEW.
Pour entrer dans ce menu, consultez la notice de votre
émetteur ou de la Smart-Box
RECEPTEUR 1.0 < >
>Type de Modèle: Aile
ALARME VOLT:
ALARME TEMP:
Alt. max:
Cycle:
SUMD sur Voie 6:
Sensor sur Voi9:
SPRACHE:
3.8V
70°C
125m
10ms
Non
Non
francaise
Afchage écran
RECEPTEUR 1.0 1.0 indique la version du Firmware du récepteur Type de Modèle Le choix du type de modèle Aile, Heli
ALARME VOLT. Seuil de déclenchement de l’alarme si tension du récepteur trop
ALARME TEMP. Seuil de déclenchement de l’alarme en cas de temp° récepteur
Alt. max. Altitude maximale 0 - 2500 m
Cycle Temps cycle en ms 10 / 20 ms
SUMD sur voie K8 Signal digital cumulé sur voie 8 Oui / Non
Sensor sur voi K9 Telemetrie Sensor sur voie K9 (uniquement sur 33579/GR-18) Oui / Non
LANGUE Choix de la langue du menu allemand, anglais, français,
Sélection du type de modèle (Type de modèle) : Ici vous pouvez choisir le type de modèle.
Dans la sélection « Aile » vous pouvez dénir les réglages du gyroscope pour les modèles Ailes, comme décrit sur les
pages suivantes à partir du point 4.
La sélection « Heli » sera seulement possible par une mise à jour logicielle dans l’avenir. Ici un système Flybarless sera
intégré prenant les réglages de ce menu.
Explication Réglages
2.5 - 24.0 V
basse (ou mesure de la tension)
trop élevée
Réglage par défaut: 3.8 V
50 - 80° C
Réglage par défaut: +70° C
par 25 m
italien et espagnol
Seuil de déclenchement de l’alarme en cas de tension trop basse du récepteur (ALARM VOLT) : si la tension
du récepteur, c’est à dire de son alimentation chute en dessous du seuil mini enregistré, le module HF de l’émetteur
déclenche une alarme soit sous la forme d’un bip sonore régulier à chaque seconde, soit sous la forme d’une annonce
vocale « Tension récepteur ».
Page 63

innovation & technologie
Seuil de déclenchement de l’alarme en cas de température récepteur trop élevée (ALARM TEMP) : si la température
du récepteur dépasse le seuil de température enregistré, le module HF de l’émetteur déclenche une alarme soit sous la
forme d’un bip sonore régulier à chaque seconde, soit sous la forme d’une annonce vocale « Température récepteur ».
Altitude maximale (Alt. Max) – uniquement sur la Réf. 33577 avec Vario intégré : Là, vous pouvez enregistrer une
altitude maximale à partir de laquelle une alarme est déclenchée, soit par le module HF de l’émetteur sous forme d’un
bip sonore régulier à chaque seconde, soit sous la forme d’une annonce vocale « Altitude ». Attention: lorsque vous
allumez le récepteur, l’altitude actuelle se met sur 0, l’altitude afchée est donc l’altitude relative par rapport au point
de départ.
Temps cycle (CYCLE) : Si vous n’utilisez que des servos digitaux, vous pouvez enregistrer un temps cycle de 10 ms,
par contre, si vous utilisez des servos digitaux et des servos analogiques, ou uniquement des servos analogiques, il est
conseillé d’enregistrer un temps cycle de 20 ms, sinon, les servos analogiques risquent de «frétiller» et de «grogner».
Signal HoTT cumulé (SUMD) : Si le signal HoTT cumulé est activé sur la voie 8 (à la place d’un servo), ce signal
cumulé sera retransmis par cette sortie, jusqu’à un maximum de 8 voies. Le récepteur HoTT conguré en SUMD
génère en permanence à partir de huit signaux de commande de le transmetteur un signal digital cumulé, en le rendant
disponible sur les sorties récepteur déterminées. A l’heure de la rédaction de cette notice, un tel signal est utilisé dans
les toutes dernières innovations électroniques du domaine des systèmes Flybarless, alimentations, etc.
MISE EN GARDE : A ce sujet, respectez impérativement les conseils de réglage de l’élément que vous
branchez, sinon, vous risquez éventuellement que vous modèle ne soit plus contrôlable.
ais
ç
Fran
Point de menu uniquement à 33579 GR-18 PRO 3XG 3 A + Vario
Capteur de télémétrie (capteur à K9): Cette prise vous permet d‘utiliser soit pour la télémétrie ou pour un canal
supplémentaire (9). (Remarque : Les deux ensemble n‘est pas possible) commutation est effectuée dans ce menu. Si
vous sélectionnez « Oui », la prise est reliée à la connexion d‘un capteur. Si vous sélectionnez « Non » une prise est
reliée au canal de commande 9.
Initialisation du gyroscope (Avion)
Après avoir allumé le modèle du gyroscope est immédiatement actif mais pas encore initialisés. Pour initialiser, vous
gardez votre modèle lors du passage calme. La calibration est effectuée uniquement si le destinataire est absolument
calme. Après environ 3 secondes dans la position de repos, les ailerons se déplacent vers le haut et vers le bas une
seule fois. Cette « shimmy » indique l‘initialisation réussie, la n de l‘étalonnage. Attendez, ce calibrage après chaque
mise hors tension avant de commencer le modèle!
Mixages libres
MIXAGES LIBRES < >
>MiXAGE:
DE LA VOIE:
VERS LA VOIE:
>TRIM:
>COURSE-:
COURSE+:
1
1
6
+0%
+100%
+100%
Remarque importante :
l’émetteur, le type de modèle avec empennage: normal. Des modèles avec empennage
en V ou par ex. deux servos de commande de profondeur devront être commandés à
travers les mixages du récepteur, et non avec des mixages de l’émetteur, sinon la compensation
gyroscopique ne sera pas transmise aux servos! Les quatre mixages récepteur agissent en aval
des gyroscopes. Si dans le menu « Mixages ailes » ou « Mixages libres » de votre émetteur HoTT,
vous avez déjà programmé des mixages, veillez impérativement à ce que ceux-ci n’interfèrent
pas ou qu’ils ne fassent pas «doublons» avec les mixages de ce menu-ci!
Pour utiliser les gyroscopes, il faut toujours enregistrer, sur
Afchage écran
MIXAGE Sélection du mixage 1, 2....4
DE VOIE Source du signal / Voie source 0,1,2,...6
VERS VOIE Voie cible 0,1,2,...6
TRIM Position du trim en % -15 - + 15%
COURSE- Limitation du débattement en % de la course du servo -150 bis +150%
COURSE+ Limitation du débattement en % de la course du servo -150 bis +150%
MIXAGE : Vous pouvez programmer un maximum de quatre mixages en même temps. Sur la ligne « Mixages », passez d’un
mixage à l’autre, mixage 1, mixage 2 … et mixage 4.
Les réglages qui suivent ne concernent que le mixage qui a été sélectionné sur cette ligne.
Explication Réglages
63
Page 64

DE VOIE : le signal disponible à la source du signal (voie source) est mixé dans des proportions réglables à la voie
cible (VERS VOIE). Ce principe de fonctionnement est similaire au menu « Mixages libres » des émetteurs HoTT.
VERS VOIE : une part du signal de la voie source (DE VOIE) est mixée à la voie cible (VERS VOIE). La part de mixage
est déterminée par le pourcentage enregistré dans les lignes « COURSE– » et « COURSE+ ». Si vous ne souhaitez
pas de mixages, enregistrez « 0 ».
Part de mixage (COURSE -/+) : avec les valeurs enregistrées sur ces deux lignes, on dénit la part de mixage en %
par rapport à la voie source (DE VOIE), séparément, pour les deux sens de débattement.
Exemple de programmation
:
Empennage en V avec Différentiel sur la direction
Fran
ç
ais
MIXAGES LIBRES < >
>MIXAGE:
DE LA VOIE:
VERS LA VOIE:
>TRIM:
>COURSE-:
COURSE+:
+100%
+100%
MIXAGES LIBRES < >
>MIXAGE:
1
3
DE LA VOIE:
4
VERS LA VOIE:
+0%
>TRIM:
>COURSE-:
COURSE+:
+0%
-60%
+100%
MIXAGES LIBRES < >
>MIXAGE:
2
4
DE LA VOIE:
3
VERS LA VOIE:
>TRIM:
>COURSE-:
COURSE+:
3
4
4
+0%
+100%
+60%
Normalement sur ce type d’empennage on ne met pas de différentiel. Sans différentiel, pas besoin du mixage 3, par ailleurs,
il faudra enregistrer dans COURSE- du mixage 2, -100%. Mais la programmation peut également se faire par le menu de
l’émetteur. Vous pouvez utiliser, à la place du ‚Mixage libre 3’ du récepteur, un mixage émetteur « Direction » → « Profondeur »
réglé de manière asymétrique, par ex. +30%, -30%. De ce fait vous libérez de nouveau un mixage sur le récepteur.
Modèle Delta avec Différentiel (1 Aileron)
MIXAGES LIBRES < >
>MIXAGE:
DE LA VOIE:
VERS LA VOIE:
>TRIM:
>COURSE-:
COURSE+:
+100%
+60%
MIXAGES LIBRES < >
>MIXAGE:
1
2
DE LA VOIE:
3
VERS LA VOIE:
+0%
>TRIM:
>COURSE-:
COURSE+:
+0%
-100%
-100%
MIXAGES LIBRES < >
>MIXAGE:
2
3
DE LA VOIE:
2
VERS LA VOIE:
>TRIM:
>COURSE-:
COURSE+:
3
2
2
+0%
+60%
+100%
Dans cet exemple, le Différentiel est de 40%. Mais la programmation peut également se faire par le menu de l’émetteur.
Vous pouvez utiliser, à la place du « Mixage libre 3 » du récepteur, un mixage émetteur « Aileron » → « Profondeur »
réglé de manière asymétrique, par ex. +30%, -30%. De ce fait vous libérez de nouveau un mixage sur le récepteur.
Deux servos de commande de profondeur
(Sortie 6 pour le deuxième servo de commande de la profondeur)
MIXAGES LIBRES < >
>MIXAGE:
DE LA VOIE:
VERS LA VOIE:
>TRIM:
>COURSE-:
COURSE+:
Uniquement pour émetteurs sans mixage Buttery (par ex.
1
3
8
+0%
+100%
+100%
mx-10 HoTT):
Si vous voulez utiliser un mixage Buttery, vous n’aurez plus de possibilité d’enregistrer un Différentiel ou de possibilités
de positionnement des volets d’atterrissage, car là, il va vous falloir deux mixages
.
Exemple :
MIXAGES LIBRES < >
>MIXAGE:
DE LA VOIE:
VERS LA VOIE:
>TRIM:
>COURSE-:
COURSE+:
+100%
+100%
MIXAGES LIBRES < >
>MIXAGE:
1
1
DE LA VOIE:
2
VERS LA VOIE:
+0%
>TRIM:
>COURSE-:
COURSE+:
2
1
5
+0%
-100%
-100%
Page 65

innovation & technologie
Exemple:
MIXAGES LIBRES < >
>MIXAGE:
DE LA VOIE:
VERS LA VOIE:
>TRIM:
>COURSE-:
COURSE+:
+100%
+100%
MIXAGES LIBRES < >
>MIXAGE:
1
1
DE LA VOIE:
2
VERS LA VOIE:
+0%
>TRIM:
>COURSE-:
COURSE+:
2
1
3
+0%
-100%
-100%
Attribution des Axes du Gyroscope
ATTRIBUTION GYRO <
>Servos AIL.:
NOUVEAU REGL.:
AILERON:
>PROFONDEUR:
>DIRECTION:
2
Oui
+2
+0
+0
ATTRIBUTION GYRO <
>Servos AIL.:
NOUVEAU REGL.:
AILERON:
>PROFONDEUR:
>DIRECTION:
2
Non
+2
+1
-3
Servos ailerons : Indiquez ici si votre modèle est équipé de deux servos de commande des ailerons (enregistrez 2). Le
gyroscope pour la voie (servo) 2 agira alors également sur le servo 5. Par ailleurs, la somme des deux voies sera utilisée
pour le masquage gyroscopique si les ailerons sont également utilisés en tant que aperons ou aérofreins (Speebrake).
ATTENTION :
Le sens de rotation des deux servos de commande doit être le même, c’est-à-dire soit normal,
soit Reverse! Si cela n’est pas possible, il ne faut en aucun cas inverser un servo dans le menu de l’émetteur, il
faudra alors modier son emplacement dans le modèle! Si par contre vous utilisez des servos programmables (par
ex. des servos Graupner DES, HVS ou HBS, consultez la notice du programme de mise à jour Firmware_Upgrade_
grStudio, l’inversion du sens de rotation peut alors directement être effectuée sur le servo.
Respectez les consignes de montage en page 5 de cette notice! Dans un premier temps, il faut d’abord dénir, étalonner
les trois axes et directions du gyroscope du récepteur. Allumez l’émetteur et le modèle et allez, dans le menu Réglages
gyroscope sur Nouveau réglage : Oui.
• mettez ensuite le manche de commande, de n’importe quelle gouverne, à fond dans une direction, dans l’exemple
qui suit, c’est celui des ailerons
• L’axe ainsi reconnu (aileron) s’afche en surbrillance (à la livraison, la valeur «+0 » s’afche pour tous les axes, mais
on peut enregistrer manuellement « +0 » pour ces axes. 0 = inaktiv)
• En fonction du débattement du manche, faites pivoter le modèle d’au moins 45°, si vous avez déplacé le manche de
commande des ailerons vers la gauche, il faut simuler un virage à gauche du modèle → abaisser l’aile gauche d’au
moins 45° cet axe et la direction sont ainsi étalonnés, il ne reste plus qu’à dénir et étalonner de la même manière
les deux autres axes manquants.
• Sur l’afchage Aileron/Profondeur/Direction apparaît alors l’axe gyroscopique 1, 2 ou 3 avec un signe – devant
lorsque Servoreverse est activé
• Lorsque les trois axes sont étalonnés, l’afchage passe sur « Nouveau réglage: Non ».
ais
ç
Fran
MISE EN GARDE :
Après étalonnage, vériez si les gyroscopes fonctionnent correctement! Déplacez le
modèle autour de tous ses axes et observez les débattements des gouvernes – voir vue ci-dessous. Si une
des gouvernes se déplace dans le mauvais sens, reprenez le Nouveau réglage. Il est hors de question de
décoller dans ce cas, risque de Crash!
65
Page 66

Fran
ç
ais
ELEVATOR
Model movement Control surface response (seen from the tail)
RUDDER
Model movement Control surface response (seen from the tail)
AILERON
Model movement Control surface response (seen from the tail)
Réglez servolimit pour les canaux
SERVOLIMIT <
> 1:
2:
3:
4:
5:
6:
7:
SERVOLIMIT <
> 1:
2:
3:
4:
5:
6:
7:
-150% +150% SEL
-150% +150% SEL
-150% +150% SEL
-150% +150% SEL
-150% +150% SEL
-150% +150% SEL
-150% +150% SEL
-150% +150% STO
-150% +150% SEL
-150% +150% SEL
-150% +150% SEL
-150% +150% SEL
-150% +150% SEL
-150% +150% SEL
Dans ce menu, vous pouvez limiter le Voyage d‘asservissement pour tous les canaux.
Limiter le servo Voyage à la déviation maximale possible, de sorte que les servos ne
peuvent pas fonctionner dans l‘arrêt de l‘opération de gyroscope. Déplacez le curseur
sur la ligne souhaitée (par déplacement supplémentaire vers le bas du curseur sera
afché autres canaux), ici « 1 » pour le canal 1 Appuyez sur le bouton SET est pressé
le champ « SEL » dans « STO ».
Déplacez maintenant le manche de la voie 1 dans la direction et la position souhaitée,
tandis que l‘écran de pourcentage correspondant est représenté inversé. Maintenant,
appuyez sur le bouton SET et la valeur de consigne est afchée et stockée. Passez
par la procédure pour les autres chaînes.
Programmarion des Reglages Gyro
Compensation PiD (proportional-integral-diferenzial)
En règle générale, la compensation des capteurs gyroscopiques est basée sur trois paramètres:
Page 67

innovation & technologie
Facteur P : permet d’enregistrer une compensation proportionnelle
P-proportionnel: si la valeur nominale s’écarte de la valeur réelle, celle-ci entre dans l’amplitude du débattement, plus
simplement, la valeur à l’entrée (e) est simplement multipliée par un paramètre xe: u(t)=Kp*e(t). Cette valeur Kp est
appelée gain. La valeur de sortie est donc proportionnelle à la valeur de l’entrée. Mais il faut qu’il y ait toujours d ‘abord
un écart par rapport à la valeur nominale pour que la compensation proportionnelle puisse se déclencher – si cet écart
est de 0, le résultat sera également nul. Si le gain enregistré est trop important, la compensation P se met à «vibrer» et
devient instable.
Facteur i : Compensation intégrale (pour l’instant elle n’est pas encore mise en œuvre)
Facteur D : permet d’enregistrer une compensation différentielle
Différentiel D : ici, c’est la vitesse de la modication de la valeur d’entrée qui agit sur la valeur de sortie du compensateur.
Plus la rotation du modèle autour de son axe est rapide, plus la compensation sera grande. Si le modèle pivote à
peine, le compensateur D ne déclenchera qu’une faible compensation. La vitesse de la modication sera également
multipliée par un facteur (comme pour la compensation P), ce qui donnera la valeur de sortie. De ce fait, il n’existe pas
de compensateur D seul, il devra toujours être utilisé en combinaison avec un compensateur P.
Réglages gyro à l’écran
ATTENTION : Avant d’entreprendre les réglages sur un nouveau modèle, il faut enregistrer, dans le menu
Servos ailerons, le nombre de servos de commande des ailerons et dénir/étalonner les axes et directions des
gyroscopes dans le menu Nouveau réglage.
ais
ç
Fran
Ailerons/Profondeur/Direction : afche les facteurs P de la gouverne en question.
A noter: Les axes du gyroscope doivent d’abord être étalonnés dans Nouveau réglage (voir paragraphe 3.4)! Le gyroscope
peut être désactivé en enregistrant AUS (OFF) pour chacune des voies de commande en question.
Facteur P : En règle générale, on enregistre d’abord la part P, puis la part D (plage de réglage de 0 à10 respectivement).
Règle empirique: plus la gouverne est grande, plus la part P nécessaire est petite. Débutez avec le facteur 2 (réglage par
défaut), il est conseillé de ne pas dépasser les 4-5 en vol normal, 2-3 pour le vol de vitesse, 3-6 pour les atterrissages;
pour les Torq-Roll vous pourrez enregistrer la valeur maximale de 10.
MISE EN GARDE : Si les phases de vol sont enregistrées/programmées séparément, il faut, durant le vol, faire
attention à la sélection de la phase de vol, sinon, les gouvernes risquent de faire un peu n’importe quoi, et dans le pire
des cas, entraîner le Crash du modèle!
Remarque : Plus la vitesse du modèle est élevée et plus il aura tendance à se cabrer.
Facteur D : avec la même part P, une plus petite part du facteur D pour réduire cette tendance à l’autocabrage. Si
toutefois, pour le facteur P vous enregistrez un degré plus bas, il est possible que la part D puisse être augmentée, avant
que les gouvernes ne se mettent à «uter». Par un réglage n du facteur D, vous pouvez optimiser l’effet gyroscopique.
Remarque: avec les valeurs P et D préenregistrés, le modèle devrait réagir rapidement sans phénomène d’autocabrage.
Pour chaque modèle, il faudra néanmoins dénir les valeurs exactes en vol. Si avec les réglages par défaut, le modèle
réagit mollement ou même pas du tout, il faut augmenter cette valeur, par contre, s’il a tendance à cabrer (reconnaissable
aux «montagnes russes» qu’il effectue en vol, il faut la réduire.
Si votre émetteur est équipé d’éléments de commande proportionnels, cette valeur peut également être modiée durant le vol.
Selon le type d’émetteur que vous possédez, ce facteur peut être enregistré de manière xe ou modié, durant le vol, à
l’aide des éléments de commande proportionnels.
Programmation sur émetteur avec éléments de
commande proportionnels
Si votre émetteur HoTT est équipé d’éléments de commande proportionnels, les facteurs P et D, pour chacun des axes,
peuvent être modiés et pour ainsi dire, être testés en vol. Affectez les éléments de commande ( par ex. les curseurs
dans le cas de la mc-20) à n’importe quelle voie 5 à 16 (dans cet exemple il s’agit de la voie 9). Avec ces éléments de
commande proportionnels le facteur P (mais également le facteur D) peut être modié. Les valeurs actuelles sont afchées entre parenthèses.
67
Page 68

Procédure avec l’exemple des ailerons (Ail.)
REGL. GYRO. < >
>AILERON:
>PROFONDEUR:
>DIRECTION:
COEFF. :
COEFF. D:
• Poursuivez en allant sur Profondeur ou Direction et sélectionnez ici aussi, une voie et un facteur (vous pouvez soit
sélectionner une voie, pour modier tous les axes en même temps ou différentes voies pour pouvoir programmer
Fran
ç
ais
les axes séparément)
• Avec le curseur, allez sur la ligne Facteur. Là, vous avez encore une possibilité de modier le facteur P des ailerons,
de la profondeur et de la direction avec un élément de commande propor tionnel (plage de réglage jusqu’à 200%)
• Avec le curseur, allez sur la ligne Facteur D. Là, vous avez encore une possibilité de modier le facteur D des ailerons, de la profondeur et de la direction avec un élément de commande proportionnel (plage de réglage jusqu’à
200%, sachant que la valeur -100% de la voie correspond à un facteur de 0%, qu’une valeur de voie de 0% est
égale à 100% et que +100% est égal à un facteur de 200%). De ce fait, on peut, de manière simple, s’adapter à
la vitesse de vol, notamment en activant une sensibilité gyroscopique plus grande pour l’atterrissage (même sans
changement de phase de vol).
• Pilotez votre modèle et modiez les valeurs successivement, les unes après les autres, jusqu’à ce que vous ayez
trouvé la compensation gyroscopique souhaitée, sans cabrage excessif
• il est peut être souhaitable, et plus simple dans un premier temps, de n’activer le gyroscope que pour compenser
un seul axe, et de tester le réglage en vol, au lieu de plusieurs axes en même temps
(2)K9
(3)K8
(44%)K10
(140%)K11
• avec le curseur, allez sur la ligne souhaitée, dans ce cas
• une impulsion sur la touche SET active le champ Voie,
• Sélectionnez la voie souhaitée et enregistrez-la
• Pour modier le facteur, appuyez de nouveau fois sur la touche SET
6
• en déplaçant l’élément de cde proportionnel correspondant (plage de réglage 0-10,
sachant que 0 correspond à aucune compensation gyroscopique de l’axe en question)
• Ce facteur peut être enregistré directement en appuyant sur la touche gauche ou
droite . De ce fait, la voie utilisée par l’élément de cde proportionnel se libère et
pourra être utilisée pour autre chose, par ex ; pour la profondeur ou la direction
« Ail. » qui correspond à l’aileron
Programmation sans éléments de commande
proportionnels
REGL. GYRO. < >
REGL. GYRO. < >
>AILERON:
>AILERON:
>PROFONDEUR:
>PROFONDEUR:
>DIRECTION:
>DIRECTION:
COEFF: :
COEFF: :
COEFF. D:
COEFF. D:
• Poursuivez et allez sur Profondeur ou Direction et enregistrez la valeur souhaitée (ou OFF)
• Ne touchez pas aux réglages « Facteur » et « Facteur D » et laissez-les, dans ce cas-là, sur OFF.
• il est peut être souhaitable, et plus simple dans un premier temps, de n’activer le gyroscope que
• pour compenser un seul axe, et de tester le réglage en vol, au lieu de plusieurs axes en même temps
Si vous avez trouvé le réglage optimal, vous pouvez attribuer, par souci de sécurité, un interrupteur correspondant, ou
pour commuter d’un réglage de facteur de sensibilité à l’autre. Vous pouvez par ex. attribuer un interrupteur 3 positions
au « Facteur » et au « Facteur D » et ainsi avoir la possibilité de passer de la valeur 0% (OFF) à 100% ou à 200%.
Réglages dépendants de la phase de vol
L’accès au réglage facteur au travers d’une voie par des réglages d’éléments de commande dépendants de la phase
de vol n’est possible que sur MX 20 / MC20 / MC32, à ce sujet, consultez la notice de l’émetteur en question, points de
menu « Réglages des éléments de commande » et « Réglage des phases de vol »
• avec le curseur, allez sur la ligne souhaitée, dans ce cas « Ail. » qui correspond à l’aileron
• une impulsion sur la touche SET active le champ Voie,sélectionnez la valeur souhai
2
2
4
tée (1 - 10 ou OFF) et enregistrez-la en appuyant une nouvelle fois sur la touche SET
4
6
• Dans un premier temps, choisissez une valeur plutôt faible (point de repère, voir pa
6
OFF
OFF
OFF
OFF
ragraphe Facteur P) et faites un essai en vol. Si la compensation gyroscopique est trop
faible, augmentez, pas à pas, la valeur, jusqu’à atteindre la compensation souhaitée, si
le modèle a tendance à cabrer, diminuez, pas à pas, cette valeur.
• Ne pas sélectionner les voies (5-16), cette fonction est réservée aux émetteurs avec
élément de commande proportionnels
Page 69

innovation & technologie
MENU DE RÉGLAGE HELI DU RÉCEPTEUR
Menu sur modèle GR-18Menu sur modèle GR-24
RECEPTEUR 1.0 < >
>Type de Modèle :
ALARME VOLT :
ALARME TEMP. :
Alt. max. :
>CYCLE :
>SUMD sur VOIE 8 :
SPRACHE :
HELI
3,2 V
70 °C
125 m
10 ms
française
Le menu de réglage du récepteur apparaît
dans le menu « Télémétrie », à la rubrique
« RÉGLER / AFFICHER », ou sous « SETTING
& DATAVIEW » en cas d'utilisation de la SMART-
BOX. La manière d'accéder à ce menu est décrite
dans la notice d'utilisation de votre émetteur ou
non
de la Smart-Box.
RECEPTEUR 1.0 < >
>Type de modèle :
ALARME VOLT :
ALARME TEMP. :
Alt. max. :
>CYCLE :
>SUMD sur voie 6 :
Sensor sur Voi9
SPRACHE :
française
HELI
3,2 V
70 °C
125 m
10 ms
non
non
Afchage
Explication Réglages
écran
RECEPTEUR
1.0 indique la version du micrologiciel du récepteur -
1.0
TYPE DE
Choix du type de modèle Aile, Heli
MODELE
ALARME
VOLT
ALARME
TEMP.
Seuil d'alarme de l'alerte sous-tension du récepteur 2,5 - 24,0 V
Réglage usine : 3,8 V
Alerte surchauffe récepteur 50 - 80 ° C
Réglage usine : + 70 °C
Alt. max. Altitude maximale 0 - 2 500 m
par étapes de 25 m
CYCLE Temps de cycle en ms 10 / 20 ms
SUMD sur
Signal numérique cumulé au niveau du canal 8 (6) Oui / Non
voie 8 (6)
Sensor sur
Sonde télémétrie sur canal 9 (uniquement sur GR 18) Oui / Non
Voi 9
SPRACHE Choisir la langue des menus allemand, anglais, français, italien et espagnol
Sélection du type de modèle (type modèle) : ici, vous pouvez choisir le type de modèle.
En sélectionnant « Aile », vous pouvez ensuite régler les paramètres du gyro pour les modèles surfaciques dans les
pages du menu, comme décrit à partir du point 5.
En sélectionnant « Heli », vous pouvez ensuite régler les paramètres du gyro du système Flybarless pour hélicoptère
dans les pages suivantes du menu.
ais
ç
Fran
Alerte sous-tension (ALARME VOLT) : si la tension du récepteur descend en dessous de la valeur paramétrée, une
alerte de sous-tension est déclenchée par le module HF de l'émetteur sous forme de « signal d'alarme général », un bip
régulier à la fréquence de env. une seconde ou l'annonce vocale « Tension récepteur ».
Alerte température (ALARME TEMP) : si la température du récepteur monte au-delà de la température paramétrée,
une alerte est déclenchée par le module HF de l‘émetteur sous forme de « signal d‘alarme général », un bip régulier à
la fréquence de env. une seconde ou l‘annonce vocale « Température récepteur ».
Altitude maximale (ALT. MAX) : une altitude maximale peut être prédénie ici. Lorsqu‘elle est atteinte, une alarme est
déclenchée par le module HF de l‘émetteur sous forme de « signal d‘alarme général », un bip régulier à la fréquence de
env. une seconde ou l‘annonce vocale « Température récepteur ». Attention : lorsque le récepteur est allumé, l‘altitude
actuelle est réglée sur 0. L‘altitude indiquée est donc la hauteur relative à partir du point de départ.
Temps de cycle (CYCLE) : en cas d‘utilisation exclusive de servos numériques, un temps de cycle de 10 ms peut être
réglé. En cas de fonctionnement mixte ou d‘utilisation exclusive de servos analogiques, choisir un temps de cycle de
20 ms car les servos analogiques peuvent être hypersollicités et réagir par des tremblements ou des grondements.
Signal cumulé HoTT (SUMD) : si le signal cumulé numérique est activé au niveau du canal 8 (6 pour le modèle GR
18), le signal cumulé est émis (au lieu d‘un servo) avec 8 canaux à partir de cette prise. Le récepteur HoTT conguré en
tant que SUMD génère en permanence un signal cumulé numérique à partir de 8 signaux de commande de l‘émetteur
et le prépare au niveau du raccord de servo déni spéciquement pour le récepteur. Au moment de l‘élaboration de cette
notice, un tel signal est exploité pour certains des développements électroniques les plus récents dans le domaine des
alimentations de puissance électriques, etc.
69
Page 70

AVERTISSEMENT : dans ce contexte, respecter impérativement les consignes de réglage associées à
l'appareil raccordé, sans quoi votre modèle pourrait être incapable de voler.
Montage du récepteur
Le récepteur doit impérativement être orienté perpendiculairement sur la plateforme du récepteur au niveau de
l'hélicoptère. Dans tous les cas, veuillez respecter la notice de montage à la section 3.1. Avant le montage, retirer
l'étiquette à l'arrière du récepteur et utiliser idéalement la bande adhésive double face réf. : 96382.1.
Pour une alimentation électrique stable, le récepteur doit être raccordé à l'aide de deux câbles électriques au minimum.
Respecter la consommation électrique maximale possible des servos !
Fran
Attention : les récepteurs doivent uniquement être utilisés dans des modèles d'hélicoptères électriques !
ç
Préparation de l'hélicoptère
ais
Régler tous les servos sur le neutre. Les leviers doivent impérativement être perpendiculaires et le plateau cyclique doit être
en position neutre (rectangulaire à l'axe du rotor principal). Les tringles de commande TS doivent avoir la même longueur.
Pré-réglages de l'émetteur
Choisir une mémoire de modèle libre / effacée et activer le modèle réduit d'hélicoptère.
Tous les trims doivent être sur 0 et ne doivent être modiés en aucun cas, même en vol. Si possible, on doit donc
désactiver les trims dans l'émetteur. Pour les émetteurs MX-20, MC-16/20/32 et mz-18/24, désactiver le trim dans le
menu (régler les étapes du trim sur 0)
• Activer ou maintenir le servo de type plateau cyclique 1 (le mélange des plateaux cycliques est effectué dans le
système FBL)
• La course du canal d'accélération (K6) doit impérativement être réglée de telle sorte qu'une valeur proche de 100 %
(afchage servo) est atteinte lorsque le moteur est éteint, sans quoi le calibrage du gyroscope n'est pas assuré.
• Les réglages de course de l'émetteur restent dans tous les cas sur 100 % avec les paramètres de base
• Si la servocommande arrière n'est pas au milieu du type 1,5 ms (standard), ne pas l'encher pour le moment !
• Disposition du servo TS à 120/135/140 degrés :
avant gauche = 1, avant droite = 2, arrière =3
2
1
3
• Relier le récepteur à l'émetteur
• Ouvrir le menu « Télémétrie » du récepteur. Sur la première page, régler le type de modèle sur Heli sur la première ligne
• Régler tous les paramètres du servo en position neutre au niveau de l'émetteur (afchage servo 0 %).
Initialisation du gyroscope (Heli)
Après avoir allumé le modèle, le gyroscope est activé immédiatement, mais il n'est pas encore initialisé. An de l'initialiser,
maintenir votre modèle immobilisé lors de la mise en marche. Le calibrage est uniquement effectué si le récepteur est
absolument inactif. Après 3 secondes env. en position immobile, le plateau cyclique se déplace brièvement trois fois.
Ces mouvements signalent la réussite de l'initialisation et la n du calibrage. Attendre ce calibrage après chaque mise
en marche avant de démarrer le modèle !
Page 71

innovation & technologie
Réglages de base (procédure)
1. Après une préparation réussie de l'émetteur et de l'hélicoptère, ouvrir le menu « Télémétrie » dans l'émetteur (voir
notice de l'émetteur) et basculer dans le menu « BASE REGL CONTR. ».
2. Ce faisant, passer les menus de réglage « Cycl comp ». Ils seront traités ultérieurement !
3. Ici, il est désormais nécessaire de travailler point par point de haut en bas :
Règle de paramétrage de base
Base règle contr.<v>
>Dir Rotation droit
PCy Type
PCy Frequency
PCy Dir
S1 mil
S2 mil
S3 mil
140 Deg
50 Hz
+0
+0
+0
+0
ais
ç
↕ ↕ En appuyant sur les èches sur le pavé tactile de droite, vous
accédez aux autres points de menu qui se trouvent plus bas !
PCy Travel 7d +100
Collectif_B +100
Cycliq Max +50
PCy Rotation +0
Queue Servo 1,5 ms
Queue fréquence 50Hz
Queue mil +0
Queue Limit B +50
Expo Oui
Logging +3
Mode Expert Non
Dir Rotation
Choisir le sens de rotation du rotor : droite ou gauche
PCy Type
Type de plateau cyclique : choisir le type de plateau cyclique qui convient. 90°, 120°, 135°, 140°.
Réglage usine 140°
Les servos de roulis sont raccordés aux canaux 1 et 2, le servo de tangage au canal 3 et le servo arrière ne doit être
relié au canal 4 que si le paramètre « Servo arrière » est correctement paramétré.
La commande du moteur est enchée sur le canal 6.
Fran
PCy Frequency
Fréquence TS : fréquence pour les servos du plateau cyclique
Réglage usine : 50 Hz
Avertissement : les servos analogiques doivent uniquement fonctionner sur 50 Hz. Sinon, les servos seraient
détruits. De nombreux servos numériques peuvent fonctionner à une fréquence supérieure. (Utilisation à vos
risques et périls). Ainsi, la régulation est plus rapide. Dans le cas de servos HBS, nous recommandons un réglage
sur 200 Hz.
PCy Dir
Réglage usine : 0
Ici, le sens de marche des servos TS est réglé de telle sorte que le plateau cyclique ne bascule pas en cas d'inclinaison.
Sélectionner simplement le sens approprié dans les options (le sens d'inclinaison est réglé, si nécessaire, dans le menu
servo de l'émetteur sous K1).
Désormais, le sens de marche du plateau cyclique est contrôlé. En cas d'inclinaison vers le haut, le plateau cyclique
doit se déplacer parallèlement vers le haut. Si le plateau cyclique se déplace dans le sens inverse, l'inversion du servo
doit être réglée dans l'émetteur au niveau des réglages du servo 1 et le sens de roulis et de tangage est paramétré par
le biais de l'inversion des servos Servo 2 et Servo 3.
71
Page 72

S1 mil, S2 mil et S3 mil
Réglage usine : 0
Le plateau cyclique doit être orienté aussi perpendiculairement que possible par rapport à l'axe du rotor principal.
Commencer par régler mécaniquement de manière optimale, puis régler les 3 servos dans le menu. Un réglage parfait
est alors atteint si l'hélicoptère plane sur place.
PCy Travel 7d
Réglage usine : +100
La course cyclique à 7 degrés du plateau cyclique doit être réglée alors que le menu est activé de telle sorte que, dans
le cas d'une déviation de roulis intégrale = 100 % de la course, une déviation cyclique aussi précise que possible de
+/- 7° des pales du rotor est entraînée des deux côtés sur l'afchage servo de l'émetteur. Pour ce faire, le champ doit
impérativement être sélectionné (afchage inversé), an que le plateau cyclique soit commandé et puisse être réglé
sans effet de gyro sur un mode direct. Seul ce mode permet de régler correctement la course. Le réglage correct de la
course est extrêmement important. L'action correcte du gyroscope en dépend en grande partie. C'est pour cela que le
Fran
réglage doit être effectué aussi précisément que possible avec un gabarit de déviation numérique.
Collectif A/B
ç
Réglage usine : 100
ais
Il est sélectionné automatiquement conformément à la déviation du manche d'inclinaison au niveau de l'émetteur.
Mesurer les courses d'inclinaison souhaitées à l'aide du gabarit d'inclinaison avec une déviation complète de +/- 100 %
et les paramétrer dans ce menu. Tous les autres paramètres peuvent être réglés ultérieurement sur l'émetteur au niveau
des courbes d'inclinaison dans la phase de vol correspondante.
Cycliq max
Réglage usine : +50
Limite du plateau cyclique. La limite du plateau cyclique doit être réglée de telle sorte qu'un servo ne peut en aucun cas
fonctionner en déviation, mais permet cependant une course aussi importante que possible. Ainsi, aucun servo ne doit
bourdonner lors de toutes les déviations complètes.
PCy Rotation
PCy rotation = ici, une rotation du plateau cyclique (en degrés) virtuelle peut être réglée (pour certains systèmes à pales
multiples).
Ainsi, le réglage du plateau cyclique (TS) est terminé. On poursuit avec l'arrière :
Queue Servo
Queue Servo : choisir ici la position médiane correcte pour votre servocommande arrière.
Impulsion moyenne : 1,5 ms, 760 µs pi 960 µs.
Réglage usine 1,5 ms. Normalement, la norme est de 1,5 ms pour des servos arrière. Les servos à bande étroite (en
principe des servos de rotor arrière spéciaux) peuvent cependant exiger une autre impulsion moyenne. Déterminer
impérativement cette valeur à partir du manuel du servo et la régler correctement. Si aucune valeur n'est indiquée, il
s'agit en principe d'un servo standard de 1,5 ms. Dans le cas de servos DES, HVS ou HBS, cette valeur est partiellement
programmable. Nous recommandons toutefois de conserver le réglage standard.
Queue Fréquence
Queue Fréquence : la fréquence arrière peut être réglé de 50 à 333 Hz.
Réglage usine : 50 Hz
Avertissement : les servos analogiques doivent uniquement fonctionner sur 50 Hz. Sinon, les servos
seraient détruits.
De nombreux servos numériques peuvent fonctionner à une fréquence supérieure. (Utilisation à vos risques et
périls). Ainsi, la régulation est plus rapide. Dans le cas de servos HBS, nous recommandons un réglage sur 333 Hz.
Page 73

innovation & technologie
Queue Mil
Réglage usine : 0
Le levier de servocommande arrière doit être à 90 degrés par rapport à la tringle de commande de queue.
Le réglage n du trim est ensuite effectué par le biais du milieu de queue. Le rotor arrière doit être réglé avec un angle
d'incidence de 2-3° env. par rapport au couple en cas de position neutre du servo.
Queue Limit A/B
Réglage usine : 50
Limite des courses du servo arrière. Régler de sorte qu'il n'y ait jamais de blocage mécanique, mais que la course
possible soit exploitée intégralement. Ici, des valeurs pertinentes sur le plan aérodynamique doivent être choisies. En
cas de déviations trop importantes, un décrochage peut se produire.
Expo
Expo = par défaut, « Oui ». Une expo de 25 % env. sur le plateau cyclique et de 30 % env. sur la queue est utilisée dans le
cadre de la régulation. Le réglage peut également être exécuté au niveau de l'émetteur (Dual Rate / Expo). Pour ce faire,
régler la valeur sur Non, mais paramétrer impérativement des valeurs similaires au niveau de l'émetteur pour le premier vol.
Logging
Enregistre la fonction servo correspondante sur la carte SD pour une évaluation et une analyse des défauts ultérieures.
0 = aucun enregistrement
1 = enregistrement roulis et tangage
2 = enregistrement roulis
3 = enregistrement tangage
4 = enregistrement queue
Nous recommandons toujours d'enregistrer une fonction au minimum.
Mode Expert
Mode Expert = réglé sur NON par défaut. Même les experts doivent conserver ce réglage pour les premiers pas
avec le nouveau système (nettement moins d'options apparaissent dans le menu « PCy » et « Queue ») et basculer en cas de besoin sur le mode expert et ses possibilités supplémentaires uniquement après s'être habitué
au fonctionnement.
ais
ç
Fran
Ainsi, les réglages de base sont terminés. Poursuivre avec les réglages suivants :
Affectation des axes
AXES DESIGN <
>Nouveau régl.
Ail (droit) :
>Prof (av) :
>Queue : (droit)
Nouveau régl.
Nouveau régl. : oui / non
Attribution du gyroscope et sens de fonctionnement du gyroscope.
Si cela ne s'est pas encore produit, régler maintenant impérativement les directions K1-4 du servi au niveau de l'émetteur
de telle sorte que tout fonctionne correctement.
Accéder au menu du récepteur « Axes Design » et à la rubrique Nouveau régl., indiquer Oui. Maintenant, affecter les
axes comme suit :
• au niveau de l'émetteur, commander le roulis brièvement totalement à droite. L'axe de roulis est représenté inversé.
Ensuite, nous avons à nouveau les deux mains libres pour l'hélicoptère !
• Incliner l'hélicoptère de plus de 45 degrés vers la droite → l'axe détecté est indiqué avec le signe nécessaire, le
champ n'est plus inversé et cette détection d'axe est terminée
• Procéder maintenant de la même manière pour le tangage : commander brièvement un tangage complet vers
l'avant au niveau de l'émetteur
• Tourner l'hélicoptère de plus de 45 degrés vers l'avant ; l'axe détecté est indiqué avec le signe nécessaire, le champ
n'est plus inversé et cette détection d'axe est terminée
• Pour nir avec la queue : commander brièvement la queue totalement vers la droite au niveau de l'émetteur
• Tourner l'hélicoptère de telle sorte que la pointe avant tourne de plus de 45 degrés vers la droite ; l'axe détecté est
indiqué avec le signe nécessaire, le champ n'est plus inversé et cette détection d'axe est terminée
Les gyroscopes et les directions sont désormais affectés. Vérier maintenant l'exactitude des directions à des ns de
sécurité. Voir les illustrations suivantes !
Oui
+2
+0
+0
AXES DESIGN <
>Nouveau régl.
Ail (droit) :
Prof (av) :
>Queue (droit) :
Non
+2
+1
-3
73
Page 74

Contrôle du tangage = Elv = élévateur
Incliner l'hélicoptère avec la pointe avant vers le bas. Le plateau cyclique doit être commandé de telle sorte qu'il reste horizontal.
Faux ! Correct !
Fran
ç
Contrôle du roulis = Ail = aileron
ais
Incliner l'hélicoptère vers la droite. Le plateau cyclique doit automatiquement rester horizontal.
Faux ! Correct !
Véri cation de la direction de la queue (en regardant depuis l'arrière)
Tourner la queue vers la gauche. La pale du rotor arrière doit tourner vers la droite. Tourner la queue vers la droite. La pale
du rotor arrière doit tourner vers la gauche. L'hélicoptère doit agir contre le sens de rotation avec le rotor arrière !
Drehrichtung
Heckrotorblatt
Drehrichtung
Heli
Si l'une des directions ne correspond pas, le nouveau réglage doit être répété !
Drehrichtung
Heckrotorblatt
Drehrichtung
Heli
L'optimisation des paramètres du plateau cyclique et de la queue peut être exécutée en mode expert pour
l'hélicoptère et le style de vol correspondant. Cependant, il est instamment recommandé de commencer à
voler avec les réglages sans activer le mode expert !
Si les sens de marche sont modi és sur l'émetteur par n'importe quelle modi cation au niveau de
l'hélicoptère (par ex. nouveaux servos) ou que le récepteur est intégré dans une autre position, cette
opération de détection doit impérativement être exécutée totalement une nouvelle fois !
74
Page 75

innovation & technologie
Mise a jour
Les mises à jour du récepteur se font sur la sortie 5 à l’aide d’un PC équipé d’un système d’exploitation Windows XP,
Vista ou 7. Pour cela, il vous faut le port USB Réf. 7168.6 et le cordon adaptateur Réf. 7168.6A ou 7168.S
Vous trouverez les programmes et chiers nécessaires pour les produits en question dans la rubrique Download sous
www.graupner.de
Branchez le cordon adaptateur sur la prise USB Réf. 7168.6. Les prises sont équipées de
détrompeurs. Il s’agit des petites arêtes latérales. Ne les branchez en aucun cas en force, la
prise doit se connecter sans effort.
5.1. Récepteur
Récepteur GR-24PRO+3xG+3A+3M+Vario HoTT/ (Réf. 33583):
Branchez le cordon adaptateur sur la sortie Telemetrie du récepteur. Les prises sont équipées
de détrompeurs. Il s’agit des petites arêtes latérales. Ne les branchez en aucun cas en force, la
prise doit se connecter sans effort.
ais
ç
Fran
Démarrer « Slowyer/Gyro Empfänger Update »
Il est préférable d’ouvrir le programme « Slowyer/Gyro Empfänger Update » à partir du programme « Firmware_Upgrade_grStudio ». Dans le menu des fonctions de gauche, sous « Link », cliquez sur « Slowyer/Gyro Empfänger
Update ».(vous pouvez également sélectionner l’entrée « Micro Receiver Upgrade »).
Vous pouvez également lancer directement le programme correspondant. Pour cela, double-cliquez sur le chier
« micro_gyro_swloader.exe ». Vous trouverez ce chier .exe dans le répertoire « Graupner_ PC-Software » du paquet
« HoTT_Software VX ».
Dans le programme qui apparaît maintenant, enregistrez d’abord dans la fenêtre, le port COM « correct » de l’interface
USB Réf. 7168.8
Si vous avez un doute, vériez le port COM dans la fenêtre « Port wählen (choix du port) » dans le menu « ControllerMenu », voir ci-dessous, et notez le numéro du port COM pour l’enregistrement « Silicon Labs CP210x USB to UART
Bridge » – dans notre cas là, « COM03 ». (si vous avez sélectionné un mauvais Port, vous en serez avisé lors de
la consultation des données récepteur). Cliquez dessus pour charger, à partir du disque dur, le chier du Firmware
correspondant dénommé « MicroStabi7X_V_XX.bin » (« XX » désigne le numéro de la version).
75
Page 76

Après chargement du chier, cliquez sur Start ...
... branchez le récepteur et allumez-le.
Fran
ç
ais
La barre de progression indique que le chargement se fait correctement. Pendant ce temps, la LED du récepteur est
éteinte, et clignotera dès que la transmission sera terminée.
Consultez la notice détaillée des mises à jour sous http://www.graupner.de dans la rubrique Download de l’article en
question.
Page 77

Certi cat de conformité
Konformitätserklärung gemäß dem Gesetz über Funkanlagen und
Telekomunikationsendeinrichtungen (FTEG) und der Richtlinie 1999/5/EG (R&TTE)
Declaration of Conformity in accordiance with the Radio and Telecomunikations Terminal Equipment
Act (FTEG) and Directive 1999/5/EG (R&TTE)
Graupner/SJ GmbH
Henriettenstraße 96
D-73230 Kirchheim/Teck
erklärt, dass das Produkt:
declares that the product
Geräteklasse: 1
Equipment class
GR-24 PRO +3xG + 3A + 3M+Vario HoTT - No. 33583
GR-18 +3xG + 3A+Vario HoTT - No. 33579
INNOVATION & TECHNOLOGIE
ais
ç
Fran
den grundlegenden Anforderungen des § 3 und den übrigen einschlägigen Bestimmungen des
FTEG (Artikel 3 der R&TTE) entspricht.
complies with the essential requirements of § 3 and the other relevant provisions of the FTEG (Article 3 of the
R&TTE Directive).
Angewendete harmonisierte Normen:
Harmonised standards applied
EN 60950-1:2006+A11:
2009+A1:2010+A12:
2011
EN 301 489-1 V1.9.2
EN 301 489-17 V2.1.1
EN 300 328 V1.7.1
Health and safety requirements pursuant to § 3 (1) 1. (Article 3 (1) a))
Protection requirement concernig electromagnetic compatibility
§ 3 (1) 2, Artikel 3 (1) b))
Measures for the efficient use of the radio frequency spectrum
§ 3 (2) (Article 3 (2))
Gesundheit und Sicherheit gemäß § 3 (1) 1. (Artikel 3 (1)a))
Schutzanforderungen in Bezug auf elektromagnetische
Verträglichkeit § 3 (1) 2, Artikel 3 (1) b))
Maßnahmen zur effizienten Nutzung des Frequenzspektrums
§ 3 (2) (Artikel 3 (2))
Kirchheim, 17. April 2013
Graupner/ SJ GmbH Henriettenstraße 96 D-73230 Kirchheim/Teck Germany
Tel: 07021/722-0 EMail: info@graupner.deFax: 07021/722-188
Ralf Helbing, Geschäftsführer
Ralf Helbing, Managing Director
77
Page 78

Déclaration de la Société Graupner/SJ GmbH
Contenu de la déclaration fabricant
Si une pièce, que nous avons mise sur le marché allemand, devait présenter un défaut ou un vice
caché (conformément au § 13 BGB), nous, Sté Graupner/SJ GmbH, Kirchheim/Teck nous nous
engageons à la remplacer dans le cadre ci-dessous.
Le consommateur (client) ne peut faire valoir les droits de cette déclaration, si la pièce en question a
fait l’objet d’une usure normale, si elle a été utilisée dans des conditions anormales, si son utilisation
n’est pas conforme (y compris le montage) ou si elle a été sujette à des inuences extérieures.
Cette déclaration ne change en rien les droits du consommateur (client) vis à vis de son détaillant
Fran
(reven-deur).
Etendue de la garantie
ç
Dans le cas d’une prise en charge au titre de la garantie, nous nous réservons le droit, soit de
ais
remplacer la pièce en question, soit de la réparer. D’autres revendications, en particulier, les coûts
(par ex. de montage ou de démontage) liés de la pièce défectueuse et un dédommagement des
dégâts engendrés par cette pièce sont exclus du cadre légal. Les droits issus des différentes
législations, en particulier, les régles de responsabilités au niveau du produit, ne sont pas remises
en cause
Conditions de garantie
L’acheteur peut faire valoir la garantie, par écrit, sur présentation de la preuve d’achat (par ex. facture,
quittance, reçu, bon de livraison). Les frais d’envoi, à l’adresse ci-dessous, restant à sa charge.
Fa. Graupner/SJ GmbH, Serviceabteilung,
Henriettenstr.96, D 73230 Kirchheim/Teck
Par ailleurs, l’acheteur est prié de décrire le défaut ou dysfonctionnement constaté de la manière
la plus explicite et la plus concrète possible, de sorte que nous puissions vérier la possibilité de la
prise en charge au titre de la garantie.
Les marchandises voyagent toujours aux risques et périls du client, qu’il s’agisse de l’expédition du
client vers nos services ou l’inverse
Durée de la garantie
La durée de la garantie est de 24 mois, à partir de la date d’achat, et achat effectué sur le territoire
allemand. Si des dysfonctionnements ou dommages devaient être constatés au delà de cette durée,
ou si des déclarations de non-conformité devaient nous parvenir au delà de cette date, même avec
les preuves d’achat demandées, le client perd tout droit à la garantie, malgré la déclaration de
conformité ci-dessus
Prescription
Tant que nous n’avons pas reconnu le bien fondé d’une réclamation, il y a prescription au bout de 6
mois, à partir de la date de la réclamation, néanmoins, pas avant la date d’expiration de la garantie.
Droit applicable
Tous les droits et devoirs issus de la présente déclaration sont exclusivement basés sur la législation
matérielle en vigueur en Allemagne, à l’exclusion de l’application du droit privé international et des
droits des consommateurs.
Page 79

Protection de l‘environnement
Le symbole, qui gure sur le produit, dans la notice ou sur l’emballage indique que cet
article ne peut pas être jeté aux or-dures ménagères en n de vie. Il doit être remis à
une collecte pour le recyclage des appareils électriques et électroniques.
Selon leur marquage, les matériaux sont recyclables. Avec ce recyclage, sous
quelque forme que ce soit, vous participez de manière signicative, à la protection de
l’environnement.
Les piles et accus doivent être retirés des appareils, et remis à un centre de tri
approprié. Renseignez-vous auprès de votre commune pour connaître les centres de
collecte et de tri compétents.
innovation & technologie
ais
ç
Fran
79
Page 80

Wir gewähren auf dieses Erzeugnis eine / This product is / Sur ce produit nous accordons une
Garantie von
Garan-
warrantied for
tie
garantie de
Die Fa.Graupner/SJ GmbH, Henriettenstrasse 96, 73230
Kirchheim/Teck gewährt ab dem Kaufdatum auf dieses Produkt eine Garantie von 24 Monaten. Die Garantie gilt nur für
die bereits beim Kauf des Produktes vorhandenen Materialoder Funktionsmängel. Schäden, die auf Abnützung, Überlastung, falsches Zubehör oder unsachgemäße Behandlung
zurückzuführen sind, sind von der Garantie ausgeschlossen.
Die gesetzlichen Rechte und Gewährleistu sansprüche des
Verbrauchers werden durch diese Garantie nicht berührt. Bitte überprüfen Sie vor einer Reklamation oder Rücksendung
das Produkt genau auf Mängel, da wir Ihnen bei Mängelfreiheit die entstandenen Unkosten in Rechnung stellen müssen.
Graupner/SJ GmbH, Henriettenstrasse 96, 73230 Kirchheim/
Teck, Germany guarantees this product for a period of 24
months from date of purchase. The guarantee applies only to
such material or operational defects witch are present at the
time of purchase of the product. Damage due to wear, overloading, incompetent handling or the use of incorrect accessories is not covered by the guaratee. The user´s legal rights and
claims under garantee are not affected by this guarantee. Please check the product carefully for defects before you are make
a claim or send the item to us, since we are obliged to make a
charge for our cost if the product is found to be free of faults.
24
Monaten
months
mois
Servicestellen / Service / Service après-vente
Graupner/SJ-Zentralservice
Graupner/SJ GmbH
Henriettenstrasse 96
D-73230 Kirchheim / Teck
Die Adressen der Servicestellen außerhalb Deutschlands
entnehmen Sie bitte unserer Webseite www.graupner.de.
For adresses of service points outside of germany please
refer to www.graupner.de/en/.
Pour adresses des points de service situés en dehors de
l‘Allemagne s‘il vous plaît se référer à www.graupner.de/fr/.
Servicehotline
(+49) (0)7021/722-130
Montag - Donnerstag
7:30 -9:00 Uhr
9:15 -16:00 Uhr
Freitag
9:00 - 13:00 Uhr
La société Graupner/SJ GmbH, Henriettenstrasse 96, 73230
Kirchheim/Teck, Allemagne, accorde sur ce produit une garantie de 24 mois à partir de la date d´achat. La garantie prend
effet uniquement sur les vices de fonction-nement et de matériel du produit acheté. Les dommages dûs à de l´usure, à de la
surcharge, à de mauvais accessoires ou à d´une application
inadaptée, sont exclus de la garantie. Cette garantie ne remet
pas en cause les droits et prétentions légaux du consommateur. Avant toute réclamation et tout retour du produit, veuillez s.v.p. contrôler et noter exactement les défauts ou vices.
Garantie-Urkunde
Warranty certi cate / Certi cat de garantie
Übergabedatum
Date of purchase/delivery
Date de remise
Name des Käufers
Owner´s name
Nom de I`acheteur
Straße, Wohnort
Complete adress
Adresse complète
Firmenstempel und Unterschrift des Einzelhändlers
Stamp and signature of dealer
Cachet et signature du vendeur
MF80
 Loading...