

Page 1

GRAUPNER GmbH & Co. KG D-73230 KIRCHHEIM/TECK GERMANY
Keine Haftung für Druckfehler. Technische Änderungen vorbehalten! 12/2008
1
zu Best.-Nr. 9366
Anleitung
GF9 PANTHER
Mit Elektroimpellerantrieb,
für 3 LiPo-Zellen ab 1100 mAh
Page 2

GRAUPNER GmbH & Co. KG D-73230 KIRCHHEIM/TECK GERMANY
Keine Haftung für Druckfehler. Technische Änderungen vorbehalten! 12/2008
2
Technische Daten
Spannweite ca. 770 mm
Rumpflänge ca. 793 mm
Fluggewicht je nach Akku ca. 510 g
Impeller Ø 64 mm
Schwerpunkt: 30-42 mm hinter der Nasenleiste
Das Modell ist komplett vorgefertigt, alle Servos sind eingebaut. Impeller mit
Brushlessmotor- und Regler, herstellerseitig konfektioniert. Innerhalb von ein paar
Stunden ist dieses Flugmodell funktionsfähig, es sind keine Spezialwerkzeuge
erforderlich!, lediglich, die Tragflügel und das Höhenleitwerk ist zu verkleben und die
Rudergestänge einzuhängen. Zum Betrieb wird eine Fernsteuerung mit 4 Funktionen
benötigt, Empfänger und Flugakku sind im Bausatz nicht enthalten!
Das Modell erfordert sehr gute Flugkenntnisse voraus,
Nach der neuen Regelung des §103 Abs. 3 LuftVZO müssen alle Flugmodelle, egal ob
Slowflyer, Parkflyer, Segelflugzeuge, Flugmodelle mit Antrieben jeglicher Art vor
Aufnahme des Flugbetriebs versichert sein. Schließen Sie daher eine spezielle RCModell-Haftplichtversicherung ab. Fragen hierzu werden Ihnen vom Fachhandel gerne
beantwortet.
Diese Sicherheitshinweise müssen unbedingt aufbewahrt werden und müssen bei
einem Weiterverkauf des Modells an den Käufer weitergegeben werden.
Sicherheitshinweise
Vor dem Versuch der ersten Inbetriebnahme muss die gesamte Betriebs- und
Montageanleitung sorgfältig gelesen werden. Sie alleine sind verantwortlich für den
sicheren Betrieb Ihres RC-Flugmodells. Das Modell ist geeignet für Personen ab 16
Jahre, bei Personen unter 18 Jahren muss der Bau und Betrieb von einem
Erwachsenen, der mit den Gegebenheiten und möglichen Gefahren eines RCFlugmodells vertraut ist, verantwortlich überwacht werden.
Diese Bedienungsanleitung muss sorgfältig aufbewahrt und im Falle einer
Weitergabe dem nachfolgenden Benutzer unbedingt mit ausgehändigt werden.
Fragen, bezüglich der Sicherheit beim Betrieb des RC-Flugmodells, werden Ihnen
vom Fachhandel gerne beantwortet.
Achten Sie beim Kauf einer Funkfernsteuerung darauf, dass die Sende- und
Empfangsgeräte auch für Flugmodelle geeignet und bei der Deutschen
Bundespost-Telekom zugelassen sind, sowie eine FTZ-Serienprüfnummer besitzen.
In den Frequenzbereichen für Funkfernsteuerungen werden auch andere
Funkanlagen und Hochfrequenzgeräte betrieben. Deshalb kann kein Schutz vor
Störungen durch solche Geräte gewährt werden.
Der Betrieb einer Funkfernsteuerung für Flugmodelle auf den freigegebenen
Kanälen im 35 MHz-Band sind gebührenfrei.
Fernsteuer-Flugmodelle sind sehr anspruchsvolle und gefährliche Gegenstände
und erfordern vom Betreiber einen hohen Sachverstand, Können und
Verantwortungsbewusstsein.
Rechtlich gesehen, ist ein Flugmodell ein Luftfahrzeug und unterliegt
entsprechenden Gesetzen, die unbedingt eingehalten werden müssen. Die
Page 3

GRAUPNER GmbH & Co. KG D-73230 KIRCHHEIM/TECK GERMANY
Keine Haftung für Druckfehler. Technische Änderungen vorbehalten! 12/2008
3
Broschüre »Modellflugrecht, Paragrafen und mehr«, Best.-Nr. 8034.02, stellt eine
Zusammenfassung dieser Gesetze dar; sie kann auch beim Fachhandel
eingesehen werden. Ferner müssen postalische Auflagen, die die Fernlenkanlage
betreffen, beachtet werden. Entsprechende Hinweise finden Sie in der
Bedienungsanleitung Ihrer Fernsteueranlage.
Es dürfen nur die im Bausatz enthaltenen Teile, sowie die ausdrücklich von uns
empfohlenen Original-Graupner-Zubehör- und Ersatzteile verwendet werden.
Wird auch nur eine Komponente der Antriebseinheit geändert, ist ein sicherer
Betrieb nicht mehr gewährleistet und es erlischt jeglicher etwaiger
Garantieanspruch.
Verwenden Sie immer nur passende, verpolungssichere Steckverbindungen. Alle
stromführenden Leitungen, Steckverbindungen, sowie die Antriebsbatterie, bei
Selbstkonfektionierung, kurzschlusssicher isolieren. Kombinieren Sie niemals
unterschiedliche, z. B. Blech- und Goldkontakte, da hier keine sichere Funktion
gewährleistet ist.
Bei Verwendung von Schaltern bzw. Reglern mit Empfängerstromversorgung nur
Steckverbindungen mit Graupner-Gold-Kontakten verwenden.
Kurzschlüsse und Falschpolungen vermeiden.
Durch die hohe Energie der LiPo-Batterien besteht Explosions- und Brandgefahr.
Ein RC-Flugmodell kann nur funktionsfähig sein und den Erwartungen
entsprechen, wenn es im Sinne der Bauanleitung sorgfältigst gebaut wurde. Nur
ein vorsichtiger und überlegter Umgang beim Betrieb schützt vor Personen- und
Sachschäden. Niemand würde sich in ein Flugzeug setzen und - ohne
vorausgegangene Schulung - versuchen, damit zu fliegen. Auch Modellfliegen
bedarf einer fundierten Schulung.
Der Hersteller hat jedoch keine Möglichkeit, den Bau und den Betrieb eines RCFlugmodells zu beeinflussen. Deshalb wird hiermit auf die Gefahren
nachdrücklich hingewiesen und jede Haftung dafür abgelehnt.
Bitte wenden Sie sich dazu an erfahrene Modellflieger, an Vereine oder
Modellflugschulen. Ferner sei auf den Fachhandel und die einschlägige Fachpresse
verwiesen. Am besten als Club-Mitglied auf zugelassenem Modellflugplatz fliegen.
Sie alleine sind verantwortlich für den sicheren Betrieb Ihres RC-Flugmodells.
Fragen, die die Sicherheit beim Betrieb des RC-Flugmodells betreffen, werden
Ihnen vom Fachhandel gerne beantwortet.
Klebstoffe und Lacke enthalten Lösungsmittel, die unter Umständen
gesundheitsschädlich sein können. Beachten Sie daher unbedingt auch die
entsprechenden Hinweise und Warnungen der Hersteller.
Der Betreiber muss im Besitz seiner vollen körperlichen und geistigen Fähigkeiten
sein. Wie beim Autofahren, ist der Betrieb des Flugmodells unter Alkohol oder
Drogeneinwirkung nicht erlaubt.
Informieren Sie alle Passanten und Zuschauer vor der Inbetriebnahme über alle
möglichen Gefahren, die von Ihrem Modell ausgehen und ermahnen diese, sich in
ausreichendem Schutzabstand, wenigstens 5 m hinter der Luftschraubenebene,
aufzuhalten.
Stets mit dem notwendigen Sicherheitsabstand zu Personen oder Gegenständen
Page 4

GRAUPNER GmbH & Co. KG D-73230 KIRCHHEIM/TECK GERMANY
Keine Haftung für Druckfehler. Technische Änderungen vorbehalten! 12/2008
4
fliegen; nie Personen in niedriger Höhe überfliegen oder auf sie zufliegen!
Modellflug darf nur bei Außentemperaturen von - 5º C bis + 35º C betrieben werden.
Extremere Temperaturen können zu Veränderungen von z. B. Akkukapazität,
Werkstoffeigenschaften und mangelhafte Klebeverbindungen führen.
Jeder Modellflieger hat sich so zu verhalten, dass die öffentliche Sicherheit und
Ordnung, insbesondere andere Personen und Sachen, sowie die Ordnung des
Modellflugbetriebs nicht gefährdet oder gestört wird.
Das Flugmodell niemals in der Nähe von Hochspannungsleitungen,
Industriegelände, in Wohngebieten, öffentlichen Straßen, Plätzen, Schulhöfen,
Parks und Spielplätzen usw. fliegen lassen.
Warnungen müssen unbedingt beachtet werden. Sie beziehen sich auf Dinge und
Vorgänge, die bei einer Nichtbeachtung zu schweren - in Extremfällen tödlichen
Verletzungen oder bleibenden Schäden führen können.
Luftschrauben und generell alle sich drehenden Teile, die durch einen Motor
angetrieben werden, stellen eine ständige Verletzungsgefahr dar. Sie dürfen mit
keinem Körperteil berührt werden! Eine schnell drehende Luftschraube kann z. B.
einen Finger abschlagen!
Sich niemals in oder vor der Drehebene von Luftschrauben aufhalten! Es könnte
sich doch einmal ein Teil davon lösen und mit hoher Geschwindigkeit und viel
Energie wegfliegen und Sie oder Dritte treffen. Darauf achten, dass kein sonstiger
Gegenstand mit einer laufenden Luftschraube in Berührung kommt!
Die Blockierung der Luftschraube, durch irgendwelche Teile, muss ausgeschlossen
sein.
Vorsicht bei losen Kleidungsstücken wie Schals, weiten Hemden usw.: sie werden
vom Propellerstrahl angesaugt und können in den Luftschraubenkreis gelangen.
Überprüfen Sie vor jeder Inbetriebnahme das Modell und alle an ihm gekoppelten
Teile (z. B. Luftschrauben, Getriebe, RC-Teile usw.) auf festen Sitz und mögliche
Beschädigungen. Das Modell darf erst nach Beseitigung aller Mängel in Betrieb
genommen werden.
Auf gute Standfestigkeit achten, wenn Sie das Modell in der Hand halten.
Passendes Schuhwerk, z. B. Sportschuhe, tragen.
Vergewissern Sie sich, dass die verwendete Frequenz frei ist. Erst dann
einschalten! Funkstörungen, verursacht durch Unbekannte, können stets ohne
Vorwarnung auftreten! Das Modell ist dann steuerlos und unberechenbar!
Fernlenkanlage nicht unbeaufsichtigt lassen, um ein Betätigen durch Dritte zu
verhindern.
Elektromotor nur einschalten, wenn nichts im Drehbereich der Luftschraube ist.
Nicht versuchen, die laufende Luftschraube anzuhalten. Elektromotor mit
Luftschraube nur im fest eingebauten Zustand laufen lassen.
Page 5

GRAUPNER GmbH & Co. KG D-73230 KIRCHHEIM/TECK GERMANY
Keine Haftung für Druckfehler. Technische Änderungen vorbehalten! 12/2008
5
Die Fluglage des Modells muss während des gesamten Fluges immer eindeutig
erkennbar sein, um immer ein sicheres Steuern und Ausweichen zu gewährleisten.
Machen sich während des Fluges Funktionsbeeinträchtigungen /Störungen
bemerkbar, muss aus Sicherheitsgründen sofort die Landung eingeleitet werden.
Sie haben anderen Luftfahrzeugen stets auszuweichen. Start- und Landeflächen
müssen frei von Personen und sonstigen Hindernissen sein.
Immer auf vollgeladene Akkus achten, da sonst keine einwandfreie Funktion der
RC-Anlage gewährleistet ist.
Niemals heiß gewordene, defekte oder beschädigte Batterien verwenden. Es sind
stets die Gebrauchsvorschriften des Batterieherstellers zu beachten.
Vor jedem Flug eine Überprüfung der kompletten RC-Anlage, sowie des
Flugmodells auf volle Funktionstüchtigkeit und Reichweite durchführen.
Dabei ist zu beachten, dass bei der Inbetriebnahme die Motorsteuerfunktion am
Sender immer zuerst in AUS-Stellung gebracht wird. Danach Sender und dann erst
Empfangsanlage einschalten, um ein unkontrolliertes Anlaufen des Elektromotors
zu vermeiden. Gleichfalls gilt immer zuerst Empfangsanlage ausschalten, danach
erst den Sender.
Überprüfen Sie, dass die Ruder sich entsprechend der Steuerknüppel-Betätigung
bewegen.
Für den Betrieb des Modells wird eine gültige Haftpflichtversicherung benötigt.
Mit diesen Hinweisen soll auf die vielfältigen Gefahren hingewiesen werden, die
durch unsachgemäße und verantwortungslose Handhabung entstehen können.
Richtig und gewissenhaft betrieben ist Modellflug eine kreative, lehrreiche und
erholsame Freizeitgestaltung.
Empfohlenes Zubehör
Fernsteuerung
Ab MX – 12S, 35- MHz- Band, Best.-Nr. 4745 oder
IFS MX -.16 Best.-Nr. 23000
Empfänger
SMC-14, Best.-Nr. 7033
Es ist empfehlenswert, in jedem Fall einen SPCM-Empfänger zu verwenden! Oder
XR – 16 IFS Best.-Nr. 23601
Antriebsbatterie
LiPo-Akku V-MAXX 35C 3/1100 11,1 V/1,1 Ah G3,5
Best.-Nr. 7628.3 oder
LiPo–Akku V-MAXX 35C 3/1700 11,1 V/1,7 Ah G3,5
Best.-Nr. 7636.3
Erforderliches Material und Werkzeug
Klebstoff
Devcon- 5 Minuten-Epoxykleber, Best.-Nr. 961.7
oder vergleichbare Epoxydharz-Schnellklebstoffe
Henkel Panal express Best.-Nr. 969
Beachten Sie die Verarbeitungshinweise der Klebstoffe! Achten Sie auf besondere Hinweise in der Montageanleitung über den Einsatz
bestimmter Klebstoffe! Bei Verwendung von Spiritus und anderen Lösungsmitteln als Reinigungsmittel, sind besondere
Vorsichtsmaßnahmen nötig. Richten Sie sich nach den jeweiligen Verarbeitungsrichtlinien.
Page 6
GRAUPNER GmbH & Co. KG D-73230 KIRCHHEIM/TECK GERMANY
Keine Haftung für Druckfehler. Technische Änderungen vorbehalten! 12/2008
6
Messer Best.-Nr.14.2
Schraubendreher, Kreuzschlitz, Langschlitz
Telefonzange, Seitenschneider Feile
Bauanleitung
Vor dem Zusammenkleben der Teile die Servos auf Funktion überprüfen mit Servotester
oder Fernsteuerung.
Ruderhorn mit den beiliegenden Schrauben an Querruder mit Gegenplatte
anschrauben.
Querruderservo auf Neutralstellung bringen, Servohebelbohrung mit entsprechendem
Bohrer für Gestänge aufbohren, Gestänge einhängen, einstellen und einhängen.
Tipp Tanks an Tragflügel ankleben
Page 7

GRAUPNER GmbH & Co. KG D-73230 KIRCHHEIM/TECK GERMANY
Keine Haftung für Druckfehler. Technische Änderungen vorbehalten! 12/2008
7
Tragflügel ohne Klebstoff an Rumpf anstecken, evtl. Nacharbeit an Steckung, damit
der Tragflügel in die Führung eingeklebt werden kann.
Revisionsöffnung am Rumpfboden entfernen.
An Tragflügel und Rumpf an entsprechenden Stellen Klebstoff auftragen, die Teile
zusammenkleben und fixieren bis Klebstoff trocken ist (darauf achten, dass kein
Klebstoff im Bereich der Revisionsöffnung ist).
An den Fugen zwischen Rumpf und Tragflügel mit Weißleim (PVAc-Leim) auffüllen für
stabilere Verklebung.
Page 8
GRAUPNER GmbH & Co. KG D-73230 KIRCHHEIM/TECK GERMANY
Keine Haftung für Druckfehler. Technische Änderungen vorbehalten! 12/2008
8
Revisionsöffnung mit den 2 dazugehörigen Schrauben befestigen.
Querruder-Servostecker mit Verlängerungskabel verbinden und in den Kabelkanal
einklemmen
Hauptfahrwerk in Aufnahme stecken, mit Laschen und Schrauben befestigen.
Bugfahrwerk in Alubuchse schieben und mit Gewindestift befestigen.
Ruderhorn an Höhenruder mit Gegenplatte anschrauben, überstehende Schrauben
abzwicken und bündig feilen (Ruderhorn wird links angelenkt).
Page 9

GRAUPNER GmbH & Co. KG D-73230 KIRCHHEIM/TECK GERMANY
Keine Haftung für Druckfehler. Technische Änderungen vorbehalten! 12/2008
9
Höhenleitwerk in Seitenleitwerk rechtwinklig einkleben.
Höhenruderservo auf Neutralstellung bringen, Ruderhornbohrung mit entsprechendem
Bohrer für Gestänge aufbohren. Gestänge einhängen, Länge einstellen und einhängen.
Höhenruder-Servostecker mit Verlängerungskabel verbinden und Höhenleitwerk mit
Rumpf verkleben.
Page 10

GRAUPNER GmbH & Co. KG D-73230 KIRCHHEIM/TECK GERMANY
Keine Haftung für Druckfehler. Technische Änderungen vorbehalten! 12/2008
10
An den Fugen zwischen Rumpf und Seitenleitwerk mit Weißleim (PVAc-Leim) auffüllen
für stabilere Verklebung.
Für den Cockpitausbau kann die Pilotenbüste Best.-Nr. 916.3 (im Baukasten nicht
enthalten) nach entsprechender Bearbeitung eingeklebt werden.
Kabinenhaube aufkleben.
In eine Sprühflasche Wasser füllen, einen Spritzer Spülmittel dazugeben, das
Schiebebild von hinten damit besprühen, etwas warten, weichen lassen, wenn es sich
schieben lässt, auf die entsprechende Stelle aufschieben und restliches Wasser mit
Haushaltstuch abtupfen.
Page 11

GRAUPNER GmbH & Co. KG D-73230 KIRCHHEIM/TECK GERMANY
Keine Haftung für Druckfehler. Technische Änderungen vorbehalten! 12/2008
11
Servokabel entsprechend in Empfänger einstecken, Empfänger in Aussparung stecken
und Antennenkabel entsprechend am Rumpf entlang verlegen. Es ist empfehlenswert,
einen SPCM-Empfänger zu verwenden! Antriebsakku wird in Akkuschacht unter Zugabe
von Dämmstoff eingesteckt.
Ruderausschläge:
Querruderausschlag ± 10 mm 25% Expo
Höhenruderausschlag ± 7 mm 20% Expo
Bugrad voll 30% Expo
Schwerpunkt : 30-42 mm hinter der Nasenleiste
Erstflug:
- Nachdem Sie das Modell nach Anleitung zusammengebaut, die Fernsteuerung,
nach Angabe programmiert , alle Akkus geladen haben, steht dem Erstflug nichts
im Weg.
- Es ist auch empfehlenswert, einen Reichweitentest mit laufendem Motor
durchzuführen!
- Empfehlenswert: den Schwerpunkt im Mittelbereich zu wählen!
- Gute Flugerfahrung ist zum Betrieb des Modells Voraussetzung!
- Der Bau des Modells ist sehr einfach, das Fliegen anspruchsvoller.
Page 12

GRAUPNER GmbH & Co. KG D-73230 KIRCHHEIM/TECK GERMANY
Keine Haftung für Druckfehler. Technische Änderungen vorbehalten! 12/2008
12
Die Panther wird bei uns mit den dafür vorgesehenen Komponenten geflogen ohne
Einschränkungen und ohne technische Probleme.
Verbrauchte Batterien, Akkus, Servos und Regler dürfen nicht in den Hausmüll
gelangen. Geben Sie defekte Batterien und Akkus im Fachhandel oder bei
Sondermüllsammelstellen ab.
Nun bleibt nur noch viel Spaß und Freude beim Fliegen mit Ihrem Panther zu
wünschen.
Ihr
Team !
Page 13

GRAUPNER GmbH & Co. KG D-73230 KIRCHHEIM/TECK GERMANY
Keine Haftung für Druckfehler. Technische Änderungen vorbehalten! 12/2008
13
Graupner CE
Order No. 9366
Instructions
GF9 PANTHER
With electric ducted fan power unit,
for three 1100 mAh or larger LiPo cells
Specification
Wingspan approx. 770 mm
Fuselage length approx. 793 mm
All-up weight according to battery approx. 510 g
Impeller diameter 64 mm
Centre of Gravity 30 - 42 mm
The model is supplied completely pre-fabricated, with all servos fitted, the ducted fan
unit with brushless motor and controller installed and ready for use. The aeroplane can
be ready for the air within just a few hours, and no special tools are required to complete
it. The only construction you have to do is to glue the wings and tailplane to the
fuselage, and connect the control surface linkages. The model requires a four-function
radio control system; please note that the receiver and flight battery are not included in
the kit.
The GF-16 is suitable for model pilots with very good flying skills.
According to the new regulation of §103 Paragraph 3 of the LuftVZO (German Aviation
Approvals Office), all model aircraft - whether slow-flyer, park-flyer, glider, or model
aircraft propelled by any form of power plant - must be insured before the model is
operated. If you are not sure about this, please ask at your local model shop where the
staff will be glad to advise you.
These safety notes must be kept in a safe place. If you ever dispose of the model, be
sure to pass them on to the new owner.
Safety Notes
Before you start assembly, please read right through these assembly and
operating instructions You alone are responsible for the safe operation of your
radio-controlled model. The model is suitable for persons of sixteen years and
over. Young persons under eighteen years should only be permitted to build and
operate this model under the instruction and supervision of an adult who is aware
of the hazards involved in this activity.
Please keep these operating instructions in a safe place. If you ever dispose of the
model, be sure to pass them on to the new owner. If you have any questions
regarding the safe operation of your RC model aeroplane, please turn to your
local model shop in the first instance, as the staff will be pleased to help you.
Page 14

GRAUPNER GmbH & Co. KG D-73230 KIRCHHEIM/TECK GERMANY
Keine Haftung für Druckfehler. Technische Änderungen vorbehalten! 12/2008
14
If you are buying a radio control system for your new model, ensure that the
transmitter and receiving system are expressly stated to be suitable for use in
model aircraft, and bear the appropriate approval stickers.
The frequency bands used for the radio control of models are also employed by
other radio transmitting and RF equipment. For this reason it is not possible to be
completely sure that no interference will occur when you are flying your model.
You may need to pay a licence fee for using approved RC equipment to control a
model aircraft on the appropriate channels in the 35 MHz band; this depends on
the country in which you wish to fly the model.
Radio-controlled model aircraft are extremely demanding and potentially
dangerous objects, and require a high level of expertise, skill and responsibility
from the operator.
In legal terms our models are classed as aircraft, and as such are subject to legal
regulations and restrictions which must be observed at all times. Our brochure
“Modellflugrecht, Paragrafen und mehr” (Model Aviation Law, Legal Requirements
and more) is available under Order No. 8034.02, and contains a summary of all
these rules. Your local model shop should have a copy which you can read. There
are also Post Office regulations concerning your radio control system, and these
must be observed. Refer to your RC system instructions for more details.
Be sure to use only those parts included in the kit, together with other genuine
Graupner accessories and replacement parts as recommended expressly by us.
Even if you change a single component you can no longer be sure that the system
will work reliably, and such changes also invalidate your guarantee.
Be sure to use matching polarised electrical connectors. All high-current cables,
connectors and the drive battery terminals must be insulated to prevent shortcircuits, especially if you attach the connectors yourself. Never combine different
types of connector, e.g. tin-plated and gold-plated contacts, as they cannot be
expected to work reliably in the long-term.
If you are using a BEC speed controller or switch (integral receiver power supply),
it must be fitted with Graupner gold-contact connectors.
Avoid short-circuits and reversed polarity.
The high energy density of Li-Po batteries involves a risk of fire and even
explosion.
A radio-controlled model aircraft can only work properly and fulfil your
expectations if it is built very carefully and in accordance with the building
instructions. If you wish to avoid injuring people and damaging property it is
essential to be careful and painstaking at all stages of building and operating your
model. Nobody would consider climbing into a light aircraft and - without training
- try to fly it. Model flying is just such a skill, and needs to be learned properly.
As manufacturers we are not in a position to influence the way you build and
operate your RC model aircraft, and for this reason we deny all liability. All we can
do is expressly point out the hazards involved in this activity.
We suggest that you ask an experienced model flyer for help, or join a model club
or flight training school. Your local model shop and the specialist magazines are
excellent sources of information. If at all possible, it is always best to join a club
Page 15

GRAUPNER GmbH & Co. KG D-73230 KIRCHHEIM/TECK GERMANY
Keine Haftung für Druckfehler. Technische Änderungen vorbehalten! 12/2008
15
and fly at the approved model flying site.
You alone are responsible for the safe operation of your radio-controlled model.
If you have any questions regarding the safe operation of your RC model
aeroplane, please turn to your local model shop in the first instance, as the staff
will be pleased to help you.
Adhesives and paints contain solvents which may be hazardous to health under
certain circumstances. Read and observe the notes and warnings supplied by the
manufacturer of these materials.
The operator of the model must be in full possession of his or her bodily and
mental faculties. As with car driving, operating a model aircraft under the
influence of alcohol or drugs is not permissible under any circumstances.
If there are passers-by or spectators at your flying site, make sure that they are
aware of the dangers inherent in your activity before you start the motor, and
insist that they keep a safe distance away (at least 5 m behind the rotational plane
of the propeller).
Always keep a safe distance away from people and objects when flying; never fly
low over people’s heads, and never fly directly towards them.
Radio-controlled models should only be flown in “normal” weather conditions, i.e.
a temperature range of -5° to +35° C. More extreme temperatures can lead to
changes in battery capacity and material characteristics, weakened glued joints
and other unwanted effects.
All model flyers should behave in a way that minimises the danger to people and
property. Never act in any manner which will disturb other flyers and jeopardise
safe, orderly flying at the site.
Never operate your model aircraft close to high-tension overhead cables,
industrial sites, residential areas, public roads, squares, school playgrounds,
public parks or sports grounds etc.
Don’t ignore our warnings. They refer to materials and situations which, if
ignored, can result in fatal injury or permanent damage.
Propellers and other rotating parts which are powered by a motor constitute a
permanent hazard and represent a real risk of injury. Don’t touch them with any
part of your body. For example, a propeller spinning at high speed can easily cut
your finger badly.
Keep well clear of the rotational plane of the impeller. You never know when some
part may come loose and fly off at high speed, hitting you or anybody else in the
vicinity. Never touch the revolving propeller with any object.
Ensure that it is impossible for any object to stall or block the propeller.
Take care with loose clothing such as scarves, loose shirts etc. Flapping cloth
can easily be sucked into the area of the propeller and then get tangled in the
Page 16

GRAUPNER GmbH & Co. KG D-73230 KIRCHHEIM/TECK GERMANY
Keine Haftung für Druckfehler. Technische Änderungen vorbehalten! 12/2008
16
blades; this is extremely dangerous.
Every time you intend to operate your model check carefully that it and everything
attached to it (e.g. propeller, gearbox, RC components etc.) is in good condition
and undamaged. If you find a fault, do not fly the model until you have corrected
it.
Whenever you are holding the model make sure that you are standing on a stable
surface and cannot slip. Wear shoes with high-grip soles, such as trainers.
Satisfy yourself that your frequency is vacant before you switch on. Radio
interference caused by unknown sources can occur at any time without warning.
If this should happen, your model will be uncontrollable and completely
unpredictable. Never leave your radio control system unguarded, as another
person might pick it up and try to use it.
Do not switch on the electric motor unless you are sure that there is nothing in
the rotational plane of the propeller. Never attempt to stop the spinning propeller.
Electric motors with the propeller attached should only be run when firmly
mounted.
If you are to fly your model safely and avoid problems, it is essential that you are
aware of its position and attitude throughout each flight - so don’t let it fly too far
away! If you detect a control problem or interference during a flight, immediately
land the model to prevent a potential accident. Models must always give way to
full-size aircraft. Take-off and landing strips should be kept free of people and
other obstacles.
Your RC system can only work reliably if the batteries are kept fully charged.
Never use batteries which are hot, faulty or damaged. At all times heed the
instructions provided by the battery manufacturer.
Before each flight check that all functions on the model aircraft are working
correctly, and that the radio control system is in good order and operating at full
range.
Note that the motor control (throttle) function on the transmitter must always be
moved to the OFF position as the first stage in preparing for a flight. To avoid the
danger of the electric motor bursting into life unexpectedly, always switch on the
transmitter first, and only then the receiving system. The opposite applies at the
end of a flight: always switch off the receiving system first, and finally the
transmitter.
Check that the control surfaces follow the movement of the transmitter sticks.
It is essential to take out valid third-party insurance before you fly this model.
Please don’t misunderstand the purpose of these notes. We only want to make
you aware of the many dangers and hazards which can arise if you work
carelessly or irresponsibly. If you take reasonable care, model flying is a highly
creative, instructive, enjoyable and relaxing pastime.
Recommended accessories
Page 17

GRAUPNER GmbH & Co. KG D-73230 KIRCHHEIM/TECK GERMANY
Keine Haftung für Druckfehler. Technische Änderungen vorbehalten! 12/2008
17
Radio control system
Min. MX-12S, 35 MHz band, Order No. 4745, or
MX-16 iFS, Order No. 23000
Receiver
SMC-14, Order No. 7033
We strongly recommend that you use a PCM receiver in this aircraft.
With an iFS transmitter use the XR-16 iFS, Order No. 23601.
Flight battery
LiPo V-MAXX 35C 3/1100 11.1 V / 1.1 Ah G3.5,
Order No. 7628.3, or
LiPo V-MAXX 35C 3/1700 11.1 V / 1.7 Ah G3.5,
Order No. 7636.3
Essential materials and tools
Adhesives
Devcon 5-minute epoxy Order No. 961.7
Alternatively any comparable epoxy resin glue can be used.
Henkel Ponal express Order No. 969
Read and observe the instructions supplied with all adhesives! The building instructions inform
you when to use particular glues. If you wish to use white spirit or other solvent as a cleaning
agent, note that special safety measures are required. Read the instructions supplied with these
materials.
Knife Order No. 14.2
Slot-head / cross-point screwdrivers, fine-nose pliers, side-cutters, file
Building instructions
Before you start gluing parts together, use a servo tester or the radio control system to
check that the servos are working properly.
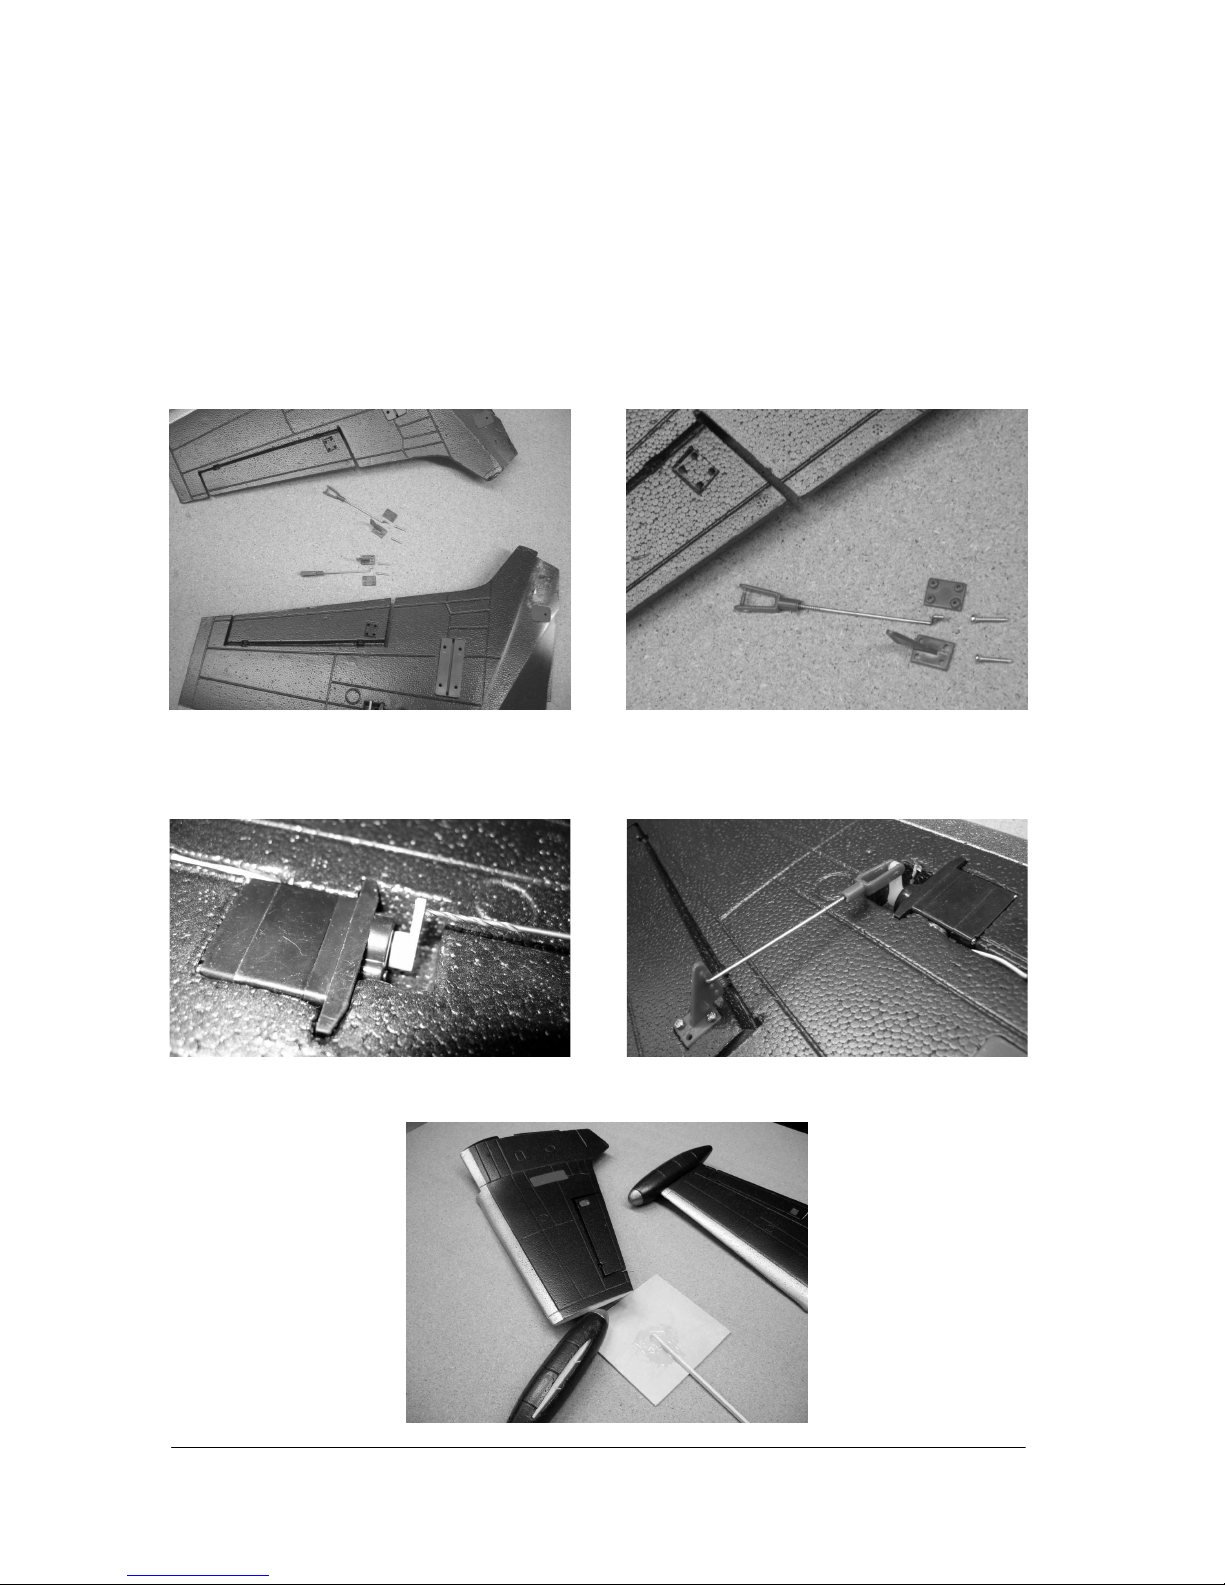
Attach the horns to the ailerons using the retaining screws and spreader plates provided.
Set the aileron servo to neutral from the transmitter. Open up the hole in the servo
output arm to the appropriate diameter for the pushrod. Connect the pushrod at one end,
adjust its length and connect the other end.
Glue the tiptanks to the wings.
Offer up the wings to the fuselage dry (without glue) and check that they fit snugly.
Carry out any minor trimming required, so that the wings can be glued fully in their
recesses.
Remove the access hatch from the underside of the fuselage.
Apply glue to the joint surfaces of the wings and fuselage, press the parts together and
pin or tape them to prevent them shifting while the glue is hardening. Take care that no
glue gets into the area of the access hatch.
Page 18

GRAUPNER GmbH & Co. KG D-73230 KIRCHHEIM/TECK GERMANY
Keine Haftung für Druckfehler. Technische Änderungen vorbehalten! 12/2008
18
When the glue has set hard, apply white glue (PVA wood adhesive) to any gaps
between the fuselage and wing panels for increased strength.
Fix the access hatch in place using the two screws supplied.
Connect the aileron servo to the extension lead, and press the lead into the cable
channel.
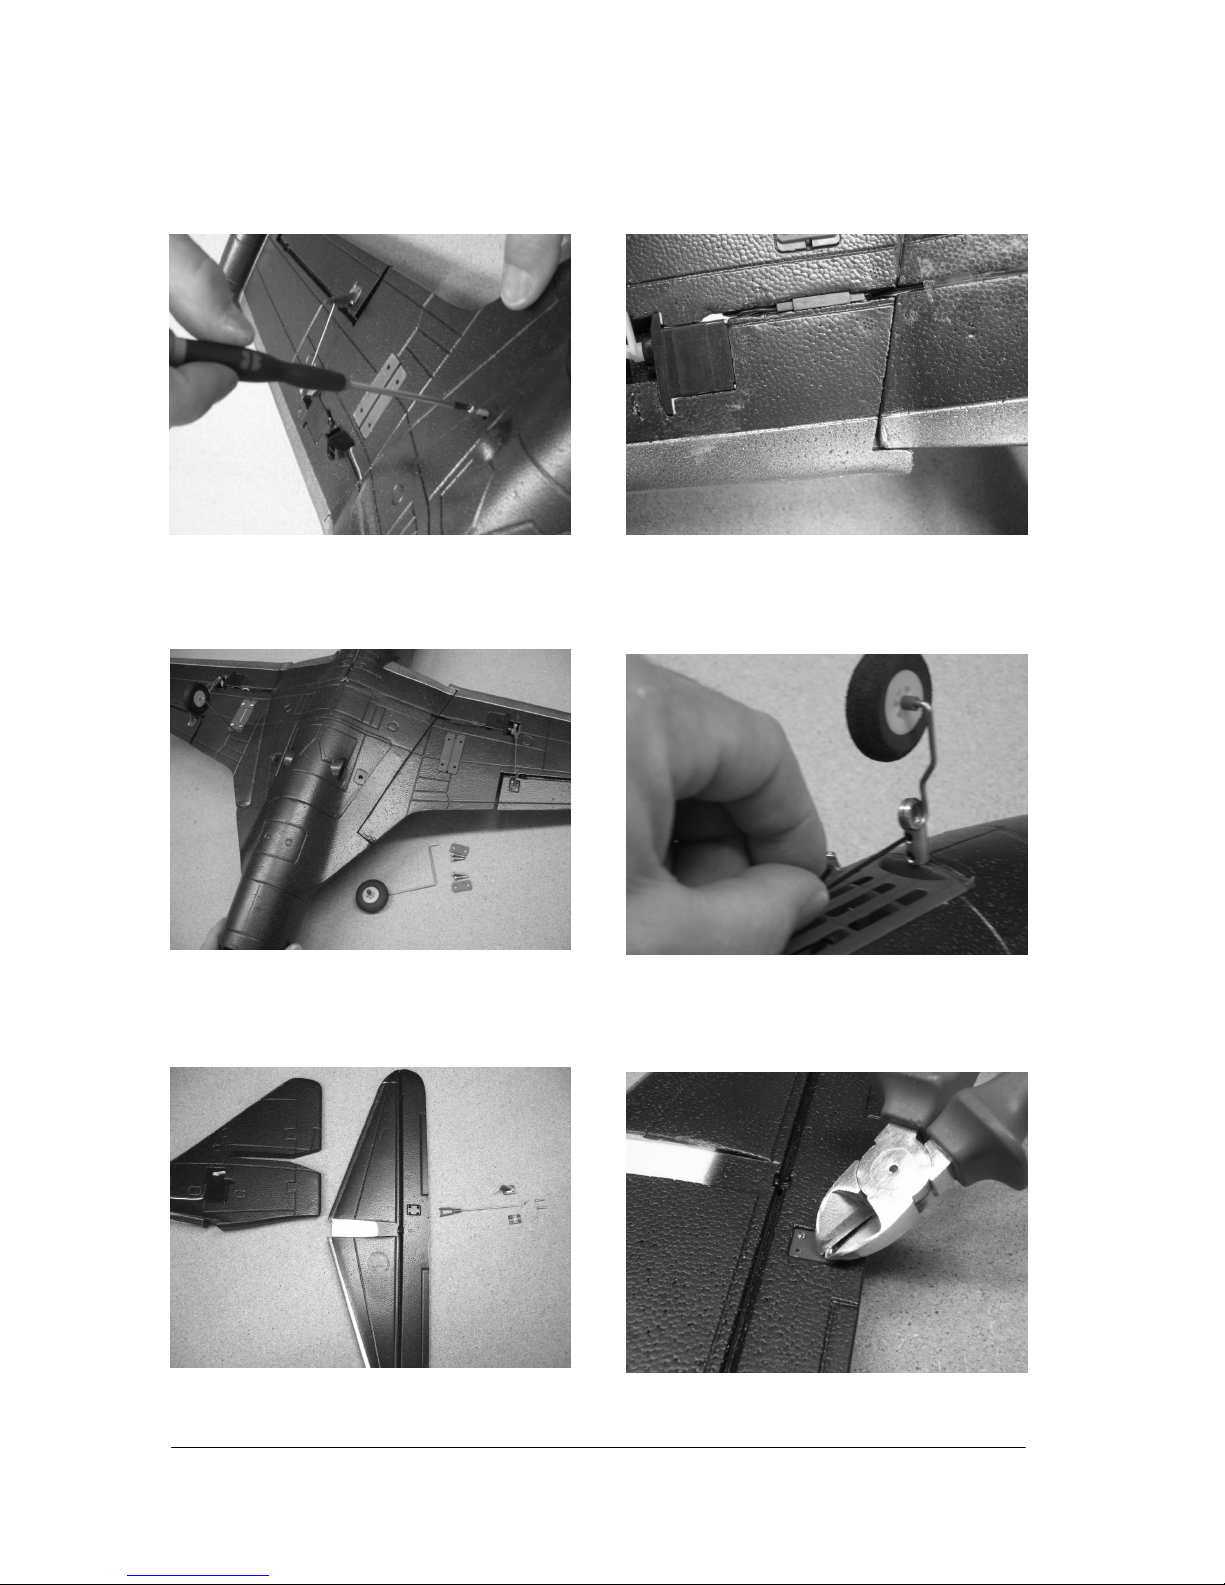
Place the main undercarriage units in the supports and secure them using the saddle
clamps and screws supplied.
Slide the noseleg into the aluminium sleeve, and tighten the grubscrew to secure it.
Fix the horn to the elevator using the retaining screws and spreader plate; snip off
excess screw length and file the ends flush with the plate. Note that the horn is actuated
from the left-hand side.
Glue the tailplane to the fin, taking care to keep the panels exactly at right-angles.
Set the elevator servo to neutral. Open up the hole in the servo output arm to the
appropriate diameter for the pushrod. Connect the pushrod at one end, adjust its length
and connect the other end.
Connect the elevator servo to the extension lead before gluing the tailplane to the
fuselage.
Apply white glue (PVA wood glue) to any gaps between the fuselage and fin for
increased strength.
If you wish, the cockpit can be fitted out with a dummy pilot, Order No. 916.3 (not
included in the kit), after trimming it to the size required.
Glue the canopy in place.
Fill a spray bottle with water and mix in a squirt of liquid detergent. Spray a little of this
mixture on the rear of the transfer and wait a while for the paper to soak up the moisture.
When the transfer can be shifted on the backing paper, slide it carefully onto the model
in the appropriate position and gently dab any remaining water from the surface using a
piece of paper towel.
Connect the servo leads to the receiver output sockets in the appropriate sequence (see
RC system instructions), fit the receiver in its compartment, and deploy the aerial lead
along the fuselage. We recommend using an SPCM receiver in this model. The flight
battery should be fitted in the battery compartment and secured with blocks of foam.
Control surface travels:
Aileron travel +/- 10 mm 25% Expo
Elevator travel +/- 7 mm 20% Expo
Nosewheel full travel 30% Expo
Centre of Gravity: 30 - 42 mm aft of wing root leading edge
First flight:
- Assemble the model as described in these instructions, program the radio control
Page 19

GRAUPNER GmbH & Co. KG D-73230 KIRCHHEIM/TECK GERMANY
Keine Haftung für Druckfehler. Technische Änderungen vorbehalten! 12/2008
19
system as explained above, and charge all the batteries fully. There is now no excuse
for not flying the model!
- We recommend that you carry out a range check with the motor running before you fly
your new aeroplane.
- It is advisable to balance the model in the middle of the stated range initially.
- Do not attempt to fly this model unless you are a pilot with considerable flying
skill and experience.
- Although the aeroplane is extremely simple to build, it is demanding to fly.
We have flown the Panther in all conditions equipped with the recommended
components, and have encountered no technical problems.
Do not dispose of exhausted batteries, old servos and speed controllers in the
household waste. Take old rechargeable and dry batteries back to your model shop, or
to your local battery reclamation centre.
All of us in the Graupner Team hope you thoroughly enjoy building and flying your
Panther.
Yours - the Graupner team
Page 20

GRAUPNER GmbH & Co. KG D-73230 KIRCHHEIM/TECK GERMANY
Keine Haftung für Druckfehler. Technische Änderungen vorbehalten! 12/2008
20
Réf. N° 9366
GF9 PANTHER
Instructions de montage
Avec propulsion par turbine électrique
alimentée par 3 éléments LiPo à partir de 1100 mAh
Caractéristiques techniques
Envergure, env. 770mm
Longueur du fuselage, env. 793mm
Poids en ordre de vol, selon l’accu 510 g.
Centre de gravité: 30-42 mm derrière le bord d’attaque de l’aile.
Ce modèle est entièrement préfabriqué, tous les servos sont montés, la turbine avec le
moteur brushless et le régulateur sont installés en fabrication. Cet appareil en mis en
ordre de vol dans l’espace de deux heures et aucun outillage spécial n’est nécessaire ; il
reste simplement à coller l’aile et le stabilisateur, puis à connecter les transmissions de
gouverne. Un ensemble R/C à 4 voies est nécessaire pour son équipement, le récepteur
et l’accu de propulsion ne sont pas fournis dans le kit de montage !
Ce modèle exige une très bonne expérience du pilotage.
L’utilisation de tous les modèles volants, qu’il s’agisse de Slowflyer, Parkflyer, planeurs,
avions avec des propulsions de tous genres exige la possession d’une assurance.
Contractez une assurance spéciale pour l’utilisation des modèles réduits
radiocommandés. Adressez vous pour cela à votre revendeur qui vous renseignera
volontiers.
Ces conseils de sécurité devront être soigneusement conservés et remis à l’acheteur en
cas de vente du modèle.
Conseils de sécurité
Avant de tenter la première mise en service, les instructions de montage et
d’utilisation devront être attentivement lus. Vous être seul responsable de la
sécurité d’utilisation de votre modèle R/C. Les jeunes gens en dessous de 18 ans
devront effectuer les assemblages et utiliser le modèle sous la surveillance d’un
adulte familiarisé avec les particularités et les dangers possibles que peut
présenter un modèle R/C.
Les modèles d'avions R/C sont des appareils pouvant être dangereux et qui
exigent de leur utilisateur une grande compétence et la conscience de sa
responsabilité.
Page 21

GRAUPNER GmbH & Co. KG D-73230 KIRCHHEIM/TECK GERMANY
Keine Haftung für Druckfehler. Technische Änderungen vorbehalten! 12/2008
21
Parmi les bandes de fréquences disponibles avec les ensembles R/C Graupner/JR
conseillés, seule la bande des 41 MHz est autorisée en France.
Il conviendra d'utiliser exclusivement les éléments fournis dans la boite de
construction ainsi que les accessoires d'origine Graupner et les pièces détachées
conseillées. Si un seul composant de la propulsion est remplacé, une parfaite
sécurité de fonctionnement de peut plus être assurée et peut entraîner la perte du
bénéfice de la garantie.
Utilisez toujours des connecteurs adaptés entre eux avec sécurité contre les
inversions de polarité. Tous les conducteurs de courant, les connexions ainsi
que les batteries de confection personnelle devront être isolés contre les courts
circuits.
Ne combinez jamais des connecteurs différents, par ex. des contacts en tôle avec
des contacts dorés, car ici aucune sécurité de fonction ne pourra être garantie.
Avec l’utilisation des commutateurs et des régulateurs assurant l’alimentation de
la réception, utilisez uniquement des connecteurs Graupner à contacts dorés.
Evitez les courts circuits et les inversions de polarité.
Par la forte énergie emmagasinée par les batteries LiPo, il existe un danger
d’explosion et d’incendie.
Un modèle volant R/C ne peut évoluer correctement que s'il a été construit et
réglé conformément aux instructions de montage et seule une utilisation prudente
et responsable évitera de provoquer des dommages matériels ou corporels. Le
pilotage sûr d’un modèle réduit n’est possible qu’après un entraînement ou un
écolage appropriés.
Le fabricant n'a cependant aucune possibilité d'influencer la construction et
l'utilisation d'un modèle de sa production. C'est pourquoi nous attirons ici
l'attention sur les dangers représentés en dégageant toute responsabilité.
Faites-vous assister par un modéliste expérimenté, ou inscrivez-vous dans une
association ou dans une école de pilotage. Consultez en outre votre revendeur et
la Presse spécialisée. Le mieux est de faire partie d'un club d'aéromodélisme pour
pouvoir voler sur un terrain autorisé.
Les colles et les peintures contiennent des solvants qui dans certaines conditions
peuvent être nocifs pour la santé. Pour cette raison, observez impérativement le
mode d'emploi et les avertissements indiqués par le fabricant correspondant.
L'utilisateur doit être en pleine possession de ses facultés physiques et mentales.
Comme pour la conduite des automobiles, le pilotage des modèles volants sous
l'effet de l'alcool ou de la drogue n'est pas autorisé.
Avant de faire voler votre modèle, informez tous les passants et les spectateurs
sur les dangers qu'il peut présenter et demandez-leur de se tenir à une distance
de sécurité d’au moins 5 m derrière le champ de rotation de l’hélice.
Tenez-vous à une distance de sécurité suffisante de personnes ou d'objets; ne
survolez jamais de personnes à basse altitude et ne volez jamais dans leur
direction.
Page 22

GRAUPNER GmbH & Co. KG D-73230 KIRCHHEIM/TECK GERMANY
Keine Haftung für Druckfehler. Technische Änderungen vorbehalten! 12/2008
22
Un modèle volant R/C ne doit voler que par des températures extérieures
comprises entre – 5° à + 35°C. Des températures extrêmes peuvent conduire par
ex. à une modification de la capacité des accus, des propriétés des matériaux et
de la résistance des collages.
Chaque modéliste doit se comporter de façon à ce que l'ordre et la sécurité
publique, vis-à-vis des autres personnes et des biens, ainsi que l'activité des
autres modélistes ne soient pas mis en danger, ni perturbés.
Ne faites jamais voler votre modèle à proximité des lignes à haute tension, dans
les zones industrielles, les agglomérations, sur les voies publiques, les places,
dans les cours d'école, les parcs et les aires de jeux, etc…
Les avertissements donnés devront être impérativement respectés. Leur non
observation peut conduire à de sérieux dommages et dans les cas extrêmes à des
blessures graves.
Les hélices et en général toutes les pièces mécaniques entraînées par un moteur
présentent un danger de blessures permanent et ne doivent être touchées par
aucune partie du corps! Une hélice tournant à haut régime peut par ex. couper un
doigt!
Ne vous tenez jamais dans le champ de rotation d'une hélice! Une pièce peut se
détacher et être éjectée à haute vitesse avec une forte inertie et vous toucher, ou
une tierce personne. Veillez également à ce qu'aucun objet quelconque vienne en
contact avec l'hélice en rotation.
Le blocage de l’hélice par un objet quelconque doit absolument être exclu.
Veillez également aux vêtements flottants tels qu'écharpe ou cravate, etc…qui
peuvent être aspirés et s'enrouler sur l'hélice.
Avant chaque utilisation, vérifiez le modèle et toutes les pièces qui y sont
rattachées (par ex. hélice, réducteur, éléments R/C, etc…) pour détecter une
possible détérioration. Ce n'est qu'après avoir remédié à tous les défauts
éventuels que le modèle pourra être mis en vol.
Assurez-vous que la fréquence que vous utilisez est libre avant de mettre votre
émetteur en contact! Une perturbation peut toujours se produire pour une cause
inconnue, sans prévenir! Le modèle devient alors incontrôlable et livré à luimême! Ne laissez pas votre émetteur sans surveillance pour éviter une
manipulation par un tiers.
Ne mettez le moteur électrique en contact que lorsque rien ne se trouve dans le
champ de rotation de l’hélice. Faites tourner le moteur électrique avec l’hélice
montée uniquement lorsqu’il est solidement fixé dans le modèle.
La position du modèle doit être nettement identifiable durant tout le vol pour
garantir un pilotage sûr. Si vous remarquez l'influence d'une perturbation durant
le vol, préparez-vous immédiatement à atterrir pour des raisons de sécurité.
Durant le départ et le processus d'atterrissage, le terrain doit être libre de toute
Page 23

GRAUPNER GmbH & Co. KG D-73230 KIRCHHEIM/TECK GERMANY
Keine Haftung für Druckfehler. Technische Änderungen vorbehalten! 12/2008
23
personne et d'obstacle.
Veillez toujours au bon état de charge des accus, car autrement le parfait
fonctionnement de l'ensemble R/C ne peut être garanti.
N’utilisez jamais de batteries échauffées, défectueuses ou détériorées. Observez
les prescriptions d’utilisation indiquées par le fabricant des batteries
Avant chaque vol, effectuez une vérification complète du bon fonctionnement de
l’installation R/C ainsi que du modèle et faites un essai de portée.
Pour faire un essai de fonctionnement du moteur, assurez-vous d’abord que
l’organe de commande soit sur la position COUPE sur l’émetteur. Mettez ensuite
d’abord l’émetteur en contact, ensuite la réception pour éviter un démarrage
involontaire du moteur. Procédez inversement pour couper le contact ; d’abord
celui de la réception, ensuite celui de l’émetteur.
Vérifiez si les gouvernes se déplacent dans le sens correspondant des manches
de commande.
Ces conseils mettent en évidence la diversité des dangers pouvant résulter d'une
manipulation incorrecte et irresponsable. Leur observation permettra de pratiquer
en toute sécurité ce loisir créatif et éducatif que représente l'aéromodélisme.
Accessoires conseillés
Ensemble R/C
A partir de mx-12S, dans la bande des 40/41 MHz, Réf. N°4747,
ou IFS MX -.16 Réf. N° 23000.
Récepteur
SMC-14, 41 MHz, Réf. N°7034.41
Il est conseillé d’utiliser dans chaque cas un récepteur PCM,
ou XR – 16 IFS Réf. N° 23601.
Batterie de propulsion
Accu LiPo V-MAXX 35C 3/1100 11,1 V/1,1 Ah G3,5
Réf. N° 7628.3 ou
Accu LiPo V-MAXX 35C 3/1700 11,1 V/1,7 Ah G3,5
Réf. N° 7636.3
Colles et outils nécessaires
Colle epoxy 5 minutes Devcon, Réf. N°961.7
ou résine epoxy a prise rapide comparable.
Henkel Ponal Express, Réf. N°969
Scalpel Réf. N°14.2
Tournevis cruciforme et à lame, pinces plates,
pinces coupantes et lime.
Page 24

GRAUPNER GmbH & Co. KG D-73230 KIRCHHEIM/TECK GERMANY
Keine Haftung für Druckfehler. Technische Änderungen vorbehalten! 12/2008
24
Instructions de montage
Avant l’assemblage des pièces par collages, vérifier la fonction des servos avec un
Testeur de servos ou avec l’ensemble R/C.
Fixer les guignols de gouverne sur les volets d’ailerons avec les vis et les contre
plaques fournies.
Mettre les servos d’ailerons en position neutre, repercer le trou de connexion sur le
palonnier des servos en correspondance de la tringlerie, puis régler les tringleries et les
connecter.
Coller les réservoirs de bout d’aile sur celle-ci.
Placer l’aile sur le fuselage sans colle, la rectifier éventuellement afin qu’elle puisse être
collée dans l’encastrement.
Retirer l’ouverture d’inspection sur le fond du fuselage.
Appliquer de la colle aux emplacements correspondants sur l’aile et le fuselage, coller
les pièces ensemble et les fixer jusqu’à la prise de la colle (veiller à ce que de la colle ne
pénètre pas au niveau de l’ouverture d’inspection).
Remplir les joints entre le fuselage et l’aile avec de la colle blanche (Colle PVAc) pour
stabiliser le collage.
Fixer l’ouverture d’inspection avec les 2 vis fournies.
Relier la prise des servos d’ailerons aux cordons de rallonge et les coller dans la
canalisation des cordons.
Mettre en place les jambes du train principal dans les supports et les fixer avec les
pattes et les vis.
Introduire la jambe du train avant dans la douille en aluminium et la fixer avec la vis
pointeau.
Fixer le guignol sur la gouverne de profondeur avec la contre plaque, couper la longueur
excédentaire des vis et les limer au ras de la contre plaque.(le guignol sera connecté sur
la gauche).
Coller le stabilisateur perpendiculairement dans la dérive.
Mettre le servo de profondeur en position neutre, repercer le trou de connexion sur le
palonnier en correspondance de la tringlerie, régler la longueur de celle-ci et la
connecter.
Relier la prise du servo de profondeur au cordon de rallonge et coller le stabilisateur
avec le fuselage.
Remplir les joints entre le fuselage et la dérive avec de la colle blanche (Colle PVAc)
pour stabiliser le collage.
Le buste de pilote, Réf. N°916.3 (Non fourni dans le kit de montage) pourra être collé
Page 25

GRAUPNER GmbH & Co. KG D-73230 KIRCHHEIM/TECK GERMANY
Keine Haftung für Druckfehler. Technische Änderungen vorbehalten! 12/2008
25
pour l’aménagement du cockpit, après une préparation correspondante.
Coller le verrière du cockpit.
Remplir un vaporisateur d’eau, ajouter un peu de produit pour vaisselle, vaporiser le
verso des décalcomanies et attendre un peu qu’elles ramollissent. Lorsqu’elles peuvent
glisser sur le support, les poser aux emplacements correspondants et éponger l’eau
restante avec du papier ménager.
Connecter le cordon des servos sur les sorties de voie correspondantes du récepteur,
l’introduire dans l’ouverture prévue et disposer le fil d’antenne de réception le long du
fuselage. Il est conseillé d’utiliser un récepteur SPCM ! L’accu de propulsion sera placé
dans son logement et calé avec de la mousse.
Débattements des gouvernes
Débattements des ailerons ± 10 mm 25% d’exponentiel
Débattements de la profondeur ± 7 mm 20% d’exponentiel
Roue du train avant Total 30% d’exponentiel
Centre de gravité: 30-42mm derrière le bord d’attaque de l’aile.
Le premier vol:
- Après avoir assemblé le modèle conformément aux instructions, programmé
l’ensemble R/C selon les indications et avoir chargé tous les accus, le premier
vol pourra être effectué sans tarder.
- Il est conseillé de faire un essai de portée avec la turbine en marche!
- Une bonne expérience est supposée pour le pilotage de ce modèle!
- La construction du modèle est très simple, le vol est exigeant.
Le Panther équipé des éléments prévus et que nous conseillons volera sans limitations
et sans problème technique.
Les batteries, les accus, les servos et le régulateur défectueux ou usagés ne devront
pas être jetés dans une poubelle domestique. Remettez les à votre revendeur, ou
déposez les dans un container spécial réservé à cet usage.
Il nous reste à vous souhaiter beaucoup de plaisir avec les vols de votre Panther!
Votre équipe Graupner !
 Loading...