

Page 1
Bedienungsanleitung
Instruction Manual
Manuel d’utilisation
Ersatzteile -
Spare Parts -
Pièces de rechange
Montage -
Assembly -
Montage
Garantie -
Warranty -
Garantie
Deutsch 01-09
English 10-18
Francais 19-27
28-32
33-51
54
GM-Racing 90170.RTR Flash 3.0 Race Brushless 4WD Buggy
www.gm-racing.de
1/8 4WD RACE BUGGY
1/8 4WD RACE BUGGY
BRUSHLESS
Page 2

SAFTEY PRECAUTIONS
This high-quality RC model should be used with caution and responsibility . Failure to operate this model in a safe and
responsible manner could result in personal and/or property damage. The vehicle should not be taken by children without supervision by the parents. GM-Racing/Graupner accepts no responsibility for any loss or damage rising from the
operation, not proper use or misuse of this product or other necessary operations to his product, regardless of whether
they directly, indirectly, on detours, acciden-tally or as a result of its use. So far required by law not compellingly , the
obligation of the company GRAUPNER for the achievement of payment of damages, impossible which reason also always (inclusive personal injuries, death, damage of buildings as well as damage by turnover or trading loss, by business
interruption or other indirect or direct damages), which are due to the employment of the model. The joint and several
liabilities are limited under all circumstances and each case to the amount, which you actually paid for this model.
This model is controlled by radio signals, with in f uences beyond your control. This inf uences can be a temporary •
loss of the ability to control the model, so it is advisable to have a safe distance in all directions to avoid collisions.
Operate your model on open terrain, away from cars, traff c and people.•
Never walk out onto the street, for whatever reason.•
Run your vehicle never with weak batteries.•
Follow carefully to the instructions and warnings for this and any other equipment used by you (Chargers, rechar-•
geable battery packs, etc.).
Keep chemicals, hardware and electrical components out of reach of children.•
Don‘t drive against obstacles, which the model cannot overcome, and stay on full throttle. This can destroy the •
engine, clutch or the transmission!
Don‘t drive in wet grass, puddles or snow, because the electronic equipment (servo, receiver and ESC) is not water-•
proof. If you want to drive in the wet, these parts must be protected waterproof (e.g. by a ballon). Under no circumstances the engine should suck water in by the air f lter, otherwise the engine can be destroyed immediately.
Plastic is less f exible with cold weather and can break more easily.•
The start-up and the operation of the model take place solely on danger of the owner. Only careful and considered •
handling of the R/C car protects against damages to property and person.
INTRODUCTION
Thank you for buying the Flash 3.0 Race Brushless-RTR by GM-Racing. This introduction contains the basic instructions
for the operation of your new vehicle. The Flash is a great model for RC Beginners, but it also requires a degree of craftsmanship and with drivers under 14 years, the guidance from the parents. It is important that you read all instructions and
the entire printed collateral, so you can operate without causing unnecessary damage.
Please take a moment to read through it completely before running the model.
These operating instructions are part of this product. They contains important notes to the operation and handling of
the model. Please take this into consideration when you pass on the product to third parties. Neglect of the operating
instructions and the safety instructions lead to expiring the warranty.
GM-Racing and Graupner constantly work on the advancement of all RC cars, engines and remote control systems;
changes of the scope of delivery in form, technology and equipment we must reserve ourselves therefore. Please have
understanding for the fact that from data and illustrations of this operating instructions no requirements can be derived.
Please keep these instructions for further reference!
GM-Racing 90170.RTR Flash 3.0 Race Brushless 4WD Buggy 10
GUARANTEE CONDITIONS
The guarantee applies only to such material or operational defects which are present at the time of purchase of the
product. Damage due to wear, overloading, incompetent handling or the use of incorrect accessories is not covered by
the guarantee. The user‘s legal rights and claims under guarantee are not affected by this guarantee. Please check the
product carefully for defects before you make a claim or send the item to us, since we are obliged to make a charge for
our cost if the product is found to be free of faults.
Please follow the safety instructions in your own interest. Read these references also carefully if you are already familiar
with the handling and operation of an RC car.
If you discover a part in the kit, which is defective concerning material or processing, send it - before you used it – back
to us and we will supply replacement to you.
Page 3
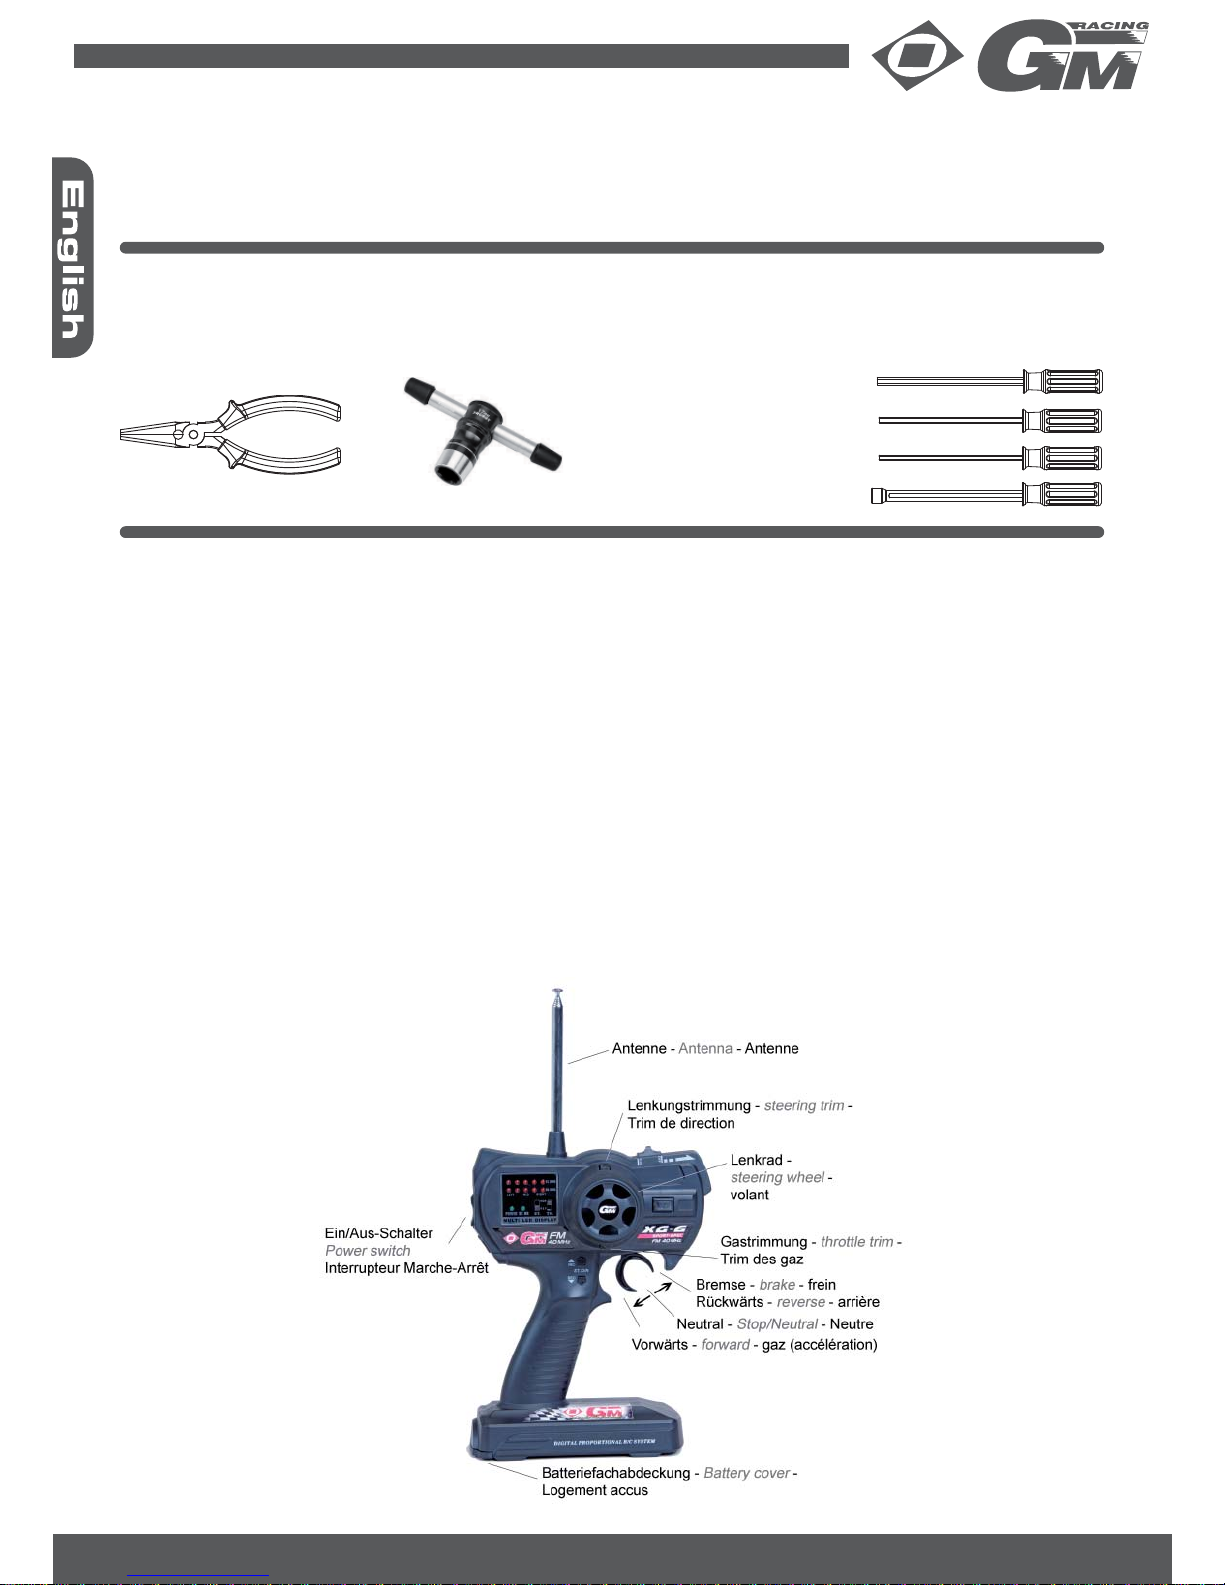
TOOLS REQUIRED
In addition to the tool that accompanied the vehicle, the following tools are useful and - in some cases - necessary:
Hex wrench with 1.5 mm, 2 mm and 2.5 mm (5775.1,5; 5775.2 and 5775.2,5), Nut driver 5.5mm (5783.5,5)•
Wheel nut driver 17mm (No. 98004)•
small needle-nose pliers•
THE REMOTE CONTROL SYSTEM
Here you get an overview of the remote control system of the Flash 3.0 and its various functions and settings. Before
the f rst trip you should be sure all of these functions and settings have read and understood.
First screw the enclosed transmitter antenna into the mounting plate at the top of the transmitter. Place 8 AA batteries in
the battery compartment of the transmitter. Pay attention to the polarity!
REQUIRES
To operate your new Flash 3.0 Brushless you will need the following:
8 alkaline AA batteries e.g. No. 3426, or 12 AA battery cells e.g. No. 3621 for transmitter•
2x 7.4 V LiPo-batteries e.g. No. 98997, 98998, 99000 or 99003•
or 3-cell LiPo 11.1V e.g. No. 98990, 98991 or 9740.3 and a suitable charger like the Graupner Ultramat series•
REMOTE CONTROL (TRANSMITTER)
1. On / off switch: Turns the power on/off
2. Steering wheel: Controls direction (left/right) of the model
3. Steering trim: Adjusts the “hands off” direction of the model
4. Throttle Trigger: Controls speed (forward/brake/reverse) of the model
5. Throttle Trim: Adjusts the motor speed to stop at neutral
6. Control light: indicates adequate battery power
7. Antenna: Transmits signal to the model
The remote control system of the Flash 3.0 is optimally adjusted by the factory. Nevertheless you should read the following chapter, maybe slight adjustments on the remote control should be necessary. For further information to the remote
control system please refer to the enclosed XG-6 manual.
Allen key 1.5, 2, 2.5mm
Wrench 5.5mm
Needle-nosed pliers
Wheel nut wrench
11 GM-Racing 90170.RTR Flash 3.0 Race Brushless 4WD Buggy
Page 4

Running multiple vehicle
If you have a vehicle of your and your friends with other vehicles that you will be racing with, it is very important that you
f rst check what frequency channel your vehicle is on and con f rm that none of your friends have the same frequency
as yours. If you do f nd that someone else is using the same frequency channel that you are, you must wait for them to
turn their transmitter and vehicle OFF or you may choose to change the frequency crystals in your transmitter and receiver (so that you can run together at the same time without causing any radio interference). Additional frequency crystal
sets can be purchased separately and installed in a few quick seconds. To change frequency crystals simply remove
the black plastic crystal holder from the back of your transmitter by carefully pulling it straight out. Slide the crystal out
of the holder and install the new crystal labelled „Tx“ in its place. Then carefully align the two pins that extend from the
transmitter, and gently press it into place. DO NOT force the crystal! The pins can easily be broken! Remove the crystal
from your receiver in the same careful manner using a pair of needle-nose pliers and install the new „Rx“ crystal in its
place.
PLEASE NOTE: It is very important that the crystal labelled „Tx“ is installed in the transmitter and the crystal marked
„Rx“ is installed in the receiver.
OPERATING THE REMOTE CONTROL
• Run your Flash 3.0 Brushless never with low transmitter or receiver batteries.
• Never forget switch off the radio after running your Flash 3.0 Brushless, otherwise the batteries do not last long.
• Turn on the transmitter f rst, then the vehicle.
• After driving f rst turn off the vehicle, then the transmitter.
• For optimal use f rst check the steering and throttle trim positions.
Before the f rst trip you should be sure all of these functions and settings have read and understood. •
GM-Racing 90170.RTR Flash 3.0 Race Brushless 4WD Buggy 12
STEERING TRIM
The vehicle should go straight without turning the steering wheel. If not, press the Steering Trim knob above the steering
wheel in the direction needed for the vehicle to go straight.
THROTTLE/BRAKE TRIM
Here you do not need to adjust anything, because the neutral point is stored automatically during the ESC setting.
CHECKLIST BEFORE YOU START
Check all screws on permanent seat.•
Check all the moving parts to work without binding.•
Check the batteries in the remote control.•
Check your frequency, so that a trouble-free operation is ensured.•
LET THE FUN BEGIN
Note: Use only fully charged batteries! The ESC has an undervoltage identi f cation by measuring the battery voltage
when switching on and calculates thereby the number of cells of the battery and/or the cutoff voltage. With not fully charged batteries this cannot function correctly and the batteries become discharged too low, which can lead to a permanent
damage.
Switch on the transmitter. Connect the batteries correctly to the ESC and switch it on (position „ON “). The ESC signals
its ready status by a sequence of beeps (
--
and
--
). In addition the LED lits permanently green. If the LED
should f ash green, the throttle trigger of the transmitter did not stand on neutral when switching ON and the motor did
not start for safety reasons. If this happens, switch off and on the ESC again.
Always switch off the vehicle f rst (position „OFF“), then the transmitter. Disconnect the batteries from the ESC.
Consider please:
if you move the throttle trigger from forward on backwards, the vehicle brakes to a complete stop. In order to ac-•
tivate the reverse gear , you must release the throttle trigger brie f y (neutral position) and then press it again on
backwards
The ESC switches OFF also when overheating. Switch of f the vehicle (ESC position „OFF “) then and let the ESC •
cool down. Check the function of the ESC‘s fan (exchange when defective) and the smooth running of the drive train
of your Flash 3.0 Brushless.
Page 5

ADJUSTING THE ELECTRONIC SPEED CONTROLLER
The ESC of the Flash 3.0 Brushless is already adjusted. Nevertheless you should read the following chapter, in order to
f nd out more over the adjustment possibilities of the ESC. Check before adjusting that the servo-reverse switch at the
transmitter is on „N“, also the throttle end point adjustment (EPA) is 100% on forward and reverse (if adjustable). As well
you have to press the throttle trigger during the adjustment procedure up to the f nal position, so that the ESC stores the
correct position. If you do not do that, it maybe happen that the vehicle accelerates to top speed already with smallest
movement of the throttle trigger and becomes uncontrollable. If this should happen, you have to repeat the adjusting
procedure.
Additionally to the calibration on the remote control the following parameters can adjust:
Max. braking force (60% or 100%) 1.
Automatic brake (0% or 10%) 2.
Battery type (NiMH, LiPo) 3.
Reverse ON or OFF 4.
Proceed for adjustment on the remote control as follows:
Place the vehicle in such a way that the wheels can turn freely.•
Switch on the transmitter now. Guarantee before adjusting the throttle trim stands on neutral. •
Connect the battery to the ESC. Make sure that the ESC switch stands on „OFF “. •
Pull the throttle trigger of the transmitter to full throttle and hold this position. Switch the ESC on (switch „ON “), the •
LED lits red and signals the programming mode.
Keep the throttle trigger pressed until the ESC beeps 6-times (•
-----
), the full throttle position is stored. In
addition the LED lits with each beep green.
Release the throttle trigger now (neutral position) until the ESC beeps again for conf rmation (•
--
). The neutral
position is now stored.
At last you have pull the throttle trigger on full reverse (throttle trigger to the mechanical end) until the ESC beeps •
(
--
) for conf rmation. The reverse position is now stored.
Release the throttle trigger now (neutral position). After approximately 1 sec. the ESC goes into the programming •
mode for the additional settings speci f ed above. If you want to set nothing here, you can switch the ESC now of f
(switch „OFF “), otherwise the ESC goes automatically into the programming mode.
The additional settings are indicated successively by beep. In order to adjust something here, you must give full •
throttle brief y at the throttle trigger of the transmitter, if the necessary parameter is indicated by a beep.
Successful programming is always conf rmed by a beep (•
---
).
Adjust the maximum braking force: 1.
Determines the maximum braking action, in order to receive the optimal delay, you should adjust 100%. On slippe ry surfaces only 60% should be adjusted, so that the vehicle remains controllable.
---
60% braking force
----
100% braking force
Adjust the automatic brake: 2.
Determines the braking action for the vehicle after releasing the throttle. 0% braking mean that the vehicle coast
to a stop after release the throttle trigger „normally “, 10% braking action slows down the vehicle a little, curves
can be driven more closely.
----
0% braking force
-----
10% braking force
Selecting the battery type:3.
You can select between NiMH or LiPo batteries. This function is very important, because the batteries (mainly
LiPo-batteries) can be damaged irreparably when this setting is incorrect.
-----
NiMH
------
LiPo
Reverse movement: 4.
The reverse function can be disabled.
------
reverse off
-------
reverse on
To leave the additionally settings, switch off the ESC (switch „OFF “) after programming.
13 GM-Racing 90170.RTR Flash 3.0 Race Brushless 4WD Buggy
Page 6

GM-Racing 90170.RTR Flash 3.0 Race Brushless 4WD Buggy 14
Specifi cations ESC:
Number of cells NiMH 6-12
Number of cells LiPo 2-4
Constant current forward 120A (135A ~ 5 sec., 150A ~ 1 sec.)
Constant current reverse 30A (34A ~ 5 sec., 38A ~ 1 sec.)
BEC 5V/3A
Undervoltage protection NiMH < 4.5V
LiPo 2-cell < 5.8V
LiPo 3-cell < 8.7V
LiPo 4-cell < 11.6V
Dimensions ca. 65x45x40mm (w/o wiring)
Weight approx. 145g
Receiver connector Graupner/JR
SERVICE
In addition to the already described service work should always try to keep your vehicle in order to prevent wear. If there
is dirt in moving parts, this can affect the performance of the model signif cantly. Remove dirt or dust with compressed
air, a soft brush and / or with a toothbrush. If possible, try using no solvents, as this can move the dirt in normally inaccessible places and thus cause additional wear. We recommend the following simple procedures:
Remove dirt and dust as far as possible with the methods described above.•
Check the car for worn, broken or gripping parts and repair them if necessary.•
Check regularly the f xed seating all screws and tighten them if necessary.•
SERVICE AND REPAIR, SPARE PARTS
For the Flash 3.0 all parts are available as spare parts. So if a part is defective or worn, you can identify these parts with
the Exploded view, buy these parts and f x the car yourself with the help of the assembly instruction (pages 33 - 51).
In problem cases, or for questions and repairs, please contact the Service department in your country (see
warranty card on page 54) or:
GRAUPNER-Service, Henriettenstrasse 94-96, D-73230 Kirchheim/Teck,
Tel. +49/1805/472876
SPARE PARTS: at your local hobby shop or online at Graupner spare-parts Shop http://www .graupner-ersatzteilshop.
de/ under order.-nr.: 90170.RTR
Lenght: 480 mm
Width: 300 mm
Height: 180 mm
Tyre Diameter: 115 mm
Weight: 3200 g
Chassis: 3 mm Alu 6061-T6
Motor: Brushless GM PRO 650
Radio System: GM-Racing XG-6 Sport Spec 40Mhz FM
SPECIFICATIONS
To make the additional settings more comfortable, the program card (order-no. 90170.83) is optionally available.
Page 7

Problem Possible errors To do
Motor does not run Broken motor wiring Resolder wiring
Battery empty Change or charge battery
Remote control does not function
correctly, throttle trim wrong adjusted
Check Remote control, adjust throttle
trim
Motor not working Change motor
ESC not adjusted properly Check ESC settings
Motor rotates reverse Motor connected wrong Change 2 motor wires
No motor performance Battery almost empty Change or charge battery
Speed control not adjusted properly Adjust ESC
Drivetrain runs heavily Check drivetrain
Drivetrain works loud Check gear mesh
Motor is getting hot Check drivetrain, gear mesh, check
for binding parts
The car is diff cult to steer Transmitter batteries empty Change or charge batteries
Steering servo trim not adjusted
properly
Trim steering servo
Interferences Make a short break an then try again
or change crystals
ESC not adjusted properly Check ESC settings
TROUBLESHOOTING
15 GM-Racing 90170.RTR Flash 3.0 Race Brushless 4WD Buggy
Page 8

DAMPING
The four oil-f lled shocks of this GM-Racing car have largest inf uence on its handling. Whenever you re-assemble these
shock absorbers again: Do it carefully! Assemble the absorbers always in pairs (in front and in the back). If one of the
front shocks should be somewhat softer or harder than the other one, the vehicle will steer along curves in one direction
different than in the other one. The same is valid for the rear shock absorbers. The absorption should be a bit harder in
the front than in the back to achieve a good-natured handling.
The ride height of the model is very important. It is to be adjusted in such a way that the arms of the front and rear
suspension go back to parallel to the ground, if you raise the model from the ground and then release it. This ensures
suff cient movement of the suspension in both directions (compression and releasing). If the car does not go back the
correct driving height, the feather/spring seals must be adjusted accordingly again.
It is normally best to begin with a softer shock oil and then try a harder oil. If the chassis jumps excessively strong on a
rough track, you should use a softer oil. If the tires take off with the same impacts from the surface of the track, the oil is
too thick. In this case a thinner oil is to be used, so the suspension reacts faster. Thus it is reached that the tire remains
as much as possible in contact with the surface of the course.
The shock absorbers can also affect the steering behavior of your car. This can be regulated by an appropriate soft or
hard adjustment of the front and rear suspension. The f rmness is affected by feather/spring characteristic, thickness of
the oil and the inclination of the shock absorbers, as well as the combination of these three factors. With a soft rear end
the traction power (road grip) is improved, the steering more weakly. The handling of the vehicle can be foreseen here
more easily, because this is inclined in curves to understeer, i.e. pushes to the outside of the curve. If the rear suspension is too hard, the steering effect is stronger, but requires more skill by the driver, in order to avoid spinning the vehicle
around. During softer adjustment of the front suspension the guidance effect is strengthened and turned around, decreased during harder attitude. Within the correct absorption range - chassis jump and hop the wheels - there is a narrow
f ne tuning range, in which you can adjust the f rmness of front and rear suspension. This is a tricky attitude, which must
be made by very small changes in the viscosity of the oil.
WEIGHT DISTRIBUTION
Always remember with adjusting the shock absorbers that the correct weight distribution is from great importance, so
that the GM-Racing car can show a perfect handling.
Preload the rear shock-absorbers on the right and on the left side with the same amount of tension directly and check
this for example with the help of a Tweak-board. The chassis tweak is adjusted if necessary by easily preload the springs
on the front axle.
With reducing the speed in the curve entrance the weight shifts on the two front wheels and/or - tire, with maximum
effect on the steering. On the opposite with accelerating the weight is shifted on the two rear tires, for maximum traction
power.
The more softly the suspension is, the more the weight transfer af fects the handling of the car . For this reason it is
appropriate to make the suspension as fast responding as possible, but not so softly that the absorption becomes ineffective. Between these two extremes the „midway“ is the best, which you can determine on the own race track only by
the practical attempt.
ADJUSTING THE WHEELS
First: make sure that the steering trim at the transmitter is in neutral position. Then adjust the servo-saver and the tie
rods in such a way that the wheels stand exactly in straight line adjustment. Thus it is guaranteed that the steering travel
is the same on both sides.
The toe-in is a skew of the wheels in driving direction (seen from above). This adjustment of the front wheels is important
for the handling of the vehicle. The travelling straight ahead of the model is improved by a small angle. The toe-in can
be adjusted by rotating of the right/left- threaded rods (tie rods) without disassembly of the ball joints. The tie rods are to
be adjusted in such a way that the toe-in amounts to approx. 0°-1°. It should be paid attention to the fact that the right
and left tie rod is equivalent long. At the beginning of driving with the car adjust all four wheels in such a way that they
stand with normal driving height perpendicularly to the ground. For examination hold a rectangle or an indication triangle
against the wheel, so that the wheels are adjusted exactly. When pressing on the suspension you will determine that the
wheels gets a little negative camber (spreading).
The reason for this is that you want to reduce the positive camber of the outside wheels when going into the curve. Thus
the bearing surface and the traction power of the outside tires and concomitantly the speed are increased when driving
through curves. The change of the negative camber (thus spreading) with the rear wheels is however the cause for a
reduction of the bearing surface of the tires of the rear wheels when pressing the suspension down by accelerating.
If your track has more straights than curves, it will possibly turn out that an additional decrease (positive) of the camber
is not necessary with driving along curves.
GM-Racing 90170.RTR Flash 3.0 Race Brushless 4WD Buggy 16
Page 9

In this case it recommends to leave the rear wheels within the entire range of the suspension perpendicularly to the
ground. A small enlargement of spreading (negative fall) at the front suspension will improve the steering control of the
car when squeezing the suspension together. But: In the case of a too large change of the camber the bearing surface
of the tire is strongly made smaller.
WAYS TO IMPROVE YOUR DRIVING
The improvement of your driving skills is extraordinarily important, often however unconsidered aspect with R/C driving.
Consistent „smooth“ driving is the key to understand the effect of even smallest setup changes of your car on its handling. Here a few hints, which will help to driver faster from run to run.
Avoid collisions1.
The winner of a race is often not the fastest vehicle, but that, which is involved fewest into accidents and which makes the fewest driving errors. Drive carefully in places, in which vehicles become wedged into one another again and
again.
Stay away from vehicles, which are slower or are controlled by inexperienced drivers. If you drive near too closely at
their rear end, such drivers can run scared, make an accident and entangle you therein. You lose less time, if you wait
for the fact that a slow vehicle is passed through a critical curve, as if you are entangled into an accident and have to
wait that the (hopefully attentive) track marshal helps your car . Apart from the fact that such an accident costs time, it
can cause also a damage of your vehicle, whereby you are ruled out possibly completely from running. Remember that
a collision with a wall with a maximum speed of 60 – 80 km/h corresponds to a case of a fall from your car of the roof of
a house. If the manufacturer wanted to make an R/C car absolutely indestructible, he would become much too heavy ,
that the car would be still competitive. The better solution is called “drive carefully!“
Driving through a curve correctly 2.
You drive through a curve correctly, if you start from the outside, then to the inside at the apex of the curve and then go
again to the outside.
If more closely traff c on the course prevails, you will not always be able to drive the racing line in the curves. In these
cases decrease the speed and try to drive as closely as possible along the inside of the curve. Colliding vehicles because of close traff c are normally pushed of the curve. Also track conditions can force you to change your racing line in
the curves. It is often better to drive around holes and peaks, instead of driving over it, only to follow the racing line.
With the entering into a curve reduce the speed, on the exit accelerate your vehicle. Reduce the throttle with the entrance gradually. Thereby you shift the weight of the car on the front wheels and improve the steering performance of the
car (see also chapter „damping“). Do not accelerate too strongly, because otherwise your R/C car slides to the outside
of the track, or drives, under-steering, to the external wall. Smooth, consistent throttle manipulation and steering is the
key to fast driving through curves. „Burnouts“ and full braking increase the wear of the car , increase the danger of an
accident and result in a lower average speed. It is important that the R/C car always rolls! If you try to drive completely
smooth and consistent your lap-times will improve naturally.
GM-Racing/GRAUPNER GmbH & CO. Kg D-73230 KIRCHHEIM/TECK GERMANY
Subject to change! /We reserve the right to introduce modif cations
17 GM-Racing 90170.RTR Flash 3.0 Race Brushless 4WD Buggy
Page 10

LIABILITY FOR PRINTING ERRORS EXCLUDED!
WE RESERVE THE RIGHT TO INTRODUCE MODIFICATIONS!
EG DECLARATION OF CONFORMITY:
We hereby declare that the following product:
Electr. Speed controller Flash 3.0 order.-nr. 90170.70
conf rms with the essential protective requirements as laid down in the directive for harmonising the statuatory directives of the member states concerning electro-magnetic interference 2004/108/EC.
This product has been tested for electro-magnetic interference in accordance with the following norms:
EN 61000-6-1
EN 61000-6-3
This declaration was produced by
Graupner GmbH & Co. KG
Henriettenstr. 94-96
73230 Kirchheim/Teck
and is valid for the manufacturer / importer of the product
73230 Kirchheim/Teck, den 18.01.2010 Hans Graupner
Managing Director
Environmental Protection Notes
When this product comes to the end of its useful life, you must not dispose of it in the ordinary
domestic waste. The correct method of disposal is to take it to your local collection point for re-
cycling electrical and electronic equipment. The symbol shown here, which may be found on the
product itself, in the operating instructions or on the packaging, indicates that this is the case.
Individual markings indicate which materials can be recycled and re-used. You can make an
important contribution to the protection of our common environment by re-using the product, recycling the
basic materials or recycling redundant equipment in other ways.
Remove batteries from your device and dispose of them at your local collection point for batteries.
In case of R/C models, you have to remove electronic parts like servos, receiver or speed controller from the
product in question, and these parts must be disposed of with a corresponding collection point for electrical
scrap.
If you don’t know the location of your nearest disposal centre, please enquire at your local council off ce.
GM-Racing 90170.RTR Flash 3.0 Race Brushless 4WD Buggy 18
Page 11
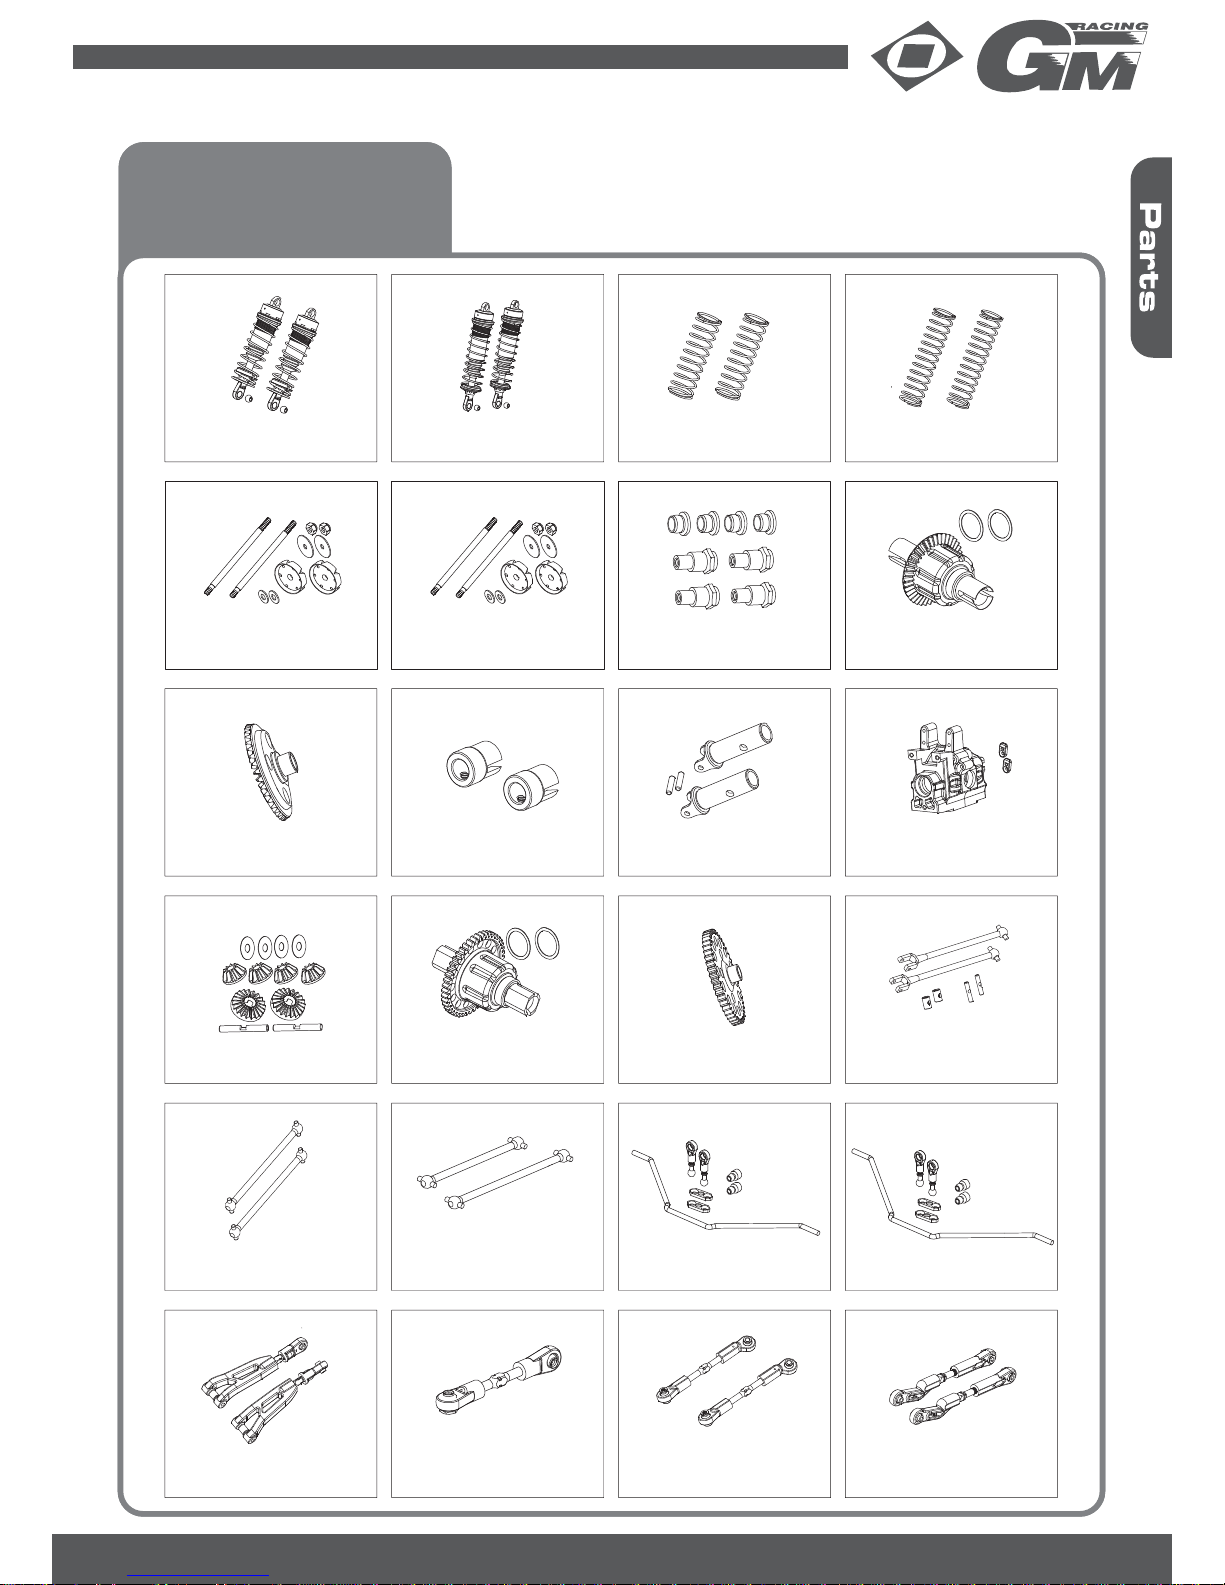
Ersatzteile (1)
Spare Parts
Pièces de rechange
90170.2
Stoßdämpfer vorne (2) komplett
Front shocks (2)
Amortisseur avant (2)
90170.3
Stoßdämpfer hinten (2) komplett
Front shocks (2)
Amortisseur arrière (2)
90170.4
Stoßdämpferfedern vorne weiß (med.)
Shock Springs Front white (med) (2)
Ressort Amortisseur avant blanc (med)
90170.5
Stoßdämpferfedern hinten weiß (med.)
Shock Springs Rear white (med) (2)
Ressort Amortisseur arrière blanc (med)
90170.6
Kolbenstangen und -platten vorne (2)
Shock Rods and Piston Front (2)
Axe Amortisseur et Piston avant (2)
90170.7
Kolbenstangen und -platten hinten (2)
Shock Rods and Piston Rear (2)
Axe Amortisseur et Piston arrière (2)
90170.8
Dämpferbefestigung oben (4)
Upper Shock Mount (4)
Crochet Amortisseur en haut (4)
90170.9
Differenzial komplett vo./hi. (1)
Differential complete F/R (1)
Differéntiel complète avant/arrière (1)
90170.10
Differenzialkegelrad 38 Z. groß vo./hi.
Crown Gear 38 T F/R (1)
Pignon conique Differéntiel 38 D. (1)
90170.11
Mitnehmer für Mittelantriebswellen (2)
Center Differential Drive Shaft (2)
Coupler arbre de transmission de centre (2)
90170.12
Radachsen vorne (2)
Front Axle (2)
Arbre de transmission avant (2)
90170.13
Getriebegehäuse komplett (1)
Gear Box complete (1)
Boîter transmission (1)
90170.14
Differenzialkegelräder innen komplett
Differential gears complete
Pinion de differéntiel complète
90170.15
Mitteldifferenzial komplett (1)
Center Differential complete (1)
Differéntiel complète de centre (1)
90170.16
Hauptzahnrad 60 Z. (1)
Steel Spur Gear 60 T (1)
Pignon Differéntiel 60 D. (1)
90170.17
Kardanwellen Vorderachse (2)
Front Universal Drive Shaft (2)
Arbre de transmission avant (2)
90170.18
Antriebsknochen hinten (2)
Rear dogbones (2)
Arbre de transmission arrière (2)
90170.19
Mittelantriebswellen (2)
Center Drive Shafts (2)
Arbre de transmission de centre (2)
90170.20
Stabilisator Vorderachse komplett
Front Anti-Roll Bar complete
Antiroulis avant complète
90170.21
Stabilisator Hinterachse komplett
Rear Anti-Roll Bar complete
Antiroulis arrière complète
90170.22
90170.23
90170.24
Obere Querlenker vorne (2)
Front Upper Suspension Arms (2)
Bras avant supérieur (2)
Lenkstange (1)
Servo Connecting Rod (1)
Triangle servo-renvoi (1)
Spurstangen vorne li./re. (2)
Steering Rods (2)
Tige filetée de direction (2)
90170.25
Obere Querlenker hinten (2)
Rear Upper Suspension Arms (2)
Bras arrière supérieur (2)
GM-Racing 90170.RTR Flash 3.0 Race Brushless 4WD Buggy 28
Page 12
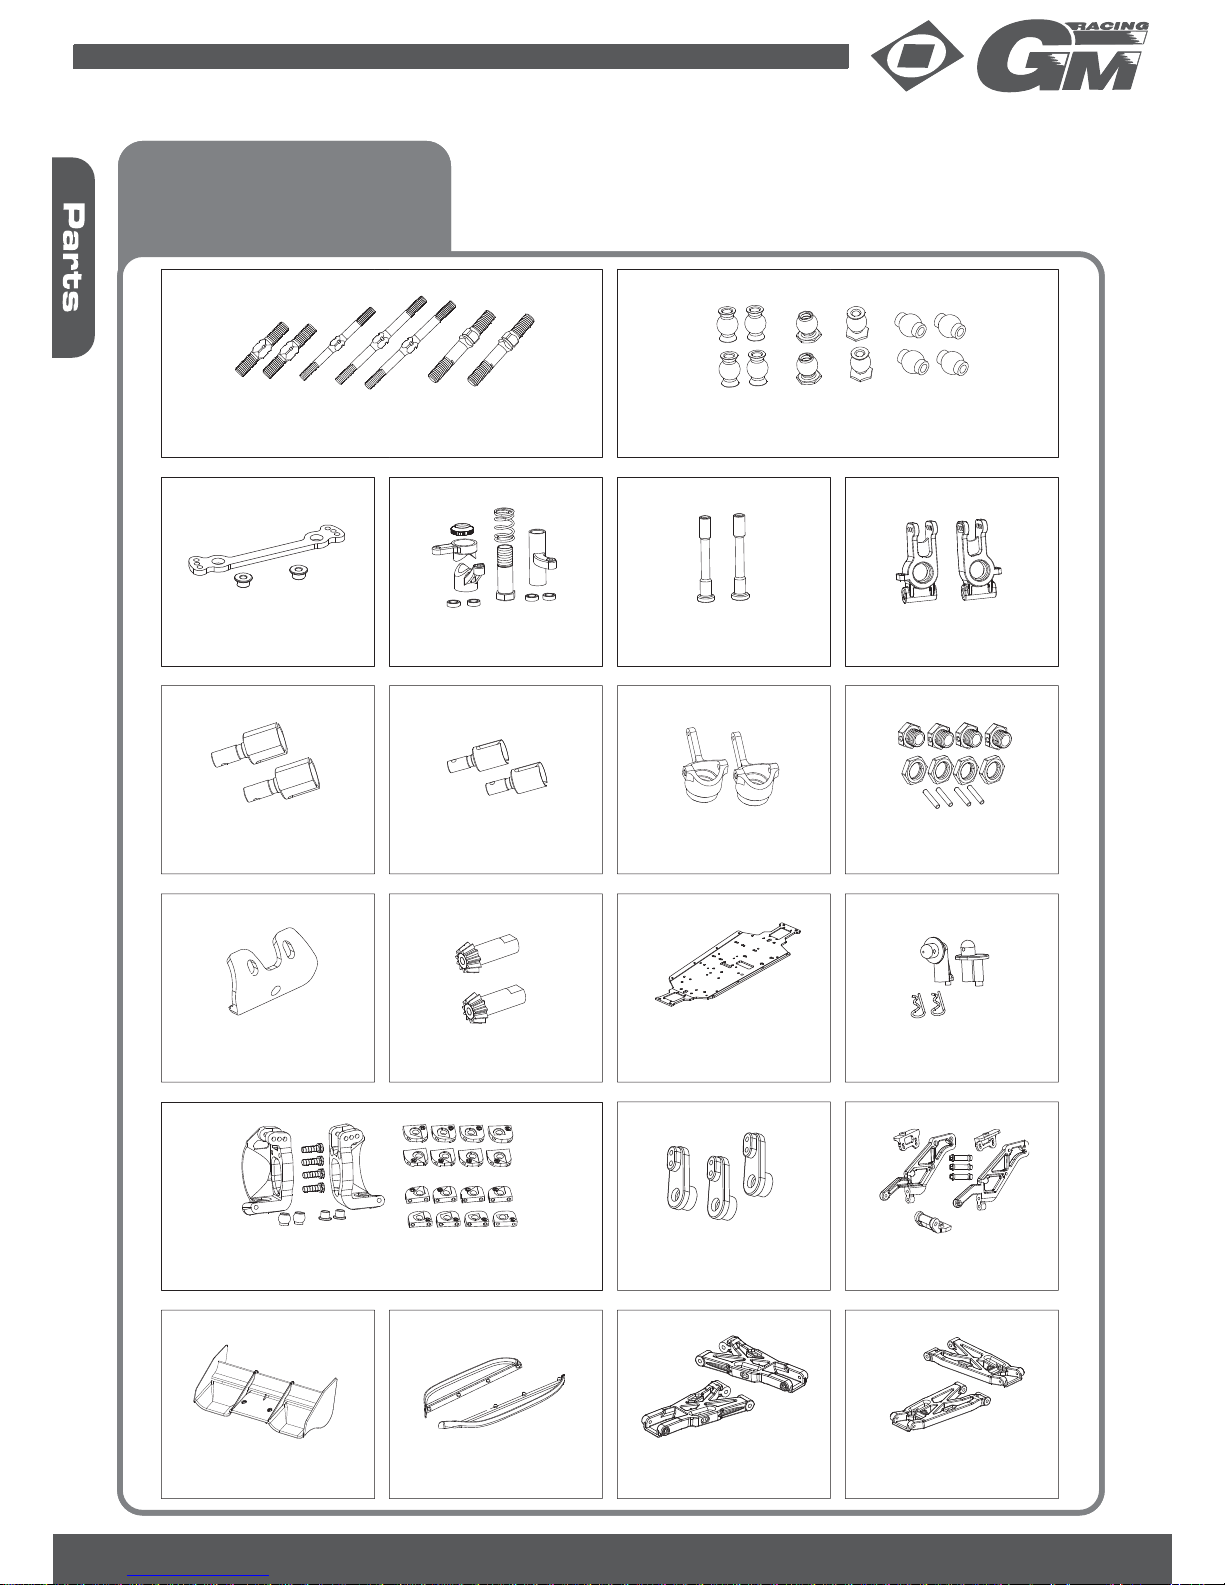
Ersatzteile (2)
Spare Parts
Pièces de rechange
90170.26
90170.27
Re-Li Gewindestangen komplett (7)
All rods (7)
Tige filetée complète (7)
Aufhängungskugeln komplett (12)
All ball heads (12)
Rotules complète (12)
90170.28
90170.29 90170.30 90170.31
Lenkverbinder mit Lager
Steering Connecting plate w/ Bushings
Bras de liaison renvoi avec palir lisse
Servosaver mit Umlenkhebel komplett
Servo Saver/Steering Arms
Palonnier Servo saver
Pfosten für Umlenkhebel (2)
Steering Shaft (2)
Support Servo Saver (2)
Radträger hinten (2)
Rear Wheel Hubs (2)
Support de roues arrière (2)
Ausgänge Mitteldifferenzial (2)
Center Differential Joints (2)
Sortie de différentiel de center (2)
Differenzialausgänge (2)
Differential Joints (2)
Sortie de différentiel (2)
Lenkhebel vorne (2)
Steering Knuckles (2)
Renvoi de direction avant (2)
Radmitnehmer komplett (4)
Wheel Hub Set (4)
Entraînement roue (4)
90170.32
90170.33 90170.34
90170.35
90170.36
90170.37
90170.38
90170.39
Rammer vorne
Front Bumper
Jupe de protection
Kegelrad mit Welle (2)
Pinion Gears (2)
Pignon conique (2)
Chassis
Chassis
Châssis
Karosseriehalter vo./hi.
Body Posts F/R
Support carosserie
90170.40
90170.41
90170.42
90170.43
90170.44
90170.45 90170.46
C-Hubs mit Einsätzen komplett (2)
C-Hubs with Inserts (2)
C-Hubs avec inserts (2)
Ruderarme Lenkung
Steering Servo Arms
Palonnier de servo de direction
Heckflügelhalterung komplett
Rear Wing Mount Set
Support stabilisateur arrière comp.
Heckflügel
Rear Wing
Aileron arrière
Chassisseitenwangen (2)
Side plates (2)
Pièce latérale de chassis (2)
Untere Querlenker vorne (2)
Front Lower Suspension Arms (2)
Bras avant inférieur (2)
Untere Querlenker hinten (2)
Rear Lower Suspension Arms (2)
Bras arrière inférieur (2)
29 GM-Racing 90170.RTR Flash 3.0 Race Brushless 4WD Buggy
Page 13

Ersatzteile (3)
Spare Parts
Pièces de rechange
90170.47
Querlenkerstifte innen (4)
Inner Lower Suspension Arm Pins (4)
Goupille bras inférieur (4)
90170.48
Querlenkerstifte außen (4)
Outer Lower Suspension Arm Pins (4)
Goupille bras extérieur (4)
90170.49
Querlenkerhalter unten vorne (2)
Front Lower Suspension Arm Mounts (2)
Support de bras avant (2)
90170.50
Bulkheadplatte vorne
Front Bulkhead
Plaque supériere avant
90170.51
Querlenkerhalter unten hinten (2)
Rear Lower Suspension Arm Mounts (2)
Support de bras arrière (2)
90170.73
Karosserie Flash 3.0 Brushless lackiert
Body Flash 3.0 Brushless painted
Carosserie Flash 3.0 Brushless verni
90170.52
Dämpferbrücke vorne
Front Shock Tower
Plaque amortisseurs avant
90170.53
Dämpferbrücke hinten
Rear Shock Tower
Plaque amortisseurs arrière
90170.54
Chassisstrebe hinten Alu
Rear Alum. Chassis Brace
Châssis support arrière
90170.55
Räder Pin-Spike verklebt (2)
Tires Pin-Spike glued (2)
Pneu Pin-Spike collée (2)
90170.75
GM Disc-Felgen 84mm weiß (2)
Rims GM-Disc 84mm white (2)
Jante GM-Disc 84mm blanc (2)
90170.77
Reifen Pin-Spike mit Einlagen (2)
Tires Pin-Spike w/ inserts (2)
Pneu Pin-Spike avec mousse (2)
90170.56
Chassisstrebe vorne Alu
Front Alum. Chassis Brace
Châssis support avant
90170.57
Flügelbefestigungsscheiben (2)
Rear Wing Washers (2)
Rondelle de Aileron (2)
90170.58
Differenzialgehäuse mit Dichtungen
Differential Case with Seal
Boîter de differéntiel avec joint
90170.59
Querlenkerhalter vorne oben komplett
Front Upper Suspension Arm Mounts
Support de bras avant en haut
90170.60
Radachsen hinten (2)
Rear Axles (2)
Arbre de transmission arrière (2)
90170.61
Zahnräder Zwischengetriebe mit Welle
Reduction Gears with Shaft
Pignon de Réducteur avec arbre
90170.62
Motorhalterung Brushless
Brushless Motor Mount
Fixation moteur
90170.63
Getriebegehäuse Zwischenwelle
Reduction Gear Case
Boîter de Réducteur
90170.64
Akkuhalteschale
Battery Box
Support accu
90170.65
Befestigungspfosten Akkuhalteschale
Battery Box Alum. Mounts
Plot pour support accu
90170.66
Akkuhalteklammer
Battery Fixation
Clip pour support accu
90170.67
Akkuhalterung Klettband
Magic Strip
Ruban crochet pour support accu
GM-Racing 90170.RTR Flash 3.0 Race Brushless 4WD Buggy 30
Page 14

Ersatzteile (4)
Spare Parts
Pièces de rechange
90170.68
Servo-/Empfängerhalterung
Servo-Receiver Mount
Support servo - récepteur
90170.69
90170.70
90170.71
90170.72
Halterung elektr. Fahrtenregler
ESC Mount
Support Variateur électr. Brushless
Elektr. Fahrtenregler Flash 3.0
ESC Flash 3.0
Variateur électr. Brushless Flash 3.0
Verstärkungsplatte Mitteldifferenzial
Reducer Base
Support Différentiel de centre
Shock Boots (4)
Shock Boots (4)
Shock Boots (4)
Karosserieclipse (10)
Body clips (10)
Clip de fixation de carosserie (10)
90170.74
Schraubensatz komplett
Screw Set
Lot de visserie complet
90170.78
Reifen Micro-Pin mit Einlagen (2)
Tires Micro-Pin w/ inserts (2)
Pneu Micro-Pin avec mousse (2)
107
Madenschraube M3x3 (10)
Set Screw M3x3 (10)
Vis sans tête M3x3 (10)
65.04K
Madenschraube M4x4 (10)
Set Screw M4x4 (10)
Vis sans tête M4x4 (10)
90170.79
Madenschraube M5x4 (10)
Set Screw M5x4 (10)
Vis sans tête M5x4 (10)
90170.80
Madenschraube M4x10 (10)
Set Screw M4x10 (10)
Vis sans tête M4x10 (10)
90170.81
Kragenstoppmutter M3 (10)
Lock Nut M3 with flange (10)
Ecrou auto freiné M3 (10)
90501.55
Stoppmutter M3 (6)
Lock Nut M3 (6)
Ecrou auto freiné M3 (6)
90502.78
Stoppmutter M4 (6)
Lock Nut M4 (6)
Ecrou auto freiné M4 (6)
95183.D
Kugellager 8x16x5mm
Ball bearing 8x16x5mm
Roulement 8x16x5mm
95175
Kugellager 6x10x3mm
Ball bearing 6x10x3mm
Roulement 6x10x3mm
90502.83
90170.1
Brushless GM PRO 11.1V (2100 KV)
98022
Antennenrohr mit Kappe
Antenna Pipe & Cap
Tube d'antenne avec capuchon
90170.82
Stoßdämpfer-Reparaturset
Shock Rebuild Kit
Set de réparer de amortisseur
90170.76
Räder Micro-Pin verklebt (2)
Tires Micro-Pin glued (2)
Pneu Micro-Pin collée (2)
90170.43SW
Heckflügel schwarz
Rear Wing black
Aileron arrière noir
90170.83
Programmierkarte für Regler Flash 3.0
Program card for ESC Flash 3.0
Carte de programmation de variateur
Flash 3.0
31 GM-Racing 90170.RTR Flash 3.0 Race Brushless 4WD Buggy
Page 15

GM-Racing 90170.RTR Flash 3.0 Race Brushless 4WD Buggy 32
Tuningteile
Tuning Parts
Pièces de tuning
90170.100
Radträger hinten Alu CNC gefräst (2)
Alum. Rear Wheel Hub CNC (2)
Support de roues arrière CNC (2)
90170.101
Lenkverbinder mit Lager CNC gefräst
Steering Connecting plate CNC
Bras de liaison renvoi CNC
90170.102
Chassis CNC gefräst
Chassis CNC
Chassis CNC
90170.103
Querlenkerhalter unten hinten Alu CNC (2)
Rear Lower Suspension Arm Mounts Alum. (2)
Support de bras arrière Alum. CNC (2)
90170.105
Querlenkerhalter unten vorne Alu CNC (2)
Front Lower Suspension Arm Mounts Alum. (2)
Support de bras avant Alum. CNC (2)
90170.104
Querlenkerhalter vorne oben Alu CNC
Front Upper Suspension Arm Mounts Alum CNC
Support de bras avant en haut Alum. CNC
90170.108
Flügelbefestigungsscheiben Alu (2)
Rear Wing Washers Alum. (2)
Rondelle de Aileron Alum. (2)
90170.109
Stoßdämpferfedern vorne blau (weich)
Shock Springs Front blue (soft) (2)
Ressort Amortisseur avant bleu (mal.)
90170.110
Stoßdämpferfedern vorne schwarz (hart)
Shock Springs Front black (hard) (2)
Ressort Amortisseur avant noir (2)
90170.111
Stoßdämpferfedern hinten blau (weich)
Shock Springs Rear blue (soft) (2)
Ressort Amortisseur arrière bleu (mal.)
90170.112
Stoßdämpferfedern hinten schwarz (hart)
Shock Springs Rear black (hard) (2)
Ressort Amortisseur arrière noir (2)
Page 16

Silikonöl
Pure Silicon Oil
Huile de silicone
Fett
Grease
Graisse
Für vorne und hinten bauen
Assemble front and rear
Assembler avant et arriére
Für links und rechts bauen
Assemble both left and right side
Assembler à gauche et á droite
Sekundenkleber
CA glue
Colle secunde
Luftfilteröl
Filter oil
Filtre à aire
Bitte beachten Sie die folgenden Symbole in der Anleitung, sie geben wichtige Hinweise zum Zusammenbau:
Please consider the following symbols in the manual, they give important notes to the assembly:
Veuillez considérer les symboles suivants dans le manuel d‘utilisation, elle donnez des indications importantes à
l‘assemblage:
Montage
Assembly
Assemblage
C-Mount Adjusting plate 17 - 24°
The caster angle can be changed easily by different C-mount
adjusting plates as shown above.
L'angle de chasse peut simplement être modifié par montré
différents inserts comme represénté en haut.
Der Nachlaufwinkel kann einfach durch verschiedene Einsätze wie
oben gezeigt verändert werden.
33 GM-Racing 90170.RTR Flash 3.0 Race Brushless 4WD Buggy
Page 17

Montage Differenzial
Differential Assembly
Assemblage différentiel
90170.33
95183.D
90170.58
90170.14
90170.14
90170.14
90170.14
90170.14 90170.14
65.04K 90170.74
90170.58
90170.58
90170.10
95183.D
90170.33
M3x12
65.04K 90170.74
90170.32
M4x4
90170.32
95183.D
95183.D
90170.16
M3x12
90170.58
90170.14
90170.58
90170.58
90170.14
90170.14
90170.14
90170.14
90170.14
M4x4
GM-Racing 90170.RTR Flash 3.0 Race Brushless 4WD Buggy 34
Page 18

Montage Hinterachse
Rear End Assembly
Assemblage suspension arrière
90170.79
90170.74
5x4mm
90170.11
90170.13
95183.D
90170.52
90170.13
90170.9
90170.9
90170.37
95183.D
90170.74
90170.74
90170.74107
3x16mm
3x12mm
3x12mm
3x12mm
90170.36
90170.47
90170.49
M3x3
3x8mm
90170.13
90170.20
90170.20
90170.20
90170.45
90170.45
90170.20
90170.49
M3x3
35 GM-Racing 90170.RTR Flash 3.0 Race Brushless 4WD Buggy
Page 19

Montage Vordere Radaufhängung
Front Suspension Assembly
Assemblage suspension avant
90170.74
90170.74
90170.79
90170.35
90170.35
M5x4
95183.D
95183.D
90170.34
M4x16
90170.27
M3x12
90170.17
90170.17
90170.17
90170.12
90170.12
90170.40
90170.40
90170.40
M4x12
90170.74
90170.74
90501.55
M3
M3x26
M3
90170.27
90170.22
90170.26
M3x12
90170.59
90170.59
90170.59
M3x6
90170.48
GM-Racing 90170.RTR Flash 3.0 Race Brushless 4WD Buggy 36
Page 20

Montage Vorderachse
Front Assembly
Assemblage avant
90170.79
90170.74
M3x12
90170.13
90170.9
90170.9
90170.9
M3x12
90170.37
90170.53
90170.39
90170.11
M5x4
95183.D
95183.D
90170.13
M3x12
M3x12
37 GM-Racing 90170.RTR Flash 3.0 Race Brushless 4WD Buggy
Page 21

Montage Hinterachse
Rear Assembly
Assemblage arrrière
90170.47
107
90170.74
90170.74
M3x12
90170.51
M3x8
M3x3
90170.21
90170.21
90170.21
M3x3
90170.13
90170.46
M3x8
90170.51
M3x12
90170.74
90170.74
90501.55
90170.79
M3x12
90170.42
M3x12
90170.18
90170.48
M3x22
90170.31
M3
90170.27
90170.27
90170.26
90170.25
90170.35
M5x4
95183.D
95183.D
M3
90170.60
GM-Racing 90170.RTR Flash 3.0 Race Brushless 4WD Buggy 38
Page 22

Montage Heckfl ügel
Rear Wing Assembly
Assemblage Aileron arrière
90170.74
90501.55
M3x12
90170.57
90170.43
90170.42
90170.42
90170.42
90170.42
M3x12
M3x12
M3
M3
90170.74
M3x16
M3x12
39 GM-Racing 90170.RTR Flash 3.0 Race Brushless 4WD Buggy
Page 23

Montage Vorder-/Hinterachse
Front-Rear End Assembly
Assemblage avant - arrière
90170.74
90170.74
90170.38
M4x12
M4x12
M4x12
M3x12
M3x12
M3x12
90170.38
M4x12
M4x12
M4x12
M3x12
M3x12
M3x12
GM-Racing 90170.RTR Flash 3.0 Race Brushless 4WD Buggy 40
Page 24

Montage Chassisseitenteile / Lenkung
Side Plate and Steering arms Assembly
Assemblage pièce latérale de chassis et bras de liaison
90170.74
90170.44
90170.44
90170.74
90170.74
90170.7490501.55
90170.30
90170.30
90170.29
90170.29
M3x12
90170.28
90170.28
90170.28
M3
41 GM-Racing 90170.RTR Flash 3.0 Race Brushless 4WD Buggy
Page 25

Montage Lenkung
Steering Assembly
Assemblage direction
90170.74
M4x8
M3x16
M3x16M3
M3
M3
90170.27
90170.26
90170.24
M4x8
90170.74
90501.55
GM-Racing 90170.RTR Flash 3.0 Race Brushless 4WD Buggy 42
Page 26

Montage Chassisstreben
Chassis Brace Assembly
Assemblage châssis support
90170.74
90170.74
90501.55
90170.71
90170.50
90170.39
M3x8
M3x16
M3
90170.56
M4x8
M4x8
M3x10
M3x10
90170.74
90501.55
M3
M3
90170.54
90170.48
M3x16
43 GM-Racing 90170.RTR Flash 3.0 Race Brushless 4WD Buggy
Page 27

Montage Mitteldifferenzial
Mid-differential Assembly
Assemblage différentiel de centre
90170.74
90170.63
90170.63
95183.D
95183.D
90170.15
90170.61
90170.61
90170.61
90170.61
90170.61
M3x8
M3x10
M3x10
90170.74
90170.19
90170.19
M4x8
GM-Racing 90170.RTR Flash 3.0 Race Brushless 4WD Buggy 44
Page 28

Montage Motor und Empfängerbox
Motor and Receiver Box Assembly
Assemblage moteur et box de récepteur
90170.74
65.04K
M4x8
M4x8
65.04K
90170.61
M4x8
90170.62
90170.62
M4x8
90170.74
M3x10
90170.68
90170.68
90170.68
94010.1
45 GM-Racing 90170.RTR Flash 3.0 Race Brushless 4WD Buggy
Page 29

Montage Lenkservo
Steering servo Assembly
Assemblage servo de direction
90170.74
M3x10
M3x10
Rundkopf
90170.74
90501.55
M3
M3
M3x8
M3x18
GM-Racing 90170.RTR Flash 3.0 Race Brushless 4WD Buggy 46
Page 30

Montage Akkuhalter und Fahrtenregler
Akkubox and ESC Assembly
Assemblage support accu et variateur électr.
90170.74
M3x8
M4x8
90170.67
90170.66
90170.65
90502.83
90170.64
90170.74
M4x8
90170.69
90170.70
47 GM-Racing 90170.RTR Flash 3.0 Race Brushless 4WD Buggy
Page 31

Montage Stoßdämpfer
Shock Assembly
Assemblage amortisseur
90501.55
90170.6
90170.7
59.5 x 3.5
72 x 3.5
Vorne / Front / Avant (mm) Hinten / Rear / Arriére (mm)
M3
90170.6
90170.6
(90170.7)
(90170.7)
2X
2X
90170.2
(90170.3)
90170.490170.5
90170.4
(90170.5)
90170.72
90170.2
(90170.3)
90170.82
90170.2
(90170.3)
90170.82
90170.82
GM-Racing 90170.RTR Flash 3.0 Race Brushless 4WD Buggy 48
Page 32

Montage Stoßdämpfer (2)
Shock Assembly
Assemblage amortisseur
TM3
90170.81 90170.74
M3x24
90170.8
90170.82
90170.81
M3x26
M3x26
90170.8
90170.81
M3x24
90170.82
49 GM-Racing 90170.RTR Flash 3.0 Race Brushless 4WD Buggy
Page 33

Montage Räder und Karosserie
Wheel and Body Assembly
Assemblage pneu et carrosserie
90170.35
90170.77
90170.77
90170.75
90170.55
90170.73
98022
GM-Racing 90170.RTR Flash 3.0 Race Brushless 4WD Buggy 50
Page 34

90170.35
90170.77
90170.75
90170.24
90170.2
90170.8
90170.36
90170.59
90170.49
90170.20 90170.2
90170.13
90170.47
90170.52
90170.59
90170.13
90170.8
90170.9
90170.17
90170.12
90170.40
90170.47
90170.13
90170.37
90170.11
90170.29
90170.28
90170.29
90170.24
90170.29
90170.30
90170.34
90170.35
90170.40
90170.48
90170.45
90170.20
90170.59
90170.56
90170.42
90170.49
90170.19
90170.39
90170.43
90170.57
90170.54
90170.50
90170.19
90170.22
90170.41
90170.23
90170.68
90170.38
90170.77
90170.35
90170.68
90170.44
90170.44
90170.61
90170.63
90170.63
90170.15 90170.71
90170.69
90170.62
90170.62
90170.61
90170.13
90170.51
90170.61
90170.47
90170.47
90170.18
90170.13
90170.11
90170.37
90170.9
90170.60
90170.66
90170.31
90502.83
90170.65
90170.64
90170.77
90170.35
90170.75
90170.46
90170.21
90170.21
90170.35
90170.13
90170.39
90170.53
90170.3
90170.8
90170.25
90170.51
90170.8
90170.25
90170.48
90170.75
90170.35
51 GM-Racing 90170.RTR Flash 3.0 Race Brushless 4WD Buggy
Page 35

GM-Racing 90170.RTR Flash 3.0 Race Brushless 4WD Buggy 52
Page 36

ZUGELASSENE FREQUENZEN - PERMITTED FREQUENCIES - FRÉQUENCES AUTORISÉES
53 GM-Racing 90170.RTR Flash 3.0 Race Brushless 4WD Buggy
Page 37

Die Firma G raupner Gm bH & Co. KG,
kceT/miehhcriK 03237-D ,69-49 eßartsnetteirneH
gewährt a b dem Kaufdatum auf die ses Produkt
eine Garantie von 24 Monaten.
Die Garan tie gilt nur für d ie bereits be im Kauf des
Produkte s vorhanden en Material - oder Funkti -
onsmäng el. Schäden d ie auf Abnüt zung, Über -
lastung, falsches Zubehör oder unsachgemäße
Behandlung zurückzuführen sind, sind von der
Garantie ausgeschlossen.
Die gesetzlichen Rechte und Gewährleistungsan -
sprüche des Verbrauchers werden durch diese
Garantie nicht berührt.
Bitte über prüfen Sie vor einer R eklamation oder
Rücksendung das Produkt genau auf Mängel,
da wir Ihnen bei Mängelfreiheit die entstandenen
Unkosten in Rechnung stellen müssen.
Wir gewähren a uf dieses Erzeugni s eine
GARANT IE
von
24
MONATEN
Graupner GmbH & Co. KG, Henriettenstraße
94-96, D-73230 Kirchheim/Teck, Germany
guarantees this product for a period of 24 months
from date of purchase.
The guarantee applies only to such material or
operatio nal defects wh ich are presen t at the time
of purchase of the product.
Damage due to wear, overloading, incompetent
handling or the use of incorrect accessories is
not covered by the gu arantee.
The user‘s legal rights and claims under garan -
tee are not a ected by this guaran tee.
Please check the product carefully for defects
before you make a c laim or send the item to us,
since we are obliged to make a charge for our
cost if the pro duct is found to be fre e of faults.
This product is
WARRANTIED
for
24
MONTHS
La société G raupner Gm bH & Co. KG,
Henriettenstraße 94-96, D-73230 Kirchheim/
Teck, Allemagne, accorde sur ce produit une ga -
rantie de 24 mois à partir de la date d‘achat.
La garantie prend eet uniquement sur les vices
de fonctionnement et de matériel du produit
acheté. Les do mmages dûs à d e l‘usure, à de
la surcharge, à de mauvais accessoires ou à
d‘une applic ation inada ptée, sont exclus de l a
garantie.
Cette gara ntie ne remet pas en caus e les droits
et prétentions légaux du consommateur.
Avant toute ré clamation et to ut retour du pro duit,
veuillez s.v.p. contrôler et noter exactement les
défauts ou vices du produit, car tout autre frais
relatif au produit vous sera facturé.
Nous accordons une
GARANTIE
de
24
MOIS
La Ditta G raupner Gm bH & Co. KG,
Henriet tenstraße 94-9 6, D-73230 Kirchheim /
Teck, Germani a, a partire dalla d ata di acquisto,
concede su questo prodotto una Garanzia di 24
mesi.
La garanz ia è valida sol o per i diet ti di materi -
ale e di funzionamento esistenti già al momento
dell’acquisto d el prodotto. Dan ni dovuti a log o -
rio, sovraccarico, accesssori sbagliati o ricondu -
cibili ad uso personale improprio, sono esclusi
dalla gara nzia.
I diritti legali e le pretese assicurative dell’utente
non trovano ri scontro nella pres ente garanzia.
Vi preghiamo di controllare i difetti dell’articolo
prima di inoltrare un reclamo o di restituirlo per -
ché, in asse nza di difetti, sa remo costrett i a con -
teggiare le spese.
Su questo pro prodotto, diamo una
GARANZIA
di
24
MESI
La rma Graupner GmbH & Co. KG,
Henriettenstraße 94-96, D-73230 Kirchheim/Teck,
concede sobre este producto una garantiá de 24
meses des de la fecha de comp ra.
La garantiá vale solo para el material de los produc -
tos comprados especicados - o bién funcio na -
mientos - defectuosos. Las averías producidas por
desgaste, sobrecarga, accesorios equivocados o
usos inade cuados están excl uidos de la garant ía.
El derecho legal y el cumplimiento de la garantía
para el consumidor se conseguirá a través de esta
garantía sin modicaciones.
Por favor, antes de hac er una recla mación o en -
viar una devolución comprobar minuciosamente el
defecto del producto, puesto que si está correcto
tendremos que cobrarle en la factura el importe de
la revisión.
Nuestra Sociedad concende una
GARANTÍA
de
24
MESES
Firma Grau pner GmbH & Co. KG,
Henriettenstraße 94-96, 73230 Kirchheim/Teck
poskytuje na tento produkt záruku v délce trvání
24 mesícu od data prodeje.
Záruka platí pouze na práve pri koupi existující
vady materiálu a na vady funkce. Škody, které
vznikly pretízením, prirozeným opotrebením,
nevhodnzm pouzitím príslušenství nebo neod -
borným zacházením, jsou ze záruky vylouceny.
Právní a zárucní nároky spotrebitele nebudou
touto záru kou dotceny.
Prosíme zkontrolujte pred uplatnením reklamace
a pred zasláním produktu zpet presne vadu,
abychom Vám nem useli v príp ade bezzáva d -
nosti vys tavit úcet za vzni klé náklady
Posky tujeme na tento výrobe k
ZÁRUKU
v délce trvání
24
mesícu
Service-Hotline:
Montag - Freitag
9
30
- 11
30
h und 13
00
- 15
00
h
Tel.: (+49) 18 05 / 47 28 76
Espana
FA-Sol S.A.
C. Avinyo 4 (Pujada Roja)
E 8240 Manresa
Tel.: (+34) 93 87 34 23 4
Fax: (+34) 93 87 41 55 4
France
Graupner Service France
Gérald Altmayer
86, rue St. Antoine
F 57601 Forbach-Oeting
Tel.: (+33) 38 78 56 21 2
Fax: (+33) 38 78 50 00 8
Servicestellen
Service
Service après-vente
Deutschland / Österreich
Graupner GmbH & Co. KG
Henriettenstrasse 94-96
73230 Kirchheim Teck
Belgien / Niederlande
Jan van Mouwerik
Slot de Houvelaan 30
NL 3155 Maasland VT
Tel.: (+31) 10 59 13 59 4
Fax: (+31) 31 10 59 13 59 4
Ceská Republika/
Slovenská Republika
RC Service Z. Hnizdil
Letecka 666/22
CZ 16100 Praha 6 – Ruzyne
Tel.: (+42) 23 33 13 09 5
Fax: (+42) 23 33 13 09 5
Italia
GiMax
Via Manzoni, no. 8
25064 Gussago
Tel.: (+39) 30 25 22 73 2
Fax: (+39) 30 25 22 71 1
Luxembourg
Kit Flammang
129, Route d’Arlon
L 8009 Strassen
Tel.: (+35) 23 12 23 2
Fax: (+35) 23 13 04 9
Schweiz
Graupner Service Schweiz
Wehntalerstrasse 37
CH 8181 HÖRI / ZH
Tel.: (+41) 43 26 66 58 3
Fax: (+41) 43 26 66 58 3
Sverige
Baltechno Electronics
P.O. Box 5307
S 40227 Göteborg
Tel.: (+46) 31 70 73 00 0
Fax: (+46) 31 70 73 00 0
United Kingdom
Gliders
Brunel Drive
GB Newark,
Nottinghamshire NG242EG
Tel.: (+44) 16 36 61 05 39
Fax: (+44) 16 36 60 52 55
Best.-Nr.
Order No.
N° de l’article
Name des Käufers, Straße, Wohnort
Owner‘s name, complete adress
Nom de l‘acheteur, Domicie et rue Übergabedatum
Date of purchase/delivery
Date de remise
Firmenstempel und Unterschrift des Einzelhändlers
Stamp and signature of dealer
Cachet de la rme et signature du detailant
Muss an einem Sammelpunkt für elektronische
Geräte abgegeben werden. Darf nicht über den
normalen Hausmüll entsorgt werden.
Graupner GmbH & Co. KG
D-73230 Kirchheim/Teck, Henriettenstraße 94-96, Germany
GARANTIE
URKUNDE
Warranty certicate
Certicat de garantie
Certicato di garanzia
Certicado de garantía
Zarucní list
GRAUPNER t GRAUPNER t GRAUPNER
GRAUPNER
t GRAUPNER t GRAUPNER
GRAUPNER t
GRAUPNER t
GRAUPNER t GRAUPNER t GRAUPNER
GRAUPNER
t
GRAUPNER
t
GRAUPNER
t GRAUPNER
t
GRAUPNER
90170.RTR
GM-Racing 90170.RTR Flash 3.0 Race Brushless 4WD Buggy 54
Page 38

 Loading...