

Page 1

Diamond digital DD10
4. EXTRA
4. EXTRA
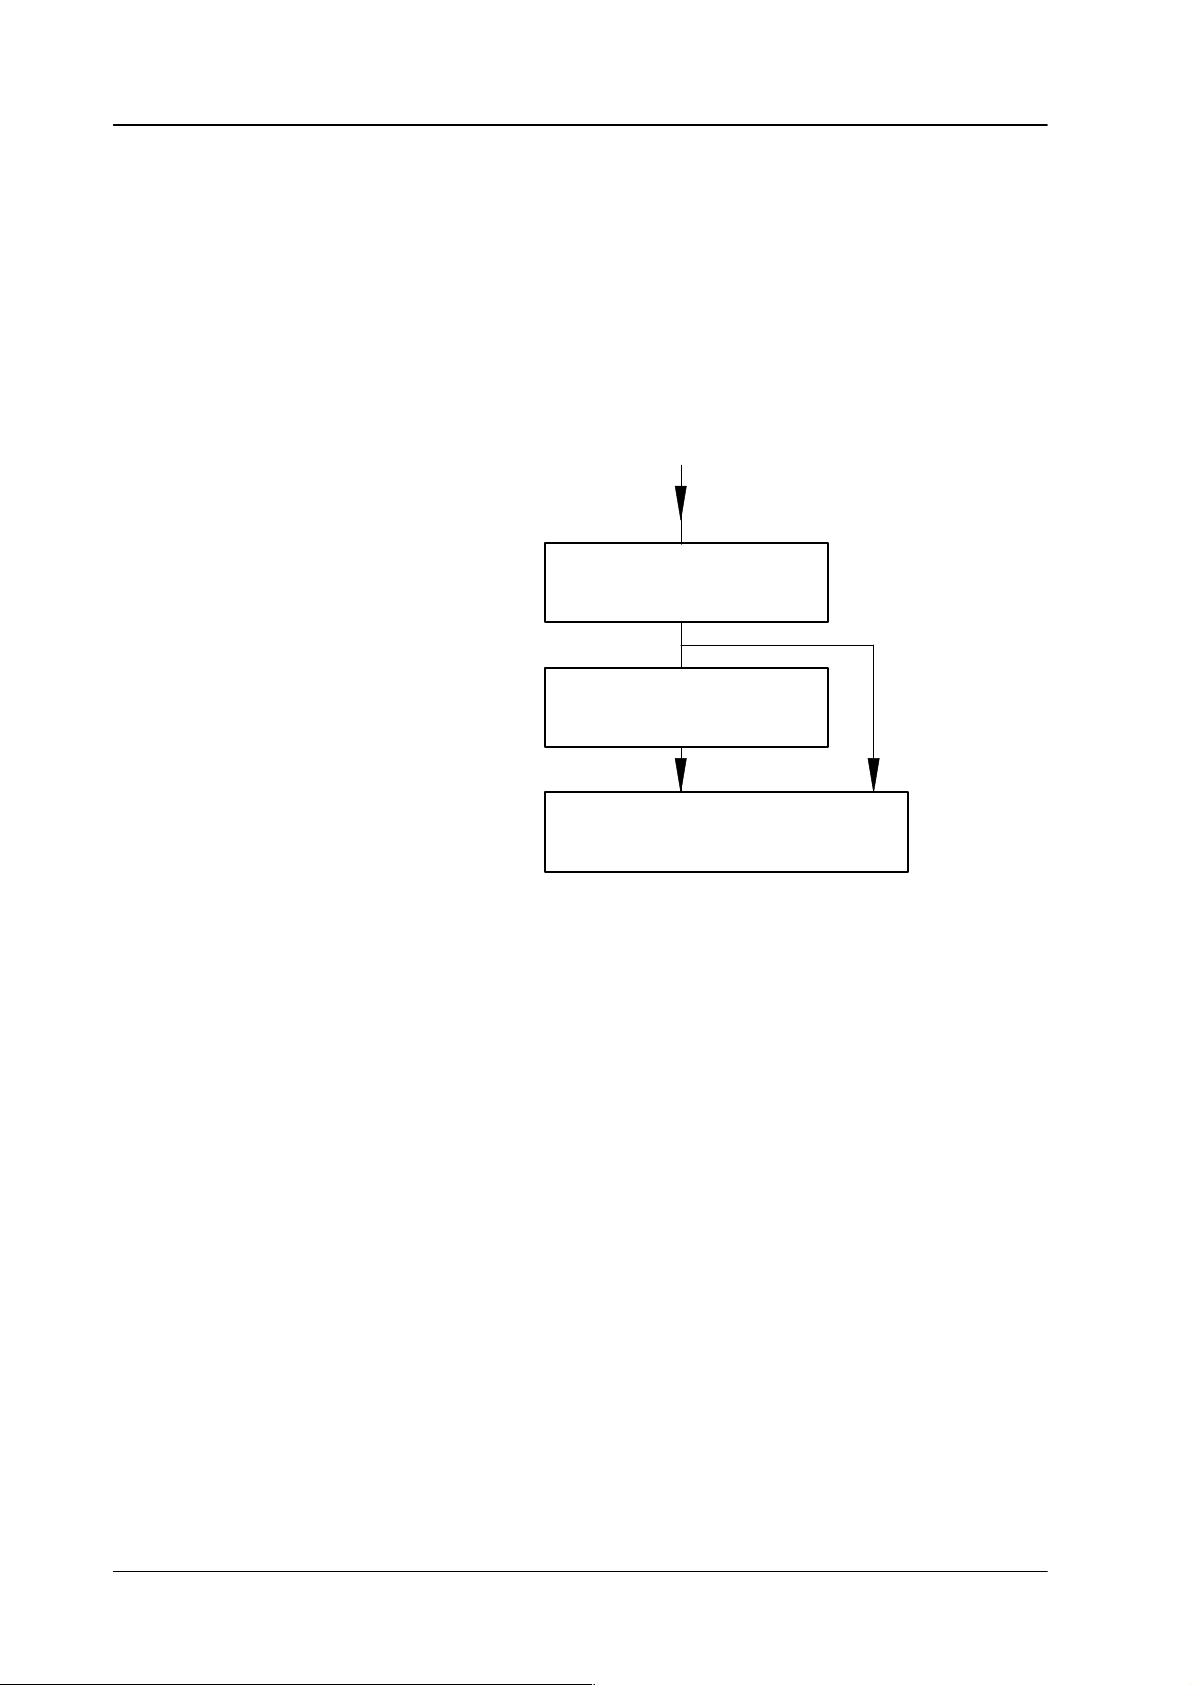
EXTRA (Extended Transition Recall Automatic) is a software package for storing
and
recalling switcher statuses and processes.
EXTRA
and
tioning,
EXTRA is used for storing and recalling
interpolated timelines.
The snapshots and timelines are identified with numbers (Register 1 ... 99). The
numbers
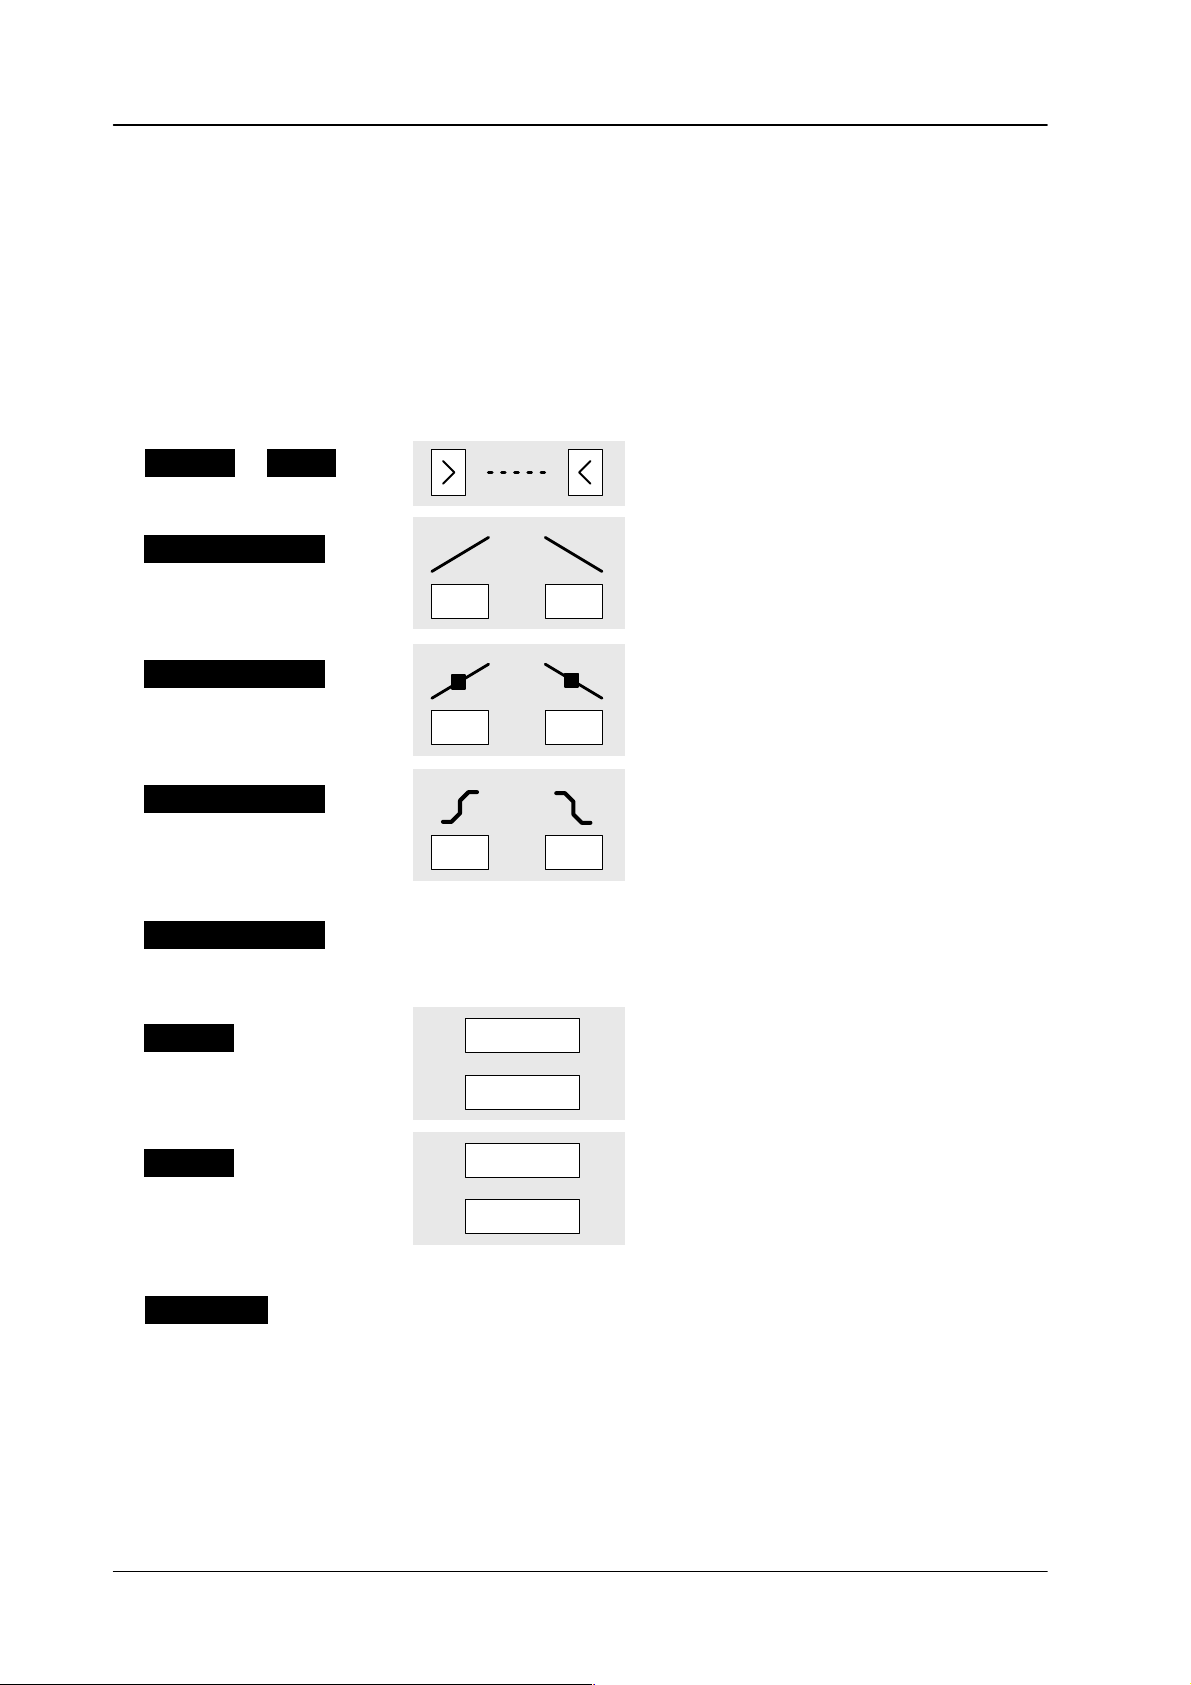
EXTRA can be operated in two ways:
D
D
D
The
respective
tions.
With
about
level
to
thus permits
sequences with dif
coloring etc.
100 ... 999 are reserved for other applications (e.g. disk).
operation via the keys of the EXTRA panel
operation via the EXTRA menu, and
operation with the Source Selection keys (EXTRA ME operation) – DD20 /
DD30 only
number of keyframes in
switcher computer and the number of
the
DD30
39;
DD10
(ME1, ME2 or
72.
storing and recalling individually prepared operating statuses
ferent background, key sources, borders, wipe pattern posi
static settings (statuses, snapshots) and
a timeline is only limited by the storage capacity of the
mixing levels and storable func
about 30 complete keyframes may be stored in one timeline. (
: about 54, and
PP) are to be stored, the number of possible keyframes rises
DD5: about 59). If only the keyframes of one mixing
DD20:
-
-
The operator can edit a timeline in order to produce more sophisticated ef
NOTE
The maximum memory available for a timeline is 64 kB. This
corresponds
electronics
173 kB.
to 37% of the
box RAM for snapshots and timelines is approx.
total memory
. The total memory in the
fects.
221
Page 2

4. EXTRA
DEFINITION OF TERMS
Diamond digital DD10
SNAPSHOT
KEYFRAME (KF)
TIMELINE (TIML)
DISSOLVE is
DISSOL
STORE
RECALL
RECORD
EDITING (EDIT)
(SNAP)
VE TIME
is a switcher status or the status of a switcher part.
is a static switcher status within one timeline.
is a stored sequence of switcher statuses (keyframes).
a dissolve between static switcher statuses. The ana-
logue
values are dissolved, the switching functions are
switched at the end of the dissolve procedure.
is the time for dissolving between two static switcher
statuses.
is the storing of a static switcher status.
is the reproduction of a stored static switcher status.
is the storing of keyframes to a timeline in real time.
is the creation or the processing of a timeline outside
real-time.
PLAY
TRAJECTORY
HOTKEY are
REGISTER is a memory location where a snapshot or a timeline can
REGISTER MODE
BANK MODE
is the play of a stored timeline.
is the ”trajectory” between keyframes.
the 15 upper keys of the wipe pattern selection key
pad
(DD20 / DD30 only).
be
stored. Registers are identified with a number
between 1 ... 99.
is an input mode for the register number in the EXTRA
panel,
in which the number is entered in one digit
(0
...
9) or in two digits (10 ... 99) followed by functional
selections
is an input mode for the register number in the EXTRA
panel.
digit of the register number. When the units digit of the
register
or
timeline is triggered immediately (hotkey).
such as
The bank number 0 ... 9 corresponds to the tens
number is entered, the corresponding snapshot
Enter, Cut or Auto.
222
Page 3
Diamond digital DD10
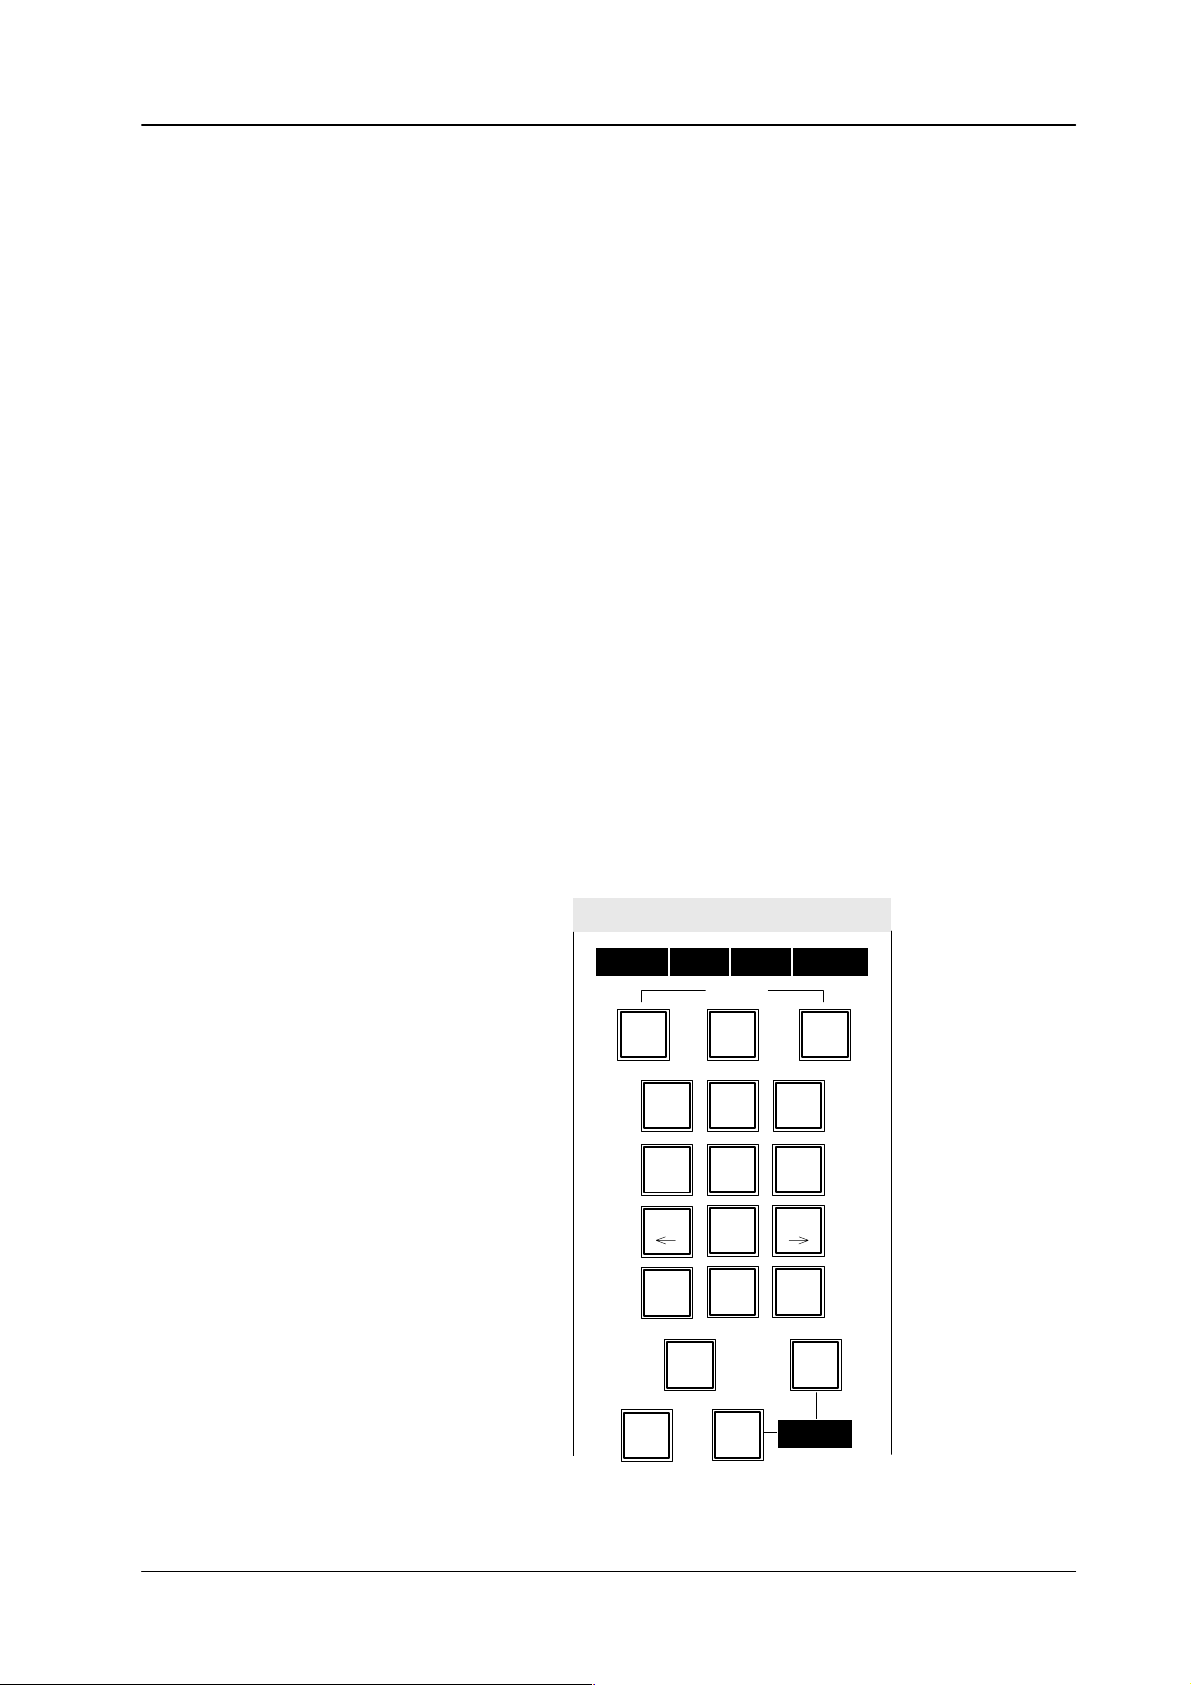
4.1 EXTRA PANEL
The
chers..
• Input
•
• Operation
• Operation
This section of the operating instructions only describes the EXTRA operation in
the
in
4.1 EXTRA
EXTRA panel has dif
of the transition durations (Trans dur
and EXTRA fading. For this the keys
her
details please refer to the relevant sections.
ferent functions in the
) for transitions, DSK, Fade-to-Black
0 ... 9
and the
Diamond Digital DD20/DD30
Enter
key are used. For furt
Input of figures in conjunction with the alphabetical keypad for text input.
with
of the setup functions. Here the
dif
ferent functions. For further details please refer to section
Store, Bank
and
Edit
keys are used
Setup.
of the EXTRA functions. Here the keys with double lettering have dif
ferent
functions in the various operations.
The secondary lettering of the keys
modified.
ster
an
In
the following instructions only the applicable function of the double lettering
is
mentioned.
The secondary lettering
is selected.The secondary lettering
unassigned register
.
EXTRA panel. Further EXTRA operations using
the section
EXTRA Menu
.
0 ... 9
FREE
applies when existing timelines are
of the
Clear
key applies when a regi
FREE
of the
Clear
key serves to select
the data monitor are described
panel
swit-
-
-
-
EXTRA panel DD10
EXTRA
T I M L
9 9
Store Bank
78
4
H
TM TRTM TRAJ
1
FREE
Undo
E
Set up
56
23
VIEW
0
X T R A
9
DELMODINS
EnterClear
NEXTLOOP
Trans
dur
Edit
Cut
Auto
1 2 3 4
223
Page 4

4.1 EXTRA
panel
EXTRA panel
DD20/DD30
EXTRA
Flip
Flop
Rev
Stop
Next
Stop
Diamond digital DD10
EXTRA
0 1 2 3 4 5 6 7 8 9 1 2 3 4 5
Store Bank
78
4
H
FREE
56
TM TRTM TRAY
1
23
VIEW
0
Edit
9
DELMODINS
EnterClear
NEXTLOOP
ME1
ME2
PP
Undo
Cut Auto
Col
BGD
Misc
Reloc
Trans
dur
1 2 3 4
224
Page 5

Diamond digital DD10
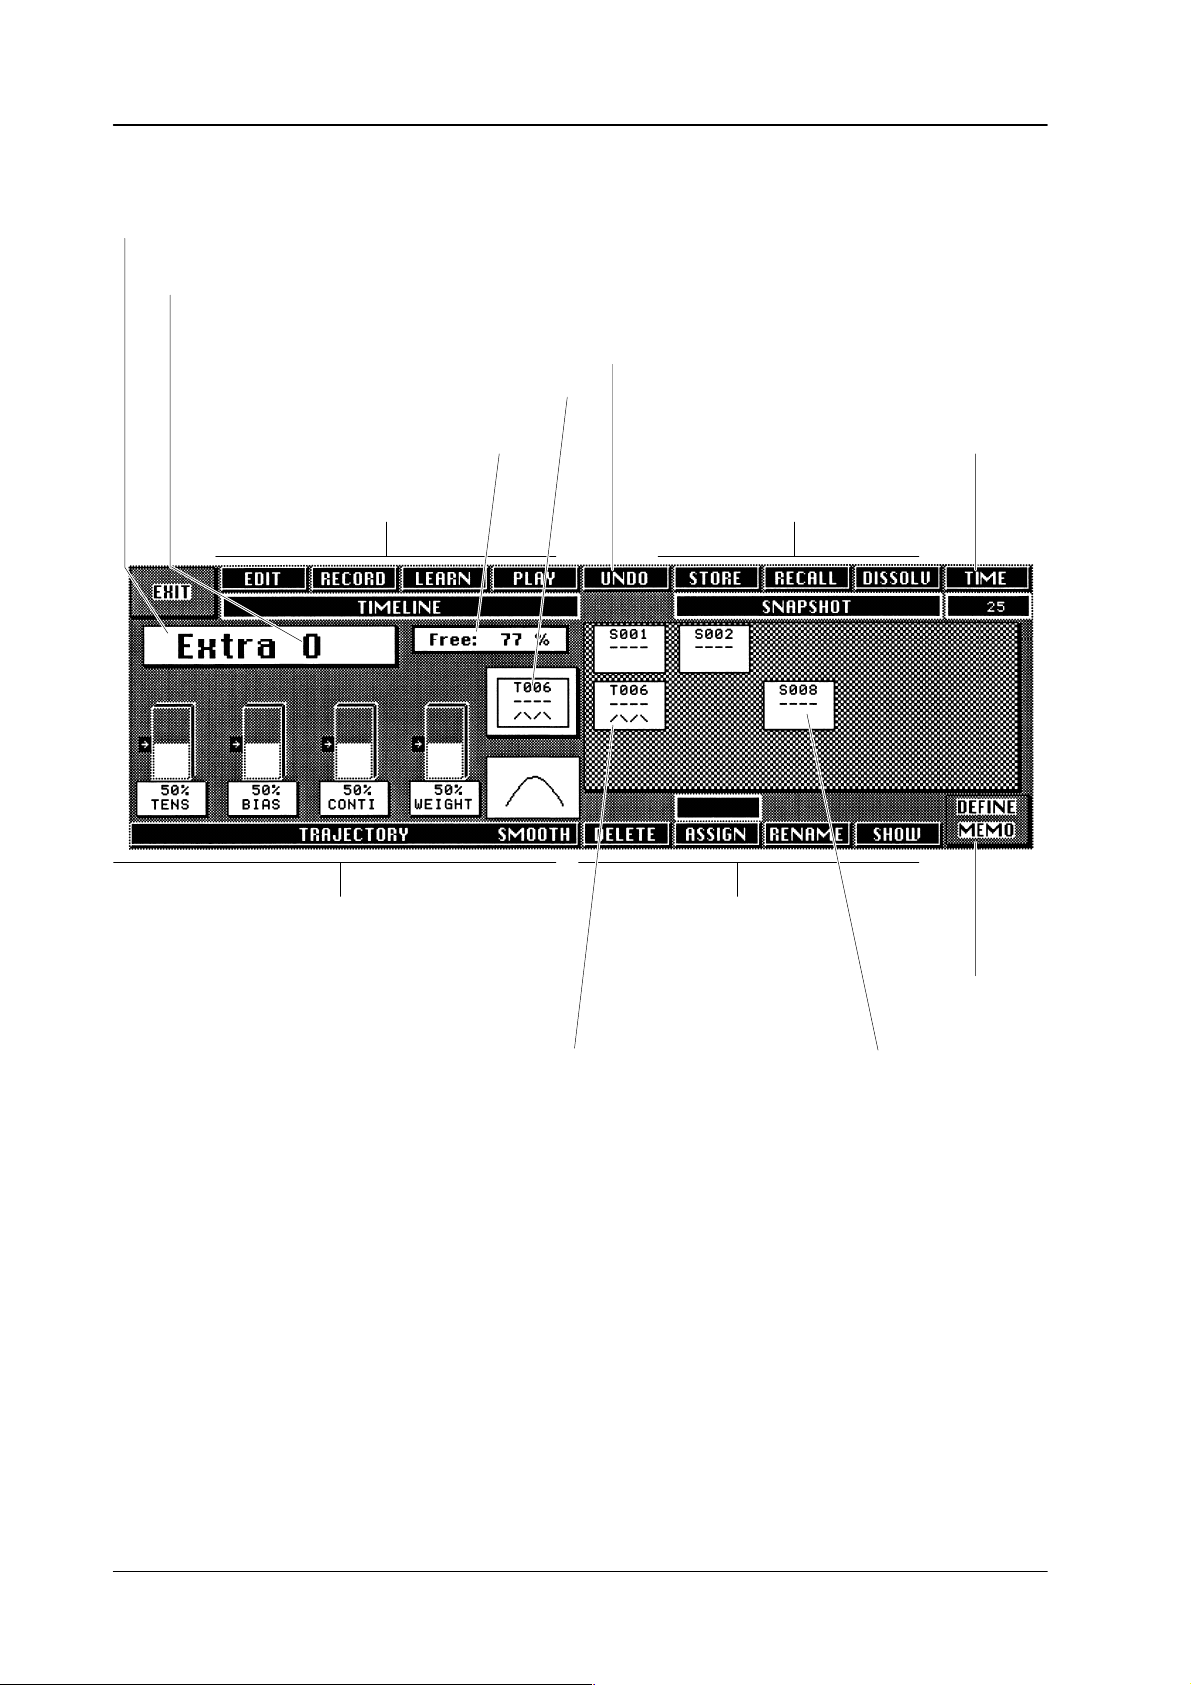
4.1.1 DISPLAY
If
panel
Display 1 Display 2 Display 3 Display 4
R E G
X X
no editing function or store function is selected,
may show the following indications:
No register is selected. The register is empty
4.1 EXTRA
panel
the 16 digit display of the EXTRA
.
R E G
R E G
S N A P 0 5
S N A P B 0 5
S N A P 0 5
S N A P B 0 5
2 4
B 2 4
S 0 0 5
S 0 0 5
A B C DE F G H
A B C DE F G H
– – – –
– – – –
Register 24 is selected. The register is empty
.
In Bank mode, bank 2, position 5 is selected (this corresponds to
register 24). Register 24 is empty
Register
particular
05 is selected. The register contains a snapshot and has no
name (a default name will be used).
.
As above but in Bank mode bank 0 with hotkey 5.
Register 05 is selected. The register contains a snapshot with the
name ”ABCDEFGH”.
The name can only be entered in the EXTRA menu.
As above but in Bank mode 0 with hotkey 5.
T I M L
T I M L
T I M L
T I M L
1 6
B 1 6
1 6
B 1 6
T 0 1 6
T 0 1 6
K L
M N
K L
M N
– – – –
– – – –
O P Q R
O P Q R
Register 16 is selected. The register contains a timeline and has no
particular name (a default name will be used).
As above but in Bank mode bank 1 with hotkey 6.
Register
16 is selected. The register contains a timeline
with the name
”KLMNOPQR”.
The
name can only be entered in the EXTRA menu.
As above but in Bank mode bank 1 with hotkey 6.
225
Page 6

4.1 EXTRA
panel
Diamond digital DD10
4.1.2
DEFINE MEMO IN EXTRA-P
The
EXTRA panel permits a rough but fast filtering for storing and recalling snaps
hots
and timelines.
In generating a snapshot or a timeline, the lighting keys show which switcher
selections
which
is
smaller than the available target section, only the recalled section is af
are stored. In
switcher sections are af
ANEL (DD20 / DD30 ONL
ME1
ME2
PP
recalling
a snapshot or a timeline, the
fected by
Y)
-
Col
BGD
Misc
Reloc
lighting keys show
the stored functions. If the recalled section
fected.
Example:
Mixing
level ME1 is stored. The entire switcher is ready for recalling. Only ME1 is
affected,
the other sections of the switcher remain unchanged.
The indication is also shown in the EXTRA menu under DEFINE MEMO.
226
Page 7
Diamond digital DD10
4.1 EXTRA
panel
4.1.3 RELOCA
Switch on Source ME
Press RELOC
TING T
(key lights up)
O A DIFFERENT MIXING LEVEL (DD20 / DD30 ONL
When a snapshot or a timeline is recalled, the Relocate function permits addres
sing
a dif
be
switched.
This function is activated with the
Y)
ferent mixing level (ME) than that used during storing, i. e.
Reloc
key
.
If several MEs are selected as source, the
ME with the highest number (PP
used as a source.
a relocation can
= ME3) is
-
Switch on Target ME
The
EXTRA menu always shows the source ME in Define Memo.
227
Page 8

4.1 EXTRA
The functions of the keys including those in conjunction with Reloc can be seen from the following table:
panel
Diamond digital DD10
Key
ME1
Key does not light up
Key lights up
ME2
Key does not light up
Key lights up
PP
Key does not light up
Key lights up
COL
BGD
Relocate OFF
Reloc
key does not light up
Mischebene ME2
is not stored or not restored
is stored or restored
Mischebene ME1
is not stored or not restored
is stored or restored
Mischebene PP
is not stored or not restored
is stored or restored
Hintergrundfarbflächen
Relocate ON
Reloc
key lights up
relocate to ME1
relocate to ME2
relocate to PP
Key does not light up
Key lights up
MISC
Key does not light up
Key lights up
is not stored or not restored
is stored or restored
Sonstige AUX, DVE, Store
is not stored or not restored
is stored or restored
no function
no function
228
Page 9

Diamond digital DD10
4.1 EXTRA
panel
4.1.4
ENABLING AND DISABLING BANK MODE
Enabling
Bank mode
Disabling
Bank mode
4.1.5
SELECTING A REGISTER DURING ST
The
Bank mode in the EXTRA panel permits
line
with a single key (hotkey). The bank number is the tens digit of the register
hotkeys
storing
Hold
are
the units digits of the register
but this does not have any particular benefit.
the
Bank
key
down and select the desired bank with the numeric keypad. The
access to a stored snapshot or time
. The Bank mode may be enabled during
Bank key lights up. In the display a ”B” appears before the register number
Example:
Press the lighting
S N A P B 0 5
Bank
key.
S 0 0 5
– – – –
ORING
-
. The
.
During
the storing of snapshots or timelines the register to be used for storage must
be
selected. The procedure is the same for both cases.
However
, the indication in the display dif
for snapshots
fers.
STOR
for Timelines EDIT
• If
the register number is to be taken over that
of
the
Store or Edit
Note:
key
, no further selection is necessary
In storing, the contents of the register may be overwritten,
was shown before the actuation
.
assuming that the logged-in USER has stored in the register
With the
•
• By
with Enter
by pressing
Note:
FREE
key the next unassigned register can be selected.
entering a one– or two–digit number in the numeric key pad and confirming
, any register may be selected. An incorrect entry can be cancelled
Clear.
In storing, the contents of an assigned register will be
overwritten, assuming that the logged-in USER has stored in
the register
.
.
229
Page 10

4.1 EXTRA
panel
Diamond digital DD10
4.1.6
SELECTING A REGISTER DURING RECALLING
When
a snapshot or a
sponding
• If
• To
• To
register
the register shown in the display is to be used, no further selection is neces
sary.
select the next free register, press the
select a particular register
keypad.
If
play
after
The
mation
Errors can be deleted with
a two-digit number is entered (e.g. 15), the related bank (1) appears in the dis
when the first digit (1) has been entered. The desired register (15) appears
the input of the second digit.
input of the figures
with
timeline is recalled, there are several ways to select a corre
.
, enter a one- or two-digit number with the numeric
need not
Enter
avoids an erroneous entry of too many digits.
Clear
NEXT
key
be confirmed with
provided
Enter
has not be pressed before.
.
Enter
. However
, the
confir
-
-
-
-
230
Page 11
Diamond digital DD10
4.1 EXTRA
panel
4.1.7 ST
ORING A SNAPSHOT
Set switcher
Set
DEFINE MEMO
(DD20 / DD30 only)
Press STORE
If data monitor is present:
Set
DEFINE MEMO
(DD10 only)
Example:
Select register
Press ENTER
S T O R
? 1 7
Register 17 was selected before.
S T O R
? 2 4
Register 24 was selected for
storing.
S N A P 2 4
Indication for about 1 second, if
the register was assigned, a short
indication shows what was erased.
S N A P 2 4
A
Default Name (e.g.
is assigned.
S T O R E D
S 0 2 4
– – – –
S024
)
231
Page 12
4.1 EXTRA
panel
Diamond digital DD10
4.1.8 GENERA
DEFINE MEMO
(DD20 / DD30 only)
TING A TIMELINE
Set
Press EDIT
Select register
Press ENTER
If data monitor is present:
Set
DEFINE MEMO
(DD10 only)
Example:
E D I T
Register 17 was selected before.
E D I T
Register 24 was selected for
storing. If the register is assigned
an indication shows what will be
erased.
? 1 7
? 2 4
Set keyframe
Press
STORE or INS
last
Keyframe
no
yes
Press EDIT
short time
E 2 4
E 2 4
E 2 4
E 2 4
E 2 4
T I M L
T I M L
S T
K F
K F
K F
K F
2 4
2 4
R T E N D
A
1
2
8
9
C A L
T 0 2 4
E N D
E N D
E N D
E N D
C U L A
– – – –
232
Page 13
Diamond digital DD10
4.1 EXTRA
The
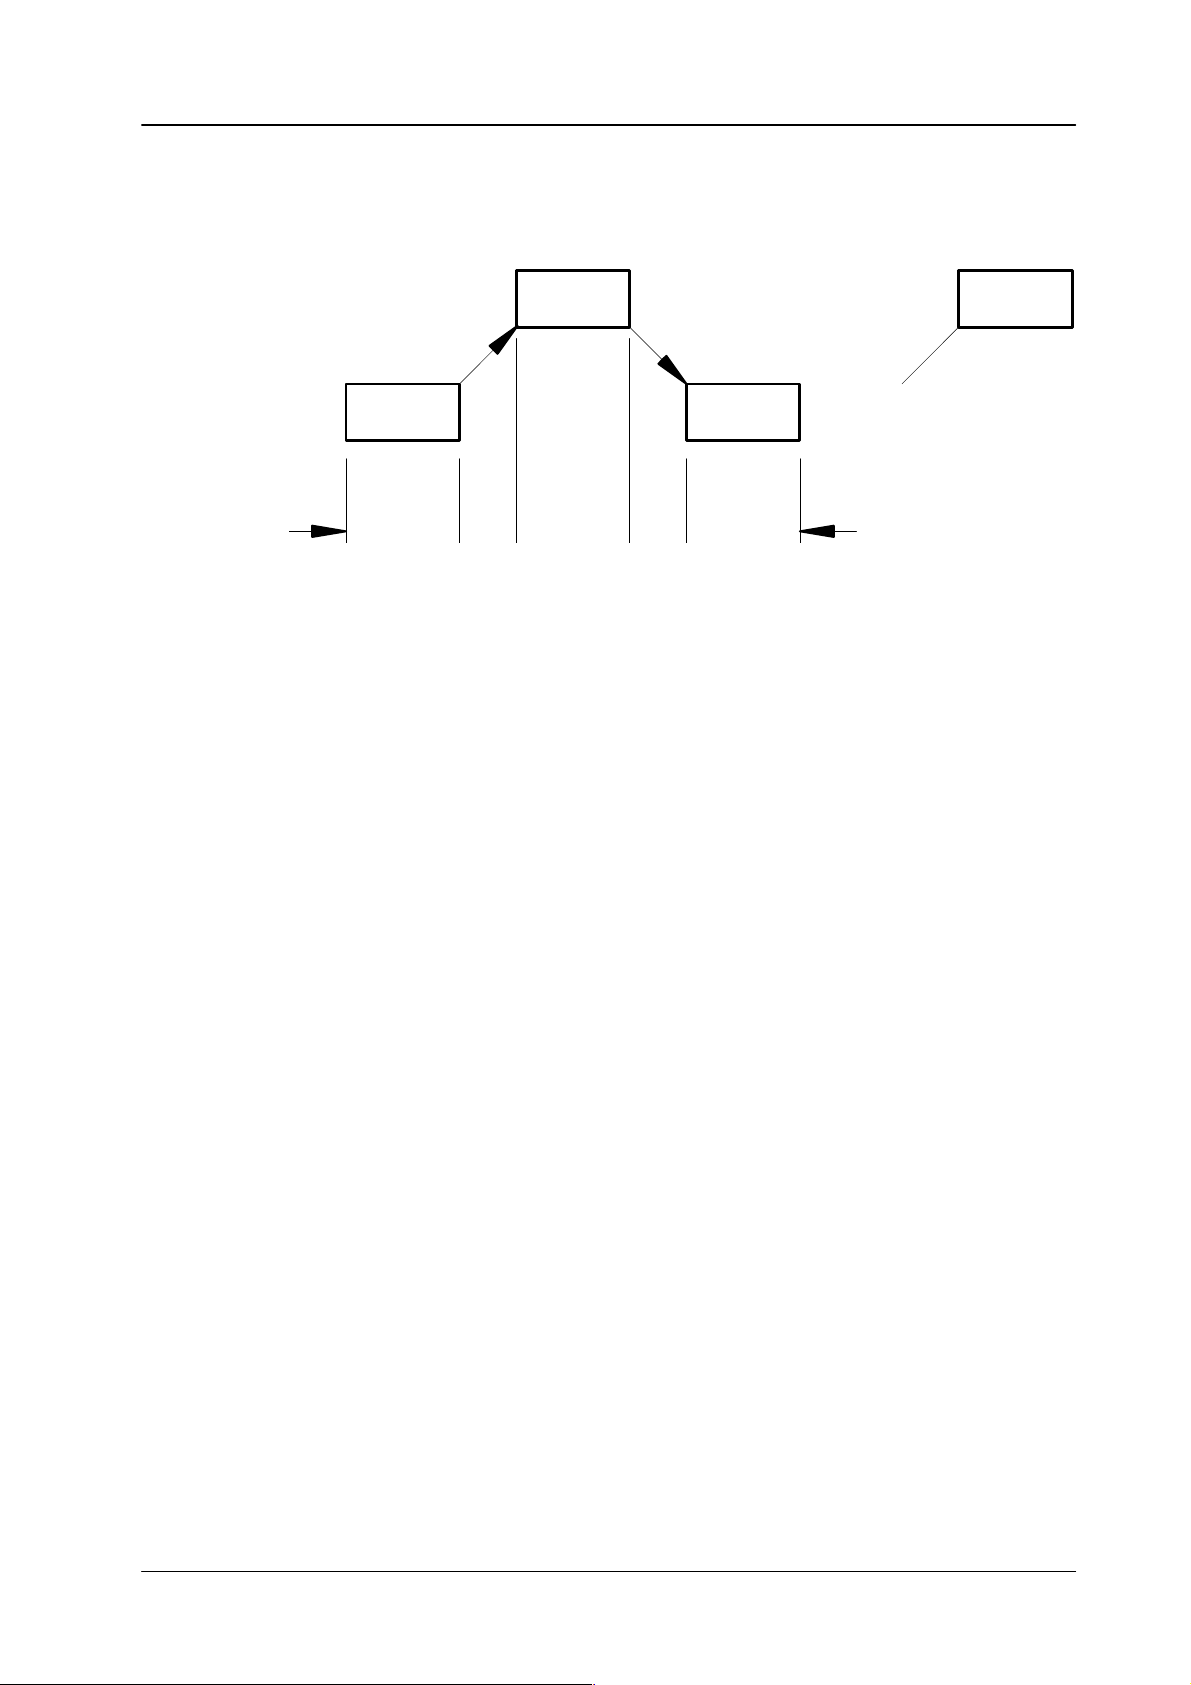
timeline is stored as a chain of keyframes with related dissolves between the
keyframes.
panel
Keyframe
2
Keyframe
1
t
H
Store
and
The dissolve between the keyframes is set to
t
INS
T
first set
t
H
tH = waiting or hold time to 0 frames
tT
= transition time to the Trans dur
panel.
t
T
Keyframe
3
t
H
.....
time set
smooth.
Keyframe
n
for Auto in the EXTRA
EXTRA panel permits changing the following components of an existing time
The
line. For further details please refer to section Modifying a timeline in the
EXTRA panel.
• W
aiting or hold time (HOLD) with the
• T
ransition time (TRANS) with the
• T
rajectory (TRAJ) with the
•
Press
INS
ert to insert a key frame before an existing key frame
•
Inserting a keyframe with the
•
Starting a loop (LOOP) with the
Ending a loop (ELOOP) with the
•
Deleting a keyframe with the
•
TRAJ
INS
DEL
HTM
TRTM
ectory key
ert key
LOOP
key
LOOP
key
ete key
(hold time) key
(transition time) key
.
.
.
-
233
Page 14
4.1 EXTRA
panel
Diamond digital DD10
4.1.9
COMPONENTS OF A TIMELINE
In
the EXTRA panel and the EXTRA menu, the components of a timeline are shown
differently
as a consequence of the dif
The components marked * can only be
A deletion with
DEL
fering display options.
edited and modified in the EXTRA menu.
is possible in the EXTRA panel.
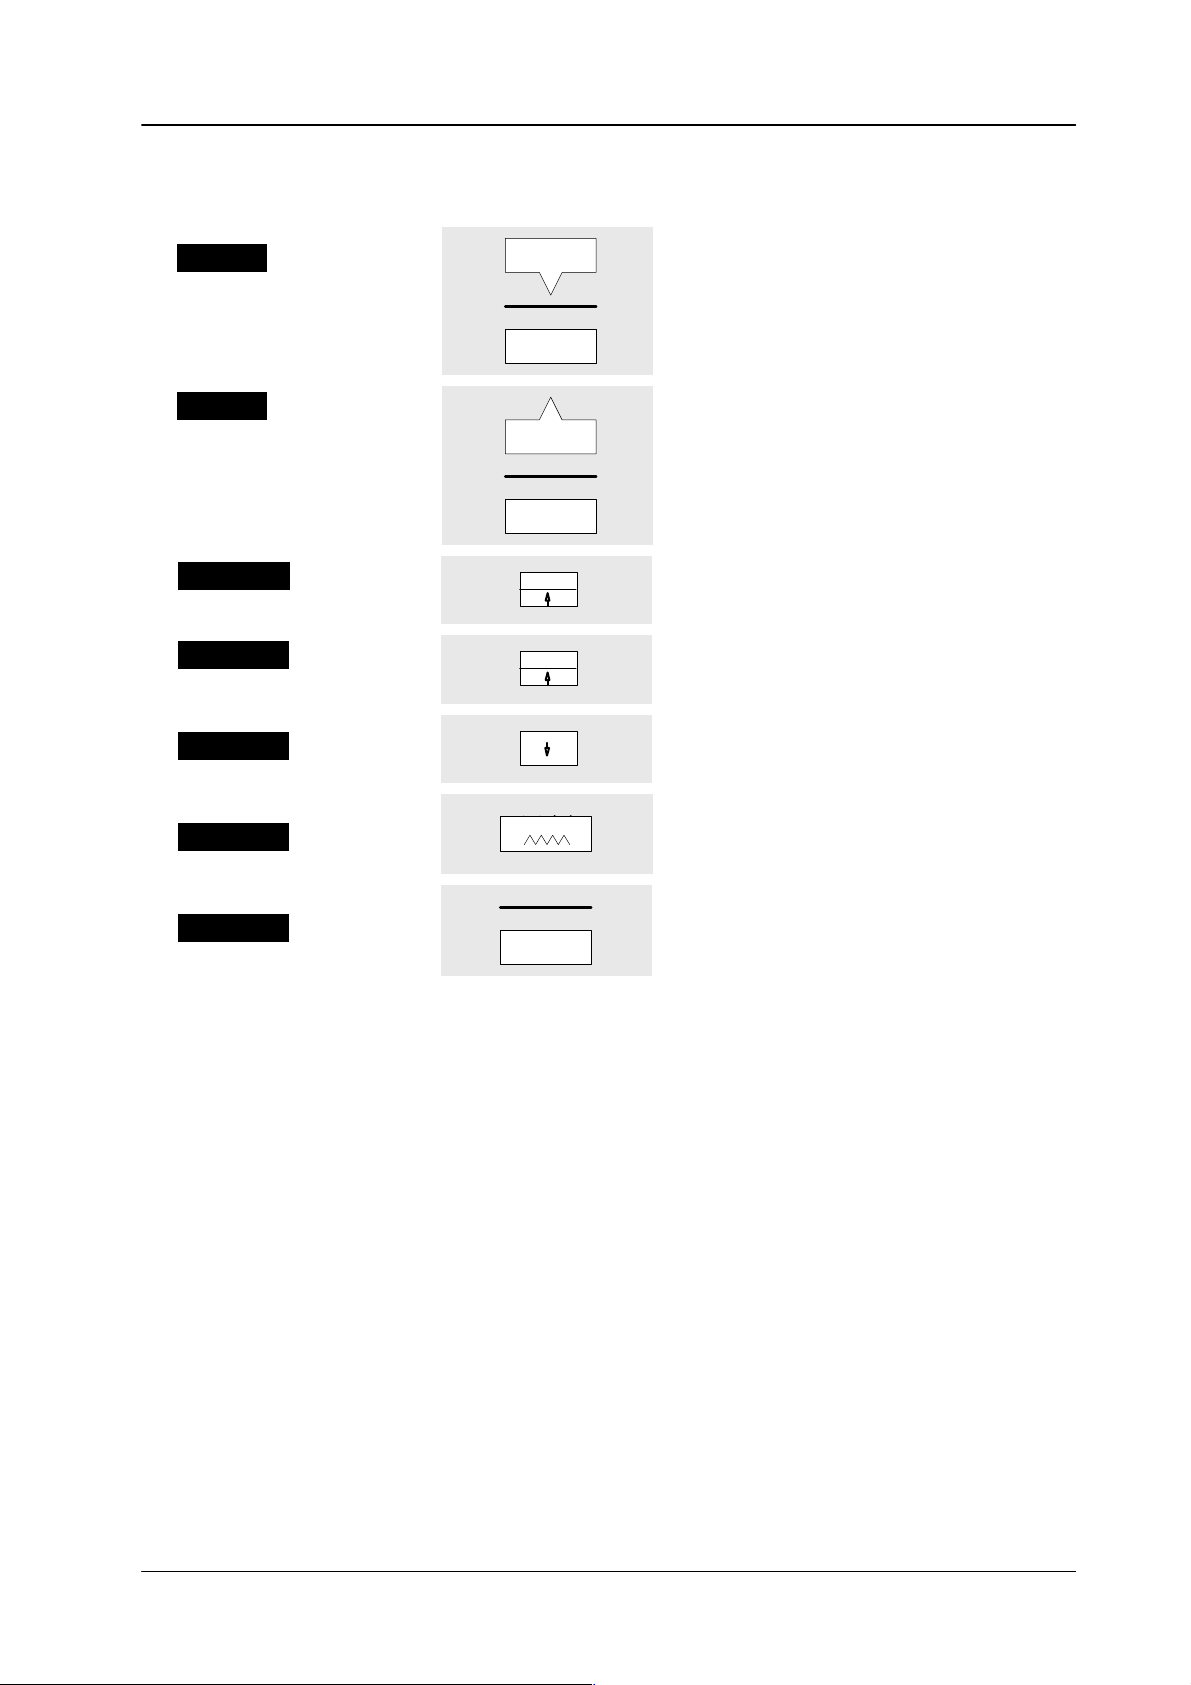
EXTRA panel EXTRA menu Comment
S T
A R T E N D
T R A
J l i n e a r
When calling trajectory
with the TRAJ key
T R A
J s – c u r v
When calling trajectory
with the TRAJ key
xx xx
xx xx
xx
xx
Start and end of a timeline
Change of trajectory mode by
toggling thr
EXTRA
•
Dissolve linear
TRAJ
control panel.
i.e. dissolve in xx frames
•
Dissolve (S-Curve)
key in the
T R A
J s m o o t h
When calling trajectory
with the TRAJ key
T R A
N S x x
When calling transition
with the TR
S N n n
*
K F n n
H O L
TM key
D x x
When calling the hold
time with the HTM key
xx xx
S015––––
ABC
act nn
act
xx
xx
xx
xx
xx
nn
•
Dissolve (smooth)
T
ransition in xx frames
The keyframe is a snapshot
(register nn) generated with
INSER
T ST
ORED with name
and hold time in xx frames.
The keyframe is generated with
INSER
T ACTUAL (current switcher
status) with the hold time xx frames
(nn = serial number)
Hold time with keyframes in frames
234
Page 15
Diamond digital DD10
EXTRA panel EXTRA menu Comment
4.1 EXTRA
panel
*
*
*
G P
I n
G P
O n
L O O P
L O O P
E L
O O P
n
0
Trigger
... 8 ,T
timeline waits for the corresponding
event
Activate EDIT Enbl.
Event symbol for switching the GPO
outputs
n
Start–of–loop for n cycles
Start–of–loop for endless repetition
End–of–loop
event symbols for GPI–IN 1
ime (xx:xx:xx:xx) or User
. The
*
*
T L
n n
W x x
T001
xx
T
imeline
W
aiting time with xx frames
T001 (register nn)
235
Page 16
4.1 EXTRA
panel
Diamond digital DD10
4.1.10
MODIFYING A TIMELINE IN THE EXTRA P
The following procedure is used for all modifications of a timeline:
Press EDIT
Select register
Press ENTER
ANEL
Example:
E D I T
? 1 7
Register 17 was selected before.
E D I T
? 2 4
Register 24 is to be modified.
E 2 4
S T
A
R T K
F 1
Modify timeline as described below
Several dif
ferent modifications are possible.
.
At the completion of all modifications:
Press EDIT
short time
T I M L
T I M L
2 4
2 4
C A L
T 0 2 4
C U L A
– – – –
236
Page 17

Diamond digital DD10
Note:
4.1 EXTRA
panel
VIEW
Modifications
the
display
The following actions are ef
of an existing timeline always relate to the last keyframe indicated
. In the following example this is keyframe 4.
E 2 4
K F
3 K
F 4
fective for the keyframe:
Changing the keyframe
Deleting the keyframe
Changing the hold time of the keyframe
The following actions are ef
fective before the keyframe:
Inserting a new keyframe
Return-of-loop
The following actions af
fect the time belonging to the keyframe:
Changing the transition time
Changing the trajectory
The
keys and permit a successive selection of the individual events of a timeline.
With
the V
iew function enabled (key lights up), the switcher is switched to the status
stored
in the keyframe (the outputs will be switched).
in
←
→
The keys ← and → permit a successive selection of the individual events of a
timeline.
237
Page 18
4.1 EXTRA
panel
4.1.10.1 Changing the hold time
Select key frame
keys ← and
→
Press HTM
Diamond digital DD10
Example:
E 2 4
E 2 4
S T
K F
A
R T K
3 K
F 1
F 4
Hold time of keyframe 4 is to be
changed.
K F
4 H
O L D
0
Enter hold time
with numeric keypad
Press ENTER
Errors can be deleted with
Hold time of keyframe 4 is to be
25 frames.
K F
E 2 4
4 H
K F
O L D
3 K
Clear.
2 5
F 4
238
Page 19
Diamond digital DD10
4.1.10.2 Changing the transition time
Select key frame
keys ←
and
→
Press TRTM
4.1 EXTRA
Example:
E 2 4
E 2 4
T
ransition time of keyframe 4 is
S T
K F
A
R T K
3 K
F 1
F 4
to be changed.
panel
Enter transition time
with numeric keypad
Press ENTER
Errors
can be deleted with
K F
4 T R
Old transition time is 30
frames.
4 T R
K F
New transition time is 50
frames.
E 2 4
K F
Clear.
A N S
A N S
3 K
3 0
5 0
F 4
239
Page 20
4.1 EXTRA
panel
4.1.10.3 Changing the trajectory
Example:
E 2 4
Diamond digital DD10
S T
A
R T K
F 1
Select between:
linear
s–curve
smooth
Select keyframe
keys ← and
→
Press TRAJ
When desired
trajectory has been
selected,
press Enter
LINEAR Produces a linear movement at constant speed between the key-
frames
speed
and sudden changes in the direction of movement
at the keyframe (“jerky behavior”).
Trajectory
changed.
E 2 4
K F
4 T RA J s m
K F
4 T RA J s –
K F
4 T RA J l i
E 2 4
to keyframe 4 is to be
K F
K F
3 K
3 K
F 4
o o t h
c u r v
n e a r
F 4
and in the
240
S-CURV Produces
rises
keyframes
a straight-line course of movement. The speed starts at 0,
to maximum and falls again to 0. The direction changes with the
(speed curve).
SMOOTH Produces a smooth even movement avoiding sudden changes in
direction
controls
effective
shown
and speed. This makes
the movement appear ”natural”. The
TENS, CONTI, BIAS, WEIGHT in the EXTRA panel are only
for Smooth T
rajectory (shown on display: DD20 / DD30 only
on data monitor: DD10).
,
Page 21
Diamond digital DD10
4.1 EXTRA
panel
4.1.10.4
Changing a keyframe
Select keyframe
keys ← and
Set switcher
as desired
Press MOD
→
Example:
E 2 4
E 2 4
S T
K F
A
R T K
3 K
F 1
F 4
Keyframe 4 is to be changed.
E 2 4
K F
3 K
F 4
The V
iew function may be helpful during adjustment.
Attention!
The timeline will only be finally stored with the
EDIT command at the end.
241
Page 22
4.1 EXTRA
panel
Diamond digital DD10
4.1.10.5
Inserting a new keyframe (INSert)
Select the keyframe
before which the
new keyframe
is to be inserted
keys ← and
→
Set switcher
as desired
Example:
E 2 4
E 2 4
S T
K F
A
R T K
3 K
F 1
F 4
A new keyframe is to be
inserted before keyframe 4.
Press INS
The V
iew function may be helpful during adjustment.
Attention! After
INSERT, the sequence immediately after the
inserted key frame should be checked.
E 2 4
K F
3 K
F 4
The new keyframe has been
inserted as keyframe 4.
The previous keyframe 4 now is
keyframe 5. The timeline is one
keyframe longer
.
242
Page 23
Diamond digital DD10
4.1.10.6 Inserting a loop in a timeline
The
EXTRA panel only permits the insertion of an
with
predefined numbers of cycles 1 ... 9 can be entered in the EXTRA menu.
Entering a loop
during the generation
of a timeline
Enter last keyframe
before the loop
endless
Example:
E 2 4
4.1 EXTRA
loop in a timeline. Loops
K F
3
E N D
panel
Press LOOP
Enter first keyframe
in the loop
The timeline ends with the end of the loop.
Note:
If the LOOP key is disabled before the end of the timeline, the loop ends at that
point.
However
any more.
, as the loop is endless, the end of the timeline will not be reached
The
LOOP
E 2 4
E 2 4 4 E
key lights up.
L
O O
K F
P
E
L
O O P
L
O O P
243
Page 24
4.1 EXTRA
panel
Inserting a loop
into an existing timeline
Select keyframe
before which the
loop should start
keys ← and
Press LOOP
→
Diamond digital DD10
Example:
E 2 4
E 2 4
The
S T
K F
loop is to begin before
R T K
A
3 K
keyframe 4
F 1
F 4
The timeline ends with the end of the loop.
Deleting a loop
in an exisiting timeline
Shift LOOP indication
at the end
of the display
E 2 4
L
O O
P
0 K
F 4
Note:
If the LOOP key is disabled before the end of the timeline, the loop ends at that
point.
However
, as the loop is endless, the end of the timeline will not be reached
any more.
Example:
E 2 4
S T
R T K
A
F 1
244
keys ← and
Press DEL
→
E 2 4
K F
3 L
O O P
Page 25
Diamond digital DD10
4.1 EXTRA
panel
4.1.10.7 Deleting
Select keyframe
to be deleted
a keyframe
keys ← and
Press DEL
→
Example:
E 2 4
E 2 4
S T
K F
A
R T K
3 K
F 1
F 4
Keyframe 4 is to be deleted
E 2 4
K F
3 K
F 4
Keyframe 4 was deleted.
The previous keyframe 5 now is
keyframe 4.
The timeline is one keyframe
shorter.
245
Page 26
4.1 EXTRA
panel
Diamond digital DD10
4.1.11 RECALLING
SNAPSHOT OR TIMELINE
• In
Bank mode snapshots and timelines are directly recalled by pressing a key
in
the numeric keypad (hotkey).
•
In Bank mode:
– Press and hold down
– Press numeric key for the desired bank.
•
In Register mode snapshots and timelines are recalled as follows:
BANK.
Select register
Press ENTER
Press CUT or AUTO
246
Page 27
Diamond digital DD10
Dissolve functions depending on snapshot or timeline preselection (DD20 / DD30 only):
4.1 EXTRA
panel
Key
Auto
Cut
or
Hotkey in Bank-mode
Fader
Note: Timelines
Key functions depending on snapshot or timeline preselection (DD20 / DD30 only):
Key Snapshot Timeline
STOP
STOP
NEXT
Snapshot preselected
Dissolve to the snapshot in the
time set with Trans dur
Recall the snapshots.
Dissolve to snapshot.
that contain
with
the Record function, or that are waiting for an event (GPI,
T
ime) can only be recalled with
Cancelling dissolve.
.
an endless loop, that have been generated
T
imeline preselected
Playing the timeline in the time
set with Trans dur
Playin
g the t
imelin
d t
store
Playin
Cancelling playing.
T
frame.
ime.
g the t
imeline.
Cut.
imeline pauses at next key
e i
.
n t
he
-
Trans
Undo
dur
REV
FLIP
FLOP
Reverse: timelines are played
in reverse direction.
T
imeline Play changes running
direction at each end.
Note:
Entry of the Auto transition duration.
•
Press Trans dur
•
Enter transition duration with numeric keypad.
The time is indicated in the
•
Complete the entry with
you press this key
If
be
restored even if several other keyframes have been performed in the meantime.
The following timelines cannot be played in reverse direction:
• time
• timelines
• timelines
embedded, and
• timelines
lines created with Record,
with loops,
into which snapshots or other timelines are
with trigger events (GPI, T
. The key lights up.
FRAMES
Enter
or T
, the status before the last recall of a snapshot or a timeline can
display
rans dur
.
.
ime and User).
247
Page 28
4.1 EXTRA
panel
Diamond digital DD10
4.1.12
DELETING SNAPSHOTS AND TIMELINES
The
procedure of deleting or clearing a register is the same for timelines and
hots.
Press CLEAR
Select other register
(1 ... 99)
Press ENTER
Short time
Example:
C L R ?
The
register entered after CLR
is deleted.
S N A
or
P
T I M L
C L E 2 4
C L E 2 4
snaps
2 4
A R E D
A R E D
-
R E G
2 4
248
Page 29
Diamond digital DD10
4.2 Basic functions ST
ORE, RECALL
4.2
4.2.1
BASIC FUNCTIONS STORE, RECALL
USING THE EXTRA MENU
DD10
DD20/DD30
VTR
Enbl
Edit
Enbl
GPI
Enbl
The
EXTRA
identical
The
basic functions
EXTRA
T
o select a softkey within a menu, proceed as follows:
• Move
or
•
Click on with
menu can only be selected in conjunction with the
to the menus of the DD20 and DD30 switchers.
of ST
ORE, RECALL and PLA
Y are more easily operated in the
panel and are only mentioned here for the sake of completeness.
the cursor with the mouse of the trackball to the softkey or the timeline
snapshot symbol.
H–Lock
or with the left mouse key
data monitor
. It is
.
ME1
ME2
PP
Status
EXTRA
Access
Mont
Proc
Stores
Transf
GPI
KEY
Install
Masks
1
2
Exit
Exit
3
4
Display Softkeys
Press this key
to select
the EXTRA menu
and then successively
select banks 0....9
249
Page 30
4.2 Basic functions ST
T
itle line
ORE, RECALL
Diamond digital DD10
Bank number (may be dif
Indication of available storage capacity
T
imeline functions
ferent to the bank number in the EXTRA
Last function: Restoring status before
the last RECALL, DISSOL
Selected timeline or snapshot
panel)
VE or PLA
T
ransitionduration in FRAMES
Snapshot functions
Y
T
rajectory adjustment
Please refer to selecton
T
imeline symbol, can be selected
with associated hotkey
The bank number indicated in the EXTRA menu can be changed as follows:
• Press
EXTRA in the menu panel (DD20 and DD30 only) to select successively
Bank
0, 1, ... 9, 0, 1, ... .
The bank number is independent of the bank number selected in the EXTRA
panel.
• Provided the EXTRA menu is enabled, the relevant bank is enabled in the
EXTRA
menu when the register or the bank is selected in the EXTRA panel.
Trajectory
V
arios function
Snapshot symbol, can be selected
with associated hotkey
Submenu
250
• Clicking
the
EXTRA
field with the mouse (possible for DD10 with data monitor).
Page 31

Diamond digital DD10
4.2.1.1 Storing Snapshots in Menu
Set desired
switcher status.
Select EXTRA menu
and bank number.
4.2 Basic functions ST
If EXTRA menu is not selected
ORE, RECALL
If not sure, check
DEFINE MEMO.
Press STORE.
Press desired hotkey
Store
lights up and a running light in the hotkeys
prompts the next step (DD20 / DD30 only).
To
store a new snapshot,
already stored snapshot can be overwritten with
a new one, provided the logged-in USER is
OWNER.
Comments:
1.
A timeline cannot be overwritten with a snap-
shot. Any attempt will trigger a warning.
2.
In order to disable the procedure without
storing, press
Store
select a free hotkey
again.
. An
251
Page 32

4.2 Basic functions ST
ORE, RECALL
Diamond digital DD10
4.2.1.2
Recalling Snapshots in Menu (DD10: data monitor required)
If EXTRA menu is not selected
Select EXTRA menu
And / or bank.
Press RCALL.
The current switcher settings are immediately
Press desired hotkey
replaced
by the settings stored under this hotkey
.
252
Page 33

Diamond digital DD10
4.2 Basic functions ST
ORE, RECALL
4.2.1.3 Dissolve
If
a direct recall of the stored switcher settings is not desired, the Dissolve
can
be used to execute a dissolve from the current switcher status to the status of
the
selected snapshot.
If not already selected in EXTRA menu
function
Select EXTRA menu
and / or bank
Press DISSOLVE
Press desired hotkey
Dissolve
hotkeys
(DD20 / DD30 only).
The dissolve begins, the dissolve time is
counted
lights up and a running light in
prompts the next step
down.
the
The dissolve time can be modified with the following steps:
Press TIME
Enter new time
Press ENTER or TIME
or any fifth figure
Time lights up and a running light in the
numeric
(DD20 / DD30 only).
Any time between 0 ... 9999 frames is
admissible.
Press
The
is
keypad prompts the next step
Clear
to reset the time to 0.
dissolve time is also used if a timeline
created with Learn.
to complete
the time entre
253
Page 34

4.2 Basic functions ST
ORE, RECALL
Diamond digital DD10
4.2.2
USING THE SOURCE SELECTION KEYS (EXTRA ME OPERA
CAM1
Key Buses
Background 1
Background Preset
CAM4 VTR1 VTR2 VTR3 VTR4 CHG1
CAM2 CAM3
CAM1
CAM1
CHG2 STIL STIL
EXT1 EXT2
EXT4 DVE1 DVE2 CINE SDR1 SDR2 PROC NR COL1 COL2 MATT BLCK
EXT3
Press this key
to select
EXTRA ME operation
TION, DD20 / DD30 ONL
Extra
ME2
ME2
ME2
Y)
2nd
Key 1
Key 2
Key 1
Key 2
On
On
Air
Air
If
you activate EXTRA in the matrix panel (ME1, ME2, PP), the keys, displays and
the fader in the associated Transition panel are delegated to the special EXTRA
functions
(see below).
This mode is only useful for switchers that are equipped with the optional Input
Mnemonics
•
LED display bank shows the stored snapshots (S nnn) or timelines (T nnn).
•
Key Buses key bank (no function).
•
Background key bank
Display
.
EXTRA program bank for direct recall of snapshots and timelines.
•
Background Preset
EXTRA
Preset bank for the preselection of the next snapshot or the next time-
key bank
line.
• 2nd
key
Change-over key for the EXTRA Program Preset key bank.
2nd inactive:
Access
to the snapshots and timelines stored under 1 –
27
(DD30)
2nd
active:
• EXTRA
Access to the snapshots and timelines
stored under 28 – 54 (
DD30).
key Selection of EXTRA ME operation.
key lights up:
key flashes:
EXTRA key assignment enabled.
EXTRA
Learn mode with ”normal” functions of the switcher
keys.
254
• Cut
key
(in T
ransition panel) Recall function for snapshots selected on the Preset
bank; or
Play function for timelines selected on the Preset bank.
Page 35

Diamond digital DD10
4.2 Basic functions ST
ORE, RECALL
• Auto
• Fader (in T
key (in T
Dissolve function (with Auto T
Preset bank; or
Play function for timelines selected on the Preset bank.
Manual
solve
or
Play function for timelines selected on the Preset bank. As soon as the fader
is moved from its final position, the timeline is started.
Dissolve function for snapshots selected on the Preset bank. The dis-
time depends on the manual movement of the fader;
ransition panel)
ransition panel)
ransition T
ime) for snapshots selected on the
255
Page 36

4.2 Basic functions ST
4.2.2.1 Recalling Snapshots
ORE, RECALL
Diamond digital DD10
Select EXTRA (ME)
Press the desired key
on the Preset bank
to select the Snapshot.
Press CUT
Switsh off
EXTRA (ME)
Press the desired key
on the Program bank
to recall the snapshot.
Return to normal
operation without
EXTRA.
256
In this mode snapshots are treated as video sources. Thus Program selection
Recall)
is
and Preset selection +
indicated in the Program bank.
Cut
produce the same result.
The recalled snapshot
(=
Page 37

Diamond digital DD10
4.2.2.2 Dissolve
4.2 Basic functions ST
In addition to recalling, (automatic and manual) dissolves are possible. The Auto
T
ransition T
The flip-flop principle
manual dissolve with the fader permits coupling analogue settings such as color
key clip level, border width, wipe position etc. with the fader
hue,
ime corresponds to the duration of the automatic dissolve.
permits a dissolve to be executed between snapshots. The
ORE, RECALL
.
Select EXTRA (ME).
Select snapshot
in Preset bank
Automatic Manual
Press AUTO
to start dissolve
Move fader from one
final position to the
other final position
To cancel,
press AUTO again.
At the end of the dissolve the preselectes snapshot
becomes the program snapshot and vice versa.
Switch off EXTRA (ME)
after execution.
Return to normal opera tion without EXTRA.
257
Page 38

4.2 Basic functions ST
ORE, RECALL
Diamond digital DD10
4.2.3
4.2.3.1
USING THE KEYS IN THE EXTRA P
Storing Snapshots
Adjust switcher
Press STORE
ANEL (DD20 / DD30 only)
Select register
1 .. 99
Press ENTER
Press FREE to select
the next free store
258
Page 39

Diamond digital DD10
4.2.3.2 Recalling Snapshots
Select register
1 .. 99
Press ENTER
indication in display
4.2 Basic functions ST
ORE, RECALL
CUT or AUTO
or fader
259
Page 40

4.2 Basic functions ST
ORE, RECALL
Diamond digital DD10
260
Page 41

Diamond digital DD10
4.3 Basic functions EDIT
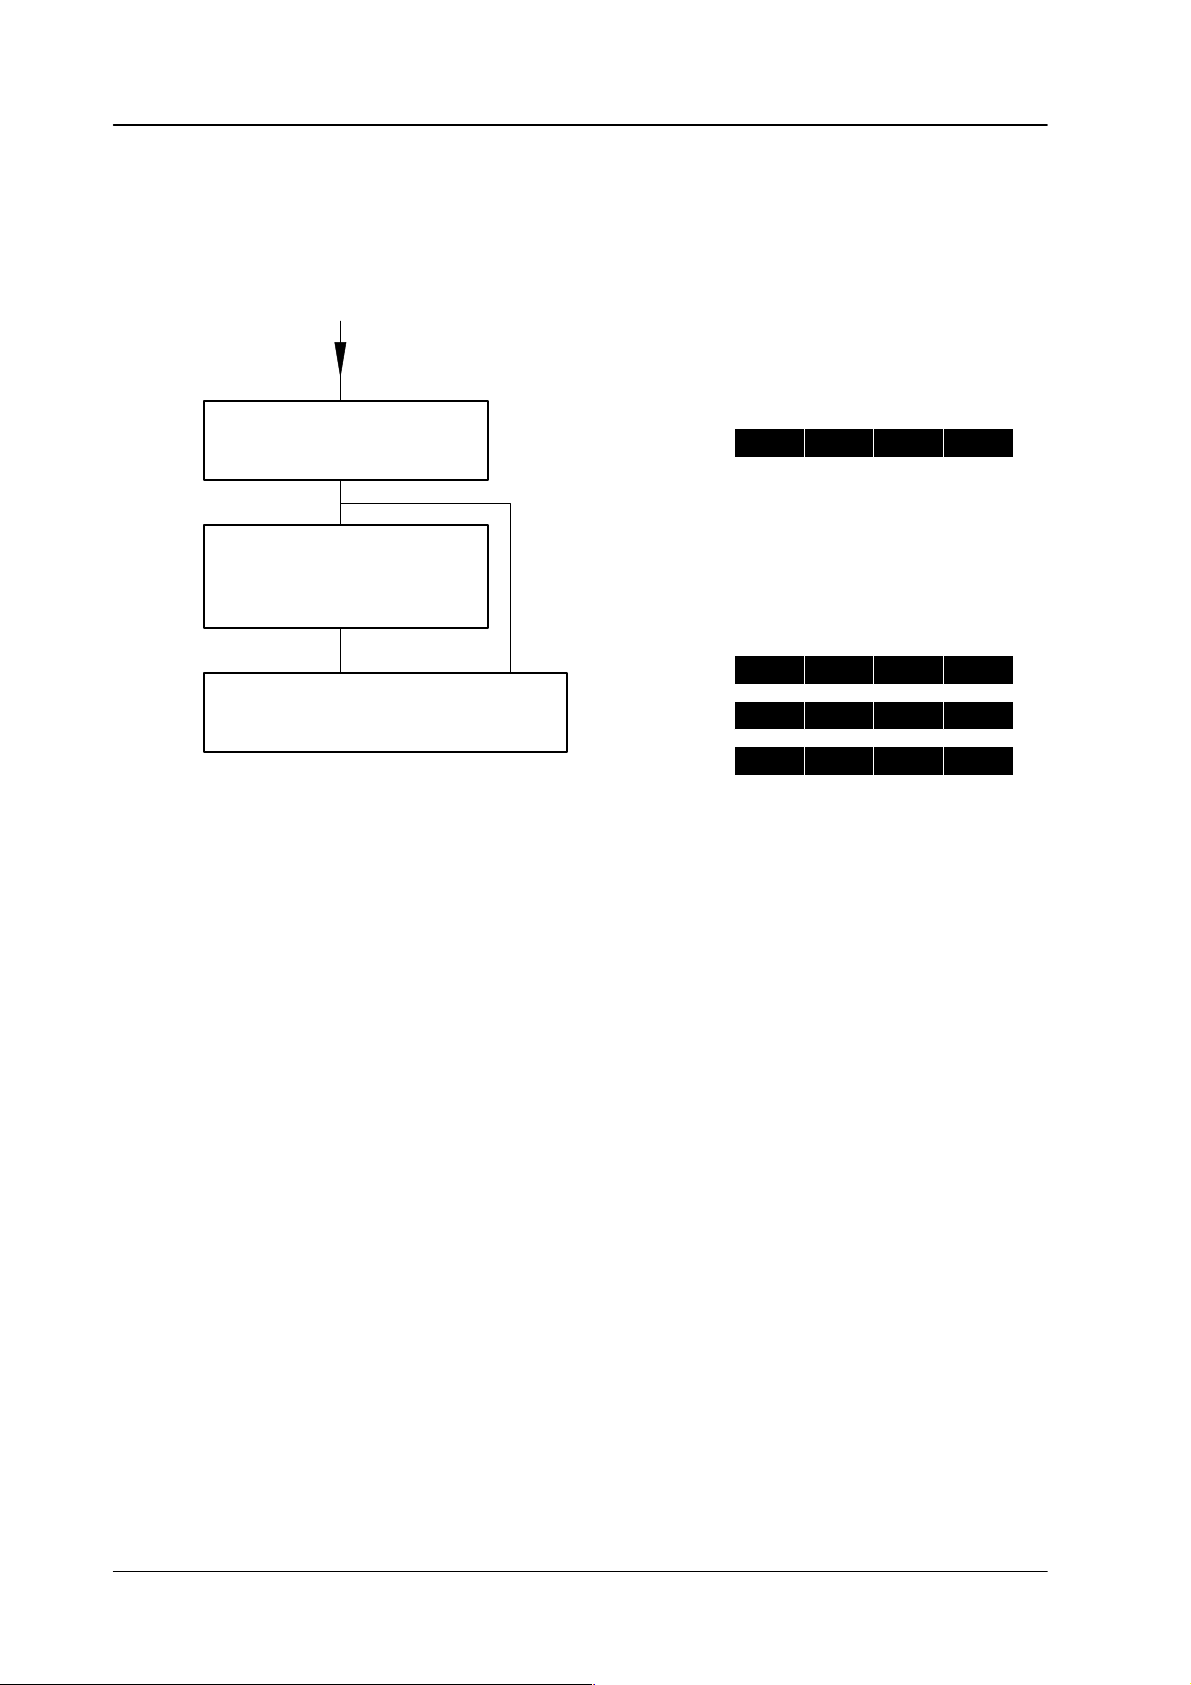
4.3 BASIC FUNCTIONS EDIT, RECORD, AND PLAY
, RECORD and PLA
Y
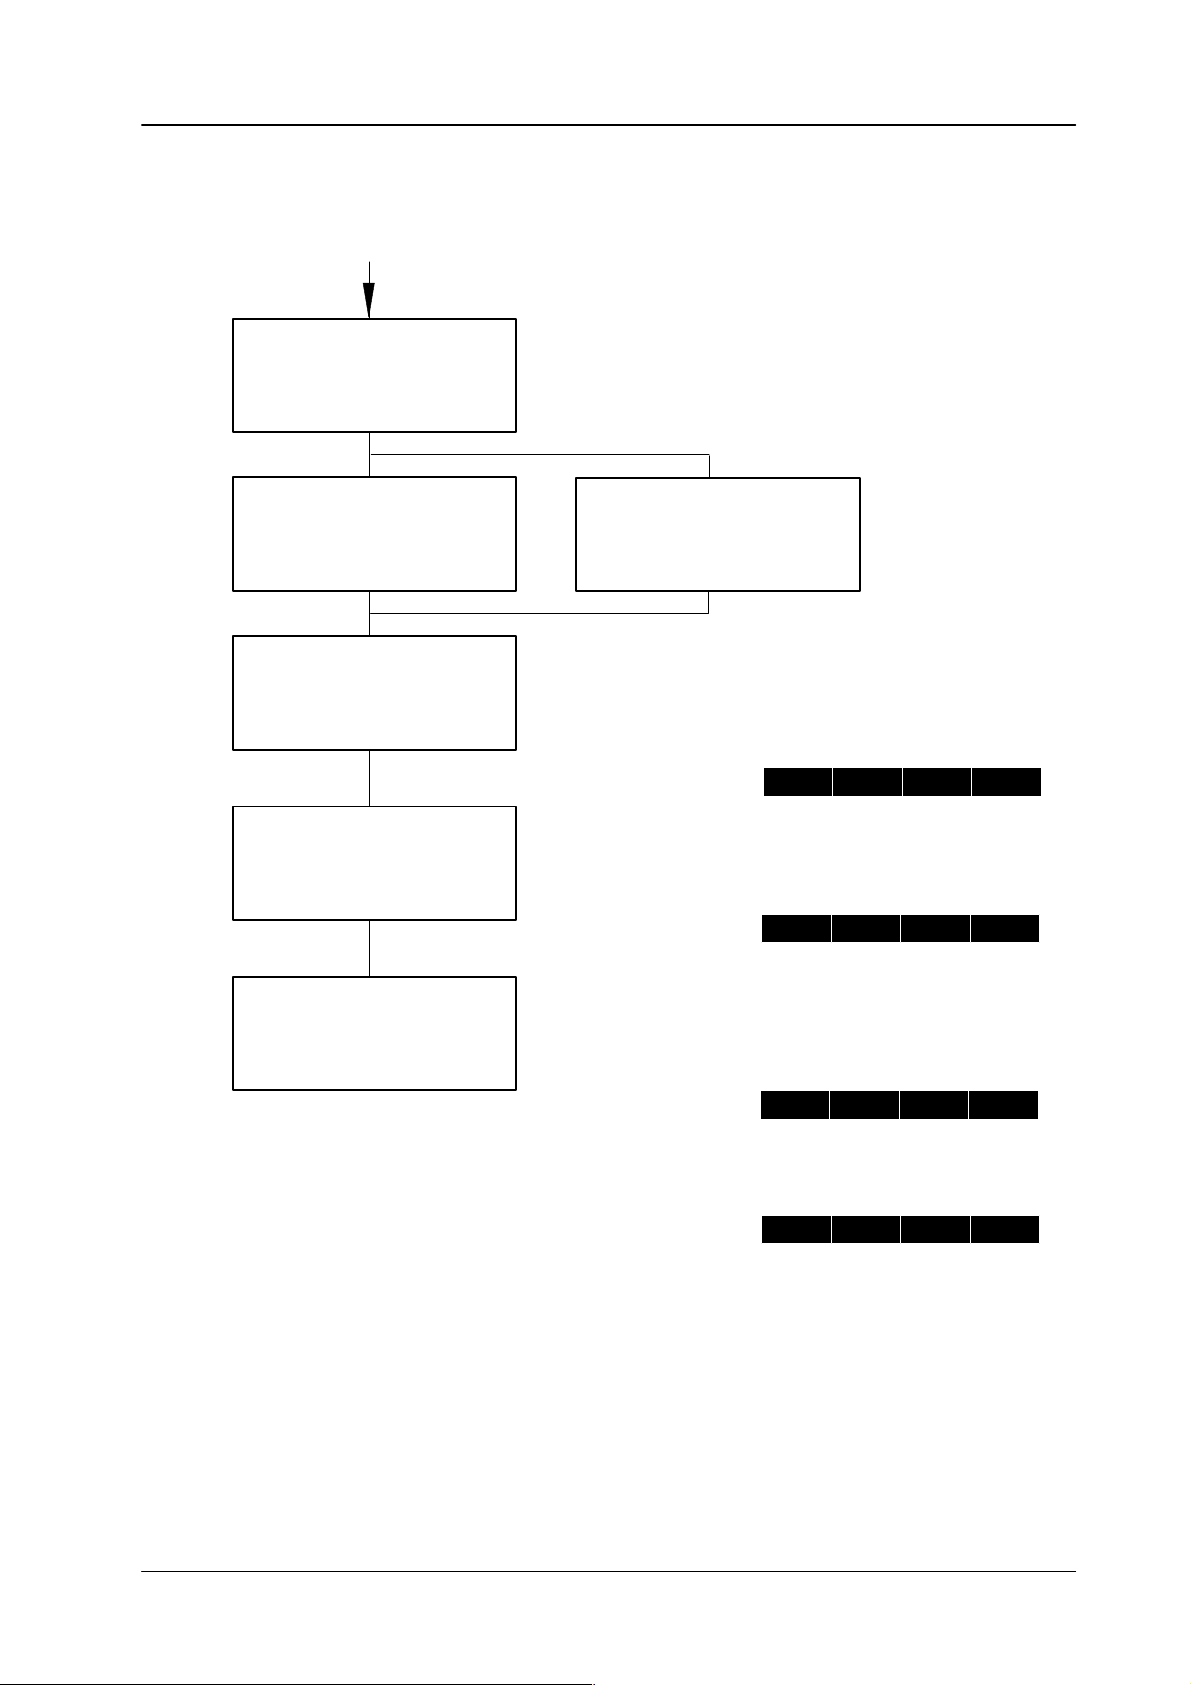
4.3.1 CREATING
A TIMELINE WITH EDIT
Press EDIT
Select register
1 .. 99
Press ENTER
Set keyframe
Press STORE
or INS
last
yes
Press EDIT
no
261
Page 42

4.3 Basic functions EDIT
, RECORD and PLA
The
timeline is stored as a chain of keyframes with associated dissolves between
the
keyframes.
Y
Diamond digital DD10
Keyframe
2
Keyframe
1
t
H
t
H
t
T
If
you press
corresponding keyframe. The duration of the timeline is the sum of all transition
times tT.
The
number of keyframes in
respective
tions.
t
T
= hold time
= transition time
Store
switcher computer and the number of
t
H
or
Ins, any tH is set at 0
a timeline is only limited by the storage capacity of the
t
T
Keyframe
3
t
H
frames. tT is entered together with the
.....
mixing levels and storable func
Keyframe
n
-
With
the
DD30
about 30 complete keyframes may be stored in one timeline. (
about
39;
DD10:
about 54, and
level
(ME1, ME2 or
to
72.
The
operator can edit a timeline in order to produce more
further
information please refer to section
PP) are to be stored, the number of possible keyframes rises
DD5
about 59). If only the keyframes of one mixing
EXTRA Editor
sophisticated ef
.
DD20:
fects. For
262
Page 43

Diamond digital DD10
4.3 Basic functions EDIT
, RECORD and PLA
Y
4.3.2 PLA
YING A TIMELINE IN MENU
In order to play a timeline in real time, proceed as follows:
Select EXTRA menu
and / or bank.
Press PLAY
The selected timeline
will start.
select desired hotkey
e.g. T006
While a timeline is played, the menu display is as follows:
”Duration”
that
procedure.
indicates the total time of the timeline. ”Elapsed time” indicates the time
has already been played. If you press
Play
again, you can cancel the playing
NOTE If
a timeline is e.g. GPI controlled, DURA
TION is unknown.
263
Page 44

4.3 Basic functions EDIT
, RECORD and PLA
Y
Diamond digital DD10
4.3.3
RECORDING A TIMELINE IN MENU
In Record mode the operating actions are stored in real time in the order of their
occurrence.
Proceed as follows:
No interpolation is made.
Select EXTRA menu
and / or bank
Press RECORD
Select desired hotkey
Record lights up and a running light
in the hotkeys prompts the next step.
Recording and time measurement start
immediately
not active, the associated EXTRA key
flashes.
. If EXTRA ME operation is
Execute desired
operation
It is not necessary to remain in the
EXTRA menu.
select EXTRA menu
(if left)
Press RECORD
to end timeline
For
recorded timelines, Edit,
A
timeline generated in RECORD mode cannot be edited.
Auto Play
, Fader Play and T
rajectory cannot be used.
264
Page 45

Diamond digital DD10
4.4 Basic functions PLAY,
AUT
O PLAY and F
ADER PLA
Y
4.4 BASIC FUNCTIONS PLAY, AUTO PLAY AND FADER PLA
In
addition to real-time Play
Auto Transition T
the
fader). The fader path represents the timeline duration.
ime as timeline duration) and Fader Play (playing the timeline with
, EXTRA ME operation also
of
DD20 / DD30 only
Select EXTRA (ME).
PLAY PLAY AUTO PLAY FADER PLAY
Y
fers Auto Play (takes the
Select timeline
in the
Program bank.
Select timeline Select timeline Select timeline
in the in the in the
Preset bank. Preset bank. Preset bank.
Move fader
Press CUT. Press AUTO.
from one limit po-
sition to the other
limit position.
265
Page 46

4.4 Basic functions PLAY,
AUT
O PLAY and F
As
long as
Comment:
The
the timeline is running, this is indicated in the Program and Preset banks.
EXTRA menu also shows the Play function.
ADER PLA
Y
Diamond digital DD10
266
In
Auto Play the elapsed time runs faster (more slowly) if the Auto T
is shorter (longer) than the original duration of the timeline. In Fader Play the
elapsed
is
time depends on the fader position and can even be reduced if the fader
moved back through the timeline.
ransition T
ime
Page 47

Diamond digital DD10
4.5 OTHER FUNCTIONS IN THE EXTRA MENU
4.5.1 DELETE
4.5 Other functions in the EXTRA
menu
the associated function key to delete snapshots or timelines. A running
Press
in
the right wipe selection pad (hotkeys) prompts the selection of the snapshot or
timeline
Attention:
The stored snapshot or timeline is deleted immediately!
Snapshots
currently logged-in USER must be the OWNER of the timeline or the snapshot
(recall
to be deleted.
or timelines can only be
with
SHOW
and selection of the register).
deleted by the user who created them, i.e. the
light
267
Page 48

4.5 Other functions in the EXTRA
4.5.2 ASSIGN
The
Assign function
shots
in the preselection field or even move them to other levels (banks).
Operational Display
step
menu
Diamond digital DD10
permits the owner to change the positions of timelines or snap
-
Press ASSIGN.
Select bank.
Press hotkey
of snapshot or timeline
to be moved
Select bank
FROM
ASSIGN
EXTRA key in the menu
panel.
Running light in the hotkeys prompts the next
step.
TO
ASSIGN
268
Press destination
hotkey
changes the assignment. If the T
This
snapshots/timelines
exchange their positions.
ASSIGN
O position is already assigned, the respective
Page 49

Diamond digital DD10
4.5 Other functions in the EXTRA
menu
4.5.3
RENAME (only available by the owner)
With
the Rename function you can give snapshots and/or timelines a name of up
to
8 characters or figures (DD20 / DD30 only). If you press
key, a running light in the right wipe selection keypad prompts the entry of the
desired
If you press the associated function key for the desired snapshot or timeline, a
Rename
name
storage location.
window with a new key assignment
with the wipe selection keypad.
OK
RUBOUT
CLEAR
CANCEL
The entered name is stored, the window is closed.
Press the associated function key to delete individual
in the entry line.Löschen von Zeichen in der Eingabezeile.
Press the associated function key to clear the entire entry line.
Press the associated function key to cancel the Rename procedure and to close the window
the associated function
appears in the menu. Enter the new
characters
.
269
Page 50

4.5 Other functions in the EXTRA
menu
Diamond digital DD10
4.5.4
DEFINE MEMO
This menu indicates which switcher functions are stored in snapshots and timelines. For this purpose, a symbolic representation of the switcher appears in the
menu.
ME1
ME2
PP+DSK
(DD20
/ DD30 only
(DD20 / DD30 only
OTHER
ALL
TOGGLE
EXIT
Recall BGD HPT disable
ME1
ME2
PP
the associated function key to mark (highlight) functional
Press
areas
that are taken into account for storing the EXTRA snap
shots
or timelines.
Cursor movement
Press
the associated function key to
tional
unit marked with the cursor
Press
the associated function key to return to the higher order
EXTRA
Press
crosspoints
menu.
the associated function key to prohibit RECALL of BGD
(in both ME and Layer mode!).
enable or disable the func
.
-
-
270
In
this example, ME2+COLOR 2 are stored by EXTRA of ME2. The above example
does
not include access to COLOR 2 so that COLOR 2 is unaf
is
called that was stored with this DEFINE MEMO.
fected
if a snapshot
Page 51

Diamond digital DD10
Example:
DD20
/ DD30
4.5 Other functions in the EXTRA
The following functions are stored with a snapshot in EXTRA operation or are
excluded
units in the DEFINE MEMO menu or according to the functional units of the
switcher.
from the storage procedure. The functions are grouped according to the
menu
white: enabled
black: disabled
271
Page 52

4.5 Other functions in the EXTRA
menu
Diamond digital DD10
Unit
MATRIX
AUX
BUS
TRANSI
PATT
KEY
+
MASK
COL
1, 2
AUX
BUS
4,
5, 6
(DD20/
only)
DD30
stored
Set
matrix points
Automatic dissolve time AUT
LIMIT
, LIMIT ON
KEY CHANGE
GPI ENABLE/ASSIGN
NEXT TRANSITION
TRANSITION MODE
BLACK PRESET
NORMAL/REV
CURVE
BACKGROUNDs, KEYs
ADD-parameter
Basic wipes
SIZE
H-/V-MUL
POS ON, Extended
Position values
RA
TIO ON, value
STRECH
ROT ON, mode, value
MOD ON, LOCK, MUL
MOD SHAPE, value
MOD, amplitude
BORDER ON, WIDTH
SOFTNESS ON, valve
SYMMETRY
MA
TTE, W
CHROMA, LUM,
COMBINE
Mode
COUPLED
IDENTICAL (KEY BUS – KEY BUS)
KEY INVERS
MASK ON
BORDER, OUTLINE,
SHADOW,OPACITY
, SOFT
CLIP
HUE, SELECTIVITY
BORDER OPACITY
MATT
E W
CHROM, LUM (Fill and Border)
AKA-window position
MASK INVER
FORCED FOREGROUND
PAINT CURSOR ON
MASK TYPE
LEFT
, RIGHT
SIZE,
WASH
HUE,
CHROMA, LUM 2 x
Set matrix points from
PVW
, DVE (video + key),
FxLoop-DVE1
, REVERSE
TI, O, X
, valve
ASH, HUE
/ SEP
ARA
ASH
, HUE, (
T
, TOP, BOTT
TI
TE /
Fil
l and B
O
order)
OM
not stored
On Air information
Non-Sync information
2nd-delegation keys
AUT
O TRANSITION
Fader-position
Fader direction of movement
ACTIVE
AUT
O PREVIEW
TRANSITION PREVIEW
EXTRA
ADE T
O BLACK
F
TRANSFER MODE
Status GPI OUTPUTS
PA
TTERN PREVIEW
USER P
Digipot-delegation
Auto
KEY PREVIEW
LOGO
Digipot-delegation
MASK PREVIEW
P
Digipot-delegation
On-Air
bus delegation
ATTERN
AINTED MASK SHAPE
, Non-Sync, 2nd,
272
Page 53

Diamond digital DD10
4.5 Other functions in the EXTRA
menu
Unit
AUX
BU
S 1...3
EXT
DVE
STORES
stored not
Set
matrix points
Effect-no.,
Settings:
V
ideo store, Matte store,
Mask store, Montage proc.
actual position within ef
fect
On-Air
bus delegation
V
ideo store of memorys
stored
, Non-Sync, 2nd,
273
Page 54

4.5 Other functions in the EXTRA
menu
Diamond digital DD10
4.5.5 SHOW
MEMO
This
function shows the
shot
or the timeline. The menu also contains additional information.
user which functions of the switcher are stored in the shap
Press SHOW.
Press hotkey of timeline
or snapshot.
-
The following information can be seen from the menu:
Left window:
• Type
• Key
•
•
• T
•
In
this example it is the timeline T001 which can be selected by pressing “J”. The
timeline
was stored by COMMON at 13.45 h on 14 Sept. 1994.
of selected storage location with name (timeline or snapshot)
address (number of bank with letter on key)
Date and time of storingOwner (user who stored)
Owner (user who stored)
otal running time of timelines
Number of keyframes of timelines
274
Page 55

Diamond digital DD10
4.6 EXTRA EDITOR
4.6 EXTRA
Editor
4.6.1 MODIFYING
A TIMELINE CREA
Note: The
TED WITH EDIT IN THE EXTRA P
menus shown in this section are only examples. In
tical operation different values may appear in the display.
With the Edit function you can
•
•
Edit is selected as follows:
modify timelines
create new timelines.
Select EXTRA menu
and / or bank.
ANEL
prac-
Press EDIT.
Press hotkey
of timeline for Edit.
Let
us assume, a timeline T009 was created with Learn. This timeline is to include
7
keyframes and
ciated
EDIT menu is shown on the next page (the cursor was moved to keyframe
4).
In Edit operation, the individual keyframes are identified as ”act#” (=actual snapshot).
In
the example, the following operations are to be executed:
1.
2.
3.
4.
5.
the dissolve time is to be 30 frames for each keyframe. The asso
The contents of act#4 is to be changed.
A trigger event ”W
The GP output GPO 1 is to be triggered.
One keyframe is to be deleted.
A loop is to be inserted.
ait for GPI 1” is to be inserted.
-
A more detailed description will be found on the following pages.
275
Page 56

4.6 EXTRA
T
imeline name
Editor
T
otal running time
Elapsed time from start to current cursor position
A
vailable storage capacity
Diamond digital DD10
ON: Keyframe is called
and displayed on the
video outputs.
OFF: V
Delete current object
in timeline
ideo outputs unaf
by keyframe selection
with cursor
.
fected
Change current object
Endediting operation
Cursor movement
Insert new object
Objects
Duration of objects
276
Page 57

Diamond digital DD10
Changing contents and duration of act#4
Press MODIFY ALL.
4.6 EXTRA
Editor
Cancel without changing
Cursor movement
Storing the modified keyframes (current switcher status and new times)
Please refer to selection ”T
Set new switcher
status.
The new contents of act4 is no stored.
Press OK.
The window in the menu is closed.
rajectory”.
277
Page 58

4.6 EXTRA
Editor
Inserting a ”Wait for GPI 1” before the object act#4
Diamond digital DD10
Press
Insertion
Comments:
USER is a special trigger event waiting for an
operator
time
ger time is entered with the numeric keypad. In
Play mode, the timeline waits until the real time
has
is always made
action. 00:00:00:00 indicates the trigger
(real–time clock). After the selection, the
reached the trigger time
before
the cursor
and then continues.
.
trig
-
Cursor for the selection
of the trigger event
Selected trigger event
is inserted before the
current cursor position.
Select trigger event
with the
cursor keys.
Press OK.
Insertion of trigger event.
Cancellation
The new contents of act4 is stored.
The T
rigger Event window is closed.
278
Page 59

Diamond digital DD10
4.6 EXTRA
The following figure shows a ”Wait for GPI 1” inserted before act#4. The trigger
event
is indicated in the line above the keyframe.
Editor
Note:
(DD20 / DD30 only)
T
imelines with trigger events canot be played with
is not possible either
.
AUT
O or the fader
. REV
erse
279
Page 60

4.6 EXTRA
Editor
Inserting a GPO 1 before object act#5
Move cursor to
5act
Press
Diamond digital DD10
Cursor for the selection
of the trigger event
Selected trigger event
is inserted before the
corrent cursor position
Select GPO
with cursor keys.
Press OK.
Insertion of
trigger event.
Cancellation
280
Page 61

Diamond digital DD10
4.6 EXTRA
GPOs are indicated in a line above the keyframe. The following menu will now
appear:
Inserted GPO
Editor
281
Page 62

4.6 EXTRA
Editor
Deleting object act#5
Move cursor to
5act
Press DELETE
act
Diamond digital DD10
Object disappears,
the numbering of the
5
following objects
is updated.
282
Page 63

Diamond digital DD10
Inserting a loop
4.6 EXTRA
Editor
Move cursor to
1act
The loop should be returned to
the start of the timeline.
Any other position may also be
selected.
Start-of-loop
Press
283
Page 64

4.6 EXTRA
Editor
Diamond digital DD10
The loop counter (Repeat Count) is entered with the numeric keypad. The entry for
the
loop c
ounte
r may b
e 1 ... 9
. I
f you wish an e
ndles
s l
oop
, s
elect FOREVE
R (or 0
).
Endless loop
Insertion Cancellation
of a loop
Press OK.
284
Page 65

Diamond digital DD10
4.6 EXTRA
The start–of–loop (two) is inserted. The end–of–loop will automatically be added
at the end
of the timeline
Editor
Comment:
Attention! If
For
a loop, the start of the loop must be selected first (i.e. the point to which it will
return). Only then can the end be selected or modified. Please refer also to the
descriptions
Loops cannot be nested.
the cursor is moved to the end of the loop
so
far is indicated when moving back.
on the following pages.
< , the time elapsed
As loops cannot be nested,
–
appears outside the loop to mark the start–of–loop
–
appears inside a loop to mark the end–of–loop.
Note:
(DD20 / DD30 onlay)
Timelines
AUTO
with loops cannot be played in REV
and the fader is no longer possible, either
erse. W
.
ith FOREVER, playing with
285
Page 66

4.6 EXTRA
Editor
Setting end-of-loop before object act#5
Move cursor to
5act
Diamond digital DD10
Press
End-of-loop
286
Page 67

Diamond digital DD10
The
end–of–loop is now before object act#5.
4.6 EXTRA
Editor
287
Page 68

4.6 EXTRA
Editor
Ending timeline editing
Diamond digital DD10
Press
END
EDIT
During the calkulation of the interpolation
parameters, the display indecates the
following message:
Ends editing
Subsequently the original EXTRA
menu appers again.
288
Page 69

Diamond digital DD10
While
the newly created timeline is played, the display shows the following informa
tion:
When ”Wait for GPI1” is reached, the sequence is interrupted and the switcher
waits
for the GPI1 input pulse.
The total running time is unknown on
account of the ”Wait for GPI” event.
4.6 EXTRA
Editor
-
Continuation of playing without waiting for GPI 1.
289
Page 70

4.6 EXTRA
Editor
Diamond digital DD10
290
Page 71

Diamond digital DD10
4.6 EXTRA
editor
4.6.2 CREA
TING A NEW TIMELINE IN MENU
The following example shows how a new timeline (T006) is created.
This timeline contains
Press EDIT.
Select free hotkey.
• previously
•
a previously created timeline
•
trigger time, trigger event.
stored snapshots
The display shows the new timeline.
End editing
291
Page 72

4.6 EXTRA
editor
Inserting a previously stored snapshot
Press STORED.
Diamond digital DD10
The selection field with the titled hotkeys
is displayed in the menu. If the desired hotkey
is not in this bank, you can select a dif
bank by pressing ”Bank” in the EXTRA
ferent
panel.
Insertion of a previously stored
snapshot or timeline.
292
Page 73

Diamond digital DD10
Press hotkey
of the
desired snapshot.
4.6 EXTRA
In this example, snapshot ”S001”.
A
new window appears and prompts the entry
of the transition and the hold time.
T
o facilitate operation, default values for transi
tion duration (25 or 30 frames) and hold time
(0 frames) are of
0 ...
9999 frames can be entered.
fered. Any value between
editor
-
Press OK.
In this example a transition time of 30 frames
is entered.
293
Page 74

4.6 EXTRA
editor
Diamond digital DD10
The snapshot has now been inserted in the new timeline.
Note:
T
imelines with ”stored” snapshots cannot be played in REV
(DD20 / DD30 only).
erse
294
Page 75

Diamond digital DD10
Inserting a waiting time WAIT (especially in combination with DVE rise)
In
the meantime GPO 8 has been inserted.
After this GPO, a waiting time is to be inserted.
The W
AIT window appears and prompts the
Press WAIT.
entry of a waiting time. The numeric keypad
can be used to enter waiting times between
0 ....
9999 frames.
4.6 EXTRA
editor
Press OK.
Insertion of a waiting time (enter time with the numeric keypad).
The symbol
10
appears in the timeline.
295
Page 76

4.6 EXTRA
editor
Diamond digital DD10
In the meantime, a previously stored timeline has been inserted after the waiting
time.
This was executed in the same way as with the insertion of the snapshot. It
is not necessary to enter transition and hold time.
Note:
T
imelines with ”stored” snapshots cannot be played in REV
erse.
296
Page 77

Diamond digital DD10
Inserting a trigger time
(In the meantime a timeline recall for T007 has been programmed)
Now
the trigger time is to be set.
Press
Select the timecode
dummy with the
cursor keys.
Enter time with the
numeric keypad.
e.g. 17:30:00:00
4.6 EXTRA
editor
Press OK.
297
Page 78

4.6 EXTRA
editor
Diamond digital DD10
The
trigger time has now been inserted.
S003
have been inserted afterwards. The last has a hold time of 10 frames.
In addition two further snapshots S002 and
Note:
If an object to be inserted is stored in a different bank, press the
EXTRA control panel to switch to this bank.
Attention! The
values indicated in the Total and the Cursor field do not
include the duration of the inserted timeline T007.
Bank key in the
298
Page 79

Diamond digital DD10
Changing snapshots, modifying the times of ”S003”
(transition time 100 and hold time 0)
Move cursor
to S003.
The
Press MODIFY.
time values can be modified with the
numeric keypad.
4.6 EXTRA
display shows a window where the
editor
Selected snapshot
can be replaced by
another one.
Press OK.
299
Page 80

4.6 EXTRA
editor
Diamond digital DD10
After the modification, the following timeline is indicated in the display
.
300
Press
END
EDIT
Page 81

Diamond digital DD10
4.6 EXTRA
When the stored timeline is played, EXTRA waits for the trigger time.
17:30
00:00
While the timeline is played, the display shows the following information:
editor
T
ime of the internal R
Press CONTINUE to continue playing without reaching the trigger time.
TC module on the E-Box controller
.
301
Page 82

4.6 EXTRA
Editor
Diamond digital DD10
4.6.3 OVER
CHANGE
INSERT
VIEW OF EDIT FUNCTIONS
WAIT
STORED
Cursor movement
The current cursor position is marked black.
The symbol under the cursor marks the current object.
Serves to select a window which depends on the current
object. Most of these windows are identical to the Insert windows.
These windows were shown in the previous examples.
Insertion is always made before the cursor position
–W
aiting time in frames (0
– Previously
given
–
Previously created timeline
Comment:
These snapshots and timelines may be modified separately.
However,
menu.
stored snapshot with given transition time tT and
hold time tH.The transition is always linear
they may not be deleted or re-assigned
... 9999)
.
in the EXTRA
DELETE
VIEW
ACTUAL
– Inserts
together with transition and hold times.
The
– Trigger
– GPO
Start-of-loop and end-of-loop
–
Serves to delete the current object or the current keyframe.
(only available by the owner)
If View is OFF
switcher
If View is ON, the respective snapshots (keyframes) are called,
when
Thus the video monitors show the stored status.
the current switcher status as keyframe act#,
transition will be influenced by the T
event
, the timeline can be edited
status.
the cursor is moved.
rajectory settings.
without changing the
302
Page 83

Diamond digital DD10
4.6 EXTRA
editor
4.6.4 OVER
VIEW OF ALL GRAPHIC SYMBOLS
Start
and end of a timeline
Dissolve (s-curve), i.e. a transition between keyframes
xx xx
xx
in xx frames.
Dissolve (smooth)
xx xx
ABC
ABC
xx
Snapshot, creates Insert Stored under the name
ABC and the hold time of xx frames.
xx
xx
act nn
act
nn
Snapshot, created with ACTUAL and with a hold time of xx frames.
xx
xx
n
T001
Event symbol for GPI, time (xx:xx:xx:xx) and User
The timeline waits for the respective event.
Event symbol for switching the GPO outputs.
Start-of-loop, loop counter with n repetitions.
(n = ”–” means ”forever”)
End–of–loop
Playing a timeline, created with INSER
T ST
ORED
.
xx
aiting time of xx frames
W
303
Page 84

4.6 EXTRA
Editor
Diamond digital DD10
4.6.5
NOTES AND COMMENTS
1. ”Actual”
this
is possible.
2.
With V
– Insert the stored snapshot.
– Move cursor to this snapshot.
– Press
– Delete stored snapshot.
3.
If a given keyframe is needed as single snapshot, proceed as follows:
– Edit timeline with this keyframe (V
– Move cursor to this keyframe.
– Leave editor by pressing
– Store a snapshot with
4. Sometimes
together
This
can be done very easily by creating a timeline
one
stored snapshot.
and ”Stored” snapshots should
iew ON you can convert a ”Stored” snapshot to an ”Actual” snapshot.
Insert Actual
it is useful to execute
with the snapshot on one key).
.
End Edit
Store.
a transition to a snapshot (transition duration
not
be mixed in one timeline, although
iew ON).
.
with Edit which only contains
S xxx
25 0
5.
The
functions Fader Play (DD20 / DD30
tions
– Fader
–
Play and Auto Play do not work with timelines that contain trigger
events ( ), endless loops (FOREVER) or stored timelines.
Fader Play reverse is ignored if the timeline contains stored snapshots
and/or loops.
only) and Auto Play have certain limita
-
304
Page 85

Diamond digital DD10
4.7 TRAJECTORY
4. 7 T
rajectory
Curve example
Typ
With the trajectory types and the associated adjustment options, the user can
change the course of movements between the keyframes of a timeline. This can
be clearly seen when the timeline changes the wipe position. The trajectory settings
are stored automatically when
–
a keyframe is entered in Learn
–
an actual keyframe is inserted or changed in Edit.
Each
keyframe may have a dif
tion
to the next keyframe.
The
trajectory controls TENS, BIAS, CONTI, WEIGHT are adjusted with the digi
pots.
The function keys below the respective bars can be used to set the value to
”50%”
which is indicated with an arrow
with
the function key or with the mouse (DD10) below the indication. The
trajectory
LINEAR Produces
S-CURV
types are available:
frames
the speed of keyframe.
Produces a straight–line course of movements. The speed starts
at
with
and sudden changes in the direction of movement and in
0, rises to maximum and falls again to 0. The direction changes
the keyframes.
ferent trajectory setting which describes the transi
. The dif
a linear movement at
ferent trajectory types are selected
constant speed between the key-
following
-
-
SMOOTH
Produces a smooth even movement avoiding sudden changes
direction and speed. This makes the movement appear ”natural”.
The
controls TENS, BIAS, CONTI, WEIGHT are only ef
Smooth Trajectory.
fective for
in
305
Page 86

4.7 Trajectory
Diamond digital DD10
To describe how Smooth Trajectory mode works and how the user can modify
the
following example describes a timeline with
tion
e.g. of ME1 changes (the positions are shown below).
Wipe = small rhombus
act 1
–
Set ME1 so that the monitor shows the positioned wipe as displayed above
in act#1.
–
Select EXTRA menu.
–
V
erify that ME1 is enabled in DEFINE MEMO.
–
V
erify that TIME is not 0 (try 12 frames).
–
Set all trajectory modifiers to normal.
–
Set the trajectory type to SMOOTH.
–
Press
Learn
and select a storage location (hotkey).
–
Set ME1 so that it corresponds to the above act#1.
–
Press ST
–
Set positioner so that it corresponds to the above act#2.
–
Press ST
–
Set positioner so that it corresponds to the above act#3.
–
Press ST
–
Press
–
Play the timeline.
ORE to enter the first keyframe.
ORE to enter the second keyframe.
ORE to enter the third keyframe.
Learn
to complete the storing of the timeline.
act
3 keyframes in which the wipe posi
2 act 3
it,
-
306
In
order to display the resulting trajectory
picture.
Use the ST
ORE-function in the menu.
act
1 act 3
act
, the three keyframes are combined in one
2
Page 87

Diamond digital DD10
4. 7 T
rajectory
With normal setting (50%) of the trajectory modifiers TENS, BIAS, CONTI, and
WEIGHT,
the following course of movements results:
The
following describes the influence
timeline
As the trajectory controls are not effective for the first and the last keyframe, this
example
The
–
–
–
–
–
–
–
–
design you can experiment with the controls and/or combine them.
only shows the modification of the values of the second keyframe (act#2).
procedure is as follows:
Press
Edit
and select the hotkey of this timeline.
V
erify that V
Go to act#2 with the function key (act#2 is black).
Press Change (a l
Set all modifier to 50%.
Set modifier of the respective example to the indicated value and press
to enter the new value.
Press
Press hotkey
iew is enabled.
End Edit
PLAY
arg
e w
indo
to end editing.
to play the result.
of each control separately
w a
ppear
s with the bars o
. For more creative
f the t
rajector
y m
odifiers).
OK
307
Page 88

4.7 Trajectory
Diamond digital DD10
4.7.1
TENS (TENSION)
This
negative
The other trajectory controls remain in ”50%” position.
modify
control modifies the curvature of the trajectory
curvature results in a loop.
. The
curve may be pointed. A
ca.18 %
ca.66 %
308
Page 89

Diamond digital DD10
4.7.2 BIAS
4. 7 T
rajectory
This control influences the direction of the trajectory at the keyframe. The angle
between
The other trajectory controls remain in ”50%” position.
entry and exit is 180
°.
ca.27 %
modify
ca.72 %
If the wipe pattern (rhombus) is to leave the image area (beyond the margin),
EXTEND
POS
must be enabled in the corresponding wipe generator
.
309
Page 90

4.7 Trajectory
4.7.3 CONTInuity
Diamond digital DD10
control serves to produce a kink at the keyframe. The angle between entry and
This
exit
is no longer 180°. The speed rises and produces a ”hop” (jumping ball).
The other trajectory settings remain in ”50%” position.
modify
ca.24 %
ca.70%
310
Page 91

Diamond digital DD10
4.7.4 WEIGHT
4. 7 T
rajectory
control serves to change the speed at the keyframe. The flow of the curve
This
changes.
The other trajectory settings remain in ”50%” position.
ca.24 %
modify
also
ATTENTION!
Approx. 24%
Approx. 70%
A ”jerk” may appear at the key frame.
Slow movement before the key frame
fast movement after the key frame
Fast movement before the key frame
slow movement after the key frame
ca.70%
311
Page 92

4.7 Trajectory
Diamond digital DD10
312
Page 93

Diamond digital DD10
4.8 ERROR MESSAGES
”Not
enough FREE space”
”Y
ou are not the OWNER”
4.8 Error messages
Cause:
The EXTRA storage is too full to permit storing this (new) snapshot
or timeline.
Remedy:
Delete snapshots or timelines that are no longer required and store
again with
Cause:
You
have tried to delete, assign or rename a snapshot or a timeline,
that
was stored by another user
For safety reasons, this is not permitted.
Store or Learn
.
.
”Contains deleted SNAPSHOT
or timeline ignored”
”Snapshot
line or vice versa. Ignored”.
”NAME already exists”
”Nested PLA
”Cannot INSER
into itself” You
”More than 30 different analog Cause:
values. Ignoring some of them.”
replaced by time-
Y ignored”
T timeline
Cause:
A snapshot or timeline stored in this timeline has been deleted (or
assigned) in the meantime. A snapshot or timeline selected on the
Preset
Cause:
You
have used a function that does not apply to the
Play
for a snapshot.
Cause:
have tried to rename a snapshot or a timeline using
You
already
Remedy:
Select a dif
Cause:
The
currently played timeline contains a timeline and this timeline in
turn
contains another timeline.
Cause:
have tried to insert the timeline you are currently editing as Stored
timeline.
You
have changed an excessive number of analog values during this
Learn
ments
bank has been deleted
exists (in a dif
ferent name.
For safety reasons this is not permitted.
or Edit procedure. The limit has been set to avoid jerky move-
while a timeline is played.
ferent bank).
in the meantime (DD20 / DD30 only).
stored object, e.g.
a name that
”Ignored because nothing Cause:
enabled in DEFINE MEMO.”
You
have tried to store (
no
functions were enabled in DEFINE MEMO. This is ignored in order
to
avoid empty snapshots or timelines.
Remedy:
Change DEFINE MEMO.
Store
or
Learn) or to record (
Record
) when
313
Page 94

4.8 Error messages
Diamond digital DD10
”No EDIT during
AUT
O TRANSITION”.
”No EDIT during
AUT
O TRANSITION or other
EXTRA PLA
”Cannot change DEFINE
MEMO during LEARN,
RECORD or EDIT”
”DISSOL
keyframe is always 0!”
”Ignored! No F
backwards”
”Ignored! No F
because .......”
”Ignored! No AUT
because .......”
”Ignored! No EDIT because
RECORDED”
Y/DISSOLVE” pleted.
VE TIME for first
ADER play
ADER play
O play
Remedy:
Select Edit after Auto T
Remedy:
Select Edit after Auto T
More possible error messages.
(Fader play: DD20 / DD30 only)
ransition is completed.
ransition or EXTRA Play/Dissolve is com-
314
Page 95

Diamond digital DD10
4.9 EXTRA-VTR-PROTOKOLL
4.9 EXTRA-VTR-Protokoll
As of software version ”I” a new port protocol is available. This
real-time
a tape machine and presents timelines like a piece of recorded tape.
in
the timeline has a specific time code assigned to it. For the connection to the edi
ting
nection
(port
Editor-Setup The
control of switcher timelines by an editing system. The switcher emulates
system, a standard RS422 cable (1:1 assignment,
at the switcher
can be established directly at one of the three RS422 ports
pin-pin) is used. The con
1, 2 or 3). Please refer to the switcher installation manual.
switcher identifies to the editing system
as a tape machine of the ”BVW
protocol permits a
Each
position
-75P”
type.
In
the editor setup the corresponding setting has to be made.
Switcher-Setup In the switcher setup (E-Box) the EXTRA-VTR protocol must be selected for the
relevant port
In
VTR
Enbl
Edit
Enbl
case of DD20/30 switchers the remote control is enabled by the
case of DD5/10 switchers the remote control is released implicitly when the Edit
In
Enbl
key is pressed
.
VTR Enbl
key.
-
-
Functioning A
remote control is only possible if a valid timeline is
meets
the following requirements:
selected at the switcher which
The timeline must have a defined duration, i.e.
– it must not contain an endless loop,
– it must not contain a ”wait for GPI”.
The playing of timelines from the editor is subject to the same limitations as the
manual
– T
playing with the fader (DD20 / DD30 only).
imelines containing external snapshots (generated with ”insert stored”) can
only be played forward.
– T
imelines containing loops can only be played forward.
As
a consequence timelines which are exclusively created by ”insert actual” com
mands
should be preferred in connection with the VTR interface. If no timeline or
an
unsuitable timeline is selected, this is signalled to the editor as a tape unthread
status.
In Sony editors, for example, this status produces the indication T
OUT (tape
out).
If
the switcher is not released (”EDIT Enbl” not active) this is signalled to the editor
as
a LOCAL state.
The
start of a timeline always is 10 hours (timecode 10:00:00:00). In ef
fect preroll
this avoids possible problems caused by time code wrap around. All time codes
between
00:00:00:00 and 10:00:00:00 position the timeline at the start.
-
315
Page 96

4.9 EXTRA-VTR-Protokoll
Diamond digital DD10
At
the end of the timeline the time code continues, yet the switcher status is unaf
fected
by any positioning beyond the end.
The editor can control the timeline with the normal operator tape motion controls
(e.
g. B. Stop, Play
In NTSC systems the VTR emulation operates in Non-Drop-Frame mode.
, Shuttle, Jog, Cue etc.).
-
316
Page 97

Diamond digital DD10
5.
5. APPLICATION NOTES
5.1 LOADING FLASH SOFTWARE FROM DD FLOPPY DISK DRIVE
The software permits loading updates (FLASH software) directly from the floppy
disk
drives of the switcher
procedure. This mode is only possible if EPROM type PR752A (or higher) is
installed in the switcher control panel and if EPROM type PR695A (or higher) is
installed
There
or
D
D
in the switcher E-box .
are two ways of loading the FLASH software with the internal
the external (DD5/DD10) floppy disk drive:
SELFLOAD
LOAD FOREIGN DEVICE
. This eliminates the need
Selfloading procedure of a control
with own floppy disk drive.
panel
From a control panel that is in the
application and has its own floppy
drive, the software can be loaded into
any device in the network (E-box or
panel
without disk drive).
to connect a PC for the loading
Application Notes
(DD20/DD30)
disk
Starting SELFLOAD
In
case of a control panel that (as a
to
the operating status, it is suf
into
the floppy disk drive and then trigger a reset (controller board).
cedure
is started automatically
If a control panel already is in the application, a reloading of the software can be
started
in the SETUP menu (EXTRA panel).
SETUP menu option
L O A D S O F T W A
In the subloop the options
LOAD MY P
LOAD E-BOX MASTER
LOAD E-BOX SLA
LOAD OTHER P
can be selected.
result of an EPROM change) is unable to return
ficient to insert a floppy with a control panel LOC file
The loading pro
.
R E : >
ANEL
for ”Selfload” and
VE
ANEL
for ”Load foreign devices”
-
317
Page 98

5.
Application Notes
Diamond digital DD10
If
LOAD MY P
ANEL
is confirmed, the selfloading procedure is started.
The selfloading procedure comprises a test and a loading procedure that are
executed
successively
. In the test procedure (approx. 5 minutes) the date on the
floppy disk are verified for safety purposes. This is signalled by a cyclical beep
sound.
The loading procedure (approx. 5 minutes) is signalled by a cyclical long beep
sound
and the ”running” of the controller status LEDs.
The
loading procedure is completed when the control panel executes a REST
ART.
Starting
LOAD FOREIGN DEVICE
If
the control panel is already in the application,
can
be started in the SETUP menu (EXTRA panel).
Note:
Setup Menu option
In the subloop the following foreign devices can be selected:
If
one of the submenu options is confirmed, the foreign loading procedure is started.
As
described above, the loading operating itself comprises a testing
procedure that are executed successively. In this case both procedures are signalled
with a rotating activity indication in the
will
also show any error messages.
a foreign device loading procedure
It is assumed that only the device to receive the software is active
in the Cheapernet. Switch off all devices that are not involved
before the foreign device loading procedure is started and press
the reset button on the control panel controller afterwards.
L O A D S O F T W A
R E : >
LOAD E-BOX MASTER
LOAD E-BOX SLA
LOAD OTHER P
VE
ANEL
and a loading
EXTRA display
. The EXTRA display
Floppy disk contents
The loading procedure is completed when the newly loaded device executes a
RESTART. In the control panel the EXTRA display shows the submenu option
executed
In
line with the BTS designation conventions for LOC files,
ing
All
three
last together with the indication
names can be loaded in the switcher:
Control panel
E-box master
E-box slave
LOC files must be in the
root directory of the floppy
LOC files on a floppy can be loaded.
DONE.
only files with the follow
F*.LOC
M*.LOC
S*.LOC
. In this operation only the first
-
318
Page 99

Diamond digital DD10
ÁÁ
ÁÁ
ÁÁ
ÁÁ
ÁÁ
ÁÁ
ÁÁ
ÁÁ
ÁÁ
Á
Á
Á
Á
Á
Á
Á
Á
Á
Á
5.2 INPUT ASSIGNMENTS (ON SMALL PANELS)
5.
Application Notes
5.2.1 PREMISES
5.2.1.1 ST
Standard
ANDARD BUTT
*)
1
Key Index
DD 5
DD10
DD20
DD30
I 1
I 1
I 1
I 1
Current
Depart
no
assignment limitations (For Software versions up to Release ”H”):
from descriptions in the DD5 / DD10 Operations Manuals there is actually
”ASSIGN” menu button in the INST
ALLA
TION \
IDENT menu of these panels.
So, with these panels it wasn’t possible to gain access to physical input numbers
greater
than the maximum count of D5 / DD10 E-Box inputs. This especially
out as a drawback when a user operates a number of panels and one (or more)
E-Box(es)
inputs
releases.
ment
ments
files from one panel to another
how
in a Multi-Panel configuration. In case there is a desire for an access to
# 17-32 of a large E-Box this could not be accomplished on former Software
Since release ”I” there is still no possibility to directly control the assign
for greater input numbers, but BTS will now supply users of network environ
with an elegant solution to that problem. The solution is:
Copy of ASSIGN-
. These Application Notes will show an example of
this is done and what restrictions will apply
.
ON ROW INDEXING
2
3
4
5
6
7
8
9
10
11
12
13
14
15
16
I 2
I 3
I 4
I 5
I 6
I 7
I 8
Bgd
Blk
I 9
I 10
I 11
I 12
Vid
I 2
I 3
I 4
I 5
I 6
I 7
I 8
I 9
I 10
I 11
I 12
Bgd
Blk
I 13
I 14
I 2
I 3
I 4
I 5
I 6
I 7
I 8
I 9
I 10
I 11
I 12
I 13
I 14
I 15
I 16
I 2
I 3
I 4
I 5
I 6
I 7
I 8
I 9
I 10
I 11
I 12
I 13
I 14
I 15
I 16
turns
17
I 15
Bg1
I 17
-
-
18
I 16
Bg2
I 18
Standard
*)
Key Index
DD 5
DD10
DD20
DD30
Standard
Key Index
ÁÁÁÁ
*)
DD 5
DD10
DD20
DD30
19
Bgd
Vid
Blk
I 19
37
Mp1
20
21
22
23
24
25
26
27
28
29
30
31
Blk
Bgd
Blk
I 17
I 18
I 19
I 20
I 21
I 22
I 23
I 24
I 25
I 26
I 27
I 28
I 20
I 21
I 22
I 23
I 24
Bg1
Bg2
Blk
I 25
I 26
I 27
I 28
38
39
40
41
42
43
44
45
46
47
48
49
Á
Mp2
Bgd = Single
Bg1/2 =
Blk
Vid = V
Mp1/2 =
M1k, M2k =
Á
Á
Á
=
ME1-PVW/Key
M1k
Á
M2k
Á
Vid
Mp1
Color Generator
Color Generator 1/2
Black
ideo Store (MEM)
Montage Processor Channel 1/2
, ME2-PVW/Key
...all other blank fields appear as blanked Mnemonics on the panel.
32
I 29
I 29
Á
Mp2
50
33
I 30
I 30
51
34
I 31
I 31
Á
Bg1
52
35
I 32
I 32
Bg2
53
36
Vid
54
Á
Blk
*) With BLACK_BUTT (in Setup Menu) being on the right side.
319
Page 100

5.
Application Notes
Diamond digital DD10
5.2.1.2
NETWORK EXAMPLES
5.2.1.3 APPLICATIONS
NETWORK FOR INDEPENDENT STUDIOS / EDIT SUITES:
Basics
for this application will be big edit suites that many users have to time share.
For example you could have setup a large editor, cameras, up to two DVEs, one
or
more CGs, Disk Recorders and a number of VTRs to the big unit to perform (pre-)
productions. Supposed the small system is installed in another room with no live
sources (cameras.....) connected, the editor can later move on to the small post
production
copy
the
order of connected inputs and keep the big room free for live shots etc...
DUAL P
Supposed
want
access
ble
to ”download” a specific 32 input button assignment to the DD10 panel and have
access
room to finalize the edit with the material that already is on tape. He
his disk stored ”user input setup” from the
ANEL NETWORK FOR OB-V
you have live productions on the DD20 panel (with a DD30 E-Box) and
to do a small production with dif
to all E-Box connected sources. For the user’s convenience it is now possi
to any 16 of all sources.
ferent cuts at the same time, you need to
DD30 to the DD10 panel to maintain
AN PRODUCTIONS:
can
have
-
320
 Loading...