

Page 1
Diamond digital DD10
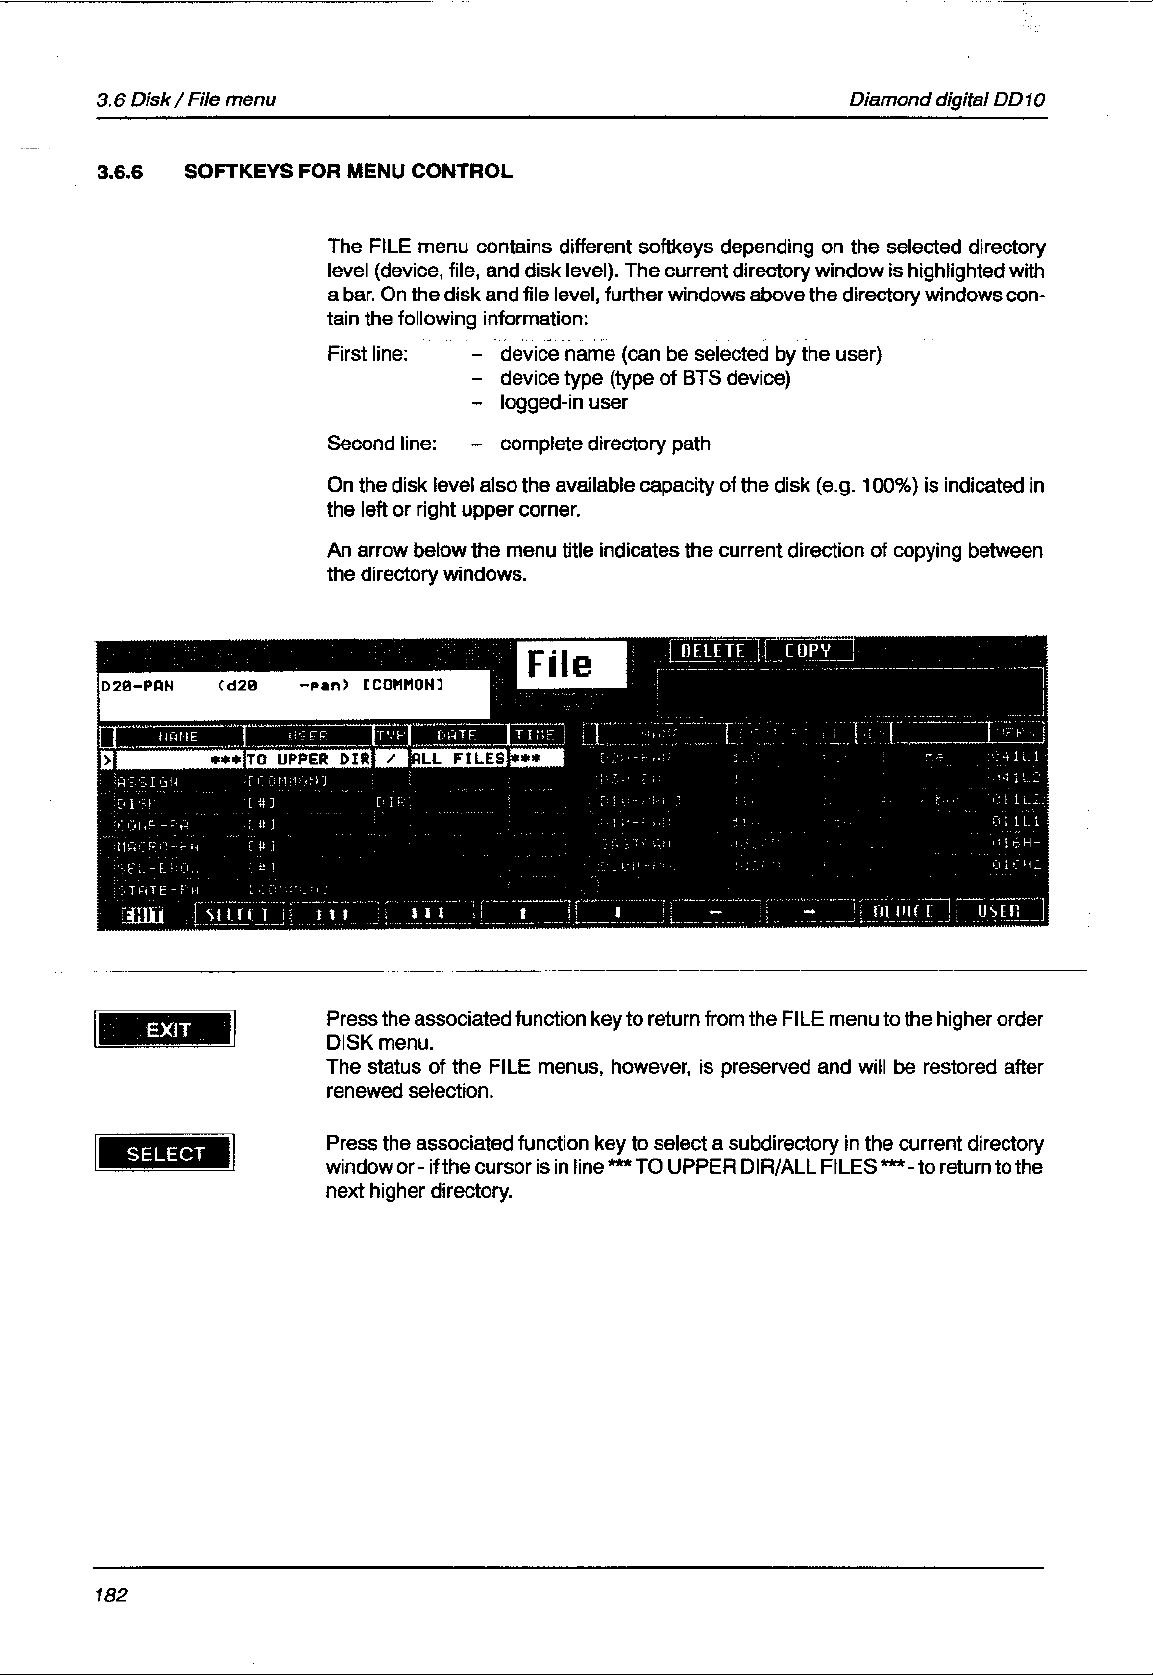
3.6 DISK AND FILE MENUS
The
DISK menu is used to store and recall switcher files. The FILE submenu serves
for
the file management and file processing within the switcher system.
3.6 Disk / File menu
3.6.1 ST
ORING AND RECALLING DATA WITH FLOPPY DISK
The DISK menu can be selected from the STATUS menu.
EXIT
FILE
Press
the associated function key to return from the DISK menu to the higher
STATUS
Press the associated function key to change into the FILE submenu. For further
information
menu.
please refer to the sections below
.
order
173
Page 2
3.6 Disk / File menu
Diamond digital DD10
DELETE
DISK
ALL
SETUPS
STORE RECALL
USER DA
TA
Press the associated function key to erase the disk in the disk drive. Before the
instruction
cel
the procedure and
Press the associated function key to STORE or RECALL all
and the associated E-box. In this process two directories are generated on the
floppy
This function can be used to create the standard backup disk.
is executed, a safety confirmation inquiry is made. Use
DELETE
disk in which the following data are stored:
ALL-EB
ALL-PA
to erase the disk.
contains all files of the E-box
contains all files of the control panel.
CANCEL
files of the switcher
to can
-
STORE RECALL
Press
the control panel and the associated E-box. During storing, the following internal
files
From the E-box:
From the control panel:
For further information please refer to
Note:
When
must
the associated function key to
of the logged-in user are written on the disk:
TEXTURES
STATE-PA
STATE-EB
EXTRA
PATT-USR
the user files are recalled, the same system configuration (user
be given as at the time of storing.
STORE
or
RECALL
Standard files in FILE menu
user specific data from
.
, access etc.)
174
Page 3
Diamond digital DD10
3.6 Disk / File menu
3.6.2
3.6.3
GENERAL INFORMA
The
operation and the terms in the FILE menu are mostly identical with those used
for
the file management on personal computers. A
as
a PC network in which the various E-boxes and panels represent a PC.
A
3.5” HD floppy disk with a capacity of 1.44 MB is used as storage medium. The
FILE
etc. individual files. Files can also be transferred between the individual units
(devices)
The
FILE menu consists of a left and right overview window
tem hierarchy, these windows permit the selection of the devices, the directory
structure
the
source file in one
contain
One window can also be used to show the contents of a disk in another control
panel.
DIRECTOR
Y STRUCTURE OF THE SWITCHER
TION ON FILE MENU
switcher system may be seen
menu serves to create, copy and
delete directories or to delete, copy
in the network.
. Depending on the
or the individual files. During a copying procedure, the system will show
window and the destination in the other
the directory structure and the right
window the files of the current directory
. The left window may
, rename
sys
-
.
Device Directory/File
EBOX
ACCESS
CONF–EB
COUPLE
EXTRA
Example E–box
BANK 1
S001
S002
Snnn
BANK N
175
Page 4

3.6 Disk / File menu
Diamond digital DD10
The highest level in the directory structure is the DEVICE level. Here all devices
connected
highest level from any place within the directory hierarchy simply by pressing the
DEVICE softkey (F19).
On
the lower levels the files of the individual devices are stored (FILE level). The
directory structure is fixed. The only directory that can be changed is DISK in the
control panel (DISK level).
Within
USER
1.
USER-TYPE = [#] SHARED
This type of file is available only once and is used by all users.
2.
USER-TYPE = [USER-name]
These
the
through
3.
USER-TYPE = [USER-name]
to the network (P
the directory there are three dif
columns of the directory window
files exist separately for each user (maximum 8). If files of this type are
directory
, a new
the individual files arranged by users (toggle mode).
ANELS, E-BOX) are indicated. Y
ferent types of files.
.
USER
softkey will appear below F20 which serves to scroll
ou can return to this
They are identified in the
in
Files
of this type
sonal”
files (e.g. EXTRA, DISK) and cannot be toggled with the
are assigned to a given user on a fixed basis. These are ”per
USER
key
-
.
176
Page 5
Diamond digital DD10
3.6 Disk / File menu
3.6.4 ST
Files in the electronics box
ANDARD FILES IN FILE MENU
The following standard files are indicated in the FILE menu. Depending on the
access
rights of the logged-in user (see table) there are dif
File
(Type)
ACCESS
(shared)
CONF-EB
(shared)
User table with name, access right and password.
Logged-in user with assigned functional units of all
control
panels.
All basic video settings of the E-BOX (16/9 - 3/4,
Round
8bit, Genlock Phase, Col Limiter).
Selected port protocols.
Preselections by the users
(Aux
Couple, Auto PVW
ferent possibilities.
Contents
, GPI, TVS, pre-matrix DVE).
COUPLE
(user)
EXTRA
(shared)
IDENT
(user)
MARCO-EB
(shared)
MATR-TVS
(shared)
PATT
-USR (user)
STATE-EB
(user)
Key/Fill-Signalpaare
Contains
As
and
Each snapshot and each timeline belong to a user
Table of the symbolic names for the video and key
inputs.
Table of the symbolic names for the video and key
inputs.
Conversion
a TVS matrix which is used
of
the switcher input signals according to the switcher
file
Data
tions.
Data
tion, wipe generator, key
(without PaintMask), matte generator, PVW selection, GPI assignment and activation, EXTRA Define
Memo).
all snapshots and timelines of all users.
EXTRA is a directory file,
timelines are directly accessible.
table for the input and output numbers
ASSIGN.
of the user wipe patterns including the modifica
on the current switcher status (matrices, transi
the individual snapshots
for monitor switch-overs
processor
, mask generator
.
of
-
-
TEXTURES
(shared)
Patterns
for color background.
177
Page 6
3.6 Disk / File menu
Access rights
Diamond digital DD10
User Permit
File SYSTEM CONFIG OPERATOR
ACCESS
CONF-EB
COUPLE
EXTRA
IDENT
MACRO-EB
MATR-TVS
PATT-US
STATE-EB
TEXTURES
D
D
D
D
D
D
D
D
D
D
D
D
D
D
D
D
D
D
D
D
D
D
D
D
D
178
Page 7
Diamond digital DD10
Files in the control panel
3.6 Disk / File menu
Access rights
File
(Type)
ASSIGN
(user)
DISK
(shared
oder User)
CONF-PA
(shared)
MARCO-PA
(shared)
STATE-PA
(user)
Contents
Assignment
to
the inputs of the electronics box.
Contents
individual
Data
of all available
menu and the functions LCD, LOWLI, MOUSE and
T.BALL
Contains the macros defined in DICMAC.
Data of the current control panel status (menu, bus
delegation,
ment
table of matrix keys on
of the memory disk in directories. Access to
files possible.
functions in the CONFIG P
in the INST
trackball
based on selection in ACCESS menu).
ALL menu.
and/or mouse lock, fader assign
User Permit
the control panel
ANEL
-
File SYSTEM CONFIG OPERATOR
ASSIGN
DISK
CONF-PA
MACRO-PA
STATE-PA
D
D
D
D
D
D
D
D
D
D
D
D
D
179
Page 8
3.6 Disk / File menu
Diamond digital DD10
3.6.5
Device level
The directory window contains the following information:
CONTENTS OF DIRECTORY WINDOWS
12 3 564
1
Marking symbol ”>”:
2
Device name:
3
Device type:
4 Address:
5
Current devices:
6 VERS:
indicates the last device selection.
can be freely selected by the customer
indicates
control
Cheapernet address, is automatically determined when the system is
started.
the
currently
indicates the software version of the respective device.
the respective type of BTS device (e.g. diamond pan = Diamond
panel, diamond box = Diamond electronics box).
currently operated control panel is identified in this column as ”me”.The
selected electronics box is identified as ”my box”.
.
180
Page 9
Diamond digital DD10
File / directory level
12 3 564
3.6 Disk / File menu
The directory window contains the following information:
1
Marking symbol ”>”:
2
Device name:
3 User:
4 Typ:
5
Date:
indicates the last file or directory selection
name of file or directory
User column
[#] =
[user-name] =
identification of directories and origin of data files:
DIR =
ALD =
for internal files, the date when the menu was selected; for DISK and
EXTRA files, the last date of storing.
shared; only one file of this type is available
and is used by all users.
file available for each user (max. 8) or ”personal” file
directories that can be selected
Auto Load Directory
6 Time:
7
*** T
time when the menu was selected.
O UPPER DIR / ALL FILES ***:
returning to the higher order directory and selection when you copy or
erase directories.
181
Page 10
Page 11
Diamond digital DD10
3.6 Disk / File menu
Press
the associated function key to
dow.
Press the associated function key to move the cursor one line up or down in the
current
directory window
.
page up or down in the current directory win
-
DEVICE
USER
ALD
PfeiltastenPress
windows.
The marker bar in the windows moves to the now active window. In addition, the
window
Press the associated function key to return from the current directory window
directly
This
function
the
This softkey appears only when the directory window displays the disk contents
(refer
above the directory window is highlighted.
to the highest level (device level).
softkey is only available on the file level. Each time you press the associated
key
dif
ferent users within the directory (toggle mode).
to section 3.6.14).
the associated function key to jump between
, you switch over between the files that are available several times for
the active directory
183
Page 12
3.6 Disk / File menu
Diamond digital DD10
3.6.7
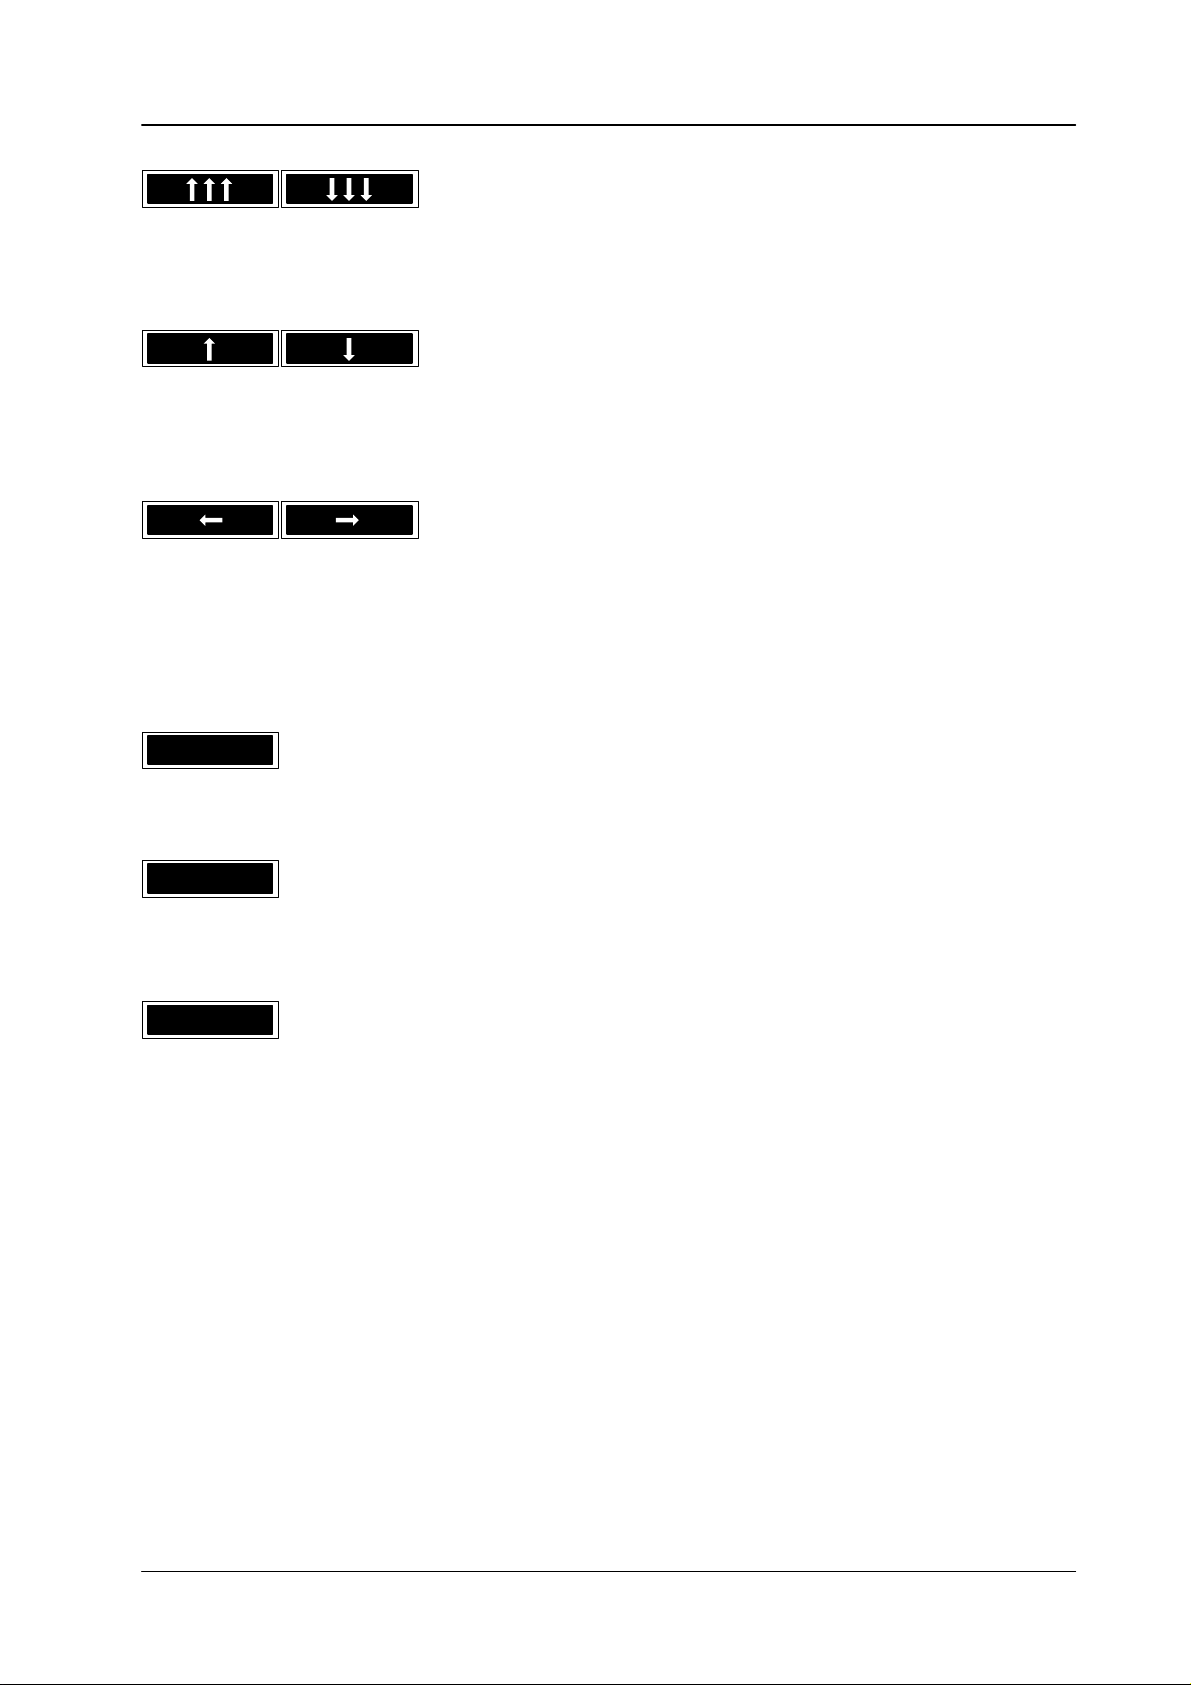
RENAMING FILES AND DEVICES
The
Rename function permits changing the names of files, directories or devices.
Device
names can only be changed by users with
SYSTEM
access.
RENAME
If
you press the associated function key
appears
Names can have the following lengths:
All
used
lighted
in the menu, where the new name can be entered.
Device name:
File names:
Directory names:
letters of the alphabet as well as the special and the numeric characters can be
for the name. The keypad in the Wipe panel and the numeric keypad are
with a running light to prompt the entry
, a new window with a new key assignment
8 characters
12 characters
8 characters
.
high
-
184
Page 13

Diamond digital DD10
OK
Press
the associated function key
3.6 Disk / File menu
to change the selected name to the new name.
RUBOUT
CLEAR
CANCEL
Press the associated function key to delete the character left of the current cursor
position
Press the associated function key to clear the entire editing line.
Press the associated function key to cancel the renaming procedure.
in the editing line.
185
Page 14
3.6 Disk / File menu
Diamond digital DD10
3.6.8
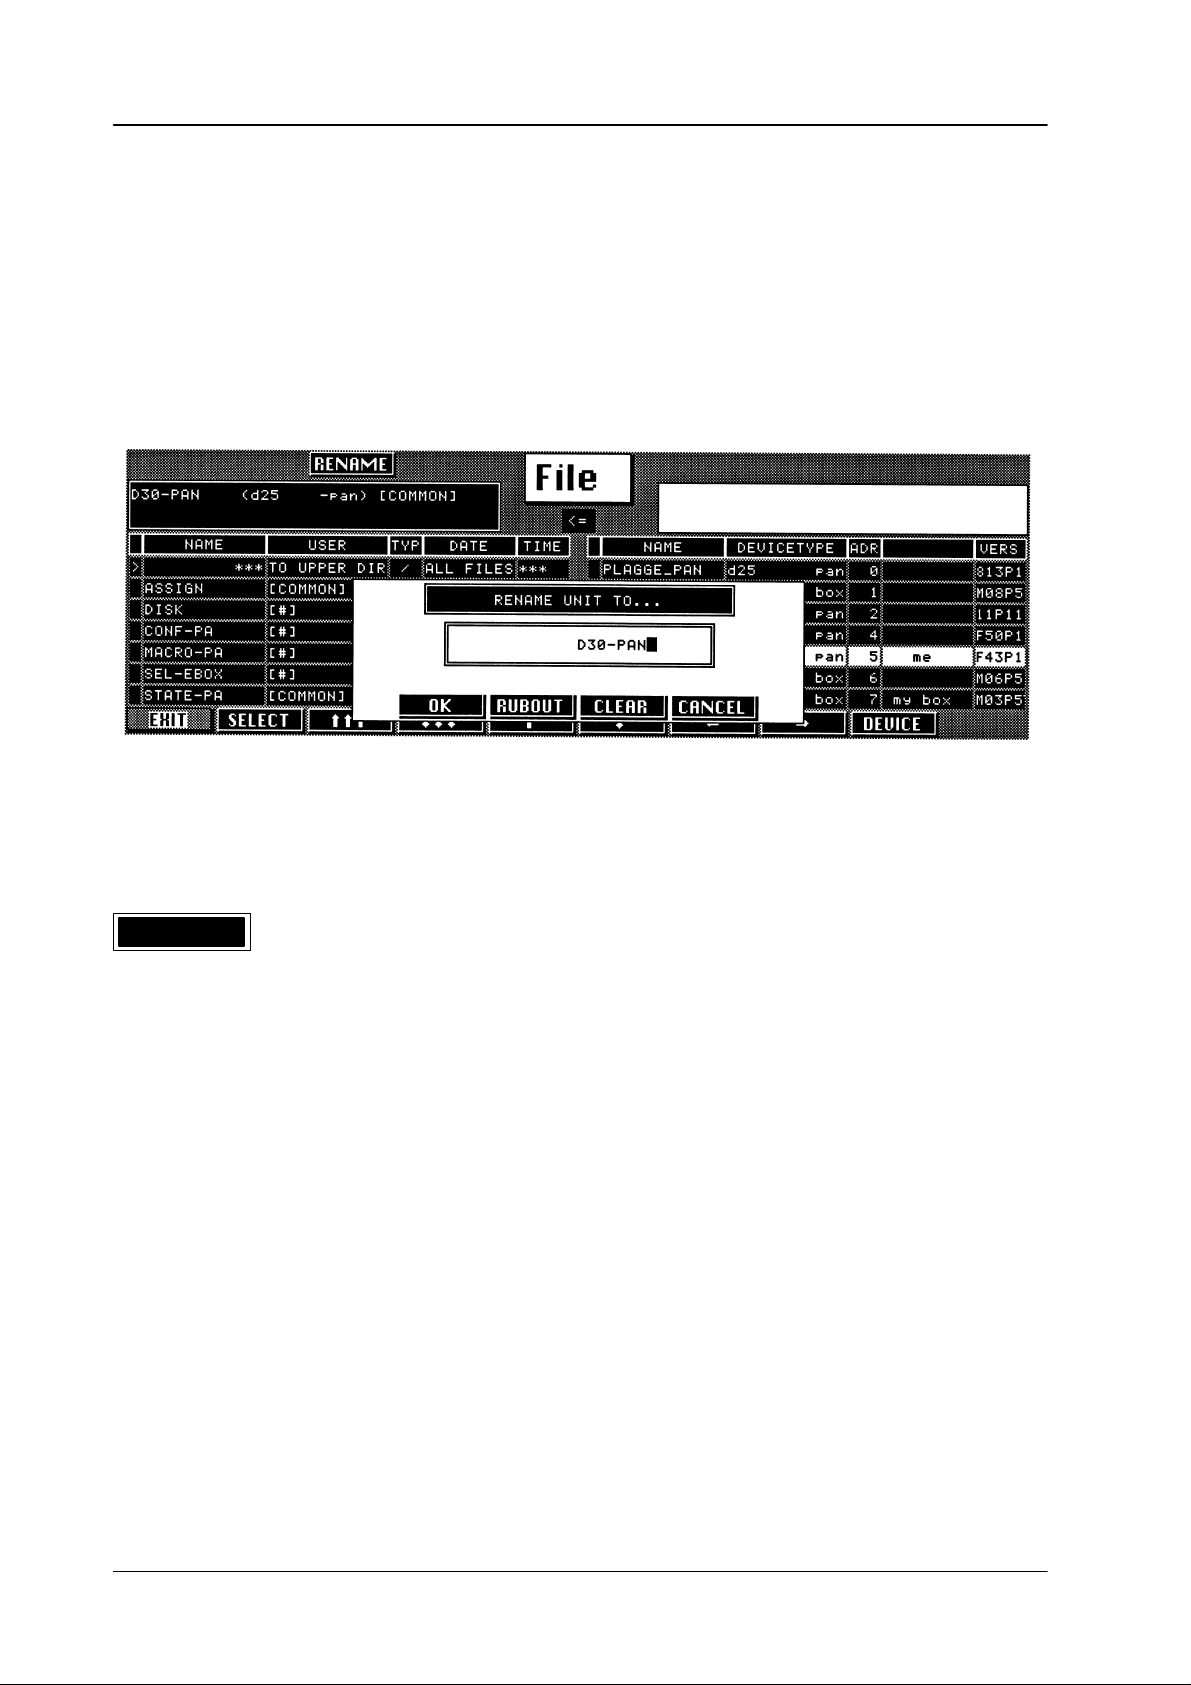
MAKING DIRECT
MKDIR
ORIES (MKDIR)
The Make Directory function
subdirectories on the disk.
If you press the associated function key, a window with a new key assignment
appears
The name of the directory may have up to 8 characters.
All
used.
The
ning
in the menu, where the new name of the directory can be entered.
letters of the alphabet as well as the special and the numeric characters can be
keypad in the Wipe panel and the numeric keypad are highlighted with a run
light to prompt the entry
(MKDIR) can be used to create new directories and
.
-
OK
RUBOUT
CLEAR
CANCEL
Press the associated function key to create the new directory
the associated
Press
position
Press the associated function key to clear the entire editing line.
Press the associated function key to cancel the MKDIR procedure.
in the editing line.
function key to delete the character left of the current cursor
.
186
Page 15
Diamond digital DD10
3.6 Disk / File menu
3.6.9
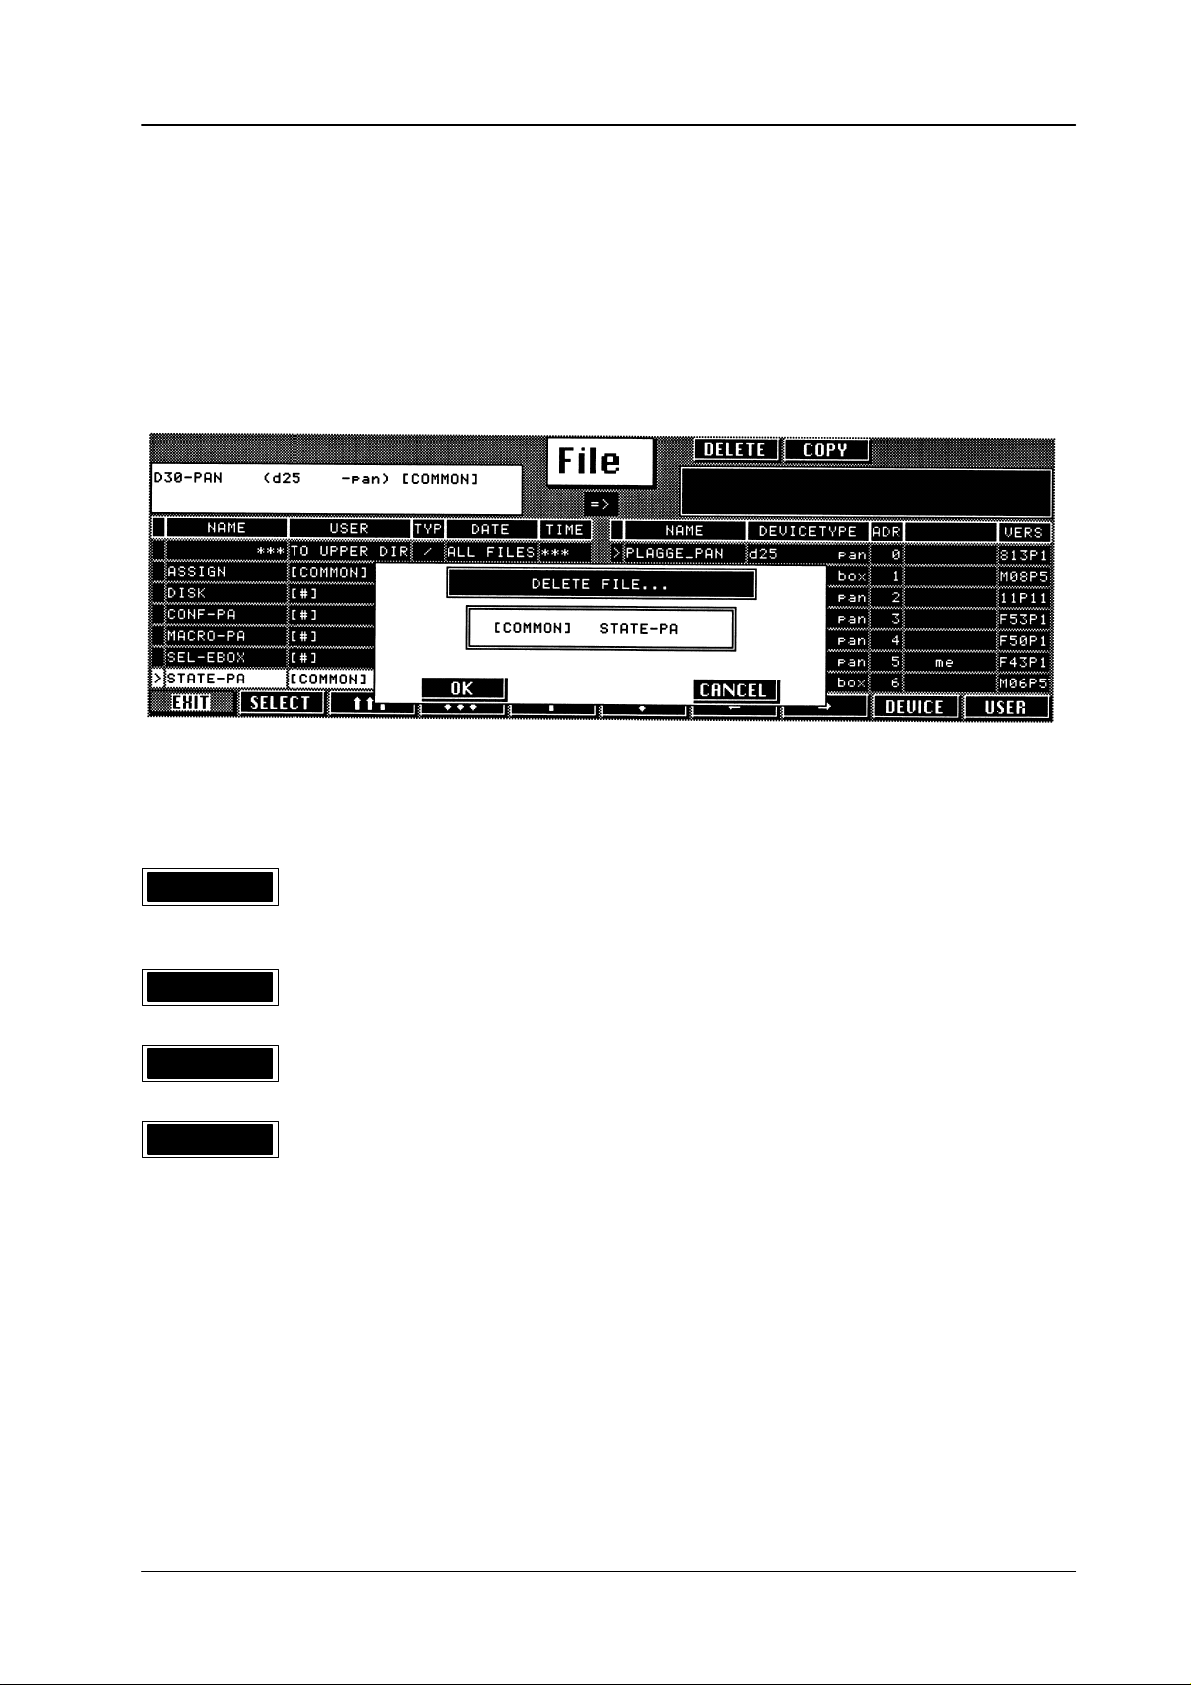
DELETING AND RESETTING FILES
With the Delete function you can delete ”own”, i.e. user created files on the disk
level.
Any
files on the file level are not erased with the Delete function but are reset
to
their default system status. The DELETE Disk instruction can be used to erase
all
files available on the disk and to make a selected user the new owner
The respective file must be selected with the marker bar
.
.
DELETE
OK
CANCEL
USER
If you press the associated function key, a window with a new key assignment
appears
This window serves as a safety confirmation inquiry
Press
system
Press the associated function key to cancel the deletion procedure.
This softkey is only available on the disk level.
Repeated
all
dow. After completion of the deletion process (OK), the disk is reformatted and
automatically
key.
in the menu.
.
the associated function key to delete the selected file or to reset the selected
file to default status.
pressing of the associated function key permits
logged-in users in the switcher system. The user names are indicated
assigned to the
user whose name was last selected with the
successive selection of
in the win
USER
-
187
Page 16

3.6 Disk / File menu
Diamond digital DD10
3.6.10 DELETING
DELETE
AND RESETTING DIRECT
If you want to delete or reset entire directories, the marker bar must be on
***T
O UPPER DIR/ALL FILES*** in the current directory window
If you press the associated function key, a window with a new key assignment
appears in the window. The menu window also contains the name of the user
whose
files are deleted or reset.
ORIES
.
OK
OK+DEL
CANCEL
Press the associated function key to delete or reset to default all files of the
logged-in
Press
user
Press the associated function key to cancel the deletion procedure.
user within this directory
the associated function key to delete or reset to default all files of the selected
within this directory and in all subdirectories.
.
188
Page 17

Diamond digital DD10
3.6 Disk / File menu
3.6.11
COPYING FILES
The Copy function permits to copy system files or user specific files within the
switcher
With this function you can
– create backup copies
– transfer system tables
– exchange switcher settings among various users etc.
Copying
window).
panel.
work
menu.
If you copy from file to disk level, you will be asked to change the file name. The
copied
or the entire switcher network.
is always made between two
The directory need not belong to your ”own” E-box or your ”own” control
In copying you can access all directories
with the only limitation given by the user access rights defined in the ACCESS
file will automatically take the user name of the logged-in user
directory windows (source and destination
of all devices connected to the net
.
-
189
Page 18

3.6 Disk / File menu
Diamond digital DD10
COPY
OK
RUBOUT
CLEAR
CANCEL
If you press the associated function key, a window with a new key assignment
appears
from
The name of the file may have up to 12 characters (XXXXXXXX.EXT).
Press
under
Press
position
Press
when
Press the associated function key to cancel the copying procedure.
in the menu, where the new file name can be entered if you wish to copy
the file level to the disk level.
the associated function key to copy
its new name into the destination directory
the associated
in the editing line (only when copying from file level to disk level).
the associated function key to delete the entire entry in the editing line (only
copying from file level to disk level).
function key to delete the character left of the current cursor
the file selected in the source directory
.
190
Page 19

Diamond digital DD10
3.6 Disk / File menu
3.6.12
COPYING DIRECT
COPY
ORIES
If
you want to copy entire directories, the marker bar must be on ***T
ALL
FILES*** in the currently selected directory window
If you press the associated function key, a window with a new key assignment
appears
are
in the menu. The menu window also indicates the user to whom the files
assigned.
.
O UPPER DIR/
OK
OK+DIR
CANCEL
Press the associated function key to copy all
destination directory
the associated function key to copy all files
Press
the
subdirectories into the destination directory
Press the associated function key to cancel the copying procedure.
.
files in the current directory into the
in the current directory as well as
.
191
Page 20

3.6 Disk / File menu
Diamond digital DD10
3.6.13
Prerequisites For
Procedure
COPYING USER–SPECIFIC FILES
Dif
be
ther
D
D
D
D
D
ferent users may copy user-specific files within the switcher as follows:
copying a file to another user
logged in.
information please refer to the file description in the operating instructions).
Select FILE menu.
Move cursor into the directory into which the file is to be copied (target direc
tory).
Change to the second directory window and position cursor on the file to be
copied (source file)
If you wish to copy the source file of a user dif
the
Press the
logged–in user will appear
Press the
In addition, the user must have access to the file to be copied (for fur
USER
softkey permits selecting the file of another user
COPY
OK
softkey
softkey to start the copying procedure.
, the user to receive the file (destination user)
ferent from the indicated user
.
. A window with the name of the target file and the
.
must
-
-
,
3.6.14
If
the copying cannot be executed, a corresponding message appears in the acti
vity
window
LOADING BACKUP FILES (AUT
Supplement to the operation instructions, section File Menu.
When
designation ALD
tion
is evaluated.
Directories with the type information ALD are reloaded from the floppy disk into
the
corresponding device (EBox, panel).
Directories with the type information
Should
work,
ALD
into
Conversion
menu.
ding
directory and press softkey
mation
See in the figure (page 1) the files D5-PAN with the type DIR and D30-PAN with
the
type
Softkey
.
creating backup
be prevented that data are reloaded into the devices connected to the net
you can skip the corresponding directory by converting the type information
DIR.
of the type information is possible by means of softkey
Insert the disk into the disk drive,
changes from
ALD.
ALD
appears only when the directory window displays the disk contents.
O LOAD)
files, directory entries are made on the disk, having the type
. When loading the backup data into the mixer, this type informa
DIR
are skipped when reloading.
ALD
in the
File
move the cursor bar onto the correspon
ALD
. Every time the key is pressed, the type infor
DIR
into
ALD
.
-
-
-
-
-
192
Page 21

Diamond digital DD10
3.6 Disk / File menu
3.6.15
ERROR MESSAGES
The following error messages may appear in the DISK menu. These messages
must
status
be seen in the direct context of the previously selected operating status. This
is also indicated in the error messages window
.
"on system"
"user doesn't exist"
"checksum error"
"different file type"
"not enough space for file"
"no digital diamond file"
"mask hardware not ready"
"file contents lost"
"illegal file name"
"EXTRA currently locked"
"no answer from device"
"disk missing"
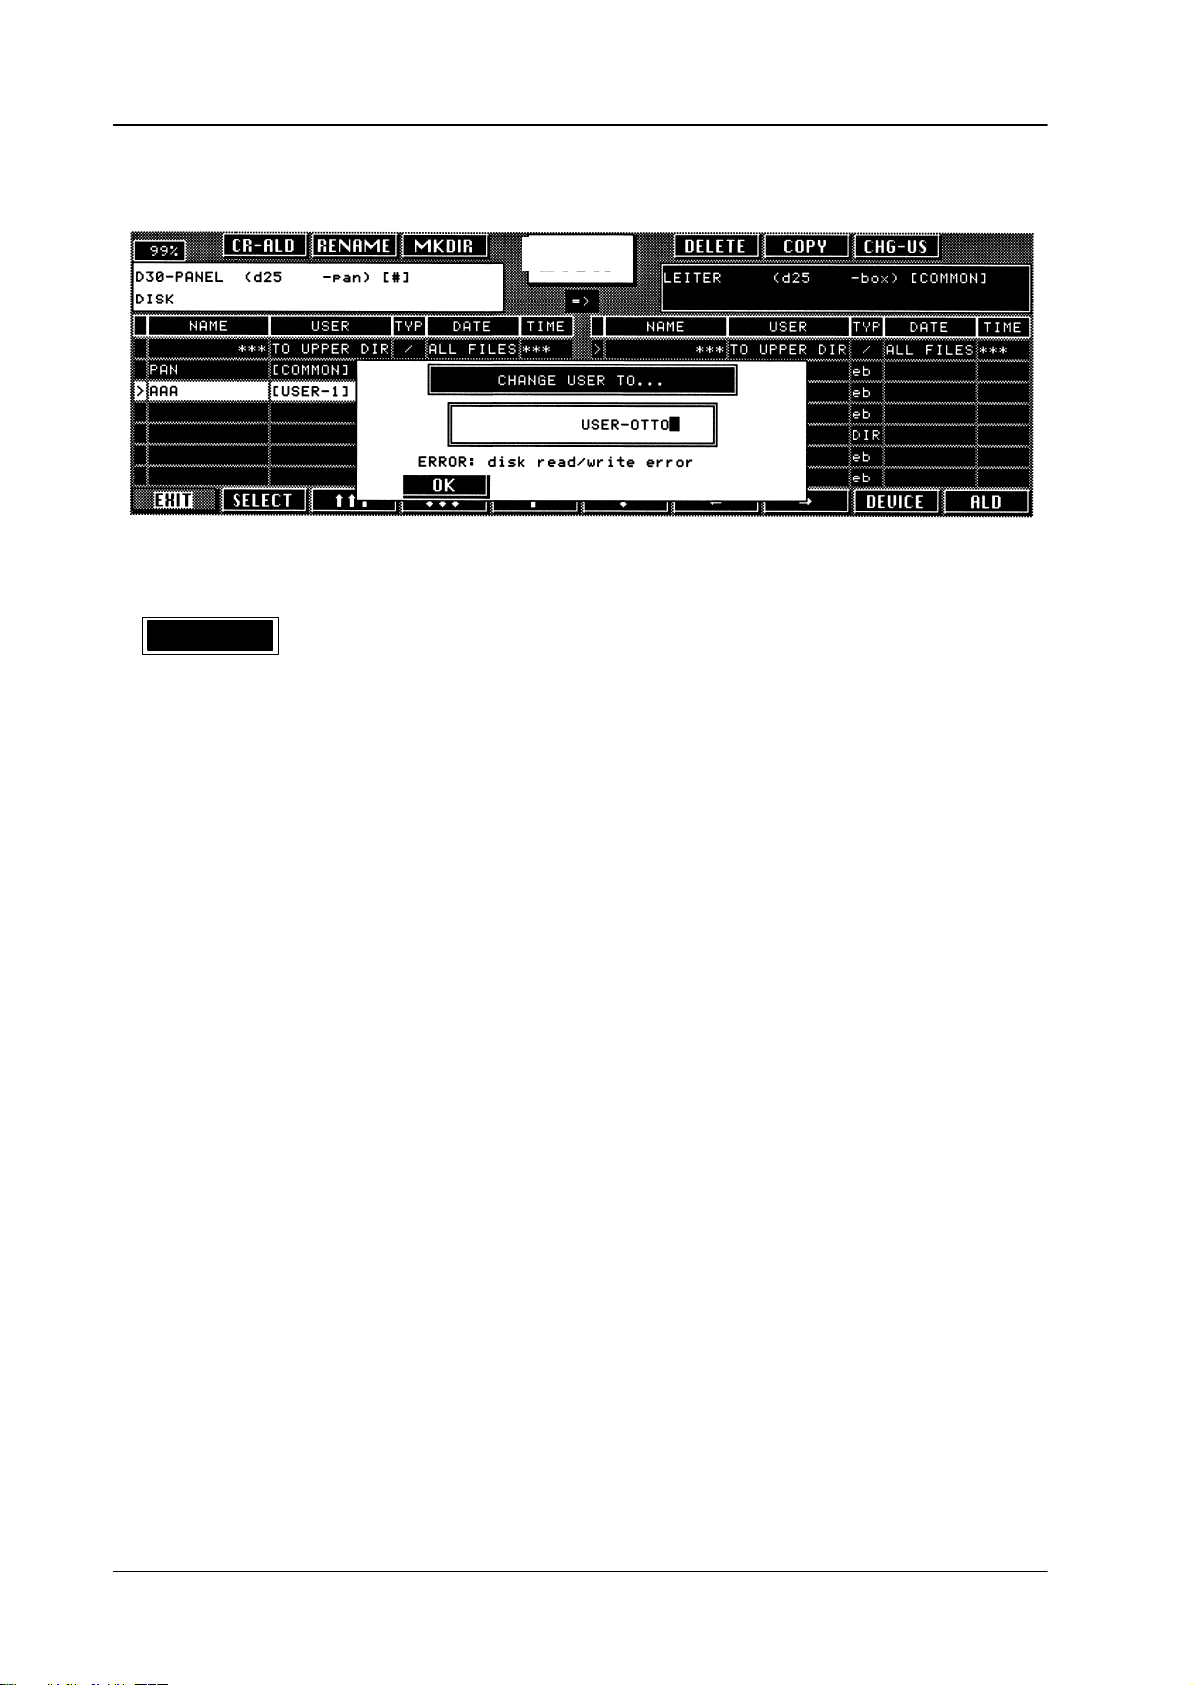
"disk read/write error"
"no more space on disk"
"no user access right"
"disk contents lost"
"directory not empty"
"file already exists"
"file not found"
"no open special"
"file system occupied"
"no file access right"
"function not possible"
"no such destination file"
"directory limit reached"
"no more allocation in bank"
"it's a local function only"
"system permission missing"
"invalid path combination"
"system limit reached"
"no box selected"
"illegal device""invalid directory"
"disk user must be"
"no 1.44 MB disk format"
"disk is write protected"
193
Page 22
3.6 Disk / File menu
Diamond digital DD10
Example
of an error message
OK
Press
the
File
the associated function key to
selected function.
acknowledge the error message and to cancel
194
Page 23

Page 24

3.7 T
ransfer menu
UNDO
Press
the associated
cedure.
Diamond digital DD10
function key to recall the previous status after a transfer pro
-
MODE
EXCHNG
MODULE
PATTER KEY COLOR
Each time you press the associated function key, you select a different mode for
the
transfer:
EXCHNG
COPY In this transfer mode, the settings of one level are copied to the
other
Press
the associated function key to determine which settings are to be transferred.
PATTERN wipe
KEY
COLOR
After
the selection a new menu appears with new
options depending on the selection. Please refer to the illustrations on the next
pages.
Subsequently enter the source of the setting transfer in the ”from” line and the
destination
as softkeys in the menu. The transfer will automatically be executed after the entry
has
been completed.
of the setting transfer in the ”to” line. The possible entries are available
In this transfer mode, the settings of the two defined levels are
exchanged.
level,
thus overwriting the previous setting.
pattern setting including wipe modifications
key setting of one key level
color setting of the matte generators
softkeys that of
fer dif
ferent entry
196
Press the associated function key to return to the higher order STATUS menu.
EXIT
Page 25

Page 26

3.7 T
ransfer menu
Diamond digital DD10
198
Page 27
Page 28

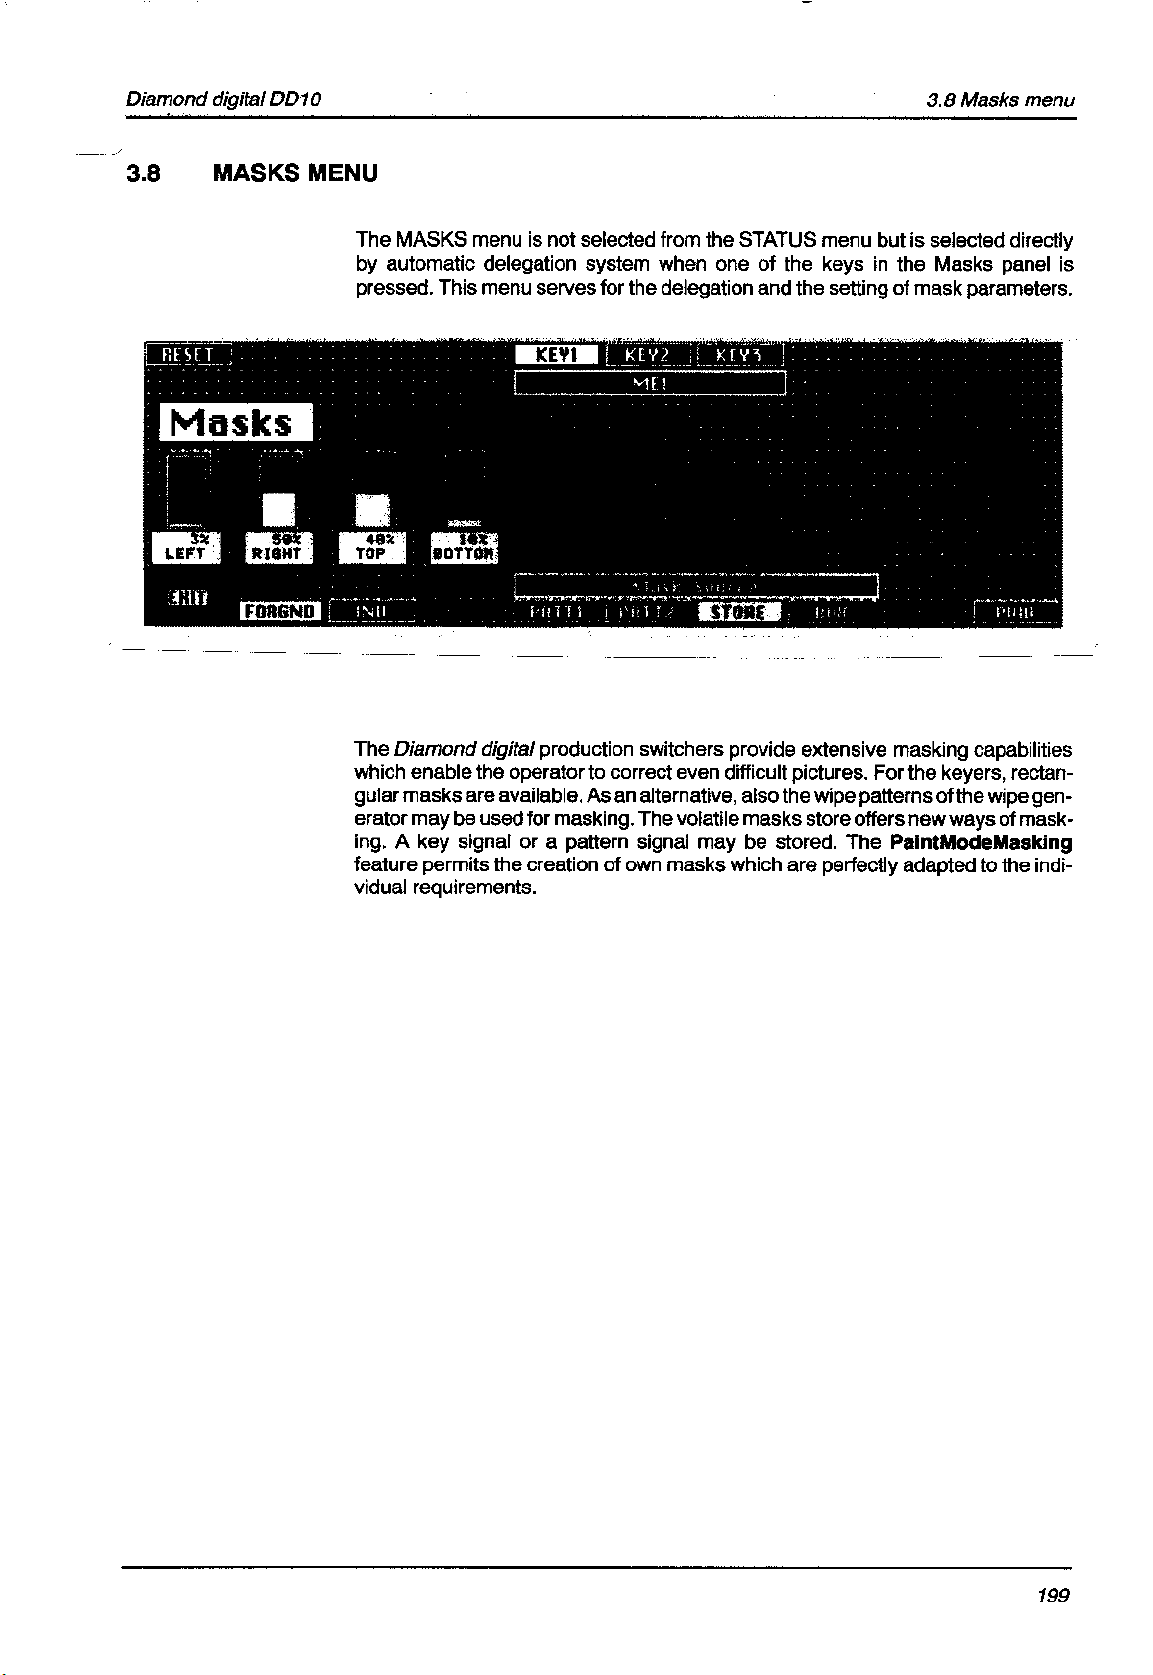
3.8 Masks menu
Diamond digital DD10
3.8.1
3.8.2 CREATING
MASK DELEGA
KEY1 KEY2 KEY3 DSK1 DSK2
PATT1 PATT2 STORE BOX BUS
TION
ME1
Press the associated function key to delegate the Masks panel to a keyer if you
want
to change the mask generator proposed by the automatic delegation system.
A BOX MASK
Mask Source
The
BOX
key serves to select a rectangular mask for masking. The size of the mask
can
be adjusted with the four controls
LEFT, RIGHT, TOP
, and
BOTTOM.
LEFT RIGHT TOP BUTTON
Bar graphs to indicate the mask size.
200
Page 29

Diamond digital DD10
3.8 Masks menu
3.8.3
ADJUSTING THE MASK POSITION
Y
ou can
freely position the mask in the picture with the trackball in the Positioner
panel.
For further information please refer to section
Positioner Panel
.
3.8.4 CREA
TING A WIPE MASK
Mask Source
PATT1 PATT2 STORE BOX BUS
PATT1
With
wipe
pattern can be directly selected with the wipe pattern selection keypad in the
Wipe
panel. The size of the wipe pattern can be adjusted with the
the
Wipe panel.
You
can freely position the
tioner
or PATT2
one of the wipe generators can be selected for masking. The
S I Z E
wipe mask in the picture with the trackball in the Posi
panel after you have enabled
Pos or
Extend Pos
SIZE
control in
in the Wipe panel.
-
For
further information
Panel.
Note:
Please
several
on the wipe pattern control please refer to the section
note
that the wipe generators can be used simultaneously for
applications which may interact with one another
.
Wipe
201
Page 30

3.8 Masks menu
Diamond digital DD10
3.8.5 CREA
PATT1 PATT2 STORE BOX BUS
3.8.6
FORGND
TING A MASK FROM MASK ST
Mask Source
The STORE
delegation
trol.
For
further information on store control and
section Stores Panel
OTHER SETTING OPTIONS
Press the associated function key to select whether the mask should suppress
(mask) or force the foreground picture (Forced Foreground). If enabled, Forced
Foreground
system automatically switches over the Stores
is active.
ORE
key serves to select the mask store as mask source. The
.
panel to Mask store con
PaintModeMasking
automatic
-
please refer to the
INV
Press the associated function key to invert the mask signal.
This
means that, for instance, with a rectangular mask, not the inside but the out
side
of the rectangle is used for masking.
-
202
Page 31

Diamond digital DD10
3.8 Masks menu
PVW
RESET
Press
the associated function key to highlight the mask signal on the preview moni
tor.
This
function serves to adjust the mask.
Note:
In
Mask PVW mode, the mask is only represented as a 1-bit signal. If
exactly
key
Press
ture
position
in the Keyers panel.
the associated function key to position the box mask in the center of the pic
at a preset size.
a mask with softness, simply switch on the mask with the
you want to
-
Mask on
-
EXIT
Press the associated function key to return to the previously selected menu.
203
Page 32

3.8 Masks menu
Diamond digital DD10
204
Page 33

Page 34

3.9 Stores menu
Diamond digital DD10
3.9.1 STORE
MASK MATTE VIDEO
3.9.2
FIELD AND FRAME MODE
FRAME
FIELD
DELEGA
Store Selection
TION
The
delegation keys
to
one of the stores.
If
you press the associated
whether
This key is enabled in all store modes.
Each
cal order.
time you press this key
MASK, MATTE, and
function key
both fields or a particular field is to be recalled from the store.
, one of three operational statuses will appear in cycli
VIDEO
, you can select separately for each store
serve to switch
the menu control
-
• FRAME
•
1st FIELD
•
2nd FIELD
For the mask store also the read-in operation can be switched over to Field or
mode. This avoids field flickering during storing.
Frame
206
Page 35

Diamond digital DD10
3.9.3 FREEZE
3.9 Stores menu
FREEZE
3.9.4 ST
ORING A VIDEO PICTURE (VIDEO ST
Video Store
Press the associated function key to store a picture signal.
Note:
o store a video picture, proceed as follows:
T
• Enable
In
addition to the input sources you can of course also select the matte signals
or
the Previews or Program outputs.
• The
Video
Please note that a signal is delayed by one frame when it passes
through
the Video Store
stored picture signal
Store
the store.
ORE)
key in the Aux Buses panel and select
can be recalled as input signal with the keys
in the Source Selection panel.
a picture source.
2nd
and
3.9.5 MA
PATT1 PATT2 KEY1 KEY2 KEY3
Matte Store
TTE ST
ORE
Store Source
T
o store a background, proceed as follows:
•
Select the signal to be stored in the Matte store with
KEY1/KEY2/KEY3
• T
o store a wipe signal, press
the modification can then be selected in the Wipe panel.
•
For storing a texture, please refer to section WIPE P
• T
o assign a key signal as a source to the store, press
The required adjustments can subsequently be made in the Keyers panel.
.
PATT1 or PATT2
PATT1/PATT2 or
. The desired wipe pattern and
ANEL.
KEY1 or KEY2.
207
Page 36

3.9 Stores menu
Diamond digital DD10
3.9.6 MASK
PATT1 PATT2 KEY1 KEY2 KEY3
Mask Store
ST
ORE
Store Source
The signals used in the mask store are to be taken from the same ME.
T
o store a mask, proceed as follows:
•
Select the signal to be stored in the mask store with
KEY1/KEY2/
• In
order to assign a key signal as a source to the store, press
The
required adjustments can subsequently be made in the Keyers panel.
• T
o store a wipe signal, press
the modification can then be selected in the Wipe panel.
KEY3
in the menu.
PATT1 or PATT2
PATT1/PATT2 or
KEY1
or
KEY2.
. The desired wipe pattern and
208
Page 37

Diamond digital DD10
3.9 Stores menu
3.9.7 PAINT
ON
PAINT
RUBOUT
MODE MASKING
Paint Mode
PAINT RUBOUT CLEARON
you wish to create an individual mask, it is
If
brush. For this purpose, select the corresponding trick generator with WIPE1 or
WIPE2.
• For
a free design of a
The
p
as mas
Type
can
be adjusted with the
•
Start the painting process with
•
Press
SHIFT
recommended to use a wipe signal as
mask, enable
revie
w m
onito
r now s
k s
ourc
e i
n a mask g
of wipe and any modifications can be selected in the Wipe panel. The size
RUB
to use the cursor as rubber
how
enerator.
SIZE
PaintModeMasking with the ON softkey
s the w
ipe patter
control.
PAINT
and paint using the cursor as brush.
.
n a
s c
urso
r i
f S
TOR
E i
s s
elected
.
CLEAR
SHIFT
EXIT
MASKS
•
Press
CLEAR
•
Press
SHIFT
If
a key signal is selected as brush, either the key signal may be
or,
in the case of a moving picture such as camera pan or zoom, a mask may be
created.
Press the associated function key to return to the previously selected menu.
Press the associated function key to change directly for the MASKS menu.
to delete the contents of the mask store.
to shift the output picture of the store with the trackball.
stored as freeze
209
Page 38

3.9 Stores menu
Diamond digital DD10
210
Page 39

Page 40

3.10 GPI-AC menu
DELETE
TRIGGER
Diamond digital DD10
Press
the associated function key to delete a mark at the position selected with the
cursor
keys.
Press
the associated function key to simulate the currently
(the
column in which the cursor is positioned) for testing and installation purposes.
Press the associated function key to move the cursor in the entry matrix. The
selected
position is identified with a frame.
selected GPI channel
212
Page 41

Page 42

3.10 GPI-AC menu
Diamond digital DD10
TRIGGER
Press the associated function key to enable the associated GPI output.
Press the associated function key to move the cursor in the entry matrix. The
selected
position is identified with a frame.
214
Page 43

Page 44
3.1
1 Bus Correction menu
Press the associated function key to return to the previously selected menu.
EXIT
BRIGHT CONTR. SATUR. BALANC
Bar graphs for the indication of the color parameters. These parameters are
adjusted
with four digipots.
Diamond digital DD10
PGM RST FILL1 FILL2
Calib. Calib. Calib. Calib.
ME1
Press
the associated function key to select one of the output buses for the respec
mixing level ME1. ME2, PP
tive
be
adjusted with the four digipots.
The status of the buses is indicated with
Calib.
= calibrated
Modif.
= modified
COLOFF
RESET
ME
Col off
Press the associated function key to switch the color on/of
the associated function key to reset the values for all busses of the
Press
ME
to their default values.
= black and white
. The color parameters of
-
the output signal may then
f completely
.
selected
216
RESET
BUS
Press the associated function key to reset the values for a single bus of the
selected
ME to their default value.
Page 45

Page 46

3.12 Input Correction Menü
Press the associated function key to return to the previously selected menu.
EXIT
BRIGHT CONTR. SATUR. BALANC
Bar
graphs for the indication of the color parameters. The mask position is adjusted
with
four digipots.
Diamond digital DD10
RESET
COLOFF
Press
the associated function
default
value.
Press the associated function key to switch the color on/of
Press
the associated
matrix.
function key to move the cursor from field to field in the entry
key to reset the values for the selected input to their
f completely
.
218
RESET
ALL
the associated function key to reset the values for all
Press
values.
inputs to their default
Page 47

Diamond digital DD10
3.13 KEYERS MENU
For
3.13 Keyers menu
informations to KEYERS menu please see section 2.8.
219
Page 48

3.13 Keyers menu
Diamond digital DD10
220
 Loading...