

Page 1

CopperHead PowerWafer User
Guide
M4002-9900-102
21 March 2014
Page 2

Notices
Copyright & Trademark Notice
Copyright © 2014, Miranda Technologies Partnership. All rights reserved.
Belden, Belden Sending All The Right Signals, and the Belden logo are trademarks or
registered trademarks of Belden Inc. or its affiliated companies in the United States and
other jurisdictions. Miranda, CopperHead PowerWafer are trademarks or registered
trademarks of Miranda Technologies Partnership. Belden Inc., Miranda Technologies
Partnership, and other parties may also have trademark rights in other terms used herein.
Terms and Conditions
Please read the following terms and conditions carefully. By using CopperHead PowerWafer
documentation, you agree to the following terms and conditions.
Miranda Technologies Partnership (“Miranda”) hereby grants permission and license to
owners of CopperHead PowerWafer to use their product manuals for their own internal
business use. Manuals for Miranda products may not be reproduced or transmitted in any
form or by any means, electronic or mechanical, including photocopying and recording, for
any purpose unless specifically authorized in writing by Miranda.
A Miranda manual may have been revised to reflect changes made to the product during its
manufacturing life. Thus, different versions of a manual may exist for any given product.
Care should be taken to ensure that one obtains the proper manual version for a specific
product serial number.
Information in this document is subject to change without notice and does not represent a
commitment on the part of Miranda.
Warranty information is available in the Support section of the Miranda Web site
(www.miranda.com).
Title CopperHead PowerWafer User Guide
Part Number M4002-9900-102
Revision 21 March 2014
ii
Page 3

Table of Contents
1 About CopperHead PowerWafer. . . . . . . . . . . . . . . . . . . . . . . . . 1
About CopperHead PowerWafer . . . . . . . . . . . . . . . . . . . . . . . . . . . . . . . . . . . . . . . . . . . . . . . . . . .2
CopperHead System Features. . . . . . . . . . . . . . . . . . . . . . . . . . . . . . . . . . . . . . . . . . . . . . . . . . 2
Unpacking the CopperHead PowerWafer. . . . . . . . . . . . . . . . . . . . . . . . . . . . . . . . . . . . . . . . . . . 3
Product Returns . . . . . . . . . . . . . . . . . . . . . . . . . . . . . . . . . . . . . . . . . . . . . . . . . . . . . . . . . . . . . . . 3
About this User Guide . . . . . . . . . . . . . . . . . . . . . . . . . . . . . . . . . . . . . . . . . . . . . . . . . . . . . . . . . 3
Safety and Fiber Optic Systems . . . . . . . . . . . . . . . . . . . . . . . . . . . . . . . . . . . . . . . . . . . . . . . . . . . .4
Optical Fiber Safety. . . . . . . . . . . . . . . . . . . . . . . . . . . . . . . . . . . . . . . . . . . . . . . . . . . . . . . . . . . . 4
Power Fuses. . . . . . . . . . . . . . . . . . . . . . . . . . . . . . . . . . . . . . . . . . . . . . . . . . . . . . . . . . . . . . . . . . .4
2 System Overview . . . . . . . . . . . . . . . . . . . . . . . . . . . . . . . . . . . . . . . 5
CopperHead System Configurations . . . . . . . . . . . . . . . . . . . . . . . . . . . . . . . . . . . . . . . . . . . . . . . 6
Powered Systems using the PowerWafer . . . . . . . . . . . . . . . . . . . . . . . . . . . . . . . . . . . . . . .6
PowerWafer, Direct to Base Station . . . . . . . . . . . . . . . . . . . . . . . . . . . . . . . . . . . . . . . . . . . . 8
Power Wafer, Remote Panel-Mounted Fiber Connector . . . . . . . . . . . . . . . . . . . . . . . . 9
PowerWafer, with MPS Power Supply. . . . . . . . . . . . . . . . . . . . . . . . . . . . . . . . . . . . . . . . . 10
CopperHead Transceiver System Components . . . . . . . . . . . . . . . . . . . . . . . . . . . . . . . . . . . .11
Base Station Overview . . . . . . . . . . . . . . . . . . . . . . . . . . . . . . . . . . . . . . . . . . . . . . . . . . . . . . . .12
Types of Base Stations . . . . . . . . . . . . . . . . . . . . . . . . . . . . . . . . . . . . . . . . . . . . . . . . . . . . . . . .13
3 CopperHead System Components . . . . . . . . . . . . . . . . . . . . . . 15
Base Station . . . . . . . . . . . . . . . . . . . . . . . . . . . . . . . . . . . . . . . . . . . . . . . . . . . . . . . . . . . . . . . . . . . . . .16
Base Station Front Panel . . . . . . . . . . . . . . . . . . . . . . . . . . . . . . . . . . . . . . . . . . . . . . . . . . . . . .16
Front Panel Section A - Signal Status Indicators . . . . . . . . . . . . . . . . . . . . . . . . . . . . . . . 16
Front Panel Section B- Power Switch and Indicator . . . . . . . . . . . . . . . . . . . . . . . . . . . . 17
Front Panel Section C- Hybrid Power Status Indicators . . . . . . . . . . . . . . . . . . . . . . . . 18
Base Station Rear Panel . . . . . . . . . . . . . . . . . . . . . . . . . . . . . . . . . . . . . . . . . . . . . . . . . . . . . . .19
Rear Panel Section A - Power Connector . . . . . . . . . . . . . . . . . . . . . . . . . . . . . . . . . . . . . . 19
Rear Panel Section B - Optical Connector . . . . . . . . . . . . . . . . . . . . . . . . . . . . . . . . . . . . . 20
Rear Panel Section C - Signal Connectors . . . . . . . . . . . . . . . . . . . . . . . . . . . . . . . . . . . . . 20
PowerWafer Camera Adaptor . . . . . . . . . . . . . . . . . . . . . . . . . . . . . . . . . . . . . . . . . . . . . . . . . . . . .22
MPS External PowerWafer Power Supply . . . . . . . . . . . . . . . . . . . . . . . . . . . . . . . . . . . . . . . . . .23
HDX Power Supply . . . . . . . . . . . . . . . . . . . . . . . . . . . . . . . . . . . . . . . . . . . . . . . . . . . . . . . . . . . . . . .25
HDX Status Indicators . . . . . . . . . . . . . . . . . . . . . . . . . . . . . . . . . . . . . . . . . . . . . . . . . . . . . . . .26
4 Camera Unit and Power Supply Installation . . . . . . . . . . . . . 27
Mounting the Copperhead Camera Unit with the PowerWafer . . . . . . . . . . . . . . . . . . . . .28
SMPTE Hybrid Fiber between Base Station (powered) and Camera Unit . . . . . . . .29
Hybrid Fiber between Base Station and Camera Unit (Infrastructure Wiring) . . . .30
Hybrid Fiber Cable between MPS Power Unit and Camera Unit. . . . . . . . . . . . . . . . .30
iii
Page 4

Table of Contents
Deployment of the CopperHead System . . . . . . . . . . . . . . . . . . . . . . . . . . . . . . . . . . . . . . . . . .32
Insuring a Positive Fiber Link. . . . . . . . . . . . . . . . . . . . . . . . . . . . . . . . . . . . . . . . . . . . . . . . . . . . . .32
5 Specifications . . . . . . . . . . . . . . . . . . . . . . . . . . . . . . . . . . . . . . . . . 33
6 Contact Us . . . . . . . . . . . . . . . . . . . . . . . . . . . . . . . . . . . . . . . . . . . . 35
Technical Support . . . . . . . . . . . . . . . . . . . . . . . . . . . . . . . . . . . . . . . . . . . . . . . . . . . . . . . . . . . . . . . .35
Related documentation . . . . . . . . . . . . . . . . . . . . . . . . . . . . . . . . . . . . . . . . . . . . . . . . . . . . . .35
Customer service and sales . . . . . . . . . . . . . . . . . . . . . . . . . . . . . . . . . . . . . . . . . . . . . . . . . . .36
Miranda’s corporate headquarters . . . . . . . . . . . . . . . . . . . . . . . . . . . . . . . . . . . . . . . . . . . .36
A Connectors and Accessories . . . . . . . . . . . . . . . . . . . . . . . . . . . . 37
MPS Power Supply Connector . . . . . . . . . . . . . . . . . . . . . . . . . . . . . . . . . . . . . . . . . . . . . . . . . . . .38
Parts and Accessories . . . . . . . . . . . . . . . . . . . . . . . . . . . . . . . . . . . . . . . . . . . . . . . . . . . . . . . . . . . . .38
7 Intercom Pinouts . . . . . . . . . . . . . . . . . . . . . . . . . . . . . . . . . . . . . . 41
4-Wire Intercom . . . . . . . . . . . . . . . . . . . . . . . . . . . . . . . . . . . . . . . . . . . . . . . . . . . . . . . . . . . . . . . . . .42
Clear-Com Intercom . . . . . . . . . . . . . . . . . . . . . . . . . . . . . . . . . . . . . . . . . . . . . . . . . . . . . . . . . . . . . .42
iv
Page 5

About CopperHead PowerWafer
This chapter provides an overview of the CopperHead PowerWafer and includes the safety
and warranty information about it.
About CopperHead PowerWafer . . . . . . . . . . . . . . . . . . . . . . . . . . . . . . . . . . . . . . . . . . . . . . . . . . . . . . . 2
Unpacking the CopperHead PowerWafer . . . . . . . . . . . . . . . . . . . . . . . . . . . . . . . . . . . . . . . . . . . . . . 3
Safety and Fiber Optic Systems . . . . . . . . . . . . . . . . . . . . . . . . . . . . . . . . . . . . . . . . . . . . . . . . . . . . . . . . 4
1
Page 6
About CopperHead PowerWafer
About CopperHead PowerWafer
About CopperHead PowerWafer
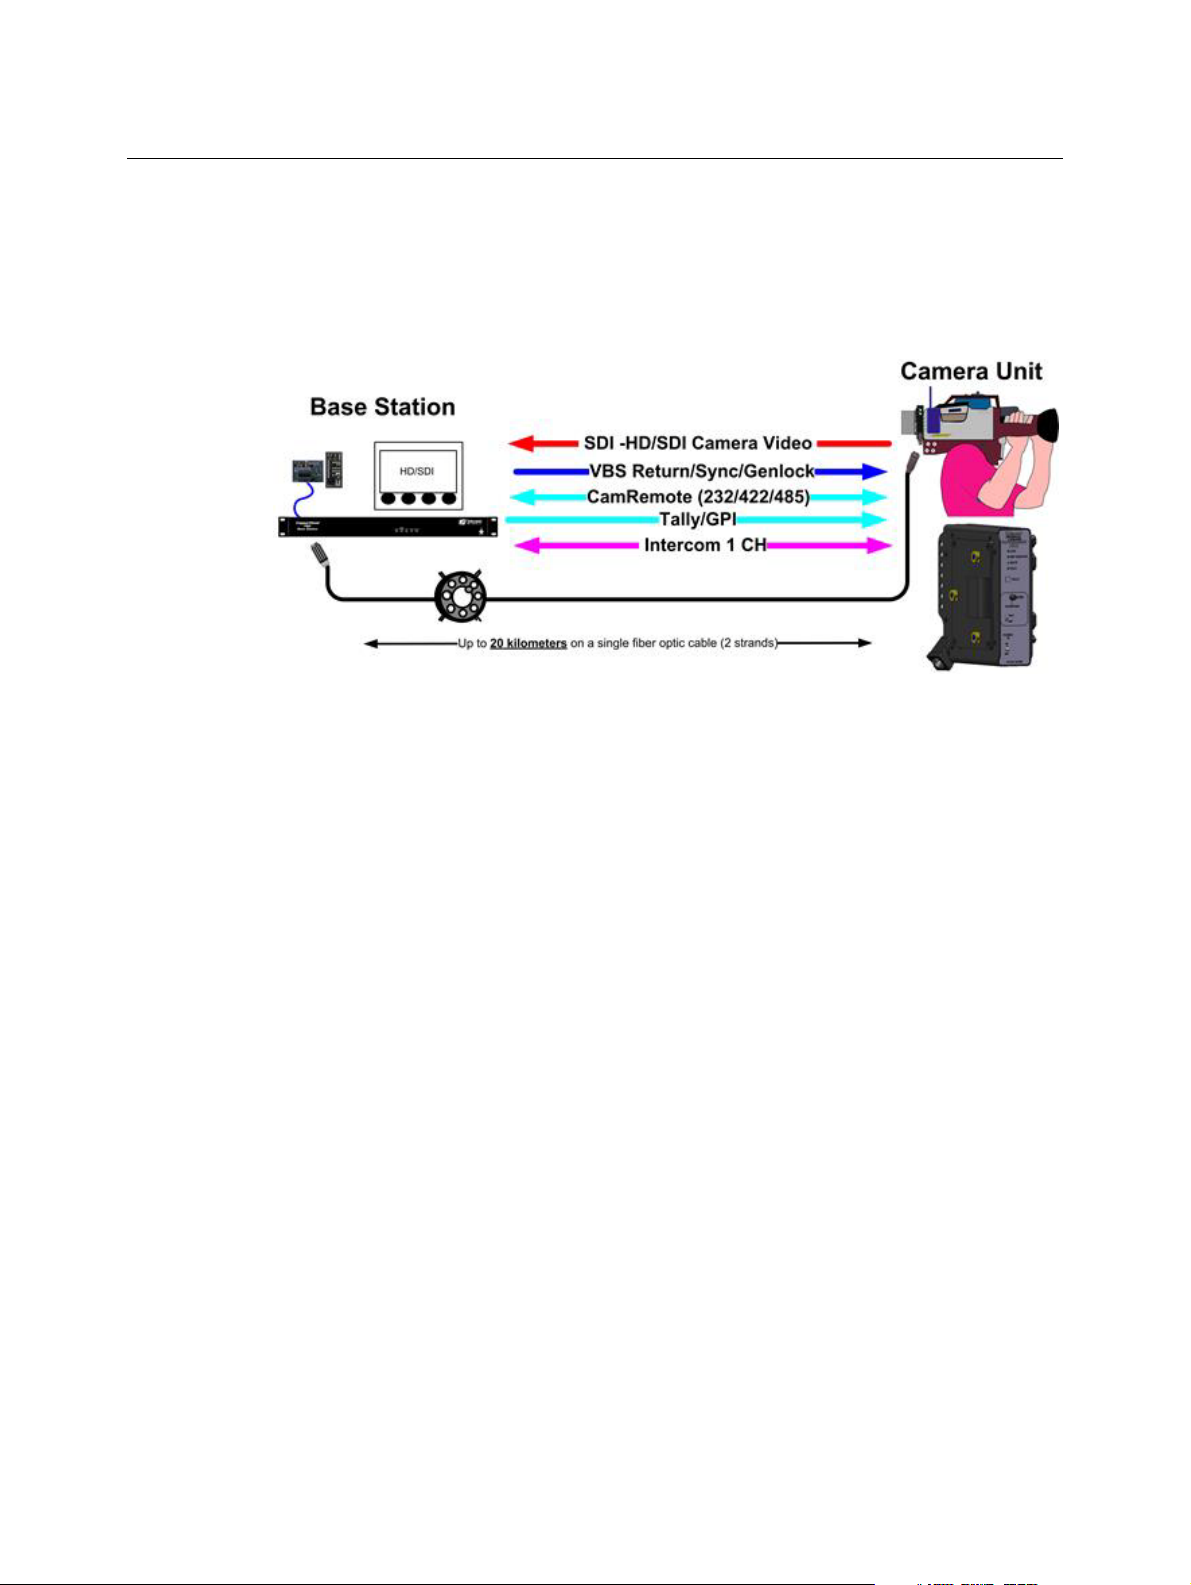
The CopperHead System is a fiber optic transmission system that enables camcorders to be
used in live, multi-camera production environments.
The system uses a fiber optic cable to transport a variety of signals between a Camera Unit
and a Base Station.
The CopperHead Camera Unit is typically mounted to a camera that is placed in a studio,
theatre, sports venue, or other live-event location. The system's Base Station is usually
located in a truck, control room or other video production control area.
When "dry" fiber is used (typically lightweight "tactical" fiber cable), the signals are
transmitted bi-directionally, over distances as long as 5 km or more.
When hybrid fiber cable is used, the link powers the Camera Unit and the camera itself.
CopperHead System Features
• The system makes any camcorder practical for multi-camera production.
• All camera signals are carried on one lightweight fiber cable.
• Can be run through building or campus infrastructure on two strands of Single Mode
fiber.*
• Thin, lightweight, modular design.
• Studio quality uncompressed HD/SDI video up to 3 Gb/s.
• Multi-kilometer distance capability
• Anton/Bauer® Gold Mount and "V-Mount" battery options
• Wide temp range, low power consumption
• Durable, high reliability design
• Two fiber cable options
• Tactical Fiber: Military Spec, battery/local power, 10+km
•SMPTE Hybrid Fiber
• Low voltage camera-mounted "PowerWafer": 95 watts to 300m (984 ft.)
• High-voltage camera-mounted "PowerPlus": up to 150 watts to 2 km (1.2 miles)
Fig. 1-1: CopperHead Signal Paths
2
Page 7

Note: The CopperHead System is not readily compatible with active
or passive CWDM multiplexing technologies, including Teleport or
TeleThon systems.
Unpacking the CopperHead PowerWafer
Please consult your packing slip and purchase order to insure that you have received all of
the expected components.
Inspect all components for scratches and other mechanical damage, and inspect the
electrical connectors for bent or damaged pins and latches. Report any missing or
damaged components to Miranda (see Contact Us on page 35). See Product Returns on
page 3.
Leave the protective caps on the optical connectors whenever the fiber is disconnected.
Product Returns
In the unlikely event of damage to your CopperHead PowerWafer during shipping or
delivery please note the damage with the delivery or shipping service and document the
packaging and product where you see damage. If any component does not work correctly
out of the box please contact Miranda (see Contact Us on page 35).
CopperHead PowerWafer
User Guide
If the problem cannot be remedied through a service telephone call an RMA (Return of
Merchandise Authorization) will be issued and you will receive an RMA number. Please
note this RMA number inside and outside of all shipping boxes and on all documentation
provided with the items to be returned.
About this User Guide
This CopperHead Fiber Optic Transceiver System can be delivered in a number of
configurations depending on the Power and Battery Mount options selected. This user
guide is designed to cover all of the various options and so not every page in this guide will
apply to your specific system.
Throughout this guide a number of informational pointers are used to mark important or
useful information.
3
Page 8

About CopperHead PowerWafer
Safety and Fiber Optic Systems
Safety and Fiber Optic Systems
Optical Fiber Safety
Never look directly into the end of the optic fiber while either end of the system is
operating.
Always use cable connector caps when the cables are not connected. This protects the
connector from damage and the unlikely event of exposure to an operating optical link.
Keeping the caps in place when the connectors are not in use will prevent dirt and dust
from entering the connector and degrading the performance of the optical link.
Power Fuses
The CopperHead PowerWafer Base Stations CHG3-BS-3050-95VD-xxx-xxx are equipped
with two fuses located next to the AC Power receptacle at the left rear of the unit. Refer to
Connectors and Accessories on page 37 for specific fuse and location information.
NEVERoperatetheCopperHeadCHG3‐BS‐3050‐95VD‐xxx‐xxxBaseStationwithout
properlyinstalledandratedfuses.Severeelectricalandheatdamagecouldresultaswell
aspersonalinjuryordeath.
4
Page 9

System Overview
This chapter provides a system overview about the Fiber Cables and the Transceiver
System.
CopperHead System Configurations . . . . . . . . . . . . . . . . . . . . . . . . . . . . . . . . . . . . . . . . . . . . . . . . . . . 6
CopperHead Transceiver System Components . . . . . . . . . . . . . . . . . . . . . . . . . . . . . . . . . . . . . . . . 11
5
Page 10
System Overview
CopperHead System Configurations
CopperHead System Configurations
The CopperHead system is available in a variety of configurations that maximize the
advantages of either "dry" fiber cable, "hybrid" fiber cable, or a combination of the two.
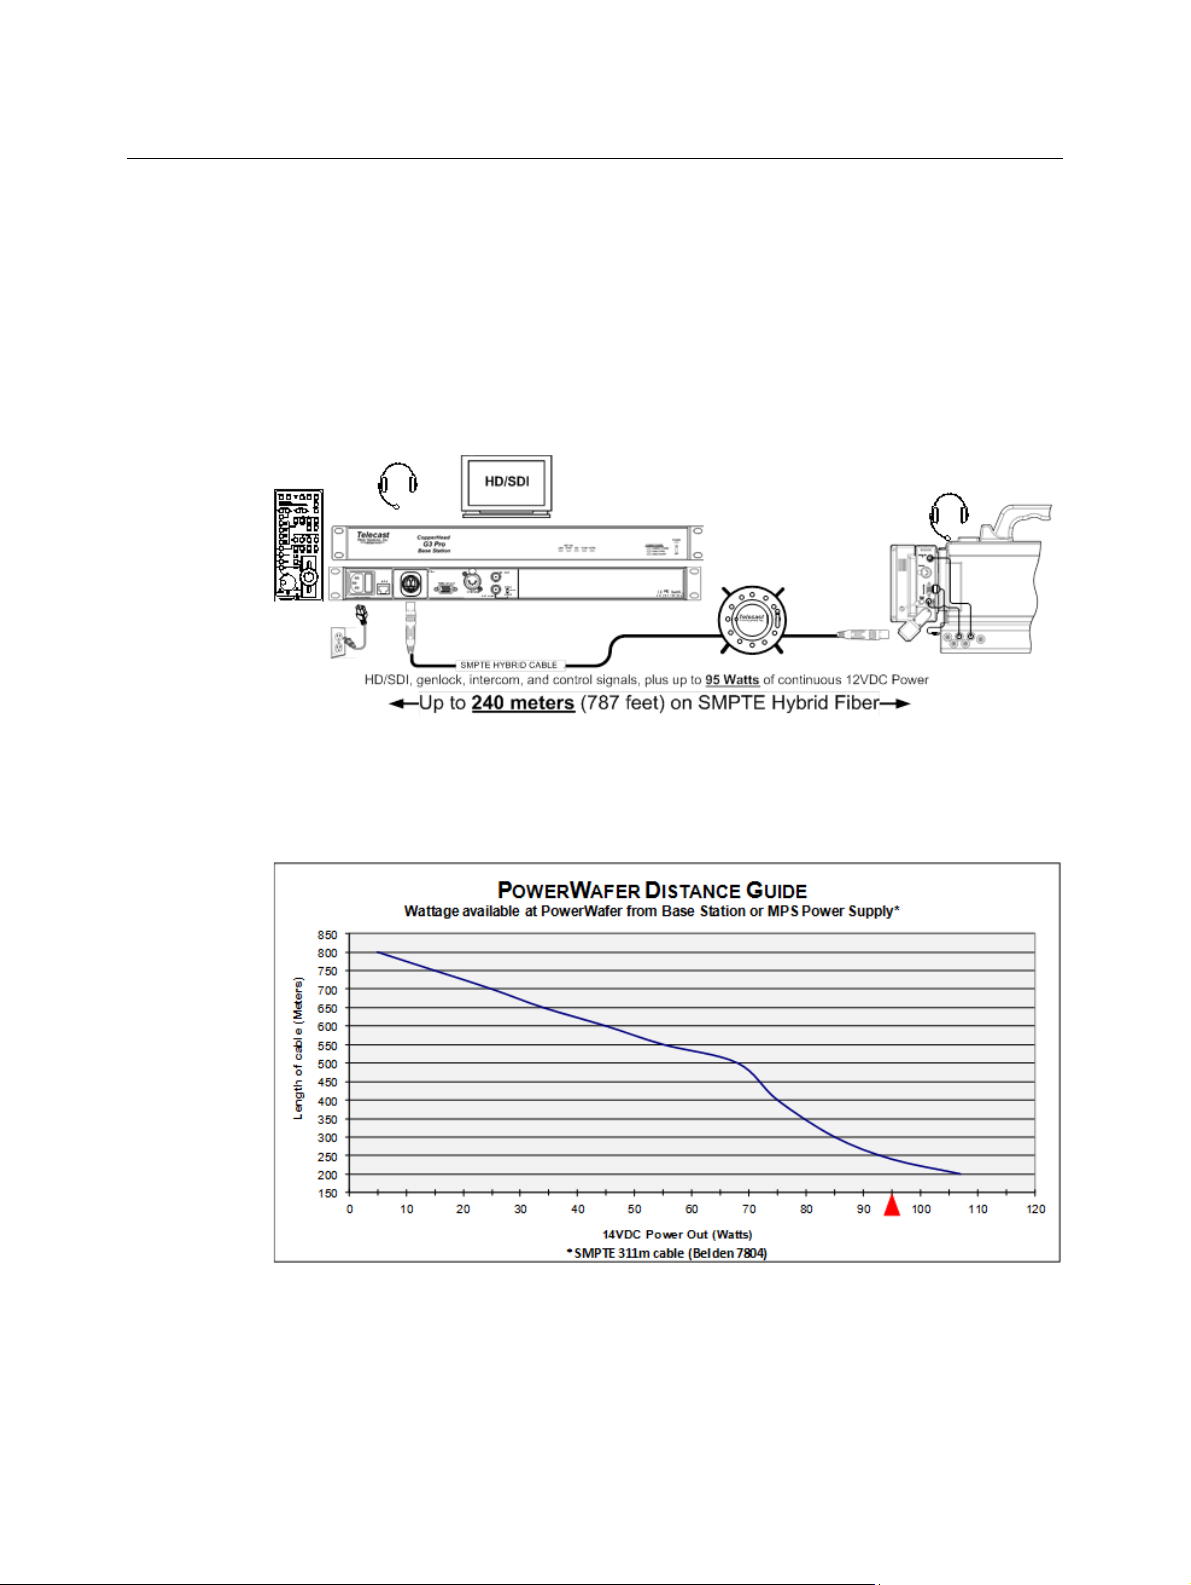
Powered Systems using the PowerWafer
CopperHead Base Stations can be equipped with an internal power supply that, when used
with SMPTE hybrid fiber cable and a PowerWafer at the Camera Unit, will deliver
approximately 95 Watts of power to the camera and related accessories.
Fig. 2-1: Powered System Overview
The maximum range of the system is nominally 240 meters (787 feet)* when drawing 95
watts at the camera, but distances will vary depending on total power draw at the
PowerWafer, as shown in Figure 2-2.
Fig. 2-2: PowerWafer Distance Chart
* The maximum operational cable length varies due to optical loss that can depend on
cable quality, dirt/dust/contamination on connectors, and the number of cable connectors.
When using hybrid cables for camera power, the size of the hybrid cable, as well as the
power draw of the camera, lens, viewfinder, and other accessories are also factors.
6
Page 11
CopperHead PowerWafer
Female
Male
User Guide
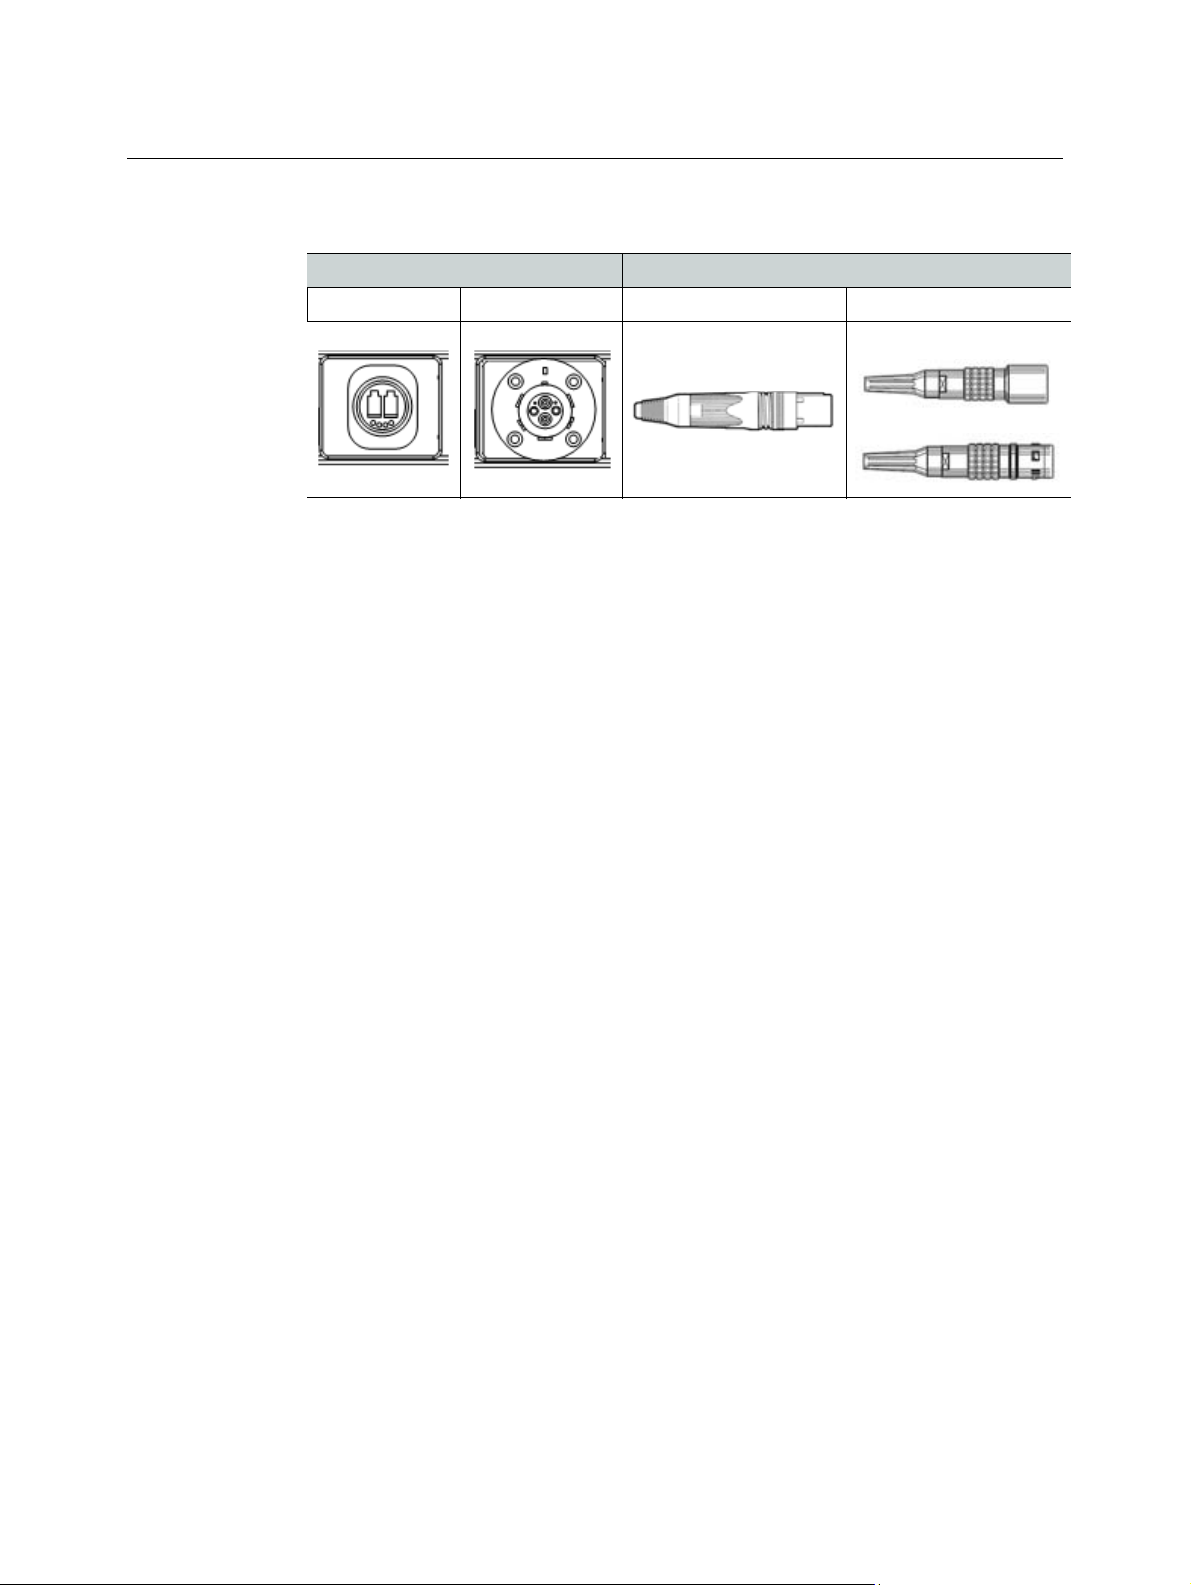
In powered fiber configurations, the Camera Unit, Base Station and hybrid fiber cable can
be equipped with one of two types of fiber connectors:
Panel Connectors Cable Plugs
OpticalCON SMPTE 304M OpticalCON SMPTE 304M
7
Page 12
System Overview
Powered Systems using the PowerWafer
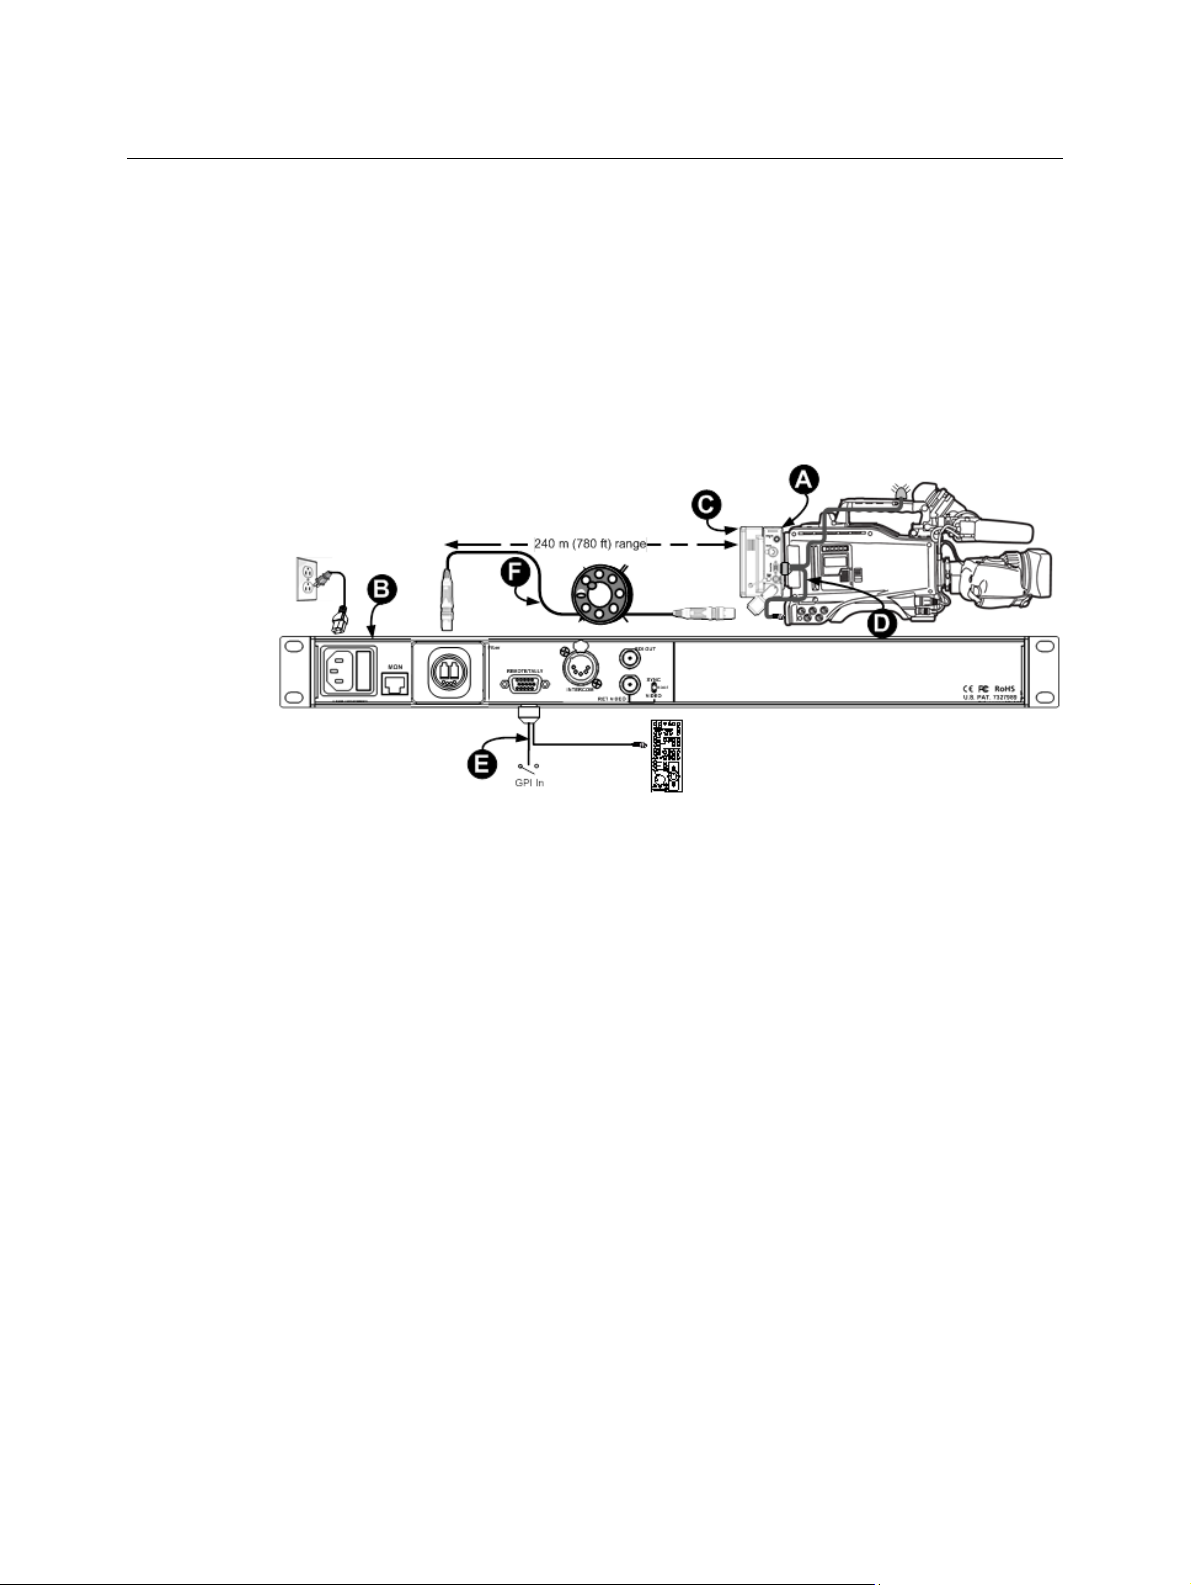
PowerWafer, Direct to Base Station
When connected directly to an AC-powered Base Station using SMPTE hybrid fiber cable,
the system delivers up to 95 watts of power to the camera and accessories. Such a system is
typically configured as shown in Figure 2-3, and includes the following components:
• A: Camera Unit
• B: AC-powered Base Station with
internal camera power supply
• C: PowerWafer
Fig. 2-3: Direct Connect to Base Station with Power Wafer
• D: CHCR camera remote cable
• E: CHBR base remote cable
• F: Hybrid fiber optic cable
8
Page 13
CopperHead PowerWafer
User Guide
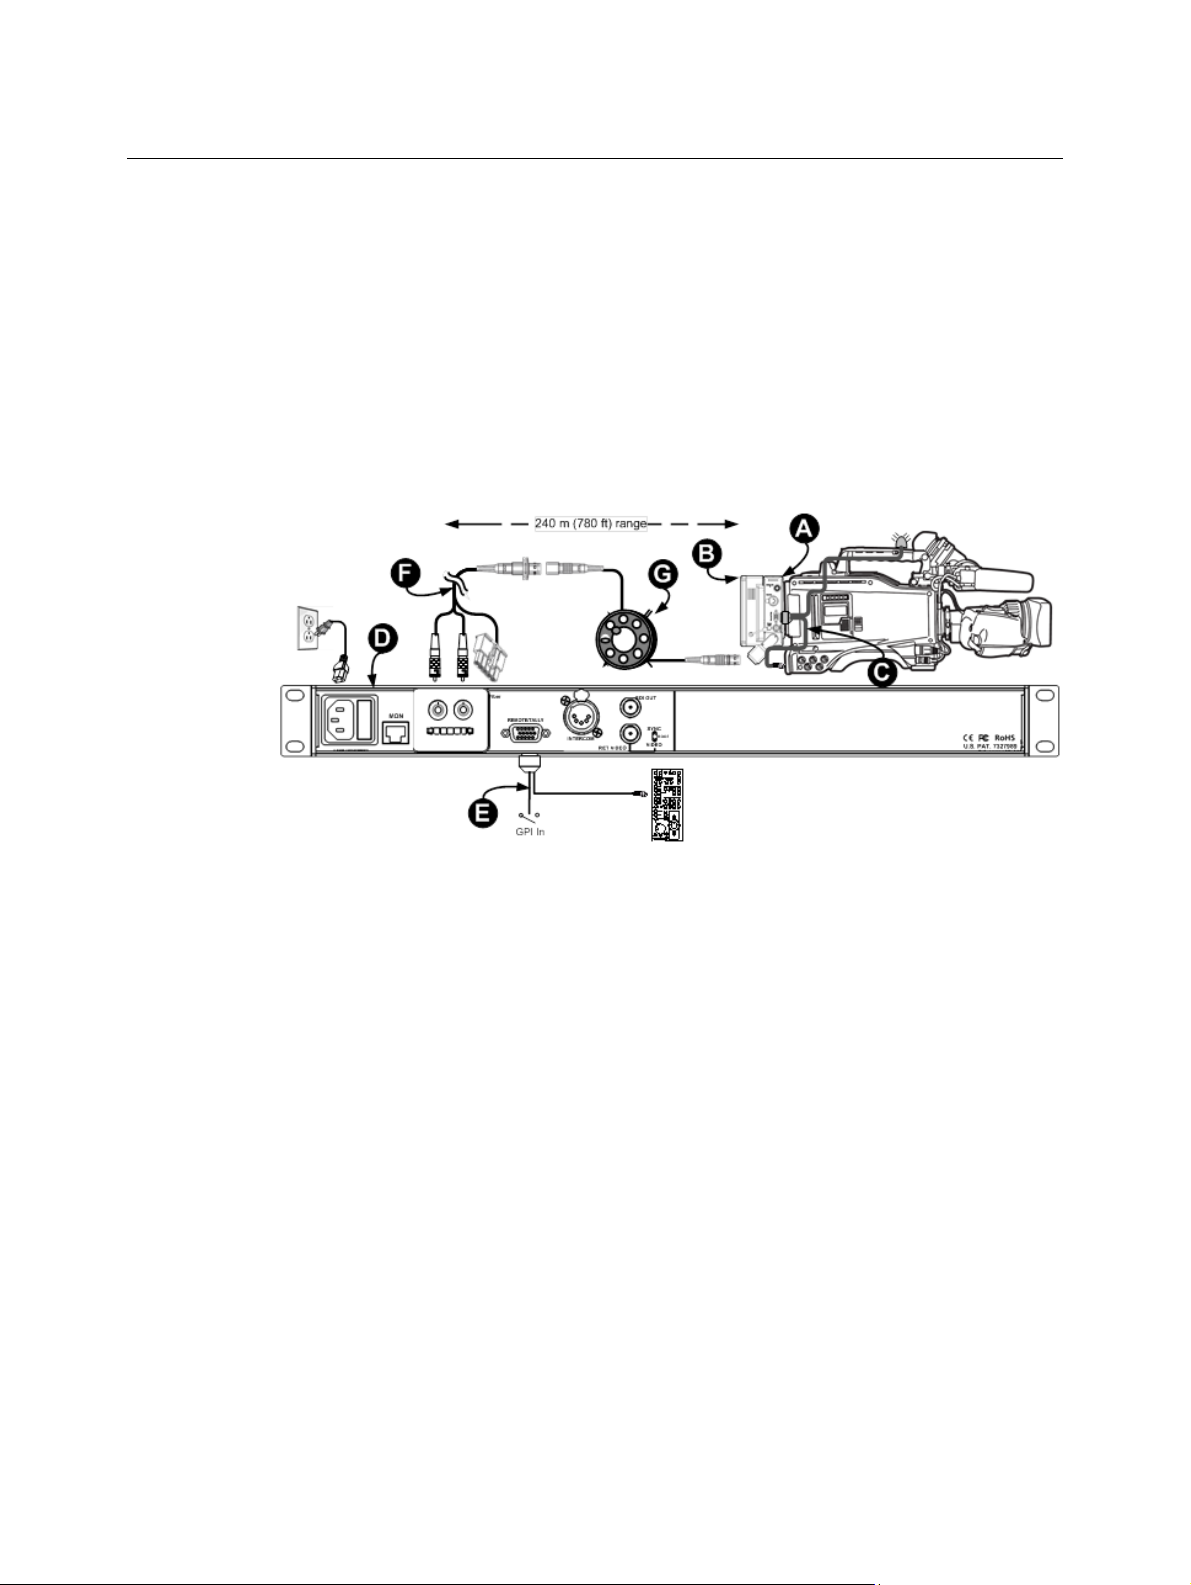
Power Wafer, Remote Panel-Mounted Fiber Connector
The hybrid fiber receptacle may be mounted a distance from the Base Station if the station
is equipped with a pair of inexpensive ST fiber connectors and a Molex receptacle to carry
power, as shown in Figure 2-4. A breakout cable can be used to connect the hybrid fiber
receptacle to Base Station, or infrastructure wiring can be used.
• A: Camera Unit
• B: Power Wafer
• C: CHCR camera remote cable
• D:
AC-powered Base Station with internal
camera power supply
Fig. 2-4: Powered Base Station with Fiber Receptacle Extension
• E: CHBR base remote cable
• F:
ST & Molex breakout cable or
campus/building infrastructure
• G: Hybrid fiber optic cable
9
Page 14
System Overview
Powered Systems using the PowerWafer
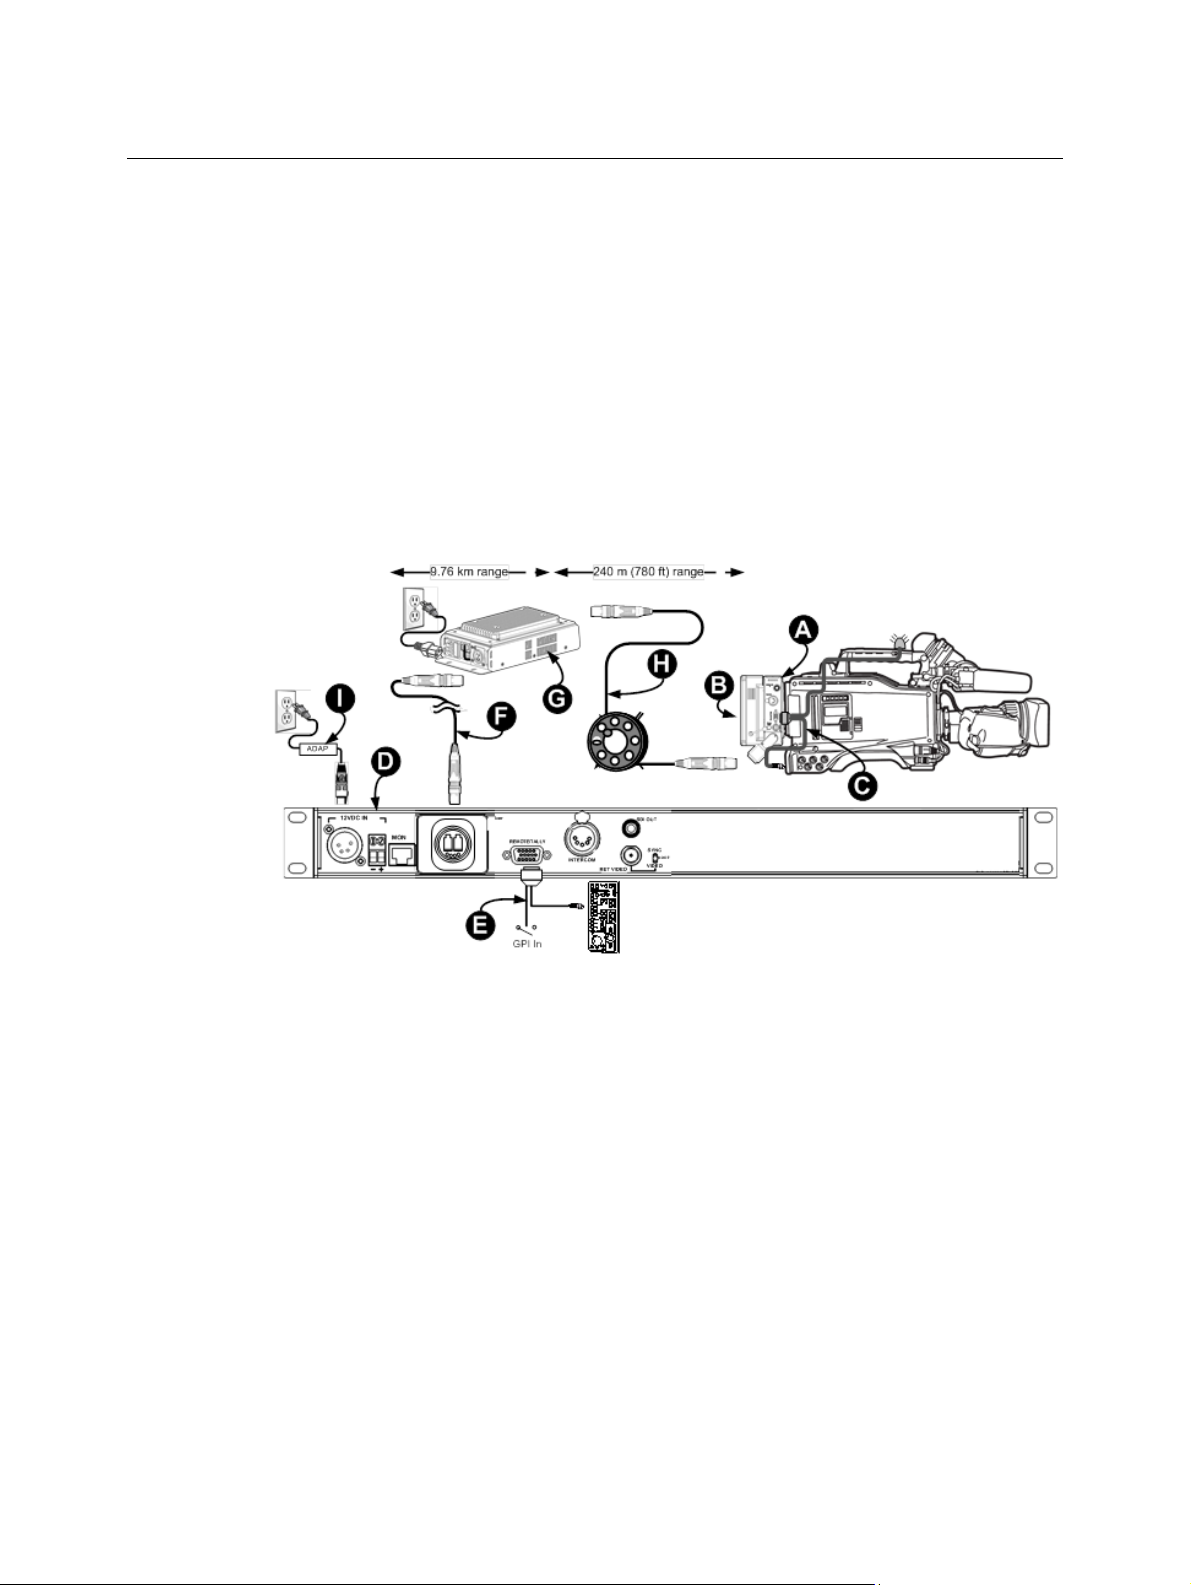
PowerWafer, with MPS Power Supply
Systems can be configured so that the majority of the fiber run is made via "dry" tactical or
infrastructure fiber, after which a "throwdown" MPS Power Supply is placed in line to
provide powered SMPTE hybrid fiber cable to the camera. In this configuration, as shown in
Figure 2-5, the Base Station can be separated from the MPS power supply by more than
nine kilometers (5.6 miles), where powered cable can be run to the camera for 240 meters
(780 feet), providing up to 95 watts of power to the camera and accessories.
• A: Camera Unit
• B: Power Wafer
• C: CHCR camera remote cable
• D:
DC-powered Base Station
• E: CHBR base remote cable
• F:
Tactical fiber or Infrastructure fiber run
• G: MPS Power Supply
• H: Hybrid fiber optic cable
• I: ADAP 12VDC power supply
10
Fig. 2-5: System using MPS Power Supply
Page 15

CopperHead Transceiver System Components
Camera Unit Front
(attaches to the camera)
Camera Unit Rear (attaches to
battery or power supply)
The CopperHead Camera Unit fits between the battery or optional power supply and the
camera. The Camera Unit is configured at time of purchase with mounting plates to
accommodate the appropriate camera battery type.
The camera battery or optional power source attaches to Camera Unit, which in turn,
attaches to the video camera. Batteries accommodated are Anton/Bauer Gold Mount and
Sony "V" Mount. Other camera mounting plates may be available by special order. Please
contact Miranda (see Contact Us on page 35) or your authorized dealer.
The Camera Unit is equipped with a swivel-mounted fiber optic connector, which can be
ordered with an OpticalCON, MX or SMPTE 304M connector. For more information, see
Parts and Accessories on page 38.
CopperHead PowerWafer
User Guide
Fig. 2-6: Camera Unit Front and Rear
The actual appearance of your CopperHead Camera Unit will vary depending on the
battery mount and fiber cable connector options specified at the time of purchase.
11
Page 16

System Overview
Base Station Overview
Base Station Overview
The CopperHead Base Station is a one rack-unit high device that provides all of the inputs
for signals going to the CopperHead Camera Unit, as well as the outputs for the signals
coming from Camera Unit. Base Station is available in a variety of configurations. The
options are:
Power Supply Single or Double Fiber Connector
12 Volt DC Input: “Dry Fiber”
No Internal camera power supply
Does not supply power to Camera
Unit via SMPTE hybrid fiber cable
Is typically used with Tactical fiber
cable and/or infrastructure cabling
Available in “Dual” configuration for
interface and control of two Camera
Units in a single one RU device.
120/220 Volt AC Input – “Powered
Fiber”
Includes internal power supply for
Camera Unit.
Supplies power to Camera Unit via
SMPTE hybrid fiber cable
Not available in “Dual” configuration.
Can only interface and control a
single Camera Unit.
Single Configuration
Interface and control a single
Camera Unit.
Available in 12 Volt DC and
120/220 VAC models
Dual Configuration
Interface and control two
Camera Units in a one RU
device.
Available in 12 Volt DC only.
Not available for 120/220 VAC
models
Six different fiber connectors are
available for the CopperHead Base
Station. See Rear Panel Section B -
Optical Connector on page 20 for
details
OpticalCON (dry)
Two STs
MX (Expanded
Beam)
OpticalCON
(powered)
12
SMPTE 304M
Two STs and
Molex
Page 17

Types of Base Stations
The actual appearance of your CopperHead Base Station will vary depending on the fiber
cable connectors and power option specified at the time of purchase.
Single “Dry” Station
Fig. 2-7: Single "Dry" Base Station - Front Panel (top) and Rear Panel (bottom)
Dual Unpowered Base Station
CopperHead PowerWafer
User Guide
Fig. 2-8: Dual Unpowered Base Station - Front Panel (top) and Rear Panel (bottom)
Powered Base Station
Fig. 2-9: Powered Base Station - Front Panel (top) and Rear Panel (bottom)
13
Page 18

System Overview
Types of Base Stations
14
Page 19

CopperHead System Components
This chapter describes the main system components in the CopperHead PowerWafer
system.
Base Station . . . . . . . . . . . . . . . . . . . . . . . . . . . . . . . . . . . . . . . . . . . . . . . . . . . . . . . . . . . . . . . . . . . . . . . . . . 16
PowerWafer Camera Adaptor . . . . . . . . . . . . . . . . . . . . . . . . . . . . . . . . . . . . . . . . . . . . . . . . . . . . . . . . . 22
MPS External PowerWafer Power Supply . . . . . . . . . . . . . . . . . . . . . . . . . . . . . . . . . . . . . . . . . . . . . . 23
HDX Power Supply . . . . . . . . . . . . . . . . . . . . . . . . . . . . . . . . . . . . . . . . . . . . . . . . . . . . . . . . . . . . . . . . . . . 25
15
Page 20

CopperHead System Components
Base Station
Base Station
The CopperHead Base Station is available with a number of options. The unit is ordered
with a specified Power Module, Audio/Intercom Module and Fiber Connector. For an overall
view of component location please see the overall diagrams in Error! Reference source not
found..
Base Station Front Panel
Fig. 3-1: Base Station Front Panel - single unit, 120/220 VAC power w/internal hybrid power supply
Fig. 3-2: Base Station Front Panel - dual unit, 12 VDC power
The front of Base Station has three areas of interest:
• A: Signal Status Indicators (see Front Panel Section A - Signal Status Indicators on
page 16)
If Dual Base Station, A1 and A2. Otherwise, A2 only.
• B: Power Switch and Indicator (see Front Panel Section B- Power Switch and Indicator
on page 17)
• C: Hybrid Power Status Indicators (see Front Panel Section C- Hybrid Power Status
Indicators on page 18)
Note: These indicators only appears on Base Stations equipped with
internal hybrid power supply.
Front Panel Section A - Signal Status Indicators
Fig. 3-3: Base Station Status Indicators
16
•1: Link
Indicates the status of the data link from Camera Unit to Base Station. This is a good
indicator of adequate optical link.
• GREEN when Base Station has a data "lock" with Camera Unit.
Page 21

CopperHead PowerWafer
• RED when Base Station is not "locked" to Camera Unit.
• 2: Return Video/Sync
Indicates the presence of the analog video signal (VBS) at Base Station's "VBS In" BNC.
This VBS can be used for return "program" video or for genlock to the camera.
• 3: SDI Presence
Illuminates GREEN to indicate the presence of digital SDI video from Camera Unit. This
will stay illuminated GREEN as long as there is adequate optical power being received
at Base Station. See Error! Reference source not found. for more information.
•4: Intercom
Illuminates GREEN to indicate audio activity on the Intercom channel.
•5: Control
Illuminates GREEN when camera control data is being transmitted between Camera
Unit and Base Station.
Front Panel Section B- Power Switch and Indicator
User Guide
Fig. 3-4: Base Station Power Switch
•6: Power
Indicates that power is applied to Base Station.
• GREEN when Base Station is fully powered.
• RED when there is power connected to Base Station, but Base Station is not turned
on.
• 7: Power Switch
Used to turn Base Station on and off. With a hybrid power system (power supplied by
Base Station) this switch will control power to the camera and Camera Unit.
17
Page 22

CopperHead System Components
Base Station Front Panel
Front Panel Section C- Hybrid Power Status Indicators
This section is optional, and only appears on CopperHead Base Stations equipped with
internal power supplies designed to work with a CopperHead Camera Unit connected to a
PowerWafer.
•8: Camera Power
Illuminates GREEN when high voltage is being supplied to Camera Unit.
• 9: Cable Open
Illuminates RED to indicate that the SMPTE hybrid cable is open or there is no SMPTE
hybrid cable connected.
High voltage will not be applied to the hybrid connector until the open condition is
corrected.
•10: Cable Short
Illuminates RED to indicate that the SMPTE hybrid cable has a short circuit in it.
High voltage will not be applied to the hybrid connector until the "short" condition is
corrected or the cable is replaced.
Fig. 3-5: Base Station Hybrid Power Status Indicators
18
Page 23

Base Station Rear Panel
• A: Power Connector (see Rear Panel Section A - Power Connector on page 19)
• B: Optical Connectors (seeRear Panel Section B - Optical Connector on page 20 )
• C: Signal Connectors (see Rear Panel Section C - Signal Connectors on page 20)
Rear Panel Section A - Power Connector
The CopperHead Base Station can be configured for DC or AC power.
12VDC Power Interface
This power interface is used on CopperHead Base Stations that are not equipped with
internal power supplies. This type of Base Station is typically used with Camera Units
powered locally with a battery or a local power supply at the camera.
CopperHead PowerWafer
User Guide
Fig. 3-6: CopperHead Base Station Back Panel (Dual model shown)
Fig. 3-7: 12VDC Power Connector
• 11: 12V DC Power input connector (XLR 4 Pin).
• 12: 12V DC Input - terminal block
This can be used in lieu of the 4-pin XLR or in parallel as a redundant input. See Error!
Reference source not found.for pin-out details
• 13: For Future Use (RJ45)
AC Power Connector Interface
This power interface is used on CopperHead Base Stations that are equipped with an
internal power supply. This type of Base Station is typically used with Camera Units
powered with a PowerWafer via SMPTE Hybrid cable
19
Page 24

CopperHead System Components
Base Station Rear Panel
• 20: AC Power Receptacle 100-240V 50/60 Hz
• 21: 3.15 amp dual fuse assembly
Two 4 amp fuses (5 x 20mm).fuses are in operation at all times – both the AC Line Hot
and the AC Line Neutral are fused.
• 13: For Future Use (RJ45)
Rear Panel Section B - Optical Connector
Fig. 3-8: AC Mains Connector
The fiber optic connector is used to connect Base Station directly to Camera Unit or to the
external MPS or HDX power supply configured with your system. The type of fiber
connector will vary depending on your system configuration. Six types of fiber optic
connectors are available for use with the CopperHead Base Station.
"Dry" (unpowered) fiber connectors Fiber Connectors with Copper for Power
A: OpticalCON
(dry)
B: STs C: MX D: OpticalCON
(powered)
E. SMPTE 304M F. STs & Molex
Rear Panel Section C - Signal Connectors
20
Fig. 3-9: Rear Panel Signal Connectors
• 5: Connector for Camera Remote Control Panel and Tally input (DB15HD)
Connect CHBR-PRO cable here, specified for your particular Camera Remote Control
Panel.
Page 25

CopperHead PowerWafer
User Guide
See Error! Reference source not found.to specify the correct cable for your Camera
Remote Control Panel
• 6: Base Station Intercom Connector
Connect your house intercom system here:
• XLR3: Two-wire (Clear-Com or RTS)
• XLR5M: Four-wire (matrix-style)
Two 4 amp fuses (5 x 20mm).fuses are in operation at all times – both the AC Line Hot
and the AC Line Neutral are fused.
For more information, see Intercom Pinouts on page 41.
• 7: SD/SDI or HD/SDI Output
Digital video from camera's SDI output
•8: VBS Return Input
Analog composite video signal sent to Camera Unit.
•9: VBS Return Input Switch
Switches the VBS Return Input connector to be optimized for one of two uses:
• A: Sync In: Genlock/Sync/Tri-Level sync signal.
• B: Composite Video In: Typically used to send analog VBS return video to the
camera or an external monitor.
21
Page 26

CopperHead System Components
PowerWafer Camera Adaptor
PowerWafer Camera Adaptor
The CopperHead Camera Unit can be powered by the optional "PowerWafer" Camera
Adaptor. The PowerWafer replaces the local camera battery and any local AC power supply
adaptor. The PowerWafer gets its power from the use hybrid fiber cable and the
CopperHead Base Station equipped with the internal power supply or from the MPS
external power supply.
Up to 95 watts of power can be delivered to the camera, Camera Unit and camera powered
accessories. Up to 780 feet (240 meters) of cable can be used when Camera Unit is powered
directly from Base Station.
The use of an external power supply can extend Base Station to Camera range and increase
camera power flexibility. The MPS "Throw Down" device or Wafer Power Adaptor provides
this functionality. This unit is described in MPS External PowerWafer Power Supply on
page 23.
The PowerWafer replaces the battery or local battery mountable AC adaptor (shown with
the Anton/Bauer "Gold Mount" option).
•1: Heat Sink
• 2: Battery Mounting Plate (Anton/Bauer Gold Mont or "V-Mount")
• 3: Power Input Connector
High voltage power is carried from Base Station to Camera Unit. A short jumper cable
(CH3CP-INF-2FAG) carries the high voltage power from Camera Unit to the PowerWafer's
power input connector, where it is converted to 12VDC power. The 12VDC power is
delivered back to the camera via the battery mounting plate.
Fig. 3-10: PowerWafer Power Adaptor and Jumper Cable
22
Page 27

MPS External PowerWafer Power Supply
The CopperHead MPS external power supply provides 95 watts of 12VDC power and fiber
connectivity from Base Station to Camera Unit equipped with a CopperHead PowerWafer.
Connectivity between the MPS unit to the camera can be configured using either a Hybrid
OpticalCON connector or a SMPTE 304M connector. The nominal distance between them is
240 meters (780 feet).
Connectivity between the MPS unit and Base Station uses "dry" fiber and can be configured
with a "dry" OpticalCON connector or two ST connectors. The MPS is powered locally with
standard AC power. The unit is free standing (see MPS External PowerWafer Power Supply
on page 23).
CopperHead PowerWafer
User Guide
Fig. 3-11: MPS Power Supply, Front and Rear
• 1: AC Power Receptacle: 100-240V 50/60 Hz
•2: Fuse compartment
Two 4 amp fuses (5 x 20mm).fuses are in operation at all times – both the AC Line Hot
and the AC Line Neutral are fused.
For more information, see Intercom Pinouts on page 41.
• 3: Power Switch
• 4: For Future Use (RJ45)
• 5: "Dry" Fiber Optic Connection to CopperHead Base Station
This removable plate can be equipped with two ST connectors or a "dry" OpticalCON
connector. See Figure 3-12.
•6: Heat Sink
• 7: Powered Fiber Optic Connection to CopperHead Camera Unit
This removable plate can be equipped with a SMPTE 304M connector or a powered
OpticalCON connector. See Figure 3-13.
23
Page 28

CopperHead System Components
MPS External PowerWafer Power Supply
The "dry" connection y to the CopperHead Base Station can be equipped with two ST
connectors or a "dry" OpticalCON connector.
The powered connection V to the CopperHead Camera Unit can be equipped with a SMPTE
304M connector or a powered OpticalCON connector.
Fig. 3-12: MPS "dry" fiber connector options
Fig. 3-13: MPS powered fiber connector options
Dry Unpowered Fiber
Part Number
CH2-MPS-95VD-2ST-NEU 2 STs OpticalCON
CH2-MPS-95VD-2ST-304 2 STs SMPTE 304M
CH2-MPS-95VD-NEU-NEU OpticalCON OpticalCON
CH2-MPS-95VD-NEU-304 OpticalCON SMPTE 304
Connection to Base Station (y)
Powered Fiber Connection
to Camera (V)
24
Page 29

HDX Power Supply
The HDX Power Supply Unit is required when using the PowerPlus Camera Adaptor. The
HDX can be used as a free-standing unit or rack mounted, using the HDX-FR-2 for mounting
two HDX units. See PowerPlus 300 User Guide for details on connecting the HDX to a
CopperHead system.
The unit sends power via a SMPTE hybrid fiber cable to the PowerPlus, where it is converted
to 12VDC and optionally to 24VDC).
CopperHead PowerWafer
User Guide
Fig. 3-14: HDX device setups
The HDX has five features:
• A: AC Power Input Module and Switch
Power Switch and connector for AC Mains.
• B: "Wet" SMPTE 304M Hybrid Fiber Connector
The SMPTE hybrid cable is connected here. This cable connects to the PowerPlus at the
camera. This mating connector pair always uses SMPTE 304M connectors.
• C: "Dry" Fiber connector(s).
The CopperHead Base Station is connected here. This interface can be equipped with a
variety of fiber connectors:
• Two ST connectors
• MX connector
• OpticalCON connector
•D: Status Indicators
These indicators show the status of the HDX's power system (see HDX Status Indicators
on page 26).
• E: HDX Integrated Handle
Stand-alone unit can be carried or hung from this robust handle
25
Page 30

CopperHead System Components
HDX Status Indicators
HDX Status Indicators
• 1: AC IN - MAINS
AC Input power is present
• 2: DC HV ENABLE
DC "Sense" voltage from PowerPlus is present
•3: AC HV ENABLE
AC "Sense" voltage from PowerPlus is present
• 4: HV Present
AC or DC voltage is available on Hybrid connector
• 5: CABLE OPEN
No camera cable connected
•6: CABLE SHORT
Camera cable non-functional due to short
• 7: REMOTE PWR ENABLE
• Displays red if local/remote sw in remote position and opt power <= -27 dBm
• Displays green if local/remote sw in remote position and opt power >= -24 dBm
gates HV power
• 8: LOAD TYPE
Indicates the type of load or camera being used:
• N/A - No load detected
• PWR+ - PowerPlus detected
•9: Optical Power
Not used with PowerPlus.
• 10: Local Remote
Not Used With PowerPlus.
Fig. 3-15: HDX Displays
26
Page 31

Camera Unit and Power Supply Installation
This chapter explains how to mount the Camera Unit and deploy CopperHead PowerWafer
system.
Mounting the Copperhead Camera Unit with the PowerWafer . . . . . . . . . . . . . . . . . . . . . . . . 28
Deployment of the CopperHead System . . . . . . . . . . . . . . . . . . . . . . . . . . . . . . . . . . . . . . . . . . . . . . 32
Insuring a Positive Fiber Link . . . . . . . . . . . . . . . . . . . . . . . . . . . . . . . . . . . . . . . . . . . . . . . . . . . . . . . . . . 32
27
Page 32

Camera Unit and Power Supply Installation
Mounting the Copperhead Camera Unit with the PowerWafer
Mounting the Copperhead Camera Unit with the PowerWafer
When mounting the CopperHead Camera Unit, always position the camera so that the
battery mounting plate at the rear of the camera is easy to access. Insure that the camera is
well supported and stable. If a battery is mounted remove it and put it to one side. The
camera model shown here is for illustrative purposes only - your camera may differ.
The PowerWafer allows the camera and Camera Unit to be powered via hybrid fiber cable,
which is powered from the CopperHead Base Station or MPS External Power Supply.
Fig. 4-1: The PowerWafer Unit and the Cable
To attach the PowerWafer Cable
1 Attach the CopperHead Camera Unit A to the camera battery mounting plate B. The
mounting is mechanically identical to attaching a battery.
For instructions for attaching the required cables between the camera and the Camera
Unit, refer to any of the CopperHead User Guides.
2Mount the PowerWafer C to the CopperHead Camera Unit battery mounting plate D
exactly as you would mount the battery to the camera.
3 Connect the supplied PowerWafer connector cable E. (model CH3CP-INF-FAG2)
between the PowerWafer C and the PowerWafer connector on Camera Unit A.
4 For best results, plug the straight connector F into the PowerWafer and the connector
with the Right Angle G into the Copperhead Camera Unit.
The following table summarizes the various fiber cable connection options between the
Copperhead Base Station and Camera Unit.
Distance Range Between
Cable Type Base Station Power Camera Unit Power
Tactical Fiber 12VDC Local Battery or AC
Power
SMPTE Hybrid
Fiber
120/220VAC with
Internal Camera
Power Supply
PowerWafer
Adaptor
Camera and Base
Up to 10 KM
240 meters
28
Page 33

CopperHead PowerWafer
Distance Range Between
Cable Type Base Station Power Camera Unit Power
SMPTE Hybrid
Fiber
SMPTE Hybrid
Fiber
External MPS Power
Supply 95 Watts1
External HDX Power
Supply - 150 Watts2
PowerWafer
Adaptor
PowerPlus Adaptor 5 KM between base and
Camera and Base
5 KM between base and
power supply
240 meters between
power supply and
camera
power supply
3.2 KM between power
supply and camera
Note: The external MPS power supply must be equipped with the
required fiber cable connectors depending on your system
requirements. See MPS External PowerWafer Power Supply on
page 23 for a description of the various options
User Guide
SMPTE Hybrid Fiber between Base Station (powered) and Camera Unit
Fig. 4-2: SMPTE Hybrid Fiber between Base Station (powered) and Camera Unit
Connect a length of SMPTE Hybrid fiber cable A between Camera Unit B and the fiber
receptacle C on the back of Base Station D.
At each end of the fiber cable will be either an OpticalCON or SMPTE 304M Hybrid fiber
connector E and F.
The camera will be powered by the CopperHead PowerWafer Camera Power Supply G.
29
Page 34

Camera Unit and Power Supply Installation
Hybrid Fiber between Base Station and Camera Unit (Infrastructure Wiring)
Hybrid Fiber between Base Station and Camera Unit (Infrastructure Wiring)
Fig. 4-3: Hybrid Fiber between Base Station and Camera Unit (Infrastructure Wiring)
A remotely-mounted fiber connector can be used for permanent installations such as
communications closets, truck connector panels and within/between buildings. A panel
(D) with two STs (fiber) and a Molex connector (power) is mounted on Base Station (C).
Infrastructure fiber and copper wiring from Base Station connects to a remote panelmounted OpticalCON or SMPTE 304M receptacle (E). The standard hybrid fiber optic cable
(A) connects the panel- mounted receptacle and Camera Unit (B), equipped with a
PowerWafer (G).
Hybrid Fiber Cable between MPS Power Unit and Camera Unit
30
Fig. 4-4: Hybrid Fiber cable between the MPS Power Supply and Camera Unit
Dry fiber can be used between Base Station and the MPS External Power Unit, and the
camera can be powered by the MPS over powered hybrid fiber.
Connect "dry" (unpowered) single mode fiber cable (A) between the fiber connector(s) (B)
on Base Station (C) and the "dry" fiber connector(s) (D) on the MPS Power Supply (E).
Page 35

CopperHead PowerWafer
User Guide
Connect the MPS Power Supply (E) to AC Mains (F). Connect a length of hybrid fiber cable
(G) between the powered connector (H) on the MPS Power Supply (E) and the swiveled
fiber connector (I) on Camera Unit (J). The hybrid fiber cable can be equipped with either
OpticalCON or SMPTE 304M connectors (K). The camera and Camera Unit will be powered
via the hybrid cable by the PowerWafer (L).
The "dry" fiber connectors (D) on the MPS Power Supply (E) and the "dry" fiber connector(s)
(B) on Base Station (C) can equipped with one of two connector options:
• Two ST connectors (shown)
• OpticalCON connector
The powered fiber connectors (H) on the MPS Power Supply (E) and the fiber connector I on
Camera Unit (J) be equipped with one of two connector options:
• Two ST connectors (shown)
• OpticalCON connector
Other fiber optic connectors are available by special order. Contact Miranda (see Contact
Us on page 35) or your CopperHead dealer for more information.
31
Page 36

Camera Unit and Power Supply Installation
Deployment of the CopperHead System
Deployment of the CopperHead System
The CopperHead system is available with many different variations, including different
battery mounting plates, powering options, fiber cable connectors and intercom system
interfaces. This allows for many permutations that are all slightly different. Hence, not
every possible operational environment can be described.
However, the following steps are recommended:
1 Set up and test your Copperhead system immediately to confirm proper operation and
to provide training to you and your team prior to an actual production.
2 Do not attempt to power up the system until the fiber optic cable has been connected
at both ends.
3 Install Camera Unit and battery or power supply (see Mounting the Copperhead
Camera Unit with the PowerWafer on page 28).
4 Connect all Camera Unit and Base Station cables (see any of the CopperHead User
Guides).
The order in which you connect the cables makes no difference. However, to prevent
damage other sensitive electronics (such as camcorders and Remote Control Panels):
• Make sure to connect the CHCR Camera Remote Control cable to the camera when
the camera is powered off.
• Make sure to connect the CHBR Base Remote Cable to the remote control panel
when Base Station power is turned off.
5 Deploy the fiber cable.
Read the Using Fiber Optics Guide for information on how to manage and deploy your
fiber optics cabling, safety precautions, tips & tricks, and recommendations for creating
complex fiber optic networks. You can find a copy of this document on the Support
portal (see Contact Us on page 35).
Insuring a Positive Fiber Link
To insure a positive Fiber Link
1 Connect the fiber cable connectors at each end.
2 Power up Camera Unit and Base Station or power supply and check the LED "Link"
indicators on each device.
3 Confirm that the LED "Link" indicators on Camera Unit and Base Station are both
illuminated GREEN. If so, all signals should now be passing between Camera Unit and
Base Station.
32
Page 37

Specifications
Distance Limit *see note below
Tactical Fiber (Local Power at Camera):
“Dry” fiber (1.5Gb/s) ............................................................ 16 db optical loss (≈ 30 km*)
SMPTE 311M Hybrid Fiber...........................................................................................................
Standard Internal Power Supply w/PowerWafer
.............................................................................................. 240m (787 ft): 95W @ 12VDC*
Long Range: HDX w/PowerPlus .............2km (6562 ft.): 100W Cont./150W Peak*
Mechanical/Environmental
Dimensions (WxLxD)
PowerWafer ............................................................................................... 5" x 6.12" x 2.2"
MPS Power Supply.................................................................................. 9.7" x 2.5" x 4.5"
Weight
PowerWafer ..................................................................................................................1.5 lb.
MPS Power Supply................................................................................................... 3.0 lb.
Power Consumption
Base Station (Hybrid Fiber):
Power Req................................................................ 110-120/220-240 VAC, 50 to 60Hz
Power Consumption ................................................................ 250 watts max @120VAC
Temperature Range ............................................................................................ -25° to +55°C
Humidity Range ................................................................... 0 to 95% RH, Noncondensing
* The maximum cable length varies due to optical loss that can depend on cable quality,
dirt/dust/contamination on connectors, and the number of cable connectors. When using
hybrid cable for camera power, the size of the hybrid cable, as well as the power draw of the
camera, lens, viewfinder, and other accessories are also factors
33
Page 38

Specifications
34
Page 39

Technical Suppor t
For technical assistance, please contact the Miranda Technical support centre nearest you:
Americas
Office hours: 9:00 a.m. - 9:00 p.m. (EST)
Telephone: +1-800-224-7882
Fax: +1-514-335-1614
e-mail: support@miranda.com
Asia
Office hours: 9:00 am - 5:00 pm (GMT+8)
Telephone: +852-2539-6987
Fax: +852-2539-0804
e-mail: asiatech@miranda.com
China
Telephone: +86-10-5873-1814
e-mail: asiatech@miranda.com
Europe, Middle East, Africa, UK
Office hours: 9:00 a.m. - 6:00 p.m. (GMT)
Telephone: +44 118 952 3444
Fax: +44 118 952 3401
e-mail: eurotech@miranda.com
France (only)
Office hours: 9:00 a.m. - 6:00 p.m. (GMT + 1)
Telephone: +33 (0) 1 55 86 87 88
Fax: +33 1 55 86 00 29
e-mail: eurotech@miranda.com
Contact Us
Related documentation
To access the most recent updates to this document, or to access other Miranda user
documentation, please visit the Miranda Support Portal:
http://www.miranda.com/support/
35
Page 40

Contact Us
Customer service and sales
Customer service and sales
For customer service or sales information, please contact a Miranda Technologies
Partnership’s sales office. Visit our web site at
http://www.miranda.com/contact.php?link=worldwide
Miranda’s corporate headquarters
You can also contact Miranda’s corporate headquarters at:
Miranda Technologies Partnership
3499 Douglas-B.-Floreani
St-Laurent, Quebec, Canada H4S 2C6
Tel. 514-333-1772
Fax. 514-333-9828
Visit our web site at www.miranda.com
to find office nearest to you.
36
Page 41

Connectors and Accessories
This appendix lists the specification for the CopperHead PowerWafer parts and accessories.
MPS Power Supply Connector . . . . . . . . . . . . . . . . . . . . . . . . . . . . . . . . . . . . . . . . . . . . . . . . . . . . . . . . 38
Parts and Accessories . . . . . . . . . . . . . . . . . . . . . . . . . . . . . . . . . . . . . . . . . . . . . . . . . . . . . . . . . . . . . . . . . 38
37
Page 42

MPS Power Supply Connector
MPS Power Supply Connector
Fig. A-1: MPS Power Interface IEC C14 Receptacle
• Panel Mounted AC Power Receptacle: 110/220 VAC
• Fuses: Two 3.15 amp slo-blo fuses (5 x 20mm). Littlefuse Series 218, part #02183.15 or
equivalent.
Parts and Accessories
Graphic Description Graphic Description
PWRWFR-95VD
Power Wafer Camera
Adaptor (for use with CH
Series Pro-BS-95VD)
CH3CP-INF-2FAG
PowerWafer-to-Camera
Unit jumper cable
CASM/MD/XL
Tac tica l Fiber on Reel :
Small (SM), Medium
(MD), or Large (XL)
CH2-MPS-95VD
External Power Supply for
PowerWafer
CHRCP-2050A
Universal Camera Control
Panel
38
Page 43

CopperHead PowerWafer
Graphic Description Graphic Description
CAXX-MX
Tactical Fiber Assembly,
MX Connectors
CAXX-XT2S-NOC
Tactical Fiber Cable
Assembly, OpticalCON
Connectors
User Guide
CAXX-XSM311-NOC
SMPTE 311M Hybrid
Fiber Cable Assembly,
OpticalCON connectors
MXRE
MX Receptacle Flange
Mount Assembly
Breakout to STs
CH3BFC-NOC-2ST/MOL
OpticalCON receptacle
to STs and Molex
39-01-4051
CH3BFC-304M-2ST
SMPTE Hybrid 304M
plug to STs and Molex
39-01-4051
CAXX-XSM311-SMPTE
SMPTE 311M Hybrid Fiber
Cable Assembly, SMPTE
304M connectors
MXRV
MX Receptacle Jam Nut
Assembly Breakout to STs
CH3BFC-NOC-NOC
OpticalCON receptacle to
OpticalCON Plug
CH3BFC-304M-NOC
SMPTE Hybrid 304M plug
to OpticalCON Plug
39
Page 44

Parts and Accessories
40
Page 45

Intercom Pinouts
This appendix lists the pinouts for the 4-Wire and Clear-Com Intercoms.
4-Wire Intercom . . . . . . . . . . . . . . . . . . . . . . . . . . . . . . . . . . . . . . . . . . . . . . . . . . . . . . . . . . . . . . . . . . . . . . 42
Clear-Com Intercom . . . . . . . . . . . . . . . . . . . . . . . . . . . . . . . . . . . . . . . . . . . . . . . . . . . . . . . . . . . . . . . . . . 42
41
Page 46

Intercom Pinouts
4-Wire Intercom
4-Wire Intercom
This cable is end-user supplied.
Base Station Four Wire
Intercom Output Wiring
Base Station #16 & #17
XLR5 Male
Clear-Com Intercom
Pin Function Impedance Signal
1Ground
2 + Input 600 Ohm
3- Input Mic: -32 dBm
4 + Output >=600 Ohm
5- Output
Input
Load
Line: +8 dBm
+8 dBm
Base Station Clear-Com
Intercom Output Wiring
Base Station #16 & #17
XLR3 Female (x2)
Pin Signal
1Ground
2+ VDC Power
3Power
42
 Loading...