

GSI 70
™
Setting The Clinical Standard www.grason-stadler.com
Grason-Stadler, 7625 Golden Triangle Drive, Suite F, Eden Prairie MN 55344
800-700-2282 • 952-278-4402 • fax 952-278-4401 • e-mail info@grason-stadler.com
Part Number 1770-0100 Rev A
Title: GSI 70
Automated OAE Screener
User Manual
Date: November 2009
Copyright © 2005
All rights reserved. No part of this publication may be
reproduced or transmitted in any form or by any means without the prior written permission of
Part number:
The information in this publication is proprietary to
1770-0100
.
Printing history: August, 1999 First printing Rev 1.0
January, 2000 Second printing Rev 2.0
February, 2001 Third printing Rev 3.0
February, 2003 Fourth printing Rev 4.0
September, 2003 Fifth printing Rev 5.0
March, 2004 Sixth printing Rev 6.0 DCO 1770-0303
March, 2005 Seventh printing Rev 7.0 DCO 1770-0302
Electromagnetic compatibility (EMC)
Please refer to the Electromagnet ic Comp atibilit y Refer ence Guide on C D (part n umber 482 -6387x x)
for EMC information concerning your sy stem.
Compatibilité électromagnétique (CEM)
Veuillez vous reporter au guide de référence de compatibilité électromagnétique sur CD
(numéro de pièce 482-6387xx) pour des informations sur la CEM relatives à votre système.
Elektromagnetische Verträglichkeit (EMV)
Informationen über die EMV des Systems finden Sie im Referenz-Handbuch
Elektromagnetische Verträglichkeit auf der CD (Teilenummer 482-6387xx).
Compatibilità elettromagnetica (EMC)
Vedere la guida alla consultazione per la compatibilità elettromagnetica contenuta sul CD (numero di
parte 482-6387xx) per informazioni sulla compatibilità elettromagnetica relativa al sistema in dotazione.
Compatibilidad electromagnética (CEM)
Consulte la Guía de referencia sobre com patibilidad electro mágnetica in cluida en el CD (n úmero
de pieza 482-6387xx) para obtener la inform ación sobr e la CEM de su sistem a.

Addenda
b
SELECTPRO
4:2OUTO
F
SELEC
Addendum to Chapter 4:
Using the GSI 70 Single-Patient Screener
Two default protocols are available:
OAE 1: GSI Default
OAE 4: 2 OUT OF 3
Selecting a Protocol
1. Turn the GSI 70 Automated OAE Screener on by pressing any button. (The Screener
can be in the Printer/Charger cradle during this procedure.)
.
When the DPGram appears on the display, simultaneously press the LEF T (blue)
2
and RIGHT (pink) buttons to enter the UTILITY MENU.
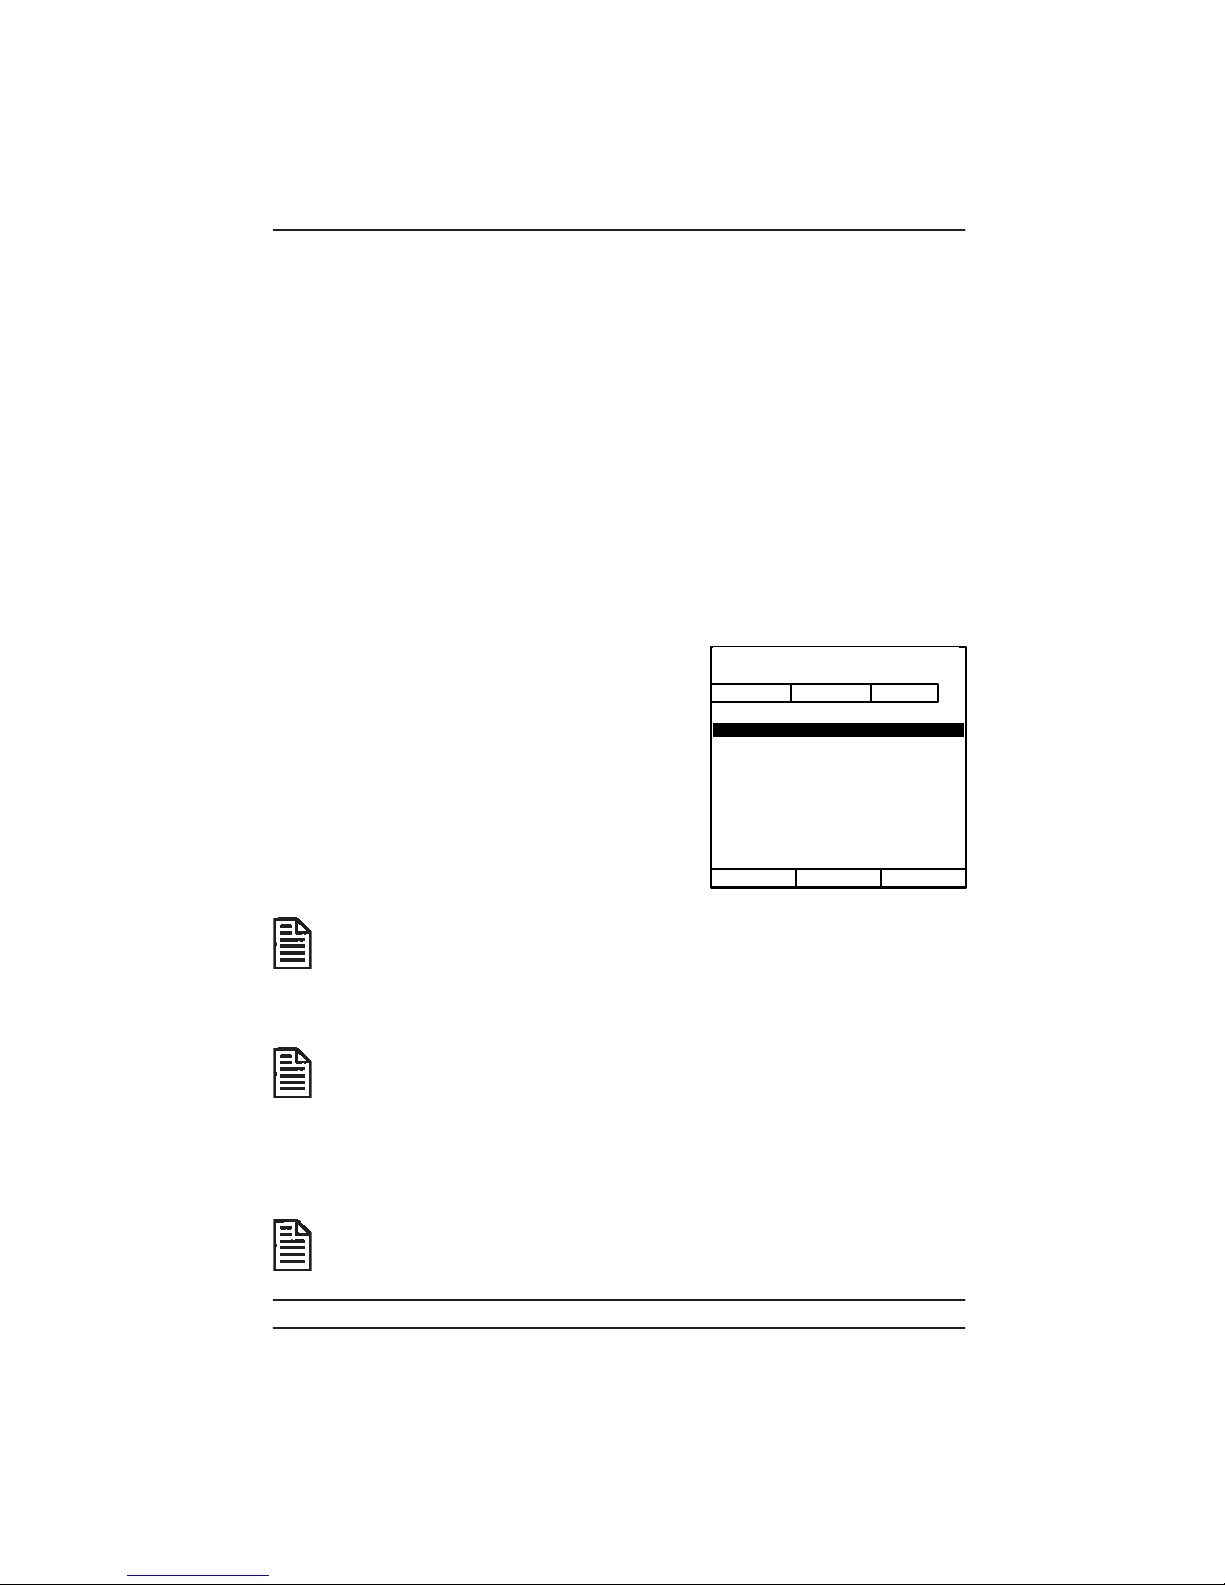
3
.
Use the down arrow button (blue) to highlight
CHANGE PRO TOCOL. The Select Protocol screen
appears.
.
Use the down arrow button (blue) or up arrow
4
button (pink) to highlight either:
OAE 1: GSI Default or
OAE 4: 2 OUT OF 3
1: GSI DEFAULT
4
CANCEL
TOCOL
3
Once highlighted, press the SELECT button (green)
to choose the desired protocol.
▼
5. The UTILITY MENU is now displayed. Use the down arrow
utton (blue) or up
T
arrow button (pink) to scroll to and highlight the word EXIT. Press RUN to return to
the DPGram screen.
The label to the right of the Pass/Refer line indicates the protocol being used
once the TEST (green) button is pressed.
▲
Addenda
Protocol Scoring Rules
OAE 1: GSI Default
■
Scores the test result as PASS when all three response s are at or above the
Pass/Refer line and each response is individually scored as a Pass.
■
Scores the test result as REFER when at least one re sponse is below the Pass/Refer
line and its response is individually scored as a Refer.
■
Scores the test result as NOISE when at least one response is individually scored as
noise.
OAE 4: 2 OUT OF 3
■
Scores the test result as PASS when at least 2 out of 3 responses are at or above the
Pass/Refer line and these 2 responses are individually scored as Pass.
■
Scores the test result as REFER when at least 2 out of 3 responses are below the
Pass/Refer line and these 2 responses are individually scored as Refer.
■
Scores the test result as NOISE when at least 2 out of 3 responses are individually
scored as Noise.
■
If one response is PASS, one is REFER, and one is NOISE, the test result is scored
as NOISE.
Selection of protocol OAE 1 versus OAE 4 depends upon the program's
performance objective for hearing screening.
It is possible to save and print one ear with OAE 1 and the other ear with
OAE 4.
GSI 70 User Manual
Addendum to Chapter 5:
E
RASES
ELEC
Using the GSI 70 Multi-Patient Screener
Two default protocols are available:
OAE 1: GSI Default
OAE 4: 2 OUT OF 3
Selecting a Protocol
1. Turn the GSI 70 Automated OAE Screener on by pressing any button. (The Screener
can be in the Printer/Charger cradle during this procedure.)
.
Once the DPGram appears on the display, simultaneously press the NAME (blue)
2
and DATA (pink) buttons to enter the UTILITY MENU screen.
3. Use the down arrow button (blue) to select
CHANGE PROTOCOL. The Select Protocol
screen appears.
.
Use the stylus to select either the GSI Default
4
(OAE1) or the 2 OUT OF 3 (OAE4) protocol.
Once highlighted, press SELECT to activate this
protocol and return to the Utility Menu screen.
SELECT PROTOCOL
(OAE)
CANCEL
1: GSI DEFAULT
4: 2 OUT OF 3
: EM PTY
: EMPTY
: EMPTY
The first 2 positions on this CHANGE
PROTOCOL screen are now reserved for factory default protocols.
protocol positions cannot be overwritten by a user-defined protocol.
T LOAD
Both
The
three remaining protocol positions may be used to store user-defined
protocols and may be overwritten.
The OAE 4 protocol is loaded into the GSI 70 DMS program when the first
te s t results for OAE 4 are collected from the Screener.
5. Scroll to the word EXIT by using the down arrow button (blue) or up arrow button
(pink) and press RUN (green button) to return to the DPGram display.
The label to the right of the Pass/Refer line indicates the protocol being used
once the TEST (green) button is pressed.

Addenda
Protocol Scoring Rules
OAE 1: GSI Default
■
Scores the test result as PASS when all three responses are at or above the Pass/
Refer line and each response is individually scored as a Pass.
■
Scores the test result as REFER when at least one re sponse is below the Pass/Refer
line and its response is individually scored as a Refer.
■
Scores the test result as NOISE when at least one response is individually scored as
noise.
OAE 4: 2 OUT OF 3
■
Scores the test result as PASS when at least 2 out of 3 responses are at or above the
Pass/Refer line and these 2 responses are individually scored as Pass.
■
Scores the test result as REFER when at least 2 out of 3 responses are below the
Pass/Refer line and these 2 responses are individually scored as Refer.
■
Scores the test result as NOISE when at least 2 out of 3 responses are individually
scored as Noise.
■
If one response is PASS, one is REFER, and one is NOISE, the test result is scored
as NOISE.
Selection of protocol OAE 1 versus OAE 4 depends upon the program's
performance objective for hearing screening.
If the results for the left and right ears are run with both default protocols
(i.e., OAE 1 and OAE 4), the right and left ear results will be paired for printout in
the time sequence that they were acquired.
GSI 70 User Manual
Sample Printouts
OAE 1:
OAE 4: 2 OUT OF 3
GSI Default

Addenda
GSI 70 User Manual

Contents
1
Introduction ...........................................................
1
Product Information .........................................................................
About This Manual ..........................................................................
Conventions ...............................................................................
Product Symbols ..............................................................................
2
Getting Started ...................................................... 5
Unpacking and Verifying Contents ..................................................
Precautions.................................................................................
Automated OAE Screener Features ...........................................
Printer/Charger Features ............................................................
Setting Up the Automated OAE Screener ...............................
Installing the battery ..........................................................
Setting the Screener date and time ....................................
Attaching the Footswitch to the Screener ..........................
Mounting the Screener or Printer Charger to the optional
Rolling Stand .....................................................................
Checking the Battery ..........................................................11
Adjusting the LCD Contrast ...............................................11
Installing the GSI 70DMS Software into your Computer 12
Connecting the Optional Infrared (IrDA) Adapter to a
Computer
Setting Up the Printer/Charger ................................................
Connecting the Printer/Charger to Mains Power ...............
Connecting the Printer/Charger to a Computer .................
Preparing for a Test ..................................................................
Selecting an Eartip .............................................................
Attaching an Eartip to the Probe T ip .................................
Securing the Pod and Probe to the Screener ......................
...........................................................................
1
2
2
3
5
6
7
8
10
10
10
10
10
12
12
13
13
14
14
15
16
1

3
Understanding the display................................... 17
Common Displays .........................................................................
Power-Up Display....................................................................
Version Information ...........................................................
Blank DPGram ..................................................................
Completed DPGram ..........................................................
Stored DPGram........................................................................
4
Using the GSI70 Single-Patient Screener........... 21
Checking the Screener’s Performance ...........................................
Running a Test ...............................................................................
Message CHECK SEAL ..........................................................
Storing a Test .................................................................................
Reviewing a Test............................................................................
Printing a Test ................................................................................
Contents of the Printout ...........................................................
Canceling the Printout .............................................................
Advancing the Paper ................................................................
Stopping a Test ..............................................................................
Erasing a Test .................................................................................
Power-Saving Mode ......................................................................
Power-Down ..................................................................................
Low-Battery Icon ...........................................................................
Battery Discharge T im e .................................................................
17
17
17
18
19
20
21
22
23
24
24
24
25
26
26
26
26
27
27
28
28
5
Using the GSI70 Multi-Patient Screener ............. 29
Setting Up the Screener .................................................................
Setting the Screener’ s Date and Tim e ......................................
Transferring a Patient List from the Computer ........................
Entering Patient Names or ID Numbers from the Screener.....
Selecting a Patient from the List..............................................
Erasing a Patient Name from the List ......................................
30
30
30
31
33
34

Selecting a Test Protocol .........................................................
Transferring a New Test Protocol from the Computer ............
Deleting a Test Protocol...........................................................
Testing Patients ..............................................................................
Running a Test .........................................................................
Message CHECK SEAL ....................................................
Stopping a Test ........................................................................
Storing a Test ...........................................................................
Managing the Test Results .............................................................
Sending Test Results to the GSI 70 DMS ................................
Erasing a Test ...........................................................................
Reviewing a Test......................................................................
Printing a Test ..........................................................................
Printing All Tests for a Patient ...........................................
Printing Selected Tests .......................................................
Printing Individual Test Results.........................................
Contents of the Printout .....................................................
Canceling the Printout .......................................................
Advancing the Paper ..........................................................
Power-Saving Mode ..........................................................
Power-Down ..................................................................................
Low Battery Icon ...........................................................................
Battery Discharge T im e .................................................................
34
35
35
37
37
38
38
38
39
39
41
42
43
44
44
45
45
47
47
47
47
48
48
6
Reviewing the Test Results ................................. 49
Test Result PASS ...........................................................................
Test Result REFER ........................................................................
Test Result NOISE.........................................................................
Test Result ABORT .......................................................................
49
50
51
52

7
Maintenance........................................................ 51
Setting the Date and Time (GSI 70 Multi-Patient Screener Only) 53
Setting the Date and Time from the Computer ..................
Setting Date and T ime Using the Touchscreen ..................
Cleaning .........................................................................................
Cleaning the Housings, Display , and Cables ...........................
Cleaning the Probe Tips...........................................................
Removing the Probe Tip....................................................
Cleaning the Probe Tip ......................................................
Attaching the Probe Tip to the Probe.................................
Cleaning the Infrared Port Windows and Charging Contacts ..
Recharging the Battery ..................................................................
Removing or Replacing the Battery...............................................
Disposing of the Battery ..........................................................
Checking the Screener ...................................................................
Running the Quick Check Test ................................................
Quick Check Passed ..........................................................
Quick Check Failed ...........................................................
Calibrating the T ouchscreen ....................................................
Checking the Printer/Charger ........................................................
Printing a Test Pattern ..............................................................
About the Printer Paper .....................................................
When to Replace the Paper................................................
Replacing the Paper .................................................................
53
54
56
56
56
57
57
58
58
59
60
61
62
62
63
63
64
65
66
66
67
67
8
Troubleshooting................................................... 69
Error Codes ....................................................................................
Troubleshooting T ips .....................................................................
Screener Problems ...................................................................
What to Check First .................................................................
Printer/Charger Module Problems ...........................................
What to Check First .................................................................
69
70
70
70
74
74

9
Guide to Otoacoustic Emmissions ...................... 75
What are Otoacoustic Emissions? .................................................
How is an OAE Generated and Detected?.....................................
Testing with the GSI 70 Automated OAE Screener ......................
77
77
77
10 Service and Warranty Information...................... 79
Warranty for the Screener and Printer/Charger..............................
Repair.............................................................................................
T echnical Service Department .................................................
Recalibration..................................................................................
79
79
79
80
11 Replacement Parts and Accessories.................. 81
Ordering Information .....................................................................
Eartips ............................................................................................
Screener Parts and Accessories......................................................
Printer/Charger Parts and Accessories ...........................................
81
82
83
85
12 Specifications ..................................................... 87
General Specifications ...................................................................
GSI 70 Automated OAE Screener Specifications .........................
Charging Tim e .........................................................................
Probe Tones and Test Protocol.................................................
Eartips ......................................................................................
Display .....................................................................................
Dimensions ..............................................................................
DIP Switch Functions ..............................................................
Changing the Language Setting for the Screener ....................
Printer/Charger Specifications .......................................................
Dimensions ..............................................................................
Plain Paper ...............................................................................
Adhesive-Backed Paper ...........................................................
87
91
91
91
91
92
93
94
94
96
96
96
96

Optional Charging T ransformer Specifications .............................
Dimensions ..............................................................................
97
98
Index ..................................................................
Index-1

Introduction
Thank you for purchasing the Grason-Stadler GSI 70 Automated OAE Screener.
The GSI 70 provides a quick, reliable way to screen for cochlear function, particularly
among patients from birth to age four or five. This promotes earlier diagnostic testing and
earlier intervention for those with cochlear hearing loss. The Screener offers the
following features:
■
Quickly evaluates cochlear function
■
Displays results as they happen
■
Stores data from two ears before printing (Single-Patient Model)
■
Prints out hardcopy on demand
■
Electronically stores test results in database (Multi-Patient Model)
The Printer/Charger Module prints data stored in the GSI 70 and charges the rechargeable
battery in the GSI 70
Module (PCM).
This manual describes how to operate and maintain the GSI 70 and Printer/Charger.
Please follow these instructions to ensure many years of accurate and reliable service.
.
The Printer/Charger is sometimes referred to as the Printer/Charger
1
For additional information on the technology used in the GSI 70, see the Guide to
Otoacoustic Emissions on page 77.
Product Information
For future reference, record the Screener’s serial number here.
The serial number is printed on a label on the back of the instrument, and has the
following format: 1999 0914 where the first four digits are the year of manufacture and
the next digits are a unique product number assigned by the factory.
1

Chapter 1 Introduction
About This Manual
This manual assumes a certain level of medical knowledge, particularly how to perform
.
tests on infants and small children
instrument may be cared for in a Neonatal Intensive Care Unit (NICU) and may have
been born quite premature
.
screening devices and are familiar with a graphical interface and using buttons to select
different options.
Conventions
Throughout this manual, the following typeface: EXAMPLE OF MESSAGE indicates
the following items:
■
Messages that appear on the Screener LCD display
■
Names of buttons and LEDs on the Screener and the Printer/Charger
Some of the newborns that will be tested with this
In addition, we assume that you have used other medical
Messages that appear on the printouts from the Printer/Charger appear in
This manual also uses icons and symbols, described below.
Provides important related information, reminders, recommendations, and
suggestions.
Indicates patient safety alerts. Also indicates that a specific action could cause
harm to your instrument or result in lost data.
.
Indicates an electrical danger to you or a patient
Follow the guidelines in the
manual or on the instrument itself when handling electrical equipment.
Courier
.
2
GSI 70 User Manual

Product Symbols
Product Symbols
The symbols on the GSI 70 Automated OAE Screener and Printer/Charger Module
(PCM) are defined below.
Table 1 – Product Symbols
Symbol Means
Refer to User Manual.
Disconnect from the Mains.
Disassembly of the Screener, Probe/Pod, or Printer/Cha rger be yond
the extent described in this manual voids the warranty. Refer all
servicing to Grason-Stadler or a Graso n-Stadler Autho rized Service
Representative.
Charge the Screener battery only in the Printer/Charger or with the
specified Charging Transformer. Do not use either the Printer/Charger
or the Charging Transformer with any other in strume nts.
Disassembly of the Printer/Charger presents a possible electrical
shock hazard. Refer all servicing to Grason-Stadler or a GrasonStadler Authorized Service Representative.
3

Chapter 1 Introduction
4
GSI 70 User Manual

Getting Started
Unpacking and Verifying Contents
Inspect the packaging for any damage incurred during shipping. If you find any damage,
.
notify the carrier
warranty and allows Grason-Stadler to send announcements of product enhancements.
When you unpack your new GSI 70 Automated OAE System, verify that the following
items are included:
■
Automated OAE Screener
■
Screener battery
■
User Manual (this document)
■
Quick-Reference Guide
■
Starter Kit, Single-Use Eartips
■
Quick Check Cavity
■
Cleaning Kit
■
Calibration Certificate
■
Videotape and Training Booklet
■
Printer/Charger Module
■
Two rolls of paper (one thermal paper, one adhesive backed)
■
Hospital-grade Power Cord t o connect the P rinter/Charger to Mains outlet
Complete and return the warranty registration card. It validates the
2
In addition, you may have some of the following, depending on the system and optional
components you purchased:
■
Charging Transformer, for systems with no Printer/Charger
■
Footswitch
■
Stand
■
RS232 Cable and 9 to 25 pin adapter
■
Infrared (IrDA) communication adapter
■
GSI 70 DMS software installation disks (or CD ROM) and User’s Guide
If you believe any items are missing, contact your Grason-Stadler representative.
5
Chapter 2 Getting Started
Precautions
If the Automated OAE is not at room temperature, allow 30 minutes for it to return to
operating temperature range before using.
Do not charge the battery (do not place the Screener in the Printer/Charger
Module or attach the Screener to the Charging Transformer) at temperatures
greater than 113°F (50°C).
Do not store the Automated OAE or Printer/Charger Module at temperatures that exceed
158°F (70°C).
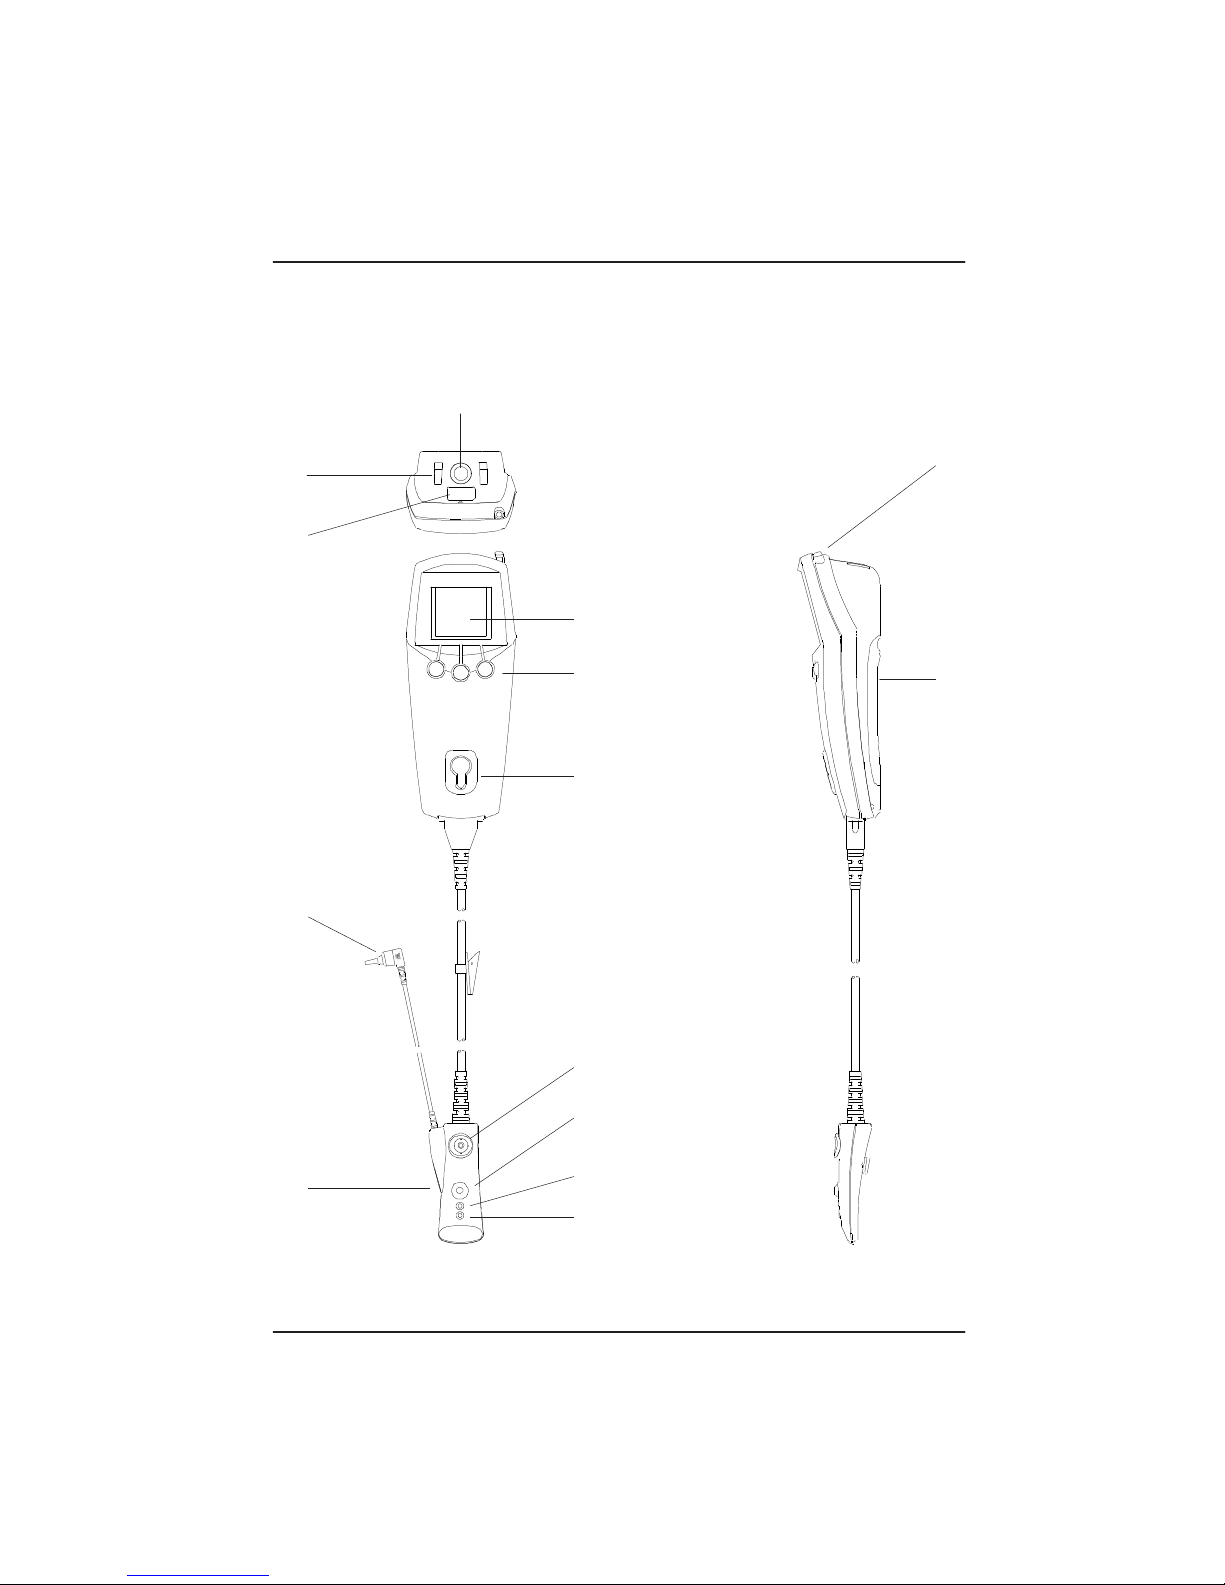
The following is a Key to Screener, Pod and Probe Features Shown on the Next Page:
1 Display Screen (Touchscreen in Multi-Patient Models only)
2
LEFT Ear memory Button (Blue)
3 TEST Button (Green)
4 RIGHT Ear Memory Button (Pink)
5 Pod Storage Cavity
6 Pod (contains probe calibration information)
6A Probe Storage Cavity
6B Start/Stop Button (Green)
6C Yellow LED: Poor Eartip Seal Indicator
6D Green LED: Test Progress Indicator
7 Probe (shown with probe tip attached)
8 Stylus (in Multi-Patient Models only; for use with Touchscreen)
The stylus has a pointed end
children.
9 Access Door for Battery and Language Selector Switches
10 Connector for Charging Transformer and Footswitch
11 Charging Contacts for Battery
12 Infrared Port Window
6
GSI 70 User Manual
.
Keep stylus out of reach of infants and small
Unpacking and Verifying Contents
Automated OAE Screener Features
Use this figure to familiarize yourself with the features of the Screener, Pod, and Probe.
10
11
12
7
1
2, 3, 4
5
8
9
6
Automated OAE Screener, Pod and Probe Features
6A
6B
6C
6D
7
Chapter 2 Getting Started
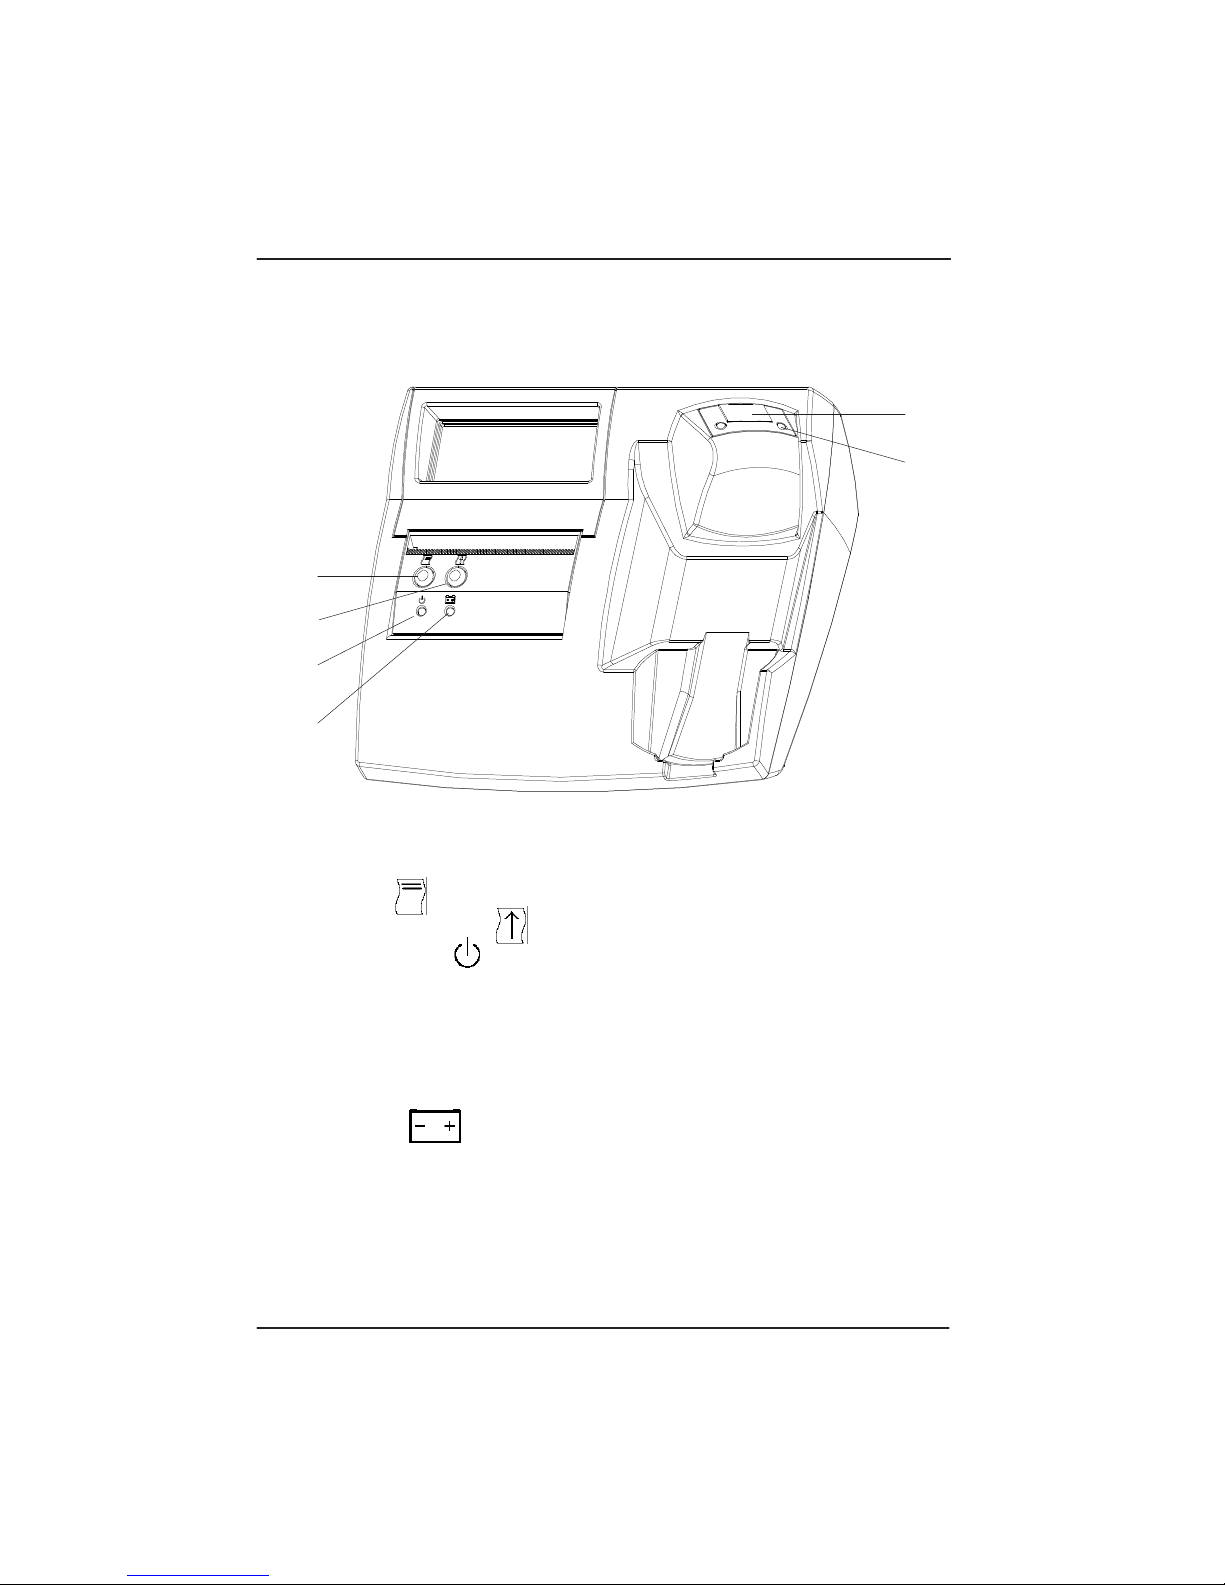
Printer/Charger Features
The front and rear illustrations presented below show the features of the Printer/Charger.
5
6
1
2
3
4
Printer/Charger Features (Front)
1 Print button
2 Paper Advance button
3 Power / Status LED
Off — Charger not connected to Mains power
On — Charger is connected to Mains power
Single Flashes — Out of paper
Double Flashes — Printer or Charger malfunction
For more information, see Troubleshooting on page 69.
4 Battery LED
Off — No Screener in Charger
On — Screener seated correctly in Charger, and charging
5 IrDA port for communication with Screener
6 Charging contacts for recharging Screener
8
GSI 70 User Manual
Unpacking and Verifying Contents
1
23
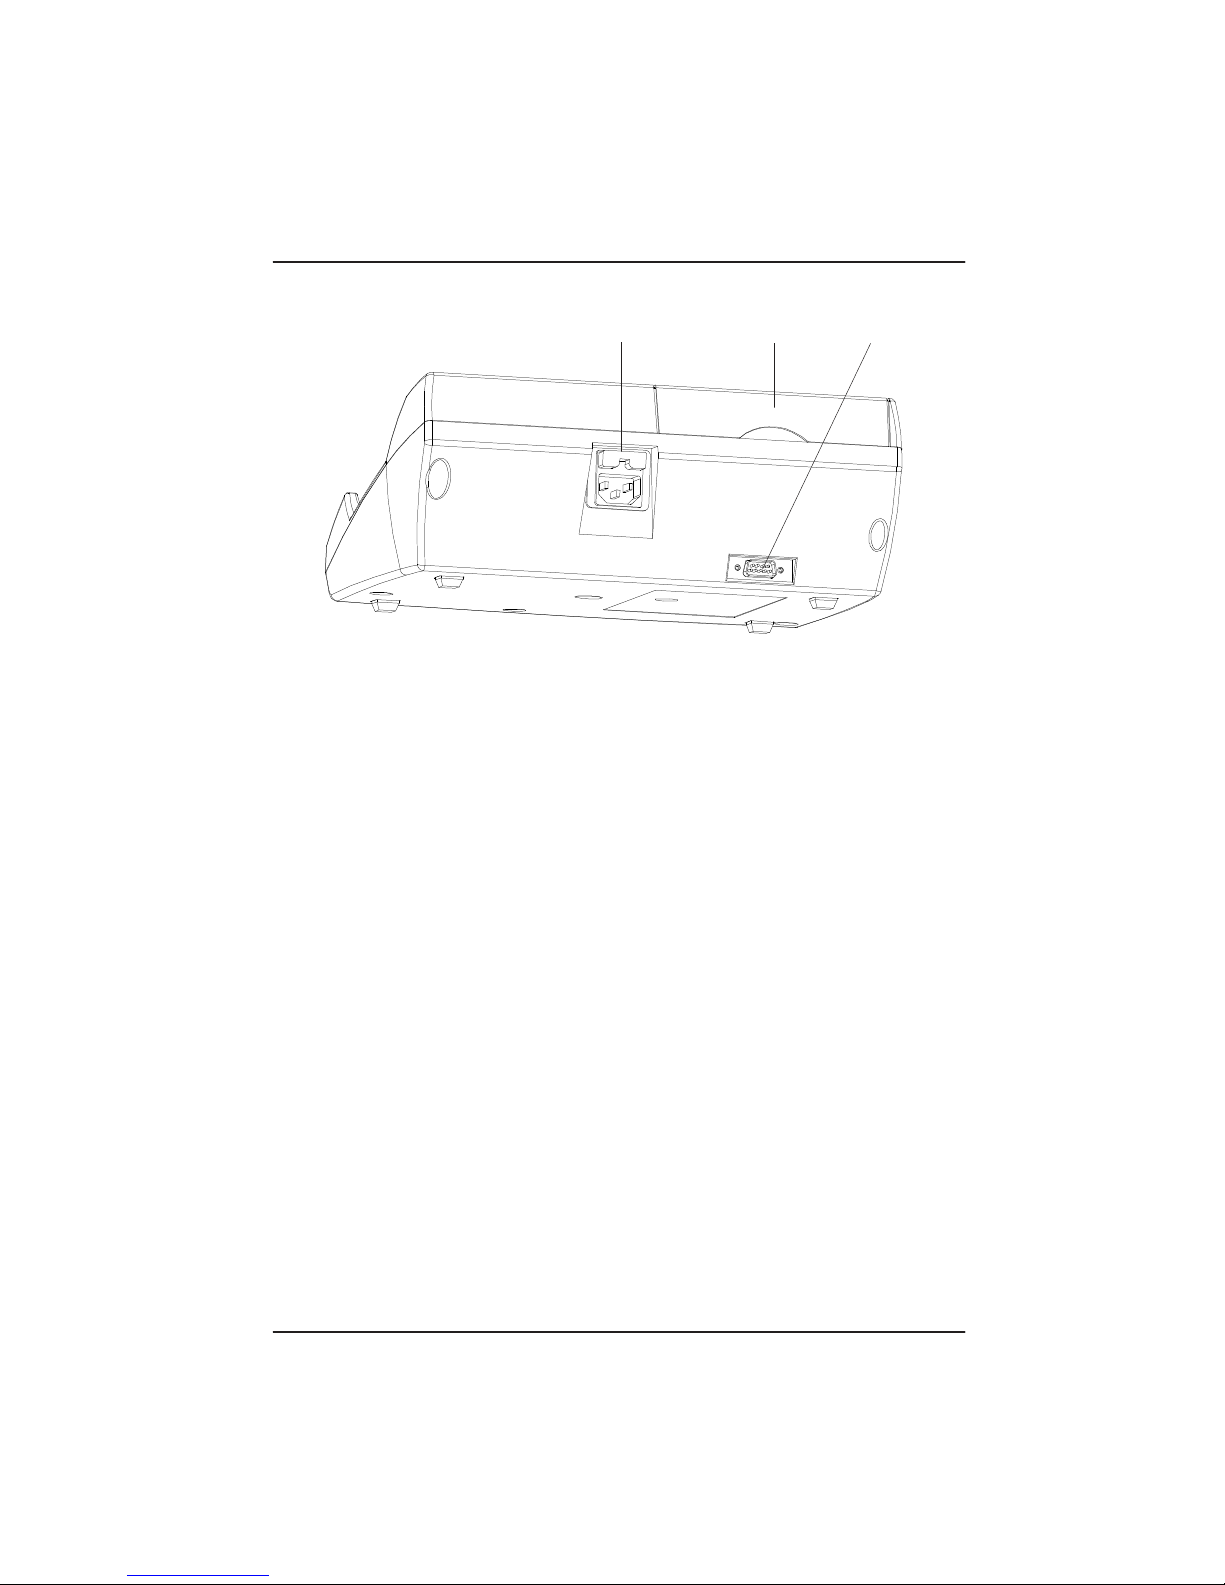
Printer/Charger Features (Rear View)
1 Fuse drawer and Mains power connector
2 Paper cover
Push here and lift up to open.
3 RS-232 connector for attaching the Printer/Charger to a computer (for use with
the GSI 70DMS Software only)
9

Chapter 2 Getting Started
Setting Up the Automated OAE Screener
This section covers setting up the Screener for your working environment. Depending on
the accessories you purchased and the setting in which you intend to use the Screener,
you will need to do one or more of the following:
■
Install the battery
■
Set the Screener date and time (Multi-Patient model)
■
Attach the footswitch to the Screener (Optional)
■
Mount the Printer/Charger on the rolling stand (Optional)
■
Check the battery
■
Adjust the Screener LCD contrast (Optional)
■
Install the GSI 70DMS software into your computer (Multi-Patient model)
■
Connect the infrared (IrDA) communications adapter to your computer (Optional for
the Multi-Patient version of the Screener)
Installing the battery
To install the battery, follow the instructions shown in Removing or Replacing the Battery
on page 58.
Setting the Screener date and time
The date and time are stored in the Multi-Patient version of the Screener and will be
associated with test results. The date and time must be set after the Screener battery is
installed. To set the date and time, follow the instructions shown in Setting the Date and
Time on page 53.
Attaching the Footswitch to the Screener
You can use the footswitch (if purchased) to start and stop tests, enabling you to use both
hands to handle an infant or hold the probe tip steady in a premature baby’s ear canal.
To attach the footswitch to the Screener:
1
. Connect the footswitch to DIN connector on the top of the screener unit.
See Automated OAE Screener Features page 7, (#10).
Mounting the Screener or Printer Charger to the optional Rolling S tand
The rolling stand lets you move the Screener, Printer/Charger , a box of eartips, and spare
rolls of printer paper easily from patient to patient in a large nursery, or onto an elevator
for use in multiple departments.
10 GSI 70 User Manual
Setting up the Automated OAE Screener
To mount the Screener to the rolling stand:
1
. Slide the screener into the upper bracket.
2
. Adjust upper bracket for optimal LCD position by rotating control knob.
To mount the Printer/Charger to the rolling stand:
1
. Pull downward on the plate locking mechanism, slide the Printer/Charger mounting
plate within the grooves on stand shelf.
2
. Release the locking mechanism once the Printer/Charger is fully in place.
Checking the Battery
To check the battery, turn on the GSI 70 Automated OAE by pressing any button.
■
If you see a low-battery icon ( ) in the upper-right area of the display, you need to
recharge the Screener battery. This icon means you have up to eight minutes in which
you can conduct and store about six more tests. The Screener will not allow a test to
.
begin unless there is sufficient battery charge to complete the test
See Recharging the
Battery on page 59.
■
If you do not see the low-battery icon, the Screener battery has sufficient charge.
Adjusting the LCD Contrast
You can adjust the contrast of the LCD to improve the readability of the display or better
match the lighting conditions in your work environment.
To adjust the LCD contrast:
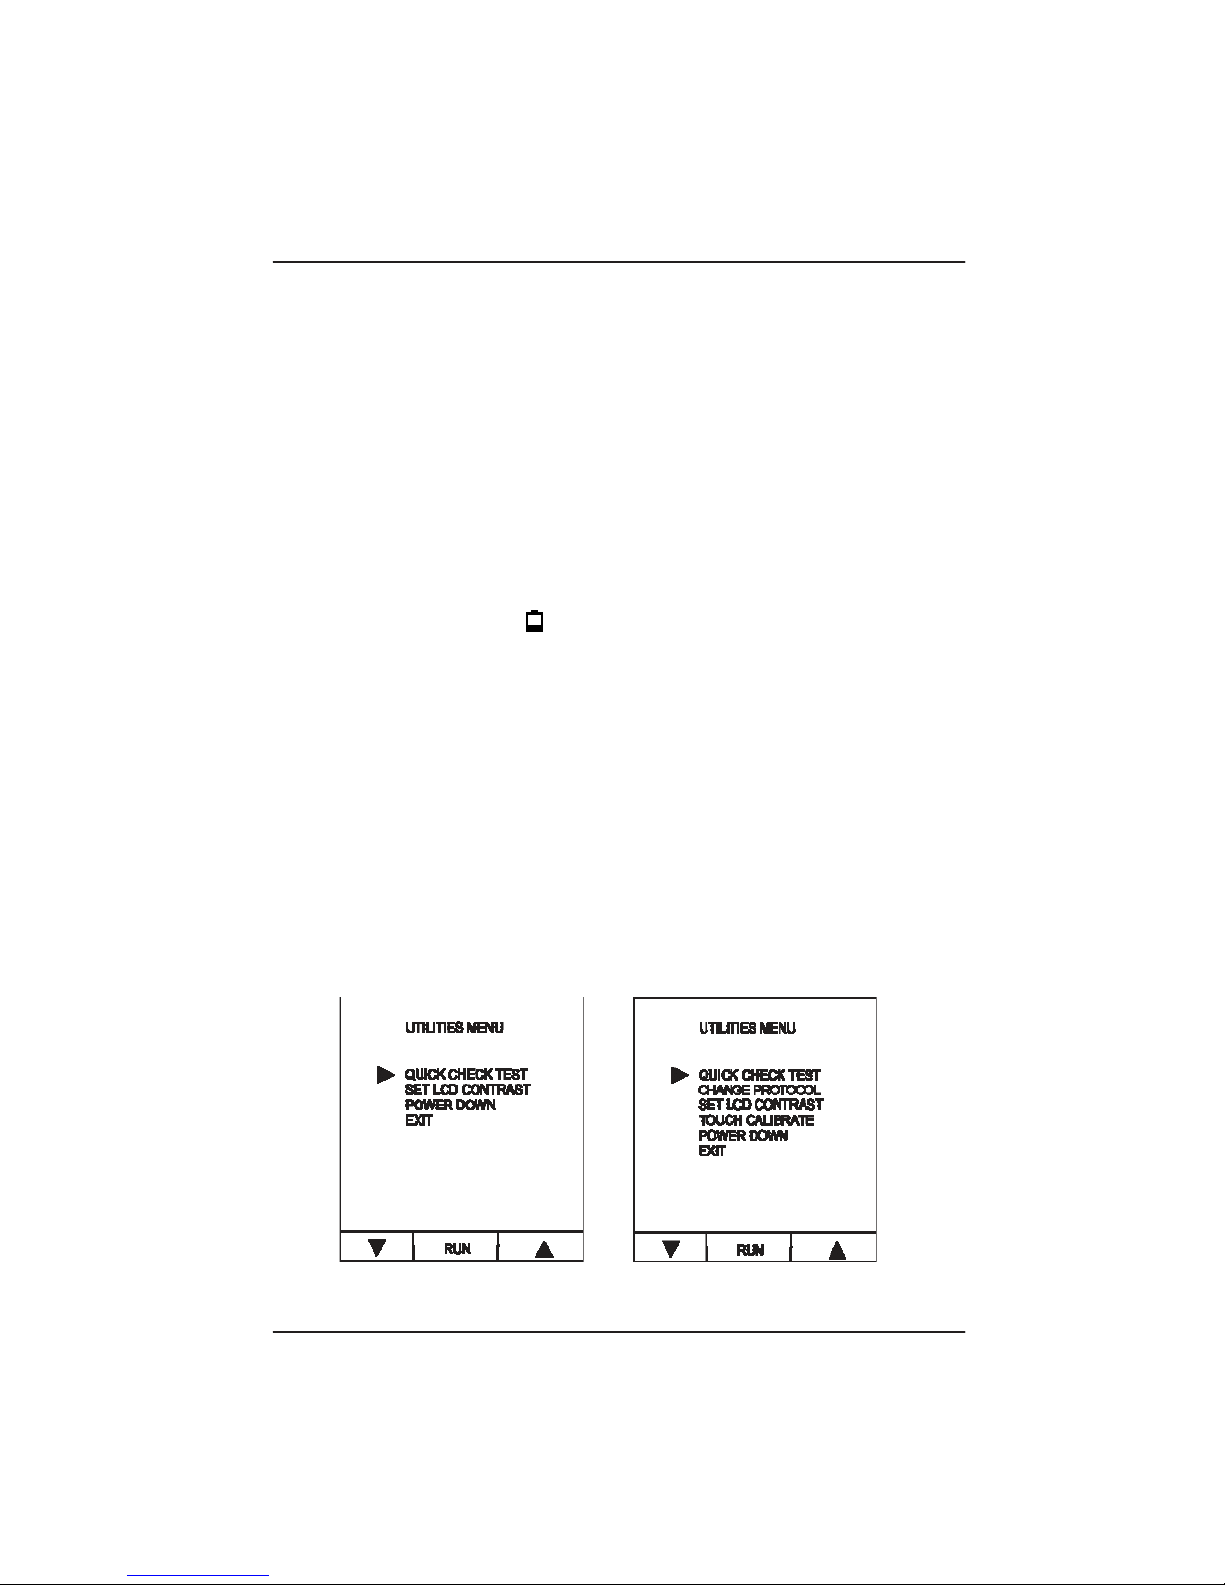
1
. Press the left (blue) and right (pink) buttons simultaneously.
The Utilities Menu appears.
Single-Patient Model
Multi-Patient Model
11
Chapter 2 Getting Started
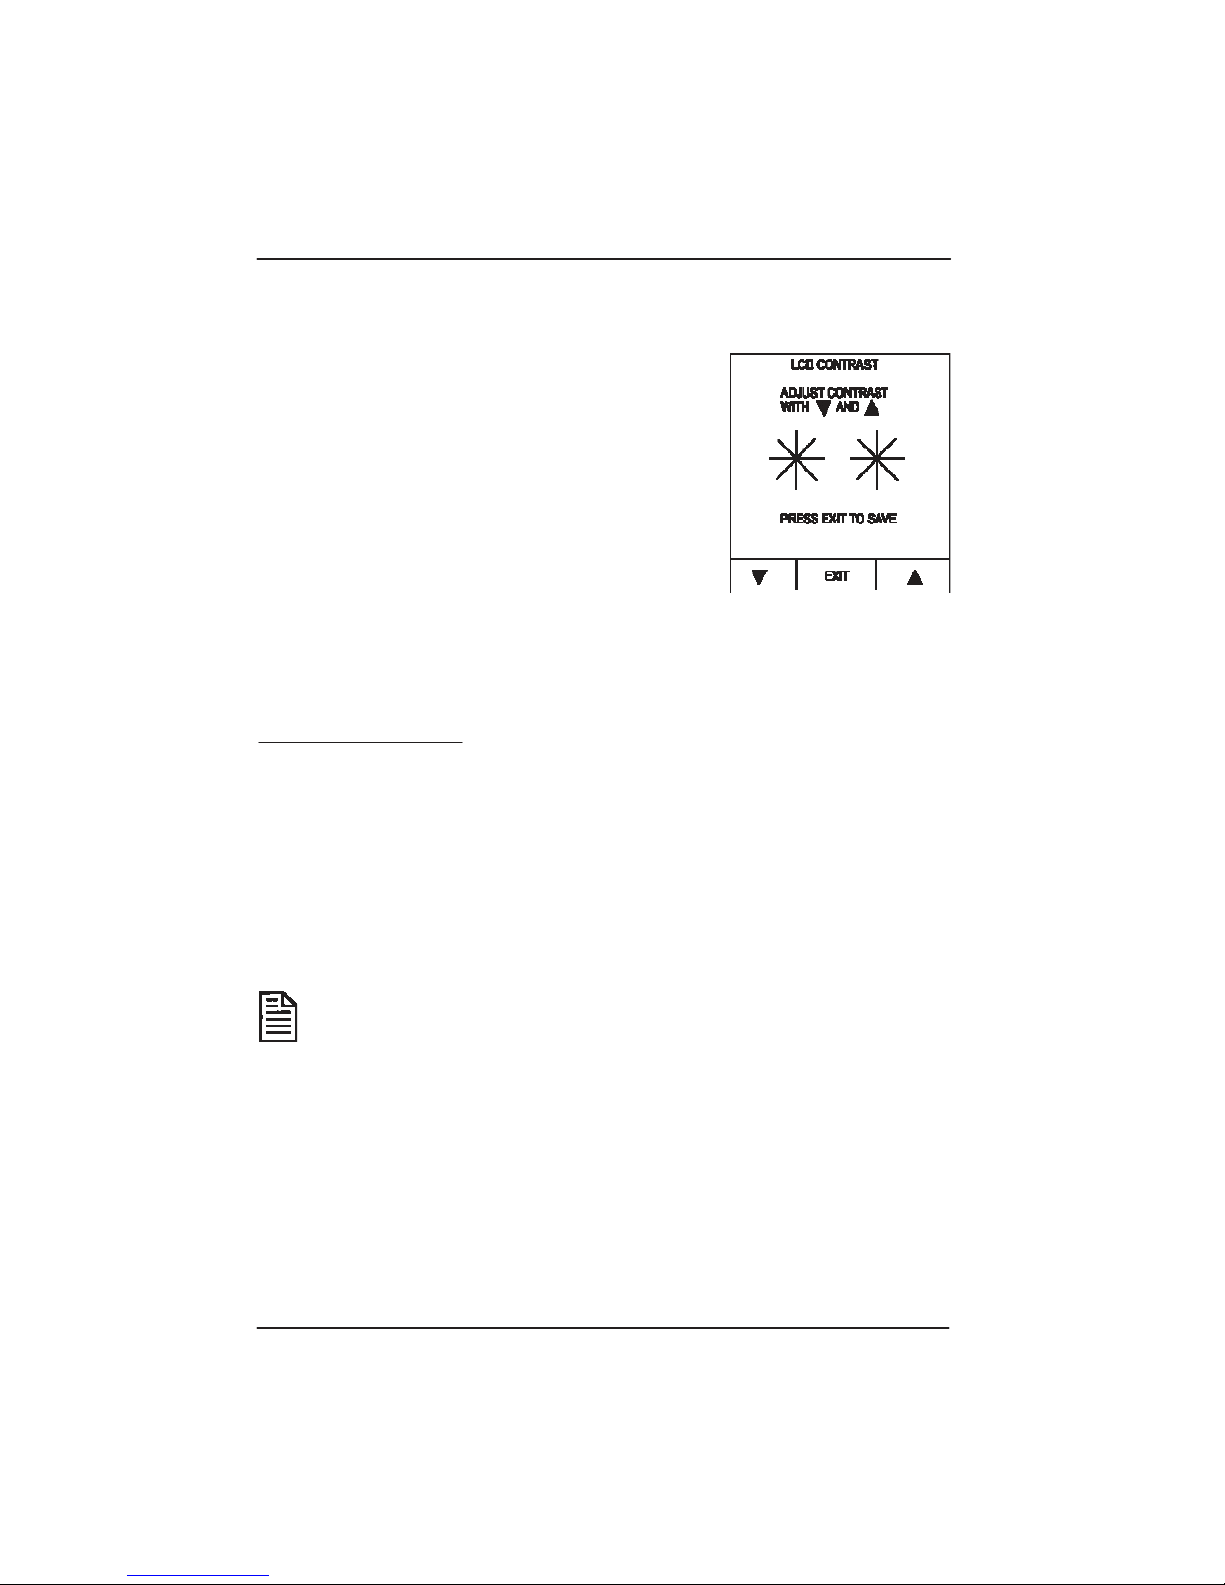
2
. Press the down arrow button to move the pointer to the SET LCD CONTRAST
OPTION, then press RUN.
.
The LCD CONTRAST screen appears
The stars are
there to help you see the contrast better.
3
. Use the up or down arrow buttons to adjust the contrast
to your preference, then press EXIT.
The blank DPGram screen appears, and the Single-
Patient Screener is ready for testing
.
For Multi-Patient
models, see Using the GSI 70 Multi-Patient Screener
on page 29.
Installing the GSI 70DMS Software into your Computer
Multi-Patient Screeners require the GSI 70DMS software to communicate with your
computer. To install the GSI 70DMS software, follow the instructions provided in the
GSI 70DMS User’
s Guide that was shipped with the software installation disk set (or CD
ROM).
Connecting the Optional Infrared (IrDA) Adapter to a Computer
For Multi-Patient Systems that will use a wireless infrared connection as the interface
between the Screener and the computer, connect the optional infrared (IrDA) adapter to
one of the computer’s COM ports following the instructions that were shipped with the
infrared adapter.
Once the GSI 70DMS software is installed on the computer and the infrared
(IrDA) adapter is connected, the GSI 70DMS software must be used to
configure the COM port to communicate with the Screener. Follow the COM
Port Configuration instructions provided in the GSI 70DMS User’s Guide.
Setting Up the Printer/Charger
For both Single-Patient and Multi-Patient systems, you need to connect the Printer/
Charger to Mains power.
If you purchased the Multi-Patient Screener and intend to use the Printer/Charger as the
interface between the Screener and a personal computer, you also need to co nnect the
12 GSI 70 User Manual

Setting up the Automated OAE Screener
serial cable from the Printer/Charger to the computer. However, if you plan to use a
wireless infrared communication connection between the Screener and computer instead
of the Printer/Charger and serial cable, you will need to connect the optional infrared
(IrDA) adapter to the computer.
Connecting the Printer/Charger to Mains Power
To set up the Printer/Charger and connect it to Mains power:
1
. Place the Printer/Charger on a sturdy, level surface near an electrical outlet. Make sure
the Printer/Charger is not near a source of moisture or direct heat.
2
. Attach the supplied power cord to the back of the Printer/Charger.
See
Printer/Charger Features (Rear View), on page 9.
3
. Plug the other end of the cord into the electrical outlet for Mains power.
The power/status LED on the Printer/Charger turns on.
If you have a Single-Patient Screener, or a Multi-Patient Screener that will communicate
with the computer over an infrared communication connection, the GSI 70 OAE Screener
is ready to use.
Connecting the Printer/Charger to a Computer
For Multi-Patient Systems that will use the Printer/Charger as the interface between the
Screener and the computer, connect the Printer/Charger to the computer you will use to
exchange patient data with the Screener. To connect the Printer/Charger to a computer:
1
. Attach the male end of the supplied DB9-pin serial cable to the back of the Printer/
.
Charger
See Printer/Charger Features (Rear View), on page 9. Tighten the
thumbscrews on the connector.
2
. Locate an available serial port on the back of the computer.
If you are unsure where to connect the cable, consult the documentation that came with
your computer.
3
. Attach the female end of the cable to the serial port and tighten the thumbscrews.
4
. To make sure the computer establishes communications with the Printer/Charger, start
the GSI 70 Data Management Software (DMS) and configure the port
.
See the GSI 70
DMS manual for more information.
The Printer/Charger Module (PCM) is ready to use.
13
T
Chapter 2 Getting Started
N
Preparing for a Test
The Screener must be removed from the Printer/Charger cradle before tests
can be performed.
Selecting an Eartip
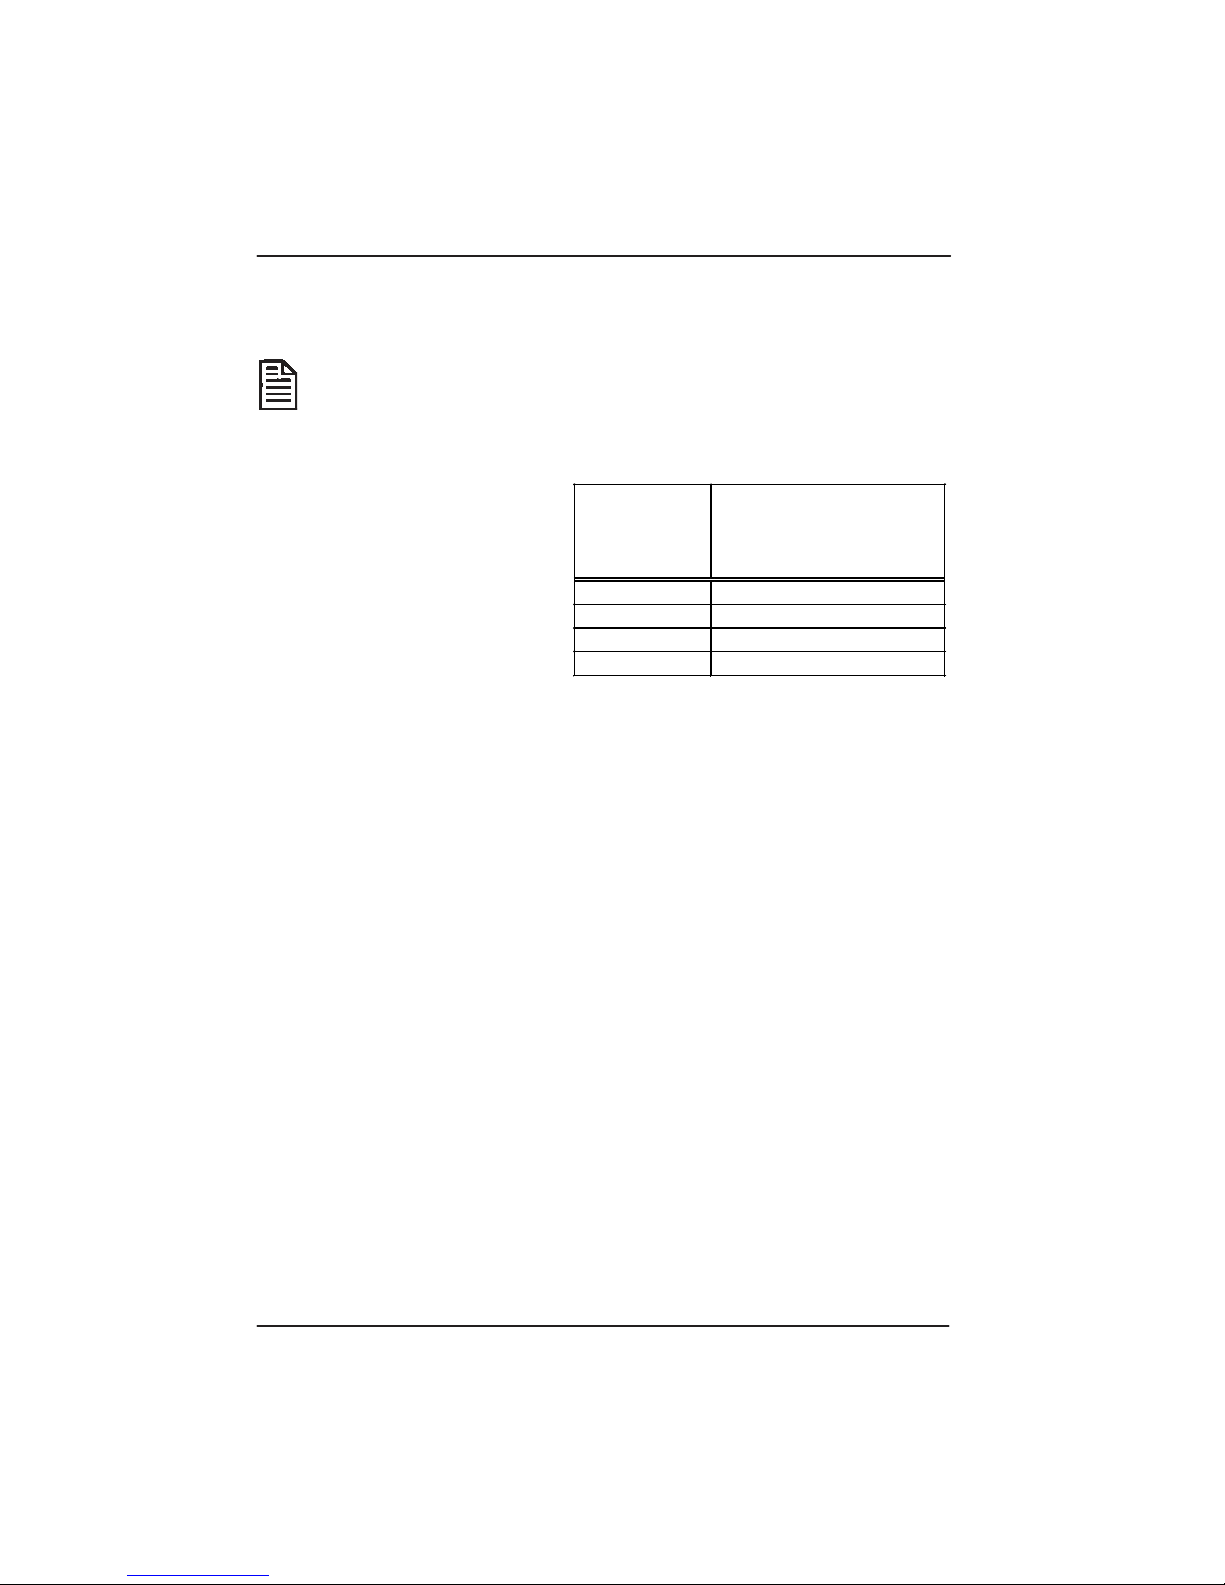
Examine the patient’s ear canal then
select an eartip that will fit snugly
.
inside the ear canal
Refer to Table 2.
able 2–Guide to Eartip Selection
Fits These Patients
Eartip Size
3 – 5 mm
5 – 6 mm
6 – 9 mm
9 – 14 mm
(Approximations only)
ewborns
Infants
Young Children
Adults (Age 10 and up)
14 GSI 70 User Manual

Preparing for a Test
Attaching an Eartip to the Probe Tip
To attach an eartip to the probe tip:
1
. Slide and twist the eartip clockwise onto the probe tip until the eartip is seated snugly
against the junction where the probe tip widens (see below).
2
. Inspect the end of the probe tip to ensure you can see the ends of all three metal tubes
clearly (verify the eartip is not blocking any tubes).
No Gap
Attaching an Eartip to the Probe Tip
When removing an eartip, twist the eartip clockwise and pull gently. Discard used eartips.
Always attach and remove eartips using a clockwise twisting motion. A
counter-clockwise twist may remove the probe tip from the Probe.
KEEP EARTIPS OUT OF REACH OF INFANTS AND YOUNG
CHILDREN
.
EARTIPS MAY BE A CHOKING HAZARD.
15
Chapter 2 Getting Started
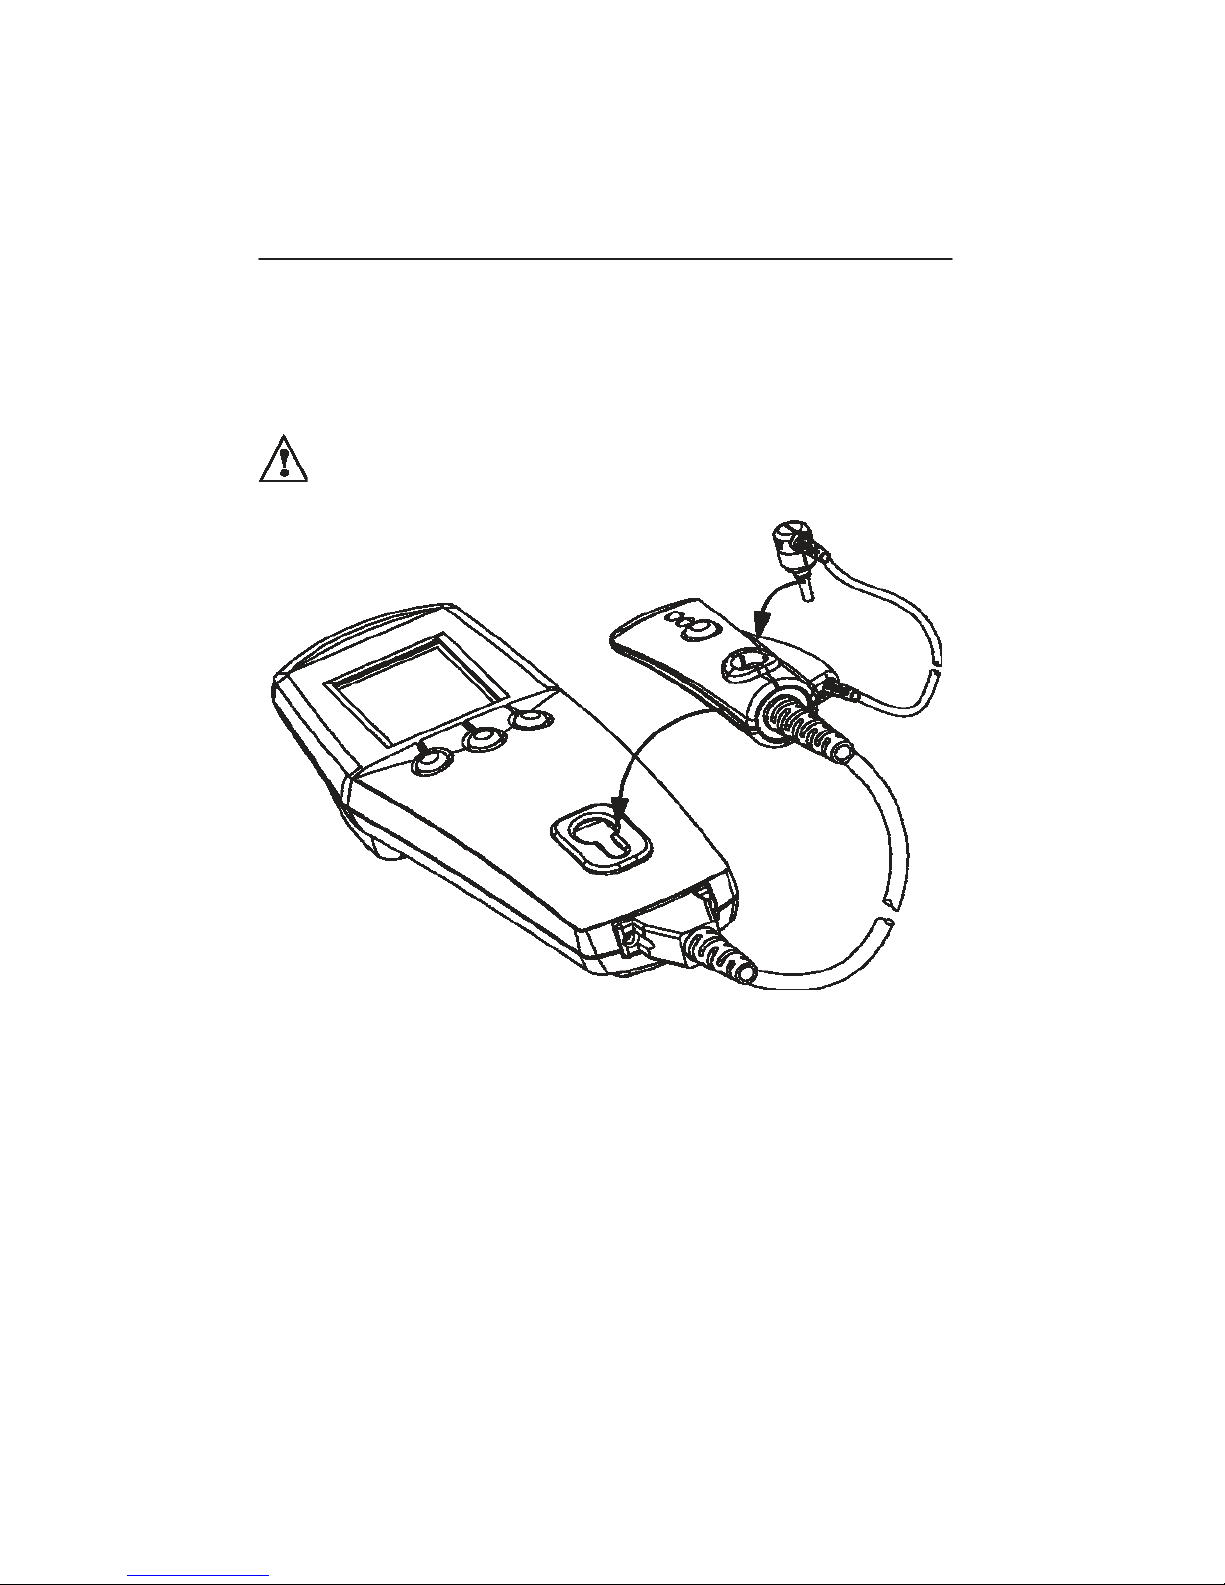
Securing the Pod and Probe to the Screener
To make it easy to carry the Screener from patient to patient, you can attach the Pod to the
Screener body, and the Probe (without an eartip attached) to the Pod. You can leave the
Pod attached to the Screener while running tests.
Remove the eartip before attaching the Probe to the Pod.
To attach the Pod to the Screener, align the “button” on the under surface of the Pod with
the circular opening in the Screener
into the keyed opening on the Screener. To remove the Pod, slide it forward and pull it out
of the circular opening
snugly. It is not necessary to force the Probe into a secure position.
16 GSI 70 User Manual
Attaching Probe to Pod, and Pod to Screener
.
Press down on the Pod case while sliding the Pod
.
Gently insert the Probe into the opening on the Pod until it fits

Understanding the display
Common Displays
This section describes the displays and messages common to the GSI 70 Single-Patient
and Multi-Patient Automated OAE Screeners.
Power-Up Display
When you turn on the Screener, it performs a brief self-test.
3
Power-Up Display
Version Information
To see the software and hardware versions of the Screener, press VER #S as soon as or
before the Power-Up screen appears. The System Information screen appears, listing the
software and hardware versions for all the major components of the Screener.
The Printer/Charger
(PCM) version is shown
only when the Screener
is seated in the cradle.
System Information Screen
Press EXIT to continue system initialization.
17

Chapter 3 Understanding the Display
After the self-test, the GSI 70 Screener briefly displays the message SYSTEM
LOADING, and also the date and time for Multi-Patient Screeners. When the Screener is
ready to use, a blank DPGram appears.
Blank DPGram
A DPGram is the graphical representation of the patient’s test results. When the Screener
is ready to begin testing and the memory is empty, it displays a blank DPGram
.
If test data
is present in the Screener memory, the last test stored will be visible on the DPGram
display.
Message and
Test Status Area
Low Battery Icon Area
Pass/Refer Line
Test Protocol Number
1
Single-Patient
Softkey Labels
Multi-Patient
Softkey Labels
Blank DPGram
■
Across the top of the display, messages appear about the test and the status of the
Screener, such as error conditions.
■
In the upper-right area of the display, the low-battery icon appears when the battery
.
level is almost too low to continue testing
See Recharging the Battery on page 59.
The GSI 70 will not allow testing if the battery charge is too low for valid testing.
■
The line across the middle of the graph represents the pass/r efer line. See Reviewing
the Test Results on page 49. The current Test Protocol Number is displayed to the right
of the pass/refer line.
■
Test response DP amplitudes are shown on the vertical axis of the DPGram, and test
stimulus frequencies are shown across the horizontal axis. The default OAE test
protocol for the Single-Patient and Multi-Patient Screener contains 3 stimulus
18 GSI 70 User Manual

Common Displays
frequencies
. Additional test protocols can be defined
by the user for the Multi-Patient Screener that contain
up to 6 stimulus frequencies using the GSI 70DMS
.
software
When more than 3 stimulus frequencies are
shown, the presentation of frequencies is reoriented
along the horizontal axis to enhance readability.
■
The labels across the bottom of the display indicate the
function of the buttons directly below them on the
.
Screener
Patient and Multi-Patient models.
These labels differ between the Single-
Stimulus Frequencies
Reoriented 90 Degrees
Completed DPGram
As the GSI 70 conducts a test, the display shows the:
■
Response from the outer hair cells within the cochlea, call ed the distortion product or
DP
■
Averaged noise level within the ear canal, called the noise floor or NF
Before storing the result, the DP is shown as a solid circle and the noise floor is shown as
a solid rectangular bar.
When the test is complete, the Screener displays the message OAE TEST COMPLETE
and the test result.
Single-Patient Completed DPGram
(not yet stored in memory)
19

Chapter 3 Understanding the Display
A
t
Stored DPGram
When you store a DPGram, the Screener replaces the message OAE TEST COMPLETE
with LEFT ear or RIGHT ear.
NAME
DATA
NAME
DAT
Stored DPGrams: Left and Righ
The DPs change from solid circles to standard audiometric symbols, accordin g to which
button you pressed:
X Left arE
O Right arE
(Blue Button)
(Pink Button)
20 GSI 70 User Manual

Using the GSI70 Single-Patient Screener
4
This chapter describes the operation of the Single-Patient GSI 70 Automated OAE
Screener:
■
Daily check of the Screener ’s performance
■
Running a test
■
Storing a test
■
Printing a test
■
Stopping a test
■
Retrieving a test
■
Erasing a test
■
Turning off the Screener
The two LEDs on the Pod indicate the status of the Screener while testing and allow you
to monitor the test’s progress:
■
The green LED flashes while the Screener is checking the eartip’s seal in the patient’s
.
ear and becomes solid green while the test runs
When the test is complete, the green
LED turns off.
■
If the Screener detects a problem with the eartip seal, the yellow LED turns on and the
green LED turns off.
■
If both LEDs are turned on, the Screener is connected to a Printer/Charger o r a
charging transformer and it is not testing.
Checking the Screener’s Performance
Each day, or before each work shift, check the Screener’s performance by running the
Quick Check test with the included Quick Check Cavity. This test takes about 10 seconds
and ensures that the Screener is working properly and that your test results will be
reliable.
Run the Quick Check test at least once a day.
See Running the Quick Check Test on page 62.
21

Chapter 4
r
Using the GSI70 Single-Patient Screene
Running a Test
1
. Remove the Screener from the Printer/Charger cradle and press any button on the
GSI 70 Automated OAE Screener to turn it on.
After a few seconds, the blank DPGram will appear
if no prior results are stored in memory.
The TEST key will not appear if the battery is
too low to run a test or if the Screener is
seated in the Printer/Charger cradle.
. Insert the probe tip with an eartip attached into the
2
patient’s ear, seating the eartip well into the ear canal
to achieve a tight seal.
3
. To start a test, do one of the following:
■
Press the Pod button (green)
■
Press TEST (green) on the Screener
The TEST key only shows if the Screener is not connected to a charging device
and the battery is charged enough to finish a test
visible and the unit must be charged.
.
Blank DPGram
Otherwise, the test key is not
1
The Screener displays CHECKING FOR OAE PROBE IN EAR.
If the eartip is not properly sealed in the patient’s ear, the Screener does not start a test.
After 30 seconds, the Screener stops checking for a seal and displays the message
ABORT.
If the eartip seal is good, the Screener displays TESTING OAE
.
When the test is
complete, the Screener displays:
■
OAE TEST COMPLETE
■
A graph of the test data
■
The test result (see Reviewin g the Test Results on page 49).
The Pod’s green LED turns off.
22 GSI 70 User Manual

Running a Test
Message CHECK SEAL
If the Screener detects a problem with the eartip seal, the Screener pauses the test, turns
the Pod yellow LED on and the green LED off, and displays CHECK SEAL
the probe tip in the patient’s ear, use a different size eartip, or clean the probe tip of
debris
.
See Cleaning the Probe Tip on page 57.
When the seal is acceptable, the GSI 70 Automated OAE Screener restarts the test
automatically and redisplays TESTING OAE.
If a second seal problem occurs, the GSI 70 Automated OAE Screener stops the test. The
display shows:
■
OAE TEST COMPLETE
■
The data, if any, collected to that point
■
The test result ABORT
You can store any data the Screener collected.
.
Reposition
23

Chapter 4
Using the GSI70 Single-Patient Screener
Storing a Test
To store a just-completed test:
1
. Press the button for the ear you just tested (LEFT - blue or RIGHT - pink).
The Screener stores the data and replaces the message OAE TEST COMPLETE with
LEFT EAR or RIGHT EAR.
.
The Automated OAE Screener stores two results, one test per ear
LEFT or RIGHT to store a new test, the Screener overwrites the last test stored for that
ear.
Each time you press
Reviewing a Test
To review a stored test:
1
. Press LEFT or RIGHT to recall the data for that ear to the screen.
If there is no stored data for the button you pressed, the GSI 70 Automated OAE Screener
displays NO TEST TO RECALL.
The data for each ear remains in permanent memory until the next time you store (and
thereby overwrite) a test, even when the GSI 70 Automated OAE Screener is off or the
battery is removed.
Printing a Test
At any time, you can print the stored tests in the Screener. The Screener sends all the
stored data, whether for one or two ears, to the printer. You cannot print data for only one
ear if the Screener contains stored data for two ears.
You do not need to retrieve stored test data to print it. To print the stored data:
1
. Turn on the Screener.
2
. Place the Screener in the Printer/Charger cradle.
3
. Press the Printer/Charger’s PRINT button.
The Screener displays TRANSFER TO PRINTER. If the transfer is successful, the
Screener displays TRANSFER COMPLETE, and the printout begins. If there is no
stored data to print, the Printer/Charger prints No Data.
24 GSI 70 User Manual

Printing a Test
If you remove the Screener before the printer receives all the data, the message
REMOVED TOO SOON appears on the Screener display and the printer.
4
. To continue testing, wait until the printout begins (about three seconds after you press
print) then remove the Screener from the Printer/Charger cradle.
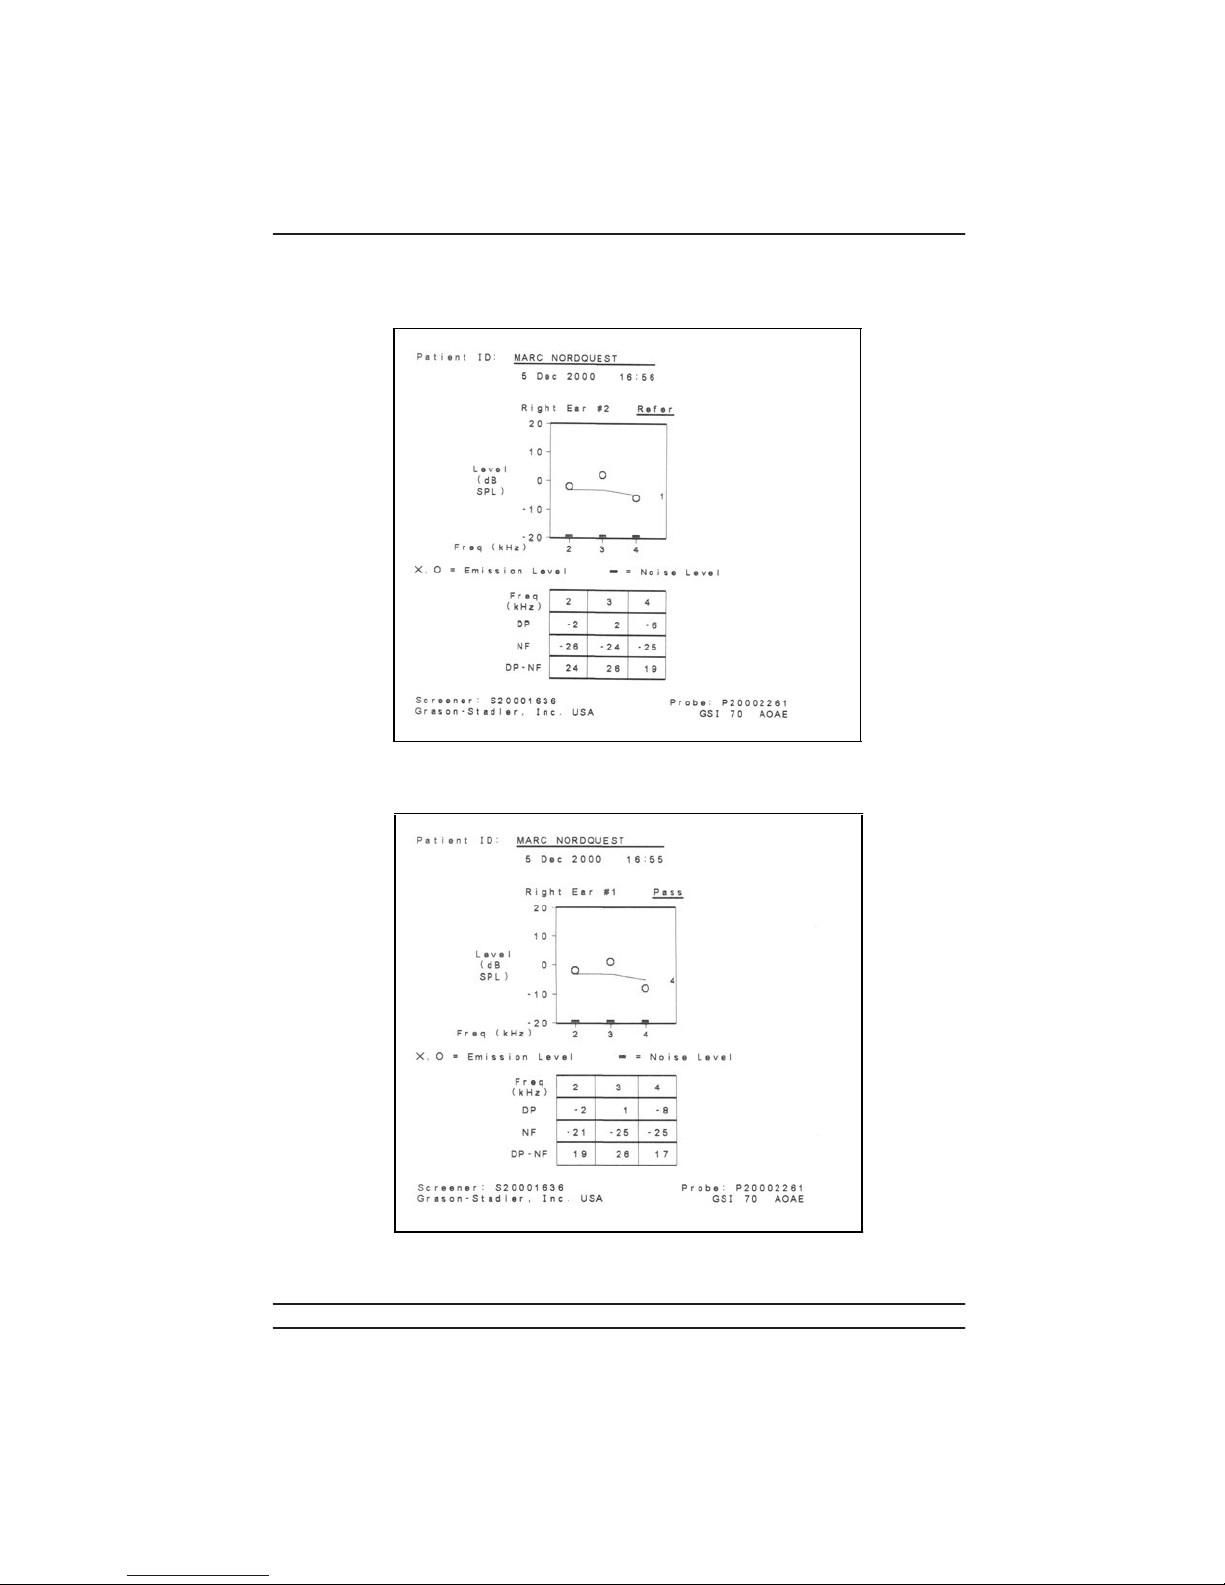
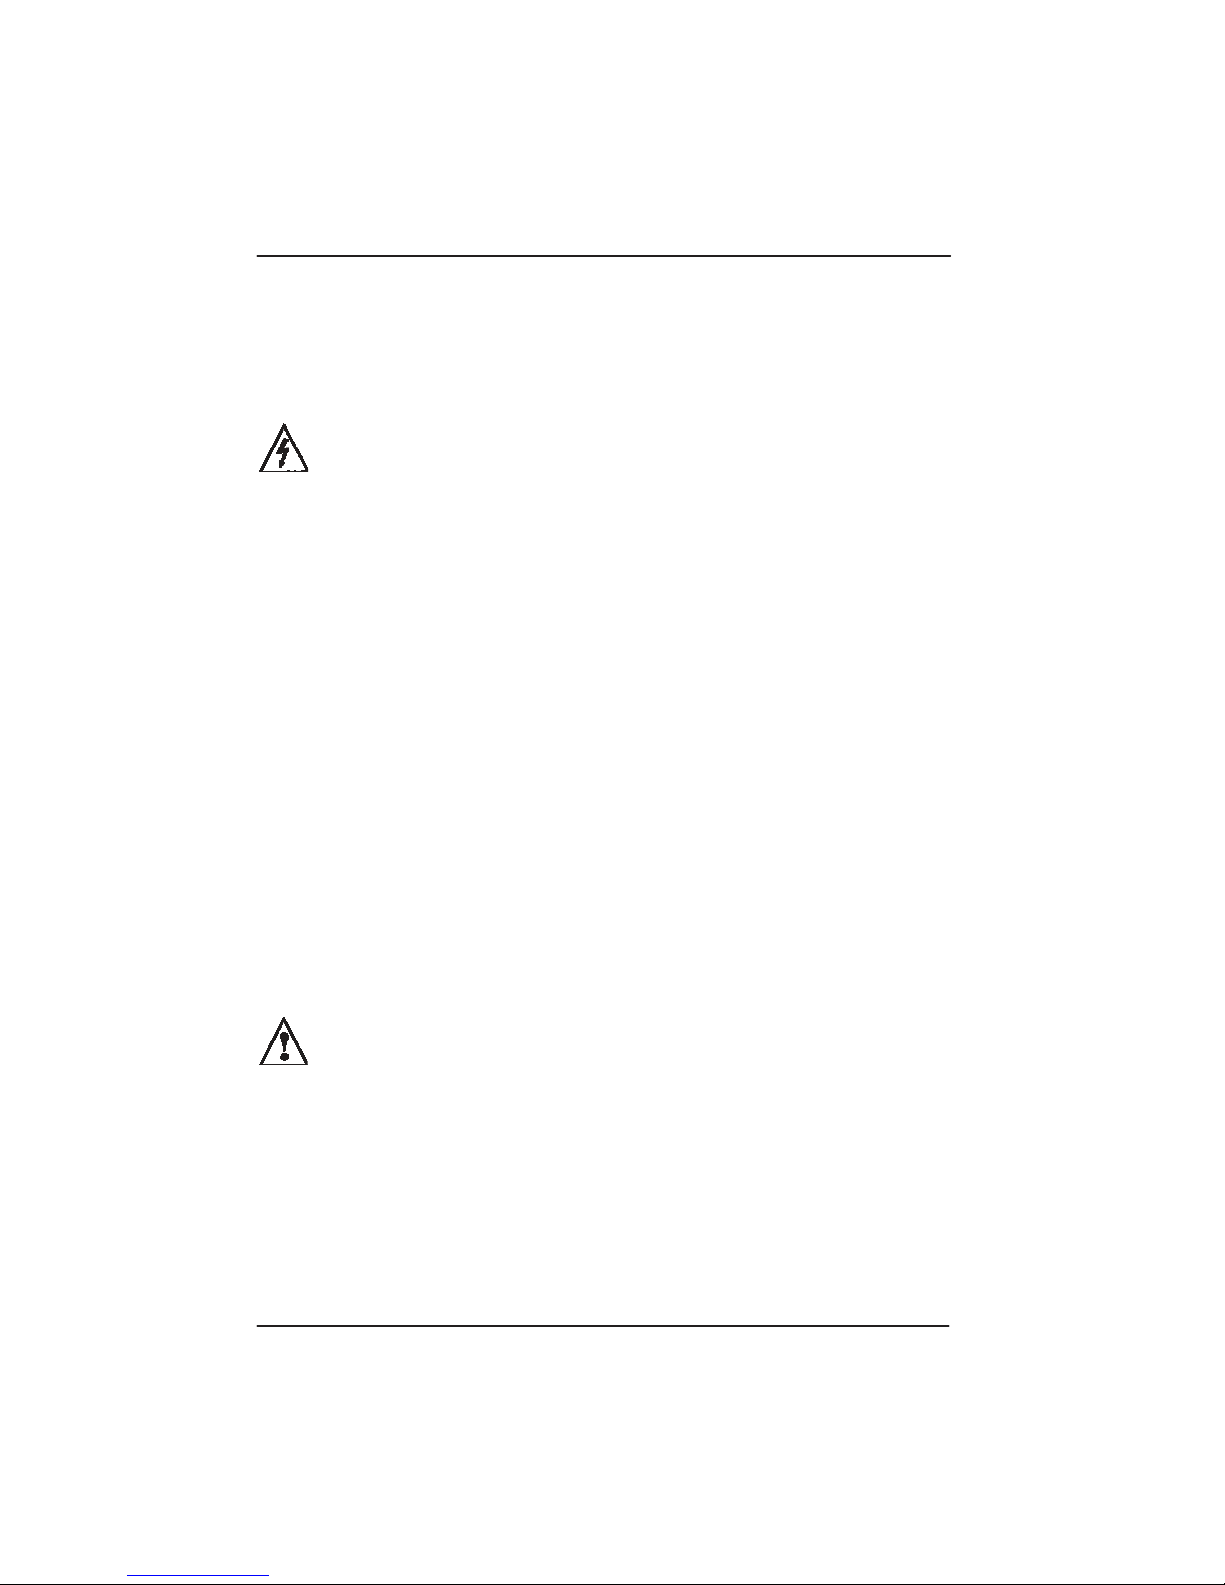
Contents of the Printout
A printout of a single-ear test result is shown below and includes:
■
The ear tested (Right, Left or both) and the test result for each test for one or two tests
■
The number of the test protocol used to conduct the test
■
One or two DPGrams that display the DP (distortion product) points and NF
(noise floor) points and the Pass/Refer line
■
One or two tables containing the actual numeric values for the patient’s DPs and NFs,
and the difference between the two points (signal to noise ratio) for each frequency
All DP values at or above 20 dB are shown on the 19 dB line. All NF values at or
below -20 dB are shown on the -19 dB line. The table contains the actual distortion
product and noise floor values.
■
The serial numbers for the Screener and the Probe, and the Protocol used for the test
■
Product identification information
Patient Data
Ear and Test Result
DP Results *
Pass/Refer Line *
Test Protocol Number *
Noise Floor Results per DP Point *
* DPGram
Numeric Test Results
Printout of Test Results for a Single Ear
25

Chapter 4
r
Using the GSI70 Single-Patient Screene
The double-ear test result printout includes the
same information as shown for the single ear
on the previous page.
Canceling the Printout
To stop a printout in process, press the PRINT
button on the Printer/Charger.
The printer immediately stops printing the test,
and prints Print cancelled on the next
line.
Printout of Test Results
Advancing the Paper
for Both Ears
To advance the paper, do one of the following:
■
Press the PAPER ADVANCE button. The paper advances by one line.
■
Hold down the PAPER ADVANCE button. The paper advances continuously until you
release the button.
Stopping a Test
To stop a test in progress:
1
. Press the Pod button.
The GSI 70 Automated OAE Screener displays OAE TEST COMPLETE ABORT and
any data collected to that point.
If you press RIGHT or LEFT after stopping a test in progress, the Screener
saves the stopped test and overwrites any previously stored data for that ear.
To start a new test, do one of the following:
■
Press the green Pod button
■
Press the green TEST button on the Screener
Erasing a Test
There are two ways to erase a test. Either:
■
Store a new test for the same ear
This action overwrites the previously stored test in that memory location
(RIGHT or LEFT).
26 GSI 70 User Manual

Stopping a Test
■
Press and hold LEFT or RIGHT for four seconds and then release the button. The data
is cleared and the GSI 70 Automated OAE Screener displays DATA ERASED.
If there is nothing to erase, the GSI 70 Automated OAE Screener displays NO TEST TO
ERASE.
Power-Saving Mode
The Screener has a power-saving mode that preserves the battery’s charge when you are
not running tests. This power-saving mode allows the Screener to preserve the battery
charge, yet be ready to continue testing quickly
remains in memory and the display backlighting turns off.
The Screener enters this power-saving mode after 45 seconds of inactivity, as long as the
Screener is not either placed in the Printer/Charger Module or connected to the Charging
Transformer.
.
In this mode, the last screen displayed
To exit the power-saving mode, press any button
.
The display lights up and the Screener
is immediately ready to use. Any data that was on the screen, including unsaved test data,
reappears.
When the Screener is not being used, place it in the (powered) Printer/Charger
cradle to increase the battery charge.
Power-Down
You never have to turn off the Screener. The Screener turns itself off completely under
the following conditions:
■
If the Screener remains idle for two minutes after it enters the power-saving mode
■
If the Screener is either placed in the Printer/Charger cradle or connected to the
Charging Transformer, it turns off completely after 45 seconds and does not enter the
power-saving mode.
When the Screener powers down, it does not retain the information (such as an
unsaved test) that was on the display.
27

Chapter 4
■
To turn on the Screener, press any button.
■
To turn the Screener off immediately, go to the utility menu by pressing the left and
Using the GSI70 Single-Patient Screener
right buttons simultaneously, move the selector arrow to POWER DOWN and select.
See the Utilities Menu on Page 11.
Low-Battery Icon
When the battery’s charge nears the minimum usable level, a low-battery icon ( )
appears on the display. You then have up to eight minutes in which you can conduct and
store about six more tests. The GSI 70 Automated OAE Screener will not allow a test to
begin unless there is sufficient battery charge to complete the test.
When the battery level falls too low, the GSI 70 Automated OAE Screener turns off. All
.
previously stored test data remains intact
See Recharging the Battery on page 59.
Battery Discharge Time
A fully charged new battery will allow the Screener to operate for up to 90 minutes of
.
continuous use without recharging
hours will allow the battery to be fully recharged. When testing patients on an intermittent
basis the Screener should be placed in the Printer/Charger when not being used as this
will allow the battery to recharge between patients. Allowing the battery to recharge
between patients will extend the time the Screener can be used before the battery is
.
discharged
This is important as the Screener can not be used for testing if the battery is
discharged.
Placing the Screener in the Printer/Charger for 10
For high volume screening programs it is recommended to purchase an accessory battery
charger so that a spare battery can be kept on the charger
discharged during a test session the spare battery can be installed in the Screener and the
discharged battery put on the accessory charger.
28 GSI 70 User Manual
.
If the Screener battery becomes

Using the GSI70 Multi-Patient Screener
5
The GSI 70 Multi-Patient Screener lets you transfer a list of up to 150 names or
identification numbers from a computer running the GSI 70 DMS (Data Management
Software) for the patients you need to test. You can also enter patient names or ID
numbers with the stylus and the touch screen.
The Screener stores up to 320 tests (a test is the result for one ear). After you run the
tests, you can send the data back to the GSI 70 DMS database by either:
■
Placing the Screener in the Printer/Charger cradle, thereby using the serial cable for
information exchange
■
Transmitting data from the Screener to your computer over an infrared (IrDA)
connection.
The two LEDs on the Pod indicate the status of the Screener while testing and allow you
to monitor the test’s progress:
■
The green LED flashes while the Screener is checking the eartip’s seal in the patient’s
.
ear and becomes solid green while the test runs
When the test is complete, the green
LED turns off.
■
If the Screener detects a problem with the eartip seal, the yellow LED turns on and the
green LED turns off.
■
If both LEDs are turned on, the Screener is connected to a Printer/Charger o r a
charging transformer and it is not testing.
This chapter describes the operation of the GSI 70 Multi-Patient Screener:
■
Setting up the Screener for testing
■
Testing Patients
■
Managing the Test Results
For information on using the GSI 70 DMS software, refer to the GSI 70DMS User’s
that was shipped with the software.
Guide
29

Chapter 5
Using the GSI70 Multi-Patient Screener
Setting Up the Screener
To prepare the Screener for testing:
1
. Set the Screener’s date and time
2
. Transfer a list of patients from the computer
3
. Select a patient from the list
4
. Select a test protocol (if necessary)
Setting the Screener’s Date and Time
The date and time are displayed briefly each time the Screener power is turned on, and
are included with test results transmitted from the Screeener to the GSI 70DMS software.
To set the Screener’s date and time, follow the instructions provided by Setting the Date
and Time on page 53.
Transferring a Patient List from the Computer
This section assumes that you have installed the GSI 70 DMS program on your computer
and set up either the serial cable or the IrDA port on the computer.
See the GSI 70 DMS manual for the steps to install and start the software and select the
patients to test
Connecting the Optional IrDA Adapter to a Computer on page 12.
.
See Connecting the Printer/Charger to Mains Power on page 13 or
To transfer a list of patients to the Screener:
1
. Start the GSI 70 DMS, select the Transfer Names tab, and select up to 150 names to
transfer
.
Click the Transfer Names button to begin the transfer process (see the GSI 70
DMS User’
2
. Press any button to turn on the Screener.
s Guide for details).
The Screener performs a brief self-test, displays the current date and time and then
displays one of the following screens depending on its state the last time someone used
the Screener:
■
Last test stored
■
Blank DPGram if the patient database is empty
3
. Press the NAME (blue) button on the screener.
The SELECT PATIENT NAME screen appears.
4
. Do one of the following:
■
Place the Screener in the (powered) Printer/Charger cradle for transfer via the serial
30 GSI 70 User Manual
Setting Up the Screener
cable.
■
Point the Screener infrared (IrDA) lens toward the lens on the infrared
communication adapter attached to your computer (if purchased).
5
. Press LOAD.
The POSITION FOR LOAD screen appears. When the computer begins to automatically
transfer the selected patients to the Screener, the Screener message LOADING appears.
When complete, the Screener displays LOAD COMPLETE, then returns to the SELECT
PATIENT NAME screen which shows the new list of patients.
Entering Patient Names or ID Numbers from the Screener
The GSI 70 Multi-Patient Screener lets you enter a patient name or ID number as you
work. Use this feature when you need to test a patient whose name or ID is not in the GSI
70 DMS database. This feature allows you to test a patient whose name was not
transferred from the GSI 70 DMS program to the Screener
this manner adds the name to the patient list in the screener.
All names in the Screener’s current patient list will be erased when a new list of
names is transferred from the GSI 70DMS program.
.
Entering a patient name in
Entering patient names and ID’s using the touchscreen while the Screener is out
of the Printer/Charger’s cradle will use some of the Screener battery’s charge.
Less charge will be used when the screener is in the Printer/Charger cradle
while entering the names. It is best to enter the names and ID’s into the GSI
70DMS Software and then transfer them to the Screener.
To enter a patient name or ID number:
1
. Press any softkey to wake up the Screener.
The Screener performs a brief self-test, displays the current date and time and then
displays one of the following screens depending on its state the last time someone used
the Screener:
■
Last test stored
■
Blank DPGram if the patient database is empty
2
. Press the NAME (blue) button on the Screener.
The SELECT PATIENT NAME screen appears.
31
Chapter 5
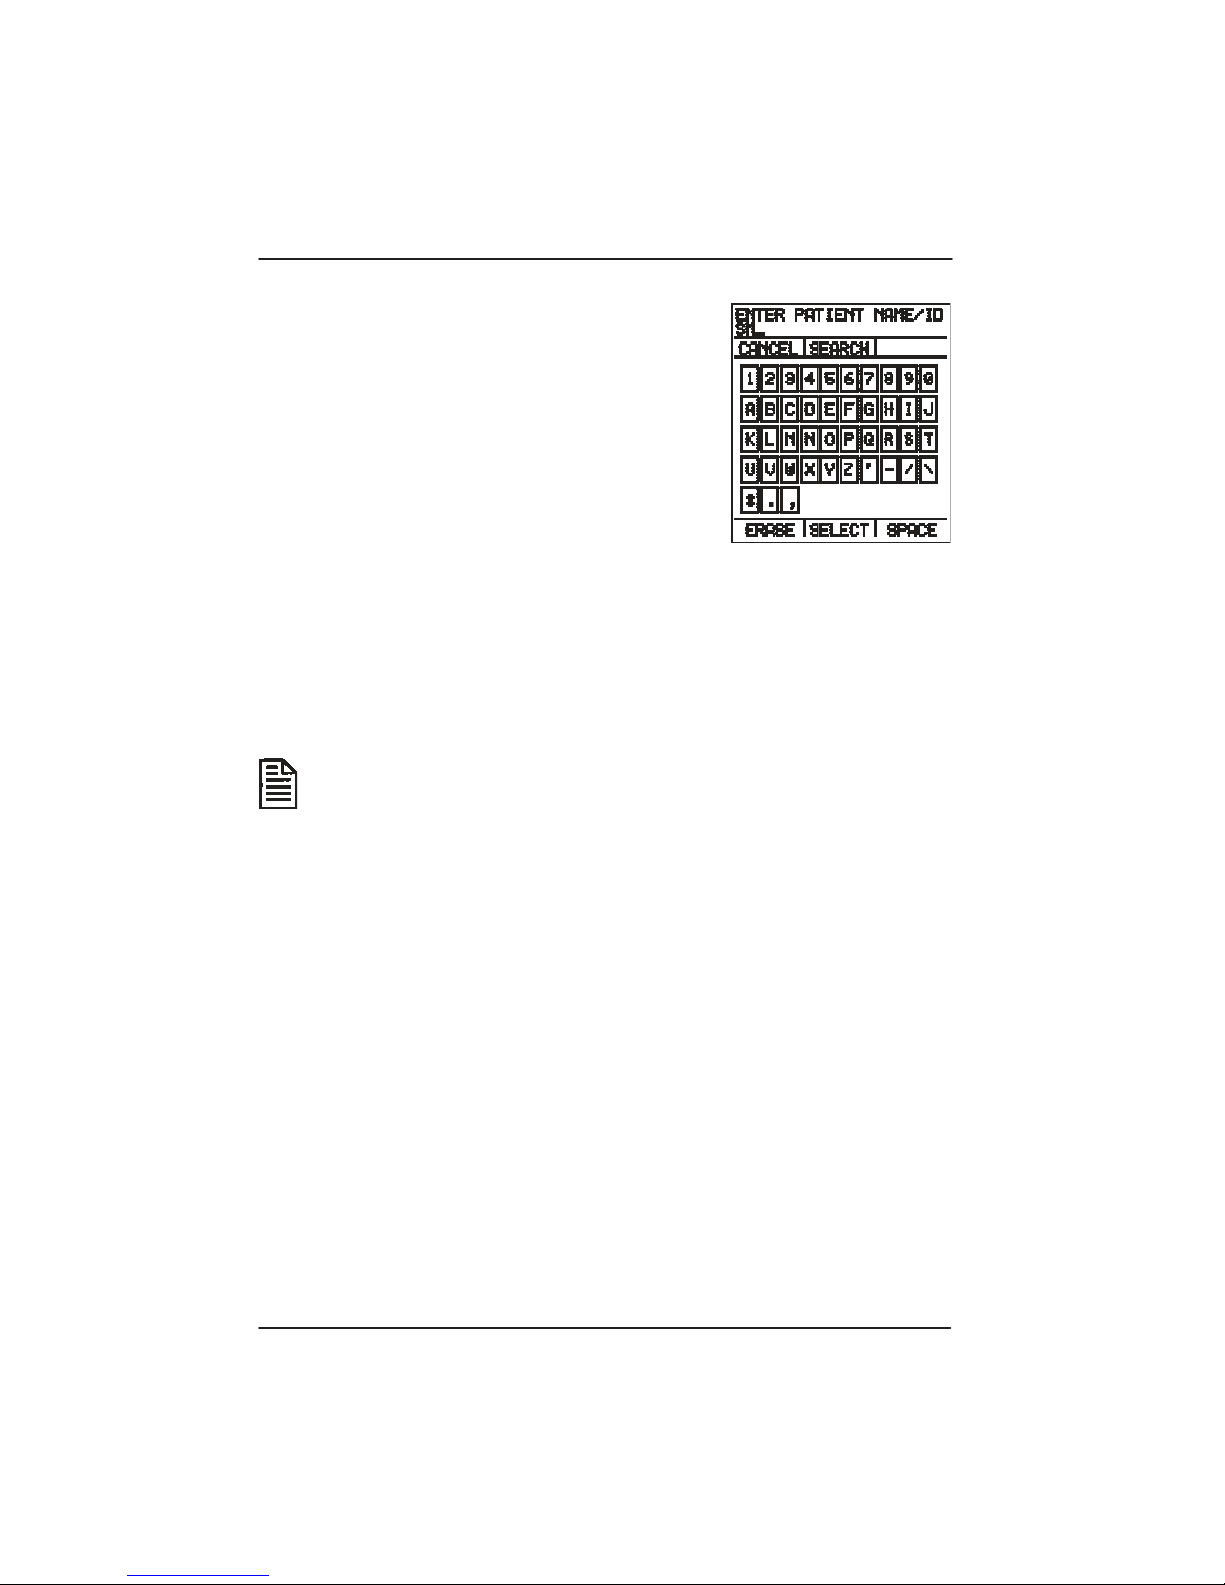
3
. Press KEYBD.
Using the GSI70 Multi-Patient Screener
The ENTER PATIENT NAME/ID screen appears.
4
. Use the stylus (stored in the body of the Screener) to
enter up to 19 characters for the patient’s name or ID
.
number
The characters can be any combination of
numbers, letters, punctuation marks, and spaces,
but you cannot begin a name or ID with a space.
■
To enter a character, touch the character with the
stylus.
■
To enter a space, press space. The cursor moves
forward one space.
■
If you make a mistake, press erase to back up and erase the previous character, then
enter the correct character. You can back up to the beginning and start over.
5
. Press SELECT.
The Screener displays a blank DPGram, with the name or ID number you just entered
.
across the top
The Screener is ready to test this patient.
All the tests you run are associated with this patient until you select another
name or ID number.
32 GSI 70 User Manual

Setting Up the Screener
p
N
Selecting a Patient from the List
Once you transfer a list of patient names or ID
numbers from the GSI 70 DMS, you can select the
atient to test from the SELECT PATIENT NAME
screen as you work. When you select a patient, all the
tests you run are associated with that patient until you
select another name or ID number.
ames you enter manually from the touchscreen and
names that come from the computer remain in the
PATIENT list until the next time names are transferred
from the GSI 70 DMS software. You can reselect a
name that you have already tested for further testing. Up to nine tests can be stored per
patient.
To select a patient to test:
1
. Press the NAME (blue) button on the Screener.
2
. From the SELECT PATIENT NAME screen, use the stylus to scroll through the list of
patients:
■
Touch to page down one screen, and to page up one screen
■
Touch to go to the end of the list, and to go to the beginning of the list
SelectPatientName Screen
To search for a patient:
1
. Press KEYBD.
The ENTER PATIENT NAME/ID screen appears.
2
. Enter the first few characters of the patient’s name or ID number, and then touch
SEARCH.
The SELECT PATIENT NAME screen reappears, and the first name/ID matching
those characters appears highlighted at the top of the list.
3
. Touch the patient name or ID number you want to test, and then press SELECT.
The Screener displays a blank DPGram and the patient’s name or ID number
Screener is ready to test this patient.
.
The
33

Chapter 5
r
N
Using the GSI70 Multi-Patient Screene
Erasing a Patient Name from the List
ames entered from the touchscreen or loaded from the computer can be eras ed at any
time from the SELECT PATIENT NAME screen. To erase a name:
1
. Select the Patient name as described earlier in this section.
2
. Touch ERASE . You will be asked to confirm your intention to erase the name. Touch
YES to erase the name. The name will be erased, but the test data are still stor ed.
Selecting a Test Protocol
The number of the test protocol currently selected for
scoring test results is shown on the right side of the
DPGram screen.
The Single-Patient Screener uses only one protocol,
but the Multi-Patient Screener can store up to 5
different OAE test protocols. These protocols can be
defined by the user and transferred to the Screener
using the GSI 70DMS software. Test protocols
contain up to 6 stimulus frequencies and are selected
from the Utilities Menu. Test protocol number 1 is the
default protocol. Other factory-installed protocols are assigned numbers from 2 to 99,
and user-defined protocols are assigned numbers 100 and higher.
Test Protocol
Number
To change the current test protocol:
1
. Press the LEFT (blue) and RIGHT (pink) Screener buttons to display the Utilities
Menu.
2
. Scroll down to CHANGE PROTOCOL and press
RUN. The SELECT PROTOCOL screen is
displayed.
3
. Use the sylus to select the desired test protocol and
press SELECT. The protocol will be selected and
the Utilities Menu will be displayed again.
4
. Scroll down to EXIT on the Utilities Menu and
press RUN.
The new protocol is ready to be used for testing.
34 GSI 70 User Manual

Setting Up the Screener
Transferring a New Test Protocol from the Computer
This section assumes that you have installed the GSI 70 DMS program on your computer
and set up either the serial cable or the IrDA port on the computer.
See the GSI 70 DMS User’
the protocol to transfer
s Guide for the steps to install and start the software and select
.
See Connecting the Printer/Charge r to Mains Power on page 13
or Connecting the Optional IrDA Adapter to a Computer on page 12.
To transfer a protocol to the Screener:
1
. Start the GSI 70 DMS, select the Transfer Protocol command of the Screener menu,
enter your password and select the protocol to be transferred (see the GSI 70 DMS
User’
s Guide for details).
2
. Press any Screener button to turn on the Screener.
The Screener performs a brief self-test, displays the current date and time and then
displays one of the following screens depending on its state the last time someone used
the Screener:
■
Last test stored
■
Blank DPGram if the patient database is empty
3
. Press the RIGHT and LEFT Screener buttons simultaneously to display the
UTILITIES MENU.
The UTILITIES MENU screen appears.
4
. Scroll to CHANGE PROTOCOL and touch RUN.
The SELECT PROTOCOL screen appears.
5
. Select an EMPTY location and press LOAD.
The new protocol will be transferred to the Screener and will appear in the list of
protocols on the SELECT PROTOCOL screen.
A maximum of 5 protocols can be stored in the Screener. Location #1 is
reserved for the factory default protocol.
Deleting a Test Protocol from the Screener
Test protocols can be deleted from the Screener at any time to make room for new
protocols or remove unnecessary or obsolete protocols. To delete a test protocol:
1
. Press the RIGHT and LEFT Screener buttons simultaneously to display the
35

Chapter 5
Using the GSI70 Multi-Patient Screener
UTILITIES MENU.
The UTILITIES MENU screen appears.
2
. Scroll to CHANGE PROTOCOL and touch RUN.
The SELECT PROTOCOL screen appears.
3. Select the protocol that you wish to remove from the Screener.
Confirm that the protocol selected is actually the one you wish to remove.
4. Press ERASE to remove the highlighted protocol.
You will be asked to confirm your intention to erase the highlighted protocol. Touch
YES to complete the delete operation.
The highlighted protocol will be removed from the Screener’s memory and from the
SELECT PROTOCOL screen. The facory default protocol in location #1 cannot be
erased.
36 GSI 70 User Manual

Testing Patients
Testing Patients
This section assumes that you have set the date and time, selected a new test protocol if
necessay, and either:
■
Transferred a list of patients from the GSI 70 DMS and selected one of them to test,
OR
■
Entered a new patient name or ID number from the Screener touchscre en via the
keyboard.
Until you select a name or ID number, the Multi-Patient Screener cannot
run a test. When you select a patient, a blank DPGram appears with that
patient’s name or ID number across the top.
The TEST key only shows up when the Screener is not connected to a
charging device and the battery has enough charge to finish a test.
Otherwise, the TEST key will disappear preventing the test from being
started.
Running a Test
To run a test:
1
. Select and attach an appropriate size eartip to the probe tip.
2
. Insert the probe tip into the patient’s ear, seating it well into the ear canal to achieve a
tight seal.
3
. Do one of the following:
■
Press the green button on the Pod
■
Press TEST (green button) on the Screener
■
Press the footswitch
The Screener displays CHECKING FOR OAE PROBE IN EAR, and the Pod’s green
LED flashes. If the eartip seal is good, the Screener displays TESTING OAE and the
Pod’s green LED stays on continuously. If the eartip does not properly seal the
patient’s ear, the Screener does not start a test. After 30 seconds, the Screener stops
checking for a seal and displays the message ABORT.When the test is complete, the
Screener displays:
■
OAE TEST COMPLETE
■
A graph of the test data
37

Chapter 5
Using the GSI70 Multi-Patient Screener
■
The test result (see Reviewin g the Test Results on page 49).
The Pod’s green LED turns off.
Message CHECK SEAL
If the Screener detects a problem with the eartip seal, the Screener pauses the test, turns
the Pod yellow LED on and the green LED off, and displays CHECK SEAL
.
Reposition
the probe tip in the patient’s ear, use a different size eartip, or clean the probe tip of
.
See Cleaning the Probe Tip on page 57.
debris
When the seal is acceptable, the Screener restarts the test automatically and re-displays
TESTING OAE. If a second seal problem occurs, the Screener stops the test. The
Screener displays the message ABORT.
Stopping a Test
To stop a test in progress:
■
Press the green Pod button.
The GSI 70 Automated OAE Screener displays OAE TEST COMPLETE ABORT and
also displays data collected to that point.
To erase the aborted test, press the CLEAR (green) button on the Screener.
Storing a Test
To store a completed test:
■
Press the button for the ear you just tested (LEFT - blue or RIGHT - pink).
The Screener stores the data and replaces the message OAE TEST COMPLETE with left
ear or right ear
displays this number to the right of the patient’s name or ID number.
If the Screener contains nine tests for the same patient and you try to run another test, the
Screener displays the message TEST SEQUENCE FULL. You can erase and reuse test
sequence numbers
38 GSI 70 User Manual
.
The Screener assigns each test a sequence number fro m 1 to 9, and
.
See Erasing a Test on page 41.

Managing the Test Results
Managing the Test Results
The GSI 70 Multi-Patient Screener lets you:
■
Review the tests by patient and sequence nu mber
■
Download test results to the GSI 70 DMS program on a computer
■
Erase test results from the Screener memory
Sending Test Results to the GSI 70 DMS
You can select which test results you want to download to the computer, either by patient
or by category.
There are two numbers on the top line of the DATA
screen
. The first number, which appears highlighted,
represents the number of tests selected
number represents the total number of tests in the
.
Screener’s test database
In addition, the test category or
the patient name also appears highlighted in the list area.
The GSI 70 DMS compares the patient names or ID
numbers to the information in its database to determine
whether it already contains data for a patient. If it does,
the program then compares the time and date stamp and the data for the test(s) being sent
.
to the test(s) in its database
If the time and date stamp along with all DP and NF values
are identical, the GSI 70 DMS disregards the duplicate test record.
.
The second
Data Screen
This feature prevents two testers from sending the same data to the computer and filling
up the database with duplicate records.
To download test results to the computer:
1
. In the GSI 70 DMS, select the COLLECT RESULTS tab. Click on the Collect Results
.
Button
2
. On the Screener, display the DATA screen by doing one of the following:
■
■
See the GSI 70 DMS manual for details.
If the Screener shows a DPGram, press DATA
If the Screener is in display mode, press EXIT
The DATA screen appears.
39

Chapter 5
3
. Select the tests you want to send to the computer by doing one of the following:
Using the GSI70 Multi-Patient Screener
■
To select all tests, touch ALL with the stylus.
■
To select ALL PASSES, ALL REFERS, or ALL NOISES, touch the test category
with the stylus.
■
To select the results for one or more patients, touch the tests you want to send. Once
selected, the name/result is highlighted.
■
To select both a test category and individual tests from the list, touch the test
.
category and then touch the additional tests you want to review
(With this option, the
test category name becomes unhighlighted, but the tests within that category, and all
additional tests you select, remain highlighted.)
4
. Do one of the following:
■
Point the Screener toward the IrDA adapter on the computer. The Screener can be up
to three feet (or 1 meter) from the IrDA adapter.
■
Place the Screener in the powered Printer/Charger Module (PCM).
Typically, it takes up to 50 seconds to transfer a full database of 320 tests to the
computer. You may want to place the Screener in the Printer/Charger Module
(PCM) or put the Screener on a flat surface pointing towards the IrDA port
while transferring large numbers of test results.
5
. On the Screener, press the SEND (green) button.
The words POSITION FOR TRANSFER appear at the top of the display. When the
Screener begins to automatically download the selected tests to the computer, the
TRANSFERRING message appears.
Hold the Screener steady or leave it in the Printer/Charger until the message
.
TRANSFER COMPLETE appears
See the GSI 70 DMS manual for information on
working with the transferred test results.
40 GSI 70 User Manual

Managing the Test Results
Erasing a Test
At any time, you can erase tests from the Screener. For instance, after you download test
results to the computer, you can erase those results from the Screener’s memory to
provide space for additional tests.
A patient’s test sequence numbers represent the order in which the tests were performed.
The Screener does not allow a test with a low sequence number to occur after a test with
a higher sequence number provided the date and time have not been changed between
tests.
You can erase any number of tests for a specific patient
.
However, if you want to retest
that patient and reuse certain test sequence numb ers, you must erase all the te sts for that
patient back to the number you want to reuse.
You cannot reuse sequence number 3 if the Screener contains numbers 4 and 5
.
The next
test you run for this patient will be number 6. The Screener does not renumber the tests to
fill in any missing numbers.
To erase test results from the Screener’s memory:
1
. Display the DATA screen by doing one of the following:
■
If the Screener shows a DPGram, press DATA
■
If the Screener is in display mode, press EXIT
The DATA screen appears (see page 39).
2
. Select the tests you want to erase by doing one of the following:
■
To select all tests, touch ALL with the stylus
■
To select ALL PASSES, ALL REFERS, or ALL NOISES, touch the category name
with the stylus
■
To select the results for one or more patients, touch the tests you want to erase
■
To select both a test category and individual tests from the list, touch the test
category and then touch the additional tests you want to review
.
(With this option, the
test category name becomes unhighlighted, but the tests within that category, and all
additional tests you select, remain highlighted.)
As you select a category or individual tests, the highlighted number at the top of the
display shows the number of tests currently selected.
41

Chapter 5
3
. Press ERASE.
Using the GSI70 Multi-Patient Screener
The Screener displays a confirmation message ERASE DATA?
.
Do one of the
following:
■
Press YES to proceed. The Screener erases the selected tests and returns to the data
screen.
■
Press NO to cancel the erase request and return to the DATA screen.
The second number at the top of the DATA screen decreases by the number of tests
erased, and shows the new total number of tests in the list. The first number in the
list becomes zero.
Reviewing a Test
You can look at the test results for any patient or group of patients, or any result category.
For example, you can look at all the patients you tested today, or all the tests with a
REFER result
Results on page 49.
The test data remains in permanent memory even when the Screener is off or the battery
is removed until it is erased.
.
For more information on the test result definitions, see Reviewing the Test
To review a test:
1
. Display the DATA screen by doing one of the following:
■
If the Screener shows a DPGram, press DATA
■
If the Screener is in display mode, press EXIT
The DATA screen appears.
2
. Select the tests you want to review by doing one of the following:
■
To select all tests, touch ALL with the stylus
■
To select ALL PASSES, ALL REFERS, or ALL NOISES, touch the test category
with the stylus
■
To select tests for one or more patients, touch the tests y ou want to review
■
To select both a test category and individual tests from the list, touch the test
.
category and then touch the additional tests you want to review
(With this option, the
test category name becomes unhighlighted, but the tests within that category, and all
additional tests you select, remain highlighted.)
42 GSI 70 User Manual

Managing the Test Results
3
. Touch DISPLAY.
The Screener displays the DPGram for the first test
you selected. The patient’s name or ID number and the
test sequence number appear on the first line, and the
ear tested and result appear on the next line.
In display mode, the left (blue) and right (pink) buttons
on the Screener are marked with left and right arrows,
allowing you to scroll through the selected tests.
4. Press
to display the next test, and
to display
the previous test.
■
If you selected ALL, the Screener displays the next test in sequenc e each time you
press until it reaches the end of the database, then the Screener displays the first
test again.
■
If you selected a test category or several tests from the list, the Screener displays the
next test in the selected sequence each time you press until you reach the end of
the selected tests, then the Screener displays the first test again.
5
. Press EXIT to return to the DATA screen.
Printing a Test
At any time, you can print the stored tests in the Screener. There are three ways to select
and print tests:
■
After running and storing a test, print all the tests for that patient
■
Print all tests in a result category
■
Select specific tests to print
1
For each patient, the Screener automatically pairs the test results for the left ear with
those for the right ear
any order, the Screener pairs the first left with the first right, and prints them on the same
.
Then it pairs the second left with the second right, and so on.
report
If there is an unpaired test left over, the Screener prints it on its own report.
.
For example, if you ran four left ear tests and four right ear tests in
43

Chapter 5
Using the GSI70 Multi-Patient Screener
When the Screener begins sending the information to the Printer/Charger, it displays the
.
message TRANSFER TO PRINTER
If the transfer is successful, the Screener displays
TRANSFER COMPLETE, and the printout begins, except:
■
If there is nothing to print, the Printer/Charger prints No Data.
■
If you remove the Screener before the Printer/Charger receives all the data, the
message REMOVED TOO SOON appears on both the Screener display and the
printout.
■
If the Screener is not properly placed in the Printer/Charger cradle, the Printer/
Charger prints No Screener.
Printing All T ests for a Patient
The Screener provides a quick way to print all the tests for a patient, right after you run a
test.
To print all tests for a patient:
1
. Run and store a test. Leave the completed DPGram on the display.
2
. Place the Screener in the (powered) Printer/Charger cradle.
3
. Press the PRINT button on the Printer/Charger.
The Screener downloads all the stored tests for this patient to the Printer/Charger, and
automatically pairs the results
.
If this is the first test for this patient, the printout contains
only this test.
Printing Selected Tests
To print tests in a certain category or for several patients:
1
. Display the DATA screen by doing one of the following:
■
If the Screener shows a DPGram, press DATA
■
If the Screener is in display mode, press EXIT
2
. Select the tests you want to print by doing one of the following:
■
To select all tests, touch ALL with the stylus
■
To select ALL PASSES, ALL REFERS, or ALL NOISES, touch the category name
with the stylus
■
To select tests for one or more patients, touch the tests you want to print
■
To select both a test category and individual tests from the list, touch the test
category and then touch the additional tests you want to review
.
(With this option, the
test category name becomes unhighlighted, but the tests within that category, and all
44 GSI 70 User Manual

Managing the Test Results
additional tests you select, remain highlighted).
3
. Place the Screener in the (powered) Printer/Charger cradle.
4
. Press PRINT.
The Screener downloads all the selected tests to the PCM, and automatically pairs the
results for each patient
.
If there is only one test for a patient, that test appears on it own
printout.
Printing Individual Test Results
If you are reviewing test results on the Screener display, you can print them individually.
To print tests from the display:
1
. In the DATA screen, select one or more tests to display. See Reviewing Test Results on
page 49.
2
. Press DISPLA Y .
The Screener displays the DPGram for the first test you selected.
3
. Place the Screener in the (powered) Printer/Charger cradle.
4
. Press PRINT.
The Printer/Charger prints the displayed test.
5
. To print additional tests, press to display the test you wish to print, and then press
PRINT.
.
The Screener prints tests one by one from the DISPLAY screen
Even if you selected
multiple tests for the same patient, the Screener does not automatically pair the results
when you print them from this screen.
Contents of the Printout
The printout includes:
■
The patient’s name or ID number and the date and time tested
■
The ear tested (Right, Left or both), the test results, and the test sequence nu mber
■
One or two DPGrams that display the DP (distortion product) points, NF (noise
floor) points, Pass/Refer line (optional) and test protocol number
■
One or two tables containing the actual numeric values for the patient’s DPs and NFs,
and the difference between the two points for each frequency
All DP values at or above 20 dB are shown on the 19 dB line, and all NF values at or
below -20 dB are shown on the -19 dB line. The table contains the actual distortion
45

Chapter 5
Using the GSI70 Multi-Patient Screener
product and noise floor values.
■
The serial numbers for the Screener and the probe
■
Product identification information
Printout of Test Results for a Single Ear
Patient Data
Ear and Test Result
DP Results *
Pass/Refer Line *
Test Protocol Number *
Noise Floor Results per DP Point *
* DPGram
Numeric Test Results
Printouts of test results for both
ears contain the same
information as those for single
ears. DPGram frequencies for
test protocols containing more
than 3 stimulus frequencies are
reoriented 90 degrees along the
horizontal axis.
46 GSI 70 User Manual
Printout of Test Results for Both Ears

Power Down
Canceling the Printout
To stop a printout in process:
■
Press PRINT.
The printer immediately stops printing the test, and prints Print cancelled on the
next line.
Advancing the Paper
To advance the paper, do one of the following:
■
Press PAPER ADVANCE. The paper advances by one line.
■
Hold down PAPER ADVANCE. The paper advances continuously until you release
the button.
Power-Saving Mode
The Screener has a power-saving mode that preserves the battery’s charge when you are
not running tests. This power-saving mode allows the Screener to preserve the battery
charge, yet be ready to continue testing quickly. The Screener enters this po w er-saving
mode after 45 seconds of inactivity, as long as the Screener is not either placed in the
.
Printer/Charger cradle or connected to the Charging Transformer
In this mode, the last
screen displayed remains in memory and the display backlighting turns off.
To exit the power-saving mode, press any button or touch the LCD. The display lights up
and the Screener is immediately ready to use. Any data that was on the screen, including
unsaved test data, reappears.
When the Screener is not being used, place it in the (powered) Printer/Charger
cradle to increase the battery charge.
Power-Down
You never have to turn off the Screener. The Screener turns itself off completely under
the following conditions:
■
If the Screener remains idle for two minutes after it enters the power-saving mode
■
If the Screener is either placed in the Printer/Charger cradle or connected to the
Charging Transformer, it turns off completely after 45 seconds and does not enter the
47

Chapter 5
Using the GSI70 Multi-Patient Screener
power-saving mode.
■
If you want to turn the Screener off immediately, use the UTILITY MENU by pressing
the LEFT and RIGHT keys simultaneously and run the POWER-DOWN procedure.
In these cases, the Screener does not retain the information (such as an unsaved test) that
was on the display.
■
To turn on the Screener, press any button.
■
To turn the Screener off immediately, use the UTILITY MENU by pressing the LEFT
and RIGHT keys simultaneously and run the POWER-DOWN procedure.
Low Battery Icon
When the battery’s charge nears the minimum usable level, a low battery icon (
appears on the display. You then have up to eight minutes in which you can conduct and
store about six more tests. The GSI 70 Automated OAE Screener will not allow a test to
begin unless there is sufficient battery charge to complete the test.
When the battery level falls too low, the GSI 70 Automated OAE Screener turns off. All
previously stored test data remains intact, but a test in progress at the time is lost
Recharging the Battery on page 57.
.
)
See
Battery Discharge Time
A fully charged new battery will allow the Screener to operate for up to 90 minutes of
.
continuous use without recharging
hours will allow the battery to be fully recharged. When testing patients on an intermittent
basis the Screener should be placed in the printer charger when not being used as this will
allow the battery to recharge between patients. Allowing the battery to recharge between
patients will extend the time the Screener can be used before the battery is discharged.
This is important as the Screener can not be used for testing if the battery is discharged.
For high volume screening programs it is recommended to purchase an accessory battery
charger so that a spare battery can be kept on the charger
discharged during a test session the spare battery can be installed in the Screener and the
discharged battery put on the accessory charger.
48 GSI 70 User Manual
Placing the Screener in the printer charger for 10
.
If the Screener battery becomes

Reviewing the Test Results
Test Result PASS
A screening result of PASS means that at the time of testing, the cochlea responded well
.
to the tones presented through the probe
line, and the noise level at each frequency tested is at least 10 dB below the
corresponding OAE response.
Each OAE response is above the PASS/REFER
6
An X (left ear) or an O (right ear) is used to represent the OAE response
which runs horizontally from 2k to 4k Hz, represents the PASS/REFER line. The solid
dashes represent the intensity of the noise present within the ear canal during each OAE
measurement at 2k, 3k, and 4k Hz.
The example Multi-Patient printout below for PASS indicates that the intensity of the
OAE responses at 2k, 3k, and 4k Hz are 5 dB, 10 dB, and 7 dB, respectively. The noise
floor measured at each OAE frequency is at or below -6 dB. As a result, this example
shows a very large separation between the OAE (O) and the noise floor (—). The values
for this separation (signalto-noise) are extremely
good at 11 dB (2k), 20 dB
(3k), and 20 dB (4k),
.
respectively
Automated OAE Screener
scores the test result as a
PASS when the OAE
responses are above the
PASS/REFER line and the
signal-to-noise is at least
10 dB.
The GSI 70
.
The thin line,
49

Chapter 6
Reviewing the Test Results
Test Result REFER
An OAE screening scored as REFER indicates that both the OAE response and the noise
floor at each test frequency are very low.
In this example, the OAE response at 2k, 3k, and 4k Hz are 1 dB, 2 dB, and -15 dB,
respectively. The noise floor at each frequency is sufficiently low to allow the GSI 70
.
Automated OAE Screener to reliably measure for an OAE response
is also very low in intensity at 4k Hz. When a REFER result is obtained, it is
recommended that the test be run a second time to see if it is repeatable
repeatable, there are at least three possible explanations:
■
The cochlea is not responding well to the tones being presented due to some problem at
the outer hair cells.
■
There is fluid present within the middle-ear space that is preventing the stimulating
tones from reaching the cochlea at a high enough intensity to activate the OAE
response.
■
The ear canal and/or the probe tip are plugge d with vernix or debris that is preventing
the tones from traveling through the middle ear to the cochlea. Thus, the outer hair
cells are not being activated properly.
The OAE response
.
If the result is
It is highly recommended
that the screening session be
repeated once again prior to
discharge, as the possible
conditions described above
may be resolved over time.
If the results are not
repeatable, check the probe
tip for debris and re-check
the ear canal for size and
.
Clean the probe tip
shape
with the cleaning wires or
select a different size ear tip
before repeating the test
once again.
50 GSI 70 User Manual

Test Result NOISE
Test Result NOISE
A response is scored as NOISE when there is either too much biological or room noise
present while performing the test. This noise prevents the GSI 70 from being able to
accurately measure the presence of an OAE response.
The example shows that the noise floor at the OAE frequency of 2k Hz is at 0 dB
the noise floor is high, it is very difficult to obtain a 10 dB separation between the OAE
.
response and the noise floor
dB (3k), and 10 dB (4k)
too small at 2k Hz to reliably score the test result as a PASS or REFER
NOISE indicates that either room noise or the baby’s biological sounds are interfering
with data collection, the ear canal is collapsed, or the ear tip fit is poor.
You can store any data the
Screener collected.
In the current example, the signal-to-noise is -1 dB (2k), 11
.
The separation between the OAE response and the noise floor is
.
The score of
.
When
51

Chapter 6
Reviewing the Test Results
Test Result ABORT
The result ABORT means either:
■
You stopped a test by pressing the green Pod button.
■
The Screener detected that the eartip was not making a good seal in the patient’s ear
and stopped running a test.
In both cases, if you see a stored test with the result ABORT, it means you saved the test.
There may be no data points or only one or two. Any data points are valid, since the
.
Screener stops collecting data when the eartip’s seal in the ear is broken
should run a new test, since the result ABORT does not indicate the test status as a PASS
or a REFER.
However, you
52 GSI 70 User Manual

Maintenance
This section describes the basic procedures to maintain your system:
■
Cleaning the Screener, Printer/Charger, and probe tip
■
Recharging the battery
■
Checking the Screener with the Quick Check Cavity
■
Calibrating the Touchscreen
■
Checking the Printer/Charger by printing a test pattern
7
Setting the Date and Time (GSI 70 Multi-Patient Screener Only)
You can set the date and time in the GSI 70 Multi-Patient Screener so that test results you
print or send to the computer will contain a date and time record. There are two ways to
set the date and time:
■
Enter the date and time on the touchscreen
■
Transfer the date and time settings from the computer running the GSI 70 DMS to the
Screener
If you remove the battery from the Screener, such as when you replace a discharged
battery with a new one, you must reset the date and time if the unit is without a battery for
.
more than five minutes
SET DATE AND TIME screen appears automatically during system initialization.
When you turn the Screener on after changing the battery, the
Date and time are preserved for approximately five minutes after battery is
removed.
Setting the Date and Time from the Computer
You can let the computer set the date and time in the Screener to match its settings. This
ensures that the date and time stamp associated with each test result does not c onflict with
the computer clock.
If you want to set the Screener’s date and time from the computer, you must install the
GSI 70 DMS on the computer
to communicate with the computer, attach the serial cable to the Printer/Charger.
.
If you are using the Printer/Charger to allow the Screener
53

Chapter 7
Maintenance
See the GSI 70 DMS manual for the steps to install and start the software. Also see
Connecting the Printer/Charger to Mains Power on page 13 or Connecting the Optional
IrDA Adapter to a Computer on page 12.
To set the date and time in the Screener from the computer:
1
. Start GSI 70 DMS and begin the process for transferring date and time to the Screener
(see the GSI 70 DMS manual for details).
2
. Press any button to turn on the Screener.
The Screener performs a brief self-test and displays one of the following screens
depending on its state the last time someone used the Screener:
■
Last test stored
■
Blank DPGram if the patient test database is empty
3
. Press the DATA (pink) button on the screener, then touch DATE with the stylus.
The SET DATE AND TIME screen appears.
4
. Do one of the following:
■
Place the Screener in the (powered) Printer/Charger cradle
■
Point the Screener toward the IrDA port on the computer
5
. Touch LOAD.
The POSITION FOR LOAD screen appears
computer’s date and time settings to the Screener
.
The computer automatically transfers the
.
When complete, the Screener returns
to the data screen.
The Screener’s internal clock is synchronized to the computer
.
The Screener
automatically records the date and time of each test you run. The test’s date and time
appears on all printouts, and is sent to the GSI 70 DMS when you download patient test
data to the computer.
Setting Date and Time Using the Touchscreen
From the Screener’s touchscreen, y ou can manually set the day, month, year, hour, and
minute, in any order.
The Screener will not accept a day less than 1 or more than 31, or a year before 1999 or
after 2095
any invalid entries, such as June 31
54 GSI 70 User Manual
.
In addition, the Screener verifies that you entered a valid date, and indicates
.
The Screener also checks for the leap year status, and

Setting Date and Time
indicates an invalid date for February 29 in a non-leap year.
To set the date and time from the touchscreen:
1
. Press any button to turn on the Screener.
The Screener performs a brief self-test and displays one of the following screens
depending on its state the last time someone used the Screener:
■
Last test stored
■
Blank DPGram if the patient database is empty
2
. Press the DATA (pink) button on the screener, then touch DATE with the stylus (stored
in the Screener body)
The SET DATE AND TIME SCREEN appears and the day element is highlighted.
3
. Touch any of the date or time elements with the stylus.
4
. Press the left or right arrow buttons to adjust the selected element.
The left arrow decreases the value and the right arrow increases the value. As you
adjust the element, the screen displays the current setting.
5
. To set another element, repeat steps 3 and 4.
6
. When done, press STORE.
The Screener verifies that the dates entered are valid (such as making sure you did not
select June 31)
you correct it
.
If there is a problem, the Screener highlights the DAY element and lets
.
If the settings are valid, the Screener returns to the DATA screen.
55

Chapter 7
Maintenance
Cleaning
You can clean the following components of the GSI 70 Automated OAE Screener
System:
■
Exterior of the Screener and PCM
■
LCD display
■
Cables
■
IrDA port windows and charging contacts
■
Probe tips
.
The eartips are intended for a single use only
Cleaning the Housings, Display, and Cables
To clean the exterior of the GSI 70 Automated OAE Screener (including the display), the
Pod and Printer/Charger, and the cables, use a lint-free cloth moistened with either:
■
Plain water
■
Water and a mild detergent/soap solution
■
70% isopropyl alcohol
Discard after use.
To avoid damaging the instrument, do not:
• Spray anything directly onto the Screener display
• Immerse instruments in water or cleaning solutions
• Autoclave the instruments
Cleaning the Probe Tips
Clean the probe tips with the supplied Cleaning Kit:
■
At the start of every day or shift
■
After testing an ear that contained cerumen, vernix, or other material
■
The following events could indicate blocked probe tube s:
■
Quick Check test fails
■
Screener reports unusual numbers of REFER results
■
Screener repeatedly cannot achieve a seal in a patient’s ear
56 GSI 70 User Manual

Cleaning
There are three parts to the probe tip cleaning process:
■
Removing the probe tip from the probe
■
Cleaning the probe tip
■
Attaching the probe tip to the probe
Removing the Probe Tip
The probe tip is held in place by three tabs that fit into notches in the probe. The probe tip
sits on a firm rubber gasket that provides pressure to hold the probe tip in place.
To remove the probe tip:
1
. Push the probe tip into the probe to compress the rubber gasket, and turn the probe tip
counter-clockwise about one-sixteenth turn.
2
. Lift out the probe tip.
The probe is vulnerable to dust and moisture
.
Do not put the probe on a dirty or
wet surface.
Cleaning the Probe Tip
To clean the probe tip:
1
. Moisten a tissue or lint-free cloth with 70% isopropyl alcohol.
2
. Push the large cleaning wire through the large diameter probe tube, from the back
(large end) toward the front.
3
. Wipe off the cleaning wire with the moistened tissue, then pull the wire back out of the
tube.
4
. Push the smaller cleaning wire through one of the smaller diameter probe tubes, from
the back toward the front.
5
. Wipe off the cleaning wire with the moistened tissue, then pull the wire back out of the
tube.
57

Chapter 7
6
. Repeat steps 4 and 5 for the other small probe tube.
Maintenance
Do not attempt to clean probe tip while attached to probe
.
Debris may become
lodged in probe.
Attaching the Probe Tip to the Probe
To attach the probe tip to the probe:
1
. Align the tabs on the probe tip with the notches in the probe, so that the white
alignment markers on each piece are between the same pair of notches.
2
. Push the eartip firmly into the probe, and turn clockwise about one-sixteenth turn.
Probe Tip with Eartip
Attached
White Alignment Markers
(Surfaces shown darker for
clarity)
Probe
When the probe tip is correctly locked in place, the white alignment markers line up.
Cleaning the Infrared Port Windows and Charging Contacts
Disconnect the Printer/Charger from Mains power before cleaning the charg ing
contacts.
Use a lint-free cloth moistened only with water to clean:
■
Charging contacts in the Printer/Charger
■
Infrared port windows on the Screener and the Printer/Charger
58 GSI 70 User Manual

Recharging the Battery
Recharging the Battery
To recharge the battery, do one of the following:
■
Plug the Printer/Charger into the Mains outlet. Place the Screener in the Printer/
Charger cradle.
■
Connect the round DIN connector of the optional Charging Transformer to the
Screener, then plug the transformer (or the attached cable) into the
Mains outlet.
Charging Transformer:
Connect to Mains (Wall)
Outlet
Round DIN Connetor:
Connect to Screener
Charge the Screener only in the Printer/Charger or with the specified Charging
Transformer.
Do not charge the battery if the ambient temperature exceeds 113°F (50°C).
Charging the battery at high temperatures causes the battery to overcharge and
become extremely hot. This will ruin the battery and possibly damage the
instruments.
Both Printer/Charger LEDs are turned on. The TEST key is disabled so that the Screener
will not conduct any tests while connected to mains power. After 45 seconds of inactivity,
the Screener will be turned off.
The Screener may be charged indefinitely (longer than five hours) without damage to the
battery
.
Slight heating of the Screener while charging is normal.
.
59

Chapter 7
Maintenance
Removing or Replacing the Battery
1
. Using your thumb, turn the battery cover screw counterclockwise approximately one-
half turn. The retaining screw is attach ed to the battery cover; it pops halfway out of
the hole but remains attached to the cover.
Battery Cover
Battery Connector
Retaining Screw
Battery
2
. Pull gently on the retaining screw until the cover lifts out.
3
. Press the tab on the battery connector and pull the two halves apart. Lift out the battery.
4
. Align the connector on the replacement battery with the connector in the Screener, and
slide the connector in until the tab locks into place.
60 GSI 70 User Manual
You will hear a click when it locks.

Removing or Replacing the Battery
Install the battery as shown. The two parts of the connector are keyed and fit together
only one way.
5
. Replace the battery cover by sliding the cover’s tab into the notch in the Screener, then
fitting the cover into place.
6
. With your thumb, push the screw down into the hole and turn approximately one-half
turn clockwise to tighten
.
Do not over-tighten.
When removed from the Screener, the battery discharges gradually over a period
of approximately a year when stored at room temperature (70°F / 21°C); storage
at higher temperatures increases the discharge rate
.
Long-term storage does not
affect the battery’s recharge capacity.
Remove the battery if you plan to store the Screener or place it anywhere other
than in the powered Printer/Charger Module for more than one month. After you
remove the battery, do not place the Screener in the powered Printer/Charger
Module.
Disposing of the Battery
When the Nickel-Cadmium battery loses its capacity to be recharged, please dispose of it
according to the environmental regulations in your area.
THE NICKEL-CADMIUM BATTERY MUST BE RECYCLED OR
DISPOSED OF PROPERLY.
If the battery is removed for more than five minutes, the Date and Time settings
in the Screener will be lost.
61

Chapter 7
Maintenance
Checking the Screener
Use the supplied Quick Check Cavity to perform a rapid functional check of the Screener.
This is a simple test to perform and indicates that the Screener is working properly.
.
Grason-Stadler recommends using the Quick Check Cavity at least daily
your department or facility might decide to check the Screener at the start of each shift.
The test, which takes about 10 seconds, detects:
■
Plugged microphone or speaker cha mbers in probe
■
Change in speaker or microphone sensitivity
■
Loss of output from one or both speakers
■
Loss of output from microphone
Running the Quick Check Test
To run the Quick Check Test:
1
. Simultaneously press the left and right (blue and pink) buttons.
The Utilities Menu appears on the display. An arrow points to the first menu option,
QUICK CHECK TEST.
For example,
Single-Patient Model
62 GSI 70 User Manual
Multi-Patient Model

Checking the Screener
2
. Press RUN.
The Quick Check Test screen appears.
3
. Attach a 4mm eartip onto the probe tip.
4
. Insert the probe into the Quick Check Cavity.
5
. Press NEXT.
The Screener quickly performs several tests, and some
numbers appear briefly on the display.
You do not need to
observe these numbers. When finished, the Screener
displays the test result.
Quick Check Passed
If the Screener passed, you may perform OAE tests.
1
. Press NEXT to return to normal testing mode.
2
. See Using the Single-Patient Screener on page 21, or
Using the GSI 70 Multi-Patient Screener on page 29.
Quick Check Failed
1
. Inspect the tubes in the probe tip. The tubes may be blocked with cerumen or other
material.
2
. Clean the probe tip. See Cleaning the Probe Tip on page 57.
3
. Run the Quick Check test again.
4
. If the Quick Check fails a second time, press NEXT to return to normal testing mode
and allow the Screener to turn off.
5
. Replace Probe/Pod assembly by removing the screws from the connector, if you have a
spare probe.
6
. Ensure that the pink (4mm) eartip is totally seated on the probe tip and that no part of
the eartip blocks the small metal tubes.
7
. Contact your GSI Service Representative. The Probe/Pod assembly requires service
before you can use it again.
63

Chapter 7
Maintenance
Calibrating the Touchscreen
The Multi-Patient Screener contains a touch-sensitive layer (called the touchscreen) over
the LCD that responds to pressure from a stylus. This touchscreen allows you to enter
new patient names or ID numbers as you work, and also provides access to additional
functions through touchscreen “buttons” on the LCD.
As you use the Multi-Patient Screener, if you notice that the areas you touch with the
stylus do not respond properly or if a different command is activated, this indicates that
the touchscreen’s calibration has drifted. This drifting may occur due to vigorous
handling, or extremes of heat and cold. At any time, you can calibrate the touchscreen.
To calibrate the touchscreen:
1
. Press any button to turn on the Screener.
The Screener performs a brief self-test and displays one of the following screens
depending on its state the last time someone used the Screener:
■
Last test stored
■
Blank DPGram if the patient database is empty
2
. Press the left (blue) and right (pink) buttons simultaneously.
The UTILITIES MENU appears.
Single-Patient Model
3
. Press the down arrow to move the cursor to the TOUCH CALIBRATE option, and then
press RUN.
64 GSI 70 User Manual
Multi-Patient Model

Checking the Printer/Charger
The TOUCHSCREEN CALIBRATION screen
appears.
4
. Use the stylus (stored in the body of the Screener) to
press the small box on the display. Use steady
pressure and do not let the point of the stylus slip.
Hold the stylus on this box until the NEXT message
appears, and then remove the stylus.
5
. Follow the next step, again holding the stylus on the
NEXT box that appears on the display.
6
. When prompted, remove the stylus.
The touchscreen calibration is complete, and the Screener returns to the UTILITIES
MENU.
7
. Press the down arrow to move the cursor to the EXIT option, and then press RUN.
The Screener returns to the display that appeared when you turned it on.
Checking the Printer/Charger
When you connect the Printer/Charger to Mains power, it performs a self-test. It also
checks whether the printer is out of paper and identifies any other error conditions.
■
If the printer is out of paper, the POWER/STATUS LED ( ) flashes singly. Install a
new roll of paper (see Replacing the Paper on page 67). The LED stops flashing
when the paper is installed.
■
If the printer is malfunctioning, the POWER/STATUS LED flashes doubly. Disconnect
the Printer/Charger from Mains power and wait about five minutes before reconnecting
.
to power. The printer may be overheated, and this allows it to cool down
.
not correct the problem, the Printer/Charger may require service
.
GSI Service Representative
(You may continue to use the Printer/Charger to charge
Contact your local
the Screener).
If this does
65

Chapter 7
Maintenance
Printing a Test Pattern
You can check the printer quickly by printing out a test pattern. This lets you verify that
the printer is working.
To print a test pattern:
1
. Make sure that:
■
Printer/Charger is plugged into Mains power and contains paper
■
POWER/STATUS LED is lit
■
No LEDs are flashing
2
. Simultaneously press the PRINT and ADVANCE buttons. The printer prints a test
pattern:
This test pattern indicates that the printer is working properly.
If the test pattern does not print out or if you see any flashing LEDs, consult Table 4 on
page 74.
About the Printer Paper
Use only:
■
Heat-sensitive paper available from Grason-Stadler (#1738-9600).
■
Adhesive-backed paper available from Grason-Stadler (#1770-9602).
Using the wrong paper can wear out the printer prematurely and may void the
warranty.
The paper is thermally activated
.
Before use, store the paper in a cool, dark location to
prevent exposure and degraded performance. After printing test results, store the printouts
.
in a cool, dark place such as a patient’s file folder
Exposure to light, sun, and heat will
degrade the printing, and over time the results will be illegible.
66 GSI 70 User Manual

Checking the Printer/Charger
Only one side of the paper is thermally active; no printing will appear on the paper if you
insert it backwards.
Do not use transparent adhesive tape on printed portions of the printout, as those portions
will fade.
When to Replace the Paper
Replace the paper roll in the Printer/Charger when either of the following happens:
■
A pink strip appears along the edge of the paper, indicating the paper is nearing the end
of the roll
■
The power/status indicator flashes in single pulses, indicating the printer is completely
out of paper
Replacing the Paper
To replace the paper:
1
. Remove the eartip box from the well of the Printer/Charger.
2
. Press the depression on the back edge of the paper cover to release the latch.
3
. Carefully lift the back of the cover up and out of the Printer/Charger.
Press here
and lift up
4
. Lift out the paper roll and tear off any remaining paper against the back edge of the
paper well.
Do not pull the paper backwards out of the printer. This will damage the
mechanism.
5
. Press ADVANCE to re move the remaining paper.
67

Chapter 7
Maintenance
6 Place a new roll of paper in the cavity, with the paper’s leading edge coming from
underneath the roll, toward the front of the cavity, like this:
7
. Make sure the new paper has a straight edge. Feed the leading
edge squarely into the paper guide. The printer automatically
pulls the paper in and stops when the paper’s top edge is
.
positioned correctly
If the paper is not evenly aligned with the cutting edge, tear off the
new roll, trim the edge, remove the remaining paper using ADVANCE, and try again.
8
. Replace the printer cover, first inserting the tabs into the notches, then pressing the
back edge down until it clicks into place.
9
. Replace the eartip box in the well.
The POWER/STATUS LED stops flashing, and the Printer/Charger is ready to print
tests.
68 GSI 70 User Manual

Troubleshooting
This chapter covers:
■
Error messages that may appear on the Screener
■
Possible causes and solutions for problems with the Screener or Printer/Charger
8
Error Codes
If an error message followed by two sets of numbers appears on the display, for example:
ERROR 25 802
or
ERROR 5017 14
indicates the Screener requires service before you can use it again.
If this happens:
1
. Allow the Screener to turn off.
2
. Contact your local Service Representative.
69
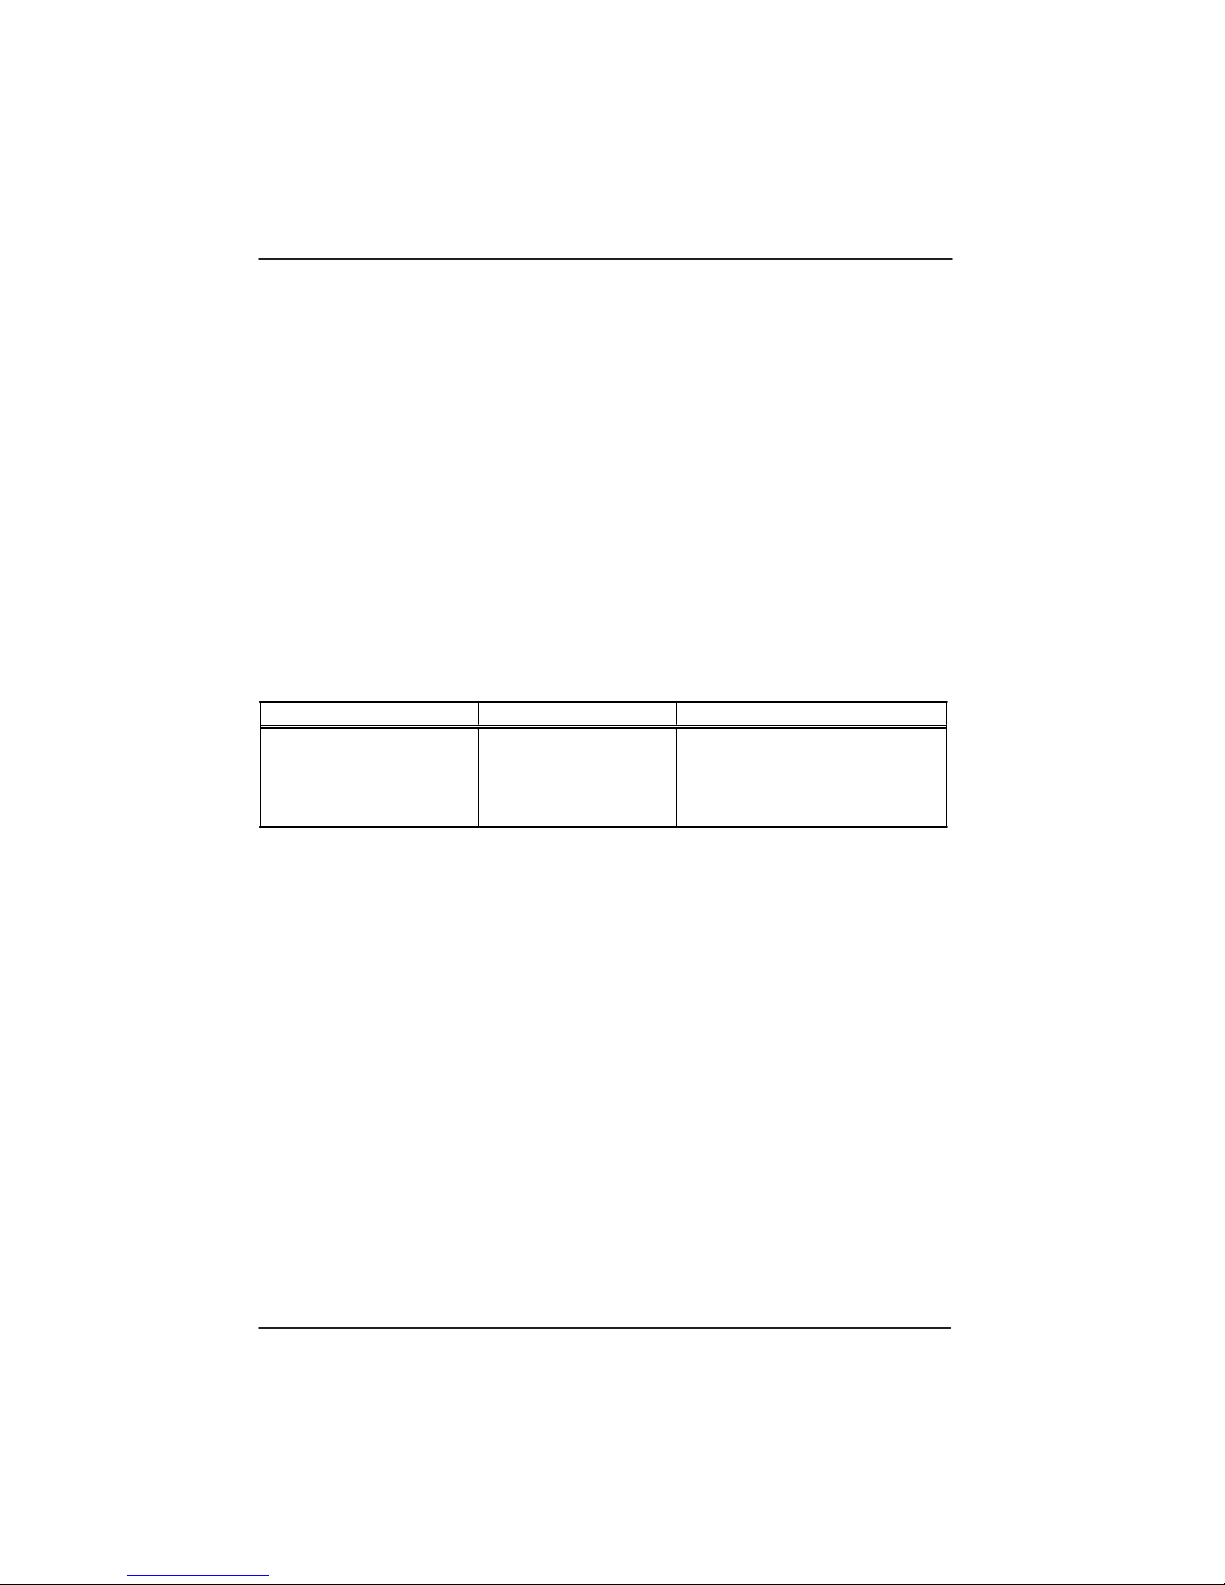
Chapter 8 Troubleshooting
Troubleshooting Tips
Screener Problems
If you think your Screener is not working properly, consult Table 3 to find the symptom
.
and the likely cause and its solution
solve the problem you are having, call Technical Support
Information on page 79 for more information.
What to Check First
Make sure the Screener has a battery installed. See Removing or Replacing the Battery
page 60.
T able 3 – Troubleshooting Guide for the Screener
If the information in this table does not describe or
.
See Service and Warranty
on
Problem
Screener will not turn on Battery drained
Possible Cause
Solution
Charge the battery.
See
Recharging the battery
page 59.
on
70 GSI 70 User Manual

Troubleshooting Tips
Table 3 – Troubleshooting Guide for the Screener (Co ntinued)
Problem Possible Cause Solution
Screener will not run Screener in Remove Screener from
tests (L ED bli nks bu t no Printer /Cha rge r Printer /Char ger cradl e and try a gain .
test starts) cradle (Screener will not run tests while in
contact with power source)
Screener connected Unplug from Charging Transformer
to Chargi ng and try again. (Screene r will not run
Transformer tests while in contact with power
source)
Probe malfunction Run the Quic k Check test.
See Running the Quick Check Test
on page 62.
If Sc re e ne r fails, ca ll you r lo c a l
service re presentative.
Loose cable Check cable connection between
Screener an d Pod. Tighten the
screws if necessary.
71

Chapte
r
T
D
8
roubleshooting
Table 3 – Troubleshooting Guide for the Screener (Co ntinued)
Problem
Screener does not
recharge
Possible Cause
Printer/Charger is
not plugged in
Charging contacts
are blocked or dirty
Screener not seated
properly in
Printer/Charger
cradle
Charging
Transformer is not
connected properly
Cannot see anything on Contrast is out of
Screener display, but
adjustment
LCD is illuminated
Solution
Plug cable into back of
Printer/Charger, then into Mains
(wall) outlet.
Inspect and clean charging
contacts in Printer/Charger and on
Screener.
See
Cleaning the Housings,
isplay, and Cables
on page 56.
Remove and replace Screener in
cradle.
Plug round end of Chargin g
Transformer into back of
Screener, plug large square end
into Mains (wall) outlet.
Recharging the Battery
See
on
page 59.
See
Adjusting the LCD Contr ast
on page 11.
72 GSI 70 User Manual

Troubleshooting Tips
Table 3 – Troubleshooting Guide for the Screener (Co ntinued)
Problem
Yellow LED a ppears on
Possible Cause
Probe not seated
Solution
Reposition eartip in ea r canal. Align
Pod properly in ear canal eartip straight in for adults and
children , sl igh tly a n te rior f or infants
and new borns.
Try a different size eartip.
Probe tip not fully
attached to Probe
Remove and reattach pr obe tip; make
sure white marks in probe and probe
tip line up.
Attaching the Probe Tip
See
to the
Probe on page 58.
Probe tip bloc ked Re move and in spect the prob e tip.
Clean if nec essary. See
Cleaning the
Probe Tip on page 57.
Run the Quick Check test . If
Screener fai ls, call your l ocal Ser vice
Representative.
Screener displays DIP Switches set See
Changing the Language Setting
incorrect language wrong for the Screener on page 94.
Screener comes up in DIP Switche s set Call your local Service
Diagnostic or Calibra tion wrong
Representative.
Mode
Touchscreen does not
respond prop erl y or a t all calibrated properly
(in Multi-Patient
Touchscreen not
Calibrate the touchscreen
Calibrating the Touchscreen
64.
. See
on page
Screener)
73

Chapter 8 Troubleshooting
Printer/Charger Module Problems
If you think your Printer/Charger Module (PCM) is not working correctly, consult Table 4
to find the symptom and the likely cause and its solution. If the information in this table
does not describe or solve the problem you are having, call your local GSI Service
Representative
.
See Service and Warranty Information on page 77 for more information.
What to Check First
Make sure the PCM is connected to Mains power. If the PCM is connected properly and
has no other malfunctions, the power/status LED will be on.
T able 4 – Troubleshooting Guide for the Printer/Charger
Problem
Printer Prints “
Screener
Printer prints “
Data
”
properly in PCM
”
No
No
Possible Cause
Screener not seated
Screener contains no Run and save a test for one or more
test data
If Screener does
contain data, the
PCM or Screener
has an internal
malfunction.
Infrared port
window is blocked windows in PCM and on Screener.
or dirty.
Solution
Remove an d replace screener in
cradle.
ears.
Call your local Service
Representative.
Inspect and clean Infrared port
See
Cleaning the Housings, Display,
and Cables
on pa ge 5 6.
74 GSI 70 User Manual

T
roubleshooting Tips
p
p
t
T able 4 – Troubleshooting Guide for the Printer/Charger (Continued)
Problem
Printer does not prin
anything
Printer prints
“Removed too
soon
”
Power/Status LED
flashing singly
Possible Cause
Printer is out of
aper.
Infrared port
window is blocked
or dirty.
Screener removed
from PCM befor e
test data finished
downloading.
Printer is out of
aper.
Solution
Replace paper.
See Replacing the Paper on page
67.
Inspect an d clean Infr ared por t
windows in PCM and o n Screener.
See Cleaning the Housings,
Display, and Cables on page 56.
Leave Scree ner in PCM for three
seconds after you press print, for
single-patien t unit or if multi-patient
unit and printing one te st. If multipatient and printing ma ny tests, leave
Screen er in PCM for durati on of
printing until TRANSFER
COMPLETE is displayed.
Replace the paper .
See Replacing the Paper on page
67.
75

Chapte
r
T
8
roubleshooting
T able 4 – Troubleshooting Guide for the Printer/Charger (Continued)
Problem
Power/Status LED
flashing doubly
Pink strip appears on
paper
Possible Cause
Printer may be too
hot.
Paper is almost used
up.
Solution
Unplug the Printer/Charger for about
five minutes. Plug back into Mains
power.
If LED still flashes, call your local
Service Representative.
You can still use t he
Printer/Charger to charge the
Screener.
Replace paper.
See
Replacing the Paper
on page
67.
76 GSI 70 User Manual

Guide to Otoacoustic Emmissions
9
What are Otoacoustic Emissions?
Otoacoustic emissions (OAEs) are sounds generated within the cochlea of all normal-
.
hearing ears by active biomechanical processes within the outer hair cells
ears produce OAEs, the absence of an emission is a reliable sign of abnormal cochlear
function, which could indicate hearing loss.
Otoacoustic emissions testing provides a fast, non-invasive method of testing for cochlear
pathology
test patients such as infants, young children, or neurologically impaired patients.
.
In addition, OAE testing is completely objective—making it ideal for hard-to-
Since normal
How is an OAE Generated and Detected?
The OAE probe, similar to a tympanometry probe, contains two speakers and a
.
microphone
send tones to the ear canal. These tones travel through the middle ear and into the
cochlea
third tone. This third tone then travels outward from the cochlea back through the middle
ear to the ear canal, where the probe microphone detects it.
Eartips cover the probe and seal the ear canal tightly. The probe speakers
.
Outer hair cells in the cochlea react to the tones by generating and emitting a
This emitted response has a very small amplitude and gets mixed in with other biological
.
and environmental sounds present in the ear canal
of these sounds, the instrument must use signal averaging techniques to sep arate the
emitted response — OAE — (signal) from these other sounds (noise).
Since the microphone measures the response at the entrance to the ear canal, rather than
at the site of its origination (the cochlea), the anatomy along the return path (i.e., the
ossicular chain and the tympanic membrane) can influence the amplitude of the response.
To identify these effects, measure the status of the middle ear using tympanometry
screening whenever possible.
Since the probe microphone detects all
Testing with the GSI 70 Automated OAE Screener
The GSI 70 Automated OAE Screener uses Distortion Product Otoacoustic Emissi ons.
Distortion Product Otoacoustic Emissions are emissions resulting from the presentation of
a series of primary tone pairs.
77

Chapter 9
Guide to Otoacoustic Emmissions
The stimulus consists of a series of pure tone pairs. The instrument presents each tone
pair and measures the OAE in an ascending or descending frequency pattern.
When the tone pair reaches the cochlea, each t one stimulates a different group of outer
hair cells. As these two different groups are stimulated, they vibrate—causing a third tone
to be generated between the two groups. This third tone is known as the distortion
product (DP).
Cochlea
F1 Stimulation Site
Distortion Product
Origination Site
F2 Stimulation Site
Example of
Distortion Product Generation
The relationship between the tone pair ’s
frequencies and intensity levels has an effect on the amplitude and frequency of the DP
.
response
The lower frequency in each pair is referred to as F1. The higher frequency is
F2.
Researchers have shown that an F2 to F1 ratio (F2/F1) of 1.2 (or 1.22) produces the most
robust response in humans. Also, using a higher-intensity stimulus for F1 than F2 (by
approximately 10 dB) provides greater test sensitivity.
The response from the cochlea during DP testing consists of a single frequency per tone
.
pair presentation
The frequency of the DP equals 2F1 - F2. Since the frequency of the
DP occurs within a narrow range, the instrument needs to use signal averaging only
within a very narrow frequency band for each data point.
The equation 2F1 - F2 also tells the DPOAE system what specific DP response frequency
to look for. Thus, the system can disregard any other tones that are present in the ear
canal—making DPOAE testing far less sensitive to room noise than other test methods.
The GSI 70 Automated OAE Screener displays DPGrams as a function of the F2
frequency.
78 GSI 70 User Manual

Service and Warranty Information
10
Warranty for the Screener and Printer/Charger
Grason-Stadler warrants the GSI 70 Automated OAE Screener and Printer/Charger to be
free of original defects in material and workmanship and to perform in accordance with
.
manufacturer’s specifications for a period of one y ear from the date of purchase
instrument or any component thereof is found to be defective or at variance from the
manufacturer’s specifications during the warranty period, Grason-Stadler will repair,
replace, or recalibrate the instrument or component at no cost to the purchaser.
This warranty only applies to instruments purchased new from Grason-Stadler or its
authorized distributors or representatives. The purchaser must return the instrument
directly to Grason-Stadler or an authorized GSI 70 Automated OAE Screener distributor
or representative and bear the costs of shipping.
This warranty does not cover breakage or failure due to tampering, misuse, neglect,
accidents, modification, or shipping, and is void if the instrument is not used in
accordance with manufacturer’s reco mmendations or if repaired or serviced by other than
Grason-Stadler or a Grason-Stadler authorized representative.
If this
Please return the instrument registration card for proof of purchase and warranty
validation.
Repair
Repair must be performed by authorized factory-trained personnel. Failure to do so
invalidates the GSI 70 Automated OAE Screener warranty.
Technical Service Department
For customers in North America, please return instruments requiring service to the
Grason-Stadler Technical Service Department or to an authorized Grason-Stadler Service
Representative.
79

Chapter 10
Service and Warranty Information
Please call the Technical Service Department for a Return Authorization Number prior to
shipping the GSI 70 back to GSI for repair.
Grason-Stadler
7625 Golden Triangle Drive, Suite F,
Eden Prairie, MN 55344 USA
Telephone: 1-800-700-2282
Fax: 952-278-4401
Recalibration
Grason-Stadler recommends that the GSI 70 Automated OAE Screener be recalibrated
annually. You can make arrangements for calibration by contacting an authorized GrasonStadler representative. A moderate fee is charged for recalibration.
The Printer/Charger does not require calibration.
80 GSI 70 User Manual

Replacement Parts and Accessories 11
Ordering Information
To order replacement parts or accessories, contact your local Grason-Stadler
representative or call the Customer Service Department in Eden Prairie, MN.
81

Chapter 11 Replacement Parts and Accessories
Eartips
All eartips are packaged 100 per bag.
Table 5 – Replacement Eartip s
(Bulk Quantity of 100 each)
Eartip Size
3.5 mm
4 mm
5 mm
6 mm
7 mm
8 mm
9 mm
10 mm
11 mm
12 mm
13 mm
14 mm
Part Number
1770-9603
1770-9604
1770-9605
1770-9606
1770-9607
1770-9608
1770-9609
1770-9610
1770-9611
1770-9612
1770-9613
1770-9614
Eartip Starter Kit - 1770-9660 (four each sizes 3.5 - 14mm)
Table 6 – Replacement Eartip s
Bulk Quantity of 25 each
Size
3.5 - 7 mm
7 - 11 mm
10-14 mm
Group
Infant
Child/Adult
Adult
Part Number
1770-9662
1770-9663
1770-9664
82
GSI 70 User Manual

Screener Parts and Accessories
Screener Parts and Accessories
T able 7 – Screener Part s and Accessories
Item
Probe Tip Molded black plastic Replacement probe tip
piece with thre e metal tu bes
inside, that locks onto the Probe
Probe Tip Cleaning Kit
Pod/Probe Assembly
Rechargeable Battery
Charging Transformer
Description / Com ments
Consists of thin cleaning wire and
thick clean i ng w ir e
Fully calibrated replacem ent
assembly
1 each
Charges th e Screener directly
from Mains power
Battery Cha rg er
Accesso ry that charges a spare
battery while the Screener is in
use
GSI 70 Automated OAE
Single–Patient Model:
Screener Only
Multi–Patient Model:
Upgrade Kit f or Screener
Upgrades a Si ngle–Pati e n t
Screener to a Multi–Patient
Screener
GSI Part
Number
1770-9661
1770-9670
1770-9690
1770-9672
Varies by
country.
See Table 12 on
page 97 or call
Customer
Service.
1770-9615
(North A meric a )
1770-9708
1770-9705
1770-9630
Carrying Case, Screener
Carrying Case, System
Quick Check Cavity
Requires installation by a
Service Representative
Hold s the Scr e ener and a box of
1770-9688
eartips
Holds the Screener and the
1770-9689
Printer/Charger
Allows functional check of the
1770-1020
Screener
83

Chapter 11 Replacement Parts and Accessories
T able 7 – Screener Part s and Access ories (Continued)
Item
Description / Comments GSI Part
Number
Footswitch Allows hands-free operation 1770-9676
(starting tests)
Rolling Stand with Shelf Supports Screener in holde r, 17 70-9 67 5
Printer/Charger and e artips on
shelf
Stylus Used with Multi-Patient 1770-6020
touchscreen
84
GSI 70 User Manual
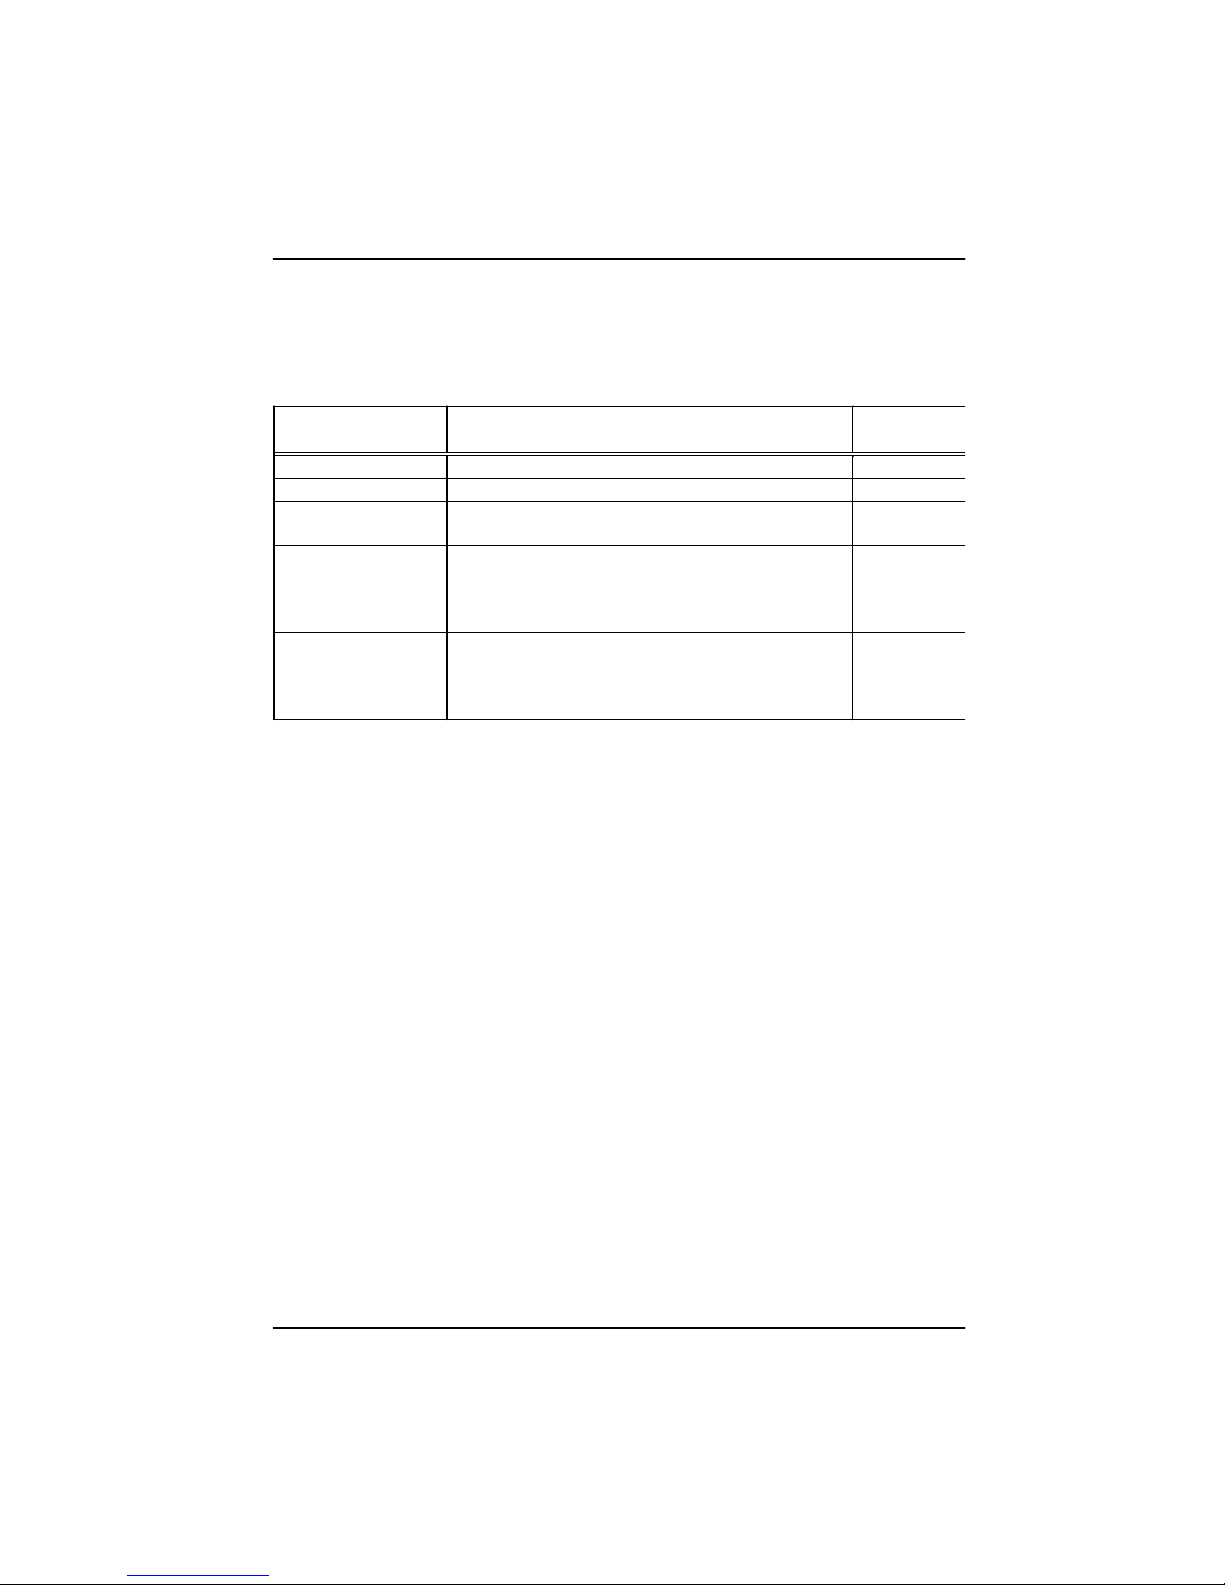
Printer/Charger Parts and Accessories
Printer/Charger Parts and Accessories
T able 8 – Printer/Charger Part s and Accessories
Item
Thermal Pa pe r
Adhesive paper
Printer/Ch arger
Training mate rial
Training mate rial
(International)
Description / Comments GSI Part
Number
Five rolls of printer paper 1700-9627
Five rolls of printer paper 1770-9602
Complete replacement, including two rolls of 1770-9710
paper
Video tape and instructional booklet 1770-9695
Consisting of:
Instructional Booklet, GSI 70 (1770-0195)
Video tape VHS USA (1770-9693)
Video tape and instructional booklet 1770-9696
Consistin g of:
Instructional Booklet, GSI 70 (1770-0195)
Video tape PAL INT GSI (1770-9694)
85

Chapter 11 Replacement Parts and Accessories
86
GSI 70 User Manual
 Loading...