

Graphic Products Echo User Manual

LARGE FORMAT PRINTER & ENLARGER
800.788.5572
GraphicProducts.com

Contents
Introduction ............................................................................................................1
Copyright ................................................................................................................2
Warranty .................................................................................................................3
Safety Warnings .....................................................................................................5
1. Getting to Know Echo .......................................................................................7
1.1 Positioning .................................................................................................... 8
1.2 Parts and Terms ........................................................................................... 8
2. Setup Instructions .......................................................................................... 12
2.1 Normal Setup .............................................................................................12
2.2 Optional – Using an SD Memory Card ......................................................14
2.3 Optional – Preparing for PC Printing ........................................................14
3. Operating Instructions ................................................................................... 16
3.1 Printing from a Scanned Document .........................................................16
3.2 Printing from the Poster Gallery ................................................................17
3.3 Printing from a PC ...................................................................................... 18
4. Menu Options ................................................................................................. 20
4.1 Main Menu Options ....................................................................................20
4.2 Advanced Options ......................................................................................23
4.3 Setup Options ............................................................................................. 28
5. Echo Software ................................................................................................ 32
5.1 Echo’s Driver and Printing Preferences....................................................32
5.2 Echo Canvas ............................................................................................... 33
5.3 Word Plug-in for Echo ................................................................................33
6. Echo Poster Catcher ...................................................................................... 34
6.1 Installing the Poster Catcher ..................................................................... 34
6.2 Using the Poster Catcher ........................................................................... 34
7. Maintenance and Troubleshooting ............................................................... 35
7.1 Cleaning Your Echo .................................................................................... 35
7.2 Troubleshooting ..........................................................................................35
8. Glossary ........................................................................................................... 39
9. Certifications .................................................................................................. 41
9.1 FCC Compliance ......................................................................................... 41
9.2 US, Canadian and European EMC and EMI standards ........................... 41
9.3 TUV Compliance .........................................................................................42
9.4 Printer Disposal/Recycling ........................................................................42

1
800.788.5572 GraphicProducts.com
INTRODUCTION
Introduction
Congratulations! Now that you have your Echo large format printer and enlarger,
you’ll be creating posters in no time.
In addition to helping you set up and use Echo, this User Guide will serve as a
reference document for maintaining the system, and for using its more advanced
features.
If you need supplies, or have questions about Echo, give us a call at 800.788.5572
(or, internationally, at 1.503.644.5572) and we’ll be happy to help.

2
GraphicProducts.com 800.788.5572
COPYRIGHT
Copyright
This manual is copyrighted with all rights reserved. No portion may be copied or
reproduced by any means without the prior consent of Graphic Products, Inc.
While every precaution has been taken in preparation of this document, Graphic
Products, Inc. assumes no liability to any party for any loss or damage caused by
errors or omissions or by statements resulting from negligence, accident or any
other cause. Graphic Products, Inc. further assumes no liability for incidental or
consequential damages arising from the use of this document. Graphic Products,
Inc. disclaims all warranties of merchantability or fitness for a particular purpose.
Graphic Products, Inc. reserves the right to make changes without further notice to
any product or system herein to improve reliability, function or design.
Reproduction of this material, in part or whole, is strictly prohibited without the
written permission of Graphic Products, Inc.

3
800.788.5572 GraphicProducts.com
WARRANTY
Warranty
Graphic Products’ printers are warrantied to be free from defects in materials or
workmanship for a period of one year from the date of purchase. Within this period,
Graphic Products, Inc. will, at its sole option, repair or replace any components
which fail in normal use. Such repairs or replacement will be made at no charge to
the purchaser for parts or labor, provided that the purchaser shall be responsible
for any transportation cost. This warranty does not cover loss, damages from
accident, equipment or parts which have been misused, altered, neglected,
carelessly handled, or used for purposes other than those for which the printer was
manufactured, or damages resulting from unauthorized service.
Repairs have a 90 day warranty, or will be covered under the original warranty
duration, whichever is longer.
The warranties and remedies contained herein are exclusive and in lieu of all other
warranties whether express, implied, or statutory, including any liability arising under
any warranty of merchantability or fitness for a particular purpose, statutory or
otherwise.
This warranty gives the purchaser specific legal rights, which may vary from state
to state. In no event shall Graphic Products be liable for any incidental, special,
indirect, or consequential damages, whether resulting from the use, misuse, or
inability to use the product for any reason including defect. Some states do not allow
the exclusion of incidental or consequential damages, so the above limitation may
not apply in all areas.
Graphic Products retains the exclusive right within all warranty periods to repair,
replace the product or offer a full refund of the purchase price at its sole discretion.
Such remedy shall be the purchaser’s sole and exclusive remedy for any breach of
warranty.
General maintenance and cleaning of the printer is the purchaser’s responsibility
and is not covered by the warranty. Expendable items or parts such as paper
supplies are not covered by this warranty.
NOTE: Some printers require specic preparation before shipping. Please contact
your Graphic Products representatives to ensure correct return procedure: call
800.788.5572 or visit GraphicProducts.com. Graphic Products, Inc. shall not be
responsible for any loss or damages incurred during shipping.

4
GraphicProducts.com 800.788.5572
WARRANTY
To prevent damage to Echo and to avoid nullifying the Echo warranty, please follow
these rules:
• Only use official Graphic Products paper supplies in Echo.
• Read all instructions and rules in this manual completely.
If something seems to be wrong with Echo, refer to section 7, Maintenance and
Troubleshooting. If your problem is not resolved by following the recommended
steps, please contact Graphic Products for assistance.

5
800.788.5572 GraphicProducts.com
SAFETY WARNINGS
Safety Warnings
Please review the following safety instructions before using Echo.
• Echo is intended for indoor use only. Keep the printer away from humidity and
prolonged exposure to direct sunlight.
• Echo is designed for use at normal room temperatures of 50-105°F (10-40°C),
and at a maximum altitude of approximately 6500 feet (2000 meters) above
sea level.
• Check the power source voltage before connecting the printer to a power outlet.
Echo is designed for use with standard, grounded 110-240 VAC, 50-60 Hz
power outlets. Typical current consumption for Echo is 2.2 A.
• Only use the approved power cord with Echo. If a replacement cord is needed,
please contact Graphic Products for support at 800.788.5572.
• Before plugging the power cord into Echo, make sure the On/Off switch is set to
Off.
• Do not allow liquids or metals to contact any of Echo’s internal parts. For
ordinary cleaning, follow the instructions included in this guide.
• Only qualified service personnel should attempt to perform maintenance on the
printer.
• The printer must be turned off before any type of maintenance work is done.
• Echo may build a small static charge in static-sensitive environments. Do not
operate Echo near flammable materials.
• The power outlet should be near the printer and easily accessible for quick
power disconnection. Unplug the printer from the wall socket to completely
disconnect power.
• Power off and unplug Echo if:
◦ Echo makes an unusual noise.
◦ Liquids or metals are inserted into the system.
◦ There is an electrical storm or power failure.
◦ There is smoke or an unusual smell coming from Echo.
NOTE: Changes or modications not expressly approved by the party responsible
for compliance could void the user’s authority to operate the equipment.
WARNING: Do not place your ngers near the cutting blades. If you must clear a
paper jam, turn the printer off rst, and use a tool, such as a pencil, to remove
the jammed paper. Do not use your ngers.

6
GraphicProducts.com 800.788.5572
SAFETY WARNINGS
The cutting blade is located on the inside of the printing unit. The cutting blade is
sharp and may cycle automatically after a poster is printed. If Echo is powered off
while the cutter is moving, it may stop before returning to its home position on the
far right. Do not move the cutter by hand; instead, turn the system on and allow the
blade to move automatically. Do not attempt to load supply paper when the cutter is
not in its home position.
Under normal operating conditions, the blade poses no harm to a user. Echo's cutter
mechanism is equipped with an over-torque circuit that is meant to shut off the
cutter if too much resistance is sensed; however, the blade still has the potential to
cause injury if misused.
We recommend the use of the surge suppressor that is provided with Echo. It will
help protect Echo from possible damage during nearby lighting storms. It should be
installed between the AC wall outlet and the AC input to the device.
7
800.788.5572 GraphicProducts.com
GETTING TO KNOW ECHO
1. Getting to Know Echo
Echo is a Thermal Printer, meaning that it uses heat to activate ink that is included
in its special supply paper. You will never need to change an ink cartridge in this
system! Echo is a versatile device, and allows you to print large posters from several
different sources:
• Enlarge an existing document or picture, using the built-in scanner.
• Print from Echo’s Gallery of saved posters.
• Print from a computer, either using a USB cord or across a network.
Echo is larger than most desktop printers, and weighs about 57 pounds (about 25
kg). We recommend that you have two people work together to unpack and position
the system, one person at each end.
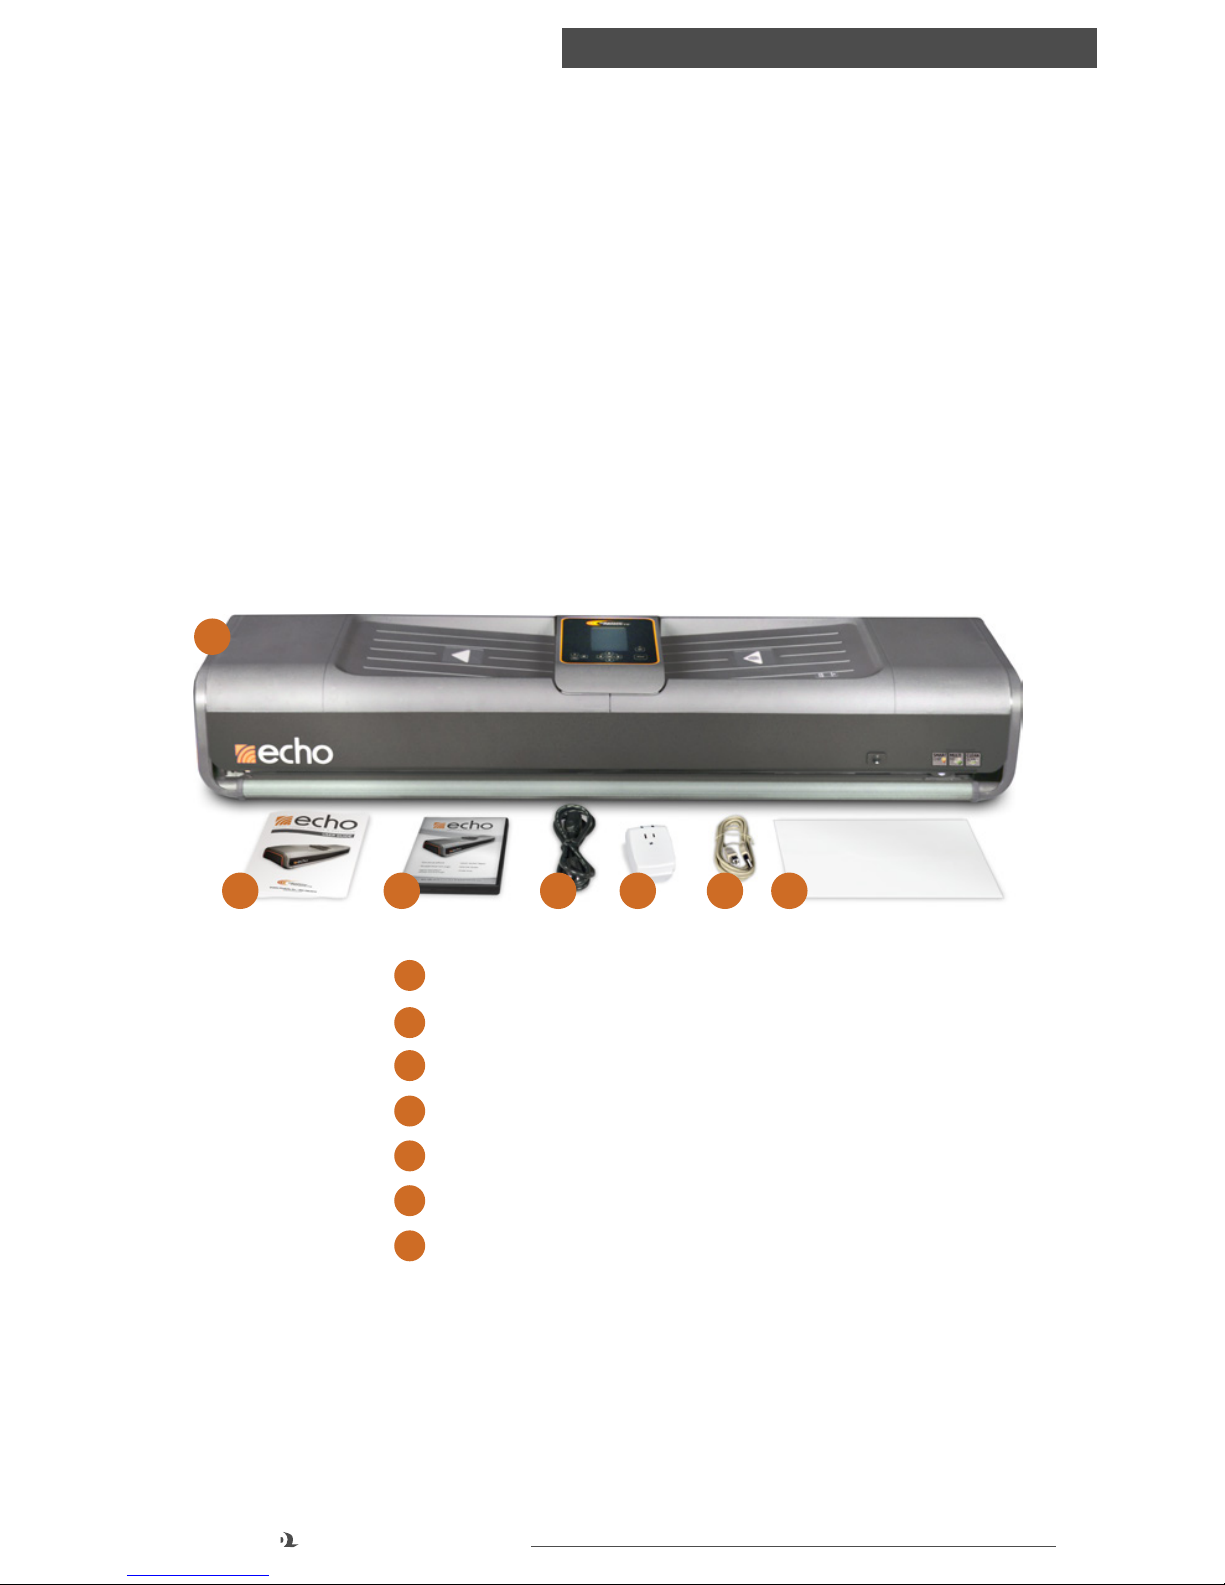
In Echo’s box, you will find the following materials:
3
1
2 4 5 6
1
Echo Large Format Printer & Enlarger
2
User Documentation
3
Software Installation CD
4
Electrical Power Cord
5
Surge Suppressor
6
USB Cable
7
Document Carrier Sheet
If any of these materials are not included, please contact Graphic Products at
800.788.5572.
Set aside the box and packaging material for future use. You may need the box and
packing material later, when moving or shipping Echo.
7

8
GraphicProducts.com 800.788.5572
GETTING TO KNOW ECHO
1.1 Positioning
There are a few things to keep in mind when deciding where to use Echo:
• Echo is a large device. Place it on a flat, level surface that can safely support its
weight. Have one person lifting at each end when you need to move Echo.
• Leave an open space of about 2" (5 cm) behind Echo, so that you can fully open
the lid to load supply paper, and so that the power and computer connection
cables do not bind or kink.
• Do not cover or block the air vents on the ends of Echo; they provide necessary
ventilation for the internal components. A space of at least 2" (5 cm) is
recommended here as well.
1.2 Parts and Terms
Echo is designed for ease of use. There are only a few basic parts for you to know
about. These parts are labeled here.
OK
Print
Lid Release Button
Control Panel
Scanning Tray
Platen
Left Paper
Bracket
Cutter
Feed Rollers
Print HeadsPressure Rollers
9
800.788.5572 GraphicProducts.com
GETTING TO KNOW ECHO
Control Panel
3
2
OK
Print
9
8
7
4
5 6
1
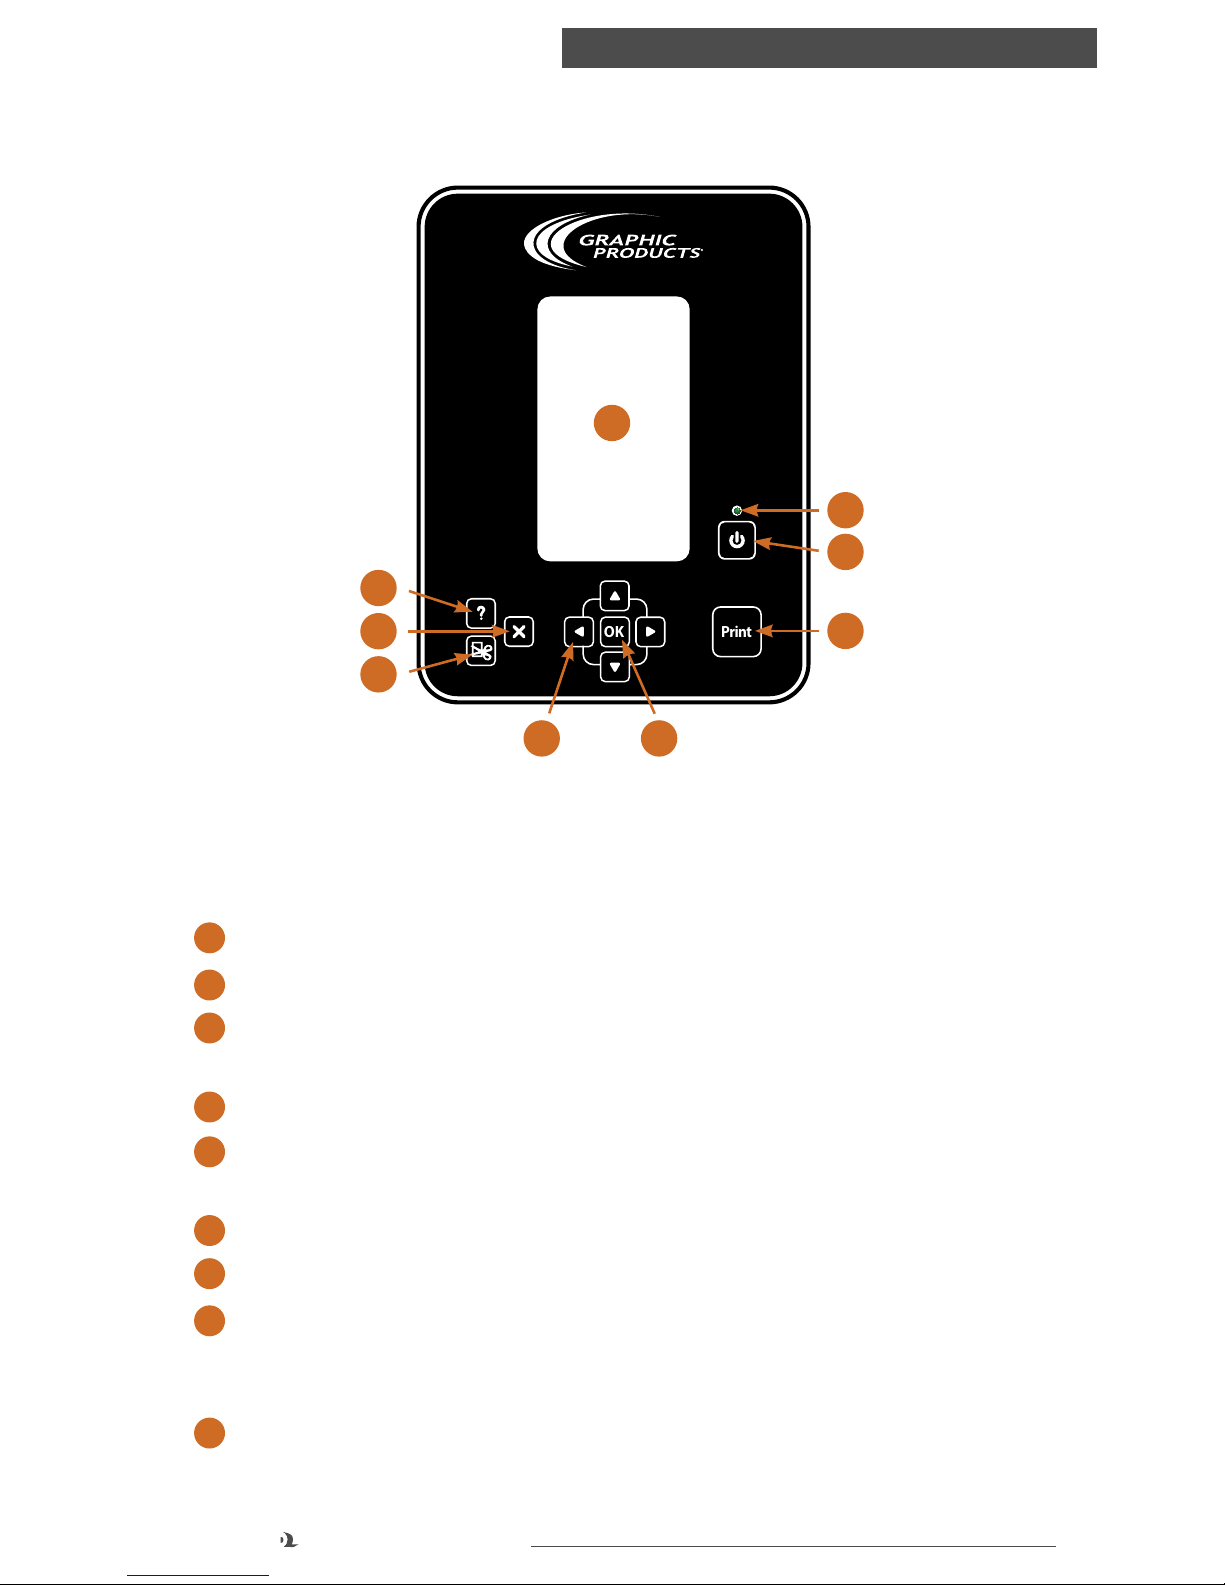
Echo’s Control Panel gives you easy access to all of Echo’s controls and settings.
Individual buttons and functions are labeled below. Detailed descriptions of the
different menu options appear in section 8.1, Main Menu Options.
1
Control Screen – Displays menu options.
2
Help – Open Echo's on-screen Help menu.
3
Close – Close the current menu, cancel the current set of prints, or go back a
step when browsing folders.
4
Cut – Operate the motorized paper cutter.
5
Navigation Arrows – Four arrows (up, down, right, left) used to navigate through
the menus in the Control Screen.
6
OK Button – Press OK to activate or select a menu option.
7
Power Indicator LED – Glows green when Echo is ready to print.
8
Power On/Off Button – Turn Echo’s scanner and LCD display on or off. Note that
this is different from the Master Power Switch, which is located on the Connection
Panel on the rear of the printer. The Master Power Switch can be left on.
9
Print – Scan an original document from the scanning tray and print it as an
enlarged poster.
10
GraphicProducts.com 800.788.5572
GETTING TO KNOW ECHO
Control Screen
100'
3
1
2
9
8
7
4
5
6
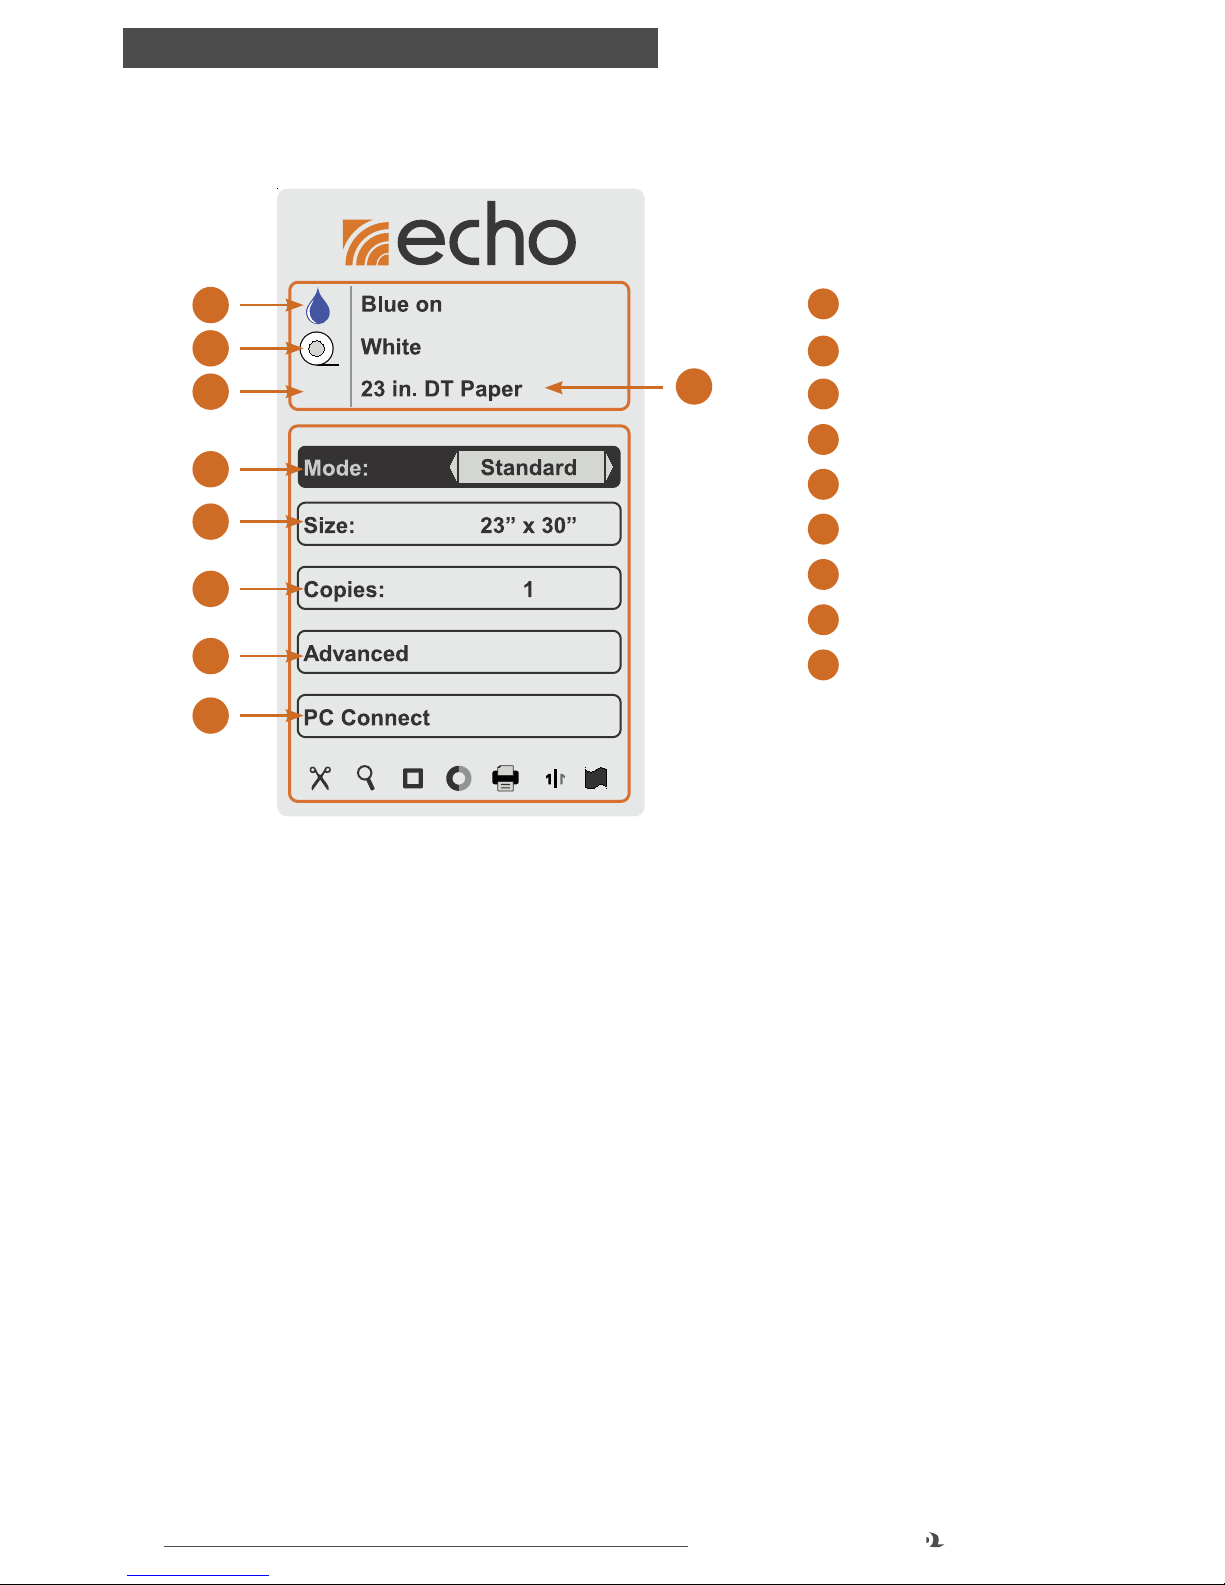
1
Ink Color
2
Paper Color
3
Remaining Supply
4
Paper Width/Type
5
Printing Mode
6
Poster Size
7
Number of Copies
8
Advanced Menu
9
PC Connect Menu
The screen shows details about the current paper supplies, and displays the various
options that are available. This main menu appears when you turn on the system.
To navigate the options shown on the screen, use the Navigation Arrow buttons,
then use the OK button to select. Use the Up and Down arrow buttons to highlight
different options, and use the Right and Left arrow buttons to choose different
settings for the highlighted option.
In certain menus, you may see arrows at the top and bottom edges of the menu.
This indicates that the menu continues to another page; use the Up and Down arrow
buttons to cycle through options and continue to the next page. Pressing the Close
button will return you to the previous menu.
The following Indicator Icons, along the bottom of the screen, will only appear when
the represented option is enabled. Some of them will usually appear, as those
functions are on by default.
11
800.788.5572 GraphicProducts.com
GETTING TO KNOW ECHO
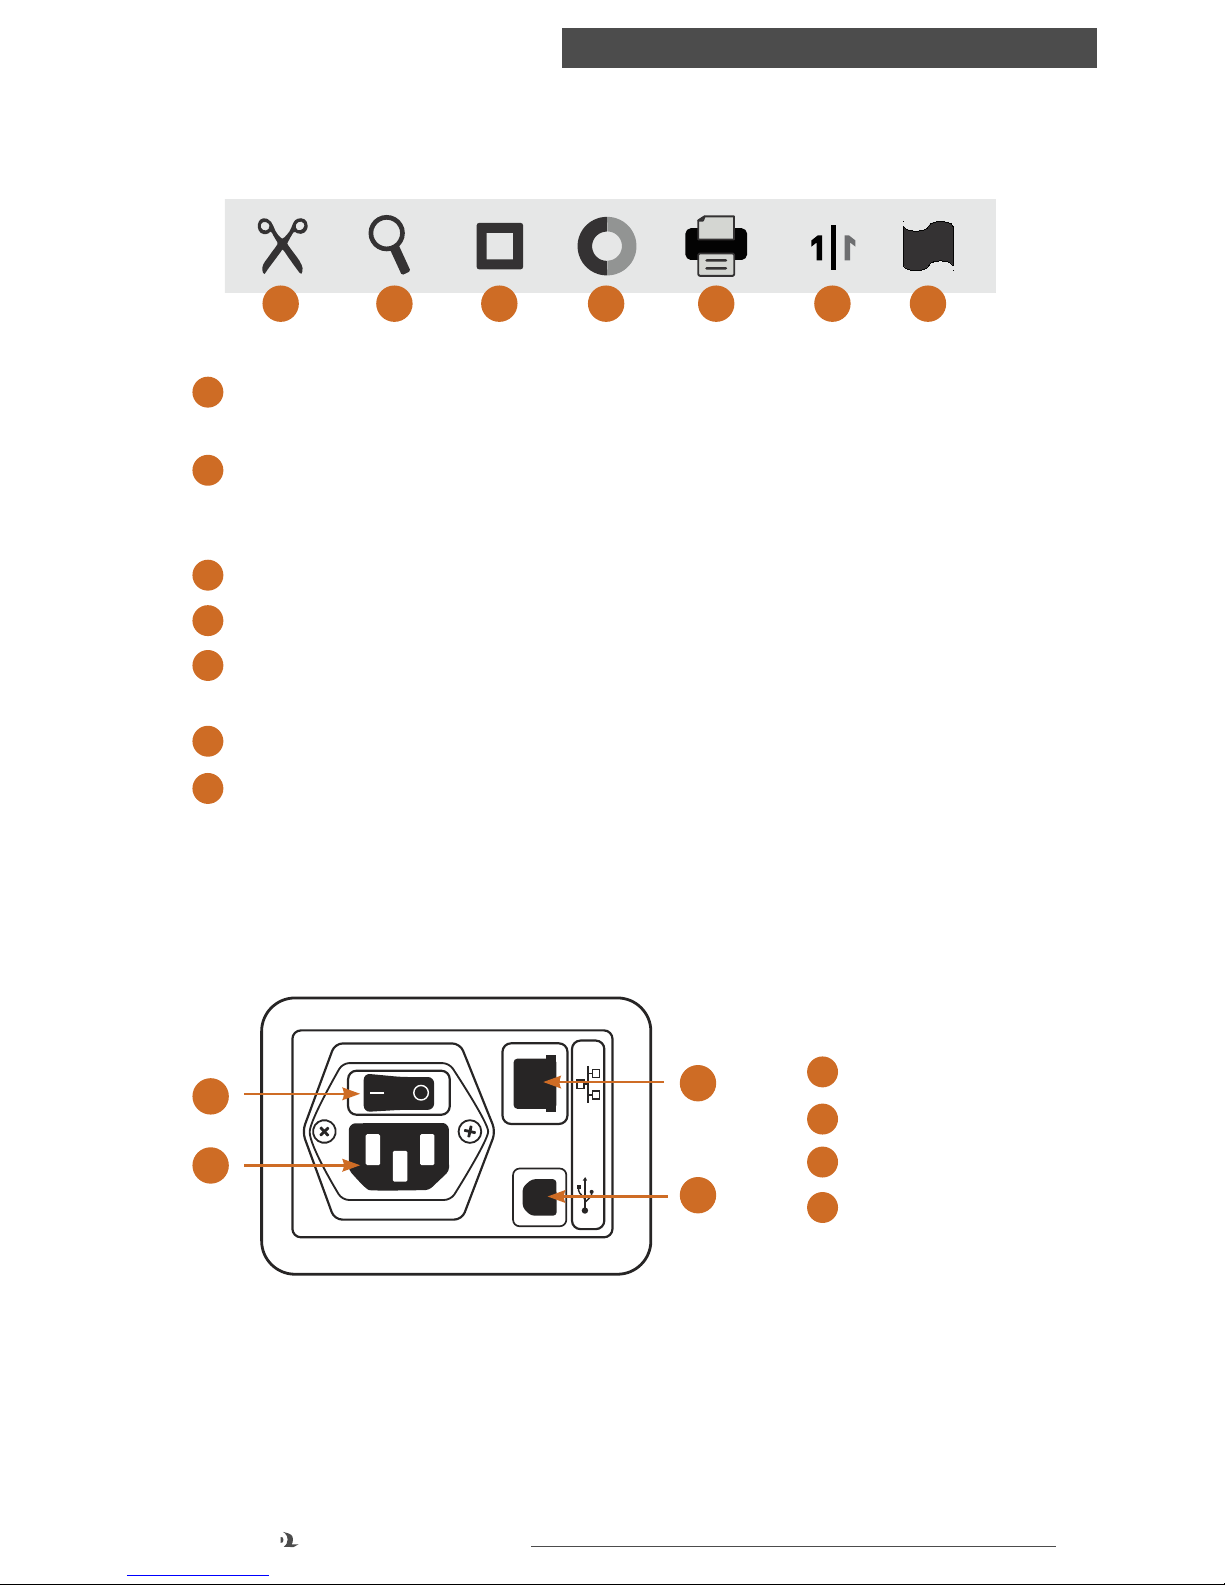
Indicator Icons
100'
1 2 3 4 5 6 7
1
Auto Cut – Each poster will be cut immediately after being printed. This option is
enabled by default.
2
Preview – A preview of your poster will appear on the screen before it is printed.
You will need to press OK or Print again to begin printing. This option is enabled by
default.
3
Border – A printed Border is being added to your poster.
4
Contrast – The default Contrast has been adjusted for this print.
5
Alignment/Darkness – The default Alignments or Darkness have been adjusted
for this print.
6
Mirror – This print will be reversed, as if seen in a mirror.
7
Banner – A series of original documents, or a single long document, are being
printed as a single long banner (rather than as a series of individual posters.)
Connection Panel
3
1
2
4
1
Electricity on/off
2
3-prong outlet
3
Ethernet port
4
USB port

12
GraphicProducts.com 800.788.5572
SETUP INSTRUCTIONS
2. Setup Instructions
2.1 Normal Setup
To begin using Echo, you will need to follow several basic steps. There are also some
optional steps, which will prepare your Echo for more advanced uses.
Power
Echo needs power from a standard, grounded 110-240V wall socket. Before
connecting the power cord, make sure that the Master Power Switch is set to the
“Off” position. (The Master Power Switch is located on the Connection Panel, on the
back of the system.) Connect the surge suppressor to a wall socket. Then, connect
Echo’s power cable to the surge suppressor and to Echo’s power plug, next to the
Master Power Switch. You can then turn the Master Power Switch on.
Moving the Left Paper Bracket
Echo can use supply paper rolls in two different sizes: 23" and 36". (The 23" width is
actually just over 23" wide; for simplicity, it is referred to as 23".)
When changing from one supply paper size to the other, you will need to move the
left paper bracket to the appropriate position inside the system.
1. Press the Lid Release button on Echo’s front panel, and raise the printer lid.
With the printer lid open, you can check the label inside the system to see if the
bracket is in the correct position for your paper.
2. The left paper bracket has an attached thumbscrew to secure it in place. If
you need to move the bracket, release the thumbscrew by turning it counterclockwise.
3. Pull the bracket toward the front of the printer, “unlocking” the bracket from its
alignment pins, and then lift it out. Be careful, as the edges of this bracket may
be sharp.
4. Position the left paper bracket over the appropriate set of alignment pins, and
push the bracket toward the back of the printer. The alignment pins and bracket
will “lock” together.
2
3
4
5. Secure the bracket with the thumbscrew, turning the screw clockwise until snug.
13
800.788.5572 GraphicProducts.com
SETUP INSTRUCTIONS
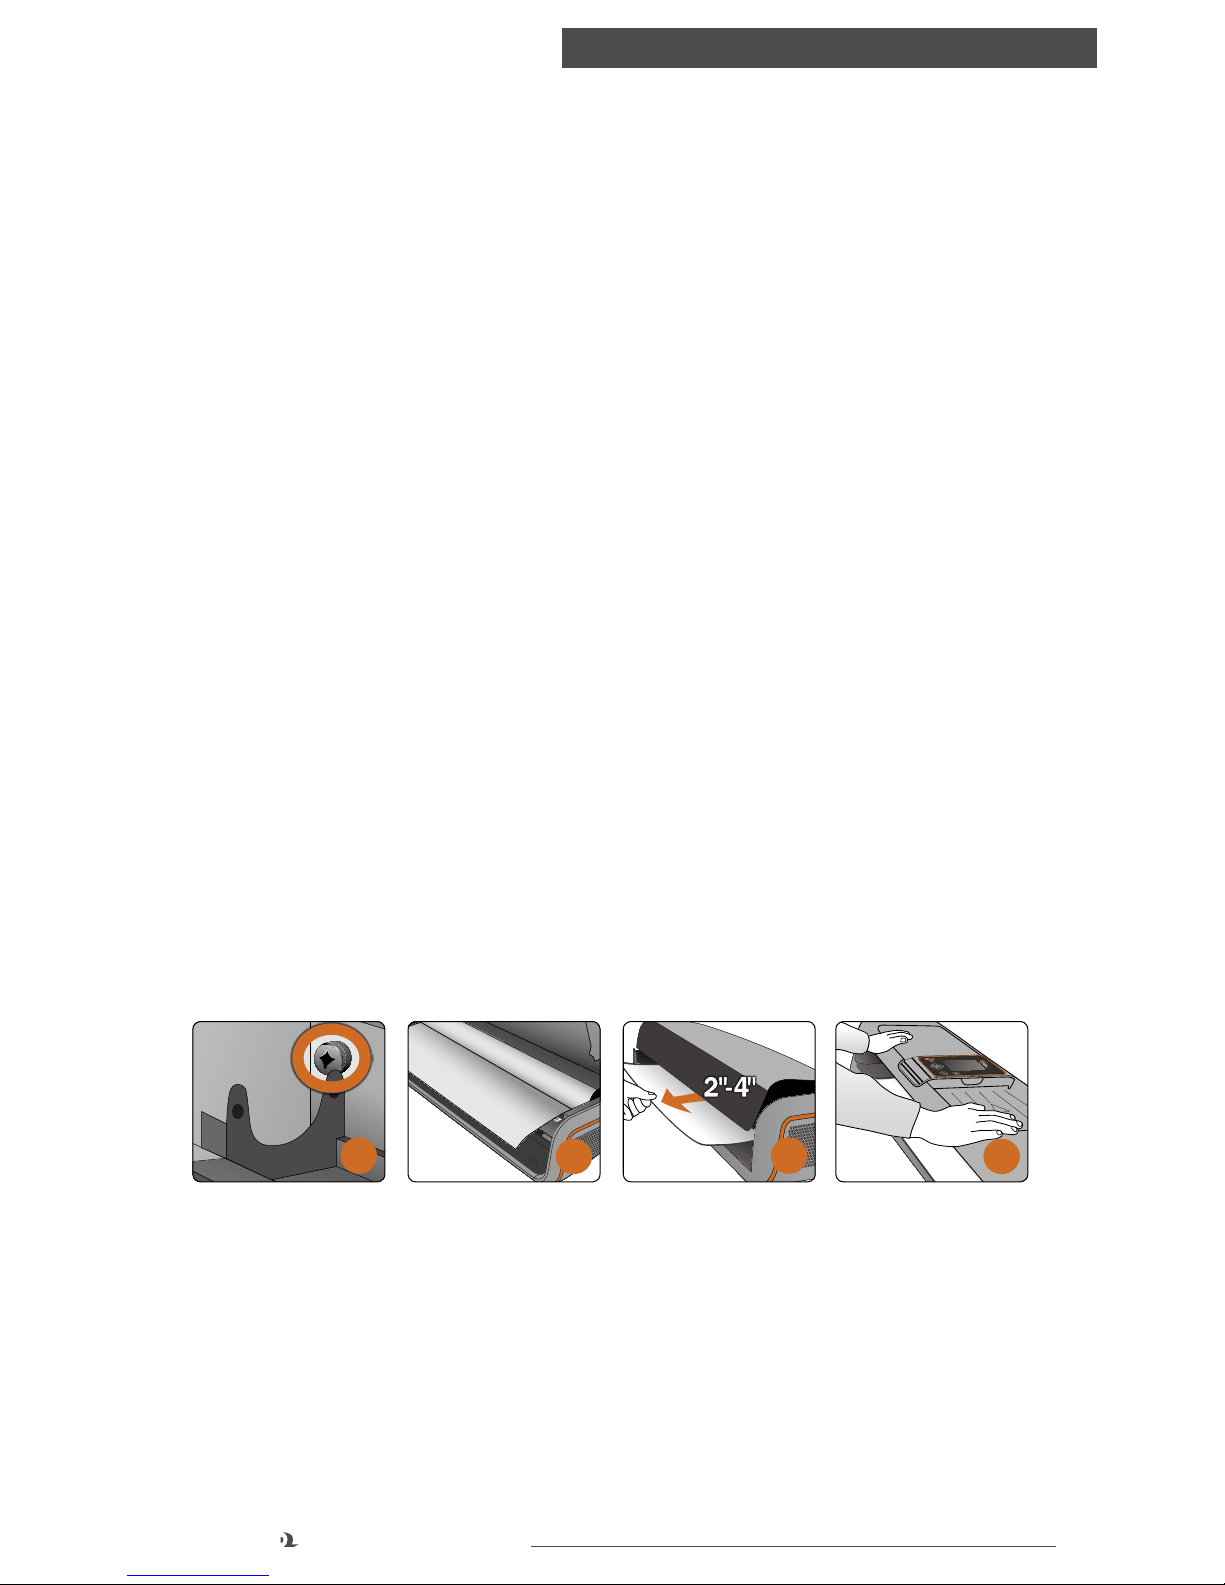
Loading Supply Paper
Echo uses special supply paper to print posters. You will need to load this paper
properly before beginning to use the system. You will also need to load a new supply
roll when the old one runs out, or when you want to change paper colors or types.
When you load supply paper, the cutter should be in its home position, at the far
right of the printer. If the cutter is not at the home position, do not move it by hand.
Instead, close the lid, and use the Power On/Off button to turn Echo on, prompting
the cutter to return home. Then, turn the system off again and continue.
1. Turn Echo off with the Power On/Off button. Press the Lid Release button on the
front of the system, and raise the lid.
2. If you are replacing an existing roll of supply paper, lift the existing roll out of its
place.
3. Make sure that the left paper bracket is in the correct position for the paper
you will be using. (For details on moving the bracket, see Moving the Left Paper
Bracket in this section.)
4. Place your new roll of supply paper in the printer, with the end caps resting
in the paper brackets, and with the paper unrolling from beneath the roll, as
shown.
5. Pull the edge of the paper a few inches out of the printer, so that you can keep
the paper in place when you close the lid. Hold the edge of the paper with one
hand as you gently lower the lid, to keep the paper from curling back in. Then,
use both hands to press the lid fully closed.
6. Turn Echo back on with the Power On/Off button. At this point, Echo will be
ready to print. If preferred, you may use Echo’s cutter to trim the edge of the
paper with the Cut (scissors) button.
3
4
5
5
 Loading...