

Graphic Products DuraLabel 4000 User Manual
DuraLabel
®
4000
User’s Guide
Graphic Products, Inc.
1-800-788-5572
www.DuraLabel.com
www.GraphicProducts.com
E-mail: info@GraphicProducts.com

Graphic Products, Inc.
PO Box 4030, Beaverton, OR 97076-4030
web site: www.GraphicProducts.com | email: info@GraphicProducts.com
phone: 1-800-788-5572

INTRODUCTION
Welcome... and congratulations on the purchase of your new DuraLabel® 4000
Thermal Transfer Printer! This guide is provided to get you printing as quickly
as possible.
In this guide, you'll fi nd information on setting up your printer, confi guring your
software and creating custom labels. We understand not every topic relating to the
printer can be addressed in this document, so at Graphic Products we stand ready to
help. If you have any questions or concerns, you are welcome to call us anytime!
Please contact us for all your labeling needs. From standardized labels to custom
labels, we’re ready to provide the labeling supplies you need. Call today to get your
labeling problems solved.
Contents
Warranty ............................................................pg. 2
FCC Compliance ................................................pg. 3
Safety Instructions ............................................pg. 3
Getting Started ..................................................pg. 5
Minimum System Requirements .................pg. 5
Supplies ........................................................pg. 5
Prepare Printer .............................................pg. 5
Load Printer .......................................................pg. 6
Printer Inside Parts.......................................pg. 6
Supplies ........................................................pg. 7
Load Label Supply ........................................pg. 7
Printer Ribbon Parts .....................................pg. 9
Load Ribbon ..................................................pg. 10
Install Driver ......................................................pg. 12
Auto Install Instructions ...............................pg. 12
Manual Install Instructions ..........................pg. 14
Driver Settings ...................................................pg. 18
Configure Windows 2000/XP/Vista/7 ........pg. 18
Continuous Vinyl Printing Instructions ........pg. 19
Die-Cut Label Instructions ...........................pg. 19
Die-Cut Label Calibration ........................pg. 19
Driver Settings for Die-Cut Labels ..........pg. 19
Black Mark Label Instructions .....................pg. 20
Black Mark Label Calibration ..................pg. 20
Driver Settings for Black Mark Labels ....pg. 20
Cut Labels in Intervals .................................pg. 20
Adjust Print Speed ........................................pg. 21
Adjust Darkness ...........................................pg. 21
Label Creation ...................................................pg. 22
Use Templates ..............................................pg. 23
Set Up Microsoft Word Document ...............pg. 23
Select Printer .....................................................pg. 23
Change Automatic Cutter Settings ..............pg. 24
Change Page Setup ..........................................pg. 25
Orientation ....................................................pg. 26
Label Design ......................................................pg. 27
Text ................................................................pg. 27
Graphics ........................................................pg. 29
Symbols .........................................................pg. 31
Barcodes .......................................................pg. 33
Sequencing ...................................................pg. 35
Import from Excel .........................................pg. 39
Printer Settings..................................................pg. 44
FEED Key .......................................................pg. 44
Auto-Sensing .................................................pg. 44
Cleaning & General Maintenance ....................pg. 45
Clean Print Head ..........................................pg. 45
Clean Manual Cutter Module ......................pg. 46
Clean Electronic Guillotine
Cutter Module ...............................................pg. 47
Clean Platen Roller (DL4000 with
Manual Cutter Module) ................................pg. 48
Clean Platen Roller (DL4000 with
Electric Guillotine Cutter Module) ...............pg. 49
Troubleshooting .................................................pg. 50
Specifications ....................................................pg. 53
-1-

WARRANTY
The DuraLabel 4000 by Graphic Products is warranted to be free from defects in
materials or workmanship for a period of two years from the date of purchase, with
the following exception: The DuraLabel 4000 print head is warranted to be free
from defects in materials and workmanship for a period of one year from the date of
purchase. Within this period, Graphic Products, Inc. will, at its sole discretion, repair
or replace any components that fail in normal use. Such repairs or replacements will
be made at no charge to the customer for parts or labor, provided the customer shall
be responsible for any transportation cost. This warranty does not cover equipment
or parts that have been misused, altered, neglected, carelessly handled, used for
purpose other than those for which the printer was manufactured, or damages
resulting from unauthorized service.
NOTE: Repairs have a 90 day warranty. If the unit sent in is still under its original warranty, then the
new warr
anty is 90 da
ys or to the end of the original warranty, depending upon which is longer.
The Warranties and remedies contained herein are exclusive and in lieu of all other
warranties whether expressed, implied or statutory, including any liability arising
under any warranty of merchantability or fi tness for a particular purpose, statutory or
otherwise. This warranty gives you specifi c legal rights, which may vary from state
to state.
In no event shall Graphic Products be liable for any incidental, special, indirect or
consequential damages, whether resulting from the use, misuse or inability to use
the product for any reason, including defect. Some states do not allow the exclusion
of incidental or consequential damages, so the above limitation may not apply in all
areas.
Graphic Products retains the exclusive right within all warranty periods to repair the
product, replace the product or offer a full refund of the purchase price, at its sole
discretion. Such remedy shall be your sole and exclusive remedy for any breach of
warranty.
For further service information, please contact your Graphic Products representative
at 1-800-788-5572, or visit www.GraphicProducts.com.
-2-

FCC COMPLIANCE STATEMENT FOR AMERICAN USERS
This equipment has been tested and found to comply with the limits for a CLASS A
digital device, pursuant to Part 15 of the FCC Rules. These limits are designed to
provide reasonable protection against harmful interference when the equipment is
operated in a commercial environment. This equipment generates, uses, and can
radiate radio frequency energy and, if not installed and used in accordance with the
instructions, may cause harmful interference to radio communications. Operation of
this equipment in a residential area is likely to cause harmful interference in which
case the user will be required to correct the interference at own expense.
CAUTION
Only use with power supply adapter model: WDS060240 (7A).
Changes or modifi cations not expressly approved by the party responsible for
compliance could void the user's authority to operate the equipment.
Specifi cations are subject to change without notice.
Safety Instructions
Please review the following safety instructions prior to using the printer:
1. Keep the printer away from humidity.
2. Before you connect the printer to a power outlet, please check the voltage of the
power source.
3. Disconnect the printer from the voltage of the power source to prevent possible
transient-over-voltage damage.
4. To avoid electrial shock, DO NOT pour any liquid onto the printer or printer parts.
5. ONLY qualified service personnel should attempt to repair the printer.
6. Under any circumstances, DO NOT repair or adjust energized equipment without
supervision. For your protection, a person capable of providing first aid must
always be present.
7. Obtain first aid or medical attention immediately after an injury. Never neglect an
injury, no matter how slight it seems.
-3-

-4-

GETTING STARTED
Minimum System Requirements
Operating System– Windows: 2000 SP4, XP SP2, Vista and 7
Memory– 128 MB RAM
Additional Requirements– IT administrative privileges
Supplies
The ribbon and various print media for the DuraLabel 4000 have been optimized for
compatibility and print quality. Only authorized supplies from Graphic Products will
print correctly in the DuraLabel 4000.
Prepare Printer
Instructions for loading supplies and connecting your printer are located in the
QuickStart Guide as well as this User's Guide. Please read and follow those
instructions carefully before continuing.
NOTE: To view the electronic version of the User's Guide, you will need a corresponding document
viewer (.PDF or .doc). A suit
able viewer–Adobe Acr
obat Reader–is included on the installation CD.
Please contact us for all your labeling needs. From standardized to custom
labels, we’re ready to pro
vide the labeling supplies you need.
Call 1-800-788-5572 today to get your labeling problems solved.
-5-
LOAD PRINTER
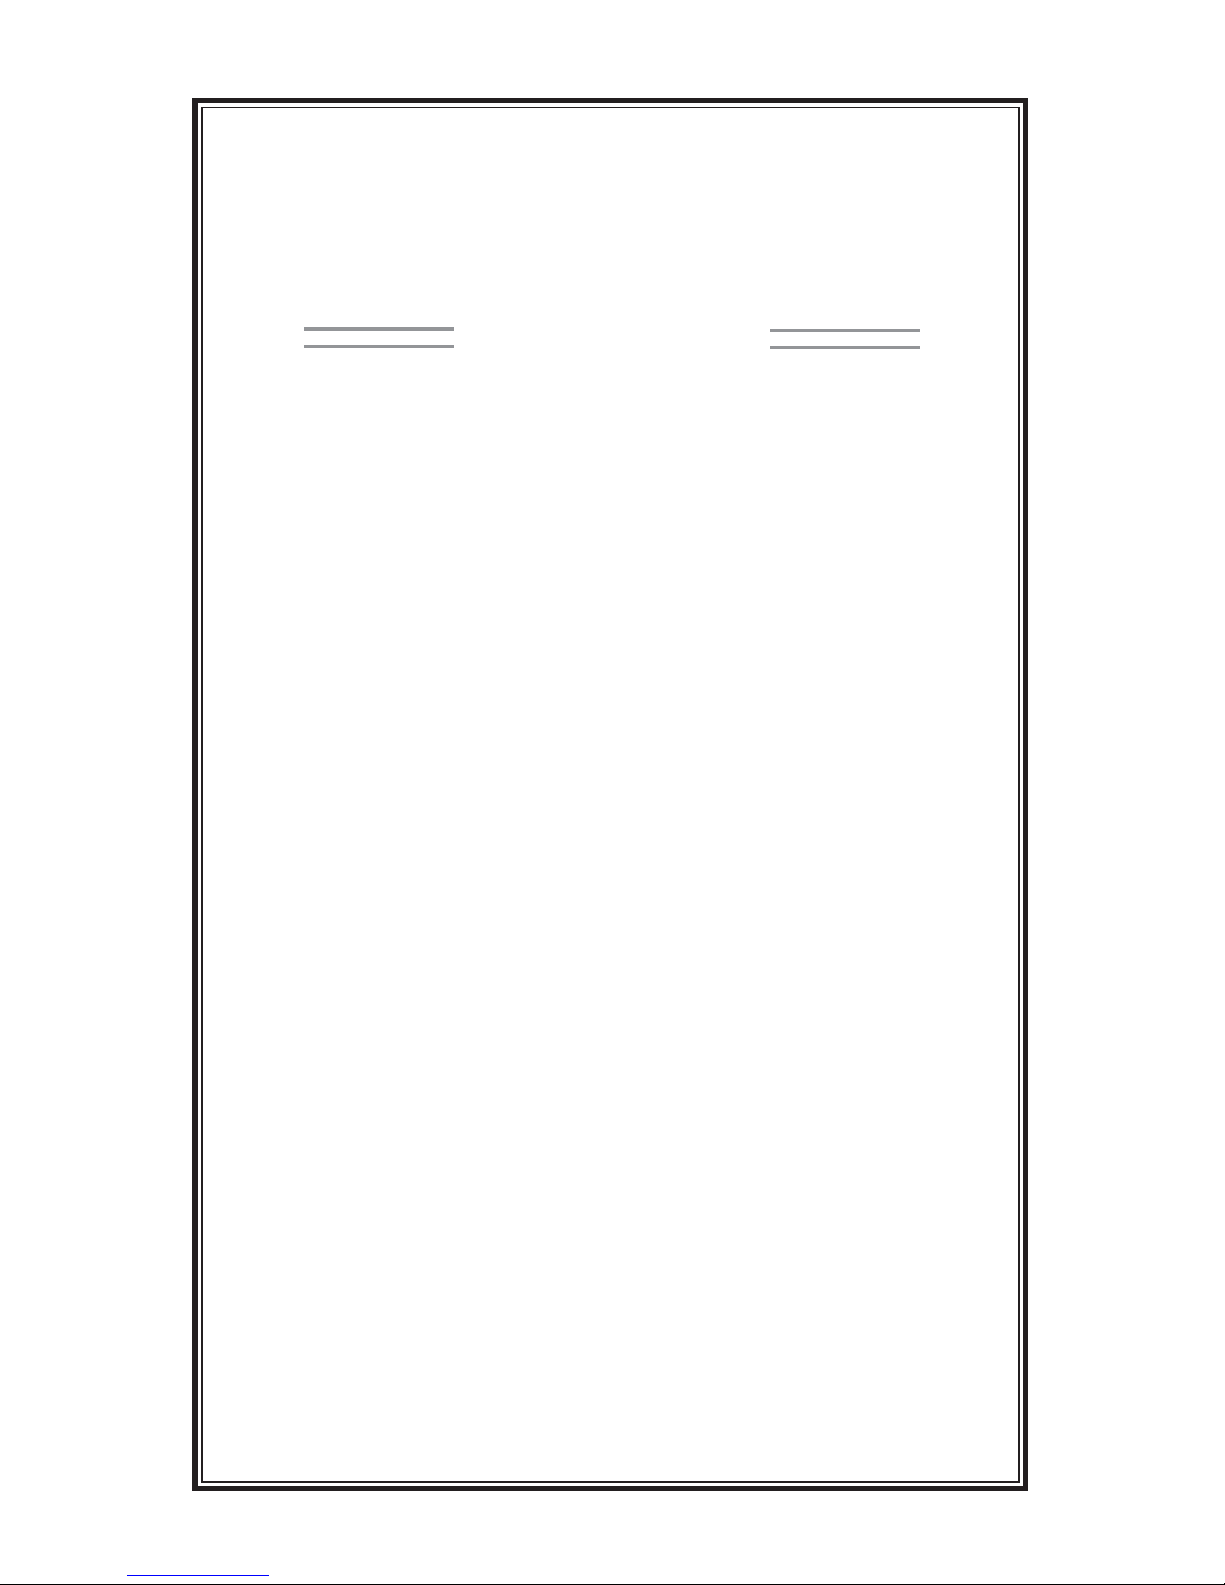
Printer Inside Parts
2. LED Light
3. Ribbon Observing Window
4. Ribbon Rewind Wheel
5. Print Carriage (outlined)
6. Locking Levers
7
. Printer Cover
8. Thermal Print Head
9. Print Line Adjus
tment Gear
10. Label Guides
12. Label Sensor
13. Platen Roller
1c
4
2
3
1
6
13
12
7
8
9
10
5
1a
1b
1. Label Supply Spindle (outlined)
1a. Supply Shaft
1b. Label Stop Plates (2)
1c. Label Mount Slots (2)
-6-
SUPPLIES
IMPORTANT! Always turn OFF the power fi rst! Always wait at least 5 seconds before
turning the power back ON.
The ribbon and various printer media for the DuraLabel 4000 are optimized for
compatibility and print quality. Only authorized supplies from Graphic Products will
print correctly in the DuraLabel 4000.
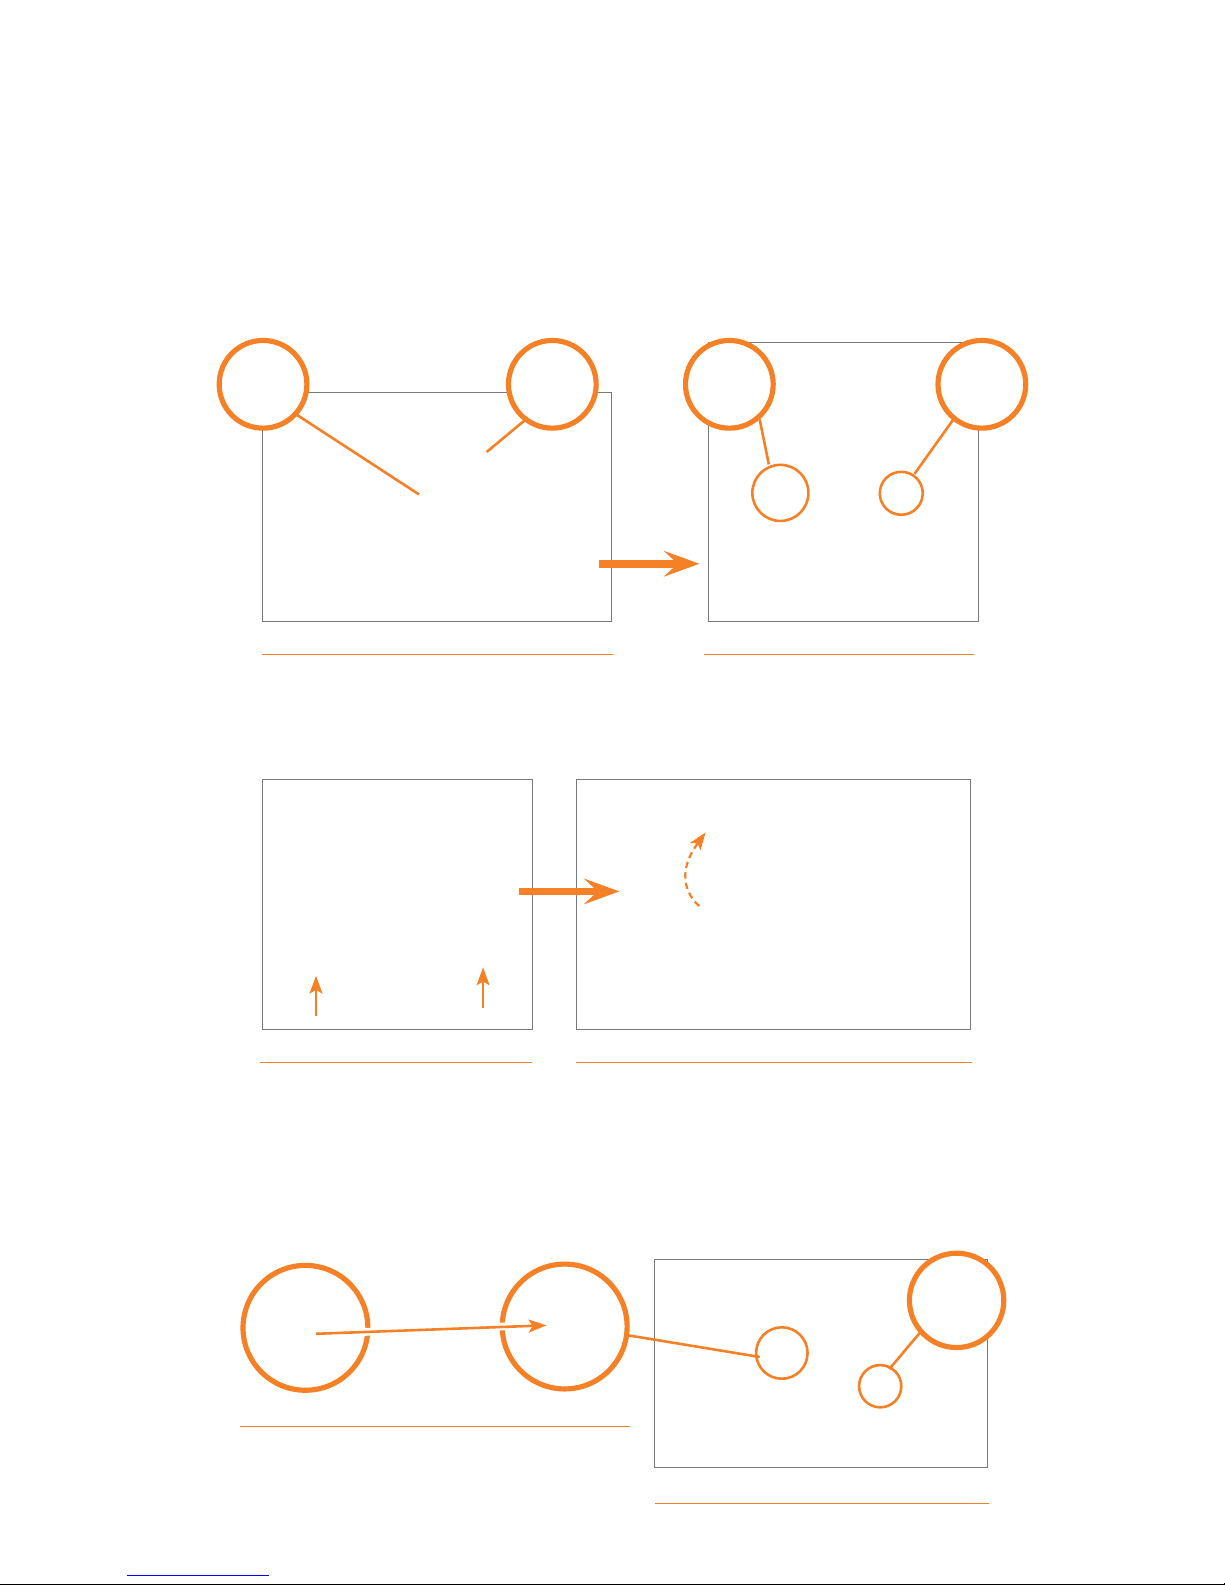
Load Label Supply
IMPORTANT! Always turn OFF the power fi rst!
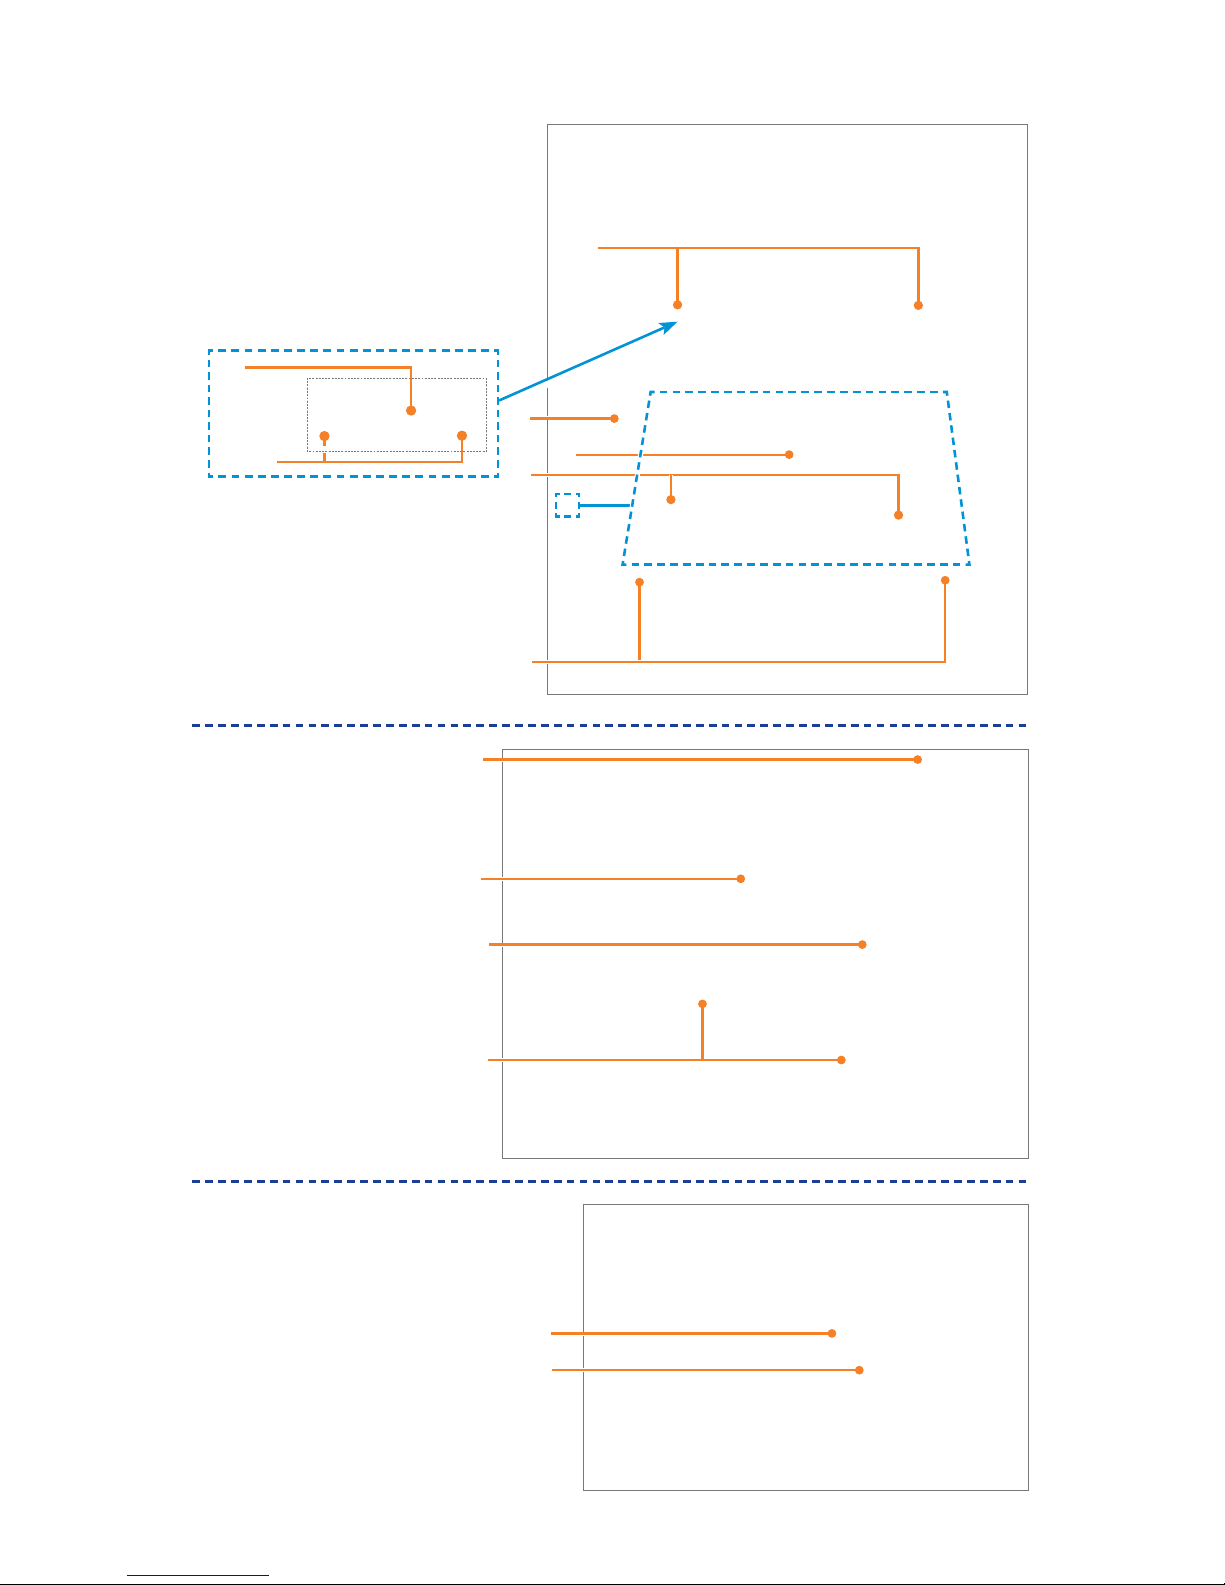
1. Open the printer cover by pressing the cover open buttons located on each side of
the printer cover.
2. Place label supply onto the supply shaft. Assemble the label stop plates on each
end of the supply shaft, centering the label supply using the measurements on the
supply shaft.
3. With the label supply extending over the top, towards the front of the printer, place
the loaded label supply spindle in the label mount slots at the back of the printer.
(A) 4" label supply installation
Label supply spindle set in label mount slots
Printer cover in open position
Left cover
open button
Right cover
open button
-7-

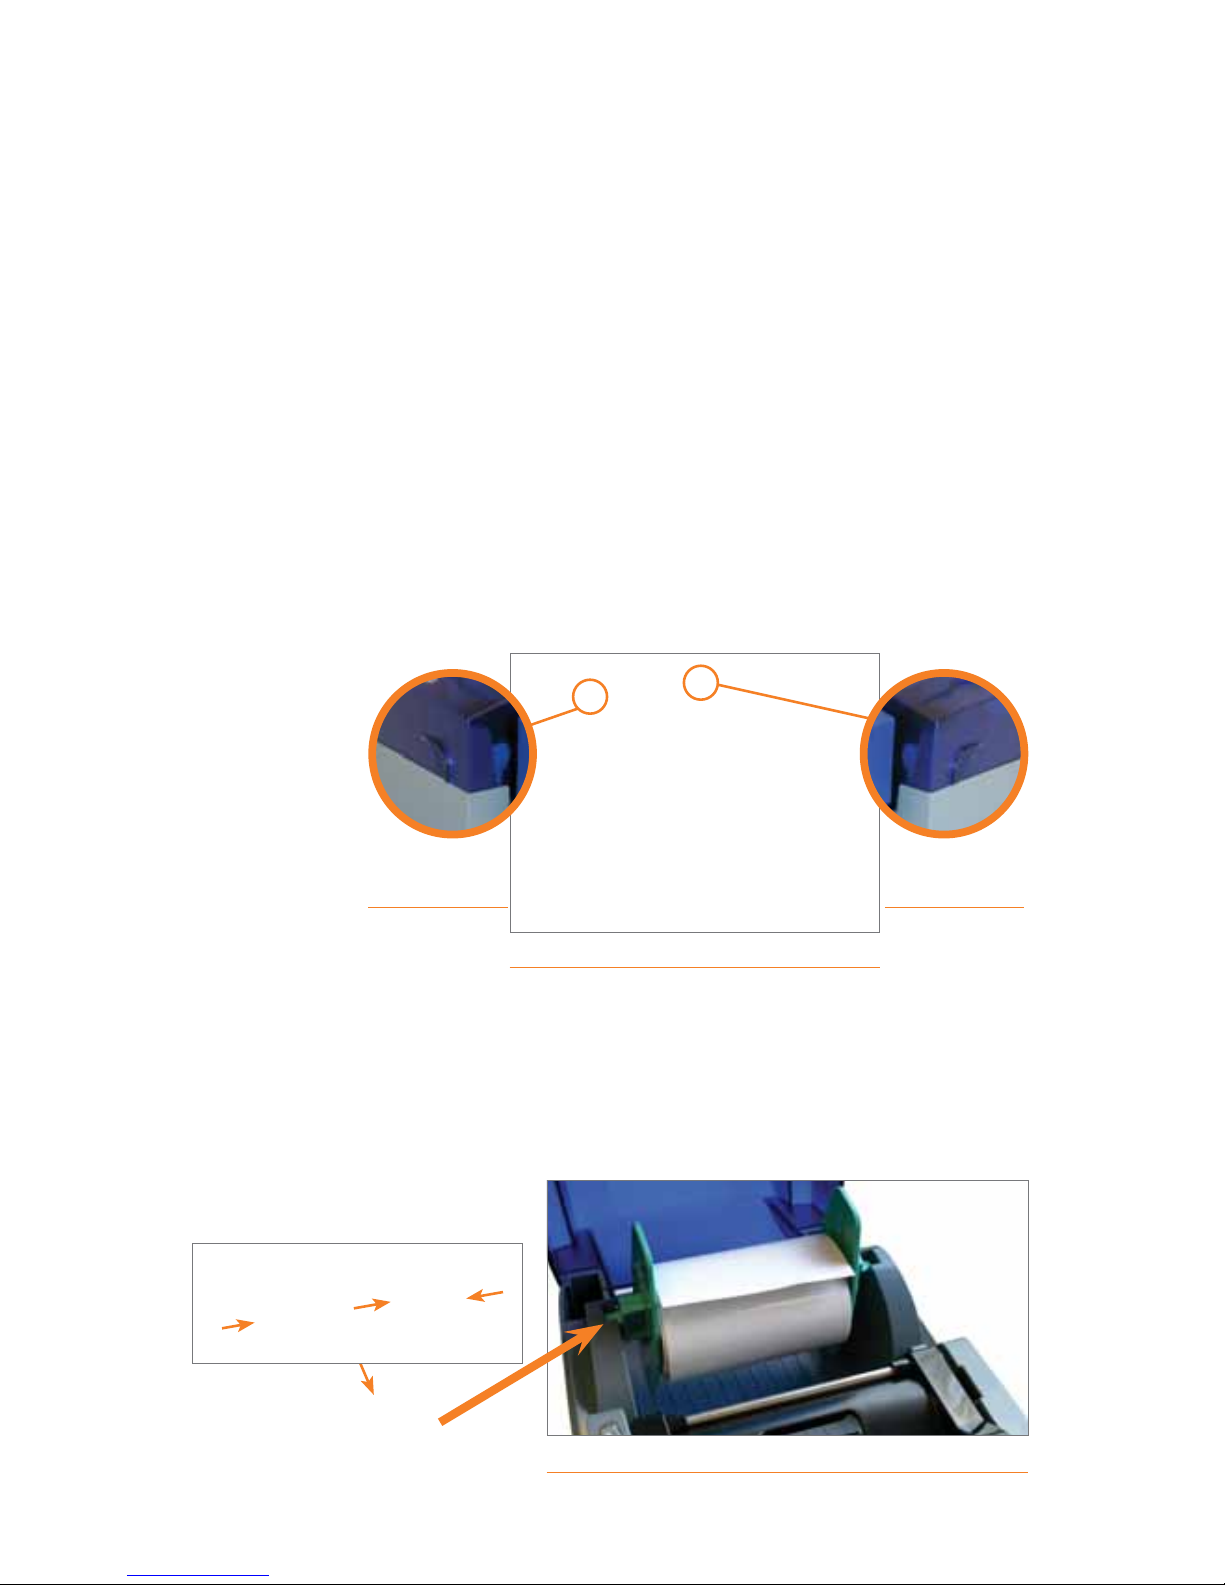
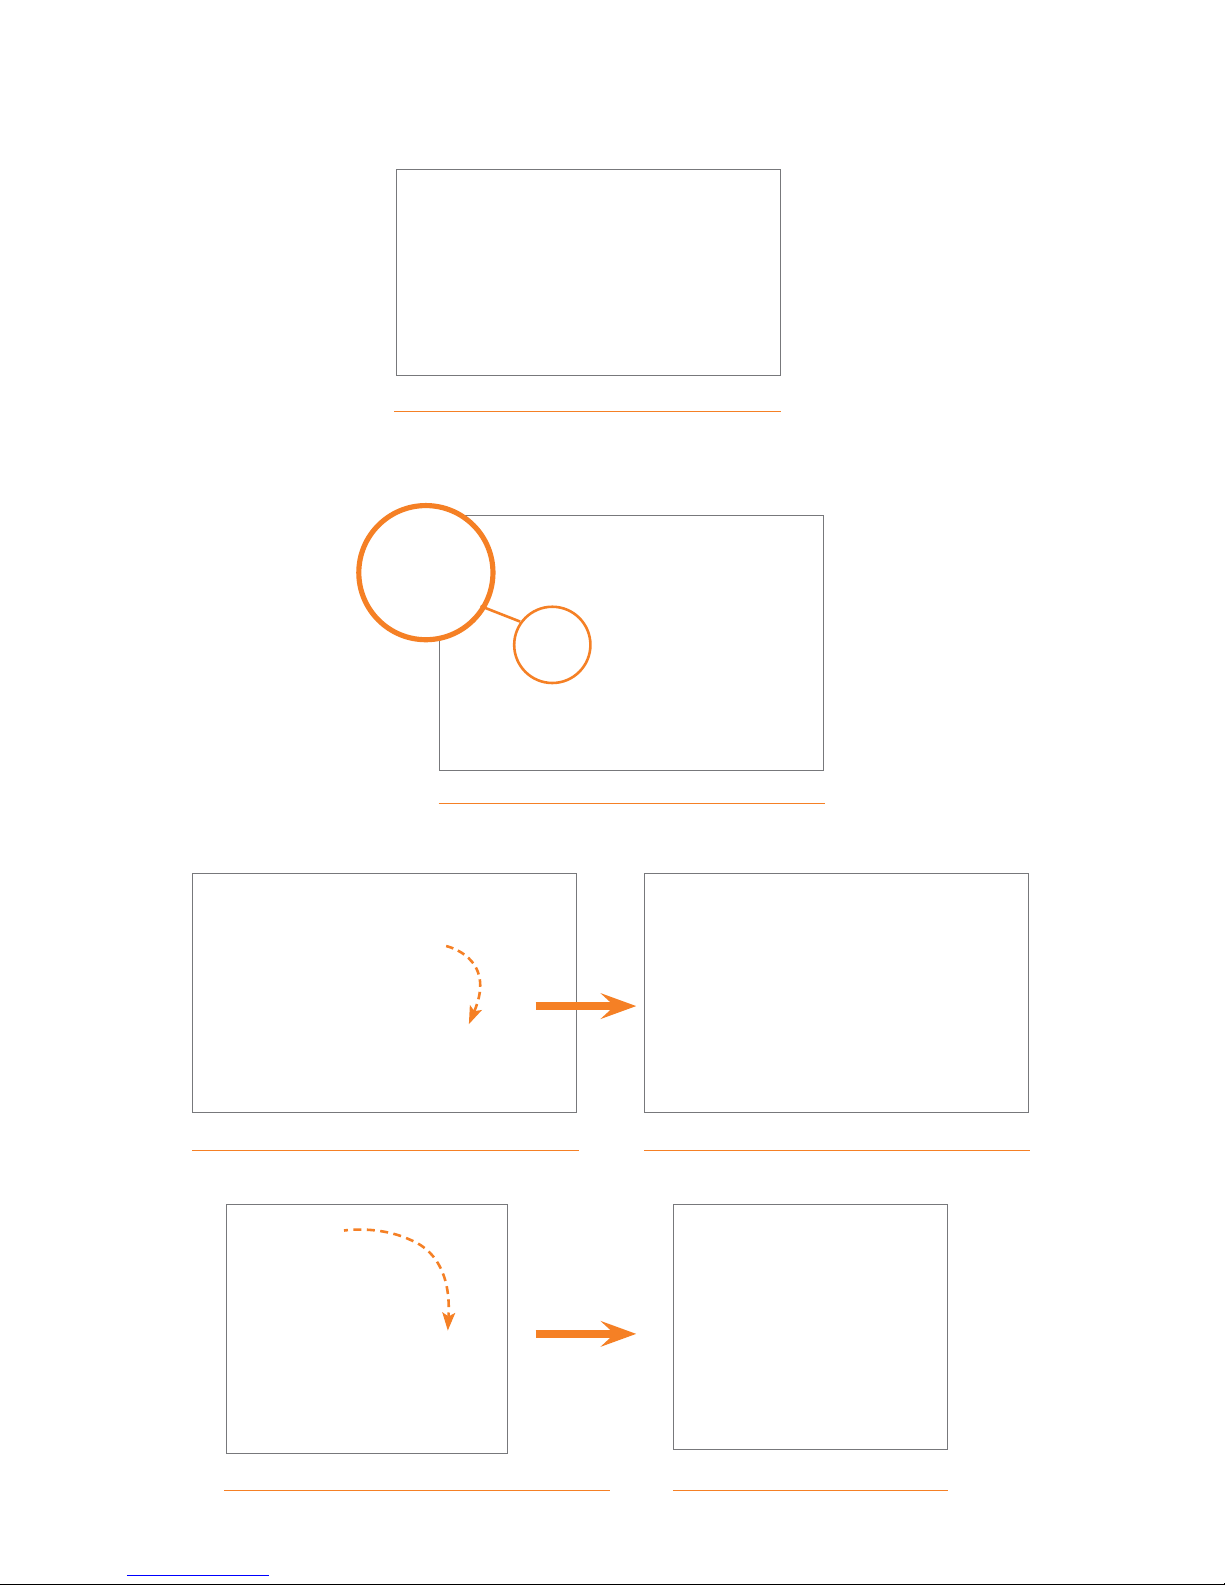
4. Press the locking levers inward, and lift up the print carriage.
4. Feed the end of the label supply under the print carriage and through the manual
cutter module, leaving an inch or two of label supply visible outside of
the printer.
5. Align the label guides to the edges of the label supply by sliding both label guides
toward the label supply at the same time.
6. Close the print carriage (
A) by gently pressing down until it locks into place.
Press locking levers inward
Label supply threaded through printer
Label guides adjusted to label supply
Print carriage in up position Print carriage down in locked position
Print carriage in up position
A
A
-8-
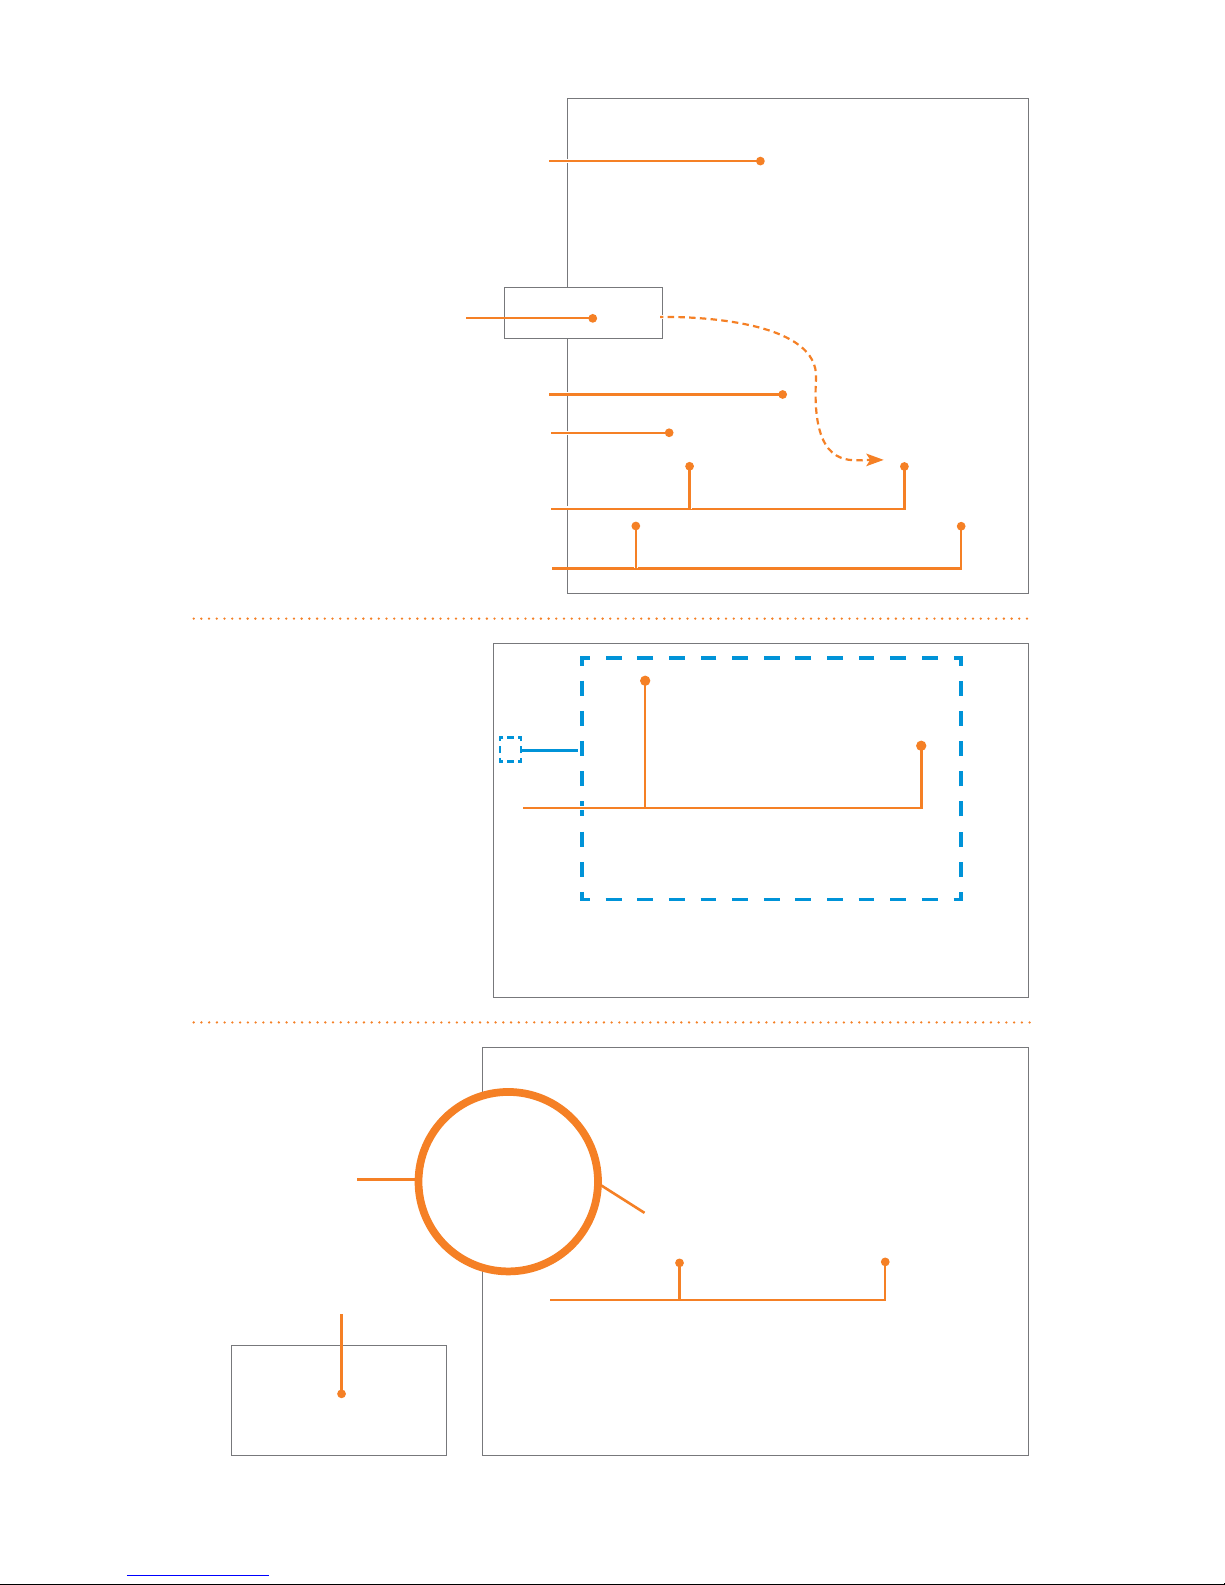
Printer Ribbon Parts
1. Printer Cover
2. Ribbon Rewind Core
3. Ribbon Observing Window
4. Ribbon Rewind Wheel
5. Ribbon Rewind Holders (A & B)
6. Locking Levers
5
6
8
7
1
2
3
4
10 11
9
B
B
A
A
A
A
B
B
7. Print Carriage (outlined)
8. Locking Levers
9. Ribbon Wheels (3)
10. Ribbon
1
1. Ribbon Holders (A & B)
-9-
Load Ribbon
IMPORTANT! Always turn OFF the power fi rst before loading supplies! Always wait at
least 5 seconds before turning ON the power.
1. With the printer cover open, install one end of the ribbon rewind core onto ribbon
rewind holder (
B), located inside right. Install the other end of the ribbon rewind
core onto ribbon rewind holder (
A), located inside left.
NOTE: Make sure to align the notch on the ribbon rewind core with the notch on ribbon rewind
holder A. Y
ou may rotate the ribbon rewind wheel to help align the ribbon rewind core.
2. Press the locking levers inward and lift up on the print carriage.
3. Hold the ribbon so that the loose end of the ribbon falls to the rear of the printer,
then install one end of the ribbon onto ribbon holder (
B), located inside right; then
install the other end of the ribbon onto ribbon holder (
A), located inside left.
NOTE: Make sure to align the notch on the ribbon core with the notch on ribbon holder
A.
B
B
B
B
A
A
Before ribbon rewind core is installed
Press locking levers inward
Ribbon loaded under print carriage
Align ribbon notch w/ribbon holder notch
Print carriage in up position
Ribbon rewind core installed
A
A
B
B
A
A
-10-
4. Extend the ribbon back over the “top” of the print carriage and, using a small piece
of tape, adhere the ribbon onto the ribbon rewind core.
5. Rotate the center ribbon rewind wheel clockwise; toward the back of the printer to
make the ribbon tight and smooth.
6. Close the print carriage (
A) until it gently snaps into place.
7. Close the printer cover (
B).
Ribbon supply taped to rewind core
Ribbon tightened
Print carriage in up position
Printer cover in open position Printer cover closed
Print carriage down in locked position
B
A
-11-

IMPORTANT! You must have administrative rights in order to install the driver.
NOTE: Find out your Windows version by right-clicking on the My Computer icon (located on your
desktop). Select the Properties option. Your Windows version is located under the System heading.
Make sure you have installed the latest updates from Microsoft, including service packs.
INSTALL DRIVER
Auto Install Instructions
IMPORTANT! If you are upgrading from an existing DuraLabel installation, see the
inside cover of the QuickStart Guide.
NOTE: Make sure the printer is powered OFF prior to connecting the printer.
Insert the DuraLabel 4000 installation CD into your CD-ROM.
Connect the power supply from the DuraLabel 4000 to an electrical outlet. Connect
the USB cable from the DuraLabel 4000 to your PC. Power ON the DuraLabel 4000.
A “Found New Hardware” window may appear. If so, select No, not this time then
click Next.
Select Install the software automatically (Recommended) and click Next.
-12-

A window may appear showing the progress of searching for the fi les.
If a hardware installation window appears, click Continue Anyway.
A screen may appear showing the progress of copying the fi les.
Click Finish to Completing the Found New Hardware Wizard.
-13-

Manual Install Instructions
IMPORTANT! If you are upgrading from an existing DuraLabel installation, see the
inside cover of the QuickStart Guide.
Insert the DuraLabel 4000 installation CD into your CD-ROM.
Connect the power supply from the DuraLabel 4000 to an electrical outlet. Connect
the USB cable from the DuraLabel 4000 to your PC. Power ON the DuraLabel 4000.
To begin, click Manual Driver Install at the bottom right corner of your DuraLabel
4000 setup screen.
Click Next to Welcome to the Add Printer Wizard window.
Read the License Agreement and the click I Agree to continue installing.
Verify the installation directory chosen. The default is “C:\DL4000” and click Install.
A window may appear showing the progress of installation.
Click Next to the Add Printer Wizard window.
-14-

Select either Local or Network for your printer driver. If you select Local, make sure
the "Automatically detect and install my Plug and Play printer" is checked.
Check Use the following port, and select USB001 (Virtual printer port for USB) and
click Next. (This step may automatically be skipped.)
Select Graphic Products DuraLabel 4000 and click Have Disk....
-15-
 Loading...