

Graphic Products DuraLabel 4 User Manual


Graphic Products
DuraLabel 4 Thermal Transfer Printer Series
USER'S MANUAL
Version 2.09
TEL: 1-800-788-5572
Web site: www.graphicproducts.com


5.1.5 Environment
z Operating temperature: 40oF to 104oF (5oC to 40oC)
o
z Storage temperature: 40
F to 140oF (5oC to 60oC)
z Humidity: 10% to 95% non-condensing
z Ventilation: Free air movement
5.1.6 Printer Body
z Dimension s:
6.14"H x 9.13"W x 11.34"D (15.6 cm H x 23.2 cm W x 28.8 cm D)
z Weight:
8.50 lbs (3.85 kg)
22

CONTENTS
1. PRODUCT INTRODUCTION...............................................................1
1.1 Compliances..................................................................................................... 1
1.2 Warranty Information........................................................................................ 1
1.2.1 Thermal Print Head ................................................................................... 2
1.2.2 Warranty Service Procedures ................................................................... 2
1.2.3 General Warranty Provisions .................................................................... 2
1.2.4 Limitation of Liability.................................................................................. 3
2. GETTING STARTED............................................................................4
2.1 Unpacking and Inspection ................................................................................ 4
2.2 Equipment Checklist......................................................................................... 4
2.3 Printer Parts ..................................................................................................... 5
2.4 Buttons and Indicators...................................................................................... 8
3. SET UP ................................................................................................9
3.1 Setting Up the Printer ....................................................................................... 9
3.2 Loading Label and Tag Stock........................................................................... 9
3.3 Ribbon Loading Instructions ........................................................................... 12
3.4 Installing the printer driver .............................................................................. 14
3.4.2 Configure the printer driver...................................................................... 15
4. USING THE DURALABEL 4 TTP......................................................16
4.1 Power-on Utilities............................................................................................ 16
4.1.1 Gap Sensor Calibration Utility ................................................................. 16
4.1.2 Printer Initialization.................................................................................. 17
4.2 Troubleshooting Guide ................................................................................... 18
4.3 Cleaning Print Head ....................................................................................... 20
5. SPECIFICATIONS, OPTIONS, & SUPPLIES.......................................... 21
5.1 Specifications ................................................................................................. 21
5.1.1 Printer ..................................................................................................... 21
5.1.2 Indicators and Buttons............................................................................. 21
5.1.3 Communication Interface ........................................................................ 21
5.1.4 Power Requirements............................................................................... 21
5.1.5 Environment ............................................................................................ 22
5.1.6 Printer Body ............................................................................................ 22


5. SPECIFICATIONS, OPTIONS, & SUPPLIES
5.1 Specifications
5.1.1 Printer
z Type: Thermal transfer
z Print speed: Selectable speeds of 1.0, 1.5 or 2.0 inches per second
z Resolution: 300 DPI, or 12 dots per mm
5.1.2 Indicators and Buttons
z Indicators: PWR., ON-LINE, ERR.
z Buttons: POWER, PAUSE, FEED.
5.1.3 Communication Interface
z Communications: RS-232C (DB-9) at 2400, 4800, 9600 or 19200 baud and
standard Centronics interface.
z Character set: ANSI ASCII character set
z Word length: 7 or 8 data bits, 1 or 2 stop bits, even, odd or none parity.
z Handshaking: Xon/Xoff (on receive mode only) and DSR/DTR
z Input buffer: 60KB
5.1.4 Power Requirements
z Input voltage: Switching power, 110-240 VAC, 50-60 Hz
z Output voltage: 24 VDC
z Circuit protection: 2A maximum
21
4.3 Cleaning the Thermal Print Head
You will need the following materials:
• Several cotton swabs
• Isopropyl alcohol (rubbing alcohol)
• Compressed air (optional)
Follow these steps to clean the DuraLabel 4’s thermal print head:
1. Turn off and unplug the printer. Make sure you unplug the power and computer
connections.
2. Remove all supplies (tape and ribbon) from the printer. (Optional: If you work in an
environment with excess dust or airborne particles you may want to clean your
DuraLabel 4 periodically with compressed air. Do this now.)
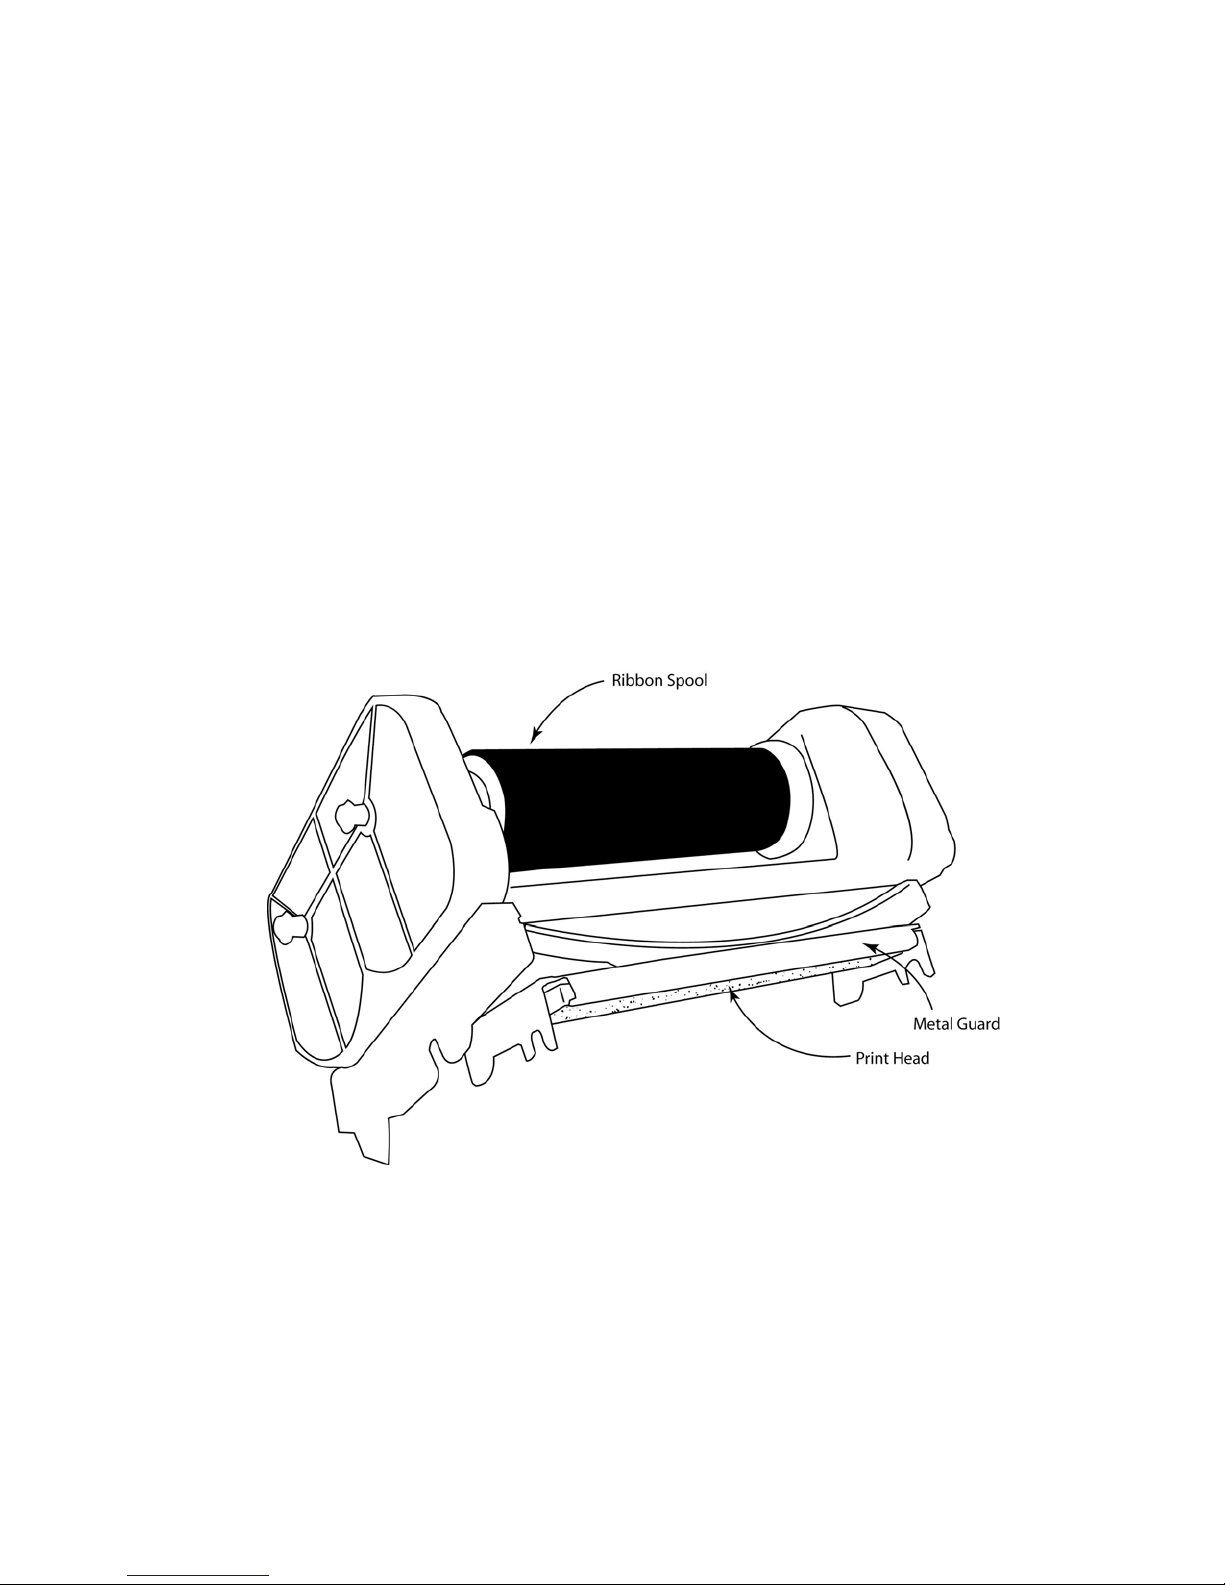
3. Open the Ribbon Mechanism (see graphic below). The print head is located underneath
the front edge of the Ribbon Mechanism; it is a light brown strip with white triangles
located just behind the metal guard.
4. Dip a clean cotton swab in the alcohol and gently wipe down the print head. You may
also use a foam-tipped swab that comes with alchohol in the stem. Squeeze the stem to
release the alcohol.
5. Repeat the process 2 to 3 times. When you’re done dry the print head with a clean, dry
cotton swab.
6. Repeat step 4 for the metal guard (see graphic above).
7. Let the unit dry for 5 minutes.
You can now reload your supplies and reconnect your cables.
20
 Loading...