

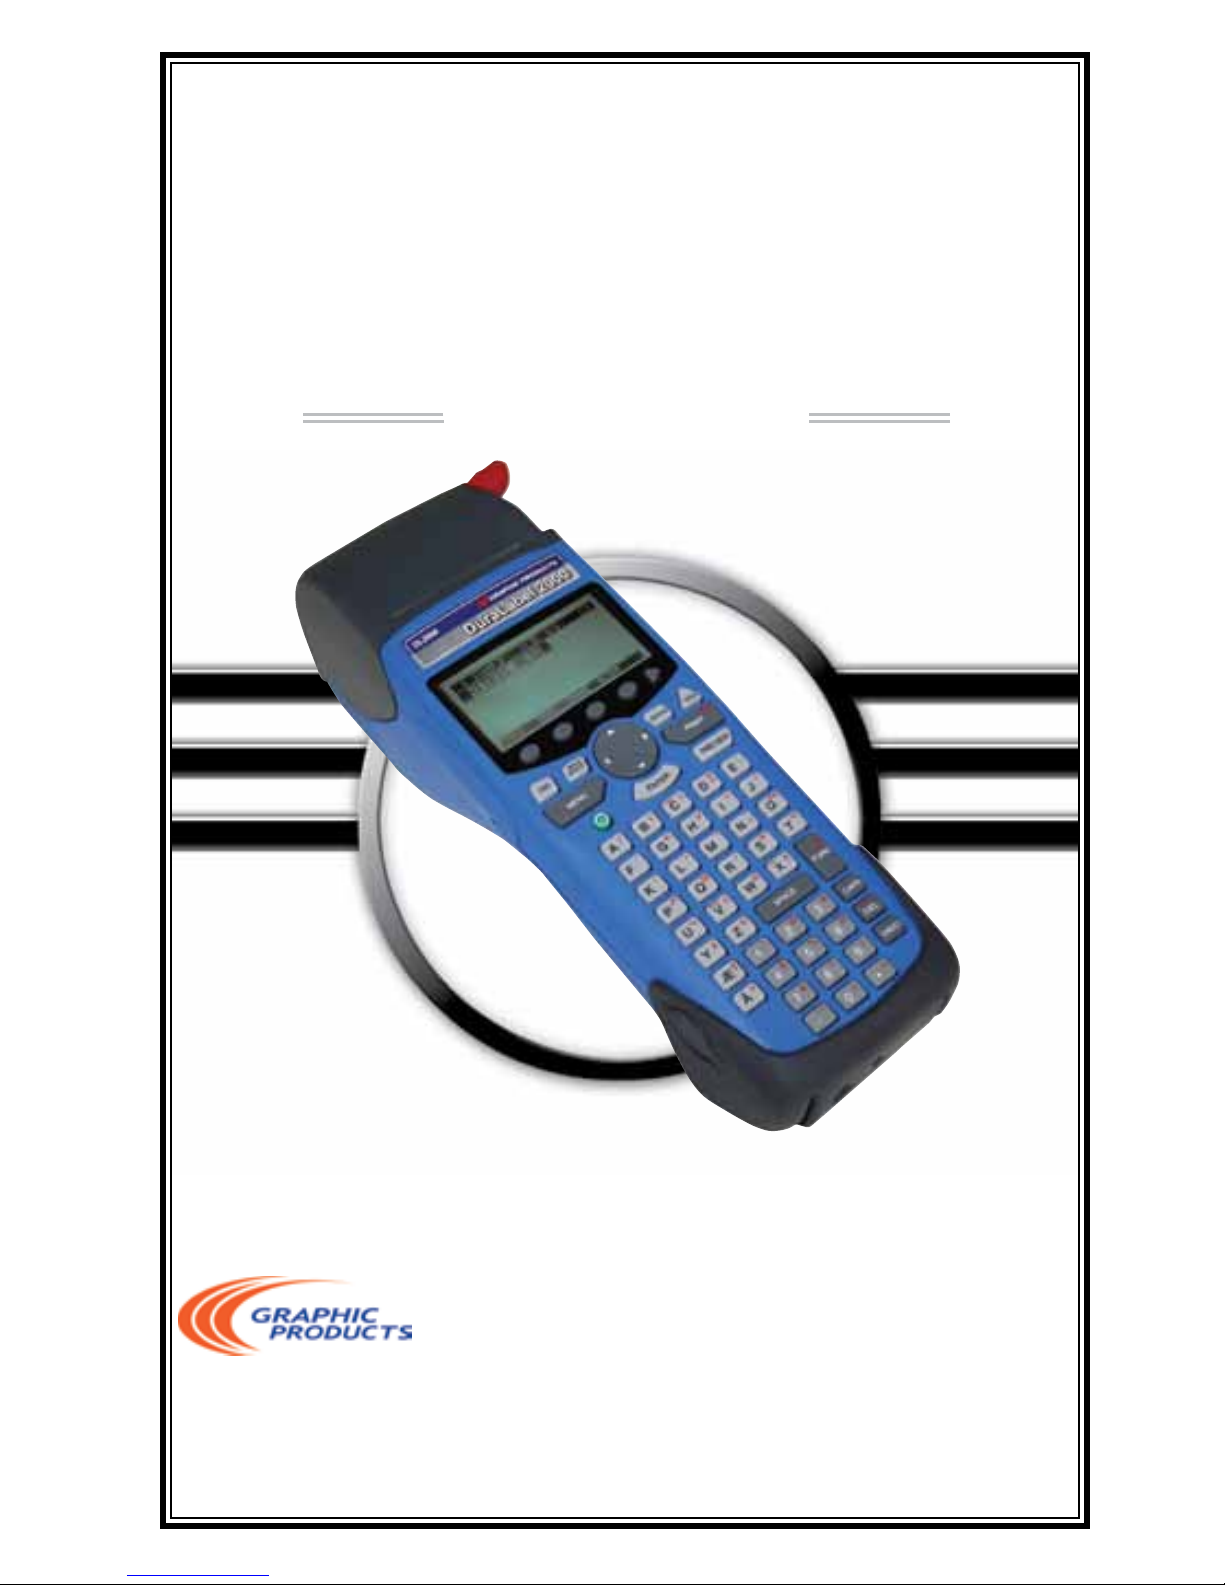
Graphic Products DuraLabel 2000, DuraLabel 2000 PLUS User Manual
1-800-788-5572
International: +1 503-644-5572
info@GraphicProducts.com
www.GraphicProducts.com
www.DuraLabel.com
User’s Guide
DuraLabel
®
2000

1. INTRODUCTION ..................................................................................................1
Welcome ...........................................................................................................1
Safety Precautions ...........................................................................................1
DeviceSpecications .......................................................................................2
2. GETTING STARTED .............................................................................................3
Unpacking & Inspection ...................................................................................3
Equipment Checklist ........................................................................................3
3. The BATTERY ......................................................................................................4
Inserting & Removing Battery ..........................................................................4
Charging Battery ...............................................................................................4
Using the Battery ..............................................................................................5
4. LOADING PRINTER SUPPLY ..............................................................................6
Installing Ribbon Cartridge ..............................................................................6
Loading Supply Spindle ....................................................................................7
Installing Supply Spindle in Printer .................................................................7
5. MAKING LABELS ................................................................................................8
Keys ...................................................................................................................8
Soft Keys .....................................................................................................8
Key Pad .......................................................................................................8
Screens .............................................................................................................9
Edit Screen .................................................................................................9
Edit Screen Guide ................................................................................... 10
Size Screen .............................................................................................. 11
Image Screen .......................................................................................... 12
Preview Screen ........................................................................................ 12
Save Screen ............................................................................................. 13
Text/Image Auto-Size ..................................................................................... 13
Cells ................................................................................................................ 14
Cells As Seen On the Edit Screen........................................................... 14
Cells As Seen On the Size Screen .......................................................... 16
Changing Text/Image Size Manually ............................................................ 16
Modifying Text Style Attributes .......................................................................17
Bold, Italics, and Underline......................................................................17
Uppercase and Lowercase ......................................................................17
LineJustication ...................................................................................... 18
Applying Graphic Images to Labels .............................................................. 18
Applying Graphic Images to Labels - Image Library .........................19-20
Creating Bar Codes ....................................................................................... 21
Adding a Border ............................................................................................. 21
Previewing & Printing Labels ........................................................................ 22
-i-
TABLE OF CONTENTS

Deleting Current Labels ................................................................................ 22
Saving Labels ................................................................................................. 22
Deleting Saved Labels ................................................................................... 23
Opening Saved Labels ................................................................................... 24
6. PRINTER SYSTEM SETTINGS ......................................................................... 25
Optimizing Performance & Quality ............................................................... 25
DISP (Display) ................................................................................................ 25
PRINT .............................................................................................................. 26
Heat .......................................................................................................... 26
Motor ........................................................................................................ 27
Feed ......................................................................................................... 27
TEST ................................................................................................................ 28
Feed ......................................................................................................... 28
Test .......................................................................................................... 28
Print Ver ................................................................................................... 29
RESET ............................................................................................................. 29
HARD RESET .................................................................................................. 29
7. EXAMPLE LABELS ......................................................................................... 30
Example Label Directions #1: Pipe Marker ................................................. 30
Example Label Directions #2: OSHA Safety Label ...................................... 32
Example Label Directions #3: Wire Wrap .................................................... 36
Example Label Directions #4: Bar Code ...................................................... 39
8. CLEANING & MAINTENANCE ....................................................................... 41
Cleaning Exterior Surfaces ........................................................................... 41
Cleaning the Print Head ............................................................................... 41
Cleaning the Platen Roller ............................................................................ 42
9. COMPLIANCE & WARRANTY ......................................................................... 43
FCC Notice ..................................................................................................... 43
Warranty ......................................................................................................... 43
Thermal Print Head ....................................................................................... 44
Warranty Service Procedures ....................................................................... 44
General Warranty Provisions ........................................................................ 44
Limitation of Liability ..................................................................................... 44
10. TROUBLESHOOTING TIPS ............................................................................ 46
Symptoms & Solutions .................................................................................. 46
Error Messages/Meaning ............................................................................. 48
12. SOFTKEY MENU SYSTEM ............................................................................. 49
13. ACCESSORIES & SUPPLIES ........................................................................ 51
-ii-
© 2009, 2010 Graphic Products, Inc.
TABLE OF CONTENTS cont

WELCOME
Congratulations on your new purchase of the DuraLabel 2000 Handheld Label
Printer! We’ve included this User’s Guide to help you get printing as soon as possible.
With this guide you will learn how to set up your handheld printer, load supplies,
and create custom labels.
The DuraLabel 2000 is the best choice in handheld printing. Lightweight and
simple to operate, the DuraLabel 2000 delivers superior thermal transfer printing
performancewhileconvenientlyttinginthepalmofyourhand.Withthesoft-key
menu system, navigating between menu options and adding customize text and
graphic images to your labels is now easier than ever.
TheDuraLabel2000allowsyoutoprintlabelsintheeldwithouthavingtodoany
data entry on a PC, increasing your label production. The DuraLabel 2000 also
saves up to 32 label designs for quick retrieval during future labeling tasks.
Refer to http://duralabel.com/duralabel-2000/duralabel-2000-support.php for
instructional videos, label examples, and a User’s Guide and QuickStart Guide
in .pdf format.
Please contact us for all your labeling needs. From standardized labels to
custom labels, we’re ready to provide the labeling supplies you need. Call
Graphic Products at 1-800-788-5572 today to get your labeling problems solved.
SAFETY PRECAUTIONS
•Readallinstructionscarefully.
•Donotimmersetheprinter or the battery charger in water or other liquids; you
could receive an electrical shock.
•Donotexposetohightemperaturesorhighhumidity.Neverleaveonthe
dashboard or in the trunk of a car.
•Donotuseinverydustyplacesandavoiddirectexposuretosunlightandrain.
•Donotremovehand strap; it cannot be reinstalled without reassembly of unit.
•Donotattempttorepairtheprinter or the battery charger. There are no
serviceableparts.Ifserviceorrepairisneeded,contactaqualiedGraphic
-1-
1. INTRODUCTION
Products service representative.
•Donottouchthe print head.
•UseonlyGraphicProductscertiedbatterypackandcharger..
DEVICE SPECIFICATIONS
Output Device •203dpiThermalTransferPrintHead
Power •7.2VDC2000mAHNi-MH
•120VAC/230VAC/100VACwallmountingpackforrecharging
Display •2.62"x1.31"(128×64pixels)LCDshows5lines
Operating Temp •+40°Fto+122°F(+5°Cto+50°C)non-condensating
•Condensationcanformonanyelectronicdeviceiftransferredfromacold
to hot or hot to cold environment quickly. The device will not run until the
codensation dissipates.
Storage Temp •-34°Fto+160°F(-30°Cto+71°C)
Weight •2.7lbs.(1.22kg)
-2-
UNPACKING & INSPECTION
The DuraLabel 2000 has been specially packaged to withstand damage that
may occur during the shipping process. However, upon receiving the printer,
carefully inspect the package and the device. In case of damage, contact the
carrier directly to specify the nature and extent of the damage. Please retain the
packaging materials in case the printer needs to be reshipped.
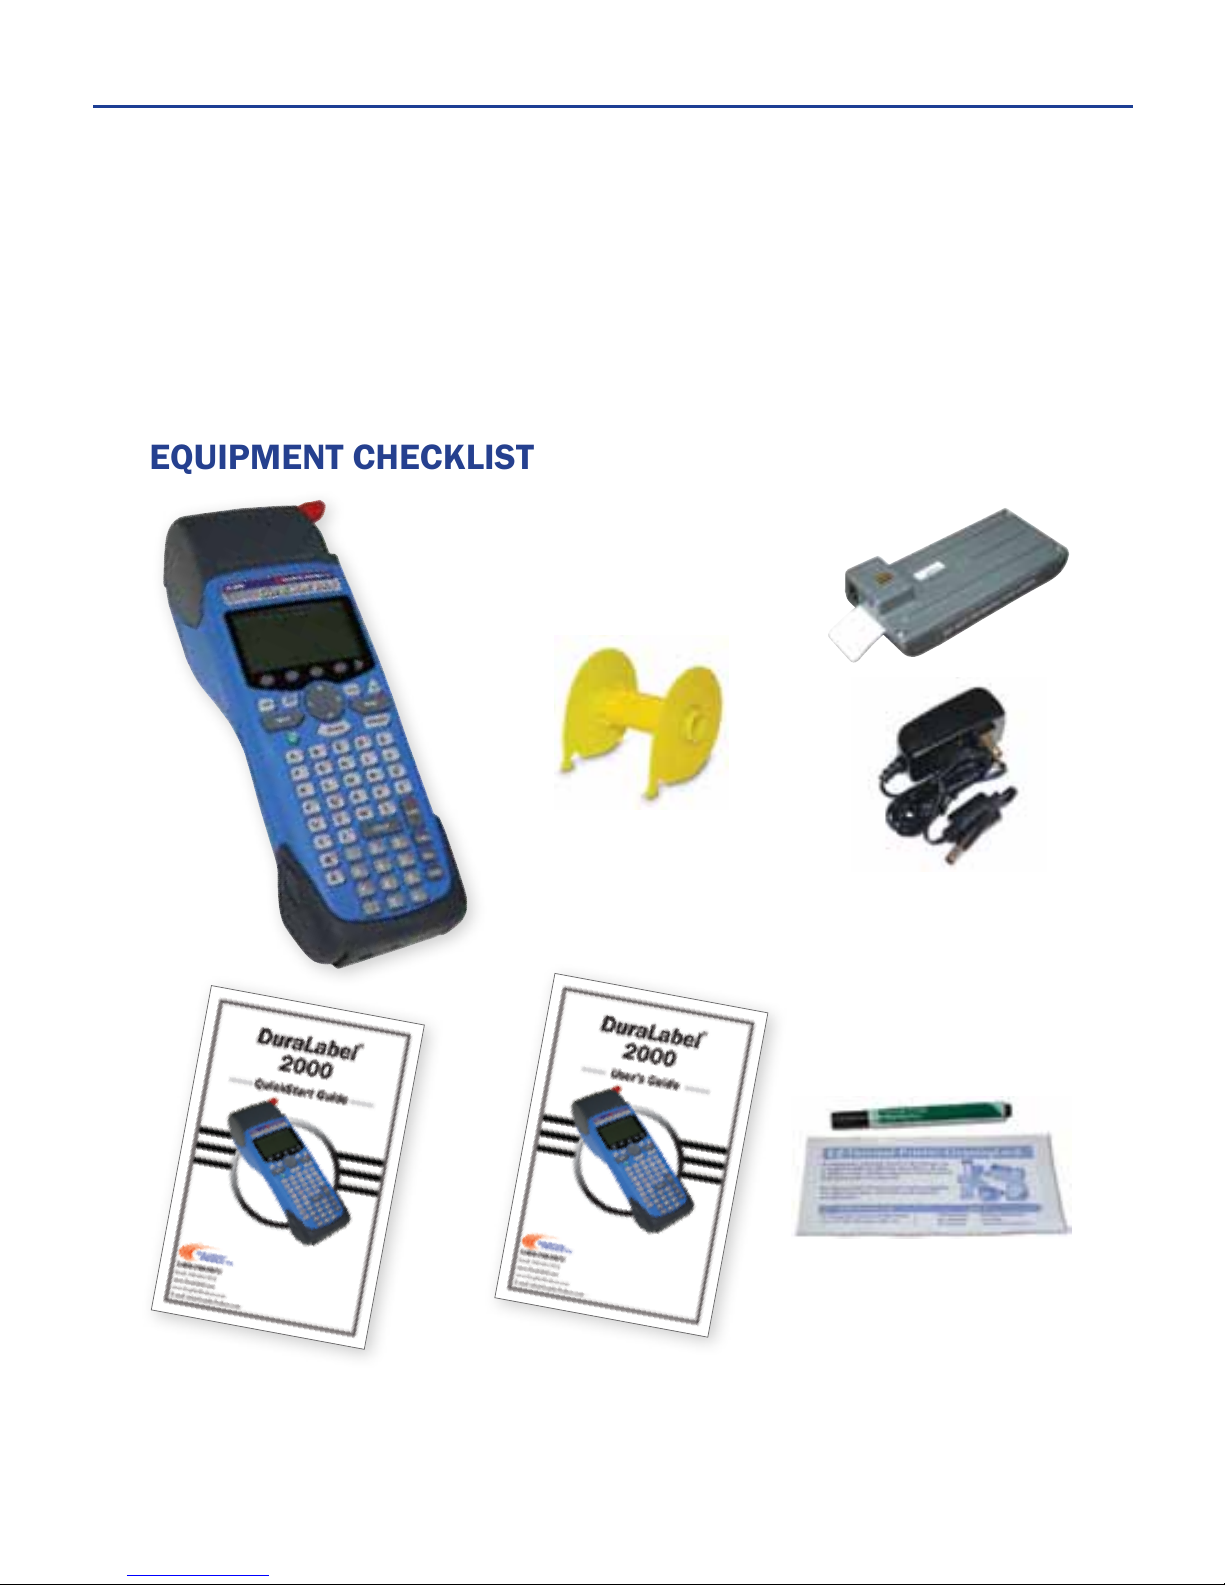
EQUIPMENT CHECKLIST
If any equipment is missing, please contact Graphic Products customer service at
1-800-788-5572.
QuickStart
Guide
User’s
Guide
DuraLabel 2000
Rechargeable Battery
and Battery Charger
Supply Spindle
(shipped inside printer)
Cleaning
Cards (5)
and Pen
-3-
2. GETTING STARTED

INSERTING & REMOVING BATTERY
1. Pull up and out on the end of the rubber battery compartment flap on the bottom
of the printer to open the battery compartment.
2. Slide the battery into the printer until it snaps into place.
uNOTE: The printer automatically turns on when the battery is installed.
3. Close the battery compartment flap.
4. To remove the battery, open the battery compartment flap and pull gently on
the pull tab on the end of the battery until it freely slides out.
uNOTE: Do not remove the pull tab.
uCAUTION: Always power down the printer before removing the battery to prevent damage to the LCD.
CHARGING THE BATTERY
The battery is pre-charged. There is no need to charge the battery prior to using
theDuraLabel2000forthersttime.Whenthebattery needs to be recharged,
plug one end of the battery charger into the battery and the other end of the
charger into an electrical outlet. Allow approximately 5 hours to fully charge.
uNOTE: The printer is not designed to operate while the battery is charging.
uWARNING: Always dispose of batteries properly. For more information, visit www.rbrc.org
LED STATUS BATTERY
On ..................................................... Charging
Blinking every 2 seconds ................ Fully Charged
Blinking every 1/2 second ............. Error
Battery
Compartment
Flap
LED Window
Pull Tab
Battery
Compartment
Battery
Power Jack
Window
LED
Power
Jack
3. The BATTERY

USING THE BATTERY
The DuraLabel 2000 has an intelligent battery voltage monitor. As the voltage drops,
thermwaredrivesthebatteryhardertodeliverthevoltageneededtomaintainhigh
print quality—even as the battery becomes completely discharged. Printed labels
maintain the same high quality right up until the battery is completely exhausted.
Printing large characters and/or large labels requires more power than small ones
and will drain the battery faster.
Battery usage is monitored by the printer internally to maximize battery life. If the
printer is on and not in use after approximately 15 minutes, the printer saves the cur-
rent label design and powers off to preserve the battery. When the printer is turned
on again, the printer will resume from the same screen as when it powered off.
uWARNING: Riskofreorexplosionifthebattery is replaced by an incorrect type. Use only a Graphic
Products approved battery.
Battery Life Indicator
Full Battery Partial Battery Empty Battery
-5-
3. The BATTERY cont.
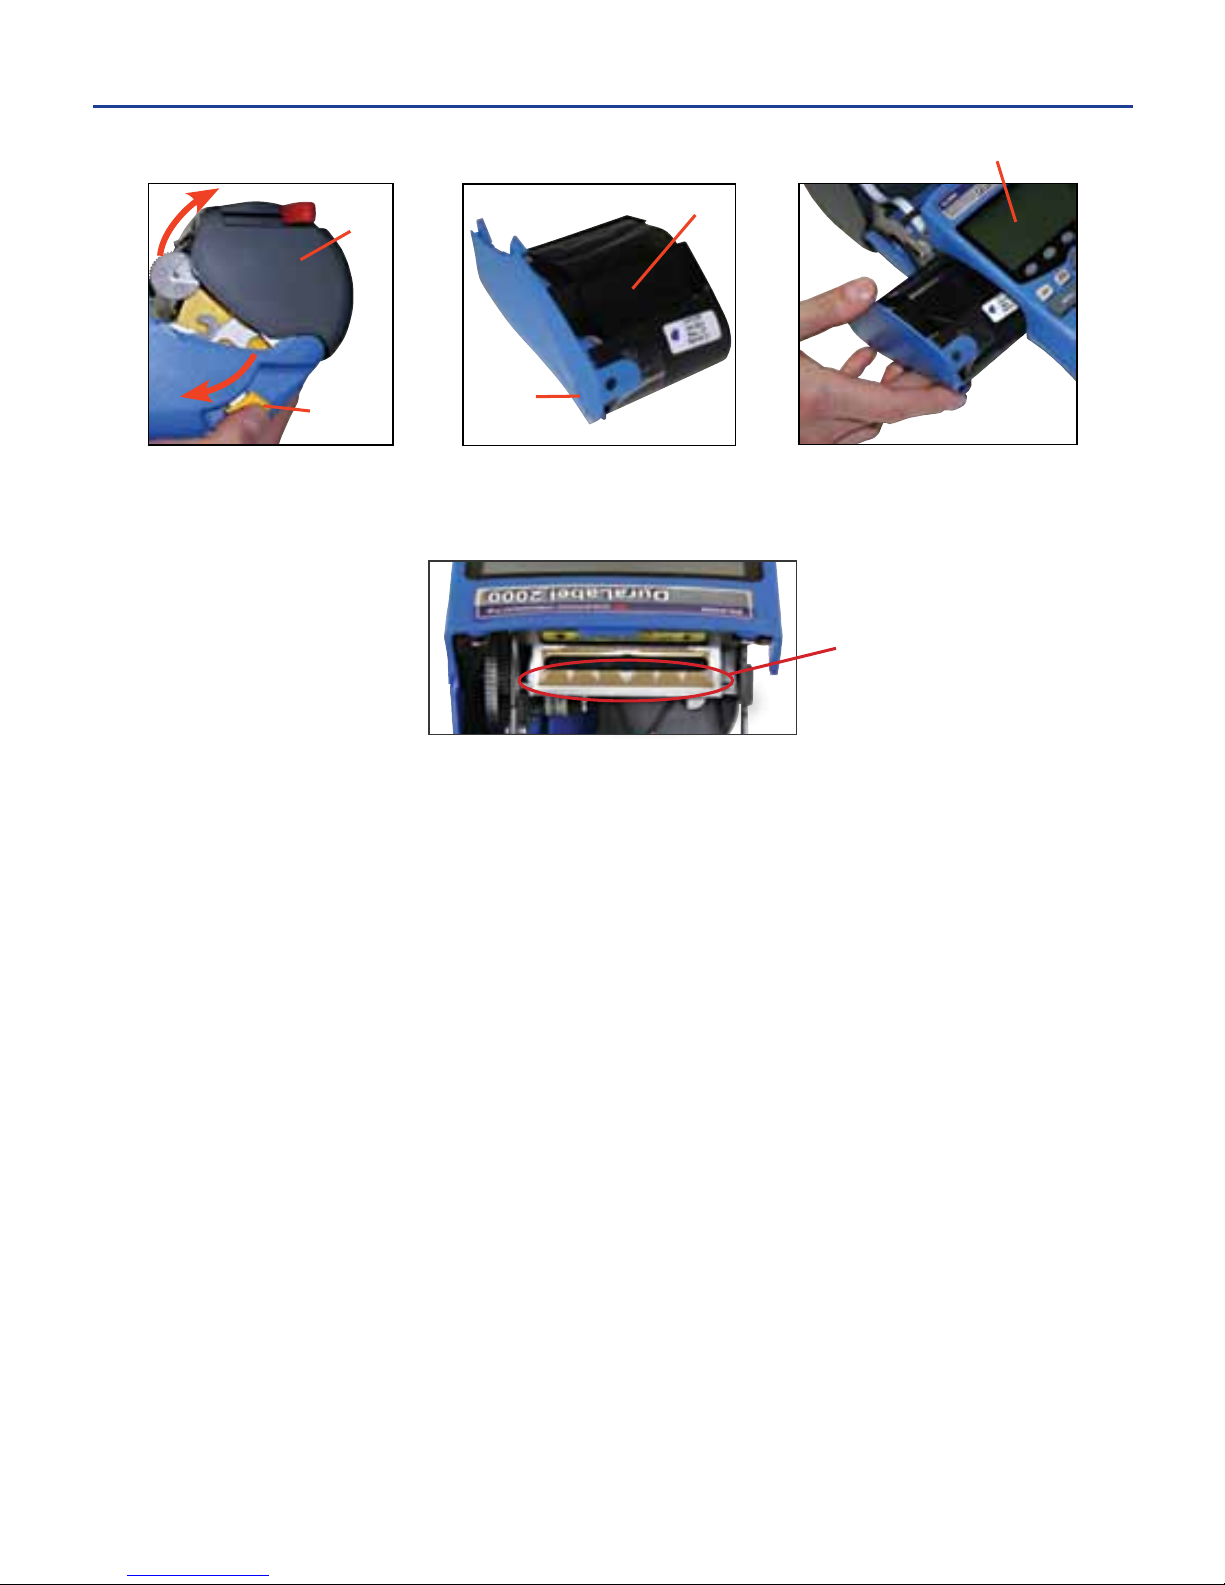
INSTALLING THE RIBBON CARTRIDGE
1. Open the printer cover by pulling the cover release lever.
uNOTE: Do not touch the print head. This could damage the print head and reduce print quality.
2. Orient the ribbon cartridge so that the section of exposed ribbon faces up,
toward the underside of the LCD screen.
3. Gently slide the ribbon cartridge into the side of the printer (avoid snagging
or wrinkling the ribbon) until it snaps tightly and is flush with the side of the
printer. Lock the ribbon cartridge in place by sliding the locking tab.
LCD Screen
Printer
Cover
Cover
Release
Lever
Ribbon
Locking
Tab
Print Head
-6-
4. LOADING PRINTER SUPPLIES
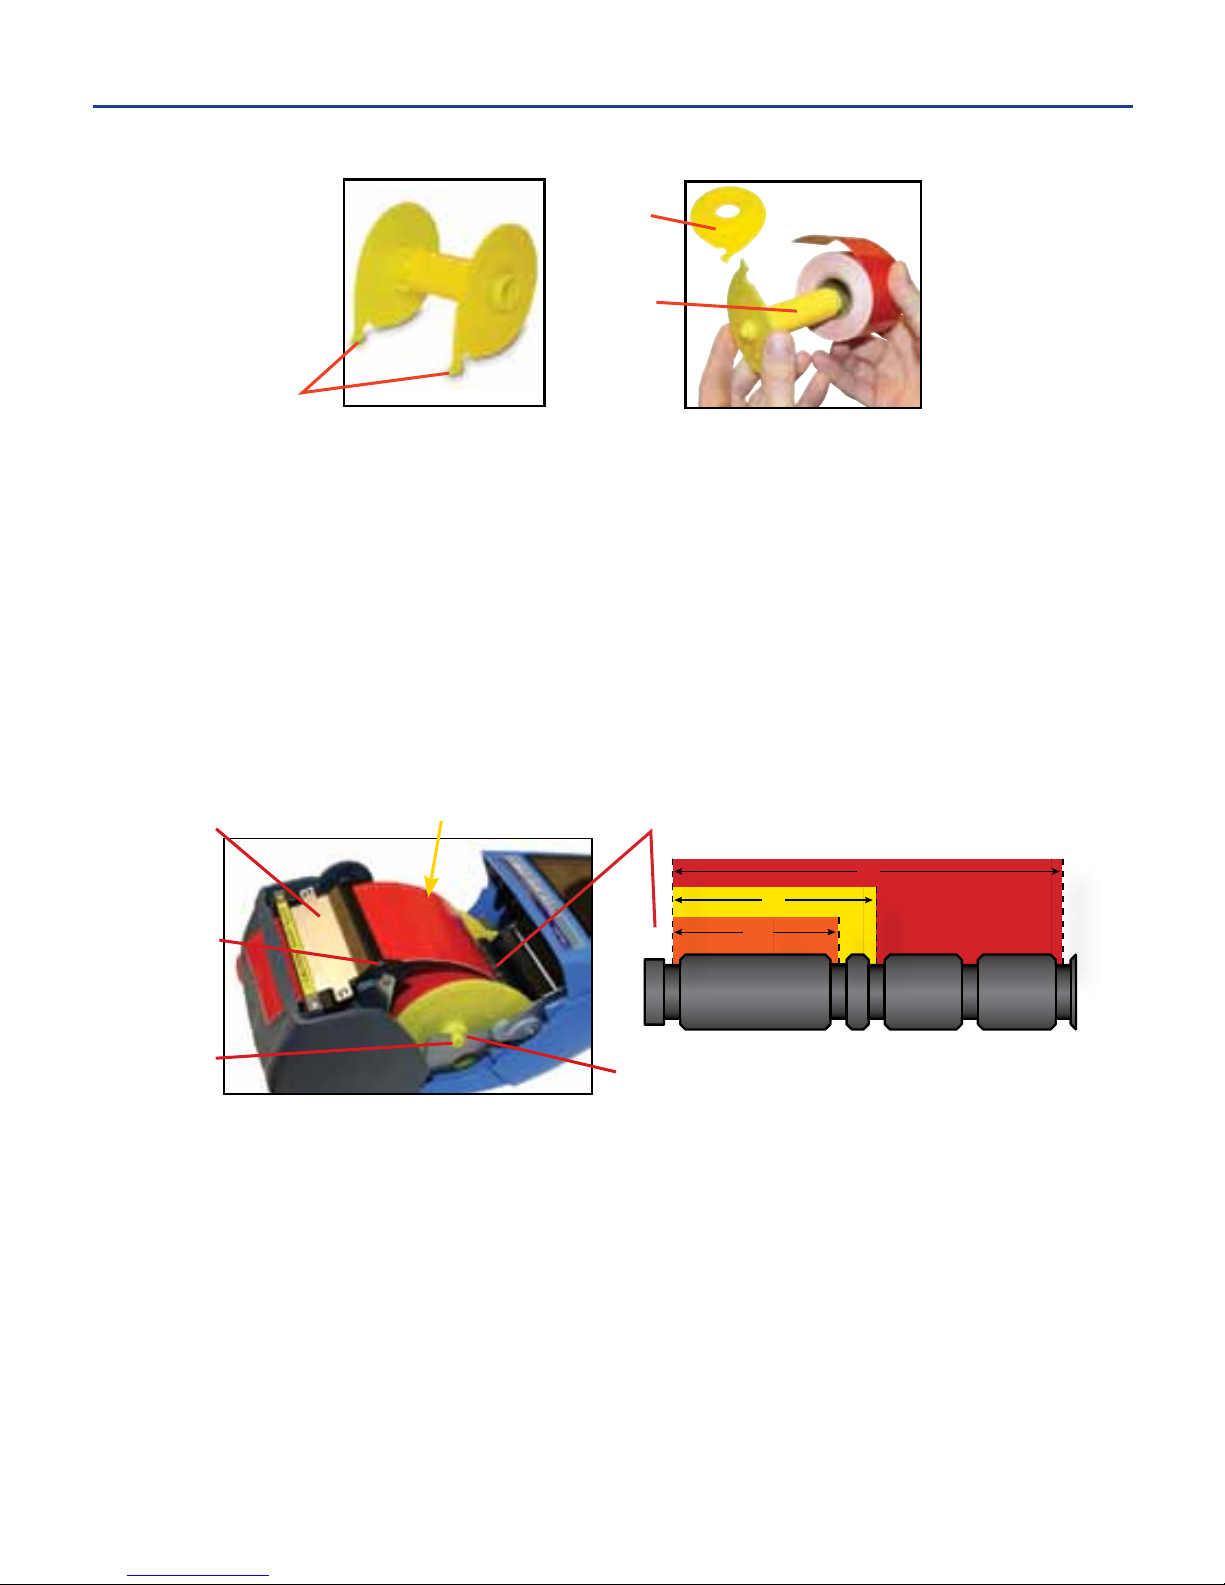
LOADING THE SUPPLY SPINDLE
1. With the printer cover open, remove the supply spindle from the printer.
2. Grasping the two sides of the supply spindle, gently pull it apart.
3. Slide the supply over the spindle shaft making sure it unwinds in the direction
indicated by the arrows on each side of the supply spindle.
4. Replace the spindle cap on the end of the spindle shaft by pressing the ends
together until they touch the supply roll, making sure the spindle hooks are aligned.
INSTALLING THE SUPPLY SPINDLE IN THE PRINTER
1. To secure the supply, place the spindle hooks in the corresponding slots on
the slotted round bar, as seen in the diagram above.
2. Press the spindle shaft ends into the spindle slots.
3. Insert the end of the supply between the platen roller and the black strip of the
guide plate, pushing it through the slot at the top of the printer cover.
4. Carefully close the printer cover without pinching the supply inside, and lock
it in place with the cover release lever.
uNOTE: Once the printer cover is closed, the printer determines the width of supply, and the supply is
aligned for printing labels.
Guide
Plate
Platen
Roller
Slotted Round BarGently push while closing
Spindle
Shaft
End
Spindle
Slot
Supply Spindle
Spindle
Hooks
Spindle
Shaft
Spindle
Cap
4. LOADING PRINTER SUPPLIES cont.
2”
½”
1”
To introduce the process of making labels, it is necessary to understand the
different keys found on the printer’s interface and the unique screens with which
the user frequently interacts.
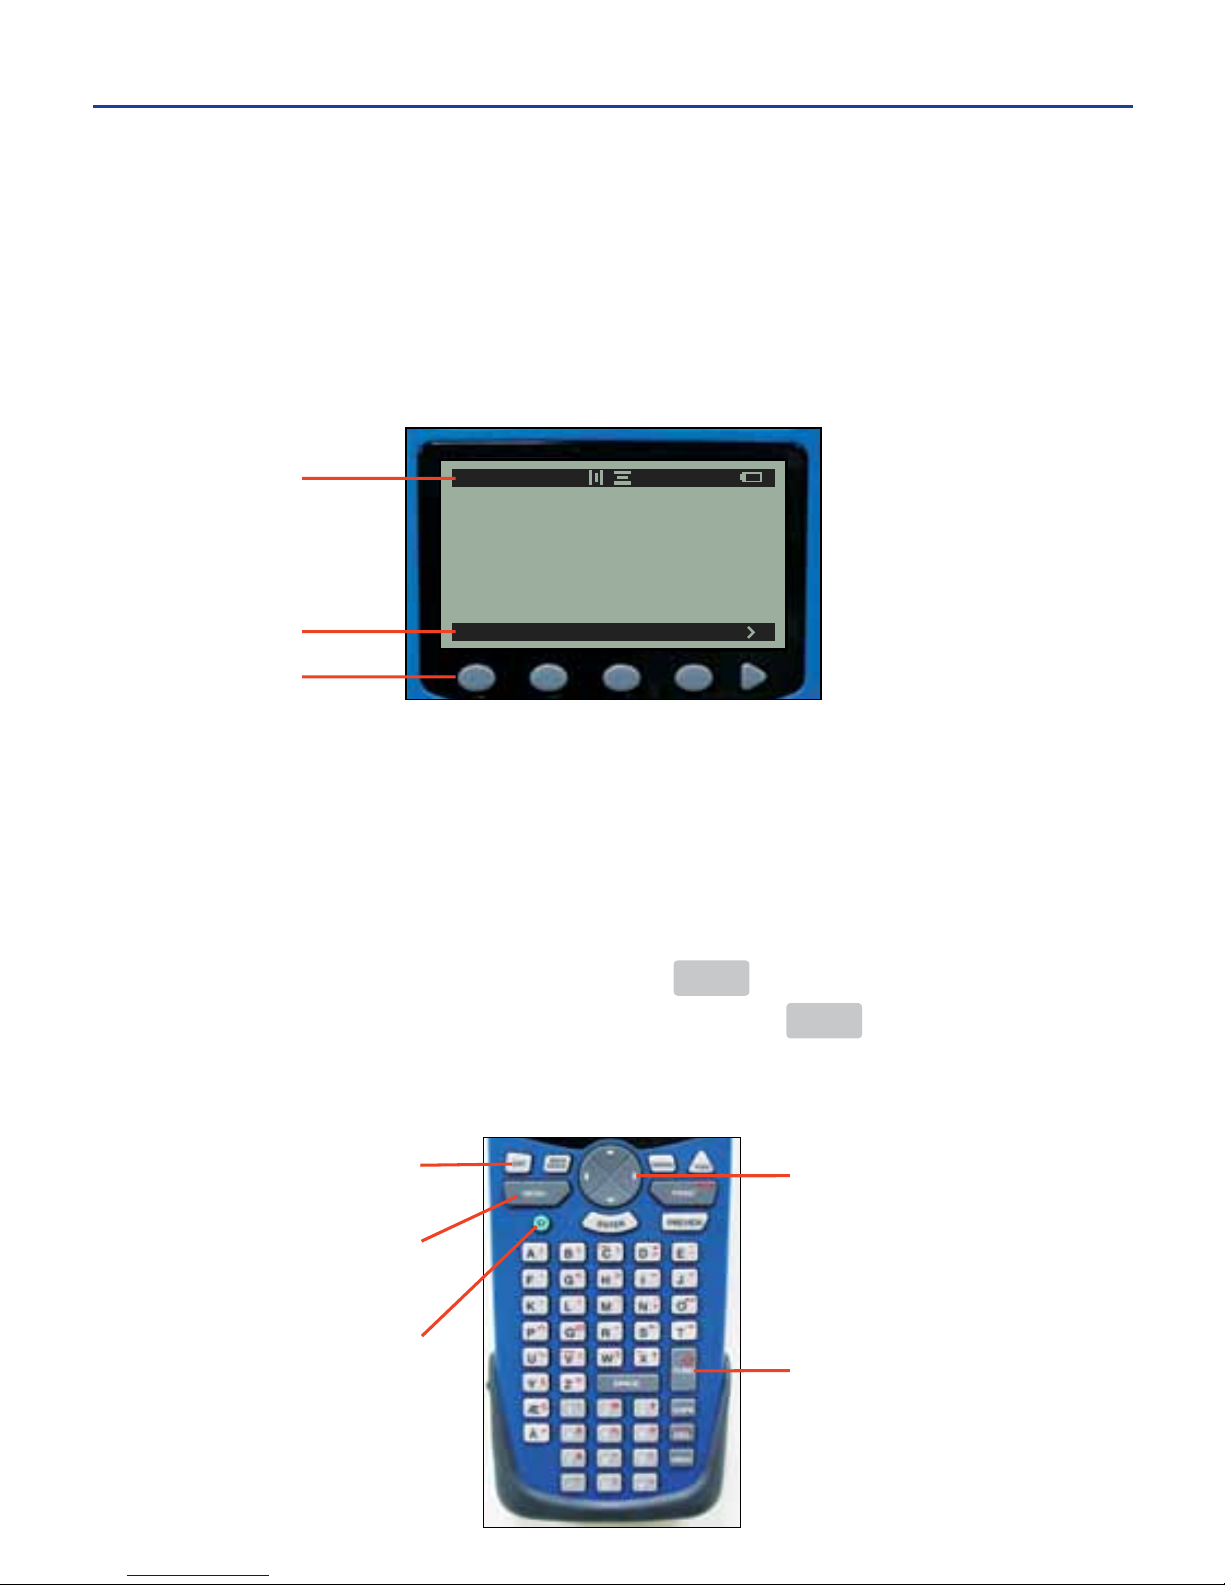
KEYS
The DuraLabel 2000 contains 63 keys used for easy menu navigation, label
design, and printer operation.
Soft Keys
Five soft keys are located just below the LCD screen. The function for each soft key
appears on the soft key menu bar above each soft key. This allows the user to
navigate between menu options when designing labels or adjusting printer settings.
Keypad
The keypad consists of all keys located below the soft keys. Keys on the keypad
generally serve one basic function, unless the FUNC key is pressed prior to
entering a letter or number on the keypad. Pressing the FUNC key activates the
red key set on the keypad. The arrow on the far left side of the status bar
indicates red key set is active (see page 10).
FILE TEXT IMAGE ALIGN
A 182 AP 1/1
Soft Key Menu
Soft Keys
Status Bar
Power Key
Menu Key
Escape
Direction Pad
Function Key
-8-
5. MAKING LABELS
Pressing the power key turns the printer on and off.
The direction pad is used for screen navigation and cursor placement.
Pressing MENU on the key pad will return user to the soft-key main menu from
any screen. The soft-key main menu looks like this:
Pressing ESC on the key pad will return to the previous soft-key menu.
SCREENS
The DuraLabel 2000 has three design screens to aid in designing labels: the
edit screen, the size screen, and the image screen. Two other screens, used
most commonly when a label design is complete, may also be utilized: the pre-
view screen, and the save screen.
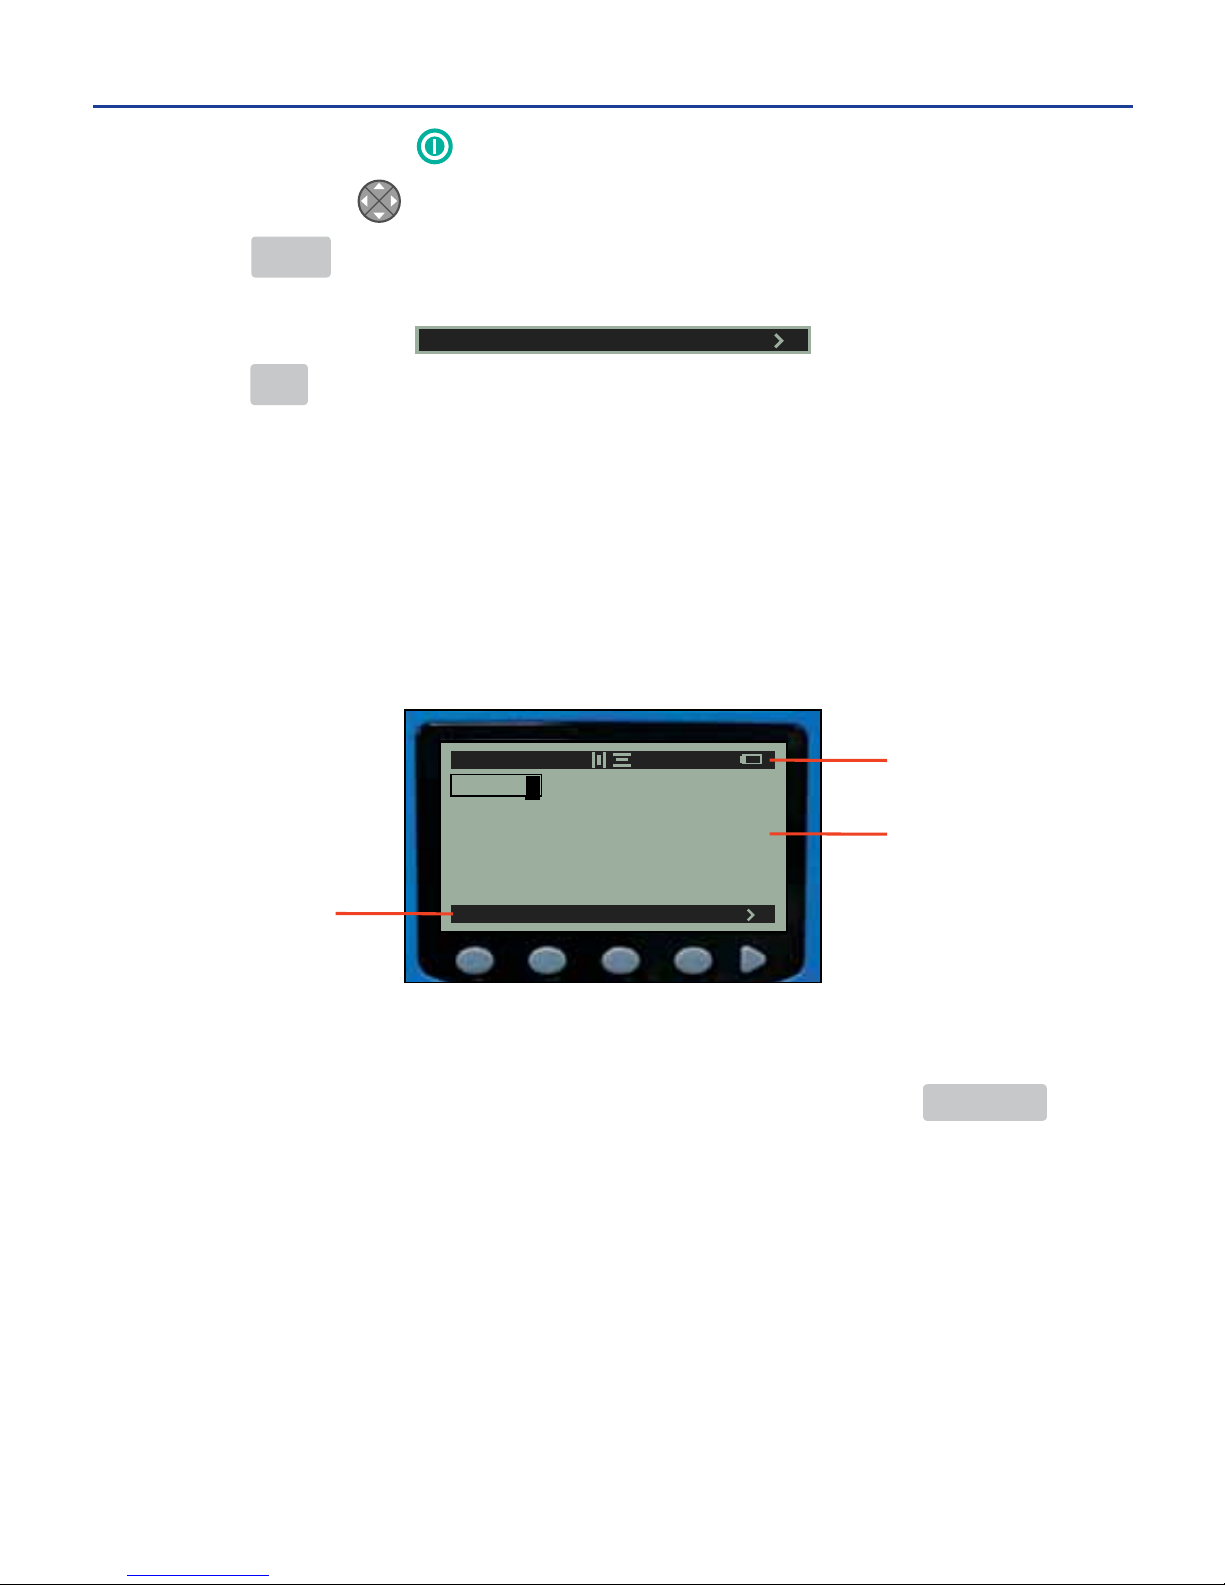
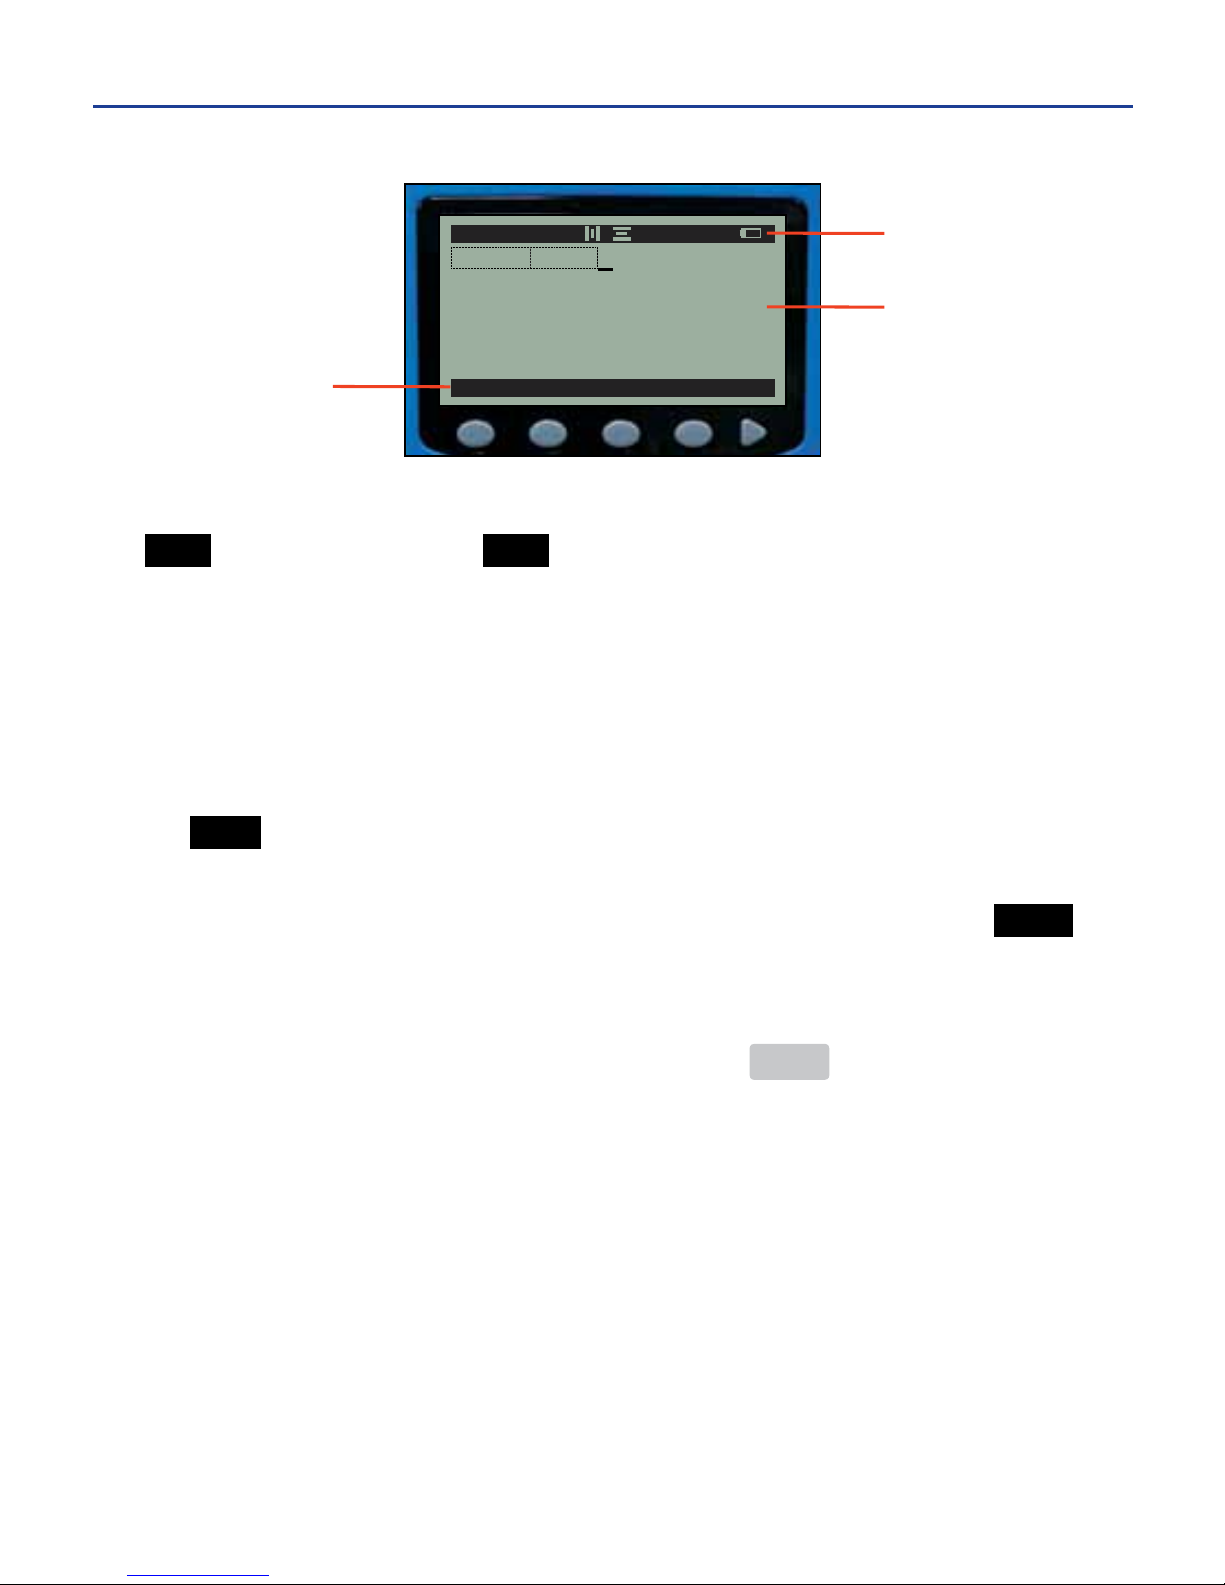
Edit Screen
The edit screen consists of a status bar, a label layout area, and a soft-key menu.
Textandimagesareenteredandmodiedonthisscreen.Theeditscreendis-
plays the layout of the text and images in the label design. Pressing PREVIEW
displays a representation of the label text and images scaled to actual print size.
uNOTE: For further information on what is included on the edit screen, see the Edit Screen Guide on
page 10.
FILE TEXT IMAGE ALIGN
A 182AP 1/1
HALON
Soft Key Menu
Status Bar
Label Layout
Area
FILE TEXT IMAGE ALIGN
-9-
5. MAKING LABELS cont.
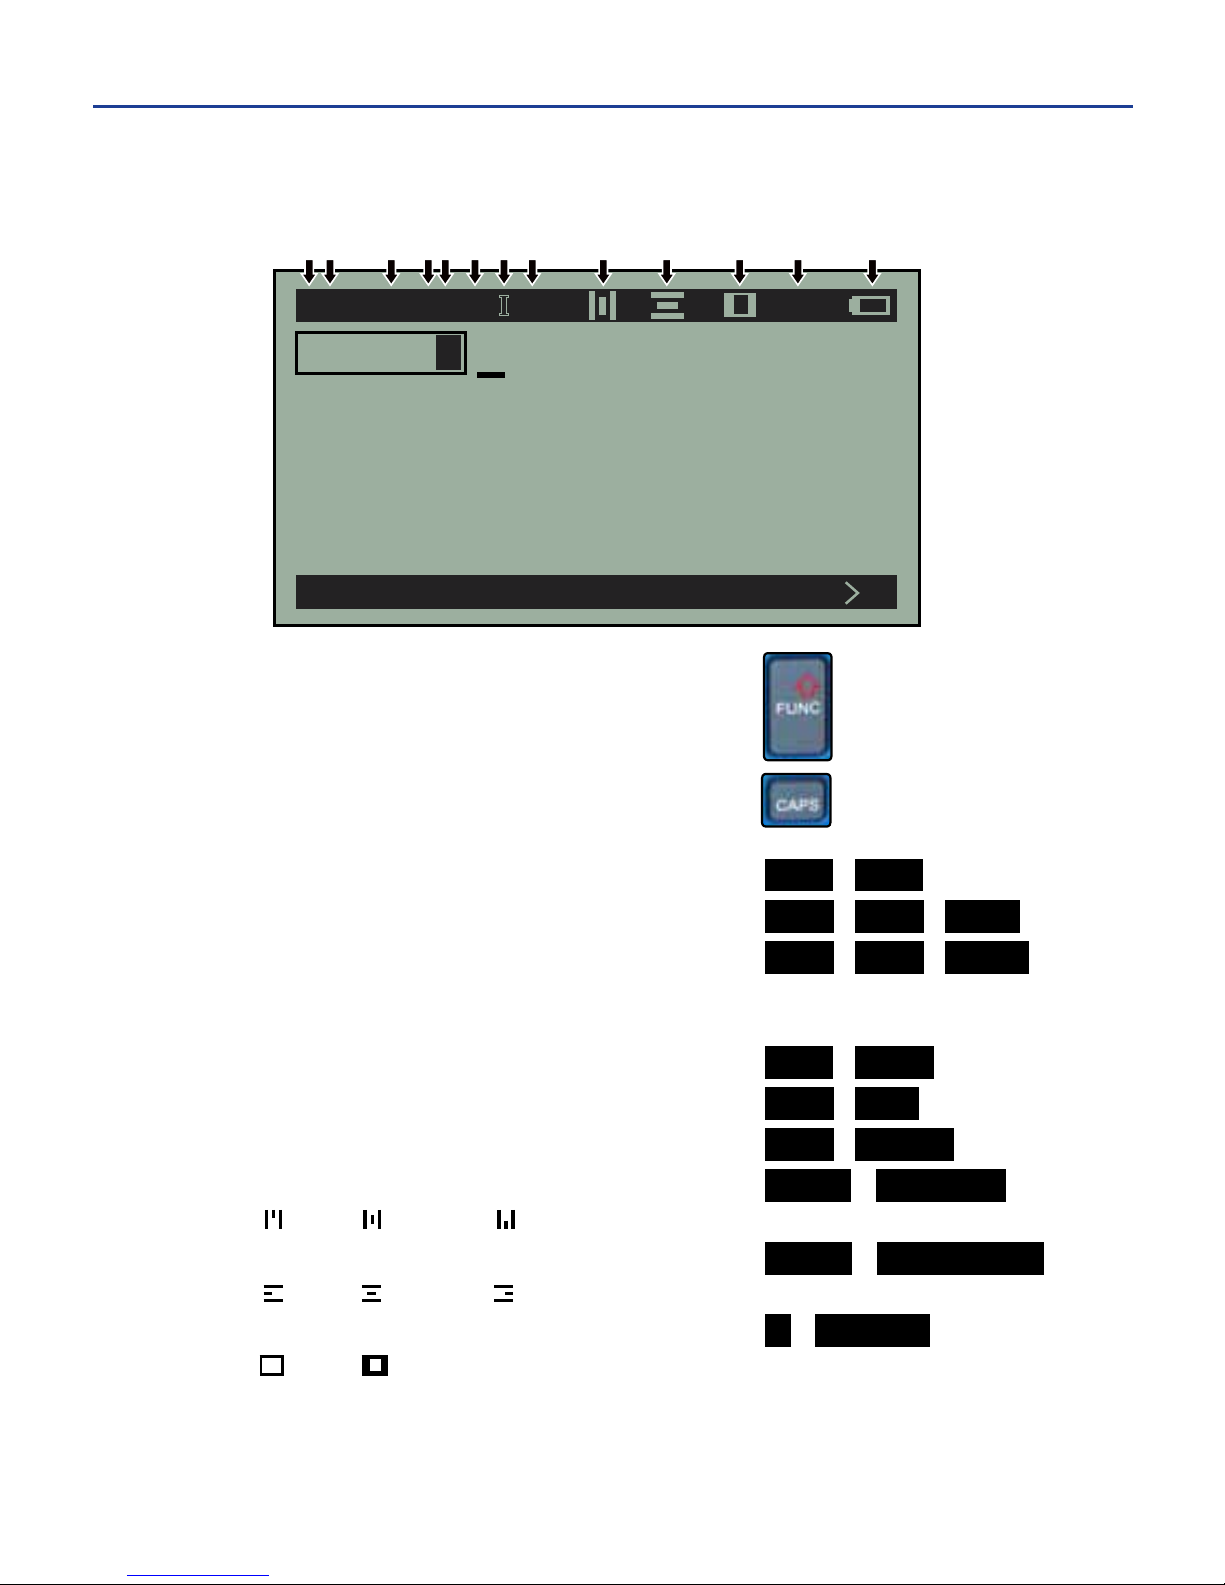
See the explanation of the numbered items below the image.
1.Redkeydenitionsactive ...................................
2. CAPS lock .............................................................
A (on) a (off)
3. Size ....................................................................... TEXT SIZE
4. Auto-size ............................................................... TEXT SIZE AUTO
5. Unit ....................................................................... TEXT SIZE UNITS
P (point size) % (percent of label)
" (height in inches) M (height in millimeters)
6. Bold ...................................................................... TEXT BOLD
7. Italic ...................................................................... TEXT ITAL
8. Underline .............................................................. TEXT UNDER
9. Vertical alignment ............................................... ALIGN VERTICAL
(top) (center) (bottom)
10. Horizontal alignment ........................................ ALIGN HORIZONTAL
(left) (center) (right)
11. Border ................................................................ > BORDER
(thin) (wide)
12. Line number over label line count
13. Battery life remaining
Edit Screen Guide
FILE TEXT IMAGE ALIGN
HALON
A 182 AP B I U 1/1
1 2 3 45 6 7 8 9 10 11 12 13
-10-
5. MAKING LABELS cont.
Size Screen
The size screen is accessed through the soft-key main menu by pressing the
TEXT soft key followed by the SIZE soft key. Like the edit screen, the size screen
consists of a status bar, a label layout area, and a soft-key menu.
Intheexampleabove,thesizeis182points,thedefaultfor2"supply.Thelabel
layout area has two sections: one for the text and one for the image.
Whileonthesizescreen,usersmodifythesizeofaspecicstringofcharacters
or images and can adjust the unit of measurement for the label design. Pressing
the AUTO soft key on the soft-key menu allows the user to enable and disable
theauto-sizesettingforaspecicstringofcharactersorimages(tolearnabout
the auto-size feature, see TEXT/IMAGE AUTO-SIZE on page 13). Pressing UNITS
allows the user to change the unit of measurement for the label design to one of the
following: POINT, PERCENT, INCHES, or MM.
To return to the edit screen from the size screen, press MENU.
uNOTE: For information on label design using the size screen, see CELLS on page 14.
AUTO UNITS
182A 182A
A 182A
P
1/1
Soft Key Menu
Status Bar
Label Layout
Area
-11-
5. MAKING LABELS cont.
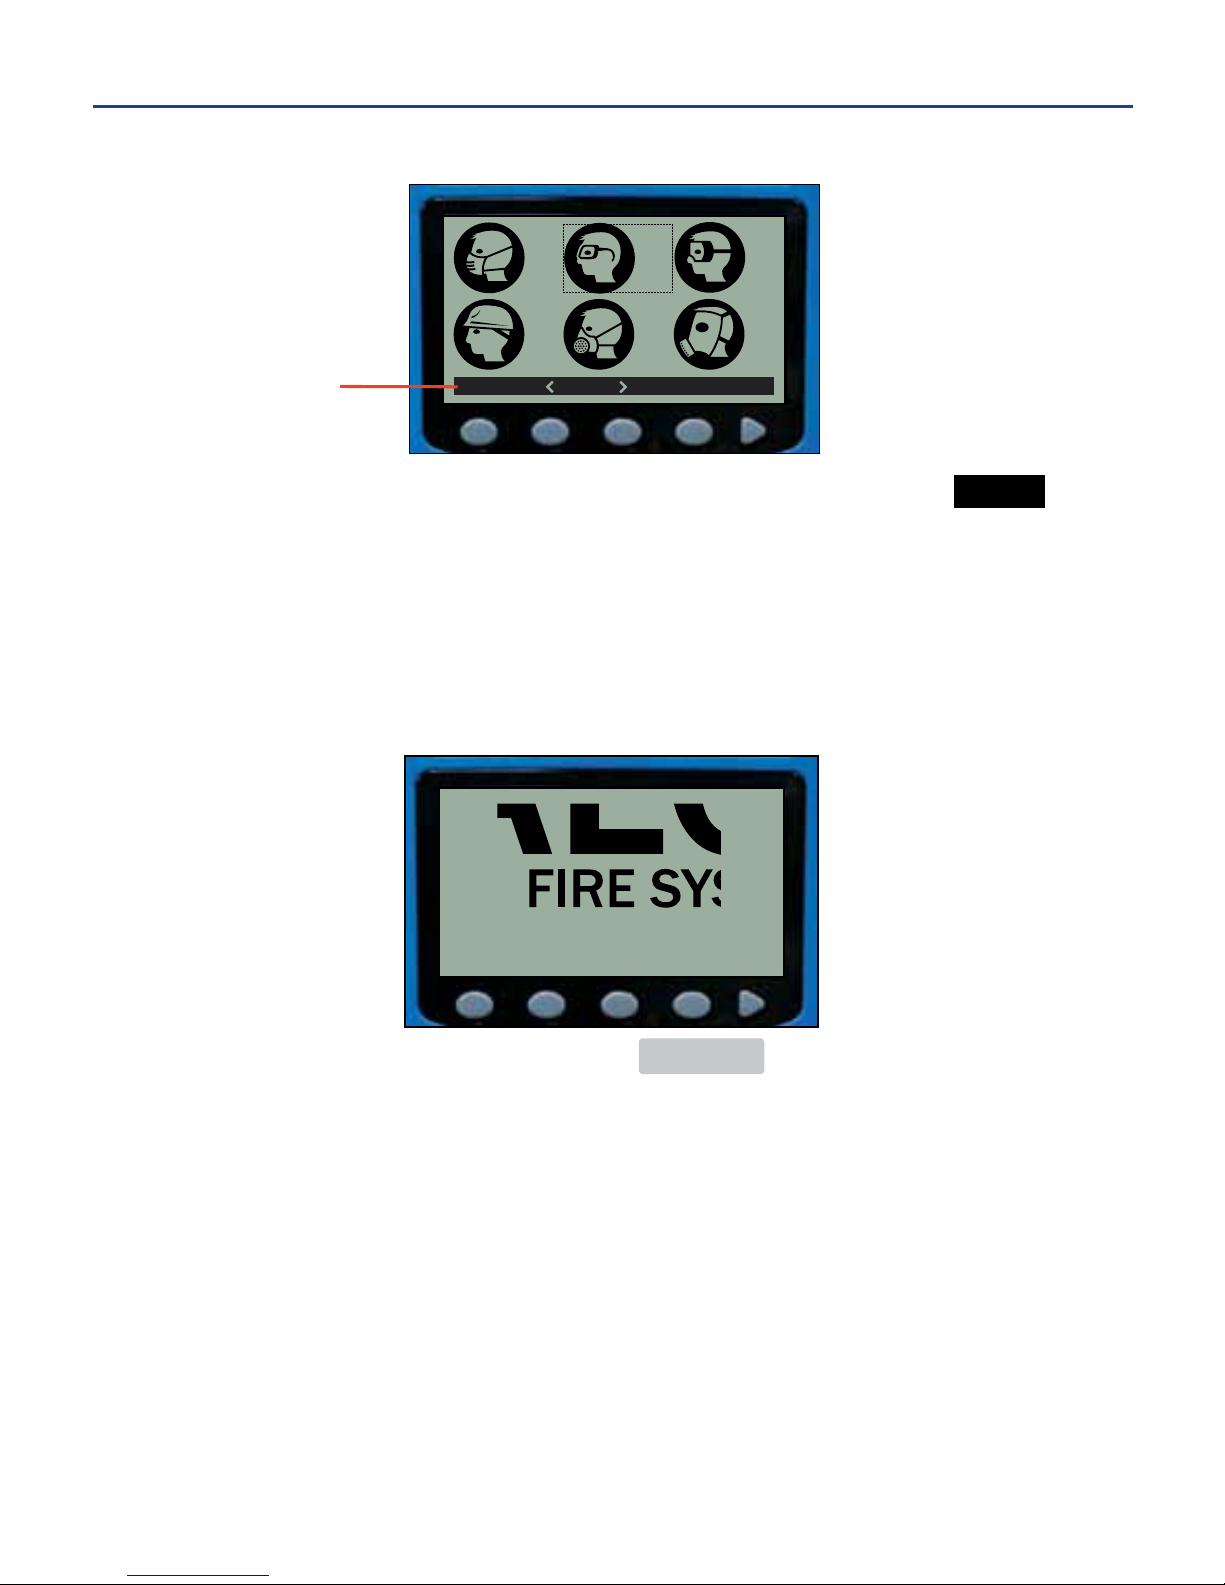
Image Screen
The image screen is accessed through the main menu by pressing the IMAGE
soft key. The image screen displays graphic images found in the DuraLabel 2000
Image Library. Browse the Image Library using the direction pad or by pressing
the options as seen in the soft key menu.
uNOTE: For information on inserting images, see APPLYING GRAPHIC IMAGES TO LABELS onpage18.
Preview Screen
The preview screen is accessed by pressing PREVIEW on the key pad. The
preview screen displays a representation of how a label will appear when printed,
showing text and images scaled to actual size. Scroll through label parts using
the direction pad.
uNOTE: For information on previewing label designs, see PREVIEWING & PRINTING LABELS on page 22.
FIND SELECT
195
198
199 200
196 197
Soft Key Menu
-12-
5. MAKING LABELS cont.
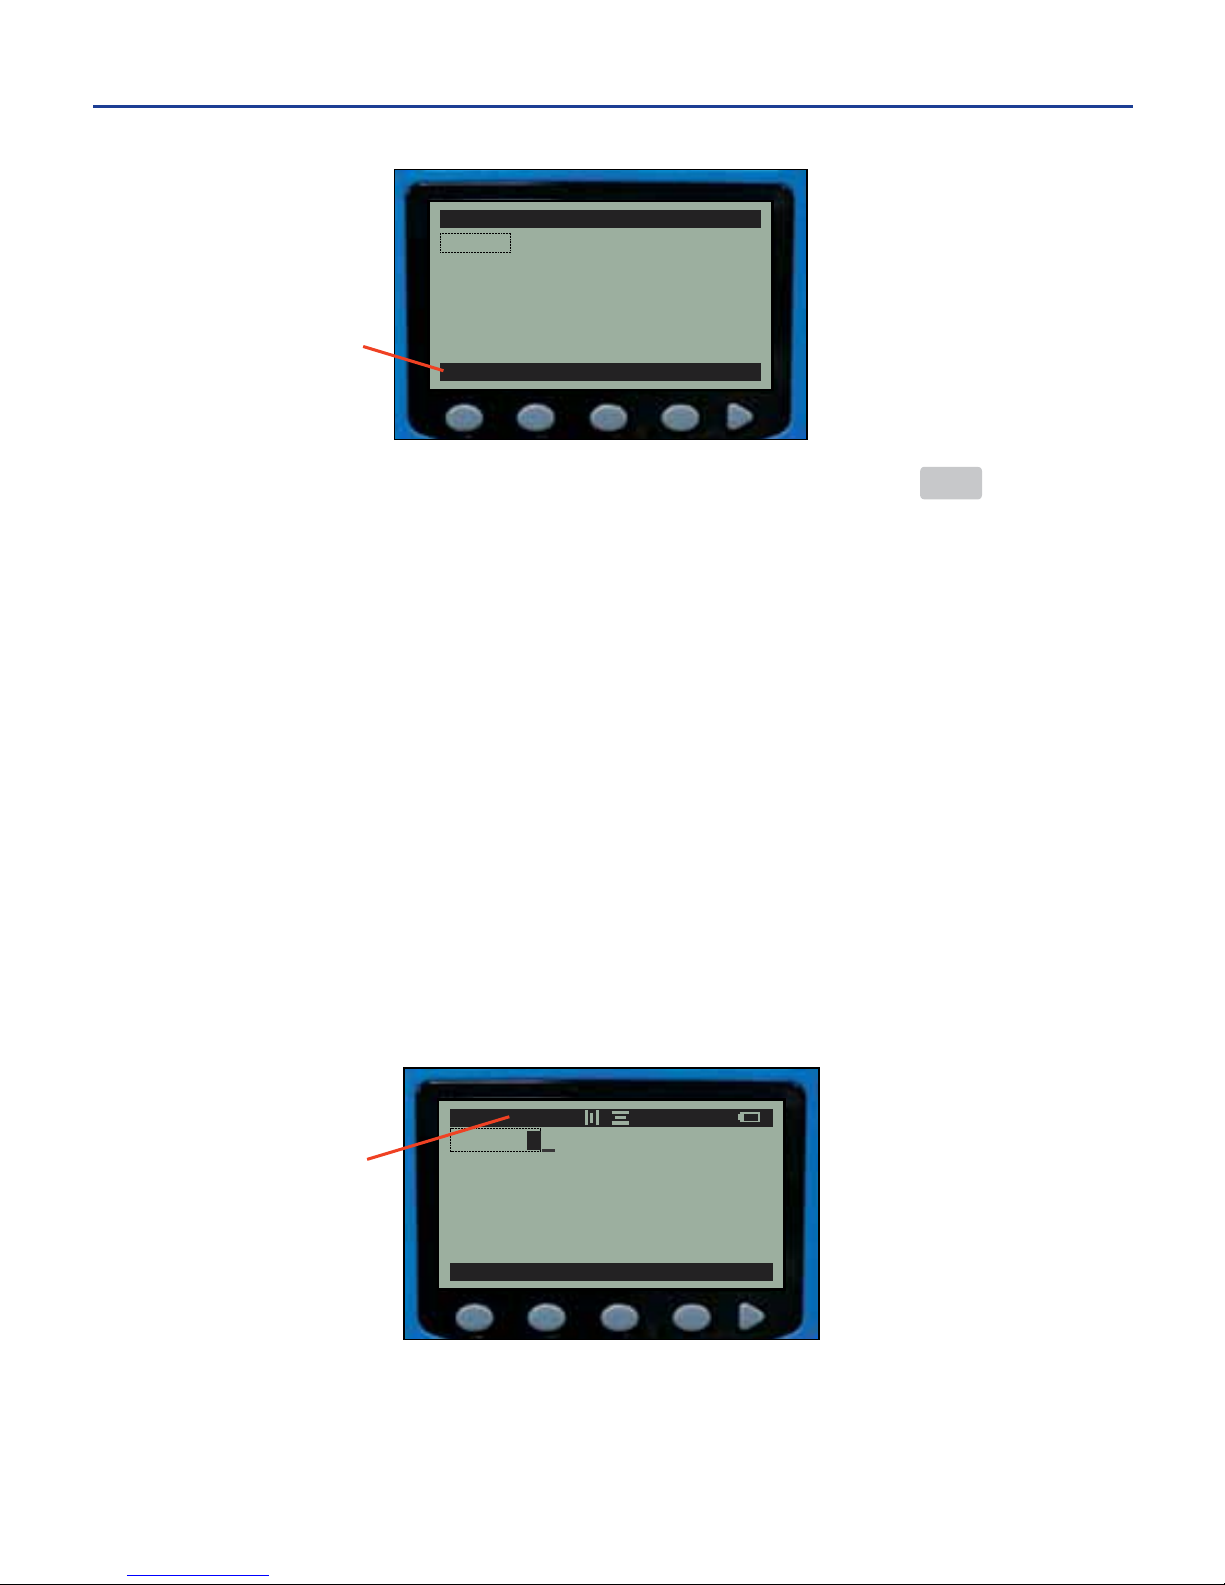
Save Screen
The save screen is accessed through the main menu by pressing the FILE soft key.
The save screen lists the label designs stored on the printer. The soft keys allow
the user to save the current label design, open previously saved label designs, and
delete label designs.
TEXT/IMAGE AUTO-SIZE
Auto-size automatically adjusts the size of the text and images to fill the entire
label area (whether the label consists of one line or many lines). Auto-size
enabled is the printer’s default setting.
Individual text characters, groups of text characters, and images may have auto-
size enabled or disabled, even if they are located within the same line. Auto-size
is denoted by an “A” immediately to the right of the number indicating the current
text or image size in the status bar on the edit screen and the size screen (see
pages 9 and 10).
The “A” also appears on the size screen in the label layout area (see size screen
image on page 10).
uNOTE: Do not get this “A” confused with the “A” that represents CAPS lock on, which is on the far
left side of the status bar.
NEW OPEN DELETE DEL ALL
SAVED LA
BELS
3/40 EDIT
[
NEW
]
HALON
JOHN SMITH
SAFETY GLASSES
Soft Key Menu
DISP PRINT TEST
RESET
HALON
A 182A
P
1/1
Auto-size Enabled
-13-
5. MAKING LABELS cont.
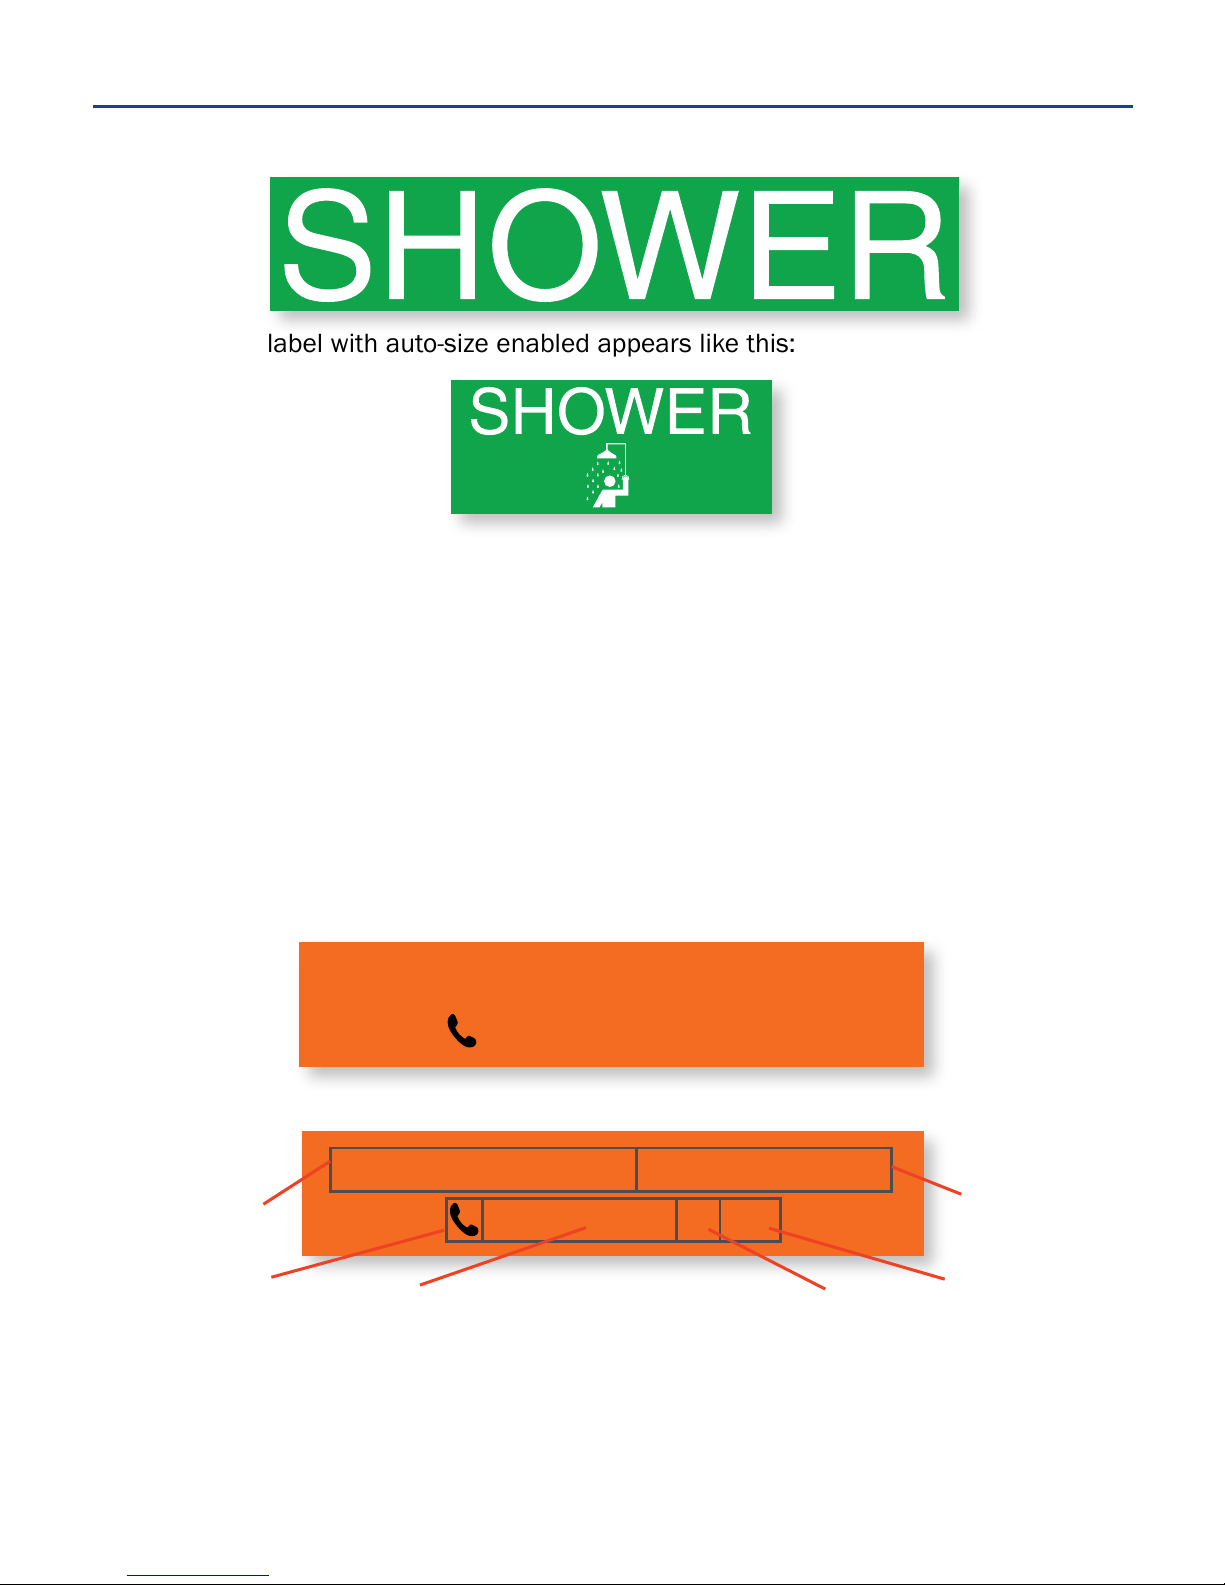
A one line label with auto-size enabled would appear like this:
A two line label with auto-size enabled appears like this:
Auto-size can be disabled by manually changing the size on the size screen.
CELLS
A cell represents text or images that have similar attributes to one another on
the same line. A label design may consist of one or many cells.
New cells are created when text attributes within a line are changed. Each image
is represented by a single cell. Cells are seen on two screens: the edit screen
and the size screen. The following examples illustrate how cells work:
Cells As Seen On the Edit Screen
The first line consists of two cells. The characters of the first cell “JOHN SMITH,”
share the same attributes: bold, and auto-size. The characters of the second cell,
“Receiving Dept.” are italicized and set to size 24 Point.
JOHN SMITH, Receiving Dept.
555-555-5555 ext. 122
JOHN SMITH, Receiving Dept.
555-555-5555 ext. 122
Auto-size
Point
Auto-size
Point
Italics,
Size 24
Point
Size 22
Point
Size 22
Point
Size 15
Point
Finished printed label on 1" supply
Label design showing cells
-14
5. MAKING LABELS cont.
 Loading...