

Page 1
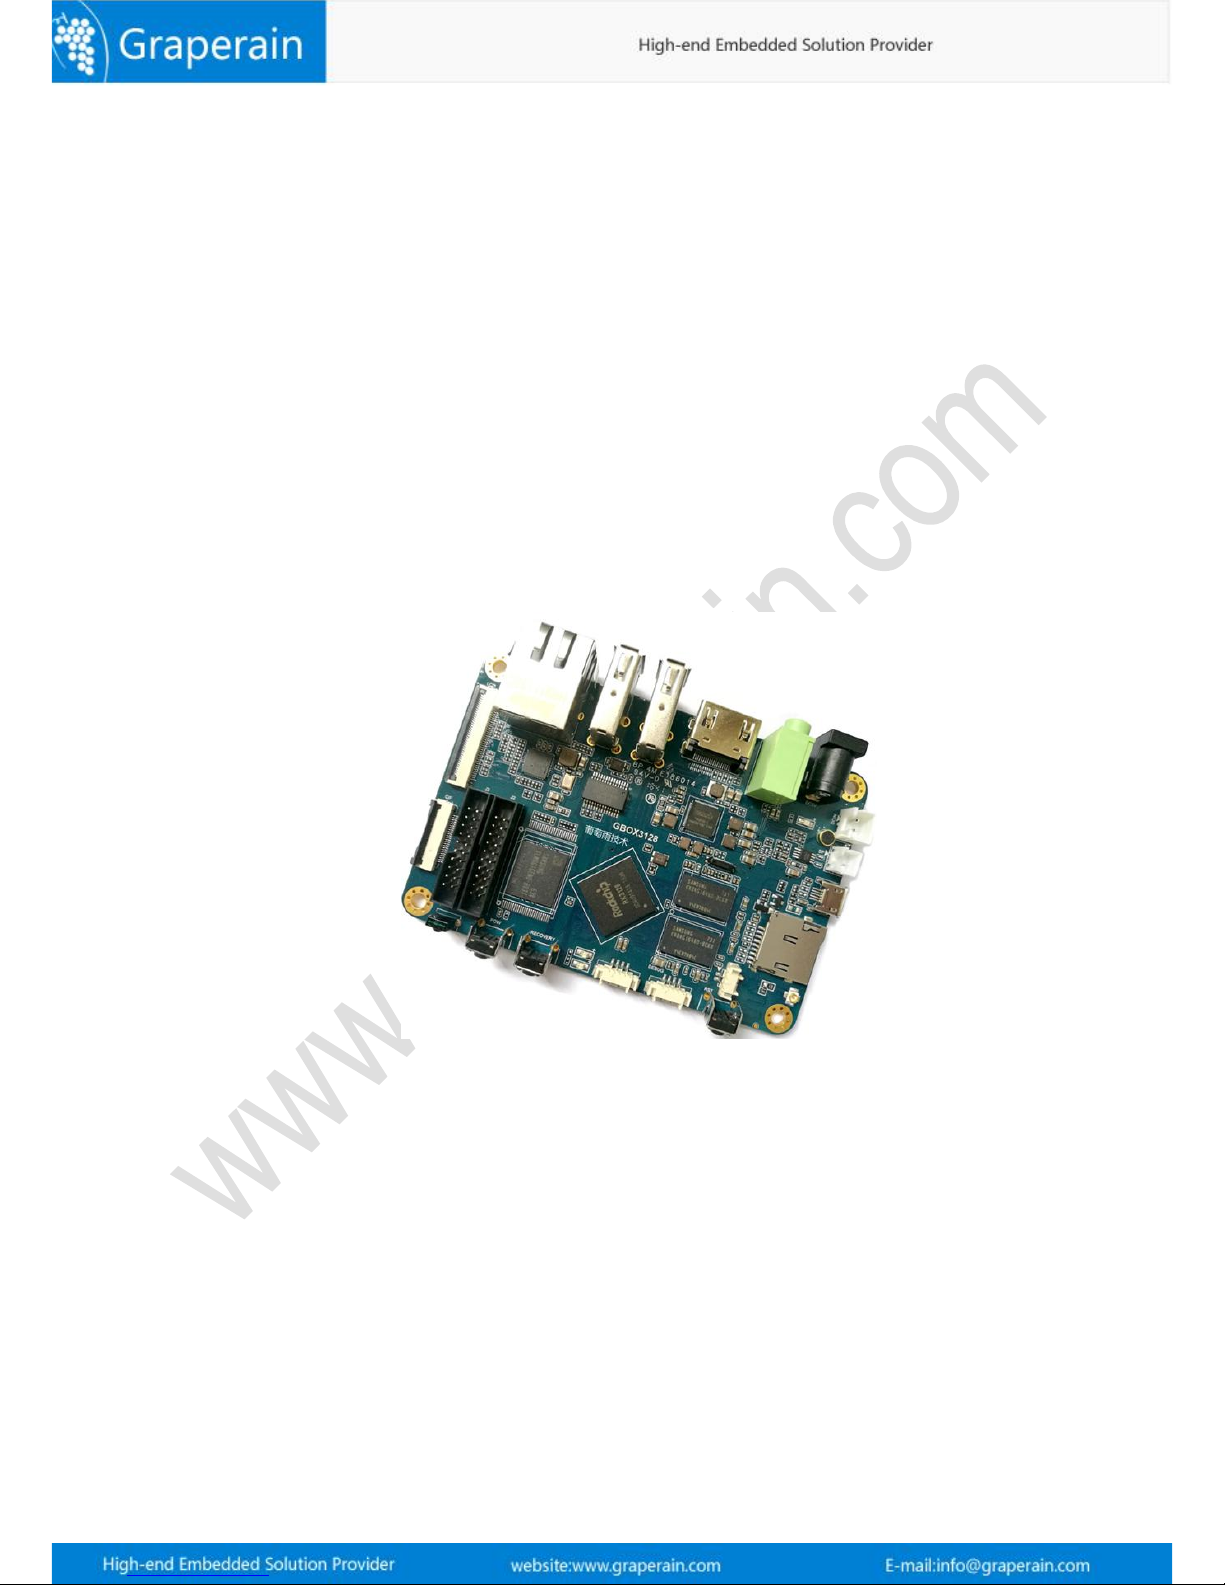
G3128
Single Board Computer
Development Manual
Shenzhen Graperain Technology Co., Ltd.
www
.graperain .com/
Page 2

Copyright Statement
Copyrights of this manual belong to Shenzhen Graperain Technology Co., Ltd. and all rights
are reserved. Any companies or individuals are not allowed to extract part or all of this
manual, and violators will be prosecuted under law.
Attention:
The manuals of development platform on sell will be updated from time to time, please
download the latest manual from website www.graperain.com or contact our company sales
representative, there would be no further notice.
Page 3

Release Notes
Version
Release Date
Author
Description
Rev.01
2018-8-20
David
Revision
Page 4
Technical Support
Any questions about the manuals, you can call our landline or email us.
Website: http://www.graperain.com
Landline:+86 755 23025312
E-mail: [email protected]
Sales and Service Network
Shenzhen Graperain Technology Co., Ltd.
Website: http://www.graperain.com
Landline: +86 755 23025312
E-mail: [email protected]
Address: Building A, Huafeng Tech. & Innov. Park Baoan Wisdom Valley, Xixiang, Baoan
Dist.Shenzhen, Guangdong. Post code 518101.
Page 5

5
Catalogue
Copyright Statement.....................................................................................................2
Chapter 1 Setting up Android Platform Development Environment............................. 7
1.1 Install Ubuntu OS by U-disk............................................................................................... 7
1.2 Install Dependent Package of Android Source Code....................................................... 8
1.3 Install Cross-complier Tool..............................................................................................10
1.4 Specify GCC Cross-complier.............................................................................................10
Chapter2 Compiling Android Source Code Package................................................... 12
2.1 Install Android Source Code Package..............................................................................12
2.2 Analysis Compiled Script.................................................................................................. 12
2.3 Compiling Source Code..................................................................................................... 13
2.3.1 Checking Compiling Assistance.............................................................................13
2.3.2 Compiling Uboot.....................................................................................................13
2.3.3 Compiling Kernel....................................................................................................13
2.3.4 Compiling Android File System.............................................................................13
2.4 Configurating Kernel.........................................................................................................13
Chapter 3 Compiling Linux QT Source Code..............................................................15
3.1 Install Linux Source Code Package.................................................................................. 15
3.2 Compiling Script Analysis.................................................................................................15
3.3 Compiling Source Code..................................................................................................... 15
3.3.1 Check compiling assistant out...............................................................................15
3.3.2 Compiling Uboot.....................................................................................................16
3.3.3 Compiling Kernel....................................................................................................16
3.3.4 Compiling Linux File System................................................................................. 16
3.3.5 Generate System Update Package.........................................................................16
3.4 Configurating Kernel.........................................................................................................16
3.5 Configuration File System.................................................................................................17
Chapter 4 Programming Android Image Files.......................................................... 18
4.1 Upgrade Firmware in Ubuntu Environment...................................................................18
4.2 Upgrade Firmware in Windows....................................................................................... 18
4.2.1 Install RK USB Drive...............................................................................................18
4.2.2 Connect Device....................................................................................................... 19
4.2.3 Take AndroidTool to Upgrade Firmware..............................................................21
4.3 Update Firmware by TF Card When Off-line...................................................................22
Chapter 5 Programme Linux-qt Image File.............................................................. 26
5.1 Update Firmware in Ubuntu Environment..................................................................... 26
5.2 Update Firmware in Windows Environment..................................................................26
5.2.1 Install RK USB Drive...............................................................................................26
Page 6

6
5.2.2 Connect Device....................................................................................................... 27
5.2.3 Take AndroidTool Update Firmware.................................................................... 28
5.3 Update Firmware When Off-line............................................................................31
Chapter 6 Product Portfolio....................................................................................... 34
6.1 System on Module Series...........................................................................................34
6.2 Development Board Series........................................................................................34
6.3 Single Board Computer (SBC) Series........................................................................34
Page 7
7
Chapter 1 Setting up Android Platform Development Environment
Please install Linux operating system in PC which could fully play PC performance as
compiling Android source could ask for high requirements in PC hardware. We use
Ubuntu14.04 64bit system in this chapter. Please keep the same as our version.
1.1 Install Ubuntu OS by U-disk
Tool
:
One U-disk bigger than 2GB
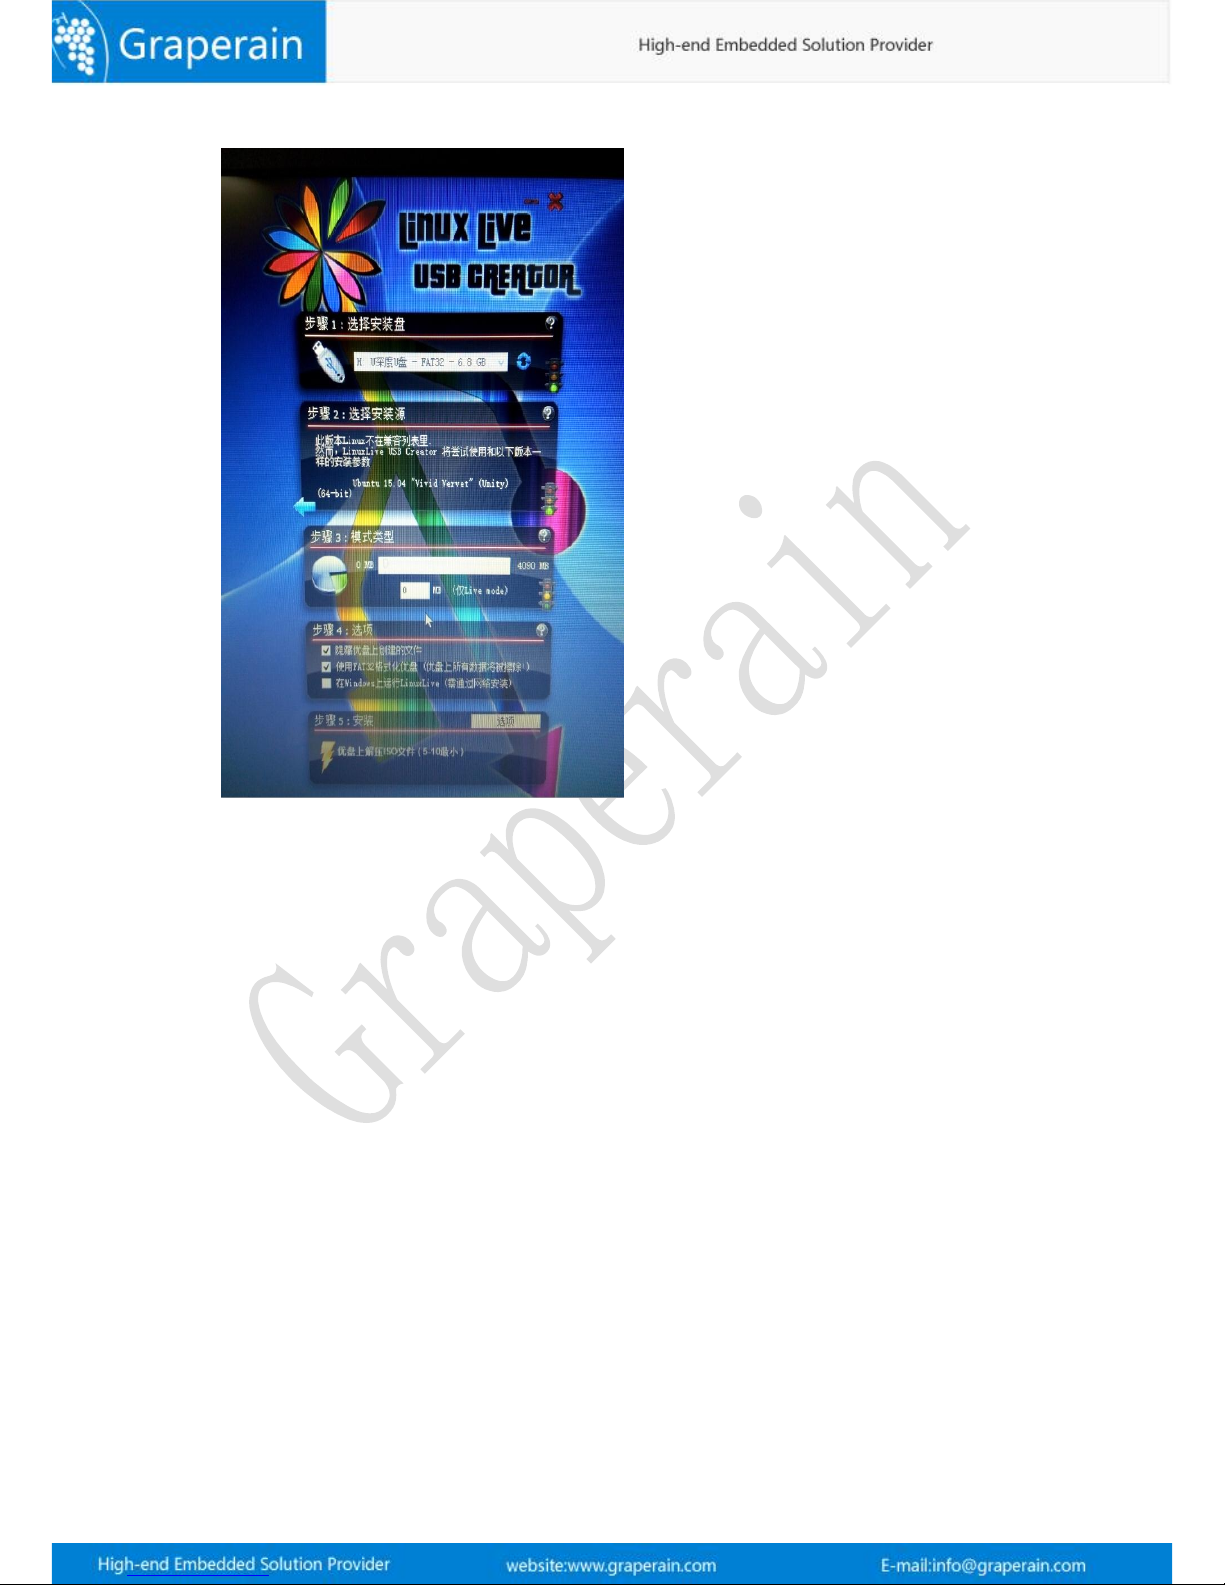
Software: Linuxlive usb creater, Download link:http://www.linuxliveusb.com/
Operating System:
Ubuntu14.04, Download link:http://www.ubuntu.com/download/desktop/
Installation Method
:
Step1: Download Ubuntu ISO file and linuxlive usb creater, and done installation.
Step2: Insert U-disk, and open usb creater file, and done setting as hints, at first, please take
installation and tell U-disk, second, find downloaded file ubuntu image file, third default, and
check hide files and FAT32 format U-disk, last click lightning icon and done installation.-
Page 8
8
Step3: Re-start computer, and enter into BIOS setting menu, and take U-disk launch.
Generally, the desktop computer press DEL key, and notebook computer F2, or F10 enter into
BIOS. Done setting, save and quit.
Step4: Re-start it one more time, and Ubuntu installation interface will be, please check your
language and go on;
Step5: Check install, and go on;
Step6: Check your language, and go on;
Step7: Netconfig, installation or not both ok, or installation it after system done;
Step8: Check something else, and Go on; separate two zones for Ubuntu,
“一个/”
and
”一
个
/home”. Zones can be re-buit or format. It depends on requirements.
Step9: Setup area, take yours;
Step10: Select Keyboard;
Step11: Login user name and password, and done setup. Go on and install it directly. Restart
when done installation, and enter into Ubuntu operating system.
1.2 Install Dependent Package of Android Source Code
Dependent software package and 64bit System patches:
Page 9
9
GIT
JDK 8
JDK 7
git-core,gnupg,flex,bison,gperf,libsdl-dev,libesd0-dev,libwxgtk2.6-dev,
libwxgtk2.8-dev,build-essential,zip,curl,libncurses5-dev,zlib1g-dev,libxml2-utils,
genromfs,lsb-core,libc6-dev-i386,g++-multilib,lib32z1-dev,lib32ncurses5-dev,
u-boot-tools,
android-tools-fastboot,Texinfo,lib32readline-gplv2-dev,gcc-multilib,libswitch-perl,
gcc-arm-linux-gnueabihf
All software package needed:
sudo apt-get update
sudo apt-get upgrade
sudo apt-get install g
it-core gnupg flex bison gperf libsdl-dev libesd0-dev
libwxgtk2.6-dev libwxgtk2.8-dev build-essential zip curl libncurses5-dev zlib1g-dev
libxml2-utils genromfs lsb-core libc6-dev-i386 g++-multilib lib32z1-dev lib32ncurses5-dev
u-boot-tools android-tools-fastboot Texinfo lib32readline-gplv2-dev
gcc-multilib,libswitch-perl gcc-arm-linux-gnueabihf
Install aboving software packages one by one, and then failing ones will be found.
Install manually JDK8:
Step details in Ubuntu os:
Step1: Execute following order:
sudo add-apt-repository ppa:openjdk-r/ppa
sudo apt-get update
sudo apt-get install openjdk-8-jdk
Step2: Re-start the system
Check Java version:
Page 10
10
root@david:/usr/lib/jvm# java -version
Till now, done JDK8 installation.
Install manually DK7:
Install manually jdk1.7 in Ubuntu:
Step1: Execute following order:
sudo add-apt-repository ppa:webupd8team/java
sudo apt-get update
sudo apt-get install oracle-java7-set-default
Step2: Re-start the system
Step3: Check Java version:
root@david:/usr/lib/jvm# java -version
Till now, done jdk7 installation.
1.3 Install Cross-complier Tool
The cross-complier tool has been integrated into source code package yet, no need manual
installation. Its path:(Android source code)
prebuilts/gcc/linux-x86/arm
1.4 Specify GCC Cross-complier
When install latest GCC cross-complier in Ubuntu system, the version is exceed 4.4. Check GG
version with the following command:
gcc –version
Maybe shows following information:
david@ubuntu-server:~$ gcc --version
gcc (Ubuntu/Linaro 4.6.3-1ubuntu5) 4.8.3
Copyright©2011 Free Software Foundation, Inc.
Above information shows version is 4.8, it will be error hint. That caused by new GCC version
error, you could find solution in internet. If you do not want to modify those error, just
downgrading your version into 4.4 will be ok.
Page 11

11
Solution:
Install 4.4 version
sudo apt-get install gcc-4.4 g++-4.4 g++-4.4-multilib
Done installation, and downgrading version gcc
cd /usr/bin
sudo mv gcc gcc.bk
sudo ln -s gcc-4.4 gcc
sudo mv g++ g++.bk
sudo ln -s g++-4.4 g++
Check version and done downgrading:
david@david-work:~$ gcc -version
gcc: unrecognized option '-version'
gcc: no input files
david@david-work:~$ gcc --version
gcc (Ubuntu/Linaro 4.4.7-8ubuntu1) 4.4.7
Copyright (C) 2010 Free Software Foundation, Inc.
Page 12
12
Chapter2 Compiling Android Source Code Package
G3128 single board computer is of eMMC memory as fault.
State: Take ordinary permissions when compiling image. Done compiling, following images
happen: uboot.img,kernel.img,resource.img,boot.img,recovery.img,misc.img
,
system.img,update.img
。
uboot.img: bootloader, which used to guide kernel
kernel.img:kernal image
resource.img: source files image
system.img: android file system image
update.img: all android system upgrading, which includes all images compiled
2.1 Install Android Source Code Package
Copy Android 5.1 source code package from cloud storage into user catalogue.
Notice: do not save this file into root catalogue of system file, if you do, there will be
administration authority problem.
For example: Do following command in user’s authority:
cp yourcdromdir/source/g3128-android-v51-xxx.tar.bz2 ~/
cd
tar -xjvf
g3128-android-v51-xxx.tar.bz2
Now all Android file saved in the extracted directory. Till here all Android source code package
installation done well.
State: Source code names could be different as its data issued, subject to cloud storage.
2.2 Analysis Compiled Script
State: Kinds of source code version is different but principle same. And its script details subject
to its relevant source code package, here it used to be analysis realizing mechanism.
Page 13
13
2.3 Compiling Source Code
2.3.1 Checking Compiling Assistance
Do following command to checking usage of mk script
./mk.sh–h
2.3.2 Compiling Uboot
Do following command and compiling uboot. Save uboot.img file into out/release catalogue
when compiling done.
./mk.sh -u -j=4
2.3.3 Compiling Kernel
Do following command to compiling Android kernel in Android source code catalogue:
./mk.sh -k -j=4
Done compiling, new image happens:
kernel.img and resource.img, save them into
out/release
2.3.4 Compiling Android File System
First, check“out catalogue”in Android root catalogue. Cancel full out cataluge at the first
compiling, and take following command as following to compiling Android image files :
./mk.sh -s -j=4
Done compiling and save images into out/release, which includes: system.img,boot.img,
misc.img,recovery.img., parameter.txt, and all system firmware package update.img.
2.4 Configurating Kernel
Kernel configuration file:kernel/arch/arm/configs/g3128_defconfig, and its steps are:
1) cp kernel/arch/arm/configs/g3128_defconfig kernel/.config (copy it)
Page 14
14
2) make menuconfig ARCH=arm (Manual configuration, and save it.)
3) cp kernel/.config kernel/arch/arm/configs/g3128_defconfig (Updating
configuration files.
)
4) ./mk.sh -k (Compiling kernel one more time.)
Page 15
15
Chapter 3 Compiling Linux QT Source Code
G3128 single board computer is of standard eMMC.
State: Take ordinary permissions when compiling image. Done compiling, following
images will be happend: uboot.img,kernel.img,resource.img,linux_system.img,
update_linux.img。
uboot.img: bootloader, which used to be guide kernel.
kernel.img: which is kernel image.
resource.img: which is source files image.
linux_
system.img: which is file system image.
update_linux.img: which includes all Linux qt system updating images.
3.1 Install Linux Source Code Package
Copy Linux QT source code package into user catalogue. Notice not save into root catalogue,
or administrative authority issue happens:
For example: Do following command in user’authority:
cp yourcdromdir/source/g3128-linux-xxx.tar.bz2 ~/
cd
tar -xjvf
g3128-linux-xxx.tar.bz2
Save all Linux files system in to current zip catalogue. And till now, Linux source
code package installation done.
State: The name of sourc e code packag e maybe different name as date, please
reference it s real name in disk .
3.2 Compiling Script Analysis
State: Different version source code script are different, but principle same.
3.3 Compiling Source Code
3.3.1 Check compiling assistant out.
Page 16
16
Do following command to check mk script details out:
./mk.sh–h
3.3.2 Compiling Uboot
Do following command to compiling uboot in Linux source code catalogue and then save the
image uboog.img into out/release:
./mk.sh -u -j=4
3.3.3 Compiling Kernel
Do following command to compiling kernel in Linux source code
catalogue
:
./mk.sh -k -j=4
Done compiling and save all images kernel.img and resource.img into
out/release.
3.3.4 Compiling Linux File System
Do following command to compiling Linux file system in Linux source code catalogue:
./mk.sh -r -j=4
Done compiling and save image
linux_system.img
into
out/release.
3.3.5 Generate System Update Package
Do following command to generate system update package in Linux source code catalogue:
./mk.sh -l -j=4
Done compiling and save image
update_linux.img
into
out/release.
3.4 Configurating Kernel
All configuration files saved in kernel/arch/arm/configs/g3128_defconfig, and configuration
steps as following;
1) cp kernel/arch/arm/configs/g3128_defconfig kernel/.config (copy files)
Page 17
17
2) make menuconfig ARCH=arm (Manual configuration and save it when done
configuration)
3) cp kernel/.config kernel/arch/arm/configs/g3128_defconfig
(
Update
configuration files
)
4) ./mk.sh -k (Compiling kernel again)
3.5 Configuration File System
The name of configuration file is rootfs/buildroot/configs/rk3128_rootfs_defconfig,and
configuration process is:
1) cp configs/rk3128_rootfs_defconfig .config (Copy it)
2) make menuconfig (Manual configuration in rootfs/buildroot, and save it after
done.)
3) cp .config configs/rk3128_rootfs_defconfig(Update configuration files
)
4) ./mk.sh -r (Compiling it again in Linux source code catalogue)
Page 18
18
Chapter 4 Programming Android Image Files
4.1 Upgrade Firmware in Ubuntu Environment
In Ubuntu Environment to upgrade firmware.
Preparation
:
Insert power charger with G3128 single board computer, and connect OTG cable with PC,
and connect serial cable with PC, and open serial terminal and command terminal;
Power on, and press Update key, meanwhile press Reset key, and upgrade automatically.
Then, take following operation in PC command line:
sudo ./upgrade_tool uf update.img (Upgrade full Android upgrade image)
Or upgrade them separately: uboot,kernel and resource firmware files
:
sudo ./upgrade_tool di uboot uboot.img
sudo ./upgrade_tool di -k kernel.img
sudo ./upgrade_tool di resource resource.img
sudo ./upgrade_tool di -b boot.img
sudo ./upgrade_tool di -r recovery.img
sudo ./upgrade_tool di -m misc.img
sudo ./upgrade_tool di -p paramater.txt
sudo ./upgrade_tool di -s system.img
Comment:
All images and download tool are in out/release.
4.2 Upgrade Firmware in Windows
4.2.1 Install RK USB Drive
Steps
:
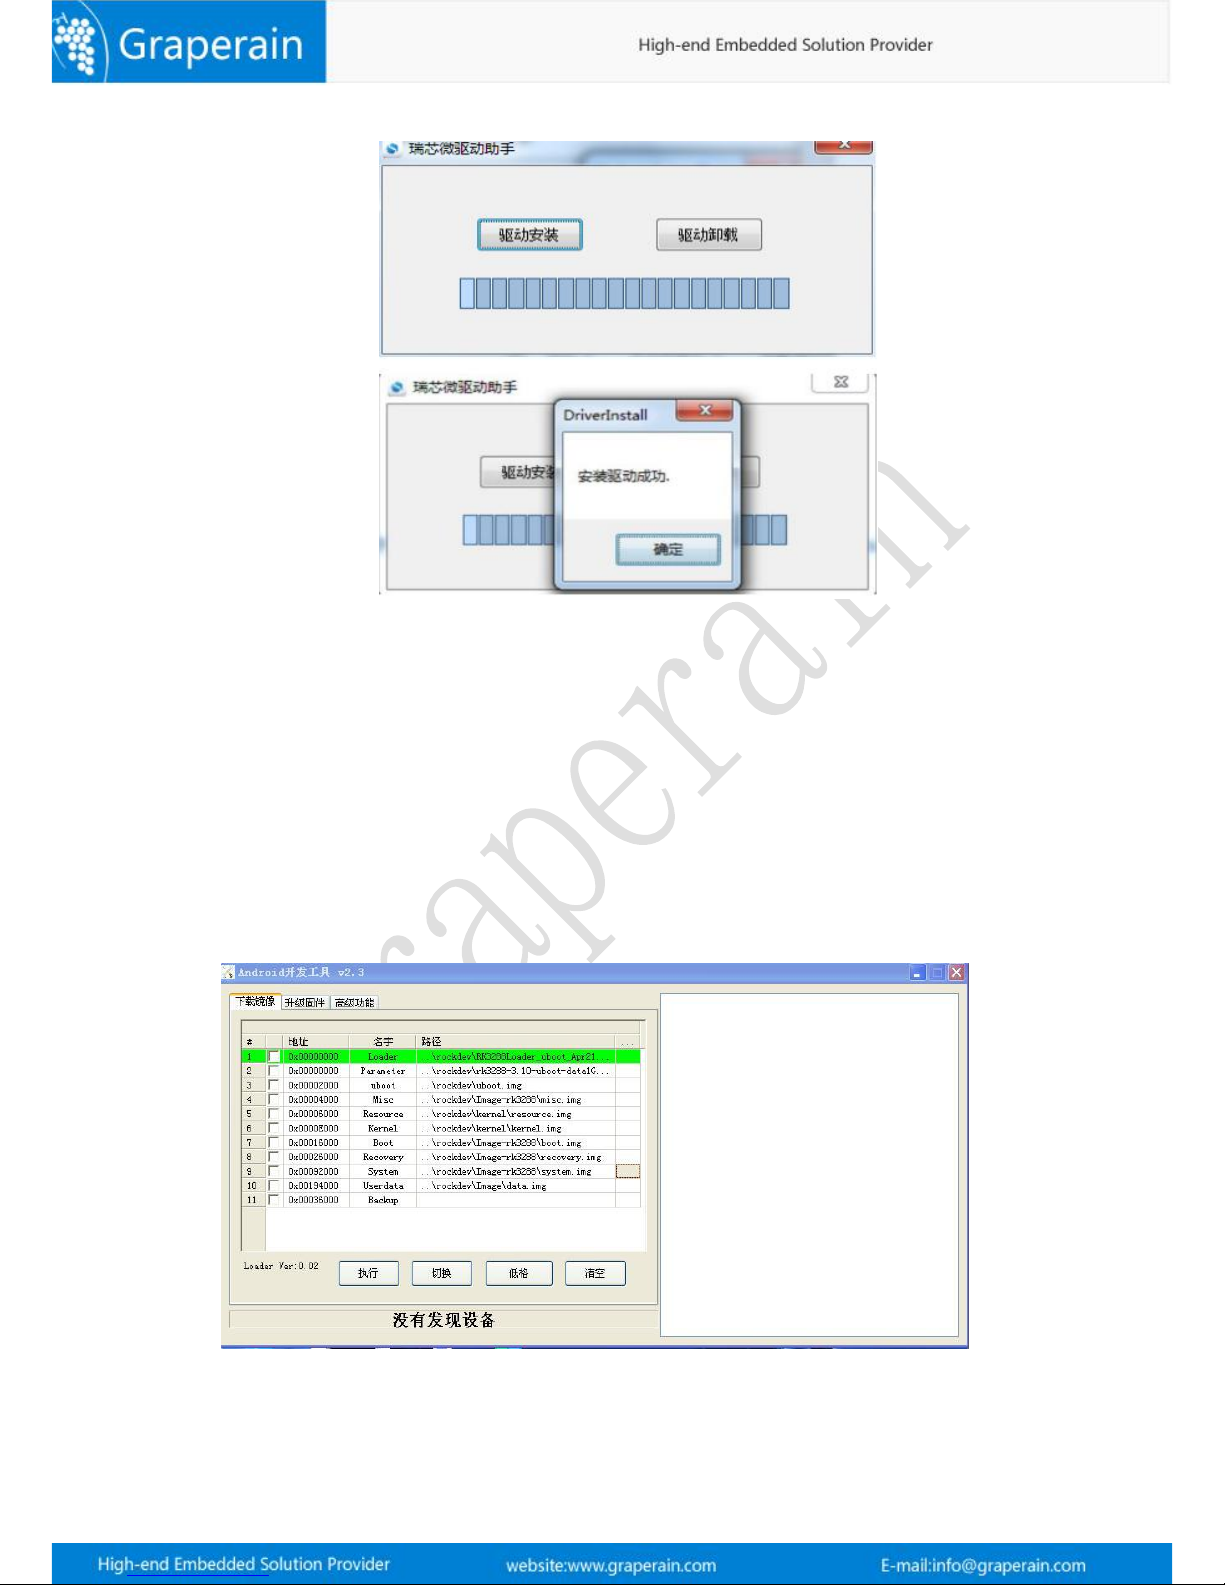
Step1, Run DriverAssitant_v4.4 in DriverInstall.exe, and done installation;
Page 19
19
Notice:
1)Support xp,win7_32,win7_64,win8_32,win8_64 OS.
2)Done installation of XP OS, still hint find new device, please take automount
“自动安装”
3)Click quit drive and install drive then if old drive version found before installation.
4.2.2 Connect Device
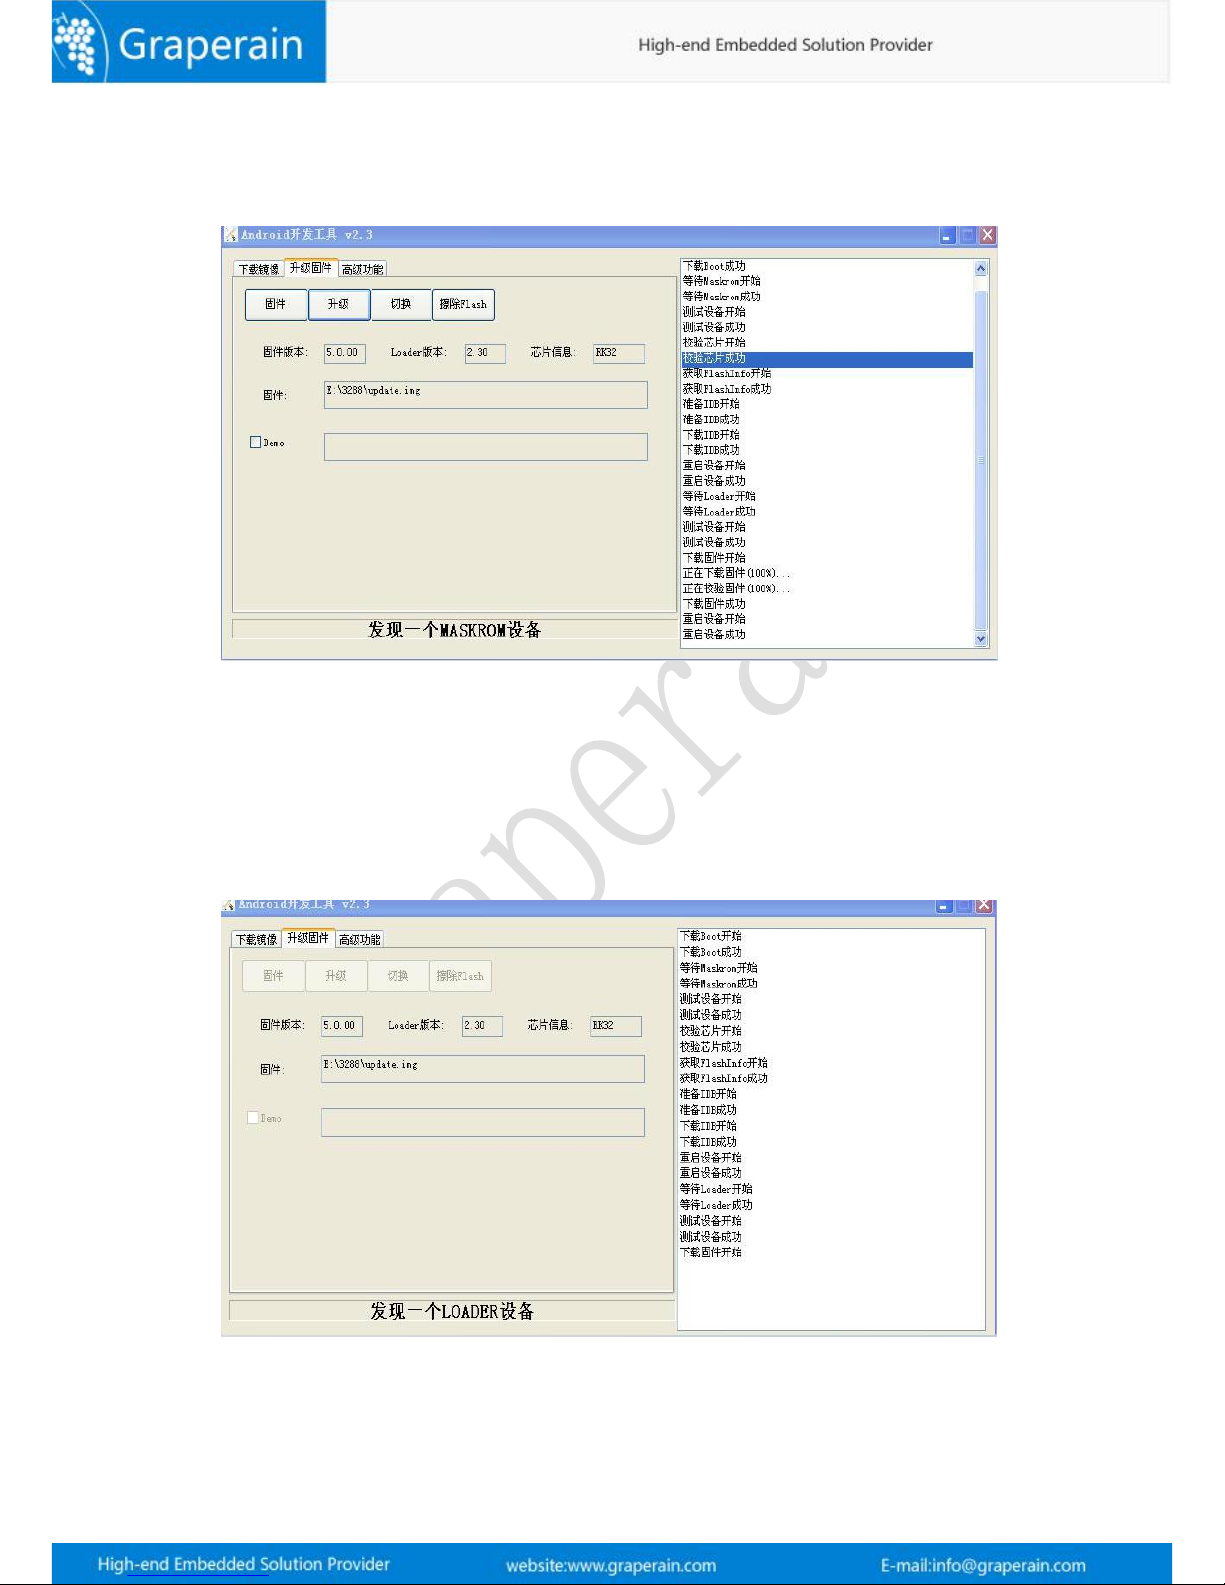
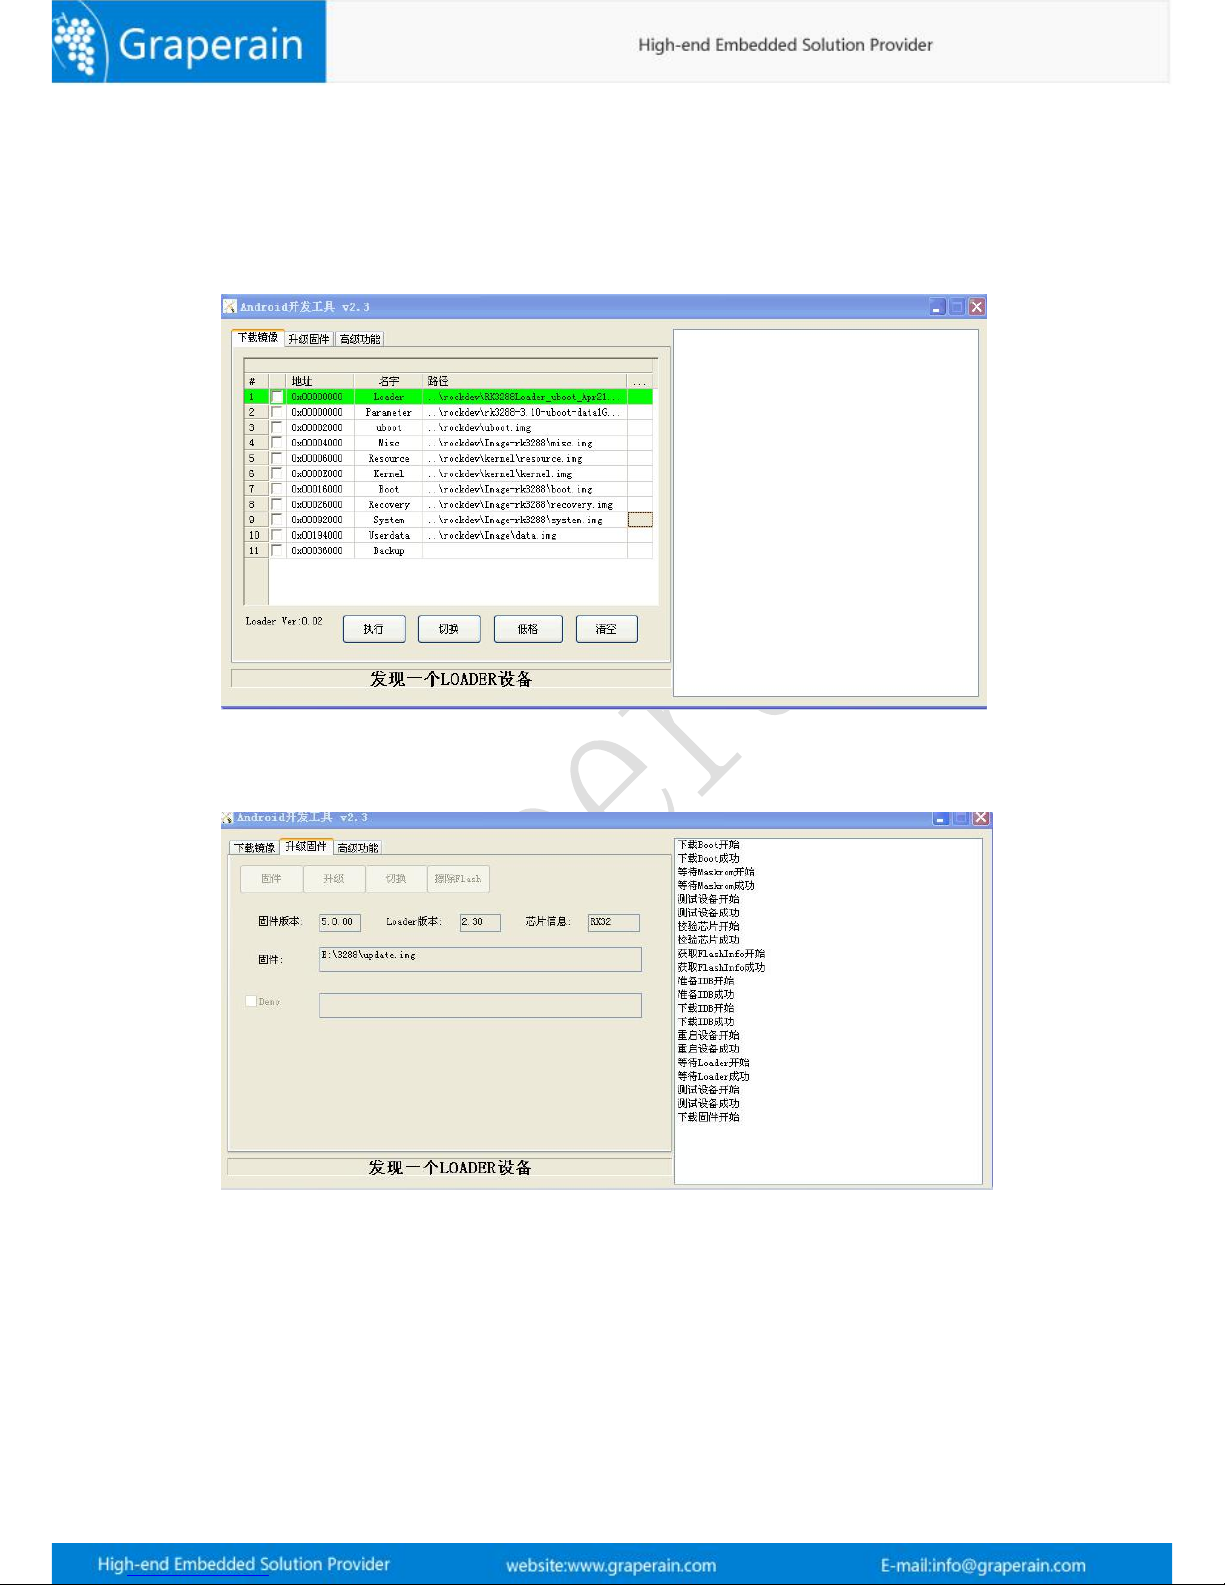
Run AnroidTool.exe tool in AndroidTool, and find following interface:
1) When eMMC have not programmed any firmware before.
Page 20
20
Press Update key, and connect G3128 single board computer with PC through OTG cable.
Done connection, take off Update key will be ok. And the board will enter into MASKROM,
and waiting for programming to upgrade.
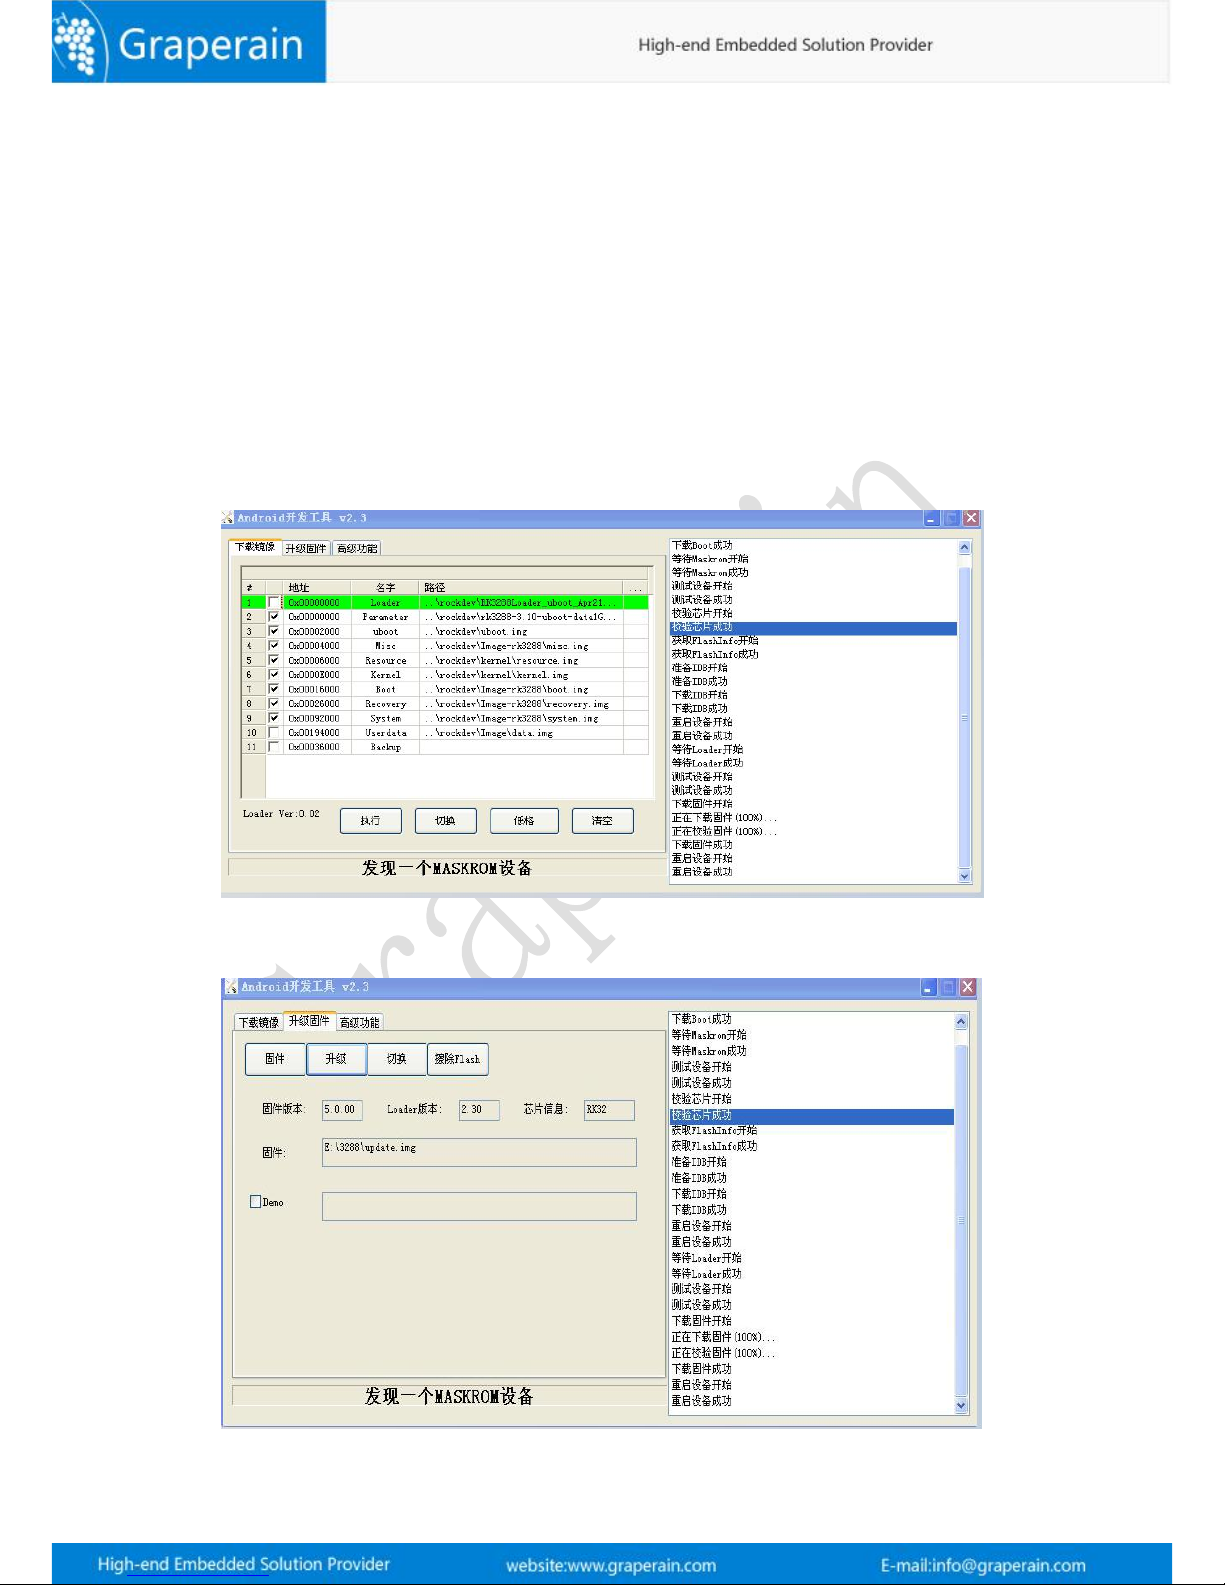
2)When the G3128 single board computer have been programmed firmware before:
Power the board, and connect the board with PC through OTC, press Update key, and
meanwhile press Reset key, re-start the board, take off Update key will be ok. And then the
board will enter into LOADER, and waiting for upgrading. And its interfaces like following
picture:
Page 21
21
4.2.3 Take AndroidTool to Upgrade Firmware
In last sections described how to install RK USB drive and how to connect with PC. No matter
blank board or upgraded board, once done upgraded and connect well, just upgrade its
firmware will be ok: Or upgrade uboot, kernel and resource firmwares one by one, or
upgrade its firmware update.img.
Run AndroidTool.exe in AndroidTool
MASKROM mode:
Upgrade every firmware: click the firmware which need to be upgraded, and clink do
“执行”
Or upgrade unit firmware update.img, and take update.img, click
‘升级’
Page 22
22
LOADER mode:
Update every firmware, and check the firmware which need to be upgraded, and click
‘执行’
Or upgrade unit firmware update.img, check update.img, and click
‘升级’
4.3 Update Firmware by TF Card When Off-line.
When board power on, the CPU will boot from SD card boot preferentially, and then guide.
There are two functions of SD Card Boot: Upgrade and Run. Here is SD card upgrade
Page 23
23
function:
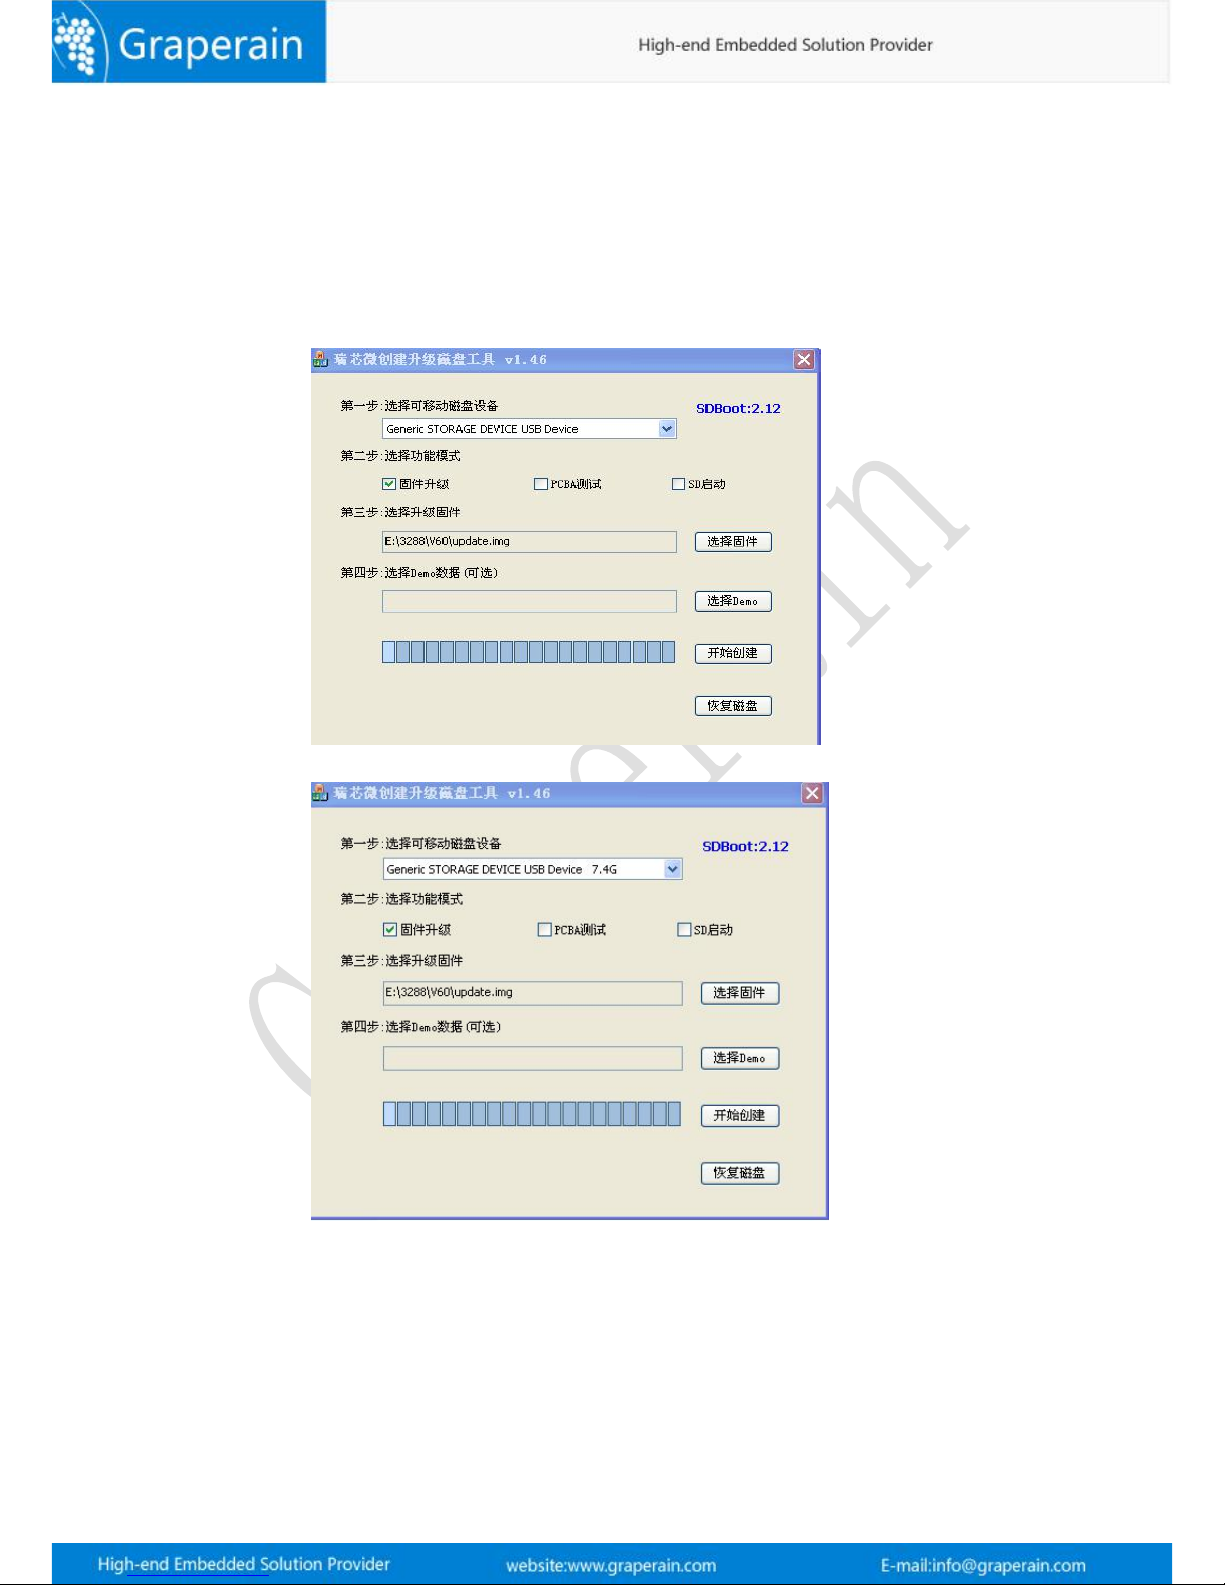
Tool:SD_Firmware_Tool.exe
Steps
:
Step1, Run SD_Firmware_Tool.exe in PC, and like following picture:
Step2, Insert TF into PC, and software tool will find TF card, like:
Step3, In function mode, check
“固件 升 级”,“选择 升级固件”
( which means zipped
firmware update-android.img in Android)
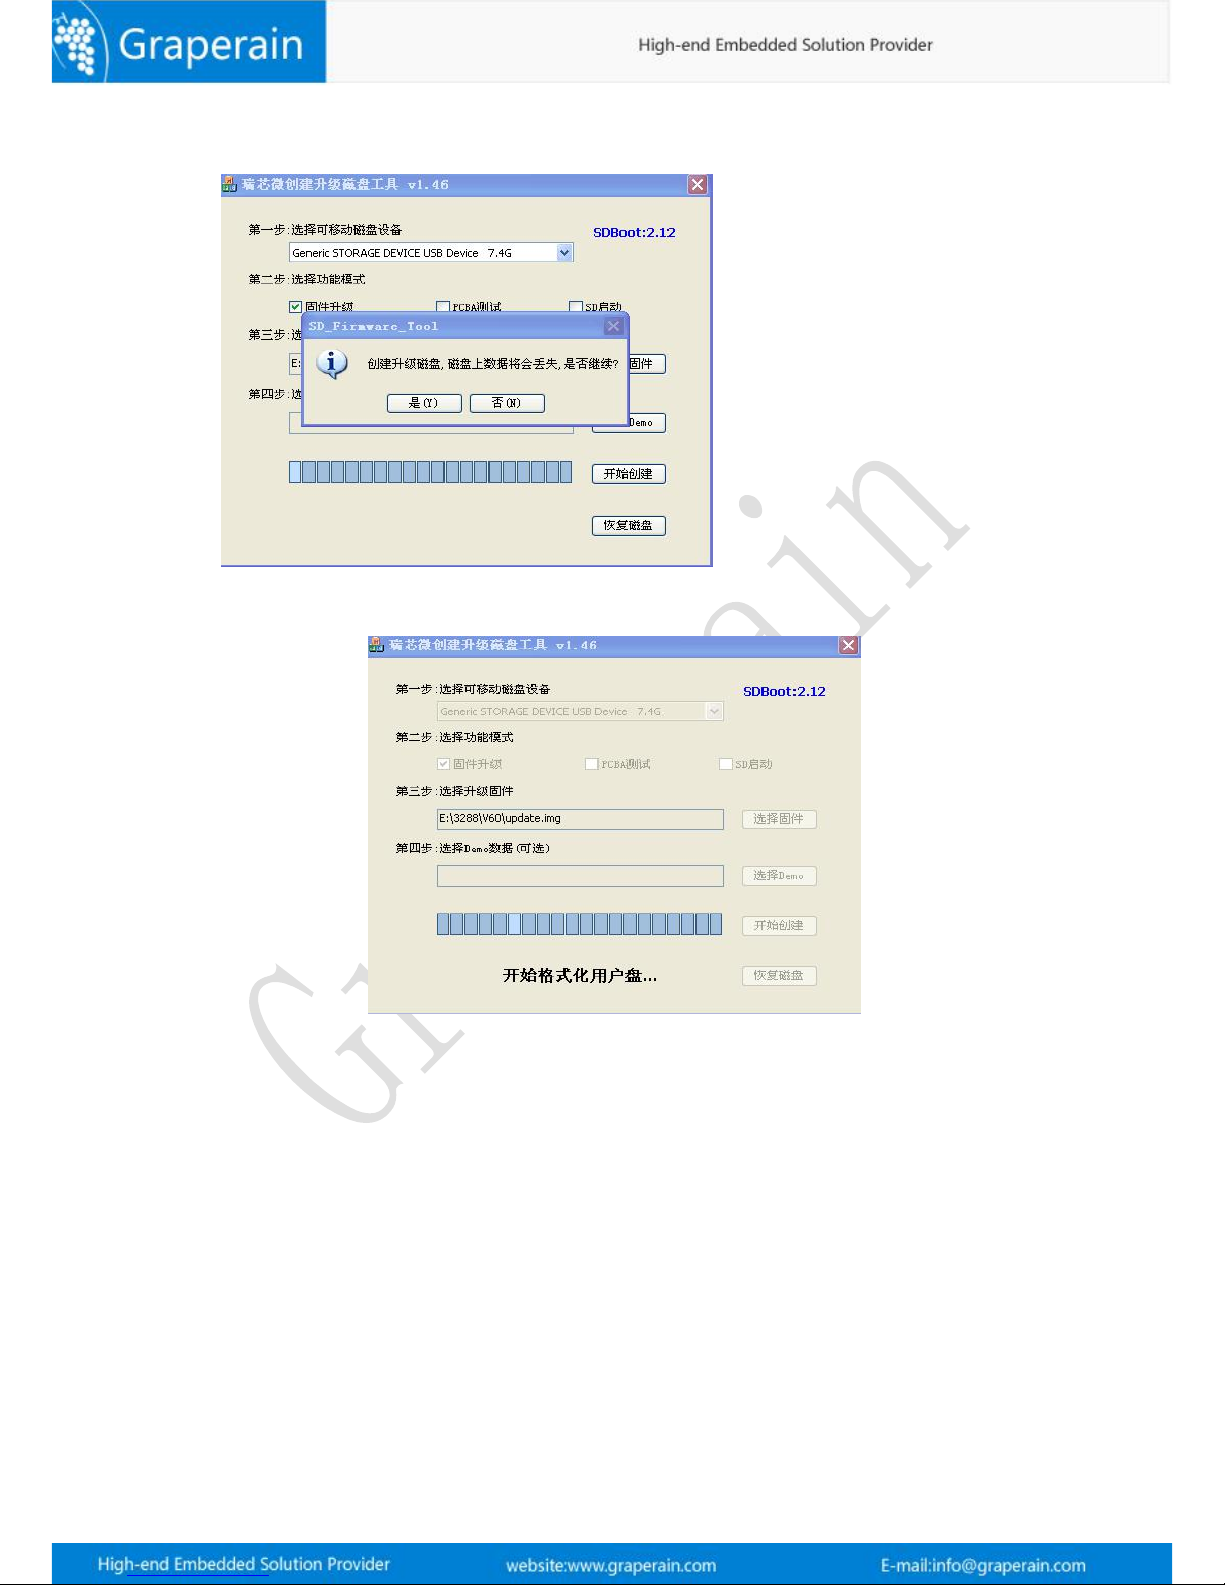
Step4, Click
“开始创建”
, and upgrade, and click
“开始创建”
, following picture will shows,
Page 24
24
and check format TF or not, yes, and upgrade then.
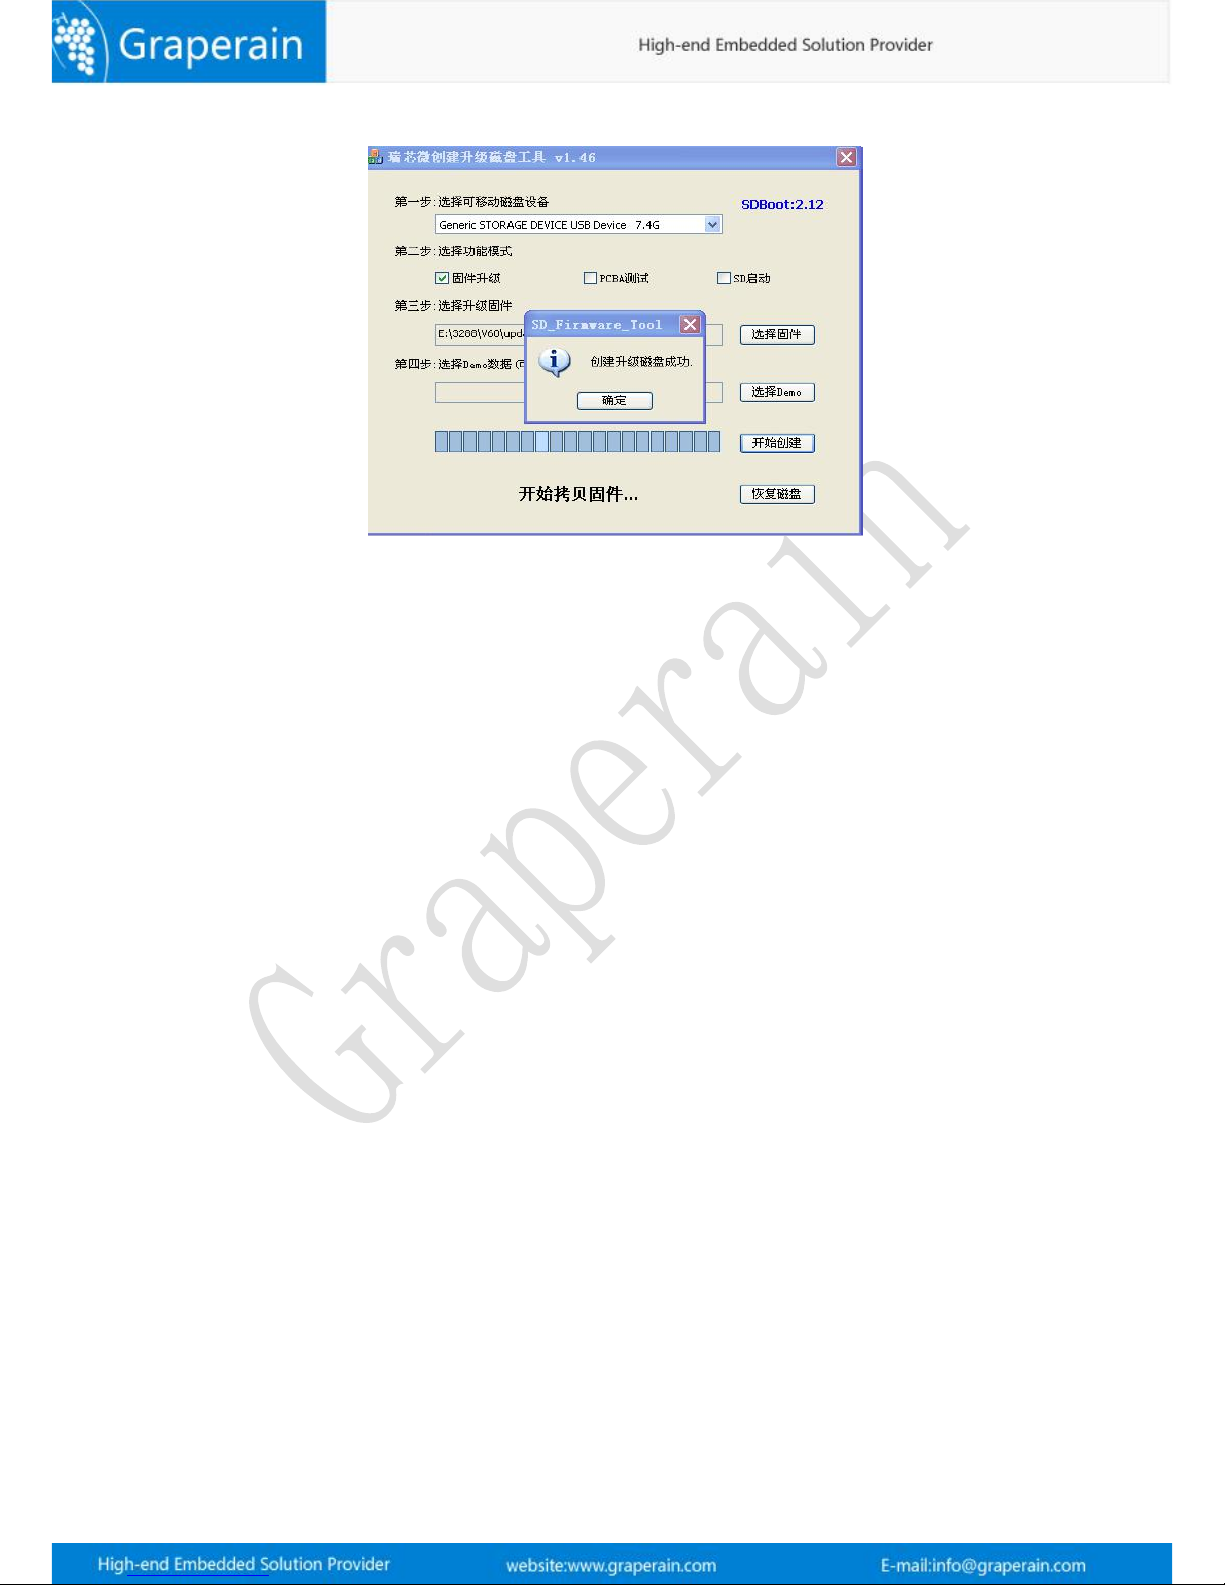
Upgrading:
Step 5, Done upgrade.
Page 25
25
Step6, Pull out TF card, and insert it into the board, and power, and it upgrade automate.
Done upgrade, following printing information shows:
[ 85.661371] ret = 0
[ 86.507524] ret = 0
librkupdate_ INFO:Start to download uboot,offset=0x2000,size=4194304
librkupdate_ INFO:Start to download misc,offset=0x6000,size=49152
librkupdate_ INFO:Start to download resource,offset=0x8000,size=3768320
librkupdate_ INFO:Start to download kernel,offset=0x10000,size=20463636
librkupdate_ INFO:Start to download boot,offset=0x1c000,size=1991896
librkupdate_ INFO:Start to download recovery,offset=0x2c000,size=28082176
librkupdate_ INFO:Start to download system,offset=0xb4000,size=1610612736
librkupdate_Finish to upgrade firmware.
SD upgrade ok.
Doing Actions succeeded.please remove the sdcard......
Step7, Power off, and pull out TF card, and power on the board, and check out upgrade done.
Page 26
26
Chapter 5 Programme Linux-qt Image File
5.1 Update Firmware in Ubuntu Environment
Update firmware in Ubuntu environment means, PC in Ubuntu OS, and done update G3128
sbc in corresponding commands.
Preparation
:
Power on G3128 sbc, connect the board with PC through OTG cable, and serial ports too.
Visit serial terminal and command terminal in PC.
Then, press Update key, and meanwhile press Reset key, and enter into upgrade mode.
Next, do following operation in PC command terminal:
sudo ./upgrade_tool uf update_linux.img (Update full Linux image)
Or Update uboot, kernel and resource firmwares separately:
sudo ./upgrade_tool di uboot uboot.img
sudo ./upgrade_tool di -k kernel.img
sudo ./upgrade_tool di resource resource.img
Comment:
All images and upgrade tools saved in out/release.
5.2 Update Firmware in Windows Environment
5.2.1 Install RK USB Drive
Steps
:
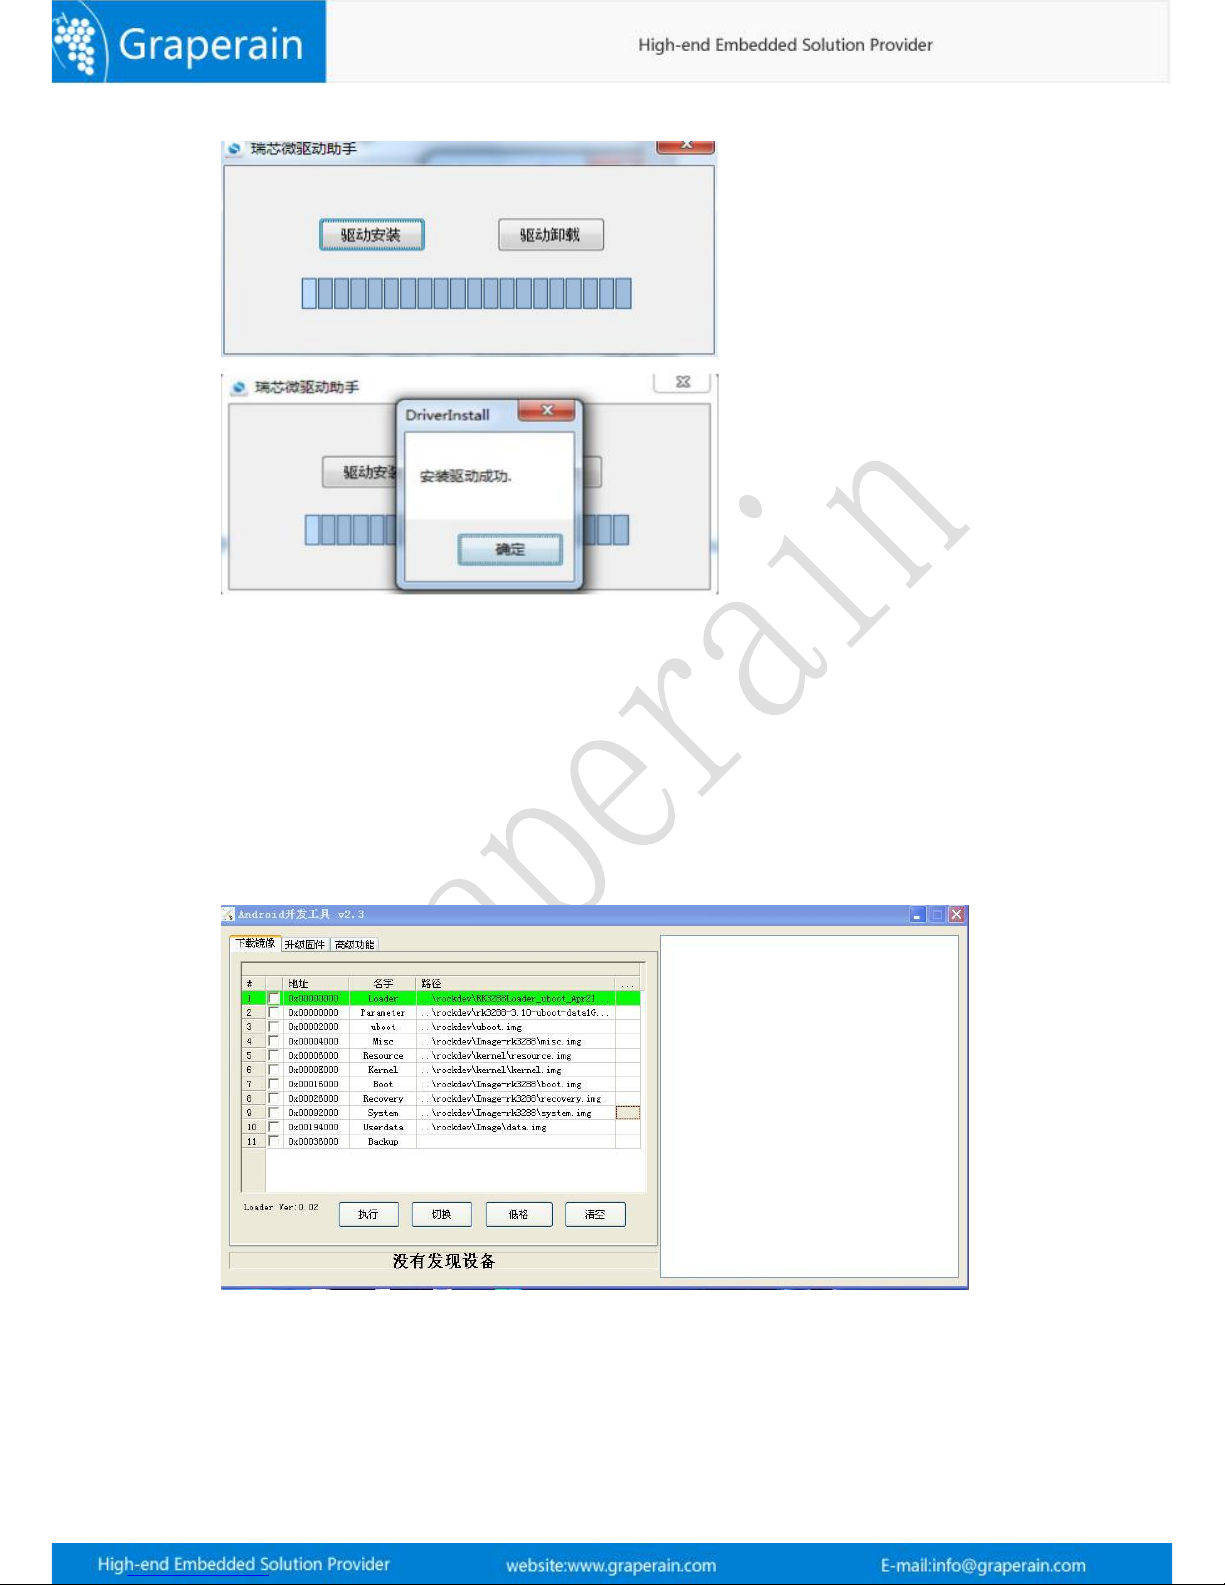
Step1, Run DriverInstall.exe in DriverAssitant_4.4 file. And one drive installation first.
Page 27
27
Notes:
Support XP, Win7_32, Win_64, Win8_32, Win8_64 OS.
Please take automate installation when XP done installation, but the system still hint
find new device.
Click quit drive and then install drive if old version drive found before installation.
5.2.2 Connect Device
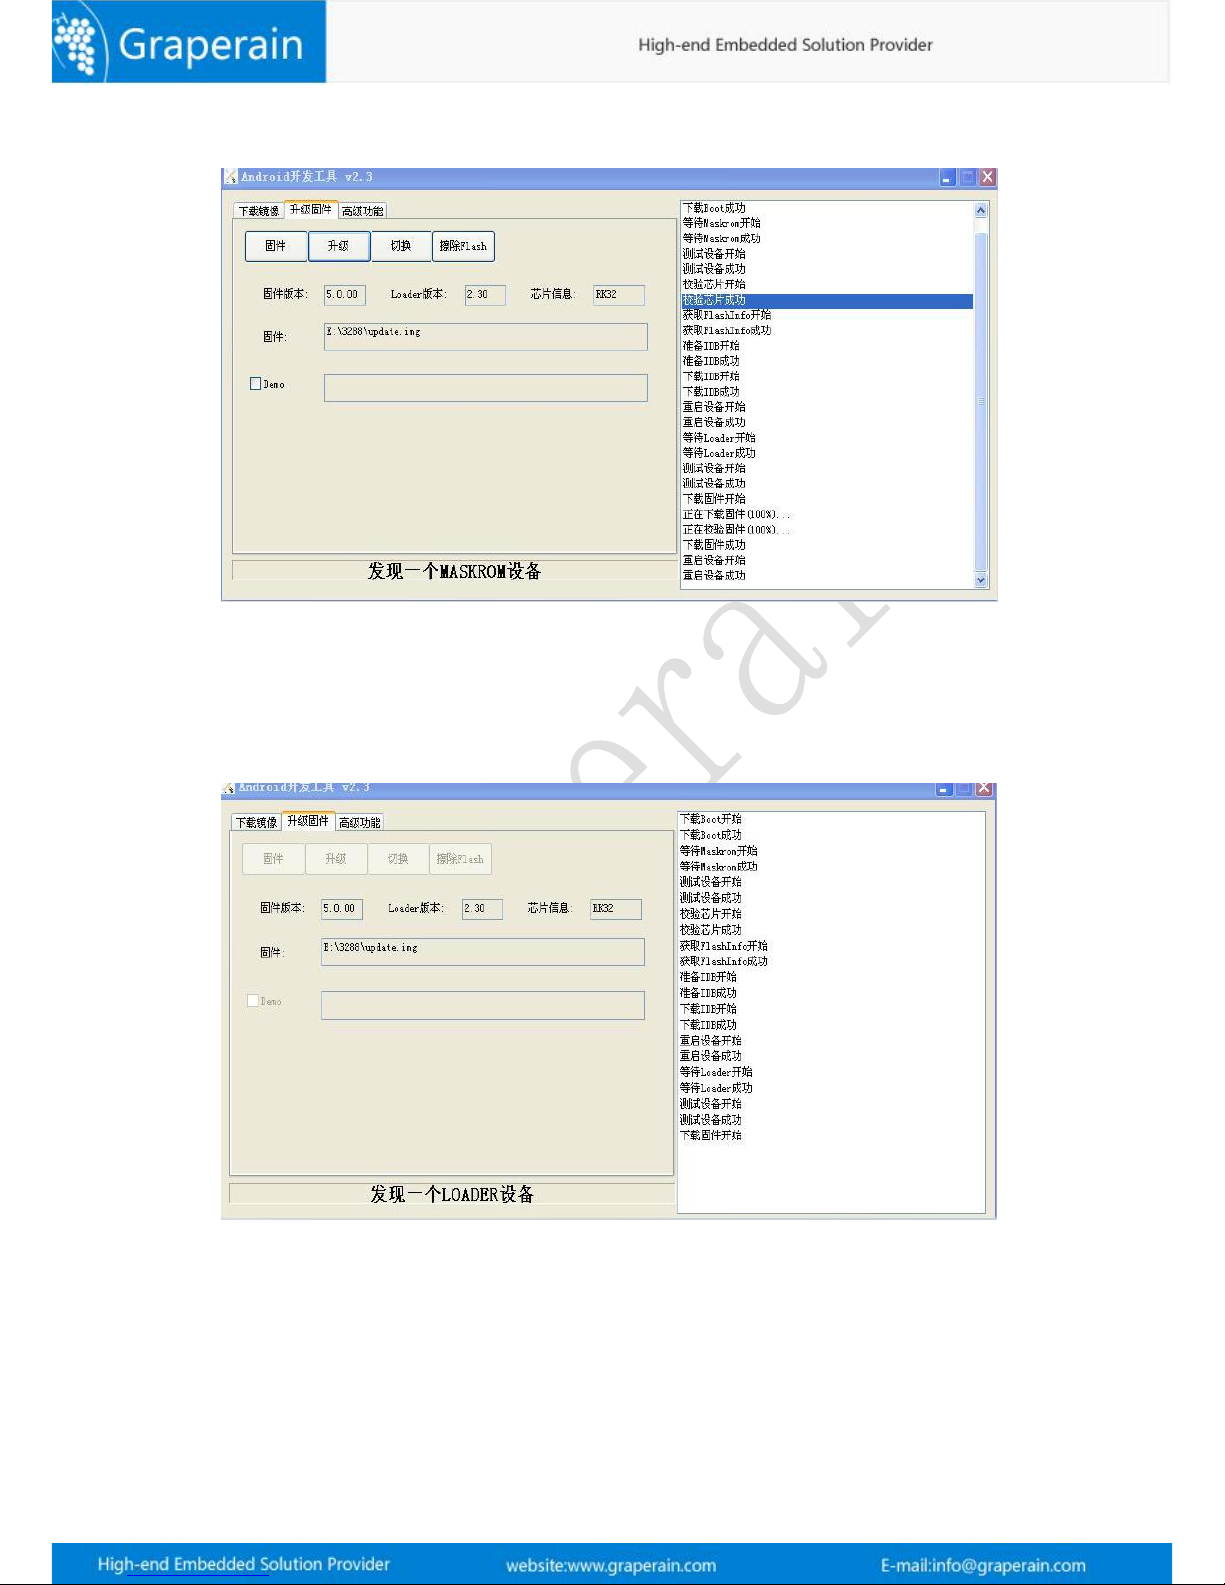
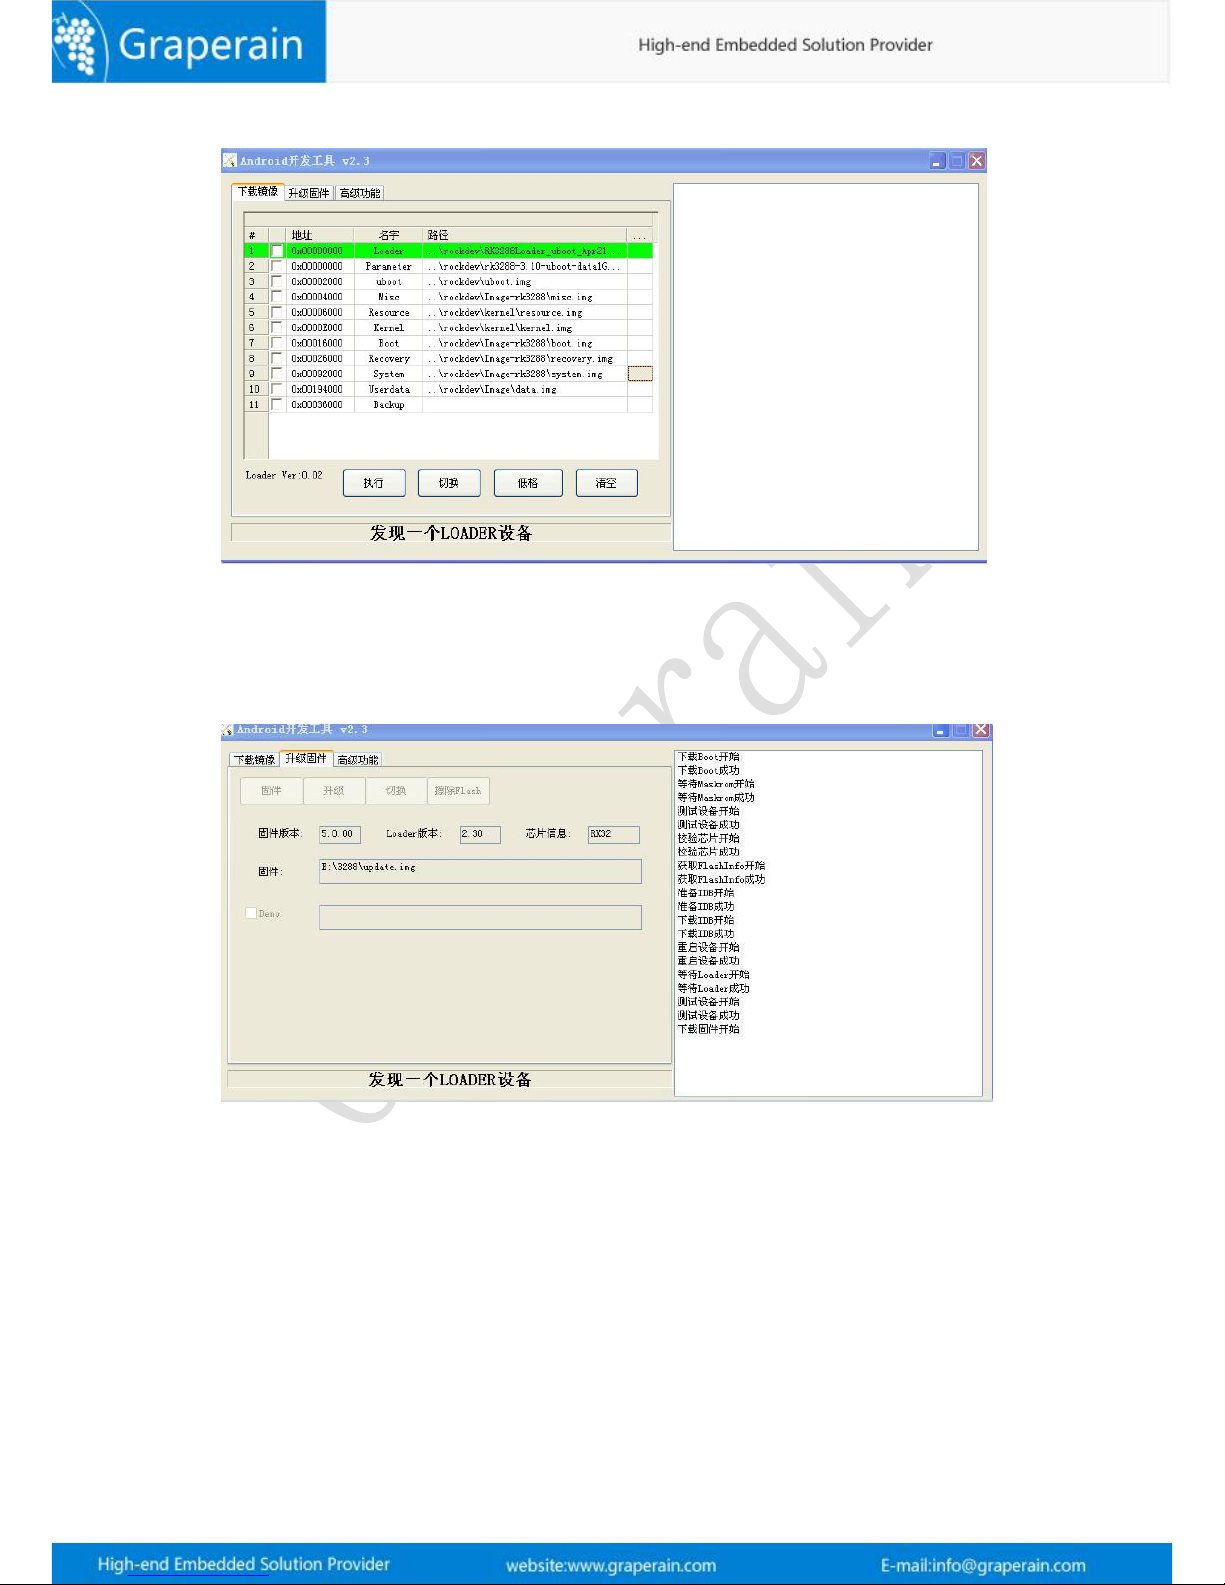
Run AndroidTool.exe in AndroidTool file, and its interface likes:
3)For blank board, which means eMMC no firmware or image.
Press Update key, and connect the board with PC ( Windows os) throgh OTG cable. Done the
connection, take off Update key will be ok. And the board will enter into MASKROM mode,
Page 28
28
and waiting for programme.
4)For the board which have been programmed firmware before.
Power on, connect the board with PC through OTG cable, press Update key, and meanwhile
press Reset key, and re-start the board. Pull off Update key will be ok. And then the board
will enter into LOADER mode, and waiting for programme, and interface likes:
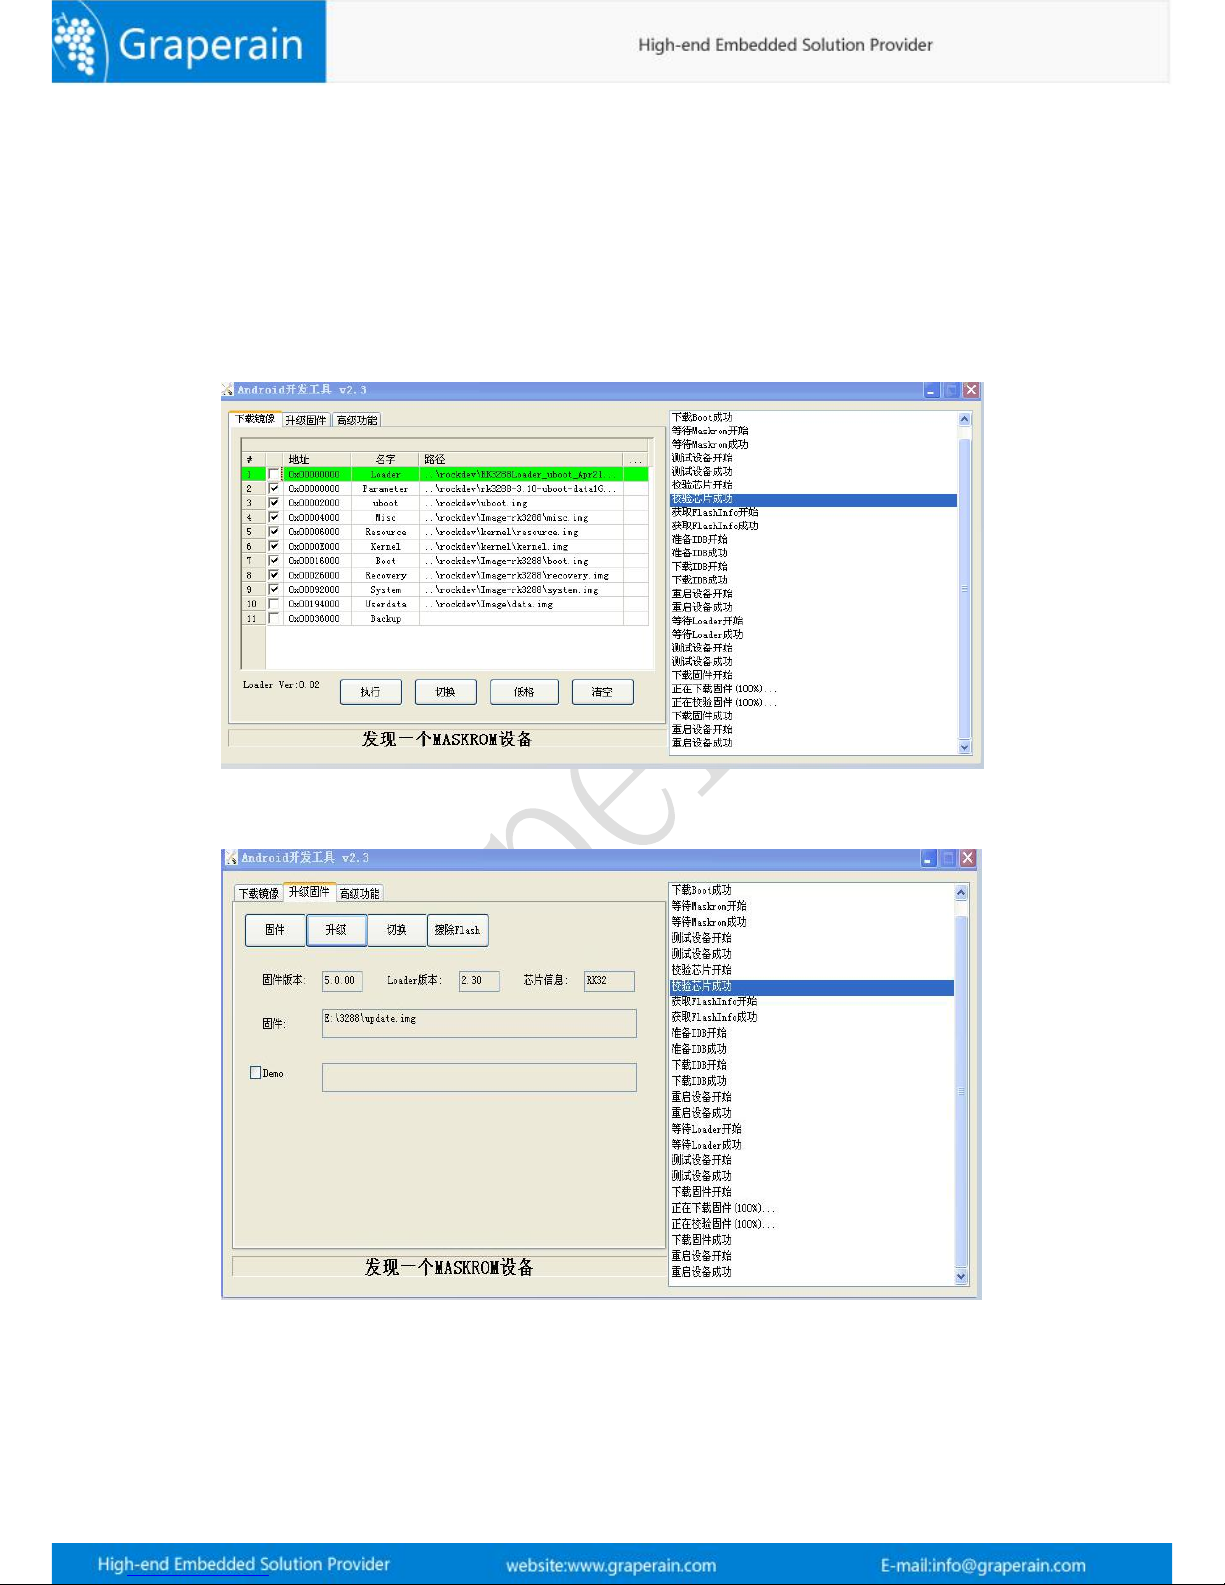
5.2.3 Take AndroidTool Update Firmware
In last sections described how to install RK USB drive and how to connect board with PC.
Both blank board or programmed board, could be update firmware as needed when
connection done. Update uboot, kernel and resource firmware files separately or update unit
Page 29
29
firmware in one time.
Run AndroidTool.exe tool in AndroidTool file.
MASKROMM mode updating:
Update every firmwares separetly: click wanted firmware, and click
‘执行’;
Or update unit firmware update_linux.img: Check update_linux.img, and click
‘ 升 级 ’
LOADER mode updating:
Update every firmwares separately: Check firmware and click
‘执行’
Page 30
30
Or update unit firmware update_linux.img: Check firmware update_linux.img, and click
‘升
级 ’
Page 31
31
5.3 Update Firmware When Off-line
When board power on, the CPU will boot from SD card boot preferentially, and then guide.
There are two functions of SD Card Boot: Upgrade and Run. Here is SD card upgrade
function:
Tool:SD_Firmware_Tool.exe
Details
:
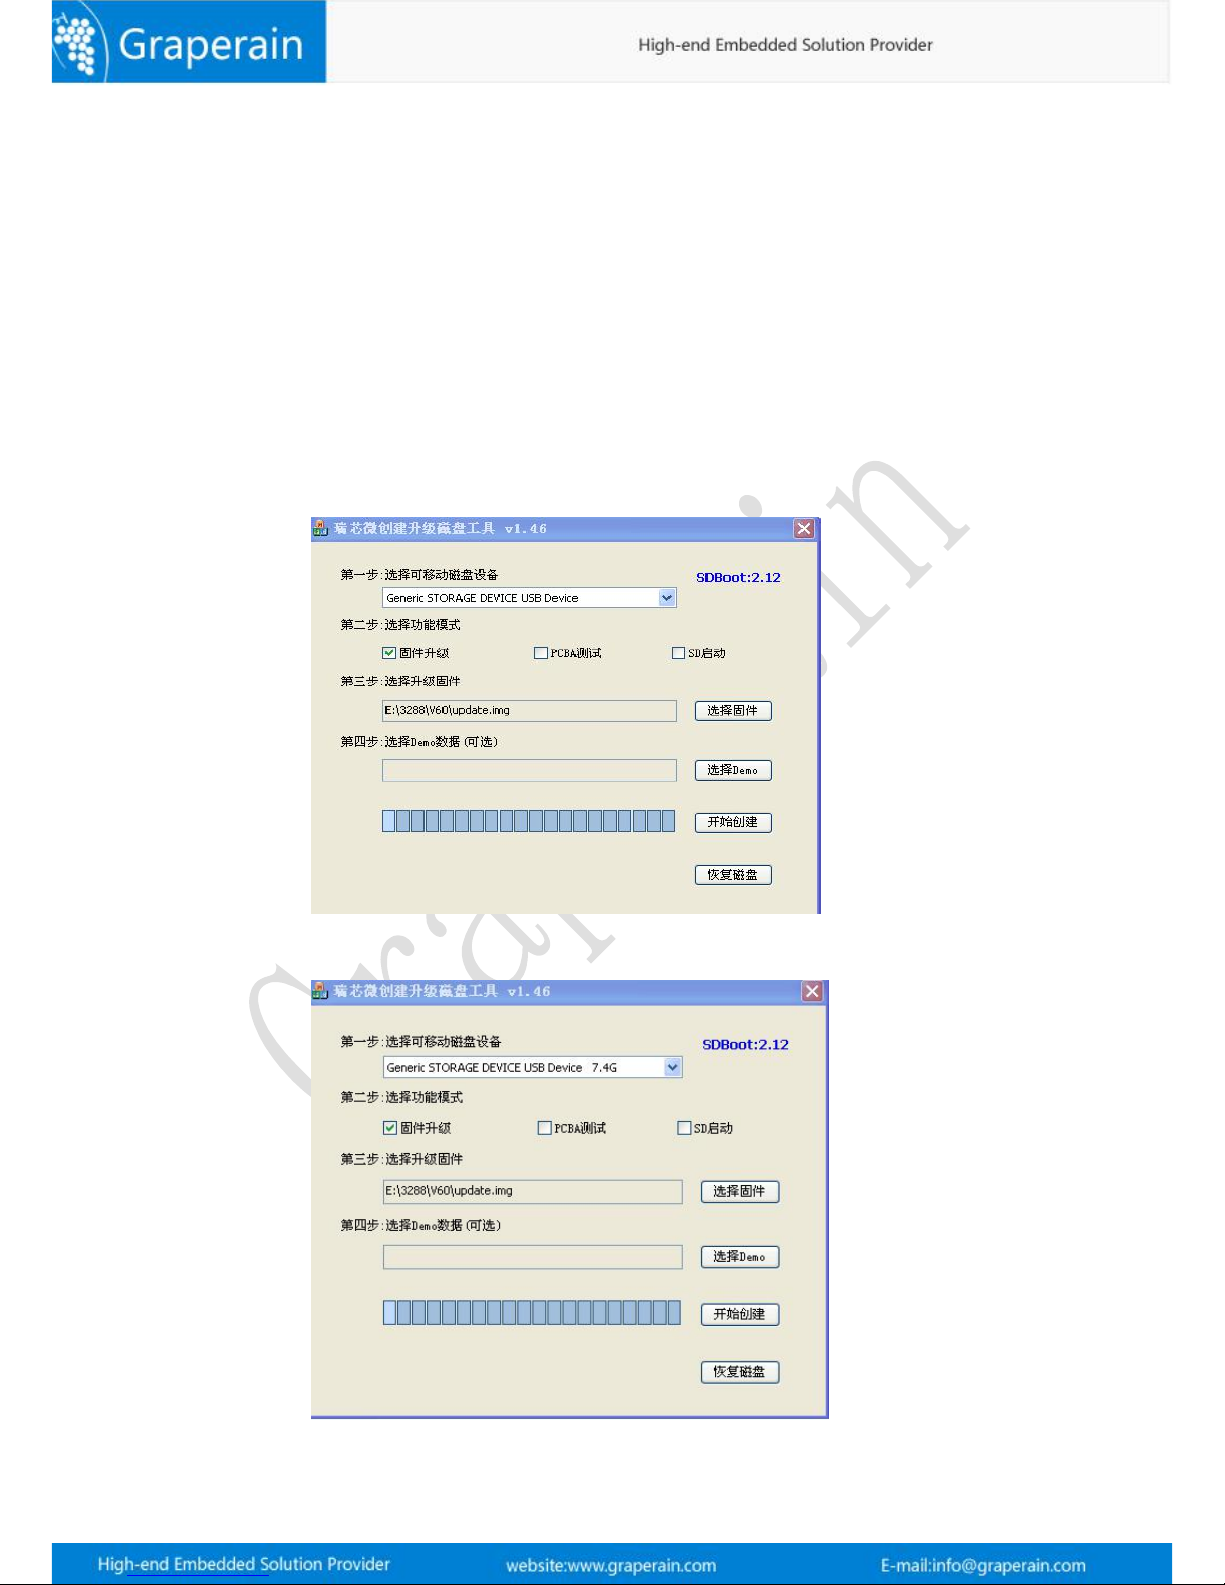
Step1, Run SD_Firmware_Tool.exe in PC ( Here is SD_Firmware_Tool._v1.46), likes:
Step2, Insert TF card into PC, and software will find TF, likes:
Page 32
32
Check
“固件升级”
, and check the firmwares (here means update-android.img in Android)
which need to be updated .
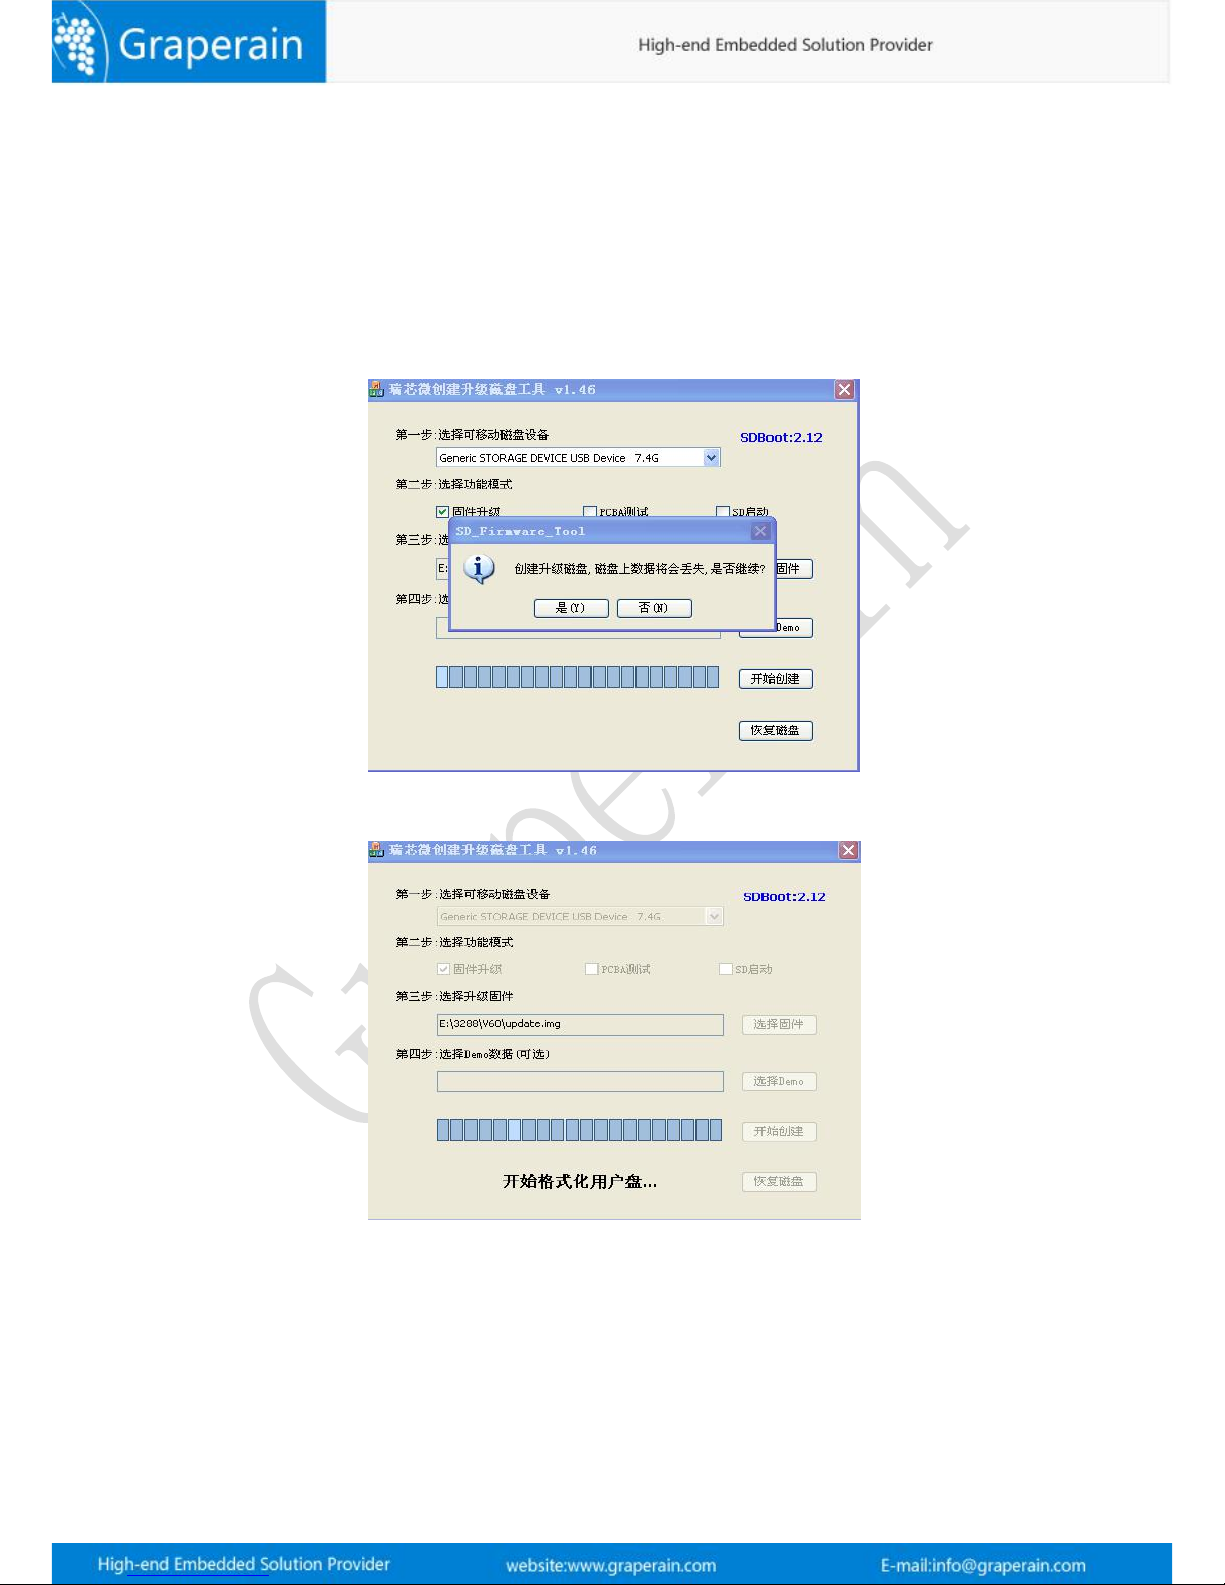
Click
“开始创建”
, and updating. One dialog box pops up when click
“开始创建”
, hints
format or not, yes
“是”
, and start updating.
Updating:
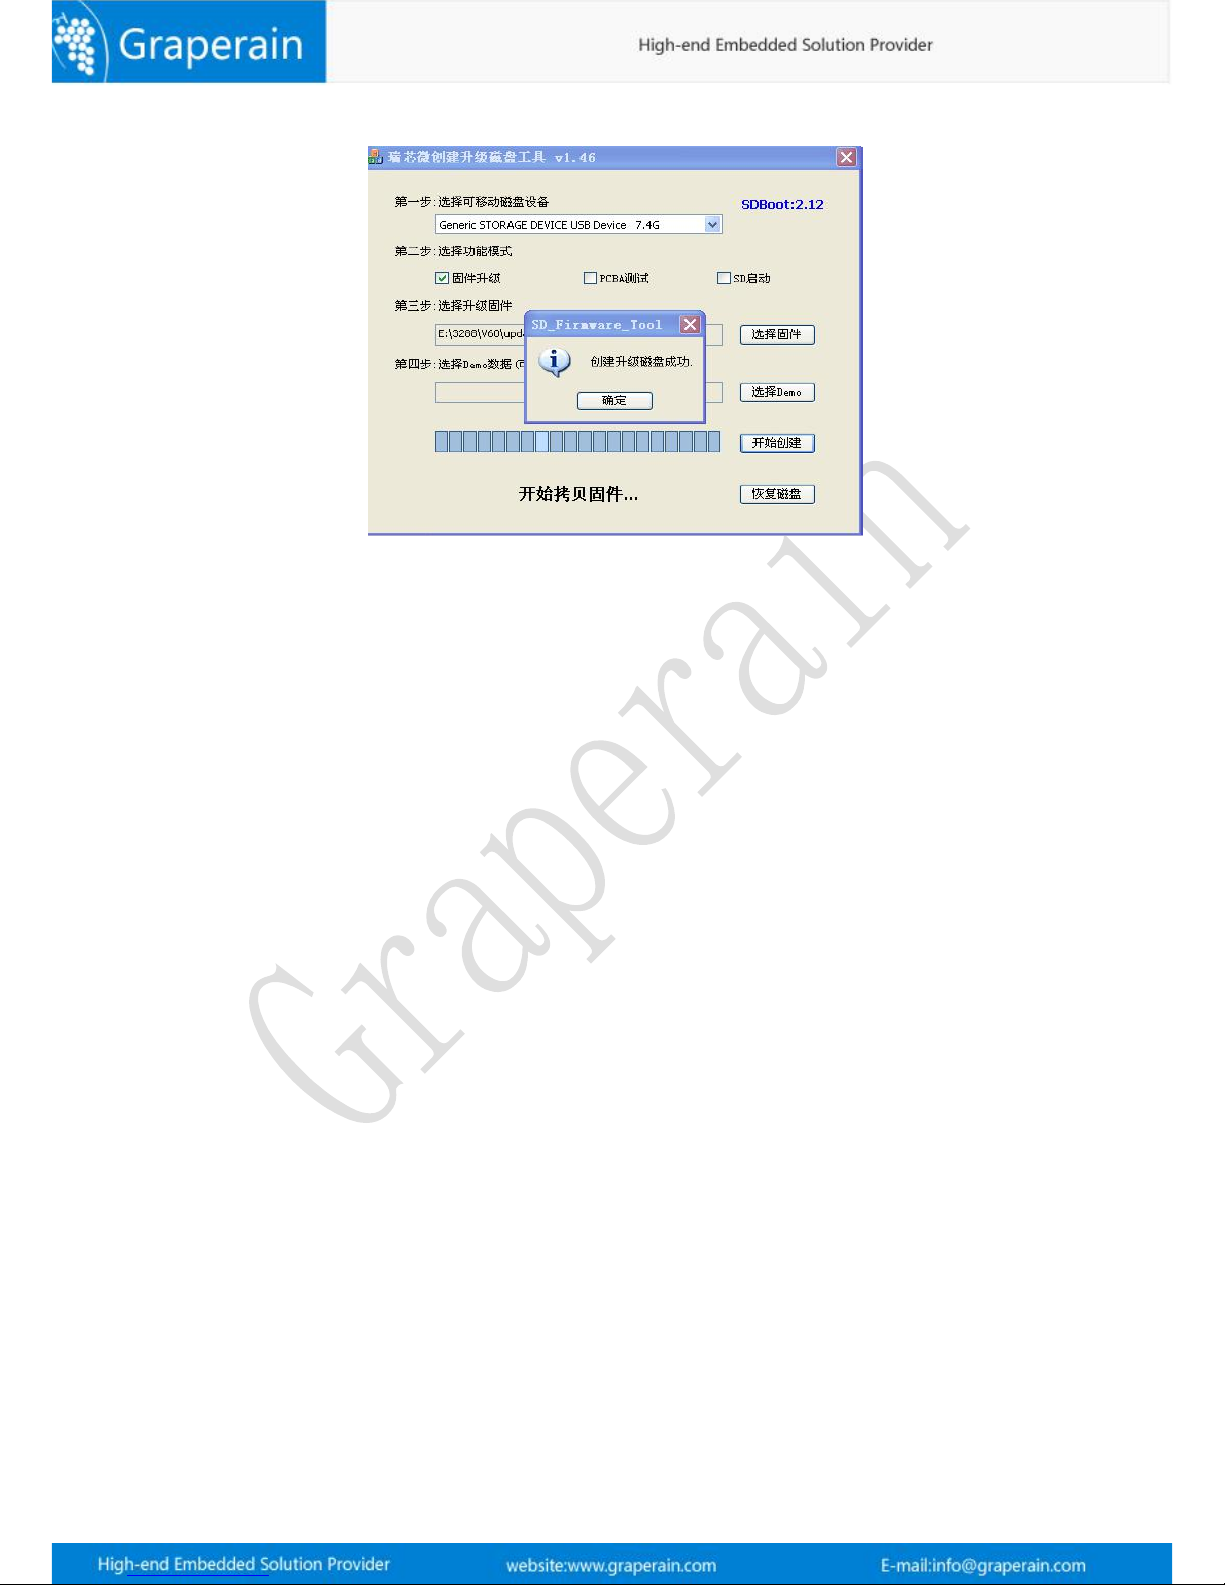
Done update.
Page 33
33
Pull out TF card, and insert it into G3128 board, power on, and it will upgrade automatically.
Done upgrade, and its printing information goes as:
[ 85.661371] ret = 0
[ 86.507524] ret = 0
librkupdate_ INFO:Start to download uboot,offset=0x2000,size=4194304
librkupdate_ INFO:Start to download misc,offset=0x6000,size=49152
librkupdate_ INFO:Start to download resource,offset=0x8000,size=3768320
librkupdate_ INFO:Start to download kernel,offset=0x10000,size=20463636
librkupdate_ INFO:Start to download boot,offset=0x1c000,size=1991896
librkupdate_ INFO:Start to download recovery,offset=0x2c000,size=28082176
librkupdate_ INFO:Start to download system,offset=0xb4000,size=1610612736
librkupdate_Finish to upgrade firmware.
SD upgrade ok.
Doing Actions succeeded.please remove the sdcard......
Power off, pull out TF card, and power on one more time, and check upgrade done.
Page 34
34
Chapter 6 Product Portfolio
6.1 System on Module Series
G4418 SOM ( Samsung S5P4418 )
G6818 SOM ( Samsung S5P 6818)
G3288 SOM (Rockchip RK3288 stamp hole)
GR3288 SOM (Rockchip RK3288 Immersion Gold MXM )
G3128 SOM (Rockchip RK3128 Immersion Gold MXM )
G3399 SOM (Rockchip RK3399 stamp hole)
GR3399 SOM (Rockchip RK3399 Immersion Gold MXM )
M9 SOM (Qualcomm 8916)
6.2 Development Board Series
G4418 development board ( Samsung S5P4418 )
G6818 development board ( Samsung S5P 6818 )
G3288 development board ( Rockchip RK3288 stamp hole)
GR3288 development board ( Rockchip RK3288 Immersion Gold MXM )
G3399 development board ( Rockchip RK3399 stamp hole)
GR3399 development board ( Rockchip RK3399 Immersion Gold MXM)
6.3 Single Board Computer (SBC) Series
G4418 single board computer ( Samsung S5P4418 )
G6818 single board computer ( Samsung S5P 6818 )
G3128 single board computer ( Rockchip RK3128 )
G3288 single board computer ( Rockchip RK3288 )
GR3399 single board computer ( Rockchip RK3399 )
Instructions: More information of specifications and other products, please pay attention to
website and contact us directly.
www.graperain.com
 Loading...