

Page 1
Granule Gastro®
User manual
Art.no E
N16235201104
GRANULDISK AB retains the right to make technical changes to the products.
No responsibility is taken for any printing errors.
www.granuldisk.com Tel. +46 40 671 50 60
Page 2

Page 3

Contents
Declaration of Conformity 5
1 General Description and Safety 7
1.1 To the user 7
1.2 Safety regulations 7
1.3 Technical data 8
2Operating 11
3 Daily cleaning 23
3.1 Collecting and cleaning PowerGranules 23
3.2 Cleaning inside the tank 25
3.3 Replacement of cleaned items 26
3.4 Over night and at longer stoppages 26
3.5 GD Memo™ 27
4 HACCP Hygiene and Operation
Documentation
29
5 Troubleshooting and alarms 31
6Notes 35
3
Page 4

Page 5
Declaration of Conformity
The Manufacturer:
GRANULDISK AB
Jägershillgatan 15
SE-213 75 MALMÖ, Sweden
declares that the following machinery:
TheGRANULDISKsystemGranuleGastro®.
Granule Gastro® is a Granule potwashing machine – a potwashing machine for commercial
kitchens that is designed for washing wares like pots and pans.
Basic conception
a. the equipment, to which the CE Mark h as been affixed, complies with the Machinery
Directive, 2006/42/EC.
b. is besides the provisions under a) manufactured according to the following directives:
the EC Low Voltage Directive 2006/95/EC and the EMC Directive 2004/108/EC
c. is manufactured in conformity with the following harmonised standards: EN
60204-1:2006, EN 55014-1, EN 60335-2-58, EN 60439-1, EN 55022, EN ISO
13850:2008, EN ISO 13857:2008, EN 61000-6-3 and EN 61000-6-2
d. is manufactured in accordance with EN 1717 and fitted with a type AB back flow
protection device with airgap in accordance with EN 13077:2008.
Malmö, Sweden 11.02.2011
Signed on behalf of
GRANULDISK AB
GRANULDISK AB
Jägershillgatan 15
213 75 MALMÖ
Phone: 040 671 50 60
Fax: 040 21 07 21
Peter Schön
President
Rev. 2011-04 5
Page 6

Declaration of Conformity
Page 7

1 General Description and
Safety
1.1 To the user
Granule Gastro® is a Granule pot washing machine – a pot washing machine for commercial
kitchens that is designed for washing pots and pans.
This manual is your guide for the correct installation and use of the Granule Gastro® pot
washing machine.
GRANULDISK recommends that you study the manual thoroughly to be sure that the machine
is installed and used correctly and safely.
Ensure that the manual is always available during the whole life of the machine.
GRANULDISK accepts no responsibility for damage to the equipment or other damage or
injury caused by not following the directions in this manual.
1.2 Safety regulations
The machine uses hot water. Avoid contact with the skin as there is a risk for scalding!
The plastic in the Granules is approved for use in conjunction with food.
There is a risk of slipping if Granules are left on the floor.
Formaldehyde, which is dangerous if inhaled, may be formed if the Granules catch fire.
Regarding thehandling of detergent in the manual, please see the manufacturer’sinstructions.
Always lock the hoo d in its upper position with the safety pin when daily cleaning is carried out.
Rev. 2011-04 7
Page 8

1.3 Technical data 1 General Description and Safety
1.3 Technical data
Weight ............................. 413 kg (filled machine), 320 kg (empty machine)
Externaldimensions ............... 2400 (± 25) x 850 x 1002 mm (H x W x D) for more
details see Installation drawing
Tank volume ............ ........... 83 litres
Granuleamount ......... ........... 8 kg
Washwatertemperature .......... 65 °C
Rinse water temperature .......... 85 °C
WashprogramswGranules ....... Eco: 2 min
Short: 3 min, 10 sec (30 sec longer with steam
reduction)
Normal 5 min, 10 sec (30 sec longer with steam
reduction)
Washprogramsw/oGranules ..... Eco: 2 min
Short:2min,40sec
Normal: 4 min, 40 sec
Rinse water volume ................ 4 litres/ECO program
8 litres/short, normal program
To achieve 3600 HUE according to NSF/ANSI 3 - 2007,
8litresisnecessary.
Capacity ............................ 6 GN 1/1, 65 mm deep or 3 GN 1/1 200 mm and 3 GN
65 mm, or equivalent in other items
Loading volume .................... 190 litres (Ø 650 mm x H 570 mm)
Design .............................. Round rotatingstainless steel basket
Voltage** .......................... 400 V (standard); 3-phase, earth
230, 415 V (option); 3-phase, earth
Fuse** ........................ ..... 400, 415 V: 25 A (cold water option 32 A)
230 V: 40 A
Frequency .......................... 50 Hz
Maximum power ................... 11.9 kW(cold water option16.9 kW)
Washpumpmotor ................. 2.6 kW
Rinse pump motor ................. 0.37 kW
Washtankelement* ............... 9 kW (cold water option 14kW)
Rinse tank element* ............... 9 kW(cold water option 14 kW)
Encapsulationclass ................ IP55
Sound pressure level ISO 11203 .. 67.7 dB(A)
Hot water ............... ........... ½”(DN15), 55-65°C,3-10°dH
NB! Reverse osmosis water and totally softened water
must not be used.
Water pressure/flow h.w. ..... ..... 1-6 bar, 15litres per min
Cold water ......................... ½” (DN15), 3-10°dH
Water pressure / fl
ow c.w. ........
1-6 bar, 15 litres
per min (3-6 bar when steam
reduction option is fitted)
8 Rev. 2011-04
Page 9
1 General Description and Safety 1.3 Technical data
Recommended ventilation
capacity ............................ 500 m³/h(without steam reduction)
150 m³/h (with steam reduction)
Outflow ............................. Pipe Ø 32 mm
Drain ............................... Required capacity100l/min. The machineshould not
be placed directly above the drain.
* Not in use simultaneously
** For specific data regarding de live red machines, please see machine rating plate
NOTE
The Granule Gastro® is supplied w ith a 2 metres long electric cable to be
connected to an approved supply disconnecting device on the wall. The
supply disconnecting device is not included in the delivery.
Rev. 2011-04 9
Page 10

1.3 Technical data 1 General Description and Safety
Page 11
2Operating
Start up
1.
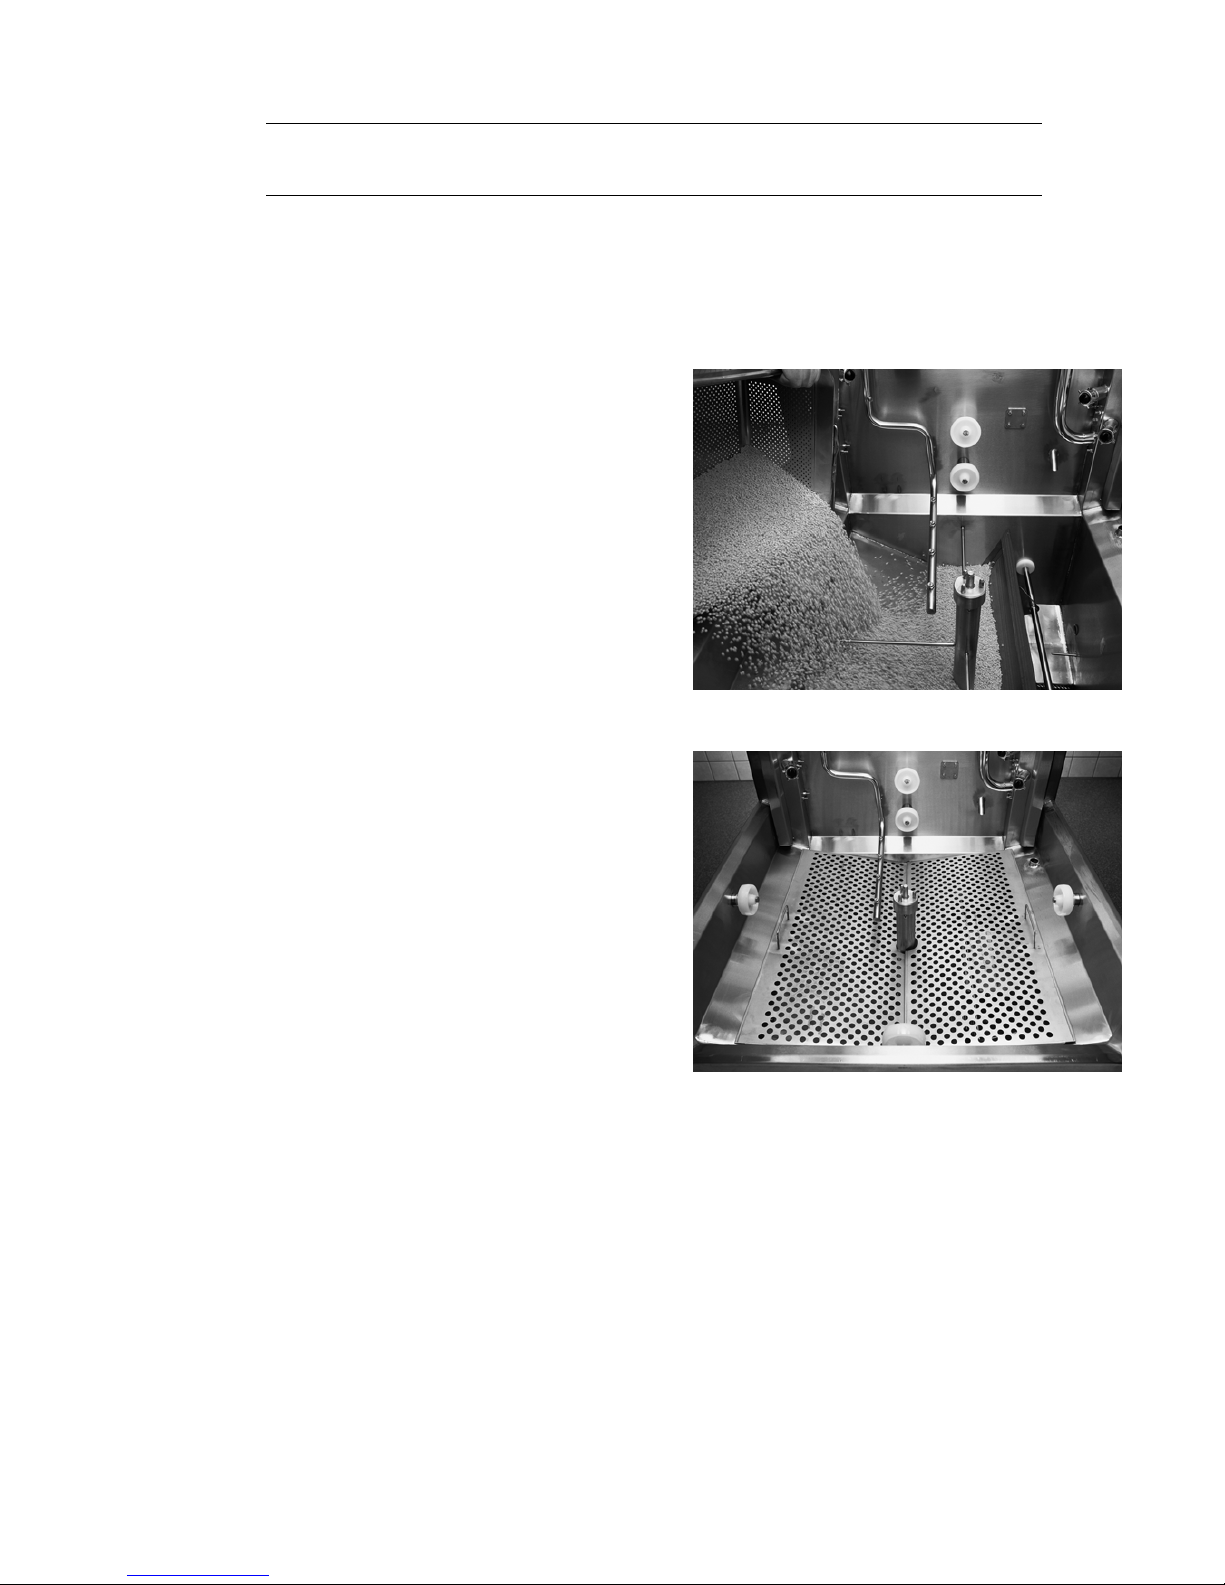
Empty the Granule Collector with
PowerGranules into the left part of the
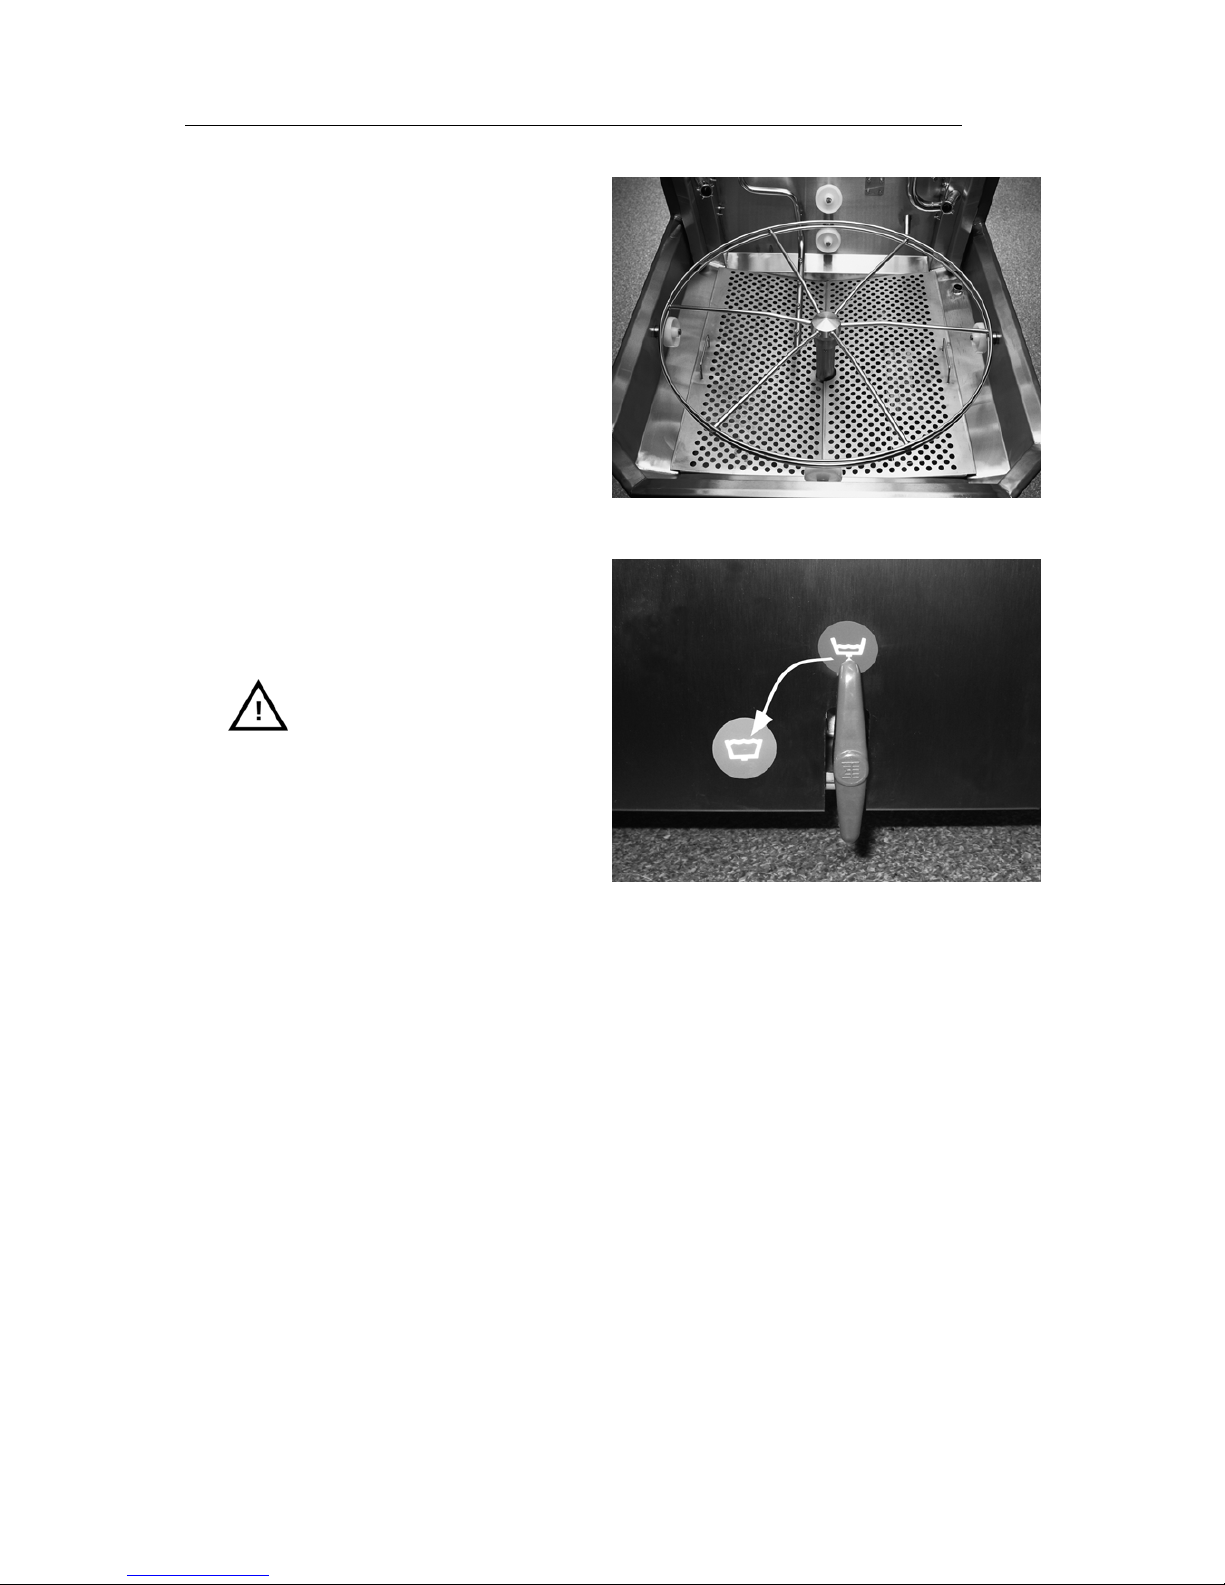
wash tank. Basket wheel and tank grid
andneedtobetakenout(Figure 1
Granule filling).
Figure 1: Granule filling
2.
Place the tw o tank grids in position
(Figure 2 Tank grids). Put the left one in
first and then the right one, so that they
overlap.
Figure 2: Tank grids
Rev. 2011-04 11
Page 12
2Operating
3.
Put the basket wheel in place (Figure 3
Basket wheel).
Figure 3: Basket wheel
4.
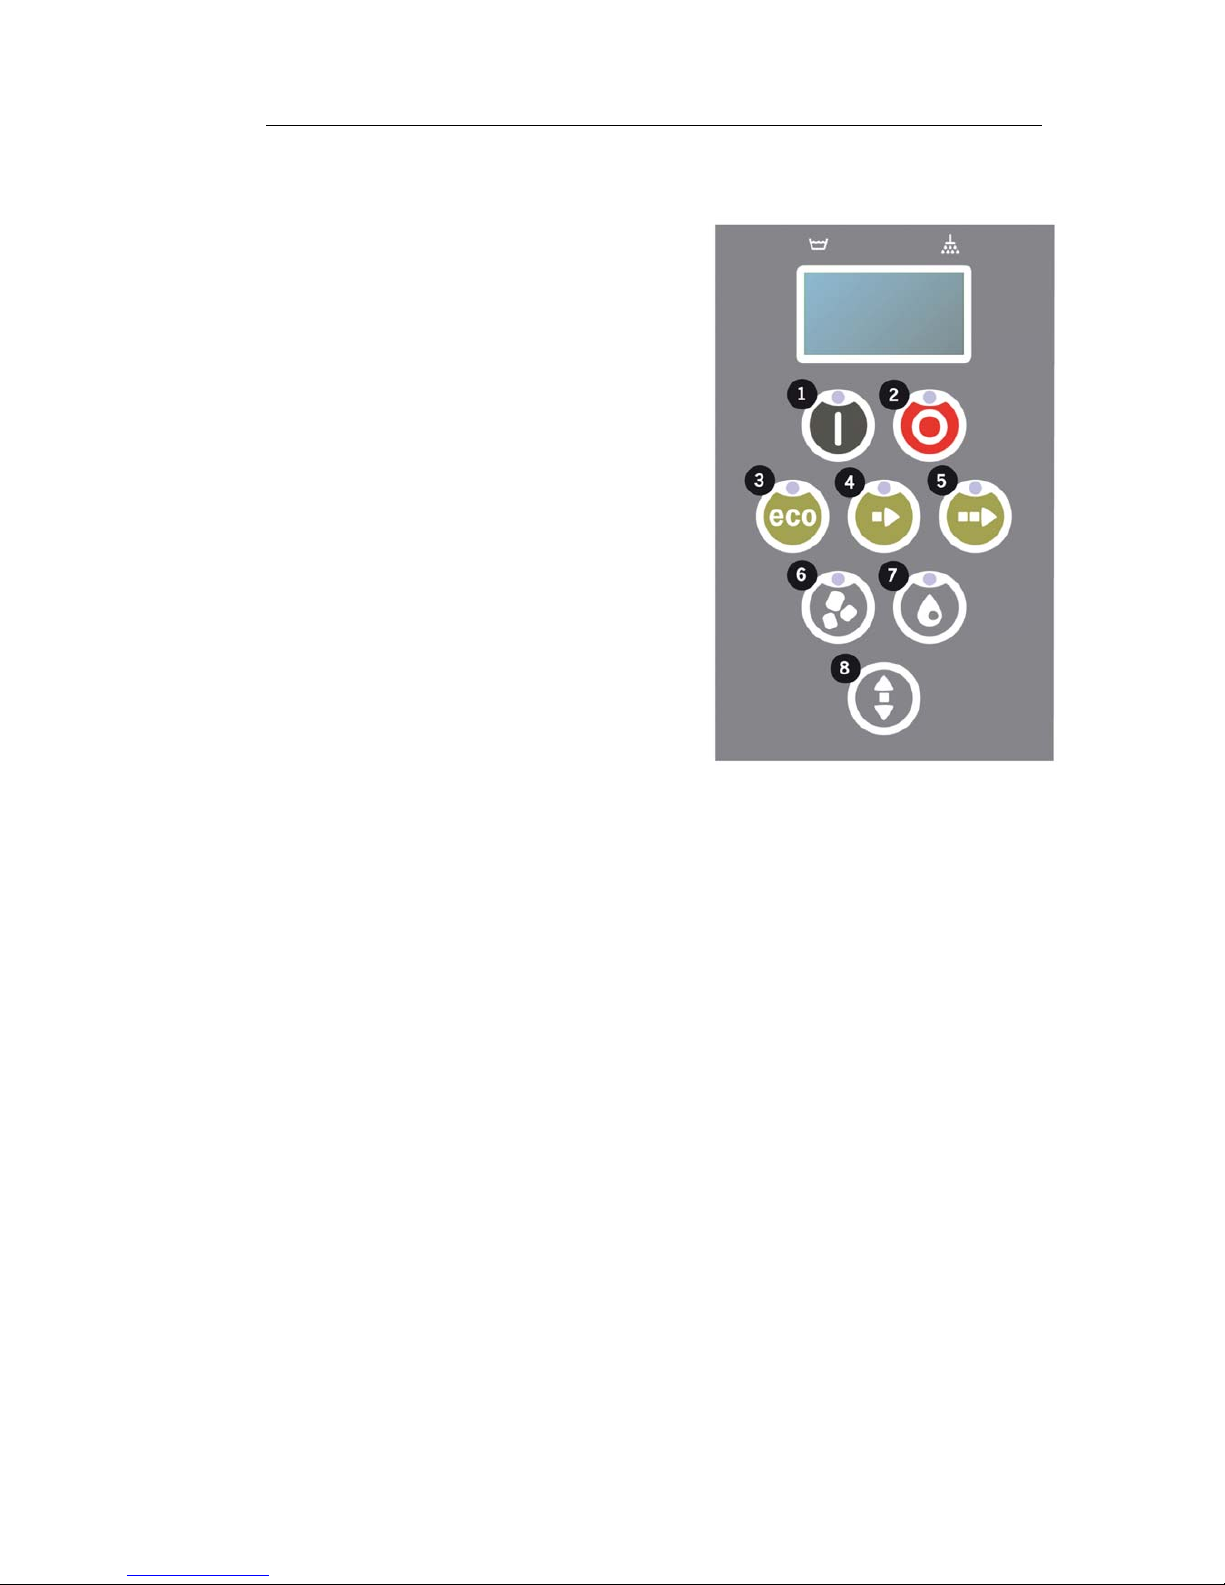
Close the drain valve on the right hand
side of the machine ().
5.
Switch on the main electrical switch.
NOTE
Never place items on top
of the hood.
Figure 4: Drain valve
12 Rev. 2011-04
Page 13
2Operating
Filling with water
1.
Press the Confirm(1)buttoninorderto
fill the wash tank.
Fill wash tank?
2.
If the hood is in the raised position, it will
close automatically before starting the
filling.
3.
The machine will now fill with water and
heat up to the correct temperature. On
the panel, the diodes for programme
selection (3-5) flash out of sequence
with the diodes for washing with or
without Granules (6-7) during filling. The
following message is displayed:
XX°C XX°C
Filling the wash
tank
4.
Filling and heating take about 20 minutes
(standard; hot water connection, +55
°C). For optional cold water connection
(+10 to 12 °C), filling and heating
take about 40 minutes. if the correct
temperature has not been attained in
the wash tank after filling, the following
message is displayed;
50°C 60°C
Heating the
wash tank, 65 C
5.
Ready to use when the correct
temperature has been attained in the
wash tank. A preselected programme is
now displayed;
65°C 85°C
Eco program
with Granules
wash time: 2:30
Figure 5: Control panel
Rev. 2011-04 13
Page 14
2Operating
Preparing utensils
1.
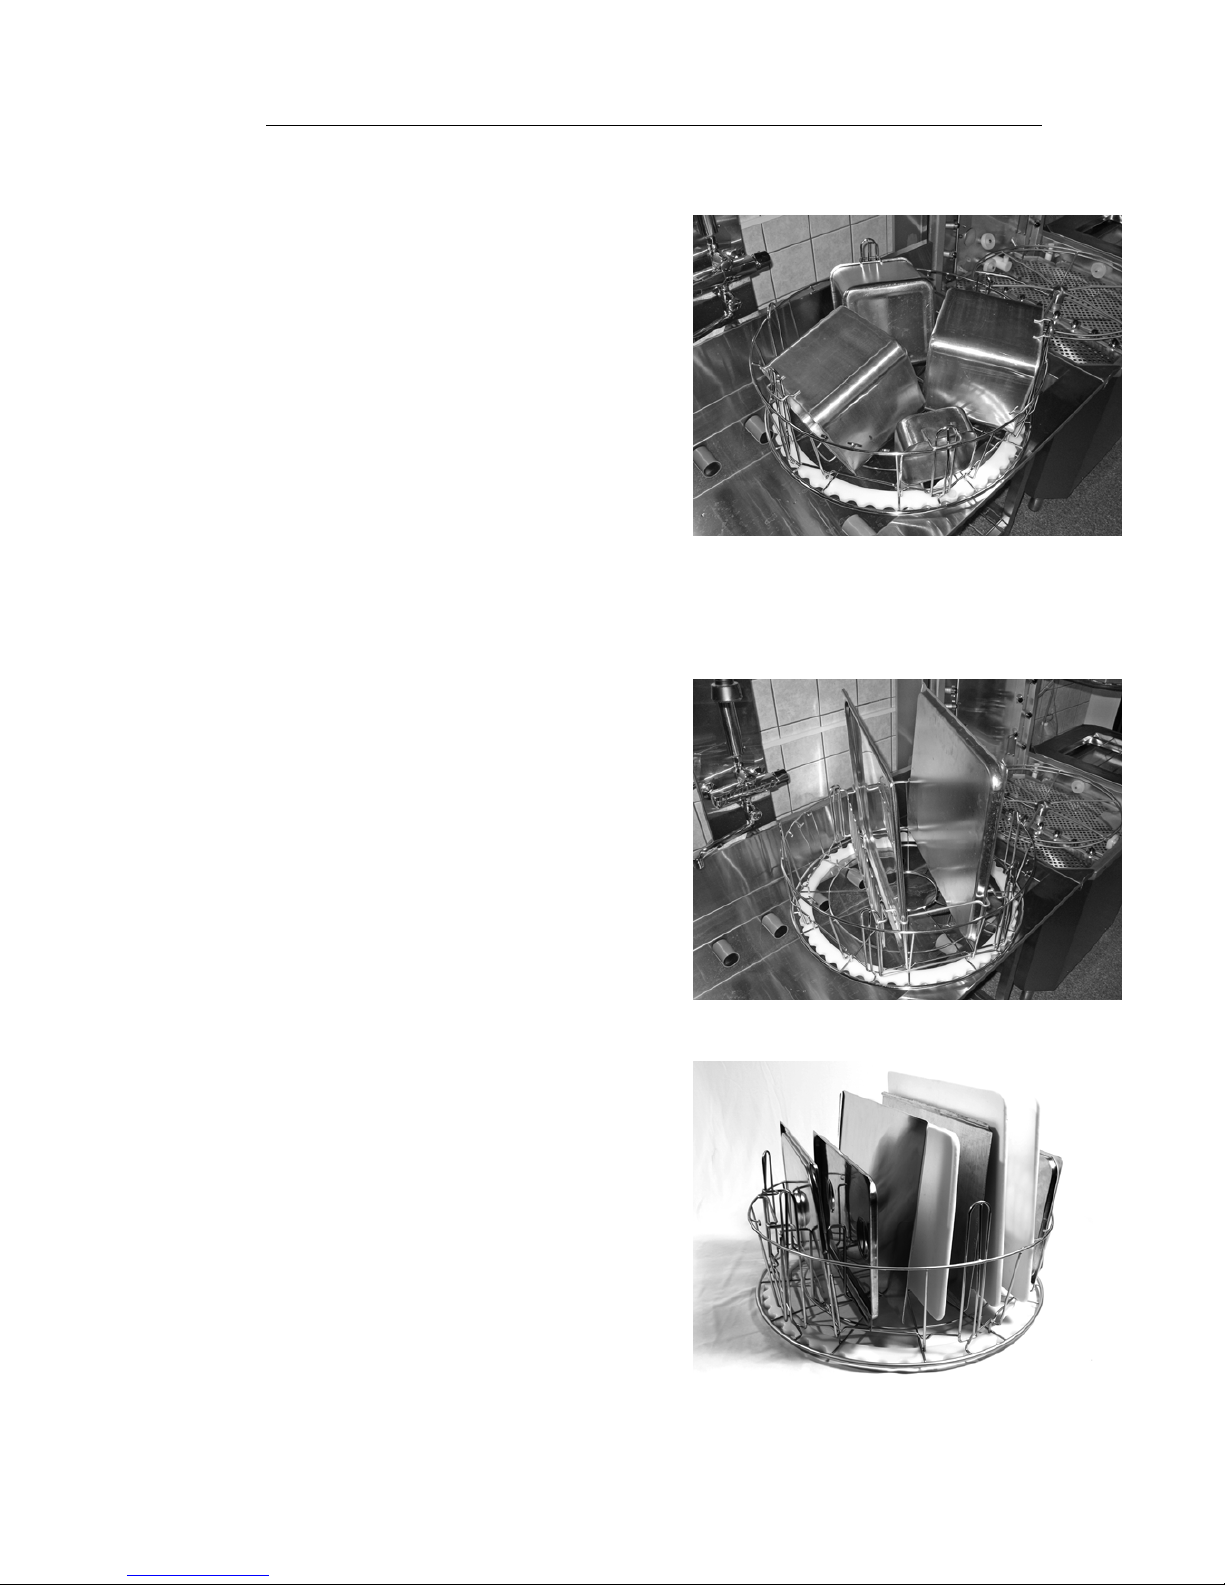
Scrape or rinse off all loose food remains
before loading the utensils (see Figure 6
Scrape off loose food).
• No soaking or scrubbing is needed.
• No usage of hand-soap or similar (to
avoid foaming which could lead to
extended problem)
Figure 6: Scrape off loose food
Loading utensils
All utensils must be loaded with the inside
facing the spray pipes, thus outwards. i t is
important that all items are firmly in place
when being washed.
Figure 7: Wash basket
Inserting and removing the basket
The basket is loaded on an adjoining table.
Press the arrow button to open the hood. slide
the wash basket into the machine. The basket
is designed so that you clearly feel when the
basket is placed correctly.
Check that n othing is sticking out from
the basket’s sides or bottom. downward
movement of the hood o r basket rotation must
not be hindered.
See Figure 7 Wash basket and Figure 8 GD
102.
Figure 8: GD 102
14 Rev. 2011-04
Page 15
2Operating
GD 102 Standard wash basket (19999)
it is possible to load 6 x GN 1/1 or 1/2
containers by sliding them into the basket.
Either 6 x 65 mm deep containers or 3 x
65 mm deep containers plus 3 x 200 mm
containers. See Figure 7 Wash basket.
Possible to load 6 x GN 1/3.
Possible to load 12 x small GN containers.
Choose among GN 1/4, GN 1/6, GN 1/9. See
Figure 8 GD 102.
Possible to load 6 x ABC c ontaine rs. Figure
9 GD 102.
Figure 9: GD 102
GD 150 Multipurpose insert for GN 2/1
and larger trays and grids (19992)
Possible to load 2 x GN 2/1. Figure 10 GD 150.
Figure 10: GD 150
Possible to load grids, chopping boards, baking
trays, flat trays and GN 1/1 lids. See Figure
11 GD 150.
Figure 11: GD 150
Rev. 2011-04 15
Page 16
2Operating
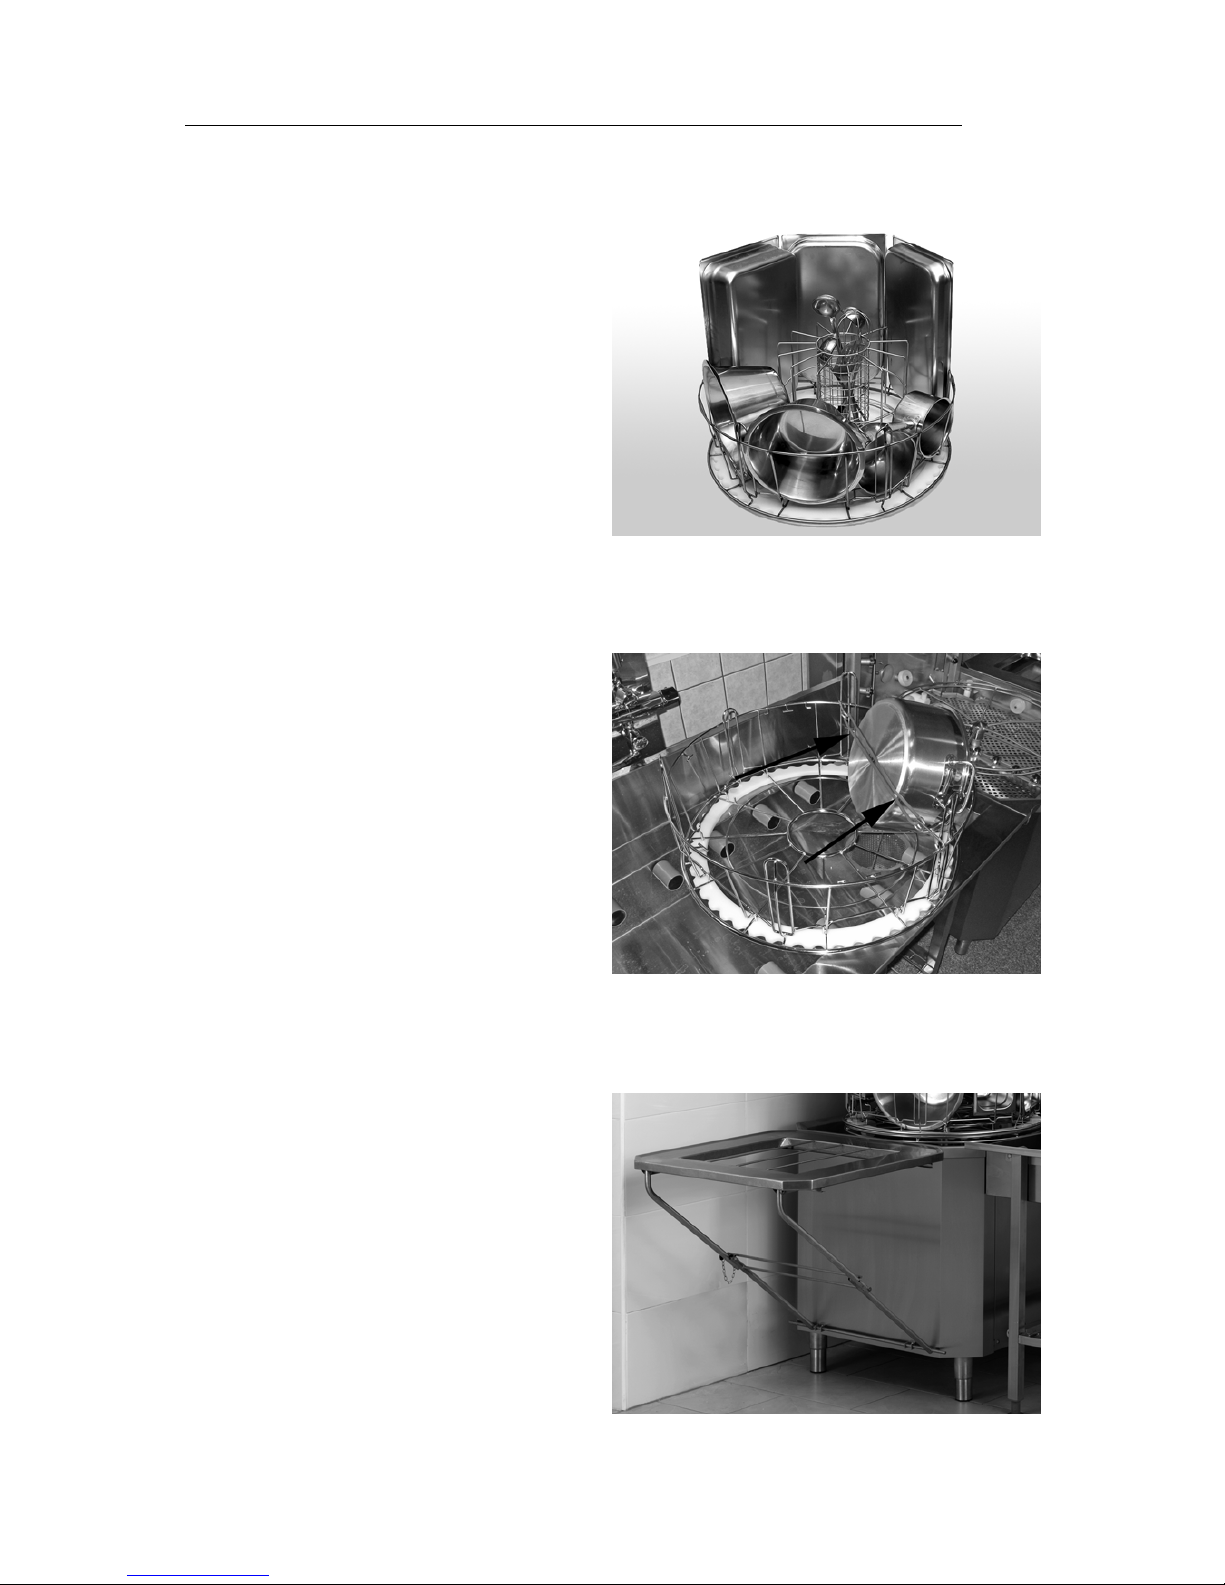
GD 750 Saucepanholder (13756)
Possible to load pots, saucepans, bowls and
smaller preperation containers. Containers
from approx 60 mm to 170 mm deep can be
washed.
Possible to load ladles, whisks, spatulas and
similar in the net basket in the middle of the
holder.
This accessory is placed in the standard wash
basket, small pegs in the bottom of the basket
hold it in place. See Figure 12 GD 750.
Figure 12: GD 750
GD 754 Flexible pot holder (13789)
Possible to place larger pots and preparation
containers. stretch the rubber band around
the item. Be careful when fastening and
releasing the rubber bands as the hooks m ay
cause harm.
See Figure 13 GD 754.
Figure 13: GD 754
GD 130 Folding Combi Table (19570)
Can be installed on front or on either side of
the machine. Figure 14 Combi table GD 130.
Figure 14: Combi table GD 130
16 Rev. 2011-04
Page 17
2Operating
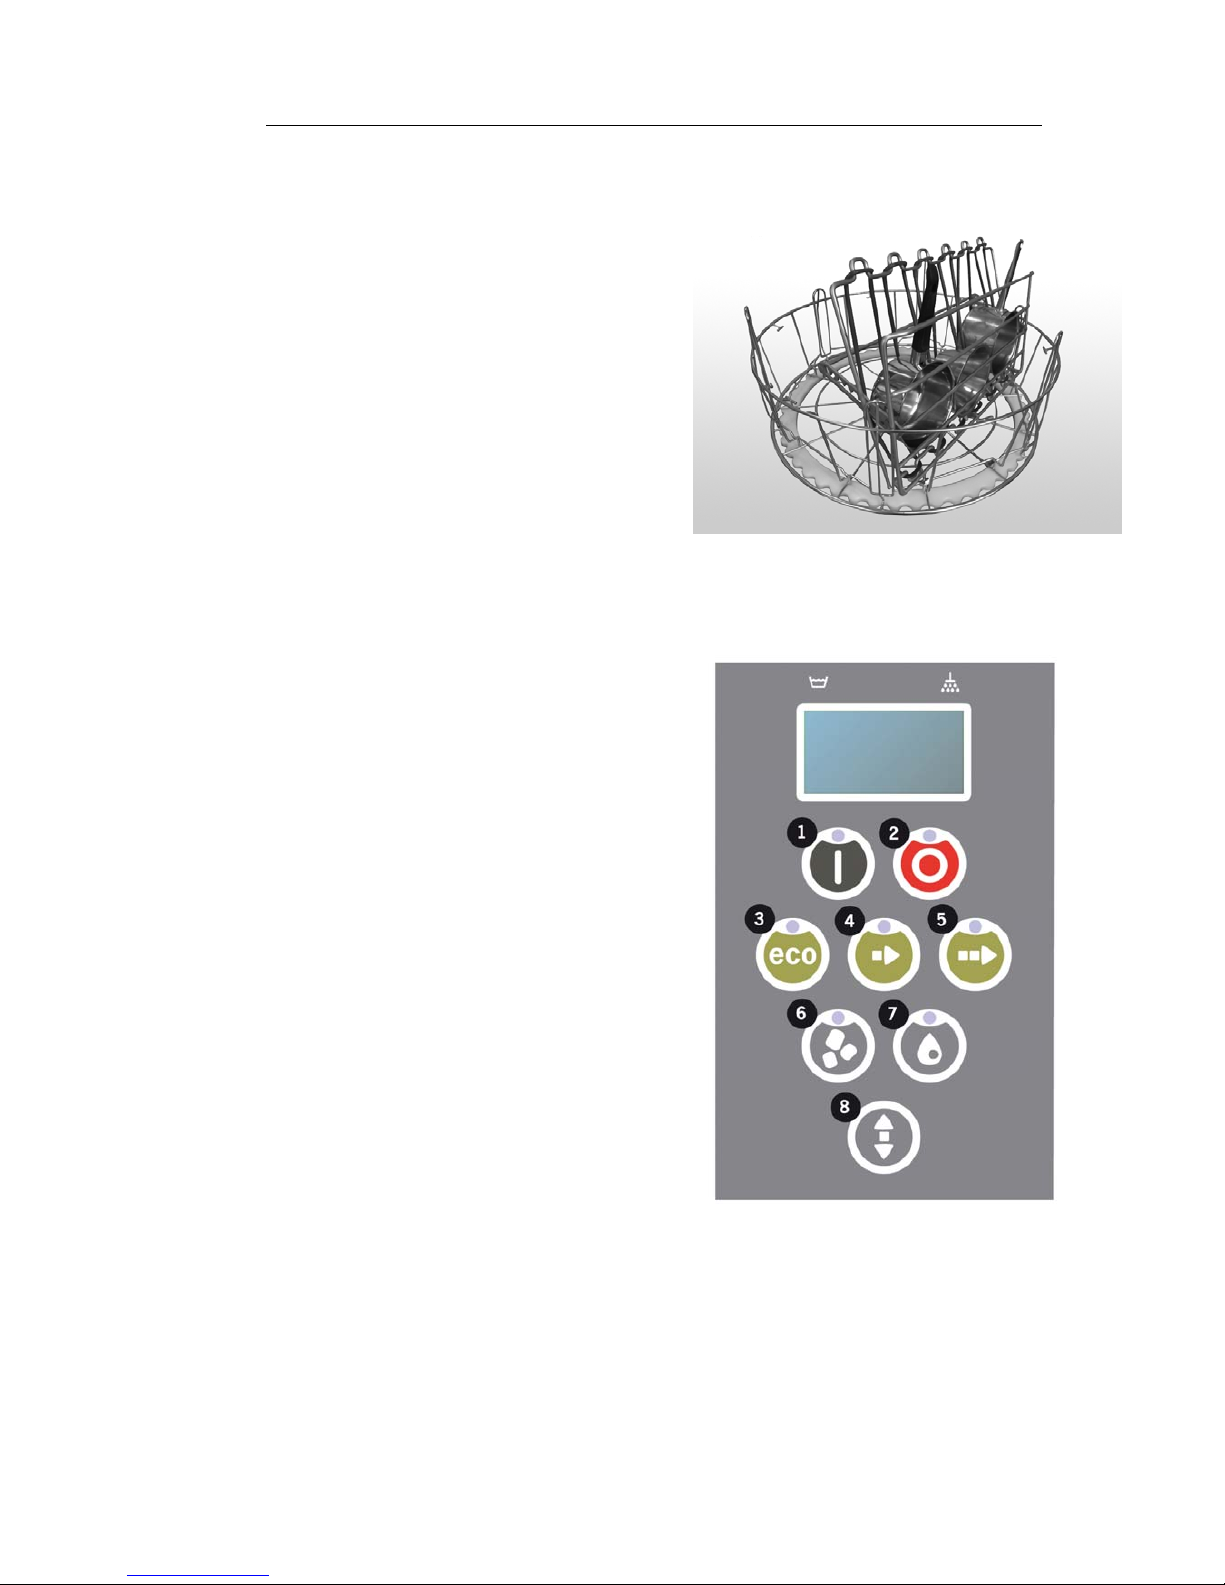
GD 152 Multiflex holder (20554)
Accessory for loading 3-5 saucepans, small
bowls, sieves etc. Figure 15 GD 152.
Figure 15: GD 152
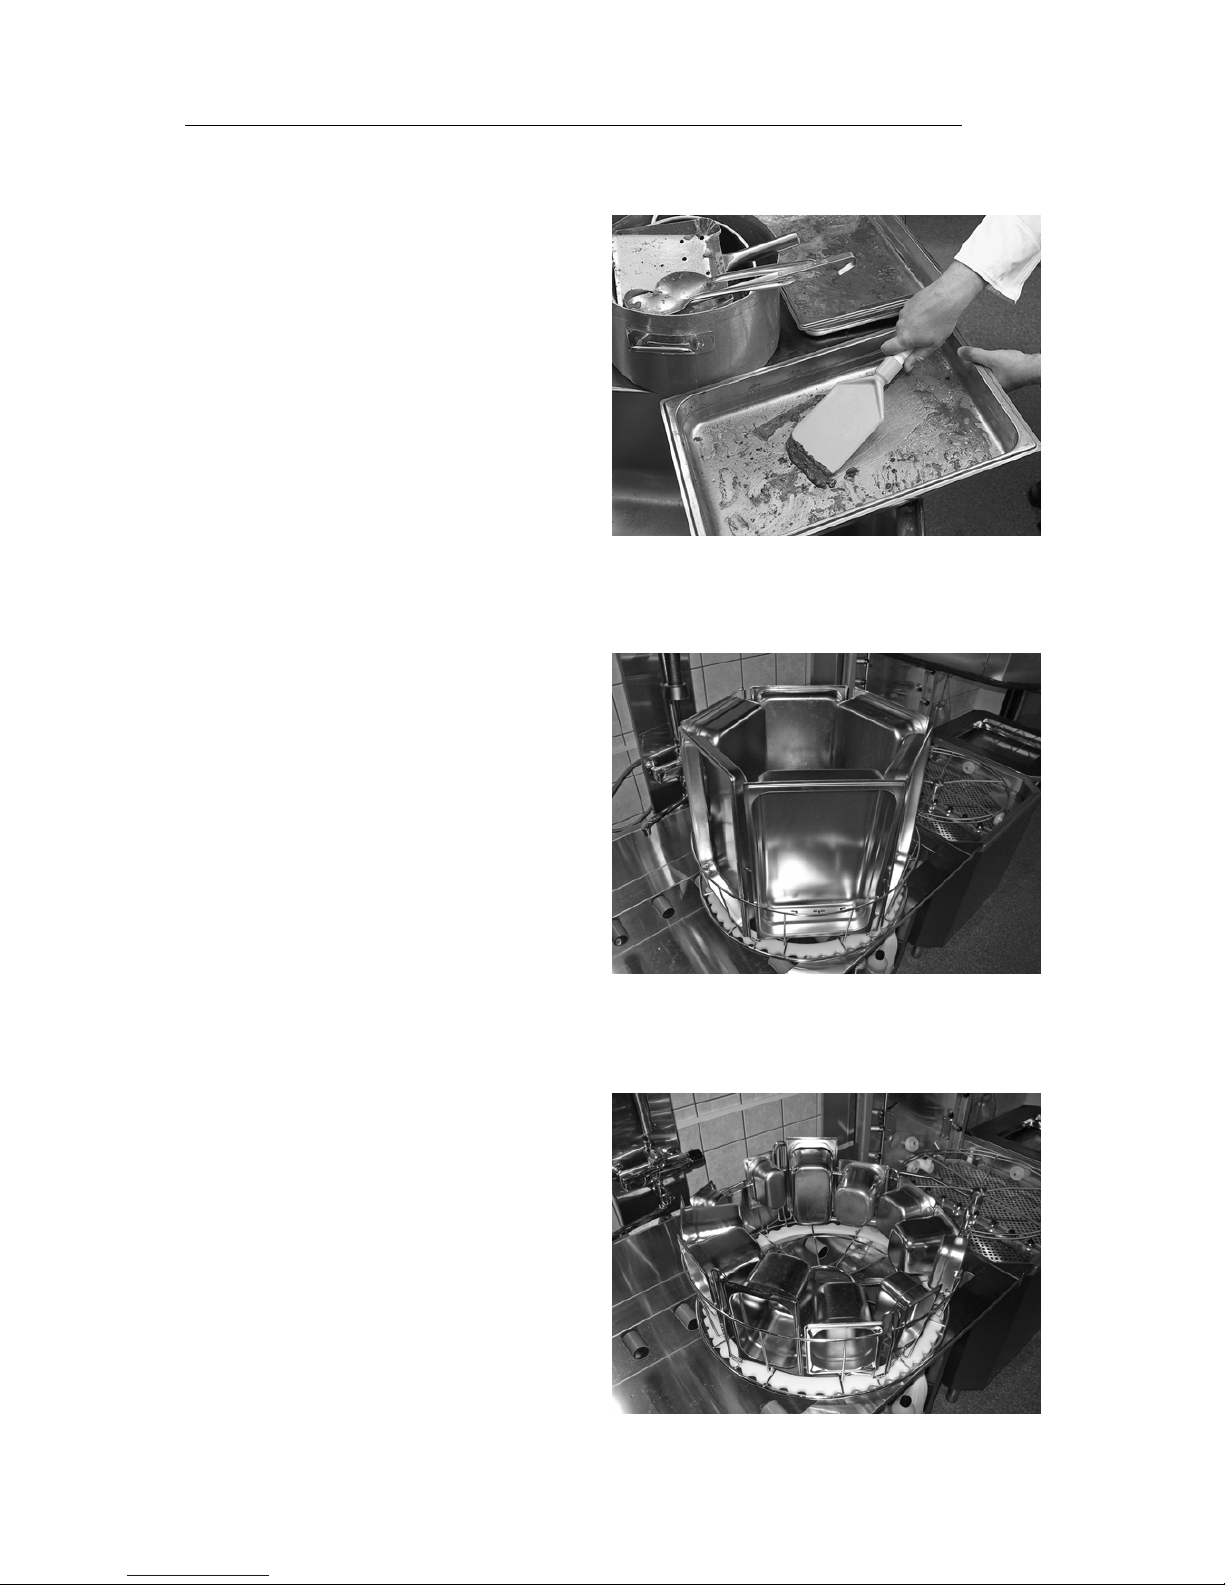
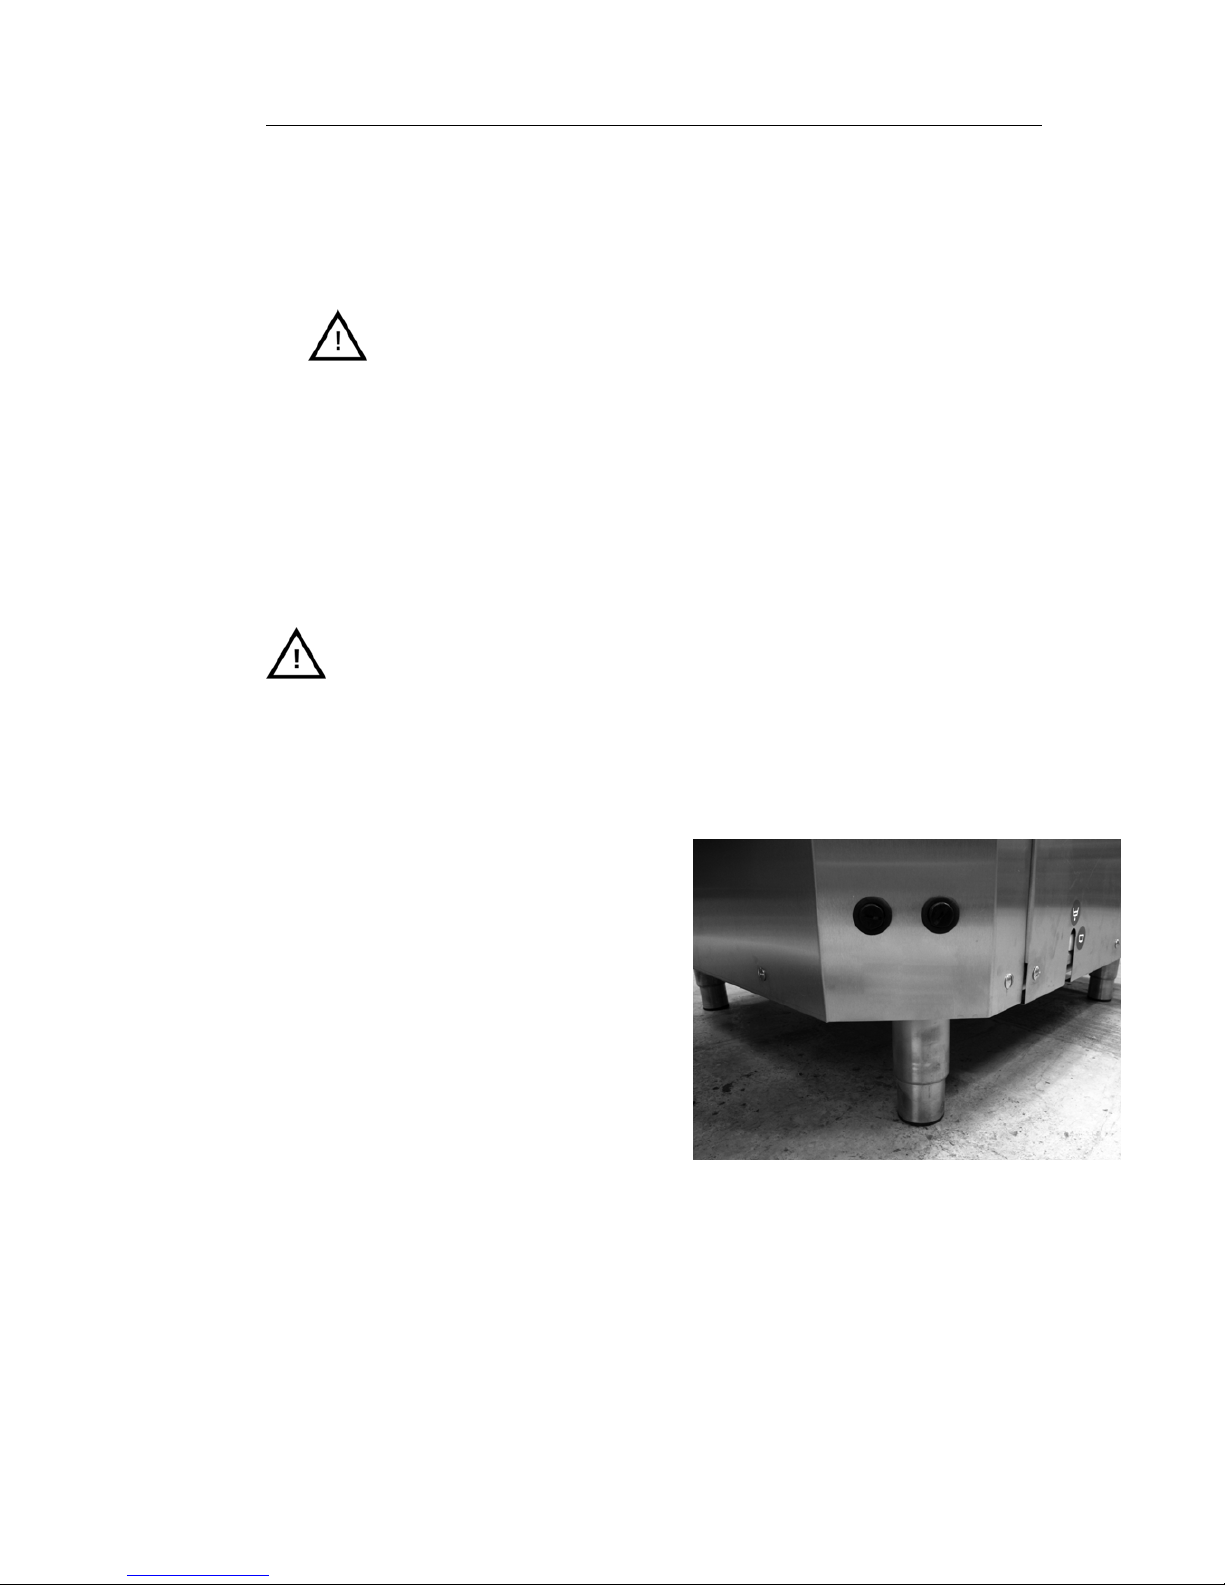
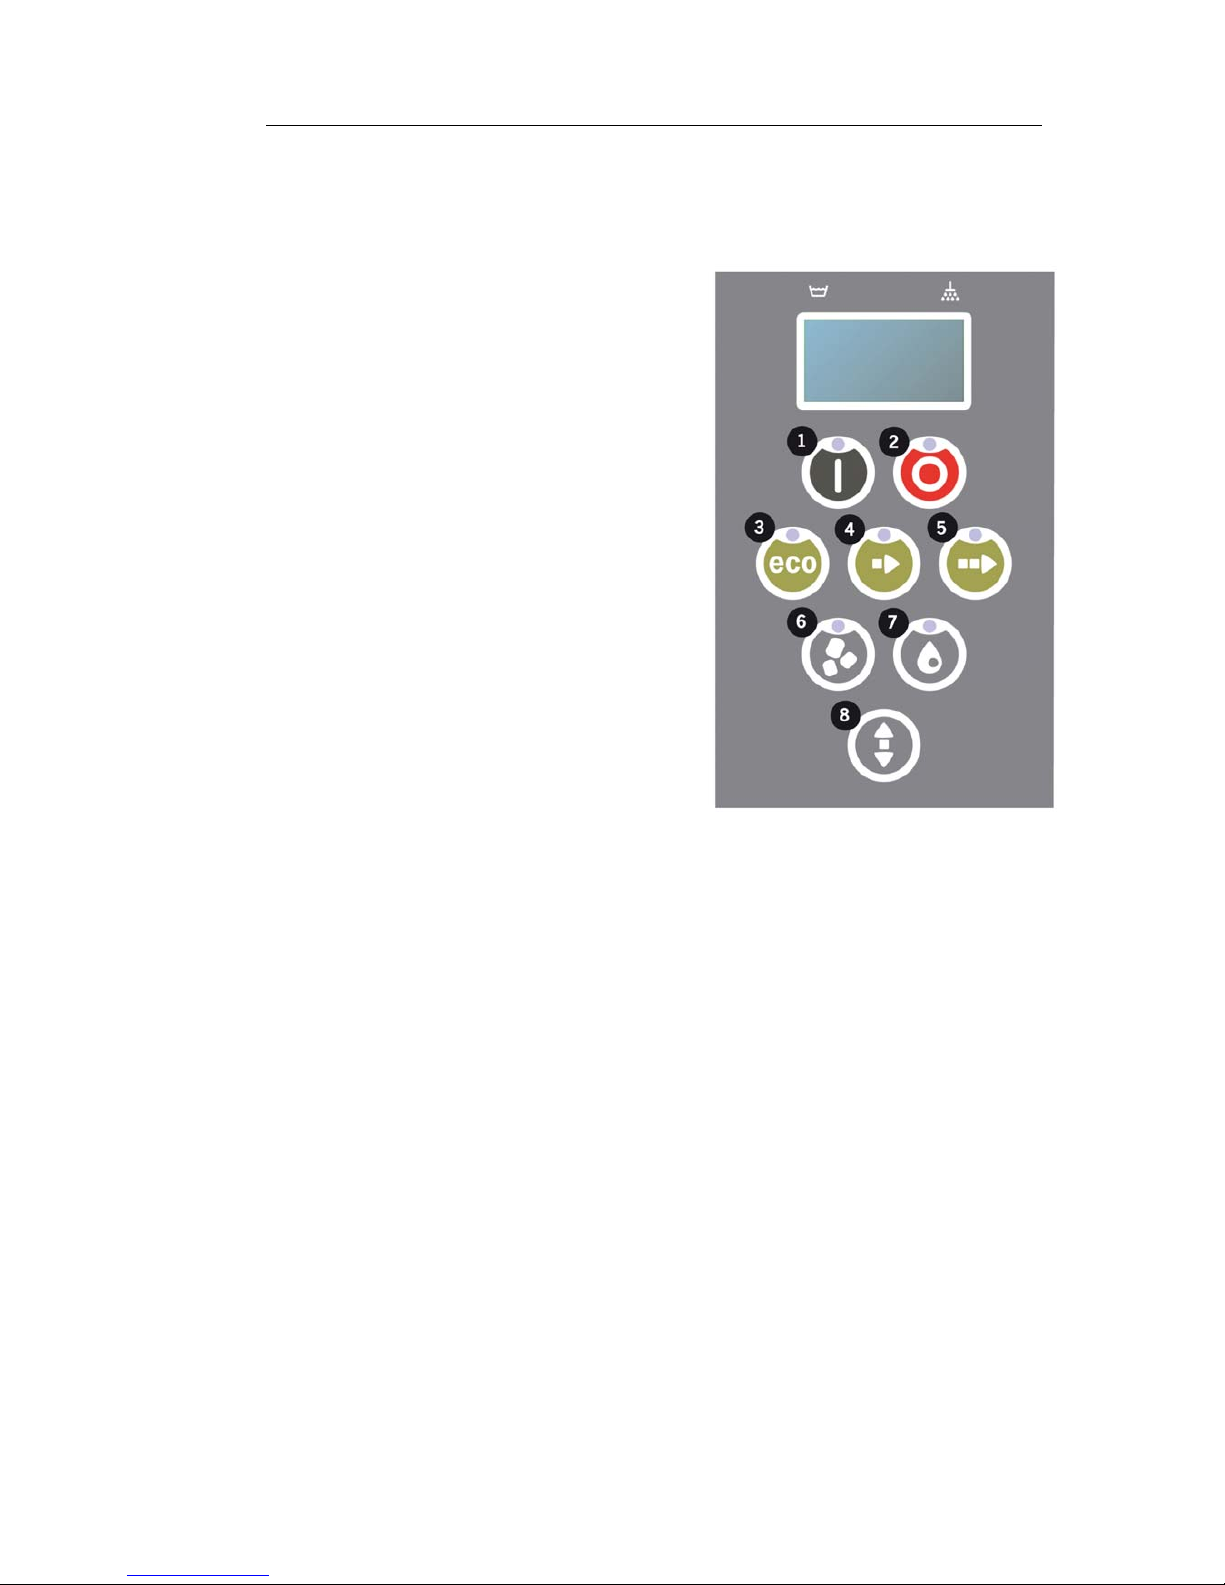
Control Panel
1.
Confirm button is used to answer “yes” to
a question shown in the display window
2.
The Stop button is used to reset potential
alarms.
It is also used to enter sleep mode. After
30 seconds the display light goes out
and the machine goes into sleep mode.
The Stop bu tton’s red diode stays lit
during sleep mode, but all functions in
the machine are deactivated.
Push any button to reactivate the
machine.
In sleep mode there is no heating of
the wash tank or rinse tank.
3. Start Eco programme
4.
Start Short programme
5.
Start Normal programme
6.
Washing with Granules
7.
Washing without Granules
8.
Hood up and down
Rev. 2011-04 17
Page 18

2Operating
Start and Operation
1.
Press the Confirm button (1)
• If temperature is lower than 65 °C in wash tank at the time of the first start, once
the wash tank has been filled, the machine will continue heating.
• Washing at too low temperature increases the risk of foaming and the items not
being hygienically clean.
• Reprogramming may be carried out by authorised personnel only.
62°C (blinking) 59°C
Heating the
wash tank, 65°C
2.
Select washing with or without Granules (6) or (7). For slightly soiled pans or spe ci fic
items with Granule “traps” (i.e perforated containers), choose programme without
Granules. Normal to heailyy soiled pots and pans, choose the powerful Granule cycles to
blast the utensils clean.
3.
Select required wash time (3), (4) or (5)
Eco
2 min (with Granules),
2 min (without Granules)
Short
3min,10s(withGranules),
2 min, 40 s (without Granules)
+ 30 sec wi th optional steamreduction
Normal
5min,10s(withGranules),
4 min, 40 s (without Granules)
+ 30 sec wi th optional steamreduction
65°C 85°C
Eco program
with Granules
Time remaining: 1:40
4.
After 3 seconds a countdown of remaining wash time will appear in the display.
65°C 85°C
2:20
5.
Once the wash programme is complete, the hood goes up, and the machine goes into
stand-by mode and show
s the latest programme used. The display now shows the
last programme run, e.g.;
18 Rev. 2011-04
Page 19
2Operating
65°C 85°C
Eco program
with Granules
Wash time: 2:00
NOTE
The hood can not be opened until the wash programme is complete.
6.
Close the hood by pressing button (8) if you are not running another wash programme
straight away. It saves energy and reduces evaporation from the wash tank.
Stopping the machine while in operation
• Switch to washing with water (7) for about 30 seconds in order to rinse off all Granules.
Then press STOP (2)
• Inanemergency:JustpressSTOP(2)
NOTE
Utensils may have remains of detergent and should be washed again before
they are taken out of the machine. Never drain an emergency stopped
machine! (Granules left in the pump without water will jam the pump
impeller.)
Resetting of overheat protection
Reset overheat protection if error codes occur.
1. Empty the wash tank.
2. Clean the level sensor.
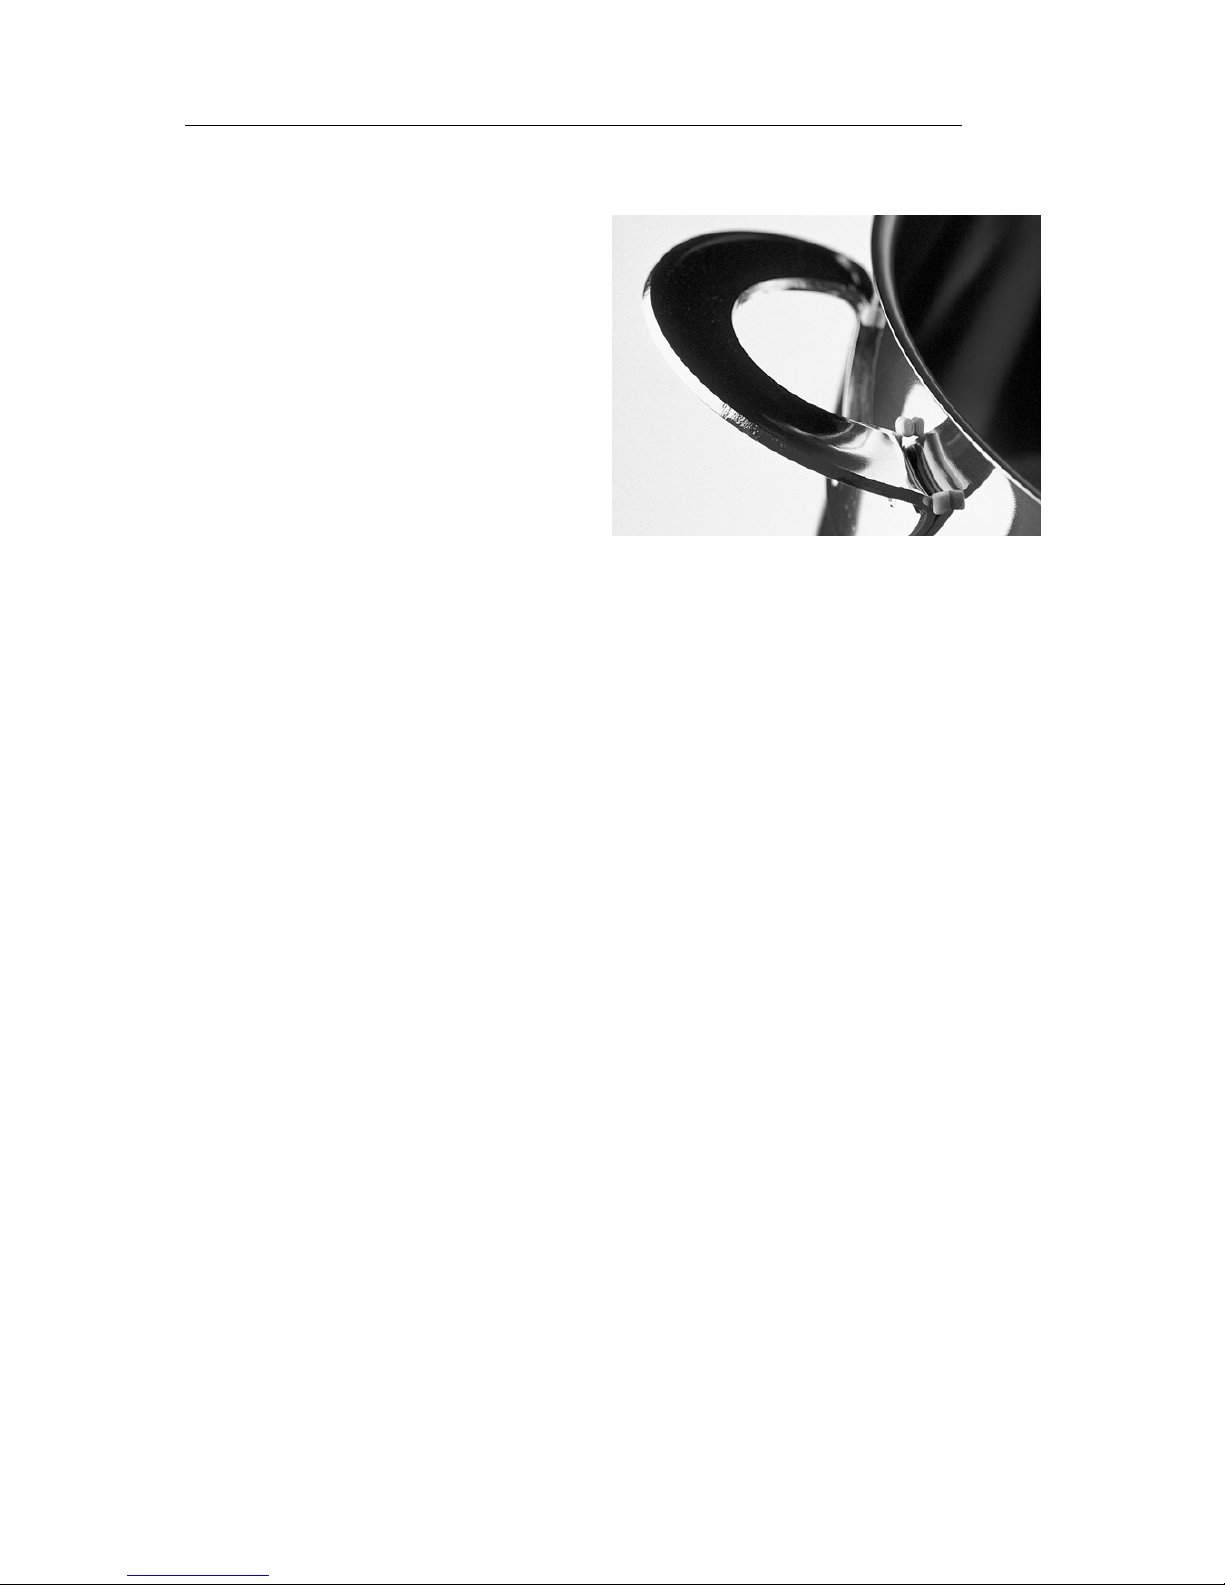
3. Unscrew the black cap, Figure 16 Access
to overheat protectors.
4. Reset the overheat protection using
a small screwdriver to stick into the
protector and push the reset button. If
the protection has tripped, a click is heard
when it is reset.
5. If the error code recurs in the next few
hours, contact a service engineer.
Figure 16: Access to overheat protectors
Rev. 2011-04 19
Page 20
2Operating
Inspecting the pots and pans
• Examine the pots and pans after each
programme.
• TomakesurenoGranulesareleft,turn
all washware (baskets, pans etc) upside
down, before taking the items out of the
machine.
• Remove any Granules that may be
stuck in corners, sharp angles and other
inaccessible places (see Figure 17 Make
sure no Granules are stuck.).
Figure 17: Make sure no Granules are stuck.
PowerGranules
• Specially designed to work with Granule pot and pan washing machines from
GRANULDISK.
• Ensure the best wash result as well as the longest working life both for themselves
and the machine.
• The plastic material is approved for use in conjunction with food.
• For spotless clean result, please control the recommended level (8 kg) of Granules every
day when collecting the PowerGranules. Top up w ith PowerGranules if the level
goes under the “8” mark.
• Please follow the recommended exchange of PowerGranules communicated by the
GDMemo™ (message occurs every 2 500 Granule cycle).
• Worn out Granules should be handled as combustible material.
20 Rev. 2011-04
Page 21
2Operating
Language selection
To ch ange the language settings:
1.
Press the STOP button, release it and
wait for 3 seconds.
2.
Press the (4) “short programme” button,
five times.
3.
The display shows the following;
4.
Press the Confirm button for “select”.
Language
English
Select Back
5.
Scroll using the buttons for eco (3) or
normal (5) programme, to step through
the list of languages.
Language
< English >
OK Cancel
6.
Select a language by pressing the
Confirm button (1); OK.
7.
Press STOP button (2) to quit
programming mode.
Rev. 2011-04 21
Page 22

2Operating
Page 23
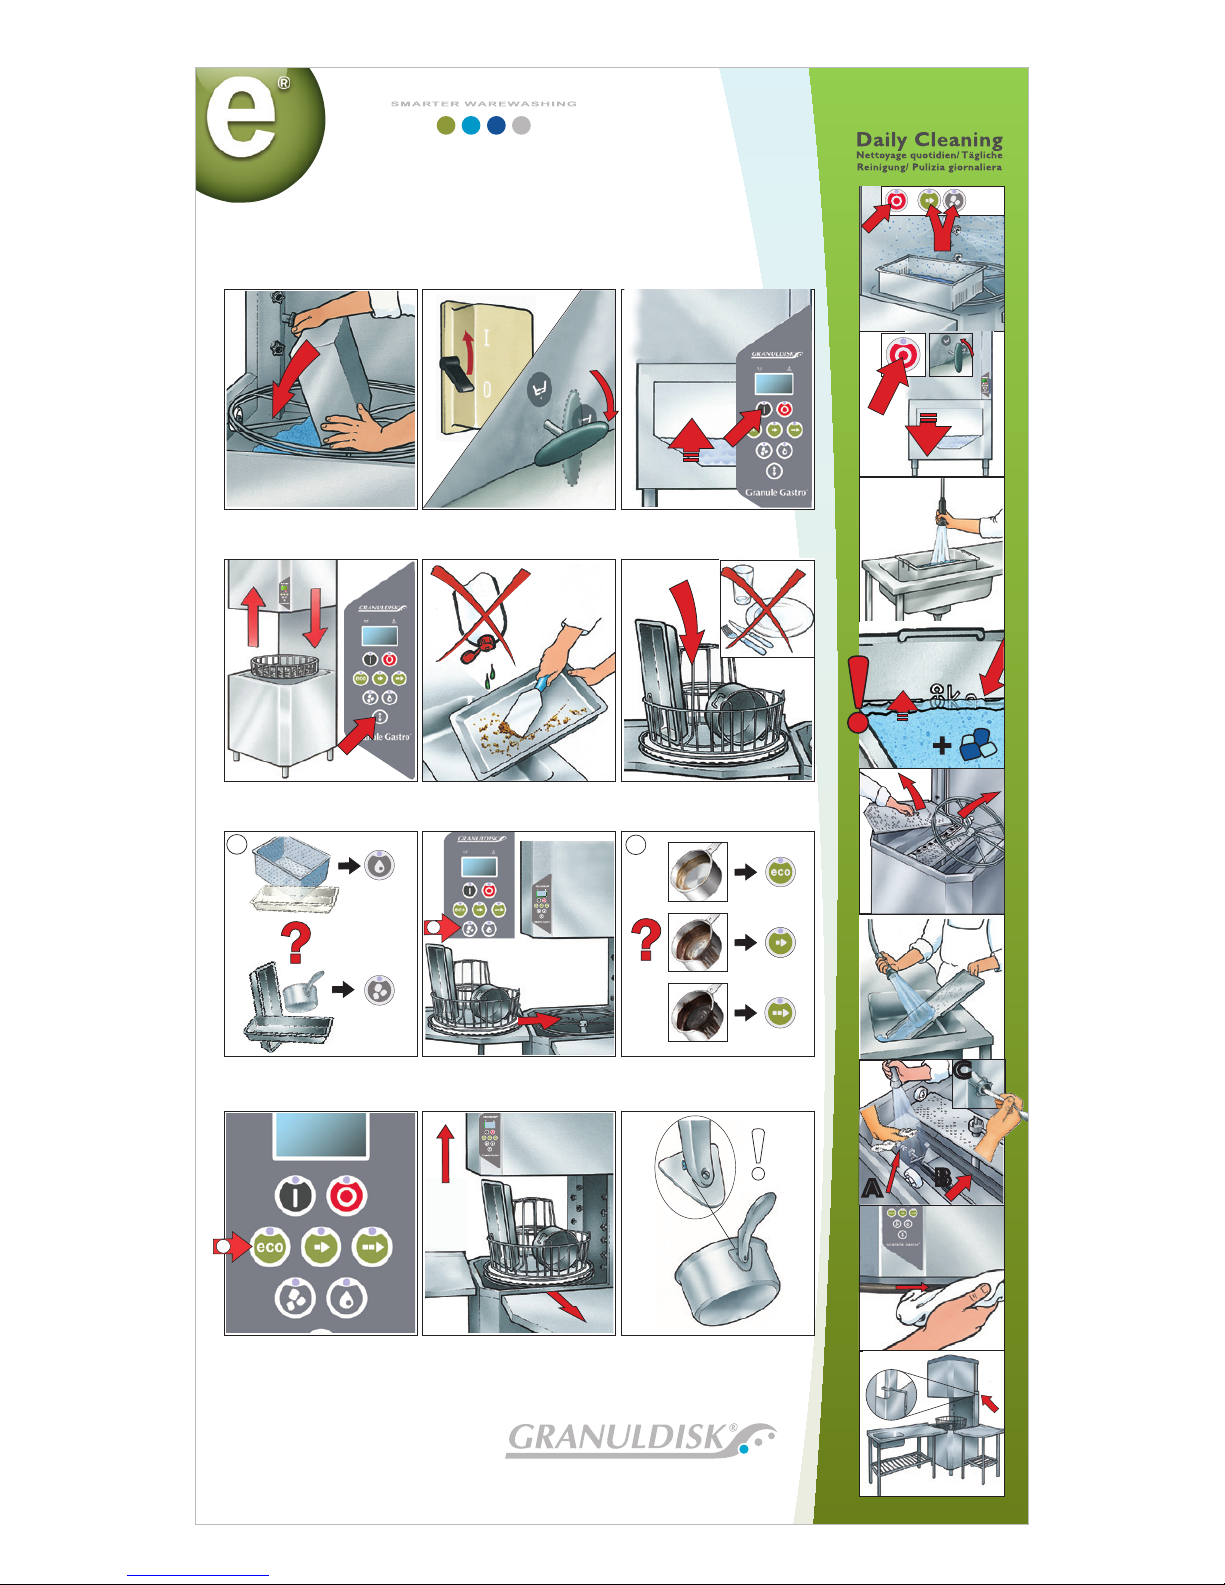
3 Daily cleaning
3.1 Collecting and cleaning PowerGranules
1.
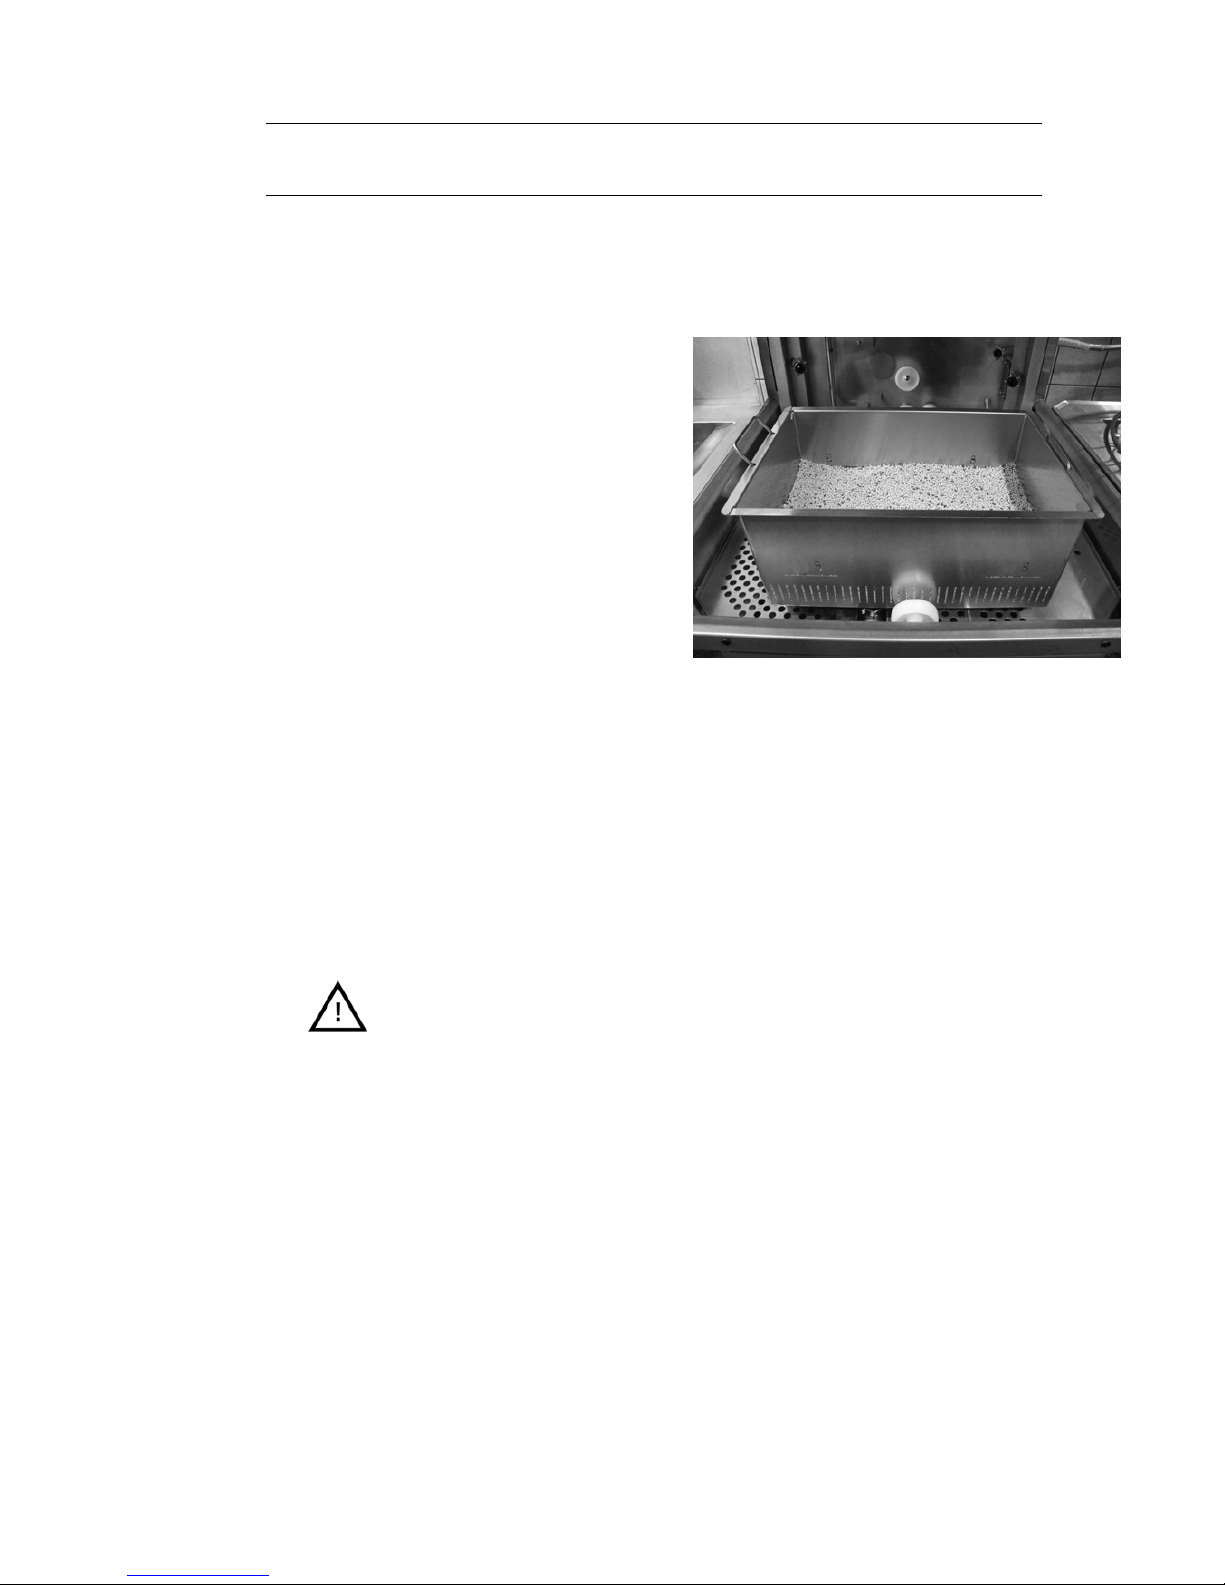
Use the G ranule Collector
2.
Place the Granule collector on the
tank grid (Figure 18 Granule collector
in machine). It is important t o place
the collector as closely to the hood as
possible.
3.
Close the hood and start the special
Granule collecting programme, as
described below.
Granule Collecting Programme:
First press the STOP button (2)
Press Short programme (4) and Granule
programme (6) buttons at the same time
for 3 seconds.
65°C 85°C
Granule collect
program
Wash time: 5:10
NOTE
No detergent dosing, no
heating of wash or rinse
tank will occur during the
collecting programme.
4.
Once the Granule collecting programme
complete, a message is shown:
• From 2500 to 501 programmes:
Check Granule level (after every 10th
collection)
• From 500 to 251 programmes: No
message (goes back to STOP mode)
• From 250 to 1 programme: Order
Granules (after every collection)
Figure 18: Granule collector in machine
Rev. 2011-04 23
Page 24
3.1 Collecting a nd cleaning PowerGranules 3 Daily cleaning
• From 0 programme: Change
Granules now (after every collection
until message is reset)
Top-up with Granules when needed.
Wash result will suffer if the Granule level
is too low.
5.
When the hood is lifted, the machine will
return to STOP mode.
6.
Take the filled Granule collector out from
the machine and rinse the Granules
thoroughly. Make sure no food residues
are left.
7.
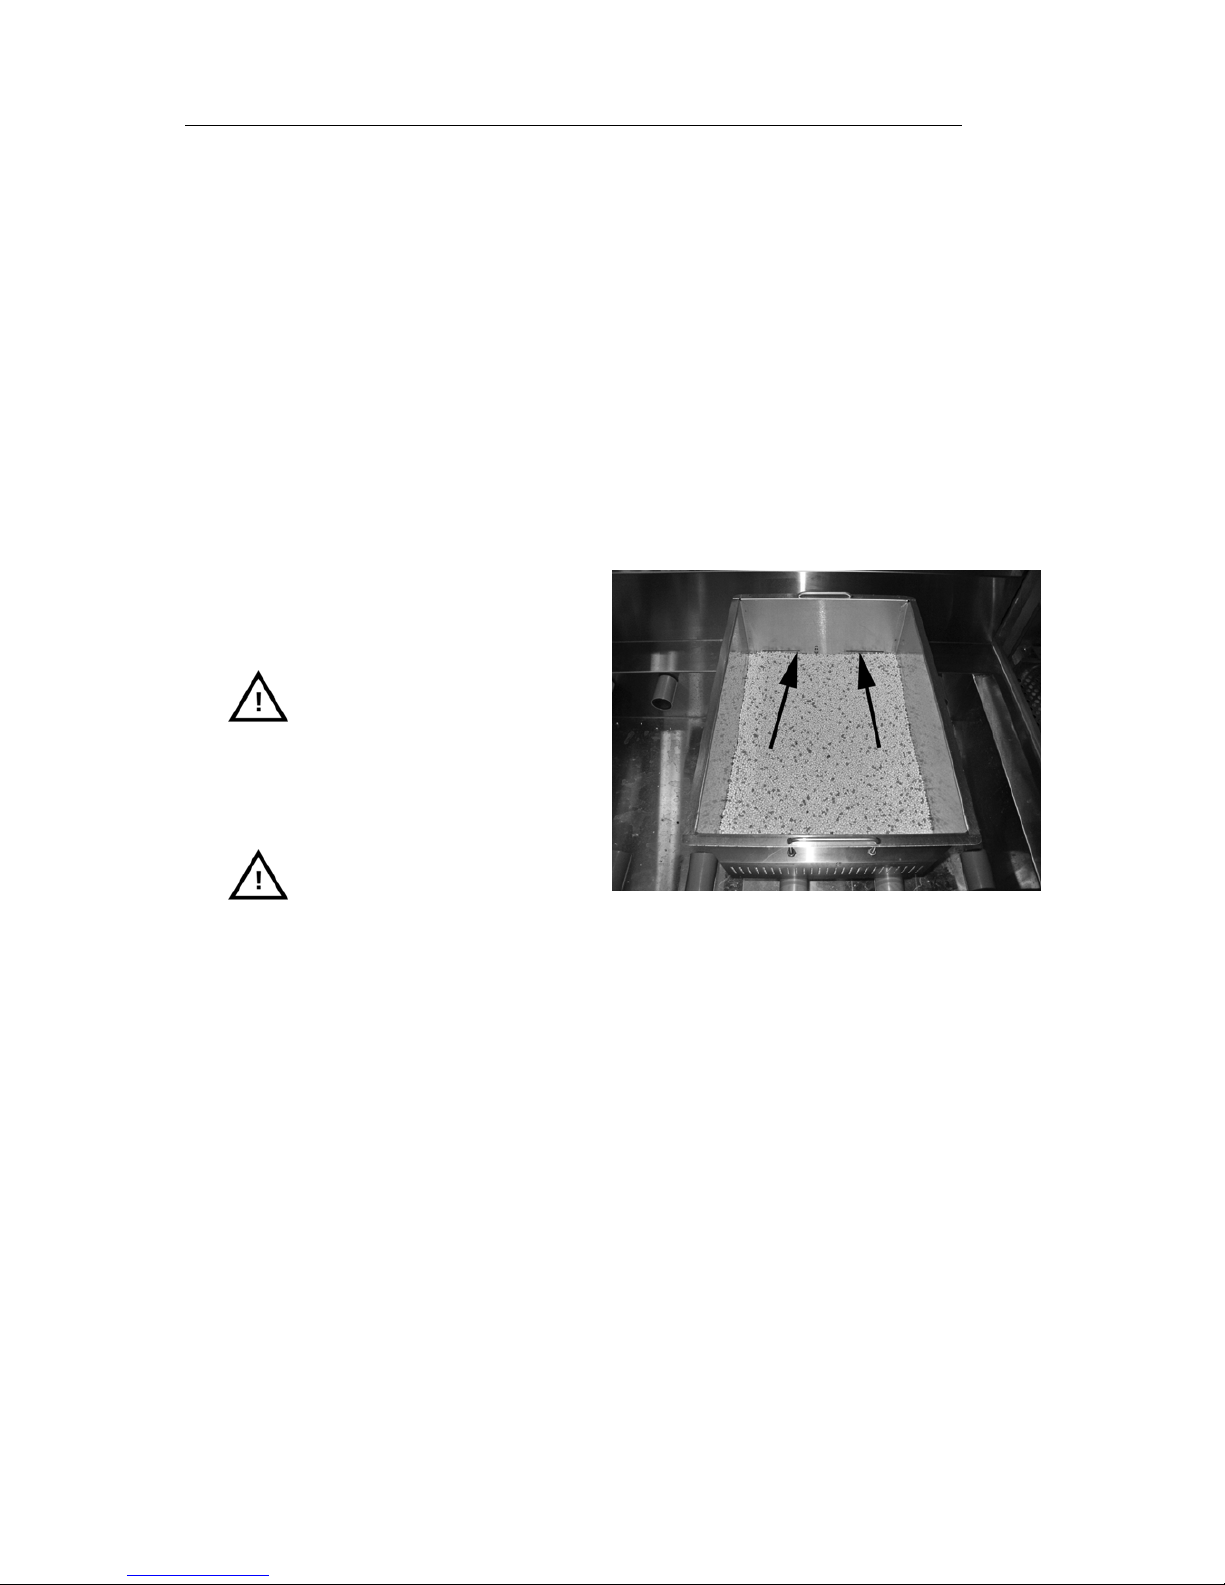
Check that the Granule level reaches up
tothe“8”markintheGranulecollector
(Figure 19 Check Granule level).
NOTE
Too many or too few
Granules will impair wash
results. Too many can
also cause blocking of
the spray nozzles.
NOTE
Do not use disinfectant or
other c leaning products
when cleaning the
Granules. The residue
from these products will
cause foaming in the
machine with poor wash
result as a consequence.
Figure 19: Check Granule level
24 Rev. 2011-04
Page 25
3 Daily cleaning 3.2 Cleaning inside the tank
3.2 Cleaning i nside the tank
1.
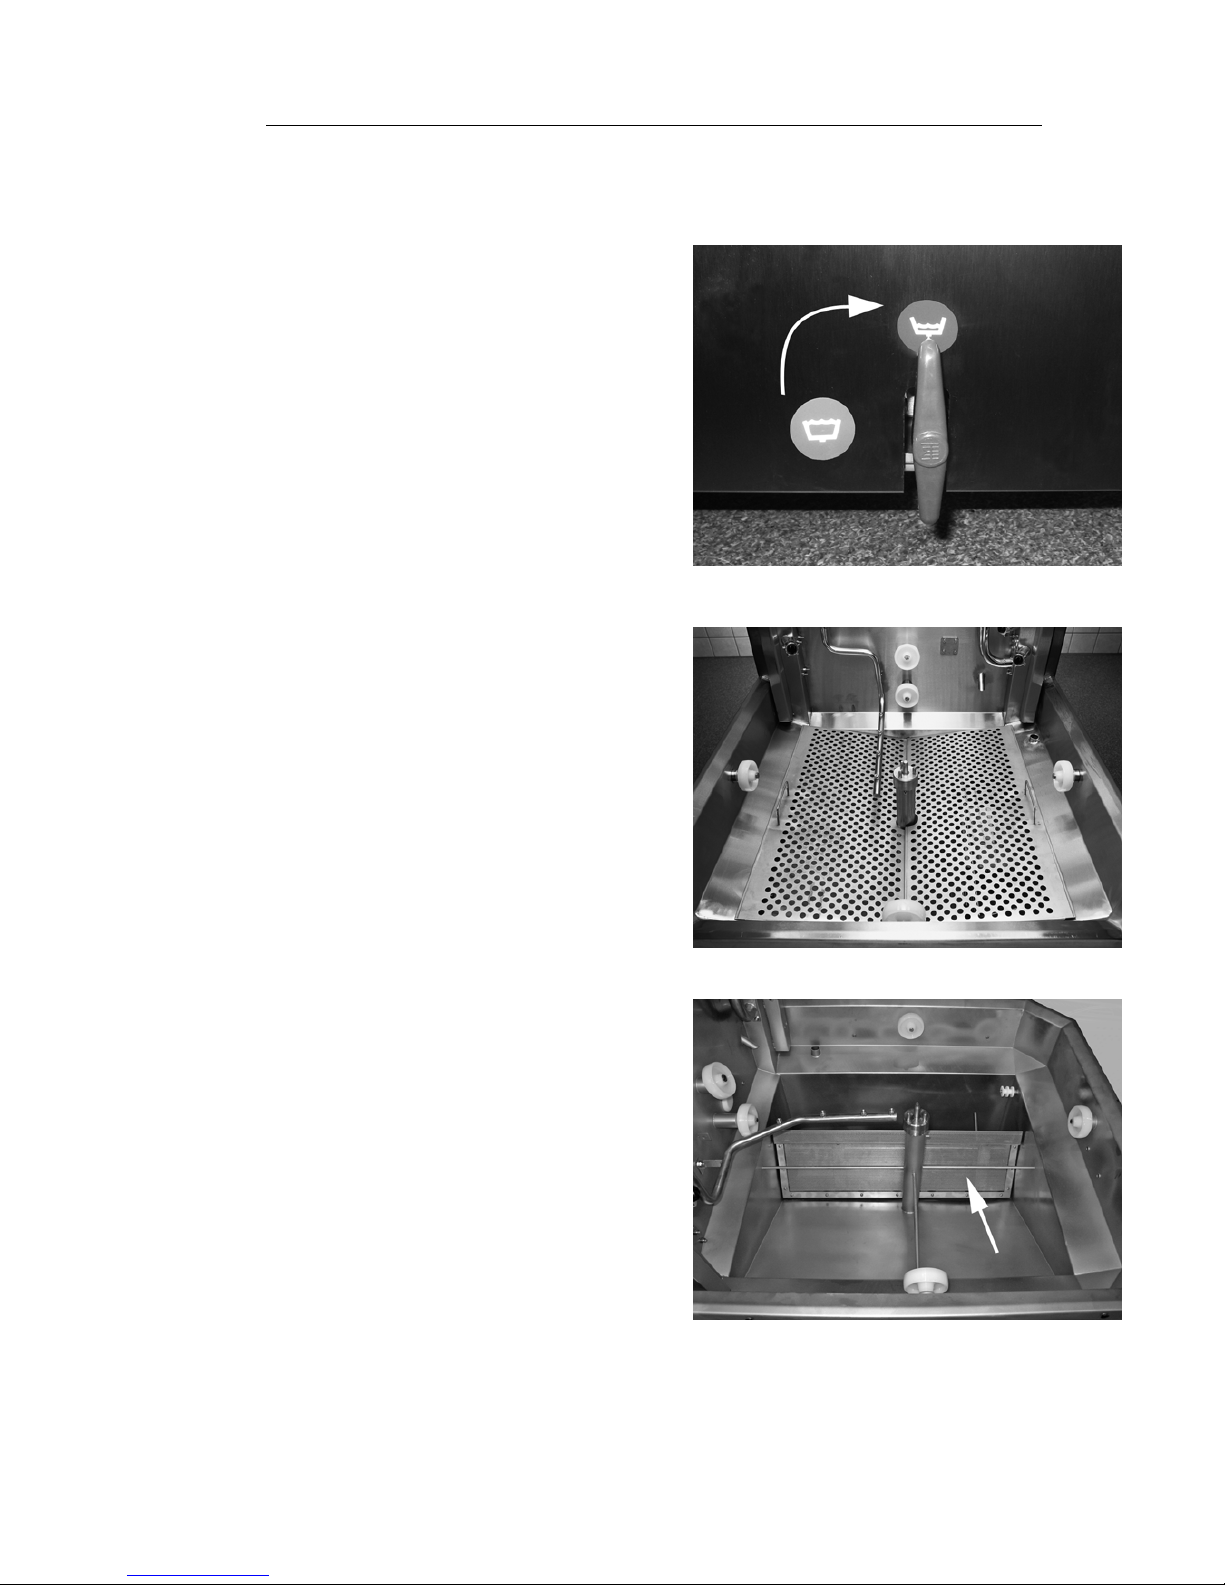
Press STOP button (2) and open drain
valve to empty wash tank. See Figure 20
Open drain valve.
2.
Secure the hood in it’s upper position
(Figure 25 Hood lock).
3.
Switch off at the main electrical switch.
Figure 20: Open drain valve
4.
Take the basket wheel out. Then lift out
the two tank grids. Clean and flush the
parts with water. See Figure 21 Tank
grids.
5.
Flush the inside of the tank with water
(no cleaning agent).
6.
Clean and flush Granule damper with
water (Figure 22 Granule damper). Clean
the perforated surface of the Granule
damper to ensure that there are no
Granules left there.
7.
Check that the sealing strip for the
Granule damper is undamaged.
Figure 21: Tank grids
Figure 22: Granule damper
Rev. 2011-04 25
Page 26
3.4 Over night and at longer stoppages 3 Daily cleaning
8.
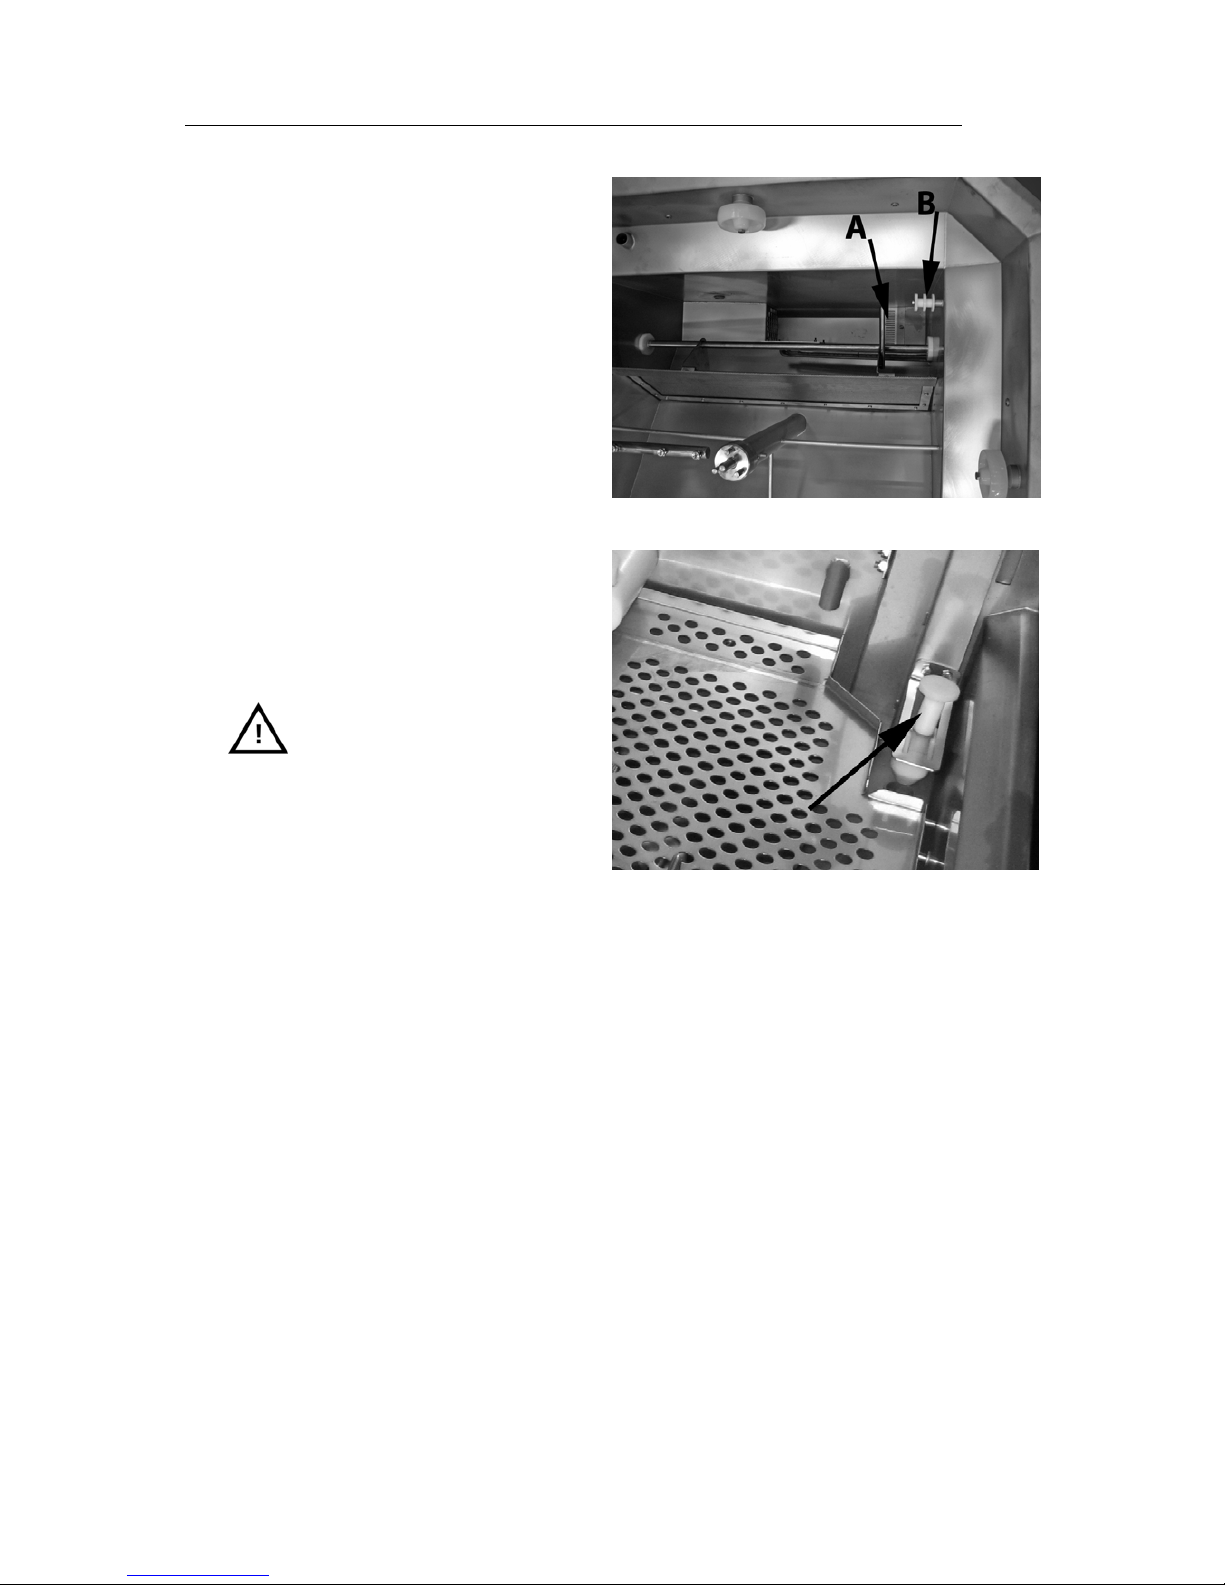
Clean and flush bottom sieve (A) with
water. To make cleaning easier, bottom
sieve can be unscrewed (Figure 23
Bottom sieve and level sensor).
9.
Wipe off level sensor (B) with a clean
cloth. See Figure 23 Bottom sieve and
level sensor.
10.
Wipe grease off hood seals.
11.
Check that the rollers supporting basket
wheel rotate freely.
12.
Check the operation of the tap on the
overflow drain. Clean if required. Figure
24 Overflow tap.
13.
The top should be wiped off as required
or at least once a month.
NOTE
The outside of the
machine should
not
be washed with
high-pressure water.
Figure 23: Bottom sieve and level sensor
Figure 24: Overflow tap
3.3 Replacement of cleaned items
1.
Replace all items
• Put back bottom sieve if it has been
unscrewed.
• Put back tank grids.
• Put back basket wheel.
3.4 Over night and at longer stoppages
• Ensure that wash tank is completely empty after cleaning.
• Any water remaining in the bottom should be removed with a sponge or similar absorbent.
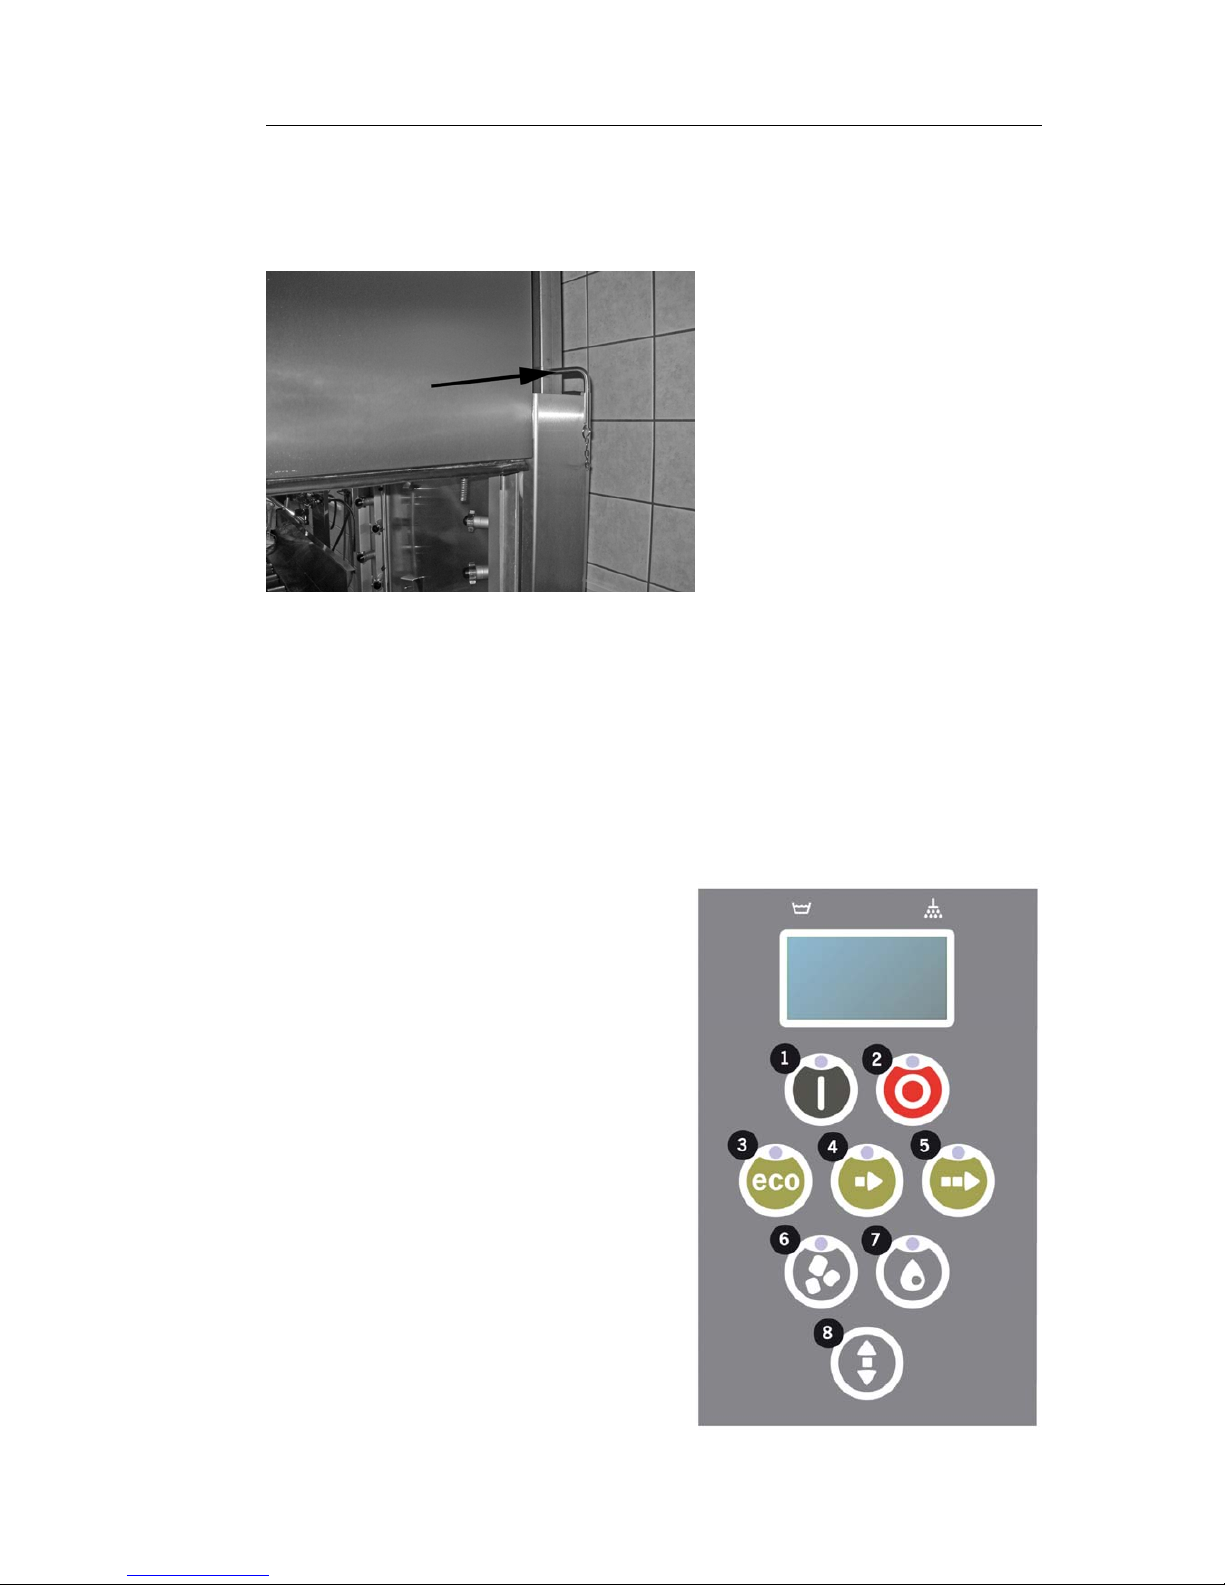
• Raise hoo d to its highest position and prevent it from descending with the peg provided
(Figure 25 Hood lock).Leavepegthereaslongasthemachineisshutdown.
26 Rev. 2011-04
Page 27
3 Daily cleaning 3.5 GD Memo™
• PowerGranules should be stored in Granule collector standing in the machine.
• After a long stoppage; check operation of the machine according to service manual,
possibly with the assistance of a service engineer.
Figure 25: Hood lock
3.5 GD Memo™
GD Memo is an integrated function which informs the user of the machine’s most important
maintenance requirements. With GD Memo, it is possible to ensure optimum wash results,
avoid stoppages during peak hours and maintainthelowestpossibleoperatingcosts.This
function is integrated in the control panel and keeps the user informed as follows:
Rev. 2011-04 27
Page 28

3.5GDMemo™ 3Dailycleaning
1. Time to change wash water
— to ensure a good washing result. The “Washing without Granules” button (7) flashes
and the message “Change water” is shown in the display. T his information disappears
once the water has been changed or can be reset by pressing Stop (2), releasing it,
waiting 3 seconds and then pressing button (7) five times. OK is shown in the display
during 2 seconds after the reset. This reminder appears after every 25 wash cycles in
preset. The number of washes may be varied between 15 and 40 washes.
2. Time to change Gran u les
— to maintain the wash power in the machine. The “Washing with Granules” button (6)
flashes and the message “Change Granules” is shown in the d isplay. After changing the
Granules, reset the reminder by pressing the STOP button (2), wait for 3 seconds, then
press the Granule button (6) 5 times. OK is shown in the display during 2 seconds after
the reset. A Granule change reminder appears after every 2500 wash cycles.
3. Time for periodical service
— to avoid expensive repairs and unnecessary breakdowns. The STOP button (2) flashes
andamessageisshowninthedisplay.Either“Timeforservice1”or“Timeforservice
2” depending on which service is required. Phone number for Service company or
GRANULDISK is shown below the service message. The reminder can be reset by an
authorised service technician, once the service is performed. OK is shown in the display
during 2 seconds after the reset. Service message appears every 8000 programmes or
once a year, whichever occurs first.
4. Alarm priority
If the reminders ”Change water”, ”Change Granules now” or ”Time for service” occurs at
the same time, the messages are prioritised as follows:
• “Change wash water” will always have first priority
• Once the water has been changed and the message reset, the next m essa ge can
be shown
• Second priority “Change Granules now”
• Third priority “Time for service”
• The reminders flash until messages are reset.
28 Rev. 2011-04
Page 29

4 HACCP Hygiene and Operation
Documentation
GRANULDISK Documentation Tool, GDTdirect™, is an integrated function for the
documentation of the warewashing machine’s operating parameters and critical hygiene
control points, HACCP.
• Operating data for the last 99 wash programmes run is viewed directly in the control
panel window.
• An external computer can be linked to the machine and operating data stored in separate
files so that all historical data can be saved. Windows 2000 or Windows XP is a system
requirement for connecting an external computer. Please contact your dealer for more
information and installation.
Reading the Data through the control panel
1.
Press STOP button (2), release it and wait 3 seconds.
2.
Press “short programme” (4), five times.
3.
use button “eco programme” (3) or button “normal programme (5) until you see “read
operating data” in the display. Confirm your choice by pressing Confirm button (1).
4.
Operating data for the last programme run is shown in the display;
090121 15:19 SG 65/85 OK
The information is defined as follows;
• Date; 090121 2009, January, 21st
• Time; 15.19 3.19 p.m
• Programme type; E, S, N equivalent to Eco, short and Normal programmes
• Washing with Granules; indicated by means of a “G”
, otherwise this box is left blank.
• 65; indicates the average temperature in the wash tank during washing.
• 85; indicates the minimum temperature in the rinse tank during rinsing.
• OK; indicates that the rinse wate
r volume is correct in accordance with factory
values; if the set values have been changed, NA (not applicable) is displayed.
NOTE
If the wash programme has be
en cancelled due to an operating error or
technical error, the temperature indication is not included and “error”
plus an error code appears in its place.
Rev. 2011-04 29
Page 30

4 HACCP Hygiene and Operation
Documentation
090121 15:19 SG Error 103
5.
To view information on programme run previously, scroll backwards and forwards in the
list using button “eco programme” (3) or button “normal programme” (5).
6.
Toendscrollingandleavethelist,pressConfirm button (1).
7.
Press the STOP button (2) to return to operating mode.
30 Rev. 2011-04
Page 31
5 Troubleshooting and alarms
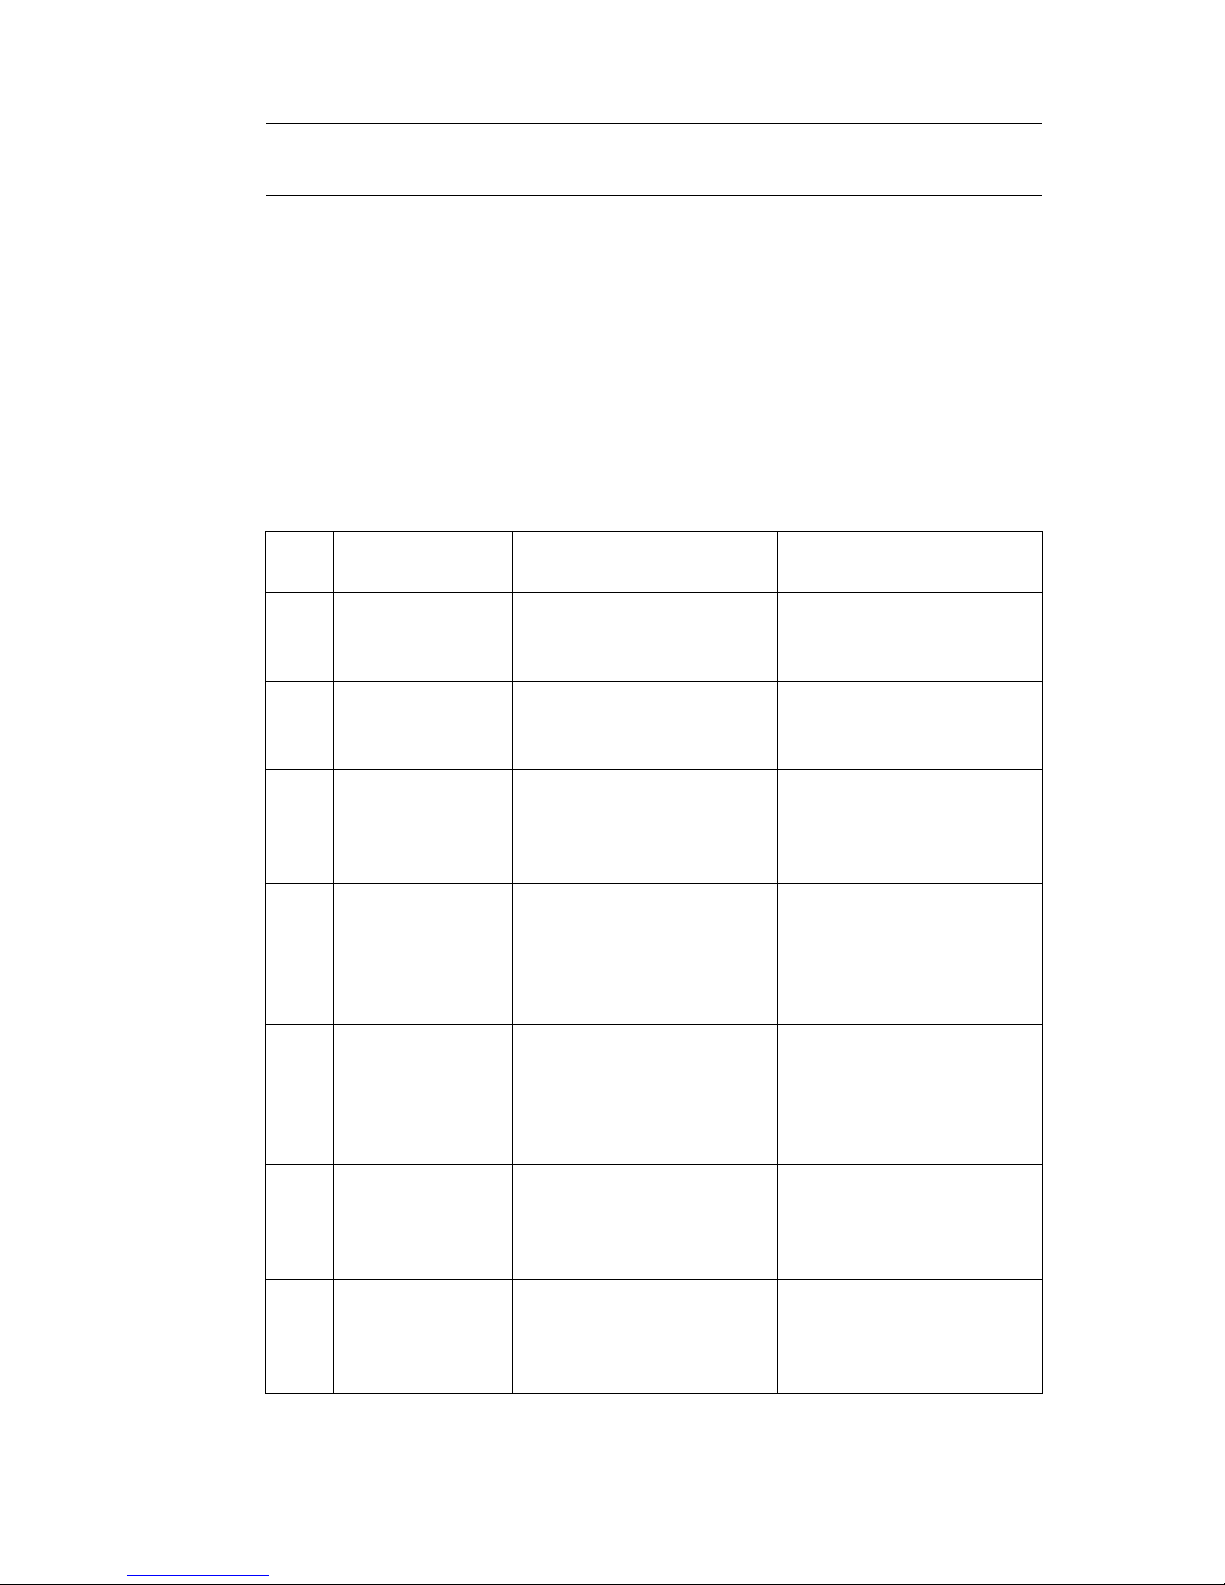
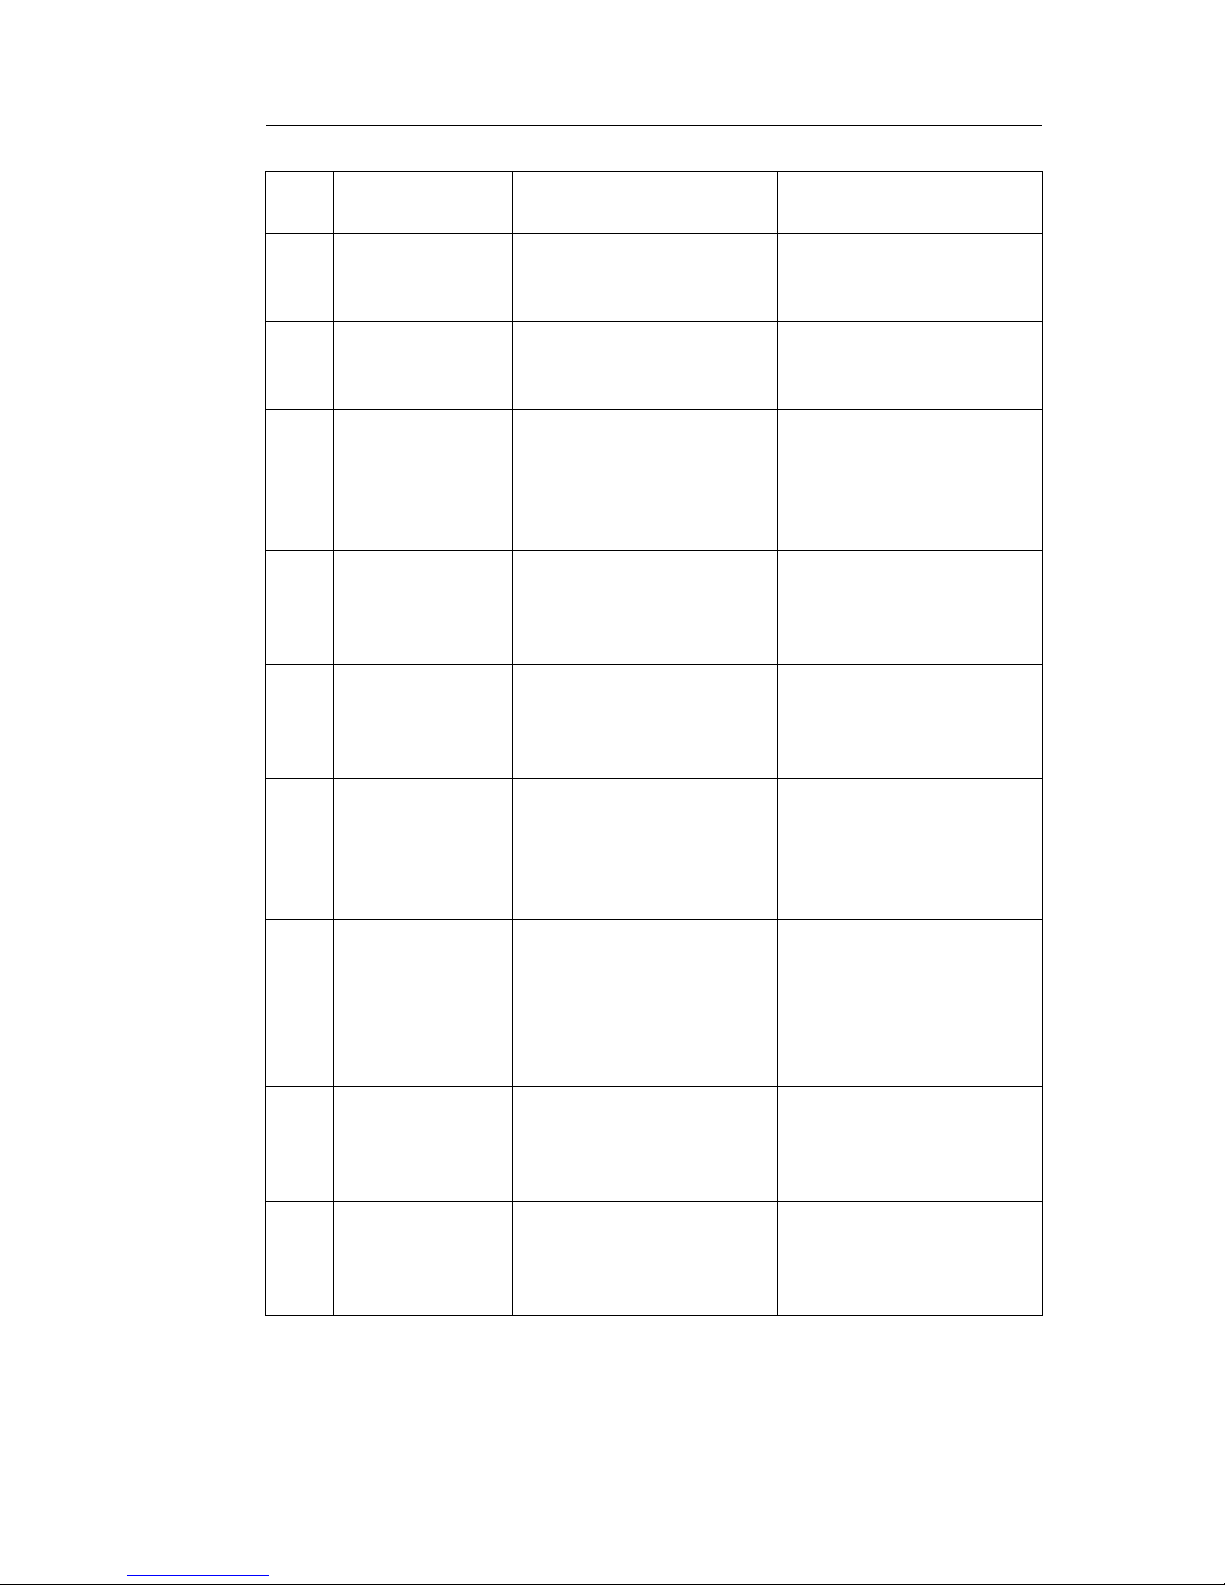
The meaning of the error codes can be read out from the table below.
• Error codes 116, 118, 120, 124, 132 are also displayed with an Error message text
shown in the Meaning column.
• When a n error code is displayed, the program is always interrupted.
• After checking and taking care of the problem, the alarm can be reset by pressing the
STOP button.
Error
code
Meaning Cause Remedy
001 Program interrupted by
operator.
This error code is displayed
only when operating data is
read in GDTdirect™ 3.x.
103 Motor circuit
breaker for rinse
pump tripped
The motor is overloaded. The
impeller is blocked.
Contact a service engineer!
104 Overheating
protector for rinse
tank tripped
The rinse tank heater has
overheated.
Clean level sensor. Reset
overheat protection. If error
code recurs in the next few
hours, call a service engineer.
105 Overheating
protector for wash
tank tripped
The wash tank heater has
overheated.
Clean level sensor in the
wash tank. Reset overheat
protection. If error code
recurs in the next few hours,
call a service engineer.
106 Overheating
protector for one
of the heaters
tripped.
One of the heater elements
has overheated.
Clean level sensor in the
wash tank. Reset overheat
protection. If error code
recurs in the next few hours,
call a service engineer.
107 Temperature not
reached in wash
tank
The wash water in the wash
tank does not reach i
ts preset
temperature during the wash
process.
Reset the ala rm by pressing
the STOP button. If t
he alarm
recurs, contact a service
engineer!
108 Temper
ature not
reached in rinse
tank
The rin
se water in the rinse
tank does not reach its preset
temperature during the wash
pr
ocess.
Reset t
he alarm by pressing
the STOP button. If the alarm
recurs, contact a service
en
gineer!
Rev. 2011-04 31
Page 32

5 Troubleshooting and alarms
Error
code
Meaning Cause Remedy
110 Temperature
sensor in wash
tank or rinse tank
not functioning probably the rinse
tank sensor.
The temperature sensor in
the wash tank or rinse tank
is broken - probably the rinse
tank sensor.
Contact a service engineer!
111 Temperature
sensor in wash
tank or rinse tank
not functioning probably the wash
tank sensor.
The temperature sensor in
the wash tank or rinse tank is
broken - probably the wash
tank sensor.
Contact a service engineer!
112 Water level too low
in rinse tank
The level in the rinse tank
has fallen incorrectly.
Contact a service engineer!
113 Water level too low
in wash tank.
The level in the wash tank
has fallen incorrectly.
Contact a service engineer!
114 Long wash tank
filling time
Thelevelsensorinthewash
tank has not been activated
within 20 minutes of the rinse
pump start.
Checkthewatersupplyto
the machine, as well as the
rinse pump. Clean the rinse
nozzles. Reset the alarm by
pressing the STOP button. If
the alarm recurs, contact a
service engineer!
115 Long rinse tank
filling time
Thelevelsensorintherinse
tank has not been activated
within 5 minutes of the
solenoid valve opening.
Checkthewatersupplyto
the machine, as well as the
solenoid valve for rinse tank
filling. Reset the alarm by
pressing the STOP button. If
the alarm recurs, contact a
service engineer!
116 Low water level,
problem with foam
Foam forming in the machine. Avoid using detergent
designed for washing up
by hand. Change th
ewash
water. Contact the detergent
supplier if the problems with
foam format
ion still persist.
Resetthealarmbypressing
the STOP button.
1
17
L
ong rinse time
T
he lower level sensor in the
rinse tank has not indicated
that the correct amount of
water has been pumped out.
C
lean the rinse nozzles. Reset
the alarm by pressing the
STOP button. If the alarm
recurs, contact a service
engineer!
32 Rev. 2011-04
Page 33
5 Troubleshooting and alarms
Error
code
Meaning Cause Remedy
118 Drain valve not
closed
The drain valve has opened
during an active process in
the machine.
Close the d rain valve and
reset the alarm by pressing
the STOP button.
119 Motor circuit
breaker for wash
pump tripped
The motor is overloaded.
The impeller is blocked by
Granules or by small utensils.
Contact a service engineer!
120 Basket drive device
blocked.
The basket is prevented from
rotating, utensils outside of
the basket.
Check that nothing is stuck
between the basket and the
basket wheel . Reset the
alarm by pressing the STOP
button.
121 Motor circuit
breaker for the
booster pump
tripped
The motor is overloaded. Contact a service engineer!
122 Incorrect
downwards hood
movement
The hood has not reached
bottom within 25 seconds;
the security switch has not
changed its status.
Contact a service engineer!
123 Incorrect upwards
movement of the
hood
The hood has not reached top
within 20 seconds. The alarm
is activated even if the hood
remains in the up position.
Check the incoming water.
reset the alarm by pressing
the STOP button. if the
alarm recurs, contact service
personnel.
124 The crush protector
has been activated
Something is preventing the
hood from moving down.
Excessive friction in the hood
motion mechanics.
Remove whatever is
obstructing the hood
movement, reload the
wash goods in the basket if
necessary. Check the hood
motion mechanics.
125 Incorrect hood
movement,
security swit
ch.
The security switch has not
signalled to the control unit
within 5 secon
ds of the hoo d
being raised from the tank.
Contact a service engineer!
128,
129
,
130,
131
System error,
con
trol card non
operational
A control card component is
bro
ken.
Contact a service engineer!
Rev. 2011-04 33
Page 34
5 Troubleshooting and alarms
Error
code
Meaning Cause Remedy
132 Clean level sensor The level sensor in the wash
tank may be dirty, or water in
the wash tank has not been
totally drained at start up if
the machine has been shut
down for more than 4 hours.
Empty the wash tank and
cleanthelevelsensorinthe
wash tank.
140 An initiation error
of the temperature sensors has
occurred./Temperature sensor in the
wash tank or rinse
tank not functioning.
The communication between
the temperature sensors and
the PCB was disturbed during
start up.
The temperature sensor in
the wash tank or rinse tank
is broken .
Cut the power to the machine
completely by switching
the machine off at the wall
socket. Wait 30 seconds.
Switch the power back on.
If the fault recurs, repeat
the procedure once again. If
the fault persists, contact a
service engineer.
34 Rev. 2011-04
Page 35

6Notes
Rev. 2011-04 35
Page 36
Granule Gastro
®
Operation / Opération / Start und Betrieb / Funzionamento
Art.nr: 20794 Rev.Date: 2010-05-05 BA
!
1
2
A
B
+
3 sec.
GRAN ULD IS K
Jägershillgatan 15
SE-213 75 MALMÖ
Sweden
Tel: +4640 671 50 60
Fax: +4640 21 07 21
[email protected]
w w w. g ra n u l d i sk . c o m
C
xxx?
1
2
 Loading...