

Page 1

GD 900
User manual
Art. nr 16060/ 03.2005/EN
Granuldisk AB retains the right to make technical changes to the products.
No responsibility is taken for any printing errors.
1. TECHNICAL DATA ........................................................ 6
2. INSTRUCTIONS ............................................................... 8
3. DAILY CLEANING ........................................................13
4. HACCP-documentation ...........................................15
5. TROUBLESHOOTING AND ALARMS ....... 17
Contents
EN
Page 2

Declaration of Conformity
The Manufacturer:
GRANULDISK AB
Jägershillgatan 15
SE-213 75 MALMÖ, Sweden
declares that the following machinery:
The Granuldisk system GD 900
Basic conception
a) is manufactured in conformity with the Svenska Arbetarskyddsstyrelsens Författningssamling AFS1994:48. This law conforms
with the COUNCIL DIRECTIVE of 22 June 1998 concerning harmonisation of member states` legislation for machinery (the
Machinery Directive 98/37/EG), with particular reference to Annex 1 concerning the essential health and safety requirements relat
-
ing to the design and construction of the machinery.
b) is besides the provisions under a) manufactured according to the following directives: the EC Low Voltage Directive 73/23/EEC
and the EMC Directive 89/336/EEC
c) is manufactured in conformity with the following harmonised standards: EN 60204-1, EN 55014, EN 60335-2-58, EN 604391, EN 418, EN 294, EN 50081-1:1992 and EN 50082-2:1995
d) is manufactured in conformity with the following national standards and technical
specifications: ELSÄK-FS 1994:7
e) is manufactured in accordance with EN 1717 and fitted with a return flow protection of type AB with an air gap in accordance
with EN 13077.
Malmö, Sweden 01.03.2005
Signed on behalf of GRANULDISK AB
GRANULDISK AB Jägershillgatan 15
SE-213 75 MALMÖ
Telefon: 040 671 50 60
Fax: 040 21 07 21
...............................................
Per Sandberg
(Managing Director)
Page 3
To the User Safety Instructions
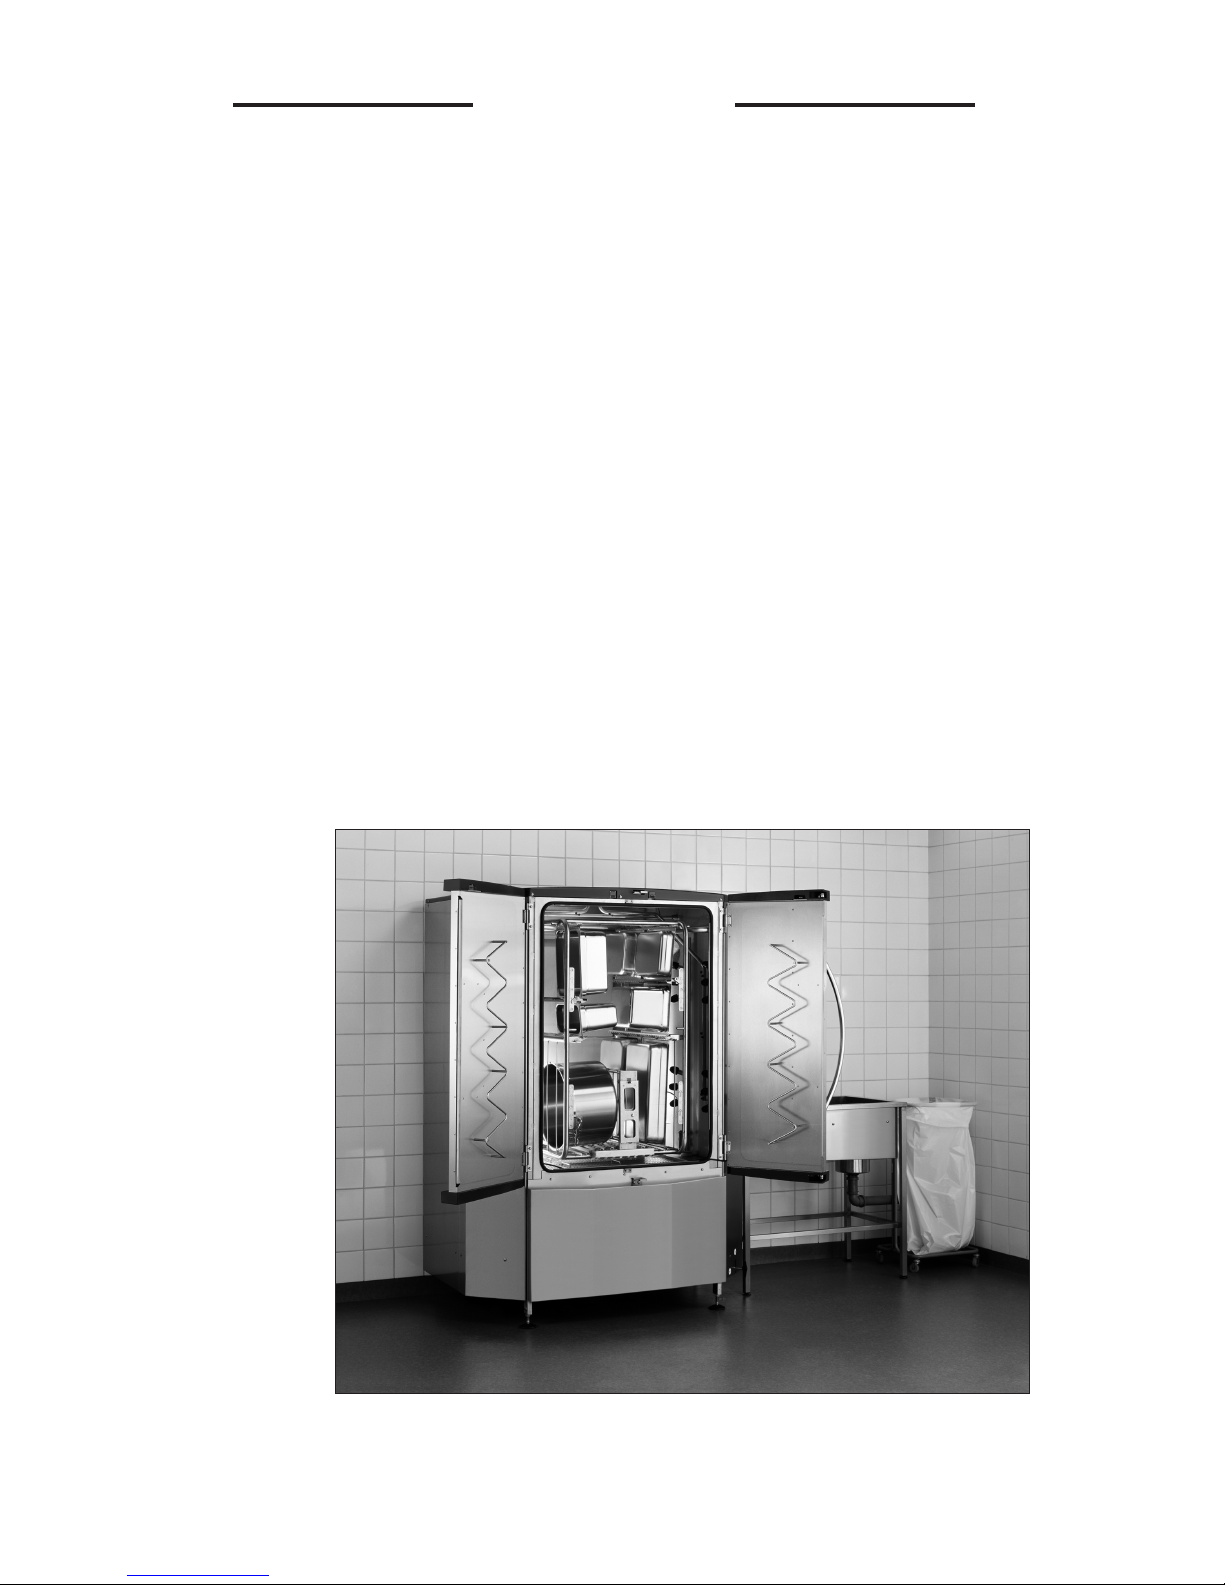
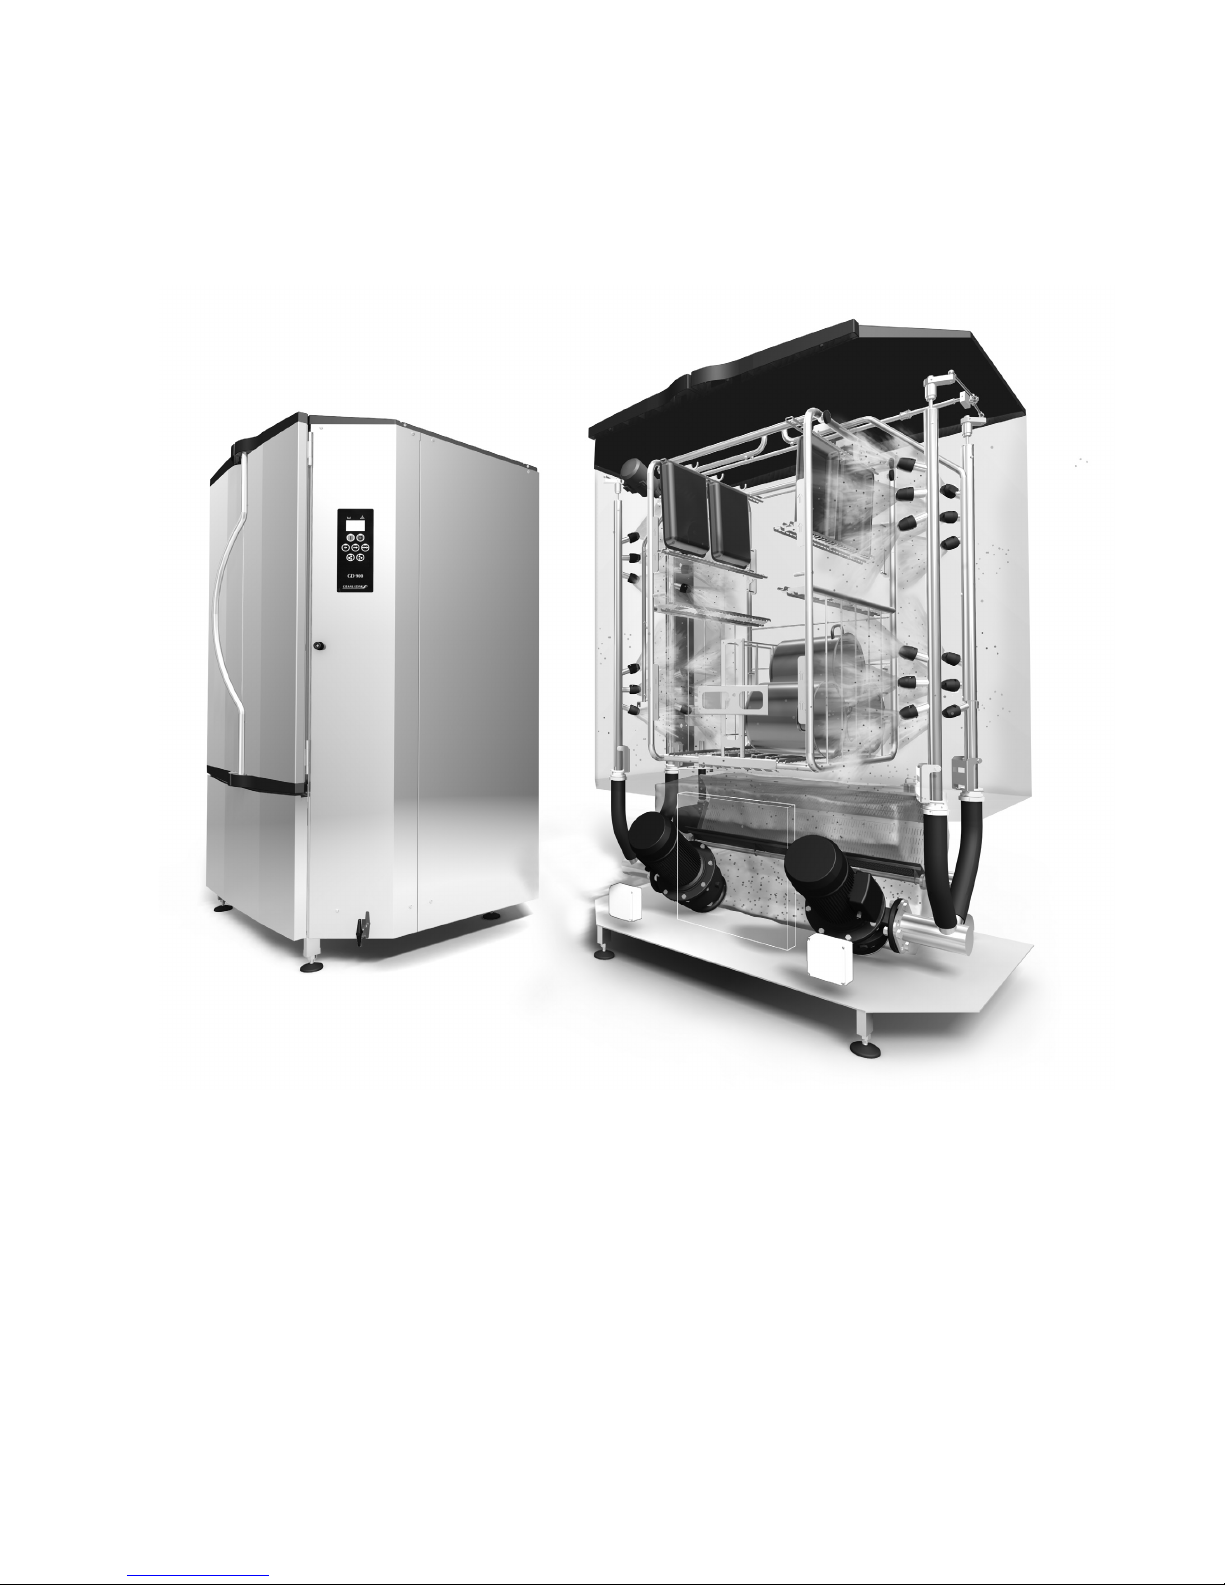
The GD 900 is a granule potwashing machine – a potwashing machine for commercial kitchens that is designed for
washing/cleaning things like pots and pans.
This manual is your guide for the correct
installation and use of the GD 900 granule
potwashing machine.
Granuldisk AB recommends that you study
the manual thoroughly to be sure that the
machine is installed and used correctly and
safely.
Ensure that the manual is always available
during the whole life of the machine.
Granuldisk AB accepts no responsibility for
damage to the equipment or other damage
or injury caused by not following the direc
-
tions in this manual.
The plastic in the granules is approved for
use in conjunction with food.
The machine uses hot water. Avoid contact
with the skin as there is a risk for scalding.
There is a risk for slipping if granules are left
on the floor.
Formaldehyde,which is dangerous if inhaled,
may be formed if the granules catch fire.
Regarding the handling of detergent in the
manual, please see the manufacturer’s
instructions.
5
Page 4

1. Technical data
6
Weight .................................................................... 685 kg filled machine
Tank volume ........................................................ 165 litres
Granule amount ................................................
16 kg
Wash power ......................................................... 10 % granule concentration
Wash water temperature ............................. 65 °C
Rinse water temperature .............................. 85 °C
Rinse water volume ......................................... 14 litres/wash programme. To obtain 3600 HUE according to ANSI/NSF
(3, 2001), 14 litres is necessary. In other cases the volume can be reduced to 5 litres.
Wash programmes ........................................... short 2 min 40 s., normal 4 min 40 s., long 6 min 40 s.
Programmes without granules are 1 minute shorter.
Time for steam reduction ............................. 1 minute
Models .................................................................... GD 900 Compact with pull-out cassette,
GD 900 Flow System with 1 trolley and 2 removable cassettes
GD 900 Freeflow System with 2 trolleys and 2 removable cassettes
Loading volume .................................................. 450 litres
Capacity ................................................................. 8 GN 1/1, 200 mm deep containers, or 16 GN 1/2, 200 mm deep containers or
the equivalent in other items to be washed
Max capacity/h (washing with granules) .... GD 900 Compact/ Flow System/ Freeflow System
115/ 122/ 144 GN 1/1
Normal capacity/h (washing with granules) .. 78/ 81/ 90 GN 1/1
Voltage** ............................................................... 400 V (normal), 3-phase, earth,
230, 415, 440 and 575 V (option), 3-phase, earth
Fuse** ..................................................................... 400 V: 40 A, 25 A for steam model
415 V: 40 A, 20 A for steam model
440 V: 40 A, 20 A for steam model
230 V: 63 A, 35 A for steam model
575 V: 25 A, 16 A for steam model
Frequency ............................................................. 50 Hz or 60 Hz
Maximum power ............................................... 21 kW
Wash tank heater element* ........................ 16 kW
Rinse tank heater element* ......................... 16 kW
Pump motors, x 2 .............................................. 2.2 kW/motor
Rinse pump .......................................................... 0.37 kW
Encapsulation class ........................................... IP 55
Hot water ............................................................. 1/2” (DN15), 55 - 65 °C, 3-7 °dH,
Note: Reverse osmosis water and distilled water must not be used.
Water pressure / flow h.w. ............................ 1-6 bar with solenoid valve open / 28 litres/minute
Cold water ............................................................ 1/2” (DN15), 3-7 °dH (refers to steam reduction)
Water pressure / flow c.w. ............................ 1-6 bar with solenoid valve open / 15 litres/minute
Detergent and rinse agent ............................ 24 and 230 VAC signals are available in separate terminal box
Recommended ventilation capacity ........ Machine without steam reduction unit: 700 m³/h
Machine with steam reduction unit: 200 m³/h
Outflow .................................................................. Pipe Ø32 mm
Drain ....................................................................... Required capacity 100 litres/minute.
The machine should not be placed directly over a drain.
* Not activated simultaneously.
** For specific data for this machine, please see rating plate.
• GD 900 can also be supplied for steam heating or cold water connection.
• The machine is supplied with a 2.5-metre long electrical cable which is connected to the main switch on the wall. The main
switch is not included in the delivery.
Page 5
7
Page 6
2. Instructions
At the start of the working day
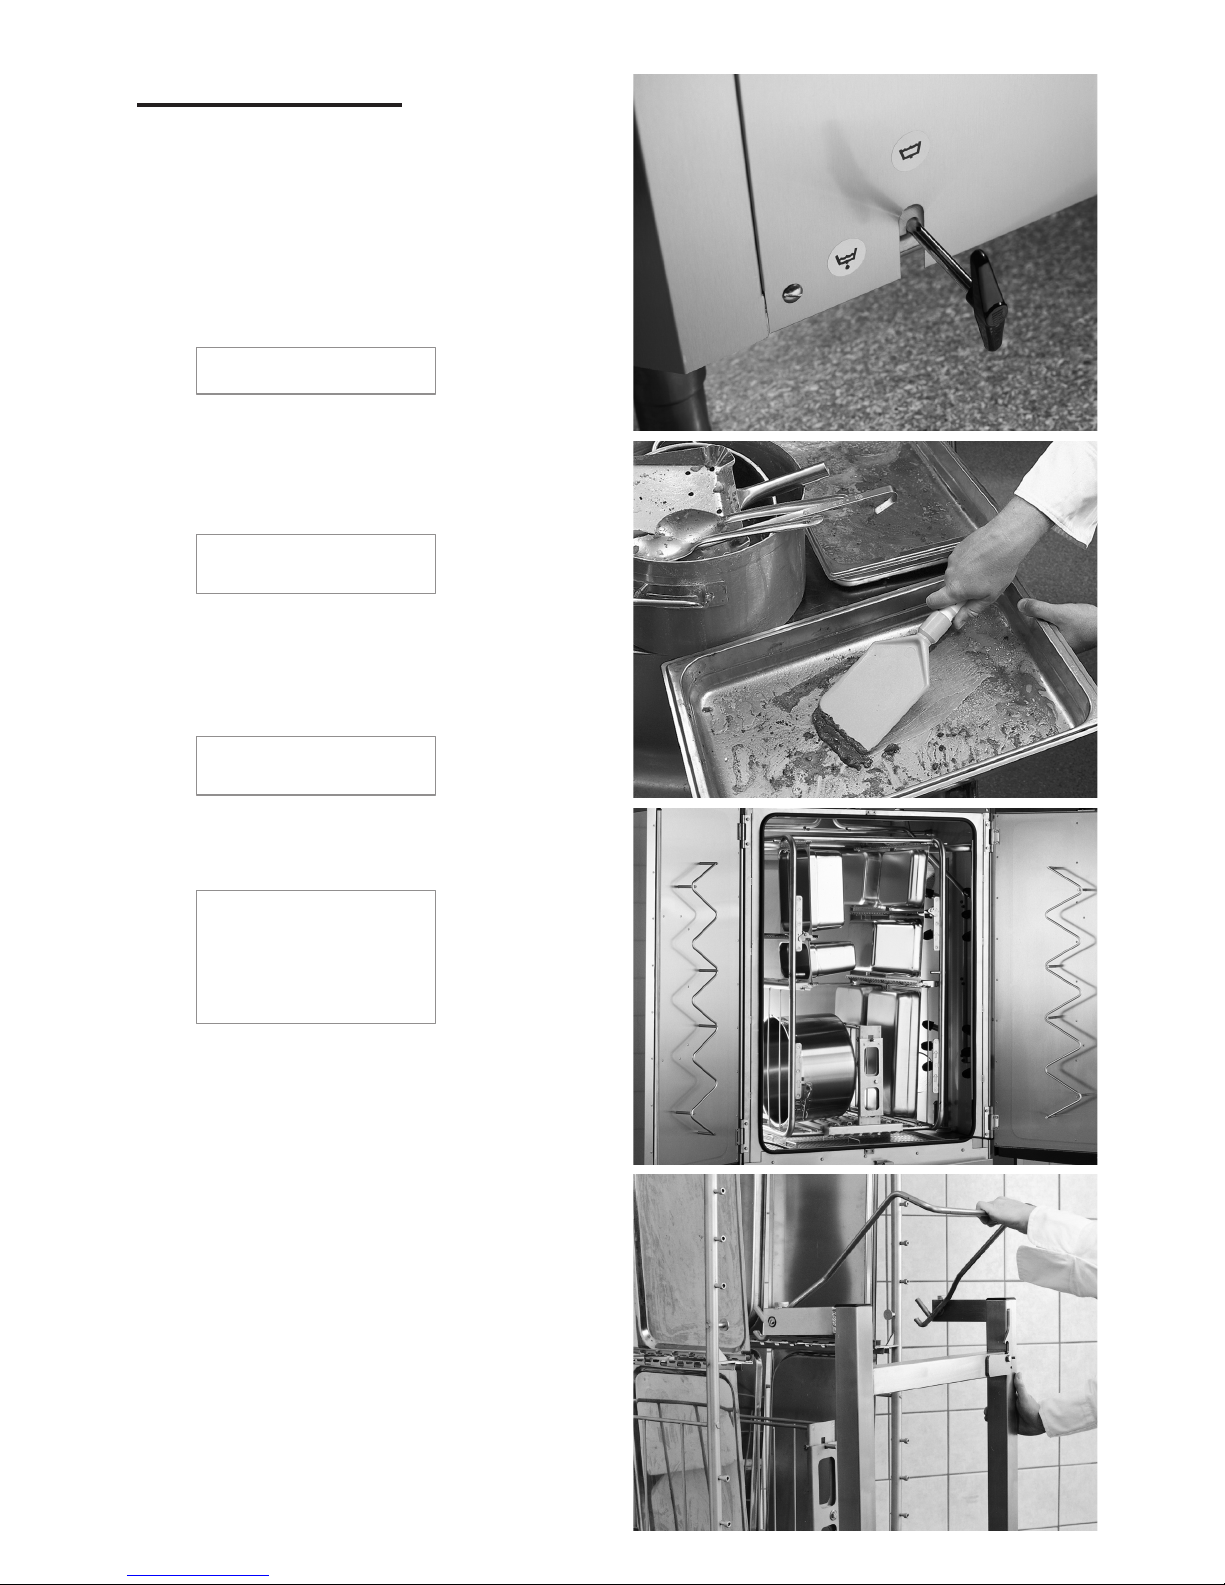
1. Pour over the granules in the wash tank.
2. Close the drain valve (Figure 1).
3. Switch on the main switch.
1
2
3
3:1
3:2
8
Filling with water
Close the doors. The message below will appear in the display:
Fill wash tank?
Press the START button. The machine will then fill with water
and heat it to the correct temperature. The programme selection
diodes flash out of sequence with the diodes for washing, with
or without granules during filling. The following message is
displayed on the machine:
XX°C XX°C
Filling the wash tank
With a hot water connection (+55 °C), filling and heating takes
20 minutes.
If the correct temperature has not been attained in the wash tank
after filling, the following message is displayed:
50°C 60°C
Heating the wash tank
When the correct temperature has been attained in the wash
tank, a preselected programme is displayed. The diodes for the
programme come on. The machine is ready for use.
65°C Standby 85°C
Normal program
with granules
Wash time: 4:10
Preparing items to be washed
Remove or scrape off extraneous waste from the items to be washed
before loading them into the machine (Figure 2).
NB! Pots should not be soaked. To avoid foaming, do not prewash
with washing-up liquid. If foaming occurs, the machine will not
clean properly.
Loading utensils
All pots shall be placed in the machine with the insides facing
the spray pipes (fig.3:1).
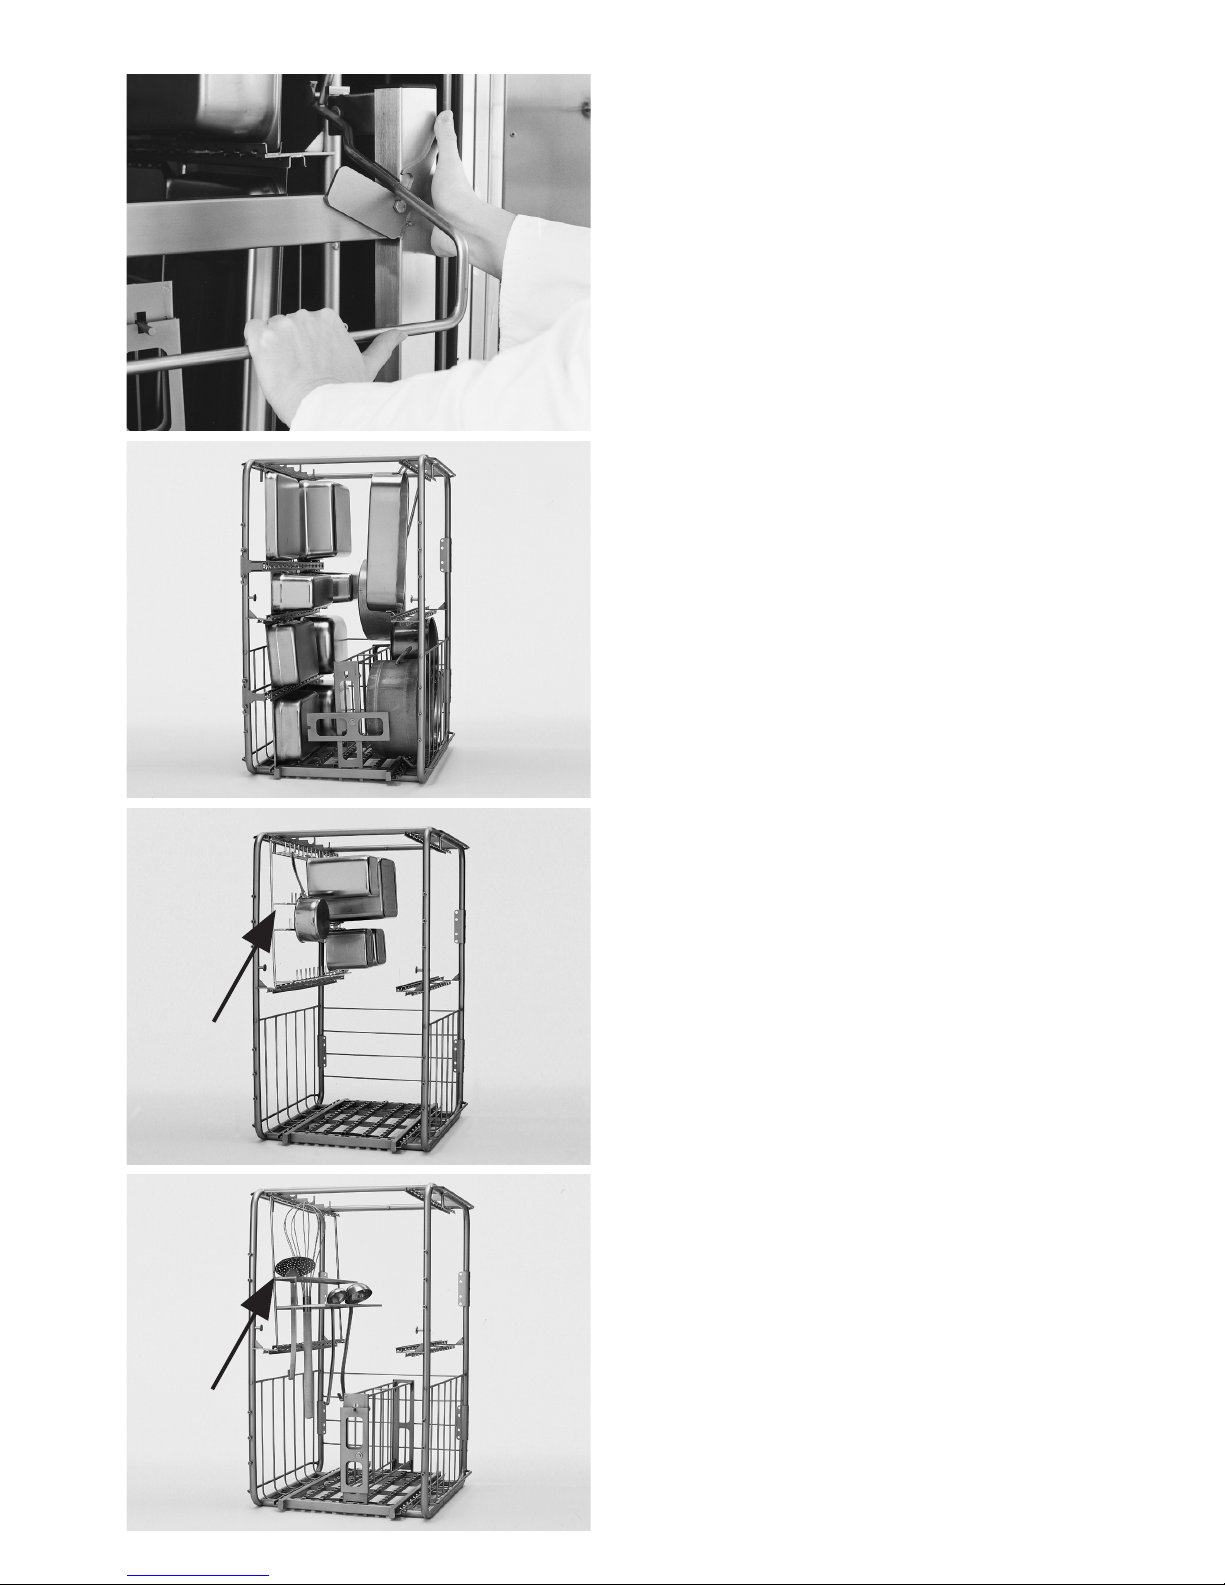
The GD 975 multi-cassette is supplied as standard with all
machines. There are also a number of optional extras.
Inserting and removing the cassette
GD 900 Compact: The cassette is an integral part of the machine
and can be slid halfway out of the machine (fig.3:1).
Page 7
3:3
4
4:1
4:2
4:3
GD 975 Multicassette (4:1)
For pots, saucepans, bowls, dough hooks etc as well as all
types of 1/1 and 2/1 GN containers. 1/1 and 2/1 GN containers are stacked directly in the lower part of the cassette
without accessories.
GD 950 Universal holder (4:2)
For ABC pans, pots and saucepans or other equipment that
can be hung on hooks. The GD 950 is fitted in one of the
four existing runners on the cassette.
GD 951 Ladle holder (4:3)
For ladles, whisks and similar utensils. The GD 951 is fitted in
one of the upper runners fitted on the cassette.
9
GD 900 Flow system: Roll the trolley up to the loaded cassette.
Undo the catch and raise the handle (Figure 3:2). Hook on the
cassette by pushing down the handle again. The cassette is then
rolled into the machine using the trolley. Unhook the cassette by
undoing the catch and raising the handle (Figure 3:3).
The cassette can easily be suspended on wall hooks next to the
machine by following the above instructions in reverse.
GD 900 Freeflow system: The cassette is loaded suspended onto
the trolley. The cassette is then rolled into the machine using the
trolley. Unhook the cassette by undoing the catch and raising the
handle (Figure 3:3).
Page 8
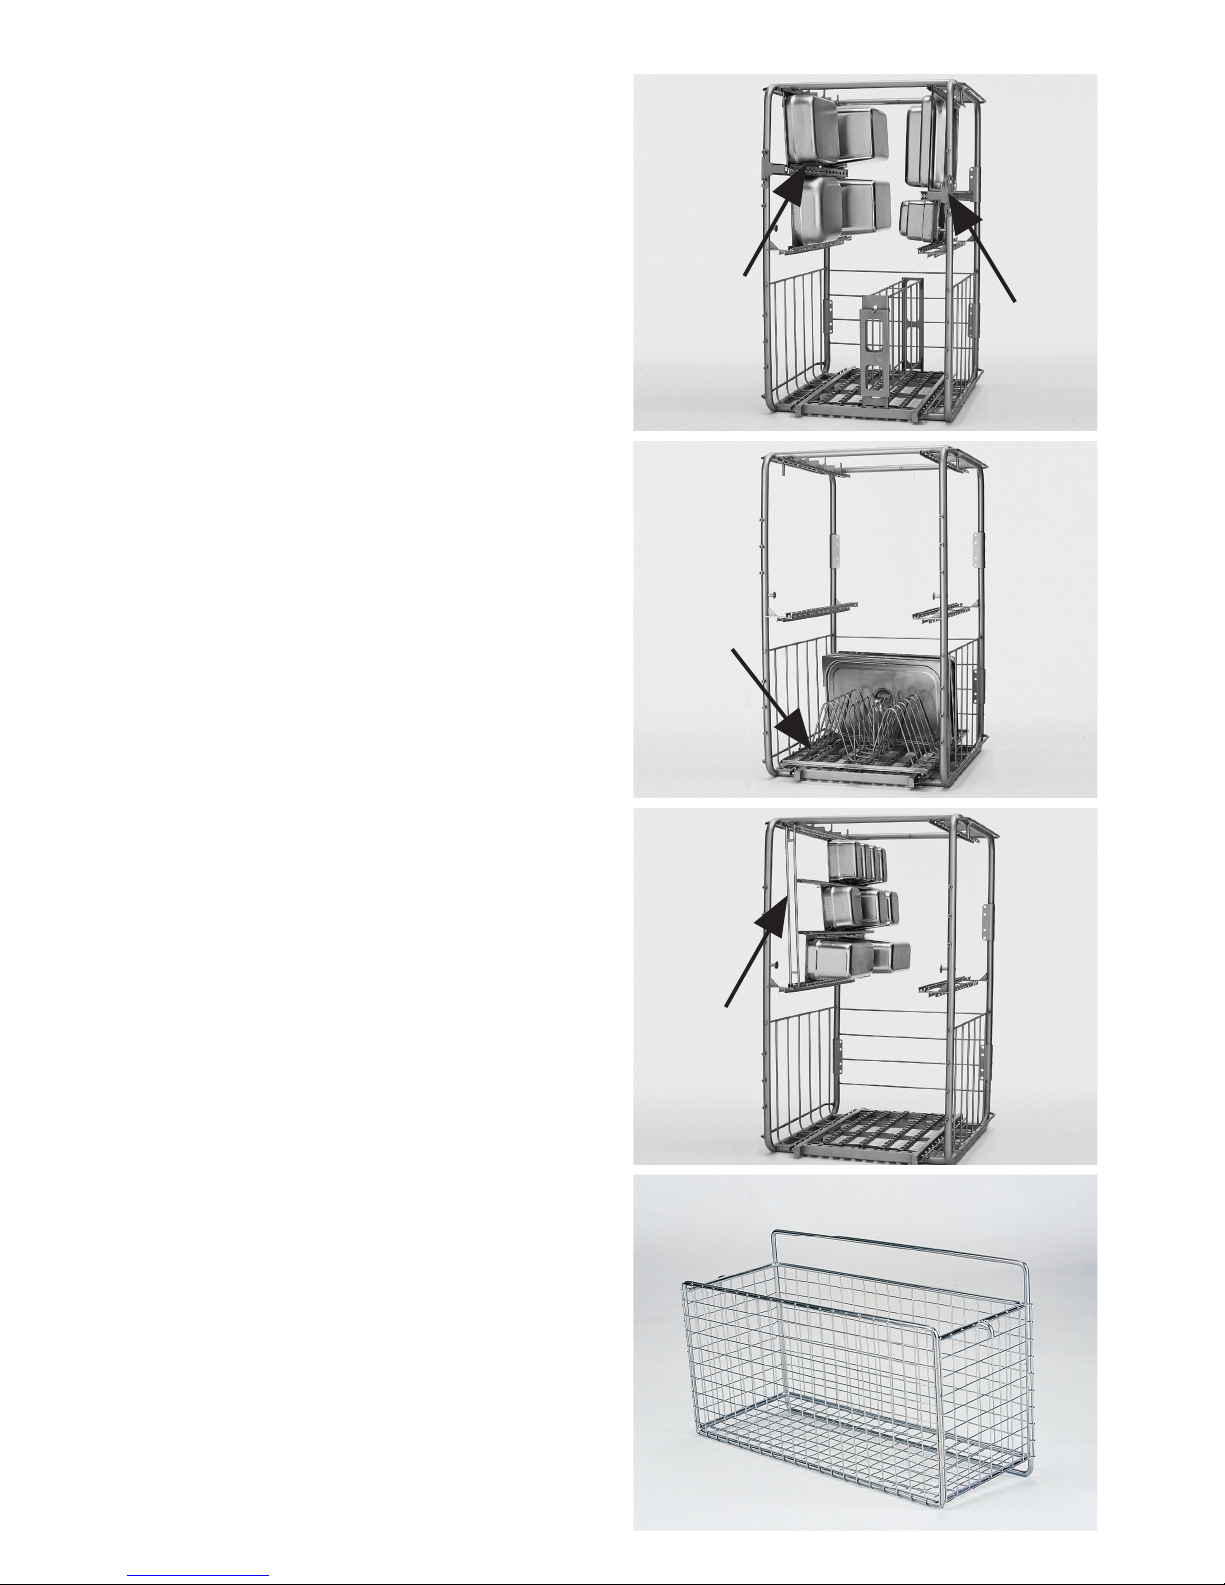
4:4
4:5
4:6
GD 956 Divider (4:4)
For 1/2, 2/3, 1/3, 1/6 and 1/9 Gastronorm containers.
The GD 956 also makes it possible to load one of the following combinations: (4x1/2 GN containers) or (2x1/3 and
2x2/3 GN containers) or (4x1/6 and 2x2/3 GN containers)
or (6x1/9 and 2x2/3 GN containers).
GD 953 Lid holder (4:5)
Lids, trays and similar equipment with a maximum depth of 20
mm can be washed using this. The GD 953 is best fitted in the
lower cassette runners.
GD 954 Holder for small Gastronorm
containers (4:6)
Holder with runners in three rows for 1/3, 1/6 and 1/9 canteens. The GD 954 is placed in one of the four existing runners
on the cassette. Each row in the holder can take the following
combination: 2x1/3 or 4x1/6 or 6x1/9 GN containers.
10
4:7
GD 651 Netbasket (4:7)
Net basket for ladles, whisks, bowls, small saucepans etc.
Page 9
R R
1 2
3
4
5
6
7
8
9
Language selection
Follow the steps below to change the language settings for the
machine.
1. Press the STOP button and wait for 3 seconds.
2. Press button (4), “Normal programme selection”, five times.
3. The display shows the following:
4. Press the START button for “Select” and continue changing
the language, or press the STOP button to cancel.
5. The display shows the following:
6. Scroll using the buttons for the short or long programme to
step through the list of languages. Select a language by pressing
the START button.
7. Then press the STOP button to quit programming mode.
Select washing with or without granules
Washing with granules (6) is selected for all potwashing. However,
the programme without granules (7) should be selected when
washing canteens and utensils where granules may be trapped in
cavities, and for transparent plastic items.
Select required wash time
Short 2 min, 40 s.
Normal 4 min, 40 s.
Long 6 min, 40 s.
All three programmes are 1 minute shorter when washing without
granules.
Starting
Press the start button (1). The machine is preprogrammed so
that it cannot be started if the temperature in the wash tank is
lower than 65 °C at the time of the first start once the water has
been added. The lock is set to 60 °C for subsequent starts so as
to achieve complete washing. Washing at too low a temperature
increases the risk of foam formation and the items to be washed
failing to wash clean. Reprogramming may be carried out by
authorised personnel only.
While the programme is running, the display shows which pro
gramme is being run, how much programme time is remaining
and the temperatures in the wash tank and rinse tank.
11
65°C 85°C
Normal program
with granuler
Time remaining:
3:10min
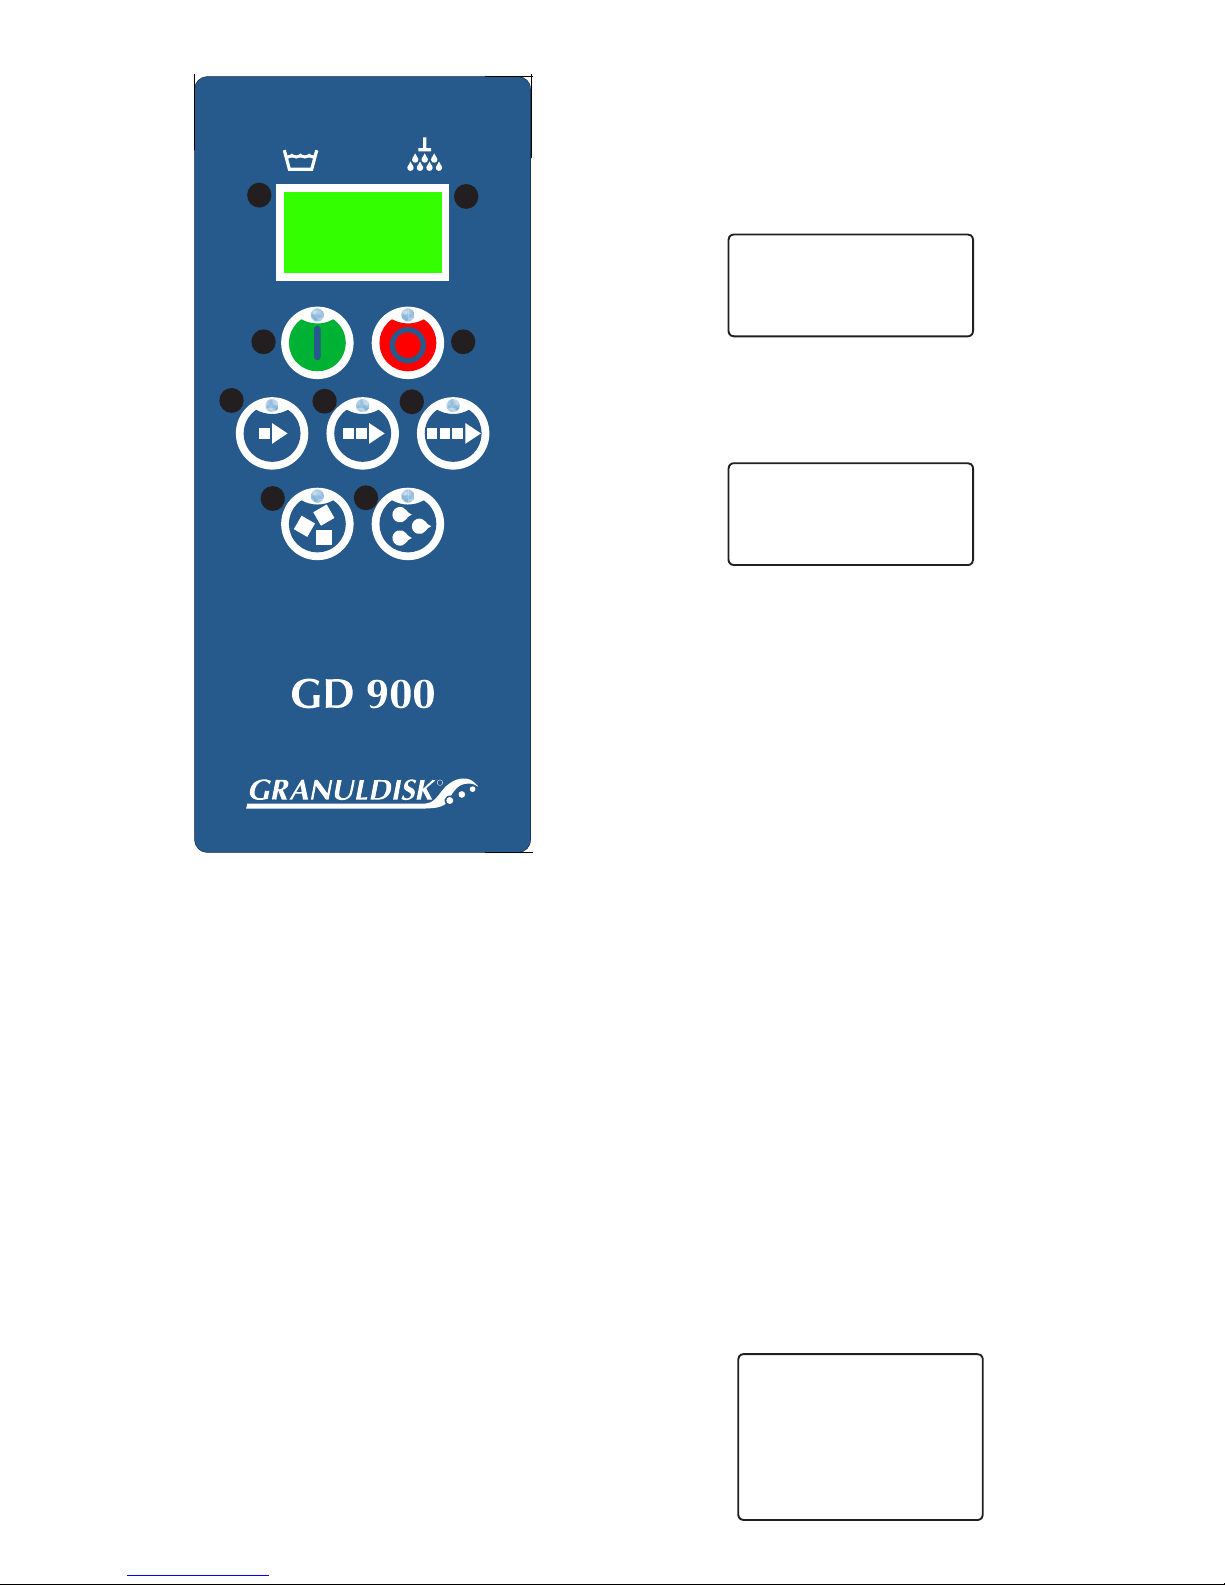
Control Panel
(1) START button
This button starts the wash program described in the dis
play. This button is also used to answer “Yes” to a question
shown in the display window.
(2) STOP button
This button stops all ongoing activities in the machine and
resets any alarms.
(3) Short programme selection
(4) Normal programme selection
(5) Long programme selection
(6) Washing with granules
(7) Washing without granules
Display
Temperature indication
The temperatures in the wash tank (8) and rinse tank (9) are
always displayed. If the figures are flashing, the water is being
heated.
Other Indications
How much time is remaining for the wash programme is always
shown while washing is in progress. Various error codes may also
be displayed. How these are to be rectified is described in section
4 of this manual.
Language
English
Choose Back
Language
< English >
OK Cancel
Page 10
When the wash programme is complete, the operating light goes
out and the display shows the last programme run, e.g.:
You can now reload the machine and run the next programme.
Close the doors if you are not running another wash programme
straight away. This saves energy and reduces water vapour evapo
-
ration.
Operation
The wash programmes short, normal and long start with washing with granules for 1, 3 or 5 minutes respectively, followed
by washing without granules for 1 minute and a final rinse
set to guarantee a water temperature of 85 °C for 30 seconds.
If the machine has the steam reduction function enabled, the
programme with take an extra 1 minute to cool the air in the
machine and so reduce the amount of steam escaping into the
potwashing area or kitchen.
NB! The doors cannot be opened before the wash programme is
complete and the running light goes out.
Stopping the machine during a programme
If you need to stop the machine before the wash programme
is completed, switch to washing with only water for about 30
seconds to rinse off all granules. Then press the stop button (2).
If the programme without granules has been selected, or if the
machine must be stopped in an emergency, the stop button can
be pressed immediately.
NB! Utensils can have remnants of detergent on them and should
be washed again before they are taken out of the machine and
used! Never drain an emergency stopped machine! Granules left
in the pump without water will jam the pump impeller.
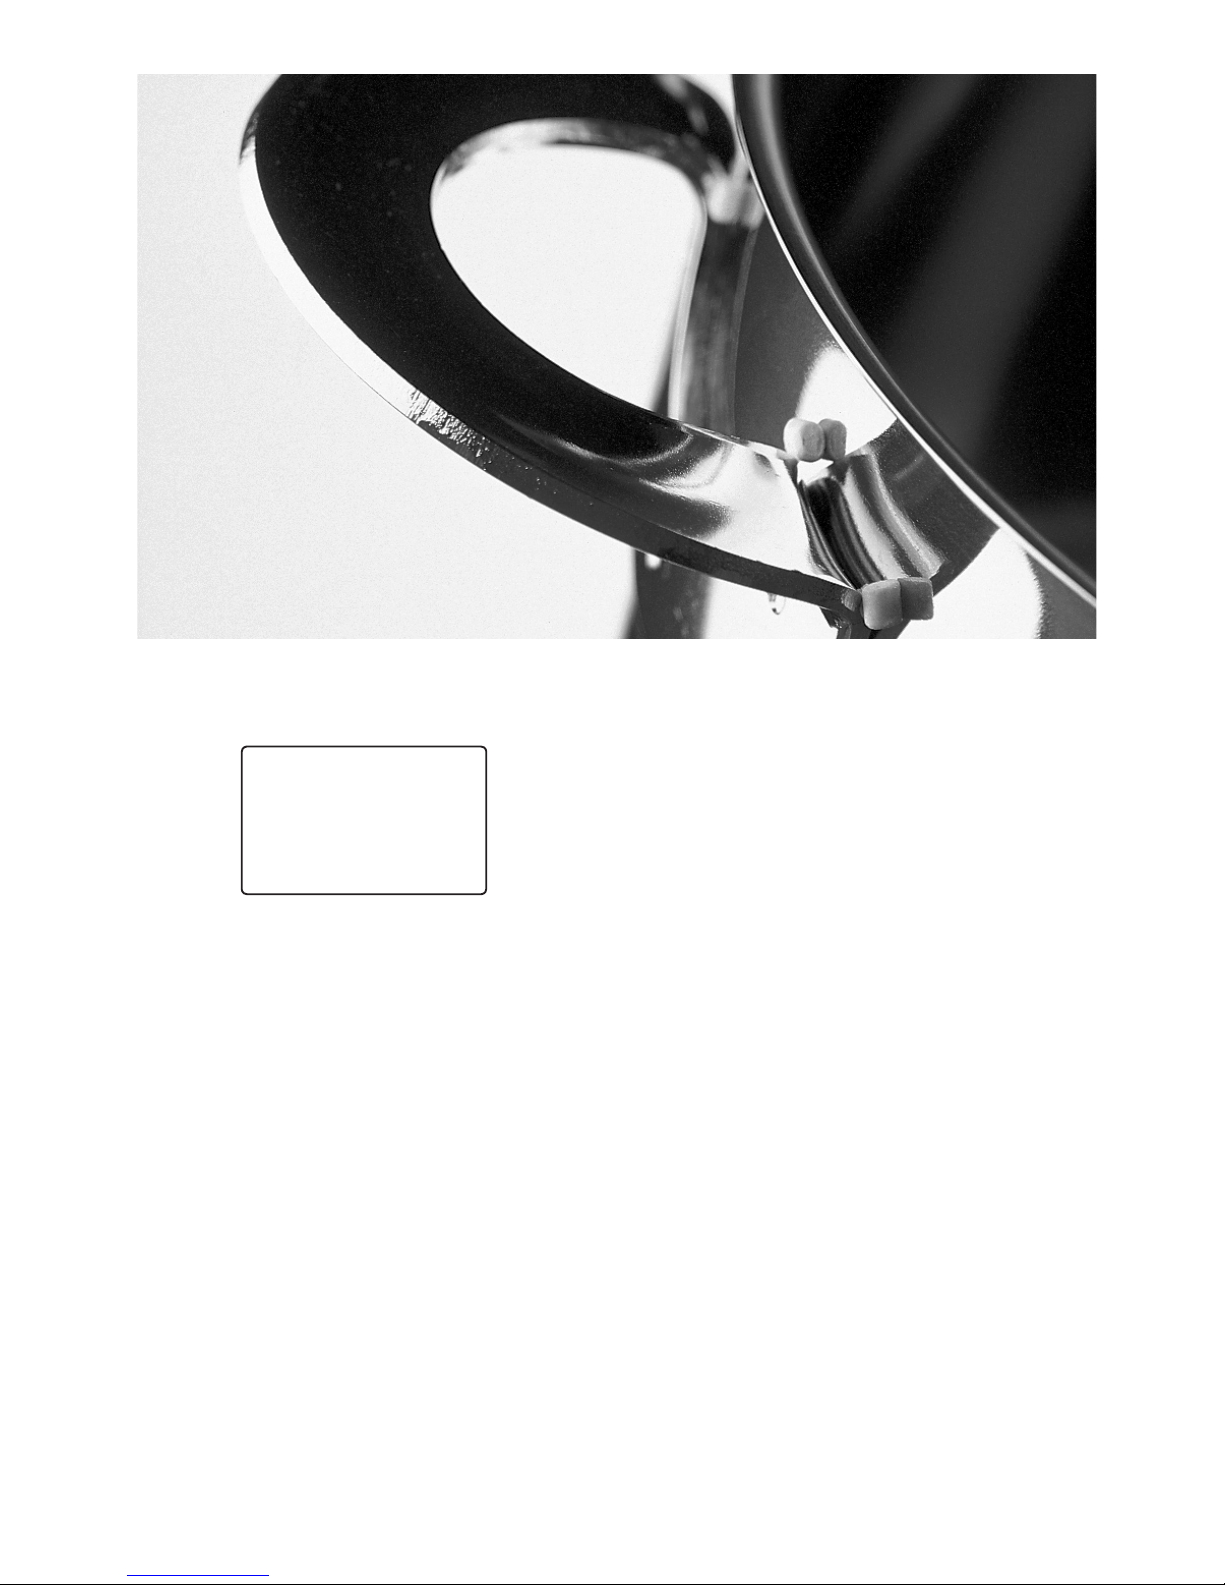
Inspecting pots and pans
It is important, as with all washing up, that staff check the results.
Remove any granules that have fastened in corners, sharp angles
and other inaccessible places, fig 6.
Granules
Granule potwashing machines from Granuldisk AB work best
with our specially designed granules. Their design ensures the
best wash results and the longest working life both for themselves
and the machine. The warranty only applies if granules from
Granuldisk AB are used. The plastic material in the granules is
approved for use in conjunction with food. We recommend that
granules are replaced several times a year.
HACCP Operation and Hygiene documentation
GD 900 meets the most stringent requirements for disinfecting
cleaning of items to be washed by guaranteeing a heat treatment
of these items equivalent to 3 600 HUE (heat unit equivalents in
accordance with ANSI/NSF 3, 2001.) This hygiene level exceeds
set European requirements and is equivalent to the most stringent
hygiene requirements set internationally.
Granuldisk® Documentation Tool, GDTdirect™, is an integrat
ed function for the documentation of the dishwashing machine’s
operating parameters and critical hygiene control points, HACCP.
Operating data for the last 100 wash programmes run is viewed
directly in the control panel window. An external computer can
be linked to the machine and operating data stored in separate
files so that all historical data can be saved. See also page 17.
6
12
65°C Standby 85°C
Normal program
with granuler
Wash time: 4:10
Page 11
3. Daily cleaning
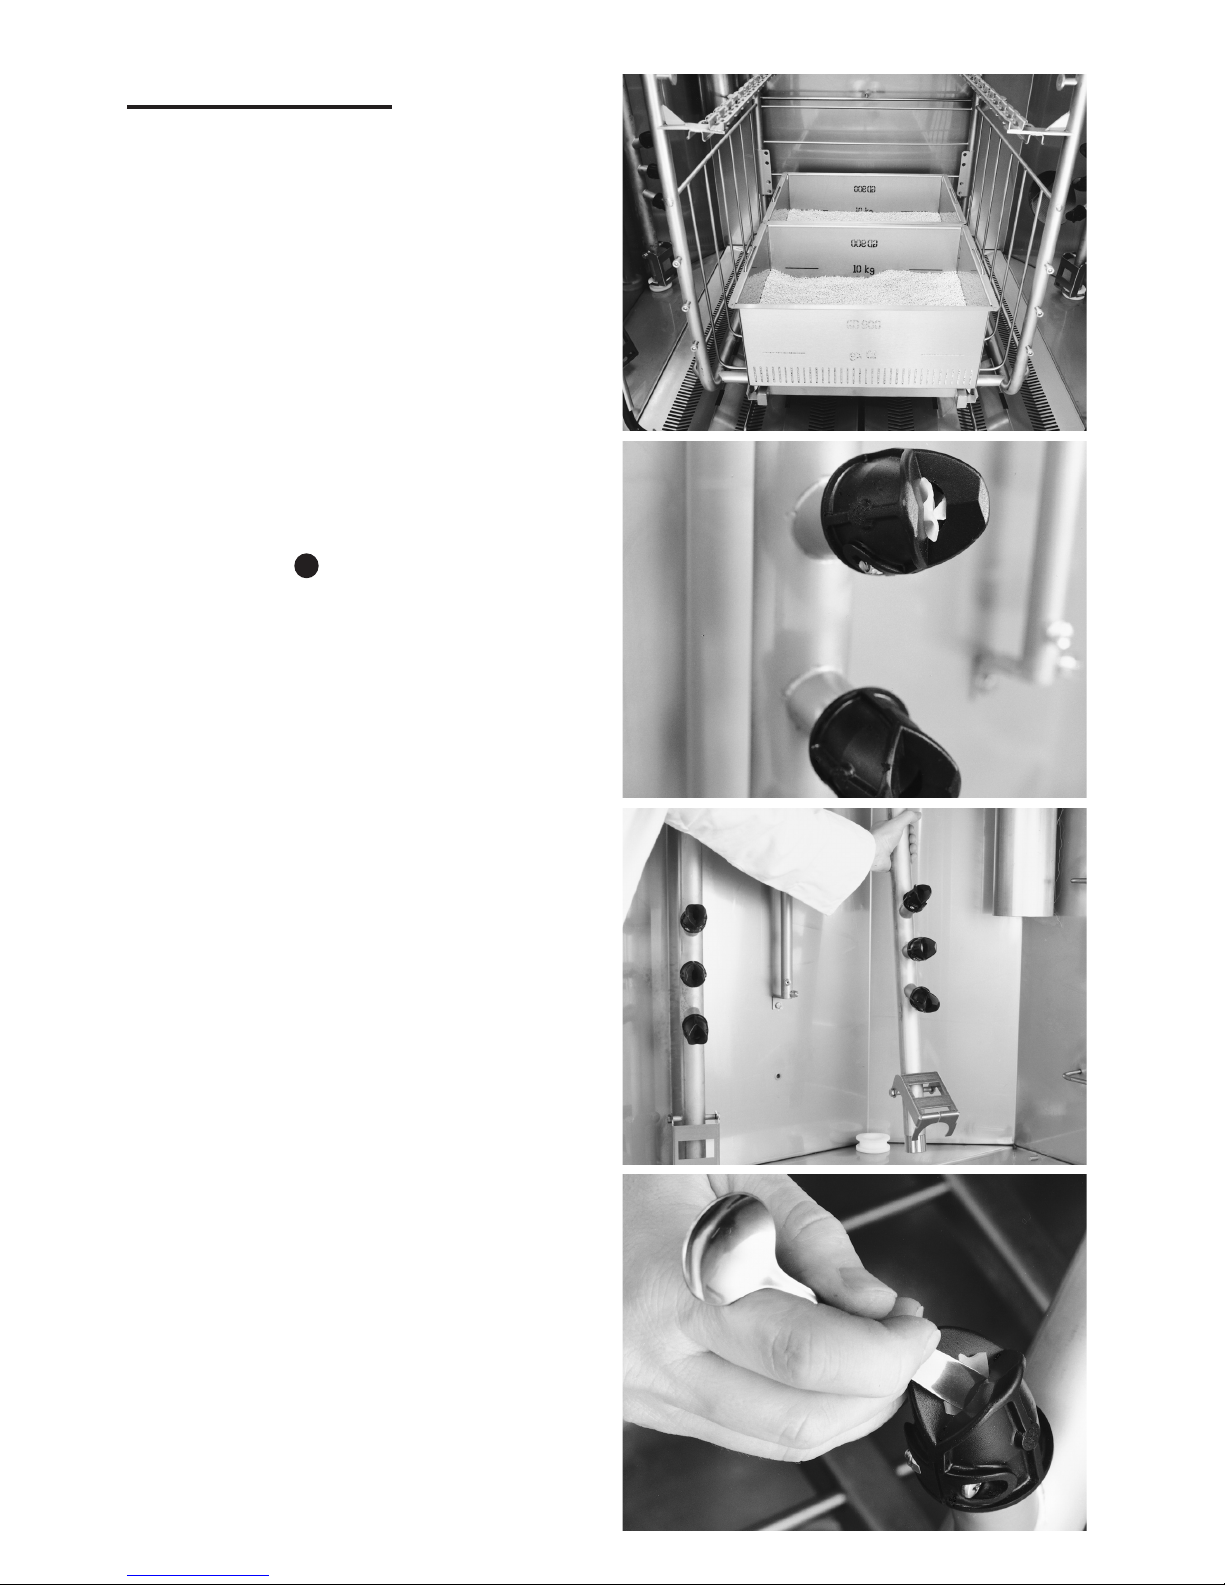
Collecting and cleaning the granules
The granule collectors, which come with the machine, are the
easiest way of emptying the machine of granules for cleaning or
changing. They are fitted in the cassette’s lower runners. The
doors are then shut and the ‘long’ programme is started (see p.
11). The granules then gather in the collectors. Each collector
can hold 10 kg of granules and is equipped with a level mark (ill.
7). Take out the filled granule collectors and wash (shower) them
thoroughly so that any food remains are washed away.
Do not use disinfectant or other detergents as these may cause
foam formation, which would impair the wash power of the
machine. Store the granules in the collector until the machine
is used again.
NB! Never use too many granules in the machine. This can lead to
blockages in the spray pipes as well as an inferior wash result.
Empying the tank
Press the STOP button (2) (see page 11) and then open the drain
valve at the bottom of the angled side plate.
Cleaning
• Lift out the cassette, if possible.
• Inspect the nozzles on the spray pipes (Figure 8). If anything
has got stick in the spray pipe nozzles, the spray pipes must be
removed. The spray pipe lock is folded up, then you push the
spray pipe up and pull it to one side. The spray pipe is pulled
down gently and removed from the machine. The spray pipe
can now be cleaned (Figure 10).
• Lift out the overflow filter (A, Figure 12).
• Lift out the bottom grids (Figure 11).
• Wipe the level sensor (C, Figure 12).
• Rinse the machine inside using just water. Rinse the back of
the wash tank with extra care so that the bottom of the tank
is also reached.
• Clean the perforated surface (B, Figure 12) of the granule
damper to ensure that there are granules left there. The same
action is carried out for perforated surfaces at the side of the
wash tank.
• Check that the sealing strip for the granule damper is
undamaged.
• The drain trench must also be rinsed clean and wiped. This
is important to ensure that the drainage of the drain trench is
not blocked (D, Figure 12).
• Then clean the parts you lifted out. Take particular care to
ensure that the spray pipes are not blocked.
• Wipe the door strips.
• Wipe the outside of the machine with a damp cloth. The
outside of the machine must not be rinsed using a highpressure wash jet.
• The roof should be wiped if so required, or at least once a
month.
2
7
8
9
13
10
Page 12
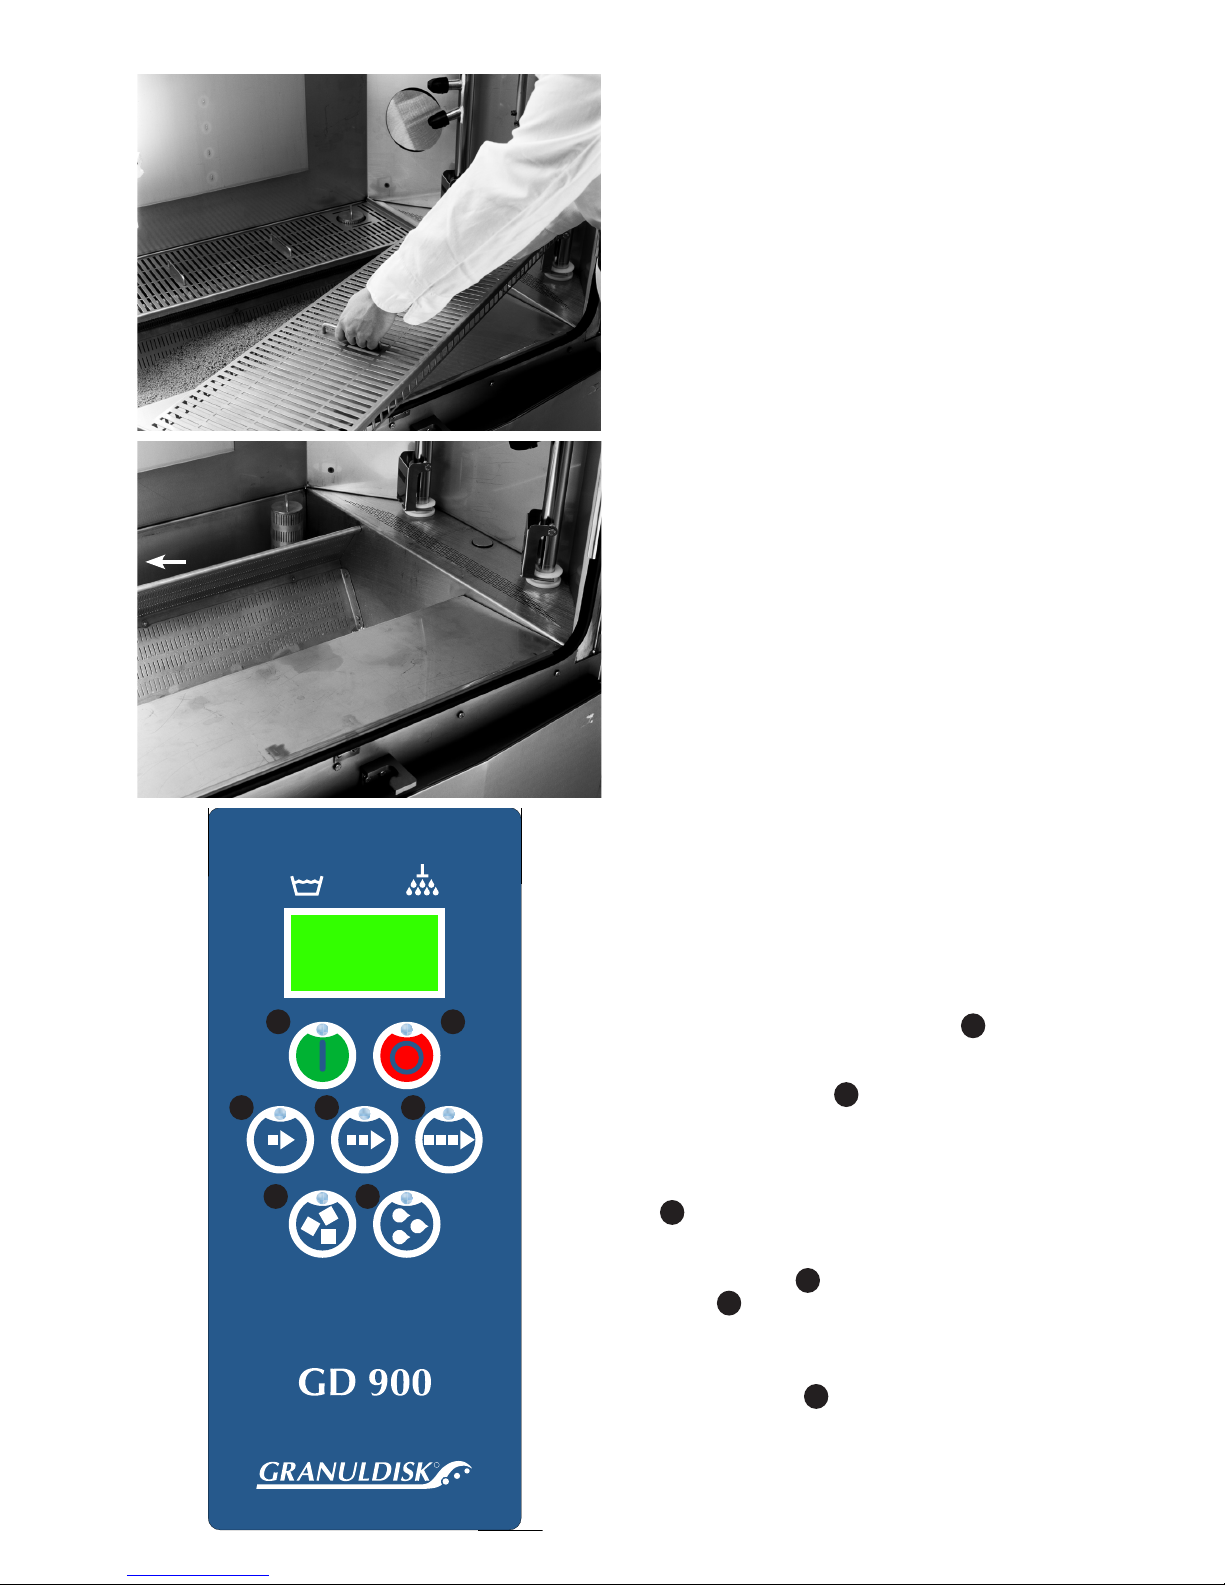
R R
Replacing the fittings
Put all fittings back in place.
Ensure that the knob on the filter cap is tightened (B, fig. 12).
Leave the doors slightly open so that the air can circulate in the
machine. The granules should be stored in the granule collectors
standing in the machine.
NB! If the overflow filter (A, fig.12) is not replaced then the
granules will run down the drain.
For a longer shutdown
• Ensure that the wash tank is completely empty after cleaning.
Any water remaining in the bottom should be removed with
a sponge or cloth.
• Leave the doors slightly open so that the air can circulate in
the machine.
• The granules should be stored in the granule collectors stand
-
ing in the machine.
• After a longer stoppage, check the operation of the machine
according to the service manual, possibly with the assistance
of a service engineer.
14
11
A
B
C
D
GD Memo™
GD Memo is an integrated function which informs the user of
the machine’s most important maintenance requirements. With
GD Memo, it is possible to ensure optimum wash results, avoid
stoppages under high loads and maintain the lowest possible
operating costs. This function is integrated in the control panel
and keeps the user informed as follows:
1. Time to change wash water
The “Washing without granules” button (7) flashes and the
message “Change water” is shown in the display. This infor
mation disappears once the water has been changed or can be
reset by pressing button (7) five times. This reminder appears
after every 20 wash cycles.
2. Time to change granules – to maintain the wash
power in the machine. The “Washing with granules” button
(6) flashes and the message “Change granules” is shown in the
display. This information disappears once the granules have
been changed and this has been acknowledged by pressing
the granule button (6) nine times and the normal programme
button (4) once. A granule change reminder appears after
every 2500 wash cycles.
3. Time for annual service
The STOP button (2) flashes and the message “Service” is
shown in the display. This information can only be reset by
an authorised service engineer once a maintenance service has
been completed. An annual service reminder appears after
every 8000 programmes or one year, whichever occurs first.
12
21
3 4 5
6 7
7
7
6
6
4
2
Page 13

15
9. HACCP Hygiene and Operation Documentation
GDTdirect™
Granuldisk Documentation Tool, GDTdirect, is an integrated
function for the documentation of the dishwashing machine’s
operating parameters and critical hygiene control points, HACCP.
This function can be used in two different ways. Operating data
for the last 100 wash programmes run is viewed directly in the
control panel window. An external computer can be linked to
the machine and operating data stored in separate files so that all
historical data can be saved. Windows 2000 or Windows XP is a
system requirement for connecting an external computer.
Reading data on the control panel
1. Press the STOP button and wait 3 s.
2. Press button 4, “Normal programme selection”, five times.
3. Use button 3, “Short programme selection”, or button 5, “Long
programme selection” until you see “Read operating data” in
the window. Confirm your choice by pressing the START
button.
4. Operating data for the last programme run is shown in the
display, as shown in the following example:
050121 15:19 SG 65/85 OK
The information is defined as follows:
• Date – 050121
• Time – 15:19
• Programme type – S, N, L, equivalent to Short; Normal; Long
programmes.
• Washing with granules selected – indicated by means of a “G”,
otherwise this box is left blank.
• 65 – indicates the average temperature in the wash tank dur
-
ing washing.
• 85 – indicates the average temperature in the rinse tank during
the final rinse.
• OK – indicates that the rinse water volume is correct in accor
dance with factory values; if the set values have been changed,
NA (not applicable) is displayed instead.
If the wash programme has been cancelled due to an operating
error or technical error, the temperature indication is not included
and “Error:” plus an error code appears in its place: see the example
below. The error messages for the most frequent error options
appear in plain language: see the manual for other errors.
050121 15:19 SG Error 103
5. To view information on programme run previously, you can
scroll backwards and forwards in the list using button 3, “Short
programme selection”, or button 5, “Long programme selec
-
tion”.
6. To end scrolling and leave the list, press the START button.
Storing data on an external computer
To store complete operating data for the machine, it needs to be
connected to an external computer via a serial cable. Software
is installed on the computer which gradually collects and stores
operating data from every wash programme run.
For storage to take place, the computer has to be switched on and
the documentation program has to be active. Data is transferred
and stored in the selected folder on the computer after every
programme run. This program can be active without stopping
the computer being used normally.
It is also possible to download the last 100 programmes by
selecting “Washer/Get all log data” if the computer has not been
connected. Note: Duplicates may appear in this mode.
Connecting the cable
A 10 m cable and serial contact are supplied upon delivery for
connecting to the machine and a computer. If the computer does
not have a serial port, what is known as a USB/serial adapter can
be used. For information on what is suitable for your particular
computer, contact your IT specialist. Connect the cable in the
Start-up box to the contact alongside the detergent connection.
This cable is then laid to the selected computer via the kitchen’s
normal communication paths and connected to a free COM
port.
Software installation
The program is supplied on a CD and is installed as follows:
1. Create a folder for the program on your hard disk and give it
a name. Use “Explorer” in your computer’s Office package.
2. Insert the CD and click on the program file gdt-direct.zip on
the CD. Save the files in the folder you just created on your
hard disk.
3. Tip: create a shortcut on your desktop to make it easier to find
the program when you want to run it.
Running the program
1. The program is run by double-clicking on the program file
gdt-direct.exe in the folder you created on your hard disk, or
by clicking on the icon you created on your desktop.
2. Once the program has started, you have to select the port to
which your dishwashing machine is connected. Click on Ports
and select the correct port.
3. Then select Washer, followed by Connect.
4. A window appears on screen and you have to select where you
want to save the log file. Select the folder created as described
in “Software installation” above, and name the file.
Tip: name the file after the week or month to make it easy to
find the operating data stored. Example:; “HACCP-w.172005”. New data will be saved in the same file after data
saved previously until you choose to give the file a new name.
Rename the log file at regular intervals so as to ensure that the
list does not become unnecessarily long.
Page 14

1416
5. Data is displayed directly on the computer screen: see the
figure on the next page. The view is of a fixed size that cannot
be changed, and the table headers are in English. The column
width can be changed by placing the mouse in the table header
and dragging.
The following information can be viewed (left to right):
Date; Time; Programme type – Short, Normal, Long; Granules
– G/washing with granules or NO/washing without gran
ules; Temperature in wash tank; Temperature in rinse tank;
Information on final rinse sufficient – OK or NA if the rinse
volume has been reduced.
To read all data, the program must be running and the com
puter connected to the dishwashing machine.
Data processing
Data can be further processed by selecting View from the
menu, followed by Log file. To read data saved in older files, use
“Explorer” and click on the relevant file name in the folder in
which these files are saved. The information can be cut and paste
from the Log file into Excel, for example, for statistics processing.
Saved files can also be placed on a shared server or be e-mailed
to a central HACCP manager, for example.
Page 15
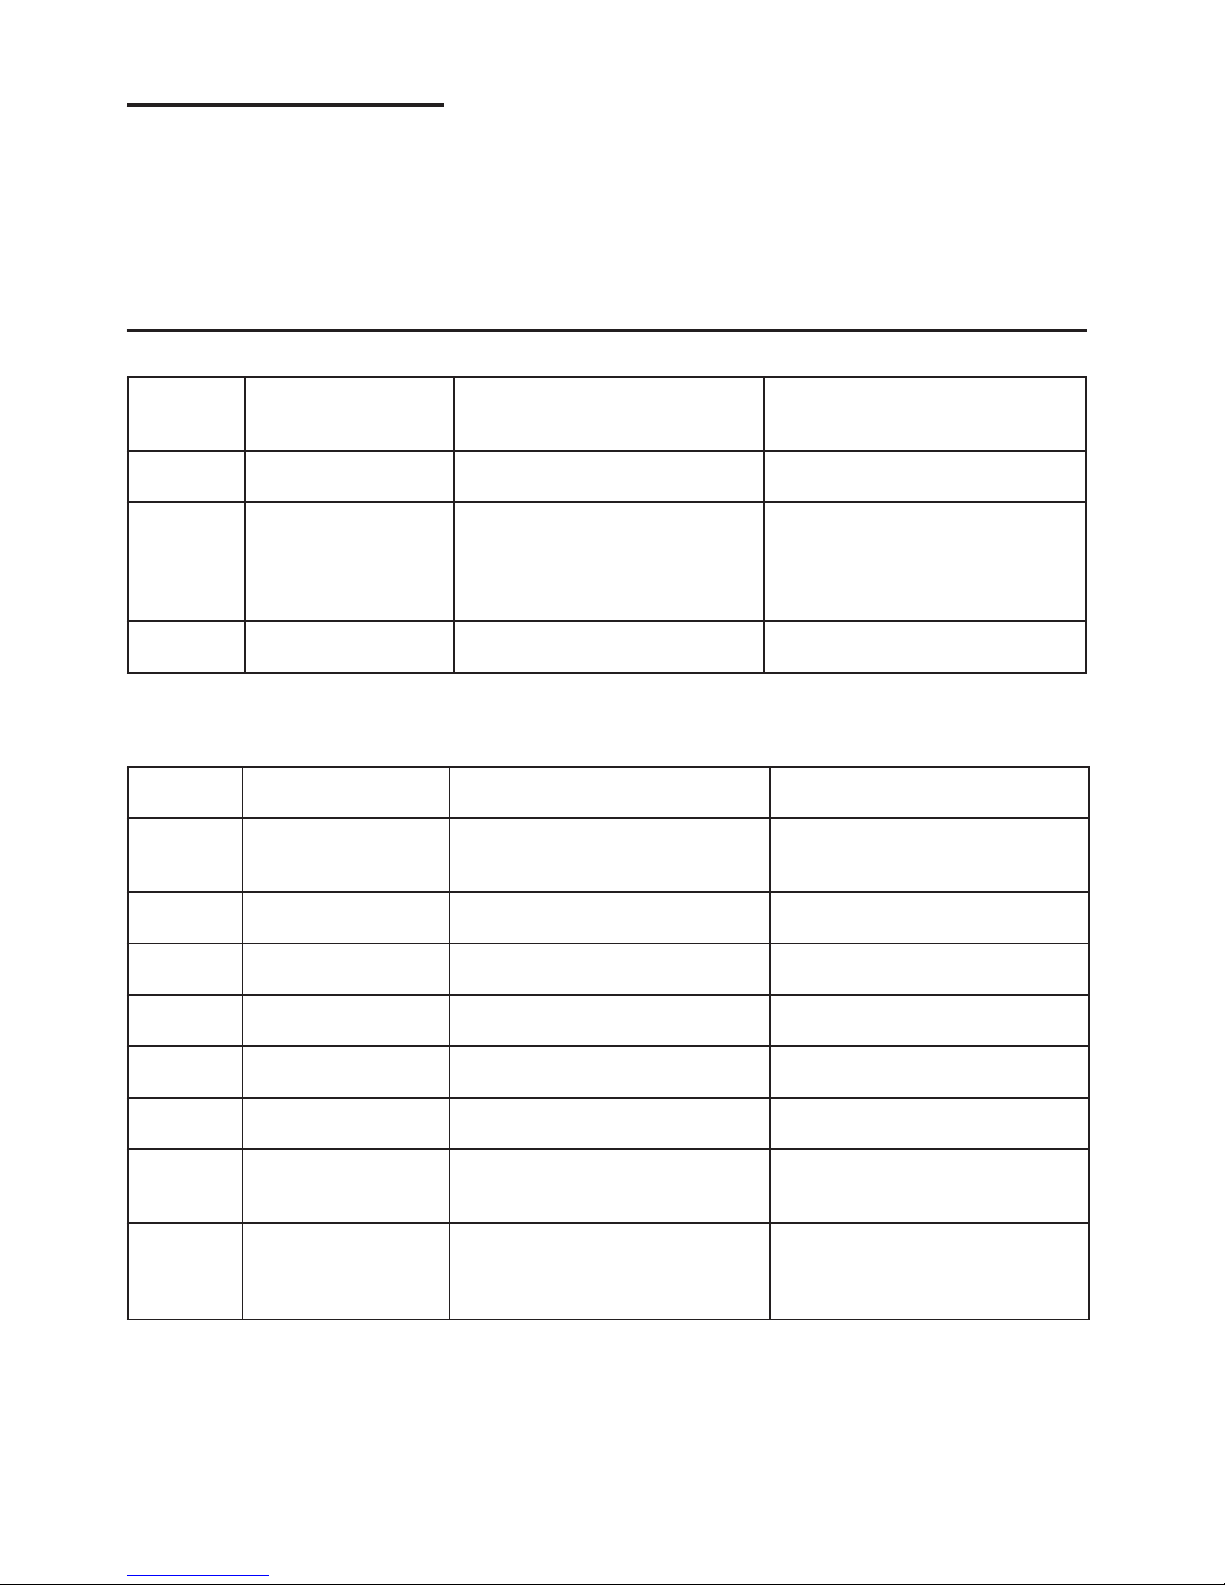
100 Spray pipe alarm Something is preventing movement of
the spray pipes.
Remove whatever is preventing movement,
then reset the alarm by pressing the STOP
button.
109 Door switch Someone has attempted to open the doors
during operation.
Reset the alarm by pressing the STOP
button.
116 Low water level, problem
with foam
Foam forming in the machine. Avoid using detergent designed for wash-
ing up by hand. Change the wash water.
Contact your detergent supplier if you still
the problems with foam formation persist.
Reset by pressing the STOP button.
118 Drain valve not closed The drain valve has opened during an
active process in the machine.
Close the drain valve and reset the alarm
by pressing the STOP button.
5. Troubleshooting and alarms
Check the following if the utensils are not completely clean:
• Are the spray nozzles blocked?
• Were the utensils located correctly?
• Was the right programme selected?
• Is the wash water very dirty?
• Are there sufficient granules?
• Is the detergent dosing correct?
17
Error messages
All alarms have a unique error code which you can report to service
staff when you contact them. All diodes on the panel flash when
an alarm is activated. An error message is also displayed for the
alarms considered to be the most frequent.
Note: If any of these error messages appears for a second time, you
must call a service engineer.
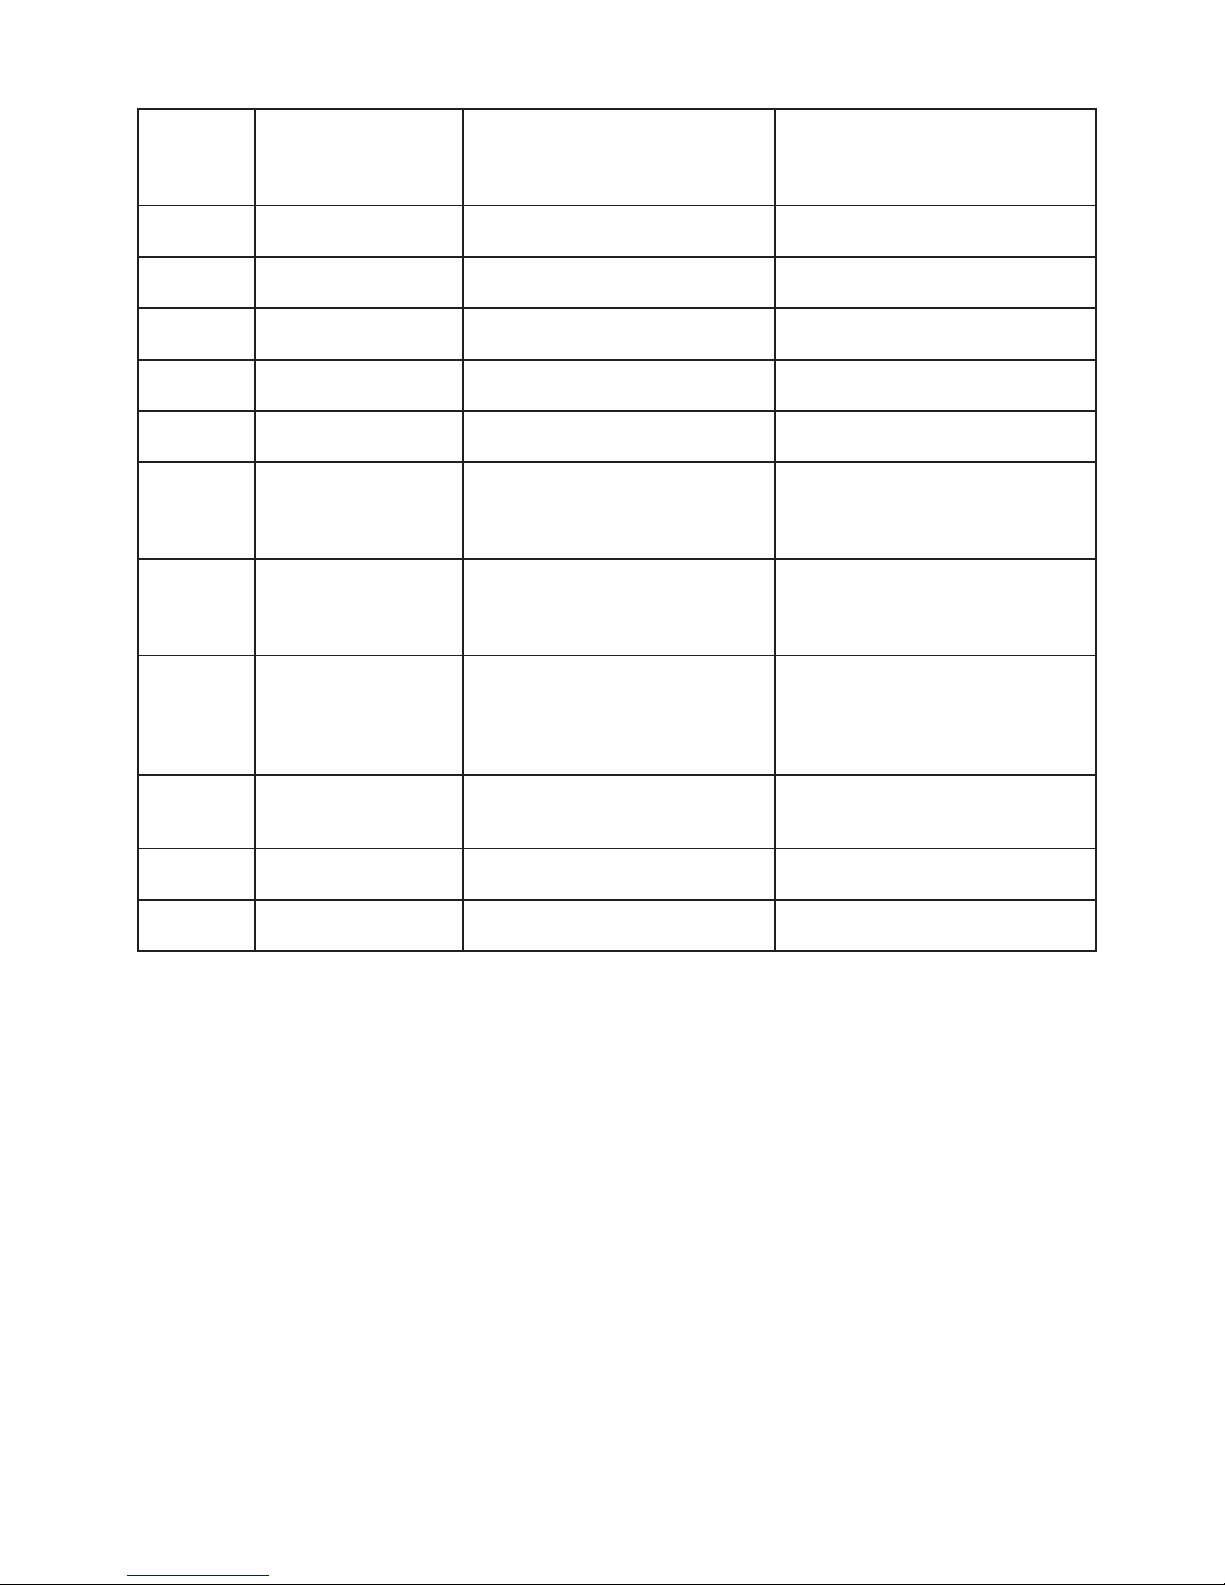
The meaning of the other error codes can be read out from the table below.
Error code Error message Cause Remedy
Error code
Meaning Cause Remedy
001 Programme cancelled by operator. This error code is displayed only when
operating data is read in GDTdirect™.
100 Spray pipe alarm Something is preventing movement of the
spray pipes.
Remove whatever is preventing movement,
then reset the alarm by pressing the STOP
button.
101 Automatic circuit breaker
for wash pump 1 tripped
The motor is overloaded, the programme
is cancelled.
Contact a service engineer!
102 Automatic circuit breaker
for wash pump 2 tripped
The motor is overloaded, the programme
is cancelled.
Contact a service engineer!
103 Automatic circuit breaker
for rinse pump tripped
The motor is overloaded, the programme
is cancelled.
Contact a service engineer!
104 Overheating protector for
rinse tank tripped
The rinse tank heater element has overheated, the programme is cancelled.
Contact a service engineer!
105 Overheating protector for
wash tank tripped
The wash tank heater element has overheated, the programme is cancelled.
Contact a service engineer!
106 Overheating protector for
one of the heater elements
tripped
One of the heater elements has overheated,
the programme is cancelled.
Contact a service engineer!
107 Temperature not reached
in wash tank
The wash water in the wash tank does
not reach its preset temperature during
the wash process, the programme is can
-
celled.
Contact a service engineer!
Page 16
1618
Error code Meaning Cause Remedy
108 Temperature not reached
in rinse tank
The rinse water in the rinse tank does
not reach its preset temperature dur
ing the wash process, the programme is
cancelled.
Contact a service engineer!
109 Door switch Someone has attempted to open the doors
during operation.
Reset the alarm by pressing the STOP
button.
110 Temperature sensor in rinse
tank non operational
The temperature sensor in the rinse tank
is broken.
Contact a service engineer!
111 Temperature sensor in wash
tank non operational
The temperature sensor in the wash tank
is broken.
Contact a service engineer!
112 Water level too low in rinse
tank
The level in the rinse tank has fallen
erroneously.
Contact a service engineer!
113 Water level too low in wash
tank
The level in the wash tank has fallen
erroneously.
Contact a service engineer!
114 Long wash tank filling
time
The level sensor in the wash tank has not
been activated within 20 minutes of the
solenoid valve opening, the programme
is cancelled.
Check the water supply to the machine,
as well as the solenoid valve for wash tank
filling. Reset the alarm by pressing the
STOP button.
115 Long rinse tank filling
time
The level sensor in the rinse tank has not
been activated within 5 minutes of the
solenoid valve opening, the programme
is cancelled.
Check the water supply to the machine,
as well as the solenoid valve for rinse tank
filling. Reset the alarm by pressing the
STOP button.
116 Low water level, problem
with foam
Foam forming in the machine. Avoid using detergent designed for wash-
ing up by hand. Change the wash water.
Contact your detergent supplier if you still
the problems with foam formation persist.
Reset by pressing the STOP button.
117 Long rinse time The lower level sensor in the rinse tank
has not indicated that the correct amount
of water has been pumped out.
Contact a service engineer!
118 Drain valve not closed The drain valve has opened during an
active process in the machine.
Close the drain valve and reset the alarm
by pressing the STOP button.
128, 129,
130, 131
System error, control card
non operational
A control card component is broken. Contact a service engineer!
Page 17

Notes
 Loading...