

Page 1

Page 2

Page 3

G D 7 0 0 U S E R M A N U A L
EN
1. TECHNICAL D ATA . . . . . . . . . . . . . . . . . . . . . . . . . . . . . . . . . . . . . . . 6
2. INSTRUCTIONS
At the start of the day
. . . . . . . . . . . . . . . . . . . . . . . . . . . . . . . . . . . . . 8
Filling with water
. . . . . . . . . . . . . . . . . . . . . . . . . . . . . . . . . . . . . . . . . . . . . . 8
Preparing utensils
. . . . . . . . . . . . . . . . . . . . . . . . . . . . . . . . . . . . . . . . . . . 9
Loading the machine
. . . . . . . . . . . . . . . . . . . . . . . . . . . . . . . . . . . . . . . 9
Control panel
. . . . . . . . . . . . . . . . . . . . . . . . . . . . . . . . . . . . . . . . . . . . . . . . . 13
The position of the hood
. . . . . . . . . . . . . . . . . . . . . . . . . . . . . . . 13
Selecting a programme
. . . . . . . . . . . . . . . . . . . . . . . . . . . . . . . . . 14
Start
. . . . . . . . . . . . . . . . . . . . . . . . . . . . . . . . . . . . . . . . . . . . . . . . . . . . . . . . . . . . . . 14
Operation
. . . . . . . . . . . . . . . . . . . . . . . . . . . . . . . . . . . . . . . . . . . . . . . . . . . . . . 14
Stopping the machine while running
. . . . . . . . . . . . . . 14
Inspection of pots
. . . . . . . . . . . . . . . . . . . . . . . . . . . . . . . . . . . . . . . . . 15
Granules
. . . . . . . . . . . . . . . . . . . . . . . . . . . . . . . . . . . . . . . . . . . . . . . . . . . . . . . . 15
3. DAILY C L E A N I N G
Collecting and cleaning the granules . . . . . . . . . . . . . 16
Emptying the tank
. . . . . . . . . . . . . . . . . . . . . . . . . . . . . . . . . . . . . . . . . 16
Cleaning
. . . . . . . . . . . . . . . . . . . . . . . . . . . . . . . . . . . . . . . . . . . . . . . . . . . . . . . . 17
For a longer shutdown
. . . . . . . . . . . . . . . . . . . . . . . . . . . . . . . . . . . 17
4. TROUBLESHOOTING
. . . . . . . . . . . . . . . . . . . . . . . . . . . . . . . . 18
Error messages
. . . . . . . . . . . . . . . . . . . . . . . . . . . . . . . . . . . . . . . . . . . . . 18
NOTES
Contents
Art. nr. 16025 / 2001-03-25 /EN
Granuldisk AB retains the right to make technical changes to the product.
No responsability is taken for any printing error.
Page 4

Declaration of Conformity
The Manufacturer:
GRANULDISK AB
Jägershillgatan 15
SE- 213 75 Malmö, Sweden
declares that the following machinery:
The Granuldisk system GD 700
Basic conception
a) is manufactured in conformity with the Svenska Arbetarskyddsstyrelsens Författnings-
samling AFS1994:48. This law conforms with the COUNCIL DIRECTIVE of 22
June 1998 concerning harmonisation of member states' legislation for machinery
(the Machinery Directive 98/37/EEC where applicable), with particular reference to
Annex 1 concerning the essential health and safety requirements relating to the design
and construction of the machinery.
b) is besides the provisions under a) manufactured according to the following directives:
the EC Low Voltage Directive 73/23/EEC and the EMC Directive 89/336/EEC
c) is manufactured in conformity with the following harmonised standards: EN 60204-1,
EN 55014, EN 60335-2-58, EN 60439-1, EN 418, EN 294, EN 50081-1:1992 and
EN 50082-2:1995
d) is manufactured in conformity with the following national standards and technical
specifications: ELSÄK-FS 1994:7
Malmö, Sweden 05.08.1999
Signed on behalf of
GRANULDISK AB GRANULDISK AB
Jägershillgatan 15
213 75 Malmö, Sweden
Per Sandberg Phone: +46 40 6715060
(Managing Director) Fax: +46 40 210721
Page 5

5
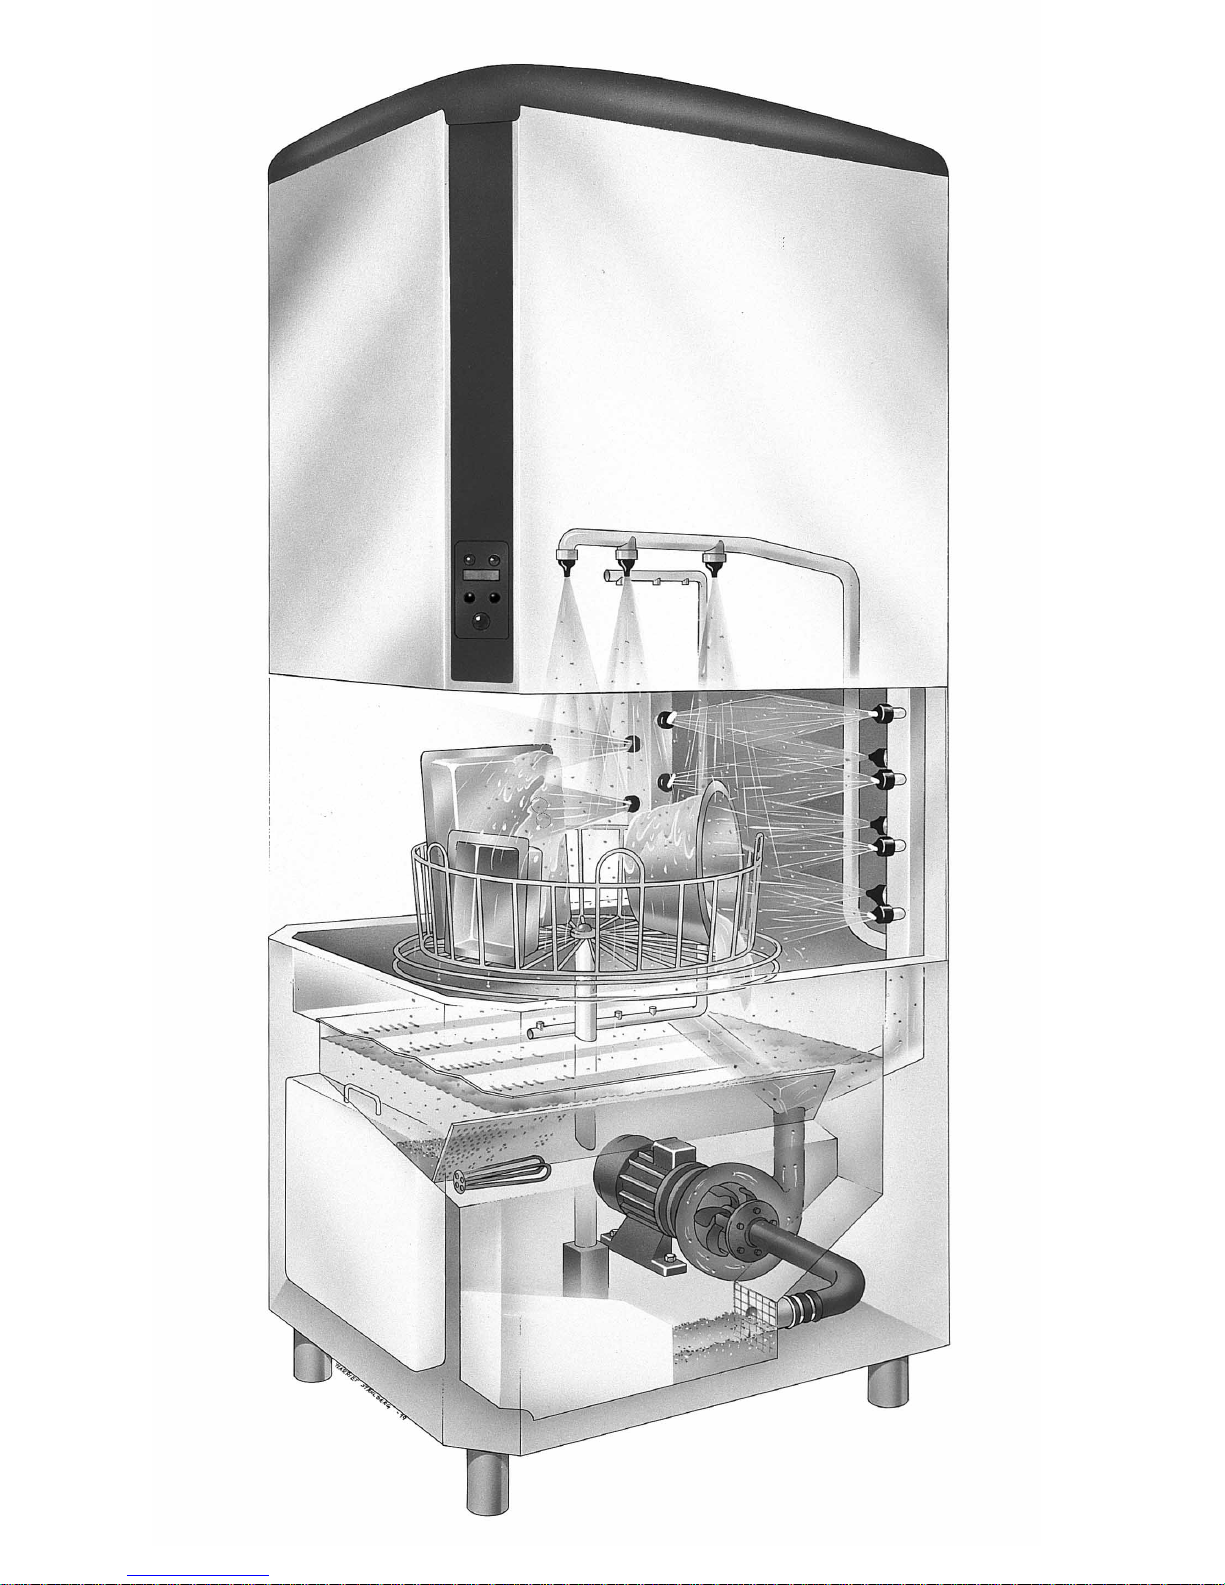
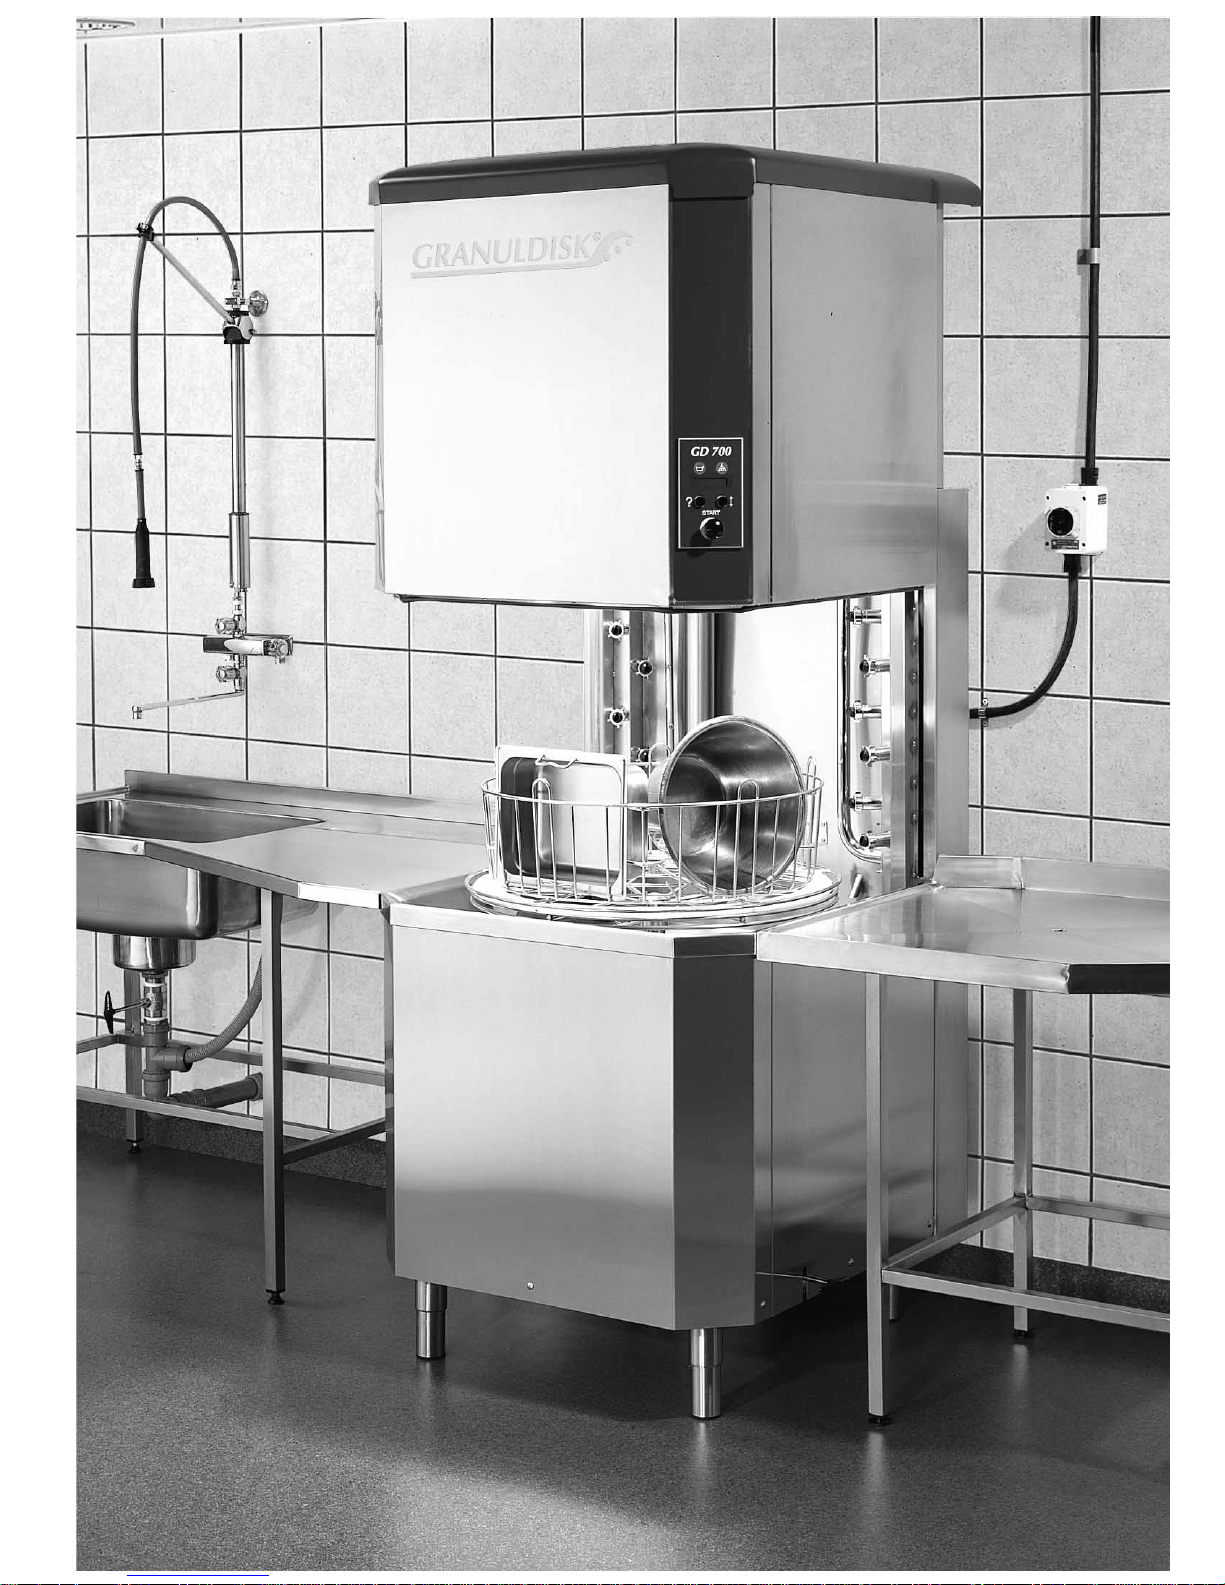
• The GD 700 is a granule pot-
washing machine - a potwashing
machine for commercial kitchens
designed for cleaning utensils
such as pots and pans.
• This instruction manual is your
guide to the correct use of the GD
700 granule potwashing machine.
• Granuldisk AB recommends that
you study this manual thoroughly
to ensure that the machine is
installed and used correctly and
safely.
• Ensure that the manual is always
available while the machine is in
use.
• Granuldisk AB is not responsible
for any damage to the machine
or any other damage caused by
the user not following these instructions.
• The plastic material used in the
granules has been approved for
use in conjunction with food.
• The machine uses hot water.
Avoid contact with the water in
the machine, as there is a risk
for scalding.
• Granules on the floor pose a risk
for slipping.
• Formaldehyde can be formed
when the granules burn and this
is dangerous if inhaled.
To t h e u s e r
Sa f e ty r egu l a tion s
Page 6

6
Weight. . . . . . . . . . . . . . . . . . . . . . . . . . . . . . . . . . . . . . . . . . . . . . . . 435 kg filled machine
Tank volume . . . . . . . . . . . . . . . . . . . . . . . . . . . . . . . . . . . . . . . 83 litres
Amount of granules . . . . . . . . . . . . . . . . . . . . . . . . . . . . 8 kg
Wash water temperature
. . . . . . . . . . . . . . . . . . . . 65°C
Rinse water temperature . . . . . . . . . . . . . . . . . . . . 85°C
Rinse water volume . . . . . . . . . . . . . . . . . . . . . . . . . . . . 8 litres per wash programme
Wash programme
. . . . . . . . . . . . . . . . . . . . . . . . . . . . . . . Normal 3 min, 50 secs.
. . . . . . . . . . . . . . . . . . . . . . . . . . . Long 6 min, 50 secs.
. . . . . . . . . . . . . . . . . . . . . . . . . . . These times can be reprogrammed
Capacity
. . . . . . . . . . . . . . . . . . . . . . . . . . . . . . . . . . . . . . . . . . . . . 5 1/1 (max depth 100 mm)
. . . . . . . . . . . . . . . . . . . . . . . . . . . or 5 1/2 GN containers
. . . . . . . . . . . . . . . . . . . . . . . . . . . for normal programme 70 GN1/1 per hour
Noise level
. . . . . . . . . . . . . . . . . . . . . . . . . . . . . . . . . . . . . . . . . . 67 dB(A) rel. 20 µPa when washing with
granules
Mains voltage*
. . . . . . . . . . . . . . . . . . . . . . . . . . . . . . . . . . . 400 V, 3-phase, earth, zero
Fuse* . . . . . . . . . . . . . . . . . . . . . . . . . . . . . . . . . . . . . . . . . . . . . . . . . 25 A
Frequency*
. . . . . . . . . . . . . . . . . . . . . . . . . . . . . . . . . . . . . . . . . 50 Hz
Pump motor . . . . . . . . . . . . . . . . . . . . . . . . . . . . . . . . . . . . . . . 2.6 kW
Tank element. . . . . . . . . . . . . . . . . . . . . . . . . . . . . . . . . . . . . . 3 kW
Rinse tank element
. . . . . . . . . . . . . . . . . . . . . . . . . . . . 9 kW
Maximum power . . . . . . . . . . . . . . . . . . . . . . . . . . . . . . . . . 14.8 kW
Detergent and rinsing agent . . . . . . . . . . . . . . . 230 V AC, signals available from a
separate connection box
Encapsulation class
. . . . . . . . . . . . . . . . . . . . . . . . . . . . IP 55
Hot water connection . . . . . . . . . . . . . . . . . . . . . . . . . . R 1/2” (DN15), 55 - 65 °C, 3 - 10° dH
Cold water connection
. . . . . . . . . . . . . . . . . . . . . . . . R 1/2” (DN15), 3 - 10° dH
Water pressure . . . . . . . . . . . . . . . . . . . . . . . . . . . . . . . . . . . 3 - 6 bars
Outflow
. . . . . . . . . . . . . . . . . . . . . . . . . . . . . . . . . . . . . . . . . . . . . . . Ø32 or Ø50 mm PE pipe
Drain . . . . . . . . . . . . . . . . . . . . . . . . . . . . . . . . . . . . . . . . . . . . . . . . . . Min. capacity 150 litres/minute
1. Te c hnic a l D a ta
* For data specific for your machine - see the sign on the right-hand upright at
the back of the machine.
The machine is supplied with a 2.5 m electrical cable that is connected to the
mains box on the wall. Ensure that the mains box is located near the machine
and is easily accessible during daily use.
The mains box is not included in the delivery.
Page 7
Page 8
8
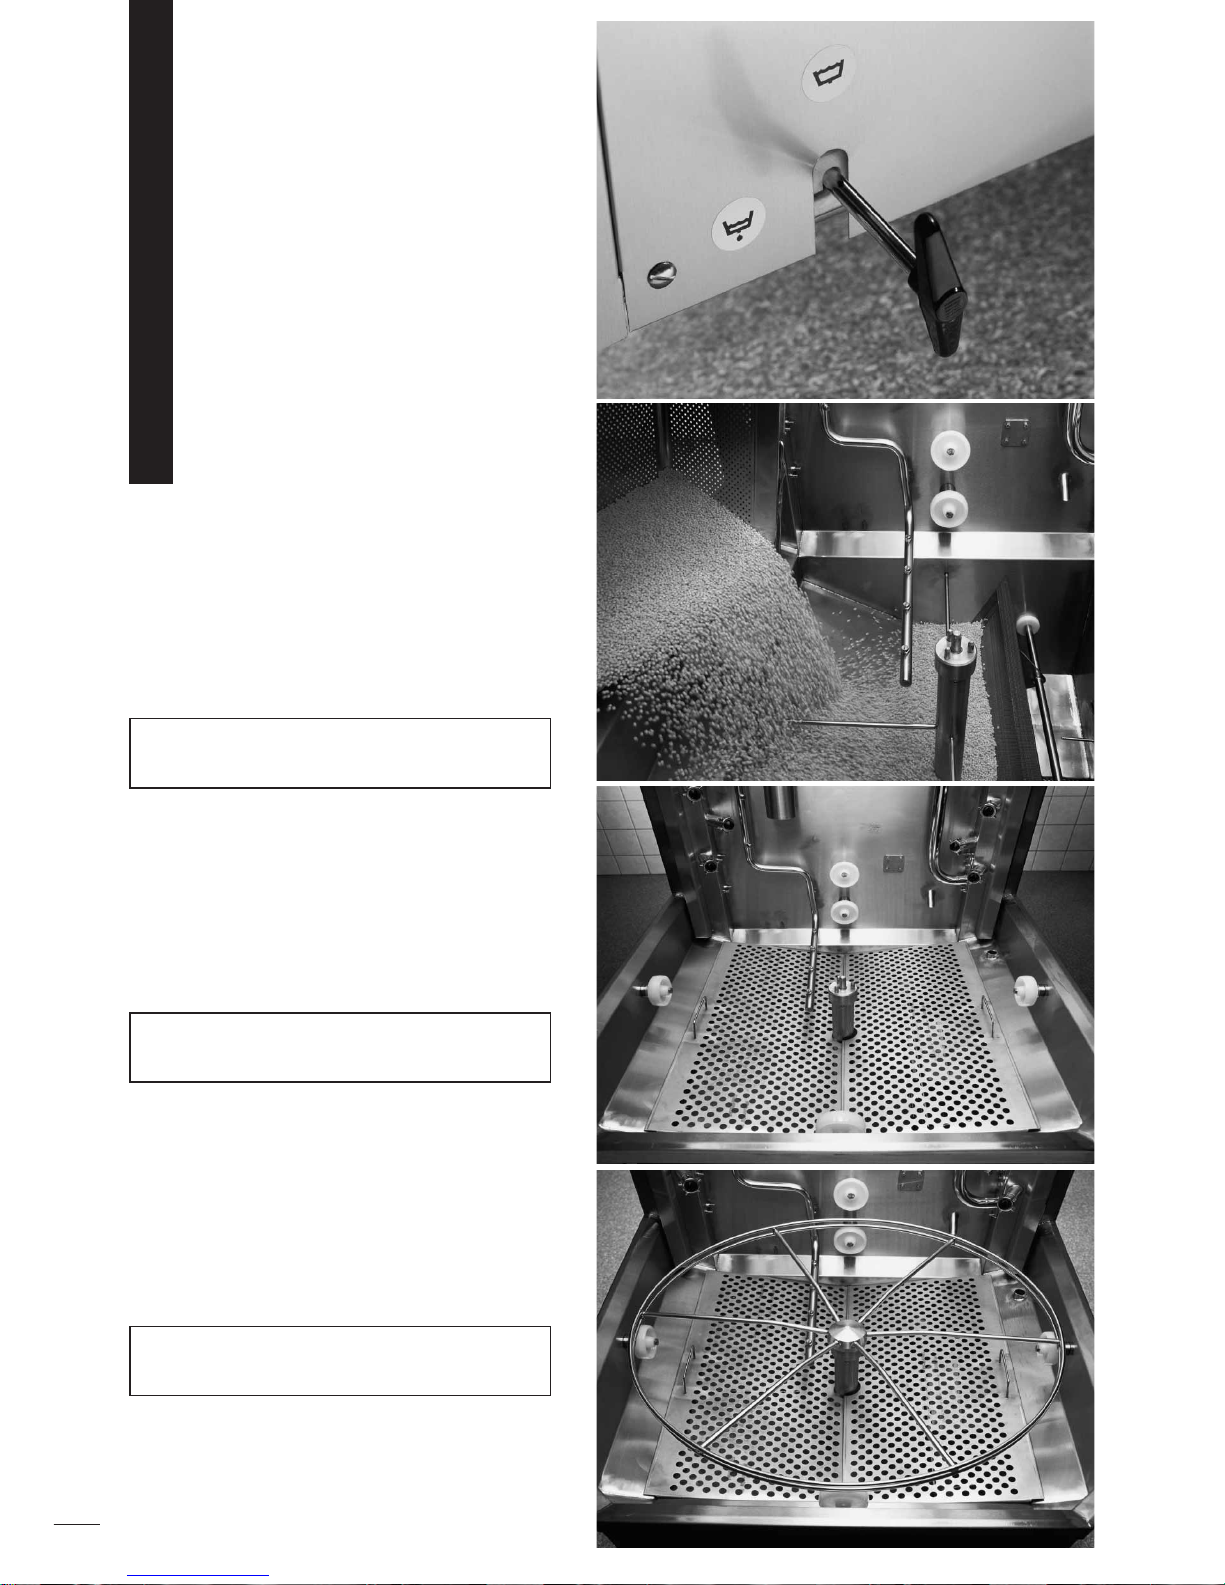
AT THE S TART O F THE D AY
• Switch on the mains switch.
• Close the outflow tap on the
right-hand side of the machine
(ill. 1).
• Pour granules in the granule
receptacle (ill. 2).
• Put in the two coarse filters. Set in
the one on the left first and then
the one on the right which should
overlap the first one (ill. 3).
• Put in the basket wheel (ill. 4).
FIL L I N G WITH W ATER
The texts below can be seen in the display:
Press the START button to close the
hood. The machine then fills with water
that is heated to the right temperature.
The following text can be seen in the
display:
When connected to a hot water supply
(+55°C), the filling and heating time is
about 20 minutes. The equivalent time for
cold water (+10°C) is about 45 minutes.
The machine can be used when the
display shows 'READY TO WASH'.
Press the START button to select programme1.
CLOSE HOOD FOR
WATERFILLING
XX° C XX° C
FILLS WATER
65° C 85° C
READY TO WASH
1
2
3
4
2. Ins t r uc t i ons
Page 9
9
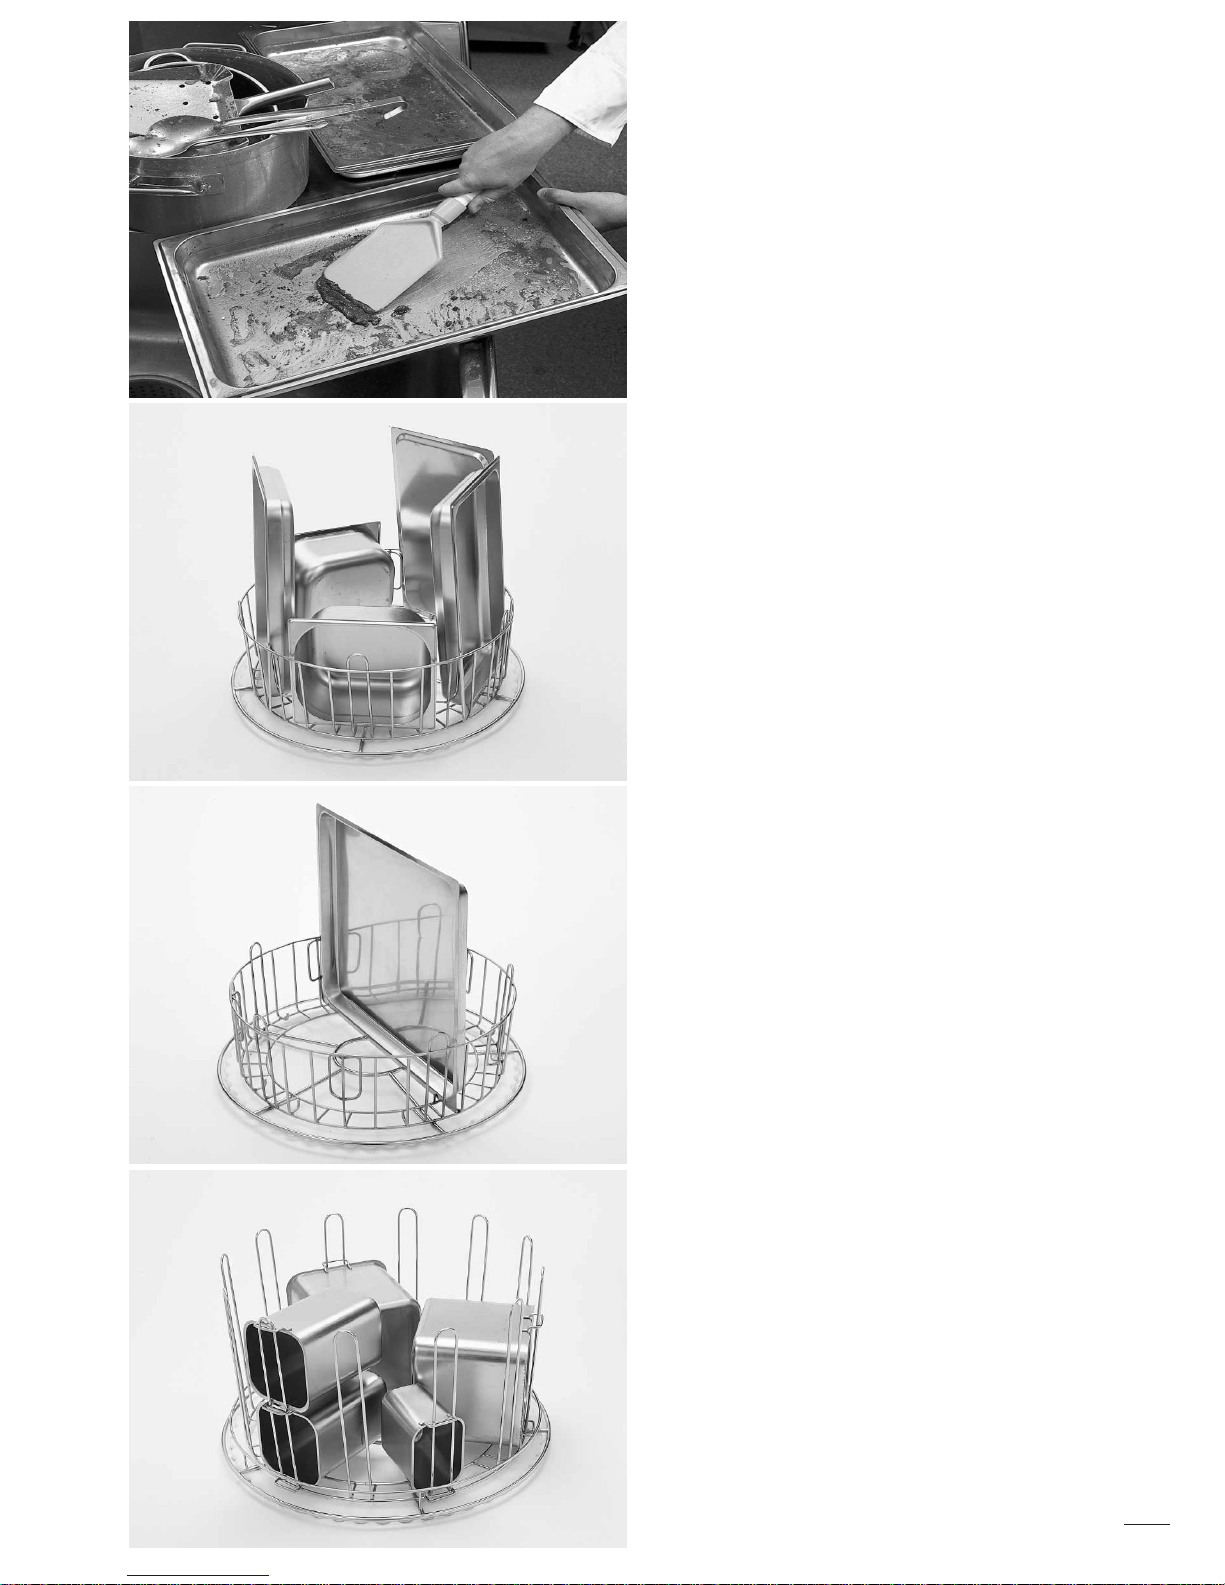
PRE PARING U T E N SILS
• Scrape and rinse off any loose food
remains before placing in the machine
(ill. 5).
NB! Do not soak. To avoid the formation of foam,
do not use washing-up liquid. If foam is formed
the machine will not clean properly.
LOA D I N G
• All potwashing should be done in the
basket with the dirty surface facing
the spray pipes. It is important that
utensils are firmly in place when being
washed.
• The basket is loaded on an adjoining
bench.
• Press the arrow key to open the hood.
• Slide the wash basket into the machine.
The basket wheel is designed so that
you can clearly feel when the basket
has been pushed in correctly.
• Check that nothing is sticking out from
the basket’s sides or bottom. This can
prevent the lowering of the hood or
the basket’s rotation.
GD 701 Standard wa sh basket (6:1 - 6:2)
The basket that takes 5 1/1 GN containers on
edge inside the guide pins on the inside of the
basket. 1/2 GN containers can also be put in in
this way.
Furthermore, the basket can take a 2/1 GN
container that is placed between two plugs in the
bottom of the basket and on the opposite side in
the v-shaped guide pin.
GD 702 Wash basket for ABC containers (6:3)
Copes with all types of ABC containers with fixed
handles. Capacity is 3 A, 12 B or 24 C 200 mm
deep containers.
5
6
6:1
6:3
6:2
Page 10
10
6:4
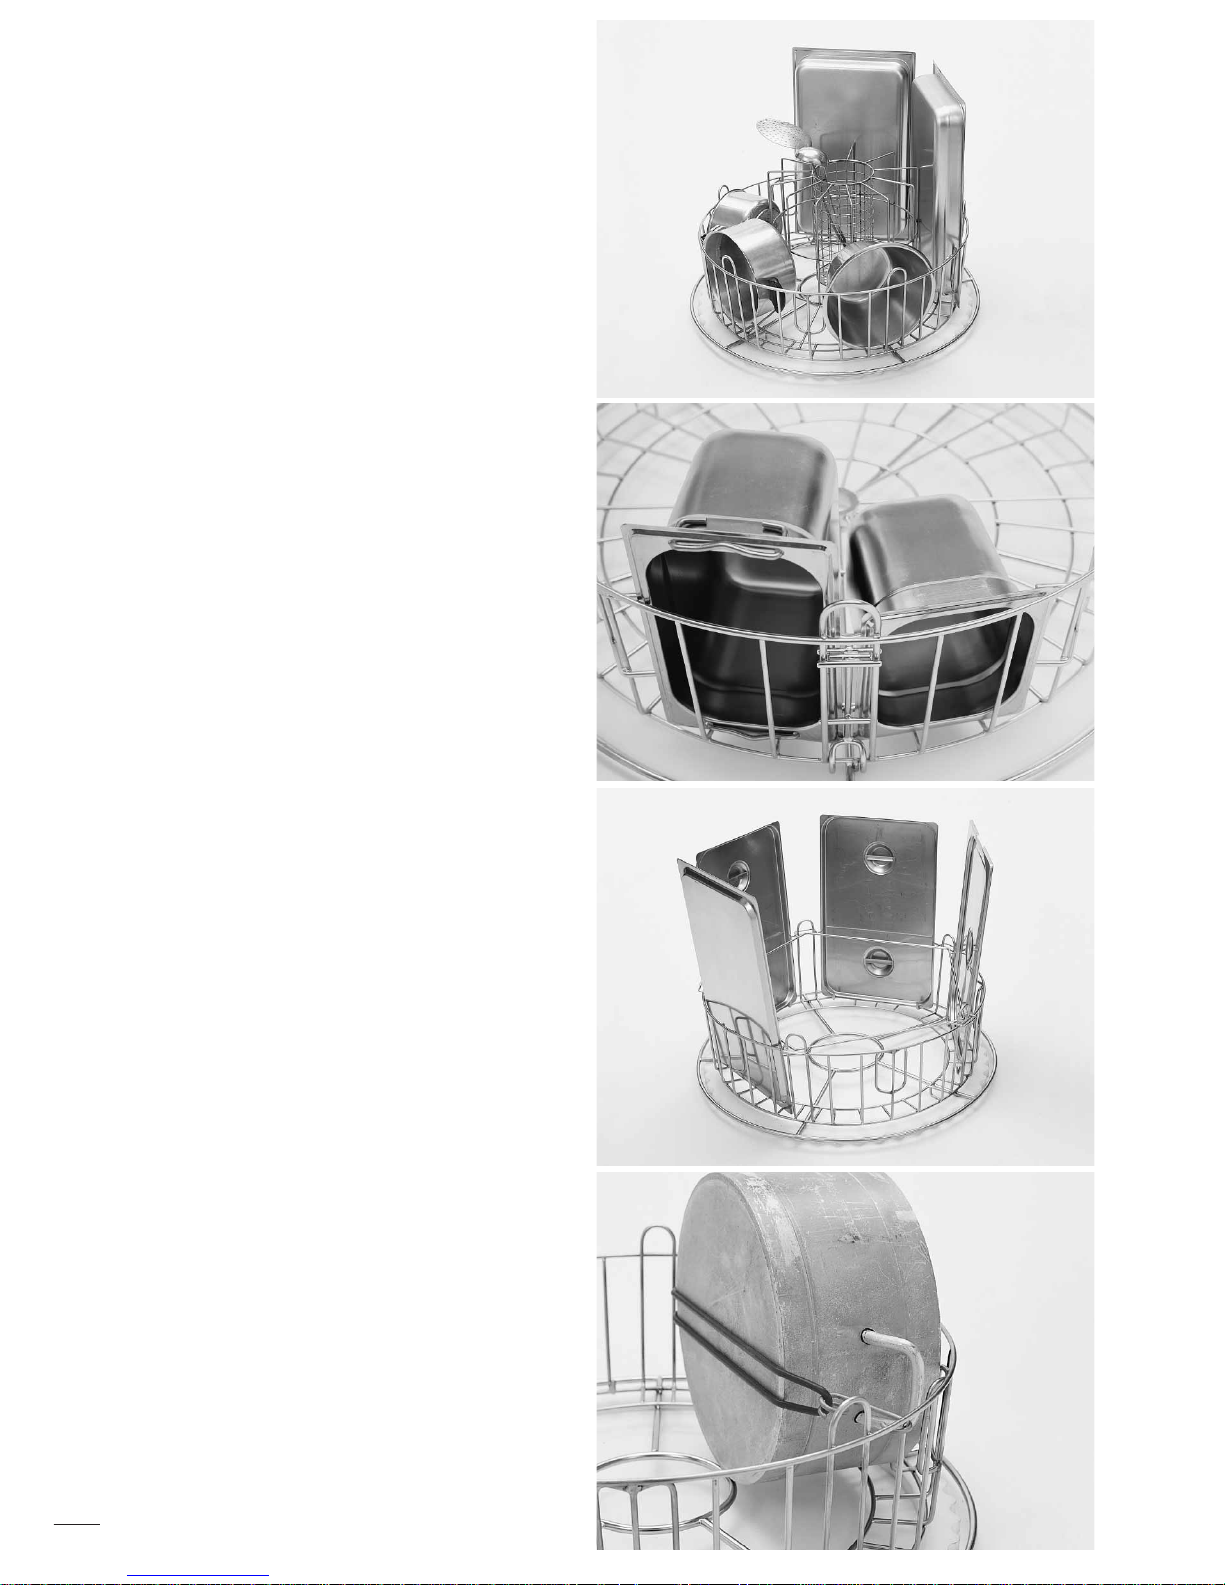
GD 750 Saucepan and l adle holder (6:4)
Holder for pots, saucepans, bowls and smaller
preparation containers. Containers from about
60 mm to 170 mm deep can be washed using
this holder in the standard wash basket. Ladles,
whisks, spatulas and the like can be washed
in the net basket in the middle of the holder.
6:5
GD 751 Holder for 1/4 and 1/6 GN containers (6:5)
The holder for washing 1/4 and 1/6 GN containers.
This accessory is easily fitted on the inside of the
standard basket and can hold two containers.
6:6
GD 752 Lid holder (6:6)
The holder for washing lids that are not
GN size. Can also be used for washing
smaller trays and flat utensils. The
holder is located on the mountings
on the standard wash basket.
6:7
GD 754 Flexible pot support (6:7)
Using this, larger pots and preparation containers are
easily put in the machine. Stretch the rubber band
around the utensils. Be careful as the hooks can fly
off when fastening and releasing the rubber bands.
Page 11
11
Page 12
12
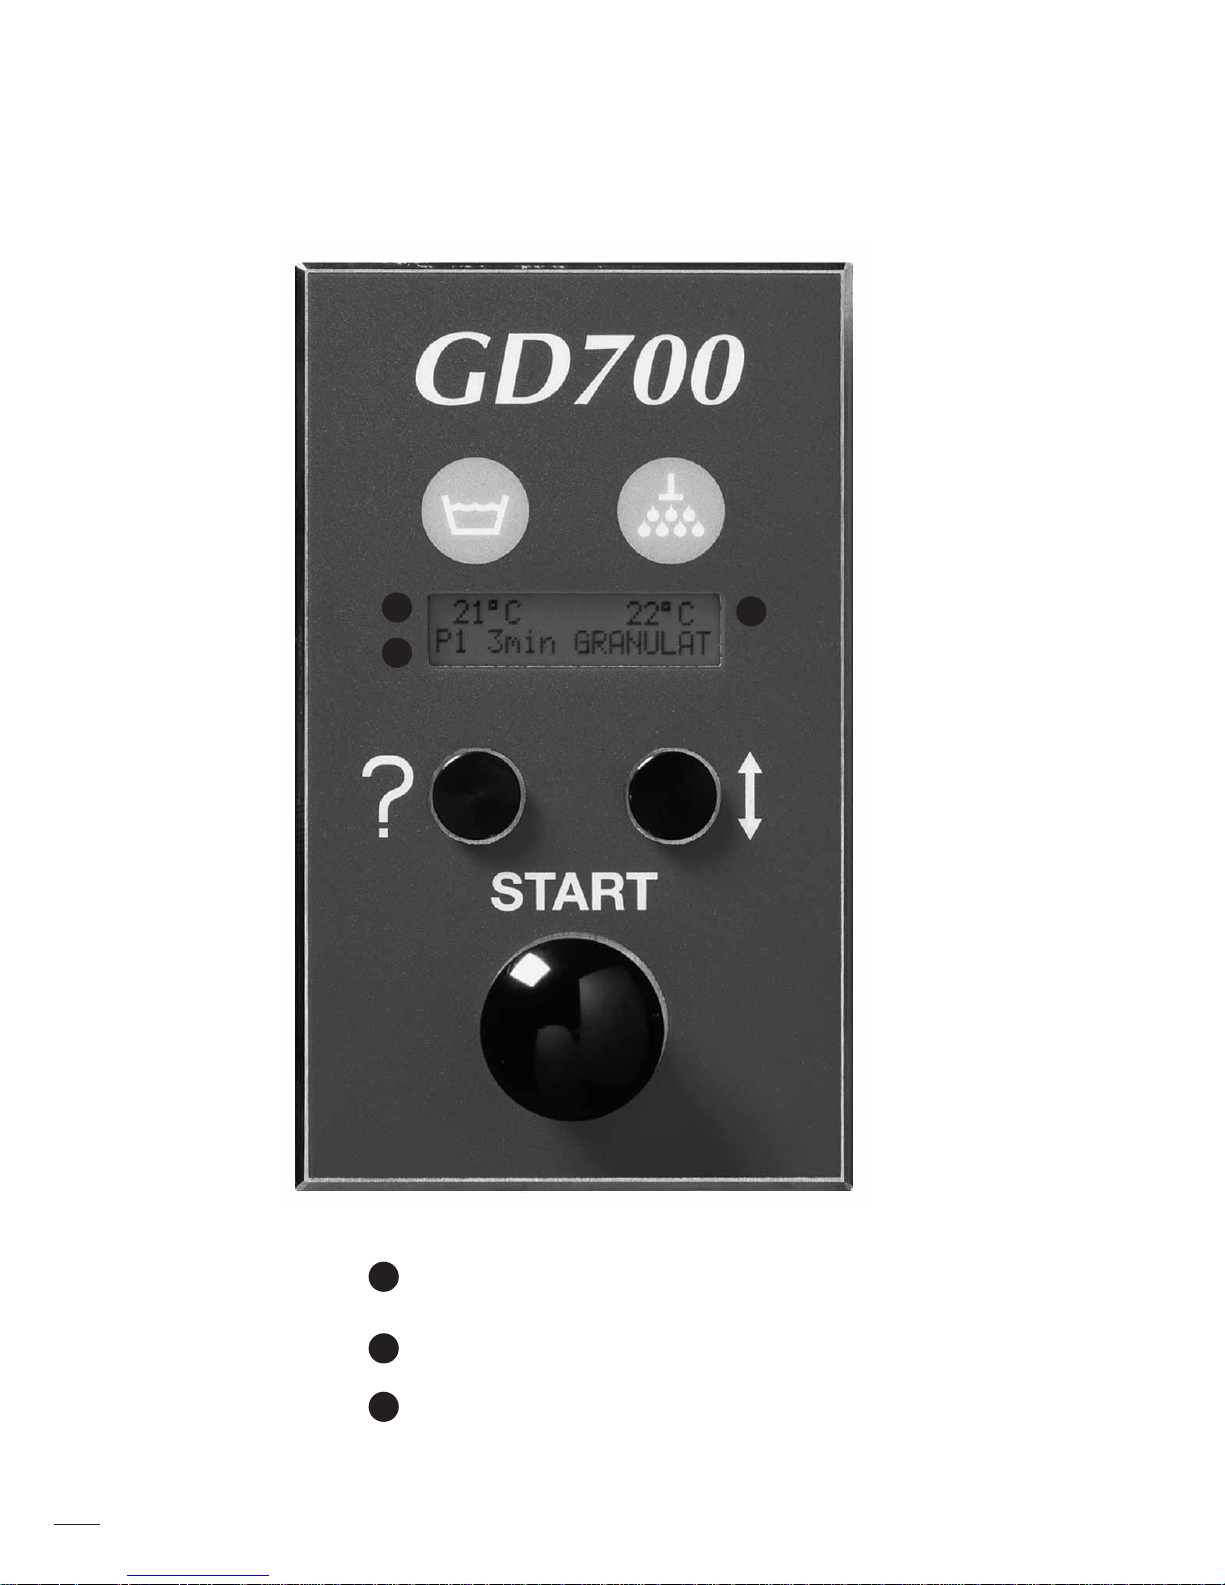
Temperature of the wash water. If the numbers
are blinking, the water is being heated.
Temperature of the rinse water. If the numbers
are blinking, the water is being heated.
Selected wash program me.
1
2
3
1
2
3
Page 13

13
CON T R O L PA N E L
Button ‘?’
This button is used to alter the settings,
for example, from Programme 1 to
Programme 2 etc. It is also used to
answer ‘No’ to questions on the display
window.
Button ‘START’
This button starts the wash programme
or other events described on the display.
The button is also used to answer ‘Yes’ to
questions on the display window.
Button ‘arrow’
The button for manually opening and
closing the hood.
Temperature indicator
The temperatures in the wash and rinse
tanks are continually shown on the
diplay.
Other indicators
The remaining wash time is continually
shown. Error messages can also occur
and how to deal with them is described
in section 5.
THE P OSITION O F THE H O O D
There are four positions.
1. Starting position (open hood)
This is the position of the machine when
the power is switched on (at the mains
switch). The hood opens and the status
of the machine is shown on the control
panel.
2. Economy position (hood closed)
This is the recommended position when
a new wash cycle is not going to be run
immediately. The hood is closed with
the ‘arrow’ button. In this way power
is saved and the emission of steam is
reduced.
3. Standby (hood open)
This is the position at the end of a wash
cycle. The hood goes up to the top and
the machine can be loaded with the next
basket.
4. Working position (hood closed)
This is the position when the wash
programme is started with the START
button. The hood closes and washing
begins.
NB! Never put anything on top of the
hood.
Page 14

14
PROGR A M M E SELECTI O N
Press the START button to be able
to select the programme. Three wash
programmes are preset at the factory, P1
- 3 minutes with granules, P2 - 6 minutes
with granules and P3 - 3 minutes without
granules as well as G4, a special granule
collection programme where the basket
does not revolve. Should other times or
combinations be required these can easily
be programmed. Choose the required
programme by going through the list
using the ‘?’ button.
STA R T
Press the START button, the hood lowers
and the wash programme begins. The
filling and heating sequence ensures that
the initial wash temperature is about
60° C.
During the programme the display
shows:
• which programme is being run
• what is happening (wash, rinse etc.)
• how much of the programme remains
• the temperatures in the wash and rinse
tanks
The hood opens automatically at the
end of the wash programme and this
text returns.
The machine can now be loaded again
and the next programme run. Close the
hood if another wash programme is not
being run at once. This saves energy and
reduces the emission of steam.
OPE R ATION
The P1 and P2 programmes begin by
washing with granules for 3 and 6 minutes
respectively. This is followed by a wash
without granules for 30 seconds and a final
rinse with fresh water at 85ºC for 20 seconds. If a steam reduction/condensation
unit is fitted, a 30-second period then
follows to cool the air in the machine
thus reducing the amount of steam that
comes out in the room.
STO P P I N G THE M A C H I N E
WHI L E RUNNING
Press the START button for at least one
second to stop a wash programme.
NB! The pots and pans may have detergent
on them and should be washed before being
taken out of the machine and used!
65° C 85° C
P1 3 min WITH GRANULES
Page 15
15
INS P E C T I O N OF P O T S
As with all washing up it is important
that the staff check the results. Remove
any granules that have fastened on pots
or in corners, sharp angles and other
inaccessible places (ill. 8).
GRA N U L E S
The granule potwashing machine from
Granuldisk AB works best with our
specially designed granules. They are
made to give the best results as well as the
longest working life for themselves and
the machine. This is why the guarantee
only applies if granules from Granuldisk
AB are used in the machine. The plastic
material in the granules may be used in
connection with food. We recommend
that all the granules are changed several
times a year.
8
Page 16
16
COL L E C T I N G AND
CLE A N I N G THE G R A N ULES
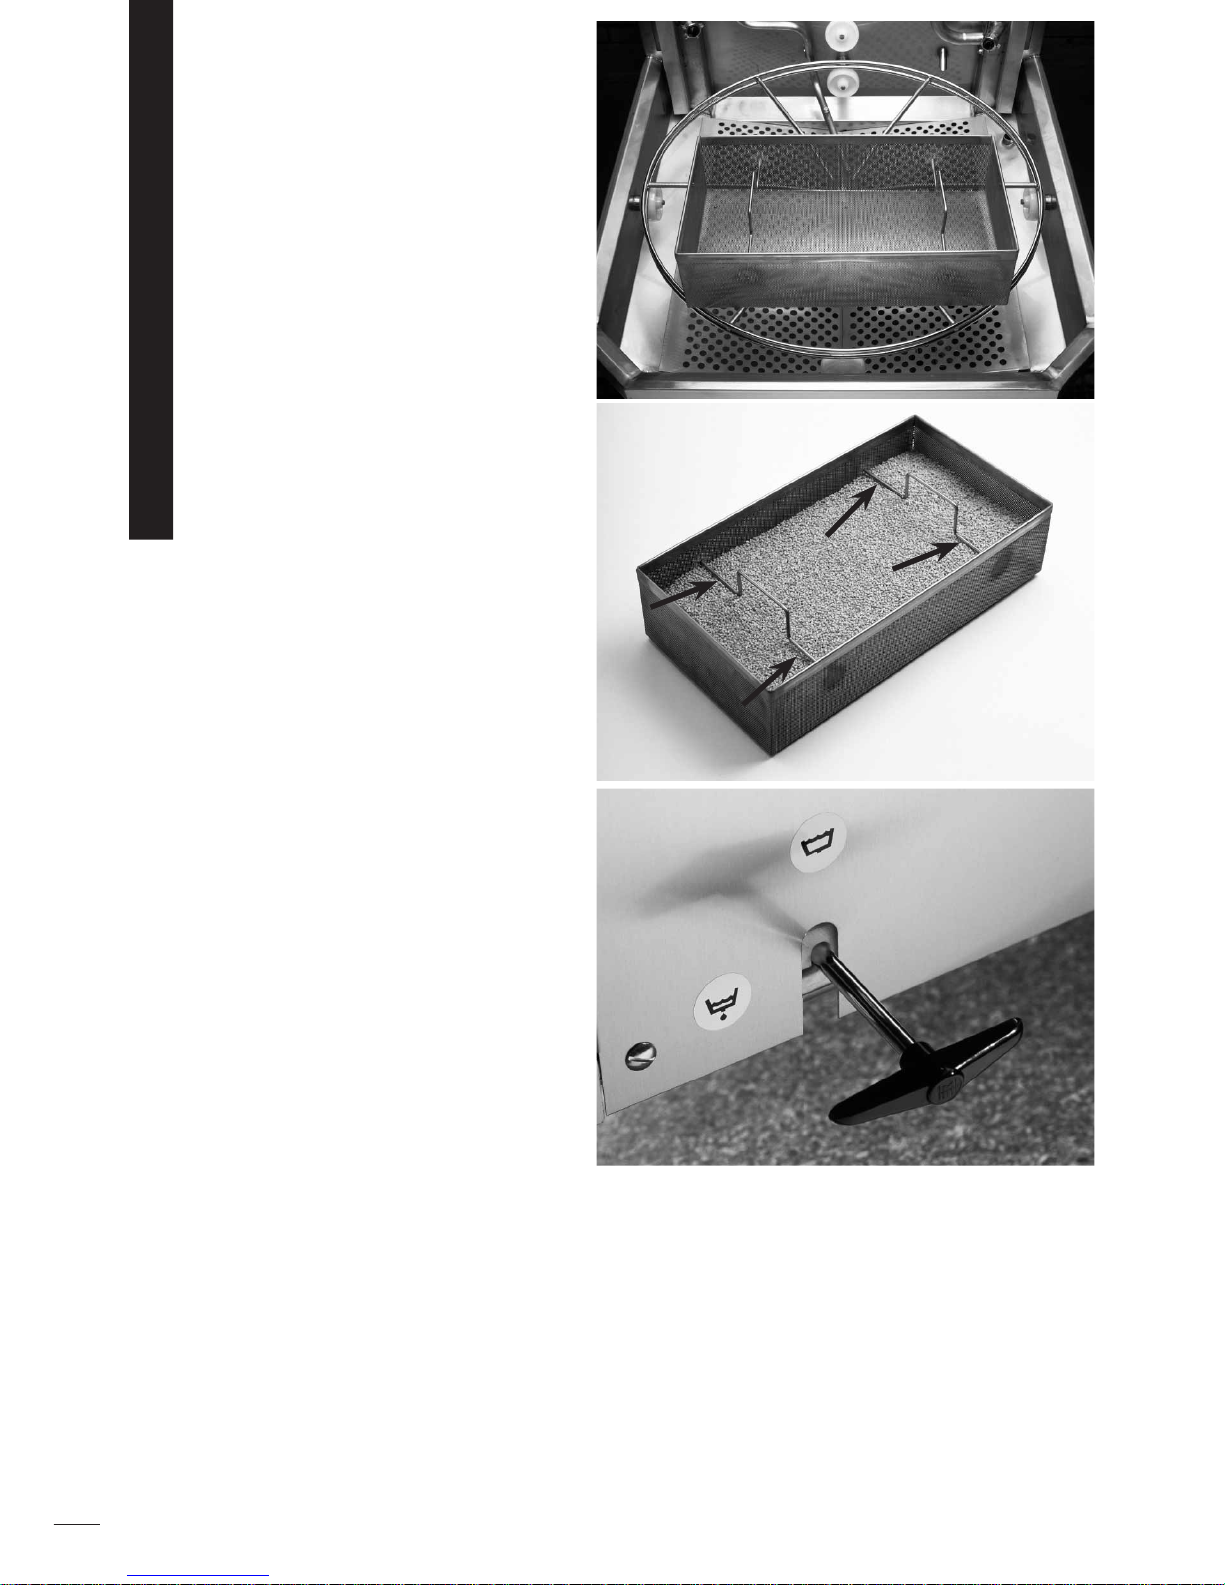
• Place the granule collector on
the basket wheel. It is important
that the collector is at the front
of the basket wheel. (ill. 9)
• Start G4, the special granule
collection programme.
• Take the granule collector out
and put it in a sink. Rinse with
clean water while stirring.
• Check the amount. The machine
should contain about 8 kg. The level
should reach the lower edge of the
handle of the granule collector (ill. 10)
when the granules have been evened
out. Add more as required. We recommend that all the granules are changed
several times a year.
• Check that there is no foreign matter
in the wash tank and that the bottom
sieve is clean.
NB! Too many or too few granules give a
worse wash result. Too many can result in the
spray nozzles becoming blocked.
E M P T YING T H E TA N K
• Switch the machine off at the mains.
• Open the outflow tap to empty the
wash tank (ill. 11).
9
10
11
3. Daily Cleaning
Page 17
17
13
CLE A N I N G
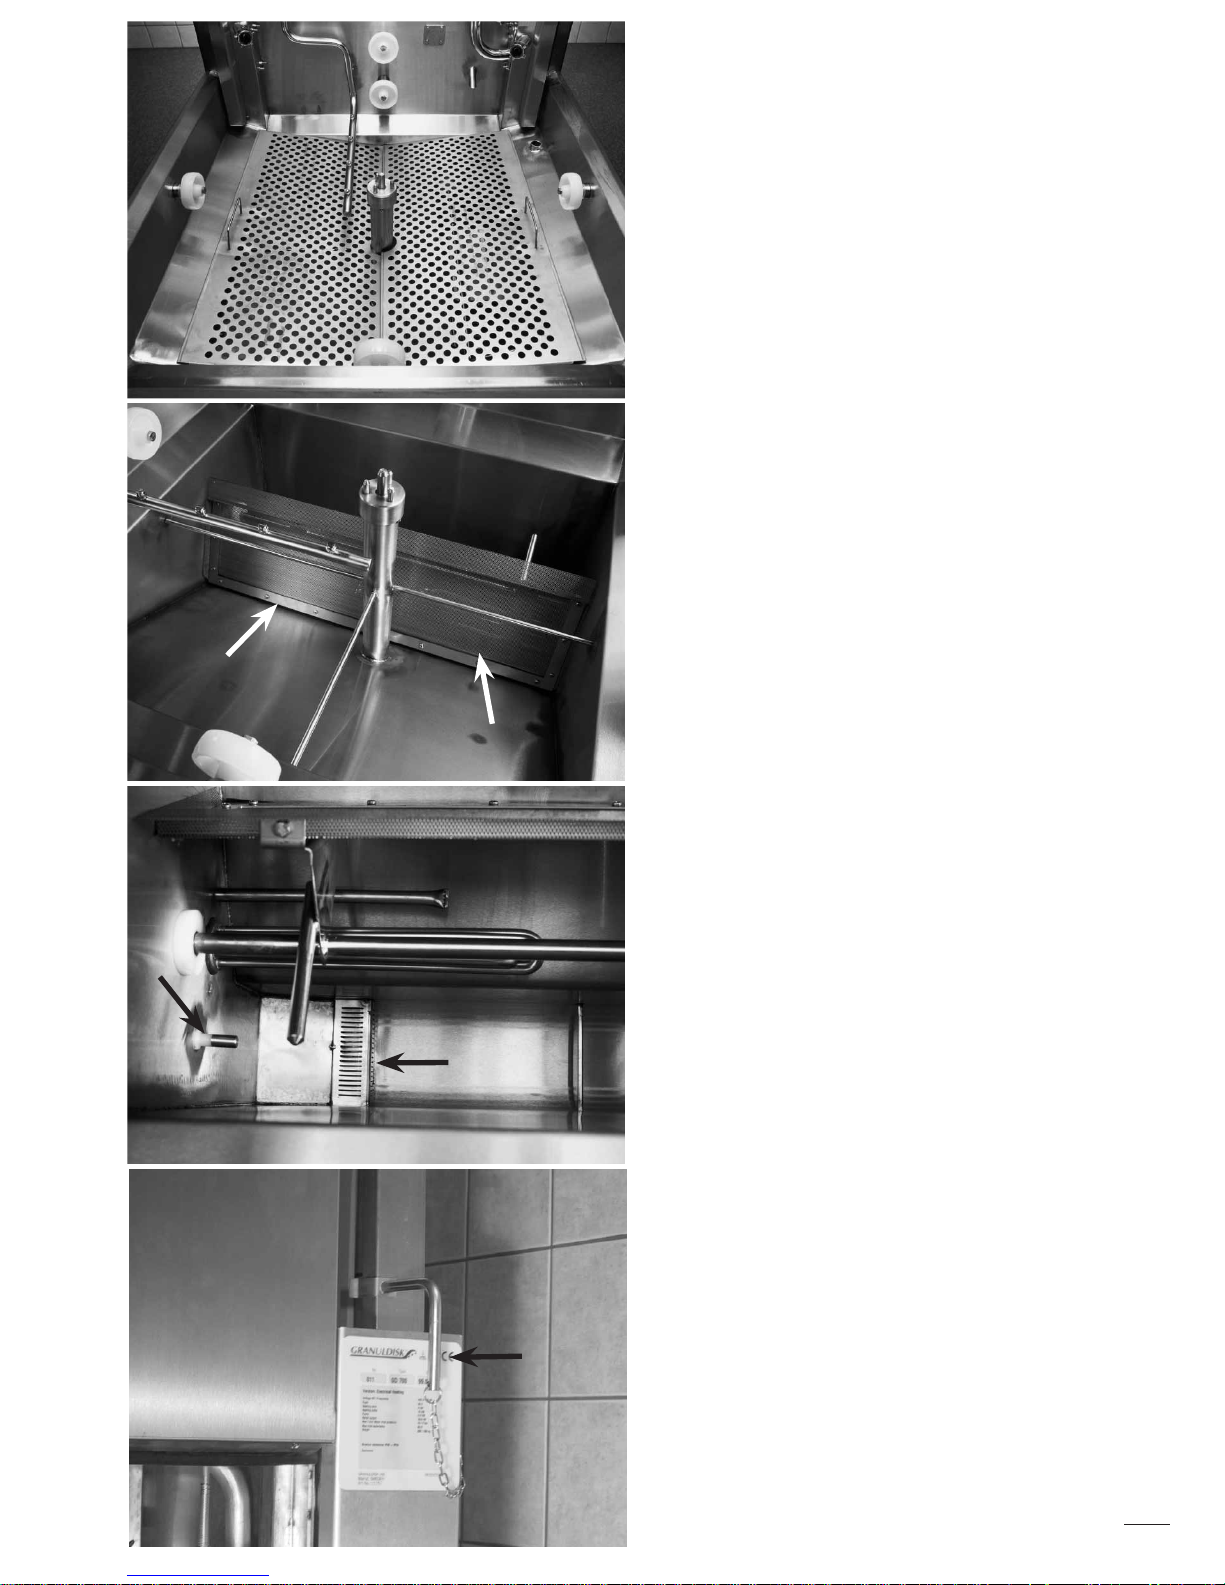
• Lift the basket wheel out and remove
and clean both the coarse sieves (ill.
12).
• Hose down the inside of the machine
with water.
• Clean the granule valve (ill. 13).
• Clean the bottom sieve. To make cleaning simpler, the bottom sieve can be
unscrewed if necessary (ill.14, arrow 1).
• Wipe fat off the hood seal.
• Wipe the level sensor (ill. 14, arrow2).
• Check that none of the spray nozzles
are blocked. Remove and clean when
necessary.
• Check that the rollers supporting the
basket wheel rotate freely.
FOR A LON G E R SHUTDOWN
• Ensure that the wash tank is completely empty after cleaning. Any water
that remains should be removed with
a sponge or the like.
• Raise the hood to its highest position
and prevent it from descending with
the peg provided (ill. 15). Leave the
peg there all the time the machine
is shutdown.
• The granules should be kept in the
collector placed in the machine.
• After a lengthy shutdown: check the
operation of the machine according to
the service manual, possibly with the
help of a service engineer.
• For shutdowns of longer than three
months, see the shutdown routine in
the Service Manual.
14
15
1
2
12
Page 18

If pots are not completely clean, check the following:
• is there a blockage in the spray nozzles?
• were the pots put into the machine and fastened correctly?
• was the correct programme selected?
• is the dishwater extremely dirty?
• is the amount of granules correct?
• is the detergent dosing correct?
18
Check that nothing stops the movement
of the hood. Press the START button
and try again.
Check that nothing prevents the basket
from rotating as it should. Press the
START button and try again.
Check that the outflow valve is closed.
Press the START button and try again.
Switch off at the mains. Check that the
stop valve in the water pipe is open.
Switch on the mains and try again.
Switch off at the mains. Check that
the drain valve is closed. Switch on
at the mains and try again. This fault
usually occurs when the outflow valve
is opened without switching off at the
mains.
ERROR H OODSAFETY
4. Tr o ubl e sh o o ting
ERROR R AC K DRIV E
CONT I N U E = S TART
ERROR F ILLING
CONT I N U E = S TART
ERROR S AFE L E V E L
I NTERRRUPTED
ERROR WAT ER PR E S S
I NTERRUPTED
ERROR M ESSAGES
NB! Contact a service engineer if any of these error messages appear a second
time or if any other error message is shown.
Page 19

No t e s
Page 20

 Loading...