

Page 1

U S E R M A N U A L G D 6 0 0 p l u s
Art.nr 16001/2001 EN
Granuldisk AB retains the right to make technical changes to the products.
No responsibility is taken for any printing errors.
1. TECHNICAL DATA ...................................................6
2. INSTRUCTIONS.........................................................8
At the start of the day..........................................8
Preparing utensils...................................................8
Removing / Replacing spray pipes............8
Loading utensils....................................................... 8
Control panel ..............................................................11
Programme selection............................................11
Inspecting utensils................................................. 12
Granules.........................................................................12
Hygiene............................................................................ 12
3. DAILY CLEANINGG................................................. 14
Collecting and cleaning the granules.......14
Cleaning..........................................................................15
Insertion of parts.....................................................15
4. TROUBLESHOOTING AND ALARMS.........16
Contents
Page 2
Declaration of Conformity
The Manufacturer:
GRANULDISK AB
Jägershillgatan 15
S-213 75 MALMÖ, Sweden
declares that the following machinery:
The Granuldisk system GD 900
Basic conception
a) is manufactured in conformity with the Svenska Arbetarskyddsstyrelsens Författningssamling AFS1994:48. This law conforms with the COUNCIL DIRECTIVE of 22 June 1998
concerning harmonisation of member states` legislation for machinery (the Machinery Directive 98/37/EG), with particular reference to Annex 1 concerning the essential health and
safety requirements relating to the design and construction of the machinery.
b) is besides the provisions under a) manufactured according to the following directives:
the EC Low Voltage Directive 73/23/EEC and the EMC Directive 89/336/EEC
c) is manufactured in conformity with the following harmonised standards:
EN 60204-1, EN 55014, EN 60335-2-58, EN 60439-1, EN 418, EN 294,
EN 50081-1:1992 and EN 50082-2:1995
d) is manufactured in conformity with the following national standards and technical
specications: ELSÄK-FS 1994:7
Malmö, Sweden 01.08.2000
Signed on behalf of
GRANULDISK AB GRANULDISK AB :
Jägershillgatan 15
S-213 75 MALMÖ, Sweden
............................................... Phone: +46 40 6715060
Per Sandberg Fax: +46 40 210721
(Managing Director)
Art no. 16001/2001 EN
Granuldisk AB retains the right to make technical changes to the products.
No responsibility is taken for any printing errors.
Page 3

To the user
Safety instructions
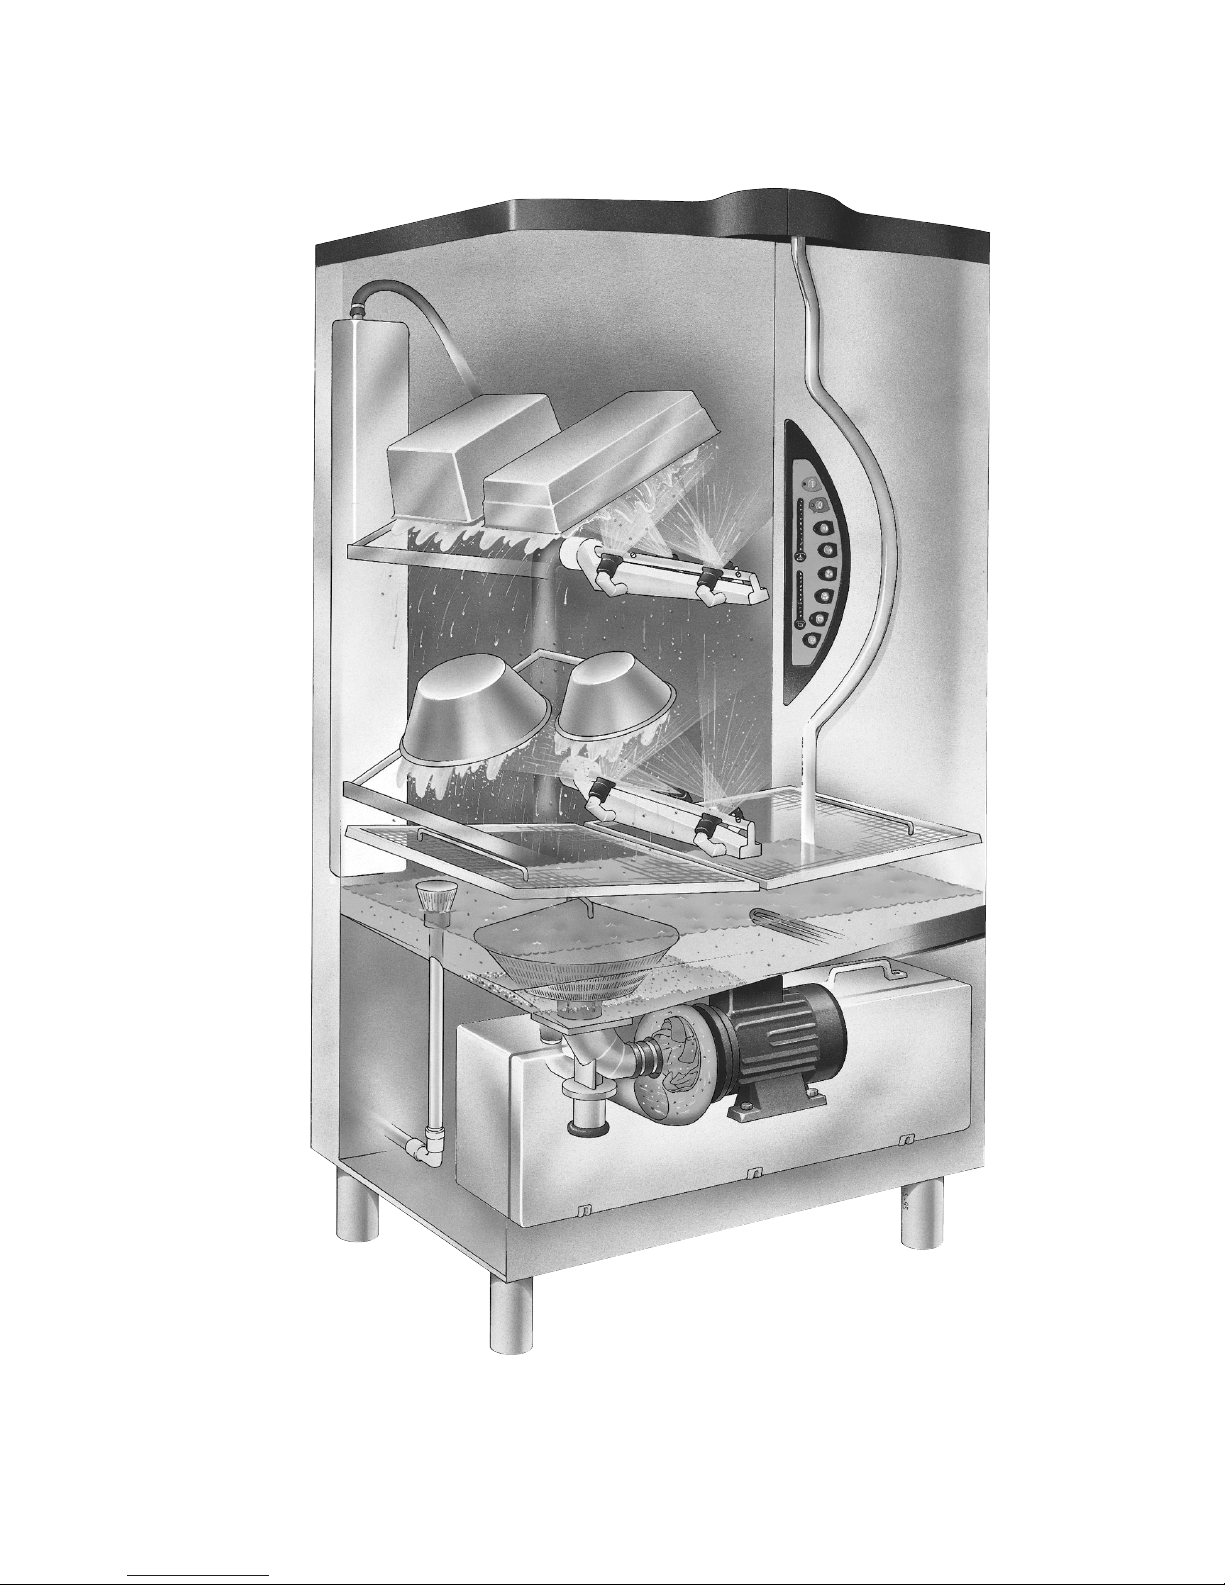
The GD 600plus is a granule
potwashing machine - a potwashing machine for commercial kitchens that is designed
for washing/cleaning things
like pots and pans
This instruction manual is your
guide to the correct use of the
GD 600plus granule potwashing machine
Granuldisk AB recommends
that you study the manual
carefully to ensure that the
machine is used correctly and
safely
Ensure that the manual is available during the whole life of
the machine
Granuldisk AB accepts no
responsibility for any damage
to the machine or any other
indirect damage caused by failing to follow the instructions in
the manual.
The plastic in the granules is
approved for use in conjunction with food
The machine uses hot water.
Avoid contact with the water in
the machine as there is a risk
for scalding
There is a risk for slipping if
granules are left on the oor
Formaldehyde, which is injurious to the lungs, can be
formed if the granules burn
5
Page 4

1. Technical data
Weight................................. 343 kg lled machine
Tank volume......................... 84 litres
Granule amount.................... 6 kg
Wash water temperature ...... 65°C
Rinse water temperature ...... 85°C
Rinse water volume .............. 8 litres/wash cycle
Wash programme ................. normal 5 min, 30 s.
............................................ long 7 min, 30 s
............................................ ultrashort 3 min, 30 s.
Design ................................. 2 ttings that slide out
Capacity .............................. 4 GN 1/1, 200 mm deep
............................................ 8 GN 1/2, 200 mm deep
............................................ or equivalent in other kitchenware
Capacity /hr with
normal programme................ GD 600plus 32 GN 1/1 /hr
Noise level ........................... 64 dB (A) relative 20 µPa when washing with granules
Tank heater*........................ 9 kW
Rinse tank heater*............... 9 kW
Voltage** ............................ 400 V, 3-phase, earth (200 - 440 V)
Fuse** ................................ 25 Ampere (200 - 230 V = 35 Ampere)
Frequency** ........................ 50/60 Hz
Max. power .......................... 12.2 kW
Pump motor ......................... 3 kW
Sealing class........................ IP 55
Hot water connection ........... R 1/2 int. 55 - 65°C, 3 - 10°dH
Cold water connection.......... R 1/2 int., 3 - 10°dH
Water pressure..................... 3 - 6 bar at the open magnetic valve
Outow ................................ Ø32/40/50 mm pipe
Drain.................................... Min. capacity 100 litres/minute
*Not in operation simultaneously
**For the exact gures for your machine look at the sign on the machine.
The machine is supplied with a 2 m long electrical cable which is connected
to the mains box on the wall. The mains box is not included.
6
Page 5
7
Page 6
2. Instructions
1
At the start of the day
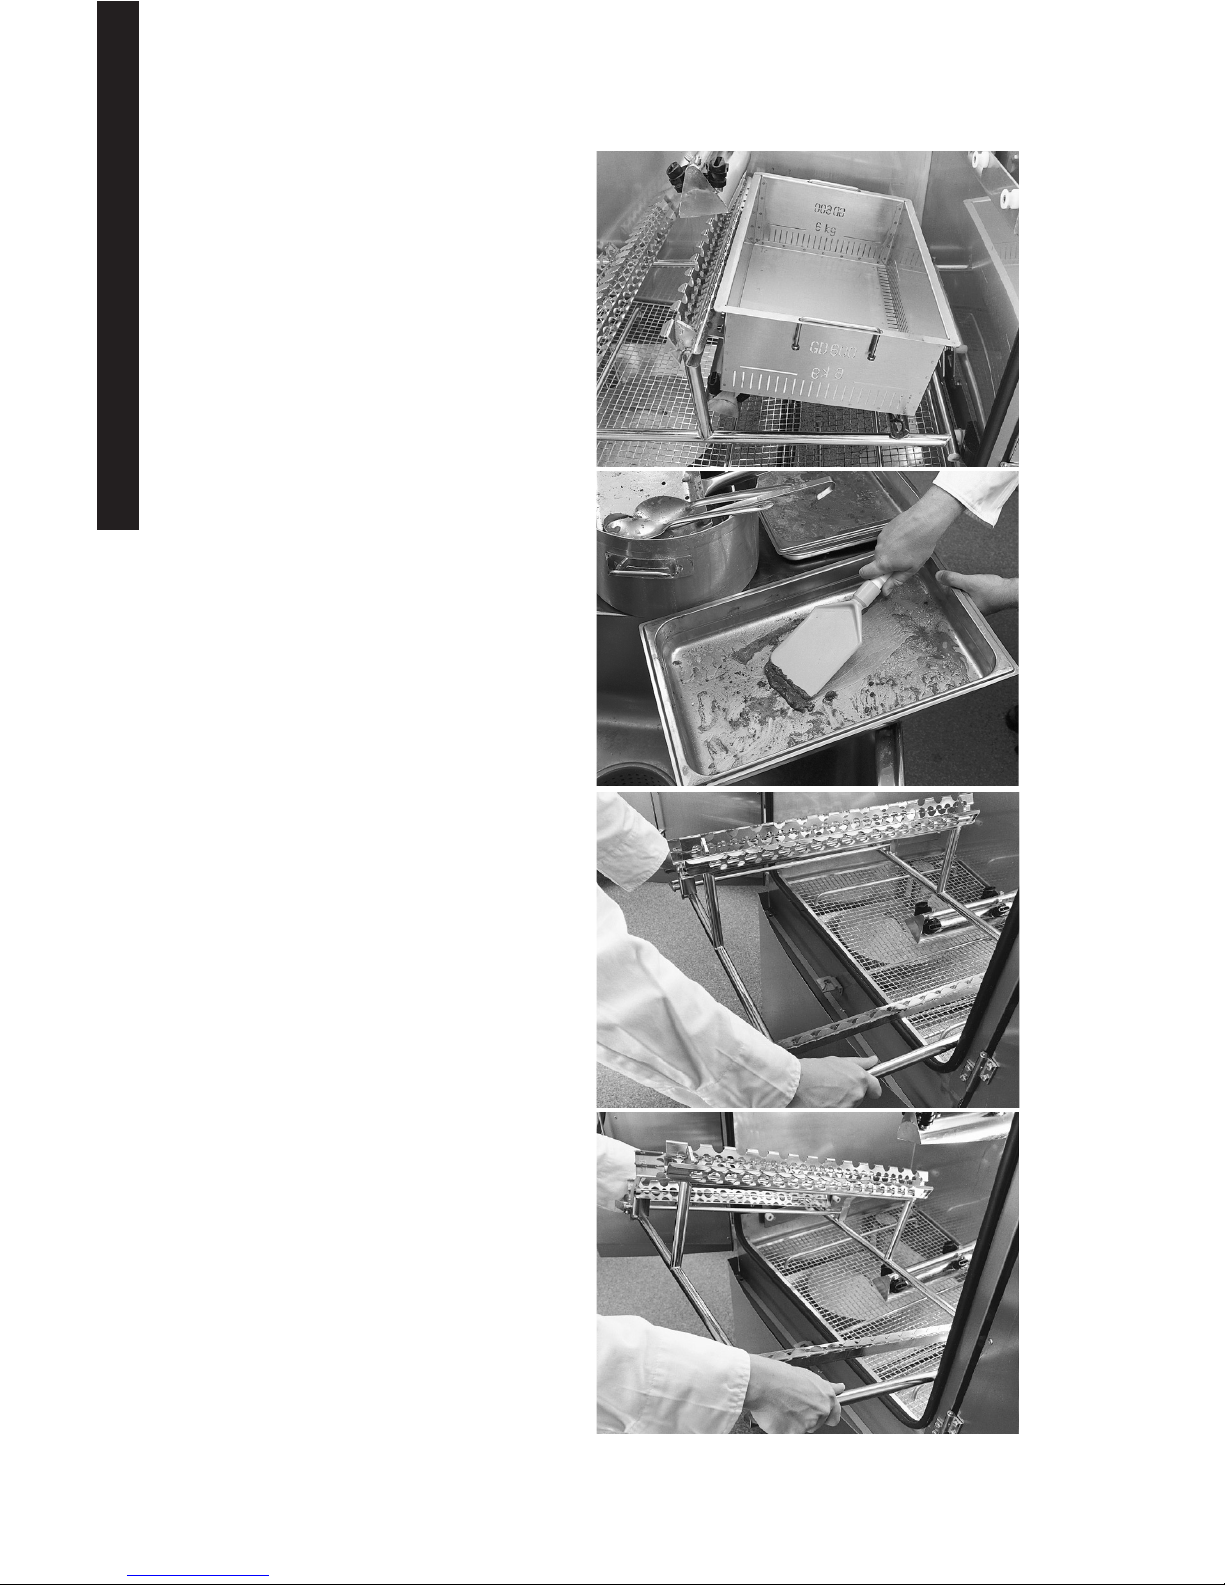
Check the amount of granules in
the granule collectors. When the
granules have been evened out they
should reach the 6 kg marking on
each collector. Add more granules
as required (ill. 1).
Pour the granules into the wash
tank.
8
Preparing utensils
Scrape or rinse off all loose food remains before placing kitchenware in the
machine.
NB! Pots should not be soaked. To avoid
foaming, do not prewash with washing-up
liquid. If foaming occurs, the machine will
not clean properly.
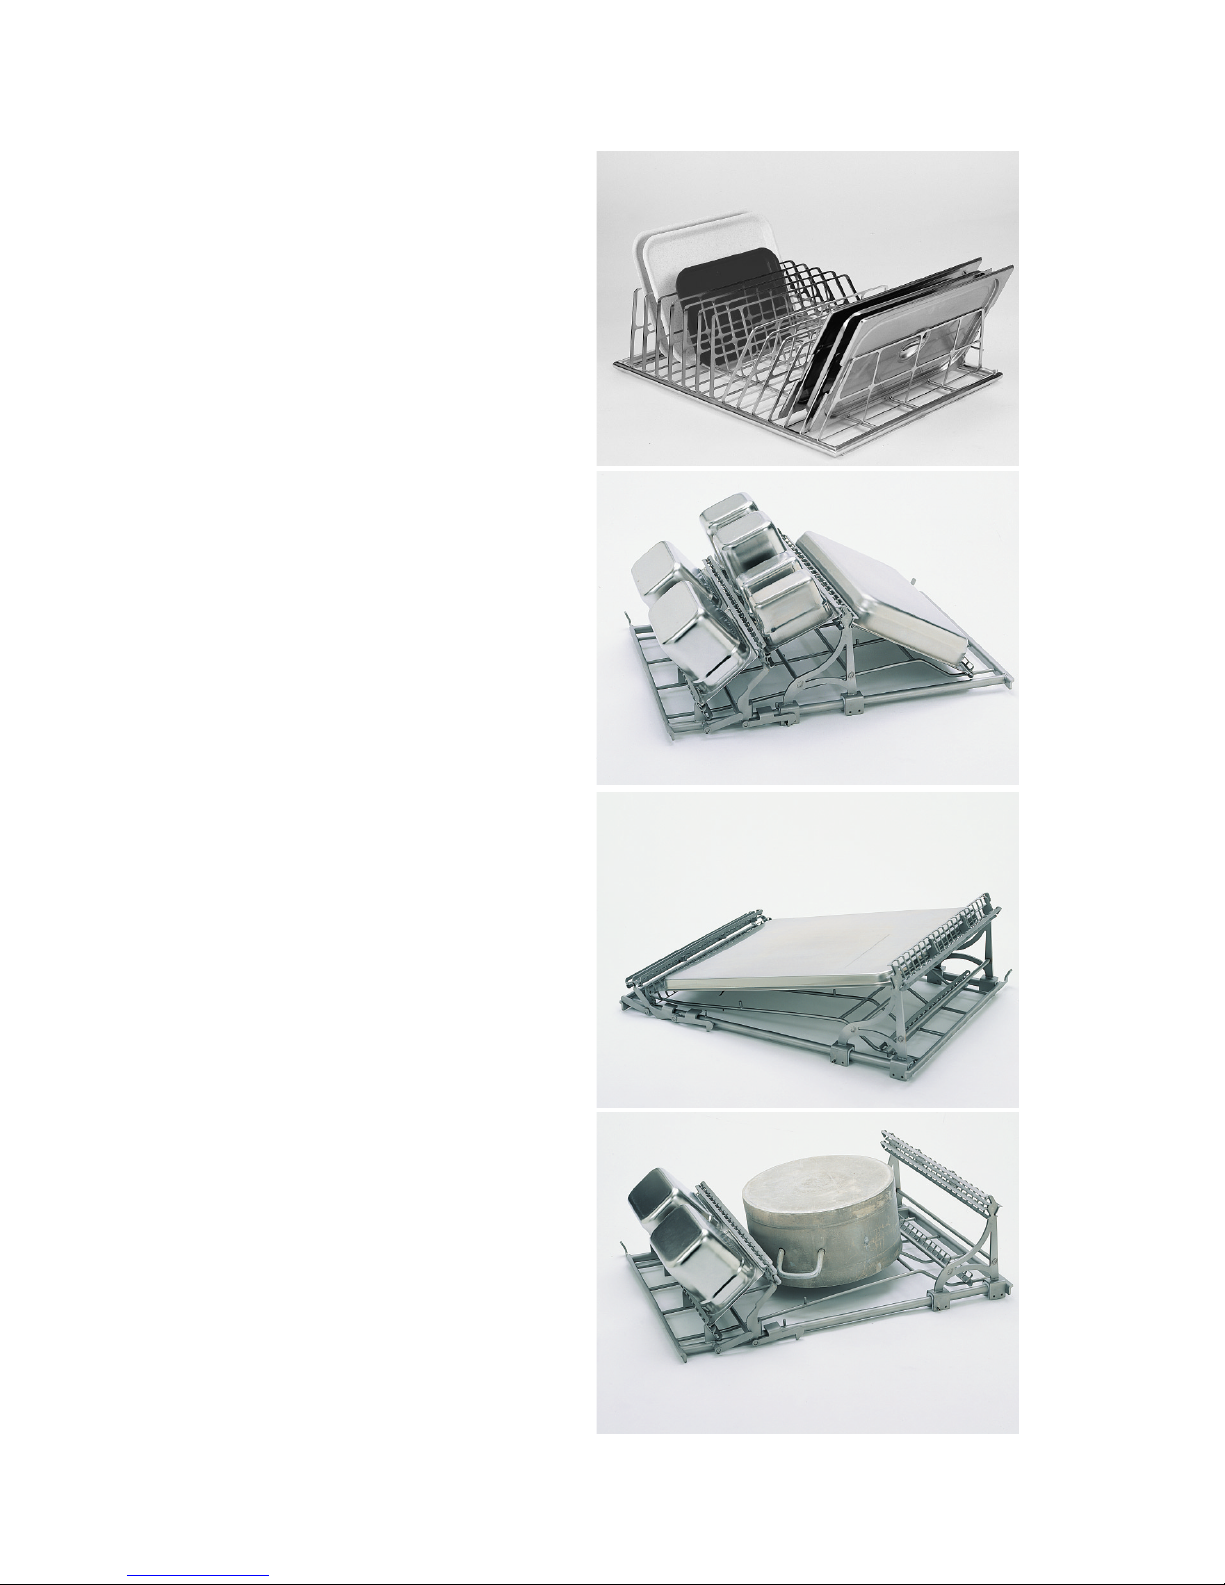
Loading utensils
All pots should be placed in the machine
with the inside facing downwards.
Changing ttings
The ttings can be removed and
changed.
To remove an insert, follow instructions
3:1 - 3:2.
Fittings are put into the machine by following the instructions below in reverse
order.
3:1 Draw the tting out as far as it will
go.
3:2 Tilt the tting by lifting it straight
up. Remove the tting.
2
3
3:1
3:2
Page 7
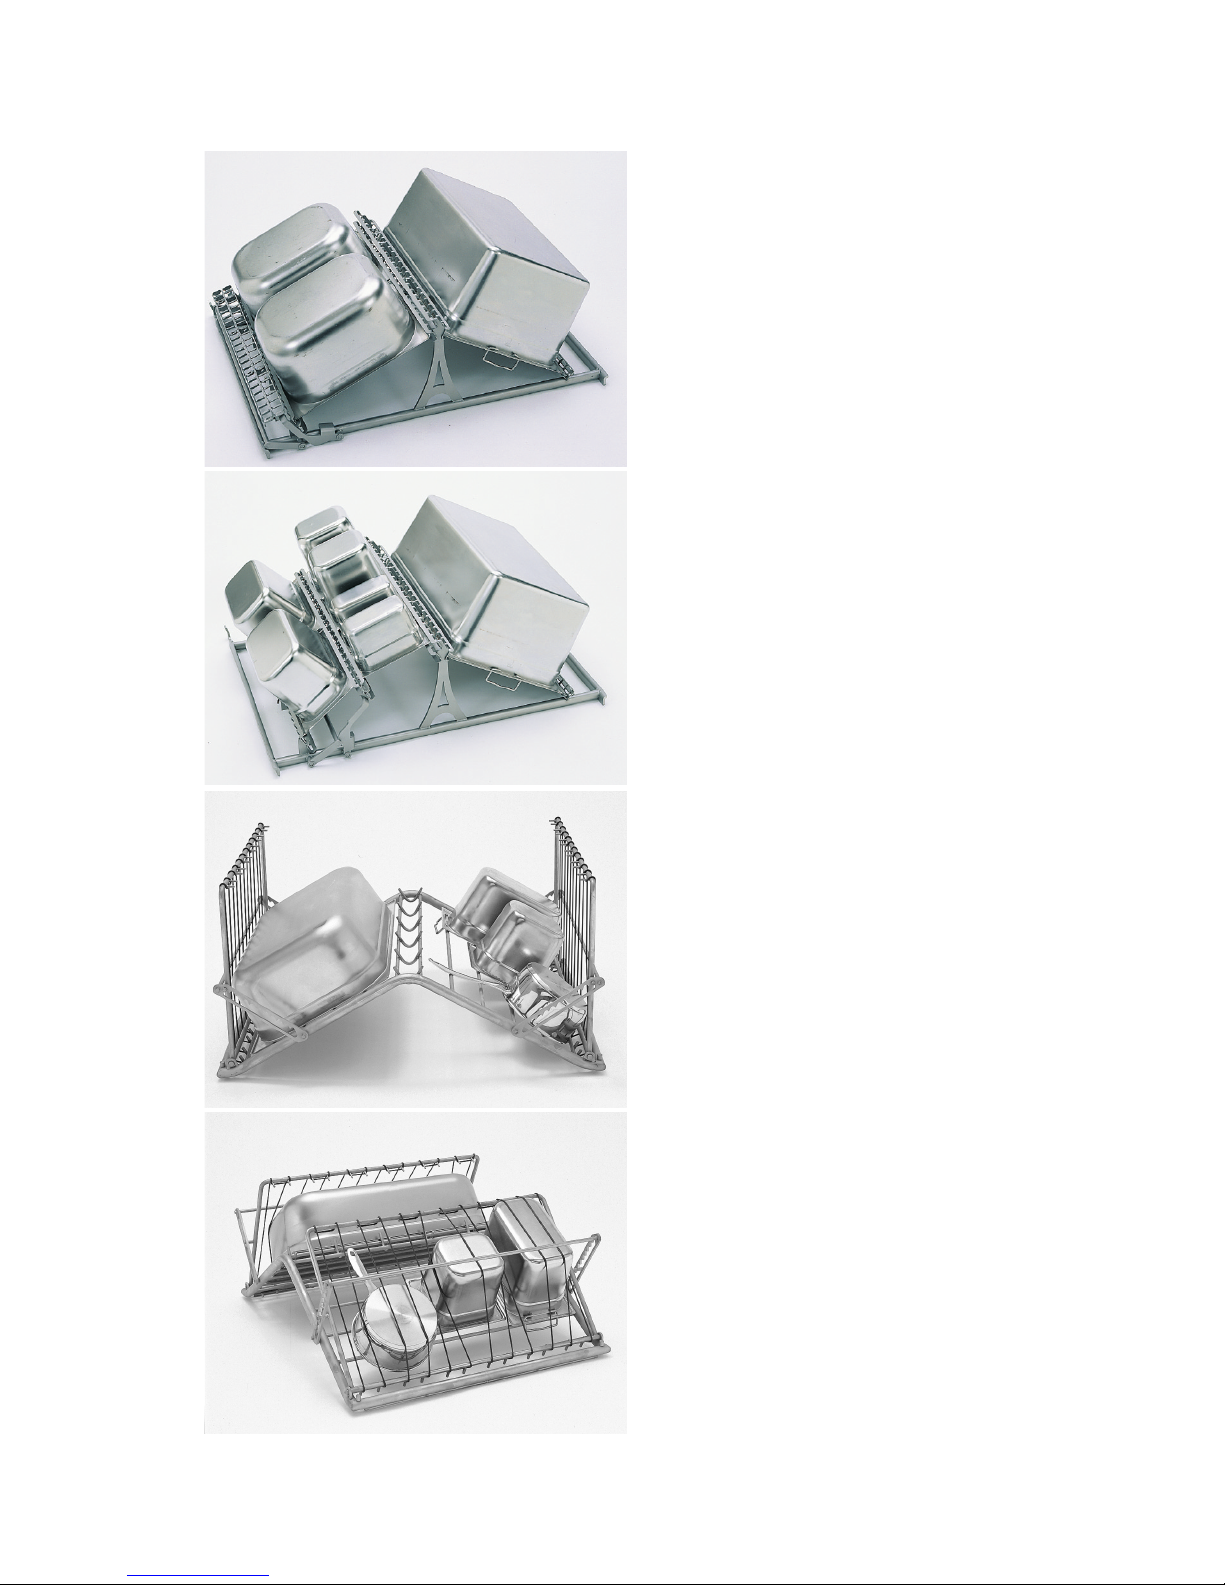
GD 672 Insert for containers (4:2)
1/1, 2/3, 1/2, 1/3, 1/4, 1/6 and 1/9
GN containers can be washed with the
divider raised.
9
GD 673Flexible insert (5:1 - 5:2)
Any kitchenware, with the inside facing
down wards, can be placed in this tting
and the fastening frame is then lowered
over. The rubber bands ensure that items
do not move during washing. The rubber
bands can break because of wear against
sharp edges and are quite simple to
replace.
NB! Items of the same depth should be
placed on the same side to ensure that they
are all properly held in place.
GD 672 Insert for containers (4:1)
1/1, 2/3, 1/2 and 1/3 GN containers can
be washed with the divider lowered.
4
4:1
4:2
5
5:1
5:2
Page 8
10
GD 675 Insert for containers and large
pots (7:1 - 7:4)
All containers in the Gastronorm series
from small 1/9 to large 2/1 as well as
mediumsize and large pots can be washed
with this insert.
GD 674 Insert for lids and pots (6)
Lids, trays and similar items with a maximum depth of 20 mm are washed with this
tting.
NB! Because of the location of this tting
it is only suitable for lightly soiled kitchenware.
6
7
7:1
7:2
7:3
Page 9
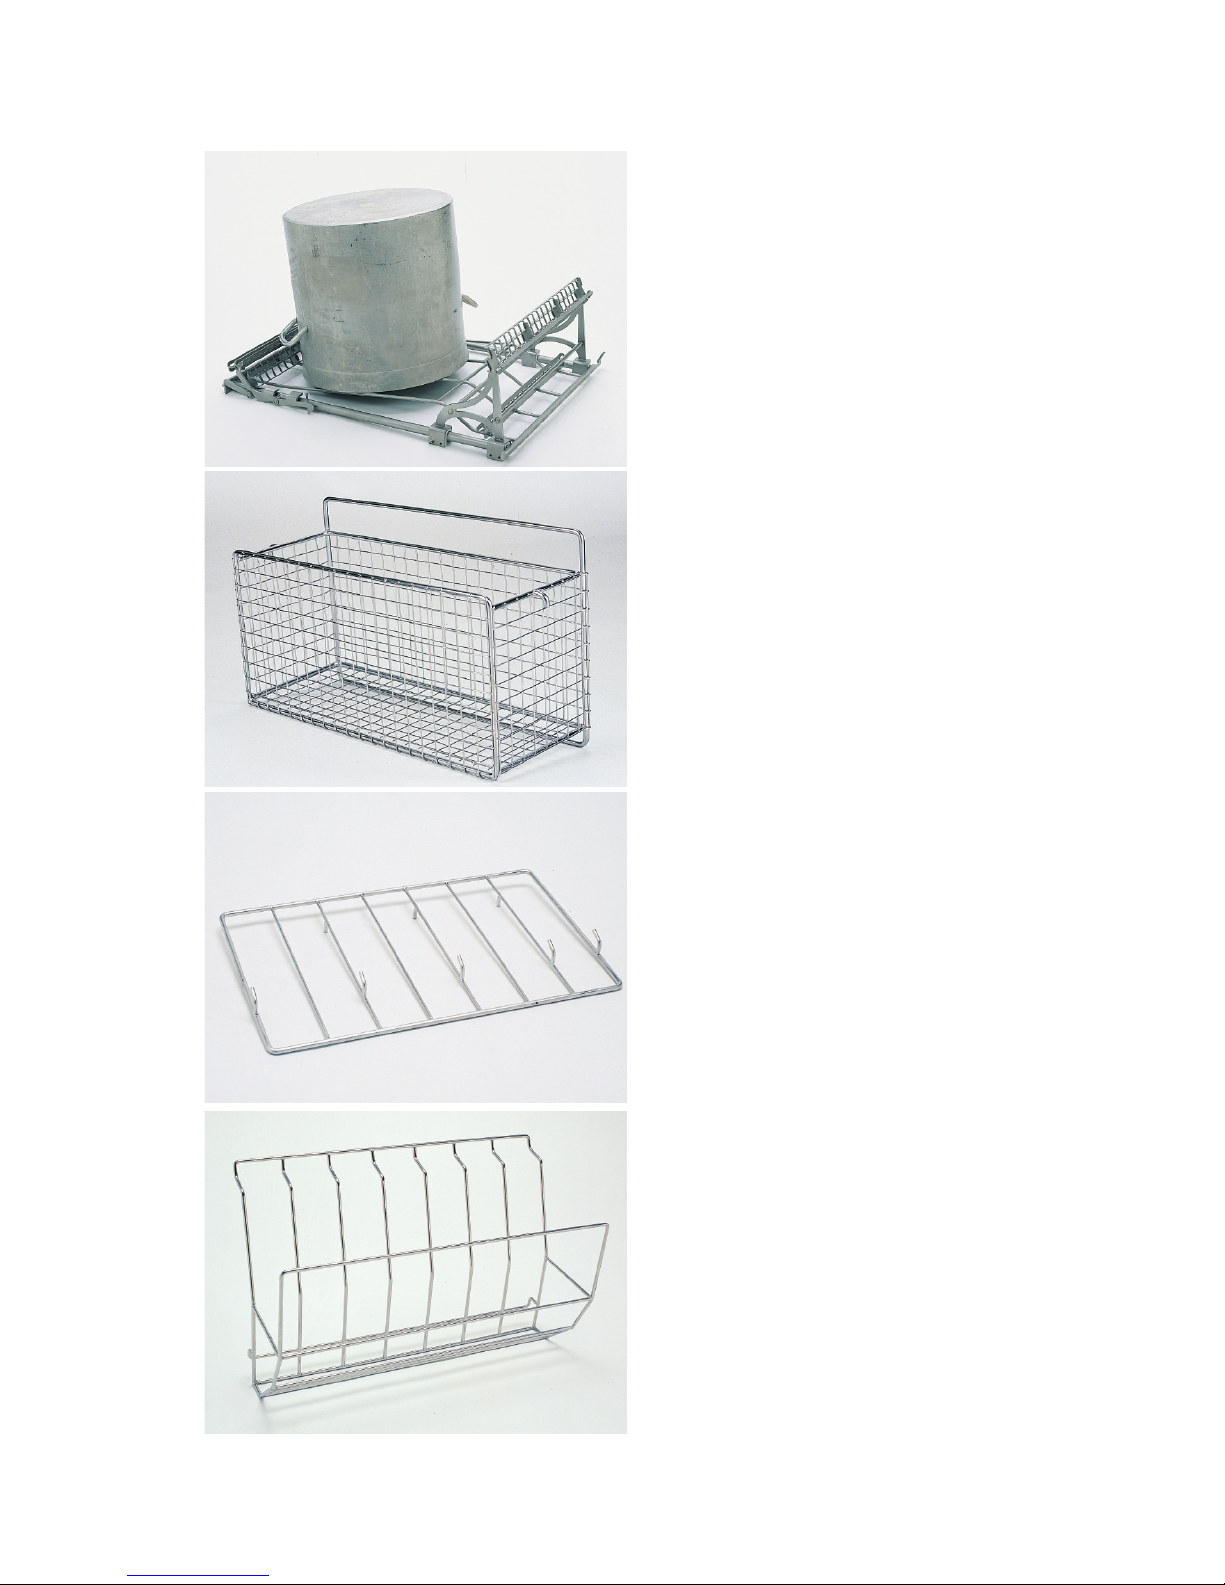
GD 675 Insert for pans and large pots
Large pots as deep as 700 mm can be
washed together with the GD 654 short
spray pipe.
GD 651 Net basket (8)
Net basket for ladles, whisks, bowls,
small saucepans etc.
GD 652 Pot grid (9)
Pot grid for mediumsized pots etc.
GD 653 Saucepan holder (10)
Saucepan holder for small and mediumsized saucepans, pots, pans etc.
7:4
8
9
10
11
Page 10
Removing / Replacing spray pipes
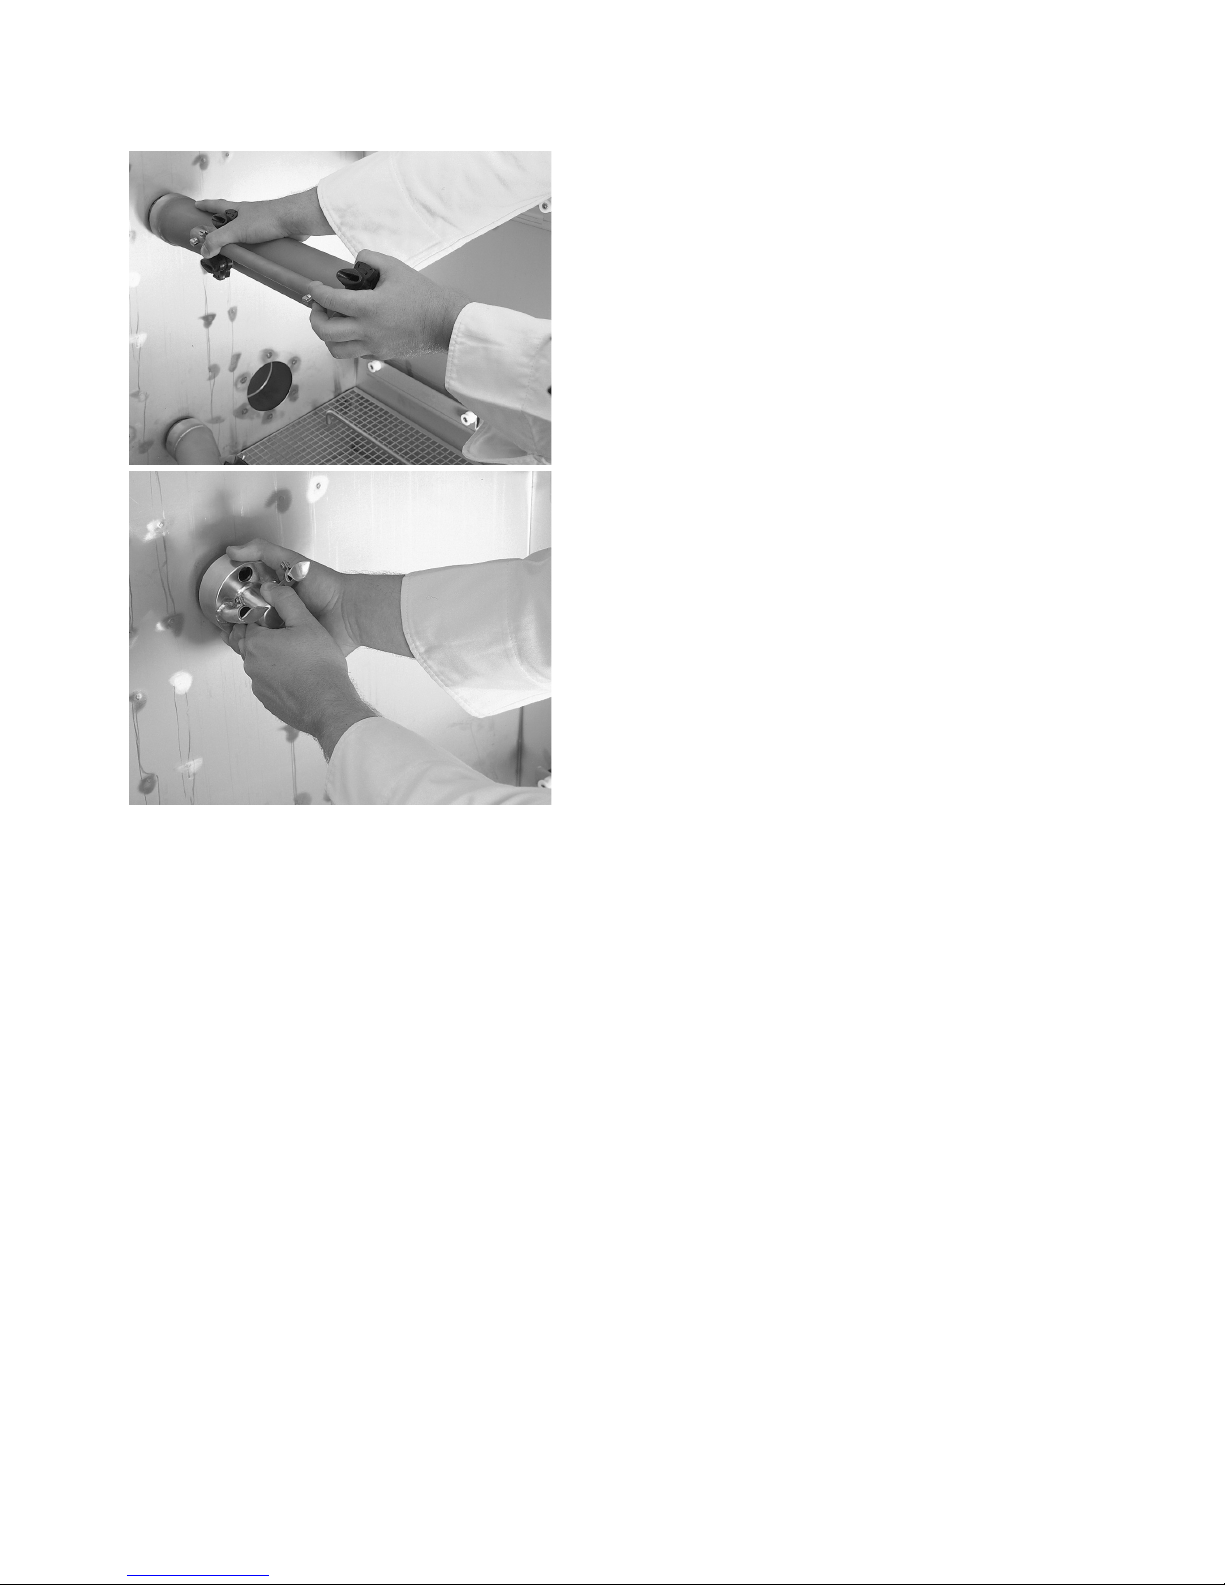
The long spray pipe is replaced with the
short spray pipe (GD 654) when washing
large pots (Ill. 11).
Press the spray pipe in and turn it anticlockwise. Pull it straight out. (Ill. 12). Press the
spray pipe in and turn it clockwise. Secure
by gently pulling it outwards. If replacing
the spray pipe is difcult then the seal may
be dry in which case dampen it with a little
water.
NB! The small spray pipe is not supplied as
standard.
11
12
12
Page 11
1
2
3
4
5
6
7
8
9
10
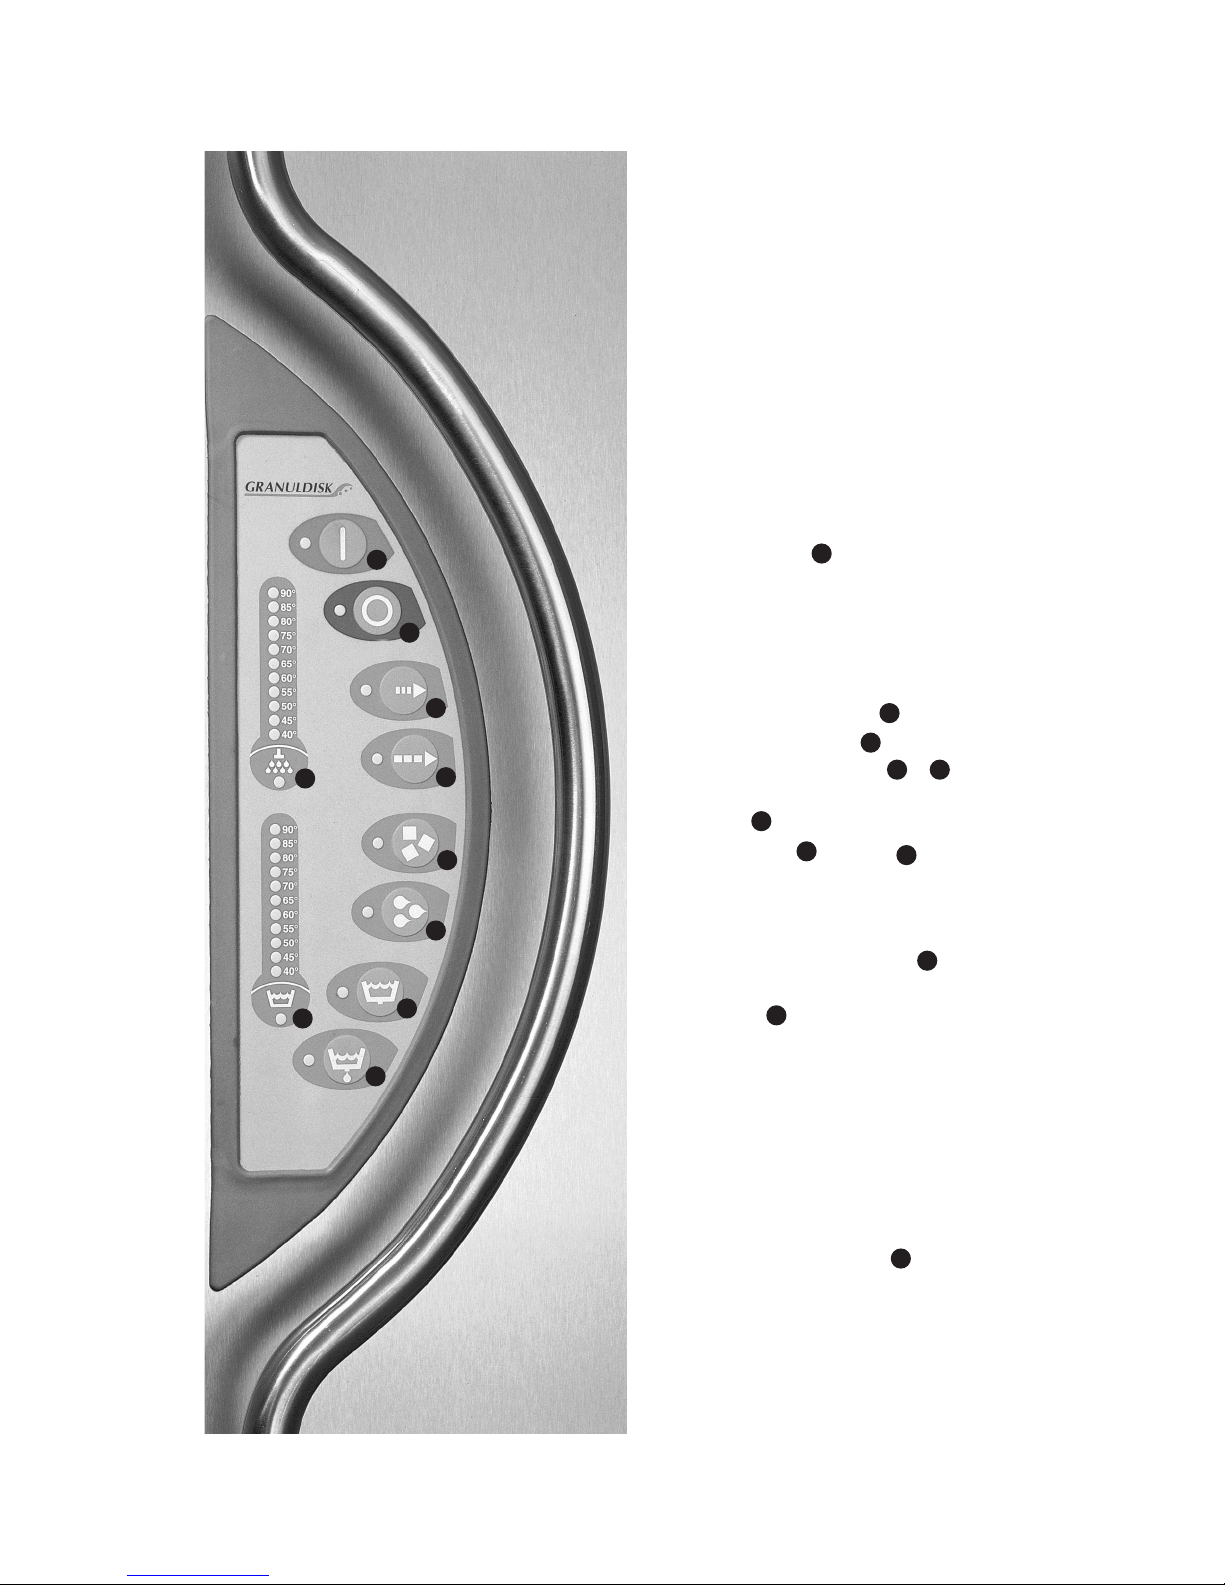
Control panel
1. startbutton
2. stopbutton
3. choice of short programme
4. choice of long programme
5. for washing with granules
6. for washing without granules
7. lling the wash tank with water
(bottom valve closed)
8. emptying the tank (bottom valve open)
9. shows wash water temperature
10. shows rinse water temperature
13
Filling the machine
The bottom valve is closed by pressing the
close button or by selecting a programme. The machine automatically lls
with water when the doors are closed and a
programme selected.
Select wash time
Normal, 5 min 30 s.
Long, 7 min 30 s.
Ultrashort 3 min, 30 s +
Hold the button for normal programme
pressed at the same time as pressing the
start button . Lamp starts to blink to
conrm the selection.
Select washing with or without granules
Washing with granules is used for
all heavily soiled items. Washing without
granules should be selected for lightly
soiled goods or for perforated trays or utensils where granules can fasten as well as
for transparent plastic materials. There is
an ultrashort programme for lightly soiled
utensils. NB! The ultrashort programme is
not designed to cope with burnt-on food.
Start
Press the start button. The water temperature in the wash tank should be at least
60°C to obtain the best results (the preset
temperature is 65°C). Washing at temperatures that are too low also increases the
risk for the creation of foam and a poor
wash result. The machine can be prepro-
7
5
6
1
1
3
1
3
3
3
4
13
Page 12
grammed so that it cannot be started before
the temperature in the tank has reached at
least 60°C. Reprogramming should only be
carried out by qualied staff. This default
temperature is already installed at the factory in machines equipped with GDT™.
To clean the inside of the machine, run a
short programme with the machine empty
before the rst run.
Operation
The wash programme begins by washing
with/without granules for 1, 3 or 5 minutes
after which there is a rinse without granules
followed by a nal rinse at 85°C with fresh
water for 30 seconds. If the temperature of
the nal rinse water is too low, the wash
time is increased until 85°C is reached.
The air in the machine is then cooled for
1 minute to lower the temperature of the
pots and remove steam.
When the rinse or wash tank elements are
activated and the water is being heated, this
is indicated by the lamp lighting under the
rinse or wash tank thermometer. Not in
operation simultaneously.
NB! The doors cannot be opened before the
wash programme is completed and the operating lamp is off.
Stopping the machine while in operation
Should it be required to stop the machine
before the washing cycle is complete, switch
to washing with water for about 30 seconds to rinse off all granules. Then
press the stop button. The stop button
can be pressed immediately if the programme without granules is being used or
if the machine must be stopped in an emergency.
NB! Utensils can have remains of detergent
on them and should be washed again before
they are taken out of the machine and used!
Inspecting pots and pans
It is important, as with all washing up,
that the staff check the results. Remove
any granules that have fastened in corners,
sharp angles and other inaccessible places.
Granules
Granule potwashing machines from Granuldisk AB work best with our specially
designed granules. Their design ensures the
best wash results as well as the longest
working life both for themselves and the
machine. For this reason, the guarantee
only applies if granules from Granuldisk AB
are used in the machine. The plastic material in the granules is approved for use in
conjunction with food.
14
9
10
2
6
14
Page 13

We recommend that the granules are
replaced several times a year.
Hygiene
The machine is prepared for automatic
HACCP documentation. Specially developed software, GDT™, Granuldisk Documentation Tool, and a modem are then
required.
15
Page 14
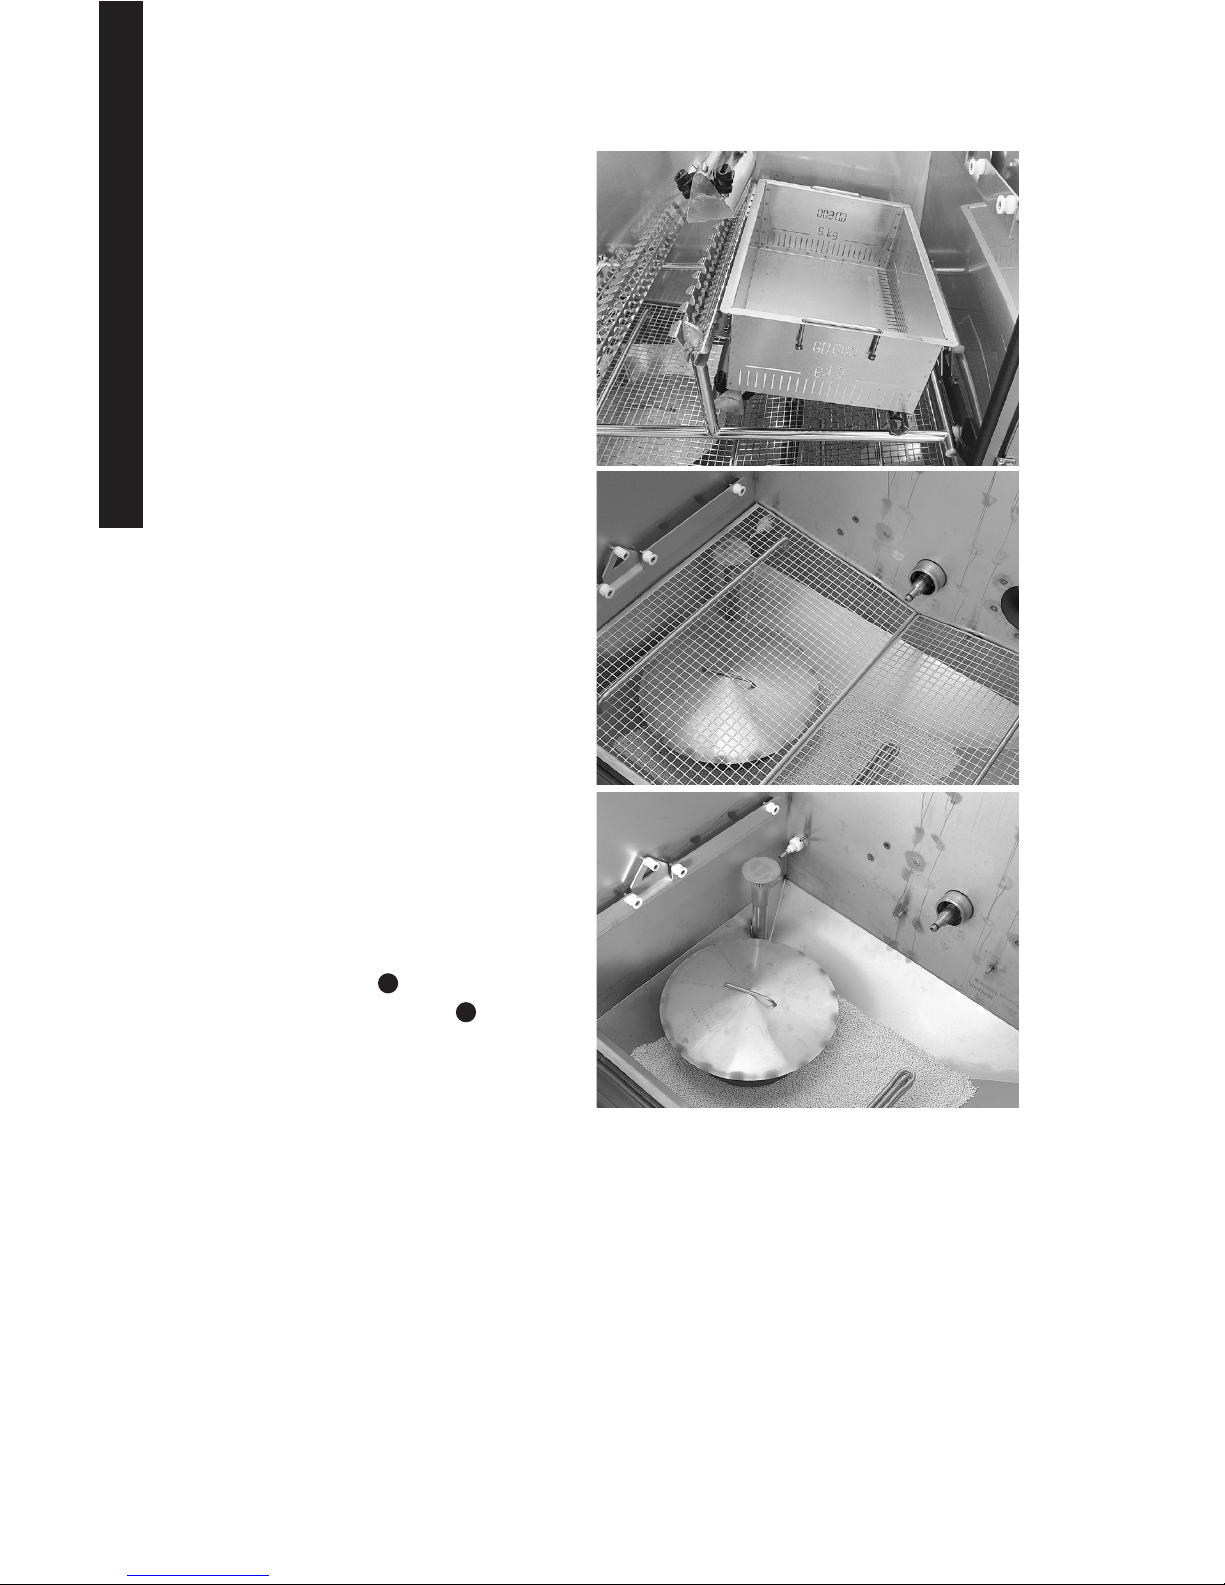
The insert should be placed in the bottom
of the cabinet. Close the doors and start a
long programme. All the granules will end
up in the granule collector.
Take out the lled granule collector and
wash (shower) the granules thoroughly so
that any food remains are washed away.
The machine should have about 6 kg granules. There is a mark for 6 kg in the granule collector.
NB! Never use too many granules in the
machine. This can lead to blockages in the
spray pipes as well as an inferior wash
result.
Emptying the tank
Pressing the stop button.
Then press the emptying button.
The lamp lights briey while the valve
moves into the open position.
Rengöring
·Lift out the inserts (see p. 8, ill. 13).
·Take out both the spray pipes
(see p. 12, ill. 11).
·Lift out the bottom grating
(see ill 16).
·Lift out the overow sieve (see ill.17)
·Wash the inside of the machine with just
water (see ill. 17).
·Remove the sieve cover by pulling the
handle straight up (see ill. 17).
·Then clean the parts that have been lifted
3. Daily cleaning
Collecting and cleaning the
granules
The granule collector, which
comes with the machine, is the
easiest way of emptying the
machine of granules for cleaning or
changing. Place the GD 655 granule collector in the runners for a
GN 1/1 on the right of a GD 672
or GD 675 insert (see ill. 15).
16
2
8
15
16
17
Page 15

out. Be especially careful to check that the
spray pipes are not blocked.
·Wipe the level guard (see ill. 17).
·The drip channel should also be washed
clean and dried. It is important that this
is done to avoid the channel becoming
blocked.
·Wipe the door seals.
·Wipe the inside of the machine with a
damp cloth. The outside of the machine
should not be washed with high pressure
water.
·The top should be wiped off as required
or at least once a month.
Replacement of ttings
Replace all ttings.
Ensure the handle on the sieve cover is
pressed in (ill. 17).
It is important that the spray pipes are
secured properly. If this is a problem it
could be that there are granules between
the spray pipe and the rubber seal. Take
out the spray pipe, remove any granules
and try again. Never use force to t the
spray pipes
NB! If the overow sieve is not put back then
the granules will run down the drain.
During longer stoppages
·Ensure that the wash tank is completely
empty after cleaning. Any water remaining
in the bottom should be removed with a
sponge or something similar.
·Leave the doors slightly open so that the
air can circulate in the machine.
·The granules should be stored in the granule collector standing in the machine.
·After a longer stoppage; check the operation of the machine according to the service manual, possibly with the assistance of
a service engineer.
·For stoppages of more than three months
see the routines for shutting down in the
service manual.
17
Page 16

The machine is equipped with various
alarms.
Spray pipe motor alarm
If the spray pipes should become blocked
for any reason, the machine comes to a
total standstill and all the lamps on the control panel - begin to blink in time.
If the alarm goes off:
Switch the machine off by pressing the stop
button. Open the doors, check what has
caused the alarm and remedy the fault.
Then close the doors, select a new wash
programme and start the machine.
NB! Contact a service engineer if no fault is
found.
Long lling time
If it takes too long to ll the wash tank, the
lamp for emptying the wash tank blinks
out of time with the others. Check that
the water supply is switched on. Another
cause can be a block in the drain valve or a
false reading for the water level. NB! If the
drain valve is blocked or there is a false level
reading, contact the service staff.
18
4. Troubleshooting and alarms
Check the following if the utensils
are not completely clean:
·Are the spray nozzles blocked?
·Were the utensils located cor
rectly?
·Wasthe right programme selected?
·Is the wash water very dirty?
·Are there sufcient granules?
·Is the detergent dosing correct?
Long time after lling
If the washing with granules lamp blinks
out of time with the others, the most likely
problem is foaming in the machine.
NB! Contact the service staff to check that
the temperatures in the wash and rinse tanks
are correct. Check that washing-up liquid is
not being used in the machine. Contact your
detergent supplier to check if the detergent
dosing is correct.
Wrong temperature in the wash or rinse
tank
If either of the lamps under the symbols
for the wash water or rinse water
thermometers blinks out of time with
the others the thermostat is not working.
The machine cannot be started before the
thermostat has been replaced.
NB! Contact the service staff for a check.
1
10
2
5
9
10
3
Page 17

Notes
Page 18

 Loading...