

Page 1

Find & Apply
User Guide
Version 2.0
Prepared April 9, 2008
Page 2

Grants.gov Find and Apply User Guide
Table of Contents
Introduction...…………………………………………………………………………….3
Find Grant Opportunities.......................................................................................4
Search Grant Opportunities..................................................................................5
Email Subscription................................................................................................8
Apply for Grants with Adobe Reader Quick Overview.........................................10
Apply for Grants with PureEdge Quick Overview................................................12
Download Application Packages .........................................................................15
Instructions for Downloading Application Packages............................................15
Complete Application Packages with Adobe Reader..........................................21
Complete Application Packages with PureEdge.................................................34
Track Your Application........................................................................................41
Instructions for Tracking Application...................................................................43
Forgot Your Password?...................................................................................... 44
Forgot Your Username? .....................................................................................44
2 of 44
Page 3
Introduction
In this user guide you can find step-by-step instructions on Finding Grant
Opportunities using a basic search, browse by category, browse by Agency or
advanced search. There are also instructions on how to sign-up for email
subscription to receive email alerts about new Grant Opportunities as well as
how to apply, download, complete and track an application.
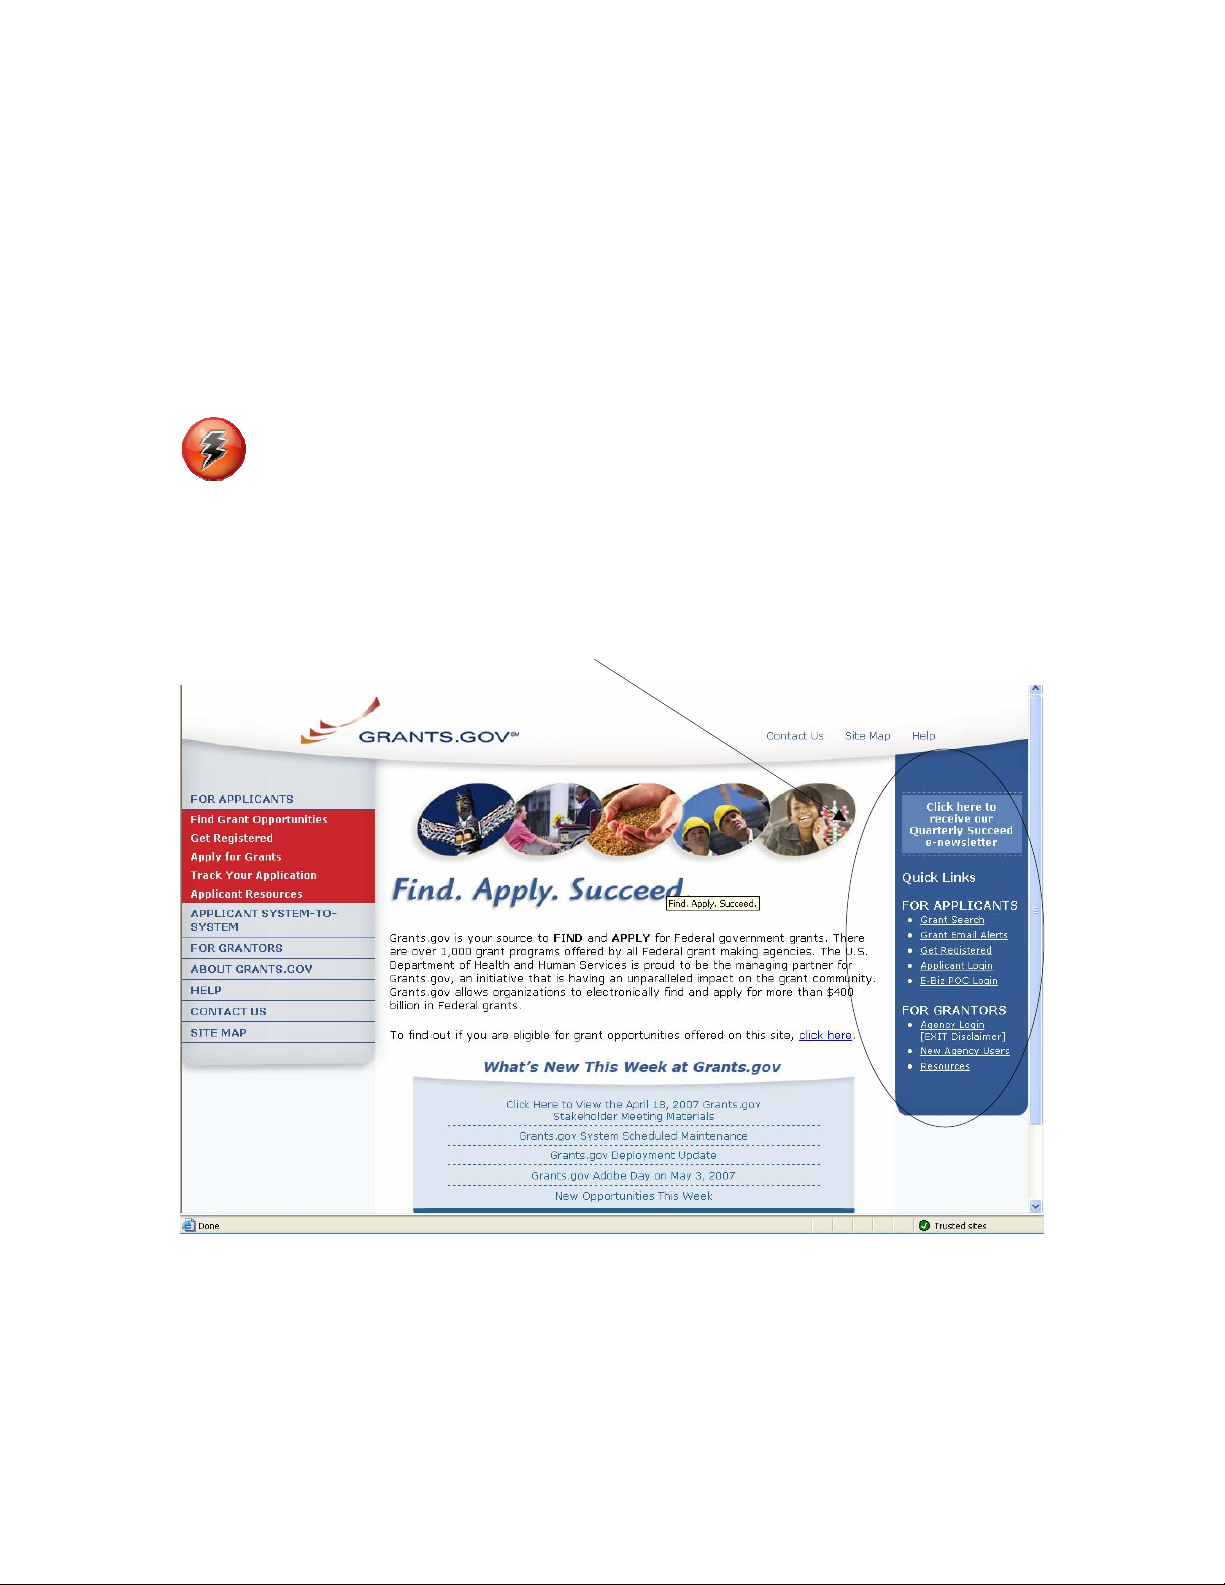
Throughout this user guide you will see this icon, it represents instructions
about Quick Links that can be accessed on most Grants.gov web pages. The
Quick Links is a blue box on the right side of the webpage with links to frequently
visited pages.
3 of 44
Page 4
Find Grant Opportunities
Grants.gov has been designed to help you search for grant opportunities
throughout the federal government. You have two options: Search Grant
Opportunities online and in real time, or Receive Email Alerts detailing new grant
postings.
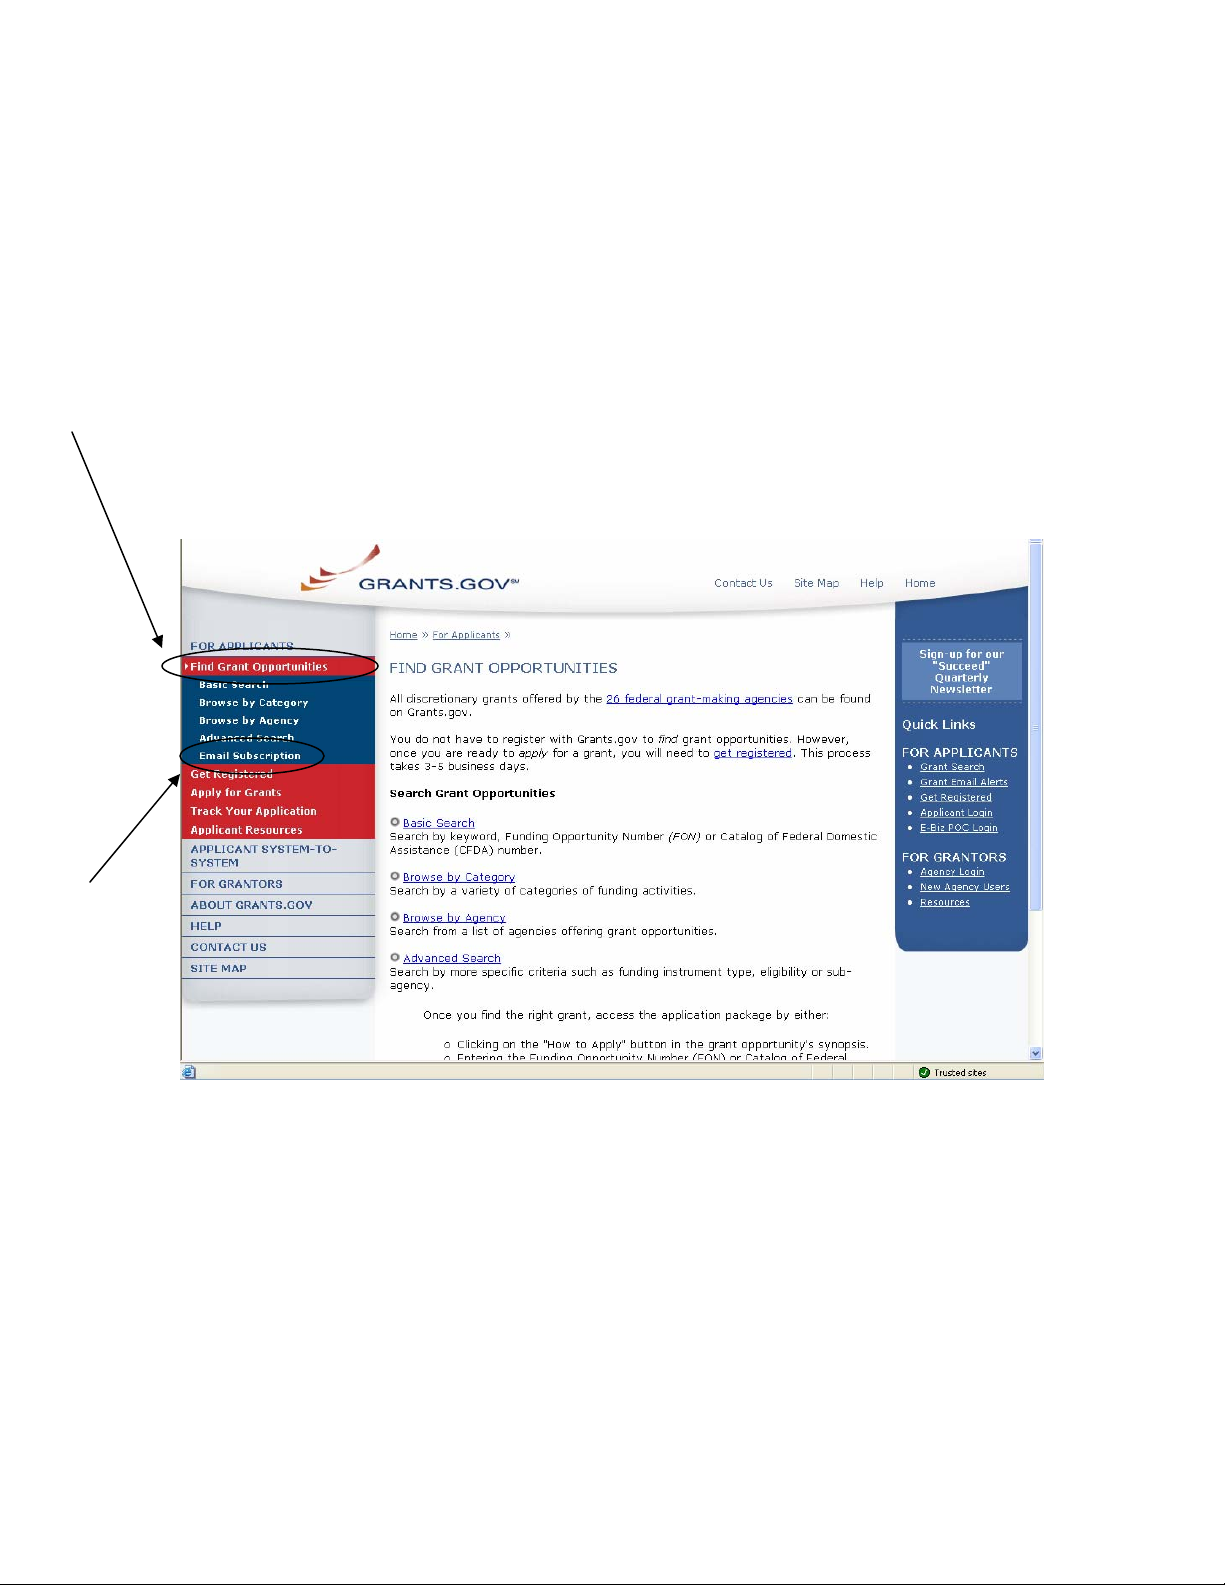
To find grant opportunities on Grants.gov, simply select Find Grant
Opportunities from the navigation on the left side of any Grants.gov screen.
This will take you to the Find Grant Opportunities screen, where you will be
able to choose whether you’d like to search grant opportunities online or be
notified of new grant postings by email.
4 of 44
Page 5
Search Grant Opportunities
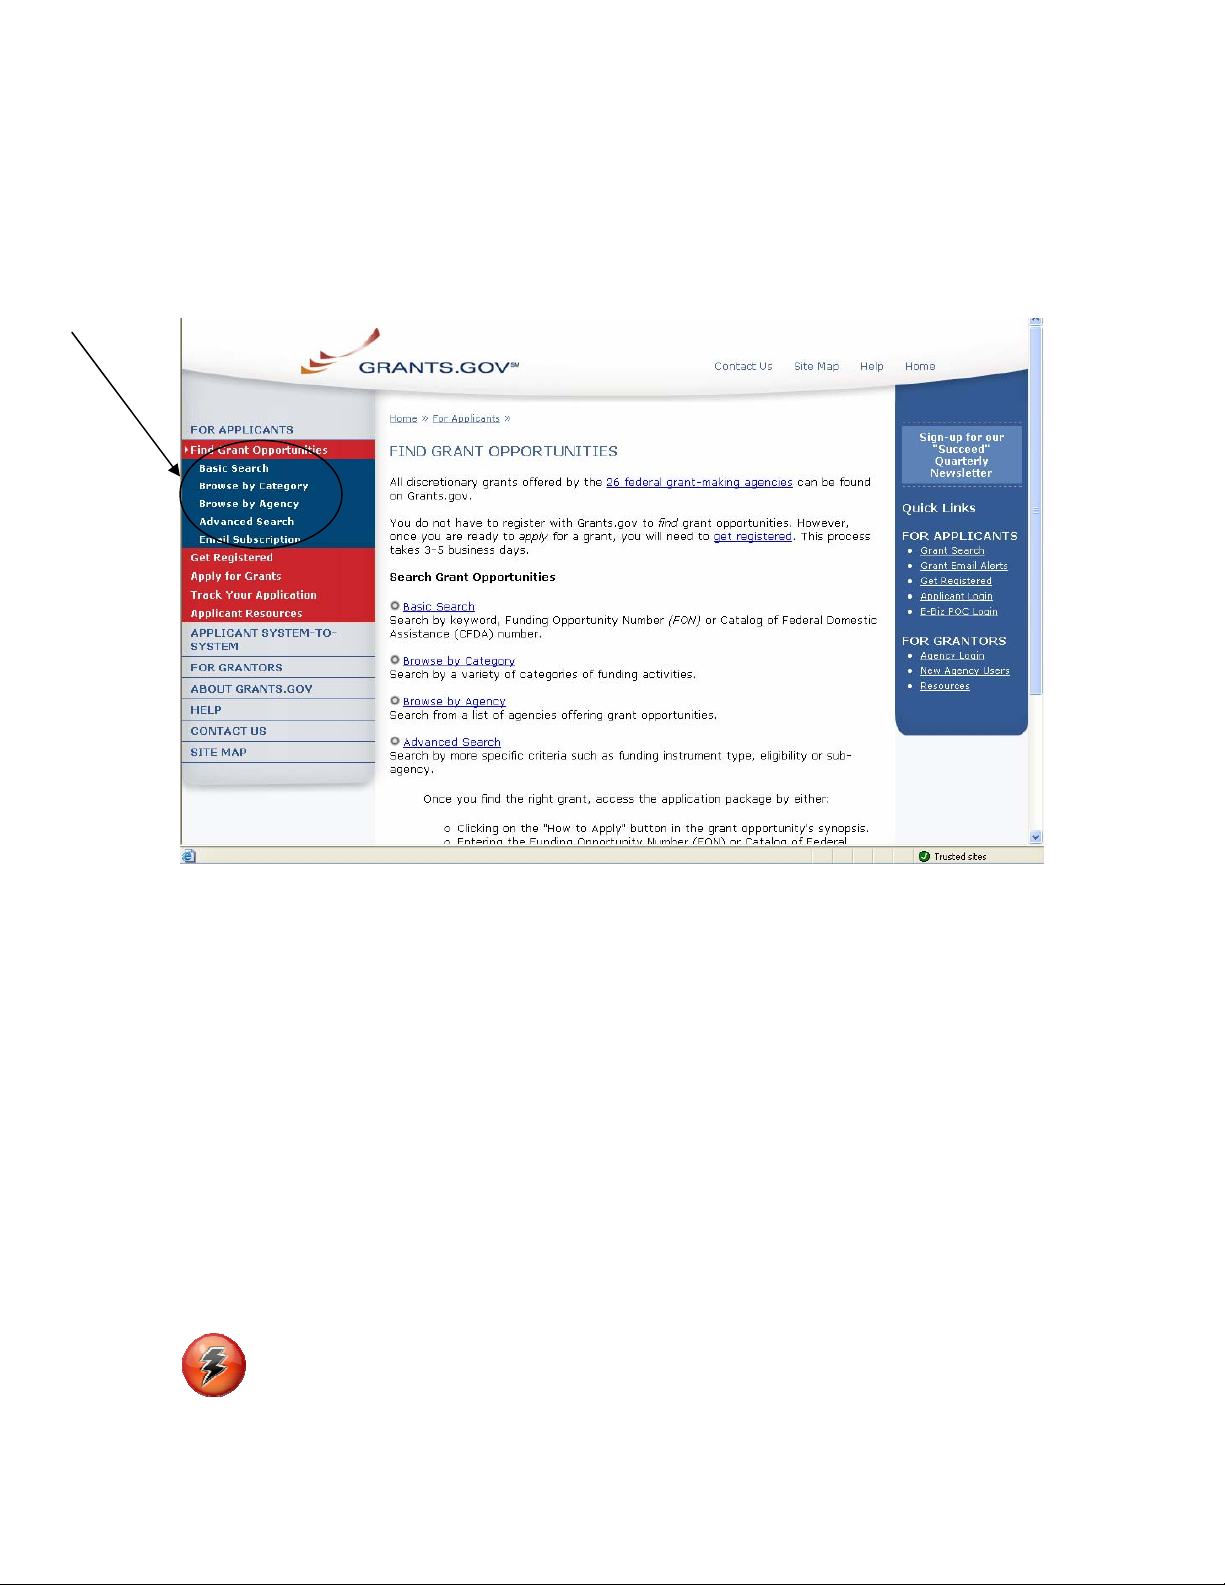
To search for opportunities online, in the For Applicants section, click on Find
Grant Opportunities in the left navigation.
Once on the Search Opportunities page, you may conduct a basic search,
browse by category, browse by agency or conduct an advanced search.
Quick Link Tip: You can also go to the Quick Links box and click on Grant
Search to begin to immediately search for grants.
5 of 44
Page 6
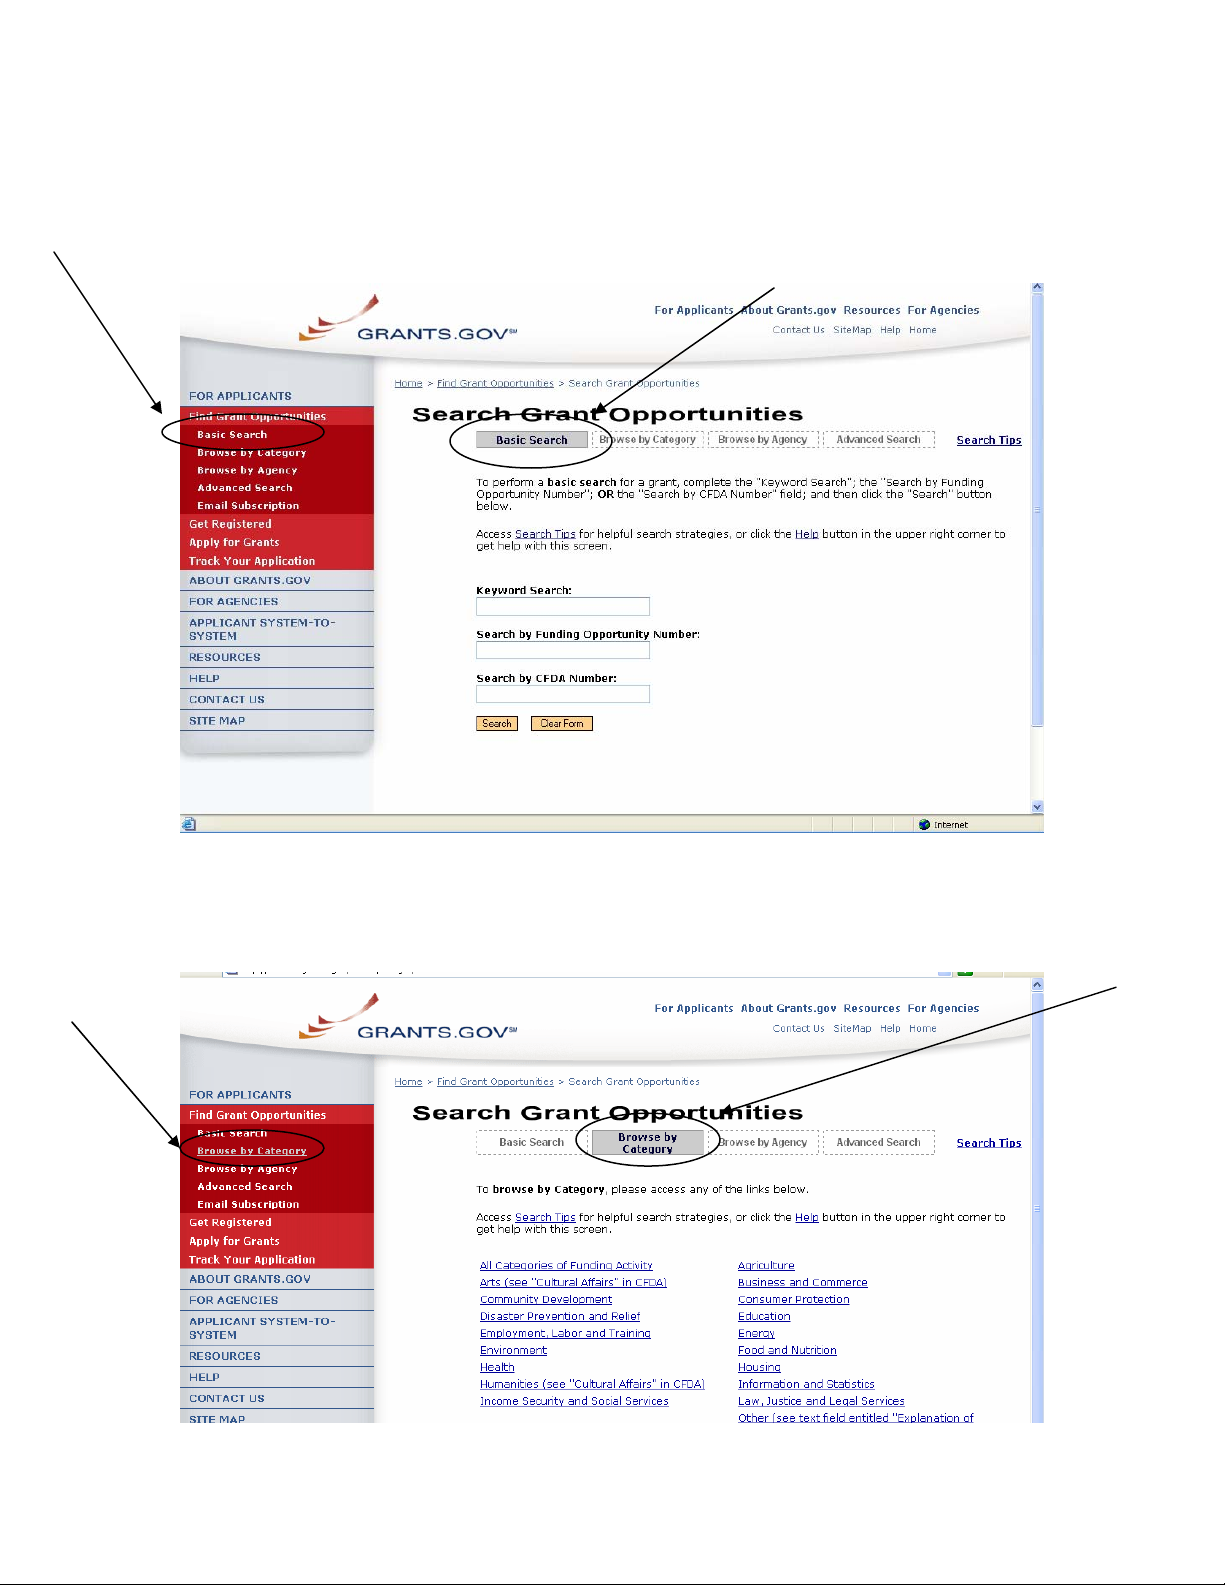
To conduct a basic search, simply click on Basic Search under Find Grant
Opportunities in the left navigation menu. Or you can click on the Basic Search
link on Search Grant Opportunities page. The Basic Search page will appear.
To browse grant opportunities by category, simply click on Browse by
Category at the top of the page or in the left navigation. The Browse by Category
page will appear.
6 of 44
Page 7
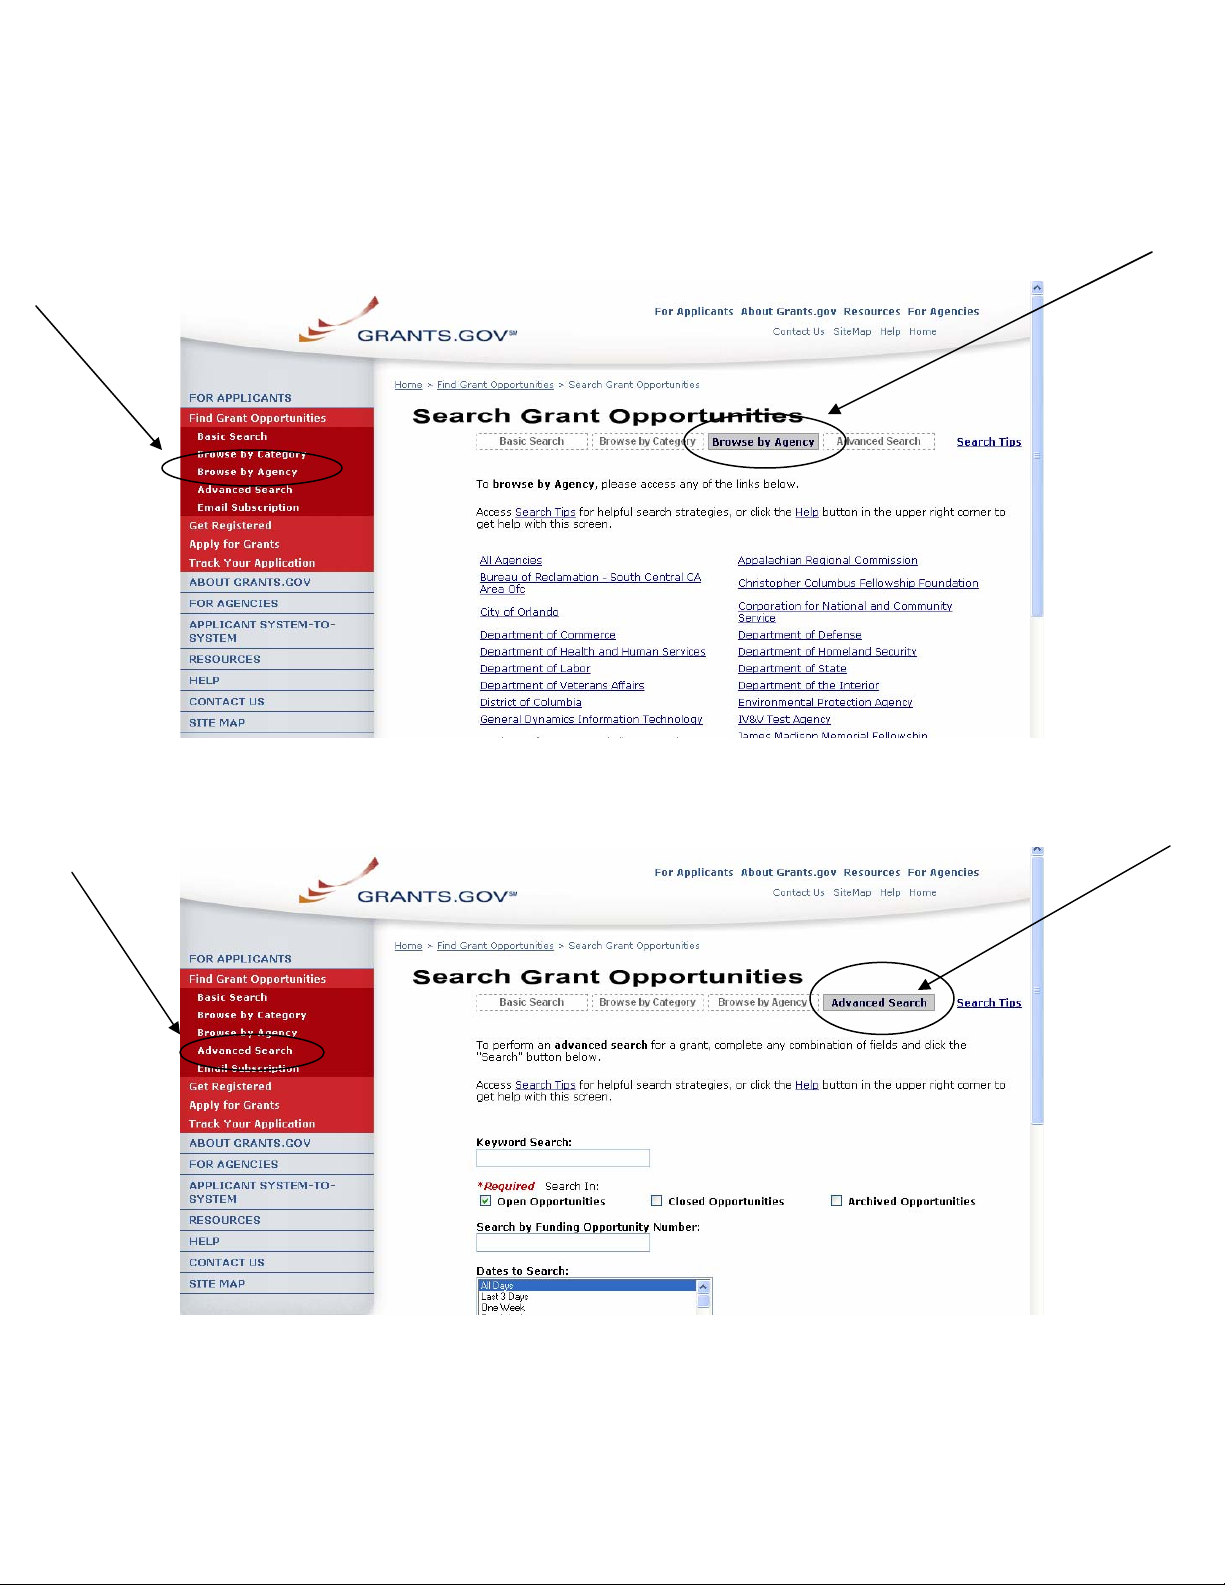
To browse grant opportunities by agency, simply click on Browse by Agency at
the top of the page or in the left navigation. The Browse by Agency page will
appear.
To conduct an advanced search, simply click on Advanced Search at the top
of the page or in the left navigation. The Advanced Search page will appear.
7 of 44
Page 8

Email Subscription
Grants.gov is designed to allow users to register (subscribe) to receive email
notifications of new grant postings that meet specific criteria.
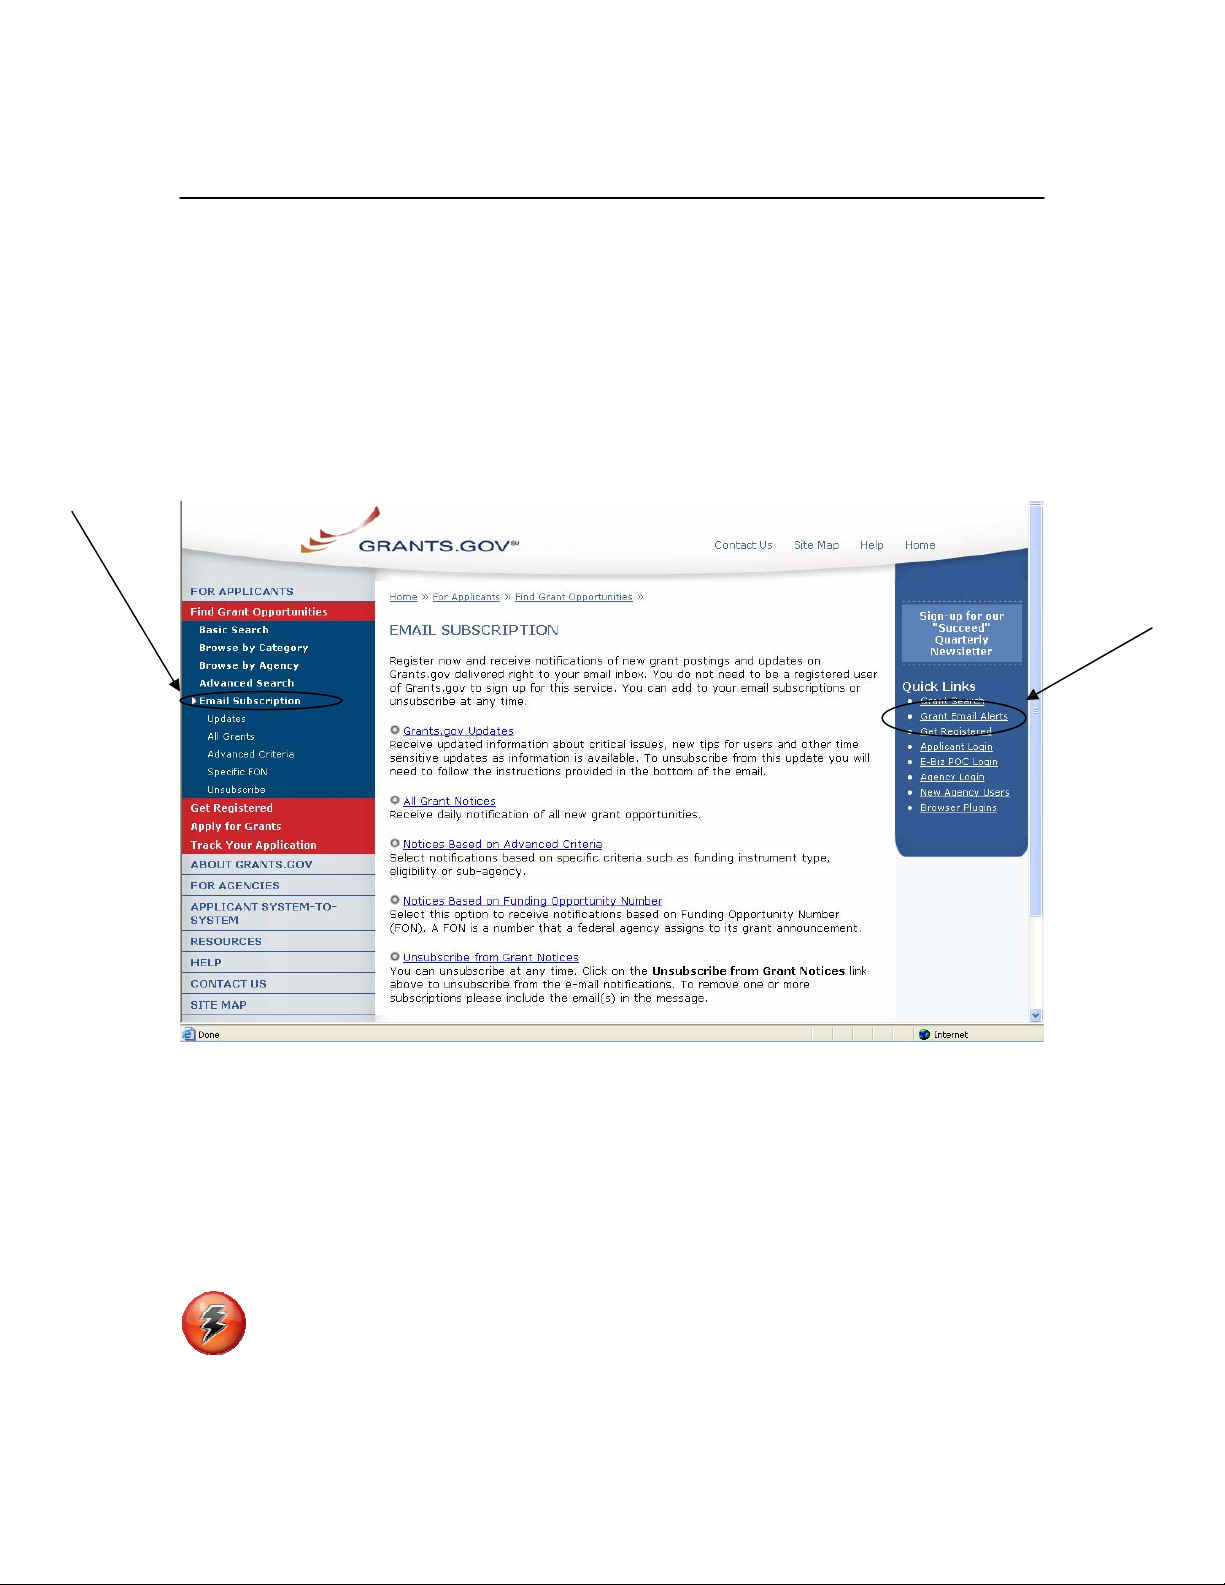
To register to receive grant postings that meet the needs of you or your
organization, in the For Applicants section, click Find Grant Opportunities from
the left side navigation. Then, click on the Email Subscription from the
submenu.
Once on the Email Subscription page, you may elect to be notified of Updates, all
grant notices, those with advanced criteria, grants with a specific Funding
Opportunity Number (FON), or, you may choose to unsubscribe from receiving
email notifications.
Grants.gov Updates:
To receive email about Grants.gov Updates, on the Email Subscription page click
on Grants.gov Updates or click on Updates under the Email Subscription left
submenu. The Subscription Services page will appear and allow you to
subscribe.
All Grant Notices:
To receive email about all grants, on the Email Subscription page click on All
Grant Notices or click on All Grants under the Email Subscription left submenu.
The Subscription Services page will appear and allow you to subscribe.
Advanced Criteria:
To be notified about grants with Advanced Criteria, in the For Applicants section
click on Find Grant Opportunities. Then, click Email Subscription from the left
navigation and click on Advanced Criteria on the Email Subscription left
submenu. The Subscription Services page will appear and allow you to
subscribe.
Specific FON:
To be notified about grants with a specific Funding Opportunity Number (FON), in
the For Applicants section click on Find Grant Opportunities. Then, select Email
Subscription from the left navigation, and click on Specific FON or click
Selected Notices based on Funding Opportunity Number link in the Email
Subscription page. The Subscription Services page will appear and allow you to
subscribe.
8 of 44
Page 9
Unsubscribe:
To unsubscribe, in the For Applicants section, simply click on Find Grant
Opportunities in the left side navigation from Grants.gov’s homepage. Then,
select Email Subscriptions from the left submenu, and click Unsubscribe. The
Subscription Services page will appear and allow you to unsubscribe from
receiving emails. You will need to confirm your unsubscription. An email will be
sent to your registered email address. Click the link enclosed in the email and the
unsubscription will be completed.
Quick Link Tip: To register to receive grant postings that meet the needs
of you or your organization, you can also click on the Grant Email Alerts in the
Quick Links box.
9 of 44
Page 10

Apply for Grants with Adobe Reader Quick Overview
Click here to view Apply for Grants Instructions for PureEdge.
Notice: Grants.gov is currently transitioning from phasing out of PureEdge
software to using Adobe Reader software exclusively. For a period of time
applicants will still be able to use PureEdge as it is applicable.
By downloading a grant application package, you can view it offline, giving you
the flexibility to complete the application when and where you want. You can also
route it through your organization for easy review and then submit it with a simple
click. Before you apply, remember you must be registered
have the Funding Opportunity Number (FON) and/or CFDA number of the
desired grant. If you don’t have a FON and or CFDA number return to Find Grant
Opportunities to search for this information. Once those steps are complete, you
will be ready to download the application package and begin the 4-step process
to apply for a grant.
Step 1: Download a Grant Application Package and Instructions
You can find the grant application package from your search results on
Grants.gov. From your search results click on the opportunity you wish to apply
for. When you are looking at the Opportunity you can click the Application
button at the top of the screen. In the next screen, you will be able to access the
application package and instructions. Or you can enter the FON and/or CFDA
number into the Download Application Package screen. In order to view the
application package, you will need to install Adobe Reader.
Step 2: Complete the Downloaded Grant Application Package
Once you have downloaded the application package, you can complete it offline,
share the document within your office and complete it at your own pace.
Instructions are available to assist you on the application package cover sheet to
explain how to open and use the forms in the application package. Also, you will
have direct access to the agency application instructions, which will include all
the necessary information on what is required for your submission. Note: Save
your application to your computer as changes are NOT automatically saved.
If you’re having problems completing the process, view our Frequently Asked
Questions. You can also view our training demonstration of How to Complete an
Application Package.
Step 3: Submit a Completed Grant Application Package
To submit your application click the Save & Submit button. The Save & Submit
button on the application package cover page will only become active after you
have completed all required forms, attached all required documents, and saved
your application package. Your package also cannot have any errors. To check
for errors click the Check Package for Errors button. Using the username ID
and password you entered when you registered with a Credential Provider, you
10 of 44
, and it is helpful to
Page 11

can submit your application package. In order to submit your application, you
must already be registered and you will need to have already completed the
application package using Adobe Reader. Click on the Save & Submit button
once this process is complete and you are ready to send the completed
application to Grants.gov.
Next, on the Application Verification and Signature page click on Sign and
Submit Application or you can click on Exit and be returned to the application.
If you are not already connected to the Internet, you will be directed to do so and
will need to login to Grants.gov using your username ID and password. After you
have clicked the Sign and Submit button on the summary page, your application
package will automatically be uploaded to Grants.gov. A confirmation screen will
appear once the upload is complete. Note: A Grants.gov tracking number will be
provided at the bottom of this screen, as well as the submission’s date and time
stamp. Record this number so that you may refer to it should you need to contact
the Contact Center for assistance.
Helpful Hints — Remember that all username ID and passwords are case
sensitive. If the Save & Submit button is not active, please check to be sure you
have:
• Completed all mandatory fields in all mandatory forms and moved them to
the Mandatory Documents for Submission box.
• Clicked the Save button AFTER all documents have been moved to the
Mandatory Documents for Submission box.
• Completed all mandatory fields in all optional forms that have been moved
to the Optional Documents for Submission box.
• Closed all Internet browser windows.
• If the Submit button is active and you are still unable to submit the form,
make sure that your computer meets the system requirements and you
have Adobe Reader installed.
• If you are using a dial-up modem, it may take several minutes for the
application to upload and be submitted. It is recommended to use a highspeed Internet connection or DSL connection. It will process the
application faster.
Step 4: Track the Status of a Completed Grant Application Package
Once an application has been submitted, you can check the status on the Track
My Application page. Click on For Applicants in the left navigation and then click
on Track Your Application below that link, you will need to login, if not already
logged in, and then click Check Application Status. You may identify your
application by CFDA Number, Funding Opportunity Number, Competition ID,
and/or Grants.gov Tracking Number.
11 of 44
Page 12

Apply for Grants with PureEdge Quick Overview
Click here to view Apply for Grants Instructions for Adobe Reader.
Notice: Grants.gov is currently transitioning from phasing out of PureEdge
software to using Adobe Reader software exclusively. For a period of time
applicants will still be able to use PureEdge as it is applicable.
Before you apply, remember you must be registered, and it is helpful to have the
Funding Opportunity Number (FON) and/or CFDA number of the desired grant.
Once those steps are complete, you will be ready to download the application
package and begin the 4-step process to apply for a grant:
Step 1: Download a Grant Application Package and Instructions
You should have the FON and/or CFDA number. If not, return to Find Grant
Opportunities to search for this information. In order to view the application
package, you will need to install the PureEdge Viewer [link to a small, free
program that provides access to the grant application]. To operate the PureEdge
Viewer, your computer must meet certain system requirements. If you are a nonWindows user, please refer to this support page.
You can also find the grant application package from your search results. From
your search results click on the opportunity you wish to apply for. When you are
looking at the Opportunity you can click the How to Apply button at the top of
the screen. In the next screen, you will be able to access the application package
and instructions.
Step 2: Complete the Downloaded Grant Application Package
Once you have downloaded the application package, you can complete it offline,
a handy feature that allows you to share the document in your office and
complete it at your own pace. Instructions are available to assist you on the
application package cover sheet to explain how to open and use the forms in the
application package. Also, you will have direct access to the agency application
instructions, which will include all the necessary information on what is required
for your submission.
Note:
• Save your application to your computer as changes are NOT automatically
saved.
• Remember to click the Save button when you have completed the
package and are ready to submit it.
• The package cannot be submitted until all required fields have been
completed.
12 of 44
Page 13

If you’re having problems completing the process, view our Frequently Asked
Questions. You can also view our training demonstration of How to Complete an
Application Package.
Step 3: Submit a Completed Grant Application Package
Using the username ID and password you entered when you registered with a
Credential Provider, you can submit your application package. In order to submit
your application, you must already be registered and you will need to have
already completed the application package using the PureEdge Viewer.
The Submit button on the application package cover page will only become
active after you have completed all required forms, attached all required
documents, and saved your application package. Click on the “Submit” button
once this process is complete and you are ready to send the completed
application to Grants.gov.
Next, review the provided application summary to confirm the application will be
submitted to the correct program. Click the Yes button if this information is
correct and you are ready to submit the application. If you are not already
connected to the Internet, you will be directed to do so and will need to login to
Grants.gov using your username ID and password.
After you have clicked the Sign and Submit button on the summary page, your
application package will automatically be uploaded to Grants.gov. A confirmation
screen will appear once the upload is complete. Note that a Grants.gov tracking
number will be provided at the bottom of this screen, as well as the submission’s
official date and time. Record this number so that you may refer to it should you
need to contact Customer Support
.
Step 4: Track the Status of a Completed Grant Application Package
Once an application has been submitted, you can check the status on the Track
Your Application page. You may identify your application by CFDA Number,
Funding Opportunity Number, Competition ID, and/or Grants.gov Tracking
Number.
Helpful Hints:
• Remember that all username IDs and passwords are case sensitive.
• If the Submit button is not active, please check to be sure you have
completed all mandatory fields in all mandatory forms and moved them to
the Mandatory Completed Documents for Submission box.
• Click the Save button AFTER all documents have been moved to the
Mandatory Completed Documents for Submission box.
• Completed all mandatory fields in all optional forms that have been moved
to the Optional Completed Documents for Submission box.
• Closed all Internet browser windows.
13 of 44
Page 14

• If the Submit button is active and you are still unable to submit the form,
make sure that your computer meets the system requirements
have the latest version for the PureEdge Viewer. If you are using a dial-up
modem, it may take several minutes for the application to upload and be
submitted. It is recommended to use a high-speed Internet connection or
DSL connection. It will process the application faster.
and you
14 of 44
Page 15
Download Application Packages
Note: You can download and complete an application at any time, but to submit
the application you must be registered with Grants.gov. Before applying for a
grant, the steps below must be completed. You will not be able to submit
applications if all the steps listed below are not complete.
• Download the Application Viewers (PureEdge and Adobe Reader)
• Request a DUNS number
• Register with the CCR
• Register with the Credential Provider
• Register with Grants.gov
Instructions for Downloading Application Packages
Follow the steps below to download application packages.
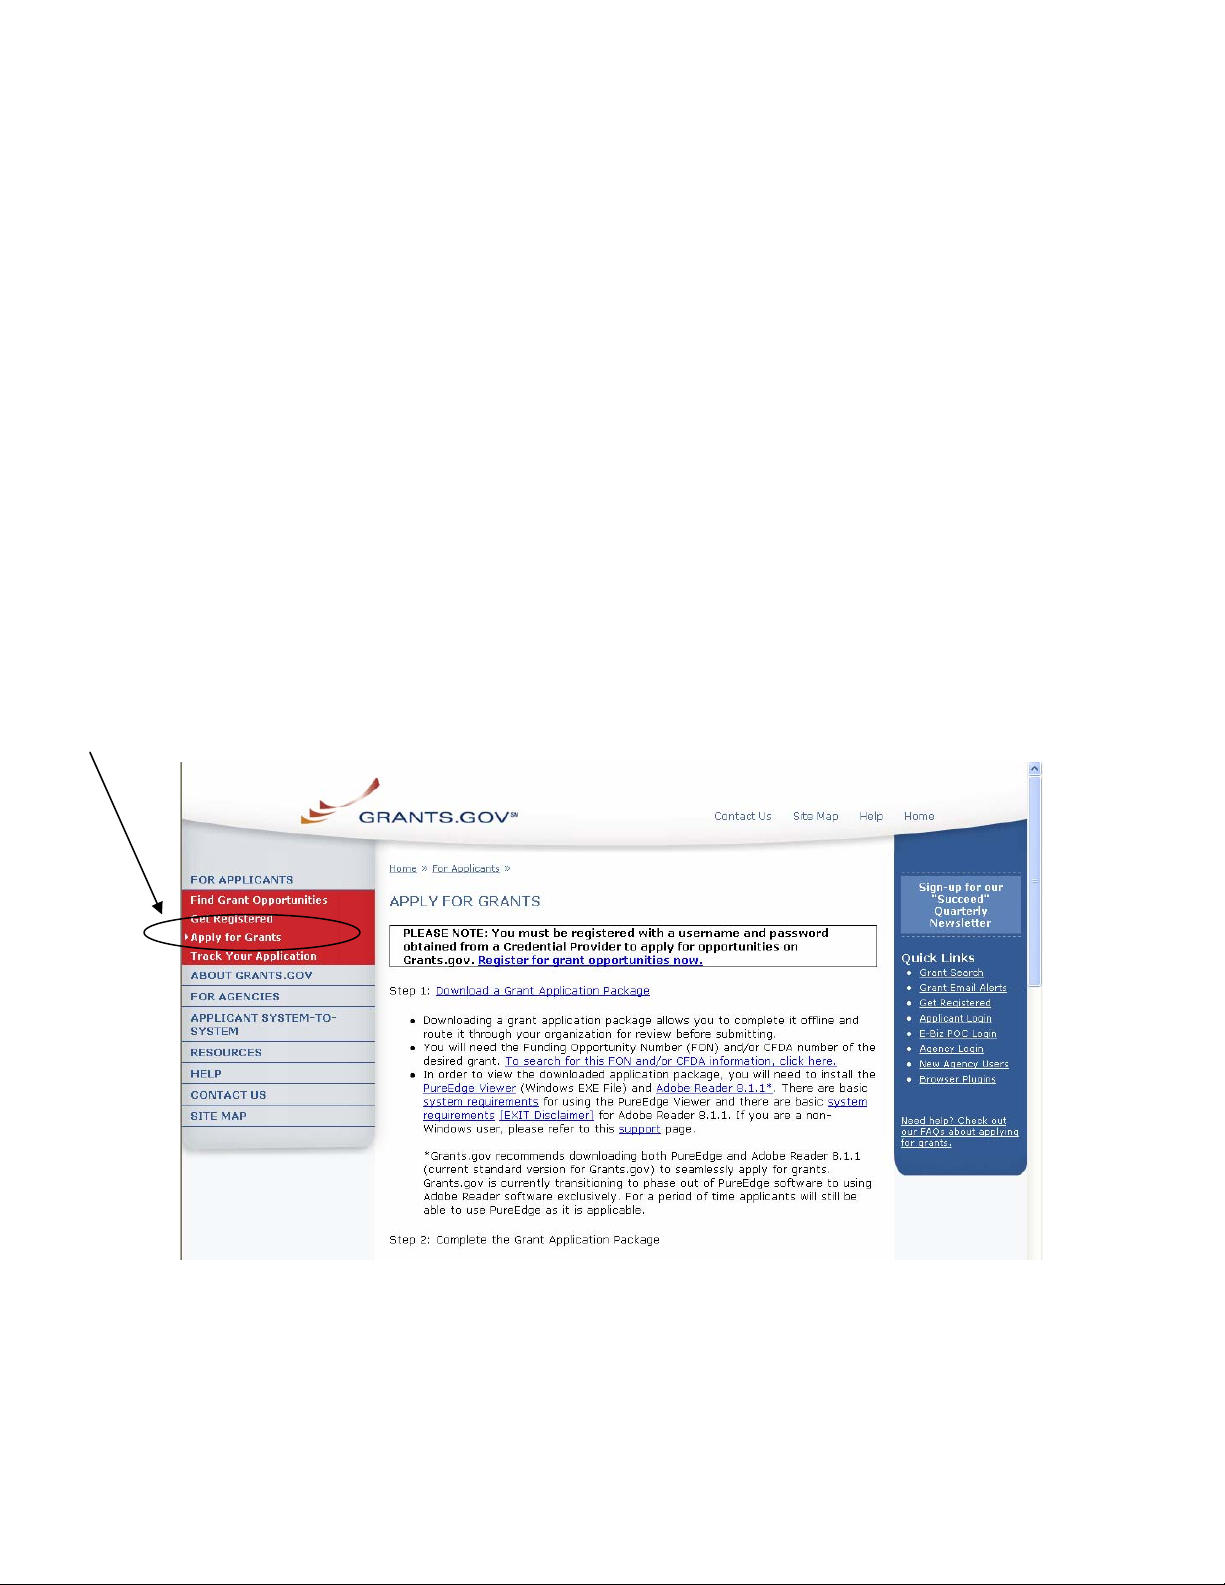
1. After all necessary steps are completed, in the For Applicants section,
click the Apply for Grants link in the left navigation from the homepage
on Grants.gov. This will take you to the Apply for Grants screen.
Or when you are searching for a Grant Opportunity, from the Synopsis page you
can click on the Application button.
15 of 44
Page 16
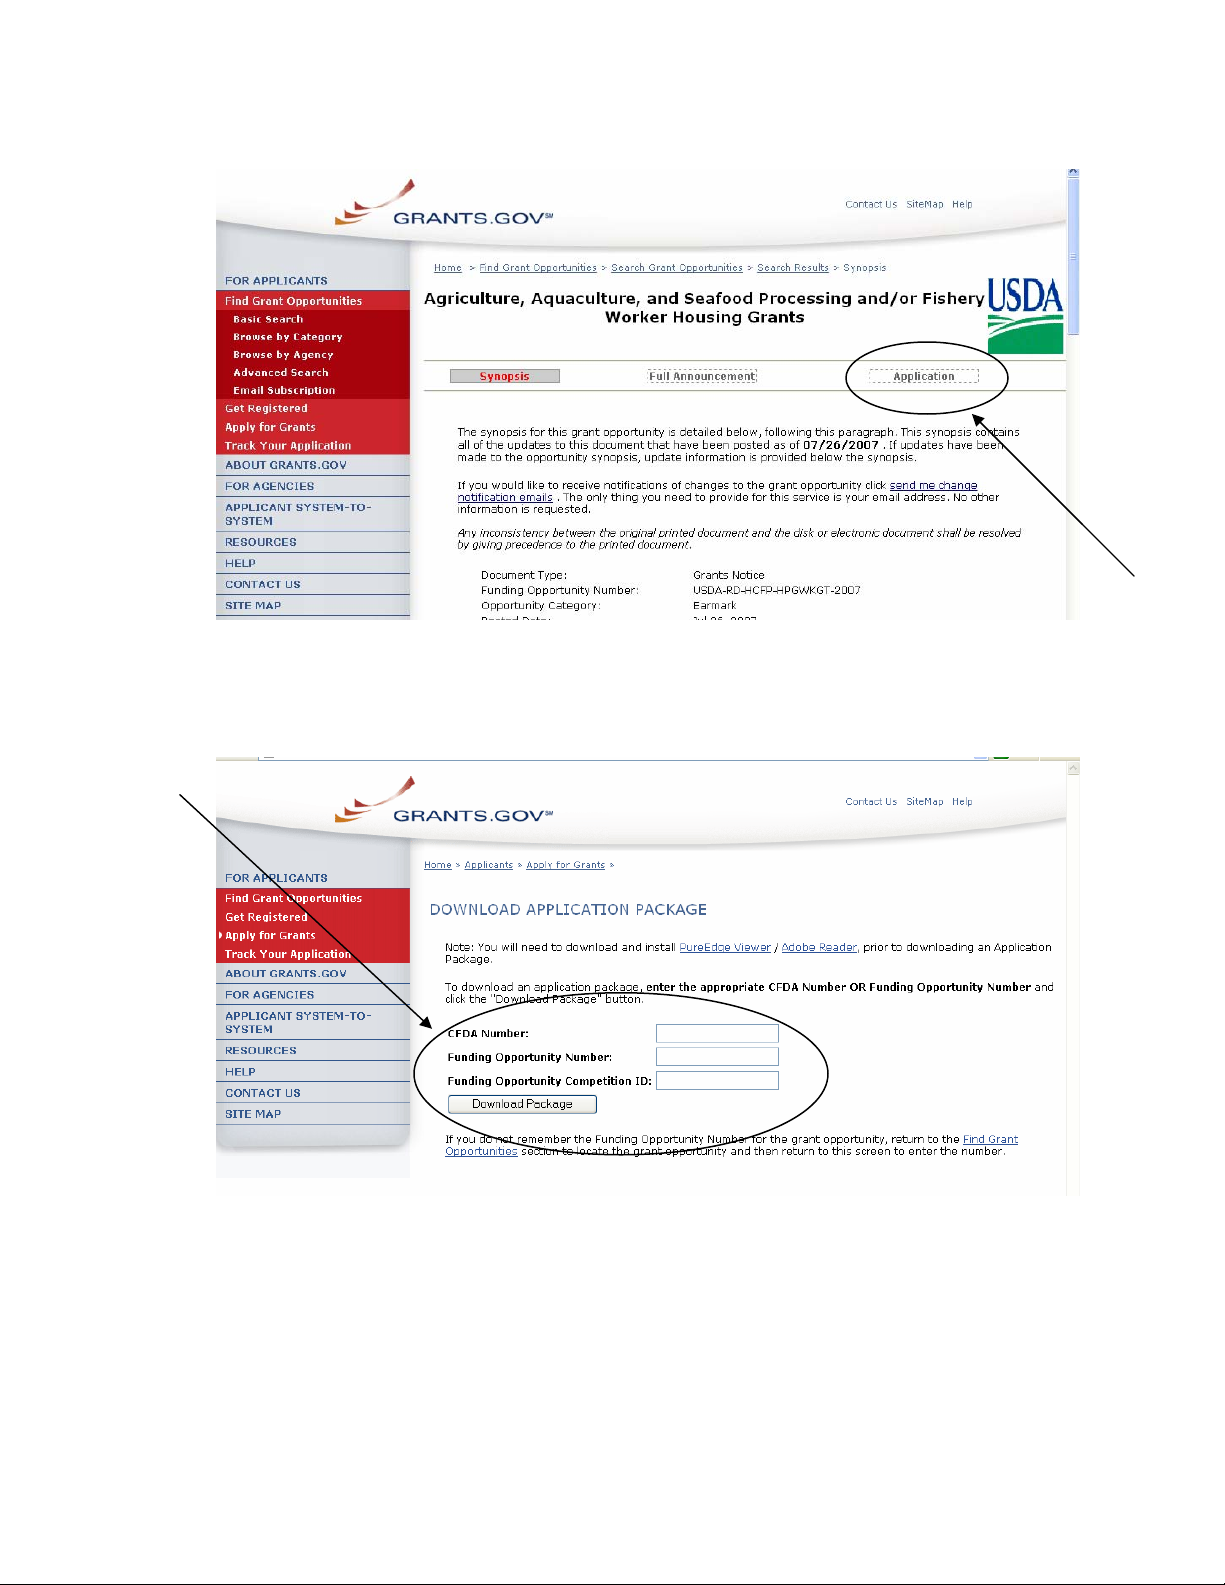
2. On the Apply for Grants page click on Step 1: Download a Grant
Application Package link. This will take you to the Download
Application Package screen.
3. Enter the Funding Opportunity Number of the opportunity for which you
want to apply in the Funding Opportunity Number field.
OR
Enter the CFDA number of the agency which is offering the opportunity for
which you want to apply in the CFDA Number field.
If you do not know the Funding Opportunity Number or CFDA Number for
the grant for which you want to apply, you will need to search for the grant
opportunity following the steps in Searching Grant Opportunities. You
16 of 44
Page 17
must complete at least one of these fields to download an
application.
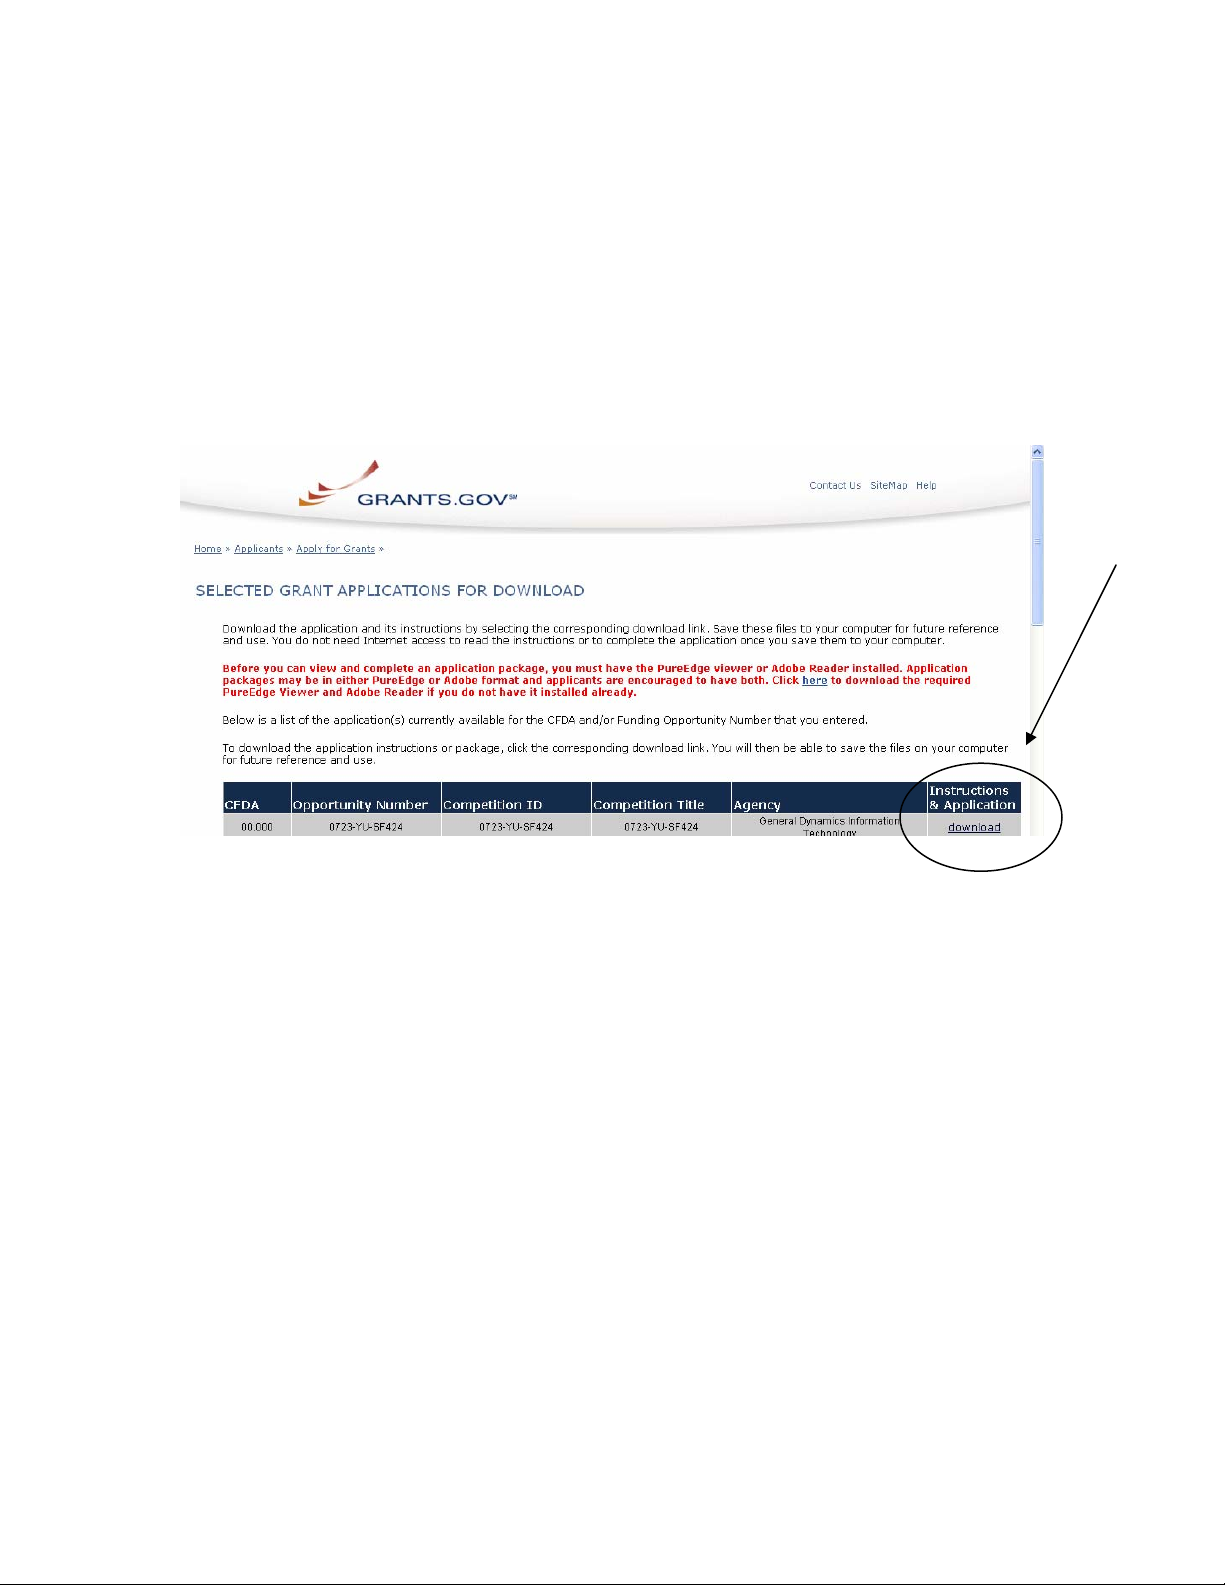
4. Click the Download Package button. This will take you to the Selected
Grant Applications for Download screen.
5. To download an application package and its instructions, click the
corresponding download link under the Instructions and Application
column on the right.
17 of 44
Page 18
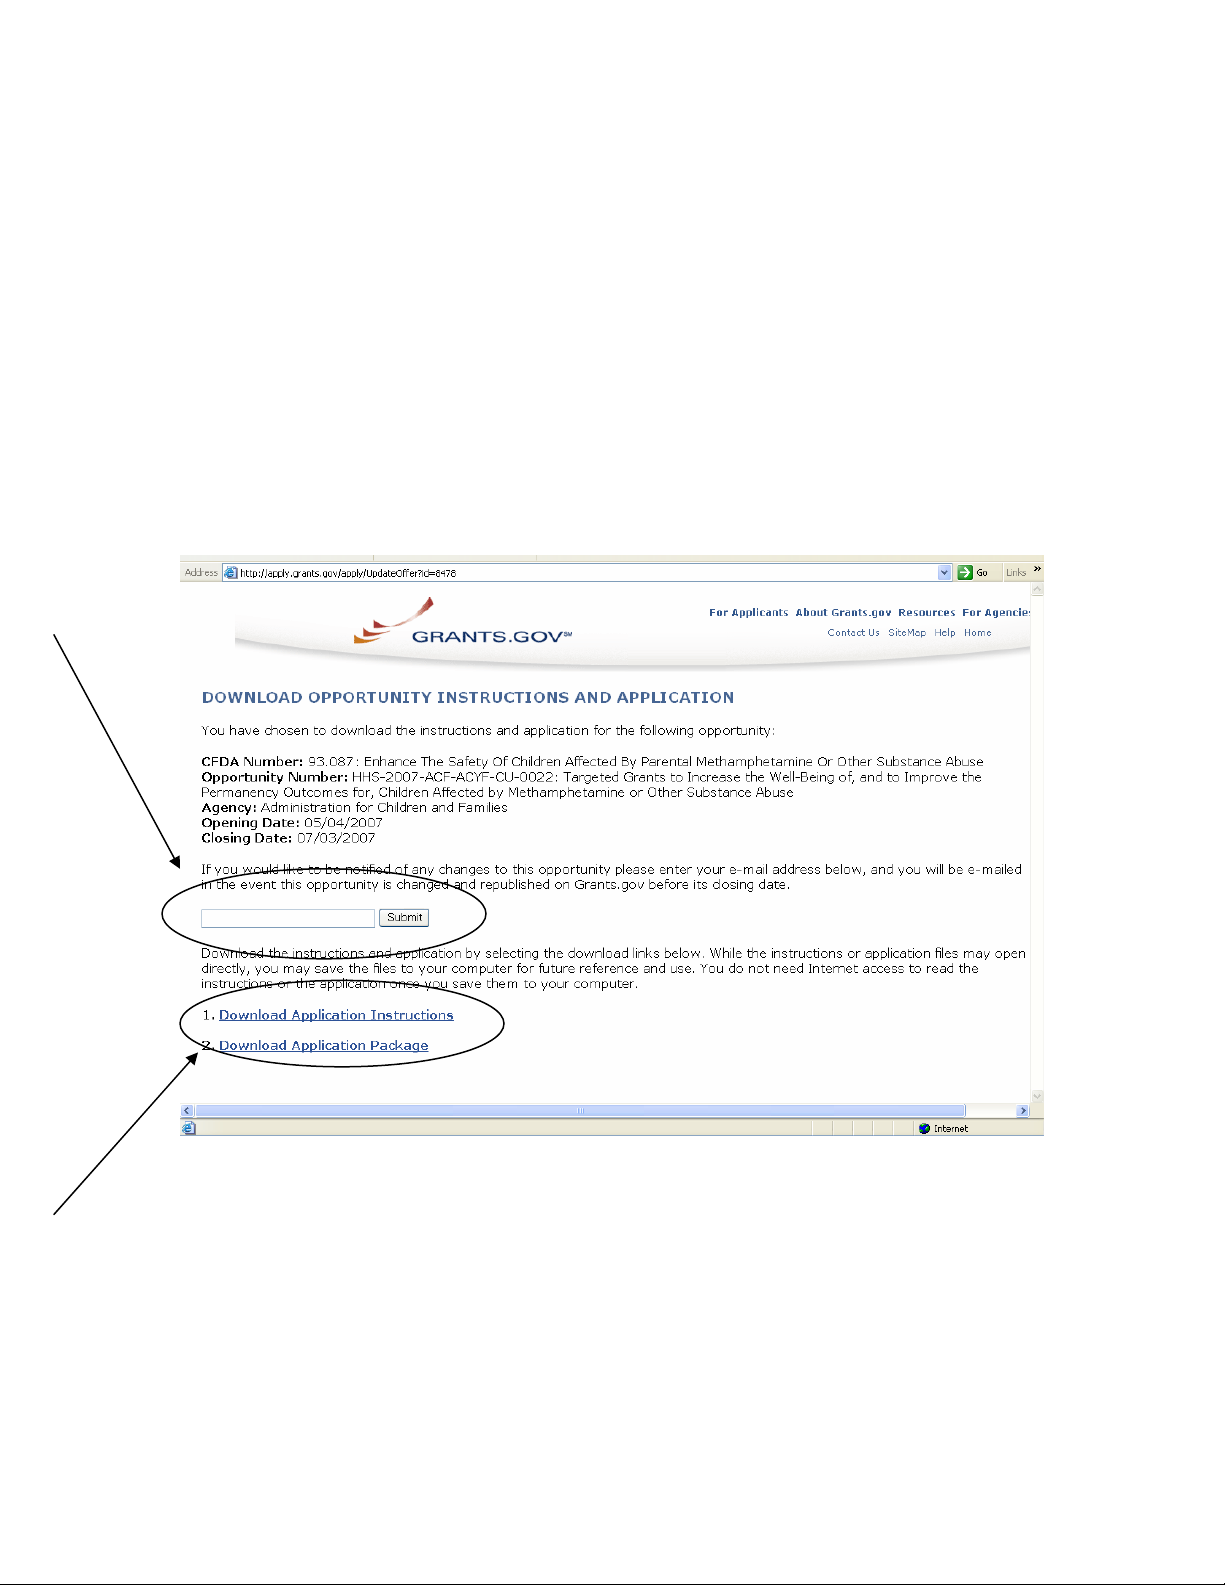
6. When you download an application package, you will first be taken to the
Download Opportunity Instructions and Application screen. From this
screen, confirm that you are downloading the correct application for the
grant you would like to apply to.
7. If you would like to be notified of any changes to this opportunity, enter
your email address in the field and then click the Submit button. If you
choose not to enter your email address and the application package is
deleted or modified, upon submitting the application package to
Grants.gov, you may receive a rejection notice.
8. Click the Download Application Package link. The application package
will open in the PureEdge Viewer or Adobe Reader.
18 of 44
Page 19
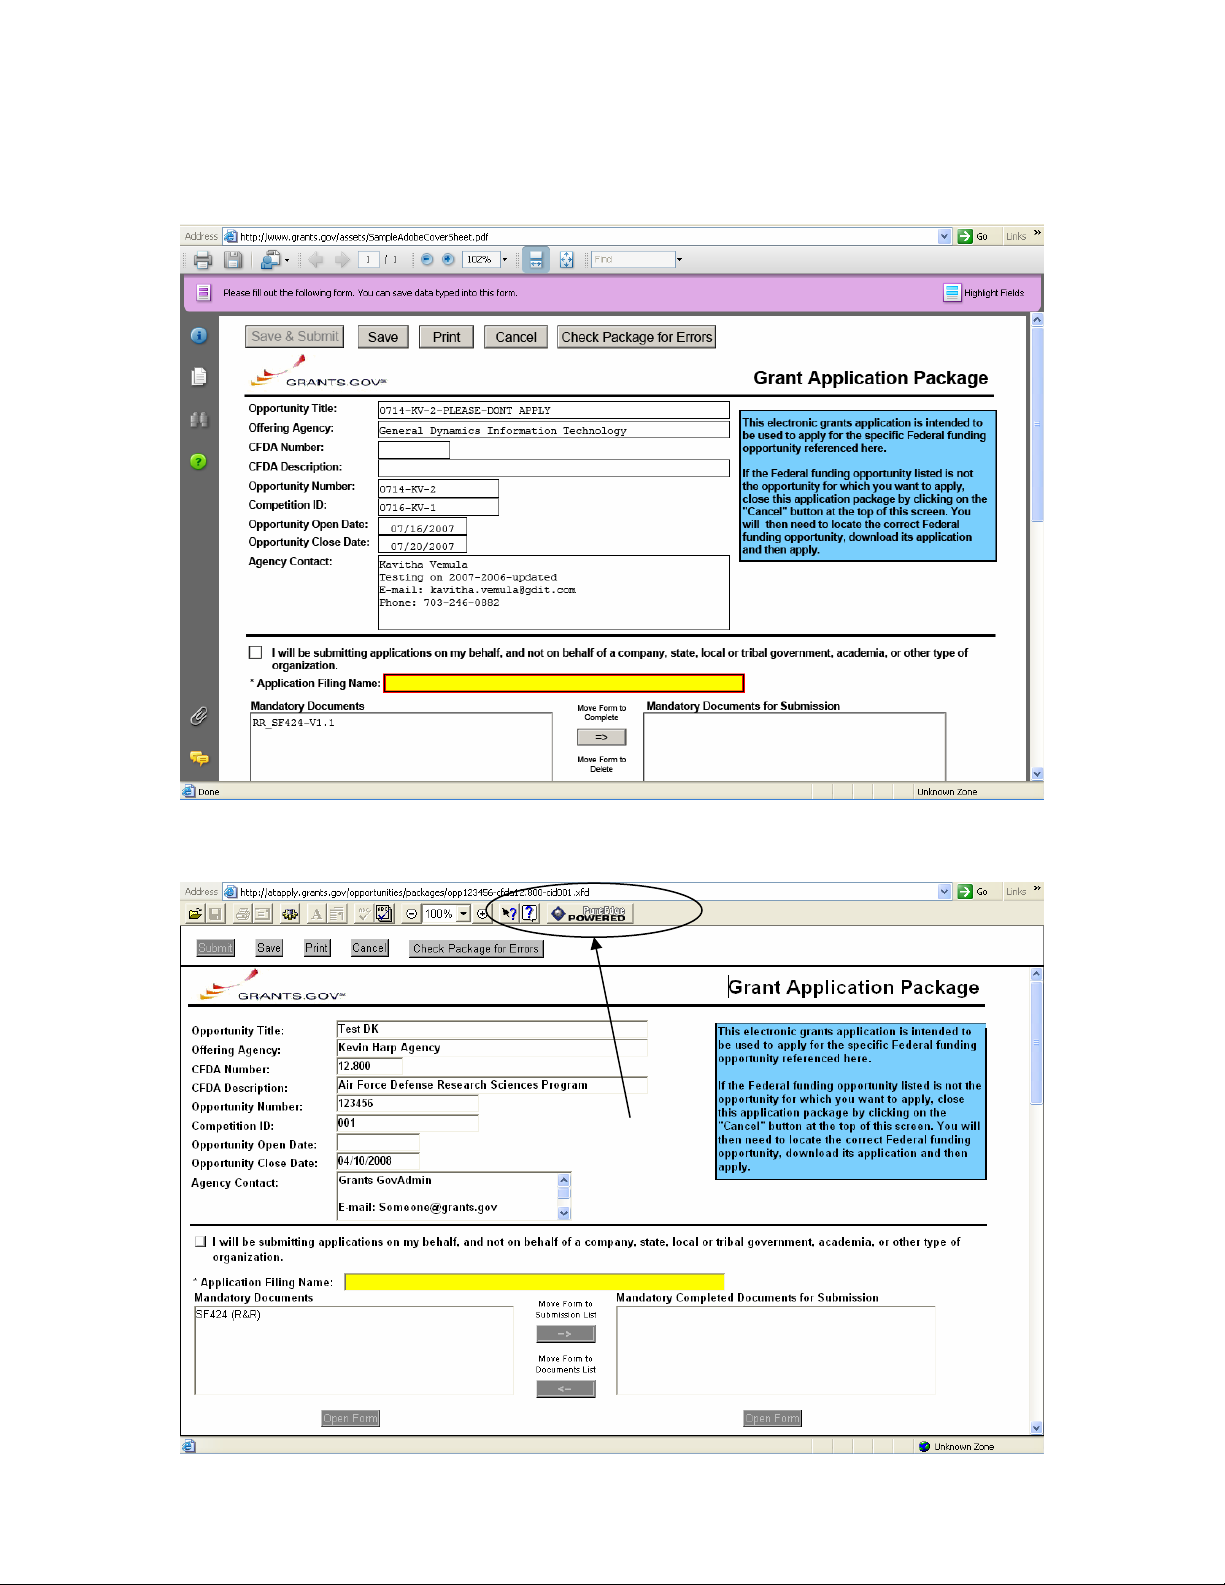
This screen shot is an example of an Adobe Reader Application Package.
This screen shot is an example of a PureEdge Application Package.
19 of 44
Page 20
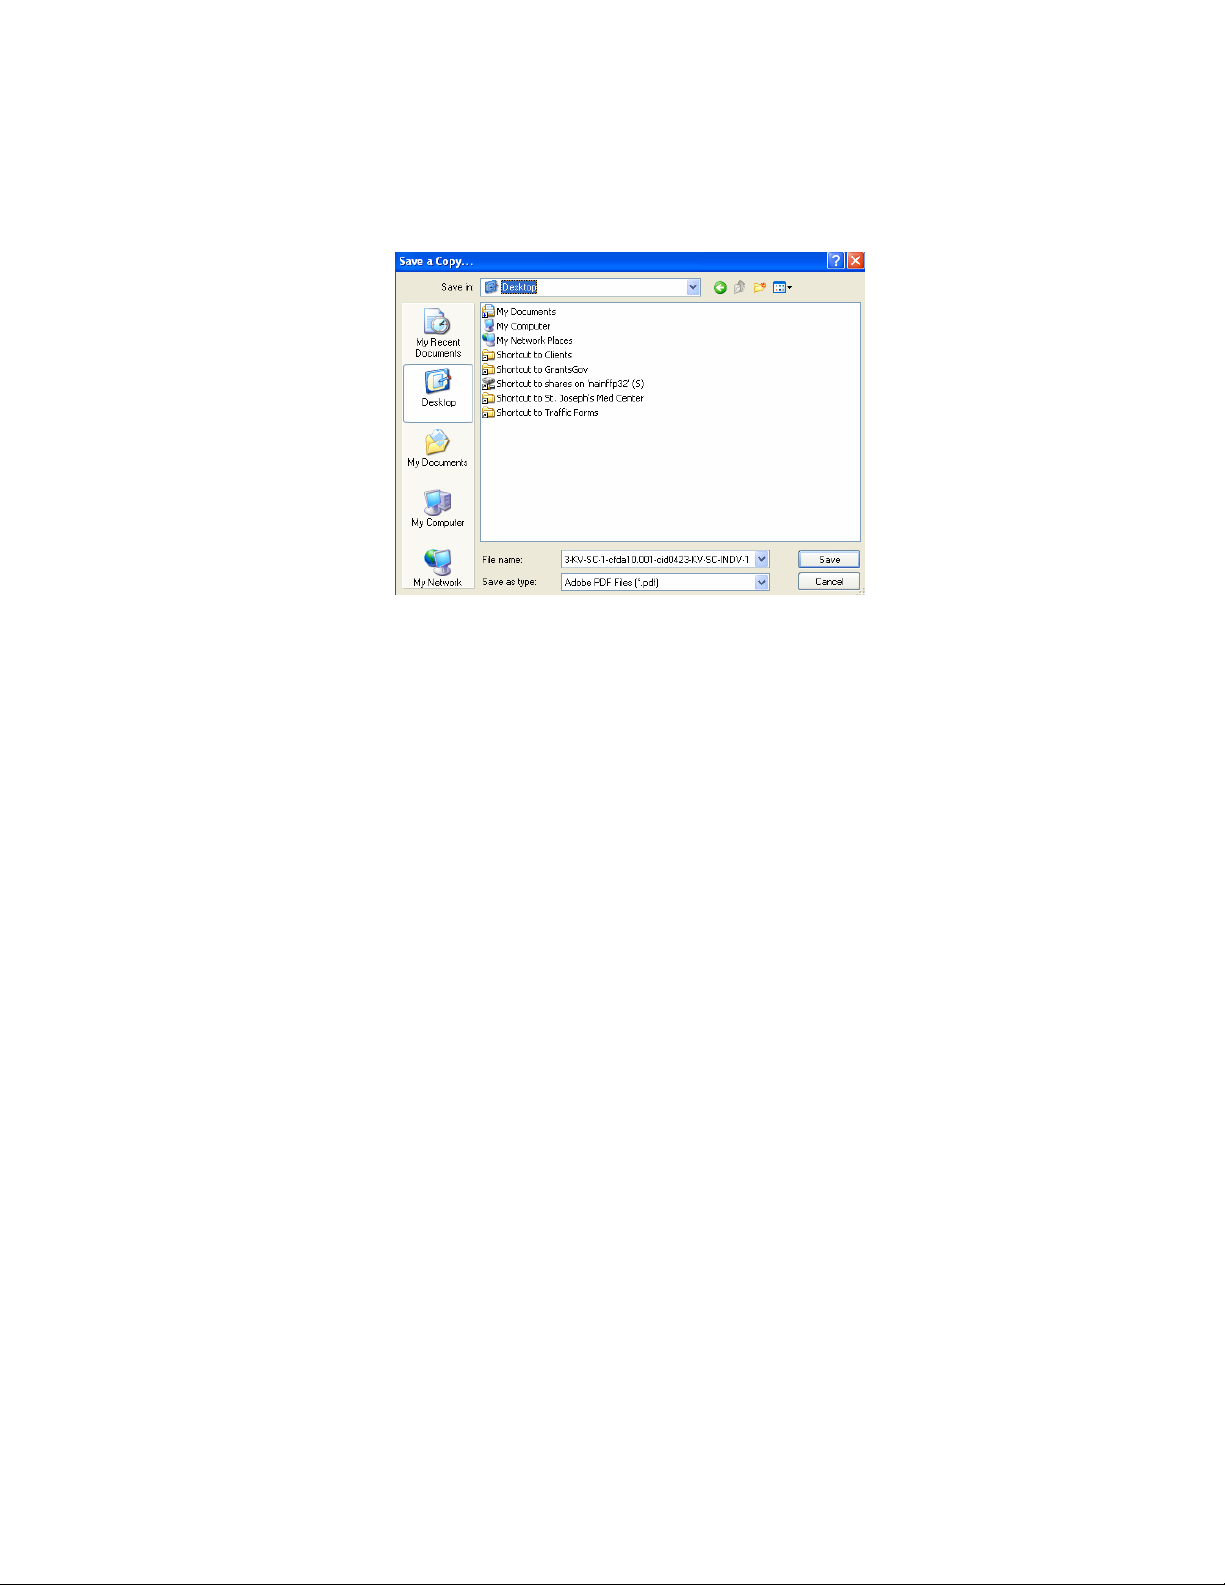
9. Click the Save button to save the application to your computer.
10. Browse to the location you will save the application on your computer or
network.
11. Enter the name of the application in the File Name field.
12. Click the Save button. The application will save to your computer. You will
not need to be online to complete the application.
20 of 44
Page 21
Complete Application Packages with Adobe Reader
Click here to view Complete Application Packages Instructions for PureEdge.
Notice: Grants.gov is currently transitioning from phasing out of PureEdge
software to using Adobe Reader software exclusively. For a period of time
applicants will still be able to use PureEdge as it is applicable.
Once you have downloaded the application and saved it to your computer, you
do not need to be online to complete the application. Follow the steps below to
complete an application package using Grants.gov. View a narrated tutorial on
how to complete a grant application package using Adobe Reader.
1. Open the saved application.
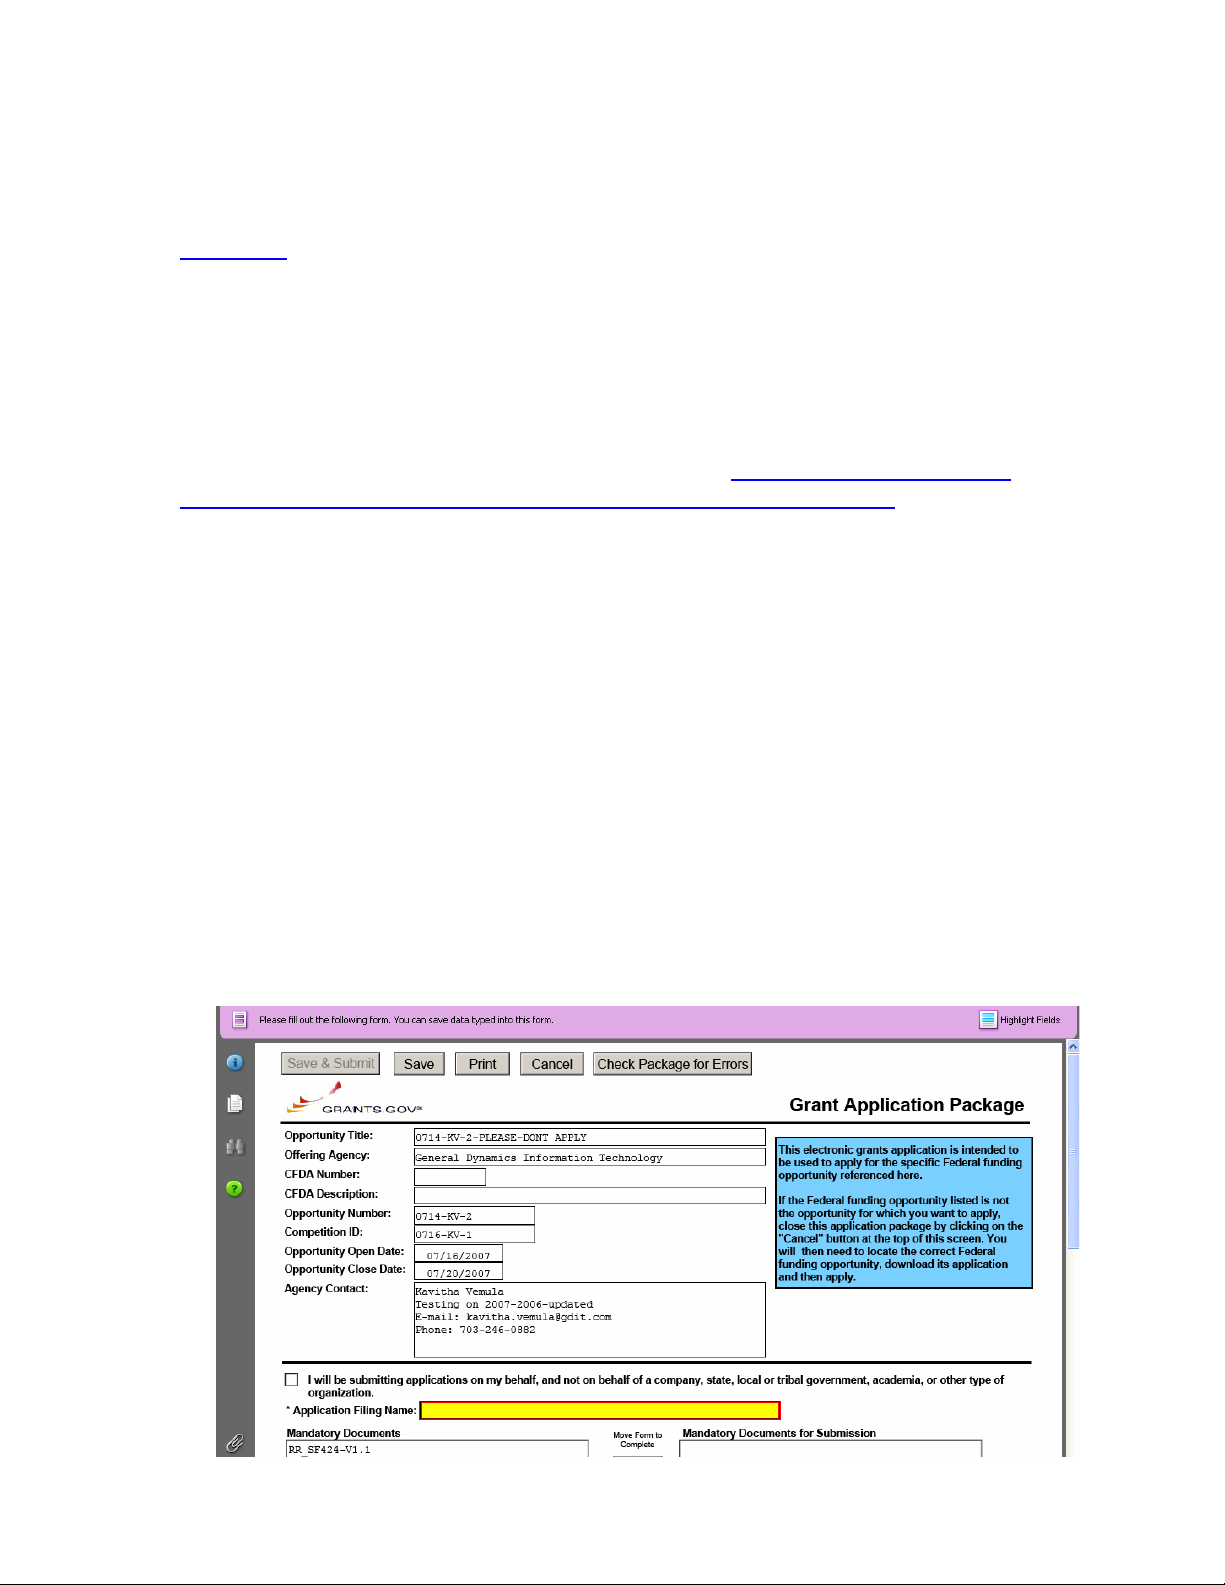
2. Verify that the pre-entered information is for the grant opportunity for which
you want to apply. If the federal funding opportunity listed is not the
opportunity for which you want to apply, close this application package by
clicking the Cancel button at the top of the screen. You will then need to
locate the correct federal funding opportunity, download its application and
then apply. If the federal funding opportunity listed is the opportunity for which
you want to apply, complete the application in its entirety before submitting it.
Applications can be completed in their entirety offline; however, to submit an
application you will need to be connected to the internet. The Save & Submit
button at the top of the screen will not be functional until the application is
properly completed and saved. If you have any application specific questions,
contact the offering agency directly, using the contact information provided on
the application's cover page.
21 of 44
Page 22
Cover Page
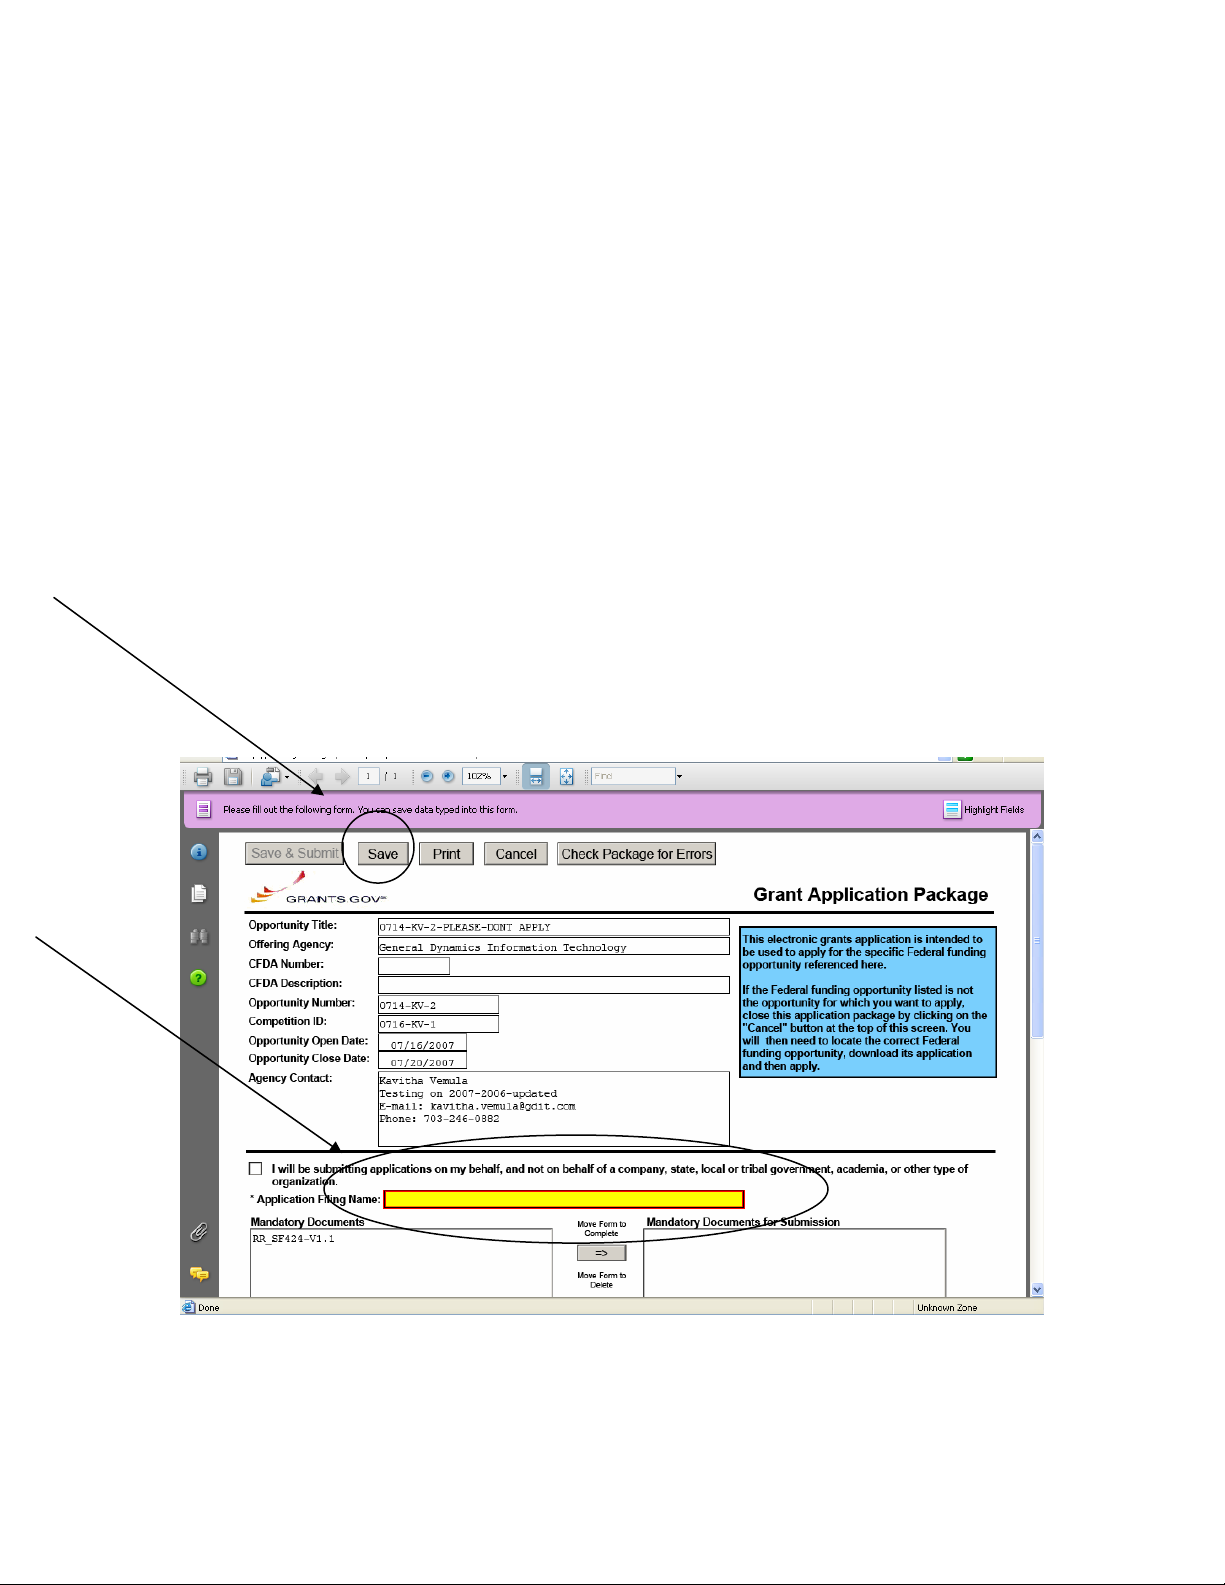
The cover page in the application package is simply the first page in the
application package which includes the Opportunity Title, Offering Agency, CFDA
Number, CFDA Description, Opportunity Number, Competition ID, Opportunity
Open and Close Date, and Agency Contact information. Also included on the
cover page for you the applicant to fill out are the Application Filing Name,
Mandatory Documents and Optional Documents.
Follow the steps below to complete the cover page of an application package.
1. Enter a name for the application in the Application Filing Name field.
• This application can be completed in its entirety offline; however, you
will need to be connected to the internet during the submission
process.
• You can save your application at any time by clicking the Save button
at the top of your screen.
• The Save & Submit button will not be functional until the application is
completed and saved.
2. Open and complete all of the documents listed in the Mandatory
Documents box and Optional Documents box.
22 of 44
Page 23
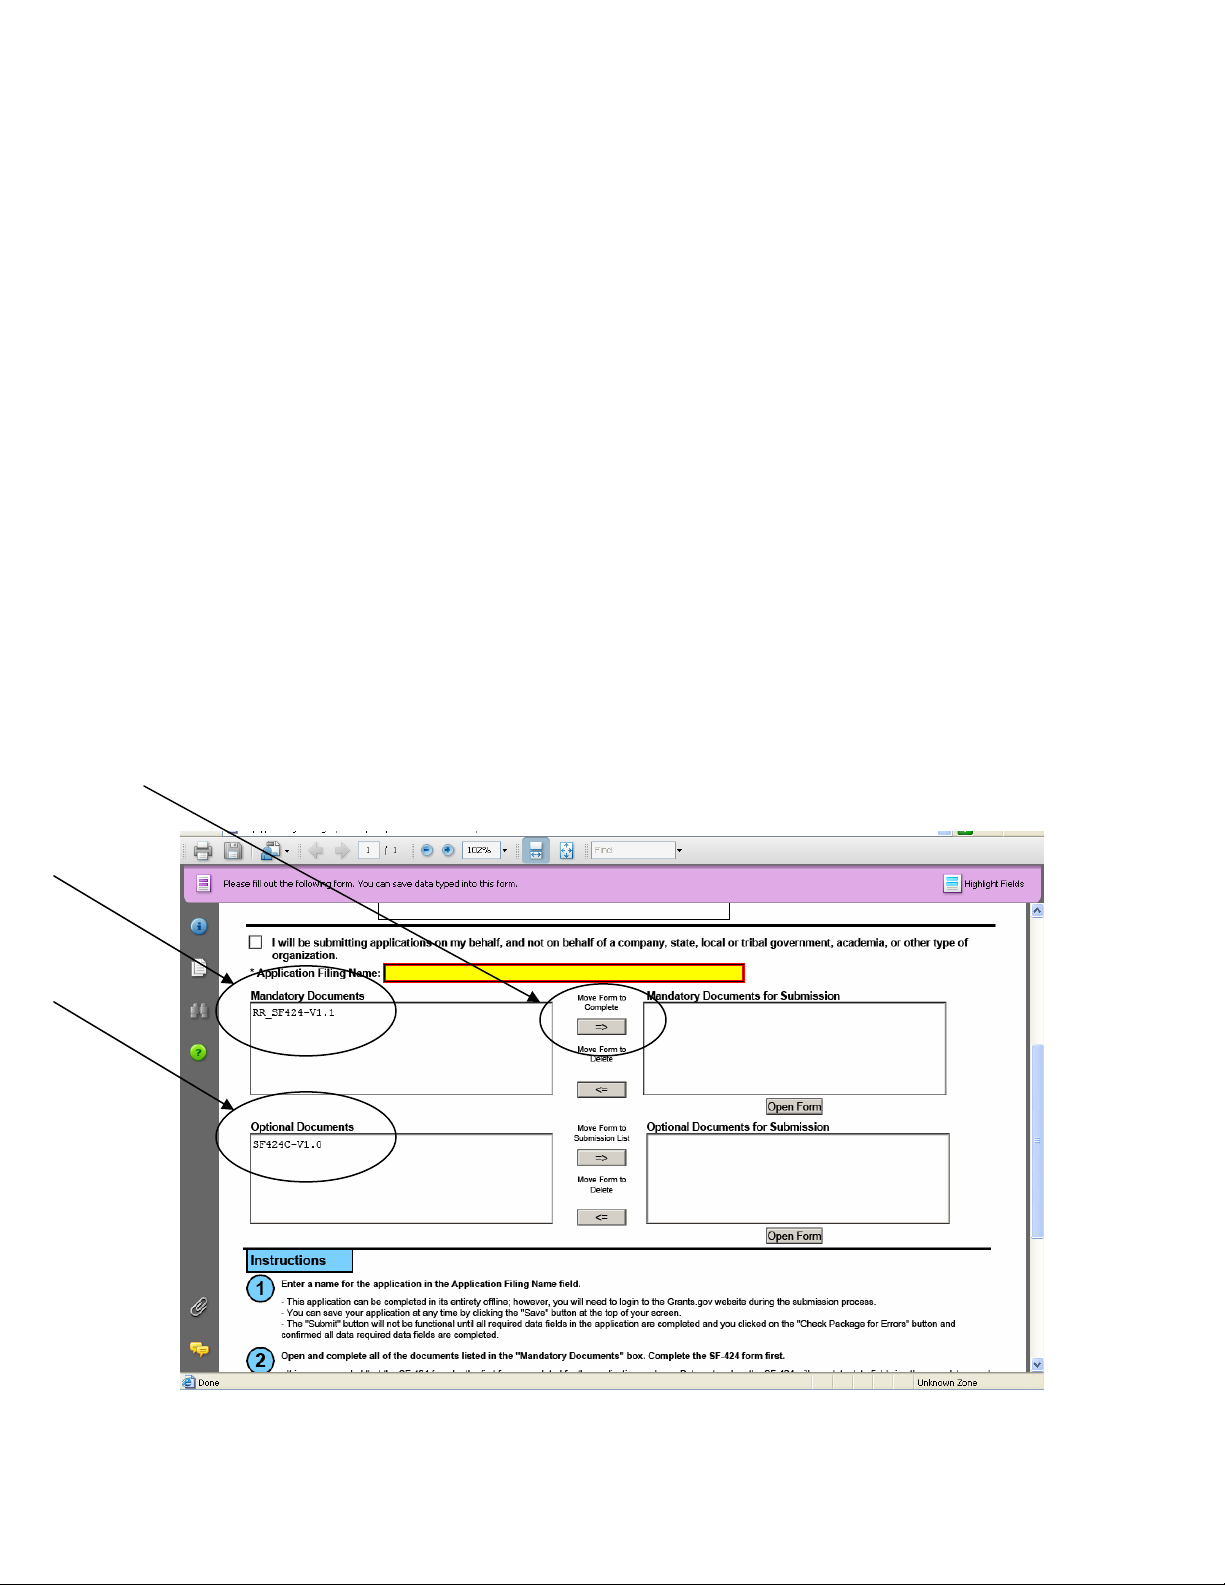
• The documents listed in the Mandatory Documents box and Optional
Documents box may be predefined forms, such as SF-424, or
documents that need to be attached, such as a program background
statement. Mandatory Documents are required for this application.
Optional Documents can be used to provide additional support for this
application or may be required for specific types of grant activity.
Reference the application package instructions for more information
regarding Optional Documents.
• To open an item, simply click on the item to select it and then click on
the Move Form to Complete arrow. This moves the form to the
Mandatory Forms for Submission dialog. The form opens immediately,
scroll down the page or click on the title of the document and click the
button below the dialog box that says Open Form and it will jump to the
first page of the form.
• To remove a form/document from the Mandatory Documents for
Submission box or the Optional Documents for Submission box,
click the form/document name to select it, and then click on the arrow to
move it to the other box. This will return the form/document to the
Mandatory Documents or Optional Documents box. EXECUTING
THIS COMMAND WILL ELIMINATE THE DATA YOU POPULATED IN
THE FIELDS.
• When you open a required form, the fields which must be completed are
noted by an asterisk and highlighted in yellow with a red border. Optional
23 of 44
Page 24
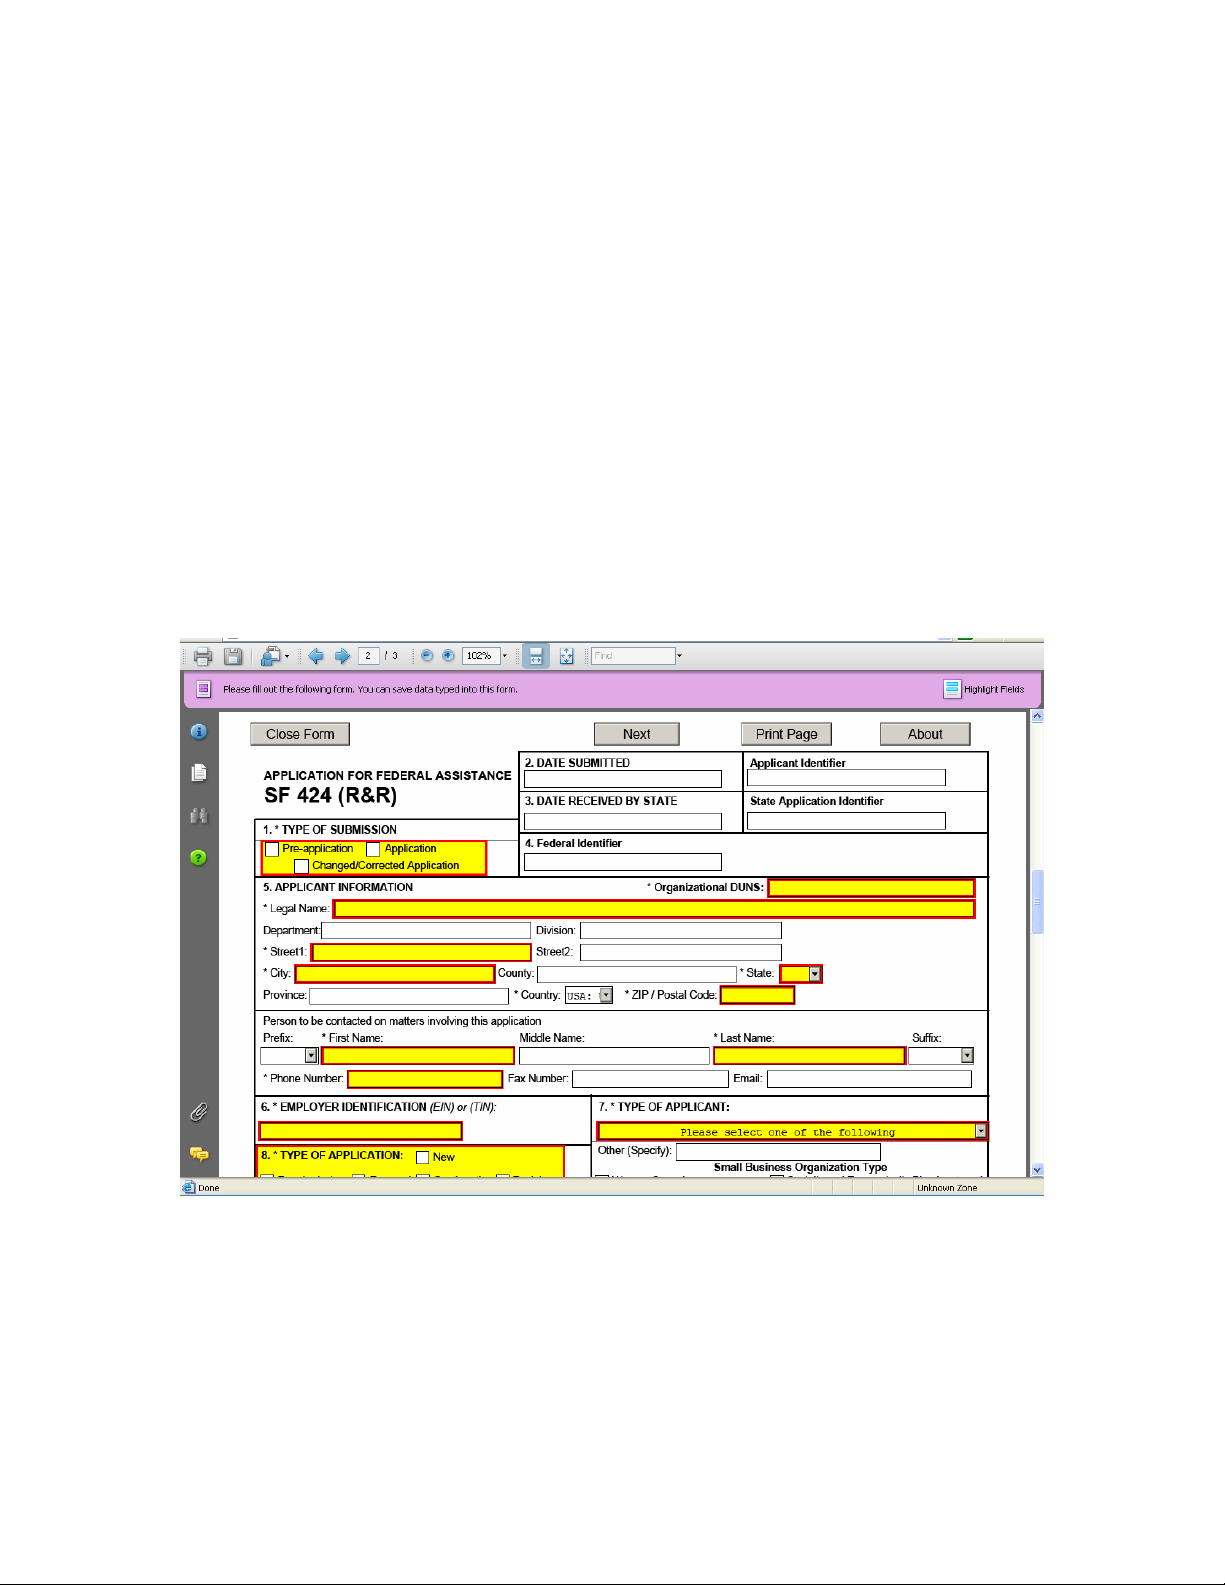
fields and completed fields are displayed in white. If you enter invalid or
incomplete information in a field, you will receive an error message.
• To exit a form within the application, click on the Close Form button at
the top of the form you are filling out. Then to save your work, click the
Save button (on the cover page) to resave your entire application.
Note: When you are tabbing out of a required field without completing it, a
message will display informing you that it is required to fill out.
Forms
Forms, such as SF-424, are predefined and will require you to enter information
into fields. If the SF-424 is in the package, you must complete the SF-424
first. SF-424 will automatically complete additional fields on other forms
with the information you entered.
Follow the steps below to complete forms contained within an application
package.
1. When you open a required form, all required fields are noted by an
asterisk and sometimes highlighted in yellow with a red border.
2. Optional fields and completed fields are displayed in white.
3. You can click any field to enter the necessary information.
24 of 44
Page 25
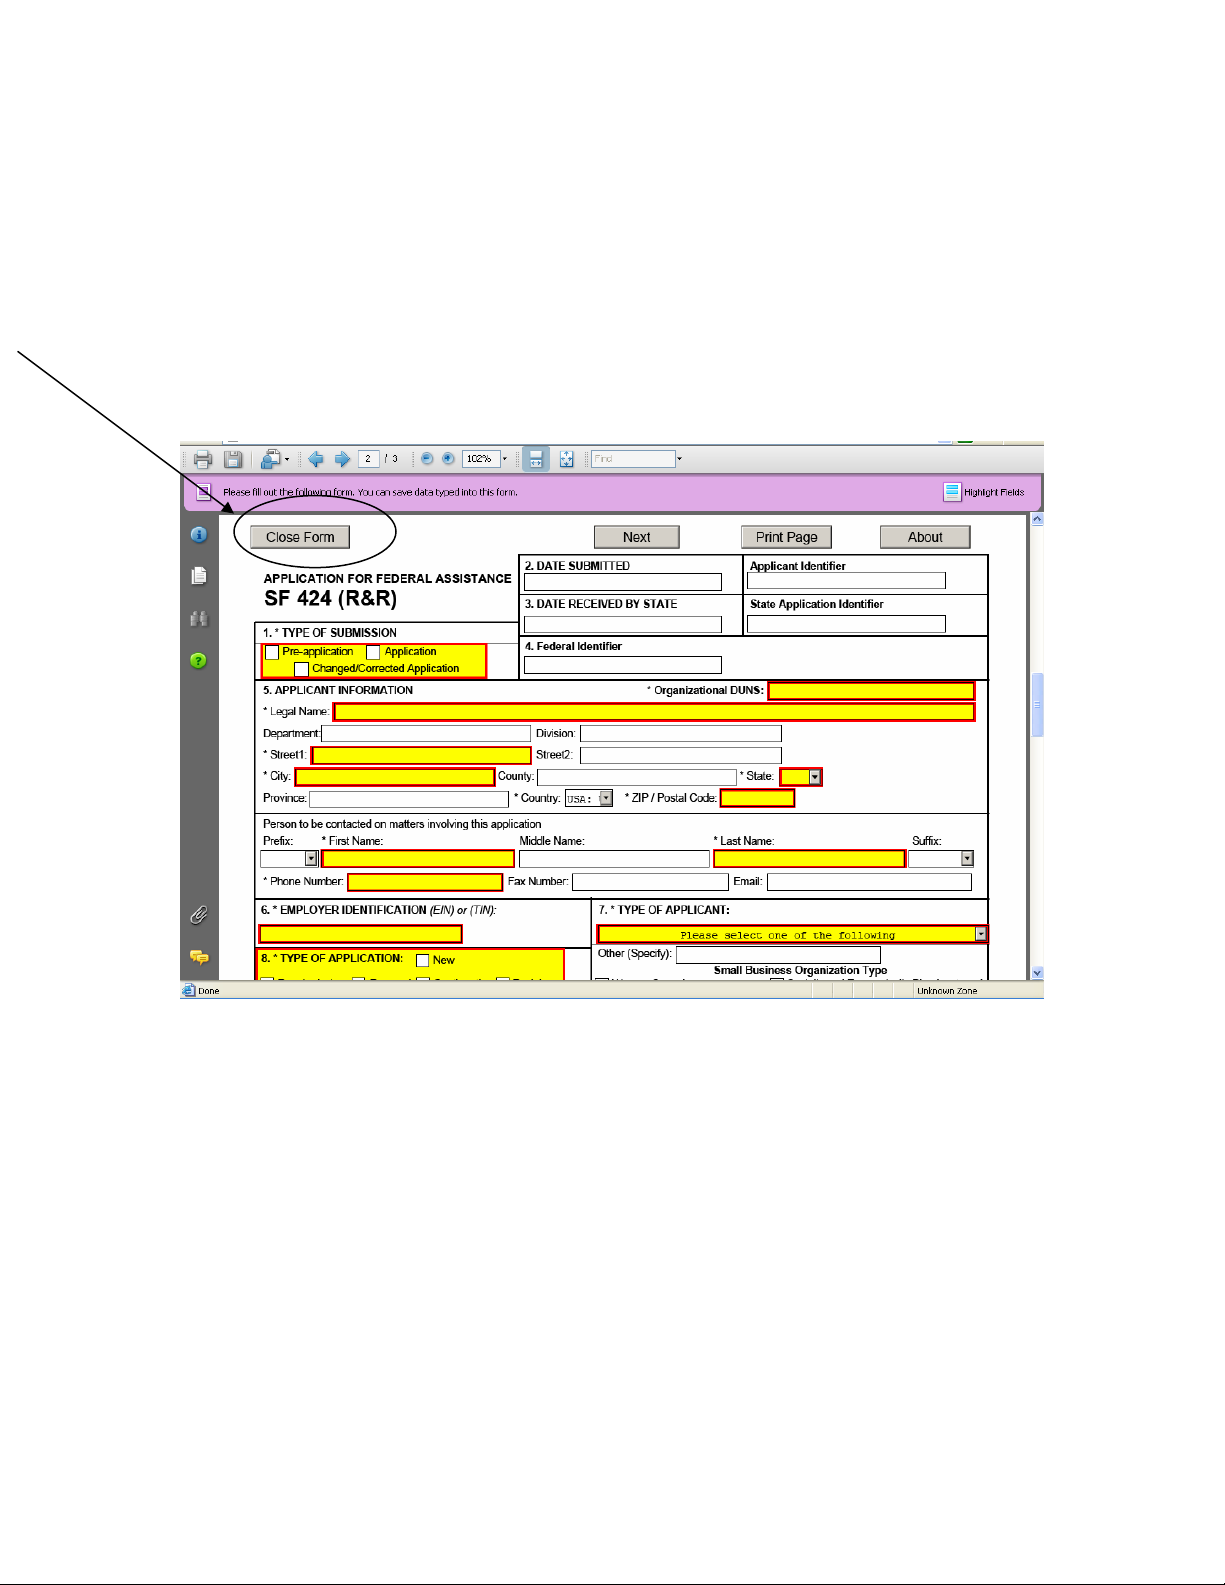
4. You can also use the TAB button on your keyboard to move from field to
field.
5. If you enter invalid or incomplete information in a required field, you will
receive an error message upon leaving the field.
6. To exit a form within the application, click on the Close Form button at the
top of the form you are filling out. This will take you to the cover page.
Then to save your work, click the Save button (on the cover page) to
resave your entire application.
Attaching Documents
In addition to forms, application packages may also require that you submit
specific documentation, such as a program background statement, for example.
Specific instructions for additional documentation will be included in the
application package instructions.
Follow the steps below to submit additional documentation (at the request of the
application package instructions) for an application package.
1. To open a form that requires you to attach a document, click on the form
name to move it to the form for submission list and then click the Open
Form button which appears below the appropriate box.
2. Once the form is open, you can attach documents from your computer to
the form. Depending on the form, you may be able to attach a PDF, Text
25 of 44
Page 26
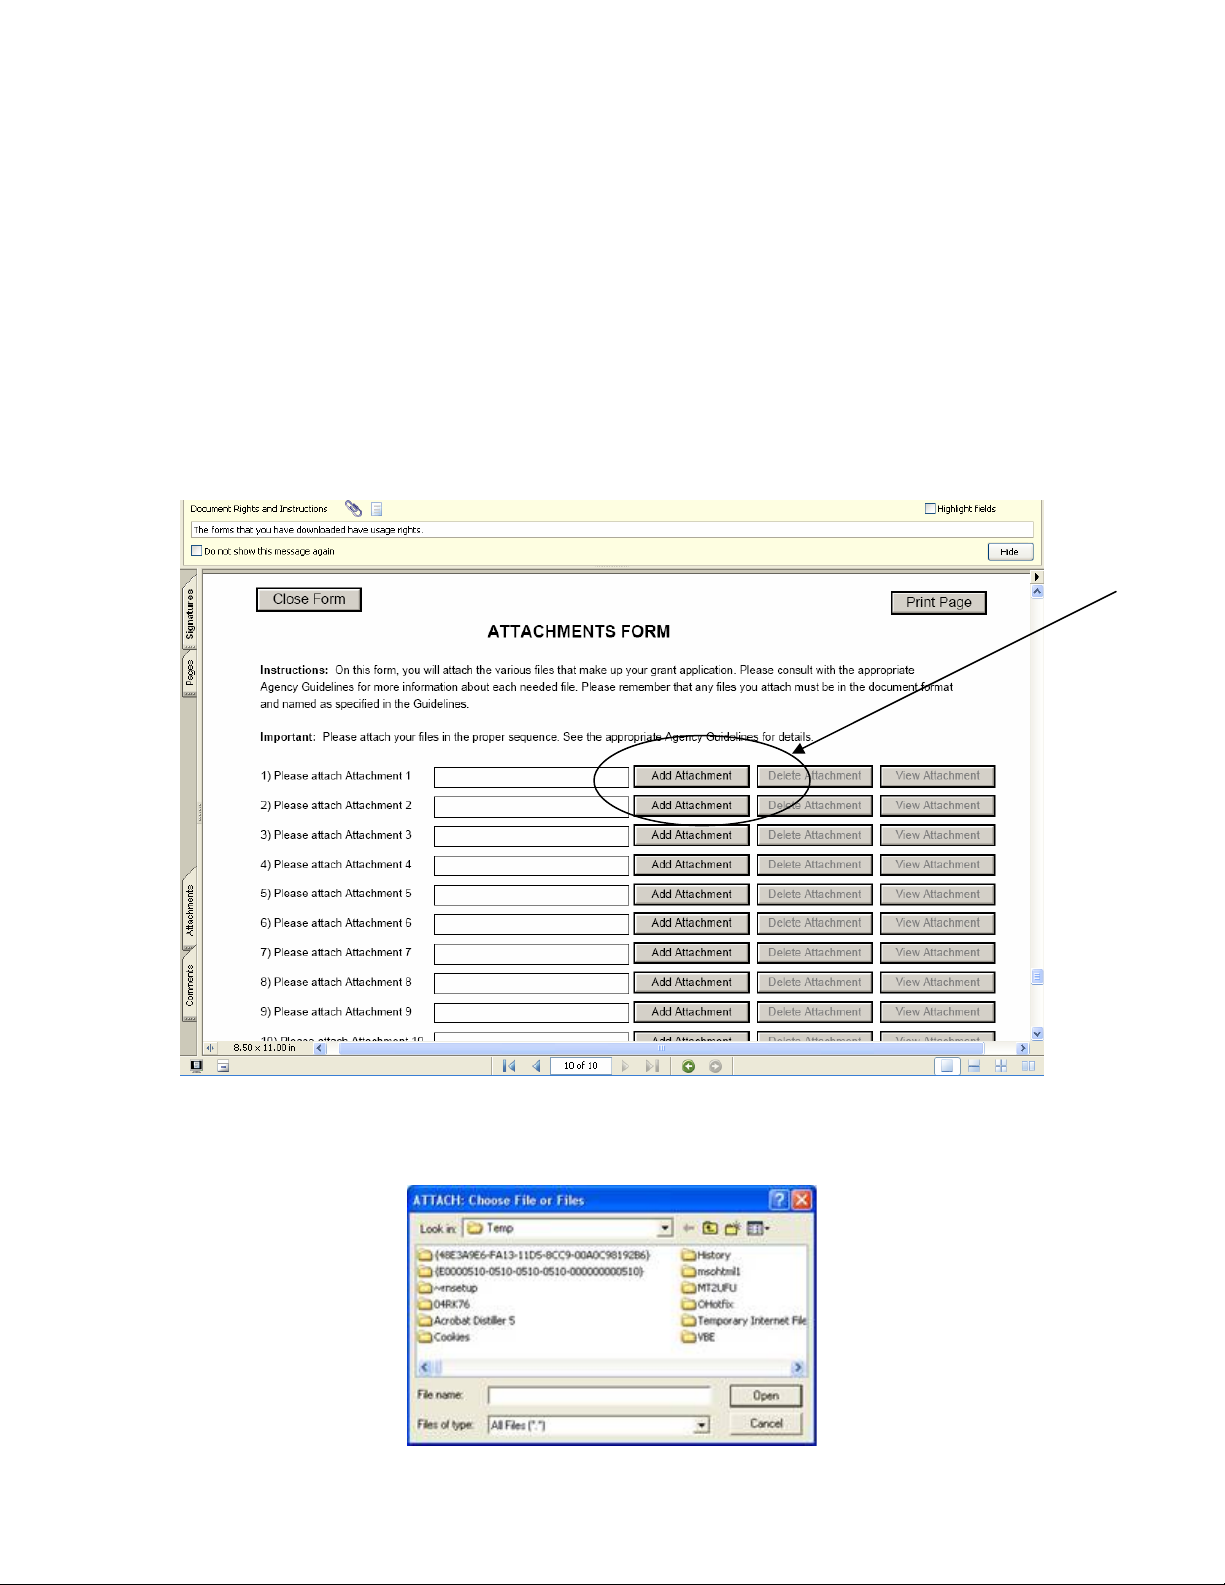
Document, Word Document or other type of documents. After completing
a form, move it to the appropriate Completed Documents for
Submission box.
To remove the Attachment document from the Mandatory Documents for
Submission box or the Optional Documents for Submission box, click the
form/document name to select it, and then click the Move Form to Delete. This
will return the form/document to the Mandatory Documents and or Optional
Documents box. EXECUTING THIS COMMAND WILL ELIMINATE THE DATA
YOU POPULATED IN THE FIELD.
(Below is an example for how you may attach additional documents)
3. A Browse window opens allowing you to select the document on your
computer (or network drive) you would like to upload.
26 of 44
Page 27
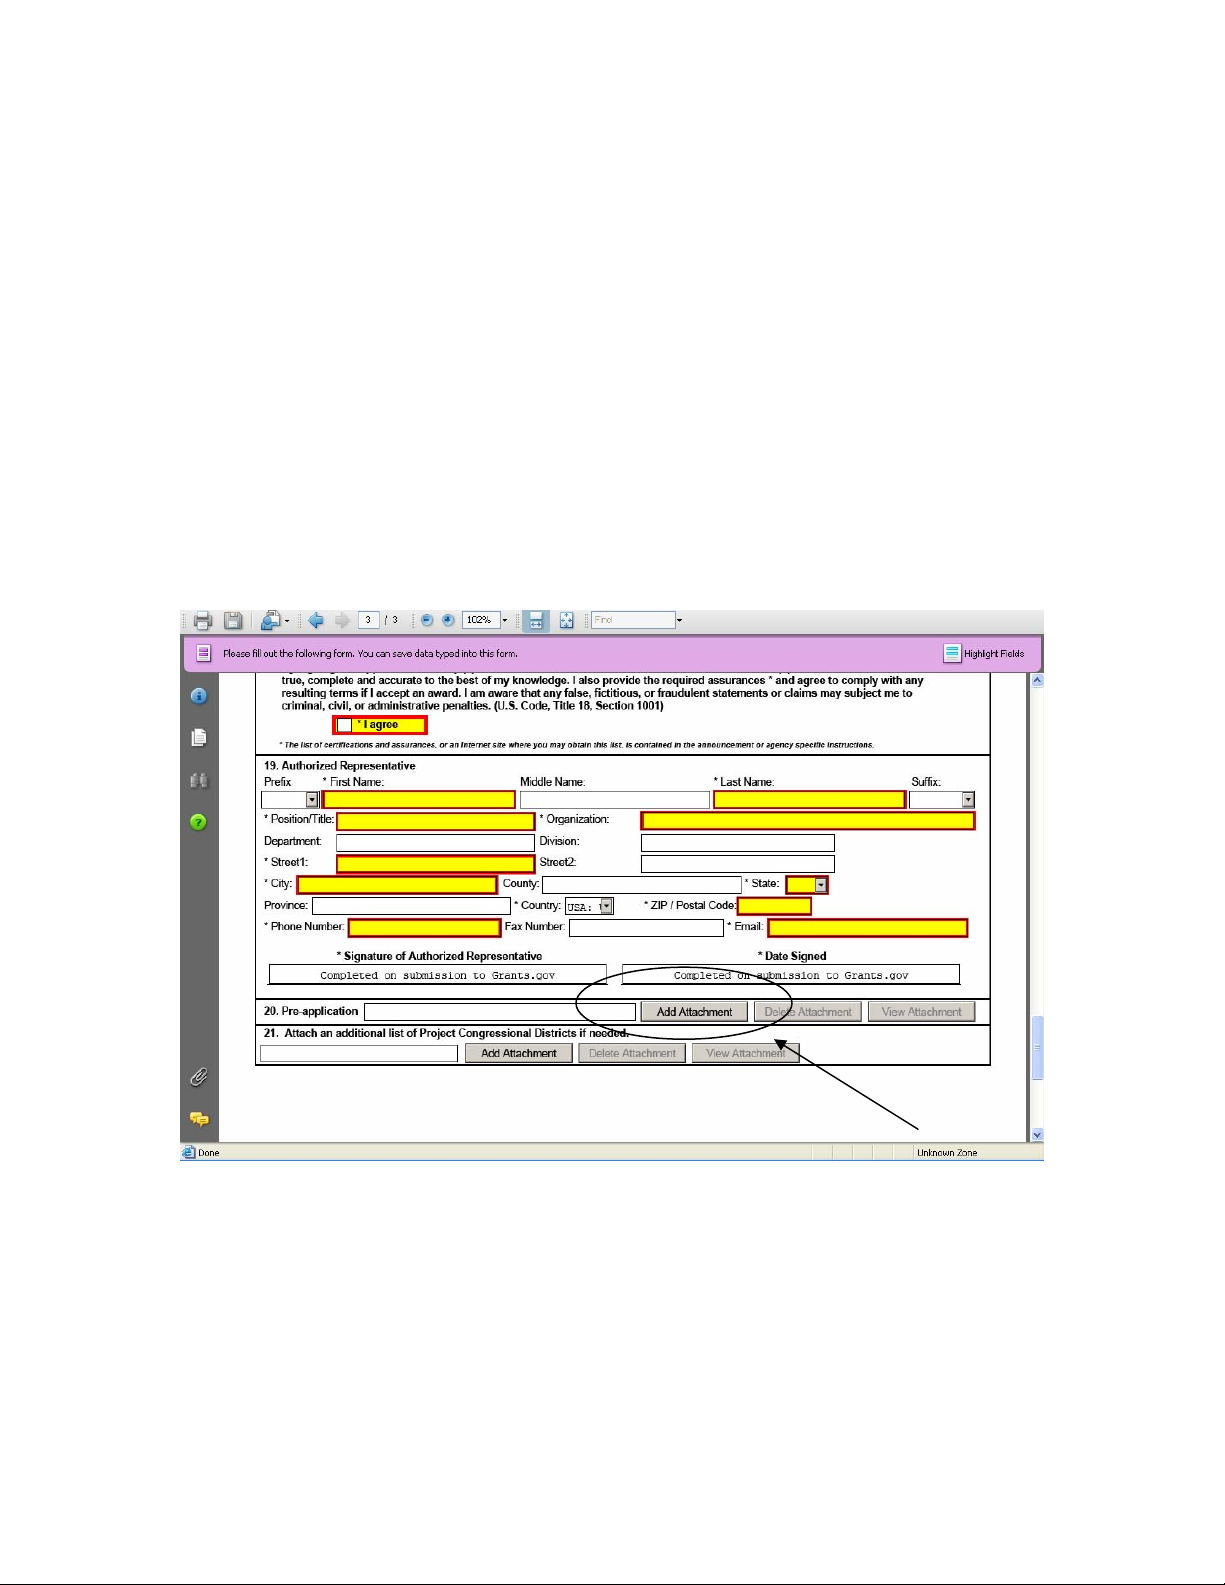
4. Once you have selected the document you would like to attach, click the Open
button. You will return to the Attachments Form. The file name of the
attachment will now appear in the form on the line of which you selected Add
Attachment.
5. Repeat this process until you have attached all of the necessary documents.
Attaching a Document within the Application Package
Depending on the application you are filling out you may be required to submit
attachments within forms. To attach documents to specific questions on a form
please follow the instructions below.
1. When you are filling out a form and come to a question requesting you to add
attachments, simply click on the Add Attachment button.
2. After clicking on the Add Attachment button a Browse window will open
allowing you to select the document on your computer (or network drive) you
would like to upload.
27 of 44
Page 28
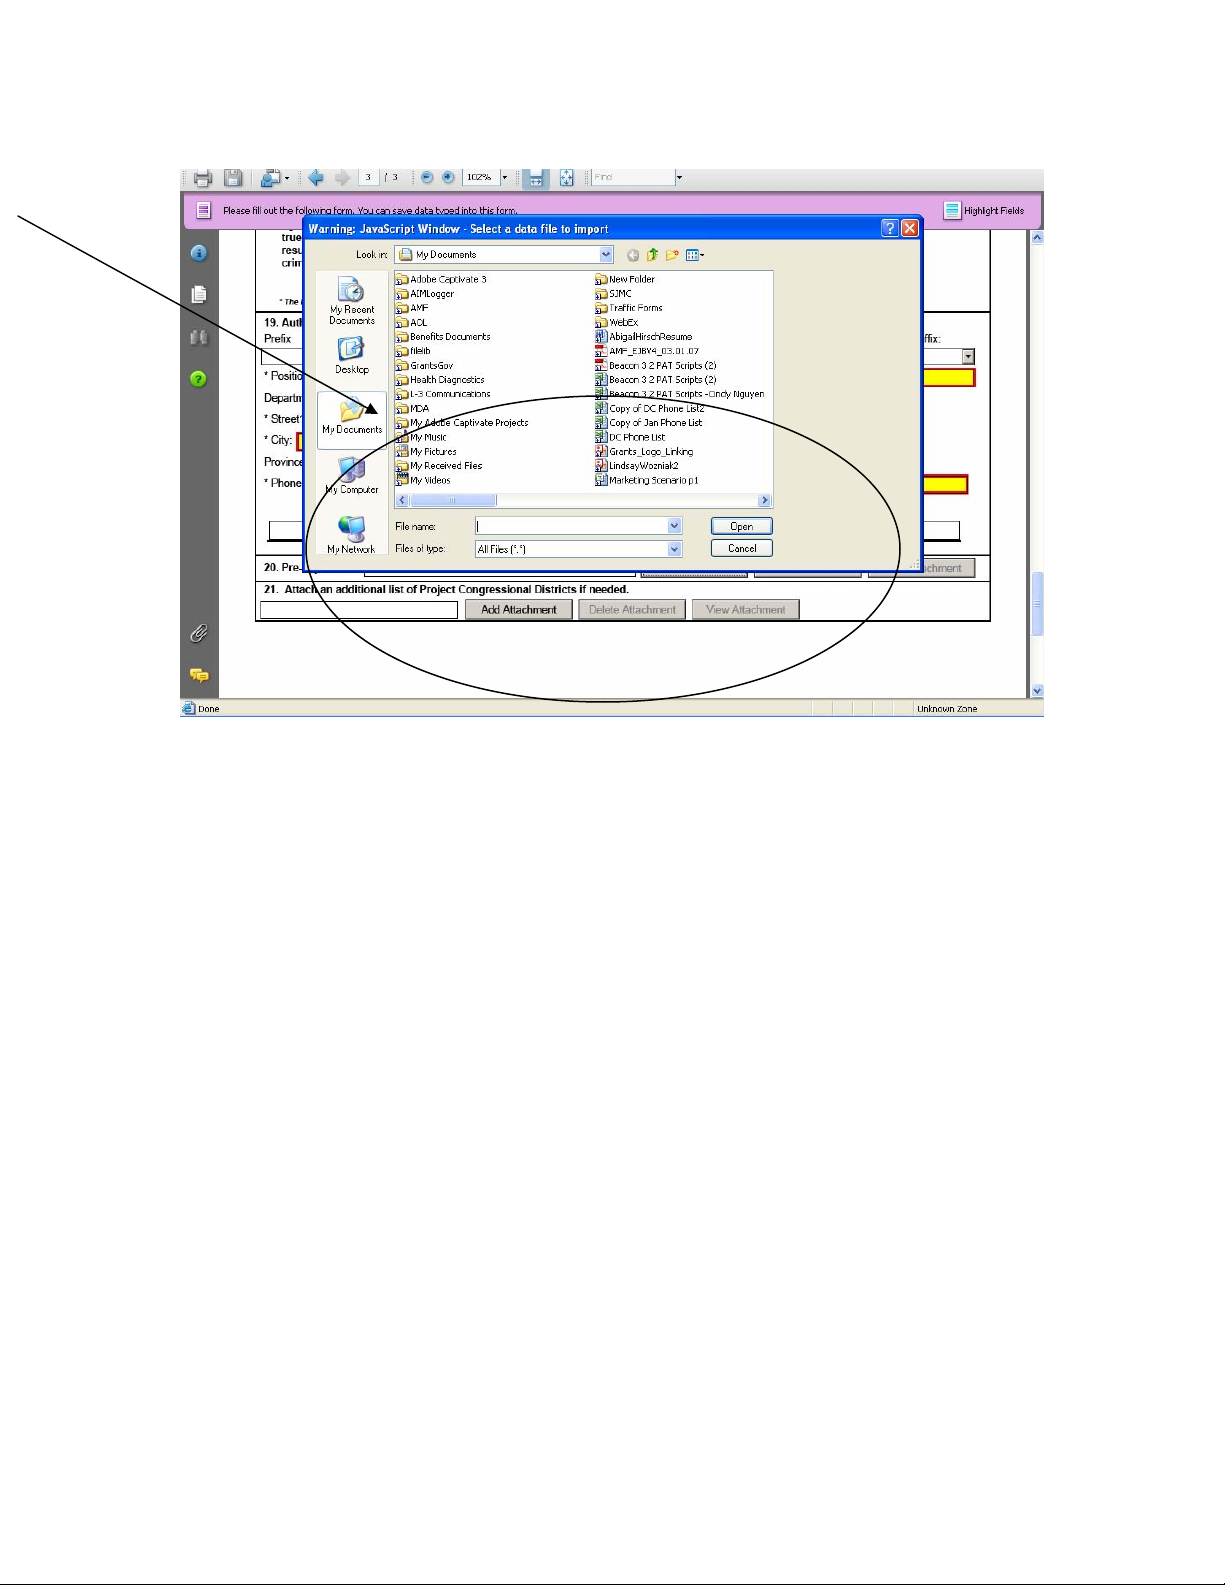
3. Once you have selected the document you would like to attach, click the Open
button. You will see the file name in the field you selected to attach.
4. Repeat this process until you have attached all of the necessary documents.
5. Once you are finished, either continue filling out the application or click the
Save button at the top of the form to save your work.
28 of 44
Page 29
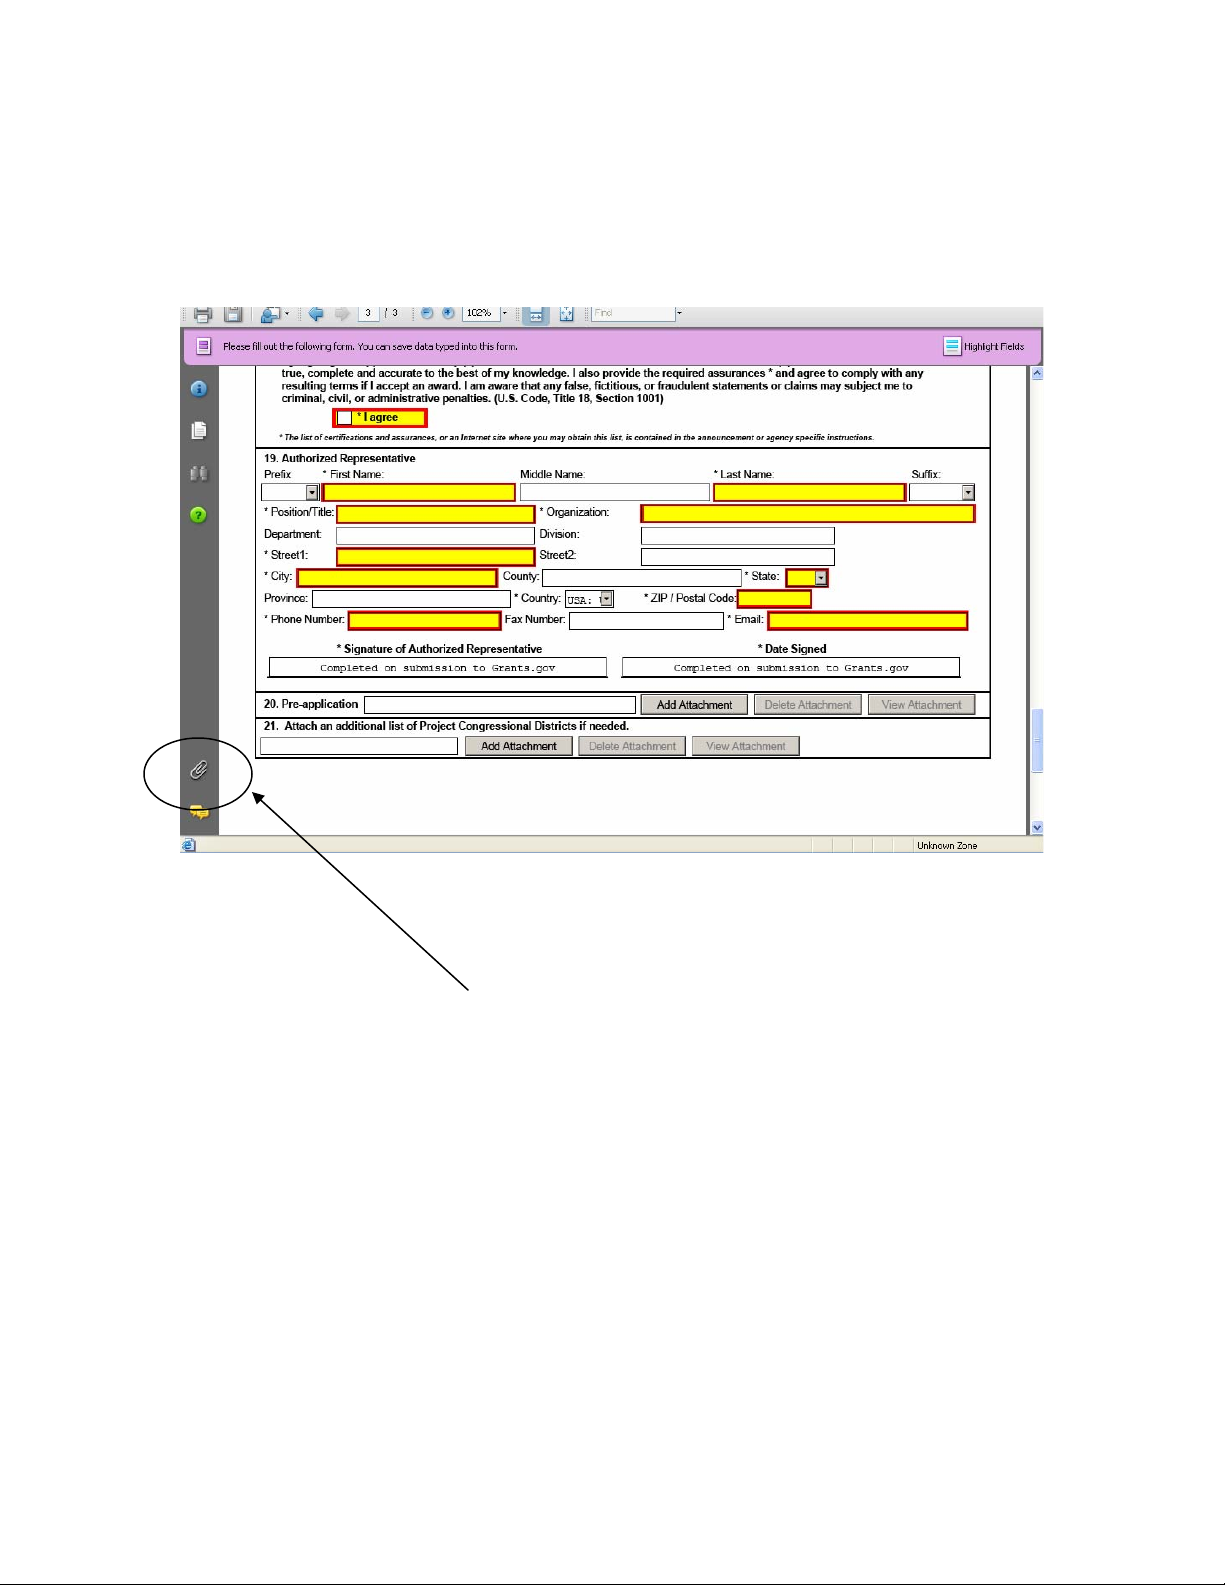
ATTENTION: There is a paper clip icon in Adobe Reader forms on the left side of
the page in every application. You CANNOT attach documents with this function.
Please do not attach documents under this function as your application will be
incomplete and cause errors if you do so.
29 of 44
Page 30
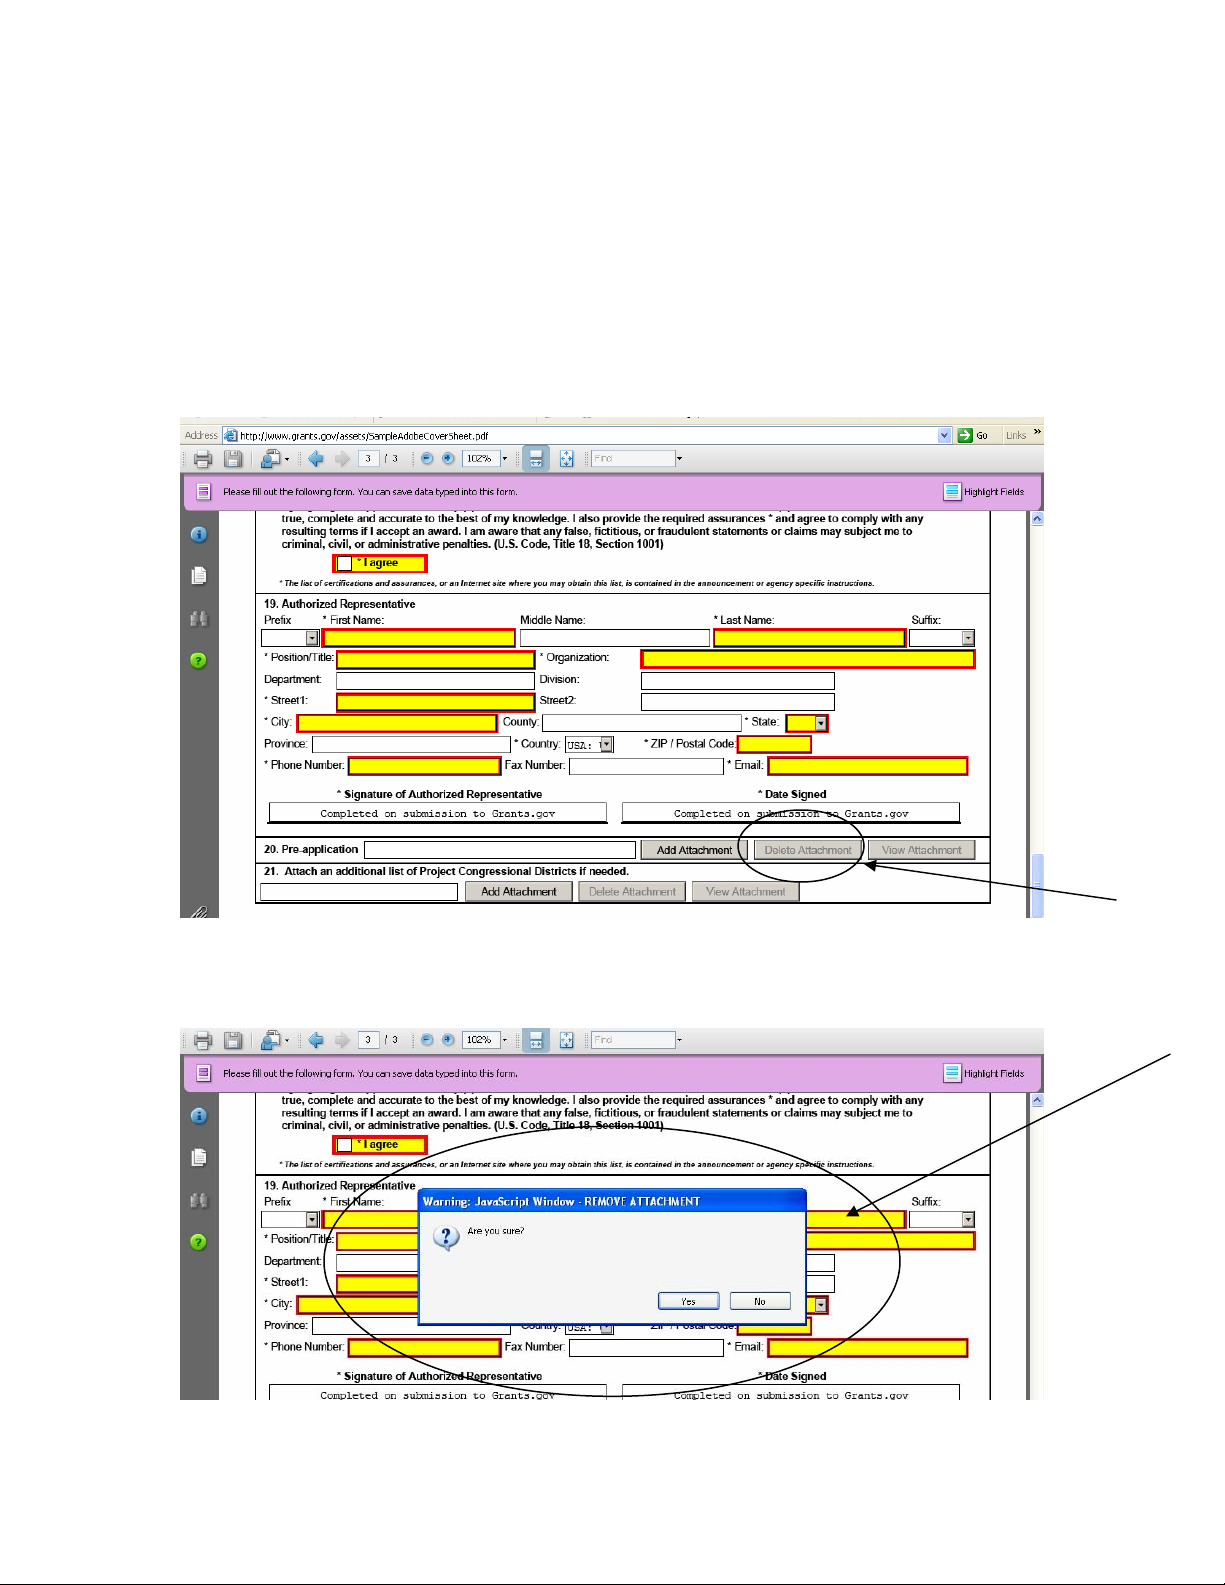
Once you have added an attachment you have the ability to add another
attachment (if the form allows), delete attachments and view attachments.
Deleting an Attachment within a Form
1. To delete an attachment within the form, go to the question you would like to
delete the attachment from and click on the Delete Attachments button. (In the
example below the user is deleting an attachment from question number 20.)
2. After clicking on the Delete Attachments button a dialog box will appear. Click
the Yes button to delete the attachment.
30 of 44
Page 31
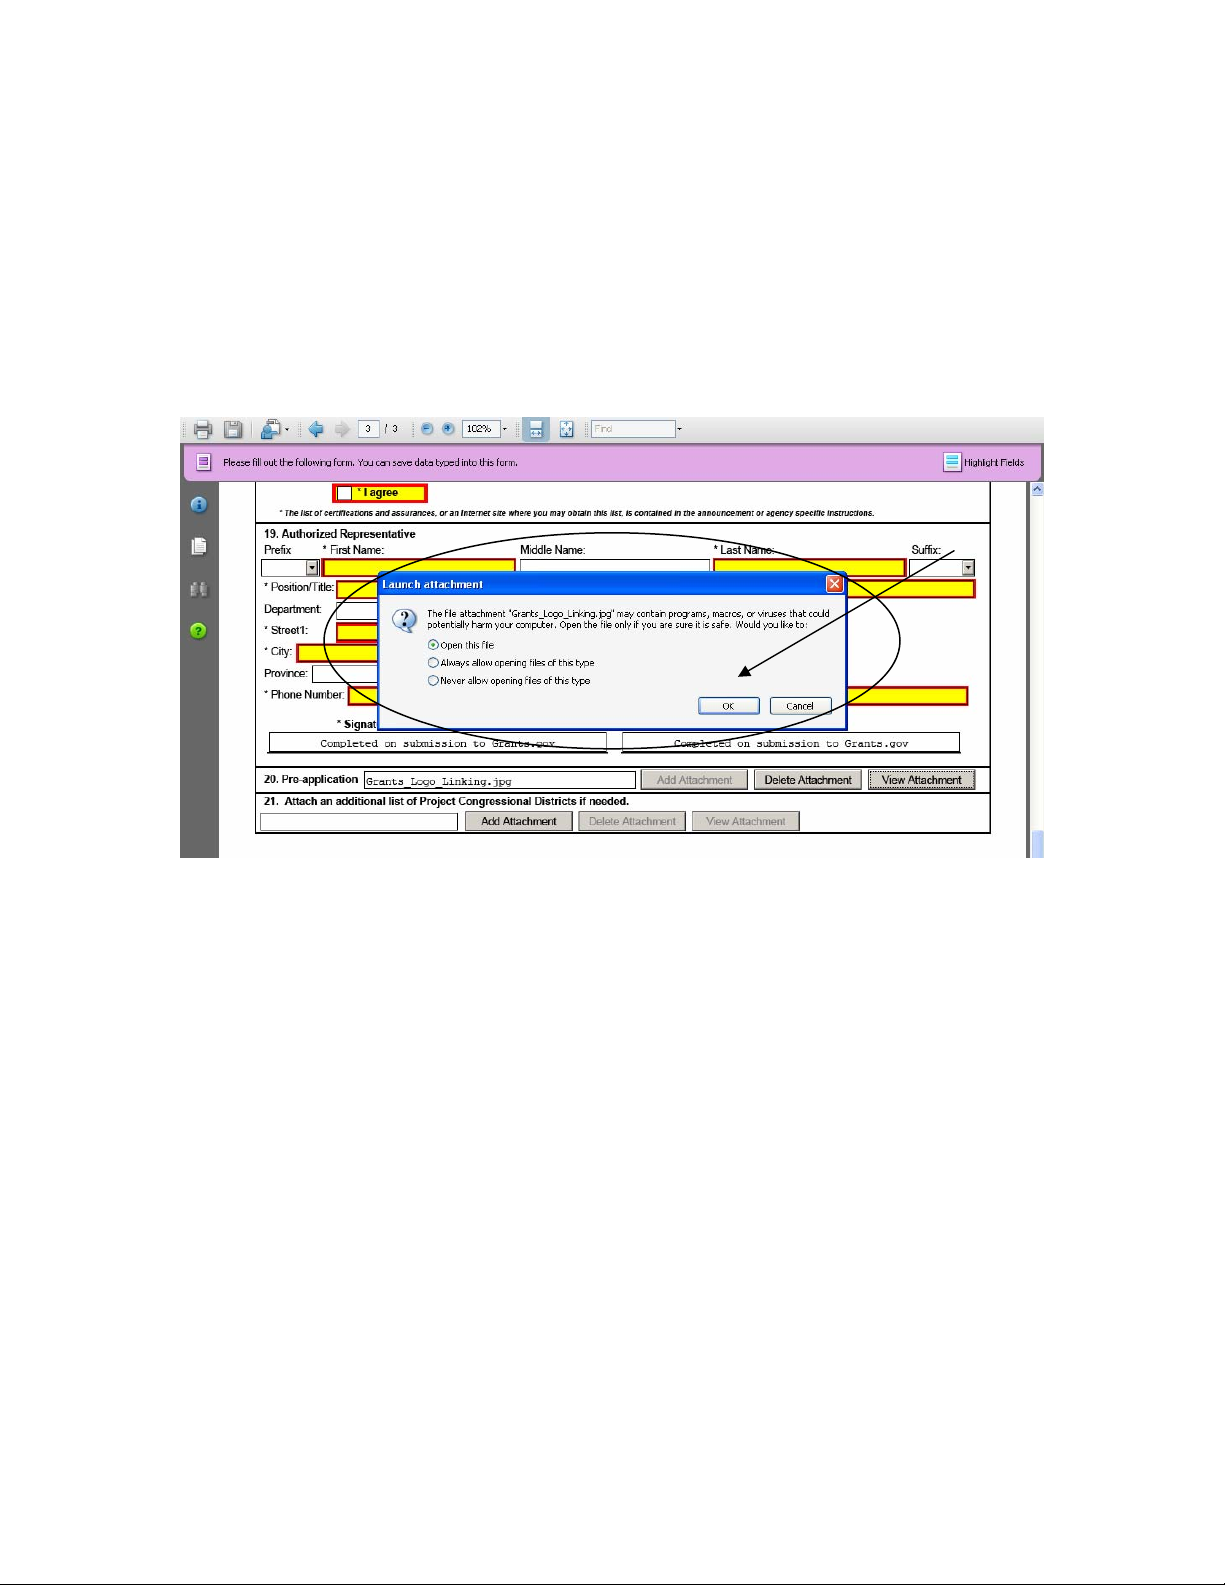
Viewing an Attachment within a Form
To view an attachment within the form, go to the question you would like to view
the attachment from and click on the View Attachment button. (In the example
below the user is viewing an attachment from question number 20.)
1. After clicking on the View Attachments button a Forms Attachment dialog box
will appear. Select Open this file and click the OK button.
2. When you are finished reviewing the document, close the document, it will still
be attached to the form. NOTE: If you want to make any edits to an attachment
you will need to save the attachment to your computer, make the edits, then save
the new document. Once that is saved you will need to attach the new document
to the form and delete the outdated attachment from the form. Please see the
sections for adding and deleting attachments.
Saving Your Application
To save your application before submitting it to Grants.gov, click on the Save
button on the cover page at the top of the screen.
Printing Your Application
To print your application, click the Print button on the cover page at the top of
your screen. Make sure your documents are in the Mandatory and/or Optional
documents submission box on the right of the application in order for your
attachments to print.
31 of 44
Page 32
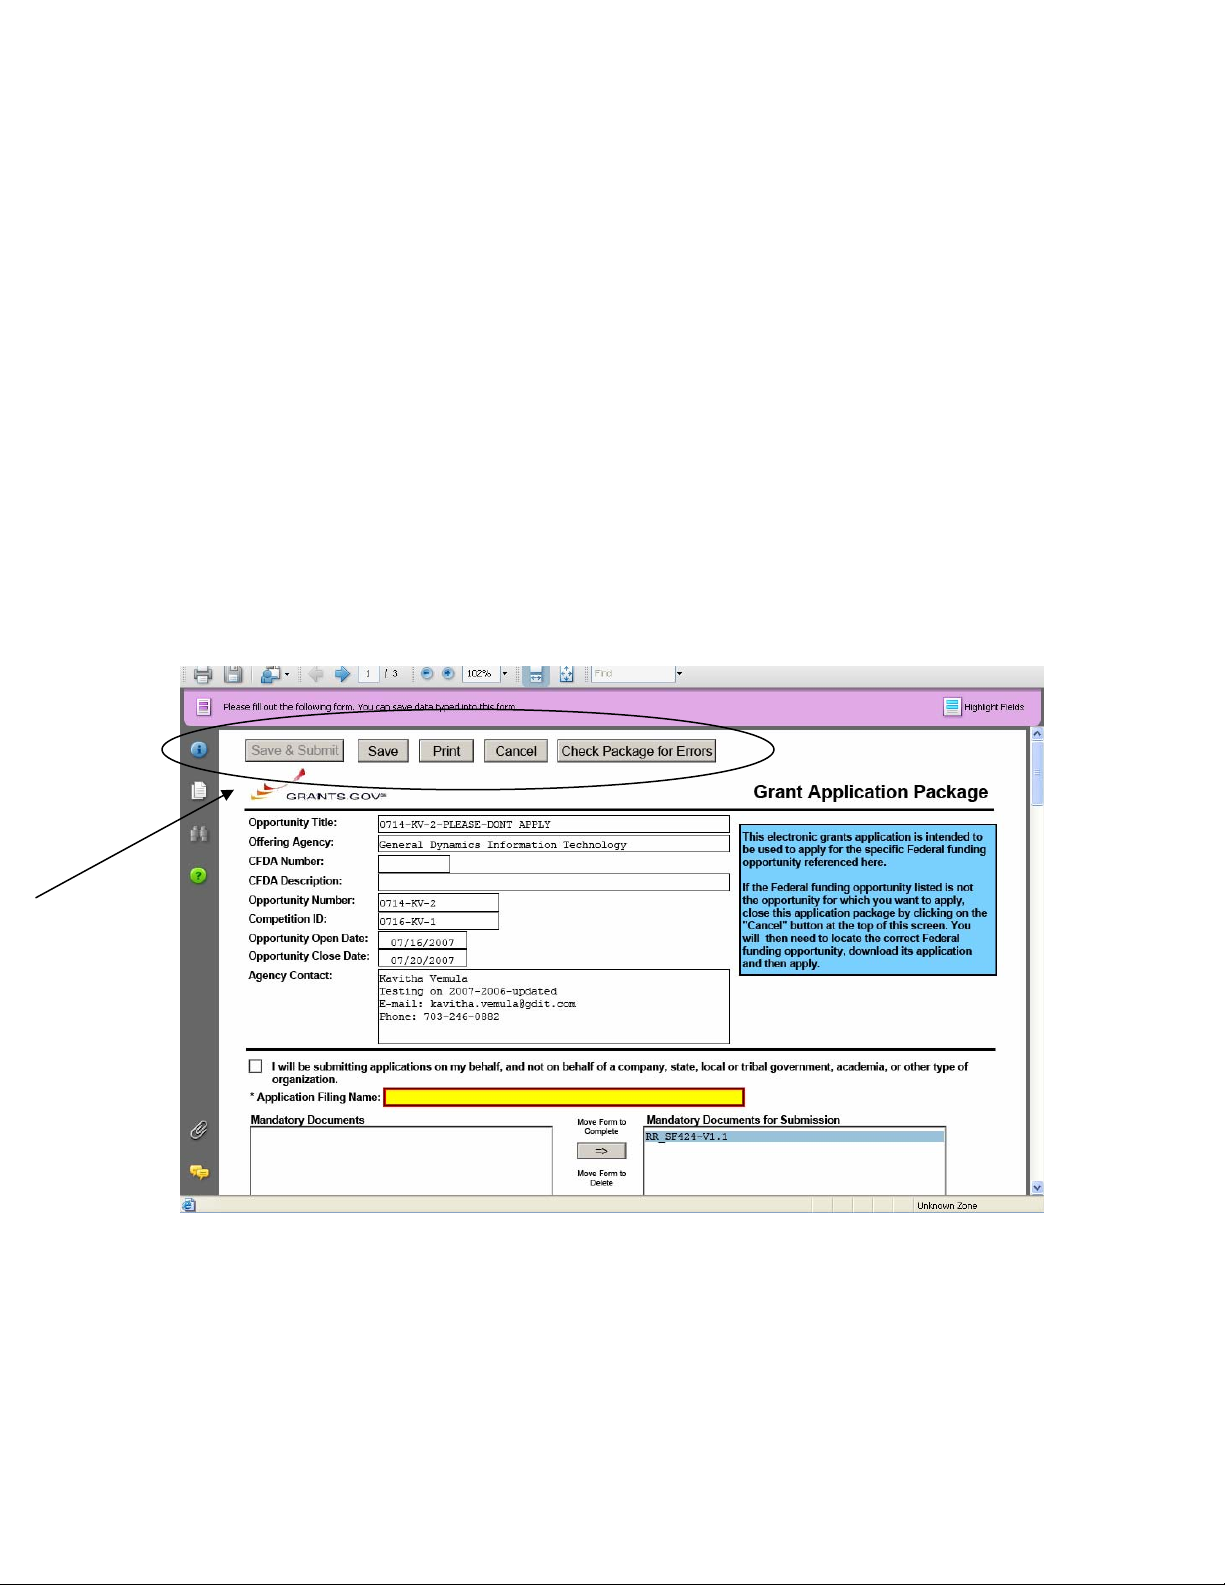
Finalizing Your Application
Once you have completed all required documents and attached any required or
optional documentation, click on Save to save your package. If errors are found,
click on the Check Package for Errors button which will identify each error.
Then correct each error.
If there are no errors, when you save the package the Save & Submit button will
be activated.
Click on the Check Package for Errors button at any time to ensure that you
have completed all required data fields.
The Save & Submit button will become active after all errors have been resolved
and the package has been saved. Click on the Save & Submit button and save
the application again. You are required to save the application at this point to
begin the application submission process.
32 of 44
Page 33
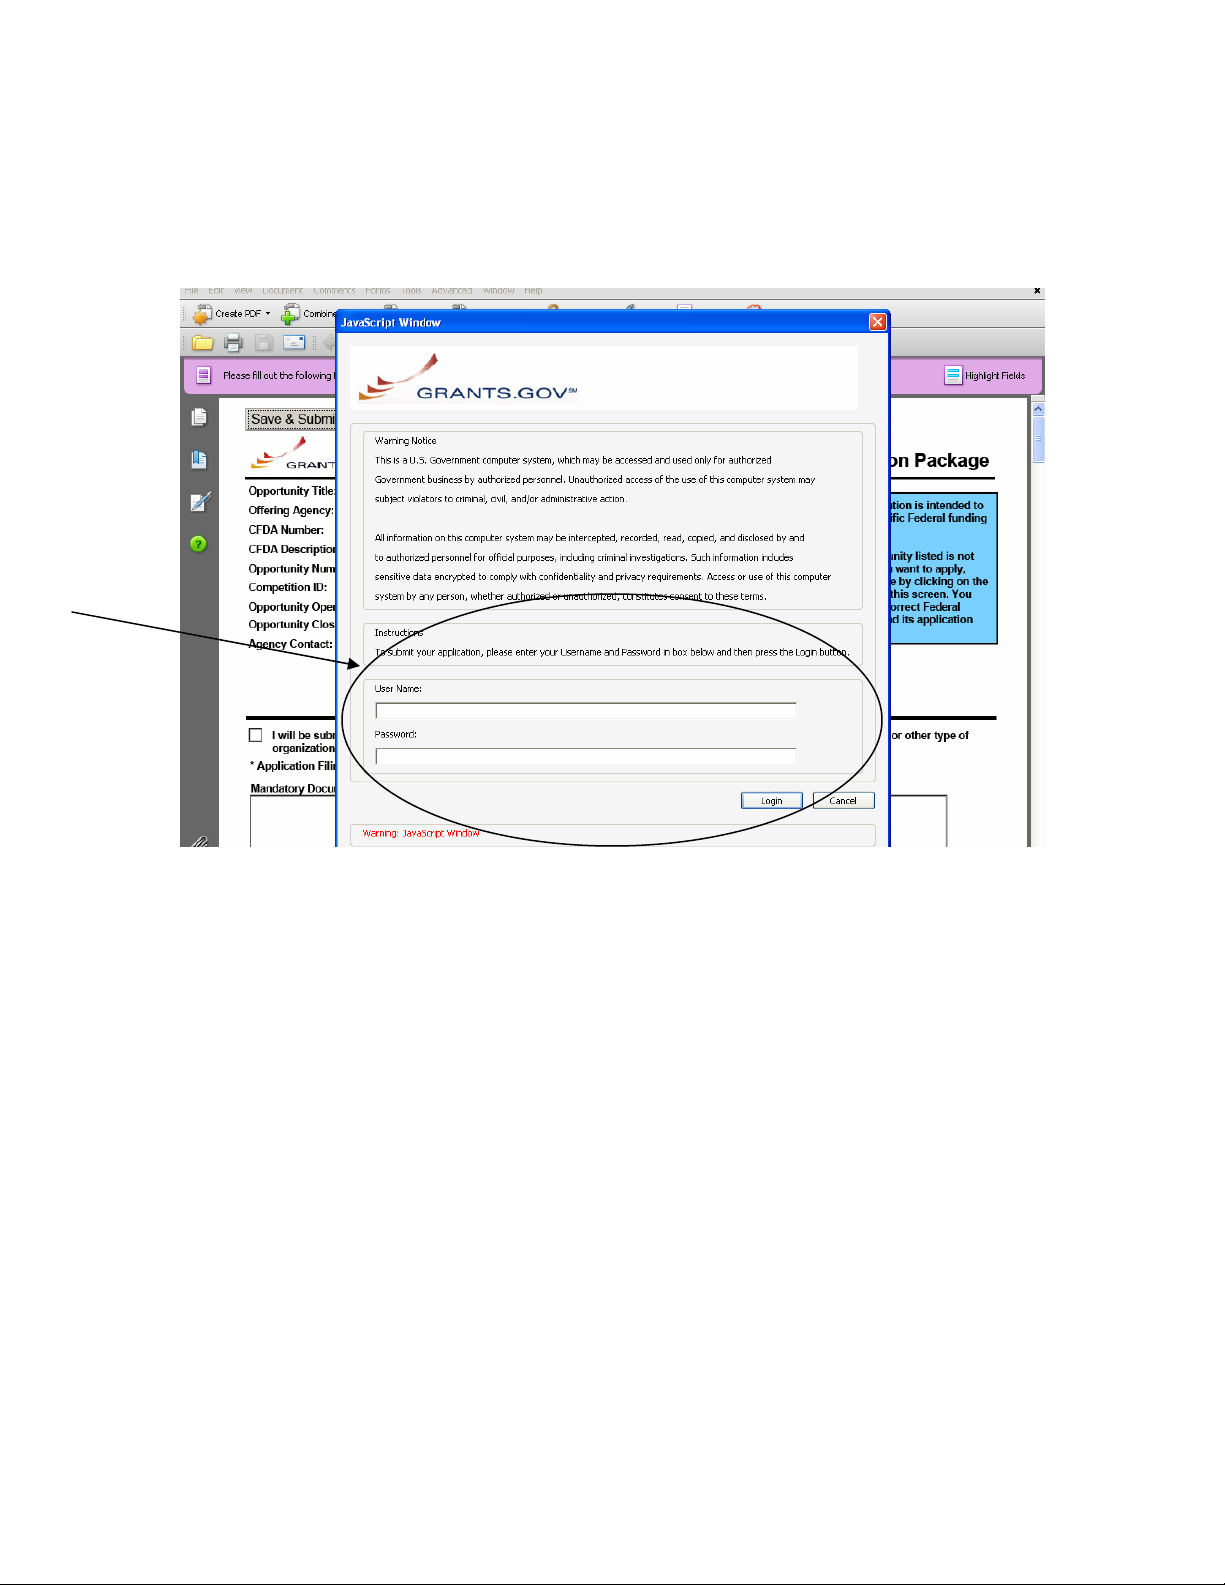
Once you have saved the application using the Save & Submit button, a dialog
box will appear and you will need to enter your Grants.gov username and
password. Follow all onscreen instructions for submission.
33 of 44
Page 34
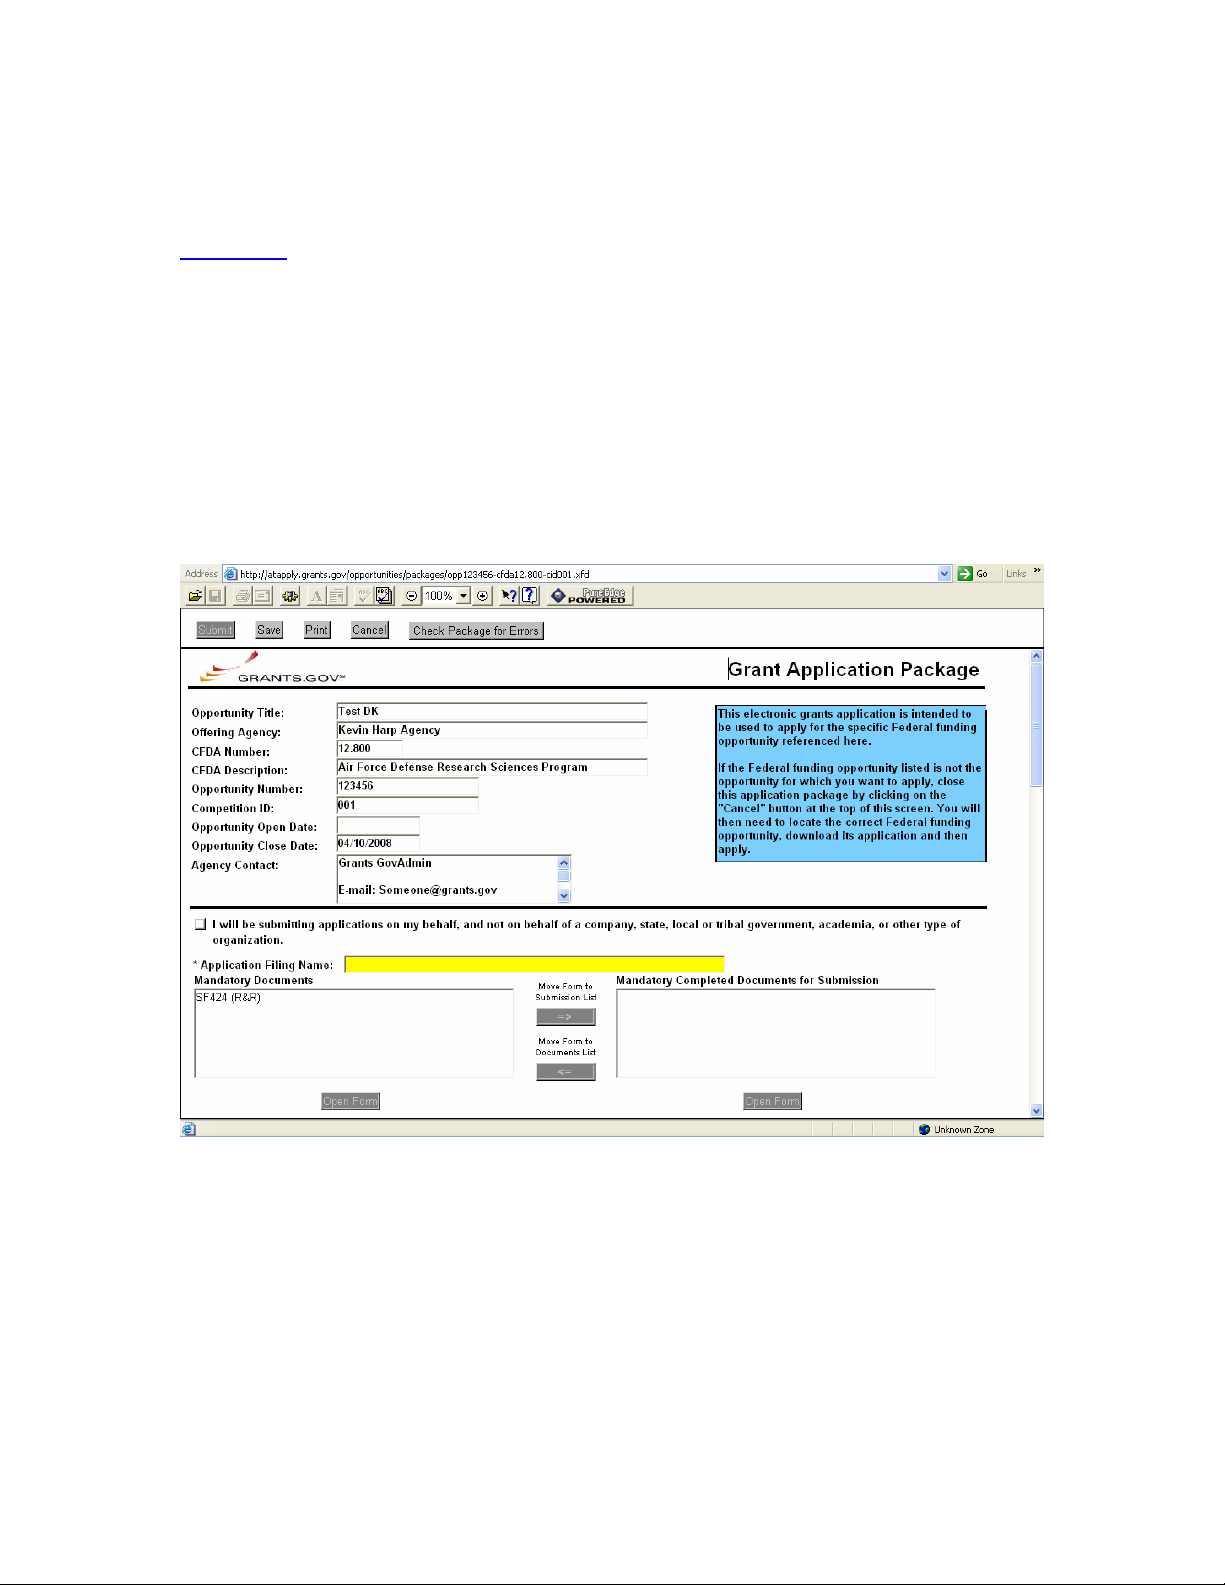
Complete Application Packages with PureEdge
Click here to view Complete Application Packages Instructions for Adobe
Reader.
Notice: Grants.gov is currently transitioning from phasing out of PureEdge
software to using Adobe Reader software exclusively. For a period of time
applicants will still be able to use PureEdge as it is applicable.
Follow the steps below to complete an application package using Grants.gov.
1. As the application downloads, it will automatically open in PureEdge
Viewer. Save the application to your computer. Once the application is
saved, you do not need to be online to complete the application.
2. Verify that the pre-entered information is for the grant opportunity for
which you want to apply. If the federal funding opportunity listed is not the
opportunity for which you want to apply, close this application package by
clicking the Cancel button at the top of the screen. You will then need to
locate the correct federal funding opportunity, download its application and
then apply. If the federal funding opportunity listed is the opportunity for
which you want to apply, complete the application in its entirety before
submitting it.
Applications can be completed in their entirety offline; however, you will
need to login to the Grants.gov website during the submission process.
34 of 44
Page 35

The Submit button at the top of the screen will not be functional until the
application is properly completed and saved.
If you have any application specific questions, contact the offering agency
directly using the contact information provided on the application's cover
page.
Cover Page
Follow the steps below to complete the cover page of an application package.
1. Enter a name for the application in the Application Filing Name field.
• You can save your application at any time by clicking the Save
button at the top of your screen.
• The Submit button will not be functional until the application is
complete and saved.
2. Open and complete all of the documents listed in the Mandatory
Documents box and Optional Documents box.
• Mandatory Documents are required for this application. Optional
Documents can be used to provide additional support for this
application or may be required for specific types of grant activity.
Reference the application package instructions for more information
regarding Optional Documents.
• To open an item, simply click on it to select the item and then click
on the Open button. When you have completed a form or
document, click the form/document name to select it, and then click
the =>> button. This will move the form/document to the
Mandatory Completed Documents or Optional Completed
Documents box for submission. To remove a form/document from
the Completed Documents box, click the form/document name to
select it, and then click the <<= button. This will return the
form/document to the Mandatory Documents or Optional
Documents box.
• When you open a required form, the fields which must be
completed are noted by an *, and on some computers highlighted in
yellow. Optional fields and completed fields are displayed in white.
If you enter invalid or incomplete information in a field, you will
receive an error message.
• To exit a form, click on the Close button at the top of the screen.
Then, click the Save button to resave your entire application.
35 of 44
Page 36
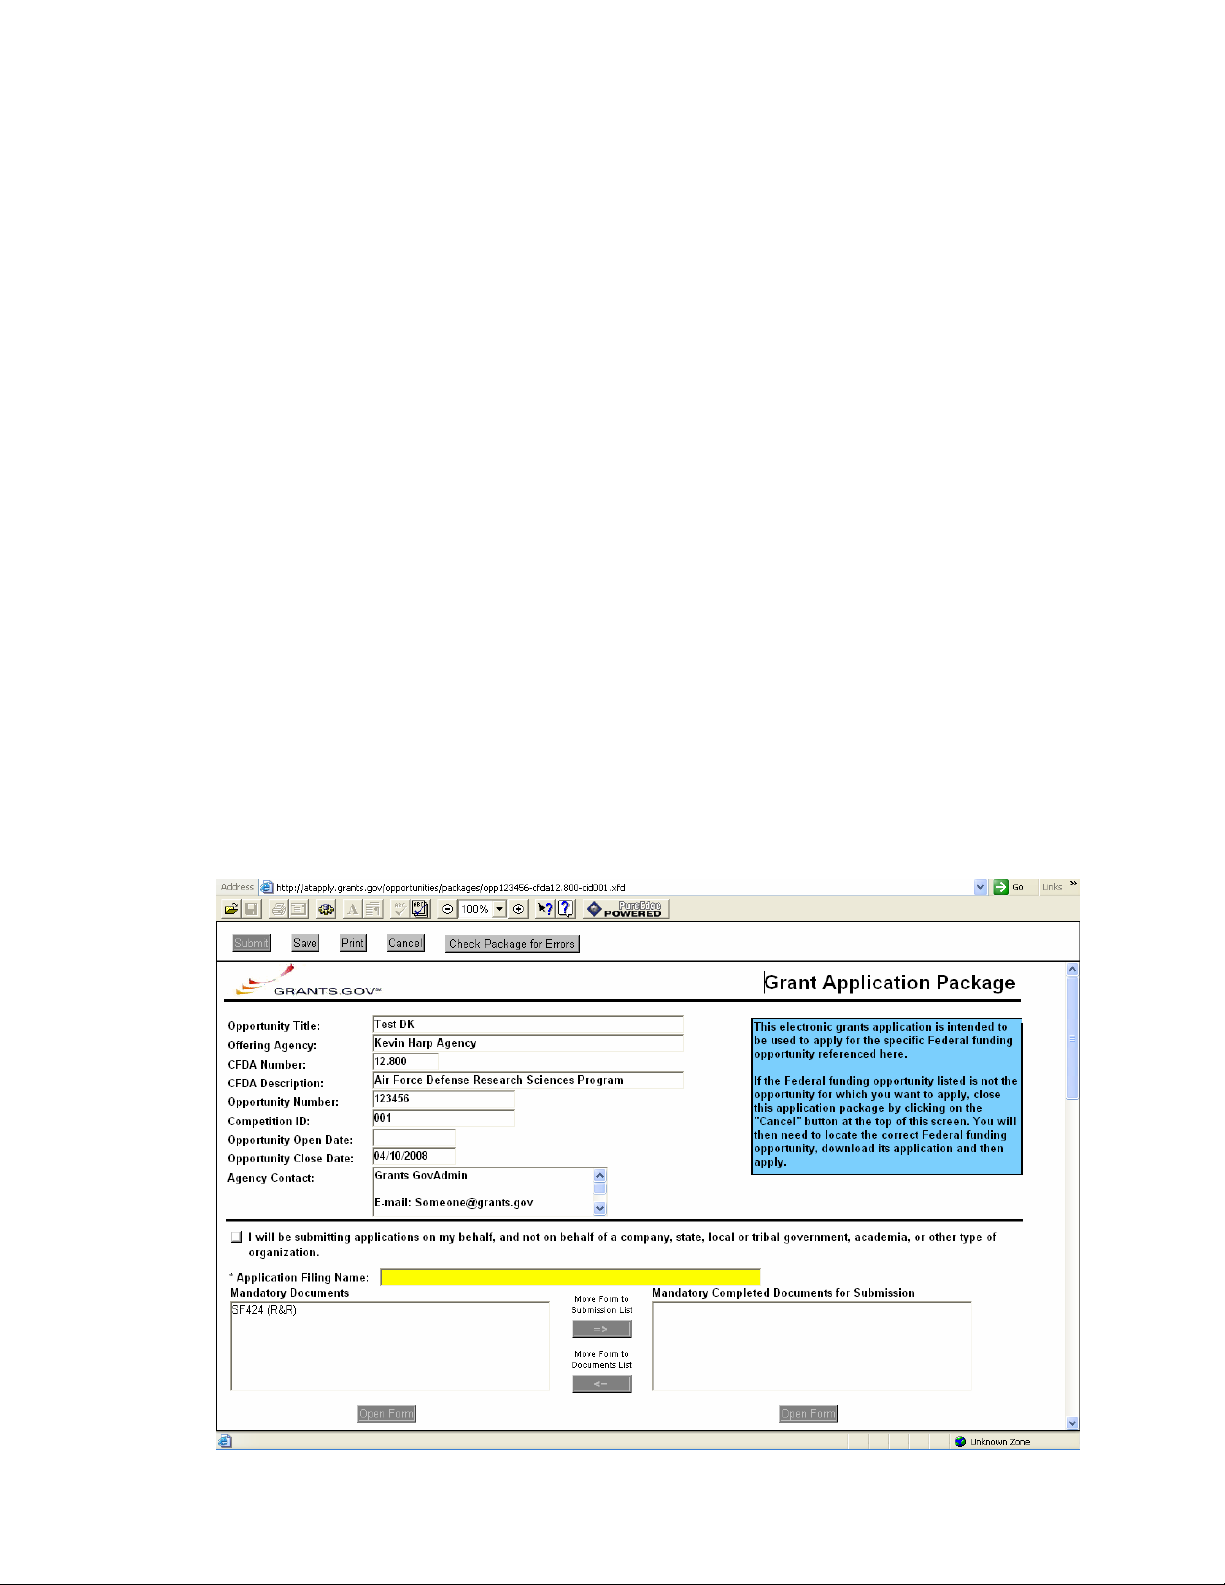
Note: Please make sure all of the following conditions have been met:
• All mandatory fields in all mandatory forms have been completed
and moved to the Mandatory Completed Documents for
Submission box.
• The Save button has been clicked AFTER all documents have
been moved to the Mandatory Completed Documents for
Submission box.
• All mandatory fields in all optional forms that have been moved to
the Optional Completed Documents for Submission box have been
completed.
• All Internet browser windows must be closed.
Forms
Forms, such as SF-424, are predefined and will require you to enter information
into fields. If the SF-424 is in the package, you must complete the SF-424
first. SF-424 will automatically complete additional fields on other forms
with the information you entered. Follow the steps below to complete forms
contained within an application package.
Note: To open a form in the Mandatory or Optional Documents box, simply
click on the form name to select it and click the Open Form button which
appears below the appropriate box. When you have completed a form, you will
need to move it to the appropriate Completed Documents for Submission box.
36 of 44
Page 37
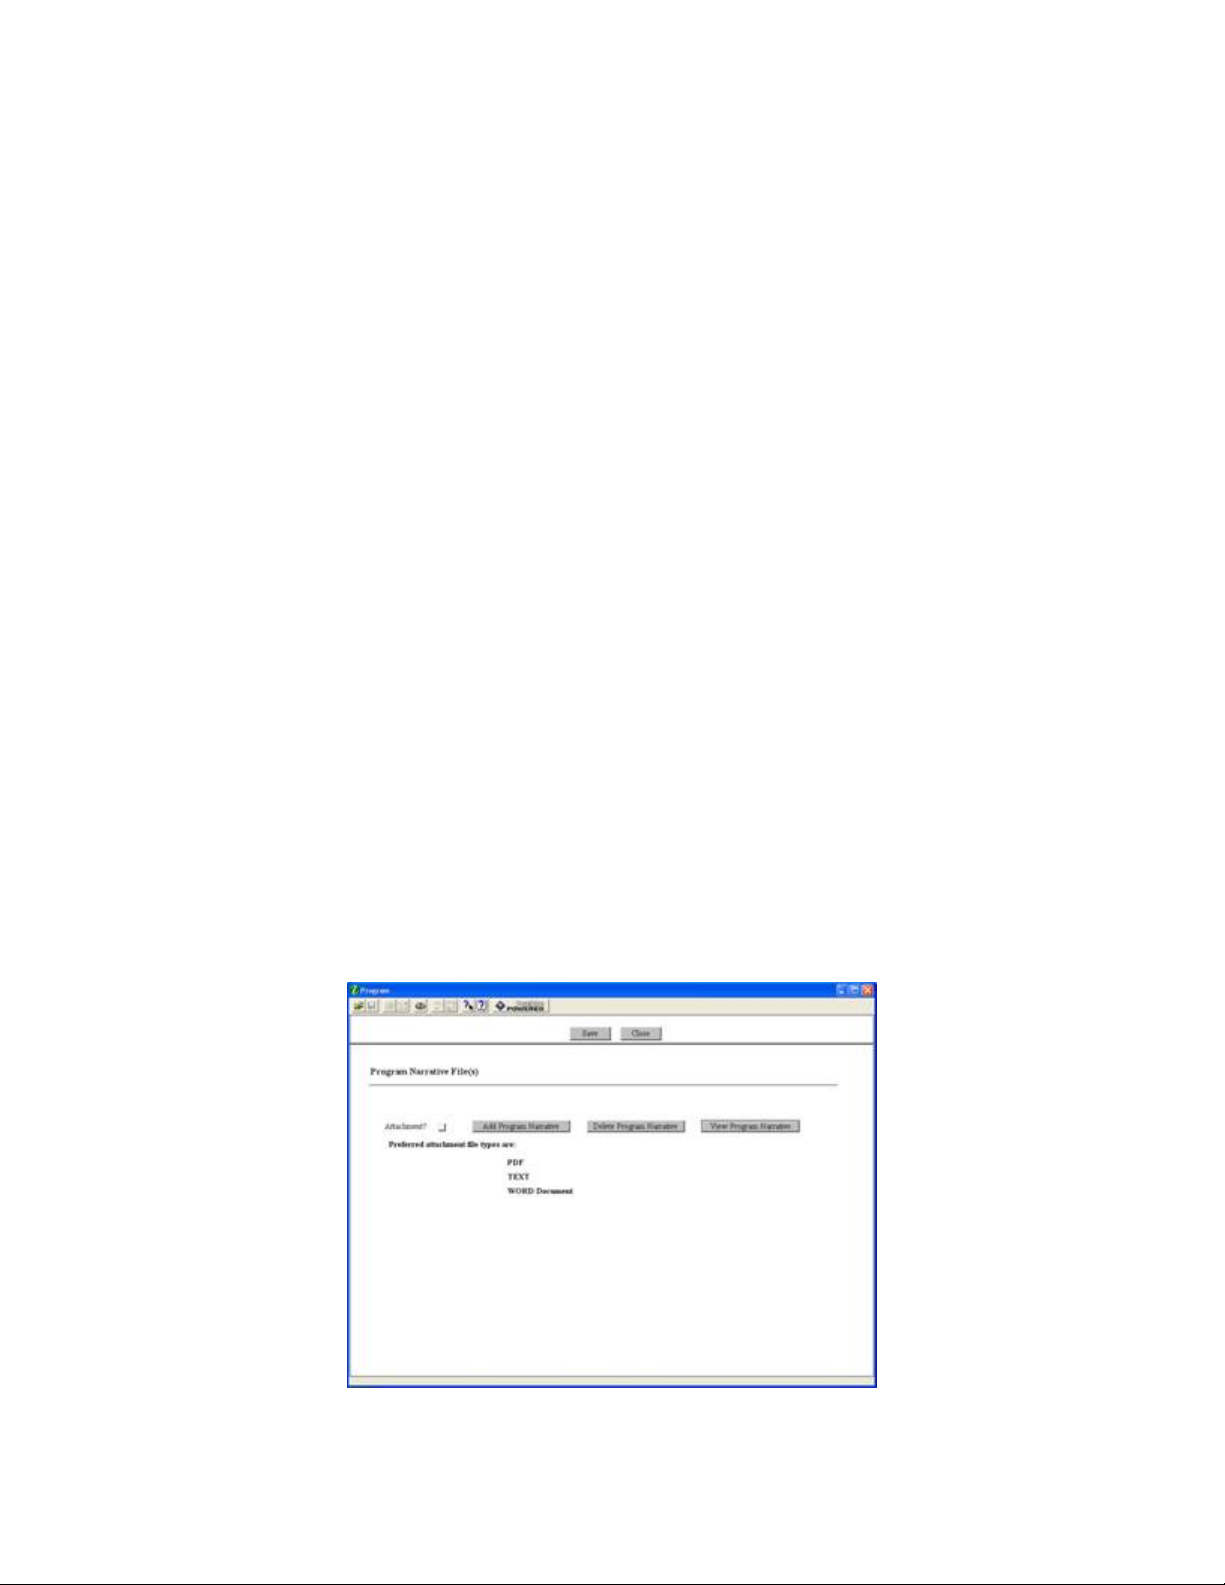
1. When you open a mandatory form, all required fields are noted by an *
and sometimes highlighted in yellow.
2. Optional fields and completed fields are displayed in white.
3. You can click any field to enter the necessary information.
4. You can also use the TAB button on your keyboard to move from field to
field.
5. If you enter invalid or incomplete information in a required field, you will
receive an error message upon leaving the field.
6. To exit a form, click the Close button at the top of the screen. Then click
the Save button to save your application.
Documents
In addition to forms, application packages may also require that you submit
specific documentation, such as a program background statement. Follow the
steps below to submit documentation for an application package.
1. To open a form that requires you to attach a document, click on the form
name to select it and then click the Open Form button which appears
below the appropriate box.
2. Once the form is open, you can attach documents from your computer to
the form. Depending on the form, you may be able to attach a PDF, Text
Document, Word Document or other type of documents. After completing
a form, move it to the appropriate Completed Documents for
Submission box.
37 of 44
Page 38
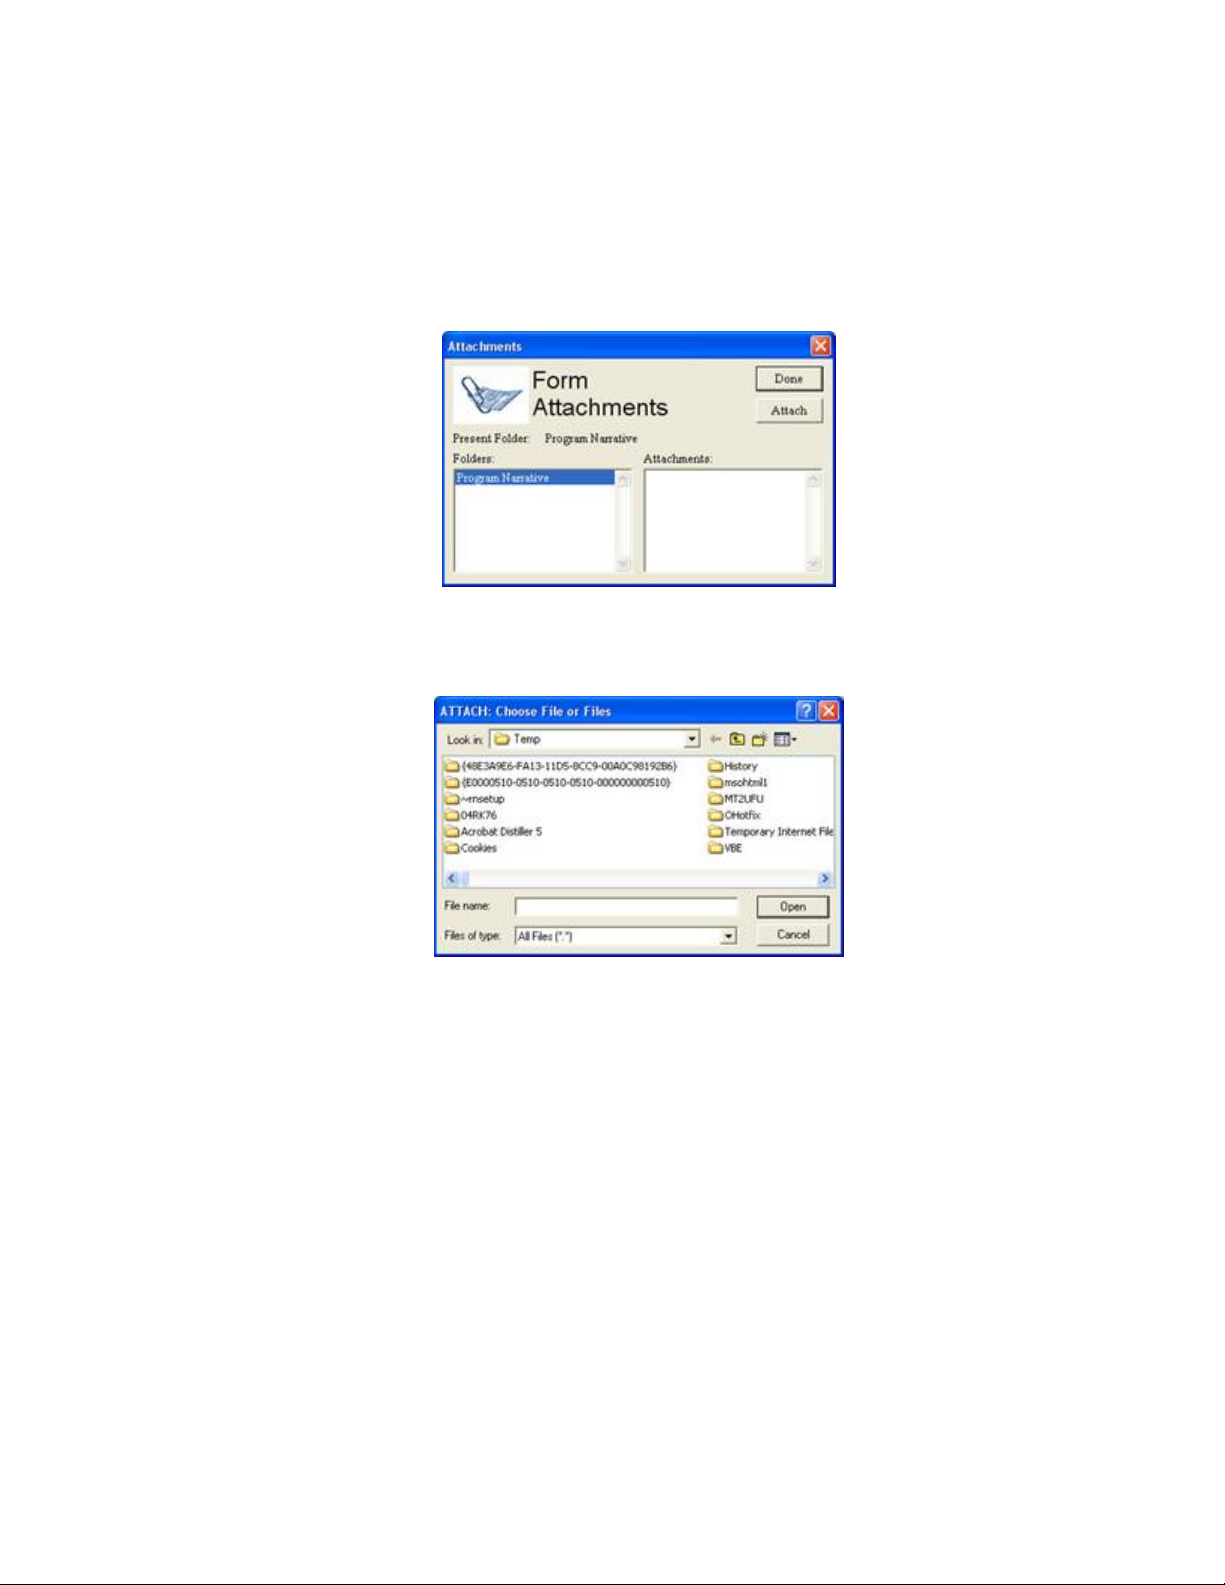
Attaching a Document
Follow the steps below to attach a document to a form.
1. To upload a document, simply click the Add button.
2. This will open an Attachment window.
3. Click the Attach button. A Browse window opens allowing you to
select the document on your computer you would like to upload.
4. Once you have selected the document you would like to attach, click
the Open button. You will return to the Attach window.
5. Repeat this process until you have attached all of the necessary
documents.
6. When you have selected all of the documents you want to include for
this requirement, click the Done button. If multiple files are attached to
the field, the box next to Attachment will be checked. If only one file is
attached, the name of the file will be displayed in the box next to
Attachment.
38 of 44
Page 39
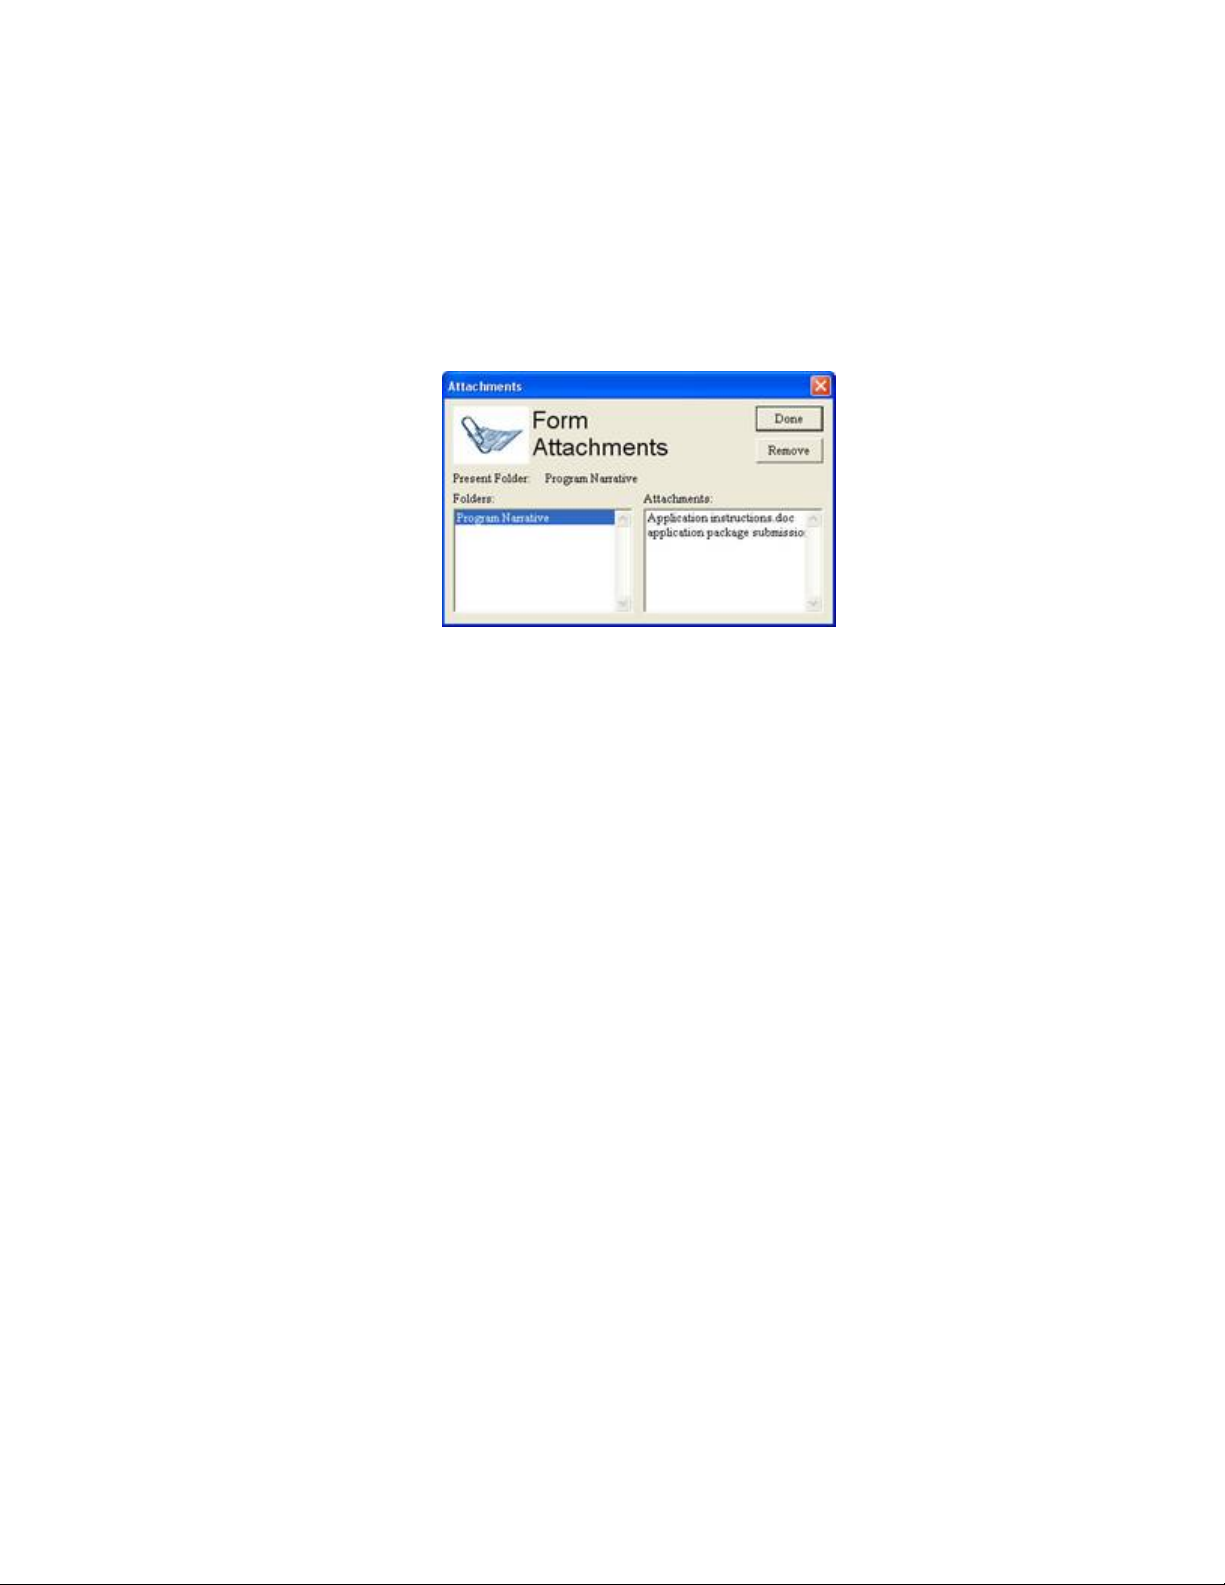
Deleting a Document
Follow the steps below to delete a document that you have uploaded to the form.
1. Open the form and click the Delete button.
2. If multiple documents are attached, the Delete Attachment window
will open.
3. From the Delete Attachment window, select the document or
documents which you want to delete and click the Remove button.
4. Click the Done button when you are finished deleting the documents.
5. Once all the attached documents have been removed, the check mark
after the attachment will be removed. If there is only one attachment,
press the Delete button.
6. The Remove Attachment window will appear. Click Yes to delete or
No to return back to the form. The file name will be removed from the
display box on the form.
Viewing a Document
Follow the steps below to view a document that you have uploaded to the form.
1. Open the form and click the View button.
2. If only one document was attached, the document will open. If multiple
documents are attached, the View Attachment window will open.
39 of 44
Page 40
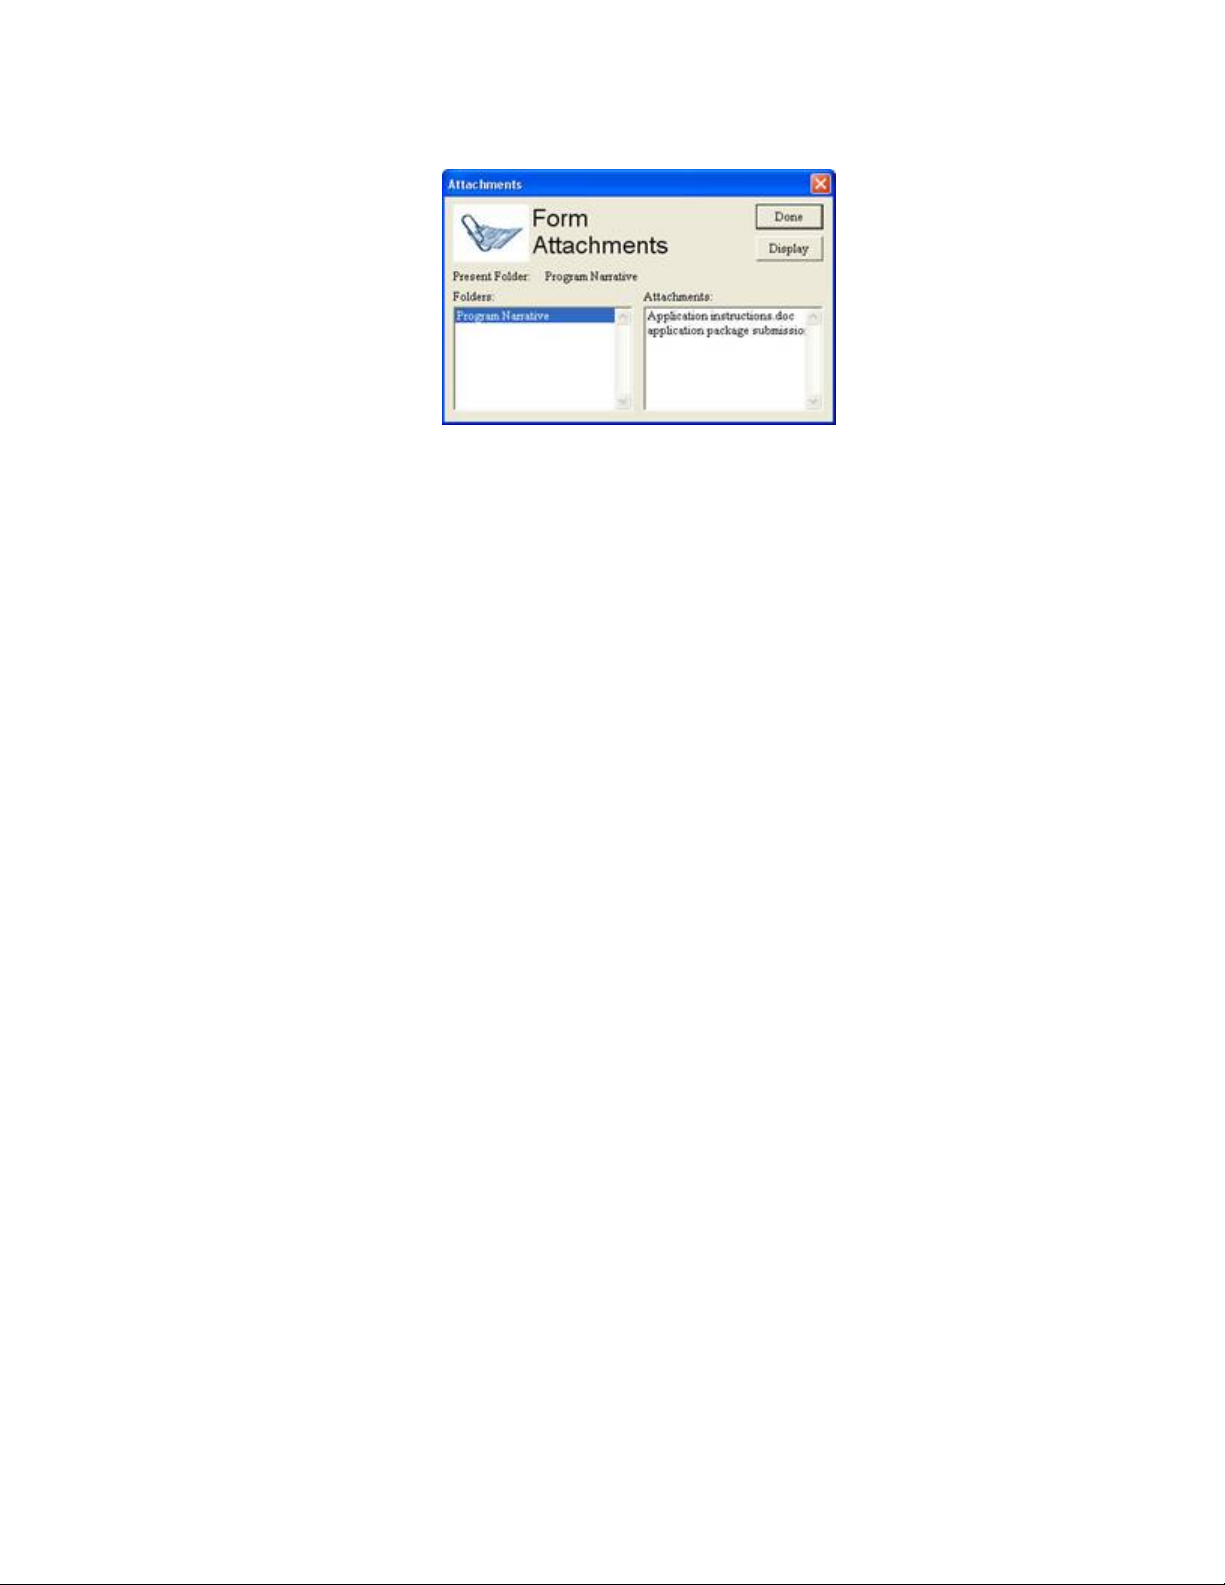
3. From the View Attachment window, select the document or
documents you would like to view and click the Display button.
4. Click the Done button to return back to the form without displaying the
attachment. Closing the open document returns you back to the form.
5. To exit the mandatory documents page, click the Close button.
Saving Your Application
Follow the step below to save your application.
1. To save your application, click the Save button at the top of your
screen.
Printing Your Application
Follow the step below to print your application.
1. To print your application, click the Print button at the top of your
screen.
Finalizing Your Application
Follow the steps below to finalize your application.
1. You can save your application at any time by clicking the Save button
at the top of your screen.
2. Once you have properly completed and saved the application, the
Submit button will become active and you will be able to submit your
application to Grants.gov. (You will need to be connected to the
Internet and login with your Grants.gov username and password.
40 of 44
Page 41
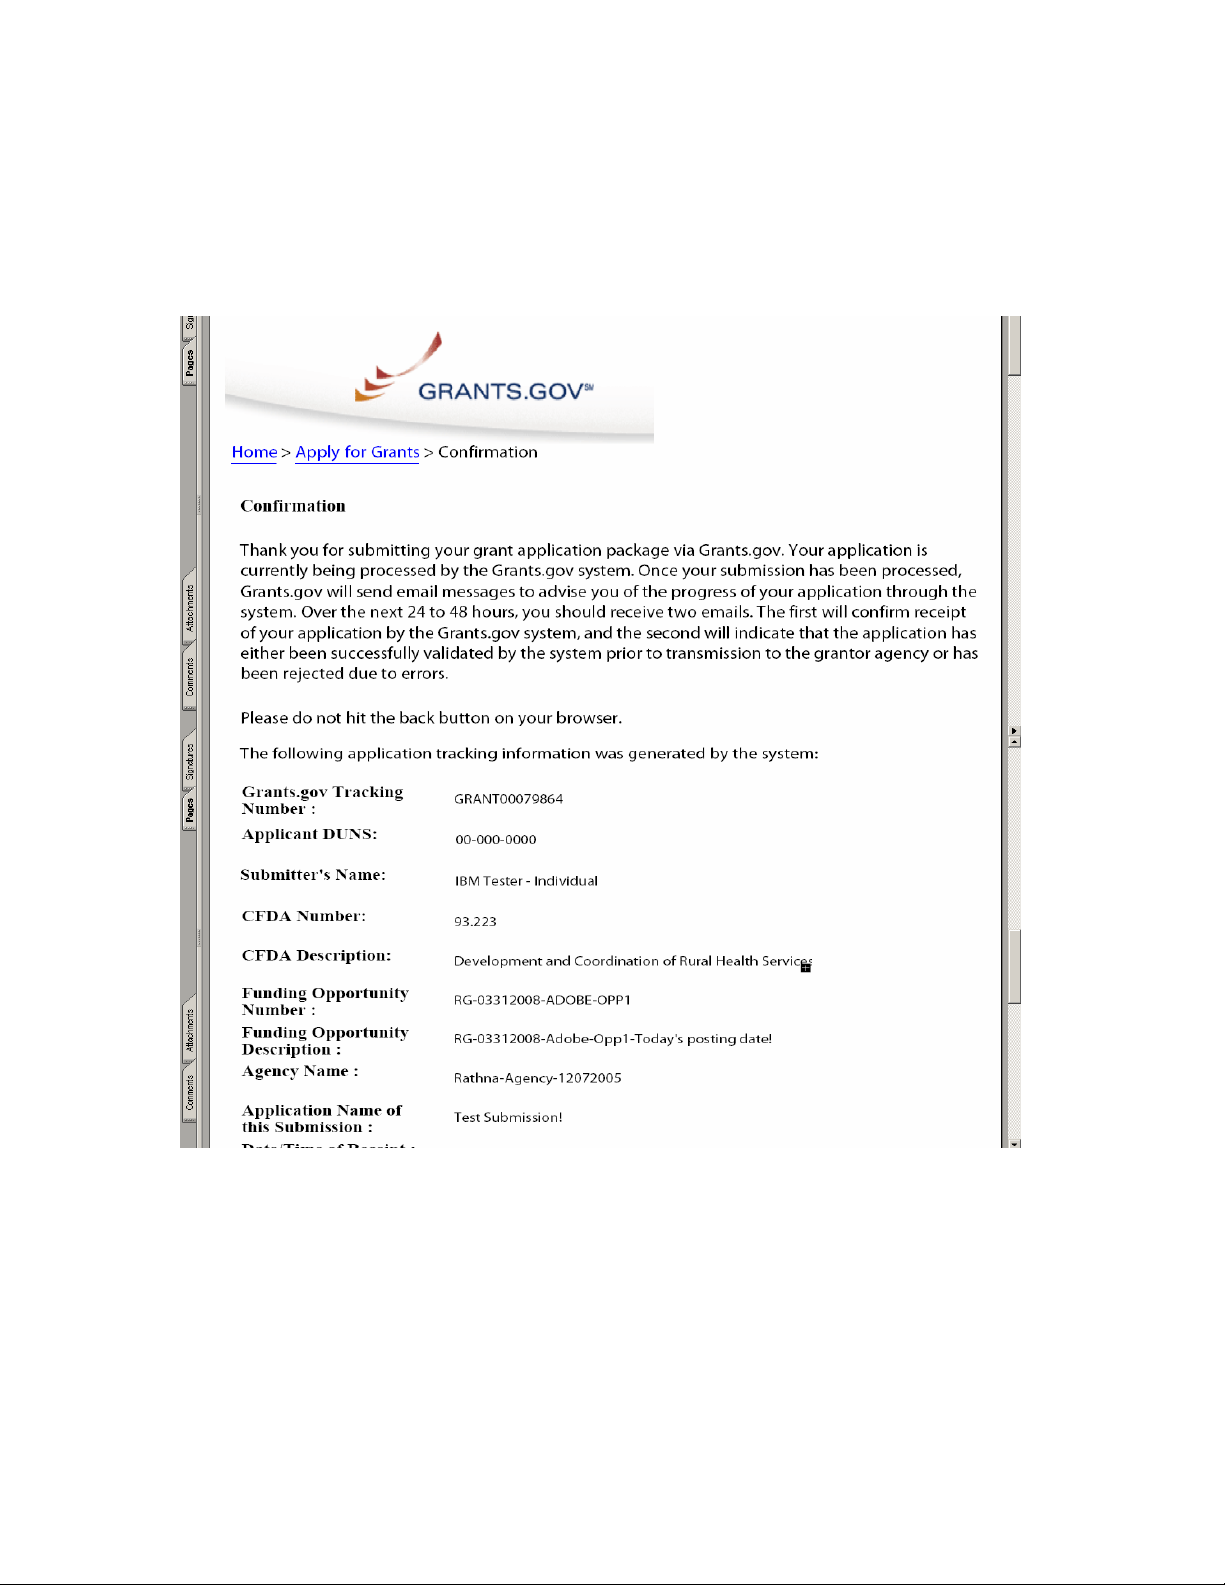
Track Your Application
Once you complete and submit your application, you will see a confirmation
screen explaining that once your submission has been processed.
Grants.gov will send email messages to advise you of the progress of your
application through the system.
41 of 44
Page 42
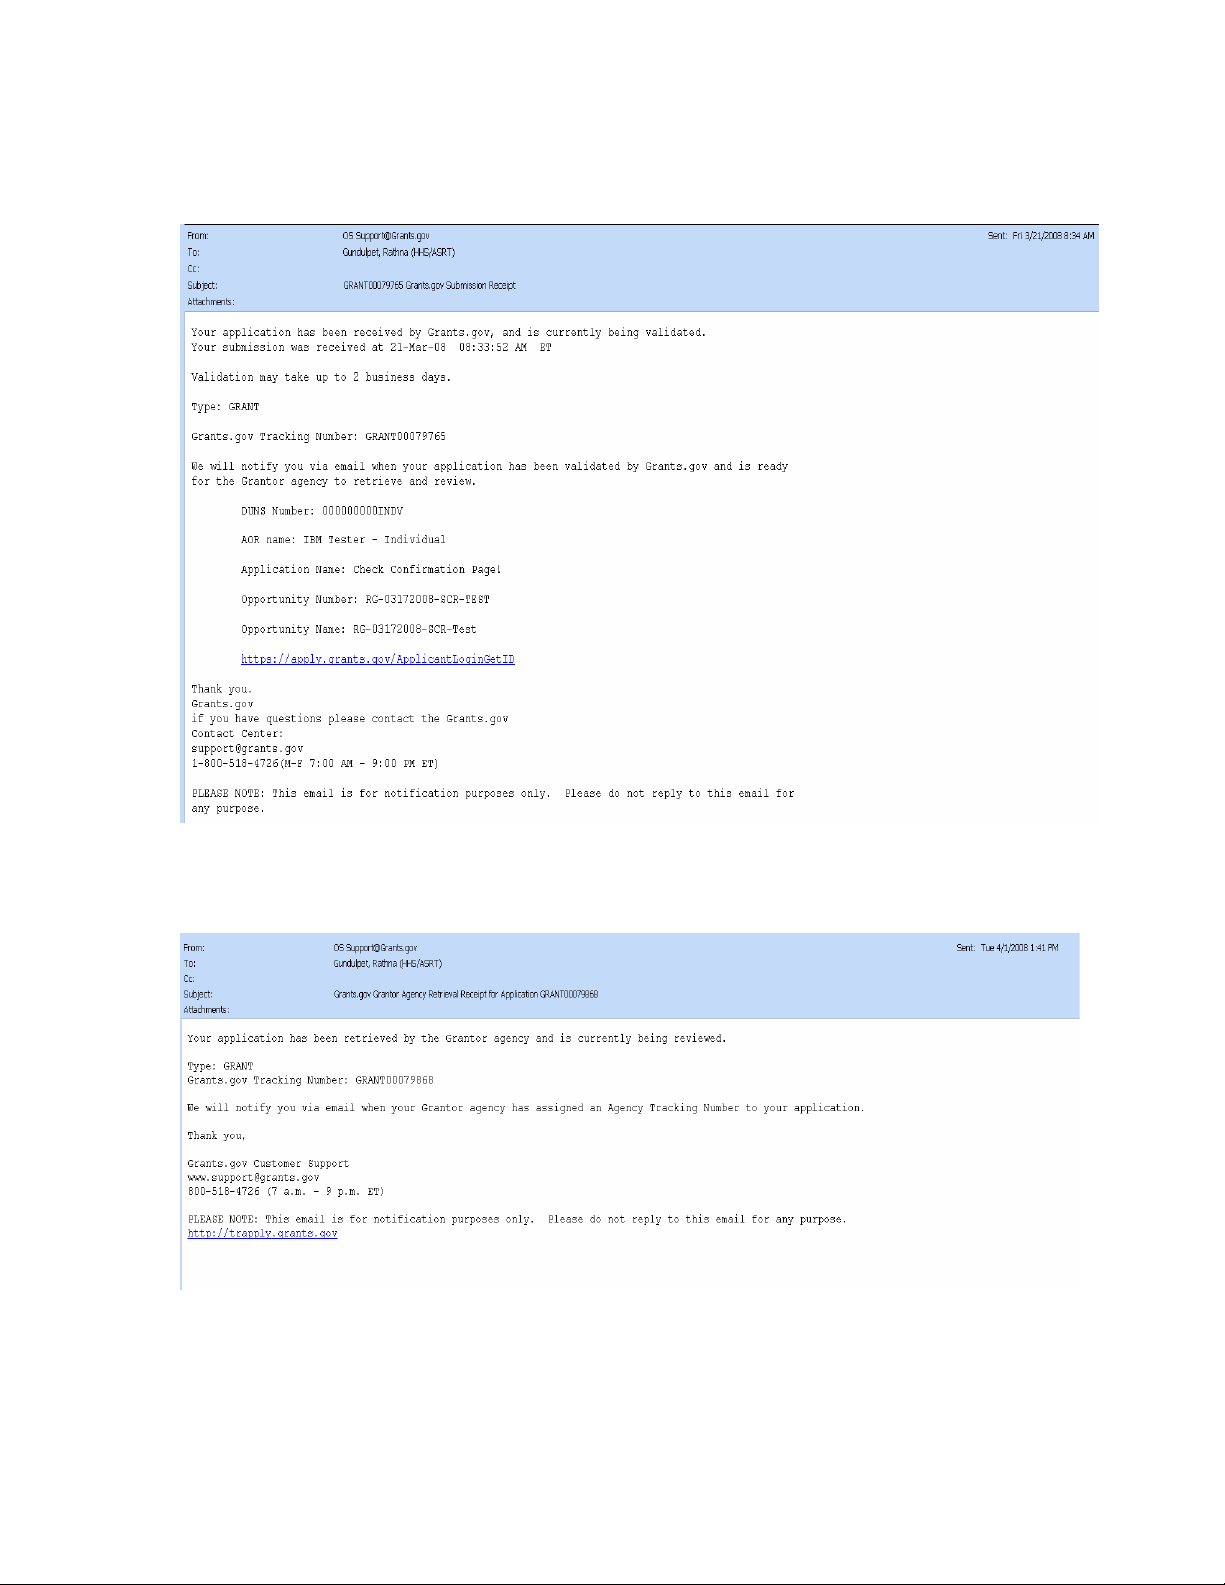
Here is an example of the email confirmation you will receive from Grants.gov.
Here is an example of the email confirmation you will receive when your
application is being reviewed by the Grantor Agency.
42 of 44
Page 43
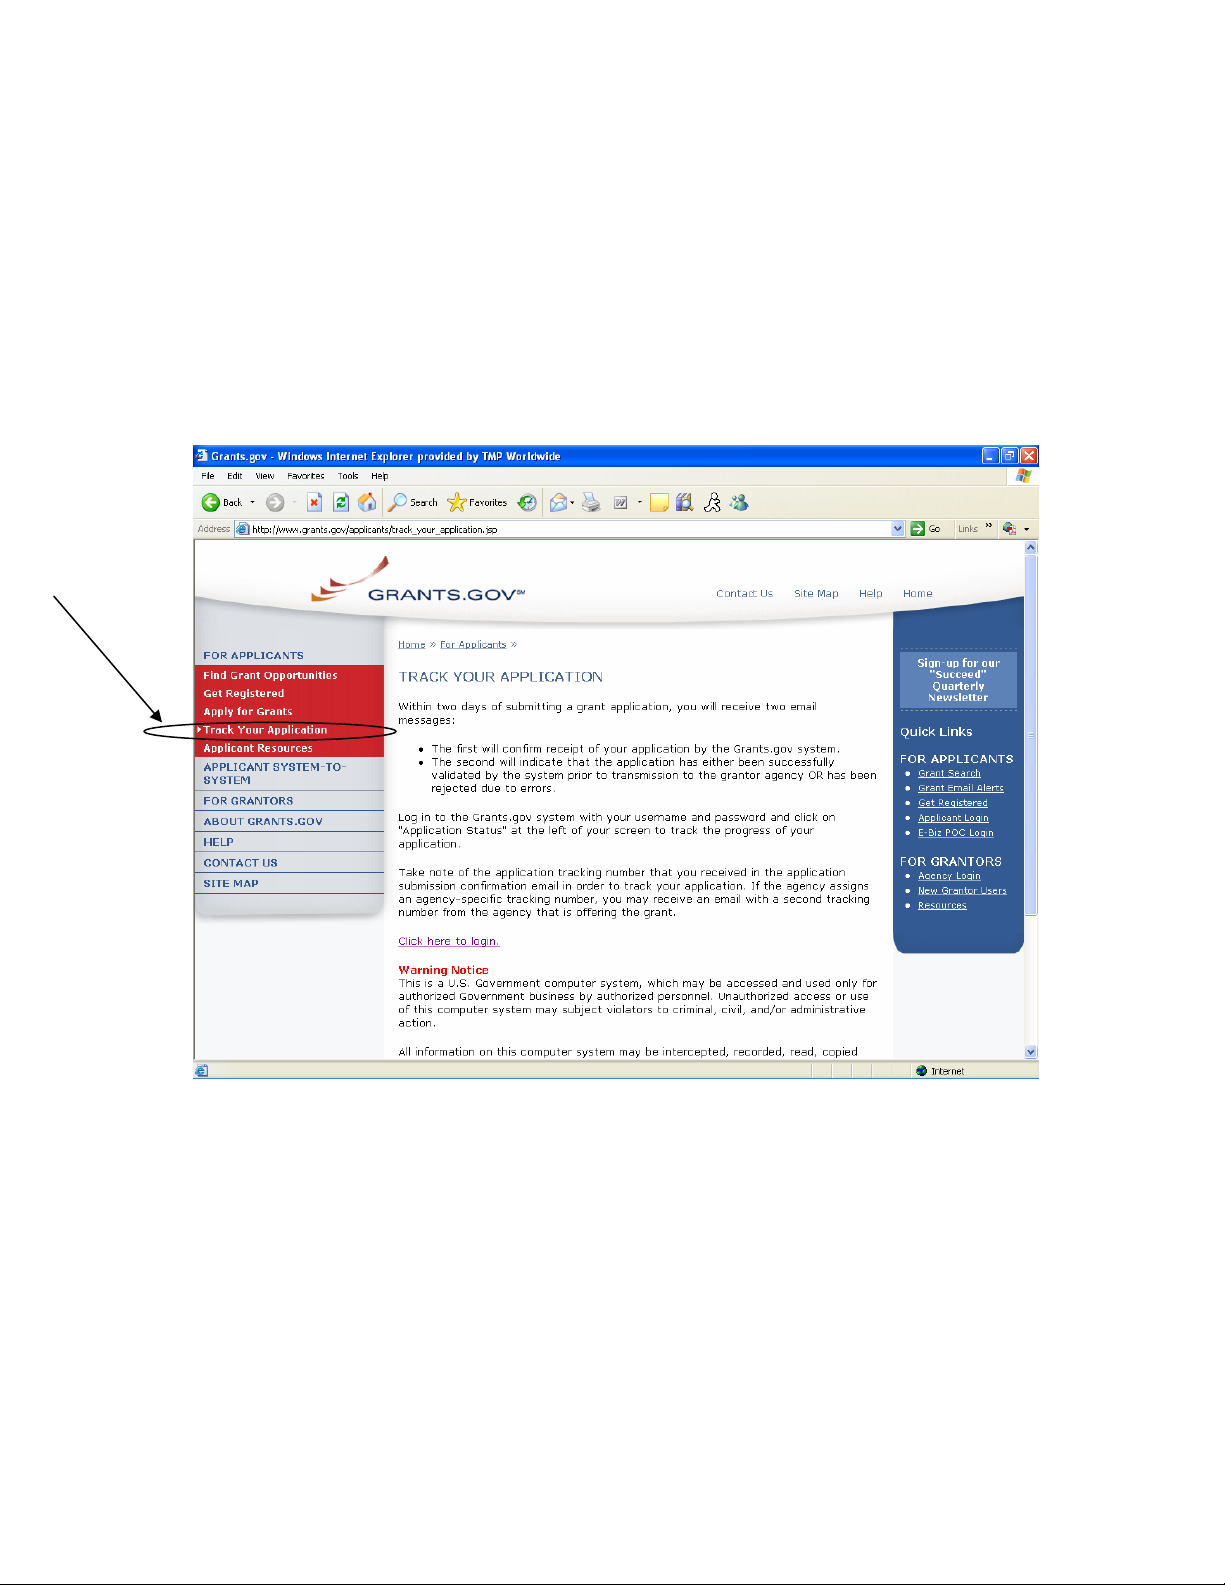
Should you choose to track the progress of your application further, you may
login with your username and password to receive information about the current
status of your application.
Instructions for Tracking Your Application
To track the progress of your application, in the For Applicants section, select
Track Your Application from the left side navigation from the Grants.gov
homepage. This will take you to the Track Your Application screen.
Once on the Track Your Application screen, select the Click here to login link.
This will take you to the Applicant login page. Enter your username and
password to proceed.
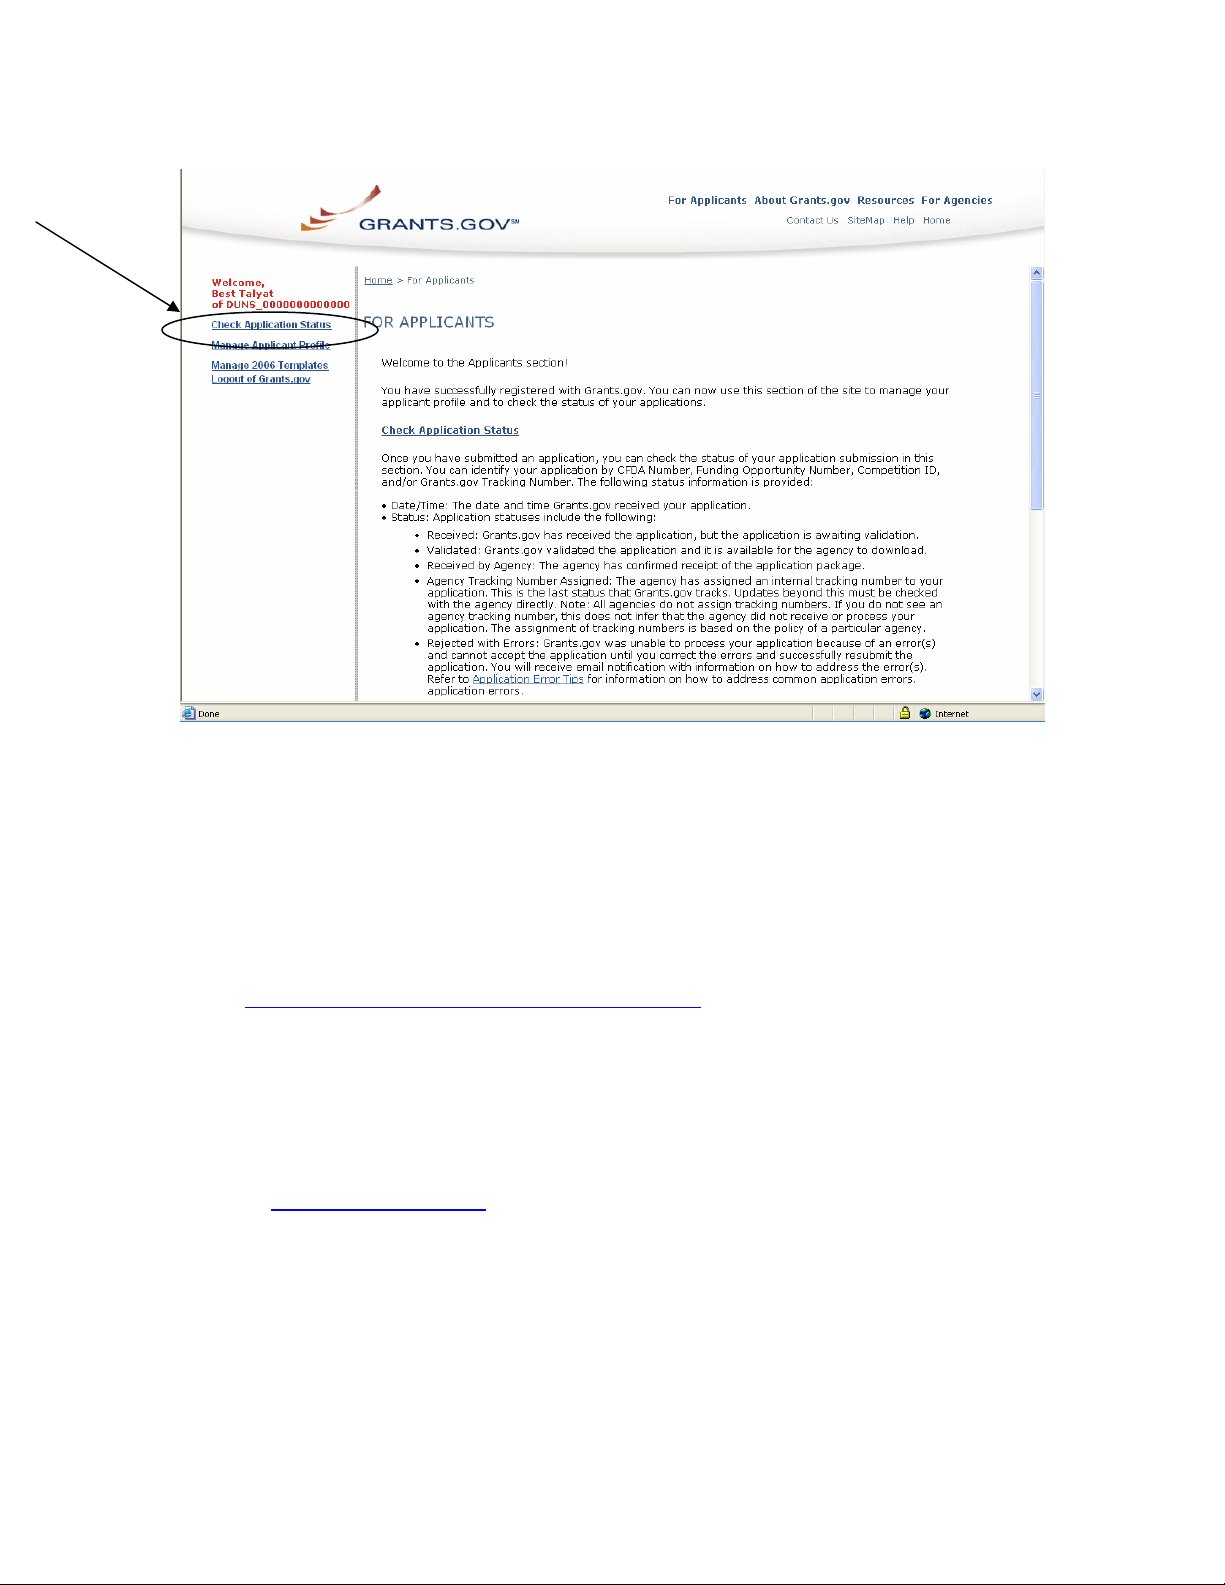
Once you enter your username and password, you will be logged into the
Grants.gov system. Click on Check Application Status on the left side of the
screen to track the progress of your application.
NOTE: It is important to retain the application tracking number that you received
in the application submission confirmation email in order to track your application.
If the agency assigns an agency-specific tracking number, you may receive an
email with a second tracking number from the agency that is offering the grant.
43 of 44
Page 44
Forgot Your Password?
In the event that you forget your password, you can obtain a new password from
the Credential Provider:
If you have forgotten your password, you will need to get it reset at the
E-Authentication Credential Provider’s website.
Go to https://e-auth.orc.com/reg/forgotReset.html and enter your username. You
will then be prompted to change your password. This information will
automatically be updated at the Grants.gov website.
Forgot Your Username?
Please contact ORC, Grants.gov's Credential Provider at 1-800-386-6820 or via
email at [email protected]
required to re-register with the Credential Provider, you will need to re-register
your new username and password with Grants.gov.
. You may be required to re-register. If you are
44 of 44
 Loading...