


-bio
Laboratory centrifuge
LMC-3000
Operating instructions

Contents
1 Safety .................................................................................4
2 General Information ..........................................................6
3 Getting started...................................................................7
4 Operation of Centrifuge....................................................9
5 Specifications..................................................................12
6 Guarantee and service....................................................13
7 Declaration of Conformity ..............................................15
Version 5 - April 2011 Page 2
Centrifuge LMC-3000
Operating Instructions

1. Safety
The following symbols mean:
Caution: Read these operating instructions fully before use and pay particular attention to
sections containing this symbol
Use only as specified by the operating instructions, or the intrinsic protection may be impaired.
After transport or storage in humid conditions, dry out the unit during 2-3 hours before connecting it to
the supply voltage. During drying out the intrinsic protection may be impaired.
The unit must be stored and transported only in a horizontal position (see marking on the package).
Connect only to a power supply with a voltage corresponding to that on the serial number label.
Connect only to a power supply which provides a safety earth (ground) terminal.
Ensure that the mains switch and isolating device (power supply connector) are easily accessible during
use.
Ensure that no persons and/or dangerous materials are located within a safety zone of 300 mm around
the equipment when the centrifuge is running. This area should be marked.
Before moving, disconnect at the power supply socket.
Do not operate the unit outside the laboratory premises.
Do not operate the unit in premises with aggressive or explosive chemical mixtures.
Do not put flammable or chemically vigorously reactive materials into the centrifuge.
If liquid is split inside the unit, disconnect it from the power supply and have it checked by a competent
person.
It is the user's responsibility to carry out appropriate decontamination if hazardous material is spilt on or
inside the equipment.
Before using any cleaning or decontamination method except those recommended by the manufacturer,
user should check with the manufacturer that the proposed method will not damage the equipment.
Do not use rotors with visible signs of corrosion, wear or mechanical damage.
When loading use even number of tubes arranged symmetrically (facing one another) to give the unit
even balance during operation. The opposite tubes must be filled up equally.
Centrifuge LMC-3000
Operating Instructions
Version 5 - April 2011
Page 3

Do not fill in the containers after they are inserted in the rotor.
Centrifuge containers must not be filled over the capacity specified by the manufacturer.
Do not centrifuge flammable or chemically vigorously reactive materials.
Without additional bioseal the centrifuge is not a biosafety system in accordance to EN61010-2-20 and
cannot be used for centrifuging hazardous materials contaminated with toxic, radioactive or pathogenic
micro-organisms.
Use only original accessories (rotors, adaptors, etc.) provided by the manufacturer.
Rotor must always be fixed securely. Stop the operation immediately with the RUN/STOP button if any
unusual noise occurs during acceleration which can be due to improper rotor fixation.
The unit should be saved from shocks and falling.
Version 5 - April 2011 Page 4
Centrifuge LMC-3000
Operating Instructions
2. General Information
LMC-3000 is a modern benchtop laboratory centrifuge useful for sedimentation of cells,
bacteria, yeast, formed blood elements. It provides operation with tubes and microtest
plates. LMC-3000 is designed for safe work (metal protecting housing), easy
maintenance and wide application range in biochemical, industrial and other type
laboratories.
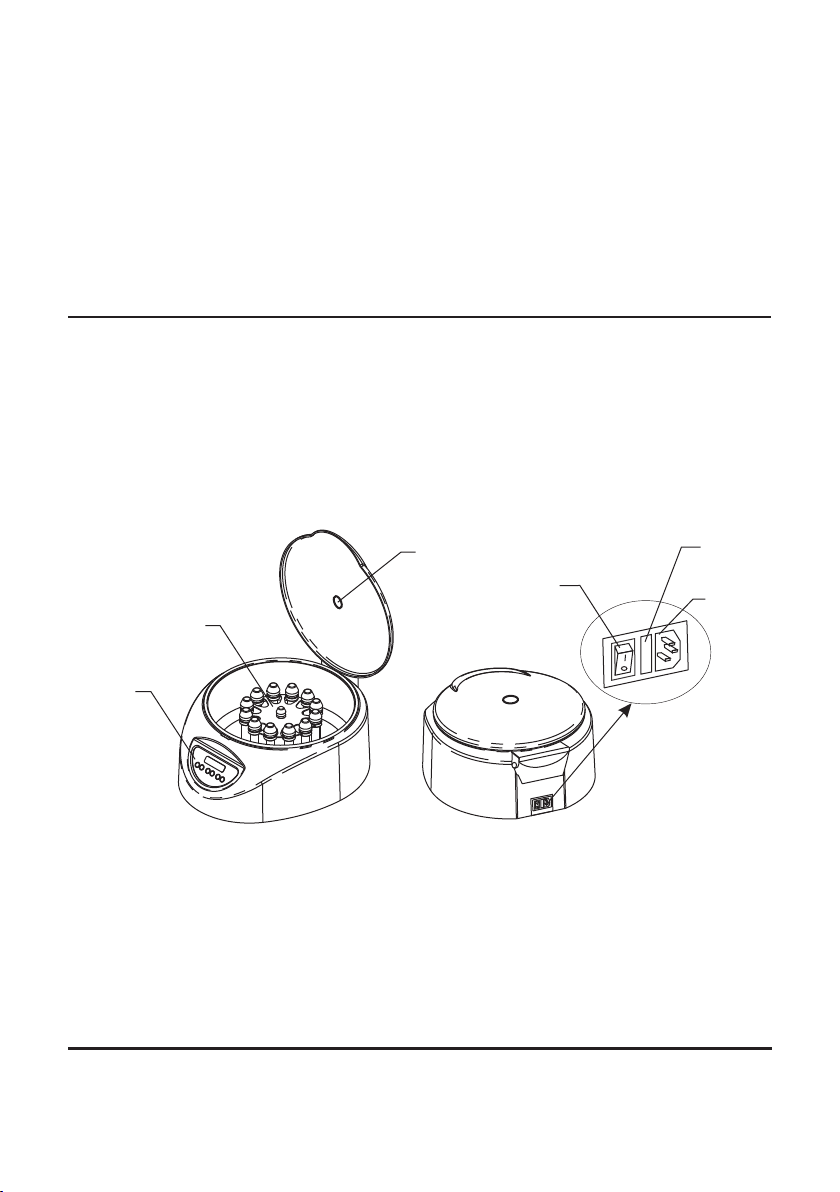
Control
panel
Centrifuge LMC-3000
Operating Instructions
Rotor
Opening for external
speed control
Fig.1 Overall view
Power switch
Fuse
compartment
Power
socket
Version 5 - April 2011
Page 5

3. Getting started
3.1. Unpacking
3.2. The Laboratory Centrifuge LMC-3000 set includes:
3.3. Set up:
3.4. Rotor replacement
Remove packing materials carefully, and retain for future shipment or storage of the unit.
• Laboratory Centrifuge LMC-3000 .........................................1 pce.
• A spare fuse (inside the fuse holder) ....................................1 pce.
• Power cord ...........................................................................1 pce.
• Rotors ...................................................................................on request
• Wrench for rotor replacement ...............................................1 pce.
• Specifications, Operating manual, Certificate ......................1 pce.
• place the centrifuge on the even stable surface;
•
plug the mains power cord into the socket on the rear, and position the centrifuge so that
there is easy access to the power switch and connector;
• It is necessary to observe the safety area of 300 mm around the centrifuge in accordance
with EN-61010-2-20. Persons and hazardous materials must not be located in the safety
area whilst the centrifuge is in operation. This area should be marked.
• do not place any objects in front of the ventilation slots underneath and 100 mm behind the
centrifuge.
• Hold the rotor with one hand and with the help of the supplied wrench (13 mm) turn
fixation nut (fig.2/1) anti-clockwise to release the rotor.
• Replace the rotor and secure the new rotor carefully and turning the fixation nut tightly.
1
Version 5 - April 2011 Page 6
Fig.2 Rotor
Centrifuge LMC-3000
Operating Instructions

4. Operation of LMC-3000
2
1
5
Min:Sec
RPM
4
10:00 2000
STOP
TIME
Fig.3 Control panel
4.1.
4.2. The centrifuge turns on and lid opens automatically.
4.3. Check the rotor and buckets for any signs of wear or corrosion and replace if necessary.
4.5. Close the lid (the clicking sound of the lock) readings STOP and (fig.3/5) in the lower
Check the power cord for any signs of damage and replace if necessary. Connect the
power cord to the mains outlet. Switch ON the power switch on the rear.
The display shows the following readouts:
·previously set time and speed in the upper line (set p.);
·mode indication (OPEN - lid opend, rotor stopped) and current speed - 0 RPM in the
lower line (actual p.).
Insert EVEN number of tubes/microtest plates in rotor facing one another. The loading in
the opposite tubes must be equal.
line of the display indicate that the lid is closed.
Note! If any of these readings has not appeared on the display centrifugation cannot be
started. Try to open and close the lid again.
RPM
0000
RUN/STOP
3
4.6. With the “p” and “q” TIME buttons (fig. 3/1) set the required time interval (0-90 min,
increment 1 min).
4.7. With the “p” and “q” RPM buttons (fig. 3/2) set the required speed (100-3000 RPM,
increment 100 RPM). Note that the speed can also be adjusted during operation.
Centrifuge LMC-3000
Operating Instructions
Version 5 - April 2011
Page 7

Note that some plastic tubes and microtest plates can be damaged at higher speeds.
Refer to the tube material specifications to make sure that it will not get damaged at the
set speed. Do not set speed higher than 2000 RPM when working with microtest plates!.
4.8. Press RUN/STOP button (fig. 3/3) to start centrifugation. Blinking indication RUN and
current speed is displayed in the lower line. The timer in the upper line starts countdown
after the set speed is achieved (stable indication RUN).
Note: If the rotor imbalance occurs causing vibration the centrifuge stops automatically
(indication IMBALANCE). After the rotor is stopped open the lid and remedy the cause of
imbalance.
4.9. Centrifugation is stopped automatically after the set time elapses (while braking display
shows blinking indication STOP. A sound signal is emitted after full stop of the rotor
(press RUN/STOP button (fig.3/3) to stop the signal).
4.10. If necessary centrifugation can be stopped before the set time elapses by pressing
RUN/STOP button. The set time interval will be shown on the display.
4.11. Press the button (fig.3/4) and open the lid lifting it upwards with a hand (it is possbile
to open the lid only when the rotor is stopped). Display shows OPEN.
4.12. At the end of operation turn OFF the centrifuge with switch on the rear. Disconnect the
power cord from the mains outlet.
Note: The electrical lid lock allows opening the lid only when the centrifuge is connected
to the power supply and is turned on. Do not force the lid to open when the centrifuge is
switched off!
Lid emergency opening
Disconnect the power cord from the mains outlet and allow the centrifuge to stop.
Slide the centrifuge to the front of the bench to access the emergency opening slot on the
underside of the unit (located in the front side). Avoid tilting the centrifuge as this may cause
spilling of the materials from the containers inside the centrifuge.
Insert a small screwdriver (or similar tool with diameter up to 3 mm) into the emergency opening
slot in front of the dot on the label “Open” and move the lever from the left to the right hand side
to release the lid lock.
Version 5 - April 2011 Page 8
Centrifuge LMC-3000
Operating Instructions

5. Specifications
Speed range .................................................100 - 3000 RPM (increment 100 RPM);
•
• Rotation direction ...........................................................................counterclockwise;
• Working diameter .........................................................................................335 mm;
• Timer ..........................................................................1 - 90 min (increment - 1 min);
• Rotor imbalance automatic diagnostics (emergency stop, indication “IMBALANCE”);
• Rotor slowdown time, not more .......................................................................30 sec;
• Display.................................................................................................................LCD;
• Power.................................................... 230 V, 50/60 Hz; 130 W or 115 V, 50/60 Hz;
• Dimensions .................................................................................. 470x400x235 mm;
• Weight, not more ...........................................................................................13,5 kg;
• Operating conditions
The product is designed for operation in closed laboratory rooms at ambient
temperature from +2°C to +40°C and maximum relative humidity 80% for
temperatures up to 31°C decreasing linearly to 50% relative humidity at 40°C.
R-12/10 Speed range , swing-out rotor with plastic open holders for 12
R-12/15 Speed range , swing-out rotor with open plastic holders for 12
R-2 Speed range 2 , swing-out rotor for 2 х standard 96-well microtest
R-6 Speed range , swing-out rotor for 6 х conical bottom centrifuge
Centrifuge LMC-3000
Operating Instructions
round bottom centrifuge tubes without cap (10-15 ml, max. dia x length - 16 x 105
mm);
conical bottom centrifuge tubes with cap (15 ml, max. dia x length - 17 x 120 mm);
plates (max. WxDxH 128x85.6x45 mm);
tubes with cap (50 ml, max. dia x length - 29 x 115 mm).
To improve the design manufacturer reserves the right to make changes in specification
without prior notice.
100 - 3000 RPM
100 - 3000 RPM
100 - 000 RPM
100 - 3000 RPM
Version 5 - April 2011
Page 9

6. Maintenance
6.1. Guarantee
When used in laboratory conditions and according to these working instructions, this
product is guaranteed for TWO YEARS against faulty materials or workmanship.
6.2. Service & Maintenance
There are no user-serviceable parts inside the unit. For all maintenance and repairs
(exept as defined below) return to our service department in the UK or in other
countries,our distributor.
6.3. Cleaning & Disinfection
Cleaning liquids that do not contain concentrate organic solvents, alkali or acid can be used
for device cleaning.
Rotors and other accessories are not autoclavable.
Standard ethanol (75%) can be used for disinfection. It is recommended to perform
disinfection after operation session by cleaning the parts inside the centrifuge chamber.
6.4. Replacement of fuses (fig.4)
Disconnect from the power supply socket.
Remove the IEC power plug from the rear of the unit. Pull out
the fuse drawer by applying leverage in recess (A). Remove
the fuse from the holder. Check and replace with the correct
fuse if necessary (230V, T1A(250V); 115V, T2A(250V).
6.5. Routine safety tests
If routine tests are to be made, we recommend a test of the integrity of the protective
earth conductor and an insulation test at 500 Vdc. Routine flash tests are not
recommended for any electrical equipment, because repeated high voltage tests
degrade insulation materials.
Fig.4 Fuse holder
Version 5 - April 2011 Page 10
Centrifuge LMC-3000
Operating Instructions

Centrifuge LMC-3000
Operating Instructions
Version 5 - April 2011
Page 11

Grant Instruments
(Cambridge) Ltd
Shepreth,
Cambridgeshire
SG8 6GB
Tel: +44 (0)1763 260811
www.grant.co.uk
sales@grant.co.uk
Fax: +44 (0)1763 262410
Centrifuge/LMC-3000/28713/5
 Loading...