

Grant VortexAir, Aerona3, VortexBlue, VTXBFAIR, HPIDAIR2 Installation And Servicing Instructions
...Page 1

Grant VortexAir
VortexBlue Oil Boiler and Aerona³ Air Source
Heat Pump Hybrid
Installation and Servicing Instructions
THESE INSTRUCTIONS SHOULD BE READ IN
CONJUNCTION WITH THE INSTALLATION AND SERVICING
INSTRUCTIONS SUPPLIED WITH THE HEAT PUMP.
UK | DOC 0110 | Rev 1.0 | November 2016
Page 2

Special Text Formats
The following special text formats are used in this manual for the
purposes listed below:
!
Warning of possible human injury as a consequence of not following the instructions in the warning.
!
Caution concerning likely damage to equipment or tools as a
consequence of not following the instructions in the caution.
!
Used for emphasis or information not directly concerned with
the surrounding tex t but of impor tance to the reader.
WARNING
CAUTION
NOTE
GRANT ENGINEERING (UK) LIMITED
Hopton House, Hopton Industrial Estate, Devizes, Wiltshire, SN10 2EU
Tel: +44 (0)1380 736920 Fax: +44 (0)1380 736991
Email: [email protected] www.grantuk.com
This manual is accurate at the date of printing but will be superseded and should be disregarded if specifications and/or appearances
are changed in the interests of continued product improvement. However, no responsibility of any kind for any injury, death, loss, damage
or delay however caused resulting from the use of this manual can be accepted by Grant Engineering (UK) Limited, the author or others
involved in its publication.
All good sold are subject to our official Conditions of Sale, a copy of which may be obtained on application.
© Grant Engineering (UK) Limited 2016. No part of this manual may be reproduced by any means without prior written consent.
Page 3

Contents
1 Introduction 4
1.1 General 4
1.2 Outputs 4
1.3 Planning Permission 4
1.4 DNO Application 4
1.5 Servicing 4
1.6 Important Advice 5
1.7 Product Contents 5
1.8 Installation Accessories 5
1.9 Hybrid Components 6
2 Technical Data 8
2.1 Boiler Technical Data 8
2.2 Heat Pump Technical Data 8
2.3 Sealed System Data 9
2.4 Burner Settings 9
2.5 Flue Gas Analysis 9
2.6 Hybrid Dimensions 10
2.7 Clearances 12
3 Oil Storage and Supply System 13
3.1 Fuel Supply 13
3.2 Burner Oil Connection 15
3.3 Burner Components 15
4 Installation Information 16
4.1 Introduction 16
4.2 VortexAir Location 16
4.3 Preparation for Installation 16
4.4 Regulations and Standards 16
4.5 Completion 17
4.6 Before you Commission 17
4.7 Heating System Design Considerations 17
4.8 Underfloor Heating Systems 17
4.9 Pipework Materials 17
4.10 Underfloor Pipework 17
5 Installation of the Oil Boiler 18
5.1 Preparation for Installation 18
5.2 Installing the Oil Boiler - External Location 18
5.3 Installing the Oil Boiler - Internal Location 18
5.4 Boiler Only Operation 18
6 Installation of the Heat Pump 20
6.1 Preparation for Installation 20
6.2 Installing the Heat Pump - Next to 20
Oil Boiler
6.3 Installing the Heat Pump - Separate 21
from Oil Boiler
6.4 Heat Pump Parameter Settings 21
7 Installation of Heat and 22
Electricity Meters
7.1 General 22
7.2 Heat Meter 22
7.3 Electricity Meter 28
7.4 Setting up the Heat Meter 28
8 Internal Pipework 30
8.1 General 30
8.2 Meter Ready 30
11 Domestic Hot Water 38
11.1 Temperature Control 38
11.2 Legionella 39
11.3 Grant Automatic DHW Boost Kit 2 39
11.4 Grant Digital 2-Stage Cylinder Thermostat 39
12 Electrical 40
12.1 General 40
12.2 Hybrid (Boiler) Electrical Supply 40
Connection
12.3 Heating System Controls Connection 41
12.4 Heat Pump Electrical Supply Connection 42
12.5 Heat Pump Controls Connection 42
13 Flue System and Air Supply 54
13.1 Flue System 54
13.2 Air Supply 55
13.3 Balanced Flue Terminal Positions 56
13.4 Prepare the Wall - Indoor Installation only 58
13.5 Prepare the Flue - Low Level 58
14 Control Panel 60
14.1 General 60
14.2 Hybrid Controls 60
14.3 Heat and Electricity Meters 60
15 Operation 62
15.1 General 62
15.2 External Heating System Controls 62
15.3 Oil/Hybrid Switch 62
15.4 Hybrid Operation 62
15.5 Boiler Only Operation 63
16 Commissioning 64
16.1 General 64
16.2 Oil Boiler 64
16.3 Before Switching On 64
16.4 Setting the Hybrid Temperature Controls 64
16.5 Digital Temperature Controllers 65
16.6 Switching On 67
16.8 Air Adjuster Disc - 15/21kW only 67
16.9 Running the Boiler 67
16.10 Balancing the System 68
16.11 Completion 68
16.12 Heat Pump 68
17 Servicing 69
17.1 Checking before Servicing 69
17.2 Dismantling prior to Servicing 69
17.3 Cleaning the Boiler 69
17.4 Cleaning the Burner 70
18 Fault Finding 72
18.1 Burner Fault Indication 72
18.2 Burner Fault Diagnostics 72
18.3 Riello RDB BLU Fault Finding Chart 73
19 Spare Parts 74
19.1 Riello RDB BLU Burner Parts List 74
19.2 Exploded View of Riello RDB BLU Burner 75
19.3 Boiler Parts List 76
9 Condensate Disposal 32
9.1 Heat Pump Condensate Disposal 32
9.2 General Requirements 32
9.3 Connections 32
9.4 Pipework 32
9.5 External Pipework 32
9.6 Condensate Soakaway 32
9.7 Condendate Trap 33
9.8 Condensate Disposal Pipework 33
9.9 Inspection and Cleaning of Trap 34
10 Sealed Systems 36
10.1 Sealed System Requirements 36
10.2 Filling the Sealed System 37
10.3 Pressure Relief (Safety) Valve Operation 37
20 EC Declaration of Conformity 78
21 ErP 79
22 Health and Safety 80
23 Recycling and Decommissioning 81
24 Guarantee 82
Appendix A 84
Contents Page 3
Page 4
1 Introduction
1.1 General
The Grant VortexAir Hybrid is a unique combination of a Grant
VortexBlue oil-fired boiler and a Grant Aerona³ inver ter driven heat
pump.
It is available in two models – HPIDAIR (15/21kW) and HPIDAIR2
(21/26kW). The outputs indicate the size of the range-rated blue
flame boiler used, either 15/21kW or 21/26kW. A 16kW Grant
Aerona³ heat pump is used in both models.
The Grant VortexAir is supplied in t wo parts, the oil boiler and the
heat pump (each on their own pallets), for connection together by
the installer on site.
It also possible to purchase the boiler only. This can be installed as
an immediate replacement for an existing boiler, with the Aerona³
HPID16 heat pump being purchased and added at a later date.
Alternatively, the boiler can simply be installed and used as a 'standalone' boiler with no heat pump fitted, if required.
Both parts of the Grant VortexAir Hybrid have are housed in a
powder coated galvanised steel weatherproof enclosure.
The Aerona³ heat pump is designed to be installed externally in a
suitable position, either against a wall or some distance away from
the property as required. Refer to Section 2.7 for guidance.
The boiler unit can be installed either:
a) Externally – located next to the heat pump
OR
b) Internally – connected through the wall to the heat pump
The Grant low level balanced flue system (Yellow system) must be
used with the VortexAir. This is supplied with the unit.
The Grant VortexAir is only suitable for use on sealed central heating
systems. Refer to Section 10.
Both models are supplied with the control panel, burner and hybrid
system pipework/valves factory fitted.
1.1.1 How it Works
The Grant VortexAir Hybrid combines the Grant Aerona³ air-to-water
inverter driven air source heat pump and the innovative VortexBlue
high-efficiency oil boiler.
The VortexAir Hybrid control system allows the Aerona³ heat pump
to operate as the primary heat source for the majority of the heating
season, thus achieving the fuel efficient and cost effective provision
of space heating.
The oil boiler will only be operated when the ambient air temperature
falls to a level where the heat pump cannot either sustain the
required flow temperature for the system, or when the heat demand
cannot be met by the heat pump at the set flow temperature.
The ambient air temperature is monitored by the air thermostat
incorporated in the control system. The two-stage air thermostat
operation allows either partial use of the boiler (to back up the heat
pump) or full operation of the boiler, under control of the boiler
thermostat controller, under the most extreme low temperature
conditions.
The air thermostat settings will vary from one installation to another.
These are critical for the correct and efficient operation of the Hybrid
unit and must be determined by using the Grant Hybrid Calculator
(available as a download at ww w.grantuk.com). The resulting values
for both the Air thermostat controller and Boiler thermostat controller
are set during commissioning. Refer to Section 12.
For further details on the operation of the Grant VortexAir Hybrid
refer to Section 15 (Operation).
1.2 Outputs
There are two models in the VortexAir range as follows:
Table 1-1: Hybrid product codes
Product code Components Output
HPIDAIR
HPIDAIR2
* 7°C air and 35°C flow temperature
Boiler:
Flue:
Heat Pump:
Boiler:
Flue:
Heat Pump:
15/21kW (factory setting 21kW)
EZ90 (included)
16kW*
21/26kW (factory setting 26kW)
EZ90 (included)
16kW*
Two models of oil boiler only are also available as follows:
Table 1-2: Oil boiler product codes
Product code Components Output
VTXBFAIR
VTXBFAIR2
Boiler:
Flue:
Boiler:
Flue:
15/21kW (factory setting 21kW)
EZ90 (included)
21/26kW (factory setting 26kW)
EZ90 (included)
1.3 Planning Permission
Oil Boiler
Boiler installation is considered to be permitted development
and therefore, you do not need to apply for planning permission.
However, there are limitations:
• External flues must not exceed the highest point of a roof by
one metre or more.
• Listed buildings and property located in conser vation areas
may be subject to listed building consent and planning
permission.
• Any external flue installed on to a propert y located in a
conservation area must not be on the front of a propert y or any
part of the propert y that fronts a highway.
• Any outside building that will form part of your boiler and
heating system will have to follow the planning permission
limitations of outbuildings and extensions.
Heat Pump
The installation of a heat pump on domestic premises may
be considered to be permitted development, not needing an
application for planning permission, provided ALL the limits and
conditions listed on the Planning Portal website are met.
For further information, visit w w w.planningportal.gov.uk.
1.4 DNO Application
An application must be made to the Distribution Network Operator
(DNO) before connecting the heat pump to the mains electrical
supply. There are six DNOs operating the electrical distribution
network throughout England, Scotland and Wales and the
application must be made to the DNO covering the area concerned.
The necessary information required to make this application
(J-forms) can be downloaded from the Grant UK website (ww w.
grantuk.com), completed and then submitted to the correct DNO for
the area in question.
1.5 Servicing
It is recommended (and a requirement of the product guarantee)
that the hybrid should be regularly serviced, at least once a year
and the details entered in the Service Log by the service engineer.
Refer to Section 16 (Commissioning).
Section 1: IntroductionPage 4
Page 5
1.6 Important Advice
1. It is essential that the full layout of the system is understo od
before the installation of any component is undertaken. If you
are in any doubt, please stop and seek advice from a qualified
heating engineer or from Grant UK. Please note that Grant
UK will not be able to offer specific advice about your system.
In this case, we will always refer you to seek the advice of a
qualified system designer.
2. The hybrid must be installed and commissioned in accordance
with these installation and servicing instructions. Deviations of
any kind will invalidate the guarantee and may cause an unsafe
situation to occur. Please seek advice from Grant UK if any of
these user, installation and servicing instructions cannot be
followed for whatever reason.
3. The heat pump contains high pressures and high temperatures
during normal working conditions. Care must be taken when
accessing the internal workings of the heat pump.
4. The heat pump contains an electrically driven fan which rotates
at high speed. Disconnect the heat pump from the electrical
supply before removing the top cover.
1.7 Product Contents
The VortexAir comes supplied on t wo pallets. The following items
are included:
Table 1-3: Product contents
Quantity Item
1
1 Heat pump remote controller
1 Heat pump remote controller cable (length: 8 metres)
1 Heat pump condensate drain elbow
2 Flexible braided hose (1" BSP / 28 mm compression)*
2 1" x 1¼" BSP elbow
2 1" BSPM x 28mm brass tail
1
1 Joiner front cover plate
1 Joiner top cover plate
1 Lockshield valve adjustment key
1 Air adjuster disc**
1 Flexible oil hose (600 mm)
1 Oil line adaptor (
1 Oil isolator
4
1
1 Vertical flue ex tension section
1 Flue clamp bolt and nut
1 Flue bubble seal
1 Hybrid Installation and Servicing Instructions
1 Aerona³ Installation and Ser vicing Instructions
1 User Guide
1 Commissioning form
1 Energy label
* If flexible braided hoses are supplied with the heat pump, they must be
discarded.
** For downrating the 15/21kW boiler to 15 or 16kW output.
(product codes: V TXBFAIR or VT XBFAIR2)
4-core heat pump controls cable - numbered 1 to 4
Aerona³ 16kW heat pump
(product code: HPID16)
VortexBlue oil boiler
⅜" x ¼")
Length: 1400 mm (refer to Section 12.5)
Low level standard flue kit
(product code: EZ90)
1.8 Installation Accessories
The following are available from Grant UK:
Table 1-4: Installation accessories
Product code Description
HPIDFOOT/KIT*
HPIDINSU/KIT
HPIDHEATMETER
HPIDKW/HMETER
HPIDBUFFER50 50 litre buffer vessel
GCSD2
HPDHWBK2
HPAWSSK18 Aerona³ 18 litre sealed system kit
HPAWSSK50 Aerona³ 50 litre sealed system kit
RBS35 Adaptor oil line - 3/8 x 1/4
RBS36 Flexible oil hose (900mm) - 3/8 x 1/4
* Two sets required (one for the oil boiler and one for the heat pump)
Anti-vibration mounts with fixings
(2 x 600mm)
Through wall insulation kit
(22 - 28mm flexible hoses)
Heat meter
(Refer to Section 7-2)
Electricity meter
(Refer to Section 7-3)
Digital two-stage cylinder
thermostat
Automatic domestic hot water boost
kit (timed)
Section 1: Introduction Page 5
Page 6
1.9 Hybrid Components
8
7
6
1
2
3
5
4
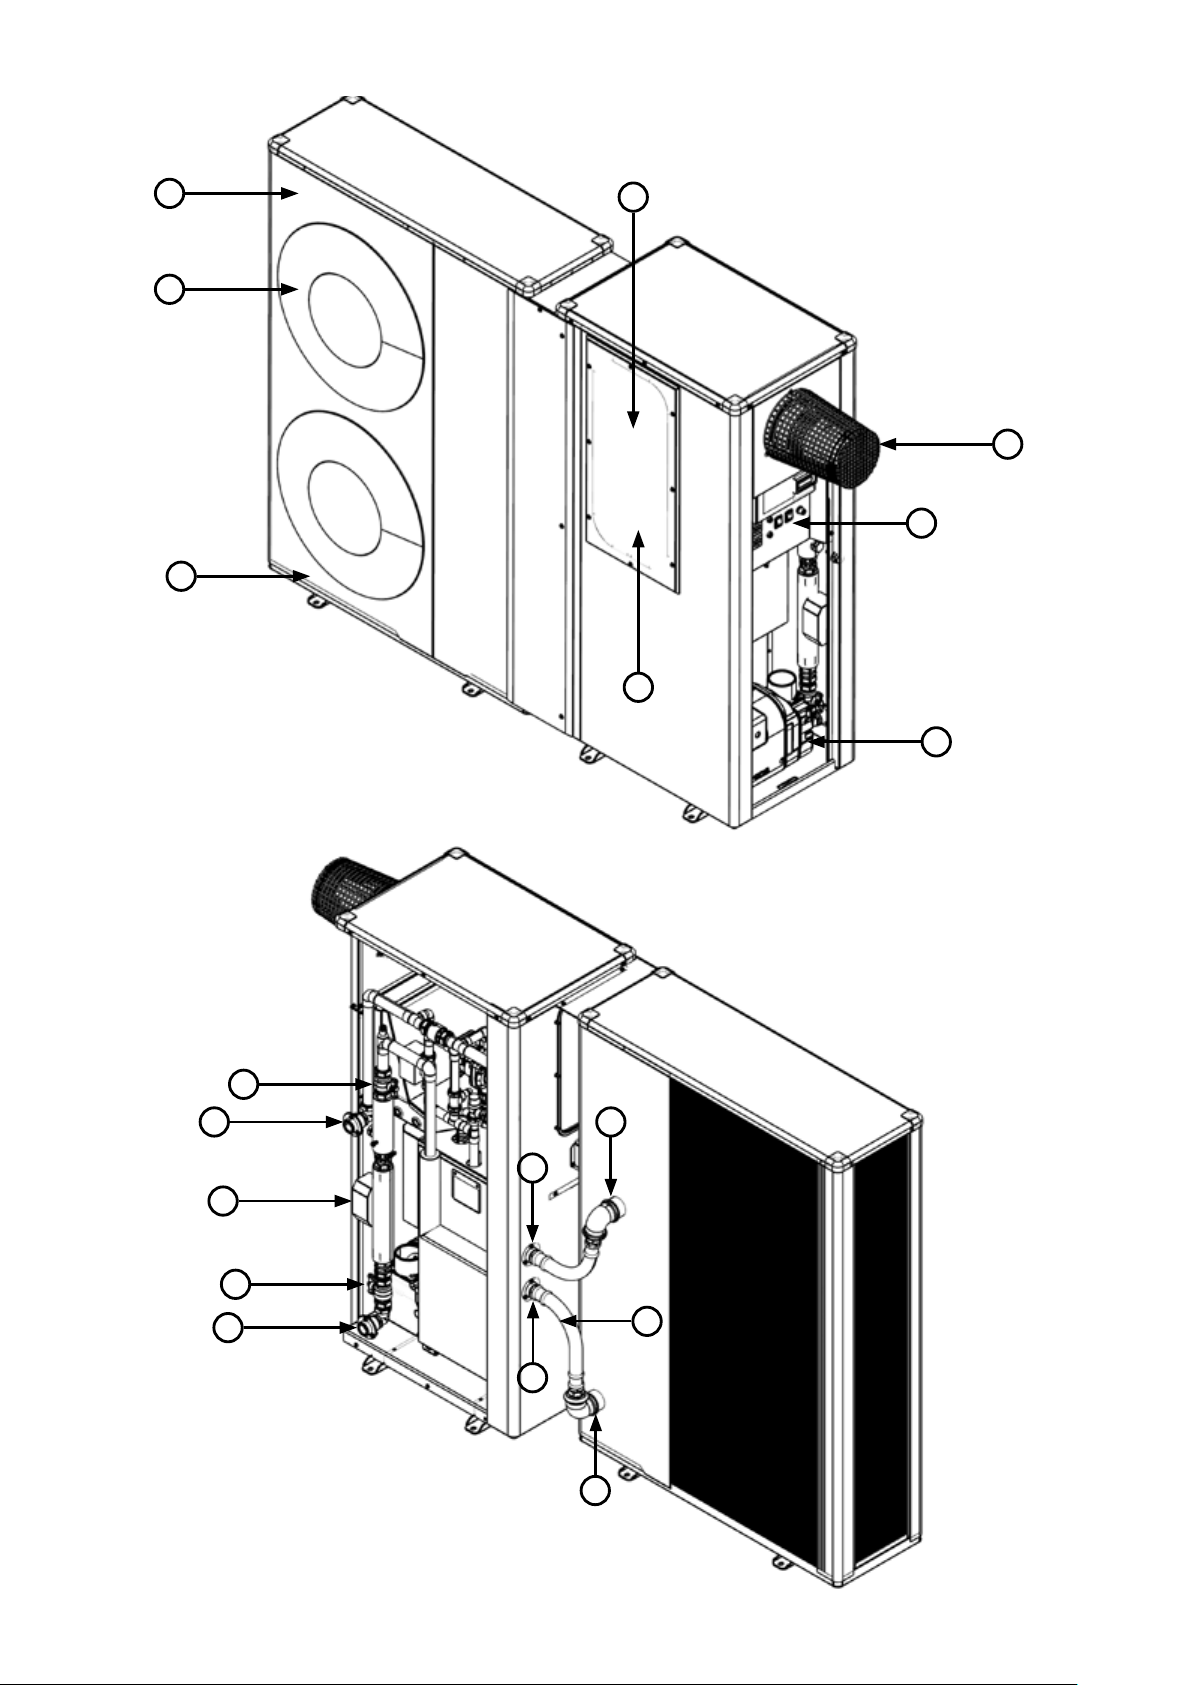
Figure 1-5: Main components - front
18
17
16
15
14
9
13
10
12
Figure 1-6: Main components - rear (oil boiler casing removed)
11
Section 1: IntroductionPage 6
Page 7

13
12
21
22
19
20
Figure 1-7: Knockouts for oil lines and condensate disposal
Table 1-8: Key to main components - front
Key Item
1
2 Flue (external applications) Refer to Section 13
3 Control panel Refer to Section 10
4 Blue flame burner A Riello high-efficiency, low NOx blue flame burner with plug and socket connection
5 Pump High efficiency circulating pump
6 Anti-freezing heater Factory fitted electric heater prevents condensate in the base of the heat pump from freezing
7 Fa n
8 Air inlet Located in the left and back of the heat pump
9 Flow Refer to Section 5
10 Flexible hose
11 Return Refer to Section 5
12 Heat pump return Refer to Section 5
13 Heat pump flow Refer to Section 5
14 System return Refer to Section 5
15 Isolation valve Refer to Section 4 (if heat meter is fitted)
16 Heat meter Refer to Section 4 (if heat meter is fitted)
17 System flow Refer to Section 5
18 Isolation valve Refer to Section 4 (if heat meter is fitted)
19 Condensate trap
20 Condensate knockout
21
22 Oil line knockouts Refer to Section 3
Not shown
Front (removable) access
cover
Condensate knockout
(base - not shown)
Heat exchanger Award winning condensing heat exchanger
DC Inverter
Compressor A high-efficiency DC t win-rotary compressor to provide smooth performance and quiet operation.
Plate Heat Exchanger
(Condenser)
Circulating Pump High-efficiency DC pump speed controlled from the ASHP control PCB.
Pressure Relief Valve A 3 bar pressure relief valve is factory fitted.
Air Purge Valve (Automatic
Air Vent)
To access the heat pump wiring centre
A high-efficiency DC fan motor is used for smo oth and quiet operation. Two fans (3 blade) are fitted to the
16kW unit.
Refer to Section 9
This responds rapidly to changing conditions to provide the necessary output to meet heating demands by
varying the speed and output of the compressor, fan and circulating pump.
This reduces the on/off times of the compressor, ke eping the water temperature constant during operation
reducing the electricity consumption.
The high-efficiency plate heat exchanger is used to transfer heat to the heating system primar y circuit.
Factory fitted to assist in the removal of air from the heating primary circuit of the heat pump.
Section 1: Introduction Page 7
Page 8
2 Technical Data
2.1 Boiler Technical Data
Table 2-1: Boiler technical data
Unit HPIDAIR - 15/21kW HPIDAIR2 - 21/26kW
Water content - oil boiler / heat pump (total)
Weight - oil boiler and heat pump (empty)*
Weight - oil boiler and heat pump (full)*
Maximum heat output (Kerosene)**
Heating system flow connection 1" BSP female
Heating system return connection 1" BSP female
Minimum flow rate (∆T=8°C) litres/min. 15
Condensate connection 22 mm (only connect plastic pipe)
Waterside resistance (∆T=10°C) mbar 26
Waterside resistance (∆T=20°C) mbar 9.5
Maximum static head metre 28
Minimum circulating head metre 1
Boiler thermostat range °C 65 to 78
Limit (safety) shut of f temperature °C 111 ± 3
Maximum hearth temperature °C Less than 50
Electricity supply 230/240V 1ph 50Hz fused at 5A
Burner motor power Watts 90
Absorbed motor power Watts 0.15
Starting current Amps 2.0
Running current Amps 0.85
Oil connection ¼" BSP male (on end of flexible tube)
Maximum operating pressure - sealed system bar 2.5
Maximum operating pressure - pressure relief valve bar 2.0
* Weight includes burner but excludes flue.
** Factory setting (ma ximum output). Refer to Section 2.4 for other boiler outputs.
litre 16.5 / 2.0 (18.5) 10.5 / 2.0 (12.5)
gallon 3.6 / 0.44 (4.04) 2.3 / 0.44 (2.74)
kg 270 272
lb 595 600
kg 290.2 286.5
lb 639.8 631.6
kW 21 26
Btu/h 71 694 88 764
2.2 Heat Pump Technical Data
For technical data relating to the heat pump, please refer to the Aerona³ installation and servicing instructions supplied with the heat pump.
Section 2: Technical DataPage 8
Page 9
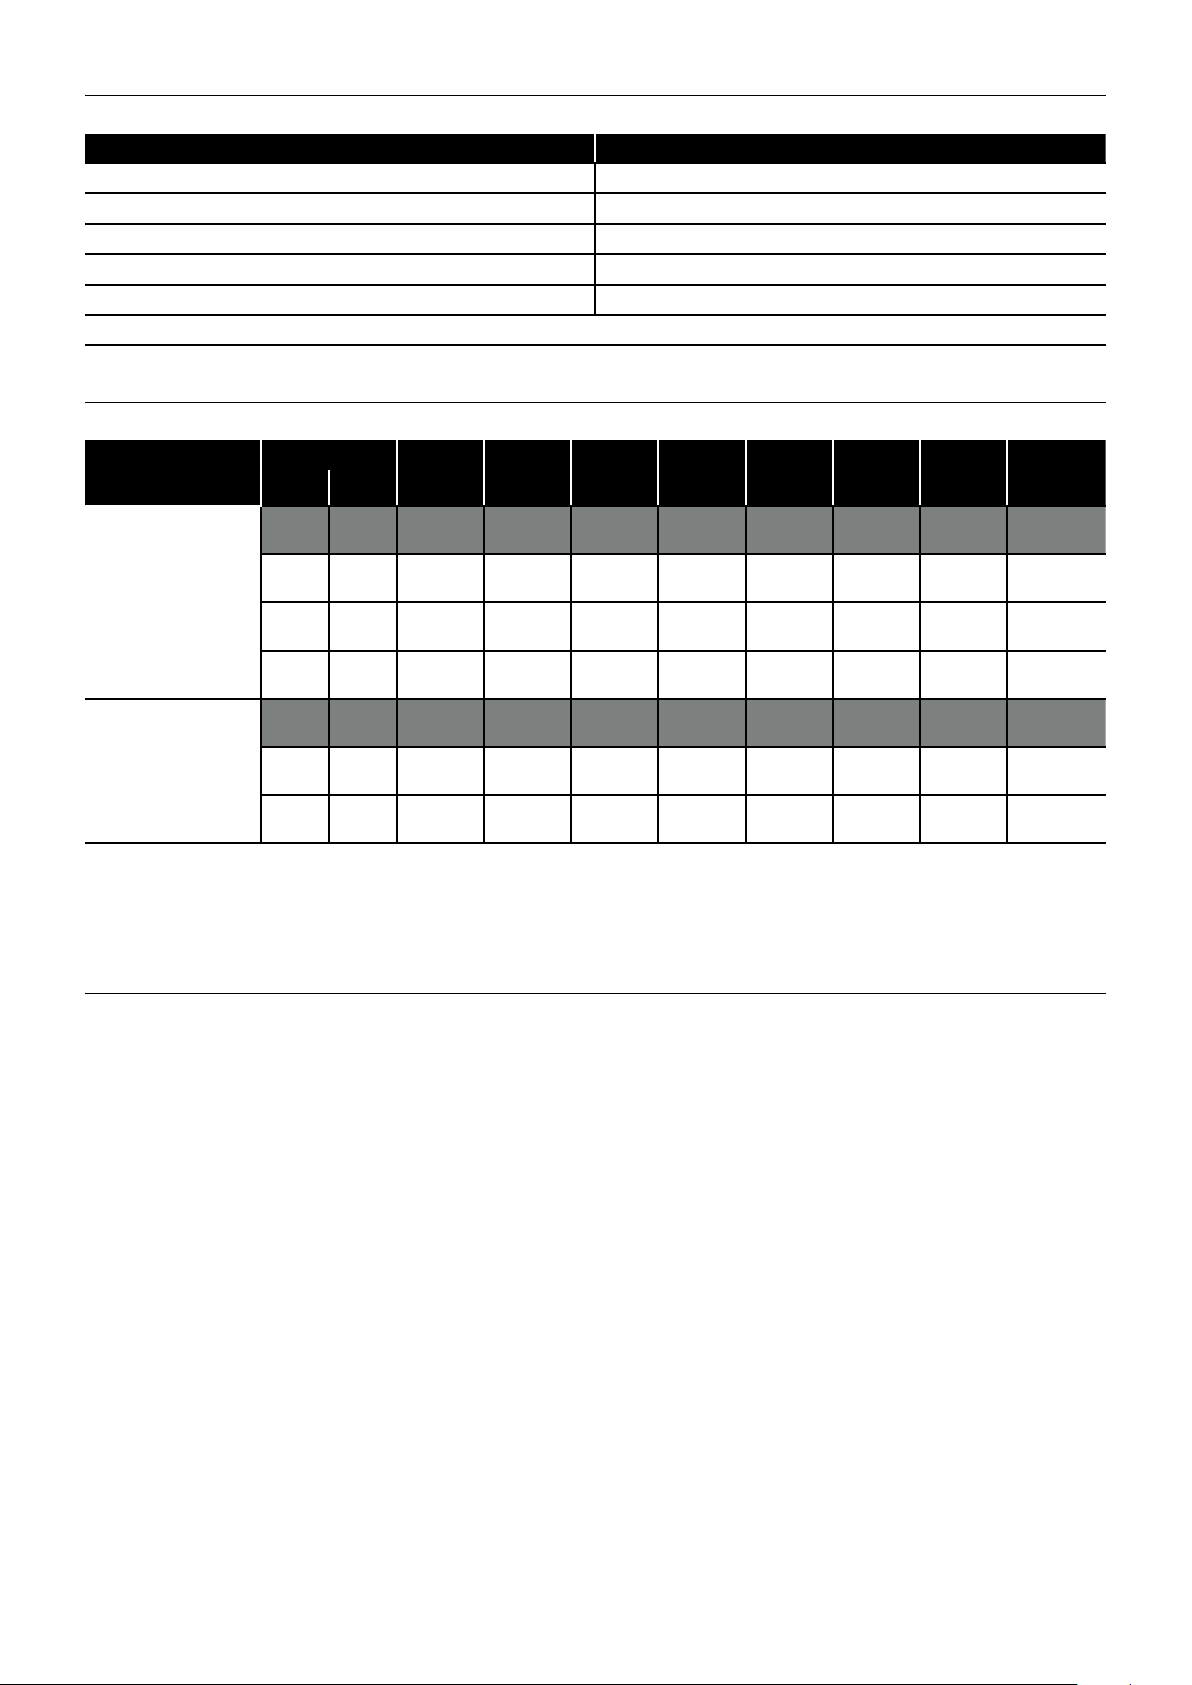
2.3 Sealed System Data
Table 2-2: Sealed system data
15/21 and 21/26kW
Heating system pressure (cold) Maximum 1.0 Minimum 0.5 bar
Operating pressure of pressure relief valve 2.5 bar
Expansion vessel size (pre-charged at 1 bar) To be selected based on the water content of the system
Cold water mains connection * 15 mm copper pipe
Pressure relief valve discharge connection * 15 mm copper pipe
* Provided that a Grant UK sealed system kit (listed in Table 1-4) has been used
2.4 Burner Settings
Table 2-3: Burner settings
Hybrid model
(burner type)
HPIDAIR
15/21kW
(RDB2.2 BG1 BLU)
HPIDAIR2
21/26kW
(RDB2.2 BG3 BLU)
Notes:
1. The data given above is approximate only.
2. The above settings may have to be adjusted on site for the correct operation of the burner.
3. Gas Oil and Bio Kerosene are NOT suitable for use with the Grant HybridAir
4. The flue gas temperatures given above are ± 10%.
5. When commissioning, the air damper must be adjusted to obtain the correct CO
6. * Factory settings: 15/21 - 21kW, 21/26 - 26kW
7. The installer must amend the boiler data label if the output is changed.
Heat output
(kW) (Btu/h)
* 21 * 71 650 0.60/80°ES 8.5 0 - 1 BG1 N/A 1.78 55 - 85 12.0
15 51 200 0.40/80°ES 9.0 0 - 1 BG1
16 54 600 0.40/80°ES 10.5 0 - 1 BG1
18 61 400 0.55/80°ES 8 0 - 1 BG1 N/A 1.53 50 - 80 12.0
* 26 * 88 700 0.65/80°ES 10 0 - 1 BG2 N/A 2.19 55 - 75 12.0
21 71 650 0.60/80°ES 8.5 0 - 1 BG2 N/A 1.78 45 - 65 12.0
23 78 475 0.65/80°ES 8.5 0 - 1 BG2 N/A 1.94 50 - 70 12.0
Nozzle
Oil
pressure
(bar)
Smoke
No.
Burner
head type
level.
2
Burner
head/disc
setting
Disc
setting B
Disc
setting B
Fuel
flow rate
(kg/h)
1.28 45 - 75 12.0
1.36 45 - 75 12.0
Flue gas
temp.
(°C)
CO
(%)
2
2.5 Flue Gas Analysis
To allow the boiler to be commissioned and ser viced, the boiler is supplied with a combustion test point on the front cleaning door. When
this test point is used please note the following:
• The test point is for CO2 and smoke readings only.
• The boiler efficiency and temperature must be taken from the flue test point on high level, vertical and conventional flue adaptors.
• Concentric low level flues do not contain a test point. The temperature and efficiency readings must be taken from the flue terminal.
Section 2: Technical Data Page 9
Page 10
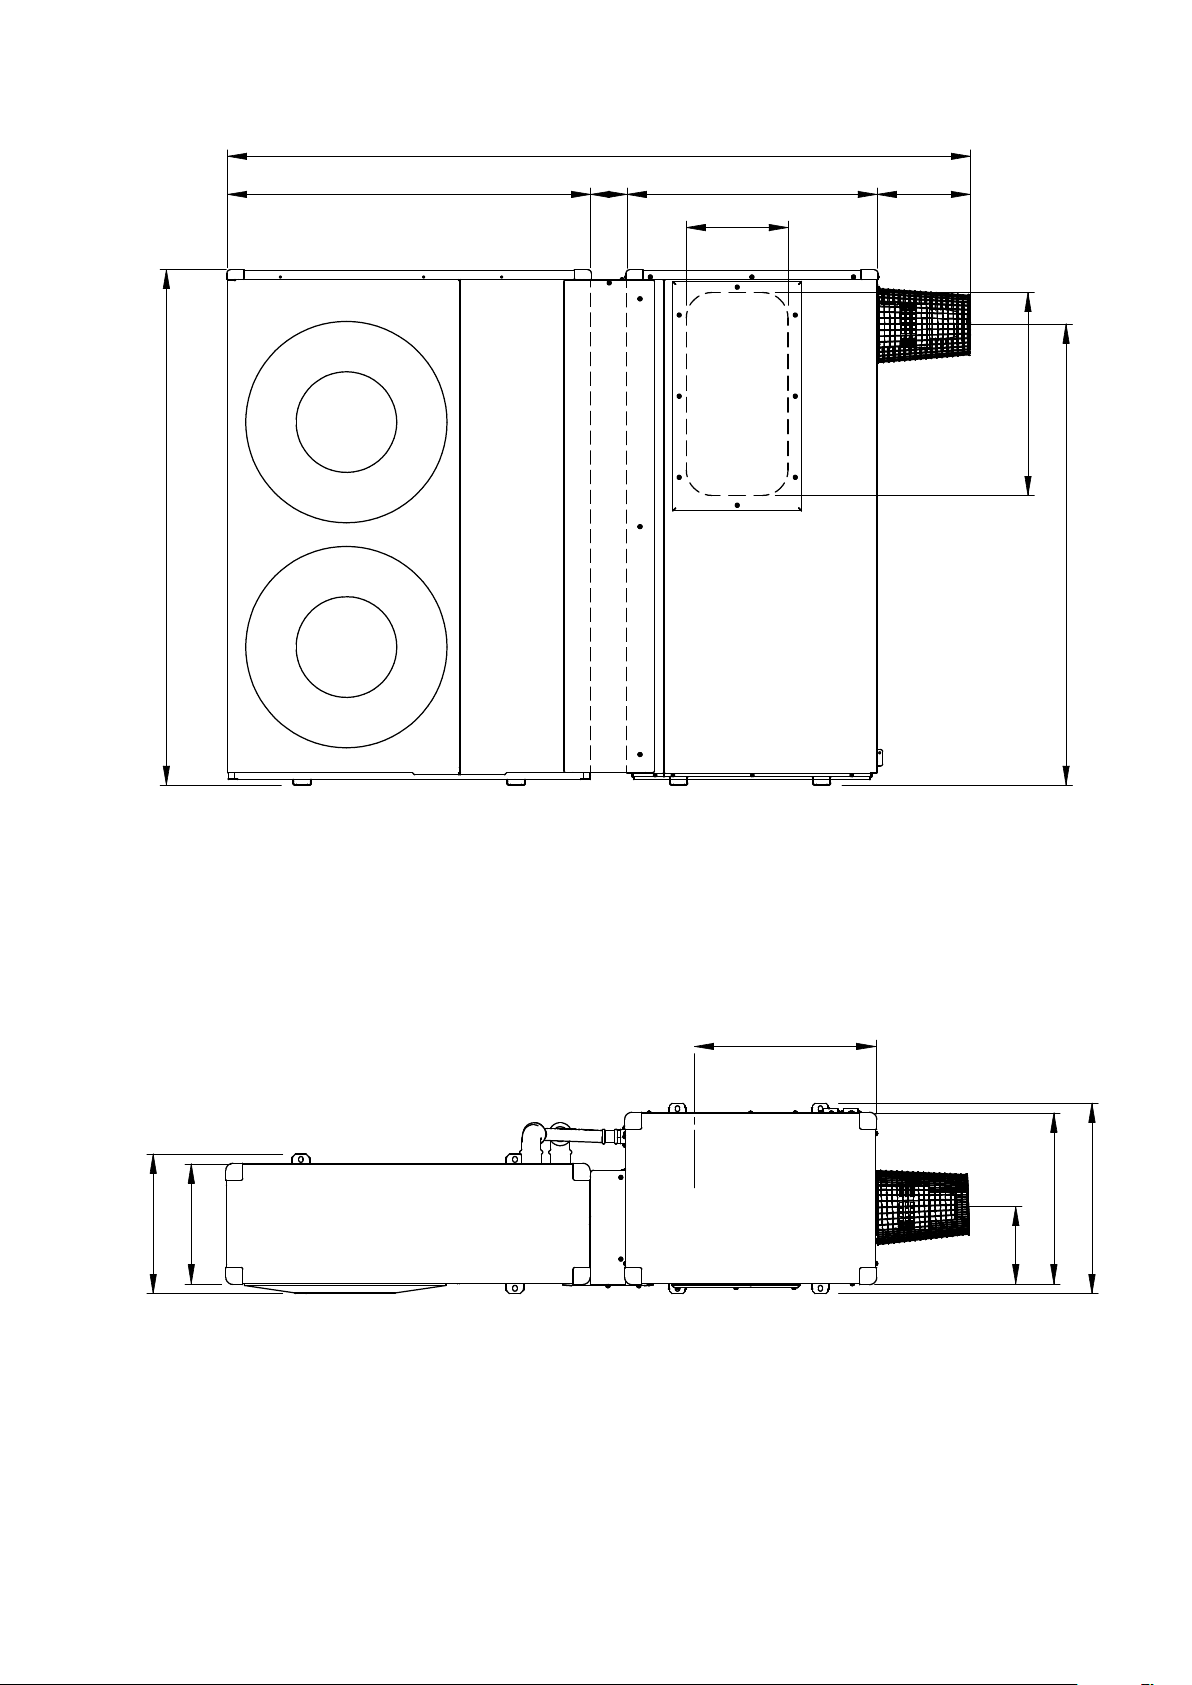
2.6 Hybrid Dimensions
2047
280
690100
257
560
1270
1000
1420
Figure 2-4: Hybrid front view
500
525
471
385
330
213
Figure 2-5: Hybrid top view
All dimensions in the diagrams are in millimetres.
Please note: all dimensions are excluding the feet (refer to Section 1.8).
For details of the heat pump only - refer to Aerona³ Installation Instructions supplied with the heat pump.
Section 2: Technical DataPage 10
Page 11
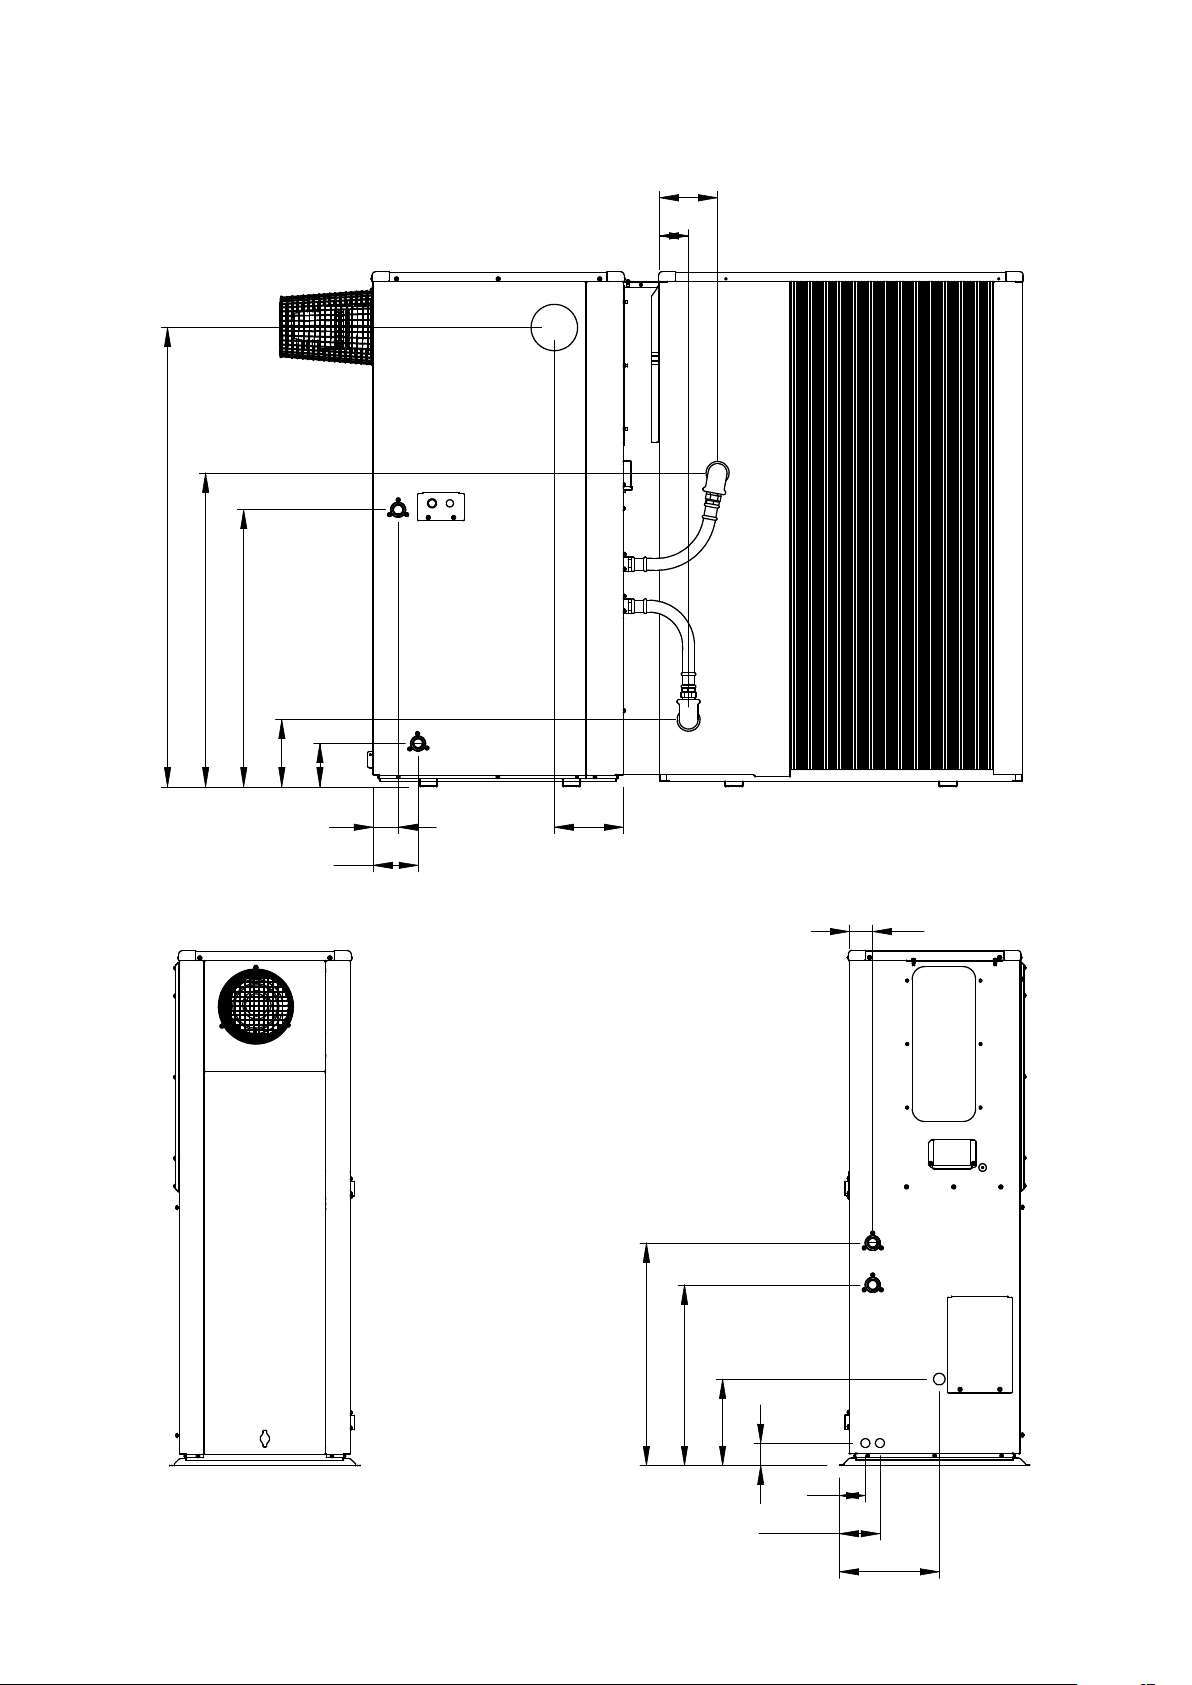
1270
160
80
865
764
185
119
69
124
190
Figure 2-6: Hybrid rear view
65
613
498
Figure 2-7: Oil boiler right hand view
Section 2: Technical Data
238
62
72
112
275
Figure 2-8: Oil boiler left hand view
Page 11
Page 12
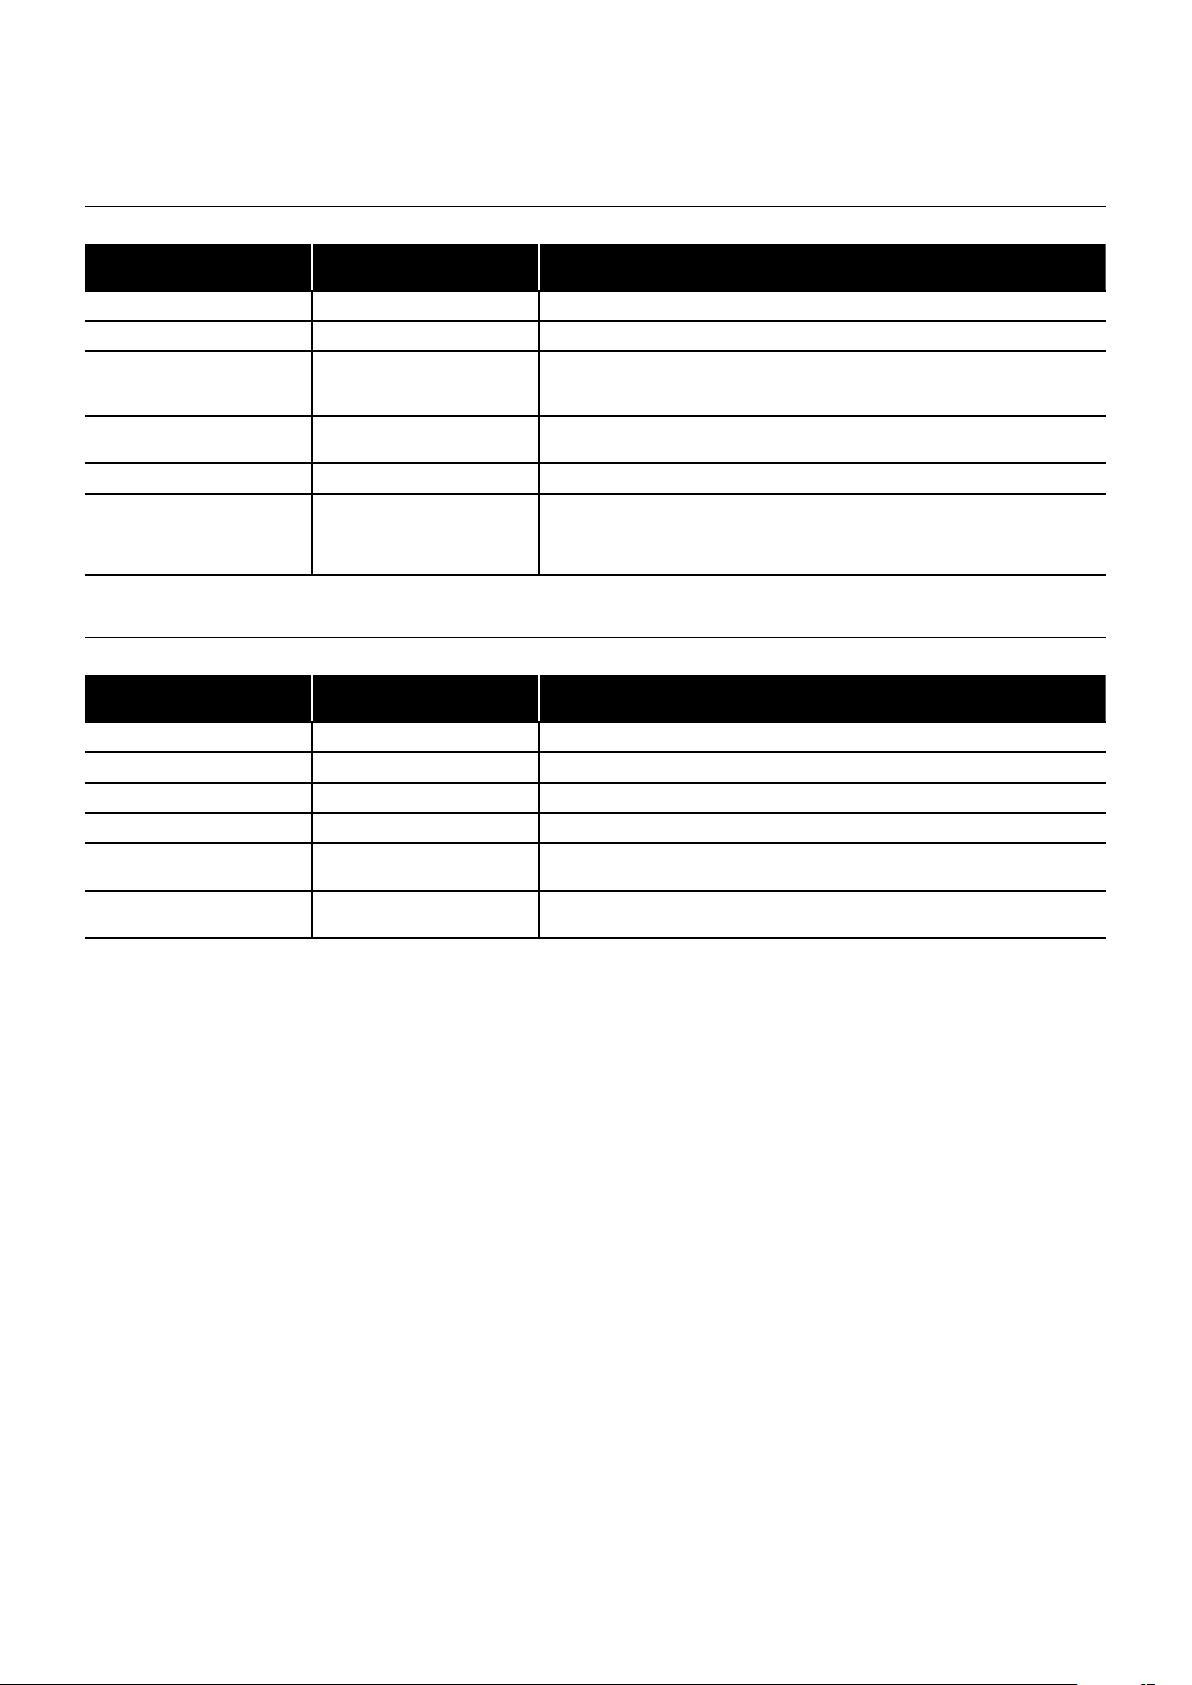
2.7 Clearances
The following minimum clearances must be used to enable the unit to be easily commissioned, serviced and maintained.
In the case of the heat pump, these will allow for adequate air flow in and out of the unit.
2.7.1 Oil Boiler and Heat Pump Installed Externally
Table 2-9: Minimum clearances required for oil boiler and heat pump installed externally
Aspect
Top (above) 300
Bottom (below)
In front of unit
Rear of unit
Left-hand side
Right-hand side (burner end) 600
Minimum clearance required
(mm)
100 This is the height of
600
300 (from rear of heat pump)
150 (from rear of oil boiler)
100
Notes
Ensure that there is adequate clearance to remove the front access panel and that the
air discharged from the heat pump will not cause a nuisance.
Ensure that there is adequate clearance to remove the access panel, the burner and
to work upon the control panel.
IMPORTANT: This distance may have to be increased in order to comply with the flue
terminal clearances. Refer to Section 13.3.
2.7.2 Oil Boiler Installed Internally
Table 2-10: Minimum clearances required for oil boiler installed internally
Aspect
Top (above) 300
Bottom (below)
In front of unit
Rear of unit
Left-hand side
Right-hand side (burner end) 600
Minimum clearance required
(mm)
N/A
600 Ensure that there is adequate clearance to remove the front access panel.
150
600
Notes
Ensure that there is adequate clearance to remove the condensate trap access panel
and condensate trap.
Ensure that there is adequate clearance to remove the access panel, the burner and
to work upon the control panel.
anti-vibration mounts. Refer to Table 1-4.
2.7.3 Heat Pump Installed Externally
For clearances for the heat pump (only) installed externally, refer to Section 3.5.2 and Figure 3-2 of the Installation and Ser vicing Instructions
supplied with the Aerona³ unit.
Section 2: Technical DataPage 12
Page 13
3 Oil Storage and Supply System
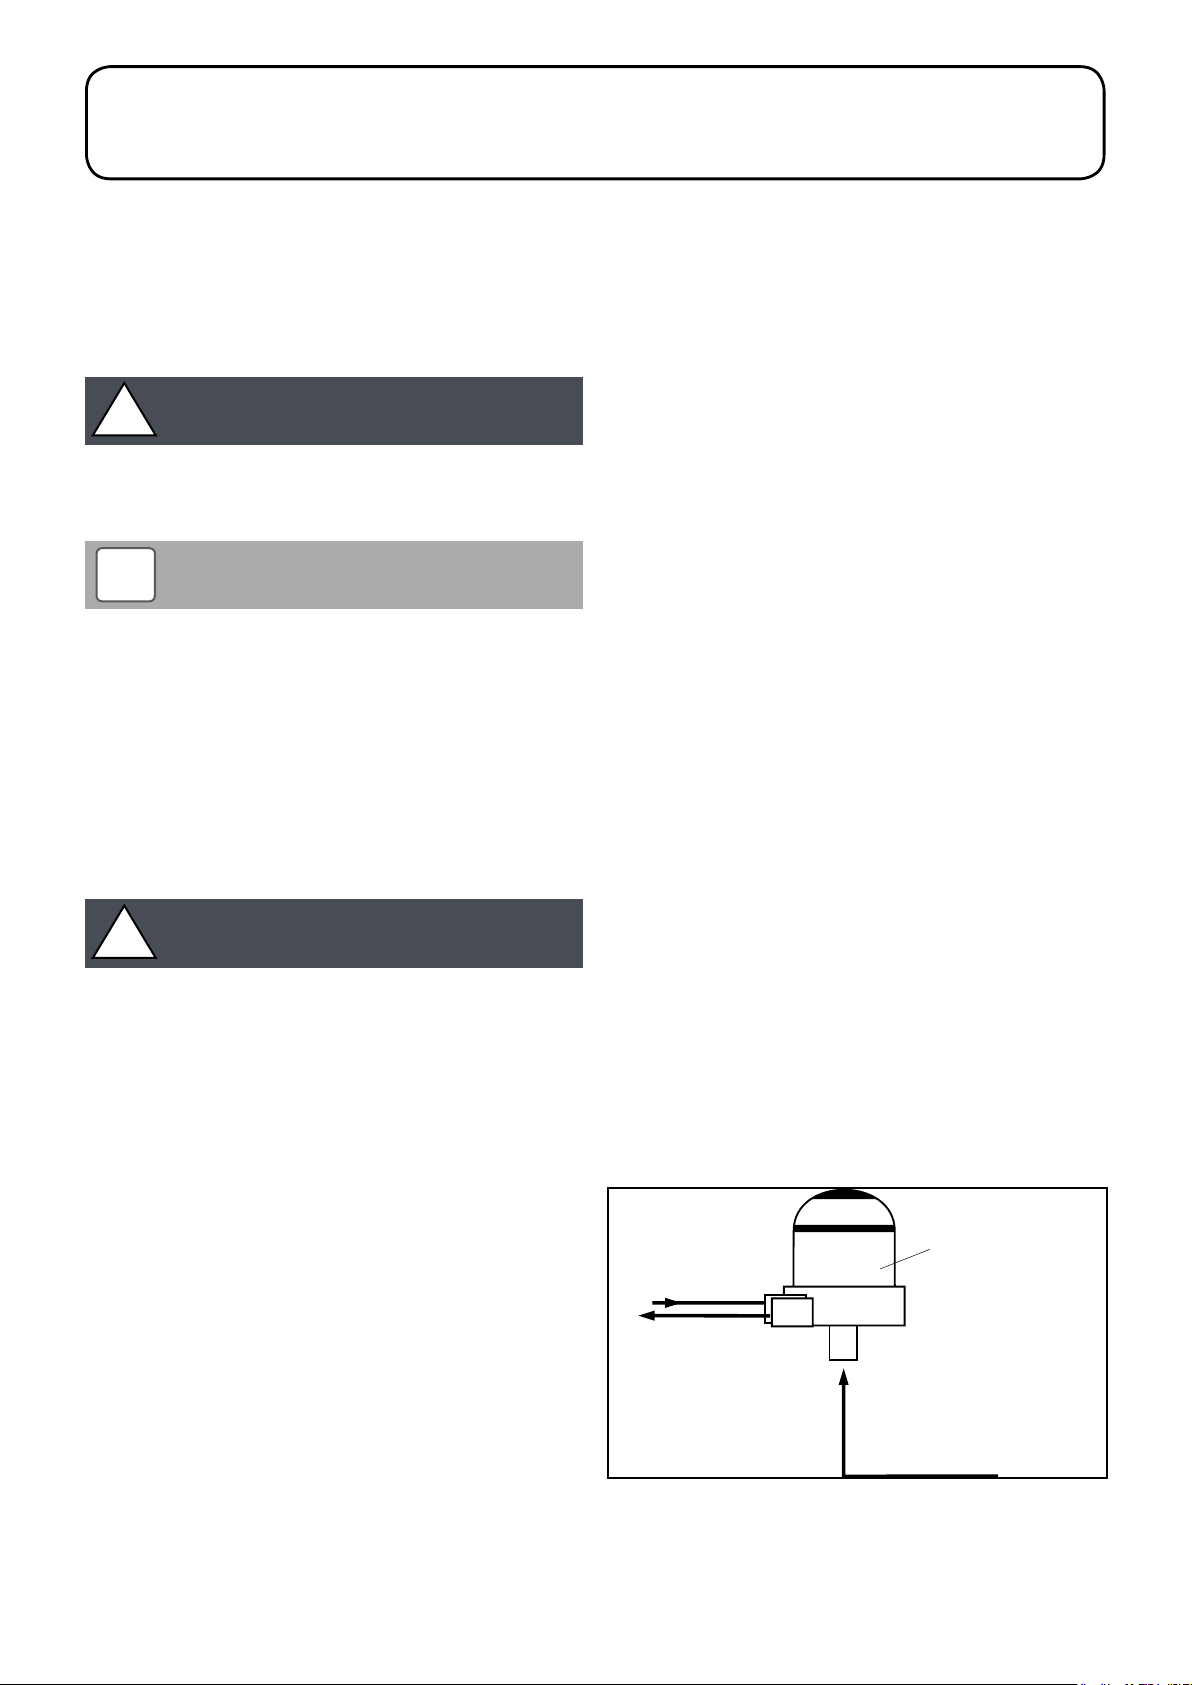
FROM PUMP
3.1 Fuel Supply
Fuel Storage
The tank should be positioned in accordance with the
recommendations given in BS 5410-1:2014, which gives details of
filling, maintenance and protection from fire.
A steel tank may be used and must be constructed to BS 7995:2010 and OFS T200.
!
A galvanised tank must NOT be used.
A plastic tank may be used and must comply with OFS T100.
!
Plastic tanks should be adequately and uniformly supported
on a smooth level sur face, across their entire base area, that
is, the area in contact with the ground.
Fuel Pipes
Fuel supply pipes should be of copper tubing with an external
diameter of at least 10 mm.
Galvanised pipe must not be used.
All pipe connections should preferably use flared fittings. Soldered
connections must not be used on oil pipes.
!
Flexible hoses must NOT be used outside the boiler casing.
A remote sensing fire valve must be installed in the fuel supply line,
with the sensing head located above the burner.
Recommendations are given in BS 5410-1:2014.
A suitable oil filter with a minimum 15µ filtration must be installed in
the oil supply line. A shut-off valve should be fitted before the filter,
to allow the filter to be serviced.
A flexible fuel line, adaptor and ¼" BSP isolation valve are supplied
loose with the boiler for the final connection to the burner. If a two
pipe system or 'Tiger Loop' type de-aerator is used, an additional
flexible fuel hose (900 mm) and 3/8" to 1/4" BSP male adaptor are
available to purchase from Grant UK (product codes: RBS35 and
RBS36).
Metal braided flexible hoses should be replaced annually when
the boiler is serviced. Long life flexible hoses should be inspected
annually and replaced at least every 60 months.
CAUTION
NOTE
CAUTION
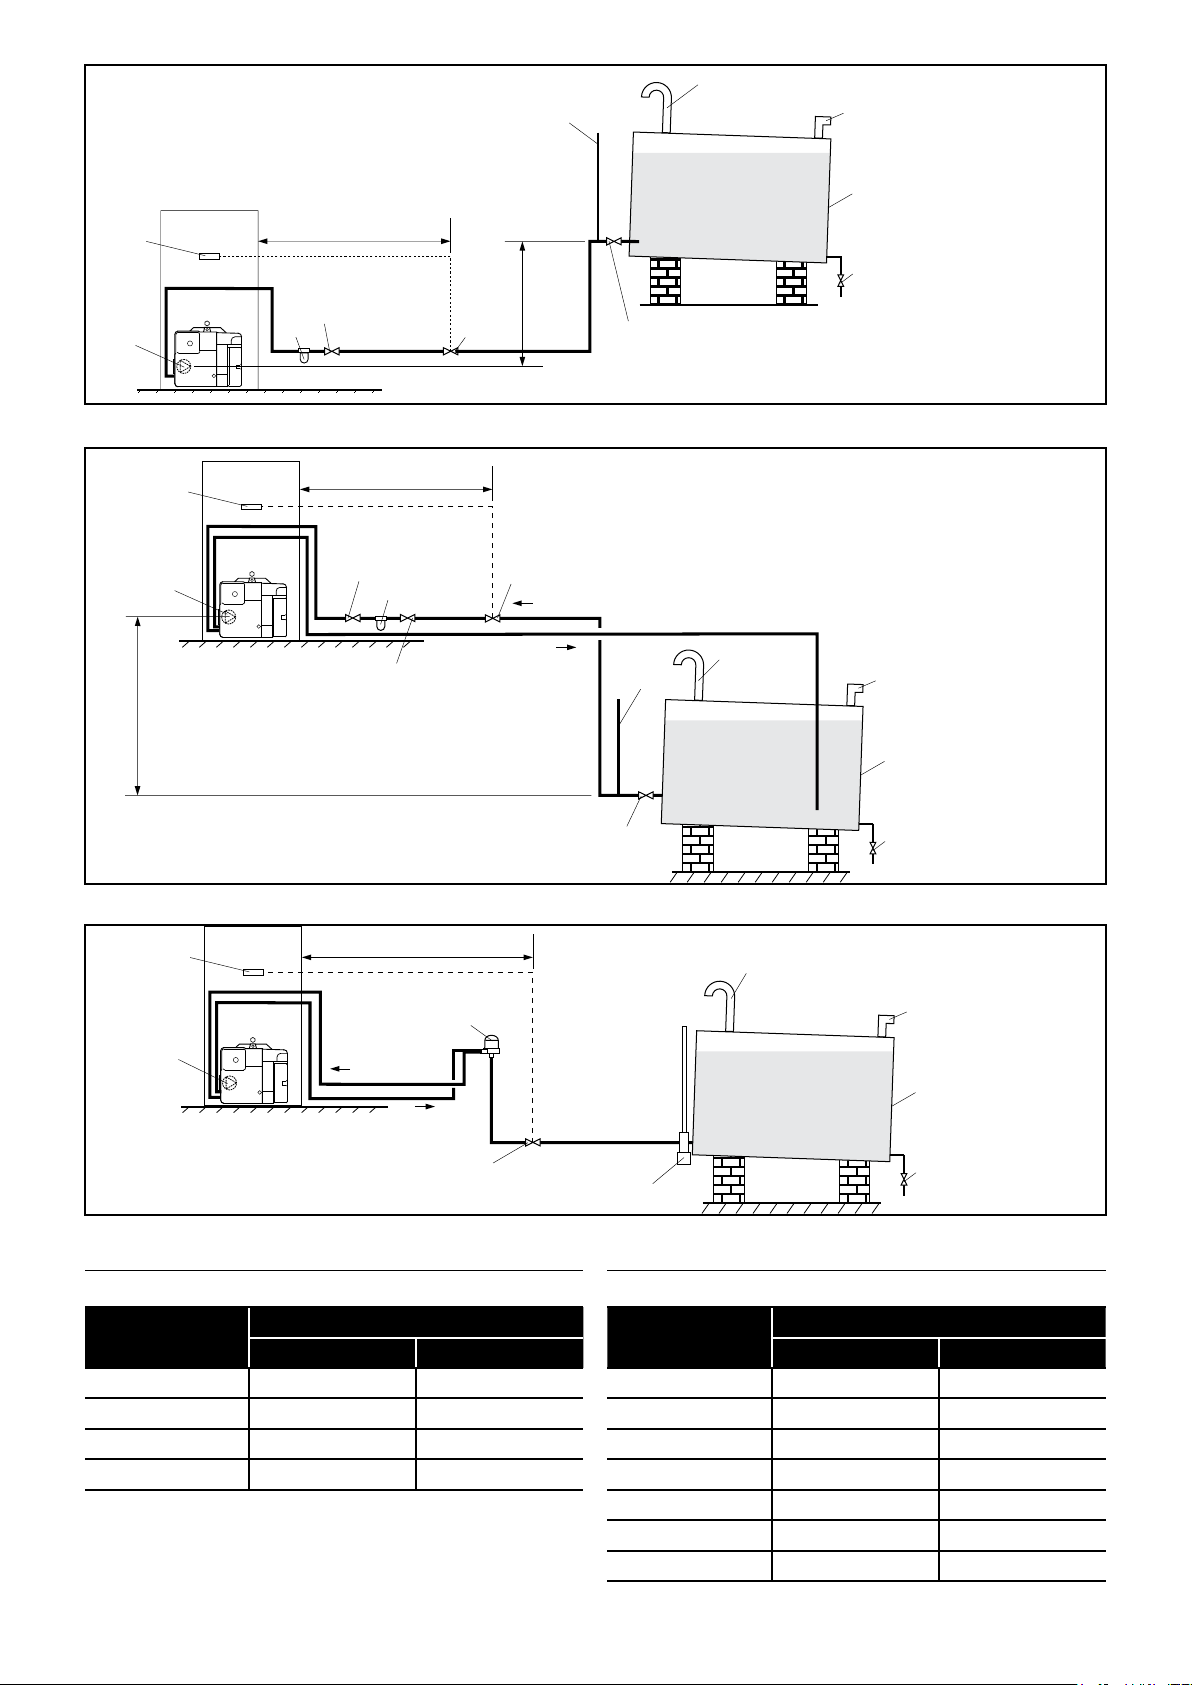
Single pipe system - (refer to Figure 3-2 and Table 3-5)
With the storage tank outlet above the burner a single pipe system
should be used. The height of the tank above the burner limits the
length of pipe run from the tank to the burner.
As supplied the burner is suitable for a single pipe system.
Two pipe system - (refer to Figure 3-3 and Table 3-6)
With the storage tank outlet below the burner, a two pipe system
should be used. The pipe runs should be as shown in Figure 3-2.
The return pipe should be the same level in the tank as the supply
pipe, both being 75 to 100 mm above the base of the tank. The pipe
ends should be a sufficient distance apart so as to prevent any
sediment disturbed by the return entering the supply pipe.
Avoid the bottom of the tank being more than 3.5 m below the
burner.
A non-return valve should be fitted in the supply pipe together with
the filter and fire valve. A non-return valve should be fitted in the
return pipe if the top of the tank is above the burner.
To be used with a t wo-pipe system, the burner must be fitted with an
additional flexible fuel hose - a flexible fuel hose (900 mm) and 3/8"
to 1/4" BSP male adaptor are available to purchase from Grant UK
(product codes: RBS35 and RBS36).
The pump vacuum should not exceed 0.4 bar. Beyond this limit gas
is released from the oil.
For guidance on installation of top outlet fuel tanks and suction oil
supply sizing, see OFTEC Technical Book 3. Available from OFTEC.
Tiger Loop system - (refer to Figure 3-1 and 3-4)
When The storage tank outlet is below the burner, an alternative to
a two pipe system can be achieved using a 'Tiger Loop' t ype oil
de-aerator. This ef fectively removes the air from the oil supply on a
single pipe lift.
The de-aerator is connected close to the boiler as a two pipe
system (omitting the non-return valve) as shown in Figure 3-3.
Refer to the manufacturers instructions supplied with the de-aerator.
The de-aerator must be mounted vertically. See Figure 3-3 and 3-4.
To be used with a de-aerator, the burner must be fitted with an
additional flexible fuel hose - a flexible fuel hose (900 mm) and 3/8"
to 1/4" BSP male adaptor are available to purchase from Grant UK
(product codes: RBS35 and RBS36).
RETURN
SUPPL Y
TO PUMP
Tiger Loop
1/4" BSP female
connections
Section 3: Oil Storage and Supply System Page 13
SUPPL Y
FROM TANK
Figure 3-1: Tiger loop de-aeration device
Page 14
Vent
Fire
valve
sensor
Pump
Filter
Figure 3-2: Single pipe system
1 m
Shut-off
valve
Fire
valve
A
Level
gauge
pipe
Fill
pipe
Fuel
storage
tank
Sludge
valve
Shut-off
valve
Fire
valve
sensor
See
Section 3.2
A
Figure 3-3: Two pipe system
Fire
valve
sensor
See
Section 3.2
1 m
Non
return
valve
Filter
Shut-off
valve
1 m
De-aeration device
e.g. Tiger Loop
See Figure 3-1
Supply
Return
Fire
valve
Return
Supply
Shut-off
valve
Level
gauge
Vent
pipe
Fill
pipe
Fuel
storage
tank
Sludge
valve
Vent
pipe
Fill
pipe
Fuel
storage
tank
Fire valve
Figure 3-4: De-aeration device system
Table 3-5: Single pipe system maximum pipe runs
Head A
(m)
0.5 10 20
1.0 20 40
1.5 40 80
2.0 60 100
Maximum pipe run (metres)
10 mm OD pipe 12 mm OD pipe
Sludge
Tankmaster
valve
Table 3-6: Two pipe system maximum pipe runs
Maximum pipe run (metres)
10 mm OD pipe 12 mm OD pipe
Head A
(m)
0 35 100
0.5 30 100
1.0 25 100
1.5 20 90
2.0 15 70
3.0 8 30
3.5 6 20
Section 3: Oil Storage and Supply SystemPage 14
Page 15
3.2 Burner Oil Connection
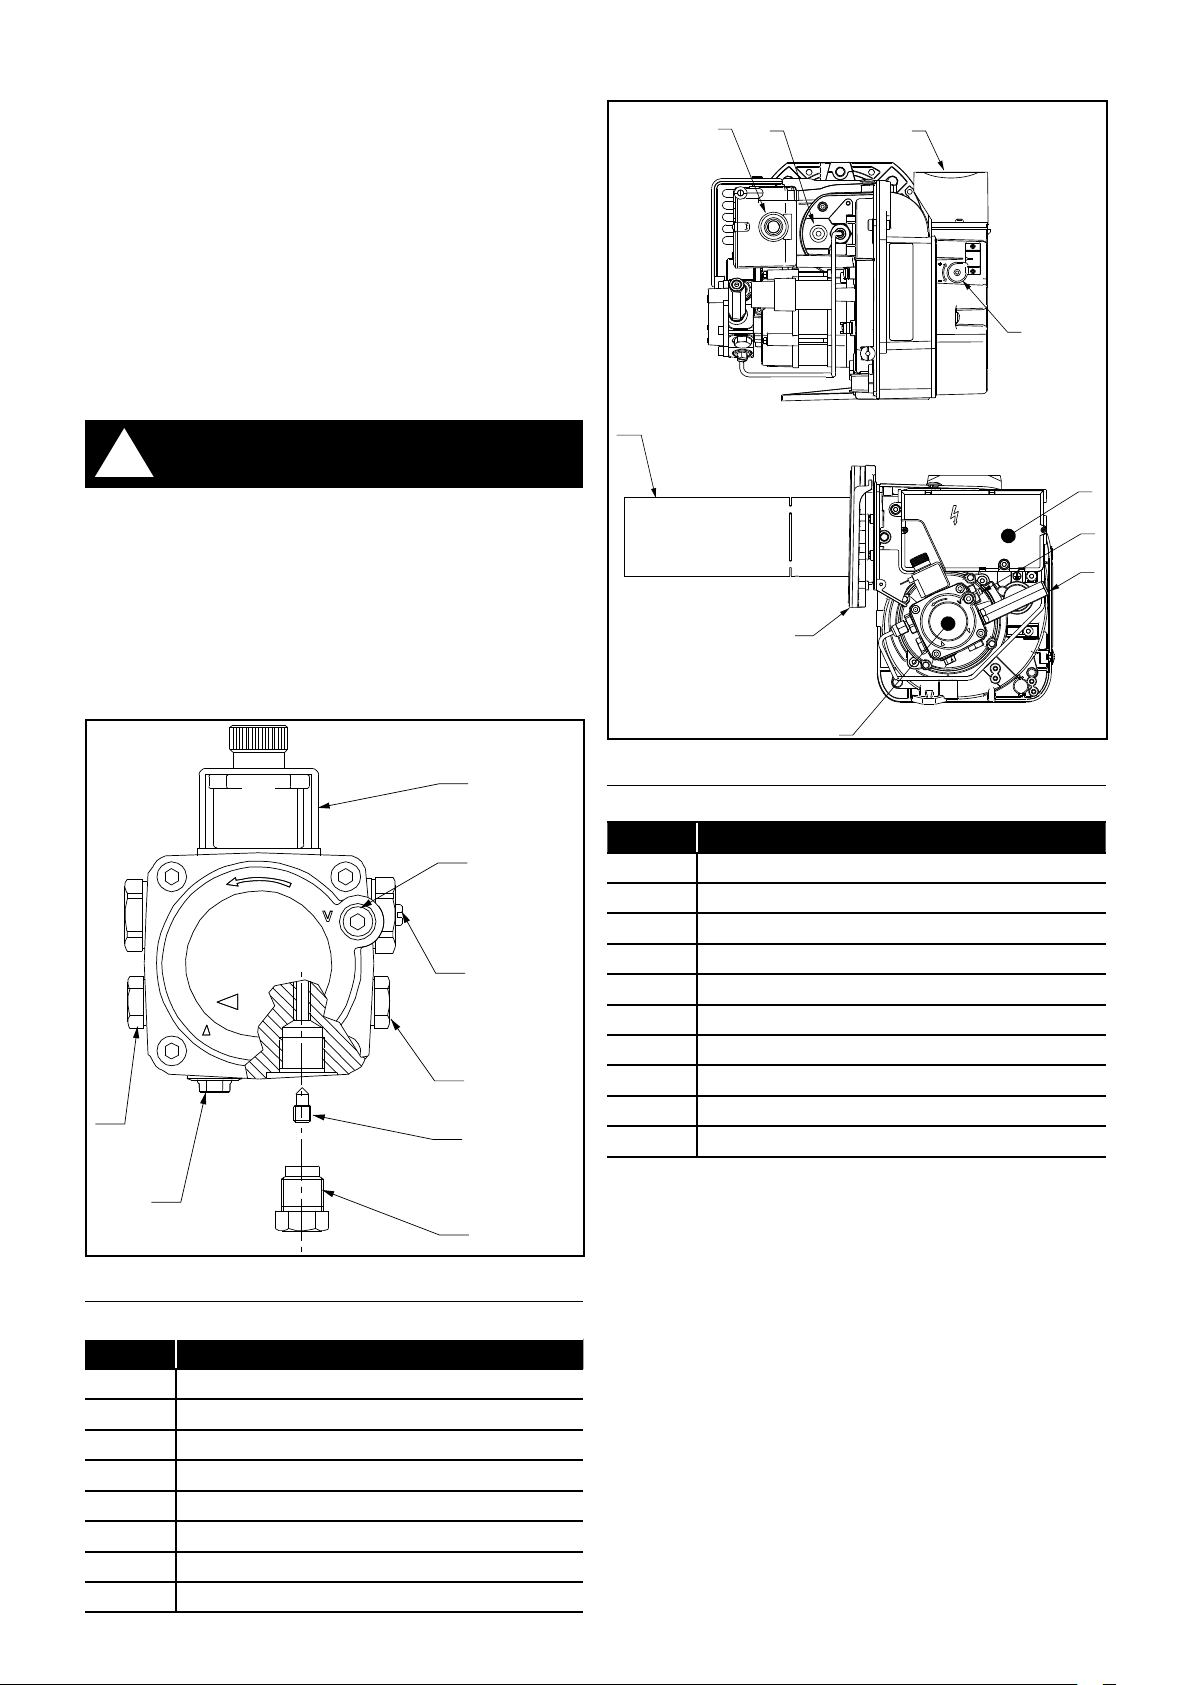
3
The burner fuel pump is supplied for use with a single pipe fuel
supply system. For use on a two pipe system, it is necessar y to fit
the by-pass screw, as shown in Figure 3-7, into the tapping in the
return port.
The by-pass screw is supplied in the boiler accessory pack.
1. Remove the plastic burner cover (secured by one screw).
For ease of access to the fuel pump, to fit the by-pass screw
and connect the oil lines, the burner can be removed from the
boiler. To do this, unscrew the single nut at the top of the burner
(using a 13 mm spanner) and withdraw the burner from the
boiler.
2. Remove and discard the blanking plug from the return
connection of the pump and fit the by-pass screw using an
hexagonal key.
3.3 Burner Components
9
10
6
5
!
The blanking plug supplied in the inlet (suction) port may now
be plastic and will not provide an oil tight seal when the pump
is running. Ensure that the supply from the tank is connected
to this port and that the plastic plug is discarded.
3. Connect the return oil flexible fuel hose to the pump.
4. Connect the 3/8" to 1/4" BSP adaptor to the flexible fuel hose.
Flexible fuel hoses and adaptors are available to purchase from
Grant UK. Refer to Section 1.8.
WARNING
7
6
5
4
8
3
2
7
8
4
1
Figure 3-9: Riello RDB burner components
Table 3-10: Riello RDB burner components key
Key Description
1 Oil pump
2 Digital control box
3 Reset push-button with lockout lamp
4 Flange with insulating gasket
5 Air damper adjustment screw
6 Snorkel (balanced flue) connection
7 Pump pressure adjustment screw
8 Pressure gauge port
9 UV sensor
10 Combustion head
1
2
Figure 3-7: Riello RDB pump
Table 3-8: Riello RDB pump key
Item Description
1 Inlet (suction) port
2 Return port
3 By-pass screw
4 Pressure gauge port
5 Pressure adjustment
6 Vacuum gauge port
7 Solenoid
8 Auxiliar y pressure test point
Section 3: Oil Storage and Supply System Page 15
Page 16

4 Installation Information
4.1 Introduction
!
Before star ting any work on the boiler or fuel supply, please
read the Health and Safet y information given in Section 18 of
these instructions.
Before star ting any work on the heat pump, please read
the Health and Safety information given in Section 14 of the
Aerona³ installation instructions.
This section gives a general overview of the installation process with
detailed installation information given in the following sections:
• Section 5 - Installing the Oil Boiler - pages 18 to 19
• Section 6 - Installing the Heat Pump - pages 20 to 21
• Section 7 - Installing the Heat Meters (where required) - pages
22 to 29
!
It is recommended, where possible, to fit the heat meter
during the installation of the oil boiler to avoid the need to
drain the system at a later date.
WARNING
NOTE
4.2 VortexAir location
4.2.1 Selection of position
• Consider a place where the noise, air and flue discharge will
not affect neighbours.
• Consider a position protected from the wind.
• Consider an area that reflects the minimum spaces
recommended.
• Consider a place that does not obstruct the access to doors or
paths.
• The surfaces of the floor must be solid enough to suppor t the
weight of the VortexAir and minimise the transmission of noise
and vibration.
• Take preventive measures so that children cannot reach the
unit.
• Install the VortexAir in a place where it will not be inclined more
than 5°.
• When installing the VortexAir where it may exposed to strong
wind, brace it securely.
Decide the mounting position as follows:
• Install the VortexAir in a level location which can withstand the
weight of the heat pump and vibration.
• Provide the indicated space to ensure good airflow.
• Do not install the VortexAir near a source of heat, steam, or
flammable gas.
• During heating operation, condensate water flows from the heat
pump. Therefore, install the heat pump in a place where the
condensate water flow will not be obstructed.
• Do not install the heat pump where strong wind blows directly
onto the heat pump or where it is very dusty.
• Do not install the VortexAir where people pass frequently.
• Install the VortexAir in a place where it will be free from adverse
weather conditions as much as possible.
•
4.2.2 Noise Level (heat pump)
All heat pumps make a noise. Discuss the potential nuisance factor
with the end-user when considering the final position of the heat
pump. Take opening windows and doors into account. It is not
essential for the heat pump to be positioned next to a wall of the
house. Behind an out-building may be more suitable so discuss the
options with the end-user.
4.2.3 Orientation (heat pump)
The North face of the building will usually have colder ambient air
than any other side. To ensure ma ximum ef ficiency from the Grant
UK Aerona³ heat pump, position the heat pump on a warmer side. In
order of preference, site the heat pump on a South face followed by
either South East or South West, then by East or West. Only install
on a North face if there is no other alternative.
4.3 Preparation for Installation
4.3.1 Base (boiler and heat pump installed externally)
The heat pump and boiler should be installed on a flat trowelled
finished concrete base 150 mm thick. This base should extend at
least 150 mm beyond the heat pump and boiler on three sides.
To avoid bridging the DPC, leave a gap of at approximately 150 mm
between the concrete base and the wall of the house.
The VortexAir unit must be raised up from the base by approximately
100mm on suitable anti vibration mounts or blocks - two each for
the boiler and the heat pump (refer to Table 1-4).
The VortexAir can be installed either against the building or 'free
standing' some distance away from the building.
4.3.2 Base (boiler installed internally)
The boiler must stand on a firm and level surface. The boiler base
temperature is less than 50°C so no special hearth is required.
4.3.3 Clearances
The minimum clearances given in Section 2.7 must be used to
enable both the boiler and heat pump of the VortexAir to be easily
commissioned, serviced and maintained and allow adequate air
flow in and out of the heat pump.
4.4 Regulations and Standards
Installation of a Grant VortexAir must be in accordance with the
following recommendations:
• Building Regulations for England and Wales, and the Building
Standards for Scotland issued by the Department of the
Environment and any local Byelaws which you must check with
the local authority for the area.
• Model and local Water Undertaking Byelaws.
• Applicable Control of Pollution Regulations.
The following OFTEC requirements:
• OFS T100 Polythene oil storage tanks for distillate fuels.
• OFS T200 Fuel oil storage tanks and tank bunds for use with
distillate fuels, lubrication oils and waste oils.
Further information may be obtained from the OFTEC Technical
Book 3 (Installation requirements for oil storage tanks) and OFTEC
Technical Book 4 (Installation requirements for oil fired boilers).
The installation should also be in accordance with the latest edition
of the following British Standard Codes of Practice:
• BS 715 Metal flue pipes, fittings, terminals and accessories.
• BS 799:5 Oil storage tanks.
• BS 1181 Clay flue linings and flue terminals.
Section 4: Installation InformationPage 16
Page 17

• BS 4543:3 Factory made insulated chimneys for oil fired
appliances.
• BS 4876 Performance requirements for oil burning appliances
• BS 5410:1 Code of Practice for oil firing appliances.
• BS 5449 Forced circulation hot water systems.
• BS 7593 Code of Practice for treatment of water in heating
systems.
• BS 7671 Requirements for electrical installations, IET Wiring
Regulations.
For a list of recommendations and regulations to the heat pump,
refer to the Installation and Servicing Instructions supplied with the
heat pump.
Grant Engineering (UK) Limited strongly recommends that
a Grant MagOne in-line magnetic filter/s (or equivalent*)
is fitted in the heating system pipework. This should be
installed and regularly serviced in accordance with the filter
manufacturer’s instructions.
* As measured by gauss. The MagOne magnetic filter has a gauss
measurement of 12000.
!
We recommend that both antifreeze and corrosion inhibitor
be used in the primary water system.
NOTE
4.5 Completion
Please ensure that the OFTEC CD/10 installation completion report
(provided with the boiler) is completed in full.
Leave the top copy with the User.
Retain the carbon copy.
Ensure that:
a. The User Information pack (supplied with the boiler) is handed
over to the Householder.
b. The householder is aware of how to use the product.
c. The householder is aware of the need to refer to the online
calculator and change the stat.
d. The product is registered for the Grant product guarantee.
4.6 Before you Commission
4.6.1 Flushing and Corrosion Protection
To avoid the danger of dir t and foreign matter entering the VortexAir
the complete heating system should be thoroughly flushed out
– both before the VortexAir is operated and then again af ter the
system has been heated and is still hot.
This is especially important where the VortexAir is installed as a
replacement for a boiler on an existing system.
In this case the system should be first flushed hot, before the old
boiler is removed and replaced by the VortexAir.
For optimum performance after installation, this VortexAir and the
central heating system must be flushed in accordance with the
guidelines given in BS 7593:2006 ‘Treatment of water in domestic
hot water central heating systems’.
This must involve the use of a proprietary cleaner, such as Sentinel
X300 or X400, or Fernox Restorer.
After flushing, a suitable thermal fluid should be used (such as
Sentinel R600) specifically designed for use in air source heat pump
installations. This provides long term protection against corrosion
and scale as well as the risk of the freezing in the ex ternal section of
the heating system (i.e. the flexible hoses, condenser and circulating
pump within the heat pump casing) in the event of power failure
during winter months.
In order to avoid bacterial growth, due to the lower system operating
temperatures, a suitable Biocide (such as Sentinel R700) should
also be used in conjunction with the thermal fluid.
Both the thermal fluid and biocide should be added to the system
water when finally filling the heating system.
Alternatively, Fernox HP5C can be used (or HP15C for greater frost
protection).
This is a suitable thermal fluid that already contains a suitable
biocide.
Full instructions on the correct use of thermal fluids and biocides are
supplied with the products, but further information can be obtained
from either ww w.sentinel-solutions.net or ww w.fernox.com.
Failure to implement the above guidelines by fully flushing the
system and using a suitable thermal fluid and biocide corrosion
inhibitor will invalidate the heat pump product guarantee.
4.7 Heating System Design Considerations
To achieve the ma ximum ef ficiency possible from the Grant
VortexAir, the heating system should be designed to the following
parameters:
Radiators:
• Flow temperature 70°C, return temperature 50°C, differential
20°C
Underfloor:
• Flow temperature 50°C, return temperature 40°C, differential
10°C
Size radiators with a mean water temperature of 60°C.
Design system controls with programmable room thermostats or
use weather compensating controls to maintain return temperatures
below 55°C.
!
The boiler should not be allowed to operate with return
temperatures of less than 40°C when the system is up to
operating temperature.
The use of a pipe thermostat is recommended to control the return
temperature when using weather compensating controls.
NOTE
4.8 Underfloor Heating Systems
In underfloor systems it is essential that the return temperature must
be maintained above 40°C to prevent internal corrosion of the boiler
water jacket.
4.9 Pipework Materials
Grant VortexAir units are compatible with both copper and plastic
pipe. Where plastic pipe is used it must be of the oxygen barrier
type and be of the correct class (to BS 7291-1:2010) for the
application concerned.
!
The first metre of pipework connected to both the heating
flow and return connections of the boiler must be made in
copper.
WARNING
4.10 Underfloor Pipework
Plastic pipe may be used on underfloor systems where the plastic
pipe is fitted after the thermostatic mixing valve.
Copper tube must be used for at least the first metre of flow and
return primary pipework between the boiler and the underfloor
mixing/blending valves.
Section 4: Installation Information Page 17
Page 18

5 Installation of the Oil Boiler
5.1 Preparation for Installation
1. Carefully remove the packaging from the boiler and remove it
from the transit pallet.
2. The oil supply line should be installed up to the position of the
boiler. Refer to Section 3 for details.
3. The final connection into the boiler enclosure can be made
when the boiler is in position. Using 10 mm soft copper, route
the oil line(s) into the boiler casing through the hole(s) provided
in the lower left corner of the left-hand casing panel. Refer to
Figure 1-7. Run it along the base of the enclosure (between
rear casing panel and the boiler) up to the burner located at the
right hand end of the enclosure. Refer to Section 3.2 for details
of the connection to the burner.
4. Position the boiler in the final location required, raised up from
the base by approximately 100 mm on suitable anti-vibration
mounts. This location may be either inside or outside the
building, as required.
• If the boiler is to be installed externally (next to the heat pump),
refer to Section 5.2.
• If the boiler is to be installed internally (with the heat pump
outside), refer to Section 5.3.
5.2 Installing the Oil Boiler – External location (nex t
to the heat pump)
1. With the boiler in the required position, ensure that the flue
terminal position complies with the necessary clearances.
Refer to Section 2.8.
2. Mark the wall and drill holes for the system flow and return
pipes. Refer to Figures 2-6 and 5-2 for the positions of the
pipework connections in the boiler rear panel.
3. Make the water connections as described in Section 8.4. If
access will be restricted, make any connections to the boiler
(and heat pump) before placing it in its final position.
4. Pipework should be insulated where it passes through the wall.
5. The boiler must be fitted to a sealed heating system. Refer to
Section 10 for details.
6. Ensure the requirements for the disposal of condensate as
described in Section 9 are met.
7. Connect the power supply to the hybrid control panel (in the
boiler) as described in Section 12.
8. Connect the flue system as described in Section 13.
5.3 Installing the Oil Boiler – Internal Location (with
heat pump outside)
1. With the boiler in required position, ensure that the flue terminal
position will comply with the necessary clearances. Refer to
Section 2.7.
2. Prepare the wall for the pipework and flue system. Mark the wall
and drill holes for the system flow and return pipes between the
boiler and the heat pump. Refer to Figures 2-6 and 5-2 for the
positions of the pipework connections in the boiler rear panel.
3. Mark the wall and make a hole for the flue system to pass
through. Refer to Section 13-.4 for the correct hole position.
4. Fit the flue system to the boiler as detailed in Section 12.5.
Ensure that there is an adequate air supply to the boiler if
required. Refer to Section 12.2.
5. Make the water connections as described in Section 8.4. If
access will be restricted, make any connections to the boiler
(and heat pump) before placing it in its final position.
6. The boiler must be fitted to a sealed heating system. Refer to
Section10 for details.
7. Ensure the requirements for the disposal of condensate as
described in Section 9 are met.
8. Connect the power supply to the hybrid control panel (in the
boiler) as described in Section 12
5.4 Boiler Only Operation (inside or outside
location)
5.4.1 Heat pump flow and return connections
If the boiler and heat pump are not to be installed at the same time,
but the boiler is required to operate immediately, e.g. following an
emergency boiler replacement, the boiler can be operated as a
‘stand-alone’ unit.
To do this the heat pump flow and return connections on the boiler,
located at the rear of the left side casing panel, must be connected
together.
This can be done by using 1" BSP x 28mm compression connectors,
as follows:
1. Using a suitable thread sealant or PTFE tape, screw one of the
connectors into the 1”BSPF ‘Heat Pump Flow’ connection on
the boiler.
2. Repeat the above process to fit the second connector to the
1”BSPF ‘Heat Pump Return’ connection on the boiler.
3. Make a 'U' section of 28mm Copper pipe (using either
two compression or capillary elbows). Fit this into the two
compression connections on the boiler to complete the loop
and tighten both compression fittings.
4. Insulate the connection bet ween the heat pump flow and return
connections. Even though this loop may only be a temporar y
measure, until the heat pump is installed, it MUST be insulated
using a suitable external insulation material.
5. Fill the sealed heating system as described in Section 10 of
these instructions.
6. Vent the system to remove trapped air using the manual air
vents located inside the boiler enclosure (refer to Figures 8-2
and 8-3).
Section 5: Installation of the Oil BoilerPage 18
Page 19

!
WARNING
!
WARNING
If the boiler is to be used without the heat pump fitted, the
heat pump flow and return connections on the boiler MUST be
connected together, as described above, BEFORE the system
and boiler are filled with water.
5.4.2 ‘Boiler only’ controls
If the boiler is to be used as a ‘stand-alone’ unit, without the heat
pump connected, the ‘Oil/Hybrid’ switch on the Hybrid control panel
(in the boiler) MUST be set to ‘Oil’ for the boiler to operate.
Depending on the hot water controls option fitted, it may be
necessary to alter either the connections to the heating system
controls terminal block (in the hybrid control panel) in the boiler or
change the control settings for the boiler to operate to heat a hot
water cylinder. Refer to Section 11 for details of the hot water control
options and Section 12 for details of the electrical connections.
Table 5-1: Flow and return key
Item Description Item Description
1 System return (1" BSP female) 4 Return (1¼" BSP male)
2 System flow (1" BSP female) 5 Heat pump return (1" BSP female)
3 Flow (1¼" BSP male) 6 Heat pump flow (1" BSP female)
Any such changes to connections or settings MUST be
reversed when the heat pump is connected to the boiler and
operation of both together as a hybrid unit is required.
2
3
6
5
1
4
Figure 5-2: Flow and return connections
Section 5: Installation of the Oil Boiler Page 19
Page 20

6 Installation of the Heat Pump
6.2 Installing the Heat Pump – Next to Oil Boiler
!
Ensure that the electrical supply to the boiler has been
isolated at the lockable isolator BEFORE commencing the
installation and connection of the heat pump.
WARNING
6.1 Preparation for Installation
• Carefully remove the packaging from the heat pump and
remove it from the transit pallet.
• Position the heat pump in the final location required, raised
up from the base by approximately 100 mm on suitable antivibration mounts.
This location may be either:
• Next to the boiler, if the boiler is installed externally. Refer
to Section 6.2
OR
• Freestanding outside, if the boiler is installed internally.
Refer to Section 6.3
!
If the boiler has been operated as a ‘stand-alone’ unit prior to
the installation of the heat pump, the loop bet ween the heat
pump flow and return connections on the boiler (as described
in Section 5.4.1) will now have to be removed to connect the
heat pump.
To avoid draining the heating system it is possible to close valves
in both the flow and return pipework within the boiler enclosure.
Referring to Figures 8-2 and 8-3, the isolation valves for the heat
meter flow sensor (13) and heat meter in the return (3) should be
closed before removing the loop bet ween the heat pump flow and
return connections on the boiler.
NOTE
(External oil boiler)
6.2.1 Electrical connections
1. Before moving heat pump into final position, remove the
wiring cover from the right hand end of the heat pump. Refer
to Section 6 of the Installation Instructions supplied with the
Aerona³ heat pump for details.
2. Remove the access panel from the front of the boiler casing.
Unscrew and remove the eight screws that secure the access
panel to the casing. Refer to Figure 12-1.
3. Working from inside the boiler enclosure, remove the internal
access cover in the left casing panel of the boiler. Slacken
off all six retaining screws. Lift the panel upwards and of f the
retaining screws using the keyhole slots.
4. Remove the t wo screws from the top lef t edge of the boiler
enclosure and fit the top spacer plate provided with the boiler.
Re-fit and tighten the screws to secure it in position on the
boiler enclosure.
5. Manoeuvre the heat pump into position such that the top
spacer plate butts against the heat pump enclosure across the
full depth of the heat pump, giving a gap between the boiler
and heat pump of 100mm.
6. Make the heat pump electrical supply connection bet ween the
heat pump electrical supply terminal block in the hybrid control
panel (in the boiler) and the electrical supply terminal block in
the Aerona³ heat pump.
Refer to Section 12 for electrical connection details. Figure 1210 shows the location of this terminal block and Figure 12-11 is
the connection diagram.
7. Make the heat pump controls connection bet ween the heat
pump controls terminal block in the hybrid control panel (in the
boiler) and the Terminal PCB in the Aerona³ heat pump.
Refer to Section 12 for electrical connection details. Figure 1212 shows the location of this terminal block and Figure 12-13 is
the connection diagram.
8. Working from both outside and through the access opening
in the left casing panel of the boiler, as required, replace
the wiring cover on the right hand end of the heat pump and
secure in place with the three fixing screws.
9. Replace the internal access cover in the lef t casing panel of the
boiler. Fit the keyhole slots onto the six retaining screws. Pull it
down and tighten the screws to secure it in position.
10. When all wiring connections have been made, re-fit the upper
cover panel at the rear of the control panel and secure it using
the two screws at the top of the cover. Refer to Figure 12-3.
11. Then replace the lower cover panel at the rear of the control
panel and secure it using the two screws. Refer to Figure 12-3.
12. Replace the access panel on the front of the boiler casing. Refit and tighten the eight screws to secure the access panel to
the casing. Refer to Figure 12-1.
Section 6: Installation of the Heat PumpPage 20
Page 21

6.2.2 Pipework connections
Make the flow and return connections between the boiler and heat
pump, using the fittings provided with the boiler, as follows:
1. Using a suitable thread sealant or PTFE tape, screw one of
the two flexible hoses into the 1”BSPF ‘Heat Pump Flow’
connection on the boiler.
2. Repeat the above process to fit the second flexible hose to
the1”BSPF ‘Heat Pump Return’ connection on the boiler.
3. Using a suitable thread sealant or PTFE tape screw the
1”BSPM x 28mm tail into the 1” x 1¼” elbow. Then fit the elbow
to the flow connection (the higher of the two connections) on
the rear of the heat pump.
4. Fit the 28mm compression connection on the end of the flexible
hose from the heat pump flow connection (on to the boiler) on
to the tail fitted to the heat pump flow connection. Tighten the
compression connection.
5. It may be necessar y to adjust the angle of the elbow/tail on the
flow connection to align it with the compression connection on
the end of the flexible hose.
6. Repeat steps 4 and 5 above to connect the heat pump return
on the boiler with the flow connection on the heat pump.
7. Fill the sealed heating system as described in Section 10 of
these instructions.
8. Vent the system to remove trapped air using the manual air
vents located inside the boiler enclosure (refer to Figures 8-2
and 8-3) and also the automatic air vent in the heat pump (refer
to Section 1 of the Installation Instructions supplied with the
Aerona³ heat pump.
6.3 Installing the Heat Pump – Separate from Oil
Boiler (Internal oil boiler)
6.3.1 Electrical connections
1. Move the heat pump into the required final position. Ensure that
it does not obstruct the flue terminal and that the flue terminal
position complies with the necessary clearances. Refer to
Section 2.8.
2. Remove the wiring cover from the right hand end of the
heat pump. Refer to Section 6 of the Installation Instructions
supplied with the Aerona³ heat pump for details.
3. Remove the access panel from the front of the boiler casing.
Unscrew and remove the eight screws that secure the access
panel to the casing. Refer to Figure 12-1.
4. Make the heat pump electrical supply connection bet ween the
heat pump electrical supply terminal block in the hybrid control
panel (in the boiler) and the electrical supply terminal block in
the Aerona³ heat pump.
Refer to Section 12 for electrical connection details. Figure 1210 shows the location of this terminal block and Figure 12-11 is
the connection diagram.
5. Make the heat pump controls connection bet ween the heat
pump controls terminal block in the hybrid control panel (in the
boiler) and the Terminal PCB in the Aerona³ heat pump.
Refer to Section 12 for electrical connection details. Figure 1212 shows the location of this terminal block and Figure 12-13 is
the connection diagram.
6. Replace the wiring cover on the right hand end of the heat
pump and secure in place with the three fixing screws.
7. When all wiring connections have been made, re-fit the upper
cover panel at the rear of the control panel and secure it using
the two screws at the top of the cover. Refer to Figure 12-3.
8. Then replace the lower cover panel at the rear of the control
panel and secure it using the two screws. Refer to Figure 12-3.
9. Replace the access panel on the front of the boiler casing. Refit and tighten the eight screws to secure the access panel to
the casing. Refer to Figure 12-1.
6.3.2 Pipework connections
Make the flow and return connections between the boiler and heat
pump, using the fittings provided with the boiler, as follows:
1. Using a suitable thread sealant or PTFE tape screw one of
the 1” x 1¼” elbows (supplied with the boiler) on to the flow
connection (the higher of the two connections) on the rear of
the heat pump.
2. Repeat the same process for the return connection (the lower
of the two connections) on the rear of the heat pump.
3. Using a suitable thread sealant or PTFE tape, screw the
1”BSPM thread on one of the two flexible hoses (supplied with
the boiler) into the elbow on the heat pump flow connection.
4. Connect the other end of this flexible hose to the flow pipe from
the boiler using the 28mm compression connection.
5. Repeat the above process to fit the second flexible hose
between the elbow on the heat pump return connection and
the return pipe to the boiler.
6. It may be necessar y to adjust the angle of the elbows on the
heat pump flow and return connections to align it with the end
of the flexible hoses.
7. Fill the sealed heating system as described in Section 10 of
these instructions.
8. Vent the system to remove trapped air using the manual air
vents located inside the boiler enclosure (refer to Figures 8-2
and 8-3) and also the automatic air vent in the heat pump (refer
to Section 1 of the Installation Instructions supplied with the
Aerona³ heat pump.
6.4 Heat Pump Parameter Settings
When connected to the boiler as part of the VortexAir Hybrid unit,
some of the Control Parameter factory default settings must be
changed. Refer to Section 15.11 of these Installation Instructions for
details of the Control Parameters to be re-set.
Also, refer to Section 9 of the Installation Instructions supplied with
the Aerona³ heat pump for guidance on how to access and change
the Control Parameters.
Section 6: Installation of the Heat Pump Page 21
Page 22

7 Installation of Heat and Electricity
Meters
7.1 General
As not all installations will require a heat meter and electricity
meter, the Grant VortexAir Hybrid is supplied without any meters
fitted. Usually only installations receiving a Renewable Heat
Incentive (RHI) payment will require both these meters to be
fitted.
Both meters are available as accessories from Grant UK for onsite fitting by the installer:
• Heat meter (Grant product code: HPIDMETER)
• Electricit y meter (Grant product code: HPIDKW/HMETER)
!
When required, only the meters supplied by Grant UK (as
listed above) must be used with the Grant VortexAir hybrid.
In accordance with MCS metering requirements, the Grant
VortexAir Hybrid is supplied ‘meter ready’ to allow both the heat
meter and electricity meter to be easily fitted when required, as
follows:
• The necessary temperature sensor points and valved
sections are incorporated in the pipework (inside the boiler
casing) for installation of the flow meter and temperature
sensors of the heat meter.
• A purpose made (DIN rail) mounting and housing is
provided for both the heat meter integrator unit and the
electricity meter.
• A 1A fused power supply for the heat meter is provided
within the meter housing.
• The incoming power to the heat pump is located inside the
meter housing for connection to the electricity meter.
NOTE
Electricity
meter
Heat
meter
Figure 7-1: Location of integrator meter when fitted
b) Flow meter (fluid oscillator flow sensor)
This measures the flow of water in the primary circuit when
the heat pump is operating. This flow rate can be displayed,
if required, on the integrator screen.
The flow meter is installed in the heating return pipe to the
heat pump. Refer to Figure 7-2. For details of how to install
the flow meter refer to Section 7.2.1.
7.2 Heat Meter
When correctly installed, this heat meter will measure and record the
heat produced by the heat pump only.
7.2.1 Description
The Sontex Superstatic 440 heat meter, supplied by Grant for
use with the Grant VortexAir Hybrid, consists of the following
components:
a) Integrator unit (Supercal 531)
This calculates the heat produced by the heat pump from
the information provided by the flow meter and the two
temperature sensors (see below). The heat produced by the
heat pump, along with the flow and return water temperatures,
can be displayed on the integrator screen if required.
Refer to Section 7.4 (or the Instructions supplied with the
heat meter kit) for guidance on how to access the information
available on the integrator screen.
When fitted, the integrator unit is located in a purpose made
housing immediately above the control panel. Refer to Figure
7-1.
Figure 7-2: Heating return pipework
c) Return temperature sensor
This measures the return water temperature. This
temperature can be displayed, if required, on the integrator
screen.
The sensor is fitted in a ‘dry pocket’ (supplied with the heat
meter kit) that is installed in a tapping located in the return
pipe to the heat pump (just above the flow meter). Refer to
Figure 7-2.
For details of how to install the return temperature sensor
refer to Section 7.2.5.
d) Flow temperature sensor
This measures the flow water temperature. This temperature
can be displayed, if required, on the integrator screen.
The sensor is fitted in a ‘dry pocket’ (supplied with the heat
Section 7: Installation of Heat and Electricity MetersPage 22
Page 23

meter kit) which is installed in a tapping located in the flow
pipe from the heat pump. Refer to Figure 7-3.
For details of how to install the flow temperature sensor
refer to Section 7.2.6.
!
The two temperature sensors supplied with the heat meter
are a matched pair. They must both be used together, and
not replaced by any other sensor(s), as the sensors supplied
have been calibrated with the heat meter. The sensor cables
MUST NOT be either shortened or extended as this will affect
the measuring accuracy of the heat meter. They should run
independently of power cables to limit interference.
Figure 7-3: Sensor and pocket
WARNING
Figure 7-5: Kit contents (flow and return sensor coiled together)
7.2.3 Fitting the Integrator unit
To fit the flow meter integrator unit, use the following procedure:
1. Remove the top panel of the VortexAir boiler. To do so,
unscrew and remove the 10 screws around the four sides of
the top casing panel. Lift the top panel up and off the boiler
casing.
2. To access the control panel remove the boiler/burner
access panel on the right hand side of the boiler casing.
Turn the handle at the bottom clockwise to release the
catch. Pull the panel forwards at the bottom and remove it
from the boiler. Refer to Figure 7-6.
7.2.2 Kit Contents
Before fitting the heat meter, check that you have all the necessary
components, as follows (refer to Figure 7-4):
Table 7-4: Kit contents
Quantity Item
1
1
2
2
2
2
(not shown)
1
1
3
(not shown)
1
(not shown)
1
(not shown)
Sontex Superstatic flow meter DN25 G1¼”
(qp 3.5m³/hr)
Sontex Supercal 531 integrator
1¼”Union nut
1”BSP Union tail
Fibre washers
1” BSPM x 28mm compression connector
Pt500 flow temperature sensor (red tag)
Pt500 return temperature sensor (blue tag)
Sticker seals
(refer to Section 7.2.8)
Calibration report
(to be left with the end user following installation)
Sontex installation instructions
(to be left with the end user following installation)
Figure 7-6: Removal of boiler access panel
3. Remove the upper panel on the right hand side of the
boiler casing. Unscrew and remove the two panel retaining
screws (accessed from inside casing), lift the panel straight
up to disengage the two tags from their slots and remove
the panel from the boiler casing. Refer to Figure 7-7.
Section 7: Installation of Heat and Electricity Meters Page 23
Page 24

6. Take the integrator unit and press in the four clips (two on each
side of the integrator unit) to release the front and carefully pull
it forwards to remove it from the rear section of the unit.
7. Pull out the tab on the rear of the LCD display to star t the clock.
Refer to Figure 7-14.
8. Push back and pull up the white plastic tab visible above the
top edge of the integrator (rear section) to open the DIN rail
clip on the back . Locate the rear section of the integrator unit
onto the DIN rail (at the left hand end of the rail) with the row of
cable grommets at the bottom.
9. Fully push the tab back down and check that the rear section of
the integrator unit us securely attached to the DIN rail.
7.2.4 Fitting the flow meter
Figure 7-7: Removal of upper side casing panel
4. Remove both the meter housing and cover (located
immediately above the control panel) from the boiler.
Unscrew the four screws (two on either side of the cover).
The meter housing and cover will come away together from
the boiler. Refer to Figure 7-8. Keep the four screws as they
will be required to re-fit the retaining bracket.
!
Whilst the flow meter and temperature sensors are best fitted
before the heating system is filled with water, they can be
fitted after filling if necessary.
To fit the flow meter use the following procedure:
1. Locate the removable section of pipe in the return to the
heat pump. Refer to Figure 7-9.
!
If the heating system has already been filled with water
ensure that the valves located both above and below this
section of pipe are CLOSED before removing the pipe.
NOTE
CAUTION
Figure 7-8: Removal of meter retaining bracket and cover
5. Cut the retaining cable ties and move the heat meter and
heat pump power supply cables to one side to gain access
to the DIN rail located behind the meter housing. Refer to
Figure 7-9.
Figure 7-9: Meter housing and DIN rail (with cover removed)
Figure 7-10: Location of removable pipe section
2. Unscrew the compression nuts at both the upper and
lower ends of the removable pipe section. Refer to Figure
7-10. Carefully lift the upper section of pipe just enough to
remove the pipe with the fittings attached at each end.
3. Remove the compression nut and olive from the 28mm
compression x 1”BSPF fitting (supplied with the heat meter)
and connect the fitting to the compression nut (just above
the lower isolating valve). Refer to Figure 7-10.
4. Using a suitable sealant or PTFE tape, fit one of the 1”BSP
threaded tails (provided with the flow meter) into the 1”
BSP socket. Ensure that the union nut is fitted on the tail
BEFORE it is screwed into the socket.
5. Repeat steps 3 and 4 above to fit the other 1”BSP threaded
tail and union nut (provided with the flow meter) into the
vacant upper 1” BSP socket. Refer to Figure 7-10.
Section 7: Installation of Heat and Electricity MetersPage 24
Page 25

7.
Cable colours: R = Red, W = White, G = Green, Br = Brown, Bk = Black, Bl = Blue, G/Y = Green/yellow
Carefully route the cable from the flow meter through one
of the grommets in the side of the lower part of the control
panel and up to the integrator unit, installed immediately
above the control panel fascia.
8. The connection terminals are located towards the bottom
of the rear section of the integrator unit. Pierce the cable
grommet located in the lower face of the integrator unit
(below terminals 9, 10 and 11) and pass the flow meter
cable through.
9. The flow meter must be connected to terminals 10, 11 and
9 on the terminal block inside the Integrator unit, as follows:
• White wire – terminal 10
• Green wire – terminal 11
• Brown wire – terminal 9
Figure 7-11: Fitting of flow meter connections
6. Using the two fibre washers (provided with the flow meter),
fit the flowmeter between the joint faces of the upper and
lower tails and tighten the union nuts. Refer to Figure 7-12.
!
Ensure that the flow meter is installed such that the arrows on
the body of the unit are pointing UPWARDS.
Return temperature
sensor
Lower isolating valve
NOTE
Upper isolating valve
Return temperature
sensor pocket
!
Ensure that the metal ferrule (at the end of the flow meter
cable) is securely trapped under the metal cable clamp to
ground the flow meter cable. Refer to Figure 7-13 (integrator
connection diagram).
!
In order to comply with the Measuring Instruments Directive
(MID) 2004/22/EU the flow meter cable MUST NOT be
shortened. Any excess cable should be gathered up (coiled
up) in a suitable location, i.e. where it will not restrict access
to any component (valve, pump, etc.) within the boiler casing.
They should run independently of power cables to limit
interference.
NOTE
NOTE
Figure 7-12: Flow meter fitted
1 2 3 4 10 11 50 51 52 53 16 17 18 24 259
R W R W WGBr
Flow
temp
sensor
(Red)
Cable must be grounded by trapping the metal ferrule under the cable clamp.
Figure 7-13: Integrator connection diagram
Return
temp
sensor
(Blue)
Flow
meter
L N
Bk Bl
230V 50Hz 1ph
1A fused supply
G/Y
Section 7: Installation of Heat and Electricity Meters Page 25
Page 26

7.2.5 Fitting the return temperature sensor
7.2.6 Fitting the flow temperature sensor
!
The return temperature sensor MUST be fitted in return
sensor pocket, as described below, and not fitted to (or on)
the return pipe in any other way.
To fit the return temperature sensor, use the following procedure:
1. Locate the return temperature sensor point on the return pipe
above the flow meter. Refer to Figure 7-12.
!
If the heating system has already been filled with water
ensure that the valves located both above and below this
section of pipe are CLOSED before removing the plug from
the sensor point.
Unscrew the plug from the temperature sensor point.
2.
3. Using a suitable sealant or PTFE tape, fit one of the t wo
temperature sensor pockets provided into the sensor point and
tighten, but only enough to achieve a seal.
4. Slacken of f the small clamp screw on the sensor pocket and fit
the stainless steel sensor fully into the sensor pocket. To ensure
the best operation of the temperature sensor (and heat meter),
first inject some heat conducting grease (not provided) into the
sensor pocket before inserting the sensor.
The sensor MUST be fitted fully into the pocket as far as it will
go. Then tighten the small clamp screw to secure the sensor
into the pocket. DO NOT OVERTIGHTEN!
5. Carefully route the cable from the return temperature sensor
through the same grommet as the flow meter cable (in the side
of the lower part of the control panel) and up to the integrator
unit, installed immediately above the control panel fascia.
6. Pierce the cable grommet located in the lower face of the
integrator unit (below terminals 3 and 4) and pass the flow
meter cable through.
7. The return temperature sensor must be connected to terminals
3 and 4 on the terminal block inside the Integrator unit, as
follows:
CAUTION
NOTE
• Red wire – terminal 3
• White wire – terminal 4
Refer to Figure 7-13 Integrator connection diagram.
Ensure that the cable is securely held under the metal cable
clamp.
!
The flow temperature sensor MUST be fit ted in flow sensor
pocket, as described below, and not fitted to (or on) the
return pipe in any other way.
To fit the flow temperature sensor, use the following procedure:
1. Locate the flow temperature sensor point. This is in the flow
pipe just above the insulated boiler jacket return pipe above the
flow meter. Refer to Figure 7-3.
!
If the heating system has already been filled with water
ensure that the valves located both above and below the flow
temperature sensor point are CLOSED before removing the
plug.
Unscrew the plug from the temperature sensor point.
2.
3. Using a suitable sealant or PTFE tape, fit one of the t wo
temperature sensor pockets provided into the sensor point and
tighten, but only enough to achieve a seal.
4. Slacken of f the small clamp screw on the sensor pocket and fit
the stainless steel sensor fully into the sensor pocket. To ensure
the best operation of the temperature sensor (and heat meter),
first inject some heat conducting grease into the sensor pocket
before inserting the sensor.
The sensor MUST be fitted fully into the pocket as far as it will
go. Then tighten the small clamp screw to secure the sensor
into the pocket. DO NOT OVERTIGHTEN!
5. Carefully route the cable from the flow temperature sensor
through the same grommet as the flow meter cable (in the side
of the lower part of the control panel) and up to the integrator
unit, installed immediately above the control panel fascia.
6. Pierce the cable grommet located in the lower face of the
integrator unit (below terminals 1 and 2) and pass the flow
meter cable through.
7. The flow temperature sensor must be connected to terminals
1 and 2 on the terminal block inside the Integrator unit, as
follows:
• Red wire – terminal 1
• White wire – terminal 2
Refer to Figure 7-12 Integrator connection diagram.
Ensure that the cable is securely held under the metal cable
clamp.
CAUTION
NOTE
!
In order to comply with the Measuring Instruments Directive
(MID) 2004/22/EU the flow meter cable MUST NOT be
shortened. Any excess cable should be gathered up (coiled
up) in a suitable location, i.e. where it will not restrict access
to any component (valve, pump, etc.) within the boiler casing.
NOTE
!
In order to comply with the Measuring Instruments Directive
(MID) 2004/22/EU the flow meter cable MUST NOT be
shortened. Any excess cable should be gathered up (coiled
up) in a suitable location, i.e. where it will not restrict access
to any component (valve, pump, etc.) within the boiler casing.
They should run independently of power cables to limit
interference.
Section 7: Installation of Heat and Electricity MetersPage 26
NOTE
Page 27
7.2.7 Connection of mains power supply
The required power supply for the heat meter is factory fitted and
terminated in a 3-way terminal block, located behind the meter
housing when the cover plate is removed. Refer to Figure 7-9.
This power supply is protected by a 1A fuse, located on the control
panel. Refer to Section 14 (Control Panel).
To connect the mains power supply to the integrator unit, use the
following procedure:
1. Unscrew the three terminals; remove the terminal block from
the three wires and discard it.
2. Pierce the cable grommet located in the lower face of the
integrator unit (below terminals L, N and
wires through.
3. Connect them to the mains power terminals in the lower right
hand corner of the integrator unit, as follows:
• Black wire – terminal L (Live)
• Blue wire – terminal N (Neutral)
• Green/Yellow wire – terminal
Refer to Figure 7-12 Integrator connection diagram.
Ensure that the wires are securely held under the metal cable
clamp.
4. Finally, re-fit the front of the integrator unit to the rear section.
Locate the four clips (two on each side of the front section)
into the corresponding openings on the two sides of the rear
section.
5. Carefully push the front onto the to rear section until it clips into
placeards to remove it from the rear section of the unit.
) and pass the three
(Earth)
Sticker seal
Wire seal
Figure 7-15: Calibration seals on flow meter
7.2.8 Security seals
Both the integrator and flow meter are supplied with factoryfitted calibration seals. These are to protect against unauthorised
tampering, manipulation or dismantling of these items that will
invalidate the product guarantee.
These seals are located as follows:
• Integrator unit - t wo stickers seals are located on the inner
(rear) face of the front section of the integrator unit. Refer to
Figure 7-14. These calibration seals must not be tampered with
or removed.
• Flow meter - t wo seals (one a sticker and the other a wire seal)
are located on the front face of the flow meter. Refer to Figure
7-15.
Following installation of the heat meter, three further user sticker
seals (supplied with the heat meter) should be applied to the
integrator unit, as follows:
• One user sticker seal must be stuck over the terminal screws
on the flow meter connections (terminals 9, 10 and 11) on the
intregrator terminal block. Refer to Figure 7-16.
• Once the front section of the integrator unit is finally fitted to the
rear section, two user sticker seals must be stuck over the joint
between the front and rear sections. These t wo stickers should
be located on the small flat area, on either side of the integrator
unit, intended for this purpose. Refer to Figure 7-17.
Figure 7-16: User sticker seal over flow meter connections
User sticker seal
Sticker seal
Ta b
Sticker seal
Figure 7-14: Calibration seals on rear of integrator front section
Figure 7-17: User sticker seal on assembled integrator unit
Section 7: Installation of Heat and Electricity Meters Page 27
Page 28
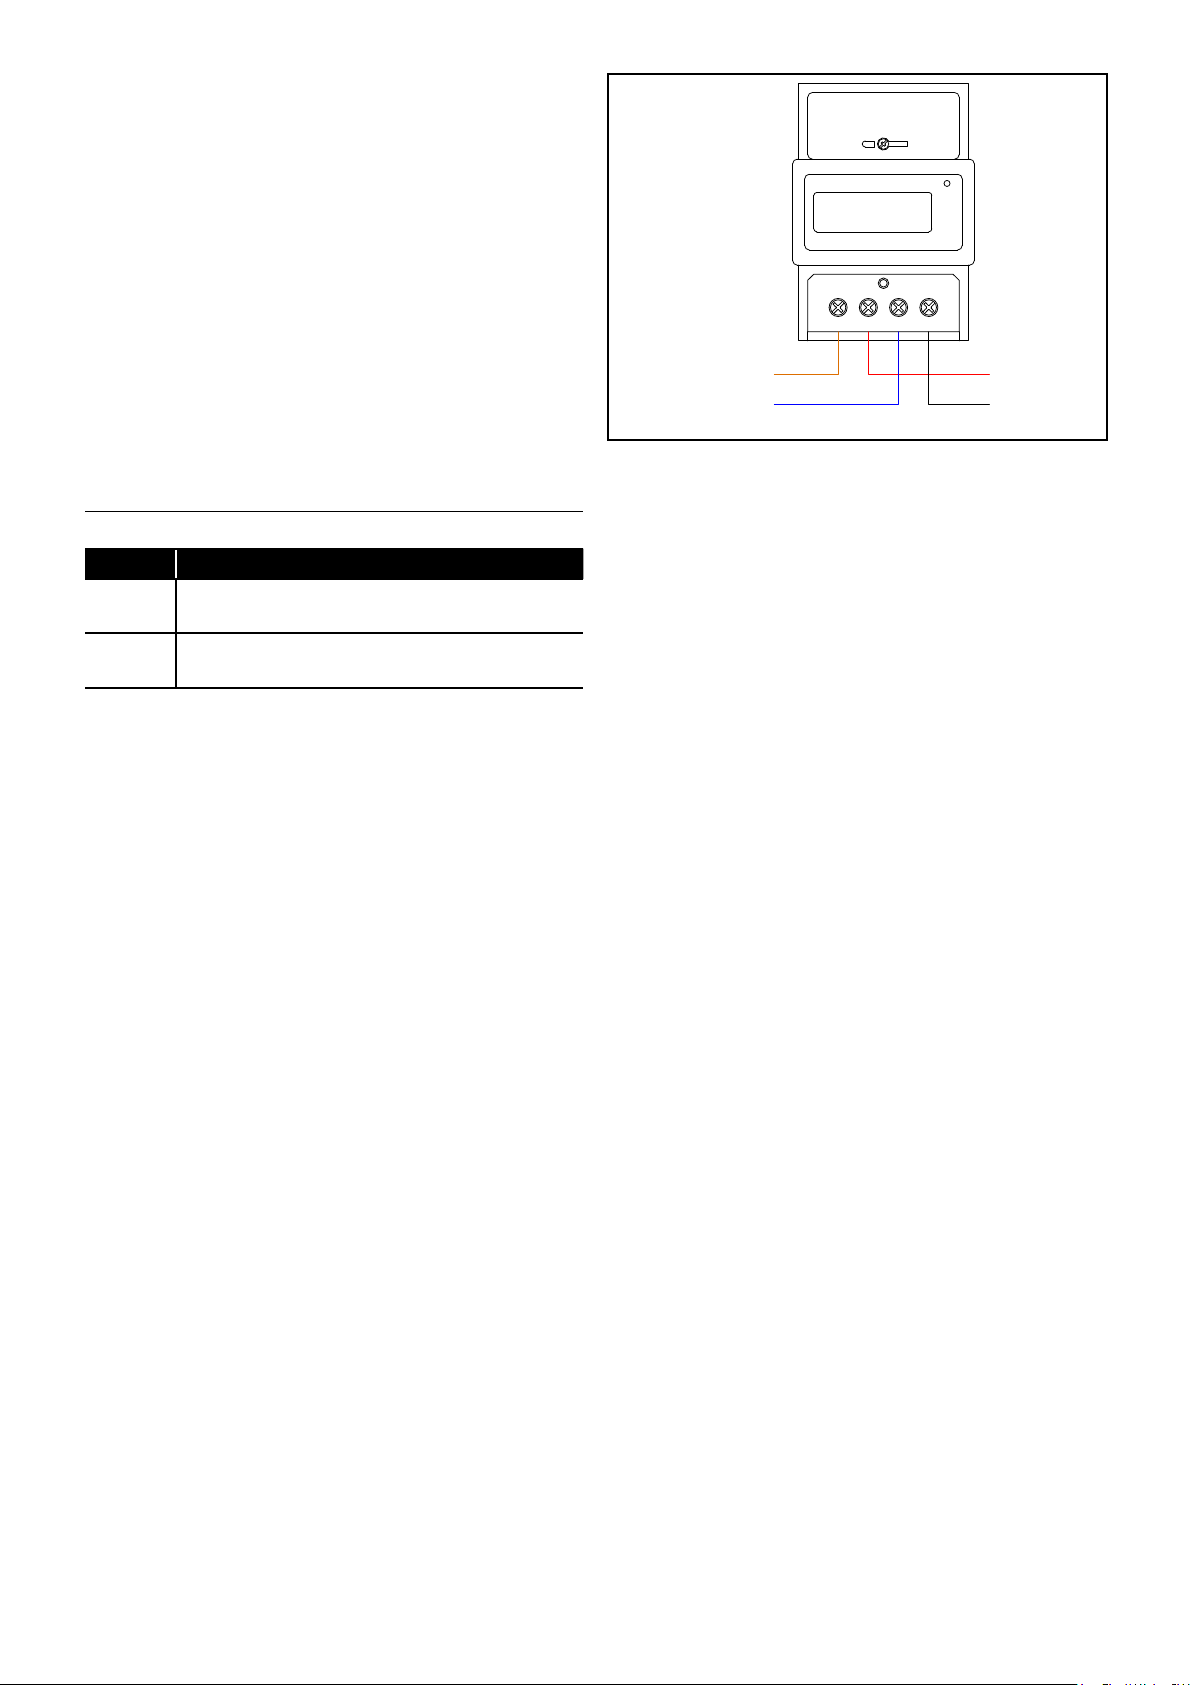
7.3 Electricity Meter
Cable colours: R = Red, Br = Brown, Bk = Black, Bl = Blue,
N
N
In accordance with MCS metering requirements, if a heat meter
is required (e.g. in order to meet the requirements for an RHI
tariff) an electricity meter will also have to be fitted.
This meter will record the electrical input to the heat pump only.
This is necessary as the amount energy eligible for an RHI
payment will be that produced by the heat pump MINUS the
electrical energy supplied.
7.3.1 Description
The electricity meter supplied by Grant UK for use with the VortexAir
Hybrid is a Rayleigh Instruments 230V 50Hz single phase meter,
Type RI-76-100-P, rated at 100A.
For full details refer to either Section 2 of these Installation
Instructions or the Information supplied with the meter.
230V 50Hz 1ph
1A fused supply
1 2 3 4
Br
L
Bl
R
L
LOAD
Bk
7.3.2 Kit Contents
Before fitting the electricity meter, check that you have the following:
Table 7-18: Kit contents
Quantity Item
Rayleigh Instruments Type RI-76-100-P electricity
1
meter
Rayleigh Instruments installation instructions (to be
1
left with the end user following installation)
7.3.3 Fitting the electricity meter
To fit the electricit y meter, use the following procedure:
1. With the meter housing removed and the power supply cables
moved to one side to gain access to the DIN rail located
behind the meter housing. See Section 7.2.3 – Fitting the
integrator unit.
2. Pull down the black plastic tab visible below the bottom edge
of the meter to open the DIN rail clip and locate the rear of the
meter onto the DIN rail (at the right hand end of the rail) with the
meter display screen the correct way up.
3. Fully push the tab back up and check that the meter us
securely attached to the DIN rail.
4. Unscrew the single retaining screw and remove the terminal
cover at the bottom of the meter.
5. Remove the terminal block from the power supply wires and
discard it.
6. Connect the four wires to the terminals on the electricit y meter
as follows:
• Brown wire – terminal 1 (Supply Live)
• Blue wire – terminal 3 (Supply Neutral)
• Red wire – terminal 2 (Load Live)
• Black wire – terminal 4 (Load Neutral)
There is no earth connection on the electricity meter.
Refer to Figure 7-19 (energy meter connection diagram).
Figure 7-19: Electricity meter connection diagram
7. Re-fit the terminal cover to the electricit y meter and secure with
the retaining screw.
8. Re-fit the meter housing and secure in place with the four
screws previously removed.
Ensure that:
• The electricity meter display screen protrudes though the
opening in the front of the housing, and
• The display screen of the integrator unit is visible through
the opening in the front of the housing.and the two
operating buttons are accessible.
7.4 Setting up the heat meter
7.4.1 Heat meter display
The heat meter integrator unit has an LCD screen to display a wide
range of information. Refer to Figure 7-20.
The integrator has the following display sequence – see list printed
on integrator fascia (below display screen):
• Favorite menu (if activated)
• Main menu (Billing relevant data)
• Set days
• Monthly values
• Average values
• Maximal values
• Configuration
• Service
The display levels can be customised; in number and in order of the
display sequence.
7.4.2 LCD control concept
With the arrow key you can address the different menus or the
positions within a menu. In the verification mode you can also
increment with the arrow key the digits from 0...9.
Section 7: Installation of Heat and Electricity MetersPage 28
Page 29
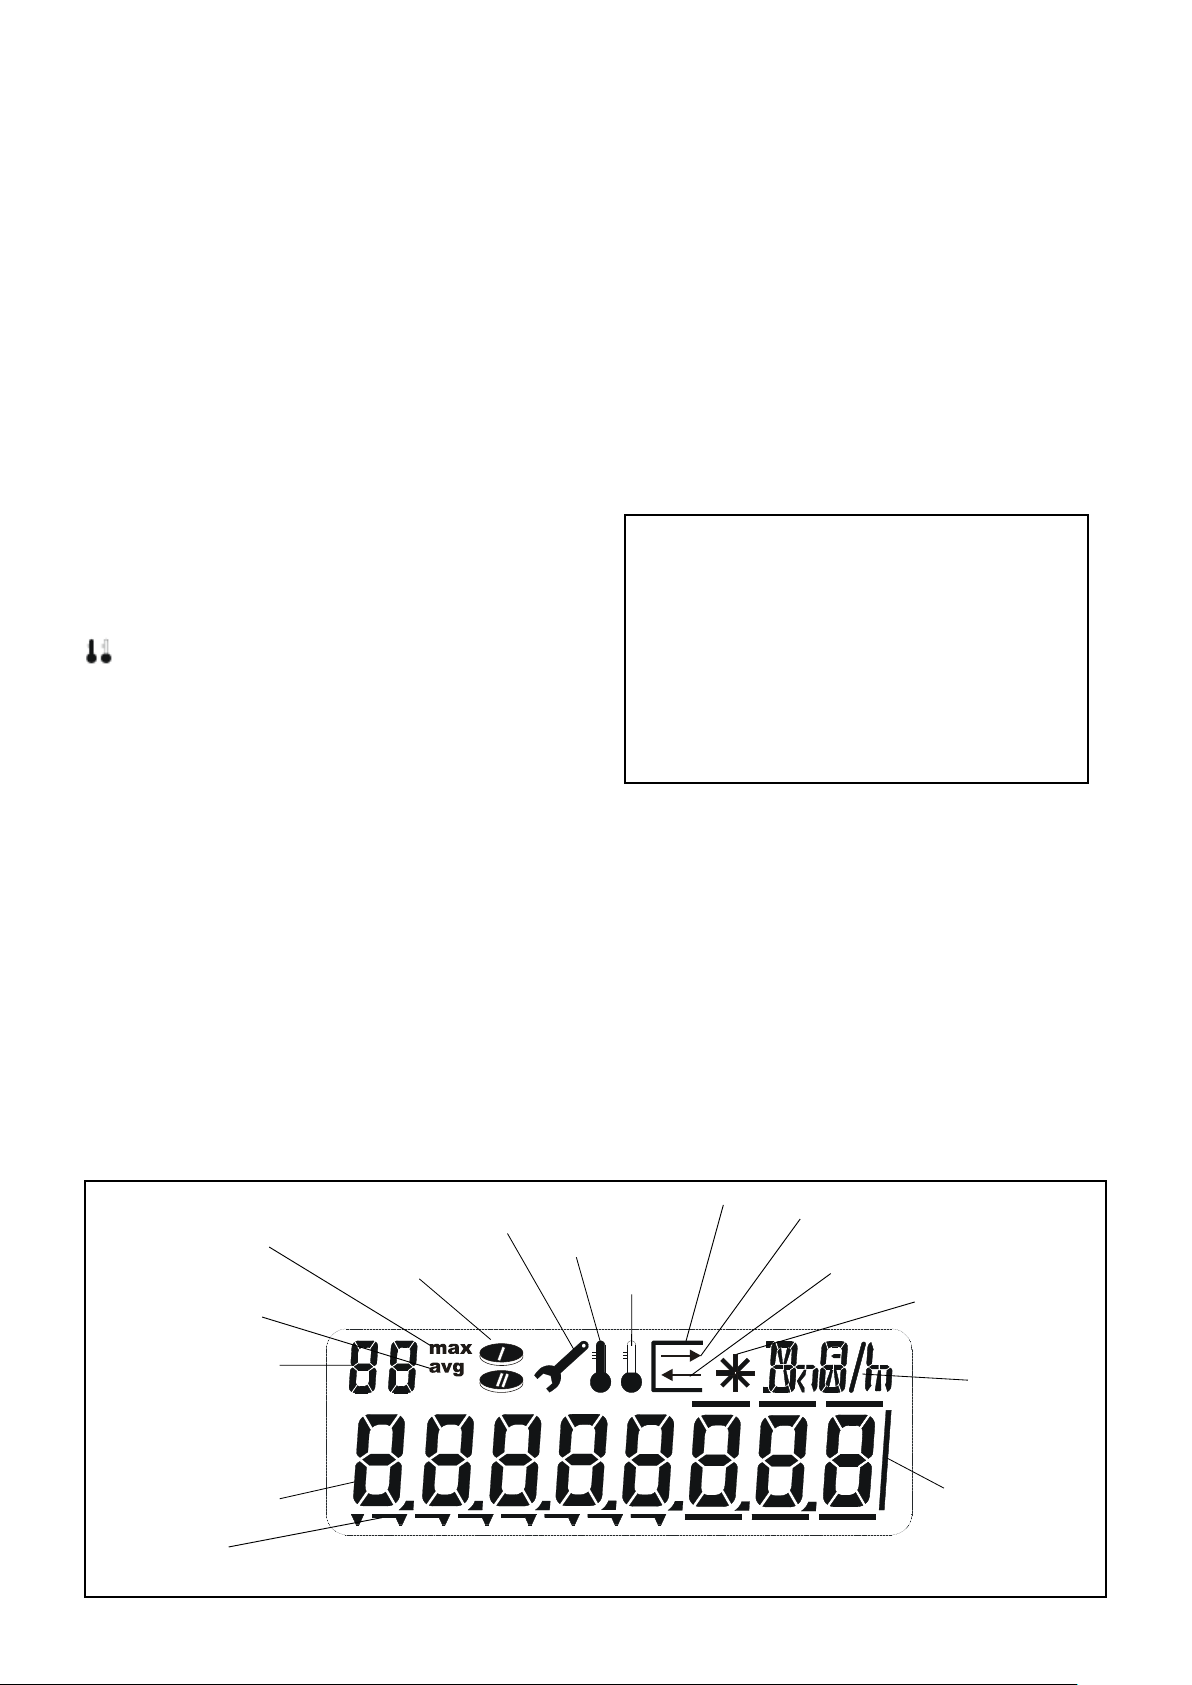
By pressing the enter key you can confirm the menu or the position.
es
When you keep pressing the enter key, you can by pressing the
arrow key (at any Pos. and/or menu) get back to the different levels
or by simultaneously pressing the enter key and the arrow key you
can get back to the previous menu position.
After 3 minutes the display of the integrator switches automatically
back to the main menu.
7.4.3 Error messages
If a fault should occur with the heat meter, an error message will
be displayed on the intergrator LCD screen. This will be Err-sign
together with a numbered code. If several errors occur at the same
time, the numbers of the error codes are added.
The possible error messages are as follows:
Err1 The supply sensor is shor t circuited or disconnected
Err2 The return sensor is shor t circuited or disconnected
The temperature sensors are switched; the temperature
sensor in the return (cooler) pipe is higher than the
temperature sensor in the (flow) warmer pipe
Err4 The flow rate too high for the flow meter
Err8 EEPROM error in the integrator base (only active af ter the
second incident)
Err16 EEPROM error in the measurement and calibration part
(only active after the second incident)
Err32 Configuration error into the measurement and calibration
part
Err64 Configuration error into the integrator base
Err128 Internal electronic failure, return to manufacturer
Err256 Voltage drop (by mains supply or bus supply)
Err512 Defective communication module connection place 1
Err1024 Defective communication module connection place 2
Err2048 Error pulse inputs additional meter A1
Err4096 Error pulse inputs additional meter A2
Err8192 Internal electronic failure, return to manufacturer
If an error lasts longer than an hour, the error will be registered in
the error register with its date and time (beginning) and duration (in
minutes).
When an error lasts less than 60 minutes the error will be
automatically deleted without being memorized.
The two temperature sensor indicators are displayed on the
cumulated energy by the main menu when:
- Temperature sensors are switched - this installation error mode
happen with most installations during the summer time
- Temperature in the cooler line is higher than the one in the warmer
line.
These error messages are automatically deleted from the LCD
display 60 seconds after the error has been removed.
7.4.4 Battery back-up
The integrator unit is fitted with a back-up battery. This is supplied
factory fitted with a jumper that permits activation or de-activation of
the back-up battery.
For the back-up battery function to be activated, the jumper MUST
be fitted. Refer to Figure 7-21. DO NOT remove this jumper as this
will result in the battery back-up function being de-activated.
Figure 7-21: Back-up battery with jumper fitted
7.4.5 Menus
For details of the menu screens, refer to the instructions supplied
with the electricity meter.
Indication measurement energy
Output communication
Input communication
Flow indication
Units
Frame for decimal figur
Maximum values
Average values
Index for the monthly , average
and maximum values
Display figures
Index for menu guidance
Edit Values
Temperature high
Tariff 1 and tariff 2
1 2 3 4 5 6 7
Temperature low
Figure 7-20: Integrator unit LCD screen
Section 7: Installation of Heat and Electricity Meters Page 29
Page 30
8 Internal Pipework
8.1 General
All the pipework and controls for the Grant VortexAir Hybrid are
factory fitted within the boiler casing.
This includes the boiler circulating pump, boiler motorised valve,
lockshield valve, isolating valves, etc. Refer to Figure 5-1.
8.2 Meter Ready
As not all applications will require a heat meter to be fitted, the
Grant VortexAir Hybrid is supplied with the pipework ‘meter ready’. It
incorporates the necessary temperature sensor points and a valved
pipework to allow the heat meter kit to be easily fitted, in accordance
with MCS metering requirements, if required (e.g. in order to meet
requirements for an RHI tariff)’. Refer to Section 7 on how to fit the
heat meter and the electricity meter.
Table 8-1: Pipework key
Item Description
1 Manual air vent - flow
2 Pressure relief valve
3 Isolation valve for heat meter - return
4 Heat meter
5 Isolation valve for heat meter - return
6 Non-return valve
7 Manual air vent - return
8 Motorised valve
9 Heat meter sensor pocket - return
10 Lockshield valve
11 Sensor pockets - high limit and boiler stat
12 Pump union c/w non-return valve
13 Isolation valve for heat meter sensor - flow
14 Circulating pump
15 Pump union c/w valve
16 Heat meter sensor pocket - flow
17 Isolation valve for heat meter sensor - flow
Section 8: Internal PipeworkPage 30
Page 31
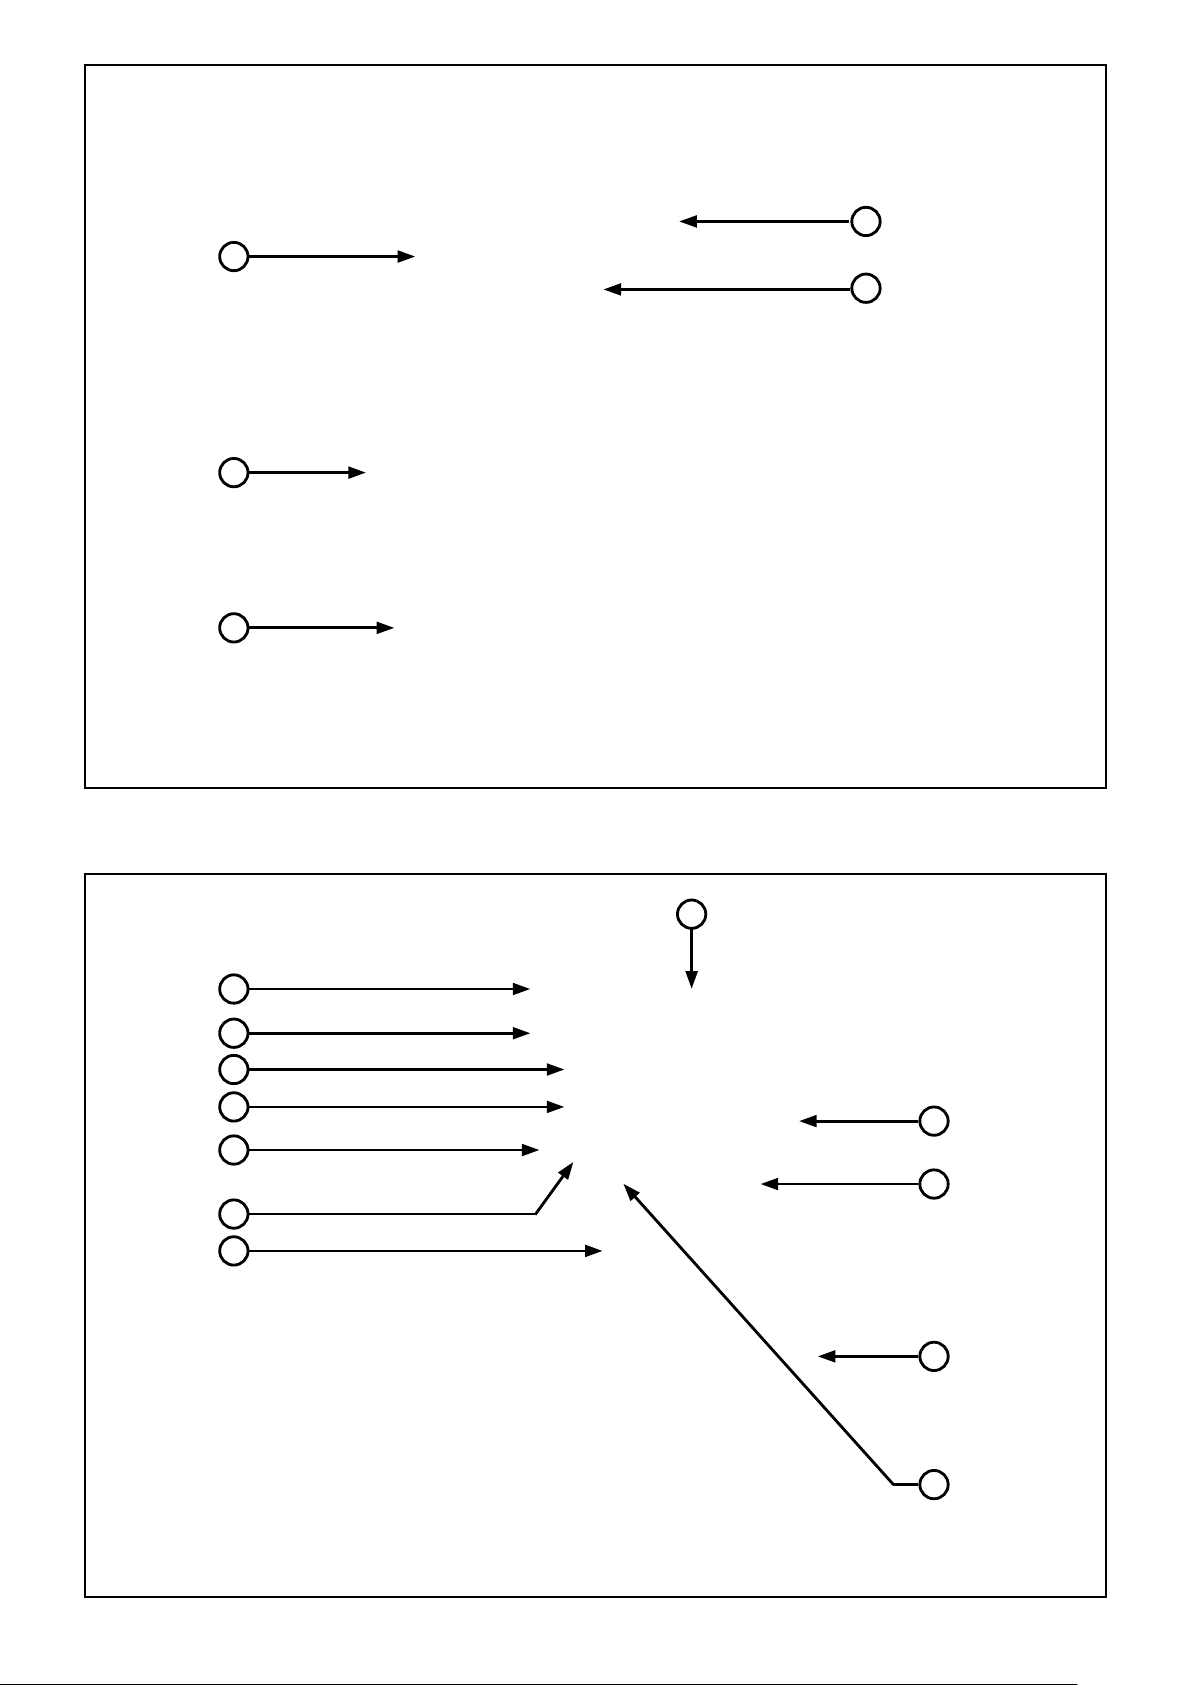
3
4
5
Figure 8-2: Hybrid pipework - rear view (rear, side and top panels removed)
1
2
6
17
16
15
14
13
12
11
7
8
9
10
Figure 8-3: Hybrid pipework - front view (front, side and top panels removed)
Section 8: Internal Pipework Page 31
Page 32

9 Condensate Disposal
9.1 Heat Pump Condensate Disposal
The information below relates to the oil boiler only.
For condensate disposal information relating to the heat pump,
please refer to Section 3.5.3 of the Aerona³ installation and servicing
instructions supplied with the heat pump.
9.2 General Requirements
When in condensing mode the Grant VortexAir boilers produce
condensate from the water vapour in the flue gases.
This condensate is slightly acidic with a ph value of around 3 (similar
to vinegar).
Provision must be made for the safe and effective disposal of this
condensate.
Condensate can be disposed of using one of the following methods
of connection:
Internal connection (preferred option):
• into an internal domestic waste system (from kitchen sink,
washing machine, etc.)
• directly into the soil stack
External connection:
• into an external soil stack
• into an external drain or gulley
• into a rainwater hopper (that is part of a combined system
where sewer carries both rainwater and foul water)
• purpose made soakaway
All condensate disposal pipes must be fitted with a trap - whether
they are connected internally or externally to a domestic waste
system/soil stack or run externally to a gully, hopper or soakaway.
!
Where it is not possible for the pipe to fall towards the
point of discharge - either internally into a waste system or
externally to a gulley (e.g. for boilers installed in a basement),
it will be necessary to use a condensate pump.
Condensate disposal pipes should be kept as short as possible and
the number of bends kept to a minimum.
Pipes should be adequately fixed to prevent sagging, i.e. at no more
than 0.5 metre intervals.
9.5 External Pipework
Ideally, external pipework, or pipework in unheated areas, should be
avoided. If unavoidable, external pipework should be kept as short
as possible (less than 3 metres) and 32 mm waste pipe used to
minimise the risk of ice blocking the pipe in freezing conditions.
The number of bends, fittings and joints on external pipes should be
kept to a minimum to reduce the risk of trapping condensate.
!
For a boiler installed in an unheated area such as an
outhouse or garage, all condensate pipework should be
considered as an ‘ex ternal’.
NOTE
NOTE
9.3 Connections
Connections into a rainwater hopper, external drain or gulley should
be terminated inside the hopper/drain/gulley below the grid level but
above the water level.
Condensate disposal pipes should not be connected directly into
rainwater downpipes or to waste/soil systems connected to septic
tanks.
Condensate should not be discharged into 'grey water' systems that
re-use water used in the home (not including water from toilets).
It should be noted that connection of a condensate pipe to the drain
may be subject to local Building Control requirements.
9.4 Pipework
Condensate disposal pipework must be plastic (plastic waste or
overflow pipe is suitable).
!
Copper or steel pipe is NOT suitable and MUST NOT be used.
Condensate disposal pipes should have a minimum 'nominal'
diameter of 22 mm (¾") - e.g. use 21.5 mm OD polypropylene
overflow pipe.
Condensate disposal pipes must be fitted with a fall (away from the
boiler) of at least 2.5° (~45 mm fall per metre run).
NOTE
9.6 Condensate Soakaway
To keep external pipework to a minimum, locate the soakaway
as close as possible to the boiler but ensure it is at least 500 mm
from building foundations and away from other services, e.g. gas,
electricity, etc.
The condensate pipe may be run above or below ground level
and can enter either the top or side of the soakaway tube. Refer to
Figure 9-1.
Ensure that the drainage holes in the soakaway tube face away from
the building.
Backfill both the soakaway tube, and the hole around it, with 10 mm
limestone chippings.
Only use a soakaway where the soil is porous and drains easily. Do
not use in clay soils or where the soil is poorly drained.
!
Any damage due to condensate backing up into the boiler due
to a high water table, in the case of a soakaway, or flooded
drains when the condensate disposal is via a gulley or soil
stack, is not covered by the Grant product guarantee.
CAUTION
Section 9: Condensate DisposalPage 32
Page 33
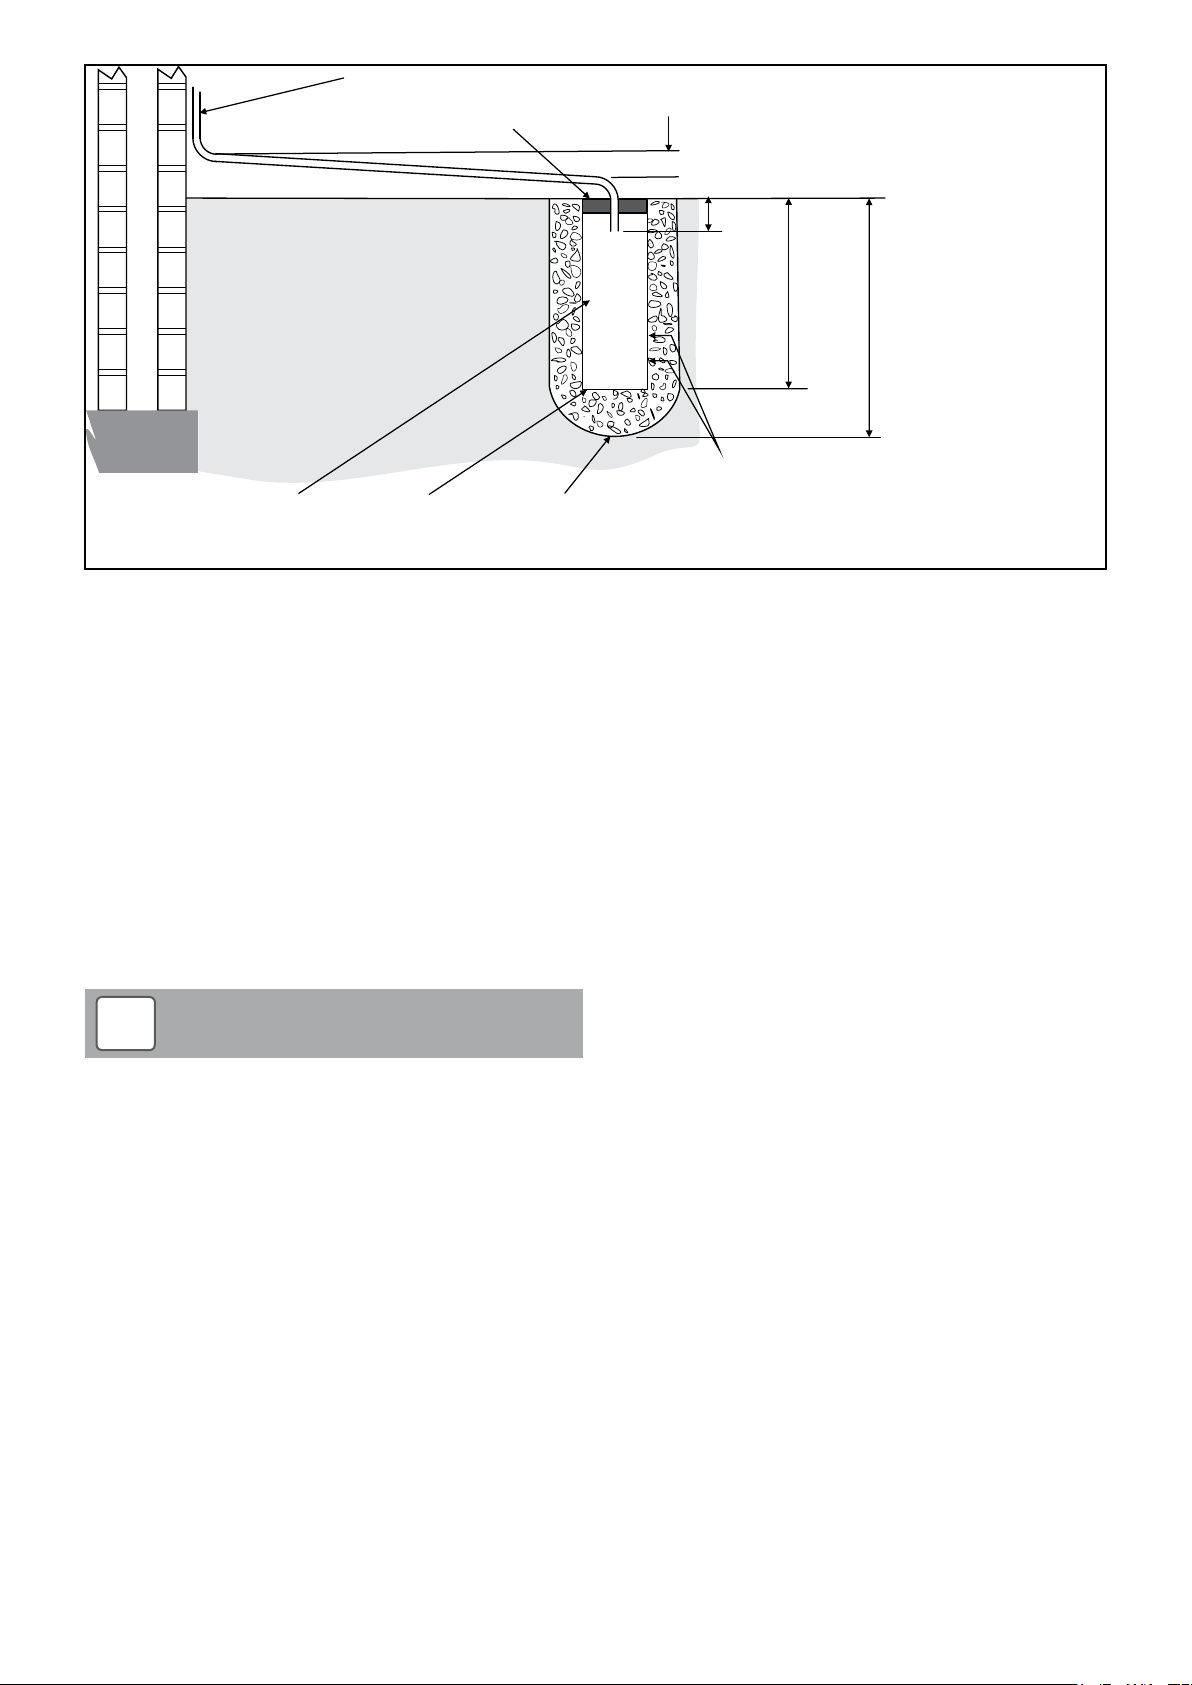
32 mm waste pipe external to the building
away from the property.
Cement seal
100 mm plastic tube
Sealed end Backfill with 10 mm
limestone chippings
Figure 9-1: Purpose made condensate soakaway
9.7 Condensate Trap
The boiler of the Grant VortexAir hybrid is supplied with a factor yfitted condensate trap to provide the required 75 mm water seal in
the condensate discharge pipe from the boiler.
This trap incorporates a float (which will create a seal when the trap
is empty) and an overflow warning outlet (fitted with a plastic sealing
cap), see Figure 9-2.
The trap is factory-fitted inside the boiler casing. It is located behind
a removable panel in the lower front corner on the left side boiler
casing panel. The outlet connection to the trap is directed towards
the rear of the boiler. Refer to Figure 9-3.
The condensate discharge pipe should be run from the trap outlet
and out of the casing through one of the holes provided; either in
the case of the enclosure or next to the access panel of the trap.
Refer to Figure 9-4.
!
Access must be available to allow for routine maintenance.
A flexible hose connects the outlet of the condensing heat
exchanger to the trap inlet. Ensure the straight connector on the
hose is fully pushed onto the 'top hat' inlet connector of the trap.
With the trap fitted inside the boiler casing, the sealing cap must be
fitted.
If connecting the condensate discharge (either internally or
externally) into a waste system or soil stack - the sealing cap must
be fitted in the trap outlet.
On external discharge systems to a hopper, gully or soakaway, the
sealing cap should be removed from the trap outlet.
If there is any discharge of condensate from the overflow outlet, this
could indicate a blockage (possibly due to freezing). Turn off the
boiler and investigate the cause. If necessary contact your service
engineer for assistance.
The condensate trap outlet is at an angle of 48° below the horizontal.
This is to automatically give a 3° fall on any 'horizontal' runs of
condensate disposal pipe. Refer to Figure 9-2.
NOTE
Minimum 2.5 fall
O
Ground level
25 mm
300 mm
400 mm
min.
Two rows of 3 x 12 mm
holes at 25 mm centres
and 50 mm from the bottom
of the tube. Holes facing
9.8 Condensate Disposal Pipework
The outlet of the trap will accept 21.5 mm to 23 mm OD
Polypropylene overflow pipe for the condensate discharge pipe.
Possible routes for disposal pipework
The boiler enclosure has several 30 mm diameter opening in the left
side panel (next to the trap access panel). There is also a second
opening in the base of the boiler unit. Refer to Figure 9-4. Either of
these openings can be used to allow the condensate disposal pipe
to exit the enclosure in one of the following ways:
Side outlet:
The opening on the left side of the enclosure can allow the
condensate disposal pipe to be installed as follows:
• Connection to an internal stack – passing back through the wall
of the house.
• Connection to an external soil stack adjacent to the boiler.
• Discharge into an adjacent (external) drain or gulley.
• Discharge into a soakaway – with pipe either above or below
ground level.
Bottom outlet:
The opening in the base that can allow the condensate disposal
pipe to be installed as follows:
• Discharge into a drain or gulley beneath the boiler (e.g. drain
built in to the concrete base for the boiler).
• Discharge into a soakaway – with pipe below ground level.
When connecting plastic discharge pipe, ensure that the
pipe is fully pushed into the outlet end on the flexible pipe to
prevent the possibilit y of leakage.
Section 9: Condensate Disposal Page 33
Page 34
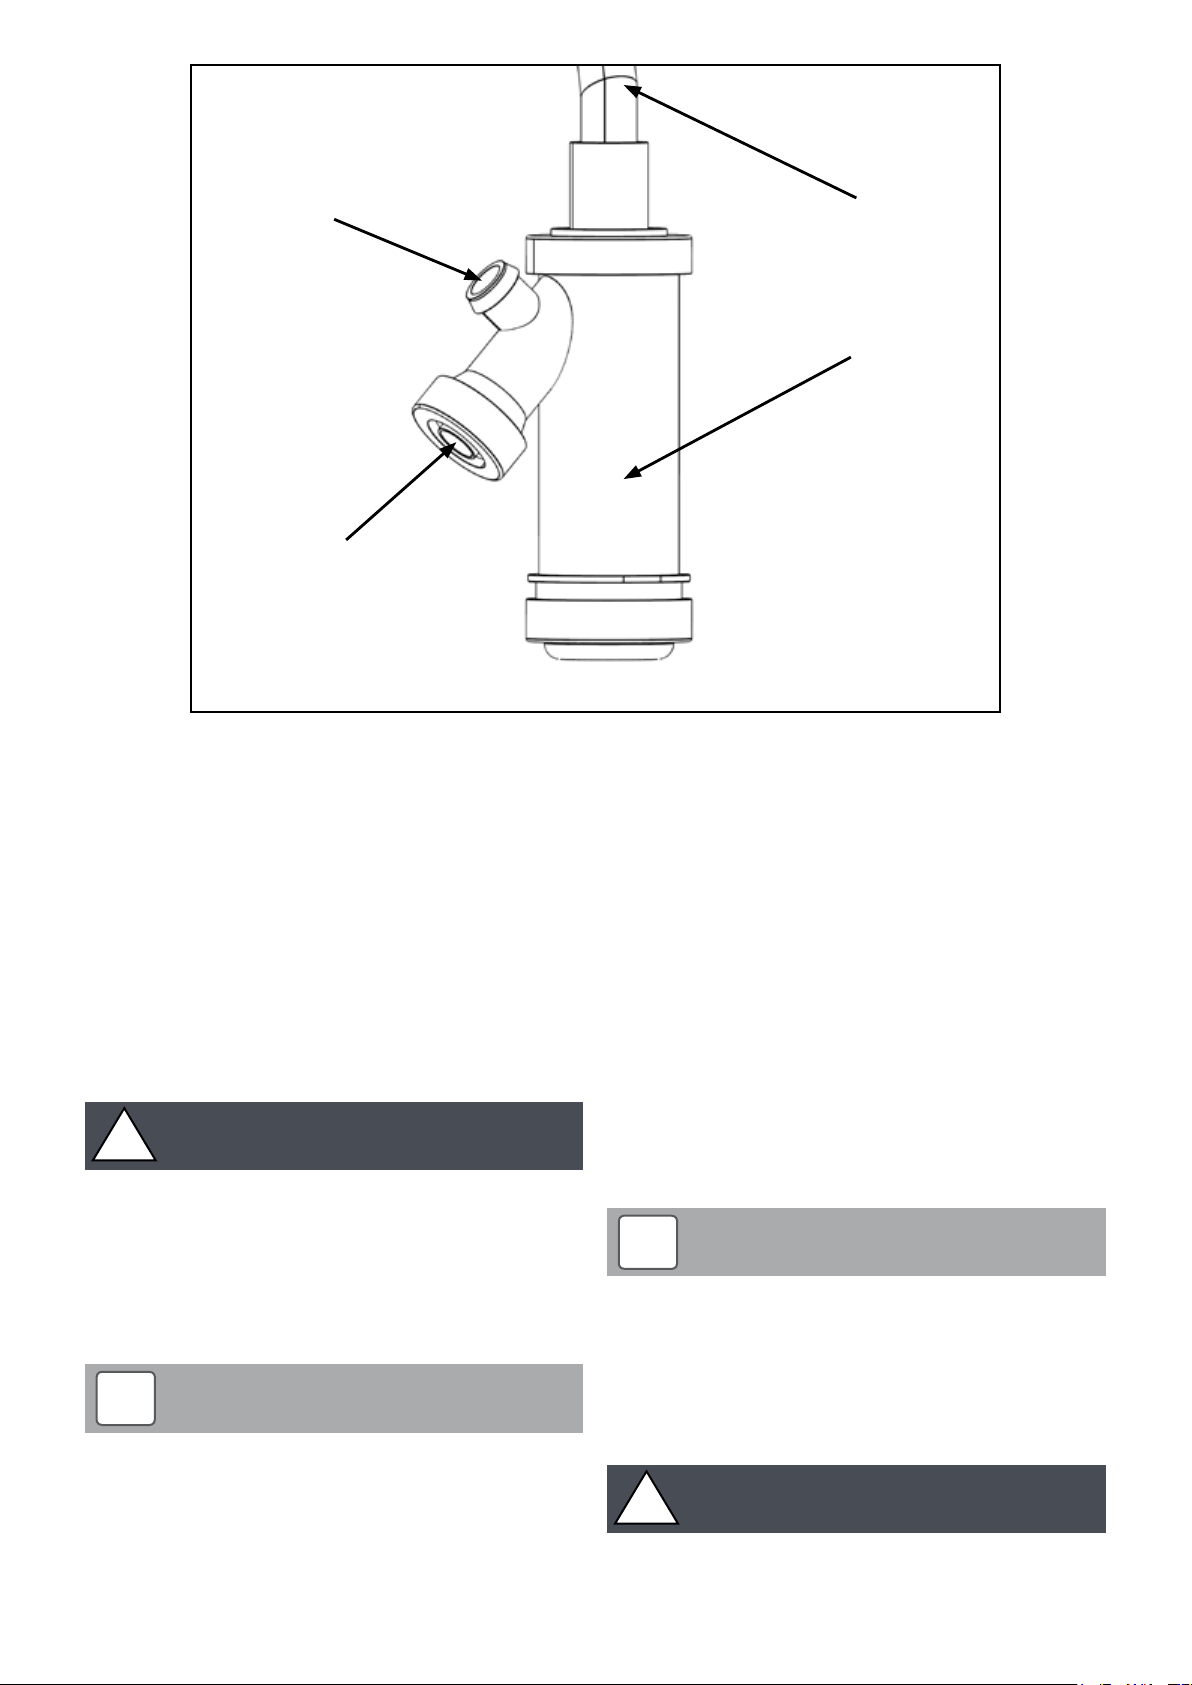
Overflow warning outlet (with cap)
Condensate outlet to drain
Condensate drain pipe from boiler
Condensate trap
Figure 9-2: Condensate trap
9.9 Inspection and Cleaning of Trap
The trap must be checked at regular intervals (e.g. on every annual
service) and cleaned as necessary to ensure that it is clear and able
to operate.
To inspect and clean the trap:
1. Disconnect flexible condensate hose from inlet connector.
2. Unscrew the inlet connection nut.
3. Remove the inlet connector and nut from trap.
4. Remove trap from bracket.
5. Remove float from trap – clean if necessar y.
6. Inspect inside of trap and clean as necessar y.
7. Re-assemble trap, re-fit to boiler and re-connect flexible hose.
Ensure that hose is fully pushed onto the trap inlet connector.
!
Failure to regularly check and clean the condensate trap may
result in damage to the boiler and will not be covered by the
product guarantee.
9.10 Relocate the Trap
To re-locate the factor y-fitted trap outside the boiler casing, use the
following procedure:
!
This procedure must be carried out before the boiler is
installed.
1. Remove the top casing panel(s) from the boiler.
2. Unscrew and remove the screws fastening the lef t side panel to
the rear casing panel of the boiler.
3. Carefully separate the lef t side and rear panels just enough
to gain access to the condensate outlet on the left rear of the
CAUTION
NOTE
condensing heat exchanger (see Figure 6-4).
4. Push out pre-cut 'knock-out' from the condensate outlet hole in
the rear of left side casing panel.
5. Remove the right angle end of the flexible condensate
discharge hose from the outlet connection on the condensing
heat exchanger.
6. From the front of boiler, remove the straight connector end of
the flexible hose from the top of the condensate trap.
7. Reverse the flexible hose and pass the straight connector end
through the new hole in the left hand casing panel. Push the
straight connector firmly onto the condensate outlet connection
of the condensing heat exchanger - push on at least 20 mm.
8. Refit the lef t hand casing panel to the rear panel using the
reverse procedure, ensuring all fixing screws are used.
9. Remove the trap from the mounting bracket.
10. Unscrew and remove the trap mounting bracket from the lef t
side panel.
11. Fix the trap mounting bracket to the wall adjacent to the boiler
in the required position.
!
The top of the trap must be below the condensate connection
on the boiler.
12. Re-fit the trap to the mounting bracket. The mounting bracket
supplied with the trap must be used - the trap should not be
supported by the condensate pipework only.
13. Connect the flexible condensate hose to the trap, pushing the
right angle hose connector onto the trap inlet connection.
!
The flexible hose must fall continuously from the outlet to the
top of the trap.
NOTE
CAUTION
Section 9: Condensate DisposalPage 34
Page 35
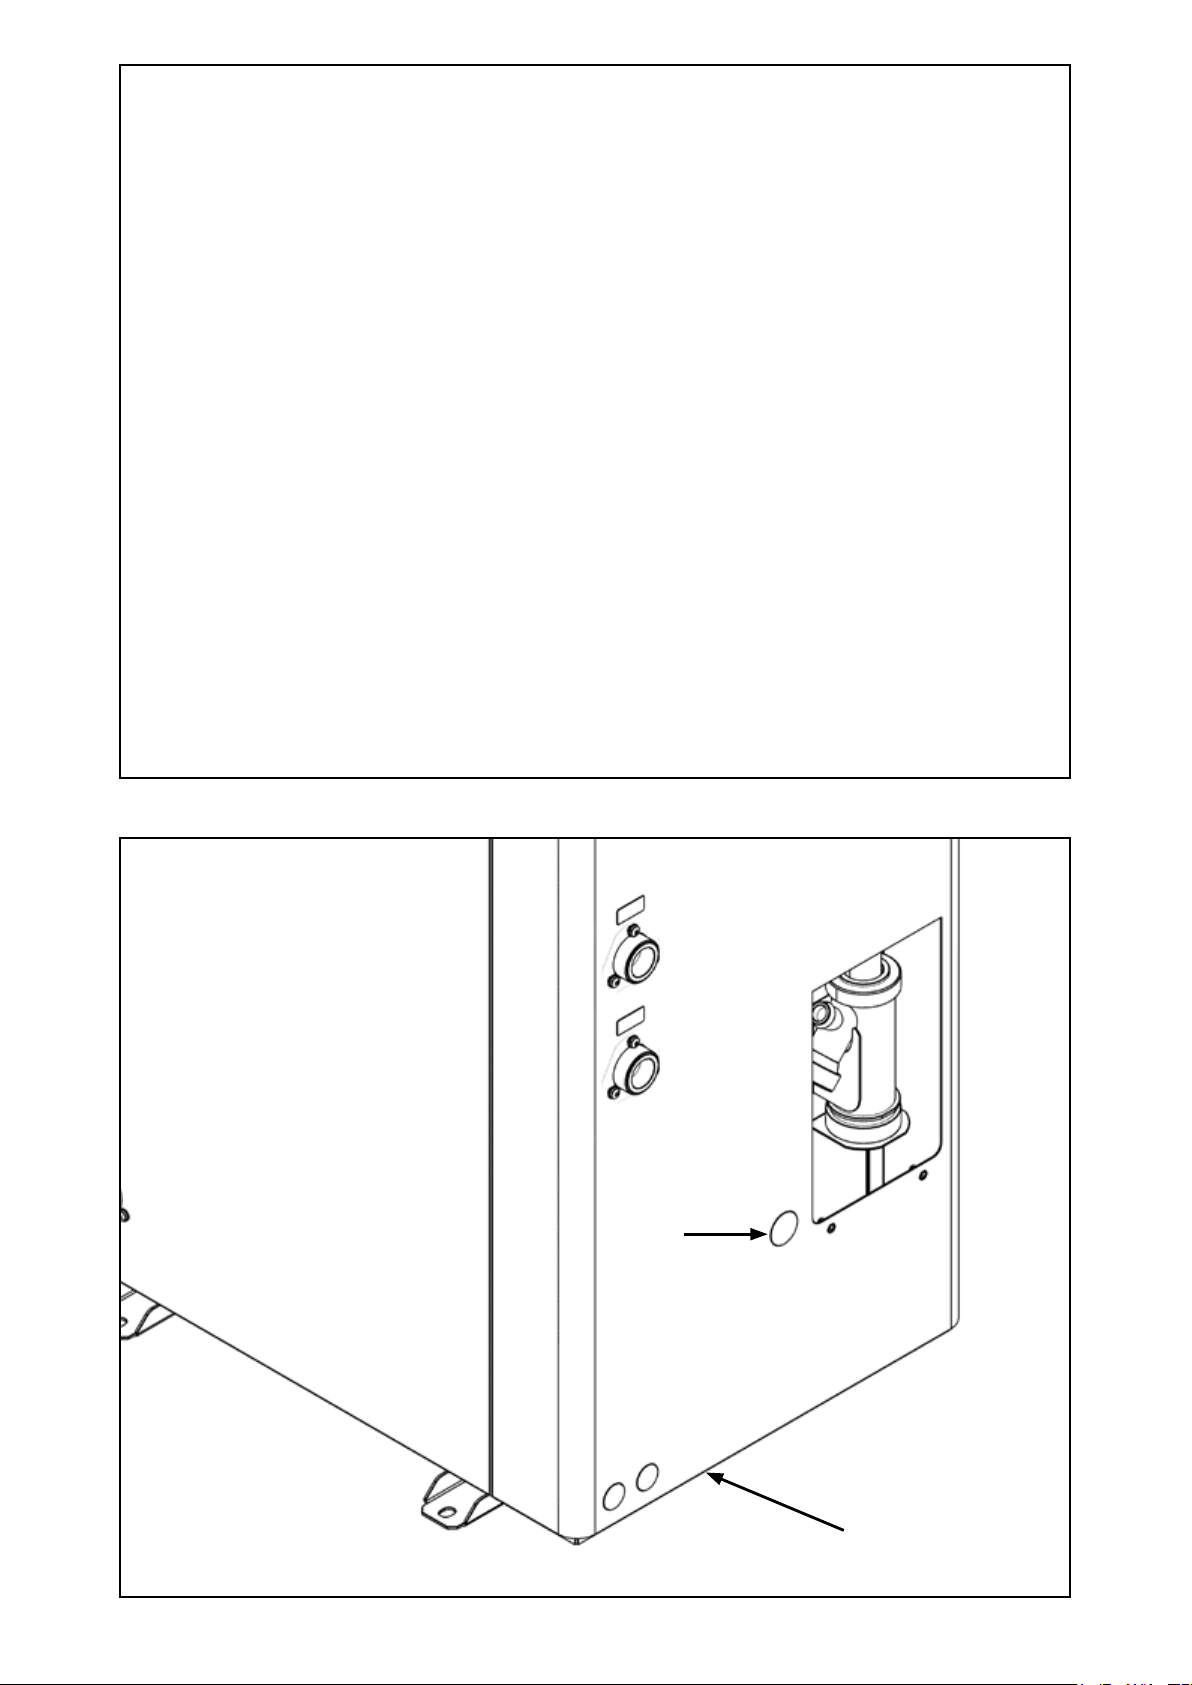
Figure 9-3: Location of trap (access cover removed)
Side outlet
Bottom outlet
Figure 9-4: Location of openings for condensate disposal pipework
Section 9: Condensate Disposal Page 35
Page 36
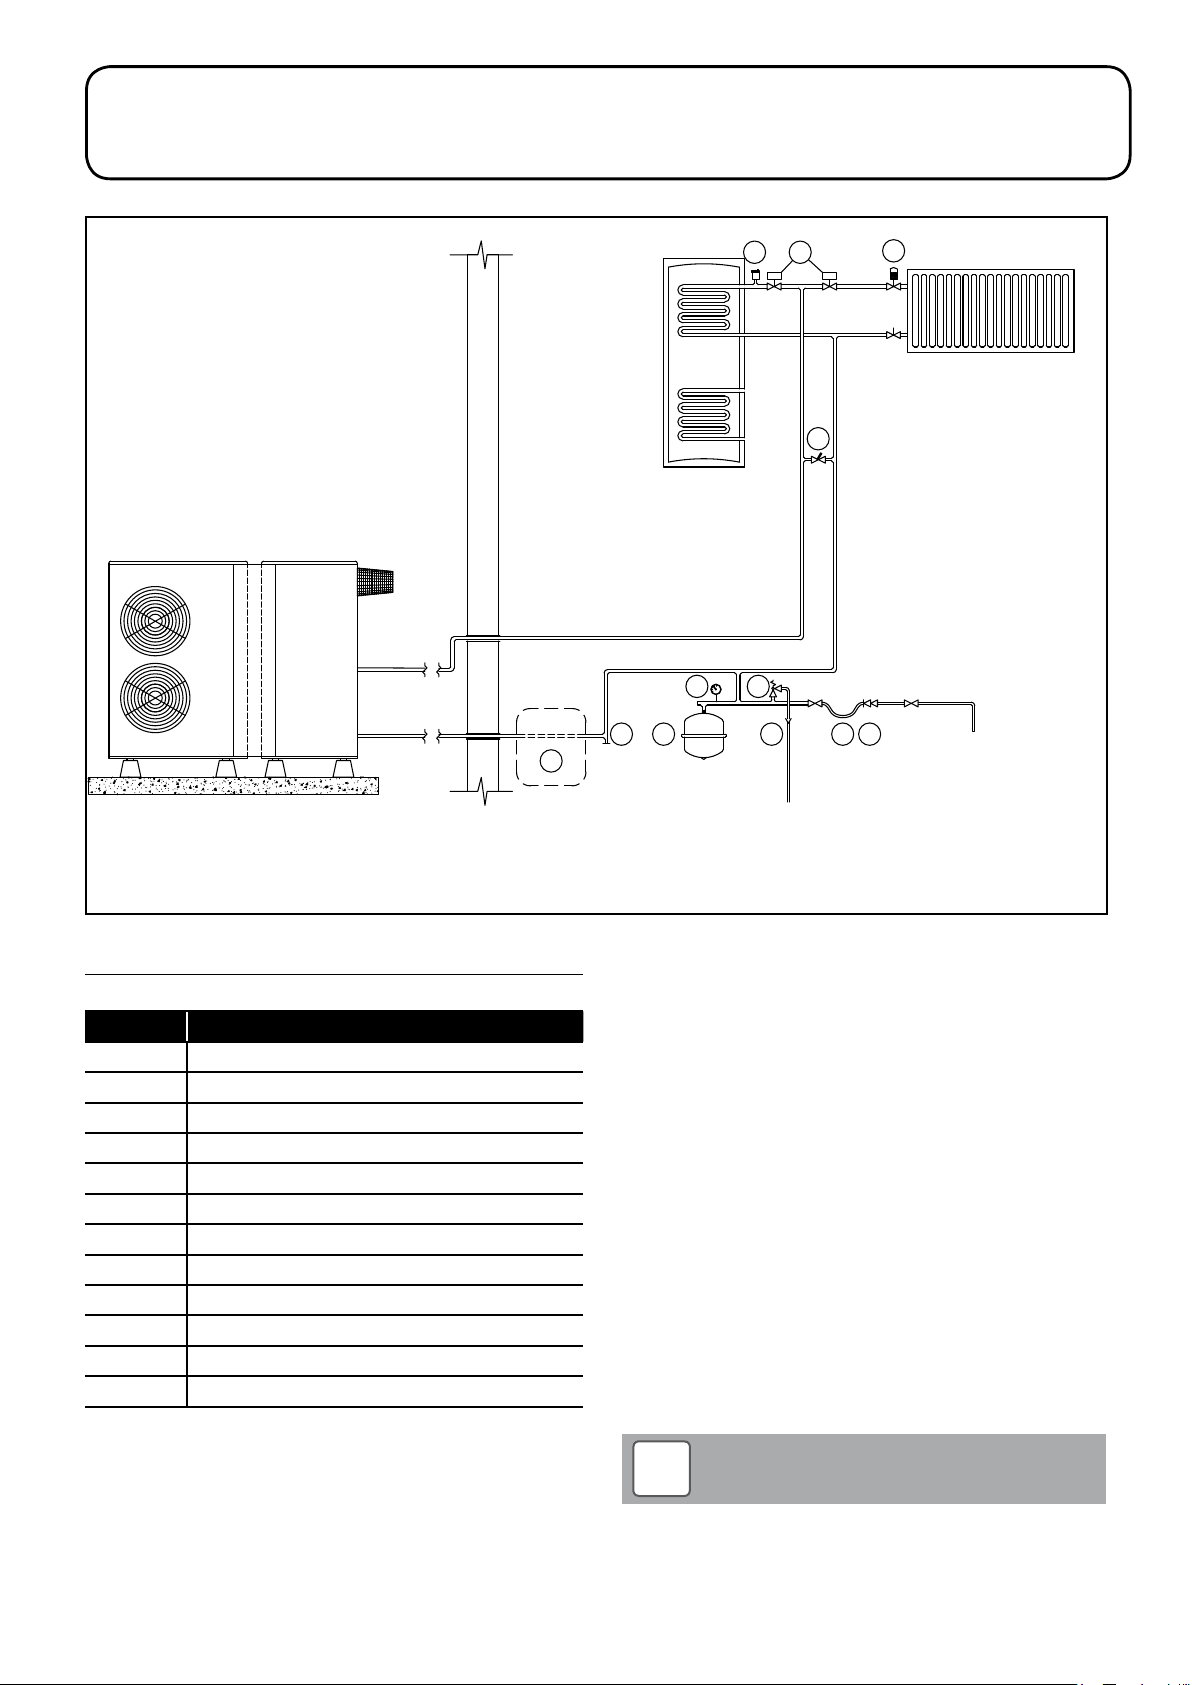
10 Sealed Systems
10.1 Sealed System Requirements
12
11
10
2
1
3
4
9
8
7
6 5
Mains supply
This is only a concept drawing, not an engineered drawing. It is not intended to describe a complete system, nor any particular
system. It is up to the system designer to determine the necessary components for and configuration of the particular system
being designed.
Figure 10-1: Sealed System heating components
Table 10-2: Sealed System heating components key
Key Description
1 Automatic air vent
2 HW/HTG zone valves
3 Thermostatic radiator valve
4 Automatic bypass
5 Double check valve
6 Removable filling loop
7 Tundish
8 Pressure relief valve
9 Pressure gauge
10 Expansion vessel
11 Drain point
12 Extra system volume
All Grant Aerona³ heat pumps must be used with sealed systems
complying with the requirements of BS EN 12828:2003, BS EN
12831:2003 ad BS EN 14336:2004.
The system must be provided with the following items:
• Diaphragm expansion vessel complying with BS EN
13831:2007
• Pressure gauge
• Pressure relief (safety) valve
• Approved method for filling the system
Expansion vessel
The expansion vessel should be fitted in the return pipework
as shown in Figure 4-1. To reduce the operating temperature
of the expansion vessel, position it below the pipe to which it is
connected.
The expansion vessel may be positioned away from the system,
providing the connecting pipe is not less than 13 mm diameter. If
the expansion vessel is connected via a flexible hose, care must
be taken to ensure that the hose is not twisted.
!
Ensure that the expansion vessel used is of suf ficient size
for the system volume. Refer to BS 7074:1:1989 or The
Domestic Heating Design Guide for sizing the required
vessel.
NOTE
Section 10: Sealed SystemsPage 36
Page 37
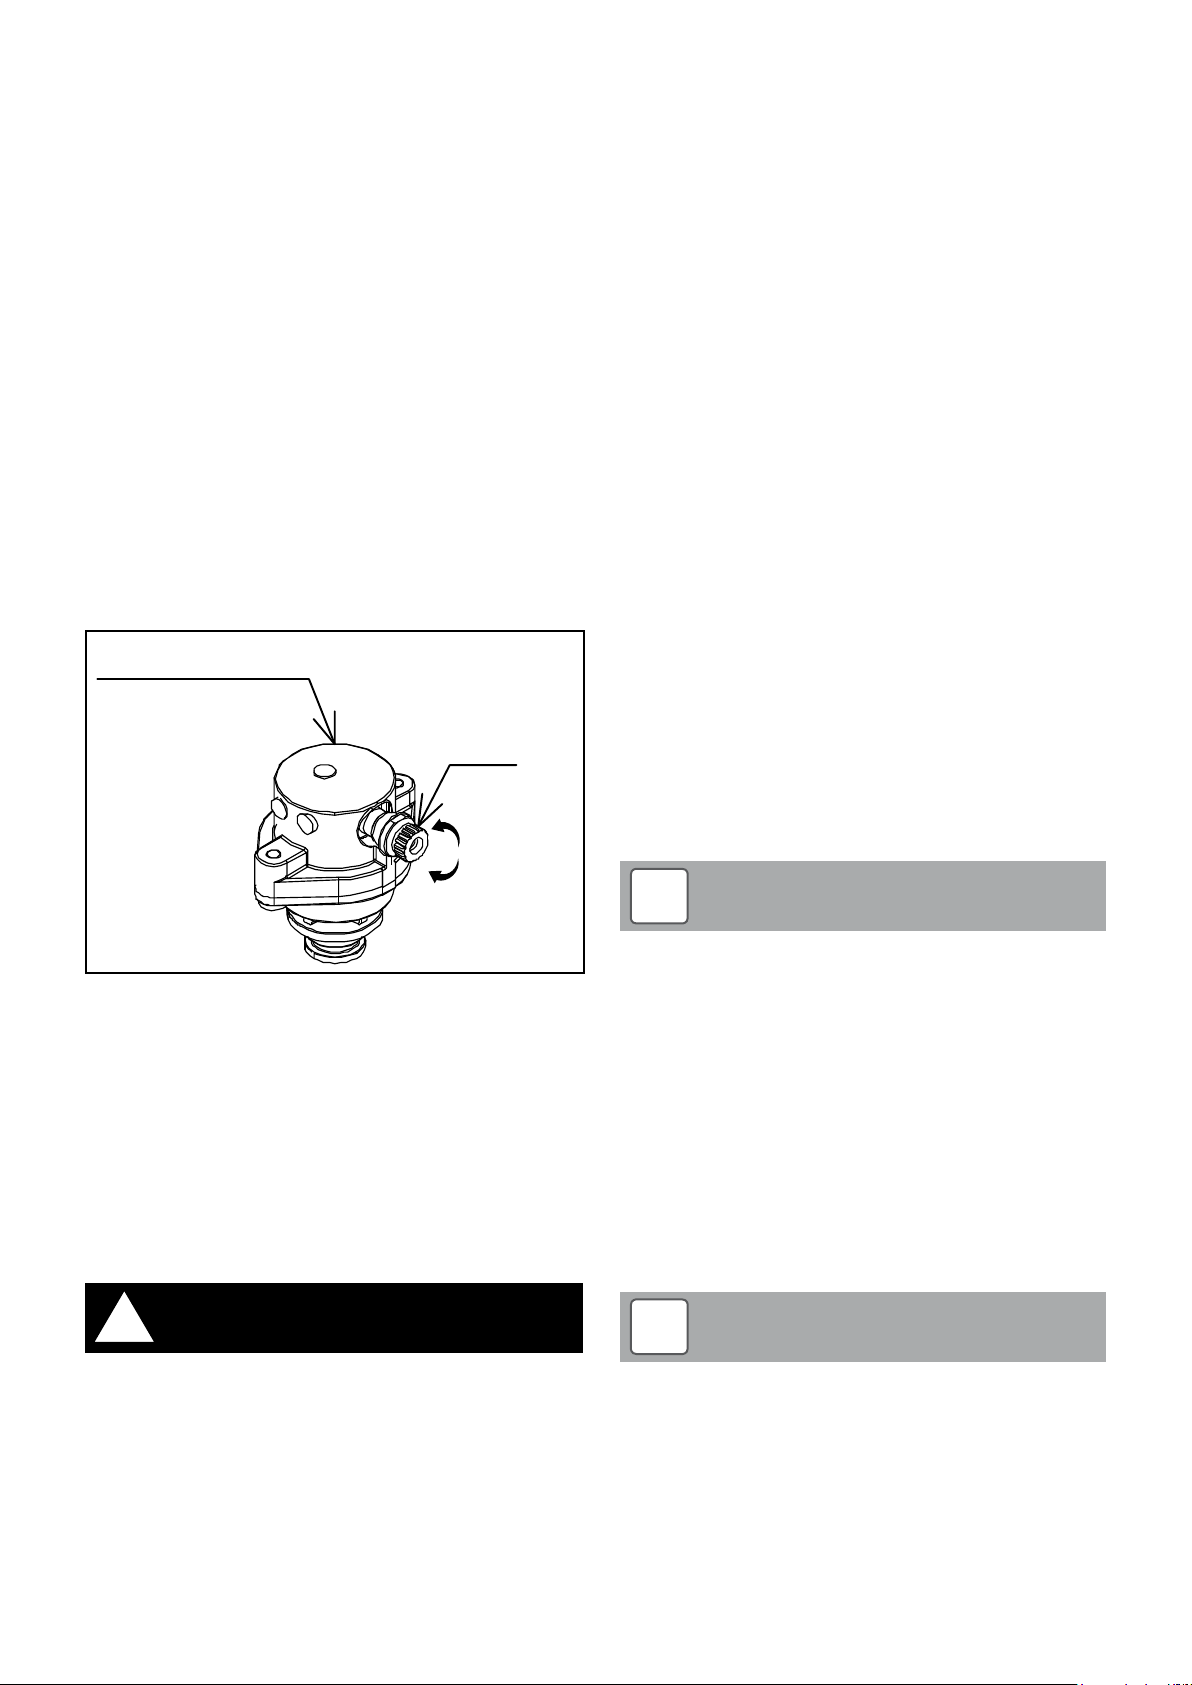
Pressure Gauge
The pressure gauge must have an operating range of 0 to 4 bar.
It must be located in an accessible place next to the filling loop for
the system.
Safety Valve
The safety valve (provided with the heat pump) is set to operate at 3
bar. It should be fitted in the flow pipework near to the heat pump.
The pipework between the safety valve and heat pump must be
unrestricted, i.e. no valves. The safety valve should be connected
to a discharge pipe which will allow the discharge to be seen, but
cannot cause injury to persons or damage to propert y.
Filling Loop
Provision should be made to replace water lost from the system.
This can be done manually (where allowed by the local water
undertaking) using an approved filling loop arrangement
incorporating a double check valve assembly.
The filling loop must be isolated and disconnected af ter filling the
system.
Heating System
The maximum ‘setpoint’ temperature for the central heating water is
55°C.
An automatic air vent should be fitted to the highest point of the
system.
Auto air vent
Plug
loosen
The charge pressure must not be less than the actual
static head at the point of connection.
2. Check that the small cap (or screw) on all automatic air vents
is open at least one turn. The cap (or screw) remains in this
position until filling is completed and then it is closed.
3. Remove the front casing and loosen the plug on the
automatic air vent located inside the heat pump. Refer to
Figure 10-3.
4. Ensure that the flexible filling loop is connected and that the
double check shut off valve connecting it to the water supply
is closed. A valve is open when the operating lever is in line
with the valve, and closed when it is at right angles to it.
5. Open the fill point valve.
6. Gradually open the double check valve from the water
supply until water is heard to flow.
7. When the needle of the pressure gauge is between 0.5 and
1.0 bar, close the valve.
8. Vent each radiator in turn, starting with the lowest one in the
system, to remove air.
9. Continue to fill the system until the pressure gauge indicates
between 0.5 and 1.0 bar. Close the fill point valve. The system
fill pressure (cold) should be 0.2 - 0.3 bar greater than the
vessel charge pressure – giving typical system fill pressures
of approx 0.5 bar for a bungalow and 1.0 bar for a two storey
house.
Refer to the Domestic Heating Design Guide for further
information if required.
10. Repeat steps 8 and 9 as required until system is full of water
at the correct pressure and vented.
11. Water may be released from the system by manually
operating the safety valve until the system design pressure is
obtained.
12. Close the fill point and double check valves either side of the
filling loop and disconnect the loop.
13. Check the system for water soundness, rectifying where
necessary.
tighten
Figure 10-3: Auto Air Vent
If thermostatic radiator valves are fitted to all radiators, a system bypass must be fitted. The by-pass must be an automatic type.
All fittings used in the system must be able to withstand pressures
up to 3 bar. Radiator valves must comply with the requirements of
BS 2767:1991.
One or more drain taps (to BS 2879) must be used to allow the
system to be completely drained.
10.2 Filling the Sealed System
Filling of the system must be carried out in a manner approved by
the local Water Undertaking.
!
Only ever fill or add water to the system when it is cold and
the heat pump is off. Do not overfill.
The procedure for filling the sealed system is as follows:
1. Check the air charge pressure in the expansion vessel BEFORE
filling the system.
The expansion vessel charge pressure should always be
approximately 0.2 bar lower than the maximum static head of
the system, at the level of the vessel (1 bar = 10.2 metres of
water).
Refer to Figure 10-1.
WARNING
!
The air charge pressure may be checked using a t yre
pressure gauge on the expansion vessel Schraeder valve.
The vessel may be re-pressurised, when necessary, using
a suitable pump. When checking the air pressure, the water
in the heating system must be cold and the system pressure
reduced to zero.
NOTE
10.3 Pressure Relief (Safety) Valve Operation
Check the operation of the pressure relief (safety) valve as follows:
1. Turning the head of the valve anticlockwise until it clicks. The
click is the safety valve head lifting off its seat allowing water
to escape from the system.
2. Check that the water is escaping from the system.
3. Top-up the system pressure, as necessary.
!
The expansion vessel air pressure, system pressure and
operation of the pressure relief valve must be checked on
each service. Refer to Section 17.
NOTE
Section 10: Sealed Systems Page 37
Page 38
11 Domestic Hot Water
11.1 Temperature Control
!
There must only be ONE demand, for either heating (CH) or
hot water (HW), on the VortexAir hybrid at a time. In all cases,
the DHW demand MUST not clash with the CH demand,
i.e. set the programmer such that the HW ON period(s) are
different from the CH ON period(s) and do not overlap each
other.
There are three options for the control of domestic hot water
production using the Grant VortexAir hybrid.
These are as follows:
11.1.1 S-Plan type system (with standard cylinder)
With this system, the hot water can be heated to 60°C (in either the
existing cylinder or a new cylinder) using the oil boiler only. The heat
pump is not used to heat the hot water.
A heat pump cylinder, with a larger primary coil, is NOT required
when using this hot water control option.
The system uses a standard ‘S-Plan’ type wiring arrangement with a
two channel programmer, room thermostat, heating zone valve, hot
water zone valve, cylinder dual thermostat and wiring centre. Refer
to Section 12, Figure 12-7.
WARNING
Grant Automatic DHW Boost Kit 2. Refer to Section 12, Figure 12-8
for wiring details.
The Automatic DHW Boost Kit 2 allows the cylinder immersion
element to be used to raise the temperature to 60°C to sterilise the
cylinder against Legionella. Refer to Section 11.2 – Legionella.
For further details of the Grant Automatic DHW Boost Kit 2 (Grant
product code: HPDHWBK2) refer to Section 11.3.
!
For this system to operate, the existing immersion switch
must be left set permanently to ON. To totally prevent
operation of the immersion element, the existing immersion
switch must be set to OFF.
!
There must be a demand from the HW channel of the heating/
hot water programmer for the Automatic DHW Boost Kit 2 to
operate when required. When setting the ON period(s) on the
Auto Boost Kit 2 timeswitch, ensure that they are within a HW
ON period on the programmer.
NOTE
NOTE
!
With this hot water control system, the boiler of the VortexAir
hybrid unit will operate to heat the hot water cylinder
irrespective of whether the Oil/Hybrid switch is set to ‘Oil’ or
‘Hybrid’. However, the Oil/Hybrid switch MUST be set to ‘Oil’
for the boiler of the VortexAir hybrid unit to provide heating in
response to a CH demand.
!
The first stage temperature (R1) on the Boiler Control
Thermostat must be set to 0°C when commissioning the
VortexAir hybrid. Refer to Section 17.6 of these Installation
Instructions for details of setting procedure.
Boiler only installations (heat pump not yet installed)
This hot water control system will still operate to heat the hot water
cylinder, even when only the boiler is installed (i.e. with no heat
pump either installed or connected); provided the Oil/Hybrid switch
on the hybrid control panel is set to ‘Oil’. Refer to Section 14 for
control panel details.
11.1.2 S-Plan type system with Grant Automatic DHW Boost
Kit 2 (with heat pump cylinder)
With this system, the hot water can be heated to 50 - 55°C (in a heat
pump cylinder) using the heat pump only.
A Grant heat pump cylinder, with a larger primary coil, MUST be
fitted when using this hot water control option.
This system uses the standard ‘S-Plan’ type wiring arrangement with
a two channel programmer, room thermostat, heating zone valve,
hot water zone valve, cylinder dual thermostat, wiring centre and a
NOTE
NOTE
!
With this hot water control system, the heat pump of the
VortexAir hybrid unit will NOT operate to heat the hot water
cylinder, in response to a DHW demand, unless the Oil/Hybrid
switch is set to ‘Hybrid’.
Boiler only installations (heat pump not yet installed)
This hot water control system will NOT operate to heat the hot water
cylinder, in response to a DHW demand, when only the boiler is
installed (i.e. with no heat pump installed and connected).
A temporary change MUST be made to the control system
connections at the Heating system controls terminal block (in the
hybrid control panel) in order for the hot water heating function to
operate. Refer to Section 12.3.2 for details.
As the boiler will be able to heat the cylinder to 60°C it will not
be necessary for the Automatic DHW Boost Kit 2 to operate
the immersion element whilst the DHW controls are temporarily
connected in this way. Thus, the immersion switch MUST be set to
OFF.
!
As soon as the heat pump is installed and connected to
the boiler, this temporary change to the control system
connections MUST be reversed. Refer to Section 12.3.2 for
details.
11.1.3 S-Plan type System with Grant digital two-stage
cylinder thermostat (with heat pump cylinder)
With this system, the hot water temperature can be switched
between t wo pre-set temperatures, as follows:
NOTE
CAUTION
Section 11: Domestic Hot WaterPage 38
Page 39
• 50°C for normal hot water heating
• 60°C for one hour either daily or weekly to sterilise the cylinder
against Legionella
Refer to Section 11.2.1 for details of how to assess the
Legionella sanitisation regime required for the installation
concerned.
A Grant heat pump cylinder, with a larger primary coil, MUST be
fitted when using this hot water control option.
Refer to Section 12, Figure 12-9 for wiring details.
For further details of the Grant Digital t wo-stage Cylinder thermostat
(Grant UK product code: GCSD2), refer to Section 11.4.
!
There must be a demand from the HW channel of the heating/
hot water programmer for the automatic anti-legionella
function of the Digital two-stage cylinder themostat to
operate. When setting the ON period(s) on the two-stage
cylinder thermostat timeswitch, ensure that they are within a
HW ON period on the programmer.
!
NOTE
NOTE
Care must also be given to households who do not use a lot of
water on a daily basis. While this chart is not exhaustive, it is
important that you discuss any potential issues with the occupants
before deciding on the appropriate regime.
It is important that this decision is based on the welfare of the
occupants and not on energy saving measures.
Table 11-1: Legionella group sanitisation regime
Uses less than 50 litres of
hot water per day
Vulnerable
Group
Non-
Vulnerable
Group
!
If the hot water stored in the cylinder has not been used for a
prolonged period of time (e.g. a few days) and has not been
stored at 60°C, then it is impor tant that the temperature is
raised to at least 60°C for a period of one hour before using
the hot water.
Store at 50°C and raise hot
water cylinder to 60°C for 1
hour every day
Store at 50°C and raise hot
water cylinder to 60°C for 1
hour every week
WARNING
Uses more than 50 litres
of hot water per day
Store at 50°C and raise hot
water cylinder to 60°C for 1
hour every 3 days
Store at 50°C and raise hot
water cylinder to 60°C for 1
hour every 2 weeks
With this hot water control system, the heat pump of the
VortexAir hybrid unit will NOT operate to heat the hot water
cylinder, in response to a DHW demand, unless the Oil/Hybrid
switch is set to ‘Hybrid’.
Boiler only installations (heat pump not yet installed)
This hot water control system will NOT operate to heat the hot water
cylinder, in response to a DHW demand, when only the boiler is
installed (i.e. with no heat pump installed or connected).
A temporary change MUST be made to the control system
connections at the Heating system controls terminal block (in the
hybrid control panel) in order for the hot water heating function to
operate. Refer to Section 12.3.3 for details.
!
As soon as the heat pump is installed and connected to
the boiler, this temporary change to the control system
connections MUST be reversed. Refer to Section 12.3.2 for
details.
CAUTION
11.2 Legionella
It is possible to use the heat pump of the VortexAir hybrid to raise
the HW cylinder to around 50 to 55°C.
For protection against Legionella the temperature should be
periodically raised to 60°C.
This can be achieved by either:
• Using the Grant Automatic DHW Boost Kit 2, available from
Grant UK (product code: HPDHWBK2), as mentioned in
section 11.1.2 above.
OR
• Using the Grant digital two-stage cylinder thermostat with
built-in timer function, also available from Grant UK (Grant UK
product code: GCSD2), as mentioned in Section 11.1.3.
11.2.1 Legionella Sanitisation Regime
Care must be given to vulnerable people who may be exposed to
potentially life-threatening legionella. This group of people include
the elderly, pregnant women, young children and those with
breathing difficulties.
11.3 Grant Automatic DHW Boost Kit 2
This system uses both the existing cylinder immersion heater and
cylinder thermostat. This is switched via a contactor operated by
a small digital timeswitch, both enclosed in a separate unit to be
mounted next to the cylinder. Thus the immersion element can be
programmed to operate for the required period on either a daily or
weekly basis.
Once set, this system is fully automatic but can be overridden by the
user if required. Also, the user can still switch the immersion element
off, via the immersion heater switch, irrespective of the programmer
or cylinder thermostat setting or whether the heat pump is operating.
11.4 Grant Digital 2-Stage Cylinder Thermostat
This consists of a digital two-stage thermostat, a single channel
digital timeswitch and relay fitted in an eletrical enclosure.
The digital temperature controller (on the front panel of the
thermostat enclosure) allows the setting of two temperatures in the
HW cylinder:
• Normal hot water heating using the heat (factory default: 50°C)
• High temperature to sterilise the cylinder against Legionella
using the boiler (factory default: 60°C)
Refer to the Installation Instructions supplied with the Grant digital
two-stage Cylinder Thermostat for details on how to set the digital
temperature controller, if required.
The frequency and length of the high temperature anti-legionella
operation is controlled by a digital timeswitch located inside the twostage cylinder thermostat enclosure.
Refer to the Installation Instructions supplied with the Grant digital
two-stage Cylinder Thermostat for details on how to set the digital
timeswitch.
!
There must only be ONE demand, for either heating (CH) or
hot water (HW), on the VortexAir hybrid at a time. In all cases,
the DHW demand MUST not clash with the CH demand,
i.e. set the programmer such that the HW ON period(s) are
different from the CH ON period(s) and do not overlap each
other.
WARNING
Section 11: Domestic Hot Water Page 39
Page 40

12 Electrical
!
Electric shock may cause serious personal injury or death.
All electrical work must be undertaken by a competent
person.
Failure to observe this legislation could result in an
unsafe installation and will invalidate all guarantees.
All electrical connections made on-site are solely the
responsibilit y of the installer.
12.1 General
The Grant VortexAir hybrid requires a 230V 50Hz single phase
electrical supply from a 32A circuit breaker.
All the controls for the operation of the VortexAir Hybrid are
contained within the boiler casing, with all the electrical wiring
housed inside the hybrid control panel. Refer to Figure 12-11 for
the hybrid internal wiring diagram.
The electrical supply and external heating system controls are
connected directly to the control panel in the boiler part of the
hybrid.
• Refer to Section 12.2 for the hybrid electrical supply
connection details.
• Refer to Section 12.3 for the heating system control
connection details.
The heat pump electrical supply and external system
control connections are provided directly from the control
panel in the boiler part of the hybrid.
• Refer to Section 12.4 for the heat pump electrical supply
connection details.
• Refer to Section 12.5 for the external system control
connections between the boiler and the heat pump.
WARNING
12.2 Hybrid (Boiler) Electrical Supply Connection
The Grant VortexAir Hybrid requires a permanent mains supply. Do
not interrupt it with any external control, e.g. programmer, timer or
room thermostat.
Use a dedicated power supply from a 32 A Type C circuit breaker in
the consumer unit.
If both the heat pump and boiler are located outdoors, the final
power supply connection to the boiler of the VortexAir Hybrid must
be made from a weatherproof lockable isolator located outside the
building.
The cable should be either armoured or run in a flexible conduit
between the lockable isolator and the boiler.
If the boiler is located indoors (with the heat pump located
outdoors), the final power supply connection to the boiler must be
made from a lockable isolator located inside and next to the boiler.
!
In the case of long cable runs, selection of correct cable
must be done in accordance with IET Wiring Regulations (17
edition).
Refer to Figure 12-4 for the location of the hybrid electrical supply
terminal block.
The electrical supply cable must be connected to the terminal block
as follows:
• Live – terminal 1 (L)
• Neutral – terminal 2 (N)
• Earth – terminal 3 (
Refer to Figure 12-5 for the electrical supply connection diagram.
NOTE
⏚)
th
!
For the heat pump internal wiring diagram and heat pump
controller connections please refer to the Installation and
Servicing Instructions supplied with the Grant Aerona³ heat
pump.
The wiring connection terminal blocks for the electrical supply,
heating system controls, heat pump electrical connections are
located within the control panel enclosure.
To access the control panel enclosure, and the electrical
connection terminal blocks within it, proceed as follows:
1. Remove the access panel from the front of the boiler
casing. Unscrew and remove the eight screws that secure
the access panel to the casing. Refer to Figure 12-1.
2. Remove the lower cover panel from the rear of the control
panel. Unscrew the two screws that secure the cover panel
in place and remove it from the boiler. Refer to Figure 12-2.
3. Remove the upper cover panel from the rear of the control
panel. Unscrew the two screws at the top of the cover and
remove it from the boiler. Refer to Figure 12-3.
4. The electrical wiring connection terminal blocks are located
on the inner base of the control panel. Refer to Figures 124, 12-6, 12-6 and 12-7.
NOTE
Section 12: ElectricalPage 40
Page 41

12.3 Heating System Controls Connection
The 230V 50Hz electrical supply for the external heating system
controls is provided from the heating controls terminal block in the
hybrid control panel in the boiler. Refer to Figure 12-4 for the location
of this terminal block. This supply is fused at 5 A via a fuse located
on the control panel fascia.
The lockable isolator (see Section 12.2 above) acts as a common
isolator for the boiler, control system and heat pump (when fitted),
providing complete electrical isolation.
The cable between the hybrid (boiler) and the external heating
controls should be at least 0.75 mm² PVC.
All the wiring and supplementary earth bonding ex ternal to
the boiler must be in accordance with the current IET Wiring
Regulations.
Any room thermostat or frost thermostat used must be suitable for
use on mains voltage.
In the event of an electrical fault after installation of the boiler, the
following electrical system checks must be carried out:
• Short circuit
• Polarity
• Earth continuity
• Resistance to earth
The boiler requires both a switched mains power supply, from an
external programmer or control system, in addition to a permanent
live supply. There is no facilit y in the boiler of the Grant VortexAir
hybrid for the fitting of a plug-in timer or programmer.
The external controls are connected to the heating system controls
terminal block in the hybrid control panel. Refer to Figure 12-6 for
the location of this terminal block.
A 6-core cable (5-core and earth) is required to connect the boiler to
the heating controls. This may be reduced to a 5-core cable (4-core
and earth) depending on the type of hot water control is used.
For typical control system wiring diagrams please refer to Figures
12-7, 12-8 and 12-10.
12.3.1 S-Plan type system (with standard cylinder)
With this system, the hot water can be heated to 65°C (in either the
existing cylinder or a new cylinder) using the oil boiler only. The heat
pump is not used to heat the hot water. Refer to Section 11.1.1.
The system uses a standard ‘S-Plan’ type wiring arrangement with a
two channel programmer, room thermostat, heating zone valve, hot
water zone valve, cylinder dual thermostat and wiring centre. Refer
to Figure 12-7
Note that the switched output from the hot water zone valve is
connected to terminal 8 on the heating system controls terminal
block in the hybrid control panel. Only the oil boiler will operate in
response to a hot water demand from the system controls.
!
Set the first stage temperature (R1) on the Boiler Control
Thermostat to 0°C when commissioning the VortexAir hybrid.
Refer to Section 17.6 of these Installation Instructions for
details of setting procedure.
12.3.2 S-Plan type system with Grant Automatic DHW Boost
Kit (with heat pump cylinder)
With this system, the hot water can be heated to 50 - 55°C (in a heat
pump cylinder) using the heat pump only. Refer to Section 11.1.2.
This system uses the standard ‘S-Plan’ type wiring arrangement with
a two channel programmer, room thermostat, heating zone valve,
hot water zone valve, cylinder dual thermostat and wiring centre.
In addition a Grant Automatic DHW Boost Kit 2 is fitted to provide
legionella protection. Refer to Figure 12-8.
NOTE
The Automatic DHW Boost Kit 2 comes pre-wired within its
enclosure, ready for installation. The connections to the Immersion
heater switch, Immersion heater and cylinder thermostat must be
made after it is installed on site.
When installed, this kit interrupts the electrical supply between the
existing immersion heater switch and immersion heater. Refer to the
electrical connection details in the Installation and User Instructions
supplied with the kit.
In order to connect and use this kit, the existing cylinder thermostat
must have two output terminals; one ‘make on rise’ (normally open)
contact and the other ‘break on rise’ (normally closed) contact.
Refer to Figure 12-8. If not, then the cylinder thermostat MUST be
replaced with one that does have two output terminals.
The use of any other type of cylinder thermostat, or any modification
to an existing thermostat, will invalidate the product guarantee and
may result in a potentially dangerous installation.
!
Do not alter the pre-wired connections within the Boost Kit
enclosure and only make the ex ternal connections as shown
in the wiring diagram. See Figure 12-8.
!
For this system to operate, the existing immersion switch
must be left set permanently to ON. To totally prevent
operation of the immersion element, the existing immersion
switch must be set to OFF.
Boiler only installations (heat pump not yet installed)
This hot water control system will NOT operate to heat the hot water
cylinder, in response to a DHW demand, when only the boiler is
installed (i.e. with no heat pump installed and connected).
A temporary change MUST be made to the control system
connections on the Heating system controls terminal block (in the
hybrid control panel) in order for the hot water heating function to
operate. Refer to Section
To make this temporar y change:
1. Isolate the electrical supply to the boiler.
2. Disconnect the DHW demand connection from terminal 7
on the Heating system controls terminal block (in the hybrid
control panel) and connect it to terminal 8 instead. Refer to
Figure 12-8.
As the boiler will be able to heat the cylinder to 60°C it will not
be necessary for the Automatic DHW Boost Kit 2 to operate
the immersion element whilst the DHW controls are temporarily
connected in this way. Thus, the immersion switch MUST be
temporarily set to OFF.
As soon as the heat pump is installed and connected the temporar y
change MUST be reversed, before the electrical supply is reconnected, as follows:
1. The DHW demand connection MUST be disconnected from
terminal 8 on the Heating system control terminal block and
reconnected to terminal 7
2. The immersion element switch set to ON
3. The Automatic DHW Bo ost Kit 2 set to operate (as described in
Section 11.3 and the Installation and User Instructions supplied
with the kit).
NOTE
NOTE
Section 12: Electrical Page 41
Page 42

12.3.3 S-Plan type System with Grant Digital two-stage
cylinder thermostat
With this system, the hot water temperature can be switched
between t wo pre-set temperatures, as follows:
• For normal hot water heating (factory default: 50°C)
• For anti-legionella sanitisation (factory default: 60°C)
Refer to the Installation and User Instructions supplied with the Grant
digital two-stage cylinder thermostat for wiring connection details
and also on how to set the digital temperature controller and digital
timer. Refer to Section 11.4 for fur ther details.
Refer to Figures 12-10 and 12-11 for the electrical connection
diagram for the digital two-stage cylinder thermostat.
Boiler only installations (heat pump not yet installed)
This hot water control system will NOT operate to heat the hot water
cylinder, in response to a DHW demand, when only the boiler is
installed (i.e. with no heat pump installed and connected).
A temporary change MUST be made to the control system
connections on the Heating system controls terminal block (in the
hybrid control panel) in order for the hot water heating function to
operate. Refer to Section
To make this temporar y change:
1. Isolate the electrical supply to the boiler.
2. Disconnect the DHW demand connection from terminal 7
on the Heating system controls terminal block (in the hybrid
control panel) and connect it to terminal 8 instead. Refer to
Figure 12-10.
As soon as the heat pump is installed and connected the temporar y
change MUST be reversed, before the electrical supply is reconnected, as follows:
1. Disconnect the DHW demand connection from terminal 8 on
the heating controls terminal block
2. Reconnect it to terminal 7 on the Heating system control
terminal block
12.5 Heat Pump Controls Connection
The heat pump control connection for the Aerona³ HPID16 heat
pump are connected to the heat pump controls terminal block in the
hybrid control panel (in the boiler part of the hybrid). Refer to Figure
12-12 for the location of this terminal block.
The 4-core heat pump controls cable (provided with the boiler) must
be connected to the heat pump controls terminal block in the hybrid
control panel as follows:
• Cable No. 1 - terminal 23
• Cable No. 2 - terminal 24
• Cable No. 3 - terminal 25
• Cable No. 4 - terminal 26
The other end of this heat pump controls cable must be connected
to the following terminals on the Terminal PCB in the heat pump:
• Cable No. 1 - terminal 18
• Cable No. 2 - terminal 19
• Cable No. 3 - terminal 20
• Cable No. 4 - terminal 46
Refer to Figure 12-13 for the heat pump controls wiring diagram.
If the boiler is installed indoors, with the heat pump located
externally, the controls cable supplied with the boiler will not be long
enough to connect the heat pump to the hybrid control panel in the
boiler and must be replaced with a longer cable (to be supplied by
the installer).
12.4 Heat Pump Electrical Supply Connection
The Aerona³ HPID16 heat pump, used in the Grant VortexAir hybrid,
requires a 230V 50Hz single phase electrical supply from a 32A
circuit breaker. This is supplied directly from the heat pump electrical
supply terminal block in the hybrid control panel (in the boiler part
of the hybrid). Refer to Figure 12-4 for the location of this terminal
block.
The cable used between the boiler and the heat pump should be
armoured.
If boiler is installed indoors, with the heat pump located outdoors,
the power supply between the control panel (in the boiler) and
the heat pump must be made via a weatherproof lockable isolator
located outside the building.
The electrical supply cable to the heat pump must be connected to
the terminal block in the control panel as follows:
• Earth – terminal 20 (
• Neutral – terminal 21 (Neutral)
• Live – terminal 22 (Live)
The other end of the heat pump electrical supply must be connected
to the terminal block in the heat pump as follows:
• Earth – terminal (
• Neutral – terminal N
• Live – terminal L
Refer to Figure 12-13 for the heat pump electrical supply connection
diagram and also Section 6 of the Installation and Servicing
Instructions supplied with the Aerona³ heat pump.
⏚)
⏚)
Section 12: ElectricalPage 42
Page 43

Figure 12-1: Removal of access panel
Figure 12-2: Lower control panel cover Figure 12-3: Upper control panel cover
Section 12: Electrical Page 43
Page 44
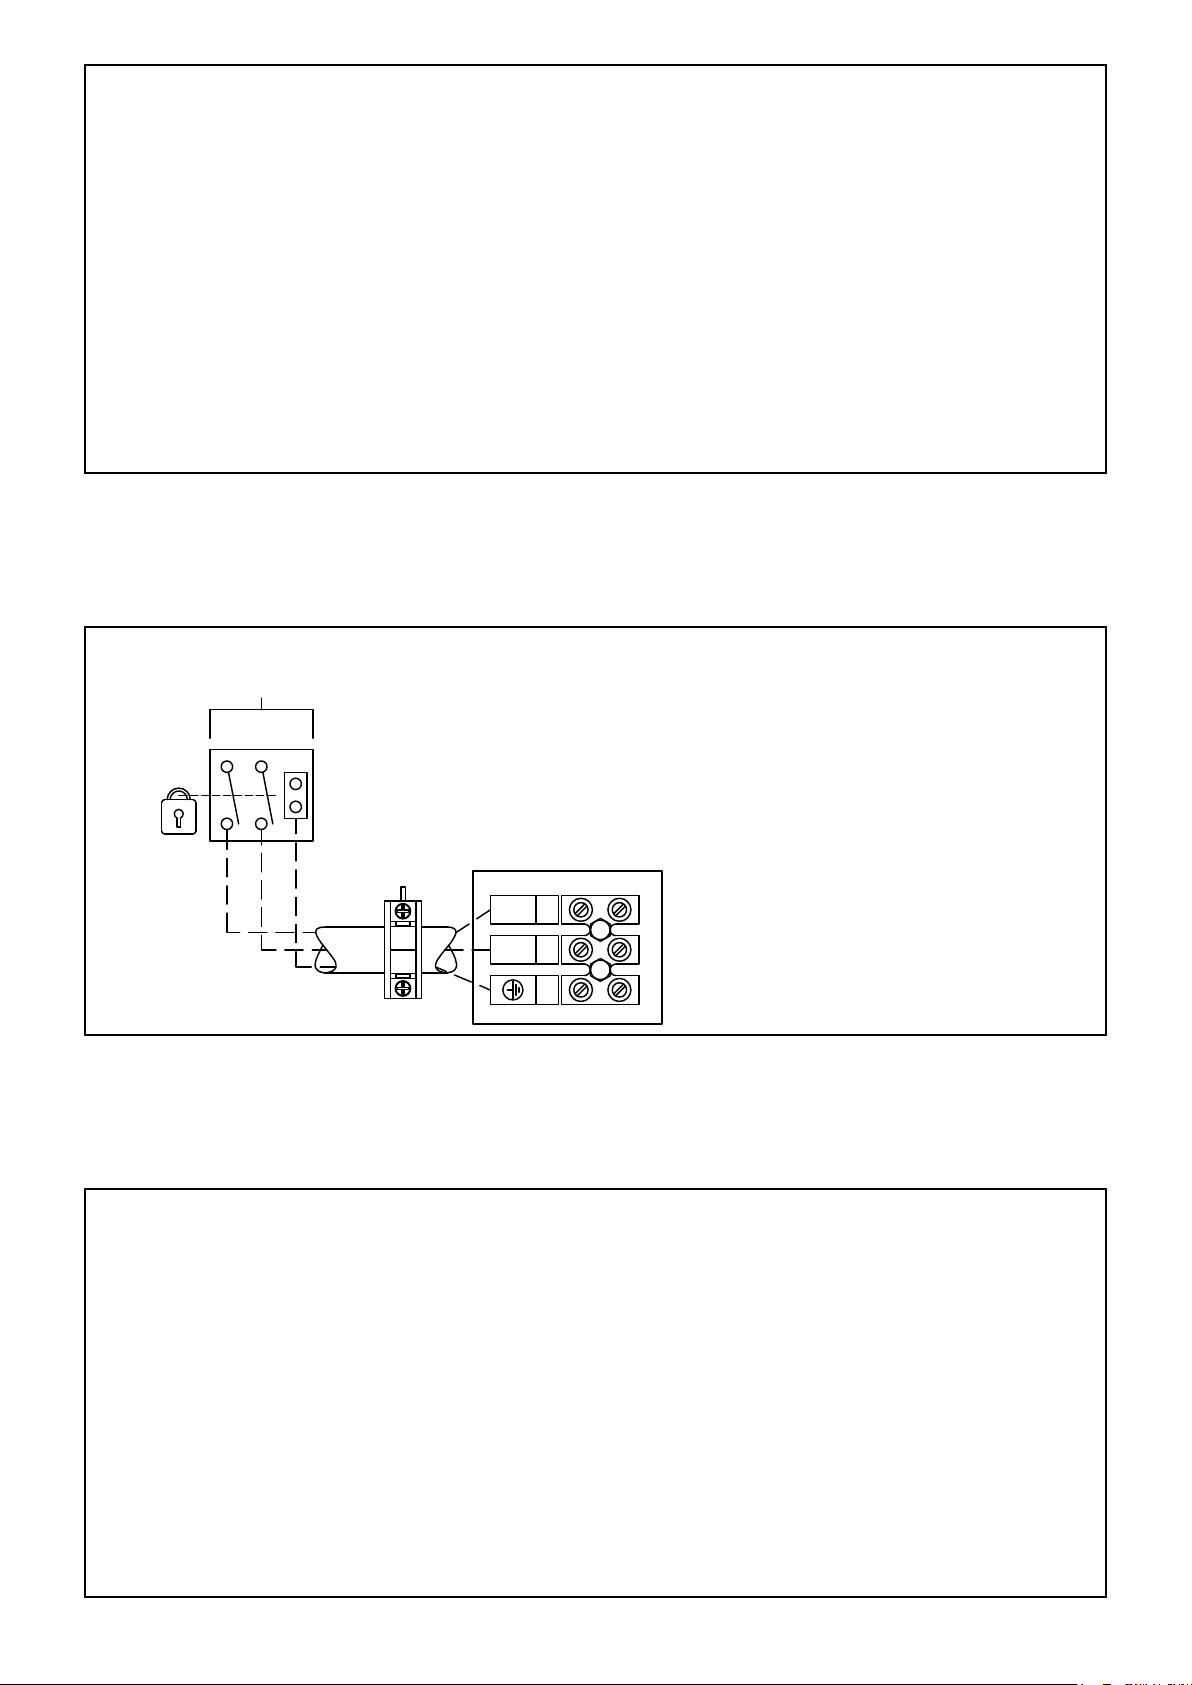
Figure 12-4: Hybrid electricity supply terminal block location
N
3
230V 50HZ
Via Circuit
Breaker
L N E
Double Pole
Lockable
Isolator
45 A
L
Figure 12-5: Hybrid electricity supply connection diagram
1
2
Figure 12-6: Heating system controls terminal block location
Section 12: ElectricalPage 44
Page 45
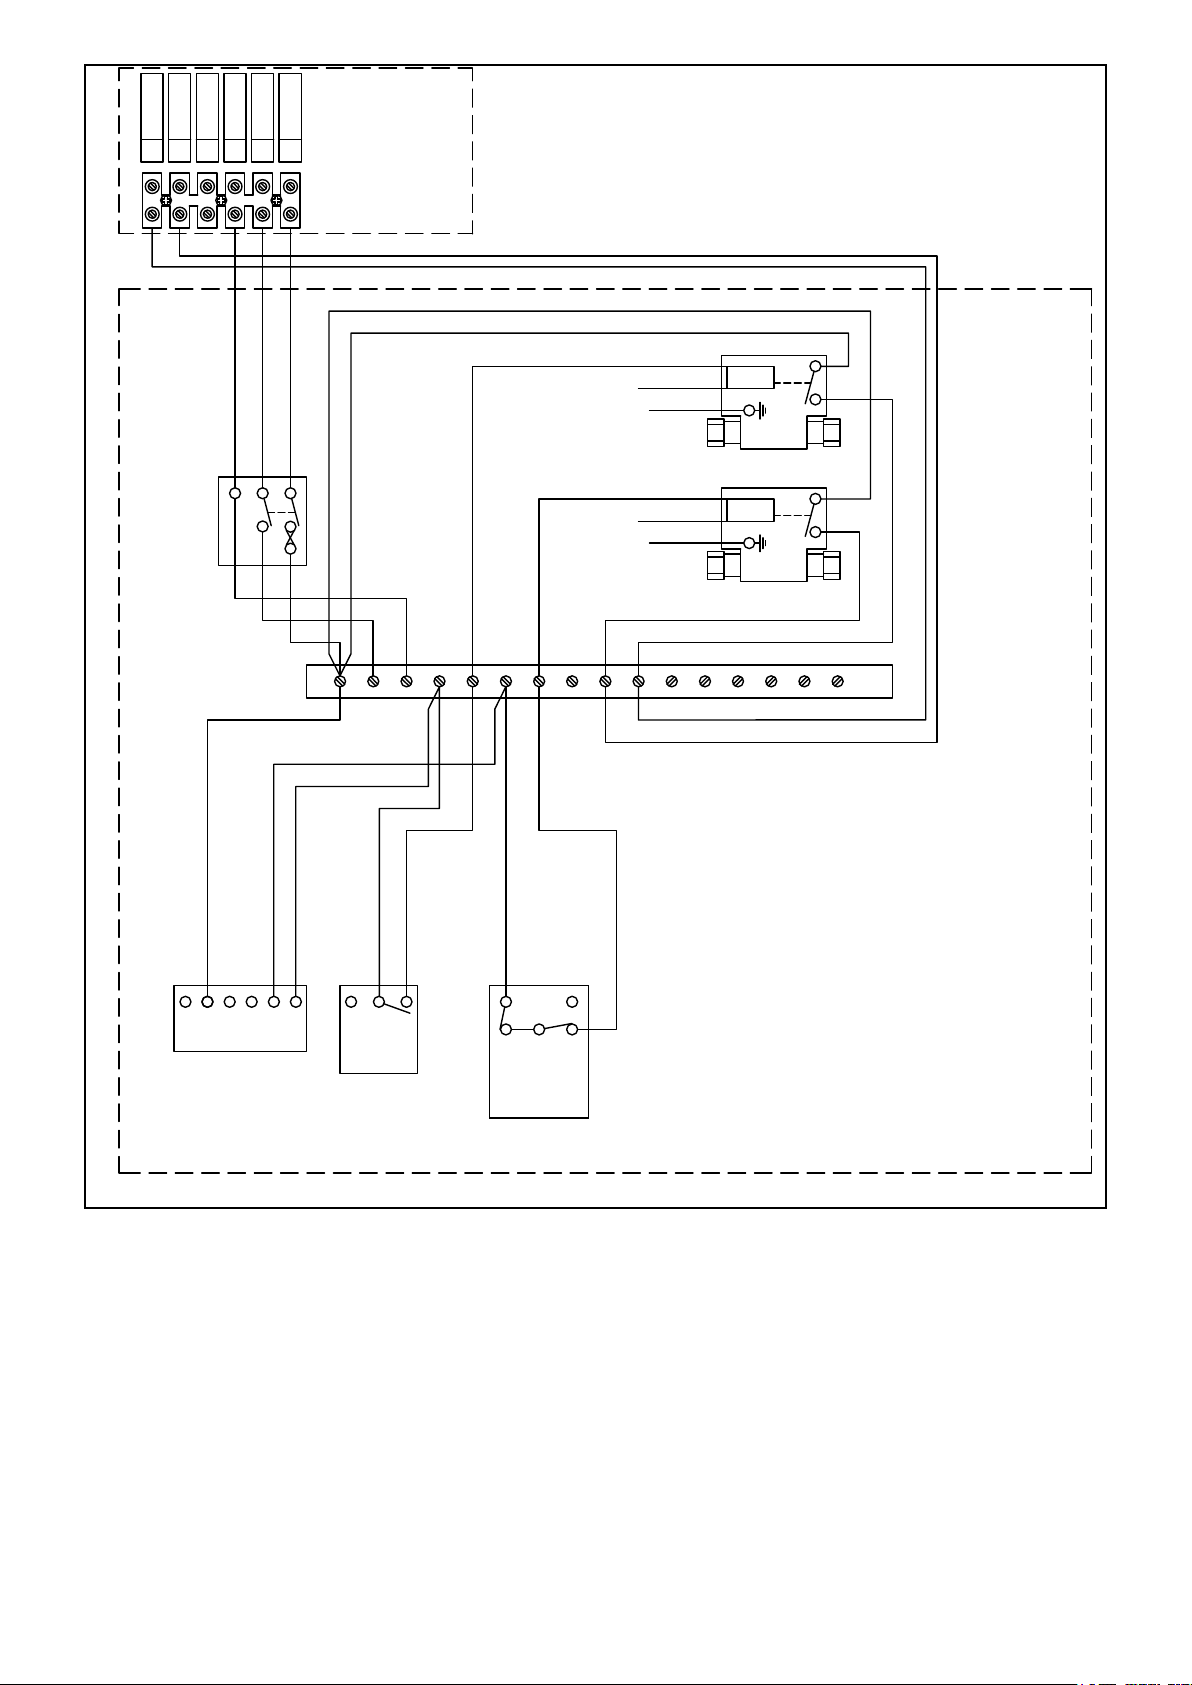
HEATING SYSTEM CONTROLS
Demand - 65
Demand
Central Heating
9
High Temp
8
EARTH
Low Temp
Demand - 50
7
6
NEUTRAL
LIVE
Domestic Control
Domestic Control
5
Domestic Control
4
Heating System
Controls
Terminal Block
Grey
Grey
Double
Pole
Isolator
5A
Wiring
Centre
Brown
Blue
Brown
Blue
1 2 3 4 5 6 7 8 9 10
Green/Yellow
Green/Yellow
Orange (HW)
Orange (HTG)
11 12
CH ASHP
65°C Boiler
HTG
Motor
2-Port Zone Valve
HW
Motor
2-Port Zone Valve
13
14
15 16
'S' Plan System
Controls wiring to
Hybrid control
panel terminals .
N
L 1 2 3 4
OFF OFF ON ON
HW HT HW HT
Grant 2-Channel
Wall Mounted
Programmer ESKIT
C
2
2 1 3
Room
Stat
C
1
2
Dual Limit &
Cylinder Stat
Figure 12-7: Heating controls - S-plan with cylinder stat (HW provided by boiler)
Section 12: Electrical Page 45
Page 46
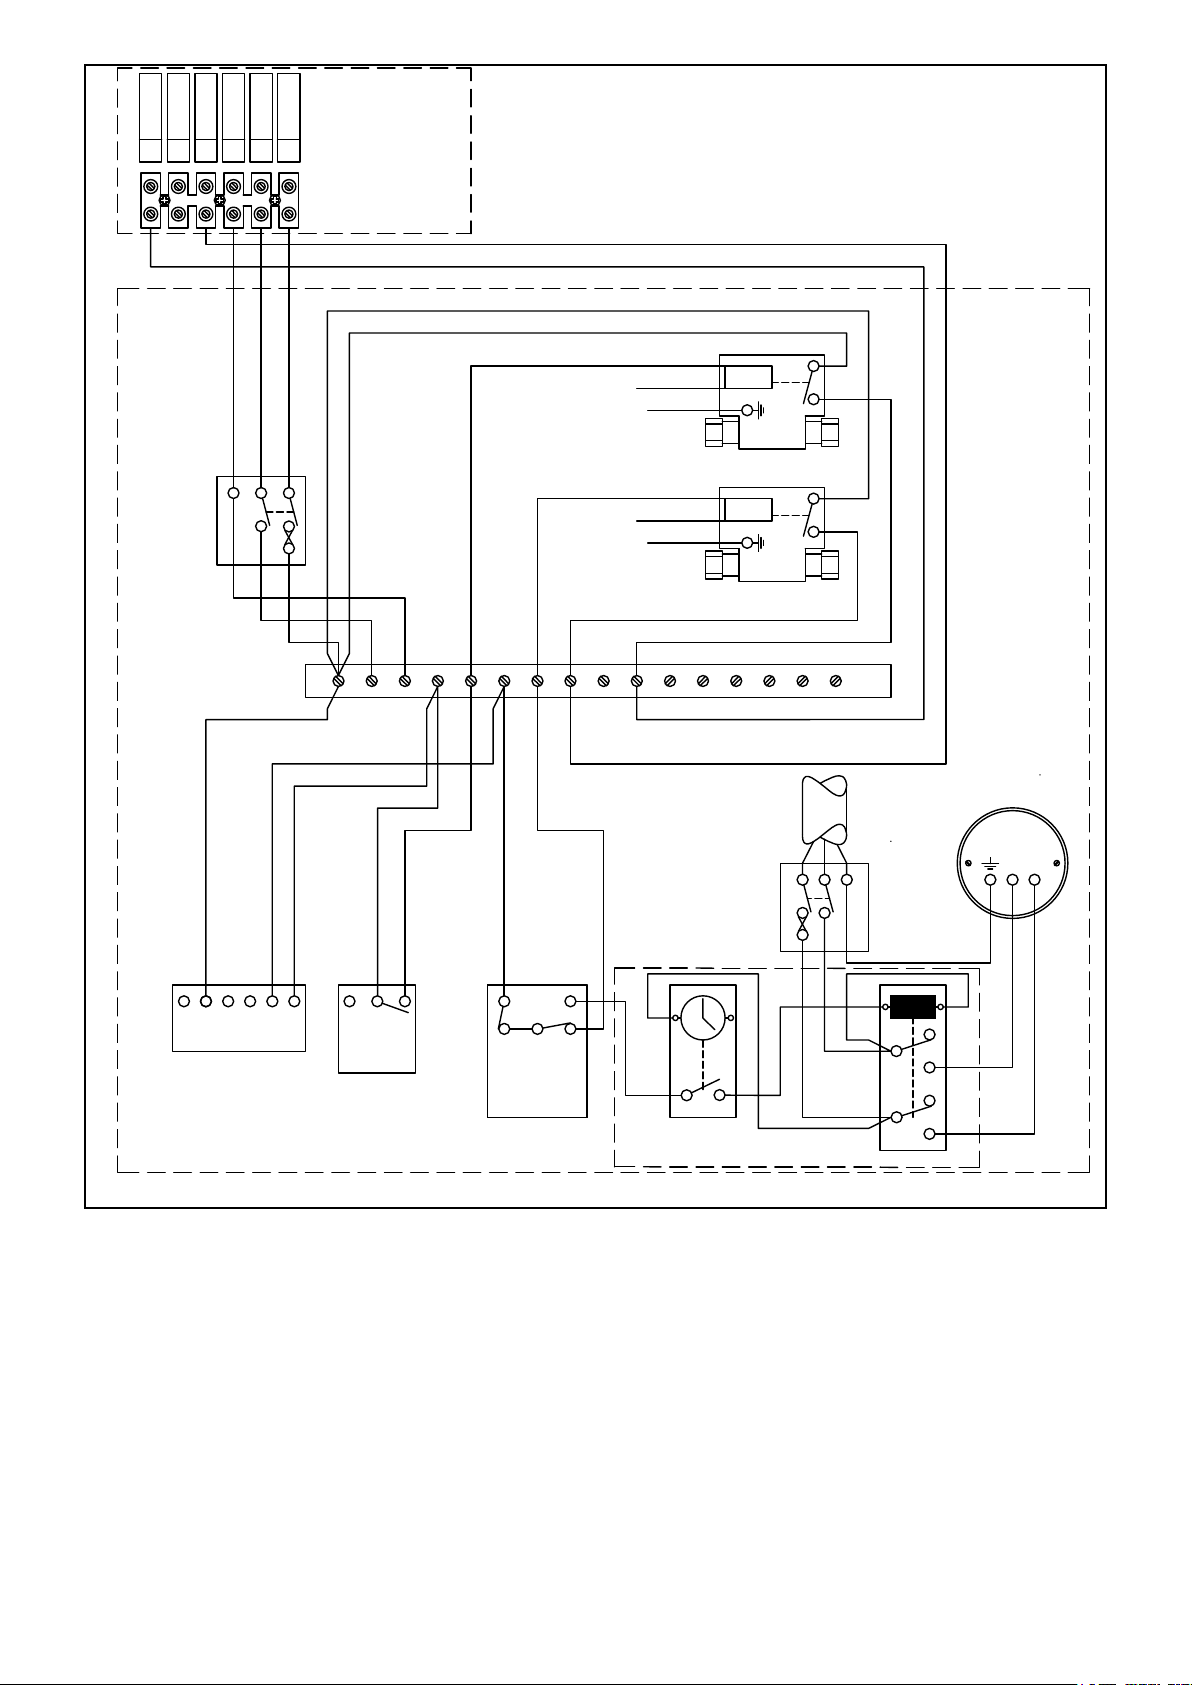
HEATING SYSTEM CONTROLS
DHW Boost Kit 2
Demand
Central Heating
9
High Temp
Demand - 65
8
EARTH
Low Temp
Demand - 50
7
6
LIVE
NEUTRAL
Domestic Control
Domestic Control
5
4
Domestic Control
Heating System
Controls
Terminal Block
Grey
Grey
Double
Pole
Isolator
5A
Wiring
Centre
Brown
Blue
Brown
Blue
1 2 3 4 5 6 7 8 9 10
Green/Yellow
Green/Yellow
Orange (HW)
Orange (HTG)
11 12
CH ASHP
50°C ASHP
HTG
Motor
2-Port Zone Valve
HW
Motor
2-Port Zone Valve
13
14
15 16
Double
Pole
Isolator
13A
'S' Plan System
Controls wiring to
Hybrid control
panel terminals .
Immersion Heater
LN
A1
N
L 1 2 3 4
OFF OFF ON ON
HW HT HW HT
Grant 2-Channel
Wall Mounted
Programmer ESKIT
2 1 3
Room
Stat
2
C
1
Dual Limit &
Cylinder Stat
N
Timer
Grant Automatic
11
21
Relay No 1
A2
12
14
22
24
Figure 12-8: Heating controls - S-plan with cylinder stat and boost kit (HW provided by heat pump and immersion heater)
Section 12: ElectricalPage 46
Page 47
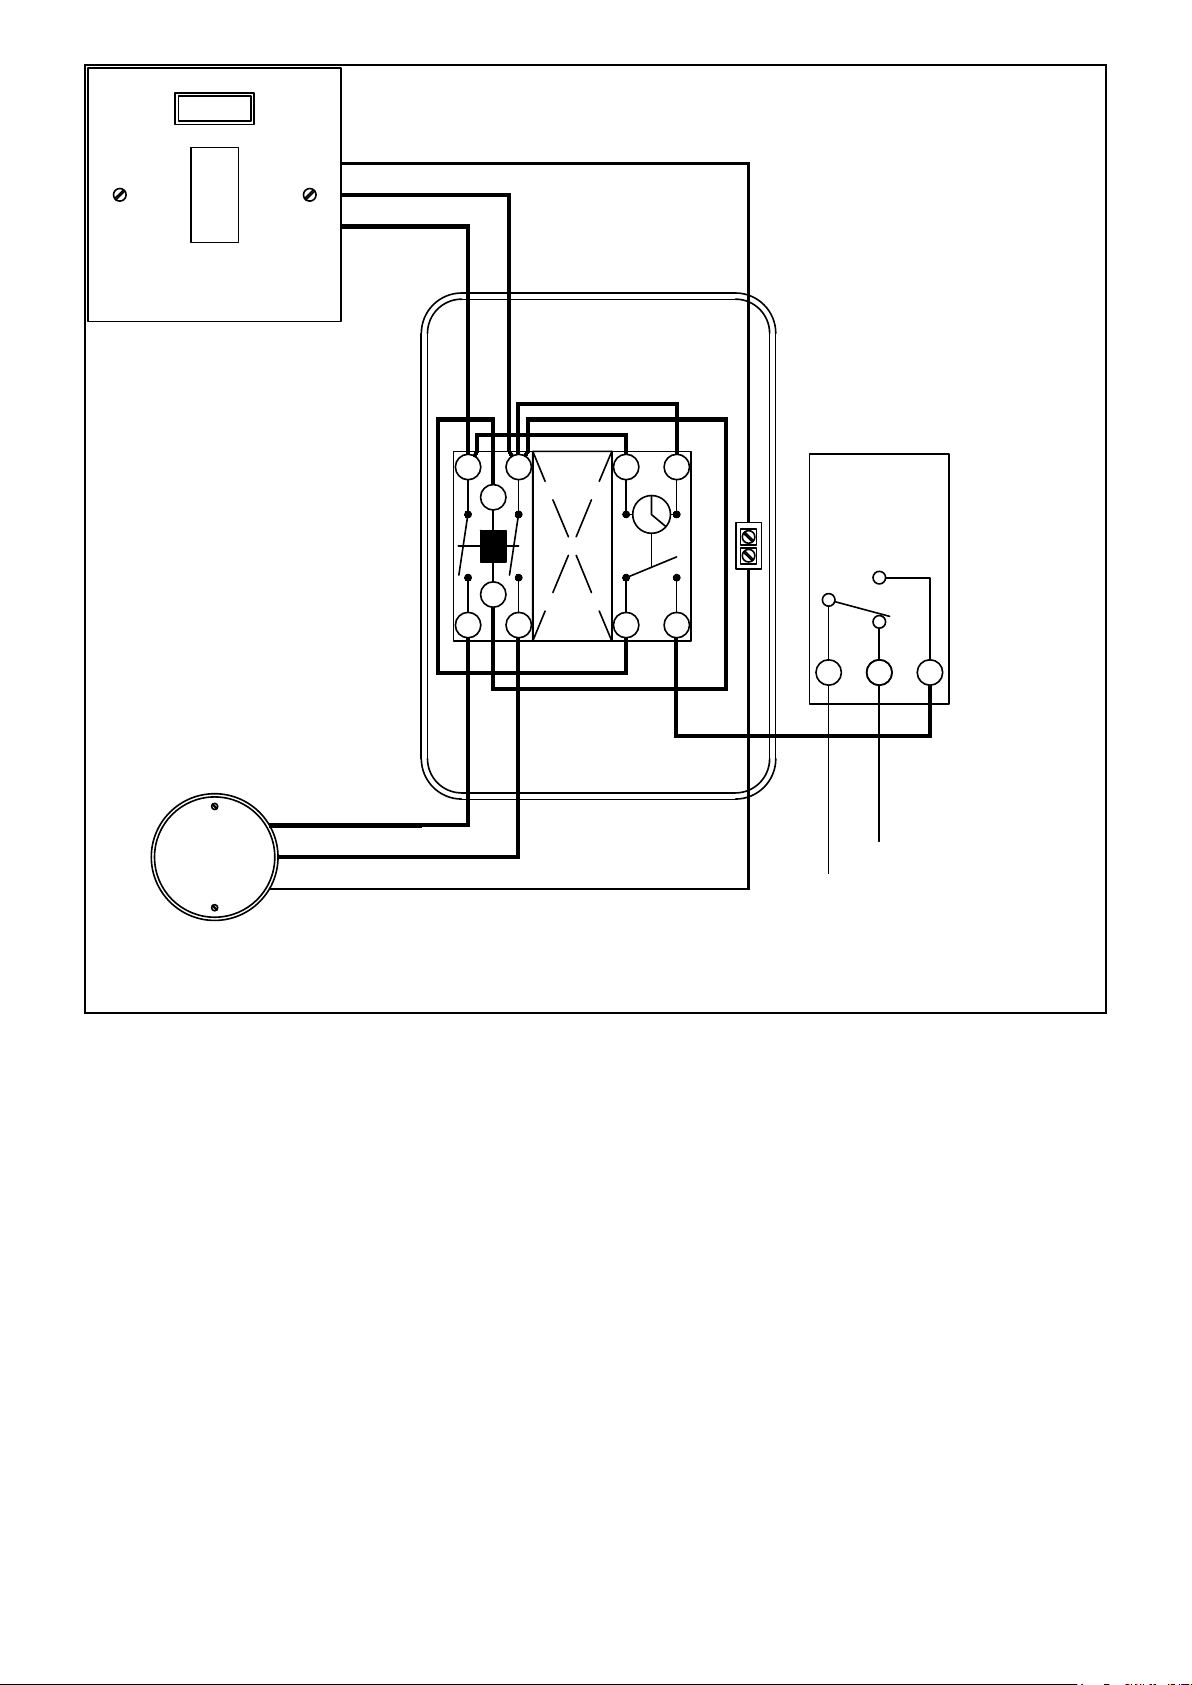
Immersion
Heater
E
N
L
Figure 12-9: Boost kit
L
N
E
Blank
Spacer
1
1
A1
A2
2234 3 4
Cylinder
Stat
1 2
C
To HW Valve
HW Controls
Section 12: Electrical Page 47
Page 48
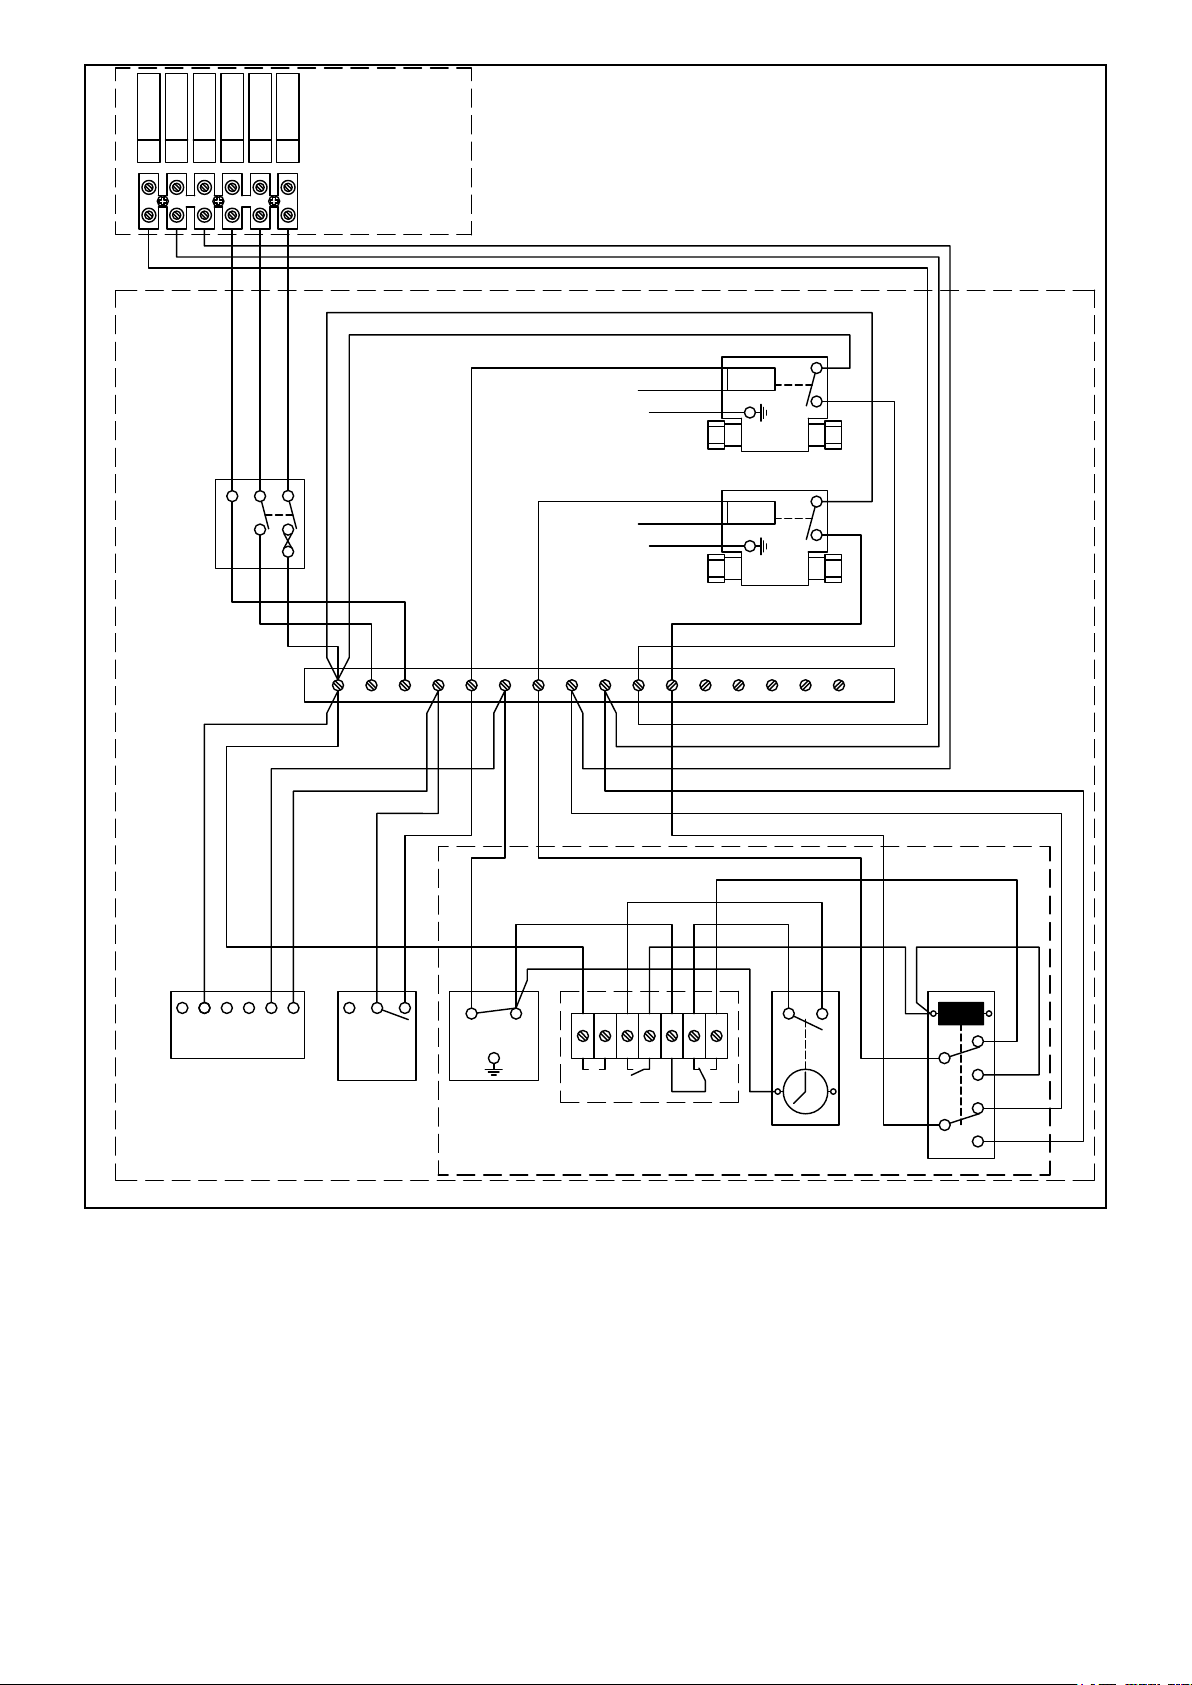
Relay No 1
HEATING SYSTEM CONTROLS
Demand
Grant digital two - stage cylinder thermostat
Central Heating
9
High Temp
Demand - 65
8
EARTH
Low Temp
Demand - 50
7
6
Domestic Control
Domestic Control
LIVE
NEUTRAL
5
Domestic Control
4
Heating System
Controls
Terminal Block
Grey
Grey
Double
Pole
Isolator
5A
Wiring
Centre
Brown
Blue
Brown
Blue
1 2 3 4 5 6 7 8 9 10
Green/Yellow
Green/Yellow
Orange (HW)
Orange (HTG)
11 12
CH ASHP
65°C Boiler
50°C ASHP
HTG
Motor
2-Port Zone Valve
HW
Motor
2-Port Zone Valve
13
14
15 16
'S' Plan System
Controls wiring to
Hybrid control
panel terminals .
A1 A2
11
21
12
14
22
24
N
L 1 2 3 4
OFF OFF ON ON
HW HT HW HT
Grant 2-Channel
Wall Mounted
Programmer ESKIT
2 1 3
Room
Stat
C 2
Overheat
Thermostat
NO
C
7
6
230V
8
R 2
5
NO
NC
C
10
9
11
R 1
HW Cylinder Thermostat
Timer
43
N
12
Figure 12-10: Heating controls - S-plan with Grant digital two-stage stat (HW provided by heat pump, boiler and two-stage cylinder stat)
Section 12: ElectricalPage 48
Page 49
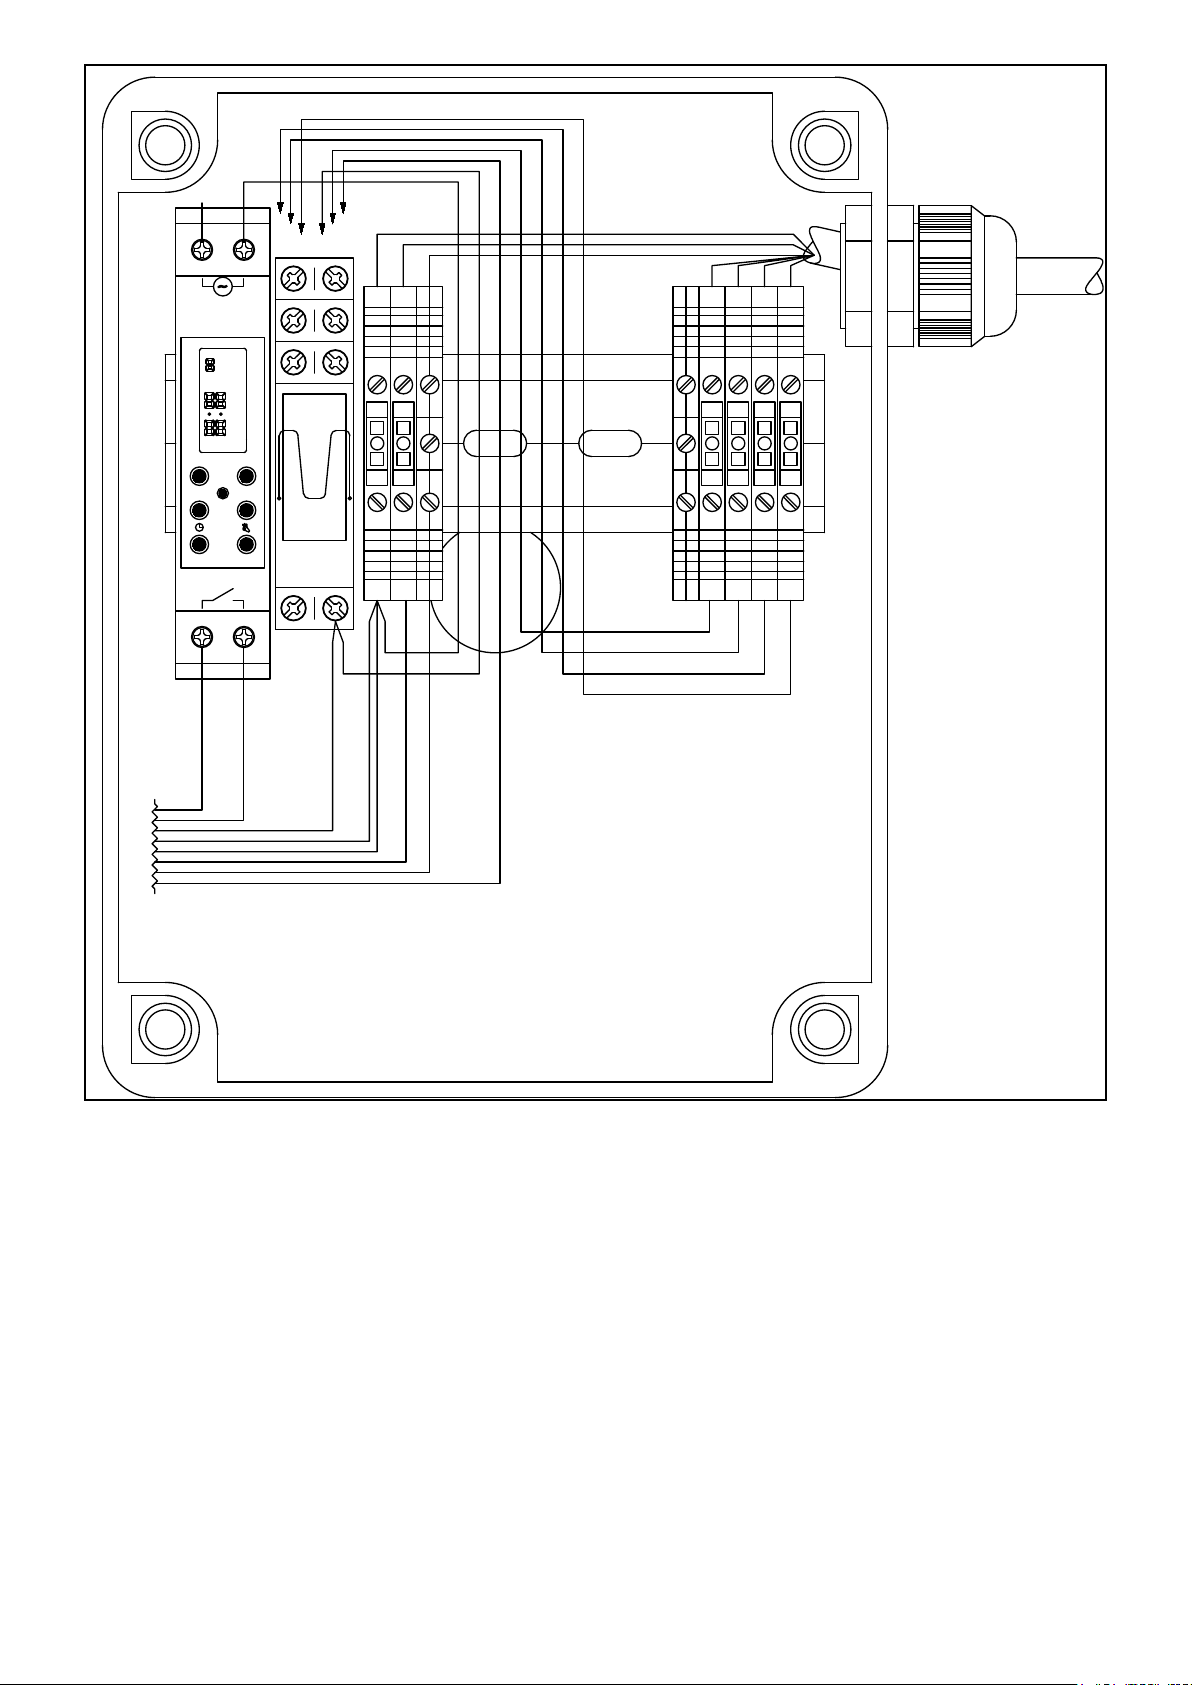
Relay No 1
HEATING SYSTEM CONTROLS
Grant digital two - stage cylinder thermostat
N
21
TIMER
MO
OFF ON
TU
WE
TH
FR
SA
SU
Day h+
Timer M+
R
43
22
1121
14
24
22 12
NO
21 11
COM
24 14
NO
E48
A2 A1
COL
12
N E
Figure 12-11: Grant digital two-stage stat
Section 12: Electrical Page 49
Page 50
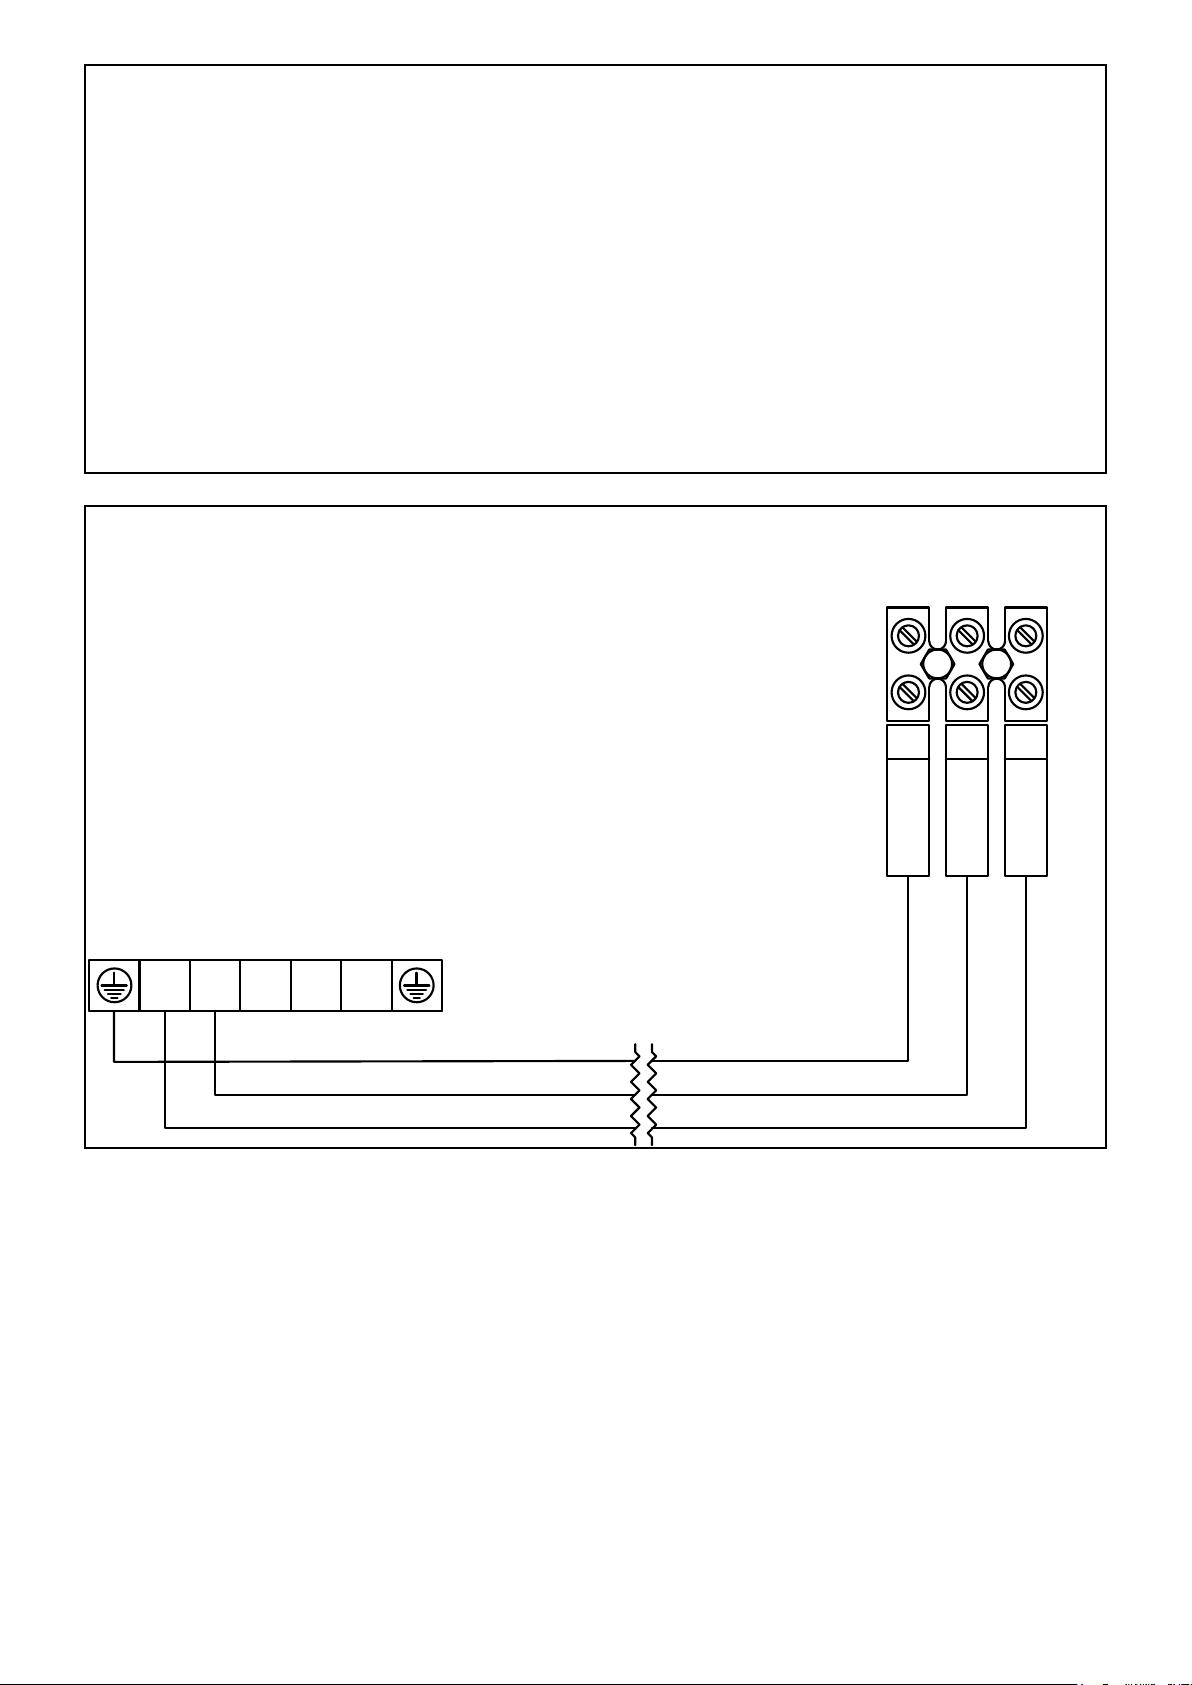
Figure 12-12: Heat pump electricity supply terminal block location
Heat Pump
22
LIVE
Heat Pump Connections
L N 1 2 3
Heat Pump
electrical supply
terminal block
20
21
NEUTRAL
EARTH
Heat Pump
Heat Pump
Figure 12-13: Heat pump electricity supply connection diagram
Section 12: ElectricalPage 50
Page 51
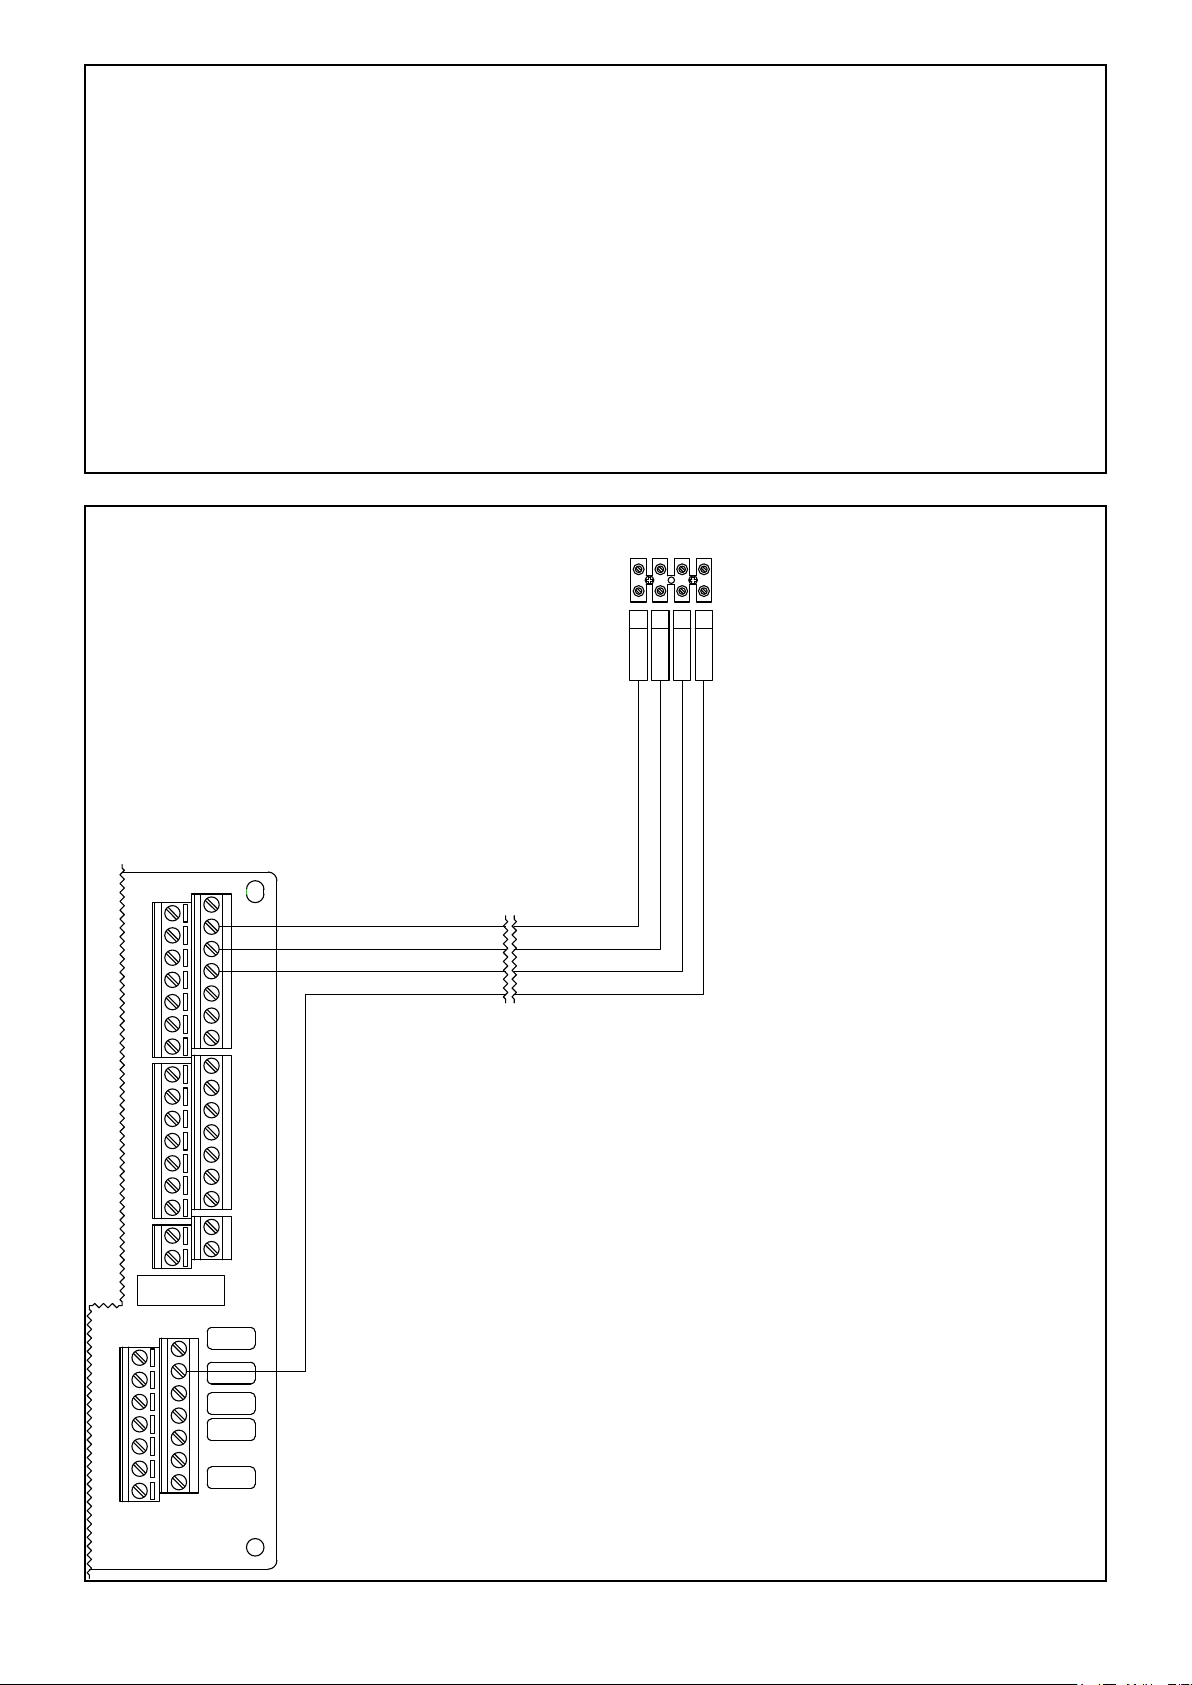
Figure 12-14: Heat pump controls terminal block location
25
26
PCB 46
Heat Pump terminals
Heat Pump
controls
terminal block
23
HP Terminal
PCB 18
24
HP Terminal
PCB 19
HP Terminal
PCB 20
HP Terminal
41
42
43
44
51
52
1
2
3
4
5
6
7
8
9
10
11
12
13
14
15
16
N
17
18
19
20
21
22
23
24
25
26
27
28
29
30
31
32
45
46
4 core flex supplied by Grant
Cable Number 1
Cable Number 2
Cable Number 3
Cable Number 4
47
48
49
50
-
Figure 12-15: Heat pump controls connection diagram
Section 12: Electrical Page 51
Page 52
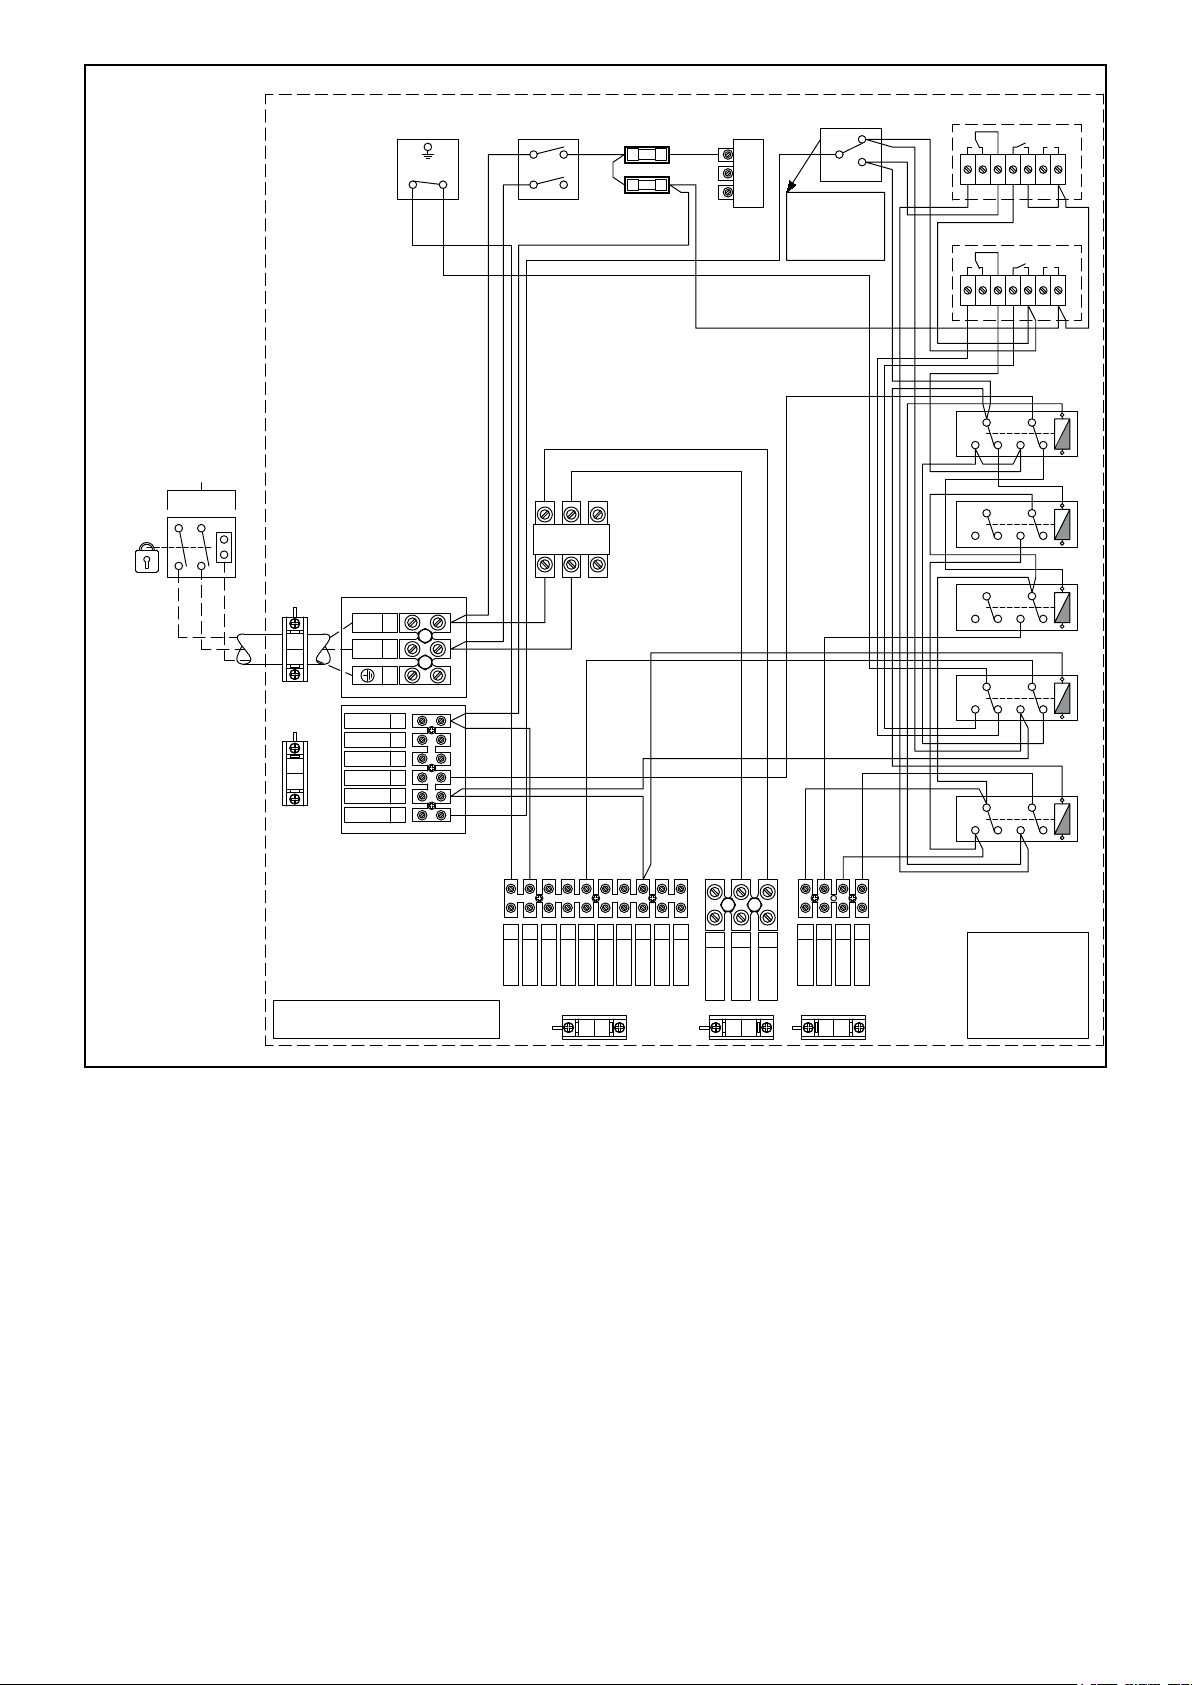
Double Pole
have been excluded for clarity.
Y - Yellow
Lockable
Isolator
45 A
230V 50HZ
Via Circuit
Breaker
L N E
Hybrid Wiring Center
Limit
Thermostat
2 C
1
L
2
N
3
Domestic Control
4
LIVE
Domestic Control
5
NEUTRAL
Domestic Control
6
EARTH
Low Temp
7
Demand - 50
High Temp
8
Demand - 65
Central Heating
9
Demand
19 R
1 BR
2 BL
7 BR
7 BR
14 BR
12 R
8 R
1BR
2 BL
Boiler
On/Off
1A 2A
4B 5B
Power Meter
5 BR
7 BR
8 R
18 R
23 R
24 BK
9 BR
FUSE 1 X 20 (F1)
FUSE 5 X 20 (F2)
12 R
12 R
6 BR
Heat Meter
Oil/Hybrid Switch
OIL ONLY
3A
(See note)*
2A
HYBRID
1A
* Note: If using dual
cylinder thermostat, Set
50°C cylinder stat to '0'
when using 'Oil Only'
switch or only use the
single cylinder thermostat.
7 BR
21 BK
20 BK
12 R
12 R
16 BR
18 O
15 R
11 R
15 R
20 BK
22 BK
18 Y
15 R
22 BK
16 BR
Air Control Thermostat
R 1
R 2
987
6
C
C
7 BR
12 R
R 2
98765
C
C
14 BR
16 BR
11
14
12
10 BR
11
14
12
13 BR
11
14
12
11
14
12
230V
230V
11
10
NONCNO
11 R
Boiler Control Thermostat
R 1
11
10
NONCNO
12 R
18 Y
21
Relay No 2
24
22
13 BR
21
Relay No 3
24
22
20 BK
20 BK
21
Relay No 4
24
22
21
Relay No 5
24
22
18 O
11 R
17 BK
20 BK
Relay No 6
24
11
21
14
12
22
5
7 BR
A1
A2
A1
A2
A1
A2
A1
A2
A1
A2
Earth and some Neutral connections
Figure 12-16: Hybrid control panel wiring diagram
10
LIVE
Burner Switched
Burner Permanent
232425
PCB 18
HP Terminal
PCB 19
HP Terminal
PCB 20
26
HP Terminal
PCB 46
Wiring Abbreviation
BK - Black
BL - Blue
BR - Brown
R - Red
O - Orange
11
12
13
14
15
16
17
18
19
20
21
22
LIVE
NEUTRAL
EARTH
LIVE
NEUTRAL
EARTH
LIVE
NEUTRAL
Burner
Burner
Pump
Pump
Pump
Motorised Valve
Motorised Valve
EARTH
Motorised Valve
EARTH
Heat Pump
Heat Pump
NEUTRAL
Heat Pump
LIVE
HP Terminal
Section 12: ElectricalPage 52
Page 53

Table 12-17: Terminal block key
Terminal Description
1 LIVE
2 NEUTRAL
3 EARTH
4 Domestic control - LIVE
5 Domestic control - NEUTRAL
6 Domestic control - EARTH
7 Low temperature demand - 50°C
8 High temperature demand - 65°C
9 Central heating demand
10 Burner switched LIVE
11 Burner permanent LIVE
12 Burner NEUTRAL
13 Burner EARTH
14 Pump LIVE
15 Pump NEUTRAL
16 Pump EARTH
17 Motorised valve LIVE
18 Motorised valve NEUTRAL
19 Motorised valve EARTH
20 Heat pump EARTH
21 Heat pump NEUTRAL
22 Heat pump LIVE
23 Heat pump terminal PCB 18
24 Heat pump terminal PCB 19
25 Heat pump terminal PCB 20
26 Heat pump terminal PCB 46
Section 12: Electrical Page 53
Page 54
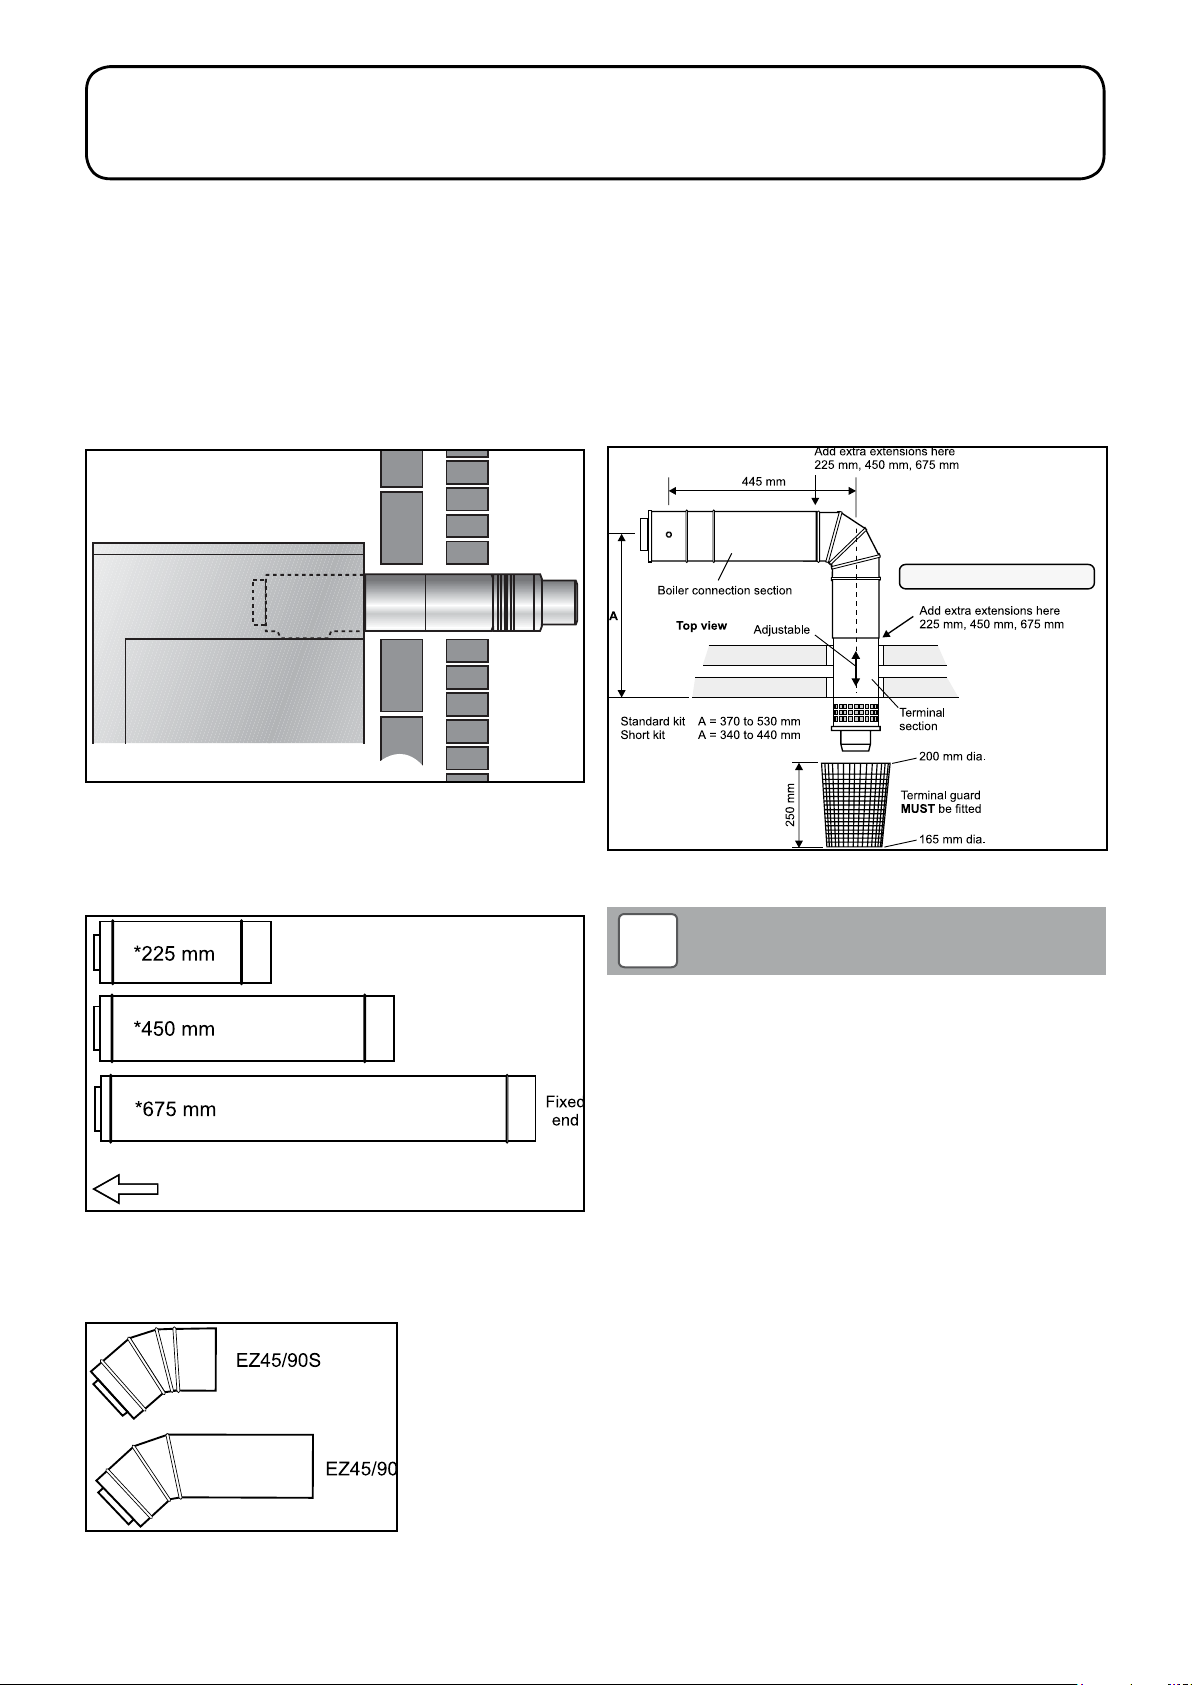
13 Flue System and Air Supply
13.1 Flue system
The oil boiler unit of the Grant VortexAir Hybrid must only be fitted
with the Grant low level balanced flue system (the Grant 'Yellow'
System), whether installed inside or outside the building.
Low Level Horizontal Balanced Flue (Grant Yellow system)
The Grant 'Yellow' low level balanced flue system is telescopic and is
available in both short (for single thickness brick walls) and standard
lengths.
The maximum flue length - from the centre of the boiler flue outlet
to the outer face of the wall - is 4 metres (with or without elbows
included). No more than 2 x 45° or 1 x 90° elbow should be fitted per
system.
The 'Yellow' system low level balanced flue is supplied with a
black painted stainless steel guard. This must be fitted in all
circumstances to prevent objects from entering the flue outlet.
The guard must be fitted centrally over the flue terminal and securely
fixed to the wall.
Note: Elbow must be horizontal
Figure 13-1: Low level balanced flue (yellow system)
Three ex tensions are available which extend the flue by 225mm,
450mm or 675mm.
* Maximum usable length allowing for 60 mm overlap
Extension slide into boiler connector up to 220 mm
Extensions insert 60 mm into previous extension socket.
Figure 13-2: Low level flue extensions
90° and 45° elbows are also available.
Figure 13-4: Low level balanced flue and EZELB90
!
The maximum horizontal run allowed is 4 metres, including
one 90° or two 45° elbows.
NOTE
Figure 13-3: Elbows
Section 13: Flue System and Air SupplyPage 54
Page 55
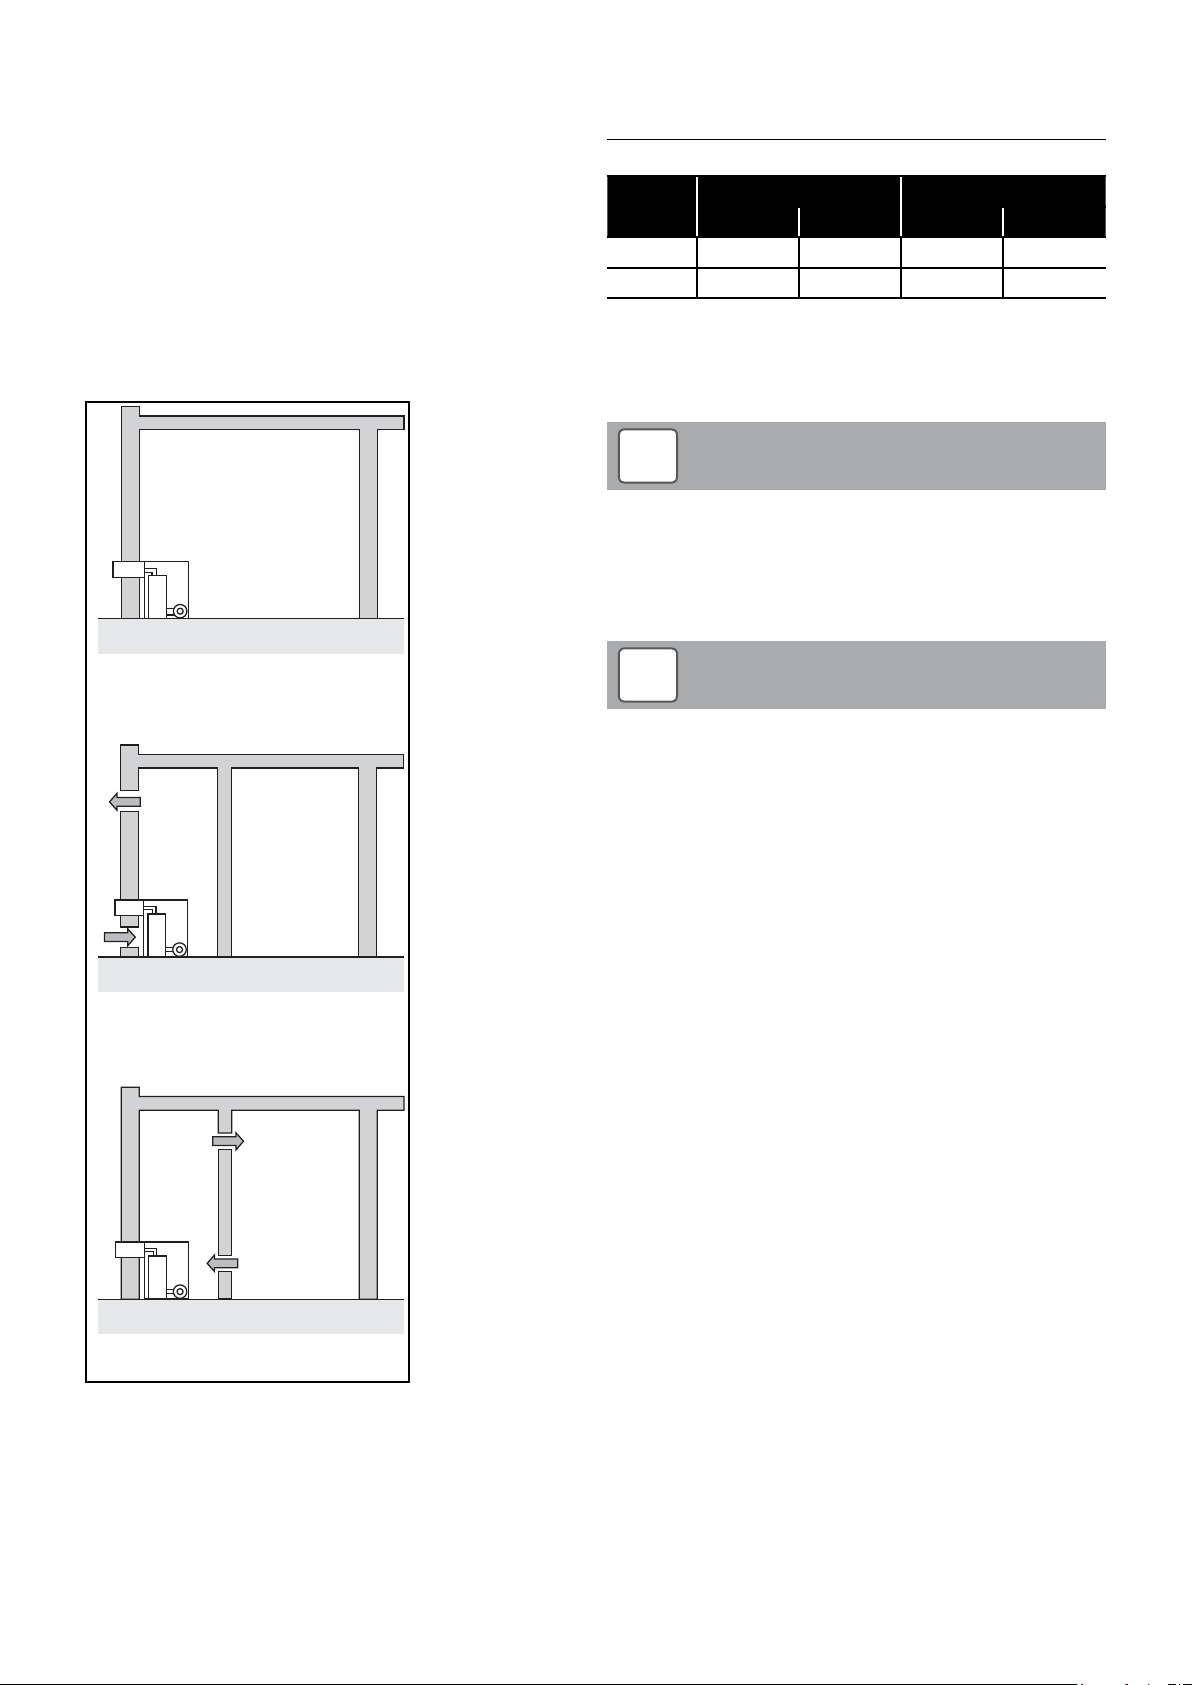
13.2 Air Supply
A sufficient permanent air supply to the boiler should be provided at
all times for the proper combustion of fuel and effective discharge of
combustion products to the open air.
If the oil boiler unit of the VortexAir Hybrid is to be installed indoors
a permanent air supply must be provided for the ventilation of any
confined space in which the boiler is installed to prevent overheating
of the boiler any equipment in and near the boiler. Refer to Figure
13-5 below.
It should be both the designer's and installer's concern that the
air required for the above is introduced so as to cause as little
discomfort as possible to the building occupants and thus to offer
them the least temptation to obstruct the ventilators.
Minimum Size of Air Vents Required
Table 13-5 shows the minimum size of air vents required as
illustrated in Figure 13-4.
Table 13-6: Minimum size of air vents required
Vent
Vent A 116 18 143 23
Vent B 231 36 286 45
Notes
In compliance with Approved Document J (2010 edition incorporating 2010
and 2013 amendments), the above ventilation areas are based on the total
appliance output without deducting the 5 kW allowance for adventitious
ventilation.
VortexAir - 15/21kW VortexAir - 21/26kW
cm² in² cm² in²
Room sealed balanced flue
no ventilation required to room
A
A
Room sealed balanced flue
compartment ventilation from outside
!
In compliance with Approved Document J (2010 edition
incorporating 2010 and 2013 amendments), the above
ventilation areas are based on the total appliance output
without deducting the 5 kW allowance for adventitious
ventilation.
!
For a boiler fitted in a compartment, which is ventilated as
shown, no additional allowance is necessary.
Further details may be obtained from BS 5410:1:2014.
All ventilation is given for domestic applications. For all other cases
refer to BS 5410-2:2013.
NOTE
NOTE
B
B
Room sealed balanced flue
compartment ventilation from room
Figure 13-5: Air supply for room sealed balanced flue boilers
Section 13: Flue System and Air Supply Page 55
Page 56
13.3 Balanced Flue Terminal Positions
The minimum dimensions for locating the terminal from building
features (windows, doors, etc.) are shown in Figure 9-6.
Table 13-7: Flue clearances
Ref Location of outlet Pressure jet Condensing
A
B
C
D
E
F
G
H
J
K
L
M
N
O
P
Q
R
S
NOTES
Section 13: Flue System and Air SupplyPage 56
Page 57

Figure 13-8: Flue clearances
Section 13: Flue System and Air Supply Page 57
Page 58
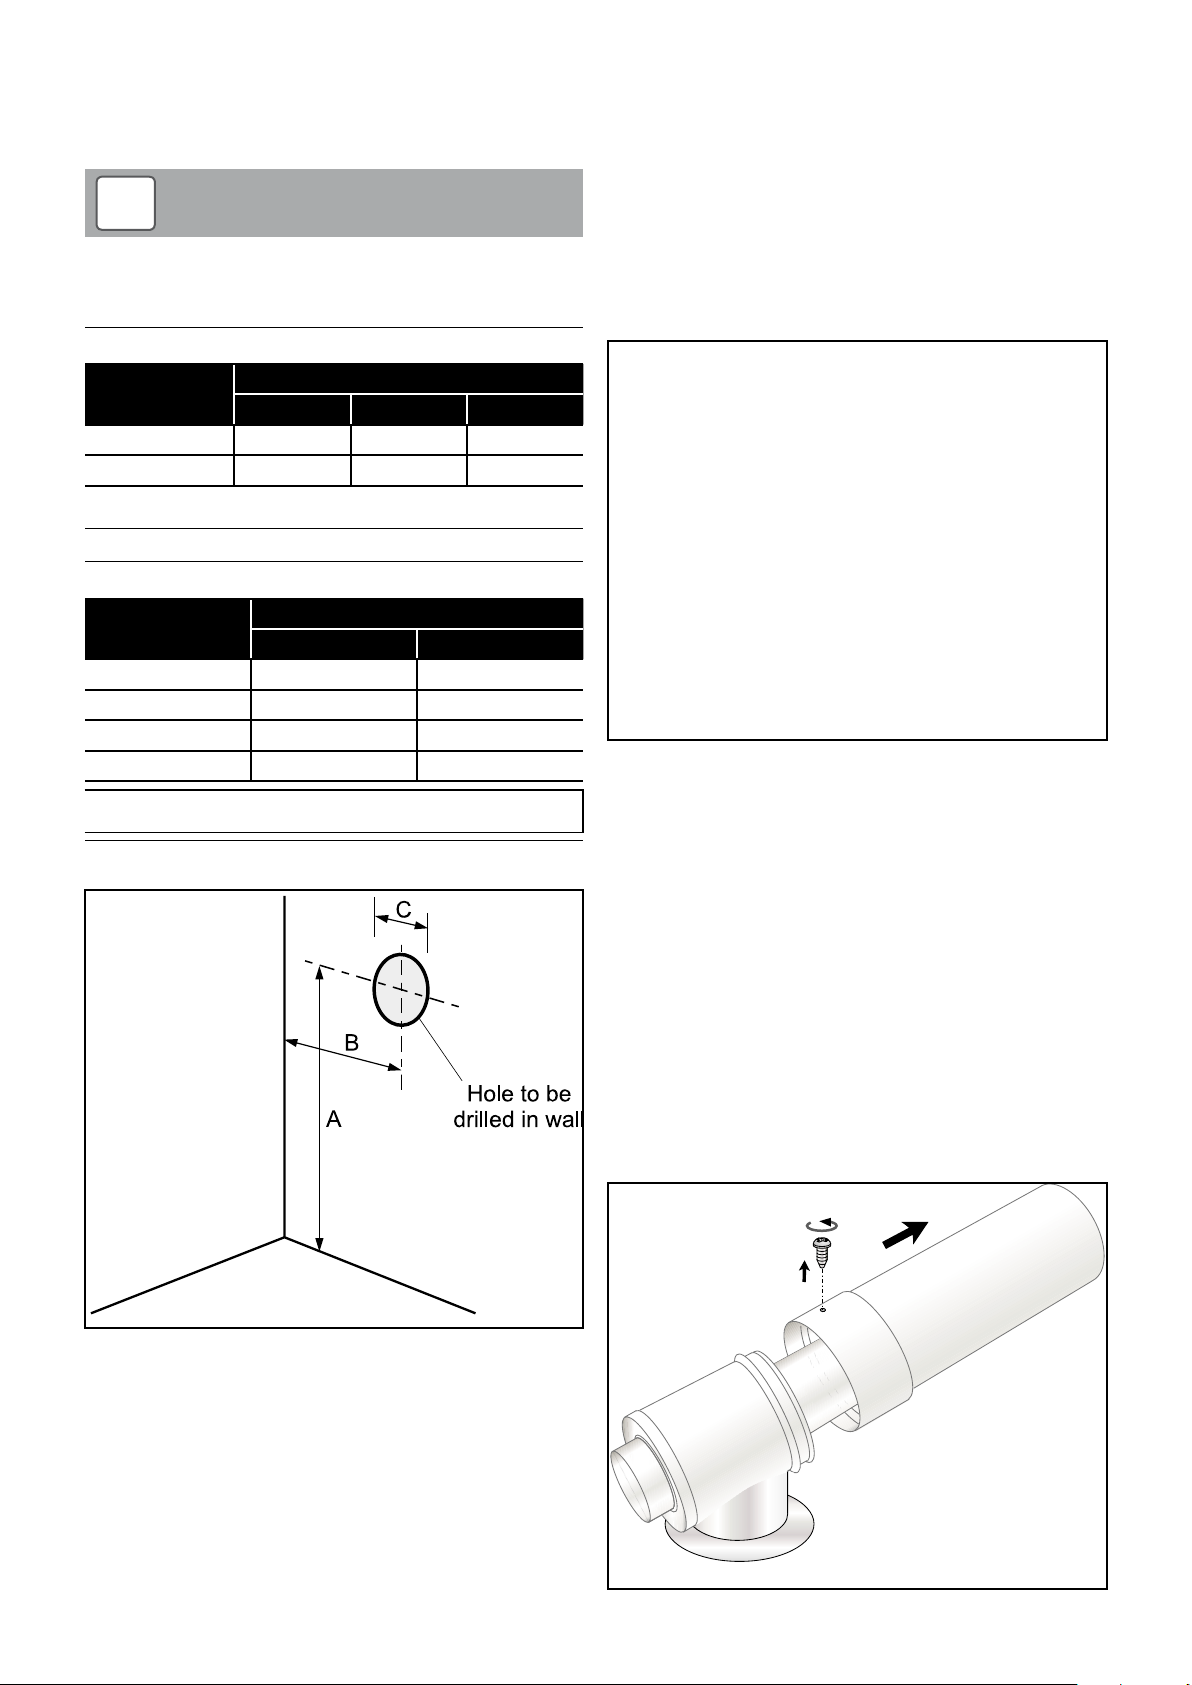
13.4 Prepare the Wall – Indoor installation only
If the oil boiler unit of the VortexAir Hybrid is to be installed indoors,
make the hole in the wall for the low level balanced flue system to
pass through, in the correct position as shown in Figure 9-10.
!
Dimension B given in Figure X-X X includes an ex tra 10mm
over the size of the terminal to provide clearance
Table 13-9: Flue hole dimensions
NOTE
13.5 Fitting the Flue – Low Level (Yellow) balanced
flue system
Remove both the burner access door, the upper access panel
(above the door) and also the access panel on the front face of the
oil boiler casing.
Fit the vertical flue extension section (supplied with the VortexAir
Hybrid).
To do so, locate the threaded stud (at the bottom of the ex tension
section) into the threaded socket in the centre of the flue outlet (on
the top of the boiler heat exchanger). See Figure 9-11.
Model
VortexAir 15/21kW 1370 790 127
VortexAir 21/26kW 1370 790 127
* Includes an additional 100 mm for the anti-vibration mount/feet.
** Includes 600 mm clearance
Table 13-10: Suitable wall thickness
EZ90 (no extension) N/A 162
EZ90 + 225mm 197 387
EZ90 + 450mm 422 612
EZ90 + 950mm 922 1 112
* Includes 150 mm (rear) clearance between inner wall and rear of casing.
Refer to Section 2.7.2.
A* B** C
Minimum Maximum*
Dimensions
To suit wall thickness
Figure 13-12: Fitting the vertical flue extension section
Rotate the extension section to screw the stud into the socket
until the flange (at the bottom of the extension section) is firmly
compressing the circular neoprene gasket on the top of the heat
exchanger.
Depending on the location selected for the Hybrid boiler unit, either
inside or outside the building, remove and discard the circular
‘knock out’ section, as required.
• For outdoor installation: Remove the ‘knock out’ from the end
face of the Hybrid boiler casing.
• For indoor installation: Remove the ‘knock out’ from the rear
face of the Hybrid boiler casing.
Side wall
Rear wall
Figure 13-11: Flue hole dimensions & position for low level system
Fit the boiler connection section
Unpack the flue kit and check the contents.
Take the boiler connector section and remove the self-tapping screw
holding the outer pipe and remove the outer pipe. See Figure 13-13.
•
Figure 13-13: Removing the self-tapping screw
Section 13: Flue System and Air SupplyPage 58
Page 59
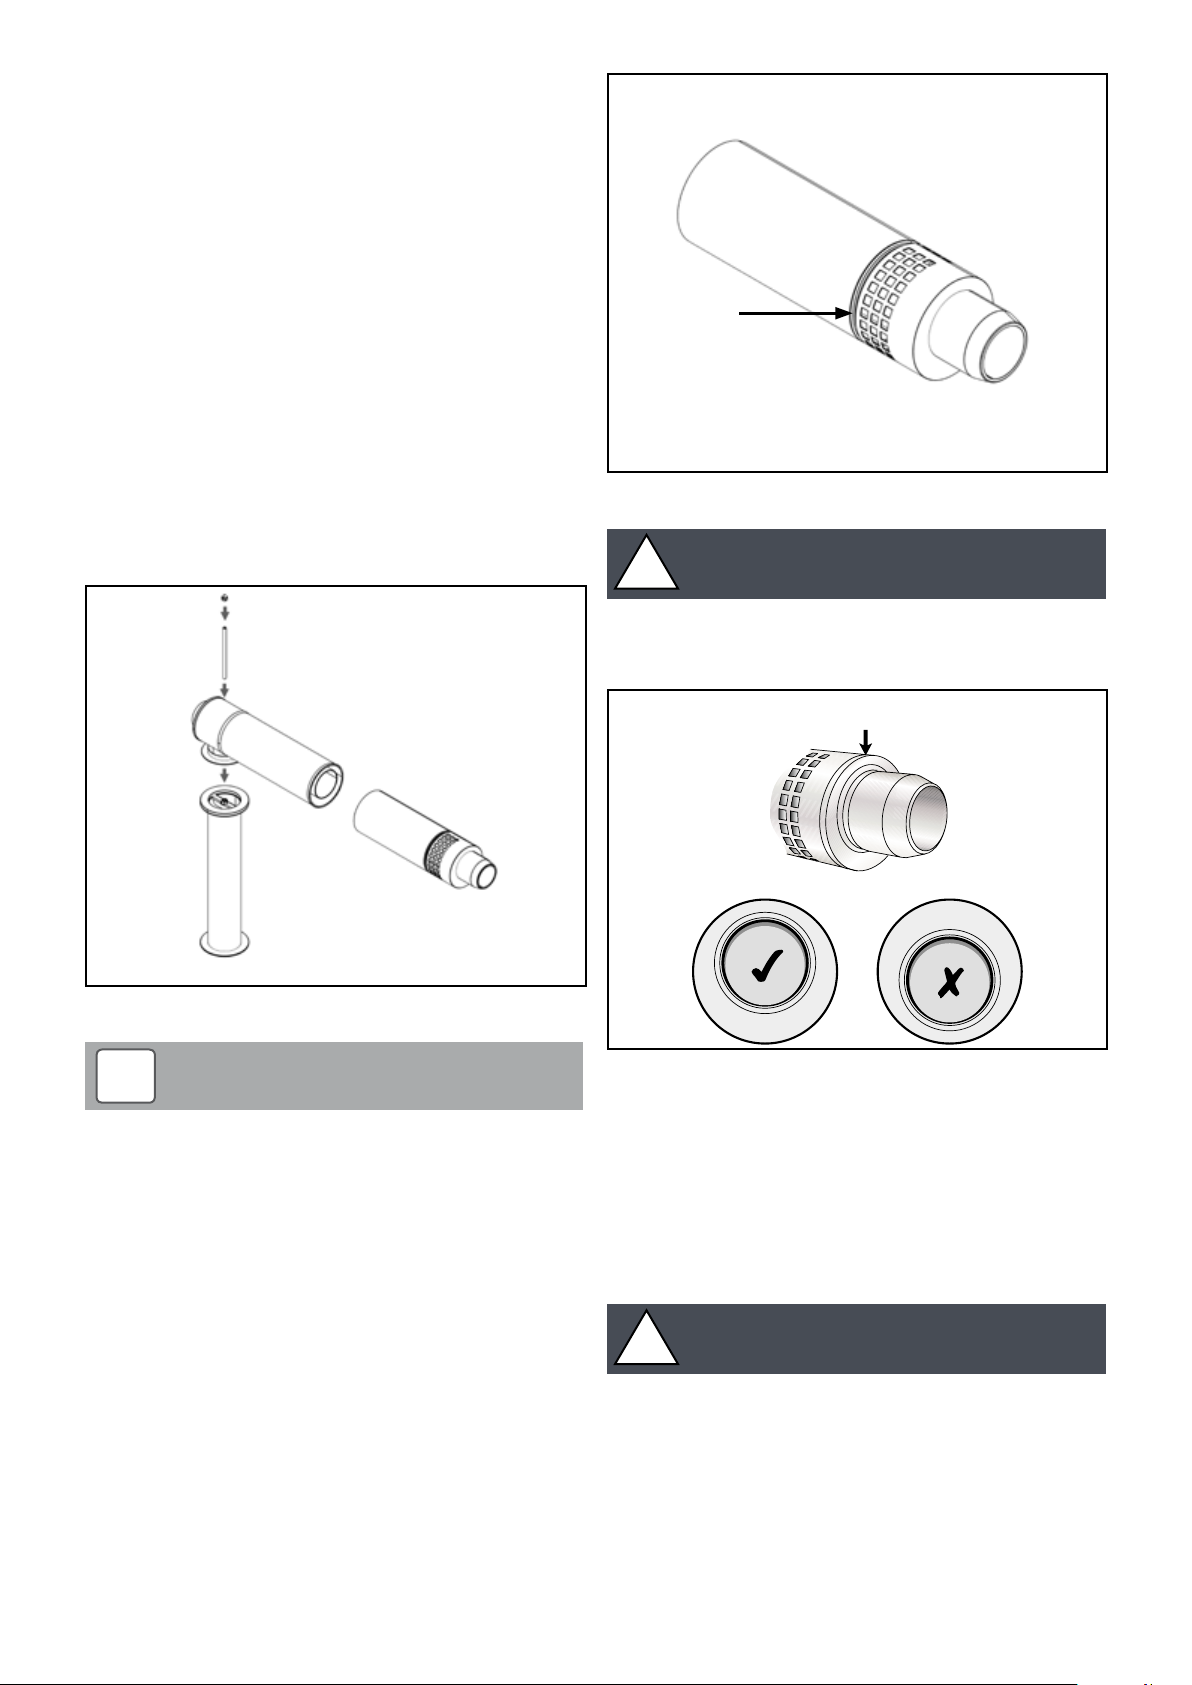
Fit steel washer and sealing washer onto the 150 mm long clamp
bolt (supplied in the boiler accessory pack). Insert clamp bolt into
hole in top of the boiler connector section.
Position the flange of the connector section onto the black neoprene
flue outlet gasket (on the top end of the vertical flue extension).
Engage the clamp bolt into the threaded socket (in centre of flue
outlet).
Position the open end of the connector section to face towards the
opening in the Hybrid boiler unit casing. Hand tighten clamp bolt at
this stage.
Hybrid boiler unit outside building – Refit the outer pipe to the
connector section in through the opening in the end of the Hybrid
boiler unit (above the burner). Align the pre-drilled hole in adjustable
sleeve with the hole in the top of the connector section. Secure
using the self-tapping screw previously removed. See Figure 13-13.
Hybrid boiler unit inside building – Refit the outer pipe to the
connector section in through the hole previously made in the wall
and the opening in the rear face of the Hybrid boiler casing. Align
the pre-drilled hole in adjustable sleeve with the hole in the top
of the connector section. Secure using the self-tapping screw
previously removed. See Figure 13-13.
Groove
Figure 13-15: Terminal section groove
•
Figure 13-14: Flue (exploded)
!
Lubricate all the seals in both the inner and outer sections
with the lubricant supplied and assemble with a twisting
motion.
Fit the Terminal section
Hybrid boiler unit outside building – Fit the terminal section in
through the opening in the end of the Hybrid boiler unit (above the
burner). Engage onto boiler connector section. See Figure 13-12.
From outside Hybrid boiler unit, rotate terminal section to position
‘TOP’ label uppermost . See Figure 13-16.
NOTE
!
Ensure that air inlet holes around outer surface of terminal
are not obstructed.
CAUTION
TOP
Figure 13-16: Correct position of flue terminal
Tighten the domed nut on the threaded bar on the boiler connector
section ensuring a good seal is made bet ween the boiler connector
flange and the vertical flue extension .
Fit the wall dress plate supplied over the terminal using and fix in
place using a suitable silicone sealant (not supplied).
Fit the flue guard supplied using the stainless steel screws and wall
plugs provided.
!
CAUTION
Hybrid boiler unit inside building – Fit the terminal section in
through the hole previously made in the wall and the opening in the
rear face of the Hybrid boiler casing. Engage onto boiler connector
section. See Figure 13-12.
From outside building, rotate terminal section to position ‘TOP’ label
uppermost . See Figure 13-16.
Pull out the terminal as required such that groove around the
terminal is aligned with the outer surface of the casing or wall.
Section 13: Flue System and Air Supply Page 59
The flue guard must always be fit ted to protect persons from
hot flue parts and to prevent entr y of objects into the flue
pipe.
Connect the flexible air snorkel tube to the air inlet spigot on the
boiler connection section of the flue system. Secure using the hose
clip provided.
Connect the other end of the flexible air snorkel tube to the burner
air inlet spigot and secure using the hose clip provided.
Page 60

14 Control Panel
14.1 General
The control panel for the Grant VortexAir hybrid is located inside the
boiler casing, immediately above the burner.
To access the control panel fascia, remove the boiler/burner access
panel on the right hand side of the boiler casing.
Turn the handle at the bottom clock wise to release the catch. Pull
the panel forwards at the bottom and remove it from the boiler. Refer
to Figure 14-1.
14.3 Heat and Electricity Meters
Not all installations will require a Heat meter and Electricity meter.
Usually only installations receiving a Renewable Heat Incentive (RHI)
payment will require both the heat meter and electricity meter to be
fitted. Refer to Section 7 for further information.
When fitted, the integrator unit of the heat meter and the electricity
meter will be located in a purpose made housing immediately
above the control panel. The display screens of both meters are
clearly visible in order for meter readings to be periodically taken, as
required, to determine the amount of RHI to be paid. Refer to Figure
14-3.
Figure 14-1: Removal of boiler access panel
14.2 Hybrid Controls
Refer to Figure 14-3 for the controls located on the control panel
fascia:
Figure 14-2: Resetting the overheat thermostat
Section 14: Control PanelPage 60
Page 61
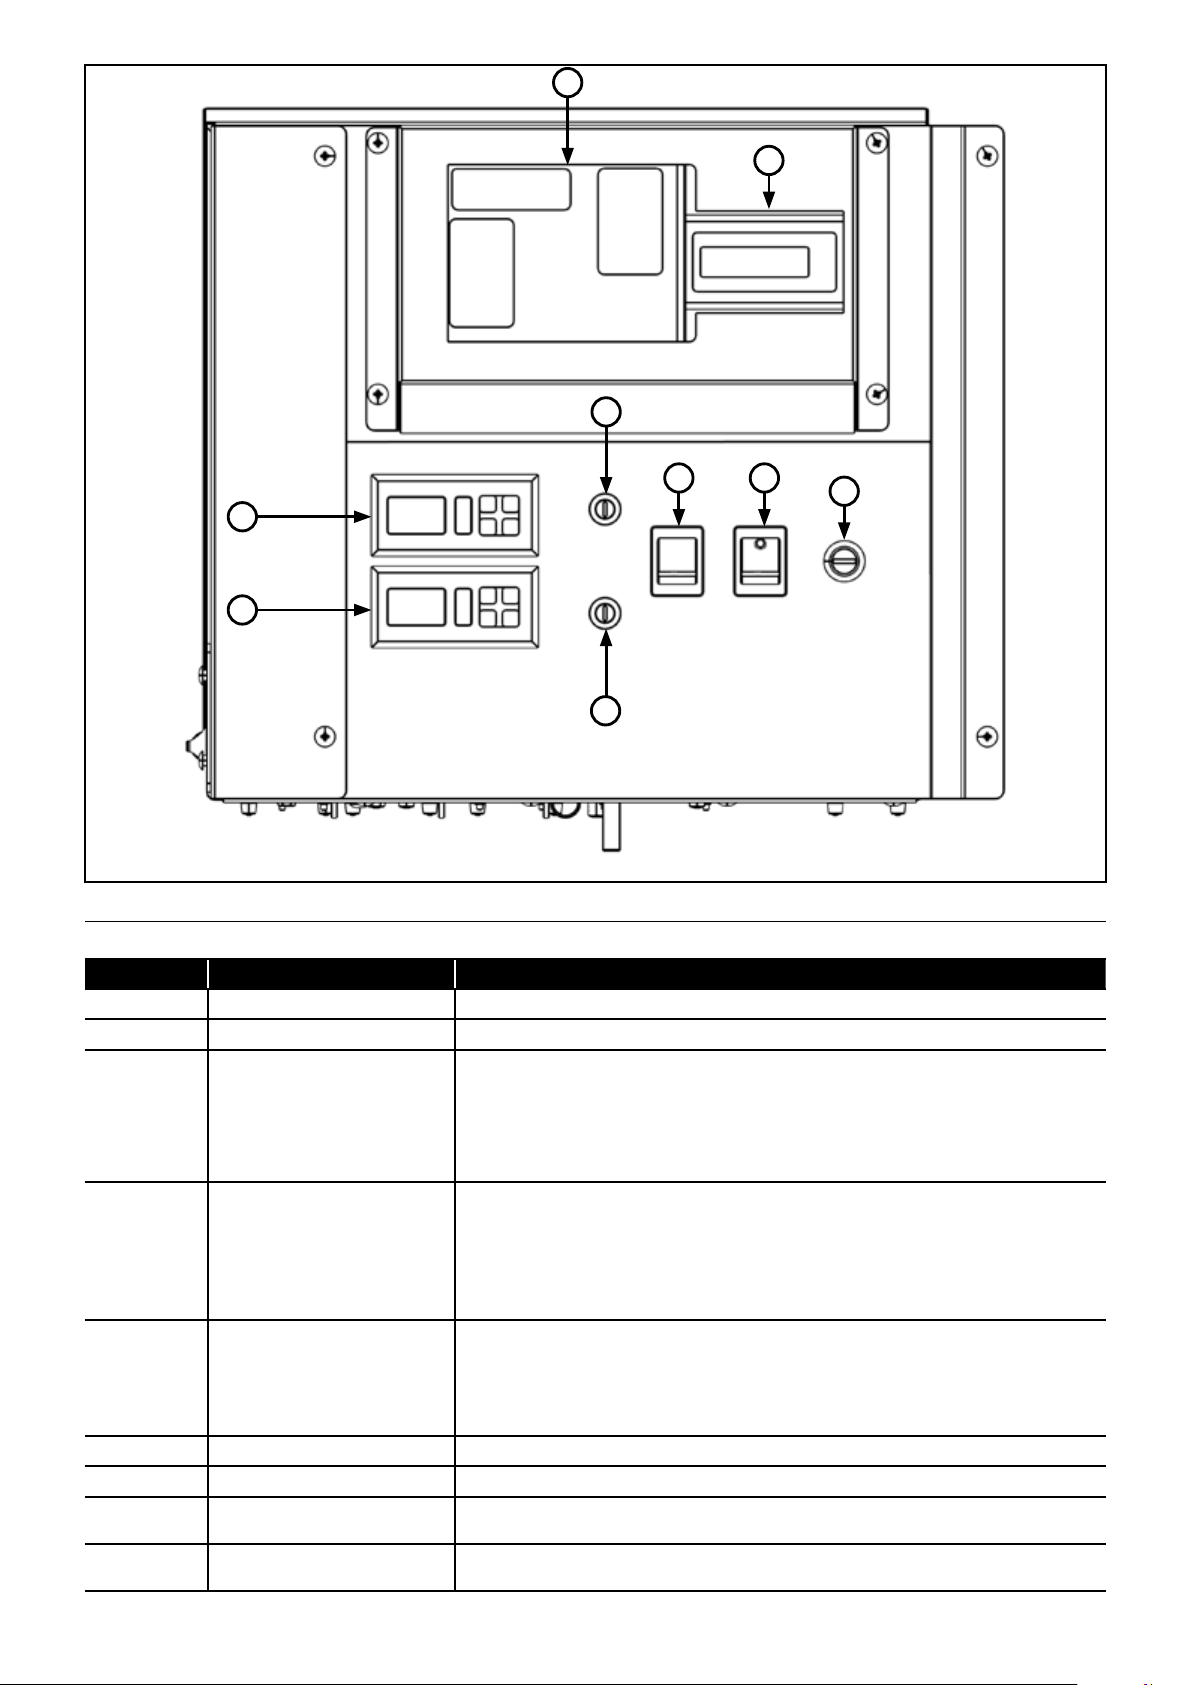
1
2
6
5 4
9
8
7
3
Figure 14-3: Control panel
Table 14-4: Control panel key
Key Item Description
1 Heat meter Refer to Section 7.2 for fur ther information
2 Electricit y meter Refer to Section 7.3 for further information
The safety overheat thermostat will automatically switch of f the boiler in the case of a control
malfunction causing overheating. If this occurs, the boiler will not light until the thermostat is reset.
To reset:
3 Overheat thermostat
4 On / Of f switch
5 Oil / Hybrid switch
6 Fuse - heat meter (1 amp) This fuse protects the electrical supply to the heat meter.
7 Fuse - heating controls (5 amps) This fuse protects the electrical supply to the external heating system controls and the oil boiler.
8 Boiler control thermostat
9 Air control thermostat
• Unscrew the small plastic cap (refer to Figure 13-2)
• Insert a small pointed implement into the hole and press the reset button
• Replace the cap
If this condition continually repeats, contact your Service Engine er.
This switch allows the hybrid unit to be switched off and back on as and when required. With this
switch set to OFF, neither the heat pump or the oil boiler will operate. This will override all heating
demands from the control system for the unit to start.
IMPORTANT: Setting this switch to OFF DOES NOT isolate the electrical supply to the heat pump
or the oil boiler. To fully isolate both heat pump and oil boiler unit, use the lockable external isolator
installed to provide power to the hybrid. Refer to Section 12 (electrical) for details of electrical
wiring.
This switch allows selection of either the 'hybrid' or 'oil' modes of operation, as follows:
• Hybrid - when the switch is set to this, the heat pump either operates alone or in conjunction
with the oil boiler, depending on air control thermostat setting.
• Oil - when the switch is set to this, only the oil boiler can operate.
Set the switch to this option if the oil boiler is to operate in a 'stand-alone' situation, i.e. if the
heat pump has not yet been installed, or it has been shut down for maintenance.
This controls the boiler flow temperature level. It has two temperature settings (R1 and R2).
Refer to Section 15.6.1 (commissioning) for details on how to set the boiler control thermostat.
This monitors the ambient (outdoor) air temperature. It has t wo temperature settings (R1 and R2).
Refer to Section 15.6.2 (commissioning) for details on how to set the air control thermostat.
Section 14: Control Panel Page 61
Page 62

15 Operation
15.1 General
The Grant VortexAir Hybrid consists of a Grant Aerona³ 16kW air
source heat pump and a Grant high efficiency condensing oil boiler
(fitted with a low NOx blue flame burner).
The principal objective of the hybrid is to use the heat pump as
much as possible to provide space heating, either with or without
any assistance from the oil boiler, throughout the major part of the
year. The oil boiler is intended only to suppor t the heat pump when
it cannot provide sufficient heat output to meet the demand and/
or where the heat emitters (eg: radiators) cannot meet the heat
demand at the lower flow temperature under the coldest conditions.
In warmer periods, the heat loss from the building will be
substantially less than that under ‘design conditions’, i.e. the lowest
temperature at which the heat loss of the building was calculated.
Under these warmer conditions the heat pump will be able to
produce the heat output required to meet this reduced heat loss at
a flow temperature sufficient to achieve the necessary heat output
from the heat emitters (radiators).
As conditions get colder the heat loss from the building will increase,
requiring a greater output from the heat pump and a greater flow
temperature to ensure the necessary heat output from the heating
system radiators.
Under the coldest conditions, the heat pump will not be able to
meet the heat loss of the building and, even if it could, the lower
flow temperature will be insufficient to ensure that the radiators
can produce the required heat output. It is under these coldest
conditions that the oil boiler will be required as a back-up. If correctly
sized, the boiler output will meet the heat losses and maintain the
indoor design temperature when the outside (ambient) temperature
is at its lowest, i.e. at the outdoor design temperature used for the
heat loss calculation.
15.2 External heating system controls
The Grant VortexAir will operate in response to a 230V switched
live demand from the heating and hot water control system, e.g. an
S-plan type system. Refer to Section 12 for electrical control wiring
details.
This switched live will be connected to one of three terminals on
the Heating System Controls terminal block, located in the hybrid
control panel, as follows:
• Terminal 7 – Hot water demand (low temperature when using
the Grant Digital two-stage Cylinder thermostat)
• Terminal 8 – Hot water demand (high temperature when using
a standard cylinder thermostat or the Grant Digital two-stage
Cylinder thermostat)
• Terminal 9 – Central heating demand
15.3 Oil/Hybrid Switch
The Grant VortexAir Hybrid has t wo basic operating modes:
• Hybrid – where both the heat pump and oil boiler can operate
together, depending on the prevailing ambient conditions. See
Section 15.4.
• Oil – where only the oil boiler can operate. The heat pump (if
installed and connected) is effectively switched off when the
VortexAir Hybrid is in this operating mode. See Section 15.5.
The operating mode is selected by the setting of the Oil/Hybrid
switch to either ‘Oil’ or ‘Hybrid’ as required. This switch is located
on the hybrid control panel fascia (inside the boiler casing). See
Section 14.
15.4 Hybrid Operation
As each application of the VortexAir Hybrid will be dif ferent, in order
to achieve the most efficient operation of the Grant VortexAir Hybrid,
using the Heat Pump to the maximum, it is essential that the Boiler
Control and Air Control Thermostats (located on the hybrid control
panel) are correctly set during commissioning. Refer to Section 16.6
for details on how to set these two thermostats.
The temperature settings for these two thermostats must be
determined for the building in question using the Grant VortexAir
Hybrid calculator. This is available as a download from the Grant UK
website ww w.grantuk.com. Refer to Section 16.5 for further details.
In the hybrid operating mode (i.e. with the Oil/Hybrid switch set
to ‘Hybrid’) the Grant VortexAir hybrid can operate in one of three
ways:
• Heat pump only – under warm/mild conditions
• Heat pump with a small input from the oil boiler – under colder
conditions
• Oil boiler with a small input from the heat pump – under the
coldest conditions
This operation is basically controlled by the ambient air temperature.
The first and second stage air temperatures, set on the Air Control
Thermostat, will govern when the hybrid switches between these
three forms of operation or where the heat pump automatically
request assistance from the oil boiler.
The first and second stage temperatures, set on the boiler control
thermostat, will govern the flow temperatures when the boiler is in
operation.
!
There must only be ONE switched live on terminals 7, 8 or
9 at any one time. Thus, hot water demands must be set (on
the programmer) to occur at a dif ferent time to the central
heating demand.
NOTE
Section 15: OperationPage 62
Page 63

15.4.1 Heat pump only
When the ambient air temperature is warmer, the heat loss from the
property will be significantly lower than that at the design conditions,
i.e. when the ambient air is at its coldest for the area concerned.
Thus the heat demand will be significantly less than the maximum
and will be within the capacity of the heat pump.
Also, with this lower heat demand the heating system emitters (e.g.
radiators) will be able to deliver the required heat output at the lower
flow temperature from the heat pump, e.g. 45°C.
This will be the situation when the ambient air temperature is above
the first stage (Relay R1) temperature setting of the Air Control
thermostat. Refer to Section 16.6.2.
Thus, at temperatures above this value only the heat pump will be
operating to meet the heat demand of the system.
The default value of this first stage (Relay R1) setting for the Air
Control thermostat
=A1 (parameter SP) default 9°C + A2 (parameter C1) default 3°C =
12°C
The actual values for A1 (parameter SP) and A2 (parameter C1)
must be determined using the Grant Hybrid calculator.
15.4.2 Heat pump with boiler back up
When the ambient air temperature is a little colder, the heat loss
(and thus the heat demand) will increase, although it will still be less
than the maximum heat demand at the design conditions.
Under these conditions the increased heat demand can either
no longer be met by the heat pump alone, or the heating system
emitters (e.g. radiators) will be unable to deliver the required heat
output at the lower flow temperature from the heat pump, or both.
This will be the situation when the ambient air temperature falls
below the first stage (Relay R1) temperature setting, but is still above
the second stage (Relay R2) temperature setting, of the Air Control
thermostat. Refer to Section 16.6.2.
The default value of the second stage (Relay R2) setting for the Air
Control thermostat
= A3 (parameter SP2) default 1°C + A4 (parameter C51) default 3°C
= 4°C
Actual values for A3 (parameter SP2) and A4 (parameter C51) must
be determined using the Grant Hybrid calculator.
In this situation, the heat pump will still be operating but is backed
up by the boiler, operating at a restricted output, to provide a greater
combined heat output and a higher flow temperature (e.g. 55°C) to
allow the heat emitters to deliver the required heat output.
This flow temperature is controlled by the first stage (Relay R1)
setting of the Boiler Control thermostat. Refer to Section 16.6.1.
The default value of this first stage (Relay R1) setting for the Boiler
Control thermostat
=B1 (parameter SP) default 52°C + B2 (parameter C1) default 3°C
= 55°C
Actual values for B1 (parameter SP) and B2 (parameter C1) must be
determined using the Grant Hybrid calculator.
15.4.3 Boiler with heat pump
When the ambient air temperature is at or near the design
conditions, the heat loss (and heat demand) will be at or near
maximum.
Under these conditions the heat demand can only be met by the
boiler, with some contribution from the heat pump.
Also, the heating system emitters (e.g. radiators) must operate at a
higher flow temperature in order to deliver the required heat output.
This will be the situation when the ambient air temperature falls
below the second stage (Relay R2) temperature setting of the Air
Control thermostat.
In this situation, the boiler will be operating at maximum output
(either 21kW or 26kW or as set on commissioning) to meet the heat
demand with a higher flow temperature (e.g. 70°C) to allow the heat
emitters to deliver the required heat output.
This flow temperature is controlled by the second stage (Relay R2)
setting of the Boiler Control thermostat. Refer to Section 16.6.1.
The default value of this second stage (Relay R2) setting for the
Boiler Control thermostat
=B3 (parameter SP2) default 67°C + B4 (parameter C51) default
3°C = 70°C
Actual values for B3 (parameter SP2) and B4 (parameter C51) must
be determined using the Grant Hybrid calculator.
The heat pump is operational and can also operate with the boiler
when the return temperature is low enough, e.g. during initial startup when the system is cold. After that the boiler will be providing the
majority of the heat output to meet the system demand.
15.5 Boiler Only Operation
When the Oil/Hybrid switch is set to ‘Oil’, only the boiler will operate
to meet any heating (or hot water) demand.
The heat pump is effectively switched off and will not respond to
any heating (or hot water) demand.
If only the boiler is installed and it is to operate as a ‘stand-alone’
unit (until the heat pump is installed and connected), the Oil/Hybrid
switch MUST be set to ‘Oil’.
!
In all conditions, the Boiler Control Thermostat will almost
always show an R1 and R2 demand as the water stored in
the boiler will be below the desired flow temperature of the
heat pump. The burner will only fire when there is a demand
from either the Air Control Thermostat or the heat pump is
switched.
NOTE
Section 15: Operation Page 63
Page 64
16 Commissioning
!
After the heat pump has been installed and connected to
the oil boiler, the control parameters shown in Section 16.11
MUST be re-set before the Hybrid system can be operated.
16.1 General
The Grant VortexAir Hybrid unit can be installed in either of the t wo
following ways:
• The oil boiler and heat pump installed at the same time, to
operate together as a hybrid unit, or
• The boiler installed to initially operate as a ‘stand-alone’ unit with
the heat pump installed at a later date.
In either case the oil boiler should be commissioned first using the
procedure detailed in this section.
16.2 Oil Boiler
It is important that the following commissioning procedure is carried
out to ensure safe and efficient operation of the boiler.
To access the boiler/hybrid control panel, remove the lower panel
(turn the handle and pull it forwards at the bottom and remove from
casing). The control panel is shown in Figure 7-6.
16.3 Before Switching On
1. Ensure the boiler On/Of f switch and the test switch are set to
OFF.
2. Check that the high limit thermostat and boiler control
thermostat sensors are correctly located in their respective
pockets. Refer to Figures 5-1, 5-2 or 5-3. Check condition
of thermostat capillaries, not damaged, broken, kinked or
crushed.
3. Remove the nuts and washers securing the front cleaning do or.
Withdraw the door - take care it is HEAVY!
4. Check that the turbulators are in position and that the ends are
vertical.
5. Check that the baf fles are in position. Refer to Figures 11-1, 112, 11-3 or 11-4 as required.
6. Re-fit the cleaning do or and check it is fitted correctly and that
a good seal is made.
7. Remove and check the burner. Check that the burner head
is correct. Refer to Section 2.3 and Figure 11-9. Check the
electrodes are set correctly. Refer to Figure 11-6 or 11-8 as
required. Check the nozzle is correct for the output rating
required. Refer to Section 2.3.
8. Check that the water system has been vented, pressurised and
there are no leaks.
9. Ensure the automatic air vent on the condensing heat
exchanger is open.
10. Check that all fuel line valves are open.
11. Remove the plastic burner cover if it was not previously
removed.
12. Connect a combined vent manifold and pressure gauge to the
pressure gauge connection port on the oil pump. See Figure
3-6. Open the vent screw on the vent manifold to vent the
supply while the pump is running.
13. Check that all system controls are calling for heat and turn the
boiler thermostat to maximum.
WARNING
16.4 Setting the Hybrid Temperature Controls
In order to achieve the most efficient operation of the Grant VortexAir
Hybrid, using the Heat Pump to the maximum, it is essential that the
temperature controls are correctly set before first using the unit.
The required temperature settings are determined by using the
Grant VortexAir Hybrid Calculator, available as a download from the
Grant UK website ww w.grantuk.com.
This calculator must be used to determine the correct setting
temperatures for the two-stage Boiler Control and Air Control
thermostats.
Refer to the user instructions provided with the Grant VortexAir
Hybrid Calculator for guidance.
Enter the following information:
• Calculated heat loss for the building concerned
• Ambient design temperature
• Flow temperature
• Radiator design temperature
• Type of heat emitters
The following nine hybrid settings will be calculated and displayed
by the calculator.
These must be set on the Heat Pump controller, the Boiler Control
Thermostat and the Air Control Thermostat, as detailed below:
• H1 - Heat Pump Flow Temperature
Set the Heat Pump controller to this temperature using Parameter
21 02.
Refer to Section 3.7 of the Installation Instructions supplied with the
Grant Aerona³ heat pump for guidance on accessing and setting
heat pump parameters.
The factory default value for parameter 21 02 is 45°C. This must be
checked and re-set, if required, to give the required value (H1) as
indicated by the calculator.
Note: this can only be done after the Heat Pump has been installed.
• B1 - Oil Boiler Flow Temperature – 1st Stage (relay R1)
Set this as parameter SP for the 1
Thermostat.
The factory default value for parameter SP is 52°C. This must be
checked and re-set, if required, to give the required parameter SP
value (B1) as indicated by the calculator.
Refer to Section 16.5.1 for guidance on setting parameter SP (B1)
on the Oil Boiler Control Thermostat.
• B2 - Oil Boiler Hysteresis – 1st Stage (relay R1)
Set this as parameter C1 for the 1
Thermostat.
The factory default value for parameter C1 is +3°C. This must be
checked and re-set, if required, to give the required parameter C1
value (B2) as indicated by the calculator.
Refer to Section 16.5.1 for guidance on setting parameter C1 on the
Oil Boiler Control Thermostat.
• B3 - Oil Boiler Flow Temperature – 2nd Stage (relay R2)
Set this as parameter SP2 for the 2
Thermostat.
The factory default value for parameter SP2 is 63°C. This must be
checked and re-set, if required, to give the required parameter SP2
value (B3) as indicated by the calculator.
Refer to Section 16.5.1 for guidance on setting parameter SP2 Oil
Boiler Control Thermostat.
st
stage on the Oil Boiler Control
st
stage on the Oil Boiler Control
nd
stage on the Oil Boiler Control
Section 16: CommissioningPage 64
Page 65
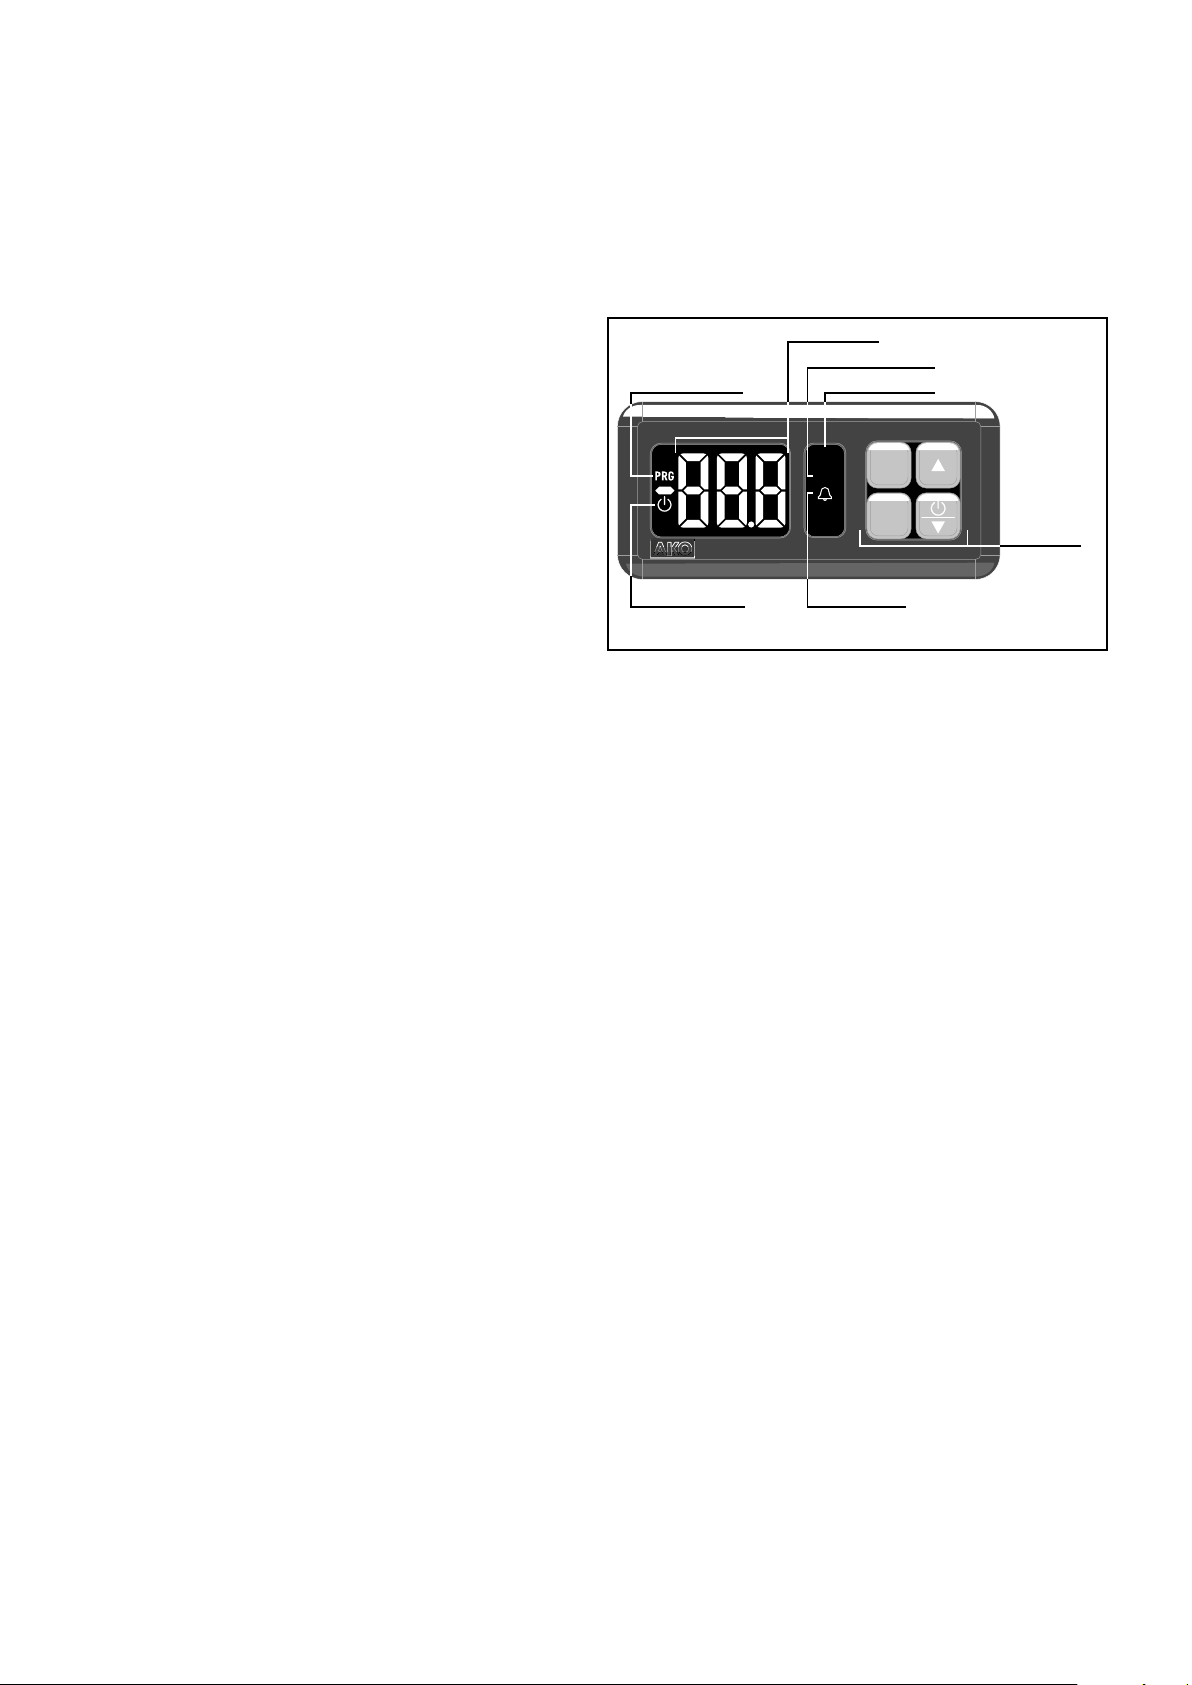
• B4 - Oil Boiler Hysteresis – 2nd Stage (relay R2)
Set this as parameter C51 for the 2
Thermostat.
The factory default value for parameter C51 is +3°C. This must be
checked and re-set, if required, to give the required parameter C51
value (B4) as indicated by the calculator.
Refer to Section 16.5.1 for guidance on setting parameter C51 on
the Oil Boiler Control Thermostat.
nd
stage on the Oil Boiler Control
• A1 - Air Thermostat Temperature – 1st Stage (relay R1)
st
Set this as parameter SP for the 1
Thermostat.
The factory default value for parameter SP is 9°C. This must be
checked and re-set, if required, to give the required parameter SP
value (A1) as indicated by the calculator.
Refer to Section 16.5.2 for guidance on setting parameter SP on the
Air Control Thermostat.
stage on the Air Control
• A2 - Air Thermostat Hysteresis – 1st Stage (relay R1)
st
Set this as parameter C1 for the 1
Thermostat.
The factory default value for parameter C1 is +3°C. This must be
checked and re-set, if required, to give the required parameter C1
value (A2) as indicated by the calculator.
Refer to Section 16.5.2 for guidance on setting parameter C1 on the
Air Control Thermostat.
stage on the Air Control
• A3 - Air Thermostat Temperature – 2nd Stage (relay R2)
nd
Set this as parameter SP2 for the 2
Thermostat.
The factory default value for SP2 is 1°C. This must be checked and
re-set, if required, to give the required parameter SP2 value (A3) as
indicated by the calculator.
Refer to Section 16.5.2 for guidance on setting parameter SP2 on
the Air Control Thermostat.
stage on the Air Control
• A4 - Air Thermostat Hysteresis – 2nd Stage (relay R2)
nd
Set this as parameter C53 for the 2
Thermostat.
The factory default value for parameter C53 is +3°C. This must be
checked and re-set, if required, to give the required parameter C53
value (A4) as indicated by the calculator.
Refer to Section 16.5.2 for guidance on setting parameter C53 on
the Air Control Thermostat.
stage (R2) on the Air Control
16.5 Digital Temperature controllers
There are two digital temperature controllers on the Hybrid unit
control panel:
• The Boiler Control Thermostat
• The Air Control Thermostat
Refer to Figure 14-3 – control panel to locate the two digital
temperature controllers.
Whilst the procedure for setting each digital controller is the same,
the temperature values set on each controller are different. It is
essential that the correct values are set on each controller.
Display
Programming
mode
Relay R2 active
Relay R1 active
R1
ESC
R2
SET
Keypad
Stand-by active
Figure 16-1: Digital temperature controller
There are FOUR buttons on the controller keypad. Their functions
are as follows:
Alarm active
• ESC
Deactivates alarms but they remain signalled (According to
parameter A16).
The save without changes, return to previous level or exit
programming parameter appears on the programming menu.
• SET
Pressing it for 5 seconds allows changing the SP set point of
relay 1.
Pressing it for 10 seconds accesses the programming menu.
In the programming menu, it accesses the level shown on the
display or, during the setting of a parameter accepts the new
value.
• Up
Pressing it for 5 seconds allows changing the SP2 set point of
relay 2.
In the programming menu it allows scrolling around the
different levels, or during the setting of a parameter, changing
its value.
• Down
Pressing it for 5 seconds activates the Stand-by mode and
pressing if for 2 seconds returns the device to the normal
mode. In the Stand-by mode, the unit does not carry out any
action and the display only shows the m indicator.
In the programming menu it allows scrolling around the
different levels, or during the setting of a parameter,
Section 16: Commissioning Page 65
Page 66

The setting procedure for the two digital controllers is as follows:
16.5.1 Setting the Boiler Control Thermostat
!
If no button is pressed for ten seconds, the display will revert
to normal display (temperature).
Set the heating system controls to OFF, e.g. set the
1.
programmer to OFF.
2. Set the ‘Oil/Hybrid’ switch on the control panel to ‘Oil’.
3. Switch on the electricit y supply.
4. Set the ON/OFF switch on the control panel to ON.
st
To set the 1
1. Press and hold SET button for 10 seconds until ‘PrG’ is
2. Release button – ‘rE’ is then displayed (1
3. Press SET – ‘SP’ is displayed.
4. Press SET again – the value of parameter SP is displayed.
5. Alter the value, if required, using the UP or DOWN arrow
6. Press SET to confirm value – ‘SP’ is then displayed again.
7. Press UP arrow button t wice – ‘C1’ is displayed
8. Press SET - the value of parameter C1 is displayed. Default
9. Alter the value, if required, using the UP or DOWN arrow
10. Press SET to confirm value – ‘C1’ is then displayed again.
11. Press ESC to go back to ‘rE’ display.
12. Press ESC again to go back to normal display (temperature).
To set the 2
1. Press and hold SET button for 10 seconds until ‘PrG’ is
2. Release button – ‘rE’ is then displayed (1
3. Press UP arrow button – ‘rE2’ is displayed.
4. Press SET – ‘SP2’ is displayed.
5. Press SET again – the value of parameter SP2 is displayed.
6. Alter the value, if required, using the UP or DOWN arrow
7. Press SET to confirm value – ‘SP2’ is then displayed again.
8. Press UP button once – ‘C51’ is displayed.
9. Press SET - the value of parameter C51 is displayed. Default
10. Alter the value, if required, using the UP or DOWN arrow
11. Press SET to confirm value – ‘C51’ is then displayed again.
12. Press ESC to go back to ‘rE2’ display.
13. Press ESC again to go back to normal display (temperature).
Stage (relay R1) parameter values B1 & B2:
displayed.
Default value 52°C.
buttons.
Set parameter SP to value B1 as indicated by the calculator.
value +3°C.
buttons.
Set parameter C1 to value B2 as indicated by the calculator.
nd
Stage (relay R2) parameter values B3 & B4:
displayed.
Default value 67°C.
buttons.
Set parameter SP2 to value B3 as indicated by the calculator.
value +3°C.
buttons.
Set parameter C51 to value B4 as indicated by the calculator.
NOTE
st
stage settings).
st
stage settings).
16.5.2 Setting the Air Control Thermostat
To set the 1
1. Press and hold SET button for 10 seconds until ‘PrG’ is
2. Release button – ‘rE’ is then displayed (1
3. Press SET – ‘SP’ is displayed.
4. Press SET again – the value of parameter SP is displayed.
5. Alter the value, if required, using the UP or DOWN arrow
6. Press SET to confirm value – ‘SP’ is then displayed again.
7. Press UP arrow button t wice – ‘C1’ is displayed
8. Press SET - the value of parameter C1 is displayed. Default
9. Alter the value, if required, using the UP or DOWN arrow
10. Press SET to confirm value – ‘C1’ is then displayed again.
11. Press ESC to go back to ‘rE’ display.
12. Press ESC again to go back to normal display (temperature).
To set the 2
1. Press and hold SET button for 10 seconds until ‘PrG’ is
2. Release button – ‘rE’ is then displayed (1
3. Press UP arrow button – ‘rE2’ is displayed.
4. Press SET – ‘SP2’ is displayed.
5. Press SET again – the value of parameter SP2 is displayed.
6. Alter the value, if required, using the UP or DOWN arrow
7. Press SET to confirm value – ‘SP2’ is then displayed again.
8. Press UP button once – ‘C51’ is displayed.
9. Press SET - the value of parameter C51 is displayed. Default
10. Alter the value, if required, using the UP or DOWN arrow
11. Press SET to confirm value – ‘C51’ is then displayed again.
12. Press ESC to go back to ‘rE2’ display.
13. Press ESC again to go back to normal display (temperature).
Set the ON/OFF switch on the control panel to OFF.
st
stage (relay R1) parameter values A1 & A2:
displayed.
st
stage settings).
Default value 9°C.
buttons.
Set parameter SP to value A1 as indicated by the calculator.
value +3°C.
buttons.
Set parameter C1 to value A2 as indicated by the calculator.
nd
Stage (relay R2) parameter values A3 & A4:
displayed.
st
stage settings).
Default value 1°C.
buttons.
Set parameter SP2 to value A3 as indicated by the calculator.
value +3°C.
buttons.
Set parameter C51 to value A4 as indicated by the calculator.
Section 16: CommissioningPage 66
Page 67
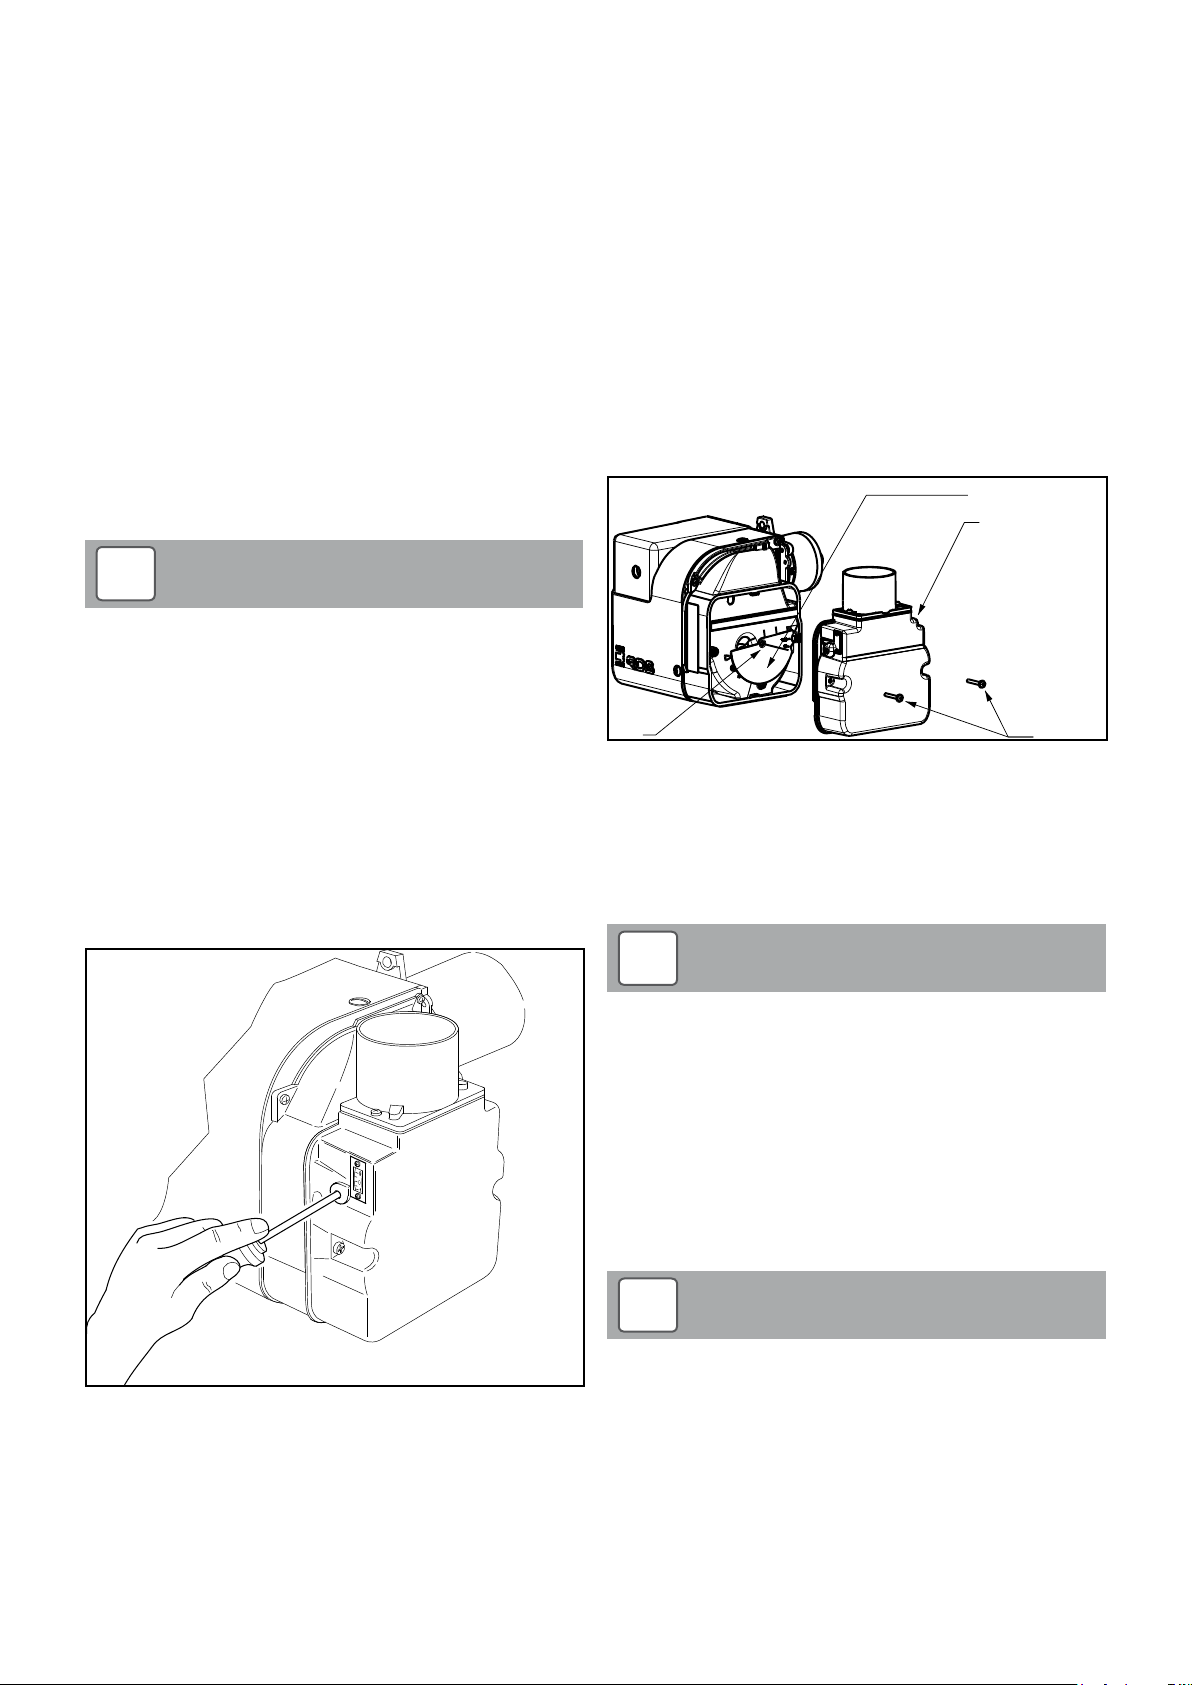
16.6 Switching On
If the boiler is installed as a ’stand-alone’ unit, i.e. the heat pump is
not yet installed
Check the ‘Oil/Hybrid’ switch on the control panel is set to ‘Oil’.
Set all system controls as required and set the ON/OFF switch on
the control panel to ON.
1. Switch on the electricit y supply.
2. Set the Boiler On/Of f switch to ON. A neon in the switch
lights when it is in the ON position. The boiler will now light
automatically. Note that the neon lights when the boiler is
switched on, but does not necessarily indicate the burner is
firing.
3. The burner fan will star t and the burner will light within about
12 seconds. If the burner does not light and the 'Lock-out' reset
button lights, wait for about 45 seconds then press the reset
button to restart the ignition process. This procedure may have
to be repeated several times during first lighting.
4. With the burner alight, check the fuel pressure.
5. Refer to the Technical Information, Section 2.3.
6. Adjust the pressure if necessar y - see Figure 3-6.
16.8 Air Adjuster Disc – 15/21kW only
The boiler is supplied with an air adjuster disc loose in the
accessories bag.
To fit and position the air adjuster disc when downrating the
15/21kW boiler to 15 or 16kW output:
1. Ensure the boiler is isolated from the electrical supply.
2. Remove the burner from the boiler.
3. Undo the t wo screws (1) and remove the air damper assembly
from the side of the burner.
4. Remove the screw (2) from the centre of where the air adjuster
disc will be fitted.
5. Position the disc such that the disc setting ‘B’ (corresponding
to 15 or 16kW output setting – refer to Section 2.4) is located
against the cast boss on the fan housing.
6. Replace the screw in the centre of the air adjuster disc and
tighten.
7. Re-fit the air damper assembly to the side of the burner and
reassemble in reverse order.
Air adjuster disc
Air damper assembly
!
It is important that the oil pressure is correctly set.
14. Operate the boiler until it reaches normal operating
temperature. Check oil supply/return pipe for leaks, rectifying
where necessary.
15. Check the operation of the boiler thermostat. Ensure that by
turning it anticlockwise it switches the burner off.
16. With the burner alight, re-check the fuel pressure and re-adjust
if necessary. Turn the boiler off, remove the pressure gauge
and replace the plug in the pump.
17. Ensure that there are no oil leaks, replace the burner cover.
NOTE
6.7 Air Damper Adjustment
Use a 3 mm Allen key to adjust the air damper. Refer to Figure 16-2.
2
Figure 16-3: Fitting the air adjuster disc
1
16.9 Running the Boiler
1. Relight the boiler and allow it to run for at least 20 minutes.
2. Check the smoke number, if satisfactor y check the CO2.
Set the CO2 to the value given in Section 2.4 for the boiler
concerned.
!
Final combustion readings can only be measured outside
through the low level flue terminal (or the test point on the
conventional flue starter elbow when used) with all the casing
panels fitted.
3. Use the hexagonal key supplied to adjust the burner air
damper (refer to Figure 16-2) as required. Turning the screw
anti-clockwise closes the damper and increases CO2 level,
turning the screw clockwise opens the damper and reduces
CO2 level.
4. Re-check the smoke number if the damper has been moved.
Under no circumstances must the smoke number be above 1.
NOTE
NOTE
Figure 16-2: Air damper adjustment
!
It is important that the air damper is correctly set.
5. Check the flue gas temperature by placing the combustion
analyser in the low level flue terminal (or into the test point on
the starter elbow if either the Green system or Hybrid system is
used).
Section 16: Commissioning Page 67
Page 68
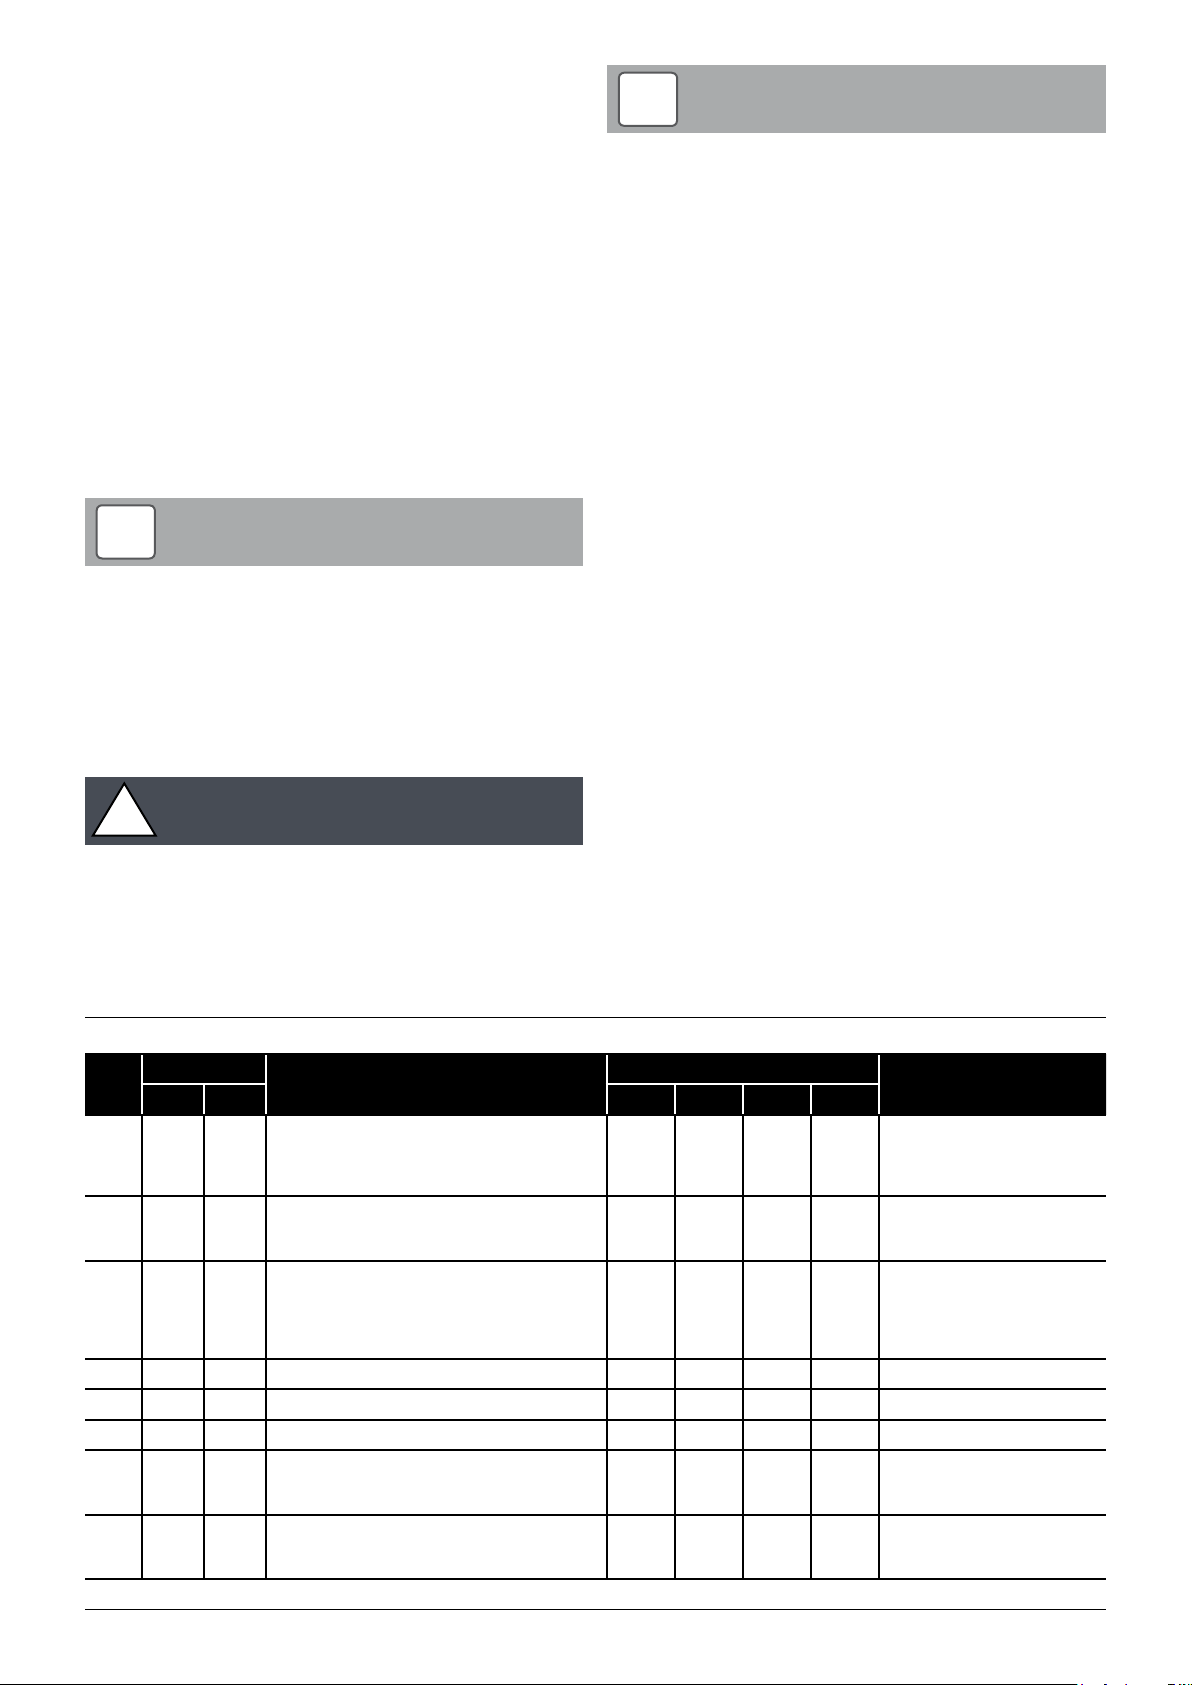
16.10 Balancing the System
1. When the boiler has been adjusted and is running satisfactorily,
balance the central heating system by adjusting the radiator
lock shield valves. Start with the radiator nearest the boiler and
adjust the valves to achieve the required temperature drop
across each radiator. If thermostatic radiator valves have been
installed, check the system by-pass.
2. Switch of f the boiler.
16.11 Completion
1. With the system hot, check again for leaks, rectif ying where
necessary. Drain the system while it is hot to complete the
flushing process. Refill, vent and pressurise.
2. A suitable central heating system inhibitor must be added to
protect the system against the effect of corrosion.
3. A suitable antifreeze should be used to prevent damage to the
boiler in areas where electrical power failure can occur in winter
months.
4. Replace the top, front and rear panels as necessar y.
!
After commissioning the boiler complete the Commissioning
Form and the OFTEC CD/11 commissioning repor t.
Leave the top copy with the User and retain the carbon copy.
If the boiler is to be left in service with the User, set the controls and
room thermostat (if fitted) to the User's requirements.
If the boiler is not to be handed over immediately, close the boiler
fuel supply valve and switch off the electricity supply.
!
If there is any possibilit y of the boiler being lef t during frost
conditions, then the boiler and system should be drained.
Alternatively, a suitable antifreeze should be used.
To allow the boiler to be commissioned and ser viced correctly a
combustion test point is provided on the front cleaning door.
The CO
and smoke test may all be carried out using this test point.
2
NOTE
CAUTION
!
The test point is not suitable for measuring boiler efficiency
or conventional flue draught.
When using the test point on the cleaning cover note that the flue
gas temperature reading will be higher than that measured in the
flue thus resulting in an inaccurate efficiency reading. To obtain an
accurate flue gas temperature and efficiency, the reading can only
be measured outside through the low level flue terminal or the test
point on the conventional flue starter elbow when fitted - with all the
casing panels fitted.
NOTE
16.12 Heat Pump
16.12.1 Heat Pump Control Parameter Set tings
After the heat pump has been installed and connected to the oil
boiler, the control parameters given in Table 16-4 MUST be updated
before the hybrid system can be operated.
These are accessed via the Installer Menu on the Heat Pump
Remote Controller.
Refer to Section 9.5 of the Aerona³ Installation and Servicing
Instructions for details of how to access the Installer Menu.
16.12.2 Setting the Heat Pump flow temperature
Set the Heat Pump controller to this temperature using Parameter
21 02.
Refer to Section 3.7 of the Installation Instructions supplied with the
Grant Aerona³ heat pump for guidance on accessing and setting
heat pump parameters.
The factory default value for parameter 21 02 is 45°C. This must be
checked and re-set, if required, to give the required value (H1) as
indicated by the calculator.
Note: this can only be done after the Heat Pump has been installed.
Table 16-4: Control parameters updates
Level
* When parameter 4600 is changed to 3, parameter 4700 (EHS type of function) becomes disabled.
Parameter
Group Code Default Min. Max. Unit
I 21 02
I 21 04
I 46 00
I 46 01 Manual water set point 50.0 40.0 60.0 0.5°C Change to parameter 2102 value
I 46 04 Heater activation delay time 5 0 900 1min Change to 45.0
I 46 05 Integration time for star ting heaters 600 0 900 °C×sec Change to 0
I 46 10
I 51 46
Maximum outgoing water temperature in Heating
Minimum outdoor air temperature corresponding
to maximum outgoing water temperature (Te1)
Conditions to be available backup heaters
Terminal 46: DHW electric heater or backup heater
Function description
mode (Tm1)
Backup heater type of function
0=disable
1=Replacement mode
2=Emergency mode
3=Supplementary mode
0=always enabled
1=depends on outdoor air temperature
0=DHW Electric heater
1=Backup heater
Display and input value
45.0 23.0 60.0 0.5°C
-4 -20.0 50.0 0.5°C
0 0 3 -
1 0 1 - Change to 0
0 0 1 - Change to 1
given in the hybrid calculator to
temperature' (cell C11) given in
Change to 3 (supplementary
Settings
Change to 'heat pump flow
temperature' (value of H1)
maximum of 55°C.
Change to 'ambient design
the hybrid calculator.
mode)*
Section 17: ServicingPage 68
Page 69
17 Servicing
This section covers the servicing procedure for the oil boiler.
For servicing information on the heat pump, refer to the Installation
Instructions supplied.
To ensure ef ficient operation of the boiler it is recommended that
it is checked and serviced as necessary at regular inter vals. The
frequency of servicing will depend upon the particular installation
conditions and usage, but in general once per year should be
adequate.
Servicing and replacement of parts must only be carried out by a
suitably qualified engineer.
!
Before star ting any work on the boiler, or fuel supply please
read the health and safet y information given in Section X.
External equipment operated at 230 volts should not be
serviced or repaired under adverse weather conditions.
WARNING
17.1 Checking Before Ser vicing
The following sequential checks should be made before any
servicing:
1. Check the flue terminal and ensure it is not blocked or
damaged.
2. Run the boiler and check the operation of its controls.
3. Ensure that all water/fuel system connections and fittings are
sound. Remake any joints and check the tightness of any
fittings that may be leaking.
4. If the boiler is used on a sealed central heating system, check
the system pressure, check the operation of the pressure relief
valve and check the expansion vessel air charge. See Section
7.2.
5. Refill, vent and re-pressurise the system as necessar y. See
Section 7.3.
6. Check that the louvres in the front panel are clear.
7. Remove any sludge/water from the fuel tank by opening the
sludge valve at the lower end of the tank.
8. With the fuel supply valve closed, clean/replace the filter
element and clean the filter bowl.
9. Braided flexible fuel supply hoses (as supplied with the boiler)
should be replaced annually. If long-life hoses have been
installed, these should be inspected annually. If in doubt
replace the hoses. In any event, these hoses must be replaced
every five years.
17.2 Dismantling Prior to Servicing
The procedure for dismantling the boiler is as follows:
1. Remove the front panel by turning the handle and withdrawing
it forwards at the bottom.
2. Remove the four screws securing the top panel and carefully
lift it off, taking care not to damage the insulation.
3. Remove the burner fixing nut (top of mounting flange) and
withdraw the burner. If required, disconnect the flexible oil
hose(s), use a suitable container to prevent any oil spillage.
!
If two flexible hoses are connected to the burner, identif y
(mark if necessary) which is the inlet and return if they are to
be disconnected.
NOTE
17.3 Cleaning the Boiler
The procedure for cleaning the boiler is as follows:
1. Remove the nuts and washers securing the front cleaning do or
and withdraw the door. Take care - it is heav y.
2. Remove the baf fles.
3. Remove all deposits from the baf fle plates and all the boiler
internal surfaces using a stiff brush and scraper if necessary.
4. Check the condition of the flue, clean as necessar y.
5. Check the condition of the front cleaning do or seal, replace if
necessary.
6. Replace the baf fles, ensuring they are correctly fitted.
7. Pull out the spiral turbulators from the heat exchanger tubes.
8. Clean the turbulators using a stif f brush
9. Test the heat exchanger condensate drain by pouring water
into one of the lower tubes and observe whether the water
discharges from the 22 mm condensate outlet. Replace the
turbulators.
10. Replace the front cleaning door, ensuring the seal is in good
condition and secure it in position with the nuts and washers
previously removed. Tighten to form a seal.
11. Remove the condensate trap and check that it is not blocked
and is operating correctly, i.e. the float is free to move. Clean
the trap and float as required. Refer to Section 6.8.
12. Check that the boiler condensate outlet is unobstructed. Clean
if necessary.
!
NOTE
!
Before ser vicing, set the boiler On/ Of f switch to Of f, isolate
the electricity supply and close the fuel supply valve.
Allow the boiler to cool.
The data label on the inside of the case side panel will indicate the
fuel used and the nozzle fitted.
WARNING
The condensate trap and condensate outlet must be checked
on every service and cleaned as necessar y.
Section 16: Servicing Page 69
Page 70

17.4 Cleaning the Burner
The procedure is as follows:
1. Combustion head: Lo osen the two screws securing the
combustion head and withdraw the head.
2. Clean the combustion head.
3. Inspect the ignition electrodes: Lo osen the electrode clamp
screw and withdraw the electrode assembly. Wipe clean and
check for any cracks in the ceramic insulation. Replace if
necessary.
4. Check the electrode setting and dif fuser setting.
5. To adjust the electrodes: Loosen the electrode clamp screw
and move the electrode unit to achieve the gap 'in Figure 16-7,
tighten the screw.
6. To adjust the air damper, refer to Section 6.7.
7. Nozzle: The nozzle should be replaced on an annual ser vice.
Check that the nozzle size and type are correct, refer to table in
Section 2.4 and boiler data label.
8. With the combustion head removed, lo osen the electrode
assembly clamp screw and slide the electrodes away from the
nozzle.
9. Do not attempt to clean the nozzle.
10. Remove the nozzle using a good fitting spanner (16 mm).
!
CAUTION
All models
UV sensor:
The photocell is a push-fit in the burner body. Carefully pull it out to
clean.
Burner fan:
With the air intake grille or spigot removed, remove the screws
securing the fan housing cover (R/H side of burner) and remove the
cover.
Inspect the fan and housing and clean as necessary. Replace the
cover.
Pump filter:
With the burner cover removed, remove the four screws securing the
pump end cover. Remove the filter and wash in kerosene. Replace
the filter and end cover, ensure the 'O' ring is in position.
Re-assemble in reverse order.
!
To ensure safe and efficient operation of the boiler it is
important that recommissioning is carried out, especially
combustion checks (CO2 level, flue gas temperature and
smoke number) after the boiler has been ser viced.
Refer to the Commissioning instructions in Section 16.
WARNING
The use of an ill-fitting spanner will damage the nozzle and
could lead to an incorrect flame pat tern.
11. Always check the electrode settings af ter replacing the nozzle,
see Figure 16-7.
Section 17: ServicingPage 70
Page 71
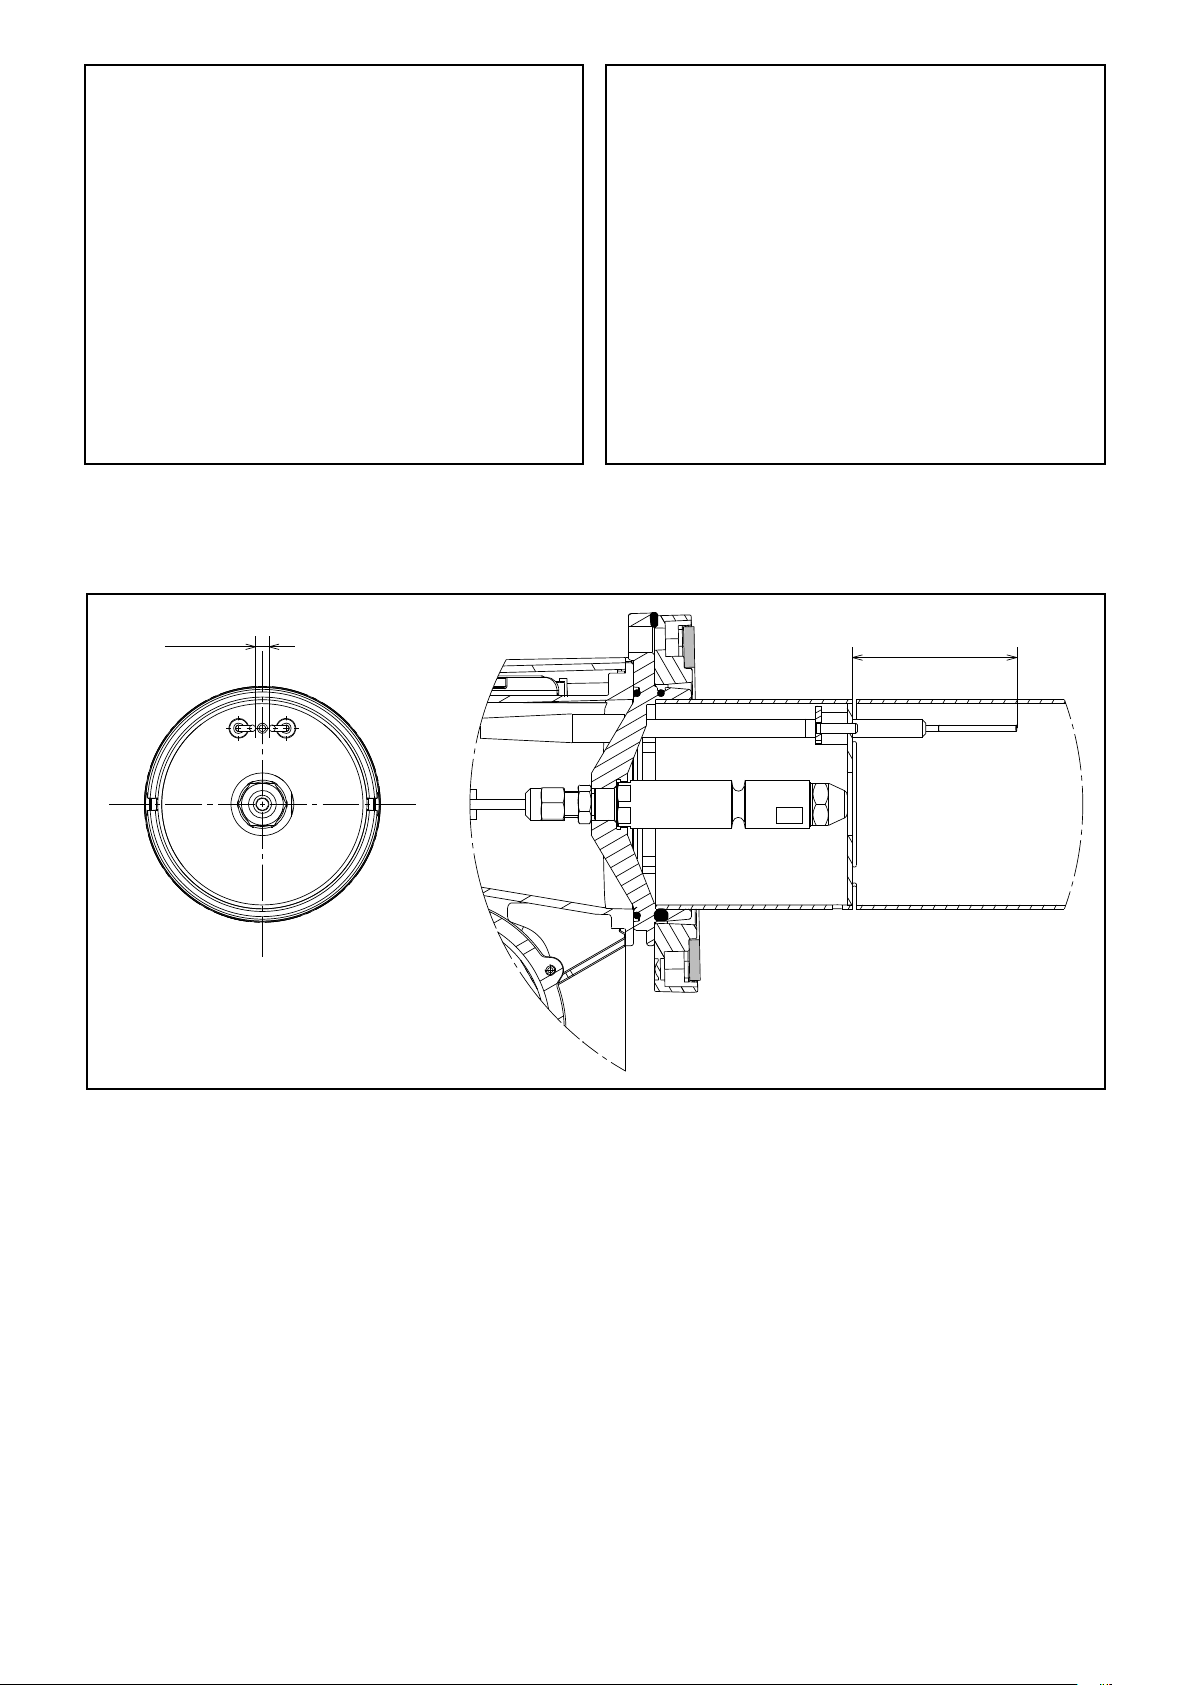
Figure 16-5: 15/21kW baffles Figure 16-6: 21/26kW baffles
±0.5
5
6 3
±0.5
Figure 16-7: Ignition electrodes
Section 17: Servicing Page 71
Page 72
18 Fault Finding
18.1 Burner Fault Indication
Whenever a burner lockout occurs the cause is displayed via the reset push button indicator LED on the control box. The colour, sequence
and speed of the indicator LED flashes identif y the specific lockout t ype and the possible causes are listed in Table X-1.
Table 18-1: Burner fault indication
Lockout description Lockout time LED colour Pr obable cause
Presence of extraneous light during
Presence of extraneous light detected
Extraneous light detected during
The flame is not detected after the
Flame failure during operation After 3 recycles
Malfunction in the internal control
circuit that drives the oil valve
standby
during pre-purging
post-purging
safety time
Fan motor error Immediate (during pre-purge)
Eeprom error Immediate (during pre-purge)
After 5 seconds from oil-valve starts
After 25 seconds
After 25 seconds
After 25 seconds
Immediate (during pre-purge)
RED
blinking
RED
blinking
RED
blinking
RED
steady ON
RED
blinking
RED, ORANGE
blinking inverted
RED, GREEN
blinking inverted
ORANGE, GREEN
blinking inverted
•Presenceofafalseflamesignalbeforetheheat
request
•Presenceoffalseflamesignalduringpre-purging
•Presenceoffalseflamesignalduringpost-purging
(or pre-heating if the short-circuit socket is not connected
•UVsensordefectiveordirt y
•Oilvalvedefectiveordirt y
•Faultyignitiontransformer
•Badlyregulatedburner
•Oilfuelnotpresent
•Badlyadjustedburner
•Oilvalvedefectiveordirt y
•UVsensordefectiveordirt y
•Faultyfanmotor
•Fanmotornotconnected
•Faultyoilvalve
•Internalcontrolcircuitthatdrivestheoilvalvefaulty
•Faultyinternalmemory
18.2 Burner Fault Diagnostics
Table 18-2: Burner faults
Faults Possible cause
The burner does not start when there
is heat demand
The burner goes into lockout mode
before or during the pre-purging
Burner runs normally in the pre-purge
and ignition cycle and locks out after
about 5 seconds
Burner starts with an ignition delay
Fault
diagnostics
Lack of electrical supply OFF
The UV sensor sees an ex traneous
light
The connections in the control box are
wrongly inserted
The UV sensor sees ex traneous light RED blinking Eliminate the extraneous light.
The UV sensor is dirt y
The UV sensor is faulty Replace it
Flame moves away or fails
The ignition electrodes are wrongly
positioned
Air output is too high
Nozzle dirt y or worn Replace it
GREEN, RED
blinking
OFF
RED steady ON
GREEN blinking
Solutions
Check presence of voltage in the L - N the pin plug
Check the conditions of the fuses.
Check that safety thermostat is not in lockout
Eliminate the extraneous light.
Check and connect all the plugs and sockets
properly.
Clear it
Check pressure and output of the fuel
Check air output
Change nozzle
Check the coil of solenoid valve
Adjust them according to the instructions of this
manual
Set the air output according to the instructions of this
manual
Section 18: Fault FindingPage 72
Page 73
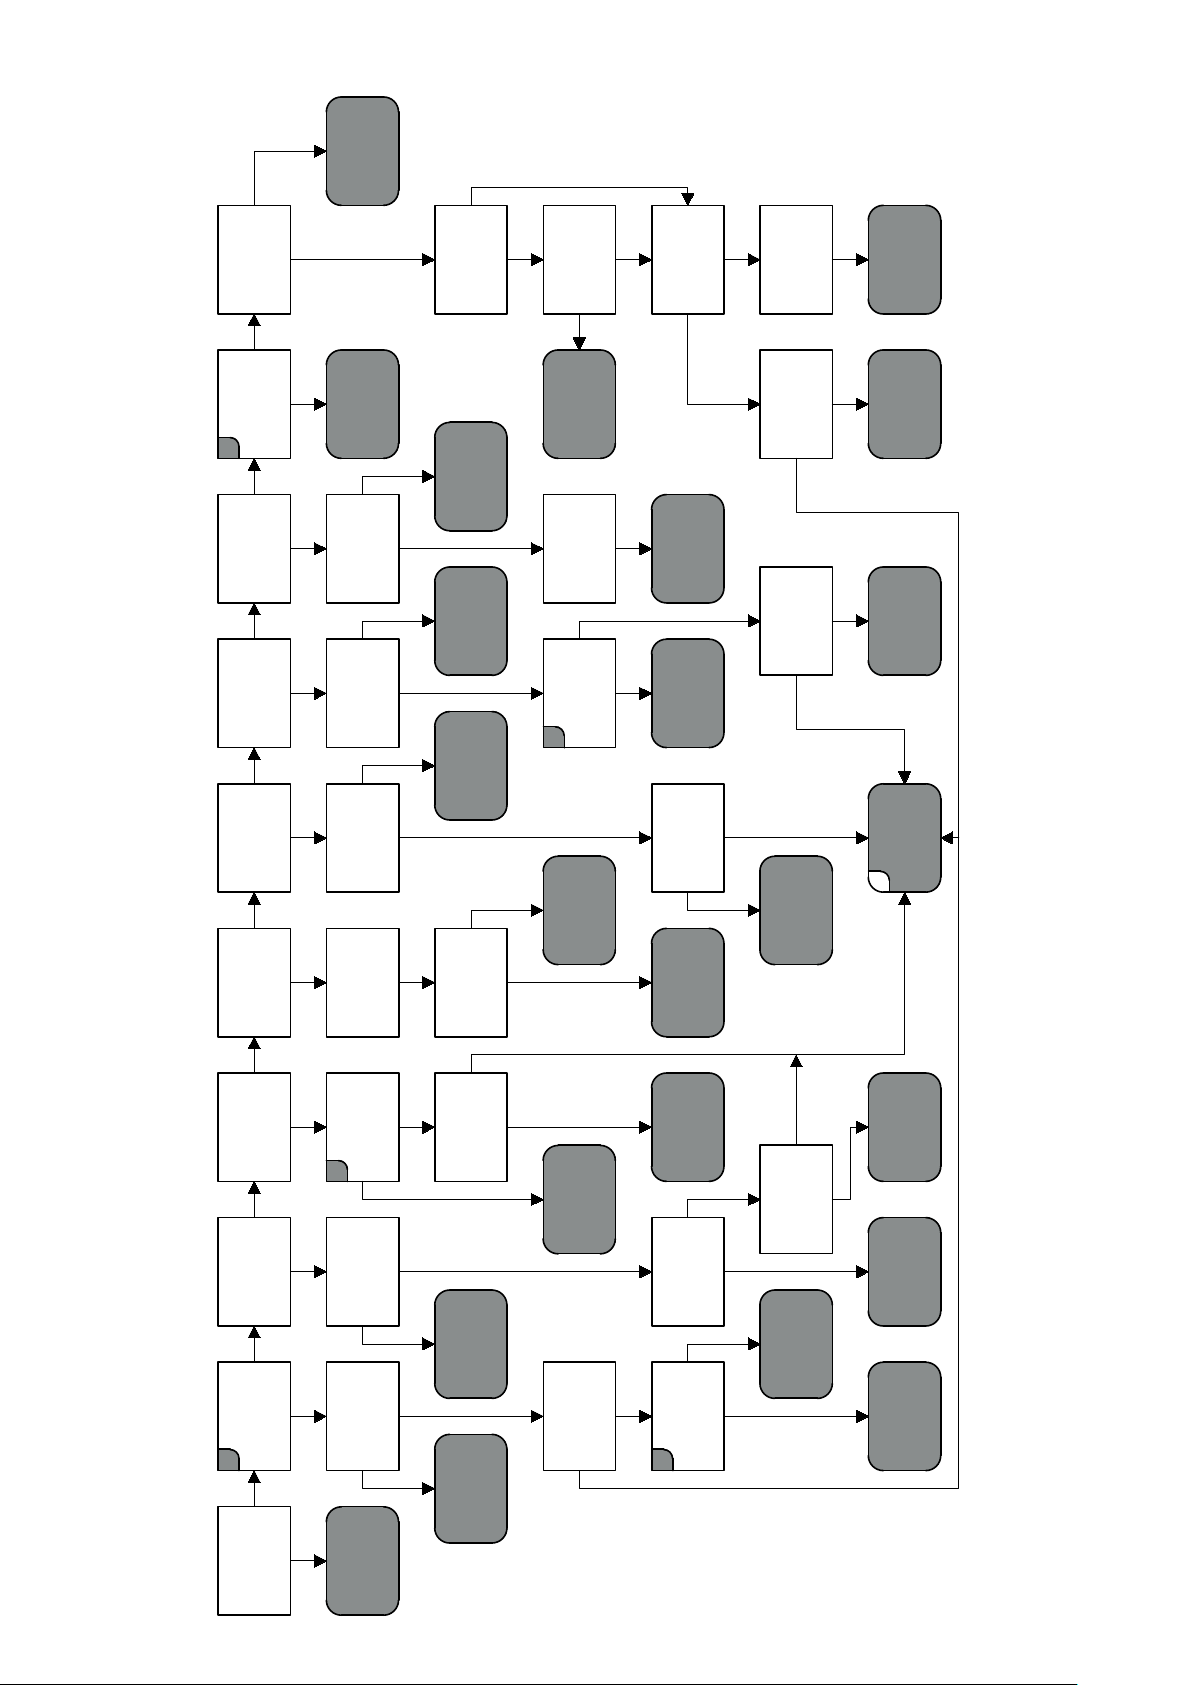
18.3 Riello RDB BLU Fault Finding Chart
head
Reset
combustion
Y
head set
correctly?
Combustion
Air
set
correctly?
C
Nozzle
the fuel?
atomising
working
pressure?
Coil releases
spark
Ignition
present
Y
Adjust
setting
combustion air
new?
Nozzle
fuel
filters?
Contaminated
OK and
set correctly?
Are electrodes
Y N Y
out then
relights?
Flame goes
nozzle
Replace
filters
replace
Clean or
reset
electrodes
Replace or
YN
N
flue
Boiler or
blocked?
Y
Clear
blockage
nozzle holder
from pump to
Check oil pipe
Y
?
Ω
Coil
resistance
90 to 110
E
pump
Replace
coupling
N
N
Y
remove snorkel
If balanced flue:
and test - now OK?
N
line filters
pump and fuel
Clean or replace
coil
Replace
Y
OK?
leads
Ignition
N
recirculate gases
causing recycling
Balanced flue can
Y Y
faulty?
Is the UV sensor
NN
(coil connected)
After 15 seconds
25-30V DC to coil?
leads
ignition
Replace
position
Check flue
Replace
UV sensor
oil
Replace
control
Replace
F
and seals
pump
box
Washing
1 - 2 bar
pressure
out after
25 seconds
Burner locks
less than
12 seconds
Fan runs for
Y N N Y Y Y Y Y N
Motor starts
after initialisation
A
Check time 3.5sec?
Y
oil pump
supply to
Check oil
Burner
fires when
UV sensor is
B
white and
Motor gives
50V AC across
or oil
Fan motor
pump seized?
Y N Y N Y N
N
covered?
Y N
black wire?
Drive
Replace
Replace
N Y
broken?
coupling
faulty?
Is the UV sensor
fan
motor
seized
component
light
Remove
extraneous
black wire?
230V to motor
across blue and
N
oil
pump
Replace
Y
coil
N
Replace
coil
Replace
motor
Replace
lead
capacitor
Replace
UV sensor
Coil
lead
OK?
N Y
Y
Approx.
D
Y N
wire?
across blue
Ω
and black motor
35
?
Ω
Coil
resistance
90 to 110
control box
Replace fan
motor and check
N N Y Y N N N N N
demand
with heat
is supplied
Control box
controls
and system
Check boiler
Figure 18-3: Riello RDB BLU Fault Finding
Section 18: Fault Finding Page 73
Page 74
19 Spare Parts
19.1 Riello RDB BLU Burner Parts List
Table 19-1: Riello RDB BLU burner parts list
Key Description 15-21kW 21-26kW Riello product code Grant UK product code
1 Gasket
2 4-pin connector 20117417 RBS201
3 Combustion head 20117435 RBS203
4 Ignition electrodes 20117455 RBS205
5 Pre-heater jumper 20045862 RBS206
6 Nozzle holder 20117459 RBS207
7 Collar (including o-rings) 20117472 RBS209
8 Ignition HT lead 20105111 RBS211
9 Air damper assembly 3008647 RBS116
10 Fan 3005788 RBS151
11 UV sensor 20095126 RBS212
12 Capacitor 4.5 µF 20071576 RBS149A
13 Solenoid valve 3007871 RBS213
14 Pump pressure regulator 20032135 RBS214
15 Air damper 20094349 RBS215
16 Oil pump 20030953 RBS101
17 O-ring (pump filter) - 10 pack 3007175 RBS216
18 Pump filter and o-ring 3020436 RBS217
19 Oil hose connector - 3/8 x 1/4 3009068 RBS218
20 Flexible oil hose 3007621 RBS219
21 Oil pipe 20117488 RBS220
22 Pressure gauge connector 3008876 RBS138
23 Oil pump drive coupling - 10 pack 3000443 RBS16
24 Solenoid coil 3008648 RBS117
25 Motor and capacitor 4.5 µF 20071577 RBS102A
26 Control box cover 20094351 RBS221
27 Control box 20117694 RBS222
28 Solenoid coil lead 3008682 RBS223
29 Cover 20117497 RBS224
30 O-ring kit 3008878 RBS140
31 Front shield 3020306 RBS225
32 Air intake - balanced flue 3020281 RBS226
33 Air baf fle 20117504 RBS227
34 Flange 3006384 RBS119
35 Air intake - conventional flue 20012046 RBS230
ü
3005787 RBS27
Section 19: Spare Par tsPage 74
Page 75
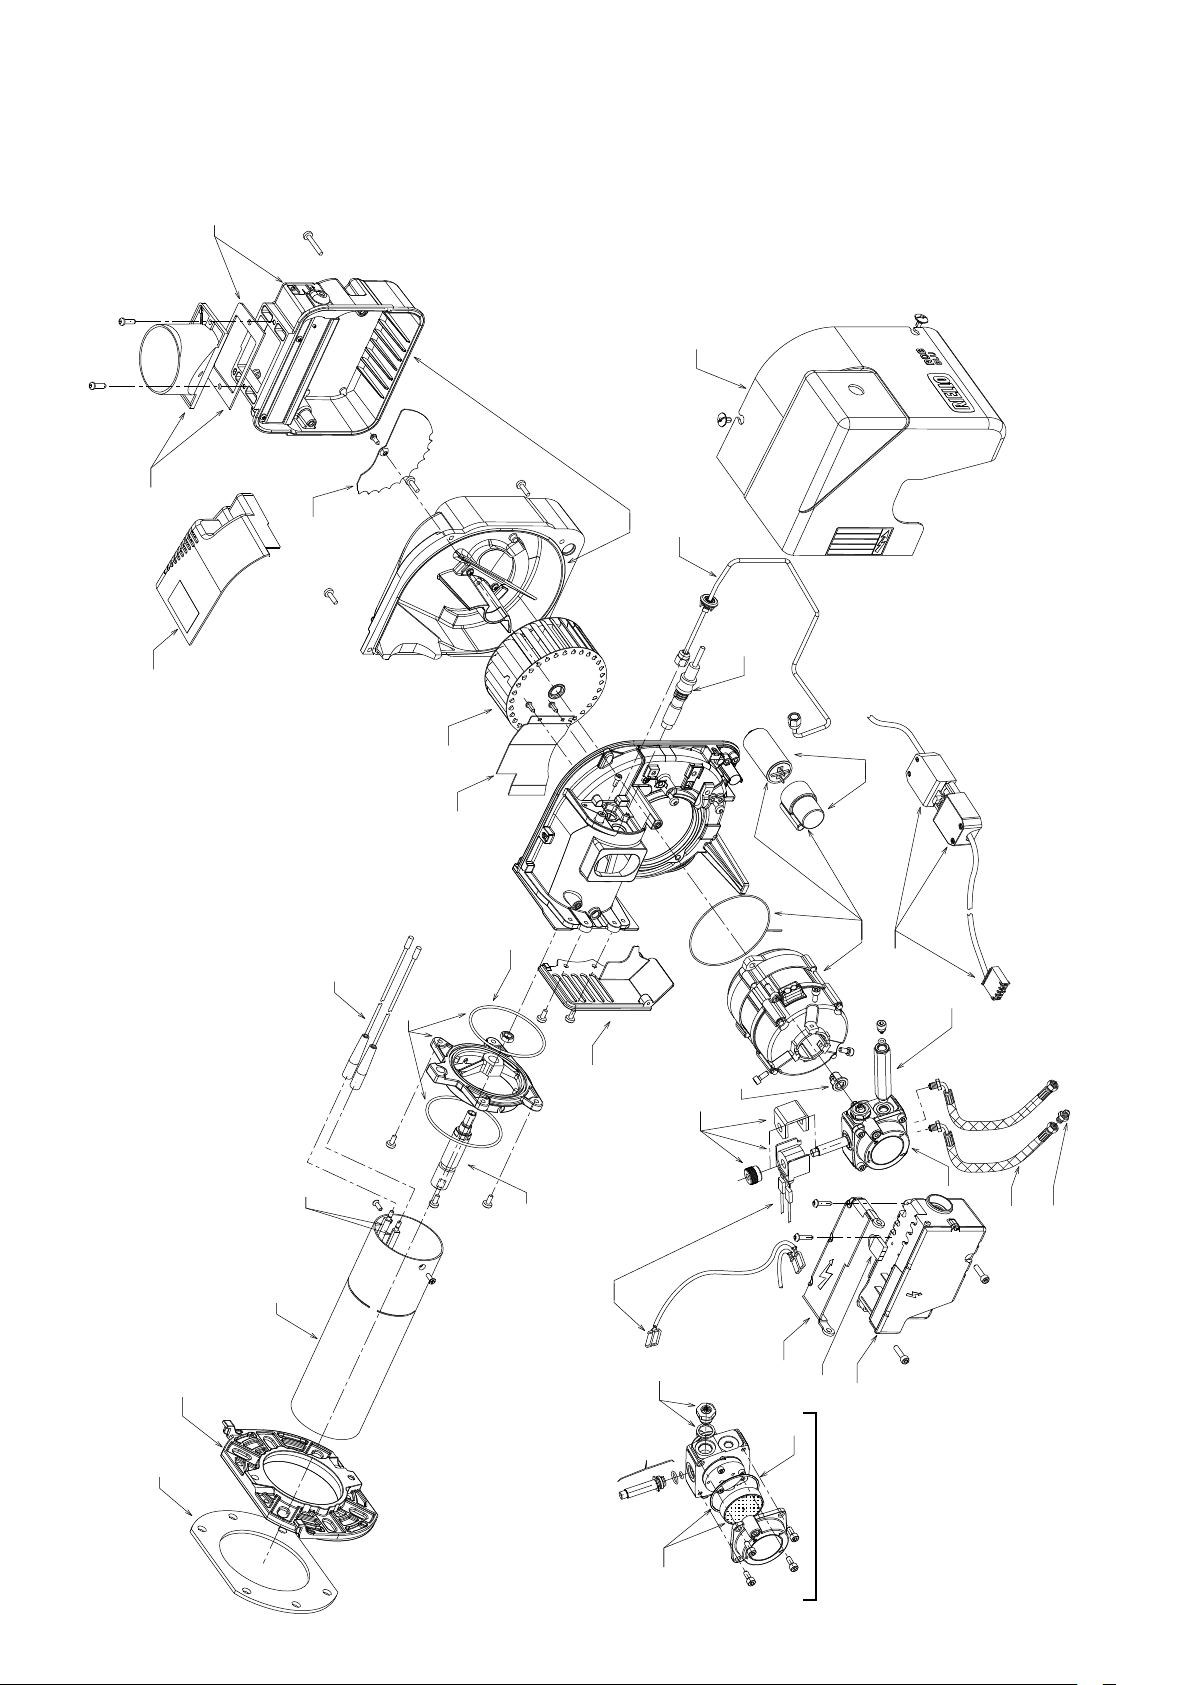
19.2 Exploded View of Riello RDB BLU Burner
9
32
15
29
30
21
35
11
10
12
33
25
30
8
7
31
23
24
4
6
2
22
16
20
19
3
34
1
28
13
14
18
26
17
5
27
16
Section 19: Spare Par ts Page 75
Figure 19-2: Exploded view of Riello RDB BLU burner
Page 76
19.3 Boiler Parts List
Table 19-3: Boiler Parts List
Key Description
15-21kW 21-26kW
Grant UK product code
19.4 Heat Pump Parts List
For details of the heat pump spare parts, please refer to the Installation and Ser vicing instructions supplied with the heat pump.
Section 19: Spare Par tsPage 76
Page 77

Figure 19-4: 15/21kW baffles Figure 19-5: 21/26kW baffles
Section 19: Spare Par ts Page 77
Page 78
20 EC Declaration of Conformity
In accordance with BS EN ISO/IEC 17050-1:2004
We: GRANT ENGINEERING (UK) Limited
Hopton House
Hopton Industrial Estate
Devizes
SN10 2EU
Telephone: 01380 736920
Fax: 01380 736991
Email: [email protected]
Website: ww w.grantuk.com
Declare that:
Equipment: Domestic Oil boilers
Model name/number: Grant Vortex (Hybrid) 15-21, & 21-26
In accordance with the following Directives:
Low Voltage Directive :2006/95/EEC
EMC Directive :2004/108/EEC
Boiler Efficiency Directive :92/42/EEC
Energy Labelling Directive :2010/30/EU Conforms with EU (no) 811/2013
Ecodesign Directive :2009/125/EC Conforms with EU (no) 813/2013
I hereby declare that the equipment named above has been tested and found to comply with the relevant sections of the above referenced
specifications. The unit complies with all essential requirements of the Directives.
Responsible Person: Neil Sawers
Position: Technical Manager
Signature:
th
Date: 15
The EC Declaration of Conformity given in this section relates to the oil boiler only. For details of the EC Declaration of Conformity for the
heat pump, refer to Section 13 of the Aerona³ installation and servicing instructions supplied.
July 2016
Section 20: Declaration of ConformityPage 78
Page 79
21 ErP
21.1 Energy and Package Labels
Figure 21-1: Energy and package labels
System Heat pump Boiler Package
Hybrid only Energy label Energy label
Hybrid + HW
cylinder
Hybrid + HW
cylinder + Solar
thermal
* Not supplied with hybrid/heat pump - download from Grant UK website
Hot water
combination
energy label*
Space heating
and hot water
combination
energy label*
Space heating
energy label
Space heating
energy label
21.2 Product Fiches
The product fiches for the 15/21 and 21/26 oil boilers are included in
this manual. Refer to Appendix A .
The product fiche for the Aerona³ is supplied with the heat pump.
No package
label required
No package
label required
Package label
required with
heat pump
as primary
heat source
and boiler as
supplementary
heater
21.3 ErP Ratings
ErP ratings are available from our website ww w.grantuk.com.
Section 21: ErP Page 79
Page 80

22 Health and Safety Information
22.1 General
The Health and Safety information given in this section relates to
the oil boiler only. For details of the Health and Safety Information
for the heat pump, refer to Section 14 of the Aerona³ installation and
servicing instructions supplied.
Under the Consumer Protection Act 1987 and Section 6 of the
Health & Safety at Work Act 1974, we are required to provide
information on substances hazardous to health (COSHH
Regulations 1988).
Adhesives, sealants and paints used in the manufacture of the
product are cured and present no known hazards when used in the
manner for which they are intended.
The following other materials are present in the product:
22.2 Insulation Materials
Material Types:
Ceramic fibre board, mineral wool.
Description:
Rigid board, slabs, sleeves, gaskets, ropes.
Known Hazards:
May cause temporary irritation or rash to skin. High dust levels may
irritate eyes and upper respiratory system.
Precautions:
Avoid unnecessary or rough handling, or harsh abrasion of boards.
Normal handling and use of material should not produce high dust
levels.
Avoid inhalation, and contact with skin and eyes.
After handling always follow normal good hygiene practices.
Protection:
Use disposable gloves, face mask and eye protection.
First Aid:
Eyes: If irritation occurs, wash eyes with copious
amounts of water. If symptoms persist, seek
immediate medical advice.
Skin: If irritation occurs, wash under running water
before washing with soap and water.
Inhalation: Remove to fresh air, drink water to clear throat
and blow nose to remove dust/fibres.
Ingestion: Drink plent y of water.
22.3 Sealant and Adhesive
Material Types:
Silicone elastomer.
Description:
Sealant and adhesive.
Known Hazards:
Irritation to eyes.
Precautions:
Avoid inhalation of vapour, contact with eyes and prolonged or
repeated contact with skin.
After handling always follow normal good hygiene practices.
Protection:
Use eye protection. Rubber or plastic gloves should be worn where
repeated contact occurs and a face mask worn when working in
confined spaces.
First Aid:
Eyes: Flush eyes with water for 15 minutes. Seek
immediate medical attention.
Skin: Wipe off and wash with soap and water.
Inhalation: Remove to fresh air.
22.4 Kerosene and Gas Oil Fuels (mineral oils)
Known Hazards:
The effect of mineral oils on the skin vary according to the duration
of exposure and the type of oil. The lighter fractions remove the
protective grease naturally present on the skin, leaving it dry, liable
to crack and more prone to damage by cuts, abrasions and irritant
chemicals.
Skin rashes (Oil acne) most often on arms, but also on any part of
the body in contact with oil or oily clothing.
Contact with fuel oils can cause dermatitis.
Precautions:
Avoid as far as possible any skin contact with mineral oil or with
clothing contaminated with mineral oil.
The use of a lanolin-based barrier cream is recommended, in
conjunction with regular washing with soap and rinsing with water to
ensure all oil is removed from the skin.
Take care to prevent clothing, especially under wear, from becoming
contaminated with oil.
Do not put oily rags or tools in pockets, especially trouser pockets.
Have first-aid treatment at once for an injury, however slight.
Do not inhale any vapours from mineral oils.
Section 22: Health and Safety InformationPage 80
Page 81
23 Recycling and Decommissioning
23.1 End of Life Information
The information below relates to the oil boiler only. For recycling and
decommissioning for the heat pump, refer to the Installation and
Servicing Instructions provided.
General
Grant oil boilers incorporate components manufactured from a
variety of different materials. The majorit y of these materials can be
recycled whilst the smaller remainder cannot.
Materials that cannot be recycled must be disposed of according to
local regulations using appropriate waste collection and/or disposal
services.
Disassembly
There is little risk to those involved in the disassembly of this
product. Please refer to and follow the Health and Safety Information
given in the Installation & Servicing Instructions provided with the
boiler.
For guidance on the disassembly of the boiler refer to the
information given in the Servicing section of the Installation &
Servicing Instructions provided with the boiler.
Recycling
Many of the materials used in Grant oil boilers can be recycled,
these are listed in the table below:
Component Material
Outer casing panels Galavanised steel
Inner casing panels Zintec
Primary heat exchanger and baffles Mild steel
Secondary heat exchanger Stainless steel
Secondary heat exchanger spirals Aluminium alloy
Pipework Copper
Burner body/flange Aluminium alloy
Burner oil pump Aluminium alloy/steel
Riello oil burner cover Plastic
Electrical wiring Copper/plastic
Thermostats Copper/plastic
Printed Circuit boards Copper/plastic
Disposal
All materials other than those listed above must be disposed of
responsibly as general waste.
Section 23: Recycling and Decommissioning Page 81
Page 82

24 Guarantee
You are now the proud owner of a Grant Vortex condensing boiler
from Grant Engineering (UK) Limited which has been designed to
give years of reliable, trouble free, operation.
Grant Engineering (UK) Limited guarantees the manufacture of
the boiler including all electrical and mechanical components for a
period of twelve months from the date of installation
4
, provided
that the boiler has been installed in full accordance with the
installation and servicing instructions issued.
This will be extended to a total period of two years if the boiler is
registered with Grant Engineering (UK) Limited within thirty days
of installation
4
and serviced at twelve monthly intervals3. See main
Terms and Conditions below.
Registering the product with Grant Engineering (UK) Limited
Please register your Grant Vortex condensing boiler with Grant
Engineering UK Limited within thirty days of installation. To do
so visit www.grantuk.com and follow the links to the ‘Homeowners
Zone’, where you can register your boiler for a further twelve
months guarantee (giving two years from the date of installation
This does not affect your statutory rights
1
.
4
).
If a fault or defect occurs within the manufacturer’s
guarantee period
If your boiler should fail within the guarantee period, you must
contact Grant Engineering (UK) Limited who will arrange for the
repair under the terms of the guarantee, providing that the boiler
has been correctly installed, commissioned and serviced (if the
appliance has been installed for more than twelve months) by a
competent person and the fault is not due to tampering, running
out of oil, oil contamination, debris, system water contamination,
misuse, trapped air or the failure of any external components
not supplied by Grant Engineering (UK) Limited, e.g. fire valve,
motorised valve, etc.
This two year guarantee only applies if the boiler is registered
with Grant Engineering (UK) Limited within thirty days of
installation
4
and is serviced after twelve months3.
In the first instance
Contact your installer or commissioning engineer to ensure
that the fault does not lie with the system components or any
incorrect setting of the system controls that falls outside of the
manufacturer’s guarantee otherwise a service charge could result.
Grant Engineering (UK) Limited will not be liable for any charges
arising from this process.
If a fault covered by the manufacturer’s guarantee is found
Ask your installer to contact Grant Engineering (UK) Limited
Service Department on +44 (0)1380 736920 who will arrange for a
competent service engineer to rectify the fault.
Remember - before you contact Grant Engineering (UK)
Limited:
• Ensure the boiler has been installed, commissioned and
serviced by a competent person in accordance with the
installation and servicing instructions.
• Ensure there is oil to supply the burner.
• Ensure the problem is not being caused by the heating system
or its controls. Consult the boiler handbook for guidance.
The following documents must be made available to Grant
Engineering (UK) Limited on request:
• Proof of purchase
• CD10 Installation Completion Form (or equivalent document)
• CD11 Commissioning Report Form (or equivalent document)
• Service documents (CD11 or equivalent document)
Chargeable repairs
A charge may be made (if necessary following testing of parts) if the
breakdown is due to any fault(s) caused by the plumbing or heating
system, e.g. contamination of parts due to system contamination,
sludge, scale, debris or trapped air. See ‘Extent of manufacturer’s
guarantee’.
Extent of manufacturer’s guarantee:
The manufacturer’s guarantee does not cover the following:
• If the boiler has been installed for over two years.
• If the boiler has not been installed, commissioned, or serviced
by a competent person in accordance with the installation and
servicing instructions.
• The serial number has been removed or made illegible.
• Fault(s) due to accidental damage, tampering, unauthorised
adjustment, neglect, misuse or operating the boiler contrary to
the manufacturer’s installation and servicing instructions.
• Damage due to external causes such as bad weather
conditions (flood, storms, lightning, frost, snow, or ice), fire,
explosion, accident or theft.
• Fault(s) due to incorrectly sized expansion vessel(s), incorrect
vessel charge pressure or inadequate expansion on the
system.
• Fault(s) caused by external electrics and external components
not supplied by Grant Engineering (UK) Limited.
• Problems caused by lack of oil or faults with the oil storage and
supply system.
• Fault(s) due to contamination of the oil storage and supply
system, e.g. water or debris.
• Bleeding or removing oil storage tank contamination or
blockages from oil lines.
• Problems due to the flue system being incorrectly fitted or not
installed to meet installation requirements.
• Boiler servicing, de-scaling or flushing.
• Cleaning out condensate traps/discharge pipes or thawing out
frozen condensate pipework.
• Checking and replenishing system pressure.
• Oil supply pipelines, electrical cables and plugs, external
controls not supplied by Grant Engineering (UK) Limited.
• Heating system components, such as radiators, pipes, fittings,
pumps and valves not supplied by Grant Engineering (UK)
Limited.
• Instances where the oil boiler has been un-installed and reinstalled in another location.
• Use of spare parts not authorised by Grant Engineering (UK)
Limited.
• Consumable items including, but not limited to, oil nozzles, oil
hoses, gaskets.
Free of charge repairs
During the two year guarantee period no charge for parts or
labour will be made, provided that the boiler has been installed and
commissioned correctly in accordance with the manufacturer’s
installation and servicing instructions, it was registered with Grant
Engineering (UK) Limited within thirty days of installation
4
and, for
boilers over twelve months old, details of annual service is available
IMPORTANT
The nozzle and braided oil hose supplied with the boiler are only
covered for the period up to the time of the first service (twelve
months). Both must be changed on the first service and on every
annual service thereafter.
3
.
Section 24: GuaranteePage 82
Page 83

IMPORTANT
Do not wait until the fuel supply runs out before you re-order.
Sludge in the bottom of the tank may be drawn into the fuel lines.
It is recommended that the boiler is switched off when the new oil
supply is delivered and that the fuel is allowed to settle for an hour
before restarting the boiler.
Terms of manufacturer’s guarantee:
• The Company shall mean Grant Engineering (UK) Limited.
• The boiler must be installed by a competent installer and in full
accordance with the relevant Codes of Practice, Regulations
and Legislation in force at the time of installation.
• The boiler is guaranteed for two years from the date of
installation
service has been completed
4
, providing that after twelve months the annual
3
and the boiler registered with the
Company within thirty days of installation. Any work undertaken
must be authorised by the Company and carried out by a
competent service engineer.
• The shell (heat exchanger) of the oil boiler is also covered by a
five year parts only guarantee from the date of installation
4
.
This is subject to the following:
• The boiler is operated correctly, in accordance with the
installation and servicing instructions.
• Proof is provided that the system has been flushed or
chemically cleaned where appropriate (refer to BS 7593)
and that the required quantity of a suitable corrosion
inhibitor added.
• Proof of annual servicing (including the checking of any
expansion vessels and pressure relief valves) must be
provided if and when requested by the Company.
IMPORTANT
Grant Engineering (UK) Limited strongly recommends
that a Grant Mag-One in-line magnetic filter/s (or
equivalent
5
) is fitted in the heating system pipework. This
should be installed and regularly serviced in accordance
with the filter manufacturer’s instructions.
• This guarantee does not cover breakdowns caused by
incorrect installation, neglect, misuse, accident or failure to
operate the boiler in accordance with the manufacturer’s
installation and servicing instructions.
• The boiler is registered with the Company within thirty days
of installation. Failure to do so does not affect your statutory
1
rights
.
• The balance of the guarantee is transferable providing the
installation is serviced prior to the dwelling’s new owners taking
up residence. Grant Engineering (UK) Limited must be informed
of the new owner’s details.
• The Company will endeavour to provide prompt service in
the unlikely event of a problem occurring, but cannot be held
responsible for any consequences of delay however caused.
• This guarantee applies to Grant Engineering (UK) Limited
boilers purchased and installed on the UK mainland, Isle of
Wight, Channel Islands and Scottish Isles only
2
. Provision of inguarantee cover elsewhere in the UK is subject to agreement
with the Company.
• All claims under this guarantee must be made to the Company
prior to any work being undertaken. Invoices for call out/repair
work by any third party will not be accepted unless previously
authorised by the Company.
• Proof of purchase and date of installation, commissioning and
service documents must be provided on request.
• If a replacement boiler is supplied under the guarantee (due to
a manufacturing fault) the product guarantee continues from
the installation date of the original boiler, and not from the
installation date of the replacement
4
.
• The oil boiler must be connected to a mains water supply
(installations utilising a private water supply are not covered by
this guarantee).
• Breakdown/failure due to lime scale will not be covered by this
guarantee.
• The replacement of a boiler under this guarantee does not
include any consequential costs, such as the removal or
replacement of worktops, kitchen units, etc.
• The boiler (excluding external modules) must not be sited in a
location where it may be subjected to frost.
Hard water advice
(for Combi boilers only)
If you live in a hard water area, protection against scaling must
be given to the domestic hot water heat exchanger of your
combination boiler.
You should fit an appropriate scale inhibitor or water softener as
any breakdown caused by water scaling is not covered by the
manufacturer’s guarantee. Ask your installer for advice.
Foot notes:
1. Your statutory rights entitle you to a one year guarantee
period only.
2. The UK mainland consists of England, Scotland and
Wales only. Please note that for the purposes of this
definition, Northern Ireland, Isle of Man and Scilly Isles are not
considered part of the UK mainland.
3. Your boiler must be regularly serviced as per the installation
and servicing instructions, (even when the guarantee has
expired) to prolong the lifespan and ensure it is operating
safely and efficiently.
4. The guarantee period will commence from the date of
installation, unless the installation date is more than six
months from the date of purchase, in which case the
guarantee period will commence six months from the date of
purchase.
5. As measured by gauss. The Mag-One magnetic filter has a
gauss measurement of 12000.
Version 1.0
Section 24: Guarantee Page 83
Page 84

Appendix A
Appendix APage 84
Page 85

Appendix A Page 85
Page 86

Appendix APage 86
Page 87

Appendix A Page 87
Page 88

GRANT ENGINEERING (UK) LIMITED
Hopton House, Hopton Industrial Estate, Devizes, Wiltshire, SN10 2EU
Tel: +44 (0)1380 736920 Fax: +44 (0)1380 736991
Email: [email protected] www.grantuk.com
 Loading...