

Page 1
GRANDVIEW REPRODUCING GENUINE COLORS
GRANDVIEW REPRODUCING GENUINE COLORS
Instruction manual for
Portable Series Classic Tripod Screen
Grandview Crystal Screen Canada Ltd.
#11- 3751 North Fraser Way,
Marine Way Business Centre,
Burnaby, BC, Canada V5J 5G4
Tel: 1-604-412-9777 Fax: 1-604-412-9796
Website: www.grandviewscreen.ca
Guangzhou Grandview Crystal Screen Co., Ltd.
P.O. 511400 Federal Ind. Zone No. 363, Yushan West Road,
Shiqiao, Panyu District, Guangzhou, Guangdong, China
Tel: +8620-8489-9499 Fax: +8620-8480-3343
Website: www.grandviewscreen.com
ISO9001:2000
International Certification
Model:PT-Lxx
Tha nk you f or pur chas ing a Gr andv iew projection screen.
Befor e us e, p le as e re ad i nstr uc ti on s ca re fu ll y. Aft er i ns ta ll at io n, s to re i ns tr uc ti on s fo r fu tu re r ef er en ce .
Page 2
Description
Warnings
1
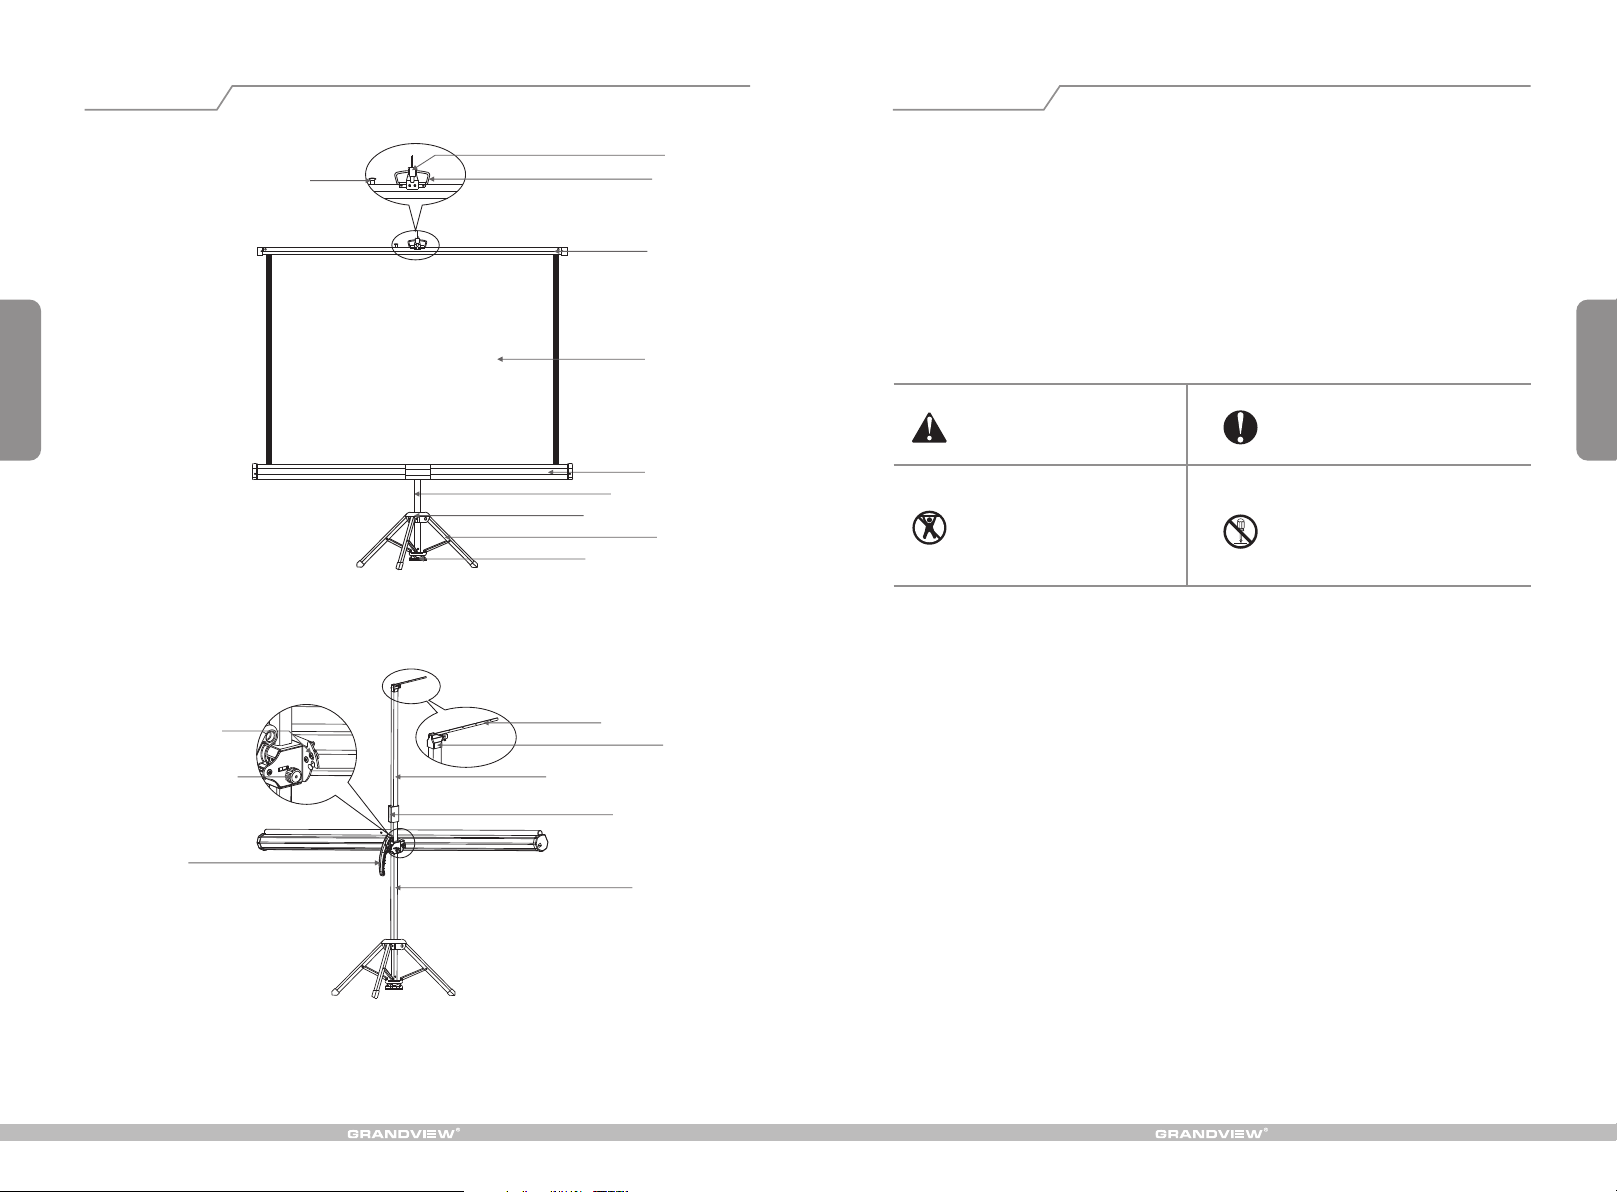
Level adjustment screw
Housing adjustment screw
Rive t
Hook
Hand le
Top bar
Fabr ic
Hous in g
Stai nl ess b ar
Tri po d con ne ctor
Tri po d
Toe rele as e pla te
Exte ns ion b ar
Hook
Adju st abl e up hold ba r
1. Please make sure the Tripod stand is fully extending during using, this can assure stability and safety.
2. You can lower down the screen height according to adjusting the height of Adjusting uphold bar. But
please hold the Adjusting uphold bar first then press the Magic button(refer to step 3 of Screen
retraction for detail), while not it would lead to damage to the screen.
3. There is a nail at the middle of screen Top bar, please make sure it to be locked onto the slot nearby
the Plastic handle. Otherwise it would cause damage during carrying.
4. During retracting, please make sure the Plastic hook lock into a hole on the housing.
5. After folding the screen, make sure that the security lock is turned to Locked position. otherwise,
accident or damage of the screen would happen.
Ignoring the safety warnings ma y
le ad t o i njuri es a nd / or da maging
the product.
Refrain from hanging anything on the
screen as it may cause the screen to
fall.
Do not ta ke apa rt and r eplace with unknown parts. If ther e are an y problems, please contact your lo cal dealer.
Product spe cifi cati ons are subject to c hange.
Ro ll u p th e s cr een a f te r ev ery u s e.
Leaving it hanging for a l on g p eriod
of time may cause the fabric to loosen.
Please contact yo ur local dealer for
repairs or maintenance. Please contact
our company if yo u hav e any fu rthe r
questions. Av oi d t ak in g a pa rt th e
fixtu re s y ou rs el f. Lo os e p ar ts ma y
cause the scr een to f all.
6
Plas ti c han dl e
Magi c bu tto n
Stan d ba r
Page 3
Lock
Unlock
Screen retraction
Screen displaying
5
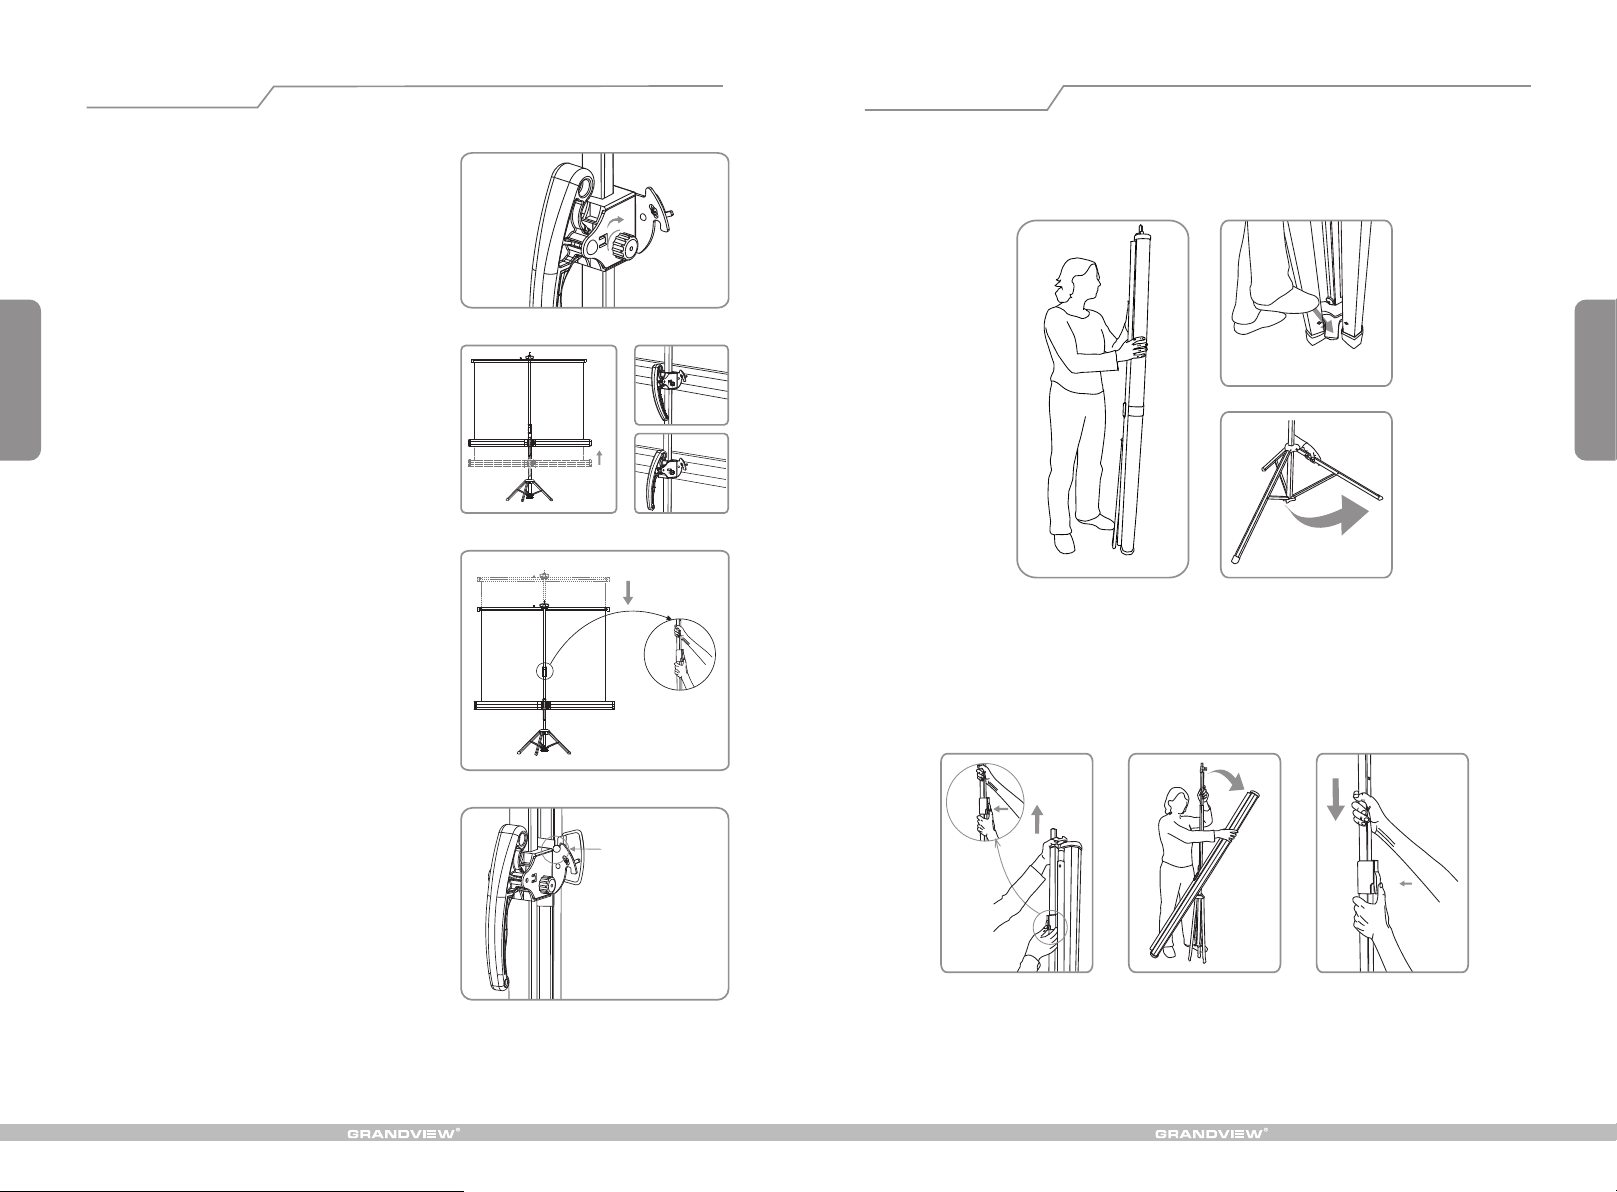
1. Tu r n t h e H o u s i n g position l o c k t o “LO C K”.
( F i g u r e 1 6 )
2. After release the Plastic handle to Unlocked
condit ion, please hold the handle toraise the
housin g until you hear a sound“DA”, which
means housing is locked, then please also
lockup the Plastic handle to Locked condition.
(Figur e 17-19 )
3. Ho ld the Adj us table uph ol d bar with yo ur right
han d, then pre ss the Magi c bu tton with y ou r left
han d to lowe r do wn the Adj usting up ho ld bar to
dow n most po in t. (Figure 20 )
Figure 17
1. Gra sp t he sc re en h and le w ith o ne h an d and s te p the t oe r el eas e pl ate t o fu ll y str et ch the tr ip od
on the g ro und . (F ig ure 1- 3)
Lock
k
c
nlo
U
Figure 16
Unl ocked
con ditio n
Lock
Unlock
Figure 18
Loc ked
con ditio n
Figure 19
Figure 1
Figure 2
2
Figure 3
2. Pre ss t he Ma gi c bu tto n, a nd ra is e th e adj us tab le u ph old b ar t o rel ea se h ous in g fro m th e
plas ti c hoo k. ( Fi gur e 4)
3. Rot at e the h ou si ng co un ter cl oc kwi se t o hor iz on tal l ev el. ( Fi gu re 5)
4. Pre ss t he Ma gi c bu tto n to l ow do wn a dj ust ab le up ho ld b ar to t he l owe st p oi nt. ( Fi gur e 6)
4. Take off the Stainless bar ring from the Plastic
hook and retract the screen slowly into the
housing. After the housing is rotated to parallel
with Aluminum bar, then adjust the Adjustable
uphold bar to make the Plastic hook on its top to
lock onto a hole on the housing . At this time you
can fully retract the Metal tripod stand. (Remarks:
Please assure the Top bar is locked onto the
Aluminum stand. Figure 21)
Figure 20
Remarks: Assure the Top bar is
locked onto the Aluminum stand.
Figure 21
Figure 4 Figure 5 Figure 6
Page 4
5. Op en the sc reen:
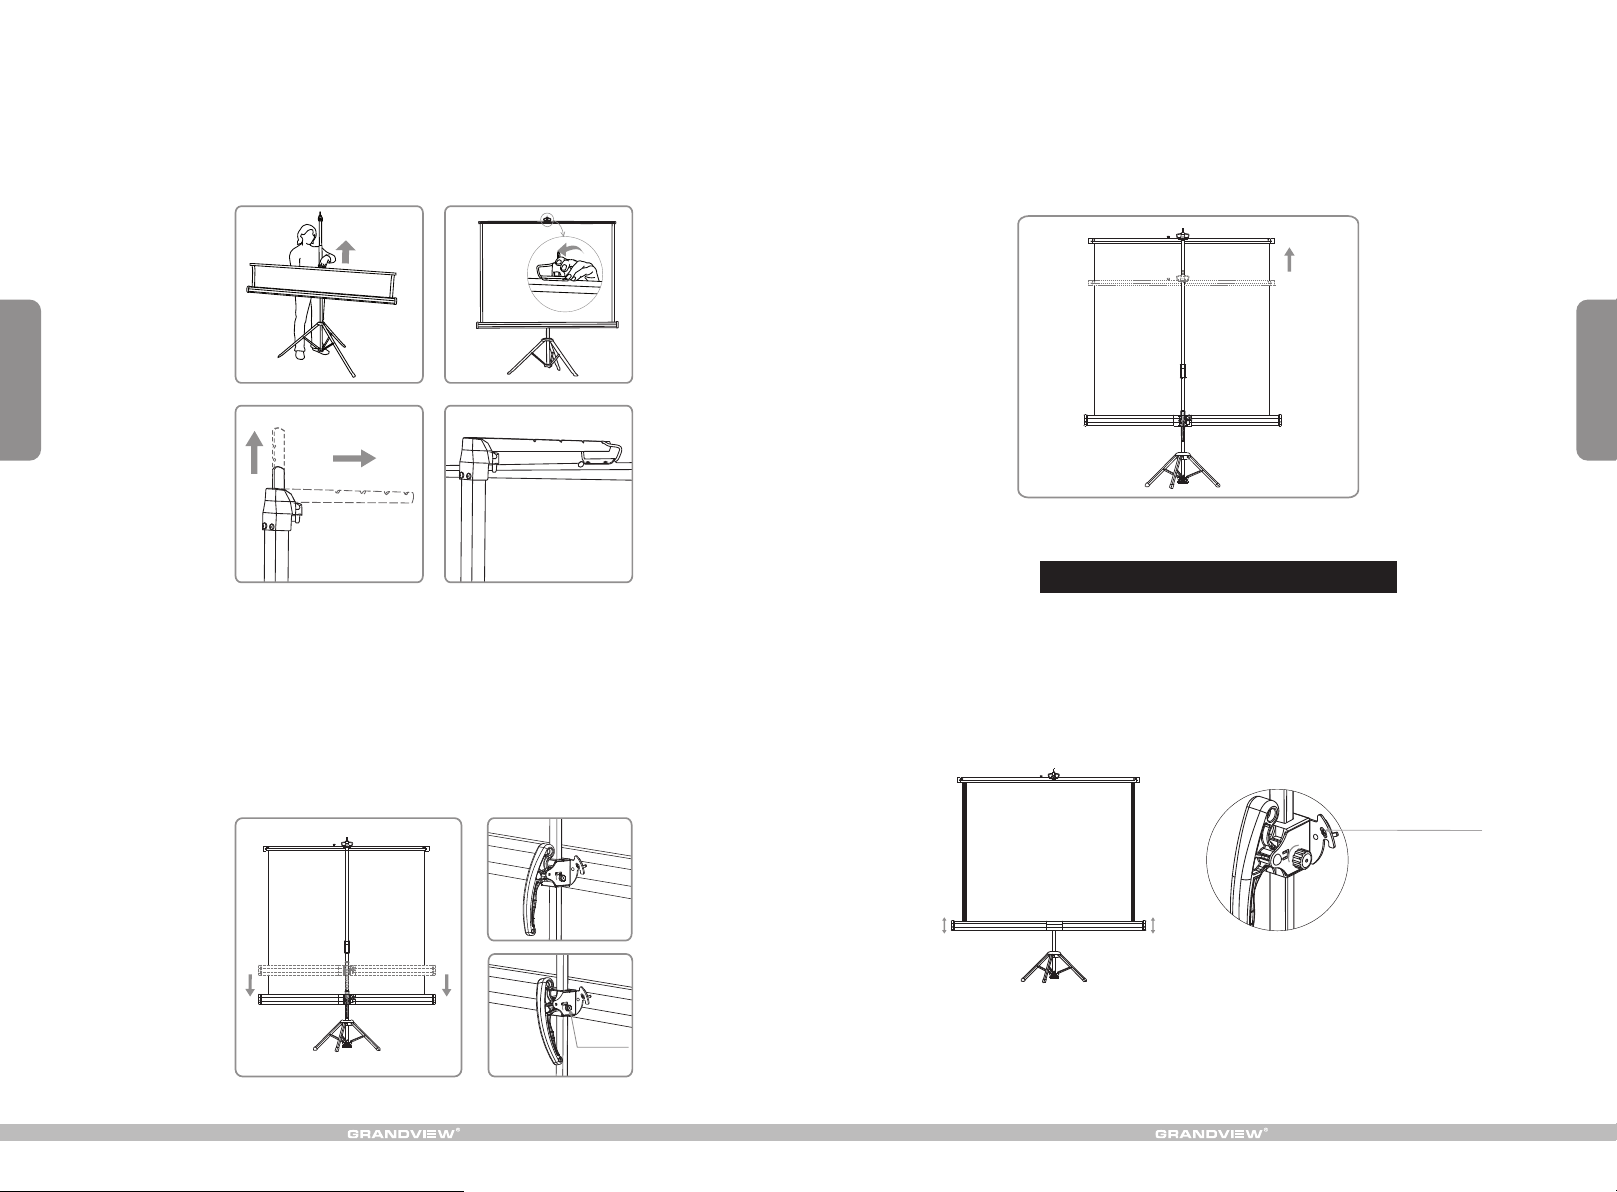
Method 1: Pu ll up and hang the bar ri ng onto the Plastic ho ok. (Fi gu re 7-8)
Method 2: Fo r different gr ad ient vi ew in g angle , we can u se Keys to ne system . Pull out the
extension ba r hidde n in the up ho ld bar an d turn it to a hor izontal lev el. Han d the met al hook rin g
ove r the ext ension ba r which has four opt ional slo ts for fi xi ng the sc reen. (Fi gu re 9-10 )
7. To hol d th e Alu minum sta nd w it h one hand, a nd h ol d th e Adjust in g up ho ld bar wi th a no th er
hand as well a s ra is e it to adjus t th e he ig ht of the scr ee n. ( Figur e 14 ) Re ma rks: You don' t
need to pres s th e Ma gic butto n wh il e raise the Ad ju st able upho ld b ar.
The s cr een vie wi ng a re a can dis pl ay i n 1: 1, 4:3 or 16: 9 fo rm at accord in g to d if fe rent heig ht o f
Adjusta bl e up ho ld bar an d he ig ht o f housi ng .
3
Figure 7
Figure 8
Figure 9 Figure 10
6. To meet diffe re nt v ie wing height (from floor to housing), you can adjust the position of housing
via t he P la st ic h an dl e. (Fi gure 11)
Met ho d: Turn t he H ou si ng p os it ion lo ck to st at us o f “UN LO CK”, a nd h ol d th e Pl as ti c
han dle as w el l as l ow er d ow n th e ho us in g sl ow ly t o yo ur a pp re ci at ed pos ition after release
the P la st ic han dle to U nl oc ked condition then lockup the Plastic handle to Locked conditio n.
The hou si ng c an b e even lower after you lower down the Adjusting uphold bar to another
loc kh ole below and th en adj ust an d lo ckup the hou sing to yo ur a pp reciated position.
(Fi gu re 12-13)
Locked
condition
Lock
ock
Unl
Figure 12
Unlocked
condition
Lock
k
loc
Un
Housing
position lock
Figure 11
Figure 13
Figure 14
Special Level Adjustment Device
If the hou sing is foun d to a li ttle in cline d when fu lly dis playe d , you c an ad ju st it h orizo nt ally
acc ording to the Level adjustme nt devi ce. (Fi gure 15 )
Level adjus tment devi ce
Lock
ck
lo
Un
Figure 15
4
 Loading...