

Page 1
Model:LF-PPxx
GRANDVIEW REPRODUCING GENUINE COLORS
Tha nk you fo r purch asing a G randv iew pro jecti on scre en.
Bef ore use , pleas e read in struc tions c arefu lly. Afte r insta llati on, sto re inst ructi ons for fu ture re feren ce.
Installation Guide for
Large-flat Series Ultimate Permanent Cinema Screen
GRANDVIEW REPRODUCING GENUINE COLORS
ISO9001:2000
International Certification
Grand view Cry stal Screen Ca nada Ltd.
#11- 3751 Nor th Fraser Way,
Marine Way B usiness Cent re,
Burnaby, BC , Canada V5J 5G4
Tel: 1-604-41 2-9777 Fax: 1- 604-412-97 96
Website : www.grandvie wscreen.ca
Guang zhou Gra ndview C rystal S creen Co ., Ltd.
P.O. 511400 Federa l Ind. Zone No. 36 3, Yushan West Road ,
Shiqiao , Panyu Distri ct, Guangzho u, Guangdong , China
Tel: +8620-84 89-9499 Fax: + 8620-8480- 3343
Website : www.grandvie wscreen.co m
www.grandvie wscreen.co m.cn
Page 2
1
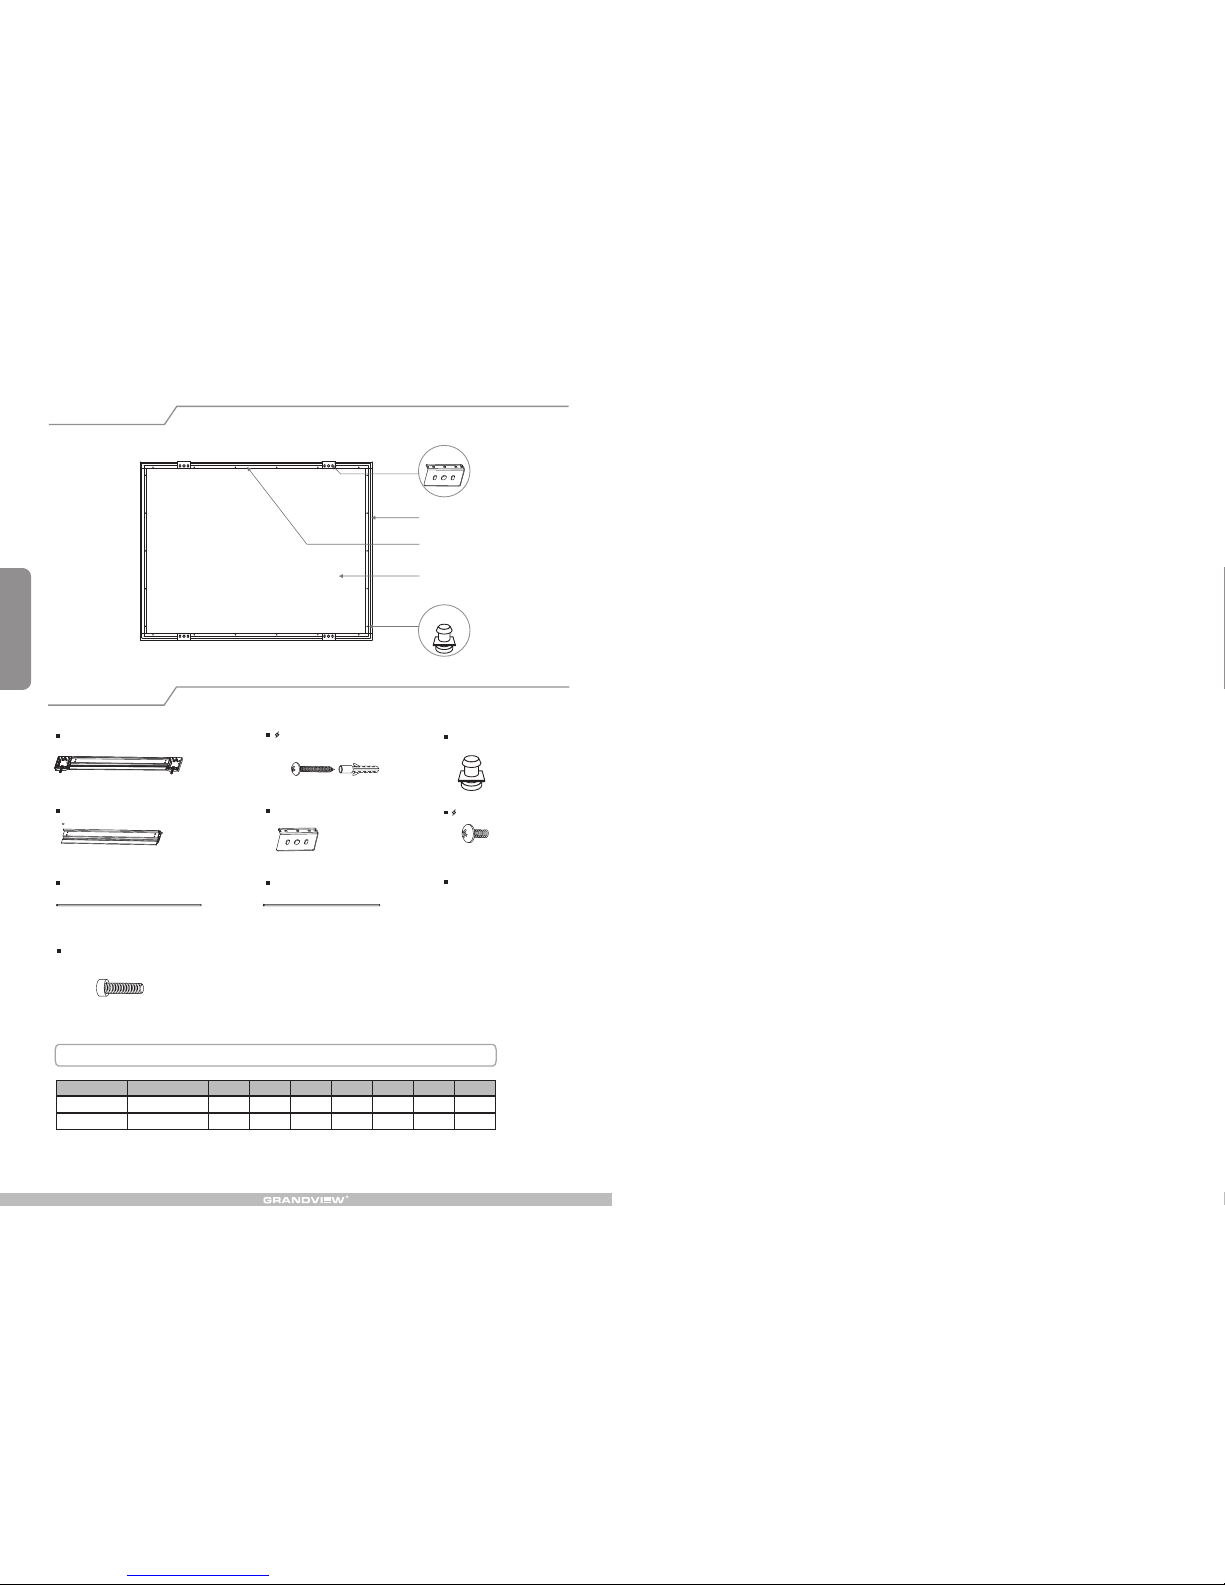
Description
Accessories
Top and Botto m Tensio n Bars (2 )pcs
Side Tension Bars (2 )pcs
Top and Botto m Frame Pie ces (2pcs)
Side Frame Pieces (2 )pcs
Fixing Lu gs
Instruction Manual(1 )pc
Corner Bra cket s Scr ews ( 4 )pcs
Bracket s
Side Fra me Pieces
Top and Bottom Frame Pieces
Fabric
Additiona l S heet (Total Fixing L ugs Quantities)
5x40 mm Sc rews with
Ancho rs (8, not inc luded)
5x10 mm Sc rews (8 )pcs
Fixing Lu g
Brack ets
※:Tw o More Fi xing Lu gs For Ea ch Scre en
303838
44
44
92241002810628120
4:3
16: 9
150 180 200
\
32
48
28
Qty
For mat
pcs
pcs
\ \
Page 3
5
2
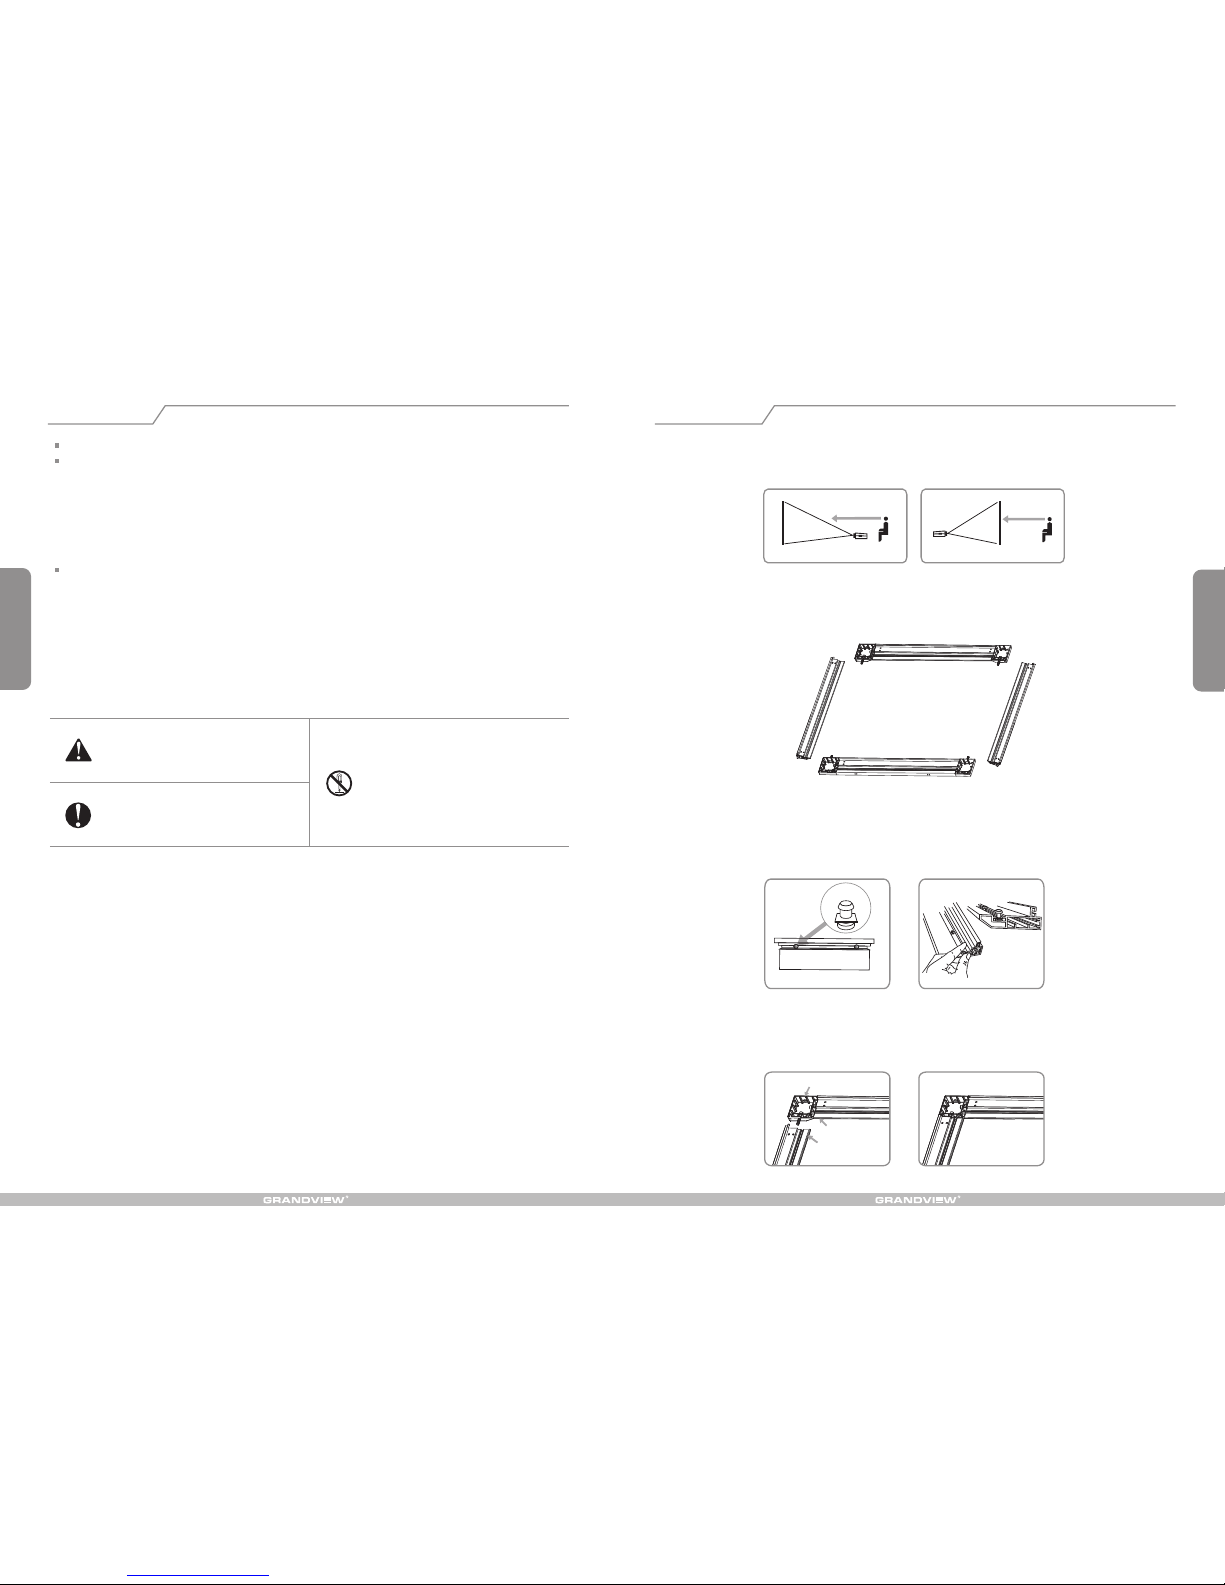
1. Take out fram e from box a nd lay on fl at surfa ce ( 3). Take out all a dditio nal part s.Figur e
2. Slid e fixing l ugs into g rooves o n revers e side of fr ame ( 4&5) a nd align w ith arro ws (Note : Arrows
are app roxima te).
Figur e
3. Loos en corne r bracke t screws and slide int o frame gr ooves. Caref ully align frame corner to 90 degree s
and fas ten with s crews. R epeat fo r each cor ner (Fig ure 6-7) .
This pr ojecti on scree n should b e instal led at the b est poss ible vie wing pos ition fo r the audi ence. Fr ont
proje ction (F igure 1) a nd Rear pr ojecti on (Figu re 2). Ins tall acc ording t o materi al chose n.
Installation
Figur e 3
Side Fra me Pieces
Top and Bottom Frame Pieces
Figur e 4
Figur e 5
Fixing Lugs
Alumi num corne r
conne ctor piec e
Side Frame Pieces
Top and Bottom
Frame Pieces
Figur e 6
Figur e 7
Figur e 1 Figur e 2
Ignor ing the sa fety war nings m ay
le ad t o in jur ies a nd/o r damaging
the pro duct.
Fixtures should be installed in a secure
place to avoid accidents or the screen
falling.
Pleas e contac t your loc al deale r for
repairs or maintenance. Please contact
our company if you h ave any furth er
que stion s. Avoi d ta kin g ap art the
fix tures you rself . Loos e part s may
cause t he scree n to fall.
Warnin gs
Do not take apar t and replace with u nknown parts. If t here are any probl ems, please cont act your local dea ler.
Product spec ifications are s ubject to change .
When in stalli ng, make s ure it is fa cing for ward. The b ack of the s creen wi ll be labe led with a s ticker.
Pleas e read the f ollowi ng as any da mage to th e screen s urface w ill affec t the qual ity of the p icture :
1.The fr ame is mad e with lig htweig ht alumi num. Ple ase hand le with ca re.
2.Avoid c ontact o r touchi ng the scr een surf ace as it ma y cause sc ratche s or tears .
3.Do not w rite or dr aw on the su rface.
4.Clean the screen wi th a soft cloth and lukewarm water. Do not use any detergent or clean ing products.
5.Use a co tton clo th to care fully wi pe off the du st on the fr ame to pre vent any d amages
6.If it is n ot in use fo r a long per iod of tim e, cover t he scree n to shut ou t dust and d irt.
To prevent unnecessary damage , the operating and maintena nce of the screen should be done by adults.
Openi ng the cas e, the fra me has ind entati ons on sur face bec ause of pa ckagin g in a dry cas e for a long
time. Th is is a norm al pheno menon an d the scre en can be us ed norma lly. Pleas e stay the s creen in a
norma l condit ion that t he inden tation s can be nat urally r emoved . Recove ry time wi ll be chan ged in 1-1 5
days be cause of t he air hum idity, If you w ant to rem ove thes e indent ations q uickly, pl ease use h alf-wet
solut ion.
Metho ds: Spri nkle wat er on the su rface th at can rem ove the in dentat ions.
Page 4
3
4
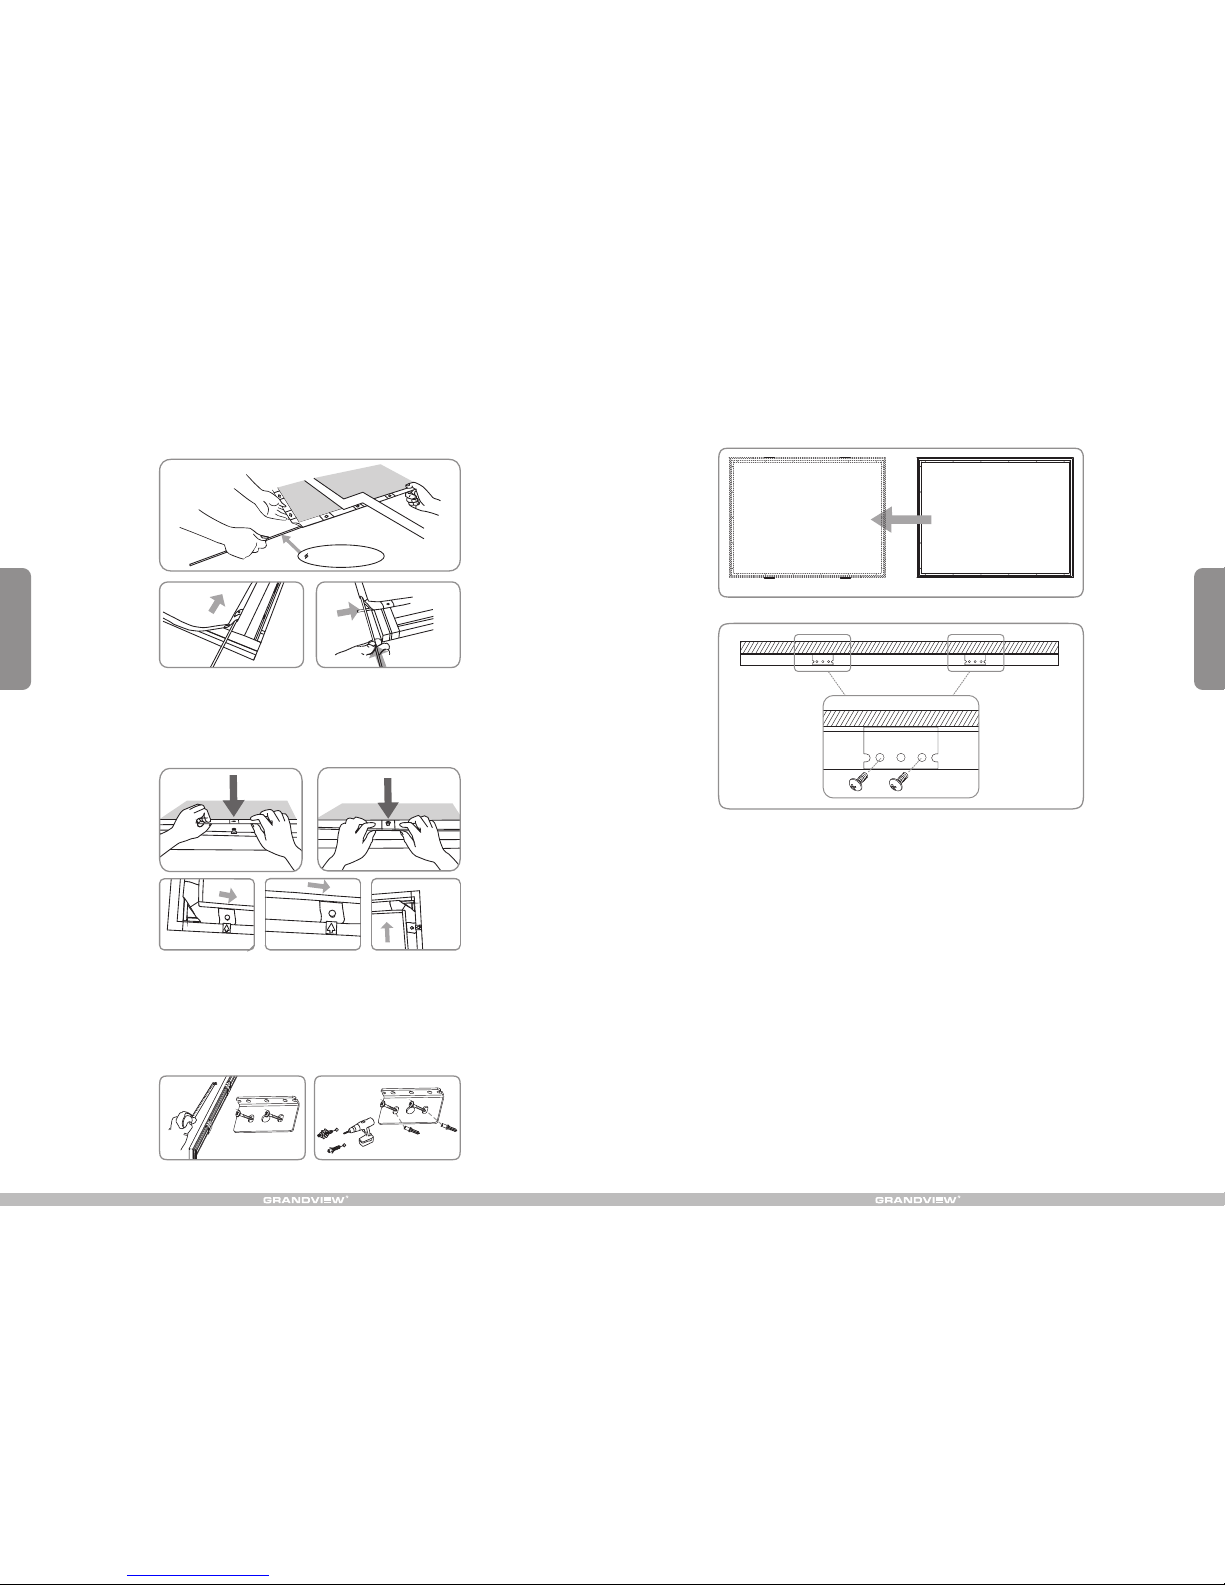
4. Un fold sc reen fa bric an d inser t tensi on bars . Use the l ong bar f or the to p & botto m and the s hort ba r
for s ides. B e caref ul not to p oke the f abric ( Figur e 8-10) .
5. Ali gn fixi ng lugs w ith arr ows. Us ing the t ensio n bar, pul l fabri c eyele ts over f ixing l ugs. Do t op side
fir st then r otate c lockw ise (Fi gure 11- 15) .
6. Adj ust scr een to en sure th at it is fl at and sm ooth.
7. Ali gn brac kets to d esire d width a nd meas ure. Dr ill tw o, or f our ho les ( If usi ng 4 br acke ts) in wal l at
mea sured w idth. I nsert 5 x40mm s crews f or stud ded wal l, or 5x4 0mm scr ews + anc hors fo r drywa ll
wit hout st uds and h ang (Fi gure 16 -17).
Figur e9 Figur e10
Figur e8
6mm Tension Bar s
Figure 14 Figure15Figure 13
Figur e11 Figur e12
Figur e16 Figure17
8. In sert 6x 12mm sc rews to f asten t he brac kets to t he top an d botto m frame s. 9(Fi gure 18 -1 )
Figur e18
Figur e19
 Loading...