

Page 1
GRANDVIEW REPRODUCING GENUINE COLORS
GRANDVIEW REPRODUCING GENUINE COLORS
Installation Guide for
Large-flat Series Ultimate Permanent Cinema Screen
Grandview Crystal Screen Canada Ltd.
#11- 3751 No rth Fraser Way,
Marin e Way Busin ess Cent re,
Burna by, BC, Canad a V5J 5G4
Tel: 1-604- 412-97 77 Fax: 1-604- 412-9796
Websit e: www.grandvi ewscreen.c a
Guangzhou Grandview Crystal Screen Co., Ltd.
P.O. 511400 Feder al Ind. Zone No. 3 63, Yushan West Roa d,
Shiqi ao, Pany u District, Gu angzhou, Gua ngdong, Chin a
Tel: +8620- 8489-9 499 Fax: +8620 -8480-3343
Websit e: www.grandvi ewscreen.c om
www.grandv iewscr een.com.cn
ISO9001:2000
International Certification
Model:LF-PPxx
Tha nk y ou f or pu rc ha sin g a Gr an dvi ew p ro jec ti on s cre en .
Befor e us e, pl ea se r ead i ns tr uct io ns c are fu ll y. Afte r in sta ll at ion , st or e ins tr uc tio ns f or f utu re r ef ere nc e.
Page 2
1
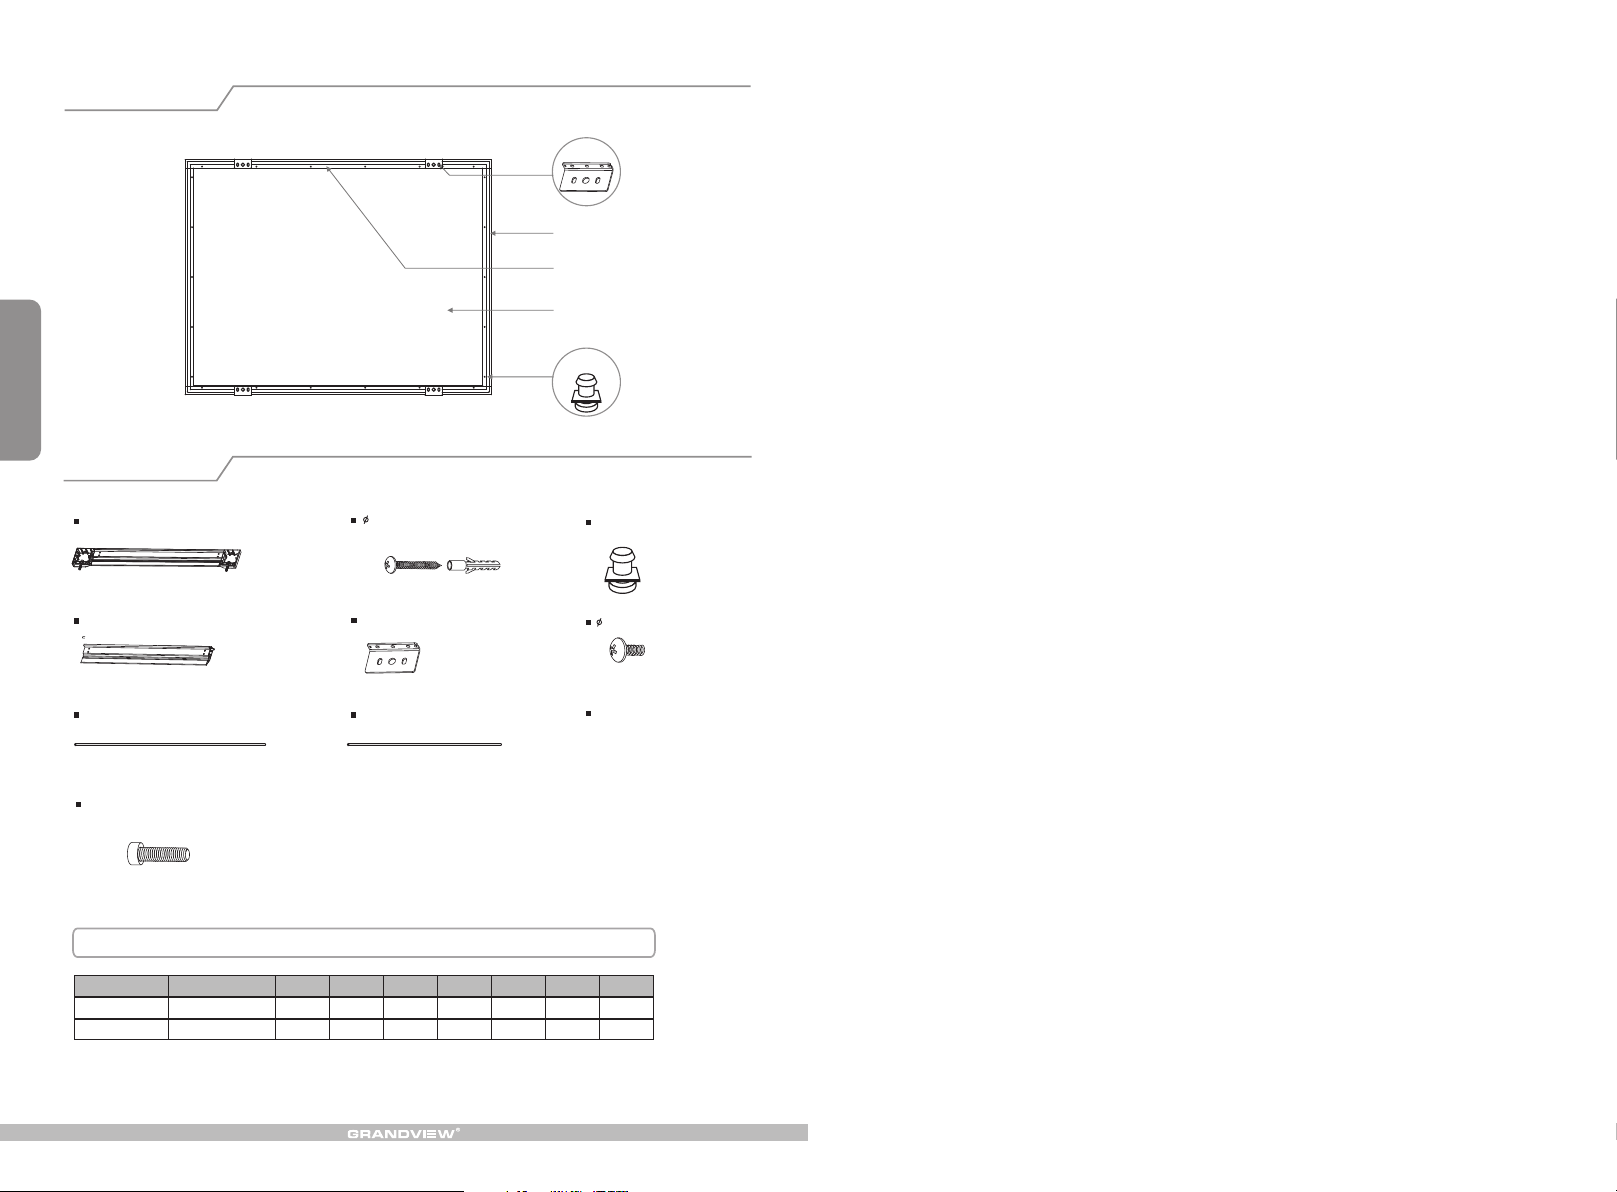
Description
Brack ets
Side Frame Pi eces
Top and Bottom Frame Pieces
Fabric
Fixin g Lug
Accessories
Top and Bottom Fram e Pieces (2pcs)
Side Frame Pieces (2 )pcs
Top and Bottom Tension Bars (2 )pcs
Corner Bra ckets Scr ews (4 )pcs
5x40 mm Screw s with
Ancho rs (8, n ot inc luded )
Brackets
Side Tension Bars (2 )pcs
Additional Sheet (Total Fixing Lugs Quantities)
For ma t
4:3
16:9
※:Tw o More Fi xing Lu gs For Ea ch Scre en
Qty
pcs
pcs
92241002810628120
28
\
32
\ \
30
150 180 200
38
38
Fixing Lugs
5x10mm S cr ew s (8 )pcs
Instruction Manual(1 )pc
44
48
44
Page 3
Warnings
Installation
When installing, make sure it is facing forward. The ba ck of th e scre en wil l be lab eled w ith a st icke r.
Please read the following as any damage to the screen surface will affect t he qua lity o f the pi ctur e:
1.The frame is made with lightweight aluminum. Please handle with care.
2.Avoi d cont act or t ouch ing th e scre en sur face a s it may c ause s crat ches o r tear s.
3.Do not write or draw on the surface.
4.Clean the screen with a soft cloth and lukewarm water. Do not use any detergent or cleaning products.
5.Use a cotton cloth to carefully wipe off the d ust on t he fra me to pr even t any da mage s
6.If it is not in use for a long period of time, cover the screen to shut out dust and dirt.
To prevent unnecessary damage, the operating and maintenance of the screen should be done by adults.
Opening the case, the frame has indentations on surface because of packaging in a dry case for a long
time. This is a n orma l phen omen on and t he scr een ca n be use d norm ally. Please stay the screen in a
5
normal condition that the indentations can be naturally removed. Recovery time will be changed in 1-15
days because of the air humidity, If you wa nt to re move t hese i nden tati ons qu ickl y, please use half-wet
solution.
Methods: Sprinkle water on the surface that can remove the indentations.
Ignoring the safety warnings may
le ad t o in jur ie s an d/o r damaging
the product.
Fixtures should be installed in a secure
place to avoid accidents or the screen
falling.
Do not take apart and replace with unknown parts. If there are any problems, please contact your local dealer.
Product specifications are subject to change.
Please contact your local dealer for
repairs or maintenance. Please contact
our company if you have a ny fur ther
questions. Av oi d t ak in g a pa rt th e
fixtures yourself. Loose parts may
cause the screen to fall.
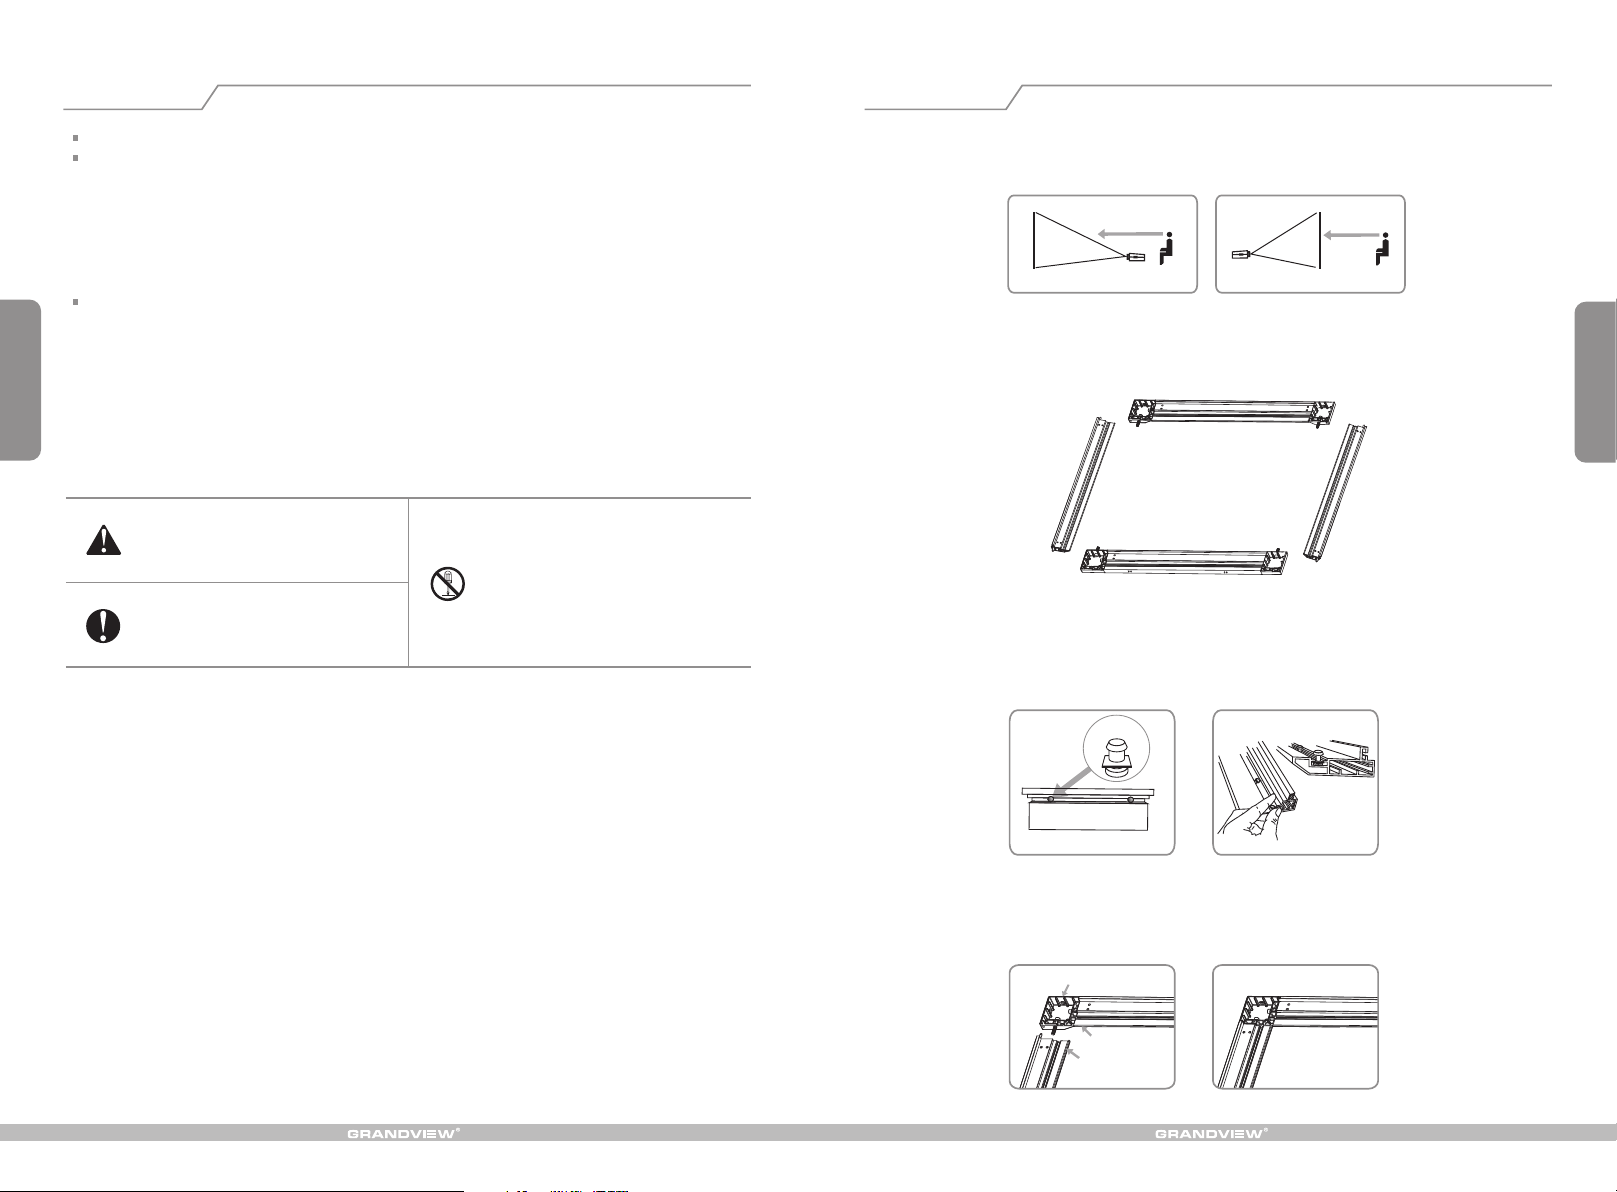
This projection screen should be installed at the best possible viewing position for the audience. Front
projection (Figure 1) and Rear projection (Figure 2). Install according to material chosen.
Figure 1 Figure 2
1. Take out fra me fro m box an d lay on f lat su rfac e ( 3). Take out al l addi tion al par ts.Figure
Top and Bottom Frame Pieces
Side Frame Pi eces
Figure 3
2. Slide fixing lugs into grooves on reverse side of frame ( 4&5) and align with arrows (Note: Arrows
are approximate).
Fixing Lugs
Figure
2
Figure 4
3. Loosen corner bracket screws and slide into frame grooves. Carefully align frame corner to 90 degree s
and fasten with screws. Repeat for each corner (Figure 6-7).
Alum inum corn er
conn ector pie ce
Top and Bottom
Frame Pieces
Side Frame Pieces
Figure 6
Figure 5
Figure 7
Page 4
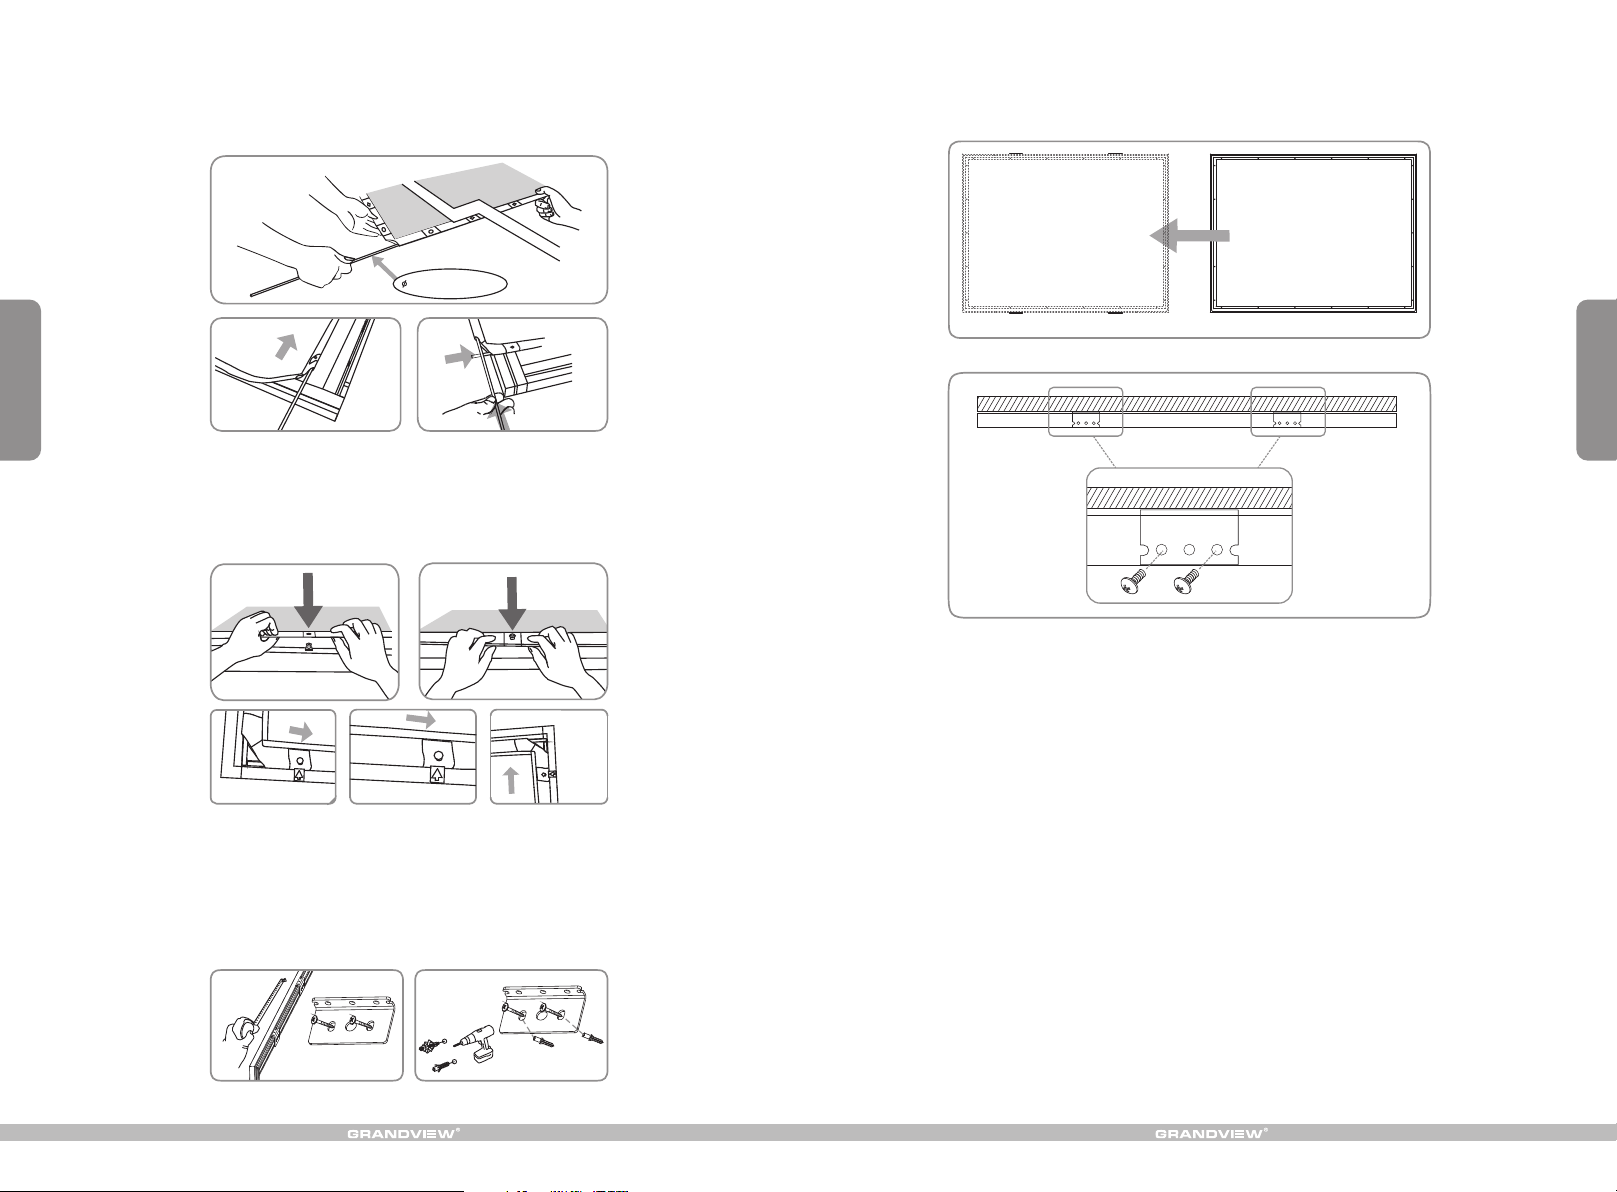
4. Unfold screen fabric and insert tension bars. Use the long bar for the top & bottom and the short bar
for sides. Be careful not to poke the fabric (Figure 8-10).
8. Insert 6x12mm screws to fasten the brackets to the top and bottom frames. 9(Figure 18-1 )
6mm Tension Ba rs
Figure8
3
Figure9 Figure10
5. Align fixing lugs with arrows. Using the tension bar, pull fabric eyelets over fixing lugs. Do top side
first then rotate clockwise (Figure 11-1 5) .
Figure11 Figure12
Figure14 Figure15Figure13
6. Adjust screen to ensure that it is flat and smooth.
7. Align brackets to desired width and measure. Drill t w o, or f our ho le s ( If us ing 4 br ack ets ) in wal l at
measured width. Insert 5x40mm screws for studded wall, or 5x40mm screws + anchors for drywall
without studs and hang (Figure 16-17).
Figure18
4
Figure19
Figure16 Figure17
 Loading...