

Page 1
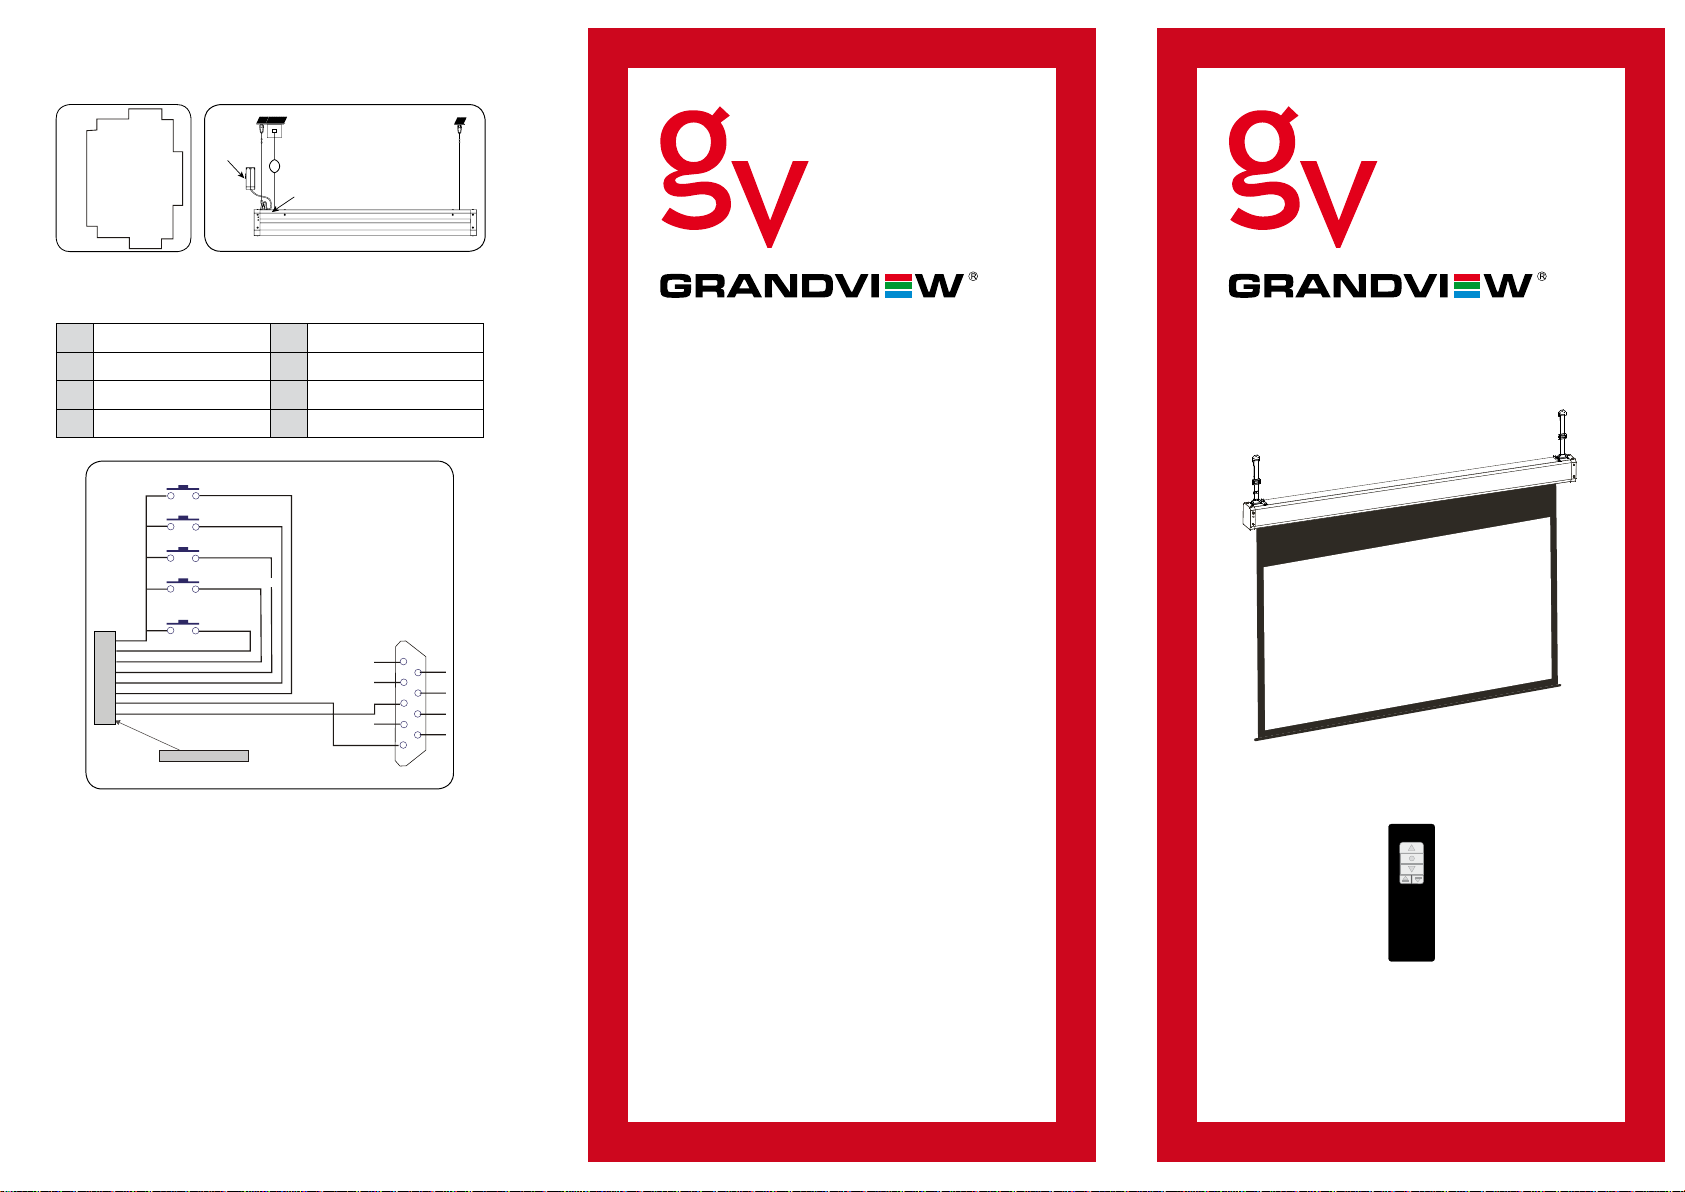
RS 232/485 Input Settings / Close Contact
Back View
1
2
3
4
5
6
7
8
Cable
Box
Etherne t C able Box
Retract or
Central Co ntrol In pu t
CrystalSocket
Control Emitter Function / Address
1 Commonline 5 CasingDown
2 Retractingthescreen 6 Stop
3 Loweringthescreen 7 Rs232InputB
4 Casingup 8 Rs232InputA
UP
SW- PB
S1
S2
S3
S4
J1
1
2
3
4
5
6
7
8
8P8 C
S5
EXT ERNAL CT RL
1. CentralControlFormatAgreementCommunication
AgreementSetting:databits:8bits,startbits:1bit,
stopbits:1bit,BaudRatio:2400.
2. Retractingthescreen:
oxFFoxEEoxEEoxEEoxDD
3. Stoppingthescreen:
oxFFoxEEoxEEoxEEoxCC
4. Loweringthescreen:
oxFFoxEEoxEEoxEEoxEE
5. Retractingthecasing:
oxFFoxEEoxEEoxEEoxC9
6. Loweringthecasing:
oxFFoxEEoxEEoxEEoxE9
7. 232setting:2400,n,8,1acontinuousdatasends
twotimes,eachtimeintervalof200ms.
SW- PB
Cas ing Dow n
SW- PB
Cas ing U p
SW- PB
Scr eenD own
SW- PB
Scr een Up
Sto p
1
2
3
4
5
P1
RS- 232
Protecting Your Screen:
• Keepawayfromdirectsunlightor
hightemperatures.
• Examineboththefrontandback
surfacesbeforeretractingintothe
casetomakesureitisfreeofdust,
dirt,insectsorotherforeignmatter.
• Useasoftbrushorclothtolightly
removeanyforeignparticles.
Cleaning Your Screen:
• Donotuseanysolvents,chemicals
6
7
8
9
orabrasivecleanersonthe
screensurface.
• Useamilddetergentwithwarmwater
toremoveanymarksonthesurfaceor
screencase.
• Alwaysimmediatelydabthescreen
withasoftclothtoavoidsoapmarks.
• Donotscrubthesurface.
Warranty: 12 Months
For more information please go to
www.projectisle.com.au
or call 1300 88 11 79
GV_Sky_Show_Large_Jun11_v1
Grandview Large Sky-Show
User Manual
Page 2
Cas ing
Buc kle
Bra ke
Mec hanis m
Bra ke Me chani sm
Han ging Piece
Cable
Secure
positioning piece
Cable
Box
Socket on
Cable Box
Cable
Box
Socket on
Cable Box
To the Owner:
CongratulationsonpurchasingaGrandviewSky-Show.
Important Notes:
• Pleasereadthisinstructionmanualbeforeuse.
• Pleasedonotattempttoadjustorrepair
theproduct.Youwillvoidthewarranty.
• Pleaseretainthisinstructionmanualfor
futurereference.
• Handlethescreencarefullyduringtransportation.
•Toensurelonglastingviewingenjoyment,alwayskeep
thescreenrolledupwhennotinuse.
Warning
• Ensurethescreenishungbythelooped
suspensioncables.
• Thescreenmustbesecurelymountedbeforebeing
operated.Failuretocomplycancausethesuspension
cablestounravelresultinginthecablesbeingtangled
andpossiblescreendamageoccurring.
• Whensuspendingthescreenunderload-bearing
support,ensurethescreenishunglevel/straight.
• Damagecausedtotheproductduetoincorrect
installation,suspensionoroperationisnotcovered
bywarranty.
Supplied
Operational Instructions
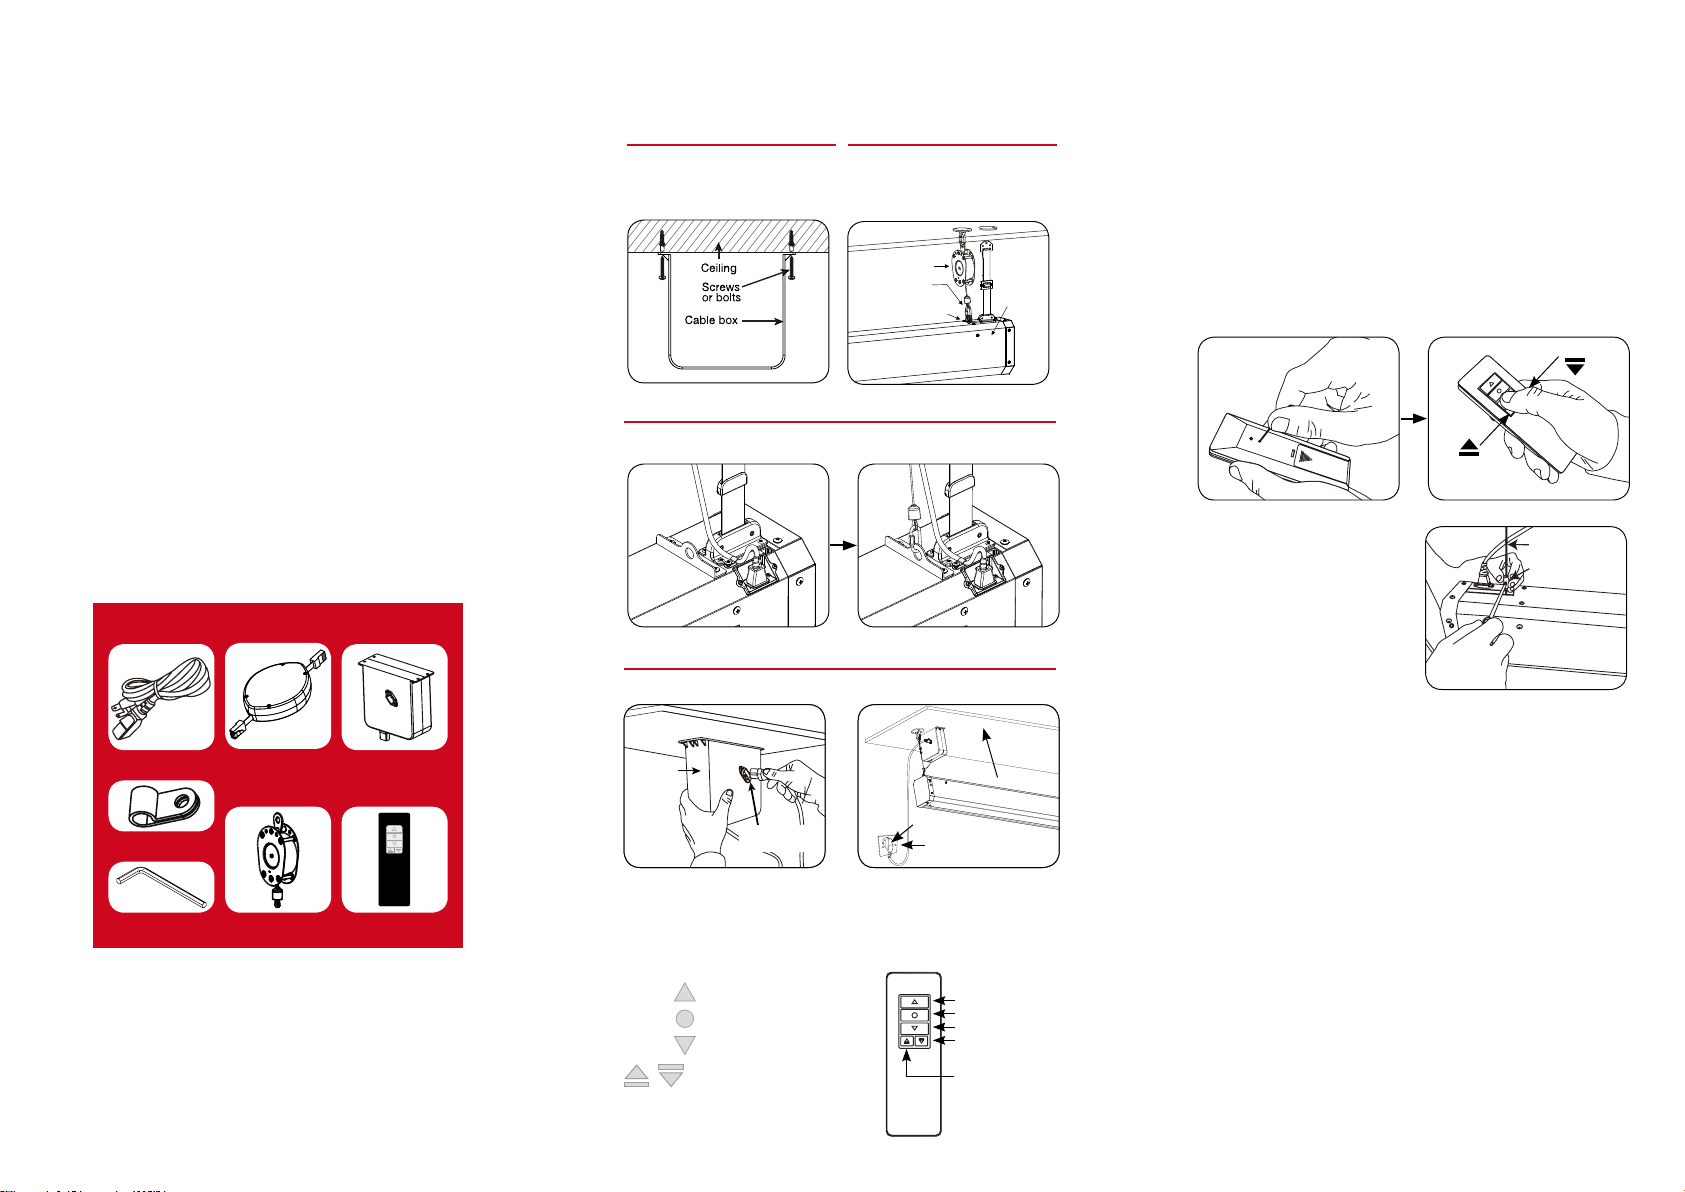
Step 2Step 1
Carefullyunpackthe
screen.Securelyattachthe
cableboxtotheceiling.
Mountthebreak
mechanismandscreen
asshownbelow.
Step 3
Insertthecableboxplugandattachbreakmechanism.
Step 4
Step 4
Cable Limit Settings
(The limits are preset at min 300mm and max 4950mm)
•Turntheremotecontrolovertolocatethe
“ProgrammingMode”activationtoggleswitch.
•PresswithafinetipandtheLEDshouldlightup,
indicating“ProgrammingMode”ison.
•Pressthemicro“UP/DOWN”buttonstomovethe
screencasetotherequiredposition.Pressthe
STOPbuttonwhenthedesiredlimitisachieved.
•PresstheProgrammingModetoggleswitchagainto
switchoffprogrammingmodeandsetthenewlimit.
Down for cable
Up for cable
Please secure your safety
limit lug at least 10mm
above the new limit
Multimedia
Cable Box
Cable Lock
Allen Key RF RemoteBrake Mechanism
PlugthepowercordintotheCableBox.
PlugthepowercordintotheCableBox.
Screen Limit Settings
Thescreenisfittedwithtwolimits.Thelimits
Cable BoxPower cord
Plug
Plug
Plug Socket
Plug Socket
Ceiling
Ceiling
Using RF Remote
Yourremotecontrolcomeswithbatteriesinstalled.
Tooperateyourremote:
Presstoliftthescreen
Presstostopthescreen
Presstolowerthescreen
TheMicroswitch
isusedforretractingor
loweringcable.
UP for screen fabric
STOP for fabric & cable
Down for screen fabric
Down for cable
Up for cable
automaticallystopthescreeninthefullyUp(toplimit)
andfullyDown(bottomlimit)positions.Youcanadjust
thebottomlimittosetyourviewingheight.
Setting The Bottom Limit
Caution:Settingthebottomlimitbeyondtheblack
leadermayrenderyourscreeninoperableandvoid
yourwarranty
Thebottomlimitswitchisaccessiblethrougha
grommetedholeatthebackoftheleftsidecasing.
Lowerthescreentotheoperatingpositionthen
insertthesuppliedAllenkeyintothewhitecoloured
screw.Turnitclockwisetoraisethescreenorturn
itanti-clockwisetolowerthescreen.
Whenloweringthebottomlimitthescreenwillmoveas
youadjustit.
Whenraisingthebottomlimitpleaseliftandlowerthe
screenwiththeremotetoseethenewposition.
 Loading...