

GRAND VIDEOKE TKR-373MP Quick Manual
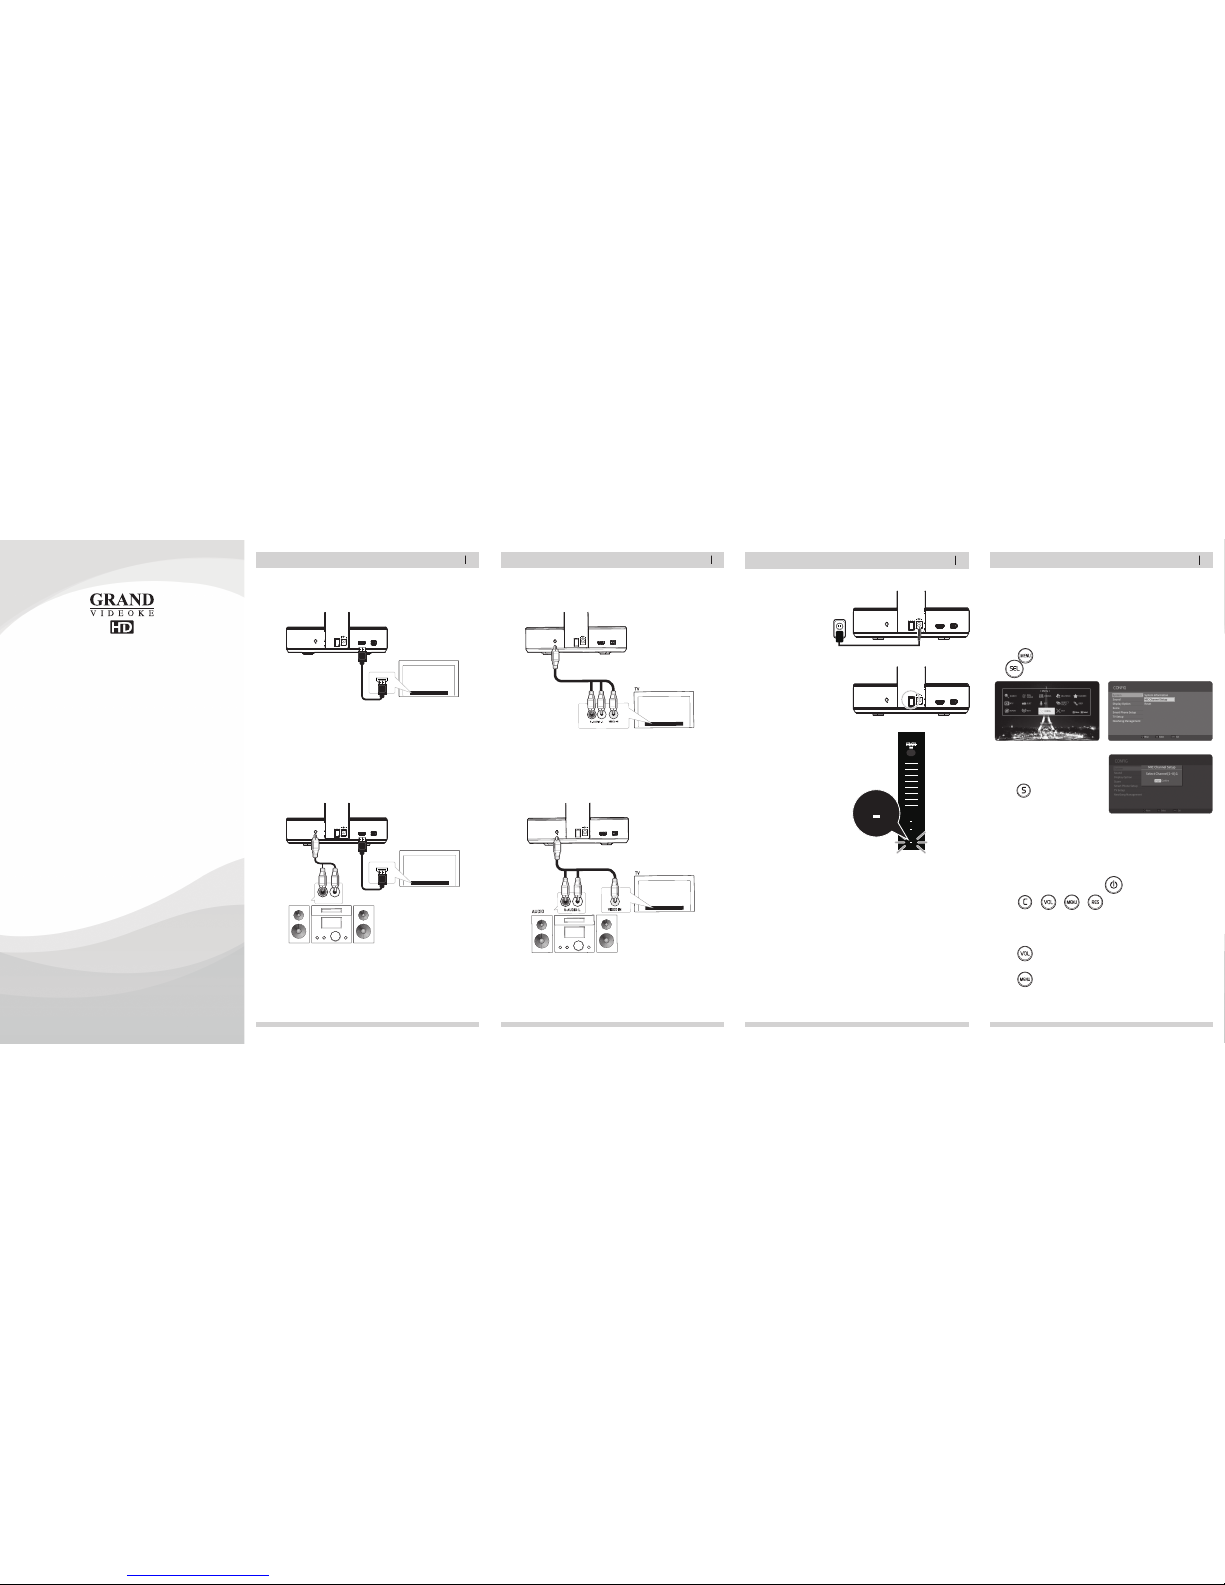
2. If a speaker system is available:
Please connect the audio output of the main unit to the audio input of the
speaker system as shown in the image below.
2. If a speaker system is available:
Please connect the audio output of the main unit to the audio input of the
speaker system as shown in the image below.
1. Please connect the main unit to the HDTV using an HD Output cable as shown in
the image below.
MAIN UNIT – HDTV CONNECTION
HOW TO INSTALL
HOW TO INSTALL / 2-4
CHANNEL SETTINGS / 5-6
BASIC FUNCTIONS / 6-7
SECONDARY FUNCTIONS / 7-8
HOW TO USE GV SMART APP / 8-9
02
1. Please connect the main unit to the TV using an RCA cable as shown in the
image below.
MAIN UNIT – STANDARD TV CONNECTION
HOW TO INSTALL
03
1. Plug the power cable into the outlet.
2. Switch on the main unit.
3. Check if the POWER LED (BLUE)
on the main unit is on.
POWER ON/OFF
HOW TO INSTALL
04
T
KR-373MP has sixteen(16)avaitable channels. (MIC1 Ch 1~ Ch 8, MIC2 Ch 1~Ch 8)
Please takeno te that microphones and main player should be on the same channel.
Incase of channel interference (either one or two of the microphones cannot be detected
b
ythe main player), please follow the step by step instructions below for re-channeling.
[STEP 1] Change the channel on the main unit by using the remote control.
[STEP 2] Set the channel of the two microphones using the microphone's
keypad.
CHANNEL SETTINGS
05
1. The default TV system is NTSC.
2. If you are using a PAL TV, please follow the instructions below.
[MENU]
→ “Config”→ “TV Setup” → Select “PAL”.
TV SET-UP
1. The wireless microphones are set in the default channel.
2. The wireless microphones can be turned on and used immediately after
turning on the main unit.
3. The wireless microphones will automatically turn off when not in use for 10 minutes.
4. When you are experiencing noise due to interference, please change the
channel of the microphone (see Channel Setting).
WIRELESS MICROPHONE CONNECTION
Quick Guide
TKR-373MP
POWER
DCIN 12V
AUDIO/VIDEO
OUT
H
DMI Wi-Fi
H
DTV
T
KR-373MP
HDINPUT
AUDIO/VIDEO
OUT
HD TV
HDINPUT
TKR-373MP
AUDIO
R-AUDIO-L
A
UD
IO/
VI
D
EO
O
UT
TKR
-37
3MP
AUDIO/VIDEO
OUT
AUDIO/VIDEO
OUT
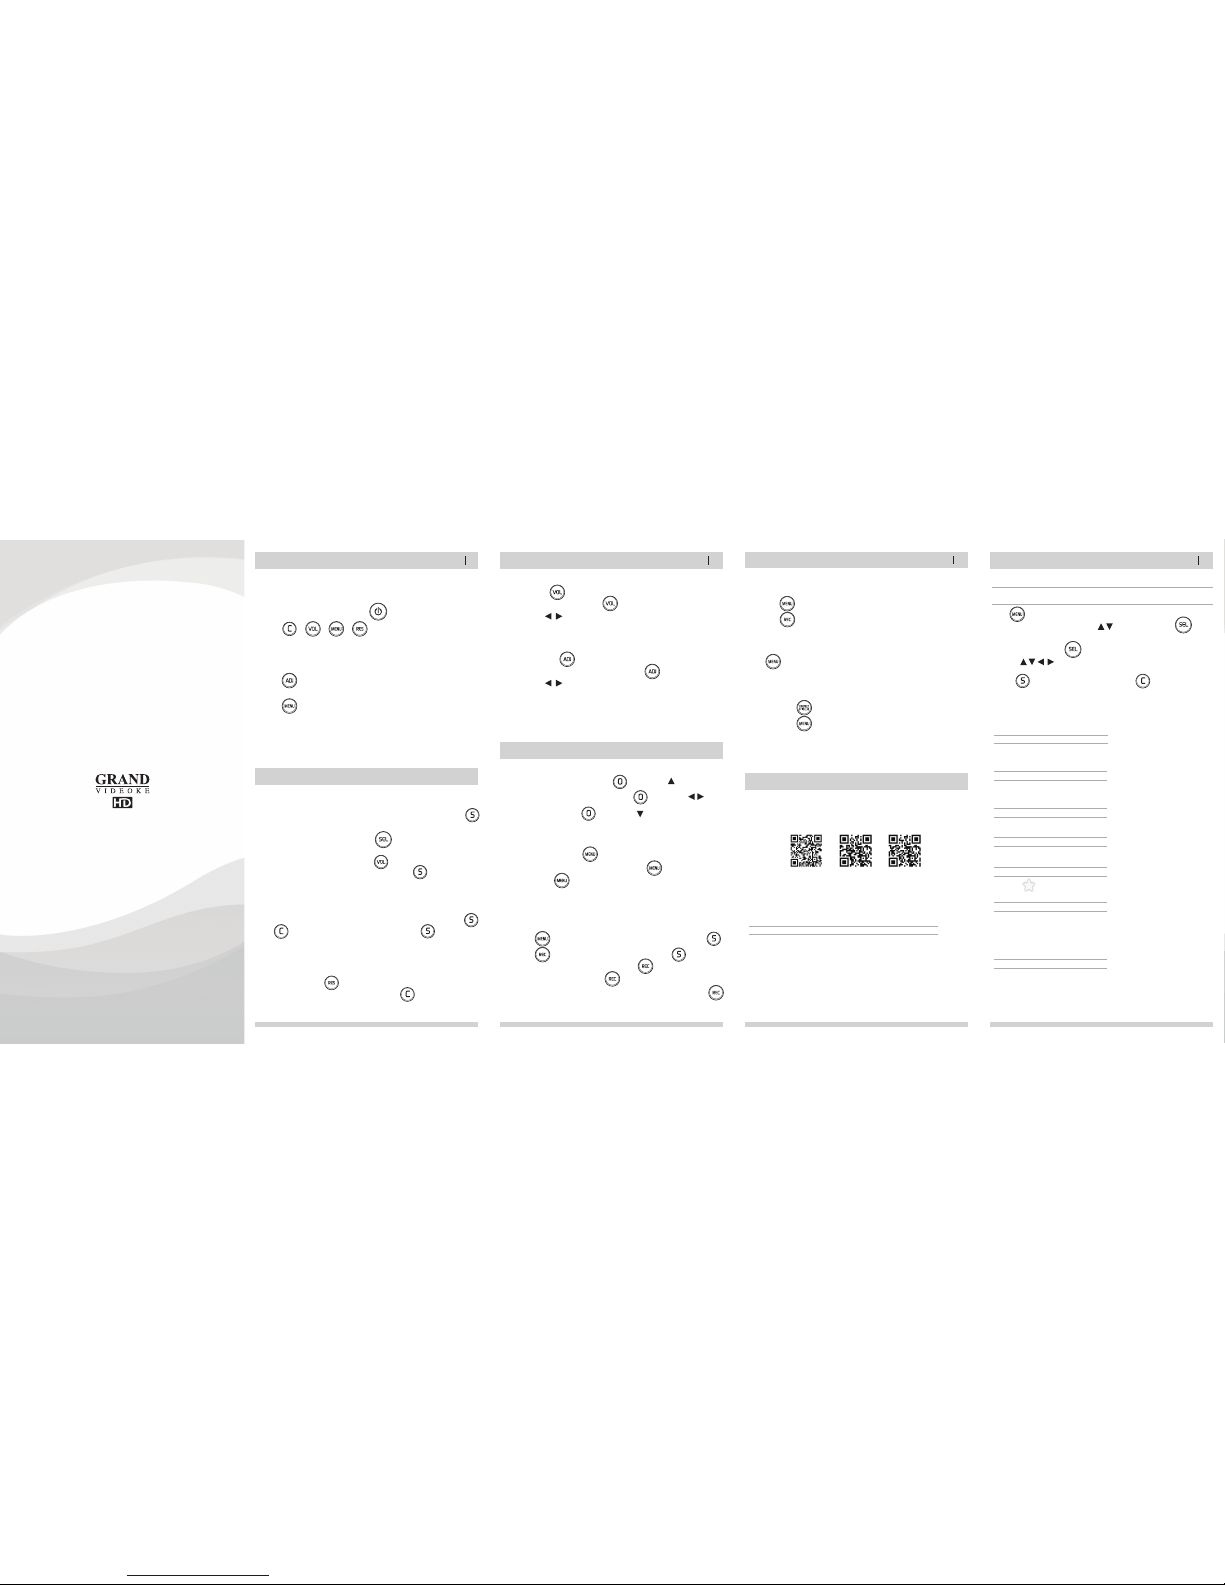
2. Go to channel select menu:
Press button + choose “Config” → ”System” → ”MIC Channel Setup”
+ button.
1. Turn on the main unit. Make sure no song is playing.
For the first(1st) microphone:
1) Turn on the microphone by pressing the button.
2) Press button in order.
The microphone LED will be turned on and off twice.
3) Press the same channel number that you set in the main player.
The microphone LED will be turned on and off twice.
4) Press button.
Microphone LED will be turned on and off twice.
5) Press button to save.
Microphone LED will be turned on and off 6 times.
3. Select one channel number from 1 to 8
and press that specific number on the
remote.
4. Press button.
5. Press [Power off] → [Power on] to save.
A
UD
IO/
VI
D
EO
O
UT
TKR
-37
3M
P
MIC 1
MIC 2
POWER
POWER
→
→
→
→ →
POWER
DCIN 12V
HDMI Wi-Fi
POWER
DCIN 12V
HDMI Wi-Fi
POWER
DCIN 12V
H
DMI Wi-Fi
POWER
D
CIN12V
HDMI Wi-Fi
POWER
DCIN12V
H
DMI Wi-Fi
CHANNEL SETTINGS
BASIC FUNCTIONS
06
HOW TO USE GV SMART APP
09
BASIC FUNCTIONS
SECONDARY FUNCTIONS
07
SECONDARY FUNCTIONS
HOW TO USE GV SMART APP
08
METHOD 1. By entering song number directly.
- Key in the song number using the alphanumeric keypad, then press .
SONG SELECTION & PLAYBACK
1. Volume : Press .
2. Type selection(MUSIC, MIC, ECHO) : .
3. Adjustment : , .
VOLUME(MUSIC, MIC, ECHO)
To stop a song while playing,
press .
STOP
METHOD 2. By searching the song.
(1) To Open the Song List : Press .
(2) Input the Title or Artist by typing on the alphanumeric keypad.
(3) To Sort by Title, Artist : Press .
(4) To Select : Press the Arrow keys, then press .
1.To pause a song while playing, press .
2.To continue, press .
PAUSE
Select a song, then press .
RESERVATION
Press Reserved song number,
then press .
CANCEL THE RESERVED SONG
METHOD 1. Prelude/Interlude skip. Press (While playing), .
METHOD 2. Rewind a tune, Forward a tune. Press (While playing), , .
METHOD 3. Verse skip. Press (While playing), .
SKIP
1. To Add: Select a song, press .
2. To Remove: Select a song that has been added, press .
3. To Search: Press , then select “FAVORITE”.
FAVORITE SONGS
You can record a song in 5 ways :
METHOD 1. , Select “REC”, Select“Recording Song”, Select a song, press .
METHOD 2. , Select“Recording Song”, Select a song, press .
METHOD 3. Open the Song List, Select a song, press .
METHOD 4. While playing music, press : Record the playing song.
METHOD 5. Key in the song number using the alphanumeric keypad, then press .
RECORDING
You can record a song in 2 ways :
METHOD 1. , Select “REC”, Select “Listen/Download”.
METHOD 2. , Select “Listen/Download”.
SEARCHING RECORDED SONGS
1. Start QR code reader on your smartphone or tablet.
2. Select one of the following QR codes applicable to your smartphone or tablet.
3. You will be redirected to either the Google Play Store or the Apple App Store
depending on your smartphone or tablet.
Install the app from there.
Android Device iPhone iPad
HOW TO INSTALL APP
Run GV Smart APP on your smartphone or tablet. →
Select "PAIRING KARAOKE MACHINE“ Turn on the main unit and select [MENU]. →
“Wi-Fi” using the remote control.
Or, select the [Wi-Fi] with remote control.(If you reconnect to a previously connected
smartphone or tablet a popup will appear. Press [START] to connect automatically.)
1] Using the QR CODE reader on the smartphone or tablet, scan the QR CODE
displayed on the main unit screen.
2] Select the same AP as the connection information displayed on your smartphone or
tablet.
3] Connection complete. (If connection fails, please retry.)
HOW TO CONNECT YOUR SMARTPHONE/TABLET WITH THE GRAND VIDEOKE
METHOD 2. (AP method – A Wi-Fi router must be present. Up to 4 smartphones or
tablets can be connected.)
Press . Select "CONFIG".
→
"Smart Phone Setup", move to "AP" with , direction key, and press .
1] Move to preferred access point (AP) with [Up / Down] direction key in list displayed in
popup window, and press .
2] Use the , , , direction keysto input the WiFi Password.
*Numbers can be input directly by the number buttons on the microphone or remote control.
3] Press → Display "Connected" tothe AP. Press to process.
4] If "AP" is selected on setting configuration, the smartphones or tablets that would be
connected to the Grand Videoke should be on the same AP as the Grand Videoke.
HOW TO CONNECT YOUR SMARTPHONE/TABLET WITH THE GRAND VIDEOKE
Press , Select “REPEAT”.
SONG REPEAT
METHOD 1. Press .
METHOD 2. Press , Select "PERFECT PITCH".
PERFECT PITCH FUNCTION
1. Adjustment : Press .
2. Type selection(KEY, TEMPO, MELODY, BGV, VOCAL) : . * VOCAL : Multiplex Only.
3. Adjustment : , .
KEY, TEMPO, MELODY, BGV, VOCAL
METHOD 1. (HOT SPOT, only one smartphone or tablet can be connected.)
DIRECT SONG DOWNLOAD (SONG UPDATE)
Select the new song volume you want to purchase.
→
Download and transfer it to the main unit.
GV SMART APP FEATURES
SONG SEARCH
Easy typing and searching of song titles and artists.
REMOTE
Use all the functions of the remote control more conveniently on your smartphone.
View various song lists including new song downloads.
SONG BOOK/TYPE
FAVORITE SONGS
If you click ,you can easily register your favorite songs and easily find them.
RECORD
- Record : The recorded songs on the main unit can be displayed and can be sent or
deleted on your smartphone or tablet.
- Print Screen : “Perfect Pitch” score screens can be managed and be sent on your
smartphone or tablet for sharing on social media.
FUN
- TRANSFER MP3 : Transfer the MP3 files stored in your smartphone or tablet to the
main unit for listening and singing.
- TRANSFER IMAGE : Transfer photos stored in your smartphone or tablet to the main
unit and use it as background.
- MESSAGE SIGN : Write and send messages that you would like to display live on screen.
[STEP 2] Set the channel of the two microphones using the microphone's
keypad.(Continued)
v.1
For the second (2nd) microphone:
1) Turn on the microphone by pressing the button.
2) Press button in order.
Microphone LED will be turned on and off twice.
3) On the alphanumeric keypad, press the same channel number that you have set in
the main player. The microphone LED will be turned on and off twice.
4) Press button.
Microphone LED will be turned on and off twice.
5) Press button to save.
Microphone LED will be turned on and off 6 times.
- Check if both microphones are now working.
If not, try again. Contact our Customer Service for other concerns.
→
→
→
→ →
 Loading...