

GrandTec Grand iFalcon Quick Manual
1
Grand iFalcon IP Cam
QUICK GUIDE
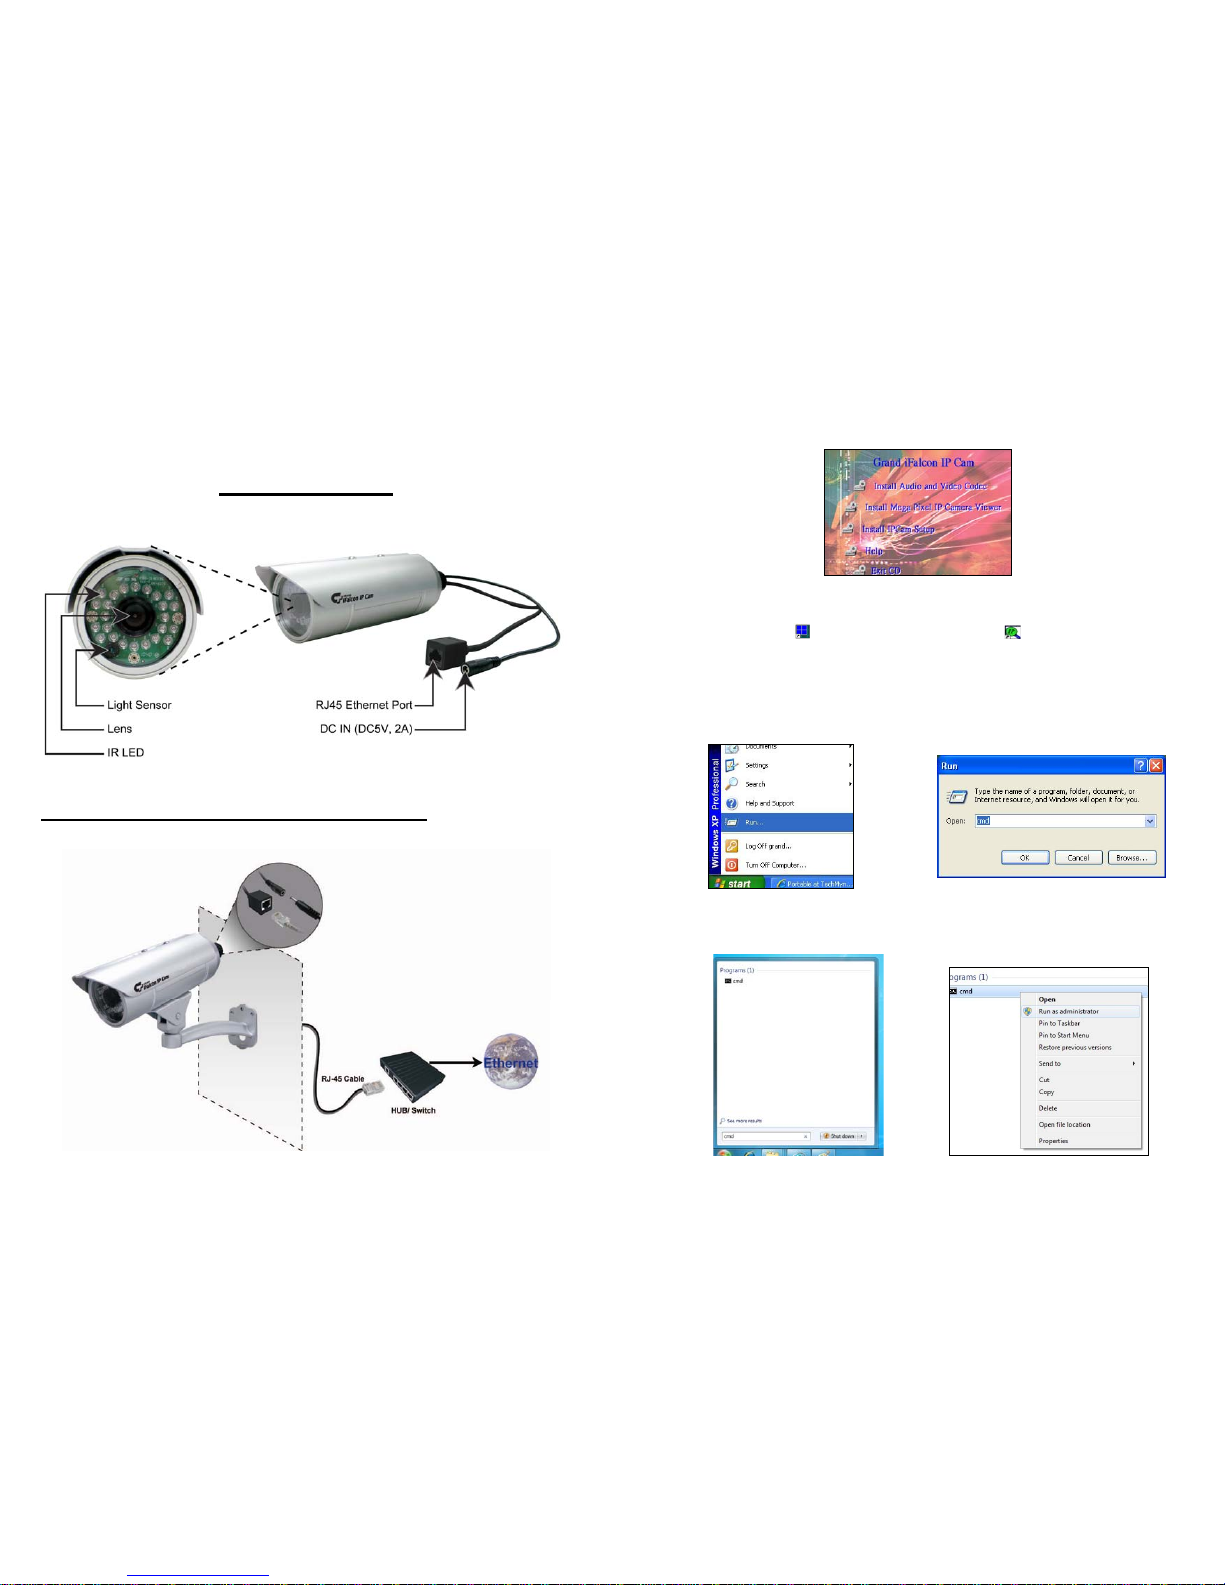
1. Hardware Overview
2. Connecting to a Network
Please consult the user manual in Driver CD for hardware installation.
Connect the network camera to an Ethernet hub or switch by using a standard cable.
Nov 19, 10
3456900
2
3. Software Installation
Insert the driver CD into your CD-ROM drive, then the autorun function will start up the shell program.
Step1. Press the Install Audio and Video Codec to install the audio and video codec.
Step2. Press the Install Mega Pixel IP Camera Viewer to install the surveillance software.
Step3. Press the Install IPCam Setup to install the IPCam Setup program.
Step4. The shortcut icons (
Mega Pixel IP Camera Viewer and IPCamSetup) will be shown
on your desktop after installing.
NOTE: If your computer is running on 64bit version of Windows 7 or Windows Vista, please follow these
steps to complete the installation
Step1.
- Windows XP: Click Start > Run, type cmd, and then click OK to open the Command Prompt
window.
- Windows 7/ Vista: Click Start and type cmd in the Start Search box (don’t press Enter).
In the list of programs, right-click cmd, and then click Run as administrator to open the
Command Prompt window.
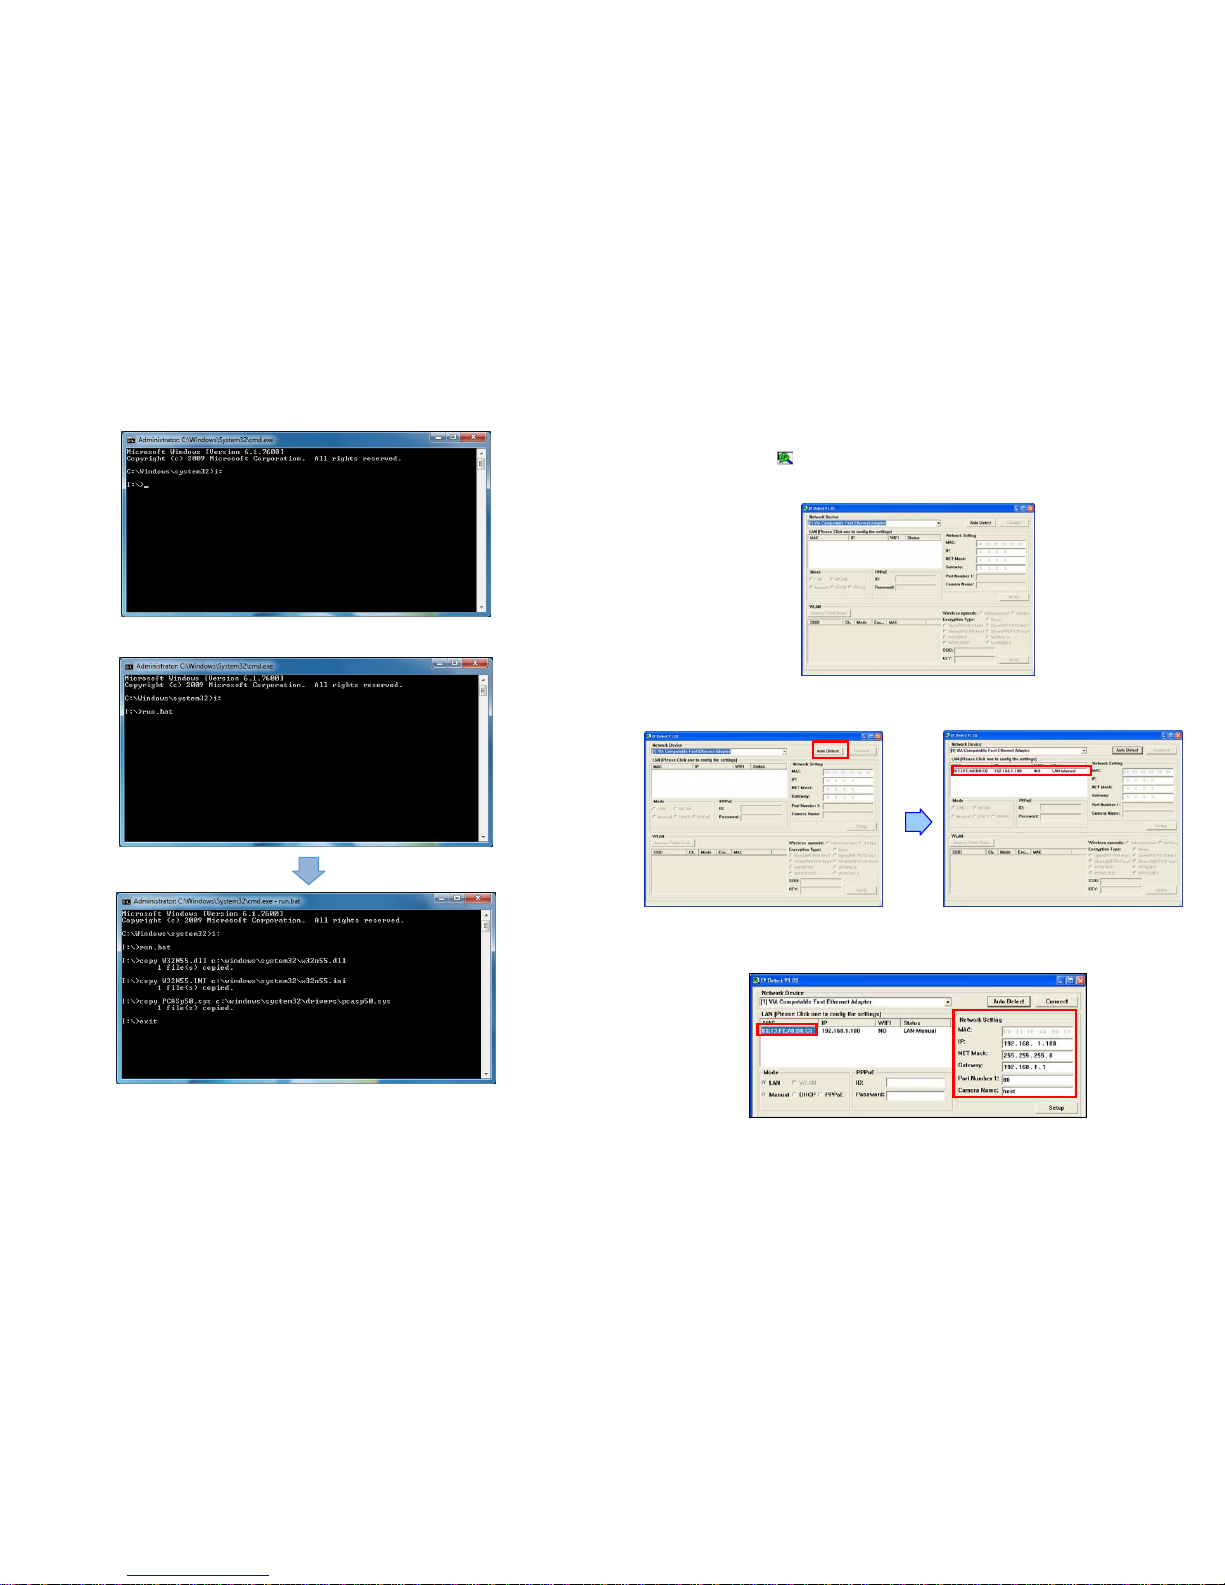
3
Step2. Type your CD-ROM driver letter (for example: i:) and press Enter to access CD-ROM driver.
Step3. Type run.bat and press Enter to copy the driver files automatically.
4
4. Network Installation
Confirm that the camera is already connected to the network.
Step1. Double click on (
) IPCam Setup’s execution file on the desktop, and the following screen will
appear.
Step2. Click the “Auto Detect” button, and your camera’s MAC and default IP Address will be listed.
Step3. Click on the “MAC”, and the “IP”, “Net Mask”, “Gateway”, “Port Number 1” and “Camera Name”
will be displayed in the “Network Setting” area.
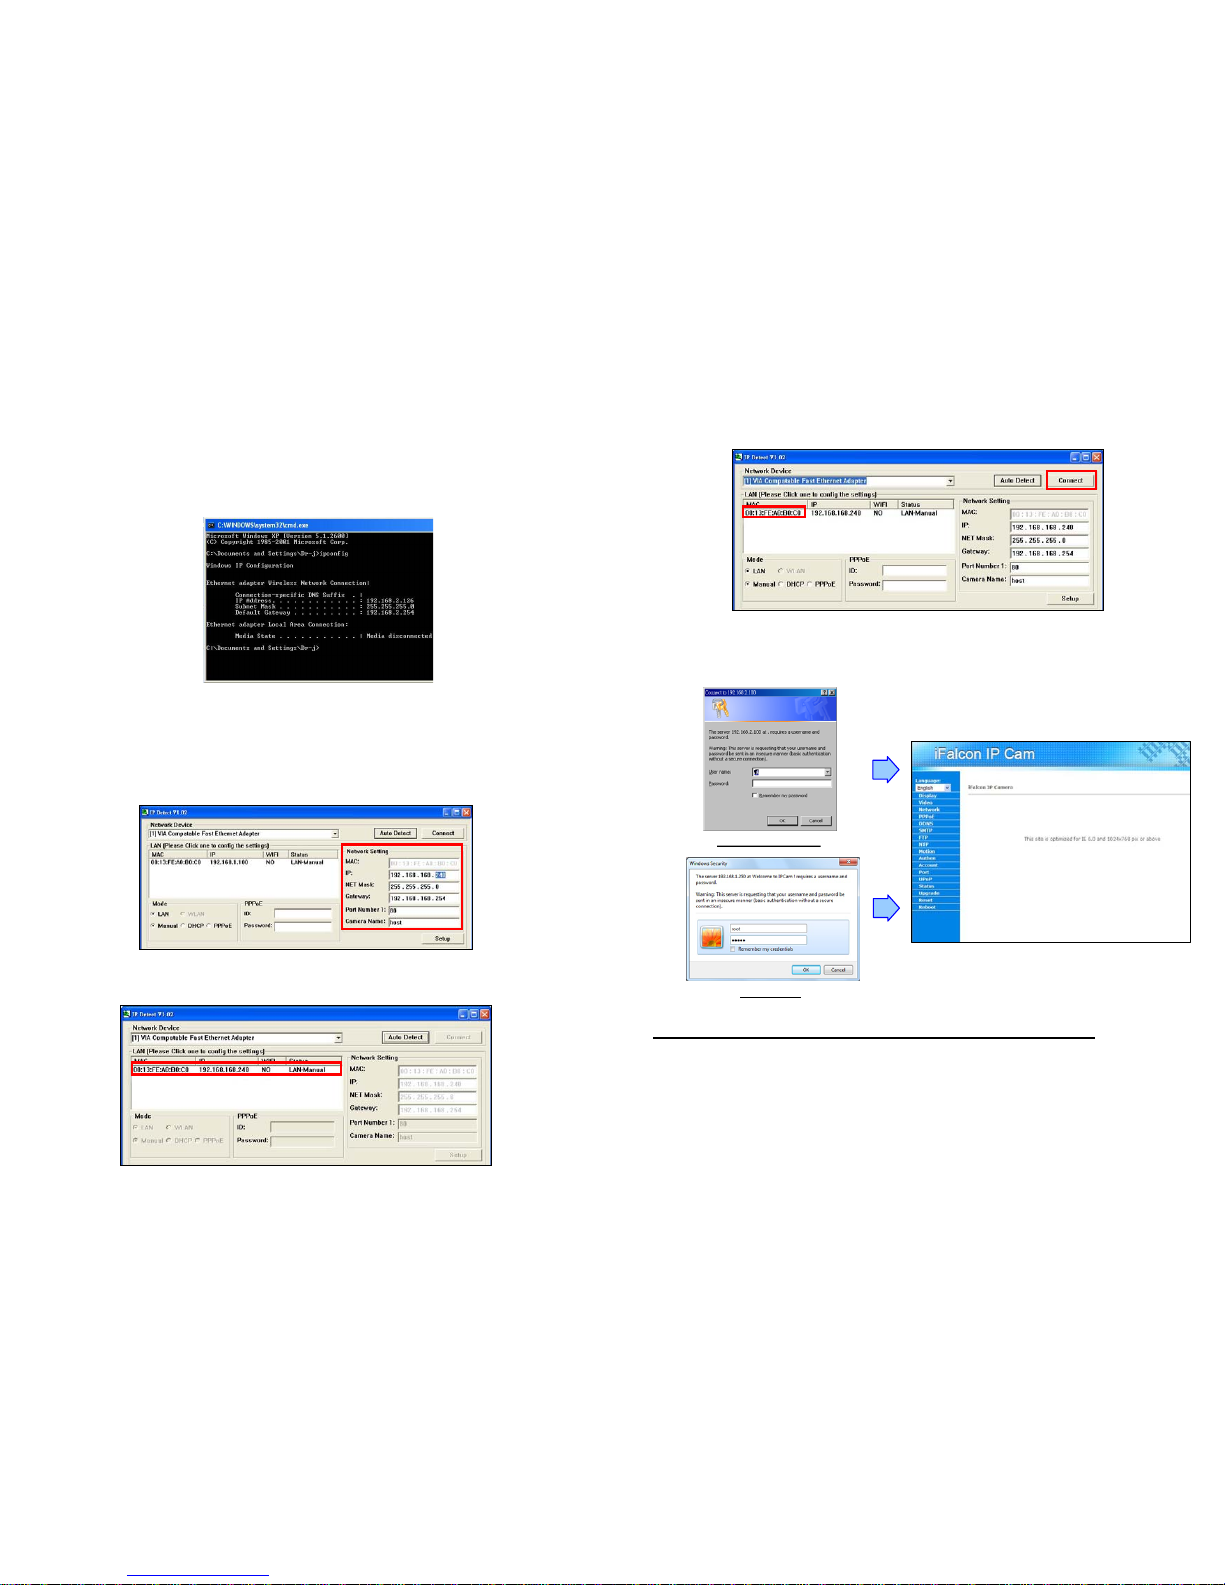
5
NOTE: The IP Address, Net Mask and Gateway must be corresponding with your network settings for
you to access the camera. You can follow the steps to get your network information.
- Open the Microsoft DOS Command Prompt shell window.
Windows XP/ Vista: <Start> → <Programs> → <Accessories> → <Command Prompt>
Windows 7: <Start> → <All Programs> → <Accessories> → <Command Prompt>
- Type “ipconfig” and then press “Enter” to get your network information.
- Assign IP Address, Netmask (Subnet Mask) and Gateway (Default Gateway) for the Mega
Pixel IP Spill-Resistant Camera. (You must use the same Net Mask (ex. 255.255.255.0) and
Gateway (192.168.2.254). You can use any IP address between 192.168.2.1-254, but make
sure that the IP Address has never been used or is used by another IP addressable device.)
Step4. Directly modify the “IP Address”, “Net Mask” and “Gateway”, and click “Setup” to save.
Step5. Click the “Auto Detect” button again, and the new network information will be shown.
6
Step6. Click on the “MAC” and click the “Connect” button to connect the Mega Pixel IP Spill-Resistant
Camera.
Step7. When the login screen appears, enter the user name and password (default user name: root,
default password: admin), and click the “OK” button to login your camera.
Windows XP/ Vista
Windows 7
PS. Please consult the user manual in Driver CD for more detail.

User’s Manual
ISSUE: Nov 16, 2010
GRAND iFalcon IP Cam
IP66 Waterproof IP Camera/ 1.3 Mega Pixel/ Compatible with Win7, Vista & XP
INDEX
1. Package Contents……………………………..………….. 1
2. Introduction………………………………….……………... 1
3. System Requirements...………..………….……………… 1
4. Product Features…….……….……………….…………... 2
5. Hardware Overview……………..…………….…………... 3
6. Hardware & Software Installation……..…..……..……… 4
6.1 Hardware Installation……….....….………………..…. 4
6.2 Software Installation.............…….…………………… 6
6.3 Internet Browser Settings….…….…………………… 10
7. Network Installation………..……..………………….….… 11
8. Using the Built-In Web for Configuration………....…….. 14
8.1 Language Select…………..………………………..…. 14
8.2 Display……..……………....…………………………… 15
8.3 Video Settings….….……..…….……………………… 16
8.4 Network Settings……….……………………………… 19
8.5 PPPoE Configuration……..………………………..…. 20
8.6 Dynamic DNS…………......…………………………… 21
8.7 SMTP Settings…….……..…….……………………… 22
8.8 FTP Settings………..…………….……………………. 23
8.9 Date and Time Settings……………………………… 24
8.10 Motion Detection Settings…………………………… 25
8.11 Authentication Settings…….…...…………………… 26
8.12 Account Management….…….……………………… 27
8.13 Port Settings………….…..………………………..…. 28
8.14 UPnP Services………......…………………………… 29
8.15 Video Connection Status….….……………………… 30
8.16 Firmware Update……………….……………………. 31
8.17 Reset Configuration…..……………………………… 32
8.18 Reboot the Camera………..………………………… 33
9. Connecting Multiple Cameras to a Router……………... 34
10. Using UPnP to Connect the Camera…………………... 35
11. Surveillance Software…..………..………………………. 37
11.1 Using the Mega Pixel IP Camera Viewer………..… 37
11.2 Motion Detect Setting………………………………… 42
11.3 Play the Recorded Files...…………………………… 43
12. Focus Adjustment & Hardware Reset………….………. 44
12.1 Camera Focus Adjustment……..…………………… 44
12.2 Hardware Reset……………………………………… 45
12.3 Replace the Silica Gel...…..………………………… 46
13. Troubleshooting………..………..………………………. 48
1
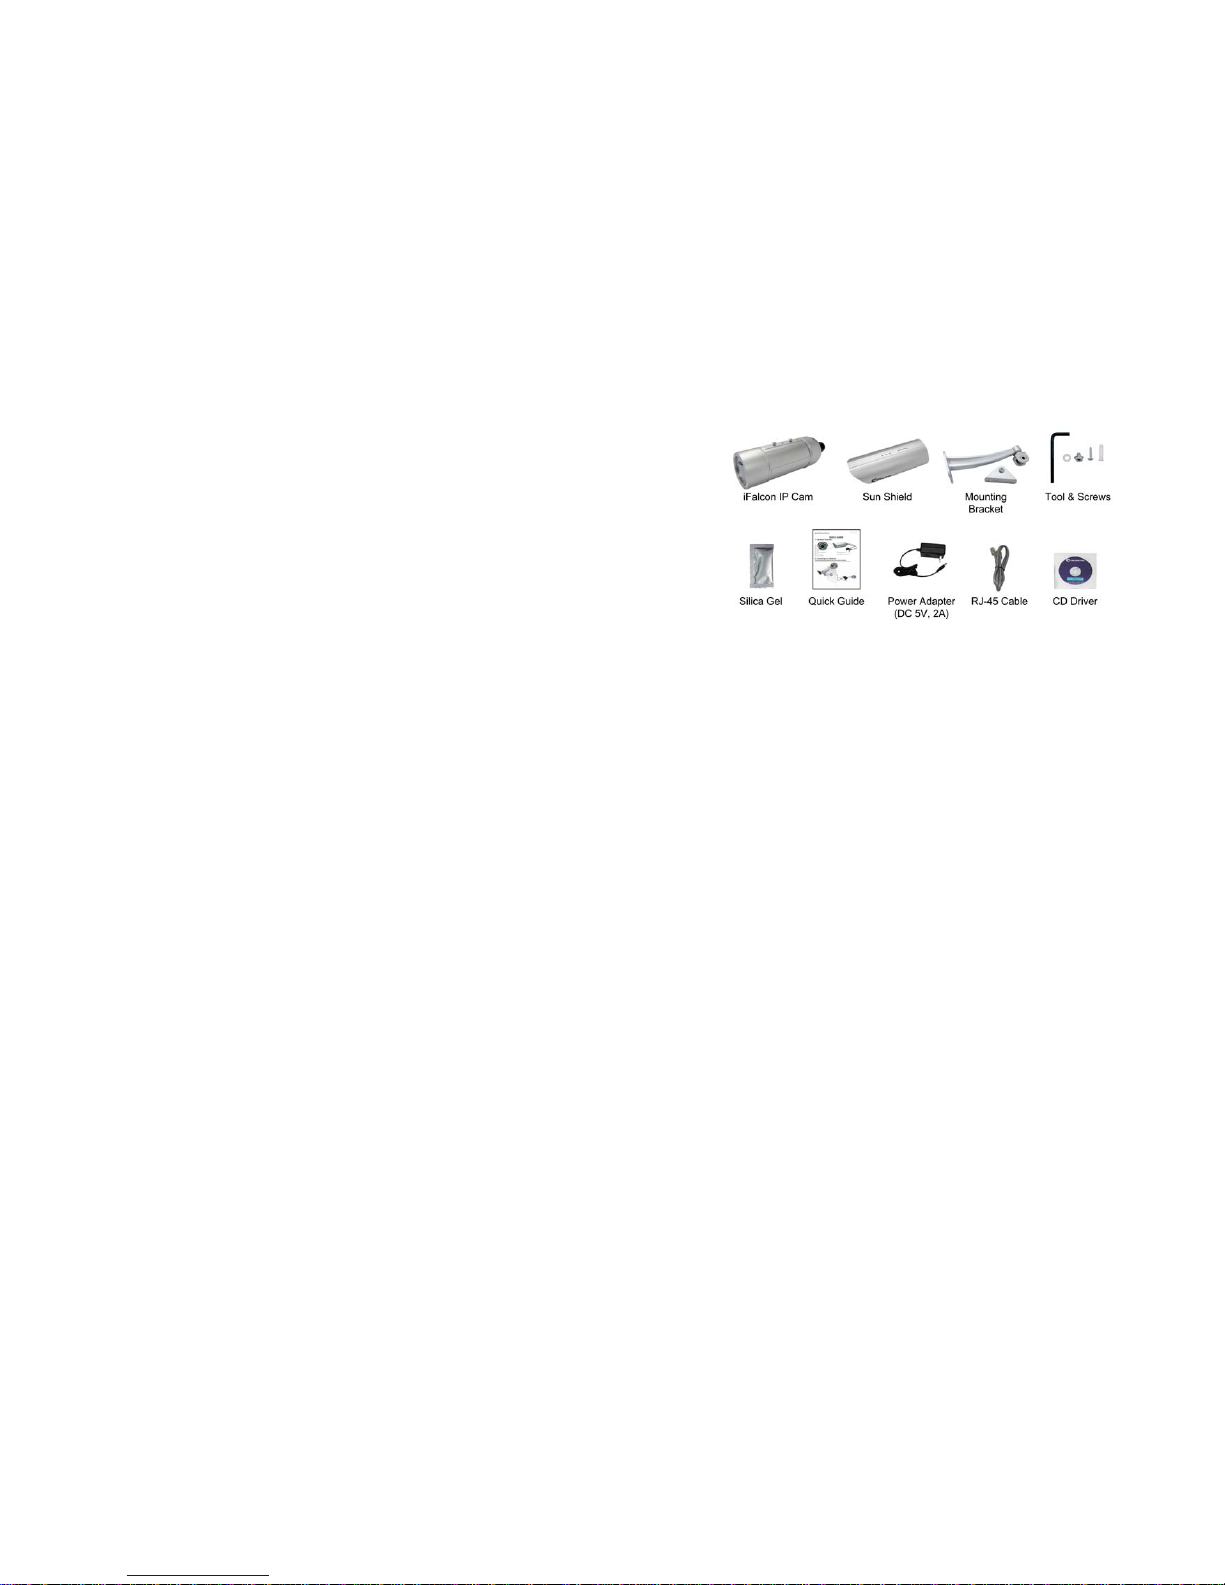
1. Package Contents
Grand iFalcon IP Cam
Sun Shield
Mounting bracket
Tool & Screws
Silica Gel
Quick Guide
Power Adapter (DC 5V, 2A)
RJ-45 Cable
CD Driver (user manual/ IP Detect Tool/ Surveillance software)
2. Introduction
The Grand iFalcon IP Cam is a 1.3 mega pixel IP66-rated outdoor network camera with built-in 24
infrared LEDs. The Grand iFalcon IP Cam uses the latest video compression technology that provides
clearer and more fluent image transmission. You can use Safari, Internet Explorer or Firefox browser on
PC or iPhone to remotely monitor your home or office from anywhere in the world.
3. System Requirements
Processor:
- IE Remote View: Intel Pentium4 2.4GHz or higher
- Surveillance Software:
1 channel: Intel Pentium4 2.4GHz or higher
2~7 channel: Intel Pentium Core 2 Duo 2.4 GHz or higher
8~16 channel: Intel Pentium Core 2 Quad 2.83 GHz or higher
RAM: 1GB or higher
Web browser: Microsoft Internet Explorer V6.0 or higher
2
4. Product Features
1/4” CMOS SXGA Sensor (1.3MegaPixel)
IP66 Waterproof housing for outdoor use.
Automatically removable IR-cut filter for day and night function
Built-in 24 infrared LEDs illuminate objects up to a distance of 10m
View Angle: Diagonal: 89 Degree / Horizontal: 71 Degree / Vertical: 49.5 Degree.
High Resolution Image Processor (160x120/ 320x240/ 640x480/ 1280x1024).
High Performance Image Compression.
Compatible with Windows 7/ Vista/ XP (32bit & 64bit) and Linux OS.
The provided IP Detect tool allows you to quickly search for and set up cameras located in the local
area network (supports Windows 7/ Vista/ XP.
Supports Safari/ Internet Explorer/ Firefox browser for remote viewing on PC or iPhone.
Supports Motion detected Mail Function
Supports digital zoom in function.
LAN connector: RJ45 port to connect to 10/ 100Mbps Ethernet
Supports TCP/IP / HTTP / FTP / SMTP / DHCP / PPPoE / DDNS / UPnP / NTP service
Multi-Languages OSD: English / French / Portuguese / German / Italian / Netherland / Spanish/
Russian / Japanese / Traditional Chinese
Bundle Surveillance Software:
- Video File Management: Video file database and playback control.
- Storage Recyclable: When running out of disk space, files with the earliest date will be
overwrite automatically.
- Motion Detection: Detect any movement in the mask area and invoke the alarm as soon as
movement is detected.
- Supports up to 16 cameras remote view and record simultaneously.
NOTE: When remote view and record 16 cameras simultaneously, a system with higher
CPU performance is recommend
- Multi-Languages OSD: English/ French/ German/ Italian/ Dutch/ Spanish/ Russian/
Japanese/ Traditional Chinese.
- Supports scheduled recording function.
3
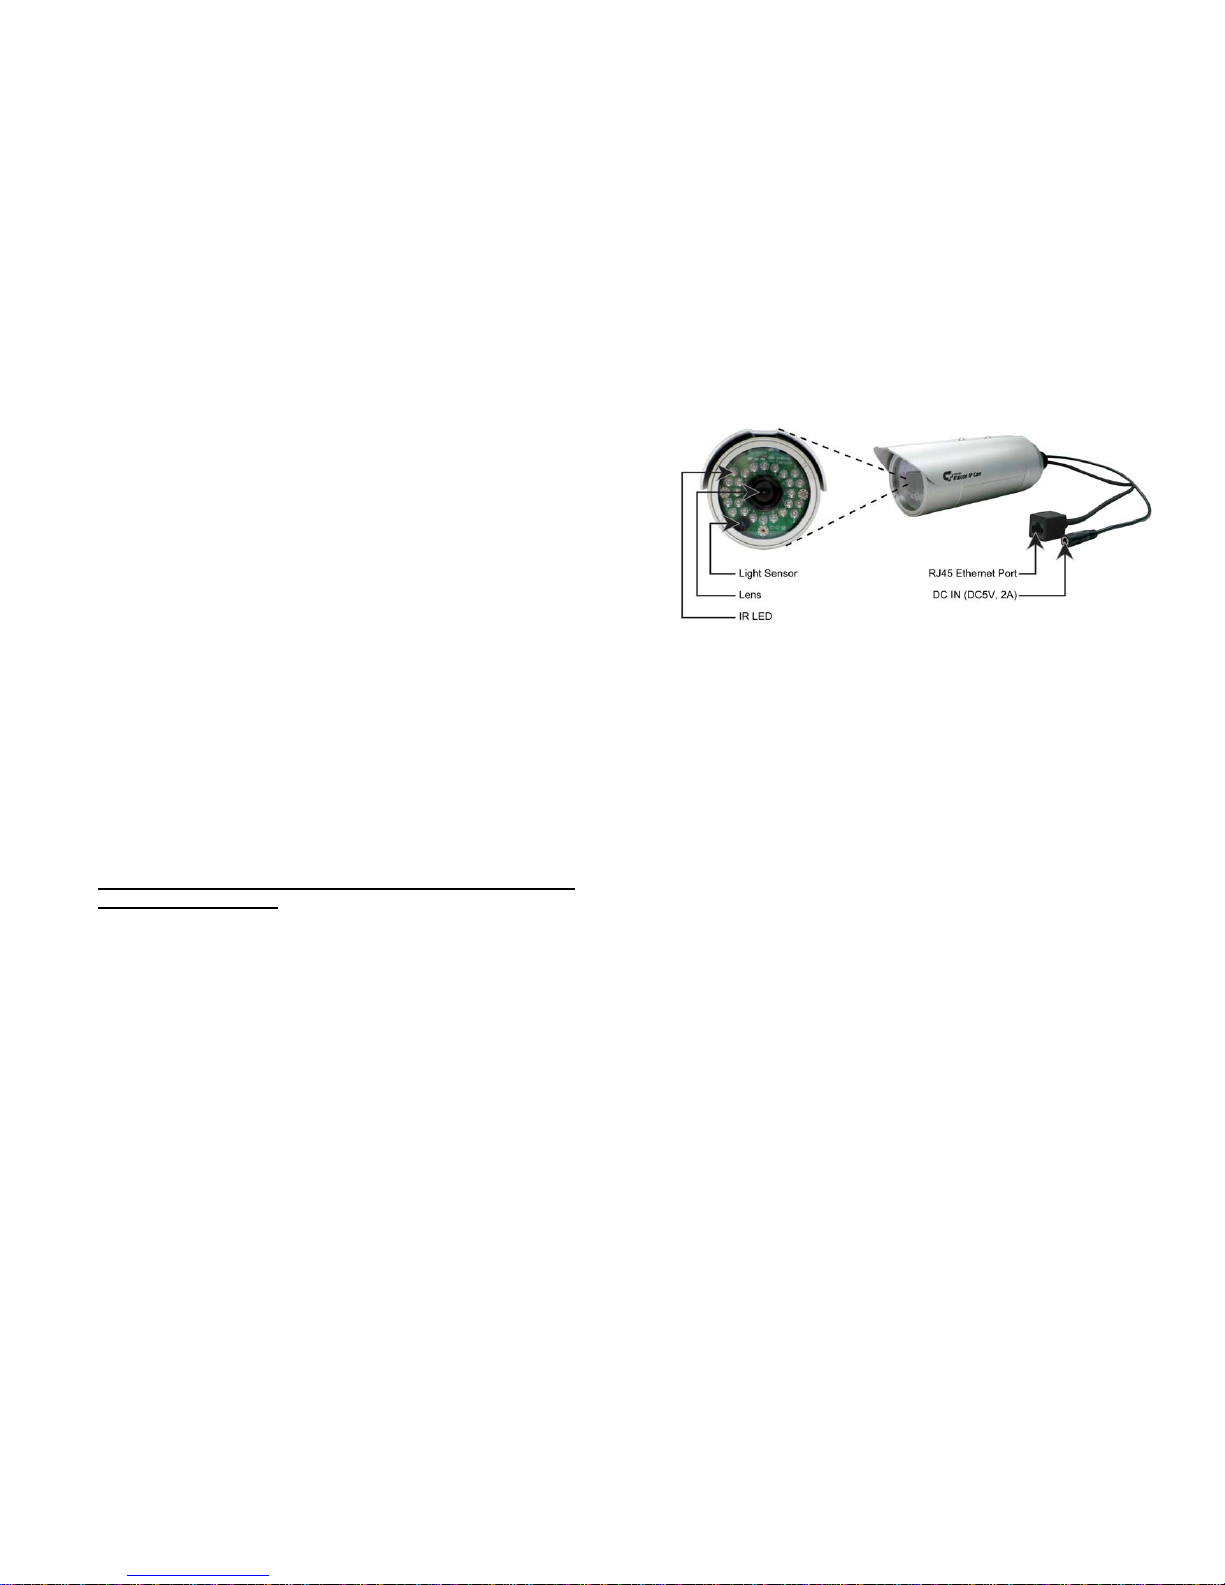
5. Hardware Overview
DC Input: Connects to the power adapter. (DC5V, 2A)
RJ-45 Ethernet Connector: For connects to 10Base-T Ethernet cabling or 100Base-TX Fast
Ethernet cabling.
4
6. Hardware & Software Installation
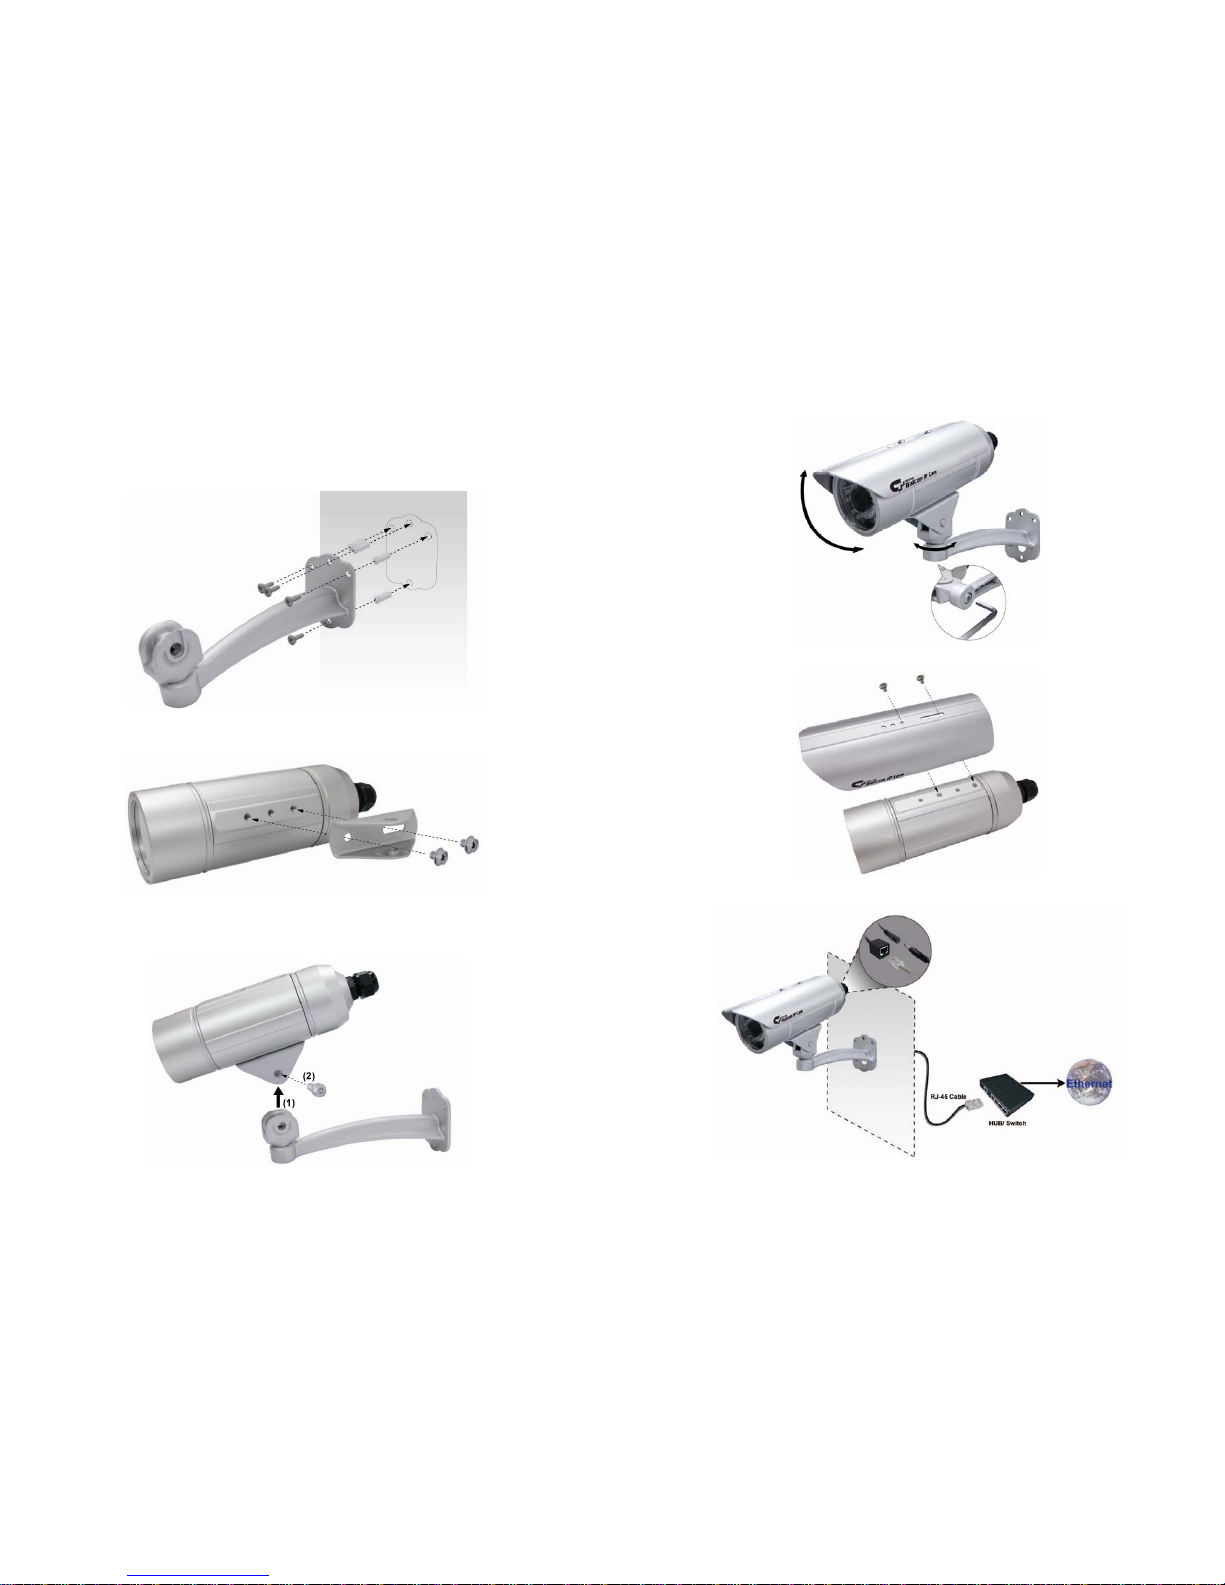
6.1 Hardware Installation
Step1. Drill four holes into the wall, and then hammer the supplied plastic anchors into the holes and
secure the wall mount bracket with supplied screws.
Step2. Use two screws to fix the bracket to the side of the network camera.
Step3. Use the screw to fix the network camera to the wall mount bracket.
NOTE: If the screw cannot be tightened, please re-tighten the screws on the other side.
5
Step4. Use the supplied hexagon wrench to adjust the angle of the wall mount bracket.
Step5. Tighten the two screws to fix the sun shield.
Step6. Connect the network camera to an Ethernet hub or switch by using a standard cable.
6
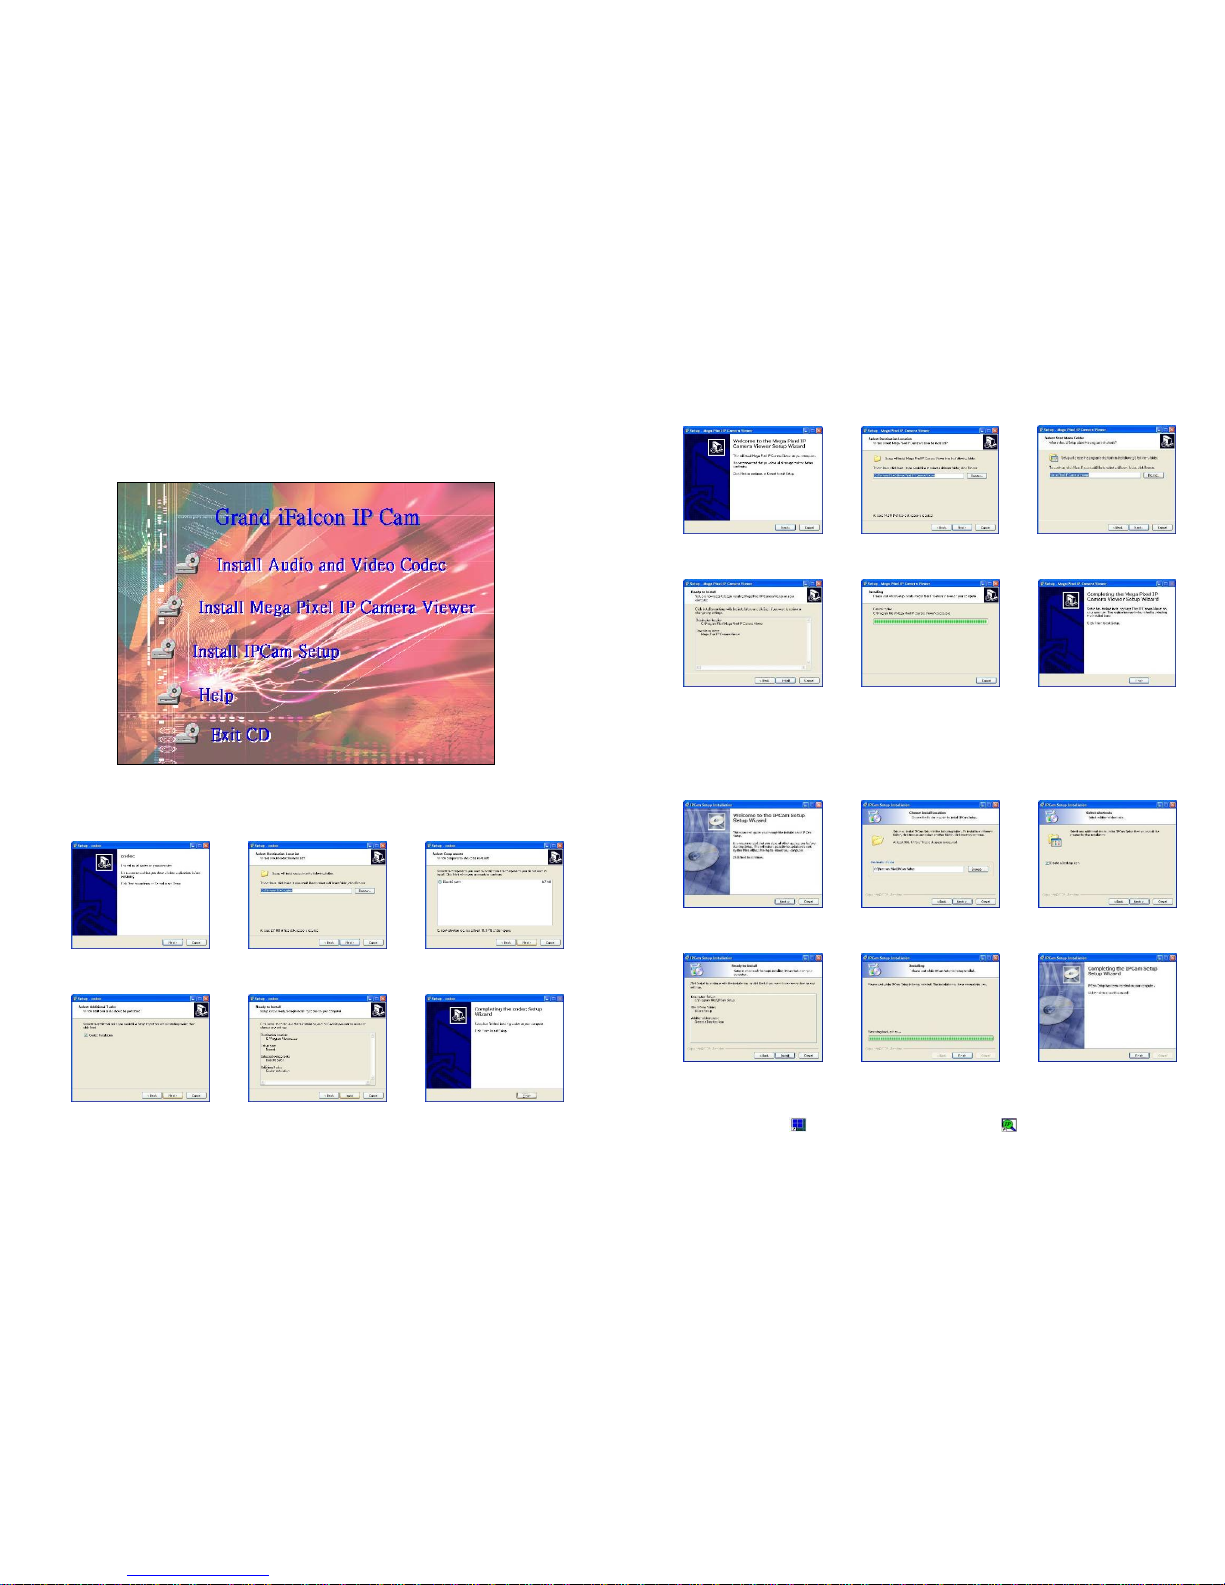
6.2 Software Installation
Insert the driver CD into your CD-ROM drive, then the autorun function will start up the shell program. If
the autorun window does not display, please execute the Autorun.exe program to bring out the autorun
screen.
Follow the below steps to install the software programs:
Step1: Press the Install Audio and Video Codec to install the audio and video codec.
click Next to continue
select the installation folder
and click Next to continue
Select the DirectX patch
and click Next to continue
click Next to continue
click Install to start
the installation
click Finish to complete
the installation
7
Step2: Press the Install Mega Pixel IP Camera Viewer to install the surveillance software.
Step3: Press the Install IPCam Setup to install the IPCam Setup program.
Step4: The shortcut icons ( Mega Pixel IP Camera Viewer and IPCamSetup) will be shown on
your desktop after installing.
click Next to continue select the installation folder
and click Next to continue
select the start menu folder
and click Next to continue
click Install to start
the installation
Installing click Finish to complete
the installation
click Next to continue
select the installation folder
and click Next to continue
Create a desktop icon and
click Next to continue
click Install to start the
installation
Installing
click Finish to complete
the installation
8
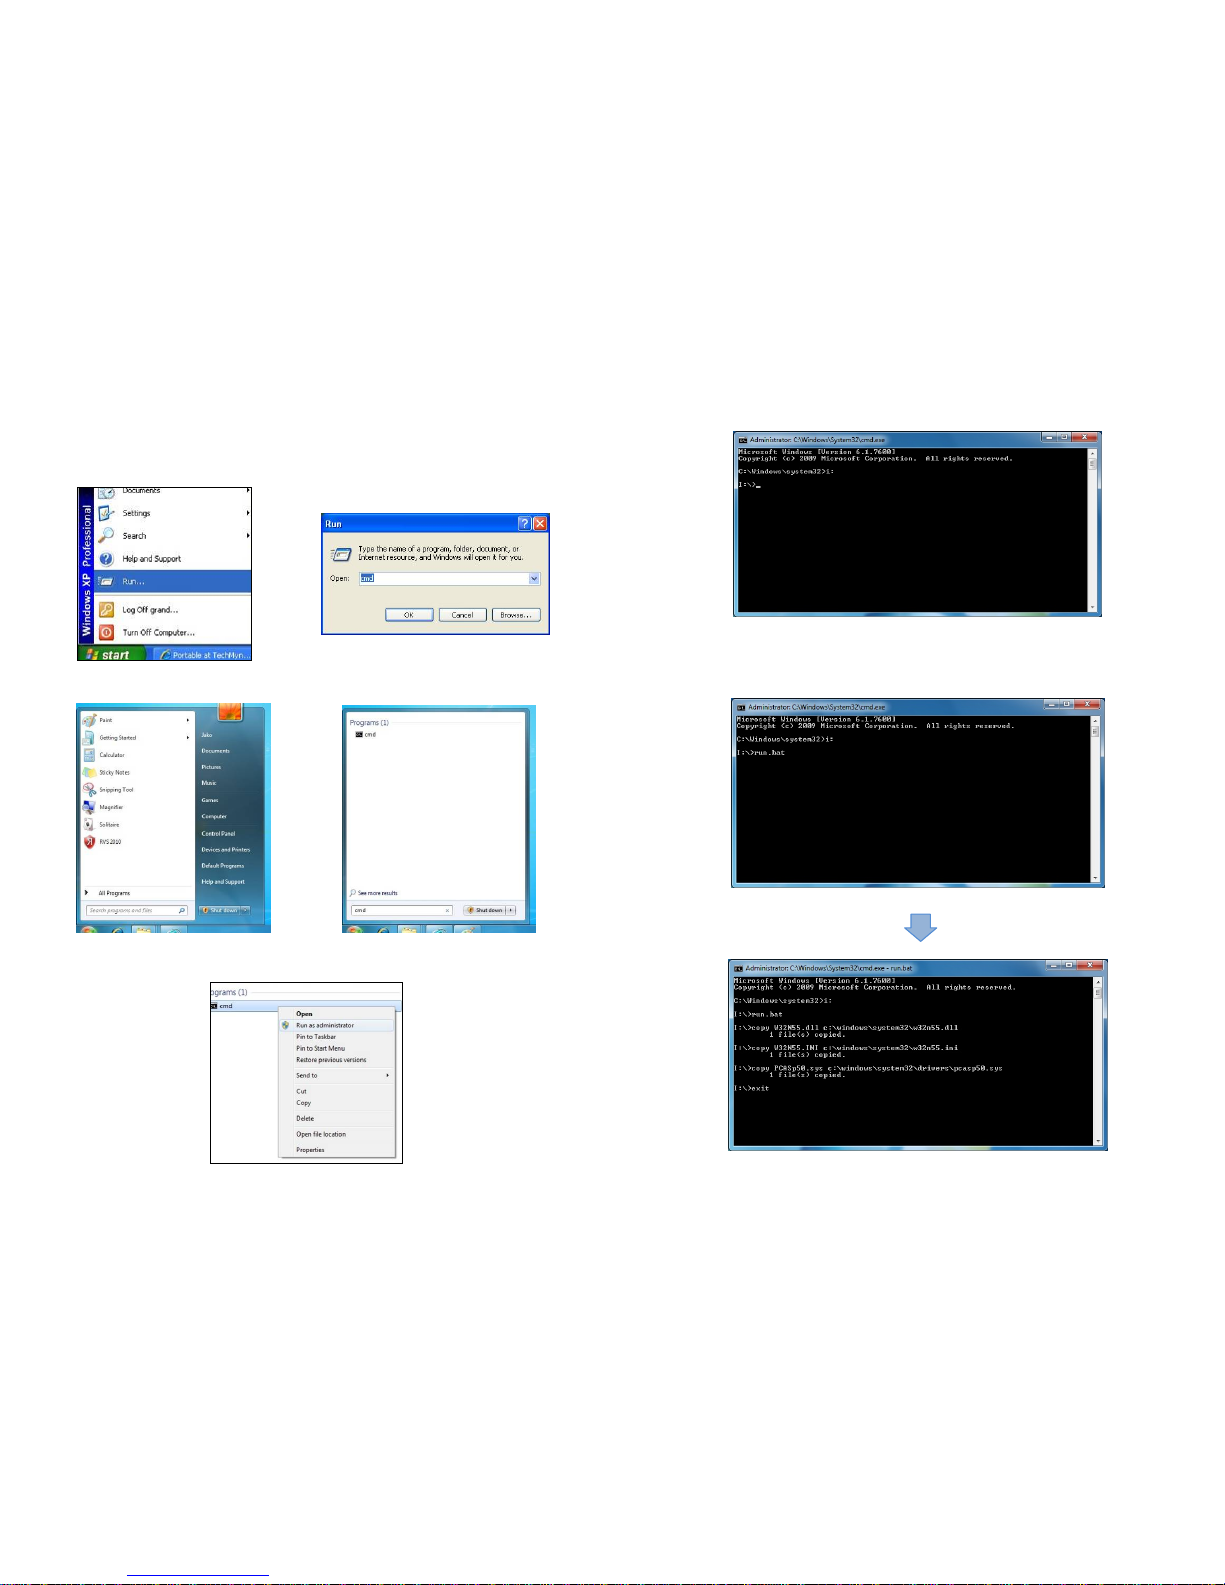
NOTE: If your computer is running on 64bit version of Windows 7, Vista or XP, please follow these steps
to complete the installation
Step1. Open the command prompt window.
Windows XP: Click Start > Run, type cmd, and then click OK to open the Command Prompt
window.
Windows 7/ Vista: Click Start and type cmd in the Start Search box (don’t press Enter).
In the list of programs, right-click cmd, and then click Run as administrator to open the Command
Prompt window.
9
Step2. Type your CD-ROM driver letter (for example: i:) and press Enter to access CD-ROM driver.
Step3. Type run.bat and press Enter to copy the driver files automatically.
 Loading...