

Grandstream Networks GXV3674_HD, GXV3674_FHD_VF Quick Start Manual
126 Brookline Avenue, 3rd FL
Boston, MA 02215, USA
Tel : +1 (617) 566 – 9300
Fax: +1 (617) 247 – 1987
For Warranty and RMA information, please visit www.grandstream.com
GXV3674_HD/FHD_VF
Quick Start Guide
Grandstream Networks, Inc.
深圳市南山高新科技园中区
科发路2号1栋(朗峰大厦)5楼
电话: +86 755-2601-4600
传真: +86 755-2601-4601
www.grandstream.cn
Outdoor Day/Night Vari-focal HD IP CAMERA
www.grandstream.com

Content
English......................................................1
Español...................................................9
Français..................................................17
简体中文................................................25
Deutsch................................................33
Italiano................................................41
Русскй................................................49
Português............................................... 57
Polski.......................................................65
~1~~2~
PRECAUTIONS
PACKAGE CONTENTS
1 x 12V Power Supply
4 x Wall Anchors
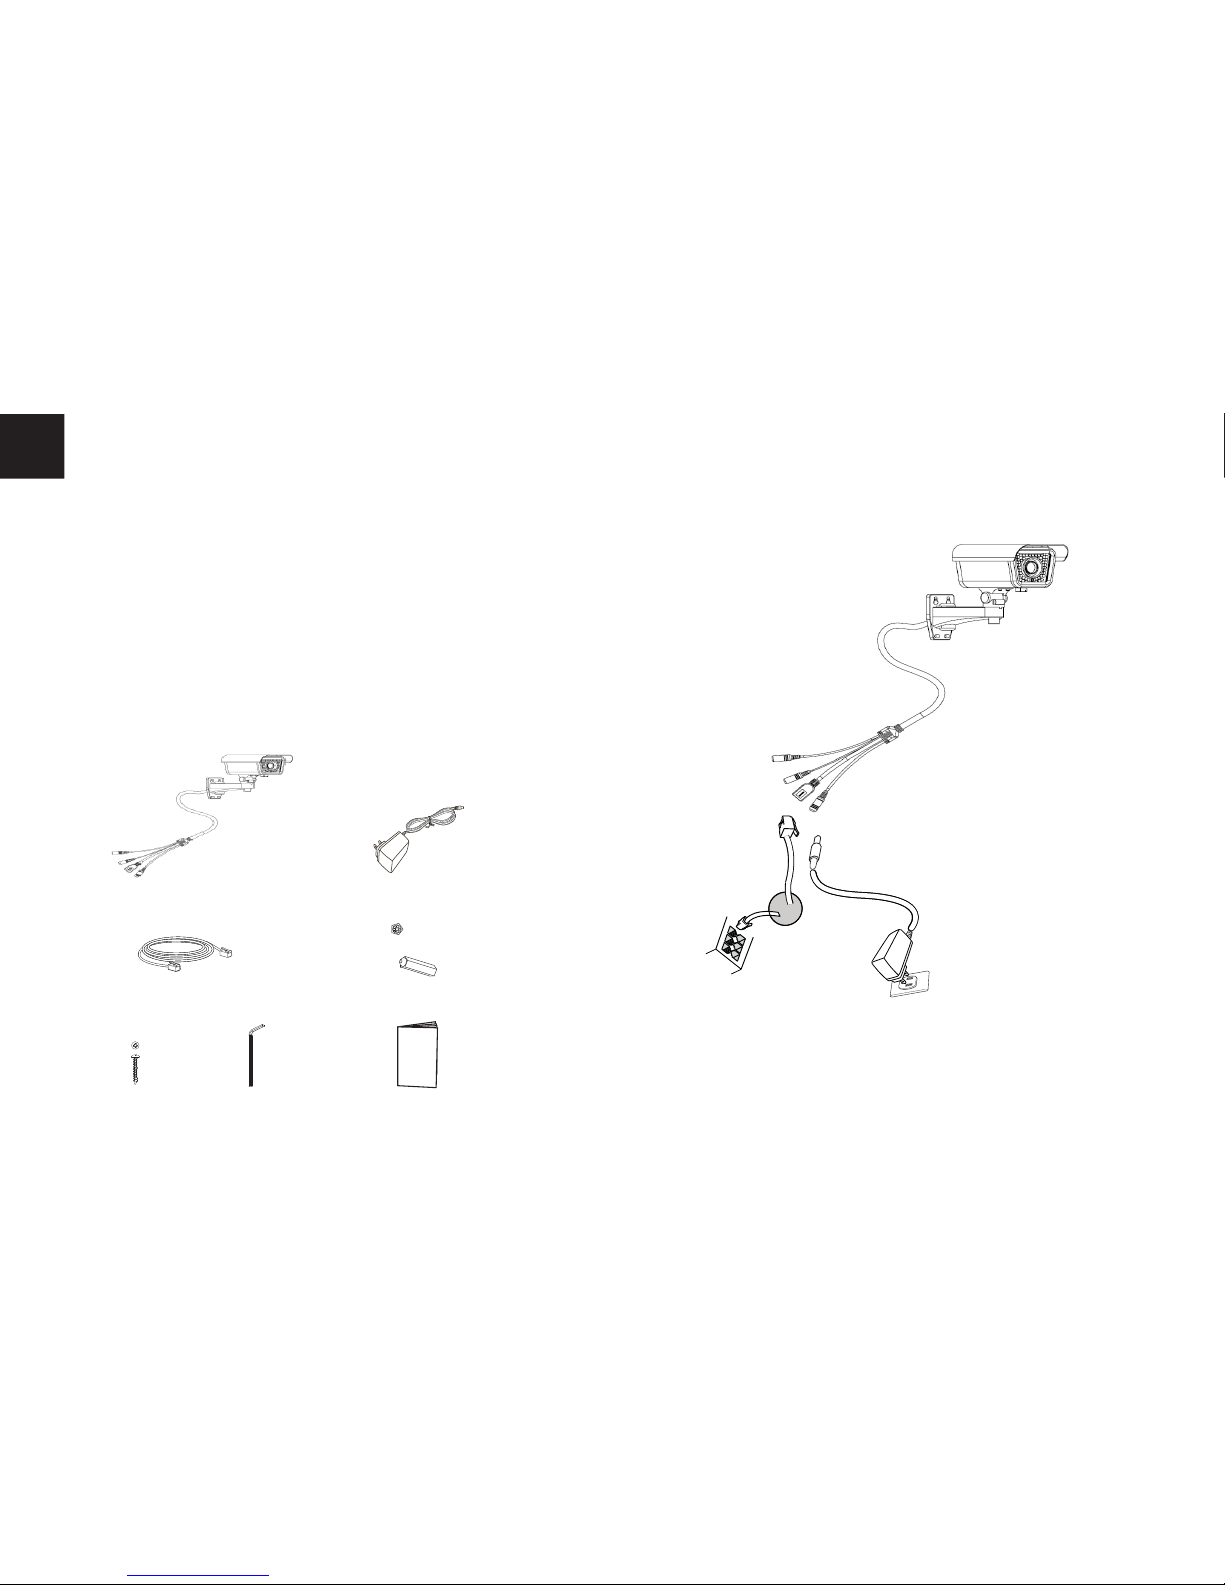
CONNECTING THE GXV3674_HD/FHD_VF
Refer to the illustration below when following the
instructions on the next page.
NOTE:
Choose Option A if using the power supply; or choose
Option B if using a Power over Ethernet (PoE) switch.
• Do not attempt to open, disassemble, or modify the
device
• Do not use a third party power adapter
• Do not expose this device to temperatures outside
the range of -20 °C to +50 °C for operating or -30 °C
to +60 °C for storage
• Do not expose this device to environments outside
of the following humidity range: 10-90% RH
(non-condensing)
• Please install camera properly for correct function
1 x
GXV3674_HD/FHD_VF
EN
1 x Ethernet Cable
Option B:
RJ45 Ethernet Cable
to Power over Ethernet
(PoE) Switch
Option A:
Power Adapter To AC
Outlet
4 x Screws 1 x Hex Key
Network
Port
Power Port
1 x Quick Start Guide
12V
12V
~3~~4~
Option A
Step 1: Insert the power adapter into the 12V DC
socket of the tail cable in GXV3674_HD/
FHD_VF. Plug the other end of the adapter
into an AC power outlet.
Step 2: Plug an RJ45 Ethernet cable into the net-
work socket of the tail cable in GXV3674_
HD/HD_VF. Plug the other end into a
switch/hub or router.
Option B
Step 1: Plug an RJ45 Ethernet cable into the
network socket of the tail cable in
GXV3674_HD/FHD_VF. Plug the other end
into a Power over Ethernet(PoE) switch.
GXV3674_HD/FHD_VF CONFIGURATION
Confi guring the GXV3674_HD/FHD_VF using
Firefox, Chrome or Microsoft Internet Explorer
(with related plug-in installed)
Step 1: Download and install GS_Search tool:
http://www.grandstream.com/products/
tools/surveillance/GS_Search.zip
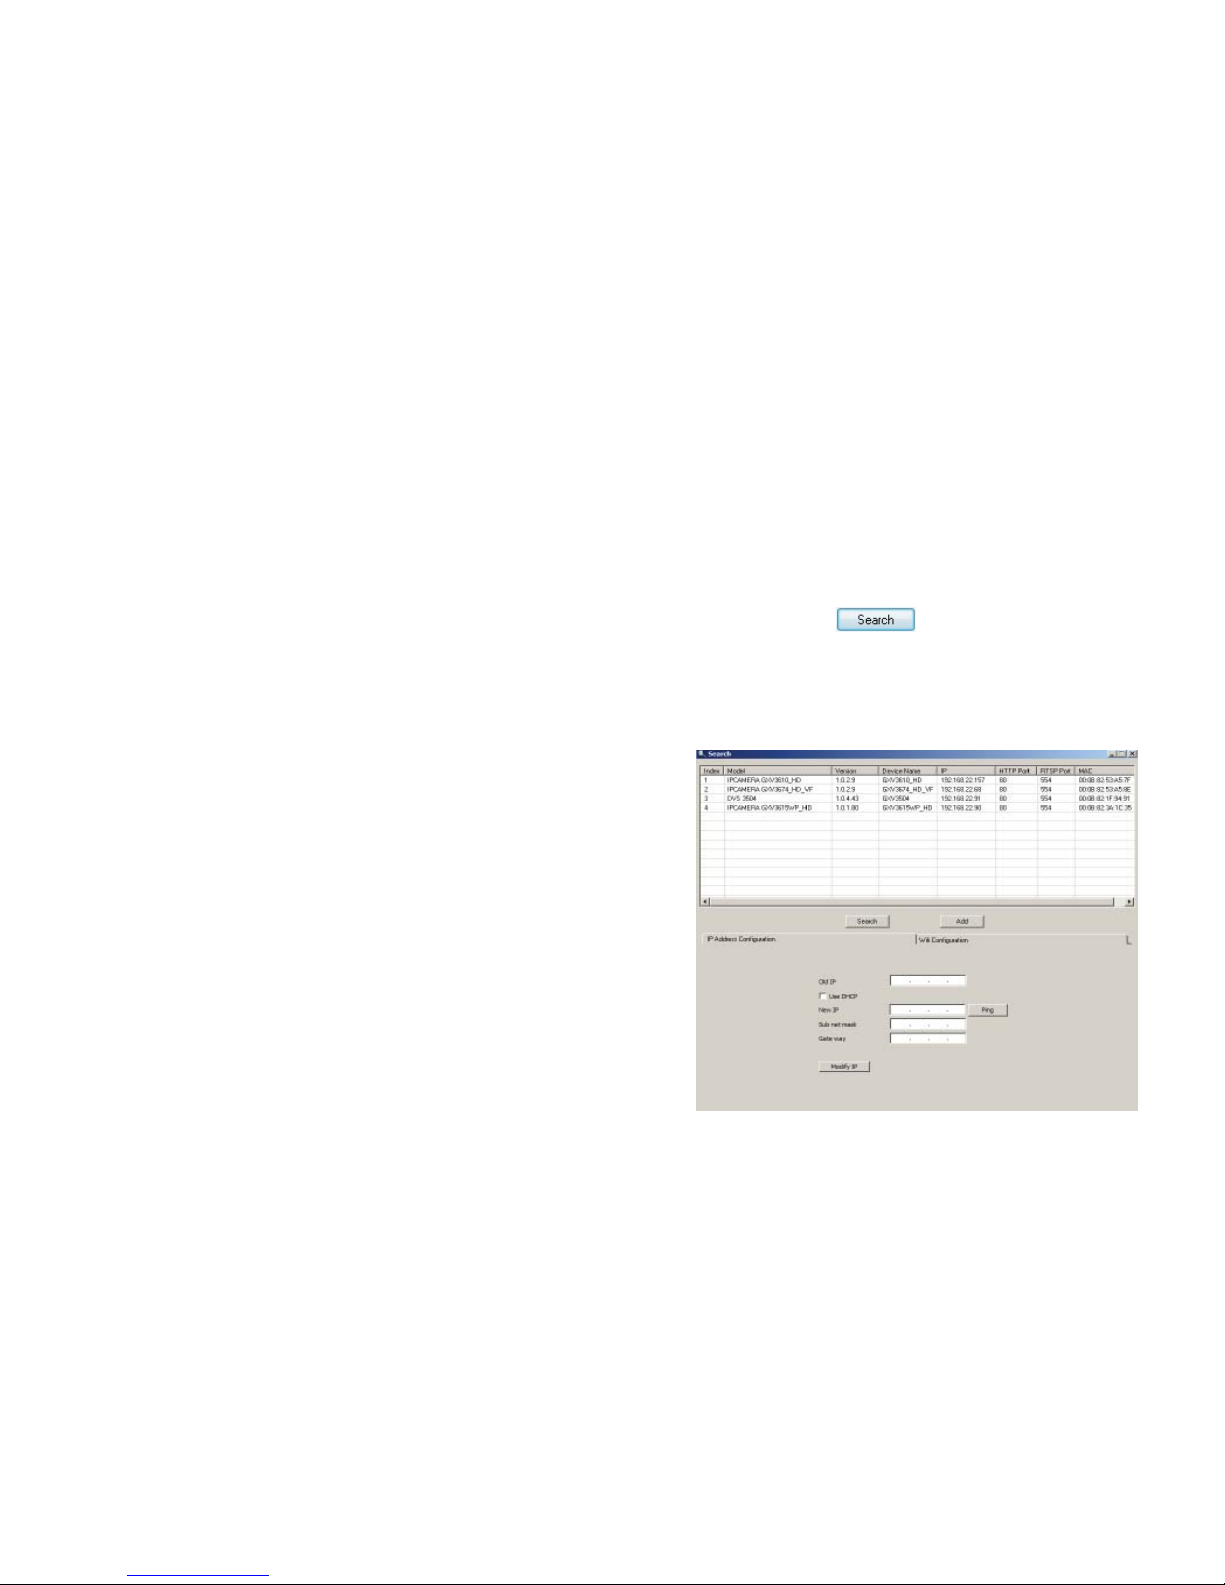
Step 2: Run the Grandstream GS_Search tool.
Step 3: Click on button to start device
detection.
Step 4: The detected devices will appear in the
output fi eld as below.
Connect the GXV3674_HD/FHD_VF to a DHCP
Server Enabled Network

~5~~6~
Step 5: Double click on the detected device. The
default browser(MS IE in this example) will
open displaying the camera’s webGUI.
Step 6: A pop-up window will prompt for user name
& password. The default administrator user
name and password are both set to
“admin” as to after the factory reset.
Step 7: Once you log into the webGUI, the device
will indicate that an Active-X or video plug in is required. Follow the displayed instruc tion to download and install the plug-in.
Step 8: If downloading or installing is unsuccessful
due to browser setting or slow Internet con
nection, please download the fi les from the
link below. Save and install the program
then restart the browser. The video will now
appear embedded inside the camera’s
web interface.
• Plug-in:
http://www.grandstream.com/products/tools/surveillance/
webcontrl_plugin.zip
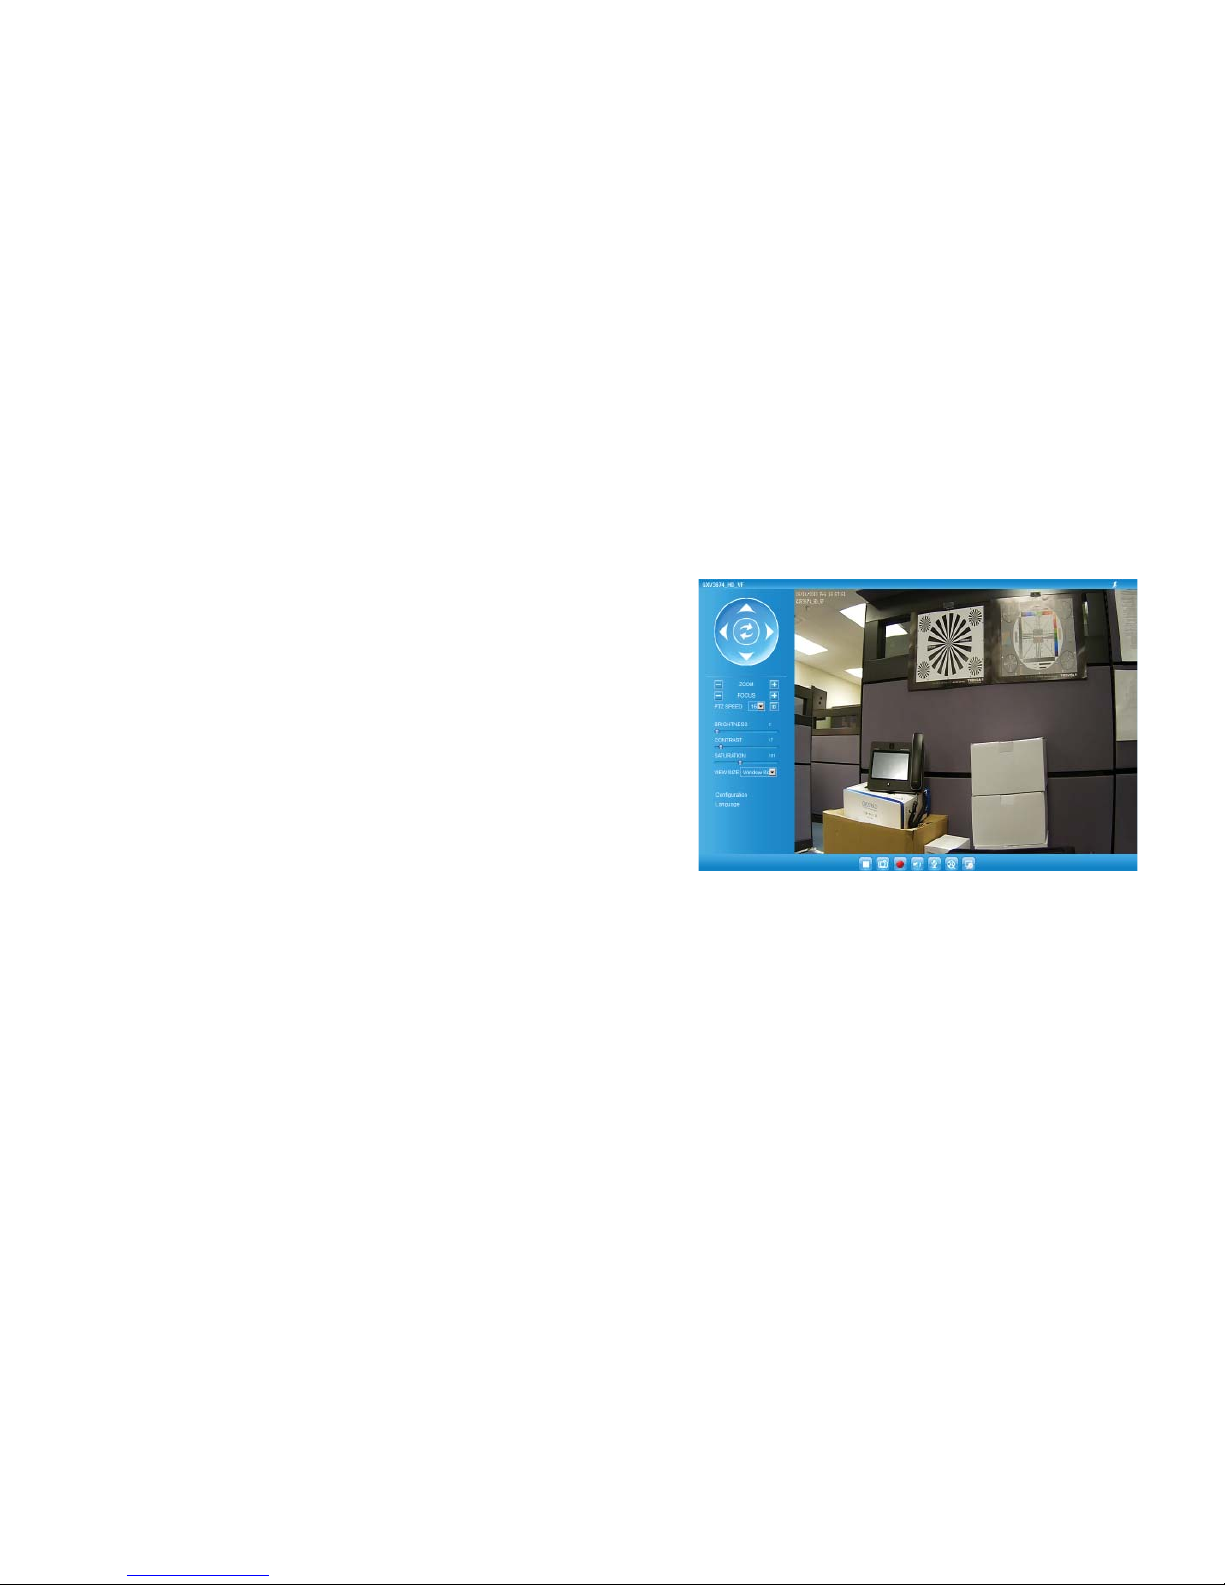
Step 9: Here is a sample screenshot with successful
Active-X or Plug-in installation.
Click on the
play button to view the video feed.
Step 10: Click through the menu on the left hand side
of the web interface for more advanced
confi guration parameters.

~7~~8~
Please download the User Manual, refer to online
documents and FAQ for more detailed information:
http://www.grandstream.com/index.php/products/
ip-video-surveillance/gxv3674
http://www.grandstream.com/support
http://www.grandstream.com/support/tools
Connect GXV3674_HD/FHD_VF using Static IP
If the camera does not get response from the DHCP
server or the network without DHCP server, after 3
minutes, it can be accessed by the default IP address
192.168.1.168.
Step 1: Use RJ-45 Ethernet cable to connect your com-
puter network port directly to the Ethernet soc ket of GXV3674_HD/FHD_VF.
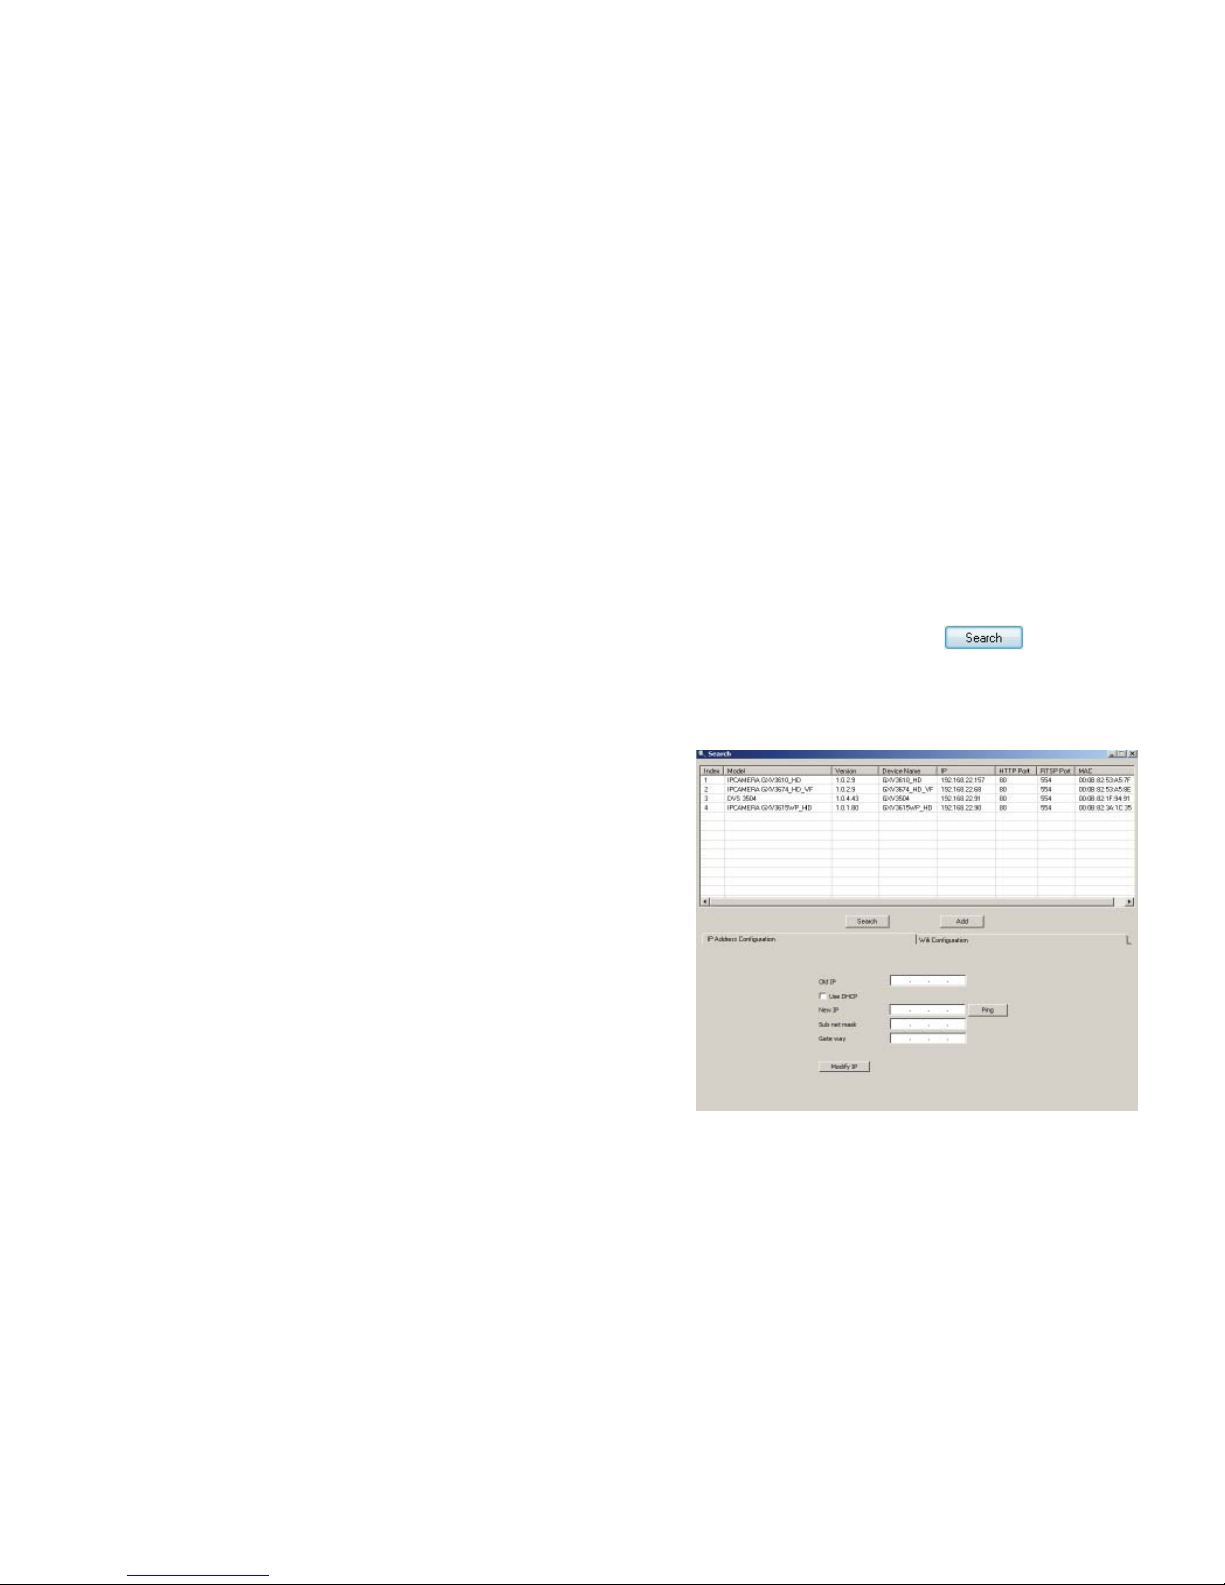
Step 2: Run the GS_Search tool as above. It will show
the original IP of the GXV3674_HD/FHD_VF
(default IP address 192.168.1.168).
Step 3: Input the NEW IP Address, Subnet Mask and
Default Gateway, according to your network
confi guration. Please check with local system
administrator for the necessary information.
Step 4: Click on “Modify IP”. The desired IP address
will be applied to GXV3674_HD/FHD_VF.
GXV3674_HD/FHD_VF SPECIFICATIONS
Image Sensor
Sensitivity
Day & Night Mode
Shutter: 1/10000 - 1/30 second
Focal Length 2.8 ~ 12 mm
Aperture F1.4, DC-IRIS
Field Angle (FOV) 90º ~ 28º (Horizontal Field)
IR Cut Filter Yes. Mechanical
Day & Night Mode Color & B/W mode
IR LED covering up to 25m
Minimum
Illumination
0.05 Lux
0 lux with IR LED on
Responsivity HD: 5.48V/lux-sec (550nm)
FHD: 1.9 V/lux-sec (550nm)
Maximum Video
Resolution and
Frame Rate
HD: 1280 x 960 (25fps)
FHD: 2048 x 1536 (15fps)
Panning Range 0º - 180º (Manual)
Tilting Range 0º - 180º (Manual)

~9~~10~
PRECAUCIONES
CONTENIDO DEL PAQUETE
1 x Adaptador de
corriente de 12 VDC
1 x Guía de
Instalación rápida
1 x GXV3674_HD/FHD_VF
• No abrir, desarmar o intentar modifi car este equipo
• No use adaptadores de corriente distintos al sumi nistrado
• No exponga este dispositivo a temperaturas fuera
del rango de -20 °C a +50 °C en funcionamiento y
desde -30 °C a +60 °C cuando están almacenadas
• No exponga este dispositivo a ambientes fuera del
siguiente rango de humedad: 10-90% RH
(Sin condensación)
• Por favor, instale la cámara adecuadamente para
un funcionamiento correcto
4 x Tornillos
ES
CONEXIÓN DE LA GXV3674_HD/FHD_VF
Consulte la siguiente ilustración y siga las instrucciones de la siguiente pagina.
12V
1 x Cable Ethernet 4 x Anclaje de pared
1 x Llave
exagonal
Puerto de
Alimentación
Opción A:
Adaptador de corriente
a la toma de CA
Puerto de
Red
Opción B:
Cable de Red RJ45 a
un switch PoE (Power
over Ethernet)
Nota: Seleccione la opción A si desea usar la fuente
de poder o seleccione la Opción B si tiene un
switch PoE (Power over ethernet).
12V
~11~~12~
CONFIGURACION DE LA
GXV3674_HD/FHD_VF
Confi guración de la GXV3674_HD/FHD_VF us-
ando Firefox, Chrome o con Microsoft Internet
Explorer
Paso 1: Descargue e instale la herramienta GS_Search
http://www.grandstream.com/products/tools/
surveillance/GS_Search.zip
Paso 2: Ejecute la herramienta de Grandstream
GS_Search.
Paso 3: Haga Click en botón para iniciar
la detección de dispositivos en la red.
Paso 4: Los dispositivos detectados se mostraran en
el campo de salida como se muestra abajo.
Opción A:
Paso 1: Conecte el adaptador de corriente en el
conector de 12 VDC que esta en la parte
post erior de la GXV3674_HD/FHD_VF y
conecte el otro extremo del adaptador a
una toma de corriente AC.
Paso 2: Conecte un cable Ethernet RJ45 en el puerto
de red que esta en la parte posterior de la
GXV3674_HD/FHD_VF y conecte el otro
extremo a un switch/hub o router.
Opción B:
Paso 1: Conecte el cable de red Ethernet RJ45 al
conector que esta en la parte posterior de la
GXV3674_HD/FHD_VF y conecte el otro
extremo al switch PoE (Power over Ethernet).
Conecte la GXV3674_HD/FHD_VF a una red
con un servidor DHCP activo
~13~~14~
Paso 5: Haga Doble click en el dispositivo detectado.
El navegador por defecto (MS IE por
ejemplo) se abrirá mostrando la interfaz web
de la cámara.
Paso 6: Una ventana emergente le pedirá el nombre
de usuario y contraseña. El nombre de usuario
y la contraseña por defecto es “admin”
para la confi guración predeterminada de
fábrica.
Paso 7: Una vez que inicie sesión en la interfaz webGUI,
el dispositivo indicará que un Active-X o el
plug-in de vídeo es necesario. Siga las
instrucciones que aparecen para la
descargar e instalación del plug-in.
Paso 8: Si la descarga/instalación no es correcta de bido a la confi guración de su navegador o
debido a una conexión lenta a Internet, des cargue los archivos desde el siguiente enlace.
Descargue e instale el programa y reinicie el
navegador. El vídeo se mostrara ahora dentro
de la interfaz web de la cámara.
Paso 9: Aquí esta una captura de pantalla con un
ejemplo de una instalación exitosa del
Active-X o del Plug-in. Haga clic en el botón
play para reproducir el vídeo.
Paso 10: Haga clic en el menú de la parte izquierda
de la interfaz web para mas parámetros de
confi guración avanzados.
• Plug-in:
http://www.grandstream.com/products/tools/surveillance/webcontrl_plugin.zip

~15~~16~
Por favor, descargue el Manual del usuario, consulte
la documentación en línea y preguntas frecuentes
para obtener información más detallada.
http://www.grandstream.com/index.php/products/
ip-video-surveillance/gxv3674
http://www.grandstream.com/support
http://www.grandstream.com/support/tools
Conecte la GXV3674_HD/FHD_VF usando IP estática
Si la cámara no recibe una respuesta desde el servidor
DHCP o la red no tiene un servidor DHCP, después de
3 minutos, se puede acceder por la dirección IP predeterminada 192.168.1.168.
Paso 1: Use el cable de red Ethernet RJ45 para cone ctar el puerto de red de su computadora dir ectamente al conector Rj45 de la GXV3674_
HD/FHD_VF.
Paso 2: Ejecute la herramienta GS_Search como se
indica anteriormente, se mostrara la IP de la
GXV3674_HD/FHD_VF (La dirección IP por
defecto es 192.168.1.168).
Paso 3: Ingrese la nueva dirección IP, mascara de red,
y puerta de enlace predeterminada de acu erdo a la confi guración de su red, por favor
contacte al administrador de su red para la
información necesaria.
Paso 4: Haga Click en “Modifi car IP”. La dirección IP
deseada se aplicara en la
GXV3674_HD/FHD_VF.
ESPECIFICACIONES DE LA
GXV3674_HD/FHD_VF
Sensibilidad del
sensor de imagen
Modo día y noche
Obturador:
1/10000 – 1/30 segundos
Longitud Focal 2.8 ~ 12 mm
Apertura F1.4, DC-IRIS
Ángulo de campo
(FOV)
90º ~ 28º (Campo de visión
horizontal)
Filtro de corte IR Si, Mecánico
Modo día y noche Modo a color y blanco y
negro, cobertura del LED IR
de hasta 25m
Iluminación mínima 0.05 Lux
0 Lux con el LED IR
Responsividad HD: 5.48V/lux-sec (550nm)
FHD: 1.9V/lux-sec (550nm)
Resolución máxima
de vídeo y velocidad
de cuadro
HD: 1280 x 960 (25fps)
FHD: 2048 x 1536 (15fps)
Rango panorámico 0º - 180º (Manual)
Rango de inclinación 0º - 180º (Manual)

~17~~18~
FR
PRECAUTIONS
CONTENU DU PACK
1 x 12V Adaptateur
d’alimentation
4 x Attaches murales
CONNEXION DU GXV3674_HD/FHD_VF
Reportez-vous à l’illustration ci-dessous en suivant les
instructions sur la page suivante.
NOTE: Choisissez l’option A si vous utilisez l’alimentation,
ou choisissez l’option B si vous utilisez un switch
à port Ethernet pré-alimenté (PoE).
• Ne pas tenter d’ouvrir, de désassembler, ou de
modifi er le dispositif
• Ne pas utiliser un adaptateur d’alimentation tiers
• Ne pas exposer cet appareil à des températures en
dehors de la plage des -20°C à +50°C en opération
ou de -30°C à +60°C en stockage
• Ne pas exposer cet appareil à un environnement
avec humidité en dehors de la plage de 10-90% RH
(sans condensation)
• Veuillez convenablement installer la caméra pour
un fonctionnement correct.
1 x Câble Ethernet
Option B:
Câble Ethernet RJ45 à un switch avec
port Ethernet pré-alimenté (PoE)
Option A:
Adaptateur d’alimentation
à une prise électrique
4 x Vis 1 x Clé Hexagonale
Port
Réseau
1 x Guide
d’Installation Rapide
12V
Port d’alimentation
12V
1 x GXV3674_HD/FHD_VF

~19~~20~
Etape 1: Téléchargez et installez l’outil GS_Search:
http://www.grandstream.com/products/tools
/surveillance/GS_Search.zip
Etape 2: Exécutez l’outil Grandstream GS_Search.
Etape 3: Cliquez sur le bouton pour lancer la
détection des appareils.
Etape 4: Les appareils détectés s’affi cheront dans le
champ de sortie comme ci-dessous.
Option A
Etape 1: Insérez l’adaptateur d’alimentation dans le
port 12V DC du GXV3674_HD/FHD_VF.
Branchez l’ autre extrémité à une prise
électrique.
Etape 2: Branchez un câble Ethernet RJ45 au port
réseau. Branchez l’autre extremité à un hub/
switch ou routeur.
Option B
Etape 1: Branchez un câble Ethernet RJ45 sur le port
réseau du
GXV3674_HD/FHD_VF.
Branchez l’autre extrémité à un switch
avec port Ethernet préalimenté (PoE).
CONFIGURATION DU GXV3674_HD/FHD_VF
Confi gurer le GXV3674_HD/FHD_VF en utilisant
le navigateur Firefox, Chrome ou Microsoft Internet Explorer (avec plugin installé)
Connecter le GXV3674_HD/FHD à un serveur
DHCP
 Loading...