

Grandstream Networks GXV3674_HD_VF, GXV3674_FHD_VF v2, GXV3674_FHD_VF User Manual
Grandstream Networks, Inc.
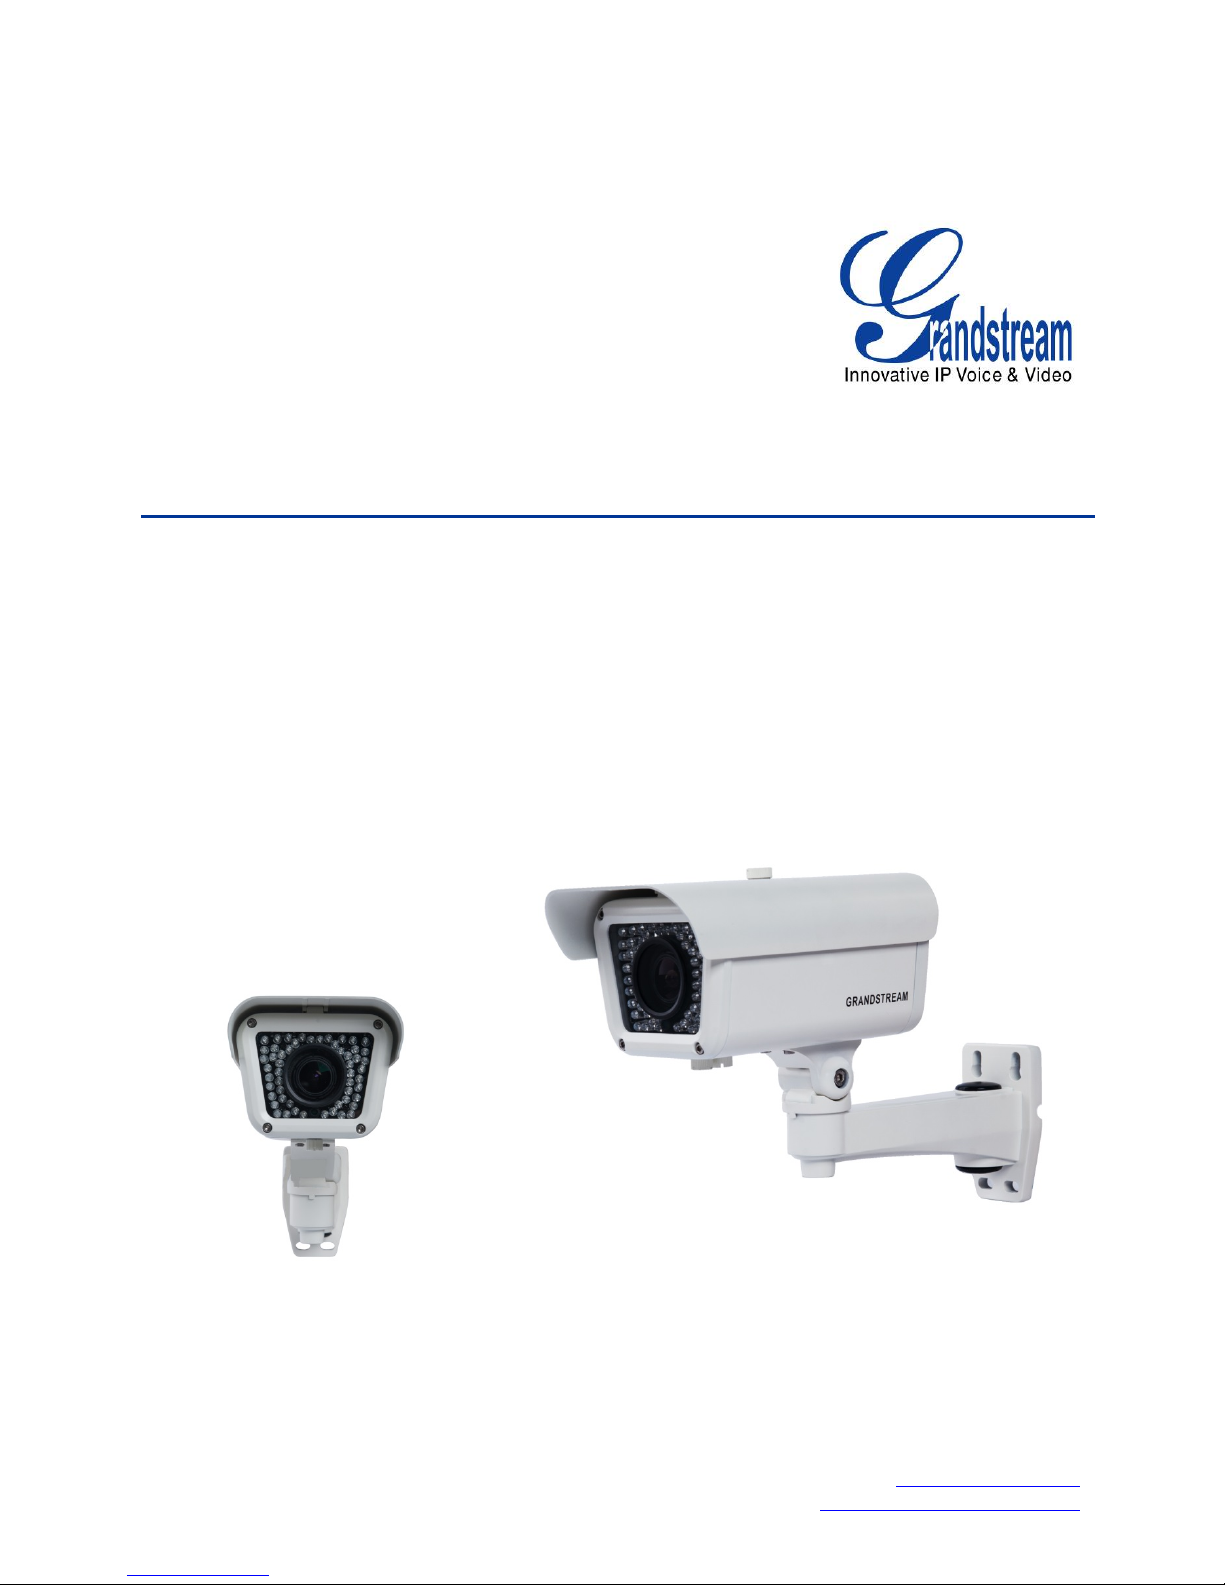
GXV3674_HD_VF/GXV3674_FHD_VF v2
Outdoor Day/Night V ari-focal HD IP C am era
GXV3674_HD/FHD_VF v2 User Manual www.grandstream.com
Firmware Version 1.0.3.5 http://esupport.grandstream.com

This page intentionally left blank
Grandstream Networks, Inc. GXV3674_HD/FHD_VF v2 User Manual Page 2 of 59
Firmware Version 1.0.3.5 Last Updated: 02/2015

TABLE OF CONTENTS
GXV3674_HD/FHD_VF v2 User Manual
WELCOME.................................................................................................................................................... 5
SAFETY COMPLIANCES ............................................................................................................................ 6
FCC CAUTION .......................................................................................................................................... 7
RF EXPOSURE INFORMATION (SAR) .................................................................................................... 7
WARRANTY ................................................................................................................................................. 8
CONNECT YOUR GXV3674_HD/FHD_VF V2 ............................................................................................. 9
EQUIPMENT PACKAGE CONTENTS ................................................................................................................. 9
CONNECTING THE GXV3674_HD/FHD_VF V2 ........................................................................................... 10
PRODUCT OVERVIEW .............................................................................................................................. 11
GXV3674_HD/FHD_VF V2 CAMERA ........................................................................................................ 11
GXV3674_HD/FHD_VF V2 SPECIFICATIONS ............................................................................................. 12
INSTALLATION GUIDE ............................................................................................................................. 13
MINIMUM RECOMMENDED COMPUTER SYSTEM REQUIREMENT ..................................................................... 13
CONFIGURE THE GXV3674_HD/FHD_VF V2 VIA WEB BROWSER ............................................................... 13
CONNECT THE CAMERA TO NETWORK WITH DHCP SERVER (RECOMMENDED) .............................................. 14
Windows Platform: ................................................................................................................................... 14
Apple Platform: ........................................................................................................................................ 16
CONNECT TO THE CAMERA USING STATIC IP ............................................................................................... 18
GXV3674_HD/FH D _VF V2 APPLICATION SC ENARIOS ......................................................................... 19
LAN W/O INTERNET ................................................................................................................................... 19
LAN WITH INTERNET .................................................................................................................................. 20
GXV3674_HD/FHD_VF V2 APPLICATION PERIPHERAL CONNECTION ......................................................... 21
GXV3674_HD/FH D _VF V2 HOME WEB PAGE ........................................................................................ 23
GXV3674_HD/FHD_VF V2 CONFIGURATION & LANGUAGE PAGE............................................................... 24
BASIC SETTINGS EXPLANATION ........................................................................................................... 25
SYSTEM SETTINGS PAGE ........................................................................................................................... 25
VIDEO & AUDIO SETTING PAGE .................................................................................................................. 26
OSD SETTING PAGE .................................................................................................................................. 28
CMOS SETTINGS PAGE ............................................................................................................................. 29
NETWORKING SETTING PAGE ..................................................................................................................... 31
DDNS SETTINGS PAGE ............................................................................................................................. 32
SIP SETTING PAGE .................................................................................................................................... 33
STATUS PAGE ............................................................................................................................................ 36
ADVANCED SETTINGS EXPLANATION .................................................................................................. 37
USER MANAGEMENT PAGE ......................................................................................................................... 37
MAINTENANCE PAGE .................................................................................................................................. 38
SMTP SETTING PAGE (EMAIL ALARM) ........................................................................................................ 41
FTP SETTINGS PAGE (UPLOAD ALARM) ...................................................................................................... 43
PRIVACY MASKS ........................................................................................................................................ 44
ALARM SERVER SETTINGS PAGE (UPLOAD ALARM TO SUPPORTED VMS OR HTTP SERVER) ........................ 45
TIME LAPSE PHOTOGRAPHY ....................................................................................................................... 46
MOTION DETECTION CONFIGURATION PAGE (SET ALARM) ........................................................................... 47
REMOTE ALARM_OUT PEERING WITH GXV3500 DECODER.......................................................................... 50
SYSLOG SETTINGS PAGE (TROUBLESHOOTING HELP) .................................................................................. 53
SOFTWARE UPGRADE ................................................................................................................................ 54
INSTRUCTIONS FOR LOCAL FIRMWARE UPGRADE USING TFTP SERVER: ........................................................ 55
CONFIGURATION FILE DOWNLOAD .............................................................................................................. 55
RESTORE FACTORY DEFAULT SETTING .............................................................................................. 56
RESET FROM WEB INTERFACE .................................................................................................................... 56
IP SURVEILLANCE FAQ ........................................................................................................................... 57
Grandstream Networks, Inc. GXV3674_HD/FHD_VF v2 User Manual Page 3 of 59
Firmware Version 1.0.3.5 Last Updated: 02/2015

T
ABLE OF FIGURES
GXV3674_HD/FHD_VF v2 U
SER MANUAL
IGURE 1: GXV3674_HD/FHD_VF V2 ILLUSTRATION ................................................................................................ 11
F
FIGURE 2: WINDOWS “NETWORK” SHOWING GXV3674_HD/FHD_VF V2 AS “OTHER DEVICES” VIA UPNP .............. 14
FIGURE 3: “GS_SEARCH” RESULT PAGE OF GXV3674_HD/FHD_VF V2 .................................................................... 15
FIGURE 4-1: APPLE SAFARI “BONJOUR” SETTING PAGE TO DISPLAY GXV3611IR_HD ................................................ 16
FIGURE 4-2: APPLE SAFARI “BONJOUR” SETTING PAGE TO DISPLAY GXV3674_HD/FHD_VF V2 ............................... 16
FIGURE 5-1: GXV3674_HD/FHD_VF V2 WORKING IN LAN ...................................................................................... 19
FIGURE 5-2: GXV3674_HD/FHD_VF V2 WORKING WITH GVR3550 AND/OR GSURF_PRO WITH INTERNET .............. 20
FIGURE 6: APPLICATION PERIPHERAL CONNECTION FOR GXV3674_HD/FHD_VF V2 ................................................. 21
FIGURE 7: HOME PAGE OF GXV3674_HD/FHD_VF V2 ............................................................................................... 23
FIGURE 8: WEB LANGUAGE SWITCH ............................................................................................................................. 24
FIGURE 9: SYSTEM SETTINGS PAGE ............................................................................................................................... 25
FIGURE 10-1: VIDEO & AUDIO SETTINGS PAGE ............................................................................................................. 26
FIGURE 10-2: VIDEO & AUDIO SETTINGS PAGE ............................................................................................................. 27
FIGURE 11: OSD SETTINGS PAGE .................................................................................................................................. 28
FIGURE 12: CMOS SETTINGS PAGE ............................................................................................................................... 29
FIGURE 13: NETWORKING SETTING PAGE...................................................................................................................... 31
FIGURE 14: DDNS SETTING PAGE ................................................................................................................................. 32
FIGURE 15-1: SIP SETTING PAGE ................................................................................................................................... 33
FIGURE 15-2: SIP SETTING PAGE ................................................................................................................................... 34
FIGURE 15-3: SIP SETTING PAGE ................................................................................................................................... 35
FIGURE 16: STATUS PAGE .............................................................................................................................................. 36
FIGURE 17: USER MANAGEMENT PAGE ......................................................................................................................... 37
FIGURE 18: MAINTENANCE PAGE .................................................................................................................................. 38
FIGURE 19-1: SMTP SETTING PAGE .............................................................................................................................. 41
FIGURE 19-2: SMTP SETTING PAGE .............................................................................................................................. 42
FIGURE 20: FTP SETTING PAGE ..................................................................................................................................... 43
FIGURE 21: PRIVACY MASKS CONFIGURATION PAGE .................................................................................................... 44
FIGURE 22: ALARM HTTP SERVER SETTING PAGE ....................................................................................................... 45
FIGURE 23: TIME LAPSE PHOTOGRAPHY CONFIGURATION PAGE ................................................................................... 46
FIGURE 24-1: MOTION DETECTION CONFIGURATION PAGE ........................................................................................... 47
FIGURE 24-2: MOTION DETECTION CONFIGURATION PAGE ........................................................................................... 48
FIGURE 24-3: MOTION DETECTION SCHEDULE CONFIGURATION PAGE ......................................................................... 49
FIGURE 24-4: REMOTE ALARM_OUT IP CAMERA CONFIGURATION .............................................................................. 50
FIGURE 24-5: REMOTE ALARM_OUT PEERING GXV3500 CONFIGURATION .................................................................. 51
FIGURE 24-6: REMOTE ALARM_OUT PEERING GXV3500 ACTION OUTPUT DISPLAY ................................................... 52
FIGURE 24-7: PEERING GXV3500 DECODER ALARM_OUT CIRCUIT ............................................................................. 52
FIGURE 25: ALARM SERVER SETTING PAGE .................................................................................................................. 53
FIGURE 26: FIRMWARE UPGRADE AND PROVISIONING .................................................................................................. 54
FIGURE 27: FACTORY RESET FROM WEB INTERFACE .................................................................................................... 56
ABLE OF TABLES
T
GXV3674_HD/FHD_VF v2 U
SER MANUAL
T
ABLE 1: GXV3674_HD/FHD_VF V2 TECHNICAL SPECIFICATIONS ...................... ERROR! BOOKMARK NOT DEFINED.
Grandstream Networks, Inc. GXV3674_HD/FHD_VF v2 User Manual Page 4 of 59
Firmware Version 1.0.3.5 Last Updated: 02/2015

WELCOME
Thank you for purchasing Grandstream’s GXV3674_HD/FHD_VF v2 Outdoor Day/Night High Definition
IP Camera, an innovative powerful weatherproof infrared next generation network camera. Its advanced
ISP (Image Sensor Processor) powered with state-of-the-art auto-exposure/auto-white-balance algorithm
and a high quality lens, ensures high fidelity video quality that matches digital still camera color grade in a
wide range of light environments. It features cutting edge H.264 real-time video compression with
excellent image clarity (720p for GXV3674_HD_VF; 1080p for GXV3674_FHD_VF) and color fidelity,
industry leading SIP/VoIP for video streaming to smartphones and video phones, integrated PoE, IR-CUT
(mechanical) for day or night mod, and advanced security protection using strong encryption.
The GXV3674_HD/FHD_VF v2 can be managed with GSurf Pro (Grandstream’s intuitive FREE video
management software that controls up to 72 cameras simultaneously), or grouped with GVR3550
Grandstream Network Vi deo Recorder (NVR) via plug-n-play, as well as other ONVIF compl iant video
management systems. It also offers an advanced and flexible HTTP API and an SDK for easy integration
with other surveillance systems. .
Designed for both indoor and outdoor environment, the GXV3674_HD/FHD_VF v2 Day/Night HD IP
camera is a new addition to the popular GXV3XXX series IP surveillance product family. It ensures ease
of use, integration and deployment, with multilingual graphical user interface, provides powerful solution
to professional surveillance applications.
Ideal application scenes for GXV3674_HD/FHD_VF v2 are like store, parking lot, elevator, office,
crossing road point, and other indoor or outdoor related environments.
This manual will help you to learn how to operate and manage your GXV3674_HD/FHD_VF v2 Outdoor
Day/Night HD IP camera and make the best use of it.
Grandstream Networks, Inc. GXV3674_HD/FHD_VF v2 User Manual Page 5 of 59
Firmware Version 1.0.3.5 Last Updated: 02/2015
SAFETY COMPLIANCES
These instructions are intended to assist users to safely operate the GXV3611IR_HD, avoid dangerous
situations or damage the device.
Warning: May cause serious injury or death if any
of the warnings below are neglected.
Caution: Equipment may be damaged if any of
the following caution messages are neglected.
Warning:
Input voltage should meet both the SELV (Safety Extra Low Voltage) and the Limited
Source with DC 12V according to the IEC60950-1 standard. Please refer to the
specifications for more
device installed on the wall or ceiling, make sure that it is firmly
details.
Do not use a third-party power adapter or power
attached.
cord.
technical
When the
•
Make sure that the power supply voltage is correct before using the
Caution
:
camera.
• Do not drop the device or expose it to physical
shock.
Power
• Do not expose the device to temperatures outside the range of -20 oC to 50oC when t
d
evice is in
operation.
• Do not expose the device to damp/wet conditions or high electromagnetism
• To avoid heat accumulation, make sure that your operating environment has
ventilation.
• Do not damage the warranty sticker.
A few parts (e.g. electrolytic capacitor) of the equipment shall be replaced regularly
to their average lifetime. The average lifetime varies from the differences between
environments and usage history. Regular maintenance checks are recommended for
Please contact your dealer for more
Grandstream Networks, Inc. GXV3674_HD/FHD_VF v2 User Manual Page 6 of 59
Firmware Version 1.0.3.5 Last Updated: 02/2015
he
radiation.
proper
according
operating
all
users.
details.

FCC CAUTION
Any Changes or modifications not expressly approved by the party responsible for compliance
could void the user's authority to operate the equipment. This device complies with part 15 of the
FCC Rules. Operation is subject to the following two conditions:
1) This device may not cause harmful interference.
2) This device must accept any interference received, including interference that may cause
undesired operation.
Note: This equipment has been tested and found to comply with the limits for a Class B digit al
device, pursuant to part 15 of the FCC Rules.
These limits are designed to provide reasonable protection against harmful interference in a
residential inst all at io n. T hi s eq ui pm ent gener at es us es and can rad iate radio frequen cy energy and,
if not installed and used in accordance with the instructions, may cause harmful interference to
radio communications. However, there is no guarantee that interference will not occur in a
particular installation. If this equipment does cause harmful interference to radio or television
reception, which can be determined by turning the equipment off and on, the user is encouraged to
try to correct the interference by one or more of the following measures:
— Reorient or relocate the receiving antenna.
— Increase the separation between the equipment and receiver.
— Connect the equipment into an outlet on a circuit different from that to w hich the receiver
is connected.
— Consult the dealer or an experienced radio/TV technician for help.
RF EXPOSURE INFORMATION (SAR)
This device is designed and manufactured not to be exceeded the emission limits for exposure to
radio frequenc y RF energy set b y the Federal Commu nications Com mission of the Unit ed States.
The exposure standard for wireless devices employing a unit of measurement is known as the
Specific Absorption Rate (SAR), and the SAR limit set by FCC is 1.6 W/kg.
This device is complied with SAR for general population/uncontrolled exposure limits in
ANSI/IEEE C95.1-1992, and has been tested in accordance with the measurement methods and
procedures specified in OET Bulletin 65 Supplement C. This device has been tested, and meets
the FCC RF exposure guidelines when tested with the device directly contacted to the body. RF
exposure compliance with anybody-worn accessory, which contains metal, was not tested and
certified, and uses such body-worn accessory, should be avoided.
Changes or modifications not expressly approved by the party responsible for compliance could
void the user’s authority to operate the equipment.
Hereby, Grandstream declares that this device is in compliance with the essential requirements
and other relevant provisions of Directive 1999/5/EC.
Grandstream Networks, Inc. GXV3674_HD/FHD_VF v2 User Manual Page 7 of 59
Firmware Version 1.0.3.5 Last Updated: 02/2015

WARRANTY
If you purchased your GXV3674_HD/FHD_VF v2 from a reseller, please contact the company w here you
purchased the device for replacement, repair or refund.
If the device was purchased directly from Grandstream, please contact our technical support team for a
RMA (Return Materials Authorization) number before the product is returned.
Grandstream reserves the right to remedy warranty policy without prior notification.
Caution:
Changes or modifications to this product not expressly approved by Grandstream, or operation of this
product in any way other than as detailed by this User Manual, could void your manuf acturer warranty.
Please do not use a different power adaptor with the GXV3674_HD/FHD_VF v2 as it may cause damage
to the products and void the manufacturer warranty.
• This document is subject to change without notice. The latest electronic version of this user manual is
available for download at:
http://www.grandstream.com/products/surveillance/GXV3672hd/documents/gxv3672hd_fhd_usermanual_
english.pdf
Reproduction or transmittal of the entire or any part, in any form or by any means, electronic or print, for
any purpose is not permitted without the express written permission of Grandstream Networks, Inc.
Grandstream Networks, Inc. GXV3674_HD/FHD_VF v2 User Manual Page 8 of 59
Firmware Version 1.0.3.5 Last Updated: 02/2015
CONNECT YOUR GXV3674_HD/FHD_VF V2
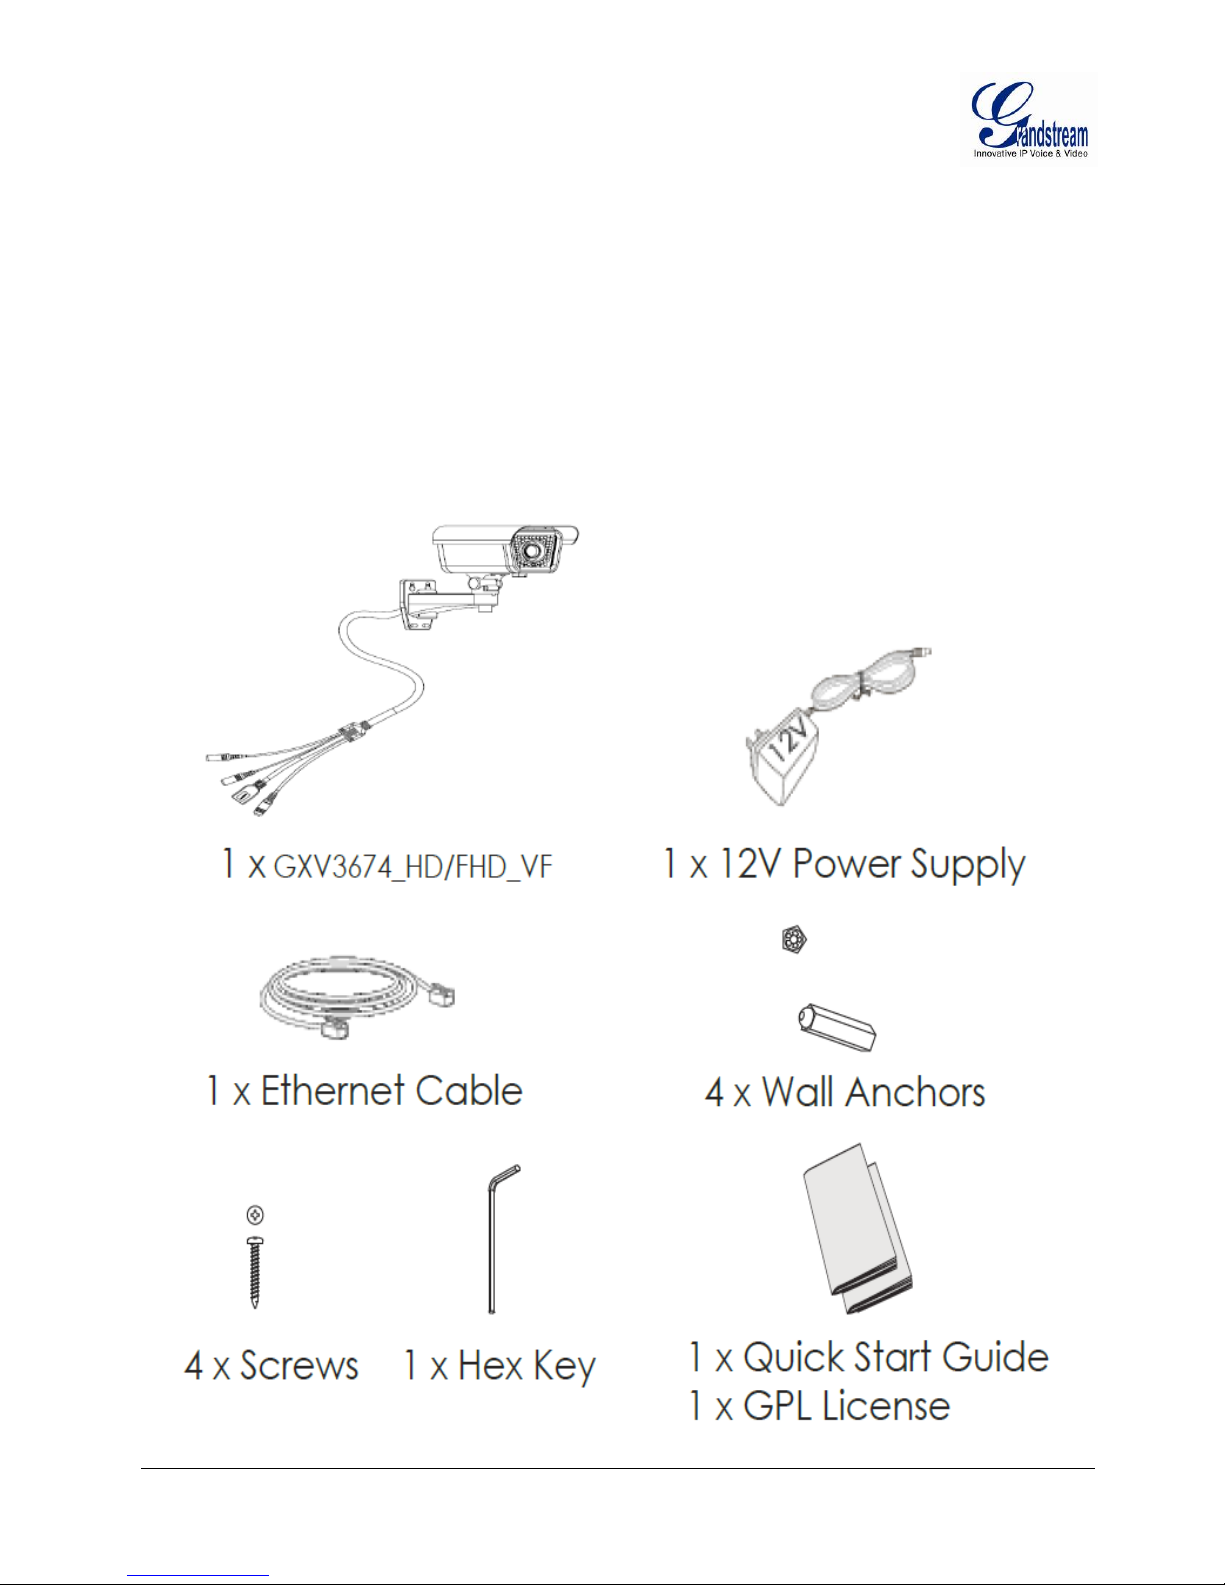
Equipment Package Contents
The GXV3674_HD/FHD_VF v2 package contains:
• GXV3674_HD/FHD_VF v2 IP Camera
• 12V DC Universal Power Adaptor
• Ethernet Cable
• Hex Key and 4 Screws and Wall Anchors
• Quick Installation Guide and GNU GPL license
Grandstream Networks, Inc. GXV3674_HD/FHD_VF v2 User Manual Page 9 of 59
Firmware Version 1.0.3.5 Last Updated: 02/2015
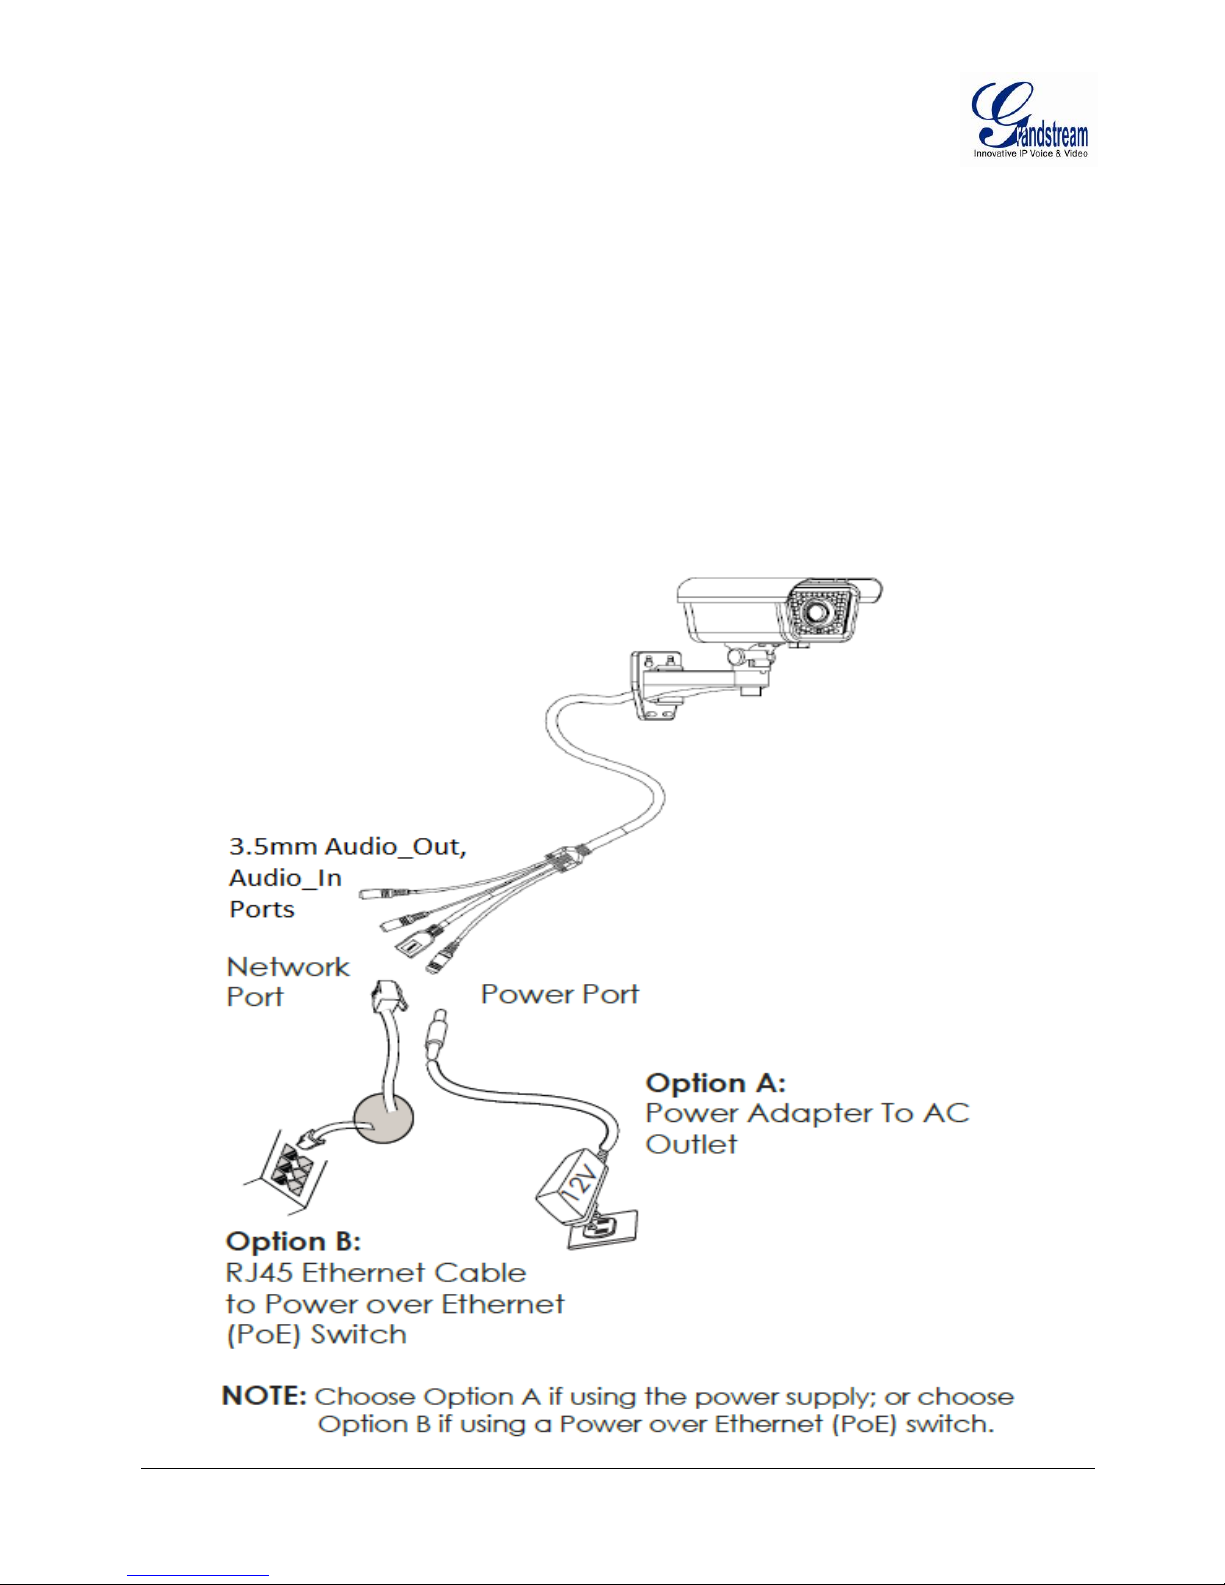
Connecting the GXV3674_HD/FHD_VF v2
Using the Power Adapter as power supply
Connect the RJ-45 Ethernet cable to the NETWORK port of the GXV3674_HD/FHD_VF
Connect the other end of the RJ-45 cable to your network (switch or router or PC)
Connect the power supply to the DC 12V power jack on the back of the GXV3674_HD/FHD_VF
Using PoE as power supply
Connect the RJ-45 Ethernet cable to the NETWORK port of GXV3610_HD/FHD v2
Connect the other end of the RJ-45 cable to your PoE switch.
PoE injector can be used if PoE switch is not available.
Please refer to following connection diagram to hook up the camera.
Grandstream Networks, Inc. GXV3674_HD/FHD_VF v2 User Manual Page 10 of 59
Firmware Version 1.0.3.5 Last Updated: 02/2015
PRODUCT OVERVIEW
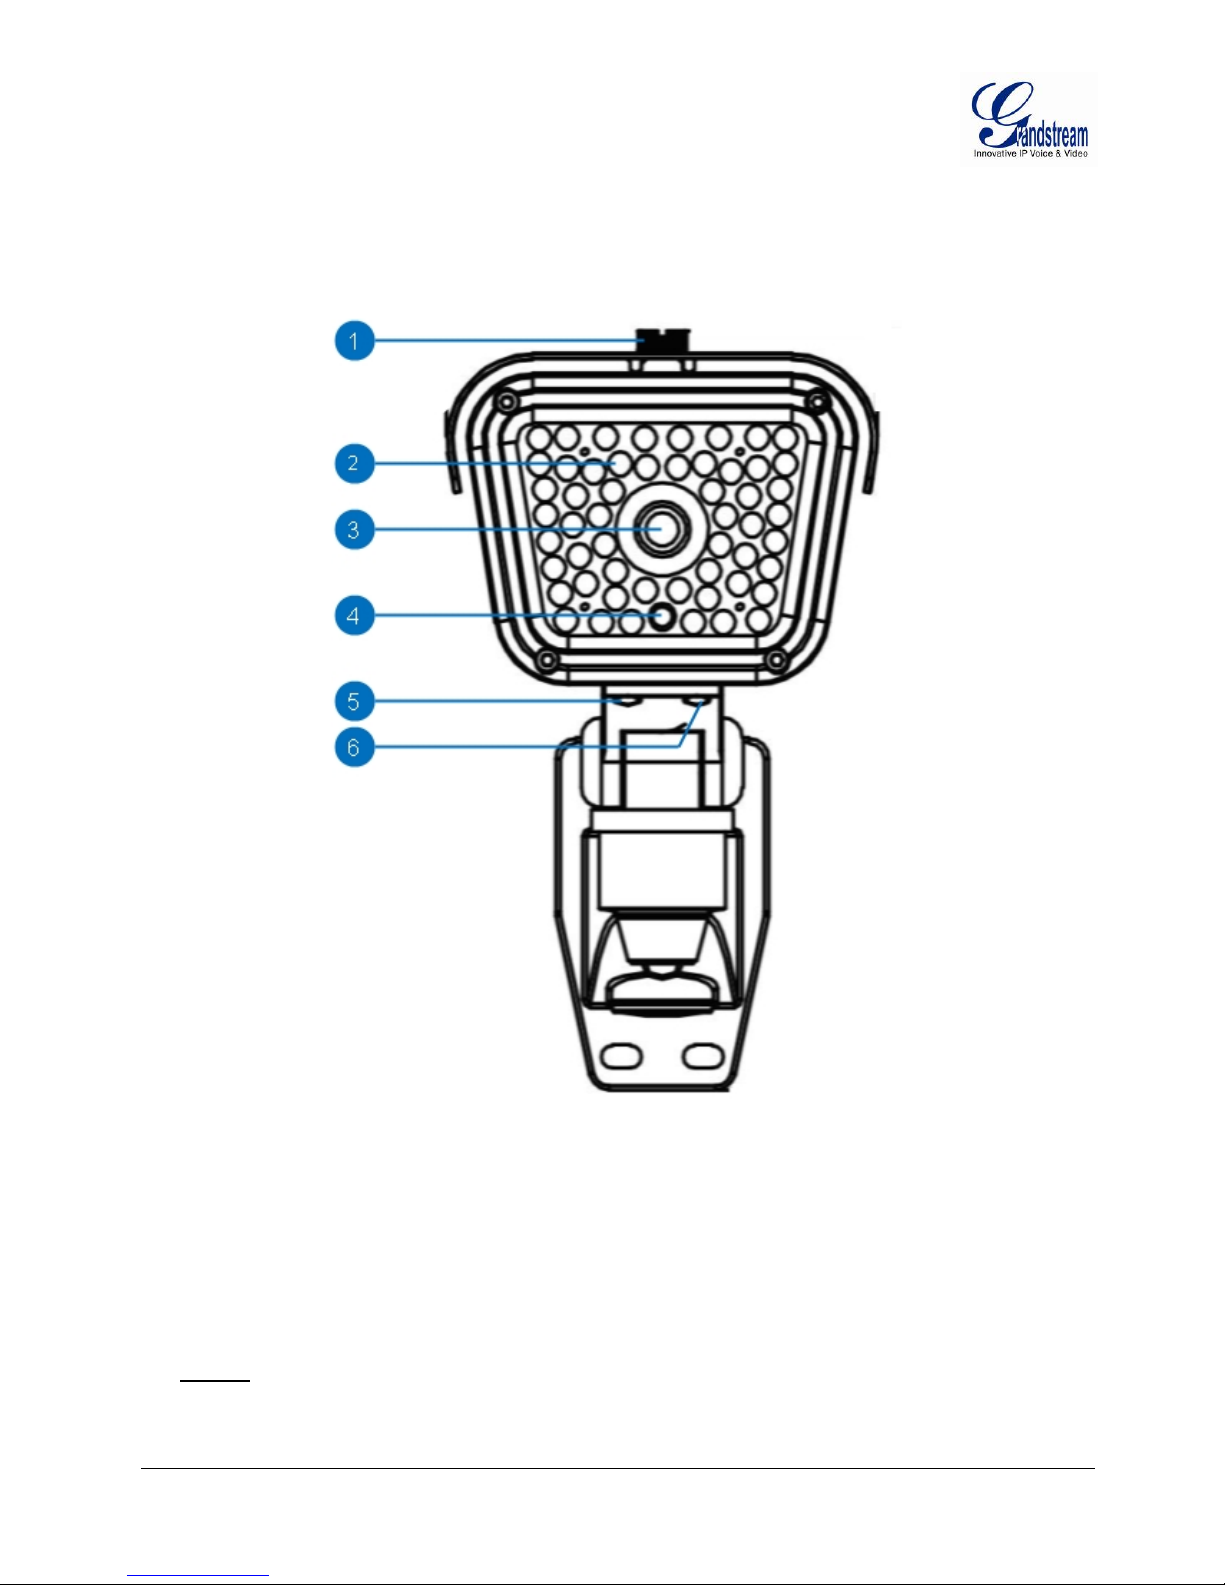
GXV3674_HD/FHD_VF v2 Camera
Figure 1: GXV3674_HD/FHD_VF v2 Illustration
1. Screw and Top Cover GXV3674_HD/FHD_VF v2 screw and Top Cover Plate
2. IR LED Light IR LED light array for Night Mode
3. LENs Adjustable Vari-focal Lens
4. IR CUT Sensor IR-Cut Photonic Sensor
5. Far/Near Adjustment Far/Near (Zoom Out/In) Adjustment screw
6. Focus Adjustment Focus Adjustment screw
NOTE:
For accuracy, please use screwdriver to adjust the Far/Near and Focus screws.
Grandstream Networks, Inc. GXV3674_HD/FHD_VF v2 User Manual Page 11 of 59
Firmware Version 1.0.3.5 Last Updated: 02/2015

GXV3674_HD/FHD_VF v2 Specifications
Model v2
GXV3674_HD_VF
GXV3674_FHD_VF
Video Compression
H.264, MJPEG
1/3”, 1.2 Megapixel Progressive
Scan CMOS, 1280H x 960V
1/3”, 3.1 Megapixel Progressive
Scan CMOS, 2048H x 1536V
Day/Night mode, exceptionally low noise & low light sensitivity.
Shutter: 1/10000 – 1/30 second
Focal Length
2.8 ~ 12 mm
Aperture
F1.4, DC-IRIS
Field Angle (FOV)
90° ~ 28° (Horizontal Field)
IR Cut Filter
Yes, Mechanical
Day & Night Mode
IR LED covering up to 25 m
Minimum Illu mination
0.05 Lux, 0 lux with IR
Responsivity
5.48V/lux-sec (550nm)
1.9V/lux-sec (550nm)
Supported Maximum Video
Resolution and Frame Rate
1280x960 (25fps)
1280x720 (30fps)
2048x1536 (15fps)
1920x1080 (30fps)
Video Bit Rate
32 Kbps ~ 8 Mbps, multi-rate for preview & recording
Audio Input
Line-In, 1500 ohms, 0.1Vrms ~ 0.707Vrms, 3.5mm
Audio Output
Line-Out, 600 ohms, 0.707Vrms, 3.5mm
Audio Compression
G.711u/a, AAC
Embedded Analytics
Motion Detection (up to 16 target areas)
Pre-/post-alarm Recording
Yes, 8MB
Yes, 3MB
Snapshots
Triggered upon events, send via email/FTP
TCP/UDP/IP, RTP/RTCP, RT SP, DHCP, DDNS, HTTP, HTTPS,
SMTP, FTP, NTP
SIP/VoIP Support
Yes
Time-Lapse Photography
Yes
Privacy Mask Support
Yes, 4 Zones
Power over Ethernet (PoE)
IEEE 802.3af, Class 0
Dimensions (L x W x H)
255mm (L) x 104mm (W) x 187mm (H)
Weight
1.10kg
Operating: -20°C ~ +50°C ( -4°F ~ 122°F), 10–90% RH (non–
Storage: -30°C ~ +60°C (-22°F ~ 140°F)
Power Adapter
Output: 12VDC/1A; Input: 100–240VAC, 50–60Hz
Casing
IP66 compliant weather-proof metal case
FCC Part 15,Subpart B Class B; EN 55022 Class B,
C-tick AS/NZS CISPR 22, IP66
Image Sensor Resolution
Image Sensor Sensitivity
Network Protocol
Network: RJ45, 10M/100M auto-sensing
External Cable Connection
Temperature / Humidity
Compliance
Table 1: GXV3674_HD/FHD_VF v2 Technical Specifications
3.5mm Line-In
3.5mm Line-Out
Power Input
condensing)
EN 61000-3-2, EN 61000-3-3, EN 55024, EN 60950-1;
Grandstream Networks, Inc. GXV3674_HD/FHD_VF v2 User Manual Page 12 of 59
Firmware Version 1.0.3.5 Last Updated: 02/2015

INSTALLATION GUIDE
Minimum Recommended Computer System Requirement
To install GXV3674_HD/FHD_VF v2, you will have a computer, PC recommend.
The minimum recommended PC system requirement listed below:
• Windows XP, Windows Vista, Windows 7 and Windows 8
• CPU: Intel Pentium 4 or higher, 2 GHz
• RAM: 2 GB (4 GB recommended for larger systems)
• Support for DirectX 8.0 and above.
Configure the GXV3674_HD/FHD_VF v2 via Web Browser
The GXV3611IR_HD has embedded Web server to respond to HTTP GET/POST requests. Embedded
HTML pages allow user to configure the IP camera through Microsoft Internet Explorer (7.0 or above),
Firefox, Chrome (plug-in from Grandstream required).
• Download WebControl Plug-in from Grandstream website:
http://www.grandstream.com/products/tools/surveillance/webcontrl_plugin.zip
For Apple platform OS-X, only MJPEG video coded s upported curren tly.
NOTE:
Please temporarily disable Antivirus or Internet Security Software when download and install the
Grandstream WebControl Plug-in for Firefox/Chrome or “GSViewerX.cab” for Microsoft Internet
Explorer. Please close Browser to install the downloaded Plug-in or Active-X.
Please trust and install the file downloaded if prompted by the Antivirus or Security software.
Grandstream Networks, Inc. GXV3674_HD/FHD_VF v2 User Manual Page 13 of 59
Firmware Version 1.0.3.5 Last Updated: 02/2015

Connect the Camera to network with DHCP server (Recommended)
The GXV3674_HD/FHD_VF v2 by default enabled as DHCP client, it will automatically get IP address
from the network with DHCP server running.
WINDOWS PLATFORM:
There are two ways for Windows user to get access to the IP Camera easily:
A. UPnP
By default, the GXV3674_HD/FHD_VF v2 has the UPnP feature turned ON. For customers using Window
network with UPnP turned on (most SOHO router support UPnP), it is very easy to access the IP camera:
• Find the “Network” icon at Windows Desktop.
• Click the icon to get into the “Network” and the IP cameras will list as “Other Devices” shown like
below. Refresh the pages if nothing displayed. Otherwise, the UPnP may not active in the network.
Figure 2: Windows “Network” showing GXV3674_HD/FHD_VF v2 as “Other Devices” via UPnP
• Click the displayed icon of related IP camera, the default browser (e.g.: Firefox or Chrome) will open
and connect directly to the camera’s webpage, prompt message will display asking for plug-in
installation.
• Disable security or antivirus software, download the plug-in, close browser and install the plug-in,
open the browser again, the embedded video will be displayed if clicking the icon of the related IP
Camera.
B. “GS_Search” Utility Tool
User can know the IP address assigned to the camera from DHCP server log or using the Grandstream
GS_Search tool. Following is the instruction for using “GS_Search” utility tool:
1. Download the GS_Search tool from Grandstream website:
http://www.grandstream.com/products/tools/surveillance/GS_Search.zip
2. Run the Grandstream GS_Search tool by double click the unzipped “GS_Search.exe”.
3. Click on the button to begin device detection
4. The detected devices will appear in the output field like below
Grandstream Networks, Inc. GXV3674_HD/FHD_VF v2 User Manual Page 14 of 59
Firmware Version 1.0.3.5 Last Updated: 02/2015
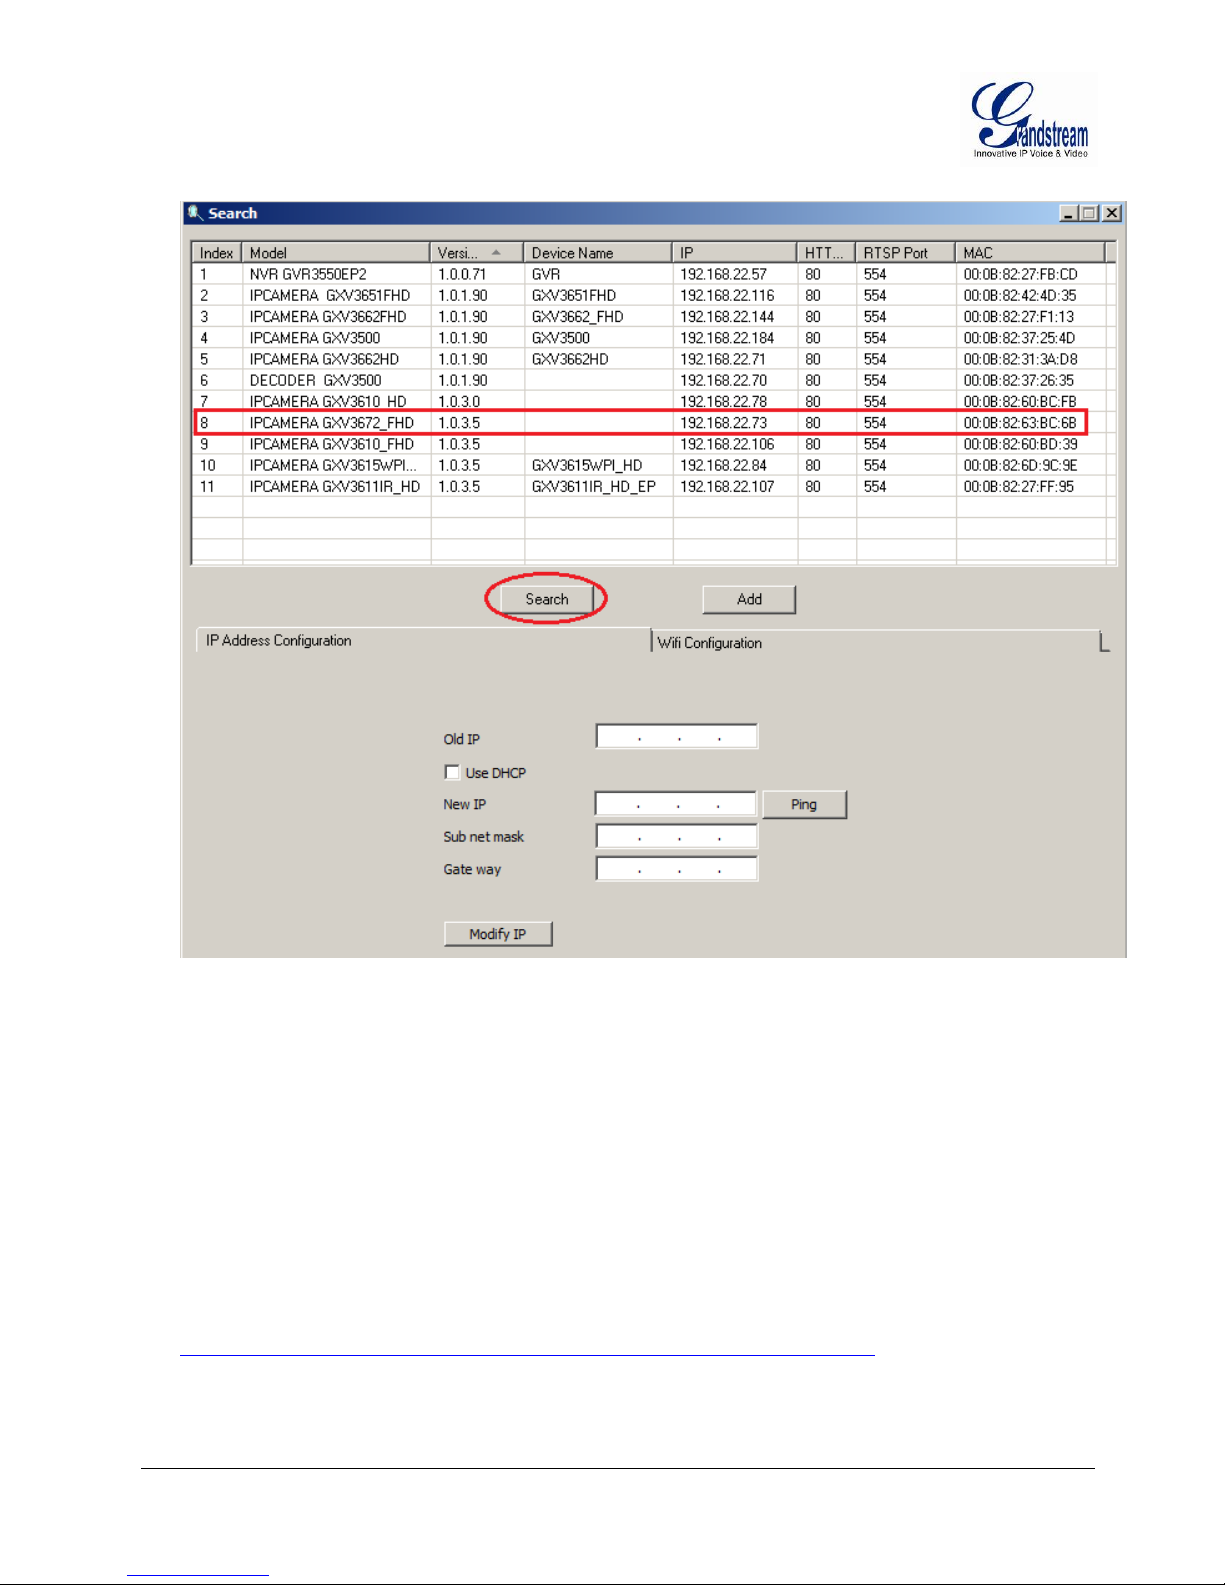
Figure 3: “GS_Search” Result Page of GXV3674_HD/FHD_VF v2
5. Double click the column of the detected camera, the browser will automatically open and link to the
device IP and the web configuration page.
6. The browser will ask for plug-in or ActiveX if not installed, otherwise it will get to Home page and
start to show the video captured by the camera (by default the camera enabled anonymous access)
7. Click “Configuration” icon, the browser will ask credentials to authorize configuration.
8. Enter the administrator user name and password to access the Web Configuration Interface, the default
user name and password are both set to admin.
9. In step 6, browser will indicate that “This website wants to install the following add-on:
GSViewerX.cab from Grandstream Networks Inc.” Please allow the installation.
10. The plug-in can be download here:
http://www.grandstream.com/products/tools/surveillance/webcontrl_plugin.zip
Grandstream Networks, Inc. GXV3674_HD/FHD_VF v2 User Manual Page 15 of 59
Firmware Version 1.0.3.5 Last Updated: 02/2015
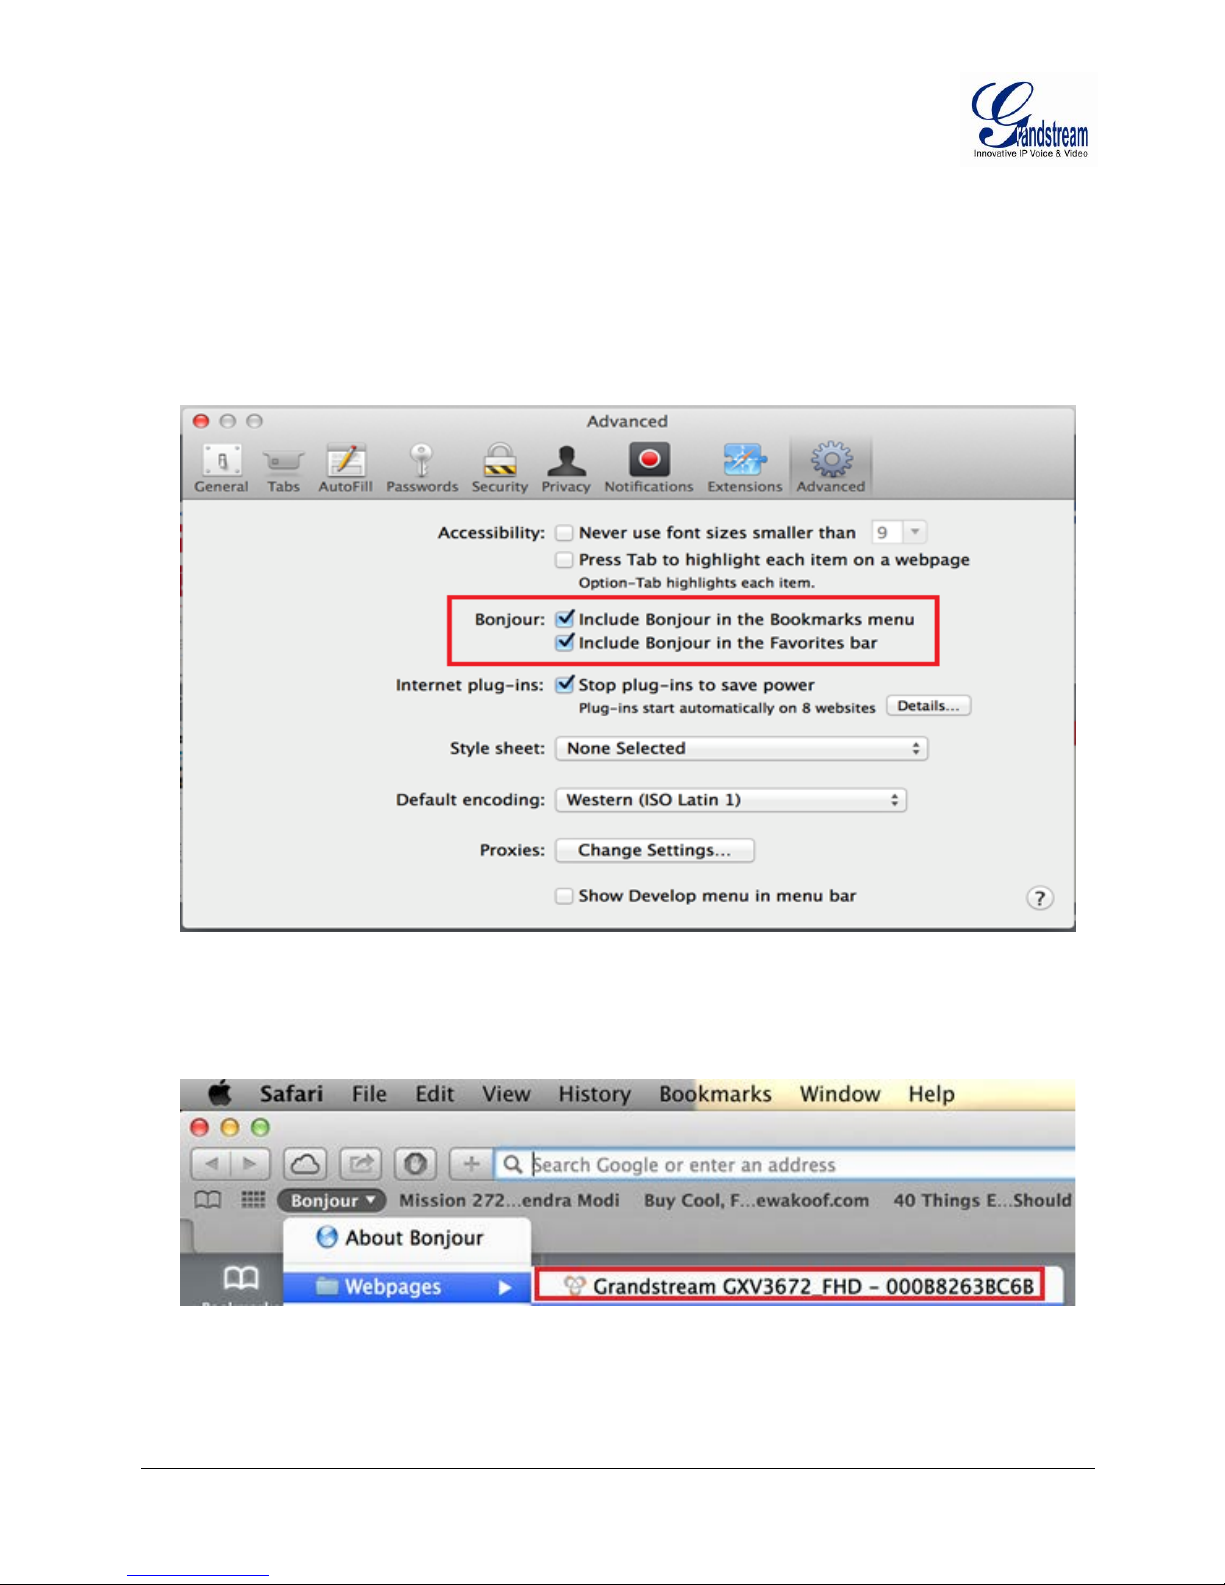
APPLE PLATFORM:
For Apple users, please turn on Bonjour of Safari to find and access the GXV3674_HD/FHD_VF v2.
1) Open Safari, select “Advanced” to open the Advanced Setting.
2) Click “Include Bonjour in the Bookmarks menu” and “Include Bonjour in the Favorites bar” then close
the setting page and back to Safari.
Figure 4-1: Apple Safari “Bonjour” Setting page to display GXV3611IR_HD
3) Bonjour will now display embedded at Safari. Select “Bonjour” pull-down menu and select
“Webpages”, the related IP Camera like GXV3674_HD/FHD_VF v2 will be there.
Figure 4-2: Apple Safari “Bonjour” Setting page to display GXV3674_HD/FHD_VF v2
4) Click the displayed camera to access to the configuration page of the camera.
Grandstream Networks, Inc. GXV3674_HD/FHD_VF v2 User Manual Page 16 of 59
Firmware Version 1.0.3.5 Last Updated: 02/2015
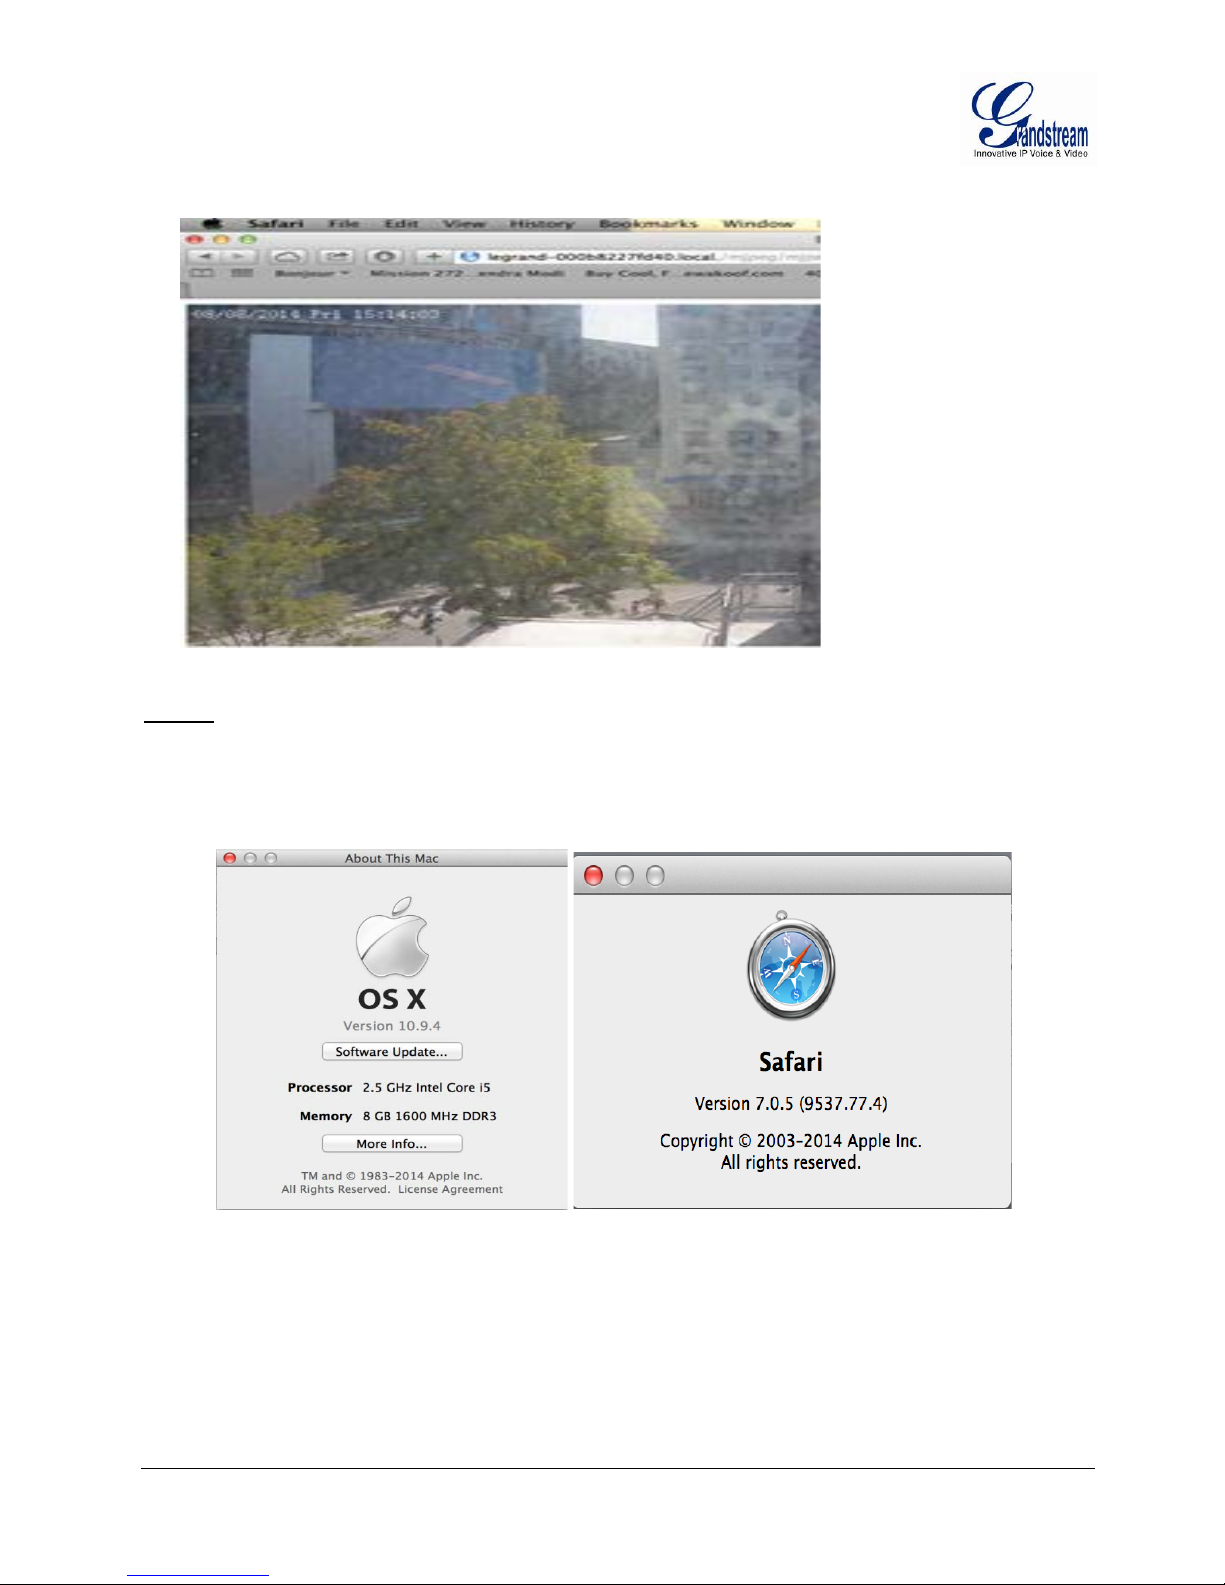
5) To see the video, user has to change the video codec from default H.264 to MJPEG.
NOTE:
The instruction given here based on Safari/OS-X, other Apple plat for m li ke iO S (iPh one /iPa d) c an
use similar method.
iPhone/iPad (iOS) users are recommended to use Applications in Apple Store.
Free or Paid applications from Apple Store like “IP Cam Viewer” are suggested and verified
working with Grandstream IP Cameras like GXV3674_HD/FHD_VF v2.
Apple Store applications like “IP Cam Viewer” will support H.264 video codec.
Grandstream Networks, Inc. GXV3674_HD/FHD_VF v2 User Manual Page 17 of 59
Firmware Version 1.0.3.5 Last Updated: 02/2015
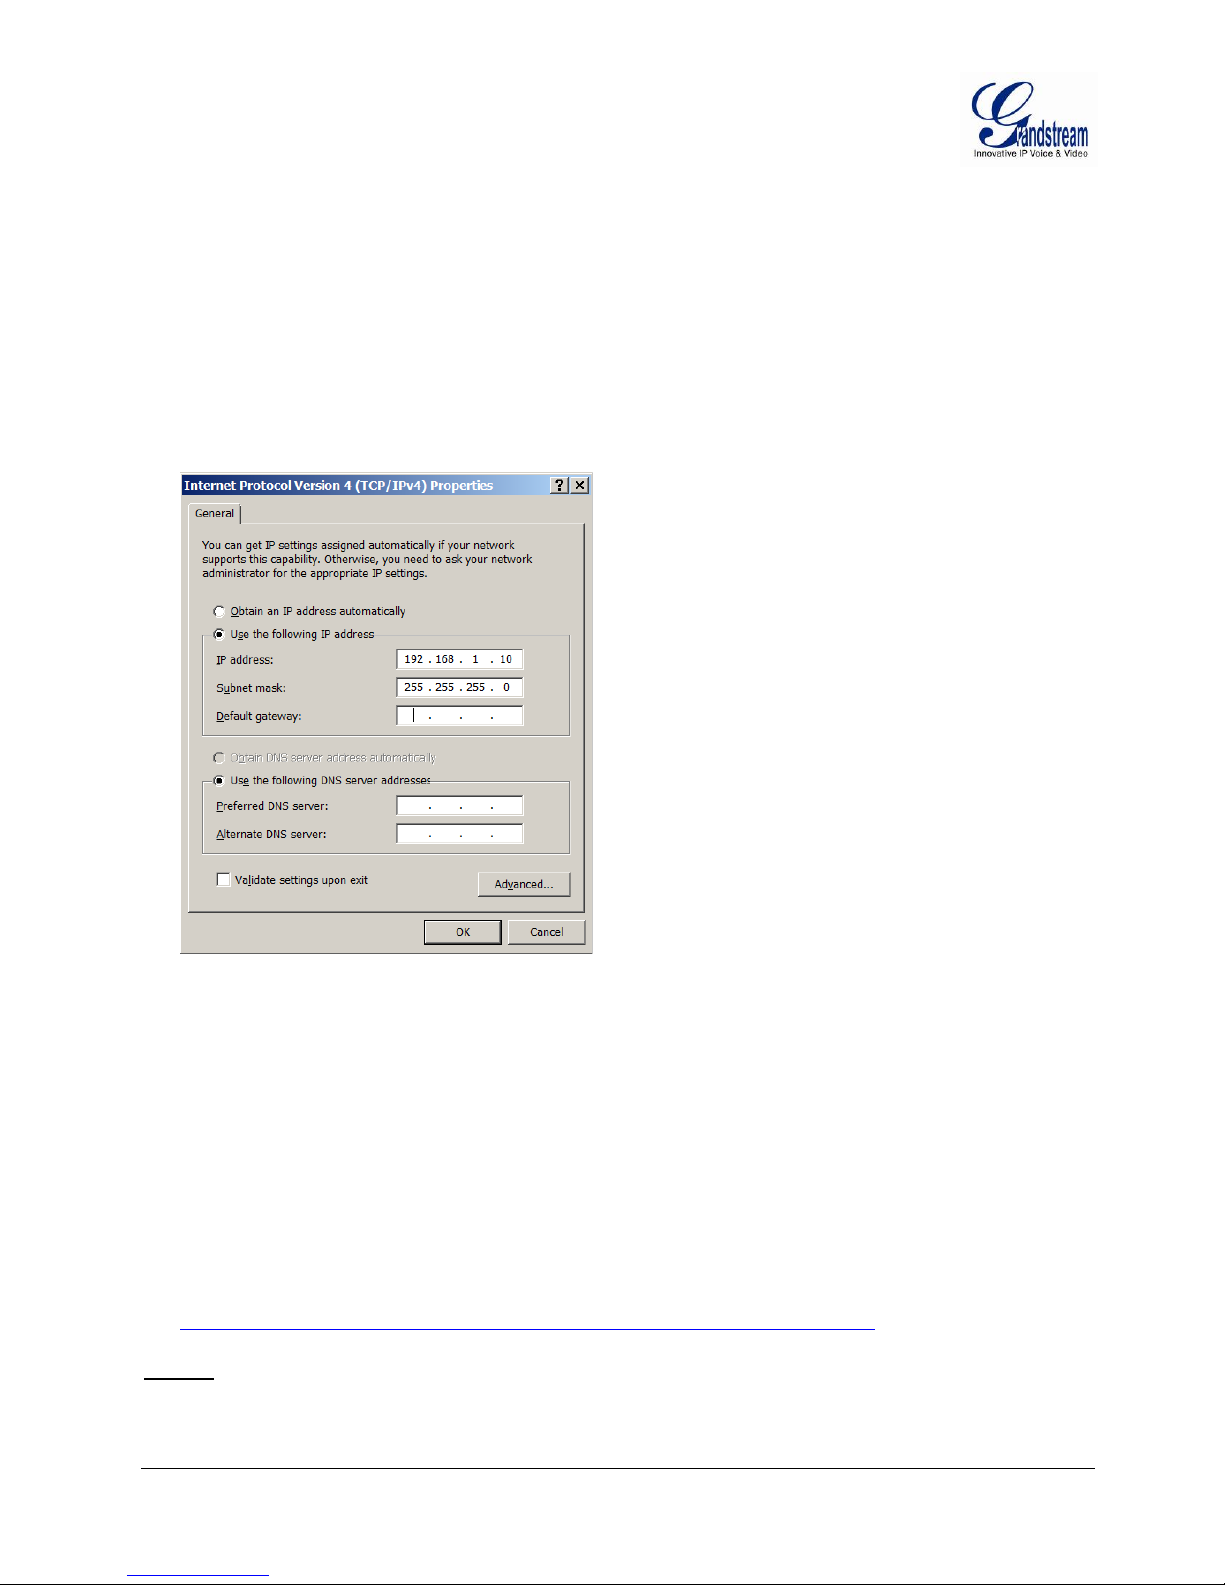
Connect to the Camera using Static IP
If no DHCP server in the network, or the camera does not get IP from DHCP server, user can connect the
camera to a computer directly, using static IP to configure the camera.
The default IP, if no DHCP server; or DHCP offer time out (3 minutes), is 192.168.1.168
1. Connect the computer RJ-45 via an Ethernet cable directly to the IP camera GXV3674_HD/FHD_VF
v2.
2. Configure the computer using Static IP: 192.168.1.XXX (1<XXX<255, but NOT 168) and configure
the “Subnet mask” to “255.255.255.0”. Leave the “Default Gateway” to “Blank” like below:
3. Power on the GXV3674_HD/FHD_VF v2.
4. Start the IE or Firefox browser when the network connection is up.
5. Enter 192.168.1.168 in the address bar of the browser.
6. The browser will ask for plug-in or ActiveX if not installed, otherwise it will get to Home page and
start to show the video captured by the camera (by default the camera enabled anonymous access)
7. Click “Configuration”, the browser will ask credentials to authorize configuration.
8. Enter the administrator user name and password to access the Web Configuration Interface, the default
user name and password are both set to admin.
9. In step 6, IE will indicate that “This website wants to install the following add-on: GSViewerX.cab
from Grandstream Networks Inc.”, allow the installation.
10. Firefox, Chrome user need to download and install the plug-in to see the video, the plug-in is here:
http://www.grandstream.com/products/tools/surveillance/webcontrl_plugin.zip
NOTE:
Please temporarily disable Antivirus or Internet Security Software when download and install the
Grandstream Firefox plug-in for video or “GSViewerX.cab” for Microsoft Internet Explorer.
Grandstream Networks, Inc. GXV3674_HD/FHD_VF v2 User Manual Page 18 of 59
Firmware Version 1.0.3.5 Last Updated: 02/2015
 Loading...