

Page 1

Grandstream Networks, Inc.
Grandstream Wave for AndroidTM
User Guide
GRANDSTREAM WAVE USER GUIDE
Page 2

Firmware Version 1.0.1.21
Grandstream Wave User Guide
Page 1 of 64
Grandstream Wave User Guide
Index
CHANGE LOG ........................................................................................... 6
FIRMWARE VERSION 1.0.1.21 ............................................................................................................ 6
WELCOME ................................................................................................. 7
FEATURE HIGHTLIGHTS ..................................................................................................................... 7
GRANDSTREAM WAVE TECHNICAL SPECIFICATIONS ................................................................... 7
GETTING READY .................................................................................................................................. 9
USING GS Wave ...................................................................................... 11
DIAL SCREEN ..................................................................................................................................... 11
DIALING A NUMBER DIRECTLY ................................................................................................. 11
REDIAL ......................................................................................................................................... 12
DIALING A NUMBER VIA CALL HISTORY .................................................................................. 13
DIALING A NUMBER VIA CONTACTS ........................................................................................ 13
SWITCHING AUDIO CHANNEL DURING CALL ................................................................................. 14
ANSWERING A CALL .......................................................................................................................... 15
SINGLE INCOMING CALL ........................................................................................................... 15
MULTIPLE CALLS ........................................................................................................................ 16
VOICE CALL ........................................................................................................................................ 17
CALL HOLD/RESUME ................................................................................................................. 19
MUTE ............................................................................................................................................ 19
SWITCHING AUDIO CHANNEL DURING CALL ......................................................................... 20
MISSED CALLS ................................................................................................................................... 21
CALL TRANSFER ................................................................................................................................ 23
BLIND TRANSFER ....................................................................................................................... 23
ATTENDED TRANSFER AFTER CALLING ................................................................................. 24
ATTENDED TRANSFER BEFORE CALLING .............................................................................. 24
6-WAY CONFERENCE ........................................................................................................................ 25
ADD NEW CONFERENCE .......................................................................................................... 27
INITIATING CONFERENCE ......................................................................................................... 27
REMOVING PARTICIPANT FROM CONFERENCE .................................................................... 29
MUTE/UNMUTE CONFERENCE ................................................................................................. 29
HOLD/RESUME CONFERENCE ................................................................................................. 30
VOICEMAIL ......................................................................................................................................... 31
CONTACTS.......................................................................................................................................... 33
ADD CONTACTS .......................................................................................................................... 35
Page 3

Firmware Version 1.0.1.21
Grandstream Wave User Guide
Page 2 of 64
SEARCH CONTACTS .................................................................................................................. 35
VIEW CONTACT .......................................................................................................................... 36
EDIT CONTACT............................................................................................................................ 37
DELETE CONTACT ...................................................................................................................... 37
ADD CONTACT TO FAVORITES ................................................................................................. 38
CALL HISTORY ................................................................................................................................... 39
MESSAGES ......................................................................................................................................... 42
VIEW MESSAGE .......................................................................................................................... 43
CREATE NEW MESSAGE ........................................................................................................... 45
EDIT MESSAGE ........................................................................................................................... 45
SETTINGS ................................................................................................ 47
ACCOUNT SETTINGS ........................................................................................................................ 47
UCM ACCOUNT (QR CODE SCAN) ............................................................................................ 47
UCM ACCOUNT (SELECT QR CODE IMAGE) ........................................................................... 48
SIP ACCOUNT ............................................................................................................................. 49
ADVANCED SETTINGS ...................................................................................................................... 55
GENERAL SETTINGS .................................................................................................................. 55
CALL SETTINGS .......................................................................................................................... 56
AUDIO SETTINGS ....................................................................................................................... 57
NETWORK SETTINGS ................................................................................................................ 58
ADDITIONAL SETTINGS ............................................................................................................. 58
CUTSOM SETTINGS .......................................................................................................................... 61
ABOUT ................................................................................................................................................. 62
DEBUG ................................................................................................................................................ 62
EXIT ..................................................................................................................................................... 62
FAQs ........................................................................................................ 63
EXPERIENCING THE GRANDSTREAM WAVE APPLICATION .............. 64
Page 4

Firmware Version 1.0.1.21
Grandstream Wave User Guide
Page 3 of 64
Table of Tables
Grandstream Wave User Guide
Table 1: GrandStream Wave Technical Specifications .................................................................................. 7
Table 2: Edit Account Parameters ............................................................................................................... 50
Table 3: Account Settings—General Settings Parameters ......................................................................... 51
Table 4: Account Settings—Call Settings Parameters ................................................................................ 51
Table 5: Account Settings—SIP Settings Parameters................................................................................. 52
Table 6: Session Expiration Settings Parameters ....................................................................................... 53
Table 7: Account Settings—Network Settings Parameters ......................................................................... 54
Table 8:Account Settings—Codec Settings Parameters ............................................................................. 54
Table 9: Advanced Settings—General Settings Parameters ...................................................................... 55
Table 10: Advanced Settings—Audio Settings Parameters ........................................................................ 57
Table 11: Advanced Settings—Network Settings Parameters .................................................................... 58
Table 12: Advanced Settings—Additional Settings Parameters ................................................................. 58
Table 13: LDAP Settings Parameters ......................................................................................................... 60
Table 14: Custom Settings Parameters ...................................................................................................... 61
Table 15: Debug Settings Parameters ........................................................................................................ 62
Page 5

Firmware Version 1.0.1.21
Grandstream Wave User Guide
Page 4 of 64
Table of Figures
Grandstream Wave User Guide
Figure 1: Grandstream Wave Installation ...................................................................................................... 9
Figure 2: Grandstream Wave Finger Gestures on the Touchscreen .......................................................... 10
Figure 3: Keypad Screen ............................................................................................................................ 11
Figure 4: Select Account ............................................................................................................................. 12
Figure 5: Dial-up via Call History ................................................................................................................ 13
Figure 6: Dial-up via Contacts ..................................................................................................................... 14
Figure 7: Switch Call Lines.......................................................................................................................... 15
Figure 8: Single Incoming Call .................................................................................................................... 16
Figure 9: Multiple Calls ................................................................................................................................ 17
Figure 10: Voice Call ................................................................................................................................... 18
Figure 11: Call Unhold ................................................................................................................................. 19
Figure 12: Call Mute .................................................................................................................................... 20
Figure 13: Call via Bluetooth ....................................................................................................................... 21
Figure 14: Missed Call Screen .................................................................................................................... 22
Figure 15: Call Transfer—Blind Transfer ..................................................................................................... 23
Figure 16: Attended Transfer after Calling—Transferring ........................................................................... 24
Figure 17: Attended Transfer before Calling—Split ..................................................................................... 25
Figure 18: Grandstream Wave Conference Screen .................................................................................... 26
Figure 19: Grandstream Wave Conference—Add New Call to the Conference ......................................... 27
Figure 20: Grandstream Wave Conference—Initiating Conference ........................................................... 28
Figure 21: Grandstream Wave Conference—Delete Conference participant ............................................. 29
Figure 22: Grandstream Wave Conference—Mute Conference Participant ............................................... 30
Figure 23: Grandstream Wave Conference—Hold Conference ................................................................. 31
Figure 24: Configure Voicemail UserID ....................................................................................................... 32
Figure 25: Retrieve Voicemail ..................................................................................................................... 33
Figure 26: GS Wave Contacts Screen ........................................................................................................ 34
Figure 27: Grandstream Wave Add New Contact ....................................................................................... 35
Figure 28: Grandstream Wave Search Contact .......................................................................................... 36
Figure 29: Grandstream Wave View Contact .............................................................................................. 37
Figure 30: Grandstream Wave Edit Contact ............................................................................................... 38
Figure 31: Add Contact to Favorites ........................................................................................................... 39
Figure 32: Grandstream Wave Call History ................................................................................................ 40
Figure 33: Grandstream Wave Call History Details Screen ........................................................................ 41
Figure 34: Grandstream Wave Call History Details Screen- Edit Contact .................................................. 42
Figure 35: Grandstream Wave Messages Screen ...................................................................................... 43
Figure 36: Grandstream Wave Message Details Screen ............................................................................ 44
Figure 37: Grandstream Wave Create New Message ................................................................................ 45
Figure 38: Grandstream Wave Message Screen—Edit Message .............................................................. 46
Page 6

Firmware Version 1.0.1.21
Grandstream Wave User Guide
Page 5 of 64
Figure 39: Add New Account Screen .......................................................................................................... 47
Figure 40: QR Code Scan Screen .............................................................................................................. 48
Figure 41: Scan QR Code Image Screen ................................................................................................... 49
Figure 42: Account Settings Screen—Registration Success ...................................................................... 50
Figure 43: Slide to Delete Account .......................................................................................................... 50
Figure 44: Call Settings Screen .................................................................................................................. 56
Figure 45: DND Settings Screen ................................................................................................................. 56
Figure 46: Reducing Noise Settings Screen ............................................................................................... 57
Figure 47: Output Gain Screen ................................................................................................................... 58
Figure 48: BLF List Screen ......................................................................................................................... 60
Figure 49: LDAP Settings Screen ............................................................................................................... 60
Page 7

Firmware Version 1.0.1.21
Grandstream Wave User Guide
Page 6 of 64
CHANGE LOG
This section documents significant changes from previous versions of Grandstream Wave user manuals.
Only major new features or major document updates are listed here. Minor updates for corrections or
editing are not documented here.
FIRMWARE VERSION 1.0.1.21
This is the initial version.
Page 8

Firmware Version 1.0.1.21
Grandstream Wave User Guide
Page 7 of 64
WELCOME
Lines
6 lines with up to 6 independent SIP accounts
Protocols and
Standards
SIP RFC3261,TCP/IP/UDP, RTP/RTCP, HTTP/HTTPS, DNS(A record, SRV,
NAPTR), STUN/ICE, SIMPLE, LDAP, TLS, DTLS, IPv6 (TBD)
Network
Support 2G/3G/4G and WiFi
Graphic Display
800 x 480 resolution or higher
Bluetooth
Support making calls with Bluetooth
Voice Codec and
Capabilities
Support G.711µ/a, G.722(wide-band), G.726-32, iLBC, GSM, Opus, HD Audio
Telephony
Features
Hold, mute, transfer, forward (unconditional/no-answer/busy/time-based) , call park,
paging/intercom, DND (Do Not Disturb) , busy lamp field (BLF) , downloadable
phone book (XML, LDAP) , call waiting, call history, flexible dial plan, custom
Thank you for purchasing Grandstream Wave. To meet the requirements of our customers, Grandstream
Wave emerged on the basis of our existing multimedia VoIP Phones. Grandstream Wave supports
Android 4.0 and higher, and it is compatible with most of Android mobile phones and tablets. By
combining powerful phone functions and integration of Grandstream UCM applications, businesses
throughout the world can use Grandstream Wave for all communication and productivity requirements
with unprecedented high quality experience.
FEATURE HIGHTLIGHTS
Support Android™ 4.0 and higher
Standard SIP-based softphone with exceptional voice quality
Strong security features including SIP over TLS and 128 or 256-bit SRTP
Support 6 SIP accounts, up to 6-way audio conferences
Support CID, voicemail and call encryption
Support synchronize with local Contacts and call history on the phone
Enterprise features including UCM integration, BLF, call transfer/pickup, LDAP
Powerful NAT traversal options including automatic NAT discovery, STUN and UPnP
Automatic call forward based on time and location rules
Support G.711, G.726, G.722, iLBC, Opus, and G.729 (Premium Edition)
Automatic provision including XML provision and QR code scan
Fully customizable skins and themes for optional branding needs
GRANDSTREAM WAVE TECHNICAL SPECIFICATIONS
Table 1: GrandStream Wave Technical Specifications
Page 9

Firmware Version 1.0.1.21
Grandstream Wave User Guide
Page 8 of 64
ringtones, server redundancy & fail-over, B LF
UCM Integration
Supports many functions like QR code scan
Feature
Functions
LDAP, MWI (Message Waiting Indicator) , display instant online status, call history
and messages
QoS
Layer 3 (ToS, DiffServ, MPLS) QoS
Security
Support AES configuration file, TLS encryption, SRTP encryption (128-bit and 256bit) , HTTPS
Multi-language
English, Simplified Chinese, Polish, Germany, Russian, Italian, Arabic, Spanish,
Portuguese, French, etc.
This document is subject to change without notice. The latest electronic version of this user manual is
available for download here: http://www.grandstream.com
Page 10
Firmware Version 1.0.1.21
Grandstream Wave User Guide
Page 9 of 64
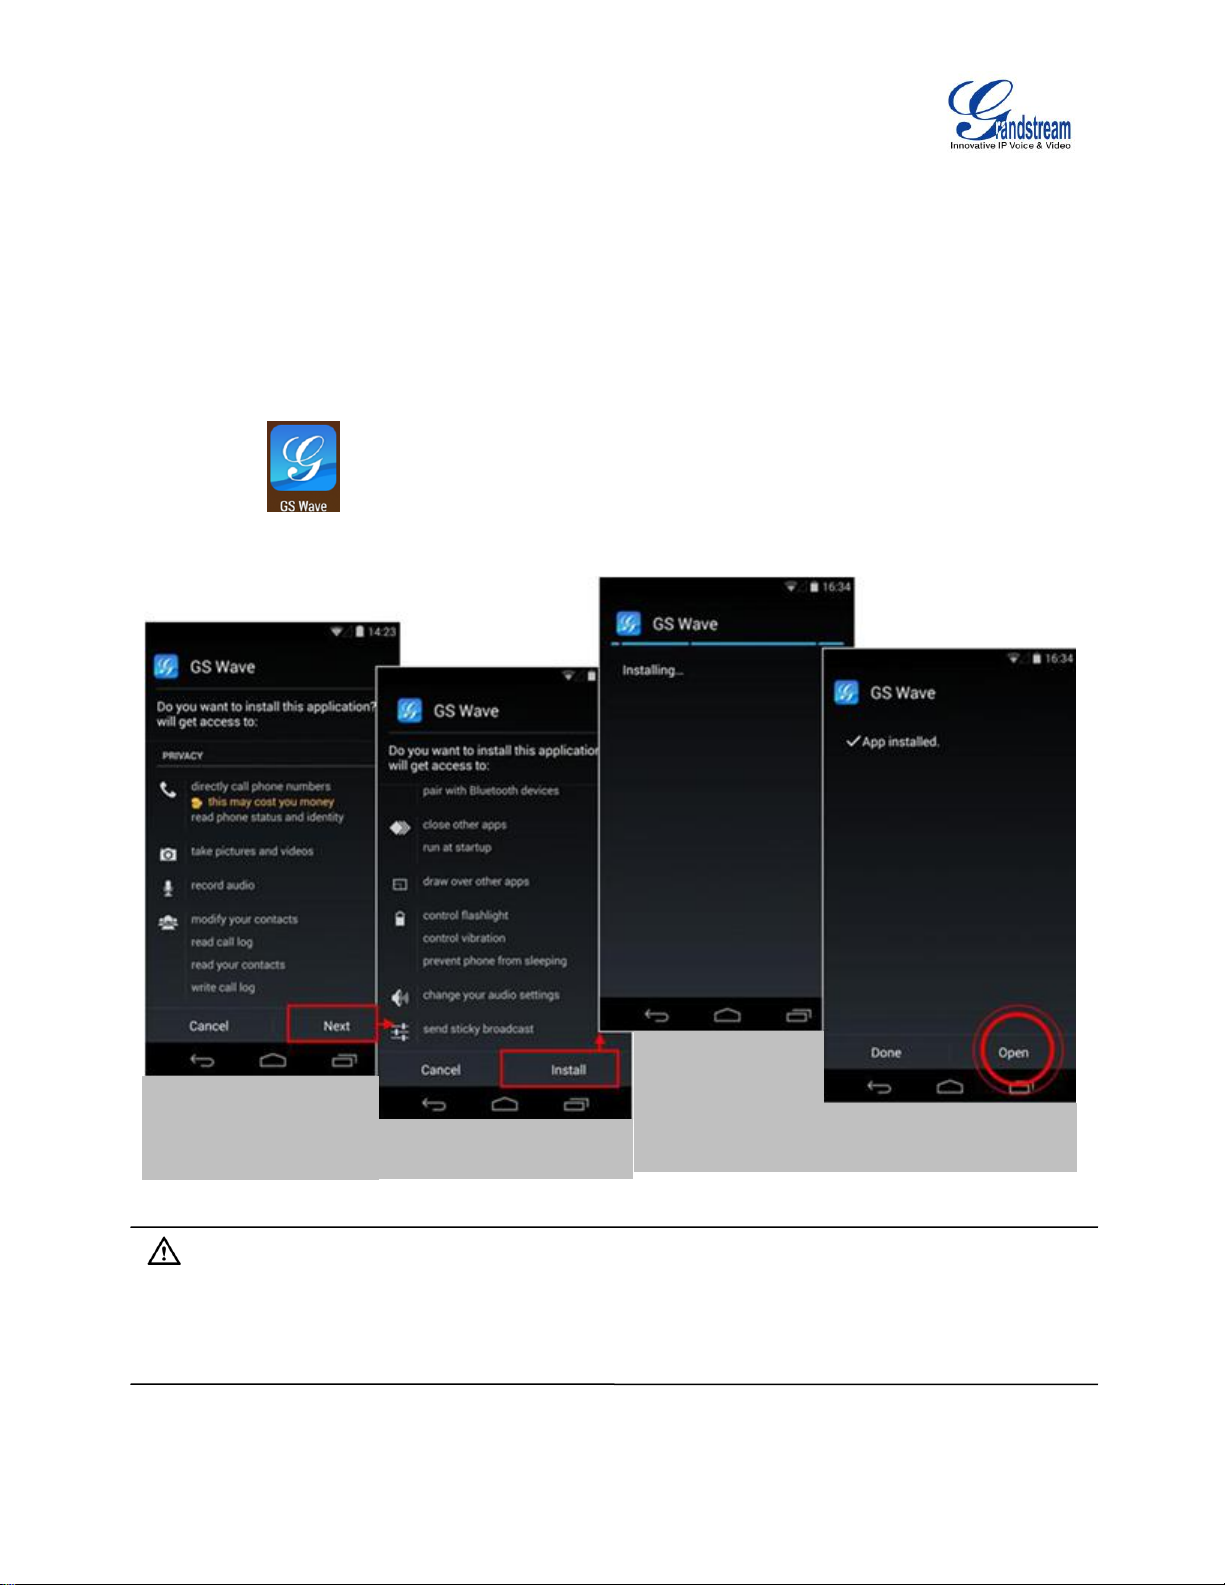
INSTALLATION AND SETUP
1. Click "Next" to check
the privacy policies to
continue.
2. Click "Install" to initiate
the installation.
3. Installing.
4. When installed, click "Done" to exit or click
"Open" to access the app.
GETTING READY
The device must run on Android 4.0 or higher. Grandstream Wave is compatible with most of Android
mobile phones and tablets with Android 4.0 operating system and higher, supports 2G/3G/4G and WiFi.
Users could download Grandstream Wave via QR code scan, or download it from Google Play.
Follow the following prompts in the installation wizard after downloading Grandstream Wave. Users could
see the icon if downloaded and installed Grandstream Wave successfully. Tap on the icon to
open it.
Note:
For first-time users, users have to confirm whether allow Grandstream Wave to read local call
histories and import contacts from the phone. If it allows, users could view local call histories and
contacts on the corresponding Grandstream Wave screen.
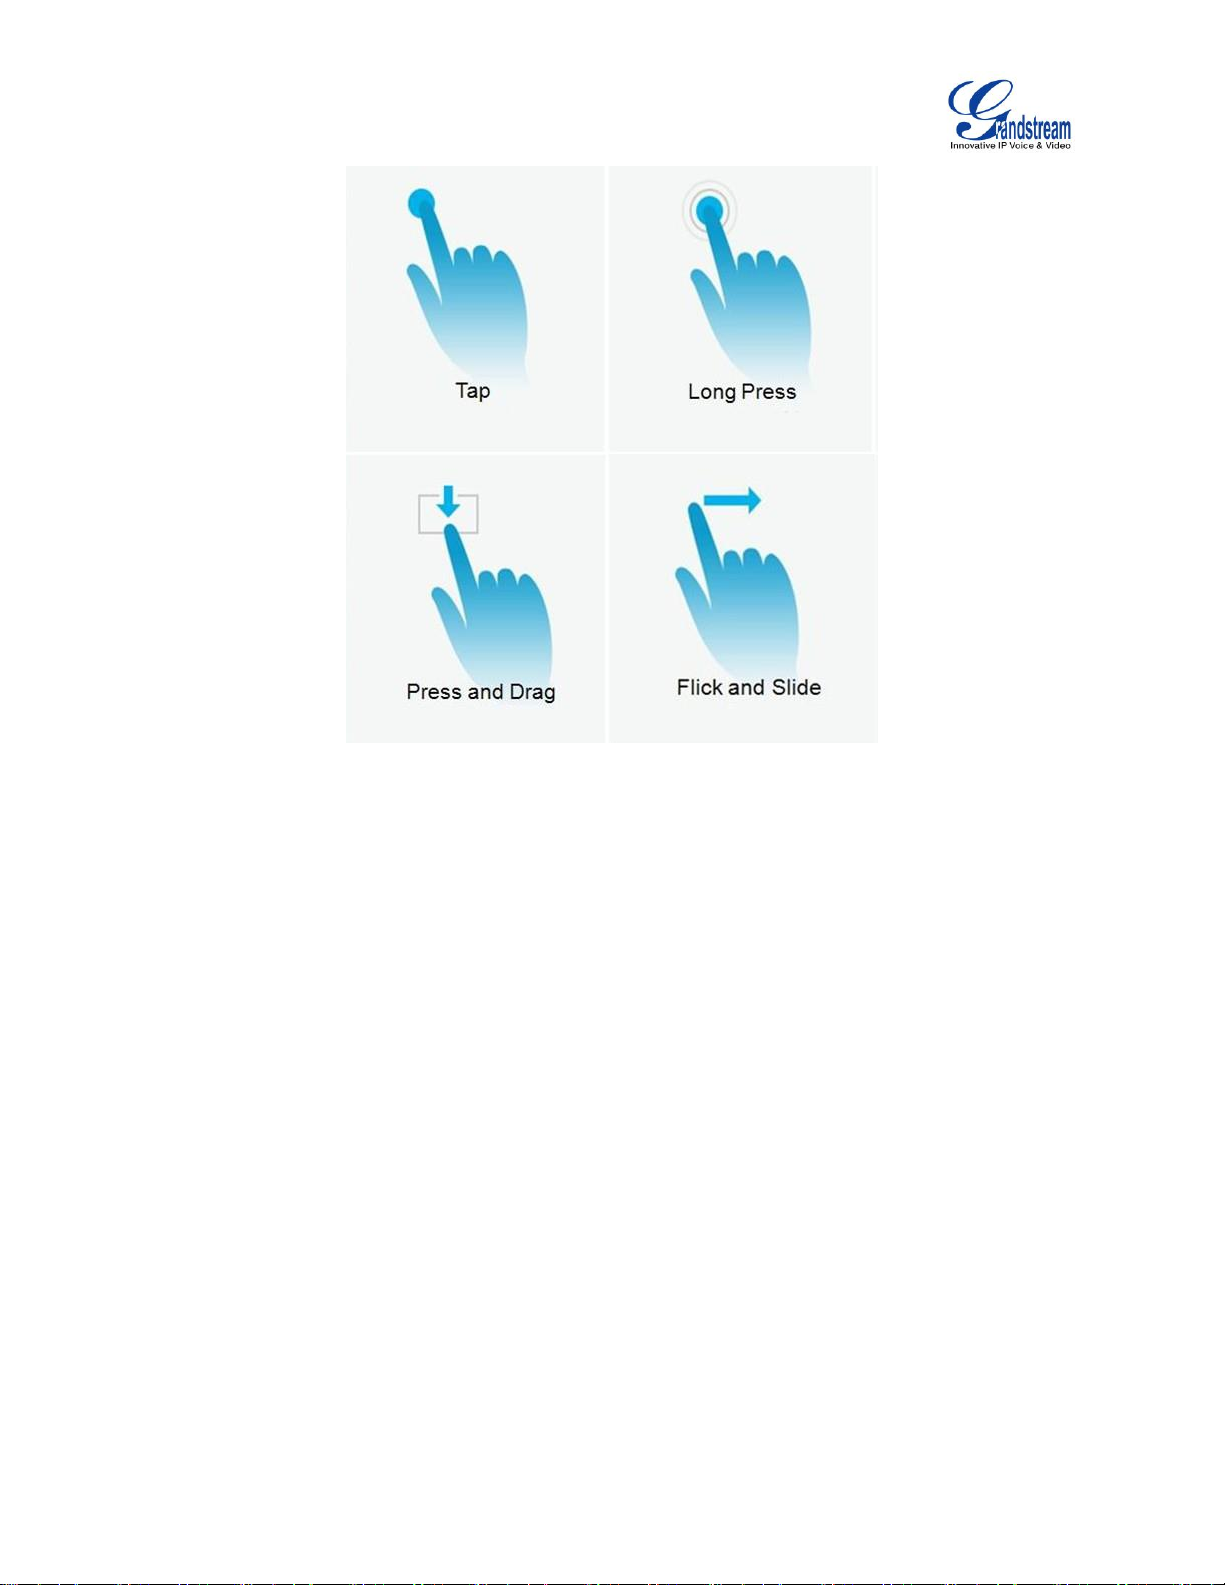
To fully manipulate the Grandstream Wave capacitive touch screen, use fingers to operate following the
introductions below on the Grandstream Wave icons, buttons, menu items, onscreen keyboard, etc.
Figure 1: Grandstream Wave Installation
Page 11
Firmware Version 1.0.1.21
Grandstream Wave User Guide
Page 10 of 64
Figure 2: Grandstream Wave Finger Gestures on the Touchscreen
Tap
Slightly touch the screen with fingertip once to initiate menu, options or applications. For example, to
select items on the screen (e.g., setting options, apps); to press onscreen buttons (e.g., "End" or
"Options" soft key during the call); to type letters and symbols using the onscreen keyboard.
Long Press
Touch the screen with fingertip for about 2 seconds without lifting finger from the screen to bring up
the context menu for more operations.
Press and Drag
Press the item and move it by dragging the finger up, down, left or right, without lifting finger from the
screen.
Flick and Slide
Touch the screen with fingertip and slide over the screen. For example, users could slide up to scroll
up the page, slide down to open dropdown menu, slide left/right to delete an item from the list. If the
finger stays on the screen for too long, the item may be selected and sliding will not occur.
Page 12
Firmware Version 1.0.1.21
Grandstream Wave User Guide
Page 11 of 64
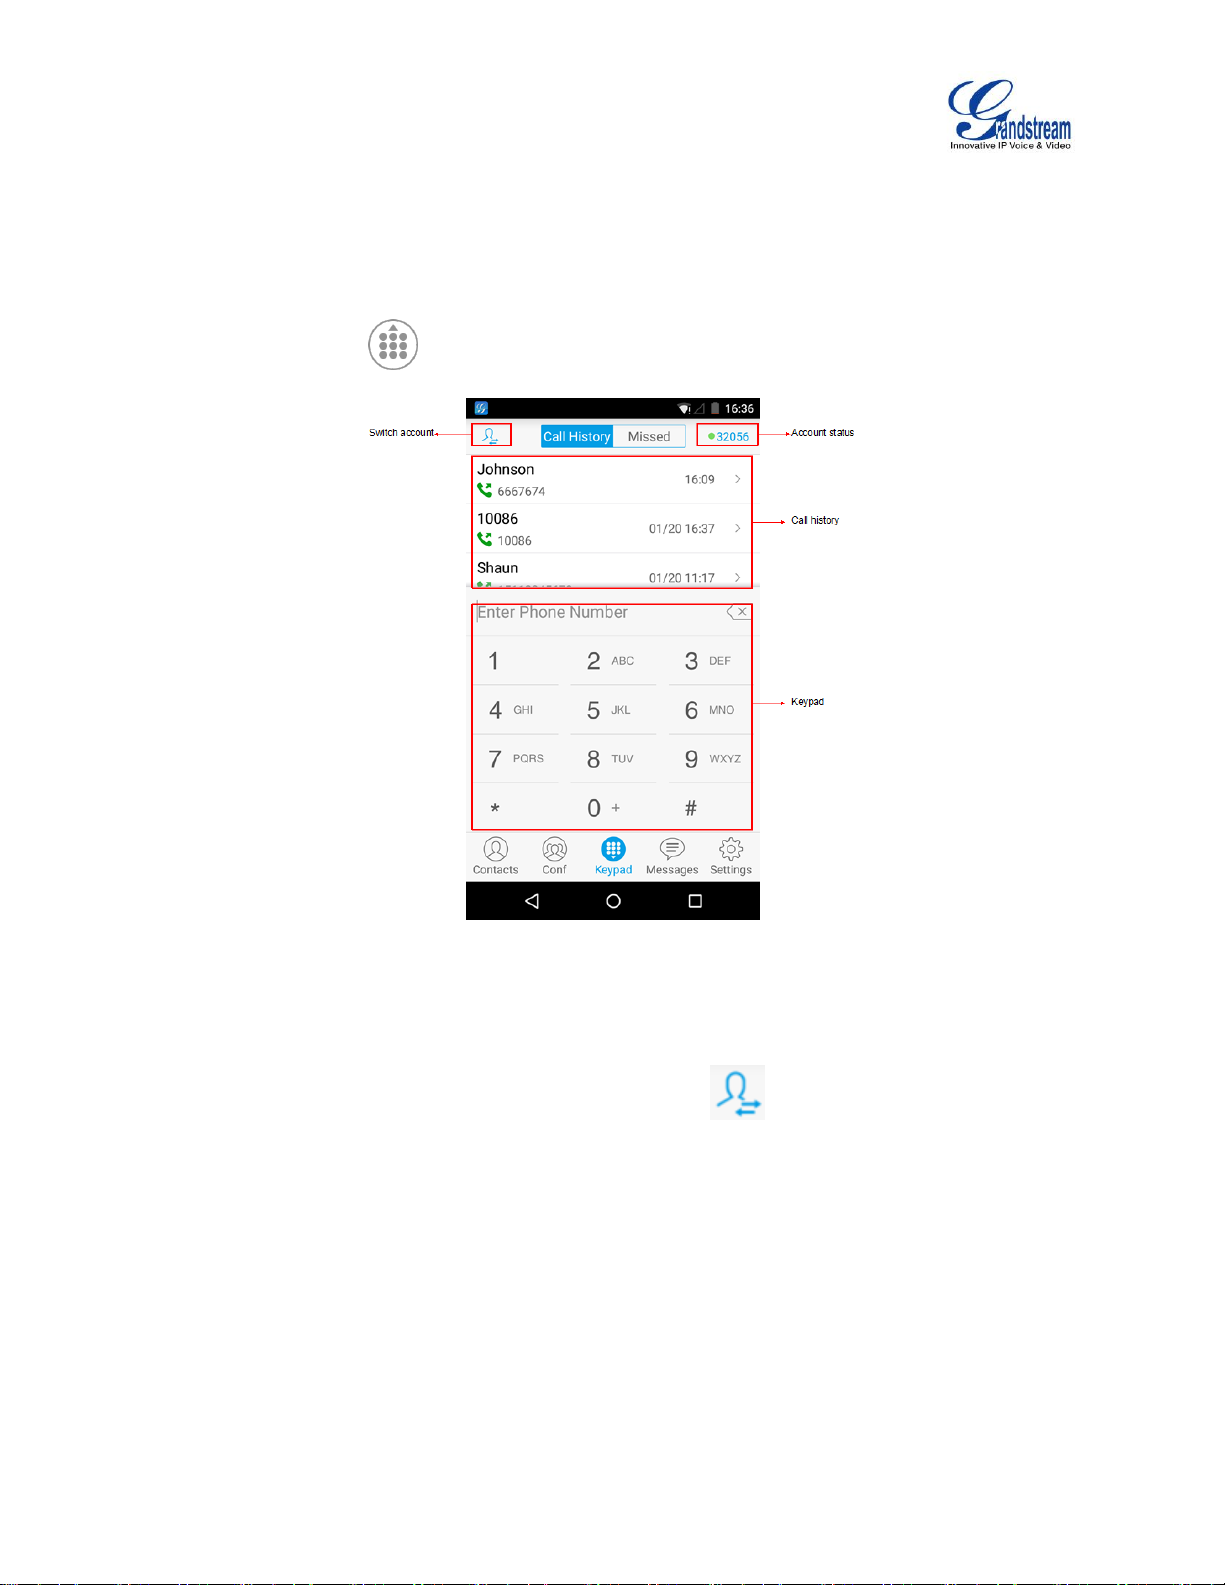
USING GS Wave
DIAL SCREEN
Tap on the keypad button at the bottom of screen to open dial screen, as shown in figure 3.
Figure 3: Keypad Screen
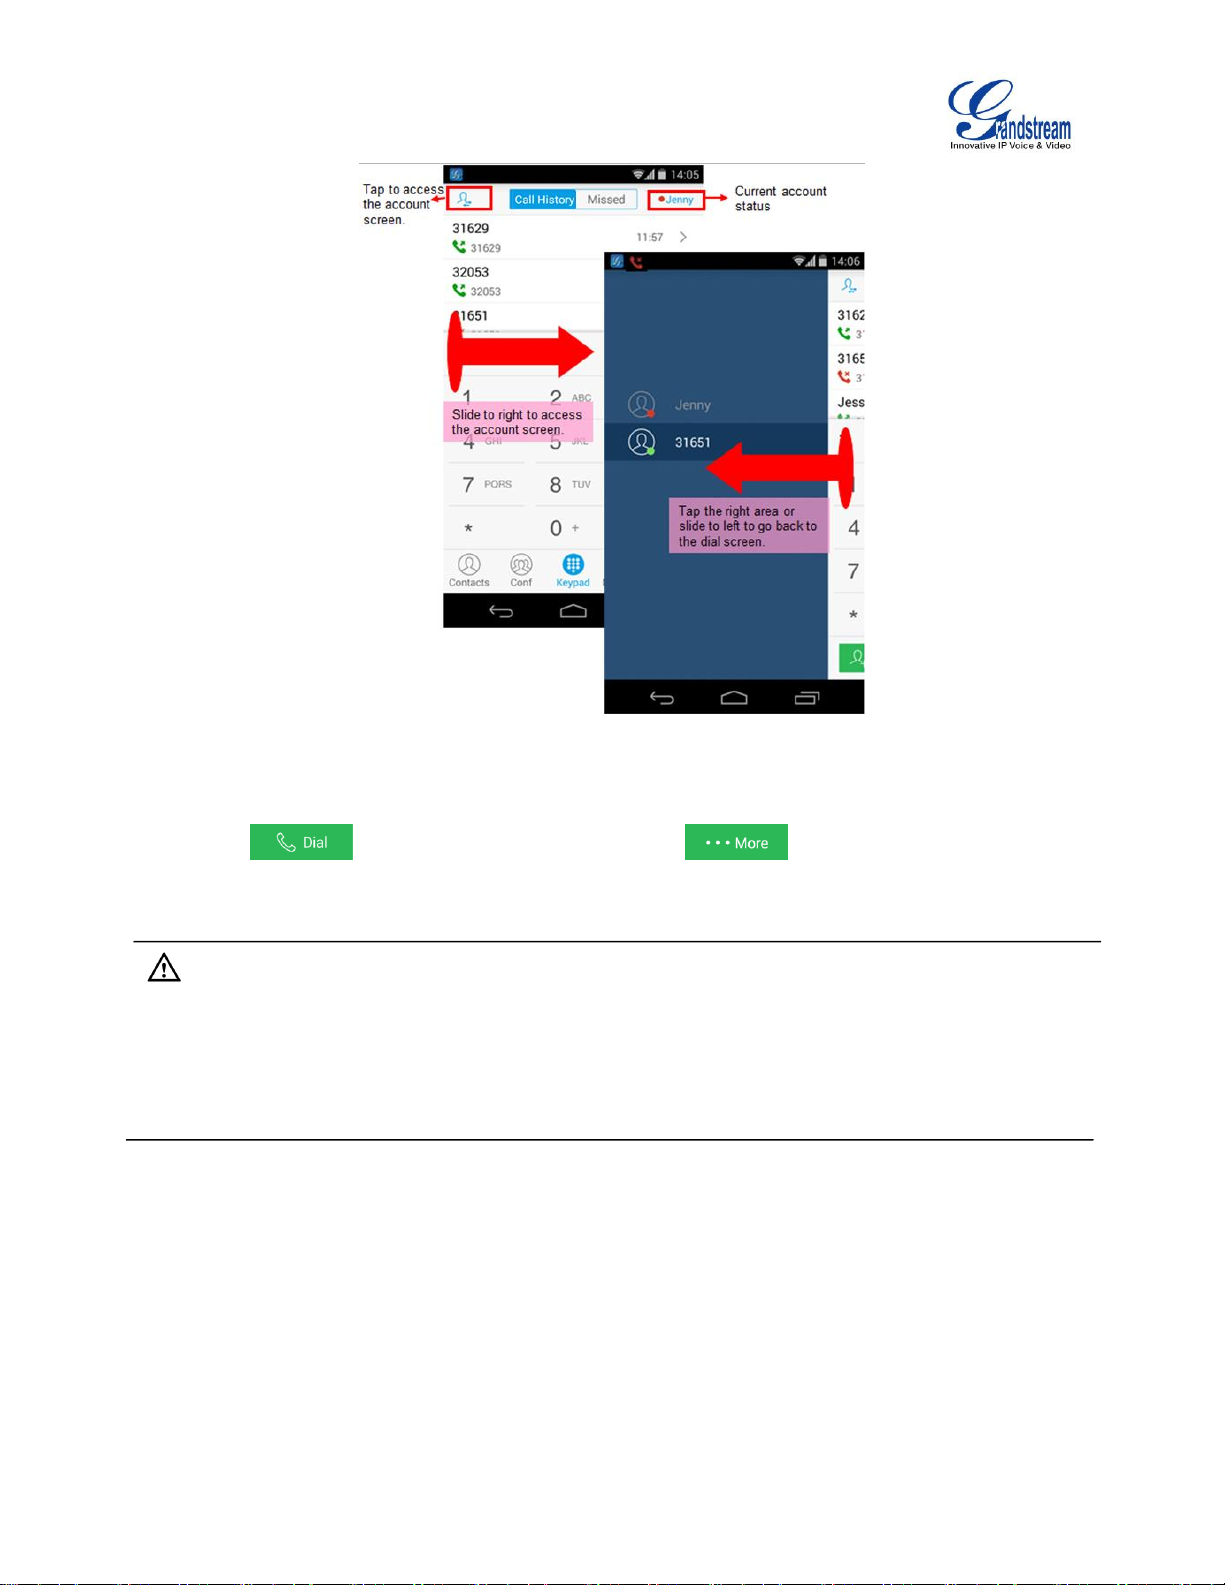
DIALING A NUMBER DIRECTLY
1. Access the dial screen;
2. Put one finger on left screen edge, and slide to right or tap on the upper left corner, select the
account as shown in figure 4;
Page 13
Firmware Version 1.0.1.21
Grandstream Wave User Guide
Page 12 of 64
Figure 4: Select Account
3. Tap the right area to go back to the dial screen;
4. Enter the phone number on the keypad;
5. Tap on to dial out with SIP account; Tap on and select "Dial", "Local Call" or
"Paging" to dial out via local phone number, or select "New Contact" to add the number as a contact
quickly.
Note:
By default, Grandstream Wave allows users to press # key as SEND key. This behavior can be
disabled via set option "Use # as Dial Key" to "No" under Settings->Account Settings.
If inserting an active SIM card into the phone, users could make calls with the SIM card number but
cannot send messages with the local phone number.
REDIAL
Users can dial out the last dialed number if there is dialed call history.
1. Access the dial screen;
2. Press # key to dial out the last dialed number.
Page 14
Firmware Version 1.0.1.21
Grandstream Wave User Guide
Page 13 of 64
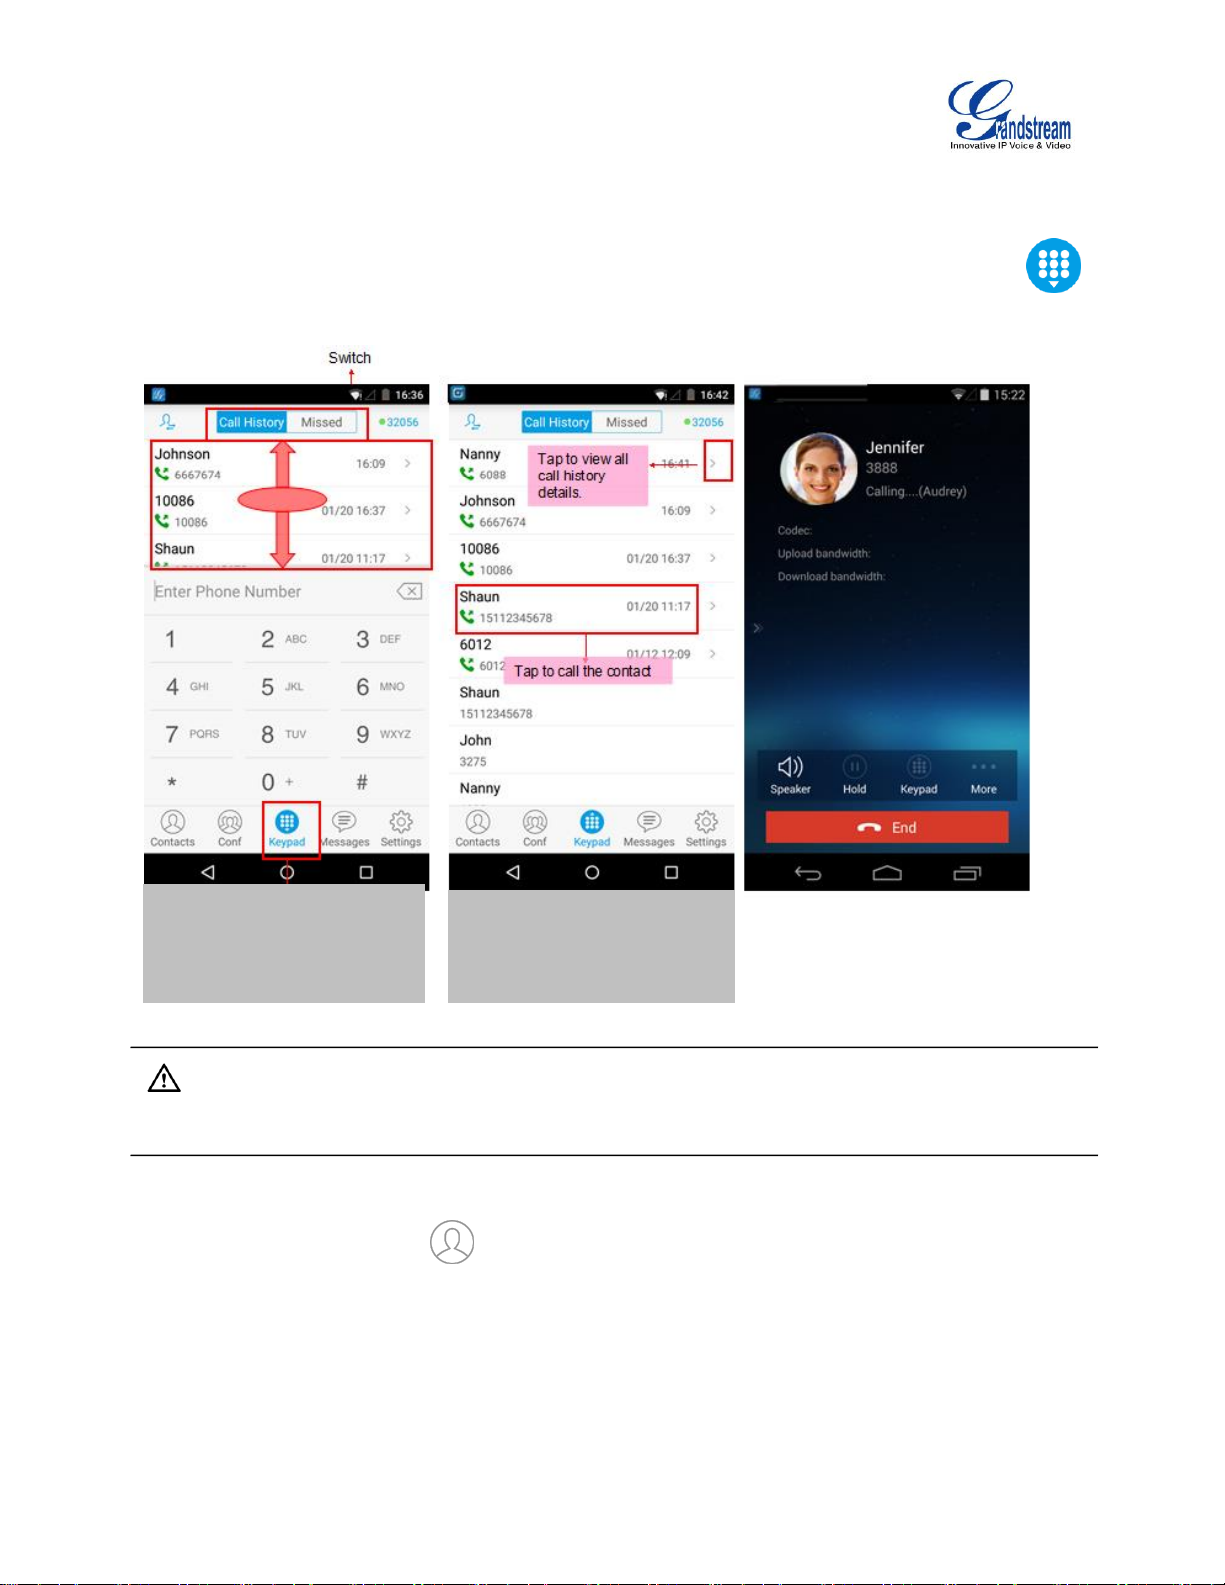
DIALING A NUMBER VIA CALL HISTORY
1. Tap on Keypad or roll
horizontal in the direction of
the arrow to view the call
history.
2. Tap on one call history
entry to dial out. The call
screen is pictured as right.
The Grandstram Wave call history is listed on the upper of the dial screen. It displays all call histories
(local and SIP account) and missed calls. Navigate on the call history entries by tapping on button
on the bottom of the main screen to slide up/down as shown in figure 5.
Note:
Dialing out through call history will use the account which made the last call.
DIALING A NUMBER VIA CONTACTS
Access Contacts by tapping on icon on the bottom of the main screen, the SIP contacts and LDAP
Contacts (please go to Settings page to configure first) are shown up individually. Follow the steps in
figure 6 to dial a number via Contacts.
Figure 5: Dial-up via Call History
Page 15
Firmware Version 1.0.1.21
Grandstream Wave User Guide
Page 14 of 64
1. Tap Contacts
to access the
Contacts screen.
2. Search for the
contacts by inputting
initials.
3. Tap on the contact
below to access the
details screen.
4. Tap on to dial out.
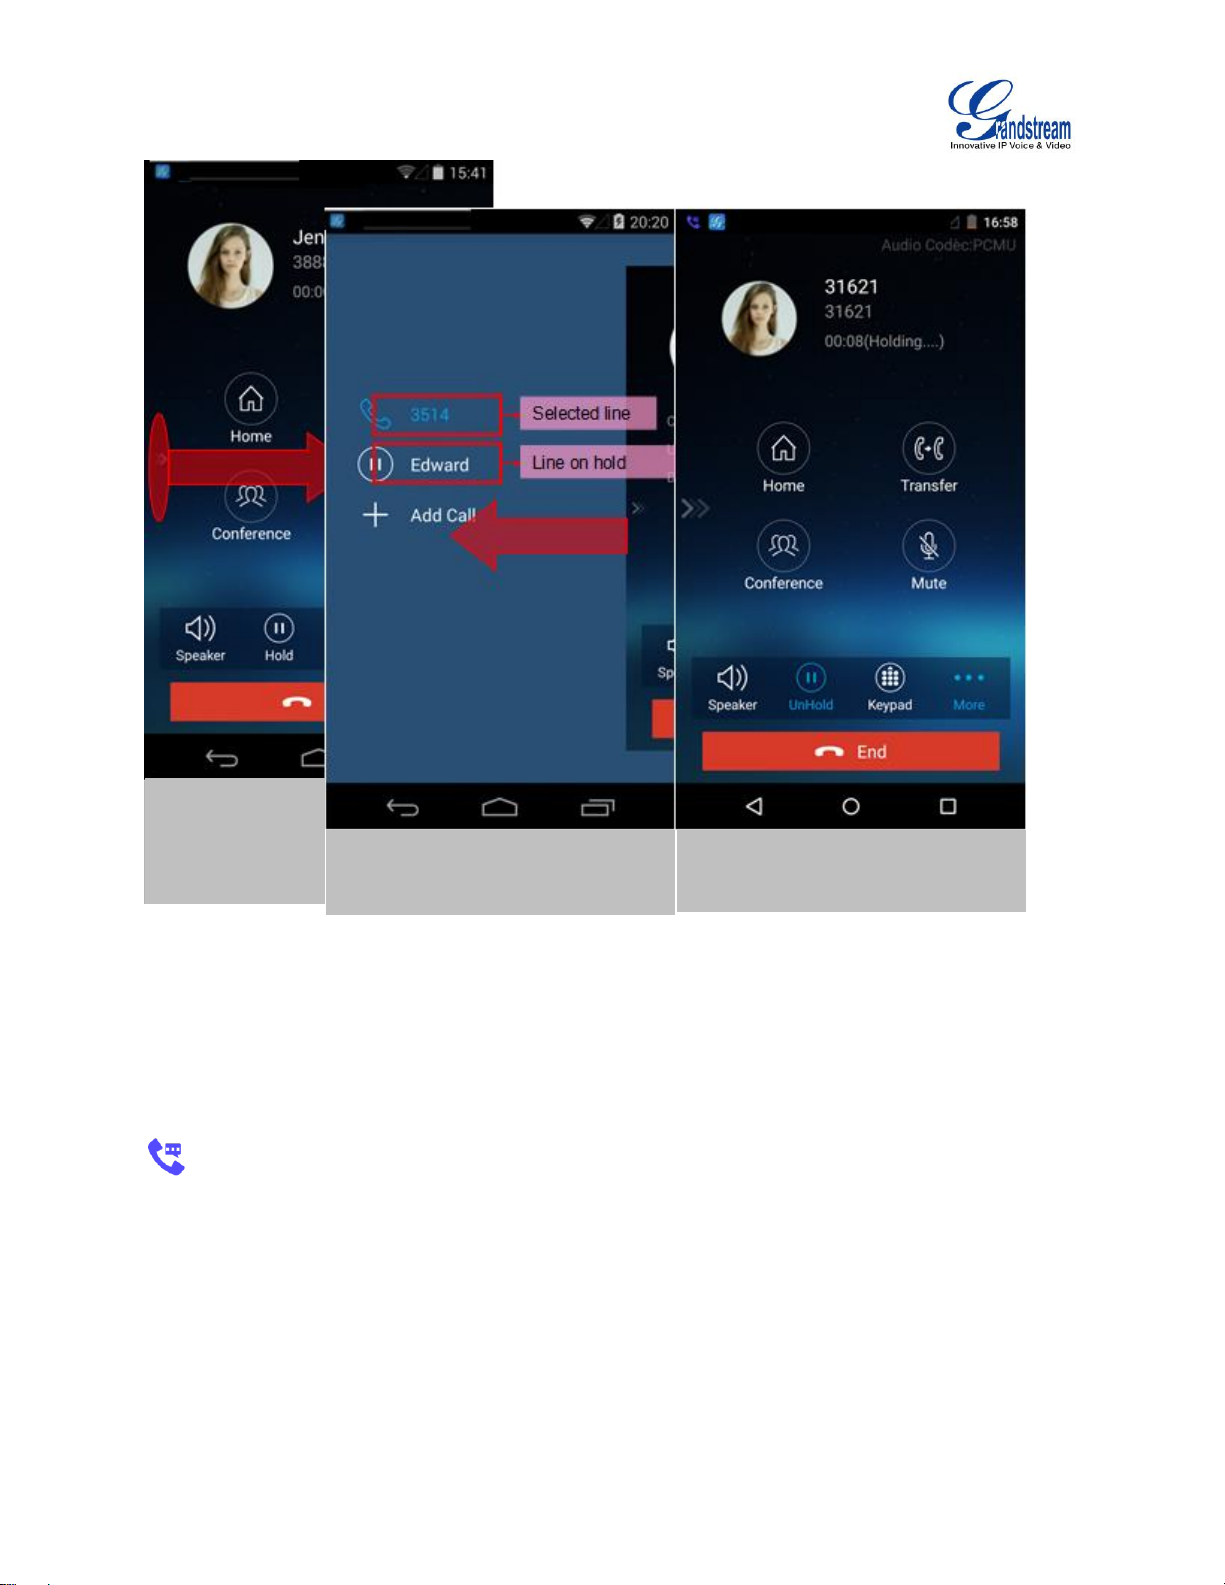
SWITCHING AUDIO CHANNEL DURING CALL
Users could switch lines by sliding the call screen when there are multiple calls, as shown in figure 7
below.
Figure 6: Dial-up via Contacts
Page 16
Firmware Version 1.0.1.21
Grandstream Wave User Guide
Page 15 of 64
1. Slide right to
access call line
screen.
2. Tap on the line to select.
3. Tap on the right area, or slide to
left and go back to the call screen.
4. Tap on "Unhold" to speak to this
line, other lines will be put on hold
automatically.
Figure 7: Switch Call Lines
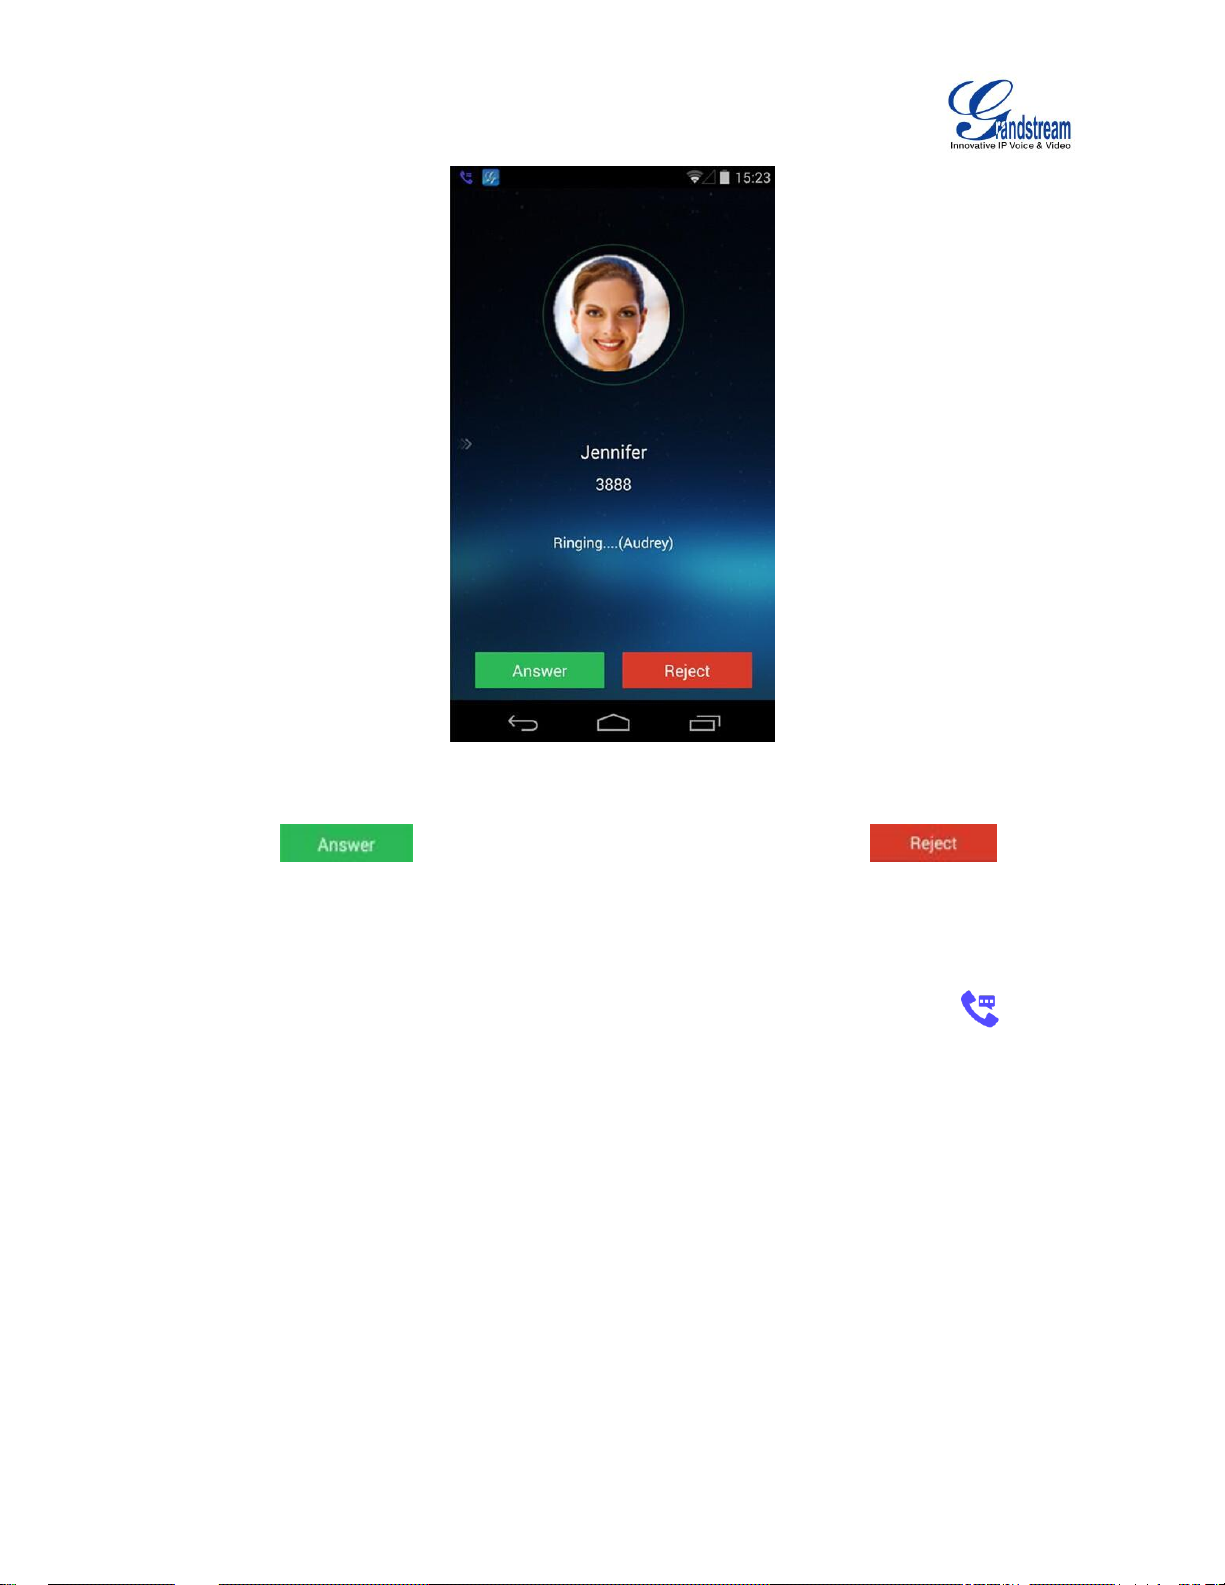
ANSWERING A CALL
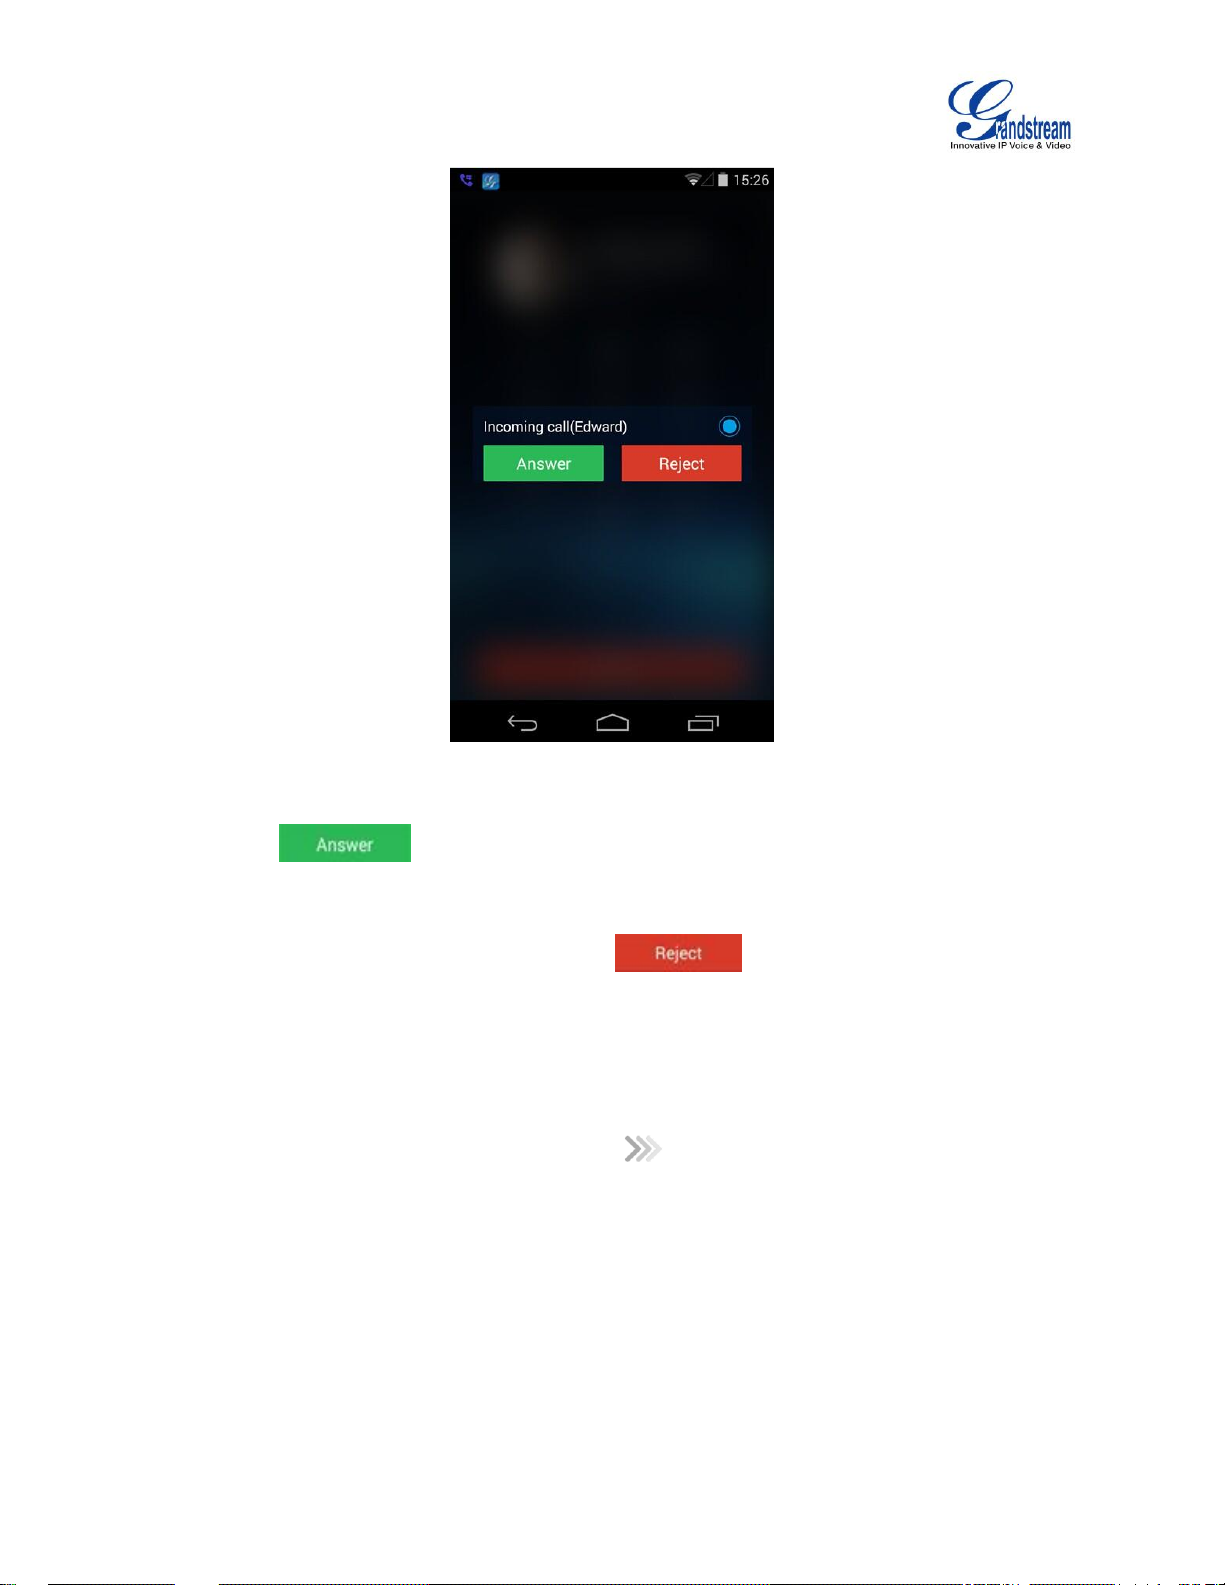
SINGLE INCOMING CALL
When the phone is at idle state, and there is an incoming audio call, the status bar will display the icon
and the phone screen is as shown in figure 8 below.
Page 17
Firmware Version 1.0.1.21
Grandstream Wave User Guide
Page 16 of 64
Figure 8: Single Incoming Call
Tap on button to answer the call via speaker, or tap on button to reject
the call.
MULTIPLE CALLS
When there is another incoming call during an active call, the status bar will display the icon , and at
the same time, users will hear call waiting tone, with the screen displaying the caller’s name or number for
the incoming call. A prompt appears for users to confirm as shown in figure 9.
Page 18
Firmware Version 1.0.1.21
Grandstream Wave User Guide
Page 17 of 64
Figure 9: Multiple Calls
Tap on button to answer the call, once the new call is answered, the current active call
will be placed on hold.
If the new call is rejected by tapping on button , the current active call will not be
interrupted.
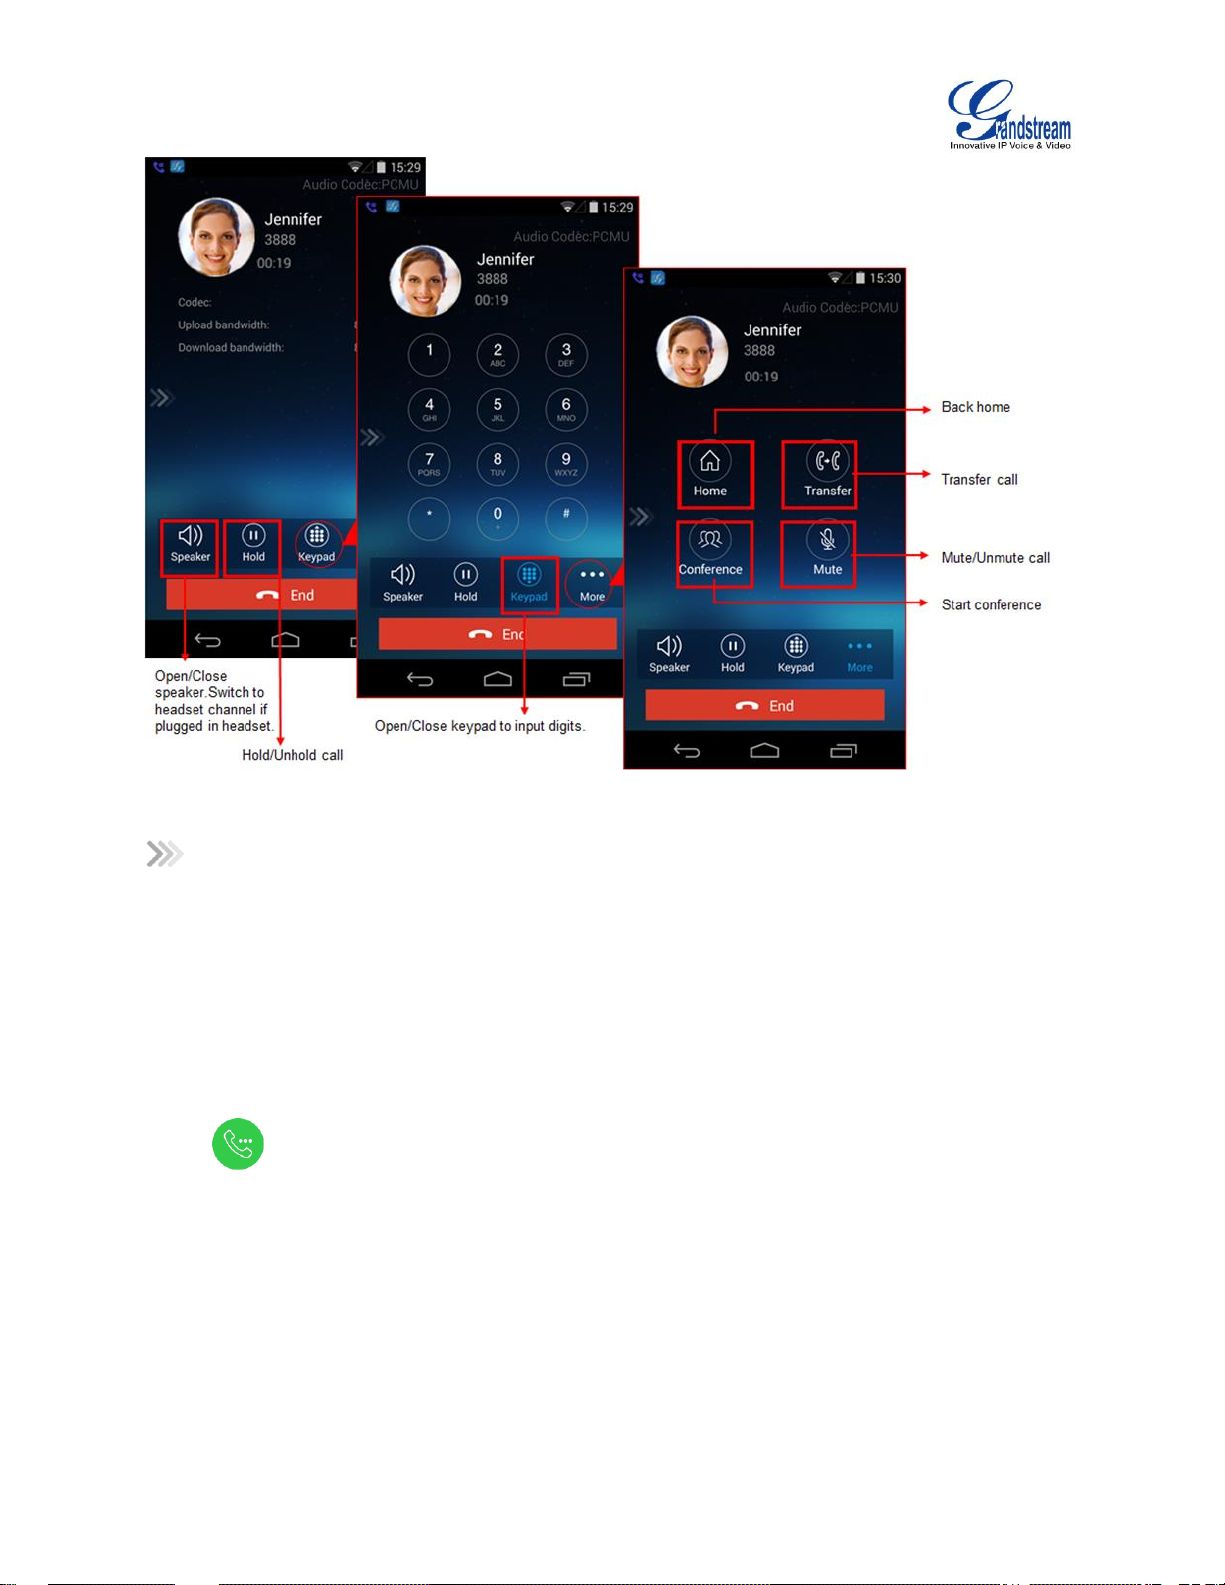
VOICE CALL
During an active call, users could hold/resume call, mute/unmute, input DTMF, add new call, initiate
conference, end a call or switch audio channel. Tap on left screen, and slide right to bring up the
lines list. Users could switch to other lines or add a new call.
Page 19
Firmware Version 1.0.1.21
Grandstream Wave User Guide
Page 18 of 64
Figure 10: Voice Call
: Slide to right to add new call or switch lines.
Speaker: Switch voice channels to speaker or 3.5mm headset if it is plugged in.
Hold/Unhold: During the call, users could press the HOLD button to hold or resume the call at any time.
Keypad: Tap on the icon to bring up digital soft keypad for inputting DTMF.
More: Access more operations including Home, Transfer, Conference and Mute/Unmute.
Home: Back to the home screen (dial screen), the active call interface will be hidden; users could tap on
button at the upper left corner of the screen to go back to the call interface.
Transfer: Switch to the transfer screen. Grandstream Wave supports blind transfer and attended transfer.
Please refer to chapter Call Transfer for more details.
Conference: Bring up conference screen.
Mute: Tap on the icon to mute/unmute the call.
End: Tap on the icon to end the call.
Page 20
Firmware Version 1.0.1.21
Grandstream Wave User Guide
Page 19 of 64
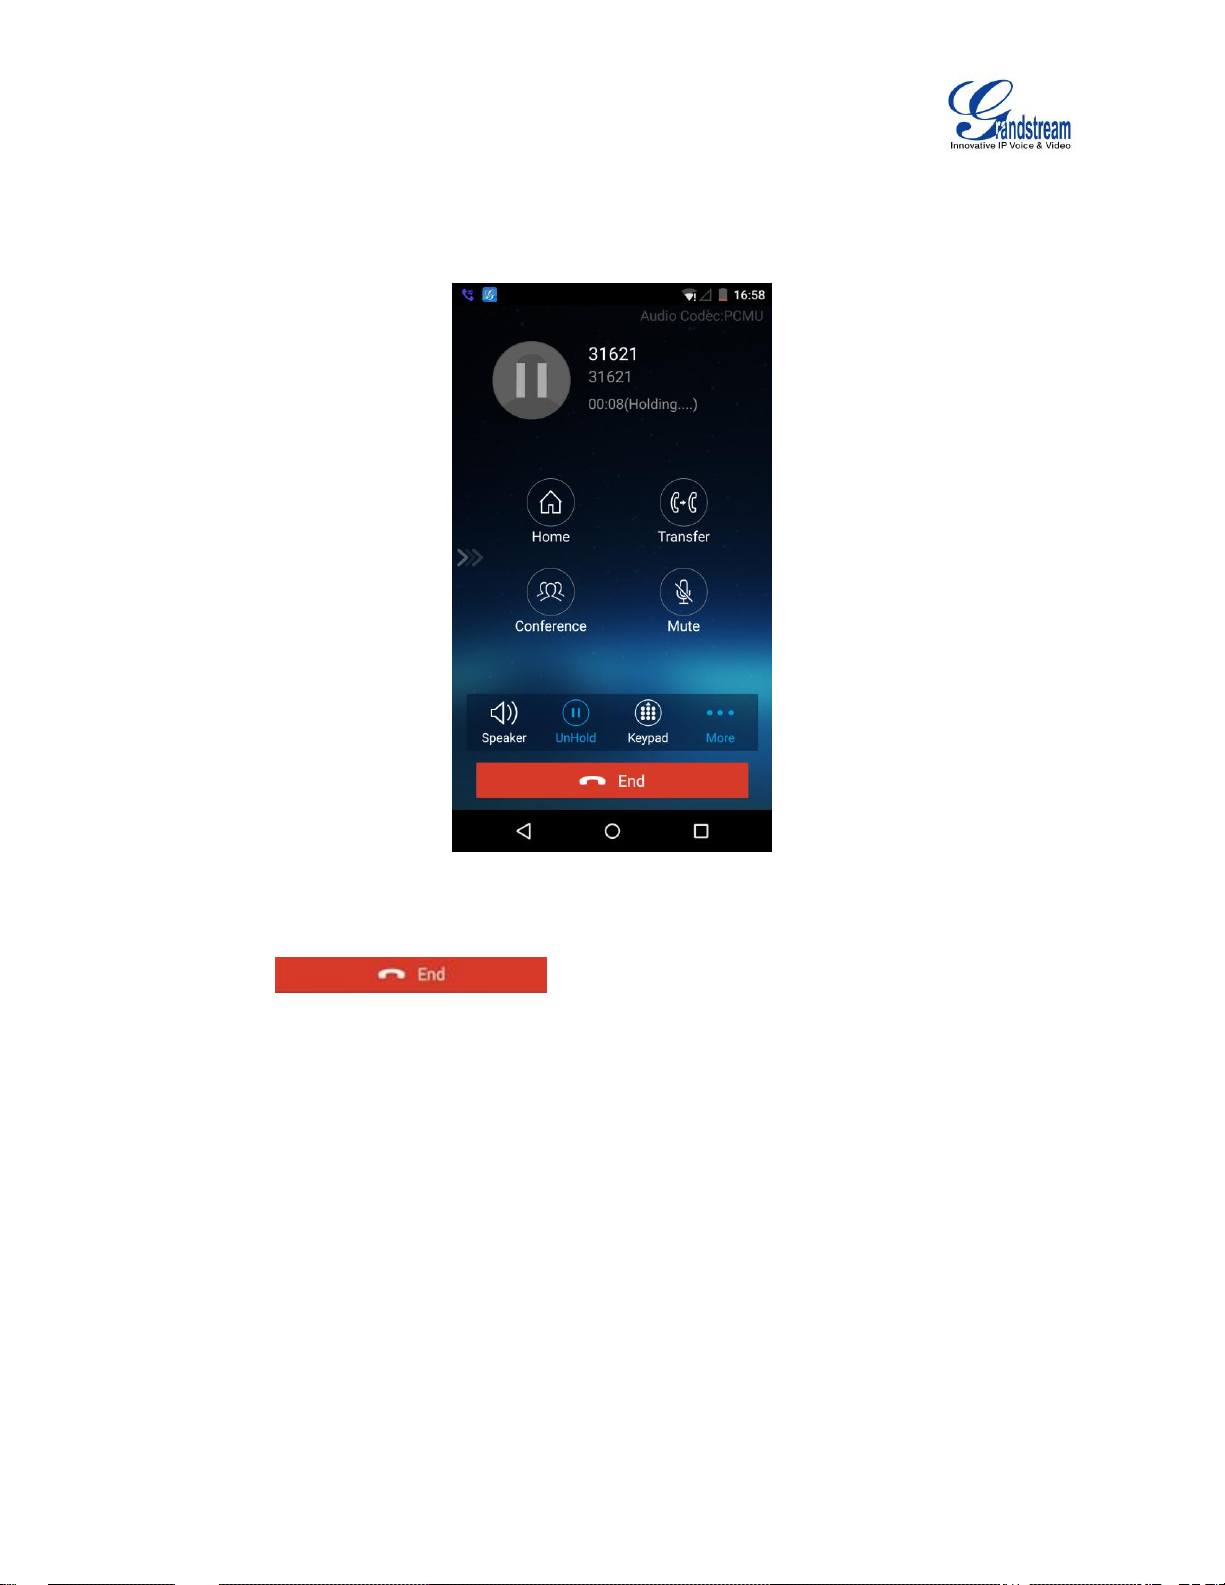
CALL HOLD/RESUME
During the active call, press the HOLD button to put the call on hold. Users could dial up or answer a new
call. The call hold screen is as shown in figure 11 below.
Figure 11: Call Unhold
To resume the call, press the UNHOLD button again to resume the call if the current active call is put on
hold, or press to end the call.
MUTE
During an active call, press the MUTE button to mute the call, press the button again to unmute the call.
The mute screen is as shown in figure 12 below.
Page 21

Firmware Version 1.0.1.21
Grandstream Wave User Guide
Page 20 of 64
Figure 12: Call Mute
SWITCHING AUDIO CHANNEL DURING CALL
Grandstream Wave allows users to switch audio channel among handset (if user plugs in headset, the
handset status will be turned into headset status), speaker or Bluetooth headset when making calls.
Figure 13 shows the call screen when using the Bluetooth, tap on button to switch channels.
Page 22

Firmware Version 1.0.1.21
Grandstream Wave User Guide
Page 21 of 64
Figure 13: Call via Bluetooth
MISSED CALLS
When there is a missed call, the phone will display on the status bar and prompt on Grandstream
Wave call history list, as shown in figure 14.
Page 23

Firmware Version 1.0.1.21
Grandstream Wave User Guide
Page 22 of 64
Figure 14: Missed Call Screen
Page 24

Firmware Version 1.0.1.21
Grandstream Wave User Guide
Page 23 of 64
CALL TRANSFER
1. During the active call, tap on
"More" and select "Transfer" in
the available options to access
the transfer screen.
2. Input the digits and then tap on
"Blind" to transfer the call.
BLIND TRANSFER
When hears the ringback tone, users will automatically go back to the main screen (dial screen) to
complete the transfer after the callee answers the call.
Note:
If entered incorrect digits, tap on button to delete the digits one by one, or long press it to clear
all digits.
Figure 15: Call Transfer—Blind Transfer
Page 25

Firmware Version 1.0.1.21
Grandstream Wave User Guide
Page 24 of 64
ATTENDED TRANSFER AFTER CALLING
1. During an
active call,
slide to right to
access call
line screen.
2. Tap on "Add Call"
to dial the number for
the second call and
make sure the call is
established. This will
place the previous
call on hold.
3. During the new
active call, tap on
"More" and select
"Transfer" in the
available options to
access the transfer
screen as shown in
figure on the right.
4. Tap on the line on hold
to transfer the call.
Grandstream Wave supports attended transfer before or after calling, which provides users a fast and
easy way to complete attended transfer.
Make an active call first and follow the steps below to transfer the call to the third party.
ATTENDED TRANSFER BEFORE CALLING
Besides the transferring mentioned above, users also could consult the third party first before transferring
the call. Make an active call first and follow the steps below to transfer the call.
Figure 16: Attended Transfer after Calling—Transferring
Page 26

Firmware Version 1.0.1.21
Grandstream Wave User Guide
Page 25 of 64
3. If the third party
has not answered
the call, the caller
could tap on
"Cancel" to end
transfer.
1. During an active
call, tap on "More"
and select "Transfer"
in the available
options to access the
transfer screen.
2. Input phone number
and then tap on
"Attended" to access
the transfer screen.
4. If the new call is
established, tap on
"Transfer" to transfer the
call. If tap on "Split", it will
place the previous call on
hold.
6-WAY CONFERENCE
Grandstream Wave supports up to 6-way conferencing. The conference screen is as shown in figure 18
below.
Figure 17: Attended Transfer before Calling—Split
Page 27

Firmware Version 1.0.1.21
Grandstream Wave User Guide
Page 26 of 64
Long press one conference
entry to delete it.
Users could start or delete the conference, or
edit conference participants after accessing
the conference screen.
Figure 18: Grandstream Wave Conference Screen
Page 28

Firmware Version 1.0.1.21
Grandstream Wave User Guide
Page 27 of 64
ADD NEW CONFERENCE
1. Tap on "Conf" to
access the
Conference screen.
2. Tap on "+" at the
upper right corner
to add a new
conference.
3. Users can edit
conference name
or add participant
(s).
4. Check numbers from
the Contacts, then tap
on "Add" to add
participants to
conference, or enter a
new number in input
box.
a
Figure 19: Grandstream Wave Conference—Add New Call to the Conference
Adding a participant to conference via 2 ways:
Enter phone number in the input box. If this is an existing contact in the Grandstream Wave, it will be
shown up. Then, users could add it to the conference.
Add the existing line to the conference directly.
INITIATING CONFERENCE
During an active call, tap on "More" and select "Conference" to access conference room. Users could add
new participants if there exits an active call.
Page 29

Firmware Version 1.0.1.21
Grandstream Wave User Guide
Page 28 of 64
1. Tap on "More" and select
"Conference" to access the
Conference screen.
2. Tap on any on the
screen to add single
participant, or tap on at
the upper right corner to add
multiple participants.
3. Tap on "Add" to add participant
to the conference.
4. Repeat the above steps to add
more participants.
While all participants have been in the conference, users could tap on the buttons below to make the
corresponding operations.
Speaker: Enable the speaker for the conference.
Hold: Hold the conference.
Mute: Mute the conference participant individually.
Delete: Delete the conference participant.
Figure 20: Grandstream Wave Conference—Initiating Conference
Page 30

Firmware Version 1.0.1.21
Grandstream Wave User Guide
Page 29 of 64
When the conference participant is disconnected, or the call with the participant is over, tap on the
top right corner of the participant to redial.
REMOVING PARTICIPANT FROM CONFERENCE
To remove a participant from the conference, users could press DELETE button on phone screen, then
tap on icon at the upper right corner of the participant, and then it will be removed.
Figure 21: Grandstream Wave Conference—Delete Conference participant
MUTE/UNMUTE CONFERENCE
During an active conference, users could press MUTE button on phone screen, and then tap on
at the upper right corner of the participant to mute the participant. The muted participant will not be heard
by other participants, but can hear other participants, while it still exists on the conference screen, as
shown in figure 22.
Page 31

Firmware Version 1.0.1.21
Grandstream Wave User Guide
Page 30 of 64
Figure 22: Grandstream Wave Conference—Mute Conference Participant
HOLD/RESUME CONFERENCE
During the conference, users could press the HOLD button on phone screen to hold the conference with
all participants at any time. If the remote participant presses the HOLD button, it will only hold his/her own
call from the conference, as shown in figure 23.
Page 32

Firmware Version 1.0.1.21
Grandstream Wave User Guide
Page 31 of 64
Figure 23: Grandstream Wave Conference—Hold Conference
To end the conference, users could tap on phone screen to disconnect all
the participants from the conference. If the remote participant hangs up the call, it will be disconnected
from the conference, but other participants in the conference will stay in the conference.
VOICEMAIL
When there is a new voicemail, the voicemail icon will show up on the status bar, and at the same
time users could see a new message prompt on the Grandstream Wave messages list.
To configure voicemail UserID, go to Settings->Account Settings->Edit Account to fill in the details, as
shown in figure 24.
Page 33

Firmware Version 1.0.1.21
Grandstream Wave User Guide
Page 32 of 64
To retrieve the voicemail:
Figure 24: Configure Voicemail UserID
Page 34

Firmware Version 1.0.1.21
Grandstream Wave User Guide
Page 33 of 64
1. Tap on "Messages" to
access Messages screen.
2. Tap on "Voicemail" to
access the voicemail
screen.
3. Tap on "Listen" to dial out.
4. Listen to the voicemail by
following the voice prompt.
Figure 25: Retrieve Voicemail
Note:
It requires a password to listen to the voicemail, please contact the service provider to obtain the
password.
CONTACTS
Users can manage their phone contacts and SIP contacts in Grandstream Wave Contacts. To access
Grandstream Wave Contacts, tap on button at the bottom of the main screen, as shown in figure
26.
Page 35

Firmware Version 1.0.1.21
Grandstream Wave User Guide
Page 34 of 64
Figure 26: GS Wave Contacts Screen
Page 36

Firmware Version 1.0.1.21
Grandstream Wave User Guide
Page 35 of 64
ADD CONTACTS
1. Tap on "+" at the upper right corner to
add a new contact.
2. Input contact information and tap on
the check mark on the upper right corner
to save the contact.
SEARCH CONTACTS
Tap on the search box on the Contacts screen to access the search screen, as shown in figure 28.
Figure 27: Grandstream Wave Add New Contact
Page 37

Firmware Version 1.0.1.21
Grandstream Wave User Guide
Page 36 of 64
Figure 28: Grandstream Wave Search Contact
Enter contact name or number to search, the contact will be updated and displayed automatically when
entering the initial digits. Tap on the number to view details.
VIEW CONTACT
Tap on one contact to view details or edit, as shown in figure 29.
Page 38

Firmware Version 1.0.1.21
Grandstream Wave User Guide
Page 37 of 64
Figure 29: Grandstream Wave View Contact
Dial out the number.
Access the Messages editing screen. This function is not applicable to the local phone Contacts.
EDIT CONTACT
Long press the contact on the contact list to bring up the dialog box, tap on Edit to access the editing
screen; Or long press the contact to access the details screen, tap on button at the upper right
corner, then select Edit.
DELETE CONTACT
Long press the contact on the contact list to bring up the dialog box, select Delete to access the editing
screen; or long press the contact to access the detail interface, tap on button at the upper right
corner, then select Delete, as shown in figure 30.
Page 39

Firmware Version 1.0.1.21
Grandstream Wave User Guide
Page 38 of 64
Figure 30: Grandstream Wave Edit Contact
ADD CONTACT TO FAVORITES
To add a contact to favorites, as shown in figure 31.
Page 40

Firmware Version 1.0.1.21
Grandstream Wave User Guide
Page 39 of 64
1. Select one contact in the
Contacts to access details
screen,
2. Tap on the menu button at
the upper right corner.
3. Tap "Add to Favorites" to
add contact. Users could also
tap "Delete Contact" to delete
the contact from Favorites.
Figure 31: Add Contact to Favorites
Besides the operation mentioned above, users could also select one contact in the Contacts and long
press it to bring up the dialog box, select "Add to Favorites" to add contact to Favorites.
Via the similar way, users could delete contacts from Favorites by selecting "Remove from Favorites".
CALL HISTORY
To view recent call history or view classified call history on Grandstream Wave, tap on the dial
screen or slide down the call history, as shown in figure 32.
Page 41

Firmware Version 1.0.1.21
Grandstream Wave User Guide
Page 40 of 64
Figure 32: Grandstream Wave Call History
Answered calls
Dialed calls
Missed calls
Tap on one call history entry to dial out with the last dial-out account. To access the details for this entry,
tap on the right side of the entry, as shown in figure 33.
Page 42

Firmware Version 1.0.1.21
Grandstream Wave User Guide
Page 41 of 64
Figure 33: Grandstream Wave Call History Details Screen
Users could view recent call history of this entry, make calls or send messages to it (not applicable to SIM
card number or anonymous call). Tap on button at the upper right corner to make operations like
Edit Contact, Add to Favorites, or Delete All Call History.
If the call is not an existing contact, save it to Contacts before making the operations.
Page 43

Firmware Version 1.0.1.21
Grandstream Wave User Guide
Page 42 of 64
Figure 34: Grandstream Wave Call History Details Screen- Edit Contact
MESSAGES
Messages function allows users to send/receive messages. Tap on button to access the Messages
screen, as shown in figure 35.
Page 44

Firmware Version 1.0.1.21
Grandstream Wave User Guide
Page 43 of 64
Figure 35: Grandstream Wave Messages Screen
Note:
Messages function is not available in all countries and regions. Please contact your service provider
for more details.
VIEW MESSAGE
The Message screen displays sent & received (draft) messages, the messages are classified by contacts
names or numbers while sorted by sent & received time. Tap on one message to check the details, as
shown in figure 36.
Page 45

Firmware Version 1.0.1.21
Grandstream Wave User Guide
Page 44 of 64
Figure 36: Grandstream Wave Message Details Screen
Page 46

Firmware Version 1.0.1.21
Grandstream Wave User Guide
Page 45 of 64
CREATE NEW MESSAGE
1. Access
Messages
screen and
slide to right,
select the
account to
send message.
3. Add recipient in the
textbox and input contents.
2. Slide to left to go
back to the
Messages screen,
tap on "+" to start
composing a new
message.
4. Message sent
successfully.
Tap on the right of the input box to add one contact or more from Grandstream Wave Contacts or
input the contact phone number or name in the input box to find the corresponding contact.
If the sent or received message is phone number or Email address, you can tap on the number to dial out
directly or tap on the Email address to send an email.
EDIT MESSAGE
Long press one message on the Messages screen, select "Batch Remove" in the pop up dialog box, and
tap on the upper right corner to delete all messages with this number.
Long press one message content to access the editing screen, users could edit, copy or forward one
single message as shown in figure 38.
Figure 37: Grandstream Wave Create New Message
Page 47

Firmware Version 1.0.1.21
Grandstream Wave User Guide
Page 46 of 64
Copy the selected message.
Forward the selected message.
Delete the selected message.
Figure 38: Grandstream Wave Message Screen—Edit Message
Page 48

Firmware Version 1.0.1.21
Grandstream Wave User Guide
Page 47 of 64
SETTINGS
For the first time using Grandstream Wave, go to the Settings screen to complete the basic settings,
including Account Settings, Call Settings, Audio Codec Settings, Network Settings, etc.
ACCOUNT SETTINGS
Grandstream Wave supports up to 6 independent SIP accounts and 6 lines. Users can make calls after
registering the account to the SIP server. Tap on button at the upper right corner of the Account
Settings screen to add accounts. Users could add account via Generic Accounts or VOIP Providers.
To add generic accounts, tapping on "UCM Account (QR Code Scan)" or "UCM Account (Select QR
Code Image) ", or tap on "SIP Account" to add account, as shown in figure 39.
The way to add VOIP Providers accounts is the same as add generic accounts, just select the providers
in the list below and input required information.
UCM ACCOUNT (QR CODE SCAN)
To add account by QR code scan, please follow the steps below as shown in figure 40.
1. Tap on "UCM Account (QR Code Scan) " to access the scan screen;
2. Scan the QR code containing configuration info sent from the UCM server to the mailbox;
Figure 39: Add New Account Screen
Page 49

Firmware Version 1.0.1.21
Grandstream Wave User Guide
Page 48 of 64
3. Choose whether to overwrite account or add new account, and then the account will be added to the
list.
Figure 40: QR Code Scan Screen
Note:
Users could add up to 6 accounts, if already reached the limit, you can select overwrite account only.
UCM ACCOUNT (SELECT QR CODE IMAGE)
1. Tap on "UCM Account (Select QR Code Image)" to access the images screen;
2. Select the QR code image containing configuration info;
3. Choose whether to overwrite account or add account and then the account will be added to the list.
Page 50

Firmware Version 1.0.1.21
Grandstream Wave User Guide
Page 49 of 64
Figure 41: Scan QR Code Image Screen
Note:
Users could add up to 6 accounts, if already reached the limit, you can select overwrite account only.
SIP ACCOUNT
Follow the steps below to add account manually.
1. Tap on "SIP Account" to access the Account Settings screen, tap on the button on the right of
"Active Account" to active the account;
2. Fill in account details and the SIP server address (provided by the service provider);
3. Tap on the upper right corner to save the configuration and go back to the account settings
screen;
4. The following figure 42 shows the accounts are successfully registered, and the account icon is in
green . If the account icon is in red , it means the registration failed.
Page 51

Firmware Version 1.0.1.21
Grandstream Wave User Guide
Page 50 of 64
Figure 42: Account Settings Screen—Registration Success
Users could also slide left to delete this account as shown in figure 43.
Table 2: Edit Account Parameters
Figure 43: Slide to Delete Account
Page 52

Firmware Version 1.0.1.21
Grandstream Wave User Guide
Page 51 of 64
Activate
Account
It is used to define whether to activate account.
Account Name
The name associated with each account to be
displayed on the LCD.
SIP Server
Domain name or IP address, provided by your VoIP
service provider (ITSP).
SIP User ID
User account information, provided by your VoIP
service provider (ITSP). It's usually in the form of
digits similar to phone number or the same as the
phone number.
SIP
Authentication
ID
SIP service subscriber's Authenticate ID used for
authentication. It can be identical to or different from
the SIP User ID.
Password
The account password required for Grandstream
Wave to authenticate with the ITSP (SIP) server
before the account can be registered.
VoiceMail
UserID
To retrieve voicemail by pressing the LISTEN button
on the message screen. This ID is usually the VM
portal access number. For example, the UCM server
voicemail access number is *97.
Display Name
The SIP user uses to display on LCD when calling, it
needs SIP server to support it if this function is
enabled.
Activate
Account
It is used to configure whether to activate account.
Set as Default
It is used to set this account as default.
Edit Account
It is used to configure the account parameters.
Delete
Account
It is used to delete the current account.
After configuring the account, users could tap on the existing account for more settings, such as General
Settings, SIP Settings, Network Settings and Codec Settings.
Table 3: Account Settings—General Settings Parameters
Table 4: Account Settings—Call Settings Parameters
Page 53

Firmware Version 1.0.1.21
Grandstream Wave User Guide
Page 52 of 64
Ringtone
Users can choose different ringtones.
DialPlan
It is used to configure whether to enable Dialplan.
DialPlan
Prefix
It is used to configure the prefix to be added to each
dialed number. All numbers use this account will
automatically add the prefix. For example, if the
prefix is 5, the phone number is 337, thus the dialing
number is 5337.
Use # as Dial
Key
It is used to configure the "#" key as the "Send" key.
If set to "Yes", pressing the "#" key to dial the
numbers out immediately. If set to "No", the "#" key
will be included in the dialing string.
Call Forward
It is used to define whether to enable Call Forward
mode.
Call Forward
Settings
It is used to specify the Call Forward Type from 4
modes: Unconditional, Time Based, Others (Forward
When busy and No Answer Forward).
Auto Answer
It is used to configure auto answer mode. If set to
"Yes", the phone will automatically turn on the
speaker phone to answer incoming calls after a short
reminding beep. If set to "Enable Intercom/Paging", it
will answer the call based on the SIP info header
sent from the server/proxy. The default setting is
"No".
DialPlan
Settings
A dial plan establishes the expected number and pattern of digits for a telephone number.
This parameter configures the allowed dial-plan for the phone.
Dial Plan Rules:
1. Accepted Digits: 1,2,3,4,5,6,7,8,9,0 , *, #;
2. Grammar:
a) "x" – any digit from 0-9;
b) "xx" – any 2 digit numbers from 0-9;
c) "xx+" or "xx." – at least 2 digit numbers from 0-9;
d) "^"–exclude
e) [3-5]–digit 3, 4, or 5
f) [147]–digit 1, 4, or 7
g) <2=011>–replace digit 2 with 011 when dialing
h) {x+}–allows to dial out all digits
Example 1:
{[369]11 | 1617xxxxxxx}
Allow 311, 611, and 911 or any 10 digit numbers with leading digits 1617;
Example 2: {^1900x+ | <=1617>xxxxxxx}
Block any number of leading digits 1900 or add prefix 1617 for any dialed 7 digit numbers;
Table 5: Account Settings—SIP Settings Parameters
Page 54

Firmware Version 1.0.1.21
Grandstream Wave User Guide
Page 53 of 64
Enable
Session
Expiration
If enabled, it is used to configure the relevant
parameter in "Session Expiration Settings" option
below. The default setting is "No".
Session
Expiration
Settings
It is used to configure the relevant session expiration
parameters. See table 6.
SIP Port
It is used to define the local SIP port used to listen
and transmit.
Transmission
Protocol
It is used to configure the transmission protocol to
transmit SIP info. Users could choose TCP/UDP/
TLS. The default is "UDP".
Unregister
Before New
Registration
If set to "Register All", the SIP contact header will use
"*" to clear all SIP user's registration information. If
set to "Register Single", the phone only needs to
clear the current SIP user's info. The default is
"Unregister Single", that means do not cancel the SIP
user's registration information.
Register
Expiration
(m)
It is used to specify the frequency (in minutes) in
which the phone refreshes its registration with the
specified registrar. The minimum value is 1 minute
while the maximum is 64800 minutes (about 45
days).The default value is 60 minutes (1 hour).
Session
Expiration
(s)
The SIP Session Timer extension that enables SIP
sessions to be periodically "refreshed" via a SIP
request (UPDATE, or re-INVITE). If there is no
refresh of an UPDATE or re-INVITE message, the
session will be terminated once the session interval
expires. Session Expiration is the time (in seconds)
where the session is considered timed out, provided
no successful session refresh transaction occurs
beforehand.
Min-SE (s)
The minimum session expiration (in seconds). The
default value is 90 seconds.
UAC Specify
Refresher
As a caller, select UAC to use the phone as the
refresher; or select UAS to use the caller or proxy
server as the refresher. If set to "Omit", that means
do not specify the refresh object.
UAS Specify
Refresher
As a callee, select UAC to use caller or proxy server as the refresher; or select UAS to
use the phone as the refresher.
Force INVITE
The Session Timer can be refreshed using the INVITE method or the UPDATE method.
Select "Yes" to use the INVITE method to refresh the session timer.
Table 6: Session Expiration Settings Parameters
Page 55

Firmware Version 1.0.1.21
Grandstream Wave User Guide
Page 54 of 64
Caller
Request
Timer
If set to "Yes" and the remote party supports session timers, the phone will use a
session timer when it makes outbound calls. The default setting is "No".
Callee
Request
Timer
If set to "Yes" and the remote party supports session timers, the phone will use a
session timer when it receives inbound calls. The default setting is "No".
Force Timer
If Force Timer is set to "Yes", the phone will use the session timer even if the remote
party does not support this feature. If Force Timer is set to "No", the phone will enable
the session timer only when the remote party supports this feature. To turn off the
session timer, set Caller Request Timer, Callee Request Time and Force Timer all to
"No".
ProxyRequire
A SIP Extension to notify the SIP server that the
phone is behind a NAT/Firewall. Do not configure this
parameter unless this feature is supported on the SIP
server.
Outbound
Proxy
IP address or Domain name of the Primary Outbound
Proxy, Media Gateway, or Session Border Controller.
Secondary
Outbound
Proxy
IP address or Domain name of the Secondary
Outbound Proxy, Media Gateway, or Session Border
Controller. Secondary outbound proxy will be used
when the primary outbound proxy fails.
NAT Traversal
This configuration is to enable or disable the NAT traversal mechanism. The default
setting is "Keep-alive".
If set to "STUN" and STUN server is configured, the phone will route according
to the STUN server; If NAT type is Full Cone, Address-RestrictedCone or PortRestricted Cone, the phone will try to use public IP addresses and port number
in all the SIP&SDP messages.
The phone will send empty SDP packet to the SIP server periodically to keep
the NAT port open if it is configured to be "Keep-alive".
Configure this to be "NAT NO" if an outbound proxy is used.
Configure this to be "UPnP" if the router supports UPnP.
If set to "Auto", the phone will try to use all traversal methods mentioned above
until find the available one.
DNS Mode
This parameter controls how the search appliance looks up IP addresses for
hostnames. There are three modes: A Record, SRV, and NATPTR/SRV. The
default setting is "A Record". If the user wishes to locate the server by DNS SRV,
the user may select "SRV" or "NATPTR/SRV".
Table 7: Account Settings—Network Settings Parameters
Table 8:Account Settings—Codec Settings Parameters
Page 56

Firmware Version 1.0.1.21
Grandstream Wave User Guide
Page 55 of 64
DTMF
Users can choose different ringtones.
This parameter specifies the mechanism to transmit
DTMF digits. There are 3 supported modes:
• In audio, which means DTMF is combined in the
audio signal (not very reliable with low-bit-rate
codecs);
• RTP (RFC2833), which means to specify DTMF
with RTP packet. Users could know the packet is
DTMF in the RTP header as well as the type of
DTMF;
• SIP INFO. Use SIP info to carry DTMF. The defect
of this mode is that it's easily to cause desynchrony
of DTMF and media packet for the reason the SIP
and RTP are transmitted respectively. The default
setting is "RFC2833".
Preferred
Vocoder
It is used to configure whether to enable Dialplan.
Multiple vocoder types are supported on the phone,
the vocoders in the list is a higher preference. Users
can configure vocoders in a preference list that is
included with the same preference order in SDP
message.
SRTP Mode
The default setting is "Disable". Users could choose "Enable and Force" which
means enable and force to use SRTP; "Enable But Not Force" means enable but
not force to use SRTP.
Enable SRTP
Key Life Time
It is used to configure whether to enable SRTP key life time. If enabled, the RTP
packets received and sent during the call cannot exceed 231. The default setting is
"Yes".
Edit Before
Dial
It is used to configure whether to edit number before
dial. If set to "No", tap on the contact or one call
history entry on call screen to dial out with the last
dial-out account directly. If set to "Yes", when tap on
the contact or one call history entry on call screen,
the phone will automatically fill in the corresponding
number to the input box, users could edit the number
before dial out.
Default
Account
Registration
Notification
It is used to define whether to enable registration
notifications for default account. If enabled, users will
see the notifications in the status bar once the default
account status is changed.
Vibrate When
It is used to configure whether to vibrate when
ADVANCED SETTINGS
Advanced Settings include General Settings, Call Settings, Audio Settings, Network Settings and
Additional Settings.
GENERAL SETTINGS
Table 9: Advanced Settings—General Settings Parameters
Page 57

Firmware Version 1.0.1.21
Grandstream Wave User Guide
Page 56 of 64
Ringing
ringing. It is only applicable to the incoming calls for
the GS Wave. The phone settings priority is higher
than this option. When set the phone to silent mode,
the phone will not vibrate when ringing even set this
option to "Yes".
Start on Boot
It is used to configure whether auto start GS Wave
when starting up.
CALL SETTINGS
Call Settings is mainly used for DND settings and show bandwidth info. When DND is on, the phone will
reject calls automatically and the status bar will display the icon . Tap on "DND Settings" to
configure as shown in figure 43 and figure 44.
Figure 44: Call Settings Screen
Figure 45: DND Settings Screen
Page 58

Firmware Version 1.0.1.21
Grandstream Wave User Guide
Page 57 of 64
Note:
Noise
Reduction
Level
Grandstream Wave provides users with multiple
noise reduction levels, as shown in figure 46. Choose
the level according to the specific environment.
Output Gain
It is used to adjust the output volume of Grandstream
Wave.
When Grandstream Wave is in an active call, turning on/off DND will not affect the current active call.
It will take effect on the next incoming call.
When the DND is on, users could view all the incoming calls in missed call history.
AUDIO SETTINGS
Table 10: Advanced Settings—Audio Settings Parameters
Figure 46: Reducing Noise Settings Screen
Page 59

Firmware Version 1.0.1.21
Grandstream Wave User Guide
Page 58 of 64
Network
Users could use Grandstream Wave in
2G/3G/4G/WiFi.
Only Use
This WiFi
to Register
Account
In the WiFi environment, only register account with
this specified connected WiFi.
QoS
Settings
It is used to configure layer 3 SIP QoS and layer 3
audio QoS. The valid range is 0-63. The default setting
is 48.
Figure 47: Output Gain Screen
NETWORK SETTINGS
Grandstream Wave supports data communication via 2G/3G/4G and WiFi.
Table 11: Advanced Settings—Network Settings Parameters
ADDITIONAL SETTINGS
Additional Settings includes Config Server Path, LDAP Settings, BLF, etc.
Table 12: Advanced Settings—Additional Settings Parameters
Page 60

Firmware Version 1.0.1.21
Grandstream Wave User Guide
Page 59 of 64
Config Server
Path
It is used to define IP address or URL for the server.
Grandstreeam Wave could obtain the configurations
from the server path automatically.
Export
Configuration
It is used to export the configuration files to the path
on the phone: /sdcard/ GS Wave/ config.
BLF (Busy
Lamp Field)
If enabled, Grandstream Wave will detect the status
of the Contacts in the BLF list.
There are 3 statuses.
: Offline. The contact is not online or
unregistered.
: Busy. The contact is in an active call.
: Online. The contact is in idle.
NOTE: The server should support BLF function if
enable BLF.
BLF List
It is used to add participants and display the online
status. Users could view the online status in the SIP
Contacts, as shown in figure 47.
LDAP
Settings
Tap to access the LDAP Settings screen to set up features. Users could set by QR Code
Scan, Select QR Code Image or Manual Settings.
Tap on "QR Code Scan" to access QR code scan screen, scan the QR code which
contains LDAP information sent by the UCM server to configure LDAP settings.
Tap on "Select QR Code Image" to access screen with QR code image, select the
image which contains LDAP information to configure LDAP settings.
Tap on "Manual Settings" to access screen as shown in figure 48.
Page 61

Firmware Version 1.0.1.21
Grandstream Wave User Guide
Page 60 of 64
Figure 48: BLF List Screen
Table 13: LDAP Settings Parameters
Figure 49: LDAP Settings Screen
Page 62

Firmware Version 1.0.1.21
Grandstream Wave User Guide
Page 61 of 64
LDAP Lookup When Dialing
It is used to define whether to search LDAP when dialing. The default
setting is "Yes".
LDAP Lookup When
Incoming Call
It is used to define to search LDAP when there is an incoming call. The
default setting is "Yes".
Server Address
Fill in the LDAP server URL or IP address.
Port
Fill in the LDAP server port. The default value is 389.
Base DN
Fill in the root directory of the LDAP server, it means under which
directory to search contact.
Username (Binding DN)
Fill in the username to access the LDAP server.
Password
Fill in the password to access the LDAP server.
LADP Name Attributes
This setting specifies the "name" attributes of each record which are
returned in the LDAP search result. Example:
gn
cn sn description
LADP Number Attributes
This setting specifies the "number" attributes of each record which are
returned in the LDAP search result. Example:
telephoneNumber
telephoneNumber Mobile
LDAP Name Filter
This setting configures the filter used for name lookups. Examples:
(|(cn=%)(sn=%)) returns all records which has the "cn" or "sn" field
containing with the entered filter value;
(!(sn=%)) returns all the records which do not have the "sn" field
containing with the entered filter value;
(&(cn=%) (telephoneNumber=*)) returns all the records with the "cn"
field containing with the entered filter value and "telephoneNumber"
field set.
LDAP Number Filter
This setting configures the filter used for number lookups. Examples:
(|(telephoneNumber=%)(Mobile=%) returns all records which has the
"telephoneNumbe" or "Mobile" field containing with the entered filter
value;
(&(telephoneNumber=%) (cn=*)) returns all the records with the
"telephoneNumber" field containing with the entered filter value and "cn"
field set.
LADP Display Name
Attributes
This setting specifies the "Display Name" attributes. Up to 3 attributes
could be displayed.Examples:
%cn %sn %telephoneNumber
Max Hits (0-100)
The maximum contacts results return to the LDAP server. If set to "0",
The server will return all query results. The default setting is 100.
Search Timeout
Set the search requests much time no response, no longer to search.
The default setting is 100.
Connection Security Type
This setting configures LDAP connection security mode, users could
choose None or SSL.
CUTSOM SETTINGS
Users could configure Color, Theme and Languages on Custom Settings screen.
Table 14: Custom Settings Parameters
Page 63

Firmware Version 1.0.1.21
Grandstream Wave User Guide
Page 62 of 64
Color
It is used to configure the color of default, icon, title
bar and navigation bar.
Theme
Grandstream Wave supports 3 themes.
Languages
Tap to open a list of language options for GS Wave.
The default setting is "Auto", which means in
accordance with the language the phone uses. If the
settings is not supportive and the same is not mine
the m
ABOUT
Report
Bugs
When unexpected crash or accidents occurs, upload
the relevant logs to the server, the default settings is
"Yes". This function can help users to monitor service
condition and locate exception logs.
SIP
Message
Trace
Save the SIP message on the phone for users to
check.
SIP
Message
Retention
Period
It is used to configure the retention period of the SIP
message on the phone.
Tap on "Check Updates" to update the version, tap on "Share Application" to share this application via the
BlueTooth, Gmail, Google, etc.
DEBUG
Users could report bugs or trace SIP message with Debug function when coming across software
problems.
Table 15: Debug Settings Parameters
EXIT
Click on this option to quit Grandstream Wave entirely. Users will receive no more calls and messages
after exiting.
Page 64

Firmware Version 1.0.1.21
Grandstream Wave User Guide
Page 63 of 64
FAQs
Why can't I register account?
Check whether the network connection is normal; Whether WiFi is connected or 2G/3G/4G is on.
Why can I see my phone contacts and call records in the Grandstream Wave?
For first-time users, users have to confirm whether allow Grandstream Wave to read local call history and
import contacts. If allows, these two will be downloaded in Grandstream Wave.
Why can’t I see the Grandstream Wave notification on the phone?
Please go to Settings->Advanced Settings to enable Notifications for Default Account. If enabled, you’ll
see the notifications in the status bar.
How to switch existing accounts?
There are 3 ways: Slide to right; Click at the upper right corner of the Dial/Call History screen; Use
the MENU button on account settings screen.
Page 65

Firmware Version 1.0.1.21
Grandstream Wave User Guide
Page 64 of 64
EXPERIENCING THE GRANDSTREAM WAVE APPLICATION
Please visit our website: http://www.grandstream.com to receive the most up-to-date updates on firmware
releases, additional features, FAQs, documentation and news on new products.
We encourage you to browse our product related documentation, FAQs and User and Developer Forum
for answers to your general questions. If you have purchased our products through a Grandstream
Certified Partner or Reseller, please contact them directly for immediate support.
Our technical support staff is trained and ready to answer all of your questions. Contact a technical
support member or submit a trouble ticket online to receive in-depth support.
Thank you again for purchasing Grandstream Enterprise Application phone, it will be sure to bring
convenience and color to both your business and personal life.
 Loading...