

Page 1

Surveillance IP cameras & IP video Encoders
Grandstream Networks, Inc.
Synology Surveillance Station Conf ig urat i on Guide
Page 2

Page 2 of 20
www.grandstream.com IP cameras and IP Video Encoders Last Update : 04/2013
TABLE OF CONTENTS
SYNOLOGY CONFIGURATION GUIDE
SURVEILLANCE IP CAMERAS & IP VIDEO ENCODERS
Contents
INTRODUCTION .............................................................................................................................................. 3
REPARING GRANDSTREAM IP CAMERAS ....................................................................................................... 3
P
CCESS SYNOLOGY SURVEILLANCE STATION ................................................................................................ 4
A
DDING IP CAMERAS AND/OR IP VIDEO ENCODERS ........................................................................................ 8
A
SING QUICK SETUP .................................................................................................................................. 9
U
SING COMPLETE SETUP ......................................................................................................................... 10
U
OTION DETECTION .................................................................................................................................... 15
M
IVEVIEW ANALYTICS .................................................................................................................................. 17
L
VENTS LIST ............................................................................................................................................... 19
E
IVE VIEW ................................................................................................................................................... 20
L
Grandstream Networks, Inc. Synology configuration guide
Page 3

Page 3 of 20
www.grandstream.com IP cameras and IP Video Encoders Last Update : 04/2013
INTRODUCTION
The purpose of this document is to guide you to configure/monitor Grandstream IP cameras & IP Video
Encoders/Decoders using Synology DSM Surveillance Station.
This guide is appl icable to Synology DSM 4.0 Surveillance Statio n version 6.0-2353 and higher and to the
following Grandstream IP cameras (GXV3651_FHD , GXV3662, GXV3615WP_HD with firmware 1.0.1.71 or
higher; GXV3615, GXV3611_HD, GXV3611_LL, GXV3601, GXV3601_HD, GXV3601_LL with firmware
1.0.4.38 or higher) and IP Video Encoders/Decoders (GXV3501 with firmware 1.0.4.38, GXV3504 with
firmware 1.0.4.39 or higher; GXV3500 with firmware 1.0.1.71 or hi gher – Decoding functionality is available
on GXV3500 only)
Be aware that different firmware revisions may have different web interface formats and functionality.
P
REPARING GRANDSTREAM IP CAMERAS
1. Connect your IP cameras/encoders to your network.
2. Download and open GS_Search tool from this link to locate IP of your cameras
http://www.grandstream.com/products/tools/surveillance/GS_Search.zip
3. Click Search button to start locating your cameras
4. Your cameras and their IPs will be displayed in the reserved areas
5. Take a note of the IPs you want to add in Synology for future use
- Figure 1: GS_Search Tool -
Grandstream Networks, Inc. Synology configuration guide
Page 4
Page 4 of 20
www.grandstream.com IP cameras and IP Video Encoders Last Update : 04/2013
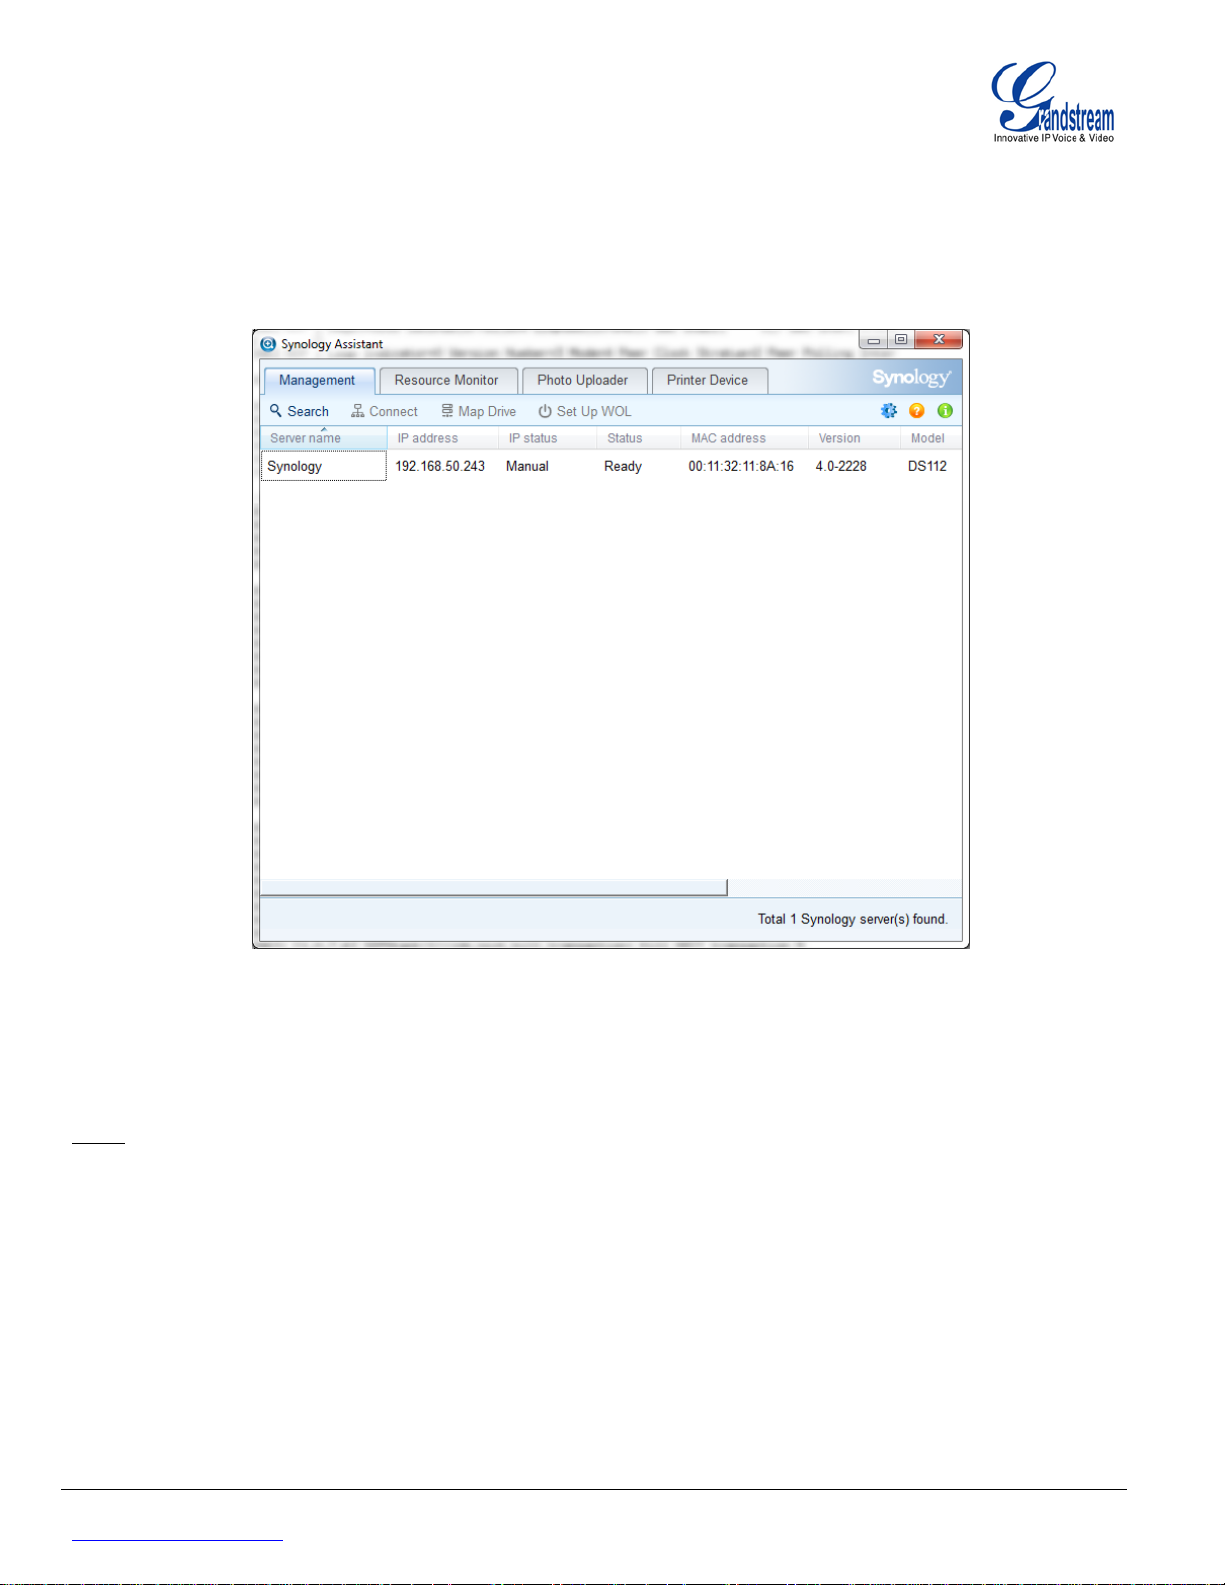
ACCESS SYNOLOGY SURVEILLANCE STATION
1. Assuming that Synology is already powered and connected to your local network, install and run
“Synology Assistant” software (available in CD provided with your DSM) to locate the IP of your DSM.
Note: if you are not able to find the IP of your device, make sure that no Firewall is running on your computer, and run
software again.
2. Double click the server name, and login page will be shown.
3. Enter Admin login and password (admin/admin by default)
- Figure 2: Synology Assistant -
Grandstream Networks, Inc. Synology configuration guide
Page 5
Page 5 of 20
www.grandstream.com IP cameras and IP Video Encoders Last Update : 04/2013
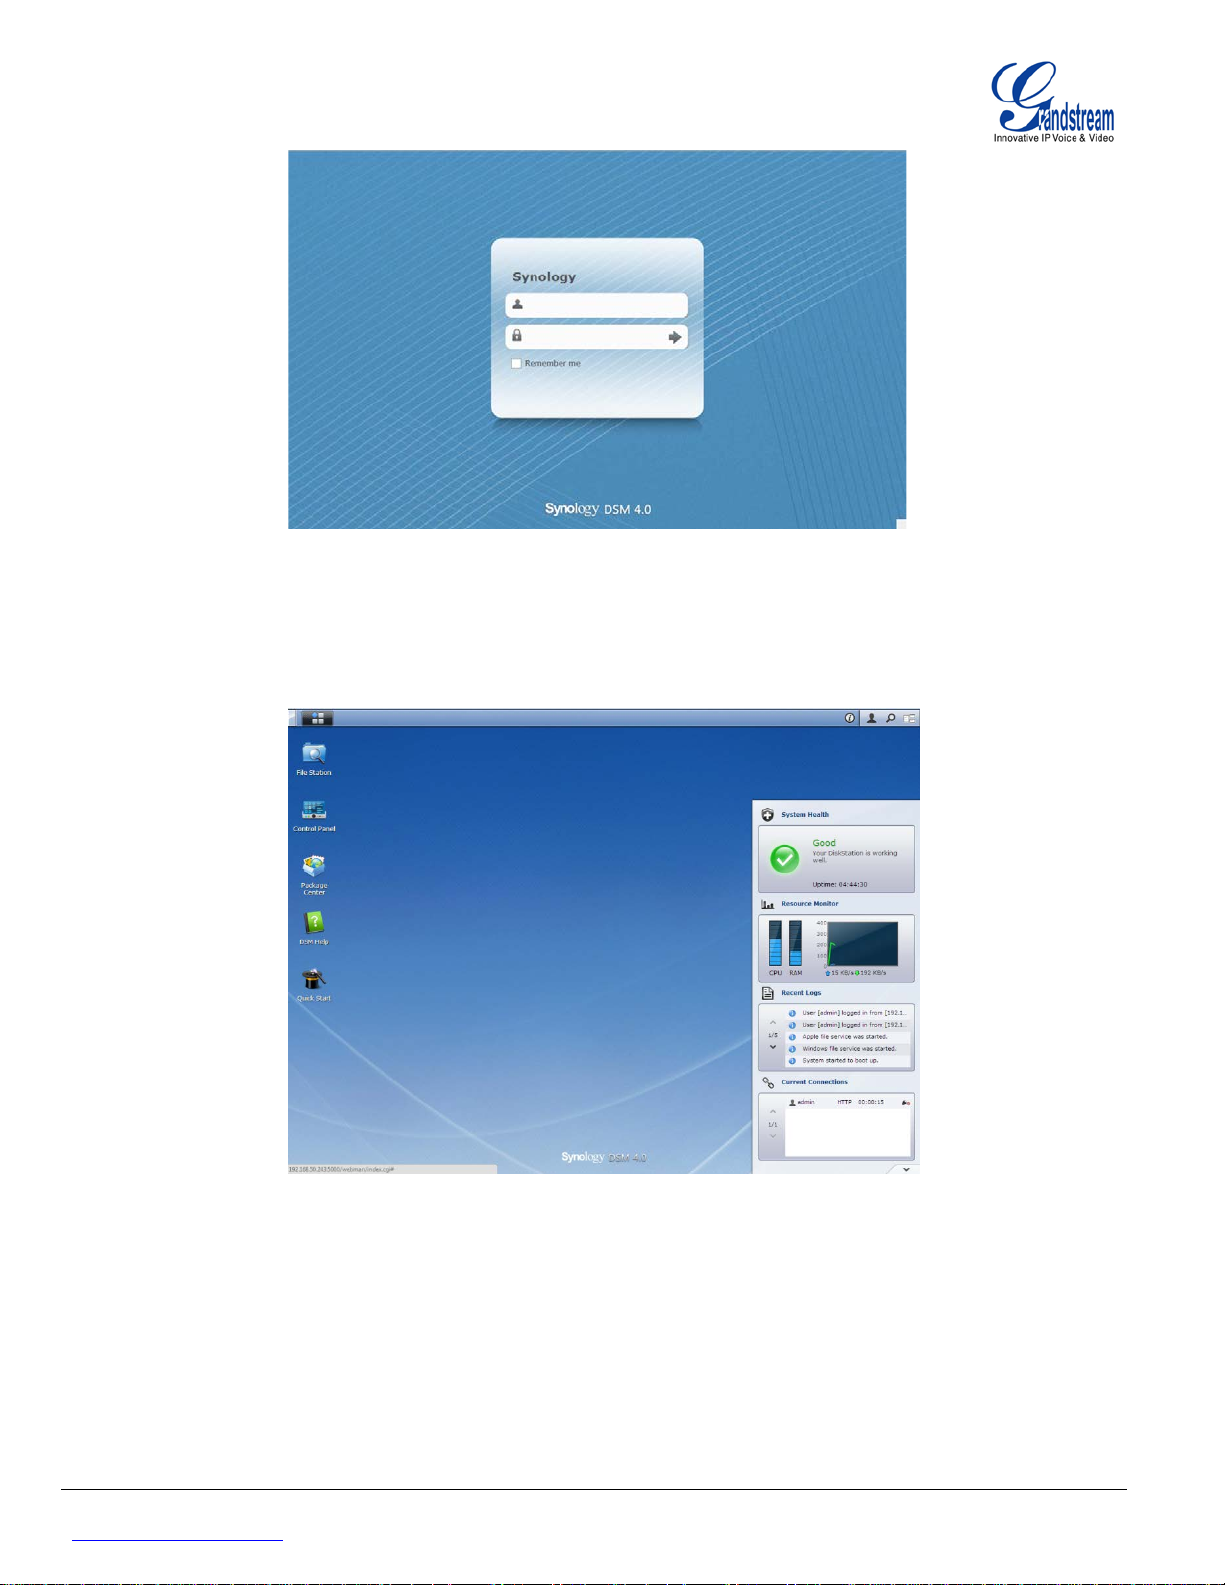
- Figure 3: Synology Login page -
4. Once successfully logged in, the main screen will be displayed as shown in figure 3.
- Figure 4: Synology main screen -
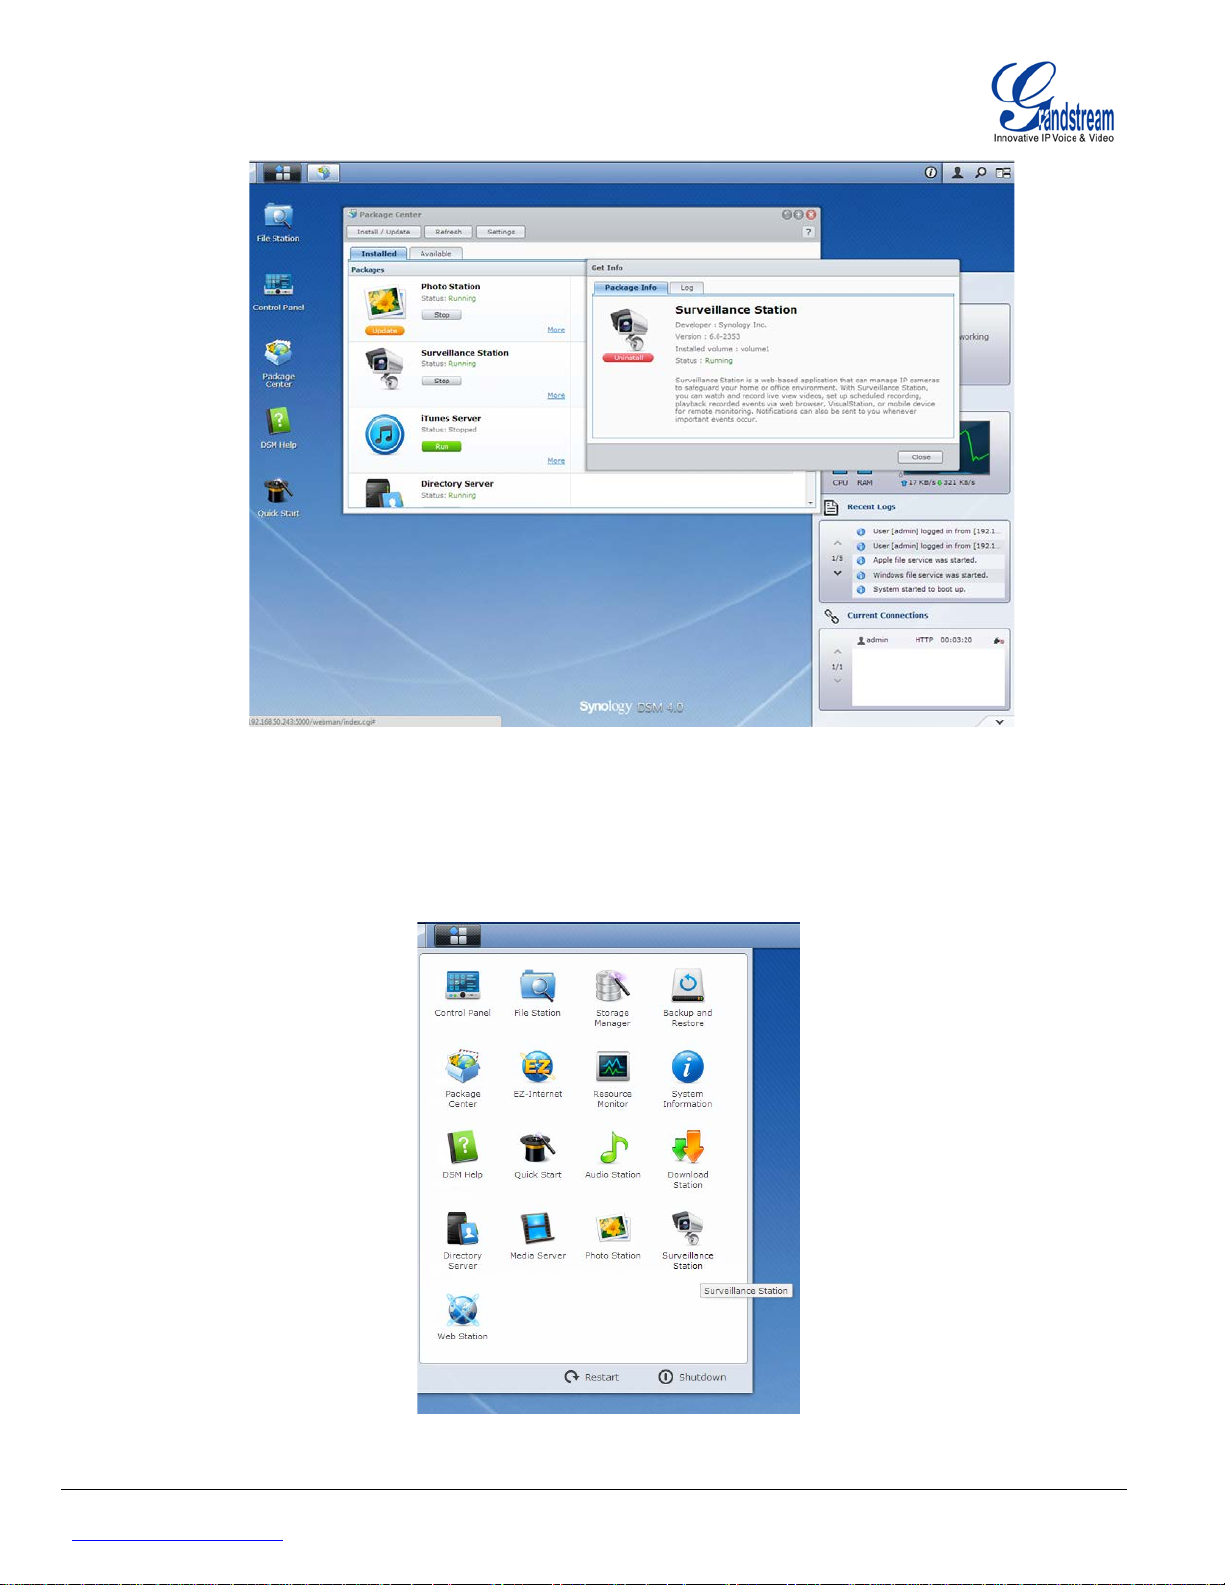
5. Access Package Center and make sure last Surveillance Station is installed and running. If not,
please install and run it.
Grandstream Networks, Inc. Synology configuration guide
Page 6
Page 6 of 20
www.grandstream.com IP cameras and IP Video Encoders Last Update : 04/2013
- Figure 5: Synology Package Center (Surveillance Station Status) -
6. Once all checked, close those 2 windows and click Menu > Surv eillanc e St atio n
- Figure 6: Synology Menu >
Surveillance Station -
Grandstream Networks, Inc. Synology configuration guide
Page 7

Page 7 of 20
www.grandstream.com IP cameras and IP Video Encoders Last Update : 04/2013
7. Surveillance Statio n windo w will be open ed as shown in Figure 7.
- Figure 7: Synology Surveillance Station Management page -
Grandstream Networks, Inc. Synology configuration guide
Page 8

Page 8 of 20
www.grandstream.com IP cameras and IP Video Encoders Last Update : 04/2013
A
DDING IP CAMERAS AND/OR IP VIDEO ENCODERS
1. In Surveillance Station Management tab, Press Add and select Add Camera or Add Batch (many
cameras at same time). In our tutorial, we will use Add Camera, to add one camera at a time.
2. A wizard window appears, click Next and then select Setup mode : Quick Setup or Complete Setup
- Figure 8: Management tab, Add Camera -
Grandstream Networks, Inc. Synology configuration guide
- Figure 9: Setup Mode selection
Page 9

Page 9 of 20
www.grandstream.com IP cameras and IP Video Encoders Last Update : 04/2013
Using Quick Setup
In Device Info window, enter your camera info as below
- Name: Name of the camera
- IP address: IP address of your camera
- Port: Keep default port 80
- Brand: Select Grandstream
- Camera model: Select your camera model from drop-down list
- Video format: Select video codec to be used on Primary Stream of the camera; H.264 or MJPEG
(if available)
- Audio format: Set G.711 to enable audio or set it to Disabled. If using MJPEG, audio will not be
available
- Username: Enter admin
- Password: Enter admin password
Once completed, press Test Connection to test your settings. If all settings are correct, a snapshot from your
camera will be displayed on the reserved area.
- Figure 10: Add Camera – Device Info page (Quick Setup) -
Press Finish button to finish the setup process
Grandstream Networks, Inc. Synology configuration guide
Page 10

Page 10 of 20
www.grandstream.com IP cameras and IP Video Encoders Last Update : 04/2013
Using Complete Setup
In Device Info window, enter your camera info as below
- Name: Name of the camera
- IP address: IP address of your camera
- Port: Keep default port 80
- Brand: Select Grandstream
- Camera model: Select your camera model from drop-down lis t
- Username: Enter admin
- Password: Enter admin password
Once completed, press Test Connection to test your settings. If all settings are correct, a snapshot from your
camera will be displayed on the reserved area.
- Figure 11: Add Camera – Device Info page (Complete Setup) -
Press Next button
Grandstream Networks, Inc. Synology configuration guide
Page 11

Page 11 of 20
www.grandstream.com IP cameras and IP Video Encoders Last Update : 04/2013
In Video page, adjust settings following your needs
- Codec
• Video format: H.264 or MJPEG (if available)
• Audio format: G711 or disabled
- Recording Image Settings / Live View Image Settings
-
• Image quality: Choose from 1 to 5 (5 is Highest quality)
• Resolution: Choose the convenient resolution for you (Resolutions depend on camera
model)
Note: If using GXV3504, you will not have the possibility to use 4*D1 resolution from
Surveillance Station
• Frame rate (FPS): Select frame rate per second (FPS depend on the resolution previously
configured)
Press Next button
- Figure 12: Add Camera – Video page (Complete Setup) -
Grandstream Networks, Inc. Synology configuration guide
Page 12

Page 12 of 20
www.grandstream.com IP cameras and IP Video Encoders Last Update : 04/2013
In Recording page, adjust settings following your needs
- Event Recording
• Save video every (minutes): Specify when video will be recorded periodically after an event;
from 5 to 60 minutes.
• Pre-recording time (sec.): Specify when recording will start before an event is detected;
from 5 to 30 seconds.
• Post-recording time (sec.): Specify when recording will stop after an event is detected; from
5 to 120 seconds.
- Event Archives
• Event archive folder: Name of folder when recording will be saved in your hard drive.
• File name prefix: Prefix to be prepended for each saved file.
• Keep the files within (days): Check this option and specify number of days to remove saved
files after this period. If not checked saved will not be removed.
• Limit the archive folder up to (GB): Check this option and specify size limit on your hard
drive to save files, once reached, no more files will be saved.
• Estimate Required Space: Click on this button to check the estimated needed space on the
hard drive for added camera (pending)
- Figure 13: Add Camera – Recording page (Complete Setup) -
Grandstream Networks, Inc. Synology configuration guide
Page 13

Page 13 of 20
www.grandstream.com IP cameras and IP Video Encoders Last Update : 04/2013
Press Next button
In Recording Schedule, set the schedule if Synology will record continuously or on Motion Detection.
- Figure 14: Add Camera – Recording Schedule page (Complete Setup) -
Press Next button
In Advanced page, set the settings depending on your needs:
- Live View Source
• From Surveillance Station: The stream will be displayed from Surveillance Station, this
stream is sent from the camera to Surveillance Station.
• From camera: The stream will be displayed from the camera directly
Grandstream Networks, Inc. Synology configuration guide
Page 14

Page 14 of 20
www.grandstream.com IP cameras and IP Video Encoders Last Update : 04/2013
- Motion Detection Recording
• Motion detection by the camera: Video stream will be analyzed to detect motion detection
from the camera, and it will send a notification to Surveillance station (pending).
• Motion detection by Surveillance Station: Video stream will analyzed by Surveillance
station to report motion detection if any.
- Archive Rotation Settings
• Remove old archives when space or time limit is reached: This allows to Surveillance
station to remove old archives to free space for new recordings.
• Stop recording when space or time limit is reached: This will stop recording when no
more space is available
- Figure 15: Add Camera – Advanced page (Complete Setup) -
Press Finish button to complete the setup of your camera.
Once added, a preview will appear in Management tab, showing Name of the camera, IP address, Status
and more info.
Grandstream Networks, Inc. Synology configuration guide
Page 15

Page 15 of 20
www.grandstream.com IP cameras and IP Video Encoders Last Update : 04/2013
- Figure 16: Add Camera – Camera Preview (Complete Setup) -
You can always change the settings including resolutions, by selecting the camera in Management tab and
pressing Edit button, to make Device Info window to appear.
M
OTION DETECTION
Grandstream Networks, Inc. Synology configuration guide
Page 16

Page 16 of 20
www.grandstream.com IP cameras and IP Video Encoders Last Update : 04/2013
1. In Surveillance Station Management tab, select the camera on which you want to enable motion
detection, and press Advanced button and select Motion Detection in the list.
- Figure 17: Management – Advanced > Motion Detection
2. Motion detection window will appear.
• Motion detection by Surveillance Station is only available option
• Detection sensitivity: set sensitivity percentage between 1 to 99%; if you set a sm aller
value, motion detection will be less sensitive and will only be triggered when the
calculated difference between a series of frames is larger than the specified value.
• Threshold: set threshold percentage between 1 to 99%; if you set a larger threshold, motion
detection will be triggered when there is larger m otion , or when the calc ula ted dif f erenc e
between a series of frames exceeds the specified threshold.
• Click Det ection Area button, to add areas for motion detection (maximum 10 detection
areas). Motion Detection Area will appear to allow you to Add, Name or Delete a Detection
Area. Press Add to specify a new Detection Area, and set a Name for it. Confirm with Ok, and
Save.
(You can adjust the size of Detection Areas by dragging small squares)
When a Motion Detection event is triggered, a recording will be saved (depending on your settings)
Grandstream Networks, Inc. Synology configuration guide
- Figure 18: Motion Detection Area
Page 17

Page 17 of 20
www.grandstream.com IP cameras and IP Video Encoders Last Update : 04/2013
LIVEVIEW ANALYTICS
1. In Surveillance Station Management tab, select the camera on which you want to configure Liveview
Analytics, and press Advanced button and select Livev i ew Analytic s in the list.
2. Choose an analytics type from the Analytics Type drop-down menu:
• None: If None is selected, the other settings on this page will all be disabled.
• Motion Detection: Detect for movements in the specified areas.
• Missing Object: Detect if any objects in the specified areas are missing.
• Foreign Object: Detect if any foreign objects appear in the specific areas.
• Camera Occlusion: Detect when the camera lens is covered and unable to effectively
• Focus Lost: Detect when the camera focus is lost and unable to effectively monitor the
• No-Idle Zone: Detect if anyone or anything lingers in the restricted zone longer than the
• Tally Counter: Detect and count the number of people or objects coming in and/or out of
• Virtual Fence: Detect if anyone or anything approaches the virtual fence from
3. Choose a sensitivity level from the Sensitivity drop-down menu. The higher the level is, the more sensitive
detection will be, and will be more likel y to be triggere d.
4. Choose a type of analytics area:
• Detection Zone (not applicable to Camera Occlusion, Focus Lost, No-Idle Zone, Tally
- Figure 19: Management – Advanced > Livev iew Analytics
monitor the environment.
environment.
time specified in Dwell time (sec.). Drag any of the four on-screen detection positions to
define your no-idle zon e.
the virtual boundary line from both/either direc tio n with the Direction drop-down menu.
Drag either of the on-screen detection positions to adjust your boundary line. Calculation
will be conducted at the bottom-left corner of the screen. You may click Simulation to
have a preview of the liveview image.
both/either direction with the Direction drop-down menu. Drag either of the on-screen
detection positions to adjust your virtual fence.
Counter, and Virtual Fence): Drag on the grid to define the analytics areas with the + or buttons. Or you can simply select or clear all areas by clicking Select All or Clear All.
Grandstream Networks, Inc. Synology configuration guide
Page 18

Page 18 of 20
www.grandstream.com IP cameras and IP Video Encoders Last Update : 04/2013
• Object Size (only applicable to Foreign Object): Drag to resize and reposition the yellow
rectangle which is larger than the object you want to search.
5. Enable the following visual/audio aids to better monitor the liveview analytics process:
• Beep when detected: DiskStation will play beep sounds when any of the analytics type is
detected.
• Show detection frames: Detection frames will appear on liveview screen to indicate the
location of the figure, object, or event of the selected analytics type for each camera.
• Show path tracking: Tracking paths will be shown on-screen to indicate the movements
of people or objects.
• Show virtual zone: Enabling this option to display the virtual zone defined by the four
detection positions on-screen will help you identify the target's activities in the vicinity of
the restricted zone more easily.
• Show boundary line: Enabling this option to display the boundary line composed of two
detection positions on-screen will help you distinguish how many targets come from which
direction.
• Show virtual fence: Enabling this option to display the virtual fence composed of two
detection positions on-screen will help you pinpoint what targets coming from which
direction.
• Simulation: Turn on this button while fine tuning liveview analytics settings to verify
whether analytics behavior is easily reproducible.
6. Click OK to save your settings.
Grandstream Networks, Inc. Synology configuration guide
Page 19

Page 19 of 20
www.grandstream.com IP cameras and IP Video Encoders Last Update : 04/2013
EVENTS LIST
1. Select Event List in left panel of the Surveillance Stat i on.
2. All stored events will be displayed, showing the name of the camera, Mode (Green is for Motion
Detection), Start Time, Duration, Size and Video format.
3. Select and event and press Play or Download (to download to your computer ). If you double clic k on an
event, the captured video will be played.
- Figure 20: Event List -
Grandstream Networks, Inc. Synology configuration guide
Page 20

Page 20 of 20
www.grandstream.com IP cameras and IP Video Encoders Last Update : 04/2013
LIVE VIEW
1. Click Live View to monitor added camera(s) to your Surveillance Station.
2. You can adjust display by adding/removing cameras from
- Figure 16: Live view
References:
For more information about the Grandstream IP Cameras and other products capabilities, please visit
http://www.grandstream.com or contact us at esupport.grandstream.com
For more information about Synology server please refer to
Grandstream Networks, Inc. Synology configuration guide
http://www.synology.com
 Loading...