

Page 1

Page 2

TABLE OF CONTENTS
GXP USER MANUAL
WELCOME .................................................................................................................................................................4
INSTALLATION.........................................................................................................................................................5
EQUIPMENT PACKAGING .............................................................................................................................................5
CONNECTING YOUR PHONE ........................................................................................................................................5
GXP-2000 EXTENSION UNIT.......................................................................................................................................5
SAFETY COMPLIANCES................................................................................................................................................7
WARRANTY.................................................................................................................................................................7
PRODUCT OVERVIEW............................................................................................................................................8
USING THE GXP SIP ENTERPRISE PHONE.....................................................................................................12
GETTING FAMILIAR WITH THE LCD..........................................................................................................................12
MAKING PHONE CALLS.............................................................................................................................................15
ANSWERING PHONE CALLS .......................................................................................................................................18
PHONE FUNCTIONS DURING A PHONE CALL .............................................................................................................18
CALL FEATURES........................................................................................................................................................20
CUSTOMIZED LCD SCREEN & XML.........................................................................................................................20
CON F I G U R A T I O N G U I D E............................... .......................... ................................ .............................................22
CONFIGURATION VIA KEYPAD..................................................................................................................................22
CONFIGURATION VIA WEB BROWSER......................................................................................................................25
SAVING THE CONFIGURATION CHANGES...................................................................................................................35
REBOOTING THE PHONE REMOTELY .........................................................................................................................35
SOFTWARE UPGRADE & CUSTOMIZATION..................................................................................................36
FIRMWARE UPGRADE THROUGH TFTP/HTTP..........................................................................................................36
CONFIGURATION FILE DOWNLOAD ...........................................................................................................................37
RESTORE FACTORY DEFAULT SETTING.......................................................................................................38
TABLE OF FIGURES
GXP USER MANUAL
Figure 1: Connecting the GXP–2000 and the GXP–Extension ...................................................... 6
Figure 2: GXP–2000 Internal Headset Wiring Schema .................................................................. 7
Figure 3: Key Pad GUI Call Flow .................................................................................................. 24
TABLE OF TABLES
GXP USER MANUAL
Table 1: Equipment Packaging ....................................................................................................... 5
Table 2: GXP Connectors ............................................................................................................... 5
Table 3: GXP Product Models .........................................................................................................8
Table 4: GXP Comparison Guide .................................................................................................... 8
Table 5: GXP Key Features in a Glance.........................................................................................9
Table 6: GXP Hardware Specifications...........................................................................................9
Table 7: GXP Technical Specifications.........................................................................................10
Grandstream Networks, Inc. GXP User Manual Page 2 of 38
Firmware 1.1.5.15 Last Updated: 12/2007
Page 3

Table 8: LCD Buttons.................................................................................................................... 12
Table 9: LCD Icons .......................................................................................................................12
Table 10: GXP Keypad Buttons .................................................................................................... 14
Table 11: GXP Call Features ........................................................................................................ 20
Table 12: Key Pad Configuration Menu........................................................................................ 22
Table 13: Device Configuration - Status .......................................................................................26
Table 14: Device Configuration – Basic Settings..........................................................................26
Table 15: Advanced Settings ........................................................................................................ 28
Table 16: SIP Account Settings ....................................................................................................31
GUI INTERFACE EXAMPLES
GXP USER MANUAL
(http://www.grandstream.com/user_manuals/GUI/GUI_GXP.rar
)
CREENSHOT OF CONFIGURATION LOGIN PAGE
1. S
2. S
CREENSHOT OF STATUS PAGE
3. S
CREENSHOT OF BASIC SETTINGS CONFIGURATION PAGE
CREENSHOT OF ADVANCED USER CONFIGURATION PAGE
4. S
CREENSHOT OF SIP ACCOUNT CONFIGURATION
5. S
CREENSHOT OF SAVED CONFIGURATION CHANGES
6. S
7. S
CREENSHOT OF REBOOT PAGE
Grandstream Networks, Inc. GXP User Manual Page 3 of 38
Firmware 1.1.5.15 Last Updated: 12/2007
Page 4

Welcome
Your Grandstream GXP Series IP phone features a new sophisticated design and is very easy to use.
The GXP combines advanced feature functionality with the latest technology to offer excellent audio
quality, ease of use, expandability, and broad interoperability with 3
the enterprise customer.
The GXP Series supports a broad range of codecs, security protection, PoE, dual 10/100mbps Ethernet
ports and are very easy to manage. Currently, the GXP Series consists of the following four models:
GXP-1200, GXP-2000, GXP-2010 and GXP-2010. Each model delivers superior audio quality using
either a handset, hands-free speakerphone or headset and supports multi-party conferencing, multilanguages, dual-color LEDs, presence and BLF (on most models). Large easy-to-read backlit graphical
displays with multiple XML keys further enhance the user experience. Some models (GXP-2000 currently)
are expandable with one or two expansion module.
The series is based on SIP standard and are interoperable with most 3rd party SIP platforms and opensource platforms.
Caution: Changes or modifications to this product not expressly approved by Gr andstream, or operation
of this product in any way other than as detailed by this User Manual, could void your manufacturer
warranty.
Warning: Please do not use a different power adaptor with the GXP as it may cause da mage to the
products and void the manufacturer warranty.
• This document is contains links to Grandstream GUI Interfaces. Please download these examples
http://www.grandstream.com/user_manuals/GUI/GUI_GXP.rar
• This document is subject to change without notice. The latest electronic version of this user manual
is available for download @: http://www.grandstream.com/user_manuals/GXP_User_Manual.pdf
• Reproduction or transmittal of the entire or any part, in any form or by any means, electronic or print,
for any purpose without the express written permission of Grandstream Networks, Inc. is not
permitted.
rd
party SIP platforms. It is ideal for
for your reference.
Grandstream Networks, Inc. GXP User Manual Page 4 of 38
Firmware 1.1.5.15 Last Updated: 12/2007
Page 5
Installation
EQUIPMENT PACKAGING
Table 1: Equipment Packaging
Main Case
Handset
Phone Cord
Power Adaptor
Ethernet Cable
High Phone Stand
Low Phone Stand
Wall Mount Spacers (2)
GXP-1200 GXP-2000 GXP-2010 GXP-2020
Yes Yes Yes Yes
Yes Yes Yes Yes
Yes Yes Yes Yes
Yes Yes Yes Yes
Yes Yes Yes Yes
Yes No Yes Yes
No No Yes Yes
Yes No Yes Yes
CONNECTING YOUR PHONE
The connectors of the GXP1200/2010/2020 are located on the bottom of the device while they are
located on the back side of the GXP2000.
Table 2: GXP Connectors
EXT
PC
LAN
Connects the GXP Extension unit directly to the GXP using connection cable.
Draws power from PoE if provided by network.
10/100Mbps RJ-45 ports for PC (downlink) connection.
10/100Mbps RJ-45 port for LAN (uplink) connection. Supports PoE (802.3af).
Draws power from either spare line or signal line.
Power Jack
5V DC power port; UL Certified
RJ22 and 2.5mm for GXP-2010/GXP-2020
Headset Jack
RJ22 for GXP-1200
2.5mm for GXP-2000 HW Rev1.0 or later
Handset Jack
RJ11
GXP-2000 EXTENSION UNIT
GXP–2000 supports two (2) extension units, providing up to 112 additional programmable extensions.
Each GXP Extension unit has 56 multi–purpose keys, dual color LEDs (red/green) and support BLF (Busy
Lamp Field) and Presence.
GXP–2000 Extension package contains:
1) One GXP Extension unit
Grandstream Networks, Inc. GXP User Manual Page 5 of 38
Firmware 1.1.5.15 Last Updated: 12/2007
Page 6

2) One PS2 cable
3) One connection plate
4) One Universal Power Adaptor
FIGURE 1: CONNECTING THE GXP–2000 AND THE GXP–EXTENSION
GXP–2000 w/GXP–Extension GXP Extension
Connecting the GXP–2000
w/GXP–Extension
Reverse side of connection
w/connection plate
Connect the first GXP –EXT to the GXP–2000 using the PS2 cable found in the GXP Extension package.
The first GXP–Ext draws power directly from the phone. Connect the second GXP Extension unit using
the connection plate and the PS2 cable. The GXP2000 will automatically reboot and power up the GXP
Extensions. Grandstream recommends, though not required, to use a separate power supply with the
second GXP Ext. NOTE: should your system loose power, please unplug your devices and power up
the GXP–2000 first.
Powering up the system:
1. The GXP–2000 will boot up first;
2. The GXP LEDs will be solid red;
3. The status light in the top right corner of the GXP–Ext will blink red;
4. All of the LED indicators on the GXP–Ext will flash three times;
5. The status light at the top right corner of the GXP–Ext will turn to solid green.
Grandstream Networks, Inc. GXP User Manual Page 6 of 38
Firmware 1.1.5.15 Last Updated: 12/2007
Page 7
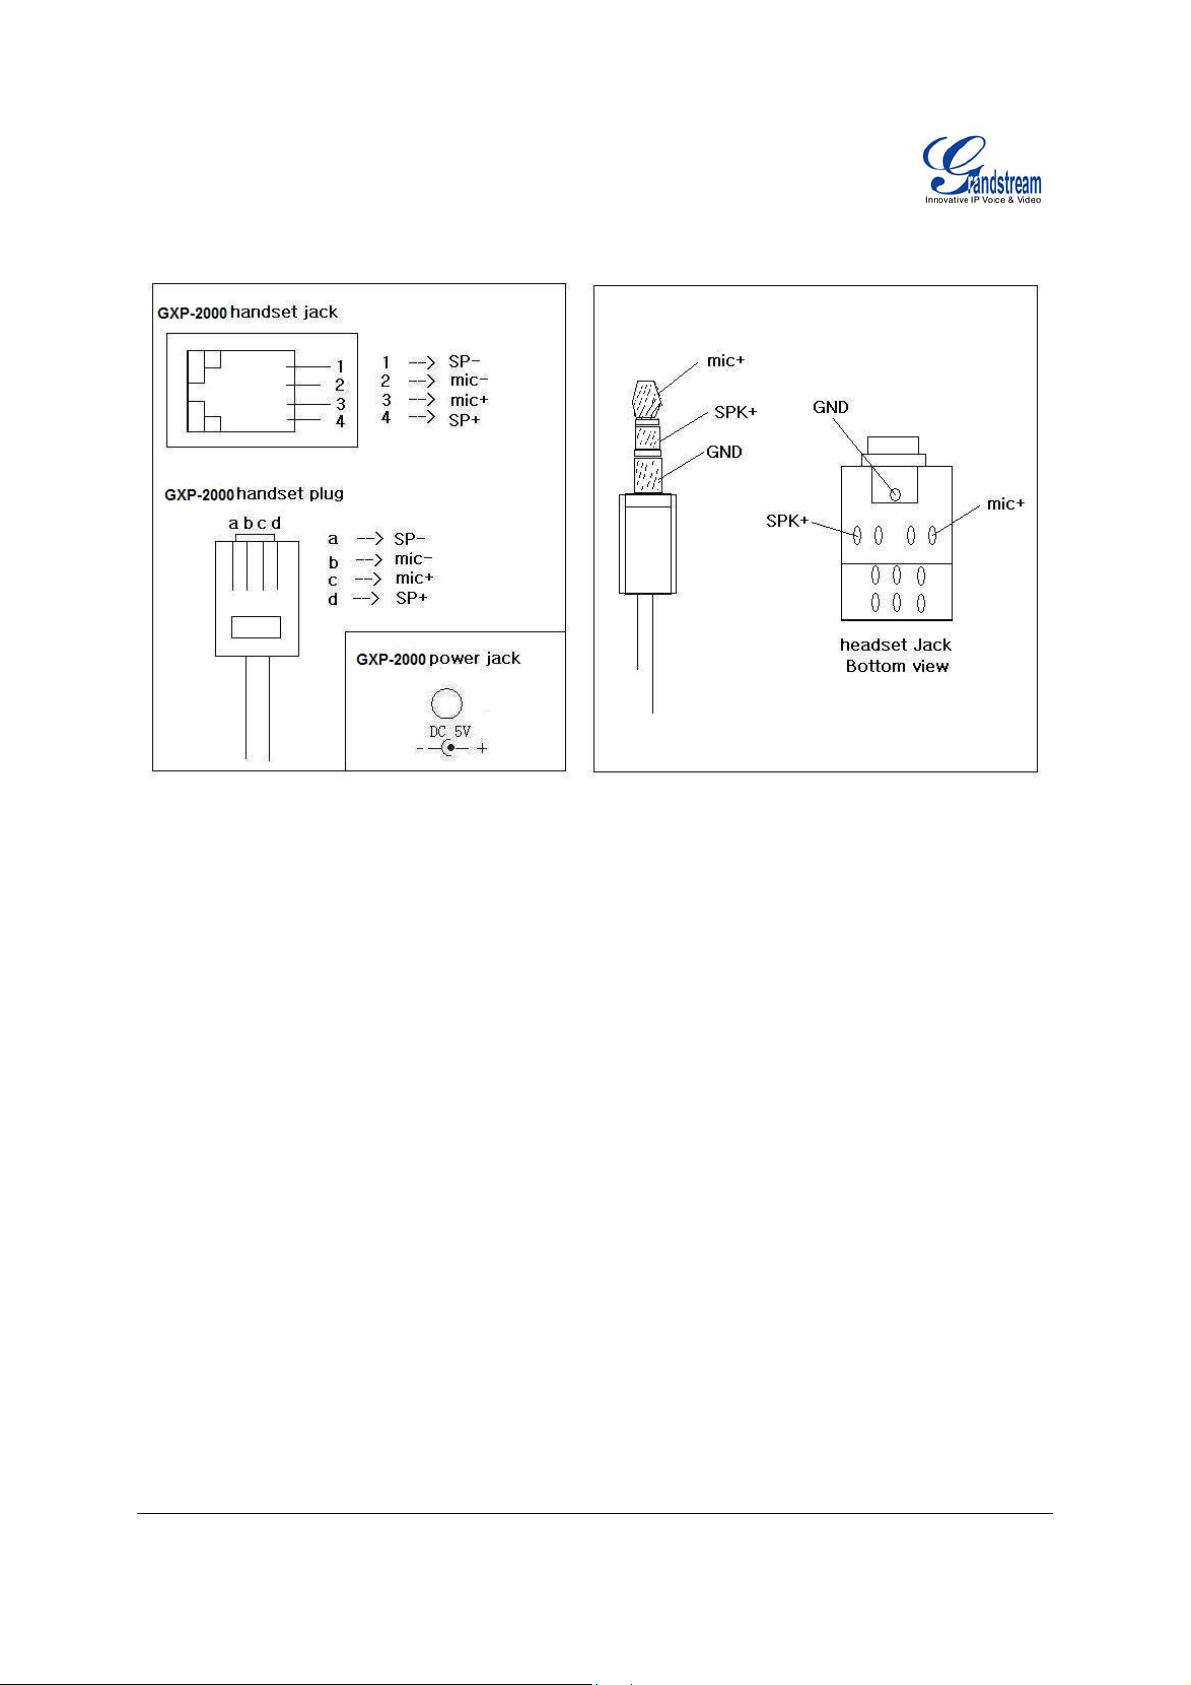
Figure 2: GXP–2000 Internal Headset Wiring Schema
NOTE: For GXP-2000 HW REV. 0.3 and 0.4, a 3.5mm to 2.5mm plug converter is required to use a
2.5mm headset. The converter can be purchased at any electronics store.
SAFETY COMPLIANCES
The GXP phone complies with FCC/CE and various safety standards. The GXP power adaptor is
compliant with the UL standard. Only use the universal power adaptor provided with the GXP package.
The manufacturer’s warranty does not cover damages to the phone caused by unsupported power
adaptors.
WARRANTY
If you purchased your GXP from a reseller, please contact the company where you purchased your
phone for replacement, repair or refund. If you purchased the product directly from Grandstream, contact
your Grandstream Sales and Service Representative for a RMA (Return Materials Authorization) number
before you return the product. Grandstream reserves the right to remedy warranty policy without prior
notification.
Grandstream Networks, Inc. GXP User Manual Page 7 of 38
Firmware 1.1.5.15 Last Updated: 12/2007
Page 8
Product Overview
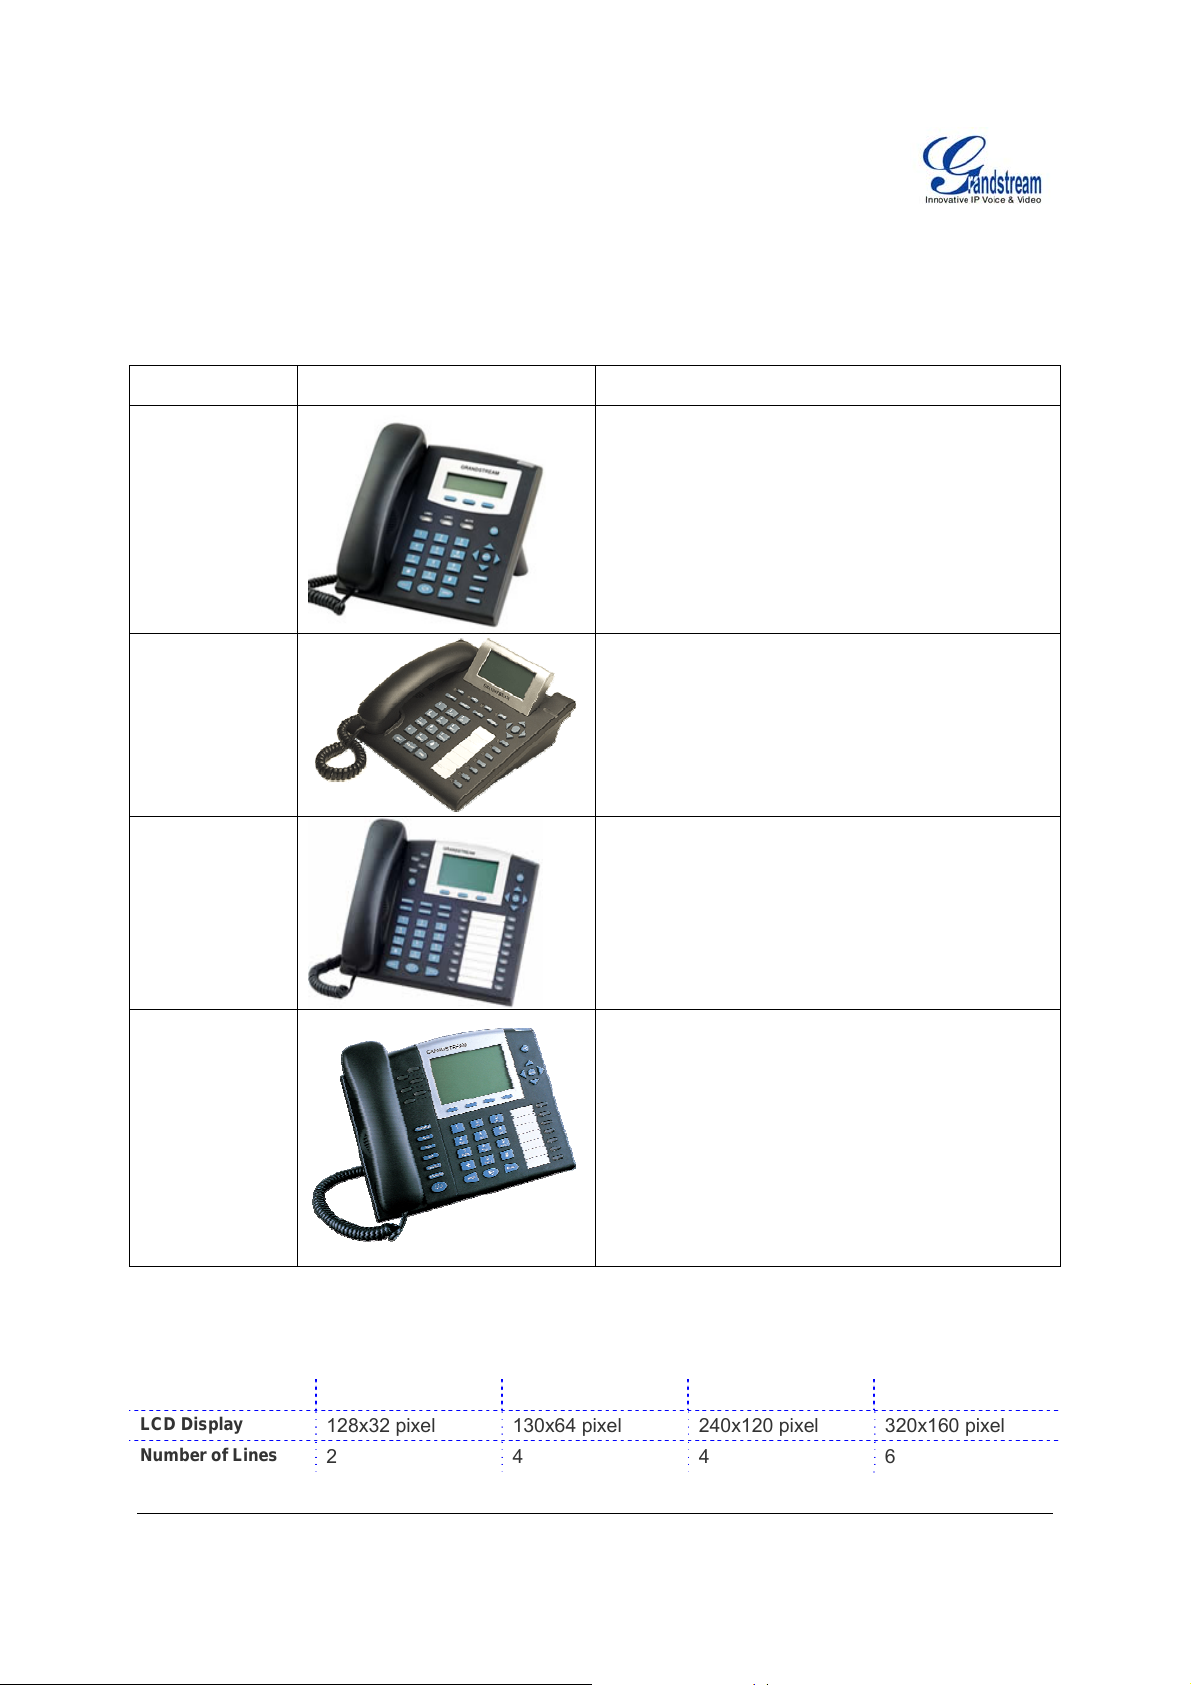
Table 3: GXP Product Models
Model Picture Overview
GXP1200 is an entry-level SIP phone. It features:
y Two lines
y Three XML programmable soft keys
GXP-1200
GXP2000 is a mainstream SIP phone. It features:
y Four lines
GXP-2000
y Seven programmable hard keys
GXP2010 is a key system SIP phone. It features:
y Four lines
y Eighteen programmable hard keys
GXP-2010
y Three XML programmable soft keys
GXP2020 is an executive SIP phone. It features:
y Six lines
y Seven programmable hard keys
y Four XML programmable soft keys
GXP-2020
Table 4: GXP Comparison Guide
Features GXP-1200 GXP-2000 GXP-2010 GXP-2020
LCD Display
Number of Lines
128x32 pixel 130x64 pixel 240x120 pixel 320x160 pixel
2 4 4 6
Grandstream Networks, Inc. GXP User Manual Page 8 of 38
Firmware 1.1.5.15 Last Updated: 12/2007
Page 9
Programmable
Hard Keys
Soft Keys
Extension Module
No 7 18 7
3 No 3 4
No
Yes, up to 2
Yes Yes
Expansion
Modules, 56 nodes
each
Table 5: GXP Key Features in a Glance
Features Benefits
Open Standards Compatible
SIP 2.0, TCP/IP/UDP, RTP/RTCP, HTTP/HTTPS, ARP/RARP, ICMP,
DNS (A record and SRV), DHCP (both client and server), PPPoE,
TFTP, NTP, Telnet, and TLS.
Superb Audio Quality
Advanced Digital Signal Processing (DSP), Silence suppression,
VAD, CNG, AGC.
Network Interfaces
Dual 10/100mbps Ethernet ports; headset jack (RJ22 and/or 2.5mm
jack).
Feature Rich
Traditional voice features including caller ID, call waiting, hold,
transfer, forward, block, autodial, off-hook dial, and click to dial.
Advanced Featur es
Multi-line support with dual-color LED, multi-party conferencing, line
extension interface, large back-lit graphic LCD, 5 navigation keys,
dedicated buttons for hold, send, speakerphone, headset, transfer,
conference (for up to 5 parties), mute, message, Do-not-disturb,
phone book, intercom/paging.
Advanced Functionality
Custom down-loadable ring-tones, SRTP, SIP over TLS (pending),
multi-language support and XML enabled, adjustable positioning
angles, wall mountable, AES encryption.
Table 6: GXP Hardware Specifications
LAN Interface (Ethernet ports)
Graphic LCD Display
Expansion Module Support
Headset Jack
Call Appearance LED
Grandstream Networks, Inc. GXP User Manual Page 9 of 38
Firmware 1.1.5.15 Last Updated: 12/2007
Two (2) 10/100 Mbps Full/Half Duplex Ethernet Switch with LAN and PC port
with auto detection
GXP-1200 GXP-2000 GXP-2010 GXP-2020
128x32 pixel 130x64 pixel 240x120 pixel 320x160 pixel
GXP-1200 GXP-2000 GXP-2010 GXP-2020
No Yes Pending Pending
GXP-1200 GXP-2000 GXP-2010 GXP-2020
2.5mm and
RJ22
2.5mm 2.5mm and
RJ22
2.5mm and
RJ22
Dual color (green/red)
Page 10
Power over Ethernet
Universal Switching
Power Adaptor
Dimension
Weight
Temperature
Humidity
Compliance
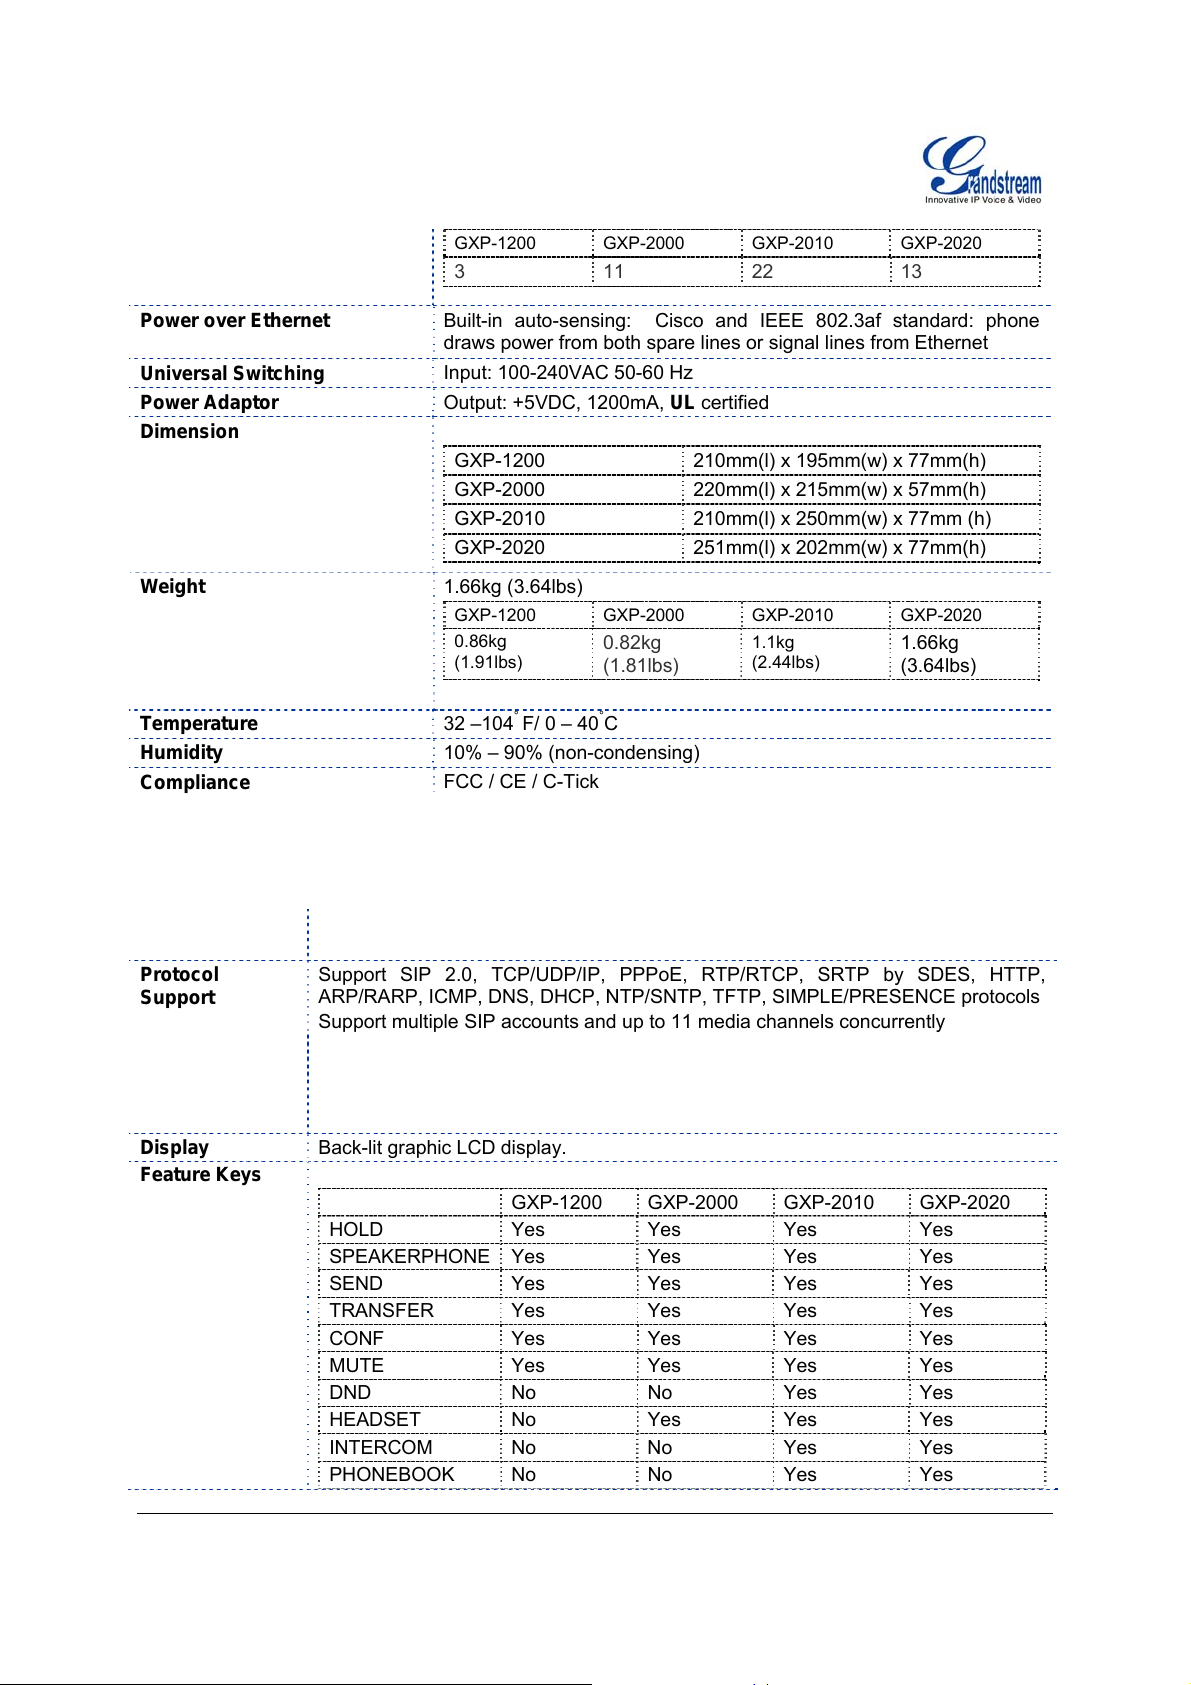
GXP-1200 GXP-2000 GXP-2010 GXP-2020
3 11 22 13
Built-in auto-sensing: Cisco and IEEE 802.3af standard: phone
draws power from both spare lines or signal lines from Ethernet
Input: 100-240VAC 50-60 Hz
Output: +5VDC, 1200mA, UL certified
GXP-1200 210mm(l) x 195mm(w) x 77mm(h)
GXP-2000 220mm(l) x 215mm(w) x 57mm(h)
GXP-2010 210mm(l) x 250mm(w) x 77mm (h)
GXP-2020 251mm(l) x 202mm(w) x 77mm(h)
1.66kg (3.64lbs)
GXP-1200 GXP-2000 GXP-2010 GXP-2020
0.86kg
(1.91lbs)
0.82kg
(1.81lbs)
1.1kg
(2.44lbs)
1.66kg
(3.64lbs)
32 –104
°
F/ 0 – 40°C
10% – 90% (non-condensing)
FCC / CE / C-Tick
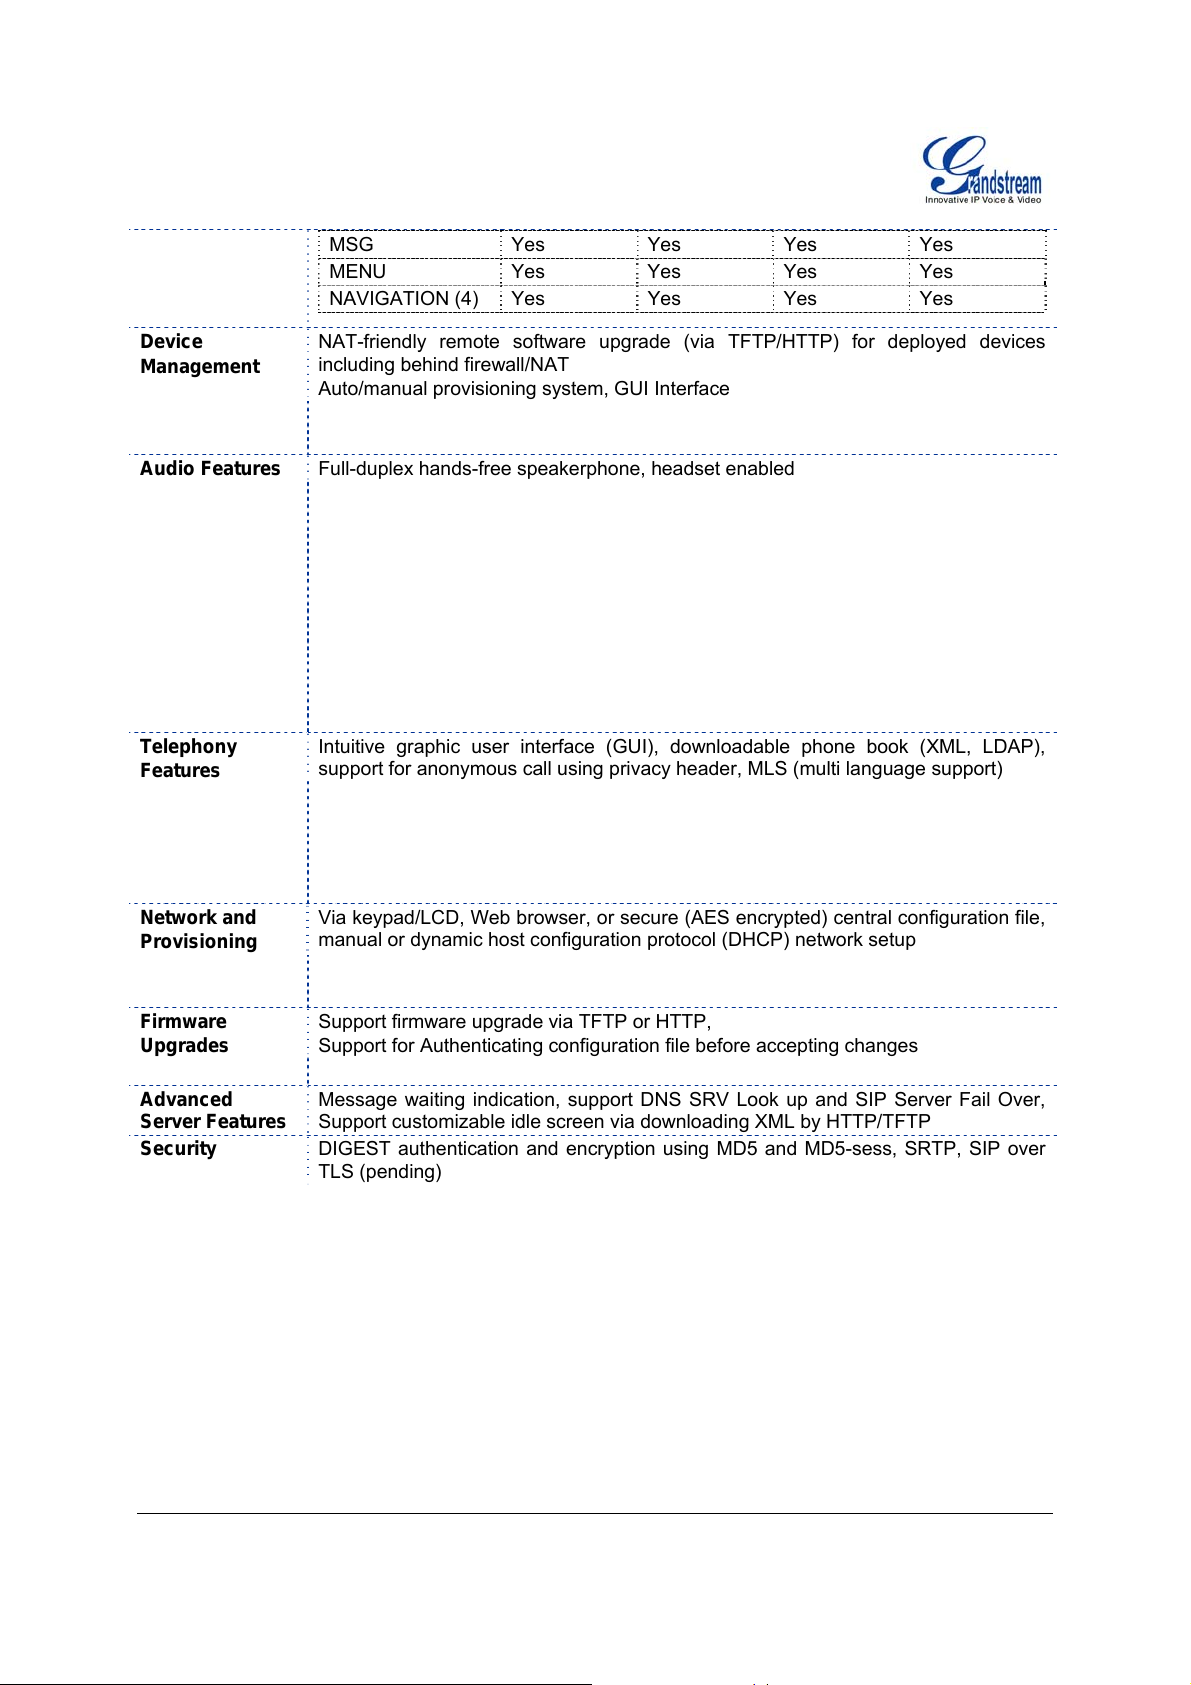
Table 7: GXP Technical Specifications
Lines
Multiple direct lines with independent SIP accounts, programmable speed dial keys,
XML programmable soft-keys
Protocol
Support
Support SIP 2.0, TCP/UDP/IP, PPPoE, RTP/RTCP, SRTP by SDES, HTTP,
ARP/RARP, ICMP, DNS, DHCP, NTP/SNTP, TFTP, SIMPLE/PRESENCE protocols
Support multiple SIP accounts and up to 11 media channels concurrently
Support SIP PUBLISH method (RFC 3903), SIP Presence package (RFC 3856,
3863) for use of 7 MFKs, SIP Dialog package (RFC 4235)
Support for SIP MESSAGE method (RFC 3428)
Stores up to 100 incoming IM messages (drops IM message 101 plus)
Display
Feature Keys
Back-lit graphic LCD display.
GXP-1200 GXP-2000 GXP-2010 GXP-2020
HOLD Yes Yes Yes Yes
SPEAKERPHONE Yes Yes Yes Yes
SEND Yes Yes Yes Yes
TRANSFER Yes Yes Yes Yes
CONF Yes Yes Yes Yes
MUTE Yes Yes Yes Yes
DND No No Yes Yes
HEADSET No Yes Yes Yes
INTERCOM No No Yes Yes
PHONEBOOK No No Yes Yes
Grandstream Networks, Inc. GXP User Manual Page 10 of 38
Firmware 1.1.5.15 Last Updated: 12/2007
Page 11
Device
Management
MSG Yes Yes Yes Yes
MENU Yes Yes Yes Yes
NAVIGATION (4) Yes Yes Yes Yes
NAT-friendly remote software upgrade (via TFTP/HTTP) for deployed devices
including behind firewall/NAT
Auto/manual provisioning system, GUI Interface
Support Layer 2 (802.1Q, VLAN, 802.1p) and Layer 3 QoS (ToS, DiffServ, MPLS)
Expansion interface, Address Book
Audio Features
Full-duplex hands-free speakerphone, headset enabled
Advanced Digital Signal Processing (DSP)
Dynamic negotiation of codec and voice payload length
Support for G.723,1 (5.3/6.3K), G.729A/B, G.711 a/µ-law, G.726-32, G.722 (wide-
band), GSM and iLBC codecs
In-band and out-of-band DTMF (in audio, RFC2833, SIP INFO)
Silence Suppression, VAD (voice activity detection), CNG (comfort noise
generation), ANG (automatic gain control)
Acoustic Echo Cancellation (AEC) with Acoustic Gain Control (AGC) for
speakerphone mode, Support side tone
Telephony
Features
Adaptive jitter buffer control (patent-pending) and packet delay & loss concealment
Intuitive graphic user interface (GUI), downloadable phone book (XML, LDAP),
support for anonymous call using privacy header, MLS (multi language support)
Voice mail indicator, downloadable custom ring-tones, call hold, call transfer
(attended/blind), call forward, call waiting, caller ID, mute, redial, call log, caller ID
display or block, Do-Not-Disturb (DND) and volume control
Multi-party conferencing (up to 5), dial plans, off-hook auto dial, auto answer, early
dial and speed dial
Network and
Provisioning
Firmware
Upgrades
Advanced
Server Features
Via keypad/LCD, Web browser, or secure (AES encrypted) central configuration file,
manual or dynamic host configuration protocol (DHCP) network setup
Support NAT traversal using IETF STUN and Symmetric RTP
Support for IEEE 802.1p/Q tagging (VLAN), Layer 3 TOS
Support firmware upgrade via TFTP or HTTP,
Support for Authenticating configuration file before accepting changes
User specific URL for configuration file and firmware files
Message waiting indication, support DNS SRV Look up and SIP Server Fail Over,
Support customizable idle screen via downloading XML by HTTP/TFTP
Security DIGEST authentication and encryption using MD5 and MD5-sess, SRTP, SIP over
TLS (pending)
Grandstream Networks, Inc. GXP User Manual Page 11 of 38
Firmware 1.1.5.15 Last Updated: 12/2007
Page 12
Using the GXP SIP Enterprise Phone
GETTING FAMILIAR WITH THE LCD
GXP-20xx has a dynamic and customizable screen. The screen displays differently depending on
whether the phone is idle or in use (active screen).
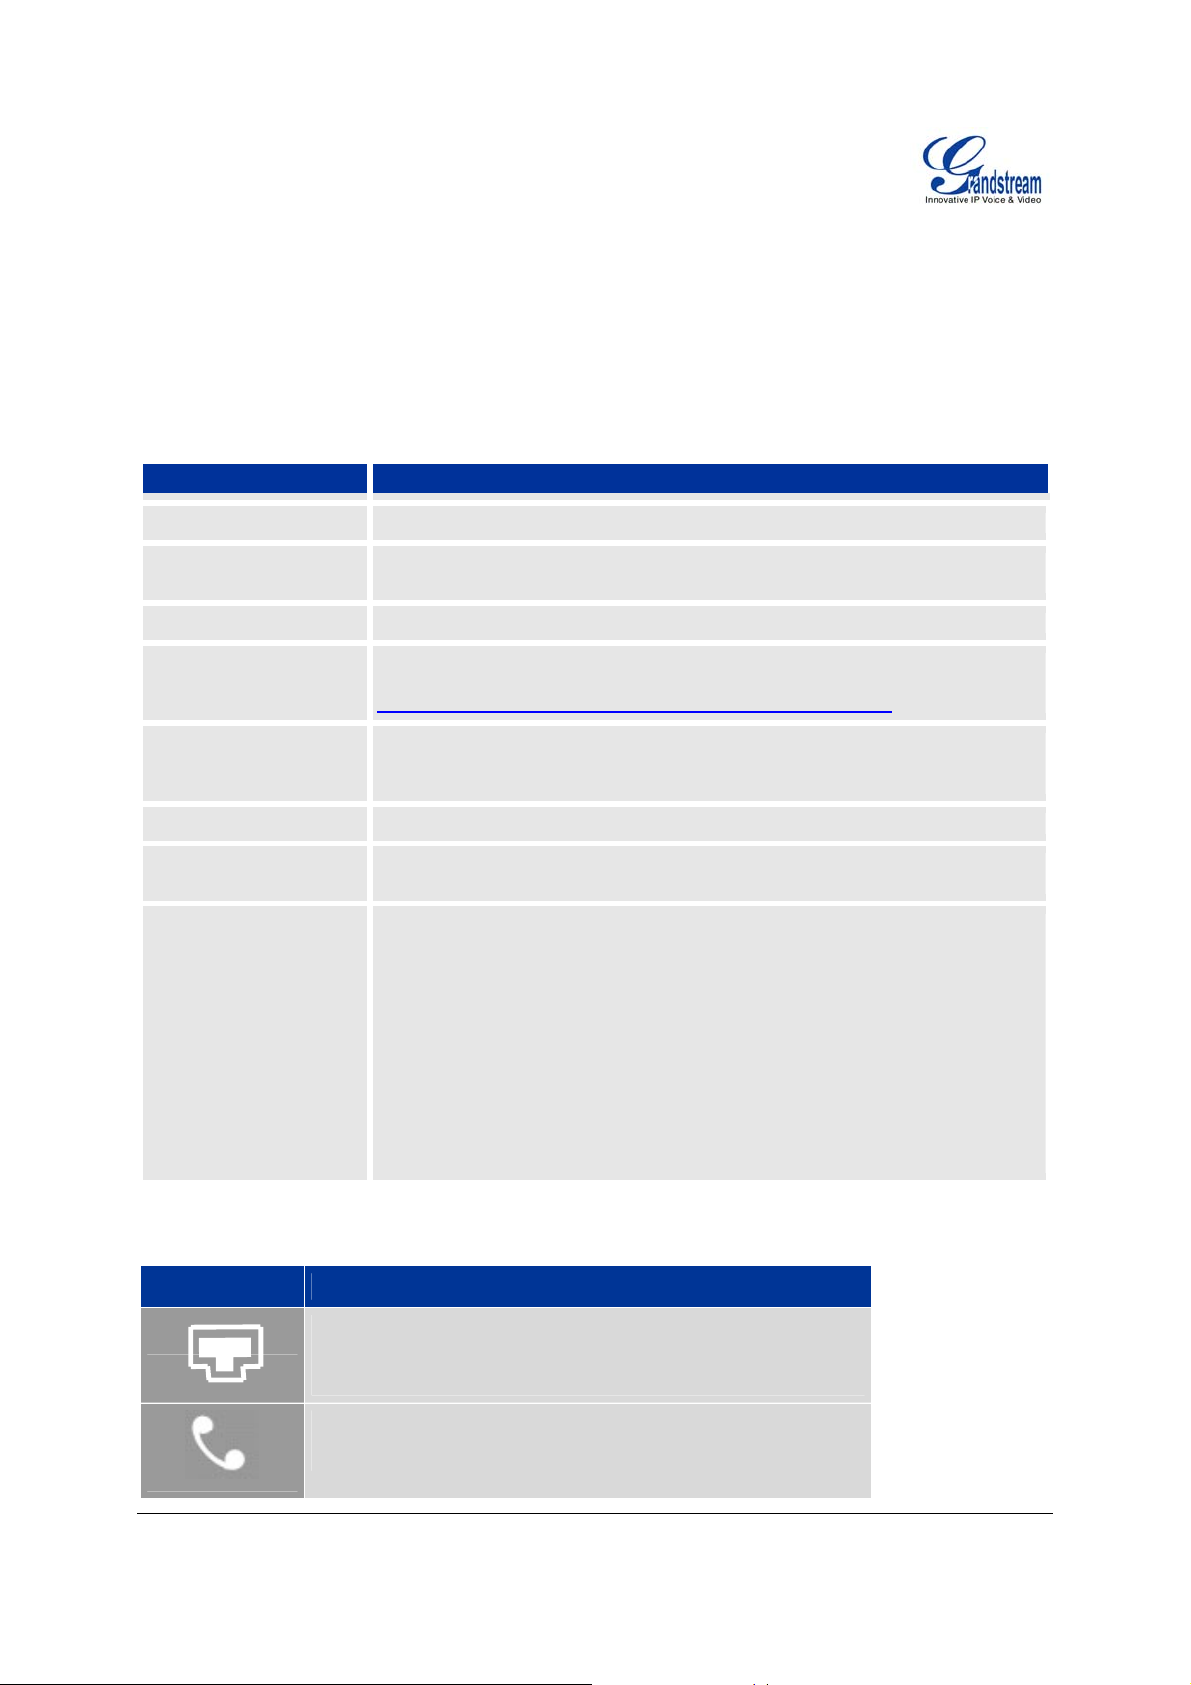
Table 8: LCD Buttons
Key Button Key Button Definitions
LINE SELECTORS
SIP PHONE LINES
DATE AND TIME
LOGO
NETWORK STATUS
STATUS BAR
LINE STATUS
INDICATOR
SOFT-BUTTONS
(Excluding GXP-2000)
Selects the phone line printed on its right-hand side.
Displays the available phone lines. Choose a phone line by pressing the
corresponding line selector on the left-hand side.
Displays the current date and time. Can be synchronized with Internet time servers.
Displays company logo. This logo can be customized. For more information on
customizing the logo, please check the document at:
http://www.grandstream.com/documents/XMLApplicationGuide.pdf
Shows the status of the phone and network. It will indicate whether the network is
down, starting or is running (show IP-number). Other messages such as “DO NOT
DISTURB” or “## MISSED CALLS” are shown here too.
Shows the status of the phone, using icons as shown in the next table.
Displays the name of the account that is in use. Select another account by pressing
the LINE SELECTOR BUTTONS
The soft-buttons are context sensitive and will change depending on the status of
the phone. Typical functions assigned to soft-buttons are:
• NEW CALL Press this button to make a new hand-free call.
• FORW ARD ALL Unconditionally forwards the main phone line to another
phone
• MISSED CALLS This option shows up there were unanswered calls to this
phone. The MissedCalls option shows a list of the missed
calls
• CALL RETURN Calls the phone that called/tried to call your phone last.
• REDIAL Redials the last number
• END CALL Hangs up phone
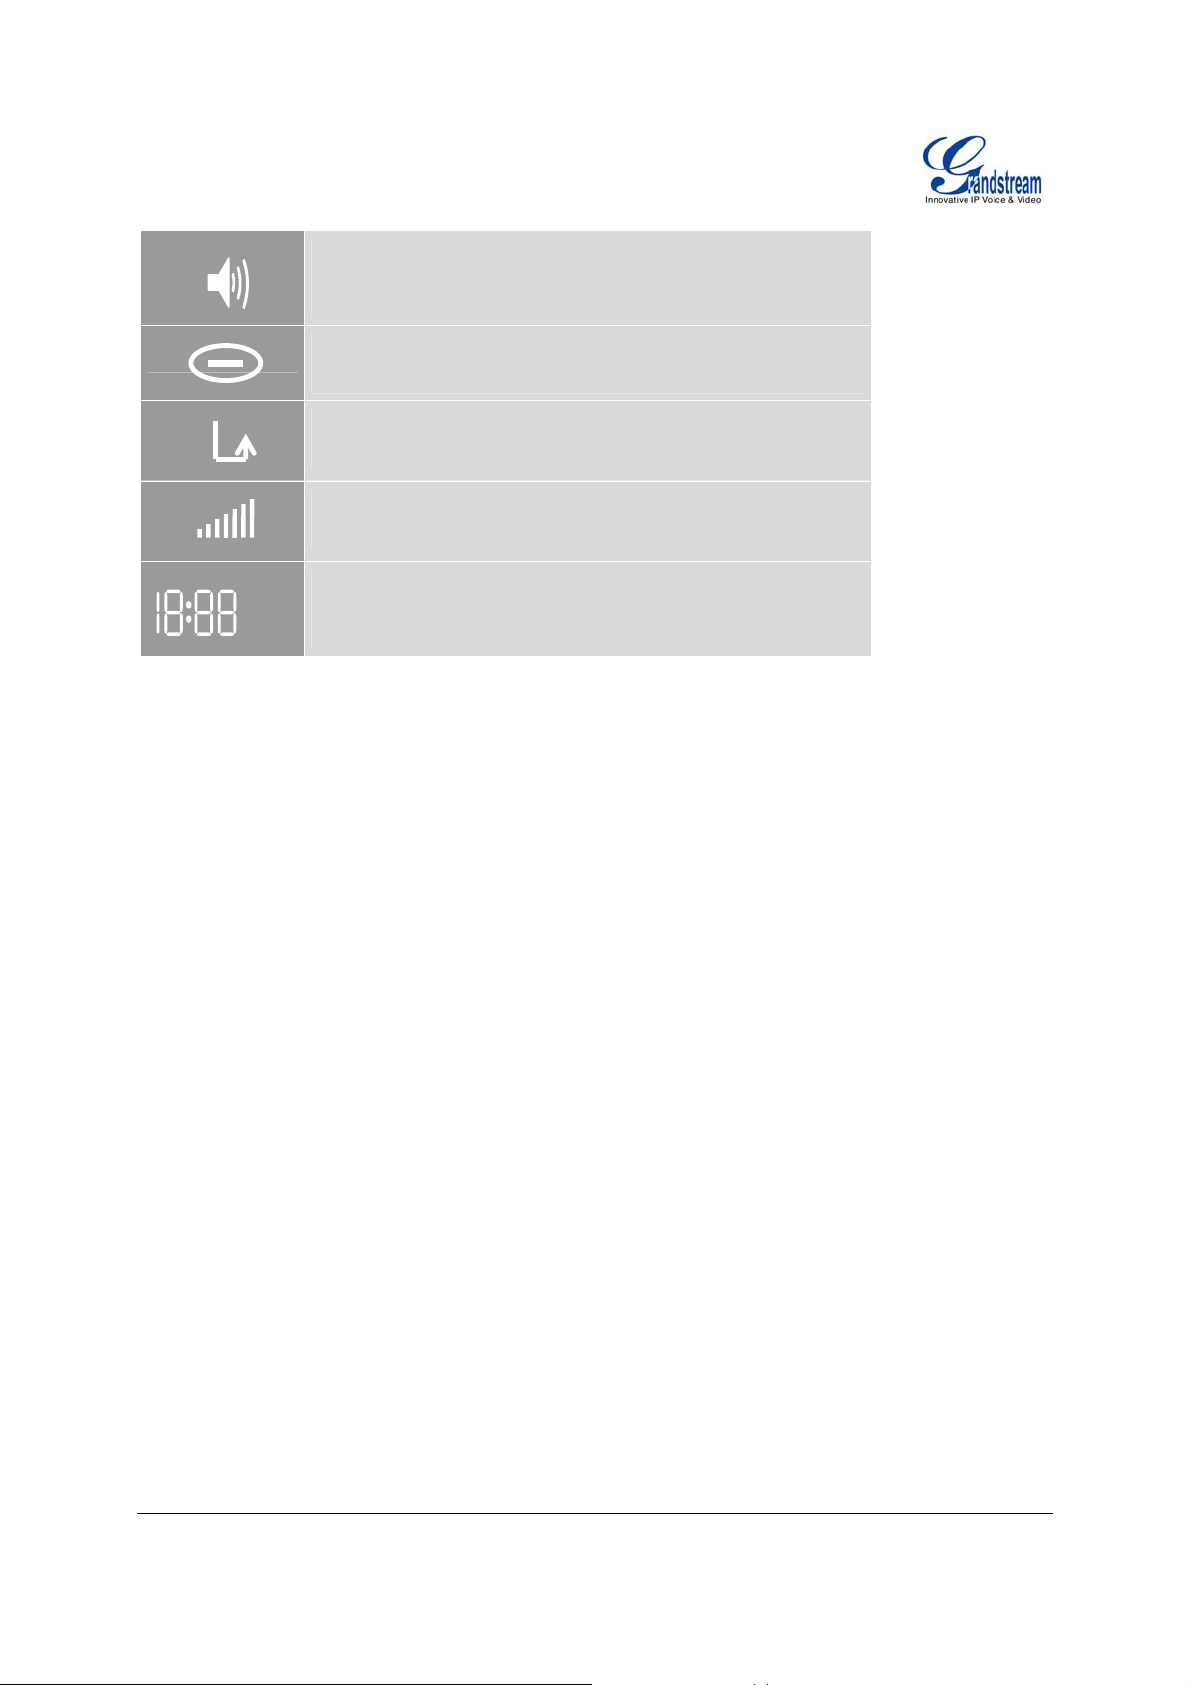
Table 9: LCD Icons
Icon LCD Icon Definitions
Grandstream Networks, Inc. GXP User Manual Page 12 of 38
Firmware 1.1.5.15 Last Updated: 12/2007
Connectivity Status / SIP Proxy/Server Icon:
Solid – connected to SIP Server/IP address received
Blinking – physical connection failed
Blank – SIP Proxy/Server not registered
Phone Status Icon:
OFF when the handset is on-hook
ON when the handset is off-hook
Page 13
AM
PM
Speaker Phone Status Icon:
FLASH when phone rings or a call is pending
OFF when the speakerphone is off
ON when the speakerphone is on
DND Icon:
ON when the “do not disturb” is activated
Activate by pressing MUTE/DEL button twice
Calls Forwarded Icon:
INDICATES calls are forwarded
Follow ‘call forwarding’ procedures
Handset, Speakerphone and Ring Volume Icon:
Each icon appears next to the volume icon
To adjust volume, use the up/down button
Real–time Clock:
Synchronized to Internet time server
Time zone configurable via web browser
AM/PM indicator
Grandstream Networks, Inc. GXP User Manual Page 13 of 38
Firmware 1.1.5.15 Last Updated: 12/2007
Page 14
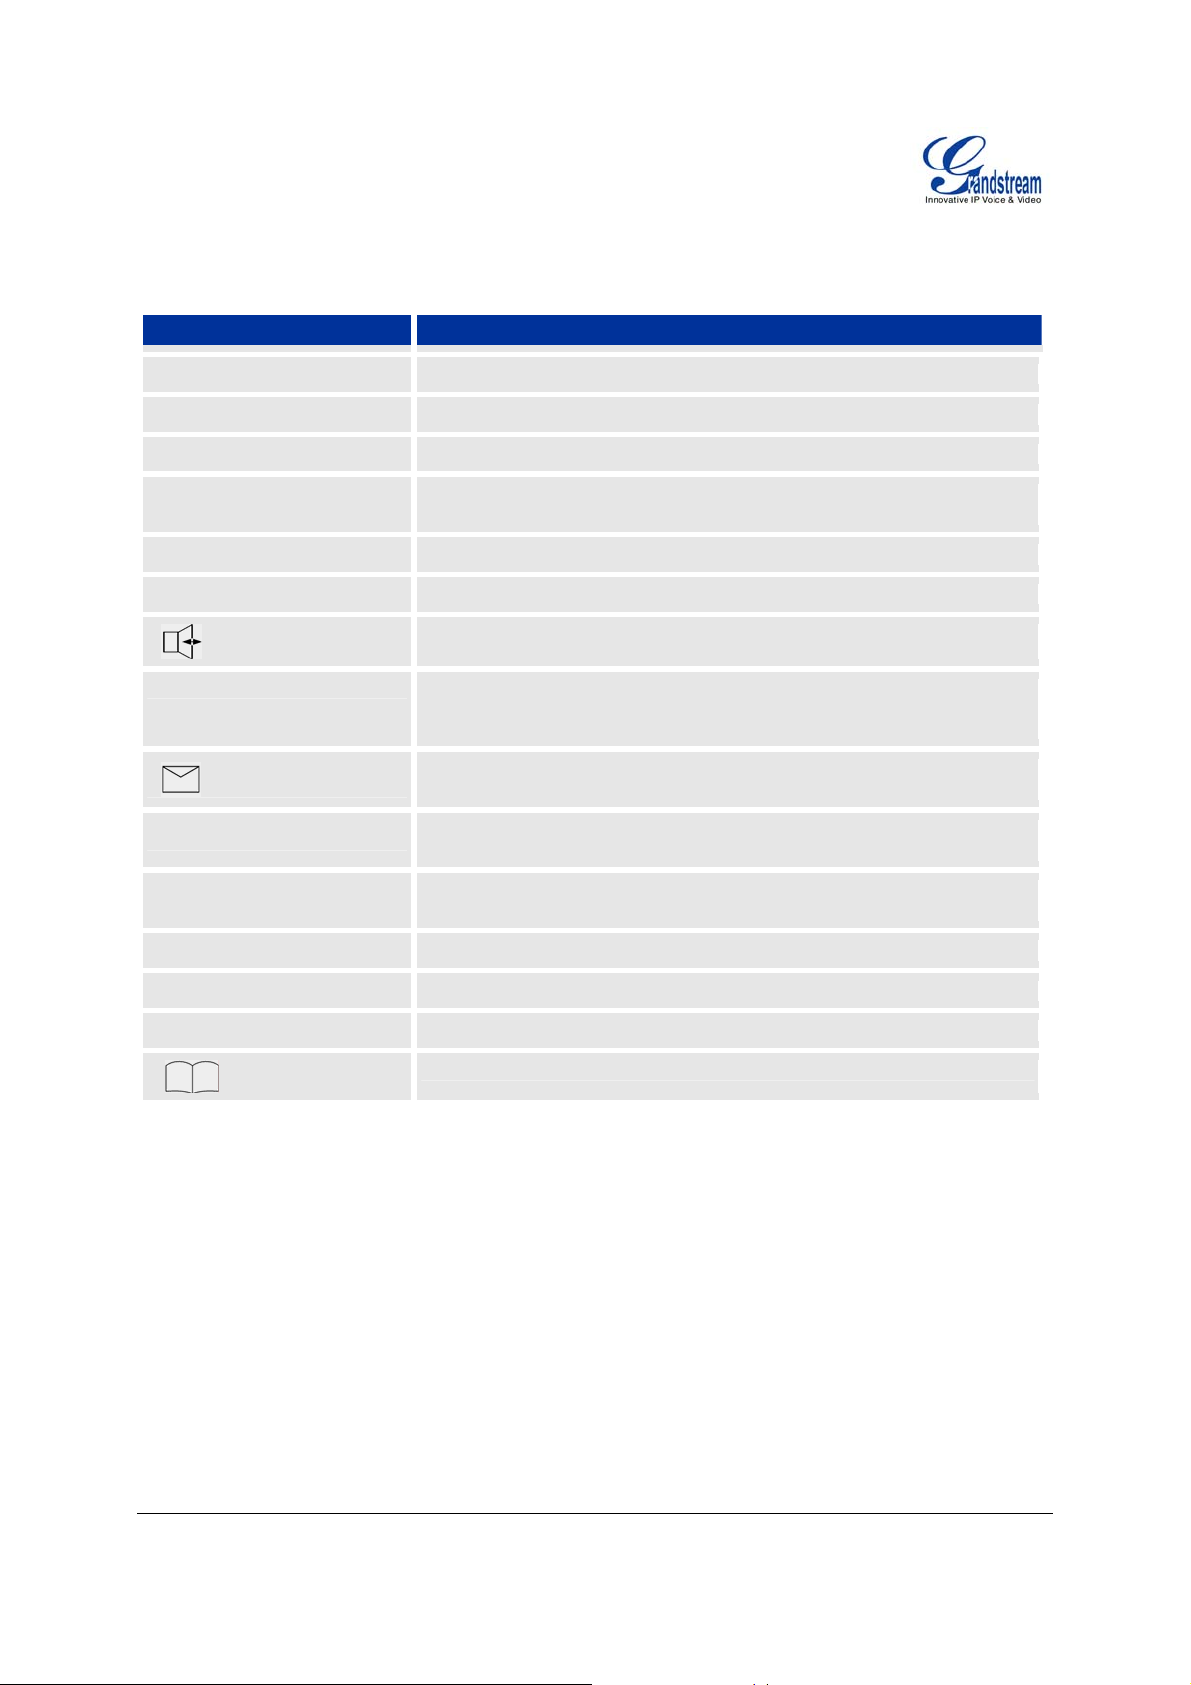
Table 10: GXP Keypad Buttons
Key Button Key Button Definitions
LINE BUTTONS
TRANSFER
CONF
MUTE
HOLD
MSG
SEND
MENU
0 - 9, *, #
DND
Line keys with LED, can be configured to different SIP profiles
TRANSFER key: Transfer an ACTIVE call to another number
Press CONF button to connect Calling/Called party into conference
Mute an active call; or Delete a key entry
Also used to ‘REJECT’ incoming call.
Place ACTIVE call on hold
Enter to retrieve voice mails or other messages
Enable/Disable hands-free speaker mode
Press SEND to dial a new number or redial the last number dialed. Press
send button to send a call immediately before “no key entry timeout” value
expires
Enter to retrieve voice mails or other messages
Enter Keypad Configuration “MENU” mode when phone is in IDLE mode.
Use as ENTER key when in Keypad Configuration.
Standard phone keypad; press # key to send call; press * key to for IVR
functions
DO NOT DISTURB key; Press DND to turn “Do not disturb” function on or off.
HEADSET
INTERCOM
Toggle between headset and speakerphone mode when in hands free mode
Turn intercom function on/off
Brings phonebook on screen
Grandstream Networks, Inc. GXP User Manual Page 14 of 38
Firmware 1.1.5.15 Last Updated: 12/2007
Page 15

MAKING PHONE CALLS
Handset, Speakerphone and Headset Mode
Handset can be toggled between Speaker and Headset. To switch between Handset and
Speaker/Headset, press the Hook Flash in the handset cradle or press the SPEAKER button.
Multiple SIP Accounts and Lines
GXP can support up to six independent SIP accounts depending on the product model. Each account is
capable of independent SIP server, user and NAT settings. Each of the line buttons is “virtually” mapped
to an individual SIP account. The name of each account is conveniently printed next to its corresponding
button. In off-hook state, select an idle line and the name of the account (as configured in the web
interface) is displayed on the LCD and a dial tone is heard.
For example: Configure ACCOUNT 1 and ACCOUNT 2 with Account Name as “VoIP 1”, “VoIP 2”,
respectively and ensure that they are active and registered. When LINE1 is pressed, you will hear a dial
tone and see “VoIP 1” on the LCD display; when LINE2 is pressed, you will hear a dial tone and see
“VoIP 2” on the LCD display.
To make a call, select the line you wish to use. The corresponding LINE LED will light up in green. User
can switch lines before dialing any number by pressing the same LINE button one or more times. If you
continue to press a LINE button, the selected account will circulate among the registered accounts.
For example: when LINE1 is pressed, the LCD displays “VoIP 1”; If LINE1 is pressed twice, the LCD
displays “VoIP 2” and the subsequent call will be made through SIP account 2.
Incoming calls to a specific account will attempt to use its corresponding LINE if it is not in use. When
the “virtually” mapped line is in use, the GXP will flash the next available LINE (from left to right, or from
top to bottom for Multi Purpose Keys) in red. A line is ACTIVE when it is in use and the corresponding
LED is red.
Completing Calls
There are six ways to complete a call:
1. D
IAL: To make a phone call.
• Take Handset/SPEAKER/Headset off-hook
or press an available LINE key (activates speakerphone)
or press the NEW CALL soft-key.
• The line will have a dial tone and the primary line (LINE1) LED is red.
If you wish, select another LINE key (alternative SIP account).
• Enter the phone number
• Press the SEND key
or press the “DIAL” soft-key.
2. R
EDIAL: To redial the last dialed phone number.
When redialing the phone will use the same SIP account as was used for the last call. Thus,
when the third SIP account was made for the last call/call attempt, the phone will use the third
account to redial.
• Take Handset/SPEAKER/Headset off-hook or
press an available LINE key (activates speakerphone), the corresponding LED will be red.
• Press the SEND button
or press the REDIAL soft-key.
Grandstream Networks, Inc. GXP User Manual Page 15 of 38
Firmware 1.1.5.15 Last Updated: 12/2007
Page 16

3. CALL RETURN: To call the last phone number that called your phone.
When returning a call, the phone will use the same SIP account as the call was made to. Thus,
when returning a call made to the third SIP account, the phone will use the third SIP account
return the call.
i. Hand-free option
1. Press the CALL RETURN soft-key
ii. Hand-set option
1. Take the Handset off-hook
2. Press the CALL RETURN soft-key
4. U
SING THE CALL HISTORY: To call the a phone number in the phone’s history
When using the call history, the phone will use the same SIP account as was used for the last
call/call attempt. Thus, when returning a call made to the third SIP account, the phone will use the
third SIP account return the call.
• Press the MENU button to bring up the Main Menu.
• Select Call History and then “Received Calls”, “Missed Calls” or “Dialed Calls” depending
on your needs
• Select phone number using the arrow keys
• Press OK to select
• Press OK again to dial.
5. U
SING THE PHONEBOOK: Calling a phone in from the phone’s phonebook.
Each entry in the phonebook can be attached to an individual SIP account. The phone will use
that SIP account to make the phone call.
• Go to the phonebook by:
i. Pressing the phonebook button (bottom, left-hand side of phone), or
ii. Pressing the DOWN arrow key, or
iii. Pressing the menu button and
Selecting “Phone book” and
Press MENU
• Select the phone number by using the arrow keys
• Press OK so select
• Press OK again to dial.
AGING/INTERCOM:
6. P
The paging/intercom function can only be used if the SERVER/PBX supports this feature and
both the phones and PBX are correctly configured.
• Take the Handset/SPEAKER/Headset off-hook,
• Select the LINE key associated with account
• Press OK key to display LCD: LINEx: PAGE USING.
• Dial the phone number you want to Page/Intercom
• Press SEND key.
NOTE: Dial-tone and dialed number display occurs after the handset is off-hook and the line key is
selected. The phone waits 4 seconds (by default; No key Entry Timeout) before sending and initiating the
call. Press the “SEND” or “#” button to override the 4 second delay.
Speed Dial
The Multi Purpose Key buttons, located on the right-hand-side of the phone, can be configured for speed
dial. Press the speed dial button to automatically call the assigned extension.
Grandstream Networks, Inc. GXP User Manual Page 16 of 38
Firmware 1.1.5.15 Last Updated: 12/2007
Page 17

Note: The multi-functional buttons will function as LINE keys when all LINEs are busy. The LED will flash
in red to indicate an incoming call. Press the button to pick up the call. If any one of the Multi Purpose
Keys is associated with a call, the button’s speed dial/BLF function will not work.
Making Calls using IP Addresses
Direct IP calling allows two phones to talk to each other in an ad hoc fashion without a SIP proxy. VoIP
calls can be made between two phones if:
• Both phones have public IP addresses, or
• Both phones are on a same LAN/VPN using private or public IP addresses, or
• Both phones can be connected through a router using public or private IP addresses (with
necessary port forwarding or DMZ)
To make a direct IP call, please follow these steps:
1. Press MENU button to bring up MAIN MENU.
2. Select “Direct IP Call” using the arrow-keys.
3. Press OK to select.
4. Input the 12-digit target IP address. (Please see example below).
5. Press OK key to initiate call.
To make a quick IP call, please see next section.
For example: If the target IP address is 192.168.1.60 and the port is 5062 (e.g. 192.168.1.60:5062),
input the following: 192*168*1*60#5062 - The “ * ” key represent the dot“.” ; The “#” key represent colon
“:”. Press OK to dial out.
Quick IP Call Mode
The GXP also supports Quick IP call mode. This enables the phone to make direct IP-calls, using only the
last few digits (last octet) of the target phone’s IP-number.
This is possible only if both phones are in under the same LAN/VPN. This simulates a PBX function using
the CMSA/CD without a SIP server. Controlled static IP usage is recommended.
Setting up the phone to make Quick IP calls
To enable Quick IP calls, the phone has to be setup first. This is done through the web-setup function. In
the “Advanced Settings” page, set the "Use Quick IP-call mode to YES. When #xxx is dialed, where x is
0-9 and xxx <=255, a direct IP call to aaa.bbb.ccc.XXX is completed. “aaa.bbb.ccc” is from the local IP
address regardless of subnet mask. The numbers #xx or #x are also valid. The leading 0 is not required
(but OK).
For example:
192.168.0.2 calling 192.168.0.3 -- dial #3 follow by SEND or #
192.168.0.2 calling 192.168.0.23 -- dial #23 follow by SEND or #
192.168.0.2 calling 192.168.0.123 -- dial #123 follow by SEND or #
192.168.0.2: dial #3 and #03 and #003 results in the same call -- call 192.168.0.3
NOTE: If you have a SIP Server configured, a Direct IP-IP still works. If you are using STUN, the Direct
IP-IP call will also use STUN. Configure the “Use Random Port” to “NO” when completing Direct IP calls.
Grandstream Networks, Inc. GXP User Manual Page 17 of 38
Firmware 1.1.5.15 Last Updated: 12/2007
Page 18

ANSWERING PHONE CALLS
Receiving Calls
1. Incoming single call: Phone rings with selected ring-tone. The corresponding account LINE
flashes red. Answer call by taking Handset/SPEAKER/Headset off hook or pressing SPEAKER
or by pressing the corresponding account LINE button.
2. Incoming multiple calls: When another call comes in while having an active call, the phone will
produce a Call Waiting tone (stutter tone). Next available lines will flash red (as described in
section 4.3.2). Answer the incoming call by pressing its corresponding LINE button. The current
active call will be put on hold.
3. Paging/Intercom Enabled: Phone beeps once and automatically establishes the call via
SPEAKER. (PBX (or Server) must also supports this feature)
Do Not Disturb
1. Press the “DND” button if you do not want to take a call. This will send the caller directly to
voicemail.
2. Press the “DND” button to set phone to ‘do not disturb’ (icon will be on the screen). The phone
will not ring and send caller directly to voicemail. (see note above)
PHONE FUNCTIONS DURING A PHONE CALL
Call Waiting/ Call Hold
1. Hold: Place a call on ‘hold’ by pressing the “HOLD” button.
2. Resume: Resume call by pressing the corresponding blinking LINE.
3. Multiple Calls
to place or receive another call. Call Waiting tone (stutter tone) audible when line is in use.
: Automatically place ACTIVE call on ‘HOLD’ by selecting another available LINE
Mute/Delete
1. Press the MUTE button to enable/disable muting the microphone.
2. The “Line Status Indicator” will show “LINEx: SPEAKING” or “LINEx: MUTE” to indicate whether
the microphone is muted.
NOTE: Pressing MUTE button for an incoming call will reject the call. MUTE button also functions as
delete key when user wish to delete the last entered digit.
Call Transfer
GXP supports both Blind and Attended (or supervised) transfer:
1. Blind Transfer: Press “TRANSFER (or TRNF for GXP-2000)” button, then dial the number and
press the “SEND” button to complete transfer of active call.
2. Attended (or Supervised) Transfer: Press “LINEx” button to make a call and automatically
place the ACTIVE LINE on HOLD. Once the call is established, press “TRANSFER (or TRNF)”
key to transfer the call and hang up.
NOTE: To transfer calls across SIP domains, SIP service providers must support transfer across SIP
domains. Blind transfer will usually use the primary account SIP profile.
Grandstream Networks, Inc. GXP User Manual Page 18 of 38
Firmware 1.1.5.15 Last Updated: 12/2007
Page 19

5-Way Conferencing
GXP can host conference calls and supports 5-way conference calling.
1. Initiate a Conference Call
Establish a connection with two or more parties
Press CONF button
Choose the desired line to join the conference by pressing the corresponding LINE button.
Repeat step 2 and 3 for all parties that you want to join the conference. This can be done
at any time, thus also if a n
2. Cancel Conference: Canceling establishing conference call.
If after pressing the “CONF” button, a user decides not to conference anyone, press
CONF again or the original LINE button.
This will resume two-way conversation.
3. End Conference:
Press HOLD to end the conference call and put all parties on hold;
To speak with an individual party, select the corresponding blinking LINE.
:
Voice Messages (Message Waiting Indicator)
A blinking red MWI (Message Waiting Indicator) indicates a message is waiting. Press the MSG button to
retrieve the message. An IVR will prompt the user through the process of message retrieval. Press a
specific LINE to retrieve messages for a specific line account.
NOTE:
• Each line has a separate voicemail account. Each account requires a voicemail portal number to
be configured in the “voicemail user id” field.
• To check which line account has a message 1) press the message button (this always checks the
primary account), 2) check each line for stutter tone or 3) check missed calls using the menu.
Busy Lamp Field
The Multi Purpose Key buttons can be configured for Busy Lamp Field function with a specified account.
When BLF is configured on one of the multi-functional buttons, the Speed Dial function will work when
that line is not in use. Call Pick Up is supported when user presses a flashing BLF key.
Grandstream Networks, Inc. GXP User Manual Page 19 of 38
Firmware 1.1.5.15 Last Updated: 12/2007
Page 20

CALL FEATURES
The GXP supports traditional and advanced telephony features including caller ID, caller ID w/name, call
forward/transfer/park/hold as well as intercom/paging and BLF.
Table 11: GXP Call Features
Key Call Features
*30 Block Caller ID (for all subsequent calls)
*31 Send Caller ID (for all subsequent calls)
*67 Block Caller ID (per call)
*82 Send Caller ID (per call)
*70 Disable Call Waiting (per Call)
*71 Enable Call Waiting (per Call)
*72 Unconditional Call Forward
Dial “*72” for a dial tone. Dial the forwarding number followed by “#”. Wait for dial
tone. LCD will display “Call FWD Activated”.
*73 Cancel Unconditional Call Forward: dial “*73” and get the dial tone, then hang up.
LCD will display “Call FWD Activated”.
*90 Busy Call Forward
Dial “*90” for a dial tone. Dial the forwarding number followed by “#”. Wait for a dial
tone. Hang up.
*91 Cancel Busy Call Forward: dial “*91”. Wait for dial tone. Hang up.
*92 Delayed Call Forward
Dial “*92” for a dial tone. Dial the forwarding number followed by “#”. Wait for a dial
tone. Hang up. LCD will display “Call FWD Activated”.
*93 Cancel Delayed Call Forward
Dial “*93” for a dial tone, then hang up.
C
USTOMIZED LCD SCREEN & XML
With its graphical LCD screen, soft-keys and XML-support, the GXP is a highly customizable phone. XML is
used to communicate between web-servers and the GXP to dynamically update the phone’s phonebook and
idle screen logo and functions.
XML Phonebook
The Grandstream GXP enables you to easily share and maintain a phonebook through the web. The XMLphonebook must be stored on a web-server. For more information on how to setup the phone to download the
phonebook, please check section Configuration with Web Br owser. For more information on how to create a
downloadable XML phonebook, detailed information and configuration guides are located on the website in the
GXP tab @ http://www.grandstream.com/resources.html
.
Grandstream Networks, Inc. GXP User Manual Page 20 of 38
Firmware 1.1.5.15 Last Updated: 12/2007
Page 21

Customizable Idle Screen and Soft-buttons
GXP also allows you to customize the idle-screen using your own logo on the display of the phone, instead of
the Grandstream logo. In addition to the logo, you can reprogram the soft-keys on GXP-1200/GXP2010/GXP2020 for your own customized applications. For more information about creating a custom idle screen
and/or reprogramming the soft-keys, please visit our website at: http://www.grandstream.com/resources.html
.
Grandstream Networks, Inc. GXP User Manual Page 21 of 38
Firmware 1.1.5.15 Last Updated: 12/2007
Page 22

Configuration Guide
The GXP can be configured in two ways. Firstly, using the Key Pad Configuration Menu on the phone; secondly,
through embedded web-configuration menu.
CONFIGURATION VIA KEYPAD
To enter the MENU, press the round button. Navigate the menu by using the arrow keys: up/down and
left/right. Press the OK button to confirm a menu selection, delete an entry by pressing the MUTE/DEL button.
The phone automatically exits MENU mode with an incoming call, the phone is off-hook or the MENU mode if
left idle for 20 seconds.
Press the MENU button to enter the key the Key Pad Menu. The menu options available are listed in table 8.
Table 12: Key Pad Configuration Menu
Call History
Status
Phone Book
Instant Messages
Direct IP call
Preference
Press Menu button to choose the menu item.
Press ‘←’ to return to the main menu.
Displays histories of incoming, dialed and missed calls.
Displays the network status, account statuses, software version and
MAC-address of the phone.
Displays the phonebook
Goes to voice messages
Displays the IP-call options menu
Press Menu button to enter this sub menu including
• “Do NOT Disturb”
DND (Do NOT Disturb) function could be turned on or off in
the “DO NOT Disturb” menu.
• Ring Tone
Choose different ring tones in the “Ring Tone” menu.
• Ring Volume
Press Menu button to hear the selected ring volume, press
‘←’ or ’ →’ to hear and adjust the ring tone volume.
• Download SCR XML
The phone will download the custom idle screen (if available)
• Erase Custom SCR
Custom idle screen will be erased and will be replaced with
default Grandstream logo.
Grandstream Networks, Inc. GXP User Manual Page 22 of 38
Firmware 1.1.5.15 Last Updated: 12/2007
Page 23

Configure
Press Menu button to display the configuration selections:
• Network.
To enable/disable DHCP.
To setup IP-address, Net mask and Gateway address
• SIP
To change SIP-server settings for primary account.
• Audio
• Upgrade
In this menu setting regarding the firmware server and config
server can be changed. It also enables the user to make the
phone attempt to download new firmware.
• Factory Reset
Key in the physical/MAC address on back of the phone.
Press Menu button to reset FACTORY DEFAULT setting. Do not
use Factory Reset unless you want to restore factory settings
Press ‘←’ to return the main menu.
Factory Functions
Press Menu to display the factory function items including
• Ethernet Loopback
Connect a cross Ethernet cable from your “PC” port, and the
“LAN” port. The test result is displayed on the screen. Use this
feature to diagnose the state of health of the RJ45 jacks. Press
Menu button to exit the diagnostic mode.
Note: Running the Ethernet Loopback mode with a normal
connection will cause IP loss.
• Audio Loopback
Speak into the handset. If you hear your voice in the handset,
your audio works fine.
Press Menu button to exit the mode.
• Diagnostic Mode
All LEDs will light up
Press any key on the keypad, to display the button name in the
LCD. Lift and put back the handset or press Menu button to exit
the diagnostic mode.
Press ‘←’ to return to the main menu.
Reboot
Press Menu button to reboot the device
Display “Exit”
Press Menu button to exit the menu
Exit
Exit from this menu.
Grandstream Networks, Inc. GXP User Manual Page 23 of 38
Firmware 1.1.5.15 Last Updated: 12/2007
Page 24
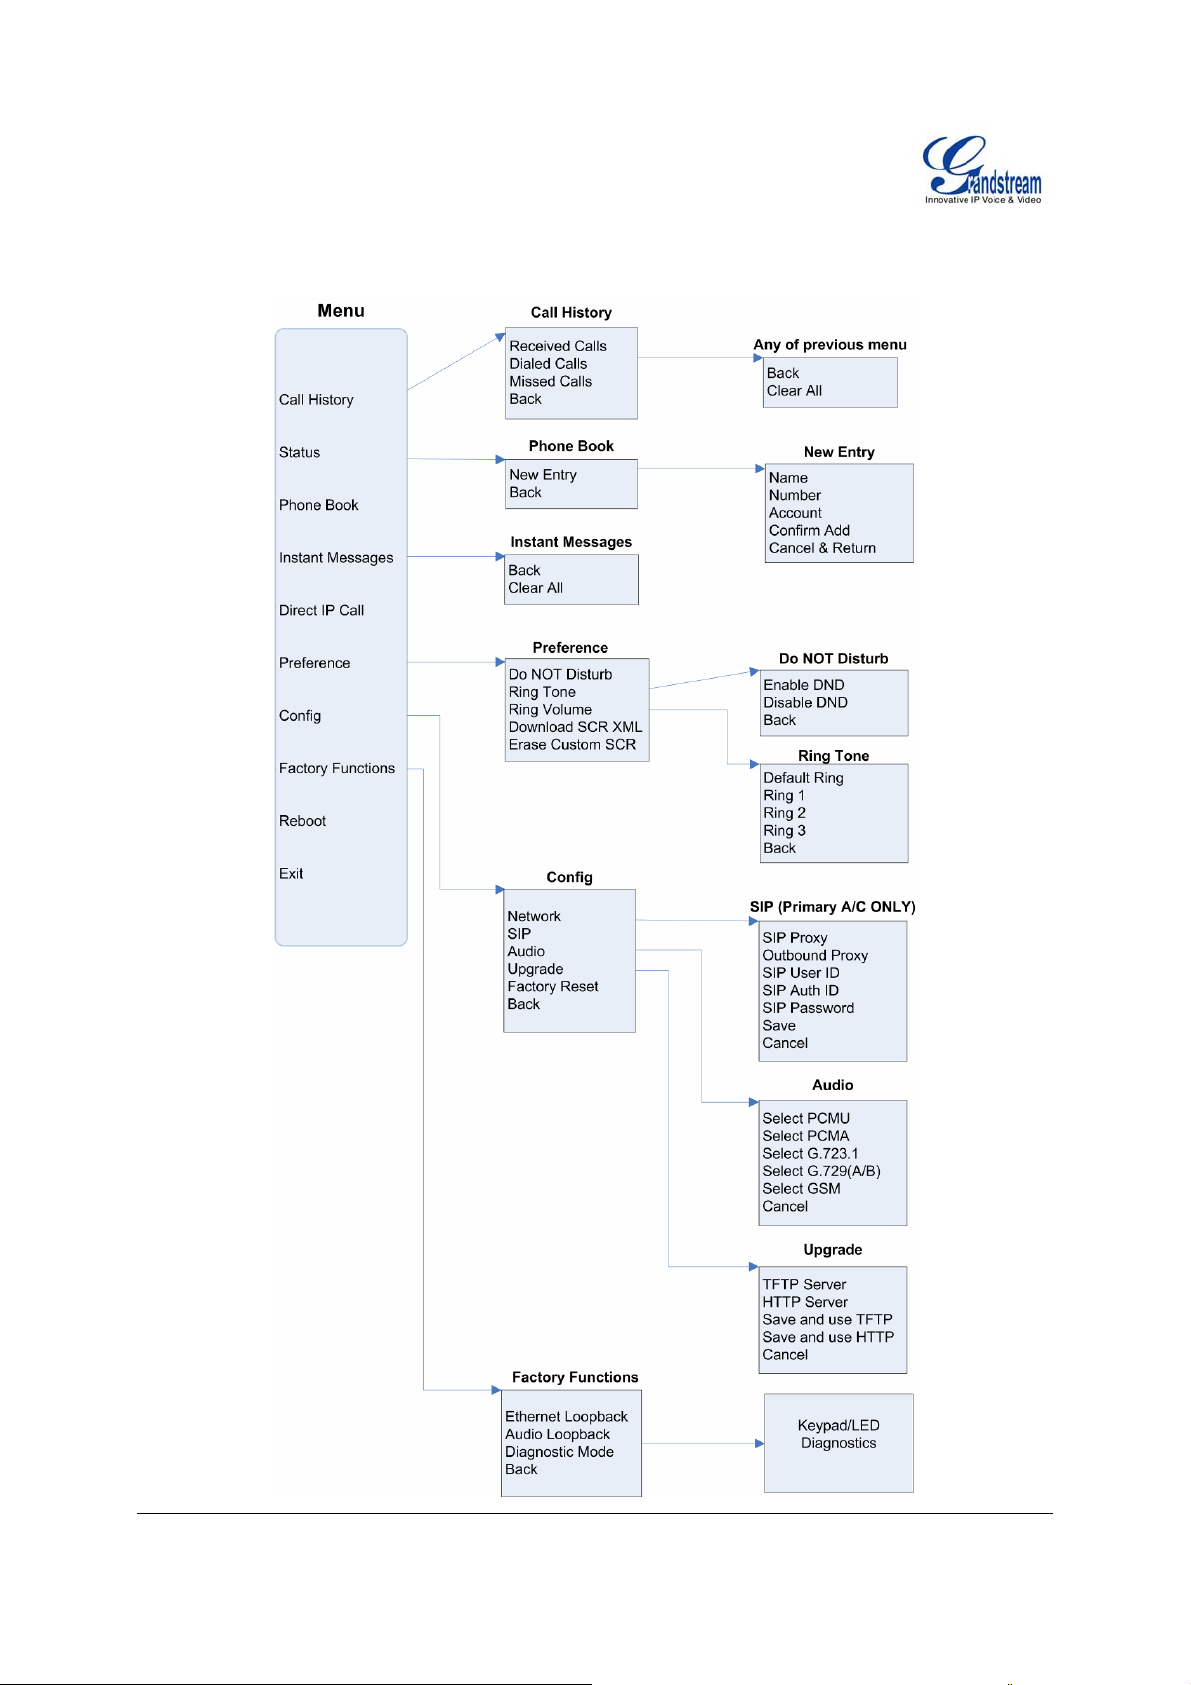
FIGURE 3: KEY PAD GUI CALL FLOW
Grandstream Networks, Inc. GXP User Manual Page 24 of 38
Firmware 1.1.5.15 Last Updated: 12/2007
Page 25

CONFIGURATION VIA WEB BROWSER
The GXP embedded Web server responds to HTTP/HTTPS GET/POST requests. Embedded HTML
pages allow a user to configure the IP phone through a Web browser such as Microsoft’s IE or Mozilla
Firefox.
Access the Web Configuration Menu
To access the phone’s Web Configuration Menu
• Connect the computer to the same network as the phone
• Make sure the phone is turned on and shows its IP-address
• Start a Web-browser on your computer
• Enter the phone’s IP-address in the address bar of the browser
• Enter the administrator’s password to access the Web Configuration Menu
1
The Web-enabled computer has to be connected to the same sub-network as the phone. This can
easily be done by connecting the computer to the same hub or switch as the phone is connected to. In
absence of a hub/switch (or free ports on the hub/switch), please connect the computer directly to the
phone using the PC-port on the phone.
2
If the phone is properly connected to a working Internet connection, the phone will display its IP
address. This address has the format: xxx.xxx.xxx.xxx, where xxx stands for a number from 0-255. You
will need this number to access the Web Configuration Menu. e.g. if the phone shows 192.168.0.60,
please use “http://192.168.0.60” in the address bar your browser.
3
The default administrator password is “admin”; the default end-user password is “123”.
NOTE: When changing any settings, always SUBMIT them by pressing the button on the bottom of the
page. Reboot the phone to have the changes take effect. If, after having submitted some changes, more
settings have to be changed, press the menu option needed.
1
2
3
Definitions
This section will describe the options in the Web configuration user interface. As mentioned, a used can
log in as an administrator or end-user.
Functions available for the end-user are:
• Status: Displays the network status, account statuses, software version and MAC-address of the
phone
• Basic: Basic preferences such as date and time settings, multi-purpose keys and LCD settings
can be set here.
Additional functions available to administrators are:
• Advanced Settings: To set advanced network settings, codec settings and XML configuration
settings.
• Account X: To configure each of the SIP accounts.
Grandstream Networks, Inc. GXP User Manual Page 25 of 38
Firmware 1.1.5.15 Last Updated: 12/2007
Page 26
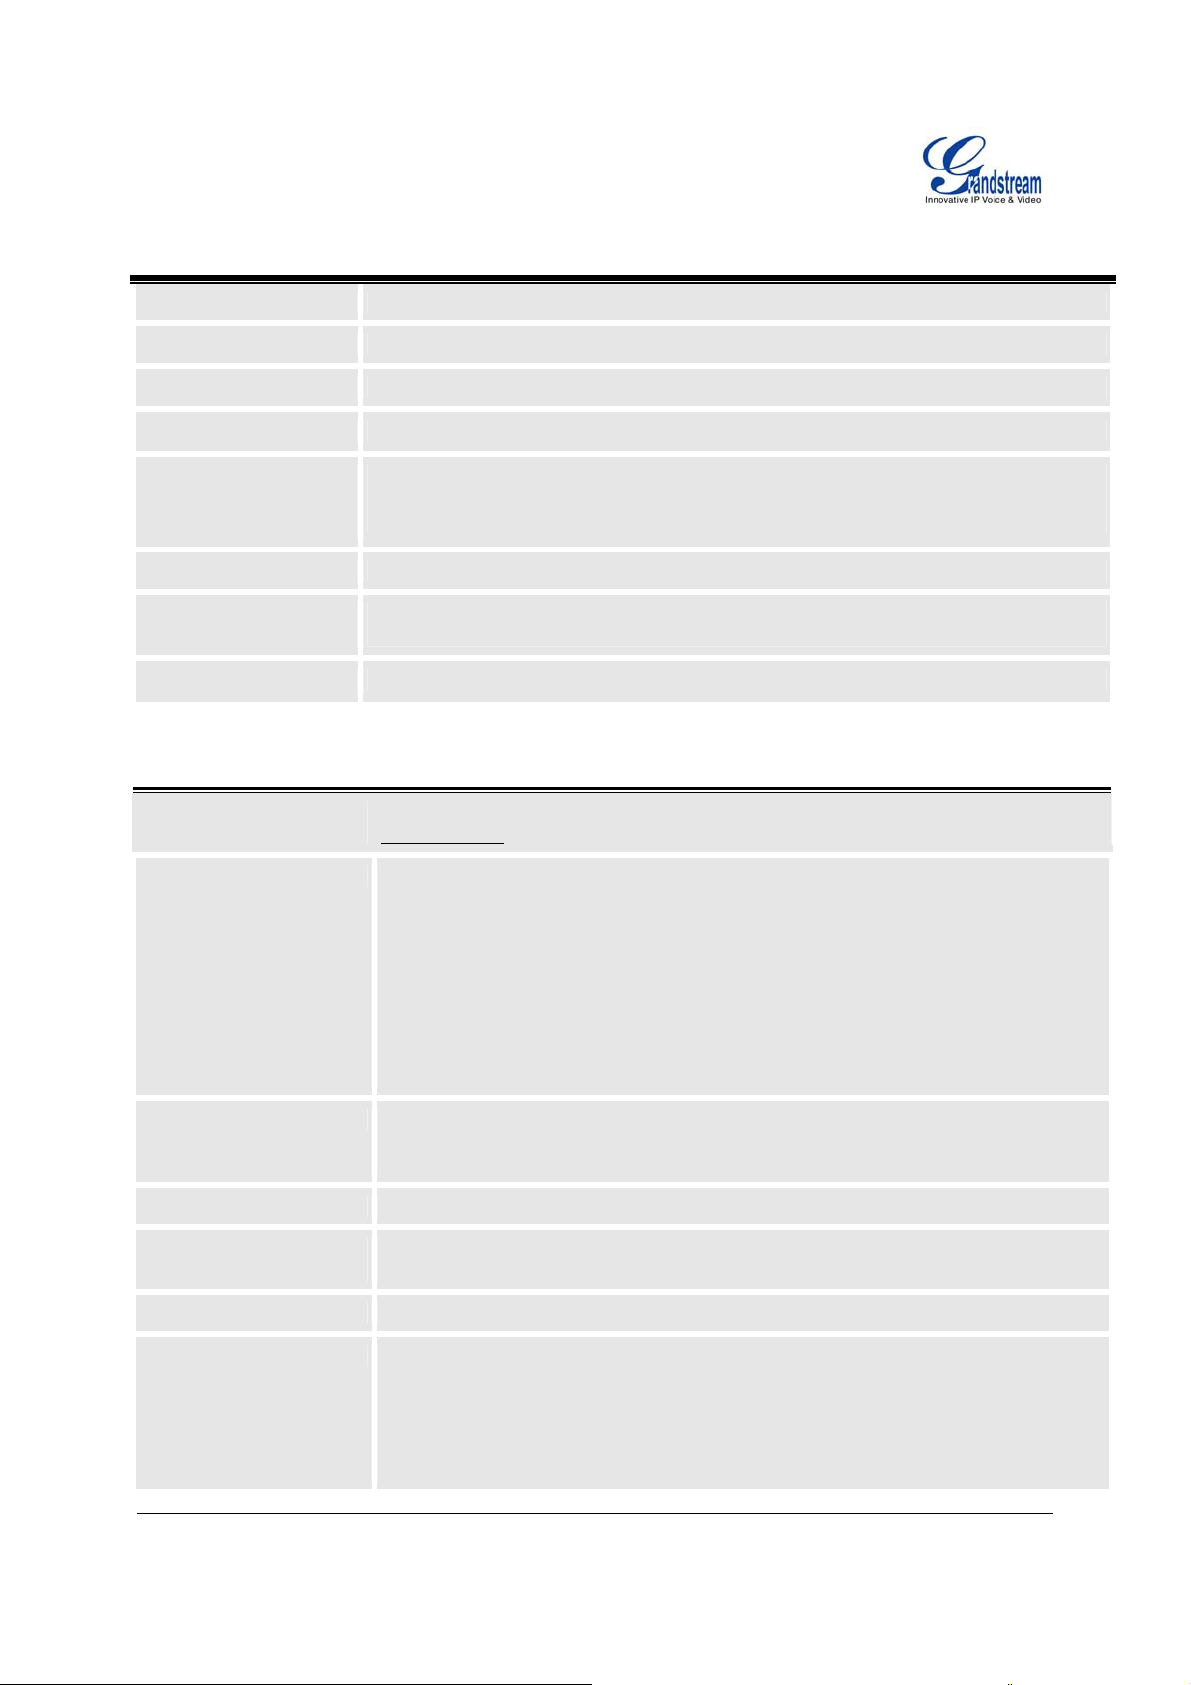
Table 13: Device Configuration - Status
Hardware Revision
MAC Address
IP Address
Product Model
Software Version
Hardware version number: Main Board, Interface Board
The device ID, in HEXADECIMAL format.
This field shows IP address of GXP
This field contains the product model information.
• Program: This is the main software (firmware) release number, always used to
identify the software (firmware) system of the phone.
• Boot: Booting code version number
System Up Time
Registered
This field shows system up time since the last reboot.
Indicates whether accounts are registered to the related SIP server(s). GXP can
support four unique SIP profiles.
PPPoE Link Up
Indicates whether the PPPoE connection is enabled (connected to a modem).
Table 14: Device Configuration – Basic Settings
End User
Password
IP Address
This contains the password to access the Web Configuration Menu. This field is
case sensitive with a maximum length of 25 characters.
There GXP operates in two modes:
1. DHCP mode: all the field values for the Static IP mode are not used (even
though they are still saved in the Flash memory.) The GXP acquires its IP
address from the first DHCP server it discovers on its LAN. The DHCP
option is reserved for NAT router mode. To use the PPPoE feature, set the
PPPoE account settings. The GXP establishes a PPPoE session if any of
the PPPoE fields are set.
2. Static IP mode: configure all of the following fields: IP address, Subnet
Mask, Default Router IP address, DNS Server 1 (primary), DNS Server 2
(secondary). These fields are set to zero by default.
Multi Purpose Key X
These options are used to assign a function to the corresponding multi purpose key.
Options available are: “Speed Dial”, “BLF”, “Presence Watcher” and “Eventlist BLF”.
Each function is connected to one of the accounts and has a target user ID.
Time Zone
LCD Backlight Always
On
Time Display Format
Date Display Format
This parameter controls the date/time display according to the specified time zone.
Turn on LC backlight at all times. Default is No. This option applies to GXP1200/GXP-2000 only.
LCD time display in 12 hour or 24 hour format
Choose one of the following formats:
• Year-Month-Day
• Month-Day-Year
• Day-Month-Year
This option applies to GXP-1200/GXP-2000 only.
Grandstream Networks, Inc. GXP User Manual Page 26 of 38
Firmware 1.1.5.15 Last Updated: 12/2007
Page 27

Display Clock instead of
Date
Daylight Savings Time
Choose to display clock or date on LCD. This option applies to GXP-1200/GXP2000 only.
This parameter controls time displayed in daylight savings time. If set to “Yes”, then the
displayed time will be 1 hour ahead of normal time.
The “Optional Rule” is configured to automatically adjust the Daylight Savings Time (DST)
based on the rule set in this field.
Rule Syntax:
• start-time; end-time; saving
• Both start-time and end-time have the same syntax: month,day,weekday,hour,minute
o month: 1,2,3,..,12 (for Jan, Feb, .., Dec)
o day: [+|-]1,2,3,..,31
o weekday: 1, 2, 3, .., 7 (for Mon, Tue, .., Sun), or 0 which means the daylight
saving rule is not based on week days but based on the day of the month.
o hour: hour (0-23), minute: minute (0-59)
If “weekday” is 0, it means the date to start or end daylight saving is at exactly the given date.
In that case, the “day” value must not be negative. If “weekday” is not zero and “day” is
positive, then the daylight saving starts on the first “day” the iteration of the weekday (e.g.:
1st Sunday, 3rd Tuesday etc). If “weekday” is not zero and “day” is negative, then the
daylight saving starts on the last “day” the iteration of the weekday (e.g.: last Sunday, 3rd last
Tuesday etc).
The saving is in the unit of minutes. The saving time may also be preceded by a negative (-)
sign if subtraction is desired instead of addition.
The default value is set for US, the “Automatic Daylight Saving Time Rule” shall be set to
“3,2,7,2,0;11,1,7,2,0;60”
Examples
US/Canada where daylight saving time is applicable:
03,02,7,02,00;11,1,7,02,00;60
This means the daylight saving time starts from the second Sunday of March at 2AM and
ends the first Sunday of November at 2AM. The saving is 60 minutes.
LCD Backlight
Brightness
Disable in-call DTMF
Set the LCD brightness level. Range from 0 to 8 where 0 means off and 8 means
the brightest.
Default is No. This field is used to hide the keypad input during a call.
display
Mute Speaker Ringer
in Headset Mode
Disable Missed Call
Default is No. This field lets user to choose whether to ring the phone Speaker
when headset is connected.
Default is No. By default, LCD backlight will lit whenever there is a missed call.
Backlight
Advanced User configuration includes not only the end user configuration, but also advanced
configuration such as SIP configuration, Codec selection, NAT Traversal Setting and other miscellaneous
configuration.
Grandstream Networks, Inc. GXP User Manual Page 27 of 38
Firmware 1.1.5.15 Last Updated: 12/2007
Page 28

Table 15: Advanced Settings
Admin
Password
G723 rate
iLBC frame size
iLBC payload
type
Silence
Suppression
Voice Frames
per TX
Administrator password. Only the administrator can access the “Advanced Settings” and
“Account Settings” page. Password field is purposely blank for security reasons after
clicking update and saved. The maximum password length is 25 characters.
Encoding rate for G723 codec. By default, 6.3kbps rate is set.
iLBC packet frame size. Default is 20ms. For Asterisk PBX, 30ms might be required.
Payload type for iLBC. Default value is 97. The valid range is between 96 and 127.
This controls the silence suppression/VAD feature of the audio codec G.723 and G.729.
If set to “Yes”, when silence is detected, a small quantity of VAD packets (instead of
audio packets) will be sent during the period of no talking. If set to “No”, this feature is
disabled.
This field contains the number of voice frames to be transmitted in a single Ethernet
packet (be advised the IS limit is based on the maximum size of Ethernet packet is 1500
byte (or 120kbps)).
When setting this value, be aware of the requested packet time (ptime, used in SDP
message) is a result of configuring this parameter. This parameter is associated with the
first codec in the above codec Preference List or the actual used payload type
negotiated between the 2 conversation parties at run time. e.g., if the first codec is
configured as G.723 and the “Voice Frames per TX” is set to 2, then the “ptime” value in
the SDP message of an INVITE request will be 60ms because each G.723 voice frame
contains 30ms of audio. Similarly, if this field is set to 2 and the first codec is G.729 or
G.711 or G.726, then the “ptime” value in the SDP message of an INVITE request will be
20ms.
If the configured voice frames per TX exceeds the maximum allowed value, the IP phone
will use and save the maximum allowed value for the corresponding first codec choice.
The maximum value for PCM is 10 (x10ms) frames; for G.726, it is 20 (x10ms) frames;
for G.723, it is 32 (x30ms) frames; for G.729/G.728, 64 (x10ms) and 64 (x2.5ms) frames
respectively.
Please be careful when editing these parameters. Adjusting these parameters will also
change the dynamic jitter buffer. The GXP has a patent dynamic jitter buffer handling
algorithm. The jitter buffer range is 20 ~ 200 ms.
Grandstream recommends using the default settings provided. Grandstream does not
recommend adjusting these parameters if you are an average user. Incorrect settings
will affect the voice quality. Please refer to the Codec FAQ at
http://www.grandstream.com/faqscodec.html for more technical detail.
Layer 3 QoS
This field defines the layer 3 QoS parameter. It is the value used for IP Precedence or
Diff-Serv or MPLS. Default value is 48.
Layer 2 QoS
No Key Entry
This contains the value used for layer 2 VLAN tag. Default setting is blank.
Default is 4 seconds.
Timeout
Grandstream Networks, Inc. GXP User Manual Page 28 of 38
Firmware 1.1.5.15 Last Updated: 12/2007
Page 29

Use # as
Dial Key
Local RTP port
Use Random
Port
Keep-alive
interval
Use NAT IP
STUN Server
Firmware
Upgrade and
Provisioning
Via TFTP Server
This parameter allows users to configure the “#” key as the “Send” (or “Dial”) key. If set
to “Yes”, the “#” key will immediately send the call. In this case, this key is essentially
equivalent to the “(Re)Dial” key. If set to “No”, the “#” key is included as part of the dial
string.
This parameter defines the local RTP-RTCP port pair used to listen and transmit. It is the
base RTP port for channel 0. When configured, channel 0 will use this port _value for
RTP and the port_value+1 for its RTCP; channel 1 will use port_value+2 for RTP and
port_value+3 for its RTCP. The default value is 5004.
This parameter, when set to “Yes”, will force random generation of both the local SIP
and RTP ports. This is usually necessary when multiple GXPs are behind the same
NAT. Default is No.
This parameter specifies how often the GXP sends a blank UDP packet to the SIP
server in order to keep the “hole” on the NAT open. Default is 20 seconds.
NAT IP address used in SIP/SDP message. Default is blank.
IP address or Domain name of the STUN server. STUN resolution result will display in
the STATUS page of the Web UI.
Default method is HTTP. Firmware upgrade may take up to 10 minutes depending on
network environment. Do not interrupt the firmware upgrading process.
This is the IP address of the configured TFTP server. If selected and it is non-zero or not
blank, the GXP will attempt to retrieve a new configuration file or new code image from
the specified TFTP server at boot time. It will make up to 3 attempts before timeout and
then it will start the boot process using the existing code image in the Flash memory. If a
TFTP server is configured and a new code image is retrieved, the new downloaded
image will be verified and then saved into the Flash memory.
Note: Grandstream strongly recommends that the user upgrade firmware locally in a
LAN environment if using TFTP to upgrade. Please do NOT interrupt the TFTP upgrade
process (especially the power supply) as this will damage the device.
Via HTTP
Server
The HTTP server URL used for firmware upgrade and configuration via HTTP. For
example: http://provisioning.mycompany.com:6688/Grandstream/1.1.5.15 .
Here “:6688” is the specific TCP port that the HTTP server is using; omit if using default
port 80.
Note: If Auto Upgrade is set to No, GXP will only perform HTTP download once at boot
up.
Config Server
Path
Firmware File
Prefix/Postfix
IP address or domain name of firmware server.
Default is blank. If configured, GXP will request the firmware file with the prefix/postfix.
This setting is useful for ITSPs. End user should keep it blank.
Config File
Prefix/Postfix
Grandstream Networks, Inc. GXP User Manual Page 29 of 38
Firmware 1.1.5.15 Last Updated: 12/2007
Default is blank. End user should keep it blank.
Page 30

Allow DHCP
Option 66 to
override server
Authenticate
Conf File
Automatic
Upgrade
Phonebook
XML
Idle Screen XML
Download
XML
Application
Offhook Auto
Dial
DTMF Payload
Type
Default is Yes. This allows device gets provisioned automatically.
Default is “No”. If set to “Yes”, configuration file would be authenticated before
acceptance. End user should use default setting.
This function is used by ITSP. End user should NOT touch these parameters.
Default is No. Choose “Yes” to enable automatic HTTP upgrade and provisioning.
In “Check for upgrade every” field, enter the number of minutes to check the HTTP
server for firmware upgrade or configuration changes. When set to “No”, the phone will
only perform HTTP upgrade and configuration check once at boot up.
Enable the XML phonebook via TFTP or HTTP. Define XML server path and download
interval.
Enable XML Idle Screen download via TFTP or HTTP. Define XML server path.
Enter server path for XML application. This option applies to GXP-2020 only.
To configure a User ID/extension to dial automatically when the phone is taken offhook.
This parameter sets the payload type for DTMF using RFC2833. Default is 101.
Syslog Server
Syslog Level
NTP server
The IP address or URL of System log server. This feature is especially useful for ITSPs.
Select the ATA to report the log level. Default is NONE. The level is one of DEBUG,
INFO, WARNING or ERROR. Syslog messages are sent based on the following events:
• product model/version on boot up (INFO level)
• NAT related info (INFO level)
• sent or received SIP message (DEBUG level)
• SIP message summary (INFO level)
• inbound and outbound calls (INFO level)
• registration status change (INFO level)
• negotiated codec (INFO level)
• Ethernet link up (INFO level)
• SLIC chip exception (WARNING and ERROR levels)
• memory exception (ERROR level)
The Syslog uses USER facility. In addition to standard Syslog payload, it contains the
following components: GS_LOG: [device MAC address][error code] error message
For example: May 19 02:40:38 192.168.1.14 GS_LOG: [00:0b:82:00:a1:be][000].
Ethernet link is up.
This parameter defines the URI or IP address of the NTP (Network Time Protocol) serve.
It is used to display the current date/time.
Grandstream Networks, Inc. GXP User Manual Page 30 of 38
Firmware 1.1.5.15 Last Updated: 12/2007
Page 31

Distinctive Ring
Tone
System Ring
Tone
Call Progress
Tones
Disable Call
Waiting
Use Quick IP
Call Mode
Caller ID must be configured. Select a Distinctive Ring Tone 1 through 3 for a particular
Caller ID. The GXP will ONLY use selected ring tones for particular Caller IDs. For all
other calls, the GXP will use System Ring Tone. When selected and no Caller ID is
configured, the selected ring tone will be used for all incoming calls.
System ring tone. Default is North American standard.
Adjust system ring tone frequencies and cadences based on local telecom standard.
Using these settings, users can configure ring or tone frequencies based on parameters
from local telecom. By default, they are set to North American standard.
Frequencies should be configured with known values to avoid uncomfortable high pitch
sounds.
Syntax: f1=val,f2=val[,c=on1/off1[-on2/off2[-on3/off3]]];
(Frequencies are in Hz and cadence on and off are in 10ms)
ON is the period of ringing (“On time” in ‘ms’) while OFF is the period of silence. In order
to set a continuous ring, OFF should be zero. Otherwise it will ring ON ms and a pause
of OFF ms and then repeat the pattern. Up to three cadences are supported.
Default is No. If set to Yes, the call waiting will be disabled.
Dial an IP address under the same LAN/VPN segment by entering the last octet in the IP
address.
In the Advanced Settings page there is an option "Use Quick IP-call mode". Default
setting is No. When set to YES, and #XXX is dialed, where X is 0-9 and XXX <=255,
phone will make direct IP call to aaa.bbb.ccc.XXX where aaa.bbb.ccc comes from the
local IP address REGARDLESS of subnet mask.
#XX or #X are also valid so leading 0 is not required (but OK). See Quic k IP Call Mode
for details.
Lock keypad
If set to “Yes”, the configuration changes via keypad are disabled.
update
Display
Allows user to choose preferred display language in web UI and key pad UI.
Language
GXP has up to six line appearances, each with an independent SIP account. Each SIP account requires
its own configuration page. Their configurations are identical.
Table 16: SIP Account Settings
Account Active
This field indicates whether the account is active. The default value for the
primary account (Account 1) is Yes. The default value for the other two accounts
is No.
Account Name
SIP Server
Grandstream Networks, Inc. GXP User Manual Page 31 of 38
Firmware 1.1.5.15 Last Updated: 12/2007
The name associated with each account - displayed on LCD.
SIP Server’s IP address or Domain name provided by VoIP service provider.
Page 32

Outbound Proxy
SIP User ID
Authenticate ID
Authenticate Password
Name
Use DNS SRV:
User ID is Phone
Number
SIP Registration
Un-register on Reboot
IP address or Domain name of Outbound Proxy, Media Gateway, or Session
Border Controller. Used for firewall or NAT penetration in different network
environment. If the system detects symmetric NAT, STUN will not work. ONLY
outbound proxy can provide solution for symmetric NAT.
User account information provided by VoIP service provider (ITSP); either an
actual phone number or formatted like one.
SIP service subscriber’s Authenticate ID used for authentication. It can be
identical to or different from SIP User ID.
SIP service subscriber’s account password for GXP to register to (SIP) servers of
ITSP.
SIP service subscriber’s name that is used for Caller ID display.
Default is No. If set to “Yes”, the client will use DNS SRV to look up server.
If the phone has an assigned PSTN telephone number, this field should be set to
“Yes”. Otherwise, set it to “No”. If “Yes” is set, a “user=phone” parameter will be
attached to the “From” header in SIP request
This parameter controls sending REGISTER messages to the proxy server. The
default setting is “Yes”.
Default is No. If set to “Yes”, the SIP user’s registration information will be
cleared on reboot.
Register Expiration
Local SIP Port
SIP Registration Failure
Retry Wait Time
SIP T1 Timeout
SIP T2 Interval
SIP Transport
Use RFC3581
Symmetric Routing
NAT Traversal (STUN)
This parameter allows user to specify the time frequency (in minutes) that GXP
refreshes its registration with the specified registrar. The default interval is 60
minutes. The maximum interval is 65,535 minutes (about 45 days).
This parameter defines the local SIP port used to listen and transmit. The default
value for Account 1 is 5060. It is 5062, 5064, 5066 for Account 2, Account 3 and
Account 4 respectively.
Retry registration if the process failed. Default is 20 seconds.
RFC 3261 SIP T1 timer. Default is 1 second.
RFC 3261 SIP T2 timer. Default is 0.5 seconds.
Choose SIP Transport between UDP and TCP. Default is UDP.
This option allows a SIP client to request that the server send the response back
to the source IP address and port from which the request originated.
This parameter activates the NAT traversal mechanism. If activated (by choosing
“Yes”) and a STUN server is also specified, the phone performs according to the
STUN client specification. Using this mode, the embedded STUN client detects if
and what type of NAT/Firewall configuration is used. If the detected NAT is a Full
Cone, Restricted Cone, or a Port-Restricted Cone, the phone will use its mapped
public IP address and port in all of its SIP and SDP messages. If the NAT
Traversal field is set to “Yes” with no specified STUN server, the GXP will
periodically (every 20 seconds or so) send a blank UDP packet (with no payload
data) to the SIP server to keep the “hole” on the NAT open.
Grandstream Networks, Inc. GXP User Manual Page 32 of 38
Firmware 1.1.5.15 Last Updated: 12/2007
Page 33

Subscribe for MWI:
PUBLISH for Presence
Proxy-Require
Voice Mail UserID
Send DTMF
Early Dial
Dial Plan Prefix
Delayed Call Forward
Wait Time
Enable Call Features
Call Log
Session Expiration
Default is No. When set to “Yes” a SUBSCRIBE for Message Waiting Indication
will be sent periodically.
Enable Presence feature.
SIP Extension to notify SIP server that the unit is behind the NAT/Firewall.
When configured, user can access messages by pressing “MSG” button. This ID
is usually the VM portal access number.
This parameter specifies the mechanism to transmit DTMF digit. There are 3
supported modes: in audio which means DTMF is combined in audio signal (not
very reliable with low-bit-rate codec), via RTP (RFC2833), or via SIP INFO.
Default is No. Use only if proxy supports 484 response.
Sets the prefix added to each dialed number.
Time waited before the call is forward to a number or VM.
Default is 20 seconds.
Default is Yes. If set to “Yes”, all star code call features will be supported locally.
User can choose to disable Call Log and what kind of calls to log.
The SIP Session Timer extension enables SIP sessions to be periodically
“refreshed” via a SIP request (UPDATE, or re-INVITE. Once the session interval
expires, if there is no refresh via a UPDATE or re-INVITE message, the session is
terminated.
Session Expiration is the time (in seconds) at which the session is considered
timed out, provided no successful session refresh transaction occurs beforehand.
The default value is 180 seconds.
Min-SE
Caller Request Timer
Defines the minimum session expiration (in seconds). Default is 90 seconds.
If set to “Yes”, the phone will use session timer when it makes outbound calls if
remote party supports session timer.
Callee Request Timer
If selecting “Yes”, the phone will use session timer when it receives inbound calls
with session timer request.
Force Timer
If set to “Yes”, the phone will use session timer even if the remote party does not
support this feature. If set to “No”, the session timer is enabled only when the
remote party supports this feature. To turn off Session Timer, select “No” for
Caller Request Timer, Callee Request Timer, and Force Timer.
UAC Specify Refresher
As a Caller, select UAC to use the phone as the refresher, or UAS to use the
Callee or proxy server as the refresher.
UAS Specify Refresher
As a Callee, select UAC to use caller or proxy server as the refresher, or UAS to
use the phone as the refresher.
Force INVITE
Session Timer can be refreshed using INVITE method or UPDATE method.
Select “Yes” to use INVITE method to refresh the session timer.
Grandstream Networks, Inc. GXP User Manual Page 33 of 38
Firmware 1.1.5.15 Last Updated: 12/2007
Page 34

Enable 100rel
Account Ring Tone
Send Anonymous
Anonymous Method
Anonymous Call
Rejection
Auto Answer
Allow Auto Answer by
Call-Info
Turn off speaker on
remote disconnect
PRACK (Provisional Acknowledgment) method enables reliability to SIP
provisional responses (1xx series). This is required to support PSTN internetworking..
There are 4 uniquely defined ring tones:
• One (1) System Ring Tone: when selected, all calls will ring with system
ring tone.
• Three (3) Customer Ring Tones: when selected, incoming calls from
designated account will play selected ring tone.
If this parameter is set to “Yes”, the “From” header in outgoing INVITE message
will be set to anonymous, essentially blocking the Caller ID from displaying.
Whether to use “sip:[email protected]>” in the From Header or PAsserted-Identity header.
Default is NO. If set to YES, anonymous call will be rejected
Default is No. If set to “Yes”, GXP will automatically switch on speaker to answer
the incoming call. Set to Intercom/Paging mode, it will answer the call based on
the SIP info header from the server.
If the Call-Info header contains answer-after=0, the call be answered
automatically (so called paging mode).
When BYE is received, the phone will turn off its speaker automatically.
Check SIP User ID for
incoming INVITE
Refer-To Use Target
Contact
Disable Multiple Media
Attribute in SDP
Preferred Vocoder
SRTP Mode
eventlist BLF URI
Check the SIP User ID in Request URI. If they don’t match, the call will be
rejected.
Default is NO. If set to YES, then for Attended Transfer, the “Refer-To” header uses the
transferred target’s Contact header information.
Default is No.
GXP supports up to 5 different Vocoder types including G.711(a/µ) (also known
as PCMU/PCMA), GSM, G.723.1, G.729A/B.
Configure Vocoders in a preference list that is included with the same preference
order in SDP message. Enter the first Vocoder in this list by choosing the
appropriate option in “Choice 1”. Similarly, enter the last Vocoder in this list by
choosing the appropriate option in “Choice 8”.
Enable SRTP mode based on selection. Default is No.
If a server supports this feature, user needs to configure an "eventlist BLF" URI
on the service side (i.e.: [email protected])
On the GXP, under Account page, fill in the ""eventlist BLF" field with the URI
without the domain. (i.e.: BLF1006). Under Basic Settings, please select "eventlist
BLF", choose account nubmer, monitored number, etc.
Grandstream Networks, Inc. GXP User Manual Page 34 of 38
Firmware 1.1.5.15 Last Updated: 12/2007
Page 35

Special Feature
Default is Standard. Choose the selection to meet special requirements from Soft
Switch vendors.
SAVING THE CONFIGURATION CHANGES
After the user makes a change to the configuration, press the “Update” button in the Configuration Menu.
The web browser will then display a message window to confirm saved changes.
Grandstream recommends reboot or power cycle the IP phone after saving changes.
REBOOTING THE PHONE REMOTELY
Press the “Reboot” button at the bottom of the configuration menu to reboot the phone remotely. The web
browser will then display a message window to confirm that reboot is underway. Wait 30 seconds to log in
again.
Grandstream Networks, Inc. GXP User Manual Page 35 of 38
Firmware 1.1.5.15 Last Updated: 12/2007
Page 36

Software Upgrade & Customization
Software (or firmware) upgrades are completed via either TFTP or HTTP. The corresponding
configuration settings are in the ADVANCED SETTINGS configuration page.
FIRMWARE UPGRADE THROUGH TFTP/HTTP
To upgrade via TFTP or HTTP, select TFTP or HTTP upgrade method. “Upgrade Server” needs to be set
to a valid URL of a HTTP server. Server name can be in either FQDN or IP address format. Here are
examples of some valid URLs.
• firmware.mycompany.com:6688/Grandstream/1.1.5.15
• 168.75.215.189
There are two ways to set up the Upgrade Server to upgrade firmware: via Key Pad Menu and Web
Configuration Interface.
Key Pad Menu
To configure the Upgrade Server via Key Pad Menu options, select “Config” from the Main Menu, then
select “Upgrade”. Under this sub Menu, user can edit Upgrade Server in either an IP address format or
FQDN format. Choose “Save and use TFTP” or “Save and use HTTP” to select upgrade method. Select
“Reboot” from the Main Menu to reboot the phone.
Web Configuration Interface
To configure the Upgrade Server via the Web configuration interface, open the web browser. Enter the
GXP IP address. Enter the admin password to access the web configuration interface. In the
ADVANCED SETTINGS page, enter the Upgrade Server’s IP address or FQDN in the “Firmware Server
Path” field. Select TFTP or HTTP upgrade method. Update the change by clicking the “Update” button.
“Reboot” or power cycle the phone to update the new firmware.
During this stage, the LCD will display the firmware file downloading process. If a firmware upgrade fails
for any reason (e.g., TFTP/HTTP server is not responding, there are no code image files available for
upgrade, or checksum test fails, etc), the phone will stop the upgrading process and re-boot using the
existing firmware/software.
Firmware upgrades take around 60 seconds in a controlled LAN or 5-10 minutes over the Internet.
Grandstream recommends completing firmware upgrades in a controlled LAN environment whenever
possible.
No Local TFTP Server
For users who do not have a local TFTP server, Grandstream provides a NAT-friendly TFTP server on
the public Internet for users to download the latest firmware upgrade automatically. Please check the
Support/Download section of our website to obtain this TFTP server IP address:
http://www.grandstream.com/firmware.html
Alternatively, download and install a free TFTP or HTTP server to the LAN to perform firmware upgrades.
A free Windows version TFTP server is available: http://support.solarwinds.net/updates/New-
customerFree.cfm.
.
Grandstream Networks, Inc. GXP User Manual Page 36 of 38
Firmware 1.1.5.15 Last Updated: 12/2007
Page 37

Instructions for local TFTP Upgrade:
1. Unzip the file and put all of them under the root directory of the TFTP server.
2. The PC running the TFTP server and the GXP should be in the same LAN segment.
3. Go to File -> Configure -> Security to change the TFTP server's default setting from
"Receive Only" to "Transmit Only" for the firmware upgrade.
4. Start the TFTP server, in the phone’s web configuration page
5. Configure the Firmware Server Path with the IP address of the PC
6. Update the change and reboot the unit
User can also choose to download the free HTTP server from http://httpd.apache.org/
or use Microsoft IIS
web server.
NOTE:
• When GXP phone boots up, it will send TFTP or HTTP request to download configuration file
“cfg000b82xxxxxx”, where “000b82xxxxxx” is the MAC address of the GXP phone. This file is for
provisioning purpose. For normal TFTP or HTTP firmware upgrades, the following error
messages in a TFTP or HTTP server log can be ignored: “TFTP Error from [IP ADRESS]
requesting cfg000b82023dd4 : File does not exist. Configuration File Download”
CONFIGURATION FILE DOWNLOAD
The GXP can be configured via Web Interface as well as via Configuration File through TFTP or HTTP.
“Config Server Path” is the TFTP or HTTP server path for the configuration file. It needs to be set to a
valid URL, either in FQDN or IP address format.
A configuration parameter is associated with each particular field in the web configuration page. A
parameter consists of a Capital letter P and 2 to 4 digit numeric numbers. i.e., P2 is associated with
“Admin Password” in the ADVANCED SETTINGS page. For a detailed parameter list, please refer to the
corresponding configuration template of the firmware.
Once the GXP boots up (or re-booted), it will request a configuration file named “cfgxxxxxxxxxxxx”, where
“xxxxxxxxxxxx” is the MAC address of the device, i.e., “cfg000b820102ab”. The configuration file name
should be in lower cases.
Managing Firmware and Configuration File Download
When “Automatic Upgrade” is set to “Yes”, a Service Provider can use P193 (Auto Check Interval, in
minutes, default and minimum is 60 minutes) to have the devices periodically check for upgrades at prescheduled time intervals. By defining different intervals in P193 for different devices, a Server Provider
can manage and reduce the Firmware or Provisioning Server load at any given time.
Grandstream Networks, Inc. GXP User Manual Page 37 of 38
Firmware 1.1.5.15 Last Updated: 12/2007
Page 38

Restore Factory Default Setting
WARNING: Restoring the Factory Default Setting will delete all configuration information of the phone.
Please backup or print all the settin gs before you restoring factory default settings. Grandstream is not
responsible for restoring lost parameters and cannot connect your device to your VoIP service provider.
INSTRUCTIONS FOR RESTORATION:
Step 1: Press “OK” button to bring up the keypad configuration menu, select “Config”, press “OK” to
enter submenu, select “Factory Reset” (Please refer to Table 5-1 of keypad flow chart)
Step 2: Enter the MAC address printed on the bottom of the sticker. Please use the following
mapping:
0-9: 0-9
A: 22 (press the “2” key twice, “A” will show on the LCD)
B: 222
C: 2222
D: 33 (press the “3” key twice, “D” will show on the LCD)
E: 333
F: 3333
Example: if the MAC address is 000b
NOTE: If there are digits like “22” in the MAC, you need to type “2” then press “->” right arrow key to
move the cursor or wait for 4 seconds to continue to key in another “2”.
Step 3: Press the “OK” button to move the cursor to “OK”. Press “OK” button again to confirm. If the
MAC address is correct, the phone will reboot. Otherwise, it will exit to previous keypad menu
interface.
8200e395, it should be key in as “0002228200333395”.
Grandstream Networks, Inc. GXP User Manual Page 38 of 38
Firmware 1.1.5.15 Last Updated: 12/2007
 Loading...