

Page 1

Configuration Guide
Grandstream Networks, Inc.
2N Helios IP Door System & Grandstream IP Multimedia Phones
Page 2

Page 2 of 15
TABLE OF CONTENTS
2N HELIOS IP DOOR SYSTEM & GRANDSTREAM IP MULTIMEDIA PHONES
ONFIGURATION GUIDE
C
Introduction ................................................................................................................................................... 3
Tutorial Environment .................................................................................................................................... 3
Peer The 2N Helios IP Door System with a GXV3140 or GXV3175 (Single Peer) .......................................... 4
Peer the 2N Helios IP Door System with Multiple Grandstream GXV3140 and/or GXV3175 (Multi-Peers) 9
2N Helios IP Door System with Multiple Grandstream GXV3140 and/or GXV3175 using a SIP server ...... 11
Grandstream Networks, Inc. 2N Helios IP Door System & Grandstream IP Multimedia Phones
www.grandstream.com Configuration Guide Last Update : 04/2013
Page 3

Page 3 of 15
NTRODUCTION
I
The purpose of this document is to provide basic configuration guidance for 2N Helios IP Door System &
Grandstream IP Multimedia Phones GXV3140/GXV3175v1/v2.
This guide is applicable to the following Grandstream IP Multimedia Phones (GXV3140 with firmware
1.0.7.76 or higher, GXV3175 with firmware 1.0.3.74 or higher and GXV3175v2 with firmware 1.0.1.46 or
higher)
Be aware that different firmware revisions m ay have different web interface formats and fun ct ionality.
This guide is describing 3 basic scenarios:
1- Peer 2N Helios IP Door System with a GXV3140 or GX V 3175 (S ingle Peer)
2- Peer 2N Helios IP Door System with Multiple Grandstream GXV3140 and/or GXV3175 (Multi-
Peers)
3- 2N Helios IP Door System with Multiple Grandstream GXV3140 and/or GXV3175v1/v2 using a
SIP server
TUTORIAL ENVIRONMENT
For this tutorial, we will be using Grands tream IP Multimedia Phone GXV3175 with firmware 1.0.3.46 and
Grandstream IP Multimedia Phone GXV3140 with firmware 1.0. 7.76.
GXV3175 IP is 192.168.50.199
GXV3140 IP is 192.168.50.132
2N Helios IP is 192.168.50.107
Note: Make sure that devices are set to use Static IPs; otherwise, the communication cannot be
established if one of them changes its IP from original one. (This apply to First and Second scenario o nl y)
Grandstream Networks, Inc. 2N Helios IP Door System & Grandstream IP Multimedia Phones
www.grandstream.com Configuration Guide Last Update : 04/2013
Page 4

Page 4 of 15
GXV3140
2nd Floor
Ethernet PoE connection
IP: 192.168.50.132
2N Helios IP
GXV3175
IP: 192.168.50.199
IP: 192.168.50.107
1st Scenario:
PEER THE 2N HELIOS IP DOOR SYSTEM WITH A GXV3140 OR GXV3175V1/V2 (SINGLE PEER)
Power connection
Ethernet cable
Door System
Grandstream Networks, Inc. 2N Helios IP Door System & Grandstream IP Multimedia Phones
www.grandstream.com Configuration Guide Last Update : 04/2013
Page 5
Page 5 of 15
S
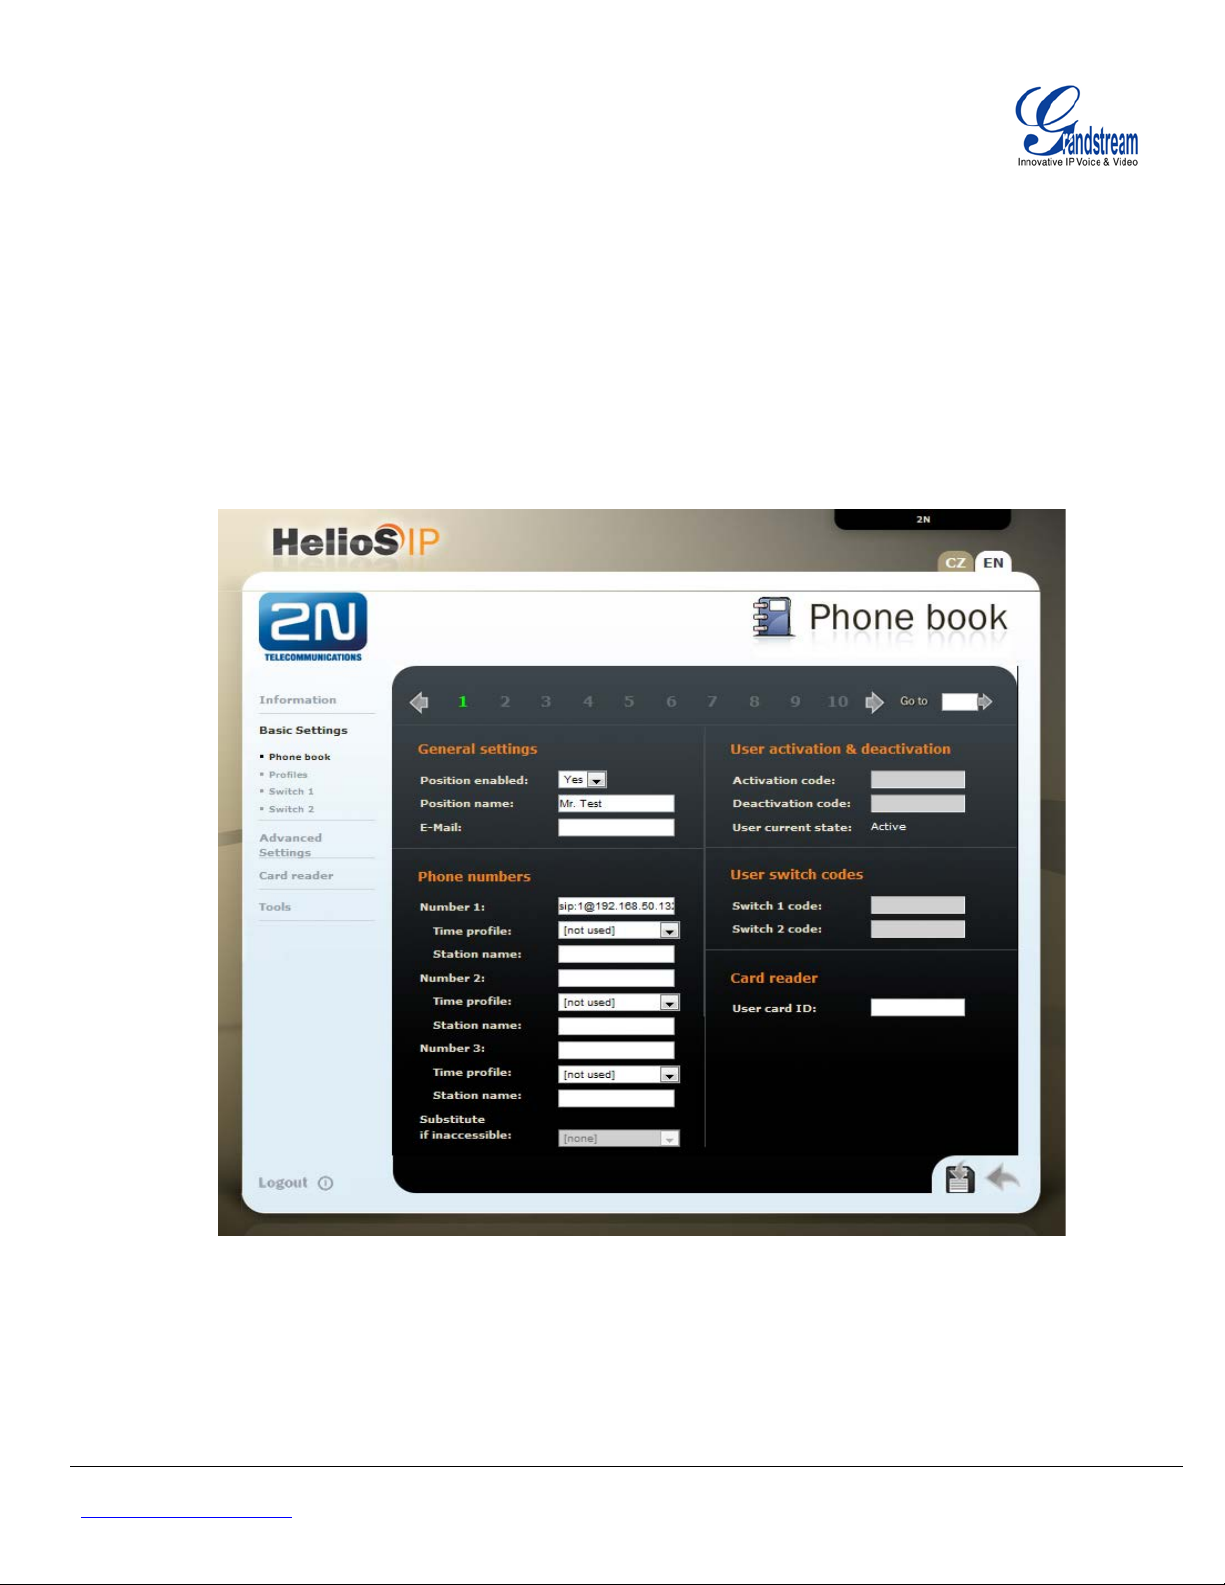
TEP 1: 2N HELIOS IP DOOR SYSTEM CONFIGURATION
1- Access the web interface of your Helios
2- Go to Basic Settings > Phonebook
3- Select a contact which is mapped for one touch call (for example for button #1 on your
HeliosIP). You need to modify Phone number fo r this contact according to your peer telephone. In
our example, you can use either GXV3140 with IP 192.168.50.132 or GXV3175 with IP
192.168.50.199
Number value needs to be like sip: x@192.168.50.132
(x can be replaced by any letter(s) or digit(s))
4- Press Save to apply settings
5- Go to Advanced Settings > SIP Settings and set the followin g settings as shown in next figure.
IP addresses should match your network pl an (in our example: 192.168.50.x)
SIP registration > Enable registration should be set to No
User ID/Auth ID/Password can be set to any extension
Keep Other settings to default (refer to above figure)
Grandstream Networks, Inc. 2N Helios IP Door System & Grandstream IP Multimedia Phones
www.grandstream.com Configuration Guide Last Update : 04/2013
Page 6

Page 6 of 15
6- Press Save to apply settings
Grandstream Networks, Inc. 2N Helios IP Door System & Grandstream IP Multimedia Phones
www.grandstream.com Configuration Guide Last Update : 04/2013
Page 7

Page 7 of 15
TEP 2: GRANDSTREAM GXV3140 OR GXV3175V1/V2 CONFIGURATION
S
1. Access to the web interface of your IP Multimedia Phone by entering the IP of the IP
Multimedia Phone on your browser.
http://<IP_Multimedia_Phone_IP> (Default; username: admin, password: admin)
(i.e. http://192.168.50.132)
2. Go to Advanced Settings > General Settings and uncheck Use Random Port (Default is
Yes).
3. Click Save on the bottom of the page and then apply your settings by clicking Apply on the
top of the page.
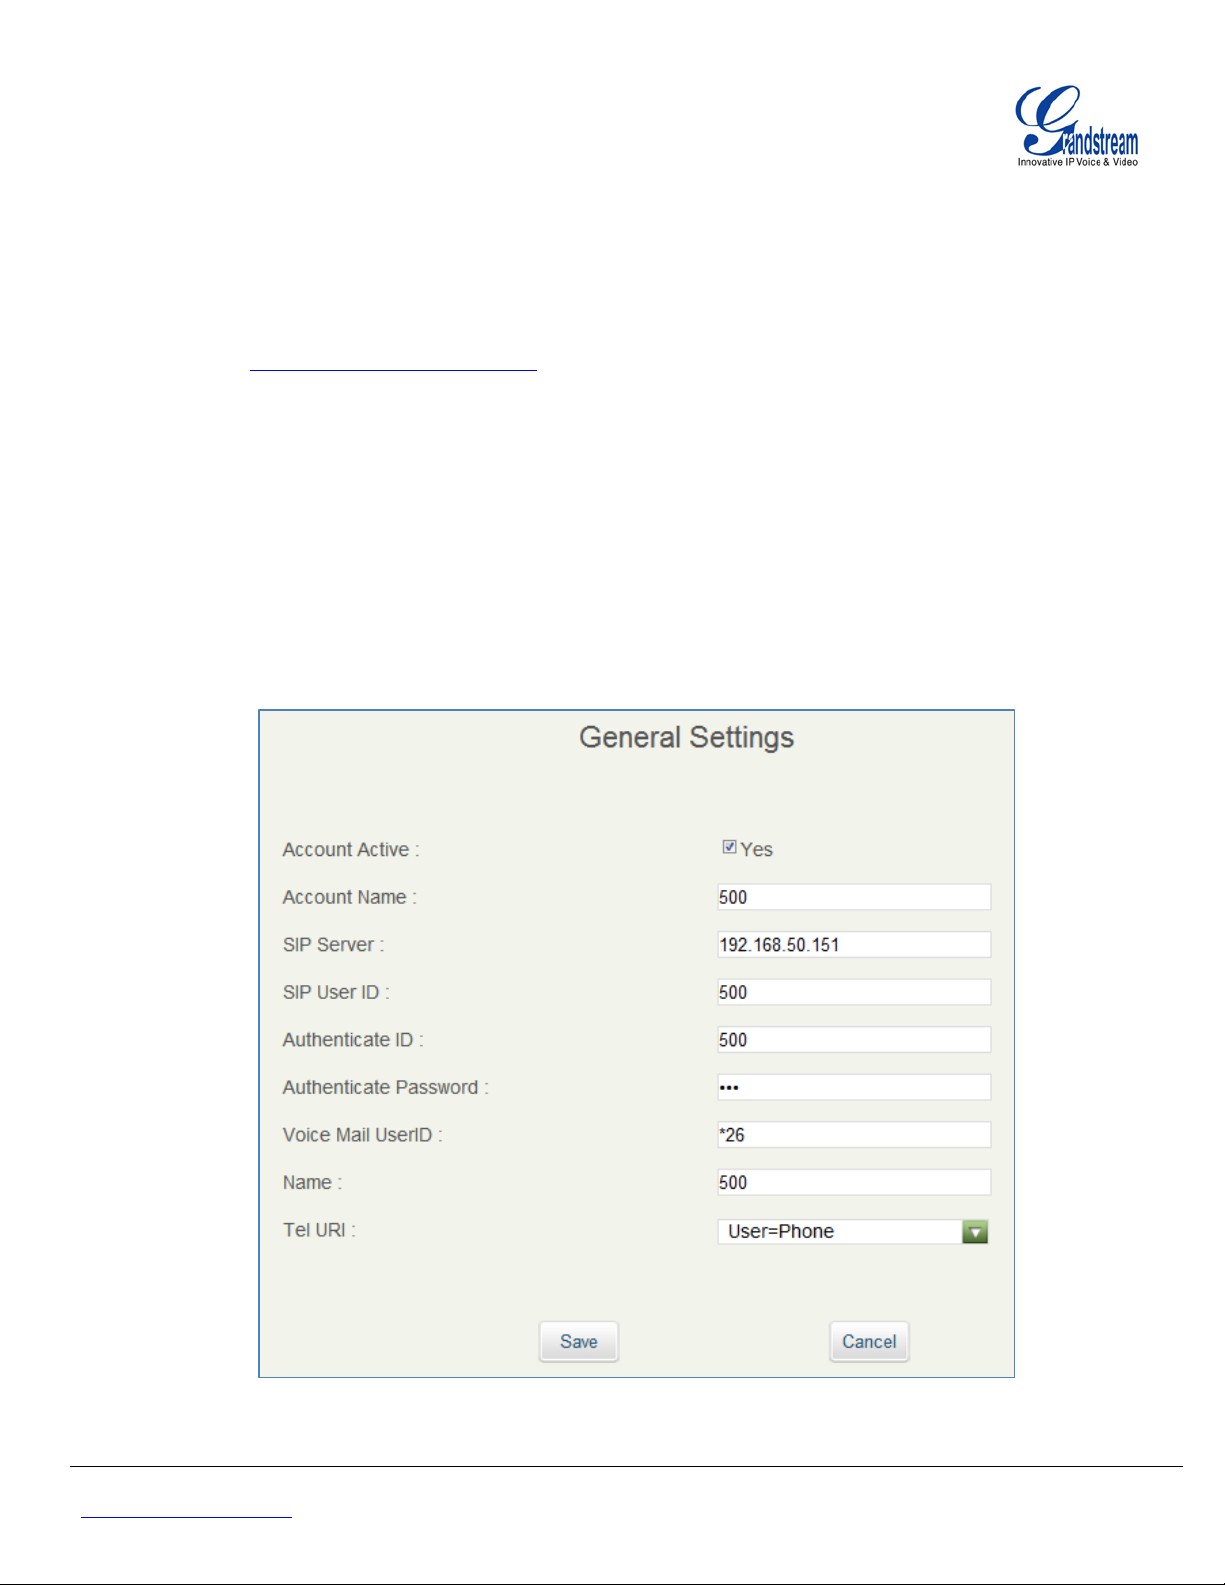
4. Go to Account 1 and enter the following :
a. Account Active : Yes (by enabling the check box)
b. Account Name : Any name (for example : Door Phone1)
c. SIP Server : Enter the IP of 2N Helios System (in our example : 192.168.50.107)
d. SIP User ID : Any extension number (for example : 100)
e. Authenticate ID : Same as SIP User ID (for example : 100)
f. Authenticate Password : Any password, can be same as SIP User ID (for example :
100)
g. Name : Any name (for example : Door Phone1)
Grandstream Networks, Inc. 2N Helios IP Door System & Grandstream IP Multimedia Phones
www.grandstream.com Configuration Guide Last Update : 04/2013
Page 8

Page 8 of 15
5. Repeat Step 3 to save and apply your settings.
6. Go to Account 1 > SIP Settings and set the following :
a. SIP Registration : No (Disable the check box)
b. Unregister On Reboot : Yes (Default is Yes)
c. Local SIP port : 5060 (Default is 5060)
7. Go to Account 1 > Network Settings, set NAT Traversal to NAT NO and click Save.
8. Go to Account 1 > Call Settings and set the following:
a. Start Video Automatically: Yes (Enable check box)
b. Remote Video Request: Select “Accept” from the dropdown list
Grandstream Networks, Inc. 2N Helios IP Door System & Grandstream IP Multimedia Phones
www.grandstream.com Configuration Guide Last Update : 04/2013
Page 9

Page 9 of 15
GXV3175
GXV3140
GXV3175
GXV3175
GXV3140
GXV3140
Ethernet PoE connection
1st Floor
2nd Floor
3rd Floor
4th Floor
5th Floor
6th Floor
2nd Scenario:
PEER THE 2N HELIOS IP DOOR SYSTEM WITH MULTIPLE GRANDSTREAM GXV3140 AND/OR GXV3175V1/V2 (MULTI-PEERS)
IP: 192.168.50.15
IP: 192.168.50.14
IP: 192.168.50.13
IP: 192.168.50.12
IP: 192.168.50.11
IP: 192.168.50.10
Power connection
Ethernet cable
Grandstream Networks, Inc. 2N Helios IP Door System & Grandstream IP Multimedia Phones
www.grandstream.com Configuration Guide Last Update : 04/2013
Page 10

Page 10 of 15
Phone
Phonebook
entry number
Position
enabled
Position Name
Phone Numbers
(Number 1)
Floor1
1
Yes
Floor1
sip:100@192.168.50.10
Floor2
2
Yes
Floor2
sip:101@192.168.50.11
Floor3
3
Yes
Floor3
sip:102@192.168.50.12
Floor4
4
Yes
Floor4
sip:103@192.168.50.13
Floor5
5
Yes
Floor5
sip:104@192.168.50.14
Floor6
6
Yes
Floor6
sip:105@192.168.50.15
Phone/IP
Account
Active
Account
Name
SIP Server
SIP User
ID
Auth. ID
Authenticate
Password
Name
Phone1
192.168.50.10
Phone2
192.168.50.11
Phone3
192.168.50.12
Phone4
192.168.50.13
Phone5
192.168.50.14
Phone6
192.168.50.15
TEP 1: IP HELIOS DOOR SYTEM CONFIGURATION
S
Please refer to “Step 1: IP Helios Door System Conf iguration” described in First scenario, the steps are
the same, except for 3
The Phonebook entry number / Position enabled / Position Name / Phone Numbers (Number 1)
need to be adjusted to match the actual scena ri o. You can refer to the next table for an example of
configuration.
rd
step.
TEP 2: GRANDSTREAM GXV3140/GXV3175V1/V2 CONFIGURATION
S
Please refer to “Step 2: GXV3140/GXV3175 Confi guration” described in First scenario, the steps are the
same and should be done on each phone.
The Account Name / SIP User ID / Authenticate ID / Authenticate P asswo rd / Name need to be
different on each phone. You can refer to the next table for an example of configuration.
Grandstream Networks, Inc. 2N Helios IP Door System & Grandstream IP Multimedia Phones
www.grandstream.com Configuration Guide Last Update : 04/2013
Yes Floor1 192.168.50.107 100 100 100 Floor1
Yes Floor2 192.168.50.107 101 101 101 Floor2
Yes Floor3 192.168.50.107 102 102 102 Floor3
Yes Floor4 192.168.50.107 103 103 103 Floor4
Yes Floor5 192.168.50.107 104 104 104 Floor5
Yes Floor6 192.168.50.107 105 105 105 Floor6
Page 11

Page 11 of 15
GXV3175
GXV3175
GXV3140
GXV3140
Any Preferred IP-PBX
2N Helios Door System
Ethernet connection
3rd Scenario:
2N HELIOS IP DOOR SYSTEM WITH MULTIPLE GRANDSTREAM GXV3140 AND/OR GXV3175 USING A SIP SERVER
Ext: 505
Ext: 300
IP: 192.168.50.151
Ext: 503
Ext: 502
Ext: 500
Grandstream Networks, Inc. 2N Helios IP Door System & Grandstream IP Multimedia Phones
www.grandstream.com Configuration Guide Last Update : 04/2013
Ethernet PoE connection
Ethernet cable
Page 12

Page 12 of 15
STEP 1: IP HELIOS DOOR SYSTEM CONFIGURATION
1- Access the web interface of your Helios
2- Go to Basic Settings > Phonebook
3- Select a contact which is mapped for one touch call (for example for button #1 on your HeliosIP).
You need to modify Phone number for this contact according to an extension registered on a
Grandstream Multimedia IP Phone.
In our example, you can use either a GXV3140 or a GXV3175 with an extension registered to your
SIP server (example: 501)
Number value needs to be like 501
Grandstream Networks, Inc. 2N Helios IP Door System & Grandstream IP Multimedia Phones
www.grandstream.com Configuration Guide Last Update : 04/2013
Page 13

Page 13 of 15
4- Press Save to apply settings
Note: Repeat steps 4 & 5, in other Phonebook Entries if you need to configure other phones
specifying the extension of each in “Number 1” field.
5- Go to Advanced Settings > SIP Settings and set the following settings as shown in nex t figure.
Domain / Proxy address / Registrar address need to be set to the IP or FQ DN of your SIP server (in our
example: 192.168.50.151)
SIP registration > Enable registration should be set to Yes
User ID/Auth ID/Password should be entered as configured on the SIP server
(in our example: 300 / 300 / password)
Keep Other settings to default (refer to above figure)
6- Press Save to apply settings.
7- You can check if the registration was successful from Information page
Grandstream Networks, Inc. 2N Helios IP Door System & Grandstream IP Multimedia Phones
www.grandstream.com Configuration Guide Last Update : 04/2013
Page 14
Page 14 of 15
TEP 2: GRANDSTREAM GXV3140 OR GXV3175V1/V2 CONFIGURATION
S
1. Access to the web interface of your IP Multimedia Phone by entering the IP of the IP
Multimedia Phone on your browser.
http://<IP_Multimedia_Phone_IP> (Default; username: admin, password: admin)
(i.e. http://192.168.50.132)
2. Go to Account 1 and enter the following :
a. Account Active : Yes (by enabling the check box)
b. Account Name : Any name (for example : Door Phone1)
c. SIP Server : Enter the IP of the SIP Server (in our example : 192.168.50.151)
d. SIP User ID : Enter SIP User ID as configured in SIP Server (for example : 500)
e. Authenticate ID : Enter Auth. ID as configured in SIP Server (for example : 500)
f. Authenticate Password : Enter Auth. Password as configured in SIP Server (for
example : Grandstream)
g. Name : Any name (for example : Door Phone1)
3. Repeat Save and Apply to save and apply your settings.
Grandstream Networks, Inc. 2N Helios IP Door System & Grandstream IP Multimedia Phones
www.grandstream.com Configuration Guide Last Update : 04/2013
Page 15

Page 15 of 15
4. Go to Account 1 > SIP Settings and set the following :
c. SIP Registration : Yes (Enable the check box)
d. Unregister On Reboot : Yes (Default is Yes)
e. Local SIP port : 5060 (Default is 5060)
5. Go to Account 1 > Network Settings, set NAT Traversal to NAT NO and click Save.
6. Go to Account 1 > Call Settings and set the following:
f. Start Video Automatically: Yes (Enable check box)
g. Remote Video Request : Select “Accept” from the dropdown list
Grandstream Networks, Inc. 2N Helios IP Door System & Grandstream IP Multimedia Phones
www.grandstream.com Configuration Guide Last Update : 04/2013
 Loading...