

Grandio GRA-812BR-GR User Manual

GRANDIO
GREENHOU S E S
Model GRA-812BR-GR
8x12 GRANDIO ELITE
GREENHOUSE USER MANUAL
© 2013 Grandio Greenhouses, Backyard Living Source Inc. All rights reserved
GRANDIO
GREENHOU S E S
IMPORTANT! PLEASE READ BEFORE BEGINNING ASSEMBLY
Dear Valued Customer,
We would like to congratulate you on your new
Grandio Greenhouse purchase. We are confident
that you have made the right decision in choosing Grandio. Our greenhouses are made with
high quality aluminium and polycarbonate and
will last for many garden seasons to come.
Please take the time to carefully read this
instruction manual for an easier and more
enjoyable assembly experience.
Cheers!
Grandio Greenhouses
Save this owner’s manual for future
reference and if you need our help.
CONTACT OUR CUSTOMER SERVICE
DEPARTMENT at:
1-866-928-3150
Hours: 8:30a.m.-5:00p.m. Monday through
Friday (Mountain Standard Time)
Before you begin take time to complete this check list.
Take inventory of all parts using the parts list at the back of this manual.
Be cautious where you place the polycarbonate panels as they will burn grass
or plants if left on top of them in direct sunlight. Note that clear film side of
panels should always face the sun and opal film side faces inside greenhouse.
Plan out when and where you are going to place the greenhouse, we recommend that you place it in an area that will receive direct sunlight and will be
protected from the wind as much as possible
It will take at least (2) people to put the greenhouse together.
Before your build, make sure you are allowed to build it! Consult all building
codes, as well as City or Municipality ordinances and HOA’s, as you may need
a permit or documentation before you build.
Contact your insurance company to make sure your Grandio Greenhouse will
be covered on your policy.
Call your local utilities companies before digging.
Do not attempt to begin construction on a windy day.
Backyard Living Source
9543 W. Emerald St., Suite 101
Boise, ID 83704
www.grandiogreenhouses.com
Your greenhouse should be built on a flat level surface allowing for drainage.
Read this entire manual to get familiar with all pieces and parts prior to
beginning assembly. Follow the steps outlined in the order presented!
1
IMPORTANT! SAFETY INSTRUCTIONS
FAILURE TO FOLLOW THESE WARNINGS MAY RESULT IN SERIOUS INJURY OR
PROPERTY DAMAGE AND WILL VOID WARRANTY.
To ensure safety, do not attempt to assemble this product without following the instructions carefully. Check entire box and
inside all packing material for parts and/or additional instruction materials. Before beginning assembly, read the instruc-
tions and identify all parts using the hardware identifier and parts list on pages 35-40. Complete assembly and
proper usage are essential to reduce the risk of accident or injury when using your Grandio Greenhouse.
CAUTION: Do not leave polycarbonate panels laying on grass or leave in the sun or extreme heat, keep in a cool
dry place until they are to be installed!! (May cause burning to plants or grass if left directly on top of them, also may
damage panels due to the protective lm adhering to panels.)
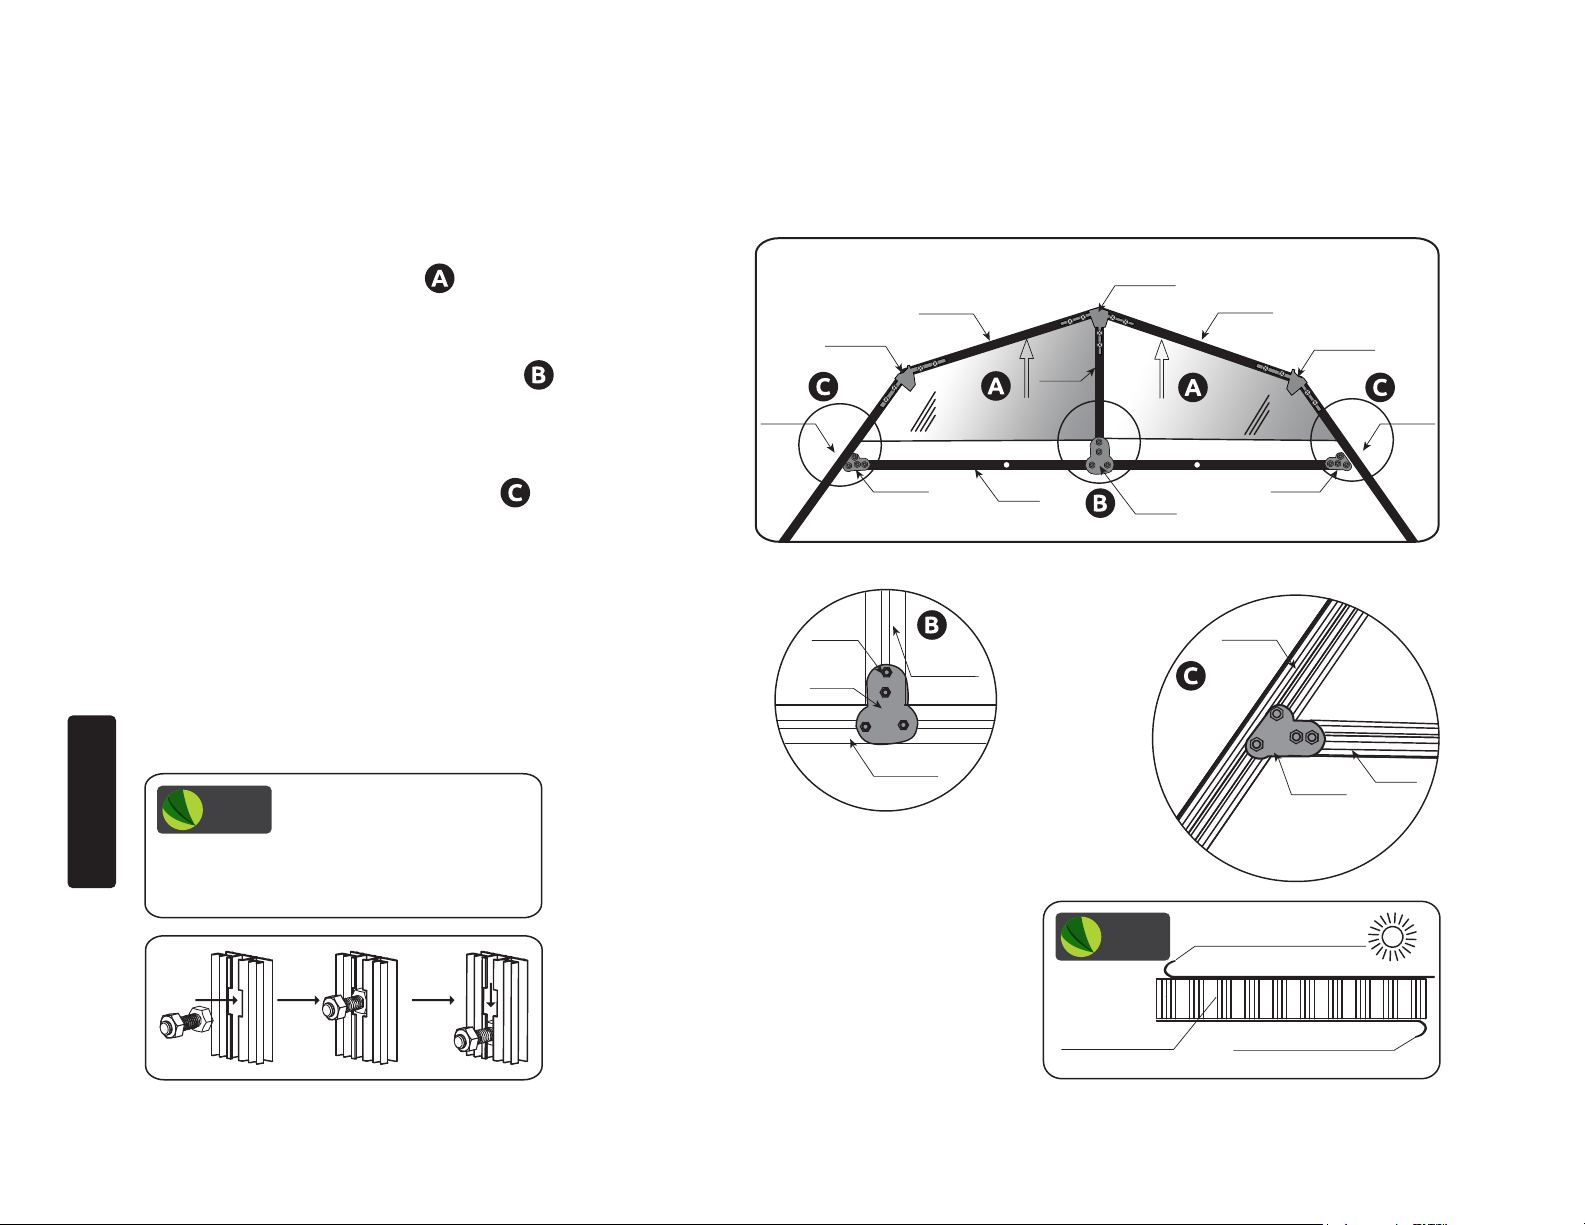
• Remove approximately 2 inches of lm from all polycarbonate sheet edges before installing. Remove all protective lm immediately after the construction is completed.
• Due to shipping, the grooves of some of the aluminum proles may be too small to insert into the polycarbonate sheet, you may
carefully use a screwdriver to pry the framework open so the polycarbonate sheet can be inserted smoothly.
• Do not use or store hot objects such as grills, blow torches, welding equipment, etc. in or near your greenhouse.
Clear film side of panels should always face the sun and opal film side faces inside.
• Do not allow children or pets to play in greenhouse or in the set up area until assembly is complete.
• If using a ladder during assembly, use extreme caution.
• A clean level surface is essential to maintaining the solid integrity of the structure, Install the base correctly as described in
manual. Please anchor the greenhouse down to a rm and level base.
TOOLS YOU WILL NEED FOR ASSEMBLY
• Tape Measure • Step Ladder • Masking Tape
• Level • Work Gloves • Safety Glasses
• Carpenter Square • Flathead Screwdriver • 10mm Wrench
• At Least 2 Adults • No. 1, 2 and 3 Phillips Screwdrivers
2
GRANDIO
TIP
the helpful tips we have provided that will
make installation more ecient.
When you see this icon
pay special attention to
PREPARE A FOUNDATION FOR YOUR
GRANDIO GREENHOUSE
Before assembling your new greenhouse a proper
foundation must be prepared. A number of anchoring options are acceptable, based on wind and
ground conditions in your area.
It is extremely important to have the area prepared
and leveled for installation of your greenhouse prior
to starting the assembly of your Grandio Greenhouse.
Decide at this time the nal orientation of your
Greenhouse. We recommend that you place your
greenhouse in a location where it will receive the
most direct sunlight and will be best protected from
wind and storm conditions.
Go to www.grandiogreenhouses.com for foundation ideas and tour our online learning center for tips
and tricks for putting your greenhouse together.
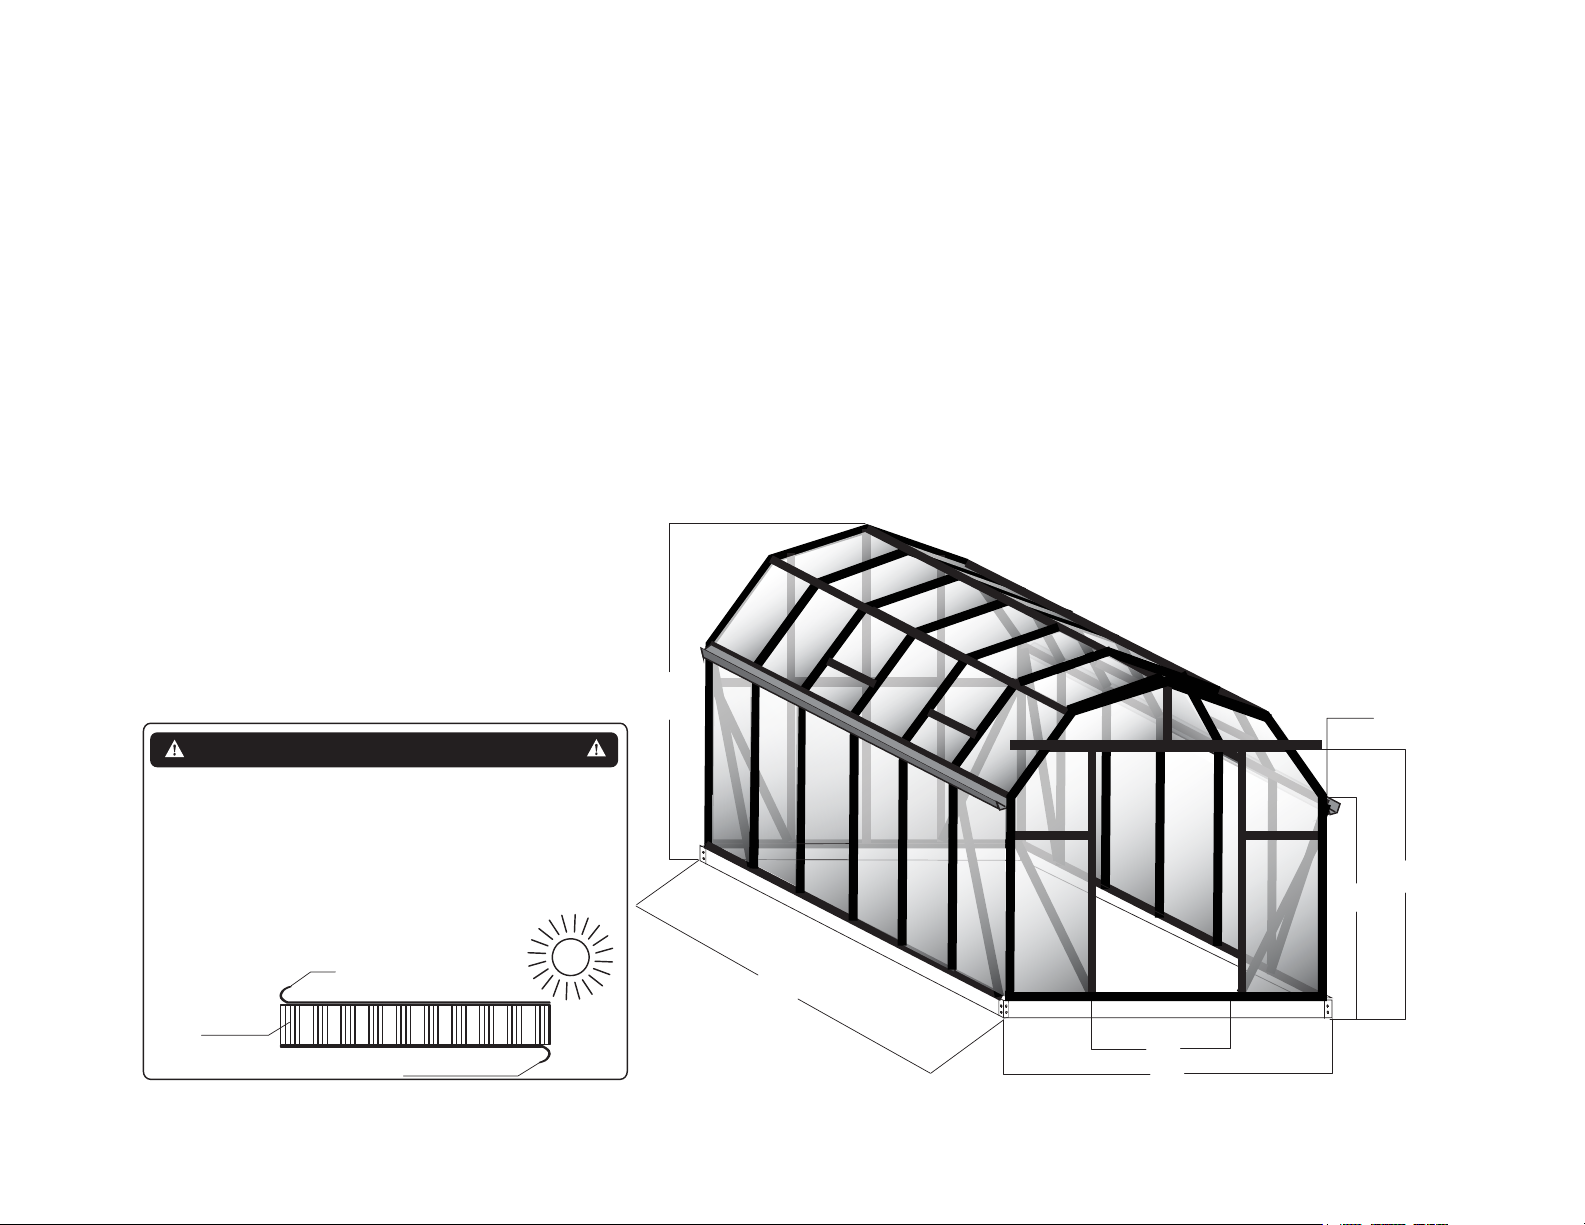
IMPORTANT: POLYCARBONATE PANELS
Remove approximately 2 inches of lm on both sides of
each panel prior to installation. Remove all lm immediately after assembly is complete. The UV-Protected side
is covered with transparent lm and must face toward
the sun. The side covered in opal lm will always face
the interior of the greenhouse.
Sun
Transparent Film
Polycarbonate
Panels
Opal White Film
96”
ROOF PEAK HEIGHT
LEFT SIDE
146”
8X8
8X12 GRANDIO ELITE BARN STYLE
GREENHOUSE DIMENSIONS
44”
99”
3
/
1
4
”
GUTTERS
74”
54”
EAVE HEIGHT
DOOR HEIGHT
3
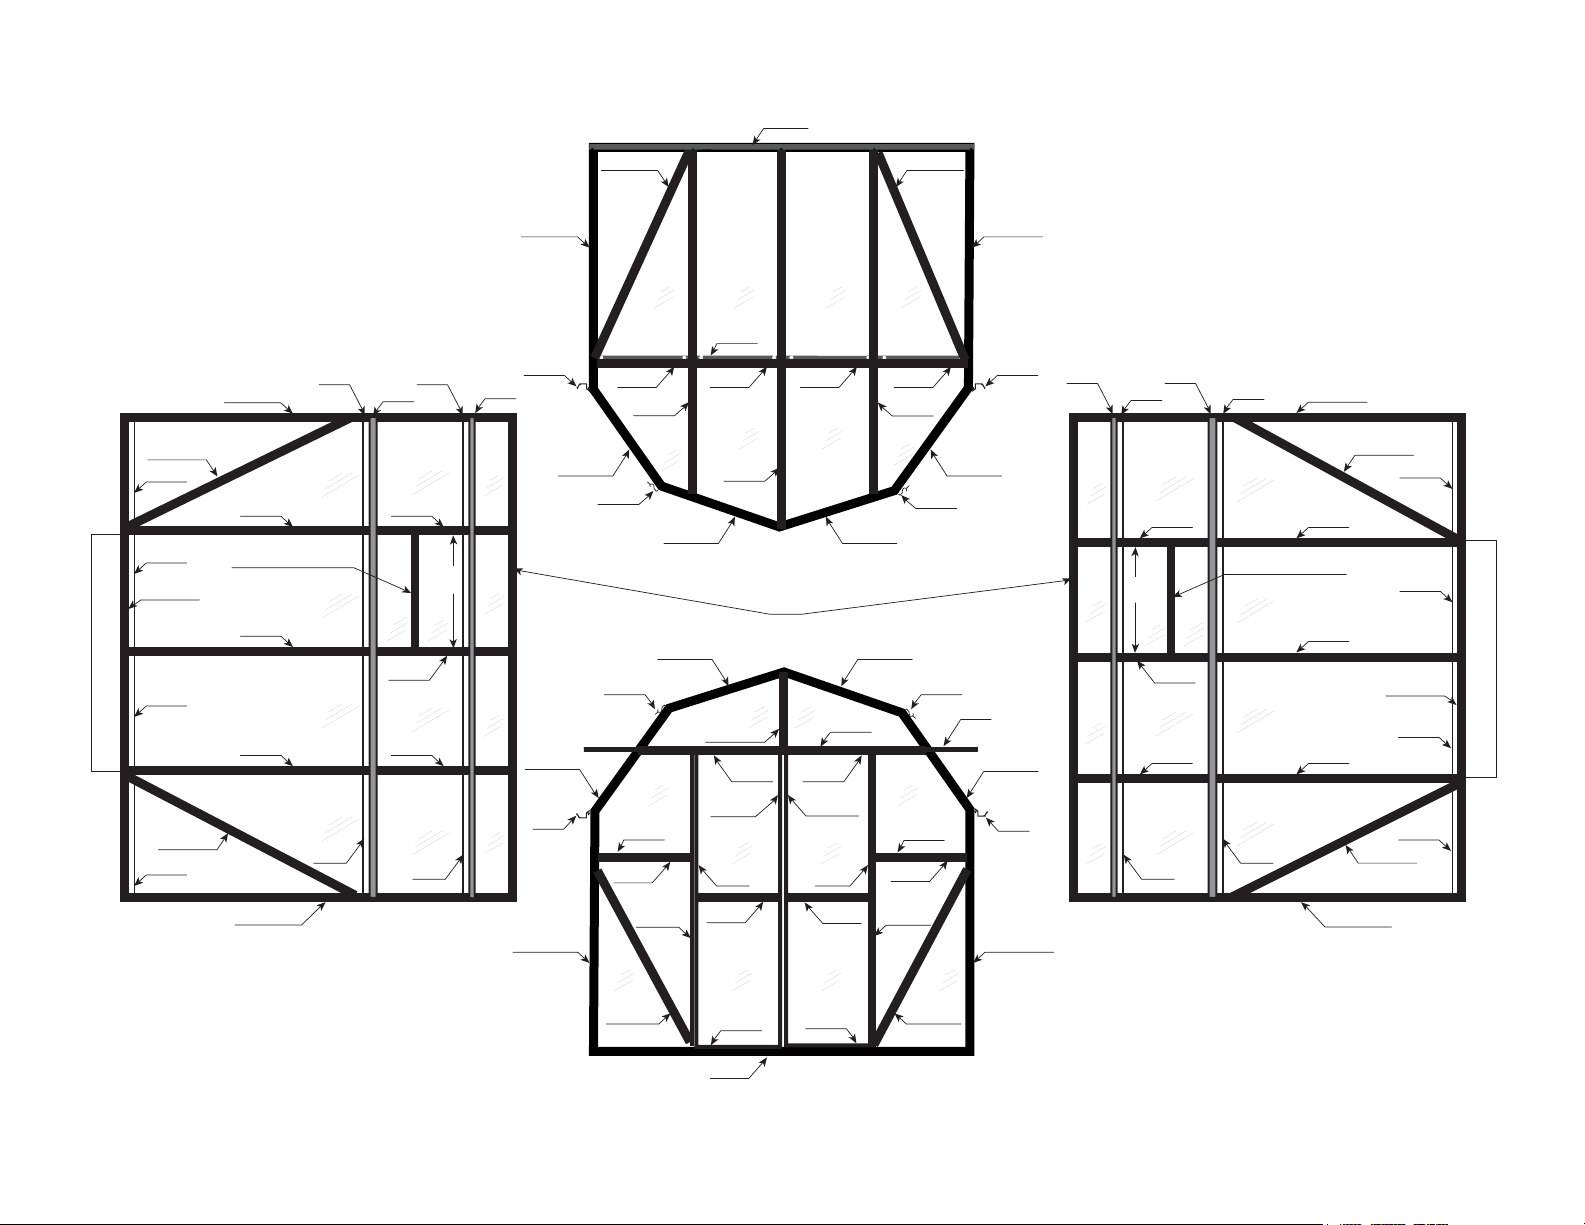
This diagram shows the 8x8 Grandio, for the
8x12 Grandio you will repeat the middle section
of the sides as shown below on LEFT SIDE and
RIGHT SIDE.
L08C-X
606
606
L08C
606
ON BOTH SIDES
8x12 REPEATS THIS SECTION
L08C-X
606
601A-B
609 609
Y7
602A
603C/616
Y7
602A
Y7
602A
Y7
609
610
602B
Y9 Y10
602B
602B
Y8
Y8
Y8
609
618
630
Y11
Y11
Y11
Y11
BACK
L08A
L08B-X
601A-B
Y1 Y1Y1 Y1
L08B
603C
602D 602D
Y4-1
601B 601B
630
601B
630
601B
610
L08D
603C
Y5-1 Y5-2
602C
601B
603E
623B
622-L
Y6 Y6
622
603C603C
607
Y3-1 Y3-1
603D
623B
622-R
622
L08B-X
603C
Y4-2
601B
601B
Y2-2Y2-2
L08D
603C
630
630
L21
601A-B
610610
601B
610
630
Y11
Y11
Y11
Y11
609
Y8
602B
618
Y10 Y9
602B
Y8
602B
Y8
609
610
609
Y7
Y7
Y7
Y7
609
601A-B
602A
603C/616
602A
602A
L08C-X
L08C
L08C-X
606
606
606
606
8x12 REPEATS THIS SECTION
ON BOTH SIDES
601A-FL
601A-FL
604-L
620
Y6 Y6Y1 Y1
620
604-R
601A-FR
601A-FR
LEFT SIDE RIGHT SIDE
L08A-X L08A-X
623B
619
623B
FRONT
4
GRANDIO
GREENHOU S E S
ASSEMBLY INSTRUCTION STEPS
STEP ONE: BASE ASSEMBLY
STEP TWO: FRONT ASSEMBLY
©
STEP THREE: BACK ASSEMBLY
STEP FOUR: MIDDLE ASSEMBLY
STEP FIVE: DOOR ASSEMBLY
5
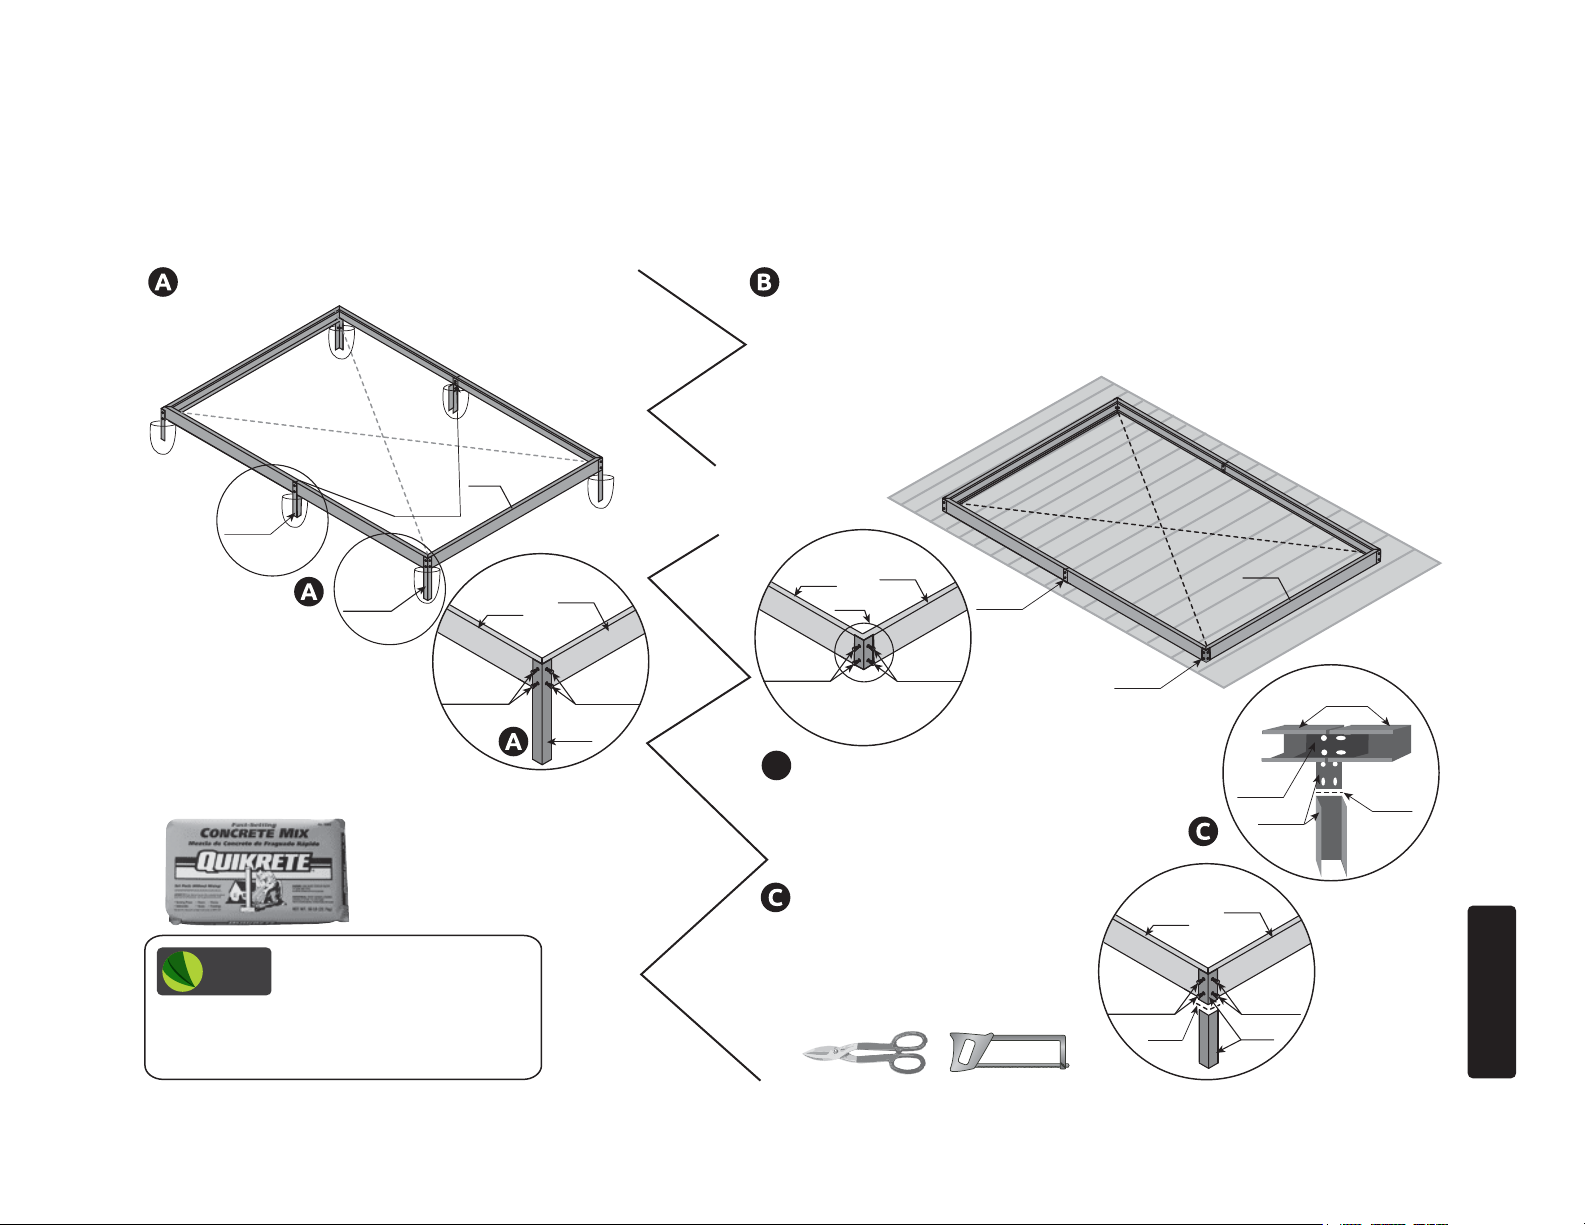
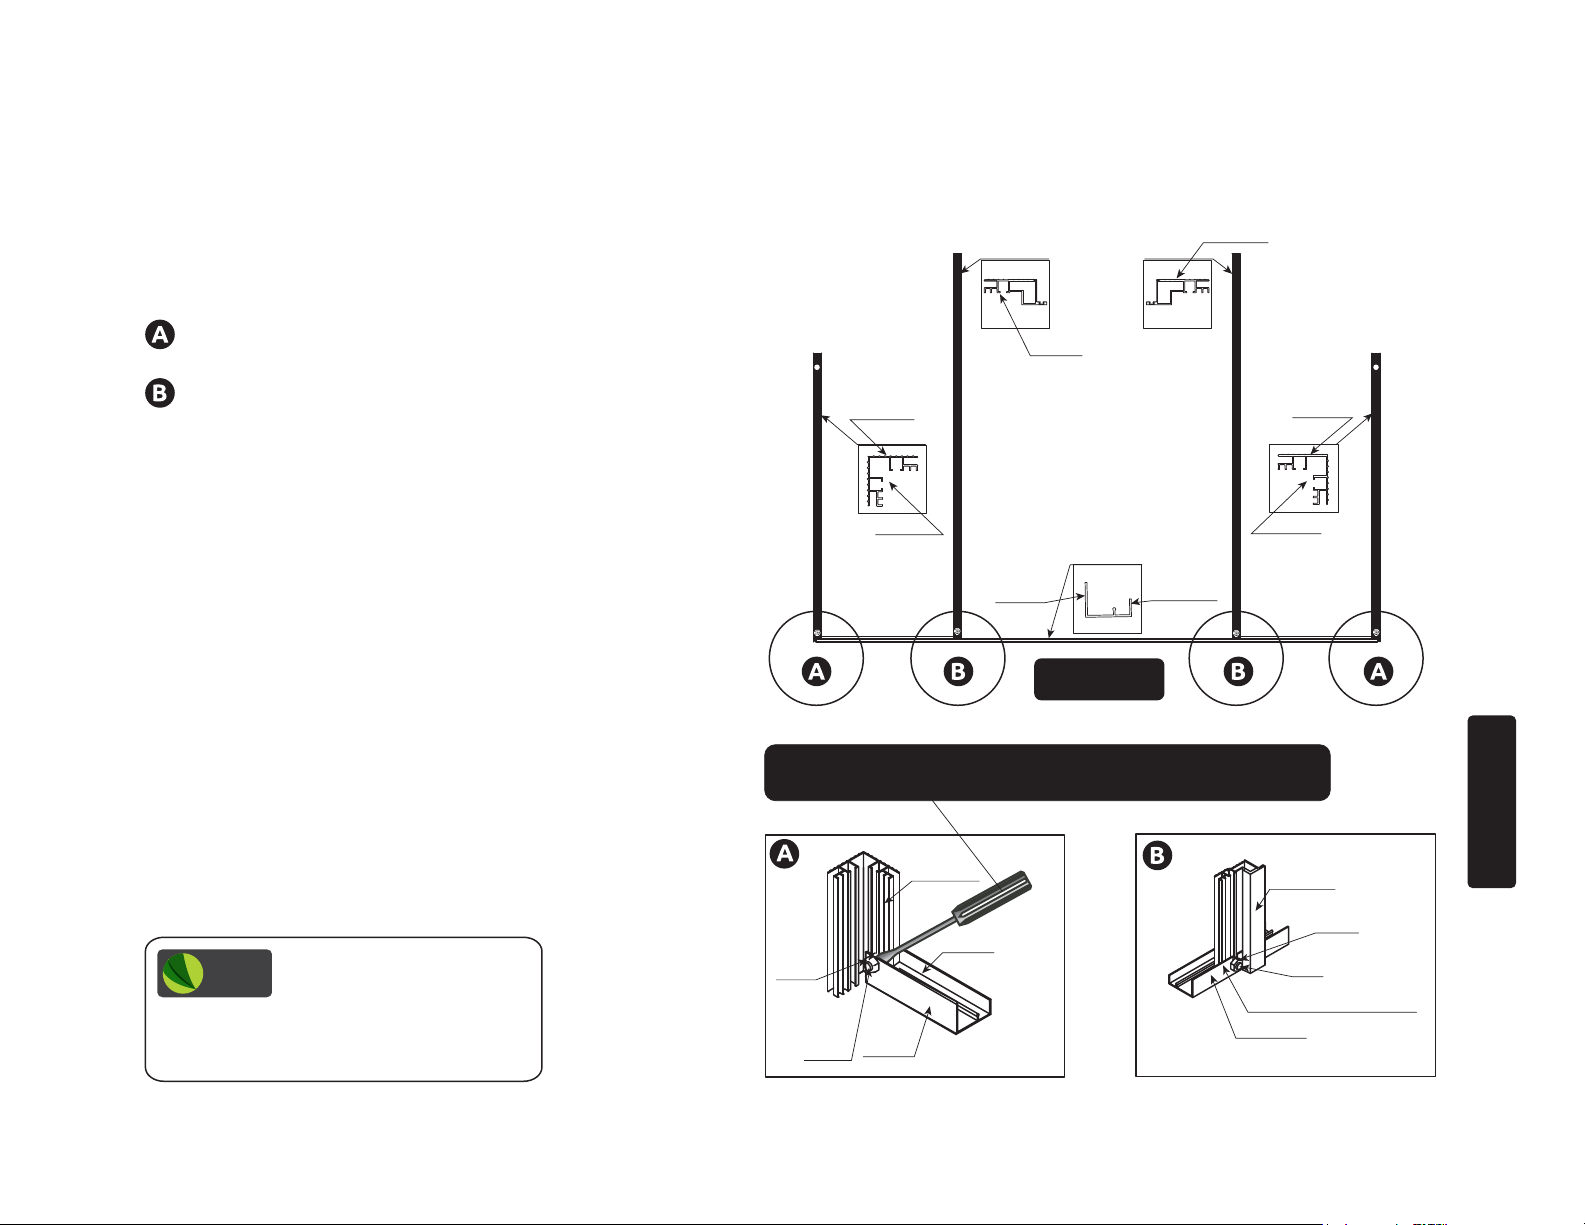
BASE KIT ASSEMBLY INSTRUCTIONS
**BASE MUST BE LEVEL & SQUARE, FOUNDATION MUST BE PROPERLY ANCHORED PRIOR TO GREENHOUSE ASSEMBLY
W06 must be buried in ground.
Outdoor
Ground
Assembly
Base
W08
W07
W06
W06/W07 * Must be
inserted into the ground,
and secured with concrete.
GRANDIO
TIP
anchor into concrete. Use a measuring tape
to ensure all corners are the same. Use level
on all four sides.
Make sure base is squared
and level before setting
S03 BOLT
Use: Quikrete fast setting
concrete to anchor base.
Pour in Quikrete and water
no mixing required.
(Not Included).
Base
Base
S03 BOLT
W06
OR
W06/W07 must be cut for patio or deck installation
Drill holes in bottom of base to allow for proper fastener to pass
through prior to moving forward with assembly. You determine and
aquire proper fastener prior to installation.
Deck or
Patio
Assembly
Base
Base
W08
W07
Base
S03 BOLT
W06
W06
Base
W07
S03 BOLTS03 BOLT
Base
DECK OR PATIO
INSTALLATION
W06/W07 * Must be cut ush with
B
frame. Use decking screws or
concrete anchors to attach base.
(Fasteners not included).
W06/W07 Must Be Modified
Use a Hacksaw or Tinsnip to
cut down the length of W06
and W07, then install cut side
down to level surface.
W06
Base
S03 BOLT
CUT
CUT
STEP ONE
6
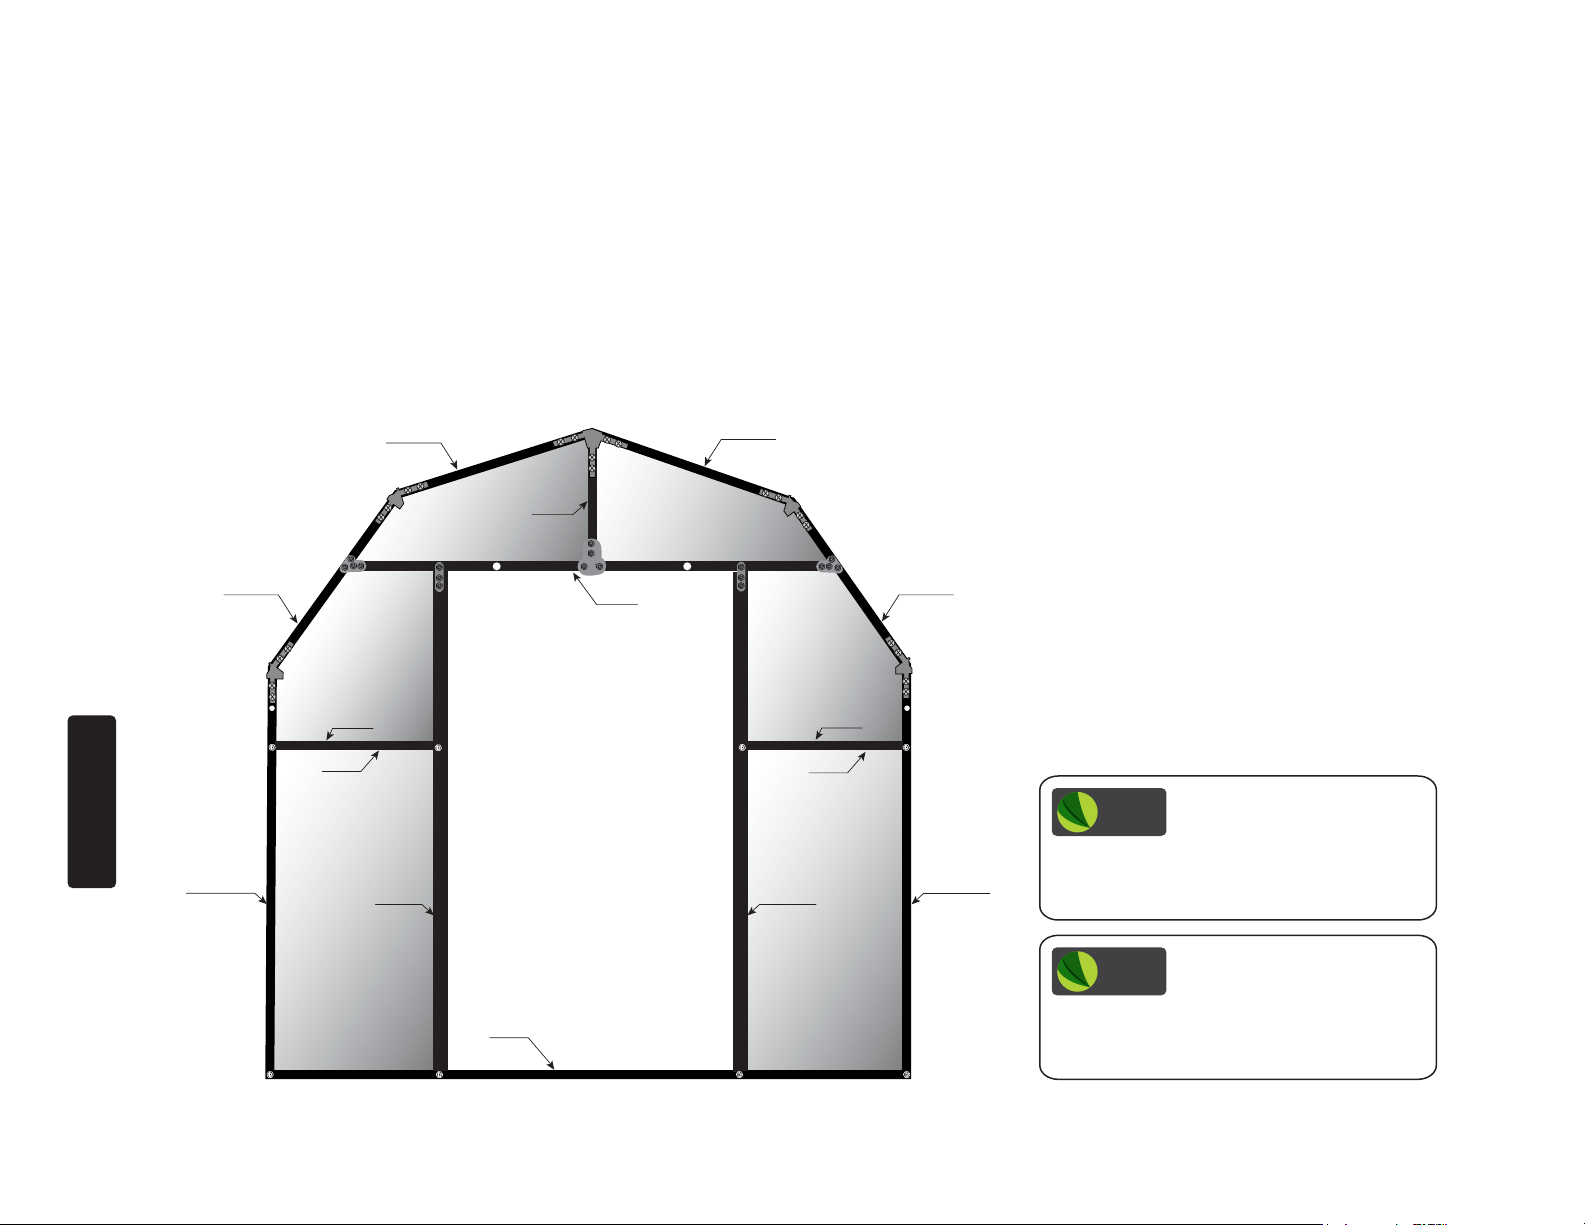
FRONT FRAME ASSEMBLY INSTRUCTIONS
This picture shows the inside view of front section fully assembled.
STEP TWO
601B
601B
601B
601B
Y3-2
603E
Y3-1
603D
Y2-2 Y2-1
L08D
603C
L08D
603C
Y2 Y1
601A-FR 601A-FL
604-R
604-L
619
GRANDIO
TIP
with tricks and tips for easier assembly and
installation of your Grandio Greenhouse at:
www.grandiogreenhouses.com
GRANDIO
TIP
your greenhouse. If possible try to nd a
shady area protected from the wind. Panels
can burn grass and plants if in direct light.
We recommend watching
our how to assembly videos
Lay at on ground to
assemble the front frame of
7
FRONT FRAME ASSEMBLY
2.1 Prethread all S05 screws into the WG01
and WG02’s for ease of installation.
2.2 Use WG01 bracket to attach the (2)
601B’s together with the 603E, secure
parts with the S05 screws provided see .
2.3 Install WG02’s into (2) 601B’s then
tighten S05 screws when extrusions are
completely tight see . Note: the fat end of
the WG02 will always be on the bottom side.
WG01
601B
601B
WG02
601B
S05
601B
WG01
603E
Inside View
GRANDIO
TIP
thread and place in the groove of the
extrusion to make installation easier. Move
up or down for exact placement.
BOLT INSTALLATION TIP:
Locate all nuts and bolts, pre
601B
STEP TWO
601B
WG02
WG02
603E
601B
8
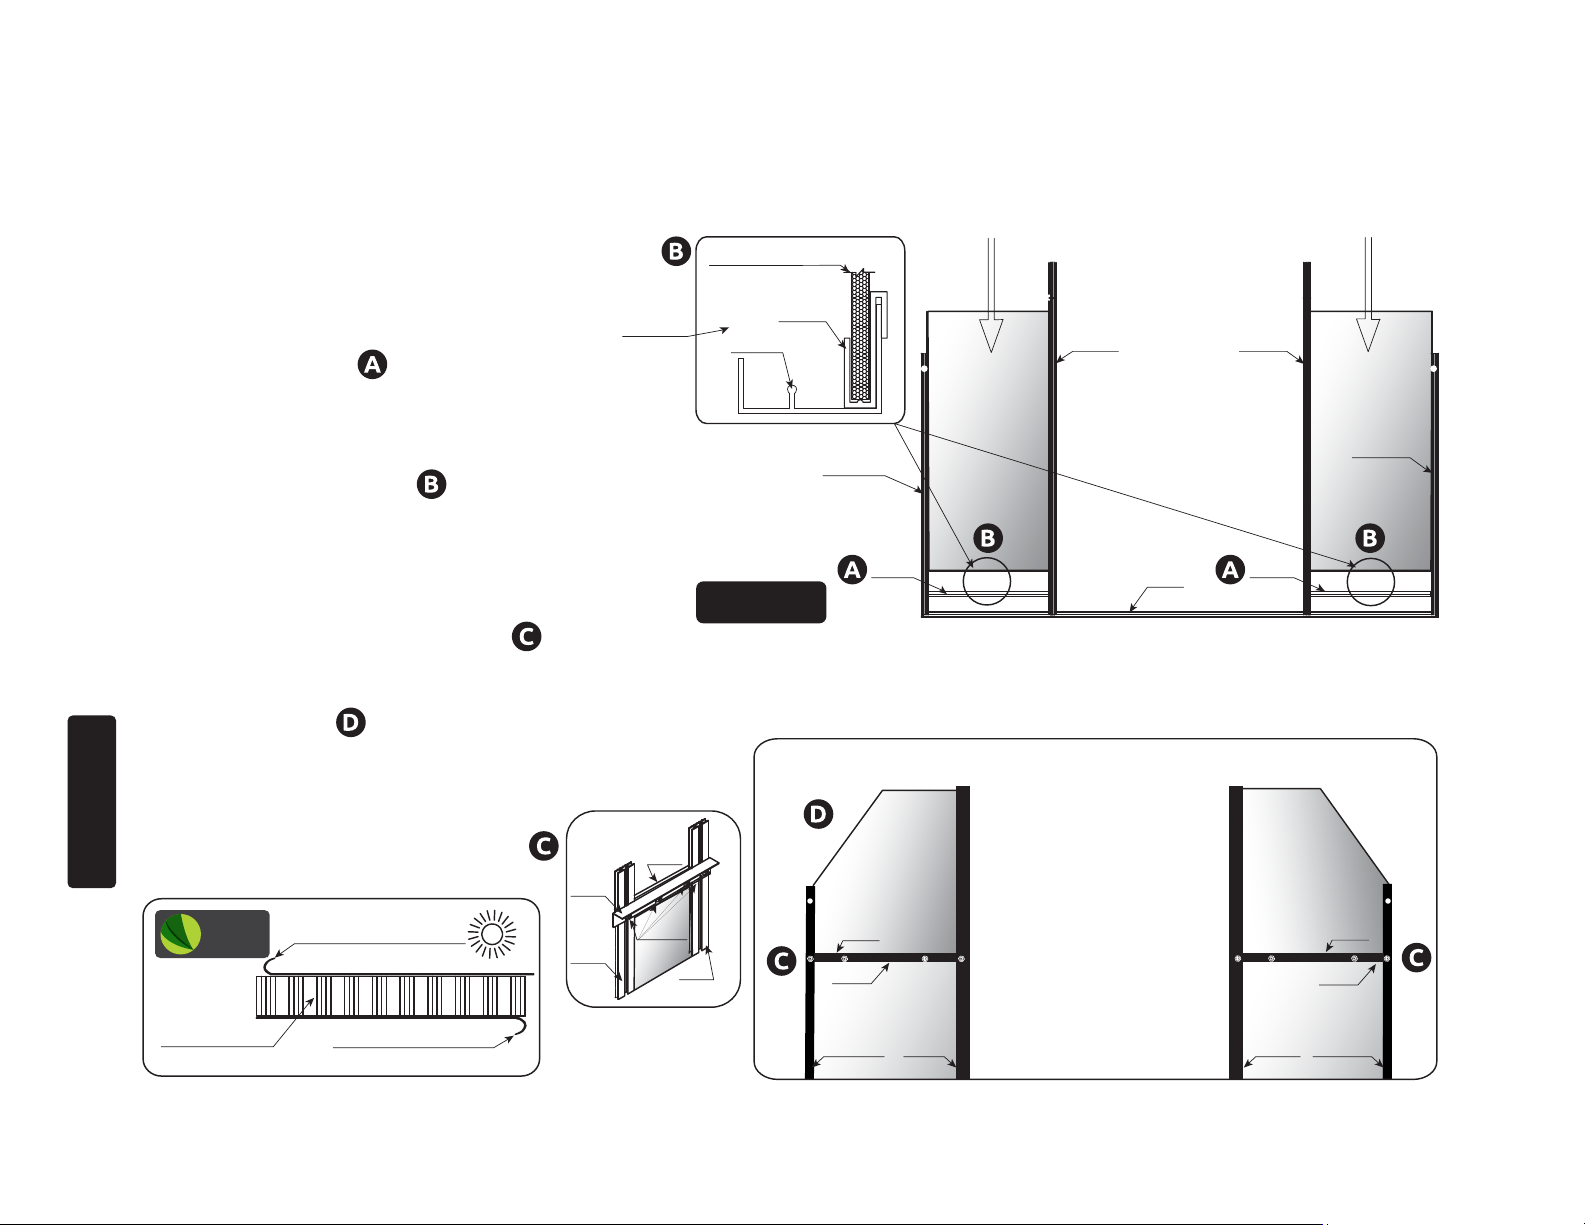
FRONT FRAME ASSEMBLY
2.4 Insert polycarbonate panels Y3-2 and
Y3-1 into place as shown in .
2.5: Attach 603E and 603D with W04
and S04/ML01 fasteners as shown in .
2.6 Attach the 603D to the 601B’s
using the W04-1’s with the S04/ML01
fasteners on both sides as shown in .
WG01
601B
WG02
603E
601B 601B
W04-1 W04-1
Y3-2
603D
W04
601B
WG02
Y3-1
STEP TWO
GRANDIO
TIP
thread and place in the groove of the
extrusion to make installation easier. Move
up or down for exact placement.
BOLT INSTALLATION TIP:
Locate all nuts and bolts, pre
9
S04
ML01
W04
603D
603E
GRANDIO
TIP
Polycarbonate
Panel
601B
W04-1
Transparent Film
Outside Greenhouse
Opal White Film
Inside Greenhouse
603D
Sun
FRONT FRAME ASSEMBLY
2.7 View diagrams and attach the (2) 604’s and (2)
601A’s to the 619.
shows where the corner pieces attach to 619.
shows where the door frame attaches to the 619.
604-R 604-L
INSIDE
OUTSIDE
601A-FR
INSIDE
619
INSIDE
OUTSIDE
OUTSIDE
601A-FL
INSIDE
OUTSIDE
Inside View
TIP: If necessary you may use a screwdriver to wedge behind the
bolt head. This prevents bolt from falling into the track.
GRANDIO
TIP
the sides of greenhouse for future installation of the rain gutter downspout attachment .
Make sure the small screw
hole on the 601A face to
ML01
10
S04
INSIDE
601A-FR
Inside View
STEP TWO
604-L
ML01
619
S04
INSIDE DOOR FRAME
619
603C
L08D
604-L
601A-FL
601A-FR
L08D
603C
604-R
Y2 Y1
Y2-2 Y2-1
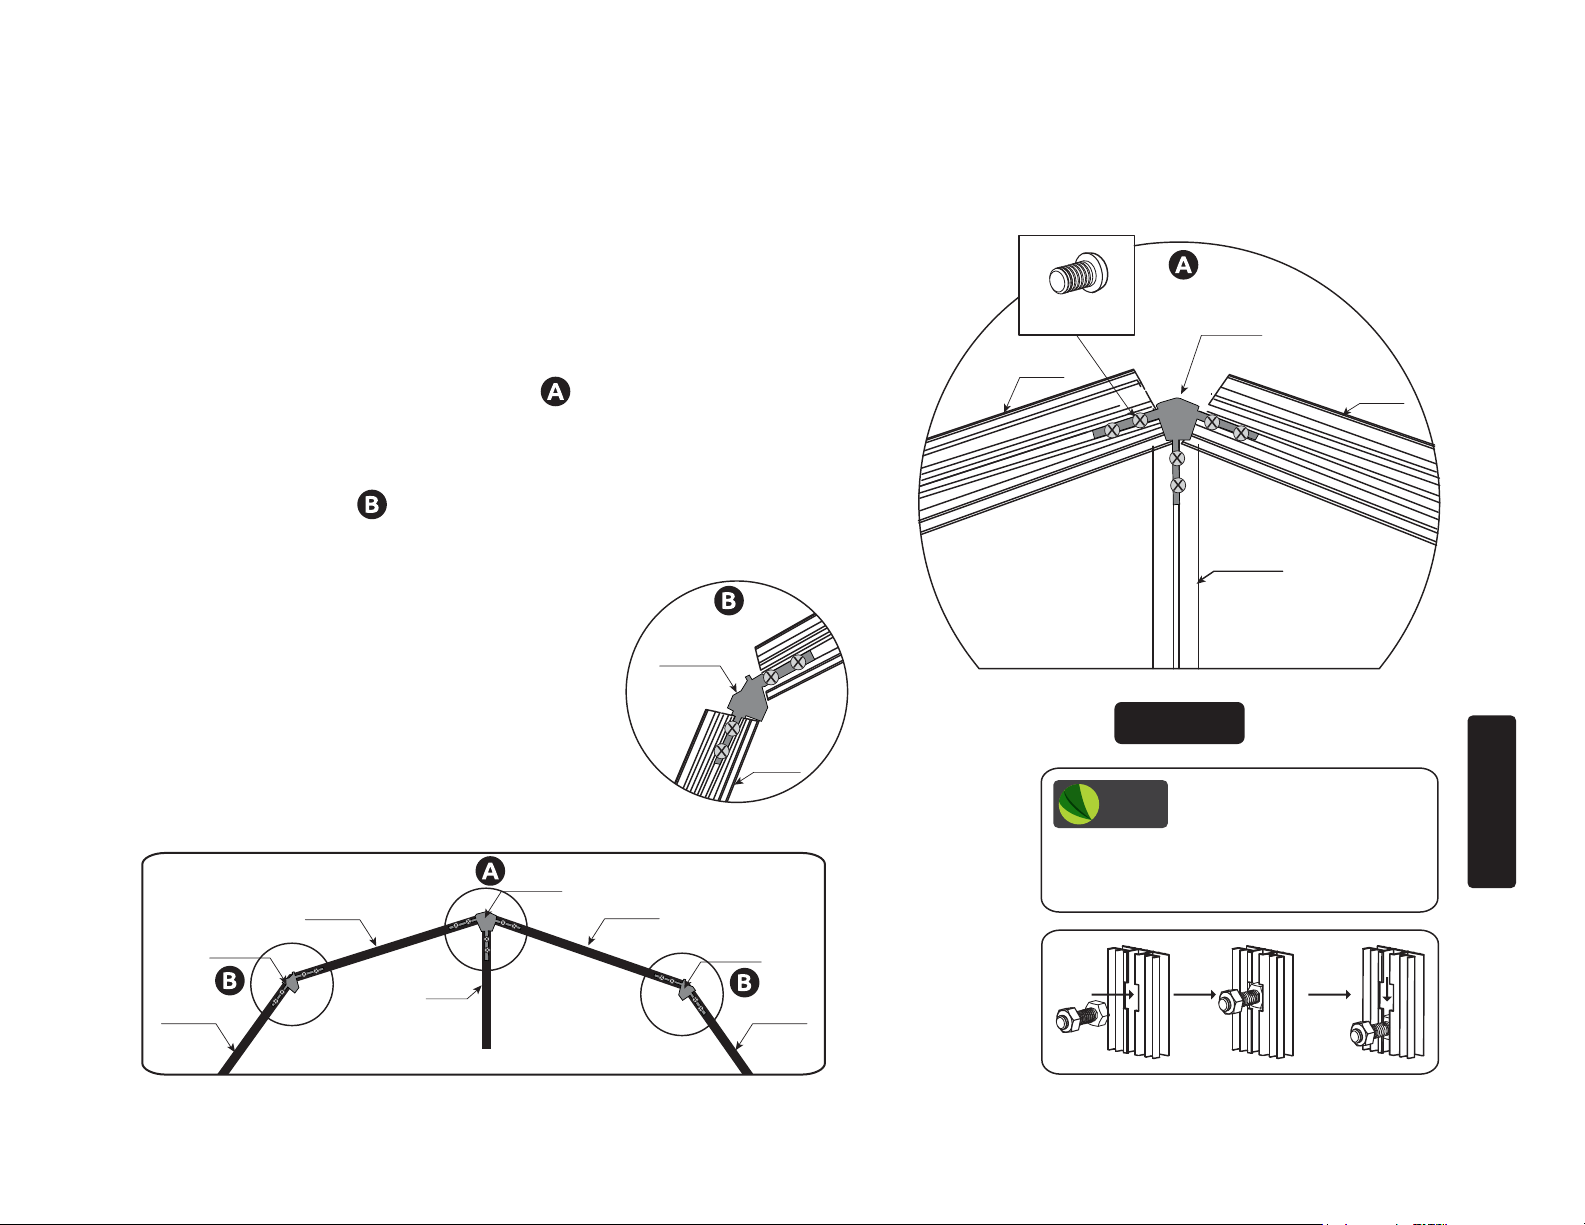
FRONT FRAME ASSEMBLY
2.8 Attach 606 to 619, this will hold the
polycarbonate panels in place. If it seems too
tight slide ngers or a screw driver along
edges, gently stretching the 606 to allow
room for panels to t .
2.9 Insert Y1 and Y2 polycarbonate panels
into place, make sure Y1 and Y2 slide completely into 606 as show in .
2.10 Attach (2) 603C’s to (2) L08D’s, then to
601A’s and 604’s using S04/ML01 fasteners,
make sure it is snug with the tops of Y2 and
Y1 panels and tighten fasteners. See .
2.11 Insert the Y2-2 and Y2-1 polycarbonate
panels as shown in .
OUTSIDE
Polycarbonate panel
606
619
Inside View
601A-FR
606
Y2
619
604-L604-R
Y1
601A-FL
606
STEP TWO
GRANDIO
TIP
Transparent Film
Outside Greenhouse
Sun
Polycarbonate
Panel
Opal White Film
Inside Greenhouse
L08D
601A
603C
S04/
ML01
604
11
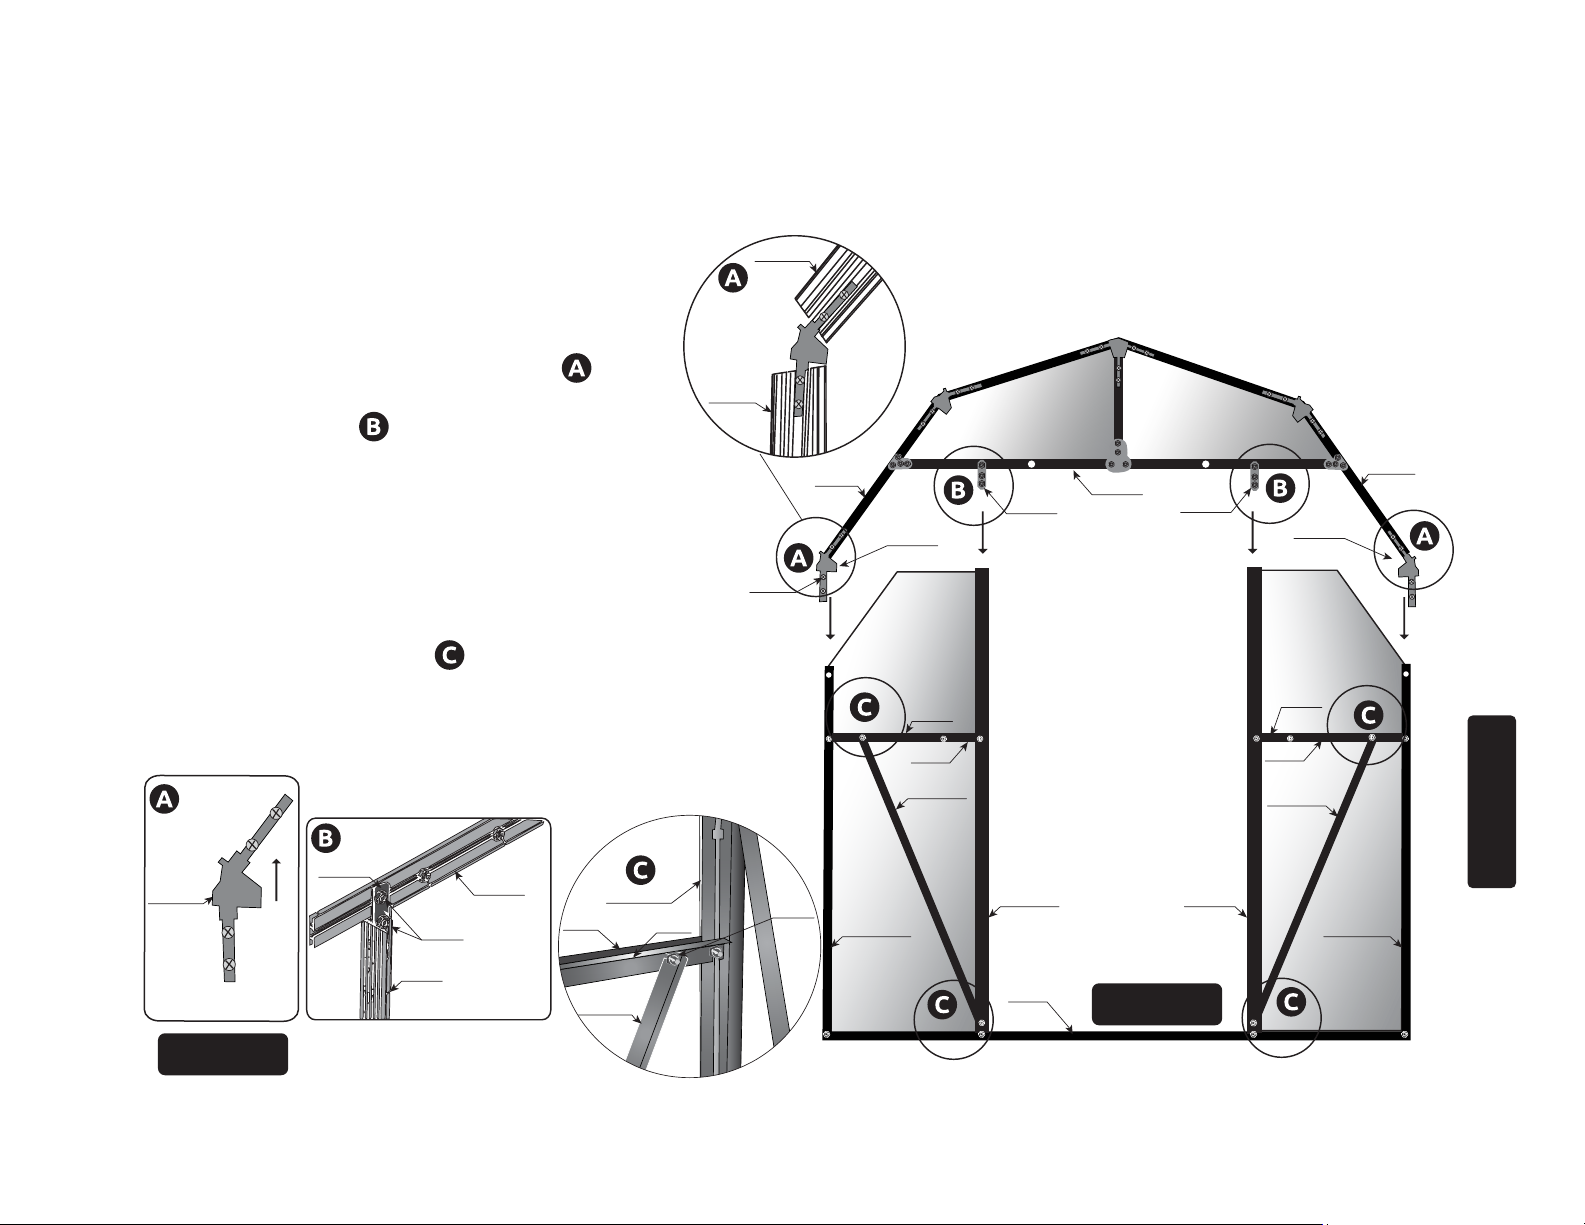
FRONT FRAME ASSEMBLY
2.12 Move roof and front section together
and align the WG02’s into the 601A’s, and the
W04-2’s into the 604’s. Insure a snug t
between the WG02’s, 601B’s and 601A’s and
then tighten the S05 screw as shown in .
Tighten the W04-2’s with the S04 /ML01 nut
and bolt as shown in .
2.13 Attach the L08A-X to L08D and 604 to
square front section loosen S04/ML01
attached to the bottom of the (2) 604’s,
square the frame with carpenter square or use
a measuring tape to make sure corner measurements are the same, tighten L08A-X’s to
hold squareness as shown in .
601A
601B
S04
ML01
601B
Y3-2
603D
W04-2
WG02
Y3-1
W04-2
WG02
Y2-2 Y2-1
L08D
603C
L08A-X
L08D
603C
L08A-X
601B
Fat End
609-Localizer
Profile View
UP
W04-2
S04
ML01
604
603D
603C
L08A-X
601A-FL
L08D
S04
ML01
12
Y2
601A-FL
604-L
619
604-R
Inside View
STEP TWO
Y1
601A-FR
 Loading...