

Grandin LD224GTB Operating Instructions Manual

GRANDIN
OPERATING INSTRUCTIONS
MODE D'EMPLOI
MANUAL DE INSTRUCCIONES
MANUAL DE INSTRUÇÕES
ISTRUZIONI PER L' USO
LD224GTB
COLOUR TELEVISION WITH REMOTE CONTROL
TELEVISEUR COULEUR A TELECOMMANDE
TV A CORES COM REMOTE CONTROLE
TELEVISORE A COLORI CON TELECOMANDO
TELEVISION CON MANDO A DISTANCIA

www.vestel-france.fr

English - 1 -
Safety Precautions
Please read these instructions fully
before installing or operating.
Preparation
Place the device on a solid even surface. For
ventilation, leave a free space of at least 10 cm
all around the set. To prevent any fault and unsafe
situations, do not place any objects on top of
the set. Use this device in moderate climates.
Operation temperature and operation humidity:
5ºC up to 45ºC, 85% rel. humidity max. (not blocking
ventilation openings).
Intended Use
This device is used to receive and display TV
programmmes.The different connection options
make an additional expansion of the reception and
display sources possible (various external devices).
This device is only suitable for the operation in dry
interiors. This appliance is intended solely for private
domestic use and may not be used for industrial and
commercial purposes. We exclude liability in principle,
if the device is not used as intended, or unauthorized
modications have been made. To operate your LED
TV in extreme ambient conditions may cause the
damage of the device.
WARNING: Never let people (including
children) with physical, sensory or mental
abilities or lack of experience and / or knowledge
unsupervised use electrical device!
Children may not recognize dangers right!
The swallowing of batteries can be fatal. Keep
batteries always out of reach of small children.
If a battery is swallowed, immediately seek
medical attention. Keep the packaging lms out
of reach of children. Risk of suffocation.
Power source
• The TV should be operated only from a 220-240 V
AC, 50 Hz outlet.
• Warning: Do not leave your TV in standby or
operating mode when you leave your house.
Positioning the TV
• For ventilation, please leave a clear space of at least
10cm all around the TV.
• Do not block the ventilation openings.
• Do not place the TV on sloping or unstable surfaces,
the TV may tip over.
• To prevent damage to the TV, do not place any
objects on top of the TV.
• Only use the TV in moderate climates.
Contents
Safety Precautions ................................................. 1
Environmental Information ..................................... 2
Accessories included .............................................. 3
TV - Features ......................................................... 3
Viewing the TV ....................................................... 3
TV Control buttons & Operation ............................. 3
Installing the Batteries to the Remote..................... 4
Connect Power & Antenna/Cable ........................... 4
Viewing remote control .......................................... 5
Switching On/Off ..................................................... 7
First Time Installation.............................................. 7
Media Playback via USB Input ............................... 8
Changing Image Size: Picture Formats .................. 9
Using the Channel List ........................................... 9
Menu Features and Functions .............................. 10
Menu Features and Functions ...............................11
Menu Features and Functions .............................. 12
Electronic Programme Guide (EPG) .................... 13
Recording a Programme ...................................... 13
Timeshift Recording ............................................. 14
Instant Recording ................................................. 14
Watching Recorded Programmes ....................... 14
Recording Conguration ....................................... 14
Teletext ................................................................. 14
Software Upgrade................................................. 15
Troubleshooting & Tips ......................................... 15
PC Typical Display Modes ................................... 16
Specications ..............................................................17
Supported File Formats for USB Mode ................ 17
English - 2 -
Power cord and plug
• The power cord plug should be easily accessible.
In case of storms and lightning, when going on
holiday, or when the TV is not used for a long period
of time disconnect the power cord from the mains
power socket.
• The mains plug is used to disconnect TV set from the
mains and therefore it must remain readily operable.
• Do not place the TV, furniture, etc. on the power
cord or pinch the cord.
• Handle the power cord by the plug, do not unplug
the TV by pulling the power cord.
• Never touch the power cord/plug with wet hands
as this could cause a short circuit or electric shock.
• Never make a knot in the power cord or tie it with
other cords.
• Power cords should be placed in such a way that
they are not likely to be stepped on or driven over.
• A damaged power cord/plug can cause re or give
you an electric shock. When damaged it must be
replaced, this should only be done by qualied
personnel.
Moisture and Water
• Do not use this TV in a humid or damp place (avoid
bathrooms, the sink in the kitchen, and near the
washing machine).
• Do not expose this TV to rain or water, as this may
be dangerous.
• Do not place objects lled with liquids, such as
ower vases, on top of the TV. Avoid from dripping
or splashing.
• If any solid object or liquid falls into the cabinet,
unplug the TV and have it checked by qualied
personnel before operating it any further.
Ventilation
• The slots and openings on the TV set are intended
for ventilation and to ensure reliable operation.
• To prevent overheating, these openings must not be
blocked or covered in anyway.
Heat sources and Flames
• Do not expose the TV to direct
sunlight or other heat sources.
• The TV should not be placed near to
open ames and sources of intense
heat such as an electric heater.
• Ensure that no open ame sources,
such as lighted candles, are placed
on top of the TV.
Headphone Volume
• Excessive sound pressure from
earphones and headphones can cause
hearing loss, please take care.
Wall Mounting (optional)
• To prevent injury, this TV must be securely attached
to the wall in accordance with the installation
instructions (if the option is available).
LCD Screen
• Occasionally, a few non-active pixels may appear
on the screen as a xed blue, green or red point.
Please note that this does not affect the performance
of your product.
• Take care not to scratch the screen with ngernails
or other hard objects.
Cleaning
• Before cleaning, unplug the TV from the wall socket.
• Do not use liquid or aerosol cleaners. Only use a
soft, dry cloth.
Environmental Information
This television is designed to consume less energy
to save environment. You not only help to save the
environment but also you can save money by reducing
electricity bills thanks to the energy efciency feauture
of this TV. To reduce energy consumption, you should
take the following steps:
You can use Power Save Mode setting, located in the
Picture menu. If you set Power Save Mode as On, the
TV will switch to energy-saving mode and luminance
level of TV set will be decreased to optimum level.
Note that some picture settings will be unavailable
to be changed when the TV is in Power Save Mode.
When the TV is not in use, please switch off or
disconnect the TV from the mains plug. This will also
reduce energy consumption.
Disconnect power when going away for longer time.
It is highly recommended to activate Power Save Mode
setting to reduce your annual power consumption. And
also it is recommended to disconnect the TV from the
mains plug to save energy more when you do not use.
Please helps us to save environment by following
these steps.
Repair Information
Please refer all servicing to qualied personnel. Only
qualied personnel must repair the TV. Please contact
your local dealer, where you have purchased this TV
for further information.
English - 3 -
Accessories included
• Remote Control
• Batteries not included.
• Instruction Book
• Side AV Connection Cable
TV - Features
• Fully integrated digital/cableTV (DVB-T/C).
• HDMI connectors for digital video and audio.
• USB input.
• 10000 programmes.
• OSD menu system.
• Scart socket for external devices.
• Stereo sound system.
• Teletext, fastext, TOP text.
• Headphone connection.
• Automatic programming system.
• Forward or backward manual tuning.
• Automatic power down after up to six hours.
• Sleep timer.
• Child lock.
• Automatic sound mute when no transmission.
• NTSC playback.
• AVL (Automatic Volume Limiting).
• PLL (Frequency Search).
• PC input.
• Plug&Play for Windows 98, ME, 2000, XP, Vista,
Windows 7.
• Game Mode (optional).
• Picture off function.
Viewing the TV
TV Control buttons & Operation
1. Up direction
2. Down direction
3. Programme/Volume / AV / Standby-On selection
switch
You can move the switch, upward or downward to
change the volume. If you want to change channels,
press the middle of the switch once (Position 3) and
then move upward or downward. If you press the
middle of the switch once more,source OSD will be
displayed. To select desired source, move the switch
upward or downward and release. If you press the
middle of the switch and hold about a few seconds,
the TV will switch to standby mode. Main menu OSD
cannot be displayed via the control button.
English - 4 -
Operation with the Remote Control
Press MENU button on your remote control to display
main menu screen. Use Left or Right button to select
a menu tab and press OK to enter. Use Left / Right
/ Up / Down to select or set an item. Press RETURN
or MENU button to quit a menu screen.
Input Selection
Once you have connected external systems to your
TV, you can switch to different input sources. Press
SOURCE button on your remote control consecutively
to select the different sources.
Changing Channels and Volume
You can change the channel and adjust the volume by
using the V ^ / v and CH ^ / v buttons on the remote.
Installing the Batteries to the Remote
1. Lift the cover on the back of the remote upward
gently.
2. Install two AAA batteries. Make sure to match
the + and - ends of the batteries in the battery
compartment (observe the correct polarity.
3. Replace the cover.
Connect Power & Antenna/Cable
IMPORTANT: The TV set is designed to operate on 220-240V
AC, 50 Hz socket. After unpacking, allow the TV set to reach
the ambient room temperature before you connect the set to
the mains. Plug the power cable to the mains socket outlet.
SPDIF
VGA
Aerial or Cable
English - 5 -
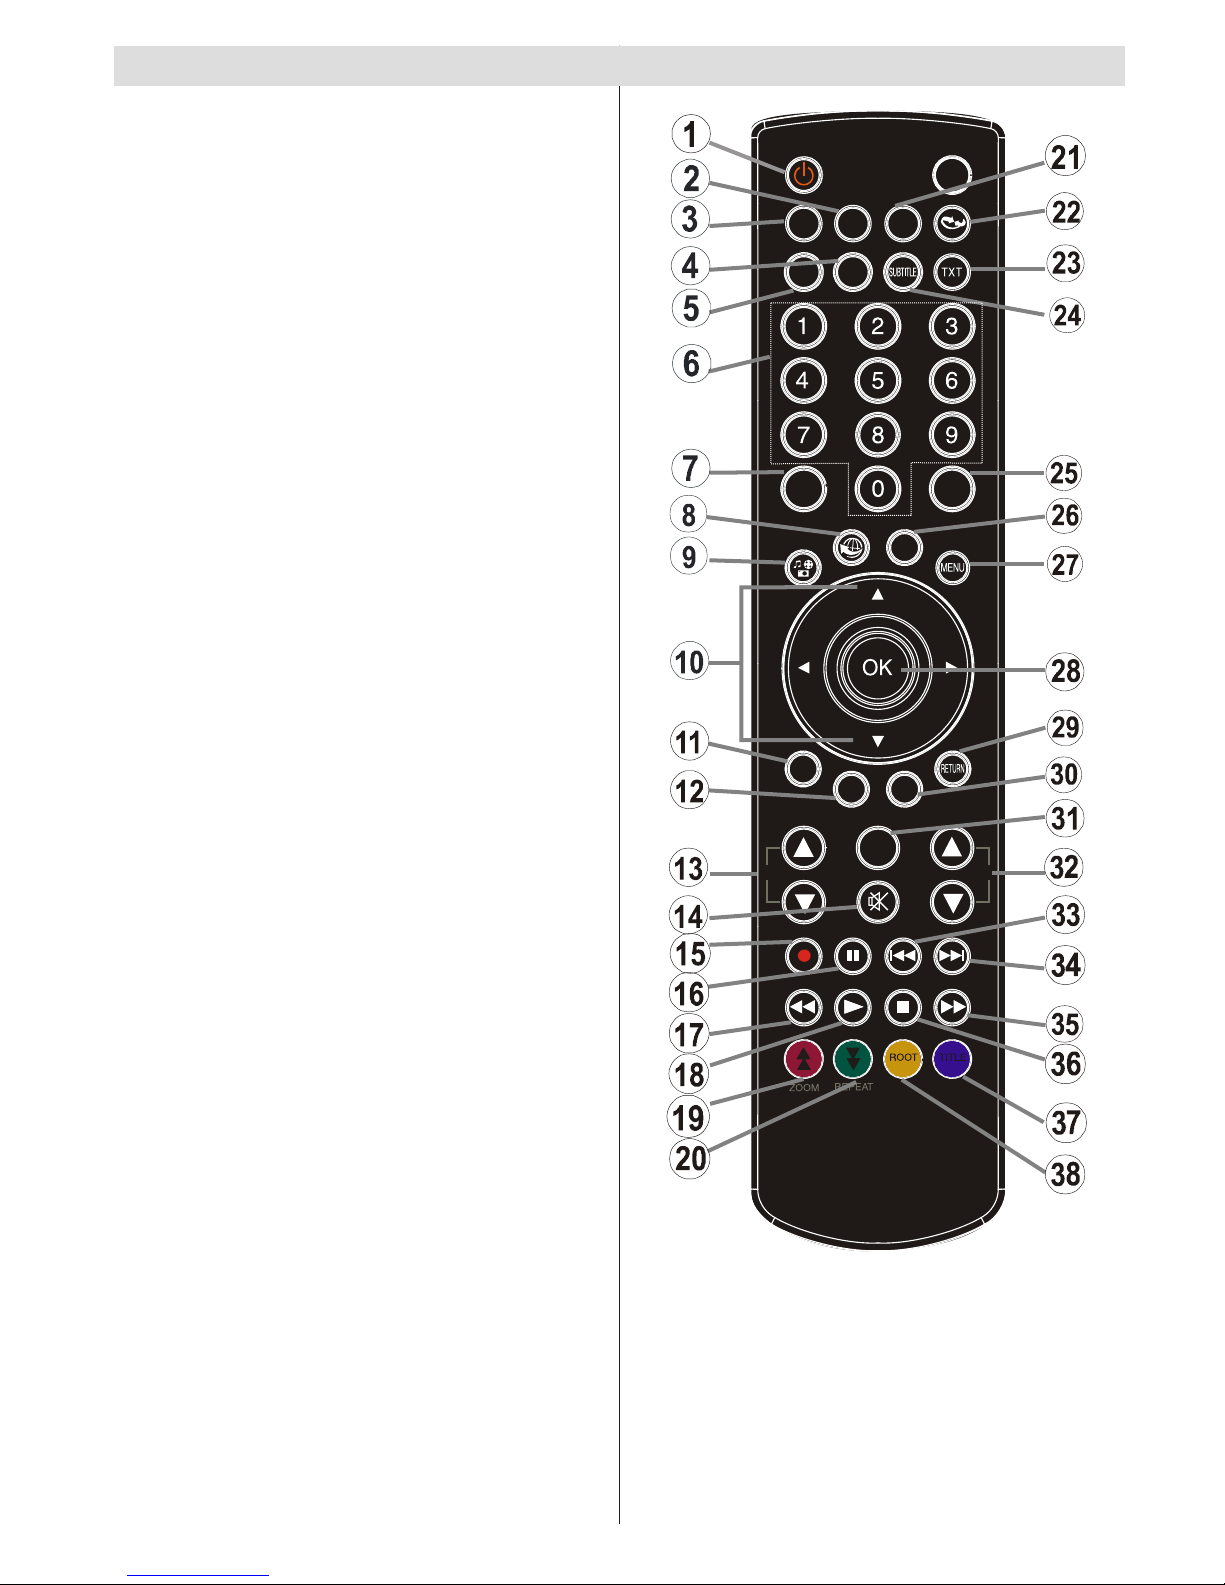
1. Standby
2. Image size
3. Sleep Timer
4. Mono/Stereo - Dual I-II / Currrent Language (*)
(in DVB channels)
5. Favourite channels
6. Numeric buttons
7. Electronic programme guide(in DVB channels)
8. No function
9. Media Browser
10. Navigation buttons (Up/Down/Left/Right)
11. No function
12. No function
13. Programme Down / Page up - Programme Up /
Page down
14. Mute
15. Programme recording
16. Pause (in Media Browser mode) / Timeshift
recording
17. Rapid reverse (in Media Browser mode)
18. Play (in Media Browser mode)
19. Red button
20. Green button
21. Picture mode selecion
22. No function
23. Teletext / Mix (in TXT mode)
24. Subtitle on-off (in DVB channels)
25. Previous programme
26. AV / Source selection
27. Menu on-off
28. Okay (Conrm) / Hold (in TXT mode)/ Channel
List
29. Exit / Return / Index page (in TXT mode)
30. No function
31. Info / Reveal (in TXT mode)
32. Volume Up / Down
33. No function
34. No function
35. Rapid advance (in Media Browser mode)
36. Stop (in Media Browser mode)
37. Blue button
38. Yellow button
SLEEP
SCREEN
PRESETS
LANG.
FAV
EPG
SWAP
SOURCE
C
DISP.
SEARCH
MODE
INFO
CH
V
Viewing remote control
English - 6 -
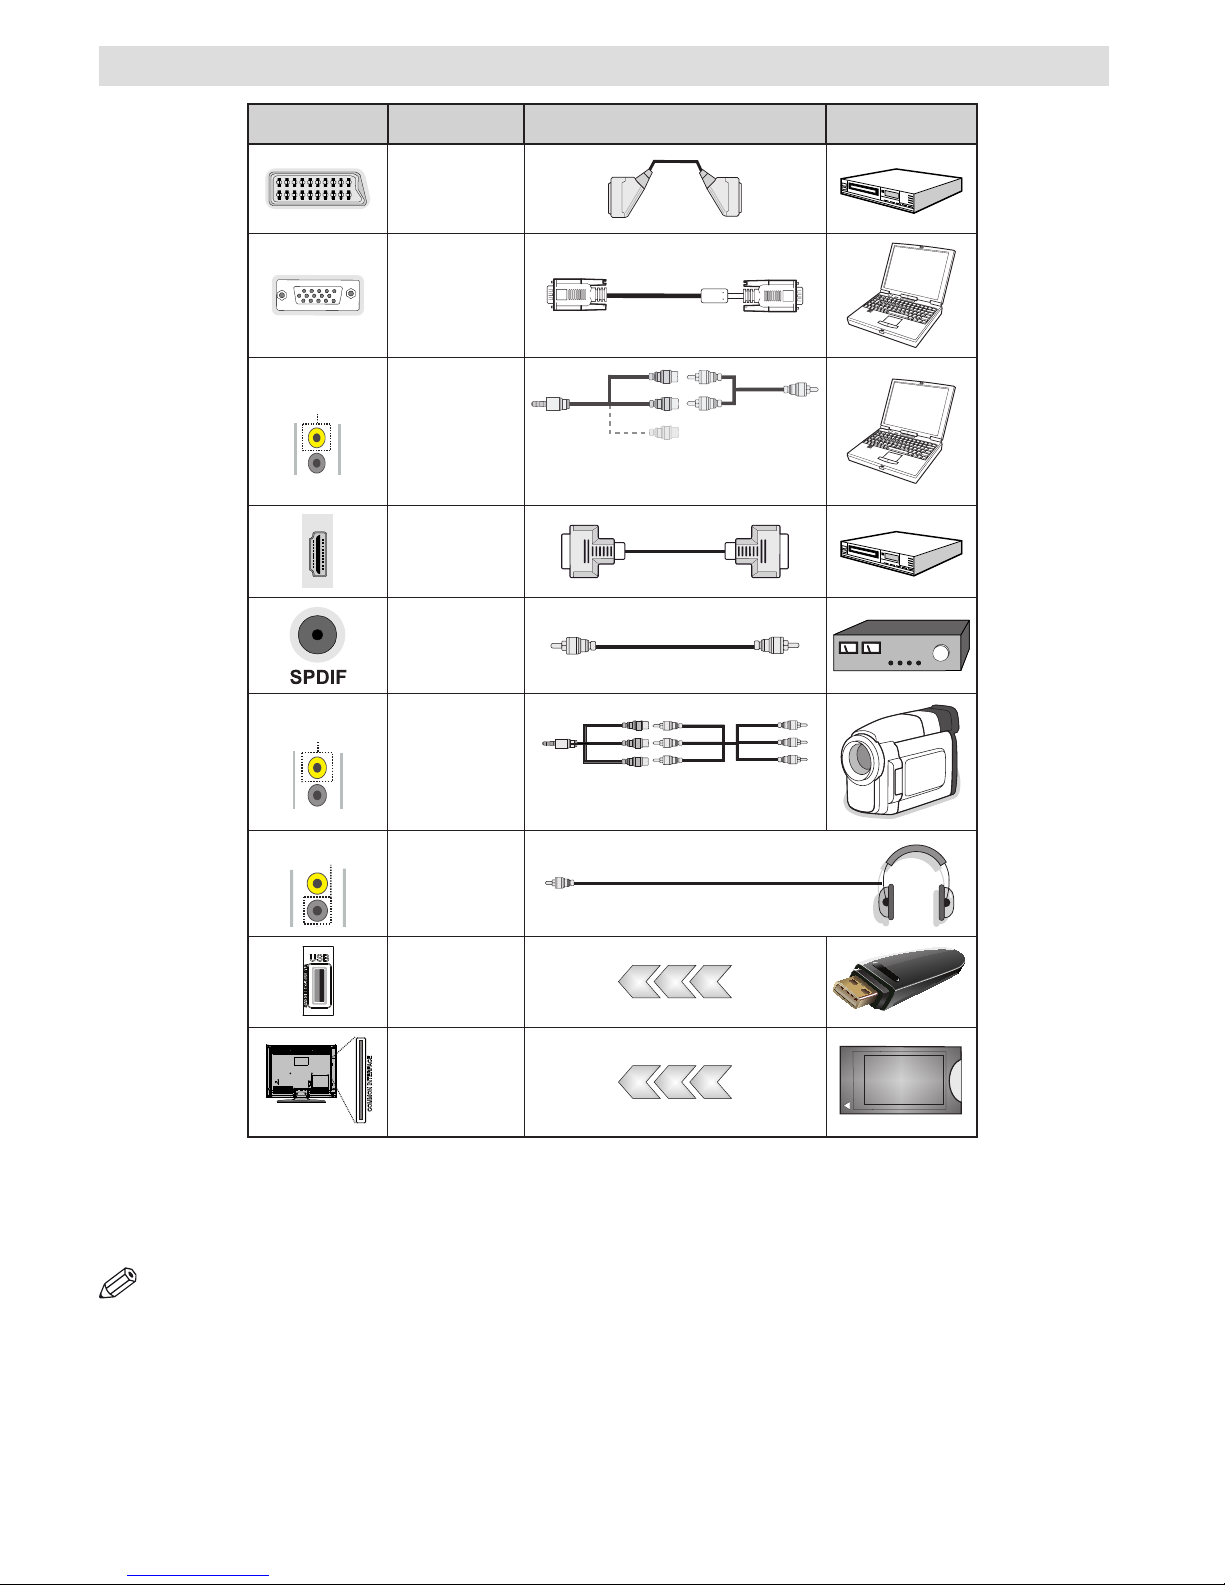
Viewing the Connections
NOTE: When connecting a device via the Side AV input, you must use the supplied connection cables to enable
connection. See the illustrations above. | To enable PC audio, you will need to use the supplied SIDE AV CONNECTION
cable’s WHITE & RED inputs. | If an external device is connected via the SCART socket, the TV will automatically switch to
AV mode.| When receiving DTV channels (Mpeg4 H.264) or while in Media Browser mode, output will not be available via
the scart socket. | When using the wall mounting kit (optional), we recommend that you plug all your cables into the back of
the TV before mounting on the wall. | Insert or remove the CI module only when the TV is SWITCHED OFF. You should refer
to the module instruction manual for details of the settings. You can use the VGA input for connecting a YPbPr device. To do
this, you need a YPbPr to PC cable (Not supplied).
Connector Type Cables Device
Scart
Connection
(back)
VGA
Connection
(back)
SIDE AV
PC/YPbPr
Audio
Connection
(side)
Side Audio/Video
Connection Cable
(Supplied)
PC Audio Cable
(Not supplied)
HDMI
Connection
(back)
SPDIFF
Connection
(back)
SIDE AV
Side AV
Connection
(side)
AV Connection Cable
(supplied)
HEADPHONE
Headphone
Connection
(side)
USB
Connection
(side)
CI
Connection
(side)
CAM
module
English - 7 -
Switching On/Off
Switching the TV On
With power cord plug connected to the mains power
socket, the TV is in ‘Standby’ mode.
To switch the TV on from standby mode:
Press the “ ” button and the TV will switch to
standby mode. Then the standby LED lights up.
To switch on the TV from standby mode either:
a. Press the “ ” button,CH ^/ v or a numeric button
on the remote control.
b. Press the middle of the “ ” button on the TV.
By either method the TV will switch on.
Switching the TV Off
Press the “ ” button on the remote control or press
the standby “ ” button, so the TV will switch to
standby mode.
To turn off the TV completely, remove the power
cord plug from the mains power socket.
Note: When the TV is switched to standby mode, standby
LED can blink to indicate that features such as Standby
Search, Over Air Download or Timer is active. The LED can
also blink when you switch on the TV from standby mode.
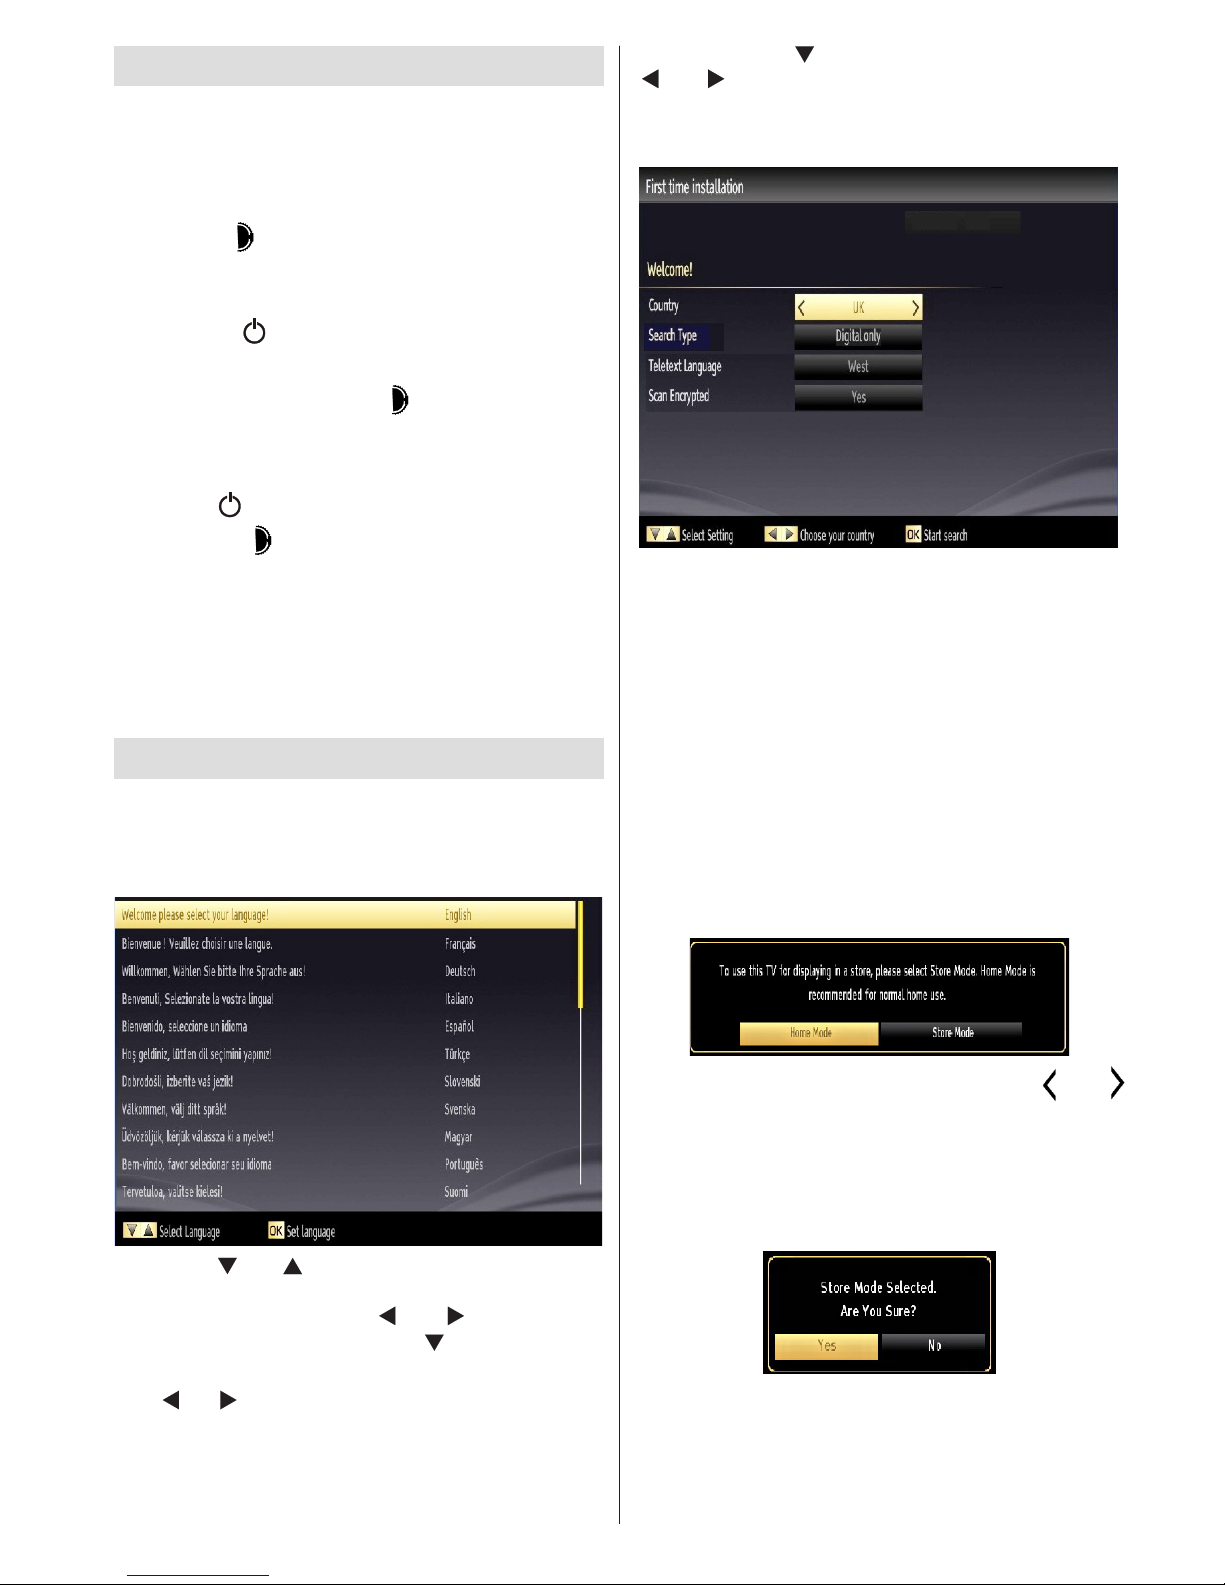
First Time Installation
When turned on for the rst time, the “language
selection” menu appears. The message “Welcome
please select your language!” is displayed in all
language options listed alphabetically.
Press the “ ” or “ ” button to highlight the required
language, press OK button to select. “First Time
Installation” appears. Use “ ” or “ ” button to set
the required country, and press “ ” button to select
Search Type.
Use “ ” or “ ” to set the desired search type. Available
search types are Digital and analog, digital only and
analog only.
When set, press “ ” to select Teletext Language. Use
“ ” or “ ” to select the desired Teletext Language.
Next, select Scan Encrypted and set as Yes if you
want to scan coded stations.
(*) IMPORTANT: When you select Country option
as France or Italy, you will be asked to set and
conrm a PIN number. Selected PIN number cannot
be 0000. Enter a PIN number and conrm it by
entering once more. Press OK button to continue.
If the two PIN numbers match, your master PIN
number will be set.
WARNING: When you are required to enter a PIN
number for any menu operation you should use
the PIN that you have previously dened during
the rst time installation. If you have forgotten
the PIN number you have set during the rst time
installation, you should use the master PIN code,
4725.
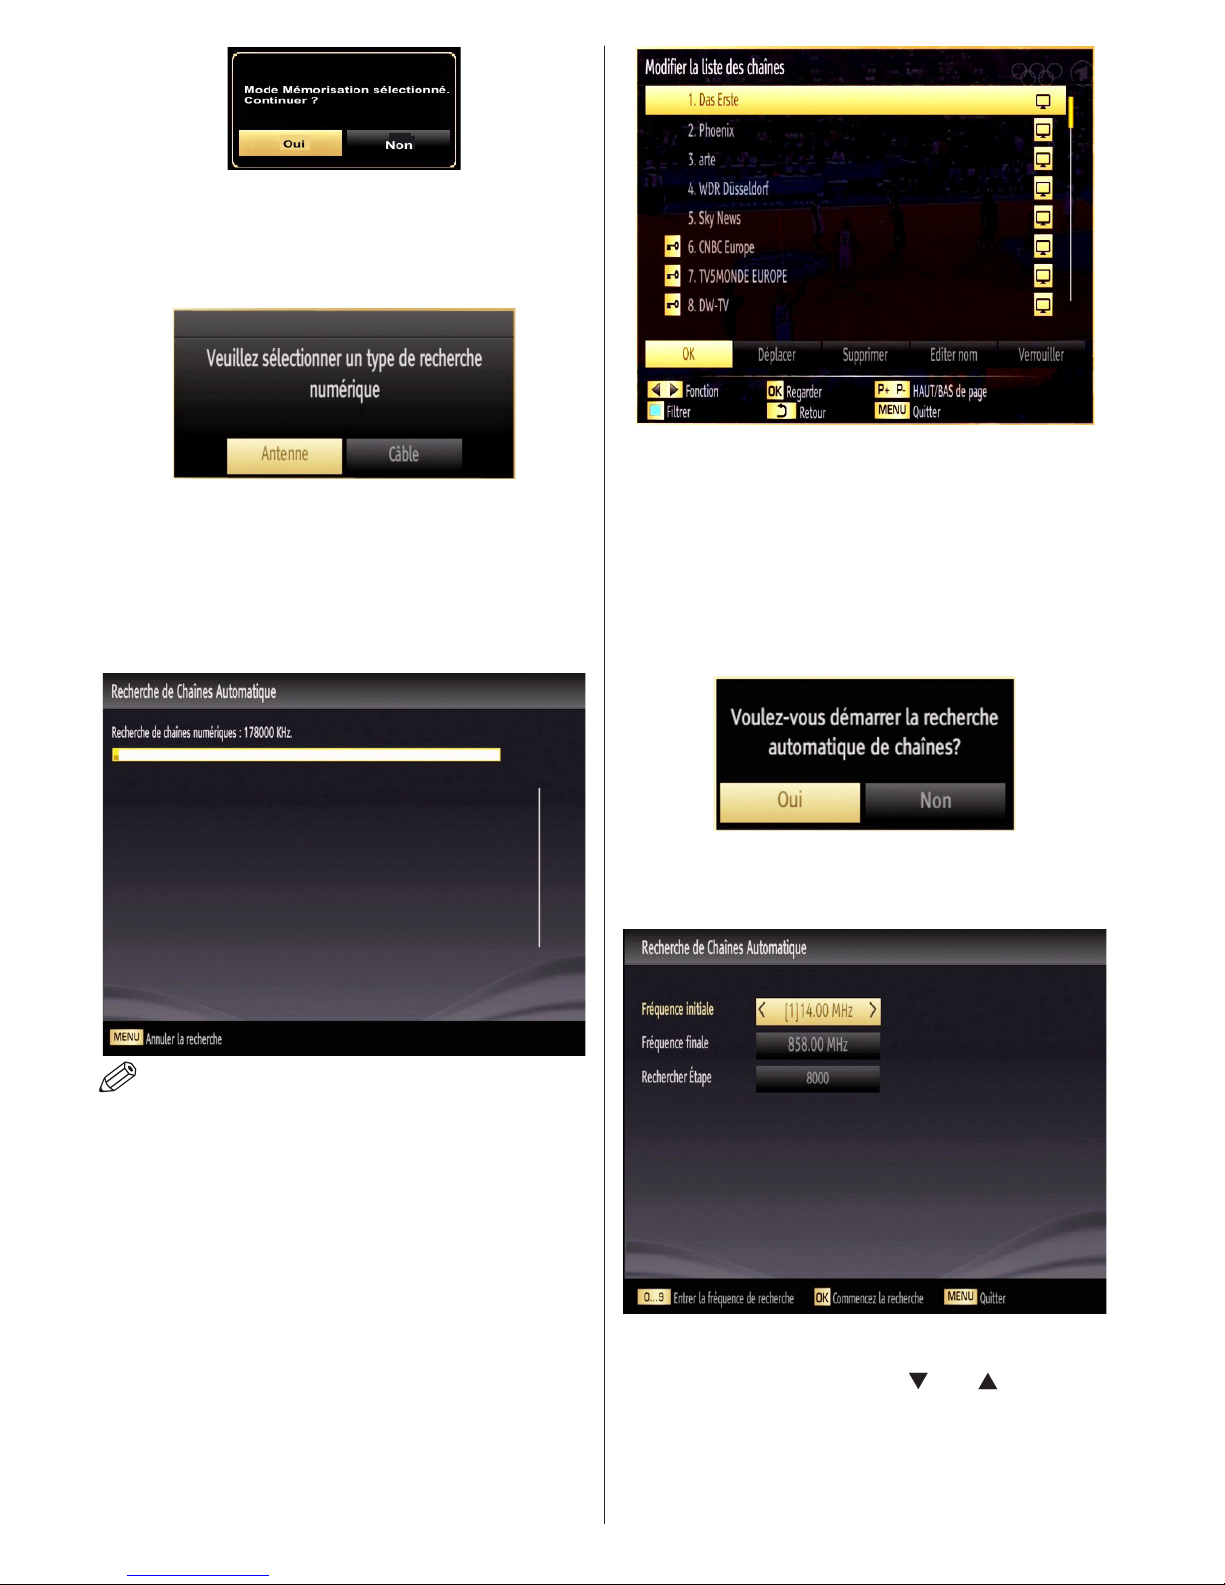
Press OK button on the remote control to continue and the
following message will be displayed on the screen.
You can activate Store mode option by using “ ” or “
” button. If Store Mode is selected, Store mode option will
be available in other settings menu and your TV’s features
will be illustrated on the top of the screen. A conrmation
screen will be displayed after selecting the Store Mode.
Select YES to proceed.
If Home Mode is selected, Store mode will not be available
after the First Time Installation. Press OK button on the remote
control to continue and the following message will be displayed on
the screen..
English - 8 -
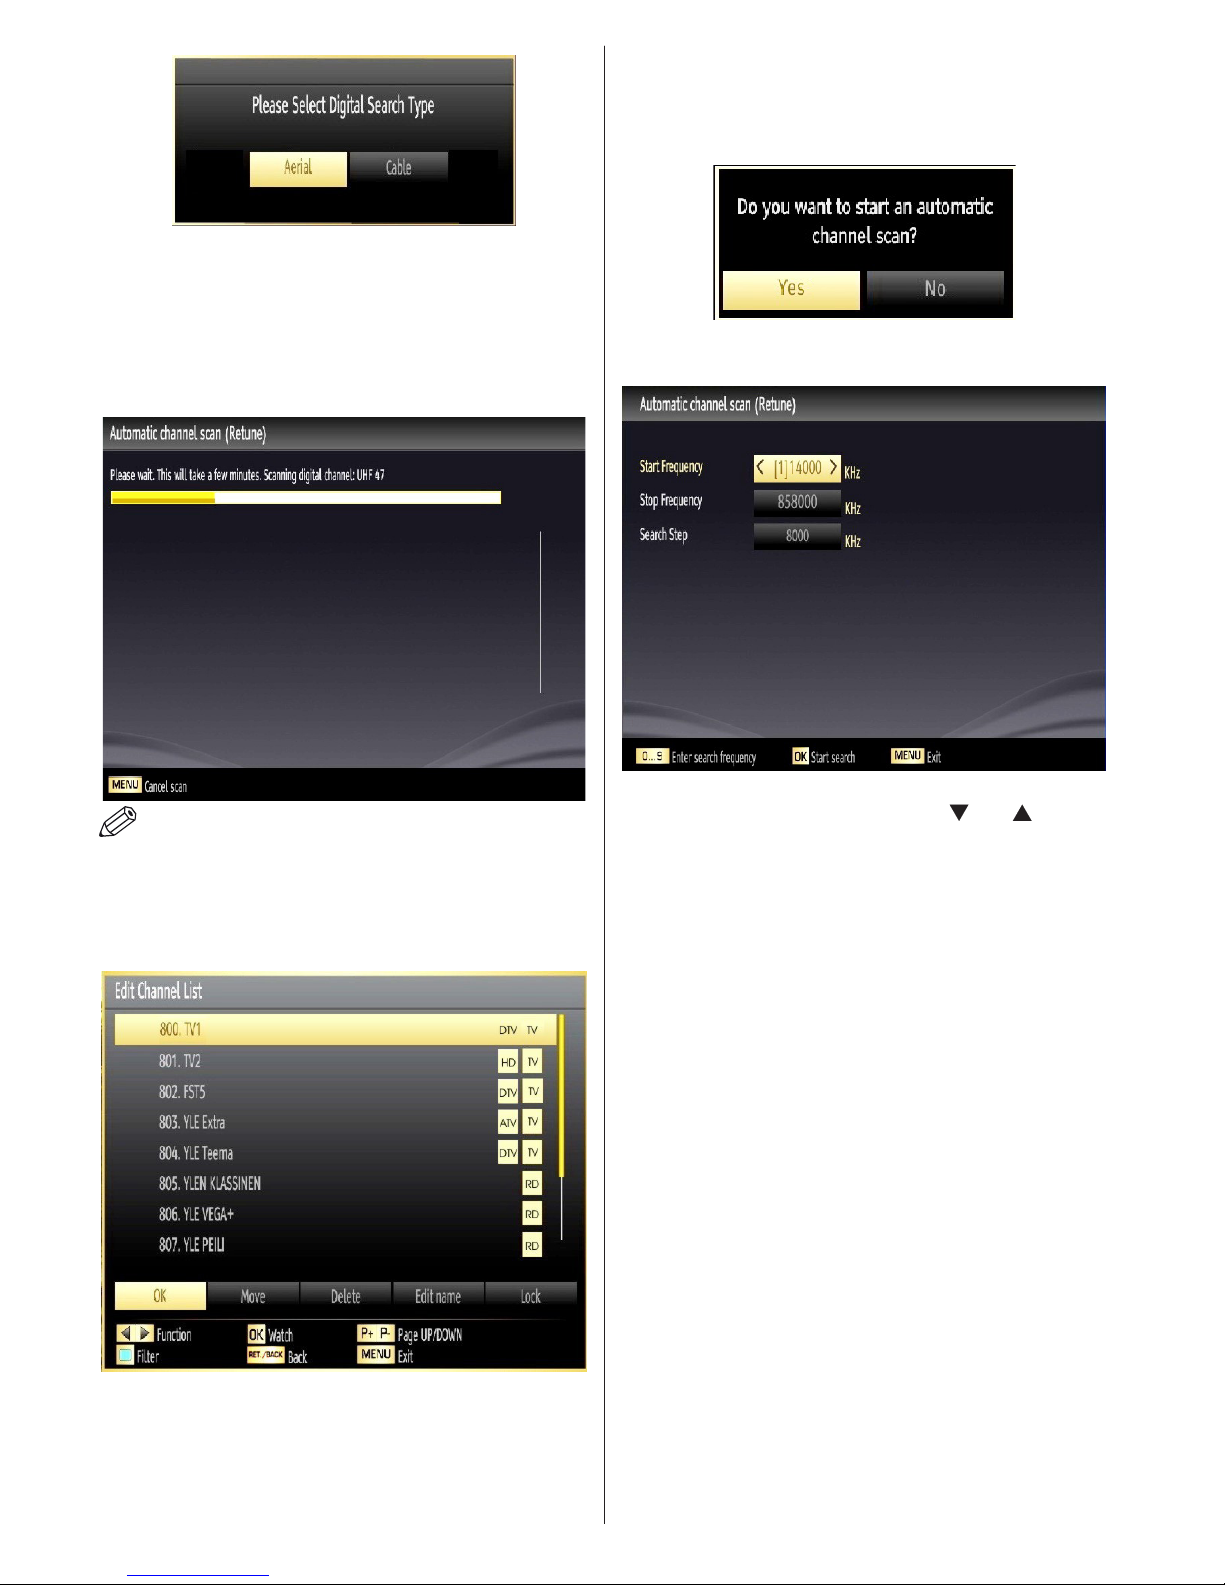
You must select a search type to search and store
broadcasts from the desired source.
Aerial Installation
If you select AERIAL option from the Search Type
screen, the television will search for digital terrestrial
TV broadcasts.
NOTE: You can press MENU button to cancel.
After all the available stations are stored, Channel
List will be displayed on the screen. If you like the
sort channels, according to the LCN (*), please select
“Yes” and than press OK.
Press OK button to quit channel list and watch TV.
(*) LCN is the Logical Channel Number system that
organizes available broadcasts in accordance with a
recognizable channel sequence.
Cable Installation
If you select CABLE option and press OK button on
the remote control to continue, the following message
will be displayed on the screen:
To continue please select YES and press OK. To
cancel operation, select NO and press OK.
You can select frequency ranges from this screen.
For highlighting lines you see, use “ ” or “ ” button.
You can enter the frequency range manually by using
the numeric buttons on the remote control.
Set Start and Stop Frequency as desired by using
numeric buttons on the remote control.
After this operation, you can set Search Step as 8000
KHz or 1000 KHz.
If you select 1000 KHz, the TV will perform search
process in a detailed way. Searching duration will
thus increase accordingly. When nished, press OK
button to start automatic search. The TV will search
and store available broadcasts.
English - 9 -
Media Playback via USB Input
You can connect a USB hard disk drive or USB
memory stick to your TV by using the USB inputs of
the TV. This feature allows you to play les stored in
a USB drive. 2.5” and 3.5” inch (hdd with external
power supply) external hard disk drives are supported.
IMPORTANT! You should back up your les before
making any connections to the TV set in order to
avoid any possible data loss. Manufacturer will not
be responsible for any le damage or data loss. It is
possible that certain types of USB devices (e.g. MP3
Players) or USB hard disk drives/memory sticks may
not be compatible with this TV. The TV supports FAT32
and NTFS disk formatting but recording will not be
available with NTFS formatted disks. Note: While
formatting a USB hard disk that has 1TB (Tera Byte)
or more le capacity, you can experience problems
with the formatting process.
Quickly plugging and unplugging USB devices, is a
very hazardous operation. Do not repeatedly quickly
plug and unplug the drive. This may cause physical
damage to the USB player and USB device itself. Do
not pull out USB module while playing a le.
Media Browser Menu
You can play photo, music, and movie les stored
on a USB disk by connecting it to your TV and using
the Media Browser screen. To do this, perform the
following: Connect a USB disk to one of the USB input
located on the side of the TV.
Press MENU button and select Media Browser tab by
using Left/Right and OK buttons. Main media browser
screen will be displayed. You can display the related
content by selecting the Video, Music or Picture tab.
Follow the button indications under each on screen
menu for media playback features.
You can set your Media Browser preferences by using
the Settings dialog.
Changing Image Size: Picture Formats
Programmes can be watched in different picture
formats, depending on the transmission received. You
can change the aspect ratio (image size) of the TV
for viewing the picture in different zoom modes. Press
SCREEN button repeatedly to change the image size.
You can shift the screen up or down by using “ ” or “
” buttons while in 14:9 Zoom, Cinema or Subtitle.
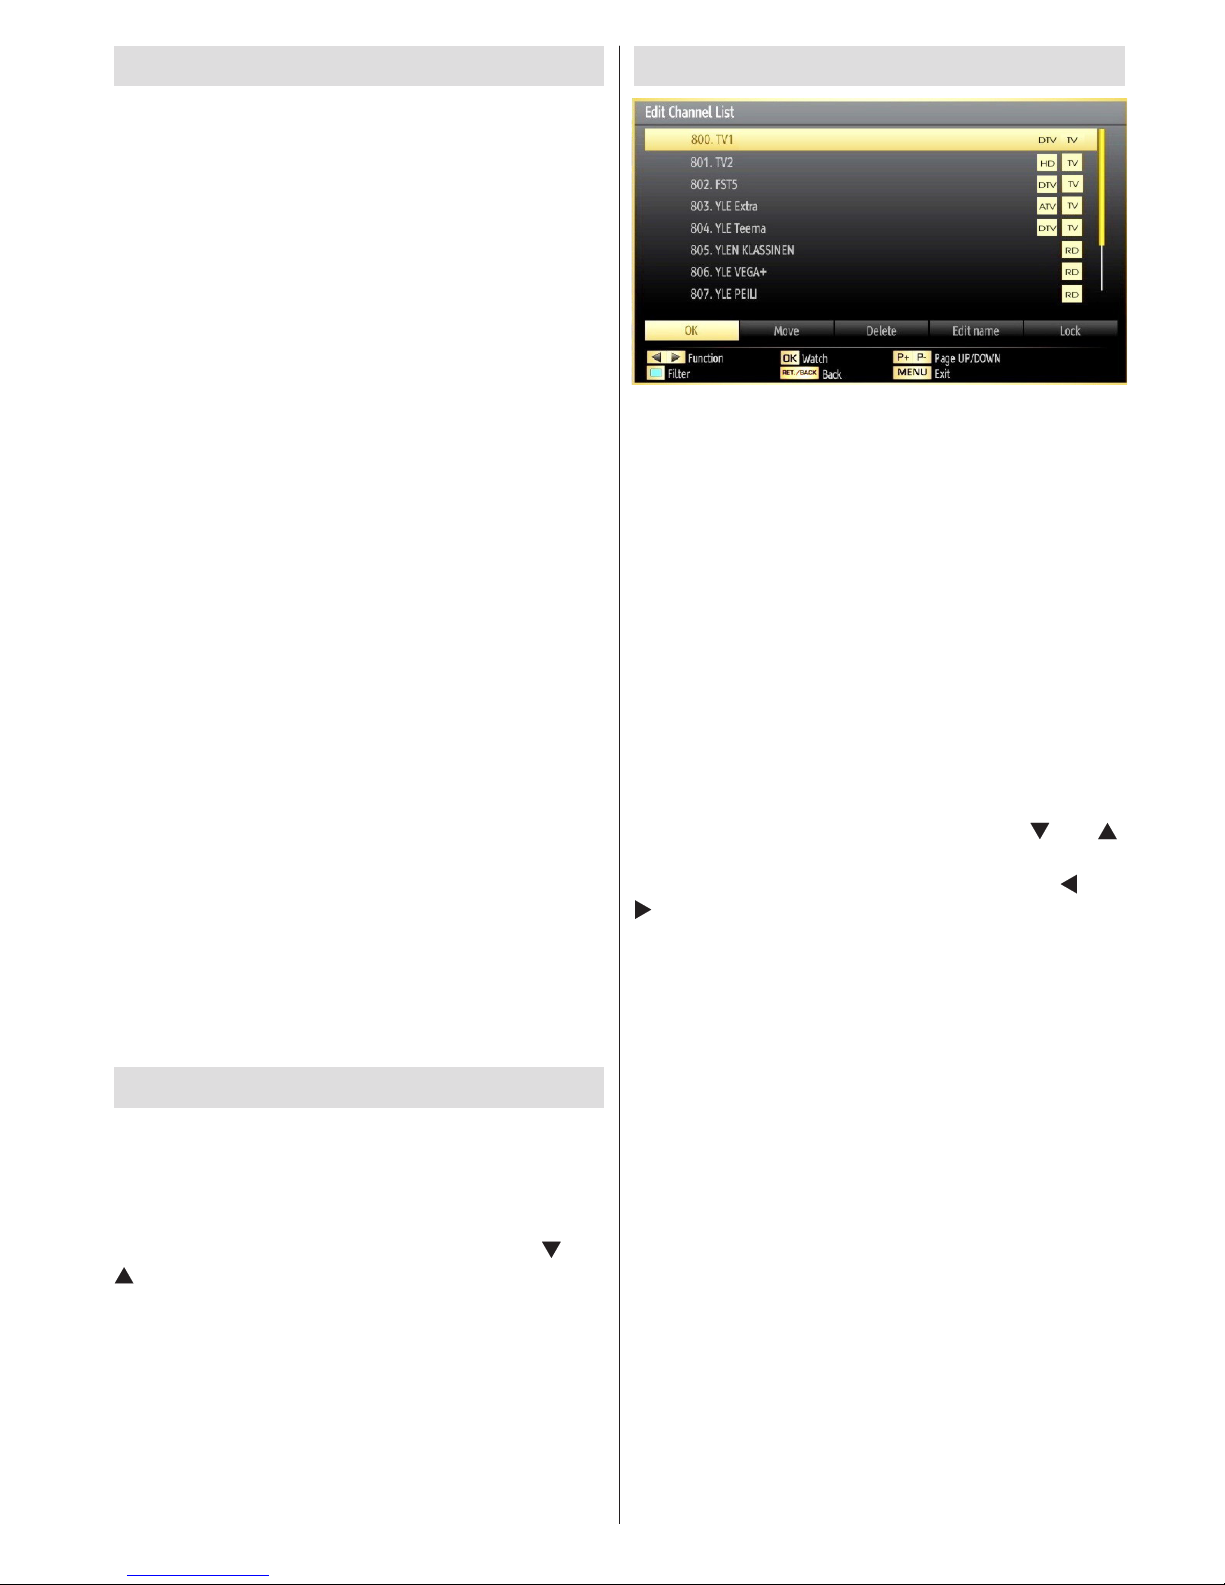
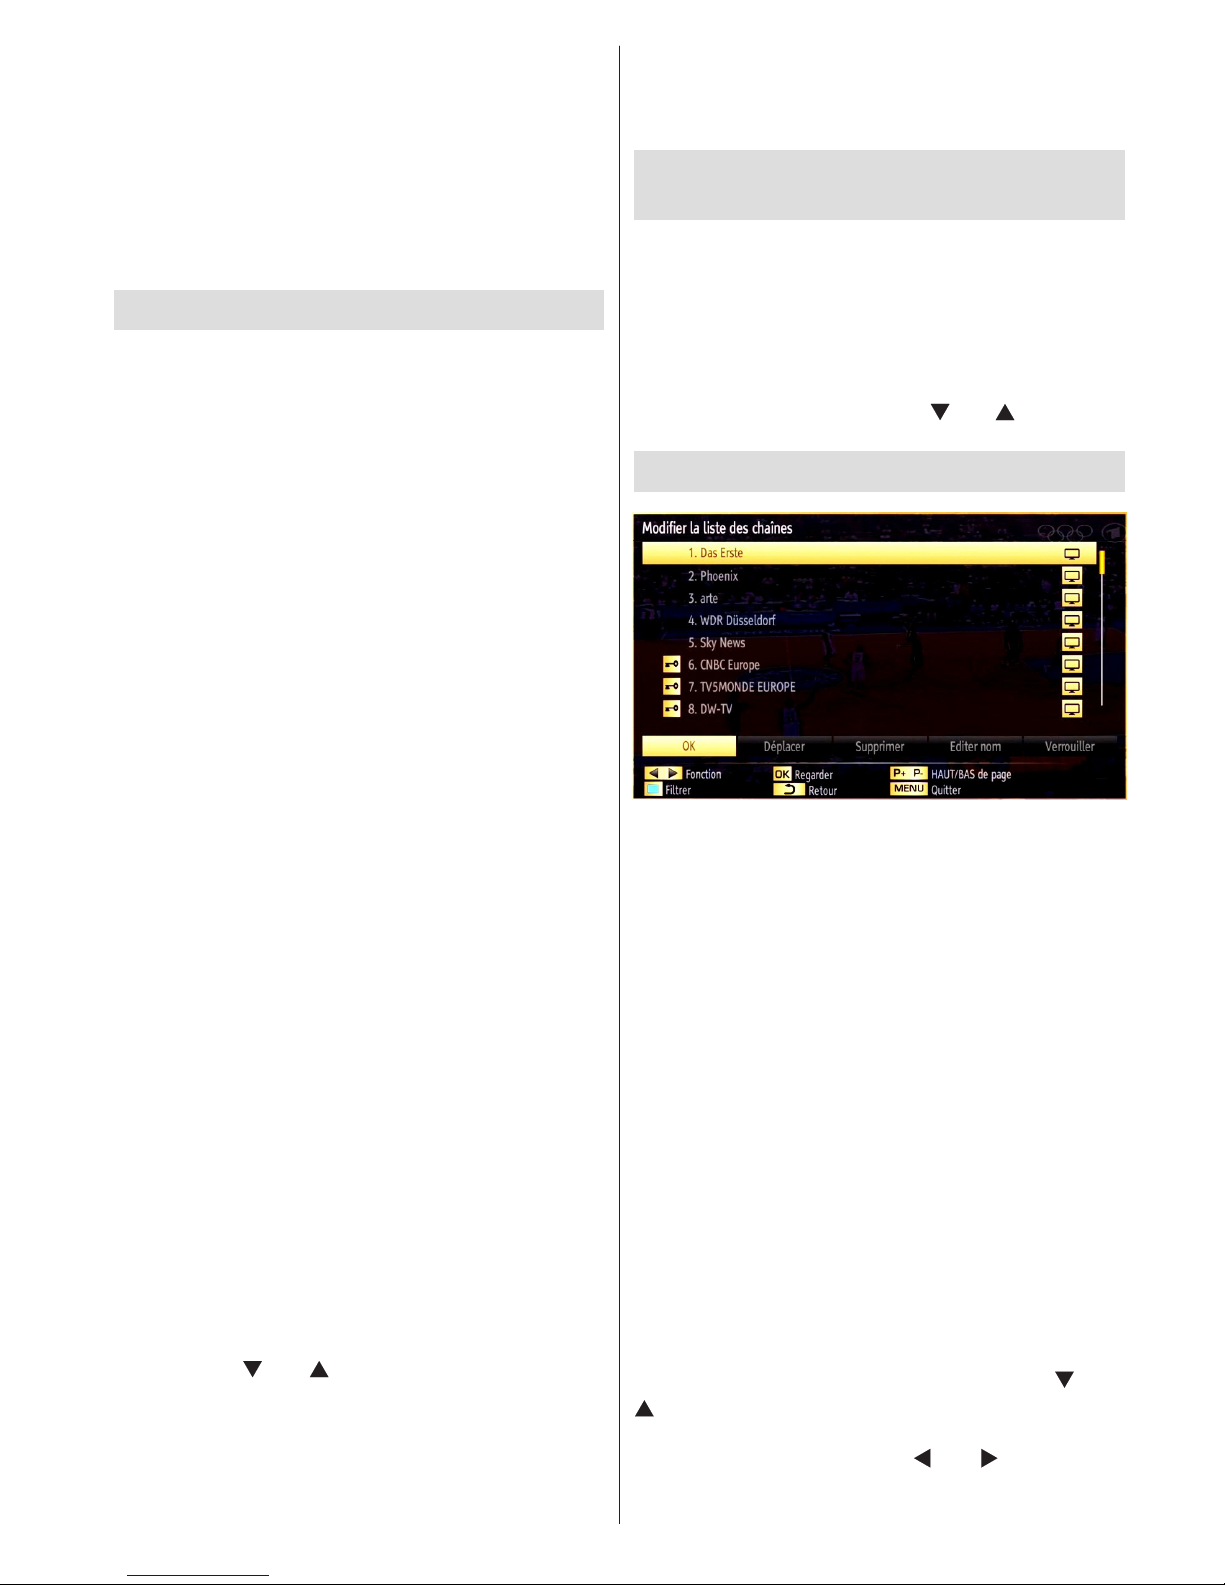
Using the Channel List
The TV sorts all stored stations in the Channel List.
You can edit this channel list, set favourites or set
active stations to be listed by using the Channel List
options. Press MENU button to view main menu.
Select Channel List item by using Left or Right button.
Press OK to view menu contents. Select Edit Channel
List to manage all stored channels. Use Up or Down
and OK buttons to select Edit Channel List. Press
Up or Down button to select the channel that will be
processed. Press Left or Right button to select a
function on Channel List menu. Use P+/P- buttons to
move page up or down. Press MENU button to exit.
Sorting Channel List
You can select broadcasts to be listed in the channel
list. To display specic types of broadcast, you should
use Active channel list setting. Select Active channel
list from the Channel list menu by using “ ” or “ ”
button. Press OK button to continue. You can select
a network type option from the list by using “ ” or “
” and OK buttons.

English - 10 -
Menu Features and Functions
Picture Menu Contents
Mode
For your viewing requirements, you can set the related mode option. Picture mode
can be set to one of these options: Cinema, Game, Dynamic and Natural.
Contrast Sets the lightness and darkness values of the screen.
Brightness Sets the brightness value for the screen.
Sharpness Sets the sharpness value for the objects displayed on the screen.
Colour Sets the colour value, adjusting the colors.
Power Save
Mode
To set Power Save Mode as Eco, Picture Off and Disabled. See the section,
“Environmental Information” in this manual for further information on Power Save
Mode.
Backlight
(optional)
This setting controls the backlight level and it can be set to Auto, Maximum, Minimum
and Eco Mode. Backlight function will be inactive if Power Save Mode is set to On.
Backlight cannot be activated in VGA, Media Browser mode or while the picture
mode is set to Game.
Noise
Reduction
If the broadcast signal is weak and the picture is noisy, use Noise Reduction setting
to reduce the noise amount. Noise Reduction can be set to one of these options:
Low, Medium, High or Off.
Advanced Settings
Dynamic
Contrast
You can change contrast rate by using dynamic contrast function. Dynamic contrast
can be set to one of these options: Low, Medium, High or Off.
Colour Temp Sets the desired colour tone.
Picture Zoom Sets the picture size to Auto,16:9, Subtitle,14:9, 14:9 Zoom, 4:3 or Cinema.
HDMI True
Black
While watching from HDMI source, this feature will be visible in the Picture Settings
menu. You can use this feature to enhance blackness in the picture.
Film Mode
Films are recorded at a different number of frames per second to normal television
programmes. Turn this feature on when you are watching lms to see the fast
motion scenes clearly.
Skin Tone Adjust the desired skin tone.
Colour Shift Adjust the desired colour tone.
RGB Gain
Press OK button to edit RGB gain. You can congure the colour temperature values
using the RGB Gain feature.
Reset Resets the picture settings to factory default settings.
Autoposition
(in PC mode)
Automatically optimizes the display. Press OK to optimize.
H Position (in
PC mode)
This item shifts the image horizontally to right hand side or left hand side of the screen.
V Position (in
PC mode)
This item shifts the image vertically towards the top or bottom of the screen.
Dot Clock (in
PC mode)
Dot Clock adjustments correct the interference that appear as vertical banding in
dot intensive presentations like spreadsheets or paragraphs or text in smaller fonts.
Phase (in PC
mode)
Depending on the resolution and scan frequency that you input to the TV set, you
may see a hazy or noisy picture on the screen. In such a case you can use this item
to get a clear picture by trial and error method.
While in VGA (PC) mode, some items in Picture menu will be unavailable. Instead, VGA mode settings will be added
to the Picture Settings while in PC mode.

English - 11 -
Menu Features and Functions
Sound Menu Contents
Volume Adjusts volume level.
Equalizer:
In equalizer menu, the preset can be changed to Music, Movie, Speech,
Flat, Classic and User. Press the MENU button to return to the previous
menu. Equalizer menu settings can be changed manually only when the
Equalizer Mode is in User.
Balance This setting is used for emphasizing left or right speaker balance.
Headphone Sets headphone volume.
Sound Mode
You can select Mono, Stereo, Dual I or Dual II mode, only if the selected
channel supports that mode.
AVL
Automatic Volume Limiting (AVL) function sets the sound to obtain xed output
level between programmes (For instance, volume level of advertisements
tend to be louder than programmes).
Dynamic Bass
(optional)
Enables or disables the Dynamic Bass.
Digital Out Sets digital out audio type.
Install and Retune Menu Contents
Automatic Channel
Scan (Retune)
Displays automatic tuning options.
Digital Aerial: Searches and stores aerial DVB stations.
Digital Cable: Searches and stores cable DVB stations.
Analogue: Searches and stores analogue stations.
Digital Aerial & Analogue: Searches and stores aerial DVB and analogue stations.
Digital Cable & Analogue: Searches and stores cable DVB and analogue stations.
Manual Channel
Scan
This feature can be used for direct broadcast entry.
Network Channel
Scan
Searches for the linked channels in the broadcast system.
Analogue Fine Tune
You can use this setting for ne tuning analogue channels. This feature is
not available if no analogue channels are stored.
First Time
Installation
Deletes all stored channels and settings, resets TV to factory settings and
starts rst time installation. You can follow the instructions in the Initial
Installation section for more information on this process.
English - 12 -
Menu Features and Functions
Settings Menu Contents
Conditional Access Controls conditional access modules when available.
Language Congures language settings.
Parental Congures parental settings.
Timers Sets timers for selected programmes.
Recording
Conguration
Displays recording conguration menu.
Date/Time Sets date and time.
Sources Enables or disables selected source options.
Other Settings: Displays other setting options of the TV set:
Menu Timeout Changes timeout duration for menu screens.
Scan Encrypted
When this setting is on, search process will locate the encrypted channels as well.
If it is set as Off, encrypted channels will not be located in automatic search or
manual search.
Blue Background Activates or deactivates blue background system when the signal is weak or absent.
Software Upgrade
To ensure that your TV always has the most update information, you can use
this setting. In order for the proper operation, please ensure that the TV is set to
standby mode.
Application Version Displays application version.
Hard of Hearing
If the broadcaster enables any special signal concerning the audio, you can set
this setting as On to receive such signals.
Audio Description
Audio description refers to an additional narration track for blind and visually
impaired viewers of visual media, including television and movies. You can use this
feature, only if the broadcaster supports that additional narration track.
Auto TV Off
You can set the timeout value of auto off feature.After the timeout value is reached
and the Tv is not operated for selected time , the TV will go off.
Store Mode
If you are displaying the TV in a store, you can activate this mode. While Store
Mode is enabled, some items in the TV menu may not be available to be set. Your
TV’s features will be illustrated on the top of the screen.
Standby Search
(optional)
If you change Standby Search to Off, this function will be unavailable. To use
Standby search please make sure that you select Standby Search as On. If the
Standby Search is set to On, when the TV is in standby mode, available broadcasts
will be searched. If the TV locates any new or missing broadcasts, a menu screen
will be displayed, asking you whether or not to execute these changes. Channel list
will be updated and changed after this process. Please activate Standby Search
setting in order to enable your TV for automatically updating the broadcast frequency
of the broadcaster, broadcast denition and similar changes.
English - 13 -
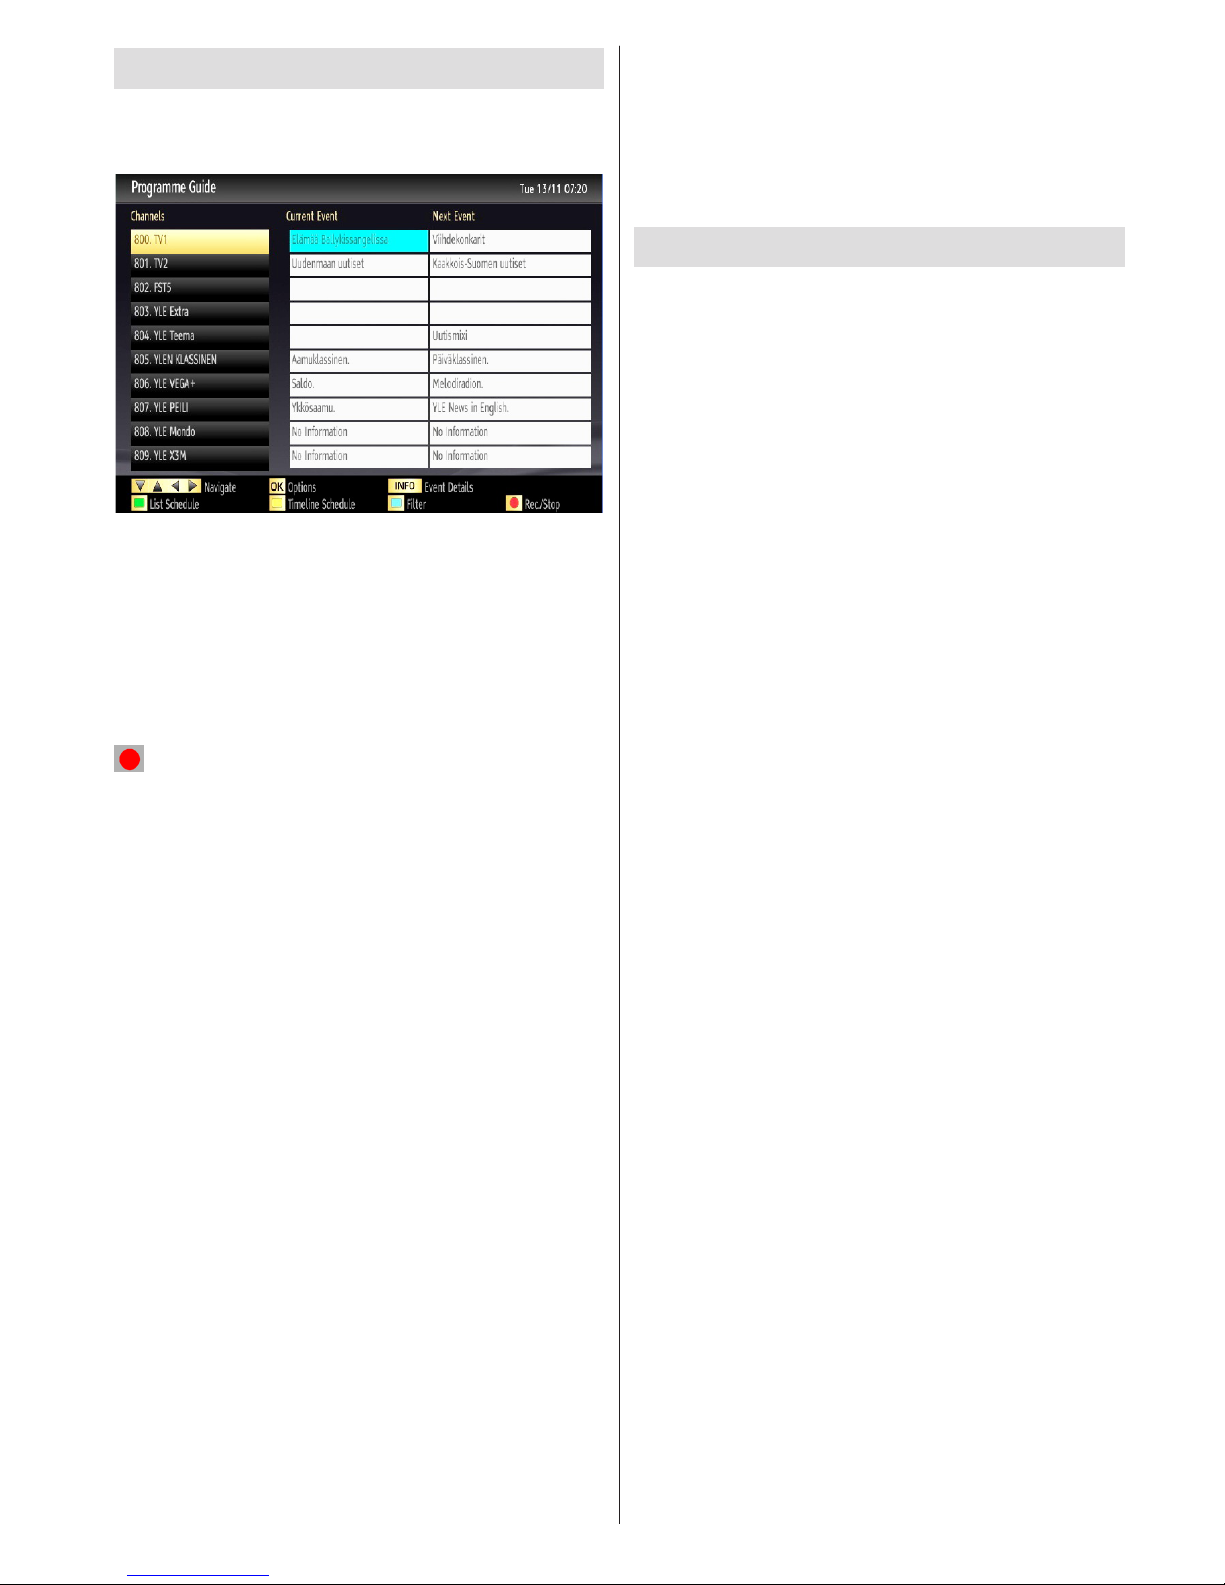
Electronic Programme Guide (EPG)
Some, but not all channels send information about
the current and next programmes. Press the GUIDE
button to view the EPG menu.
Up/Down/Left/Right: Navigate EPG.
OK: Displays programme options.
INFO: Displays, in detail information on programme
selected.
GREEN: Switches to List Schedule EPG.
YELLOW: Switches to Timeline Schedule EPG.
BLUE: displays ltering options.
(RECORD): the TV will start to record the selected
progamme. You can press again to stop the recording.
IMPORTANT: To record a programme, you should first
connect a USB disk to your TV while the TV is switched off.
You should then switch on the TV to enable recording feature.
Otherwise, recording feature will not be available.
Note: Switching to a different broadcast or source is not
available during the recording.
Programme Options
In EPG menu, press the OK button to enter the Event
Options menu.
Select Channel
In EPG menu, using this option, you can switch to the
selected channel.
Record / Delete Record Timer
After you have selected a programme in EPG menu,
press the OK button and Options screen will be
displayed. Select “Record” option and press the OK
button. After this operation, a recording becomes set
to the selected programme.
To cancel an already set recording, highlight that
programme and press the OK button and select the
option “Delete Rec. Timer”. The recording will be
cancelled.
Set Timer / Delete Timer
After you have selected a programme in EPG menu,
press the OK button and Options screen will be
displayed. Select “Set Timer on Event” option and
press OK button. You can set a timer for future
programmes. To cancel an already set timer, highlight
that programme and press the OK button. Then select
“Delete Timer” option. The timer will be cancelled.
Note: It is not possible to record or set timer for two or more
individual events at the same time interval.
Recording a Programme
IMPORTANT: When using a new USB hard disk drive, it is
recommended that you rst format the disk using your TV’s
“Format Disk” option.
To record a programme, you should rst connect a
USB disk to your TV while the TV is switched off.
You should then switch on the TV to enable recording
feature.
For using recording function, you should connect a
USB disk or an external hard disk drive to the TV
and connected USB disk should have at least 1 GB
capacity and should have 2.0 speed compatibility.
If the connected USB device does not support 2.0
speed, an error message will be displayed.
Note: Recorded programmes are saved into the connected
USB disk. If desired, you can store/copy recordings on a
computer; however, these les will not be available to be
played on a computer. You can play the recordings only
via your TV.
Note: Lip Sync delay may occur during the timeshifting.
Radio record is not supported. The TV can record
programmes up to ten hours.
Recorded programmes are split into 4GB partitions.
If the writing speed of the connected USB disk is not
sufcient, recording may fail and timeshifting feature
may not be available.
Recordings of HD programmes can occupy bigger
size on the USB disk depending on the broadcast’s
resolution. For this reason it is recommended to use
USB hard disk drives for recording HD programmes.
Do not plug out the USB/HDD during the recording.
This may harm the connected USB/HDD.
Multipartition support is available. Maximum two
different partitions are supported. If the disk have more
than two partitions, crash may occur. First partition of
the usb disk is used for PVR ready features. It also
must be formatted as primary partition to be used for
PVR ready features.
Some stream packets may not be recorded because
of signal problems, so sometimes video may freezes
during playback.
Record, Play, Pause, Display (for PlayListDialog) keys
could not be used when teletext is ON. If a recording
starts from timer when teletext is ON, teletext is
automatically turned off. Also teletext usage is
disabled when there is ongoing recording or playback.
English - 14 -
Timeshift Recording
Press (PAUSE) button while watching a broadcast
for switching to timeshifting mode. In timeshifting
mode, the programme is paused and simultaneously
recorded to the connected USB disk. Press (PLAY)
button again to watch the paused programme from
the stopped moment. You will see the timeshift gap
between the real and the timeshifted programme in
the info bar.
Instant Recording
Press (RECORD) button to start recording an
event instantly while watching a programme. You can
press (RECORD) button on the remote control
again to record the next event on the EPG. In this
case, OSD will display the programmed events for
recording. Press (STOP) button to cancel instant
recording. Switching to a different broadcast or source;
and viewing Media Browser are not available during
the recording.
Note: While recording a programme or during the timeshifting,
a warning message appears on the screen if your USB device
speed is not sufcent.
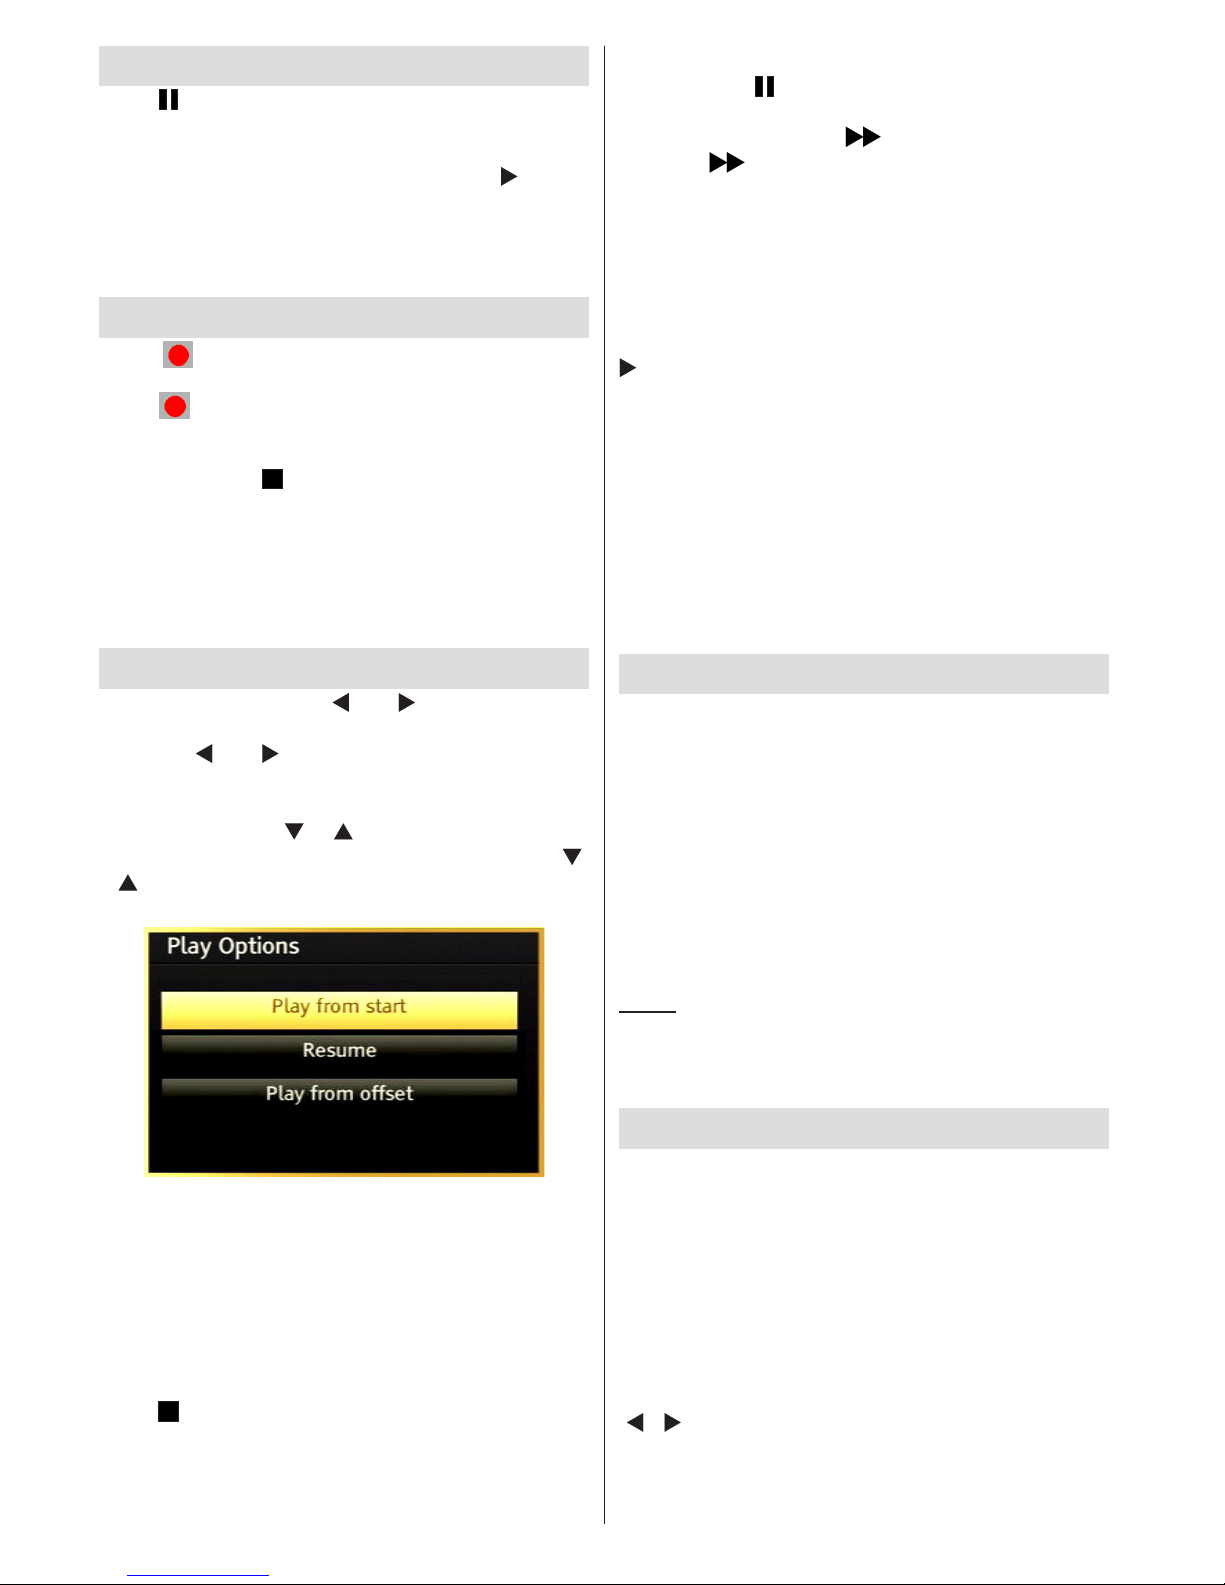
Watching Recorded Programmes
In the main menu, use “ ” or “ ” buttons to select
Media Browser. Highlight Recordings Library item
by using “ ” or “ ” button and press OK button to
enter. Recordings Library will then be displayed.
Select a recorded item from the list (if previously
recorded) by using “ ” / “ ” button. Press OK button
to view Play Options. Select an option by using “ ”
/ “ ” or OK buttons.
Available playback options:
• Play from start: Plays the recording from the
beginning.
• Resume: Recommences the recordings.
• Play from offset: Species a playing point.
Note: Viewing main menu and menu items will not be available
during the playback.
Press (STOP) button to stop a playback and return
to return to Recordings Library.
Slow Forward
If you press (PAUSE) button while watching
recorded programmes, slow forward feature will be
available. You can use button to slow forward.
Pressing button consecutively will change slow
forwarding speed.
Recordings Library
To view the list of recordings, select “Recordings
Library” and press the OK button. Recordings Library
will then be displayed with available recordings. All the
recordings are kept in a list in the recordings library.
(Resume): Recommences the recordings.
RED button (Delete) :Erases the selected recording.
GREEN button (Edit): Makes changes on the
selected recording.
BLUE button (Sort): Changes the order of the
recordings. You can select from a wide range of
sorting options.
OK button: Activates play options menu:
INFO (Details): Displays the short extended programmes
in detail.
Recording Conguration
Select Recording Conguration item in the Settings
menu to congure recording settings.
Format Disk: You can use Format Disk feature for
formatting the connected USB disk. IMPORTANT:
Note that ALL the data stored on the USB disk will
be lost and then the disk format will be converted to
FAT32 if you activate this feature. If your USB disk
malfunctions, you can try formatting the USB disk. In
most cases formatting the USB disk will restore normal
operation; however, ALL the data stored on the USB
disk will be lost in such a case.
Note: If “USB is too slow” message is displayed on the
screen while starting a recording, try restarting the recording.
If you still get the same error, it is possible that your USB
disk does not meet the speed requirements. Try connecting
another USB disk.
Teletext
“TXT” Teletext / Mix: Activates teletext mode when
pressed once. Press again to place the teletext screen
over the programme (mix). Pressing again will quit
the teletext mode.
“BACK” Index: Selects the teletext index page.
“INFO” Reveal: Shows hidden information (e.g.
solutions of games).
“OK” Hold: Holds a text page when convenient. Press
again to resume.
“ ”/“ ” Subcode Pages: Selects subcode pages if
available when the teletext is activated.
P+ / P- and numbers (0-9): Press to select a page.
Note: Most TV stations use code 100 for their index pages.

English - 15 -
Your TV supports both FASTEXT and TOP text
systems. When these systems are available, the
pages are divided into groups or topics. When
FASTEXT system is available, sections in a teletext
page will become colour-coded and can be selected
by pressing the coloured buttons. Press a coloured
button that corresponds to with your needs. The
coloured writings will appear, showing you which
coloured buttons to use when TOP text transmission
is present. Pressing “ ” or “ ” commands will request
the next or previous page respec tively.
Digital Teletext (for UK only)
• Press the “TXT” button. The digital teletext
information appears. Operate it with the coloured
buttons, cursor buttons and OK button.
The operation method may differ depending on the
contents of the digital teletext. Follow the instructions
displayed on digital teletext screen.
When the “TXT” button is pressed again, the TV
returns to television broadcasting.
Software Upgrade
Your TV is capable of finding and updating new
software upgrades over broadcast channels. For
broadcast channels search, TV looks the available
channels stored in your settings. So before software
upgrade search, it is advised to auto search and
update all available channels.
1) Software upgrade search via user
interface
• It is possible manually to check if there is a new
software upgrade for your TV set.
• Simply navigate on your main menu. Choose
Settings and select Other Settings menu. In
Other Settings menu navigate on to the Software
Upgrade item and press OK button to open
Upgrade Options menu.
• In Upgrade Options menu select Scan for upgrade
and press OK button.
• If a new upgrade is found, it starts to download the
upgrade. A progress bar indicates the remaining
download progress. When download completes
with success a message is displayed for reboot to
activate new software. Press OK to continue with
the reboot operation.
2) Background search and upgrade mode
• While TV is connected to Internet, in background it
searches for critical software upgrades. If a critical
software upgrade is found it downloads the upgrade
silently. When download completes with success a
message is displayed for reboot operation to activate
new software. Press OK to continue with the reboot
operation.
3) 3 AM search and upgrade mode
• If Automatic scanning in Upgrade Options menu
is enabled, TV wakes up at 03:00 and searches
broadcast channels for new software upgrade. If new
software is found and downloaded successfully, with
next power up TV opens with new software version.
Note on reboot operation: Reboot is the last step in software
upgrade operation if download of new software is nished
successfully. During reboot TV makes nal initialization. In
reboot sequence panel power is closed and front led indicates
the activity with blinking. Around 5 minutes later TV restarts
with new software activated.
• If your TV fails to restart in 10 minutes, unplug power
for 10 minutes and re-plug again. TV should open
with new software safely. If you still can not get
TV working, please kindly repeat unplug and plug
sequence a few times more. If your set still can not
operate, please call the service personnel to x the
problem for you.
Caution: While led is blinking during reboot do not unplug
your TV’s power. Doing this may cause your TV not to
re-open again and can only be xed by service personnel.
Troubleshooting & Tips
Image persistence - ghosting
Please note that ghosting may occur while displaying
a persistent image (still or paused image). LED TV’s
image persistence may disappear after a short time.
Try turning off the TV for a while. To avoid this, do not
leave the screen in still picture mode for extended
periods.
No power
If your TV has no power, please check the power cord
plug is connect to the mains power socket.
Poor picture
1. Have you selected the correct TV system?
2. Is your TV or house aerial located too close to a
non-earthed audio equipment or neon lights, etc.?
3. Mountains or high buildings can cause double
pictures or ghost images. Sometimes you can
improve the picture quality by changing the
direction of the aerial. Is the picture or teletext
unrecognisable?
4. Check if you have entered the correct frequency.
5. Please retune the channels.
6. The picture quality may degrade when two devices
are connected to the TV at the same time. In such
a case, disconnect one of the devices.
No picture
1. No Picture means that your TV is not receiving a
transmission. Have you selected the correct button
on the remote control? Try once more. Also make
sure the correct input source has been selected.
English - 16 -
2. Is the aerial connected properly?
3. Are the plugs connected tightly to the aerial socket?
4. Is the aerial cable damaged?
5. Are suitable plugs used to connect the aerial?
6. If you are in doubt, consult your dealer.
No sound
1. Has the TV been set to mute? To cancel mute,
press the “ ” button, or increase the volume level.
2. Sound is coming from only one speaker. Is the
balance set to one extreme? See Sound Menu
section.
Remote control - does not operate
Your TV no longer responds to the remote control.
The batteries may be exhausted, if so you can still
use the control buttons on the TV. (* Is only possible
if they are not blocked by parental control.)
Input sources - can not be selected
1. If you cannot select an input source, it is possible
that no device is connected.
2. Check the AV cables and connections if you have
tried to connect a device.
Recording Unavailable
To record a programme, you should rst connect
a USB disk to your TV while the TV is switched
off. You should then switch on the TV to enable
recording feature. Otherwise, recording feature will
not be available. If you cannot perform recording, try
switching off the TV and then re-inserting the USB
device while the TV is switched off.
USB Is too Slow
If “USB is too slow” message is displayed on the
screen while starting a recording, try restarting
the recording. If you still get the same error, it is
possible that your USB disk does not meet the speed
requirements. Try connecting another USB disk.
Manufactured under license from Dolby Laboratories.
TRADEMARK ACKNOWLEDGMENT
“Dolby” and the double-D symbol are trademarks of
Dolby Laboratories.
Information for Users on Disposal of Old
Equipment and Batteries
[European Union only]
These symbols indicate that equipment with these
symbols should not be disposed of as general
household waste. If you want to dispose of the product
or battery, please consider the collection systems or
facilities for appropriate recycling.
Notice: The sign Pb below the symbol for batteries indicates
that this battery contains lead.
Products
Battery
PC Typical Display Modes
The following table is an illustration of some of the
typical video display modes. Your TV may not support
all resolutions. Your TV supports up to 1920x1080.
Index Resolution Frequency
1 640x350p 60 Hz
2
640x400p 60 Hz
3 1024x768 60 Hz
4
1280x768 60 Hz
5
1360x768 60 Hz
6 720x400 60 Hz
7
800x600 56 Hz
8 800x600 60 Hz
9 1024x768 60 Hz
10
1024x768 66 Hz
11 1280x768 60 Hz
12
1360x768 60 Hz
13 1280x1024 60 Hz
14 1280x960 60 Hz
15
1280x1024 60 Hz
16 1400x1050 60 Hz
17
1920x1080 60 Hz
18 1600x1200 60 Hz
English - 17 -
Specications
TV BROADCASTING
PAL/SECAM B/G D/K K’ I/I’ L/L’
DIGITAL RECEPTION
DVB-T MPEG2
DVB-T MPEG4 HD
DVB-T MHEG-5 Engine (for UK only)
DVB-C MPEG2
DVB-C MPEG4 HD
RECEIVING CHANNELS
VHF (BAND I/III)
UHF (BAND U)
HYPERBAND
NUMBER OF PRESET CHANNELS
10000
CHANNEL INDICATOR
On Screen Display
RF AERIAL INPUT
75 Ohm (unbalanced)
Supported File Formats for USB Mode
Media
File
Extension
Format
Remarks
Video Audio (Maximum resolution/Bit rate etc.)
Movie
.mpg .mpeg MPEG1,2
MPEG Layer 1/2/3
MAX 1920x1080 @ 30P 20Mbit/sec
.dat MPEG1,2
MPEG2
.vob MPEG2
.mkv H.264, MPEG1,2,4 EAC3/ AC3
.mp4
MPEG4
Xvid 1.00,
Xvid 1.01, Xvid 1.02, Xvid 1.03,
Xvid 1.10-beta1/2
H.264
PCM/MP3
.avi
MPEG2, MPEG4
Xvid 1.00,
Xvid 1.01, Xvid 1.02, Xvid 1.03,
Xvid 1.10-beta1/2
H.264
PCM
Music
.mp3 -
MPEG 1 Layer 1 /
2 (MP3)
32Kbps ~ 320Kbps(Bit rate)
32KHz ~ 48KHz(Sampling rate)
Photo
.jpg .jpeg Baseline JPEG - max WxH = 15360x8640 4147200bytes
. Progressive JPEG - max WxH = 9600x6400 3840000bytes
.bmp - - max WxH = 9600x6400 3840000bytes
Subtitle
.sub .srt--
-
OPERATING VOLTAGE
220-240V AC, 50 Hz.
AUDIO
German + Nicam Stereo
AUDIO OUTPUT POWER (W) (10% THD)
2x2.5
POWER CONSUMPTION (W)
50 W (max)
PANEL
16:9 display, 22” Screen Size
DIMENSIONS (mm)
DxLxH (With foot):134 x 516 x 352
Weight (Kg):3,00
DxLxH (Without foot): 35 x 516 x 317
Weight (Kg):2,80

Français - 18 -
Safety Precautions
Veuillez lire complètement ces consignes
avant d’installer ou d’utilisation.
Préparation
İnstallez l’appareil sur une surface à niveau solide.
Pour la ventilation, laissez un espace d’au moins
10 cm autour du poste. Pour éviter toute panne ou
situation périlleuse, ne placez aucun objet au-dessus
du poste. Utilisez cet appareil sous des climats
modérés. Humidité et température de fonctionnement :
5ºC jusqu’à 45ºC, humidité relative max:85% (non
obstruant les orices d’aération).
Utilisation prévue
Le présent appareil a été fabriqué pour recevoir et
afcher les programmes de télévision. Les différentes
options de connexion font une expansion additionnelle
de la réception et afchent les sources possibles
(divers appareils externes). Le fonctionnement de cet
appareil doit se faire uniquement à l’abri de l’humidité.
Il a été fabriqué exclusivement pour être utilisé à titre
privé et ne peut par conséquent être utilisé ni à titre
commercial, ni à titre industriel. Toute utilisation non
prévue ou toute modication non autorisée annule
de fait la garantie. Le fait de faire fonctionner votre
téléviseur LED dans des conditions ambiantes
extrêmes peut l’endommager.
AVERTISSEMENT: Ne jamais permettre aux
personnes (y compris les enfants) souffrant
de déficiences physiques, sensorielles ou
mentales et / ou manquant de connaissances
appropriées, dutiliser un appareil électrique
sans être encadrées par une autre personne
responsable de leur sécurité !
Les enfants peuvent ne pas être conscient
du risque quils encourent ! Les piles peuvent
savérer dangereuses si elles sont avalées.
Toujours tenir les piles hors de portée des
enfants. Consultez immédiatement un médecin
au cas où une personne avale une pile. Tenir les
lms d’emballage hors de portée des enfants.
Risque de suffocation.
Source D’alimentation
• Ce téléviseur ne doit être raccordé qu’à une prise
de 220-240 V AC 50 Hz.
• Avertissement : Ne laissez pas votre téléviseur
en veille ou en fonctionnement lorsque vous quittez
votre domicile.
Positionner le téléviseur
• Pour la ventilation, laissez un espace d’au moins
10 cm autour du téléviseur.
• Ne bloquez pas les trous de ventilation.
• Évitez d’installer le téléviseur en surface en pente
ou instable, le téléviseur se renverser
• Pour eviter d’endommager le téléviseur, ne placez
d’objet sur au-dessus du téléviseur.
Table des matières
Safety Precautions ............................................... 18
Informations à caractère environnemental ........... 20
Accessoires inclus. ............................................... 21
TV - Fonctions ...................................................... 21
Regarder la télévision ........................................... 21
le bouton de contrôle&Operation de TV ............... 21
Insertion des piles dans la télécommande ........... 22
Branchez l’alimentation&Antenne/Câble .............. 22
Afchage de la télécommande ............................. 23
Mise sous/hors tension ......................................... 25
Première installation ............................................. 25
Lecture de média via entrée USB......................... 27
Changement de la taille d’une image : Formats
d’image ................................................................. 27
Utilisation de la liste de chaînes ........................... 27
Options et fonctions du menu ............................... 28
Options et fonctions du menu ............................... 29
Options et fonctions du menu ............................... 30
Guide électronique de programmes (EPG) .......... 31
Enregistrement d’un programme .......................... 31
Enregistrement du décalage temporel.................. 32
Enregistrement instantané.................................... 32
Regarder les programmes enregistrés ................. 32
Conguration Enregistrements ............................. 32
Télétexte ............................................................... 33
Mise à jour du logiciel ........................................... 33
Dépannage ........................................................... 34
Modes d’afchage typiques d’une PC .................. 35
Formats de chier pris en charge pour le mode
USB ...................................................................... 36
Spécications ....................................................... 36

Français - 19 -
• Uniquement utilisez le téléviseur sous des climats
modérés.
Le cordon et d’alimentation et la prise
d’alimentation
• Le cordon et d’alimentation et la prise d’alimentation
doivent être facilements accessibles. En cas d’orage
et de foudre ou lorsque vous partez en vacances ou
lorsque le téléviseur n’est pas utilisé pendant une
longue période débranchez le cordon d’alimentation
de la prise secteur.
• La prise d’alimentation est utilisée pour débrancher
le téléviseur de l’alimentation secteur et doit donc
rester facilement opérable.
• Ne placez pas l’appareil, ni un meuble, etc. sur le
cordon d’alimentation et évitez qu’il se retrouve
coincé.
• Tenez le cordon d’alimentation par sa che,
Ne pas débrancher le téléviseur en tirant sur le cordon
d’alimentation.
• Ne touchez jamais le cordon/la prise d’alimentation
avec des mains humides, car cela pourrait causer
un court-circuit ou une commotion électrique.
• Ne nouez jamais le cordon ni ne l’attachez à d’autres
cordons.
• Les cordons d’alimentation doivent être placés de
façon à ne pas risquer d’être piétinés.
• Un cordon/prises de raccordement endommagé
peut causer un incendie ou vous infliger une
décharge électrique. Lorsqu’il est endommagé, le
cordon doit être remplacé, cette opération doit être
effectuée par un personnel qualié.
Humidité et eau
• N’utilisez pas cet TV dans un endroit humide (évitez
la salle de bain, l’évier de la cuisine, et les environs
d’une machine à laver).
• N’exposez pas ce téléviseur de la pluie ou de l’eau,
car cela pourrait être dangereuse.
• Ne placez aucun objet rempli de liquide, comme un
vase par exemple, au dessus. Ne pas exposer à des
suintements ou à des éclaboussures.
• Si un objet solide ou un liquide tombe à l’intérieur
du poste, débranchez-le et faites-le vérier par un
personnel qualié avant de continuer à l’utiliser.
Ventilation
• Les fentes et les orices du téléviseur sont prévus
pour la ventilation et pour assurer un fonctionnement
able.
• Pour éviter la surchauffe, ces orices ne doivent
pas être obstrués ni couverts de quelque façon
que ce soit.
Une source de chaleur et ammes
• N’exposez pas le téléviseur directement à la lumière
solaire ou à des sources de chaleur
• Le téléviseur ne doit pas être placé à côté des
ammes nues ou des sources de chaleur, comme
un radiateur.
• Assurez-vous qu’aucune source de
amme vive, telles que des bougies
allumées, ne soit placée sur le
téléviseur.
Volume du casque
• Une pression sonore excessive
provenant des écouteurs et du
casque peut provoquer une perte
auditive, Prenez garde.
Installation sur un mur
(optionnelle)
• Pour éviter toute blessure, le téléviseur doit
être solidement xé au mur conformément aux
instructions d’installation (si l’option est disponible).
Écran LCD
• Occasionnellement, quelques pixels non actifs
peuvent apparaître à l’écran comme un point xe
bleu, vert ou rouge. Veuillez noter que ceci n’affecte
pas les performances de votre appareil.
• veillez à ne pas rayer l’écran avec les ongles ou
autres objets durs.
Nettoyage
• Avant de nettoyer, débranchez le poste TV de la
prise murale.
• N’utilisez pas de nettoyant en liquide ou en aérosol.
Nettoyez avec un tissu doux et sec.

Français - 20 -
Informations à caractère environnemental
Ce téléviseur a été fabriqué dans l’intention de consommer moins d’énergie an de protéger l’environnement.
Grâce à l’option d’économie d’énergie offerte par le présent téléviseur, vous avez la possibilité non seulement de
préserver l’environnement, mais aussi et surtout de réaliser des économies sur votre facture de consommation
électrique. Pour réduire effectivement votre consommation électrique, vous devez suivre les étapes ci-après :
Vous pouvez utiliser le réglage Mode économie d’énergie qui se trouve dans le menu Paramètres d’image. Si
vous dénissez le Mode économie d’énergie sur Activé, le téléviseur basculera en mode Économie d’énergie
et le niveau de luminosité de l’appareil sera réduit au niveau le plus bas possible. Veuillez toutefois remarquer
que certains paramètres d’image ne seront pas disponibles pour modication lorsque le téléviseur est en
mode Économie d’énergie.
Veuillez mettre le téléviseur hors tension et le débrancher du secteur lorsque vous ne vous en servez pas.
Cette bonne pratique vous permet aussi d’économiser de l’énergie.
Débranchez l’appareil du secteur si vous ne comptez pas vous en servir pendant un certain temps.
Il est vivement recommandé d’activer l’option Economie d’énergie en vue de réduire voter consommation
annuelle d’électricité. De même, il est conseillé de débrancher le téléviseur du secteur pour économiser
davantage l’énergie lorsque vous n’utilisez pas l’appareil.
Veuillez nous aider à préserver l’environnement en suivant ces étapes.
Informations relatives aux travaux de réparation
Veuillez coner toute la maintenance à un technicien qualié. Seuls les techniciens qualiés sont autorisés
à réparer le téléviseur. Veuillez pour cela rentrer en contact avec le revendeur chez qui vous avez acheté le
présent appareil pour de plus amples informations.

Français - 21 -
Regarder la télévision
le bouton de contrôle&Operation de TV
1. Direction précédente
2. Direction suivante
3. Programme/Volume / AV / Veille sur commande
de sélection
Vous pouvez déplacer le contacteur vers le haut ou
vers le bas pour modier le volume. Si vous souhaitez
changer de chaîne, appuyez au milieu de l’interrupteur
une fois (position 3) puis déplacez-vous vers le haut
ou vers le bas. Si vous appuyez à nouveau au milieu
de l’interrupteur, l’OSD source s’affichera. Pour
sélectionner la source de votre choix, déplacer le
bouton vers le haut ou vers le bas, puis relâchez.
Si vous appuyez sur le milieu de l’interrupteur et
le maintenez ainsi pendant quelques secondes, le
téléviseur basculera en mode de veille. Impossible
d’afcher le menu principal à l’écran à l’aide du bouton
de commande.
Accessoires inclus.
• Télécommande
• Les piles ne soit pas.
• Manuel d’utilisation
• Câble de connexion AV latéral
TV - Fonctions
• TV numérique/par câble entièrement intégrée
(DVB-T/C) (*).
• Prise HDMI pour vidéo et audio numériques.
• Entrée USB.
• 10000 programmes.
• Menu de paramétrage OSD.
• Prise péritel pour les périphériques externes.
• Système de son stéréo.
• Télétexte, Fastext, TOP text.
• Branchement du casque
• Système d’auto programmation.
• Réglage manuel vers l’avant ou vers l’arrière.
• L’arrêt automatique apres de plus de six heures
de temps
• Arrêt programmé.
• Verrouillage parental
• Coupure du son automatique quand il n’y a aucune
transmission.
• Lecture NTSC.
• AVL (Limitation Automatique du Volume)
• PLL (Recherche de Fréquence).
• Entrée PC.
• Plug&Play (branchement et utilisation instantanée)
pour Windows 98, ME, 2000, XP, Vista.
• Mode jeu (optionnel)
• Fonction de coupure de l’image.
Français - 22 -
Utilisation des touches de la
télécommande
Appuyez sur le bouton MENU de votre télécommande
pour afficher l’écran de menu principal. Utilisez
le bouton Gauche ou Droit pour sélectionner un
onglet de menu et appuyez sur OK pour entrer.
Utilisez le bouton Gauche / Droite / Haut / Bas pour
sélectionner ou régler une rubrique. Appuyez sur le
bouton “RETURN” ou “MENU” pour quitter un écran
de menu.
Sélection d’entrée
Une fois les équipements externes connectés à votre
téléviseur, vous pouvez commuter entre différentes
sources d’entrée. Appuyez sur la touche SOURCE
de votre télécommande de manière consécutive pour
sélectionner les différentes sources.
Changement de chaînes et de volume
Vous pouvez changer la chaîne et ajuster le volume en
utilisant les boutons V+/- et P+/- de la télécommande.
Insertion des piles dans la
télécommande
1. Soulever le couvercle situé à l’arrière de la
télécommande.
2. Insérer deux piles AAA. S’assurer que les
extrémités + et –des piles correspondent dans
le compartiment de piles (respecter la bonne
polarité).
3. Replacer le couvercle.
Branchez l’alimentation&Antenne/Câble
IMPORTANT: Le téléviseur a été conçu uniquement pour
fonctionner en 220-240V AC, 50 Hz. Après avoir retiré la TV
de l’emballage, attendez un moment pour que la TV atteigne
la température ambiante avant de brancher la TV à la prise de
courant. Branchez le câble d’alimentation à la prise secteur.
SPDIF
VGA
Câble d'antenne

Français - 23 -
1. Veille
2. Taille de l’image
3. Minuteur de mise en veille
4. Mono/Stéréo - Dual I-II / Langue en cours (*)
(dans les chaînes DVB)
5. Chaînes favorites.
6. Touches numériques
7. Guide électronique de programme (dans les
chaînes DVB)
8. Aucune fonction
9. Navigateur média
10. Boutons de navigation (Précédent/Suivant/
Gauche/Droite)
11. Aucune fonction
12. Aucune fonction
13. Programme vers le bas / Page précédente (*) /
Programme vers le haut – Page suivante
14. Muet
15. Enregistrement de programmes
16. Pause (en mode vidéo du Navigateur média) /
Enregistrement décalé
17. Retour rapide (en mode vidéo du Navigateur
média)
18. Lecture (en mode vidéo du Navigateur média)
19. Touche rouge
20. Touche verte
21. Sélection du mode image
22. Aucune fonction
23. Télétexte /Mélanger (en mode texte)
24. Sous-titre Activé-Désactivé (dans les chaînes
DVB)
25. Programme précédent
26. AV / Sélection de la Source
27. Menu Marche-Arrêt
28. Ok (Conrmer) / Retenir (en mode TXT)/ la liste
des chaînes
29. Quitter / Retour / Page d’index (en mode TXT)
30. Aucune fonction
31. Info / Afcher (en mode TXT)
32. Augmenter/Diminuer le volume (Volume Up/
Down)
33. Aucune fonction
34. Aucune fonction
35. Avance rapide (en mode vidéo du Navigateur
média)
SLEEP
SCREEN
PRESETS
LANG.
FAV
EPG
SWAP
SOURCE
C
DISP.
SEARCH
MODE
INFO
CH
V
Afchage de la télécommande
36. Arrêter (en mode vidéo du Navigateur média)
37. Touche bleue
38. Touche jaune
Français - 24 -
Afchage des connecteurs
REMARQUE : Quand vous branchez un périphérique via l’entrée AV latérale, vous devez utiliser le branchement
des câbles pour activer la connexion voir l’illustration ci-dessus Pour activer la fonction audio du PC, vous devrez utiliser
les entrées BLANCHES et ROUGES de la CONNEXION AUDIO. Si un périphérique externe est branché à l’aide des prises
PÉRITEL, le téléviseur passe automatiquement en mode AV.| Pendant la réception des chaînes DTV (Mpeg 4 H. 264) ou
en mode Navigateur multimédia, la sortie ne sera pas disponible à travers la prise péritel. | Lorsque vous utilisez le kit de
montage mural fourni, Il est recommandé de brancher tous vos câbles à l’arrière du téléviseur avant tout montage mural.
| Insérez ou effacez le module CI uniquement lorsque le téléviseur est ETEINT (SWITCHED OFF). Consultez le manuel
d’instructions du module pour plus d’informations sur les réglages. Vous pouvez recourir à l’entrée VGA pour connecter un
périphérique YPbPr. Pour ce faire, vous avez besoin d’un câble YPbPr pour PC (non fourni).
Connecteur Type Câbles Appareil
Péritel
Branchement
(arrière)
VGA
Branchement
(arrière)
AV SUR CÔTÉ
PC/YPbPr
Audio
Branchement
(côté)
Câble de Connexion
Latérale Audio/Vidéo
(fourni)
Câble audio du PC
(Non fourni)
HDMI
Branchement
(arrière)
SPDIFF
Branchement
(arrière)
AV SUR CÔTÉ
Side AV
Branchement
(côté)
Câble de connexion
AV (fourni)
CASQUE
(HEADPHONE)
Casque
Branchement
(côté)
USB
Branchement
(côté)
CI
Branchement
(côté)
CAM
module
Français - 25 -
Mise sous/hors tension
Allumer le téléviseur
Lorsque le cordon d’alimentation est branché à la
prise secteur, le téléviseur est en mode “Veille”.
Pour allumer le téléviseur à partir du mode veille,
vous pouvez soit :
appuyer sur le bouton “ ” pour que l’appareil
bascule en mode de veille; Le TÉMOIN de mise en
veille s’allume.
Pour allumer le téléviseur à partir du mode veille,
vous pouvez soit :
a. Appuyez sur le bouton, “ ”,CH ^/ v ou sur une
touche numérique de la télécommande.
b. Appuyer au milieu du bouton “ ” sur le
téléviseur.
Quelle que soit la méthode, le téléviseur s’allumera.
Éteindre le téléviseur
Pressez le bouton“ ” ur la télécommande ou
pressez le commutateur “ ” le téléviseur, et la
TV passera ainsi en mode veille
Pour éteindre complètement le téléviseur,
débranchez le cordon d’alimentation de la prise
secteur.
Remarque: Lorsque le téléviseur est en mode veille, le
voyant lumineux du mode veille clignote pour signier
que des options comme Recherche en mode veille,
téléchargement automatique ou Minuterie sont actives.
La DEL peut également clignoter lorsque vous allumez le
téléviseur à partir du mode de veille.
Première installation
Lorsque le téléviseur est mis en marche pour la
première fois, le menu pour la sélection de la langue
apparaî. Le message “Bienvenue, sélectionnez
votre langue!” apparaît dans toutes les langues en
ordre alphabétique.sur le menu de l’écran.
Appuyez sur les touches “ ” ou “ ” pour sélectionner
la langue de votre choix, appuyez le bouton OK pour
sélectionner..“Première installation” apparaît. Utilisez
le bouton “ ” ou “ ” pour régler le pays de votre choix
et appuyez le boutton “ ” pour sélectionner le type
de recherche (optionnelle):
Utiliser l’option “ ” ou “ ” pour définir le type
de recherche souhaité. Il existe deux types de
recherche disponibles : Numérique et analogique, puis
numérique uniquement et analogique uniquement.
Une fois définie, appuyez sur la touche pour
sélectionner l’option Langue télétexte. Pressez le
bouton “ ” “ ” ou “ ” pour sélectionner Langue
télétexte. Vous pouvez régler l’option Balayage des
chaînes cryptées sur Oui si vous souhaitez rechercher
des stations codées.
(*) IMPORTANT: Si vous sélectionnez l’option Pays
comme la France ou Italie, vous serez invité à dénir
et à conrmer un code PIN. Le code PIN sélectionné
ne saurait être 0000. Saisissez un code PIN et
conrmez-le en le saisissant à nouveau. Appuyez
sur la touche OK pour continuer. Si les deux codes
PIN correspondent l’un à l’autre, le code PIN principal
sera déni.
AVERTISSEMENT: Vous êtes invité à saisir un mot de
passe pour tout fonctionnement du menu, Vous devez
utiliser le code PIN que vous avez précédemment
défini au cours de la première installation. En
cas d’oubli du code PIN déni lors de la première
installation, utiliser le code PIN principal 4725.
Pressez le bouton OK sur la télécommande pour continuer
et le message suivant s’afchera à l’écran.
Vous pouvez activer l’option du mode de mémorisation
en vous servant du bouton “ ” ou “ ”. Si le Mode de
mémorisation est activé, l’option correspondante sera
disponible dans le menu Autres paramètres et les
fonctionnalités de votre téléviseur s’afcheront dans la
partie supérieure de l’écran. Un écran de conrmation
s’afche après avoir sélectionné le Mode de mémorisation.
Sélectionnez OUI pour continuer.
Français - 26 -
Si le mode Domicile est sélectionné, le mode de
Mémorisation ne sera plus disponible après la première
installation. Pressez le bouton OK sur la télécommande
pour continuer et le message suivant s’affichera à
l’écran.
Vous devez sélectionner le type de recherche pour
lancer la recherche et garder les émissions de la
source souhaitée.
Installation de l’antenne
Si vous sélectionnez l’option ANTENNE à partir de
l’écran Type de recherche, la télévision numérique
recherchera les diffusions terrestres numériques.
REMARQUE : Vous pouvez appuyez sur la touche
MENU pour annuler.
Une fois toutes les stations disponibles enregistrées,
la liste des chaînes s’afchera à l’écran. Si les chaînes
retrouvées vous intéressent, en fonction du LCN,
veuillez sélectionner Oui, puis appuyez sur OK.
Appuyez sur le bouton OK pour quitter la liste des
chaînes et regarder la télé.
(*) LCN Système de numéro de chaîne logique qui
organise les diffusions disponibles conformément à
la séquence de chaîne reconnaissable .
Installation du câble
Si vous sélectionnez l’option CABLE et pressez le
bouton OK sur la télécommande pour continuer, le
message suivant s’afchera à l’écran :
Pour continuer, veuillez sélectionner OUI et appuyez
sur OK. Pour annuler l’opération, sélectionnez NON
et appuyez surv OK.
Vous pouvez sélectionner des plages de fréquence à
partir de cet écran. Pour sélectionner les lignes que
vous voyez, utilisez la touche “ ” ou “ ” .
Vous pouvez procéder à une sélection manuelle de la
plage de fréquences à l’aide des touches numériques
de la télécommande.
Français - 27 -
Réglez la fréquence de démarrage et d’arrêt à souhait
à l’aide des touches numériques de la télécommande.
Après cette opération, vous pouvez dénir l’étape de
recherche sur 8000 KHz ou 1000 KHz.
Si vous sélectionnez 1000 KHz, le téléviseur
effectuera une recherche détaillée. La durée de
recherche augmentera alors en conséquence. Une
fois terminé, appuyez sur le bouton OK pour lancer
la recherche automatique. Le téléviseur cherchera et
garder les émissions disponibles.
Lecture de média via entrée USB
• Vous pouvez connecter un lecteur de disque dur USB
ou une carte mémoire USB à votre téléviseur grâce
aux entrées USB du téléviseur. Cette option vous
donne la possibilité de lire des chiers mémorisés
dans un disque USB. 2.5” Les disques durs externes
de 2,5 et 3,5 pouces (hdd avec alimentation externe)
sont pris en charge.
IMPORTANT ! Vous devez sauvegarder vos chiers
avant d’effectuer tout branchement au téléviseur an
d’éviter de probables pertes de données. Veuillez
remarquer que la responsabilité du fabricant ne
saurait être engagée en cas de dommage de chier
ou de perte de données. Il est possible que certains
types de périphériques USB (à l’exemple des lecteurs
MP3) ou des lecteurs de disque dur/cartes mémoires
USB soient incompatibles avec ce téléviseur. Le
téléviseur prend en charge le formatage de disque
FAT32 et NTFS. Toutefois, l’enregistrement ne sera
pas possible avec les disques formatés NTFS.
Remarque Pendant le formatage d’un disque dur USB
d’une capacité de 1TO (Tera Octet), il peut arriver que
vous soyez confronté à certains problèmes au cours
du processus de formatage.
Il est très dangereux de brancher et de débrancher les
périphériques USB avec une certaine rapidité. Évitez
de brancher et de débrancher le lecteur avec une
certaine rapidité. Ceci peut physiquement endommager
le lecteur USB et surtout le périphérique USB lui-même.
Ne jamais enlever l’USB durant la lecture d’un chier.
Menu Navigateur média
Vous pouvez lire les chiers de photo, de musique, et de
lm stockés sur un disque USB en connectant ce dernier
à votre téléviseur et en utilisant l’écran du navigateur
média. Pour ce faire, procédez comme suit: Branchez
un disque USB à l’une des entrées USB située sur le
côté du téléviseur.
Vous pouvez brancher jusqu’à deux périphériques USB
à votre téléviseur. Si les deux périphériques contiennent
des chiers de musiques, de photos, ou de vidéos,
l’OSD de sélection de l’USB s’afchera à l’écran. Le
premier périphérique USB connecté au téléviseur sera
le lecteur USB 1. Sélectionnez un périphérique à l’aide
de la touche “ ” ou “ ” et appuyez sur OK.
Appuyez sur le bouton “MENU” et sélectionnez l’onglet
Navigateur média en utilisant les boutons Gauche/Droite
et OK. L’écran principal du navigateur média s’afche.
Vous pouvez afficher le contenu correspondant en
sélectionnant l’onglet Vidéo, musique ou Image. Suivez
les indications du bouton sous chaque menu à l’écran
pour les options de lecture média.
Vous pouvez régler les préférences de votre navigateur
média grâce à la boîte de dialogue Réglages.
Changement de la taille d’une image :
Formats d’image
Les programmes peuvent être regardés dans différents
formats d’image, en fonction de la transmission reçue.
Vous pouvez modier le format de l’image (la taille de
l’image) du téléviseur pour afcher l’image dans des
modes zoom différents. Appuyez sans interruption sur
le bouton SCREEN (ECRAN) pour modier la taille de
l’image. Vous pouvez passer à l’option Ecran Haut
ou Bas en utilisant les boutons“ ” ou “ ” tandis que
dans 14:9 Zoom, Cinéma ou Sous-titre.
Utilisation de la liste de chaînes
Le téléviseur trie toutes les stations mémorisées dans
la liste des chaînes. Vous pouvez modier cette liste de
chaînes, congurer les favoris ou les stations actives
à inclure dans la liste en utilisant les options Liste de
chaînes. Pressez le bouton MENU pour afcher le
menu Principal. Sélectionnez la rubrique Channel List
(Liste des chaînes) en utilisant le bouton “Gauche”
ou “Droite”. Appuyez sur OK pour afcher le contenu
du menu. Sélectionnez l’option Modier la liste des
chaînes pour gérer toutes les chaînes mémorisées.
Utilisez les boutons haut et bas et OK pour sélectionner
l’option Modier la liste des chaînes. Appuyez sur les
touches “Haut” ou “Bas” pour sélectionner la chaîne
à utiliser. Appuyez sur les touches Gauche ou Droite
pour sélectionner une fonction dans le menu Channel
List Tableau des programmes. Utilisez les touches
P+/P- pour faire déler les pages. Appuyez sur la touche
MENU pour quitter.
Trier une liste de chaînes
Vous pouvez sélectionner les émissions à inclure dans
la liste des chaînes. Pour afcher les types de diffusions
spéciques, vous devez utiliser l’option Liste de chaîne
active. Sélectionnez Liste de chaînes actives à partir du
menu Liste de chaînes en utilisant le bouton “ ” ou “
” Appuyez sur la touche OK pour continuer. Vous
pouvez sélectionner un type de diffusion à partir de la
liste en utilisant les boutons “ ” ou “ ” et O
 Loading...