

grandimpianti WFM 8, WFM 18, WFM 11, WFM 22 Instructions For Installation And Use Manual

ISTRUZIONI PER L'INSTALLAZIONE E L'USO
INSTRUCTIONS FOR INSTALLATION AND USE
INSTRUCTIONS POUR L'INSTALLATION ET MODE D'EMPLOI
INSTALLATIONS- UND GEBRAUCHSANWEISUNG
INSTRUCCIONES PARA LA INSTALACIÓN Y PARA EL USO
WFM 8
WFM 11
WFM 18
WFM 22
LAVATRICE
MICROPROCESSORE G900
WASHING MACHINE
MICROPROCESSOR G900
MACHINE À LAVER
MICROPROCESSEUR G900
WASCHMASCHINE
MIKROPROZESSOR G900
LAVADORA
MICROPROCESADOR G900
Industrial Laundry EquipmentIndustrial Laundry Equipment
Industrial Laundry EquipmentIndustrial Laundry Equipment
grandimpiantigrandimpianti
grandimpiantigrandimpianti
grandimpianti
LAVA-WFM 8-11-18-22.v3.57
VIA MASIERE, 211/C
32037 - SOSPIROLO (BL)
ITALY
Industrial Laundry Equipment
ISTRUZIONI PER L'INSTALLAZIONE E L'USO
INSTRUCTIONS FOR INSTALLATION AND USE
INSTRUCTIONS POUR L'INSTALLATION ET MODE D'EMPLOI
INSTALLATIONS- UND GEBRAUCHSANWEISUNG
INSTRUCCIONES PARA LA INSTALACION Y PARA EL USO
I
INDICE Pagina
1) Garanzia ....................................................4
2) Introduzione .............................................. 4
3) Prescrizioni, divieti, ed usi diversi
della macchina .......................................... 4
ISTRUZIONI PER L’INSTALLATORE
4) Trasporto, disimballaggio ed
immagazzinamento ................................... 4
5) Messa in servizio della macchina ............ 5
ISTRUZIONI PER L’OPERATORE
6) Indicazioni relative alla macchina ...........6
7) Indicazioni relative all’uso ....................... 7
ISTRUZIONI PER MANUTENTORE ED IL
RIPARATORE
8) Manutenzione straordinaria ed
approvvigionamento pezzi di ricambio .. 13
9) Messa fuori servizio, smantellamento, ed
eliminazione della macchina .................. 13
Descrizione cicli ..........................................57
Figure ........................................................... 81
Dati tecnici ................................................... 83
Componenti-Connettori ...............................84
Schemi elettrici ............................................ 88
GB
INDEX Page
1) Guarantee ................................................ 14
2) Introduction .............................................14
3) Prescriptions, restrictions and other uses14
INSTRUCTIONS FOR THE INSTALLER
4) Shipping, unpacking, handling
and storing the appliance .......................14
5) Getting the appliance started .................15
INSTRUCTIONS FOR THE USER
6) Information on the washing machine ..... 17
7) Instructions for use and ordinary
maintenance ............................................ 17
INSTRUCTIONS FOR MAINTENANCE AND
REPAIR PERSONNEL
8) Scheduled maintenance and ordering
spare parts ............................................... 22
9) Lay up, dismantling and disposal ..........23
Description of cycles ................................... 61
Figures.......................................................... 81
Technical details .......................................... 83
Components - Connectors ........................... 85
Wiring diagrams ..........................................88
F
INDEX Page
1) Garantie...................................................24
2) Introduction .............................................24
3) Prescriptions, interdictions, utilisations
diverses de l'appareil .............................. 24
INSTRUCTIONS POUR L'INSTALLATEUR
4) Transport, déballage, mise
en place et stockage de l'appareil .......... 24
5) Mise en service ....................................... 25
INSTRUCTIONS POUR L'UTILISATEUR
6) Informations sur l'appareil...................... 26
7) Utilisation et entretien ordinaire
de l'appareil ............................................. 27
INSTRUCTIONS POUR LE PERSONNEL
RESPONSABLE DE L'ENTRETIEN ET
RÉPARATIONS
8) Entretien extraordinaire et acquisition
pièces détachées .....................................33
9) Mise hors service, démontage
et élimination de l'appareil.....................34
Description des cycles .................................66
Figures.......................................................... 81
Données techniques ..................................... 83
Composants - Connecteurs .......................... 86
Schémas électriques ....................................88
D
INHALTSVERZEICHNIS Seite
1) Garantie ...................................................35
2) Einführung ...............................................35
3) Vorschriften, Verbote, verschiedene Hin-
weise für den Gebrauch des Gerätes ......35
ANWEISUNGEN FÜR DEN INSTALLATEUR
4) Transport, Auspacken, Auf-
stellen und Lagern des Gerätes ............... 35
5) Inbetriebnahme ........................................ 36
ANWEISUNGEN FÜR DEN BENUTZER
6) Hinweise zum Gerät ................................ 38
7) Gebrauch und Wartung des Gerätes .......38
ANWEISUNGEN FÜR DEN WARTUNGSUND TECHNISCHEN KUNDENDIENST
8) Instandhaltung des Gerätes und
Bestellung von Ersatzteilen ....................44
9) Außerbetriebnahme, Abbau und
Entsorgung des Gerätes........................... 45
Beschreibung der Programme ...................... 71
Abbildungen .................................................81
Technische Daten ......................................... 83
Einbauteile - Verbindungen ......................... 87
Schaltpläne ...................................................89
E
INDICE Página
1) Garantía................................................... 46
2) Introducción ............................................46
3) Prescripciones, prohibiciones y otros
usos de la máquina .................................46
INSTRUCCIONES PARA INSTALADORES
4) Transporte, desembalaje, desplazamiento
y depósito ................................................46
5) Puesta en servicio ...................................47
INSTRUCCIONES PARA EL USUARIO
6) Indicaciones sobre la máquina ...............48
7) Uso de la máquina y mantenimiento
ordinario ..................................................49
INSTRUCCIONES PARA LOS
ENCARGADOS DEL MANTENIMIENTO Y
REPARACIONES
8) Mantenimiento extraordinario y
abastecimiento de repuestos .................. 54
9) Puesta fuera de servicio,
desmantelamiento y eliminación
de la máquina .......................................... 55
Descripción de los ciclos ............................. 76
Figuras .......................................................... 81
Datos técnicos ..............................................83
Componentes - Bornes.................................88
Esquemas eléctricos ....................................89
3

ISTRUZIONI PER L'INSTALLAZIONE E L'USO
I
PREMESSA
Desideriamo ringraziarvi della preferenza
accordataci con l’acquisto della nostra
macchina. Siamo certi che otterrete le
migliori soddisfazioni e garanzie se seguirete
attentamente le indicazioni contenute nel
presente manuale.
Vi informiamo inoltre che in qualsiasi caso
il testo di riferimento per eventuali
contestazioni od osservazioni rimane quello
in lingua originale del costruttore, ovverosia
l’Italiano
1. GARANZIA
- La garanzia ha durata di mesi dodici (12)
a partire dalla data di acquisto
dell’apparecchiatura o parte integrante della
stessa.
- La garanzia consiste nella sostituzione
delle parti eventualmente difettose per
accertate cause di fabbricazione e viene
applicata direttamente dal vostro fornitore.
- La mano d’opera è sempre a carico
dell’acquirente come pure le spese di
spedizione, imballo e rischi di trasporto.
- La garanzia è subordinata alla restituzione
dei pezzi avariati in PORTO FRANCO ed
alla contemporanea comunicazione dei dati
riguardanti il modello, il numero di matricola
ed il difetto della macchina sulla quale il
particolare era montato.
- La garanzia non si applica alle
apparecchiature che siano state danneggiate
per negligenza, errato collegamento, installo
inadatto, mancata osservanza delle istruzioni
di montaggio o impiego e comunque alterate
da personale non autorizzato. Non si applica
inoltre qualora il numero di matricola sia
stato alterato, cancellato o asportato.
- Non si applica la garanzia sul seguente
materiale:
parti soggette alla normale usura quali
cinghie, membrane delle elettrovalvole e
parti di gomma in generale. Componenti
elettrici quali motore, bobine, contattori,
resistenze ecc.
2. INTRODUZIONE
Il presente manuale è stato realizzato in
modo semplice e razionale affinché
leggendolo conosciate a fondo la vostra
macchina. Si raccomanda di leggere
attentamente il contenuto e di conservarlo
unitamente alla macchina. Le avvertenze e
le attenzioni contenute in questo manuale,
non possono coprire tutte le eventualità; è
importante tenere presente che buon senso
attenzione e prudenza sono fattori che non
possono essere aggiunti all’apparecchiatura
da parte del costruttore, ma devono essere
previsti dalle persone che effettuano
l’installazione la manutenzione e/o uso della
macchina. Qualsiasi persona utilizzi questa
apparecchiatura dovrà leggere il presente
manuale d’uso.
In caso di interventi sulla macchina la
presente ditta raccomanda vivamente di
usare pezzi di ricambio originali, per la cui
ordinazione si consiglia di consultare il
paragrafo 8.
Le descrizioni ed illustrazioni contenute nel
presente manuale non si intendono
impegnative; la ditta pertanto si riserva il
diritto in qualunque momento e senza
impegno, di aggiornare tempestivamente la
pubblicazione e/o di apportare eventuali
modifiche ad organi, componenti e accessori,
nel caso in cui questo venga ritenuto
conveniente per un miglioramento o per
qualsiasi esigenza di carattere costruttivo o
commerciale.
3. PRESCRIZIONI, DIVIETI ED USI
DIVERSI DELLA MACCHINA
L’apparecchiatura deve essere utilizzata solo
da persone addestrate all’uso della stessa.
Disattivare la lavatrice in caso di guasto e/
o di cattivo funzionamento.
Durante l’uso la pulizia e la manutenzione
si deve prestare attenzione a non accedere
con arnesi e tanto meno con le mani a parti
in movimento (motore, cinghie). In caso di
incidenti la ditta costruttrice non si assume
alcuna responsabilità per danni all’operatore
o ad altri persone che avvengano durante
l’uso, la pulizia e la manutenzione della
macchina.
Non aprire il dispenser durante il
funzionamento per i detersivi in esso
contenuto e per la temperatura dell’acqua
calda.
Questa apparecchiatura è stata progettata
per il lavaggio di tessuti secondo le
indicazioni riportate sulle etichette degli
indumenti o tessuti, lavare solo indumenti,
biancheria per la casa e tessuti normali da
uso quotidiano.
Non inserite capi che siano stati a contatto
con prodotti chimici o infiammabili, ma
provvedete prima ad un lavaggio a mano e
asciugarli all’aria per far evaporare
completamente queste sostanze.
L’uso di qualunque apparecchio elettrico ed
elettronico comporta l’osservanza di alcune
regole fondamentali. In particolare: non
toccare l’apparecchio con mani e piedi
bagnati o umidi. Non usare l’apparecchio a
piedi nudi, non lasciare esposto
l’apparecchio agli agenti atmosferici
(pioggia, sale, salsedine, ecc.). Non
permettere che l’apparecchio sia usato da
bambini o da incapaci senza una adeguata
sorveglianza. Non fumare in prossimità della
lavatrice o durante l’uso. Non rimuovere o
scavalcare i dispositivi di sicurezza. Non
utilizzare mai getti d’acqua diretti od
indiretti sulla macchina, fare attenzione
pertanto a non installarla in prossimità di
zone in cui è possibile questa evenienza.
OGNI ALTRO USO NON
ESPLICITAMENTE INDICATO E’ DA
CONSIDERARSI PERICOLOSO. IL
COSTRUTTORE NON PUÒ ESSERE
RITENUTO RESPONSABILE PER
EVENTUALI DANNI DERIVANTI DA
USO IMPROPRIO, ERRONEO ED
IRRAGIONEVOLE.
ISTRUZIONI PER
L’INSTALLATORE
4. INDICAZIONI RELATIVE AL
TRASPORTO, DISIMBALLAGGIO
ED IMMAGAZZINAMENTO DELLA
MACCHINA
4.1 TRASPORTO MACCHINA
Se è necessario un eventuale trasporto e/o
spedizione della macchina è utile seguire
attentamente le seguenti raccomandazioni:
Qualora si debba trasportare
l’apparecchiatura all’interno di un edificio
utilizzare esclusivamente l’apposito bancale
o uno equivalente; utilizzare un carrello
elevatore a mano oppure elettrico idoneo al
trasporto di queste macchine e con capacità
di sollevamento sufficiente (vedi dati
tecnici). Controllare che la lavatrice possa
superare tutti gli ostacoli es. scale, porte
ecc. Non trascinate mai la macchina per i
fianchi o per qualsiasi altra parte.
Nel caso in cui la macchina debba essere
spedita utilizzare esclusivamente l’imballo
originale che aiuta a garantire sufficiente
stabilità alla macchina durante il trasporto.
4.2 IMMAGAZZINAMENTO
Qualora la macchina dovesse rimanere in
deposito per lungo tempo prima di essere
utilizzata lasciarla all’interno del suo
imballo originale il quale garantisce una
ottima protezione. Assicurarsi inoltre che
le condizioni ambientali siano
corrispondenti a quelle di cui al paragrafo
5. Nel caso in cui invece debba rimanere
ferma per lunghi periodi dopo che è già
stata usata; verificare che sia materialmente
scollegata dalla rete di alimentazione
elettrica e coprirla con il sacco protettivo
originale.
4.3 DISIMBALLAGGIO
1) Prima di prendere in consegna la
macchina dal trasportatore, controllare le
condizioni dell’imballo. Se il medesimo
presenta danni evidenti all’esterno, può
darsi che anche la macchina abbia subito
delle conseguenze. In tal caso sballate la
macchina in presenza del trasportatore
4
stesso e firmate, con riserva, il relativo
documento di consegna. Eventuali danni
dovuti al trasporto o ad errato stoccaggio
non sono da attribuire alla casa costruttrice
della macchina.
2) Disimballate la macchina con tutte le
cure atte ad evitare di danneggiarla. Per
togliere il bancale rimuovere le viti
all’interno poste sui fori di fissaggio al
pavimento.
3) Aprire l'oblò (vedi paragrafo 7.2).
4) Verificate la presenza del seguente
materiale: 2 fascette metalliche, 1 gomito a
90° in gomma, 3 tubi flessibili con ghiera da
3/4, 1* filtro in ottone per l’ingresso vapore,
1* tubo flessibile metallico, delle chiavi del
cassetto gettoni e di 15 gettoni (solo
funzionamento gettoniera).
Le chiavi per l’apertura del coperchio della
macchina. (Solo modelli 18-22kg)
(*solo macchine con riscaldamento vapore).
5) È TASSATIVO CHE VENGANO
TOLTE LE STAFFE DI FISSAGGIO
DELLA VASCA PRIMA DELLA MESSA
IN SERVIZIO DELLA MACCHINA.
6) Accertatevi che non resti nell’imballo o
vada perduto il manuale di istruzioni.
Gli elementi dell'imballaggio (sacchetti di
plastica, polistirolo, legno, cartone, chiodi
ecc.) non devono essere lasciati
assolutamente alla portata dei bambini in
quanto fonti di potenziale pericolo; essi
devono essere raccolti e conservati per
eventuali futuri spostamenti della macchina
o per eventuali lunghi periodi di fermo
macchina (vedi paragrafo 9). Prima di
collegare l’apparecchio accertarsi che i dati
di targa corrispondano alle caratteristiche
della rete elettrica a cui deve essere collegata
la macchina stessa. L’apparecchio dovrà
essere destinato solo all’uso per il quale è
stato espressamente progettato.
5. INDICAZIONI PER LA MESSA IN
SERVIZIO DELLA MACCHINA
5.1 PRESCRIZIONI PER IL
POSIZIONAMENTO DELLA
MACCHINA
Le lavatrici non presentano alcun problema
di ubicazione all’infuori di una superficie
piana, livellata e solida.
Mettere in bolla la macchina facendo uso di
una livella.
È consigliato, per facilitare la manutenzione
alla macchina, lasciare tra la facciata
posteriore della stessa ed il muro almeno
500mm (1000 per il modello 22kg).
Inoltre, se vengono posizionate più macchine
l’una a fianco dell’altra, si consiglia di
lasciare uno spazio di almeno 30mm.
Predisponete uno scarico a pavimento, più
basso di quello della lavabiancheria, a una
distanza dalla macchina che ne consenta il
collegamento mediante il tubo a gomito
fornito in dotazione.
Attenzione! Se viene spostata
l’apparecchiatura ripetere l’operazione
di livellamento.
5.2 SPAZIO NECESSARIO PER
L’INSTALLAZIONE, USO E
MANUTENZIONE MACCHINA
La lavatrice dovrà avere a disposizione lo
spazio minimo indicato nelle figure
dimensionali (vedi figura 1):
1) linea alimentazione elettrica con a monte
interruttore differenziale automatico ed
interruttore magnetotermico*
2) presa elettrica interbloccata dotata di
fusibili ed interruttore onnipolare manuale
3) spina per l'alimentazione elettrica
4) saracinesche per le entrate dell'acqua
5) griglia o piastra (consigliata) per la
chiusura del pozzetto di scarico
6) tubo in gomma per lo scarico dell'acqua
da 3" (in dotazione)
7) pozzetto di scarico con portata pari a 160
litri/min.
8) oblò
9) entrata per l'acqua dura da 3/4 "
10) entrata per l'acqua calda da 3/4 "
11) entrata per l'acqua dolce da 3/4 "
12) entrata vapore da 3/4 " (solo nei modelli
a vapore)
13) pressacavo per entrata alimentazione
elettrica (modelli 8-11-18)
14) dima per il posizionamento dei
prigionieri per il fissaggio della macchina a
terra.
15) 3 tubi per carico dell'acqua dura, calda
e dolce (in dotazione)
16) tubo collegamento vapore da 3/4 "
flessibile (in dotazione solo ai modelli a
vapore)
17) filtro meccanico da 3/4 " ( in dotazione
solo ai modelli a vapore)
18) linea di alimentazione del vapore con
pressione compresa tra 4 e 6 bar; consumo
circa 15 Kg/h (solo modelli vapore)
19) saracinesca di intercettazione del vapore
(solo modelli vapore)
20) scarico condensa da 3/4" (solo modelli
con riscaldamento a vapore indiretto 8-1118 kg)
21) pressacavo per entrata alimentazione
elettrica (modello 22kg)
22) carter protezione inverter (solo modello
22kg)
23) Predisposizione per collegamento tubi
detersivi liquidi ( solo modello 22kg)
24) Collegamento cavo programmazione
cicli di lavaggio (utilizzare kit di
collegamento, Personal Computer con
apposito software)
25) Scarico acqua
* La posizione dell'interruttore
sezionatore automatico deve essere tale
da poter essere facilmente azionato
dall’operatore in una situazione di
EMERGENZA (distanza massima m 3).
5.3 CONDIZIONI AMBIENTALI
CONSENTITE PER IL CORRETTO
USO DELLA MACCHINA
Queste condizioni di installo sono da rendere
note al o agli utilizzatori diretti della
macchina.
- TIPO LOCALE: CHIUSO
- TEMPERATURA MINIMA: 10°C
(n.b.: i componenti elettronici sotto tale
temperatura possono avere un
funzionamento discontinuo)
- TEMPERATURA MASSIMA: 40°C
- UMIDITÀ RELATIVA: 75% U.R.
- ILLUMINAMENTO: 100 LUX (dato
valido per lo stato italiano, vista la non
omogeneità in materia di luminosità
negli ambienti di lavoro per gli altri
paesi è necessario rifarsi alle singole
leggi nazionali.
5.4 COLLEGAMENTO ELETTRICO
L’installazione deve essere effettuata
secondo le istruzioni del costruttore da
personale professionalmente qualificato e
conformemente alle norme sugli impianti
elettrici vigenti nei singoli paesi. Un’errata
installazione può causare danni a persone,
animali o cose, nei confronti dei quali il
costruttore non può essere considerato
responsabile.
Accertarsi che la tensione di alimentazione
corrisponda ai dati di targa della lavatrice;
inoltre considerare che le variazioni massime
consentite per la tensione di alimentazione
sono del ±10%.
IMPORTANTE:
È OBBLIGATORIO COLLEGARE LA
MACCHINA A TERRA.
A questo scopo, all’interno, sulla morsettiera,
vi è un morsetto per il relativo collegamento,
da eseguire secondo le norme di legge. Il
costruttore declina ogni responsabilità
qualora questa norma antinfortunistica non
venga rispettata.
In conformità alle più recenti norme
antinfortunistiche la macchina è dotata di
morsetto esterno per la connessione
equipotenziale a disposizione per il
collegamento.
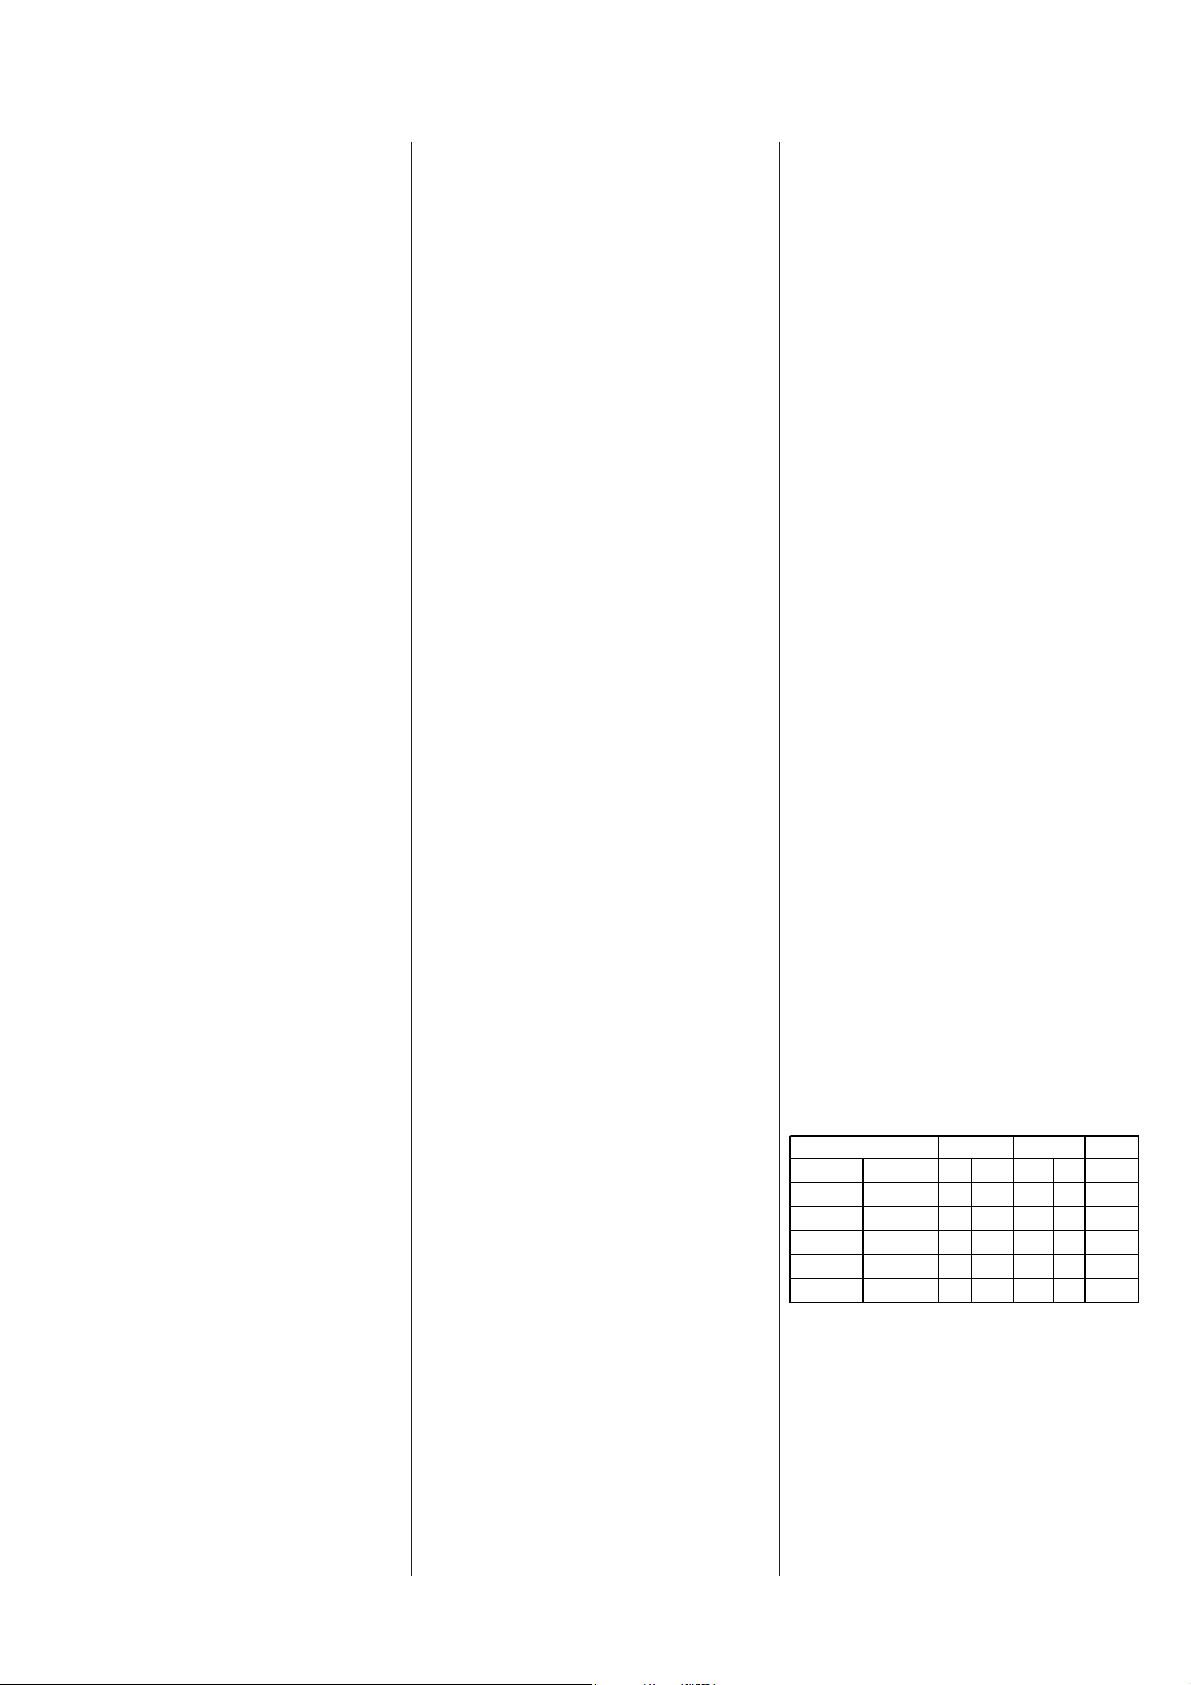
È indispensabile inserire a monte
dell’apparecchiatura un interruttore
onnipolare sezionatore automatico con
distanza minima fra i contatti di 3 mm,
tarato in base ai massimi assorbimenti (vedi
dati di targa della apparecchiatura e tabella
sotto):
Potenza totale apparecchiatura
Riscaldamento
da 6000 a
da 10000 a
da 18000 a
elettrico
10000W
13000W
25000W
Riscaldamento
vap ore
da 550 a
1100W
da 1500 a
2500W
Numero dei poli
230/3 400/3 230/3 400/3
34 6630mA
34161630mA
3420-301630mA
3430-402530mA
3 4 50-70 30-40 30mA
Corrente
nom inale In
Corr.diff.
d'intervent
Predisporre un tubo passacavo del diametri
esterno di 20mm (30 mm per il modello
22kg) tra l’interruttore sezionatore e
l’ingresso per l’alimentazione elettrica
dell'apparecchio. Utilizzare il pressacavo
montato sulla schiena della macchina, per
inserire il cavo di alimentazione e, dopo aver
collegato i cavi alla morsettiera rispettando
la sequenza indicata sulla stessa, bloccare il
cavo con il dado in plastica. Utilizzare un
cavo del tipo indicato nella tabella che segue,
assicurandosi che il cavo sia non propagante
la fiamma ed opportunamente protetto.
5
Potenza totale
apparecchiatura
Riscaldamento
elettrico
da 6000 a
10000W
da 10000 a
13000W
da 18000 a
25000W
Riscaldamento
vapore/ac qua
da 550 a
1100W
da 1500
a 25000 W
Nume ro
conduttori
230/3 400/3 230/3 400/3 230/3 400/3
calda
34
34
34
34
34
Tipo di cavo
H05VV-F H05VV-F
H05VV-F H05VV-F
A07VV-F A 07VV-F
A07VV-F A 07VV-F
S07VV-F A 07VV-F
Sezione
conduttori mmq
11
2,5 1
62,5
64
10 6
Attenzione!
Queste apparecchiature sono dotate di
dispositivi elettronici di controllo quali
schede ed inverter: tali dispositivi per essere
omologati CE devono montare dei filtri
antidisturbo nel rispetto della normativa per
l’emissione delle correnti parassite EMC.
Tali filtri disperdono tramite il conduttore
di terra, per funzionare correttamente, una
piccola corrente, dell’ordine dei 10-15mA.
È quindi indispensabile che ad ogni
macchina corrisponda un solo interruttore
differenziale a protezione dell’impianto.
Evitare di collegare a valle di un solo
interruttore differenziale più apparecchi,
anche di diversa capacità o marca.
IMPORTANTE: REGOLAZIONE
DEL MICROINTERRUTTORE DI
SBILANCIAMENTO.
Tutte le lavabiancheria supercentrifuganti
sono dotate di un dipositivo che interrompe
la fase di centrifuga nel caso in cui questa
risulti particolarmente sbilanciata e quindi
potenzialmente dannosa per gli organi
meccanici che compongono la macchina.
Questo dispositivo di sicurezza è
raggiungibile aprendo il coperchio superiore
della macchina, ed è situato circa nel punto
più alto della vasca. Eseguire questa
operazione solo dopo aver tolto tensione
all’apparecchiatura tramite l’interruttore
sezionatore a parete.
Questa operazione di taratura deve essere
eseguita solo da personale autorizzato e
qualificato.
Tale dispositivo consta di un
microinterruttore, fissato al telaio della
macchina, che è azionato tramite un’asta
flessibile posta all’interno di una finestra
metallica che si muove solidale al cestello
della lavabiancheria. In caso di eccessive
vibrazioni la finestra sposta detta asta e fa
intervenire la sicurezza ( vedi anche allarme
“E9” alla descrizione degli allarmi).
In fase di installazione della macchina,
dopo aver rimosso le staffe di trasporto e
con il cestello vuoto, procedere al
posizionamento dell’asta flessibile al centro
della finestra, onde evitare interventi
anomali del dispositivo di sicurezza .
Per eseguire tale operazione agire sulle viti
di fissaggio del supporto del
microinterruttore e posizionarlo
correttamente.
5.5 COLLEGAMENTO IDRICO
La lavabiancheria è predisposta per
un'entrata d'acqua calda (circa 60°C) e due
entrate d'acqua fredda (dura e dolce), tutte
da 3/4".
La pressione dell’acqua in entrata deve essere
compresa tra 0,5 e 5 bar (0,05 e 0,5 MPa).
Predisporre gli attacchi a parete ad una
distanza che non superi la lunghezza dei
tubi dati in dotazione.
Se non vi è acqua calda a disposizione,
predisporre una ‘T’ sull’attacco dell’acqua
fredda dolce e collegare l’attacco dell’acqua
calda con l’acqua fredda. In qualsiasi caso
vanno alimentati tutti e tre gli ingressi.
Modello Capacità boiler
Mod. 8 55 litri
Mod.11 80 litri
Mod.18 120 litri
Mod.22 155 litri
Verificare a fine montaggio che non vi siano
strozzature nei tubi utilizzati.
5.6 COLLEGAMENTO VAPORE
(SOLO PER LE MACCHINE CON
QUESTO TIPO DI RISCALDAMENTO)
La lavabiancheria è predisposta per
un’entrata di vapore da 3/4". La pressione
del vapore in entrata deve essere compresa
tra 1 e 6 bar (0,05 e 0,6 MPa). La pressione
consigliata per avere una resa ottimale della
macchina è compresa tra 4 e 6 bar. In
qualsiasi caso leggere i dati di targa
dell’apparecchiatura. Il vapore è da
intendersi saturo e secco.
Nel modello da 22 kg il riscaldamento
dell'acqua in vasca può avvenire solo in
modo diretto mentre nei modelli 8-11-18 kg
il riscaldamento dell'acqua può avvenire
anche in modo indiretto; in quest'ultimo
caso va predisposto l'attacco per il recupero
della condensa, che è anch'esso da 3/4".
Se la macchina a vapore è soggetta a controllo
ISPESL, occorrerà tenere sempre a
disposizione tutta la documentazione
ISPESL nei locali in cui è posizionata.
Verificare a fine montaggio che non vi siano
strozzature nei tubi utilizzati.
5.7 COLLEGAMENTO SCARICO
Accertarsi che la distanza tra l’attacco dello
scarico della macchina e lo scarico a
pavimento non sia maggiore della lunghezza
del gomito di scarico fornito in dotazione.
Lo scarico dell’acqua avviene mediante una
valvola motorizzata ad azione diretta, la
quale rimane aperta (per caduta) in assenza
di tensione. Lo scarico pertanto dovrà essere
sempre più basso dell’uscita della lavatrice
e di un diametro non inferiore a quello del
tubo dato in dotazione.
Modello Portata scarico
Mod. 8/11/18/22 160 l/min.
Il condotto di scarico deve sopportare la
temperatura di 90°C.
Interporre un sifone tra il tubo dato in
dotazione e lo scarico.
Verificare che non ci siano strozzature.
5.8 AIR BREAK
La lavatrice è dotata del dispositivo "AirBreak" che in caso di depressioni nella rete
impedisce il ritorno di acqua non potabile.
Tale dispositivo prevede un’uscita
posteriore, dalla quale, durante il
riscaldamento, possono fuoriuscire dei
vapori comunque innocui. Non tappare né
raccordare tale uscita in nessun caso.
LA GARANZIA NON RISPONDE DEI
DANNI DERIVANTI DA UN'ERRATA
INSTALLAZIONE.
ISTRUZIONI PER
L’OPERATORE
6. INDICAZIONI RELATIVE ALLA
MACCHINA
6.1 DESCRIZIONE DELLA
MACCHINA
La macchina è composta nelle sue parti
principali da (vedi fig.2):
1) Coperchio sotto il quale è collocato il
circuito di comando
2) Dispenser dove collocare il detersivo
per il lavaggio, il prelavaggio (in polvere
e non schiumogeno) e l’ultimo
risciacquo (liquido non schiumogeno).
3) Oblò per il carico e lo scarico della
biancheria.
4) Gettoniera (solo nelle versioni
predisposte).
5) Cassetto per la raccolta dei gettoni
utilizzati (solo nelle versioni previste).
6) Scarico (8-11-18-22: 3”).
7) Morsetto equipotenziale.
8) Air break.
9) Entrate acqua 3/4.
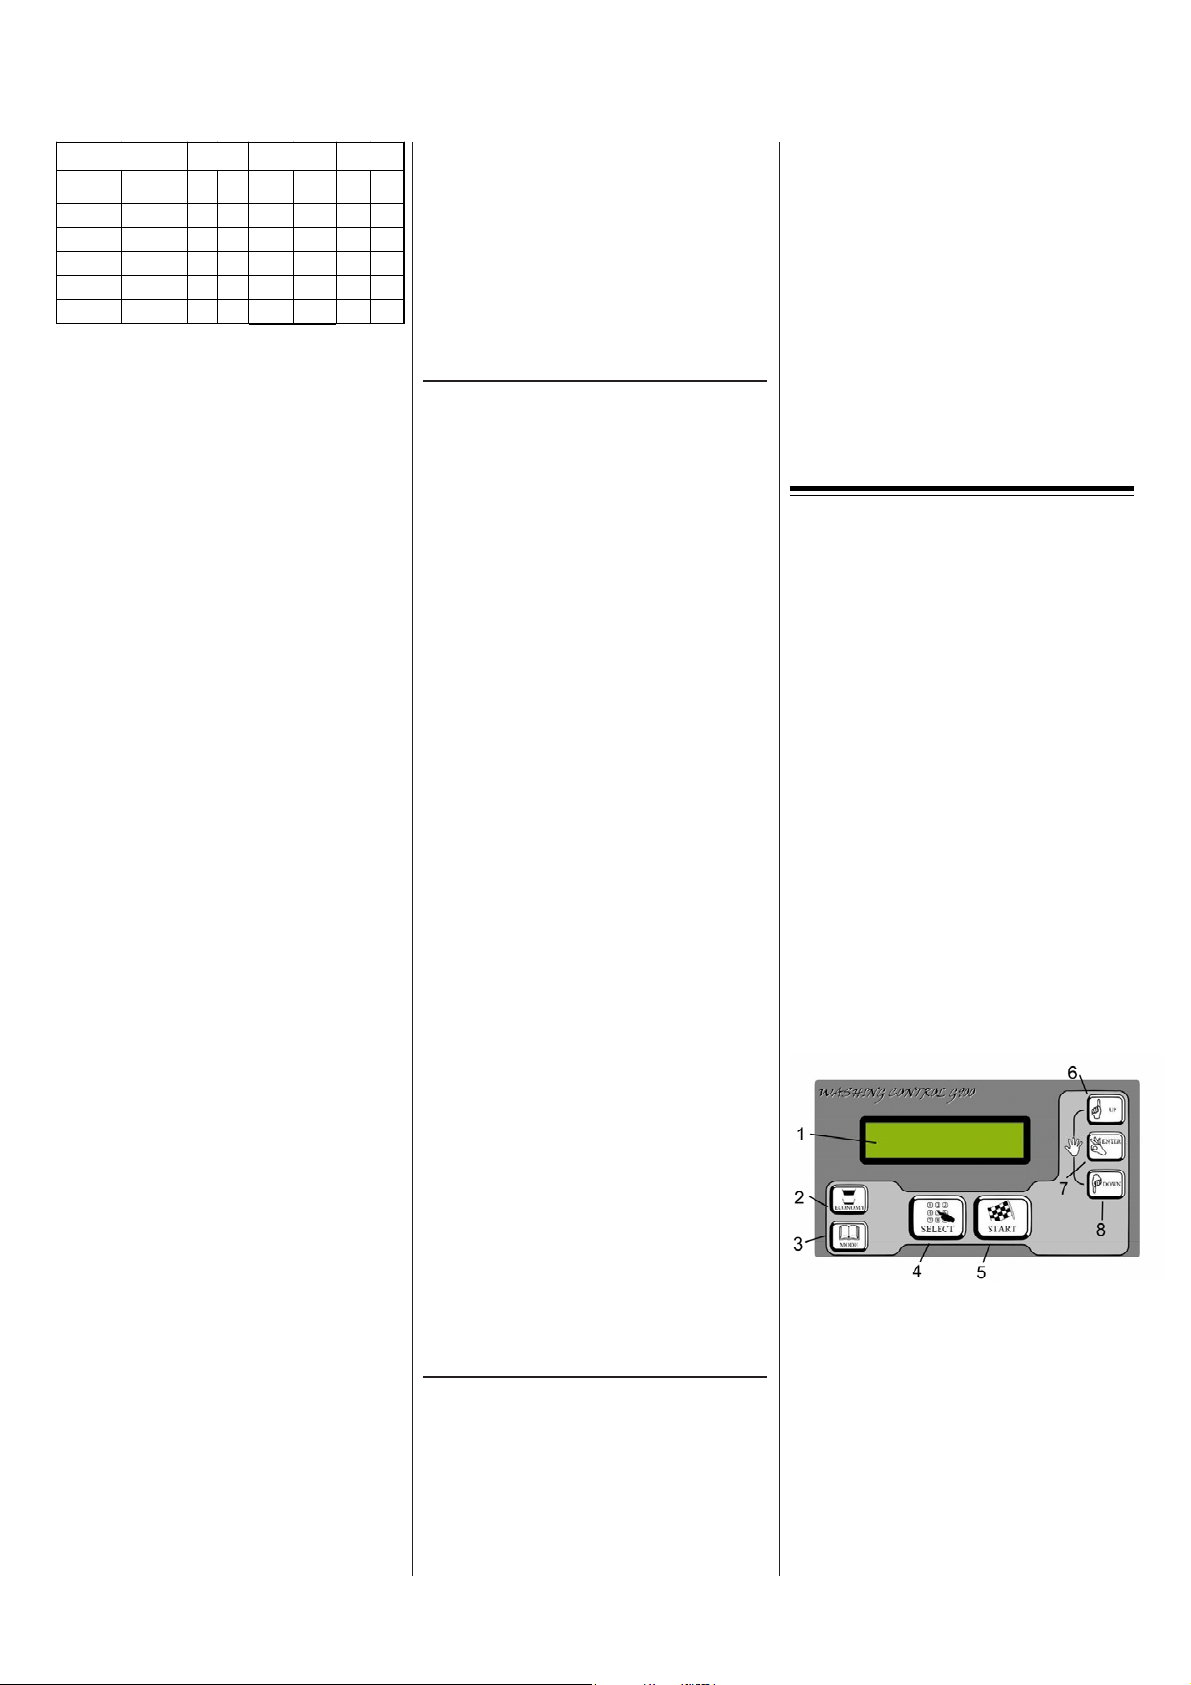
Descrizione della pulsantiera
1. Display Grafico
2. Pulsante "Economy" riduzione di tutti i
consumi idrici del 20%
3. Pulsante programmazione e scelta
visualizzazzioni
4. Pulsante per la selezione del ciclo
desiderato
5. Pulsante avviamento ciclo e
avanzamento rapido.
6. Pulsante per incremento dei valori
7. Pulsante conferma variazione dati
8. Pulsante per decremento dei valori
6
6.2 GAMMA COMPLETA DELLE
APPLICAZIONI
La lavatrice che avete acquistato è stata
progettata in modo da eseguire il lavaggio di
tessuti sintetici di vario genere, lana, cotone,
lino. Il ciclo deve essere opportunamente
selezionato tramite il relativo pulsante
seguendo le temperature indicate sulle
etichette dei capi da lavare.
6.3 INFORMAZIONI SULL’IMPIANTO
ELETTRICO
L’impianto elettrico a bordo macchina è
composto da apparecchiature di protezione
e controllo opportunamente inserite su di
una piastra nella parte superiore della
macchina. Gli schemi e le distinte relative
sono riportati successivamente.
6.4 DOCUMENTI ATTESTANTI LA
CONFORMITÀ’ DELLA MACCHINA
La lavabiancheria descritta nel presente
manuale è conforme alle seguenti direttive:
73/23 CEE, 93/68 CEE, 89/336 CEE, 92/
31 CEE, 93/68 CEE
e norme armonizzate :
EN60335-1; EN60335-2-4; EN60335-2-7
EN55014; EN61000-3-2 ; EN61000-3-3;
EN55104
7. INDICAZIONI RELATIVE
ALL’USO DELLA MACCHINA E
ALLA MANUTENZIONE
ORDINARIA
7.1 FUNZIONAMENTO
All’accensione della lavabiancheria, il
display visualizza per alcuni secondi la
versione software installata e la data di
realizzazione del software stesso.
Attenzione!
Tale data è da riferirsi alla versione del
software installato, e non ha nulla a che
vedere con il montaggio della macchina,
con il collaudo della stessa, né con la data
di riferimento per qualsivoglia pratica di
garanzia.
Successivamente, si passa ad indicare varie
informazioni che sono, partendo dall’angolo
in alto a sinistra:
- il numero riguardante il programma
selezionato.
- la temperatura massima raggiunta dal
bagno di lavaggio per quel programma.
- il tempo previsto per lo svolgimento del
programma completo, compresi i tempi di
carico e scarico acqua, del riscaldamento e
del cool-down. Tali valori sono memorizzati
di volta in volta in base all’effettivo tempo
che la macchina ha impiegato per la
realizzazione del ciclo. Non sono comunque
da intendersi vincolanti per lo svolgimento
del ciclo: servono SOLO per dare
un’indicazione di massima.
- la tipologia del ciclo, ovvero se si tratta di
un programma delicato, medio oppure
energico.
- il nome del programma, per esempio bianco,
lana, tende etc.etc.
- la scritta “attesa START” se l’oblò è chiuso
oppure “oblò aperto” se è aperto.
Alla pressione di uno dei pulsanti “)UP” o
“* DOWN”, per qualche secondo è
visualizzata la sequenza delle fasi di cui il
programma di lavaggio è composto.
Premendo contemporaneamente il pulsante
“SELECT” ed uno dei due pulsanti “)UP” o
“* DOWN” si cambia il programma
selezionato, cambiando di conseguenza
anche tutte le altre informazioni relative
alla temperatura massima, al tempo totale
etc.etc. Tutti i valori indicati sono aggiornati
al nuovo programma selezionato.
Al momento della chiusura dell’oblò, la
scritta “oblò aperto” cambia in “attesa
START” ed è ora possibile far partire il
programma selezionato semplicemente
premendo appunto il pulsante di “START”.
Alla partenza del programma di lavaggio le
scritte cambiano come indicato qui di seguito.
Si passa alla rappresentazione, ovvero delle
differenti fasi che compongono il
programma, partendo ovviamente dalla
prima fino ad arrivare all’ultima prevista.
Tutte le fasi sono chiaramente indicate a
caratteri grandi, in modo da essere visibili
chiaramente, oltre al simbolo che le
identifica.
Alternata a quest’informazione vi è quella
del tempo rimanente alla fine del ciclo, che
diminuisce man mano che il programma
avanza. Inoltre in piccolo sono riportati i
dati del numero della fase in quel momento
eseguita ed il suo nome.
In tutte le fasi rimangono in ogni modo
attive le segnalazioni tramite simboli,
relative agli eventi che caratterizzano il
programma stesso.
Infatti nell’angolo in alto a destra del display,
come indicato in figura, vengono attivati
vari simboli che informano sul carico
dell’acqua in vasca, sull’attivazione delle
pompe sapone, sull’accensione del
riscaldamento, sullo scarico dell’acqua.
Alla fine del programma di lavaggio il
display indica chiaramente l’evento
scrivendolo per esteso ed attivando il
BUZZER. Immediatamente dopo appare la
scritta “apri oblò” ed è quindi possibile
procedere allo scarico della biancheria
lavata.
Modifica ciclo in corso
Durante i primi due minuti di lavoro, è
possibile cambiare il programma in corso.
Questo tempo è evidenziato dal quadrato
attorno alla lettera “P” di Programma che
lampeggia; all’accensione fissa della cornice
quadrata, il cambio del programma
selezionato non è più possibile, se non
avanzando fino alla fine del programma
stesso o arrestandolo e quindi selezionandone
uno diverso.
Avanzamento rapido delle fasi di un
programma
Agendo sul pulsante di “START” con delle
ripetute pressioni, è possibile avanzare
rapidamente all’interno delle differenti fasi
del programma selezionato, mentre, tenendo
premuto detto pulsante per almeno 5 secondi
consecutivamente, si porta la lavabiancheria
direttamente alla fine del programma stesso
e quindi all’apertura dell’oblò.
Attenzione! Il consenso all'apertura
dell'oblò avverrà solo con cesto fermo e
vasca vuota.
Inserimento di una “PAUSA
Alla pressione simultanea dei pulsanti “)UP”
e “*DOWN” si arresta il ciclo e si mette la
macchina in stato di pausa. Questo consiste
nel fermare tutte le temporizzazioni in corso,
il movimento del cestello, i carichi dell’acqua
e l’attivazione del riscaldamento.
Durante la pausa l’oblò rimane bloccato e
l’acqua eventualmente presente all’interno
della macchina non è scaricata, infatti, la
valvola di scarico rimane chiusa.
Ovviamente è impossibile inserire la pausa
durante le fasi di centrifuga, qualsiasi sia la
velocità del cestello.
Per quantificare la durata della pausa
inserita, alla pressione contemporanea dei
due pulsanti parte un contatore, che indica
nella forma ore e minuti, la durata
dell’evento.
Per far partire nuovamente lo svolgimento
del programma, è sufficiente premere il
pulsante di “START” e la lavabiancheria
riprende il lavoro dallo stesso punto in cui è
stata inserita la pausa.
Attenzione!
Se una pausa è inserita all’interno di un
ciclo di lavaggio dove è stata riscaldata
l’acqua, lasciando la macchina ferma
sufficientemente a lungo, la temperatura è
inevitabilmente destinata a scendere.
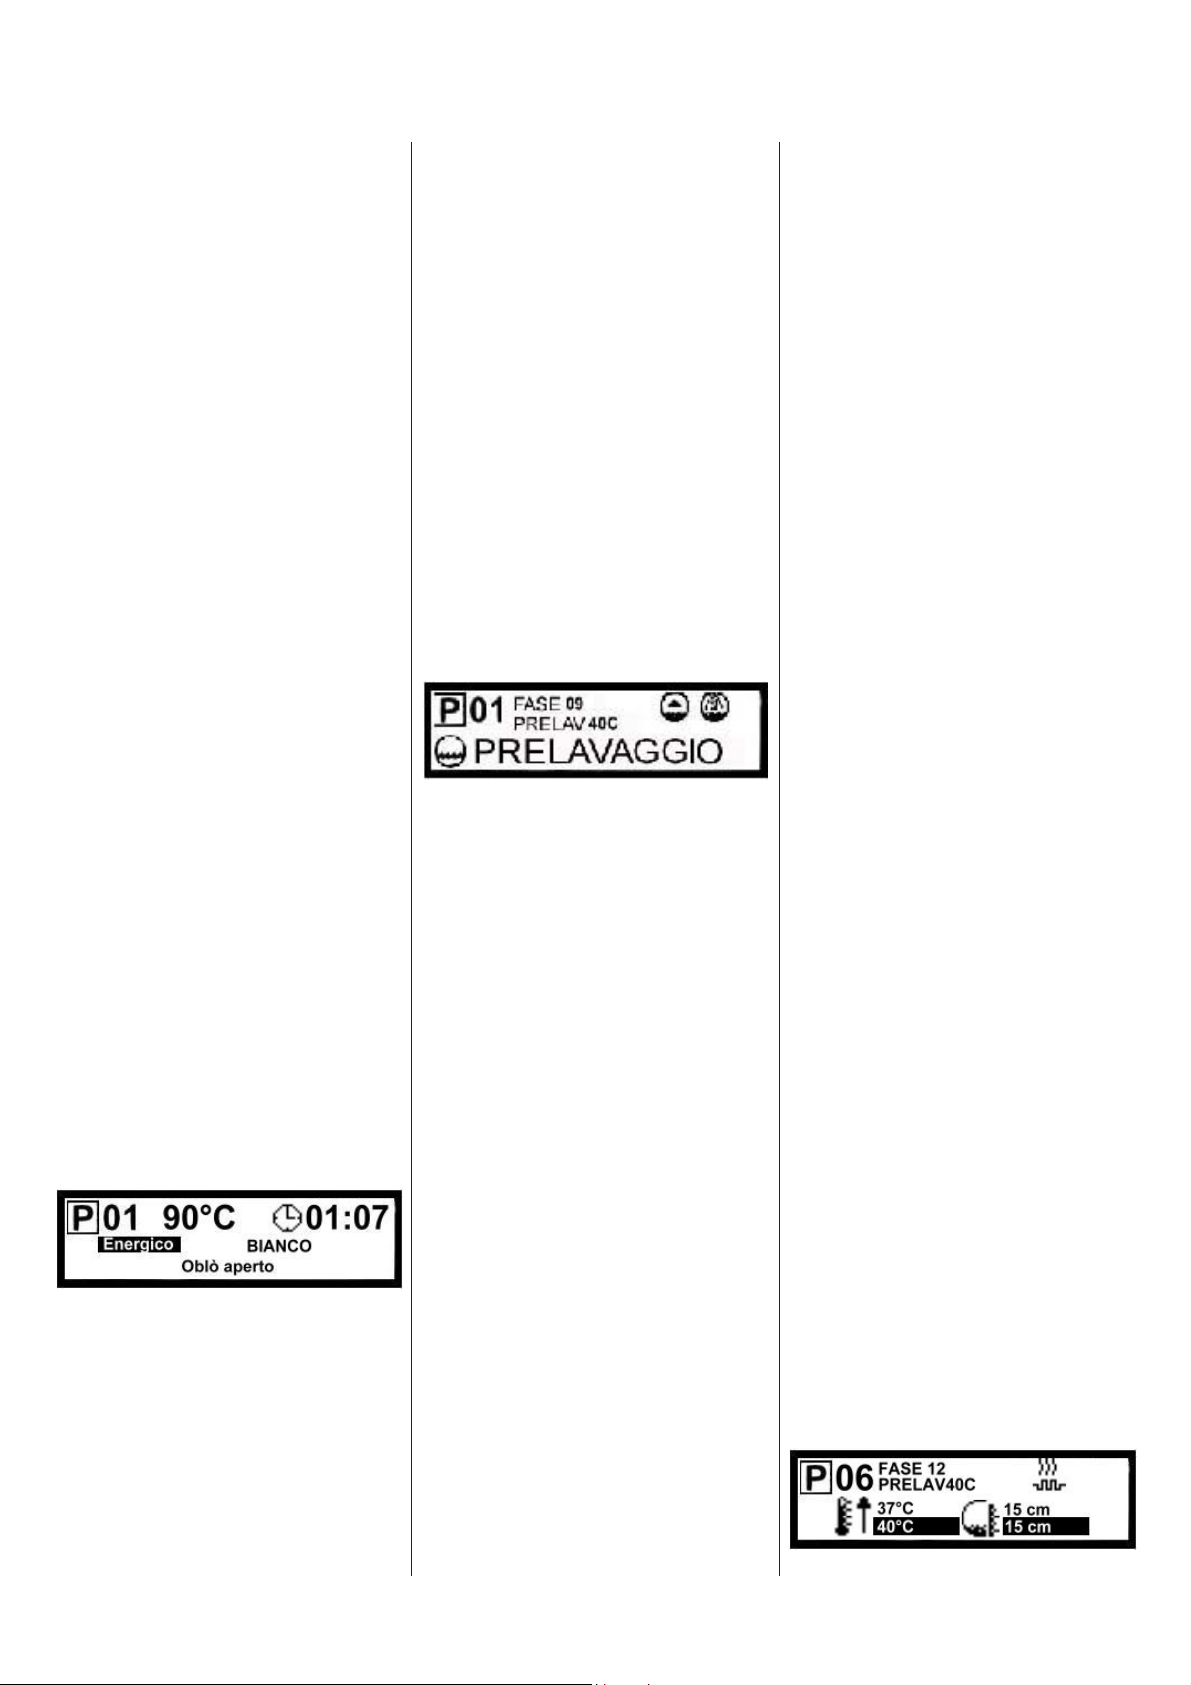
Indicazione dei parametri funzionali
Durante lo svolgimento del programma e
quindi delle fasi che lo compongono, sono
possibili delle indicazioni riguardanti vari
parametri.
Per accedere a queste informazioni è
sufficiente premere il pulsante “ MODE”
durante l’esecuzione del programma.
Il display continua ad indicare il n° del
programma selezionato, il numero della
fase eseguita ed il suo nome, ma nella parte
inferiore cambia indicazione come per
esempio indicato in figura.
Qui sono indicate la temperatura da
11
1”
11
7

raggiungere, in neretto, e quella reale,
unitamente al livello da raggiungere, sempre
in neretto con quello reale letto in vasca,
indicato sopra.
Da notare che nell’angolo in alto a destra
del display è attivo il simbolo del
riscaldamento inserito. La temperatura, in
quest’esempio, deve ancora arrivare ai 40°C
previsti poiché è ancora a 37°C. Si procede
quindi al riscaldamento del bagno di
lavaggio.
Premendo ripetutamente il pulsante “
MODE” si passa ad altre indicazioni, per
esempio riguardanti il tipo d’acqua caricato
in vasca, quale dispenser è attivato, quali
pompe sapone sono previste, la
temporizzazione del funzionamento del
motore. Dopo questa carrellata
d’informazioni, si ritorna all’indicazione di
partenza, con il nome ed il simbolo della
fase scritto in caratteri grandi.
Per le fasi di centrifuga, ovviamente
composte solo dalla rotazione veloce del
cestello, saranno visibili i dati riguardanti le
velocità.
Modifica dei parametri funzionali della
fase
Come descritto sopra, è possibile variare
l’indicazione che mostra il display
semplicemente premendo il pulsante “
MODE” durante lo svolgimento del ciclo.
Fermandosi nell’indicazione desiderata, è
possibile variare i valori impostati
semplicemente premendo i pulsanti “)UP”
e “*DOWN” rispettivamente.
In pratica, durante l’esecuzione di un’azione
è possibile variarne le impostazioni.
Per esempio, durante il carico dell’acqua è
possibile variare il livello impostato
semplicemente portandosi con il pulsante
“ MODE” nell’indicazione relativa al
carico dell’acqua e quindi con “)UP” oppure
“*DOWN” aumentare o diminuire, di cm in
cm, il valore impostato, ovvero quello in
neretto. Stessa cosa per esempio con il
riscaldamento: durante quest’azione è
possibile variare a piacimento la temperatura
da raggiungere, sempre con “) UP” e
“*DOWN”.
Analogamente per gli altri valori, quali il
tempo di mantenimento della temperatura
per esempio, oppure la durata delle varie
velocità durante la fase di centrifuga.
Avvio del programma di lavaggio
Controllare che i rubinetti dell’acqua calda,
dell’acqua fredda dura, dell’acqua fredda
dolce e del vapore (sulle macchine
predisposte) siano aperti.
Commutare l’interruttore automatico
magnetotermico a parete in posizione ON.
Una volta terminata tale operazione caricare
il detersivo (non schiumoso) nei rispettivi
scomparti a seconda del ciclo selezionato, in
particolare si ha che:
A = scomparto per il prelavaggio (se
previsto dalla procedura del ciclo
selezionato)
B = scomparto per il lavaggio
C = scomparto per eventuali additivi da
aggiungere all’ultimo risciacquo.
Selezionare il programma desiderato con i
pulsanti “SELECT” e “) UP” oppure
“*DOWN” contemporaneamente.
Caricare la lavabiancheria e chiudere l’oblò,
quindi premere il pulsante di “START”. La
macchina blocca l’oblò ed inizia il
programma di lavaggio con tutte le azioni
previste.
Segnalazioni relative ad allarmi ed
anomalie
Nel caso d’anomalie di vario genere, (dalla
caduta di tensione in rete alle
sovratemperature o livelli indesiderati
d’acqua nel cesto ) la lavabiancheria è
predisposta alla loro segnalazione mediante
vari tipi d’allarmi che saranno visualizzati
nel display del pannello frontale. Tutti i
dettagli sono spiegati nel paragrafo
"ALLARMI DI CUI E’ DOTATA LA
MACCHINA".
Fine ciclo
ATTENZIONE La porta non deve essere
assolutamente forzata; l’apertura si deve
effettuare manualmente solo una volta
che è avvenuto lo sblocco.
In ogni caso prima di procedere all’apertura
accertarsi che il cesto sia fermo, che l’acqua
sia stata scaricata e che la temperatura interna
sia scesa sotto i 40°C. Nel caso di mancanza
di tensione durante il ciclo di lavaggio, solo
nei modelli 8 e 11kg, sarà possibile aprire
l’oblò dopo circa 90 secondi, mentre in caso
di emergenza o di guasto del dispositivo di
apertura, su tutti i modelli, è possibile aprire
l’oblò agendo sul tirante di sblocco manuale
portandolo verso il basso (vedi fig.2).
Tale dispositivo, è raggiungibile rimuovendo
il pannello frontale inferiore della macchina,
agendo con un cacciavite a croce sulle due
viti di fissaggio; dopo aver sbloccato la
porta, procedere all’apertura tramite la
maniglia come spiegato sopra, e quindi
rimontare il pannello.
Calibrazione della lettura livello acqua
in vasca
Normalmente quest’operazione non è
necessaria, ma per particolari installazioni,
per esempio in quota, può essere necessario
impostare sulla macchina il valore
riguardante l’assenza d’acqua nella vasca.
Per eseguire quest’operazione, a macchina
accesa ma senza far partire il ciclo procedere
come segue:
1) Aprire l’oblò.
2) Verificare visivamente che non vi sia
acqua all’interno della vasca, che deve essere
ovviamente vuota.
3) Premere i tasti “)UP " e “*DOWN” "
contemporaneamente per almeno 5 secondi
4) Sui DISPLAY appare la scritta
“CALIBRAZIONE”
5) A questo punto confermare il valore letto
dalla scheda premendo il pulsante
“ENTER”.
6) Il BUZZER emette un beep ed il display
torna all’indicazione normale.
La procedura di calibrazione è stata eseguita
correttamente; in qualunque altro caso
rimane memorizzato il precedente
azzeramento.
7.2 FASI DEL CICLO
Tutti i Cicli oppure Programmi memorizzati
nella scheda sono realizzati dall’esecuzione
delle fasi che li compongono. In pratica un
ciclo o programma, non è altro che la
sequenza con cui le fasi (precedentemente
programmate) vanno eseguite.
In pratica si possono riassumere solo sei
tipologie di fase, qui riassunte:
1 Ammollo
2 Prelavaggio
3 Lavaggio
4 Risciacquo
5 Centrifuga
6 Srotolamento
impostando queste diverse fasi con dei valori
di livello, temperatura, movimento del
cestello etc.etc. ed eseguendole in una
successione ben definita, si ottengono i vari
programmi di lavaggio.
Le differenti fasi del programma di lavaggio
sono sempre indicate a caratteri grandi
durante l’esecuzione del programma stesso
ed inoltre sono accompagnate dal simbolo
che le identifica.
7.3 IMPOSTAZIONE PARAMETRI
PROCEDURA DI
PROGRAMMAZIONE
La procedura di programmazione si divide
in due differenti livelli.
Il primo, dedicato espressamente all’utente
della macchina, ed il secondo per l’operatore
esperto, il tecnico manutentore o gestore
della lavanderia.
Attenzione!
Il secondo livello è protetto da PASSWORD
ed è descritto nel manuale relativo alla
programmazione.
Tutte le impostazioni dedicate all’utente
sono contenute nella programmazione dei
cicli e nella definizione dei parametri della
macchina.
Programmazione cicli
I programmi di lavaggio o cicli di lavaggio
si possono riassumere come la sequenza di
operazioni che la lavabiancheria esegue
dall’inizio alla fine del trattamento della
biancheria.
Le varie operazioni sono contenute
all’interno del menu “FASI” trattato di
seguito.
Premessa: la lavabiancheria ha memorizzate
già una serie di “operazioni” o fasi di lavoro,
che sono quelle che permettono la
realizzazione dei cicli standard preimpostati.
Con questo programmatore è possibile
modificare o creare dei programmi di
lavaggio partendo semplicemente dalle fasi
esistenti, senza quindi avere delle conoscenze
specifiche relativamente ai diagrammi di
lavaggio più opportuni per il tessuto da
trattare.
8

È cioè possibile inserire o disinserire una
fase in un programma già strutturato, oppure
partire da un programma vuoto ed inserire
via via tutte le fasi che si ritengano opportune
andandole a scegliere tra quelle già pronte.
Saranno semplicemente eseguite nell’ordine
in cui sono state inserite.
In questo modo si possono realizzare dei
programmi di lavaggio personalizzati
creando la propria sequenza di fasi. Se le
esigenze si spingono oltre non si deve fare
altro che passare al “menù fasi” e creare la
propria fase personalizzata, che andrà
inserita poi all’interno di un ciclo esistente
oppure all’interno di uno completamente
nuovo.
Al menù “CICLI” si accede nel seguente
modo:
Aprire l’oblò della lavabiancheria: tutte le
operazioni di programmazione vanno fatte
con l’oblò aperto. In ogni altra condizione
non è possibile accedere alla
programmazione.
Premere il pulsante “ MODE” fino a che
non appare la scritta “CICLI” e quindi
confermare con il pulsante “ENTER”.Si
visualizza il primo dei 20 CICLI o
PROGRAMMI a disposizione e con i
pulsanti “UP” e “DOWN” si può scorrere
l’elenco completo, passando in rassegna sia
quelli impostati, contrassegnati dal proprio
nome, per esempio “BIANCO” e dal tipo,
p.es. “ENERGICO” e sia quelli “liberi” o
“vuoti”, contrassegnati semplicemente dalla
scritta “NON PROGRAMMATO”.
Una volta deciso su quale PROGRAMMA
agire, premere il pulsante “ENTER”. Il
display visualizzerà le voci:
COMMENTO
FASI
TIPOLOGIA
COPIA DA
COPIA IN
Qui si seguito le descrizioni delle varie voci.
COMMENTO
Con i pulsanti “UP” e “DOWN” portarsi
alla selezione “COMMENTO”. Confermare
la scelta premendo il pulsante “ENTER”.
Viene visualizzato un campo
di testo di lunghezza 10 caratteri da riempire
a piacimento per esempio con il nome del
programma o ciclo, supponiamo “BIANCO
90°C”. Per inserire le lettere premere il
pulsante “SELECT”: appaiono tutti i
caratteri disponibili che vanno selezionati
con i pulsanti “UP” e “DOWN”. La
conferma avviene in modo automatico.
FASI
Con i pulsanti “UP” e “DOWN” portarsi
alla selezione “FASI”.
Confermare la scelta premendo il pulsante
“ENTER”.
Alla pressione del pulsante “ENTER” si
visualizza la prima fase eseguita dal
programma selezionato, la fase in posizione
N° 01, indicato a caratteri grandi.
Oltre a questa informazione vi è, in piccolo
il numero proprio della fase, il tipo ed il
commento relativo alla stessa.
Con i pulsanti “UP” e “DOWN” si possono
ora scorrere tutte le fasi che compongono il
ciclo selezionato vedendo quindi la sequenza
di operazioni che il programma esegue: per
esempio inizia con un ammollo, poi esegue
un prelavaggio, poi un lavaggio con in
mezzo una breve centrifuga, poi passa ai
risciacqui e così via fino all’ultima fase
inserita.
Al massimo in un programma si può inserire
una sequenza di 25 fasi. Quelle che dovessero
rimanere libere riportano semplicemente
l’indicazione “NON PROGRAMMATA”.
Posizionarsi ora con i pulsanti “UP” e
“DOWN” sulla fase da “manipolare” e
premere il pulsante “ENTER”. Il display
visualizza le voci:
MODIFICA
CANCELLA
INSERISCI PRIMA
INSERISCI DOPO
Per spostare il cursore all’interno della parola
che si sta componendo utilizzare al solito
“UP” e “DOWN”.
Per eliminare una lettera, è sufficiente
posizionarvisi sopra con il cursore e premere
il pulsante di “START”.
Una volta inserito il testo voluto confermare
con il pulsante “ENTER” ed uscire con
quello “MODE”.
Modifica:confermare con il pulsante
“ENTER” se si vuole modificare
l’inserimento della fase selezionata. Con i
pulsanti “UP” e “DOWN” si sceglie quale
fase mettere al posto di quella selezionata e
quindi si conferma con “ENTER”.
Il programmatore chiede quindi
“COPIARE?” Con “ENTER” si esegue lo
scambio tra le due fasi e con il pulsante
“MODE” si annulla l’operazione.
Cancella:confermare con il pulsante
“ENTER” se si vuole cancellare
l’inserimento della fase selezionata. Il
programmatore chiede quindi
“CANCELLA?” Con “ENTER” si esegue
la cancellazione della fase selezionata e con
il pulsante “MODE” si annulla l’operazione.
Attenzione! Con il comando “CANCELLA”
non si elimina la fase dal programmatore
ma solamente dalla sequenza del programma
selezionato. Rimane sempre selezionabile,
reinseribile, modificabile etc.etc.
Inserisci prima e dopo: confermare con il
pulsante “ENTER” se si vuole inserire una
fase prima o dopo rispettivamente alla fase
selezionata. Con i pulsanti “UP” e “DOWN”
si sceglie quale fase inserire prima o
dopo rispettivamente di quella selezionata e
quindi si conferma con “ENTER”.
Con il pulsante “MODE” si annulla
l’operazione.
TIPOLOGIA
Con i pulsanti “UP” e “DOWN” portarsi
alla selezione “TIPOLOGIA”.
Confermare la scelta premendo il pulsante
“ENTER”.
il display visualizza le seguenti voci:
ENERGICO
MEDIO
DELICATO
Con i pulsanti “UP” e “DOWN” selezionare
quale tipo e confermare con il pulsante
“ENTER”. La selezione del tipo di
programma serve solo a dare un’indicazione
all’utente del tipo appunto di ciclo che
andrà ad eseguire. Questa selezione sarà
mostrata nella visualizzazione che si
presenta all’utente durante la selezione dei
cicli, in modo da aiutarlo nella scelta più
corretta.
Una volta selezionato il tipo voluto
confermare con il pulsante “ENTER” ed
uscire con quello “MODE”.
Attenzione!Questa selezione NON
MODIFICA in alcun modo lo svolgimento
del programma di lavaggio. È solo
un’indicazione.
COPIA DA E COPIA IN
Con i pulsanti “UP” e “DOWN” portarsi
alla selezione “COPIA DA” o “COPIA
IN”.Confermare la scelta premendo il
pulsante “ENTER”.
Con i pulsanti “UP” e “DOWN” selezionare
quale programma copiare o da quale
copiarlo e confermare con il pulsante
“ENTER”.
Il programmatore chiede quindi
“COPIARE?” Con “ENTER” si esegue la
copia tra i due programmi o cicli, e con il
pulsante “MODE” si annulla l’operazione.
Una volta eseguita o meno la copia uscire
con il pulsante “MODE”.
DESCRIZIONE DELLE FUNZIONI
PROGRAMMABILI
I parametri macchina servono per eseguire
delle modifiche marginali ai programmi di
lavaggio senza entrare né nella
programmazione delle fasi né nella
programmazione dei cicli.
In base alla programmazione dei cicli di
lavaggio, con queste funzioni si può decidere
se eseguire o meno delle operazioni
programmate. Nulla che comunque stravolga
la caratteristica del programma di lavaggio
stesso
Al menù “PARAMETRI MACCHINA” si
accede nel seguente modo:
Aprire l’oblò della lavabiancheria: tutte le
operazioni di programmazione vanno fatte
con l’oblò aperto. In ogni altra condizione
non è possibile accedere alla
programmazione.
Premere il pulsante “ MODE” fino a che
non appare la scritta “PARAMETRI
MACCHINA” e quindi confermare con il
pulsante “ENTER”.Si visualizzano i
seguenti parametri:
RAFFREDDARE
CENTRIFUGA
PRELAVAGGIO
RITARDO START
BUZZER
RISCALDAMENTO
ABILITAZIONE
RIPRISTINO
Qui di seguito le descrizioni
dettagliate.
Le funzioni vanno ad agire solo sul
9

programma di lavaggio e rimangono attive
fino a quando non vengono disabilitate.
RAFFREDDAMENTO
Raffreddare: Si tratta di decidere se eseguire
o meno la funzione di raffreddamento del
bagno di lavaggio appena prima dello scarico
dell’acqua. Questa funzione è normalmente
eseguita per evitare lo shock termico alla
biancheria che passa per esempio dalla fase
di lavaggio a 90°C a quella di risciacquo a
temperatura di rete dell’acquedotto.
Con i pulsanti “UP” e “DOWN” portarsi
alla selezione “RAFFREDDARE”.
Confermare la scelta premendo il pulsante
“ENTER”.
Con i pulsanti “UP” e “DOWN” si possono
scorrere tutti i programmi o cicli e vedere
per quali la funzione è attivata o meno.
Posizionarsi sul ciclo desiderato e premere
il pulsante “ENTER”. Ora sempre con i
pulsanti “UP” e “DOWN” selezionare tra
“SI” e “NO” e confermare sempre con
“ENTER”.
Utilizzare il pulsante “MODE” per uscire.
RIDUZIONE DELLA CENTRIFUGA
Centrifuga: Con questa funzione è possibile
lasciare la centrifuga finale prevista per
quel dato programma selezionato
invariata rispetto alla programmazione
standard, oppure ridurla ad un solo minuto
oppure ancora eliminarla
completamente.Con i pulsanti “UP” e
“DOWN” portarsi alla selezione
“CENTRIFUGA”.
Confermare la scelta premendo il pulsante
“ENTER”.
Con i pulsanti “UP” e “DOWN” si possono
scorrere tutti i programmi o cicli e vedere
per quali la funzione è attivata o meno.
Posizionarsi sul ciclo desiderato e premere
il pulsante “ENTER”. Ora sempre con i
pulsanti “UP” e “DOWN” selezionare tra le
voci:
NORMALE
RIDOTTA
NO CENTRIFUGA
E confermare con “ENTER”.
Normale: la centrifuga finale verrà eseguita
come previsto nella programmazione
Ridotta: la centrifuga finale avrà una durata
di un minuto. Un minuto per l’ultima velocità
prevista per quella centrifuga. La rampa di
accelerazione è sempre eseguita per intero.
No centrifuga: la centrifuga finale
non verrà eseguita.
Utilizzare il pulsante “MODE” per uscire.
ESCLUSIONE PRELAVAGGIO
Prelavaggio: Tutti i programmi di lavaggio
generalmente prevedono l’esecuzione del
prelavaggio. Con questa funzione è
possibile saltare questa fase. Particolarmente
utile per il trattamento di biancheria con
dello sporco non molto difficile.
Con i pulsanti “UP” e “DOWN” portarsi
alla selezione “PRELAVAGGIO”.
Confermare la scelta premendo il pulsante
“ENTER”.
Con i pulsanti “UP” e “DOWN” si possono
scorrere tutti i programmi o cicli e vedere
per quali la funzione è attivata o meno.
Posizionarsi sul ciclo desiderato e premere
il pulsante “ENTER”. Ora sempre con i
pulsanti “UP” e “DOWN” selezionare tra
“SI” e “NO” e confermare sempre con
“ENTER”.
Utilizzare il pulsante “MODE” per uscire.
PARTENZA RITARDATA CICLO
Ritardo START: Nel caso fosse utile
ritardare la partenza della macchina, è
possibile impostare un tempo fino a
24 ore dopo il quale la partenza del
programma di lavaggio avviene in
automatico. Durante l’attesa si visualizza il
tempo a decrementare. Alla pressione del
pulsante di “START” durante il “conto alla
rovescia” la macchina parte immediatamente
con il ciclo che era selezionato in origine.Con
i pulsanti “UP” e “DOWN” portarsi alla
selezione “RITARDO START”.
Confermare la scelta premendo il
pulsante“ENTER”.
Si visualizza lo stato del parametro,
“DISABILITATO” o “ABILITATO” e
premendo il pulsante “ENTER” si possono
modificare i valori. Con i pulsanti “UP” e
“DOWN” si impostano i minuti ed
eventualmente le ore di ritardo e si conferma
con “ENTER”.
Utilizzare il pulsante “MODE” per uscire.
Una volta che si dà lo “START” alla
macchina parte il conto alla rovescia ed il
display visualizza la scritta:
Partenza programmata tra:
tempo che decrementa.
ATTIVAZIONE/DISATTIVAZIONE
BUZZER
Buzzer: Ad ogni pressione dei pulsanti si
attiva per qualche istante il buzzer o cicalino,
che emette un breve ma intenso beep. Se ciò
non fosse gradito con questa funzione è
possibile eliminarlo.
Con i pulsanti “UP” e “DOWN” portarsi
alla selezione “BUZZER”.
Confermare la scelta premendo il pulsante
“ENTER”.
Si visualizza lo stato del parametro,
“DISABILITATO” o “ABILITATO” e
premendo il pulsante “ENTER” si possono
modificare i valori. Con i pulsanti “UP” e
“DOWN” si seleziona il dato voluto e
si conferma con “ENTER”.
Utilizzare il pulsante “MODE” per uscire.
VARIAZIONE TEMPERATURE DI
RISCALDAMENTO
Riscaldamento: È possibile abbassare, per
tutti i cicli, di 10°C la temperatura massima,
raggiunta tramite il riscaldamento, del bagno
di lavaggio.Con i pulsanti “UP” e “DOWN”
portarsi alla selezione
“RISCALDAMENTO”.
Confermare la scelta premendo il pulsante
“ENTER”.
Si visualizza lo stato del parametro,
“NORMALE” o “RIDOTTO” e premendo
il pulsante “ENTER” si possono modificare
i valori. Con i pulsanti “UP” e “DOWN” si
seleziona il dato voluto e si conferma con
“ENTER”.
Utilizzare il pulsante “MODE” per uscire.
ABILITAZIONE DEI CICLI
Abilitazione: Nel caso in cui, uno o più cicli
non si vogliano eseguire, è possibile
“nasconderli” alla selezione. Attenzione,
non sono cancellati ma solo nascosti
all’utente. Con la pressione dei pulsanti
“SELECT” e “UP” o “DOWN” si passano
cioè in rassegna solo quelli attivi, rendendo
di fatto impossibile eseguire quelli
indesiderati.Con i pulsanti “UP” e “DOWN”
portarsi alla selezione “ABILITAZIONE”.
Confermare la scelta premendo il
pulsante“ENTER”.
Con i pulsanti “UP” e “DOWN” si possono
scorrere tutti i programmi o cicli e vedere
per quali la funzione è attivata o meno.
Posizionarsi sul ciclo desiderato e premere
il pulsante “ENTER”. Ora sempre con i
pulsanti “UP” e “DOWN” selezionare tra
“ABILITATO” e “DISABILITATO” e
confermare sempre con “ENTER”.
Utilizzare il pulsante “MODE” per uscire.
RIPRISTINO:
Temperatura: Normalmente la macchina,
una volta raggiunta la temperatura impostata
su un ciclo dove è previsto il riscaldamento,
mantiene la temperatura per il tempo
impostato nella fase, è possibile tramite
questo parametro disabilitare tale funzione.
Livello: Normalmente la macchina, una
volta raggiunto il livello acqua impostato su
un ciclo dove è previsto il carico acqua ,
mantiene il livello per il tempo programmato
nella fase, è possibile tramite questo
parametro disabilitare tale funzione.
7.4 CONSIGLI UTILI PER L’USO
DELLA MACCHINA
Ricordare che un carico dell’80% della
capacità dichiarata garantisce una qualità
migliore del lavaggio.
Ricordare che una quantità maggiore di
detersivo non significa un qualità di pulito
migliore, ma anzi uno spreco con
conseguente inquinamento inutile. La
quantità di detersivo vi sarà consigliata dal
vostro fornitore nella quantità prevista per
la durezza dell’acqua che utilizzate.
Dove non sia strettamente necessario è
consigliato l’utilizzo dell’economizzazione
del carico dell’acqua e se del caso anche la
riduzione della temperatura massima
raggiunta, in modo da diminuire il consumo
idrico ed energetico della macchina, con
conseguente riduzione dei tempi di
esecuzione del ciclo stesso.
Prima di lavare qualsiasi capo fare attenzione
che gli eventuali bottoni, cerniere, zip,
fermagli e fibbie siano rivolti verso l’interno.
Controllare anche che le tasche siano vuote.
Al termine del lavoro eseguire le seguenti
operazioni:
- lasciare l’oblò aperto;
- togliere tensione all’apparecchiatura
tramite l’interruttore generale;
- chiudere i rubinetti dell’acqua calda, fredda
10
e del vapore (sulle macchine con questo tipo
di riscaldamento);
- spegnere l’interruttore sezionatore generale
a parete.
7.5 PROGRAMMI DI LAVAGGIO
Le fasi in dettaglio di tutti i cicli sono
riportate in seguito all’interno di tabelle di
facile consultazione.
7.6 RACCOMANDAZIONI
Non lasciare l’apparecchio inutilmente
inserito. SPEGNERE l’interruttore generale
dell’apparecchio quando lo stesso non è
utilizzato.
Nell’uso porre particolare attenzione a:
- Aprire l’oblò solo a cesto fermo e senza
acqua.
- In caso di mancanza di tensione durante il
ciclo di lavaggio sarà possibile aprire l’oblò
dopo circa 90 secondi. In caso di emergenza
o di guasto del dispositivo di apertura è
possibile aprire l’oblò tramite il tirante
manuale posto nella parte inferiore sinistra,
prima di utilizzarlo verificare che l’acqua
sia uscita, il cesto fermo e la temperatura sia
inferiore ai 40°C.
- Prima di effettuare qualsiasi operazione di
pulizia o manutenzione, accertarsi che i
rubinetti acqua calda, fredda e del vapore
(nelle macchine con questo tipo di
riscaldamento) siano chiusi e l’interruttore
generale a parete risulti spento.
- Non inserire nell’apparecchiatura
biancheria che sia stata pulita, bagnata,
lavata o macchiata con sostanze
infiammabili o esplosive. Altrimenti
procedere prima con un lavaggio a mano.
- Tenere liquidi infiammabili lontano dalla
lavatrice e conservarli in luogo asciutto ben
arieggiato e lontano da zone accessibili a
personale non addetto.
- Tenere i prodotti per la pulizia e i detersivi
sempre lontani dalla apparecchiatura,
possibilmente chiusi in un armadio.
- Non ostruire le aperture o fessure di
aspirazione o di smaltimento calore,
mantenere quindi una adeguata distanza tra
la macchina e le pareti o altri oggetti
7.7 ALLARMI DI CUI E’ DOTATA LA
MACCHINA
Simbolo E1: presenza acqua in
vasca.
1) Allarme presenza acqua in vasca E1 :
segnala la presenza di acqua nel cesto quando
il ciclo deve ancora partire, ogni funzione
viene disabilitata. L’allarme si disabilita
non appena l’acqua scende sotto il livello di
sicurezza.
Non è prevista l’attivazione del BUZZER.
L’allarme viene tolto solo spegnendo e
riaccendendo la macchina.
Le possibili cause sono da ricercarsi nel
corretto funzionamento dello scarico
(verificare pulizia elettrovalvola, corretto
funzionamento) e del pressostato di livello
montato a bordo macchina.
Simbolo E2: manca acqua.
2) Allarme raggiungimento livello acqua
E2: se il tempo impiegato a caricare l'acqua
supera il tempo impostato nella fase in corso
allora interviene tale segnalazione che verrà
tolta automaticamente non appena raggiunta
la quantità d'acqua necessaria. Tale allarme
non pregiudica la continuazione del ciclo in
quanto questo riparte autonomamente non
appena raggiunto il livello. Se dopo altri 10
min. di carico ininterrotto il livello non è
stato ancora raggiunto, il ciclo viene fermato
e si attiva il BUZZER. È necessario ora
spegnere e riaccendere la macchina per
eliminare questo allarme.
Le possibili cause sono da ricercarsi nella
scarsa pressione della rete idrica, nella
mancata pulizia dei filtri delle elettrovalvole
di ingresso, nella chiusura dei rubinetti di
alimentazione, nel mancato funzionamento
dell’elettrovalvola di scarico o nella perdita
di tenuta della stessa (carico acqua ma nello
stesso tempo viene scaricata non
raggiungendo mai o molto lentamente il
livello).
Simbolo e alternati
E3: non scarica l’acqua.
3) Allarme scarico acqua E3: tale segnale
indica che in 1 minuto di tempo (o nel tempo
impostato nel programma della macchina)
l'acqua non è scesa almeno sotto il livello di
sicurezza. Il ciclo riprenderà non appena
sarà realizzata tale condizione non
pregiudicandone così il completamento. Non
viene attivato il BUZZER. Per le cause vedi
allarme E1.
Simbolo E4: non riscalda.
4) Allarme di riscaldamento E4: se dopo 20
minuti di riscaldamento continuo la
temperatura non è salita di almeno 5°C sul
display appare tale allarme mentre il ciclo
prosegue regolarmente. L’allarme viene tolto
automaticamente non appena la temperatura
raggiunge la soglia calcolata. Non si esegue
l’attivazione del BUZZER. Tra le cause da
imputare a tale allarme verificare il corretto
collegamento delle resistenze, la loro pulizia
da calcare e filacce della biancheria che ne
pregiudicano il funzionamento. Controllare
inoltre che l’entrata dell’acqua calda sia
stata collegata correttamente in quanto se
nel cesto vi è presente acqua solo fredda
perché le due entrate sono state invertite i
tempi del riscaldamento vengono ad
aumentare notevolmente.
Gli elementi riscaldanti sono dotati di
termofusibile, che, in caso di anomalie
(attivazione delle resistenze senza acqua in
vasca), interviene automaticamente aprendo
il circuito elettrico.
Attenzione!
Una volta che il termofusibile è intervenuto
( ogni resistenza ne è dotata) l’elemento
riscaldante deve essere sostituito, in quanto
non più utilizzabile né riparabile.
L’intervento di questo dispositivo di
sicurezza può provocare delle segnalazioni
ripetute e continue dell’allarme E4,
indipendentemente dal ciclo e dalla
temperatura selezionate.
Simbolo E5: sovratemperatura.
5) Allarme di sovratemperatura o di sonda
di temperatura scollegata E5 : nel caso in cui
la temperatura dell’acqua superi i 95°C o la
sonda di lettura della temperatura sia
scollegata o rotta interviene tale allarme che
interrompe il ciclo in corso ed attiva il
BUZZER. E’ possibile eliminare tale allarme
solo spegnendo e poi riaccendendo la
macchina.
Simbolo E6: mancato blocco/
sblocco oblò.
6)Allarme bloccaggio porta E6 : se la porta
non risulta bloccata entro 10 s dalla partenza
del ciclo (pressione pulsante START) il
ciclo stesso viene interrotto ed è possibile
togliere l’allarme solo premendo
nuovamente lo START. Per ritentare l’avvio
ripremere START nuovamente. Non viene
attivato il BUZZER. Una possibile causa
può essere la chiusura manuale della porta
non effettuata regolarmente oppure in seguito
a forzature della maniglia sono stati
danneggiati i microinterruttori della
serratura.
Simbolo E7: anomalia oblò.
7) Allarme di anomalia alla porta E7 : se
durante lo svolgimento del ciclo la porta
dovesse danneggiarsi o peggio rompersi per
qualsiasi motivo imputabile o meno alla
macchina stessa allora in tali casi interviene
l’allarme che arresta immediatamente il
ciclo e fa si che l’acqua venga scaricata. Le
condizioni normali sono ottenibili solo
spegnendo e riaccendendo la macchina.
Viene attivato il BUZZER.
Simbolo E8: anomalia livello.
8) Allarme di anomalia livello E8; in caso di
lettura di un livello in vasca superiore di
10cm o più rispetto a quello impostato, il
ciclo viene abortito e si attiva il BUZZER. È
necessario spegnere e riaccendere la
macchina per eliminare questo allarme. Le
cause di intervento di tale allarme sono da
ricercarsi esclusivamente nella sonda di
livello essendo una sicurezza specifica per
tale dispositivo. ATTENZIONE, l'utilizzo
11
di un detergente schiumoso può provocare
l'intervento dell'allarme.
Simbolo E9: sbilanciamento.
9) Sbilanciamento E9
Quando, durante una fase di centrifuga
interviene il micro di sbilanciamento, la
fase in corso viene interrotta ma non il ciclo
e si toglie alimentazione al motore fino a che
il cesto non si è completamente fermato. Se
la macchina stava eseguendo la centrifuga
finale (dove sono programmati un certo
numero di tentativi di ripartenza) in modo
da ridistribuire la biancheria e ritentare
quindi una nuova centrifuga. Questa routine
verrà ripetuta per il numero di ri-partenze
programmate nella fase di centrifuga in
corso (massimo 15); qualora nessun tentativo
vada a buon fine il display visualizzerà
l'allarme E9 con la richiesta di START.
Premendolo una volta la macchina ritenterà
la fase di centrifuga con la procedura di cui
sopra, mentre premendolo ripetutamente la
macchina scavalcherà la centrifuga finale
portandosi a fine ciclo.
Se invece il micro di sbilanciamento
interviene durante una centrifuga intermedia
l'allarme non viene visualizzato e dopo la
pausa di rallentamento il ciclo continua
saltando quindi la fase.
Le cause di intervento di questo allarme
possono ricercarsi in un errato carico della
macchina, (o troppo poco carica o troppo
carica), oppure in un posizionamento non
livellato oppure ancora in un deterioramento
delle sospensioni dovuto a continui carichi
errati della macchina; in ogni caso
controllare periodicamente il corretto
posizionamento del micro di sbilanciamento
secondo le relative istruzioni sopra riportate.
Simbolo E0: sovraccarico
motore.
10) Relè protezione motore E0
In caso di anomalia al motore, di qualsiasi
genere, sovraccarico, sovratemperatura,
errato collegamento, etc.etc.., questo viene
messo in folle, sul DISPLAY appare la
scritta E0 lampeggiante. Oltre al segnale di
allarme sul display appare la richiesta di
START dimodochè se l'allarme motore era
transitorio premendo il pulsante START la
macchina riprende dalla fase interrotta. (Se
la macchina stava eseguendo una fase di
centrifuga, dopo la messa in folle si attende
un tempo di sicurezza per consentire al
cesto di fermarsi). Se, dopo 5 tentativi
consecutivi e a breve distanza l'uno dall'altro,
l'allarme compare ancora, sarà necessario
togliere tensione alla macchina tramite
l'interruttore generale per almeno 5 secondi
per ripristinare il controllo motore.
Procedure in caso di caduta della
tensione di rete.
Nel caso in cui ci sia una caduta di tensione
di rete durante il ciclo di lavaggio per un
tempo superiore ai 3sec. si avrà che al
ripristino dell’alimentazione il display
indica la scritta “POWER FAIL” con il
simbolo del pericolo generico acceso e quello
della clessidra lampeggiante per un minuto,
durante tale tempo tutte le funzioni vengono
disabilitate; al ritorno delle condizioni
normali il programma che era in corso
riparte automaticamente dall'inizio della
fase in cui c'è stato il calo della tensione di
rete ed il display torna alla segnalazione
normale. Se alla ripartenza la porta risulta
aperta il ciclo è interrotto.
ATTENZIONE: Se nella condizione di ciclo
avviato si va ad agire sull’interruttore ON OFF si spegne la macchina ed il
microprocessore interpreta tale operazione
come una caduta di rete e quindi verranno
adottate le procedure come in tale condizione.
ATTENZIONE :NEL CASO IN CUI
DURANTE IL FUNZIONAMENTO
DELLA MACCHINA DOVESSERO
APPARIRE SUL DISPLAY UNO O PIÙ’
DI TALI ALLARMI E’ NECESSARIO
PRIMA DI RIPETERE IL CICLO (OVE
E’ POSSIBILE) RICERCARE ED
ELIMINARE LA, OPPURE LE CAUSE
CHE LO HANNO GENERATO
RIVOLGENDOSI CON
TEMPESTIVITÀ’, ONDE EVITARE
DANNI PEGGIORI, AD UN TECNICO
AUTORIZZATO O AL PROPRIO
RIVENDITORE.
7.8 INFORMAZIONI SU SISTEMI
PARTICOLARI PER L’USO E PER LA
PROTEZIONE.
Nel primo ciclo d’utilizzo verificare quanto
segue:
- Le vaschette del detersivo devono rimanere
pulite.
• La vaschetta A dopo il carico acqua per il
prelavaggio
• La vaschetta B dopo il carico acqua per il
lavaggio;
• La vaschetta C dopo il carico acqua
dell'ultimo risciacquo.
- Controllare che le eventuali solidificazioni
di detersivo prodotte durante lo stoccaggio
vengano rimosse.
- Eseguite un ciclo a 90°C per togliere
eventuali residui di lavorazione.
- L'operatore deve riuscire a controllare il
dispenser comodamente; se è troppo basso
si consiglia di costruire una pedana adeguata.
- Verificate che i carrelli per il trasporto
della biancheria siano più bassi del limite
inferiore dell'oblò.
- Sistemate eventualmente un paracolpi
affinché i carrelli non vadano mai a colpire
l'oblò danneggiandolo.
- Non aprire mai il dispenser durante il
carico acqua o il riscaldamento.
7.9 MANUTENZIONE ORDINARIA A
CURA DELL’OPERATORE
PRIMA DI QUALSIASI OPERAZIONE
DI MANUTENZIONE TOGLIERE
TENSIONE ALLA MACCHINA
TRAMITE INTERRUTTORE
SEZIONATORE GENERALE A
PARETE, CHIUDERE I RUBINETTI
DELL’ACQUA CALDA, FREDDA E
DEL VAPORE (NELLE MACCHINE
CON QUESTO TIPO DI
RISCALDAMENTO) E VERIFICARE
CHE LA VASCA ABBIA SCARICATO
L’ACQUA, IL CESTO SIA FERMO E
LA TEMPERATURA INTERNA SIA
INFERIORE AI 40°C.
L’apparecchiatura non richiede una
particolare manutenzione grazie al design
ergonomico e all’utilizzo di componenti
affidabili di prima qualità.
Periodicamente lavare i pannelli di
rivestimento con uno straccio umido; facendo
particolare attenzione a mantenere pulite la
parti nell'intorno del dispenser; non
utilizzare assolutamente prodotti
infiammabili o abrasivi e seguire la direzione
della satinatura.
Note riguardanti il pannello di controllo
ed il display grafico
- Non pulire la superficie visiva del
DISPLAY LCD e la membrana contenente
i pulsanti utilizzando acetone, alcool od
altri agenti chimici. Evitare anche olii e
grassi.
- Evitare il contatto del vetro con lacche e
resine che possono contenere solventi.
- Il vetro si può facilmente graffiare, tagliare
o rompere. Prestare molta cura nel suo
trattamento e pulizia, che deve essere
eseguita eventualmente solo con un panno
morbido, soffice e asciutto.
Attenzione! Agire senza esercitare
eccessiva pressione.
- Durante l'uso, la formazione di condensa
sul vetro può danneggiare irrimediabilmente
il display. Anche se non in uso, eventuali
gocce d'acqua o saliva devono essere
asciugate immediatamente.
- In caso di contatto di parti del corpo umano
con il fluido eventualmente uscito dal vetro
di un display danneggiato, lavare con acqua
e sapone. In caso d’ingestione involontaria
consultare un medico. La tossicità del
prodotto è estremamente bassa ma occorre
in ogni caso agire con cautela.
- Il display è, al pari di tutti i componenti
elettronici, sensibile alle scariche
elettrostatiche. Adottare le consuete
precauzioni previste per il suo uso e
manipolazione.
NON USARE MAI GETTI D’ACQUA
PER LA PULIZIA DELLA MACCHINA.
RIPOSIZIONARE TUTTI I PANNELLI
EVENTUALMENTE RIMOSSI PRIMA
DI DARE TENSIONE ALLA
MACCHINA TRAMITE
L’INTERRUTTORE SEZIONATORE
GENERALE A PARETE.
12

ISTRUZIONI PER IL
MANUTENTORE ED IL
RIPARATORE
8. INDICAZIONE PER LA
MANUTENZIONE
STRAORDINARIA E
L'APPROVVIGIONAMENTO DI
PEZZI DI RICAMBIO
8.1 TOGLIERE IL COPERCHIO
Per accedere alla parte elettrica della
macchina togliere le viti di fissaggio con il
dispenser e operare come segue:
A) Coperchio con apertura a chiave : inserire
le chiavi date in dotazione nelle due serrature
poste nella parte frontale superiore della
macchina.
Tramite dette chiavi procedere allo sblocco
del lato frontale del coperchio ed alzarlo
fino a bloccarlo aperto con l’ausilio
dell’apposita asta di fermo posizionata sul
lato della macchina a fianco del dispenser.
Porre attenzione perché il coperchio è
incernierato nel lato posteriore della
macchina e quindi ruoterà verso l’alto, senza
di fatto poter essere rimosso dalla macchina.
B) Coperchio senza apertura a chiave:
togliere le viti di fissaggio con la schiena
quindi alzare la parte posteriore del
coperchio e spingerla verso il frontale di
5cm circa.
RIPOSIZIONARE TUTTI I PANNELLI
EVENTUALMENTE RIMOSSI PRIMA DI
DARE TENSIONE ALLA MACCHINA
TRAMITE L’INTERRUTTORE
SEZIONATORE GENERALE A PARETE.
8.2 ISTRUZIONI PER LA
LOCALIZZAZIONE DEI GUASTI.
• In caso di non funzionamento della
macchina verificare quanto segue:
- l’interruttore sezionatore generale a parete
è inserito e arriva tensione alla macchina;
- l’oblò è chiuso;
- è stato premuto il pulsante di START;
- i rubinetti dell’acqua calda, fredda e del
vapore (nelle macchine con questo tipo di
riscaldamento) sono aperti.
Qualora il difetto sussista anche dopo aver
verificato ed eventualmente eseguito queste
operazioni, chiamare il centro d’assistenza
autorizzato o in alternativa il nostro
rivenditore (vedi ultima pagina del manuale).
8.3 SICUREZZE
- Micro di sicurezza porta chiusa che stacca
l’alimentazione a tutto il circuito ausiliario
fermando la macchina.
- Termica elettronica a protezione del motore
che interrompe l’alimentazione in caso di
surriscaldamento sugli avvolgimenti.
- Sistema "Air-Break" nel dispenser, che
evita l’inquinamento della rete idrica in
caso di depressioni.
- Valvola di scarico normalmente aperta per
lo scarico dell'acqua, affinché l’operatore
possa aprire l'oblò tramite la maniglia senza
correre rischi.
- Microinterruttore di sbilanciamento per
evitare ogni possibile danno meccanico in
caso d’errati carichi.
- Resistenze di riscaldamento dotate di
termofusibile, che provvede ad interrompere
il circuito elettrico in caso di anomalie.
8.4 MANUTENZIONE PERIODICA A
CURA DEL PERSONALE TECNICO
Qualsiasi operazione di manutenzione va
fatta dai centri d’assistenza autorizzati dai
nostri rivenditori, o da personale qualificato.
PRIMA DI QUALSIASI OPERAZIONE
DI MANUTENZIONE TOGLIERE
TENSIONE ALLA MACCHINA
TRAMITE L'INTERRUTTORE
SEZIONATORE GENERALE A
PARETE E CHIUDERE I RUBINETTI
DELL’ACQUA CALDA, FREDDA E
DEL VAPORE (NELLE MACCHINE
CON QUESTO TIPO DI
RISCALDAMENTO).
Porre sempre una particolare attenzione
durante la manutenzione. Non escludere
MAI sicurezze per nessuna ragione,
utilizzare ricambi originali ed in caso di
qualsiasi dubbio consultare tempestivamente
il nostro ufficio tecnico, comunicando
sempre il modello e il numero di matricola
rilevabili dalla targhetta posta sul retro della
lavatrice o sulla parte interna dell’oblò (ove
previsto).
CONTROLLO MENSILE
- Controllare che i filtri delle elettrovalvole,
inseriti nella parte esterna delle valvole
stesse, siano puliti.
- Controllare che il filtro dell’elettrovalvola
vapore sia pulito (nelle apparecchiature con
questo tipo di riscaldamento).
- Pulire il dispenser da eventuali residui di
detersivo.
- Pulire con un panno la guarnizione dell’oblò
e la relativa bocca della vasca.
- Pulire la ventola d’aerazione dell’inverter
dai depositi di polvere e lanuggine. È la
ventola posta nella parte posteriore superiore
e centrale della macchina, protetta da una
griglia (dove prevista).
CONTROLLO ANNUALE
- Controllare la chiusura dei dadi di fissaggio
al pavimento (ove previsto).
- Controllare lo stato d’usura delle cinghie
ed eventualmente sostituirle; se più di una,
sostituire il set intero.
- Verificare il buon funzionamento delle
sicurezze, come ad esempio i micro della
serratura e quello di sbilanciamento.
- Verificare il serraggio delle viti di
connessione elettrica di potenza su teleruttori
e morsettiera d’ingresso.
- Smontare la valvola di scarico e pulirla
internamente dalle filacce.
- Controllare il funzionamento delle
resistenze e pulirle da eventuali incrostazioni
calcaree.
RIPOSIZIONARE TUTTI I PANNELLI
EVENTUALMENTE RIMOSSI PRIMA
DI DARE TENSIONE ALLA
MACCHINA TRAMITE
L'INTERRUTTORE SEZIONATORE
GENERALE A PARETE.
RICHIESTA DI MANUTENZIONE IN
AUTOMATICO
Il n° dei cicli che la macchina esegue è
memorizzato ed ogni 1000 cicli eseguiti la
macchina visualizza un messaggio dalla
partenza del ciclo n° 1001 in poi.
Più precisamente, alla pressione del pulsante
di START, al momento di iniziare un nuovo
ciclo, la macchina visualizza la scritta “10
00 C” lampeggiante per 10 secondi, dopo di
che esegue normalmente il ciclo.
Alla visualizzazione di questo messaggio
procedere come per il controllo annuale alla
manutenzione della macchina.
Per eliminare la scritta e ricominciare da
capo il conteggio dei 1000 cicli è necessario
premere per almeno 5 secondi il pulsante “
DOWN “.
8.5 RICERCA E ORDINAZIONE DEI
PEZZI DI RICAMBIO
Per l’identificazione dei codici dei pezzi di
ricambio utilizzare i disegni esplosi con
relative distinte delle parti. Una volta
identificati i codici inviare regolare ordine
scritto alla ditta costruttrice indicando
chiaramente il modello
dell’apparecchiatura, il numero di matricola,
la tensione di alimentazione e la frequenza,
oltre naturalmente al codice e descrizione
della parte di ricambio che interessa.
9. INDICAZIONI PER LA MESSA
FUORI SERVIZIO,
SMANTELLAMENTO,
ELIMINAZIONE DELLA
MACCHINA
Allorché si decida di non utilizzare più
l’apparecchiatura, si raccomanda di renderla
inoperante eliminando opportunamente i
materiali e tenendo presente quanto già detto
al paragrafo 3. In conformità alle norme per
lo smaltimento dei rifiuti vigenti nei singoli
paesi e per il rispetto dell’ambiente in cui
viviamo, vi preghiamo di dividere le parti
della macchina in modo da poterle smaltire
separatamente o recuperare opportunamente.
Tutte le parti componenti la macchina sono
assimilabili ai rifiuti solidi urbani fatta
eccezione per le parti metalliche che
comunque non sono iscritte tra i rifiuti speciali
nella maggior parte dei paesi europei.
INFORMAZIONE AGLI UTENTI
Ai sensi dell’articolo 13 del decreto
Legislativo 25 luglio 2005, n. 151 di
“Attuazione delle Direttive 2002/95/CE,
2002/96/CE e 2003/108/CE, relative alla
riduzione dell’uso di sostanze pericolose
nelle apparecchiature elettriche ed
elettroniche, nonché allo smaltimento dei
rifiuti”
13

il simbolo del cassonetto barrato riportato
sull’apparecchio indica che il prodotto, alla
fine della propria vita utile, deve essere
raccolto separatamente dagli altri rifiuti.
L’utente dovrà, pertanto, conferire
l’apparecchiatura giunta a fine vita agli
idonei centri di raccolta differenziata dei
rifiuti elettronici ed elettrotecnici, oppure
riconsegnarla al rivenditore al momento
dell’acquisto di una nuova apparecchiatura
di tipo equivalente, in ragione di uno a uno.
L’adeguata raccolta differenziata per l’avvio
successivo dell’apparecchio dismesso al
riciclaggio, al trattamento e allo smaltimento
ambientalmente compatibile contribuisce ad
evitare possibili effetti negativi sull’ambiente
e sulla salute e favorisce il riciclo dei materiali
di cui è composta l’apparecchiatura.
Lo smaltimento abusivo del prodotto da
parte dell’utente comporta l’applicazione
delle sanzioni amministrative di cui al dlgs.
n. 22/1997 (articolo 50 e seguenti del D.lgs.
n. 22/1997).
14

GB
INSTRUCTIONS FOR INSTALLATION AND USE
FOREWORD
Congratulations on your selection of our
washing machine. If you follow carefully
the present instructions you will certainly be
satisfied with its performance and guarantee.
In the event of claims or remarks, the
reference text remains the original one in
the manufacturer’s native language, that is,
the Italian version.
1. GUARANTEE
The washing machine is guaranteed for
twelve (12) months, from the date of purchase
of the appliance or of the relevant part.
The guarantee consists in the replacement
of any part that proves faulty for
manufacturing causes. It is enforced by the
supplier directly.
- In-guarantee labour, freight and packing
costs, as well as the shipping risks must be
born by the purchaser.
- The guarantee is valid only if the faulty
parts are sent back carriage paid, along with
the information on the model, serial number
and defect of the machine the part was
assembled onto.
- The guarantee does not apply to machines
that were damaged by malpractice or
carelessness, misconnection, incorrect
installation, noncompliance with the
instructions for assembly and use, nor does
it apply to machines that were tampered
with by unauthorised personnel. The
guarantee does not cover machines whose
serial number appears to have been altered,
erased or removed.
- The guarantee does not cover the following
items:
parts which are subject to ordinary wear like
belts, valve membranes and rubber parts at
large; electric components like motors, coils,
contactors, heaters and so on.
2. INTRODUCTION
The present booklet was formulated in a
simple and rational way, in order for the
reader to become familiar with the washing
machine. Please, read it carefully and keep
it near the machine at all times. The advice
and instructions contained in this manual
cannot cover every possible contingency.
This is why it is important to keep in mind
that common sense and caution cannot be
supplied by the manufacturer along with the
appliance, but must be contributed by those
in charge of its installation, maintenance
and use. Whoever operates the machine
must have read this manual beforehand.
In case of repairs the manufacturer warmly
recommends the use of original spare parts.
As for ordering these, reference is made to
paragraph 8.
The descriptions and sketches reported in
this manual do not bind the manufacturer,
who reserves the right to update them and/
or include any upgrading modification of
parts and fittings at any time and with no
previous notice if this is deemed necessary
for manufacturing or commercial purposes.
3. PRESCRIPTIONS, RESTRICTIONS
AND OTHER USES
The machine must be operated by trained
personnel only.
Disconnect it in case of malfunction and/or
faulty operation.
During use, cleaning and maintenance it is
absolutely necessary to be sure that tools or
hands are never stuck in the moving parts of
the appliance (motor, belts, etc.). The
manufacturer disclaims all liability for any
personal injury to operators or other people
occurring while using, cleaning or servicing
the machine.
Do not open the dispenser while the
appliance is working. The detergents and
warm water involved may represent a hazard.
The appliance was designed for washing
fabrics following the instructions that can
be read on the labels attached to the garments
or fabrics. Only wash clothes, household
linen and ordinary everyday-use fabrics.
Do not load the machine with fabrics that
have been in contact with inflammables or
chemicals. If this is unavoidable, handwash them and air-dry them to let those
substances evaporate.
The operation of any electric or electronic
appliance entails compliance with certain
basic rules and in this case particularly: In
particular: do not touch the machine with
damp or wet hands or feet; do not use it
while barefoot, do not expose it to
atmospheric agents like rain, salt, salinity,
etc. do not allow machine operation by
children or disabled persons without proper
supervision; do not smoke near the machine
or during operation; do not override or bypass safety devices; do not clean the machine
by spilling water directly or indirectly over
it and therefore, install far from areas in
which these events are likely to occur.
ANY USE NOT EXPLICITLY
MENTIONED HERE BELOW MUST
BE CONSIDERED AS A HAZARD. THE
MANUFACTURER ASSUMES NO
RESPONSIBILITY FOR DAMAGE
RESULTING FROM IMPROPER,
WRONG AND UNREASONABLE USE.
INSTRUCTIONS FOR
THE INSTALLER
4. SHIPPING, HANDLING,
UNPACKING AND STORING THE
MACHINE
4.1. SHIPPING AND HANDLING
To handle and/or ship the machine follow
carefully the ensuing recommendations:
Move the machine on its own pallet or on a
similar platform; use a fork lift, either manual
or electric, provided it is adequate for
handling such appliances and it has the
requisite lifting capacity (cfr. technical data).
Check beforehand that the appliance can
surmount every existing obstacle, like
staircases, doors, etc. Do not drag the
machine by the sides or by any other part.
For shipping purposes, use only the original
packaging, which helps ensure sufficient
stability during transportation.
4.2 STORING
If the appliance must be stored for a long
period before being put into operation, keep
it inside the original package, since this
guarantees best protection. Store it in
premises where ambient conditions comply
with the requirements in paragraph 5. If the
machine must be out of service for a long
period after use, ensure that it is materially
disconnected from the electric power supply
and cover it with its original plastic bag.
4.3 UNPACKING
1) Prior to accepting the machine from the
carrier, check the conditions of the package.
If it is showing visible damage, the machine
may have been damaged too. In this case,
unpack the machine in the presence of the
carrier and sign, under reservation, the
delivery slip. The manufacturer assumes no
liability for any damage caused by
transportation or improper storage.
2) Unpack the machine with the utmost care
to avoid damage. To remove the platform,
take off the screws on the inside of the same
and located at the machine floor-fastening
holes.
3) Open the door (cfr. section 7.2)
4) Ensure that the following material is
there: two metal bands, one 90° rubber
elbow, three 3/4" flexible tubes with threaded
ring, one* brass strain for the steam inlet,
one* metal flexible tube, keys to the coin
box and 15 coins (coin-operated versions
only) (* for steam-heated versions only)
; the keys to the machine's cover lid (Models
18-22 only)
(*Steam-heated machines only).
15
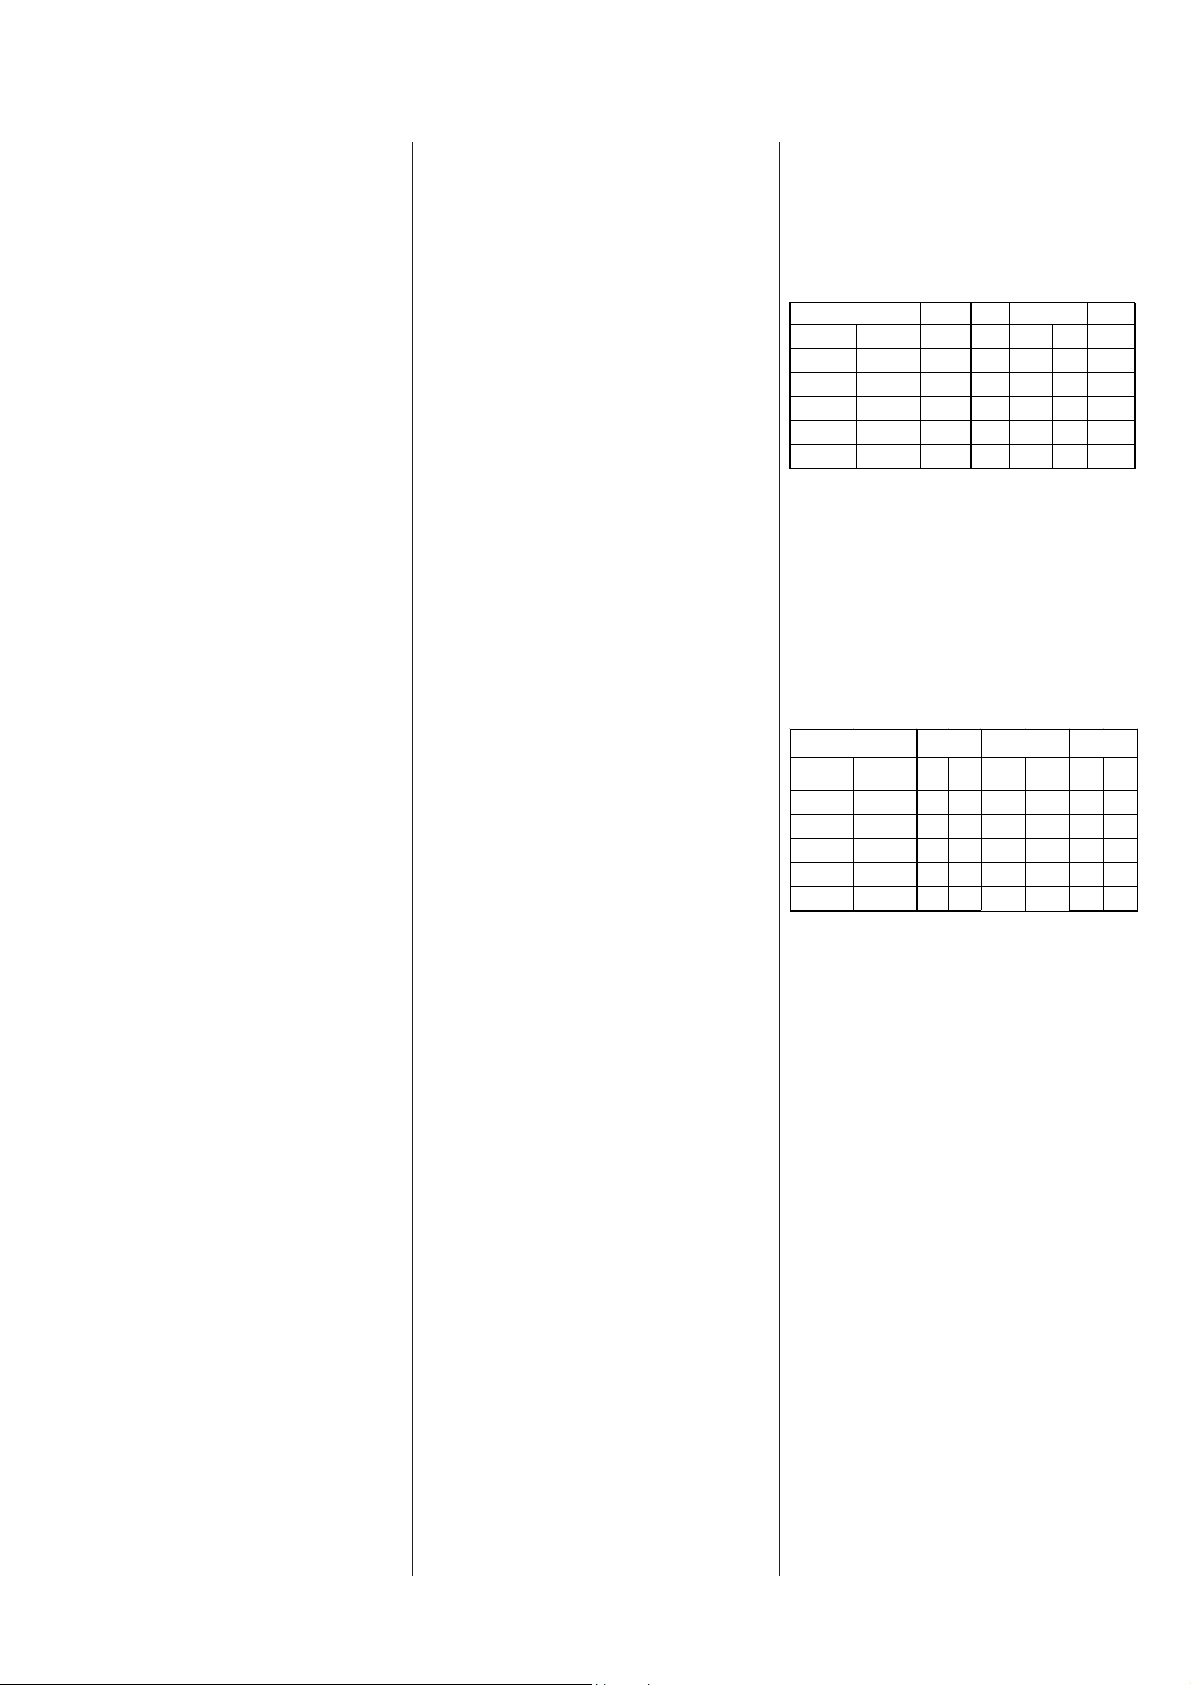
5) THE BRACKETS THAT FASTEN THE
TUB MUST ABSOLUTELY BE
REMOVED BEFORE MACHINE
STARTUP.
6) Be sure that the instruction booklet is not
left in the package and lost.
The packaging materials (plastic bags,
expanded polystyrene, wood, cardboard,
nails, etc.) represent a safety hazard and
consequently must not be left within the
reach of children. Collect and keep for
further transportation or long-term storage
(cfr. chapter 9). Before connecting the
appliance, check that the rating plate data
correspond to those of the existing electrical
system. The appliance must only ever be
used for the purposes it was explicitly
designed for.
5. GETTING THE APPLIANCE
STARTED
5.1 POSITIONING REQUIREMENTS
These washing machines demand no
positioning requirement but a flat, level and
sturdy surface.
Align by the use of a spirit level.
For servicing purposes, it is advisable to
leave at least 500mm (1000 for model 22)
between the rear face of the machine and the
wall behind.
Besides, when machines are installed in a
line, leaving at least 30mm between one
machine and the next is recommended.
Provide for a floor drain at an elevation
below the machine drain, that can be
connected to the washing machine, using
the supplied elbow fitting.
CAUTION! Repeat levelling after moving
the machine.
5.2 SPACE REQUIRED FOR
INSTALLATION, USE AND
MAINTENANCE
The washing machine requires the minimum
space indicated in the dimensional figures
(cfr. figure 1).
1) Power supply line with automatic
differential switch and thermomagnetic
cutout upstream *.
2) Interlocked socket including fuses and
manual multipolar switch.
3) Power supply plug.
4) Shutoff taps for water inlets.
5) Grille or plate (preferred) for closing
drain pit.
6) Rubber hose for water drain, diam. 3"
(provided).
7) Drain pit, flow rate of 160 litres/min.
8) Circular door.
9) Hard water inlet of 3/4".
10) Warm water inlet of 3/4".
11) Soft water inlet of 3/4".
12) Steam inlet of 3/4" (only on steamheated models).
13) Cable clamp for power supply inlet
(models 8-11-18).
14) Template to be used for positioning
machine-anchoring bolts.
15) 3 tubes for hard, warm and soft water
intake (provided)
16) Flexible tube of 3/4" for steam connection
(supplied with steam-heated models only).
17) Mechanical filter of 3/4" (attached to
steam-heated models).
18) Steam supply line, pressure comprised
between 4 and 6 bar, consumption
approximately 15 kg/h (steam models only).
19) Steam shutoff tap (steam-heated models
only).
20) Condensed water drain of 3/4" (only
with indirect steam models 8-11-18).
21) Cable clamp for power supply inlet
(model 22)
22) Inverter casing (model 22 only)
23) Connection for liquid-soap tubes (model
for 22kg only)
22) Connection for cycle-programming cable
(using the appropriate connection kit, a PC
and the relevant software)
25) Water drain
* The cutoff switch must be in a position
allowing easy access to the operator in any
EMERGENCY event (maximum distance 3
m).
5.3 ALLOWABLE AMBIENT
CONDITIONS FOR PROPER SERVICE
(INFORMATION FOR THE USER)
Let these conditions be known to machine
users.
- TYPE OF ROOM: CLOSED
- MINIMUM TEMPERATURE: 10°C
(note: when ambient temperature is
below 10°C, electronic parts may work
irregularly)
- MAXIMUM TEMPERATURE: 40°C
- RELATIVE HUMIDITY: 75% H.R.
- LIGHTING: 100 LUX (value valid for
Italy; given the variety of regulations
regarding lighting in working premises,
for other national provisions it will be
necessary to consult the relevant national
codes).
5.4 ELECTRICAL CONNECTION
The machine must be installed by
professionally qualified personnel, in
accordance with the instructions provided
by the manufacturer and local regulations.
Incorrect installation may cause harm to
persons, animals or property. The
manufacturer assumes no responsibility for
such damage.
Make sure power supply voltage corresponds
to that indicated on the rating plate of the
washing machine. Consider also that the
maximum allowable power voltage variation
is ±10%.
IMPORTANT:
CONNECTING THE MACHINE TO
EARTH IS MANDATORY.
To this purpose, the terminal block is fitted
with a specific contact, which must be
connected according to the regulations in
force. The manufacturer assumes no
responsibility for damage resulting from
nonobservance of this accident prevention
principle.
In compliance with the latest accident
prevention provisions, the machine is
provided with an external terminal for
equipotential connection.
Upstream of the appliance an automatic
omnipolar cutoff switch must be provided
for, with contact gaps no smaller than 3 mm,
and set according to the maximum rated
input (cfr. table 2 below and machine rating
table).
Total machine power Rated input In
Electric
hea ting
from 550 to
from 1500
from 6000
to 10000W
from 10000
to 13000W
from 18000
to 25000W
to 2500W
Steam
hea ting
1100W
Number
of poles
230/3 400/3 230/3 400 /3
3 4 6 6 30mA
3 4 16 16 30mA
3 4 20-30 16 30m A
3 4 30-40 25 30m A
3 4 50-70 30-40 30mA
Trip res.
curr.Id
Provide for a cable carrier duct of outer
diameter 20 mm (30 mm for model 22)
between the cutoff switch and the appliance’s
power supply inlet. Use the cable clamp
existing on the machine's back to introduce
the power cord and, after the cables have
been connected to the terminal board
according to the sequence appearing on the
same, stop the cable by the plastic nut. Use
one of the cable types appearing in the table.
Make sure it is fire-proof and properly
protected.
Total machine power
Ele c tr ic
Steam/w arm
heating
w ater heating
from 550 to
from 1500
from 6000 to
from 10000 to
from 18000 to
to 25000 W
10000W
13000W
25000W
Number of
leads
230/3 400/3 230/3 400/3 230/3 400/3
34
1100W
34
34
34
34
Cable type
H05VV-F H05VV-F
H05VV-F H05VV-F
A07VV-F A07VV-F
A07VV-F A07VV-F
S07VV-F A07VV-F
Lead cr oss
section sq.mm
11
2,5 1
62,5
64
10 6
CAUTION!
These appliances are equipped with
electronic control devices, e.g. control card
and inverter. To be CE type-approved, such
devices must include noise filters complying
with EMC standards on eddy current
emission. To operate properly, these filters
leak a small current of approximately 1015mA through the earth lead.
Therefore every machine must be fitted with
its own system-protecting differential cutoff
switch. Avoid connecting more then one
appliance, whatever their capacity or brand,
downstream of a single differential cutoff
switch.
IMPORTANT: TILT SWITCH
ADJUSTMENT
All extracting washers are equipped with a
device that aborts spinning steps when severe
imbalance poses a threat to the mechanical
parts composing the machine.
To access this safety device, open the top lid
cover: it is approximately located at the
machine's topmost point. Adjust this switch
only after the wall cutoff switch has been
turned off and the machine is disconnected
from the power mains.
Adjustment of this switch is reserved to the
authorised and qualified personnel.
This device consists of a microswitch secured
to the machine's frame, and it is driven by a
16
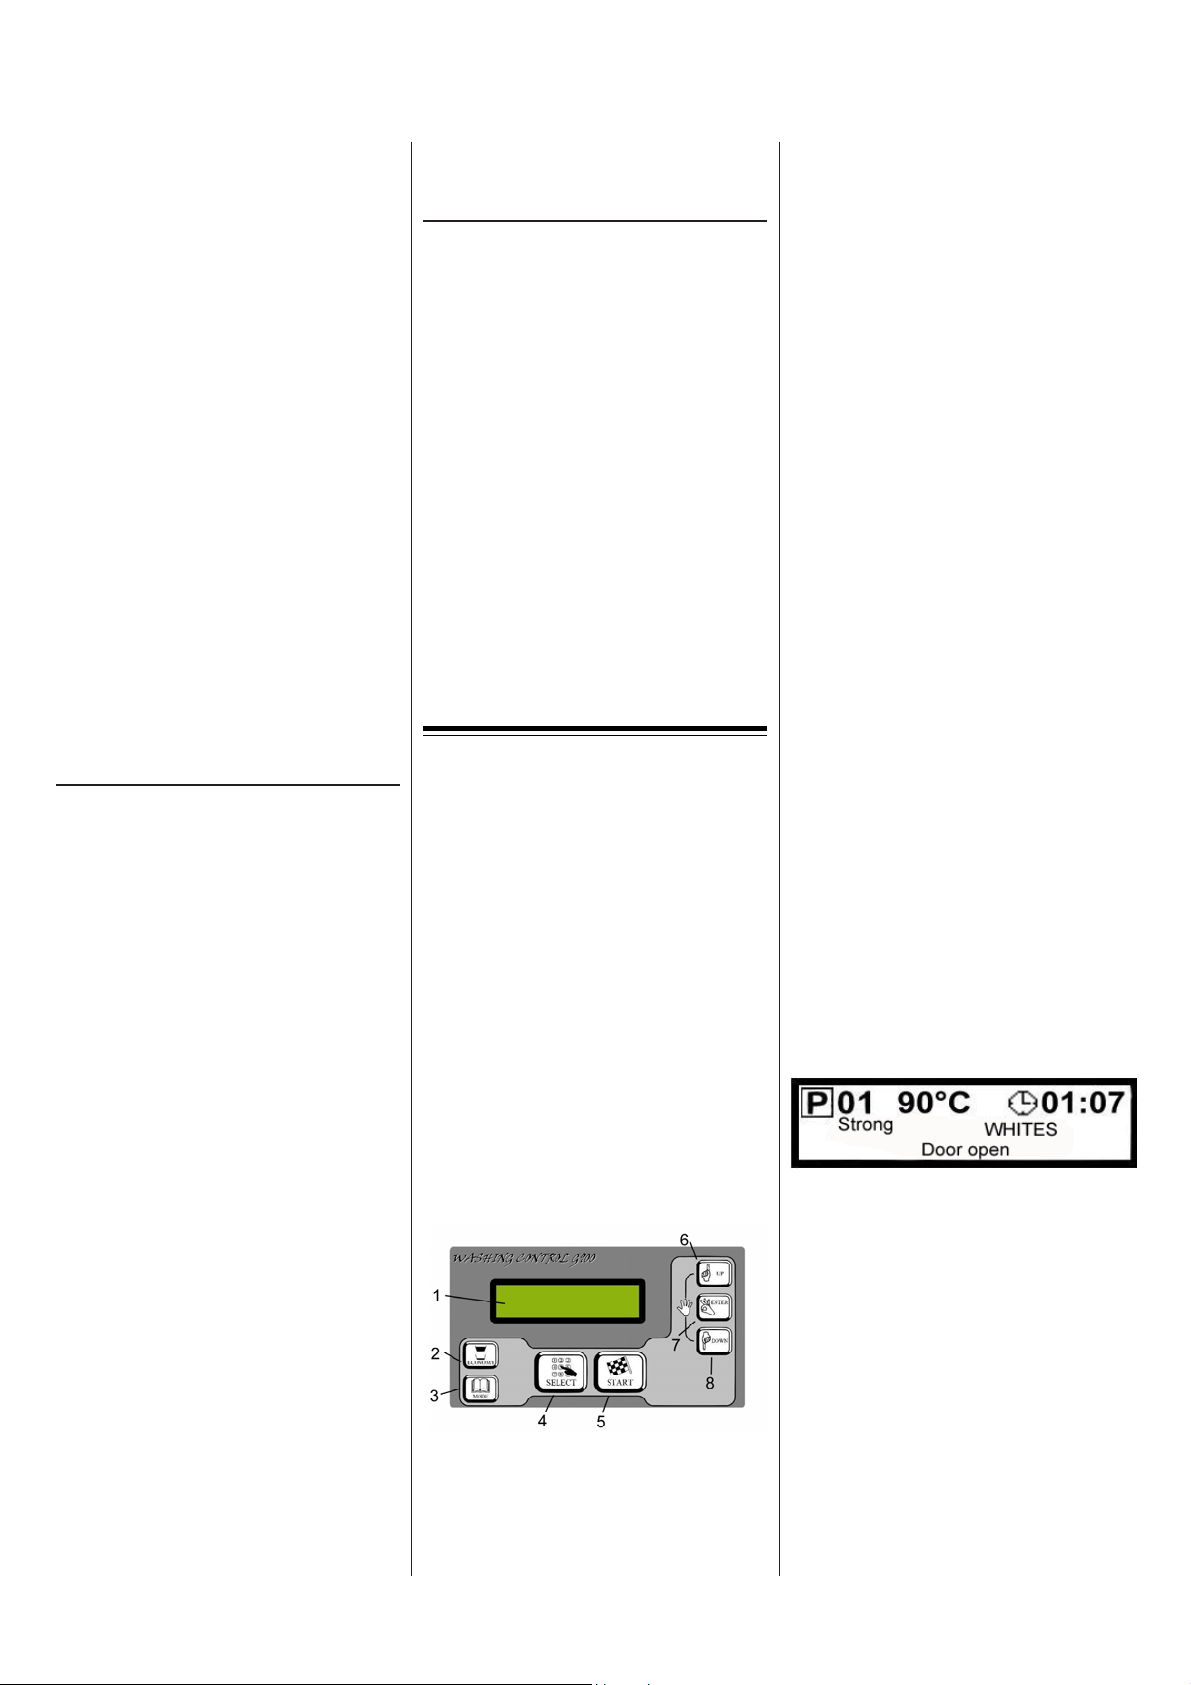
flexible rod located inside a metal window
that moves integral with the drum of the
washer. When severe vibrations occur, the
window moves the rod and the safety device
trips (cfr. also alarm "E9" and alarm
description).
During machine installation, after removing
the transportation brackets and with the
drum empty, position the flexible rod at the
centre of the window, so that abnormal
tripping of this safety device is avoided.
For proper positioning, use the screws that
fasten the support of the microswitch and
position this properly.
5.5 WATER CONNECTION
The washing machine is fitted with a warm
water inlet (approximately 60°C) and two
cold water inlets - hard and soft - both of 3/
4’’.
The incoming water pressure must be
comprised between 0.5 and 5 bar (0.05 and
0.5 MPa).
Provide for wall couplings at a distance not
exceeding the length of the pipes supplied.
If a warm water source is not available,
mount a T pipe on the soft cold water coupling
and connect all three inlets to the cold water
pipe. All three inlets must anyway be fed
water.
Model Capacity of boiler
Mod. 8 55 litres
Mod.11 80 litres
Mod.18 120 litres
Mod.22 155 litres
When the connection is done make sure that
the pipes are not crushed or blocked.
5.6 STEAM CONNECTION (steamheated machines only)
The washing machine is fitted with a 3/4"
steam inlet. The incoming steam pressure
must be between 1 and 6 bar (0.05 and 0.6
MPa). The recommended pressure for best
machine performance is between 4 and 6
bar. If doubts should arise, read the rating
plate data. Steam is intended as saturated
and dry.
For model 22, the water in the tub can be only
be heated directly, whereas for models 8-1118 it can be heated either directly or indirectly.
In the latter instance, a connection for the
recovery of condensed water will have to be
provided for (diameter 3/4").
If the machine is subject to ISPESL
inspection, keep all ISPESL documents in
the room where the washer is lodged.
When the connection is done make sure that
the pipes are not crushed or blocked.
5.7 DRAIN CONNECTION
Make certain that the distance between the
machine drain outlet and the floor drain is
not longer than the drain elbow supplied.
Water is drained through a direct-action
motor-driven valve that stays open (by
gravity) when the machine is not powered.
Therefore, the floor drain must always be
below the machine drain outlet. The diameter
of the floor drain must never be smaller than
that of the supplied hose.
Model Drain flow-rate
Mod. 8/11/18/22 160 l/min.
The draining pipe must be able to resist a
temperature of 90°C.
Install a trap between the hose supplied and
the drain.
Check that the hose is not crushed or blocked.
5.8 AIR BREAK
The washing machine is equipped with an
air-break device to stop wastewater from
flowing back into the drinkable water system
in the event of a depression. This device has
a rear outlet that may liberate innocuous
steam during heating. Do not close or couple
the air-break outlet.
THE GUARANTEE DOES NOT
COVER DAMAGE CAUSED BY
INCORRECT INSTALLATION.
INSTRUCTIONS FOR
THE USER
6. MACHINE DETAILS
6.1 MACHINE DESCRIPTION
The machine is composed of the following
main parts (see fig. 2):
1) Hood under which the control circuit is
lodged.
2) Soap dispenser for pre-wash and wash
(foam-damping washing powder) and
for liquid conditioner (foam-damping
type).
3) Circular loading door.
4) Coin-meter (on coin-operated machines
only).
5) Coin box (on coin-operated machines
only).
6) Drain (8-11-18-22: 3”).
7) Equipotential terminal.
8) Air break.
9) Water inlet (3/4").
Description of the keypad
1. Graphic Display
2. “Economy” button reduces all water
consumption by 20%
3. Programming/display selection button
4. Cycle selection button
5. Program start and Fast forward button
6. Value up button
7. Change enter (confirm) button
8. Value down button
6.2 APPLICATION RANGE
Your washing machine was designed to
wash synthetics, woollens, cottons and
linens. Choose your cycle by the appropriate
button as suggested on the labels attached to
the garments to be washed.
6.3 INFORMATION ABOUT THE
ELECTRICAL SYSTEM
The built-in electrical system is composed
of protection and control devices duly lodged
on a plate at the top part of the machine. The
relevant diagrams and lists appear later on
in this manual.
6.4 DOCUMENTS THAT CERTIFY
MACHINE CONFORMITY
The washing machine described in this
booklet complies with the following
directives:
73/23 EEC, 93/68 EEC, 89/336 EEC, 92/
31 EEC, 93/68/EEC
and harmonised norms:
EN60335-1; EN60335-2-4; EN60335-2-7
EN55014; EN61000-3-2 ; EN61000-3-3;
EN55104.
7. INSTRUCTIONS FOR USE AND
ORDINARY MAINTENANCE
7.1 OPERATION
As soon as the washing machine is switched
on, the display reads the software version
installed and the software release date for a
few seconds.
CAUTION!
The release date refers to the software
installed and has nothing to do with
machine assembly or testing and is no
reference date for guarantee purposes.
The display then lists various details, i.e,
from top left:
- the number denoting the program selected.
- the maximum wash temperature that the
program achieves.
- the length of the whole program, including
water in-taking and draining, heating and
cooling down. Such time values are those
that the machine has stored in previous
equivalent cycles. Therefore they are not
binding but represent a mere reference.
- cycle type, i.e. whether it is delicate, medium
or strong.
- program name, e.g. whites, woollens,
curtains etc.
- the words "waiting for START” if the door
is closed or “door open” if it is open.
When either the “)UP” or “*DOWN” key is
pressed, the display reads the steps
composing the wash program for a few
seconds.
17
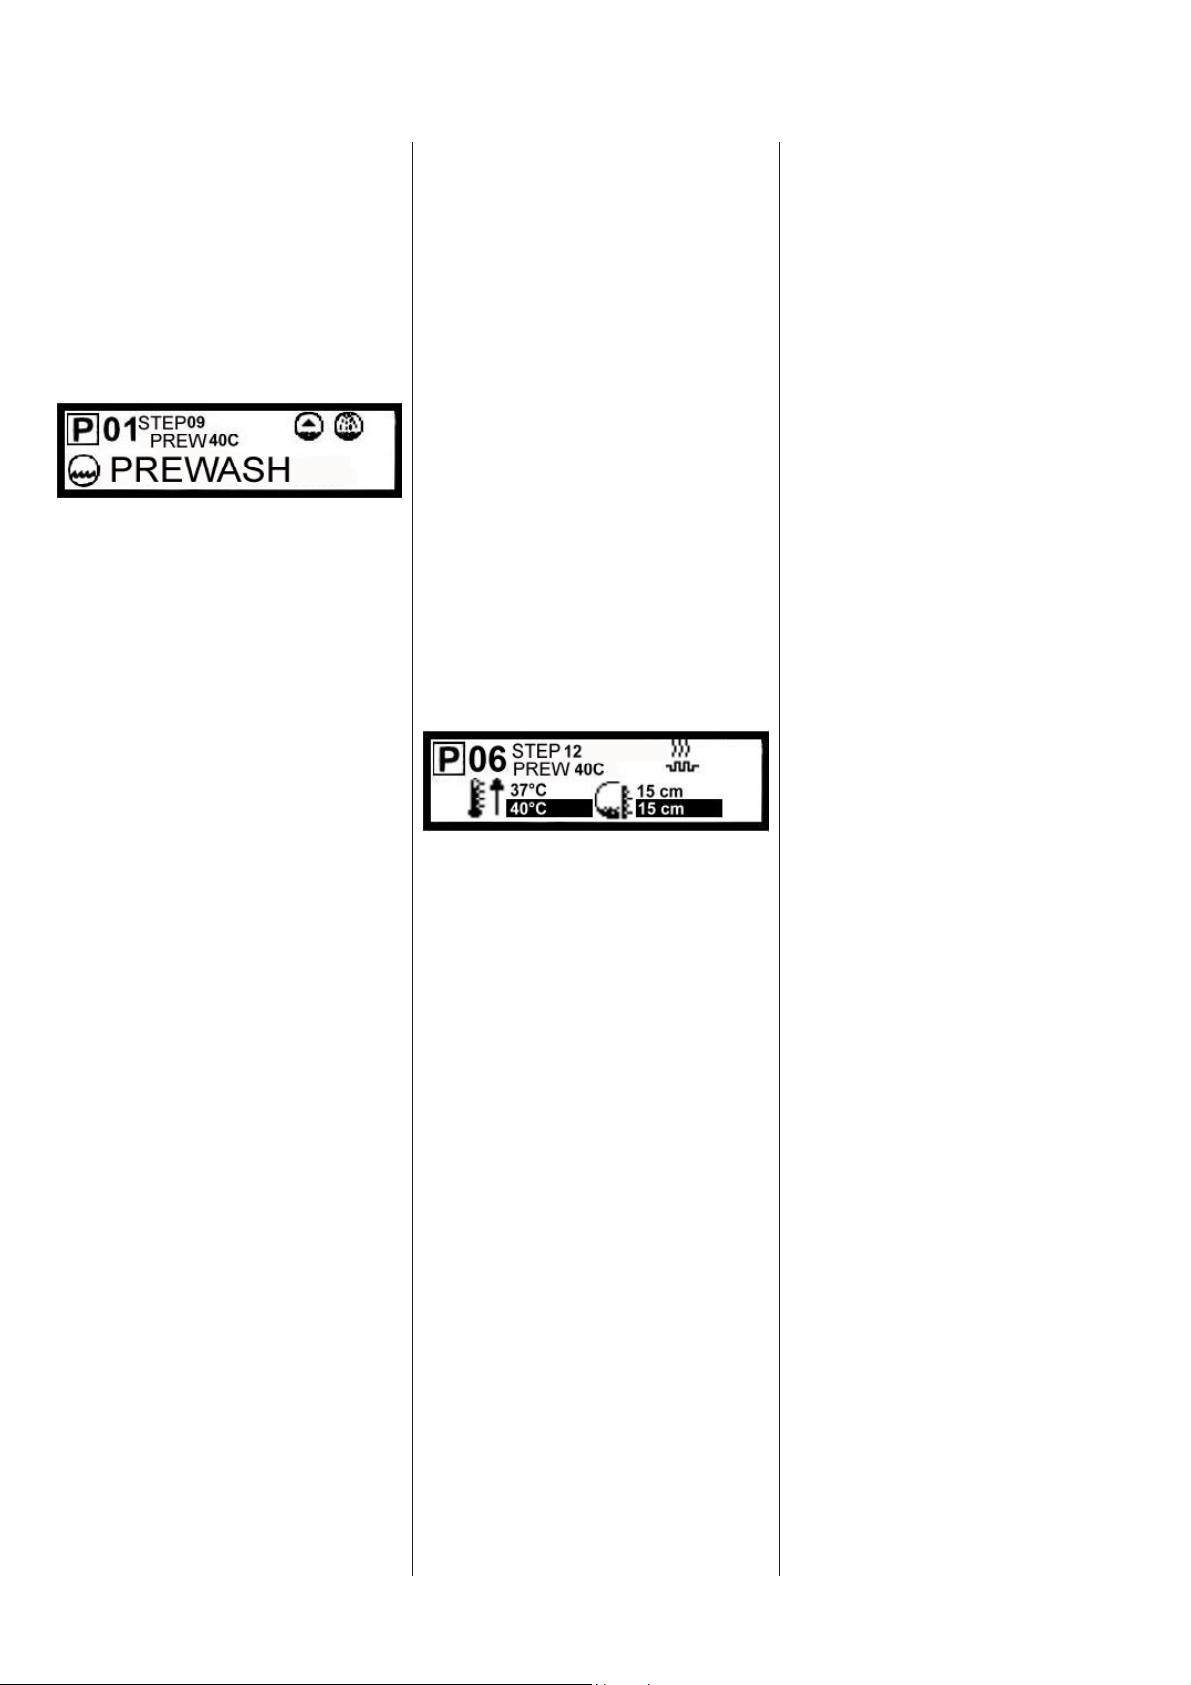
Program selection and consequently all the
relevant details, incl. maximum temperature,
total cycle time, can be changed by pressing
the “SELECT” plus either the “)UP” or
“*DOWN” key. All indicated values refer
to the new program selection.
When the door is closed, the "door open"
reading is dismissed and the " waiting for
start" reading takes over. The program
selected can now be started by simply
pressing the “START” key.
As soon as the cycle starts the display
readings change as follows.
In other words, the display then reads the
various steps composing the program, from
the first to the last scheduled step. All steps
are displayed in large print along with the
relevant symbol and are clearly visible.
The display alternates the step name with
the time remaining to the end of the cycle,
which decreases as the program goes on.
The number and name corresponding to the
step in progress are displayed in small
print.
During step execution, the display keeps
signalling any events concerning the cycle
in progress by the use of symbols.
For example, as illustrated in the figure, the
top right corner of the display reads various
symbols that provide information on the
water level in the tub, on the activation of
soap pumps, on heating and draining.
At the end of the wash program the display
reads the event clearly and enables the
buzzer. Straight afterwards the "open door"
message appears and it is possible to remove
the washing from the machine.
Changing cycle selection after the start
After the start, the program in progress can
be changed before two minutes have elapsed.
During the first two minutes of a cycle, this
is actually indicated by the square blinking
around the "P" that stands for Program;
after the square stops blinking it is no longer
possible to change cycle selection unless by
scrolling the program fast forward to the
end or stopping it and then selecting a
different cycle.
Fast-forwarding cycle steps
To fast-forward the steps of the cycle in
progress, press the “START” key repeatedly.
To go straight to the end of the cycle and
enable door opening, hold down the said key
for 5 minutes.
Caution! The door-opening go-ahead will
only be given when the drum is motionless
and the tub is empty.
Pausing (“PAUSE
To set the machine to pause during cycle
execution, press the “)UP” and “*DOWN”
keys simultaneously. Timing control, drum
movement, water in-taking and heating are
then suspended.
11
1”)
11
When pausing, the door is interlocked and
the drain valve is closed, so that the water
existing in the tub is not drained off.
Of course, it is not possible to schedule a
pause when the machine is spinning,
whatever the spinning speed.
As soon as the relevant two keys are pressed
and the pause begins, a meter starts timing
the pause, whose length is read in the hh/
mm format.
To resume cycle execution exactly from the
point it was suspended, just press the
“START” key.
CAUTION!
If the machine was set to pause during a step
in which the water was heated, water
temperature will inevitably decrease!
Reading of working settings
During program execution and of the
relevant cycle steps , various readings
concerning operation are available.
To view this information just press the “
MODE” key during program execution.
The display will keep on reading the n°
identifying the program selected and the
name and number denoting the step in
progress, but the display bottom portion will
change as illustrated.
In this case the display reads the maximum
temperature and maximum water level to be
reached on a black background, with actual
temperature and water level displayed above.
It is worth remarking that the symbol in the
top right corner indicates that the heating is
on. In this example, the present temperature
is 37°C so that the machine will keep on
heating until it is 40°C. The water in the tub
will therefore be heated.
To view other readings like type of water
taken in, active soap dispenser, soap pump
enabled, motor operation timing etc, press
the “ MODE” key again and again. After
all these details are scrolled, the display
shows the first reading, i.e. the step symbol
and name in big print.
During spinning steps, which envisage drum
rotation solely, the only details available are
speed rates.
Changing step operational settings
As explained above, it is possible to switch
the display view by simply pressing the “
MODE” key during cycle execution.
The values read for the various steps can be
increased and decreased by holding down
the “)UP” and “*DOWN” keys respectively.
In other words, it is possible to alter the
working parameters of an action in progress.
For example, when taking in water it is
possible to change the water level setting.
To do this press the “ MODE” until the
relevant reading is viewed, and then alter
the value using the “)UP” or “*DOWN”
keys: the value will gradually increase or
decrease in cm, and this will affect the
setting displayed on a black background,
i.e. the maximum value to be reached. The
same applies to heating functions: it is
possible to alter the maximum temperature
to be reached using the “) UP” and
“*DOWN” keys.
The remaining operational settings, i.e.
temperature maintenance time or spinning
time behave likewise.
Starting the wash cycle
Make sure that the cold water, warm water
and steam taps are open (the latter applies
only to steam-heated machines).
Turn ON the automatic thermomagnetic
cutoff switch on the wall.
Then fill the various dispenser compartments
with soap (foam-damping type) according
to cycle selection, i.e.:
A = prewash compartment (when
scheduled by the wash cycle selected)
B = main wash compartment
C = compartment for other products to be
added during the last rinse
Select a program using the “SELECT” and
“)UP” or “*DOWN” keys simultaneously.
Load the machine and shut the door. Then
push the “START” key. The machine will
lock the door and will start executing the
steps scheduled in the program.
Alarm and fault signalling
When faults arise (voltage drop,
supertemperature, undesired water level)
the washing machine notifies the user by a
number of alarms that appear on the front
panel DISPLAY. All alarm details are dealt
with in the "ALARMS” chapter.
End of cycle
CAUTION! Never force the door open.
Open by hand only after it has been
unlocked.
At any rate, before opening the door make
sure that the drum has stopped, the water
has been drained and the temperature inside
the drum is below 40°C. Should a potential
drop occur during the wash cycle, only for
models 8 and 11 it will be possible to open
the door after about 90 sec.; whereas in case
of emergency or defect of the door-opening
device, to open the door of any of the
models, jerk the manual puller downwards
(see fig. 2).
To reach the manual puller, it is necessary
to unscrew the two fixing screws with a
cross-bit screwdriver and withdraw the
machine’s front bottom panel. After the
door has been unlocked, open it using the
handle as explained above and then put the
panel back in place.
How to correct tub water level reading
Under normal conditions, water level reading
needn’t be corrected, but when special
installation factors like elevation ask for it, it
is possible to set the zero level value in the
tub.
Perform the following actions with the
machine energised but not yet started:
18

1) Open the door.
2) Sight-check that the tub is empty.
3) Hold the ")UP" and "*DOWN" keys
down simultaneously for at least 5
seconds.
4) The DISPLAY will read
“CALIBRAZIONE” (calibration)
5) Press the "ENTER" key to confirm the
value read by the card.
6) The BUZZER will give out a beep and
the DISPLAY will resume its normal
functions.
Water level correction has been carried out
properly. Otherwise the machine will keep
the zero value previously stored.
7.2 CYCLE STEPS
All cycles or programs stored in the card
consist in the excution of the steps composing
them. In other words, a cycle or program is
nothing but the sequence in which the steps
(previously stored) are carried out:
In practical terms, steps can be summarised
as follows:
1 Soak
2 Prewash
3 Wash
4 Rinse
5 Spin
6 Distribution
The various programs consist of a welldefined sequence of steps to which certain
level, temperature, drum movement and
other settings are associated.
The different program steps are always
displayed in big print during cycle execution
along with corresponding symbol.
7.3 CONFIGURATION OF SETTINGS
PROGRAMMING
The programming procedure is organised
in two levels.
The first level is dedicated to the user,
whereas the second is aimed for the expert
user, maintenance technician or laundry
manager.
CAUTION!
The second level is protected by a
PASSWORD and is described in the
programming manual.
All the programming that the common user
can access is explained in the cycle
programming instructions and in the
machine parameters section.
Cycle programming
The wash programs or cycles can be
summarised as a sequence of actions that
the appliance carries out from machine the
beginning to the end of laundry treatment.
The various actions are listed in the “STEPS”
menu below.
Foreword: the washing machine is delivered
with series of steps, i.e. actions, stored in
memory, which enable the execution of the
standard cycles.
Using the programmer it is possible to change
the existing programs or create new ones
starting from pre-set steps. In this case the
user does not need to possess specific
knowledge on the wash diagram that best
suits the fabrics to be washed.
In other words, it is possible to enable or
disable a certain step in a standard program
or either choose existing steps as appropriate
and add them one by one. Steps will be
carried out in the order in which they were
put in.
The user can thus customise programs
according to his/her own sequence of steps.
If this should not be sufficient to suit the
specific requirements, it will be necessary to
access the "steps menu" and create
customised steps, which can then be included
in a program, either existing or new.
The “CYCLES” menu is accessed as follows:
Open the washer door: all programming
actions must be performed with the door
open. The programming environment
cannot be accessed when the door is closed.
Hold down the “ MODE” until the
“CYCLES” reading appears. Confirm using
“ENTER”. The display will read the first
among the 20 available CYCLES OR
PROGRAMS. Use the “UP” and “DOWN”
keys to scroll the complete list of cycles,
which are associated words denoting their
name, like “WHITES” or type like
“STRONG”. Free, meaning empty cycles
are simply marked “NOT
PROGRAMMED”. Once the program to be
altered has been selected, press “ENTER”.
The display will then read the following
items:
COMMENT
STEPS
TYPE
COPY FROM
COPY TO
The various items are described below.
COMMENT
Go to the "COMMENT" field using the
“UP” and “DOWN” keys. Confirm the
selection by “ENTER”. A text field will be
displayed, which is made of 10 characters
and can be used to assign a program name,
e.g. “WHITES 90°C”. To enter characters,
press the “SELECT” key: all the available
characters will be viewed, which can be
selected using the “UP” and “DOWN” keys.
Confirmation is automatic.
STEPS
Go to the "STEPS" field using the “UP” and
“DOWN” keys.
Confirm the selection by “ENTER”.
The first step associated to the currently
selected cycle will then appear, i.e. step N°
01, which is displayed in big print.
The number assigned to the step, along with
the relevant type and comment will be
displayed in small print too.
The steps composing the currently selected
cycle and the sequence of actions associated
thereto can be scrolled using the “UP” and
“DOWN” keys: for example, soak, prewash,
wash and intermediate short spin, rinse and
so on until the last scheduled step is viewed.
A program can hold up to maximum of 25
steps. Free steps will be marked “NOT
PROGRAMMED”.
Select the step to be altered using the “UP”
and “DOWN” keys and confirm by
“ENTER”. The display will list the following
entries:
CHANGE
ERASE
INSERT BEFORE
INSERT AFTER
To move the cursor inside a word that is
being entered use the “UP” and “DOWN”
keys.
To delete a letter, point it with the cursor
and press “START”.
When the desired text has been keyed in,
confirm by “ENTER” and exit by pressing
the “MODE” key.
Change: press “ENTER” to confirm if you
wish to change the step currently selected.
Select the step with which you wish to
replace the currently selected step using the
“UP” and “DOWN” keys. Then confirm by
“ENTER”.
The programmer will next prompt
“COPY?”. Press “ENTER” to confirm the
change or either press “MODE” to cancel it.
Erase: press “ENTER” to erase the step
currently selected.
The programmer will next prompt
“ERASE?”. Press “ENTER” to erase or
either press “MODE” to cancel the action.
CAUTION! The “ERASE” command does
not erase steps from the programmer but
only from the sequence associated to the
selected program. The steps erased can be
selected again, re-entered or changed as
desired.
Insert before and after: press “ENTER” to
confirm that you wish to insert a step before
or after the currently selected step. Select
the step to be inserted before or after using
the “UP” and “DOWN” keys and then press
“ENTER” to confirm.
To cancel the insertion, press “MODE”.
TYPE
Go to the "TYPES" field using the “UP” and
“DOWN” keys.
Confirm the selection by “ENTER”.
The display will list the following entries:
STRONG
MEDIUM
DELICATE
Select cycle type using the “UP” and
“DOWN” keys and press “ENTER” to
confirm. Program type selection is a just a
reminder for the user. It is meant to assist
him in the selection of the most appropriate
cycle.
When the desired type has been selected,
confirm pushing “ENTER” and exit by the
“MODE” key.
CAUTION! This selection does not alter
cycle execution in the least. It is only a
reminder for the user.
COPY FROM AND COPY TO
Move to the “COPY FROM” or “COPY
19

TO” field using the “UP” and “DOWN”
keys. Press “ENTER” to confirm.
Select the program you wish to copy from or
to using the “UP” and “DOWN” keys. Press
“ENTER” to confirm.
The programmer will next prompt
“COPY?”. Press “ENTER” to copy between
cycles or programs or press “MODE” to
cancel.
Whether you chose to confirm or cancel the
copy, press “MODE” to exit.
DESCRIPTION OF
PROGRAMMABLE FUNCTIONS
Machine parameters are those required to
effect marginal changes to the wash
programs without having to access cycle or
step programming.
These functions enable the user to override
existing actions or add new ones in a wash
cycle. This does not alter the program
features in a radical manner, though.
The “MACHINE PARAMETERS” menu is
accessed as follows:
Open the washer door: all programming
actions must be performed with the door
open. The programming environment
cannot be accessed when the door is closed.
Hold down the “ MODE” key until the
“MACHINE PAR.” reading appears. Press
“ENTER” to confirm. The display will then
read the following items:
COOL
SPIN
PREWASH
DELAYED START
BUZZER
HEATING
ENABLE
RESET
The various items are described below.
These functions affect only the currently
selected wash cycle and remain effective
until they are disabled.
COOLING
Cool: This function decides whether the
wash bath is to be cooled right before it is
drained off. As a rule, cooling is aimed to
prevent the garments from undergoing a
thermal shock as they go, for example, from
a 90°C wash step to ambient temperature
rinsing.
Select "COOL" using the "UP” and
“DOWN” keys.
Confirm the selection by “ENTER”.
Programs/cycles and their respective cooling
setting can be scrolled using the “UP” and
“DOWN” keys. Move to the desired cycle and
press “ENTER”. Then choose between “YES”
and “NO” using the “UP” and “DOWN” keys
and press “ENTER” to confirm.
Press “MODE” to exit.
SHORT SPINNING
Spin: This function allows to acknowledge
the standard-selected spinning, reduce it to
one-minute spinning or eliminate it
altogether. Select "SPIN" using the “UP”
and “DOWN” keys.
Confirm the selection by “ENTER”.
Programs/cycles and their respective cooling
setting can be scrolled using the “UP” and
“DOWN” keys. Move to the desired cycle
and press “ENTER”. Then again using the
“UP” and “DOWN” keys choose among:
NORMAL
REDUCED
NO SPINNING
Press “ENTER” to confirm.
Normal: the machine carries out standard
final spinning. Reduced: one-minute final
spinning. Spinning length is applied to the
last spinning speed. The acceleration ramp
is never reduced.
No spinning: final spinning is not carried
out.
Press “MODE” to exit.
NO PREWASHING
Prewash: Generally speaking, all programs
include prewash. The purpose of this
function is actually to override prewash.
This is especially useful when handling
laundry that is not heavily soiled.
Select "PREWASH" using the "UP” and
“DOWN” keys.
Confirm the selection by “ENTER”.
Programs/cycles and their respective
prewash setting can be scrolled using the
“UP” and “DOWN” keys. Move to the
desired cycle and press “ENTER”. Then
choose between “YES” and “NO” using the
“UP” and “DOWN” keys and press
“ENTER” to confirm.
Press “MODE” to exit.
DEFERRED CYCLE START
Delayed START: This function defers
machine start up to a maximum of 24 hours.
As soon as the scheduled time has elapsed
the machine starts automatically.
This function defers machine start up to a
maximum of 24 hours. As soon as the
scheduled time has elapsed the machine
starts automatically.
When waiting for the deferred start the
machine reads the countdown. If during the
countdown the “START” key is pressed, the
machine immediately starts the cycle that
was originally selected. Select "DELAYED
START" using the "UP” and “DOWN”
keys.
Confirm the selection by pushing “ENTER”.
The parameter status, i.e. either
“DISABLED” or “ENABLED” will appear.
Press “ENTER” to change the selection.
Use the “UP” and “DOWN” keys to make
your selection in minutes and/or hours and
then press “ENTER” to confirm.
Press “MODE” to exit.
As soon as the “START” key is pushed the
countdown starts and the display reads the
following message:
Start scheduled in:
countdown (time remaining to the beginning
of the cycle)
ENABLE/DISABLE BUZZER
Buzzer: Each time a key is pressed the
buzzer gives out a short loud beep. This can
be eliminated by accessing this function.
Select "BUZZER" using the "UP” and
“DOWN” keys.
Confirm the selection by “ENTER”.
The parameter status, i.e. either
“DISABLED” or “ENABLED” will appear.
Press “ENTER” to change the selection.
Use the “UP” and “DOWN” keys to select
your value and then press “ENTER” to
confirm.
Press “MODE” to exit.
CHANGING HEATING
TEMPERATURE
Heating: The maximum wash bath
temperature reached through heating in any
cycle can be lowered by 10°C. Select
"HEATING" using the "UP” and “DOWN”
keys.
Confirm the selection by “ENTER”.
The parameter status, i.e. either “NORMAL”
or “REDUCED” will appear. Press
“ENTER” to change the selection. Use the
“UP” and “DOWN” keys to make your
selection and then press “ENTER” to
confirm.
Press “MODE” to exit.
ENABLING CYCLES
Enable: When one or more cycles are not
desired, it is possible to hide them from the
available alternatives. This means that they
are not erased but only concealed from the
user interface menu. The enabled cycles can
be scrolled using the “SELECT” and “UP”
or “DOWN” keys and the disabled cycles
will not be listed. Select "ENABLE" using
the "UP” and “DOWN” keys.
Confirm the selection by pushing “ENTER”.
Using the “UP” and “DOWN” keys it will be
possible to scroll all programs and their
enable/disable settings. Move to the desired
cycle and press “ENTER”. Again using the
“UP” and “DOWN” keys, choose between
“ENABLED” and “DISABLED” and press
“ENTER” to confirm.
Press “MODE” to exit.
RESET:
Temperature: As a rule, once the machine
has reached the temperature set for a cycle
in which heating is expected, it holds the
temperature for the time that the program
establishes. Using this parameter it is
possible to disable this function.
Level: As a rule, once the machine has
reached the water level set for a cycle in
which water talke-in is expected, it holds
the water level for the time that the program
establishes. Using this parameter it is
possible to disable this function.
7.4 USEFUL ADVICE FOR THE USE
OF THE MACHINE
Remember that loading 80% of the rated
capacity provides better wash results.
Mind that more soap does not mean better
wash: on the contrary, using too much
washing agent only leads to unnecessary
pollution. The right amount of soap is
indicated by the manufacturer according to
the relevant water hardness.
20
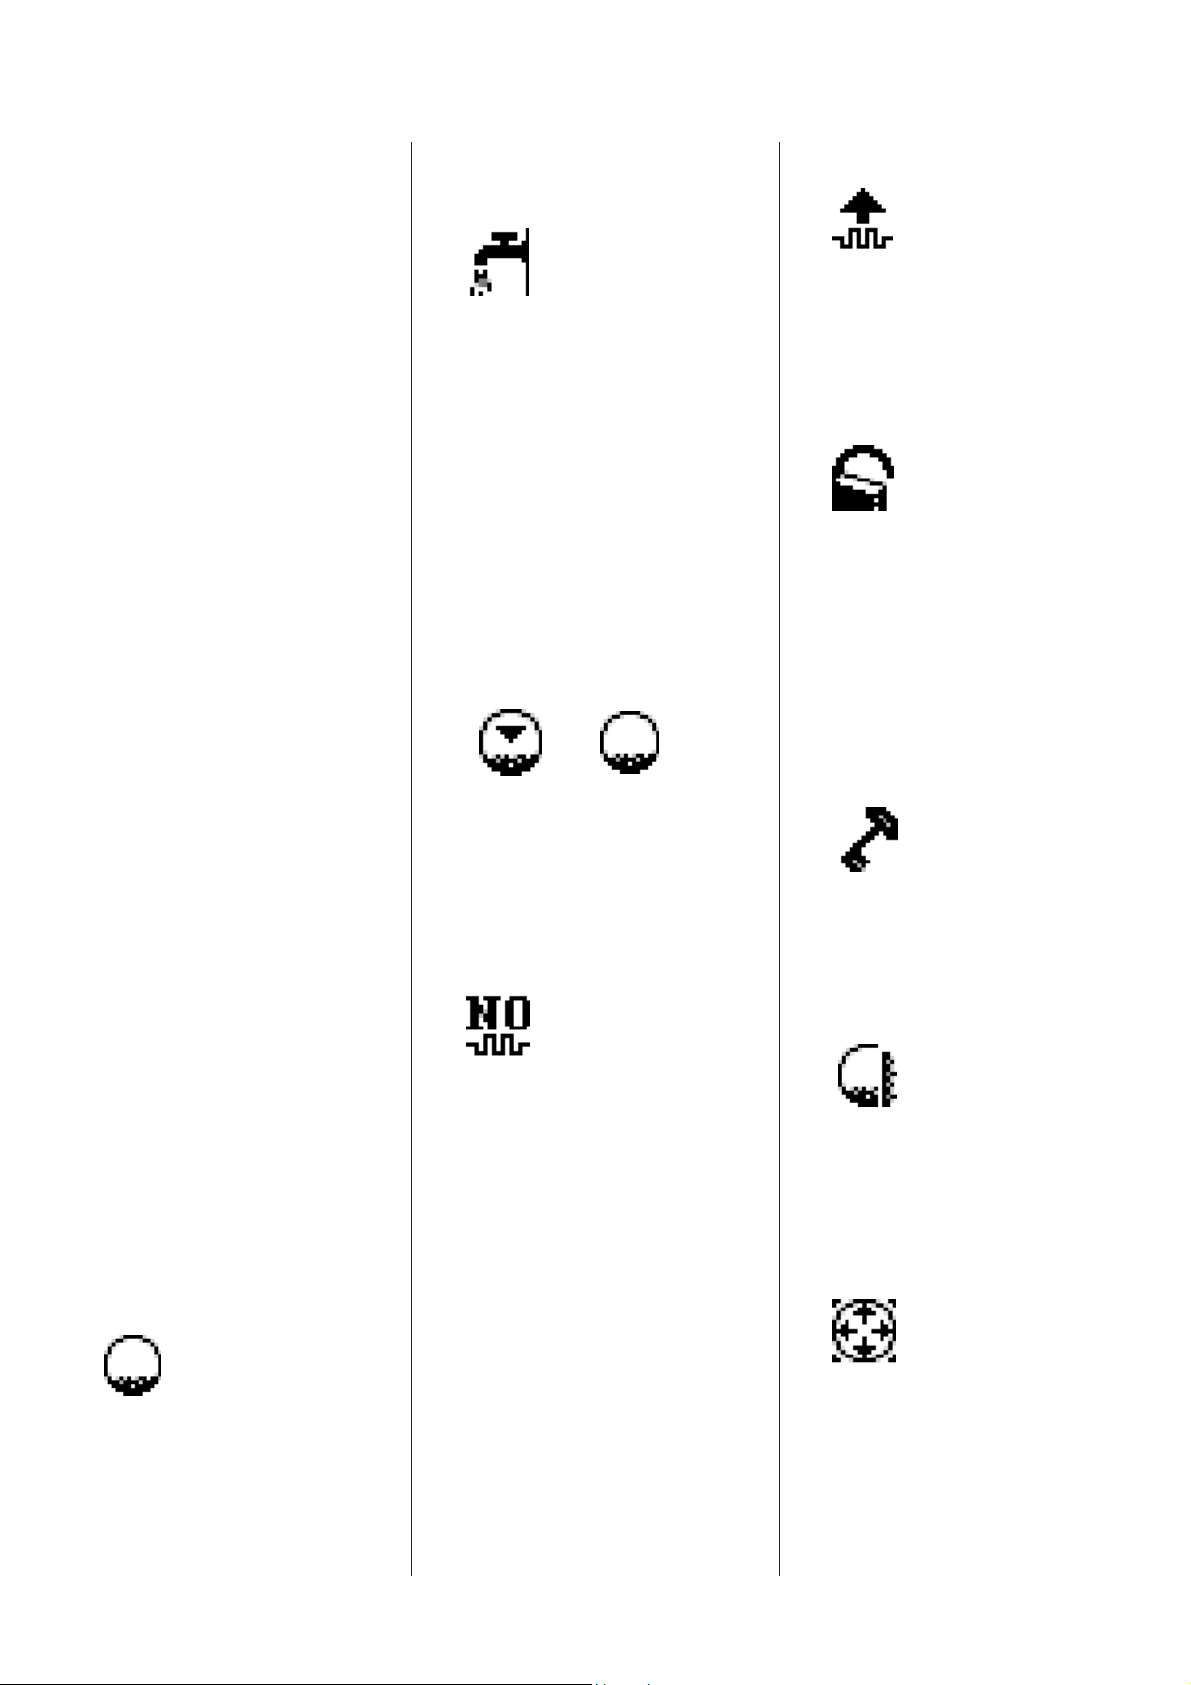
Unless specifically advised against, the use
of the water-intake economiser is warmly
recommended and so is the reduction of
maximum temperature, in order to curb
water and energy consumption and
consequently reduce cycle length.
Before loading the laundry make sure that
buttons, zips, clasps and buckles are facing
inside Check that the pockets are empty.
At the end of the job do the following:
- leave the door open;
- turn the machine off by the master switch;
- close the warm water, cold water and
steam taps (the latter applies to steam-heated
machines only);
- turn the wall cutoff switch off.
7.5 WASH PROGRAMS
Cycle steps are detailed in the user-friendly
tables attached.
7.6 WARNING
- Do not leave the machine on to no purpose.
TURN the main switch OFF when the
machine is not being used.
During use:
- Only open the door when the drum is still
and drained.
- In case of a voltage drop during a washing
cycle, the door may be opened after about 90
sec. In case of emergency or defect of the
door opening device, it is possible to open
the door by the manual puller located down
on the left. Before opening the door make
sure that the drum has come to a complete
stop, that the water has been drained and
that the temperature is below 40°C.
- Before any maintenance or cleaning
operation, check that the wall cutoff switch
is off and the warm water, cold water and
steam taps are closed (the latter applies to
steam-heated machines only).
- Do not machine-wash fabrics that have
been cleaned, dampened, washed or stained
with inflammable or explosive substances
unless they have been hand-washed and airdried first. Otherwise, hand-wash them first.
- Keep inflammable liquids far from the
washing machine, in a dry and ventilated
spot, out of the reach of outsiders.
- Keep cleaning products and washing
powder far from the machine, if possible,
closed in a cabinet.
- Do not hamper air inlets or heat-exchanging
openings. Keep an appropriate distance
between the machine and the walls or other
objects.
7.7 ALARMS INSIDE THE MACHINE
Icon E1: water in the tub.
1) Alarm E1 - water in the tub: If water is
detected in the tub before the start of a cycle,
all functions are disabled. The alarm will
disappear as soon as water drops below the
safety level.
The BUZZER will not go on. The alarm can
only be removed by switching the machine
off and then on again.
The causes of this fault are either the drain
(make sure that the solenoid valve is clean
and in good working order) or the built-in
level pressure switch.
Icon E2: poor water level.
2) Alarm E2: Poor water level alarm. This
alarm cuts in when the time needed to take
in water exceeds the value assigned in the
current step. It is automatically dismissed
as soon as the required water level is reached.
This alarm has no effect on the cycle, which
is resumed as soon as the correct water level
is reached. If the correct level fails to be
reached after water has been taken in for 10
more minutes the cycle is stopped and the
buzzer is activated. To remove this alarm,
switch the machine off and then on again.
Possible causes: poor pressure in the water
mains, a blocked filter in the water intake
solenoid, a closed supply tap, a broken drain
solenoid valve or a leak in the same (water
is taken in but it is simultaneously drained
and the machine consequently fails or is
slow to reach the required level).
Icons and alternately
E3: drain failure.
3) Alarm E3: drain alarm. This alarm
indicates that the machine has failed to
drain the water below the safety level in one
minute (or in the time set for the program).
The cycle will be resumed after water has
dropped below the safety level, with no
effect on cycle completion. The buzzer is not
actuated. As for the causes, see alarm E1.
Icon E4: heating failure.
4) Alarm E4 - Heating alarm: After the
heating has worked for 20 minutes, the
temperature has not risen by at least 5°C,
and yet the cycle proceeds normally. This
alarm will automatically disappear as soon
as the temperature reaches the established
threshold. The BUZZER will not go on.
Possible causes: an incorrect connection of
the heating elements, scale and/or lint on
the heating elements, which impair their
performance. It is advisable to also check
that the warm water inlet has been connected
properly: if the cold and warm water inlets
have been inverted, and the drum is
consequently fed cold water only, heating
times will be abnormally increased.
The heating elements are equipped with a
fuse that opens the circuit in case of
malfunction (e.g. heaters switched on with
drum empty).
CAUTION!
When the fuse has tripped (each heater has
one) the heating element cannot be reused
or repaired and will have to be replaced.
The tripping of this safety device may cause
repeated occurrences of alarm E4, no matter
the selected cycle or temperature.
Icon E5: supertemperature:
5) Alarm E5 - Overtemperature alarm disconnected temperature probe: Water
temperature has exceeded 95°C or the
temperature probe is either broken or
disconnected. The wash cycle is stopped
and the buzzer is activated. This alarm can
only be called off by switching the machine
of and then on again.
Icon E6: door failed to be
locked/unlocked.
6) Door lock alarm E6: Ten seconds after
cycle start the door has failed to be locked
(the door is not closed ten seconds after the
START button has been pressed). The wash
cycle is aborted and the alarm status can
only be removed by pressing the “START”
button again. To attempt a new start, press
START again. The buzzer is not actuated.
Possible causes: the door may have not been
closed properly by hand or the door
microswitch may be damaged owing to
handle misuse.
Icon E7: door damage.
7) Alarm E7 - Door alarm: if door damage
or breakage is detected during operation,
whatever the cause, then this alarm takes
over, the cycle is immediately aborted and
the tub is drained. Normal conditions can
only be restored by switching the machine
off and then on again. The buzzer is actuated.
Icon E8: level error.
8) Alarm E8 - level alarm: a water level 10
cm above the established height is detected:
the cycle is aborted and the buzzer is actuated.
To remove this alarm, switch the machine
off and then on again. The cause of this
alarm is surely the level probe, as this is a
specific safety device. CAUTION! this fault
can also be caused by the use of foamy soap.
Icon E9: imbalance.
9) Alarm E9 - Out-of-balance (tilt) alarm
If the tilt switch trips when the machine is
spinning, the current step - but not the cycle
- is terminated. The motor is then put to idle
until the drum has come to a complete stop.
If the current step is a final spin (which
envisages a certain number of start attempts)
the machine will then perform a distribution
action to spread out the laundry before trying
to spin again. This routine will be repeated
21

as many times as programmed for the current
spin step (maximum 15); if no attempt
succeeds, the display will read the alarm E9
and will prompt the user to press START. If
START is pressed once the machine will
resume the spinning attempts as above; if it
is pressed repeatedly, the machine will
override the final spin and proceed to the
end of the cycle.
If the tilt switch trips during an intermediate
spin step the alarm is not displayed: after
slowing down, the machine will override
the spinning and will continue the cycle.
Alarm causes may be an incorrect laundry
load (too little or too big), unlevelled machine
positioning or dampers worn out through
repeated incorrect loads; at any rate, regularly
ensure that the tilt switch is in the correct
position following the instructions provided
above.
Icon E0: motor overload.
10) Alarm E0: Motor overload cutout
In case of motor fault, i.e. overheating,
misconnection, etc., the motor is put to
neutral and the message E0 flashes on the
display. Besides the alarm signal, the display
reads the START prompt. Then, if the motor
alarm is momentary, the machine will
resume the cycle from the step in which it
was interrupted as soon as the START button
is pushed. (If the machine is at a spinning
step, after the motor is put to idle, a safety
interval will be allowed in order for the
drum to come to a complete stop). If after 5
consecutive tries performed in a short time
the alarm has not been dismissed, it will be
necessary to turn the machine off using the
master switch and then wait for at least 5
seconds in order for motor control to be reengaged.
Measures to be taken in case of a
voltage drop
If a voltage drop longer than 3 sec. occurs
during a wash cycle, on being re-energised
the display will read "POWER FAIL" with
the general danger sign and an hourglass
flashing for one minute: all functions will
be disabled. As soon as normal work
conditions are restored the cycle will be
resumed from the step that was in progress
when the voltage drop occurred and the
display unit will resume its normal functions.
Conversely, if the door is open when the
machine is re-energised, the cycle will be
aborted.
ATTENTION: If the ON - OFF switch is
actuated to turn machine off after the
cycle has been started, the microprocessor
will behave as if a voltage drop has
occurred and will react accordingly.
CAUTION! WHEN ONE OR MORE
ALARMS APPEAR ON DISPLAY
DURING MACHINE OPERATION,
REMOVE MISFUNCTION SOURCES
BEFORE STARTING A NEW CYCLE (IF
POSSIBLE). AND CONTACT THE
AUTHORISED AFTER-SALES SERVICE
OR DEALER IN ORDER TO AVOID
FURTHER DAMAGE.
7.8 INFORMATION SPECIAL
MEASURES FOR USE AND
PROTECTION
When carrying out the first cycle, verify the
following:
- Soap dispensers must stay clean.
• compartment A after taking in pre-wash
water;
• compartment B after taking in wash water;
• compartment C after taking in last rinse
water.
- Make sure that the soap made solid during
storing is washed away.
- Perform a 90°C cycle to remove all
manufacturing residue.
- The operator must be able to check soap
compartments with ease. Place a platform if
necessary.
- Make certain that laundry trolleys are
lower than the door's bottom edge.
- If need be, mount appropriate bumpers to
prevent trolleys from hitting and damaging
the door.
- Never open the soap compartment when
the machine is being filled with water or
it is heating.
7.9 ORDINARY MAINTENANCE BY
THE USER
BEFORE ANY MAINTENANCE
OPERATION, CHECK THAT THE
WALL CUTOFF SWITCH IS OFF AND
THE WATER TAPS ARE CLOSED.
THE DRUM MUST BE STILL AND
DRAINED AND THE TEMPERATURE
INSIDE IT MUST NOT EXCEED 40°C.
The machine requires no special
maintenance, thanks to its ergonomic design
and to the use of very reliable, first-quality
parts.
Regularly clean the machine outer panels
with a damp cloth. Clean the area around
the dispenser especially. Never use
flammable or abrasive products.
Notes concerning the control panel and
graphic display
- Do not clean the LCD display and the
keypad using acetone, alcohol or other
chemical agents. Also avoid using oil and
grease.
- Prevent contact of the glass with lacquer or
resin that may contain solvent; some of
these may weaken the resin that coats the
glass part.
- The glass can easily get scratched, cut or
broken. Be very careful when treating and
cleaning it. Clean only with a soft and dry
cloth.
WARNING! Do not exercise pressure on it.
- During use, condensation building up on
the glass can irremediably damage the
display. Even when not in use, any water or
saliva drops must be dried at once.
- In case of contact of body parts with the
fluid leaking out of a broken display, wash
with water and soap. In case of accidental
ingestion, see a doctor. Although the
product's toxicity is very low, it is still
necessary to proceed with caution.
- Just like any other electronic component,
the display is susceptible to electrostatic
discharge. Take the usual measures for use
and handling.
NEVER WASH THE APPLIANCE USING
WATER JETS.
BEFORE TURNING THE MACHINE
BACK ON BY THE WALL CUTOFF
SWITCH, PUT ALL THE PANELS YOU
HAVE REMOVED BACK IN PLACE.
INSTRUCTIONS FOR
MAINTENANCE AND
REPAIR PERSONNEL
8. EXTRAORDINARY
MAINTENANCE AND ORDERING
SPARE PARTS
8.1 REMOVE THE LID.
To reach the machine electrical parts, take
off the screws fastening the lid to the soap
dispenser and proceed as follows:
A) Key-locked cover lid : insert the keys
supplied into the two locks located at the
top's rear.
Unlock the lid's front and lift it until it can
be held up by the stop rod located on the side
of the machine, beside the soap dispenser.
The lid is hinged at the back of the machine
and cannot be removed altogether.
B) Lid without key-lock: take off the screws
fastening the lid to the back panel; then lift
the rear part of the lid and pull it to the front
by approximately 5 cm.
BEFORE TURNING THE MACHINE
BACK ON BY THE WALL CUTOFF
SWITCH, PUT ALL THE PANELS YOU
HAVE REMOVED BACK IN PLACE.
8.2 TROUBLESHOOTING
• If the machine does not work, check the
following:
- the main cutoff switch on the wall is on and
the machine is getting current;
- the door is closed;
- the START push-button has been pressed;
- the warm water, cold water and steam taps
are open (the steam tap only for steamheated machines).
If the fault is not due to any of the above
causes, call the authorised after-sales service
or your dealer (see last page of this booklet).
8.3 SAFETY DEVICES
- Door closed safety microswitch cuts off power
to the whole auxiliary circuit and consequently
stops the machine.
- Electronic thermal switch (overload cutout)
within the motor: disconnects power supply in
the event of coil overheating.
- Air-break system in the soap dispenser: prevents
wastewater from polluting the drinkable water
system in the event of a depression.
22

- Normally open drain valve: enables safe
manual door opening by means of the handle.
- Tilt switch: avoids mechanical damage in
the event of irregular loads.
- Fuse-fitted heating elements. the electric
circuit is disconnected in case of malfunction.
8.4 PERIODIC MAINTENANCE (TO
BE CARRIED OUT BY TECHNICIANS)
Maintenance must only be carried out by the
authorised after-sales service or by qualified
personnel.
BEFORE ANY MAINTENANCE
OPERATION, CHECK THAT THE
WALL CUTOFF SWITCH IS OFF AND
THE WARM WATER, COLD WATER
AND STEAM TAPS ARE CLOSED
(THE LATTER APPLIES TO STEAMHEATED MACHINES ONLY). THE
DRUM MUST BE STILL AND
DRAINED AND THE INSIDE
TEMPERATURE MUST NOT EXCEED
40°C.
Be very careful during maintenance. NEVER
override or ignore safety devices for any
reason. Use only original spare parts. If
doubts should arise, contact your sales person
immediately, explaining what the fault is
and indicating some information on the
machine: model and serial number (details
reported on the rating plate appearing on
the rear of the machine or inside the door,
where applicable).
MONTHLY CHECKS
- Make sure that the filters located on the
outer part of the electrical valves are clean.
- Make certain that the steam valve strain is
clean (this applies to steam-heated machines
only).
- Clean the soap dispenser from any soap
remains.
- Clean the door gasket and the tub inlet with
a cloth.
- Clean the inverter cooling fan from dust
and lint build up. This is the fan up at the
rear, in the middle of the machine, behind a
protection grid (if this is provided).
YEARLY CHECKS
- Make certain that the floor fastening nuts
are securely closed (if applicable).
- Check the wear of the belts and replace
them if necessary. If more than one of them
is worn out, replace the entire set of belts.
- Make sure that the safety devices are
working properly (e.g. the door microswitch
and the tilt microswitch).
- Check that the screws for electrical
connection are tight on the contactors and
power inlet terminal strip.
- Disassemble the drain valve and clean it
inside from lint.
- Check that the heaters are in perfect
condition and clean them from scale.
BEFORE TURNING THE MACHINE
BACK ON BY THE WALL CUTOFF
SWITCH, PUT ALL THE PANELS
REMOVED BACK IN PLACE.
AUTOMATIC MAINTENANCE
REQUEST
The machine keeps count of the number of
cycles it executes. After 1000 programs the
machine will flash a writing from cycle
1001 onwards.
More precisely, when starting a new cycle,
the machine will flash the writing "10 00 C”
for 10 seconds as the START button is
pressed, then it will carry out the selected
cycle normally.
When this message is displayed, request
yearly maintenance.
To call off this reading and start the 1000
cycle count from scratch, press the "DOWN"
push-button.
8.5 IDENTIFYING AND ORDERING
SPARE PARTS
To identify the codes of spare parts refer to
the exploded drawings and relevant list.
Once you have identified your codes, send a
standard written order to the manufacturer,
mentioning clearly machine model, serial
number, feed voltage and frequency and, of
course, including the code and description
of the spare part needed.
9. MACHINE LAY UP,
DISMANTLING AND DISPOSAL
If the washing machine is no longer to be
used, it is advisable to put it out of service
and suitably dispose of the resulting
materials, considering the information
provided in chapter 3. For the sake of the
environment, sort the materials in
accordance with the waste disposal
provisions in force in your country, so that
they can be properly disposed of or recycled.
All the parts composing the machine can be
treated as solid urban waste, except for the
metal parts, which yet are not classed among
special waste in most European countries.
INFORMATION TO USERS
Pursuant to article 13 of law decree 25 July
2005, nr. 151 relating to “Implementation
of Directives 2002/95/EC, 2002/96/EC and
2003/108/EC concerning the reduction in
the use of hazardous substances in electric
and electronic apparatus, as well as waste
disposal”
The deleted dustbin symbol on the appliance
indicates the product must be disposed of
separate from other wastes once it reaches
the end of its life cycle.
Once the appliance has reached the end of
its life cycle, the user must therefore take it
to a suitable pre-sorted waste centre for
electronic and electro-technical appliances,
or return it to the dealer on purchasing a new
similar appliance, on a one for one basis.
Adequate pre-sorted waste collection before
subsequently sending the appliance for
recycling, treatment and environmentally
compatible disposal helps avoid possible
negative effects on the environment and
health and favours the recycling of the
materials making up the appliance.
Unlawful disposal of the product by the user
is punishable by the administrative sanctions
indicated in law decree nr. 22/1997 (article
50 and following articles of law decree nr.
22/1997)
23

F
MODE D'INSTALLATION ET EMPLOI
AVANT PROPOS
Nous désirons vous remercier pour avoir
préféré notre appareil. Nous sommes sûrs
que vous obtiendrez les satisfactions et les
résultats les meilleurs, si vous suivez
scrupuleusement les indications contenues
dans le présent manuel.
Nous Vous informons en outre, qu'en cas de
contestations ou observations, il faut se
référer exclusivement au texte du
constructeur dans la langue originale, c’està-dire, l’italien.
1. GARANTIE
- La garantie a une durée de douze (12) mois
à dater de l’achat de l’appareillage ou partie
intégrante de celui-ci.
- La garantie consiste à remplacer les pièces
éventuellement défectueuses pour des motifs
de fabrication et est appliquée directement
par votre fournisseur.
Le coût de la main-d’œuvre est toujours à la
charge de l’acheteur, il en est de même pour
les frais de transport, d’emballage et risques
de transport.
- La garantie est subordonnée à la restitution
des pièces défectueuses réexpédiées en
PORT FRANC simultanément à la
communication des données concernant le
modèle, le numéro de matricule et le défaut
de la machine sur laquelle la pièce était
montée.
- La garantie n’est pas appliquée aux
appareils qui ont été endommagés suite à
négligence, branchement erroné,
installation inadaptée, non respect des
instructions de montage et d’utilisation, et
quoi qu’il en soit altérés par du personnel
non autorisé. La garantie n’est pas applicable
si le numéro de matricule a été altéré, effacé
ou enlevé.
- La garantie ne s’applique pas au matériel
suivant:
pièces exposées à l’usure normale, comme
courroies, membranes des soupapes
électriques et parties en caoutchouc.
Composants électriques comme moteur,
bobine, contacteurs, résistances etc.
2. INTRODUCTION
Le présent manuel a été réalisé de façon
simple et rationnelle pour que vous puissiez
connaître à fond votre machine en le lisant.
On recommande d’en lire attentivement le
contenu et de le conserver avec la machine.
Les précautions et avertissements, contenus
dans ce manuel, ne peuvent couvrir toutes
les éventualités; il est important de garder à
l’esprit que le sens commun, l'attention et la
prudence sont des facteurs, qui ne peuvent
pas être ajoutés à l'appareil par le
constructeur, mais ils doivent être prévus
par le personnel, qui effectue l'installation,
l'entretien et/ou l'utilisation de la machine.
Quiconque utilise cette machine doit lire le
présent mode d’emploi.
En cas de réparations, notre maison
recommande vivement l’utilisation de pièces
de rechange originales. Pour leur commande,
veuillez consulter le paragraphe 8.
Les descriptions et illustrations, contenues
dans ce manuel sont indicatives, la maison
se réserve donc le droit, à tout moment et
sans engagement, de mettre la publication à
jour en temps utile et/ou d’apporter
d’éventuelles modifications aux organes,
composants et accessoires au cas où cela
serait considéré avantageux pour une
amélioration ou pour toute exigence de
caractère constructif ou commercial.
3. PRESCRIPTIONS,
INTERDICTIONS ET UTILISATIONS
DIVERSES DE L'APPAREIL
L'appareil doit être utilisé seulement par du
personnel formé pour son utilisation.
Désactiver la machine à laver en cas de
panne et/ou de mauvais fonctionnement.
Pendant son utilisation, nettoyage et
entretien, il faut faire attention de ne pas
accéder avec des outils ou avec les mains
nues aux parties de la machine en
mouvement (moteur et courroie). En cas
d'accident le constructeur ne s'assume aucune
responsabilité pour dommages à l'opérateur
ou à d'autres personnes, qui se passent
pendant l'utilisation, le nettoyage et
l'entretien de la machine.
Ne pas ouvrir le distributeur pendant le
fonctionnement, ceci à cause des lessives
qu'il contient et de la température de l'eau
chaude.
Cet appareil a été projeté pour le lavage de
tissus suivant les indications reportées sur
les étiquettes qu’ils portent; laver seulement
des vêtements, du linge et des tissus normaux
d’usage quotidien.
Ne pas introduire de pièces qui ont été en
contact avec des produits chimiques ou
inflammables mais faire auparavant un
lavage à la main en les séchant à l'air afin de
faire évaporer complètement ces substances.
L’utilisation n’importe quel appareil
électrique et électronique comporte
l’observance de quelques règles
fondamentales. En particulier: ne pas toucher
l’appareil avec mains ou pieds mouillés ou
humides. Ne pas utiliser l’appareil pieds
nus; ne pas laisser exposé l’appareil aux
agents atmosphériques (pluie, sel, salinité,
etc.) Ne pas permettre que l’appareil soit
utilisé par des enfants ou par des personnes
qui n’en sont pas capables, sans une
surveillance adéquate. Ne pas fumer près du
lave-linge ou pendant son utilisation. Ne
pas ôter ou éviter les dispositifs de sécurité.
Ne jamais utiliser de jets d’eau directs et
indirects sur la machine, faire attention de
ne pas l’installer à proximité de zones où
ceci peut se produire.
TOUTE AUTRE UTILISATION NON
SPÉCIFIÉE EXPLICITEMENT DOIT
ÊTRE CONSIDÉRÉE DANGEREUSE. LE
CONSTRUCTEUR NE PEUT EN AUCUN
CAS ÊTRE TENU RESPONSABLE POUR
D’ÉVENTUELS DOMMAGES, DUS A
UNE UTILISATION NON-CONFORME,
ERRONÉE ET NON RAISONNABLE.
INSTRUCTIONS POUR
L’INSTALLATEUR
4. INDICATIONS POUR LE
TRANSPORT, DÉBALLAGE ET
STOCKAGE DE L’APPAREIL
4.1 TRANSPORT DE LA MACHINE
Si l'appareil doit être transporté et/ou
expédié, suivre attentivement les
recommandations ci-dessous:
Pour transporter l’appareil dans le bâtiment,
utiliser exclusivement la palette appropriée
ou équivalente. Utiliser un chariot élévateur
à fourche manuel ou électrique apte au
transport de ces appareils et ayant une force
de soulèvement suffisante (voir données
techniques). Contrôler que l’appareil peut
passé tous les obstacles comme les escaliers,
portes etc. Ne jamais traîner l’appareil par
les montants ou par toute autre partie.
Si l’appareil doit être expédié, utiliser
exclusivement son emballage original, qui
garantit la stabilité suffisante à l’appareil
pendant le transport.
4.2 STOCKAGE
Si l’appareil doit rester dans le dépôt pendant
une longue période avant son utilisation, le
laisser dans son emballage original qui lui
garantit une excellente protection. Vérifier
en outre, que les conditions du milieu
ambiant correspondent à celles contenues
au paragraphe 5. Si l'appareil reste hors
service pendant une période prolongée après
son utilisation, vérifier qu'il est débranché
matériellement du réseau électrique et le
couvrir avec son sac de protection original.
4.3 DÉBALLAGE
1) Avant de confirmer la réception de
l’appareil au transporteur, contrôler
24

attentivement l’état de l’emballage. Si
l’extérieur de l’emballage présente des
dommages évidents, on peut supposer que
l’appareil a aussi subi des conséquences.
Dans ce cas, déballer l’appareil en présence
du transporteur et signer sous réserve le bon
de livraison. Le constructeur décline toutes
responsabilités pour d’éventuels dommages
dus au transport ou à un mauvais stockage.
2) Enlever attentivement l’emballage de
l’appareil pour éviter de l’endommager. Pour
extraire la palette, enlever les vis à l’intérieur
placées sur les trous de fixation au sol.
3) Ouvrir le hublot (voir paragraphe 7.2).
4) Vérifier la présence du matériel suivant:
2 bandes métalliques, 1 coude à 90° en
gomme, 3 tuyaux flexibles avec bague de 3/
4, 1* filtre en laiton pour entrée vapeur, 1*
tube flexible métallique, des clés du tiroir
pour jetons et 15 jetons (seulement pour
fonctionnement à monnayeur) .
Les clés pour l’ouverture du couvercle de la
machine. (Seulement modèles 18-22)
(*seulement machines avec réchauffement
vapeur)
5) IL EST OBLIGATOIRE D’ENLEVER
LES CALES DE FIXATION DE LA CUVE
AVANT DE METTRE LA MACHINE EN
MARCHE.
6) Vérifier que le manuel n’a pas été oublié
dans l'emballage et qu'il ne peut pas se
perdre.
Ne jamais laisser les matériaux d’emballage
(sachets en plastique, polystyrène, bois,
carton, clous, etc.) à la portée des enfants,
parce qu’ils représentent une source
potentielle de danger. Recueillir et conserver
l’emballage pour d’éventuels transports de
l’appareil dans le futur ou pour protéger
l’appareil adéquatement pendant de longues
périodes d’arrêt (voir paragraphe 9). Avant
d’effectuer la connexion de l’appareil,
vérifier que les données techniques sur la
plaquette de l’appareil correspondent aux
caractéristiques du réseau électrique auquel
l’appareil doit être branché. L'appareil doit
être destiné exclusivement à la fonction,
pour laquelle il a été construit.
5. INDICATIONS POUR LA MISE EN
SERVICE DE L'APPAREIL
5.1 PRESCRIPTIONS POUR LA MISE
EN PLACE DE LA MACHINE
Les machines à laver ne présentent aucun
problème d’emplacement en dehors d’une
surface plate, bien nivelée et solide.
Mettre à niveau la machine en utilisant un
niveau à bulle d’air.
On conseille de laisser une distance d’au
moins 500mm entre le côté arrière de la
machine et la paroi pour en faciliter
l’entretien (1000 pour le modèle 22 kg).
En outre, si plusieurs machines sont
installées en linéaire, il faut laisser au moins
30 mm entre un appareil et un autre.
Prédisposer un écoulement au sol plus bas
que celui de la machine à laver, à une
distance qui en permette la connexion par
l’entremise du tuyau à coude fourni.
ATTENTION! Après chaque déplacement de
l’appareil, répéter l’opération de nivellement.
5.2 ESPACE NÉCESSAIRE POUR
L’INSTALLATION, UTILISATION ET
ENTRETIEN DE LA MACHINE
La machine à laver devra avoir à disposition
l’espace minimum indiqué dans les figures
dimensionnelles (voir fig. 1):
1) Ligne d’alimentation électrique avec
interrupteur différentiel automatique et
interrupteur thermomagnétique*.
2) Prise électrique enclenchée dotée de
fusibles et interrupteur multipolaire
manuel.
3) Fiche pour l'alimentation électrique
4) Vannes pour les entrées d’eau
5) Grille ou plaque (conseillée) de
fermeture du puisard d'écoulement.
6) Tuyau en caoutchouc pour l'écoulement
de l'eau, de 3" (fourni)
7) Puisard d'écoulement ayant un débit de
160 litres/ min.
8) Hublot
9) Entrée pour l'eau dure de 3/4".
10) Entrée pour l'eau chaude de 3/4"
11) Entrée pour l'eau douce de 3/4"
12) Entrée vapeur de 3/4" (modèles à vapeur
seulement)
13) Serre-câbles pour l'entrée de
l'alimentation électrique (modèles 811-18)
14) Gabarit pour le placement des goujons
d'ancrage de la machine au sol
15) 3 tuyaux pour l'entrée de l'eau dure,
chaude et douce (fournis)
16) Tuyau flexible de branchement de la
vapeur de 3/4" (fourni avec les modèles
à vapeur seulement)
17) Filtre mécanique de 3/4" (modèles à
vapeur seuls)
18) Ligne alimentation vapeur avec pression
comprise entre 4 et 6 bar; dépense 15 kg
environ (modèles à vapeur seuls)
19) Vanne de barrage de la vapeur (modèles
à vapeur seuls)
20) Écoulement pour l'eau de condensation,
de 3/4" (modèles à vapeur indirecte 811-18 seuls)
21) Serre-câbles pour l'entrée de
l'alimentation électrique (modèle 22 kg)
22) carter pour la protection de l'inverter
(seulement modèle 22kg)
23) Prédisposition pour le branchement des
tubes pour la lessive liquide (seulement
modèle 22kg)
22) Branchement du câble pour la
programmation des cycles de lavage
(utiliser le kit de connexion, un PC avec
le logiciel approprié)
25) Écoulement de l'eau
* La position du disjoncteur automatique
doit être choisie de telle façon, qu’il peut
être opéré facilement par l’utilisateur dans
quelconque situation D’ÉMERGENCE (à
une distance maximum de 3 m).
5.3 CONDITIONS DU MILIEU AMBIANT
CONSENTIES POUR UNE UTILISATION
CORRECTE DE L’APPAREIL
Informer l’utilisateur ou les utilisateurs de
ces conditions.
- TYPE DE MILIEU: FERMÉ
- TEMPÉRATURE MINIMALE: 10° C
(n.b.: les composants électroniques au
dessous de cette température peuvent
fonctionner de façon erronée)
- TEMPÉRATURE MAXIMALE: 40°C
- HUMIDITÉ RELATIVE: 75% H.R.
- ÉCLAIRAGE 100 lux (vu que cette
valeur est valide en Italie et qu’il n’existe
pas une réglementation uniforme sur
l’illumination des locaux de travail, il
faut suivre les normes locales et lois
nationales à cet effet).
5.4 BRANCHEMENT ÉLECTRIQUE
L'installation doit être effectuée suivant les
instructions du constructeur par du personnel
professionnellement qualifié et
conformément aux normes sur les
installations électriques en vigueur dans les
différents pays. Une installation erronée
peut causer des dommages aux choses et des
accidents aux personnes et aux animaux,
pour lesquels le constructeur ne peut en
aucun cas être tenu responsable.
S'assurer que la tension d'alimentation
corresponde aux données sur la plaquette
signalétique de la machine à laver, considérer
en outre que les variations de tension ne
doivent pas dépasser ±10% des valeurs
nominales.
IMPORTANT:
IL EST OBLIGATOIRE DE BRANCHER
LA MACHINE À LA TERRE.
A ce but à l’intérieur, sur la plaque à bornes,
il y a une borne pour le branchement à la
terre, qui devra être conforme aux normes
en vigueur. Le constructeur décline toutes
responsabilités, si cette norme de sécurité
n’était pas respectée.
En conformité aux normes contre les
accidents les plus récentes, la machine est
dotée d’une borne extérieure à disposition
pour la connexion équipotentielle.
Il est indispensable d’insérer en amont de
l’appareil un disjoncteur multipolaire
automatique avec une distance d’ouverture
d’au moins 3 mm entre ses contacts, étalonné
en fonction de l’absorption maximum (voir
données techniques et table ci-dessous).
vapeur
de 550 à
1100W
2500W
N° de poles
230/3 400/3 230/3 400/3
34 6630mA
3 4 16 16 30mA
3 4 20-30 16 30mA
3 4 30-40 25 30mA
3 4 50-70 30-40 30mA
Puissance totale appareil
Chauffage
électrique
de 6000 à
10000W
de 10000 à
13000W
de 18000 à
25000W
Chauffage
de 1500 à
Courant
nom inal In
Courant
enclench. Id
Positionner un tube à câbles d’un diamètre
externe de 20 mm (30 mm pour le modèle 22
kg) entre le disjoncteur et l’entrée pour
l’alimentation électrique de l’appareil.
Utiliser le serre-câble monté sur l’arrière de
la machine, pour insérer le câble
25

d’alimentation et, après avoir branché les
g
câbles à la plaque de bornes en respectant la
séquence indiquée sur celle-ci, bloquer le
câble avec l’écrou en plastique. Utiliser un
câble du type indiqué dans le tableau suivant
et s’assurer que le câble est protégé de façon
adéquate et est du type qui ne propage pas
les flammes.
Puissance totale appareil
10000W
13000W
25000W
Chauffa
vapeur/eau
chaude
de 550 à
1100W
de 1500
à 25000 W
Chauffage
électrique
de 6000 à
de 10000 à
de 18000 à
N° de
conducteurs
e
230/3 400/3 230/3 400/3 230/3 400/3
Type de câble
H05VV-F H05V V-F
34
H05VV-F H05V V-F
34
34A07VV-F A07VV-F 62,5
A07VV-F A07VV-F
34
S07VV -F A 07VV-F
34
Section
conducteurs
2
mm
11
2,5 1
64
10 6
ATTENTION!
Ces appareils sont équipés de dispositifs
électroniques de contrôle tels que cartes et
variateurs de vitesse: Ces dispositifs pour
être homologués CE doivent posséder des
filtres anti-interférences darespectant la
normative pour l’émission des courants
parasites EMC. Ces filtres dispersent par le
conducteur de terre, pour fonctionner
correctement, un petit courant, de l’ordre de
10-15mA.
Il est donc indispensable qu’à chaque
machine corresponde un seul interrupteur
différentiel comme protection de
l’installation. Éviter de brancher en aval
d’un seul interrupteur différentiel plusieurs
appareils, même de différente capacité ou
marque.
IMPORTANT: RÉGLAGE DU
MICROINTERRUPTEUR DE
BALOURD.
Tous les lave-linge superessoreurs sont
équipés d’un dispositif qui interrompt la
phase d’essorage si celui-ci est
particulièrement déséquilibré et donc
potentiellement nocif pour les organes
mécaniques qui composent la machine.
Ce dispositif de sécurité peut être atteint en
ouvrant le couvercle supérieur de la machine,
et est situé environ au point le plus haut de
la cuve. Exécuter cette opération seulement
après avoir coupée la tension à l’appareil à
l’aide du disjoncteur mural.
Cette opération de étalonnage doit être
exécutée seulement par du personnel autorisé
et qualifié.
Ce dispositif se compose d’un
microinterrupteur, fixé au châssis de la
machine, actionné par une tige flexible placée
à l’intérieur d’une fenêtre métallique qui se
déplace en même temps que le tambour du
lave-linge. En cas de vibrations excessives
la fenêtre déplace cette tige et fait intervenir
le dispositif de sécurité ( voir aussi alarme
“E9” à la description des alarmes).
En phase d’installation de la machine, après
avoir enlevé les pattes de fixation pour le
transport et avec le tambour vide, procéder
au positionnement de la tige flexible au
centre de la fenêtre, afin d’éviter des
interventions anormales du dispositif de
sécurité .
Pour exécuter cette opération, tourner les
vis de fixation du support du
microinterrupteur et le placer correctement.
5.5 BRANCHEMENT HYDRIQUE
Le lave-linge est prédisposé pour une entrée
d’eau chaude (à peu près 60°C) et deux
entrées pour eau froide (dure et douce) toutes
de 3/4".
La pression de l’eau en entrée doit être
comprise entre 0,5 et 5 bar (0,05 et 0,5
MPa).
Prédisposer les connexions murales à une
distance inférieure à la longueur des tubes
fournis.
Si l’eau chaude n’est pas disponible
prédisposer un “T” sur l’entrée de l’eau
froide douce et connecter l’eau chaude à
l’entrée de l’eau froide. Quoi qu’il en soit
toutes les entrées doivent être connectées.
Modèle Capacité boiler
Mod. 8 55 litres
Mod.11 80 litres
Mod.18 120 litres
Mod.22 155 litres
A la fin du montage, vérifier qu’il n’y a pas
d’étranglements sur les tubes utilisés.
5.6 CONNEXION VAPEUR
(seulement pour machines avec ce type de
réchauffement)
Le lave-linge est préparé pour une entrée de
la vapeur de 3/4". La pression de la vapeur
en entrée doit être comprise entre 1 et 6 bar
(0,5 et 0,6 MPa). La pression conseillée
pour un rendement optimal de la machine
est de 4 à 6 bar. Quoi qu’il en soit, lire les
données de la plaquette signalétique de la
machine. La vapeur est entendue saturée et
sèche.
Dans le modèle de 22 kg le chauffage de
l'eau dans la cuve peut seulement être direct,
tandis que dans les modèles 8-11-18 le
chauffage peut être bien direct qu'indirect.
Dans le dernier cas il faut prévoir une
connexion pour la récupération de la
condensation, qui doit être aussi de ¾".
Si cette machine à vapeur est sujette aux
contrôles ISPESL, il faudra toujours garder
toute la documentation inhérente dans le
lieu où celle-ci est installée.
A la fin du montage, vérifier qu’il n’y a pas
d’étranglements sur les tubes utilisés.
5.8 BRANCHEMENT DE
L'ÉCOULEMENT
S’assurer que la distance entre la connexion
de la sortie d’eau de la machine et
l’écoulement au sol n'est pas supérieure à la
longueur du coude fourni.
L’écoulement se produit avec une vanne
motorisée à action directe qui, en absence de
tension, reste ouverte (par gravité).
L’écoulement devra donc toujours être plus
bas que la sortie du lave-linge et avoir un
diamètre non inférieur au tube fourni.
Modèle Débit
d’écoulement
Mod. 8/11/18/22 160 l/min.
Le conduit d’écoulement doit pouvoir
supporter la température de 90°C.
Interposer un siphon entre le tube en dotation
et l’écoulement.
À la fin du montage, vérifier qu’il n’y a pas
d’étranglements.
5.7 AIR BREAK
Le lave-linge est doté d’un dispositif de “air
break” (saut en air) qui empêche le retour
d’eau non potable dans le réseau en cas de
dépression. Ce dispositif prévoit une sortie
arrière, de laquelle, pendant le
réchauffement, peuvent sortir des vapeurs
toutefois inoffensives. Cette sortie ne doit
être en aucun cas raccordée ou bouchée.
LA GARANTIE N'EST PAS APPLIQUÉE
AUX DOMMAGES DUS À UNE
INSTALLATION ERRONÉ.
INSTRUCTIONS POUR
L'OPÉRATEUR
6. INFORMATIONS SUR
L'APPAREIL
6.1 DESCRIPTION DE L'APPAREIL
L’appareil est composé des parties principales
indiquées ci-dessous (voir fig. 2):
1) Couvercle sous lequel se trouve le circuit
de commande.
2) Distributeur de lessive pour le prélavage
et le lavage (en poudre et non moussant)
et les produits du dernier rinçage (liquide
non moussant).
3) Hublot pour le chargement/
déchargement du linge.
4) Monnayeur (seulement dans les versions
préparées à cet effet).
5) Boîtier pour la récolte des jetons utilisés
(seulement dans les versions préparées
à cet effet).
6) Écoulement (8-11-18-22: 3”).
7) Borne équipotentielle.
8) Air break (saut en haut)
9) Entrées eau (3/4").
Description du tableau de boutonspoussoirs
26

1. Afficheur Graphique
2. Bouton-poussoir "Economy" pour la
réduction de toutes les consommations
hydriques de 20%
3. Bouton-poussoir de programmation et
de choix des visualisations
4. Bouton-poussoir pour la sélection du
cycle désiré
5. Bouton-poussoir démarrage cycle et
avancement rapide.
6. Bouton-poussoir pour augmenter les
valeurs
7. Bouton-poussoir de confirmation de
variation des données
8. Bouton-poussoir pour diminuer les
valeurs
6.2 GAMME COMPLÈTE DES
APPLICATIONS
Le lave-linge que vous avez acheté a été
projeté de façon à exécuter le lavage de
tissus synthétiques de genre différent,
d’articles en laine, en coton et en lin. Le
cycle doit être sélectionné de façon
appropriée à l’aide du bouton-poussoir
correspondant en fonction des températures
indiquées sur les étiquettes des articles à
laver.
6.3 INFORMATIONS SUR
L’INSTALLATION ÉLECTRIQUE
L’installation électrique à l’intérieure de
l’appareil est composée des éléments de
protection et de contrôle, assemblés
adéquatement sur une plaque dans la partie
supérieure de la machine. Les schémas et les
listes correspondantes sont reportés
successivement.
6.4 DOCUMENTS ATTESTANT DE LA
CONFORMITÉ DE L’APPAREIL
Le lave-linge décrit dans le présent manuel
est conforme aux directives suivantes:
73/23 CEE, 93/68 CEE, 89/336 CEE, 92/
31 CEE, 93/68 CEE
et aux normes harmonisées :
EN60335-1; EN60335-2-4; EN60335-2-7
EN55014; EN61000-3-2 ; EN61000-3-3;
EN55104.
7. INDICATIONS SUR
L’UTILISATION DE LA MACHINE
ET SUR L’ENTRETIEN ORDINAIRE
7.1 FONCTIONNEMENT
À l’allumage du lave-linge, l’afficheur
visualise pendant quelques secondes la
version du logiciel installée et la date de
réalisation de celui-ci.
ATTENTION!
Cette date se réfère à la version du logiciel
installé, et n’a rien à voir avec le montage
de la machine, avec son essai final ou avec
la date de référence pour toute démarche
de garantie.
Successivement, plusieurs informations
apparaissent. Ce sont, en partant de l’angle
en haut à gauche:
- le numéro concernant le programme
sélectionné.
- la température maximale atteinte par le
bain de lavage pour ce programme.
- le temps prévu pour l’accomplissement du
programme complet, y compris les temps de
chargement et de vidange de l’eau, du
chauffage et du cool-down (refroidissement).
Ces durées sont enregistrées à chaque fois
selon le temps effectif que la machine a mis
à réaliser le cycle. Elles ne sont pas
contraignantes pour le déroulement du cycle.
Elles sont seulement indicatives.
- la typologie du cycle, en d’autres termes,
s’il s’agit d’un programme délicat, moyen
ou énergique.
- le nom du programme, par exemple blanc,
laine, rideaux, etc.
- l’expression “attente START” si le hublot
est fermé ou “hublot ouvert” s’il est ouvert.
En appuyant pendant quelques secondes sur
un des boutons-poussoirs “) UP” ou
“*DOWN”, la séquence des phases qui
composent le programme de lavage apparaît.
En appuyant simultanément sur le boutonpoussoir “SELECT” et sur un des deux
boutons-poussoirs “)UP” ou “*DOWN”, on
change le programme sélectionné, en
changeant par conséquent toutes les autres
informations concernant la température
maximale, la durée totale etc. Toutes les
valeurs indiquées sont mises à jour en
fonction du nouveau programme sélectionné.
Au moment de la fermeture du hublot,
l’expression “hublot ouvert” se transforme
en “attente START” et il est alors possible
de faire partir le programme sélectionné en
appuyant simplement sur le bouton-poussoir
“START”.
Au départ du programme de lavage, les
expressions changent selon les indications
suivantes.
On passe à la représentation, en d’autres
termes, des différentes phases qui composent
le programme, en partant évidemment de la
première pour arriver à la dernière phase
prévue. Toutes les phases sont clairement
indiquées en grands caractères, de façon à
être clairement visibles, et sont identifiées
par un symbole.
En alternance avec cette information, on a le
temps qui reste avant la fin du cycle, qui
diminue au fur et à mesure que le programme
avance. On a aussi en petits les données du
numéro de la phase exécutée à ce moment et
son nom.
Dans toutes les phases, les signalisations
par symboles concernant les événements
qui caractérisent le programme, restent
actives.
En effet, comme l’indique la figure, en haut
à droite de l’afficheur, différents symboles
informant sur le chargement de l’eau en
cuve, sur l’actionnement des pompes à savon,
sur l’allumage du chauffage, sur la vidange
de l’eau sont activés.
À la fin du programme de lavage, l’afficheur
indique clairement l’événement en
l’inscrivant en entier et en activant le buzzer.
Immédiatement après, l’expression “ouvrir
hublot” apparaît et il est alors possible de
procéder au déchargement du linge lavé.
Changement du cycle en cours
Durant les deux premières minutes de travail,
il est possible de changer le programme en
cours. Cette durée est mise en évidence par
l’encart autour de la lettre “P” du Programme
qui clignote; quand l’encart reste allumé de
façon fixe, le changement du programme
sélectionné n’est plus possible, sauf en
avançant jusqu’à la fin du programme ou en
l’arrêtant et donc en sélectionnant un
nouveau.
Avancement rapide des phases d’un
programme
En appuyant plusieurs fois sur le boutonpoussoir “START”, il est possible d’avancer
rapidement à l’intérieur des différentes
phases du programme sélectionné, tandis
qu’en maintenant ce bouton-poussoir
enclenché pendant au moins 5 secondes de
suite, on porte le lave-linge directement à la
fin du programme et donc à l’ouverture du
hublot.
ATTENTION: L'accord pour l'ouverture
du hublot advient seulement si le tambour
est arrêté et la cuve vide.
Insertion d’une “PAUSE
En appuyant simultanément sur les boutonspoussoirs “)UP” et “*DOWN” le cycle
s’arrête et on met la machine en état de
pause. Ceci consiste à arrêter toutes les
temporisations en cours, le mouvement du
tambour, les chargements d’eau et
l’activation du chauffage.
Durant la pause, le hublot reste bloqué et
l’eau éventuellement présente à l’intérieur
de la machine n’est pas vidangée. En effet,
la vanne de vidange reste fermée.
Il est évidemment impossible d’insérer la
pause durant les phases d’essorage, quelle
que soit la vitesse du tambour.
Pour quantifier la durée de la pause insérée,
un compteur se met en marche lors de la
pression simultanée des deux boutonspoussoirs. Il indique sous la forme heures et
minutes, la durée de l’événement.
Pour faire à nouveau partir le programme, il
suffit d’appuyer sur le bouton-poussoir
“START” et le lave-linge reprend le travail
en partant du moment où la pause avait été
insérée.
ATTENTION!
Si l’on insère une pause à l’intérieur d’un
cycle de lavage où l’eau a été réchauffée, en
laissant la machine à l’arrêt suffisamment
longtemps, la température est inévitablement
destinée à descendre.
11
1”
11
27

Indication des paramètres fonctionnels
Durant l’accomplissement du programme
et donc des phases qui le composent, on peut
avoir des indications sur de nombreux
paramètres.
Pour accéder à ces informations, il suffit
d’appuyer sur le bouton-poussoir “
MODE” durant l’exécution du programme.
L’afficheur continue à indiquer le numéro
du programme sélectionné, le numéro de la
phase exécutée et son nom, mais dans la
partie inférieure, l’indication change,
comme ce qui est par exemple indiqué sur la
figure.
Ici, on trouve la température à atteindre, en
noir, et la température réelle, ainsi que le
niveau à atteindre, toujours en noir, et le
niveau réel lu en cuve, indiqué au-dessus.
À noter que dans l’angle en haut à droite de
l’afficheur, le symbole du chauffage inséré
est activé. La température, dans cet exemple,
doit encore arriver aux 40°C prévus car elle
est encore à 37°C. On procède alors au
chauffage du bain de lavage.
En appuyant plusieurs fois sur le boutonpoussoir “ MODE” on passe à d’autres
indications concernant, par exemple, le type
d’eau chargée en cuve, le distributeur actif,
les pompes à savon prévues, la temporisation
du fonctionnement du moteur. Après cette
vue d’ensemble des informations, on revient
à l’indication de départ, avec le nom et le
symbole de la phase indiqué en grands
caractères.
Pour les phases d’essorage, composées
évidemment de la seule rotation rapide du
tambour, on aura les données sur ses vitesses.
Modification des paramètres
fonctionnels de la phase
Comme nous l’avons décrit plus haut, il est
possible de changer l’indication sur
l’afficheur en appuyant simplement sur le
bouton-poussoir “ MODE” durant
l’accomplissement du cycle.
En s’arrêtant sur l’indication désirée, il est
possible de changer les valeurs programmées
en appuyant sur les boutons-poussoirs “)UP”
et “*DOWN”.
En fait, durant l’exécution d’une action,
il est possible d’en varier les valeurs
programmées.
Par exemple, durant le chargement de l’eau
il est possible de changer le niveau
programmé en allant simplement à l’aide
du bouton-poussoir “ MODE” sur
l’indication correspondant au chargement
de l’eau, puis, avec “)UP” ou “*DOWN”,
on diminue ou on augmente de cm en cm, la
valeur programmée, en d’autres termes la
valeur en noir. Même chose par exemple
pour le chauffage: durant cette action, il est
possible de changer selon ses goûts la
température à atteindre, toujours avec “)UP”
et “*DOWN”.
Idem pour les autres valeurs comme la durée
de maintien de la température, par exemple,
ou la durée des différentes vitesses durant la
phase d’essorage.
Démarrage du programme de lavage
Contrôler que les robinets de l’eau chaude,
de l’eau froide dure, de l’eau froide douce et
de la vapeur (sur les machines prédisposées)
sont ouverts.
Mettre l’interrupteur automatique
magnétothermique mural dans la position
ON (allumé).
Une fois cette opération terminé, remplir
ensuite les godets de lessive (non moussante)
selon le cycle sélectionné, c’est à dire:
A = compartiment pour le prélavage (si le
cycle sélectionné le prévoit)
B = compartiment pour le lavage
C = compartiment pour les éventuels
additifs à ajouter lors du dernier rinçage.
Sélectionner le programme désiré à l’aide
des boutons-poussoirs “SELECT” et “)UP”
ou “*DOWN”, simultanément.
Charger le lave-linge et fermer le hublot,
puis appuyer sur le bouton-poussoir
“START”. La machine bloque le hublot et
commence le programme de lavage avec
toutes les actions prévues.
Signalisation des alarmes et pannes
En cas de pannes de tout type (chute de
tension dans le réseau, températures
excessives, ou niveaux d’eau déréglés dans
le tambour) la machine procédera à leur
signalisation au moyen des alarmes
correspondantes, qui apparaîtront sur les
afficheurs du panneau frontal. Tous les
détails sont expliqués dans le paragraphe
“ALARMES DONT EST ÉQUIPÉE LA
MACHINE”.
Fin du cycle
ATTENTION: la porte ne doit absolument
pas être forcée; il faut l’ouvrir à la main
après qu’elle a été débloquée.
En tous cas, avant de l’ouvrir, il faut s’assurer
que le tambour s'est arrêté, que l’eau est
sortie et que la température intérieure est
inférieure à 40°C. En cas de manque de
courant, durant le cycle de lavage, seulement
dans les modèles pour 8 et 11kg il sera
possible d'ouvrir le hublot après environ 90
secondes, tandis qu'en cas d'urgence ou de
panne du dispositif d'ouverture, dans tous
les modèles il est possible d'ouvrir le hublot
en agissant sur le tirant de déblocage manuel
en le mettant vers le bas (voir fig. 2).
Ce dispositif peut être atteint après avoir
enlevé le panneau frontal inférieur de la
machine, en agissant avec un tournevis
cruciforme sur les deux vis de fixation;
après avoir débloqué la porte, l’ouvrir à
l’aide de la poignée comme expliqué cidessus, puis remonter le panneau frontal
inférieur.
Étalonnage de la lecture du niveau
d'eau dans la cuve
D’habitude cette opération n’est pas
nécessaire, mais avec certaines conditions
d’installation, par exemple dans des lieux
ayant une altitude élevée, il faut corriger sur
la machine la valeur relevée avec la cuve
vide.
Pour effectuer ce réglage, avec la machine
allumée mais sans faire démarrer le cycle,
suivre les instructions ci-dessous:
1) Ouvrir le hublot.
2) Vérifier visuellement qu’il n’y a pas
d’eau dans la cuve, qui doit évidemment
ne pas contenir de linge.
3) Appuyer sur les touches “) UP” et
“*DOWN” en même temps pour au
moins 5 secondes.
4) On lira le message “ÉTALONNAGE”
sur l’afficheur.
5) Si la valeur relevée par la carte est
correcte, confirmer en pressant le
bouton-poussoir "ENTER".
6) La sonnerie émettra un son et l'afficheur
retournera à ses fonctions habituelles.
L’étalonnage a été fait de façon correcte;
dans tous les autres cas la remise à zéro
précédente reste mémorisée.
7.2 PHASES DU CYCLE
Tous les cycles ou les programmes présents
dans la mémoire de la carte, sont réalisés à
travers l’exécution des phases qui les
composent. En fait, un cycle ou un
programme, n’est autre que la séquence
selon laquelle les différentes phases
(programmées auparavant) sont exécutées.
On peut résumer six typologies de phase,
reportées ci-dessous:
1) Trempage
2) Prélavage
3) Lavage
4) Rinçage
5) Essorage
6) Démêlage
En programmant ces différentes phases avec
des valeurs de niveau, de température, de
mouvement du tambour etc. et en les
exécutant dans une succession bien définie,
on obtient les différents programmes de
lavage.
Les différentes phases du programme de
lavage sont toujours indiquées en grands
caractères durant l’exécution du programme,
et sont en outre accompagnées du symbole
qui les identifie.
7.3 RÉGLAGE DES PARAMÈTRES
PROCÉDURE DE
PROGRAMMATION
La procédure de programmation se divise
en deux niveaux différents.
Le premier, expressément consacré à
l’utilisateur de la machine, et le second pour
l’opérateur expert, le technicien
manutentionnaire ou le gérant de la laverie.
28

ATTENTION!
Le second niveau est protégé par un MOT
DE PASSE et est décrit dans le manuel sur
la programmation.
Tous les paramètres destinés à l’utilisateur
sont contenus dans la programmation des
cycles et dans la définition des paramètres
de la machine.
Programmation des cycles
Les programmes de lavage ou les cycles de
lavage peuvent être résumés par la séquence
d’opérations que le lave-linge exécute du
début à la fin du traitement du linge.
Les différentes opérations sont contenues à
l’intérieur du menu “PHASES” expliqué ciaprès.
Avant-propos: le lave-linge a déjà mémorisé
une série de “opérations” ou de phases de
travail, qui sont celles qui permettent la
réalisation des cycles standard
préprogrammés.
Avec ce programmateur, il est possible de
modifier ou de créer des programmes de
lavage en partant simplement des phases
existantes, sans avoir donc de connaissances
spécifiques sur les diagrammes de lavage
les plus opportuns pour le tissu à traiter.
Il est donc possible d’insérer ou de neutraliser
une phase dans un programme déjà structuré,
ou de partir d’un programme vide et d’insérer
petit à petit toutes les phases qu’on retient
nécessaires en allant les choisir parmi celles
qui sont déjà prêtes. Elles seront simplement
exécutées dans l’ordre dans lequel elles ont
été insérées.
De cette façon on peut réaliser des
programmes de lavage personnalisés en
créant sa propre séquence de phases. Si les
exigences sont plus complexes, il ne faut
rien faire d’autre que passer au “menu
phases” et créer sa propre phase
personnalisée, qui devra ensuite être insérée
à l’intérieur d’un cycle existant ou à
l’intérieur d’un cycle complètement
nouveau.
On accède au menu “CYCLES” de la façon
suivante:
Ouvrir le hublot du lave-linge: toutes les
opérations de programmation sont faites
avec le hublot ouvert. Dans toute autre
condition, il n’est pas possible d’accéder à
la programmation.
Appuyer sur le bouton-poussoir “ MODE”
jusqu’à ce que l’expression “CYCLES”
apparaisse, puis confirmer avec le boutonpoussoir “ENTER”. Le premier des 20
CYCLES ou PROGRAMMES à disposition
apparaît. Avec les boutons-poussoirs “UP”
et “DOWN”, on peut faire défiler la liste
complète, en passant en revue aussi bien
ceux qui sont programmés, caractérisés par
leur propre nom, par exemple “BLANC” et
par leur type, par ex. “ÉNERGIQUE”, que
ceux qui sont “libres” ou “vides”, caractérisés
simplement par l’expression “NON
PROGRAMMÉ”.
Une fois qu’on a décidé sur quel
PROGRAMME agir, appuyer sur le boutonpoussoir “ENTER”. Les rubriques suivantes
apparaissent sur l’afficheur:
COMMENTAIRE
PHASES
TYPOLOGIE
COPIER DE
COPIER DANS
Ci-dessous descriptions des différentes
rubriques.
COMMENTAIRE
Avec les boutons-poussoirs “UP” et
“DOWN”, se placer à la sélection
“COMMENTAIRE”. Confirmer le choix
en appuyant sur le bouton-poussoir
“ENTER”. Un espace de texte d’une
longueur de 10 caractères apparaît, à remplir
selon les goûts, par exemple avec le nom du
programme ou du cycle, supposons “BLANC
90°C”. Pour insérer les lettres, appuyer sur
le bouton-poussoir “SELECT”: Tous les
caractères disponibles qui peuvent être
sélectionnés avec les boutons-poussoirs “UP”
et “DOWN” apparaissent. La confirmation
s’effectue de façon automatique.
PHASES
Avec les boutons-poussoirs “UP” et
“DOWN”, se placer à la sélection
“PHASES”. Confirmer le choix en appuyant
sur le bouton-poussoir “ENTER”.
En appuyant sur le bouton-poussoir
“ENTER”, la première phase exécutée par
le programme sélectionné apparaît, la phase
en position N° 01, indiquée en grands
caractères.
En plus de cette information il y a, en petit
caractères le numéro de la phase, le type et
le commentaire qui lui correspond.
Avec les boutons-poussoirs “UP” et
“DOWN”, on peut maintenant faire défiler
toutes les phases qui composent le cycle
sélectionné en voyant la séquence
d’opérations que le programme exécute: par
exemple on commence par un trempage, on
exécute ensuite un prélavage, puis un lavage
avec un bref essorage à mi-parcours et on
passe aux rinçages et ainsi de suite jusqu’à
la dernière phase insérée.
Au maximum dans un programme, on peut
insérer une séquence de 25 phases. Celles
qui resteront libres reporteront simplement
l’indication “NON PROGRAMMÉE”.
Se placer alors avec les boutons-poussoirs
“UP” et “DOWN” sur la phase à “manipuler”
et appuyer sur le bouton-poussoir “ENTER”.
Les rubriques suivantes apparaissent sur
l’afficheur:
MODIFIER
SUPPRIMER
INSÉRER AVANT
INSÉRER APRÈS
Pour déplacer le curseur à l’intérieur du mot
qu’on est en train de composer, utiliser les
habituels “UP” et “DOWN”.
Pour éliminer une lettre, il suffit de se placer
au-dessus de celle-ci avec le curseur et
d’appuyer sur le bouton-poussoir “START”.
Une fois le texte désiré inséré, confirmer
avec le bouton-poussoir “ENTER” et sortir
avec “MODE”.
Modifier: confirmer avec le bouton-poussoir
“ENTER” pour modifier l’insertion de la
phase sélectionnée. Avec les boutonspoussoirs “UP” et “DOWN” on choisit quelle
phase mettre à la place de celle qui est
sélectionnée, puis on confirme avec
“ENTER”.
Le programmateur demande ensuite
“COPIER?” Avec “ENTER” on exécute le
changement entre les deux phases, et avec le
bouton-poussoir “MODE”, on annule
l’opération.
Supprimer: confirmer avec le boutonpoussoir “ENTER” pour effacer l’insertion
de la phase sélectionnée. Le programmateur
demande alors “SUPPRIMER?” Avec
“ENTER”, on efface la phase sélectionnée,
et avec le bouton-poussoir “MODE”, on
annule l’opération.
ATTENTION! Avec la commande
“SUPPRIMER”, on n’élimine pas la phase
du programmateur mais seulement de la
séquence du programme sélectionné. Il est
toujours possible de la sélectionner, de
l’insérer, de la modifier, etc.
Insérer avant et après: confirmer avec le
bouton-poussoir “ENTER” pour insérer une
phase avant ou après la phase sélectionnée.
Avec les boutons-poussoirs “UP” et
“DOWN”, on choisit la phase à insérer
avant ou après la phase sélectionnée, puis on
confirme avec “ENTER”.
Avec le bouton-poussoir “MODE”, on
annule l’opération.
TYPOLOGIE
Avec les boutons-poussoirs “UP” et
“DOWN” se placer à la sélection
“TYPOLOGIE”.
Confirmer le choix en appuyant sur le
bouton-poussoir “ENTER”.
Les rubriques suivantes apparaissent sur
l’afficheur:
ÉNERGIQUE
MOYENNE
DÉLICATE
Avec les boutons-poussoirs “UP” et
“DOWN”, sélectionner le type et confirmer
avec le bouton-poussoir “ENTER”. La
sélection du type de programme sert
seulement à donner une indication à
l’utilisateur justement sur le type de cycle
qui sera exécuté. Cette sélection apparaîtra
sur la fenêtre qui se présente à l’utilisateur
durant la sélection des cycles, de façon à
l’aider dans le choix le plus correct.
Une fois le type désiré sélectionné, confirmer
avec le bouton-poussoir “ENTER” et sortir
avec “MODE”.
Attention! Cette sélection NE MODIFIE en
aucune façon le déroulement du programme
de lavage. C’est seulement une indication.
29
 Loading...