

Page 1
Manual # P80170007A - Date:2008/08/08
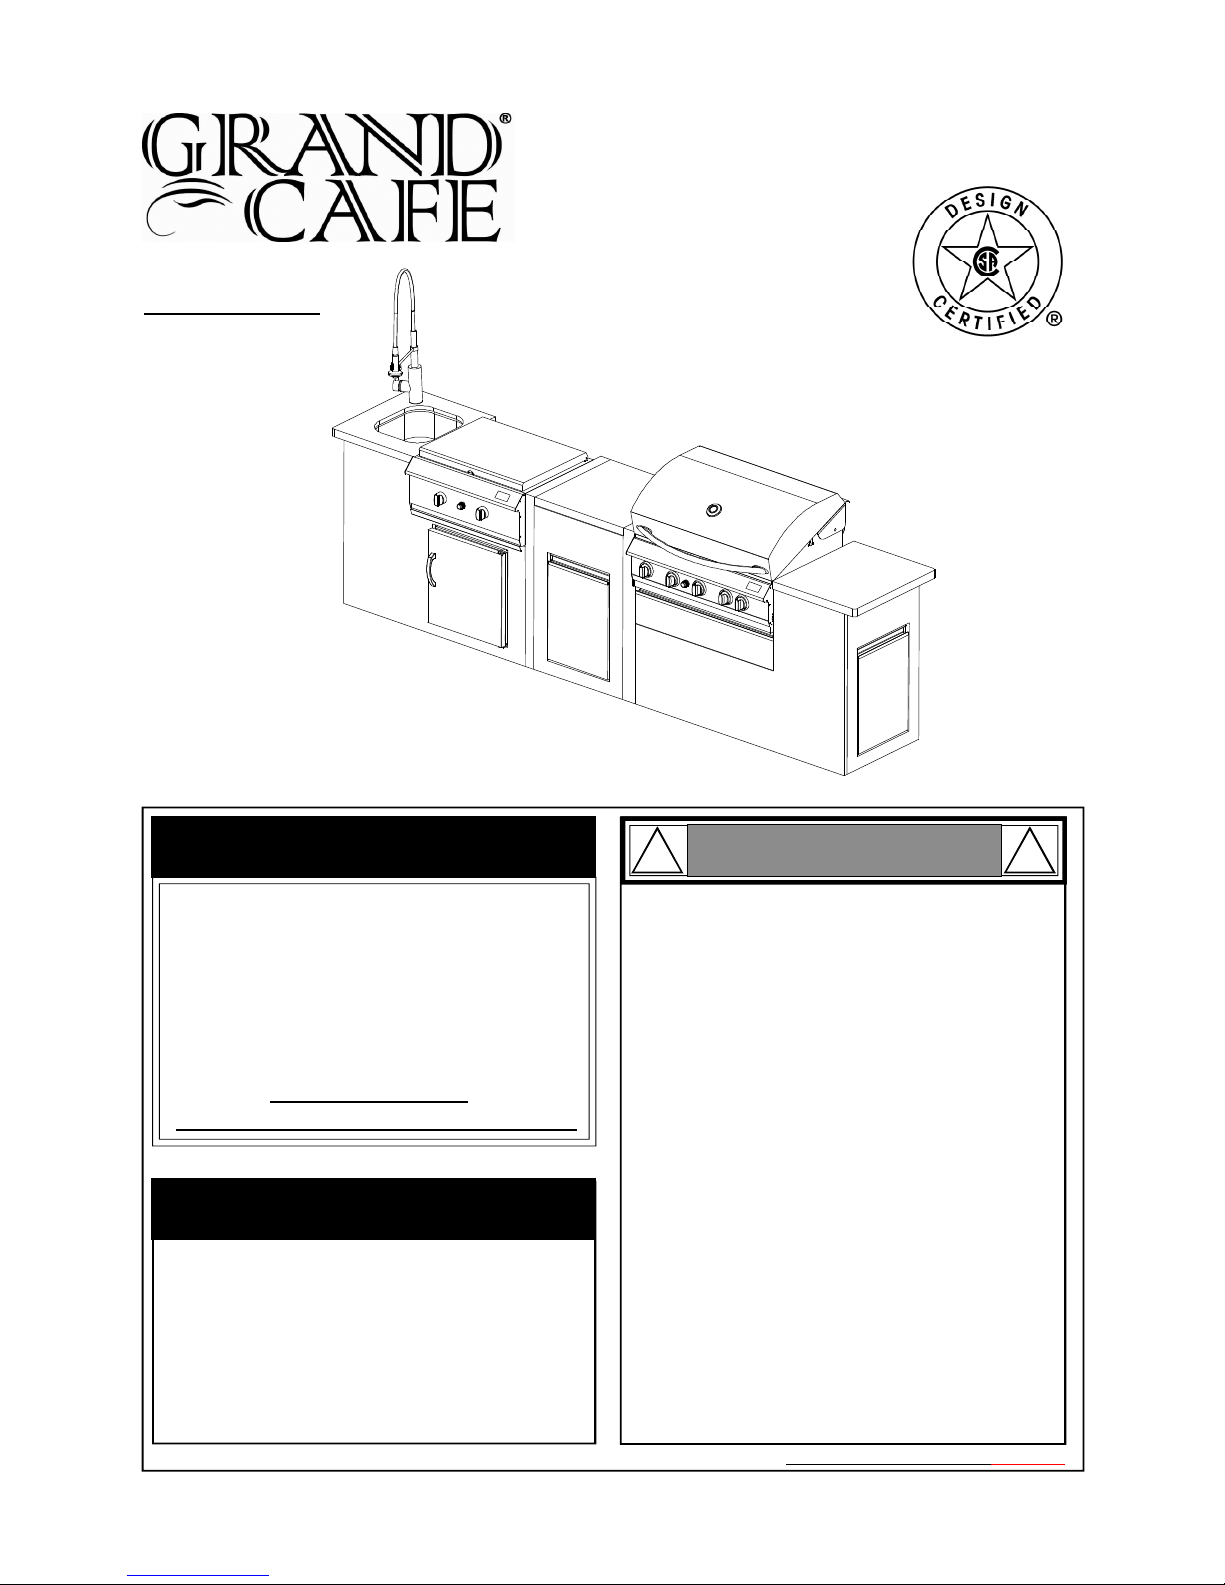
Grill Island
Model CGI07ALP
OPERATOR'S MANUAL
Failure to comply with these instructions could
result in a fire or explosion that could cause
serious bodily injury, death or property damage.
Whether this grill was assembled by you or
someone else, you must read this entire manual
before using your grill to ensure the grill is
properly assembled, installed and maintained.
Use your grill at least 3 feet away from any
wall or surface. Use your grill at least 3 feet
away from combustible objects that can melt or
catch fire (such as vinyl or wood siding, fences
and overhangs) or sources of ignition including
pilot lights on water heaters and live electrical
appliances.
THIS GAS APPLIANCE IS DESIGNED FOR
OUTDOOR USE ONLY.
Combustion byproducts produced when using
this product contain chemicals known to the
State of California to cause cancer, birth
defects, or other reproductive harm.
This product contains chemicals known to
the State of California to cause cancer, birth
defects, or other reproductive harm.
Ÿ
Ÿ
Ÿ
Ÿ
Ÿ
Ÿ
Ÿ
NOTE TO ASSEMBLER / INSTALLER:
Leave this manual with the consumer.
NOTE TO CONSUMER:
Keep this manual for future reference.
RECORD YOUR SERIAL # __________________
(see silver CSA label on main body of grill)
IMPORTANT:
Ÿ
Grill Information Center:
Call us first if you have any problem with
this product. We can help you with questions about assembly and grill operation or
if there are damaged or missing parts
when you unpack this unit from the shipping box. Please call before contacting
your local retailer.
1-800-761-5456
8am-4:30pm CST, Monday through Friday
NOTE: Complete Island Kit requires 3 boxes
Ÿ
WARNING
! !
Page 2
2
DANGER
!
!
1.
2
3.
4.
If you smell gas:
Shut off gas to the appliance.
Extinguish any open flame.
Open lid.
If odor continues, keep away from
the appliance and immediately call
your gas supplier or your fire
department.
Do not store or use gasoline or other
flammable liquids or vapors in the
vicinity of this or any other appliances.
An LP cylinder not connected for use
shall not be stored in the vicinity of
this or any other appliance.
1.
2.
WARNING
! !
•
LPG grill models must be used with Liquid
Propane Gas and the regulator assembly
supplied. Natural Gas models must be used
with Natural Gas only. Any attempt to convert
the grill from one fuel type to another is
hazardous and must be performed by a
qualified gas technician only, using a NG
Conversion Kit purchased from Grand Hall.
Never use your gas grill in a garage, porch, shed,
breezeway or any other enclosed area.
Never obstruct the flow of ventilation air around
your gas grill housing.
Never disconnect the gas regulator or any gas
fitting while your grill is lit. A lit grill can ignite
leaking gas and cause a fire or explosion which
could result in property damage, personal injury
or death.
Keep gas regulator hose away from hot grill
surfaces and dripping grease. Avoid unnecessary twisting of hose. Visually inspect hose
prior to each use for cuts, cracks, excessive
wear or other damage. If the hose appears
damaged do not use the gas grill. Call:
1-800-761-5456 for an authorized replacement
hose.
•
•
•
•
Table of Contents
Primary Safety Warnings...........................1-3
Pre-Assembly Instructions..............................3
Part Diagrams and Lists........................4-12
Assembly Instructions.............................13-18
Use & Care Instructions:
• Faucet Operation.....................................19
• Gas Safety and Leak Tests...........20-22
• Lighting Instructions............................23-24
• Troubleshooting.........................................24
• Rotisserie Instruction...........................25-27
• Cleaning and Maintenance................28-29
• Cooking Guide...................................A1-A6
• Frequently Asked Questions............A7-A8
Warranty Terms...........................Back Cover
Never use charcoal in this gas grill.
Failure to comply with these instructions
could result in a grease fire or explosion
that could cause serious bodily injury,
death or property damage.
WARNING
! !
The Grease Draining Tray and Grease
Receptacle must be visually inspected
before each grill use. Remove any grease
and wash Grease Draining Tray and
Grease Receptacle with a mild soap and
warm water solution. Failure to comply
with these instructions could result in
a grease fire or explosion that could
cause serious bodily injury, death or
property damage.
WARNING
! !
WARNING
! !
1.
WARNING
! !
Do not store spare LP cylinder
within 10 feet (3m) of this appliance.
Do not store or use gasoline or
other flammable liquids and
vapors within 25 feet (8m) of this
appliance.
When cooking with oil/grease, do
not allow the oil/grease to get
hotter 350°F (177°C)
Do not leave oil/grease unattended.
4.
2.
3.
Page 3
3
Pre-Assembly Instructions For Your Safety
Tools Required for Assembly include:
protective work gloves
protective eyewear
While it is possible for one person to unpack this gas
grill, obtain assistance from another person when
handling the large pieces.
Use the Hardware and Part Diagrams to ensure all
items are included and free of damage.
Do not assemble or operate the grill if it appears
damaged. If there are damaged or missing parts
when you unpack the shipping box or you have
questions during the assembly process, call the:
To expedite the assembly process follow these
general guidelines:
•
•
Grill Information Center 1-800-761-5456
8am-4:30pm CST, Monday through Friday
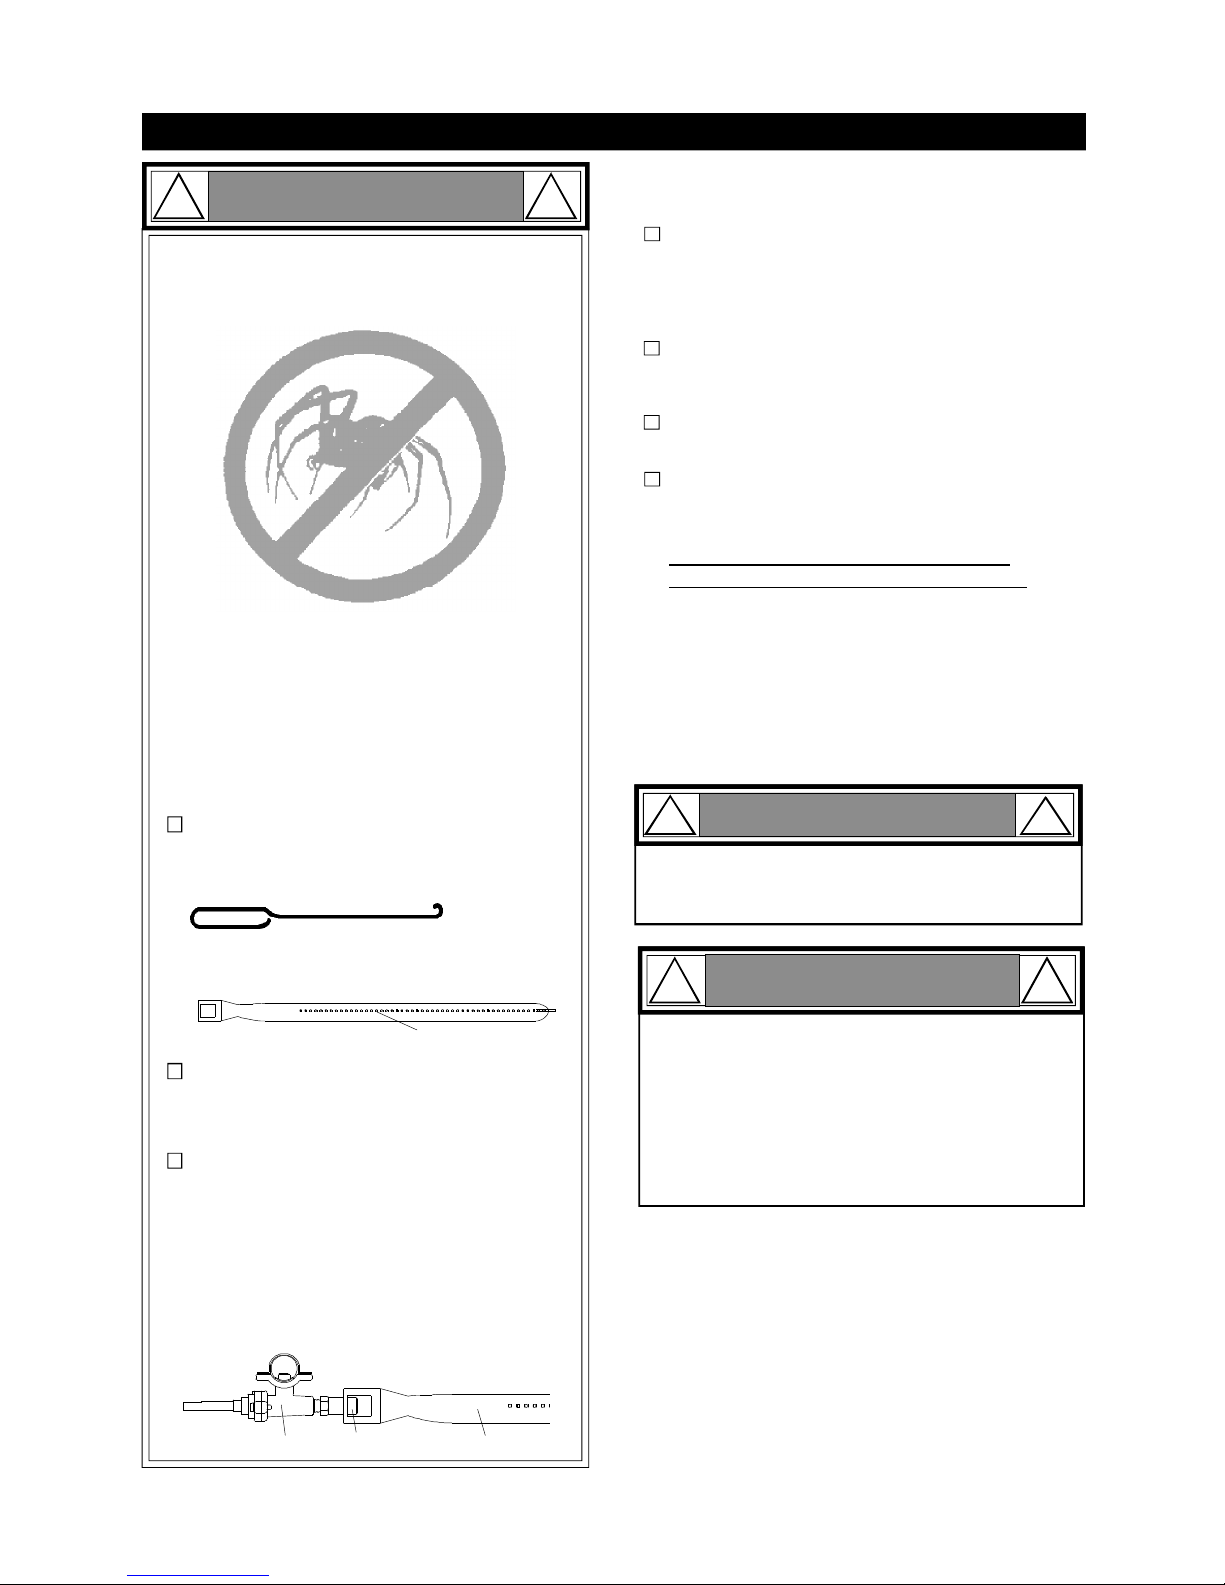
Spiders and small insects can spin webs and
nest in the grill Burner Tubes during transit and
warehousing which can lead to a gas flow
obstruction resulting in a fire in and around the
Burner Tubes. This type of "FLASHBACK FIRE"
can cause serious grill damage and create an
unsafe operating condition for the user.
To reduce the chance of FLASHBACK
FIRE you must clean the Burner Tubes
as follows before initial use. Also do this
at least once a month in summer and fall or
whenever spiders are active in your area, and if
your grill has not been used for an extended
period of time.
WARNING
! !
Failure to comply with these instructions may
result in a hazardous situation which, if not
avoided, may result in injury.
For safe operation ensure the Gas Valve Assembly Orifice is inside the Burner Tube before using
your grill. See figure. If the Orifice is not inside
the Burner Tube, lighting the Burner may cause
explosion and/or fire resulting in serious bodily
injury and/or property damage.
•
METHOD 1: Bend a stiff wire or wire coat
hanger into a small hook as shown and run
the hook through the Burner Tube and inside
the Burner several times to remove debris.
METHOD 2: Use a bottle brush with a flexible
handle and run the brush through the Burner
Tube and inside the Burner several times to
remove any debris.
METHOD 3: Use an air hose to force air
through each Burner Tube. The forced air
should pass debris or obstructions through
the Burner and out the Ports.
TO CLEAN BURNER TUBE, INSERT HOOK
HERE
Burner Tube
9
Grill Installation Codes
The installation must conform with local codes or, in the
absence of local codes, with the National Fuel Gas
Code, ANSI Z223.1/NFPA 54, Storage and Handling of
Liquefied Petroleum Gases, ANSI/NFPA58,Natural Gas
and Propane Installation Code, CSA B149.1, Propane
Storage and Handling Code, B149.2.
Orifice
Burner Tube
Gas Valve Assembly
Phillips Head Screwdriver
CAUTION
!
When using electrical appliances, basic
safety precautions should always be used.
!
WARNING
! !
This appliance, when installed, must be electrically grounded in accordance with local codes
or, in the absence of local codes, with the
National Electrical Code, ANSI/NFPA 70, or the
Canadian Electrical Code, CSA C22.1.
Keep any electrical supply cord and the fuel
supply hose away from any heated surfaces.
•
•
Carefully lift each Burner up and away from the
Gas Valve Orifice.
Check and clean Burner/Venturi Tubes for
insects and insect nests. A clogged tube can
lead to a fire beneath the grill.
Refer to the figure below and perform one of
these 3 cleaning methods:
Remove the screws from the rear of each Main
Burner using a Phillips Head Screwdriver.
1.
2.
3.
4.
Page 4
4
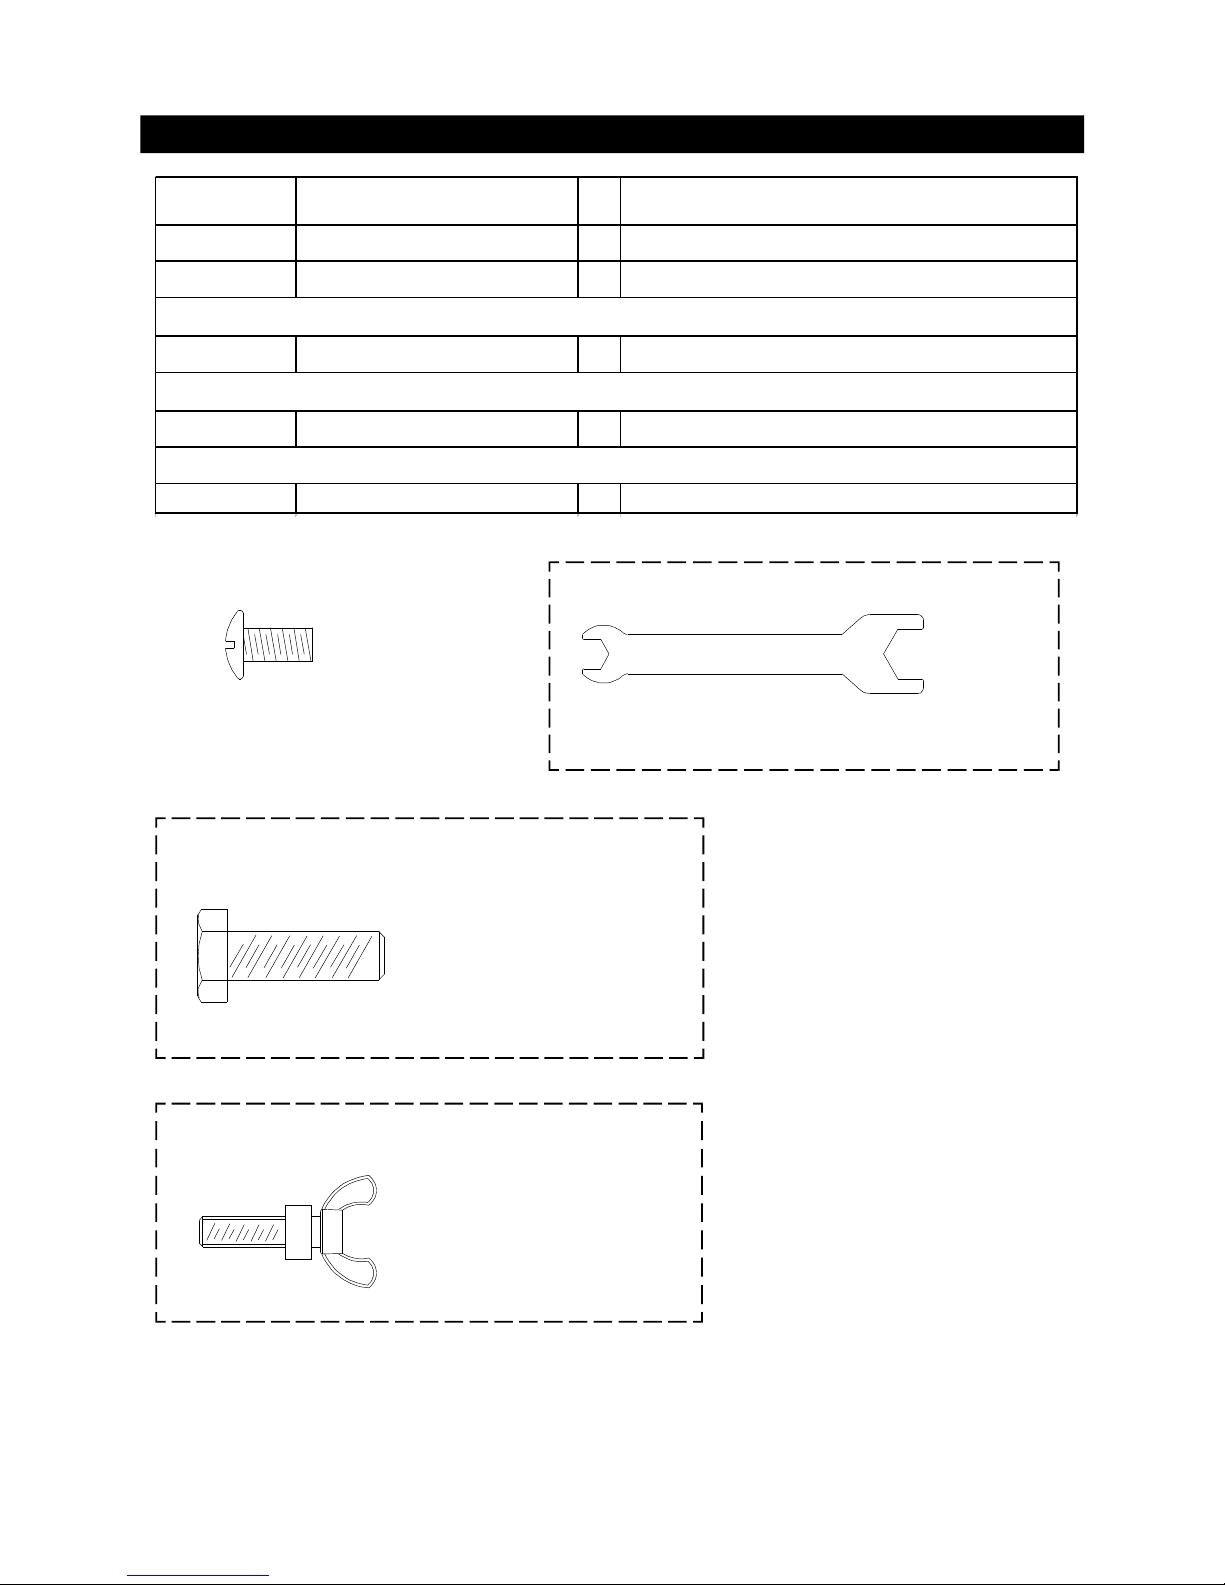
Hardware Pack Parts List for Model CGI07ALP
* Two Batteries/AA included in the Hardware Pack.
PART # PART DESCRIPTION QTYPURPOSE OF PART
P06024005A Hardware Pack 1 For use in assembly (Grill and Range)
S112G04061 Phillips Head Screw 1/4"x3/8" 8 Install Cart Frames to Left / Right Bowl Panels
S162M04201 Hex Head Screw M4X20mm 2 Secure Faucet Washer and Faucet Bracket to Faucet
S233G03194 Wing Bolt 3/16"x1-3/16" 1 Secures Gas Tank to Tank Holder
P05515017L Wrench
1
Adjust level on Island Assembly Set
Already packed in the Faucet Assembly Kit Box
Already Installed on Tank Holder
Already packed in the Cooking Components Box
Phillips Head Screw 1/4"x3/8"
Qty. 8
Part # S112G04061
Wing Bolt 3/16"x1-3/16"
Qty. 1
Part # S233G03194
Hardware already installed on the Tank Holder
Hex Head Screw M4x20mm
Qty.2
Part # S162M04201
Already packed in the Faucet Assembly Kit Box
Wrench
Qty.1
Part # P05515017L
Already packed in the Cooking Components Box
Page 5
5
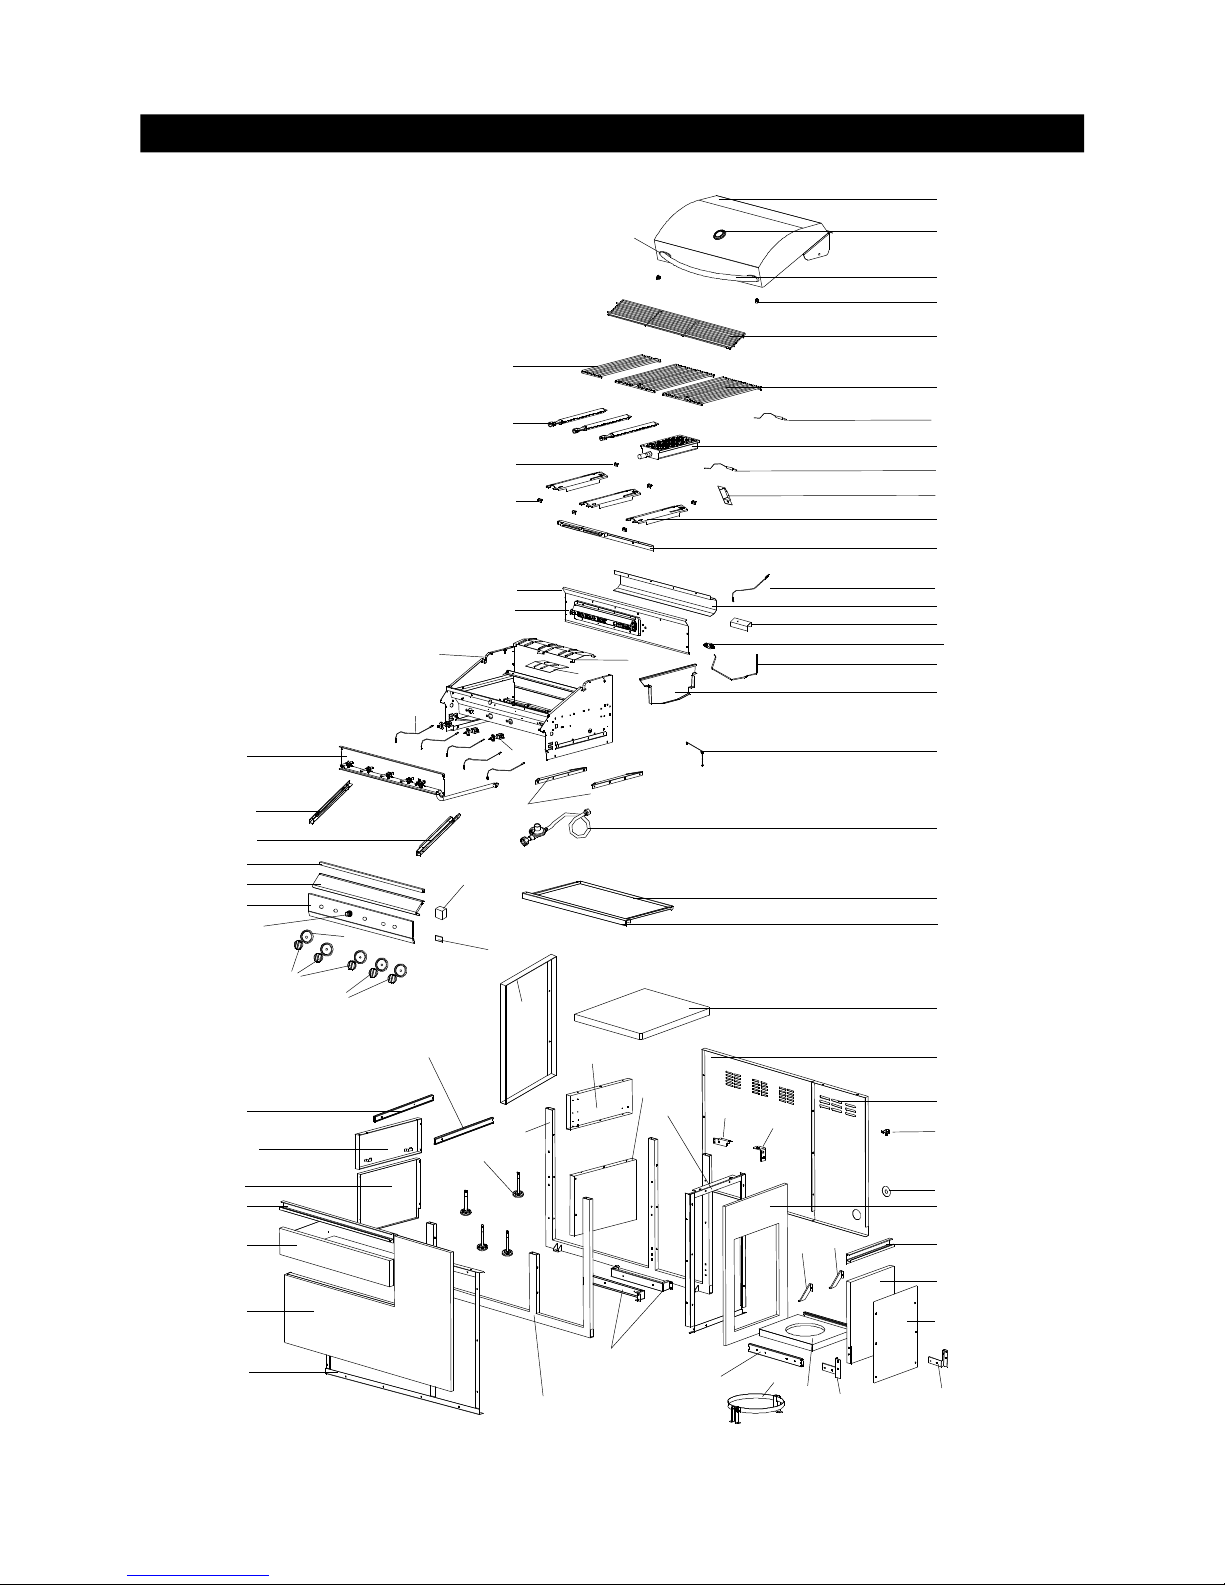
Parts Diagram for Model CGI07ALP Grill
1
2
3
4
5
6
9
7
8
13
15
18
25
26
24
27
28
29
30
31
33
48
56
55
42
46
53
51
49
50
40
45
44
47
41
38
36
35
34
22
17
16
14
12
11
23
70
43
48
59
62
10
37
71
58
68
60
61
39
39
73
72
32
69
64
63
65
66
74
52
75
54
76
57
78
77
67
19
21
20
79
Page 6
6
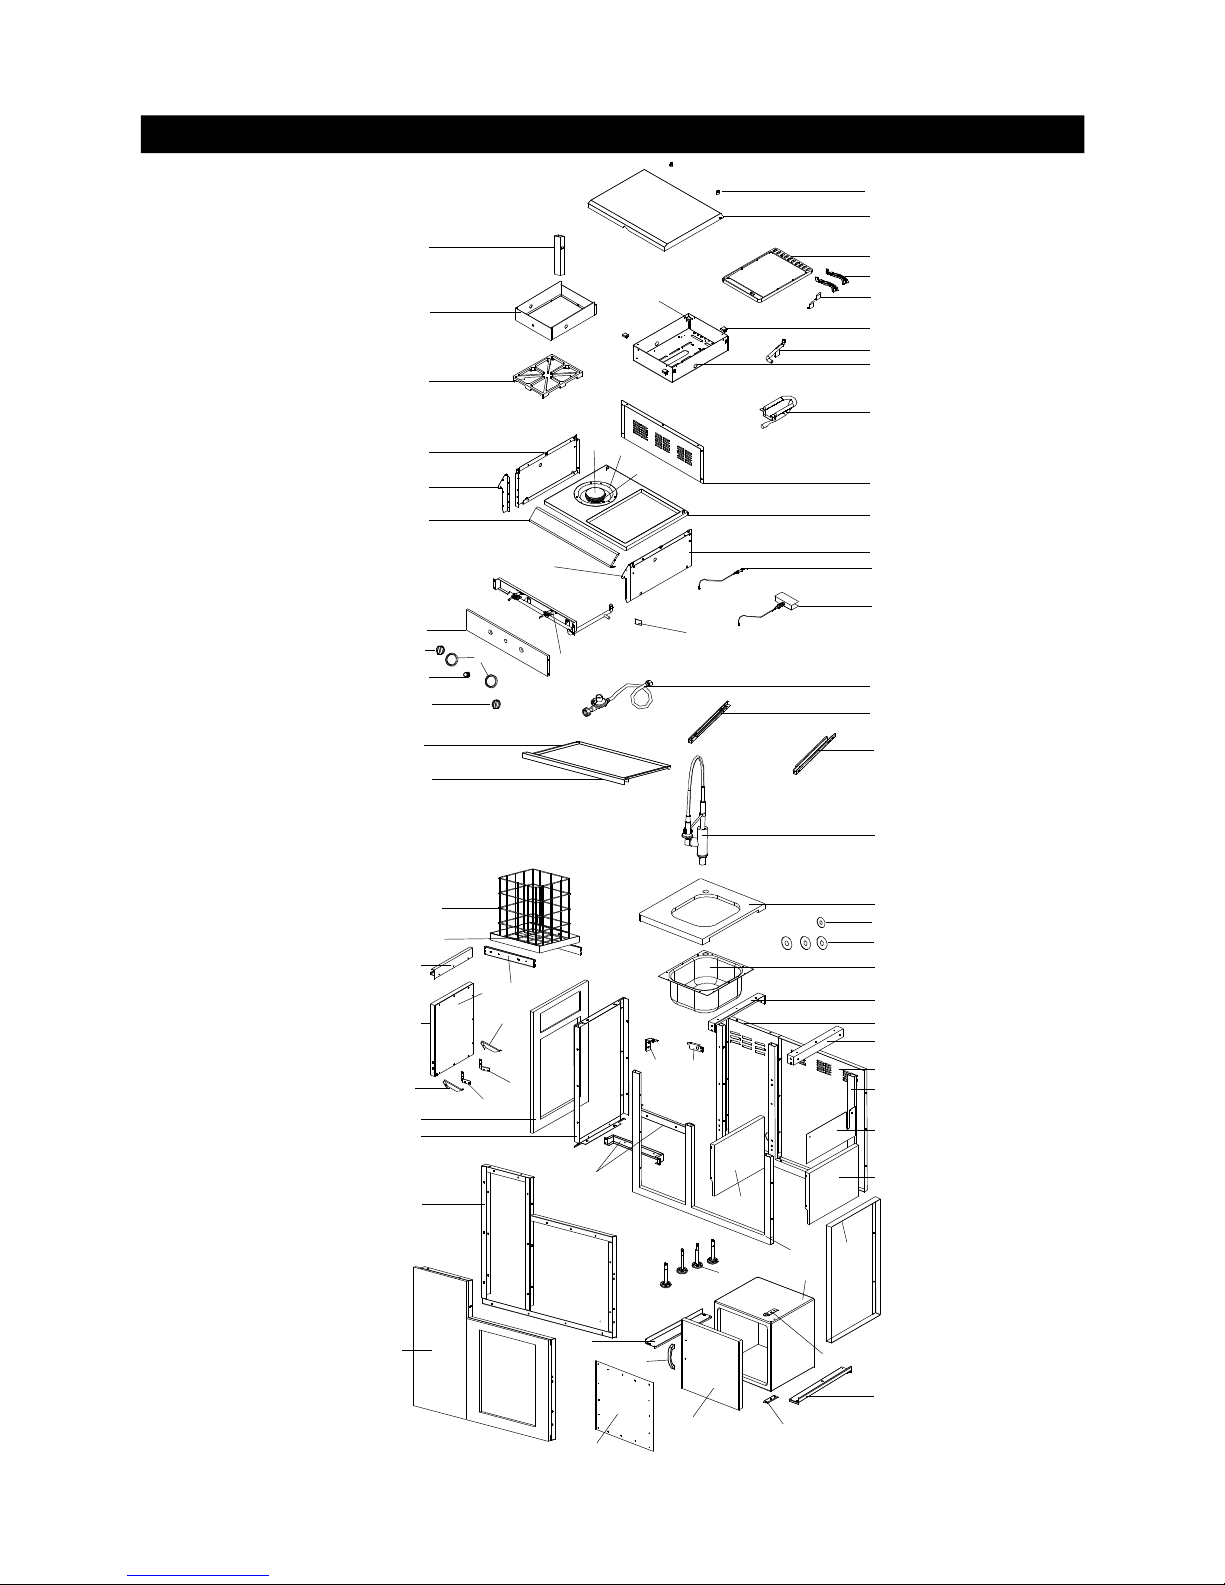
Parts Diagram for Model CGI07ALP Range
6
11
14
17
1
2
8
9
7
16
10
15
24
30
31
30
29
27
13
5
12
18
26
28
20
19
23
4
32
33
34
35
51
49
42
53
50
38
38
48
44
43
36
37
52
54
41
45
46
47
66
3
22
21
60
61
56
57
58
62
63
65
64
8
67
59
39
40
68
70
71
69
73
74
55
75
25
72
Page 7
7
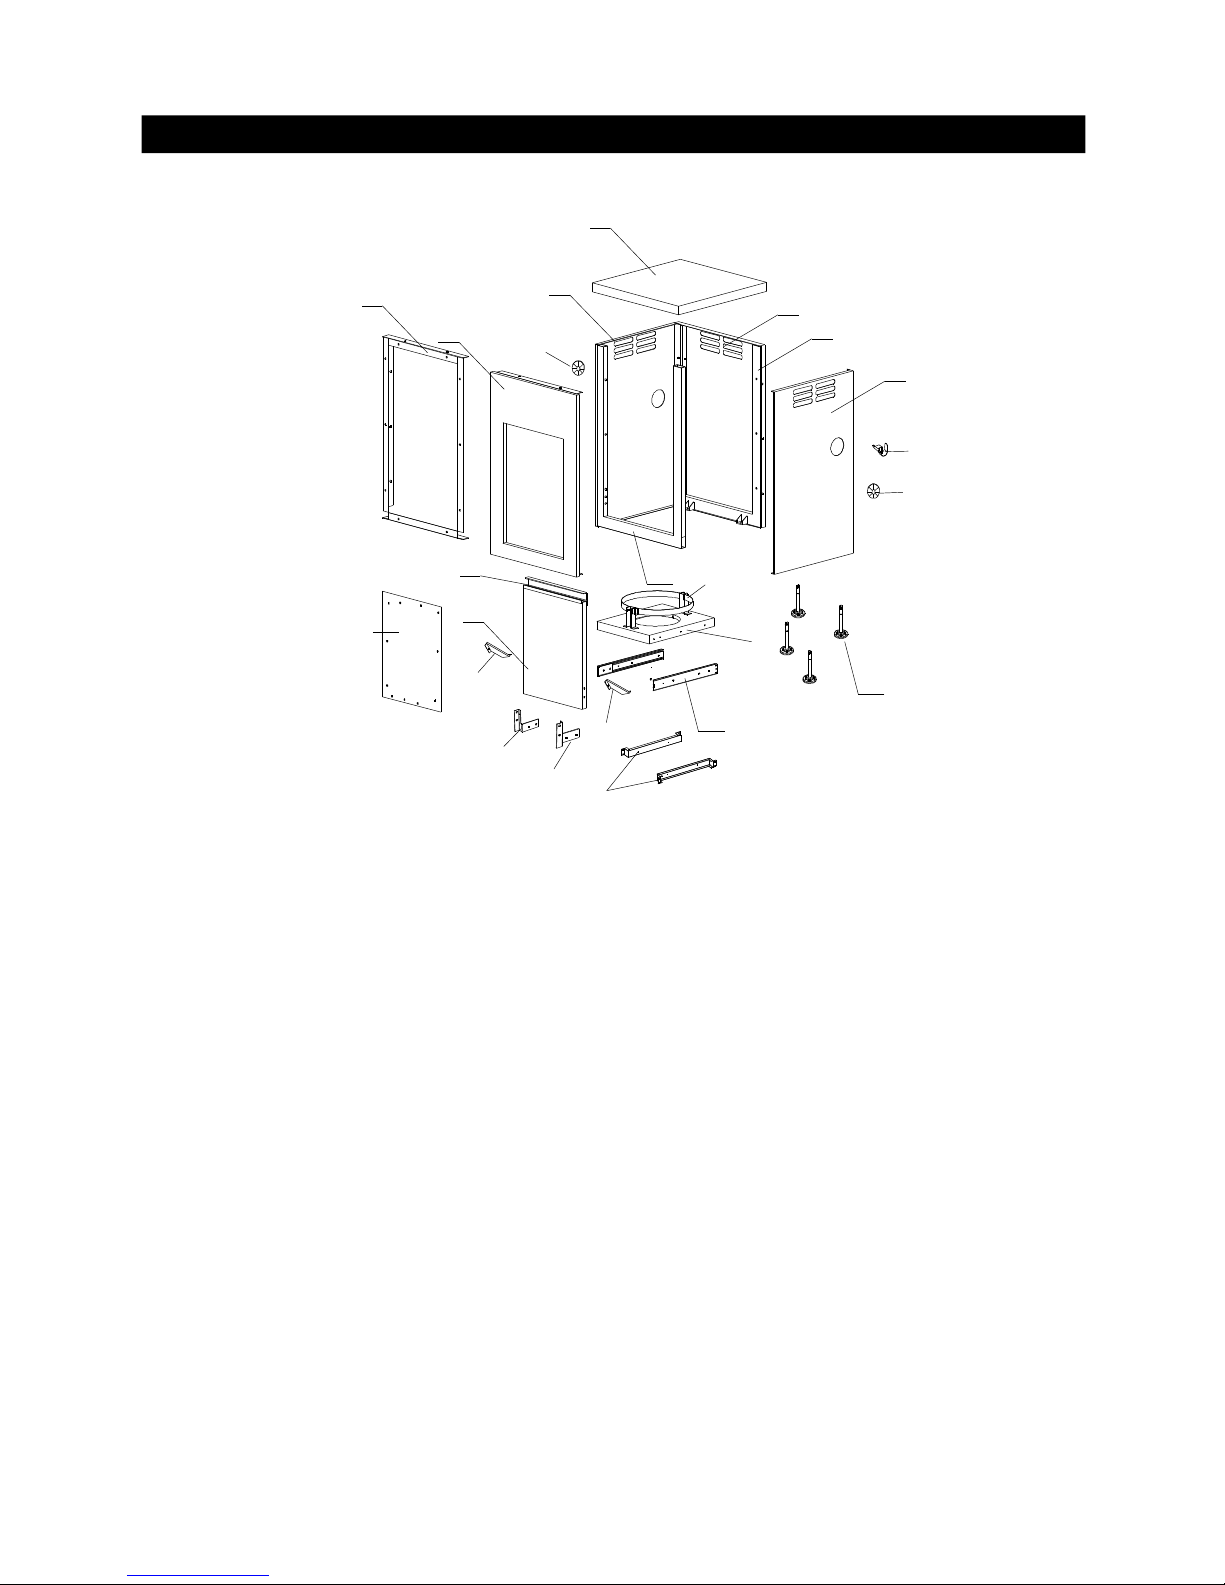
Parts Diagram for Model CGI07ALP Island
1
2
3
4
5
6
7
8
10
9
11
14
15
16
17
20
21
22
19
13
13
12
18
Page 8
8
Parts List for Model CGI07ALP Grill
KEY DESCRIPTION KEY# QTY
1 Lid Assembly P00147063A 1
2 Temperature Gauge P00601071A 1
3 Lid Handle P00205086B 1
4 Protective Pad P05518011 I 2
5 Cooking Rack/Secondary P01516004B 1
6 Cooking Grid P01604013B 2
7 Cooking Grid P01604031B 1
8 Burner/Main P02008032A 3
9 Infrared Burner Assembly P02005010A 1
10 Thermocouple P05305019A 1
11 Savor Plate® P01708033B 3
12 Burner Bracket P02203364A 1
13 Back Burner Assembly P02007068A 1
14 Back Burner Wind Shield P06906046B 1
15 Back Burner Electrode P02614025A 1
16 Back Burner Orifice P06534005A 1
17 Back Burner Extension Tube P03717045B 1
18 Bowl P0071334BC 1
19 Thermocouple Bracket P03343008C 1
20 Cart Panel Bracket A P03327038C 1
21 Cart Panel Bracket B P03327039C 1
22 Burner Heat Shield P06906045C 1
23 Grease Tray Heat Shield P06904020C 1
24 Gas Valve/Manifold Assembly Y0060412 1
25 Electric Wire Set P02615103A 1
26 Gas Collector Box with Electrode P02609010B 3
27 Control Panel Extension P02909768S 1
28 Control Panel Upper P02909771S 1
29 Control Panel P02909781A 1
30 Control Knob P03429062J 3
31 Control Knob For Back Burner/Infrared Burner P03429072J 2
32 Cart Frame, Left P01303016B 1
33 Control Knob Seat P03415014A 5
34 Lighting Stick P05507008A 1
35 Regulator With Hose P03601004A 1
36 Grease Tray P02717454A 1
37 Bowl Support Bracket, Left P01301006B 1
38 Cart Panel, Top P07801027A 1
39 Cart Panel, Lower/Left & Middle P07604016B 2
40 Cart Panel, Right P07620001D 1
41 Cart Frame, Right P03344002D 1
42 Cart Panel, Front P07621001D 1
43 Cart Frame for Front Panel P03344003D 1
44 Cart Panel, Rear/Left P07702064G 1
45 Cart Panel, Rear/Right P07702065G 1
46 Cart Frame, Front P00907003C 1
47 Cart Frame, Rear P00907004C 1
48 Drawer Slide Set P05516012C 1
49 Door P04301030A 1
50 Door Handle P00215031A 1
51 Tank Tray P04009030B 1
52 Slide Set P05516013C 1
53 Slide Bracket A P03311011D 2
Page 9
9
Parts List for Model CGI07ALP Grill
KEY DESCRIPTION KEY# QTY
54 Hose Holder P05536001A 1
55 Drawer P01901008B 1
56 Drawer Handle P00215032A 1
57 Protective Cap A P05535008I 1
58 Name Plate P00407010D 1
59 Level Adjuster P05322003A 4
60 Door Bracket, Left P03302027C 1
61 Door Bracket, Right P03302028C 1
62 Heat Insulating Spacer P06801022A 2
63 Savor Plate Bracket, Front P03328015A 3
64 Savor Plate Bracket, Rear P03328017A 3
65 Back Burner Thermocouple P05305022A 1
66 Back Burner Thermocouple Bracket P03328047C 1
67 Grease Draining Plate P06902006C 2
68 Electric Ignitor, 6-port P02502075C 1
69 Electric Ignitor Protector P05545002A 1
70 Grease Tray Handle P00213012B 1
71 Bowl Support Bracket, Right P01302006B 1
72 Cart Panel, Upper/Left P01301009B 1
73 Cart Panel, Upper/Middle P01302009B 1
74 Tank Holder P05358001Y 1
75 Grease Tray Heat Shield, Lower P06903050M 1
76 Door Trim Panel P07510023A 1
77 L Bracket, Left P03302031C 1
78 L Bracket, Right P03302032C 1
79 Infrared Burner Electrode P02614052A 1
Cover P07002064B 1
Rotisserie Assembly Y0250122 1
Hardware Pack P06024005A 1
Operator's Manual P80170007A 1
Page 10
10
Parts List for Model CGI07ALP Range
KEY DESCRIPTION KEY# QTY
1 Lid P0014605AY 1
2 Griddle P05702020E 1
3 Cover Hook P05514133A 2
4 Burner/Griddle P02008046B 1
5 Side Burner Body P01106040B 1
6 Grease Tube P02721042B 1
7 Frame For Griddle Burner P0071325FC 1
8 Griddle Bracket P03328041C 4
9 Lighting Tube P05507139A 1
10 Bowl Panel, Top P0073941DC 1
11 Side Burner Pot Support P00815013D 1
12 Side Burner P02004037B 1
13 Side Burner Cap P02013057E 1
14 Bowl Panel, Left P0072075DC 1
15 Bowl Panel, Right P0072175DC 1
16 Bowl Panel, Rear P0072575DC 1
17 Control Panel Bracket, Left P03328039C 1
18 Control Panel Bracket, Right P03328040C 1
19 Grease Tray P02717465A 1
20 Grease Tray Handle P00213011B 1
21 Bowl Support Bracket, Left P01301006B 1
22 Bowl Support Bracket, Right P01302006B 1
23 Side Burner Electrode P02607054A 1
24 Gas Collector Box With Electric Wire P02610025A 1
25 Cart Panel Bracket C P03327040C 1
26 Gas Valve/Manifold Assembly Y0060413 1
27 Control Panel, Upper P02907971S 1
28 Control Panel P02907981A 1
29 Control Knob Seat P03415014A 2
30 Control Knob P03429062J 2
31 Electric Ignitor,2-Port P02502172C 1
32 Regulator With Hose P03601040A 1
33 Faucet Assembly P05513006M 1
34 Sink Frame P07801028A 1
35 Sink P0071332BC 1
36 Cart Panel, Left P07619001D 1
37 Cart Frame, Left P03344004D 1
38 Cart Panel, Middle & Lower/Right P07604016B 2
39 Cart Panel, Front P07621002D 1
40 Cart Frame for Front Panel P03344005D 1
41 Cart Panel, Rear/Left P07702066G 1
42 Cart Panel, Rear/Right P07702067G 1
43 Door P04301030A 1
44 Door Handle P00215031A 1
45 Cart Basket P05203007G 1
46 Cart Basket Bottom P01001053D 1
47 Slide Set P05516013C 1
48 Slide Bracket A P03311011D 2
49 Bowl Bracket, Right P01305018D 1
50 Cart Panel, Upper/Right P07606026B 1
51 Bowl Bracket, Left P01306018D 1
52 Cart Frame, Front P00907005C 1
53 Cart Frame, Rear P00907006C 1
Page 11
11
Parts List for Model CGI07ALP Range
Parts List for Model CGI07ALP Island
KEY DESCRIPTION KEY# QTY
54 Refrigerator P05335018A 1
55 Door For Refrigerator P04301031A 1
56 Door Handle For Refrigerator P00201001C 1
57 Door Bracket, Upper P03302029C 1
58 Door Bracket, Bottom P03302030C 1
59 Refrigerator Bracket, Left P03329010D 1
60 Refrigerator Bracket, Right P03329011D 1
61 Level Adjuster P05322003A 4
62 Door Bracket, Right P03302028C 1
63 Door Bracket, Left P03302027C 1
64 Cart Frame, Right P01303016B 1
65 Grate Lifter P05515014E 2
66 Side Burner Frame P01903003B 1
67 Protective Pad P05518011 I 2
68 Name Plate P00407010D 1
69 Door Trim Panel P07510023A 1
70 L Bracket, Left P03302031C 1
71 L Bracket, Right P03302032C 1
72 Cart Panel Bracket D P03327041C 1
73 Protective Cap A P05535008I 1
74 Protective Cap B P05535009I 3
75 Door Trim Panel/Refrigerator P07510024A 1
Cover P07002065B 1
KEY DESCRIPTION KEY# QTY
1 Table Top P07801029A 1
2 Panel, Front P07621003D 1
3 Frame for Front Panel P03344006D 1
4 Panel, Left P07605026H 1
5
Panel, Right
P07606027H
1
6 Panel, Rear P07702068G 1
7 Frame, Front P00907007C 1
8 Frame, Rear P00907008C 1
9 Door P04301030A 1
10 Door Handle P00215031A 1
11 Slide Set P05516013C 1
12 Slide Bracket B P03311013D 2
13 Protective Cap C P05535010 I 2
14 Tank Tray P04009030B 1
15 Level Adjuster P05322003A 4
16 Door Bracket, Left P03302027C 1
17 Door Bracket, Right P03302028C 1
18 Tank Holder P05358001Y 1
19 Door Trim Panel P07510023A 1
20 L Bracket, Left P03302031C 1
21 L Bracket, Right P03302032C 1
22 Hose Holder P05528002G 1
Page 12
12
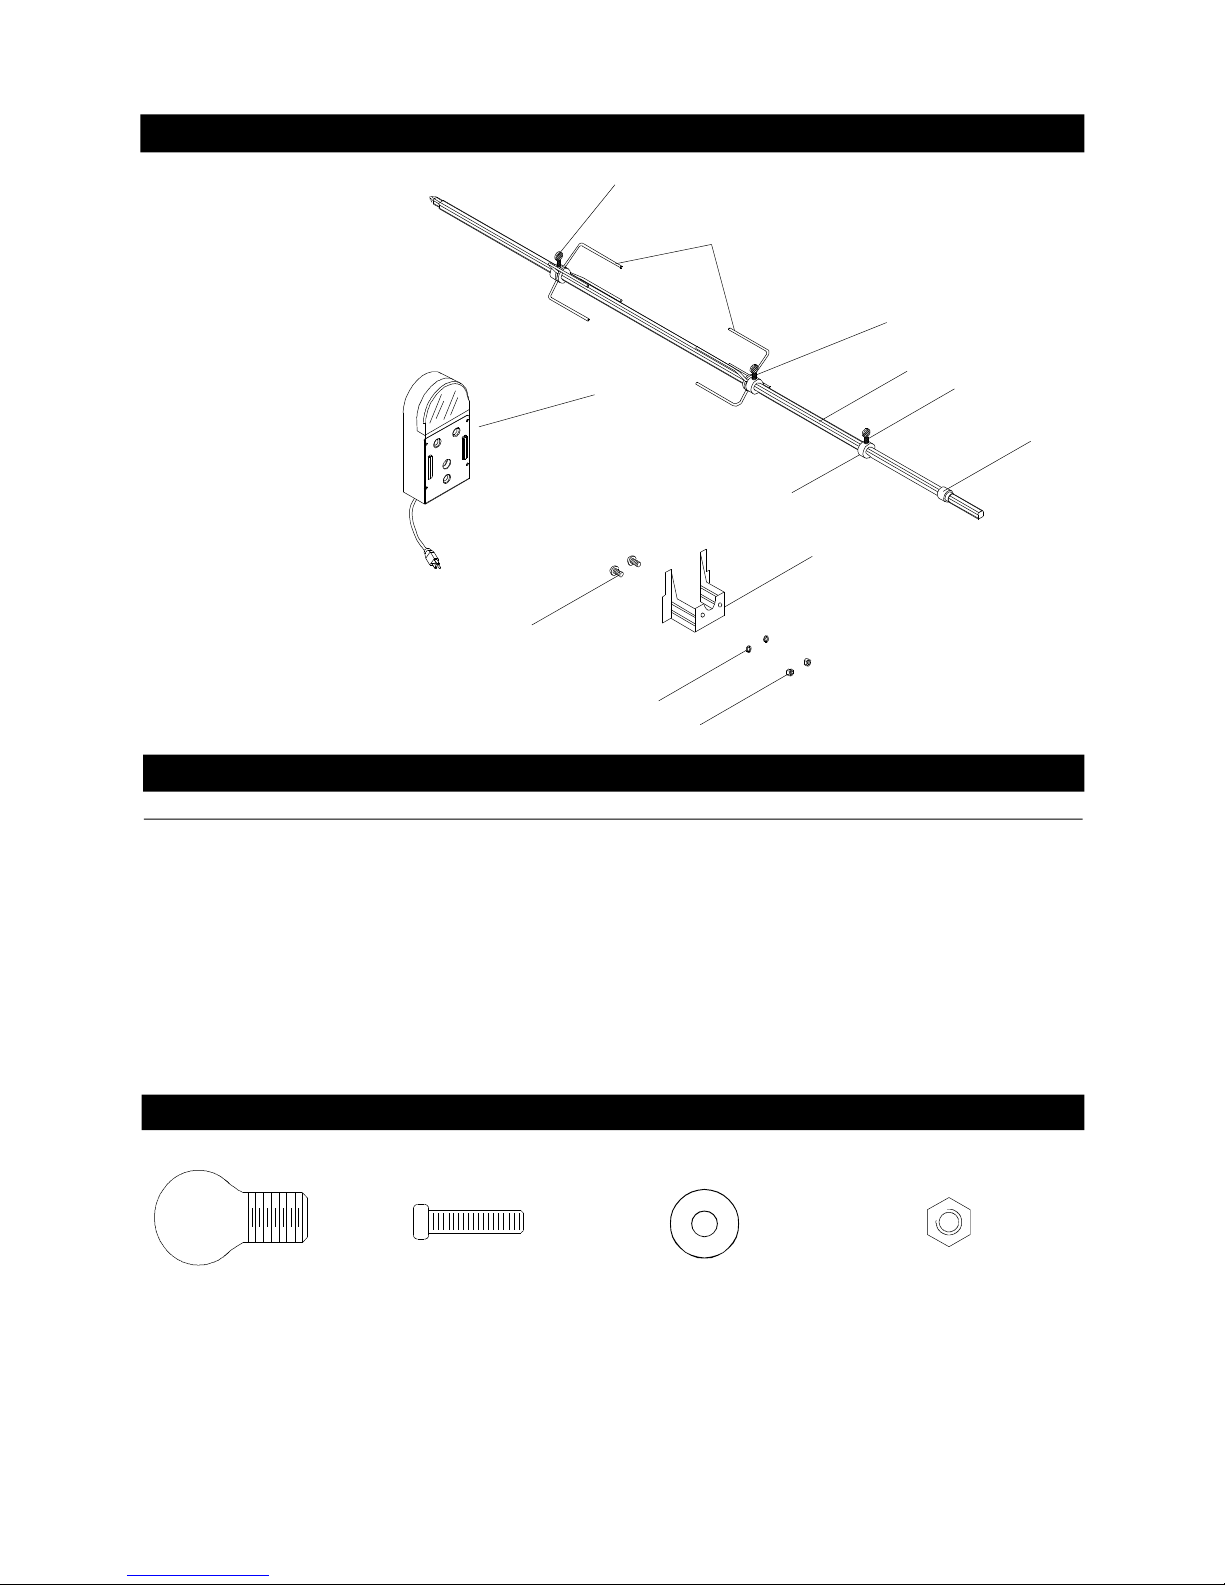
Y0250122 Rotisserie Assembly Parts Diagram
Y0250122 Rotisserie Assembly Parts List
Hardware for Rotisserie
Rot. Screw#10-24x3/4"
UNC
Qty. 2
Part # S112G10121
Rot. Thumbscrew
3/8"x1/2"
Qty. 3
Part # S196G06081
Rot.Washer
Qty. 2
Part # S411G03081
Rot. Nut.#10-24
Qty. 2
Part # S362G10121
KEY
PART#
DESCRIPTION
QTY
Rot. Bushing
Rot. Thumbscrew 3/8"x1/2"
Rot. Collar
Rot. Spit
Rot. Holding Fork
Rot. Motor Bracket
Rot. Motor/AC
Rot. Screw#10-24x3/4"UNC
Rot. Washer
Rot. Nut #10-24
1.
2.
3.
4.
5.
6.
7.
8.
9.
1
3
1
1
2
1
1
2
2
2
P05508092A
S196G06081
P05508091A
P05508175A
P05508090A
P05508174A
P07101042B
S112G10121
S411G03081
S362G10121
1.
2.
3.
4.
5.
6.
7.
8.
9.
10.
4
2
1
2
5
2
9
10
6
8
3
7
Page 13
13
Assembly Instructions
Phillips Head Screw 1/4"x3/8"
Qty.4
Part # S112G04061
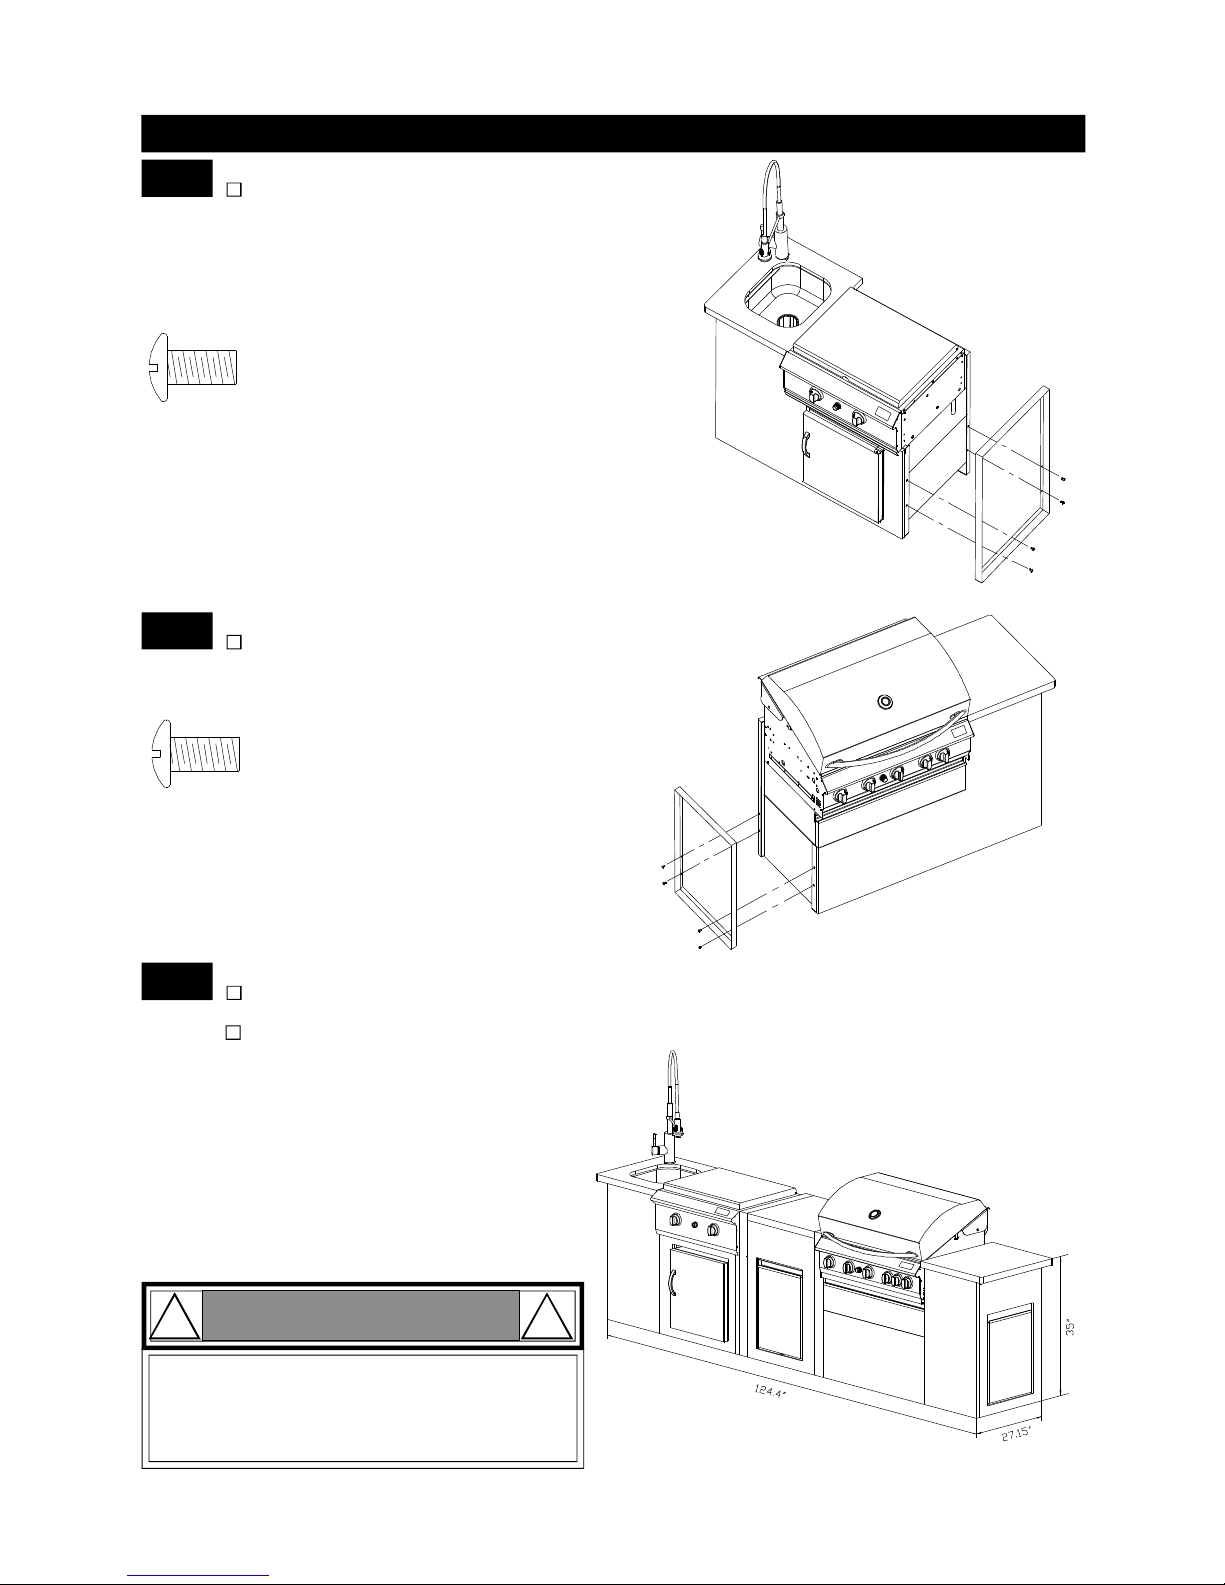
Install Cart Frame (For Range Model)
Phillips Head Screw 1/4"x3/8"
Qty.4
Part # S112G04061
Align the 4 holes in the Cart Frame and the Range,
Right (Front/Rear) Cart Legs . Insert the 4 Phillips
Head Screws 1/4"x1/2" and tighten securely.
1
Install Cart Frame (For Grill Model)
Align the 4 holes in the Cart Frame and the Grill Left
Cart Legs (Front/Rear). Insert the 4 Phillips Head
Screws 1/4"x1/2" and tighten securely.
2
Assemble Island Set (Optional Configurations)
Align the 3 individual models and slide together
as shown to your preference.
Be sure to attach the Regulator with Hose installation
from Range and Island before securely placing in to
position. (Please refer to Step 4).
3
Note:
All measurements are in inches
(Option 2 - next page)
Option 1
Grill
Range
Island
Use your grill at least 3 feet away from any wall
or surface.
Do not obstruct the flow of air for combustion
and ventilation.
CAUTION
! !
Page 14
14
Note:
All measurements are in inches
Option 2
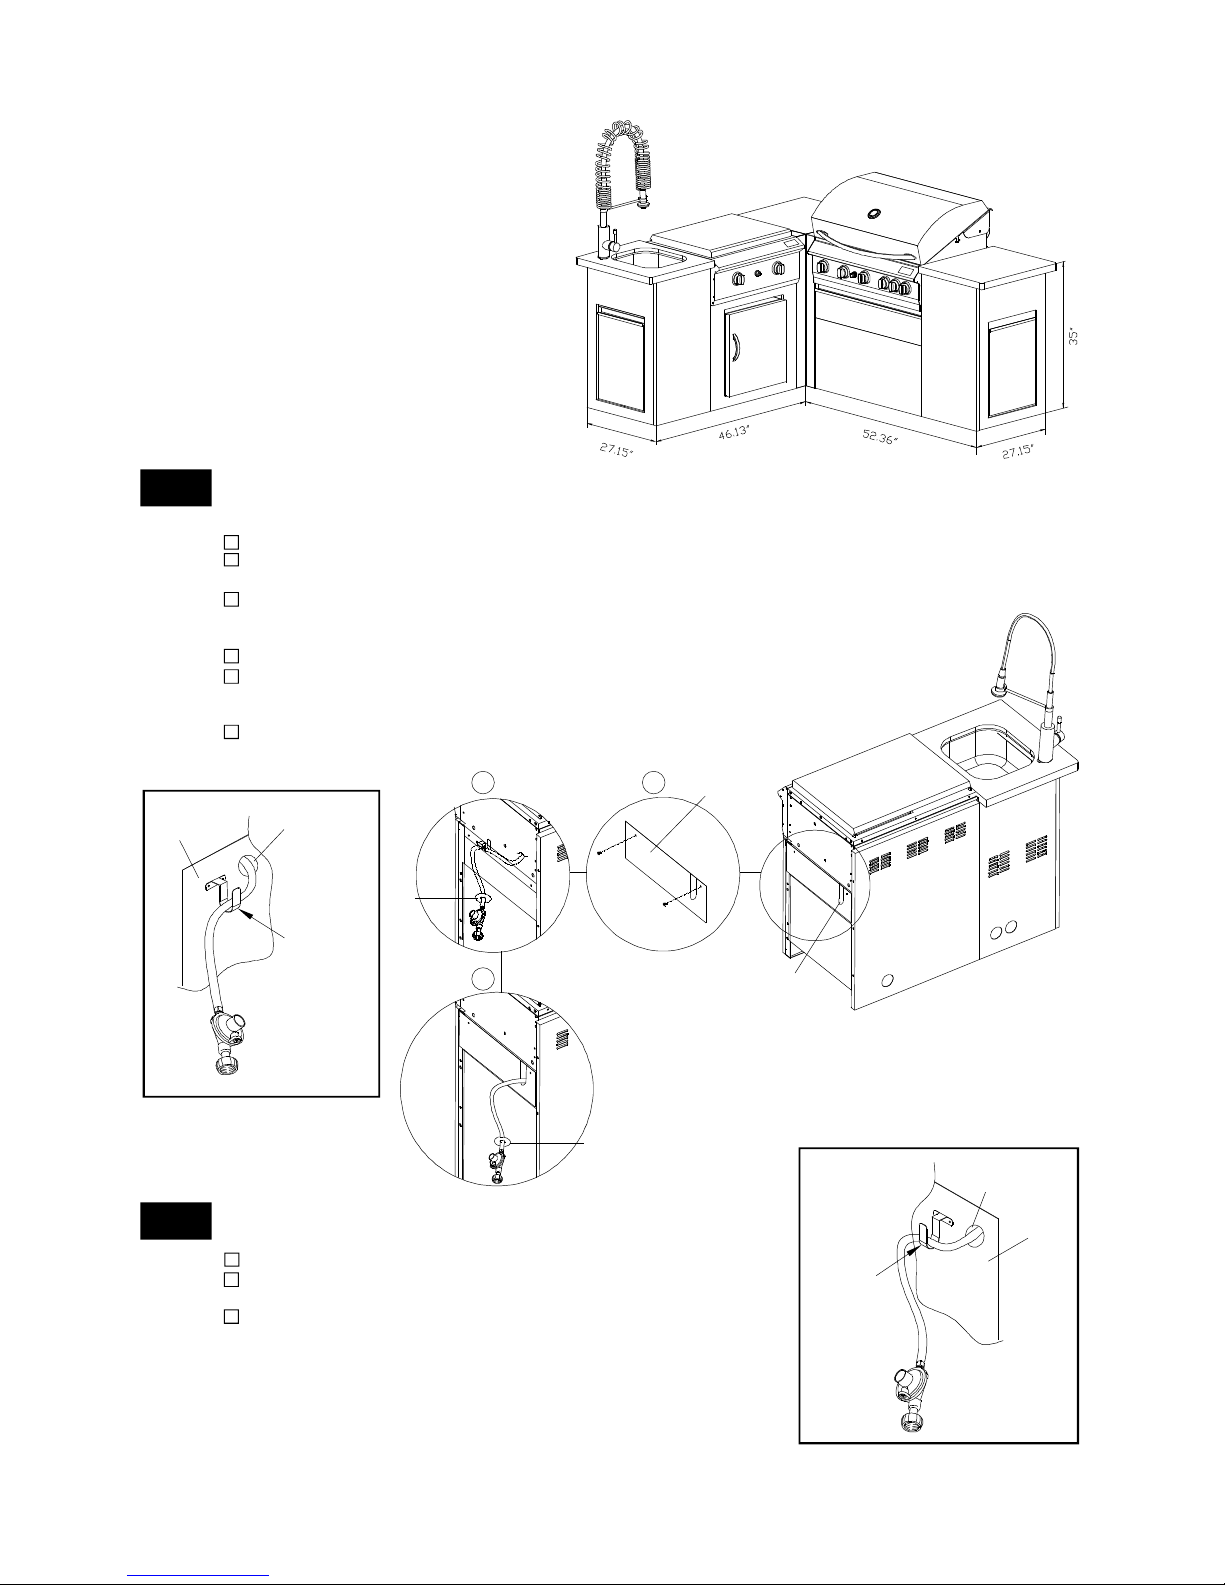
4-1
Install Regulator with Hose to Hose holder.
(Island Assembly Set - For Option 1 and 2).
With the help of an assistant, proceed with the following steps.
Remove the 2 screws and Upper Right Cart Panel.
Detach the Regulator with Hose from the Hose Holder
and insert the Regulator Hose end through the opening.
Replace the Upper Right Cart Panel and tighten securely
using the screws provided. Be sure that the Regulator Hose
sits within the designated slot opening.
Position the Range and Island set at close range.
Insert the Regulator with Hose through the Hose Inlet on
the Island set and attach the Regulator with Hose to the
Hose Holder.
From the ouside face of the panel seal the Hose Inlet with
the cap provided.
12
3
Cart Panel,
Upper/Right
Range
Island
Hose Holder
Hose
Inlet
Panel,
Left
4-2
Install Regulator with Hose to Hose holder.
(Island Assembly Set - For Option 2 Only).
Remove the screws and Hose Holder from the Left Panel.
Align the holes on the Hose Holder and designated holes
on the Right Panel and insert the screws.
Then proceed with the assembly instructions as for
Step 4-1.
Island
Panel,
Right
Hose Holder
Hose
Inlet
Cap
Cap
Slot opening
Page 15
15
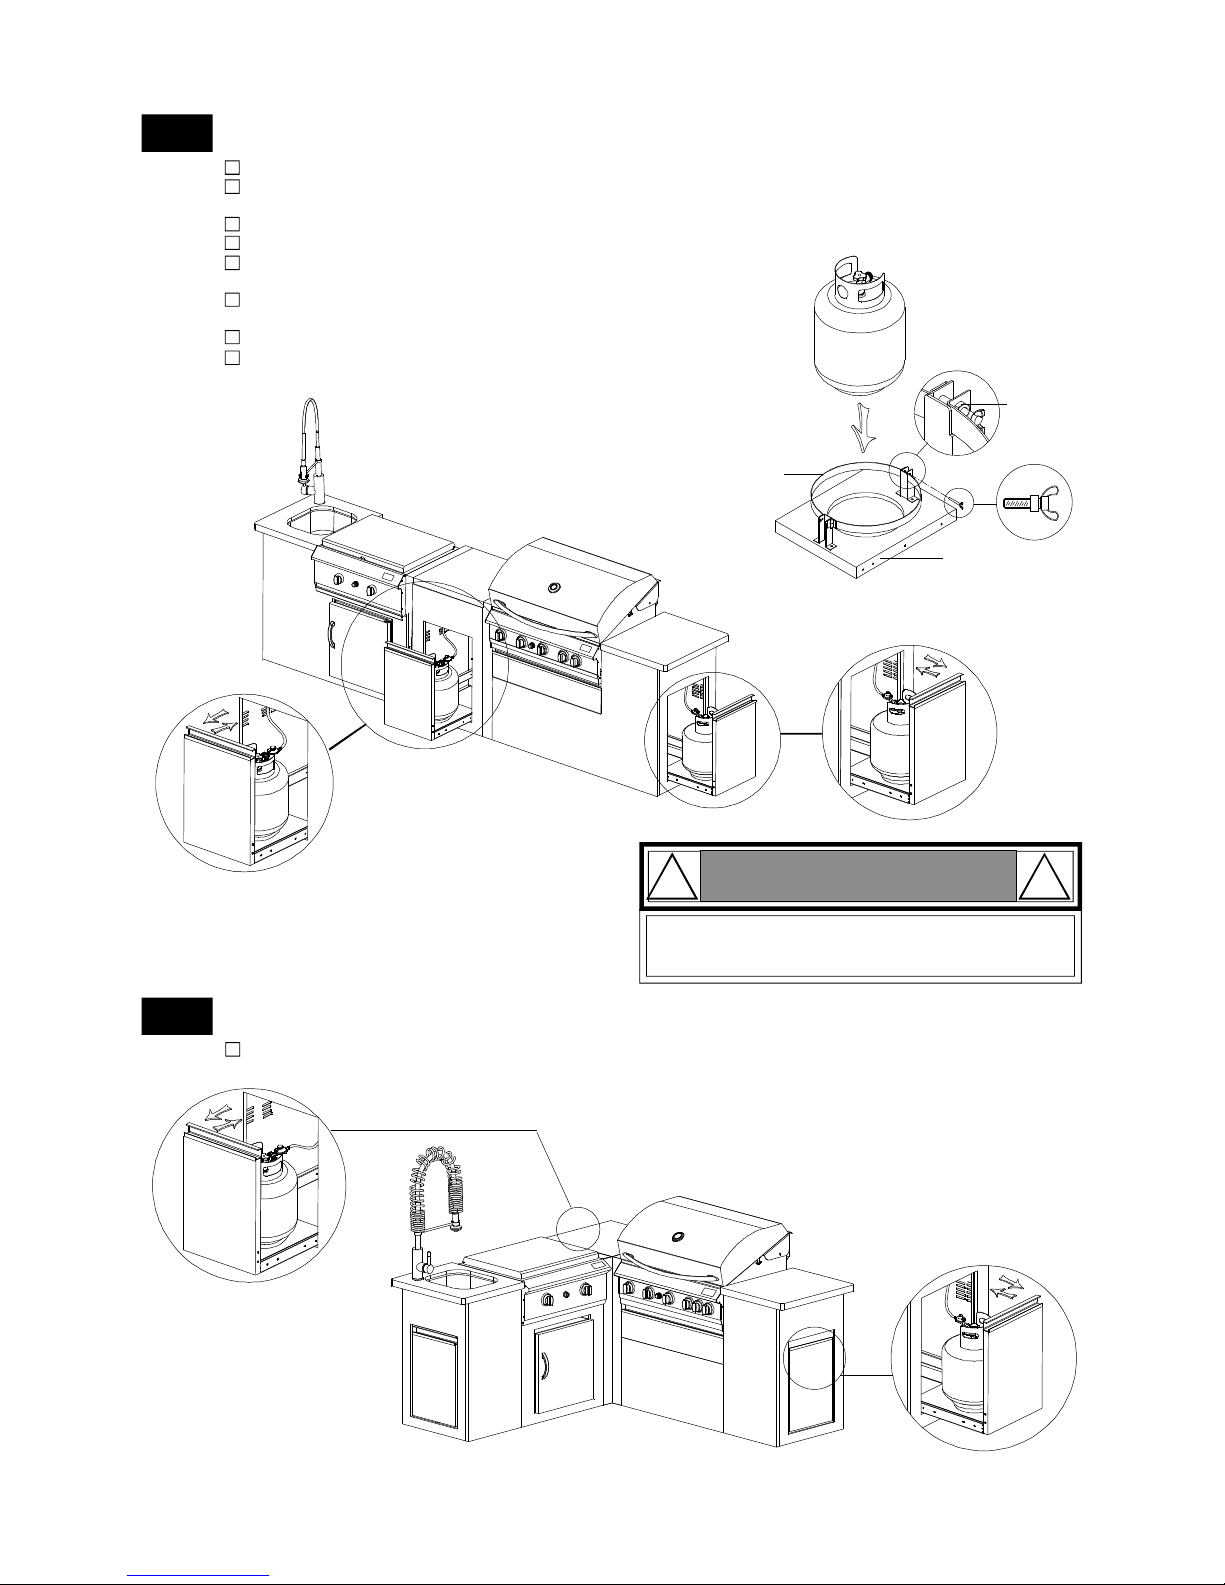
5-1
Install Gas Tank to Front & Side Tank Trays.
(Island Assembly Set - For Option 1).
Slide open the Tank Tray doors (as shown).
Turn your LP Gas Tank Valve clockwise to the closed or
OFF positon.
Unscrew the Wing Bolt from right bracket of tank holder.
Place LP Gas tank into tank holder on the Tank Tray.
Install the tank so the Tank Valve faces the rear right
corner of cabinet.
Align an additional nut and screw the Wing Bolt into right
bracket of tank holder to secure the gas tank.
Attach the Regulator with Hose to the gas tank.
Push the Tank Tray doors closed.
5-2
Install Gas Tank to Rear & Side Tank Trays.
Island Assembly Set - For Option 2).
Follow the Assembly Instruction as outlined in steps 5-1.
View of Rear
Tank Tray
Side Tank
Tray
Rear Tank
Tray
Keep the ventilation openings of the Tank Tray cabinet
free and clear of debris.
CAUTION
! !
Front Tank Tray
Additional
Nut
Tank tray
Tank
Holder
Side Tank Tray
Page 16
16
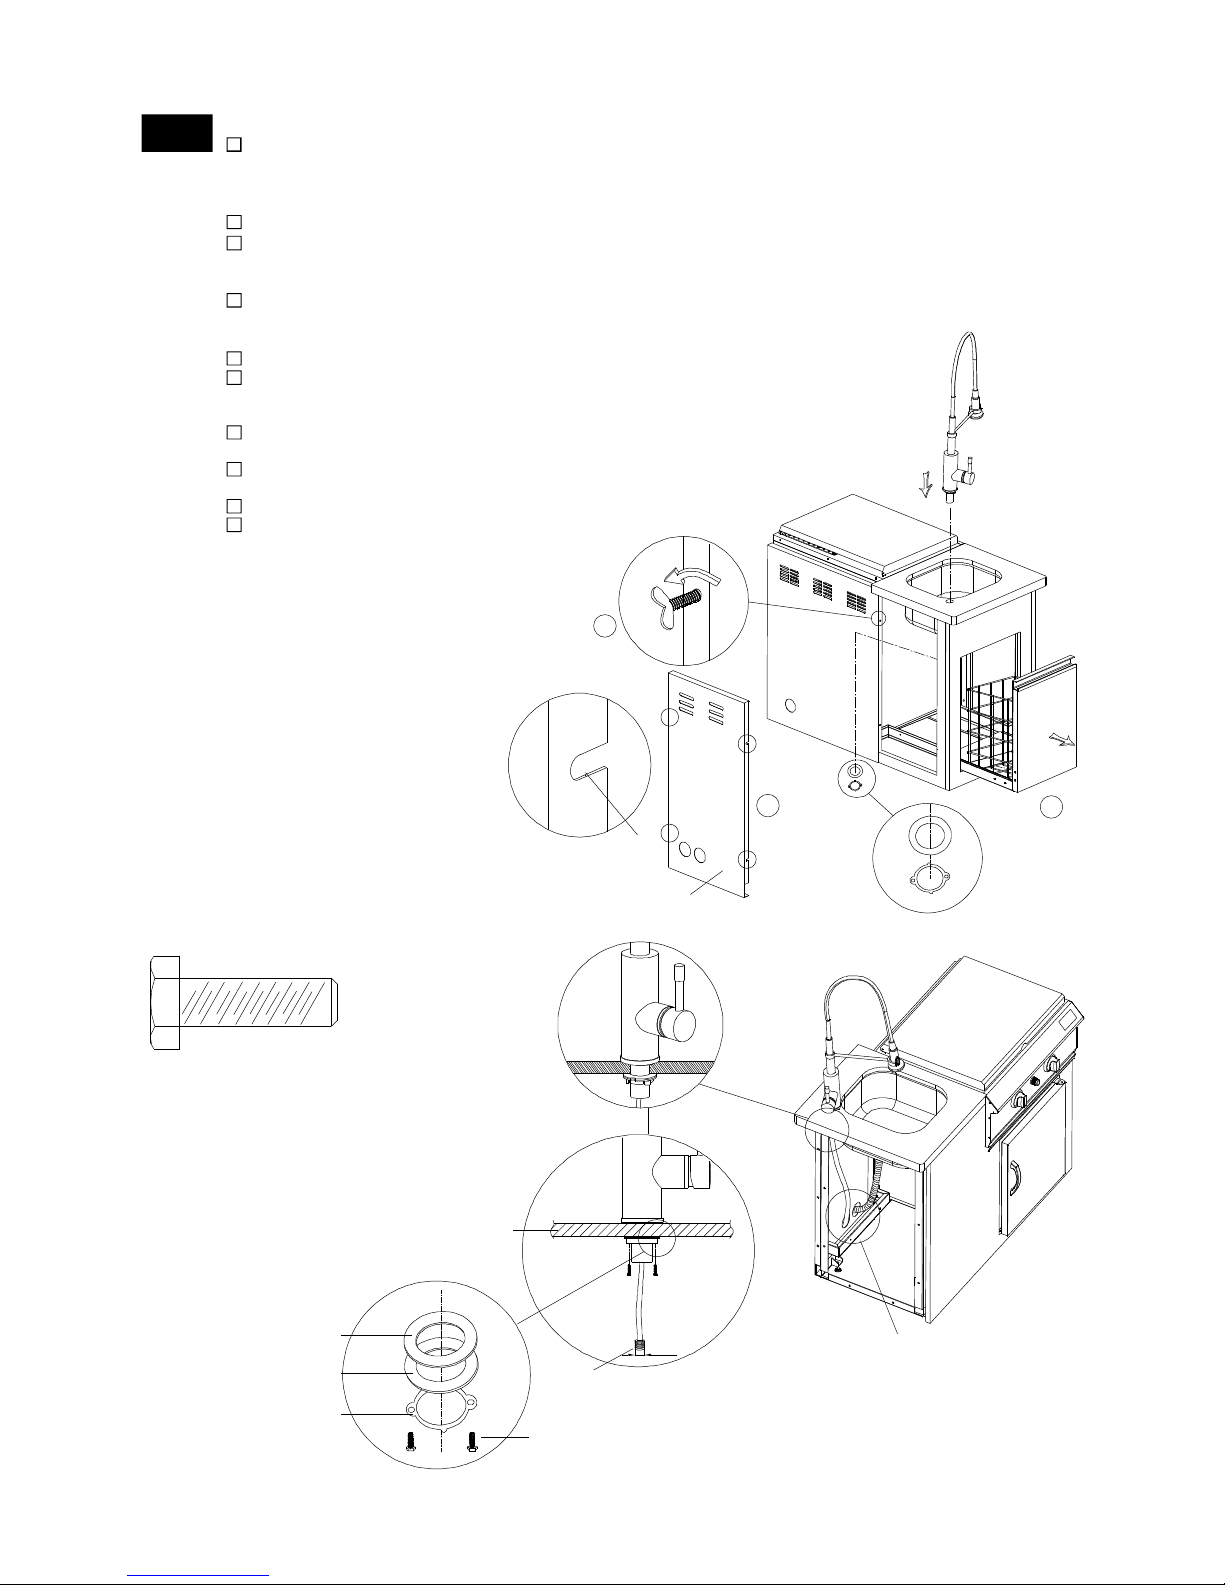
Install Faucet Assembly
Slide open the Cart Basket Door and from the underside of the Sink Frame
unscrew and remove the Left Cart Rear Panel as shown. (See fig. 1).
Loosen 4 preassembled Wing Bolts 1/4"x1/2" half way and gently push the
Left Cart Rear Panel to slide along the designated slot to remove.
Insert the faucet as shown.
From the underside of the Sink Frame attach the 2 Faucet washers and
Bracket, then insert the 2 Hex Head Screws M4x20mm to the Bracket (as
shown). Do not secure too tightly.
Grip the faucet to sit flat on the Sink Frame top and screw the Bracket
(clockwise) from the underside of the Sink Frame to secure the Faucet
firmly into position.
Then securely tighten the 2 Hex Head Screws M4x20mm. (See fig. 2).
Insert one end of the water Pipe (not supplied) to the Faucet pipe outlet
(diameter = 5/8") and thread the other end through the rear panel as shown
to the water supply line of your preference. (See page 19)
Then also thread the loose end of the preassembled Drain pipe through
the rear panel to a suitable drainage pipe.
Align the slot and slide the Left Cart Rear panel closed and retighten the
screws.
Push the Cart Bracket Door closed.
For Operation instructions refer to Use and Care
on page 19.
6
Fig 1.
1
Left Cart
Rear Panel
2
4 slots
3
Hex Head Screw M4X20mm
Qty.2
Part # S162M04201
Fig 2.
Sink Frame
top
Underside
view
Hex Head
Screw
Faucet metal
washer
Bracket
Faucet rubber
washer
5/8"
Faucet pipe
outlet
Outlet for Faucet
and Sink piping
Page 17
17
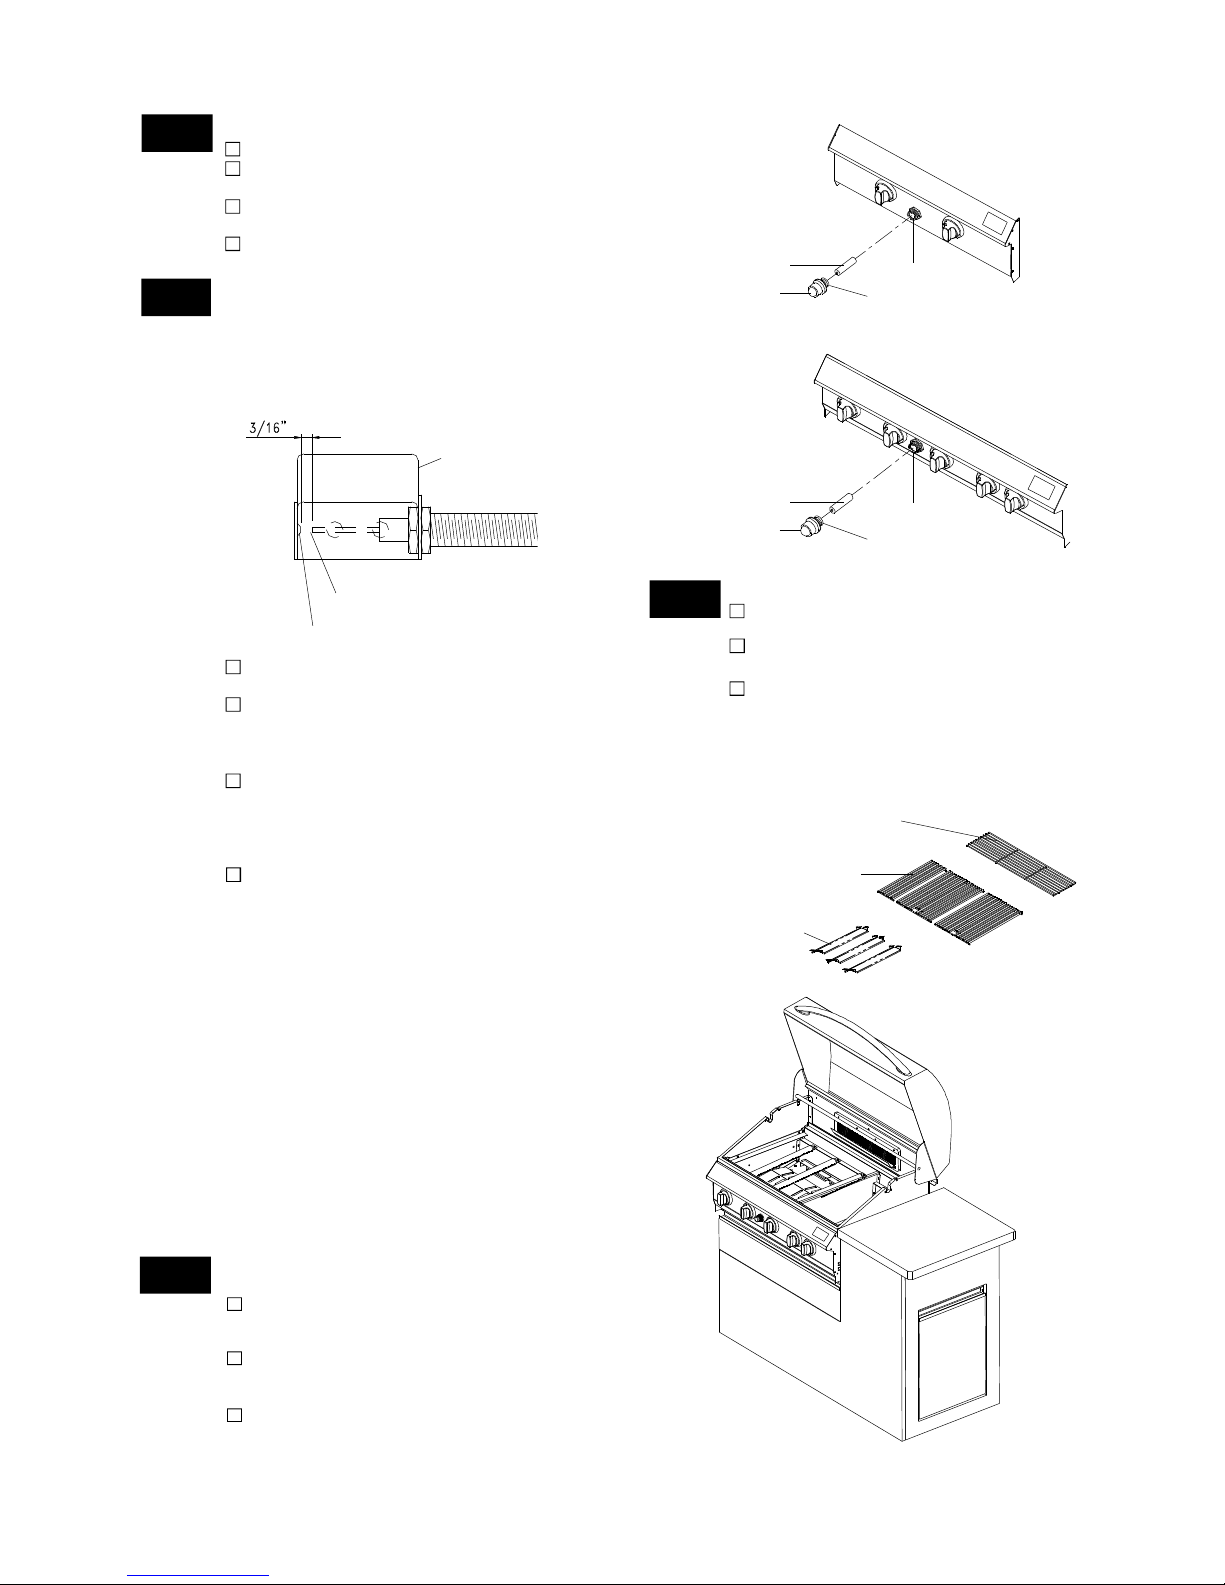
Install Ignitor Battery
Unscrew Ignitor Cap from Control Panel.
Place supplied AA battery into the Ignitor
Slot with positive pole facing you.
Position the Cap and Spring over the AA
battery and tighten onto Control Panel.
Repeat to install the other AA battery
into the Ignitor Slot.
Be sure all Control Knobs are set to
"OFF" and open the Grill Lid.
Have your assistant stand behind to the
right of the grill and look toward the front
of the grill bowl. Never put your face
inside the Grill Head.
Press the Ignitor Cap. You should hear
a "clicking" sound. Your assistant should
see a blue spark within each Gas
Collector Box. If a spark is present the
Electrode Tips are properly positioned.
If no spark is seen, the Spark Gap
needs to be adjusted as follows:
•
•
•
Using an adjustable wrench, loosen the
Inside Nut until the Gas Collector Box can
be turned upward.
If the gap between the Spark Electrode Tip and Receiver is more than
3/16" use long nose pliers to gently
squeeze the Gas Collector Box to
narrow gap.
Return the Gas Collector Box to its
original position, secure the Inside Nut
and try the Electrode Check again. If no
"clicking" sound is heard:
AA Battery may be installed backwards.
Electric wires may be loose. Remove
the AA Battery and inspect the Ignitor
Junction Box found behind the Control
Panel and reconnect any loose wires.
Side Burner Electrode Check
-
-
With the assistance of another person,
perform this Electrode Check before
proceeding.
This test will ensure that the Spark Electrode Tips
are properly positioned so your grill lights easily
and properly.
Open range lid. Remove packing material (cardboard and styrofoam) from
burner and pot support.
Push and turn side burner Control Knob
to HIGH/IGN. Look for spark between tip
of electrode and burner.
If you don't see a spark from side burner electrode, adjust gap between electrode and
burner surface to 3/16 in.
8
Install Cooking Components
Place the Savor Plates® above the
Burners.
Place the Cooking Grids on the ledge
above the Savor Plates®.
Place the Secondary Cooking Rack into
the holes on the upper left and right of
the Back Burner frame with the bottom
resting in the slots on either side of the
Grill Bowl.
Secondary Cooking Rack
Savor Plates
®
10
Cooking Grids
Spring
Ignitor Cap
Ignitor Slot
AA Battery
AA Battery
Ignitor Slot
Spring
Ignitor Cap
CGI07 Range
Control Panel
CGI07 Grill
Control Panel
Spark Electrode Tip
Spark Receiver
Spark Gap
Gas Collector Box
7
8
9
Page 18
18
WARNING
!
Failure to read and follow the Use and Care
Instructions could result in a fire or explosion
that could cause serious bodily injury, death or
property damage.
!
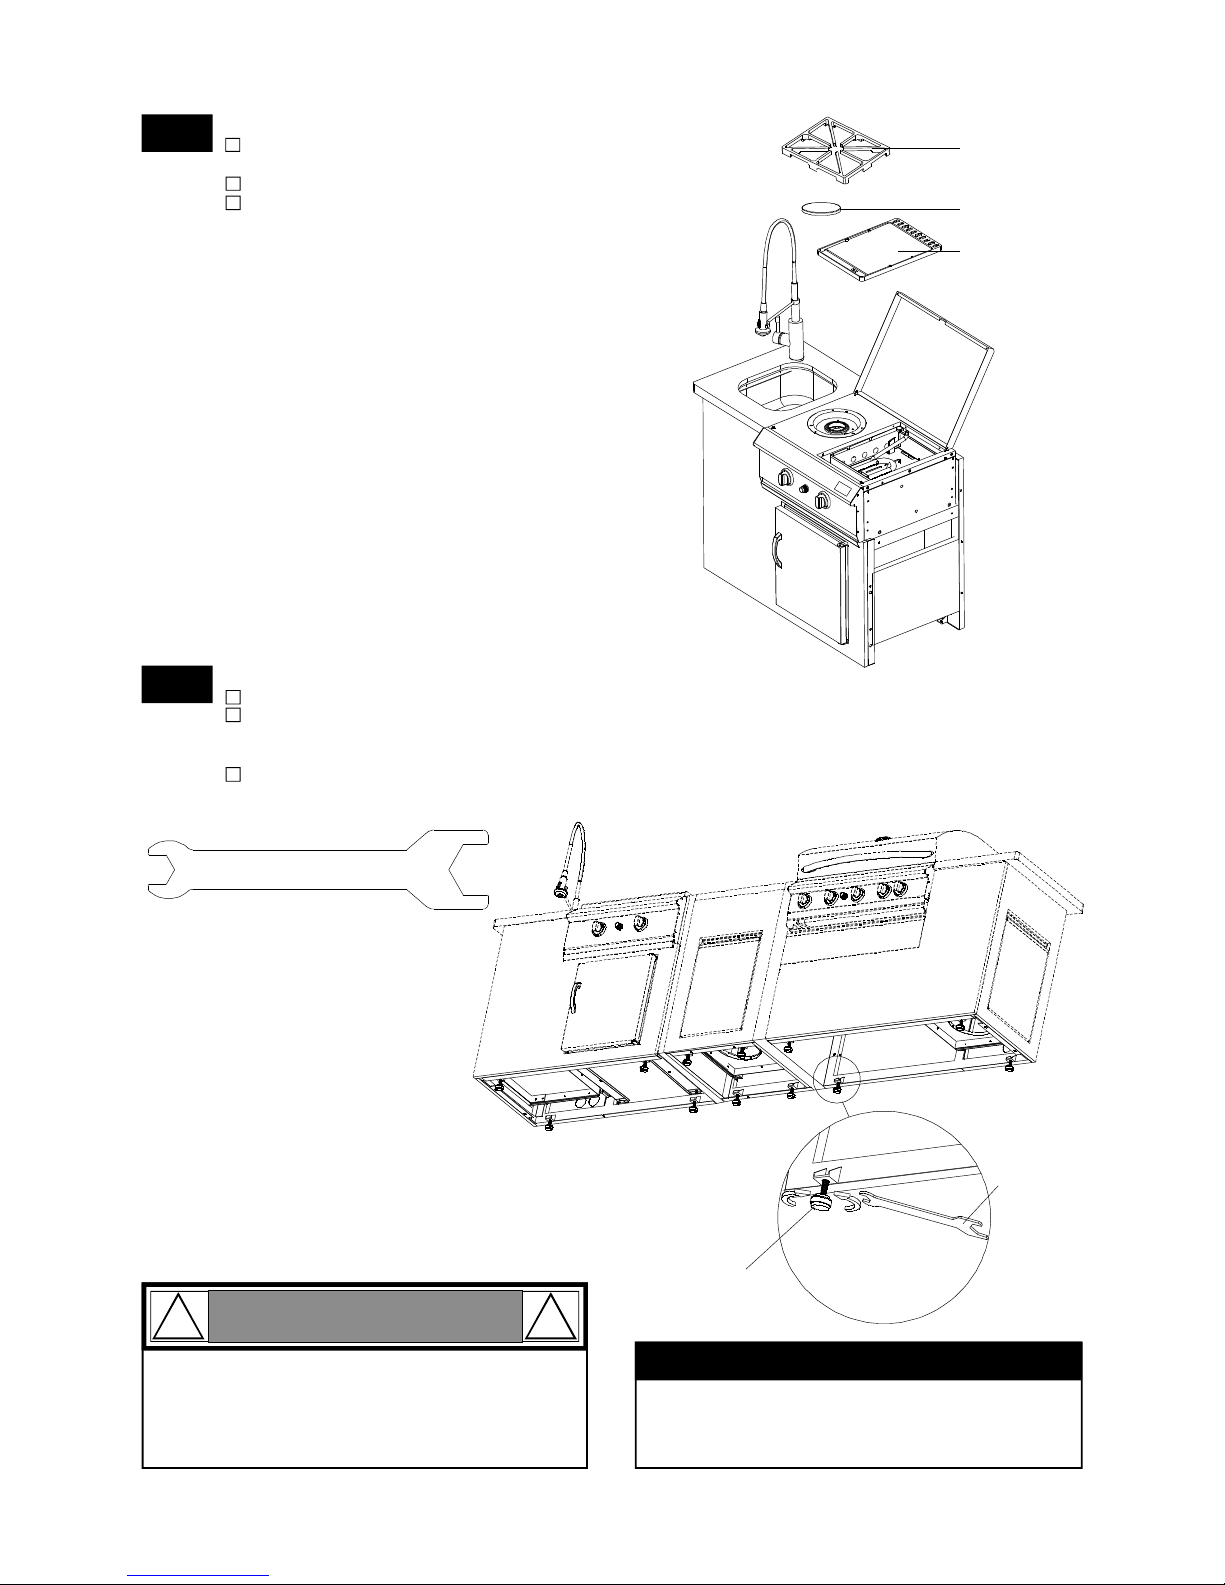
11
Install Pot Support and Griddle
Place the Side Burner Cap onto the side burner bowl
insert.
Place the Pot Support on the bowl panel Top Panel.
Place the Griddle on the Bowl Panel Top Panel.
Pot Support
Griddle
Side Burner Cap
Final Grill Assembly Step
When you have finished assembling your
grill be sure that all screws are tightened
for safe operation of your grill.
Wrench
Qty.1
Part # P05515017L
Level Adjuster are located underside of the Island Assembly as shown.
Adjust the 12 preassembled Level Adjusters using the wrench provided.
- Turn it clockwise raises the height of the Assembly and
- Turn it counterclockwise to lower the height.
IMPORTANT: For illustration purpose the Island Assembly Set is shown
on a tilted angle. FOR YOUR SAFTEY DO NOT TILT your Island Assembly
at any time.
12
Adjust Island Assembly Set (on uneven surface position).
Underside view of Island Assembly Set
Level Adjuster
Wrench
Page 19
19
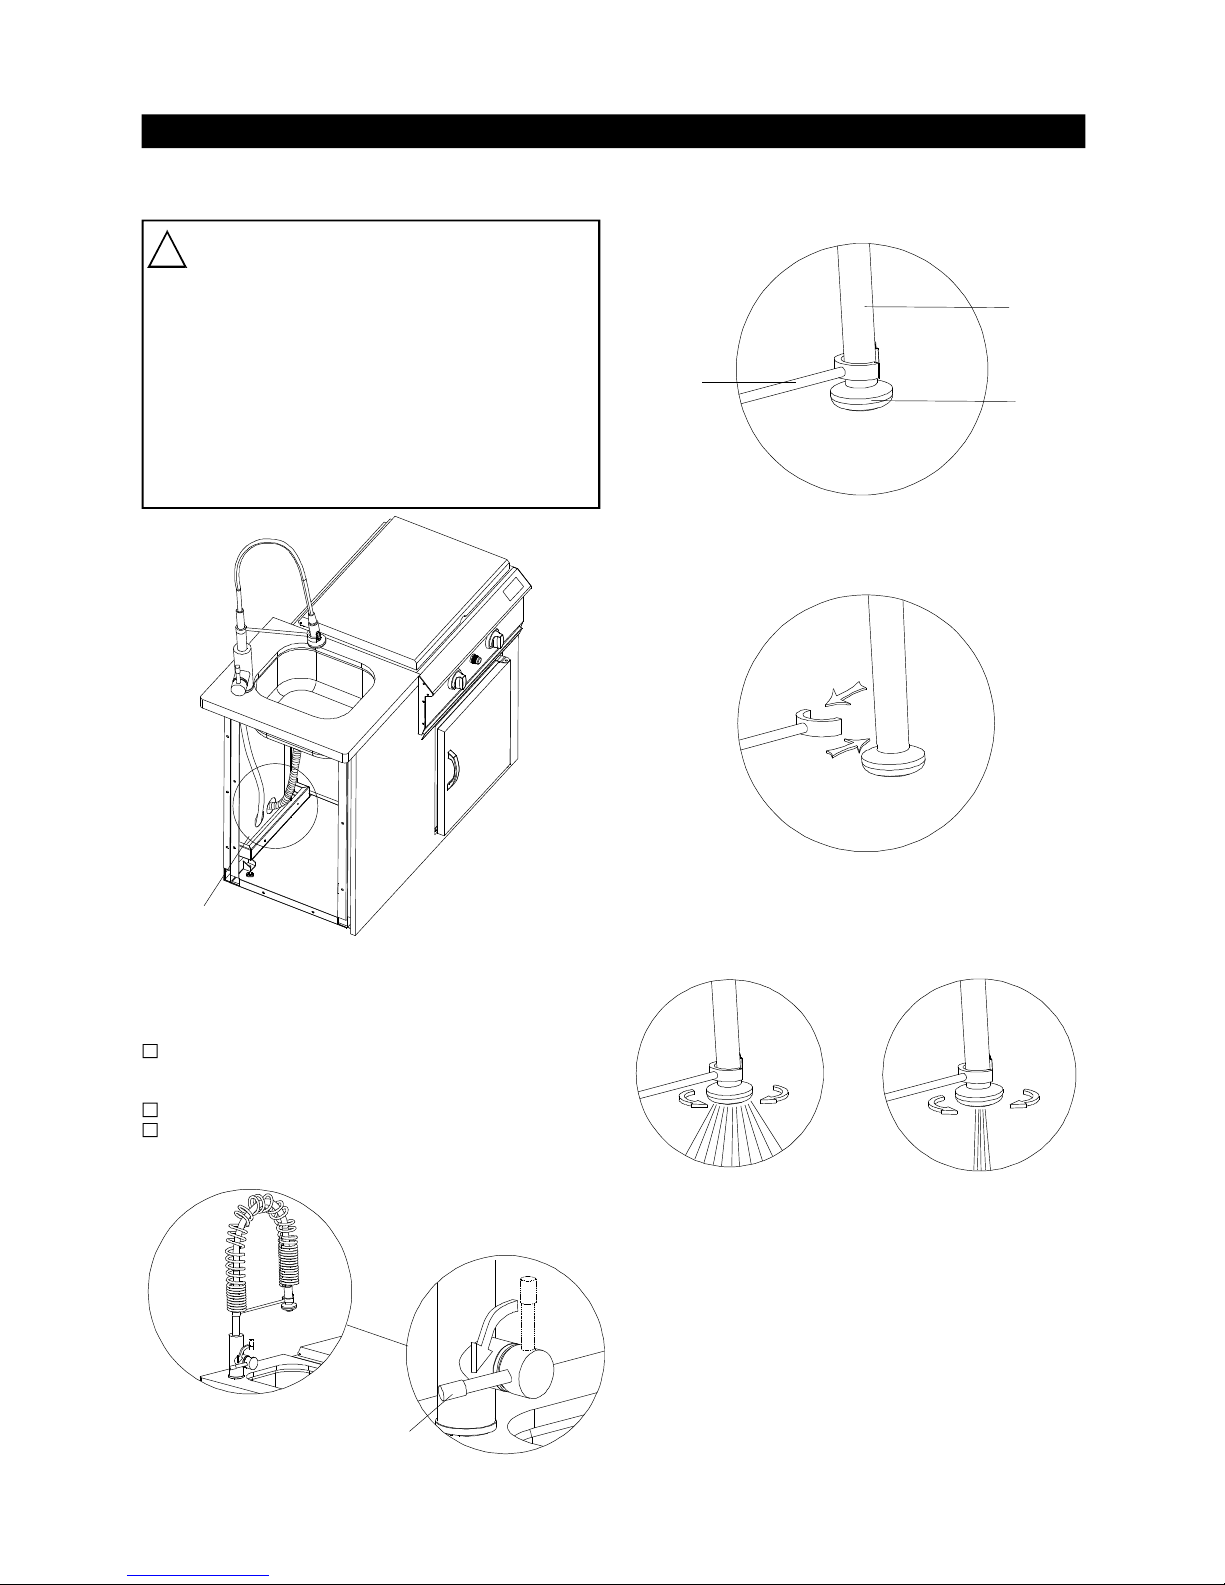
Swivel and adjust the flexible faucet neck as needed to
direct the spray head.
Remove the faucet neck from clamp holder for manual control and directional use.
USE AND CARE INSTRUCTIONS
Water supply and drainage system for
Island Assembly.
This Serving Cart is provided with an optional
faucet and water supply hose. You can have the
faucet and water supply hose plumbed directly
to your homes inside water supply line so that
your outdoor sink can be used for washing food
and dishes. However, if you elect to use this kit
and attach a garden hose to your faucet, be
aware that in some U.S. states water supplied
through a garden hose is regarded to be unfit for
drinking.
California Proposition 65 Warning
!
ON
OFF
For illustration purposes left cart side panel is not in
view.
Outlet for Faucet
and Sink piping
Faucet Operation
With the water and drain pipe fitted to a suitable outlet, be
sure the water and drain inlet/outlet connection fittings
are tightened securely.
Turn on the main water supply line.
Push the lever on the Faucet to the left to release
the water.
Two Spray setting mode:
Dual Function use
Center Spray
Full Spray
Faucet
neck
Faucet
head
Faucet
holder
Lever
Twist the Faucet Head clockwise or counter-clockwise to
adjust the spray mode.
Page 20
20
USE AND CARE INSTRUCTIONS
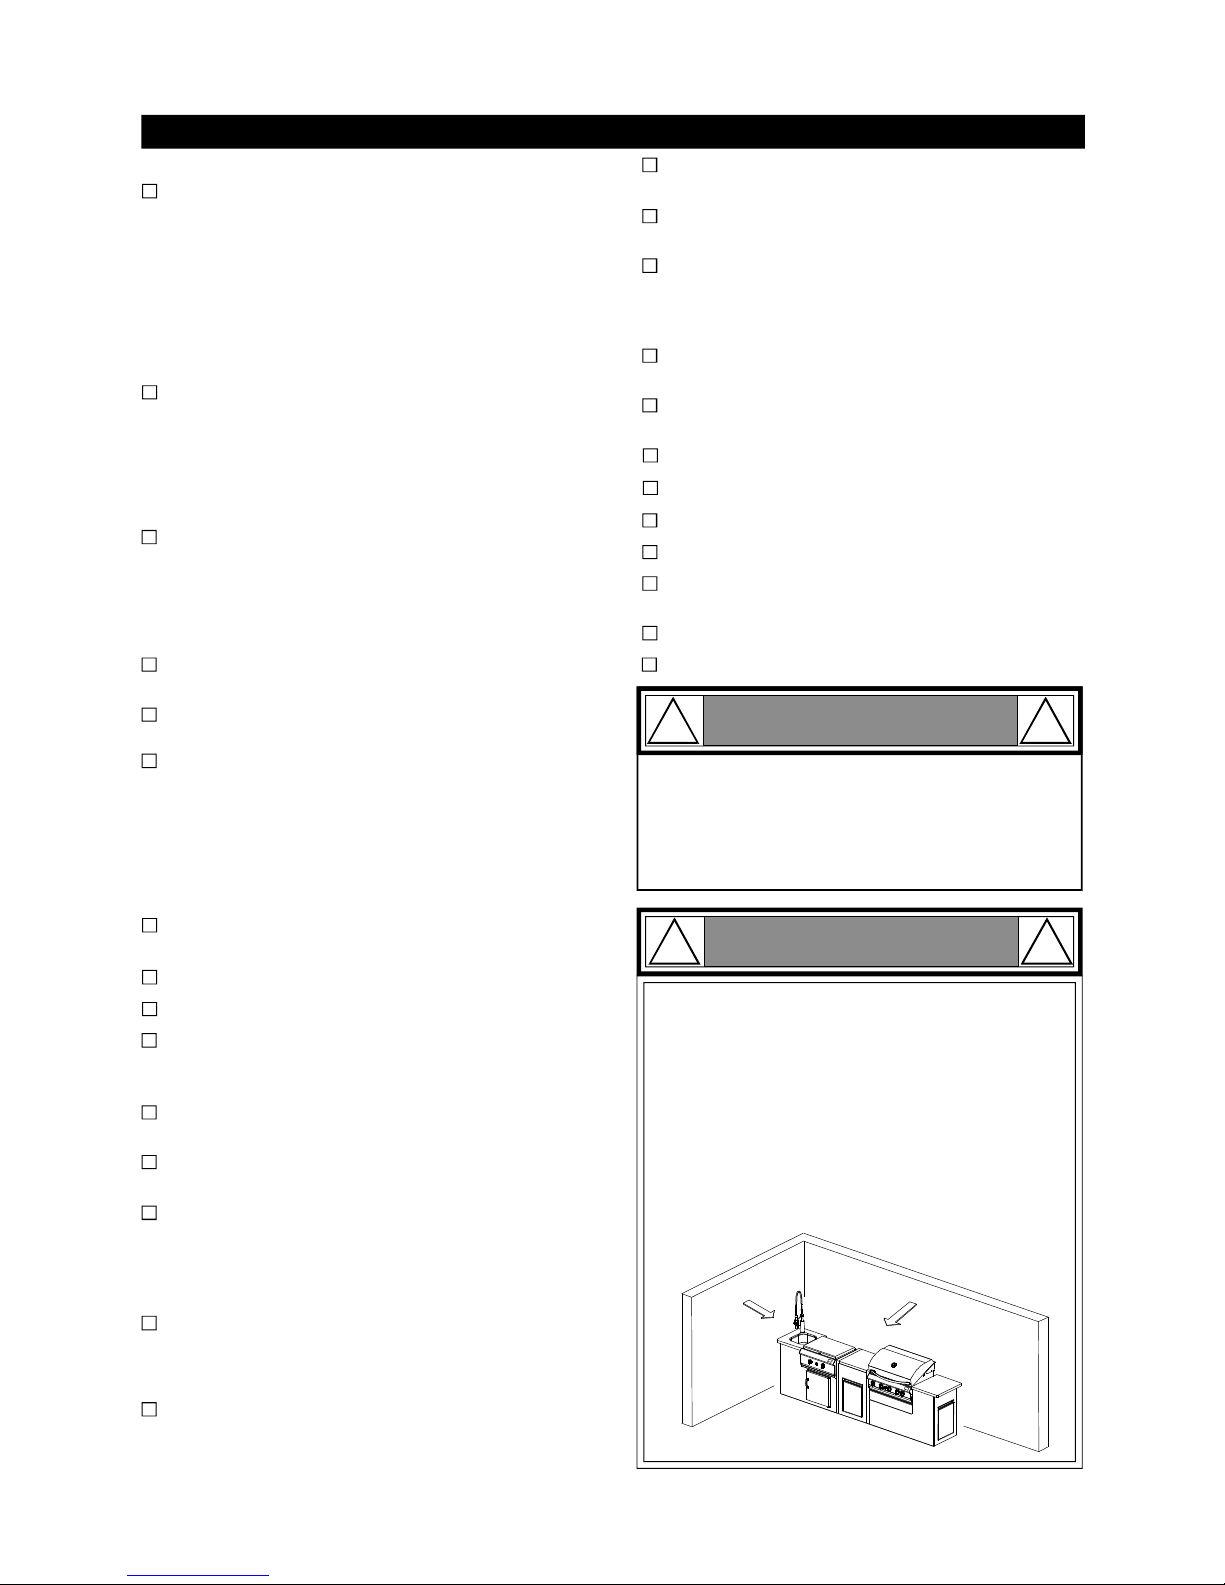
CORRECT LP GAS TANK USE
LP Gas grill models are designed for use with a
standard 20 lb. Liquid Propane Gas (LP Gas) tank,
not included with grill. Never connect your gas grill to
an LP Gas tank that exceeds this capacity. A tank of
approximately 12 inches in diameter by 18-1/2 inches
high is the maximum size LP Gas tank to use. You
must use an "OPD" gas tank which offers a listed
Overfill Prevention Device. This safety feature
prevents tank from being overfilled which can cause
malfunction of LP Gas tank, regulator and/or grill.
Never connect an unregulated LP gas tank to your
gas grill. The gas regulator assembly supplied with
your gas grill is adjusted to have an outlet pressure
of 11" water column (W.C.) for connection to an LP
gas tank. Only use the regulator and hose assembly
supplied with your gas grill. Replacement regulators
and hose assemblies must be those specified by
the Manufacturer.
Have your LP Gas dealer check the release valve
after every filling to ensure it remains free of defects.
Always keep LP Gas tank in upright position.
Do not subject the LP Gas tank to excessive heat.
Never store an LP Gas tank indoors. If you store
your gas grill in the garage always disconnect the
LP Gas tank first and store it safely outside.
LP Gas tanks must be stored outdoors in a wellventilated area and out of the reach of children.
Disconnected LP Gas tanks must not be stored in a
building, garage or any other enclosed area.
The regulator and hose assembly can be seen after
opening the doors (if applicable) and must be
inspected before each use of the grill. If there is
excessive abrasion or wear or if the hose is cut, it
must be replaced prior to using the grill again.
Any attempt to convert the grill from one fuel type
to another is extremely hazardous and must be
performed by a qualified gas technician only, using
a NG Conversion Kit purchased from Grand Hall.
Never light your gas grill with the lid closed or
before checking to ensure the burner tubes are fully
seated over the gas valve orifices.
The LP Gas tank must be constructed and marked
in accordance with the Specifications for LP-Gas
Cylinders of the U.S. Department of Transportation
(D.O.T.) or the National Standard of Canada, CAN/
CSA-B339, Cylinders, Spheres and Tubes for
Transportation of Dangerous Goods; and Commission, as applicable.
The LP Gas tank must have a shutoff valve,
terminating in an LP Gas supply tank valve outlet,
that is compatible with a Type 1 tank connection
device. The LP Gas tank must also have a safety
relief device that has a direct connection with the
vapor space of the tank.
The tank supply system must be arranged for vapor
withdrawal.
The LP Gas tank used must have a collar
to protect the tank valve.
•
•
•
Use your grill at least 3 feet away from any
wall or surface. Use your grill at least 3 feet
away from combustible objects that can melt
or catch fire (such as vinyl or wood siding,
fences and overhangs) or sources of ignition
including pilot lights on water heaters and live
electrical appliances.
Never use your gas grill in a garage, porch, shed,
breezeway or any other enclosed area.
Never obstruct the flow of ventilation air around
your gas grill housing.
Never allow children to operate your grill. Do
not allow children or pets to play near your grill.
Use of alcohol or drugs may impair the ability to
assemble and operate the appliance.
Keep fire extinguisher readily accessible. In the
event of a oil/grease fire, do not attempt to
extinguish with water. Use type B extinguisher
or smother with dirt, sand or baking soda.
In the event of rain, cover the grill and turn off
the burner and gas supply.
Use your grill on a level, stable surface in an
area clear of combustible materials.
Do not leave grill unattended when in use.
Do not move the appliance when in use.
Allow the grill to cool before moving or storing.
Do not use your grill as a heater.
This grill is not intended to be installed in
or on recreational vehicles and/or boats.
The grill is not intended for commercial use.
Never use charcoal in this gas grill.
WARNING
!!
Do not store a spare LP-Gas tank under or near
this appliance.
Never fill the tank beyond 80 percent full; and
If the information in "(a)" and "(b)" is not followed
exactly, a fire causing death or serious injury may
occur.
A.
B.
C.
WARNING
!!
Page 21
21
USE AND CARE INSTRUCTIONS
NOTE about LP Gas Tank Exchange Programs
Many retailers that sell grills offer you the option of
replacing your empty LP Gas tank through an exchange service. Use only those reputable exchange
companies that inspect, precision fill, test and certify
their tanks. Exchange your tank only for an OPD safety
feature-equipped tank as described in the LP Gas tank
section of this manual.
Ÿ
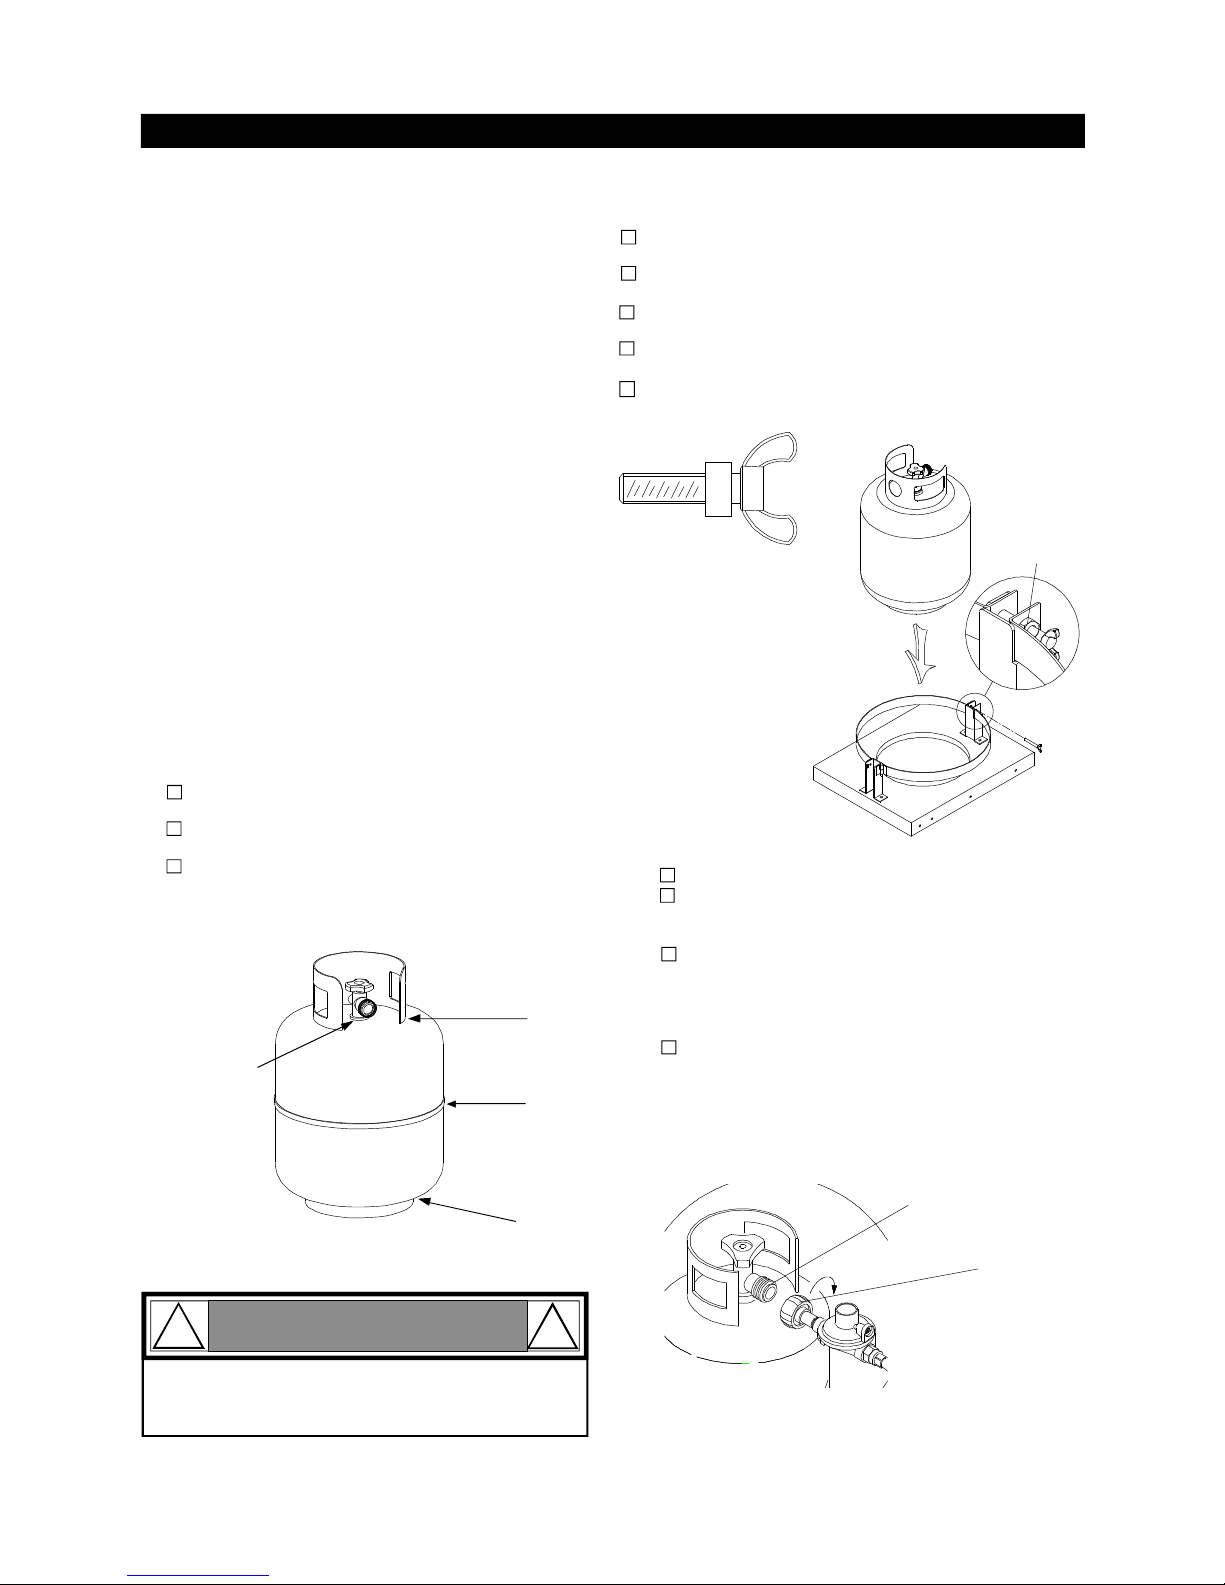
How to Leak Test your LP Gas Tank
If growing bubbles appear do not use or move
the LP Gas tank. Contact an LP Gas Supplier
or your fire department!
WARNING
!
!
Use a clean paintbrush and a 50/50 mild soap and
water solution.
Brush soapy solution onto LP Gas tank in the
areas indicated by the arrows. See diagram.
If growing bubbles appear do not use or move the
LP Gas tank. Call an LP Gas Supplier or your Fire
Department.
All leak tests must be repeated each time your LP
Gas tank is exchanged or refilled.
When checking for gas leaks do not smoke.
Do not use an open flame to check for gas leaks.
Your grill must be leak tested outdoors in a well-
ventilated area, away from ignition sources such as
gas fired or electrical appliances. During the leak test,
keep your grill away from open flames or sparks.
Do not use household cleaning agents. Damage to
gas assembly components can result.
Ÿ
Ÿ
Ÿ
Ÿ
Ÿ
Ÿ
Ÿ
For your safety:
Leak test new and exchanged LP Gas tanks BEFORE
connecting one to your grill.
Always keep new and exchanged LP Gas tanks in an
upright position during use, transit or storage.
LP Gas Model only:
Secure a 20lb LP Gas Tank to Gas Grill or
Range
Turn your LP Gas Tank Valve clockwise to the
closed or OFF positon.
Unscrew the Wing Bolt from right bracket of tank
holder.
Place LP Gas tank into tank holder on the Tank
Tray.
Install the tank so the Tank Valve faces the rear
right corner of cabinet.
Align an additional nut and screw the Wing Bolt
into right bracket of tank holder to secure the gas
tank.
Type 1 connection per
ANSI Z21.58a-2006
LP Gas Model only:
Connect Regulator with Hose to your LPG Tank
Turn all Burner Valves to the OFF position.
Inspect the valve connection port and regulator
assembly for damage or debris. Remove any
debris. Never use damaged or plugged equipment.
Connect the regulator assembly to the tank valve
and HAND TIGHTEN nut clockwise to a full stop.
DO NOT use a wrench to tighten because it could
damage the Quick Coupling Nut and result in a
hazardous condition.
Open the tank valve 1/4 to 1/2 (counterclockwise)
and use a soapy water solution to check all
connections for leaks before attempting to light
your grill. See "Checking for LP Gas Leaks". If
a leak is found, turn the tank valve off and do not
use your grill until the leak is repaired.
Quick
Coupling Nut
CAUTION: When the appliance is not in use the gas
must be turned off at the tank.
One Nut is fixed to
Tank Holder. An
additional Nut and
Wing Bolt is secured
AFTER inserting tank
into tank hole.
Wing Bolt 3/16"x1-3/16"
Qty. 1
Part # S233G03194
Additional Nut
Page 22
22
USE AND CARE INSTRUCTIONS
Disconnecting A Liquid Propane Gas (LPG)
Tank From Your Grill
Make sure the Burner Valves and LP Gas tank
valve are off. (Turn clockwise to close.)
Detach the hose and regulator assembly from
the LP Gas tank valve by turning the Quick
Coupling Nut counterclockwise.
WARNING
!!
If you have a gas leak that cannot be repaired
by tightening, turn off the gas at the source,
disconnect fuel line from your grill and call
1-800-761-5456 or your gas supplier for repair
assistance.
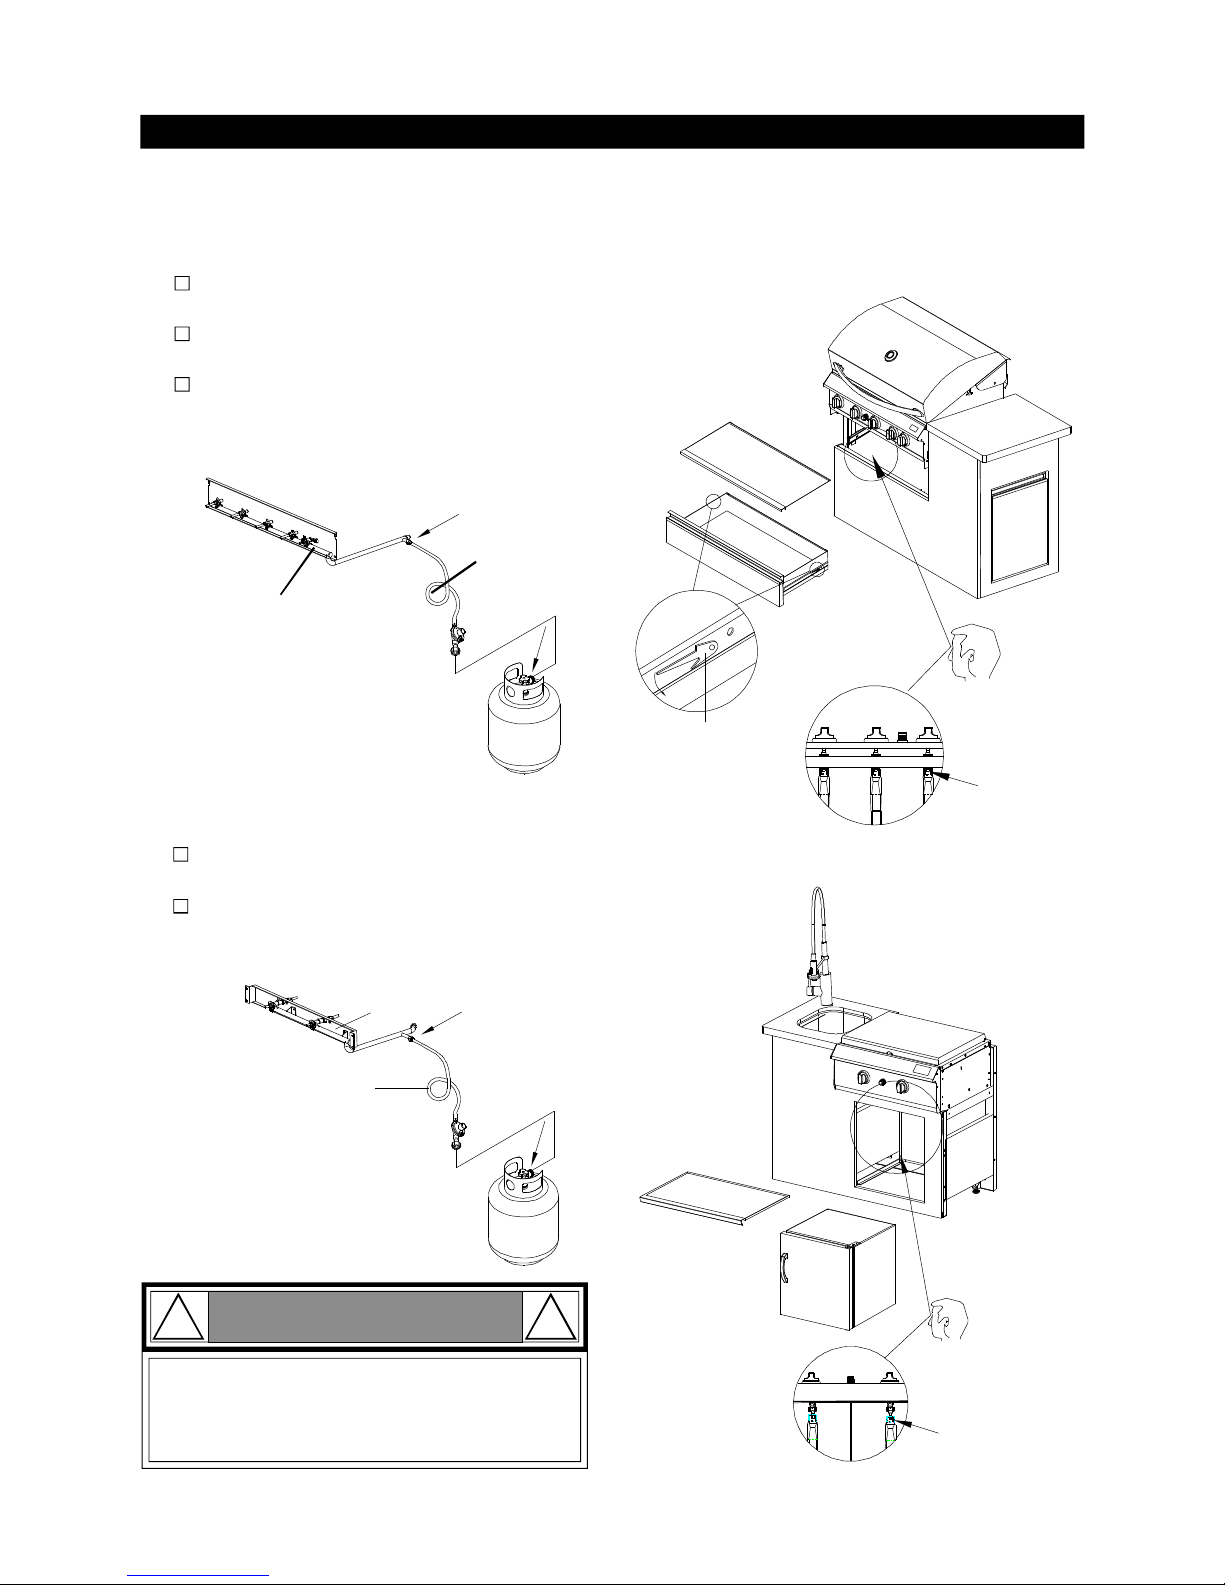
Check all connections for LP Gas Leaks
Never test for leaks with a flame. Prior to first use,
at the beginning of each season, or every time
your LP Gas tank is changed, you must check for
gas leaks. Follow these three steps:
Make a soap solution by mixing one part liquid
detergent and one part water.
Turn the grill Control Knobs to the full OFF
position, then turn the gas ON at source.
Apply the soap solution to all gas connections
indicated by the arrows. See diagram. If
bubbles appear in the soap solution the
connections are not properly sealed. Check
each fitting and tighten or repair as necessary.
Grill
Range
Check that the end of each Burner Tube is
properly located over each Valve Orifice
1. Open lid
2. Remove Grease Tray and Drawer (Note: Be sure
to push the tenon (release) down on one side
and up on the other (either side) of the drawer
to unlock to remove the Drawer.
Air
shutter
Air shutter
1. Open Lid
2. Remove Griddle and the refrigerator assembly.
Grill Model
Range Model
Push tenon down
on one side and up
on the other side to
unlock
Angle to view
orifice and
adjust air shutter
L
R
Angle to view
orifice and
adjust air shutter
Gas Valve/Manifold
Assembly
Regulator
Gas Valve/Manifold
Assembly
Regulator
Page 23
23
Follow steps 1 through 4 of the Grill Lighting
Instructions.
Then, push and turn the Infrared Burner Control Knob
to HIGH/IGN and press the electric ignitor 3 to 4 seconds to light the burner. Hold the knob in 10 seconds
before releasing. If ignition does not occur follow step
7 before retrying.
After the Infrared Burners lit it will reach cooking
temperature quickly. The orange/red glow will even
out within minutes.
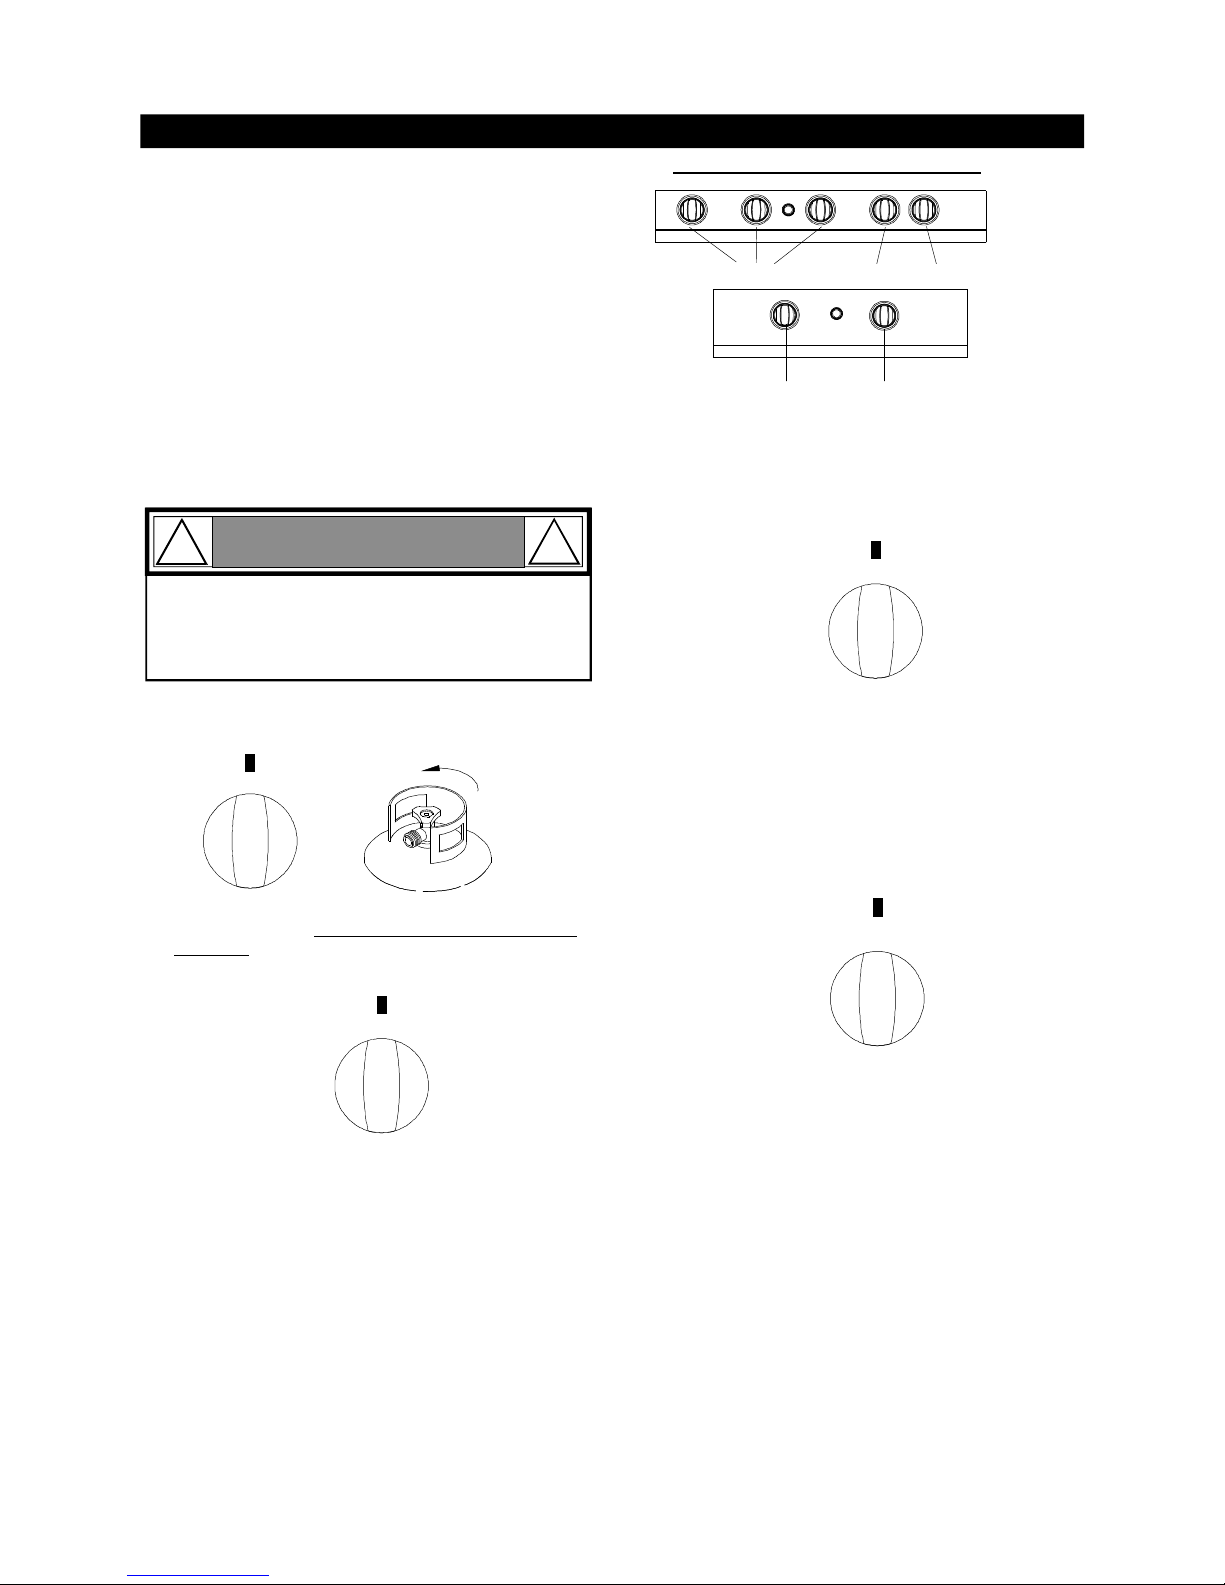
HIGH/IGN
OFF
HIGH/IGN
OFF
USE AND CARE INSTRUCTIONS
Grill Lighting Instructions
Before each use, check all hoses for cracks, nicks, cuts,
burns or abrasions. If a hose is damaged in any way, do
not use your grill before replacing the hose with an
authorized part from the Parts List. Also make sure all
gas supply connections are securely tightened.
Familiarize yourself with the safety and Use and Care
instructions in this manual. Do not smoke while lighting
grill or checking gas supply connections.
Be sure the LP Gas tank is filled or the Natural Gas Line
is attached to the gas source.
Open the Grill Lid during lighting.
Check that the end of each Burner Tube is properly
located over each Valve Orifice (see page 20).
5.
4.
3.
2.
1.
Back Burner Lighting Instructions
Follow steps 1 through 4 of the Grill Lighting
Instructions.
Then, push and turn the Back Burner Control Knob
to HIGH/IGN and press the electric ignitor 3 to 4
seconds to light the Burner. Hold the knob in 10
seconds before releasing. If ignition does not occur
follow step 7 before retrying.
1.
3.
2.
After the Back Burner is lit it will reach cooking
temperature quickly. The orange/red glow will
even out within minutes.
Burner Control Knobs on Control Panel
Set Control Knobs to OFF and open the LP Gas
SLOWLY 1/4 of a turn. For Natural Gas
open the Shut Off Valve at source.
Push and turn the LEFT Main Burner Control Knob to
HIGH/IGN. Always light the LEFT Main Burner first.
Press the electric ignitor 3 to 4 seconds to light the
burner.
If ignition does not occur in 5 seconds, turn the
Burner Control(s) off, wait 5 minutes, and repeat the
lighting procedure. If ignition still does not occur,
turn the burner control(s) and gas source OFF and
conduct a leak test of ALL gas connections and gas
sources as explained in the Use and Care section
of this manual. If no leaks are detected, wait 5
minutes for any gas to clear and repeat the lighting
procedure.
After one Burner is lit, turn the tank valve SLOWLY
one more 1/4 of a turn for 1/2 of one complete turn.
Once one Main Burner is lit, the adjacent Burner can
be lit by turning its Control Knob to HIGH/IGN.
6.
tank valve
Open LP
gas tank
9.
8.
7.
Infrared Burner Lighting Instructions
1.
3.
2.
Failure to replace a faulty hose, secure gas supply
connections or to open the Lid before proceeding
to the Lighting Procedures could result in a fire
or explosion that could cause serious bodily injury,
death, or property damage.
WARNING
! !
Follow steps 1 through 5 of the Grill Lighting
Instructions.
Open Range Lid during lighting.
Push and turn the Control Knob to HIGH/IGN. The builtin spark ignitor will light the burner automatically.
You may have to push and turn the Control Knob up to
3 to 4 times to light.
If ignition does not occur, turn the Burner Control off,
wait 5 minutes, and repeat the lighting procedure. If
ignition still does not occur, turn the burner control(s)
and gas source OFF and conduct a leak test of ALL gas
connections and gas sources as explained in the Use
and Care section of this manual. If no leaks are detected, wait 5 minutes for any gas to clear and repeat
the lighting procedure.
1.
Side Burner Lighting Instructions
2.
3.
4.
5.
OFF
HIGH/IGN
OFF
LOW
IMPORTANT: Do not use the Back Burner and Main
Burners at the same time.
Grill
Range
Main Burner
Infrared Burner
Side Burner Griddle Burner
Page 24
24
USE AND CARE INSTRUCTIONS
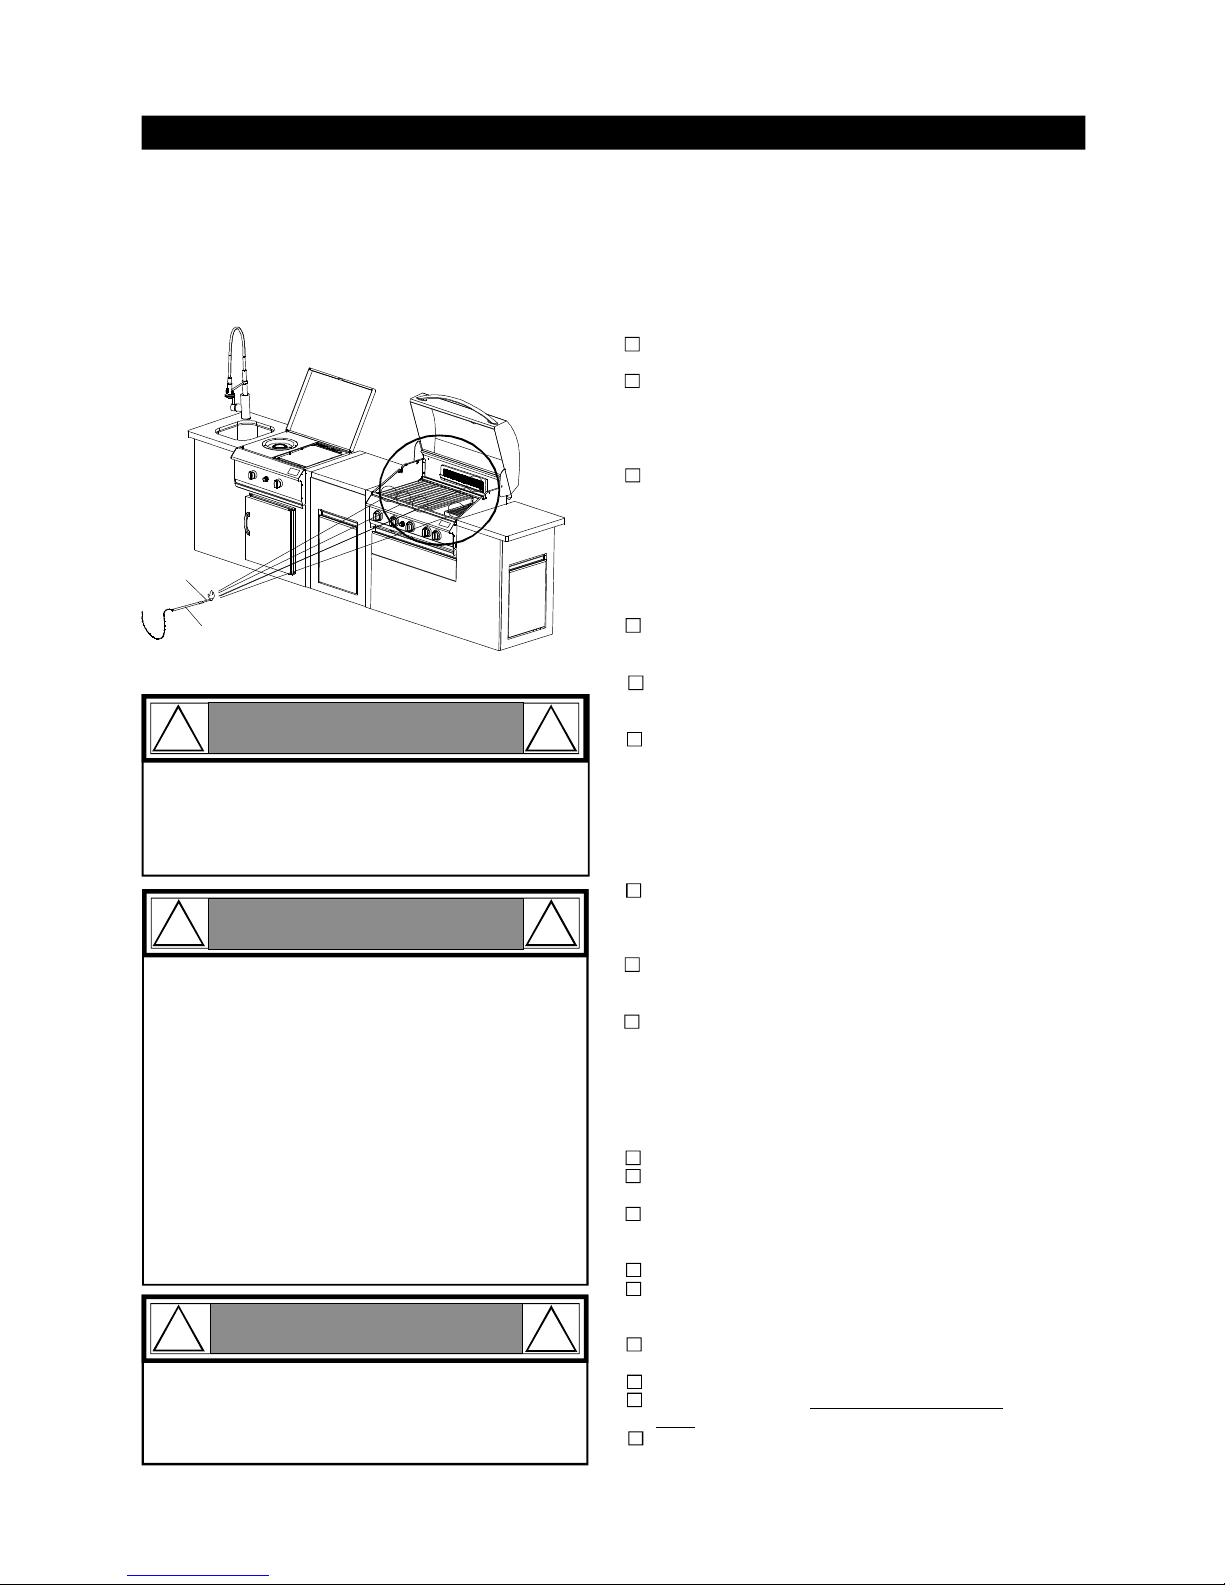
Manually Lighting Your Grill By Paper Match
To light your gas grill by match, insert a match into the
Lighting Stick and follow steps 1 through 6 of the Grill
Lighting Instructions. Then, light the match and place
Lighting Stick through the Cooking Grid on the grill as
shown below. Turn the nearest Control Knob to the HIGH
setting to release gas. The Burner should light immediately.
Never lean over the grill cooking area while
lighting your gas grill. Keep your face and body
a safe distance (at least 18 inches) from the
Lighting Hole or Burners when lighting your grill
by match.
WARNING
!
!
If ignition does not occur in 5 seconds, turn the Control
Knob(s) and gas source OFF and conduct a leak test
as explained in the Use and Care section of this manual.
If no leaks are detected, wait 5 minutes for any gas
to clear and repeat the lighting procedure.
WARNING
!
!
WARNING
!!
Should a FLASHBACK fire occur in or around
the Burner Tubes, follow the instructions below.
Failure to comply with these instructions could
result in a fire or explosion that could cause
serious bodily injury, death, or property damage.
Shut off gas supply to the gas grill.
Turn the Control Knobs to OFF position.
Open the Grill Lid.
Put out any flame with a Class B fire
extinguisher.
Once the grill has cooled down, clean
the Burner Tubes and Burners according
to the cleaning instructions in this
Operator's Manual.
Ÿ
Ÿ
Ÿ
Ÿ
Ÿ
Match
Lighting
Stick
Troubleshooting
To purge air from your gas line and/or reset
the regulator excess gas flow device:
If the grill fails to light :
Turn Control Knobs to the OFF position.
Turn off the gas at the tank valve.
For Natural Gas shut off NG valve.
Disconnect regulator from LP Gas tank.
For Natural Gas disconnect regulator from 12 ft.
Natural Gas Hose.
Let unit stand 5 minutes to allow air to purge.
Reconnect regulator to the LP Gas tank.
For Natural Gas reconnect regulator to 12 ft.
Natural Gas Hose.
Turn tank valve on SLOWLY 1/4 of a turn.
For Natural Gas open Shut Off valve.
Open the Grill Lid.
Push and turn the Left Main Burner Control
Knob to HIGH/IGN.
Press Electric Ignitor for 3-4 seconds to light
the burners.
WARNING
Misalignment of Burner Tubes over Orifices
Correction: Reposition Burner Tubes over Orifices.
Obstruction in gas line
Correction: Remove fuel line from grill. Do not smoke!
Open gas supply for one second to clear any obstruction
from fuel line. Close off gas supply at source and reconnect fuel line to grill.
Plugged Orifice
Correction: Remove Burners from grill by removing the
screw from the rear of each Burner using long nose
pliers. Carefully lift each Burner up and away from gas
valve Orifice. Remove the Orifice from gas valve and
gently clear any obstruction with a fine wire. Then
reinstall all Orifices, Burners, screws and cooking
components.
If an obstruction is suspected in Gas Valves or Manifold,
call the Grill Information Center 1-800-761-5456 8am to
4:30pm CST, Monday through Friday.
Obstruction in Burner Tubes
Correction: Follow the Burner Tube cleaning procedure
on page 29 of this Operator's Manual.
Misalignment of Ignitor on Burner
Correction: Check for proper position of the Electrode
Tip as shown in step 8 page 17. The gap between the
Spark Electrode Tip and Spark Receiver should be
approximately 3/16". Adjust if necessary. With the gas
supply closed, turn any Main Burner Control Knob to
HIGH/IGN then push in and watch for the presence of a
spark at the Electrode.
Disconnected Electric Wires
Correction: Inspect the Ignitor Junction Box found behind
the Control Panel. Connect loose Electric wires to
Junction Box and try to light the grill.
Weak AA battery
Correction: Unscrew the Ignitor Cap and replace the
battery.
If the grill still does not light you may need to purge
air from the gas line or reset the regulator excess
gas flow device. Note: This procedure should be
done every time a new LP Gas tank is connected to
your grill.
Turn gas off at source and turn Control Knobs to OFF.
Wait at least 5 minutes for gas to clear, then retry.
If your grill still fails to light, check gas supply and
connections.
Repeat lighting procedure. If your grill still fails to
operate, turn the gas off at source, turn the Control
Knobs to OFF, then check the following:
1.
2.
3.
Page 25
25
USE AND CARE INSTRUCTIONS
Keep any electrical supply cord and the fuel
supply hose away from any heated surface.
WARNING
! !
CORRECT ROTISSERIE USE
Read all instructions before initial use.
IMPORTANT: When using electrical appliances, basic
safety precautions should always be used.
The Rotisserie Motor is set for 120V, 60Hz AC current.
The Rotisserie is for outdoor use only.
Do not let children operate or play nearby your grill or
Rotisserie.
Connecting Rotisserie
Always attach the assembled Rotisserie to your grill first
and then plug the Cord into an outlet.
Operating Rotisserie
Do not operate the Rotisserie if the cord or plug becomes damaged, or if the Rotisserie malfunctions or
has been damaged in any manner.
The use of accessory attachments is not recommeded
by the manufacturer and may cause injuries. Do not use
this Rotisserie other than intended use.
Do not immerse Electrical Cord, Plug or Motor in water
or expose to rain, as this may result in an electrical
shock.
Disconnect Rotisserie
Careful as all surfaces will be hot, both grill and Rotisserie parts. Use protective mitts to handle the Rotisserie.
Unplug the Rotisserie from electrical outlet when not in
use and before cleaning. Allow to cool before adding or
removing parts.
When Roitsserie cooking place a Cooking Pan under
the food to be cooked as this will capture the drippings
and keep your grill clean of excess grease which could
cause a fire.
CAUTION: Handle with care when moving a Cooking
Pan with hot oils
Should a grease fire occur, turn the burners and gas off
and leave the grill lid Closed until the fire is out.
Store the Rotisserie indoors
When Rotisserie is not in use, store it indoors in a dry
place.
5.
4.
3.
2.
1.
Page 26
26
Rotisserie Instructions
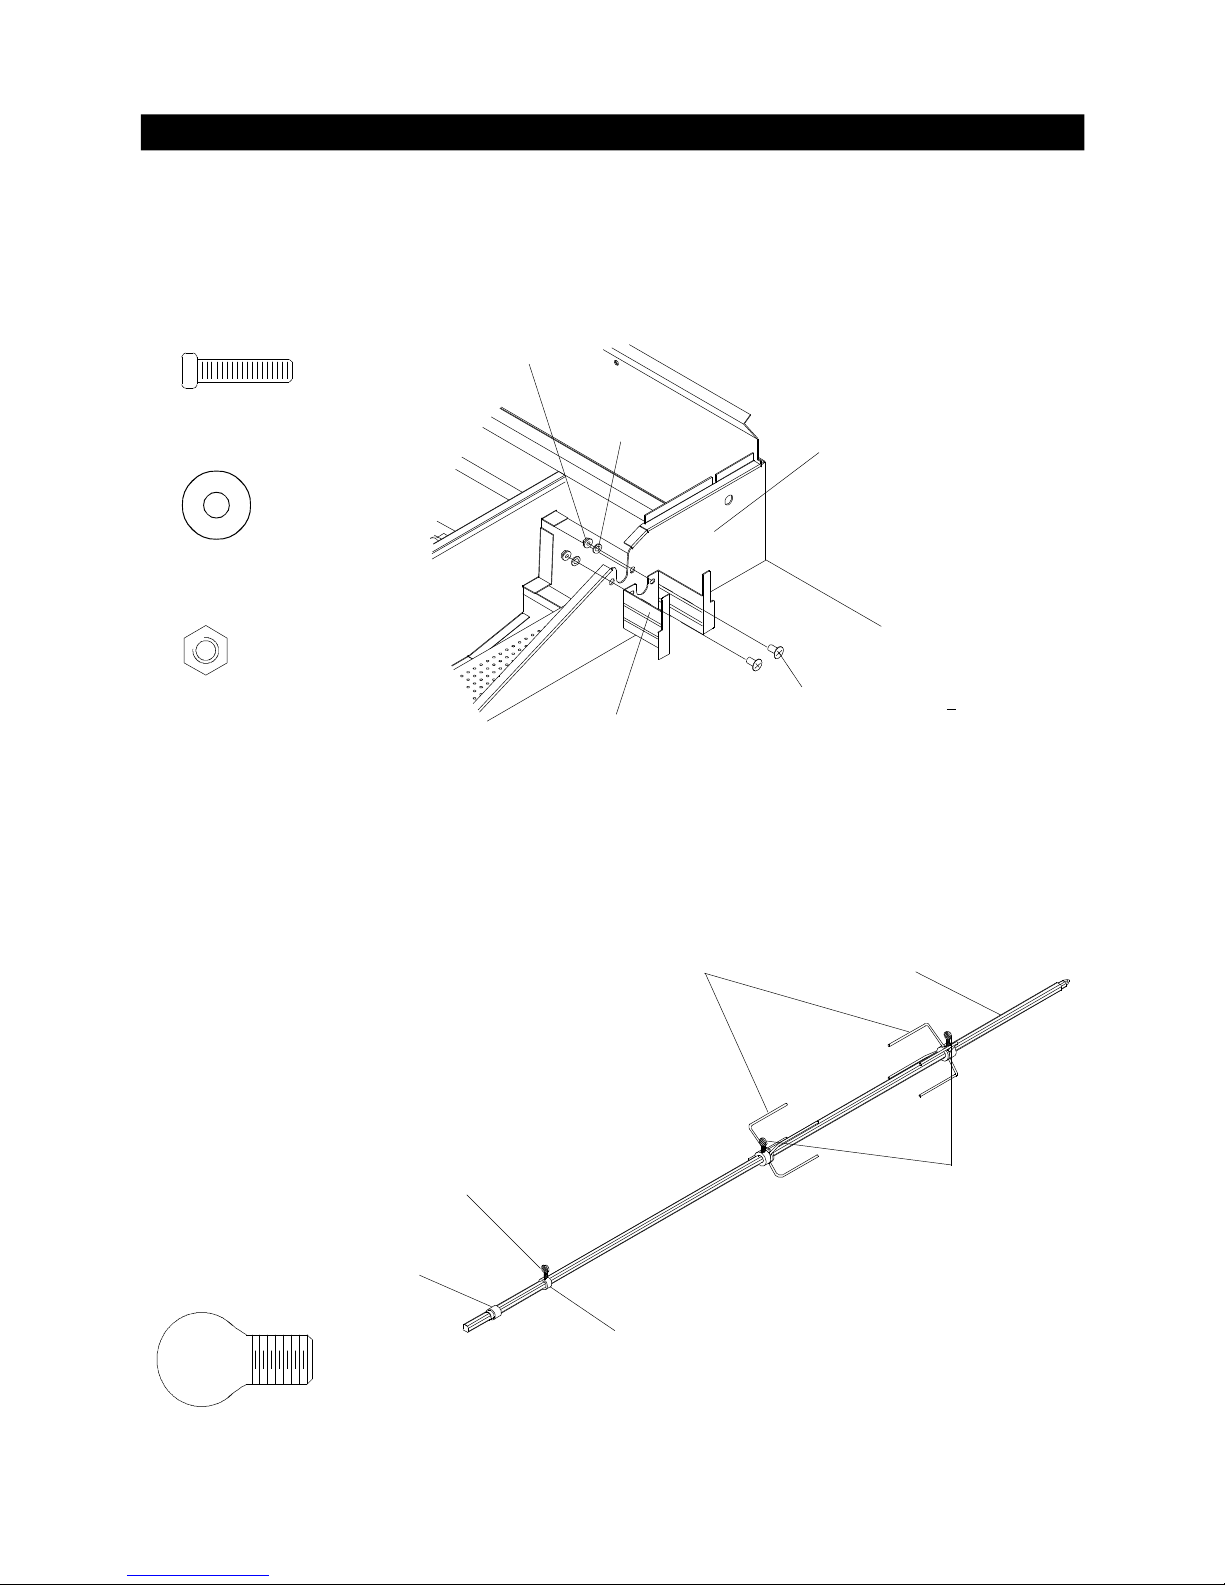
1.
Remove all components from the carton.
Attach the Motor Bracket on the outside of the right grill bowl panel. Align the two holes of the
Bracket with the holes on the grill bowl. Tighten securely using two Screws #10-24x3/4" UNC, Plain
Washers and Nuts provided.
2.
Slide a Holding Fork onto each end of the Rotisserie Spit. Adjust spacing between Holding Forks to
accommodate your food, then tighten the Thumbscrews to keep the Holding Forks in position. Slide
the Collar and Bushing onto the threaded end of the Spit. Do not tighten the Collar Thumbscrew until
the Rotisserie is placed into your grill.
3.
Rot.Thumbscrew 3/8"x1/2" x3
Rot. Screw #10-24x3/4" UNC x2
Rot. Washer x2
Rot. Nut #10-24 x2
Outside of Right Grill Bowl Panel
Rot. Screw #10-24X
3
4
"UNC
with washers and nuts
Motor Bracket
Washer
#10-24 Nut
Holding Forks
Collar
Bushing
Thumbscrew
3/8"x1/2"
Spit
Thumbscrew
3/8"x1/2"
Page 27
27
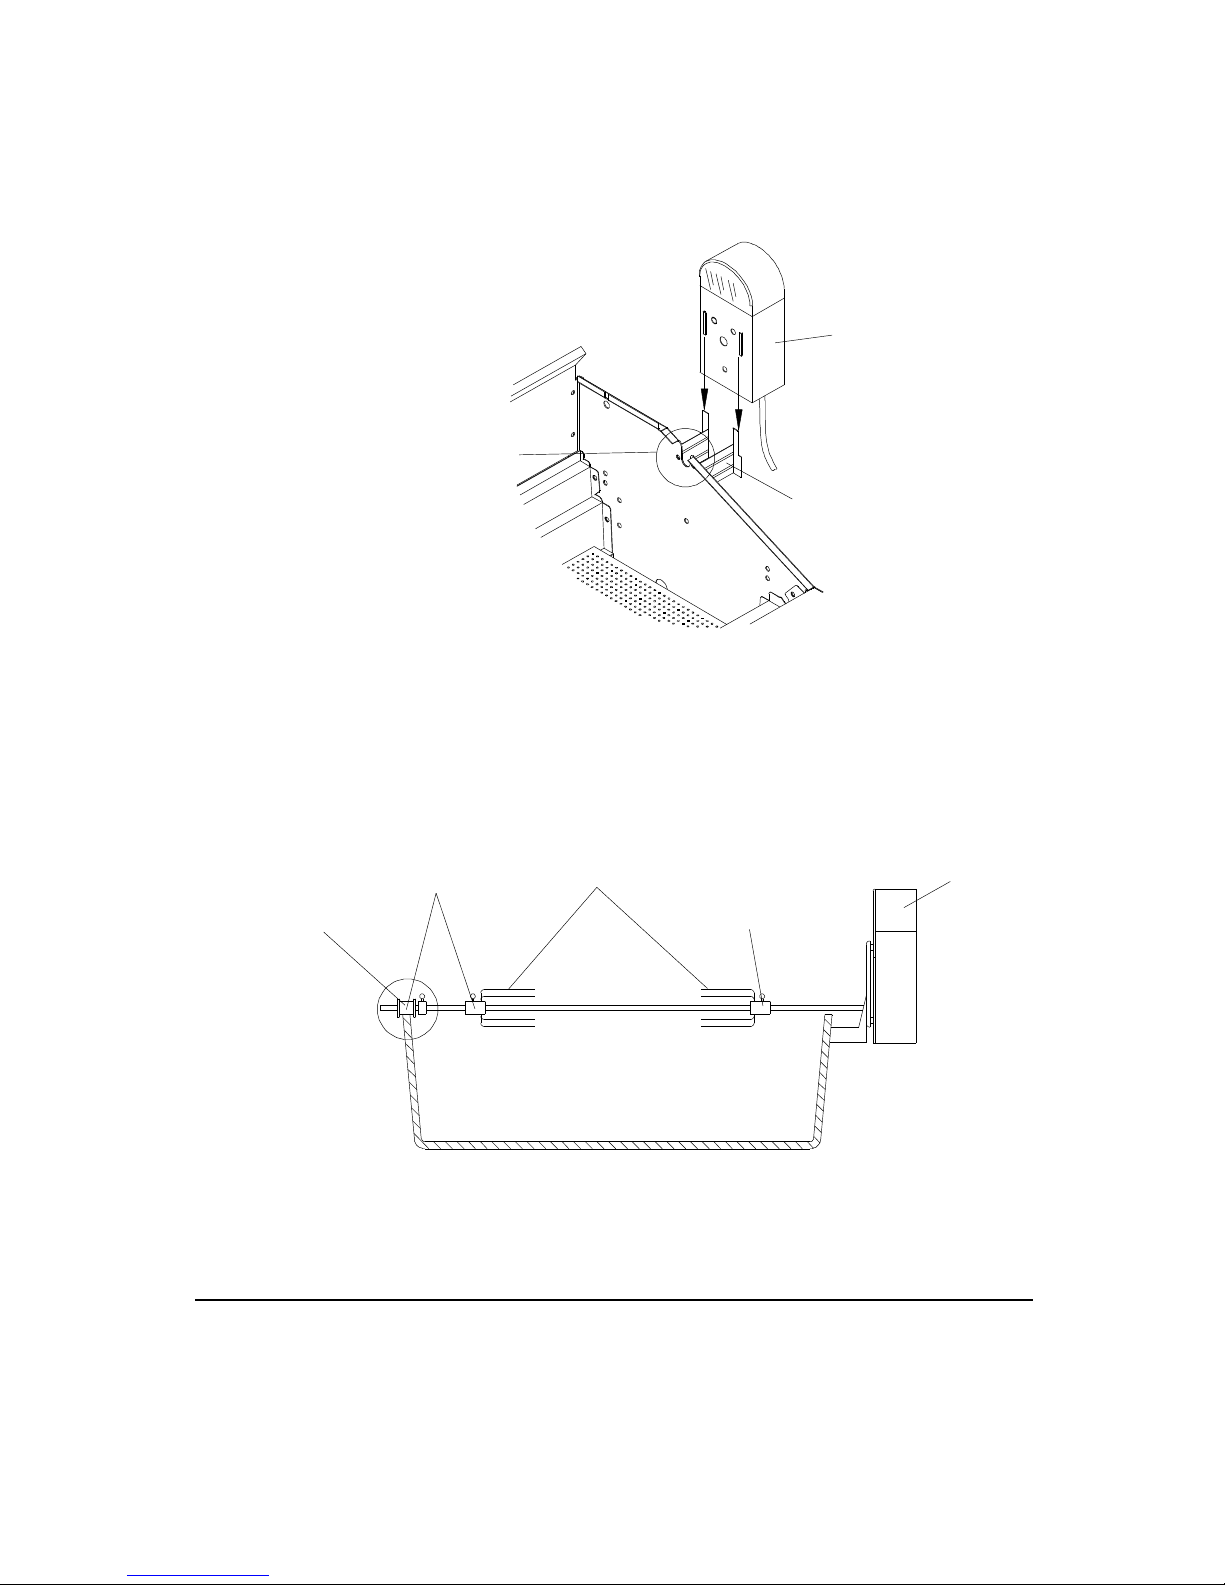
Install the AC (alternating current) Rotisserie Motor onto the Motor Bracket as shown below. Be sure
the Motor attaches to the Bracket with the electrical cord down. This installation insures that once
the Spit is inserted into the Motor it will also rest securely into the slot of your grill bowl.
4.
Insert the assembled Rotisserie into the Motor as shown below. The Motor should be on the right
side of your grill and the Handle on the left side. Place the Bushing into the slot opening on the
left side of your grill bowl, then tighten the Collar Thumbscrew to the right of the Bushing. The Collar
will stabilize the Rotisserie during the cooking process and the Bushing allows the Rotisserie Spit
to turn smoothly. Plug the Rotisserie into an outlet and turn on to test.
5.
BEFORE rotisserie cooking you will need to remove the Cooking Grid(s) and possibly the Savor Plates
®
from your grill. When rotisserie cooking place a Cooking Pan under the food to be cooked. This will
capture the drippings and keep your grill clean of excess grease which could cause a fire. Use caution
when moving a Cooking Pan containing hot oils.
The Bushing and Collar must always be used with this Rotisserie.
Bushing
Thumbscrew
Holding Forks
Motor
Thumbscrew
Rotisserie Motor
Motor Bracker
Rotisserie Spit must rest securely into
the slot of your grill bowl.
Page 28
28
Proper care and maintenance will keep your grill in top
operating condition and prolong its life. Follow these
cleaning procedures on a timely basis and your grill will
stay clean and operate with minimum effort.
CAUTION: Be sure your grill is OFF and cool before cleaning.
Cleaning The Cooking Grids
Before initial use, and periodically, wash your
Cooking Grids in a mild soap and warm water
solution. You can use a wash cloth or vegetable
brush to clean your Cooking Grids.
Cleaning The Savor Plates
®
Periodically you should wash the Savor Plates® in a
soap and warm water solution. Use a vegetable brush
to remove stubborn burnt-on cooking residue. Dry the
Savor Plates® thoroughly before you reinstall them into
the cooking bowl.
Cleaning The Grease Tray and Receptacle
To reduce the chance of fire, the Grease Draining
Tray and Grease Receptacle (some models)
should be visually inspected before each grill use.
Remove any grease and wash Grease Tray and
Receptacle with a mild soap and warm water
solution.
Cleaning the Inside of the Grill Lid
Grease can have a tendency to build up on the
inside of the Grill Lid and could drip onto deck or
patio when the lid is opened. Visually inspect the
inside of the Grill Lid before each grill use. Remove
any grease and wash with a mild soap and warm
water solution.
Annual Cleaning of The Grill Interior
Burning-off excess food after every cookout will
keep it ready for instant use. However,at least every
3 months or as often as needed you must give the
entire grill a thorough cleaning to minimize your risk
of grease fire and keep the grill in top shape.
Follow these steps:
Turn all Burner Valves to the full OFF position.
Turn the LP gas tank valve to the full OFF position.
For Natural Gas shut off valve.
Disconnect the regulator from the gas tank. Inspect
the hose with regulator assembly for cracking, cuts
or any other damage, and replace as neccessary.
Refer to the Parts List in this Operator's Manual.
Remove and clean the Savor Plates®, Cooking
Grids, Cooking Rack and Grill Burners.
Cover each Gas Valve Orifice with aluminum foil.
Brush the inside and bottom of the grill with a fiber
pad or nylon brush and wash with a mild soap and
warm water solution. Rinse thoroughly and let dry.
Remove aluminum foil from Orifices and check
each Orifice for obstruction.
Check each Spark Electrode, adjusting as needed.
The space between the Spark Electrode Tip and
Spark Receiver should be approximately 3/16".
Replace the Burners and adjust the Gas
Collector Box. The edge of the collector box should
be overlapping the Burner Port.
CLEANING AND MAINTENANCE
1.
2.
3.
4.
5.
6.
7.
8.
9.
10.
11.
Cleaning Exterior Stainless Steel Surfaces:
Weathering and extreme heat can cause exterior
stainless steel surfaces to turn tan in color. Machine
oils used in the manufacturing process of stainless
steel can also cause this tanning color. After removing any protective PVC film from the Grill Lid and
Control Panel use a Stainless Steel Cleaner to polish
the stainless steel surfaces of your grill. Never use
abrasive cleaners or scrubbers because they will
scratch and damage your grill. Follow these steps for
the best results.
Replace Savor Plates® and Cooking Grids.
Reconnect the gas source and observe the
Burner flame for correct operation.
CAUTION
! !
Keep grill area clear and free from combustible
materials, gasoline and other flammable vapors
and liquids.
Do not obstruct the flow of air for combustion
and ventilation.
Keep the ventilation openings of the tank enclosure
cabinet free and clear of debris.
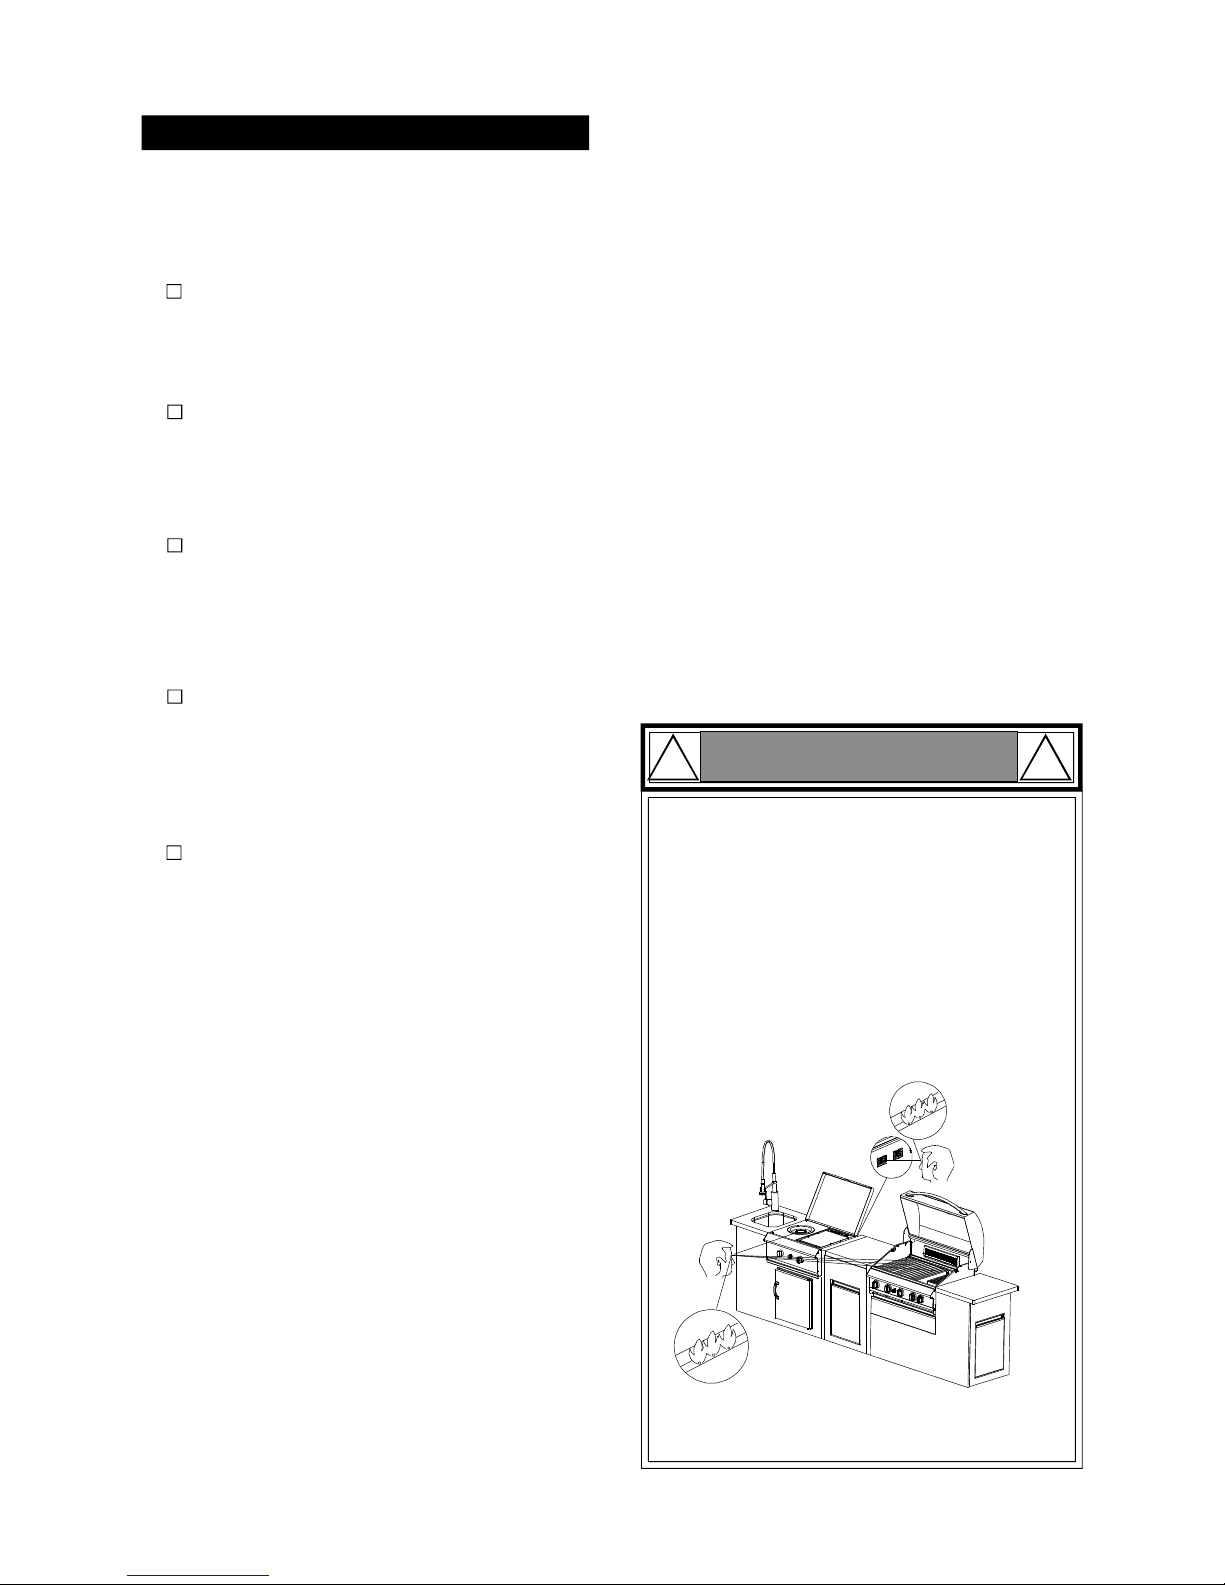
After completing each burner lighting procedure,
visually check burner flame pattern as shown below.
Failure to comply with these instructions may
result in a hazardous situation which, if not
avoided, may result in injury.
MAGNIFIED VIEW OF GRILL MAIN BURNER, INFRARED
BURNER AND SIDE BURNER FLAME THROUGH OPEN LID,
GRIDDLE BURNER FLAME THROUGH THE VENT HOLE
ON THE CART REAR PANEL OF RANGE
Turn the LP Gas tank valve (clockwise) to the full
OFF position. Disconnect the regulator and hose
assembly from LP Gas tank. For Natural Gas shut
off valve and disconnect the NG regulator and hose
from valve. Cover exposed gas fitting with
aluminum foil.
Remove dirt or grease using a soft cloth and
polish stainless surfaces. Wipe with a soft cloth.
Remove aluminum foil from exposed gas fitting
and allow grill to air dry before attaching the
regulator and hose to your LP Gas tank, or
attaching the regulator and hose to Natural Gas
valve.
1.
2.
3.
Page 29
29
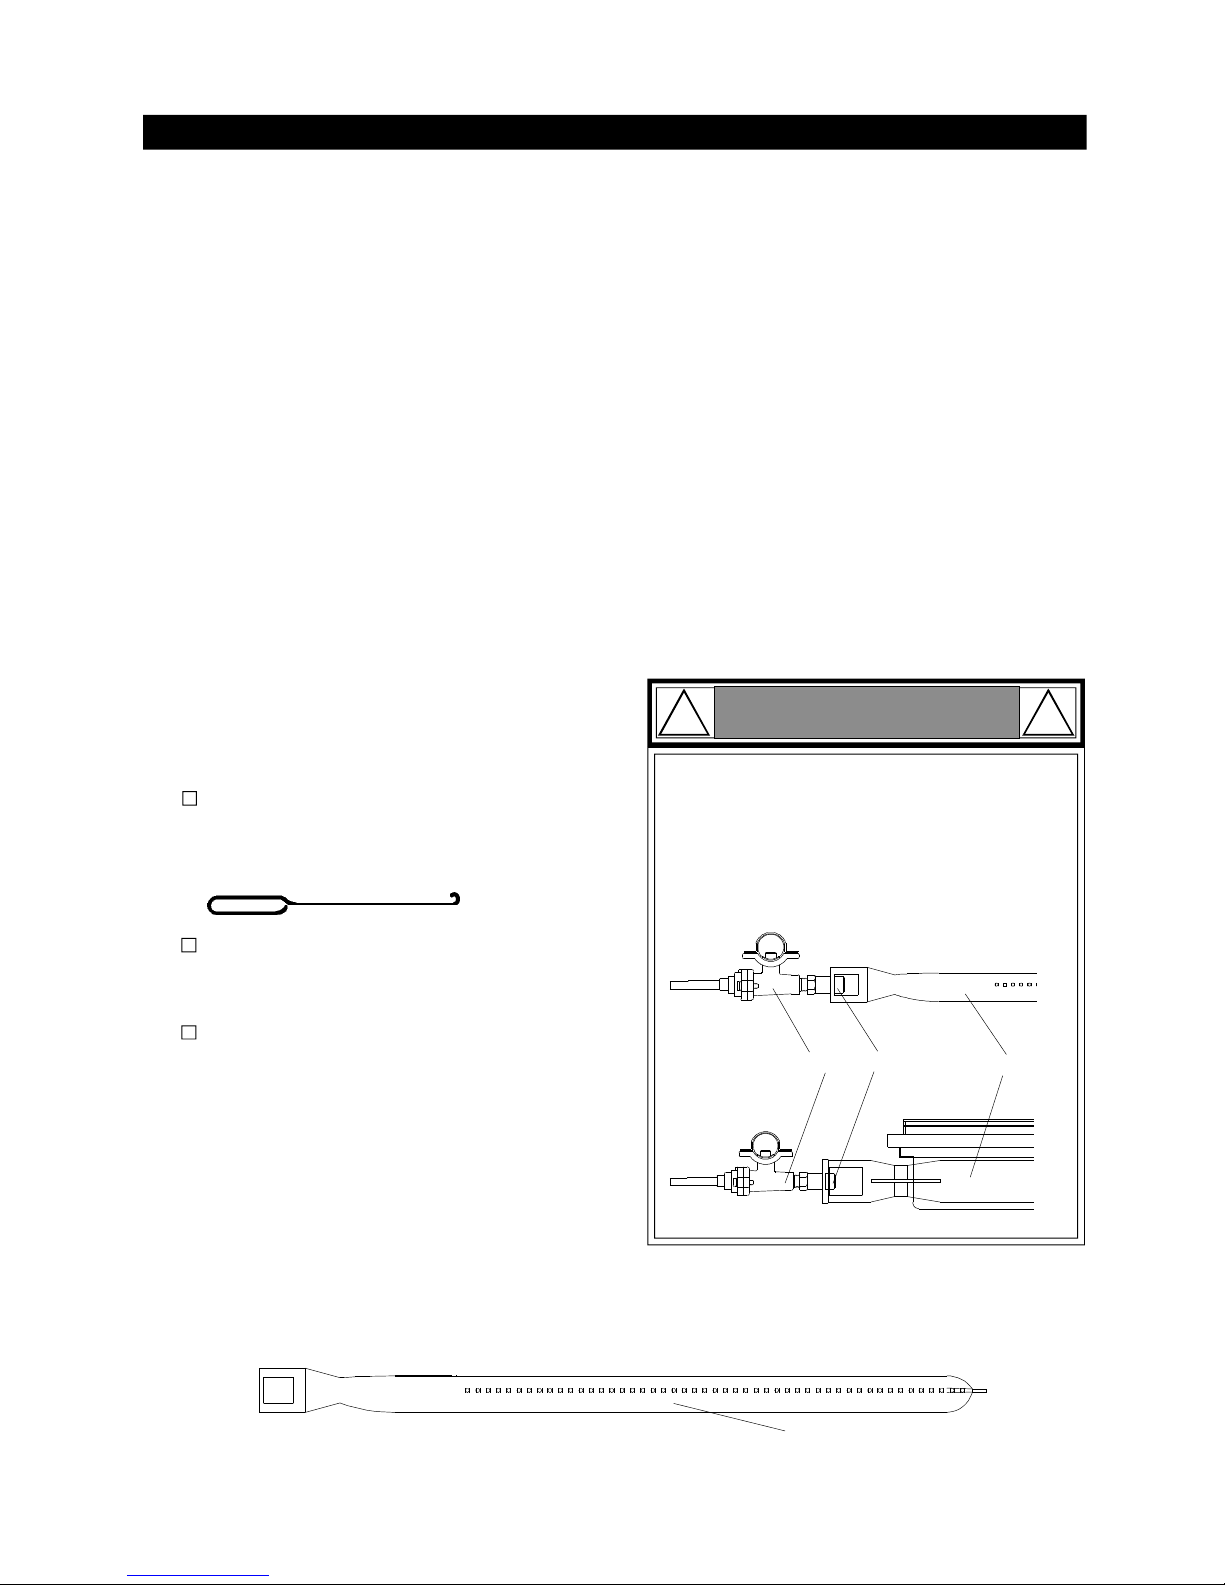
CLEANING THE BURNER TUBES AND BURNER PORTS
To reduce the chance of FLASHBACK FIRE you must
clean the Burner Tubes as follows at least once a month
in summer and fall or whenever spiders are active in your
area, and if your grill has not been used for an extended
period of time.
Regardless of which Burner cleaning procedure you
use, we recommend you also complete the following
steps to help prolong Burner life.
METHOD 1: Bend a stiff wire or wire coat
hanger into a small hook as shown and
run the hook through the Burner Tube and
inside the Burner several times to remove
debris.
METHOD 2: Use a bottle brush with a
flexible handle and run the brush through
the Burner Tube and inside the Burner
several times to remove any debris.
METHOD 3: Use an air hose to force air
through each Burner Tube. The forced air
should pass debris or obstructions through
the Burner and out the Ports.
9
Figure 1
TO CLEAN BURNER TUBE,
INSERT HOOK AS INDICATED BY THE ARROW
Burner Tube
WARNING
! !
For safe operation ensure the Gas Valve
Assembly Orifice is inside the Burner Tube
before using your grill. See figure. If the Orifice
is not inside the Burner Tube, lighting the
Burner may cause explosion and/or fire resulting in serious bodliy injury and/or property
damage.
Tube Burner
Infrared Burner
Orifice
Burner TubeGas Valve Assembly
Turn all Burner Valves to the full OFF position.
Turn the LP Gas tank valve to the full OFF position.
For Natural Gas shut off NG valve.
Detach the LP Gas regulator assembly from your
gas grill. For Natural Gas detach NG regulator from
your grill.
Remove the Cooking Grids and Savor Plates® from
your grill.
Remove the screws from the rear of each Main
Burner using a Phillips Head Screwdriver. Remove
screws along all sides of the Infra-red Burner using
a Phillips Head Screwdriver.
Carefully lift each Burner up and away from the
Gas Valve Orifice.
Check and clean burner/venturi tubes for insects
and insect nests. A clogged tube can lead to a fire
beneath the grill.
2.
1.
2.
3.
4.
5.
6.
7.
2.
8. Refer to Figure 1 and perform one of these three
cleaning methods:
1.After each use of the main grill or infrared cooking
zone it is necessary to burn off food particles and
drippings which can clog Burner ports and reduce
Burner performance. OPEN the grill Lid, ignite the
burner(s) and operate grill on HIGH setting for
3 to 5 minutes. You can close the Lid if only main
Burners are lit, but NEVER close the Lid over a lit
Infrared Burner.
3.
2.Use a nylon brush, blower or vacuum to remove
accumulated ash from the outer surface of each
Burner. Clogged tube style Burner ports can be
cleaned with a stiff wire, such as an open paper clip.
DO NOT use a stiff brush or sharp tool of any type on
the fragile infrared Burner.
Inspect each Burner for damage (cracks or
holes) and if such damage is found, order and
install a new Burner. After installation, check
to ensure that the Gas Valve Orifices are
correctly placed inside the ends of the Burner
Tubes. Also check the position of your Spark
Electrode.
Page 30
30A-1
Cooking Instructions
Burn-Off
Before cooking on your gas grill for the first time, you
should "burn off" the grill to eliminate any odor or
foreign matter. Ignite the main burners, lower the Lid,
andoperate grill on HIGH setting for 3 to 5 minutes.
The Lid must be open if the infrared burner is lit.
CAUTION: Operating your grill on the HIGH setting for
longer than five minutes may damage certain parts of
your grill. Do not leave your grill unattended when in use.
Preheating
Ÿ
Ÿ
Ÿ
Ÿ
Ÿ
Ÿ
The fats and juices dripping from grilled food can
cause flare-ups which impart a favorably, distinctive
taste and color to food. They should be accepted up to
a point. To minimize flare-ups:
Use a drip pan under foods that produce a lot of grease
Trim excess fat from meats and poultry
Preheat the grill properly
Clean grill regularly to remove food and grease build-up
Reposition your food often to avoid flare-ups
Greasing the cooking surface will help keep foods
from sticking during the cookout and reduces the
amount of cleanup required. Use a brush to apply a
thin layer of cooking oil or vegetable shortening onto
each Cooking Grid before each cookout. We do not
suggest spray type oils unless they are specified for
high-temperature cooking. Be sure to coat the entire
cooking surface.
Ÿ
Ÿ
Ÿ
Ÿ
Ÿ
Ÿ
Failure to comply with these instructions could
result in a fire or explosion that could cause
serious bodily injury, death or property damage.
Never cover the cooking grids, Savor Plates®,
bottom of grill bowl or Grease Draining Tray with
charcoal, aluminum foil, sand or any substance that
can absorb grease.
Before each use of your grill: Pull out the Grease
Tray and remove all grease and food debris to
prevent grease fire hazard.
Use your grill at least 3 feet away from any
wall or surface. Use your grill at least 3 feet
away from combustible objects that can melt or
catch fire (such as vinyl or wood siding, fences
and overhangs) or sources of ignition including
pilot lights on water heaters and live electrical
appliances.
Never use your gas grill in a garage, porch, shed,
breezeway or any other enclosed area.
Your grill will get very hot. Always wear a flame
retardant BBQ Mitt when cooking on your grill.
Never lean over cooking areas while using grill.
Do not touch cooking surfaces, Lid, grill housing
or other parts while grill is in operation, or until
the grill has cooled down after use.
Ÿ
Ÿ
Ÿ
Ÿ
Ÿ
Ÿ
WARNING
! !
The indirect cooking method can also be used with
the supplied Cooking Grids. To cook indirectly, the
food should be placed on the left or right side of your
grill with the main Burner lit on the opposite side. Or
place your food on the Secondary Cooking Rack and
light the outer main Burners. Either way, indirect
cooking must be done with the Lid down.
Flare-Ups
Prepare Cooking Grids for Grilling
The suggested heat settings and cooking times
shown in the following pages are approximate.
Unlike the controlled environment inside your kitchen,
variables including outside temperatures, direction
and conditions of wind, as well as grill location will
affect your grill's heat distribution. Because these
condition vary, and no two backyards are alike, we
offer this guide as a convenience. We recommend
you monitor your grill closely and rotate foods as
needed to prevent overcooking and ensure the most
delicious results every time.
To preheat main burners, light your grill on HIGH,
lower the Lid and follow this timetable. To preheat
the infrared burner the Lid must be open.
For high temperature cooking, preheat grill 3 to 5
minutes.
For low temperature cooking, preheat grill 3 minutes.
To slow cook, preheating is not necessary.
Cooking Temperatures
Indirect Cooking using Main Burners
High setting: The HIGH Control Knob setting should
only be used to pre-heat your grill the first 3-5 minutes
and for burning food residue off the grill for 3-5 minutes
after cooking is complete. Never use the HIGH setting
for extended cooking.
An Important Note About Cooking Temperatures
The infrared cooking area is for quick searing. Once
seared, reduce heat and continue cooking or move
food to the primary cooking area to finish cooking.
The middle and back primary cooking areas offer
high heat for grilling.
The Secondary Cooking Rack offers medium heat for
preparing breads and firm vegetables.
The front primary cooking area offers less heat and is
ideal for preparing delicate foods and for keeping
cooked foods warm.
Medium to Low Settings: Most recipes specify
medium to low settings, including all smoking,
serie cooking and cooking lean cuts such as fish.
Direct Cooking using Main Burners or Infrared Burner
The direct cooking method can be used with the
supplied Cooking Grids and food placed directly over
the lit grill Burners. Direct Cooking requires the Grill
Lid to be open. This method is ideal for searing and
grilling when you want an open-flame barbecued taste.
Page 31

31A-2
Guide to Grilling using the Main Burners and Direct Cooking Method
Grilling Steak and Ribs
Turn the grill Burners on HIGH, close the Lid and preheat
your grill 3 to 5 minutes. Open Lid and place the meat on
the Cooking Grid directly above the lit Burners. Cook the
meat on both sides until seared. Reduce the heat to
MEDIUM and cook meat until done. Grilling times will vary
according to meat thickness.
Grilling Hamburgers and Sausages
Turn the grill Burners on HIGH, close Lid and preheat your
grill 3 to 5 minutes. Open Lid and place the meat on the
Cooking Grid directly above the lit Burners. Cook the meat
on both sides until seared. Reduce the heat to MEDIUM
and cook the meat until done. Grilling times will vary
according to meat thickness.
Grilling Poultry
Turn the grill Burners on HIGH, close Lid and preheat your
grill 2 to 3 minutes. Then raise the Lid, reduce heat to
MEDIUM and cook poultry directly over lit Burners until
done. Poultry skin is fatty so you should expect some
flare-ups when using this direct method.
To minimize flare-ups, try grilling poultry using the indirect
method. Place the poultry on one side of the grill with the
opposing Burners on MEDIUM heat, and lower the grill
Lid. Grilling times will vary based on the size of your
poultry.
Grilling Pork
Turn Burners on HIGH and preheat your grill 3 to 5
minutes with the Lid closed. Raise Lid, place pork on
Cooking Grid and cook until seared. Reduce heat to
MEDIUM and cook until done. Grilling times will vary
according to meat thickness.
Whole Fish and Whole Fillets
Preheat your grill on HIGH for 2-3 minutes with the Lid
down. Raise lid and turn Burners to MEDIUM heat. Place
fish (skin down) on grill and cook over direct heat until
done. Use cooking time as a guide or until fish is opaque
but still moist.
Smaller Fish Fillets and Cubes
Follow the directions from above, using approximate
cooking times shown at right. Place a small piece of
aluminum foil on the Cooking Grids if the fish pieces are
small enough to drop between the Cooking Grids.
Vegetables and Fruit
Prepare your fruit or vegetables and brush with butter or
basting sauce if desired. To cook indirectly, the food
should be placed on the left or right side of your grill with
the Burner lit on the opposite side and the grill lid down.
Or center your food on the Secondary Cooking Rack and
light the outer grill Burners. Either way, indirect cooking
must be done with the Lid down.
In some instances, you may want to grill vegetables and
fruit directly over the heat, using the supplied Cooking
Grids. Foods that work best with direct heat are relatively
soft and require a short cooking time: mushrooms,
zucchini, tomatoes and skewered fruit such as apricots,
peaches, pineapple, strawberries and kiwis. Remember
the Grill Lid must remain up when cooking directly.
Cut of Meat
T-bone steak
Sirloin steak
Beef spare ribs
Porterhouse steak
New York strip steak
Hamburgers
Sausages
Chicken breast
(cook with bone down)
Chicken wings
Drumsticks
Whole bird
(cook with breast up)
Chops
Loins
Cutlets
Whole fish
Whole fish fillets
Fish fillets
Boneless cubes
Approximate Cooking Times
Rare: 4-8 minutes
Medium: 10-14 minutes
Well done: 15-20 minutes
Rare: 4-6 minutes
Medium: 8-10 minutes
Well done: 10-15 minutes
Direct method:
approximately 15 minutes
Indirect method:
up to 30 minutes
Indirect method:
approximately 1 hour
Medium: 10-14 minutes
Well done: 15-20 minutes
10 - 12 minutes per pound or
until fish is opaque
4 - 5 minutes each side
or until fish is opaque
For very firm vegetables—particularly potatoes and yams,
we recommend that you partially boil until almost cooked,
before placing them on the grill. Cooking times using the
indirect method with the lid down will be similar to those
for your kitchen oven. However, there are many factors
such as outside temperature, wind conditions and
location of grill that affect your grill performance so we
suggest you watch the temperature gauge and adjust the
heat accordingly.
Cooking times for foods prepared with the direct method
will be much shorter mainly because of the direct heat
source and softness of the food. Timing will be comparable to normal pan frying or grilling.
Page 32

32
A-3
Guide to Searing using the Infrared Cooking Zone
Searing Steak and Ribs
Turn the Infrared Burner on HIGH and preheat for 3 to 5
minutes with the Lid open. Then place the meat on the
Cooking Grid and sear each side for approximately 2
minutes. Reduce the Infrared Burner to LOW or move
meat to the primary grilling area and finish cooking.
Grilling times will vary according to meat thickness.
Searing Hamburgers and Sausages
Turn the Infrared Burner on HIGH and preheat for 3 to 5
minutes with the Lid open. Then place the meat on the
Cooking Grid and sear each side for approximately 2
minutes. Reduce the Infrared Burner to LOW or move food
to the primary grilling area and finish cooking. Grilling
times will vary according to meat thickness.
Hamburgers and sausages are fatty so you should expect
some flare-ups when cooking these foods.
To minimize flare-ups follow the instructions on page A-1.
You may also consider grilling these and other fatty foods
using the primary grill area and the indirect cooking
method.
Cut of Meat
T-bone steak
Sirloin steak
Beef spare ribs
Porterhouse steak
New York strip steak
Hamburgers
Sausages
Approximate Total Cooking
Time
Rare: 4 minutes
Medium: 6-7 minutes
Well done: 8-10 minutes
Rare: 4 minutes
Medium: 5 minutes
Well done: 6-7 minutes
Important notes about using the Infrared Burner
Whether you are a seasoned chef or a newcomer to gas
grilling, infrared cooking is quite different than grilling over
a traditional burner. Although the primary grill burners will
also sear meat, the Infrared Burner produces a more
intense and concentrated heat that sears the meat more
quickly. This quick searing produces a crisp and flavorful
outer crust and locks in the meat's natural flavor and
juices.
Follow the cooking guidelines provided. Then take some
time to experiment with your Infrared cooking zone. Also,
read the Cooking Instructions on page A-1 so you
understand the importance of pre-heating, cooking
temperatures and safety warnings.
Once lit, leave the Infrared Burner on High and sear
both sides of meat using the guidelines below.
Once seared, adjust the Infrared Burner to Low and
continue cooking until desired doneness. You can
also move the seared meat to the primary grilling area
to finish cooking. This method allows you to sear and
prepare larger amounts of meat.
NEVER attempt to douse a flare-up with water which
can damage the Burner. To control flare-ups:
•
•
•
The Lid must always be open when the Infrared
Burner is lit.
Infrared cooking times will be much shorter than
traditional grilling so do not leave the grill unattended.
•
•
Trim excess fat from meats and poultry.
Preheat the Burner properly.
Clean the Burner regularly to remove food and
grease build-up. See Burner Tube cleaning
instructions in this manual.
Reposition your food often and consider moving the
seared meat to the primary grilling area to finish
cooking.
•
•
•
•
Page 33
33
A-4
Type of Food
Beef
Lamb
Veal
Pork
Chicken
Duck
Fish
Turkey, under 16 pounds
Turkey, over 16 pounds
How Cooked
Rare
Medium
Well done
Medium
Well done
Approximate Cooking Times
18 minutes per pound
23 minutes per pound
27 minutes per pound
18 minutes per pound
23 minutes per pound
27 minutes per pound
30-33 minutes per pound
20-25 minutes per pound
25 minutes per pound
10 minutes per pound
20-25 per pound + 30 minutes
18-23 per pound + 15 minutes
Guide to Roasting and Baking Using the Main Burners
An Important Note About Heat Settings
The suggested heat settings shown are approximate.
There are many factors such as outside temperature,
wind conditions and grill location that affect your grill
performance. We offer these cooking times as a convenience, but suggest you watch the temperature gauge and
adjust the heat accordingly.
Preparing to Roast
Roasting uses the indirect cooking method. Therefore, the
food should be placed on the left or right side of your grill
with the Burner lit on the opposite side. You can also use
the supplied Cooking Grid with an aluminum drip pan
underneath allowing you to collect juices for making
gravies. Remember, indirect cooking requires the Lid of
your grill to be down.
Preheating your grill is not required for slow cooking
methods such as roasting. If you do choose to preheat your
grill before roasting, turn the Burners on HIGH and close Lid
for approximately 2-3 minutes.
Food preparation
Trim meat of excess fat. Truss meat and poultry with
cooking string to retain shape if desired. Bacon strips can
be used to cover the outside surface of lean meat and
poultry to help prevent it from drying out. Another method
for keeping food moist during roasting is to put water in a
cooking pan, then cover with foil. The foil should be
removed for the first or the last part of the cooking time to
ensure proper browning.
Tips for roasting
Except when roasting with water in a roasting pan, the
juices that collect in the pan can be used as the base for a
tasty sauce or gravy. Place a cooking pan directly over the
heat, add extra butter if needed, then add several spoonfuls of flour to thicken sauce. Finally, add sufficient chicken
or beef stock to obtain the desired consistency.
Once the meat is cooked, remove it from your grill and
cover with a piece of foil. Allow it to stand for 10-15
minutes which allows the juices to settle. This will make
carving easier and ensure a tender, juicy roast.
BAKING TECHNIQUES
From casseroles and cornbread to delicious desserts like
fondue fruit skewers or crumb cake, baking on the grill is as
easy as baking in the kitchen.
Preparing to Bake
To bake in your new grill you'll need a baking dish or castiron cooking pan, and a pair of flame retardant BBQ Mitts. If
the cooking pan is cast-iron be sure to season the pan
before use.
Preheat your grill 3-5 minutes, then lower heat to achieve
the baking temperature desired. Baking uses the indirect
cooking method. Therefore, your cooking pan should be
Oven Temperature
Slow 300° - 340° F
Moderate 355° - 390° F
High 410° - 480° F
Recommended Grill Setting
Both outside Burners on LOW
1 outside Burner on HIGH and 1 outside Burner on LOW
Both outside Burners on HIGH
placed on the left or right side of your grill with the burner lit
on the opposite side.
Tips for Baking
Prepare your favorite recipe as you would in the kitchen.
Foods cooked in the grill for long periods of time should
always be covered in aluminum foil to retain moisture. You
will need to stir the food several times as it bakes, and add
additional liquid if required.
Watch the temperature, and adjust to cook according to
your recipe directions.
Warning: Do not use the infrared burner when indirect cooking (roasting and baking) or anytime when the grill lid is down.
Page 34

34
A-5
Slow Cooking with a Rotisserie
Rotisserie cooking produces foods that are moist,
flavorful and attractive. The rotisserie system is most
commonly used for cooking meat or poultry and is
designed to cook food slowly. You can place a cooking
pan beneath the food to collect juices for basting and
gravy. To flavor the contents of the cooking pan you
may add herbs, onions, or other spices of your choice.
The cooking times on a rotisserie will be approximately
the same as for oven cooking.
Balancing the Food
In rotisserie cooking, balancing the food is of utmost
importance. The rotisserie must turn evenly or the
stopping and starting action will cause the food to cook
unevenly and possibly burn the heavier side.
The easiest foods to balance are those of uniform
shape and texture. To test if the food is balanced
correctly when secured, place the ends of the rotisserie spit loosely in the palms of your hands. If there is
no tendency to roll, give the spit a quarter turn. If it is
still stable, give it a final quarter turn. It should rest
without turning in each of these positions. It can then
be attached to your grill.
Food Preparation
When preparing poultry, truss the birds tightly so that
wings and drumsticks are close to the body of the bird.
The cavity of the bird may be stuffed prior to this. Pull the
neck skin down and, using a small skewer, fix it to the
back of the bird. Push the rotisserie spit through lengthwise, catching the bird in the fork of the wishbone. Center
the bird and tighten with the holding forks. Test the
balance as described before.
A rolled piece of meat requires the rotisserie skewer to be
inserted through the center of the length of meat, then
secured and balanced.
For meats that contain bones, it is best to secure the
rotisserie skewer diagonally through the meaty sections. If
protruding bones or wings brown too quickly, cover with
pieces of foil.
Guide to Rotisserie Cooking
Preparing to Smoke
Smoking gives food a distinctive, delicious flavor. You will
find a variety of wood chips available for use in smoking
grilled foods. Pre-soaking of wood chips may be
required so read and follow the manufacturers instructions for preparing smoking chips prior to use.
Note: It is our experience that many smoking chip
products do not actually produce a smoke but instead
infuses the food with flavor. Please read product labels
carefully and if in doubt, ask your retailer for details.
Using A Smoker Box
There are many optional smoker boxes available for
purchase. Follow these guidelines and always refer to
the label of your smoking chips for specific directions.
Raise your Grill Lid and light the grill. Lower the Grill Lid
allowing your grill to reach the desired cooking temperature for the food you are grilling. Fill your smoker box with
your prepared smoking chips. Dried herbs and spices
may also be added to produce different flavors. Wear a
flame retardant BBQ Mitt and place your smoker box on a
Cooking Grid or Savor Plate® directly above a lit grill
Burner. The heated smoking chips will flavor your foods.
Tips for Smoking
You can reduce the strength of the smoke flavor by only
smoking for half or three quarters of the cooking time.
The heat required for smoking is normally LOW to
MEDIUM.
Foods naturally high in oils lend themselves well to
smoking, while drier foods benefit from a marinade.
Guide to Smoking
Vegetables are generally easy to cook on the grill. The
Cooking Rack makes it convenient because you can still
use the main cooking area while the vegetables are
suspended above the grids.
Pre-cook hard vegetables by briefly boiling or
microwaving them before cooking on the grill. Wrap
vegetables in a double thickness of foil to protect them
while cooking on the grill. Then, remove the foil if desired,
10-15 minutes before the end of cooking, brush vegetables with butter or oil and finish cooking.
Guide to Using the Cooking Rack
The Cooking Rack can be used for purposes other than
just the obvious. Consider using the rack for warming
French bread, garlic bread, croissants or even bagels.
A small whole fish wrapped in foil also cooks well on the
Cooking Rack. Parcels of seafood such as scallops,
prawns and sliced fish fillets prepared in a sauce and
portioned into small foil wraps cook well this way, too.
•
•
•
•
•
•
•
•
•
Tuna steaks, marinated in Asian flavors of sesame
oil, soy sauce and sherry.
Pork fillets, rubbed with ginger, orange rind and
brushed with maple syrup.
Mussels, brushed with lemon rind and chili oil.
Lamb cutlets, marinated in virgin olive oil, lemon,
oregano and black pepper. The same marinade can
be used for a whole leg or rack of lamb.
Chicken, boneless chicken pieces—especially sliced
breasts.
Fish, sliced fillets of firm fish, assorted seafood such
as prawns, scallops and calamari.
Pork, sliced fillets, diced or minced pork, sliced leg
steak, sliced chops.
Beef, sliced fillet, rib-eye, round, rump, sirloin.
Lamb, sliced fillet, round, loin.
Page 35
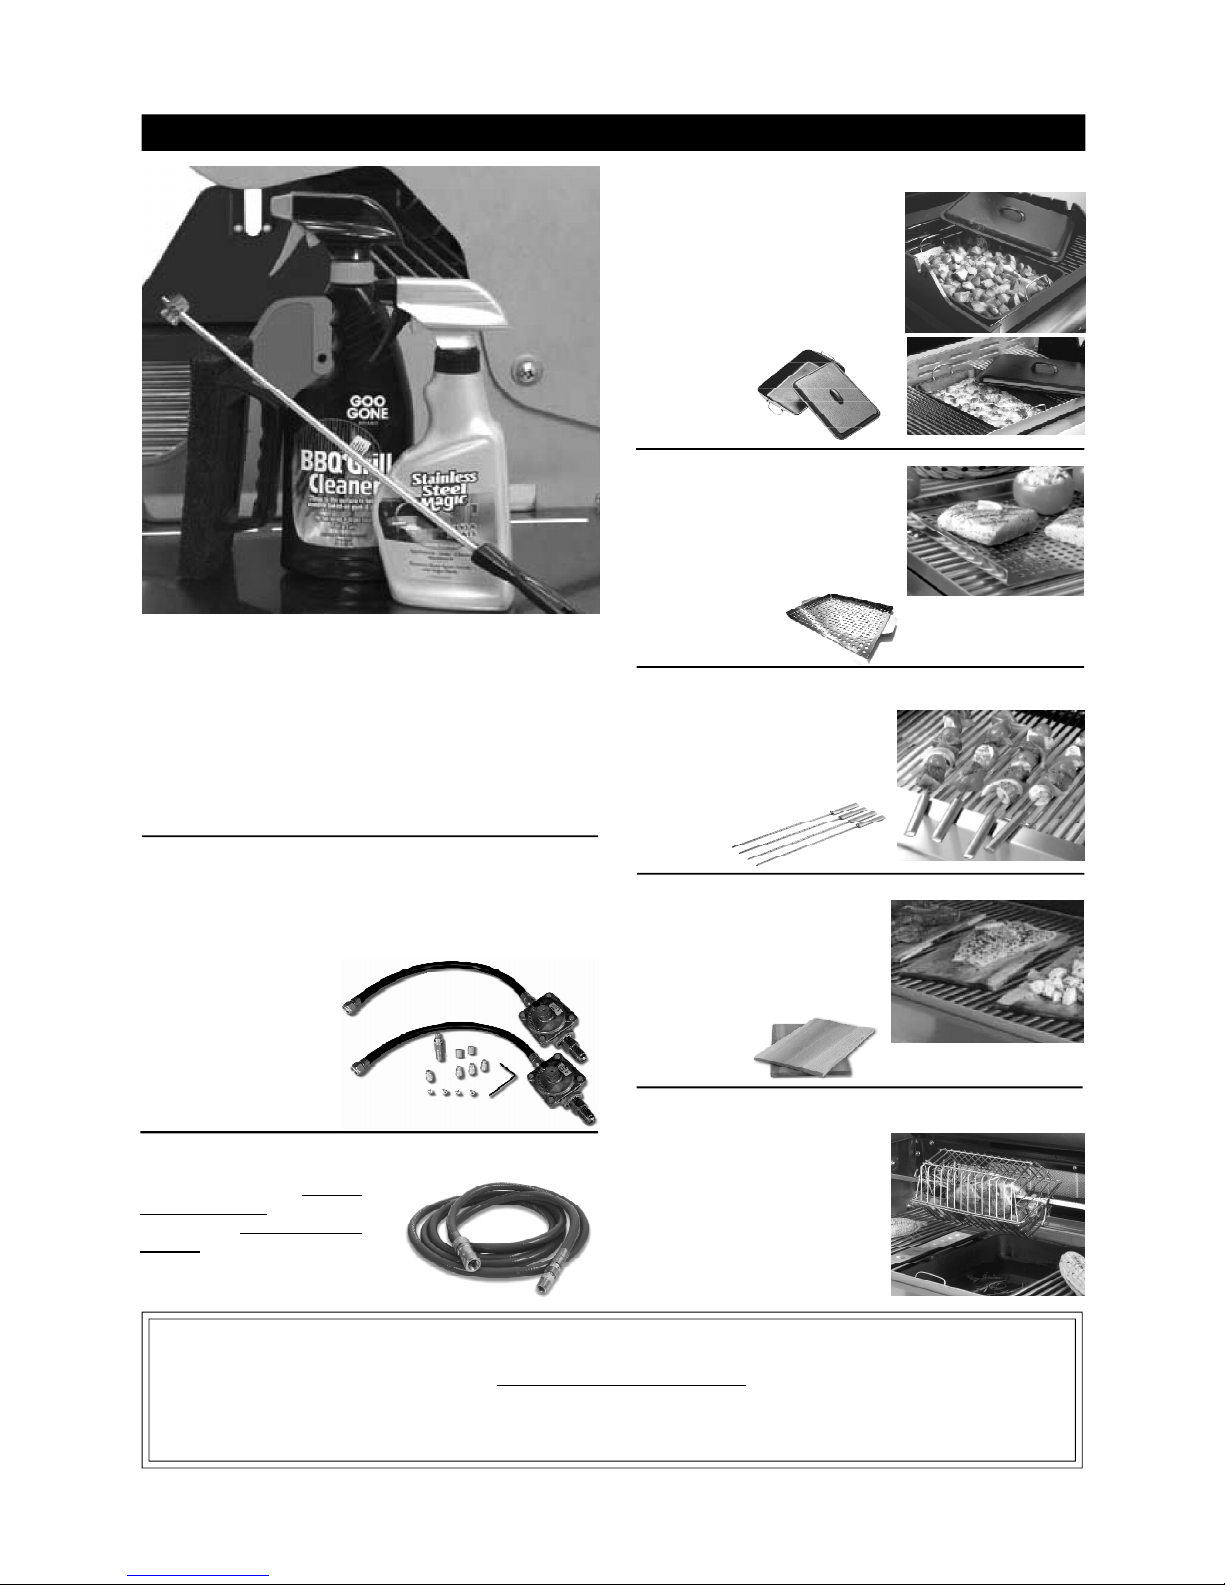
35
OPTIONAL GRILL ACCESSORIES
Online registration and unique cooking accessories now available
at www.grandhall.com
For personal assistance, call the Grill Information Center, 8am to 4.30pm CST, Monday through Friday at:
1-877-550-8040
Cast-Iron Cooking Pan with Lid
The Topper is a helpful tray that
goes from kitchen to grill top
and provides a nice clean cooking surface. Ideal for cooking
everything, especially smaller
& delicate
foods.
Stainless Steel Grill Topper
Ideal for vegetable, meat and
shrimp kabobs. Constructed of
stainless steel with a mirrored
polish finish. Set of 4 is dishwasher safe.
4-Piece Stainless Steel Skewer Set
This cast iron pan conducts
heat wonderfully and cooks
evenly, making this the ideal
accessory for baking and roasting on your new grill. Prepare
pizza, potatoes, stew, corn
bread and desserts. Can be
used in place of 1 grid and
Flame Tamer
or use on
top of grids.
Cedar Cooking Planks
Cooking on a Cedar Plank infuses food with a rich, smoked
flavor. Perfect for preparing
salmon, meat, poultry and vegetables. Set includes
2 planks.
Wire Hexagon Roti-Tumble Basket
The Basket secures to your
rotisserie spit and holds
chicken, tenderloin, fish or vegetables in place for slow cooking. Adjustable thumbscrew
hardware for a snug fit. Shown
with optional cast-iron pan sold
above.
This ultimate Cleaning Kit includes
everything you need to keep your grill
in top shape and prolong its life
To help maintain your grill properly we’ve assembled this
Cleaning Kit that includes all the essentials; a 12 ounce
stainless steel cleaner, burner cleaning brush with custom
designed brass brush head and flexible rod for cleaning
burners,16 oz. spray degreaser and a nylon fiber cleaning
brush with easy grip handle.
Natural Gas Conversion Kit
Your grill can be converted for use with Natural Gas by a
qualified gas technician only. In order to convert your grill
the tech will need this grill kit which includes: NG Orifices
for Gas Valves, NG Regulator with Hose, Hardware, NG
Conversion Label
and "L" Screwdriver.
12 Foot Natural Gas Hose
If you're having your grill and
range converted for use with
Natural Gas you will want to
order 2 of the optional 12'
extension hose with 3/8" ID
(inner diameter).
A-6
Page 36

36
FREQUENTLY ASKED QUESTIONS (FAQ'S)
A-7
Yes, however any attempt to convert the grill from one
fuel type to another is extremely hazardous and must be
performed by a qualified gas technician only, using a
NG Conversion Kit purchased from Grand Hall.
Question:
Are the serial and model numbers of my grill listed
somewhere for reference?
The serial and model numbers are listed on a silver
CSA label placed on the grill. Depending on the grill
model the silver CSA label will be located on the left or
right side bowl panel underneath the side shelf,
underneath the right side of the control panel, outside
left or right of control panel or on the back of the grill
cabinet.
Question:
My grill will not light properly. Why?
Answer:
Always light the Main Burner farthest from the fuel
source first. This will draw gas across the manifold
helping prevent air pockets which obstruct gas-flow and
prevent proper grill lighting. Also try this procedure:
1. Turn gas off at source and turn Control Knobs OFF.
Wait at least 5 minutes for gas to clear, then retry.
2. If your grill still fails to light, turn the Burner Control
Knob(s) and gas source OFF and conduct a leak test
of ALL gas connections and gas sources as
explained in the Use and Care section of this manual.
3. If no leaks are detected, wait 5 minutes for any gas to
clear and repeat the lighting procedure.
Question:
If my ignitor or battey is not working how can I light
And - Why would I need the silver
lighting stick that hangs from the side of my grill?
Answer:
If your ignition fails to work or your battery needs
replacing, you can light your grill through the Lighting
Hole on the side of the grill bowl using the Manual
Lighting Stick that hangs from the side of your grill. The
Lighting Stick is designed to hold a paper match and
allows you to safely insert a match through the Lighting
Hole without getting close to the Burner. Never remove
the Cooking Grids or Savor Plates® and attempt to
light the grill from above. To light your gas grill manually,
insert a paper match into the Manual Lighting Stick and
follow steps 1 through 6 of the Basic Lighting
Procedures. Then, light the match and place it through
the Lighting Hole on the right side of the grill (location of
hole varies by grill model). Turn the Grill Burner Control
Knob to the High setting to release gas. The Burner
should light immediately.
Question:
Can I convert my grill from one fuel type to another in
other words from LPG to NG or vice versa?
Answer:
Answer:
my grill manually?
Question:
Sometimes I hear a humming sound coming from my
regulator. What causes this? And - My grill has a low
flame and sometimes will not light. Why?
Answer:
The humming sound is gas flowing through the
regulator. A low volume of sound is normal and will not
interfere with the operation of your grill. Loud or
excessive regulator humming and/or low flow and
intermittent lighting may be caused by the regulator's
excess gas flow device. Opening the tank valve all the
way or too quickly is what triggers the regulator's
safety device to restrict gas flow, preventing excess
gas flow to your grill. Lighting the main Burner farthest
from the fuel source every time will help eliminate air
pockets in the manifold. Note: This procedure should
be done every time a new LP Gas tank is connected to
your grill.
Turn all Control Knobs to the OFF position.
Where do I use my grill for safer operation and better
performance?
Turn off the LP Gas tank at the tank valve.
For Natural Gas shut off NG valve.
Disconnect regulator from LP Gas tank.
For Natural Gas disconnect regulator from 12 ft.
Natural Gas Hose.
Let unit stand for 5 minutes.
Reconnect regulator to the LP Gas tank.
For Natural Gas reconnect regulator to 12 ft.
Natural Gas Hose.
Open grill Lid (or Side Burner Lid if you are lighting
the Side Burner).
Turn the tank valve slowly ¼ of one turn.
For Natural Gas open Shut Off valve.
Light main Burner farthest from fuel source.
Turn the tank valve slowly one more ¼ of one turn
for ½ of one complete turn.
Continue to light Burners moving towards the fuel
source.
Do not turn tank valve more than ½ of one turn on
LPG models.
Question:
Strong winds and low temperatures can affect the
heating and performance of your gas grill so
factor in these elements when positioning your
grill outdoors for cooking.
Use your grill at least 3 feet away from any wall or
surface.
Use your grill at least 3 feet away from
combustible objects that can melt or catch fire
(such as vinyl or wood siding, fences and
(overhangs) or sources of ignition including pilot
lights on water heaters and live electrical
appliances.
Never use your gas grill in a garage, porch, shed,
breezeway or any other enclosed area.
Never obstruct the flow of ventilation air around
your gas grill housing.
Answer:
Page 37

37
A-8
Question:
The Regulator and Hose supplied with my gas grill
does not fit the older LP Gas tank I’ve used for
years. Why not?
Answer:
The U.S. Government regulates gas appliances and
LP Gas tanks. When regulations are changed the LP
Gas tank fittings are altered to insure compliance. If
your LP Gas tank does not fit the Regulator and Hose
supplied with your new grill, the tank is outdated and
must be replaced. Note: Effective April 1, 2002 all LP
Gas tanks sold must include an “OPD” Overfill
Prevention Device. The OPD tanks are identified by
their triangular-shaped valve wheel. This internal
device prevents the LP Gas tank from being
overfilled. Tanks without an OPD valve can not be
refilled.
Question:
What type of pipe and fittings will I need to connect
a natural gas grill at my home?
Answer:
Even if your home is plumbed with a natural gas
connection outdoors, there is an additional fitting and
piping required to hook up a natural gas grill. Refer
to the Natural Gas section of this manual for a
diagram of recommended Natural Gas hook-up.
Because each home is unique the type and length of
fittings will vary. This is a technical process that
involves patience and time. The details below will
offer guidance but if you feel uncomfortable with this
procedure you should seek the assistance of a
plumber or gas supply professional.
Gas Line Piping: If the length of line required does
not exceed 50 feet, use a 5/8" O.D. tube. One size
larger should be used for lengths greater than 50
feet. Gas piping may be copper tubing, type K or L;
polyethylene plastic tube, with a minimum wall
thickness of .062 inch; or standard weight
(schedule 40) steel or wrought iron pipe. Copper
tubing must be tin-lined if the gas contains more
than 0.3 grams of hydrogen sulfide per 100 cubic feet
of gas. Plastic tubing is suitable only for outdoor,
underground use. Gas piping in contact with earth, or
any other material which may corrode the piping,
must be protected against corrosion in an approved
manner. Underground piping must have a minimum
of 18" cover.
Shut Off Valve:It is highly recommended that a Shut
Off Valve be installed at the gas supply source
outdoors. Install at a point after the gas pipe exits the
outside wall and before the Quick Disconnect Hose,
or install it at the point before the gas line piping
enters the ground.
Question:
What causes grill parts to rust and what affect does
it have on my grill?
Answer:
Rusting is a natural oxidation process and may
appear on cast-iron and steel parts. Rust will not
affect the short term performance of your grill.
Question:
Which is a better cooking surface to grill on;
porcelain coated steel / cast-iron cooking grids or
stainless steel grids?
Answer:
FREQUENTLY ASKED QUESTIONS (FAQ'S)
You may also review FAQ’s, Troubleshooting
and Care & Maintenance Tips online at
www.grandhall.com.
To slow the rusting process on steel Cooking Grids
(select models) we recommend greasing the Cooking
Grids before and after each cookout. Use a brush to
apply a thin layer of cooking oil or vegetable
shortening onto each Cooking Grid. We do not
suggest spray type oils unless they are specified for
high-temperature cooking. Be sure to coat the entire
cooking surface including edges and any areas with
chipped porcelain.
They all have their advantages. For traditional grilling
and searing meats, cast-iron or steel grids offer better
heat conductivity. To protect against the natural rusting
process, steel or cast-iron cooking grids offer a
porcelain finish which requires routine maintenance to
keep the grids well seasoned.
Stainless steel is popular with those who prefer less
maintenance.
A new innovative solution is available on select
models called Stainless Clad Therma-Core®. This
Cooking Grid combines a heat conducting steel core
with an easy-to-clean stainless outer shell.
All stainless grades are not created equal. The 304
grade, also called 18-8 stainless steel, is prized for its
excellent resistance to rust and corrosion and good
performance at high temperatures, which makes it ideal
for grill construction.
304 grade stainless steel is by far the most popular
stainless steel and contains 18-20% chromium and
8-10% nickel, making it non-magnetic.
Some stainless steel grills are constructed of Type 430
stainless steel which contains 16-18% chromium but
generally less than 1% nickel. It is magnetic with less
corrosion and rust resistance and designed for limited
temperature use. Beware of stainless steel grills that
offer no claim of grade because what looks shiny on the
sales floor could become a problem on your patio.
How can you tell if a product is made of 304 grade
stainless? Take the simple magnet test. If a magnet
sticks to the stainless steel it is 430 grade. If a magnet
does not stick you can trust its 304 grade quality.
Answer:
Question:
Some stainless steel grills specify 304 grade
construction while others do not mention a grade at
all? What is the difference?
Page 38
38
Grand Hall Enterprise Co., Ltd. will warrant to the ORIGINAL PURCHASER of this gas grill that it will be free of
defects in material and workmanship for set periods below from the date of purchase when used under normal
outdoor use and correct assembly:
Full Warranty on Grill – 1 year
(except for paint loss, rusting and ignitor battery)
Stainless Steel Parts and Tube Burners – 5 years no rust through
Cooking Grids – 3 years no rust through
Savor Plates® – 2 years no rust through
Grand Hall will require reasonable proof of your date of purchase. Therefore, you should send in the owner
registration card or register online at www.grandhall.com. Save your receipt in case it is required as proof of
purchase.
This Limited warranty is limited to repair or replacement of parts, at Grand Hall’s option that proved to be
defective under normal use and service.
Grand Hall may require the return of defective parts for examination before issuing replacement parts or
repairs. If you are required to return defective parts, transportation charges must be prepaid.
Upon examination and to Grand Hall’s satisfaction, if the original part is proven defective Grand Hall may
approve your claim and elect to replace such parts without charge. You are responsible for shipping charges of
such replacement parts.
This Warranty does not cover any failures or operating difficulties due to accident, abuse, misuse, alteration,
misapplication, vandalism, improper installation, maintenance or service, damages caused by flashback fires or
grease fires, as set out in this Operator’s Manual.
This warranty does not cover scratches, dents, corrosion or discoloration caused by weather, heat, abrasive and
chemical cleaners, pool or spa chemicals or any tools used in the assembly or installation of this unit. This
warranty does not cover paint loss, surface rust, corrosion or stainless steel discoloration which is considered
normal wear. This warranty does not cover the cost of any inconvenience, personal injury or property damage due
to improper use or product failure.
Deterioration or damage due to severe weather conditions such as hail, hurricane, earthquakes, tsunami, tornadoes, Acts of God or terrorism, discoloration due to exposure to chemicals either directly or in the atmosphere, is
not covered by this Limited Warranty.
No returns will be accepted without prior authorization from Grand Hall. Authorization for return may be
obtained by calling 1-800-761-5456 8 am – 4:30 pm CST, Monday through Friday.
Warranty Restrictions
Grand Hall Limited Warranty
•
•
This grill is safety certified for use only in the country where purchased. Modification
for use in any other location is a safety hazard and will void the warranty.
This warranty gives you specific legal rights, and you may also have other rights
which vary from state to state.
Manufacturer:
Grand Hall Enterprise Co., Ltd.
9th Fl., No.298, Rueiguang Rd., Neihu,
Taipei, Taiwan (114)
 Loading...