

Page 1
Version: V1.0.0
User Manual
MX0808-1011-001
HDMI Matrix
Page 2
Important Safety Instructions
Note:
In case of any content change, we are sorry for no further notice.
Warning:
To reduce the risk of fire, electric shock or product damage:
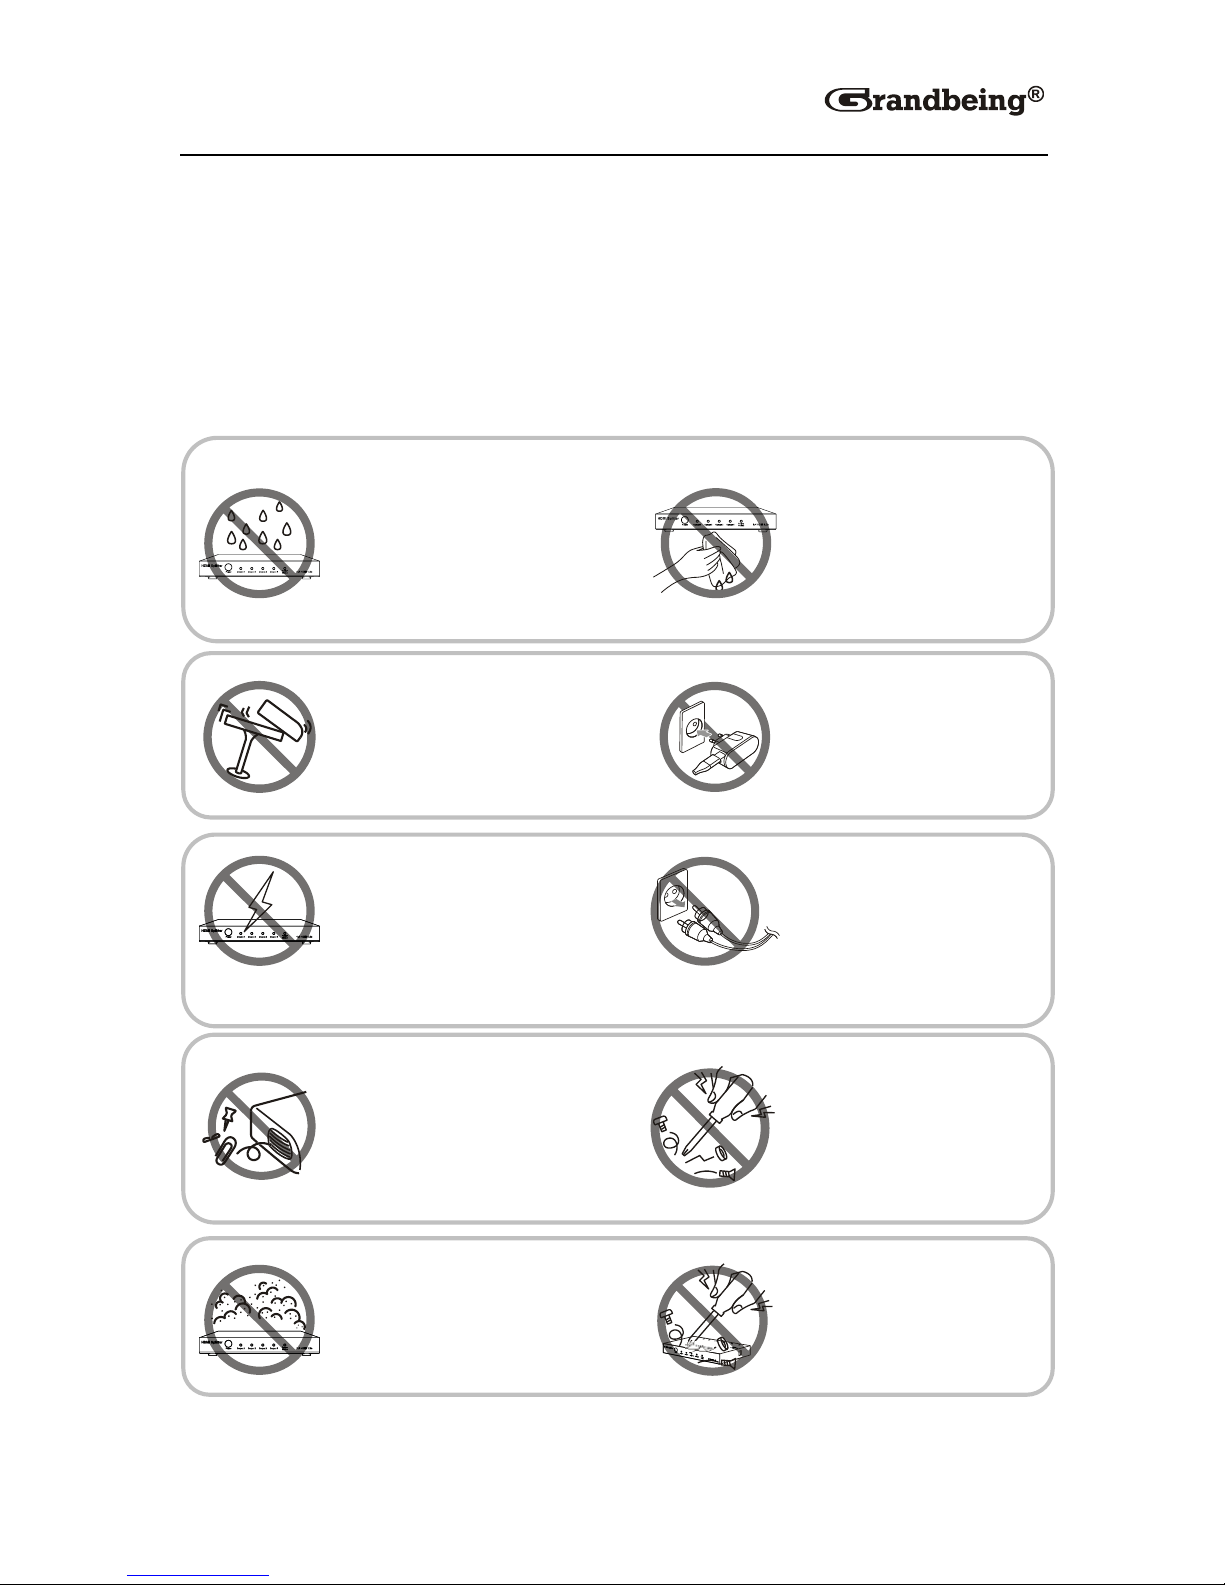
1. Do not expose this apparatus
to rain, moisture, dripping or
splashing and that no objects
filled with liquids, such as vases,
shall be placed on the apparatus.
6. Clean this apparatus
only with dry cloth.
2. Do not install or place this unit
in a bookcase, built-in cabinet or
in another confined space.
Ensure the unit is well ventilated.
3. To prevent risk of electric
shock or fire hazard due to
overheating, do not obstruct
the unit’s ventilation openings
with newspapers, tablecloths,
curtains, and similar items.
4. Do not install near any heat
sources such as radiators, heat
registers, stoves, or other
apparatus (including amplifiers)
that produce heat.
5. Do not place sources of naked
flames, such as lighted candles,
on the unit.
7. Unplug this apparatus
during lightning storms or
when unused for long
periods of time.
8. Protect the power cord
from being walked on or
pinched particularly at
plugs.
9. Only use attachments /
accessories specified by
the manufacturer.
10. Refer all servicing to
qualified service
personnel.
Page 3

1
Table of Contents
Introduction .................................................................................................... 3
Overview ................................................................................................... 3
Features ................................................................................................... 4
Package Contents .................................................................................... 4
Specifications ............................................................................................ 5
Panel ........................................................................................................ 7
Hardware Installation ..................................................................................... 9
Operation ...................................................................................................... 10
Front Panel ............................................................................................. 10
Remote Control ...................................................................................... 11
Basic Remote Control ...................................................................... 11
Advanced Remote Control .............................................................. 13
RS232 Control ........................................................................................ 14
Set Panel ......................................................................................... 15
Com Port Connect Status ................................................................ 19
Message Window ............................................................................ 20
Input/Output Switch ......................................................................... 21
Control Source code ........................................................................ 23
Read Status Command ................................................................... 24
Web Password Reset ...................................................................... 24
LAN Control ............................................................................................ 25
Telnet ................................ ................................ ...................................... 26
EDID Management ................................................................................. 28
Troubleshooting ........................................................................................... 29
Product Service ........................................................................................... 30
Maintenance ........................................................................................... 30
Provided Service .................................................................................... 30
Mail-In Service ........................................................................................ 30
Page 4

2
Warranty ................................................................................................. 31
Warranty Limits and Exclusions .............................................................. 31
Glossary ....................................................................................................... 33
Page 5
3
Introduction
Overview
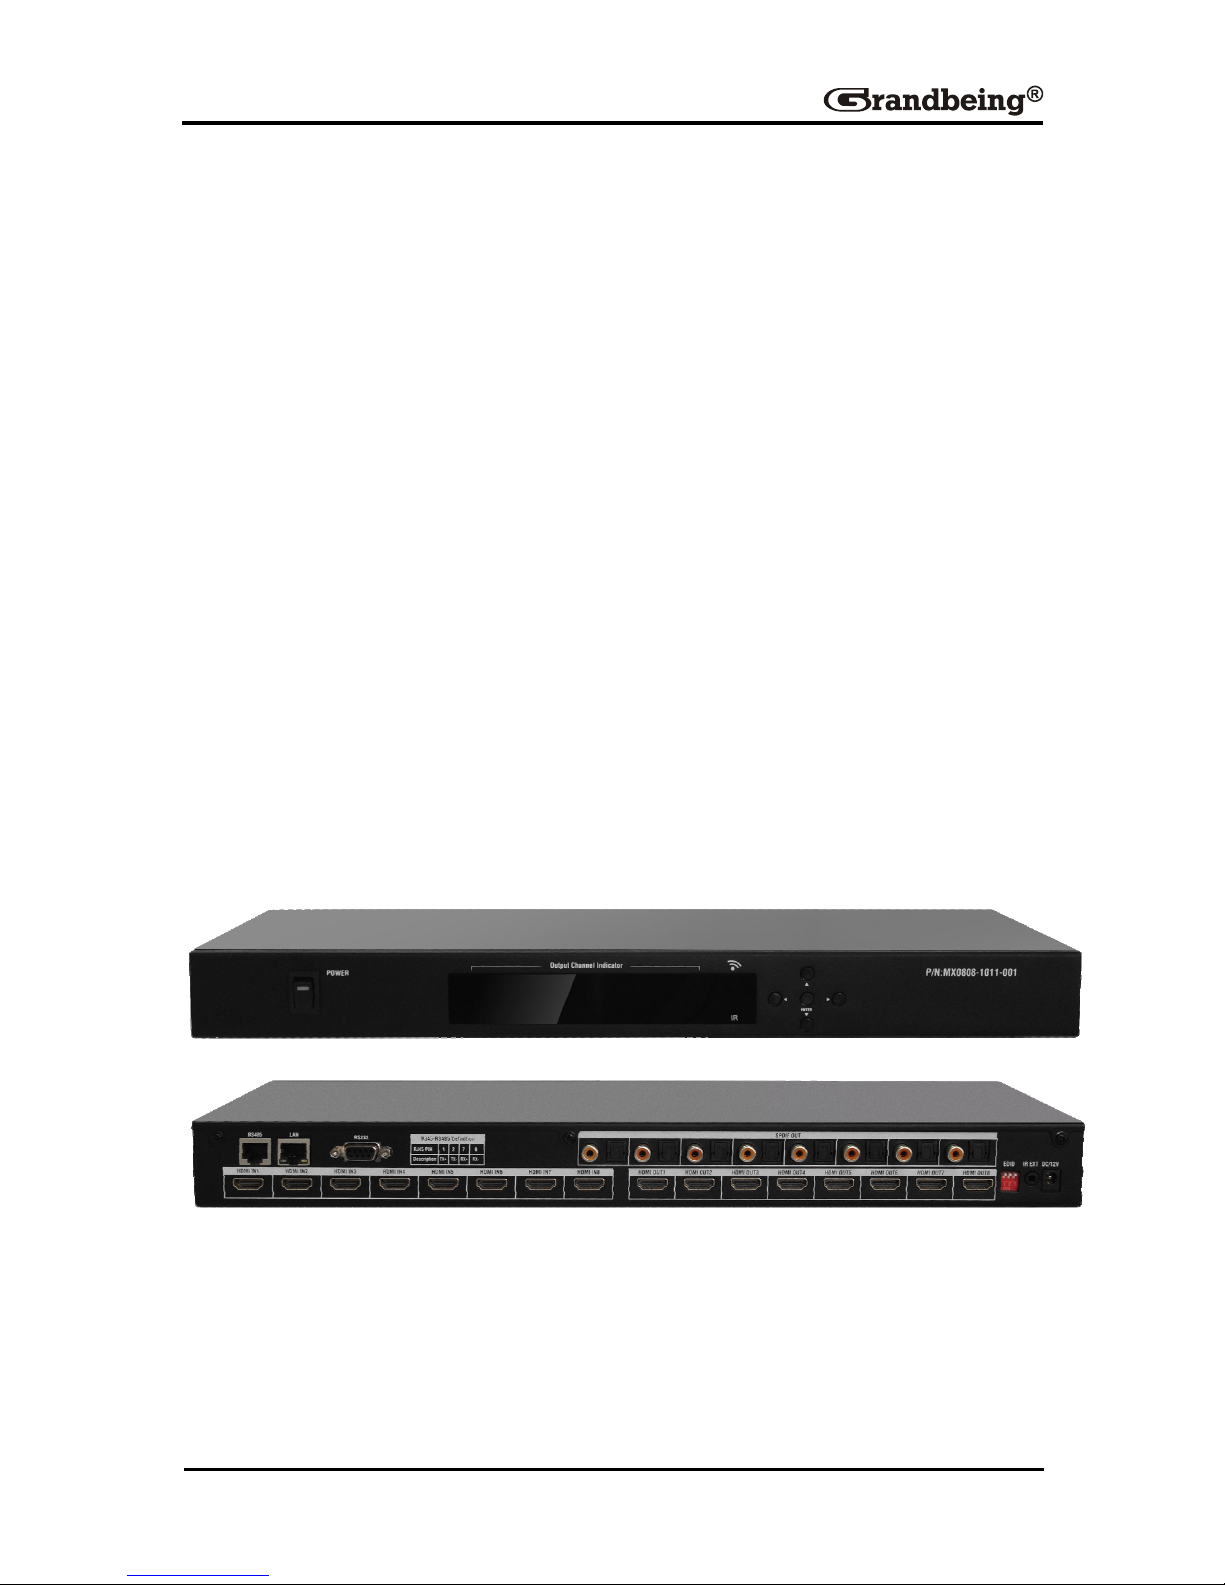
MX0808-1011-001 is an 8-by-8 HDMI matrix. It allows any of the eight Input
Channels (HDMI) to be routed to any of the eight Output Channels (HDMI),
no matter the source is HDCP or not. Users can choose several different
ways to control the matrix: by using infrared, RS232, RS485, and LAN and
supplied remote control.
MX0808-1011-001 internal EDID library features default EDID configurations,
in addition to native EDID data for any output/display.
MX0808-1011-001 offers solutions for home, office, digital entertainment
center, control center, conference room, school and corporate training
environments.
Page 6

4
Features
HDMI 1.4 compliant.
Allows up to eight HDMI audio/video devices to be independently
switched to eight HDMI monitors, HDTV’s or projectors
The eight output channels could show the same or different source
simultaneously no matter the source is HDCP or not
Reading and saving EDID function from displays
Supports high definition resolutions including: 3840 x 2160,
1080p@60Hz, 1080i, 720p and other standard video formats
Optical and RCA SPDIF Digital Audio Output extracted from HDMI input
or ARC (Audio Return Channel)
With extra infrared extension receiver
Five switching modes: front panel buttons, local IR, RS232, RS485 and
LAN
HDCP compliant
Package Contents
1 x HDMI Matrix MX0808-1011-001
1 x IR Remote
1 x CD
1 x 12V 5A DC Power Supply
1 x AC Power Cord
1 x USB to UART cable
2 x Mounting Ear
1 x IR Receiver
Page 7

5
Specifications
Technical
Maximum Distance
15m
Maximum Pixel Clock
297MHz
Video Impedance
100ohm
Audio Output Impedance
75ohm
I/O Connections
8 x HDMI IN
8 x HDMI OUT
1 x RS485 Port
1 x RJ45 Port
1 x RS232
8 x SPDIF OUT
1 x IR EXT
1 x EDID switch
Power Supply
12V 5A DC, 5.5mm
Power Consumption
40 Watts Max
Input Video Signal
1.2 volts p-p
Video Format Supported
DTV/HDTV:3840 x 2160/1080P/1080i/720P/
576P/480P/576i/480i
Audio Format Supported
DTS-HD 5.1/7.1, Dolby HD 5.1/7.1
Output Video
HDMI 1.4
Operating Temperature
32°F to 95°F (0°C to 35°C)
10% to 90%, non-condensing
Storage Temperature
-4°F to 140°F (-20°C to 70°C)
10% to 90%, non-condensing
ESD Protection
Human-body Model:
±8kV(Air-gap discharge)/±4kV(Contact
discharge)
Page 8

6
General
Dimensions
200mmW × 40mmH × 400mmL
/14.9''W × 1.5''H × 17.3''L
Mass (Main unit)
2.3kg/5.0Lb
Certification
CE, FCC, RoHS
Page 9
7
Panel
Front Panel
1 2 3 4
ID
Name
Description
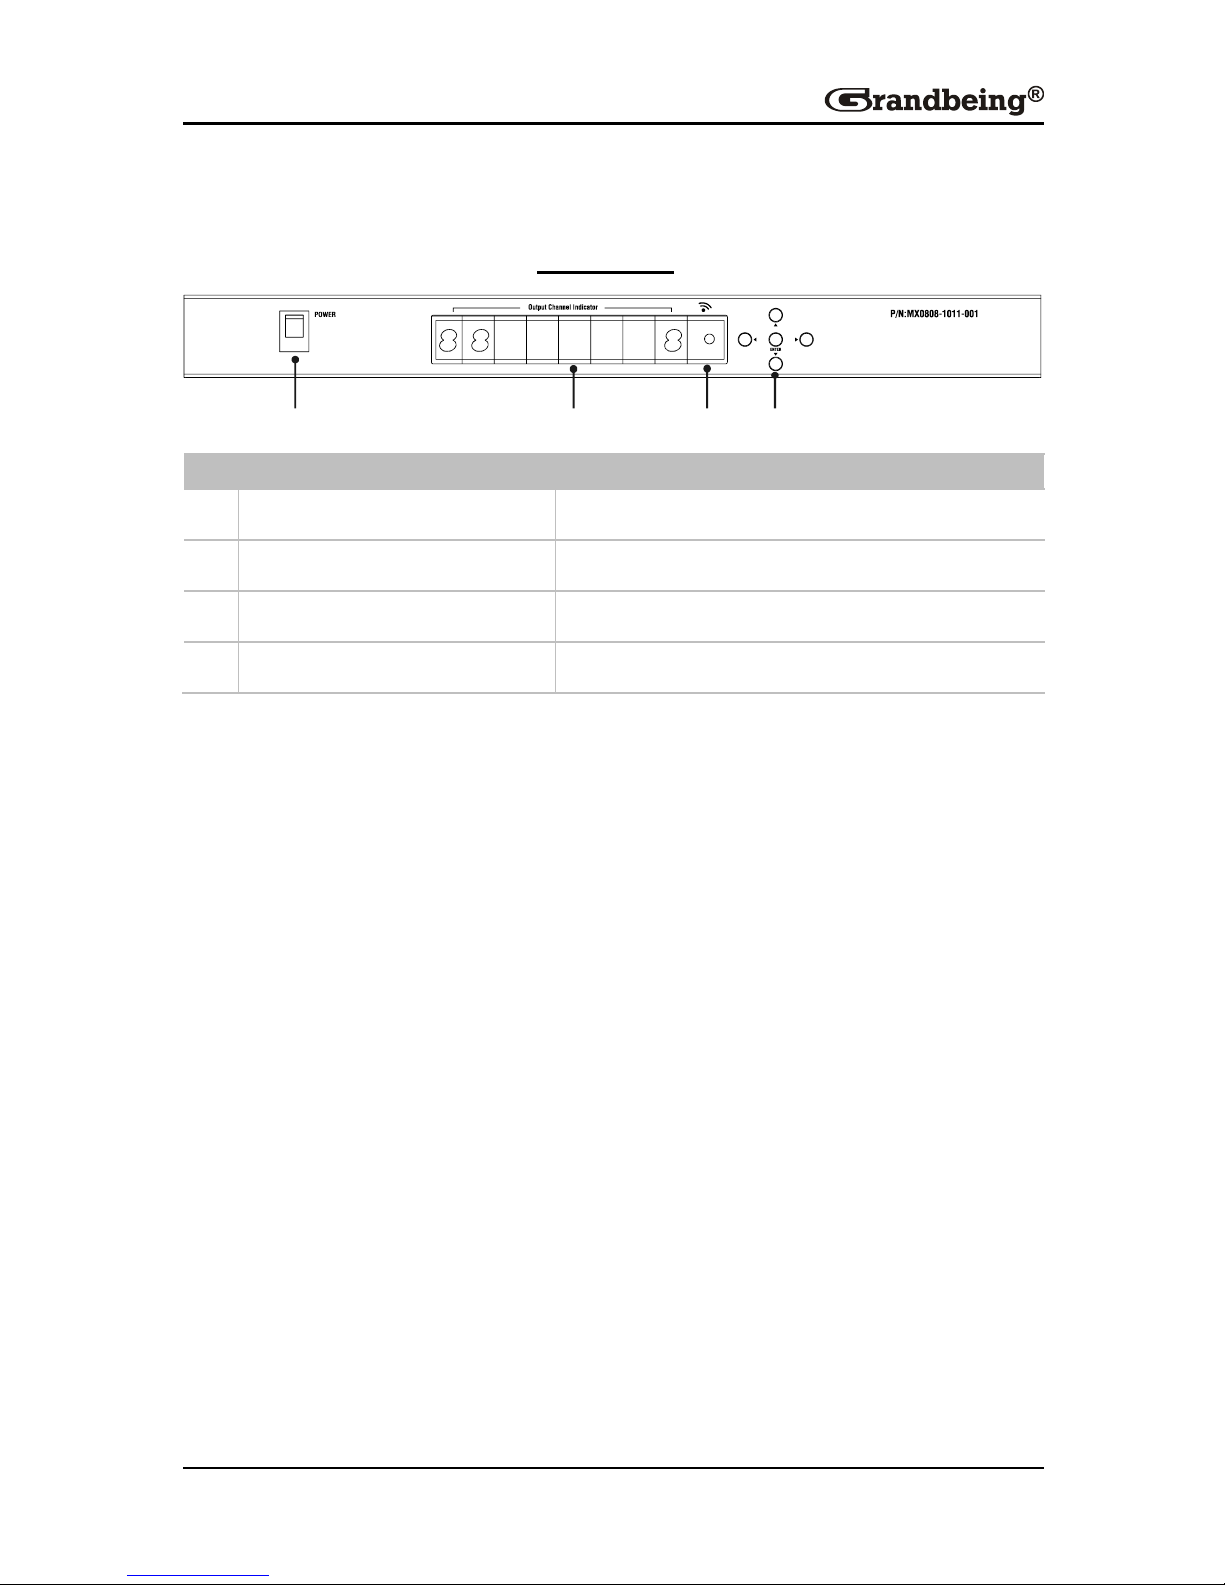
1
Power
Turns on/off the device
2
Output Channel Indicator
Indicates input for output port 1~8
3
IR
IR receive window
4
Select and enter buttons
Selects the input port for output port
Page 10
8
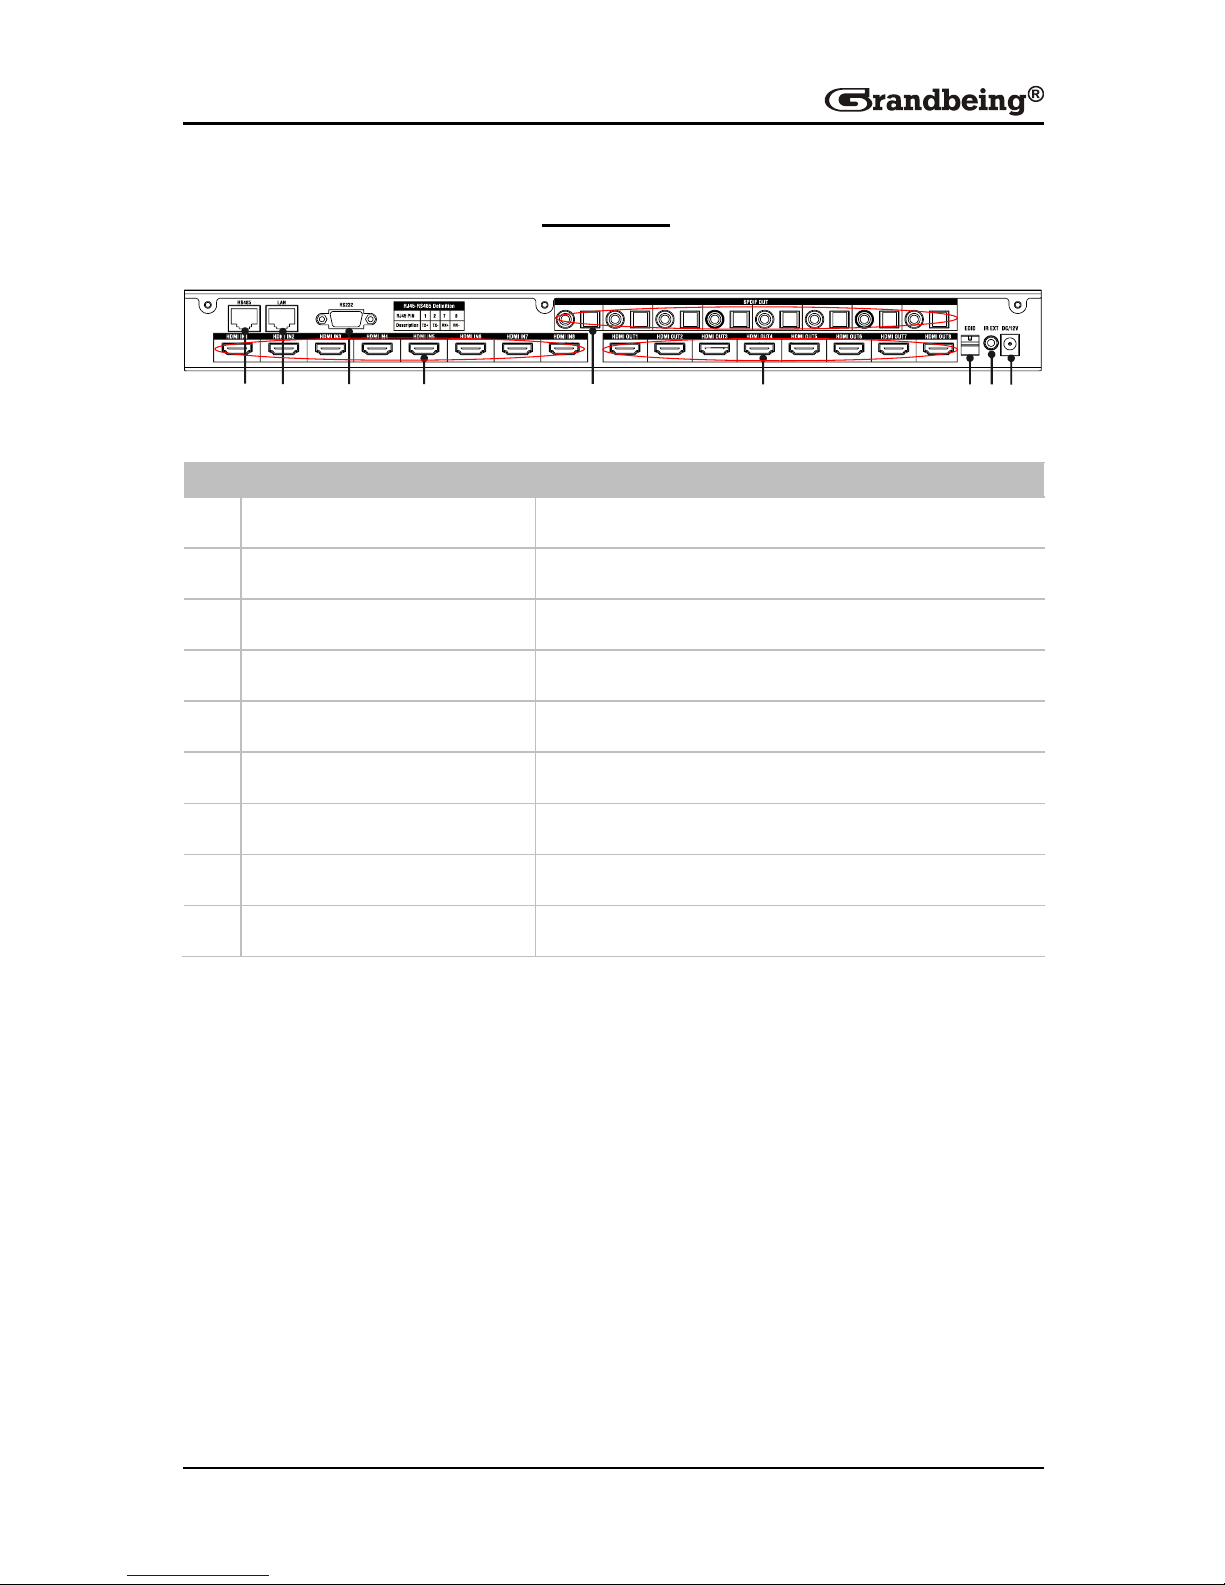
Rear Panel
1 2 3 4 5 6 7 8 9
ID
Name
Description
1
RS485 port
Connect to a RS485 device
2
LAN port
RJ45 port
3
RS232 port
Connect to a RS232 device
4
HDMI IN 1~8
Connect to HDMI sources
5
Optical Audio OUT 1~8
Connect to Audio system
6
HDMI OUT 1~8
Connect to HDMI sinks
7
DIP
DIP for Matrix setting
8
IR EXT
IR extension
9
Power
12V 5A DC power supply input
Page 11
9
Hardware Installation
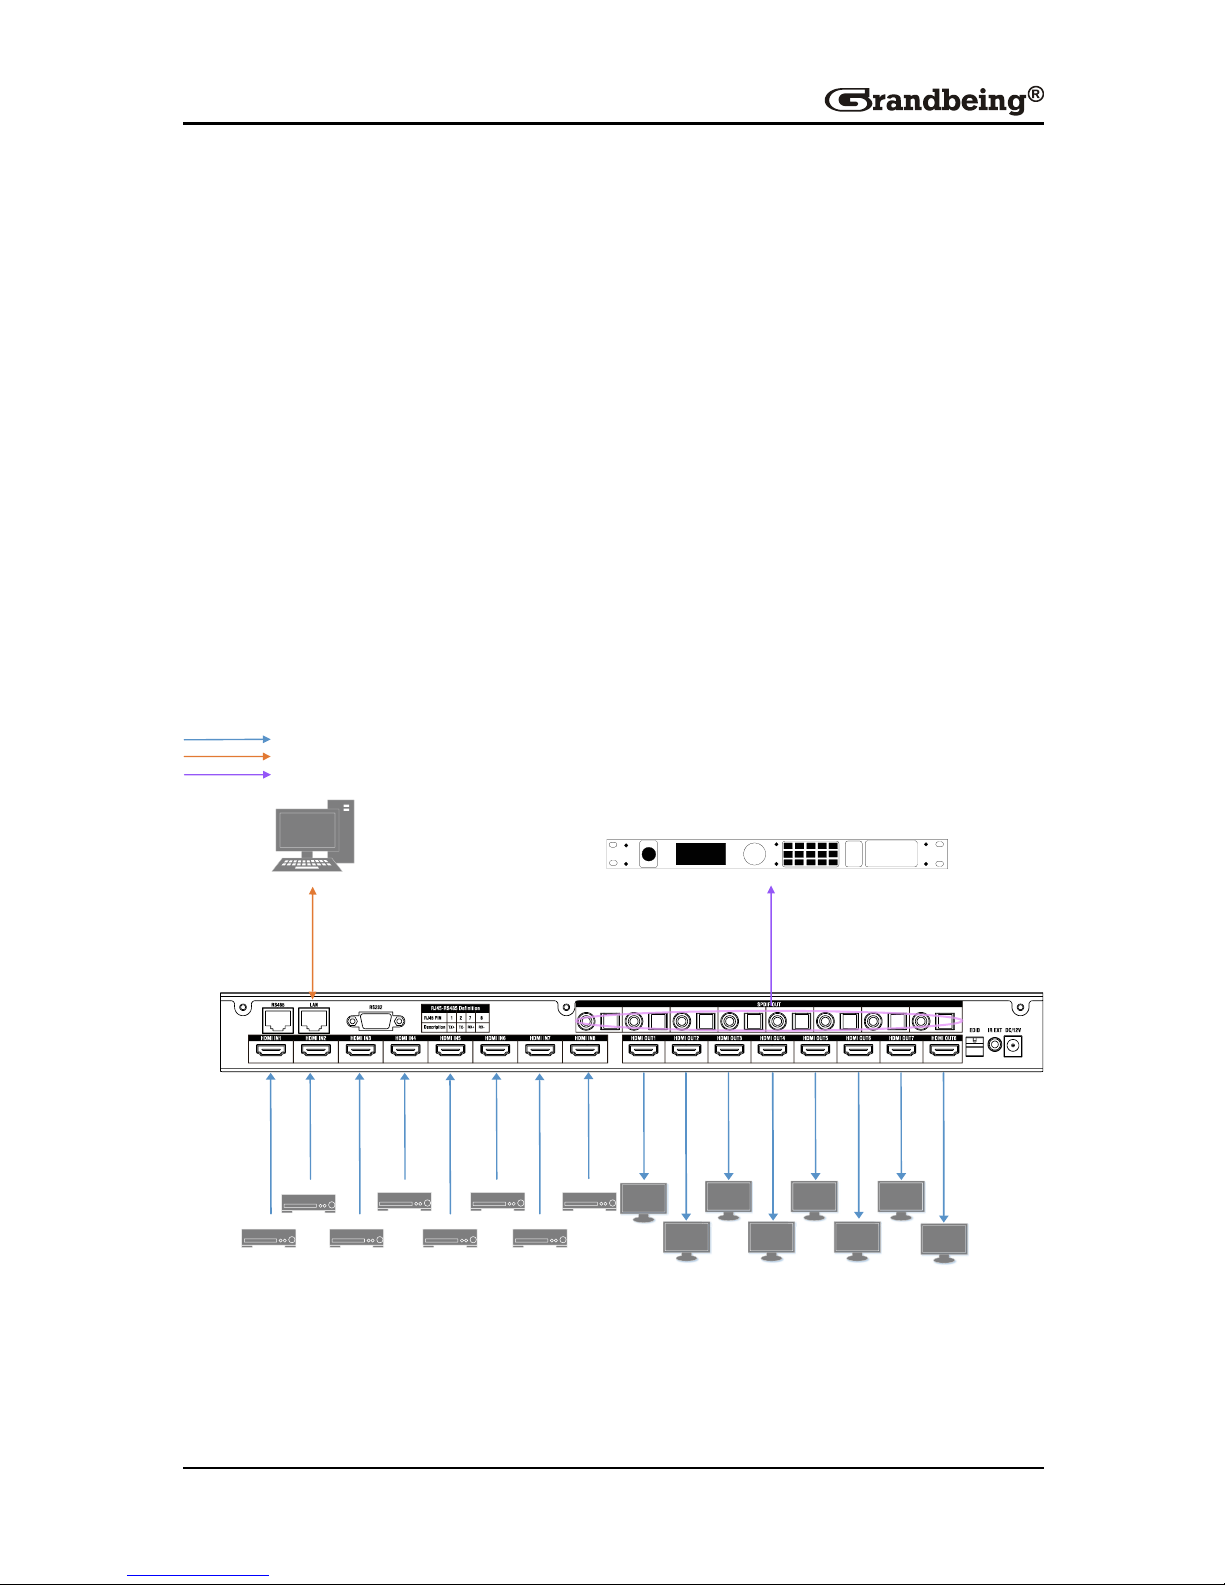
1. Connect HDMI source (such as a DVD player) to the
MX0808-1011-001.
2. Connect HDMI sink to MX0808-1011-001.
3. Connect AV receiver to Audio Output of MX0808-1011-001.
4. Connect the IR receiver to MX0808-1011-001 IR EXT ports.
5. Power on all the devices.
6. Use the remote to control the matrix, or using front panel, RS232, RS485
and LAN port to control.
TV
TV
TV
TV
TV
TV
TV
TV
DVD Player
DVD P l ayer
DVD Player
DVD Player
DVD Player
DVD P layer
DVD Player
DVD Player
PC
AV Receiver
HDMI
Ethernet
Audio
Page 12
10
Operation
Front Panel
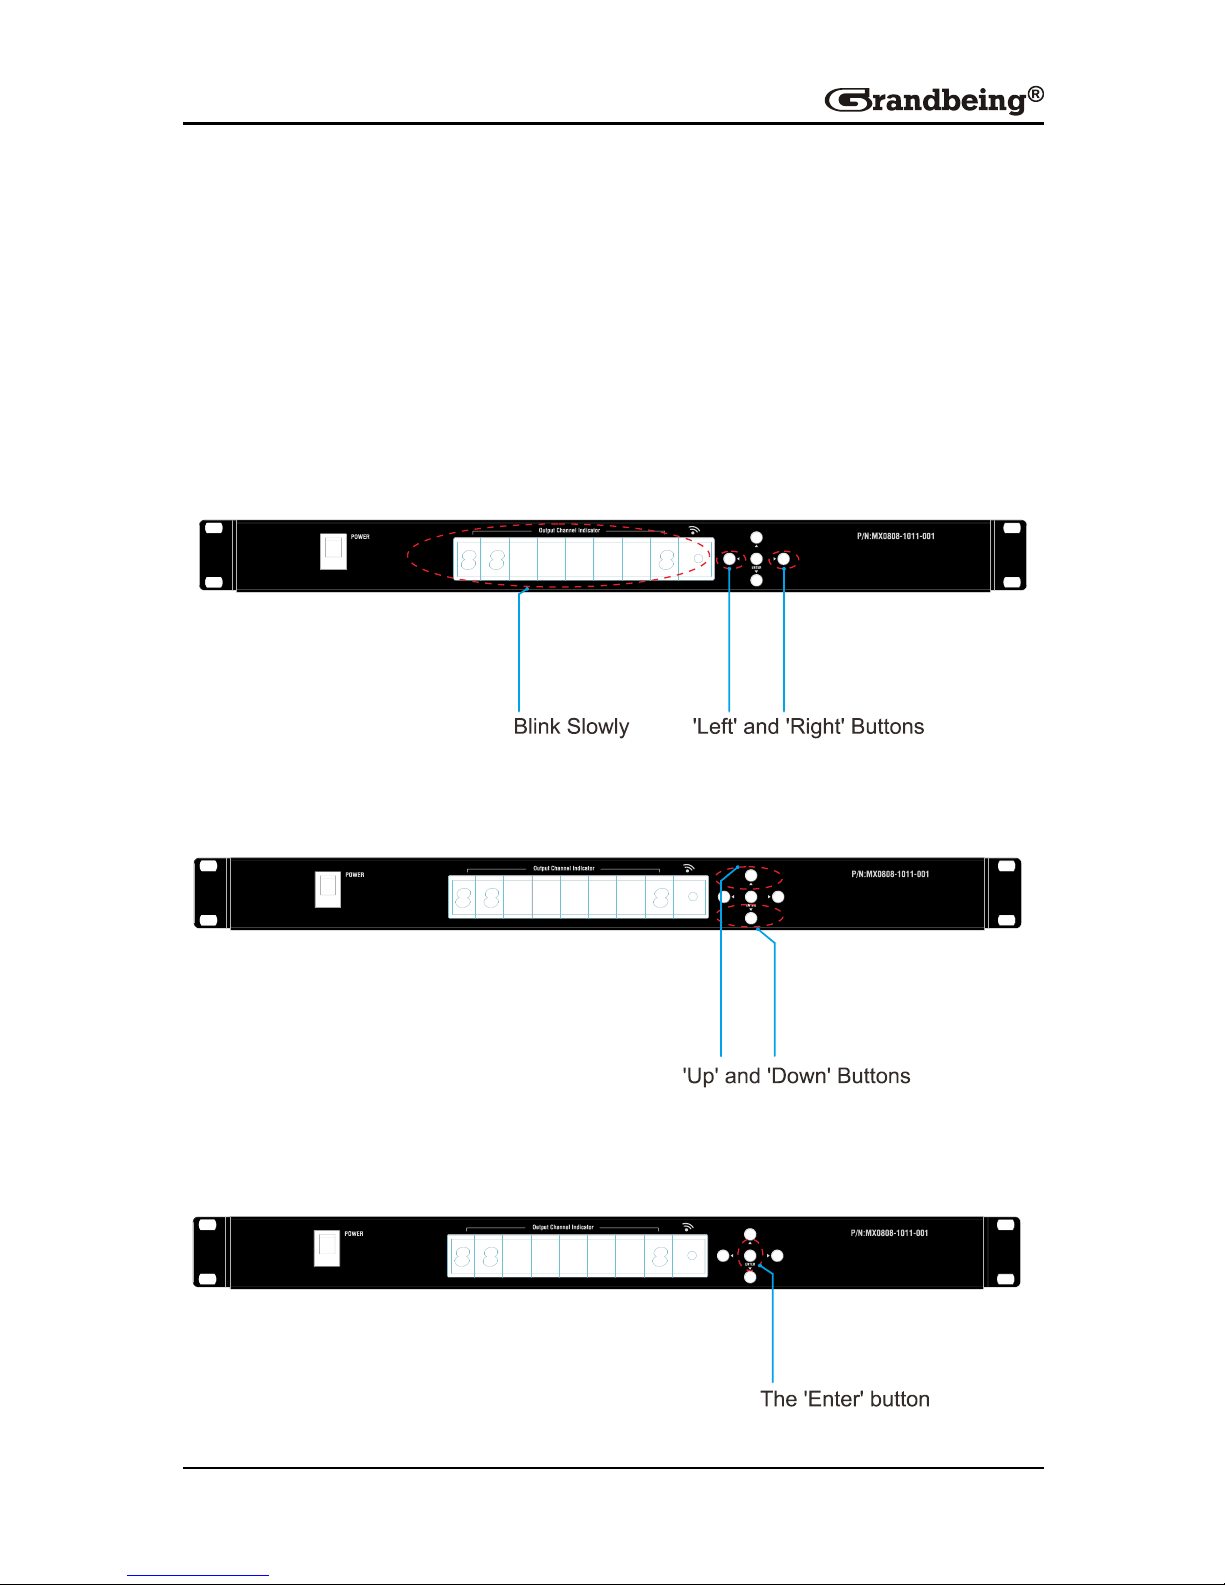
The HDMI matrix can be manually controlled by using push buttons on its
front panel.
Step 1. Press the Left or Right button to select output channel, the
corresponding LED of the output channel will blink slowly.
Step 2. Press up or down button to choose the desired input channel.
Step 3. Press the Enter button to confirm the action. The LED stops blinking.
Page 13
11
Remote Control
The HDMI matrix can be controlled by a remote as well.
Basic Remote Control
Remote Control at the Matrix end (locally)
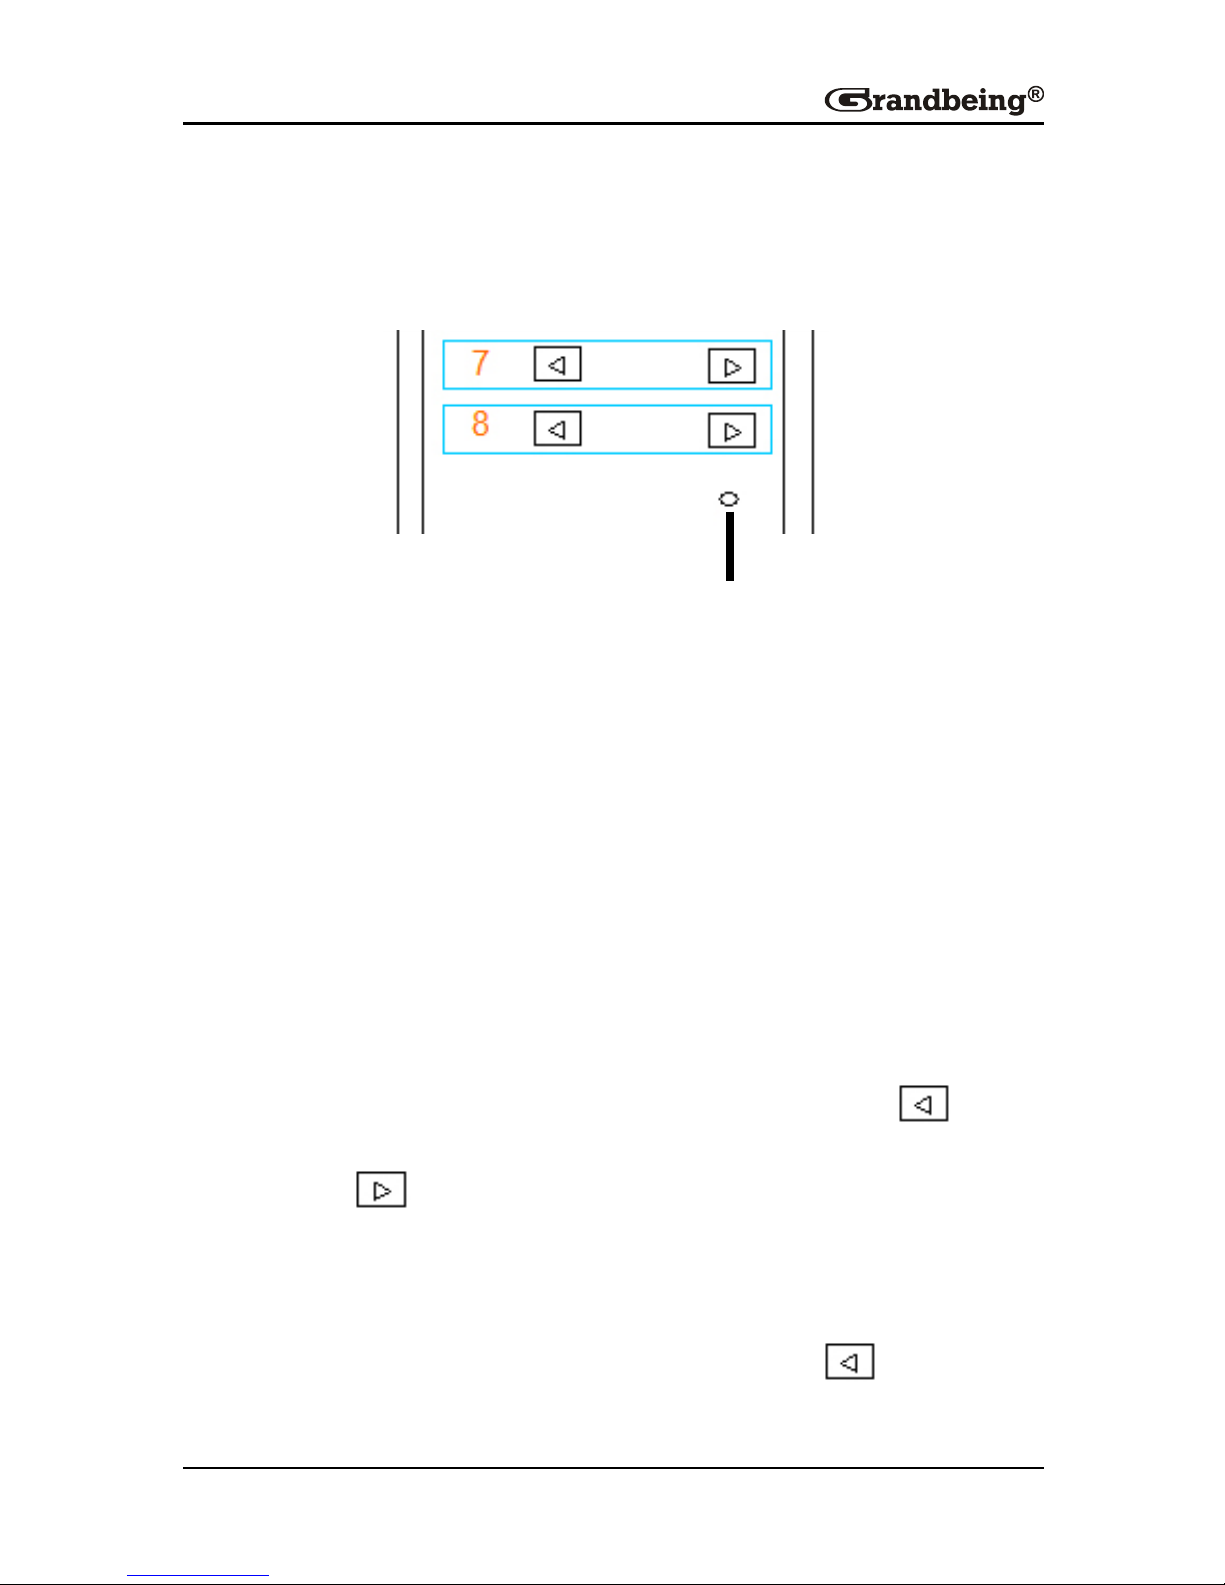
Previous/next buttons
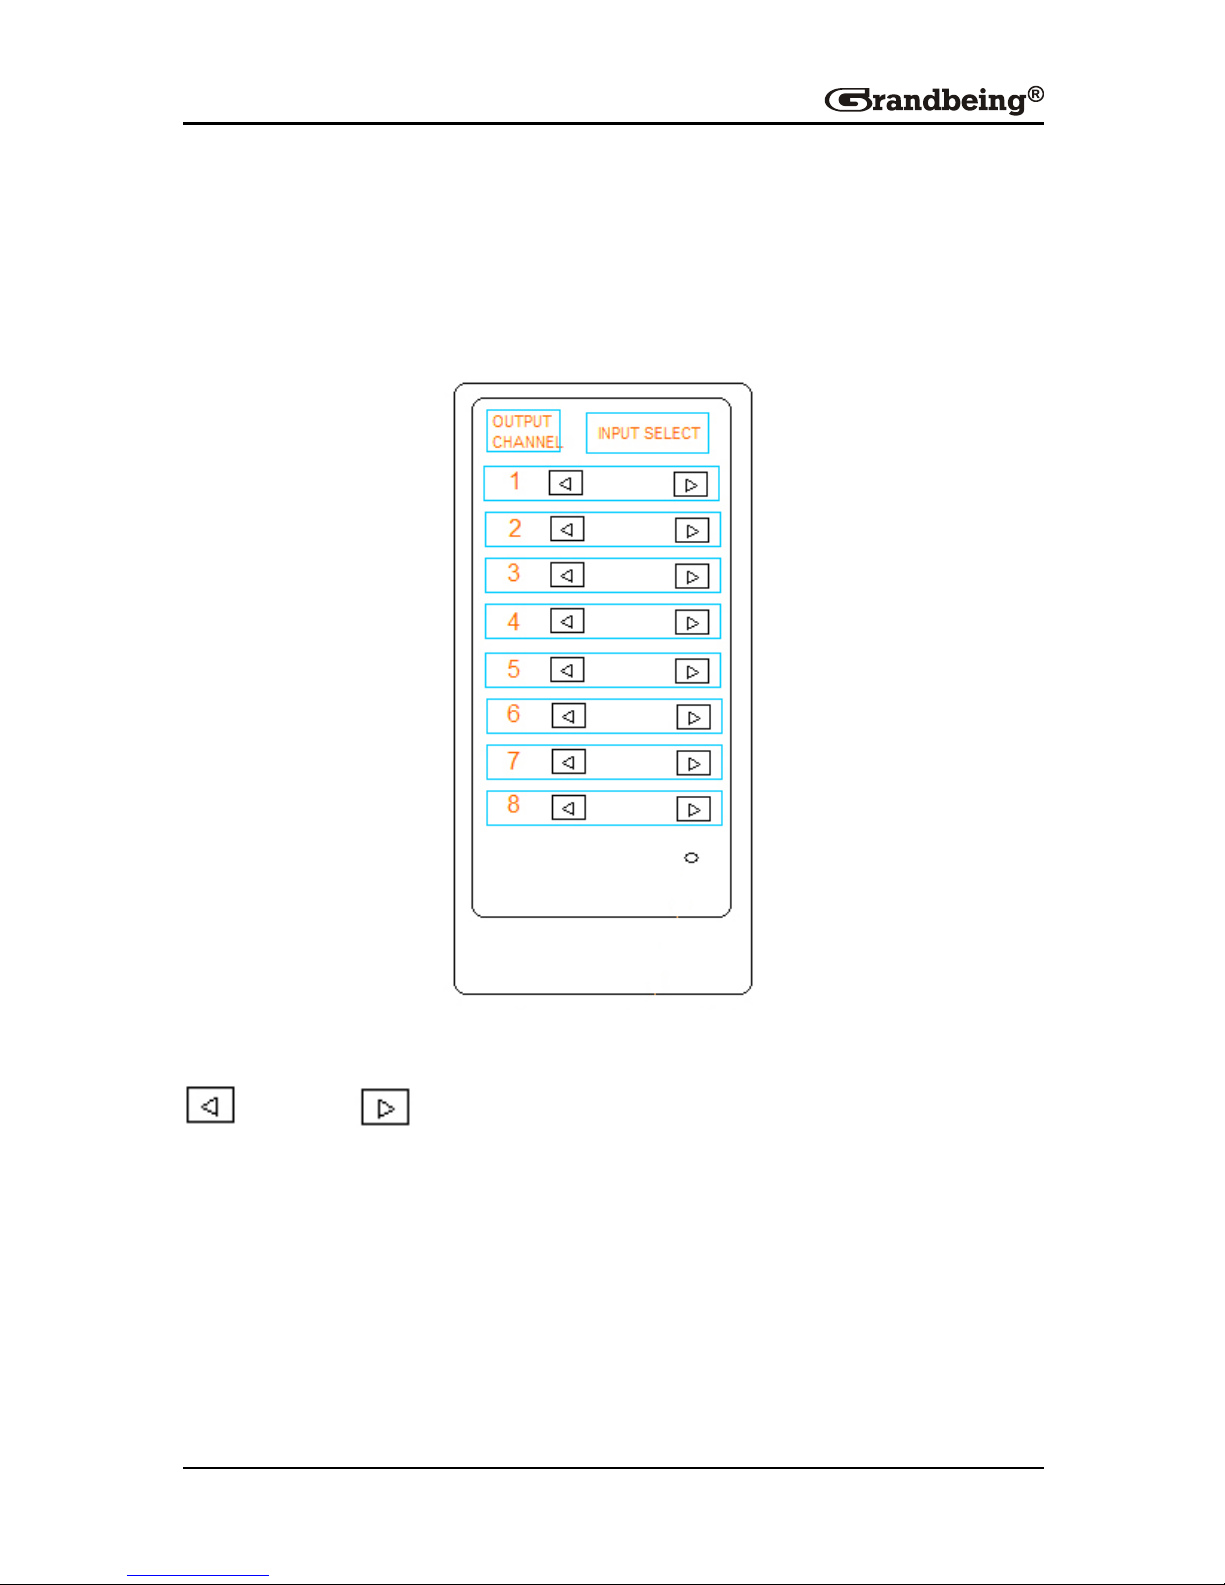
When using the remote control locally, i.e., pointed directly at the matrix, the
previous/next buttons are used to scroll between the input sources connected
to the matrix for each individual output display. For example, using the
previous/next button for 1 allows you to select the source to be set to display
1 manually. See below.
Page 14
12
Matrix System Code Switch
In the event that two MX0808-1011-001 units are used side by side in the
rack, the matrix is capable of switching between two distinct IR System
Codes to allow control of either matrix individually via the handset.
System Code Switch
The default System setting is 0x00 but pressing the SYSTEM CODE button
on the handset THREE TIMES rapidly activates the alternative Matrix
SYSTEM CODE 0x4e, allowing control of the second unit. Pressing the
button three times again to revert back to 0x00 setting.
Note: changing the System Code is only necessary if you are using two
identical units within close range of the IR signal. If using in different parts of
the same room it is likely that you will not need to change the setting.
Remote control at the Display end (remotely)
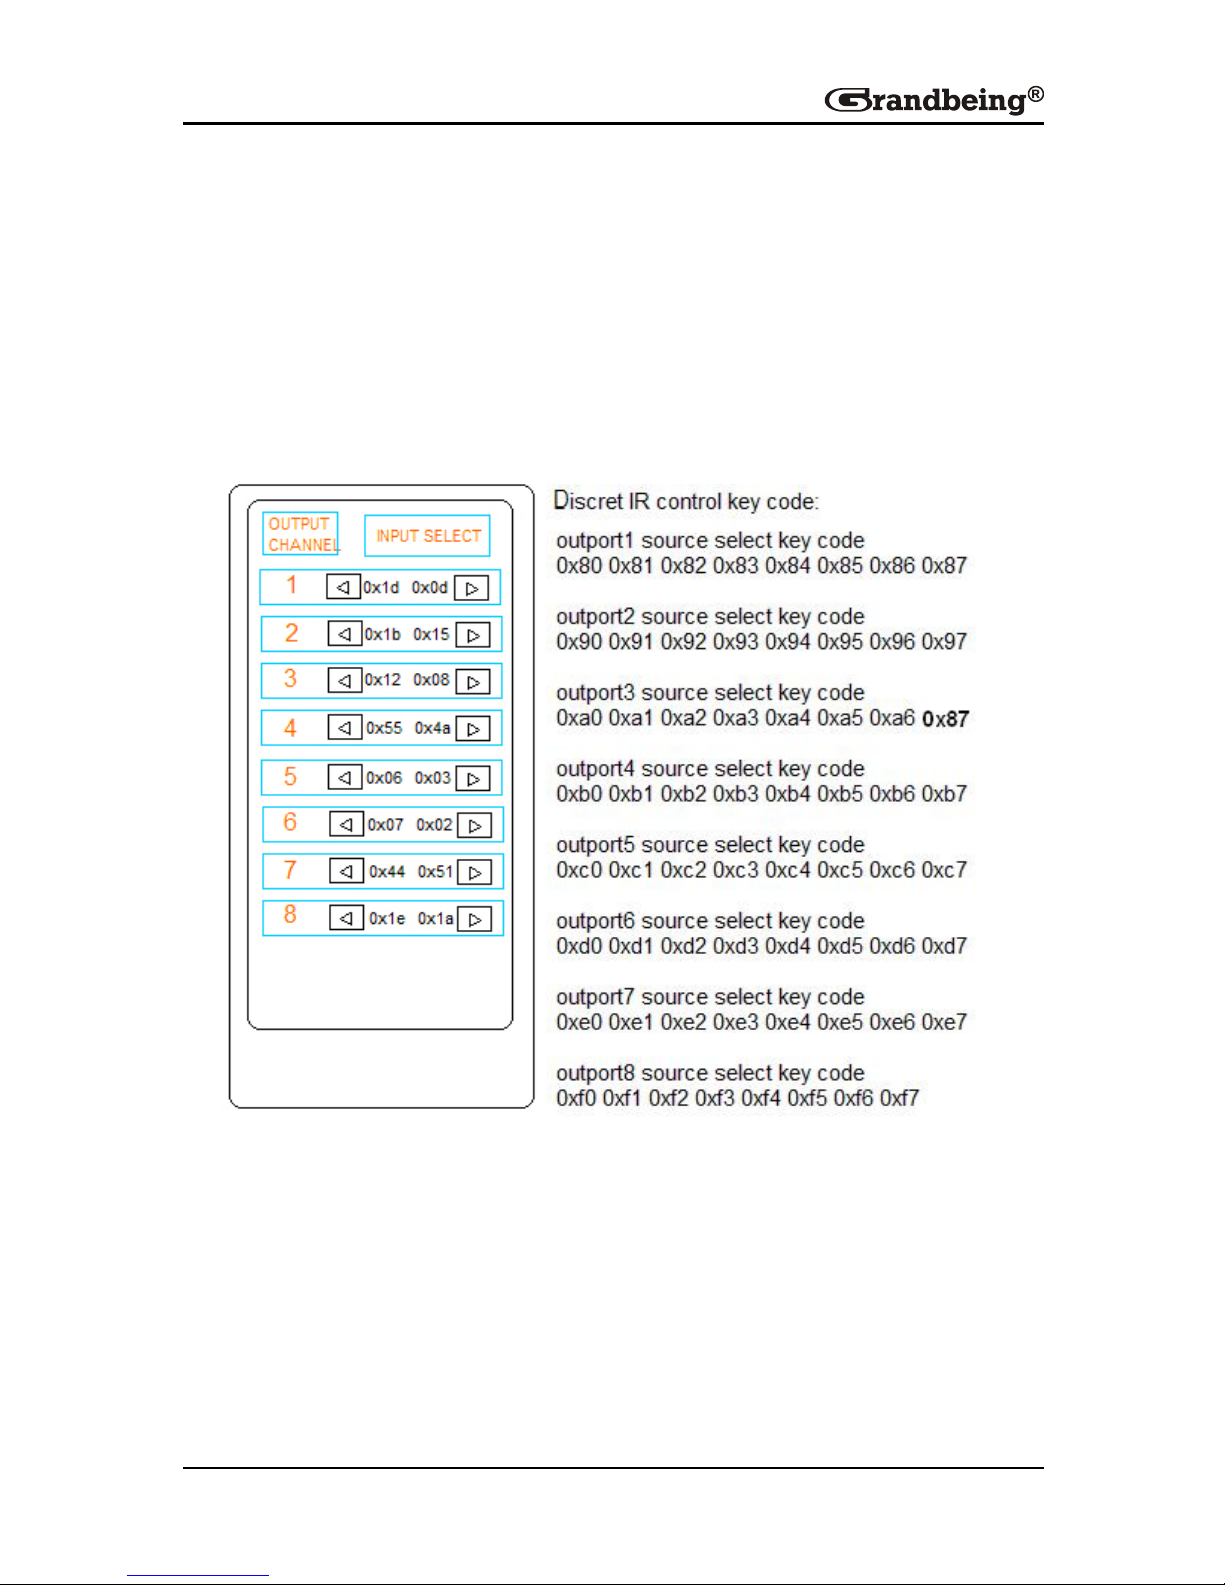
When controlling the matrix remotely from the display side, the matrix
automatically detects which particular output location the user is in and only
allows the selection of sources 1-8 for that location using the button.
The right hand button will be deactivated.
For example. If you are in the Master Bedroom with a display connected to
output 3 of the matrix, the output zone is automatically detected so options
1-8 will correspond to sources 1-8 on the matrix. Press 1-8 to scroll
through your options as you would channels on a regular TV remote.
Page 15
13
Advanced Remote Control
Please note, due to different method of control based on location, if you are
using a third party control system, learning the control from the IR is not
recommended as control will be limited to scrolling up/down between inputs.
For reference: the IR is NEC and possesses a carrier wave of 38 KHz with a
system code of 0x00.
Page 16
14
RS232 Control
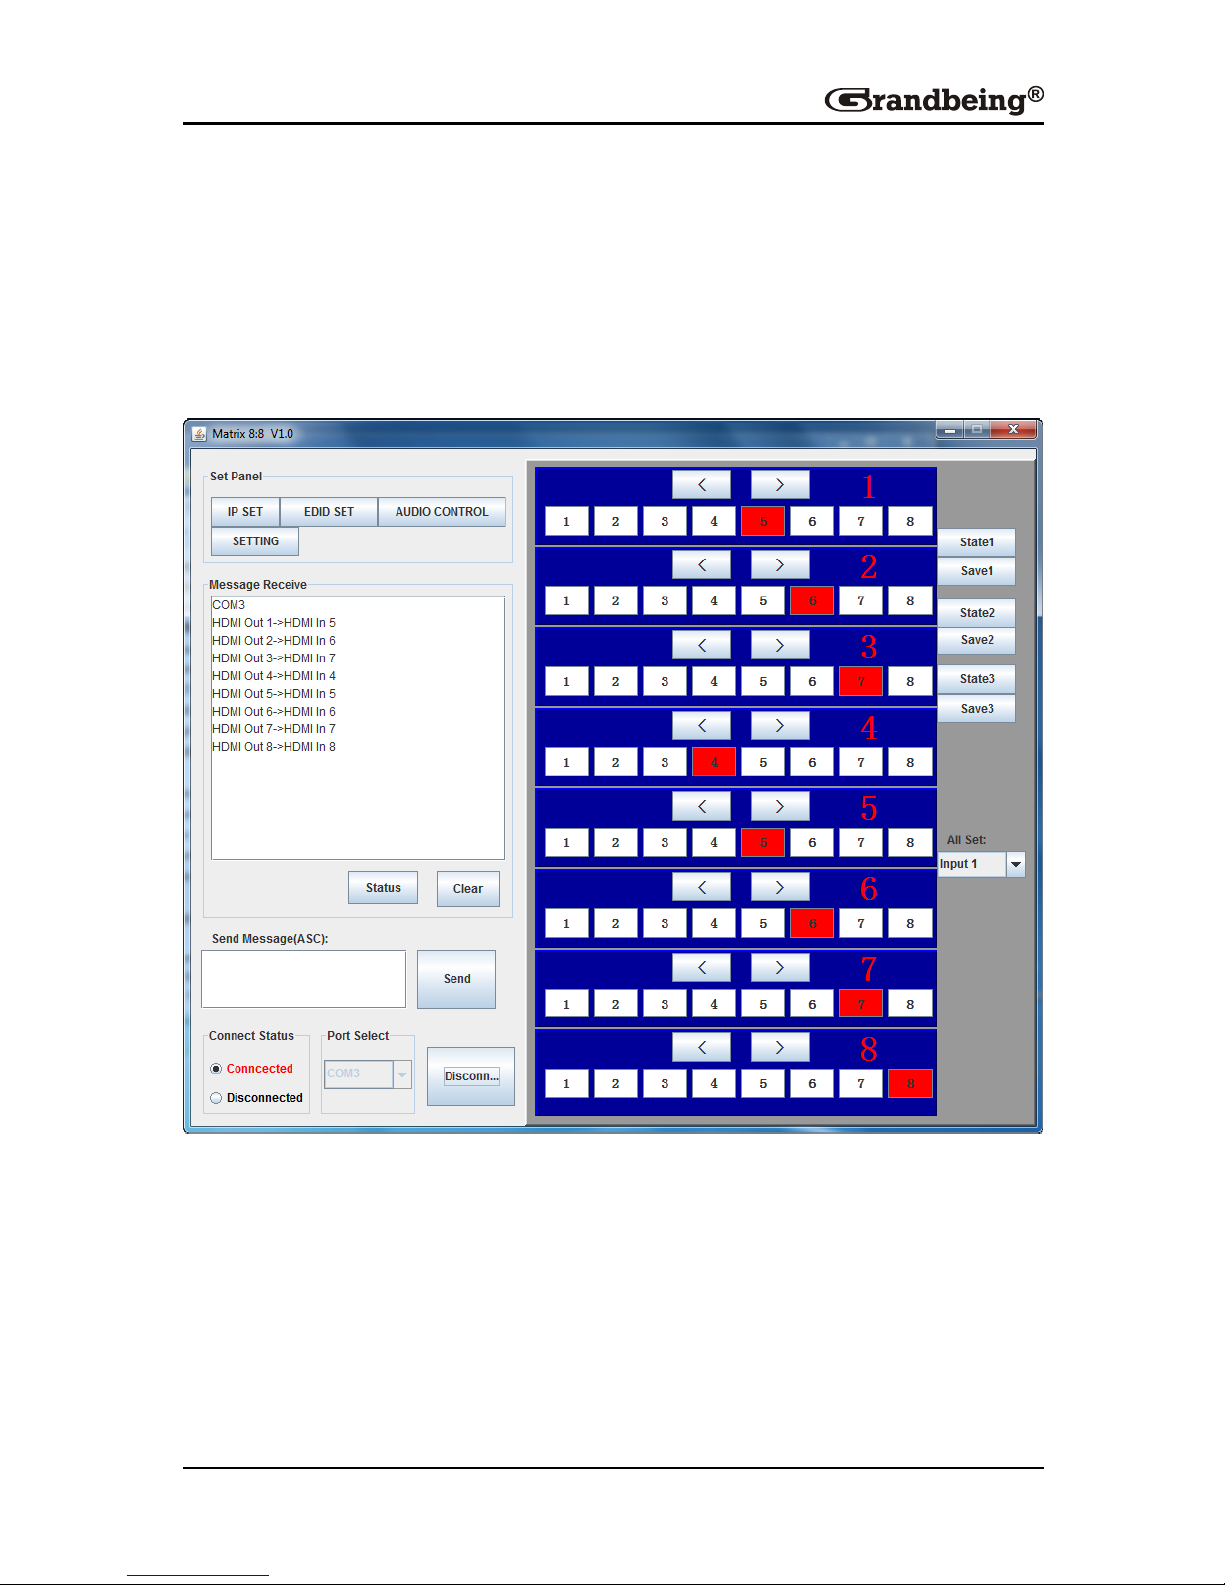
You can also control the matrix using the COM CTL software provided on the
disk included with your unit. This software offers further information on the
status of the system and greater control of settings.
The following figure shows COM CTL interface:
Page 17
15
Set Panel
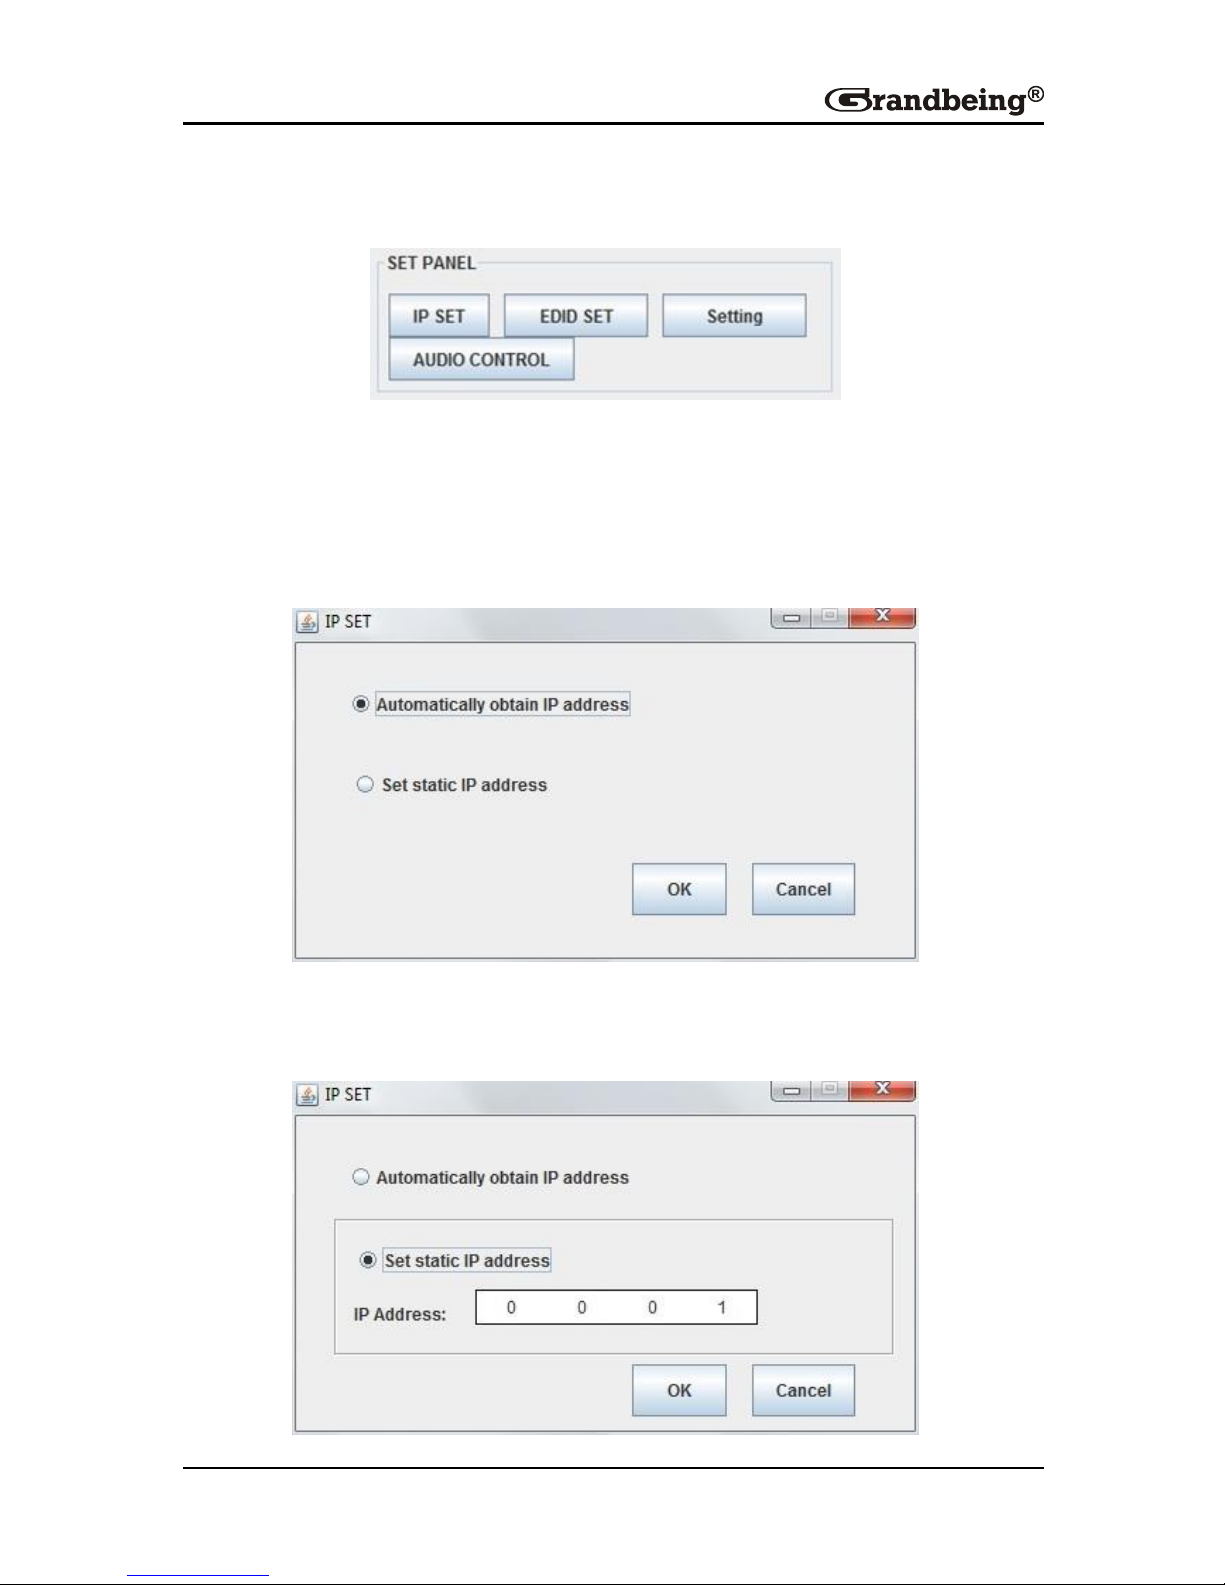
IP SET
Pressing this button, it gives access to IP functions to obtain and store IP
address.
Automatically obtain IP address is selected by default.
Or select Set static IP address to manually input the IP address, press OK
to store the IP address or Cancel to exit.
Page 18
16
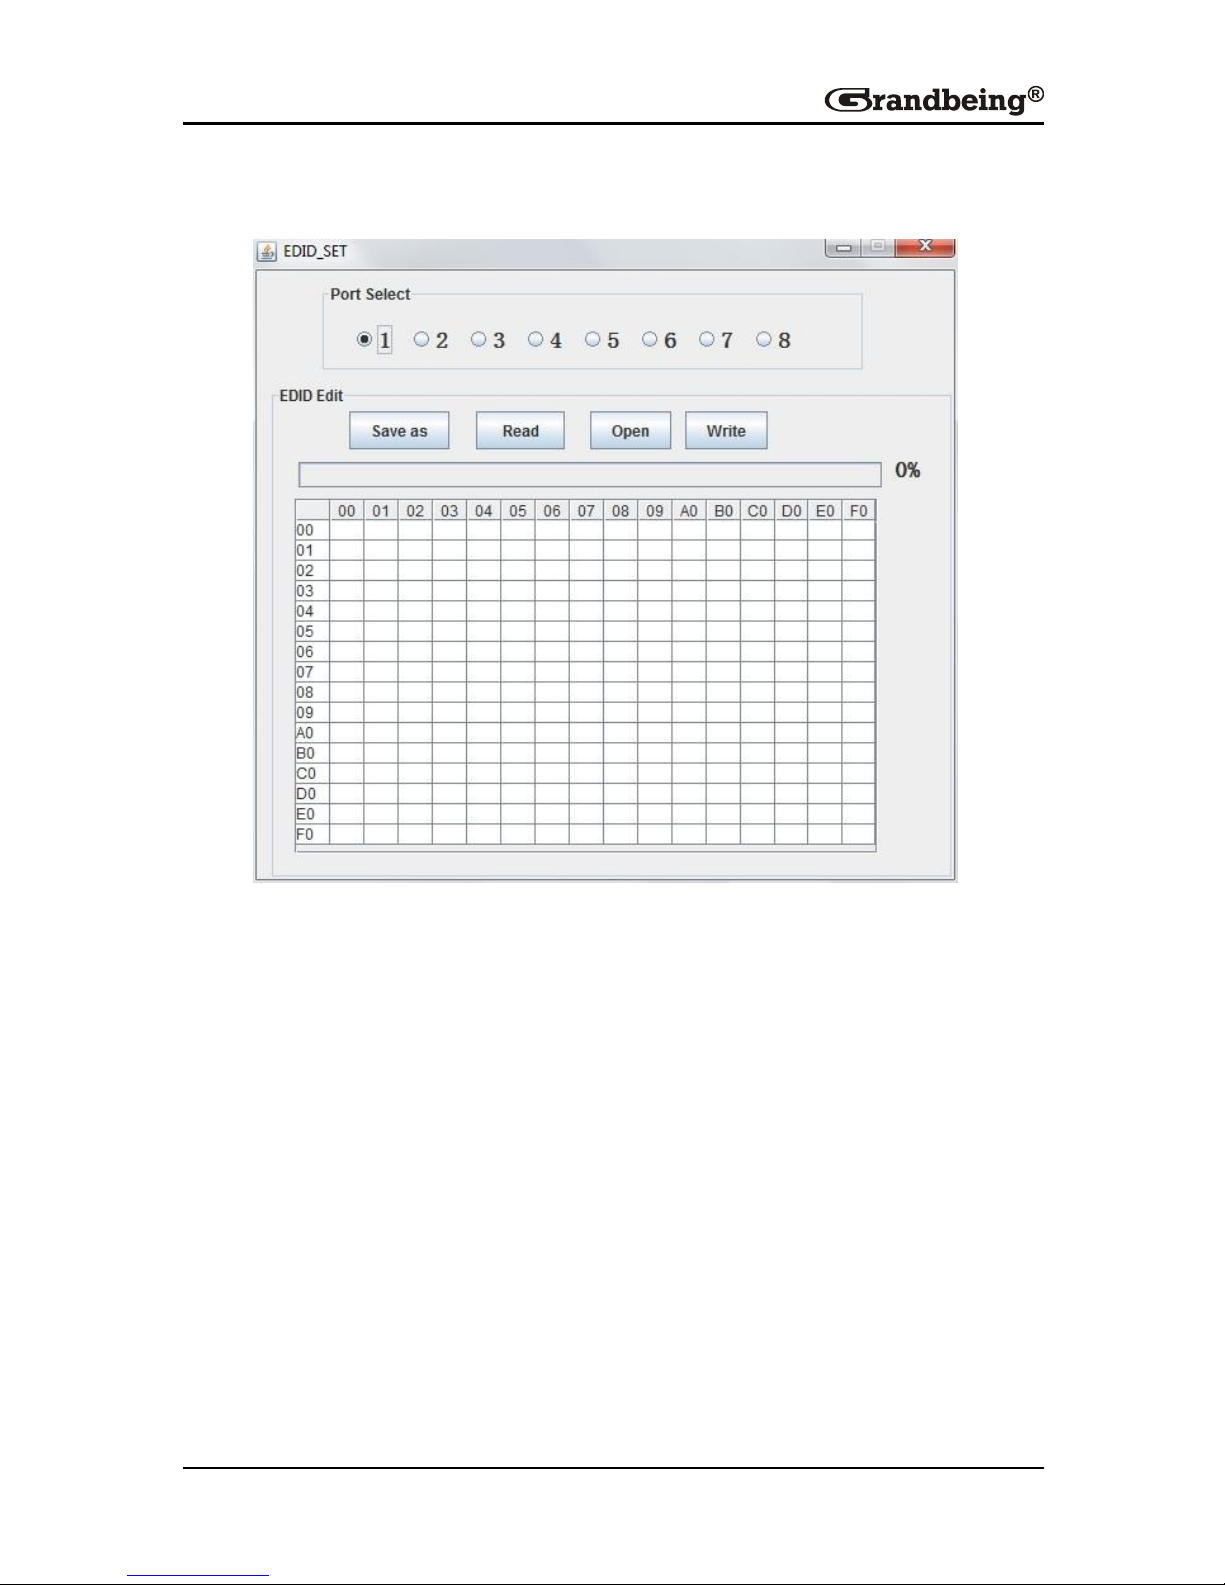
EDID SET
It allows user access to EDID settings that can be read, saved and recalled.
Step1. Select your output port in Port Select column.
Step2. Press Read to read EDID from the selected output port. The status
bar shows the progress.
Step3. Once completed, the EDID appears in the table bellowed.
Step4. Then select your input port and press Write to send the EDID to your
input.
Step5. Press Save as to save the EDID as a BIN file.
To write the EDID you previous saved, you can press Open to open the EDID,
then select input port, press Write to set EDID of this input port the same as
BIN file.
Page 19
17
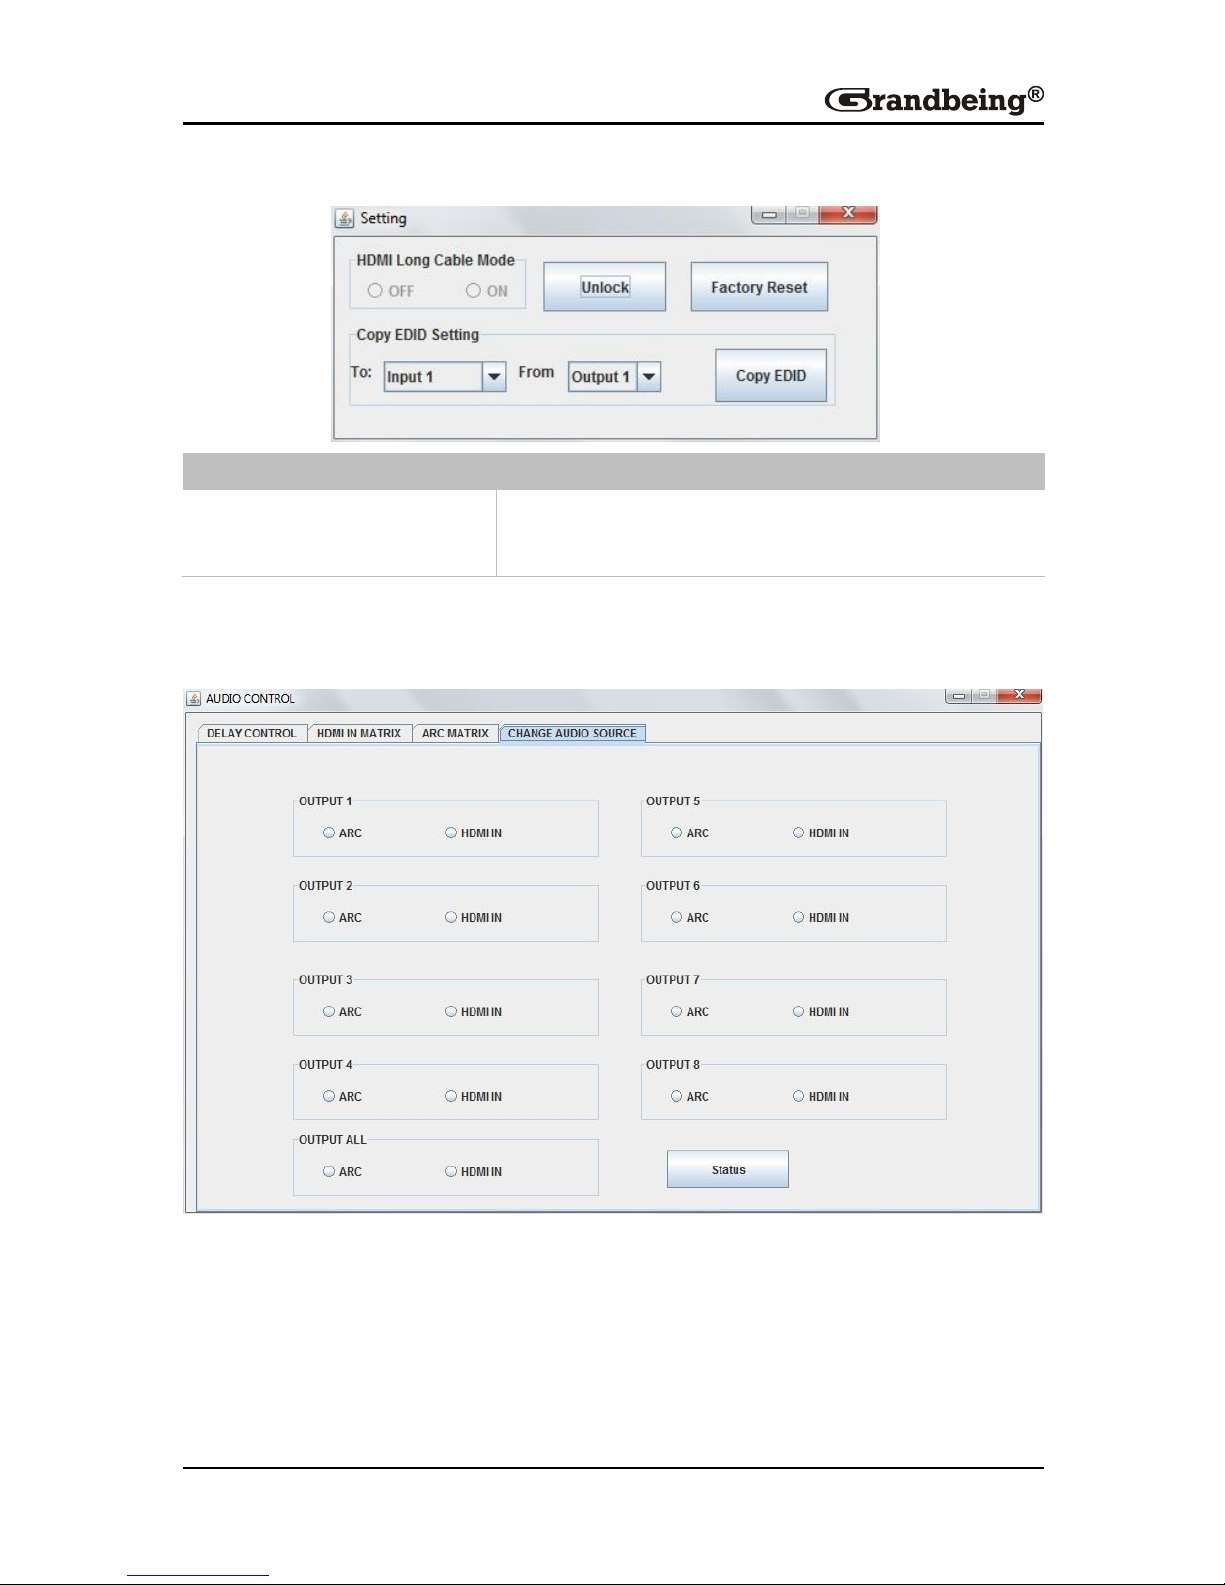
Setting
GUI Element
Description
Copy EDID Setting
Allows EDID to be copied to specific Inputs 1-8
from specific outputs 1-8.
Audio Control
Click CHANGE AUDIO SOURCE to choose the audio source
Page 20
18
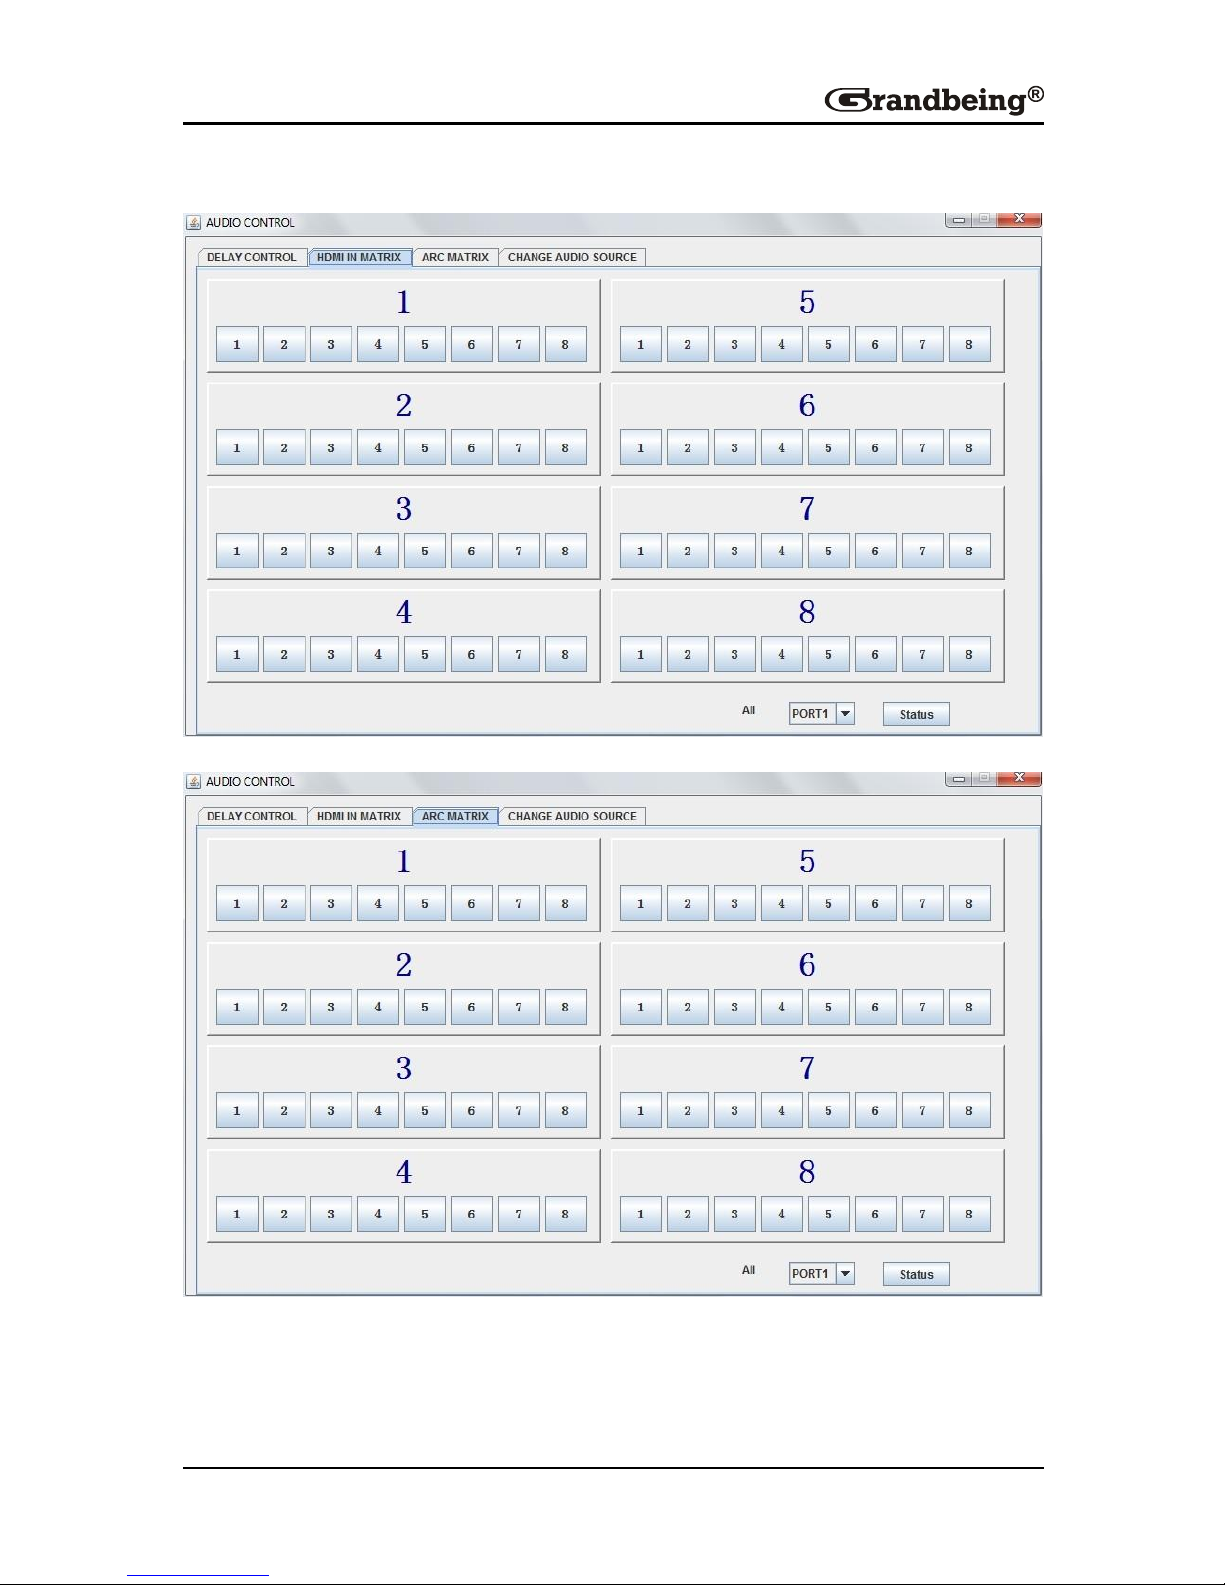
Then go to the corresponding tab to change the settings.
Page 21
19
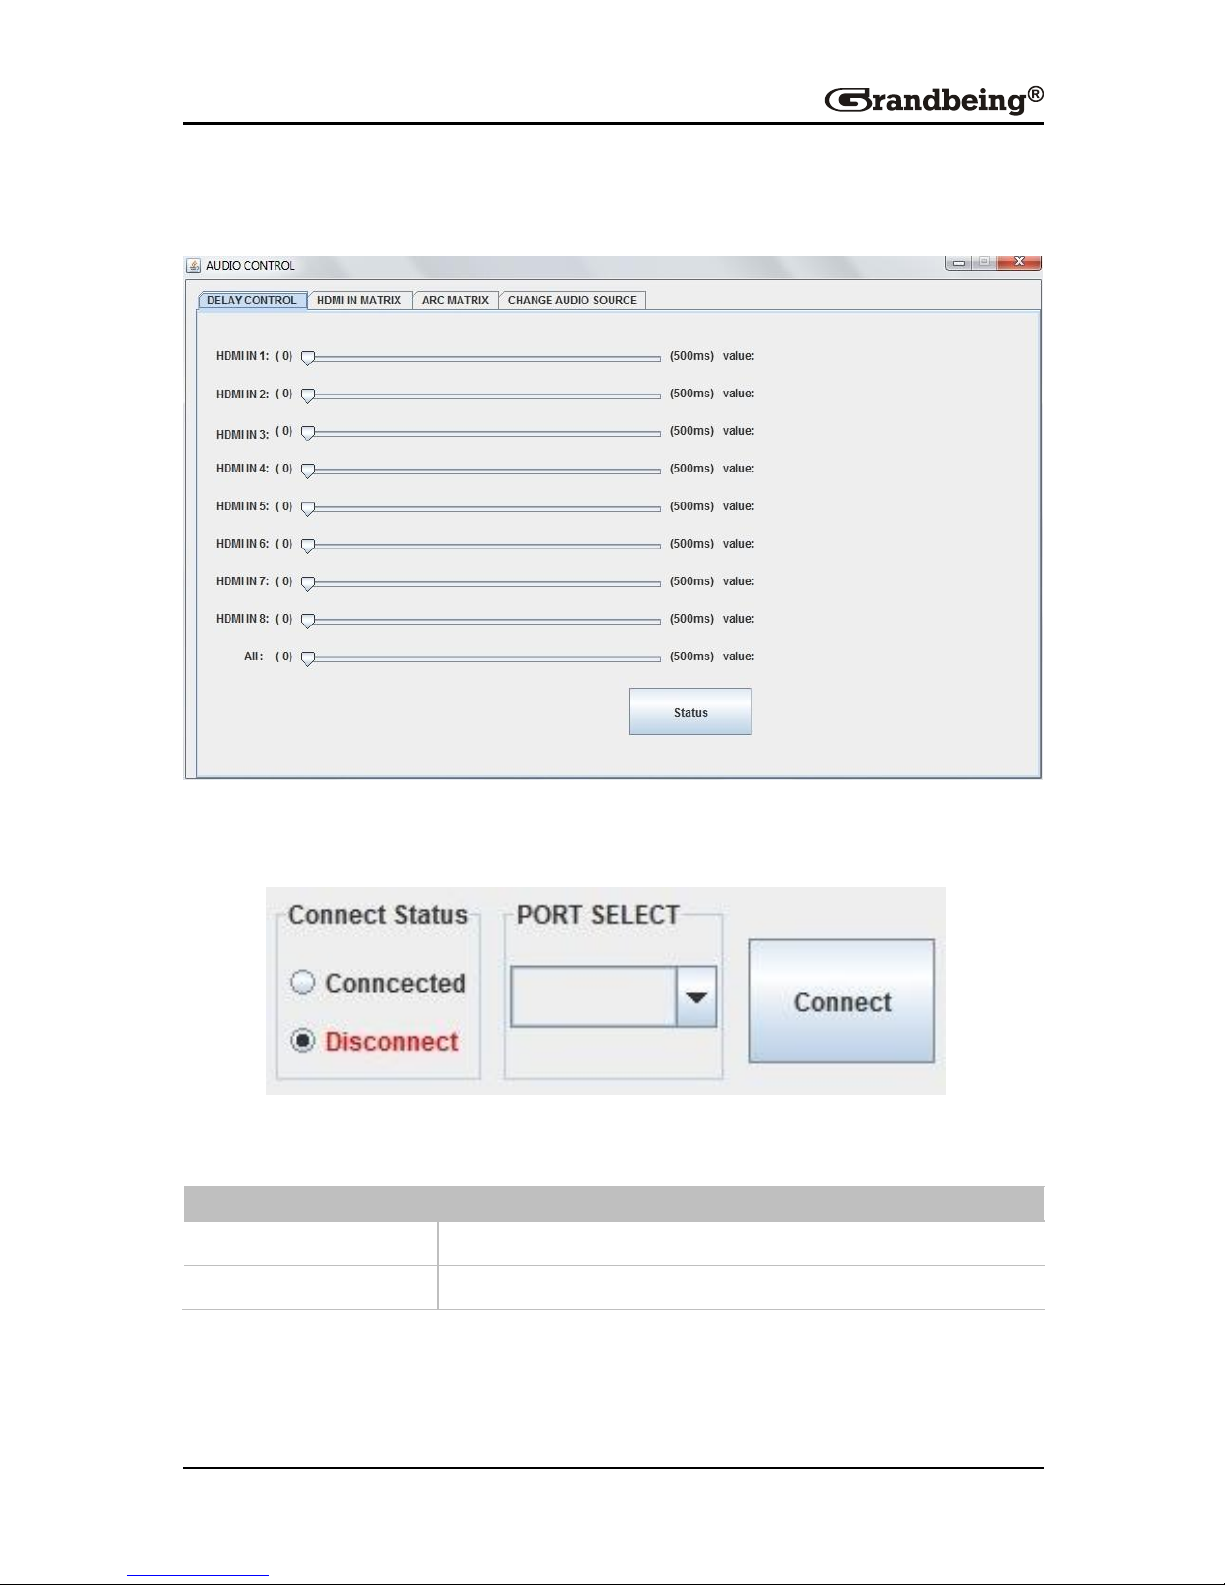
In DELAY CONTROL tab, you can adjust the delay to make the audio
synchronized with the video.
Com Port Connect Status
It shows if the matrix is connected or disconnected to the Com Port. Selection
between ports is available by pressing the PORT SELECT button.
GUI Element
Description
Connected
Matrix communication is enabled.
Disconnected
Matrix communication is disabled.
Page 22
20
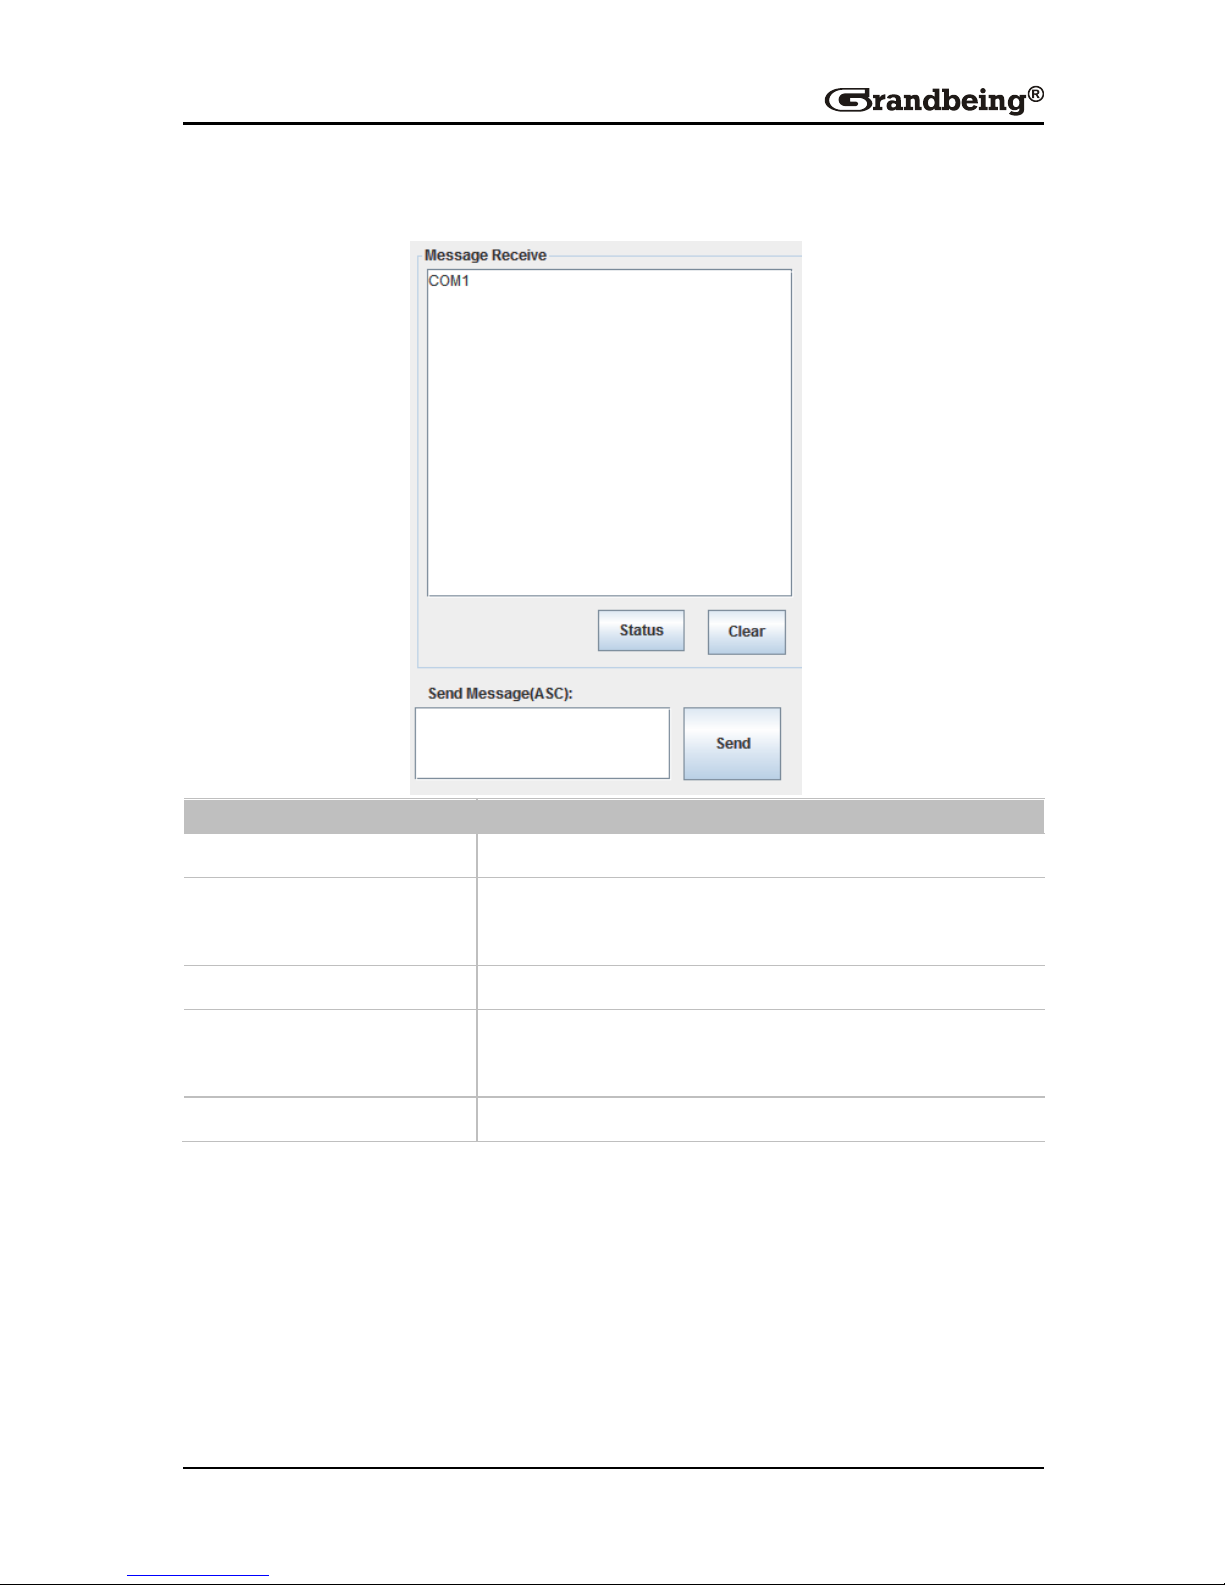
Message Window
GUI Element
Description
Message Receive
Displays information from the matrix.
Status
View the condition of all output ports by pressing
the status button.
Clear
Deletes the previous received message.
Send Message (ASC)
Send commands for matrix control or to enter
update mode.
Send
Click this button to send message to the matrix.
Page 23
21
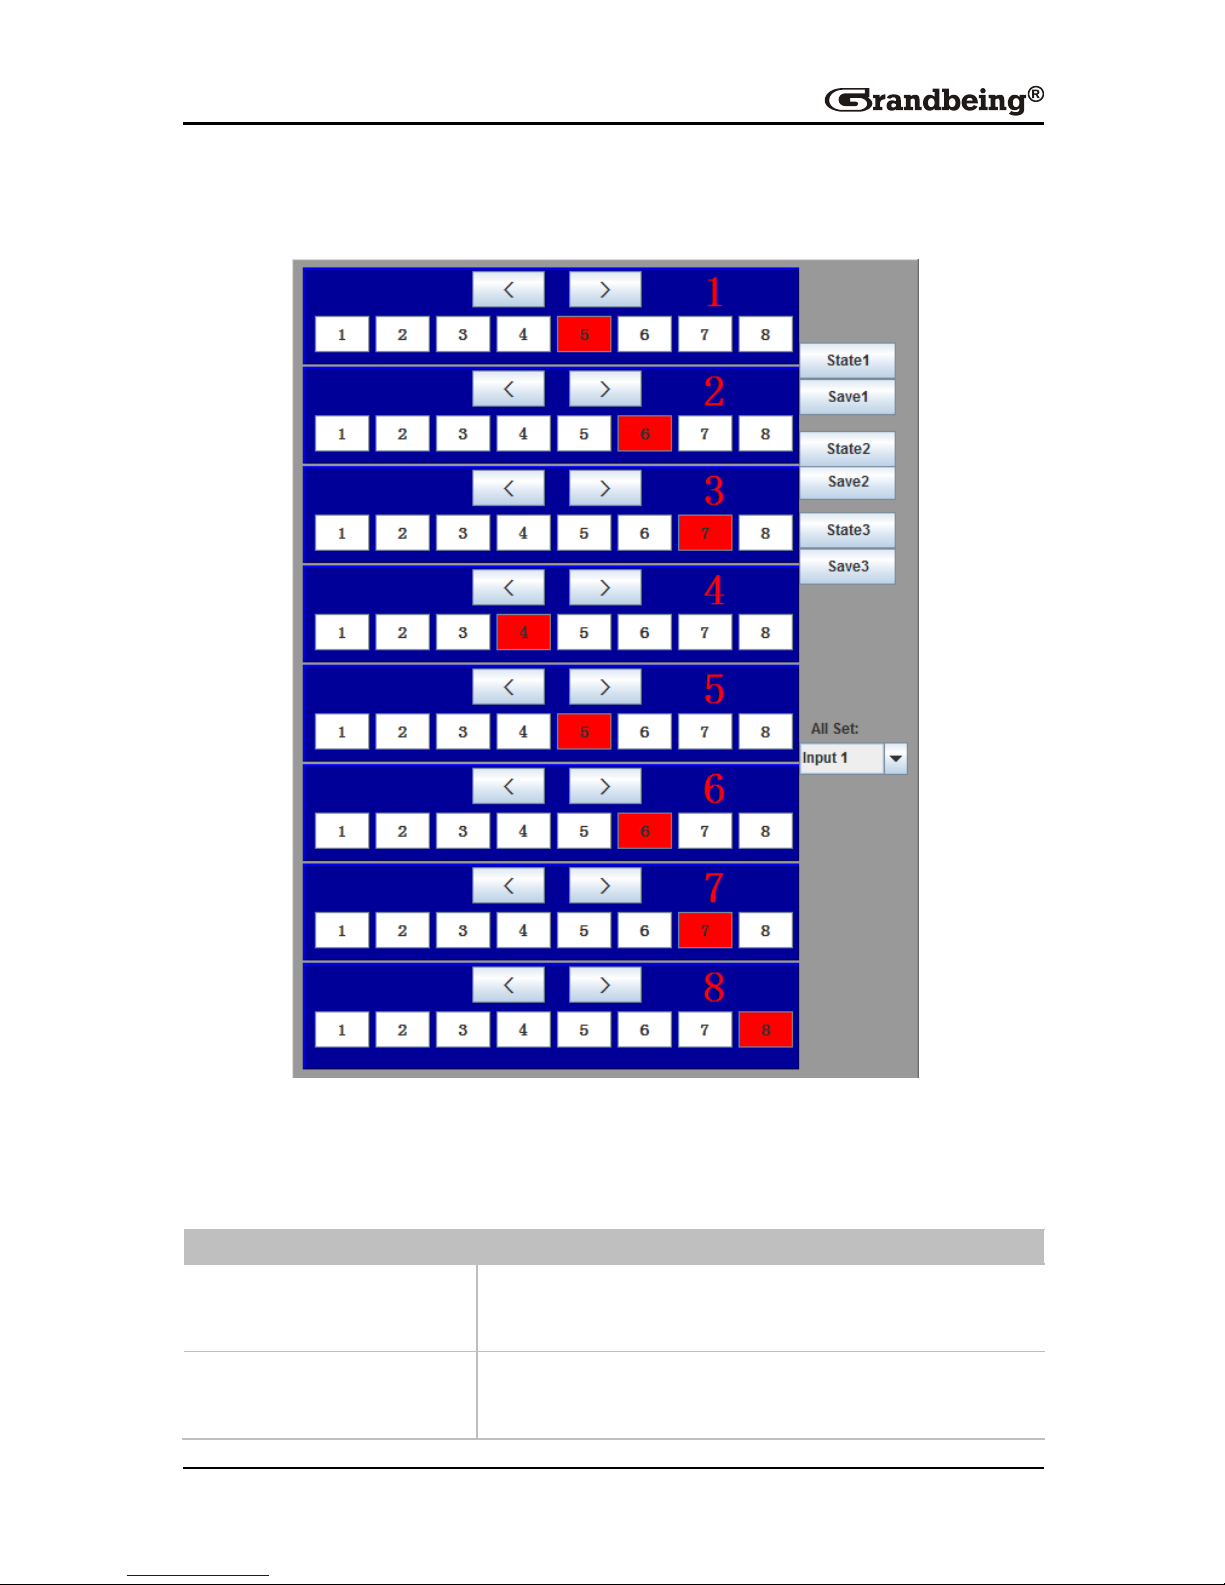
Input/Output Switch
The Input/Output switch allows output port selection (display) and input port
select (source) buttons for specific combinations of displays and sources
within the matrix.
GUI Element
Description
Save 1, Save 2, Save 3
Save your selections by allocating your choices
to save buttons.
State 1, State 2, State 3
Recall previously saved output/input
configurations by pressing State buttons.
Page 24
22
Control Command Format
If users want to use the third-party control software, please see below for
control system configuration.
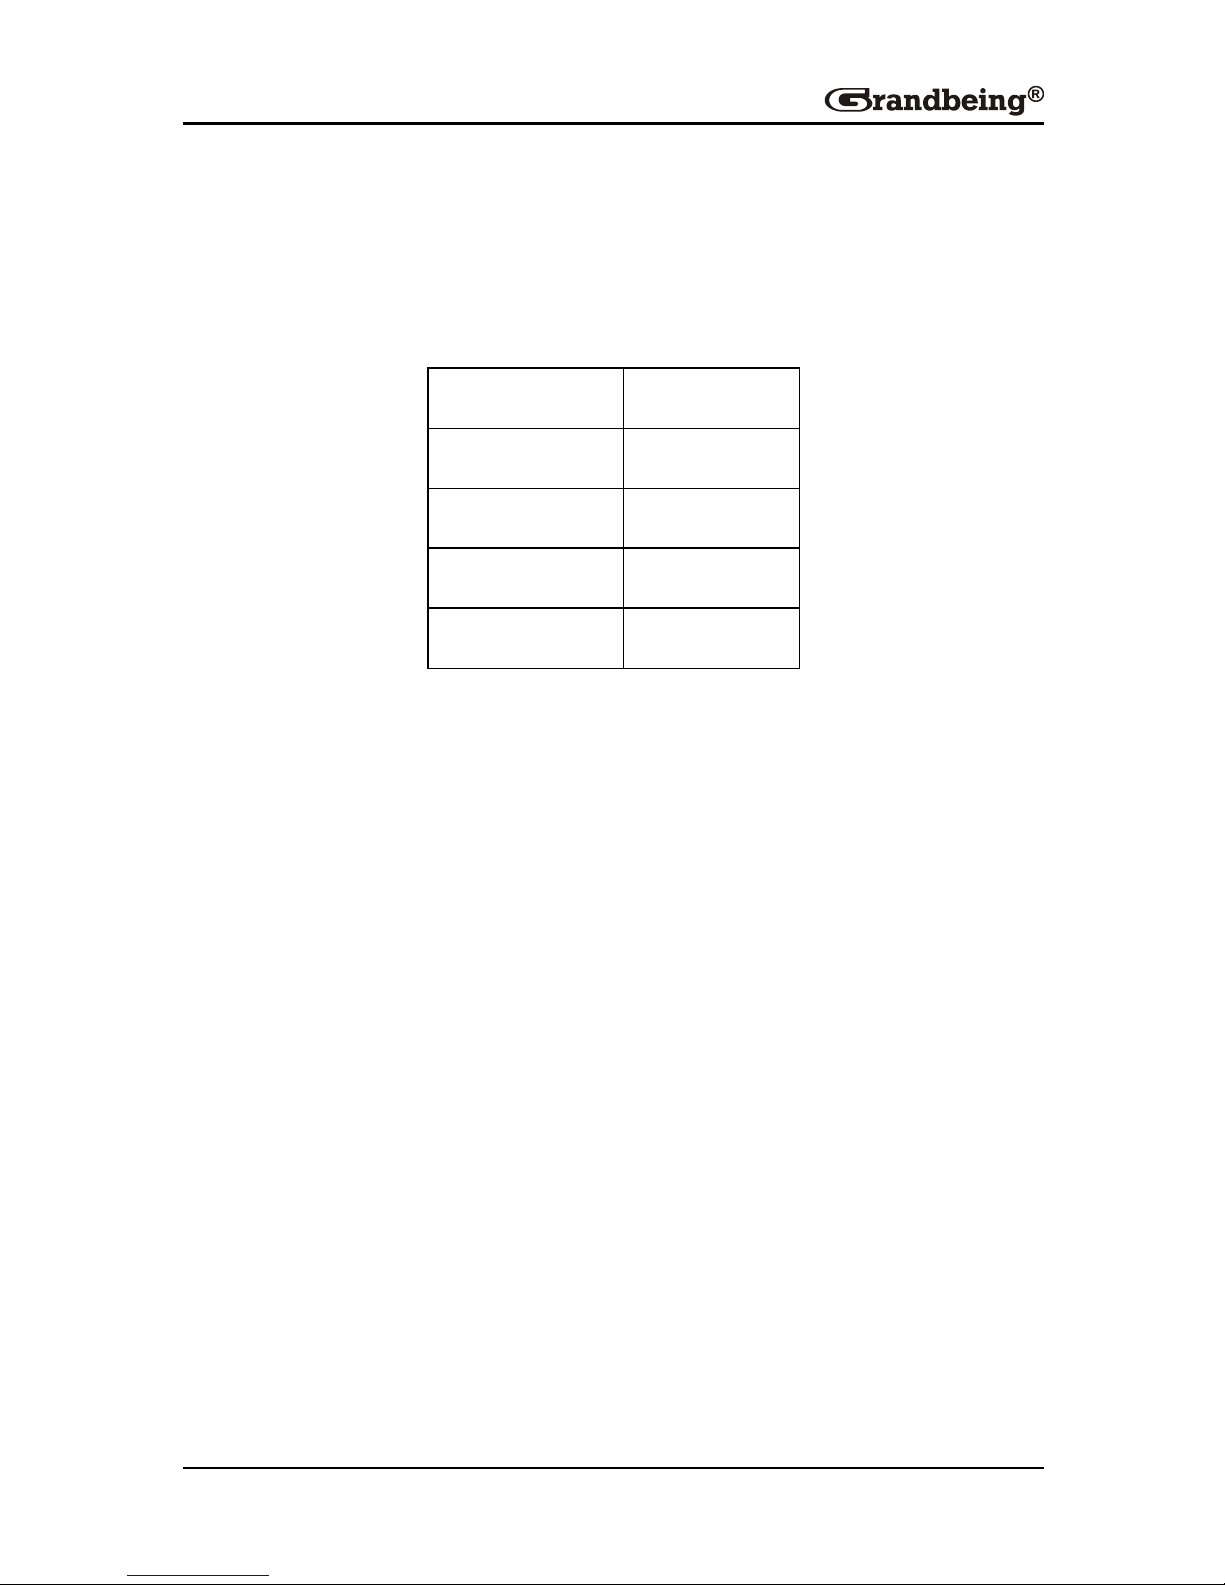
Com port setting:
Baud Rate
9600 bps
Data bits
8 bits
Parity
None
Stop bits
1 bit
Flow control
None
The command format to be put is:
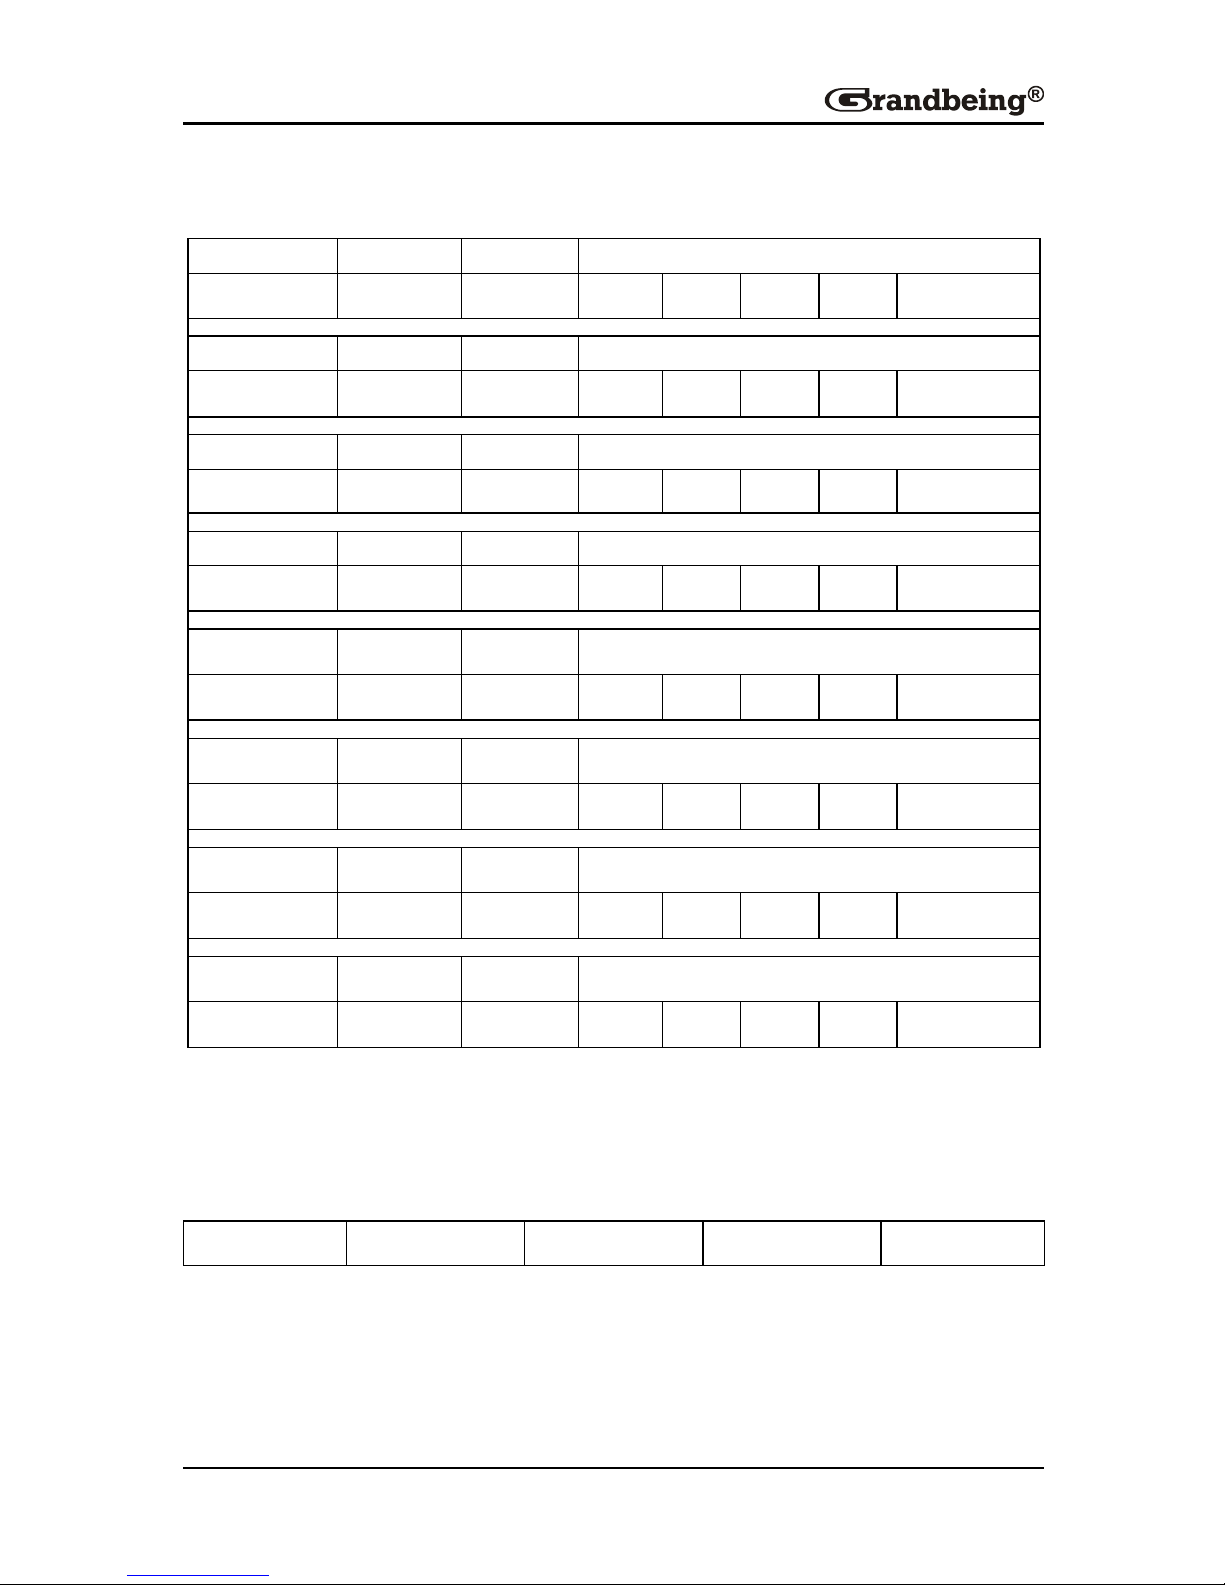
Type “Cir” – followed by a “space” – then the “code number” – and hit the
“enter” key.
For example: Cir 39 + “enter” (hex code: 63 69 72 20 33 39 0D 0A), this
command tells the matrix to select the next input source for output 4.
Page 25
23
Control Source code
Outport1
<“08”
>“09”
1“00”
2“01”
3“02”
4“03”
5“04”
6“05”
7“06”
8“07”
Outport2
< “18”
> “19”
1 “10”
2 “11”
3 “12”
4 “13”
5“14”
6“15”
7“16”
8“17”
Outport3
< “28”
> “29”
1 “20”
2 “21”
3 “22”
4 “23”
5“24”
6“25”
7“26”
8“27”
Outport4
< “38”
> “39”
1 “30”
2 “31”
3 “32”
4 “33”
5“34”
6“35”
7“36”
8“37”
Outport5
<“48”
>“49”
1“40”
2“41”
3“42”
4“43”
5“44”
6“45”
7“46”
8“47”
Outport6
< “58”
> “59”
1 “50”
2 “51”
3“52”
4 “53”
5“54”
6“55”
7“56”
8“57”
Outport7
< “68”
> “69”
1 “60”
2 “61”
3“62”
4 “63”
5“64”
6“65”
7“66”
8“67”
Outport8
< “78”
> “79”
1 “70”
2 “71”
3 “72”
4 “73”
5“74”
6“75”
7“76”
8“77”
If you send a control command to this device successfully, the current output
state selected will feedback to show the input port selected. The following
table shows the return status format:
s
X1
X2
‘\r’
‘\n’
For example, send Cir 51 “enter”, it will feedback “s62”, which means Output
6 selects Input 2.
Page 26
24
Read Status Command
The command length of the read status is 4 bytes. Type “bc” – followed by a
“space” – and hit “enter”.
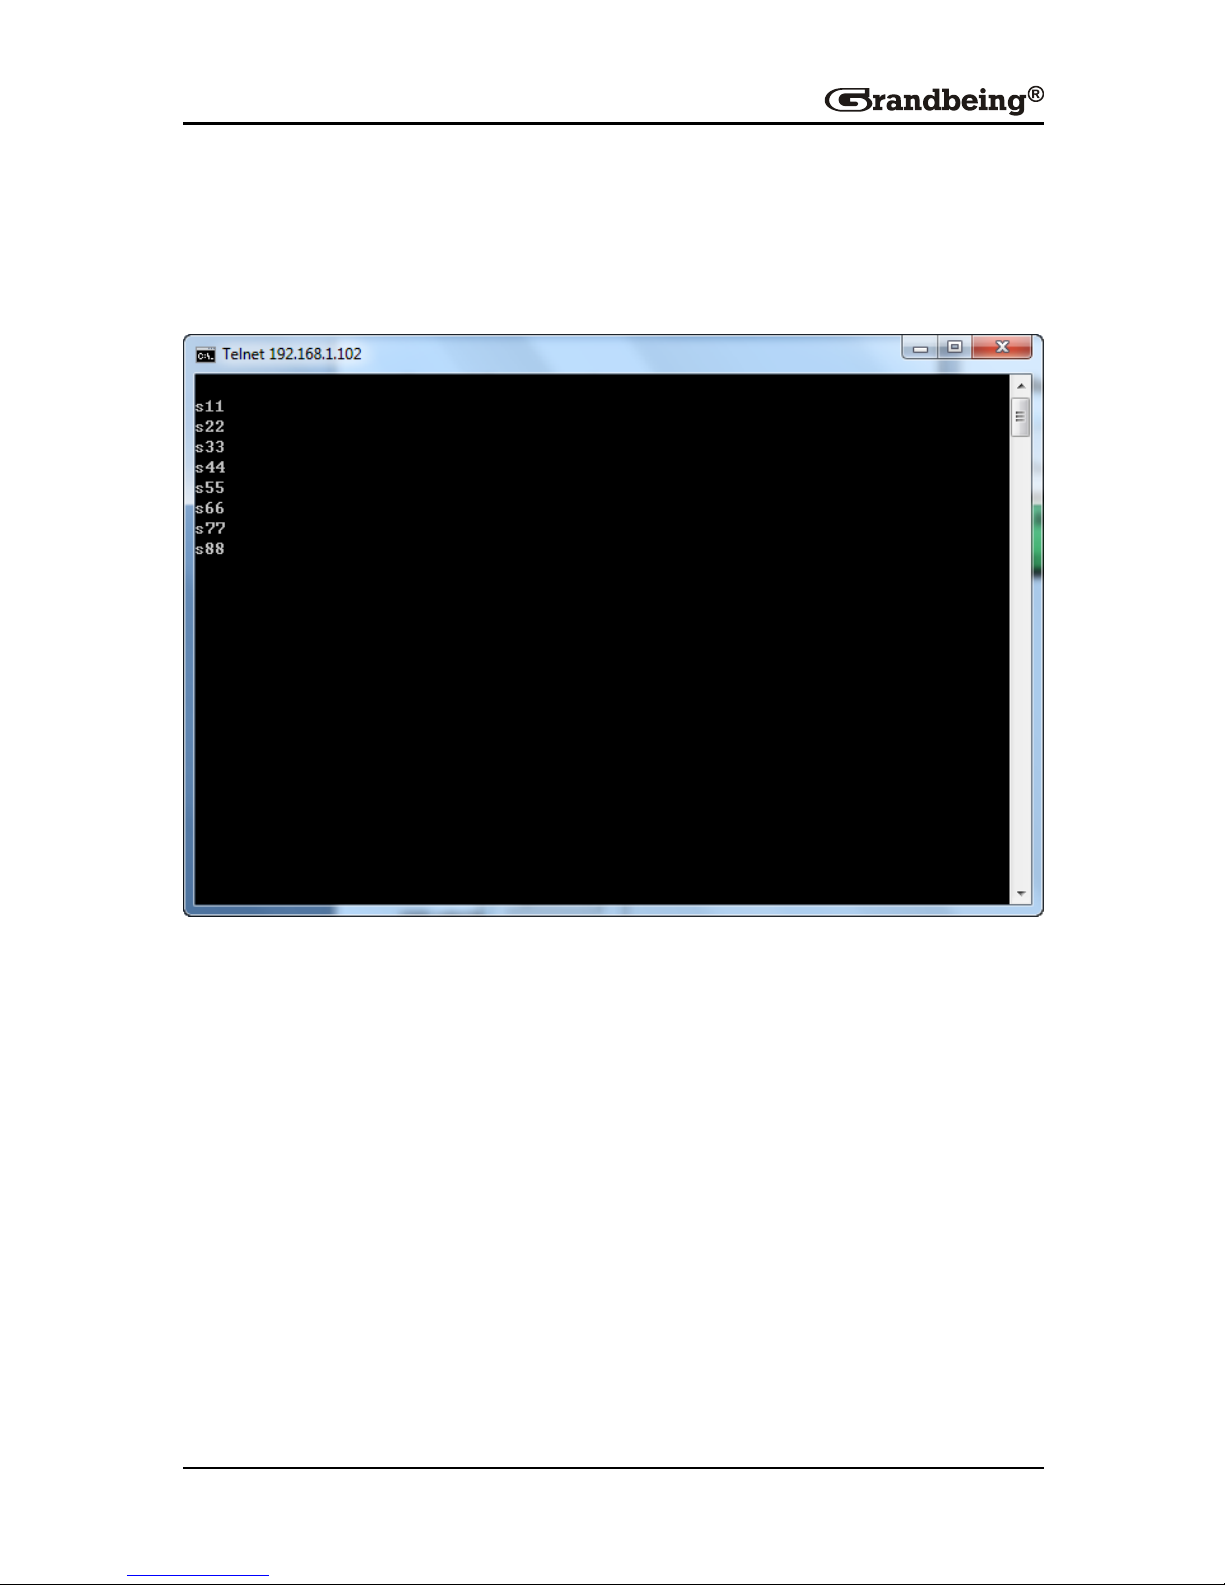
For example, bc + “enter”, it will feedback
"s11\r\n" ,"s22\r\n" ,"s33\r\n" ,"s44\r\n" ,"s55\r\n" ,"s66\r\n" ,"s77\r\n" ,"s88\r\n".
It means that the output 1 select the input 1, the output 2 selects the input 2,
output 3 selects the input3, output 4 selects the input 4, output 5 selects input
5, the output 6 selects the input 6, the output 7 selects the input 7, and the
output 8 selects the input 8.
Such a command feedback the current status of all outputs.
Web Password Reset
The command length of the read status is 4 bytes.
Type “rpw” and hit “enter”.
Send this command to the device, the web password will be reset to
Page 27
25
“0000000000”.
LAN Control
Note:
Connect to PC by direct UTP cable or connect to the Ethernet switch by cross
cable.
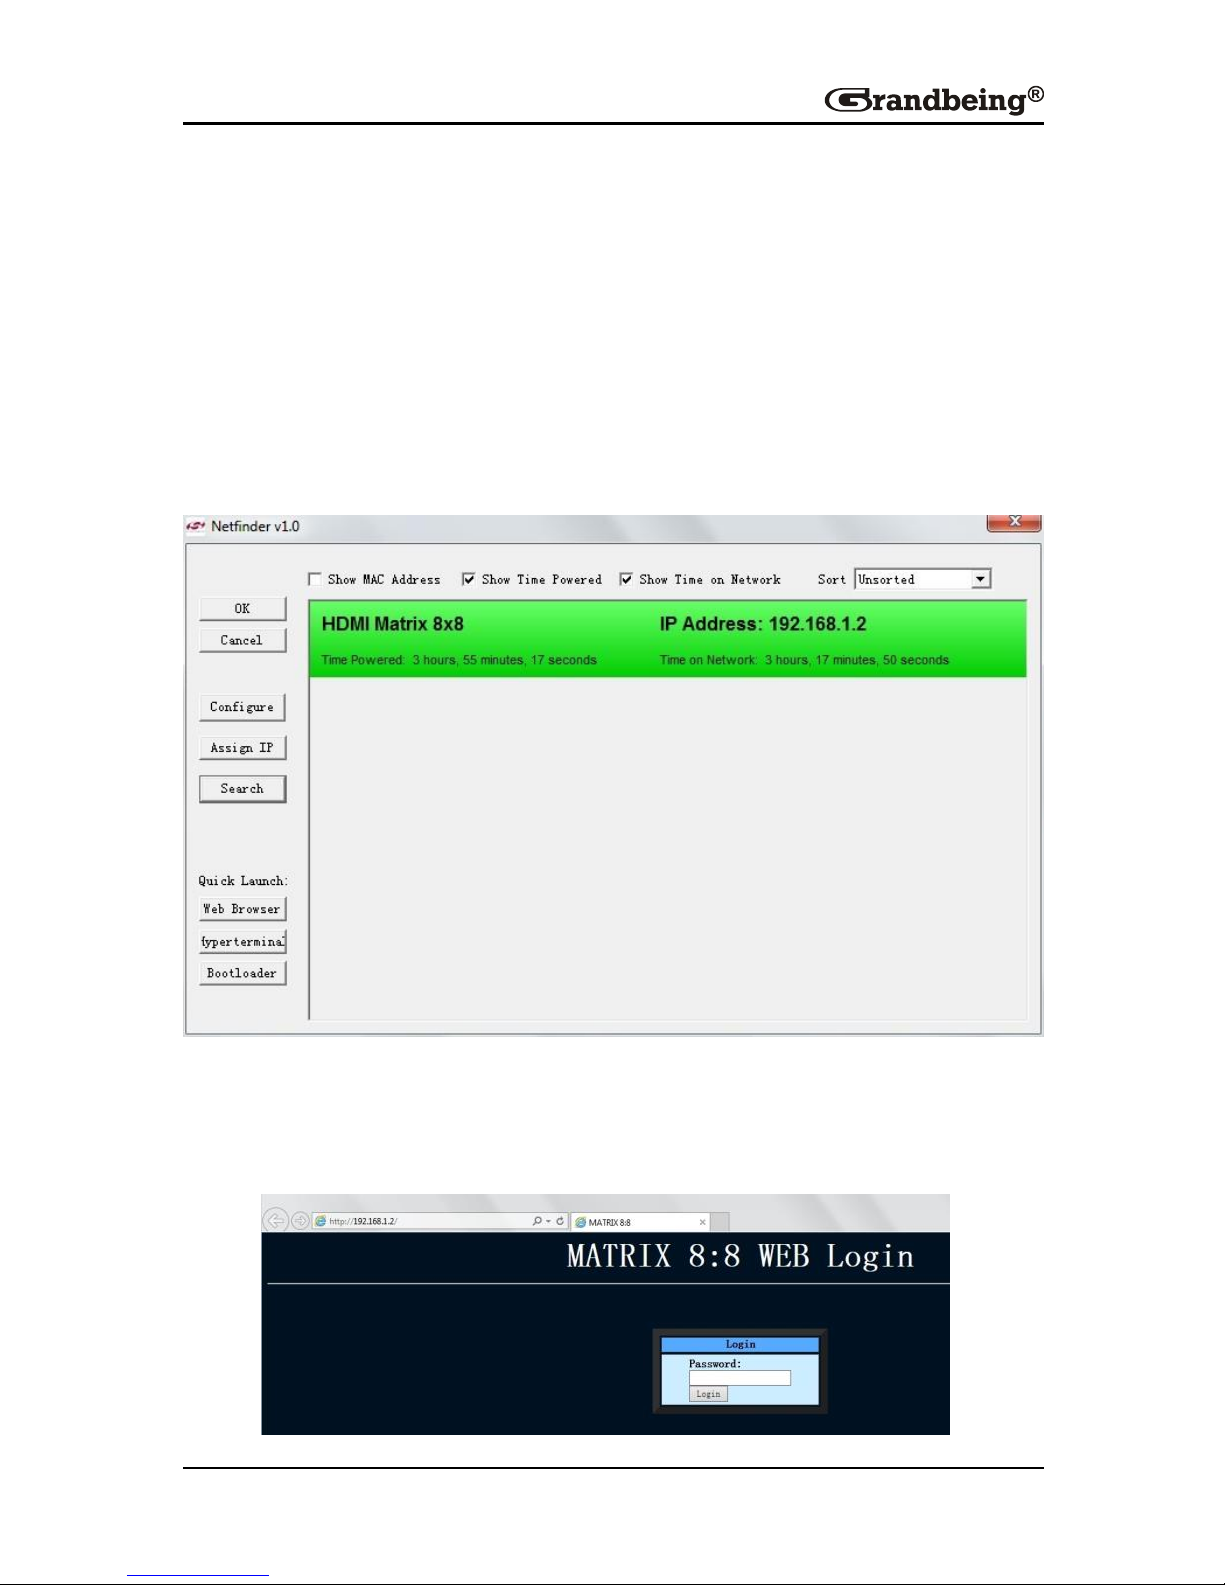
Step1. Double click Netfinder.exe. Click Search button to obtain the IP
address of the device.
Step 2. Click the IP Address, then click Web Browser button, the Web page
will be displayed. Input the password (0000000000 by default) and click
Login.
Page 28
26
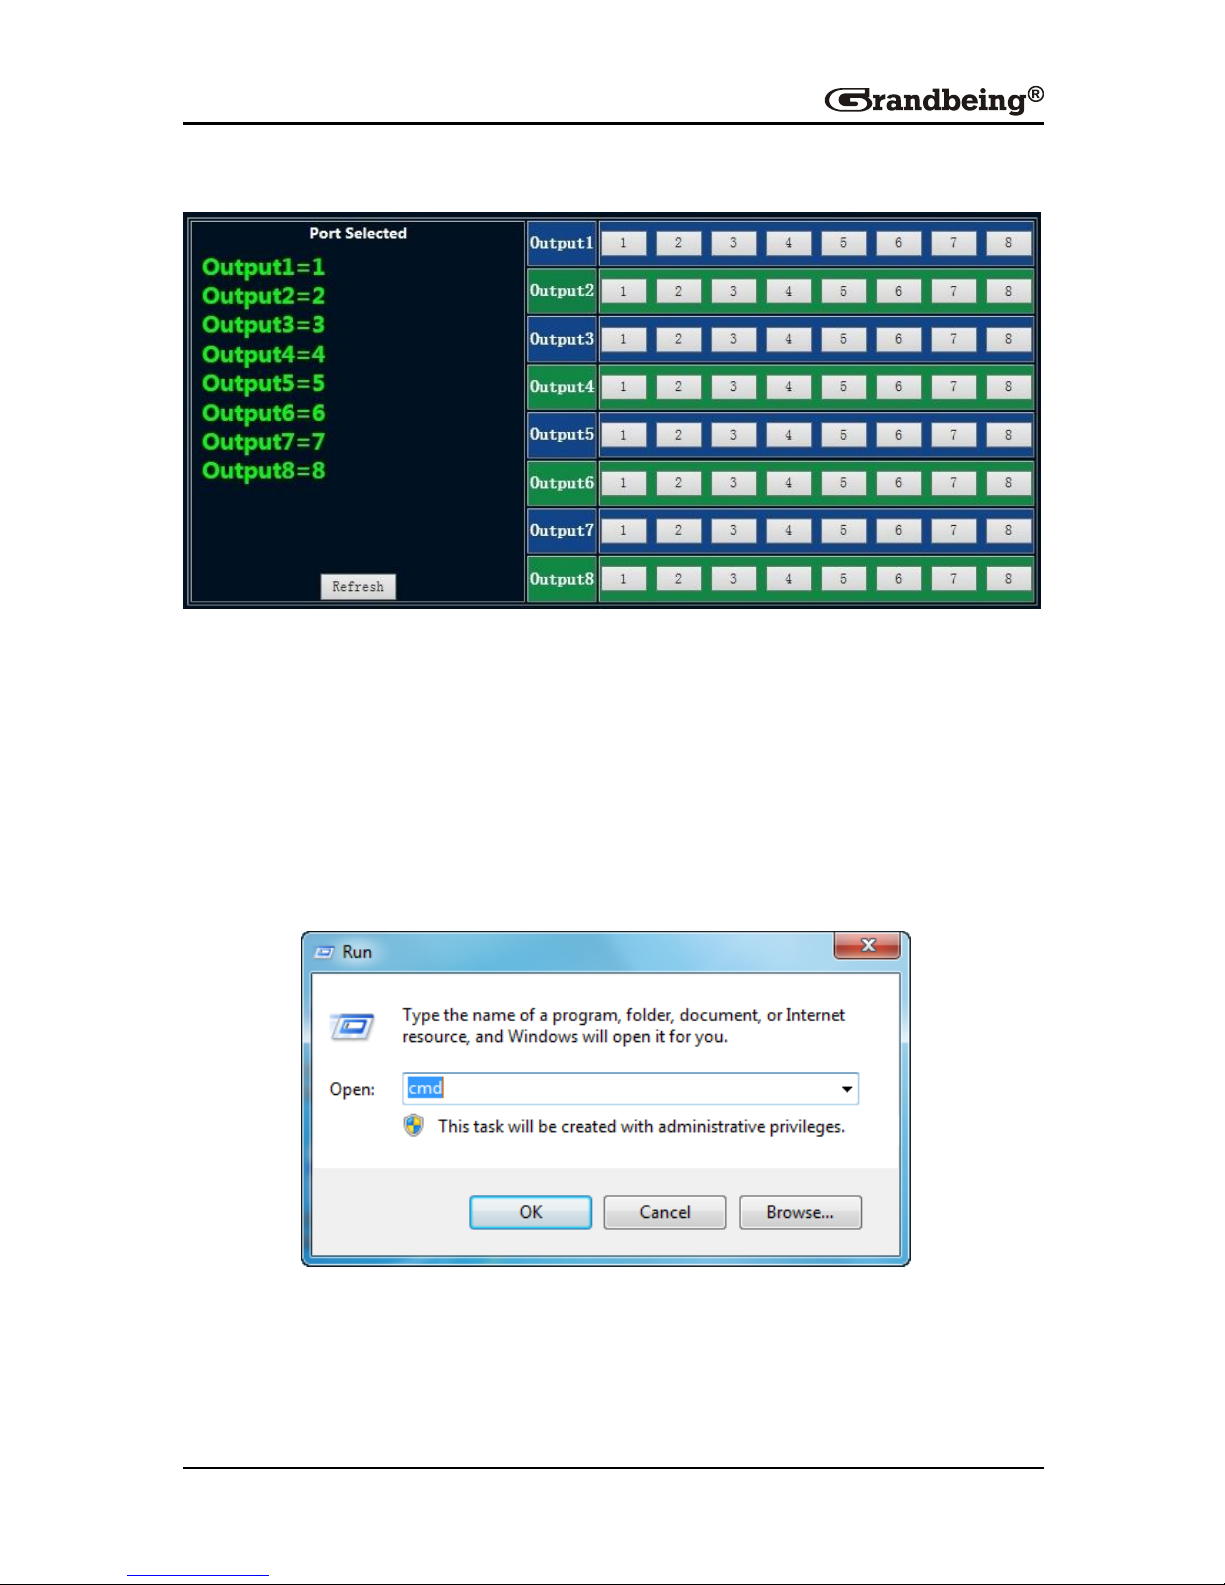
Step 3. The Web page is displayed.
Click the buttons on the right area to control the device. The left area shows
which input ports are chosen by output ports.
Telnet
To access the device through Telnet, follow these steps (here take Window 7
as an example).
Step 1. Click Start menu, go to Run. Input cmd, click OK.
Page 29
27
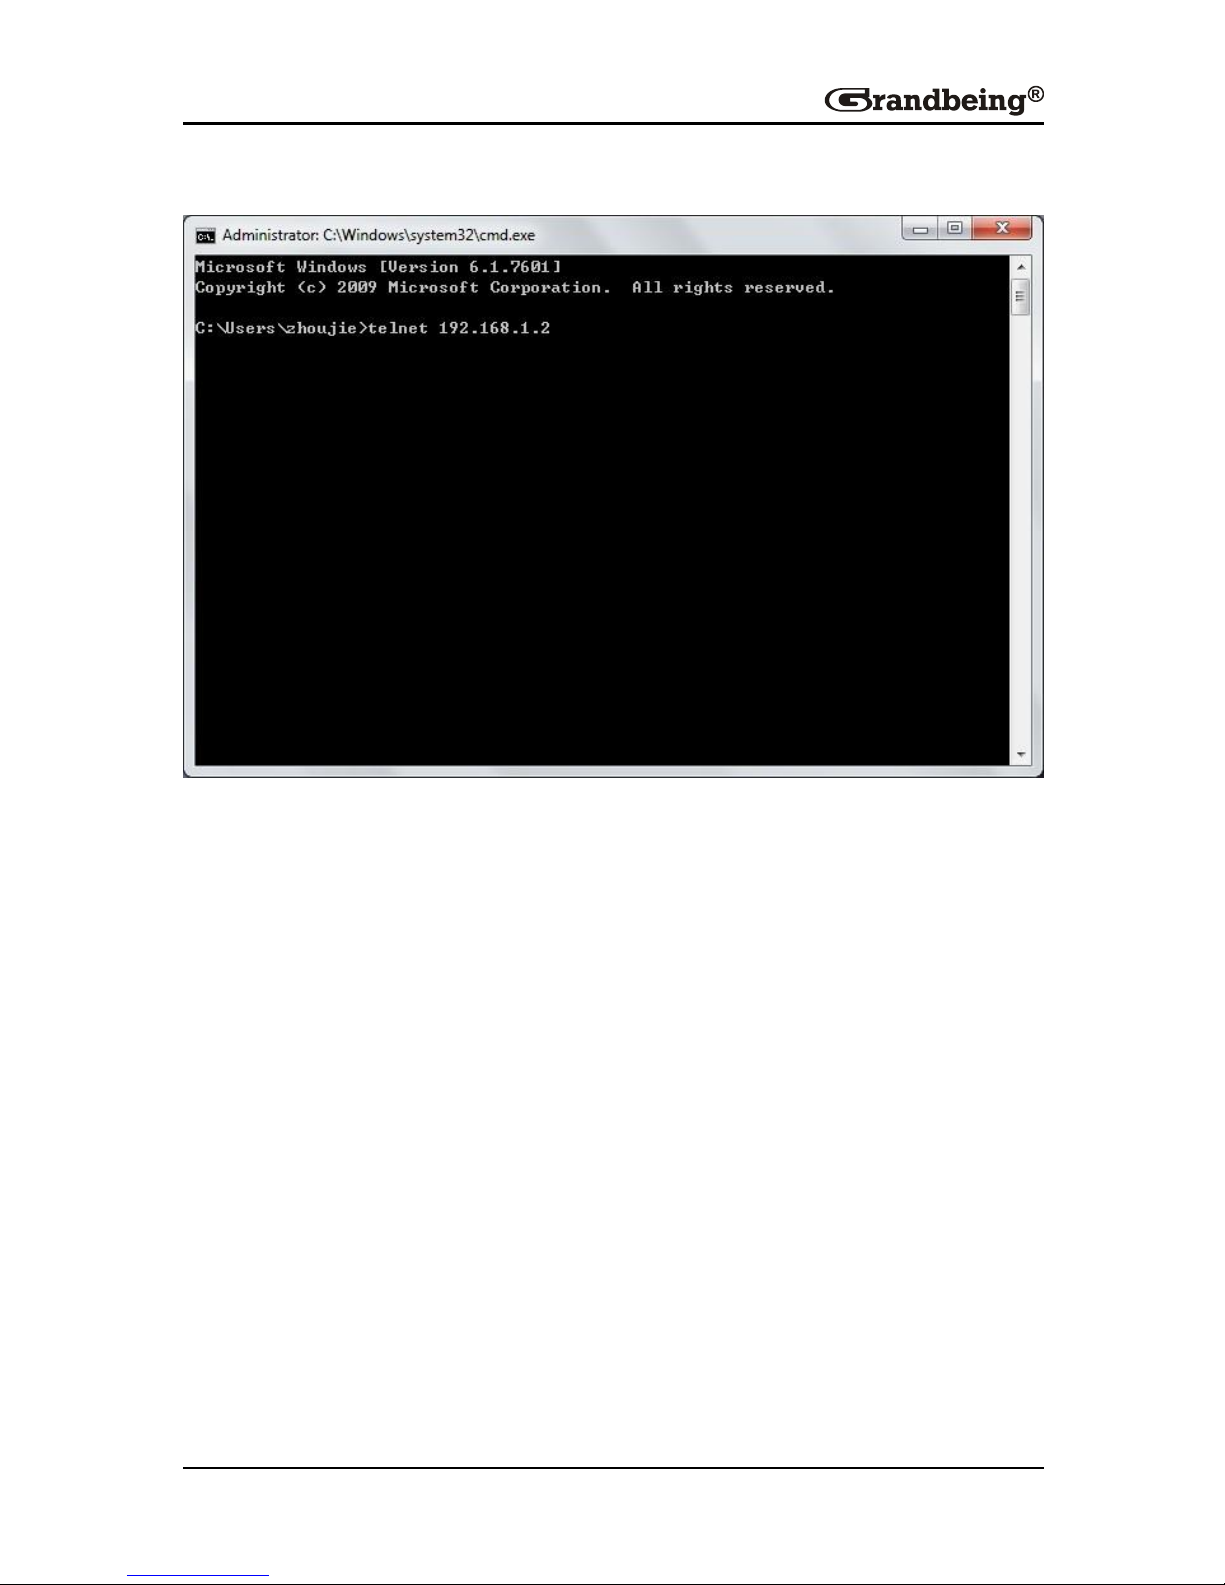
Step 2. Input telnet 192.168.1.2, press Enter.
Now you can control the matrix refer to the Control Command Format.
Page 30

28
EDID Management
The matrix features an EDID copy mode that can be used when the EDID’s
do not meet the installation requirements
DIP Switch1
DIP Switch 2
DIP Switch 3
Function
0 0 0
Copy HDMI Sink's EDID
to its current selection of
input port. You can copy
the EDID by pressing
buttons on front panel or
refer to EDID SET
0 0 1
1080P 3D stereo.
0 1 0
1080P stereo.
0 1 1
1080i stereo.
1 0 0
1080P 5.1.
1 0 1
1080P 7.1.
1 1 0
4Kx2K 2.1
1 1 1
Reserved
Page 31

29
Troubleshooting
1. Cannot view 3D content
Verify display is 3D compatible.
Verify source device can output 3D content.
Verify that DIP switch is 001
2. No image
Check the matrix connection status.
Verify that the cables are properly connected.
Verify that all devices are powered up.
Verify that the display supports HDCP.
3. Not all display devices work
Check that the display supports the source resolution.
Page 32

30
Product Service
Maintenance
Clean this unit with a soft, dry cloth. Never use alcohol, paint thinner or
benzine to clean this unit.
Provided Service
1. Damage Requiring service: The unit should be serviced by qualified
service personnel if:
The DC power supply cord or AC adapter has been damaged;
Objects or liquids have gotten into the unit;
The unit has been exposed to rain;
The unit does not operate normally or exhibits a marked change in
performance;
The unit has been dropped or the cabinet damaged.
2. Servicing Personnel: Do not attempt to service the unit beyond that
described in these operating instructions. Refer all other servicing to
authorized servicing personnel.
3. Replacement parts: When parts need replacing ensure the service uses
parts specified by the manufacturer or parts that have the same
characteristics as the original parts. Unauthorized substitutes may result in
fire, electric shock, or other hazards.
4. Safety check: After repairs or service, ask the service to perform safety
checks to confirm that the unit is in proper working condition.
Mail-In Service
When shipping the unit, carefully pack and send it prepaid, adequately insured
and preferably in the original carton. Include a letter detailing the complaint and
provide a daytime phone and/or email address where you can be reached.
Page 33

31
If repair is needed during the limited warranty period the purchaser will be
required to furnish a sales receipt/proof of purchase indicating date of
purchase, amount paid and place of purchase. Customer will be charged for
the repair of any unit received without such proof of purchase.
Warranty
If your product does not work properly because of a defect in materials or
workmanship, Grandbeing Company (referred to as “the warrantor”) will, for
the length of the period indicated as below, (Parts (1) Year, Labor(90) Days)
which starts with the date of original purchase (“Limited Warranty period”), at
its option either (a) repair your product with new or refurbished parts, or (b)
replace it with a new or a refurbished product. The decision to repair or replace
will be made by the warrantor.
During the “Labor” Limited Warranty period there will be no charge for labor.
During the “Parts” warranty period, there will be no charge for parts. You must
mail-in your product during the warranty period. This Limited Warranty is
extended only to the original purchaser and only covers product purchased as
new. A purchase receipt or other proof of original purchase date is required for
Limited Warranty service.
Warranty Limits and Exclusions
1. This Limited Warranty ONLY COVERS failures due to defects in
materials or workmanship, and DOES NOT COVER normal wear and
tear or cosmetic damage. The Limited Warranty ALSO DOES NOT
COVER damages which occurred in shipment, or failures which are caused
by products not supplied by the warrantor, or failures which result from
accidents, misuse, abuse, neglect, mishandling, misapplication, alteration,
faulty installation, set-up adjustments, maladjustment of consumer controls,
improper maintenance, power line surge, lightning damage, modification, or
service by anyone other than a Factory Service Center or other Authorized
Page 34

32
Service, or damage that is attributable to acts of God.
2. There are no express warranties except as listed under “limited
warranty coverage”. The warrantor is not liable for incidental or
consequential damages resulting from the use of this product, or
arising out of any breach of this warranty. (As examples, this excludes
damages for lost time, cost of having someone remove or re-install an
installed unit if applicable, travel to and from the service location, loss of or
damage to media or images, data or other recorded content. The items listed
are not exclusive, but are for illustration only.)
3. Parts and service, which are not covered by this limited warranty, are
your responsibility.
Page 35

33
Glossary
Acronym
Complete Term
ARC
Audio Return Channel
DTV
Digital Television
EDID
Extended Display Identification Data
HD
High Definition
HDCP
High-bandwidth Digital Content Protection
HDMI
High Definition Multimedia Interface
HDTV
High Definition Television
IR
Infrared
Page 36

Grandbeing Technology Co., Ltd.
Address:
B-301, Science and Technology Building Phase11,
1057 Nanhai Rd, Nanshan District, Shenzhen, P.P.China
Tel: 86-755-21620566 Fax: +86 755-21620564
Post Code: 518067
www.grandbeing.biz
 Loading...