

Page 1
1
Grand IP/ Wi-Fi Camera Plus
QUICK GUIDE
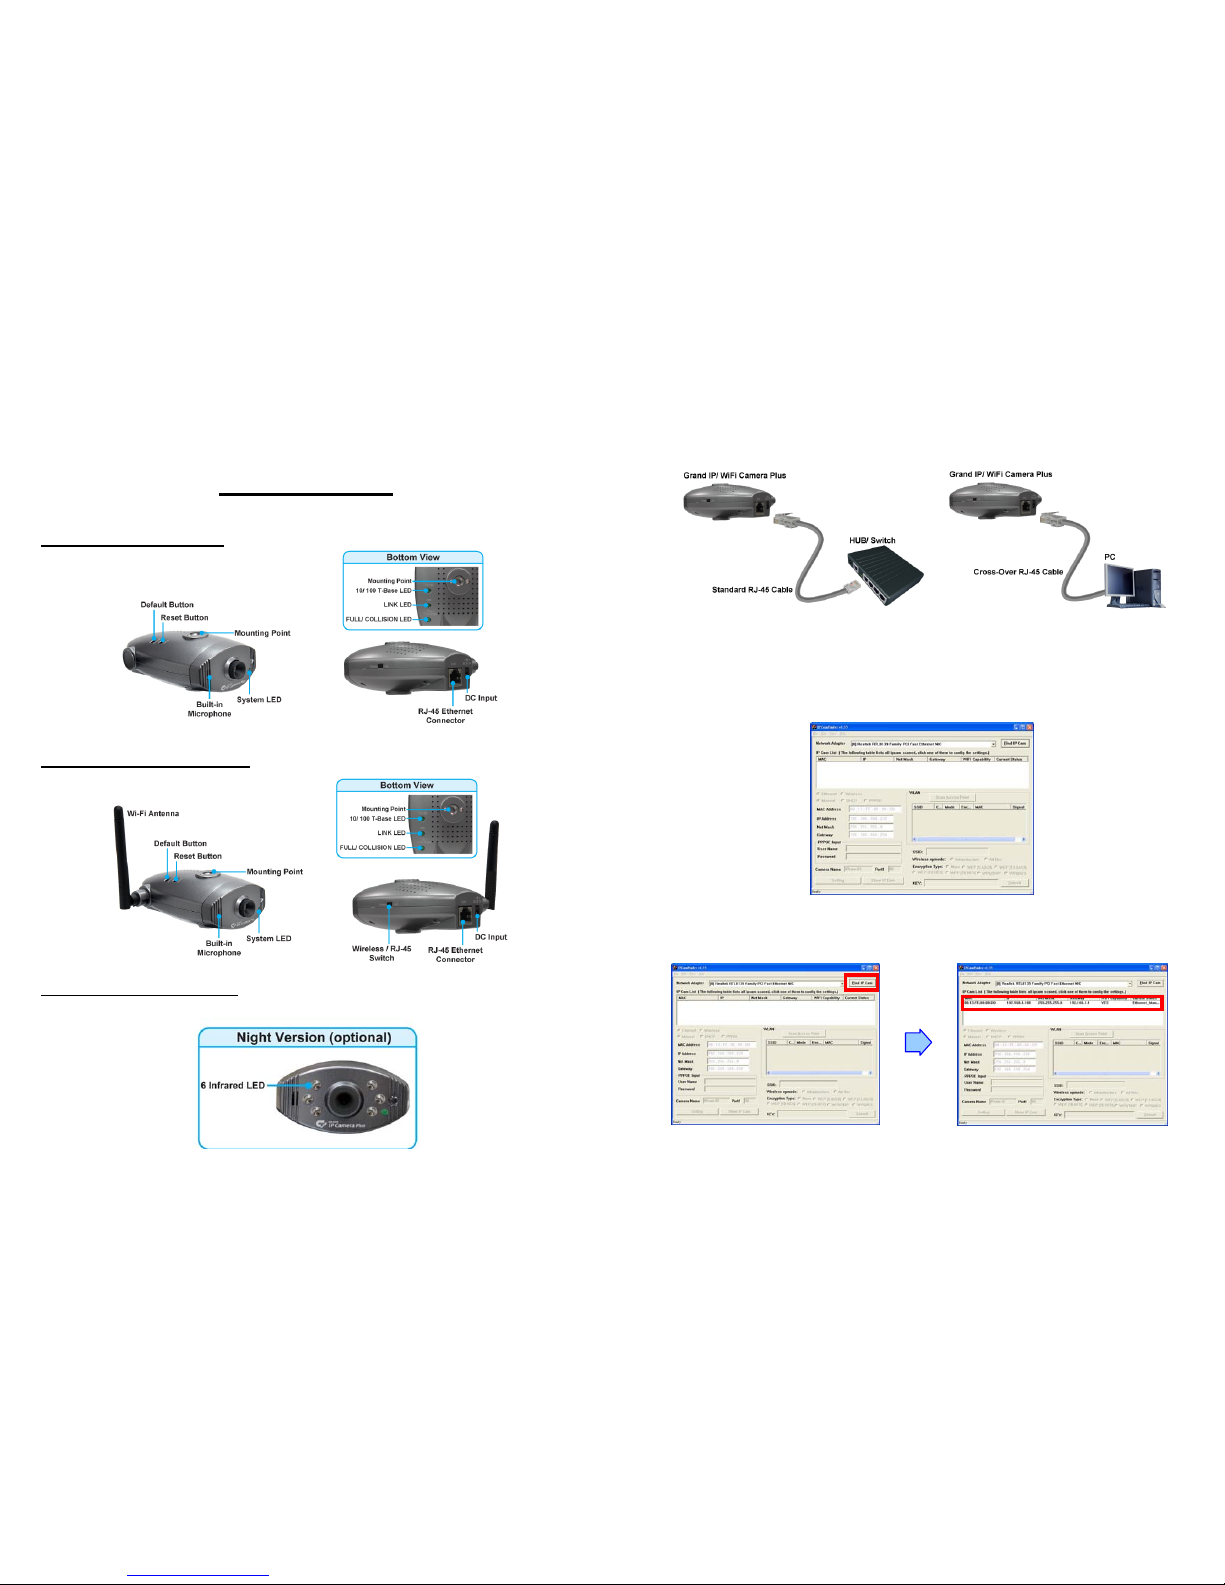
1. Hardware Overview
Grand IP Camera Plus
Grand Wi-Fi Camera Plus
Night Version (optional)
Supports 6-LED infrared for night vision.
Feb 24, 09
34457000
2
2. Connecting to a Network
Connect the Grand Wi-Fi / IP Camera Plus to an Ethernet hub or switch by using a standard
cable. You can also connect directly to a computer by using the cross-over provided.
3. Network Installation
Confirm that the camera is already connected to the network.
Step 1: Execute the “Setup.exe” to install the “IPCamFinder” software in the CD driver.
Execute the “IPCam Setup” on the desktop, and the following screen is displayed.
Step 2: Click the “Find IP Cam” button, and your camera’s MAC, default IP Address, Net
Mask and Gateway will be listed.
Page 2
3
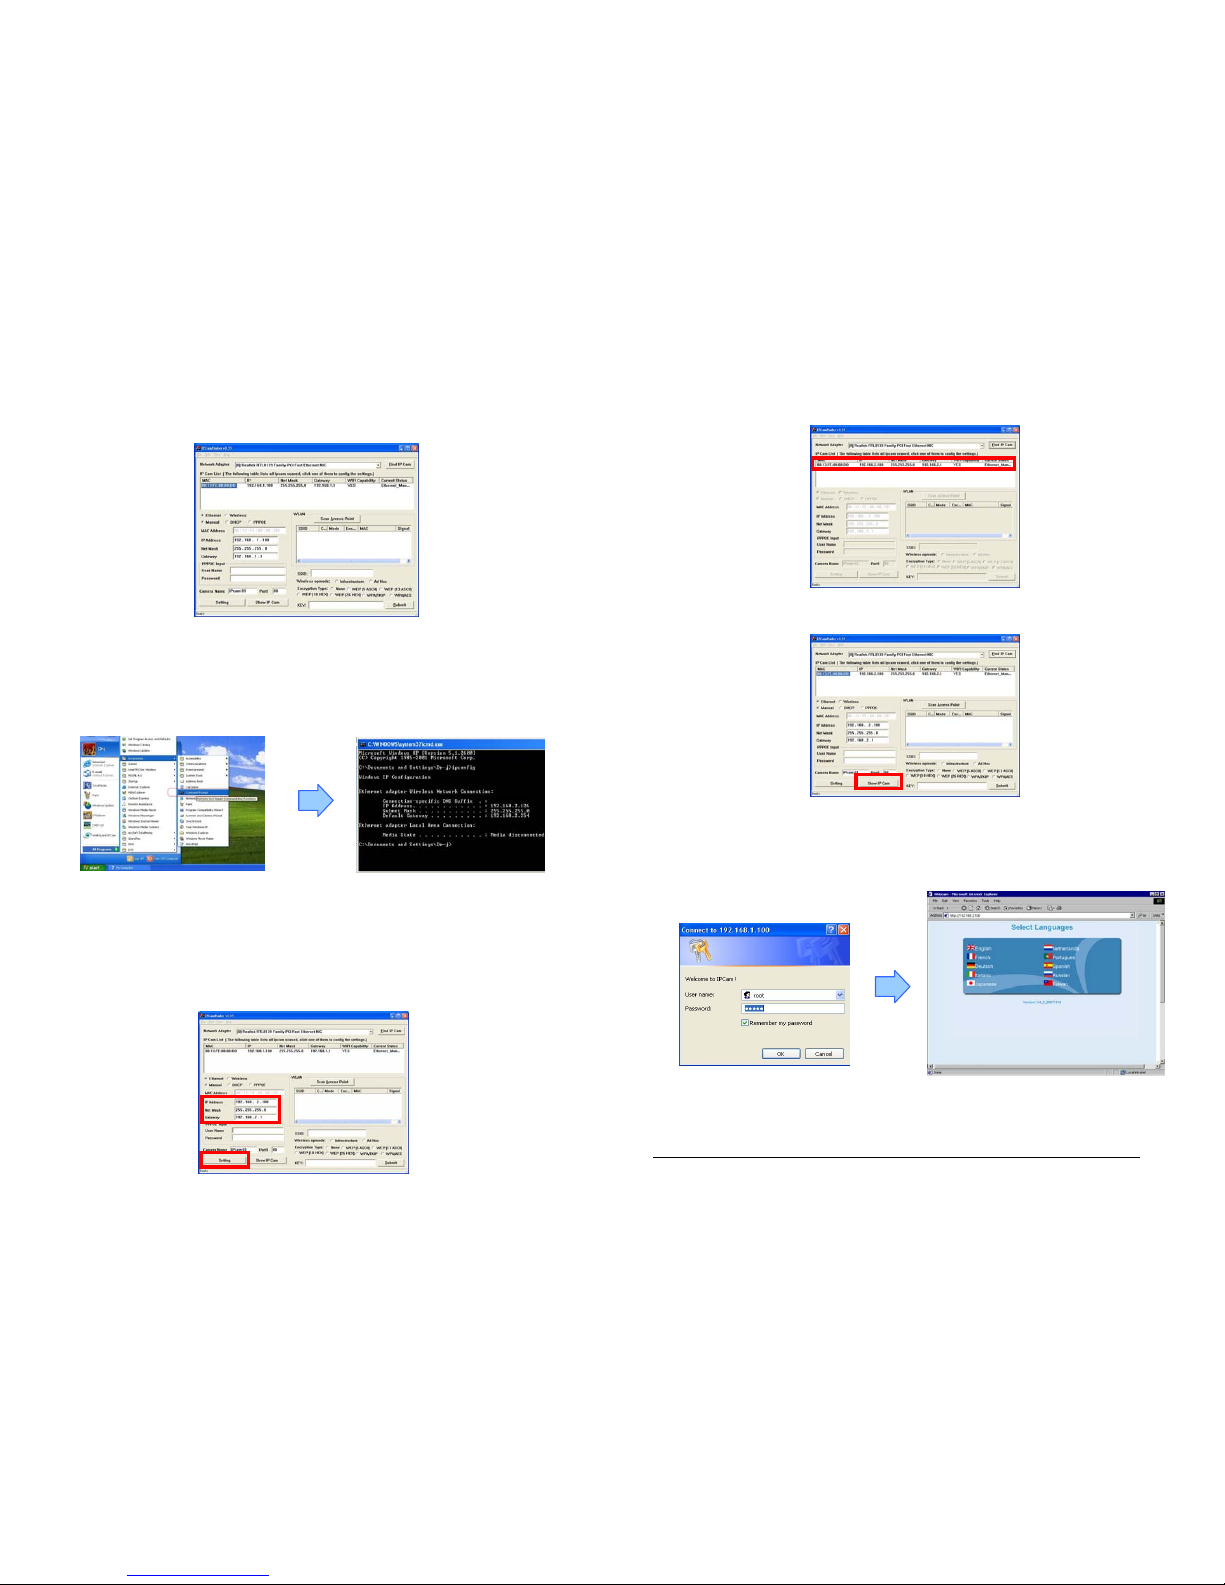
Step 3: Click on the “MAC”, and the “IP Address”, “Net Mask” and “Gateway” will be
displayed below.
NOTE: The IP Address, Net Mask and Gateway must be corresponding with your network
settings for you to access the camera. You can follow the steps below to get your network
information.
- Click “Start” → “All Programs” → “Accessories” → “Command Prompt”. A MS-DOS
window will appear. Type “ipconfig” and them press “Enter” to get your network
information.
- Assign IP Address, Netmask (Subnet Mask) and Gateway (Default Gateway) for
the Grand Wi-Fi/ IP Camera Plus. (You must use the same Net Mask (ex.
255.255.255.0) and Gateway (192.168.2.254). You can use any IP address
between 192.168.2.1-254, but make sure that the IP Address has never been used
or is used by another IP addressable device.)
Step 4: Directly modify the “IP Address”, “Net Mask” and “Gateway”, and click “Setting” to
save.
4
Step 5: Click the “Find IP Cam” button again, and the new network information will be listed.
Step 6: Select the “MAC” and click the “Show IP Cam” button to connect the Grand Wi-Fi/ IP
Camera Plus.
Step 7: When the login screen appears, enter the user name and password (default user
name: root, default password: admin), and click the “OK” button to login your camera.
PS. Please consult the “User Manual.doc” in Driver CD for more detail.
Page 3

User’s Manual
ISSUE:02/25/09
GRAND Wi-Fi / IP CAMERA PLUS
Video & Audio Transmission/ Low Lux Display/ Bundle DivX (model 2)
INDEX
1. Package Contents……………………....…………………….. 1
2. Introduction…………………………..……….……………... 1
3. System Requirement….……………..……..………………… 2
4. Product Features…….…………..……………….…………... 2
5. Hardware Overview……………..……………….…………... 3
5.1 Grand IP Camera Plus……...………………………..…. 3
5.2 Grand Wi-Fi Camera Plus…………….…………….…… 3
6. Hardware Installation……….…..……………..……..……… 4
6.1 Assembling the Stand…….....………………………..…. 4
6.2 Connecting to a Network..…….………………………… 4
6.3 Internet Browser Settings….….………………………… 5
7. Network Installation…….………..…………………….….… 6
8. Using the Configuration Menu..………………..……..…….. 9
8.1 Image Control……………..…………………………..…. 9
8.2 Basic Setup……………....…….………………………… 10
8.3 Advance Setup…….……..…….………………………… 13
8.4 Snapshot Function………………….……………………. 19
8.5 Image Recording…...………….………………………… 19
8.6 Zoom In (Out) Function……….………………………… 20
9. Connecting Multiple Cameras to a Router…………………... 21
10. Using UPnP to Connect the Camera………………………... 22
11. View the Camera from iPhone…..…………………………. 23
12. Troubleshooting………..………..…………………………. 24
Page 4
1
1. Package Contents
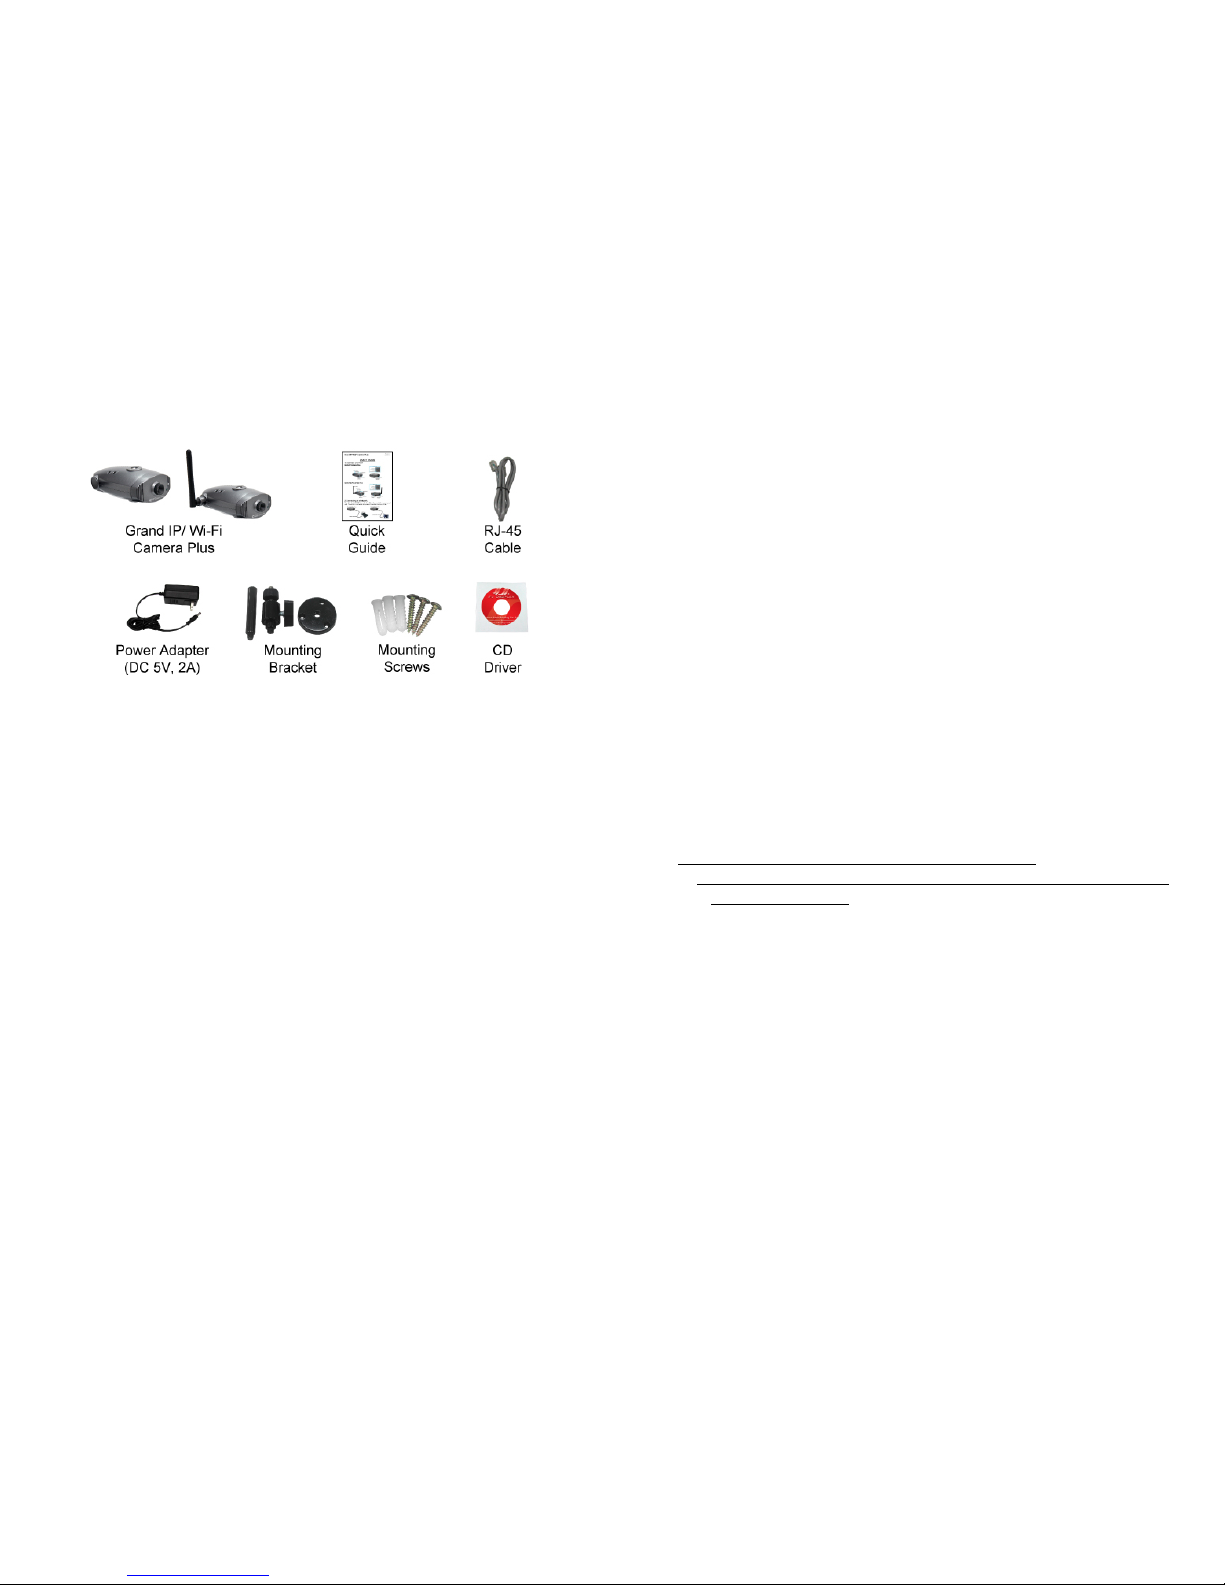
This package contains the following items:
Grand IP/ Wi-Fi Camera Plus
Quick Guide
RJ-45 Cable
Power Adapter (DC 5V, 2A)
Mounting bracket
Mounting Screws
CD-ROM with user manual/ software (IP Detect)/ Surveillance software (model 2)
2. Introduction
The Grand Wi-Fi / IP Camera Plus is a full featured network camera. You can use internet
explorer to remotely view and listen in your property or your children when away from home. By
using your internet explorer, you can even control the Grand Wi-Fi / IP Camera Plus to modify its
digital zoom (15level) to bring objects of interest into close view.
Choose the Grand Wi-Fi / IP Camera Plus to enhance safety and security at your home or office.
2
3. System Requirements
Router ( with DDNS or PPPoE function ) is required
10Base-T Ethernet or 100Base TX Fast Ethernet
Pentium 800 MHz or Equivalent or above.
64M RAM or above
VGA card with 8MB memory or above
Microsoft DirectX 9
4. Product Features
1/4” Low Lux CMOS VGA Sensor (Omni Vision)
Built-in microphone for remotely listen in.
Supports 15 level digital zoom in function.
Supports IE recording function (AVI format).
High Resolution Image Processor. (640 x 480、320 x 240、176 x 144 )
Supports up to 30 frames per second in QCIF or QVGA mode.
Supports IP Address Hidden Function.
Supports Motion Detected Mail Function.
Supports Multi-Language: English/ Spanish/ Portuguese/ Dutch/ German/ Italian/ Russian/
French/ Japanese/ Traditional Chinese.
Supports Multiple Network Protocol: NTP/ SMTP/ FTP/ DHCP/ PPPOE/ DDNS/ UPnP.
Compatible with Windows 2000/ ME/ XP/ Vista & Linux OS.
PS. 1.The IE Recording function is not available in Windows Vista.
2. The Remote Listen In, IE Recording, Digital Zoom In (Out) and UPnP functions are
not available in Linux OS.
Supports iPhone Web Browser (supports remote view, snapshot and setting function).
Supports 6-LED infrared for night vision (optional).
Bundled Surveillance Software with the following functions (only for model 2)
Supports 4/ 9/ 16 cameras preview and record in DivX format (v6.5.1).
Video File Management: Video file database and playback control.
Storage Recyclable: When running out of disk space, files with the earliest date will be overwrite
automatically.
Motion Detection: Detect any movement in the mask area and invoke the alarm as soon as
movement is detected.
Multi-Languages OSD: English/ French/ German/ Italian/ Dutch/ Spanish/ Russian/ Japanese/
Traditional Chinese.
Compatible with Windows 2000, XP and Vista.
Page 5
3
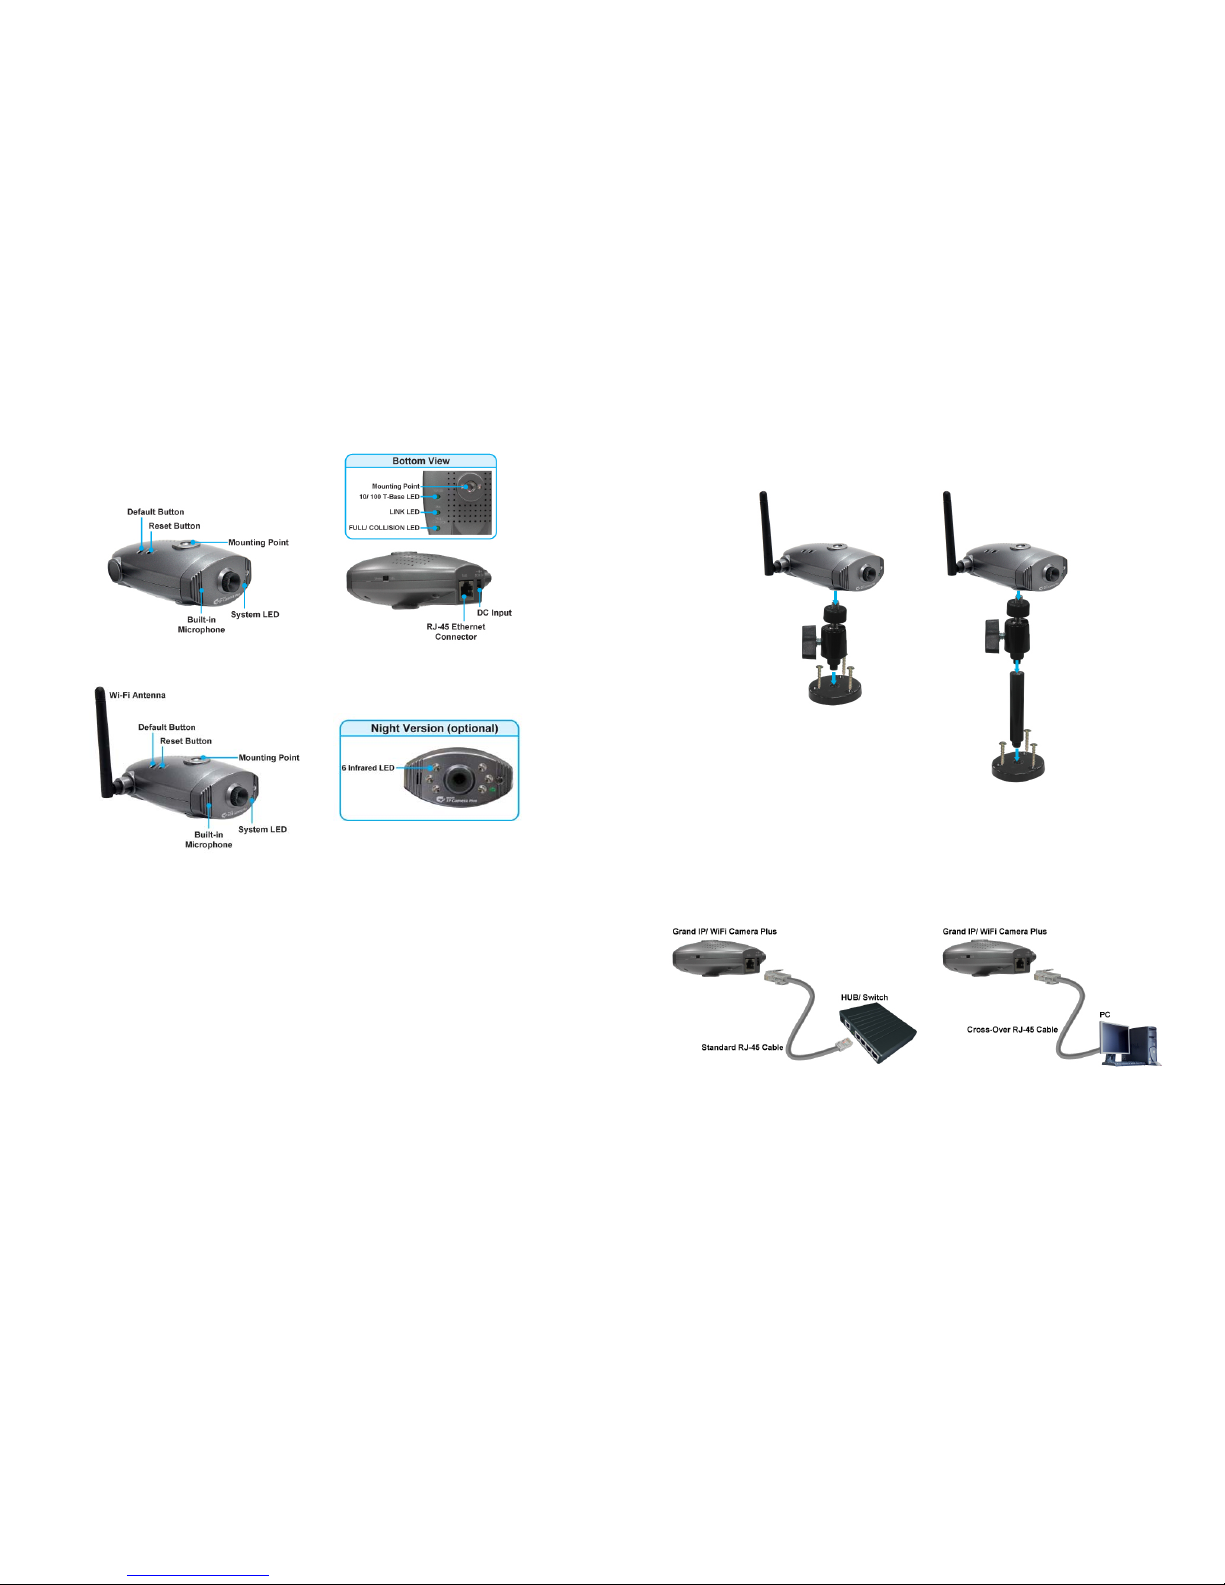
5. Hardware Overview
5.1 Grand IP Camera Plus
5.2 Grand Wi-Fi Camera Plus
Default Button: Reset all settings to the original (factory) setting.
(Default IP Address: 192.168.1.100, Default User Name: root, Default Password: admin)
Reset Button: Press the button to restart the camera.
Built-in Microphone: For remotely listen in.
System LED: Steady green indicates a proper connection to the power supply.
DC Input: Connects to the power adapter. (DC 5V, 2A)
RJ-45 Ethernet Connector: For connects to 10Base-T Ethernet cabling or 100Base-TX Fast
Ethernet cabling.
Wireless/ RJ-45 Switch: Select your network connection Wireless/ RJ-45.
10/ 100 T-Base LED: Steady green indicates the camera is connecting to 100Base-TX Fast
Ethernet.
LINK LED: Steady green indicates the camera is connecting to the LAN.
FULL/ COLLISION LED: Steady green indicates the camera is connecting to the LAN. The
will begin to flash to indicate that the camera is transmitting.
Night Version (optional): Supports 6-LED infrared for night vision.
4
6. Hardware Installation
6.1 Assembling the Stand
Use the three screws and plugs provided to fix the stand bracket to a wall.
The stand can be adjusted to allow the camera a full 360° of rotation and a pan and tilt action.
6.2 Connecting to a Network
Connect the Grand Wi-Fi / IP Camera Plus to an Ethernet hub or switch by using a standard
cable. You can also connect directly to a computer by using the cross-over cable provided.
Page 6
5
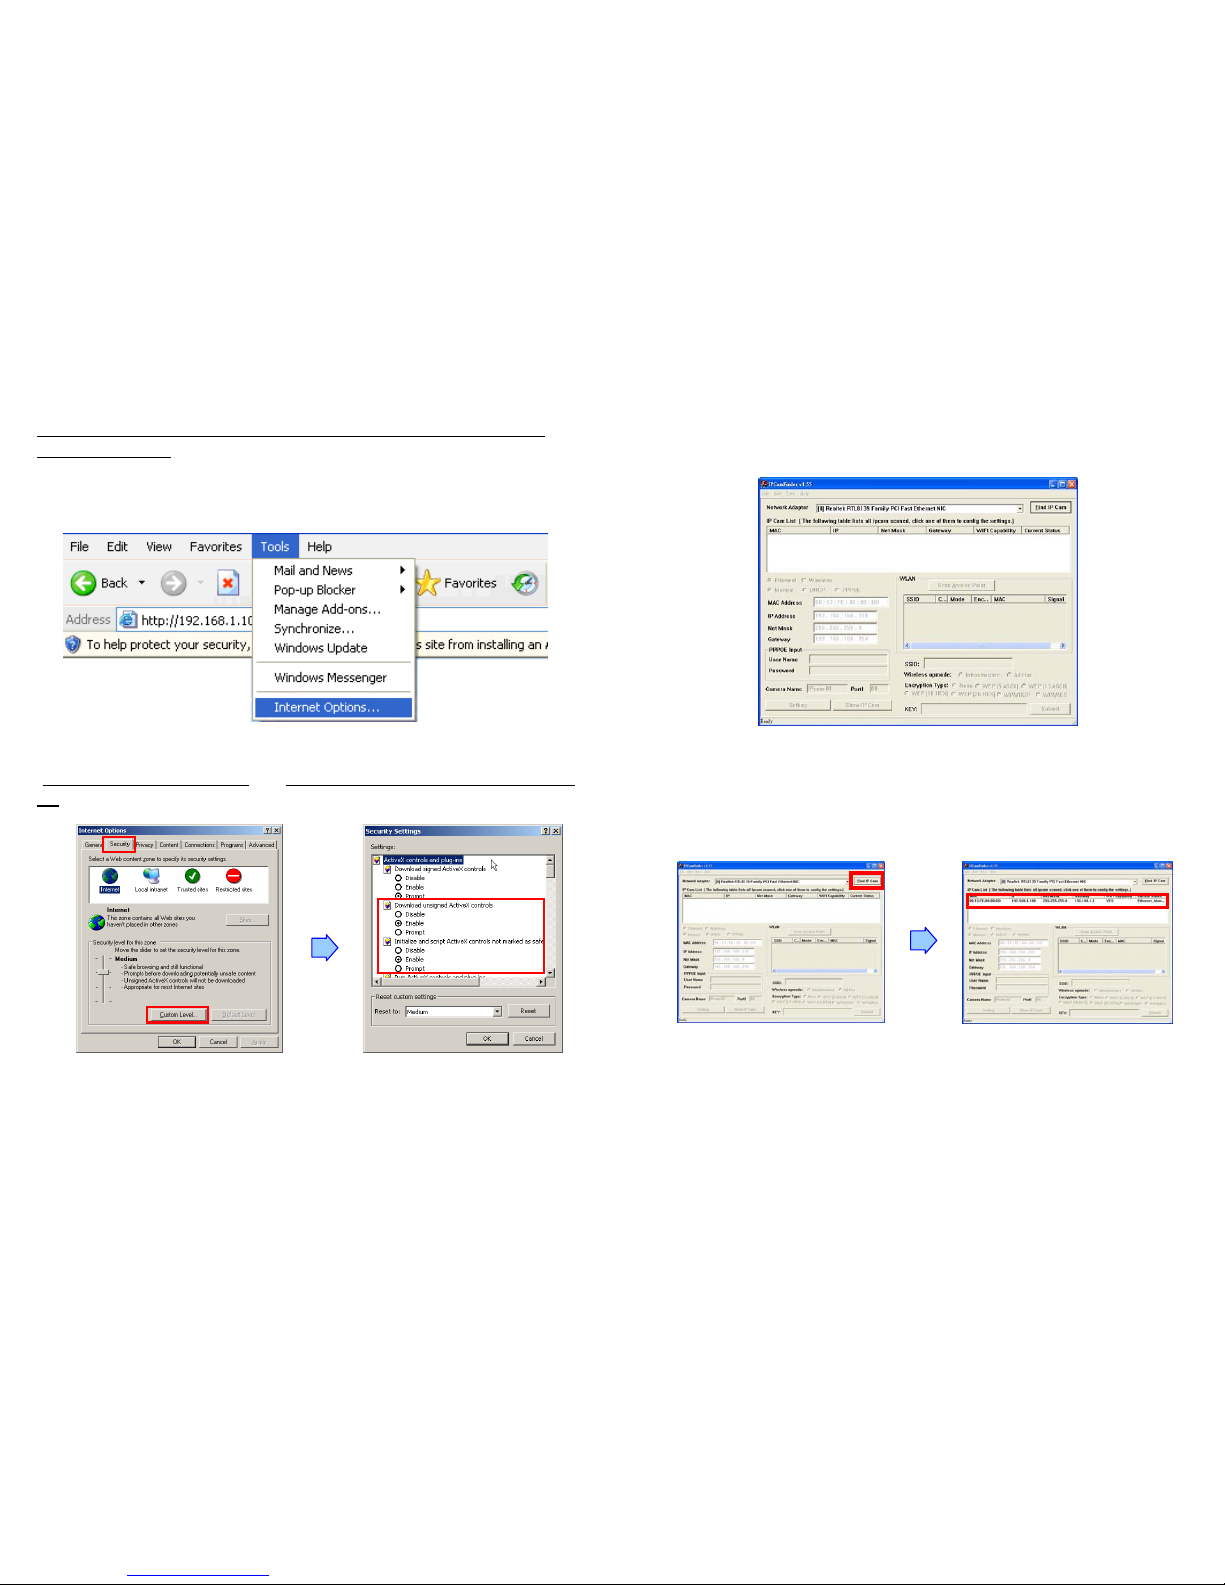
6.3 Internet Browser Settings
NOTE: Your browser must be enabled the ActiveX for connect to the Grand IP/ Wi-Fi
Camera Plus first time.
Ste p 1: Start the internet browser.
Ste p 2: Click the “Tools” at the top of the screen, and select “Internet Options…”.
Ste p 3: Select the “Security” tab, and click the “Custom Level”. Set to “Enable” or “Prompt” on the
“Download unsigned ActiveX controls
” and “Initialize and script ActiveX controls not marked as
safe” items.
6
7. Network Installation
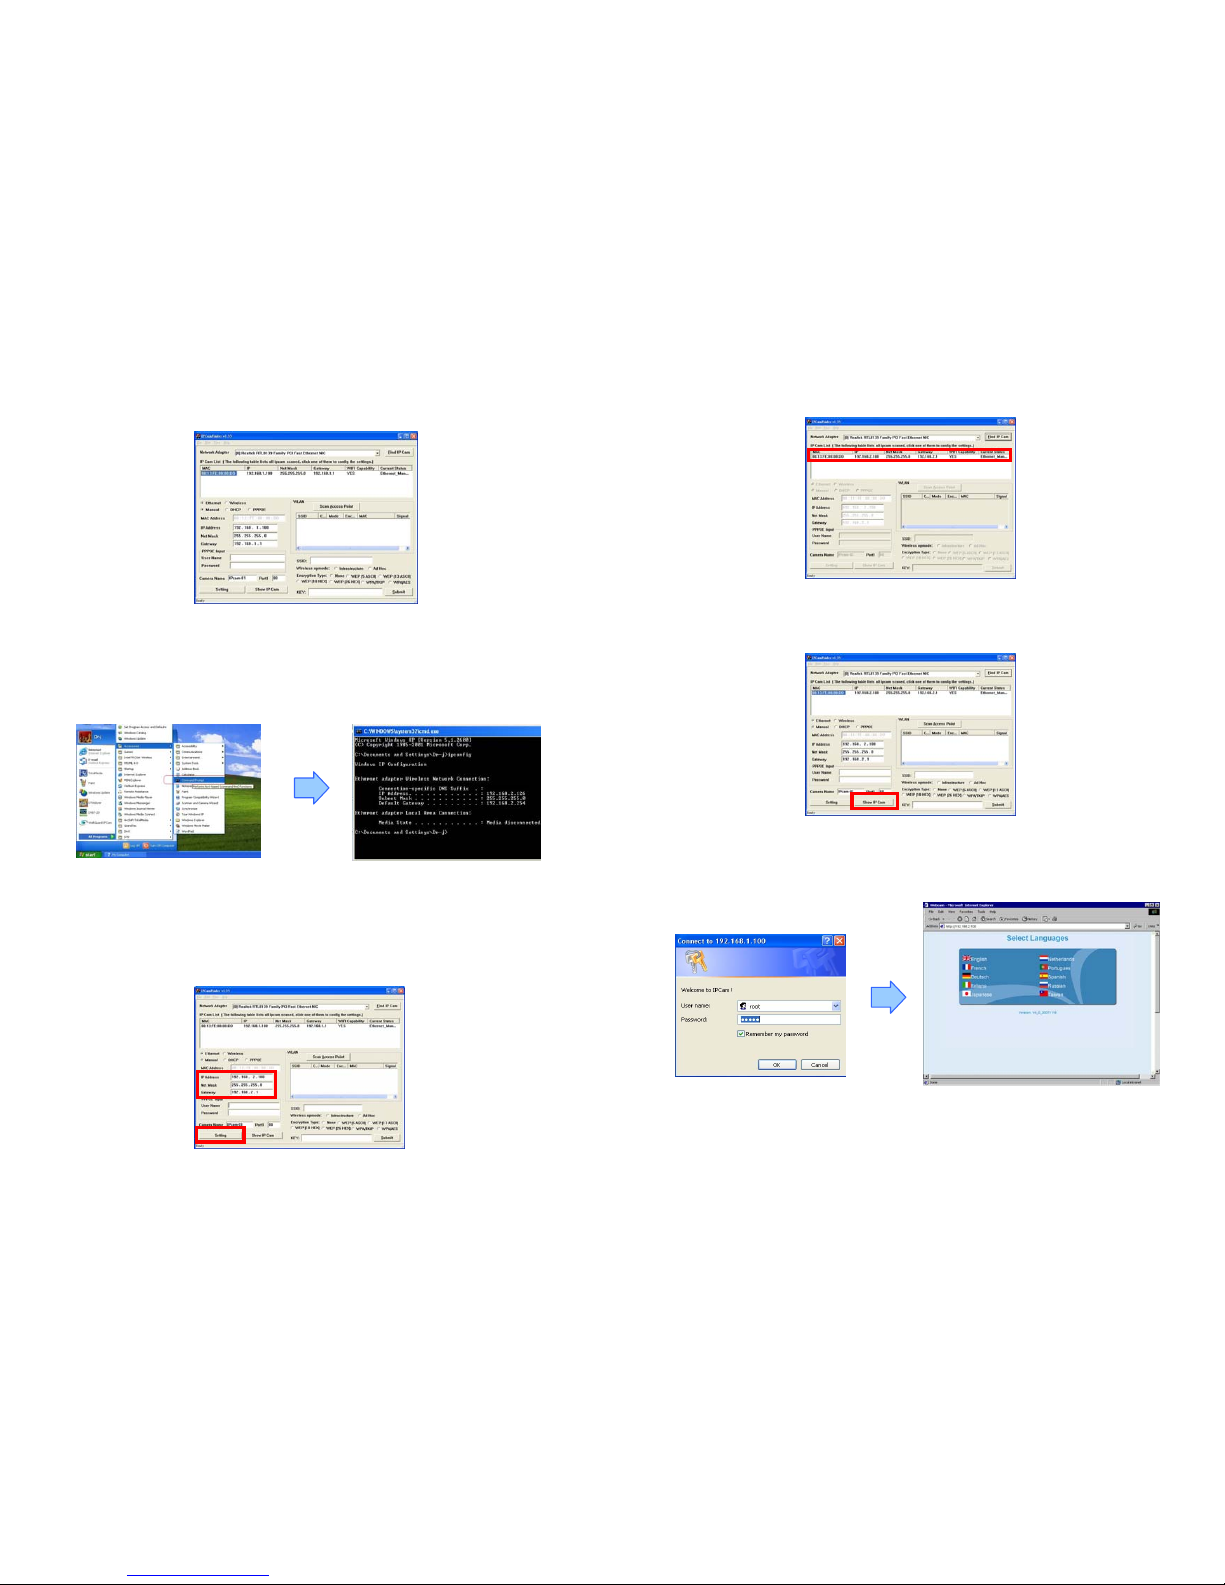
Ste p 1: Execute “Setup.exe” to install the “IPCamFinder” software in the CD driver. Execute the
“IPCam Setup” on the desktop, and the following screen is displayed:
Ste p 2: Click the “Find IP Cam” button, and your camera’s MAC, default IP Address, Net Mask and
Gateway will be listed.
Page 7
7
Ste p 3: Click on the “MAC”, and the “IP Address”, “Net Mask” and “Gateway” will be displayed
below.
NOTE: The IP Address, Net Mask and Gateway must be corresponding with your network settings
for you to access the camera. You can follow the steps below to get your network information.
- Click “Start” → “All Programs” → “Accessories” → “Command Prompt”. A MS-DOS
window will appear. Type “ipconfig” and them press “Enter” to get your network
information.
- Assign IP Address, Netmask (Subnet Mask) and Gateway (Default Gateway) for the Grand
Wi-Fi/ IP Camera Plus. (You must use the same Net Mask (ex. 255.255.255.0) and Gateway
(192.168.2.254). You can use any IP address between 192.168.2.1-254, but make sure that
the IP Address has never been used or is used by another IP addressable device.)
Ste p 4: Directly modify the “IP Address”, “Net Mask” and “Gateway”, and click “Setting” to save.
8
Ste p 5: Click the “Find IP Cam” button again, and the new network information will be listed.
Ste p 6: Select the “MAC” and click the “Show IP Cam” button to connect the Grand Wi-Fi/ IP
Camera Plus.
Ste p 7: When the login screen appears, enter the user name and password (default user name: root,
default password: admin), and click the “OK” button to login your camera.
Page 8
9
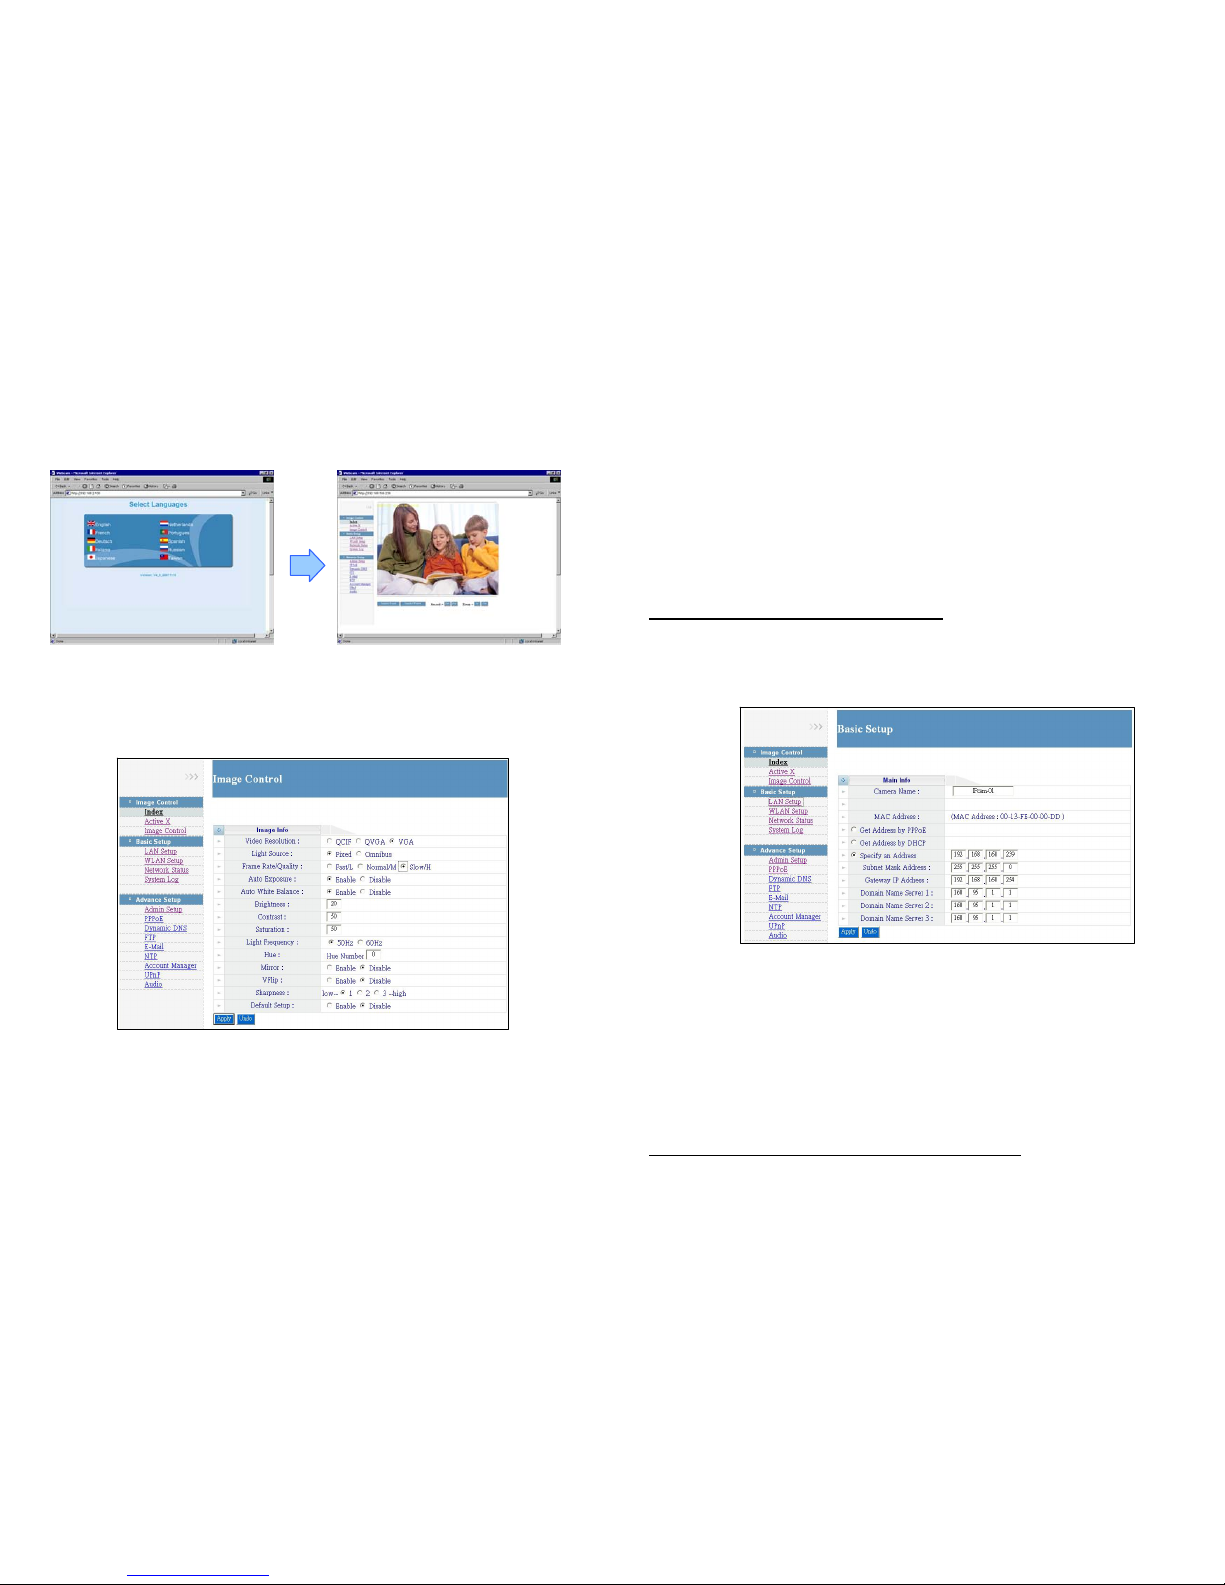
8. Using the Configuration Menu
After login the camera, the “Select Languages” window will appear. Select your language and open up
the main page.
8.1 Image Control
8.1.1 Index: Display a demo image (static image).
8.1.2 ActiveX: Click the “ActiveX” to display image (live video) from any menu.
8.1.3 Image Control
Video Resolution: Select the video resolution among QCIF (176x144)/ QVGA (320x240)/ VGA
(640x480).
Light Source: Set the light source to Fixed (for light environment) or Omnibus (for dim
environment).
Frame Rate/ Quality: Frame Rate/ Quality selection (If the frame rate more than network
bandwidth, the video will be lag or damage).
10
Auto Exposure: Enable/ disable the auto exposure function.
Auto White Balance: Enable/ disable the auto white balance function.
Brightness: Adjust the brightness of the image.
Contrast: Adjust the contrast of the image.
Saturation: Adjust the saturation of the image.
Light Frequency: Select your frequency (50Hz/ 60Hz).
Hue: Adjust the hue of the image.
Mirror: Horizontally rotate the video.
VFlip: Vertically rotate the video.
Sharpness: Sharpness selection.
Default Setup: Select “Enable” and click “Apply” to restore factory default settings.
NOTE: Click “Apply” to confirm your settings.
8.2 Basic Setup
8.2.1 LAN Setup
Camera Name: Display the camera name, you can rename directly in the field.
MAC Address: Display the MAC address of camera.
Get Address by PPPoE: If your camera via PPPoE dial up to internet, select the function and
complete the settings of PPPoE (refer to 8.3.2).
Get Address by DHCP: If you have a DHCP-enabled router, please select the function, then the
router will automatically assigns an IP address to the camera.
Specify an Address: If the camera is connected to a network without a DHCP server, type the
fixed IP Address, Subnet Mask Address, Gateway IP Address and Domain Mane Server for the
camera.
NOTE: Click “Apply” to confirm your settings after setting.
Page 9
11
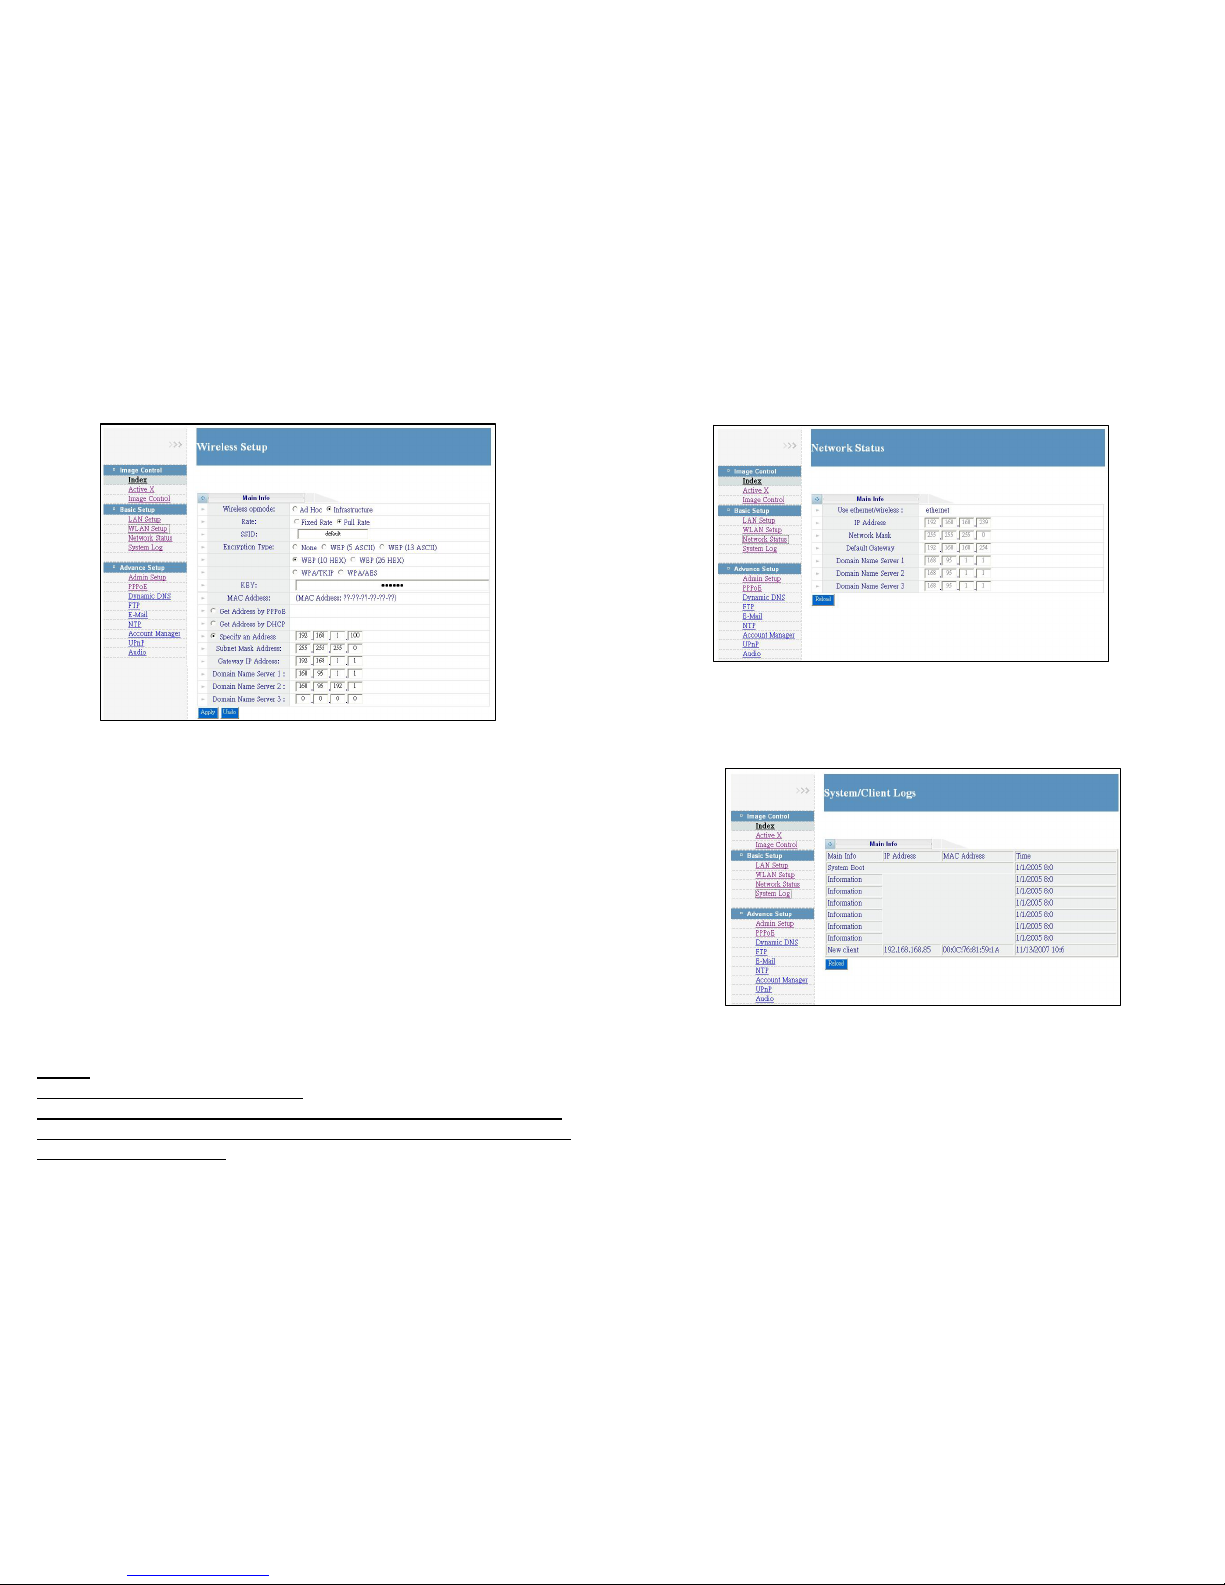
8.2.2 WLAN Setup (only for Grand Wi-Fi Camera Plus)
Wireless mode:
- Ad Hoc: Connect directly to a computer in a peer-to-peer environment.
- Infrastructure: By using an AP (Access Point) or a wireless router to connecting the
WLAN.
Rate: Select the wireless rate Fixed Rate/ Full Rate.
SSID: SSID is a name to identify a wireless network. You can enter SSID name manually.
Encryption Type: Select the Encryption Type.
Key: To connect to an encrypted wireless device, the password you enter here must match the
password of the device exactly.
MAC Address: Display the MAC address of camera.
Get Address by PPPoE: If your camera via PPPoE dial up to internet, select the function and
complete the settings of PPPoE (refer to 8.3.2).
Get Address by DHCP: If you have a DHCP-enabled router, please select the function, then the
router will automatically assigns an IP address to the camera.
Specify an Address: If the camera is connected to a network without a DHCP server, type the
fixed IP Address, Subnet Mask Address, Gateway IP Address and Domain Mane Server for the
camera.
NOTE:
1. Click “Apply” to confirm your settings.
2. If you want to use the wireless network connection, you must change the Wireless/
RJ-45 switch (on the right side of the Grand Wi-Fi Camera Plus) to the wireless mode
after setting the WLAN Setup.
12
8.2.3 Network Status: Display the current information of network.
8.2.4 System Log: List the information of connection logged (IP Address, MAC Address and Login
Time). Click the “Reload” to load the latest information.
Page 10
13
8.3 Advance Setup
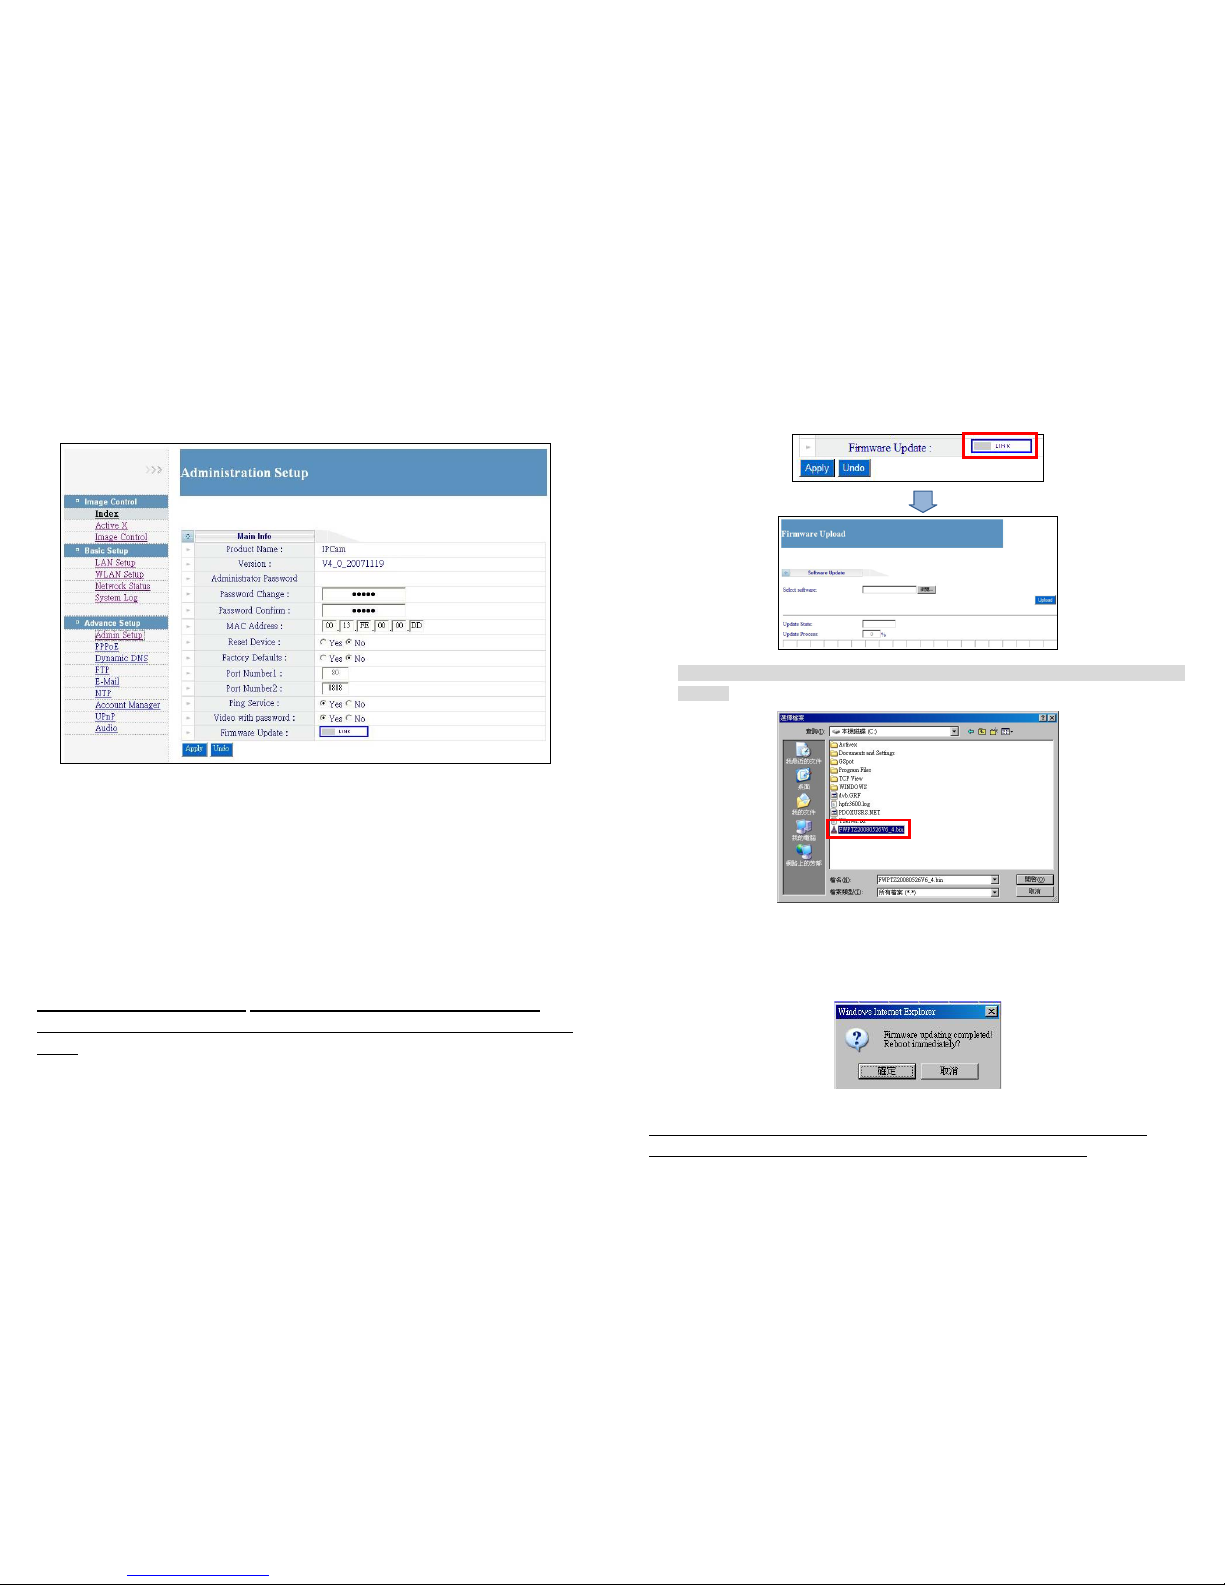
8.3.1 Admin Setup
Product Name: Display the camera’s name.
Version: Display the firmware version of camera.
Administrator Password:
- Password Change: Enter the new administrator password to access the camera.
- Password Confirm: Confirm the new password, enter it again.
MAC Address: Display the MAC address of camera.
Reset Device: Select “Yes” and click the “Apply” to restart the camera.
Factory Default: Select “Yes” and click the “Apply” to restore factory default settings.
Port Setting: You can change the port number if using multiple cameras (Port Number 1:
Defaulted as 80, Port Number 2: Defaulted as 8888).
NOTE: You must also set up your router to open the ports of cameras for remote
access the cameras via internet (refer to your router’s user manual for how to open up
ports).
Ping Service: Select “No” to hide the IP address. (prevent the ping command)
Video with password: Select “Enable”, and you can login the camera without password.
14
Firmware Update: Search the latest firmware and update automatically.
Step 1: Click on the LINK button to open the Firmware Upload page.
Step 2: Click on the Browser button, and there will pop up a dialogue box for you to choose the
firmware.
Step 3: After choosing the firmware, click the Upload button for uploading the file. When the
process is done, there will pop up a message to tell you that the update is completed and ask you
for rebooting the camera.
Notice: You should NOT power off or remove the cable from the camera before the process is
completed. For that will damage your camera and make some hardware errors on it.
Page 11
15
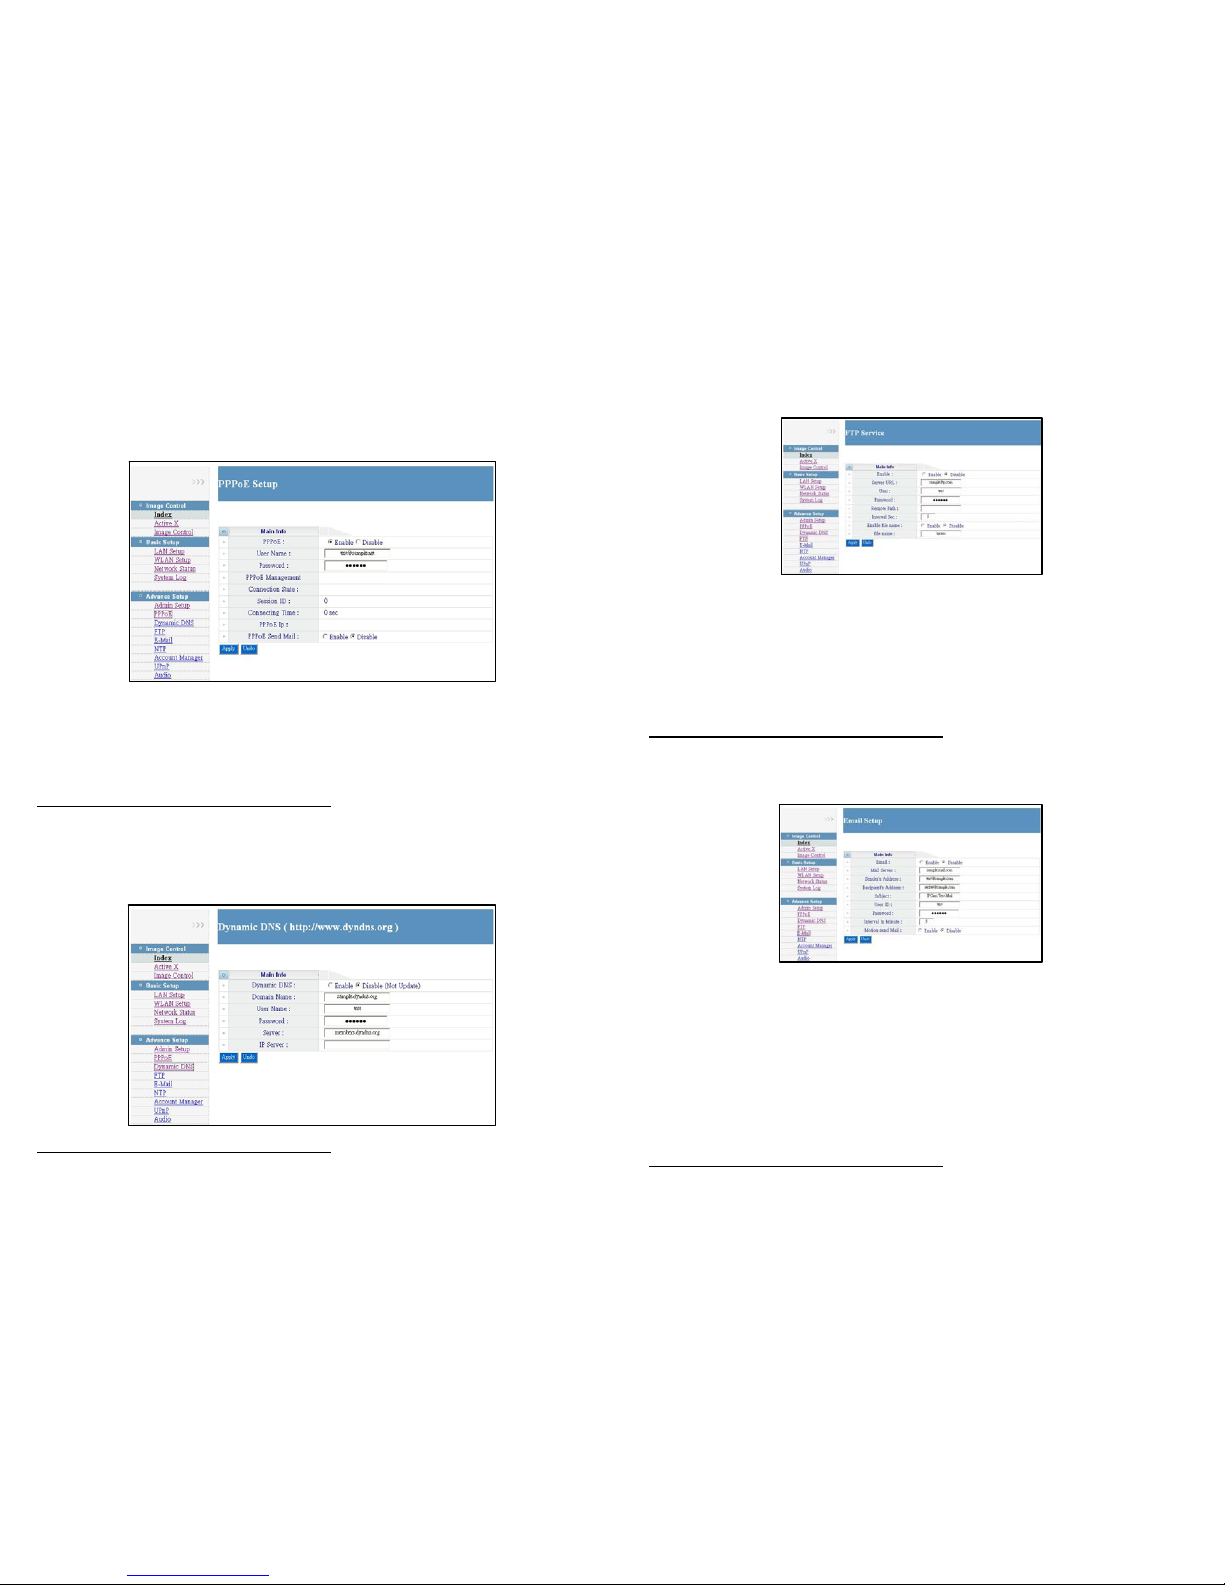
8.3.2 PPPoE:
The Grand Wi-Fi/ IP Camera Plus can directly connect to the ADSL. It should be setup on the LAN
environment to setup the PPPoE information before connecting to the ADSL modem.
PPPoE: Enable/ disable the PPPoE function.
User Name: Enter the PPPoE account provided by the ISP
Password: Enter the password provided by the ISP.
PPPoE Management: If the ADSL modem and the camera are connected and after the
information of PPPoE are set, the current PPPoE status will be displayed.
NOTE: Click “Apply” to confirm your settings.
8.3.3 Dynamic DNS: If you are using a DDNS connection, enable the DDNS function and enter
domain name, User Name and Password.
NOTE: Click “Apply” to confirm your settings.
16
8.3.4 FTP: Upload the motion-detected images to FTP server.
Enable: Enable/ disable the FTP function.
Server URL: Enter the domain name or IP address of the FTP server.
User: Enter the user name of the FTP server.
Password: Enter the password of the FTP server.
Remote Path: Enter the folder path to store the images on the FTP server.
Interval Sec: Set the interval time to upload the image.
Enable file name: If you select “Disable”, the latest image will replace the original image.
File name: Set the file name of the image.
NOTE: Click “Apply” to confirm your settings.
8.3.5 E-Mail: Capture and e-mail the image.
Enable: Enable/ disable the E-mail function.
Mail Server: Enter the domain name or IP address of the Mail server (POP3).
Sender’s Address: Enter the e-mail address of the sender.
Recipient’s Address: Enter the e-mail address of the recipient.
Subject: Enter the subject of the mail.
User ID: Enter the user name of the Mail server.
Password: Enter the password of the Mail server
Interval In Minute: Set the interval time to mail the image.
Motion send Mail: Send the mail with image while sensing approaching subjects (refer to page
17 for set the motion detection sensitivity).
NOTE: Click “Apply” to confirm your settings.
Page 12
17
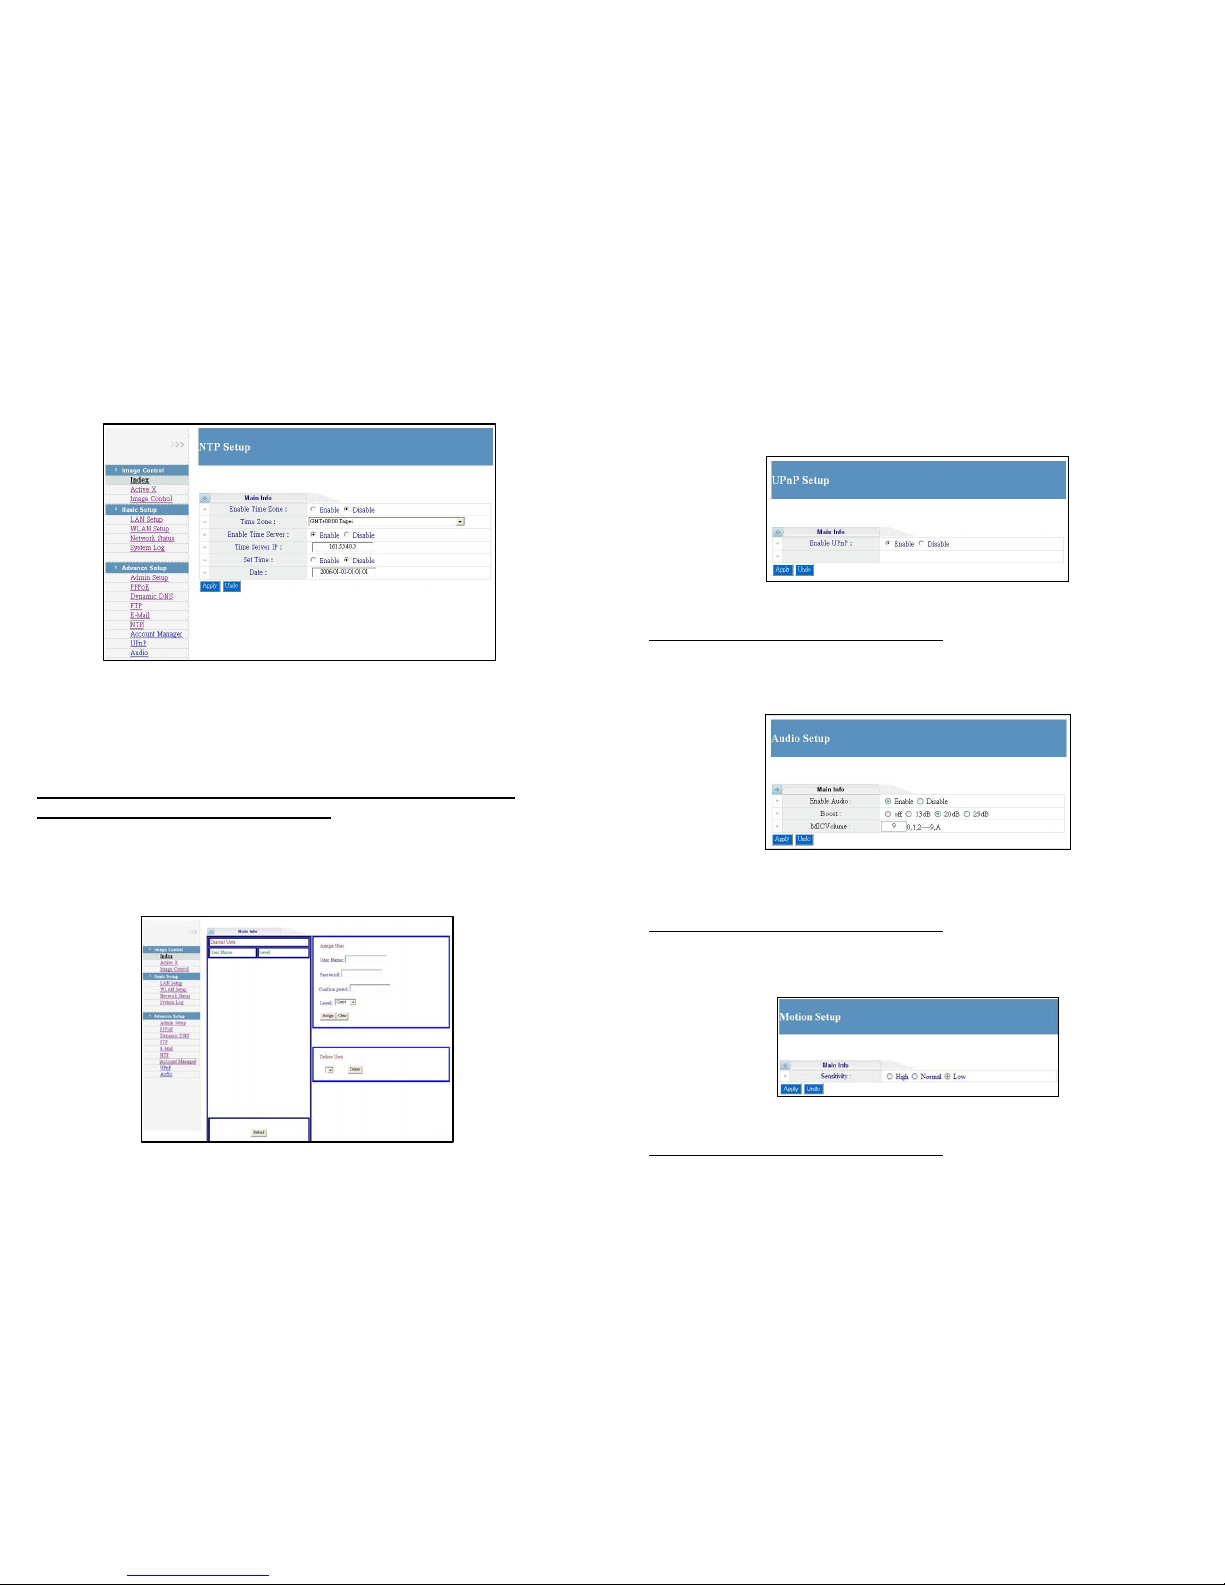
8.3.6 NTP
Enable Time Zone: Enable/ disable the Time Zone function.
Time Zone: Local time zone selection. (the Time Zone function must be enabled)
Enable Time Server: Enable/ disable the NTP server function.
Time Server IP: Enter the domain name or IP address of the NTP server.
Set Time: Enable/ disable the manually set time function.
Date: Display the current time, you can set the time manually.
PS: If you use the NTP server function, please disable the Set Time (manual) function.
NOTE: Click “Apply” to confirm your settings.
8.3.7 Account Manager: Set up the users and administrators for the camera (provides 3
layers: administrator/ User/ Guest).
18
8.3.8 UPnP: The Grand Wi-Fi/ IP Camera supports UPnP function. If your operating
system is UPnP enabled, the device will easier to configure. (If your operating system is
Windows 98/ 2000, UPnP is unavailable.)
Enable UPnP: Enable/ disable the UPnP function.
NOTE: Click “Apply” to confirm your settings.
8.3.9 Audio
Enable Audio: Enable/ disable the Audio function.
Boost: Enter the domain name or IP address of the NTP server.
MIC Volume: Enter the value of microphone volume.
NOTE: Click “Apply” to confirm your settings.
8.3.10 Motion
Sensitivity: Set the motion detection sensitivity (High/ Normal/ Low).
NOTE: Click “Apply” to confirm your settings.
Page 13
19
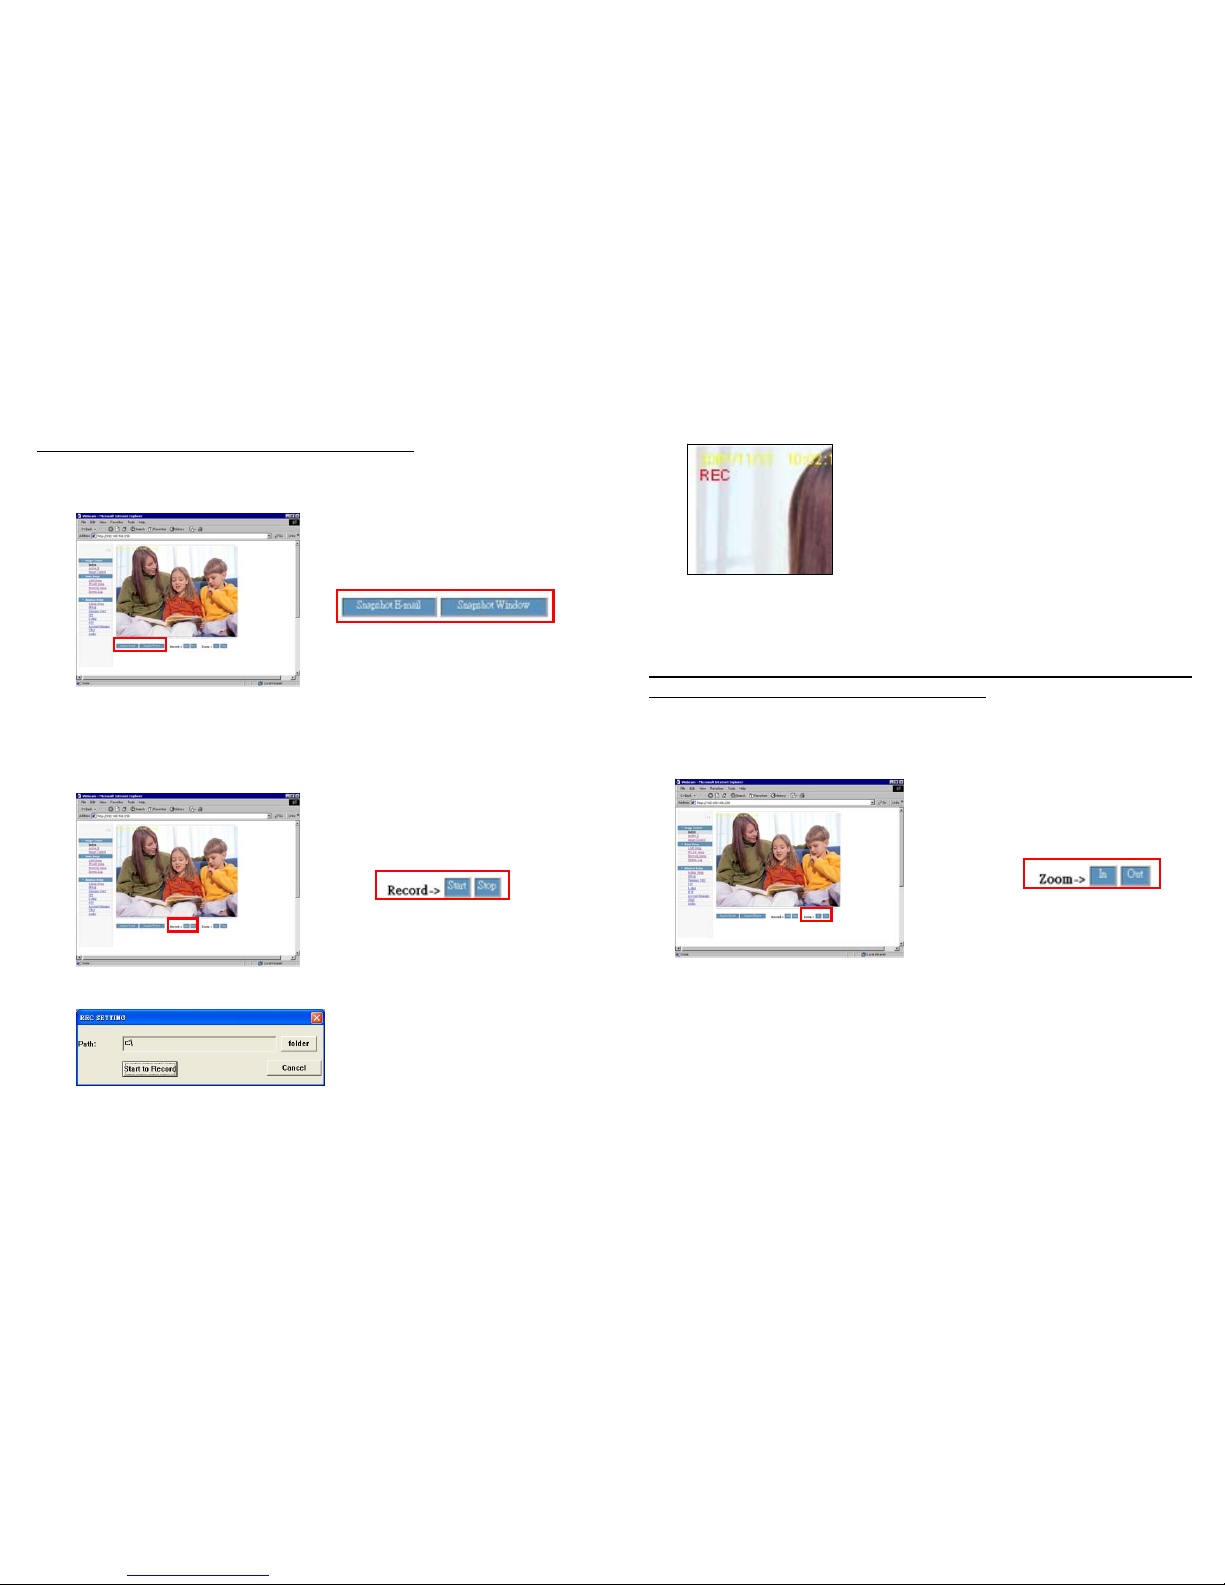
8.4 Snapshot Function
8.4.1 Snapshot E-mail: Click the “Snapshot E-mail” to send an e-mail with the current image.
NOTE: Confirm the Mail Server has been set (refer to 8.3.5).
8.4.2 Snapshot Window: To open a browser window and display the current image. You can Right
Click on the screen and save the image.
8.5 Image Recording
Step 1: Click “Start”, and the “REC SETTING” window will appear. Enter the folder path, and click
the “Start to Record” button to start recording (AVI format).
REC SETTING
20
Ste p 2: The “REC” will appear on right-up position of the image when recording, you can click
“Stop” to stop recording.
Step 3: The recording files (AVI format) can be played by Windows Media Player program. These
files are named as yyyy_mm_dd_hh_mm_ss_ms.avi.
NOTE: Do not adjust the image settings (ex. resolution, quality, brightness or contrast)
while recording, otherwise the recording file may be error.
8.6 Zoom In (Out) Function
Click the Zoom In/ Out button to digital zoom the image. (up to 15 level)
Page 14
21
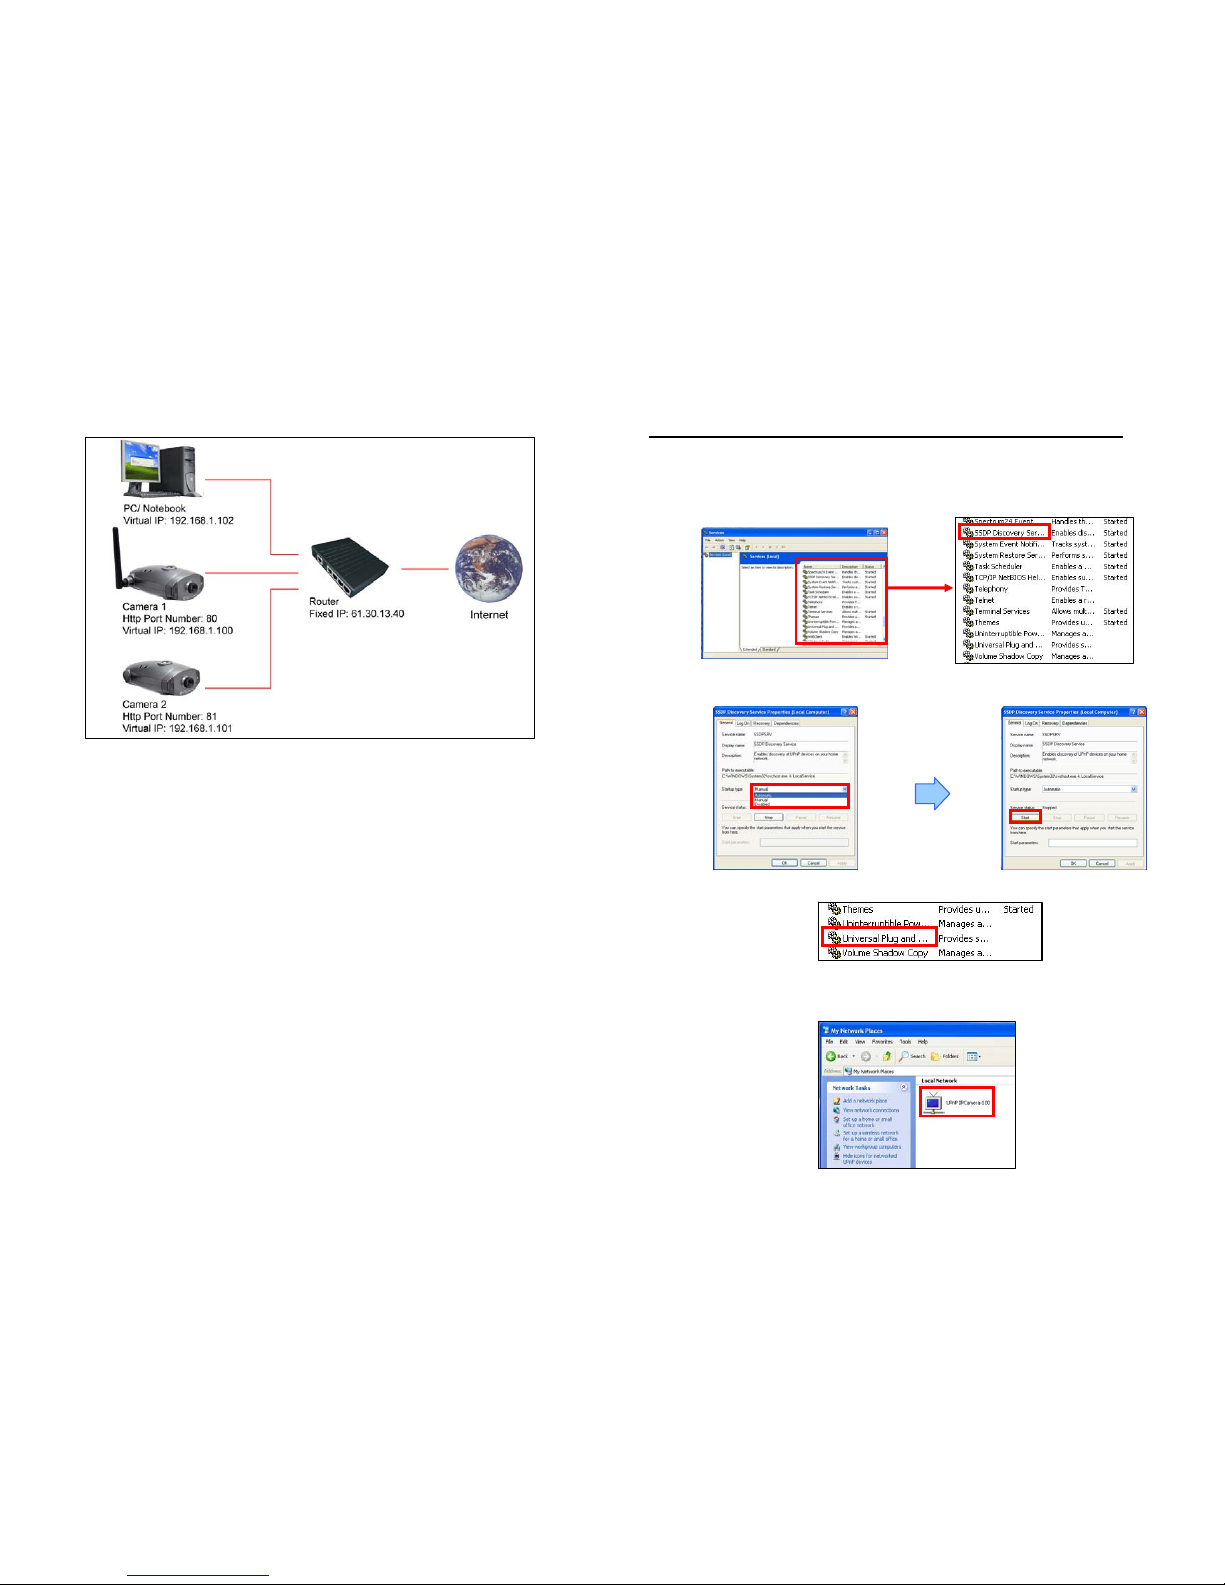
9. Connecting Multiple Cameras to a Router
Step 1: Assign a local IP Address and Http Ports for your cameras (confirm the cameras settings
corresponding to your network settings; you must use the same gateway and Subnet Mask).
Ste p 2: Set up the router to open the ports of cameras for remote access the cameras via internet (refer
to your router’s user manual for how to open up ports).
Ste p 3: Accessing your cameras.
- Access on local network
Enter “http:// 192.168.1.100” to access the camera 1; enter “http:// 192.168.1.101” to access the
camera 2.
- Access from the internet
Enter “http:// 61.30.13.40:80” to access the camera 1; enter “http:// 61.30.13.40:81” to access the
camera 2.
22
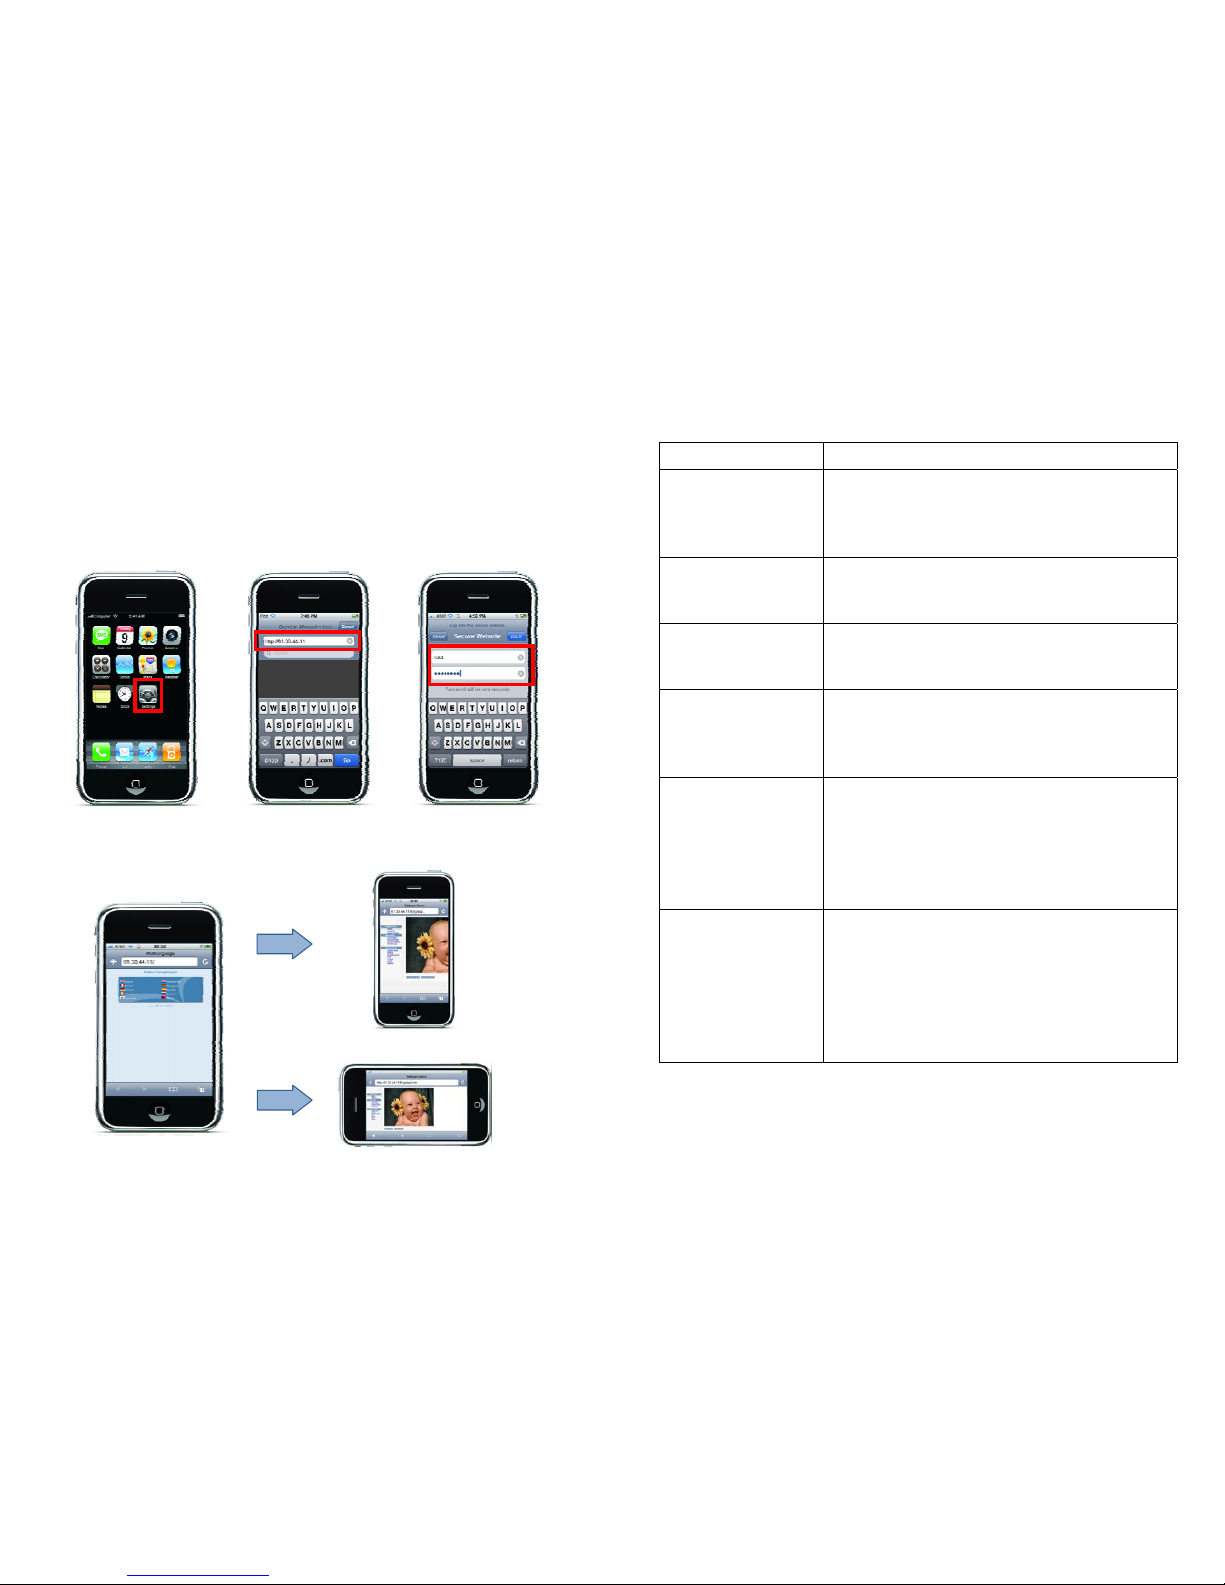
10. Using UPnP to Connect to the Camera
NOTE: If your operating system is Windows 98/ 2000, UPnP is not available.
Ste p 1: Confirm the UPnP function of camera has been enabled (refer to 8.3.8).
Step 2: Follow the steps below to enable UPnP for Windows ME/ XP.
- Click “Start” → “Setting” → “Control Panel” → “Administrative Tools” → “Services”.
- In the “Services” window, double-click the service “SSDP Discovery Service”.
- Select “Automatic” in the “Startup type” item, and click “Start” to start the service. Click
“OK” to quit.
- Repeat the steps above to start the “Universal Plug and Play” service.
Step 3: Open the “My Network Places” on the desktop, click the “UPnP IP Camera-100” to connect
directly the camera. (The last digits “100”, represent the fourth octet of your camera’s IP address)
Page 15
23
11. View the Camera from iPhone
Ste p 1: Assign your IP Camera an IP address and make your IP Camera accessible through the
Internet.
Ste p 2: Connect your iPhone to the network via 3G or Wi-Fi (refer to your user’s manual of iPhone
for detail about network setting).
Ste p 3: Touch the Web browser icon for opening the browser. Enter the URL that you assign to your
IP Camera (we use IP in this case). Then the IP Camera will ask you user name and password for
authentication.
Step 4: After login into the IP Camera, you might select the language you want to use. And you might
also rotate your iPhone for a wider view.
Rotate
24
12. T r oubleshooting
Situation Check Point
The focus is bad
1. Adjust the camera’s image quality through the
configuration menu (refer to page 9).
2. Adjust by turning clockwise or counter-clockwise the
focus manually.
Noisy Image
1. If the camera works in dim environment, the images might
be noisy. You need more lighting, or set the light source to
Omnibus mode (refer to page 9).
No images available
through Web browser
1. Confirm the ActiveX has been enabled (refer to page 5).
2. Confirm the version of your Internet Explorer. If the
version number lower than 5, you need to upgrade it.
Can’t connect externally
(can work locally)
1. This might be caused by the firewall protection. Check the
internet firewall with your system administrator.
2. Refer to page 20 for more information about connecting
multiple cameras to a router.
Forgot the login user
name and password
1. Press continuously the default button on the top of
the camera about 5 seconds to restore the factory
default settings.
Default User Name: root
Default Password: admin
Default IP Address: 192.168.1.100
Wireless network not
working (only for Grand
Wi-Fi Camera Plus)
1. Confirm the WLAN Setup has been set correctly
refer to page 11).
2. Confirm the Wireless/ RJ-45 switch (on the right side
of camera) has been switched to Wireless mode.
3. Ensure that you wireless router supports 802.11b/g.
4. Adjust the wireless antennas for better signal
reception.
Page 16
1
Dynamic DNS Online Help
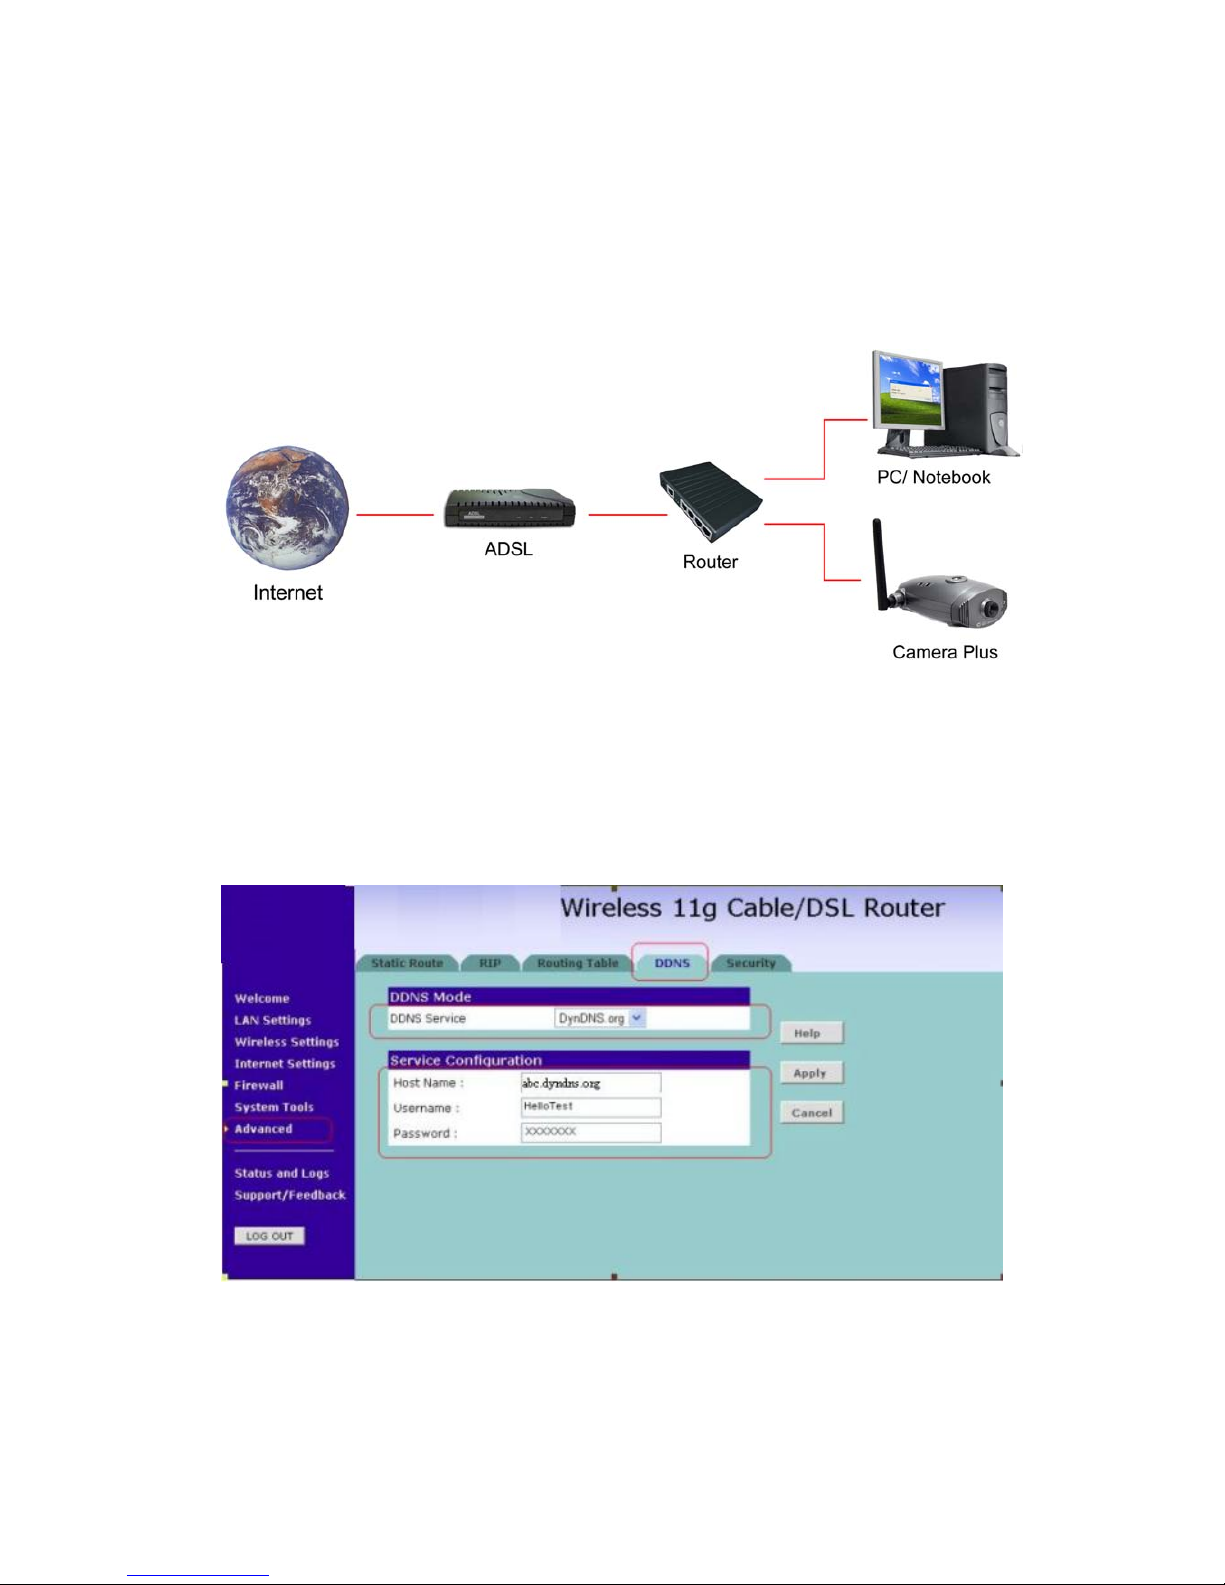
Chapter 1 Router(with DDNS function)+IP Camera
We suggest you use the Router to setup the DDNS function
The system map likes the following
ADSL + Router (with DDNS function) + IP Camera
1. Connect to your router and setup the DDNS function
Page 17
2
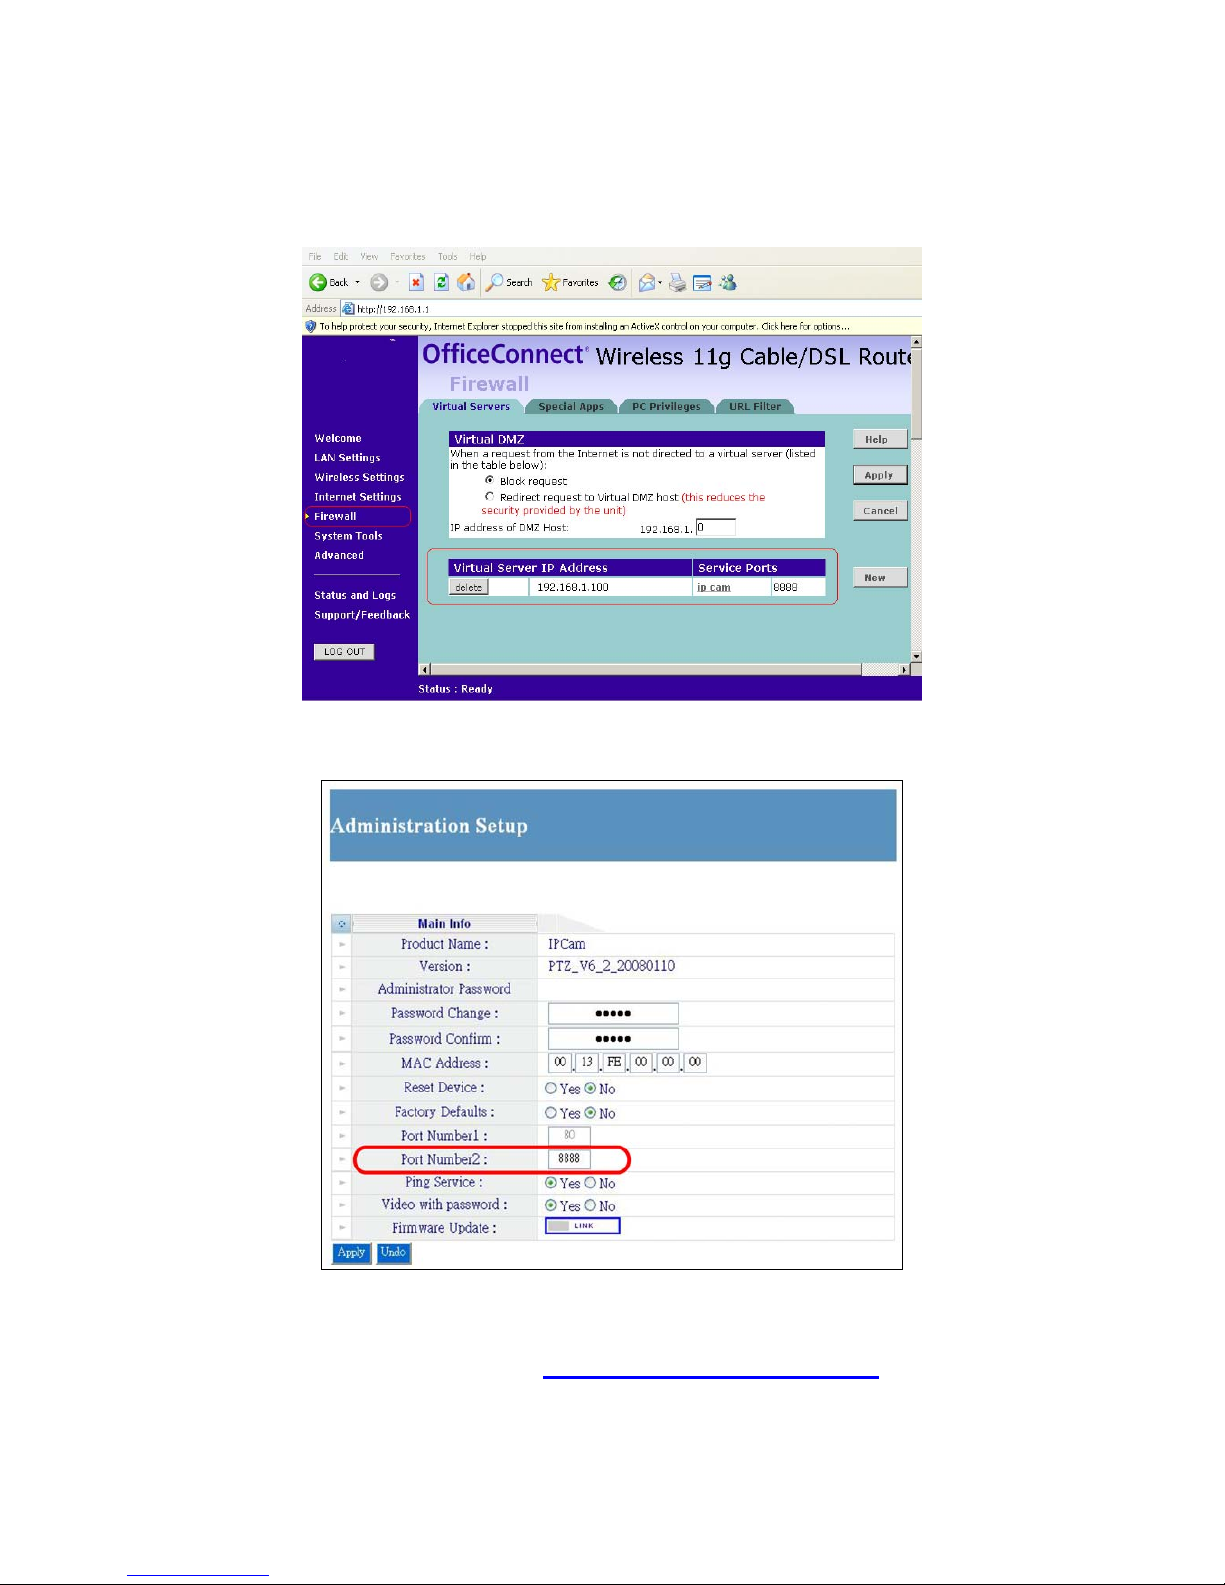
2. Setup your firewall or gateway, and assign a Local Virtual
IP:192.168.1.100 and open a port 8888 for the IP Cam, the
following figure is just a example.
3. In this Page “Administrator Setup”, assign a port number in the
Port Number2 field for the IP Cam (ex. 8888)
4. In the Remote Computer, please open the Internet Explorer
and input the IP address: http://abc.dyndns.org:8888
Page 18
3
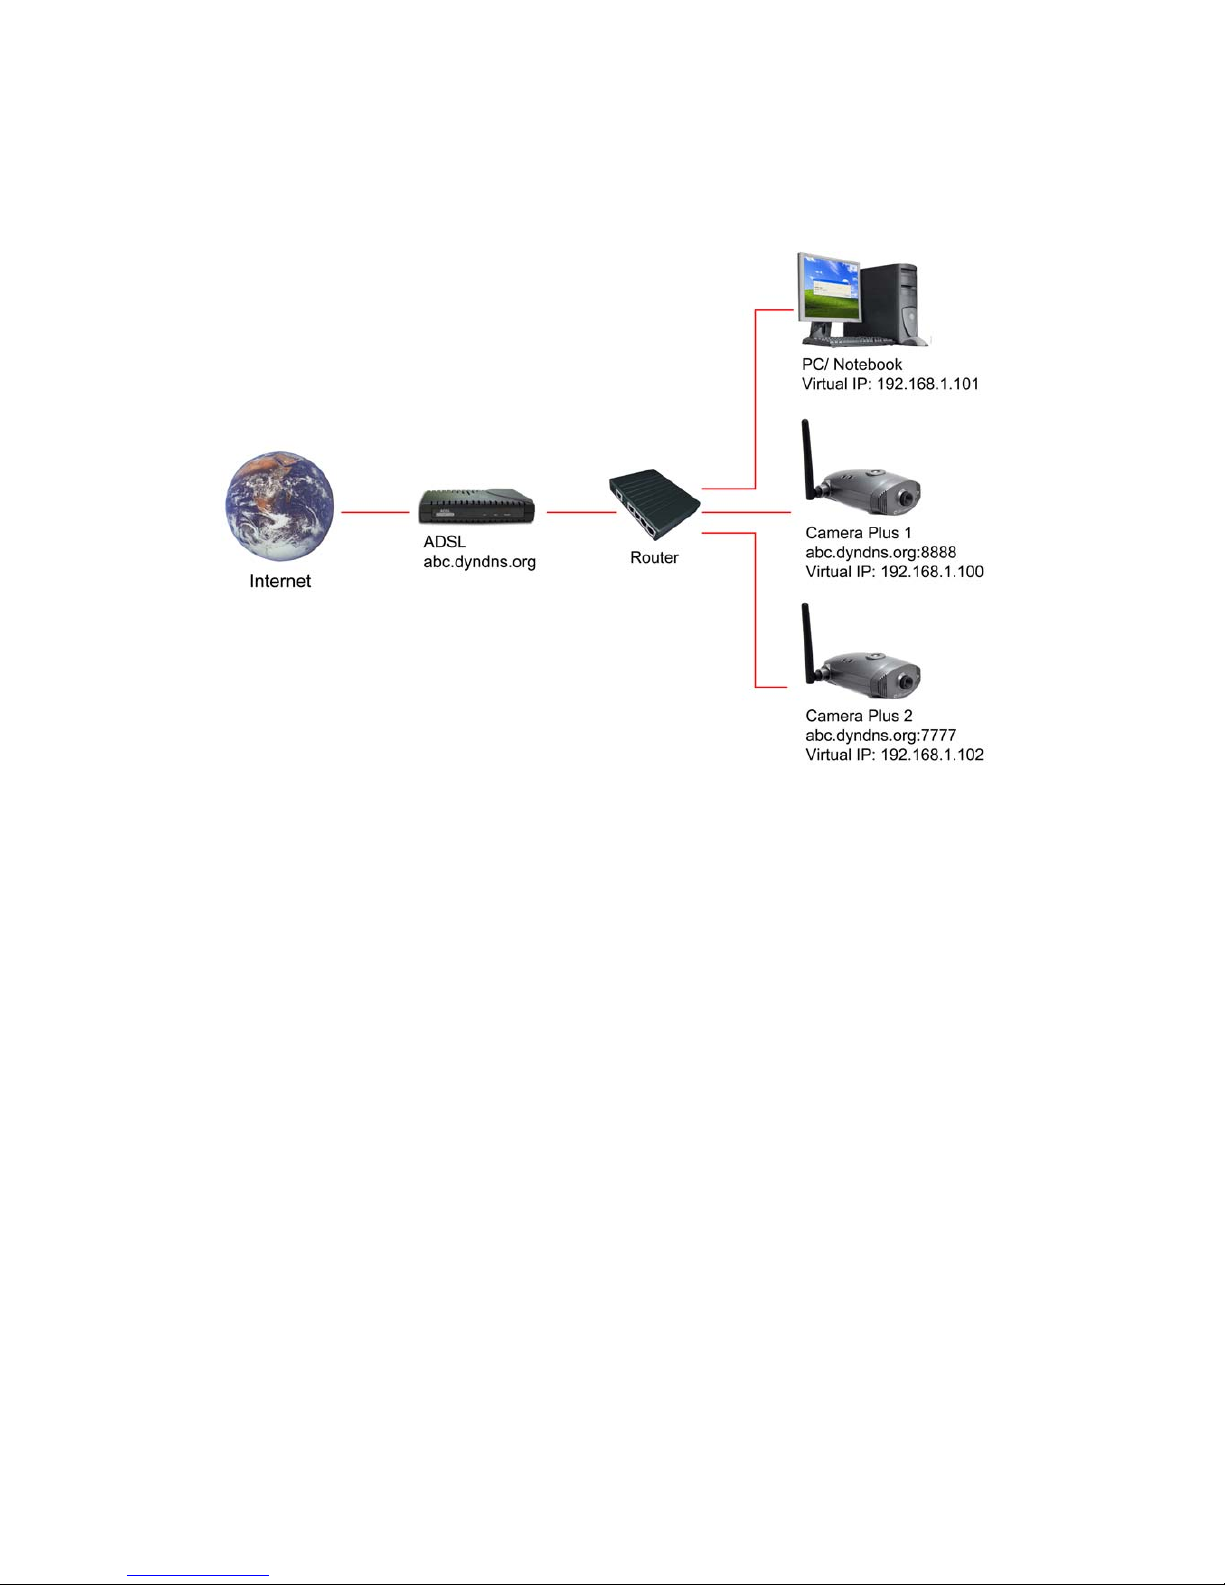
5. If there are more than one IP Cameras: likes the following
map
Page 19
4
Chapter 2 IP Camera(with DDNS Function)
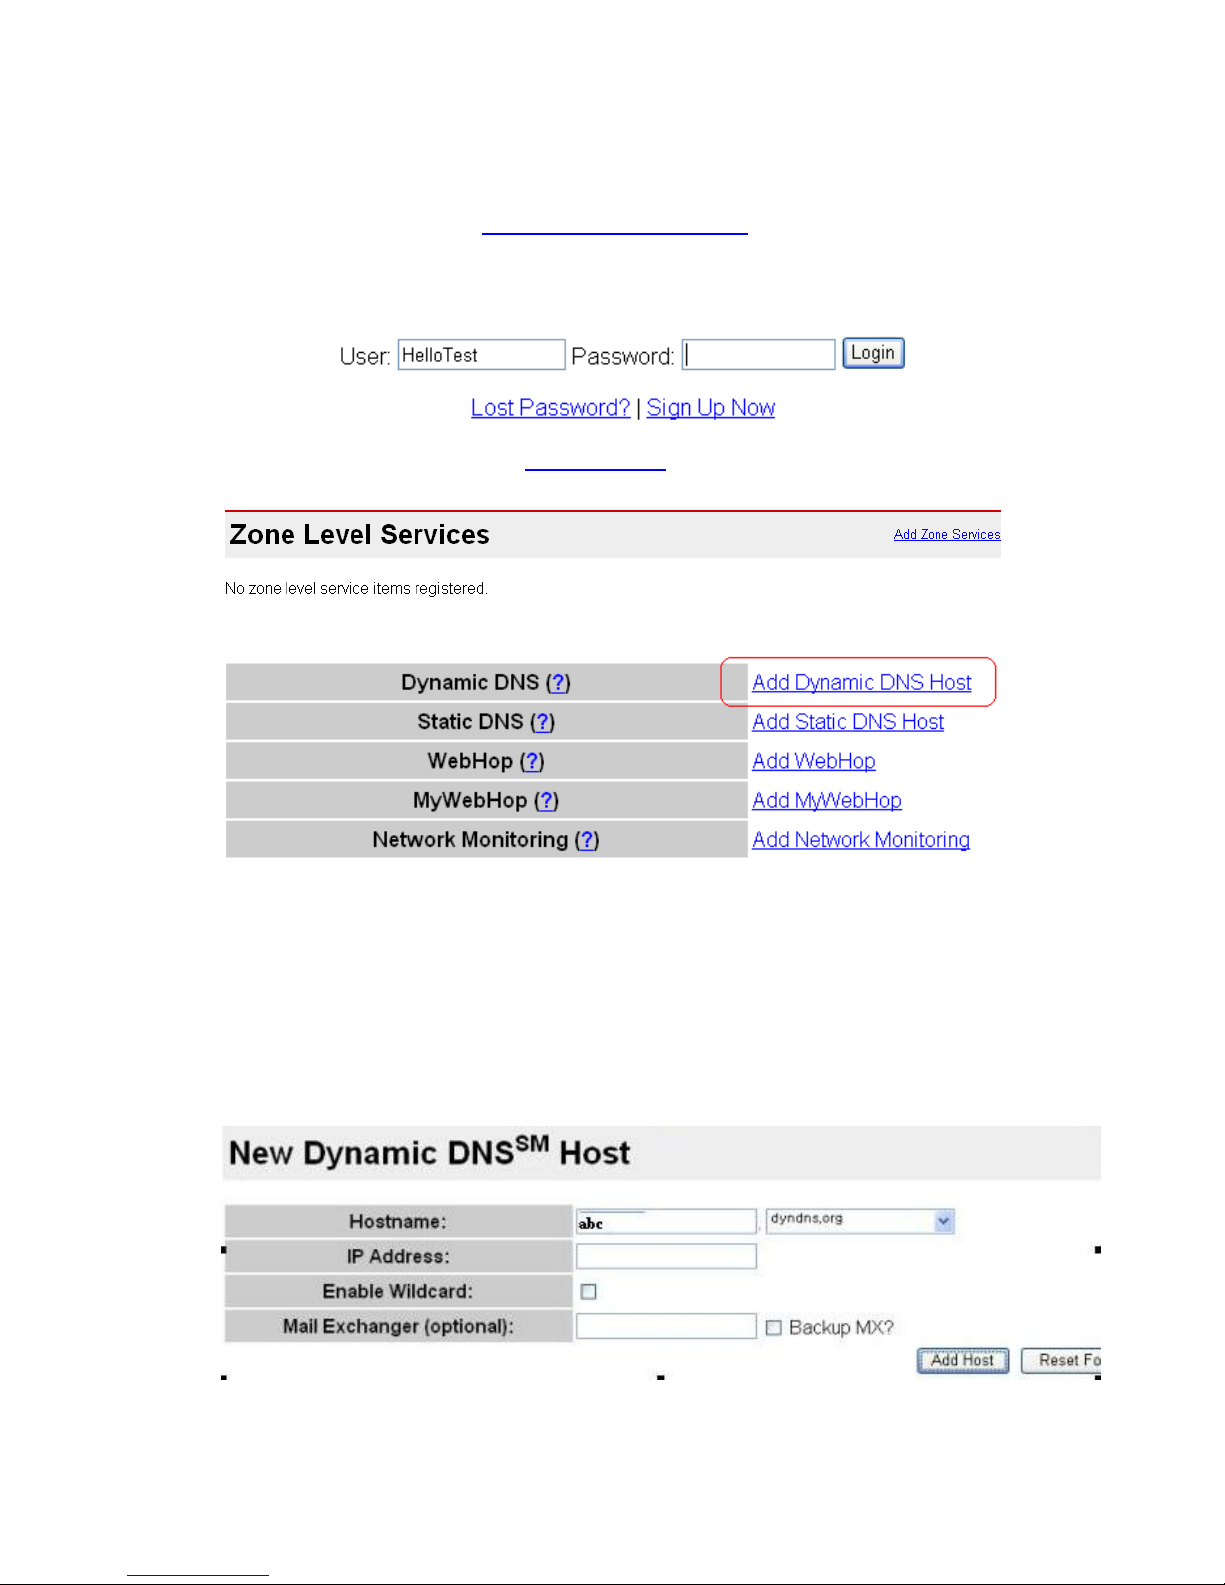
1. Please connect to http://www.dyndns.org/
2. If you own one account, please login or you need to sign up
a new one.
3. Connect to the Page”
My Services...” and click Add Zone
Services
4. Add Dynamic DNS Host
5. Select a DNS server. We suggest “dyndns.org”
6. Input a Hostname ex: abc
7. If you own s Dynamic IP Address, you can ignore the “IP
Address Item”
8. you can ignore those Items “IP Address”, ”Enable Wildcard”, “Mail
Exchanger”, ”Backup MX”
9. Add Host
Page 20
5
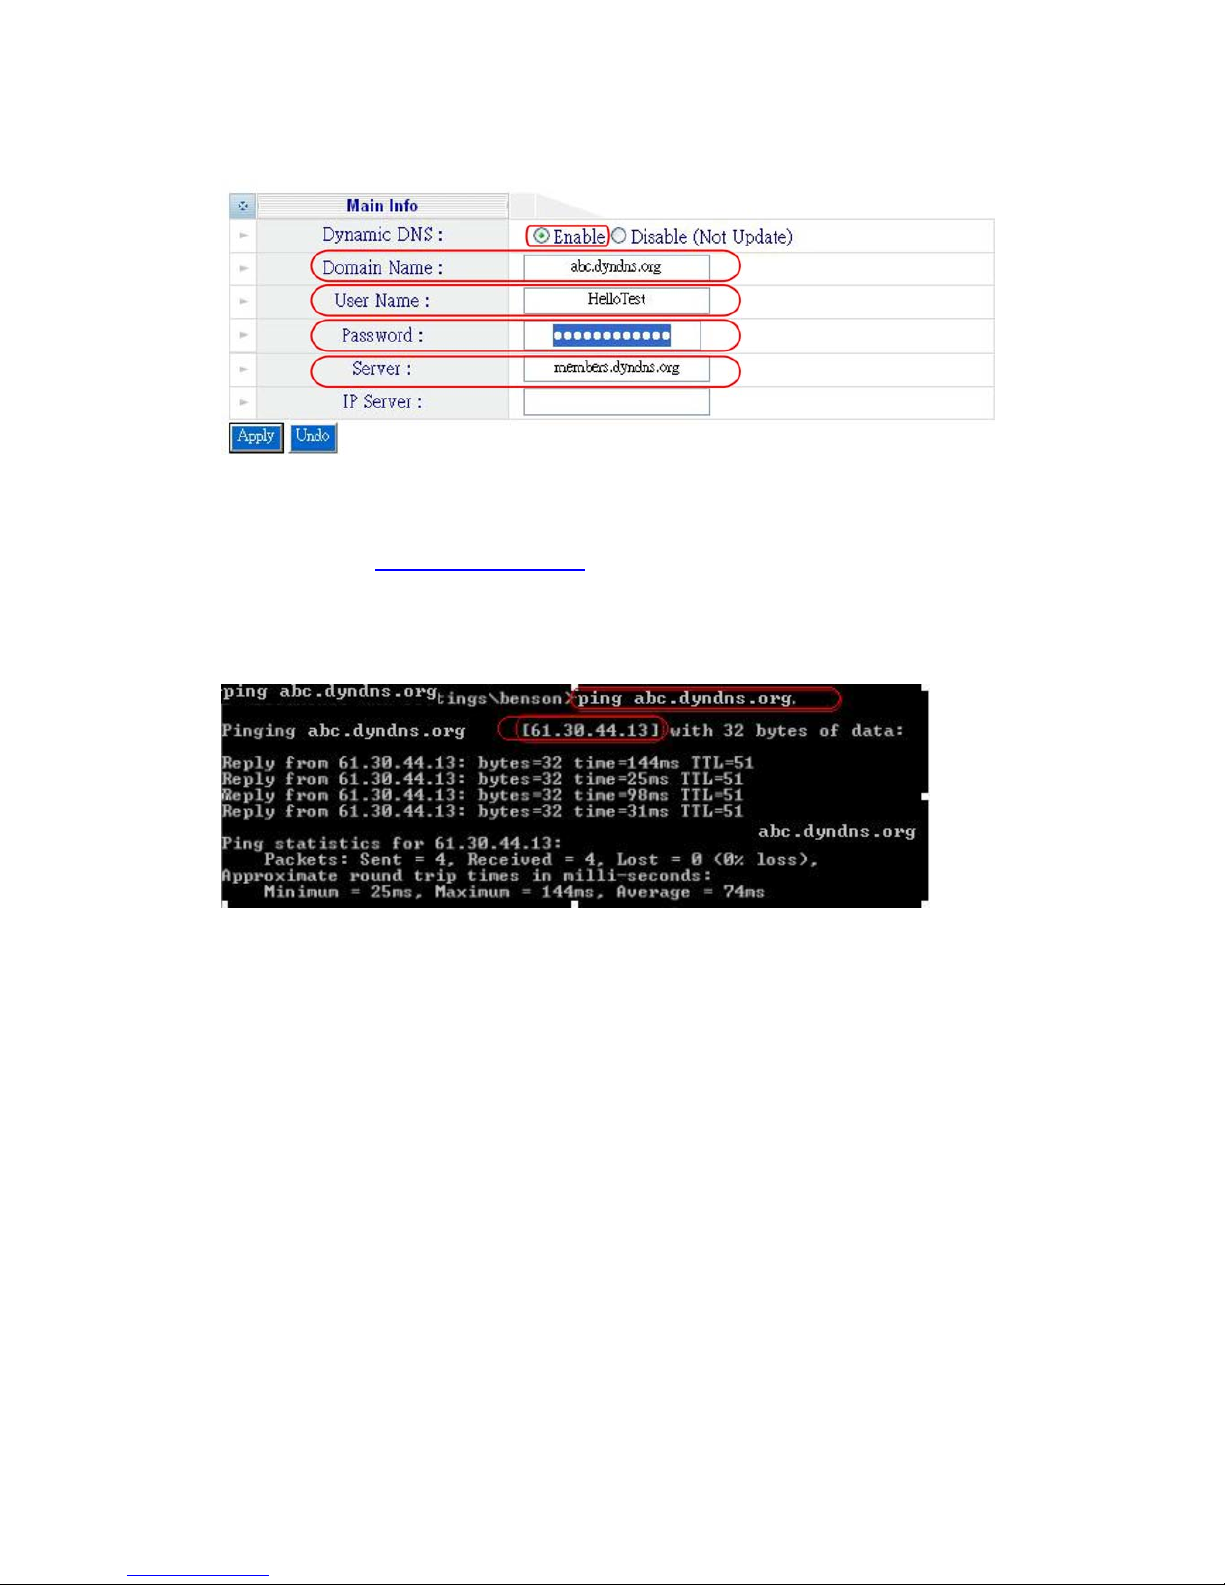
10. Setup IP Camera Dynamic DNS Page
(Important: the server must be “members.dyndns.org”)
11. Click Apply and wait about 5 minute to update the IP Address Automatically
12. Connect to http://abc.dyndns.org
13. If you can’t connect to the IP Camera, Please reboot the IP Camera and
wait about 5 minute to update the IP Address Automatically.
14. Try the Command “Ping ” to get the new IP Address
15. If the IP address cannot be updated, Please reboot the IP Camera, or
check the ID, password, Server (members.dyndns.org), and Domain name.
Page 21
Surveillance Software – WalkGuard 7.0
User Manual
1. Introduction
The WalkGuard 7.0 product is Windows based (compatible with Windows
2000/ XP/ Vista) applications that manage networked IP/ Wi-Fi cameras.
The WalkGuard 7.0 allows you to view multiple cameras (1/ 4/ 9/ 16) and
record in DivX format, and includes motion detection function and alarm functions.
The WalkGuard 7.0 is an ideal solution for IP/ Wi-Fi camera.
2. Features
1. DivX Capture (v6.5.1)
2. Video File Management: Video file database and playback control.
3. Storage Recyclable: When running out of disk space, files with the earliest date
will be overwrite automatically.
4. Motion Detection: Detect any movement in the mask area and invoke the alarm
as soon as movement is detected.
5. Supports 4/ 9/ 16 cameras preview and record.
6. Multi-Languages OSD: English/ French/ German/ Italian/ Dutch/ Spanish/
Russian/ Japanese/ Traditional Chinese.
7. Compatible with Windows 2000, XP and Vista.
3. System Requirements
1. Operating System: Microsoft Windows XP/ Vista.
2. Processor
- Pentium 4 2.4GHz or above (running on Windows XP/ Vista 32bit)
- Pentium D 3GHz or above (running on Windows Vista 64bit)
3. RAM
- 512MB RAM or above (running on Windows XP/ Vista 32bit)
- 1GB RAM or above (running on Windows Vi sta 64bit)
4. 4 GB HD space
Preview Recording
Resolution 640 x 480 NTSC:320 x 240
Frame Rate 15 – 30 frames 15 – 25 frames
HD requirement 3~5GB /24hour
4. Software Installation
4.1 Install the Software
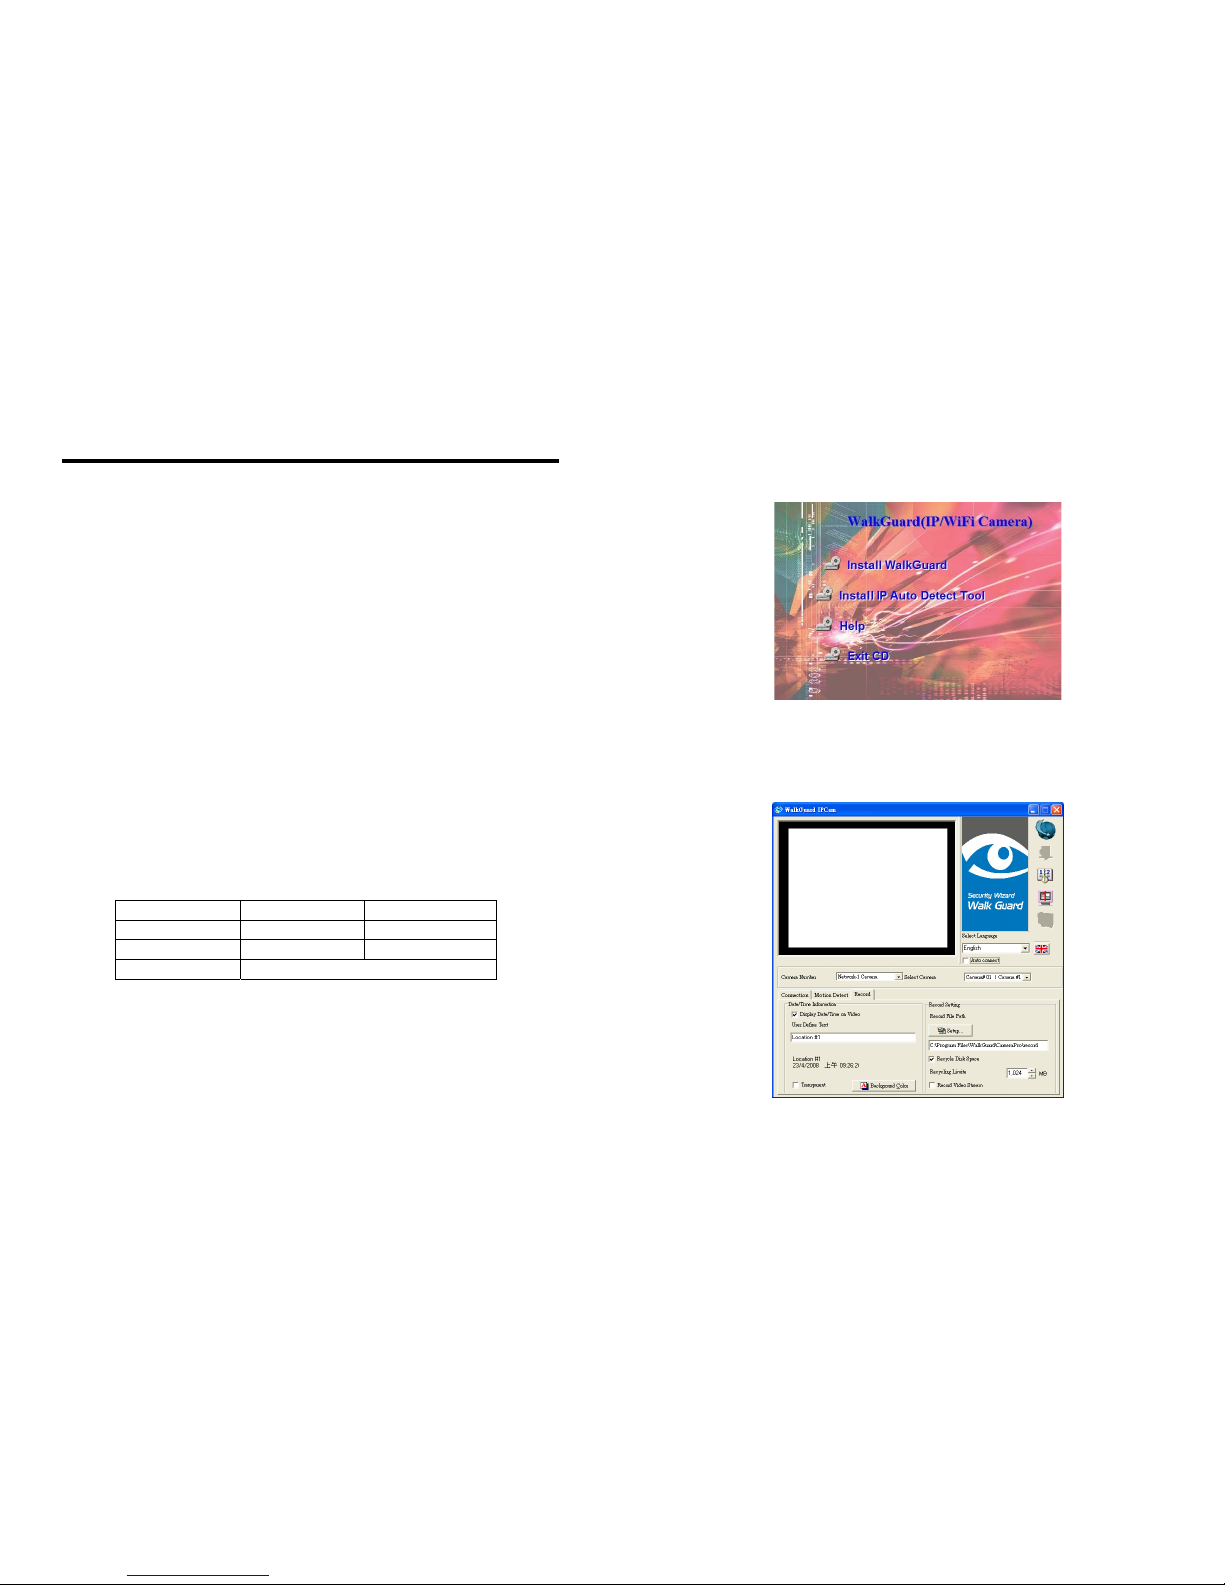
Insert the CD Driver to your CD-ROM driver, and a pop-up window will
appear. Click the “Install WalkGuard” item to install.
4.2 Starting the WalkGuard
Execute the WalkGuard on the desktop, and the following screen is
displayed.
Page 22
5. Using the WalkGuard
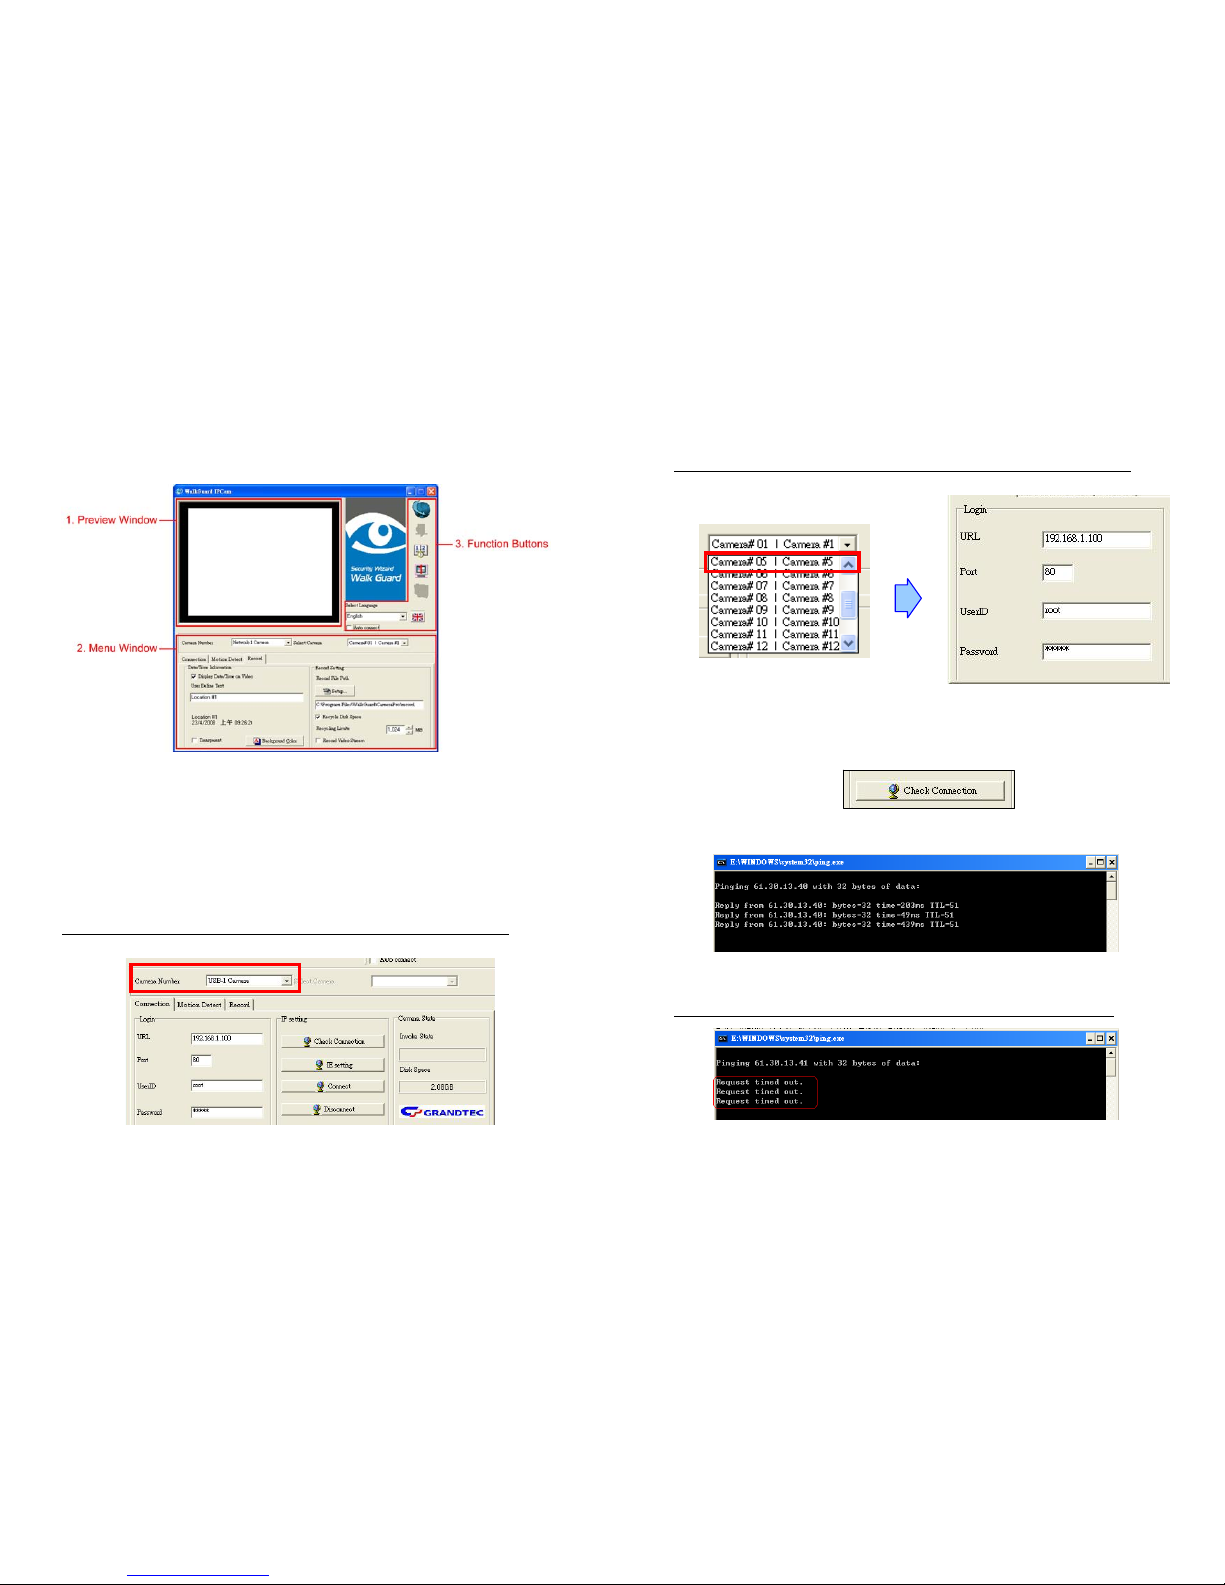
5.1 Interface
There are three parts: Preview Window, Menu Window and Function Button.
5.2 Menu Window
There are three main options for setup: Connection, Motion Detect and Record.
5.2.1 Connection
Login (for setting the camera connection)
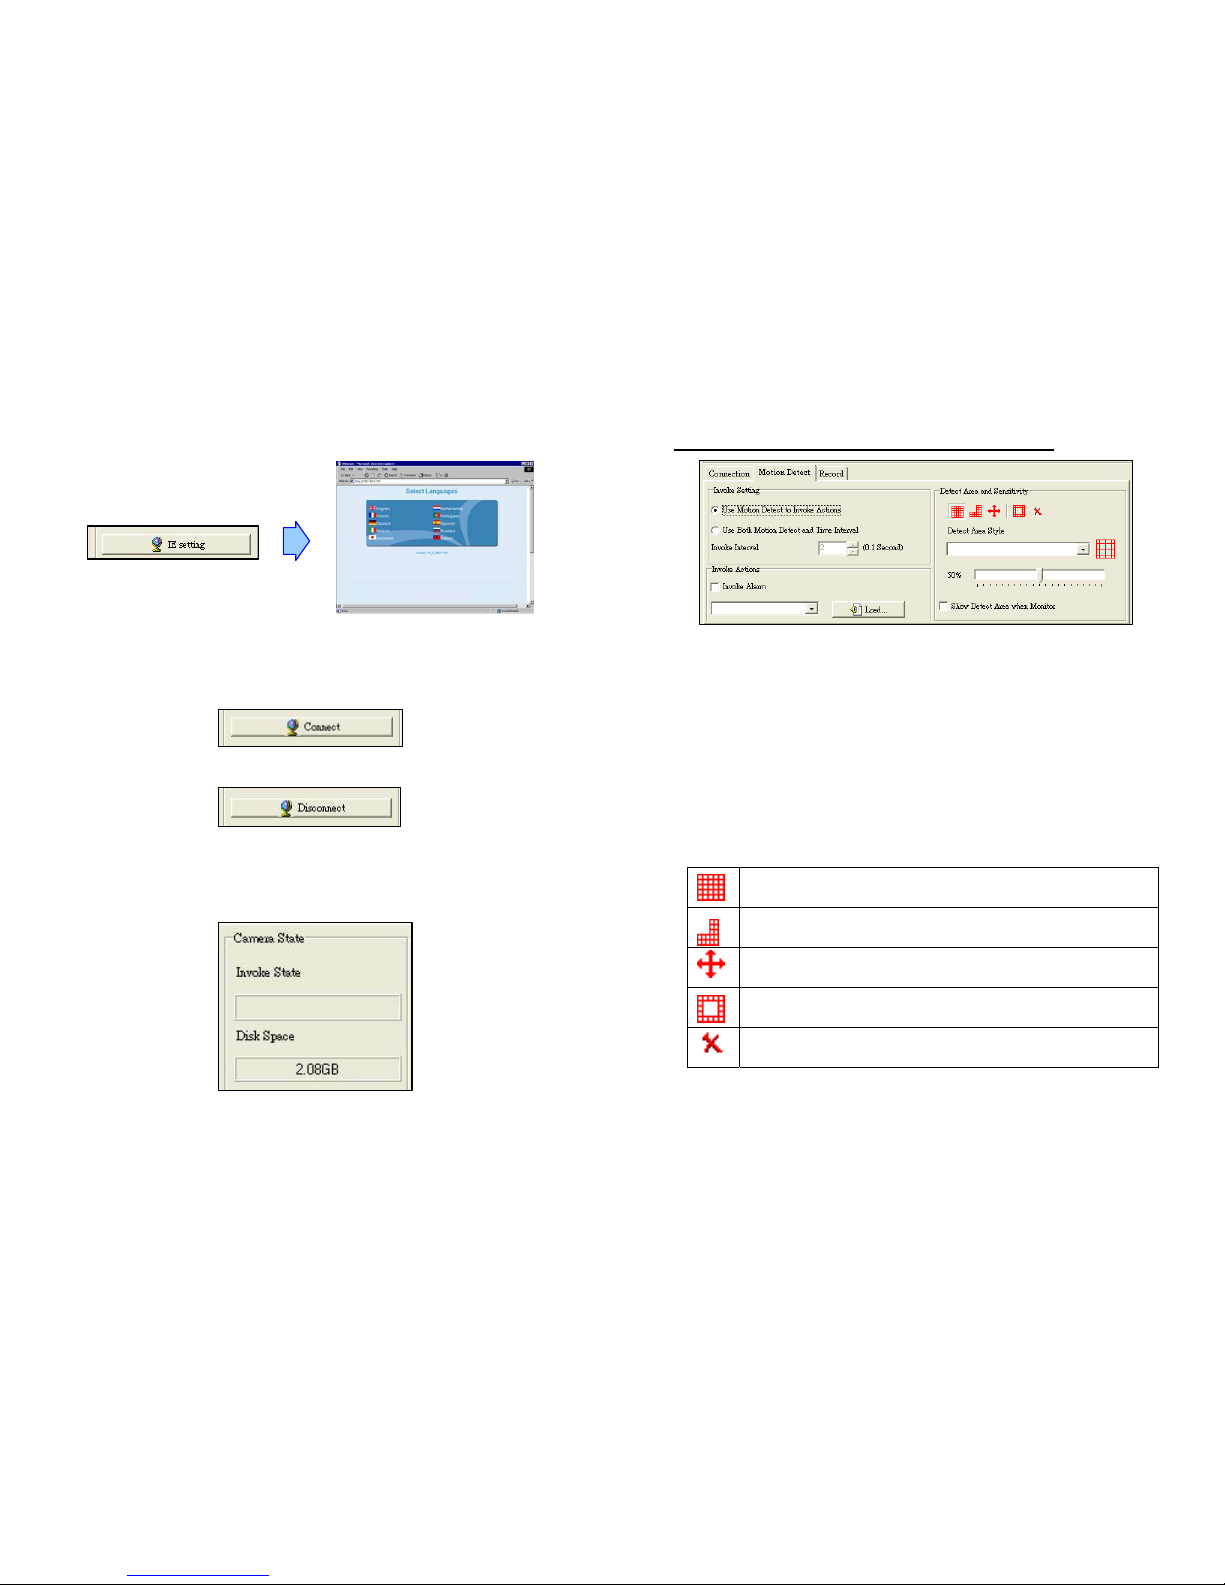
Step 1: Select the number of cameras (1/ 4/ 9/ 16) and camera mode (USB Cam/
Internet Cam).
NOTE: The Grand IP/ Wi-Fi Camera Plus not support USB camera mode.
Step 2: Enter your camera’s IP Address, Port, User ID and Password. If there is
more than one camera, please select and set the others.
Ex. Select Camera 5, and enter the IP Address, Port, User ID and Password.
IP Setting
Check Connection: Click the Check Connection button to confirm the IP address
conflicts with the camera over the network.
- If the camera set online, you will see the following:
- If the connection has failed, you will see the following:
NOTE: Refer to Camera’s User Manual for more detail to solve the problem.
Page 23
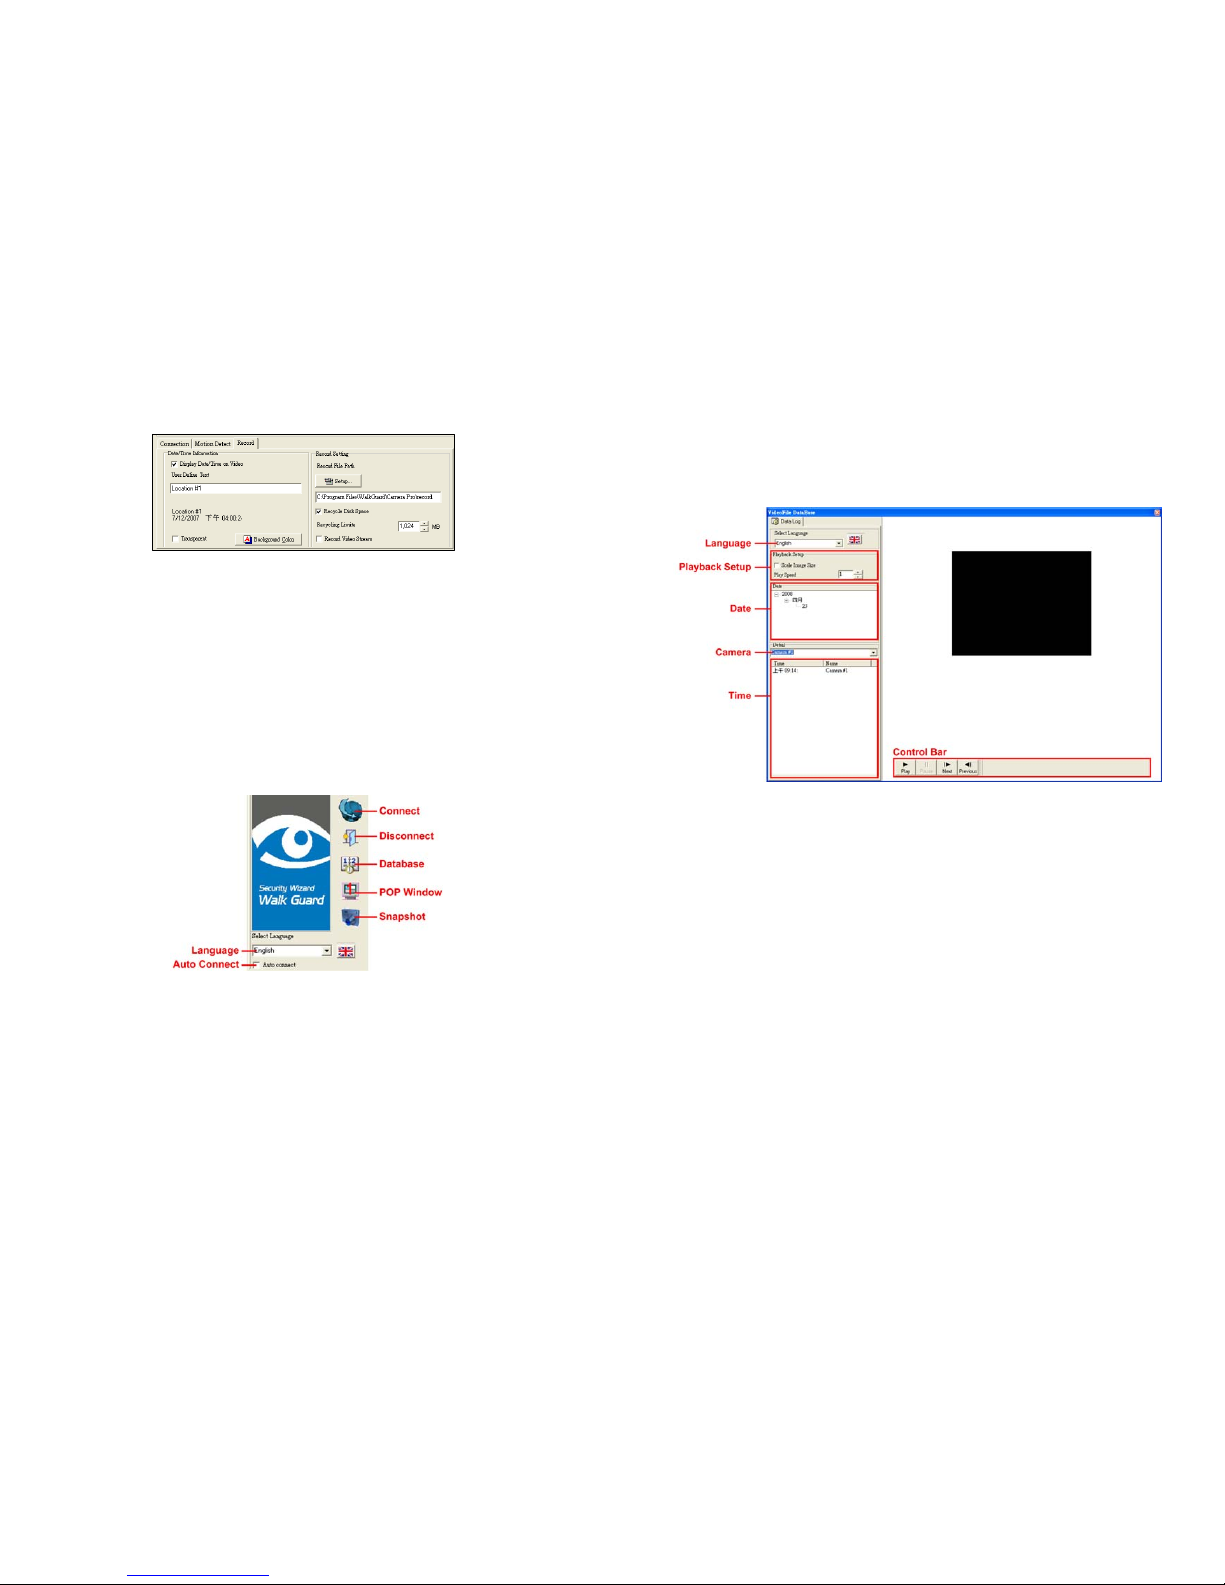
IE Setting: Click the button to open the Web Configuration of the camera directly.
(refer to Camera’s User Manual for more detail about Web configuration settings)
Connect: Click the button to connect the camera directly, the image of camera will
display in the preview window.
Disconnect: Click the button to disconnect the camera immediately.
Camera State
Invoke State: Display the system state (ready or recording).
Disk Space: Display the disk space remaining.
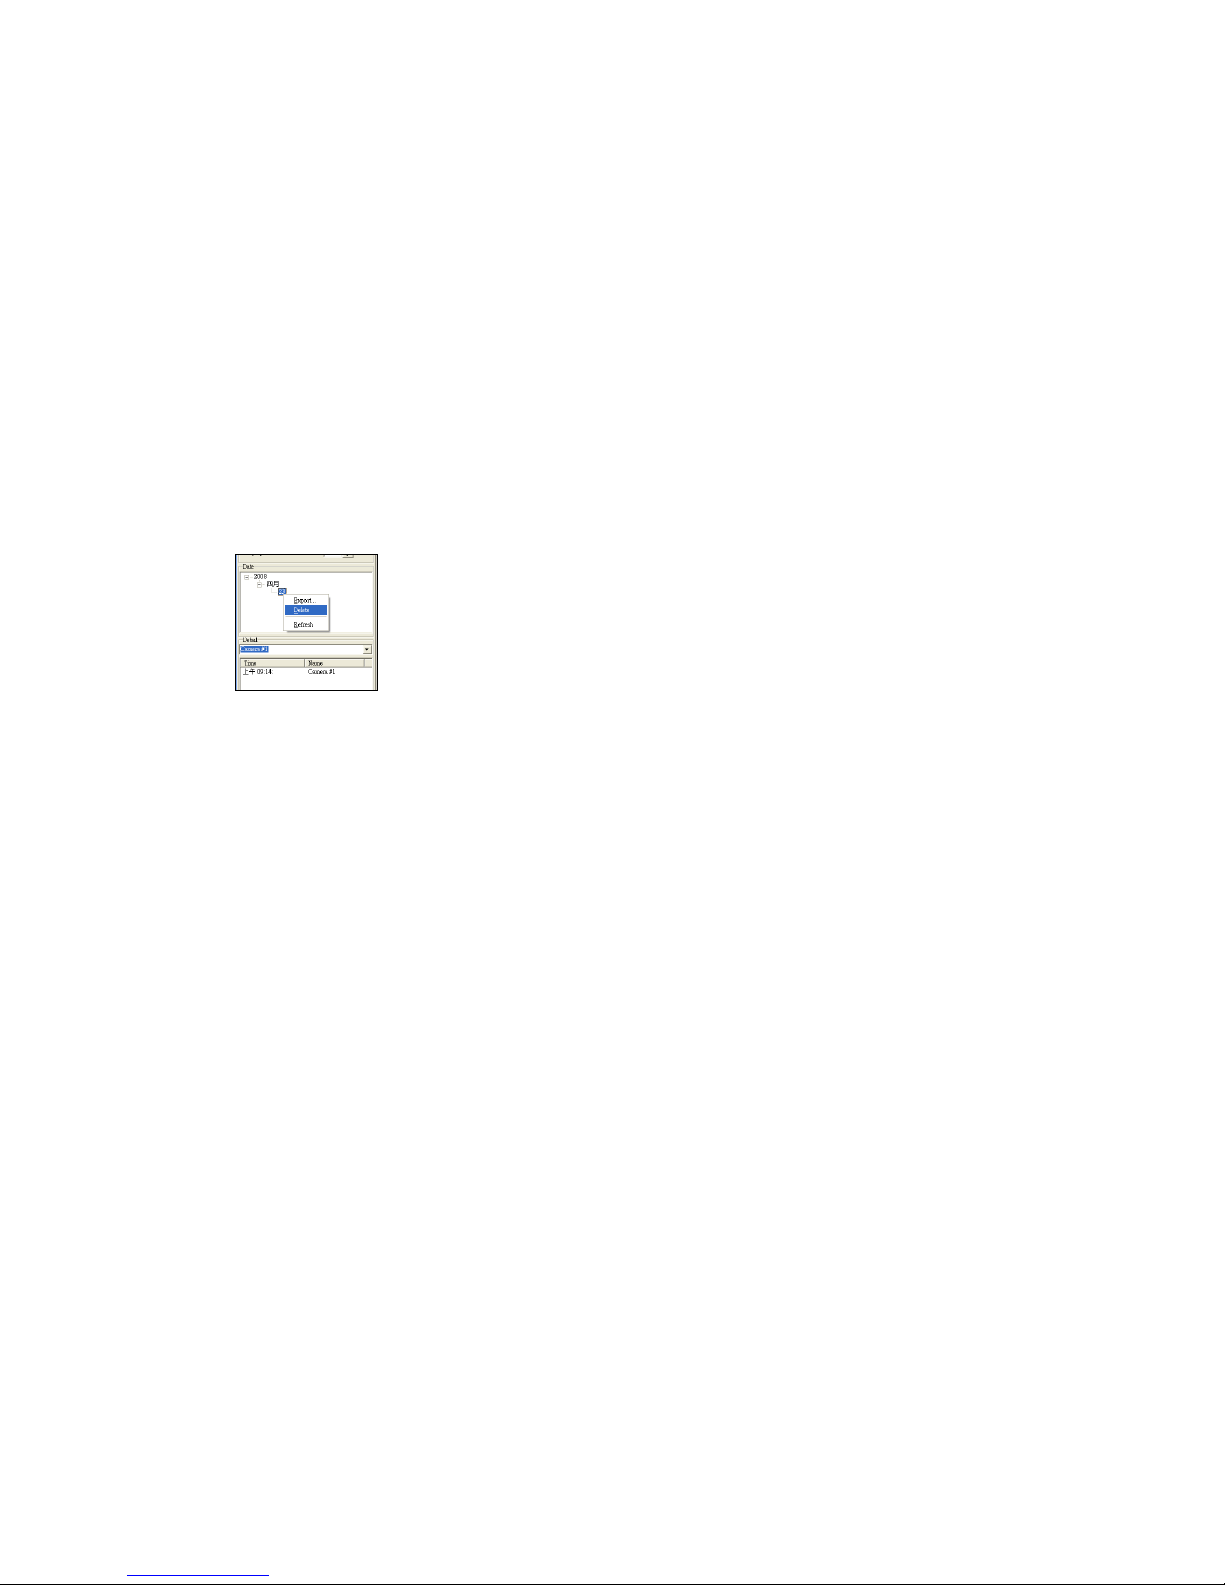
5.2.2 Motion Detect
NOTE: Connect to a camera before setting the Motion Detect.
Invoke Setting (set the recording mode)
Use Motion Detect to Invoke Actions: Start recording while detecting motion.
Use Both Motion Detect and Time Interval: Start recording while detecting motion,
and the system will also record at the interval time that you set (you need set the
interval time).
Invoke Action
To enable/ disable the invoke alarm, and select the kind of sound. You can also click
the Link to select your sound (supports wav format).
Detect Area and Sensitivity
Click the icon to directly add detect area on the preview window.
Click the icon to directly remove detect area on the preview window.
Click the icon to select all block
Click the icon to invert detect area.
Click the icon to clear all detect areas.
Detect Area Style: Select the style of detect area.
Motion Sensitivity: 0% (least sensitive)~ 100% (least sensitive)
Page 24
5.2.3 Record
Date/ Time Information
Display Date/ Time on Video: Turn on/ off the message of date and time on the
left-up of the video.
User Default Text: Enter the title for each camera.
Transparent: Select the background color of text.
Record Setting
Record File Path: Click the Setup icon to change the folder path.
Recycling Disk Space: The earliest video file will be deleted when running out the
recycling disk space that you set.
Record Video Stream: Start/ stop recording immediately.
5.3 Function Buttons
Language: Select the OSD language.
Auto Connect: Enable/ disable the auto connect function while starting the
system.
Connect: To connect the camera.
Disconnect: To disconnect the camera.
Database: To open the Database window (refer to 5.4).
POP Window: To open a 1/ 4/ 9/ 16 preview window (full screen).
Snapshot:
To capture the current image and save to bmp format.
5.4 Using the Database
This application software is a powerful database manager. All the recorded files will
be stored in this database. Yo u can play the recording file. The invoke action (motion
detection or time interval) will create a new log and record on the tree manager.
Language: Select the OSD language.
Playback Setup
- Scale Image Size: Adjust the screen size of playback.
- Play Speed: Adjust the speed of playback.
Date: Select the date (year/ month/ day).
Camera: Select the camera you want to play.
Time: Select the time you want to play.
Control Bar: Use the buttons for playback.
Page 25
5.4.1 Playing the File
Select the Date, Camera and Time you want to play, and click the Play button to play.
Use the other buttons (pause/ next/ previous) to control while playing.
5.4.2 Delete/ Export the Files
Right Click on the Year, Month, Day or Time and a pop-up window will appear.
- Select the “Export” item to export this file to another location.
- Select the “Delete” item to delete this file.
- Select the “Refresh” item to refresh the Data Log.
NOTE:
1. If you want export or delete all the files of the year, right click on the Year directly,
and select Export or Delete item.
2. If you only want export or delete one of the files, right click on the Time directly,
and select Export or Delete item.
 Loading...