

SERIES / SERIE / SÉRIE / SERIEN
CK
3 / 6 / 15 / 30
OPERATION MANUAL
MANUAL DE UTILIZACION
MANUEL D´UTILISATION
BENUTZERHANDBUCH

2
INDEX English
Power 6
Power consumption 6
Battery 6
Display description 6
Keyboard description 7
Keys function 7
Standard calibration 8
ECF-1 Weight Calibration 8
ECF-2 Zero Calibration 9
ECF-3 SPAN Calibration 9
Counting pieces function 9
Piece weight setup 9
Number of pieces setup 10
Limits function 10
Functions setup 10
UF-1 Internal Value / Display Battery Voltage 10
UF-2 Piece Weight Auto-average 11
UF-3 Auto Power-off 11
UF-4 Backlight 12
UF-5 Accumulation 12
UF-6 RS232 Output 13
Communication Protocol 13
Output examples 14
UF-7 ADC Update Rate 16
UF-8 Display Condition at Zero 16
Save and delete product memories (PLU) 17
Guarantee 17

3
ÍNDICE Español
Alimentación 18
Consumo 18
Duración de la batería 18
Descripción del display 18
Descripción del teclado 19
Función de las teclas 19
Calibración standard 20
Calibración de peso ECF-1 20
Calibración del cero ECF-2 21
Calibración del span ECF-3 21
Función cuentapiezas 22
Introducción del peso unitario 22
Muestra (Número de piezas) 22
Límites de peso 22
Configuración de funciones 23
UF-1 Valor interno / Voltaje de la batería 23
UF-2 Promedio automático del peso unitario 23
UF-3 Autodesconexión 24
UF-4 Iluminación del display 24
UF-5 Acumulación de pesadas 25
UF-6 Salida RS-232 26
Protocolo de comunicación 26
Ejemplos de transmisión 27
UF-7 ADC actualización de la frecuencia 29
UF-8 Configuración del cero 29
Guardar y eliminar memorias de producto (PLU) 30
Garantía 30

4
SOMMAIRE Français
Alimentation 31
Consommation 31
Durée de la batterie 31
Description de l’écran 31
Description du clavier 32
Fonctions des touches 32
Mode d’utilisation 34
Etalonnage 34
Etalonnage de poids ECF-1 34
Etalonnage du zéro ECF-2 34
Etalonnage du span ECF-3 35
Fonction compte-piéces 36
Comptage de pièces 36
Comptage par échantillonnage 36
Limite de poids supérieure 36
Configuration des paramètres 37
UF-1 Valeur interne / Voltage de la batterie 37
UF-2 Moyenne automatique du poids unitaire 38
UF-3 Auto-déconnexion 38
UF-4 Rétro-éclairage de l’écran 39
UF-5 Accumulation de pesées 40
UF-6 Sortie RS-232 41
Protocole de communication 41
Exemples de transmissions 42
UF-7 ADC actualisation de la fréquence 44
UF-8 Configuration du zéro 44
Enregistrer et éliminer des mémoires de produit (PLU) 45
Garantie 46

5
INHALT Deutsch
Stromversorgung 47
Verbrauch 47
Akku-betriebsdauer 47
Beschreibung des displays 47
Beschreibung der tastatur 48
Tastenfunktionen 48
Standard-kalibrierung 49
Gewicht-Kalibrierung ECF-1 49
Nullpunkt-Kalibrierung ECF-2 50
Messbereich-Kalibrierung ECF-3 50
Stückzählfunktion 51
Eingabe des einzelgewichts 51
Stichprobe (stückzahl) 51
Stückzählen mit toleranzbereich 51
Funktionseinstellungen 52
UF-1 Interner Wert / Akkuspannung 52
UF-2 Automatische Optimierung des durchschnittlichen Einzelgewichts 52
UF-3 Automatische Abschaltung 53
UF-4 Displaybeleuchtung 54
UF-5 Summenfunktion 54
UF-6 Datenausgang RS-232 55
Kommunikationsprotokoll 56
Datenübertragungsbeispiele 57
UF-7 Aktualisierung der ADC-Frequenz 58
UF-8 Einstellung des Nullbereichs 59
Artikelspeicher (PLU) speichern und löschen 60
Garantie 61
6
ENGLISH
POWER
Input: 100 ~ 240V 50/60Hz
Output: DC 12V/1A 12W
Rechargeable battery: 6V/4AH
POWER CONSUMPTION
Approx. 12mA
Approx. 36mA with backlight display
Approx. 48mA with backlight display and the RS-232 (optional)
BATTERY
Approx. 320 hours with the backlight off.
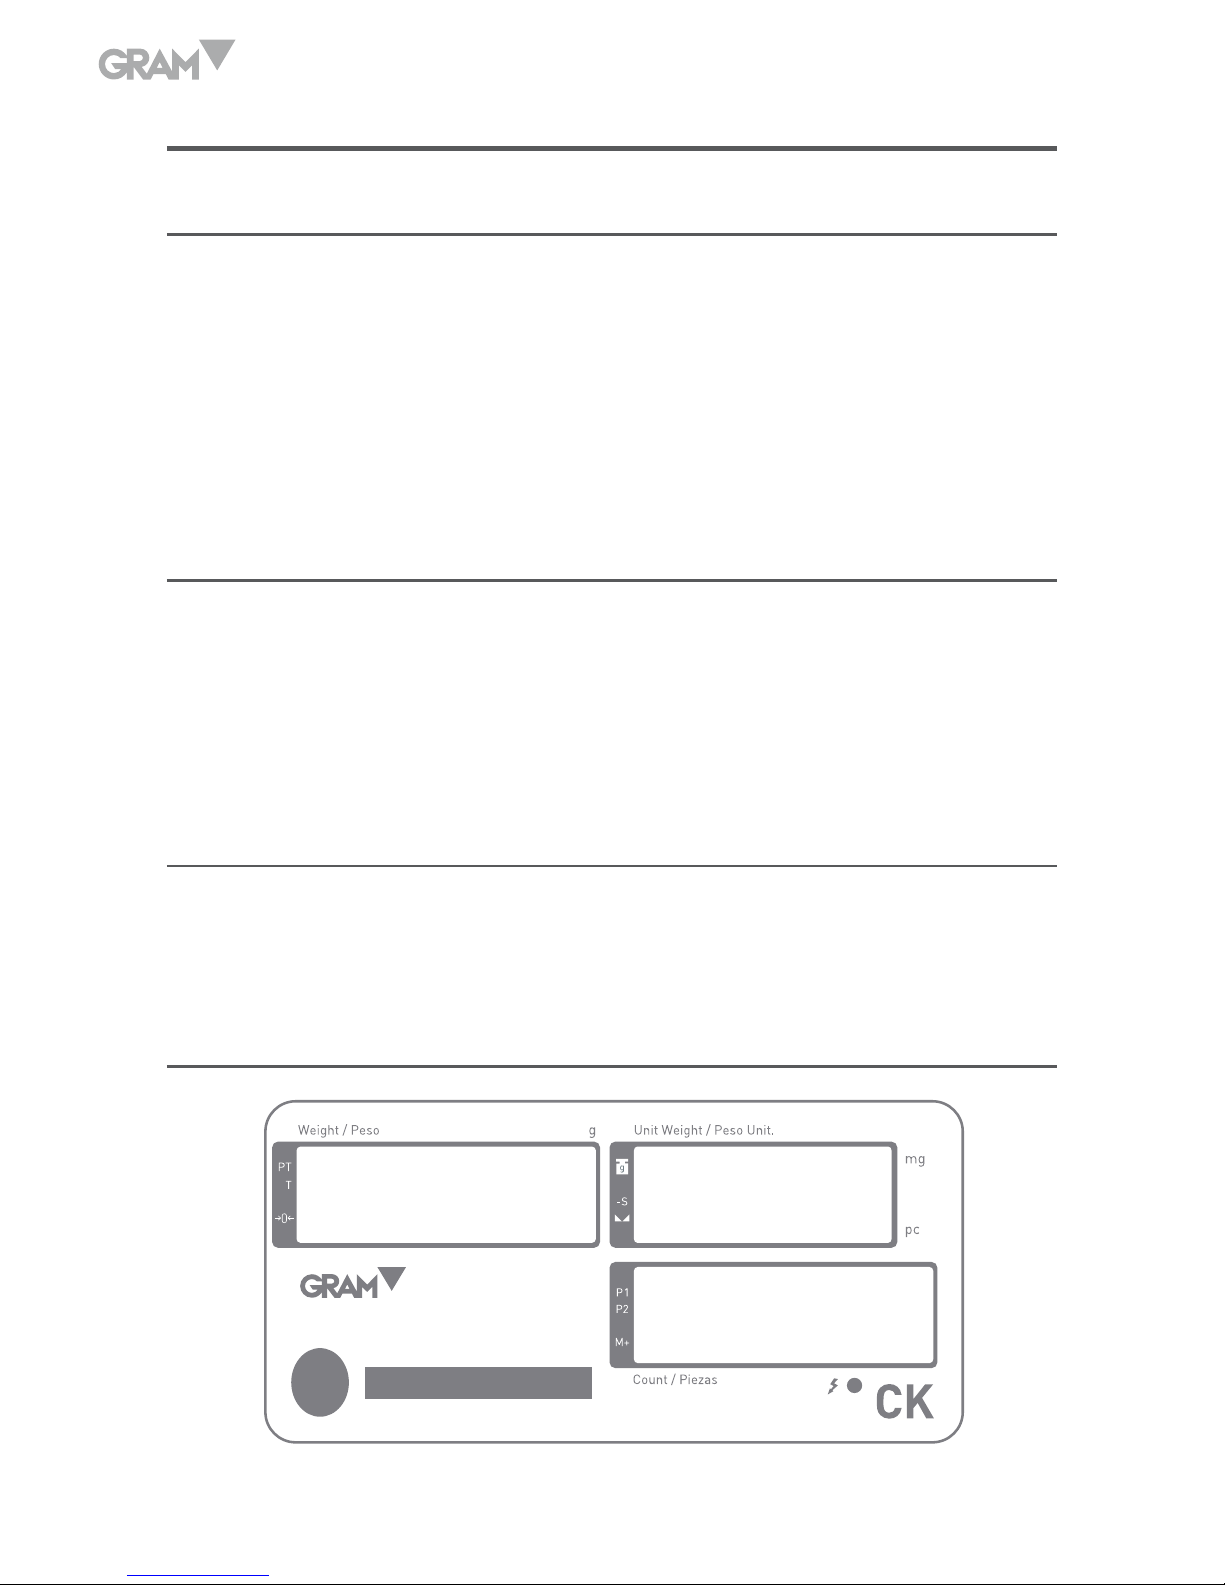
DISPLAY DESCRIPTION
7
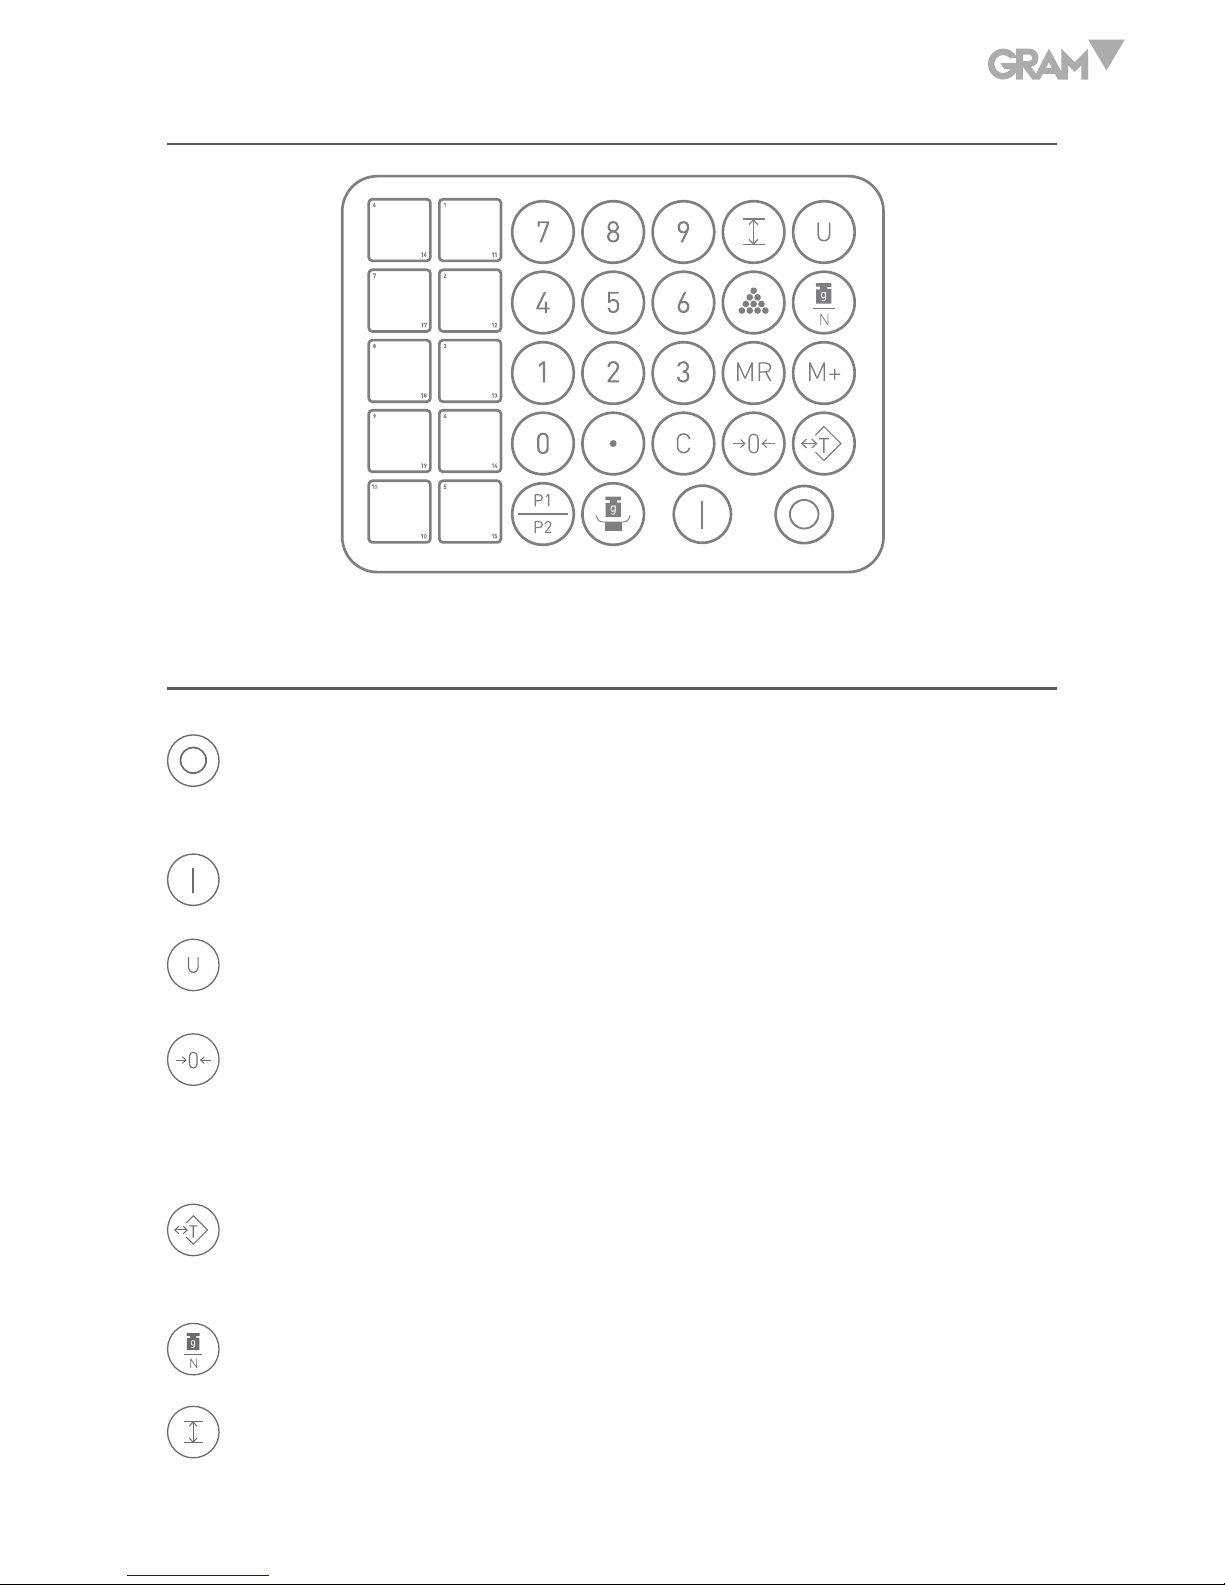
KEYBOARD DESCRIPTION
KEYS FUNCTION
To turn off the scale, keep the OFF key pressed until the display
shows “Off” for 2 seconds.
Press this key to turn on the balance.
To select the desired weighing unit.
Function 1: To reset the weight to 0, but the displayed weight value
has to be less than ± 2% of maximum capacity.
Function 2: To move one space to the left or downward in setup mode.
Function 1: To subtract the container weight.
Function 2: To move one space to the right or upward in setup mode.
To access the counting function.
To access the function of limits.
8
To access the counting function.
Memory recover function.
Accumulation Key.
Clear Key.
Choose PLU Number keys.
Enter PLU memories
STANDARD CALIBRATION
Press the key and the key to start Standard Calibrations.
ECF-1 Weight Calibration (Zero and Span).
ECF-2 Zero Calibration.
ECF-3 SPAN Calibration.
ECF-1 Weight Calibration
1. Press the key
to start and go to the ECF-1mode, and press the
key to exit menu and back to weighing mode.
2. Press the
key.
3. Use 0 ~ 9 keys to enter the weight to be calibrated and confirm with .
4. Place the required weight mass onto the scale and press the
key.
5. Calibration procedure completed and the scale will return back to
weighing mode automatically.
9
ECF-2 Zero Calibration
1. Press the
key to start and go to the ECF-2 mode, and press the
key to exit menu and back to weighing mode.
2. Press the
key to set the zero weight.
3. Calibration procedure completed and the scale will return back to
weighing mode automatically.
ECF-3 SPAN Calibration
1. Press the
key to start and go to the ECF-3 mode, and press the
key to exit menu and back to weighing mode.
2. Use 0 ~ 9 keys to enter the weight to be calibrated and confirm with .
3. Place the required weight mass onto the scale and press the
key.
4. Calibration procedure completed and the scale will return back to
weighing mode automatically.
COUNTING PIECES FUNCTION
Piece weight setup
Place the object on the weighing pan, use 0-9 number keys and decimal (.)
key to introduce the unit weight. Weight window displays the total weight,
piece weight windows shows unit weight and total count windows displays
the total pieces.
10
Number of pieces setup
Use the 0-9 numbers keys to input the desired sample quantity, when the
display weights shows the weight, press the key, the piece weight
window shows the unit weight and total count window displays the total
pieces number.
Limits function
Place the items to be counted on the weighing pan, use the 0-9 number keys
to introduce the number of pieces loaded and press the
key. Once the
balance memorizes the sample, place the maximum weight on the pan (high
limit value), press the key to confirm the high limit value.
Remove the weight from the pan, from this moment, the balance will beep and
will show the message “HI” when the load will excess the preset high value.
FUNCTIONS SETUP
Press the
and
keys to enter the parameters.
To access the function configuration:
Use the key to move to the right.
Use the key to move to the left.
Use the key to enter the desired configuration mode.
UF-1 Internal Value / Display Battery Voltage
1. Press the
key to display the following internal values:
• The Weight / Peso display shows internal value of the span.

11
• The Unit Weight / Peso Unit display shows the current battery voltage.
• The Count parts / Piezas display shows the internal value (zero).
2. Press the
key to exit menu.
UF-2 Piece Weight Auto-average
AAVG 0: Disable
AAVG 1: Enable
1. Press the
key to start.
2. Use 0 and 1 keys to enable or disable auto-average function.
3. Press the
key to confirm.
4. Press the
key to exit.
UF-3 Auto Power-off
Modes:
• AoFF 00: Auto Power-off disable.
• AoFF 01: The scale turns off automatically in 1 minute when the scale is
not in operation.
• AoFF02: The scale turns off automatically in 2 minutes when the scale
is not in operation.
• oFF 99: The scale turns off automatically in 99 minutes when the scale
is not in operation.
1. Press the
key to access the programming Auto Power-off

12
2. Use 0 ~ 9 keys to enter auto power-off time.
3. Press the
key to confirm.
4. To exit and return back to weighing mode, press the
key.
UF-4 Backlight
Modes:
• Lit 2: Backlight off.
• Lit 0: Auto light-up.
• Lit 1: Backlight on.
Factory default: Lit 0 (Auto light-up).
1. Press the v key to access display backlight programming.
2. Use 0 ~ 2 key to select backlight mode.
3. Press the
to confirm.
4. To exit and return back to the weighing mode, press the
key.
UF-5 Accumulation
Modes:
ACCU 0 0
A B
A: 0. Stable required
1. Stable not required

13
B: 0. The weight has to return to zero to accept next accumulation.
1. The weight does not have to return to zero to accept next accumulation.
2. No tare weight to accept next accumulation.
Factory default: ACCU00 (Stable required and the weight has to return to zero).
UF-6 RS232 Output
232 0 0
A B
A: 0. Baud rate 1200
1. Baud rate 2400
2. Baud rate 4800
3. Baud rate 9600
4. Baud rate 19200
B: 0. RS232 output disable
1. Manual output – Format 2
2. Stable output – Format 1
3. Stream output – Format 1
Communication Protocol
UART signal of EIA-RS232C
Format:
1. Serial output: 1200/2400/4800/9600719200/38400 BPS.
2. Data bits: 8 BITS.
3. Parity bits: None.
4. Stop bits: 1 BIT.
14
Start-Bit Data bits Stop-Bits
Format 1 (232 1 – 3)
HEAD 1 (2 BYTES) HEAD 2 (2 BYTES)
OL – Over Load
ST – Stable NT – Net Weight
US – Unstable GS – Gross Weight
Fixed 20 BYTES ASCII
1 2 1 1 2 1 1 2 3 4 5 6 7 8 1 2 3 4 1 2
Head 1 Head 2 Data Unit CR LF
Output examples
1. Example +0.876 kg stable net weight:
S T , N T , + 0 0 0 . 8 7 6 k g 0D 0A
2. Example -1.568 lb unstable gross weight:
U S , G S , - 0 0 1 . 5 6 8 l b 0D 0A
15
Format 2 (232 x1)
Press the
key to output.
I T E 1
G W + 1 1 0 0 . 0 g
T W + 1 0 0 . 0 g
P T W + 0 . 0 g
W + 1 0 0 0 . 0 g
A P W 1 . 0 0 0 0 0 g
Q T Y 1 0 0 0 p c s
I T E 2
G W + 1 1 0 0 . 0 g
T W + 0 . 0 g
P T W + 1 0 0 . 0 g
N W + 1 0 0 0 . 0 g
A P W 1 . 0 0 0 0 0 g
Q T Y 1 0 0 0 p c s
Press the
key for 3 seconds key to output.
= = = = = = = = = = = = = = = =
T . I 2
T . W 2 0 0 0 . 0 g
T . Q 2 0 0 0 p c s
1. Press the
key to access programming functions.
2. Use 0 ~ 4 keys to enter RS232 output formats.
3. Press the
key to confirm.
4. To exit and return back to weighing mode, press the
key.

16
UF-7 ADC Update Rate
SPEEd 0 Low speed 7.5 hz.
SPEEd 1 Standard speed 15 hz.
SPEEd 2 High speed 30 hz.
Factory speed: SPEEd 0
1. Press the
key to access programming functions.
2. Use 0 ~ 2 keys to enter ADC speed.
3. Press the
key to confirm.
4. To exit and return back to weighing mode, press the
key.
UF-8 Display Condition at Zero
ZP 0 Off.
ZP 1 One division not to display at zero.
ZP 2 Two division not to display at zero.
ZP 3 Three division not to display at zero.
ZP 4 Four division not to display at zero.
ZP 5 Five division not to display at zero.
Factory default: ZP 1
1. Press the
key to access programming functions.
2. Use 0 ~ 5 keys to enter condition at zero.
3. Press the
key to confirm.
4. To exit and return back to weighing mode, press the
key.
17
SAVE AND DELETE PRODUCT MEMORIES (PLU)
1. Place the sample on the weighing plate.
2. Introduce the number of pieces placed on the plate using number keys.
3. Press to calculate unit weight.
4. Press , then press the key where you want to save the product
memory (10 direct memories are available (M1 to M10). Memory will be
saved.
To use the other 10 direct memories (M11 to M20) press to switch to
PLU2 before sampling. Then follow the same routine as explained before.
To delete a PLU memory, first press on the key you want to delete (M1 to
M20), then press and now press again .
GUARANTEE
This scale is guaranteed for one year from the delivery date. The guarantee
covers any fabrication defect of the material.
During this period GRAM PRECISION, SL, covers the manpower and the
spare parts for the reparation of the scale.
This guarantee does not cover the failures caused by an inappropriate use
or overcharge.
The guarantee does not cover the freight cost (transport) necessary to
repair the scale.
18
ESPAÑOL
ALIMENTACIÓN
Entrada: 100~240V 50/60hz
Salida: 12V/1A DC 12W
Batería recargable: 6V/4AH
CONSUMO
Aprox. 12mA
Aprox. 36mA con la iluminación interna del display
Aprox. 48mA con la iluminación interna del display y el interface RS-232
(opcional)
DURACIÓN DE LA BATERÍA
Aprox. 320 horas, con la iluminación del display desactivada
DESCRIPCIÓN DEL DISPLAY
19
DESCRIPCIÓN DEL TECLADO
FUNCIÓN DE LAS TECLAS
Para apagar la balanza, mantener pulsada la tecla OFF hasta que el
display visualice “Off” durante 2 segundos.
Pulsar esta tecla para conectar la balanza.
Para seleccionar la unidad de pesada deseada.
Función 1: Para poner a cero la lectura del display, siempre y cuando el
valor del peso sea menor al ± 2% de la capacidad máxima.
Función 2: Para desplazarse hacía la izquierda en el modo de
programación.
Función 1: Para sustraer el peso de un recipiente u objeto.
Función 2: Para desplazarse hacía la derecha en el modo de
programación.
Predeterminación de Tara.
20
Para acceder a la función de límites.
Para acceder a la función de cuentapiezas.
Recuperación de memoria en función acumulación de pesadas.
Función acumulación de pesadas
Tecla de borrar datos
Seleccionar los números de PLU
Introducir memorias de PLU
CALIBRACIÓN STANDARD
Pulsar las teclas
y
para acceder a la función de calibración standard.
ECF-1 Calibración de peso (Cero y span).
ECF-2 Calibración del cero.
ECF-3 Calibración de span.
Calibración de peso ECF-1
1. Pulsar la tecla
para acceder al modo ECF-1 ó la tecla
para
salir del menú y volver al modo normal de pesaje.
2. Pulsar la tecla .
3. Con las teclas 0 ~ 9 introducir el valor de la pesa de calibración y
confirmar con la tecla .

21
4. Colocar la pesa sobre el plato y pulsar la tecla .
5. La balanza realizará la calibración automáticamente y volverá al modo
normal de pesaje.
Calibración del cero ECF-2
1. Pulsar la tecla
para acceder al modo ECF-2 ó la tecla
para
salir del menú y volver al modo normal de pesaje.
2. Pulsar la tecla pulsar
para ajustar el cero.
3. La balanza efectuará la calibración del cero automáticamente y volverá
al modo normal de pesaje.
Calibración del span ECF-3
1. Pulsar la tecla
para acceder al modo ECF-3 ó la tecla
para
salir del menú y volver al modo normal de pesaje.
2. Con las teclas 0 ~ 9 introducir el valor de la pesa de calibración y
confirmar con la tecla .
3. Colocar la pesa sobre el plato y pulsar la tecla .
4. La balanza efectuará la calibración automáticamente y volverá al modo
normal de pesaje.

22
FUNCIÓN CUENTAPIEZAS
Introducción del peso unitario
Colocar las piezas a contar sobre el plato, utilizar las teclas 0-9 y tecla
decimal (.) para introducir el peso unitario de la pieza. El display Peso
mostrará el peso total, el display Peso Unit. mostrará el peso unitario de la
pieza y el display Total mostrará el número total de piezas.
Muestra (Número de piezas)
Colocar una cantidad de piezas sobre el plato y utilizar las teclas 0-9 para
introducir el número de piezas correspondiente.
Cuando el display Peso muestre el peso total de las piezas, pulsar la tecla
en este momento el display Peso Unit. mostrará el peso unitario de
cada pieza y el display Total el número total de piezas.
Límites de peso
Colocar las piezas a contar sobre el plato, utilizar las teclas numéricas 0-9
para introducir el número de piezas y pulsar la tecla . Una vez la balanza
memorice la muestra, colocar sobre el plato de pesada el peso máximo (valor
del límite superior) y pulsar la tecla
para confirmar. Retirar el peso, a
partir de este momento la balanza emitirá una señal acústica y mostrará el
mensaje “HI” cuando el peso exceda el límite superior predeterminado.

23
CONFIGURACIÓN DE FUNCIONES
Presione las teclas
y
para ingresar los parámetros.
Para acceder a la configuración de la función:
Usa la tecla para moverte hacia la derecha.
Usa la tecla para moverte hacia la izquierda.
Use la tecla para ingresar al modo de configuración deseado.
UF-1 Valor interno / Voltaje de la batería
1. Pulsar la tecla
para visualizar los siguientes valores internos:
• En el display Weight/Peso se mostrará el valor interno del span.
• En el display Unit Weight/Peso Unit se mostrará el voltaje actual de
la batería.
• En el display Count/Piezas se mostrará el valor interno del cero.
2. Pulsar la tecla
para salir.
UF-2 Promedio automático del peso unitario
AAVG 0: Desactivado
AAVG 1: Activado
1. Pulsar la tecla
para acceder a la configuración.
2. Con las teclas 0 y 1 seleccionar el modo deseado.

24
3. Pulsar la tecla
para conirmar.
4. Pulsar la tecla
para salir.
UF-3 Autodesconexión
Modos:
• AoFF 00: Autodesconexión desactivada
• AoFF 01: La balanza se autodesconectará transcurrido 1 minuto sin ser
utilizada
• AoFF 02: La balanza se autodesconectará transcurridos 2 minutos sin
ser utilizada.
• AoFF 99: La balanza se autodesconectará transcurridos 99 minutos sin
ser utilizada.
1. Pulsar la tecla
para acceder a la programación de la autodesconexión.
2. Con las teclas 0 ~ 9 introducir el valor deseado.
3. Pulsar la tecla
para confirmar.
4. Para salir y volver al modo de pesaje, pulsar la tecla .
UF-4 Iluminación del display
Modos:
• Lit 2: Iluminación desactivada.
• Lit 0: Iluminación automática.

25
• Lit 1: Iluminación siempre activada.
El valor por defecto es: Lit 0 (automática)
1. Pulsar la tecla
para acceder a la programación de la iluminación
del display.
2. Utilizar la teclas 0 ó 2 para seleccionar el modo deseado.
3. Pulsar la tecla
para confirmar.
4. Para salir y volver al modo de pesaje, pulsar la tecla .
UF-5 Acumulación de pesadas
Modos:
ACCU 0 0
A B
A: 0. Estabilidad requerida
1. Estabilidad no requerida
B: 0. La lectura debe volver a cero para aceptar la siguiente acumulación.
1. No es necesario que la lectura vuelva a cero para efectuar otra
acumulación.
2. No es necesario efectuar una tara para efectuar otra acumulación.
Valor por defecto: ACCU00 (Estabilidad requerida y la lectura debe volver a cero).
1. Pulsar la tecla
para acceder a la programación de acumulación de
pesadas.
2. Utilizar la teclas 0 ó 2 para seleccionar el modo deseado.

26
3. Pulsar la tecla
para confirmar.
4. Para salir y volver al modo de pesaje, pulsar la tecla .
UF-6 Salida RS-232
232 0 0
A B
A: 0. Velocidad de transmisión 1200
1. Velocidad de transmisión 2400
2. Velocidad de transmisión 4800
3. Velocidad de transmisión 9600
4. Velocidad de transmisión 19200
B: 0. Salida RS-232 desactivada
1. Transmisión manual – Formato 2
2. Transmisión estable – Formato 1
3. Transmisión por comando – Formato 1
Protocolo de comunicación
Señal UART de EIA-RS232 C
Formato:
1. Transmisión de serie: 1200/2400/4800/9600/19200/38400 BPS.
2. Bits: 8 bits.
3. Bits de paridad: Ninguno.
4. Bits de parada: 1 bit.

27
Bit de comienzo Datos de los bits Parada bits
Formato 1 (232 1 – 3)
CABECERA 1 (2 BYTES) CABECERA 2 (2 BYTES)
OL – Sobrecarga
ST – Estable NT – Peso neto
US – Inestable GS – Peso bruto
Fixed 20 BYTES ASCII
1 2 1 1 2 1 1 2 3 4 5 6 7 8 1 2 3 4 1 2
Head 1 Head 2 Data Unit CR LF
Ejemplos de transmisión
1. Ejemplo +0.876 kg peso neto estable:
S T , N T , + 0 0 0 . 8 7 6 k g 0D 0A
2. Ejemplo -1.568 lb peso bruto inestable:
U S , G S , - 0 0 1 . 5 6 8 l b 0D 0A

28
Formato 2 (232 x1)
Pulsar la tecla
para transmitir.
I T E 1
G W + 1 1 0 0 . 0 g
T W + 1 0 0 . 0 g
P T W + 0 . 0 g
W + 1 0 0 0 . 0 g
A P W 1 . 0 0 0 0 0 g
Q T Y 1 0 0 0 p c s
I T E 2
G W + 1 1 0 0 . 0 g
T W + 0 . 0 g
P T W + 1 0 0 . 0 g
N W + 1 0 0 0 . 0 g
A P W 1 . 0 0 0 0 0 g
Q T Y 1 0 0 0 p c s
Pulsar la tecla
durante 3 segundos para transmitir.
= = = = = = = = = = = = = = = =
T . I 2
T . W 2 0 0 0 . 0 g
T . Q 2 0 0 0 p c s
1. Pulsar la tecla
para acceder a la programación
2. Utilizar la teclas 0 - 4 para seleccionar el modo deseado.
3. Pulsar la tecla
para confirmar.
4. Para salir y volver al modo de pesaje, pulsar la tecla .

29
UF-7 ADC actualización de la frecuencia
SPEEd 0 Velocidad baja 7.5 hz
SPEEd 1 Velocidad Standard 15 hz
SPPEd 2 Velocidad alta 30 hz
Valor por defecto: SPEED 0.
1. Pulsar la tecla
para acceder a la programación.
2. Utilizar la teclas 0 – 2 para seleccionar la velocidad ADC deseada.
3. Pulsar la tecla
para confirmar.
4. Para salir y volver al modo de pesaje, pulsar la tecla .
UF-8 Configuración del cero
ZP 0 Función desactivada
ZP 1 1 división no se muestra
ZP 2 2 divisiones no se muestran
ZP 3 3 divisiones no se muestran
ZP 4 4 divisiones no se muestran
ZP 5 5 divisiones no se muestran
Valor por defecto: ZP.
1. Pulsar la tecla
para acceder a la programación.
2. Utilizar la teclas 0 – 5 para seleccionar el modo deseado.
3. Pulsar la tecla
para confirmar.
4. Para salir y volver al modo de pesaje, pulsar la tecla .

30
GUARDAR Y ELIMINAR MEMORIAS DE PRODUCTO (PLU)
1. Coloque la muestra en el plato de pesaje.
2. Con el teclado numérico, introduzca el número de piezas que se han
colocado en el plato.
3. Pulse para calcular el peso unitario.
4. Pulse , y a continuación, pulse la tecla en la que quiere guardar la
memoria de producto (hay disponibles 10 memorias directas [de M1 a
M10]). La memoria quedará guardada.
Para utilizar las otras 10 memorias directas (de M11 a M20) pulse
para cambiar a PLU2 antes de colocar la muestra. Repita los pasos que se
explican más arriba.
Para eliminar una memoria de PLU, primero pulse la tecla que quiere
eliminar (de M1 a M20) y, a continuación, pulse y vuelva a pulsar
.
GARANTÍA
Esta balanza está garantizada contra todo defecto de fabricación y de
material, por un periodo de 1 año a partir de la fecha de entrega.
Durante este periodo, GRAM PRECISION, SL, se hará cargo de la reparación
de la balanza.
Esta garantía no incluye los daños ocasionados por uso indebido o
sobrecargas.
La garantía no cubre los gastos de envío (portes) necesarios para la
reparación de la balanza.

31
FRANÇAIS
ALIMENTATION
Entrée: 100~240V 50/60hz
Sortie: 12V/1A DC 12W
Batterie rechargeable: 6V/4AH
CONSOMMATION
Aprox. 12mA
Aprox. 36mA avec l’éclairage interne du display
Aprox. 48mA avec l’éclairage interne du display et l’interface RS-232
(optionnel)
DURÉE DE LA BATTERIE
Approx. 320 heures, avec l’éclairage du display désactivé
DESCRIPTION DE L’ÉCRAN

32
DESCRIPTION DU CLAVIER
FONCTIONS DES TOUCHES
Eteindre la balance. Maintenir la touche appuyée pendant 2 secondes
jusqu’à ce que le display « Weight/Peso » affiche “OFF”.
Allumer la balance.
Fonction1: Mettre à zéro la lecture de l’écran, (±2%de la capacité
maximale).
Fonction 2: Se déplacer vers la gauche dans le mode configuration.
Fonction 1: Soustraire le poids d’un récipient pour obtenir le poids net du
produit. (Fonction Tare).
Fonction 2: Se déplacer vers la droite dans le mode configuration.
Effacer les données enregistrées et paramétrées, puis remettre la
lecture de l’écran à zéro.
Fonction 1: Accumuler des pesées.

33
Fonction 2: Confirmer pour entrer dans le mode de configuration
sélectionné.
Visualiser le total des pesées accumulées.
Appuyer sur la touche de façon continue pour effacer les données des
pesées accumulées et remettre l’écran à Zéro.
Sur l’écran Weight/Peso: le total des pesées effectuées sera affiché
Sur l’écran Unit Weight/Peso Unit.: le nombre total des pesées
effectuées sera affiché.
Sur l’écran Count/Piezas: le total des pièces des pesées effectuées
sera affiché.
Fonction compte-pièces par échantillonage.
Prédéfinir la valeur d’une Tare. Fonction compte-pièces : introduction
du poids unitaire connu.
Configurer les paramètres de la fonction de limites de poids.
Sélectionner l’unité de pesée souhaitée.
(Réservé au Service technique- Seulement lors de configuration
technique)
Pour choisir les PLU à sélectionner.
Rechercher une PLU mémorisée.

34
ETALONNAGE
Appuyer sur les touches
et
pour entrer dans le menu d’étalonnage.
ECF-1 Etalonnage du poids (Zéro et points de signal)
ECF-2 Etalonnage du Zéro
ECF-3 Etalonnage des points de signal
Etalonnage de poids ECF-1
1. Appuyer sur la touche
pour accéder au mode ECF-1 ou la touche
pour sortir du menu et revenir au mode normal de pesage.
2. Appuyer sur la touche .
3. Avec les touches 0 à 9, introduire la valeur du poids de calibration et
confirmer avec la touche .
4. Mettre le poids sur le plateau et appuyer sur la touche .
5. La balance effectuera la calibration automatiquement et reviendra au
mode normal de pesage.
Etalonnage du zéro ECF-2
1. Appuyer sur la touche
pour accéder au mode ECF-2 ou sur la touche
pour sortir du menu et revenir au mode normal de pesage.
2. Appuyer sur la touche
pour ajuster le zéro.
3. La balance effectuera la calibration du zéro automatiquement et
reviendra au mode normal de pesage.

35
Etalonnage du span ECF-3
1. Appuyer sur la touche
pour accéder au mode ECF-3 ou sur la touche
pour sortir du menu et revenir au mode normal de pesage.
2. Avec les touches 0 à 9, introduire la valeur du poids de calibration et
confirmer avec la touche .
3. Mettre le poids sur le plateau et appuyer sur la touche .
4. La balance effectuera la calibration automatiquement et reviendra au
mode normal de pesage.
MODE D’UTILISATION
Fonction de pesage
Placer le poids sur le plateau de la balance. L’écran “Poids” affichera le poids brut.
Fonction de tare
Placer un récipient sur le plateau et lorsque le poids est stable, appuyer sur
la touche
pour effectuer la Tare. L’écran affichera 0 et une flèche “◄”
apparaîtra sur le display à gauche “Poids” (Peso) devant le symbole T.
Introduire le produit dans le récipient. Le poids affiché à l’écran sera le
poids net. Enlever les poids du plateau. L’écran affichera le poids taré qui
correspond au poids du récipient. (La valeur de la tare sera négative).
Pour annuler la tare et remettre l’écran à 0, enlever les poids du plateau et
appuyer sur la touche .

36
FONCTION COMPTE-PIÉCES
Comptage de pièces
introduction du poids unitaire connu
1. Introduire le poids unitaire à l’aide du clavier numérique 0-9 et la touche
décimale(.).
2. Appuyer sur la touche
.
3. Le display “Weight/Peso” affichera le poids total.
Le display “Unit Weight/Peso Unit” affichera le poids unitaire de la pièce.
Le display “Total” affichera le nombre total de pièces.
Comptage par échantillonnage
1. Déposer sur le plateau le nombre de pièces qui correspondra à
l’échantillonnage initial. Introduire via le clavier numérique la quantité
du nombre de pièces déposées sur le plateau.
2. Quand le display “Weight/Peso” le poids total des pièces, appuyer sur
la touche .
3. Le display “Unit weight/Peso Unit” affichera le poids unitaire de chaque pièce.
Le display “Total” affichera le nombre total de pièces.
Limite de poids supérieure
1. Dans le mode de pesée normal, déposer les pièces à compter sur le
plateau.
2. Utiliser le clavier numérique 0-9 pour introduire le nombre de pièces
déposées.

37
3. Appuyer sur la touche
pour mémoriser l’échantillon.
4. Une fois l’échantillon mémorisé, déposer sur le plateau le poids
maximum qui correspondra à la valeur de la limite supérieure.
5. Appuyer sur la touche
pour confirmer.
6. Retirer le poids.
Note: Une fois cette opération effectuée, la balance émettra un signal sonore
acoustique et affichera le message “HI” sur l’écran “Unit weight/Peso Unit”
lorsque le poids dépassera la limite supérieure prédéterminée.
CONFIGURATION DES PARAMÈTRES
Appuyer sur les touches
et
pour entrer dans les paramètres.
Pour accéder à la configuration des fonctions:
Utiliser la touche pour se déplacer vers la droite.
Utiliser la touche pour se déplacer vers la gauche.
Utiliser la touche pour entrer dans le mode de configuration souhaité.
UF-1 Valeur interne / Voltage de la batterie
1. Appuyer sur la touche
pour visualiser les valeurs internes suivantes:
• Sur le display “Weight/Poids” s’affichera la valeur interne des points
de signal.
• Sur le display “Unit Weight/Poids” Unit s’affichera le voltage actuel

38
de la batterie.
• Sur le display “Count/Pièces” s’affichera la valeur interne du zéro.
2. Appuyer sur la touche
pour sortir du menu UF-1.
Appuyer sur la touche
pour revenir au mode pesée normal.
UF-2 Moyenne automatique du poids unitaire
AAVG 0: Désactivé.
AAVG 1: Activé.
1. Appuyer sur la touche
pour accéder à la configuration.
2. Utiliser les touches 0 à 1 pour sélectionner le mode souhaité.
3. Appuyer sur la touche
pour sortir du menu UF-2.
Appuyer sur la touche
pour revenir au mode pesée normal.
UF-3 Auto-déconnexion
Modes:
• AoFF 00: Auto déconnexion désactivée
• AoFF 01: La balance se désactivera automatiquement après 1 minute
sans utilisation
• AoFF 02: La balance se désactivera automatiquement après 2 minutes
sans utilisation.
• AoFF 99: La balance se désactivera automatiquement après 99 minutes

39
sans utilisation.
1. Appuyer sur la touche
pour accéder à la programmation de l’auto-
déconnexion.
2. Utiliser les touches 0 à 9 pour sélectionner le mode souhaité.
3. Appuyer sur la touche
pour confirmer et sortir du menu UF-3.
4. Appuyer sur la touche
pour revenir au mode pesée normal.
UF-4 Rétro-éclairage de l’écran
Modes:
• Lit 2: Rétro-éclairage désactivé
• Lit 0: Rétro-éclairage automatique
• Lit 1: Rétro-éclairage toujours activé
Note: La valeur par défaut est: Lit 0 (automatique)
1. Appuyer sur la touche
pour accéder à la programmation du rétro-
éclairage de l’écran.
2. Utiliser les touches 0 à 2 pour sélectionner le mode souhaité.
3. Appuyer sur la touche
pour confirmer.
4. Appuyer sur la touche
pour revenir au mode pesée normal.

40
UF-5 Accumulation de pesées
Modes:
ACCU 0 0
A B
A: 0. Stabilité nécessaire.
1. Stabilité non nécessaire.
B: 0. La lecture du display doit revenir au zéro pour accepter la
prochaine accumulation.
1. Il n’est pas nécessaire que la lecture du display retourne au zéro
pour faire une autre accumulation.
2. Il n’est pas nécessaire d’effectuer une tare pour avoir lieu à une
autre accumulation.
Note: La valeur par défaut est : ACCU00 (Stabilité nécessaire et lecture doit
revenir à zéro).
1. Appuyer sur la touche
pour accéder à la programmation d’accumulation
de pesées.
2. Utiliser les touches 0 à 2 pour sélectionner le mode souhaité.
3. Appuyer sur la touche
pour confirmer.
4. Pour sortir et revenir au mode de pesage, appuyer sur la touche
.

41
UF-6 Sortie RS-232
Modes:
232 0 0
A B
A: 0. Vitesse de transmission 1200
1. Vitesse de transmission 2400
2. Vitesse de transmission 4800
3. Vitesse de transmission 9600
4. Vitesse de transmission 19200
B: 0. Sortie RS-232 désactivée
1. Transmission manuelle – Format 2
2. Transmission stable – Format 1
3. Transmission par commande – Format 1
Protocole de communication
Signal UART de EIA-RS232 C
Format:
1. Transmission de série: 1200/2400/4800/9600/19200/38400 BPS.
2. Bits: 8 bits.
3. Bits de parité: Aucun.
4. Bits d’arrêt: 1 bit.

42
Bit de début Données des bits Arrèt bits
Format 1 (232 1 – 3)
TÈTE 1 (2 BYTES) TÊTE 2 (2 BYTES)
OL – Surcharge
ST – Stable NT – Poids net
US – Instable GS – Poids brut
Fixed 20 BYTES ASCII
1 2 1 1 2 1 1 2 3 4 5 6 7 8 1 2 3 4 1 2
Head 1 Head 2 Data Unit CR LF
Exemples de transmissions
1. Exemple +0.876 kg Stable et Poids Net:
S T , N T , + 0 0 0 . 8 7 6 k g 0D 0A
2. Exemple -1.568 lb Instable et Poids Brut:
U S , G S , - 0 0 1 . 5 6 8 l b 0D 0A

43
Format 2 (232 x1)
Appuyer sur la touche
pour transmettre.
I T E 1
G W + 1 1 0 0 . 0 g
T W + 1 0 0 . 0 g
P T W + 0 . 0 g
W + 1 0 0 0 . 0 g
A P W 1 . 0 0 0 0 0 g
Q T Y 1 0 0 0 p c s
I T E 2
G W + 1 1 0 0 . 0 g
T W + 0 . 0 g
P T W + 1 0 0 . 0 g
N W + 1 0 0 0 . 0 g
A P W 1 . 0 0 0 0 0 g
Q T Y 1 0 0 0 p c s
Appuyer sur la touche
pendant 3 secondes pour transmettre.
= = = = = = = = = = = = = = = =
T . I 2
T . W 2 0 0 0 . 0 g
T . Q 2 0 0 0 p c s
1. Appuyer sur la touche
pour accéder à la programmation.
2. Utiliser les touches 0 à 4 pour sélectionner le mode souhaité.
3. Appuyer sur la touche
pour confirmer.
4. Pour sortir et revenir au mode de pesage, appuyer sur la touche .

44
UF-7 ADC actualisation de la fréquence
SPEEd 0 Vitesse basse 7.5 hz.
SPEEd 1 Vitesse Standard 15 hz.
SPPEd 2 Vitesse haute 30 hz.
Note: La valeur par défaut est: SPEED 0
1. Appuyer sur la touche
pour accéder à la programmation.
2. Utiliser les touches 0 à 2 pour sélectionner la vitesse ADC souhaitée.
3. Appuyer sur la touche
pour confirmer.
4. Pour sortir et revenir au mode de pesage, appuyer sur la touche .
UF-8 Configuration du zéro
ZP 0 Fonction désactivée.
ZP 1 1 division ne s’affiche pas.
ZP 2 2 divisions ne s’affichent pas.
ZP 3 3 divisions ne s’affichent pas.
ZP 4 4 divisions ne s’affichent pas.
ZP 5 5 divisions ne s’affichent pas.
Note: La Valeur par défaut est: ZP 1
1. Appuyer sur la touche
pour accéder à la programmation.
2. Utiliser les touches 0 à 5 pour sélectionner le mode souhaité.
3. Appuyer sur la touche
pour confirmer.
4. Pour sortir et revenir au mode de pesage, appuyer sur la touche .

45
ENREGISTRER ET ÉLIMINER DES MÉMOIRES DE PRODUIT (PLU)
1. Placez l’échantillon sur le plateau de pesée.
2. À l’aide du clavier numérique, saisissez le nombre de pièces placées sur
le plateau.
3. Appuyez sur pour calculer le poids unitaire.
4. Appuyez sur , et ensuite sur la touche où vous souhaitez enregistrer
la mémoire de produit (10 mémoires directes sont disponibles [de M1 à
M10]). La mémoire sera enregistrée.
Pour utiliser les 10 autres mémoires directes (de M11 à M20), appuyez sur
pour passer à PLU2 avant de placer l’échantillon. Renouvelez les étapes
détaillées ci-dessus.
Pour éliminer une mémoire de PLU, appuyez d’abord sur la touche que vous
souhaitez supprimer (de M1 à M20) et ensuite appuyez sur et
rappuyez sur .

46
GARANTIE
Cette balance est garantie contre les défauts de fabrication ou de pièce,
pendant une année, à partir de la date de livraison.
Durant cette période, GRAM PRECISON, SL, se chargera de la réparation de
la balance.
Cette garantie n’inclut pas les dommages causés par une utilisation
impropre, surcharge, ou par faute de ne pas avoir suivi les recommandations
écrites dans ce manuel (particulièrement de l’aparté CONSEILS POUR
L’ENTRETIEN).
La garantie ne couvre pas les frais d’envoi (transport) nécessaires pour la
réparation de la balance.

47
DEUTSCH
STROMVERSORGUNG
Eingang: 100~240V 50/60hz.
Ausgang: 12V/1A DC 12W.
Akku: 6V/4Ah.
VERBRAUCH
Etwa 12mA.
Etwa 36mA, bei aktivierter interner Displaybeleuchtung.
Etwa 48mA, bei aktivierter interner Displaybeleuchtung und mit RS-232
Schnittstelle (Optional).
AKKU-BETRIEBSDAUER
Etwa 320 Stunden, bei deaktivierter interner Displaybeleuchtung.
BESCHREIBUNG DES DISPLAYS

48
BESCHREIBUNG DER TASTATUR
TASTENFUNKTIONEN
Um die Waage abzuschalten, halten Sie die Taste OFF solange
gedrückt, bis auf dem Display 2 Sekunden lang “Off” angezeigt wird.
Drücken Sie diese Taste, um die Waage einzuschalten.
Zur Auswahl der gewünschten Wiegeeinheit.
Funktion 1: Zum Nullstellen der Displayanzeige, insofern das Gewichtswert
unter 2% des maximalen Wägebereichs liegt.
Funktion 2: Um innerhalb des Einstellungsmodus nach links zu wechseln.
Funktion 1: Zum subtrahieren des Gewichts eines Behälters oder
Gegenstands.
Funktion 2: Um innerhalb des Einstellungsmodus nach rechts zu
wechseln.
Tara-Vorgabe.

49
Um die der Funktion Wägen mit Toleranzbereich aufzurufen.
Um die Stückzählfunktion aufzurufen.
Speicherabruf während der Summenfunktion.
Zur Ausführung der Summenfunktion
Zum Löschen von Eingaben
Zur Eingabe von PLU-Speichern
Zur Auswahl der PLU-Nummern
STANDARD-KALIBRIERUNG
Drücken Sie die Tasten und , um die Funktion der StandardKalibrierung aufzurufen.
ECF-1 Gewicht-Kalibrierung (Nullpunkt und Messbereich)
ECF-2 Nullpunkt-Kalibrierung
ECF-3 Messbereich-Kalibrierung
Gewicht-Kalibrierung ECF-1
1. Drücken Sie die Taste , um in den Modus ECF-1 zu gelangen, oder
die Taste , um das Auswahlmenü zu verlassen und zum normalen
Wiegemodus zurückzukehren.
2. Drücken Sie die Taste .

50
3. Geben Sie mit den Tasten 0 ~ 9 den Wert des Kalibrierungsgewichts ein
und bestätigen Sie die Eingabe mit der Taste .
4. Legen Sie das Gewicht auf die Wägeplatte und drücken Sie die Taste .
5. Die Waage führt die Kalibrierung automatisch durch und kehrt dann in
den normalen Wiegemodus zurück.
Nullpunkt-Kalibrierung ECF-2
1. Drücken Sie die Taste , um in den Modus ECF-2 zu gelangen, oder
die Taste , um das Auswahlmenü zu verlassen und zum normalen
Wiegemodus zurückzukehren.
2. Drücken Sie die Taste , um den Nullpunkt festzulegen.
3. Die Waage führt die Nullpunkt-Kalibrierung automatisch durch und
kehrt dann in den normalen Wiegemodus zurück.
Messbereich-Kalibrierung ECF-3
1. Drücken Sie die Taste , um in den Modus ECF-3 zu gelangen, oder
die Taste , um das Auswahlmenü zu verlassen und zum normalen
Wiegemodus zurückzukehren.
2. Geben Sie mit den Tasten 0 ~ 9 den Wert des Kalibrierungsgewichts ein
und bestätigen Sie die Eingabe mit der Taste .
3. Legen Sie das Gewicht auf die Wägeplatte und drücken Sie die Taste .
4. Die Waage führt die Kalibrierung automatisch durch und kehrt dann in
den normalen Wiegemodus zurück.

51
STÜCKZÄHLFUNKTION
Eingabe des einzelgewichts
Legen Sie die zu zählenden Gegenstände auf die Wägeplatte und
verwenden Sie die Tasten 0-9, sowie die Dezimalpunkt-Taste, um das
Einzelgewicht des Gegenstands einzugeben. Das Display Weight/Peso
zeigt das Gesamtgewicht an, das Display Unit Weight/Peso Unit zeigt das
Einzelgewicht des Gegenstands an und das Display Count/Piezas zeigt die
Gesamtanzahl der Gegenstände an.
Stichprobe (stückzahl)
Legen Sie eine bestimmte Anzahl von Gegenständen auf die Wägeplatte und
verwenden Sie die Tasten 0-9 um die entsprechende Stückzahl einzugeben.
Wenn das Display Weight/Peso das Gesamtgewicht aller Gegenstände
anzeigt, dann drücken Sie die Taste .
Daraufhin zeigt das Display Unit Weight/Peso Unit das Gewicht von
jedem einzelnen Gegenstand an und das Display Count/Piezas zeigt die
Gesamtanzahl der Gegenstände an.
Stückzählen mit toleranzbereich
Legen Sie die zu zählenden Gegenstände auf die Wägeplatte, verwenden Sie
die Tasten 0-9, um die entsprechende Anzahl der Gegenstände einzugeben
und drücken Sie dann die Taste . Sobald die Waage die Stichprobe
gespeichert hat, legen Sie das maximale Gewicht auf die Wägeplatte
(Wert der oberen Gewichtsgrenze) und drücken zum Bestätigen die Taste
. Entfernen Sie das Gewicht. Ab diesem Zeitpunkt wird die Waage ein

52
akustisches Signal abgeben und die Nachricht “HI” auf dem Display anzeigen,
sobald das Gewicht den vorgegebenen oberen Grenzwert überschreitet.
FUNKTIONSEINSTELLUNGEN
Zum Aufrufen der Funktionseinstellungen drücken Sie die Tasten und .
Drücken Sie die Taste , um zwischen den verschiedenen Menüs zu wechseln.
UF-1 Interner Wert / Akkuspannung
1. Drücken Sie die Taste , um die folgenden internen Werte anzeigen
zu lassen:
• Im Display Weight/Peso wird der interne Wert des Messbereichs
angezeigt.
• Im Display Unit Weight/Peso Unit. wird die aktuelle Akkuspannung
angezeigt.
• Im Display Count/Piezas wird der interne Wert des Nullpunkts angezeigt.
2. Zum Verlassen drücken Sie die Taste .
UF-2 Automatische Optimierung des durchschnittlichen
Einzelgewichts
AAVG 0: Deaktiviert
AAVG 1: Aktiviert

53
1. Drücken Sie die Taste , um die Einstellungen aufzurufen.
2. Verwenden Sie die Tasten 0 und 1, um den gewünschten Modus auszuwählen.
3. Drücken Sie die Taste , um die Eingabe zu bestätigen.
4. Zum Verlassen drücken Sie die Taste .
UF-3 Automatische Abschaltung
Modus:
• AoFF 00: Automatische Abschaltung deaktiviert.
• AoFF 01: Die Waage schaltet nach 1 Minute Nichtverwendung
automatisch ab.
• AoFF 02: Die Waage schaltet nach 2 Minuten Nichtverwendung
automatisch ab.
• AoFF 99: Die Waage schaltet nach 99 Minuten Nichtverwendung
automatisch ab.
1. Drücken Sie die Taste , um die Einstellung der automatischen
Abschaltung aufzurufen.
2. Geben Sie mit den Tasten 0 ~ 9 den gewünschten Wert ein.
3. Drücken Sie die Taste , um die Eingabe zu bestätigen.
4. Zum Verlassen, und um in den Wiegemodus zurückzukehren, drücken
Sie die Taste .

54
UF-4 Displaybeleuchtung
Modus:
• Lit 2: Displaybeleuchtung deaktiviert.
• Lit 0: Displaybeleuchtung automatisch.
• Lit 1: Displaybeleuchtung immer aktiviert.
Standardeinstellung: Lit 0 (automatisch).
1. Drücken Sie die Taste , um die Einstellung der Displaybeleuchtung
aufzurufen.
2. Verwenden Sie die Tasten 0 oder 2, um den gewünschten Modus
auszuwählen.
3. Drücken Sie die Taste , um die Eingabe zu bestätigen.
4. Zum Verlassen, und um in den Wiegemodus zurückzukehren, drücken
Sie die Taste .
UF-5 Summenfunktion
Modus:
ACCU 0 0
A B
A: 0. Stabilität erforderlich.
1. Stabilität nicht erforderlich.

55
B: 0. Die Gewichtsanzeige muss erneut auf “Null“ zurückfallen, um die
nächste Akkumulation durchführen zu können.
1. Es ist nicht notwendig, dass die Gewichtsanzeige auf “Null“ zurückfällt,
um eine weitere Akkumulation durchzuführen.
2. Es ist nicht notwendig, zu tarieren, um eine weitere Akkumulation
durchzuführen.
Standardeinstellung: ACCU00 (Stabilität erforderlich und die Gewichtsanzeige
muss zurück auf “Null“ fallen).
1. Drücken Sie die Taste , um die Einstellung der Summenfunktion
aufzurufen.
2. Verwenden Sie die Tasten 0 oder 2, um den gewünschten Modus
auszuwählen.
3. Drücken Sie die Taste , um die Eingabe zu bestätigen.
4. Zum Verlassen, und um in den Wiegemodus zurückzukehren, drücken
Sie die Taste .
UF-6 Datenausgang RS-232
232 0 0
A B
A: 0. Übertragungsgeschwindigkeit 1200
1. Übertragungsgeschwindigkeit 2400
2. Übertragungsgeschwindigkeit 4800
3. Übertragungsgeschwindigkeit 9600
4. Übertragungsgeschwindigkeit 19200

56
B: 0. Ausgang RS-232 deaktiviert
1. Übertragung manuell – Format 2
2. Übertragung stabil – Format 1
3. Übertragung durch Befehlseingabe – Format 1
Kommunikationsprotokoll
UART Signal von EIA-RS232 C
Format:
1. Serielle Datenübertragung: 1200/2400/4800/9600/19200/38400 BPS.
2. Bit-Anzahl: 8 Bits.
3. Paritätsbits: keine.
4. Stoppbits: 1 Bit.
Start-Bit Datenbits Stop-Bits
Format 1 (232 1 – 3)
HEAD 1 (2 BYTES) HEAD 2 (2 BYTES)
OL – Überlastung
ST – Stabil NT – Nettogewicht
US – Instabil GS – Bruttogewicht

57
1 2 1 1 2 1 1 2 3 4 5 6 7 8 1 2 3 4 1 2
Head 1 Head 2 Data Unit CR LF
Datenübertragungsbeispiele
1. Beispiel +0.876 kg stabiles Nettogewicht:
S T , N T , + 0 0 0 . 8 7 6 k g 0D 0A
2. Beispiel -1.568 lb instabiles Bruttogewicht:
U S , G S , - 0 0 1 . 5 6 8 l b 0D 0A
Format 2 (232 x1)
Drücken Sie die Taste , um die Datenübertragung zu starten.
I T E 1
G W + 1 1 0 0 . 0 g
T W + 1 0 0 . 0 g
P T W + 0 . 0 g
W + 1 0 0 0 . 0 g
A P W 1 . 0 0 0 0 0 g
Q T Y 1 0 0 0 p c s
I T E 2
G W + 1 1 0 0 . 0 g
T W + 0 . 0 g
P T W + 1 0 0 . 0 g
N W + 1 0 0 0 . 0 g
A P W 1 . 0 0 0 0 0 g
Q T Y 1 0 0 0 p c s

58
Halten Sie die Taste
3 Sekunden lang gedrückt, um die Datenübertragung
zu starten.
= = = = = = = = = = = = = = = =
T . I 2
T . W 2 0 0 0 . 0 g
T . Q 2 0 0 0 p c s
1. Drücken Sie die Taste , um die Einstellungen aufzurufen.
2. Verwenden Sie die Tasten 0 - 4, um den gewünschten Modus auszuwählen.
3. Drücken Sie die Taste , um die Eingabe zu bestätigen.
4. Zum Verlassen, und um in den Wiegemodus zurückzukehren, drücken
Sie die Taste .
UF-7 Aktualisierung der ADC-Frequenz
SPEEd 0 Niedrige Geschwindigkeit 7,5 Hz.
SPEEd 1 Reguläre Geschwindigkeit 15 Hz.
SPPEd 2 Hohe Geschwindigkeit 30 Hz.
Standardeinstellung: SPEED 0
1. Drücken Sie die Taste , um die Einstellungen aufzurufen.
2. Verwenden Sie die Tasten 0 – 2, um die gewünschte ADC-Geschwindigkeit
auszuwählen.
3. Drücken Sie die Taste , um die Eingabe zu bestätigen.
4. Zum Verlassen, und um in den Wiegemodus zurückzukehren, drücken
Sie die Taste .

59
UF-8 Einstellung des Nullbereichs
ZP 0 Funktion deaktiviert
ZP 1 1 Nachkommastelle wird nicht angezeigt
ZP 2 2 Nachkommastellen werden nicht angezeigt
ZP 3 3 Nachkommastellen werden nicht angezeigt
ZP 4 4 Nachkommastellen werden nicht angezeigt
ZP 5 5 Nachkommastellen werden nicht angezeigt
Standardeinstellung: ZP 1
1. Drücken Sie die Taste , um die Einstellungen aufzurufen.
2. Verwenden Sie die Tasten 0 - 5, um den gewünschten Modus auszuwählen.
3. Drücken Sie die Taste , um die Eingabe zu bestätigen.
4. Zum Verlassen, und um in den Wiegemodus zurückzukehren, drücken
Sie die Taste .

60
ARTIKELSPEICHER (PLU) SPEICHERN UND LÖSCHEN
1. Stichprobe auf die Wägeplatte legen.
2. Die Anzahl der auf die Wägeplatte platzierten Probeteile mit den
Zahlentasten eingeben.
3. Die Taste drücken, um das Stückgewicht zu berechnen.
4. Die Taste , und dann die Taste drücken, unter der der Artikelspeicher
gespeichert werden soll (es stehen 10 direkte Speicher zur Verfügung
(M1 bis M10)). Der Speicher wird gespeichert.
Zur Verwendung der anderen 10 Direktspeicher (M11 bis M20) drücken Sie
vor der Stichprobenprüfung um zum PLU2 zu wechseln. Befolgen Sie
dann dasselbe Verfahren wie vorstehend beschrieben.
Zur Löschung eines PLU-Speichers drücken Sie zunächst die zu löschende
Taste (M1 bis M20). Anschließend auf und dann erneut auf
drücken.

61
GARANTIE
Diese Waage hat eine Garantie auf jegliche Herstellungs- und Materialdefekte
während eines Zeitraums von einem Jahr ab Lieferdatum.
Innerhalb dieser Zeit übernimmt GRAM PRECISION, SL, die Reparatur der
Waage.
Diese Garantie schließt keine Schäden durch unsachgemäße Verwendung
oder Überlastungen ein.
Die Garantie deckt nicht die für den Transport der Waage anfallenden
Versandkosten ab.

62

63

Gram Precision S.L.
Travesía Industrial, 11 · 08907 Hospitalet de Llobregat · Barcelona (Spain)
Tel. +34 902 208 000 · +34 93 300 33 32
Fax +34 93 300 66 98
comercial
@gram.es
www.gram-group.com
004/11012018
 Loading...