

Gram Precision CK-3 Series, CK-15 Series, CK-30 Series, CK-6 Series Operation Manual
SERIES / SERIE / SÉRIE / SERIEN
CK
3 / 6 / 15 / 30
OPERATION MANUAL
MANUAL DE UTILIZACION
MANUEL D´UTILISATION
BENUTZERHANDBUCH

2
INDEX English
Power 6
Power consumption 6
Battery 6
Display description 6
Keyboard description 7
Keys function 7
Standard calibration 8
ECF-1 Weight Calibration 8
ECF-2 Zero Calibration 9
ECF-3 SPAN Calibration 9
Counting pieces function 9
Piece weight setup 9
Number of pieces setup 10
Limits function 10
Functions setup 10
UF-1 Internal Value / Display Battery Voltage 10
UF-2 Piece Weight Auto-average 11
UF-3 Auto Power-off 11
UF-4 Backlight 12
UF-5 Accumulation 12
UF-6 RS232 Output 13
Communication Protocol 13
Output examples 14
UF-7 ADC Update Rate 16
UF-8 Display Condition at Zero 16
Save and delete product memories (PLU) 17
Guarantee 17

3
ÍNDICE Español
Alimentación 18
Consumo 18
Duración de la batería 18
Descripción del display 18
Descripción del teclado 19
Función de las teclas 19
Calibración standard 20
Calibración de peso ECF-1 20
Calibración del cero ECF-2 21
Calibración del span ECF-3 21
Función cuentapiezas 22
Introducción del peso unitario 22
Muestra (Número de piezas) 22
Límites de peso 22
Configuración de funciones 23
UF-1 Valor interno / Voltaje de la batería 23
UF-2 Promedio automático del peso unitario 23
UF-3 Autodesconexión 24
UF-4 Iluminación del display 24
UF-5 Acumulación de pesadas 25
UF-6 Salida RS-232 26
Protocolo de comunicación 26
Ejemplos de transmisión 27
UF-7 ADC actualización de la frecuencia 29
UF-8 Configuración del cero 29
Guardar y eliminar memorias de producto (PLU) 30
Garantía 30

4
SOMMAIRE Français
Alimentation 31
Consommation 31
Durée de la batterie 31
Description de l’écran 31
Description du clavier 32
Fonctions des touches 32
Mode d’utilisation 34
Etalonnage 34
Etalonnage de poids ECF-1 34
Etalonnage du zéro ECF-2 34
Etalonnage du span ECF-3 35
Fonction compte-piéces 36
Comptage de pièces 36
Comptage par échantillonnage 36
Limite de poids supérieure 36
Configuration des paramètres 37
UF-1 Valeur interne / Voltage de la batterie 37
UF-2 Moyenne automatique du poids unitaire 38
UF-3 Auto-déconnexion 38
UF-4 Rétro-éclairage de l’écran 39
UF-5 Accumulation de pesées 40
UF-6 Sortie RS-232 41
Protocole de communication 41
Exemples de transmissions 42
UF-7 ADC actualisation de la fréquence 44
UF-8 Configuration du zéro 44
Enregistrer et éliminer des mémoires de produit (PLU) 45
Garantie 46

5
INHALT Deutsch
Stromversorgung 47
Verbrauch 47
Akku-betriebsdauer 47
Beschreibung des displays 47
Beschreibung der tastatur 48
Tastenfunktionen 48
Standard-kalibrierung 49
Gewicht-Kalibrierung ECF-1 49
Nullpunkt-Kalibrierung ECF-2 50
Messbereich-Kalibrierung ECF-3 50
Stückzählfunktion 51
Eingabe des einzelgewichts 51
Stichprobe (stückzahl) 51
Stückzählen mit toleranzbereich 51
Funktionseinstellungen 52
UF-1 Interner Wert / Akkuspannung 52
UF-2 Automatische Optimierung des durchschnittlichen Einzelgewichts 52
UF-3 Automatische Abschaltung 53
UF-4 Displaybeleuchtung 54
UF-5 Summenfunktion 54
UF-6 Datenausgang RS-232 55
Kommunikationsprotokoll 56
Datenübertragungsbeispiele 57
UF-7 Aktualisierung der ADC-Frequenz 58
UF-8 Einstellung des Nullbereichs 59
Artikelspeicher (PLU) speichern und löschen 60
Garantie 61
6
ENGLISH
POWER
Input: 100 ~ 240V 50/60Hz
Output: DC 12V/1A 12W
Rechargeable battery: 6V/4AH
POWER CONSUMPTION
Approx. 12mA
Approx. 36mA with backlight display
Approx. 48mA with backlight display and the RS-232 (optional)
BATTERY
Approx. 320 hours with the backlight off.
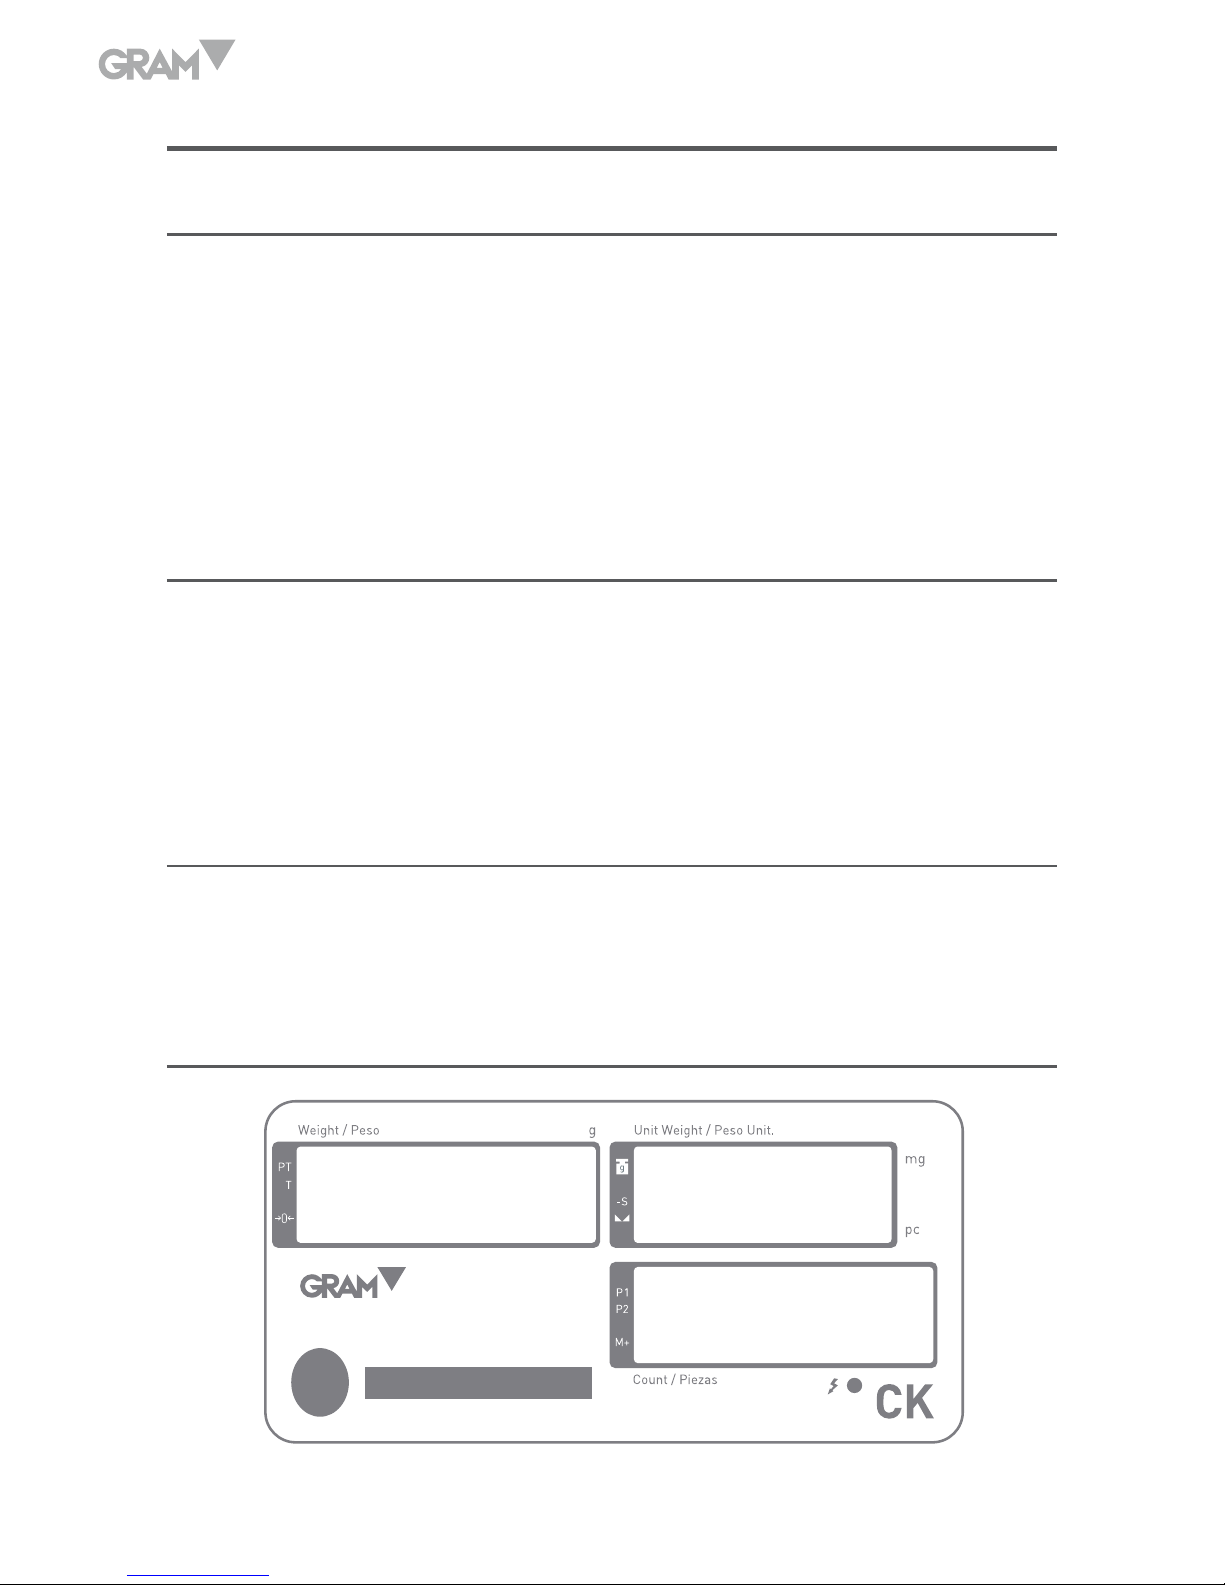
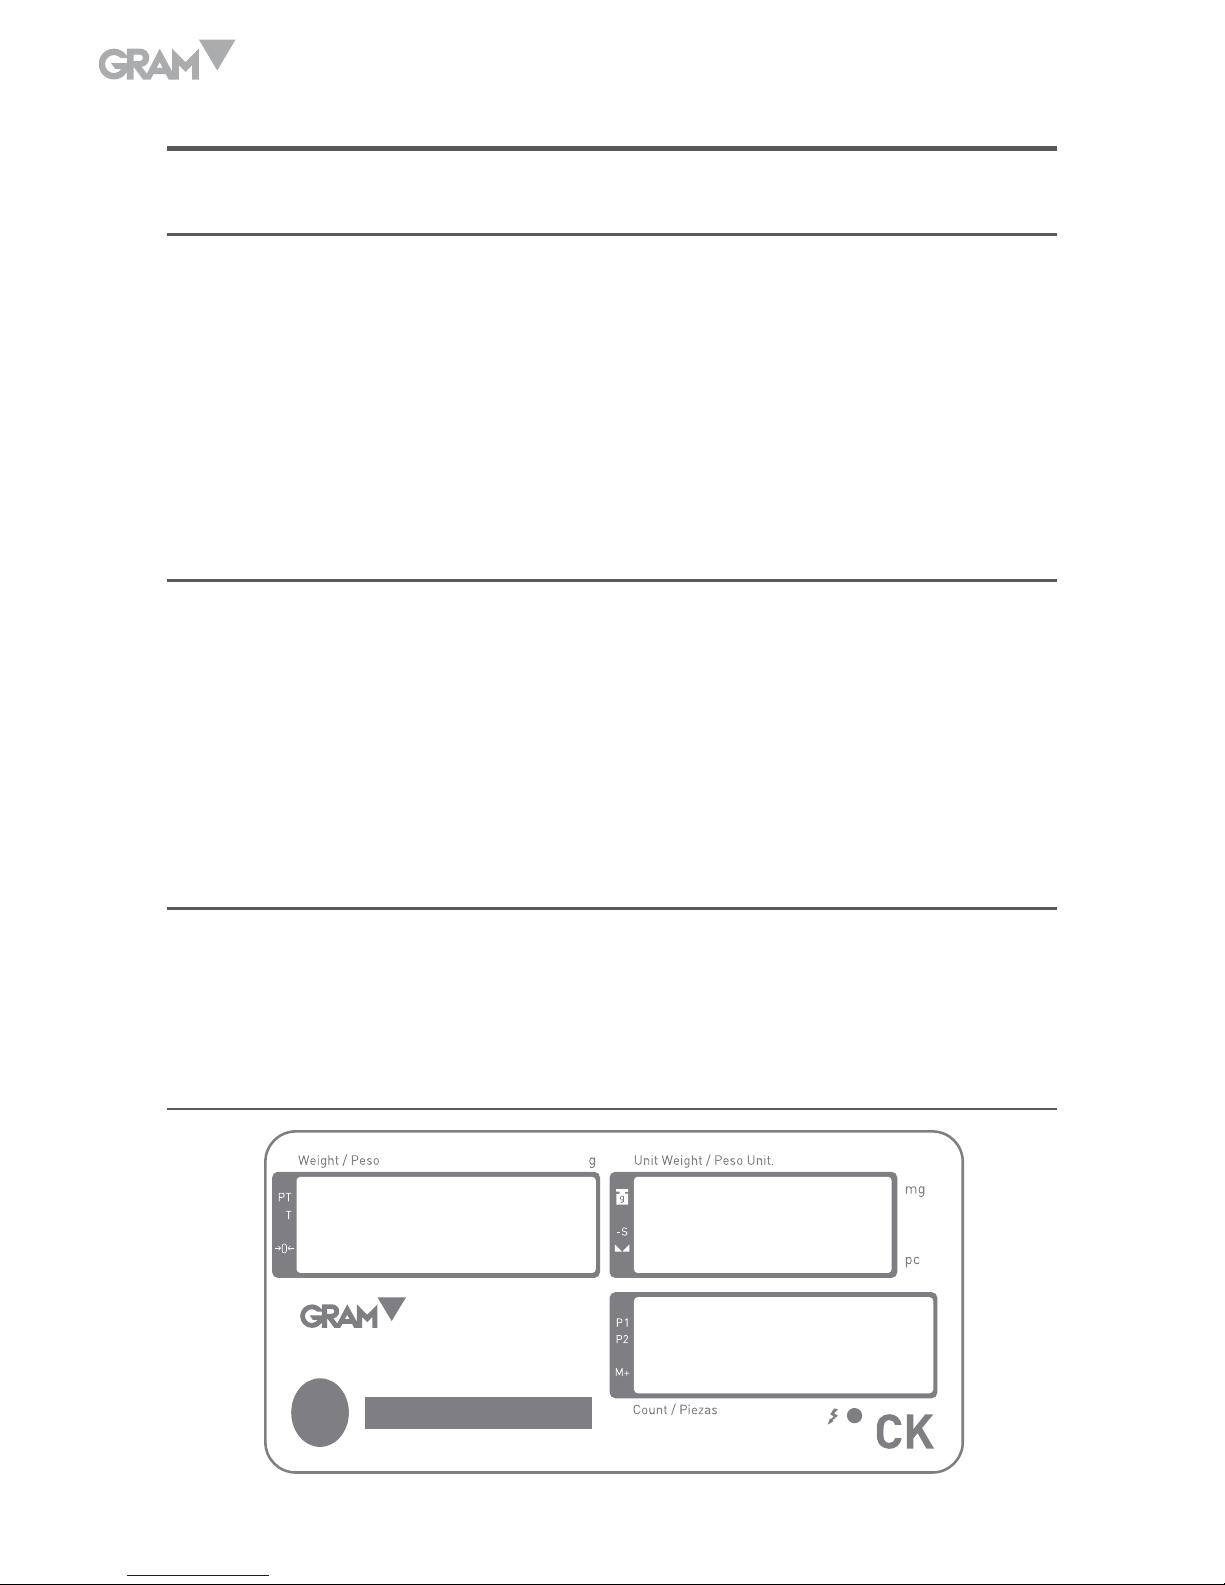
DISPLAY DESCRIPTION
7
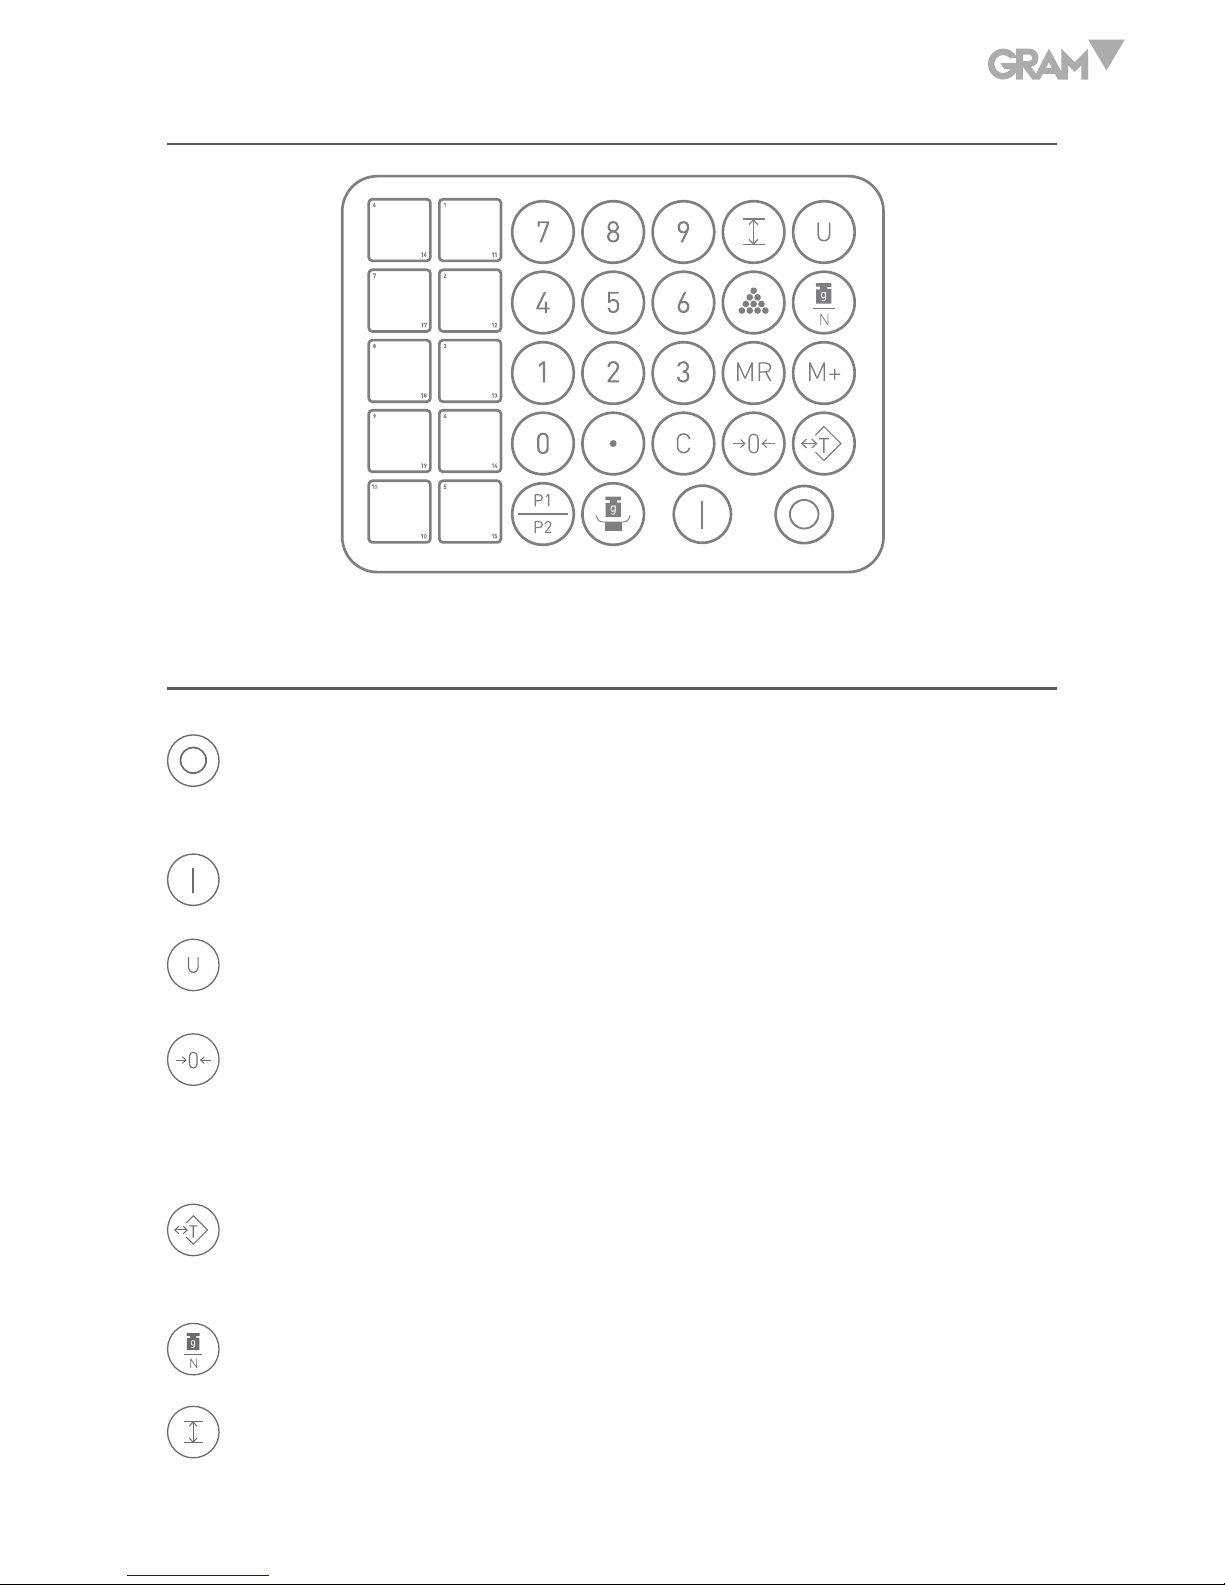
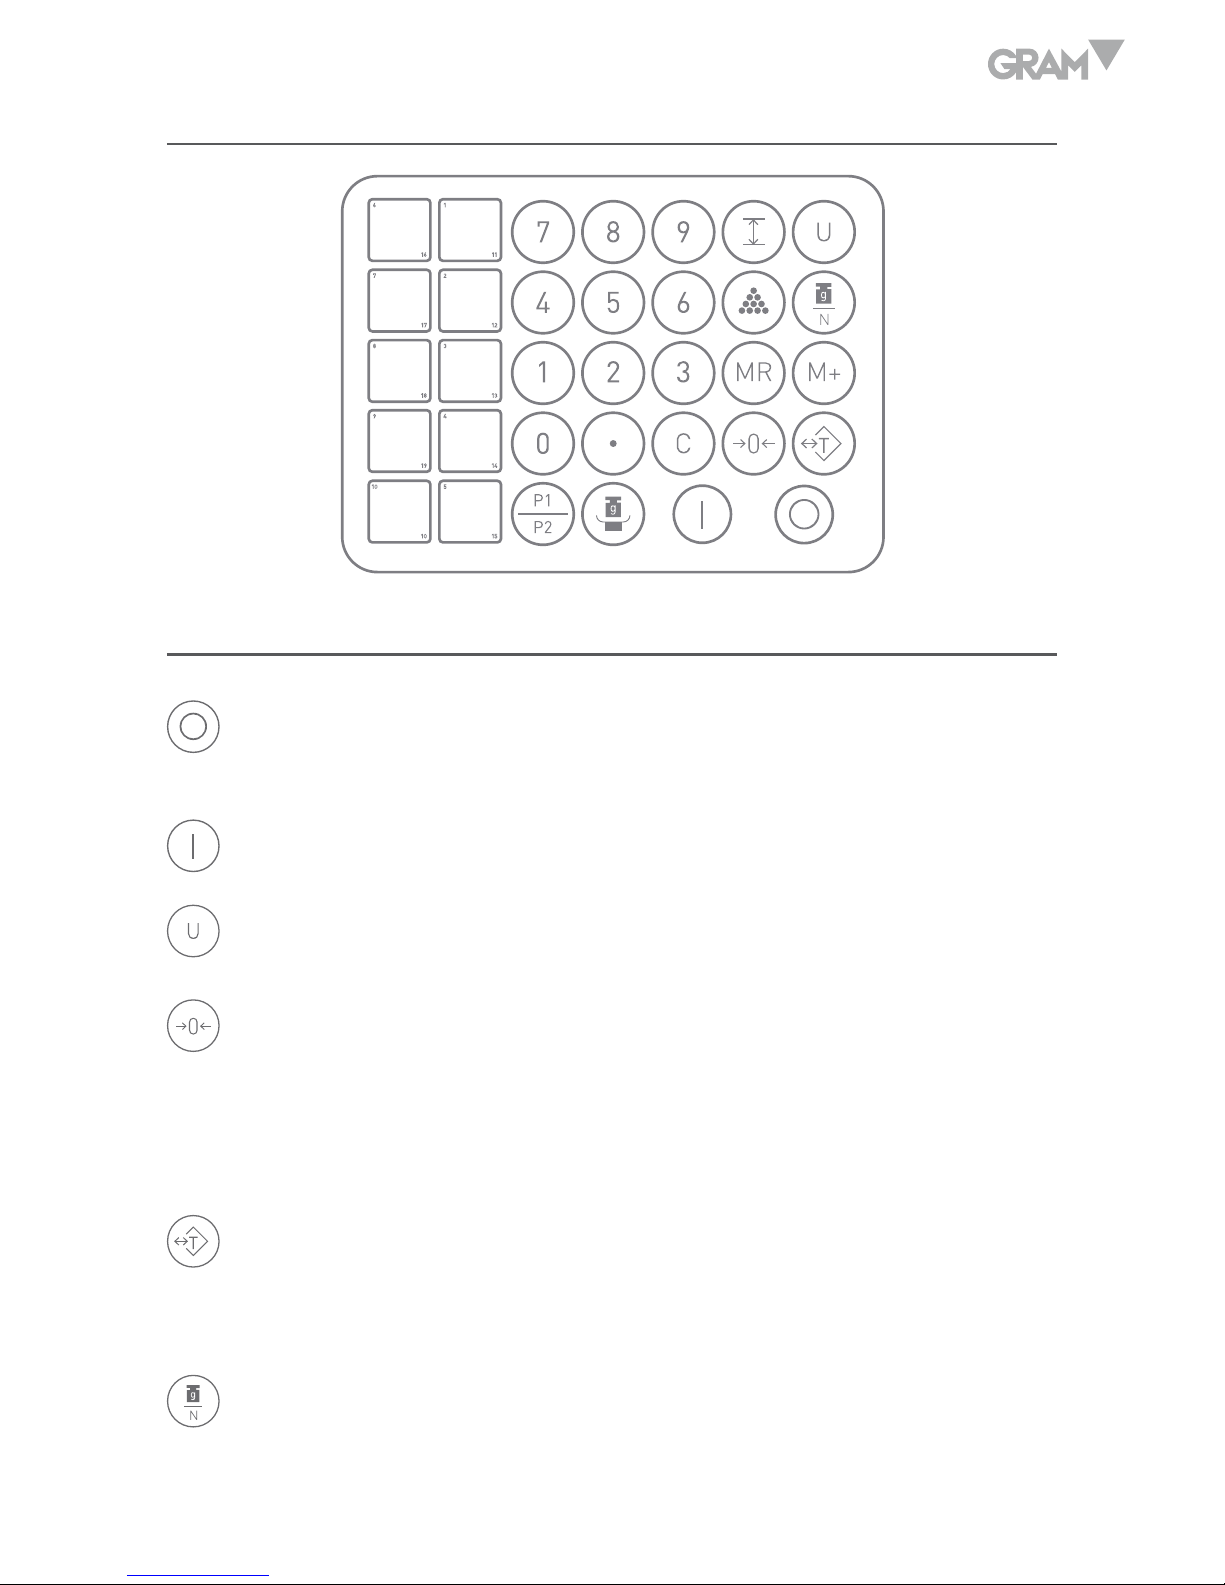
KEYBOARD DESCRIPTION
KEYS FUNCTION
To turn off the scale, keep the OFF key pressed until the display
shows “Off” for 2 seconds.
Press this key to turn on the balance.
To select the desired weighing unit.
Function 1: To reset the weight to 0, but the displayed weight value
has to be less than ± 2% of maximum capacity.
Function 2: To move one space to the left or downward in setup mode.
Function 1: To subtract the container weight.
Function 2: To move one space to the right or upward in setup mode.
To access the counting function.
To access the function of limits.
8
To access the counting function.
Memory recover function.
Accumulation Key.
Clear Key.
Choose PLU Number keys.
Enter PLU memories
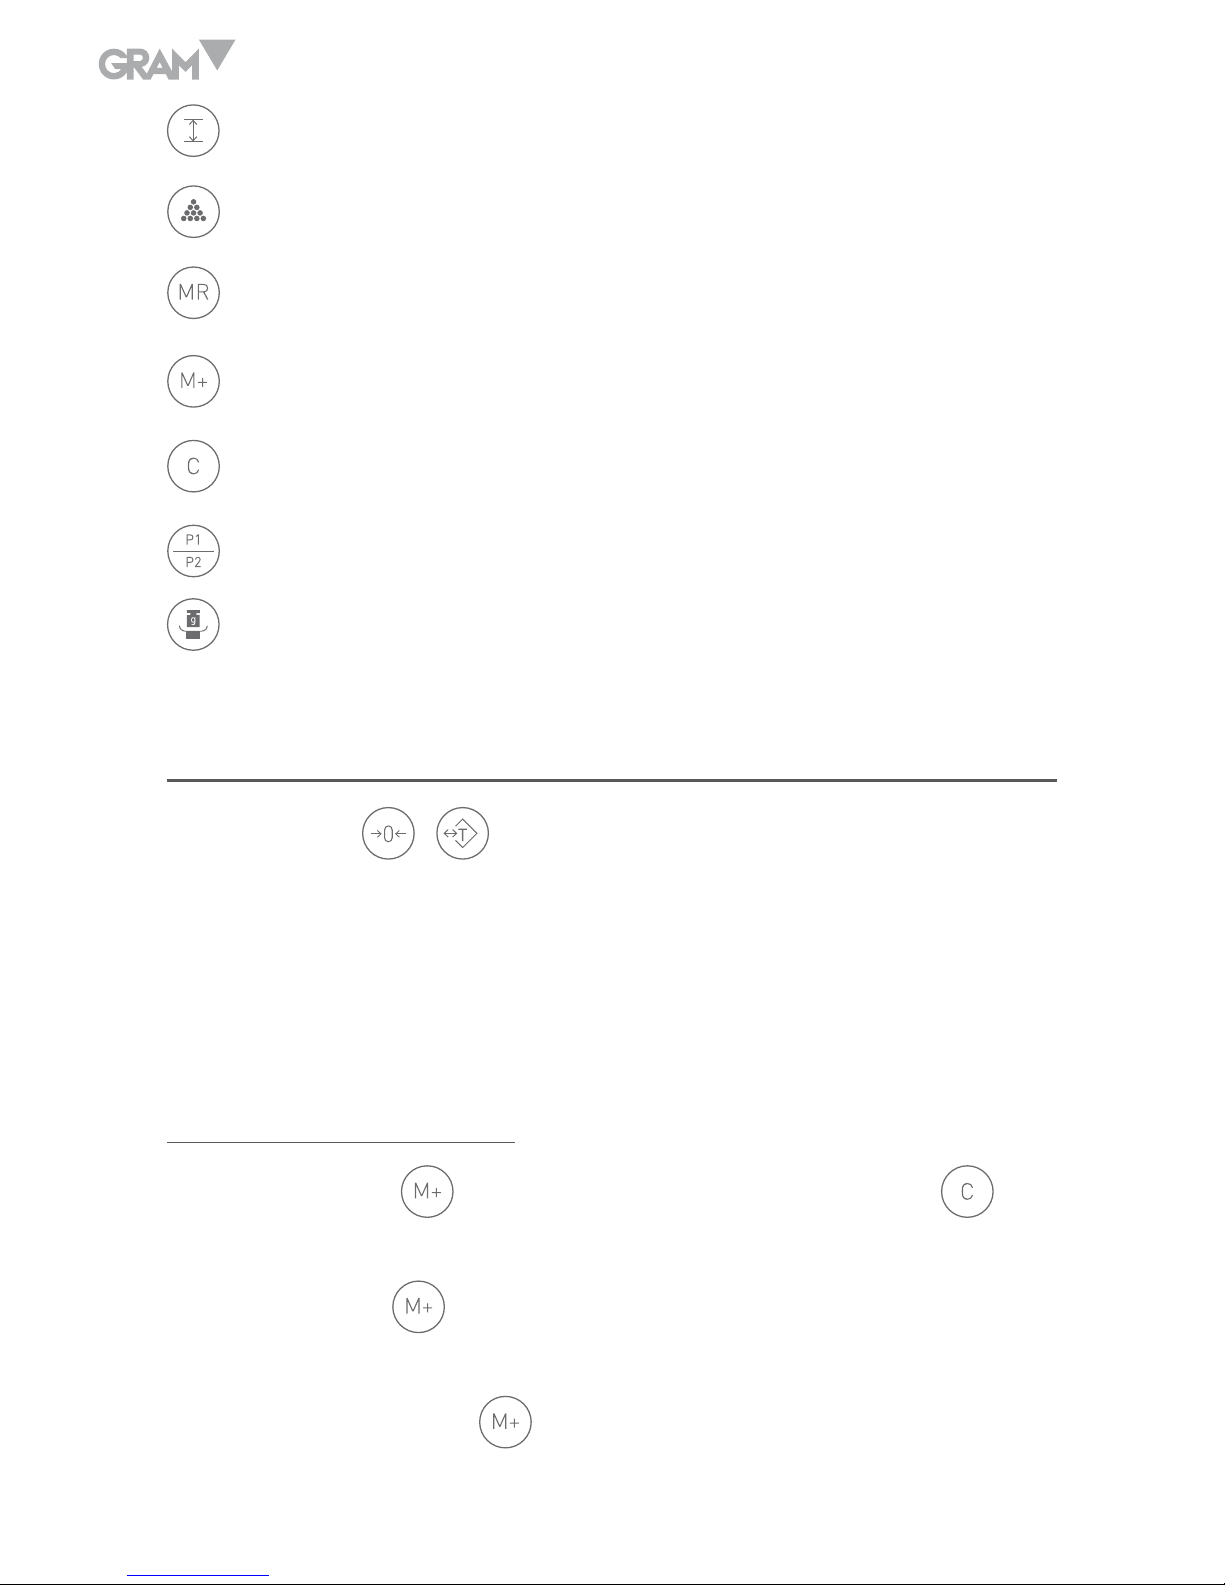
STANDARD CALIBRATION
Press the key and the key to start Standard Calibrations.
ECF-1 Weight Calibration (Zero and Span).
ECF-2 Zero Calibration.
ECF-3 SPAN Calibration.
ECF-1 Weight Calibration
1. Press the key
to start and go to the ECF-1mode, and press the
key to exit menu and back to weighing mode.
2. Press the
key.
3. Use 0 ~ 9 keys to enter the weight to be calibrated and confirm with .
4. Place the required weight mass onto the scale and press the
key.
5. Calibration procedure completed and the scale will return back to
weighing mode automatically.
9
ECF-2 Zero Calibration
1. Press the
key to start and go to the ECF-2 mode, and press the
key to exit menu and back to weighing mode.
2. Press the
key to set the zero weight.
3. Calibration procedure completed and the scale will return back to
weighing mode automatically.
ECF-3 SPAN Calibration
1. Press the
key to start and go to the ECF-3 mode, and press the
key to exit menu and back to weighing mode.
2. Use 0 ~ 9 keys to enter the weight to be calibrated and confirm with .
3. Place the required weight mass onto the scale and press the
key.
4. Calibration procedure completed and the scale will return back to
weighing mode automatically.
COUNTING PIECES FUNCTION
Piece weight setup
Place the object on the weighing pan, use 0-9 number keys and decimal (.)
key to introduce the unit weight. Weight window displays the total weight,
piece weight windows shows unit weight and total count windows displays
the total pieces.
10
Number of pieces setup
Use the 0-9 numbers keys to input the desired sample quantity, when the
display weights shows the weight, press the key, the piece weight
window shows the unit weight and total count window displays the total
pieces number.
Limits function
Place the items to be counted on the weighing pan, use the 0-9 number keys
to introduce the number of pieces loaded and press the
key. Once the
balance memorizes the sample, place the maximum weight on the pan (high
limit value), press the key to confirm the high limit value.
Remove the weight from the pan, from this moment, the balance will beep and
will show the message “HI” when the load will excess the preset high value.
FUNCTIONS SETUP
Press the
and
keys to enter the parameters.
To access the function configuration:
Use the key to move to the right.
Use the key to move to the left.
Use the key to enter the desired configuration mode.
UF-1 Internal Value / Display Battery Voltage
1. Press the
key to display the following internal values:
• The Weight / Peso display shows internal value of the span.

11
• The Unit Weight / Peso Unit display shows the current battery voltage.
• The Count parts / Piezas display shows the internal value (zero).
2. Press the
key to exit menu.
UF-2 Piece Weight Auto-average
AAVG 0: Disable
AAVG 1: Enable
1. Press the
key to start.
2. Use 0 and 1 keys to enable or disable auto-average function.
3. Press the
key to confirm.
4. Press the
key to exit.
UF-3 Auto Power-off
Modes:
• AoFF 00: Auto Power-off disable.
• AoFF 01: The scale turns off automatically in 1 minute when the scale is
not in operation.
• AoFF02: The scale turns off automatically in 2 minutes when the scale
is not in operation.
• oFF 99: The scale turns off automatically in 99 minutes when the scale
is not in operation.
1. Press the
key to access the programming Auto Power-off

12
2. Use 0 ~ 9 keys to enter auto power-off time.
3. Press the
key to confirm.
4. To exit and return back to weighing mode, press the
key.
UF-4 Backlight
Modes:
• Lit 2: Backlight off.
• Lit 0: Auto light-up.
• Lit 1: Backlight on.
Factory default: Lit 0 (Auto light-up).
1. Press the v key to access display backlight programming.
2. Use 0 ~ 2 key to select backlight mode.
3. Press the
to confirm.
4. To exit and return back to the weighing mode, press the
key.
UF-5 Accumulation
Modes:
ACCU 0 0
A B
A: 0. Stable required
1. Stable not required

13
B: 0. The weight has to return to zero to accept next accumulation.
1. The weight does not have to return to zero to accept next accumulation.
2. No tare weight to accept next accumulation.
Factory default: ACCU00 (Stable required and the weight has to return to zero).
UF-6 RS232 Output
232 0 0
A B
A: 0. Baud rate 1200
1. Baud rate 2400
2. Baud rate 4800
3. Baud rate 9600
4. Baud rate 19200
B: 0. RS232 output disable
1. Manual output – Format 2
2. Stable output – Format 1
3. Stream output – Format 1
Communication Protocol
UART signal of EIA-RS232C
Format:
1. Serial output: 1200/2400/4800/9600719200/38400 BPS.
2. Data bits: 8 BITS.
3. Parity bits: None.
4. Stop bits: 1 BIT.
14
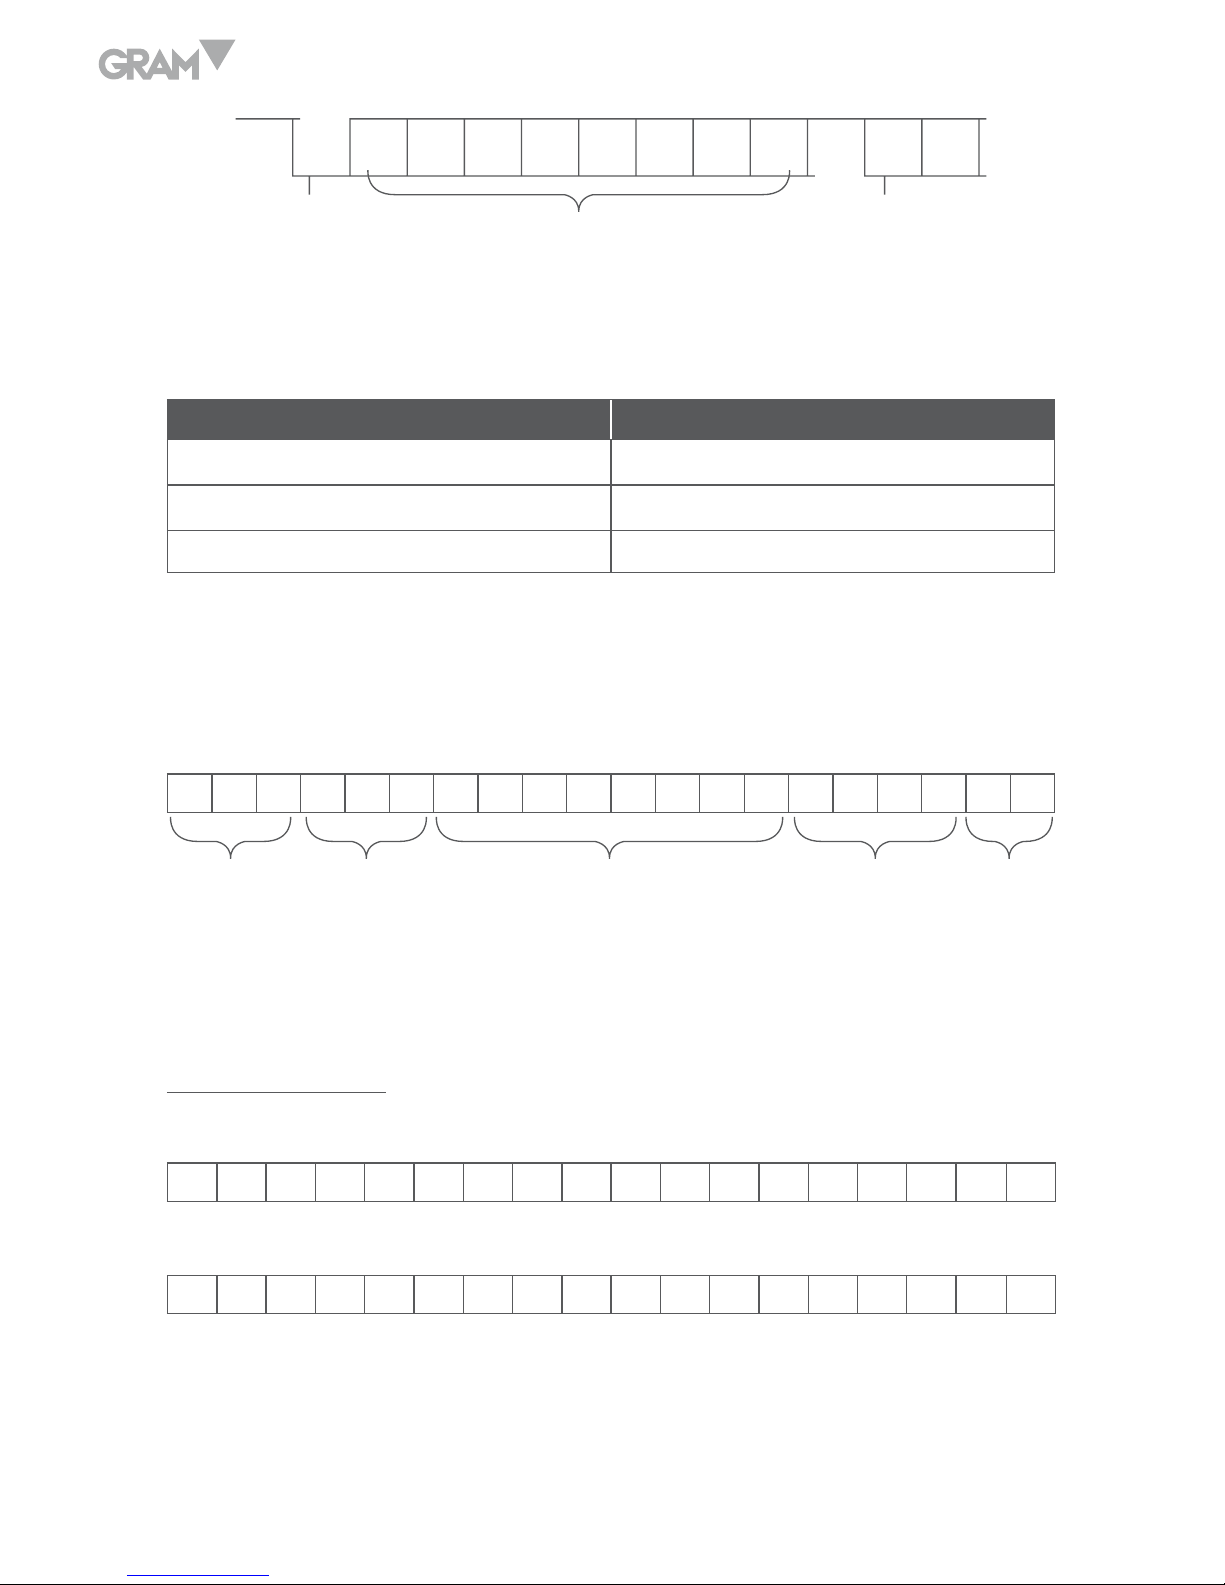
Start-Bit Data bits Stop-Bits
Format 1 (232 1 – 3)
HEAD 1 (2 BYTES) HEAD 2 (2 BYTES)
OL – Over Load
ST – Stable NT – Net Weight
US – Unstable GS – Gross Weight
Fixed 20 BYTES ASCII
1 2 1 1 2 1 1 2 3 4 5 6 7 8 1 2 3 4 1 2
Head 1 Head 2 Data Unit CR LF
Output examples
1. Example +0.876 kg stable net weight:
S T , N T , + 0 0 0 . 8 7 6 k g 0D 0A
2. Example -1.568 lb unstable gross weight:
U S , G S , - 0 0 1 . 5 6 8 l b 0D 0A
15
Format 2 (232 x1)
Press the
key to output.
I T E 1
G W + 1 1 0 0 . 0 g
T W + 1 0 0 . 0 g
P T W + 0 . 0 g
W + 1 0 0 0 . 0 g
A P W 1 . 0 0 0 0 0 g
Q T Y 1 0 0 0 p c s
I T E 2
G W + 1 1 0 0 . 0 g
T W + 0 . 0 g
P T W + 1 0 0 . 0 g
N W + 1 0 0 0 . 0 g
A P W 1 . 0 0 0 0 0 g
Q T Y 1 0 0 0 p c s
Press the
key for 3 seconds key to output.
= = = = = = = = = = = = = = = =
T . I 2
T . W 2 0 0 0 . 0 g
T . Q 2 0 0 0 p c s
1. Press the
key to access programming functions.
2. Use 0 ~ 4 keys to enter RS232 output formats.
3. Press the
key to confirm.
4. To exit and return back to weighing mode, press the
key.

16
UF-7 ADC Update Rate
SPEEd 0 Low speed 7.5 hz.
SPEEd 1 Standard speed 15 hz.
SPEEd 2 High speed 30 hz.
Factory speed: SPEEd 0
1. Press the
key to access programming functions.
2. Use 0 ~ 2 keys to enter ADC speed.
3. Press the
key to confirm.
4. To exit and return back to weighing mode, press the
key.
UF-8 Display Condition at Zero
ZP 0 Off.
ZP 1 One division not to display at zero.
ZP 2 Two division not to display at zero.
ZP 3 Three division not to display at zero.
ZP 4 Four division not to display at zero.
ZP 5 Five division not to display at zero.
Factory default: ZP 1
1. Press the
key to access programming functions.
2. Use 0 ~ 5 keys to enter condition at zero.
3. Press the
key to confirm.
4. To exit and return back to weighing mode, press the
key.
17
SAVE AND DELETE PRODUCT MEMORIES (PLU)
1. Place the sample on the weighing plate.
2. Introduce the number of pieces placed on the plate using number keys.
3. Press to calculate unit weight.
4. Press , then press the key where you want to save the product
memory (10 direct memories are available (M1 to M10). Memory will be
saved.
To use the other 10 direct memories (M11 to M20) press to switch to
PLU2 before sampling. Then follow the same routine as explained before.
To delete a PLU memory, first press on the key you want to delete (M1 to
M20), then press and now press again .
GUARANTEE
This scale is guaranteed for one year from the delivery date. The guarantee
covers any fabrication defect of the material.
During this period GRAM PRECISION, SL, covers the manpower and the
spare parts for the reparation of the scale.
This guarantee does not cover the failures caused by an inappropriate use
or overcharge.
The guarantee does not cover the freight cost (transport) necessary to
repair the scale.
18
ESPAÑOL
ALIMENTACIÓN
Entrada: 100~240V 50/60hz
Salida: 12V/1A DC 12W
Batería recargable: 6V/4AH
CONSUMO
Aprox. 12mA
Aprox. 36mA con la iluminación interna del display
Aprox. 48mA con la iluminación interna del display y el interface RS-232
(opcional)
DURACIÓN DE LA BATERÍA
Aprox. 320 horas, con la iluminación del display desactivada
DESCRIPCIÓN DEL DISPLAY
19
DESCRIPCIÓN DEL TECLADO
FUNCIÓN DE LAS TECLAS
Para apagar la balanza, mantener pulsada la tecla OFF hasta que el
display visualice “Off” durante 2 segundos.
Pulsar esta tecla para conectar la balanza.
Para seleccionar la unidad de pesada deseada.
Función 1: Para poner a cero la lectura del display, siempre y cuando el
valor del peso sea menor al ± 2% de la capacidad máxima.
Función 2: Para desplazarse hacía la izquierda en el modo de
programación.
Función 1: Para sustraer el peso de un recipiente u objeto.
Función 2: Para desplazarse hacía la derecha en el modo de
programación.
Predeterminación de Tara.
20
Para acceder a la función de límites.
Para acceder a la función de cuentapiezas.
Recuperación de memoria en función acumulación de pesadas.
Función acumulación de pesadas
Tecla de borrar datos
Seleccionar los números de PLU
Introducir memorias de PLU
CALIBRACIÓN STANDARD
Pulsar las teclas
y
para acceder a la función de calibración standard.
ECF-1 Calibración de peso (Cero y span).
ECF-2 Calibración del cero.
ECF-3 Calibración de span.
Calibración de peso ECF-1
1. Pulsar la tecla
para acceder al modo ECF-1 ó la tecla
para
salir del menú y volver al modo normal de pesaje.
2. Pulsar la tecla .
3. Con las teclas 0 ~ 9 introducir el valor de la pesa de calibración y
confirmar con la tecla .
 Loading...