

Page 1
M60
GB Instructions for use 2
NL Gebruiksaanwijzing 18
KS 290 / KS 360 / KS 390 / KS 292 /
KS 362 / KSD 29 / KSD 36 / KSD 39
Page 2

2
GB
Congratulations on your new GRAM
refrigerator
Congratulations on your new refrigerator. The refrigerator was developed taking
the different storage requirements of food items into consideration. Some must
be stored cold - others require a little higher temperature. A few must be stored
separately so as not to impart flavour and odour to other items of food. Most items
of food require high air humidity in order to stay fresh.
To ensure that you get as much joy out of your new refrigerator as possible, it is
important that you become familiar with the refrigerator functions and know how to
use the accessories. Please read the instructions for use carefully before setting
up and using your refrigerator.
As these instructions apply to several refrigerator models, the equipment may vary
from model to model.
Before using the refrigerator
On receipt, check to ensure that the refrigerator has not become damaged in
transport. Transport damage should be reported to the local supplier before the
refrigerator is put to use.
Before filling the refrigerator with items of food, the refrigerator interior should be
cleaned with lukewarm water containing a mild detergent. Use a soft cloth. If the
refrigerator has been stored in cold surroundings (colder than +5°C), it must be
allowed to stabilise for at least 2 hours before being switched on.
Read more about setting up, building in, and installation on pages 13 and 14.
Page 3

3
GB
Contents
Important information
Transporting and moving the refrigerator 5
If the refrigerator is to remain unused for a time 5
Old refrigerators 5
Disposal 5
Product description
Using the refrigerator
Electronic control 7
Temperature regulation 8
Temperature inside the refrigerator 8
Brief temperature variations 8
Alarm
Alarm codes 9
Interrupting an alarm 9
Using the refrigerator and accessories
Glass shelves 10
Bottle shelf 10
Vegetable drawers 10
Multi-boxes 10
Storage shelves in the door 10
Page 4

4
GB
Defrosting and cleaning
Automatic defrosting 11
Manual defrosting 1 1
Cleaning 11
Setting up and installation
Where to place the refrigerator 13
Building into a kitchen element 13
Building into a refrigerator element 13
Electrical connection 14
Starting up the refrigerator 14
You can change the door from right-hinged to
left-hinged or vice versa yourself 15
Replacing the bulb 17
GRAM Service
Spare parts 17
Page 5

5
GB
Important information
The refrigerator contains the
environment-friendly, non-ozonedepleting refrigerant R600a. As R600
is a flammable gas, it is important to
avoid damage to the refrigeration
circuit during transport and installation.
If the refrigeration circuit is damaged,
avoid using naked flame in the vicinity
of the refrigerator and connecting
power to the refrigerator. Also make
sure that there is good ventilation in
the room. If you are in doubt, please
contact your supplier.
Transporting and moving
the refrigerator
The refrigerator must always be moved
in the vertical position. The cabinet
must not be tilted more than approx.
40°. If the refrigerator has been tilted
more than 40°, the power supply must
not be connected until the appliance
has stood upright for at least two
hours.
If the refrigerator is not to
be used for some time
If the refrigerator is to remain unused
for a time, switch it off by pressing
button
O (2). Then disconnect
the power supply to the refrigerator and
possibly pull the plug out of the wall
socket.
Empty, defrost and clean the
refrigerator. Leave the refrigerator door
slightly ajar. This will prevent bad
smells in the refrigerator.
Warning
Old refrigerators and freezers are often
fitted with complicated latches that can
only be opened from the outside. If you
have an old unit like this stored away
somewhere, or if you scrap it,
remember to destroy the latch to
prevent children from being exposed to
danger by getting locked inside the
unit.
Note! Please also observe the
environmental rules on disposal.
Disposal
If a refrigerator is to be disposed of,
this must be done in an
environmentally correct way, in
accordance with current rules on
disposal.
Please observe the environmental
rules on disposal. There might be
special requirements/conditions to be
observed.
Information on disposal can be
obtained from:
- Gram Domestic A/S
- Your white-goods supplier
- Authorities (the local council, Ministry
of the Environment, etc.)
Page 6
6
GB
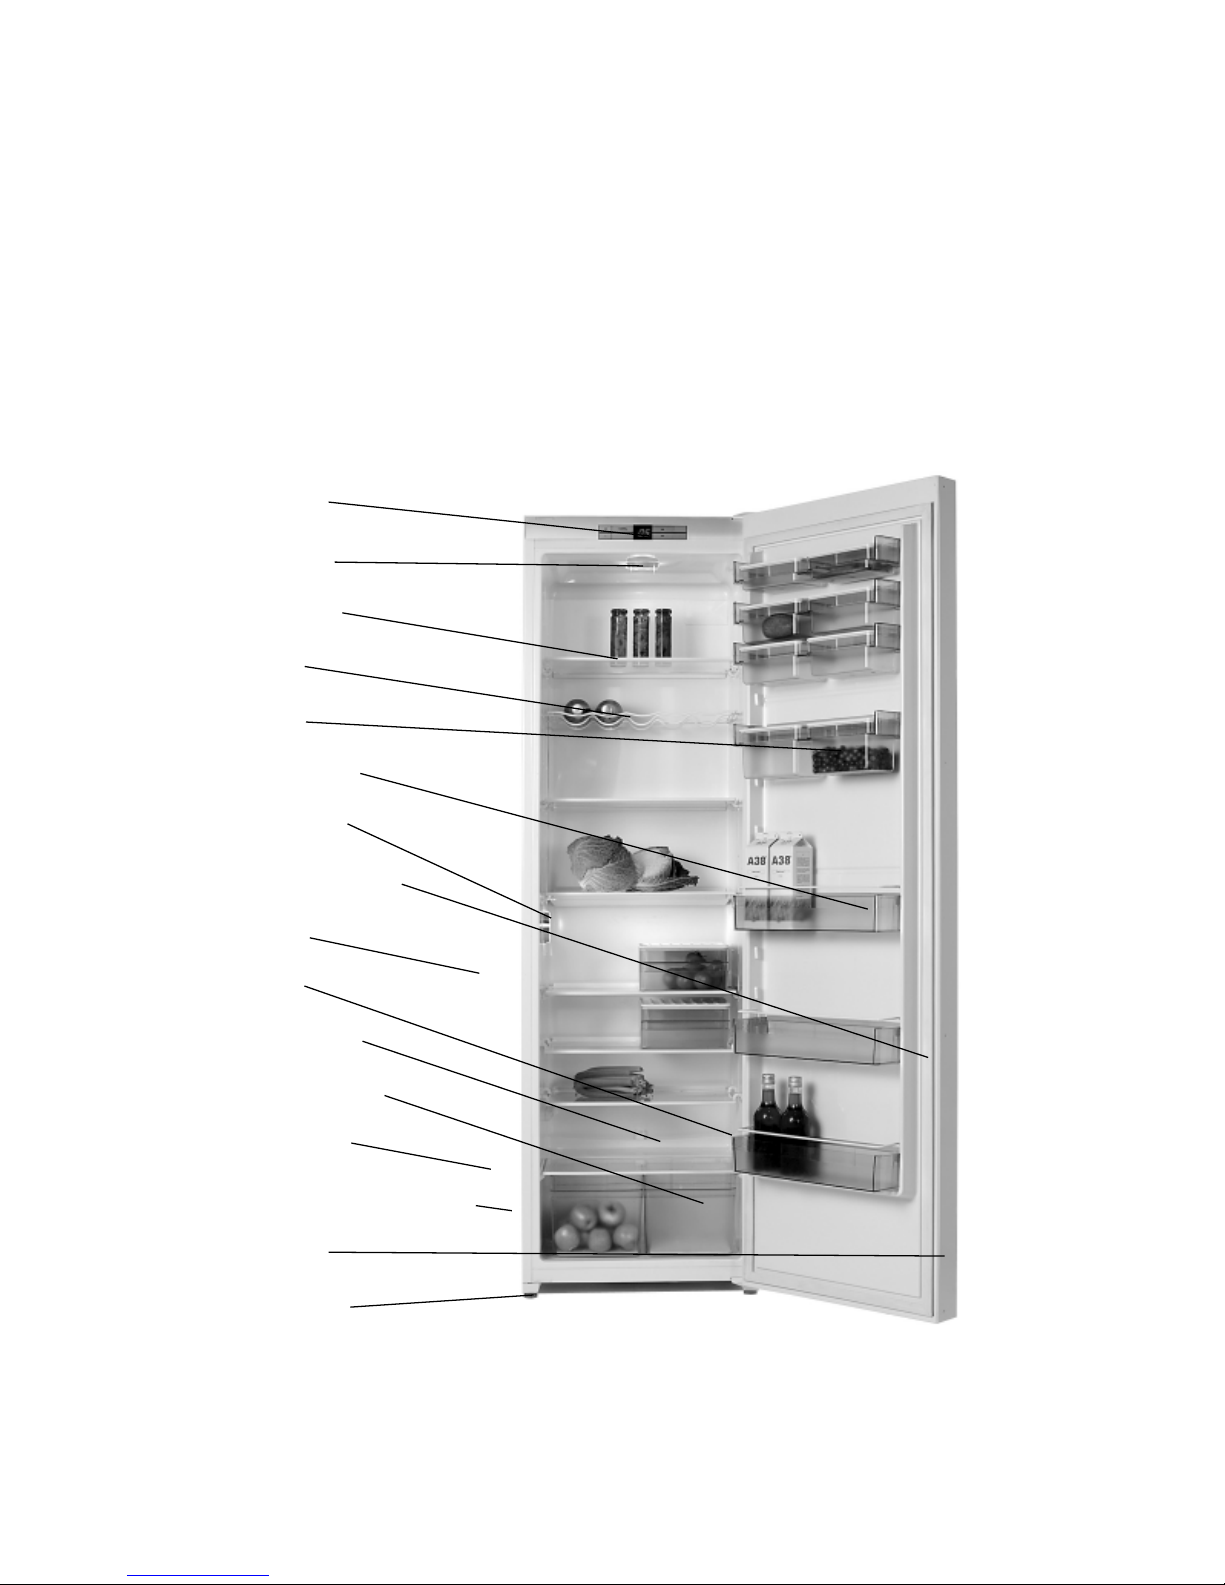
Product description
The refrigerator is intended for use in a
normal household. It is designed for
temperature class SN in accordance
with European standard EN 153. This
means that the refrigerator will run
best at a room temperature of +10°C to
Control panel
Halogen lamp
Glass shelves
Bottle shelf
Multi-boxes
Storage shelves
Halogen lamp
Rubber sealing strip
Condenser
Nameplate
Evaporation tray
Vegetable drawers
Compressor
Compressor compartment
Door handle
Adjustable feet
+32°C.
Page 7
7
GB
1
2
3
4
5
6
7
Using the refrigerator
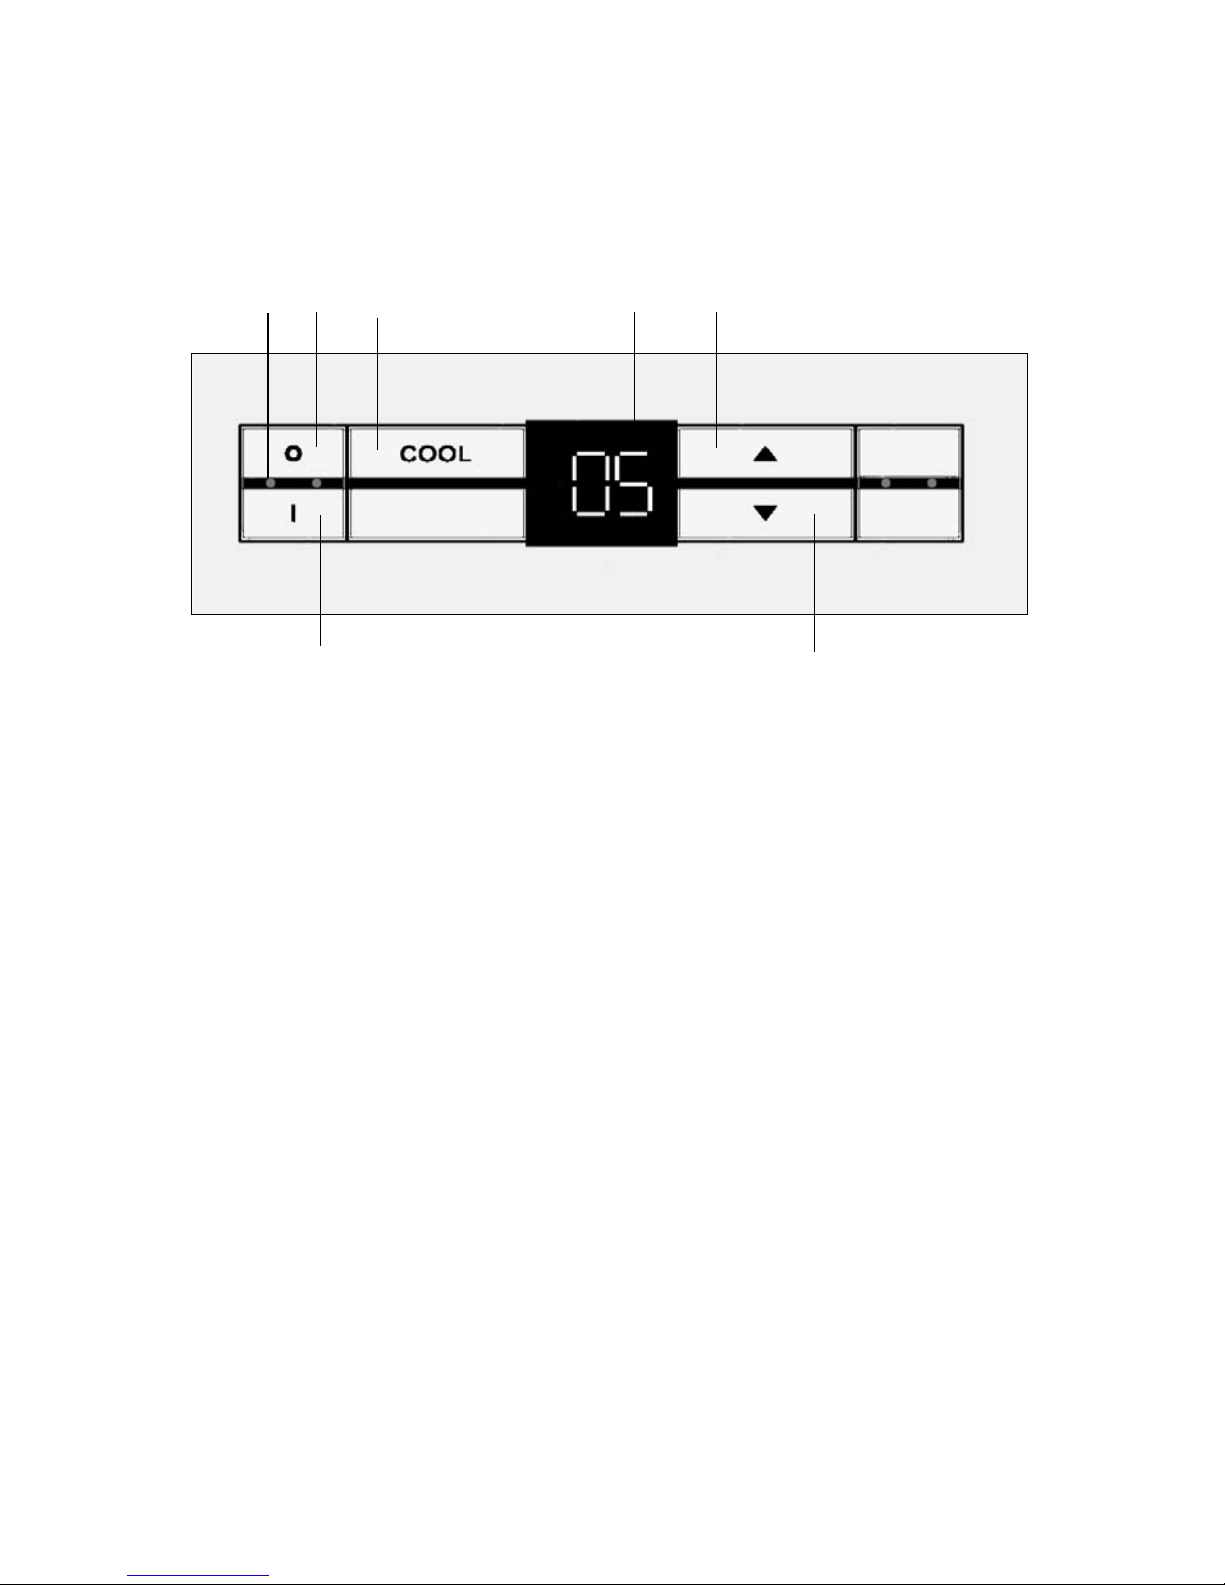
Electronic control
The refrigerator is equipped with
electronic control. The control panel is
concealed behind the refrigerator door.
The refrigerator has been factory-set to
operate at optimum temperature, i.e.
+5°C. If you wish to change the preset
temperature, the new setting will be
stored in the electronic control. In case
of power failure, the control will
remember the latest setting when
power to the cabinet is restored.
The electronic control has
the following functions:
· On/off function
· Display of actual temperature
· Temperature setting
· Acoustic and visual alarms
· Emergency program in case
of sensor fault
· Service program (not
accessible to user)
· Light-emitting diodes
· Power-saving sensors
1. Start button
2. Switch
3. Green light-emitting diode
indicating that the refrigerator
is switched on
4. Button for displaying and
setting temperature
5. Display indicating set and
actual temperature
temperature
6. Button for infinite temperature
regulation upwards
7. Button for infinite temperature
regulation downwards
Page 8

8
T emperature regulation
The temperature can be set from +2 to
+9°C by pressing button COOL (4)
and keeping it depressed. The set
temperature is shown in the display.
Press button (6) or (7) until
the new required temperature is
reached.
A brief acoustic signal will be given
when each button is activated.
When activating the buttons Start
(1) and Interrupt
O (2), the action
will not become visible on the display
until after approx. 2 seconds.
If there has been a power failure or the
current to the refrigerator has been
disconnected, the control will
remember the latest setting when
power is reconnected.
Temperature inside the
refrigerator
The temperatures set and displayed
are the average temperatures in the
refrigerator.
Do not change the temperature setting
of your refrigerator simply because it
becomes warmer in summer. A
temperature increase will be detected
by the refrigerator, and the compressor
will automatically run longer to
maintain the selected temperature.
GB
99
99
9
88
88
8
Brief temperature variations
Brief temperature variations are
normal and may occur when for
example fresh items of food are stored
in the refrigerator or when the door is
open for longer periods. Items of food
in the cabinet will not be affected by
these variations and the temperature
will quickly return to normal.
The interior light is turned on when the
refrigerator door is opened. When the
door is closed again, the light remains
switched on for about 5 seconds. If the
door is still open about 2 minutes later,
the interior light is turned off. Alarm E4
is displayed and an acoustic signal is
given.
Page 9

9
GB
Alarm
Normal use of the refrigerator may give
rise to various disruptions with
unstable refrigerator function as a
consequence. These disruptions are
shown on the display by means of an
alarm code (an E followed by a
number), and an acoustic signal is
given.
In case of several faults, the alarm
codes will be displayed in turn.
Alarm codes
99
99
9
88
88
8
E1 - Temperature sensor fault
E3 - Evaporator sensor fault
E4 - Open door
E5 - Temperature too high
E6 - Temperature too high at power
failure
E1 and E3
One of the temperature sensors has
been damaged. Call service. A built-in
emergency program maintains an
acceptable temperature until the fault
is corrected.
E4
The refrigerator door is open for more
than 2 minutes. The alarm code
disappears when the door is closed. If
the door is opened and closed
repeatedly within a short space of time,
the interior light will eventually switch
off.
E5
The temperature in the refrigerator has
been higher than the set temperature
for more than 2 hours.
E6
There has been a power failure, the
power supply to the refrigerator has
been disconnected or the temperature
in the refrigerator has been higher than
the set temperature for more than 2
hours.
Interrupting an alarm
The acoustic alarm can always be
interrupted by opening the door and
pressing any button.
An alarm code will be displayed even
though the reason for the alarm no
longer exists. To remove the alarm
code press button (6) and
(7) simultaneously for 2 to 3 seconds.
An acoustic alarm cannot then be
given for the next 2 hours.
Page 10

10
GB
10
9
8
Using the refrigerator and accessories
Glass shelves
The glass shelves can be arranged to
give more, or less, space between the
shelves thus allowing flexible cabinet
arrangement (8 and 9).
Extract the shelf by lifting up the left
shelf side (10). Start by removing the
top shelf when you want to clean the
refrigerator or rearrange the shelves.
The glass shelves can be tilted for
storing large and opened bottles. To tilt
the shelf, turn the rear fitting.
Bottle shelf
The bottle shelf is suitable for large
and small bottles.
Vegetable drawers
The drawers in the bottom of the cabinet
are suitable for storing fruit and
vegetables. The overlying shelf covers
the drawer and maintains humidity thus
preventing stored food from drying out.
Multi-boxe
The multi-boxes are ideal for all items
of food and can be placed in the
cabinet or the door, whichever is most
expedient. The tight-fitting lids prevent
drying out and save much time in
tedious wrapping and unwrapping.
The multi-boxes are made of material
that remains unaffected by mineral
oils, fats and weak acids. They
withstand temperatures up to 100°C
and can be cleaned in a dishwasher,
but must never be placed close to the
heating element.
Multi-boxes can also be purchased as
accessories.
Storage shelves in the door
The shelves in the door can hold
bottles of up to 2 litres. They can be
moved and placed throughout the
entire height of the door.
Page 11
11
Cleaning
Stop the compressor by pressing
button
O (2) and disconnect the
power supply to the refrigerator.
GB
11
Defrosting and cleaning
Automatic defrosting
The refrigerator features automatic
defrosting. In some periods, however,
frost may form on the rear wall of the
refrigerator. This normally happens
when many fresh items of food are
stored in the refrigerator or in summer
when the refrigerator is filled with
beverages to be cooled. In situations
such as these the compressor must
run for long periods of time. As
automatic defrosting takes place while
the compressor is at a standstill, the
refrigerator may not defrost completely
before the compressor restarts. In
these instances, manual defrosting is
required.
Manual defrosting
Stop the compressor by pressing
button
O (2) and disconnect the
power supply to the refrigerator.
Any loose frost on the evaporator can
be removed using a plastic or wooden
scraper. Never use a knife or a sharp
object as these can damage the
evaporator.
Warning
It is dangerous to use electrical
apparatus, knives or sharp objects to
speed up the defrosting process.
The refrigerator is best cleaned using
a weak soap solution and a soft cloth.
Never use cleaning agents that scour.
Clean the sealing strip around the
door regularly to prolong its life. Use
only clean water for cleaning the
sealing strip.
The plastic parts of the cabinet cannot
withstand boiling water (max. 85°C). It
is important to prevent water from
getting into the control panel
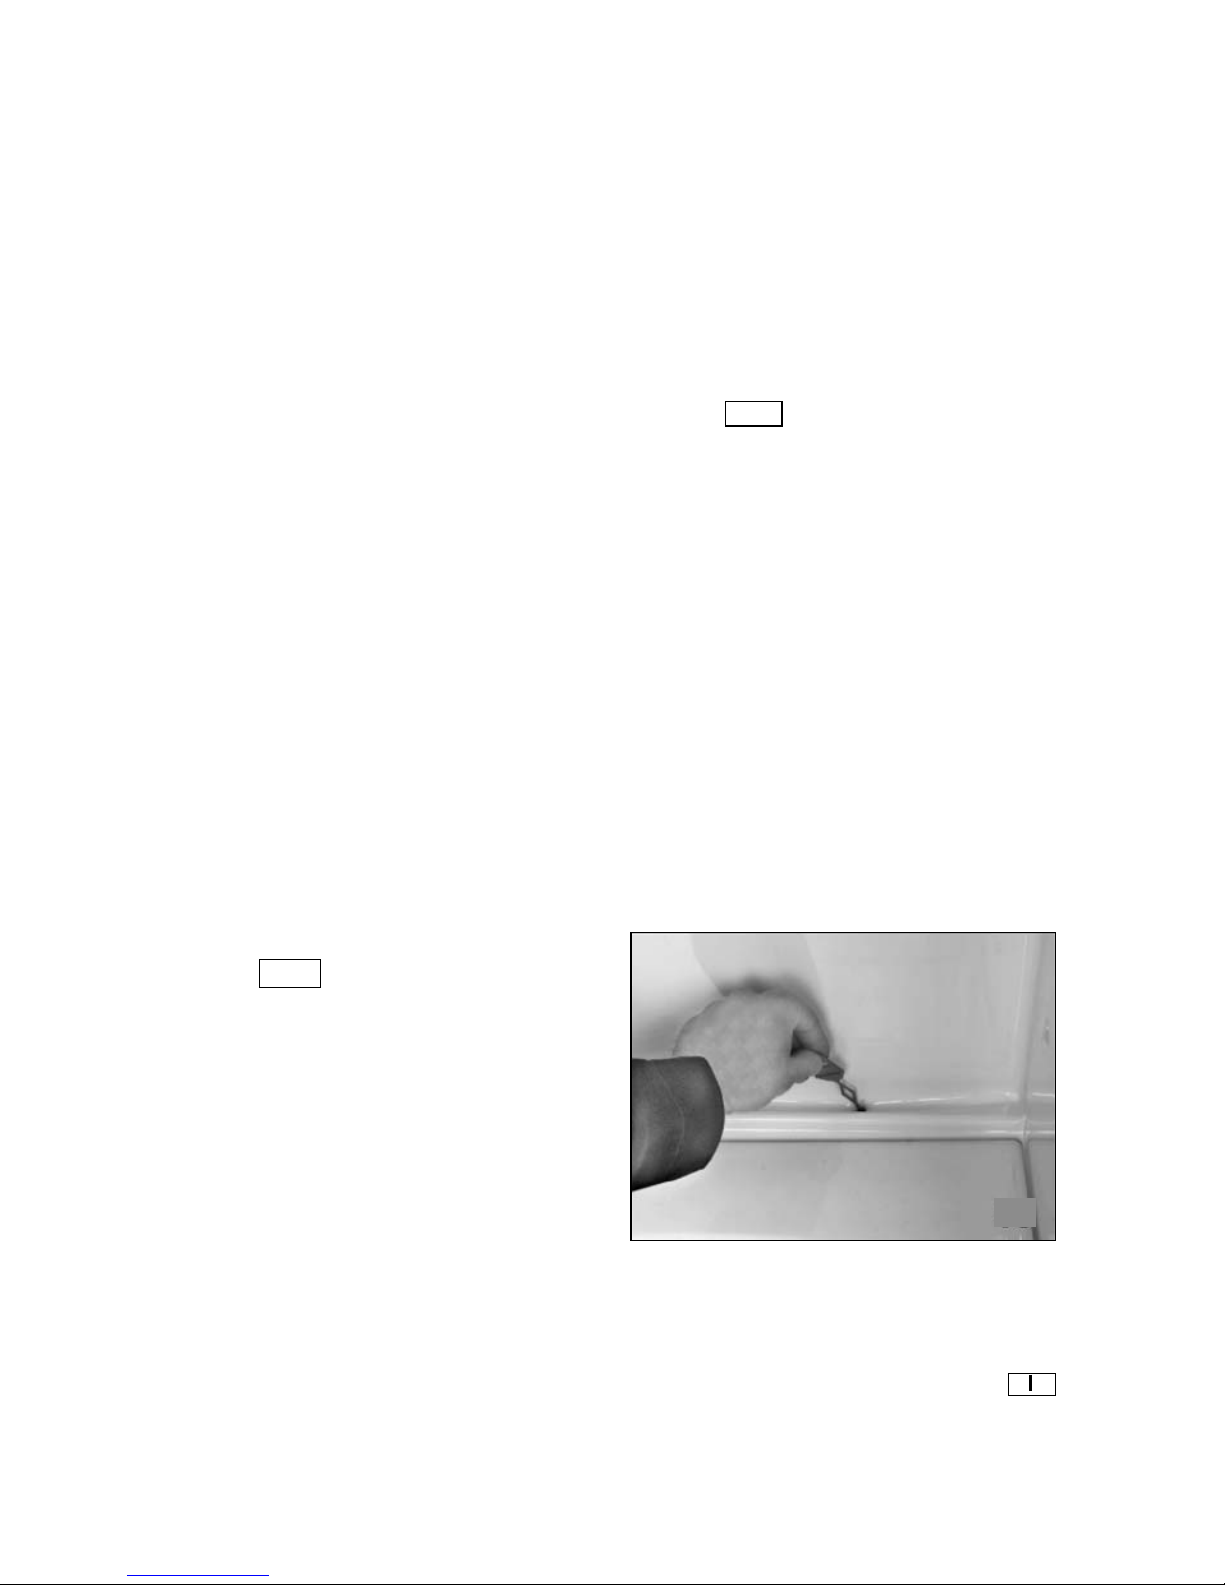
Clean the melt water drain in the
refrigerator compartment using the
cleaning pin supplied (11).
Remove dust and threads from the
compressor compartment at the back of
the refrigerator with a vacuum cleaner.
Connect the current and restart the
refrigerator by pressing start button
(1).
Page 12

12
GB
Cleaning of doors in
stainless steel or aluminium
Stainless steel or aluminium doors on
GRAM products can, with advantage,
be cleaned with a spray and a soft
cloth. There are a number of different
spraying agents for this purpose on
the market. We recommend that you
contact your usual white goods
supplier for advise on the advantages
and disadvantages of the individual
products. However, we would point out
that GRAM has good experience with
the following cleaning agents:
For stainless steel products:
· Inox Plejespray from Würth or
Steel Clean
· Precision Degreasing Solvent
292 or Metal Surface
Degreaser 277 – both from
Chesterton.
For aluminium products
· Precision Degreasing Solvent
292 or Metal Surface
Degreaser 277 – both from
Chesterton.
Chesterton products can be
purchased through
www.chesterton.com
Page 13

13
GB
12
13
Setting up and installation
Where to place the
refrigerator
For safety reasons the refrigerator must
not be installed outdoors; it must be
placed in a dry room. Never place the
appliance close to sources of heat such
as cookers or radiators, and avoid
placing it in direct sunlight. The surface
on which the appliance is placed must
be plane. Do not use a frame or similar.
The small wheels mounted at the rear
of the refrigerator make it easy to place it
in the required position.
The refrigerator can be set up freestanding against a wall or built into a
kitchen cupboard or a refrigerator
element.
It is important that the appliance stands
completely level and that there is good
air circulation over, under and around it.
The refrigerator can be adjusted by
turning the four adjusting screws on the
plinth. After adjustment, the feet and the
two rear wheels must be in contact with
the surface on which the appliance
stands.
The illustrations show how to create
sufficient air circulation around the
cabinet. The dimensions give the
actual size of openings. The circulation
area must be at least 200 cm
2
.
Building into a kitchen
element
Building into a kitchen element with
sufficient ventilation around the
refrigerator to dissipate heat from the
compressor. The appliance can stand
direct on the floor or on its plinth. (12)
Building into a refrigerator
element
Building into a refrigerator element
follows the same principle as shown
in illustration 12. (13)
Page 14

14
Proceed as follows:
Connect the GREEN-AND-YELLOW
core to the plug terminal marked „E” or
by an earth symbol, or coloured
GREEN or GREEN-AND-YELLOW.
Connect the BLUE core to the plug
terminal marked „N” or coloured
BLACK.
Connect the BROWN core to the plug
terminal marked „L” or coloured RED
Starting up the refrigerator
Start the refrigerator by plugging into a
wall socket.
If the mains lead has been damaged,
it must be replaced with a
corresponding type supplied by Gram
Domestic A/S or a Gram Domestic
service centre.
The refrigerator incorporates a „standby function” and in the display two
horizontal lines indicate that the power
supply has been connected.
Start the refrigerator by pressing the
start button (1). After approx. 2
seconds, the green light emitting diode
(3) lights to indicate that the refrigerator
is switched on. The actual temperature
in the refrigerating compartment is
shown on the display (6).
GB
Electrical connection
The appliance is intended for
connection to alternating current. The
connection values for voltage (V) and
frequency (Hz) are given on the
nameplate in the cabinet.
Power must be connected via a wall
socket with switch. The wall socket
should be easily accessible.
All earthing requirements stipulated by
the local electricity authority must be
observed. The cabinet plug and wall
socket should then give correct
earthing. If in doubt, contact your local
supplier or an authorised electrician.
WARNING – This appliance must
be earthed
The flexible cord (mains lead) fitted to
this appliance has three cores for use
with a 3-pin 13-amp or 3-pin 15-amp
plug. If a BS 1363 (13-amp) fused plug
is used, it should be fitted with a 13amp fuse.
IMPORTANT
The cores in this mains lead are
coloured in accordance with the
following code:
GREEN-AND-YELLOW: EARTH
BLUE: NEUTRAL
BROWN: LIVE
These colours might not correspond
with the colour markings identifying the
terminals in your plug.
Page 15

15
GB
You can change the door from
right-hinged to left-hinged or vice
versa yourself
Illustrations 14-19 show how easy it is
to change the doors from right-hinged
to left-hinged - or vice versa. (Changing
the door from left-hinged to righthinged is done in the same way, but
opposite).
The refrigerator must be switched off
and emptied completely.
· Remove the two screws in the
hinge top on the righthand
side of the cabinet. (14)
· Lift the refrigerator door
slightly and take the door and
upper hinge off by pulling the
door towards you.
· Remove the dummy hinge
from the opposite side by
unscrewing the two screws.
(15)
· Reverse the dummy hinge
and refit it on the opposite
side of the cabinet using two
screws.
· Tilt the refrigerator to an angle
of max. 45° and unscrew the
lower hinge. This is done by
removing the two screws
holding the bottom hinge on
the cabinet underside. (16)
· Remove the lower dummy hinge
in the opposite side in the same
way as the upper dummy hinge
was removed. (17)
· Reverse the dummy hinge
and refit it on the opposite
side of the cabinet.
· Reverse the upper righthand
hinge and refit it in the lower
lefthand corner of the cabinet.
· Place the cabinet in the
correct position again.
· Remove the door handle by
removing the screws. (18)
· Reverse the lower righthand
hinge and refit it on the top
part of the door in the left side
of the cabinet. Push the door
into position and slide the
upper hinge into the upper
lefthand hinge casing. Tighten
the two screws. Remember to
adjust the hinges.
Remove the screws on the
righthand side of the door and
screw them onto the left side
of the door. Use the screws
from the left side to attach the
handle to the righthand edge
of the door. (19)
·
Page 16

16
GB
14
15
16
19
18
17
Page 17

17
GB
20
Replacing the bulb
Switch off the refrigerator by pressing
button
O (2) and unplug the
mains lead from the wall socket.
Screw off the screen. Replace the bulb
with a new one (max. 10 W, 12 V,
halogen base G4). Refit the screen,
connect the power supply and restart
the refrigerator by pressing button
(1). 20
Spare parts
When ordering spare parts, please
give the type and serial number of the
refrigerator. This information is given
on the nameplate inside the cabinet.
GRAM Service
Page 18

18
NL
Gefeliciteerd met uw nieuwe GRAM
koelkast
Wij wensen u veel plezier met uw nieuwe koelkast. Bij het ontwikkelen van de
koelkast is er rekening gehouden met de verschillende eisen ten aanzien van de
levensmiddelen. Sommige moeten koud bewaard worden - andere hebben een
wat hogere temperatuur nodig. Sommige moeten afzonderlijk bewaard worden
zodat ze de andere levensmiddelen niet met hun smaak en geur beïnvloeden. En
de meeste hebben een hoge luchtvochtigheid nodig om vers en knapperig te
blijven. Om zoveel mogelijk plezier van uw koelkast te hebben, is het belangrijk
dat u de functies van de kast kent en weet hoe u het toebehoren kunt gebruiken.
Lees de bedieningshandleiding daarom zorgvuldig voordat u de koelkast opzet
en in gebruik neemt. Deze bedieningshandleiding geldt voor meerdere typen
koelkasten, dus de uitrusting kan van model tot model verschillen.
Voordat u de koelkast in gebruik neemt
Controleer bij de aankomst dat de kast niet beschadigd is, omdat
transportbeschadigingen aan de handelaar gemeld moeten worden voordat de
koelkast in gebruik genomen wordt. Voordat de koelkast gevuld wordt, moet deze
aan de binnenzijde met een lauw sopje van een zacht afwasmiddel gereinigd
worden. Gebruik hiervoor een zachte doek. Indien de koelkast in een koude
omgeving (kouder dan +5°C) opgeslagen is geweest, moet er een rustperiode
van minstens 2 uur in acht genomen worden voordat de kast in gebruik genomen
wordt.
Lees over het opstellen, inbouwen en installeren op blz. 28 en 29.
Page 19

19
NL
Belangrijke informatie
De koelkast vervoeren en verplaatsen ............................................ 21
Als de koelkast periodiek niet gebruikt wordt ................................... 21
Oude koelkasten .............................................................................. 21
V erschroten ...................................................................................... 21
Beschrijving van het product
De koelkast bedienen
Elektronische regeling ..................................................................... 23
Temperatuurinstelling ....................................................................... 24
De temperatuur in de koelkast ......................................................... 24
Kortstondige temperatuurschommelingen ...................................... 24
Alarm
Alarmcodes ...................................................................................... 25
Het alarm uitzetten ........................................................................... 25
Inhoud
Gebruik van het koelkast en toebehoren
Glasschappen .................................................................................. 26
Flessenrek ....................................................................................... 26
Page 20

20
NL
Opzetten en installeren
W aar moet de kast staan ................................................................ 28
Inbouwen in een keukenelement ..................................................... 28
Inbouwen in een koelkastelement .................................................... 28
Aansluitspanning .............................................................................. 29
De koelkast aanzetten ..................................................................... 29
Draairichting van de deur veranderen ............................................. 30
De gloeilamp vervangen .................................................................. 32
Reservedelen .............................................................................. 32
Groenteladen ................................................................................... 26
Multiboxen ........................................................................................ 26
Flessenrekken in de deur ................................................................ 26
Ontdooien en reinigen
Automatisch ontdooien .................................................................... 27
Handmatig ontdooien ....................................................................... 27
Reinigen ........................................................................................... 27
Page 21

21
NL
Belangrijke informatie
De koelkast bevat het
energiebesparende koelmiddel R600a
dat de ozonlaag niet afbreekt. Omdat
R600a een brandgevaarlijke gas is, is
het belangrijk dat het koelcircuit tijdens
het transport en de installatie niet
beschadigd wordt. Als het koelcircuit
toch beschadigd wordt, moet u het
gebruik van open vuur in de buurt van
de koelkast vermijden en de kast niet
op het elektriciteitsnet aansluiten. Zorg
ervoor dat de ruimte goed gelucht
wordt. Raadpleeg uw leverancier in
twijfelgevallen.
De koelkast vervoeren en
verplaatsen
De koelkast moet altijd verticaal
vervoerd worden. En de kast mag niet
meer dan ca. 40° gekanteld worden.
Als u de kast toch meer dan 40° laat
kantelen, mag de stroom pas
aangesloten worden nadat de kast
minstens 2 uur verticaal gestaan heeft.
Als de koelkast periodiek
niet gebruikt wordt
Zet de koelkast als deze een tijd niet
gebruikt wordt, uit door op de
knop o (2) te drukken. Daarna
moet u de stroom naar de kast
uitschakelen en evt. de stekker uit het
stopcontact halen.
Leeg de koelkast, ontdooi hem en
reinig hem. Laat de deur van de kast
op een kier staan. Hierdoor vermijdt u
dat er een onprettige lucht ontstaat.
Waarschuwing
Oude koelkasten en vriezers zijn vaak
voorzien van ingewikkelde sloten die
kunnen dichtslaan en alleen van buiten af
geopend kunnen worden. Voordat u een
dergelijk model ter vernietiging aanbiedt,
moet u ervoor zorgen dat u het slot onklaar
maakt. Hierdoor voorkomt u dat bv.
spelende kinderen zich erin kunnen
opsluiten en in levensgevaar komen.
Neem ook de geldende milieubepalingen
betreffende verschroten in acht.
Verschroten
Als de afgedankte koelkast
verschroten moet worden, zal dit op
een voor het milieu correcte en
verantwoorde wijze en in
overeenstemming met de geldende
bepalingen gedaan moeten worden.
Neem de milieubepalingen
betreffende verschroten in acht. Het
kan zijn dat er speciale eisen/
voorwaarden zijn die moeten worden
nageleefd. U kunt nadere informatie
over verschroten krijgen bij:
- Gram Domestic A/S
- de winkel waar u het product gekocht
heeft
- de overheid (gemeente, ministerie
van milieu e.d.).
Page 22

22
NL
Beschrijving van het product
De koelkast is bedoeld voor gebruik in
een gewone huishouding. De kast is
berekend voor temperatuurklasse SN
in overeenstemming met de Europese
standaard EN 153. Dit houdt in dat de
koelkast optimaal werkt bij een
ruimtetemperatuur van +10°C tot +32°C.
Bedieningspaneel
Halogeenverlichting
Glasschappen
Flessenrek
Multiboxen
Flessenrekken
Halogeenverlichting
Rubberen lijst
Condensor
Typeplaatje
Dooiwateropvang
Groenteladen
Compressor
Compressorruimte
Deurgreep
Afstelbare voetjes
Page 23

23
NL
1
2
3
4
5
6
7
De koelkast bedienen
Elektronische regeling
De koelkast is van een elektronische
regeling voorzien. Het
bedieningspaneel zit achter de
koelkastdeur verborgen. De kast is op
de fabriek geprogrammeerd om op
optimale temperaturen te werken d.w.z.
+5°C. Als u de ingestelde temperatuur
toch wilt veranderen, zal deze in de
elektronische regeling opgeslagen
worden. Bij een eventuele
stroomstoring zal de regeling de
laatste instelling herinneren wanneer
de kast weer op de stroom wordt
aangesloten.
De elektronische regeling
heeft de volgende functies:
· Aan/uit functie
· Aanduiding van de actuele
temperatuur
· Instelling van de temperatuur
· Akoestische en visuele alarmen
· Noodprogramma bij defecte voeler
· Serviceprogramma (niet toegankelijk
voor de gebruiker)
· Lichtdioden
· Stroombesparende sensoren
1. Startknop
2. Schakelaar
3. Groene lichtdioden die aangeven
dat de koelkast aanstaat
4. Knop voor het tonen en instellen van
de temperatuur
5. Display dat de ingestelde en actuele
temperatuur aangeeft
6. Knop voor het trapsgewijs regelen
van de temperatuur in opgaande
richting
7. Knop voor het trapsgewijs regelen
van de temperatuur in neergaande
richting
Page 24

24
NL
Temperatuurinstelling
U kunt de temperatuur instellen tussen
+2 en +9°C door op de knop COOL
(4) te drukken en deze ingedrukt te
houden. Op het display verschijnt de
ingestelde temperatuur. Druk op
knop (6) of (7) totdat de
gewenste temperatuur bereikt is.
De ingestelde temperatuur verschijnt
als u op [COOL](4) drukt.
Als er op een knop gedrukt wordt, zal
er altijd een kort akoestisch signaal
luiden. Als u de toetsen starten
(1) en verbreken o (2) gebruikt,
zal de handeling pas na ca. 2
seconden in het display verschijnen.
Temperatuuraanduiding
De actuele temperatuur wordt in het
display getoond (5).
Bij een stroomstoring of als de stroom
naar de kast uitgeschakeld is
geweest, zal de regeling de laatste
instelling herinneren als de kast weer
op de stroom wordt aangesloten.
De temperatuur in de
koelkast
Zowel de ingestelde als de getoonde
temperatuur in de koelkast zijn
gemiddelde temperaturen. U hoeft de
temperatuurinstelling in uw koelkast
niet te veranderen omdat het zomers
warmer wordt. De koelkast registreert
zelf dat het warmer is geworden, en de
compressor zal automatisch iets
langer werken om de gekozen
temperatuur aan te houden.
Kortstondige
temperatuurschommelingen
Kortstondige
temperatuurschommelingen zijn
normaal en komen o.a. voor als er
verse producten ingelegd worden of
als de deur langdurig heeft
opengestaan. De levensmiddelen
worden niet door deze
temperatuurschommelingen
beïnvloed, en de temperatuur zal weer
snel normaal worden.
De binnenverlichting gaat aan als de
deur naar het koelkast geopend wordt.
Als de deur weer gesloten wordt, zal
het licht nog ca. 5 seconden blijven
branden. Als de deur langer dan ca. 2
minuten opengestaan heeft, zal de
binnenverlichting uitgaan, alarm E4
verschijnen en een akoestische alarm
luiden.
99
99
9
88
88
8
Page 25

25
NL
Alarm
Bij normaal gebruik van de koelkast
kunnen verschillende storingen
optreden waardoor de functies van de
kast instabiel worden. Deze storingen
verschijnen op het display met een
alarmcode bestaande uit E gevolgd
door een nummer, en er zal een
akoestisch signaal luiden. Als er meer
dan één probleem is, zullen de
alarmcodes elkaar afwisselen.
Alarmcodes
E1 - Fout op temperatuurvoeler
E3 - Fout op verdampervoeler
E4 - Open deur
E5 - Te hoge temperatuur
E6 - Te hoge temperatuur bij
stroomstoring
E1 en E3
Eén van de temperatuurvoelers is
beschadigd. Haal de monteur erbij.
Een ingebouwd noodprogramma
houdt een aanvaardbare temperatuur
aan totdat de fout verholpen wordt.
E4
De deur naar de koelkast heeft langer
dan 2 minuten opengestaan. De
alarmcode verdwijnt als de deur
gesloten wordt. Als de deur vele malen
snel achtereen geopend wordt, zal het
licht in de kast tenslotte uit blijven.
E5
De temperatuur in de koelkast heeft
langer dan 2 uur boven de ingestelde
temperatuur gelegen.
E6
Er is een stroomstoring geweest of de
stroom naar de kast is uitgeschakeld
geweest, of de temperatuur in de
koelkast heeft langer dan 2 uur boven
de ingestelde temperatuur gelegen.
Het alarm uitzetten
Het akoestische alarm kan altijd
uitgezet worden door de deur te
openen en op een willekeurige toets te
drukken.
Een alarmcode zal zichtbaar blijven
nadat de oorzaak van het alarm
gevonden en het probleem verholpen
is. Druk gedurende ca. 2 à 3 seconden
gelijktijdig op de knoppen (6)
en (7) om de alarmcodes te
verwijderen. Hierna zullen er twee uur
verlopen voordat een akoestische
alarm kan luiden.
99
99
9
88
88
8
Page 26

26
NL
10
9
8
Gebruik van het koelkast en toebehoren
Glasschappen
De glasschappen zijn om te draaien
zodat de afstand tussen de
schappen groter of kleiner en de
inrichting van de koelkast flexibeler
wordt. (8 en 9)
Haal de schappen eruit door het schap
aan de linkerkant (10) omhoog te tillen.
Als u wilt schoonmaken of de
plaatsing van de schappen wilt
wijzigen, moet u de bovenste eerst
weghalen. De glasschappen zijn
schuin te stellen voor het bergen van
grote en geopende flessen. Om het
schap schuin te kunnen zetten moet
de achterste kantlijst omgedraaid
worden.
Flessenrek
Het flessenrek is geschikt voor grote
en kleine flessen.
Groenteladen
De laden onderin het koelkast zijn
geschikt voor het bewaren van
groenten en fruit. De schap die erover
ligt, werkt als deksel, waardoor het
vochtgehalte bewaard blijft zodat de
levensmiddelen niet uitdrogen.
Multiboxen
De multiboxen zijn ideaal voor allerlei
levensmiddelen en kunnen naar
behoefte in de kast of in de deur gezet
worden. Met de goed sluitende deksel
voorkomt u uitdroging en het lastige inen uitpakken. Spijsoliën, vetten en
zwakke zuren tasten het materiaal van
de multiboxen niet aan. De multiboxen
zijn ook los verkrijgbaar.
Flessenrekken in de deur
In de flessenrekken van de deur is
plaats voor grote tweeliterflessen. De
rekken zijn naar wens over de hele
hoogte van de deur te plaatsen.
Page 27

27
NL
11
Ontdooien en reinigen
Automatisch ontdooien
De koelkast heeft een automatische
ontdooiing. Het kan gebeuren dat er
rijp op de achterwand van de koelkast
gevormd wordt. Dit gebeurt typisch als
de koelkast met vele verse
levensmiddelen gevuld wordt of
gedurende de zomer waar de kast met
drankjes gevuld wordt die af moeten
koelen. In zulke gevallen moet de
compressor langer werken om de
levensmiddelen af te koelen. En omdat
er automatisch ontdooid wordt terwijl
de compressor stil staat, kan het
gebeuren dat de koelkast niet
helemaal kan ontdooien voordat de
compressor weer start. In dergelijke
gevallen moet u handmatig ontdooien.
Handmatig ontdooien
Zet de compressor uit door op de toets
o (2) te drukken en schakel de
stroom naar kast uit. Evt. losse rijp
kunt u met een kunststof of houten
schraper afschrapen. Nooit een mes
of ander scherp voorwerp gebruiken
omdat dit de verdamper kan
beschadigen.
Waarschuwing
Het is gevaarlijk om elektrische
apparaten, messen of scherpe
voorwerpen te gebruiken om het
ontdooien te versnellen.
Reinigen
Zet de compressor uit door op de toets
o (2) te drukken en schakel de
stroom naar kast uit.
Reinig de kast met een zachte
zeepoplossing en een zachte doek.
Gebruik geen schurende
reinigingsmiddelen. Reinig het
afdichtingsprofiel regelmatig om een
lange houdbaarheid te waarborgen.
Gebruik hiervoor alleen schoon water.
De kunststofdelen van de kast kunnen
niet tegen kokend water (max. 85°C).
Voorkom dat er water in het
bedieningspaneel dringt.
De dooiwaterafvoer met de bijgeleverde
schoonmaakpen (11) reinigen.
Verwijder stof en vuil uit de
compressorruimte achterop de
koelkast met een stofzuiger.
Schakel de stroom weer in en start de
koelkast opnieuw door op de
startknop (1) te drukken.
Page 28

28
NL
12
13
Opzetten en installeren
W aar moet de kast staan?
De koelkast mag om redenen van
veiligheid niet buiten geplaatst
worden, maar moet in een droge
ruimte geplaatst worden. Plaats de
koelkast niet direct naast een
warmtebron als fornuis of kachel,
evenmin in de directe zon. De
onderlaag moet waterpas zijn, en de
koelkast mag niet op een frame of
dergelijke geplaatst worden. Dankzij
de wieltjes op de achterzijde van de
koelkast kan de kast gemakkelijk op
z’n plaats geschoven worden.
De koelkast kan vrij staan en in een
keukenelement of in een
koelkastelement ingebouwd worden.
Het is belangrijk dat de koelkast
volledig recht staat en dat er boven,
onder en rondom een goede
luchtcirculatie is. U stelt de kast af door
aan de 4 stelschroeven op de sokkel
van de kast te draaien.
Na het afstellen is het belangrijk te
controleren of de voeten en de wielen op
de achterzijde van de kast contact hebben
met de onderlaag. Op de tekeningen kunt
u zien hoe u voor de vereiste circulatie
rondom de kast zorgt. De afmetingen zijn
de vrije openingen. Er moet minstens een
doorstromingsoppervlak van 200 cm
2
zijn.
Inbouwen in een keukenelement
Bij het inbouwen in een
keukenelement moet er voldoende
ventilatie rondom de koelkast zijn zodat
de warmte van de compressor kan
worden afgevoerd. De koelkast kan op
de vloer of op een plint staan. (12)
Inbouwen in een
koelkastelement
Het inbouwen in een koelkastelement
gebeurt volgens hetzelfde principe als
bij 12. (13)
Page 29

29
NL
Aansluitspanning
De koelkast is gemaakt voor
aansluiting op het wisselstroomnet.
De aansluitwaarden voor spanning (V)
en frequentie (Hz) staan op het
typeplaatje in de kast aangegeven. De
aansluiting dient aan een
wandcontactdoos (stopcontact) te
geschieden die gemakkelijk
toegankelijk is zodat de stroomtoevoer
naar de kast eenvoudig te verbreken
is.
De koelkast aanzetten
Sluit de stroom aan door de stekker
van de koelkast in het stopcontact te
steken. Als de stroomkabel
beschadigd is, moet deze door een
overeenkomstige kabel worden
vervangen. De kabel wordt door Gram
Domestic A/S geleverd.
De koelkast is voorzien van een
„standby functie”, en in het display
verschijnen twee horizontale strepen
om aan te geven dat de stroom is
aangesloten. Start de vrieskast door
op de startknop (1) te drukken.
Na ca. 2 sec. zullen de groene
lichtdioden (3) gaan branden om aan
te geven dat de kast is aangezet.
Hierna verschijnt de actuele
temperatuur in de koelkast in het
display (5).
Roestvrijstalen en
aluminium deuren reinigen
Roestvrijstalen en aluminium deuren
op GRAM producten kunnen het beste
met een spray en een zachte doek
worden gereinigd. Op de markt zijn
een aantal spraymiddelen verkrijgbaar
die te gebruiken zijn. Wij raden aan dat
u contact opneemt met uw
gebruikelijke witgoedleverancier voor
concreet advies over de voor- en
nadelen van de verschillende
producten. Wij kunnen hieraan
toevoegen dat GRAM goede ervaringen
heeft met de volgende producten.
Voor roestvrije producten:
· Inox spray van Würth of van Steel Clean
· Precision Degreasing Solvent 292 of
Metal Surface Degreaser 277 - beide
van de firma Chesterton
Voor aluminiumproducten:
· Precision Degreasing Solvent 292 of
Metal Surface Degreaser 277 - beide
van de firma Chesterton
U kunt de producten van Chesterton
bestellen op +45 3252 7100.
Page 30

30
NL
Draairichting van de deur veranderen
De afbeeldingen 14-19 tonen hoe u de
deur zelf gemakkelijk kunt veranderen
van rechts opgehangen naar links
opgehangen. (De deur van links naar
rechts ophangen gebeurt op dezelfde
manier, maar dan tegengesteld).
De koelkast moet uitgezet en helemaal
leeg zijn.
· Draai de 2 schroeven van het
bovenste scharnier op de rechterdeur
van de kast eruit. (14)
· Til de koelkastdeur op en haal de
deur en het bovenste scharnier eraf
door de deur naar u toe te trekken.
· Verwijder het loze schar nier in de
tegengestelde zijde door de 2
schroeven eruit te schroeven. (15)
· Draai het loze scharnier en monteer
deze met de 2 schroeven in de
tegengestelde zijde.
· Kantel de koelkast hoogstens 45° om
het onderste scharnier eraf te kunnen
schroeven. Dit doet u door de 2
schroeven eruit te draaien die de
onderste scharnier op de onderzijde
van de kast houden. (16)
· Verwijder het loze schar nier in de
tegengestelde zijde op dezelfde
manier als de bovenste. (17)
· Draai het loze scharnier en monteer
deze in de tegengestelde zijde.
· Draai het bovenste scharnier en
monteer deze in de onderste
linkerhoek.
· Zet de kast weer verticaal.
· Demonteer de deurgreep door de
schroeven te verwijderen. (18)
· Draai het onderste rechterscharnier
om en monteer deze op de
linkerbovenzijde van de deur. Duw de
deur op z’n plaats door het bovenste
scharnier in het scharnierhuis
linksboven te duwen. Draai de 2
schroeven vast. Vergeet niet de deur uit
te richten.
· Verwijder de schroeven op de
rechterzijde van de deur en schroef ze
vast op de linkerzijde van de deur.
Gebruik de schroeven van de
linkerzijde om de handgreep op de
rechterzijde van de deur vast te
schroeven. (19)
Page 31

31
NL
14
15
16
19
18
17
Page 32

32
NL
20
De gloeilamp vervangen
Zet de koelkast uit door de schakelaar
o (2) in te drukken en de stekker uit
het stopcontact te trekken. Schroef het
beschermkapje eraf. Vervang de
gloeilamp door een nieuwe (max. 10
W, 12 V, halogeenvoet G4). Monteer het
beschermkapje, schakel de stroom
weer in en start de koelkast opnieuw
door op de knop (1) te drukken.
20
Reservedelen
Indien u reservedelen moet bestellen,
dient u het type en serienummer van
de koelkast op te geven. Deze
gegevens vindt u op het typeplaatje in
de kast.
Page 33

33
Page 34

34
Page 35

35
Page 36

IOALGRAMM60-268a
( 09.2003/1)
Gram A/S Importeur Belgie Importeur Nederland
Aage Grams V ej 1 Gebr. Bruyninckx N.V. Magee b. v .
DK-6500 V ojens Kerksstreet 8g P ostbus 88
Telefon +45 73 20 10 10 B-2Y90 Balen NL-2215 Voorhout
Telefax +45 73 20 10 06 T el: 014 / 81 1701 Tel: 0252231560
www.gram.dk
 Loading...