

Page 1
M60
GB Instructions for use 2
NL Gebruiksaanwijzing 20
KF 310-01 / KF 320-01 / KF 350-01 / KF 312-01 /
KF 323-01 / KF 352-01 / KF 353-01 / KFD 31-01 /
KFD 32-01 / KFD 35-01
FIN Käyttöohje 39
Page 2

2
GB
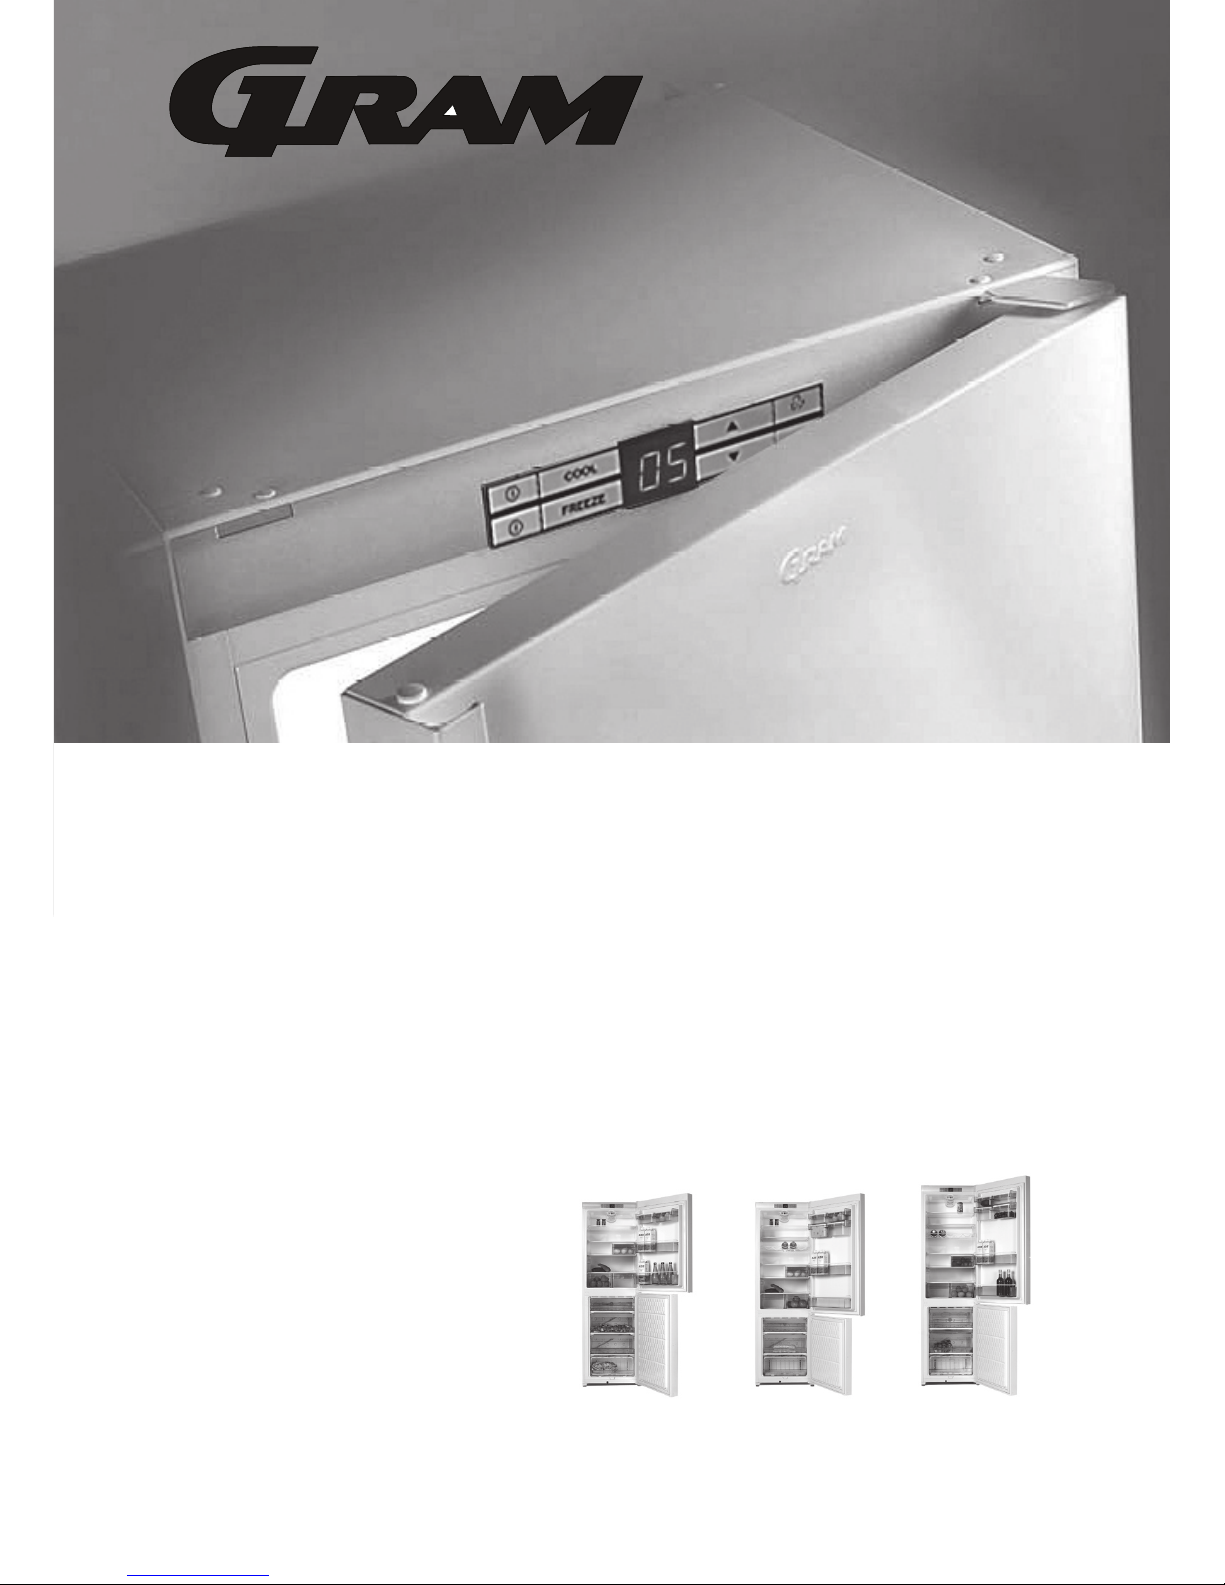
Congratulations on your new GRAM
refrigerator/freezer
Congratulations on your new refrigerator/freezer. The refrigerator/freezer was
developed taking the different storage requirements of food items into
consideration. Some must be stored cold - others require a little higher temperature.
A few must be stored separately so as not to impart flavour and odour to other items
of food. Most items of food require high air humidity in order to stay fresh.
To ensure that you get as much joy out of your refrigerator/freezer as possible, it is
important that you become familiar with the its functions and know how to use the
accessories. Please read the instructions for use carefully before setting up and
using your refrigerator/freezer.
As these instructions apply to several refrigerator/freezer models, the equipment
may vary from model to model.
Before using the refrigerator/freezer
On receipt, check to ensure that the refrigerator/freezer has not become damaged
in transport. Transport damage should be reported to the local supplier before the
refrigerator is put to use.
Before filling the refrigerator/freezer with items of food, the refrigerator/freezer
interior should be cleaned with lukewarm water containing a mild detergent. Use
a soft cloth. If the refrigerator/freezer has been stored in cold surroundings (colder
than +5°C), it must be allowed to stabilise for at least 2 hours before being switched
on.
Read more about setting up, building in, and installation on pages 14 and 15.
Page 3

3
GB
Contents
Important information
Transporting and moving the refrigerator/freezer 5
If the refrigerator is to remain unused for a time 5
Old refrigerators/freezers 5
Disposal 5
Description of the refrigerator/freezer
Using the refrigerator/freezer
Electronic control 7
Switching ON/OFF the refrigerator-freezer 8
Temperature regulation 8
Temperature display 8
Temperature inside the refrigerator-freezer 8
Quick-freezing 8
Slight temperature variations 9
Function “QUICK FREEZING” 9
Function with a ventilator 9
Display brightness adjustment 10
Alarm
Alarm codes 10
Interrupting an alarm 10
Using the refrigerating compartment and accessories
Glass shelves 11
Bottle shelf 11
Vegetable drawers 11
Page 4

4
GB
Multi-boxes 11
Storage shelves in the door 11
Using the freezer compartment and accessories
Defrosting and cleaning
Automatic defrosting of refrigerating compartment 12
Manual defrosting of refrigerating compartment 12
Manual defrosting of freezing compartment 12
Cleaning 13
Setting up and installation
Where to place the refrigerator/freezer 14
Electrical connection 15
Starting up the refrigerator/freezer 16
You can change the doors from right-hinged to
left-hinged or vice versa yourself 17
Replacing the bulb 19
GRAM Service
Spare parts 19
Page 5
5
GB
The refrigerator/freezer contains the
environment-friendly, non-ozone-depleting refrigerant R600a. As R600a is a
flammable gas, it is important to avoid
damage to the refrigeration circuit during transport and installation. If the
refrigeration circuit is damaged, avoid
using naked flame in the vicinity of the
refrigerator/freezer and connecting
power to the refrigerator/freezer. Also
make sure that there is good ventilation
in the room. If you are in doubt, please
contact your supplier.
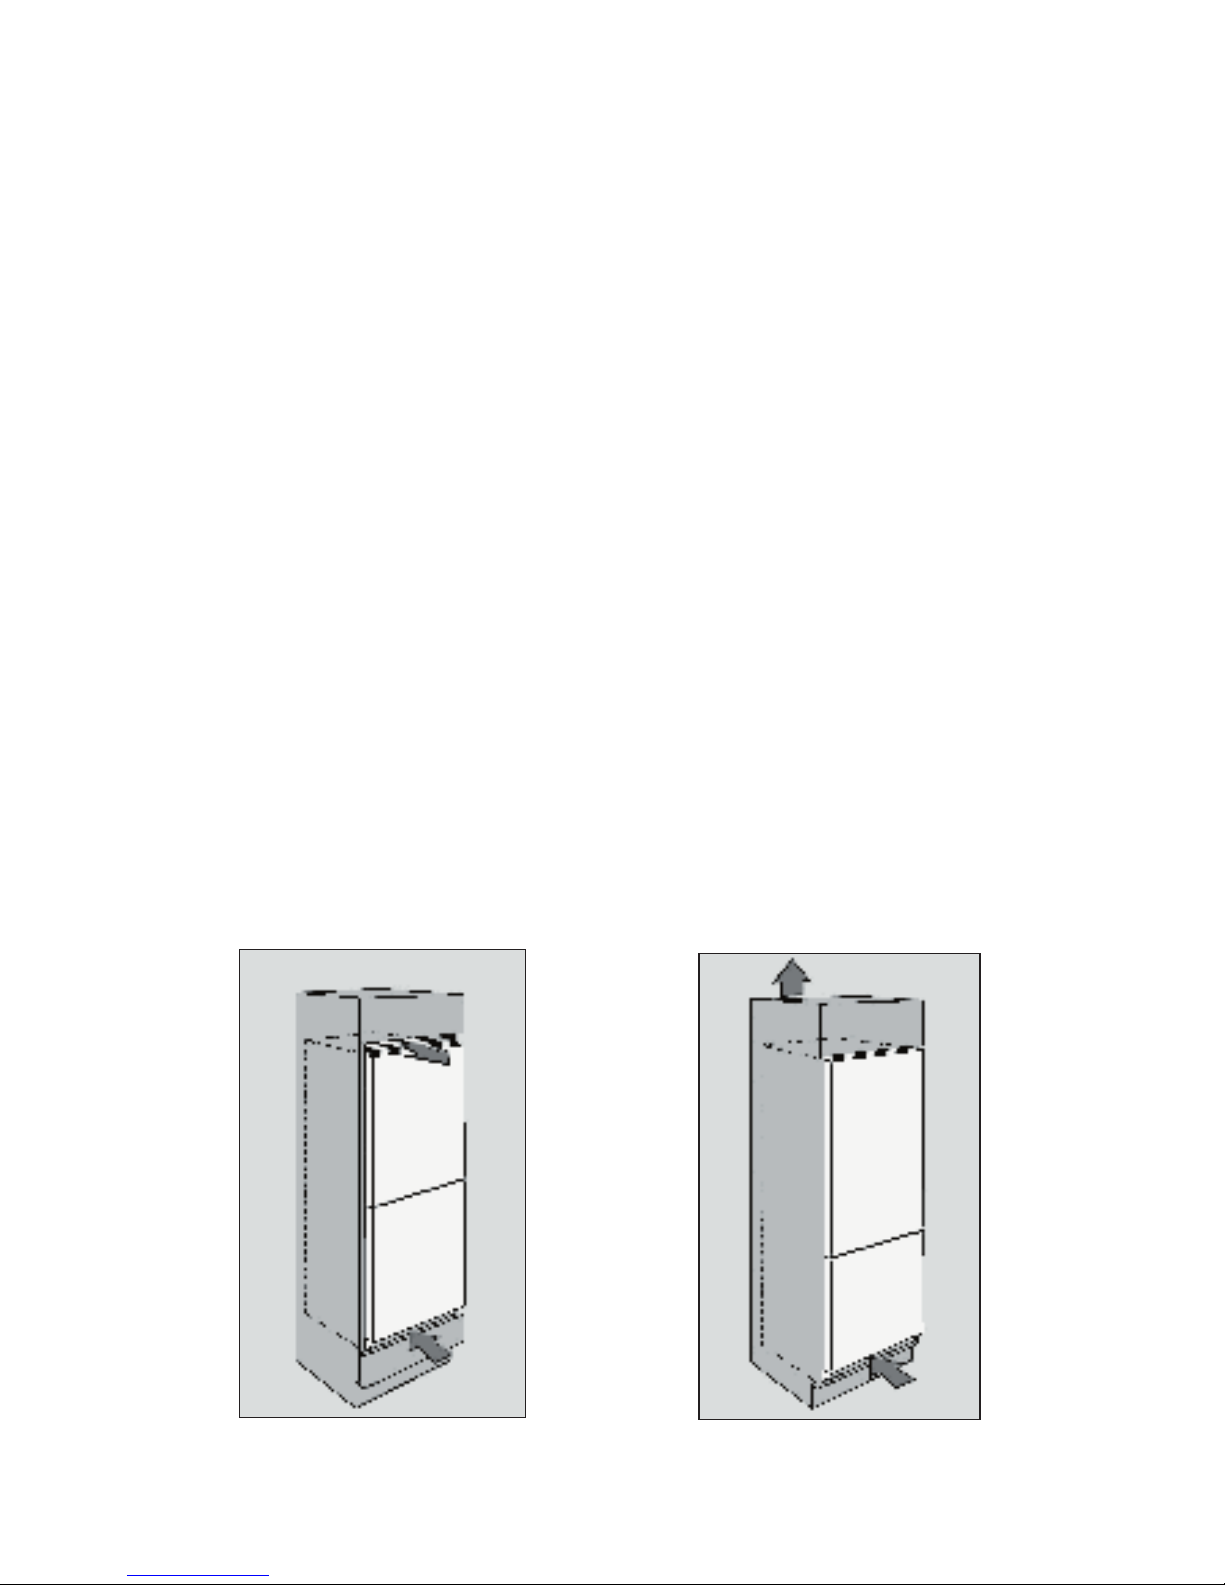
Transporting and moving the
refrigerator/freezer
The refrigerator/freezer must always be
moved in the vertical position. The cabinet must not be tilted more than approx.
40°. If the refrigerator/freezer has been
tilted more than 40°, the power supply
must not be connected until the appliance has stood upright for at least two
hours.
If the refrigerator/freezer is to
remain unused for a time
If the refrigerator/freezer is to remain
unused for a time, e.g. in a summerhouse, switch refrigerator and freezer
off by pressing the buttons
(1), (2) and then disconnecting the power supply to the cabinet and
possibly pulling the plug out of the wall
socket.
Empty, defrost and clean the refrigera
-
Important information
tor/freezer. Leave the doors to the refrigerating and freezing compartments
slightly ajar. This will prevent bad smells
in the cabinets.
Warning
Old refrigerators and freezers are often
fitted with complicated latches that can
only be opened from the outside. If you
have an old unit like this stored away
somewhere, or if you scrap it, remember to destroy the latch to prevent children from being exposed to danger by
getting locked inside the unit.
Note! Please also observe the environmental rules on disposal.
Disposal
If a refrigerator/freezer is to be disposed
of, this must be done in an environmentally correct way, in accordance with
current rules on disposal.
Please observe the environmental rules
on disposal. There might be special
requirements/conditions to be observed.
Information on disposal can be obtained
from:
- Gram A/S
- Your white-goods supplier
- Authorities (the local council, Ministry
of the Environment, etc.)
Page 6
6
GB
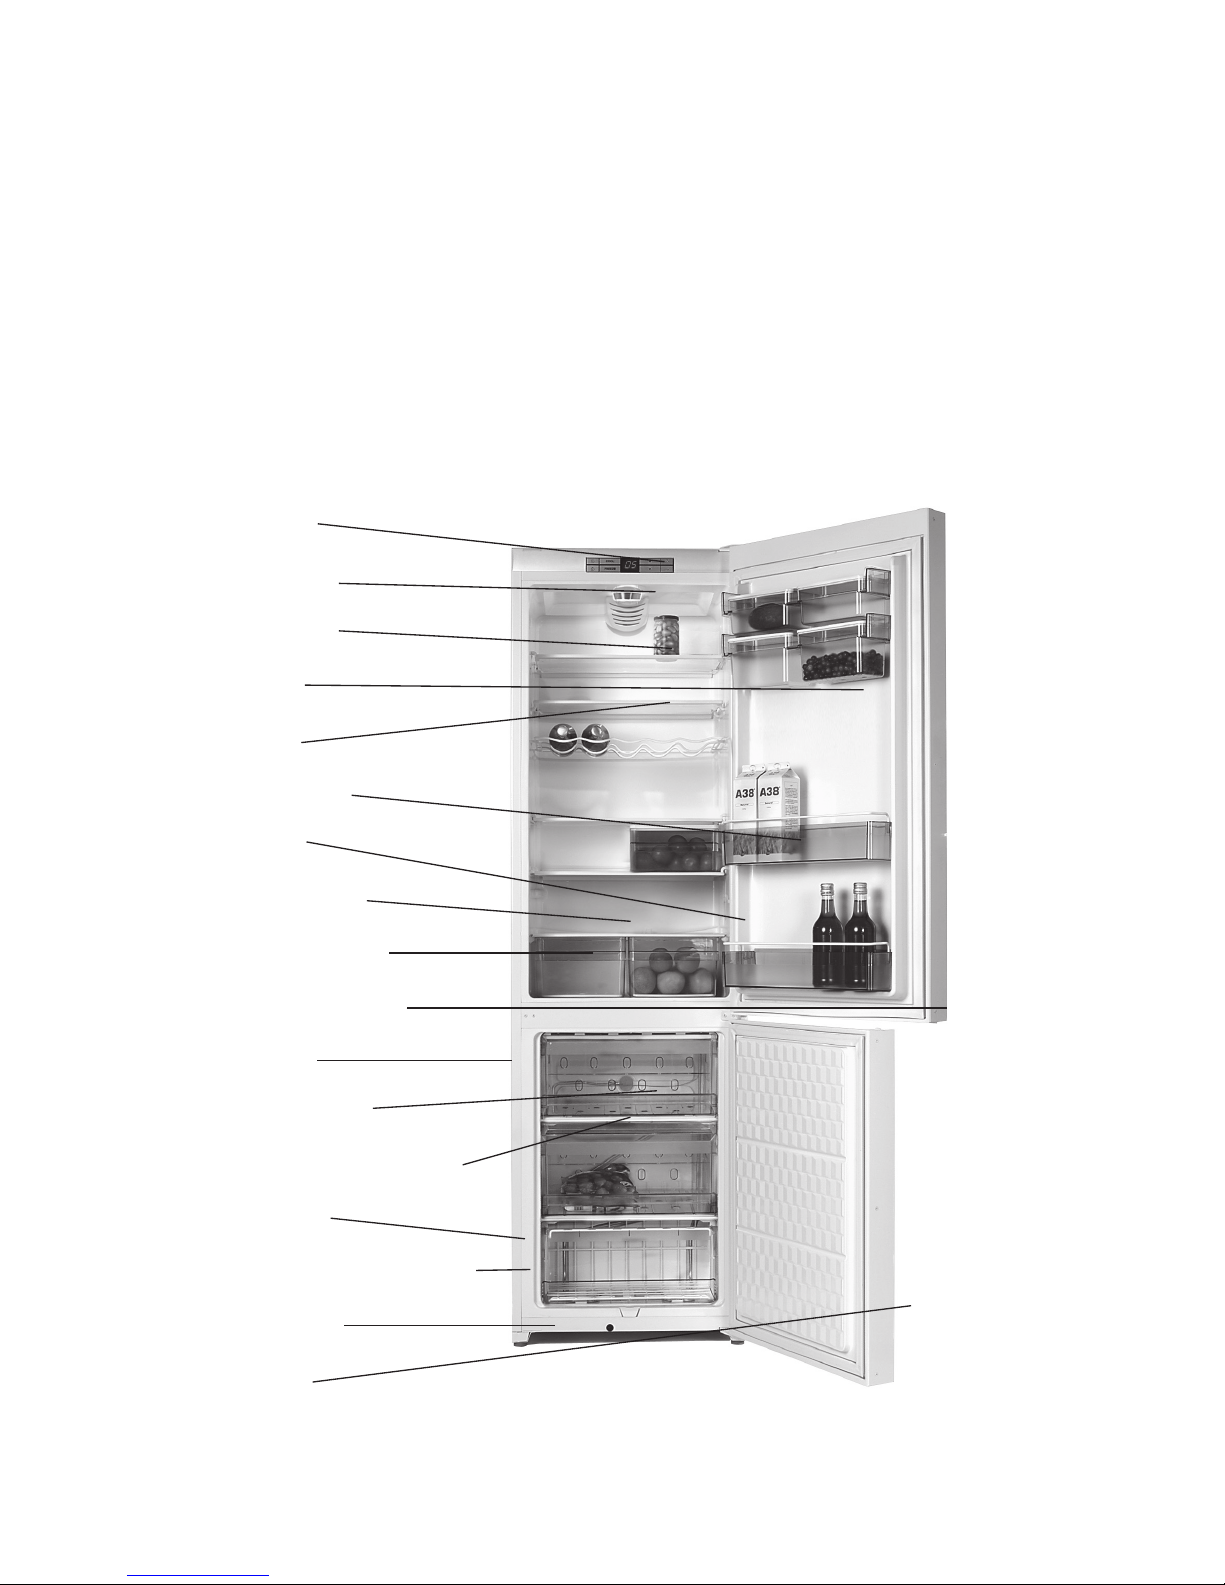
Description of the refrigerator/freezer
The refrigerator/freezer is intended for
use in a normal household. It is designed for temperature class SN-T in
accordance with European standard EN
153. This means that it will run best at
a room temperature of +10°C to +43°C.
The freezing compartment is a four-star
freezer approved for freezing down and
storing frozen items of food.
Control panel
Halogen lamp
Glass shelves
Multi-boxes
Bottle shelf
Storage shelves
Nameplate
Evaporation tray
Vegetable drawers
Rubber sealing strip
Condenser
Freezing drawers
Freezing tray (KF 350 only)
Compressor
Compressor compartment
Adjustable feet
Door handle
Page 7
7
GB
Using the refrigerator/freezer
Electronic control
The refrigerator-freezer has been equipped
with the electronic control. The equipment
has been set-up by the manufacturer for
the optimum temperature operation i.e.
+5
o
C in the refrigerator’s chamber and
–18
o
C in the freezer’s chamber.
In case the user intends to modify the
manufacturer’s set-up the new setting
shall be stored in the electronic control
memory. In case of the power supply
failure, after the power supply has been
restored, the control will keep in the
memory the latest settings.
The electronic control has been equipped
with the following functions:
- ON/OFF switch function
- Display of the real temperature in-
side the refrigerator’s chamber and
freeze’s chamber
- Setting the temperatures in the re-
frigerator’s chamber and freezer’s
chamber
- Automatic defrosting of the refrigera-
tor’s chamber
- Quick freezing
- Quick cooling
- Vent function inside the cooler chamber.
- adjustment of the display contrast
- acoustic and visual signalling of
alarms
- visual signalling with use of LEDs of
switched on functions
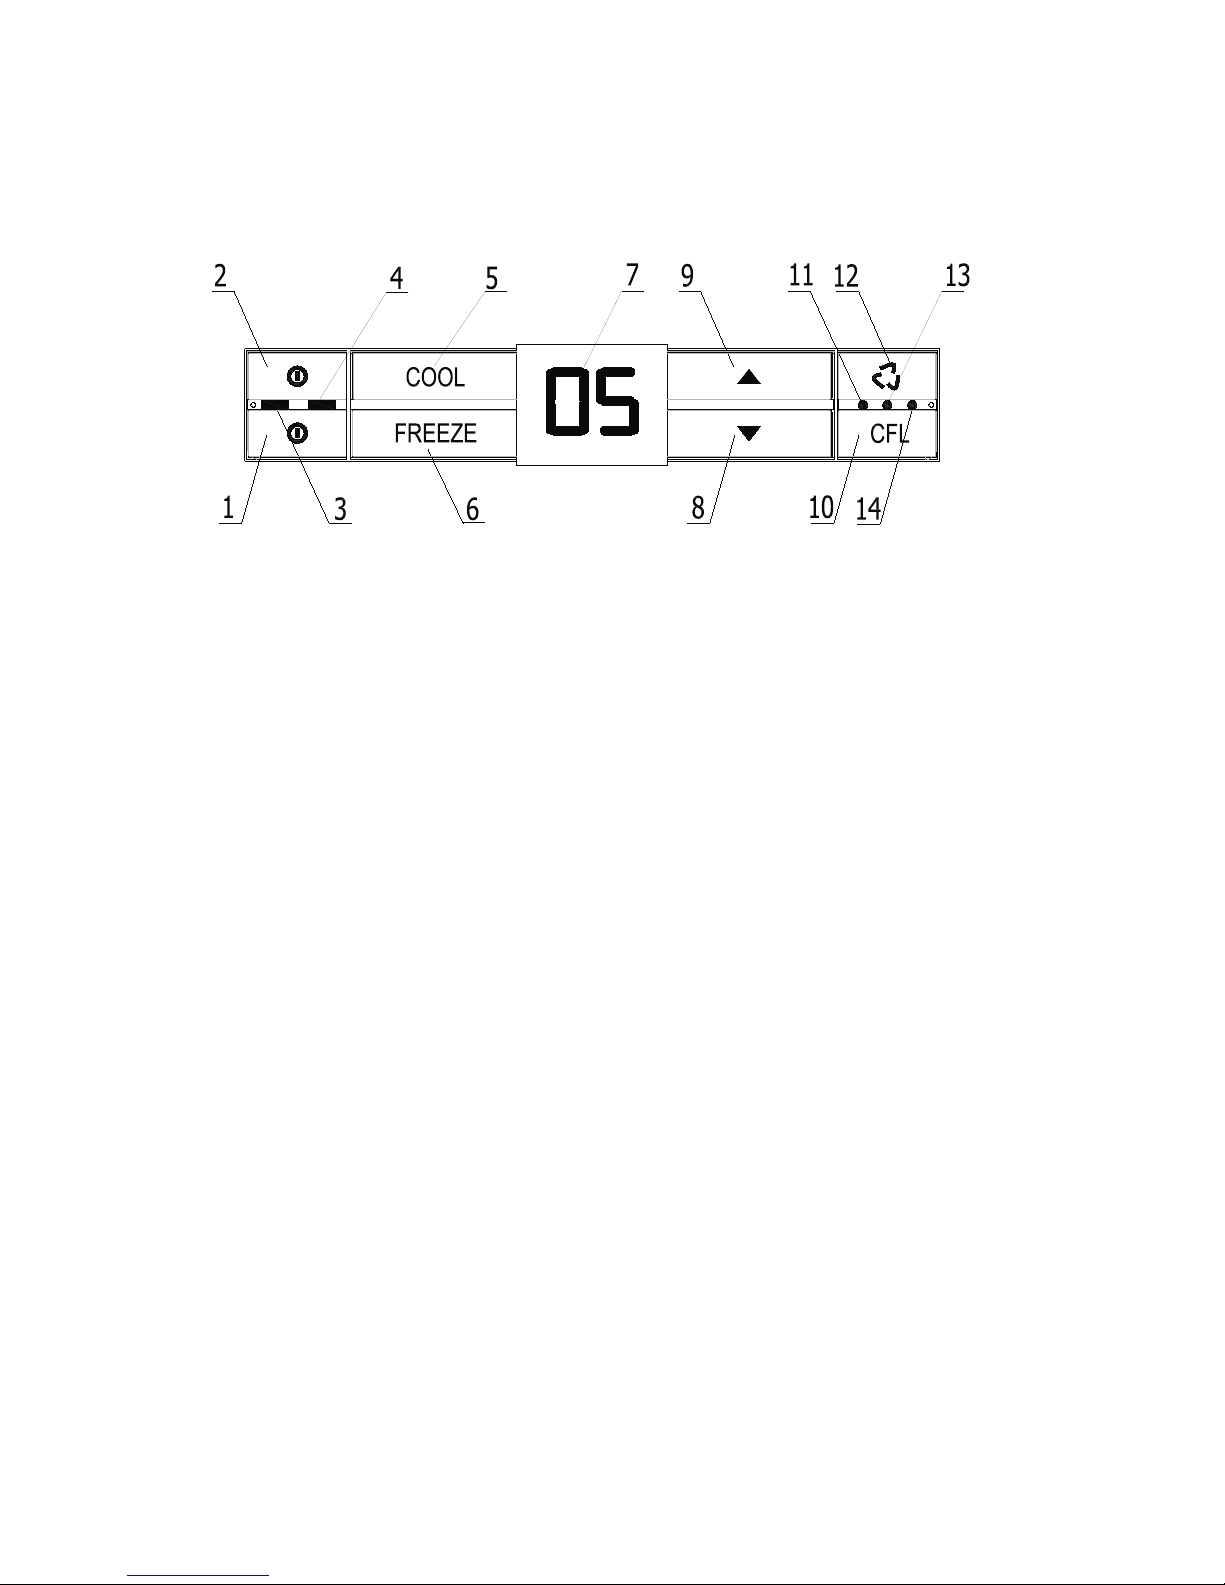
1. Freezer’s ON/OFF switching pushbuttons
2. Refrigerator’s ON/OFF switching
pushbuttons
3. Green light-emitting LED signalling
that the refrigerator’s chamber has
been switched on
4. Blue light-emitting LED signalling
that the freezer’s chamber has been
switched on
5. “COOL” pushbutton
6. “FREEZE” pushbutton
7 Display showing the set
temperature, time of super freezing,
and alarm status codes
8. Pushbutton for displaying the real
temperature inside the freezers’ chamber
9. Pushbutton for displaying the real
temperature inside the refrigerator’s
chamber
10. Function pushbutton (for quick
freezing quick cooling adjusting the
ligh on the display)
11. Blue light-emitting LED signalling
that the quick cooling function has
been switched on
12. The button turning the vent on and
off.
13. The control light (yellow) signals the
installation of the vent function.
14. Blue light-emitting LED signalling
that the quick freezing function has
been switched on
Page 8
8
GB
Switching ON/OFF the refrigerator-freezer
Switching ON the refrigerator: press and
hold the pushbutton (2). The operation of
switching on the refrigerator is signalled by
the green light-emitting LED (3), and the
real temperature inside the refrigerator’s
chamber shall be shown on the display.
Switching OFF the refrigerator: press and
hold the pushbutton (2).
Switching ON the freezer: press and
hold the pushbutton (1). The operation of
switching on the freezer is signalled by the
blue light-emitting LED (4), and the real
temperature inside the freezer’s chamber
shall be shown on the display.
Switching OFF the freezer: press and hold
the pushbutton (1).
The refrigerator and freezer can be
switched ON and OFF independently.
Temperature regulation
The temperature in the refrigerator’s
chamber can be set within the temperature range from +2oC up to +9oC. When
pressing and holding the COOL push
button (5), the set temperature shall be
shown on the display. When pressing
the pushbutton (9) or pushbutton
(8) it is possible to modify setting of the
temperature inside the refrigerator.
The temperature in the freezer’s chamber
can be set within the range from -25
o
C up
to -16oC. When pressing and holding the
FREEZE pushbutton (6), the set temperature shall be shown on the display.
When pressing the pushbutton (9)
or pushbutton (8) it is possible to
modify setting of the temperature inside
the freezer.
Every pressing of the pushbutton shall ac
tivate a brief acoustic signal. In case of the
power supply failure or disconnecting the
power supply to the refrigerator-freezer,
the control will keep in the memory the
latest settings after the power supply has
been restored.
Displaying of temperature
You can decide which temperature should
be shown on the display – the temperature
inside the refrigerator’s chamber (by press
ing the pushbutton (9)) or of the temperature
inside the freezer’s chamber (by pressing
the pushbutton (8)). The above mentioned
setting can be changed any time.
Temperature inside the
refrigerator-freezer
The temperature settings and temperature
values shown on the display are average
temperatures of the refrigerator-freezer. It
concerns both the refrigerator’s chamber
and the freezer’s chamber. Do not change
the temperature setting simply because it
is warmer in summer. The increase of the
room temperature will be detected by the
sensor and the compressor will automati
cally run for a longer time to maintain the
set temperature.
Quick freezing
Quick freezing to a low temperature is important to maintain the quality of the food
products. Quick freezing is activated by
pressing and holding the function button
(10) and pressing the FREEZE pushbut
ton (6). The blue light-emitting LED (14)
switches on signalling activation of the
quick freezing function.
You can chose between freezing in 24
or 48 hours:
- by holding the function button (10) and
pressing once the FREEZE pushbutton
(6) you switch on the 24-hours quick
freezing function and “24” is shown on
the display,
- by holding the function pushbutton
Page 9

9
GB
- the next pressing of the pushbutton (6)
switches off the quick freezing function
and switches off the blue light-emitting LED.
The quick freeze function will be automatically disabled after 24 or 48 hours.
After pressing the quick freezing function
pushbutton, the indication “24” or “48” is
displayed for 5 seconds. Afterwards the
real temperature inside the refrigerator’s
chamber and freezer’s chambers will be
shown on the display.
It is recommended to switch on the quick
freezing function (24 or 48 hours) for approximately 2 hours before loading the
freezer’s chamber with large quantities
of the food products.
Brief temperature variations
Brief temperature variations are normal
and may occur when for example the fresh
food products are stored in the refrigerator-freezer or when the door is open for a
longer time. These variations will not affect
the food products and the temperature will
quickly return to the set-point level.
The interior light switches on when the
door of the refrigerator’s chamber has
been opened. When the door remains
open, the interior light switches off after
approximately 3 minutes. The display will
show E4 alarm and the acoustic alarm
will be activated. When the door of the
freezer’s chamber is open for more than
2 minutes the display will show E4 alarm
and the acoustic alarm will be activated.
emitting LED and activates quick
cooling down of the refrigerator’s
chamber to the temperature of ap
-
proximately 1oC (the continuous
operation of the compressor), after
the temperature of 1
o
C has been
reached the function automatically
disables and the equipment switches
into a normal cyclic operation restor
ing the latest temperature set for the
refrigerator.
- during the super refrigerating function
operation, the display shows “Sc”
indication, (it is possible to monitor
the freezer temperature by pressing
the pushbutton (8)).
- the second pressing of the pushbut
tons (10) + (5), (during operation
of the quick refrigerating function),
disables the function and switches
off the blue light-emitting LED (11).
It is recommended to switch on the quick
refrigerating function “Sc” before loading
the refrigerator’s chamber with a large
quantity of the fresh food products.
(10) and pressing twice the FREEZE
pushbutton (6) you switch on the 48-hours
quick freezing function and “48” is
shown on the display,
Super cooling function
- the first pressing of the pushbuttons
(10) + (5) switches on the blue light-
Function with a ventilator
The ventilator, after being connecting the choler to the network is
inactive. It is turned on and off by
button (12)
Yellow LED light (13) turns on when
the ventilator is turned on.
The ventilator allows to maintain the
same temperature on all levels of
the cooler.
After being turned on, the ventilator works in a cycle function except
when the cooler door is opened.
Page 10

10
Alarm codes
E1 – temperature sensor fault in the refrigerator’s chamber
E2 – temperature sensor fault in the
freezer’s chamber
E4 – door is open
E5 – too high temperature inside the
freezer’s chamber
E1, E2
One of the temperature sensors has been
damaged. Call technical service. The
built-in emergency program maintains the
admissible temperature until the fault will
be eliminated by the authorized technical
service.
E4
The door of the refrigerator’s chamber or
freezer’s chamber has been opened for
more than 3 minutes (refrigerator) and 2
minutes (freezer). The alarm code disappears when the door is closed.
Display brightness adjustment
By pressing and holding the pushbutton
(10) and
- pressing at the same time the push
button (9), the display brightness
increases,
- pressing at the same time the push
button (8), the display bright
ness decreases.
When adjusting the display brightness,
the display shows the following indica
-
tions:
1.8 – minimum brightness
2.8 – medium brightness
3.8 – maximum brightness (manufactur
-
er’s setting).
Alarms
Normal use of the refrigerator-freezer may
cause different situations leading to inter
-
ruption of various functions and unstable
operation of the entire equipment as a
consequence. These interruptions are
shown on the display as the alarm code
(an E followed by a number) and signalled
by the acoustic alarm.
In case there will be several faults the
alarm codes shall be displayed in turn.
E5
The temperature inside the freezer’s
chamber has been exceeding.
Interrupting an alarm
The acoustic alarm can always be interrupted by opening the door and/or press
ing any push-button.
The alarm code E4 - E5 can be cancelled
by pressing for 7-8 seconds at the same
time the push-buttons.
The exception: in case of the alarm
E1 it
is possible to cancel the alarm only after
replacing damaged sensors.
In such cases please contact Gram Serv
-
ice Center.
GB
Page 11
11
GB
13
Using the refrigerating compartment and
accessories
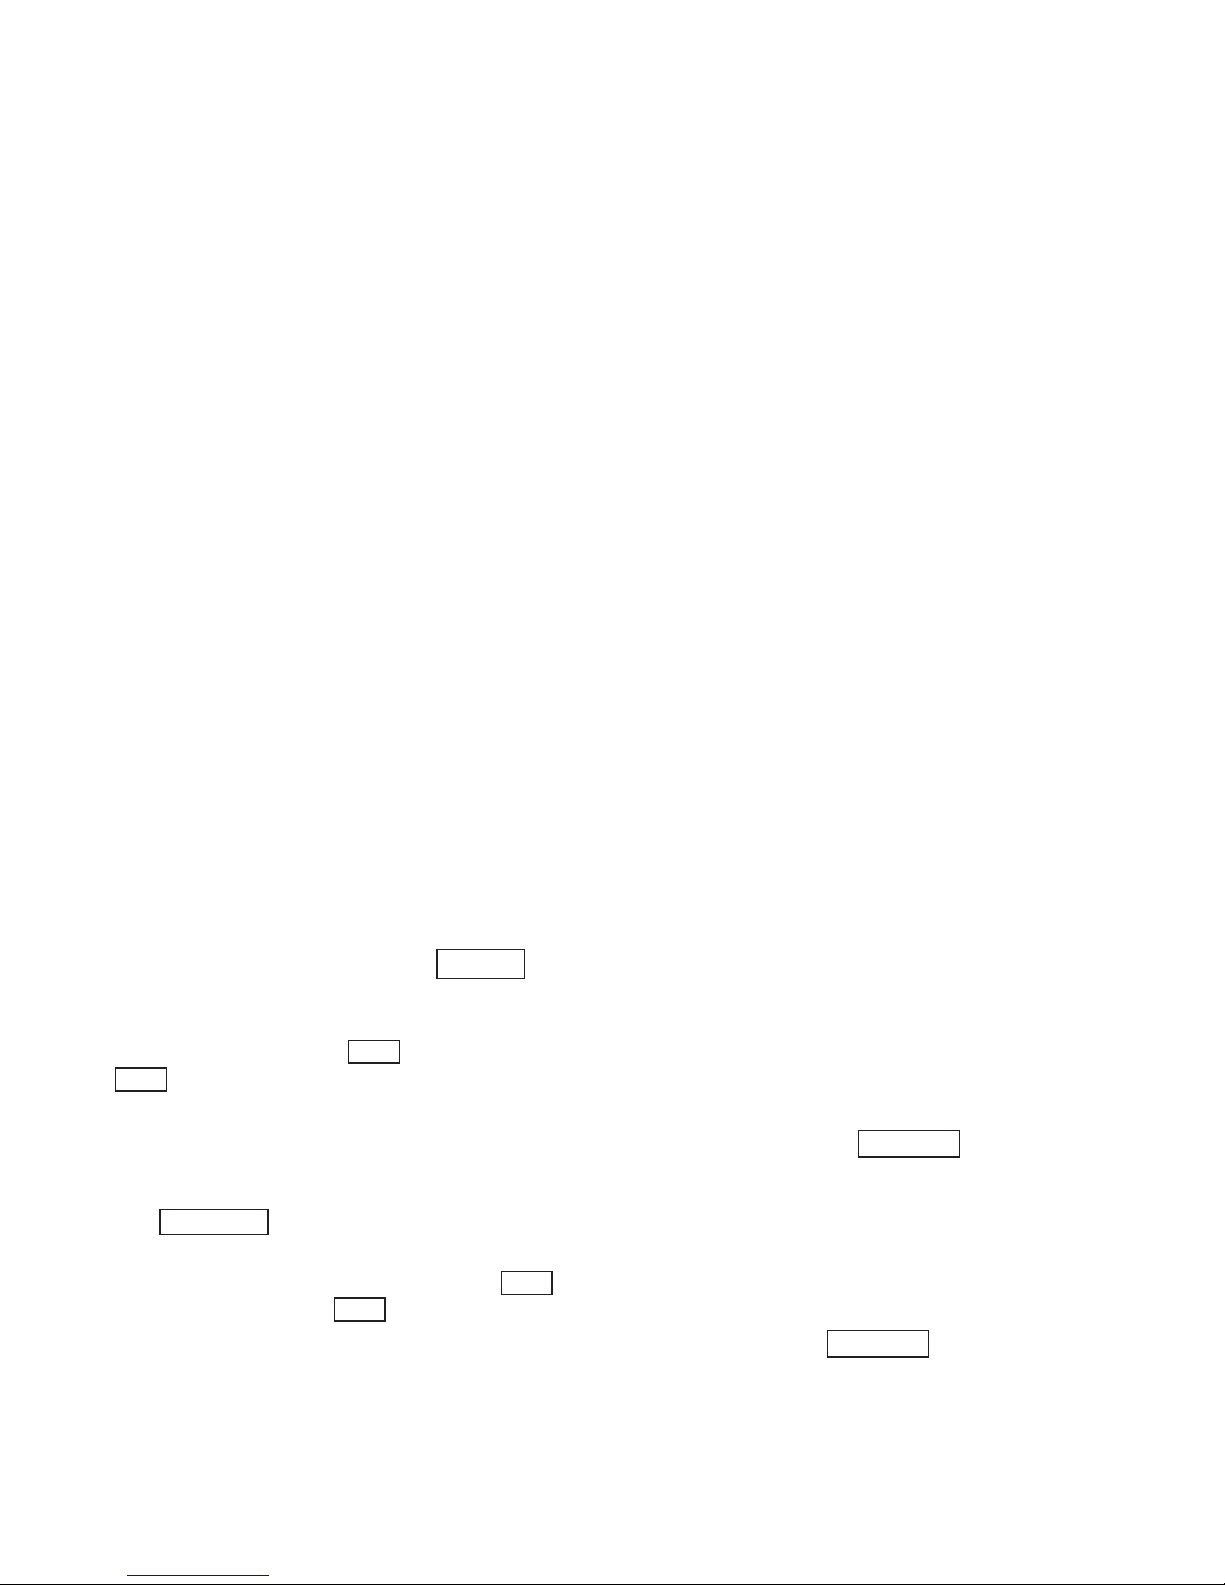
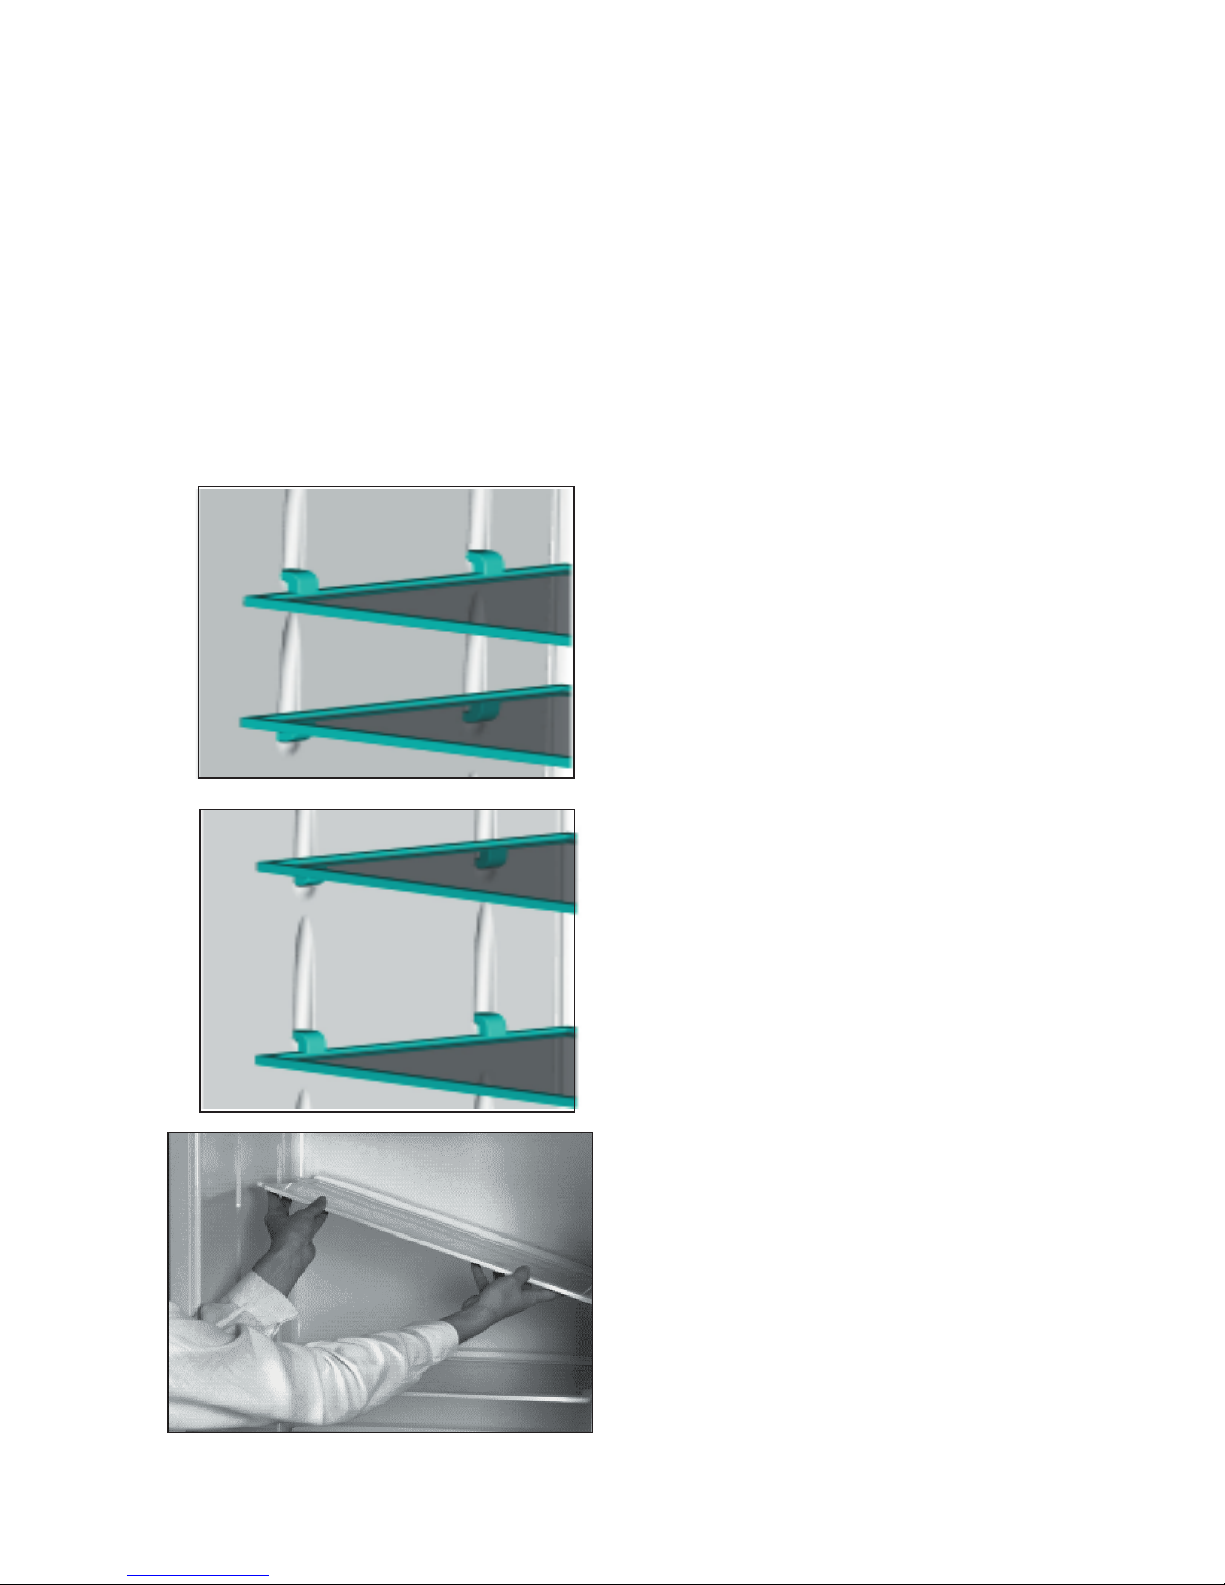
Glass shelves
The glass shelves can be arranged to
give more, or less, space between the
shelves thus allowing flexible refrigerator/freezer arrangement (11 and 12).
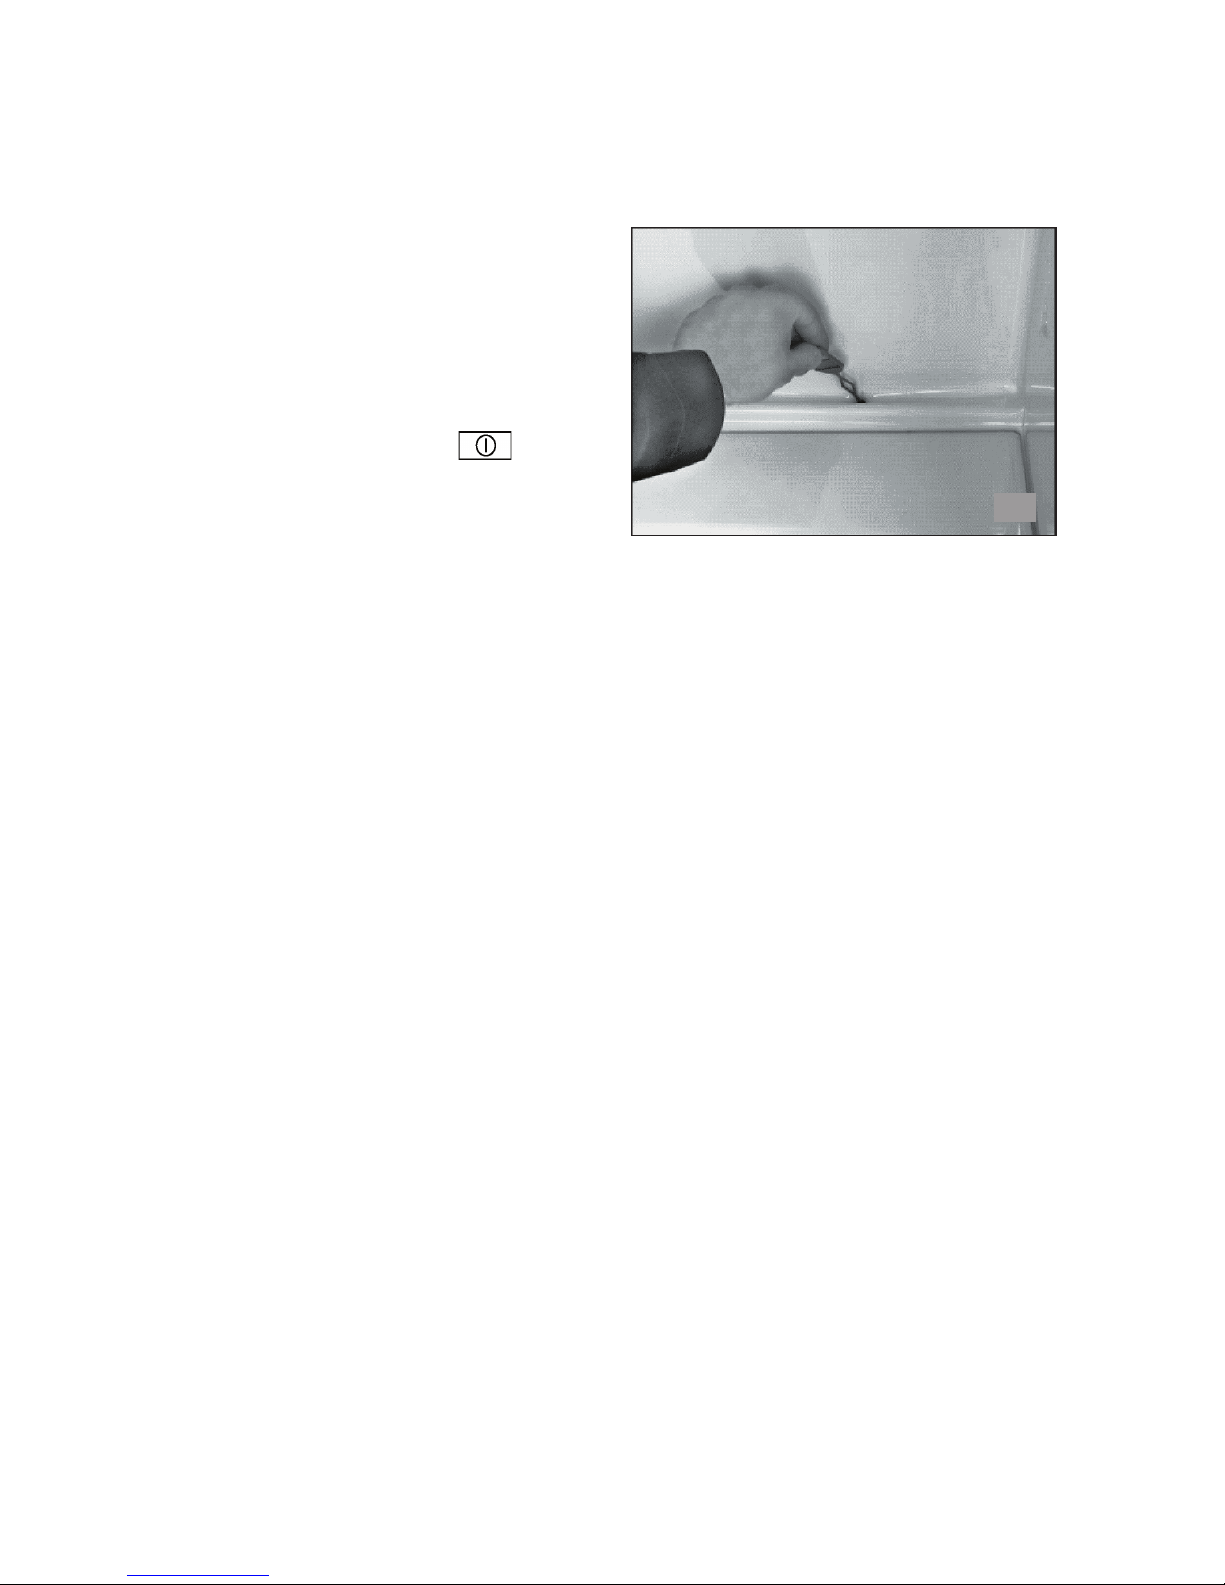
Extract the shelf by lifting up the left
shelf side (13). Start by removing the
top shelf when you want to clean the
refrigerator or rearrange the shelves.
Bottle shelf
The bottle shelf is suitable for large and
small bottles.
Vegetable drawers
The drawers at the bottom of the refrigerating compartment are very suitable
for storing fruit and vegetables. The
overlying shelf covers the drawer and
maintains humidity thus preventing
stored food from drying out.
Multi-boxes
The multi-boxes are ideal for all items of
food and can be placed in the cabinet or
the door, whichever is most expedient.
The tight-fitting lids prevent drying out
and save much time in tedious wrapping and unwrapping. The multi-boxes
are made of material that remains unaffected by mineral oils, fats and weak
acids.
Multi-boxes can also be purchased as
accessories.
Storage shelves in the door
The shelves in the door can hold bottles of up to 2 litres. They can be moved
and placed throughout the entire height
of the door.
12
11
Page 12
12
The refrigerating compartment features
automatic defrosting. In some periods,
however, frost may form on the rear wall
of the refrigerator. This normally hap
pens when many fresh food items are
stored in the refrigerator or in summer
when the refrigerator is filled with beverages to be cooled. In situations such as
these the compressor must run for long
periods of time to cool the food items.
As automatic defrosting takes place
while the compressor is at a standstill,
the refrigerator may not defrost completely before the compressor restarts.
In situations such as these manual
defrosting is required or help must be
called in to change the defrost function.
GB
14
Using the freezer compartment and accessories
The whole of the freezer can be used
for freezing down and for the long-term
storage of frozen items of food. In ad-
dition, KF 350 comes equipped with a
freezing tray for berries, etc.
Defrosting and cleaning
Automatic defrosting of refrigerating compartment
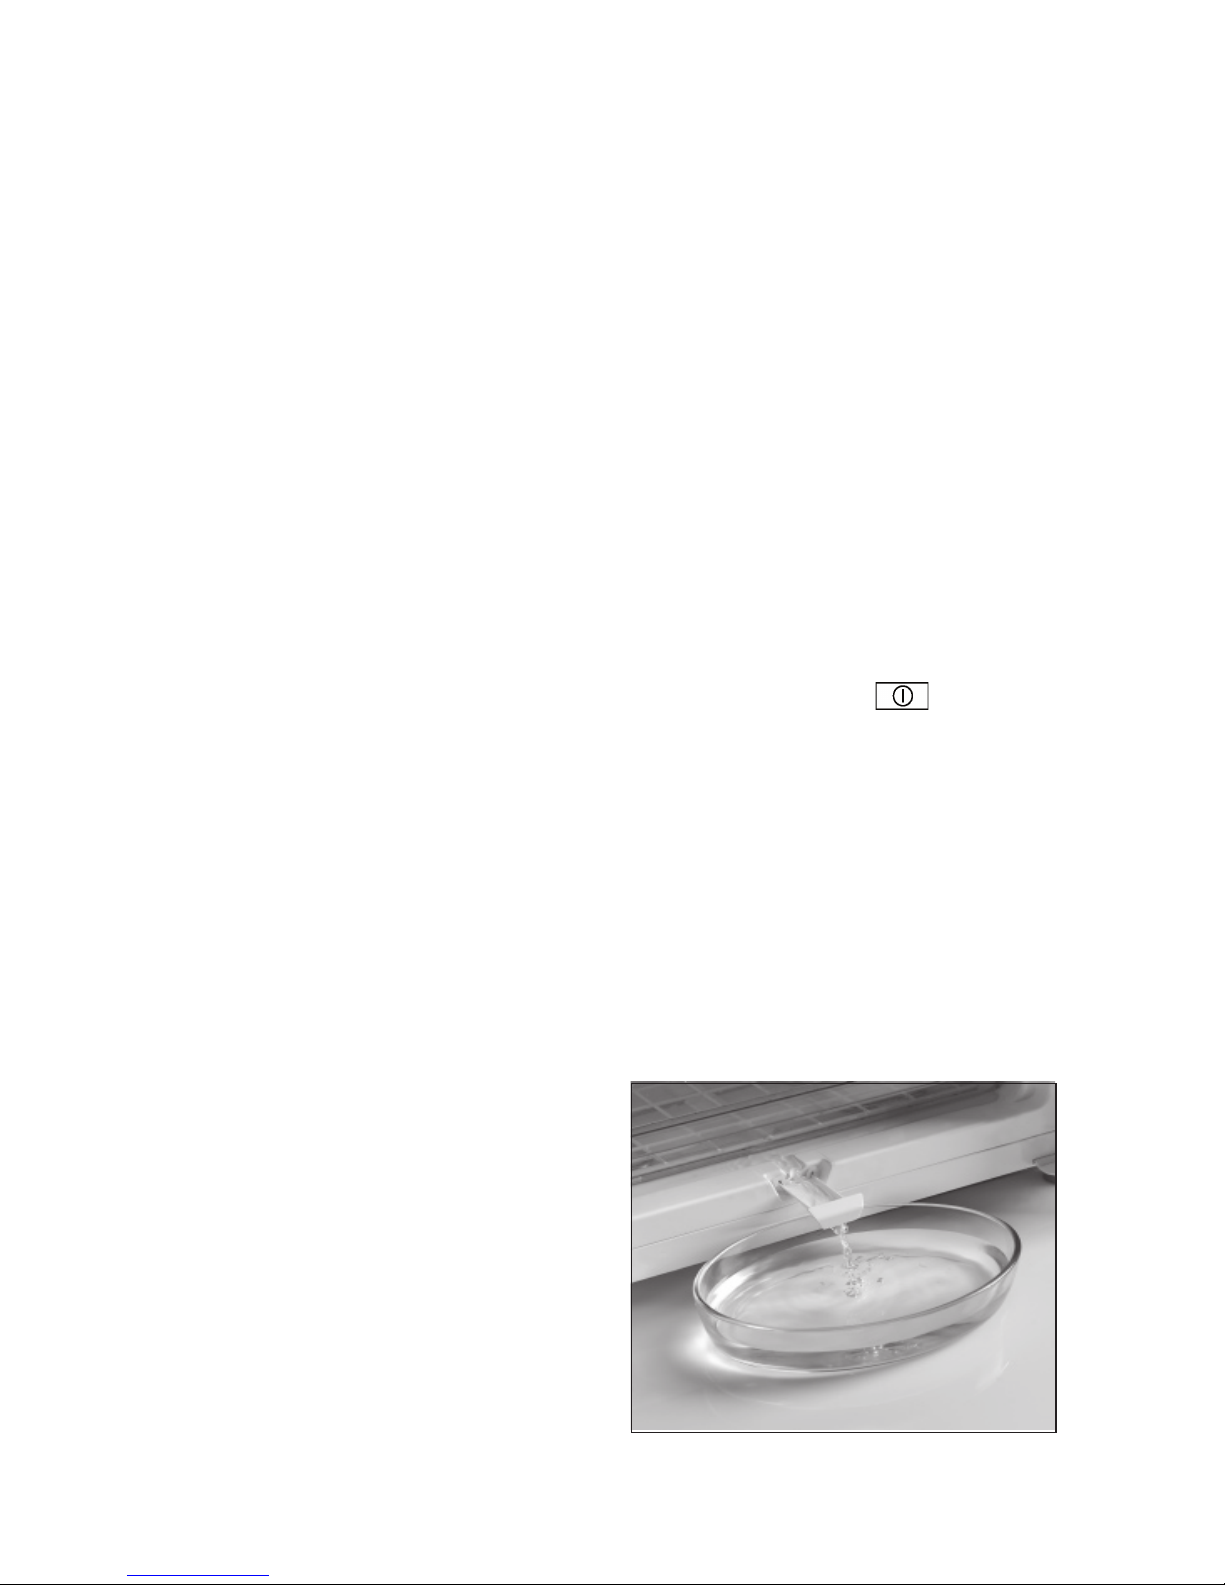
Manual defrosting of freezing
compartment
It is recommended to defrost the freezing compartment at least once a year.
Stop the freezing compressor by press-
ing the lower button (1).
Remove all items from the freezer. To
keep them as cold as possible during
defrost, they can be placed in the refrigerating compartment. Place a bowl
containing hot water (not boiling) in the
freezer.
Pull out the drain spout and place a
bowl under it to receive defrost water.
When the ice has melted, clean out the
freezer using water and a mild washing-up liquid. Dry the freezer with a soft
cloth.
Page 13
13
Remove dust and threads from the
compressor compartment at the back of
the refrigerator/freezer with a vacuum
cleaner.
GB
15
Cleaning
Stop the refrigeration compressor by
pressing the upper button (2)
and disconnect the power supply to the
refrigerator/freezer.
The cabinet is best cleaned using a
weak soap solution and a soft cloth.
Never use cleaning agents that scour.
Clean the sealing strip around the door
regularly to prolong its life. Use only
clean water for cleaning the sealing
strip.
The plastic parts of the cabinet cannot
withstand boiling water (max. 85°C). It
is important to prevent water from getting into the control panel.
Clean the melt water drain in the refrigerating compartment using the cleaning
pin supplied (15).
Cleaning of doors in stainless
steel or aluminium
Stainless steel or aluminium doors on
GRAM products can, with advantage,
be cleaned with a spray and a soft
cloth. There are a number of different
spraying agents for this purpose on
the market. We recommend that you
contact your usual white goods supplier
for advise on the advantages and disadvantages of the individual products.
Warning
It is dangerous to use electrical apparatus, knives or sharp objects to accelerate defrost.
Page 14

14
GB
Setting up and installation
Where to place the refrigerator/freezer
For safety reasons the refrigerator/
freezer must not be installed outdoors;
it must be placed in a dry room. Never
place the appliance close to sources
of heat such as cookers or radiators,
and avoid placing it in direct sunlight.
The surface on which the appliance
is placed must be plane. Do not use
a frame or similar. The small wheels
mounted at the rear of the refrigerator/freezer make it easy to place it in the
required position.
The refrigerator/freezer can stand freely
on the floor or be built into a kitchen ele-
ment or a refrigerator element.
It is important that the refrigerator/
freezer stands completely level and that
there is good air circulation over, under
and around it. The appliance can be
adjusted by turning the four adjusting
screws on the plinth. After adjustment,
the feet and the two rear wheels must
be in contact with the surface on which
the appliance stands.
The illustrations show how to create
sufficient air circulation around the cabi
net. The dimensions give the actual size
of openings. The circulation area must
be at least 200 cm2.
Page 15
15
GB
16
17
Building into a kitchen element
When building into a kitchen element
ensure that there is sufficient ventilation
around the refrigerator/freezer to dissipate heat from the compressor. The
appliance can stand direct on the floor
or on its plinth. (16)
Building into a refrigerator element
Building into a refrigerator element follows the same principle as described
under 16. (17)
Electrical connection
The appliance is intended for connec-
tion to alternating current. The connec
tion values for voltage (V) and frequency (Hz) are given on the nameplate in
the cabinet. Power must be connected
via a wall socket with switch. The wall
socket should be easily accessible.
All earthing requirements stipulated by
the local electricity authority must be
observed. The appliance plug and wall
socket should then give correct earthing. If in doubt, contact your local supplier or an authorised electrician.
WARNING
The flexible cord (mains lead) fitted to
this appliance has three cores for use
with a 3-pin 13-amp or 3-pin 15-amp
plug. If a BS 1363 (13-amp) fused plug
is used, it should be fitted with a 13amp fuse.
Page 16
16
IMPORTANT
The cores in this mains lead are coloured in accordance with the following
code:
GREEN-AND-YELLOW: EARTH )
BLUE: NEUTRAL
BROWN: LIVE
These colours might not correspond
with the colour markings identifying the
terminals in your plug.
Proceed as follows:
Connect the GREEN-AND-YELLOW
core to the plug terminal marked „E” or
by an earth symbol, or coloured GREEN
or GREEN-AND-YELLOW. Connect the
BLUE core to the plug terminal marked
„N” or coloured BLACK.
Connect the BROWN core to the plug
terminal marked „L” or coloured RED.
Starting up the refrigerator/
freezer
Start the refrigerator/freezer by plugging
into a wall socket. If the mains lead has
been damaged, it must be replaced with
a corresponding type supplied by Gram
Domestic A/S or a Gram Domestic serv-
ice centre.
The refrigerator/freezer incorporates a „stand-by function” and in
the display two horizontal lines
indicate that the power supply has
been connected.
GB
Start the refrigerating compartment
by pressing the upper on/off button
(2). After approx. 5 seconds,
the green light-emitting diode (3)
lights to indicate that the refrigerating compartment is on. Start the
freezing compartment by pressing the
lower on/off button
(1). After
approx. 5 seconds, the blue light-emitting diode (4) lights to indicate that the
freezing compartment is on. The
actual temperature in the refrigerating compartment is shown on
the display (5). By pressing button
(8) the actual temperature in the
freezing compartment is displayed.
By pressing button (9) the
actual temperature in the refrigerating compartment is displayed.
Page 17

17
GB
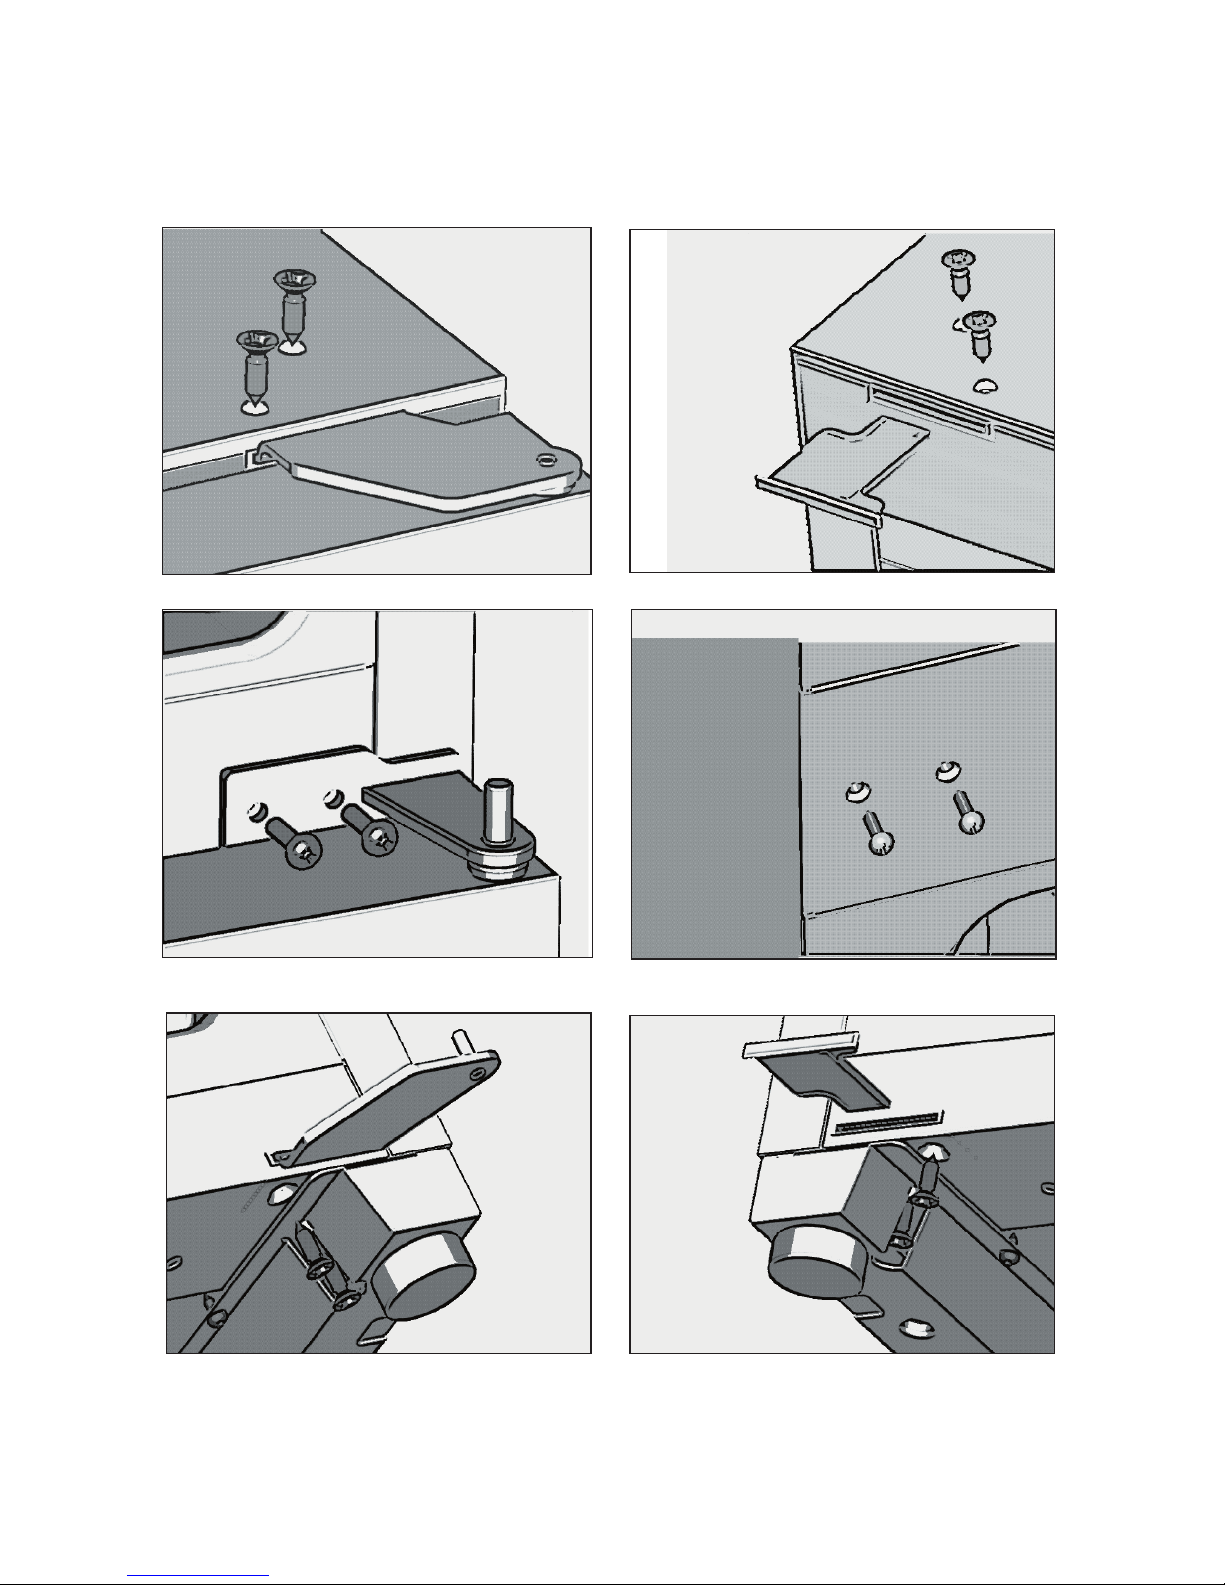
Illustrations 18-25 show how easy it is
to change the doors from right-hinged
to left-hinged - or vice versa. (Changing
the door from left-hinged to right-hinged
is done in the same way, but opposite).
The refrigerator/freezer must
be switched off and emptied
completely.
· Remove the two screws in the
hinge top on the righthand side
of the cabinet. (18)
· Lift the refrigerator door slightly
and take the door and upper
hinge off by pulling the door
towards you.
· Remove the dummy hinge
from the opposite side by unscrewing the two screws. (19)
· Reverse the dummy hinge and
refit it on the opposite side of
the cabinet using two screws.
· Remove the lower door by
unscrewing the two screws in
the centre hinge. (20)
· Refit the two screws from the
lefthand side on the righthand
side. (21)
· Lift the lower door and the centre hinge up and take them off.
· Tilt the refrigerator to an angle
of max. 45° and unscrew the
bottom hinge.
This is done by removing the
two screws holding the bottom
hinge on the cabinet underside. (22)
Remove the screws on the
righthand side of the door and
screw them onto the left side
of the door. Use the screws
from the left side to attach the
handles to the righthand edge
of the doors (25)
You can change the doors from righthinged to left-hinged or vice versa yourself
· Remove the bottom dummy
hinge in the opposite side in the
same way as the upper dummy
hinge was removed. (23)
· Reverse the dummy hinge and
refit it on the opposite side of
the cabinet.
· Reverse the upper righthand
hinge and refit it in the lower
lefthand corner of the cabinet.
· Place the cabinet in the vertical position again.
· Dismount the door handle by
removing the screws. (24)
· Place the lower door in correct
position on the bottom hinge.
· Reverse the centre hinge, refit
it on the lower door and screw
it onto the cabinet. Remember
to adjust the hinges.
· Lift the top door into position on
the centre hinge. Reverse the
lower righthand hinge and refit
it on the top part of the door
in the left side of the cabinet.
Push the door into position and
slide the upper hinge into the
upper lefthand hinge casing.
Tighten the two screws. Re
-
member to adjust the hinges.
·
Page 18
18
GB
18
19
22
23
20
21
Page 19

19
Replacing the bulb
Switch off the refrigerator/freezer by
pressing the on/off buttons
(1),
(2) and unplug the mains lead from
the wall socket. Screw off the screen.
Replace the bulb with a new one (max.
10 W, 12 V, halogen base G4). Refit the
screen, connect the power supply and
restart the refrigerator/freezer by pressing the on/off buttons (1), (2).26
GB
26
Spare parts
When ordering spare parts, please
give the refrigerator/freezer type and
number. This information is given on the
nameplate inside the cabinet.
GRAM Service
25
24
Page 20

20
NL
Wij wensen u veel plezier met uw nieuwe
GRAM koel-/vrieskast
Wij wensen u veel plezier met uw nieuwe koel-/vrieskast. Bij het ontwikkelen van de
koel-/vrieskast is er rekening gehouden met de verschillende eisen die levensmiddelen aan het bewaren stellen. Sommige moeten koud bewaard worden - andere
hebben een wat hogere temperatuur nodig. Sommige moeten afzonderlijk bewaard
worden zodat ze de andere levensmiddelen niet met hun smaak en geur beïnvloeden. En de meeste hebben een hoge luchtvochtigheid nodig om vers en knapperig
te blijven. Om zoveel mogelijk plezier van uw koel-/vrieskast te hebben, is het
belangrijk dat u de functies van de kast kent en weet hoe u het toebehoren kunt
gebruiken. Lees de bedieningshandleiding daarom zorgvuldig voordat u de koel/vrieskast opzet en in gebruik neemt. Aangezien de bedieningshandleiding voor een
aantal typen koel-/vrieskasten geldt, kan de uitrusting van model tot model variëren.
Voordat u de koel-/vrieskast in gebruik neemt
Controleer bij de aankomst dat de kast niet beschadigd is, omdat transportbeschadigingen aan de handelaar gemeld moeten worden voordat de koel-/vrieskast in
gebruik genomen wordt. Voordat de kast gevuld wordt, moet deze aan de binnenzijde met een lauw sopje van een zacht afwasmiddel gereinigd worden. Gebruik
hiervoor een zachte doek. Indien de koel-/vrieskast in een koude omgeving (kouder
dan +5°C) opgeslagen is geweest, moet er een rustperiode van minstens 2 uur in
acht genomen worden voordat de kast in gebruik genomen wordt.
Lees over het opstellen, inbouwen en installeren op blz. 33 en 34.
Page 21

21
NL
Inhoud
Belangrijke informatie
De koel-/vrieskast vervoeren en verplaatsen ..................... 24
Als de koel-/vrieskast periodiek niet gebruikt wordt ........... 24
Oude koel-/vrieskasten ....................................................... 24
Verschroten ........................................................................ 24
Beschrijving van de koel-/vrieskast
De koel-/vrieskast bedienen
Elektronische regeling ........................................................ 26
Temperatuurinstelling ......................................................... 27
Temperatuurweergave ........................................................ 27
Binnentemperatuur in de koel- diepvriescombinatie .......... 27
Functie ‘Snel invriezen’ ....................................................... 27
Kleine temperatuurveranderingen ...................................... 28
Functie ‘Super-koelen’ ........................................................ 28
Functie met ventilator’ ........................................................ 28
Wijziging van het displaylicht .............................................. 29
Page 22

22
NL
Flessenrek .......................................................................... 31
Groenteladen ...................................................................... 31
Multiboxen .......................................................................... 31
Flessenrekken in de deur ................................................... 31
De koel-/vrieskast en toebehoren gebruiken
Ontdooien en reinigen
Automatisch ontdooien van het koelgedeelte ..................... 32
Handmatig ontdooien van het koelgedeelte ....................... 32
Handmatig ontdooien van het vriesgedeelte ...................... 32
Reinigen ............................................................................. 33
Opzetten en installeren
Waar moet de kast staan .................................................... 33
Inbouwen in een keukenelement ........................................ 34
Gebruik van het koelgedeelte en toebehoren
Glasschappen .......................................................... 31
Alarm
Alarmcodes ........................................................................ 29
Het alarm uitzetten ............................................................. 29
Page 23

23
Inbouwen in een koelkastelement ...................................... 34
Aansluitspanning
De koel-/vrieskast bedienen ............................................... 35
Draairichting van de deur veranderen ................................ 36
De gloeilamp vervangen ..................................................... 38
Reservedelen ..................................................................... 38
NL
Page 24

24
NL
Belangrijke informatie
De koel-/vrieskast bevat het koelmiddel R600a dat stroombesparend is
en de ozonlaag niet afbreekt. Omdat
R600a een brandgevaarlijke gas is, is
het belangrijk dat het koelcircuit tijdens
het transport en de installatie niet beschadigd wordt. Als het koelcircuit toch
beschadigd wordt, moet u het gebruik
van open vuur in de buurt van de koel/vrieskast vermijden en de kast ook
niet op het elektriciteitsnet aansluiten.
Zorg ervoor dat de ruimte goed gelucht
wordt. Raadpleeg uw leverancier in
twijfelgevallen.
De koel-/vrieskast vervoeren
en verplaatsen De koel-/vrieskast
moet altijd verticaal vervoerd worden.
En de kast mag niet meer dan ca. 40°
gekanteld worden. Als u de kast toch
meer dan 40° laat kantelen, mag de
stroom pas aangesloten worden nadat
de kast minstens 2 uur verticaal ge-
staan heeft. Als de koel-/vries-
kast periodiek niet gebruikt
wordt Als de koel-/vrieskast pe-
riodiek niet gebruikt wordt, bv. in uw
vakantiehuisje moet u het koel- en
het vriesgedeelte uitzetten door op de
schakelaars (1), (2) te drukken,
de stroom naar de kast te onderbreken
en evt. de stekker uit het stopcontact te
trekken. Leeg de koel-/vrieskast, ontdooi hem en reinig hem. Laat de deuren
naar de koel- en vriesgedeelten op een
kier staan. Hierdoor vermijdt u dat er
een onprettige lucht ontstaat.
- Ihr importeur
- de winkel waar u het product gekocht
heeft
- de overheid (gemeente, ministerie van
milieu e.d.).
Waarschuwing
Oude koelkasten en vriezers zijn
vaak voorzien van ingewikkelde
sloten die kunnen dichtslaan en
alleen van buiten af geopend kunnen worden. Voordat u een dergelijk
model ter vernietiging aanbiedt,
moet u ervoor zorgen dat u het slot
onklaar maakt. Hierdoor voorkomt u
dat bv. spelende kinderen zich erin
kunnen opsluiten en in levensgevaar komen.
Neem ook de geldende milieubepalingen betreffende verschroten in
acht.
Verschroten
Als de afgedankte koel-/vrieskast
verschrot moet worden, zal dit op
een voor het milieu correcte en verantwoorde wijze en in overeenstemming met de geldende bepalingen
gedaan moeten worden. Neem de
milieubepalingen betreffende verschroten in acht. Het kan zijn dat er
speciale eisen/voorwaarden zijn die
moeten worden nageleefd. U kunt
nadere informatie over verschroten
krijgen bij:
Page 25

25
NL
Beschrijving van de koel-/vrieskast
De koel-/vrieskast is bedoeld voor
gebruik in een normale huishouding.
De kast is berekend voor temperatuurklasse SN-T in overeenstemming met
de Europese standaard EN 153. Dit
houdt in dat de koel-/vrieskast optimaal
werkt bij een ruimtetemperatuur van
+10°C tot +43°C. Het vriesgedeelte is
een viersterren vriezer die goedgekeurd
is voor het invriezen en bewaren van
diepvriesproducten.
Bedieningspaneel
Halogeenverlichting
Glasschappen
Multiboxen
Flessenrek
Flessenrekken
Typeplaatje
Dooiwateropvang
Groenteladen
Rubberen afdichtingsprofiel
Condensor
Vriesladen
Vriesbak (KF 350)
Compressor
Compressorruimte
Dooiwaterafvoer
Afstelbare voetjes
Deurgreep
Page 26

26
NL
De koel-/vrieskast bedienen
Elektronische besturing
De koel-diepvriescombinatie wordt volledig elektronisch gestuurd. De fabriek stelt
de bewaartemperaturen standaard in op
de optimale koudegraad: in de koelruimte
+5°C en in de diepvriesruimte
-18°C. Indien fabrieksinstellingen van de
temperatuur gewijzigd worden, slaat het
geheugen van de elektronische regelaar
het nieuwe invoer op.
Ingeval van elektriciteitsstoring bewaart
het geheugen van het besturingspro
-
gramma de laatst ingevoerde tempe
ratuurwaarden. Het apparaat stelt zich
dan opnieuw in op deze waarden nadat
stroomtoevoer hersteld is.
Elektronische besturing is uitgerust
met de volgende functies:
- Druktoetsen ‘ON/OFF’ voor het aan-
en uitzetten van het apparaat;
- Digitale weergave van de binnentem-
peraturen in de koel- en diepvriesruimte;
- Gescheiden temperatuurregeling
voor de koel- en diepvriesruimte met
de digitale temperatuurindicatie;
- Automatische ontdooiing van de
koelruimte;
- Programma ‘Snel invriezen’;
- Programma ‘Snel koelen’;
- Functie met ventilator in het koelvak;
1. Druktoets ‘diepvrieskast aan-/ uit’
2. Druktoets ‘koelkast aan/ uit’
3. (Groen) controlelampje voor ‘diep
-
vrieskast aan’
4. (Blauw) controlelampje voor ‘koelkast aan’
5. Druktoets ‘koelen’
6. Druktoets ‘vriezen’
7. Digitale temperatuurweergave, weergave van de duur programma ‘snel
vriezen’ en alarmmeldingen
8. Druktoets voor weergave van de
huidige binnentemperatuur van de
diepvrieskast
9. Druktoets voor weergave van de
huidige binnentemperatuur van de
koelkast
10. Functietoets (hulptoets)
11. (Blauw) controlelampje voor ‘superkoelen aan’
12. Aan- en uitschakelknop voor de
ventilator.
13. (Geel) controlelampje dat de werking
van de ventilatorfunctie aangeeft.
14. (Groen) controlelampje voor ‘supervriezen aan’
- Regeling van het displaycontrast;
- Waarschuwingssysteem met akoes
-
tisch en optisch alarmsignaal;
- Controlelampjes voor de actieve
functies;
Page 27

27
NL
Inschakelen en uitschakelen
van het apparaat
Inschakelen van de koelkast: houd toets
(2) ingedrukt. Controlelampje (3) gaat
groen branden en de huidige binnen
temperatuur van de koelkast verschijnt
op de display.
Uitschakelen van de koelkast: houd toets
(2) ingedrukt.
Inschakelen van de diepvrieskast: houd
toets (1) ingedrukt. Controlelampje (4)
gaat blauw branden en de huidige binnentemperatuur van de diepvrieskast
verschijnt op de display.
Uitschakelen van de diepvrieskast: houd
toets (1) ingedrukt.
Zowel de koelkast als de diepvrieskast
kunnen onafhankelijk van elkaar in- en
uitgeschakeld worden.
Temperatuurregeling
De bewaartemperatuur in de koelkast is
instelbaar van +2°C tot en met +9°C.
Door de COOL – toets (5) ingedrukt te
houden verschijnt de huidige ingestelde
binnentemperatuur op de display. Gebruik
toetsen (9) of (8) om de temperatuur van de koelruimte in te stellen.
De bewaartemperatuur in de diepvries
kast is instelbaar van -25°C tot -18°C.
Door de FREEZE – toets (6) ingedrukt
te houden verschijnt de huidige ingestelde
binnentemperatuur op de display. Ge
bruik toetsen (9) of (8) om de
temperatuur van de diepvriesruimte in te
stellen. Bij elke indrukking van een toets
is een piep-geluid te horen.
De laatst ingevoerde temperatuurwaarden blijven bewaard in het geheugen van
de regelaar van het apparaat bij afsluiten
van de stroomtoevoer.
Het apparaat stelt zich opnieuw in op
deze waarden nadat stroomtoevoer is
hersteld.
Temperatuurweergave
U kunt kiezen welke temperatuur op de
display weergegeven moet worden – die
van de koelkast (met toets 9) of die van de
diepvrieskast (met toets 8). Deze instel
-
ling kan elk moment gewijzigd worden.
Binnentemperatuur in de koeldiepvriescombinatie
Ingestelde temperaturen die op de display
verschijnen, zijn gemiddelde temperaturen van de koel-diepvriescombinatie.
Het betreft zowel de koelruimte als de
diepvriesruimte. De temperatuurinstelling
hoeft niet gewijzigd worden, wanner het
in de zomer warmer is. De sensor neemt
de stijging van de omgevingstemperatuur
waar en laat de koelmachine automatisch
langer werken om de ingestelde tempe
-
raturen te handhaven.
Functie ‘Snel invriezen’
Hetsnel invriezen naar de lage temperatuur is belangrijk om kwaliteit van
levensmiddelen te waarborgen. Door de
functietoets (10) ingedrukt te houden en
de FREEZE - toets (6) in te drukken,
wordt het programma ‘snel invriezen’
ingeschakeld. Het controlelampje gaat
blauw branden. Dit geeft aan dat de
functie ‘snel invriezen’ actief is.
U kunt kiezen tussen een snelinvriesprogramma met een duur van 24 uur of
48 uur.
- Door de functietoets (10) ingedrukt te
houden en tegelijkertijd de FREEZE
- toets (6)
één keer in te drukken, wordt
het snelinvriesprogramma met een duur
van 24 uur ingeschakeld; op de display
brandt een getal ‘24’.
- Door tweemaal op de FREEZE -toets
Page 28

28
waarschuwingssignaal.
Als de deur van de diepvriesruimte langer
dan 2 min. open heeft gestaan, verschijnt
op de display de alarmmelding E4 en
geeft het apparaat een akoestisch waarschuwingssignaal.
Functie ‘Super-koelen’
Door een keer op de toetsen (10) + (5)
te drukken gaat het blauwe LED-lampje
(11) branden en is de functie ‘snel koelen’
geactiveerd. Bij de voortdurende werking
van de koelmachine daalt de binnen
temperatuur van de koelruimte snel tot
ca. 1
o
C. Als deze temperatuur bereikt is,
schakelt de functie ‘snel koelen’ automa
tisch uit en gaat het apparaat over naar
het normale werkmodus met de laatst
ingevoerde temperatuurinstelling.
- Zolang de functie ‘snel koelen’ aanstaat, brandt op de display het symbool
‘Sc’; de binnentemperatuur in de diep
vriesruimte kan opgevraagd worden door
op de (8) te drukken.
- Als het snelkoelenprogramma actief
is, en worden de toetsen (10) + (5)
tweede keer ingedrukt, schakelt deze
functie uit. De blauwe LED-indicatie (11)
gaat uit.
Gebruik van de functie ‘Sc’ wordt aanbevolen vóór het inruimen van grotere
hoeveelheden verse levensmiddelen in
de koelruimte.
Functie met ventilator
De ventilator is niet actief nadat de
koelkast op het stroomnet aangesloten
wordt. Hij wordt aan- en uitgeschakeld
met de knop (12).
Wanneer de ventilatorfunctie actief is,
wordt dit aangegeven door de gele leddiode (13).
De ventilatorfunctie laat toe om een
NL
De getallen ‘24’ of ‘48’ die bij het starten
van programma ‘snel invriezen’ op de
display verschijnen, verdwijnen na 5
sec. Daarna wordt opnieuw de huidige
binnentemperatuur van de koel- en diepvriesruimte weergegeven.
Het is aan te bevelen dat het programma
‘snel invriezen’ (24h/48h) ca. 2 uur vóór
het inruimen van grote hoeveelheden in
te vriezen levensmiddelen in de diepvriesruimte in te schakelen.
Kleine temperatuurveranderingen
Kleine veranderingen van de binnentemperatuur is een normaal verschijnsel. Het
komt bijvoorbeeld voor na het inruimen
van de koelruimte met verse producten of indien de deur van het apparaat
langer open heeft gestaan. Dit heeft
geen invloed op de levensmiddelen; de
binnentemperatuur daalt snel naar het
ingestelde niveau.
De binnenverlichting gaat branden als de
deur van de koelruimte opent. Als de deur
langer dan 3 min. open heeft gestaan,
gaat de verlichting vanzelf uit. In dit geval
verschijnt op de display de alarmmelding
‘E4’ en geeft het apparaat een akoestisch
te drukken en tegelijkertijd de functie
toets (10) ingedrukt te houden, wordt het
snelinvriesprogramma met een duur van
48 uur geactiveerd. De display geeft een
getal ‘48’ weer.
- Indien toets (6) weer ingedrukt wordt,
schakelt de snelinvriesfunctie uit; het
blauwe licht van het controlelampje gaat
ook uit.
Indien de functie ‘snel invriezen’ niet
eerder handmatig uitgezet is, wordt het
programma na 24h/ 48h automatisch
beëindigd.
Page 29

29
NL
- het tegelijkertijd indrukken van de
toetsen (8) en maakt de display
donkerder.
Bij de lichtsterkteregeling verschijnen er
de volgende waarden:
1.8 – zwak licht
2.8 – gemiddeld licht
3.8 – sterk licht (fabrieksinstelling)
Waarschuwingssysteem
Gedurende het normale gebruik van de
koel-vriescombinatie kunnen er situaties
ontstaan waarbij de apparaatfuncties
gestoord raken. Dit kan de stabiele wer
king van het gehele apparaat in gevaar
brengen. Bij storing verschijnt er op het
display een alarmmelding (‘E’ gevolgd
door een cijfer) en is een akoestisch
signaal hoorbaar.
Indien er een aantal storingen tegelijker
tijd plaatsvinden, worden ze om de beurt
weergegeven.
Overzicht alarmmeldingen:
E1 - temperatuursensor in de koelruimte
storing
E2 - temperatuursensor in de diepvries
ruimte storing
E4 – deur staat open
E5 - binnentemperatuur in de koel- of
diepvriesruimte te hoog
E1, E2
Een van de temperatuursensoren is stuk.
Neem contact met onze technische servicedienst. Het ingebouwde beveiligingsprogramma behoudt de juiste temperatuur
totdat de storing door de geautoriseerde
servicedienst verholpen wordt.
E4
De deur van de koel- of diepvriesruimte
staat langer dan respectievelijk 3 min.
of 2 min. open. Nadat de deur gesloten
wordt, verdwijnt de alarmmelding.
E5
Binnentemperatuur in de diepvriesruimte
is over de periode.
gelijkmatige temperatuur te behouden
op alle schappen van de koelkast.
Na aanschakeling werkt de ventilator
in cycli, tenzij de deur van de koelkast
open staat.
Wijziging van het displaylicht.
- Door de functietoets (10) en de toets
(9) tegelijkertijd samen ingedrukt te
houden wordt de display lichter;
Page 30

30
NL
Waarschuwingssignaal onderbreken
Het akoestische waarschuwingssignaal
kan ieder moment onderbroken worden
door de deur van het apparaat te ope
nen en/of op een willekeurige toets te
drukken.
Alarmmelding E4-E5 kan gewist worden
door tegelijkertijd de toetsen.
Uitzondering: E1 en E2. Deze alarmmeldingen verdwijnen pas nadat er nieuwe
sensoren geplaatst worden.
Page 31

31
NL
13
Gebruik van het koelgedeelte en toebehoren
Glasschappen
De glasschappen zijn om te draaien
zodat de afstand tussen de schappen groter of kleiner en de inrichting
van de koel-/vrieskast flexibeler
wordt. (11 en 12) Haal de schappen
eruit door het schap aan de linkerkant (13) omhoog te tillen. Als u wilt
schoonmaken of de plaatsing van
de schappen wilt wijzigen, moet u
de bovenste eerst weghalen.
Flessenrek
Het flessenrek is geschikt voor
grote en kleine flessen.
Groenteladen
De laden onderin het koelgedeelte
zijn geschikt voor het bewaren van
groenten en fruit. De schap die
erover ligt, werkt als deksel, waardoor het vochtgehalte bewaard
blijft zodat de levensmiddelen niet
uitdrogen.
Multiboxen
De multiboxen zijn ideaal voor allerlei
levensmiddelen en kunnen naar behoefte in de kast of in de deur gezet
worden. Met de goed sluitende deksel voorkomt u uitdroging en het lastige in- en uitpakken. Spijsoliën, vetten
en zwakke zuren tasten het materiaal
van de multiboxen niet aan. De multi-
boxen zijn ook los verkrijgbaar.
Flessenrekken in de deur
In de flessenrekken van de deur is
plaats voor grote tweeliterflessen.
De rekken zijn naar wens over de
hele hoogte van de deur te plaatsen.
12
11
Page 32

32
NL
14
De vrieskast en toebehoren gebruiken
Heel het vriesgedeelte is te gebruiken
voor het invriezen en langdurig bewaren
van diepvriesproducten. De KF 350 is
tevens voorzien van een bak voor het
invriezen van bv. losse bessen.
Ontdooien en reinigen
Automatisch ontdooien van de koelafdeling
De koelafdeling heeft een automatische ontdooiing. Het kan gebeuren
dat er rijp op de achterwand van de
koelkast gevormd wordt. Dit gebeurt
typisch als de koelkast met vele
verse levensmiddelen gevuld wordt
of gedurende de zomer waar de
kast met drankjes gevuld wordt die
af moeten koelen. In zulke gevallen
moet de compressor langer werken
om de levensmiddelen af te koelen.
En omdat er automatisch ontdooid
wordt terwijl de compressor stil
staat, kan het gebeuren dat de koelkast niet helemaal kan ontdooien
voordat de compressor weer start.
In zulke gevallen moet u handmatig
ontdooien.
Handmatig ontdooien van het
vriesgedeelte Aangeraden
wordt de vriesgedeelte minstens
1 keer per jaar te ontdooien. Onderbreek de compressor naar het
vriesgedeelte door op de onderste
knop (1) te drukken.
Verwijder de diepvriesproducten. Leg ze evt. in de koelkast
om ze zo koud mogelijk te houden. Zet schalen met warm (niet
kokend) water in de vrieskast.
Trek de dooiwateruitloop (14) naar
buiten en zet er een schaal onder
om het dooiwater op te vangen.
Reinig de vrieskast met water en
wat afwasmiddel als het ijs gesmolten is. Droog de vrieskast met een
zachte doek af.
Page 33

33
NL
15
Waarschuwing
Het is gevaarlijk om elektrische apparaten, messen of scherpe voorwerpen te
gebruiken om het ontdooien te versnellen.
Reinigen
Onderbreek de compressor naar het
koelgedeelte door op de bovenste knop
(2) te drukken.
Reinig de kast met een zachte zeepoplossing en een zachte doek. Gebruik
geen schurende reinigingsmiddelen.
Reinig het afdichtingsprofiel regelmatig
om een lange houdbaarheid te waarborgen. Gebruik hiervoor alleen schoon
water.
De kunststofdelen van de kast kunnen
niet tegen kokend water (max. 85°C).
Voorkom dat er water in het bedienings
-
paneel dringt.
Reinig het zwarte rooster, de
condensor, aan de achterzi
jde van de kast, minimaal 1 x
per jaar met borstel of stofzuiger.
Verwijder stof en vuil uit de compressor
ruimte achterop de koel-/vrieskast met
een stofzuiger.
Opzetten en installeren
Waar moet de kast staan Zet
de koel-/vrieskast om redenen van veiligheid niet buiten, maar in een droge
ruimte. Plaats de koelkast niet direct
naast een warmtebron als fornuis of
kachel, evenmin in de directe zon. De
onderlaag moet waterpas zijn, en de
koel-/vrieskast kast mag niet op een
frame of dergelijke geplaatst worden.
Met de wieltjes op de achterzijde van
de koel-/vrieskast kan de kast gemak-
kelijk op z’n plaats geschoven worden.
De koel-/vrieskast kan vrij staan,
of in een keukenelement of koelkastelement ingebouwd worden.
Het is belangrijk dat de koel-/vrieskast
volledig recht staat en dat er boven,
onder en rondom een goede luchtcirculatie is. U stelt de kast af door aan de
2 stelschroeven op de sokkel van de
kast te draaien. Na het afstellen is het
Roestvrijstalen en aluminium
deuren reinigen Roestvrijstalen
en aluminium deuren op GRAM producten kunnen het beste met een spray en
een zachte doek worden gereinigd. Op
de markt zijn een aantal spraymiddelen
verkrijgbaar die te gebruiken zijn. Wij
raden aan dat u contact opneemt met
uw gebruikelijke witgoedleverancier.
De dooiwaterafvoer met de bijgeleverde
schoonmaakpen (15) reinigen.
Page 34

34
NL
16
17
Inbouwen in een keukenelement
Inbouw in een keukenelement met
voldoende ventilatie rondom de koel/vrieskast zodat de warmte van de
compressor kan worden afgevoerd. De
koel-/vrieskast kan op de vloer of op
een plint staan. (16)
Inbouwen in een koelkastelement
Het inbouwen in een koelkastelement
gebeurt volgens hetzelfde principe als
bij 16 (17).
Aansluitspanning
De koel-/vrieskast is gemaakt voor aansluiting op wisselstroom. De aansluitwaarden voor spanning (V) en frequentie (Hz) staan op het typeplaatje in de
kast aangegeven. De aansluiting dient
aan een wandcontactdoos (stopcontact)
te geschieden die gemakkelijk toegankelijk is zodat de stroomtoevoer naar de
kast eenvoudig te verbreken is.
belangrijk te controleren of de voeten
en de wielen op de achterzijde van de
kast contact hebben met de onderlaag.
Op de tekeningen kunt u zien hoe u
voor de vereiste circulatie rondom de
kast zorgt. De afmetingen zijn de vrije
openingen. Er moet minstens een door-
stromingsoppervlak van 200 cm2 zijn.
Page 35

35
NL
De koel-/vrieskast starten
Sluit de stroom aan door de stekker van
de koel/vrieskast in het stopcontact op
de wand te steken. Als de stroomkabel
beschadigd is, moet deze door een
overeenkomstige kabel worden vervangen.
De koel-/vrieskast is voorzien van een
„stand-by functie”, en in het display
verschijnen twee horizontale strepen
om aan te geven dat de stroom is aangesloten. Start het koelgedeelte door
op de bovenste startknop (2) te
drukken. Na ca. 2 sec. zal de groene
lichtdiode (3) gaan branden om aan te
geven dat het koelgedeelte is aangezet.
Start het vriesgedeelte door op de onderste startknop (1) te drukken.
Na ca. 2 sec. zal de blauwe lichtdiode
(4) gaan branden om aan te geven dat
het vriesgedeelte is aangezet.
Hierna toont het display (5) de actuele
temperatuur in het koelgedeelte. U kunt
de actuele temperatuur in het vriesgedeelte zien door op toets (8) te
drukken. U kunt de actuele temperatuur
in het koelgedeelte zien door op toets
(9) te drukken.
Na ca. 10 seconden verschijnt de temperatuur in het koelgedeelte weer.
Page 36

36
NL
Draairichting van de deur veranderen
De afbeeldingen 18-25 tonen hoe u de
deur zelf gemakkelijk kunt veranderen van rechts opgehangen naar links
opgehangen. (De deur van links naar
rechts ophangen gebeurt op dezelfde
manier, maar dan tegengesteld).
De koel-/vrieskast moet uitgezet en
helemaal leeg zijn.
Draai de 2 schroeven van het bovenste scharnier op de rechterdeur van de
kast eruit. (18)
Til de koelkastdeur op en haal de deur
en het bovenste scharnier eraf door de
deur naar u toe te trekken.
Verwijder het loze scharnier in de te
gengestelde zijde door de 2 schroeven
eruit te schroeven. (19)
Draai het loze scharnier en monteer
deze met de 2 schroeven in de tegengestelde zijde.
Verwijder de onderste deur door de 2
schroeven in het middelste scharnier
eruit te schroeven. (20)
Verplaats de 2 schroeven van de lin
kerkant naar de rechterkant. (21)
Til de onderste deur en het middelste
scharnier iets omhoog en dan eraf.
Kantel de koel-/vrieskast hoogstens
45° om het onderste scharnier eraf te
kunnen schroeven. Dit doet u door de 2
schroeven eruit te draaien die de onderste scharnier op de onderzijde van de
kast houden. (22)
Verwijder het loze scharnier in de te
-
gengestelde zijde op dezelfde manier
als de bovenste. (23)
Draai het loze scharnier en monteer
deze in de tegengestelde zijde.
Draai het bovenste scharnier en monteer deze in de onderste linkerhoek.
Zet de kast weer verticaal.
Demonteer de deurgrepen door de
schroeven te verwijderen. (24)
Til de onderste deur op z’n plaats op
het onderste scharnier.
Draai het middelste scharnier om, monteer het op de onderste deur en schroef
het op de kast vast. Vergeet niet de
deur uit te richten.
Til de bovenste deur op z’n plaats
op het middelste scharnier. Draai het
onderste rechterscharnier om en monteer deze op de linkerbovenzijde van de
deur. Duw de deur op z’n plaats door
het bovenste scharnier in het scharnierhuis linksboven te duwen. Draai de 2
schroeven vast. Vergeet niet de deur uit
te richten.
Verwijder de schroeven op de rech
-
Page 37

37
NL
18
19
22
23
20
21
Page 38

38
25
24
26
NL
terzijde van de deur en schroef ze vast
op de linkerzijde van de deur. Gebruik
de schroeven van de linkerzijde om de
handgrepen op de rechterzijde van de
deur vast te schroeven. (25)
De gloeilamp vervangen
Zet de koel-/vrieskast uit door de aan/
uitknoppen (1), (2) in te drukken
en de stekker uit het stopcontact te trekken. Schroef het beschermkapje eraf.
Vervang de gloeilamp door een nieuwe
(max. 10 W, 12 V, halogeenvoet G4).
Monteer het beschermkapje, schakel
de stroom weer in en start de koel/vrieskast opnieuw door op de startknop
(1), (2) te drukken. 26
Reservedelen
Indien u reservedelen moet bestellen,
dient u het type en serienummer van
de koel-/vrieskast op te geven. Deze
gegevens vindt u op het typeplaatje in
de kast.
Page 39

39
FIN
Onnittelemme uuden GRAM
jääkaappipakastimen omistajaa.
Onnittelemme uuden jääkaappipakastimen omistajaa.
Jääkaappipakastimen suunnittelussa on otettu huomioon elintarvikkeiden erilaiset
säilytysvaatimukset. Jotkut elintarvikkeet vaativat kylmää säilytyslämpötilaa - toiset
puolestaan säilyvät parhaiten hieman korkeammassa lämpötilassa. Jotkut
elintarvikkeet on säilytettävä erikseen, jotta niistä ei tartu hajuja eikä makuja muihin
elintarvikkeisiin. Useimmat elintarvikkeet tarvitsevat runsaasti kosteutta pysyäkseen
tuoreina.
Saadaksesi parhaan mahdollisen irti jääkaappipakastimestasi on tärkeää tuntea
laitteen toiminnot ja siihen kuuluvien lisätarvikkeiden käyttö. Tutustu tarkoin laitteen
käyttöohjeeseen ennen sen sijoitusta ja käyttöä.
Tämä käyttöohje koskee useita jääkaappipakastimia, joiden varustetaso vaihtelee
mallista riippuen.
Ennen käyttöönottoa
Kun otat laitteen vastaan, tarkista, ettei se ole vaurioitunut. Ennen käyttöönottoa tee
ilmoitus mahdollisista kuljetusvaurioista laitteen myyjälle.
Ennen kuin täytät kaappiin tavaroita, puhdista sen sisäosa haalealla ja miedolla
saippualiuoksella. Käytä pehmeää riepua. Jos jääkaappipakastinta on kuljetettu tai
varastoitu kylmässä (alle +5 °C), on odotettava vähintään 2 tuntia ennen laitteen
käyttöönottoa.
Sivuilla 51 ja 52 kerrotaan laitteen sijoituksesta, kalusteisiin upottamisesta ja
asennuksesta.
Page 40

40
FIN
Sisällysluettelo
Tärkeitä tietoja
Jääkaappipakastimen kuljetus ja siirto 42
Jos kaappia ei käytetä 42
Vanhat jääkaapit 42
Käytöstä poisto 42
Tuotekuvaus
Jääkaappipakastimen käyttö
Elektroninen säätö 44
Hälytys
Hälytyskoodit 47
Hälytyksen katkaisu 47
Jääkaappiosan käyttö ja siihen kuuluvat tarvikkeet
Lasihyllyt 48
Pulloteline 48
Laitteen käynnistys 45
Oikea lämpötila 45
Lämpötilan osoittimet 45
Oikea lämpötila jääkaappi-pakastin -yhdistelmässä 45
Pikapakastus 45
Pienet lämpötilamuutokset 46
Pikajäähdytys 46
Puhallin-toiminto 46
Ohjauspaneelin näytön kirkkaus 46
Page 41

41
FIN
Vihanneslaatikot 48
Jääkaappirasiat 48
Ovihyllyt 48
Pakasteosan käyttö ja siihen kuuluvat tarvikkeet
Sulatus ja puhdistus
Jääkaappiosan automaattinen sulatus 49
Jääkaappiosan manuaalinen sulatus 49
Pakasteosan manuaalinen sulatus 49
Puhdistus 50
Sijoitus ja asennus
Missä kaappi seisoo 51
Keittiökalusteisiin sijoitus 52
Upotus jääkaappielementtiin 52
Sähköliitäntä 52
Käynnistys 52
Oven kätisyyden vaihto 53
Lampun vaihto 55
Reklamaatiot ja GRAM huoltopalvelu
Kauppalaki ja reklamaatioaika 56
Gram ei korvaa 56
Varaosat 56
Page 42

42
FIN
Kaapissa on kylmäaineena energiaa
säästävä R600a, joka ei tuhoa
ilmakehän otsonia. Koska R600a on
helposti syttyvä kaasu, on tärkeää
suojata laitteen kylmäkierto
vaurioitumiselta kuljetuksessa ja
asennuksessa. Jos kylmäainekierto
kuitenkin vaurioituu, on vältettävä
votulen käyttöä kaapin läheisyydessä,
eikä kaapin virransyöttöä saa kytkeä
päälle. Huolehdi myös huonetilan
riittävästä tuuletuksesta. Epäselvissä
tapauksissa ota yhteys jälleenmyyjään.
Jääkaappipakastimen
kuljetus ja siirto
Jääkaappipakastinta on aina
kuljetettava pystysuorassa. Kaappia ei saa
kallistaa enempää kuin n. 40°. Jos kaappia
on kallistettu enemmän kuin n. 40°, on
odotettava vähintään 2 tuntia ennen kuin
kaapin virransyöttö kytketään päälle.
Jos kaappia ei käytetä
Jos jääkaappipakastinta ei käytetä,
esim. kesäasunnolla, jääkaappi ja
pakastin sammutetaan painamalla katkaisijaa (1), (2) ja katkaisemalla
kaapin virransyöttö. Voit myös irrottaa
pistokkeen pistorasiasta.
Kaappi tyhjennetään tavaroista, sulatetaan ja puhdistetaan. Jääkaappi- ja
pakasteosan ovet jätetään hieman
raolleen. Tällöin kaappiin ei pääse
muodostumaan epämiellyttävää hajua.
Tärkeitä tietoja
Jottei laitteeseen muodostu bakteereita
eikä ummehtunutta hajua, jääkaappipakastin yhdistelmä on varustettu energian säästävällä ohjausohjelmistolla.
Ohjelmisto kytkee laitteen päälle jaksottain. Suositus:
Toiminto voidaan kytkeä päälle muutaman
päivän ajaksi vain jos jääkaapissa ei ole
elintarvikkeita. Kun toiminto on päällä,
ovea ei saa avata . Ohjauspaneelissa
palaa ’Ho’. Voit tarkista pakastimen läm
pötilan painamalla (10) näppäintä. Sähkökatkon sattuessa toiminnon asetukset
säilyvät laitteen muistissa.
’Ho’ toiminnon kytketään pois päältä
painamalla näppäintä (14), kunnes ’Ho’
sammuu ohjauspaneelissa. Jääkaappi
toimii jäälleen viimeisten asetuksien
mukaisesti. Suosittelemme että ’Ho’ toiminto on kytketty pois päältä ennenkuin
elintarvikkeet laitetaan jääkaappiin
Varoitus
Vanhoissa jääkaapeissa ja pakastimissa on usein monimutkainen, vain
ulkopuolelta avautuva automaattilukko.
Kun poistat tällaisen mallin käytöstä tai
toimitat sen jätteenkeräykseen tai kaatopaikalle, muista rikkoa ensin kaapin
lukkomekanismi.
Täten estät esimerkiksi leikkiviä lapsia
lukitsemasta itseään kaappiin ja joutumasta hengenvaaraan.
Tutustu myös laitteen käytöstä poistoon
liittyviin ympäristövaatimuksiin.
Käytöstä poisto
Jos poistatte laitteen lopullisesti
käytöstä, älkää viekö sitä tavalliseen
yhdyskuntajätesäiliöön, vaan olkaa
hyvä ja toimittakaa laite lähimpään
kierrätys- tai uudelleenkäyttökeskukseen. Laitteessa, sen käyttöhjeissa
tai pakkauksessa on kierrätyskelpoisuus-merkki. Laite on valmistettu kierrätyskelpoisista materiaaleista. Viemallä
vanhan laitteen uudelleenkäyttökeskukseen autatte suojelemaan luontoa.
Jos ette tiedä, missä lähin kierrätys- tai
uudelleenkäyttökeskus sijaitsee, kysy-
kää kunnan ympäristöhallinnolta.
Page 43

43
FIN
optimaalisesti huonelämpötilan ollessa
+10 °C - + 43 °C. **** Pakasteosa so
-
veltuu pakastukseen ja
Tuotekuvaus
Jääkaappipakastin on tarkoitettu normaaliin kotitalouskäyttöön. Kaappi on tarkoitettu lämpöluokalle SN-T euronormin
EN 153 mukaisesti. Jääkaappi toimii
Ohjauspaneeli
Halogeenivalo
Lasihyllyt
Jääkaappirasiat
Pulloteline
Säilytyshyllyt
Tyyppikilpi
Sulamisvesiastia
Vihanneslaatikot
Kumilista
Lauhdutin
Pakastuslaatikot
Pakastusalusta (vain KF 350)
Kompressori
Kompressoritila
Säädettävät jalat
Ovenkahva
pakasteiden säilytykseen.
Page 44

44
FIN
Jääkaappipakastimen käyttö
Elektroninen ohjaus
Jääkaappi-pakastin yhdistelmä on
varustettu elektronisella ohjausjärjestelmällä. Laitteen valmistaja on säätänyt
jääkaappilämpötilan +5°C ja pakastinlämpötilän –18°C. Jos haluat muuttaa
lämpötilat, asettamasi lämpötila-arvot
säilyvät elektronisen ohjelmoinnin muistissa. Myös sähkökatkon sattuessa
ohjelmointi säilyttää viimeiset asetetut
parametrit, joiden mukaan ohjelma jatkuu sähkön kytkeydyttyä takaisin päälle.
Ohjaustoiminnot
- ON/OFF virtakytkin
- jääkaapin ja pakastimen lämpötilanilmaisin
- jääkaapin ja pakastimen lämpötilanvalitsin
- automaattinen jääkaapin sulatus
- pikapakastus
- pikajäähdytys
- Puhallin-toiminto jääkaapissa.
- ilmaisimen kontrastivalitsin
- hälytysääni ja merkkivalo
- päälle kytkettyjen toimintojen merk
-
kivalot
1. Pakastimen virtakytkin
2. Jääkaapin virtakytkin
3. Jääkaapin merkkivalo (vihreä)
4. Pakastimen merkkivalo (sininen)
5. Jäähdytys-näppäin
6. Pakastus-näppäin
7 Lämpötilan, lisäpakastusajan ja
hälytysten ilmaisin
8. Ajankohtaisen
pakastinlämpötilan tarkastus-
näppäin
9. Ajankohtaisen jääkaappilämpöti
-
lan tarkastusnäppäin
10. Toimintonäppäin
11. Lisäjäähdytys merkkivalo (sini
-
nen)
12. Puhaltimen ON/OFF -näppäin.
13. Keltainen puhallin-toiminnon
merkkivalo.
14. Lisäpakastus merkkivalo (sini
-
nen)
Page 45

45
FIN
Laitteen käynnistys
Jääkaapin päälle kytkeminen: paina ja
pidä painettuna näppäin (2), kunnes
vihreä merkkivalo (3) palaa ja ajan
kohtainen jääkaappilämpötila ilmestyy
ilmaisimelle.
Jääkaapin kytkeminen pois päältä: paina
ja pidä painettuna näppäin (2).
Pakastimen päälle kytkeminen: paina ja
pidä painettuna näppäin (1), kunnes sini
nen merkkivalo (4) palaa ja ajankohtainen
pakastinlämpötila ilmestyy ilmaisimelle.
Pakastimen kytkeminen pois päältä:
paina ja pidä painettuna näppäin (1).
Jääkaappia ja pakastinta voidaan käyttää toisistaan riippumatta.
Oikea lämpötila
Jääkaapin lämpötila on säädettävissä
+2°C ja +9°C välillä. Jos painat ja pidät
painettuna näppäintä COOL (5), oh
jaustaulussa oleva lämpötilanosoitin
osoittaa asettamasi lämpötilan. Muuta
jääkaapin lämpötila painamalla (9)
tai (8).
Pakastimen lämpötila on säädettävissä
–25°C ja –16°C välillä. Jos painat ja
pidät painettuna näppäintä FREEZE (6),
ohjaustaulussa oleva lämpötilanosoitin
osoittaa asetettuasi lämpötilaa. Muuta
pakastimen lämpötilä painamalla
(9) tai (8).
Jotkin toiminnon muutokset kuitataan
äänimerkillä. Sähkökatkon sattuessa
ohjelmointi säilyttää viimeksi asetetut
parametrit, joiden mukaan ohjelma jatkuu
sähkön takaisin kytkeydyttyä päälle.
Lämpötilan osoittimet
Ohjaustaulussa olevat lämpötilanosoittimet voivat osoittaa joko jääkaapin
lämpötilaa (paina näppäintä 9) tai pakastimen lämpötilaa (paina näppäintä 8).
Oikea lämpötila jääkaappi-pakastin -yhdistelmässä
Valitsimella asetetut ja osoittimessa ilmaistut jääkaapin ja pakastimen lämpötilat
ovat keskiarvoja. Älä muuta jääkaappipakastin yhdistelmän lämpötilaasetusta
kesällä. Lämpömittari havaitsee automaattisesti kylmälaitteen ympäristön
lämpötilan ja tarvittaessa kytkee ilmanpuristimen päälle, kunnes oikea lämpötila
on saavutettu.
Pikapakastus
Tuoreiden elintarvikkeiden tulee jäätyä
läpikotaisin mahdollisimman nopeasti, jotta niiden ravintoarvo, ulkonäkö
ja maku säilyisivät mahdollisimman
hyvinä. Paina ja pidä painettuna toimintonäppäintä (10), paina FREEZE
(6) näppäintä, kunnes sininen pikapakastuksen merkkivalo (14) palaa.
Pikapakastus-toiminnon voi kytkeä päälle
joko 24 tai 48 tunniksi.
- 24 tuntia: pidä toimintonäppäin (10)
painettuna ja paina kerran FREEZE
(6) näppäintä, kunnes ’24’ ilmestyy
ilmaisimella,
- 48 tuntia: pidä toimintonäppäin (10) painettuna ja paina kaksi kertaa FREEZE
(6) näppäintä, kunnes ’ 84’ ilmestyy
ilmaisimella,
- jos painat näppäintä (6), pikapakastustoiminto kytkeytyy pois päältä ja
sininen merkkivalo sammuu. Pikapa
kastus kytkeytyy pois päältä automaattisesti 24 tai 48 tunnin kuluttua.
Pikapakastus toimintonäppäintä painettaessa ’24’ tai ’48’ näkyvät
Osoittimen toimintoa voidaan vaihtaa
milloin tahansa.
Page 46

46
FIN
Pienet lämpötilamuutokset eivät vaikuta
elintarvikkeisiin. Lämpötila laskee säädettyyn arvoon nopeasti.
Sisävalaisin kytkeytyy päälle automaat
tisesti laitteen oven avautuessa. Valaisin
sammuu automaattisesti noin 3 minuutin
kuluttua, jos ovea pidetään auki. Oh
jauspaneelissa palaa E4 hälytys ja hälytysääni kuuluu.
Jos pakastimen ovea pidetään auki yli
2 minuuttia, ohjauspaneelissa palaa E4
hälytys ja hälytysääni kuuluu.
Pikajäähdytys
- paina (10) ja (6) näppäimiä kerran,
kunnes sininen LED merkkivalo (11)
syttyy. Jääkaappi jäähtyy nopeasti noin
1°C:een. Ilmanpuristin toimii jatkuvasti,
kunnes 1°C lämpötila on saavutettu.
Silloin toiminto kytkeytyy pois päältä
automaattisesti ja kylmäkoneisto jatkaa
toimintaansa normaalisti, viimeisten
asetettujen parametrien mukaan,
- ’Sc’ ilmestyy ohjauspaneelissa kun pi-
kajäähdytystoiminto on päällä (pakasti
-
men lämpötilaa voi tarkistaa painamalla
(8)
- paina (10) ja (6) näppäimiä taas (kun
pikajäähdytys toimii), kunnes sininen
LED merkkivalo (11) sammuu. Näin
katkaiset toiminnon pois päältä. Käytä
Kun jääkaappi kytketään päälle, puhallin ei toimi. Sitä voi kytkeä päälle painaamalla näppäintä (12).
Keltainen merkkivalo (13) palaa puhaltimen toiminnon osoitukseksi.
Puhallin auttaa ylläpitämään samaa
lämpötilaa jääkaapin eri kerroksissa.
Kun toimintoa on kytketty päälle, puhallin käynnistyy tarvittaessa automaattisesti. Se ei toimi kun jääkaapin ovi on
auki.
Ohjauspaneelin näytön kirkkaus
Voit kirkastaa tai himmentää näyttöä.
Kirkastaminen: paina ja pidä painettuna
näppäintä (10) ja samalla paina näppäintä
(9). Himmentäminen: paina ja pidä pai
nettuna näppäintä (10) ja samalla paina
näppäintä (8).
Näytön kirkkauden osoittakseen seuraavat arvot ilmestyvät:
1.8: heikko näytön kirkkaus
2.8: keskitason näytön kirkkaus
3.8: korkea näytön kirkkaus (valmistajan
asentama)
ohjauspaneelissa noin 5 sekuntia. Seura
avaksi näkyvät senhetkiset pakastimen ja
jääkaapin lämpötilat .
Kytke pikapakastustoiminto päälle (24/48
tunniksi) noin 2 tuntia ennen tuotteiden
asettamista pakastimeen.
Pienet lämpötilamuutokset
Pienet lämpötilamuutokset ovat luonnollisia. Niitä voi esiintyä esim. jos jääkaappi-pakastin yhdistelmään on asetettu
runsaasti tuoreita tuotteita tai jos ovi on
pitkään auki tai raollaan.
pikajäähdytystoimintoa jos haluat täyttää laitteen tuoreilla elintarvikkeilla.
Puhallin-toiminto
Jääkaappi-pakastin yhdistelmän käytössä voi sattua erilaisia vikoja, jotka voivat
häiritä tai estää koko laitteen oikeaa
toimintaa. Vikojen osoitukseksi ohjauspaneelin näyttöön vian merkkinä syttyy
E + koodi. Samalla hälytysääni kuuluu.
Muutaman vian sattuessa samanaikaisesti, niiden hälytysilmoitukset esiintyvät vuorotellen.
Page 47

47
FIN
E1, E2
Yksi lämpötilaantureista vaurioitunut.
Ota yhteys huoltoon. Laite on varustettu
hätäohjelmistolla, joka ylläpitää lämpötilaa sallitulla tasolla ennen huollon tuloa.
E4
Jääkaapin tai pakastimen ovi on ollut
auki yli 3 minuuttia (jääkaappi) tai 2
minuuttia (pakastin). Oven sulkeuduttua
hälytysmerkki sammuu.
E5
Pakastimen sisälämpötila on ollut.
Hälytyksen katkaisu
Vikahälytyksen voi aina katkaista
avaamalla kaapin oven ja painamalla
jotakin painikkeista. Vikahälytykset
E4 – E5 voidaan katkaista painamalla
yhtäaikaisesti painikkeita. Kun kaapissa
ilmenee vikahälytys E1, voidaan hälytys
katkaista vasta, kun anturi on vaihdettu.
Tässä tapauksessa ota yhteys Gramin
valtuuttamaan huoltoliikkeeseen tai
Gram asiakaspalveluun.
Hälytysmerkit
E1 – jääkaapin lämpötilaanturin vika
E2 – pakastimen lämpötilaanturin vika
E4 – ovi auki
E5 – lämpötila pakastimessa liian
korkea
Page 48

48
FIN
13
Jääkaappiosan käyttö ja siihen
kuuluvat tarvikkeet
Lasihyllyt
Lasihyllyjen välistä etäisyyttä voi muunnella hyllyjä kääntämällä, mikä joustavoittaa jääkaapin sisustamista. (11 og 12)
Hyllyt irrotetaan vasemmasta reunasta
nostamalla (13). Puhdistuksen yhteydessä ja halutessasi muuttaa hyllyjen
sijoitusta aloita irrottamalla ylin hylly.
Pulloteline
Pulloteline sopii sekä suurten että pienten pullojen säilytykseen.
Vihanneslaatikot
Jääkaapin alaosassa olevat
vihanneslaatikot ovat ihanteellinen ratkaisu hedelmien ja vihannesten säilytyk
seen. Päällä oleva hylly suojaa ruokatavaroita kuivumiselta.
Jääkaappirasiat
Jääkaappirasioissa voi säilyttää
kaikenlaisia elintarvikkeita ja ne voidaan sijoittaa sekä kaapin hyllyille että
sen oveen. Rasioiden tiiviit kannet
estävät elintarvikkeiden kuivumista ja
säästävät myös pakkausmateriaaleja.
Jääkaappirasiat kestävät mineraaliöljyä,
rasvoja ja mietoja happoja.
Jääkaappirasioita voi hankkia myös
lisävarusteena.
Oven säilytyskorit
Oven säilytyskoreihin mahtuvat suuret 2
litran pullot. Koreja voi säätää oven korkeussuunnassa tarpeen mukaan.
12
11
Page 49

49
FIN
Pakasteosan manuaalinen
sulatus
Pakasteosa on hyvä sulattaa vähintään
1 kerran vuodessa. Pysäytä pakasteosan kompressorin virransyöttö pain-
amalla alinta painiketta (1).
Tyhjennä pakasteosa. Voit laittaa ne
esim. jääkaappiin, jotta ne pysyvät mahdollisimman kylminä. Laita pakasteosaan astia, jossa on kuumaa (ei kiehuvaa)
vettä.
Vedä sulamisveden ulostuloputki
(14) esiin ja laita putken alle astia
sulamisvettä varten. Kun jää on su
lanut, puhdista pakasteosa miedolla
saippualiuoksella. Pyyhi pakasteosa
kuivaksi pehmeällä rievulla.
Pakasteosan käyttö ja siihen kuuluvat tarvikkeet
Koko pakasteosa soveltuu
pakastukseen ja pakasteiden pitkäaikaissäilytykseen.
KF 350 -mallissa on lisäksi
pakastusalusta, jolla voi pakastaa esim.
marjoja irrallaan.
14
Sulatus ja puhdistus
Jääkaappiosan automaattinen
sulatus ja puhdistus
Jääkaappiosassa on automaattinen
sulatustoiminto. Jääkaapin takaseinään
voi kuitenkin aika ajoin muodostua
huurretta. Näin käy yleensä silloin, kun
jääkaappiin laitetaan paljon tuoreita
elintarvikkeita tai myös kesäaikaan,
jolloin kaapissa jäähdytetään juomia.
Tällöin kompressori joutuu toimimaan
pitkään yhtäjaksoisesti, jotta elintarvikkeet jäähtyisivät. Automaattisulatuksen
toimiessa ja kompressorin ollessa
pysähdyksissä huurre ei aina ehdi sulaa kokonaan, ennen kuin kompressori
käynnistyy uudelleen. Tällöin joudutaan
turvautumaan manuaaliseen sulatukseen.
Page 50

50
FIN
Puhdista jääkaappipakastimen takaosan kompressoritila pölynimurilla.
15
Varoitus
Sulatuksen nopeuttaminen
sähkölaitteilla, veitsillä tai terävillä esineillä on vaarallista.
Puhdistus
Katkaise jääkaappiosan kompressorin
virransyöttö painamalla ylintä painiketta
(2).
Puhdista kaappi miedolla saippualiuoksella ja pehmeällä rievulla. Älä käytä
hankaavia pesuaineita. Ovitiivisteen
säännöllinen puhdistus pidentää sen
käyttöikää. Käytä ovitiivisteen puhdistukseen vain puhdasta vettä.
Kaapin muoviosia ei saa puhdistaa
kiehuvalla vedellä (maks. 85 °C). Ohjauspaneeliin ei saa päästä vettä.
Jääkaappiosan sulamisvesiputki puhdi-
stetaan kaapin mukana toimitetulla puhdistuspuikolla (15).
Ruostumattomien teräs- tai
alumiiniovipintojen puhdistus
GRAM-kodinkoneiden ruostumattomat teräs- tai alumiiniovipinnat on
hyvä puhdistaa spraypuhdistusaineella ja pehmeällä rievulla. Markkinoilla
on saatavilla erilaisia käyttökelpoisia
spraypuhdistusaineita. Kodinkonemyyjäsi antaa tietoja ja opastusta eri tuotteiden eduista ja haitoista.
Page 51

51
FIN
Sijoitus ja asennus
Missä kaappi seisoo
Turvallisuussyistä jääkaappipakastinta
ei saa sijoittaa ulkotiloihin, vaan se on
sijoitettava kuivaan huonetilaan. Laitetta ei saa sijoittaa lämpöä säteilevien
pintojen kuten lieden tai lämpöpatterin
läheisyyteen eikä myöskään suoraan
auringonvaloon. Sijoitusalustan on oltava tasainen, jääkaappia ei saa sijoittaa
kehikolle tms. Kaappi on helppo työntää
paikoilleen sen takareunassa olevien
pienten pyörien avulla.
Jääkaappipakastin voidaan sijoittaa
vapaasti lattialle, upottaa jääkaappielementtiin tai yhdistää keittiökalusteisiin.
Jääkaappipakastin on asennettava
aivan suoraan ja niin, että ilma kiertää
esteettä kaapin ylä- ja alapuolella ja
ympärillä. Kaapin asentoa säädetään
sokkelissa olevien 4 säätöjalan avulla.
Säädön jälkeen on tärkeää varmistaa,
että säätöjalat ja kaapin takimmainen
pyörä koskettavat alustaa.
Piirroksista näet, miten varmistat riittävän ilmakierron kaapin ympärillä. Mitat ovat vapaita aukkoja. Läpivirtausalaa
on oltava vähintään 200 cm2 .
Page 52

52
FIN
Keittiökalusteisiin upotus
Keittiökalusteisiin upotus siten, että
kaapin ympärillä on riittävä ilmanvaihto,
jolloin kompressorin lämpö johtuu pois.
Jääkaappipakastin voidaan sijoittaa
vapaasti lattialle tai sokkelin päälle. (16)
Jääkaappielementtiin upotus
Jääkaappielementtiin upotus tehdään
samalla periaatteella kuin A:ssa (16).
(17)
Sähköliitäntä
Kaappi toimii vaihtovirralla. Jännitteen
(V) ja taajuuden (Hz) liitäntäarvot käyvät
ilmi kaapin sisällä olevasta tyyppikilvestä. Pistoke liitetään pistorasiaan, johon
on päästävä helposti käsiksi.
Epäselvissä tapauksissa ota yhteyttä
valtuutettuun sähköasentajaan.
Jääkaappipakastimen käynnistys
Jääkaappipakastin liitetään sähköverkkoon työntämällä pistoke pistorasiaan.
Jos verkkojohto vaurioituu, se on va-
ihdettava uuteen vastaavaan johtoon,
jonka saat Gram-jälleenmyyjältä.
Jääkaappipakastimessa on „stand-
-by toiminto”, ja näytössä näkyy 2
vaakasuoraa viivaa merkkinä siitä, että
laite saa virtaa. Jääkaappipakastin
käynnistetään painamalla ylintä käynni-
stys/sammutus -painiketta
(2).
Vihreä valo (3) syttyy n. 5 sekunnin
kuluttua merkiksi jääkaappiosan käynnistymisestä. Pakasteosa käynnistetään
painamalla alinta käynnistys/sammutus
–painiketta (1). Vihreä valo (4)
syttyy n. 2 sekunnin kuluttua merkiksi
pakasteosan käynnistymisestä. Tämän
jälkeen näytössä (5) näkyy jääkaappiosassa vallitseva lämpötila. Painamalla
painiketta (8) saat näyttöön
pakasteosan lämpötilan. Painamalla painiketta
(9) saat näyttöön
jääkaappiosan lämpötilan.
16
17
Page 53

53
FIN
Oven kätisyyden vaihto
Kuvista 18-25 käy ilmi, kuinka helposti
ja vaivattomasti oven kätisyyden voi
vaihtaa oikeakätisestä vasenkätiseksi.
(Vaihto vasenkätisestä oikeakätiseksi su
-
juu samalla tavalla, mutta päinvastoin.)
Jääkaappipakastimen
virransyöttö katkaistaan ja
kaappi tyhjennetään.
· Ruuvaa irti oikeanpuoleisen saranan päälliosan 2 ruuvia. (18)
· Nosta jääkaapin ovea hieman
ja irrota ovi ja yläsarana vetämällä ovea itseäsi vasten.
· Irrota vastakkaisen puolen valesarana ruuvaamalla irti siinä
olevat 2 ruuvia. (19)
· Käännä valesarana ja kiinnitä
se vastakkaiselle puolelle 2
ruuvilla.
· Irrota alaovi ruuvaamalla irti
keskisaranan 2 ruuvia. (20)
Siirrä vasemmalla puolella
olevat 2 ruuvia oikealle puolelle. (21)
·
·
· Nosta alimmaista ovea ja keskisaranaa ja irrota ne.
· Kallista jääkaappi korkeintaan
45° kulmaan, jotta saat ruuvattua alasaranan
irti. Tämä tehdään ruuvaamalla
irti kaapin alaosassa olevat alasaranan 2 kiinnitysruuvia. (22)
· Irrota vastakkaisella puolella
oleva valesarana samalla tavoin kuin ylempi. (23)
· Käännä valesarana ja kiinnitä
se vastakkaiselle puolelle.
· Käännä oikeanpuoleinen yläsarana ja siirrä se vasempaan
alakulmaan.
· Laita kaappi takaisin
pystysuoraan asentoon.
· Irrota ovenkahvat kiertämällä
irti niiden kiinnitysruuvit. (24)
· Nosta alaovi paikoilleen alasaranan päälle.
· Käännä keskisarana, laita se
alaoveen ja ruuvaa kiinni kaapin runkoon. Muista oikaista
ovi.
· Nosta yläovi paikoilleen keskisaranan päälle. Käännä
keskisarana ja kiinnitä se oven
yläosaan vasemmalle puolelle.
Työnnä ovi paikoilleen työn
tämällä samalla yläsarana
vasemmalla ylhäällä olevaan
saranarunkoon. Ruuvaa 2 ru
-
uvia kiinni. Muista oikaista ovi.
Irrota oven oikealla puolella
olevat ruuvit ja kiinnitä ne
vasemmalle puolelle. Kiinnitä
ovenkahvat oikeaan reunaan
vasemman puolen ruuveilla.
(25)
Page 54

54
FIN
18
19
22
23
20
21
Page 55

55
FIN
Lampun vaihto
Sammuta jääkaappipakastin painikkeella (1), (2) ja irrota pistoke pisto-
rasiasta. Irrota lampun suojus. Vaihda
lamppu uuteen (maks. 10 W, 12 V, halogeenikanta G4). Kiinnitä lampun suojus,
kytke päälle virransyöttö ja käynnistä
jääkaappipakastin uudelleen painikkeella (1), (2). 26
25
24
26
Page 56

56
FIN
Kauppalaki ja reklamaatioaika
Gram korvaa valmistus- ja materiaalivirheet voimassa olevan kauppalain
mukaisesti. Korvauksen edellytyksenä
on ,että laitetta käytetään normaalissa
yksityistaloudessa ja että laite on uusi.
Mahd. vikojen ilmainen korjaus edellyttää, että asiakas dokumentoi osto
päivän esittämällä koneella leimatun
kassakuitin /ostotodistuksen.
Gram ei korvaa
· Virheitä eikä vaurioita, joihin
on syynä kuljetus, väärä käyttö, väärinkäyttö, puutteellinen
kunnossapito, virheellinen
kalusteisiin upotus, sijoitus ja
sähköliitäntä.
· Vaurioita, joihin on syynä tulipalo, onnettomuus, salamanisku
ja sähköhäiriöt kuten esim.
vialliset sulakkeet tai sähköasennusvirhe.
· Virheitä eikä vaurioita, jos laitetta on korjannut muu kuin valtuutettu GRAM huoltoteknikko.
Ennen kuin kutsut paikalle GRAM huoltoteknikon, varmista, että kaappi saa
virtaa ja että lämpötila on oikea. GRAM
ei korvaa takuuajan ulkopuolella suoritettuja korjauksia eikä perusteettomista
reklamaatioista aiheutuneita kuluja.
Varaosat
Kun tilaat varaosia, ilmoita kaapin malli
ja sarjanumero. Nämä tiedot löytyvät ka-
apin sisällä olevasta tyyppikilvestä.
Reklamaatiot ja GRAM huoltopalvelu
Page 57

57
Page 58

58
Page 59

59
Page 60

IOALGRAMWENT-630a
(02.2007/1)
Gram A/S
Aage Grams Vej 1
DK-6500 Vojens
Telefon +45 73 20 10 10
Telefax +45 73 20 10 06
www.gram.dk
Gram Finland OY
Sinikalliontie 3b
FIN-02630 Espoo
Puh.: 09 61 22 920
Fax.: 09 6122 9220
www.gram.fi
Importeur Belgie
Gebr. Bruyninckx N.V.
Kerksstreet 8g
B-2Y90 Balen
Tel: 014 / 81 1701
Importeur Nederland
Magee b.v.
Postbus 88
NL-2215 Voorhout
Tel: 0252231560
 Loading...